

Kenmore 758.144115 Owner's Manual

f
READ AND
SAVE THESE
INSTRUCTIONS
SF..AIRIS
OWner'S
Model No.
758.144115
QUIETCOMFORT
WHOLE HOUSE
HUMIDHFIER
FOR YOUR
READ
ALL mNSTRUCTIONS
CAREFULLY
Sears, Roebuck and Co., Hoffman Estates, IL 60179 U.S.A.
Part No. SP6520 Printed in Canada
11 Gallon Output with
Digita_ Readout
• Operating _nstructions
• Parts List
FULL ONE YEAR WARRANTY ON HUMmDmFIER
_fwithin one (1) year from the date of purchase, this humidifier falls due to a defect in
material or workmanship, Sears will repair it, free of charge. If within two (2} years from
the date of purchase, the motor fails due to defect in materia_ or workmanship, Sears
witl repair it free of charge.
This warranty service is available by simply returning the humidifier to the nearest Sears
Service Center/Department throughout the United States.
This warranty applies only while this product is used in the United States.
This warranty gives you specific _egal rights, and you may also have other rights which
vary from state to state.
Sears Roebuck and Co. D1817 Hoffman Estates IL 60179
GENERAL SAFETY
Safety Signal Words 5.
DANGER: means if the safety information is
not followed, someone will be seriously 6.
injured or killed.
WARNING: means if the safety information is
not followed, someone could be seriously 7.
injured or killed.
CAUTION: means if the safety information is 8.
not followed, someone may be seriously
injured or killed.
1. To reduce the risk of fire or shock hazard, plug 9.
humidifier directly into a !20V, A.C. electrical
outlet. Do not use extension cords.
2. Keep the electric cord out of traffic areas.
To reduce the risk of fire hazard, never put
the electric cord under rugs, near heat reg=
isters, radiators, stoves or heaters.
3. Always unplug the humidifier before mov=
ing it, before cleaning, or whenever the
humidifier is not in service.
4. Keep the humidifier clean.
Table of Contents
Warranty Information .................................. 2
General Safety instructions ........................ 2
To Save A Service Call ............................... 2
Know Your Humidifier ................................. 3
Humidifier Operation .................................. 4
Unpacking and Assembly ........................... 4
Location Instructions .................................. 5
Electrical Hook=Up ...................................... 5
iNSTRUCTiONS
Do not put foreign objects inside the
humidifier.
Do not allow to be used as a toy. Close
attention is necessary when used by or
near children.
Never use your humidifier while any part
is missing or damaged in any manner.
To reduce the risk of electrical hazard or
damage to humidifier, do not tilt, jolt or tip
humidifier while unit is running.
To reduce the risk of damage to humidifier,
unplug humidifier, when the base is empty
or when the humidifier is not in use.
1O.To reduce the risk of accidental electrical
shock, do not touch the cord or controls
with wet hands.
11.Note the warning label shown below.
_
WARNING: To reduce risk of fire, elec-
l tNc shock, or injury always unplug
|before filling, servicing or cleaning.
Water Fill .................................................. 6-7
Operating Humidifier Controls ................... 7
Using Your Humidifier ............................... !1
Operating Tips for Best Performance ....... !1
Replacement and Care of Filters ......... 12=13
Cleaning Your Humidifier ..................... 14=15
Troubleshooting .................................. 16=17
Repair Parts ......................................... 18=19
To Save a Service Calt
Check the following if your humidifier is 3_ Is airflow control in operating position?
not operating. 4. Is humidity control set high enough?
1. Is power cord attached to outlet? 5. Is the cabinet sitting on a level surface?
2. Is there electrical power to outlet?
2
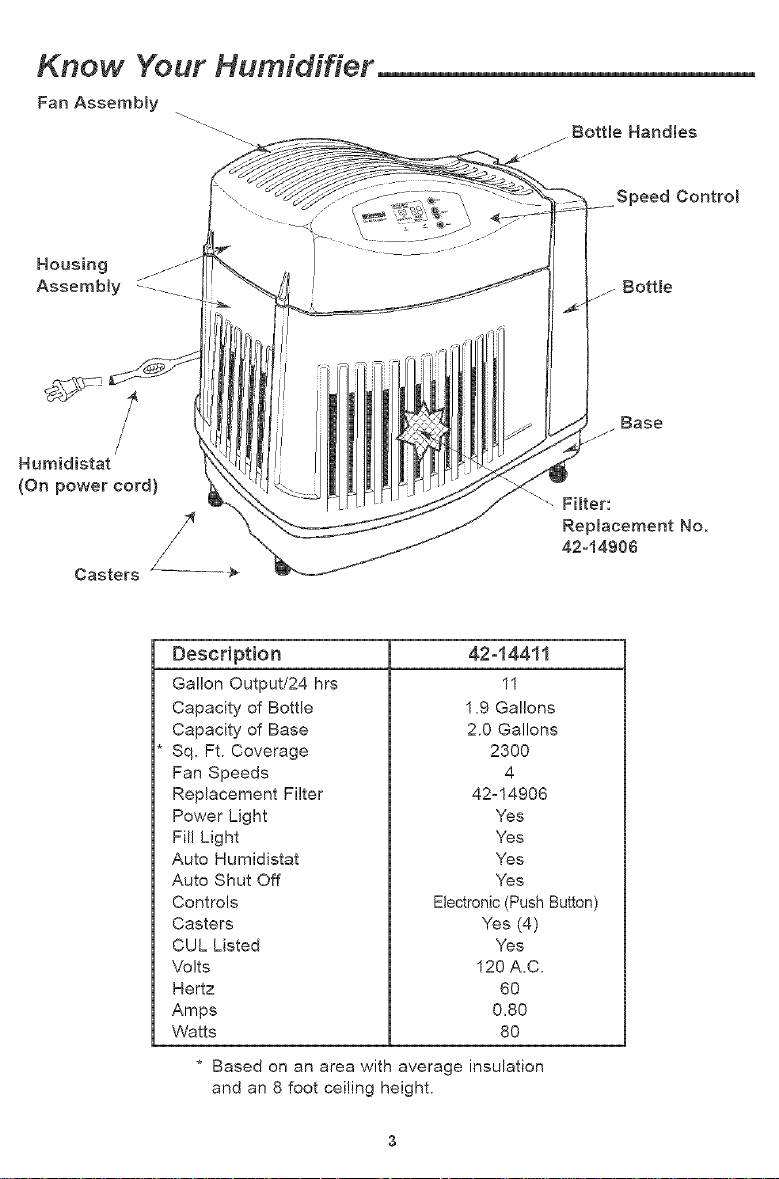
Know Your Humidifier
Fan Assembly
Casters
Bottle Handles
Speed Controm
Base
Description
Ga!lon Output/24 hrs
Capacity of Bottle
Capacity of Base
Sq. Ft. Coverage
Fan Speeds
Replacement Filter
Power Light
Fill Light
Auto Humidistat
Auto Shut Off
Controls
Casters
CUL Listed
Volts
Hertz
Amps
Watts
* Based on an area with average insulation
and an 8 foot ceiling height.
Electronic (Push Button)
42-14411
11
1,9 Gal!ons
2.0 Gallons
2300
4
42:14906
Yes
Yes
Yes
Yes
Yes(4)
Yes
120 A,C.
60
0,80
80
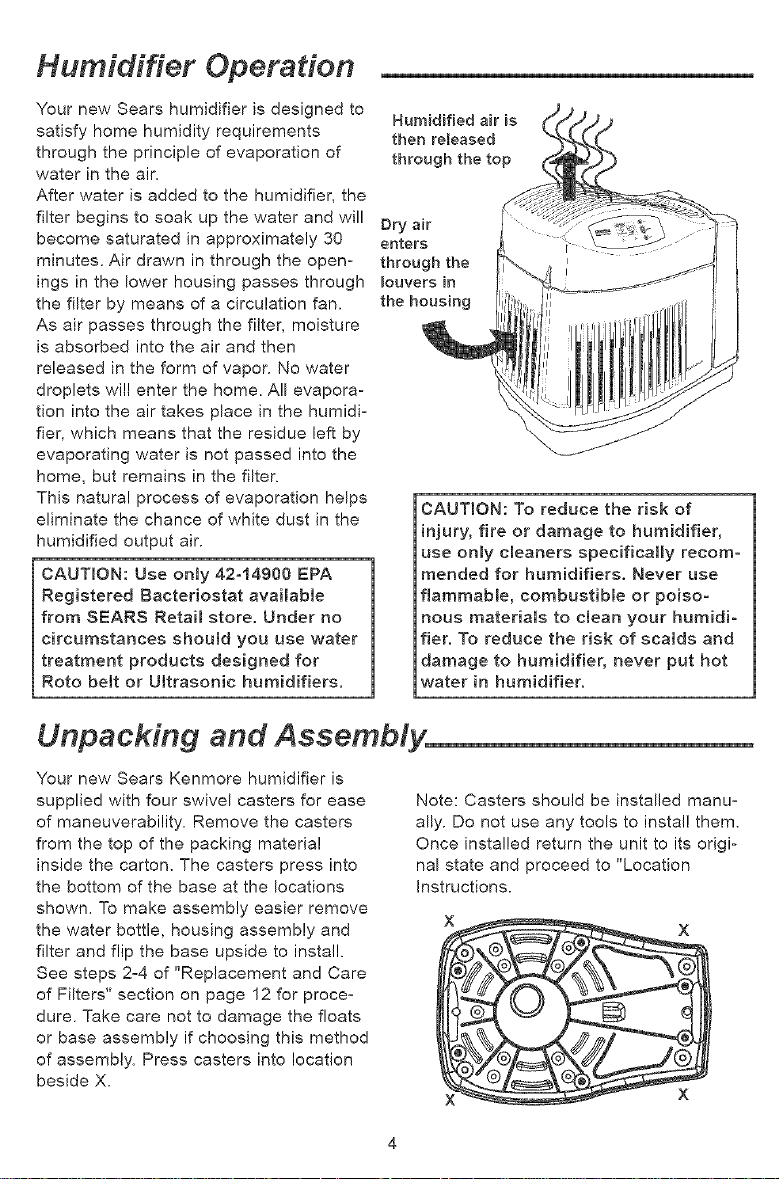
Humidifier Operation __
Your new Sears humidifier is designed to Humidified air is
satisfy home humidity requirements then reteased
through the principle of evaporation of through the top
water in the air.
After water is added to the humidifier, the
filter begins to soak up the water and will Dry air
become saturated in approximately 30 enters
minutes. Air drawn in through the open- through the
ings in the lower housing passes through _ouvers in
the filter by means of a circulation fan. the housing
As air passes through the filter, moisture
is absorbed into the air and then
released in the form of vapor. No water
droplets will enter the home. All evapora-
tion into the air takes place in the humidi-
fier, which means that the residue left by
evaporating water is not passed into the
home, but remains in the filter.
This natural process of evaporation helps
eliminate the chance of white dust in the
humidified output air.
CAUTmON: Use onJy 42°14900 EPA
Registered Bacteriostat availabJe
from SEARS Retail store. Under no
circumstances should you use water
treatment products designed for
Roto belt or Ultrasonic humidifiers.
CAUTmON: To reduce the risk of
injury, fire or damage to humidifier,
use only cleaners specifically recom-
mended for humidifiers. Never use
flammable, combustible or poiso-
nous materials to cJean your humidi-
fier. To reduce the risk of scalds and
damage to humidifier, never put hot
water in humidifier.
Unpacking and Assemb
Your new Sears Kenmore humidifier is
supplied with four swivel casters for ease
of maneuverability. Remove the casters
from the top of the packing materia!
inside the carton. The casters press into
the bottom of the base at the locations
shown. To make assembly easier remove
the water bottle, housing assembly and
filter and flip the base upside to install.
See steps 2-4 of "Replacement and Care
of Filters" section on page 12 for proce-
dure. Take care not to damage the floats
or base assembly if choosing this method
of assembly. Press casters into location
beside X.
Note: Casters should be installed manu-
ally. Do not use any tools to install them.
Once installed return the unit to its origi-
nal state and proceed to "Location
Instructions.
Location Instructions --
iWARNING: For your own safety, do
not use humidifier if any parts are
_damaged or mss ng.
Step 1
Place humidifier on a flat level surface in
an area of house where most humidity is
needed, or one which would likely result
in moist air being circulated throughout
the house such as near a cold air return.
Placing the unit level is very important.
Special attention should be given to unit's
level if the humidifier is located on car-
peting. Moist air (humidity) produced will
disperse into the whole house, but the
area closest to the unit will have the high°
est humidity. If the unit is positioned close
to a window, condensation may form on
the window pane. If this is not appropri-
ate the unit should be repositioned in
another location.
NOTE: Due to release of coo!, moist air
from humidifier, it is best to direct air
away from home thermostat and hot air
registers. It is best to position humidifier
next to an inside wall. Hot air registers
and cold air from outside walls can affect
the efficiencies of the controls. Unit
should not be placed where warm air
from a hot air register blows directly on
unit.
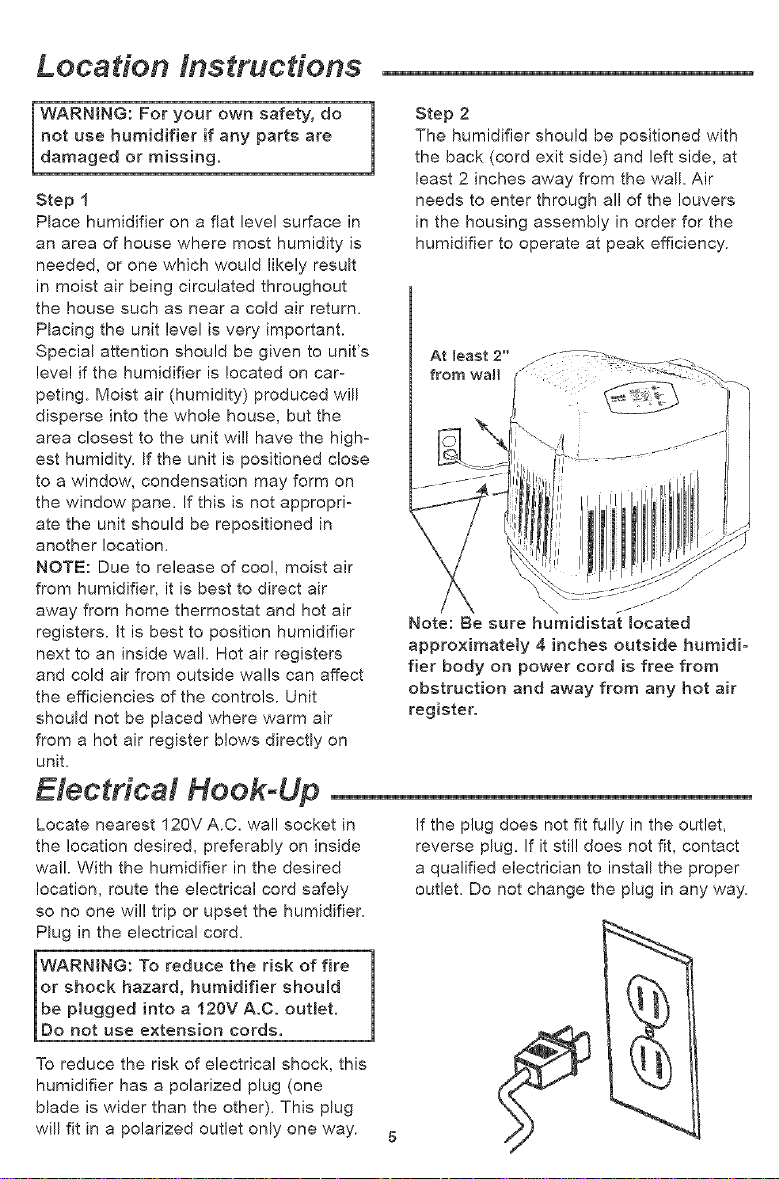
The humidifier should be positioned with
l Step 2
the back (cord exit side) and left side, at
least 2 inches away from the wall Air
needs to enter through all of the louvers
in the housing assembly in order for the
humidifier to operate at peak efficiency.
\
Note: Be sure humidistat located
approximately 4 inches outside humidi-
fier body on power cord is free from
obstruction and away from any hot air
register.
"\\_\
Electrical Hook-Up
Locate nearest 120V A.C. wall socket in
the location desired, preferably on inside
wall. With the humidifier in the desired
location, route the electrical cord safely
so no one wil! trip or upset the humidifier.
Plug in the electrical cord.
WARNING: To reduce the risk of fire ]
or shock hazard, humidifier shoumd
be plugged into a 120V A.C. outlet.
Do not use extens on cords.
To reduce the risk of electrical shock, this
humidifier has a polarized plug (one
blade is wider than the other). This plug
will fit in a polarized outlet only one way.
If the plug does not fit fully in the outlet,
reverse plug. If it still does not fit, contact
a qualified electrician to install the proper
outlet. Do not change the plug in any way.
1

Water Fill
WARNING: To reduce the risk of
shock, always unplug humidifier
before cleaning or servicing.
WARNING: To reduce the risk of fire
or shock hazard, do not pour or spH[
water into control or motor area.
If controls get wet, let them dry
comp[etemy and have unit checked by
authorized service personnel before
plugging in.
This humidifier is designed for use with
the water bottle located to the right of the
upper grill. The water bottle holds 1,9 gal-
lons of water. The humidifier should be
positioned where it will be operating,
To fill the whole house humidifier, grasp
the bottle handle at the top of the bottle
and lift it straight up and away from
humidifier base. Take care not to bump
or damage spring valve assembly on
bottom of bottle.
NOTE: If it is desired to use approved
bacteriostat, follow directions correctly.
The bottle of the whole house humidifier
will hold 1.9 gallons of water,
The water bottle is designed with an 'E-Z-
Fill Side-Cap". Remove the 'E-Z-Fill Side-
Cap" on the side of the water bottle by
twisting counterclockwise,
Place the opening of the water bottle
under a water faucet and fill. If desired,
add Sears liquid bacteriostat (stock num-
ber 42-14900) to help control the build up
of bacteria and algae, Do not use solid
water treatments, Solid debris could make
the lower valve leak.
Install the ' E-Z-Fill Side-Cap" by twisting
clockwise, Hand tighten only,
Check for possible leaks by perform°
ing the following:
1, Grasp bottle handle and hold the bottle
upright over a sink.
2, Press up on valve plunger for about
one second to let out a little water.
3, Release the plunger.
Spring Valve Assembly
//
Z
,'_ l _ Bottle
/
.- Base
 Loading...