

Owner's Manual
Manual del Propietario
®
ROOM AIR CONDITIONER
ACONDICIONADOR DE AIRE DE VENTANA
Model, Modelo 580.75080
Sears, Roebuck and Co., Hoffman Estates, IL 60179 U.S.A.
www.sears.com
TABLE OF CONTENTS ........................2
WARRANTY ..............................................2
SAFETY ......................................................3
Important Safety Instructions ...................... 3
ELECTRICAL REQUIREMENTS .......4
INSTALLATION ........................................5
Installation Requirements ......................... 5
Installation ................................................ 6
How to Install ............................................ 6
Removal from Window ................................. 7
OPERATION .............................................8
How and Why ........................................... 8
Normal Sounds ........................................ 8
Capacity and Running Time ..................... 8
Features ................................................. 9
Using the Air Conditioner ....................... 9
Control Panel .......................................... 10
Remote Control ...................................... 11
MAINTENANCE .....................................12
Air Filter Cleaning ................................... 12
Air Conditioner Cleaning ........................ 12
How to Remove the Front Grille .................. 12
How to Replace the Front Grille .................. 12
TROUBLESHOOTING .........................13
Before Calling for Service ...................... 13
ESPANOL ................................................15
MASTER PROTECTION
AGREEMENTS ......................................31
SERVICE NUMBERS ............ Back Cover
FULL ONE YEAR WARRANTY ON
ROOM AIR CONDITIONER
For one year from the date of purchase, when this
air conditioner is operated and maintained for
normal room cooling according to the instructions
in this owner's manual, Sears will repair this air
conditioner, free of charge, if defective in material or
workmanship.
FULL FIVE-YEAR WARRANTY ON
SEALED REFRIGERATION SYSTEM
For five years from the date of purchase, when this
air conditioner is operated and maintained for
normal room cooling according to the instructions
in this owner's manual, Sears will repair the sealed
refrigeration system (consisting of refrigerant,
connecting tubing, and compressor), free of charge,
if defective in material or workmanship.
WARRANTY SERVICE IS AVAILABLE BY
CONTACTING SEARS SERVICE AT
1-800-4-MY-HOME ®.
Warranty coverage applies only to air conditioners
used for non-commercial, private household
purposes.
This warranty applies only while this product is in
use in the United States.
This warranty gives you specific legal rights, and
you may also have other right which vary from state
to state.
Sears, Roebuck and Co., D/817WA,
Hoffman Estates, IL 60179 U.S.A.
-2-
IMPORTANT SAFETY INSTRUCTIONS
The safety instructions below will tell you how to use your room air conditioner to avoid harm to yourself or
damage to your ROOM AIR CONDITIONER.
FOR YOUR SAFETY
Do not store or use gasoline or other flammable
vapors and liquids in the vicinity of this or any other
appliance. Read product labels for flammability and
other warnings.
PREVENT ACCIDENTS
To reduce the risk of fire, electrical shock, or injury
to persons when using your air conditioner, follow
basic precautions, including the following:
• Be sure the electrical service is adequate for the
model you have chosen.
• If the air conditioner is to be installed in a window,
you will probably want to clean both sides of the
glass first. If the window is a triple-track type with a
screen panel included, you may want to remove
the screen completely before installation.
• Be sure the air conditioner has been securely and
correctly installed according to the separate
installation instructions provided with this manual.
Save this manual and installation instructions for
possible future use in removing or reinstalling this
unit.
• Use gloves when handling the air conditioner.
Be careful to avoid cuts from sharp metal fins on
front and rear coils.
V.'_V_Vl-'1;t_ll_[qELECTRICAL INFORMATION
The complete electrical rating of your new room air
conditioner is stated on the serial plate. Refer to the
rating when checking the electrical requirements.
• Be sure the air conditioner is properly grounded.
To minimize shock and fire hazards, proper
grounding is important. The power cord is
equipped with a three-prong grounding plug for
protection against shock hazards.
• Your air conditioner must be plugged into a
properly grounded wall receptacle. If the wall
receptacle you intend to use is not adequately
grounded or protected by a time delay fuse or
circuit breaker, have a qualified electrician install
the proper receptacle.
• Do not run air conditioner with a protective
covering. This could result in mechanical damage
within the air conditioner.
• Do not use an extension cord or an adapter
plug.
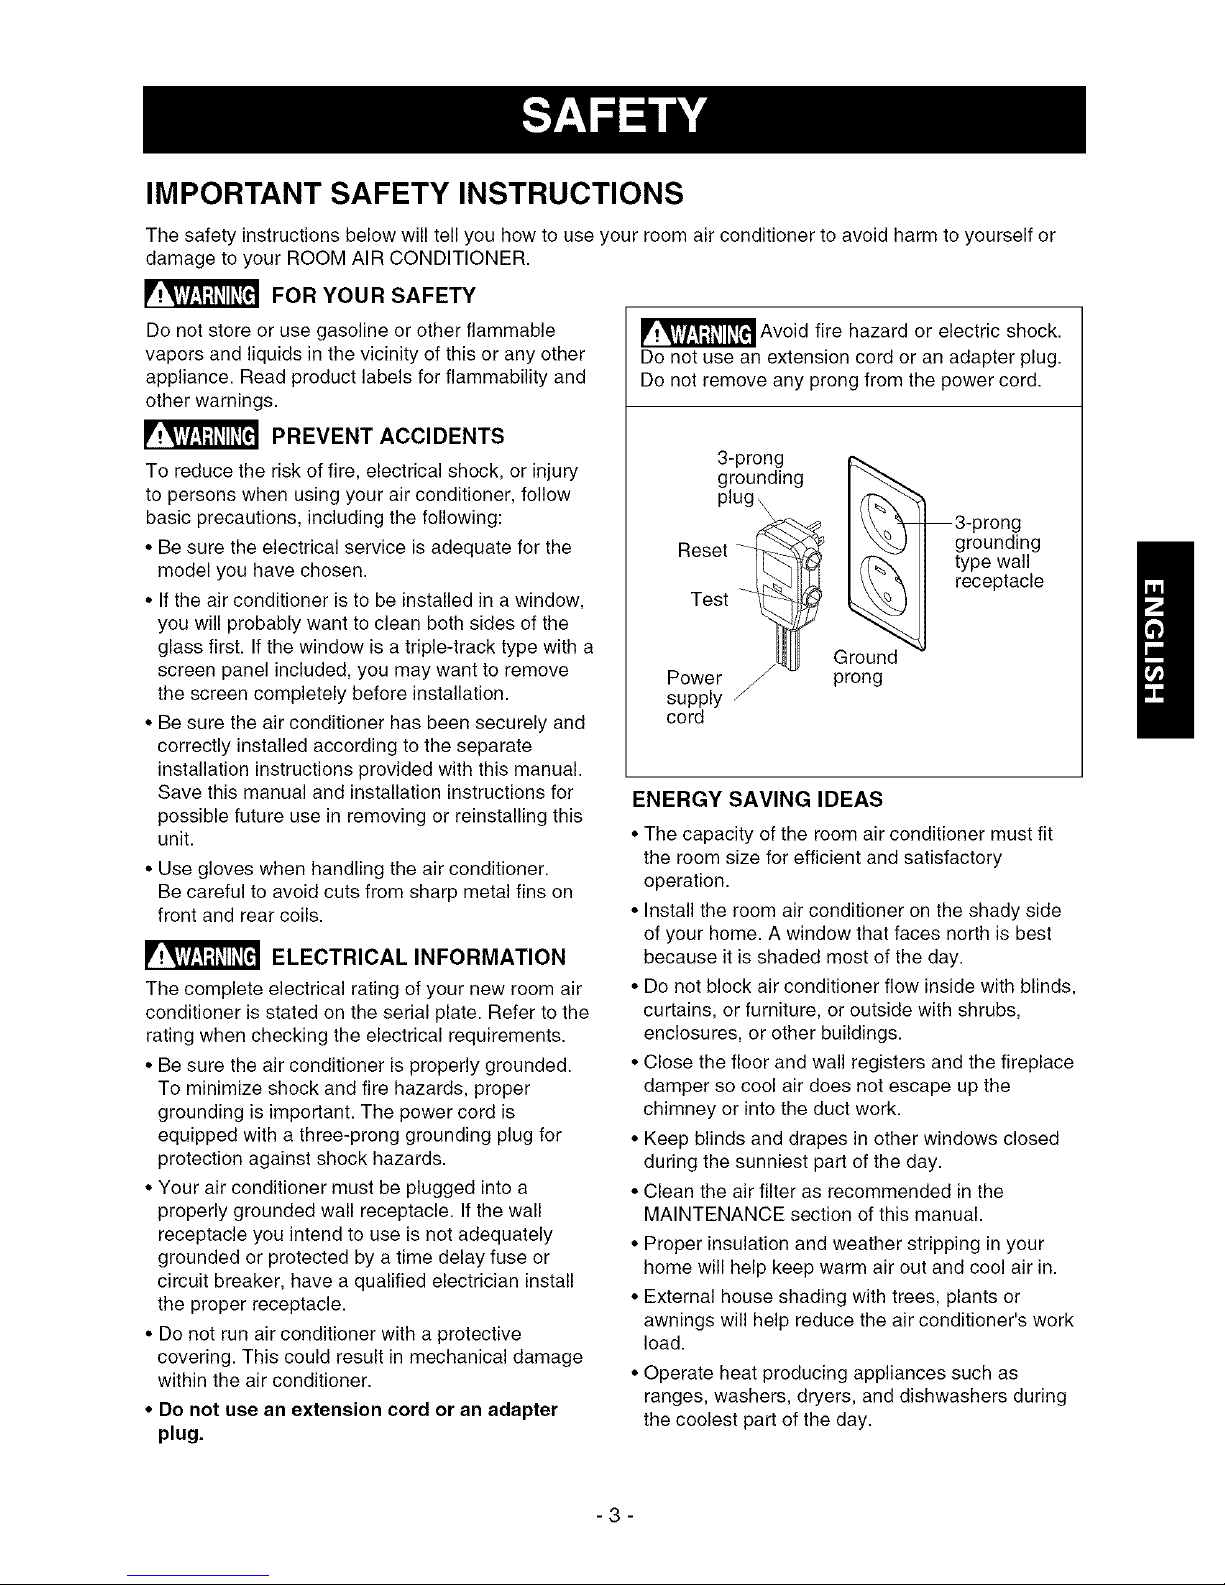
_Avoid fire hazard or electric shock.
Do not use an extension cord or an adapter plug.
Do not remove any prong from the power cord.
_pr°ngng
plug_l _3-prong
Reset _,_._ tgP°eundailr]g
Test _ _receptacle
ENERGY SAVINGIDEAS
• The capacity of the room air conditioner must fit
the room size for efficient and satisfactory
operation.
• Install the room air conditioner on the shady side
of your home. A window that faces north is best
because it is shaded most of the day.
• Do not block air conditioner flow inside with blinds,
curtains, or furniture, or outside with shrubs,
enclosures, or other buildings.
• Close the floor and wall registers and the fireplace
damper so cool air does not escape up the
chimney or into the duct work.
• Keep blinds and drapes in other windows closed
during the sunniest part of the day.
• Clean the air filter as recommended in the
MAINTENANCE section of this manual.
• Proper insulation and weather stripping in your
home will help keep warm air out and cool air in.
• External house shading with trees, plants or
awnings will help reduce the air conditioner's work
load.
• Operate heat producing appliances such as
ranges, washers, dryers, and dishwashers during
the coolest part of the day.
-3-
OBSERVE ALL LOCAL CODES AND
ORDINANCES.
DO NOT, UNDER ANY CIRCUMSTANCES,
REMOVE THE POWER SUPPLY CORD
GROUND PRONG.
ELECTRICAL GROUND IS REQUIRED ON
THIS APPLIANCE.
A 250-volt 60 Hz, AC only, 20A fused and
properly grounded electrical supply is required.
A time delay fuse or time delay circuit breaker
is recommended. Use a dedicated circuit,
serving only this appliance.
DO NOT USE AN EXTENSION CORD.
RECOMMENDED GROUNDING METHOD
For your personal safety, this appliance must
be grounded. This appliance has a power
supply cord with a 3-prong grounding plug. To
minimize possible shock hazard, the cord must
be plugged into a mating grounding type wall
receptacle and grounded in accordance with
the National Electrical Code (ANSl/NFPA 70)
latest edition and all local codes and
ordinances. If a mating wall receptacle is not
available, it is the personal responsibility and
obligation of the customer to have a properly
grounded 3-prong wall receptacle installed by a
qualified electrician.
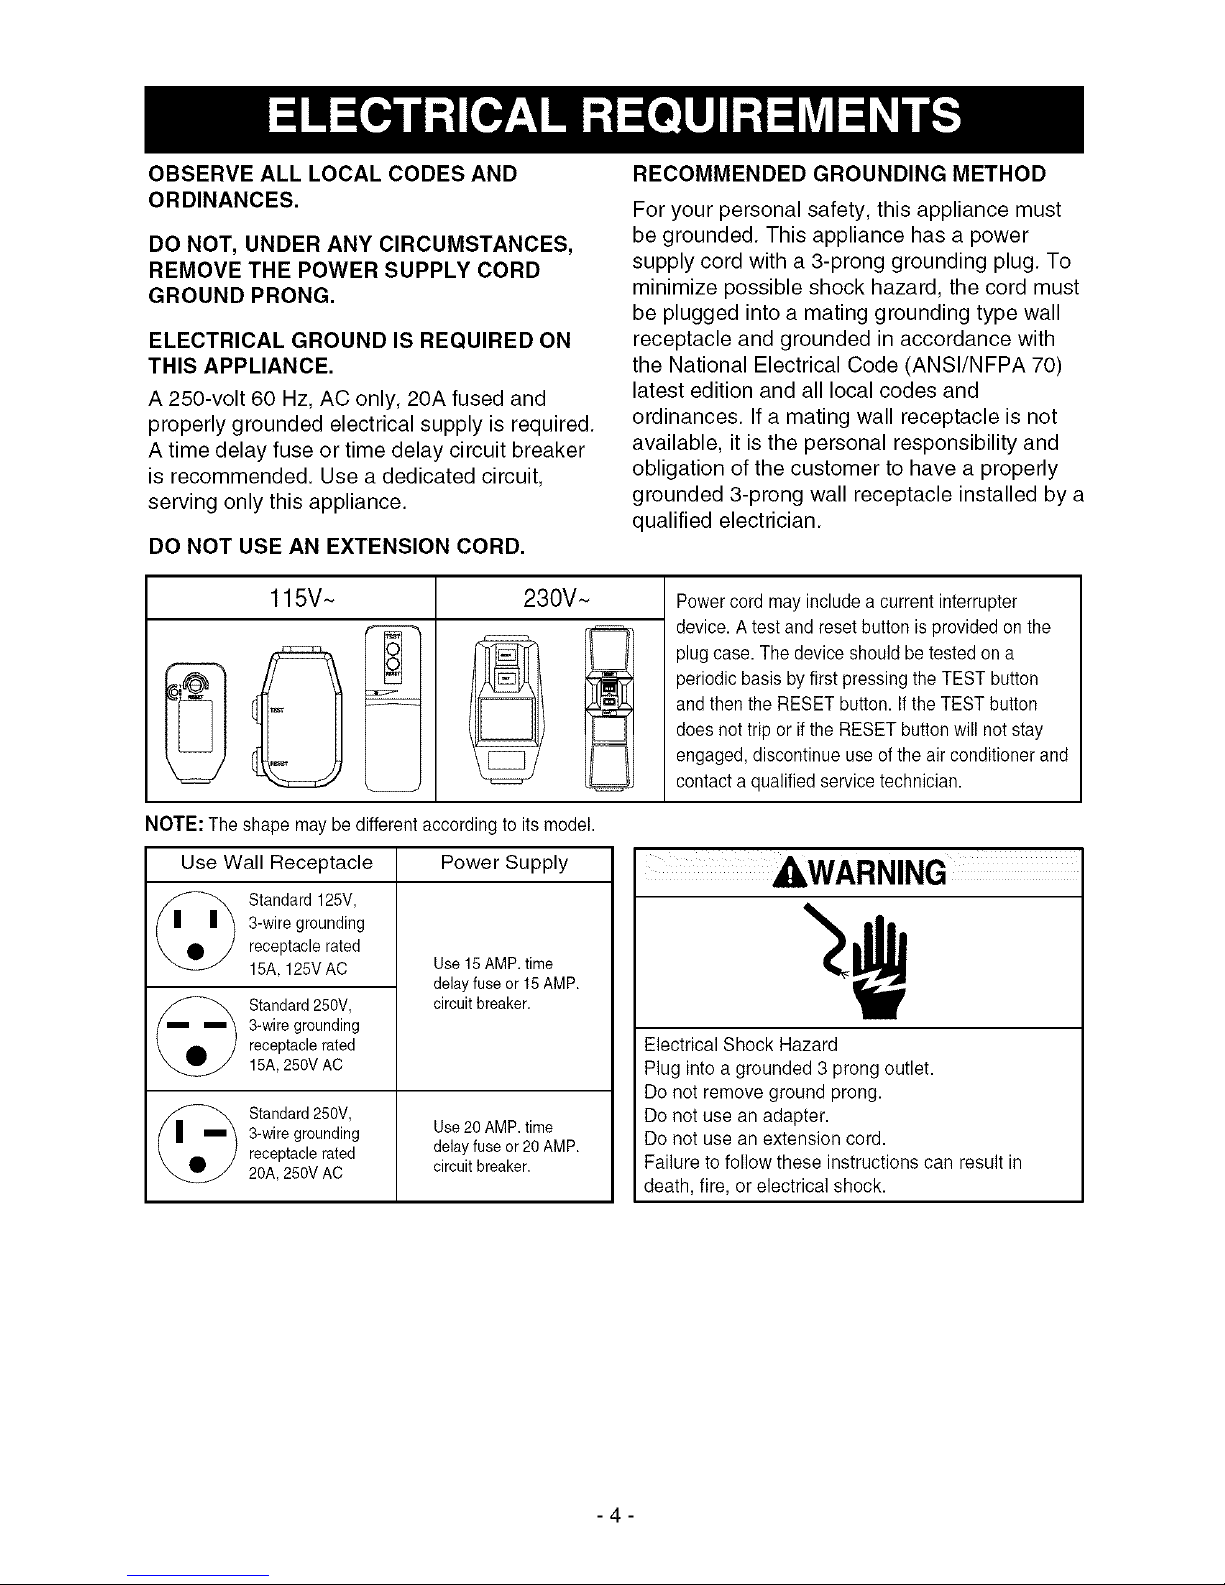
115V~ 230V~
Powercord may include a current interrupter
device. A test and reset button is provided on the
plug case. The device should be tested on a
periodic basis byfirst pressing the TEST button
and thenthe RESET button. If the TEST button
does not trip or if the RESET button will not stay
engaged, discontinue use of the air conditioner and
contact a qualified service technician.
NOTE: The shape may be different according to its model.
Use Wall Receptacle Power Supply
_) tandard 125V,
3-wire grounding
receptacle rated
15A, 125V AC
Standard 250V,
3-wire grounding
receptacle rated
15A,250V AC
Standard 250V,
3-wire grounding
receptacle rated
20A, 250V AC
Use 15 AMP. time
delayfuse or 15 AMP.
circuit breaker.
Use 20 AMP. time
delayfuse or 20 AMP.
circuit breaker.
Electrical Shock Hazard
Plug into a grounded 3 prong outlet.
Do not remove ground prong.
Do not use an adapter.
Do not use an extension cord.
Failure to follow these instructions can result in
death, fire, orelectrical shock.
-4-
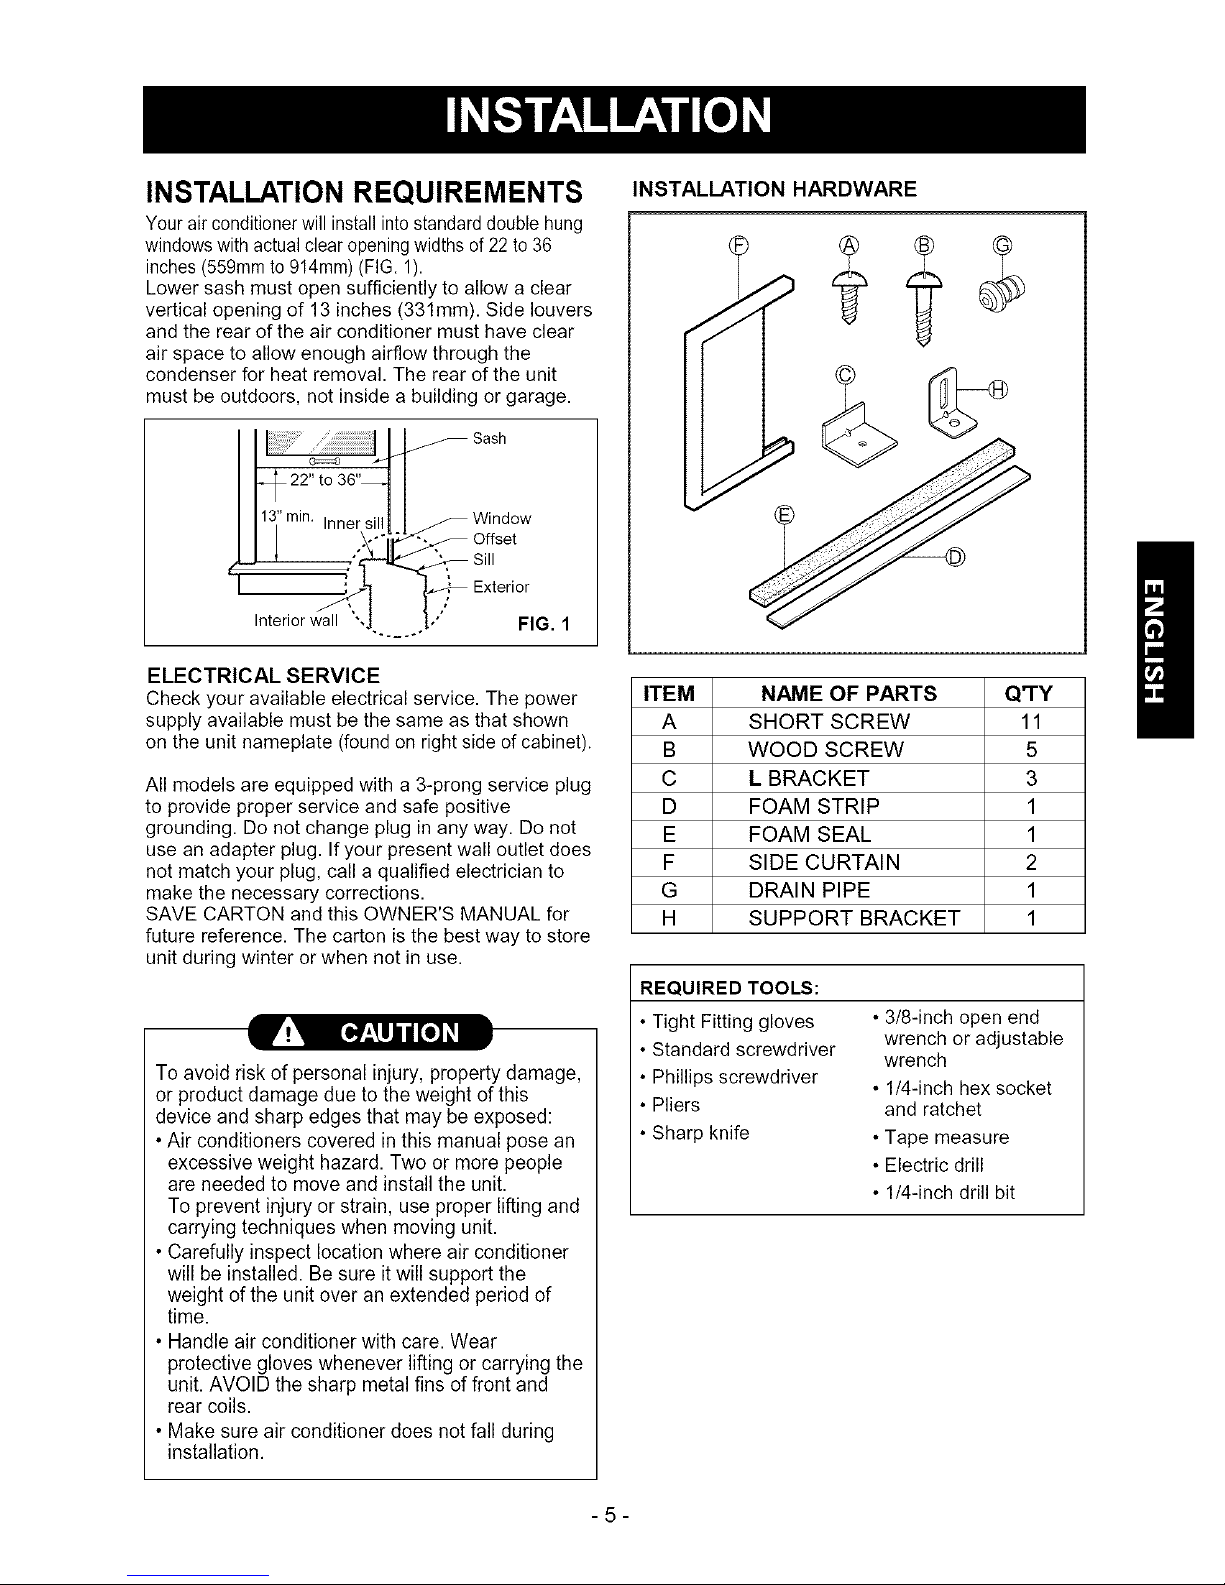
INSTALLATION REQUIREMENTS
Your air conditioner will install intostandard double hung
windows with actual clear opening widths of 22 to 36
inches (559mm to 914mm) (FIG. 1).
Lower sash must open sufficiently to allow a clear
vertical opening of 13 inches (331mm). Side louvers
and the rear of the air conditioner must have clear
air space to allow enough airflow through the
condenser for heat removal. The rear of the unit
must be outdoors, not inside a building or garage.
f" Sash
22"to36"qI
1113"m'n.innersilll I _ Window
,._"÷i'l;><-._ Offset
_,_ si,
_,1 t,_'_ Exterior
Interiorw'_l \'4 l," FIG. 1
-. .... ÷
ELECTRICAL SERVICE
Check your available electrical service. The power
supply available must be the same as that shown
on the unit nameplate (found on right side of cabinet).
All models are equipped with a 3-prong service plug
to provide proper service and safe positive
grounding. Do not change plug in any way. Do not
use an adapter plug. If your present wall outlet does
not match your plug, call a qualified electrician to
make the necessary corrections.
SAVE CARTON and this OWNER'S MANUAL for
future reference. The carton is the best way to store
unit during winter or when not in use.
_!_ [_:TIJ i [*] _1
To avoid risk of personal injury, property damage,
or product damage due to the weight of this
device and sharp edges that may be exposed:
•Air conditioners covered in this manual pose an
excessiveweight hazard. Two or more people
are needed to move and install the unit.
To prevent injury or strain, use proper lifting and
carrying techniques when moving unit.
• Carefully inspect location where air conditioner
will be installed. Be sure itwill support the
weight of the unit over an extended period of
time.
• Handle air conditioner with care. Wear
protective gloves whenever lifting or carrying the
unit. AVOID the sharp metal fins of front and
rear coils.
• Make sure air conditioner does not fall during
installation.
INSTALLATION HARDWARE
ITEM NAME OF PARTS Q"FY
A SHORT SCREW 11
B WOOD SCREW 5
C L BRACKET 3
D FOAM STRIP 1
E FOAM SEAL 1
F SIDE CURTAIN 2
G DRAIN PIPE 1
H SUPPORT BRACKET 1
REQUIRED TOOLS:
• Tight Fitting gloves
• Standard screwdriver
• Phillips screwdriver
• Pliers
• Sharp knife
• 3/8-inch open end
wrench or adjustable
wrench
• 1/4-inch hex socket
and ratchet
• Tape measure
• Electric drill
• 1/4-inch drill bit
-5-
INSTALLATION
Pick a location which will allow you to blow the cold
air into the area you want. Windows used for
installation must be strong enough to support the
weight of the air conditioner. Good installation with
special attention to the proper position of the unit will
lessen the chance that service will be needed.
If airconditioner is blocked by a storm window frame,
see step 9 on page 7 before beginning to install.
HOW TO INSTALL
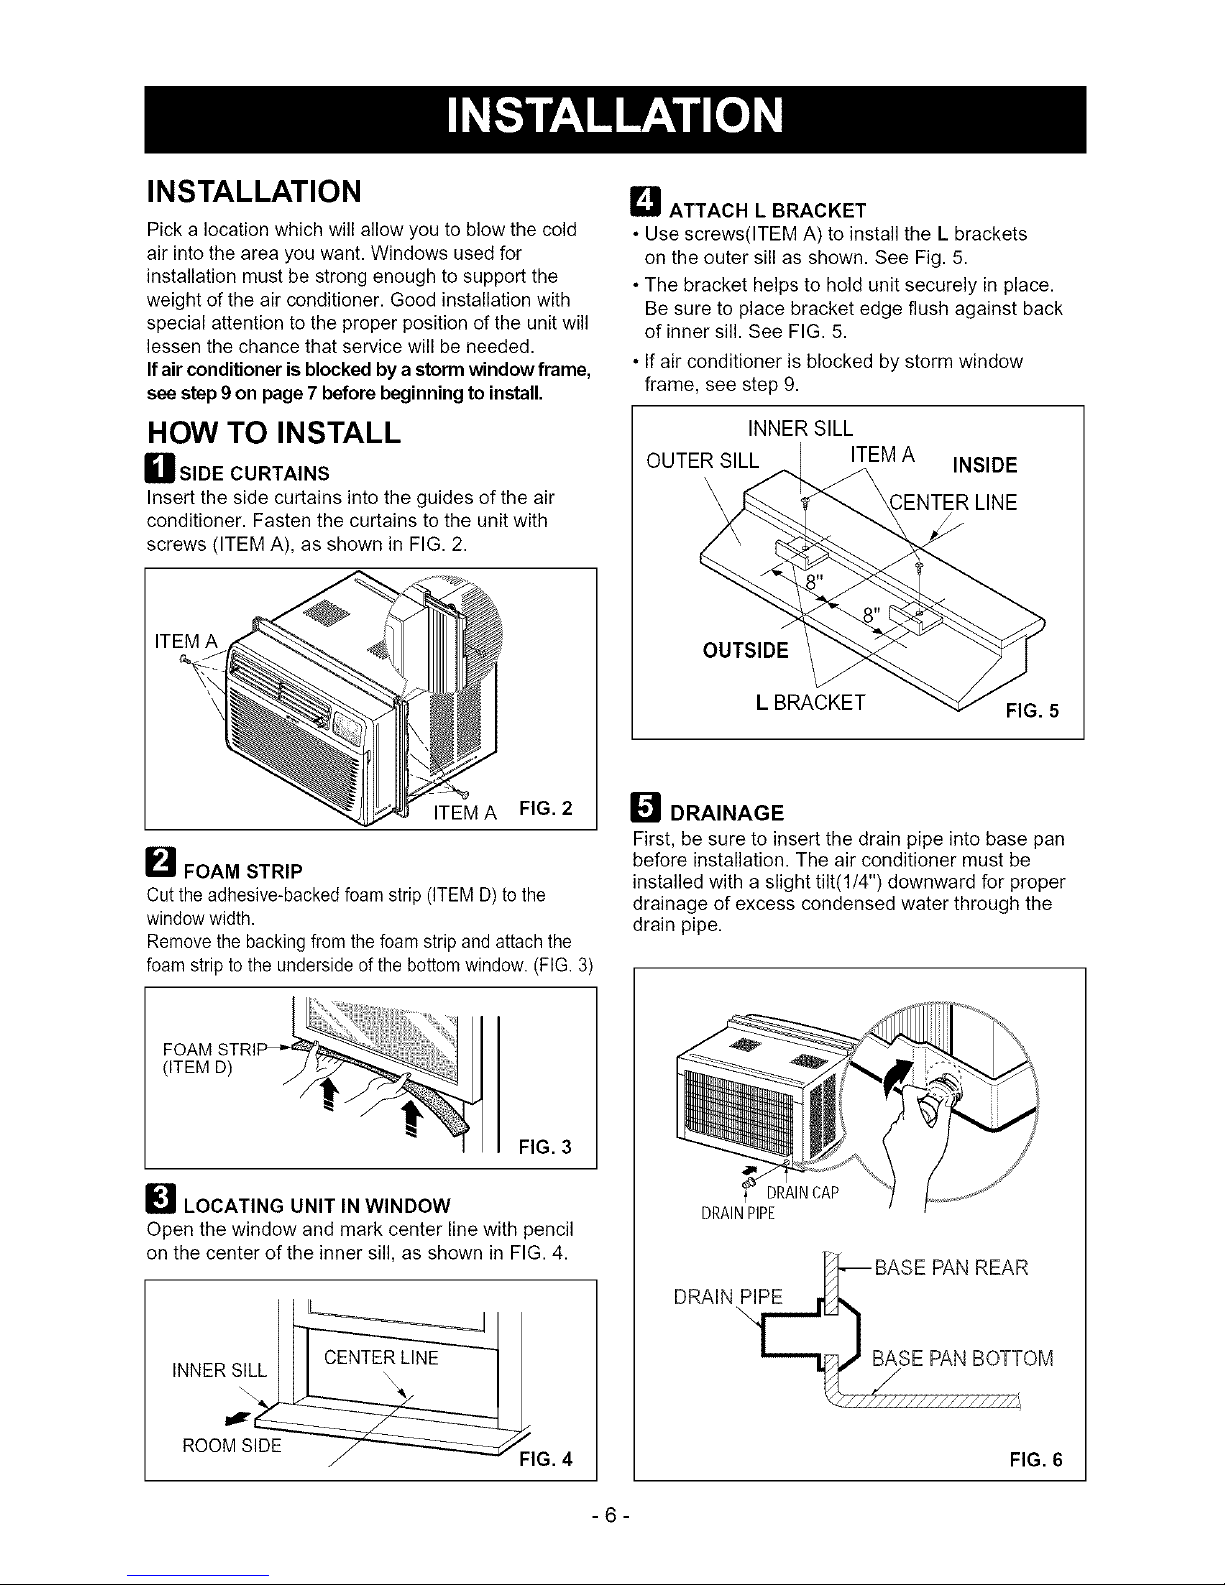
HSIDE CURTAINS
Insert the side curtains into the guides of the air
conditioner. Fasten the curtains to the unit with
screws (ITEM A), as shown in FIG. 2.
ITEM A FIG. 2
_FOAM STRIP
Cut the adhesive-backed foam strip (ITEM D) to the
window width.
Remove the backing from the foam strip and attach the
foam strip to the underside of the bottom window. (FIG. 3)
Q ATTACH L BRACKET
• Use screws(ITEM A) to install the L brackets
on the outer sill as shown. See Fig. 5.
• The bracket helps to hold unit securely in place.
Be sure to place bracket edge flush against back
of inner sill. See FIG. 5.
• If air conditioner is blocked by storm window
frame, see step 9.
INNER SILL
OUTER SILL ITEMA INSIDE
},ENTER LINE
OUTSIDE
L BRACKET
FIG. 5
DRAINAGE
First, be sure to insert the drain pipe into base pan
before installation. The air conditioner must be
installed with a slight tilt(l/4") downward for proper
drainage of excess condensed water through the
drain pipe.
FIG. 3
_J LOCATING UNIT IN WINDOW
Open the window and mark center line with pencil
on the center of the inner sill, as shown in FIG. 4.
INNER SILL
_r
ROOM SIDE
FIG. 4
t DRAINCAP
DRAINPIPE
DRAHN PHPE
\
REAR
BASE PANBOTTOM
FIG. 6
-6-
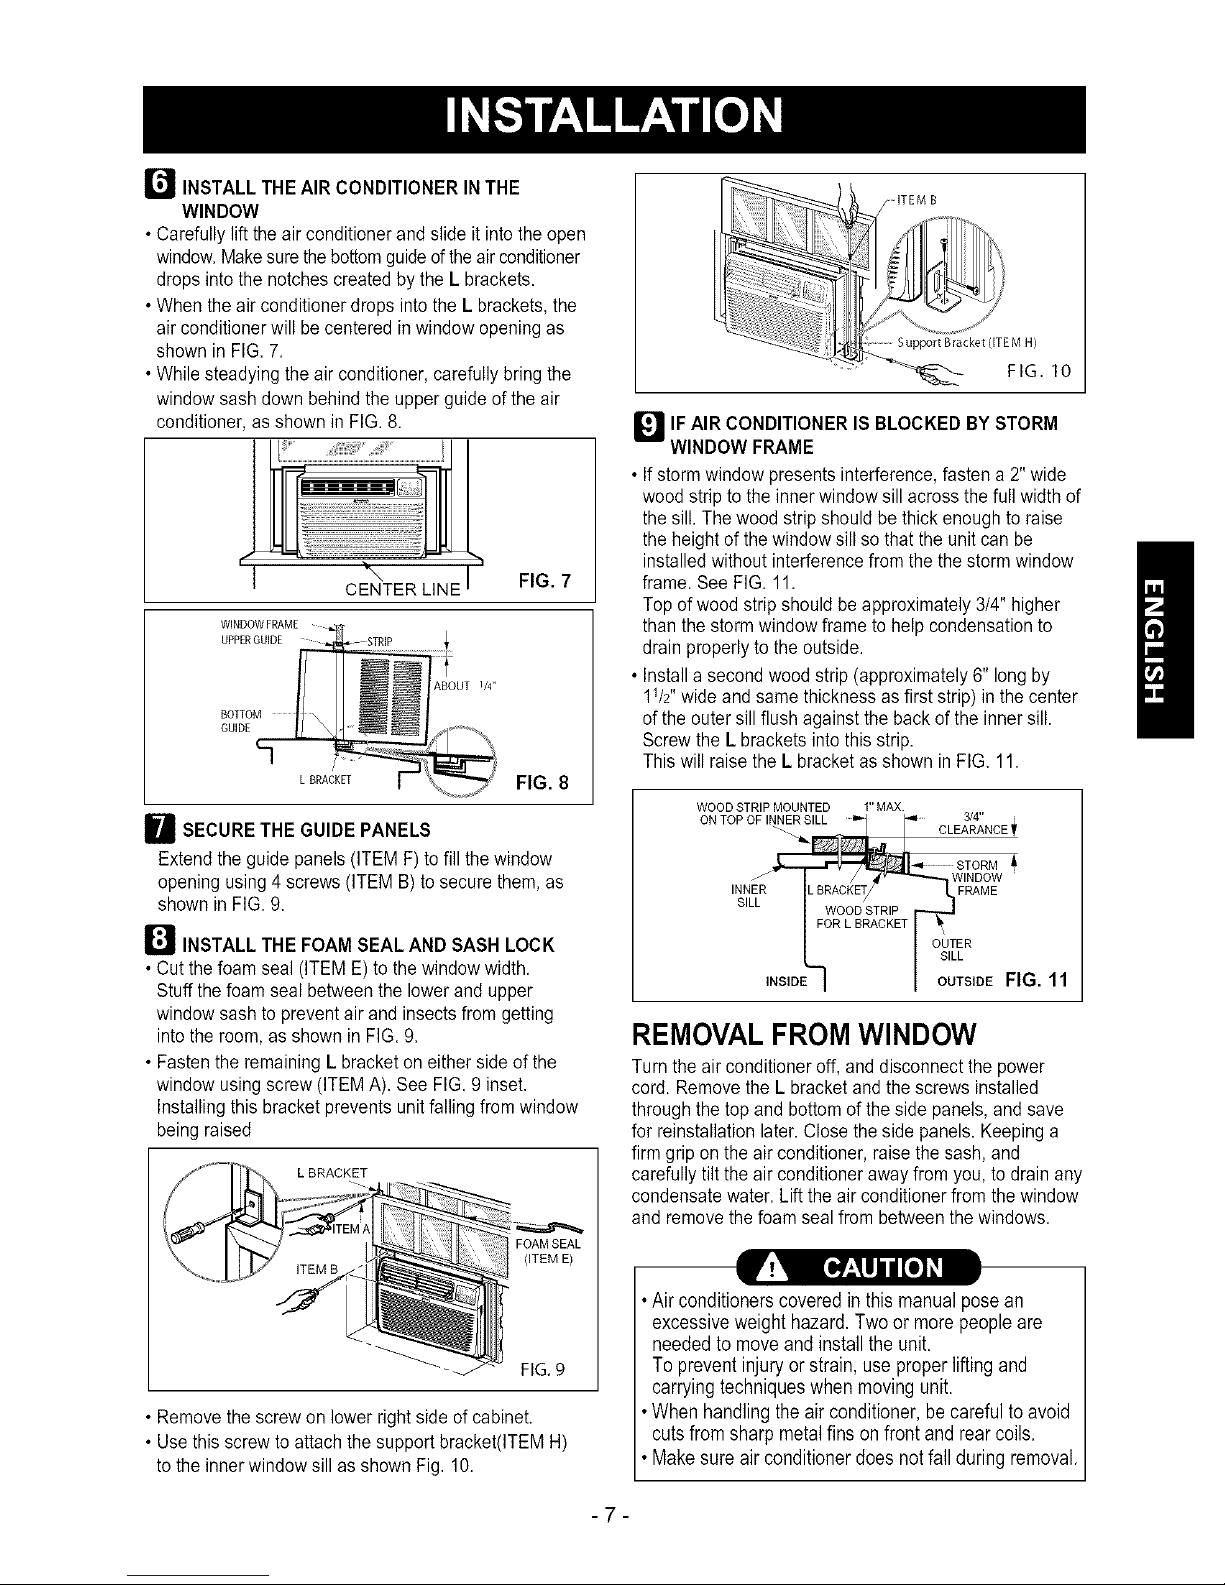
r_ INSTALL THE AIR CONDITIONER IN THE
WINDOW
• Carefully lift the air conditioner and slide it into the open
window.Makesure the bottomguide ofthe airconditioner
drops into the notches created by the L brackets.
• When the air conditioner drops into the L brackets, the
air conditioner will be centered in window opening as
shown in FIG. 7.
• While steadying the air conditioner, carefully bring the
window sash down behind the upper guide of the air
conditioner, asshown in FIG. 8.
;1 \ I-'
CENTER LINE FIG. 7
WINDOWFRAME
UPPERGUIDE
ABOUT I_"
BOTTOM
GUIDE
L BRACKET
FIG. 8
I SECURE THE GUIDE PANELS
Extend the guide panels (ITEM F)to fill the window
opening using 4screws (ITEM B) to secure them, as
shown in FIG. 9.
B INSTALL THE FOAM SEAL AND SASH LOCK
• Cut the foam seal (ITEM E) to the window width.
Stuffthe foam seal between the lower and upper
window sash to prevent air and insectsfrom getting
into the room, as shown in FIG. 9.
• Fasten the remaining L bracket on either side ofthe
window using screw (ITEM A). See FIG. 9 inset.
Installing this bracket prevents unit falling from window
being raised
L BRACKET
FOAM SEAL
(ITEM E)
FIG. 9
• Remove the screw on lower right side of cabinet.
• Use this screw to attach the support bracket(ITEM H)
to the inner window sill as shown Fig. 10.
,ITEM B
FIG. 10
_IlF AIR CONDITIONER IS BLOCKED BYSTORM
WINDOW FRAME
• If storm window presents interference, fasten a 2" wide
wood strip to the inner window sill across the full width of
the sill. The wood strip should be thick enough to raise
the height of the window sill so that the unit can be
installedwithout interference from the the storm window
frame. See FIG. 11.
Top of wood strip should be approximately 3/4" higher
than the storm window frame to help condensation to
drain properly to the outside.
• Install a second wood strip (approximately 6" long by
11/2"wide and same thickness as first strip) in the center
ofthe outer sill flush against the back of the inner sill.
Screw the L brackets into this strip.
This will raise the L bracket as shown in FIG. 11.
WOOD STRIP MOUNTED 1" MAX.
3/4"
ON TOP OF INNER SILL z
CLEARANCE T
WINDOW
INNER FRAME
SILL WOOD STRIP
FOR L BRACKET I ! I\
OUTER
SILL
INSIDE TSIDEFIG. 11
REMOVAL FROM WINDOW
Turnthe air conditioner off, and disconnect the power
cord. Remove the L bracket and the screws installed
through the top and bottom of the side panels, and save
for reinstallation later. Close the side panels. Keeping a
firm grip on the air conditioner, raise the sash, and
carefully tilt the air conditioner away from you, to drain any
condensate water. Lift the air conditioner from the window
and removethe foam seal from between the windows.
•Airconditionerscoveredinthismanualposean
excessiveweighthazard.Twoormorepeopleare
neededtomoveandinstallthe unit.
Topreventinjuryor strain,useproperliftingand
carryingtechniqueswhenmovingunit.
•Whenhandlingtheairconditioner,becarefultoavoid
cutsfromsharpmetalfinsonfrontand rearcoils.
•Makesureairconditionerdoesnotfallduringremoval.
-7-

HOW AND WHY
Your room air conditioner provides the following
functions to make hot weather living more
comfortable:
• Cools and circulates room air.
• Lowers humidity by removing excess moisture.
• Filters out summertime dust, dirt, and some
airborne impurities.
The air conditioner performs these functions by
drawing room air through a filter which traps dust
and dirt particles. The air then passes over a
cooling coil which refrigerates the air and removes
excess moisture. The same air is then returned to
the room- cooler, drier, and cleaner. Moisture
removed from the room air is carried to the outside
and evaporated.
Your air conditioner is designed to be easy to
operate and to provide plenty of cooling power.
NORMAL SOUNDS FIG.12
Aside from the regular fan motor and compressor
sounds coming from your air conditioner, you will
once in a while hear a pinging sound. This is the
result of moisture being picked up from the air in the
room and thrown against the air conditioner's fan.
This is normal and should not be cause for concern.
Also, do not be alarmed if you hear a slight hissing
or gurgling sound coming from your air conditioner
after it is off. These are normal coolant noises.
CAPACITY AND RUNNING TIME
Proper unit size is important in deciding the desired
comfort for the area you want to cool. The proper
size is determined by the number of square feet
in the area to be cooled, indoor and outdoor
temperature and humidity.
Whenever the heat or humidity load is above normal
the air conditioner must run longer and more often
to keep the desired temperature you have selected,
Under heavy heat load conditions the air conditioner
may need to run constantly to keep the temperature
you want.
At times using the MED FAN setting to circulate the
room air may make it comfortable even though the
air is not being cooled. This will decrease your cost
of use.
Compressor
The modern high efficiency
compressor may have a high
pitched hum or pulsating
noise that cycles on and off.
Unit Vibration
The unit may vibrate
and make noise
because of poor wall
or window
Fan
You may hear air
movement from
the fan.
You may hear droplets of water hitting
the condenser causing a pinging or
clicking sound.
FIG. 12
-8-
FEATURES
1 15 6 5 4 32714
9 8
11 1210 13 16
FIG. 13
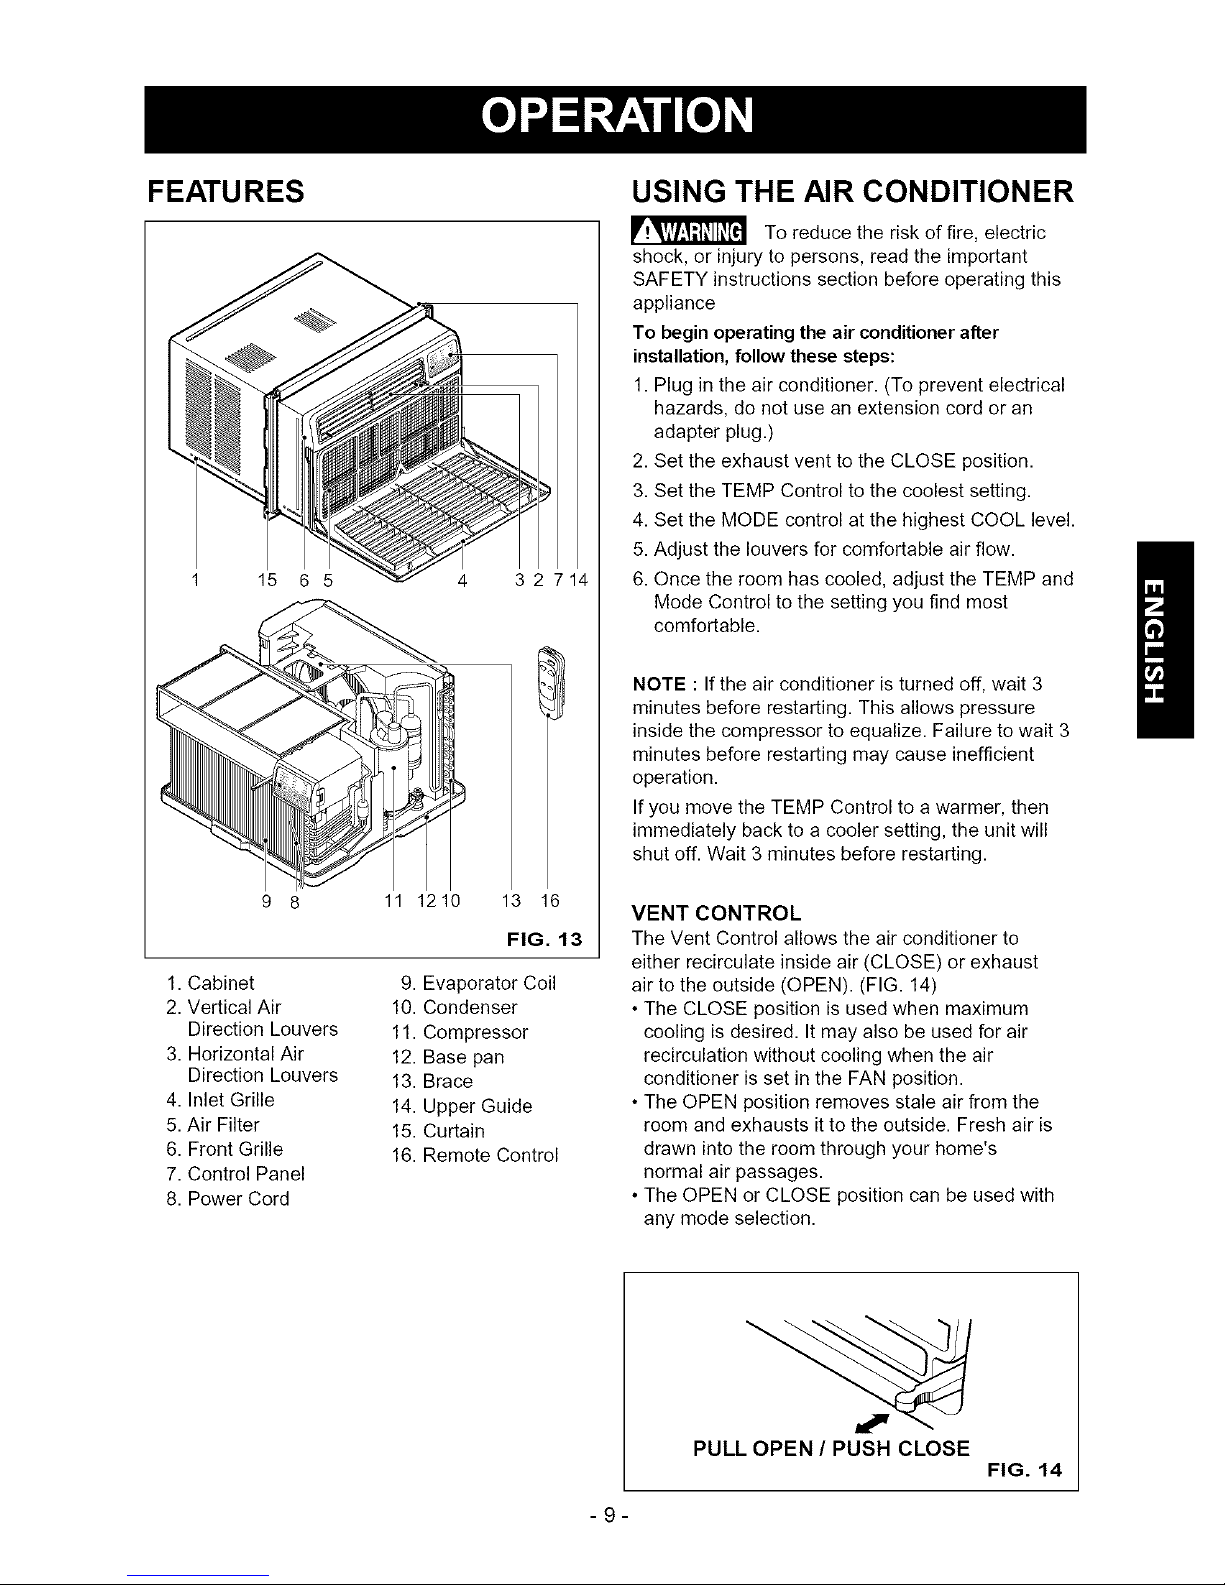
1. Cabinet
2. Vertical Air
Direction Louvers
3. Horizontal Air
Direction Louvers
4. Inlet Grille
5. Air Filter
6. Front Grille
7. Control Panel
8. Power Cord
9. Evaporator Coil
10. Condenser
11. Compressor
12. Base pan
13. Brace
14. Upper Guide
15. Curtain
16. Remote Control
USING THE AIR CONDITIONER
To reduce the risk of fire, electric
shock, or injury to persons, read the important
SAFETY instructions section before operating this
appliance
To begin operating the air conditioner after
installation, follow these steps:
1. Plug in the air conditioner. (To prevent electrical
hazards, do not use an extension cord or an
adapter plug.)
2. Set the exhaust vent to the CLOSE position.
3. Set the TEMP Control to the coolest setting.
4. Set the MODE control at the highest COOL level.
5. Adjust the louvers for comfortable air flow.
6. Once the room has cooled, adjust the TEMP and
Mode Control to the setting you find most
comfortable.
NOTE : Ifthe air conditioner is turned off, wait 3
minutes before restarting. This allows pressure
inside the compressor to equalize. Failure to wait 3
minutes before restarting may cause inefficient
operation.
If you move the TEMP Control to a warmer, then
immediately back to a cooler setting, the unit will
shut off. Wait 3 minutes before restarting.
VENT CONTROL
The Vent Control allows the air conditioner to
either recirculate inside air (CLOSE) or exhaust
air to the outside (OPEN). (FIG. 14)
• The CLOSE position is used when maximum
cooling is desired. It may also be used for air
recirculation without cooling when the air
conditioner is set in the FAN position.
• The OPEN position removes stale air from the
room and exhausts it to the outside. Fresh air is
drawn into the room through your home's
normal air passages.
• The OPEN or CLOSE position can be used with
any mode selection.
PULL OPEN / PUSH CLOSE
FIG. 14
-9-
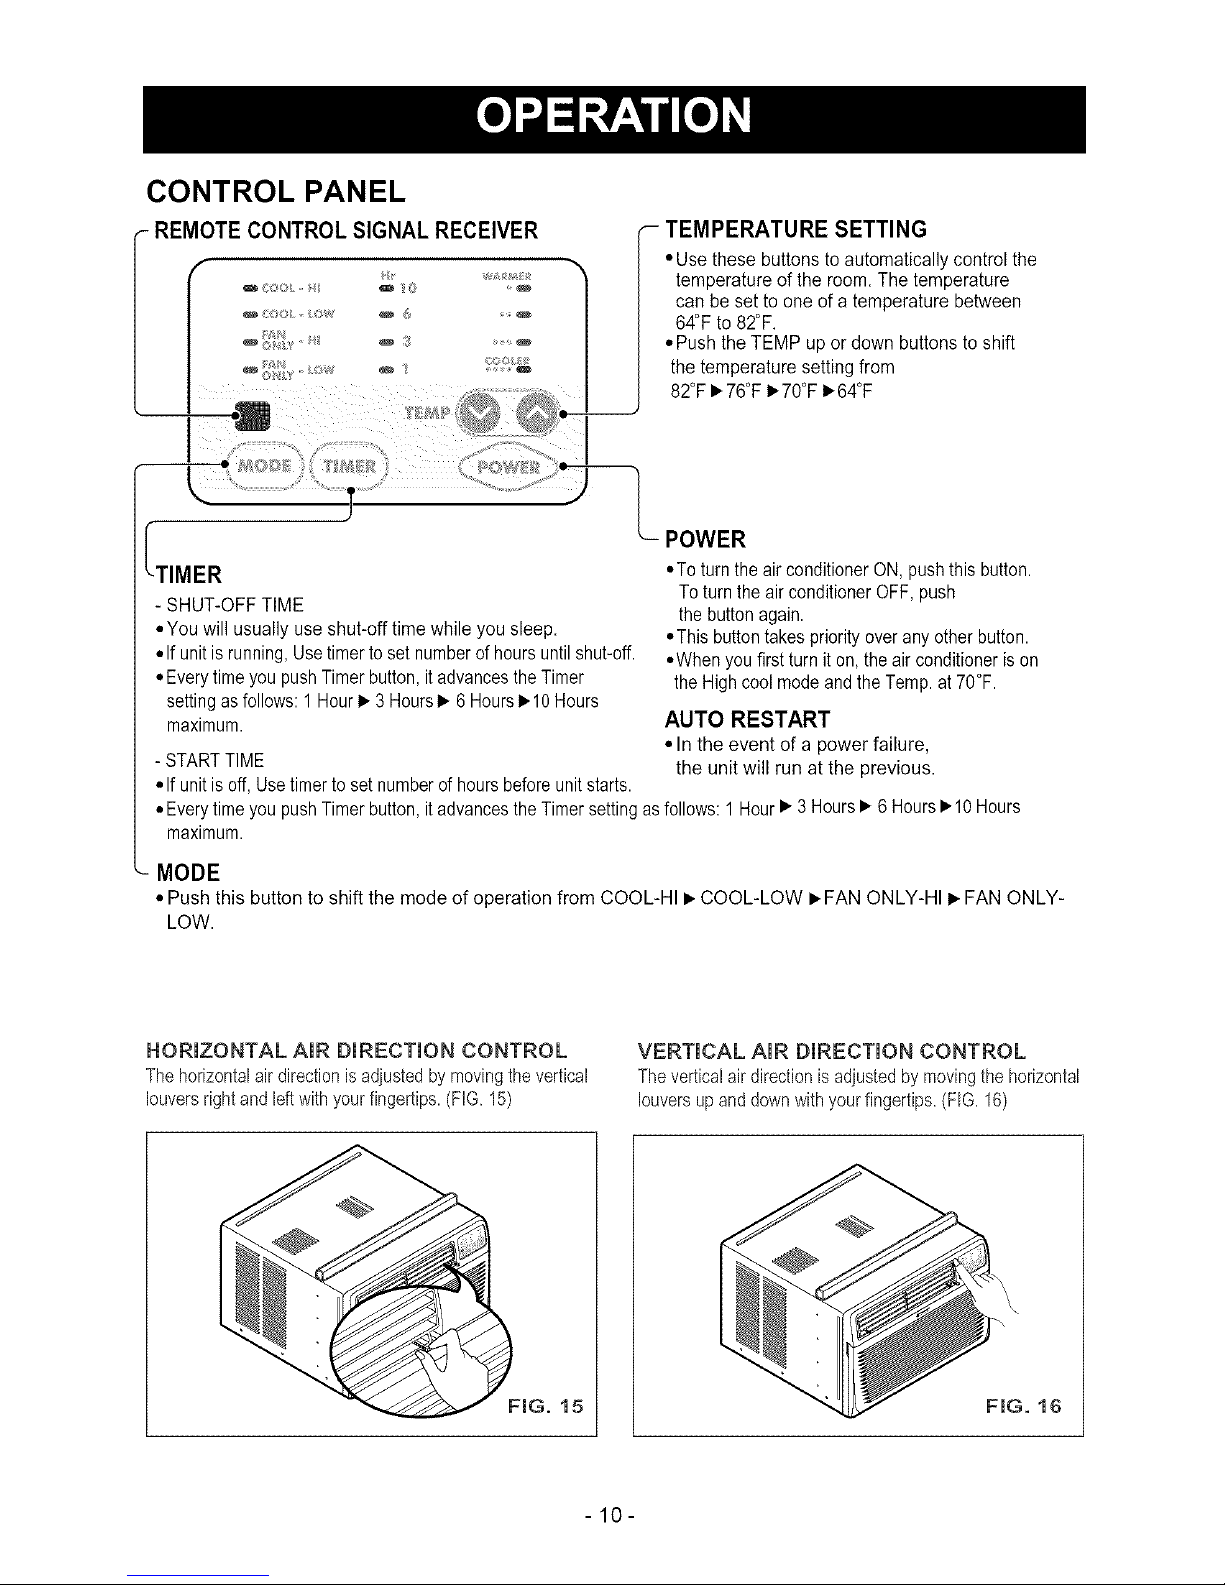
CONTROL PANEL
REMOTE CONTROL SIGNAL RECEIVER
[,.. ..............................................
ITIMER
- SHUT-OFF TIME
• You will usually use shut-off time while yousleep
• If unit is running,Usetimer toset numberof hours untilshut-off
•,Everytime you push Timerbutton, it advancesthe Timer
settingas follows: 1 Hour• 3 Hours• 6 Hours• 10Hours
maximum.
- STARTTIME
•Ifunitisoff,Usetimertosetnumberofhoursbeforeunitstarts.
TEMPERATURE SETTING
• Use these buttons to automatically control the
temperature of the room. The temperature
can be set to one of a temperature between
64°F to 82°F.
• Push the TEMP up or down buttons to shift
the temperature setting from
82°F• 76°F•70°F •64°F
---_- POWER
•To turnthe air conditioner ON, pushthis button.
Toturn the air conditioner OFF,push
the button again.
•This buttontakes priority overany otherbutton.
•When youfirst turn it on, the air conditioner is on
the High cool mode andthe Temp. at70°F.
AUTO RESTART
• In the event of a power failure,
the unit will run at the previous.
• Everytimeyou pushTimer button,itadvancesthe Timer settingas follows:1 Hour• 3 Hours• 6 Hours•10 Hours
maximum.
MODE
• Push this button to shift the mode of operation from COOL-HI • COOL-LOW • FAN ONLY-HI • FAN ONLY-
LOW.
HORIZONTAL AIR DIRECTION CONTROL
The horizontalair directionisadjusted bymovingthevertical
louversrightandleftwithyour fingertips.(FIG. 15)
VERTICAL AIR DIRECTION CONTROL
The verticalair directionisadjusted bymovingthehorizontal
louversupand downwithyourfingertips.(FIG. 16)
)
FIG. 15
-10-

REMOTE CONTROL
NOTE: The Remote Control will not operate properly if strong light shines on the sensor window of the Air
Conditioner or if there are obstacles between the Remote Control and the Air Conditioner.
Every time you push button, you will hear a beep from the Air Conditioner.
POWER
• To turn the air conditionerON, pushthis button. To turn theair conditionerOFF, push the
button again. This button takes priority over any other button.
When you first turn it on, the air conditioner is on the High cool mode and the Temp at
70°F
TEMPERATURE SETTING
• Use these buttons to automatically control the temperature of the room.
The temperature can be set within a range of 64°F to 82°F.
• Push the TEMP up or down buttons to shift the temperature setting from
82°F• 76°F• 70°F• 64°F
TIMER
- SHUT-OFF TIME
• You will usually use shut-off time while you sleep.
• If unit is running, Use Timer to set the number of hours until shut-off.
• Push Timer buttons to advance the Timer setting as follows:
1Hour(1 Hour-2 Hours)• 3 Hours(3 Hours-5 Hours)• 6 Hours(6 Hours-9 Hours)
• 10 Hours maximum.
• TEMP •
TIMER MODE
- START TIME
• If unit is off, Use the Timer to set the number of hours before unit starts.
• Push Timer buttons to advance the Timer setting as follows :
1Hour(1 Hour-2 Hours)• 3 Hours(3 Hours-5 Hours)• 6 Hours(6 Hours-9 Hours)
• 10 Hours maximum.
MODE
• Push this button to shift the mode of operation from:
COOL-HI • COOL-LOW • FAN ONLY-HI • FAN ONLY-LOW.
HOW TO iNSERT BATTERIES iNTO REMOTE CONTROL
1. Remove the cover from the back of the remote
controller.
• Open the cover according to the arrow direction on the
cover.
2. Insert two batteries.
• Be sure that the (+) and (-) directions are correct.
• Be sure that both batteries are new.
3. Re-attach the cover.
° Do not use rechargeable batteries.
Such batteries differ from standard dry cells in shape,
dimensions, and performance.
• Remove the batteries from the remote controller if the air
conditioner is not going to be used for an extended
length of time.
-11 -

AIR FILTER CLEANING
The Air Filter will become dirty as it removes dust
from the inside air. It should be washed at least
every 2 weeks. If the Air Filter remains full of dust,
the air flow will decrease and the cooling capacity
will be reduced, possibly damaging the unit.
• Pull the inlet grille forward, grasping both tabs,
then pull out the air filter. (FIG. 17)
• Wash the Air Filter under the faucet with warm
water. Be sure to shake off all the water before
replacing the filter. (FIG.18)
FIG. 18
HOWTOREMOVETHEFRONTGRILLE
• Open the inlet grille downward.
• Remove the screw securing the Front Grille.
• Push the grille up from the bottom and pull the top
of the grille away from the case to lift the top tabs
out of their slots.
\
\
Inlet Grille
Grille
FIG. 20
AIR CONDITIONER CLEANING
Clean the front grille and inlet grille by wiping with a
cloth dampened in a mild detergent solution.
The cabinet may be washed with mild soap or
detergent and lukewarm water, then polished with
liquid appliance wax.
To ensure continued peak efficiency, the condenser
coils (outdoor side at the unit) should be checked
periodically and cleaned if they become clogged
with soot or dirt from the atmosphere. Brush or
vacuum exterior coils to remove debris from fins.
FIG. 19
HOW TO REPLACE THE
FRONT GRILLE
Attach the front grille to the cabinet by inserting the
tabs on the grille into the slots on the front of the
cabinet. Push the grille in until it snaps into place.
FIG. 21
-12-

BEFORE CALLING FOR SERVICE
Check the following list to be sure a service call is really necessary. A quick reference to this manual may
help you avoid an unneeded service call.
THE AIR CONDITIONER WILL NOT OPERATE.
Check if...
Wallplug disconnected.
House fuse blown or circuit breaker tripped.
MODE selector is OFF position.
Unit was turned off and then ontoo quickly.
TEMP Control setwarmer than room temperature.
The current interrupter device is triped
Then...
Push plugfirmly into wall outlet.
Replacefuse with time delay type or reset circuit breaker.
Turn MODE selector to thedesired COOL setting.
Turn unit off andwait 3 minutes before restarting.
Turn TEMP Control clockwise to a cooler setting (higher number).
Press the RESET button located on the power cord plug
If the RESET button will not stay engaged, discontinue use of the air
conditioner and contact a qualified service technician.
AIR FROM UNIT DOES NOT FEEL COLD ENOUGH.
Check if... Then...
MODE selector in LOW COOL position.
TEMP Control set too warm (lower number).
Room temperature below 70°F (21°C).
Temperature sensing tube touching evaporator coil,
located behindfront grille.
Turn selector to HIGH COOL position
Turn TEMP Control clockwise to a cooler setting.
Cooling may not occur until room temperature rises above 70°F (21°0).
Straighten tube away from evaporatorcoil.
THE AIR CONDITIONER COOLING, BUT ROOM IS TOO WARM - ICE FORMING ON COOLING COIL BEHIND FRONT GRILLE.
Check if... Then...
Outdoor temperature below 70°F (21°C). To defrost the coil, setselector to FAN position.Then, turn TEMP control
counterclockwise to awarmer setting.
Airfilter may be dirty. Clean filter. Referto Maintenance section of owner's manual. To defrost,
set selector to FAN position.
TEMP Control settoo cold for night-time cooling. Todefrostthecoil,setselectortoa FANposition.Then,set theMODE
controlat FANpositionor "HighCool"withthe TEMPcontroltoa warmerposition.
THEAIR CONDITIONERCOOLING,BUT ROOMISTOO WARM.
Check if...
Dirty airfilter- air restricted. Clean airfilter. Referto Maintenance section of owneGsmanual.
TEMP Control set toe warm. Turn TEMP control clockwise to acooler setting (higher number).
Front of unit is blocked by drapes, blinds, furniture, Clearblockage infront of unit.
etc. Airdistribution is restricted.
Doors,windows, registers, etc. open. Cold airescapes. Close doors, windows, registers, etc.
Unit recently turned onin hot room. Allowadditionaltimeto removestoredheatfromwalls,ceiling,floor,andfurniture.
THE AIR CONDITIONER TURNS ON AND OFF RAPIDLY.
Check if... Then...
[ Outside temperature is extremely hot. [ Set MODE on HIGH speed to bringair past coolingcoils faster. [
NOISE WHEN UNIT IS COOLING.
Check if... Then...
S°und°ffanhittingwater-fr°mthem°isturerem°valsystemt Thisisn°rmalwhenhumidityishighCl°sed°°rs'wind°ws'andregisters tWindow vibration - poor installation. Refer to installation instructions or check with installer.
WATER DRIPPING INSIDE ROOM WHEN UNIT IS COOLING.
Check if... Then...
The air conditioner is improperly installed. Tilt air conditionerslightly to the outside to allow water drainage. Refer to
installationinstructions or check with installer.
WATER DRIPPING OUTSIDE WHEN UNIT IS COOLING.
Check if... Then...
The unit is removing large quantities of moisture This is normal during excessively humid days.
from humid room.
-13-

-14-

INDICE DE MATERIAS ............................. 15
GARANTIA ................................................ 15
SEGURIDAD .............................................. 16
Importantes instrucciones de seguridad ..... 16
REQU ERIMIENTOS ELC:CTRICOS ......... 17
INSTALACION ........................................... 18
Requerimientos para instalaci6n .......... 18
Installaci6n ............................................ 19
C6mo instalarlo ..................................... 19
La eliminacion de la ventana ................. 20
OPERACliN .............................................. 21
Como y por que .................................... 21
Sonidos normales .................................. 21
Capacidad y tiempo de funcionamiento ...21
Caracteristicas ..................................... 22
Uso del equipo de aire acondicionado ..22
Panel de control .................................... 23
Control remoto ...................................... 24
MANTENIMIENTO .................................... 25
Limpieza del filtro del aire ...................... 25
Limpiezadelequipode aireacondicionado....25
Cdmo sacar la rejilla frontal ................... 25
Cdmo a reemplaza el grille anterior ......25
CORRECCION DE FALLAS ...................... 26
Antes de Llamarparaservicio...................... 26
ACUERDOS DE PROTECClON
ESPEClALIZADA ...................................... 31
PARA PEDIR SERVIClO ....... Cubierta Trasera
GARANTiA DE UN ANO POR EL
EQUIPO DE AIRE ACONDICIONADO
DE HABITACION
Durante un afio completo a partir de la fecha de
compra, si este equipo de aire acondicionado recibe
mantenimiento y se utiliza para el enfriamiento
normal de habitaci6n segun las instrucciones
indicadas en este manual del propietario, Sears
reparar& gratuitamente este equipo de aire
acondicionado, si tiene algQn defecto en materiales
o fabricaci6n.
GARANTiA TOTAL DE CINCO A_IOS
POR EL SISTEMA DE REFRIGERAClON
HERMI_TICAMENTE SELLADO
Durante cinco afios a partir de la fecha de compra,
si este equipo de aire acondicionado recibe
mantenimiento y se utiliza para el enfriamiento
normal de habitacion segun las instrucciones
indicadas en este manual del propietario, Sears
reparara gratuitamente el sistema de refrigeraci6n
hermeticamente sellado (que consiste en el agente
refrigerante, los tubos de conexiOn y el compresor),
si tiene algL_ndefecto en materiales o fabricaciOn.
EL SERVIClO DE GARANTiA ES
DISPONIBLE CONTACTANDO AL SERVIClO
SEARS AL 1-800-4-MY-HOME ®
La proteccion de garantia cubre unicamente a los
equipos de aire acondicionado usados para uso
domestico y no para uso comercial.
Esta garantia s61o tiene validez mientras el producto
se este usando en los Estados Unidos.
Esta garant afle da derechos legales especificos y
usted puede tenet otros derechos que varian de
estado en estado.
Sears, Roebuck and Co., D/817WA,
Hoffman Estates, IL 60179 U.S.A.
-15-

IMPORTANTES INSTRUCCIONES DE SEGURIDAD
Las siguientes instrucciones de seguridad le indicaran c6mo usar su equipo de aire acondicionado de
habitaci6n para evitar daSos para usted mismo y para su EQUIPO DE AIRE ACONDIClONADO.
POR SU SEGURIDAD
No almacene ni use gasolina u otros vapores y
Ifquidos inflamables cerca de este o cualquier otto
electrodomestico. Lea las etiquetas de los
productos para ver si contienen advertencias sobre
el car_cter inflamable de los mismos y otras
advertencias.
PARA PREVENIR ACCIDENTES
Para reducir el riesgo de incendios, descargas
electricas o lesiones personales al usar su equipo
de aire acondicionado, tome las precauciones
bAsicas, entre las que estan las siguientes:
• Asegt]rese de que la alimentaci6n electrica sea la
apropiada para el modelo que usted ha elegido.
• Si el equipo de aire acondicionado debe instalarse
en una ventana, a usted probablemente le
conviene limpiar primero ambos lados del vidrio.
Si la ventana es del tipo de tres paneles con un
panel incluido de pantalla, le conviene sacar la
ventana completamente antes de la instalaci6n.
• Asegt]rese de que el equipo de aire
acondicionado ha sido instalado correctamente y
con seguridad segt]n se seSala en las
instrucciones separadas de instalaci6n que vienen
en este manual. Conserve este manual y las
instrucciones de instalaci6n para usarlos
posiblemente en el futuro al sacar o volver a
instalar esta unidad.
• Utilice guantes al manejar el equipo de aire
acondicionado, tenga cuidado para evitar cortadas
con las afiladas aletas metalicas que se hallan en
los serpentines frontales y posteriores.
INFORMAClON ELECTRICA
En la placa de serie del fabricante se indica cu_l es
la capacidad electrica nominal completa de su nuevo
equipo de aire acondicionado para habitaci6n. Consulte
esta placa cuando vaya a verificar los requerimientos
electricos.
• Asegurese de que el equipo de aire acondicionado
tenga una conexion correcta a tierra. Para reducir al
mfnimo los riesgosde descargas electricas e incendio,
es importante conectar el equipo correctamente a tierra.
Elcordon dealimentacion electrica est,_equipado con
unenchufe de tres espigas con conexi6n a tierra para
protegerle contra riesgos de descargas electricas.
• Su equipo de aire acondicionado debe enchufarse en
unatoma decorriente de pared quetenga una conexi6n
correcta atierra. Si la toma de corriente de pared que
usted piensa usar no esta conectada correctamente a
tierra o no est,. protegida con un fusible de acci6n
retardada o con un interrupter de circuito,haga que un
electricistacalificado le instale la toma de corriente de
pared en formacorrecta.
• No ponga a funcionar el equipo de aire acondicionado
con una cubierta protectora exterior encima. Esto podrfa
ocasionar daSos mecanicos dentro del aire
acondicionado.
• No use un cable de extension ni unenchufe
adaptador.
_ Evitelospeligrosde incendiosy
descargaselectricas.No useuncable deextensi6nniun
enchufeadaptador.No elimineningunade lasespigas
del enchufedelcord6nde alimentaci6nelectrica.
Toma de corriente
de pared con
conexi6n a tierra.
\
Rep°nga--I-_
Prueba--/_ Terminal de
conexi6n a tierra.
I
i
Bajo ninguna circunstancia corte, quite o evite
el uso de la conexidn a tierra de esta clavija.
Cable de
alimentaci6n
--con clavija
dotada de
conexi6n a
tierra de 3
terminales.
IDEAS PARA AHORRAR ENERG|A
• La capacidad del equipo de aire acondicionado
debe corresponder al tama5o de la habitaci6n
para el funcionamiento eficiente y satisfactorio del
equipo.
• Instale el equipo de aire acondicionado de
habitaci6n en el lado sombreado de su hogar. Una
ventana orientada hacia el norte es la mejor
porque tiene sombra la mayor parte del dia.
• No bloquee el aparato de aire acondicionado
tapandolo con persianas, cortinas, muebles o en
el exterior con arbustos, recintos u otros edificios.
• Cierre el regulador de tiro de la chimenea, las
rejillas de calefacci6n del piso y la pared, de tal
modo que el aire frio no se escape ni por la
chimenea ni por los conductos.
• Mantenga las persianas y las cortinas de otras
ventanas cerradas durante la parte mas soleada
del dia.
• Limpie el filtro del aire como se recomienda en la
secci6n "MANTENIMIENTO" de este manual.
• El aislamiento correcto y las juntas hermeticas en
puertas y ventanas en su hogar le ayudaran a
mantener el aire caliente afuera y el aire frfo
adentro.
• AI darle sombra externamente a la casa con
_rboles, plantas o toldos ayudar_ a reducir la
carga de trabajo del equipo de aire acondicionado.
• Opere los aparatos que producen calor como, por
ejemplo, hornos, lavadoras, secadoras y
lavaplatos durante la parte m_s frfa del dia.
-16-

RESPETE TODOS LOS CODIGOS Y
REGLAMENTOS.
BAJO NINGUNA ClRCUNSTANCIA CORTE,
QUITE O EVITE EL USO DE LA CONEXION
A TIERRA DE ESTA CLAVIJA.
ESTE APARATO NECESITA SER
CONECTADO A TIERRA.
Se requiere una alimentaci6n electrica CA,
adecuadamente conectada a tierra con un
fusible de 20 A, de 60 Hz y de 250 V.
Se recomienda un fusible de retardo o un
disyuntor de circuito que alimente solamente a
este aparato.
NO USE CABLE ELECTRICO DE
EXTENSION.
MI_TODO RECOMENDADO DE CONEXION A
TIERRA
Por su propia seguridad este aparato debe
conectarse a tierra. Este aparato viene
equipado con un cable de alimentaci6n y una
clavija de tres terminales. Para reducir al
maximo el peligro de choque electrico, el cable
debe estar conectado a una conexi6n de pared
con conexi6n a tierra, y esta conexi6n debe
hacerse de acuerdo con la ultima edici6n del
C6digo Electrico Nacional (ANSI/NFPA 70), asi
como con los c6digos y reglamentos locales. Si
no existe una conexi6n de pared adecuada, el
cliente tiene la responsabilidad y la obligaci6n
de mandar instalar, con un electricista
calificado, una conexi6n de pared adecuada de
tres terminales con conexi6n a tierra.
115V~
I I
230V~
r- I
Elcabledealimentaci6npuedeincluirundispositivo
interruptordecorriente.Lacarcasadelenchufecuenta
conunbot6ndepruebay otrodereinicio.Eldispositivo
debecomprobarseperi6dicamentepresionando
primeroelbot6nTESTydespuesRESET.
Sielbot6nTESTnosedesconectaosielbot6n
RESETnopermaneceactive,suspendaelusodelaire
acondicionadoy p6ngaseencontactoconuntecnico
deserviciocualificado.
NOTA:La forma puede ser diferente segun su modelo.
Utiliceelenchufede lapared Consumode Energfa
@ tandard 125V,
enchufe de 3
Lfneas de
15A, 125V AC Utilice un fusible de
15AMP. o un
Standard 125V, Interruptor de 15AMP,
enchufe de 3
Lineas de
15A, 125V AC
Standard 250V,
enchufe de 3 Utilice un fusible de
Lineas de 20AMP, o un
20A, 250V AC Interruptor de 20AMP.
Peligro de cheque electrico
Conecte en una conexion de pared de 3 terminales
No quite la terminal de conexion atierra
No use adaptadores
No use cable electrico de extension
Si no se siguen estas instrucciones, puede ocasionarse
la muerte, un incendio o un cheque electrico.
-17-

REQUERIMIENTOS PARA
INSTALACI ON
Suequipodeaireacondicionadoseinstalaraenventanas
estandardedoblepanelconanchosdeaberturalibrede559mm
a914mm(22a 36pulgadas).(Figura1)
El marcoinferiordebeabrirseIosuficienteparapermitiruna
aberturaverticallibrede331mm(13 pulgadas).Lasrejillas
desviadoraslateralesy laparteposteriordelequipodeaire
acondicionadodebentenerunespaciolibredeaireparapermitir
suficienteflujode aireatravesdelcondensadorparaasieliminar
elcalor.Laparteposteriorde launidaddebequedaralairelibre,
nodentrodeunedificioogaraje.
_ _H Banda
22"to36"4 I
II
I 1113"rnin"Repisa I I --Ventana
(1.__1, .'_ Antepecho
I 21 I_ Exterior
Paredinterior....... Figura I
8ERVICIOELECTRICO
Compruebecualesla alimentaci6nelectricaqueIlegaa su
domicilio.Laalimentaci6nelectricadisponibledebeserlamisma
quesemuestraen laplacadelfabricantedelaunidad(quese
hallaenel ladeizquierdodelgabinetedecorrientealterna).
Todoslosmodelosestanequipadosconunenchufedetres
espigasparasuministrarunserviciocorrectoy unaconexi6na
tierraseguray positiva.Nocambieelenchufedeningunaforma.
Nouseunenchufeadaptador.Sisu tomadecorrientedepared
actualnopuedeusarseconelenchufedel equipo,Ilameaun
electricistacalificadoparaqueefecDelascorrecciones
necesarias.
CONSERVELACAJAy esteMANUALDELPROPIETARIOpara
quelesirvacomoreferenciaenel futuro.Lacajaes la mejor
maneradeconservarlaunidadduranteelinviernoocuandono
estaen uso.
Para evitarel riesgo de heridas personales, da_os en
los bienes, o da_oen el productodebe set expuesto el
agudez de los bordesyel peso aptodel aparato:
• El aire acondicionadodelque se hablaen este
manual afirmapeligro de peso excesivo.
Dos o mas personas se requiere paramover e instalar
la unidad. Para evitar heridas oagotamlento, use
tecnicasapropiadas para levntary mover la unidad.
• Cuidadosamente inspeccioneel lugardonde el aire
acondicionadosera puesto.Asegurese que el lugar
sostengael pesode la unidadsobre un periodo de
tiempo prolongado.
• Mantengasu aire acondicionado con cuidado. Use
guantes protectorescuando levanteo mueva la
unidad. EVITElasaletas fllosas de metal en el
serpentin delantero y de atras.
• Asegurese queel aire acondicionado nose caiga
durante lainstalacion.
INSTALACION PIEZAS DE MONTAJE
TIPO NOMBREDELABPIEZA8 CANTIDAD
A TORNILLO CORTO 11
B TORNILLO MEDIANO 5
C SUPPORT EN L 3
D BANDAADHESIVA 1
E BANDA DELMARCO 1
F PANEL DE GUiA 2
G TUBO DE DRENAJE 1
H SOSTENGA PAR¢:NTESIS 1
HERRAMIENTAS REQUERIDAS
• Guantes apretados • Llave inglesa o Ilave
• Destornillador normal abierta de 3/8"
• Destornillador Phillips • Llave hexagonal de cubo
• Pinsas y trinquete de 1/4 de
• Cuchillo filoso pulgada
• Cinta para medir
• Taladro electrico
• Broca de taladro de 1/4"
-18-

INSTALACl0N
Escoja un lugar que le permita Ilevarel aire frio al &rea
quedesea. Las ventanas que se usen para la instalaci6n
deben tener la resistencia suficiente para soportar el peso
delequipo de aire acondicionado. Una buena instalaci6n
con atenci6n especial a la correcta posici6n de la unidad
disminuir&laprobabilidad de que sea necesario efectuar
reparaciones.
C0MO INSTALARLO
H CORTINAS LATERALES
Inserte las cortinas laterales en las guias del aire
acondicionado. Fije las cortinas a la unidad con
tornillos (TIPO A), como se muestra en Figura 2.
TIPOA Figura 2
_'1FAJA DE SELLANTE
Corte la cinta selladora adhesiva (TIPO D) a la anchura
de la ventana.
Quite el dorso de la cinta selladora ypeque la cinta
selladora a la superficie inferior de la ventana de abajo.
Vea la Figura 3.
Figura 3
COLOCAR LA UNIDAD EN LA
VENTANA
Abra la ventana y marque la linea central en el centro del
alf izar interior como se muestra en la Figura 4.
ANTEPECHO
INTERIOR
TABURETE
Figura 4
D SOPORTE DE FIJACION L
• Utilice tornillos(TIPO A) para instalar los soportes
en L sobre la plataforma exterior como se
muestra. Consulte Figura 5.
• El soporte ayuda a mantener la unidad
correctamente en su lugar. AsegQrese de colocar
el borde del soporte nivelado con la parte de atr&s
del alfeizar interior. V6ase la Figura 5.
• Si el aire acondicionado est& bloqueado pot el
marco de la ventana de tormenta, v6a el paso 9.
DESCANSO
EXTERIOR
\
\
\
DESCANSO
INTERIOR
TIPO A
INTERIOR
LINEA DEL CENTRO
EXTERIOR
MENSULA EN L
gura 5
DRENAJE
En primer lugar, asegQrese de insertar la tuberia
de drenaje en la bandeja de la base antes de la
instalaci6n. El aire acondicionado debe instalarse
con una ligera inclinaci6n (1/4") hacia abajo para
el drenaje adecuado del exceso de agua condensada
a traves de la tuberia de drenaje.
4ira
TUYAU
DRENAJE DI_VACUATION
PARTE POSTERIOR
TUBO DE H- DEL RECIPIENTE
DRE_,_ DE BASE
PARTE INFERIOR DEL
_- REOIPIENTE DE BASE
'_111//////////////_
Figura 6
-19-

r_ INSTALE EL ACONDICIONADOR DE AIRE
EN LA VENTANA
• Levanteconcuidado el aire acondicionadoy desicelo hasta
laventanaabierta.Asegt_resedequelaguia inferiordelaire
acondicionadopasa porlas muescasde lossoportesen L
• AI encajar en del soporte L, el acondicionador de aire
estate,centrado en la abertura de la ventana, come se
muestra en la Figura 7.
• Mientras sujeta el acondicionador de aire, baje
cuidadosamente el marco corredizo de la ventana
detr_.sde la guia superior del acondicionador de aire,
como se muestra en la Figura 8.
}
K = = "h
\\
Llneacentral Figura 7
BORDE DE LA VENTANA
SUPERIOR - ..
/
GUIASUPERIOR --_ _ BANDA
Figura 8
H FIJE LOS PANELES CORREDIZOS
Extienda los paneles corredizos para Ilenar la abertura de
la ventana, usando los 4 tornillos (TIPO B) parafijarlos,
come se muestra en la Figura 9.
D INSTALE EL SELLO DE VENTANA CORREDIZA Y
EL SEGURO DE VENTANA CORREDIZA
• Corte lajunta de espuma(TIPO E) a la anchura de la
ventana.Meta la junta de espuma entreel marco inferior
y superior de la ventanaparaevitarque entre airee insectos
en la sala, come se muestraen Figura 9.
• Coloqueel soporte en L restanteen uric de los dos lados de
la ventana utilizandountornillo (TIPO A).Consulteel detalle
de Figura9. La instalacio'nde este soporteevita quela
unidad caiga cuandose levante laventana.
_DELMARCO
pP'_ [_Ul Im7:1m[o_
BANDADEL
MARCO
(T_POE)
Figura 9
Retireeltornillo de la parte inferiorderecha de la carcasa.
•Utiliceeste tornillo para incorporarel soportede apoyo
(TIPOH)a la platatormainterior de la ventana,
comose muestra enFigura10.
TIPO B
j, *
Soste'nga'Parentesis(TIPOH)
....... _ Figura 10
I_'lsl ELACONDIClONADORDEAIREESTABLOQUEADO
POREL MARCODELACONTRAVENTANA
•Si la contraventanainterfiere,fije unlist6ndemaderade2"de
anchoal alf6izarinteriordelaventana,queatraviesela
anchuratotaldelalf6izar.El list6ndemaderadebeser
suficientementegruesoparalevantarlaalturadelalf6izardela
ventanadetal maneraquela unidadpuedaserinstaladasin la
interferenciadelmarcodelacontraventana.Veala Figura11.
Lapartesuperiordellist6ndemaderadebeser
aproximadamente3/4"m_.saltoqueel marcodela
contraventanao el list6ndemadera(fueradelacasa)para
queelvaporemanadodela unidadpuedadrenar
adecuadamentehaciaelexterior.
• Instaleunsegundolist6ndemadera(deaproximadamente6"
de largoy 1"deanchoy del mismogrosordelprimerliston)en
el centrodelalf6izarexteriorniveladoconla parteposteriordel
alf6izarinterior.AtornillelossoportesL entrela faja.Esto
levantar_elsoporteLcomosemuestraenlaFigura11.
1" MAX.
FRANJA DE MADERA _ 3/4-PULG
MONTADA SOBRE "_ _ _'_ DE SEPARACION
LA PARTE SUPERIOR _'__n L
DEL DESCANSO
INTERIOR __-'_, VENTANA DE A
ooe
ANTEPECHO
INTERIOR
AN:rEPECHO
_M ERRORFigura 11
LA ELIMINACI6N DE LA VENTANA
Apagueel aire acondicionadoy desenchufeel cablede
alimentaci6n.Retireel soporteen Ly lostornillosinstalados
en la parte superiore inferiorde los paneleslateralesy
gu&rdelospara la posterior reinstalaci6n.Cierrelos paneles
laterales.Sujetandofirmemente el aire acondicionado,
levanteel marcoe inclinecon cuidadoel aireacondicionado
hacia afueraparadrenar todael agua condensada.Levante
el aireacondicionadode la ventanay retire lajunta de
espumadeentrelas ventanas.
•Elaireacondicionadodelquesehablaenestemanualafirmapeligro
depesoexcesivo,
Dosomaspersonasserequiereparamovereinstalarlaunidad,Para
evitarheridasoagotamlento,usetecnicasapropiadasparalevntary
moverlaunidad,
•AImanejarlaunidad,tengacuidadoparaevitarcortarseconlasalertas
met_licasafiladasqueest_nenlosserpentinesfrontalyposterior,
•Aseguresequeelaireacondicionadonosecaigadurantelainstalacion,
- 20 -

COMO Y POR QUI
Su equipo de aire acondicionado de habitaci6n
brinda las siguientes funciones para hacer que la
vida en climas c&lidos sea m&s confortable:
• Enfria y hace circular el aire per la habitaci6n
• Disminuye la humedad eliminando la humedad
excesiva.
• Filtra el polvo, el sucio y algunas impurezas
transportadas en el aire del clima veraniego.
El equipo de aire acondicionado realiza estas
funciones haciendo pasar el aire del medio
ambiente a traves de un filtro que atrapa las
particulas de polvo y sucio. El aire pasa entonces
pot un serpentin de enfriamiento que refrigera el
aire y elimina el exceso de humedad. El mismo aire
regresa entonces al enfriader, secador y limpiader
del aire del ambiente. La humedad extraida del aire
ambiente es Ilevada al exterior y evaporada.
Su aire acondicionado est& diseSado para operar y
suministrar una enorme potencia de enfriamiento.
SONIDOS NORMALES Figura 12
Adem_s de los sonidos regulates del motor del
ventilador y el compresor que salen de su equipo
de aire acondicionado, usted escuchar& de vez en
cuando un sonido met&lico. Este sonido es
producido per la humedad que es recogida del aire
en el ambiente y es lanzada contra el ventilador del
equipo de aire acondicionado. Esto es algo normal
que no debe set motive de preocupaci6n. De igual
mode, no se alarme si usted escucha un ligero
sonide de silbido o borboteo proveniente de su
equipo de aire acondicionado despu6s que Io
apaga. Estos son ruidos normales del refrigerante.
CAPACIDAD Y TIEMPO DE
FUNCIONAMIENTO
AIdecidircu_.ldebeserla comodidaddeseadaparael&reaque
ustedquiereenfriar,es importantedeterminareltamaSocorrecto
delaunidad.Unaunidadpequenanotendralacapacidadpara
enfriar,dejandolaareacahrosa.EltamaSoadecuadoes
determinadoporel nL_merodemetroscuadradosquetieneel
&reaquese deseaenfriar,asi comoporlatemperaturainteriory
exterioryporlahumedad.Unaunidaddemasiadograndesi
enfria,peronodeshumedece,dejandolaareafriay humeda.
Siemprequelacargat_rmicadelventiladorest_porencimade
Ionormal,elequipodeaireacondicionadodebefuncionarm_.s
tiempoparamantenerlatemperaturadeseadaqueustedha
seleccionado.Bajocondicionesdeunacargat_rmicamuy
pesada,puedeser necesarioqueelequipodeaire
acondicionadofuncioneconstantementeparamantenerla
temperaturadeseada.
Enocasiones,el usode MEDFANparahacercircularelairepor
la habitaci6nhacequeelambienteseam&sconfortableaun
cuandoelequiponoest6enfriandoel aire.Mientrasm&stiempo
y conmayorfrecuenciafuncioneelequipodeaire
acondicionado,m_.selectricidadconsumir&ymayoresser_.nlos
costosdesuuso.
Compresor
El moderno compresor de gran
eficiencia puede producir un ruido
agudo de murmullo o un ruido de
pulsaci6n que viene y se va.
--Vibraciones de la
unidad
La unidad puede vibrar y
hacer ruido debido a la
deficiente construcci6n
Ventilador
Usted puede
escuchar el
movimiento del
aire proveniente
del ventilador
Condensador
Usted puede escuchar gotas deagua que caen
sobre el condensador causando un sonido
met&licoo un sonido de chasquido.
Figura12
-21 -

CARACTERiSTICAS
1 15 6 5 4 32714
9 8 11 1210 13 16
Figura 13
1. Gabinete
2. Deflector vertical
de aire
3. Deflector horizontal
de aire
4. Toma de aire
5. Filtro del aire
6. Parrilla frontal
7. Tablero de control
8. Cord6n de
alimentaci6n
el6ctrica
9. Evaporador
10. Condensador
11. Compresor
12. Recipiente de base
13. Puntal
14. Guia superior
15. Cortina
16. Control remoto
-22-
USO DEL EQUIPO DE AIRE
ACONDICIONADO
_Para reducir el riesgo de incendio,
descargas el6ctrica o lesiones personales, lea las
IMPORTANTES INSTRUCCIONES DE
SEGURIDAD antes de operar este aparato.
Para comenzar a utilizar el equipo de aire
acondicionado, siga estos pasos:
1. Enchufe el equipo de aire acondicionado. (Para
prevenir riesgos de descargas el_ctricas, no use
un cable de extensi6n ni un enchufe adaptador.)
2. Ajuste el extractor de aire en la posici6n CLOSE.
3. Ajuste el control de MODE al mas alto nivel
fresco.
4. Ajuste el control del ventilador al m&s alto nivel.
5. Ajuste las rejillas desviadoras para Iograr un fiujo
confortable de aire.
6. Una vez que la habitaci6n se haya enfriado,
ajuste el control de temperatura TEMP a la
graduaci6n que usted considere m&s confortable.
NOTA: Si se apaga el aire acondicionado, espere 3
minutos antes de volver a encenderlo. Esto permite
que se estabilice la presi6n dentro del compresor.
Si no sigue estas instrucciones, el equipo podria
funcionar con poca eficiencia.
Si usted mueve el TEMP el control a un warmer,
entonces inmediatamente espalda a una colocaci6n
m&s fresca, la unidad apagar&. Espere 3 minutos.
CONTROL DE VENTILAClON
El control de ventilaci6n permite que el equipo de aire
acondicionado haga recircular el aire en el interior de la
habitaci6n (CLOSE) o saque elaire hacia el exterior
(OPEN). (Figura 14)
• La posici6n CLOSE sirve cuando se desea un
enfriamiento m&ximo. Tambi_n puede usarse para
hacer recircular el aire sin enfriar la habitaci6n cuando
el equipo de aire acondicionado se ajusta en la
posici6n FAN.
• La posici6n OPEN extrae elaire estancado de la
habitaci6n y Io expulsa hacia fuera. El aire fresco es
Ilevado hacia el interior de la habitaci6n a traves de
los pasajes normales de aire que se hallan en los
hogares.
• La posici6n OPEN o CLOSE puede usarse con
cualquier selecci6n de ventilador.
PULL OPEN / PUSH CLOSE
(TIRARPARAABRIR/ EMPUJARPARACERRAR)
Figura14

PANEL DE CONTROL
RECEPTOR DE SENAL
AJUSTE DE LA TEMPERATURA
• Utilice estos botones para controlar
automaticamente la temperatura de la habitaci0n.
La temperatura puede ajustarse en un rango de
64°F a 82°F.
• Pulse los botones TEMP arriba o abajo para
cambiar el ajuste de temperatura entre 82°F •
76°F • 70°F • 64°F.
ENECNDIDO/APAGADO
IMARCADOR DE ENCENDIDO/APAGADO
- OPERAClON DE PARADA:
• Normalmente utilizara la horade apagado mientras duerma.
• Cuando la unidad este encendida, utilice Timer para ajustar
el nt_merode horas transcurridas las cuales la unidad seapagara.
• Cada vez que pulsa el bot6n Timer, el ajuste Timer avanza del
siguiente modo:l Hera • 3 Horas • 6 Horas • 10Horas maximo.
- OPERACION DE INIClACION:
• Para ENCENDER el sistema presione el boton,
y para APAGARLO presione el botdn otra vez.
• Este bot6n tiene prioridad sobre todos los otros
botones.
•Cuando Ud. Io enciende per primera vez, el
sistema esta en el y la temperatura es de 70°F.
REINICIO AUTOMATICO
•Si se produce un corte de energia, la
unidad funcionara con los ajustes previos.
•Cuandola unidadesteapagada,utiliceTimerparaajustarel numerodehorastranscurridaslascualeslaunidadse
encendera.
•Cadavezquepulsaelbot6nTimer,elajusteTimeravanzadelsiguientemode:1Hera• 3 Horas• 6 Horas• 10Horas
m_.ximo
" MODE
• Pulse este bot6n para cambiar el mode de funcionamiento entre COOL-HI • COOL-LOW • FAN ONLY-HI
• FAN ONLY-LOW.
CONTROL DE LA DIRECCION
La direcci6n horizontal del aire es ajustada rotando
la palanca vertical hacia la derecha o hacia la
izquierda. (Figura. 15)
CONTROL DE DIRECCIi N VERTICAL DEL AIRE
La direcci6n vertical del aire se ajusta moviendo la
rejilla horizontal hacia delante o hacia atras.
(Figura. 16)
)
Figura 15 Figura 16
23

CONTROL REMOTO
Precaucion: El diepositiovo de control remoto no funcionar& adecuadamente eila ventana eensora del
acondicionador de aire e$ expueeta a luz fuerte, o si hay obst&culos entre el diepositivo de control remoto y
el acondicionador de aire. Cuando opere el aire acondicionado con el control remoto, deber& oir un pito.
ENECNDIDO/APAGADO
• Para ENCENDER el sistema presione el bot6n, y para APAGARLO presione
el bot6n otra vez.
Este bot6n tiene prioridad sobre todos los otros botones.
Cuando Ud. Io enciende pot primera vez, el sistema esta.en el y la
temperatura es de 70°F.
AJUSTE DE LA TEMPERATURA
• Utilice estos botones para controlar autom&ticamente la temperatura de la
habitaci6n. La temperatura puede ajustarse en un rango de 64°Fa 82°F.
• Pulse los botones TEMP arriba o abajo para cambiar el ajuste de temperatura
entre 82°F • 76°F • 70°F • 64°E
MARCADOR DE ENCENDIDO/APAGADO
- OPERACION DE PARADA:
• Normalmente utilizara la hora de apagado mientras duerma.
• Cuando la unidad este encendida, utilice Timer para ajustar el n0mero de horas
transcurridas las cuales la unidad se apagar&.
• Pulse los botones Timer para avanzar el ajuste Timer del siguiente mode: 1Hera (1
Hera-2 Horas)• 3 Horas(3 Horas-5 Horas)• 6 Horas (6 Horas-9 Horas) • 10 Horas
m&ximo.
- OPERACION DE INICIACION:
• Cuando la unidad est6 apagada, utilice Timer para ajustar el nQmerode horas
transcurridas las cuales la unidad se encender&.
• Pulse los botones Timer para avanzar el ajuste Timer del siguiente mode: 1Hera(1
Hera-2 Horas)• 3 Horas(3 Horas-5 Horas)• 6 Horas (6 Horas-9 Horas) • 10 Horas
m&ximo.
• TEMP •
TIMER MODE
MODE
• Pulse este bot6n para cambiar el modo de funcionamiento entre COOL-HI •COOL-
LOW • FAN ONLY-HI • FAN ONLY-LOW.
COMO A BATERIAS DE ADIClON EN EL CONTROL REMOTO
1. Quite la cubierta de la espalda del director remoto.
• Abra lacubierta seg0n la direcci6n de la flecha.
2. Meta a bater'as.
• Est6 seguro que el (+) y (-) las direcciones son
correctas.
• Est_ seguro que ambas bater ias son nuevas.
3. Re-conecte la cubierta.
• No utilice bateris recargables, 6stas son diferentes de
forma, de dimensi6n y uso respecto alas baterfas
secas usuales.
• Seque las baterfas del telemando cuando el
acondicionador no vaya a ser usado durante un largo
perfodo.
- 24 -

LIMPIEZA DEL FILTRO DEL AIRE
El filtro del aire se ir_lensuciando a medida queva
atrapando el polvo proveniente del aire interior. Es
preciso lavar el filtro del aire al menos cada dos
semanas. Si el filtro del aire permanece Ileno de polvo, el
flujo de aire disminuir& y se reducir_tla capacidad de
enfriamiento del equipo, con posibles daSos para la
unidad. (Figura 17)
• Tire de la rejilla de entrada hacia delante agarrando
ambas lengtietas y tire del filtro del aire hasta sacarlo.
• Lave el filtro del aire en agua tibia a. AsegOresede
eliminar toda el agua sacudiendo el filtro antes de volver
a ponerlo en su posicion. (Figura 18)
Figura 18
LIMPIEZA DEL EQUIPO DE AIRE
ACONDICIONADO
La rejillafrontal y la rejillade entradadel airepueden lavarse
con unpahohumedecidoen unasoluci6ndedetergente
suave.(Figura19)El gabinetepuedelavarse conunjab6no
detergentesuavey aguatibia,seguidamentepuedepulirse
concera Ifquidaespecialpara electrodom_sticos.
Paraasegurarunaeficiencia m_lximacontinua,los
serpentinesdelcondensador(ladode enfrentede launidad)
deben revisarseperi6dicamenteylimpiarsesiestEln
obstruidoscon hollfno consuciode la atm6sfera.
Figura 19
COMOA REEMPLAZA EL
GRILLE ANTERIOR
• Saqueeltornilloque mantienela rejillafrontal enposici6n.
• Quiteel tomillo queasegurale rejadelantera.
• Empujela rejillahaciaarriba de abajoy jale la partede
arribade la rejillalejos de labaseparalevantarlas
lenguetasde arribahacia afuerade las ranuras.
\
Rejilladeentrada
It
COMO A REEMPLAZA EL
GRILLE ANTERIOR
Pegue el panel frontal a la caja insertando los fijadores
en el panel adentro losdel panel de la caja.
o
Figura 21
/
-25-

ANTES DE LLAMAR PARA SERVICIO
Cheque la siguiente lista para asegurarse si en realidad es necesario Ilamar para servicio. Una referencia rapida a
este manual puede evitar una Ilamada para servicio innecesaria.
EL EQUIPO DE AIRE ACONDICIONADO NO FUNCIONA.
Elenchufenoestaconectadoenlatomadecorrientedepared. Conecteel enchufefirmementeenlatomadecorrientedepared.
Elfusibleestaquemadooel interruptordecimuitosehadisparado. Reemplaceelfusibledaffadoconunfusibledeacobnretardadaoreajusteel
interruptordecimuito.
ElselectordelventiladorMODEestaenla posicionde OFF. PongaelselectorenlaposicbndeCOOL.
Launidadseapag6y sevolvioaencenderdemasiador@ido. Apaguelaunidadyespere3 minutosantesdevolveraencenderla.
ElcontroldetemperaturaTEMPseajustomascalidoquela Gireel controldetemperaturaenelsentidode lasagujasdelrelojhastauna
temperaturaambiente, graduacbnmasfria(numeromasalto).
Eldispositivointerruptorde corrienteestadesconectado. PresioneelbotonRESETsituadoenelenchufedelcabledealimentacidn
SielbotdnRESETnopermaneceactivo,suspendaelusodelaireacondicionado
y p6ngaseencontactoconuntecnicodeserviciocualificado.
EL AIRE DE LA UNIDAD NO SALE BASTANTE FR|O.
Elselectora unaposici6nm&sLOWCOOL.
ElcontroldetemperaturaTEMPseaiusbdemasiado_lido(numeromasbaio).
Latemperaturaambienteestapotdebajode los70°F(21°C)
Gire elselectora unaposici6nHIGHCOOL.
Gireelcontroldetemperaturaenelsentidodelasagujasdelrelojpara
Nopuedeproducirseelenfriamientohastaquelatemperaturaambientesuba
porencimadelos70°F(21°C).
EltubosensordetemperaturaestAtocandoelserpentinevaporador Endereceeltuboalejandolodel serpentfnevaporador.
queest&situadodetr&sdelflltrodelaire.
ELAIREACONDICIONADOENFR[A,PEROLAHABITACIONSESIENTEDEMASIADOCALIDA;SEFORMAHIELOENELSERPENTINDEENFRIAMIENTO
DETRASDELPANELDECORATIVOFRONTAL.
°[Lathe enelexteriorestapordebajodelos70°F(21_). [ Paradescongelarel serpentinIleveelselectoralaposicionFAN.
Seguidamente,gireelcontroldetemperaturaTEMPenelsentidodelasagujas
delrelojparaIlevariohastaunagraduaci6nmascalida.
Elfiltrodelairepuedeestarsucio. Limpieelfiltro.Consultelasecoi6n"Mantenimiento".Paradescongelar,Ileveel
selectora laposici6nFAN.
[ Elcontroldetemperaturaseajust6demasiadofrioparael enfriamiento Paradescongelarelserpentin,Ileveelselectora laposicionFAN.
[ nocturno. Seguidamenteajusteelcontroldetemperaturaa unaposici6nmascalida.
ELAIREACONDICIONADOENFR[A,PEROLAHABITACIONSESIENTEDEMASIADOC_,LIDA;NOSEFORMAHIELOENELSERPENT[NDE
ENFRIAMIENTODETRASDELPANELDECORATIVOFRONTAL..
ElfiltrodelaireestasucioconIoquese restringeelflujodelaire.
ElcontroldetemperaturaTEMPsegraddeenposici6ndemasiadocalida.
Lapartefrontaldelaunidadestabloqueadapotcortinas,perstanas,
mueblesetc.querestrinqenladistribuciondelaire.
Laspuertas,ventanas,rejillasdecalefacoidn,etcetera,estanabiertascon
Ioquesepermiteel escapedelairefrio.
Launidadacabadeencenderseenunahabitacidncaliente.
Limpieelfiltrodelaire.Consultelasecoion"Mantenimiento".
Gireel controldetemperaturaenelsentidode lasagujasdelrelojparaIlevarioa
unagraduacbnmasfria.(NtJmeromasalto)
Elimineelbloqueoenfrentedelaunidad.
Cierrelaspuertas,ventanas,rejillasdecalefacoi6n,etcetera.
Permitaquetranscurraunpcoomasdetiempoparaeliminarel"caloralmacenado"
enlasparedes,eltecho,el pisoylosmuebles.
EL EQUIPO DE AIRE ACONDICIONADO SE APAGA Y SE ENCIENDE RAPIDAMENTE.
Latemperaturaexterioresextremadamentecaliente. AjusteelMODOenlavelocidadALTAparahacerqueelairepaseporlabobina
derefrigeraci6nmasr@ido.
SE ESCUOHAN RUIDOS CUANDO LA UNIDAD ESTA ENFRIANDO.
Elsonidodelventiladoralchocarcontraelaguadelsistemade Estoesnormalcuandolahumedadesalta.Cierrelaspuertas,ventanasy rejillas
eliminacbnde humedad, decalefacoi6n.
Vibraciondelaventana;instalaciondeficiente. Lealasinstrucoionesdeinstalaci6noconsultealinstalador.
EL AGUA GOTEA DENTRO DELA HABITAOION CUANDO LA UNIDAD ESTA ENFRIANDO.
Instalacbninadecuada. Inclineligeramenteelequipodeaireacondbicoadohadalaparteexteriorparapermitirel
drenajedeagua.Leaas nstrucdonesde nstaacOno consultea nstaador.
EL AGUA GOTEA AFUERA CUANDO LA UNIDAD ESTA ENFRIANDO.
Launidadestaextrayendograndescantidadesdehumedaddeuna EstoesalgonormaldurantelosdiasexcesivamentehtJmedos.
habitaci6nhQmeda.
-26 -

m27m

m28m

m29m

m30m

Master Protection Agreements
Congratulations on making a smart purchase.
Your new Kenmore ® product is designed and
manufactured for years of dependable operation.
But like all products, it may require preventive
maintenance or repair from time to time.
That's when having a Master Protection Agreement
can save you money and aggravation.
Purchase a Maser Protection Agreement now and
protect yourself from unexpected hassle and
expense.
The Master Protection Agreement also helps extend
the life of your new product. Here's what's included
in the Agreement:
[] Expert service by our 12,000 professional
repair specialists
[] Unlimited service and no charge for parts and
labor on all covered repairs
[] 'lqo-lemon"guarantee - replacement of your
covered product if four or more product failures
occur within twelve months
]Product replacement if your covered product
can't be fixed
[] Annual Preventive Maintenance Check at your
request - no extra charge
[] Fast help by phone - phone support from a
Sears technician on products requiring in-home
repair, plus convenient repair scheduling
[] Power surge protection against electrical
damage due to power fluctuations
[] Rental reimbursement if repair of your covered
product takes longer than promised
Once you purchase the Agreement, a simple phone
call is all that it takes for you to schedule service.
You can call anytime day or night, or schedule a
service appointment online.
Sears has over 12,000 professional repair
specialists, who have access to over 4.5 million
quality parts and accessories. That's the kind of
professionalism you can count on to help prolong
the life of your new purchase for years to come.
Purchase your Master Protection Agreement today!
Some limitationsand exclusions apply.
For prices and additional information call
1-800-827-6655.
Sears Installation Service
For Sears professional installation of home
appliances, garage door openers, water
heaters, and other major home items, in the
U.S.A. call 1-800-4-MY-HOME _
Acuerdos de Protecci on Especializada
iEnhorabuena! Ha realizado una compra inteligente.
Su nuevo aparato Kenmore® esta diseSado y fabricado
para ofrecerle afios de buen funcionamiento.
Sin embargo, al igual que todos los productos, puede
precisar un mantenimiento preventivo o incluso alguna
reparaci6n de vez en cuando. En esas ocasiones, un
Master Protection Agreement puede ayudarle a ahorrar
dinero e inconvenientes.
Adquiera un Maser Protection Agreement ahora, y
prot_jase a si mismo de molesfias y gastos inesperados.
El Master Protection Agreement le ayudara tambi6n a
prolongar la vida de su nuevo aparato. Los siguientes
servicios estan incluidos:
[] Servicio experto por parte de cualquiera de
nuestros 12.000 tecnicos profesionales especialistas
de Sears.
[] Prestaci 6n de servicios sin limitaciones y sin
¢argarle las piezas o la mano de obra en todas las
reparaciones cubiertas por el acuerdo.
[] Garantia seria de sustituci 6n de las piezas del
producto cubierto por el acuerdo, si cuatro o mas
piezas se mostrasen defectuosas en un periodo de
doce meses.
[] Sustituci 6n del producto por otro nuevo , si el
defectuoso no pudiese repararse.
[] Control de mantenimiento anual preventivo ,
siempre que Io desee y sin gasto adicional alguno.
[] Asistencia telef 6nica inmediata de un t6cnico
especialista en productos que han de ser reparados a
domicilio, ademas de una programaci6n adecuada de
la reparaci6n.
[] Protecci 6n contra subidas de tensi 6n que
provoquen daSos electricos debidos alas
fluctuaciones en el suministro.
[] Reintegro del alquiler si la reparaci6n del producto
Ileva mas tiempo del promtetido
Una vez que haya adquirido el Agreement, no necesitara
masque una simple Ilamada para solicitar el servicio de
su aparato. Ademas, podra hacerlo en cualquier momento
del dia o de la noche, o solicitar una cita para prestaci6n
de servicios online.
Sears cuenta con mas de 12.000 tecnicos profesionales
especialistas en reparaciones, con acceso a mas de 4,5
millones de piezas de sustituci6n y accesorios de calidad.
Este sera el tipo de profesionalidad y servicio con el que
podra contar para prolongar la vida de su nuevo producto
pot muchos aSos. iAdquiera hoy mismo su Master
Protection Agreement!
Se aplicar _n algunas limitaciones y
restricciones.
Si desea hacer alguna consulta sobre los
precios u otra informaci 6n adicional, le rogamos
Ilame al tel _fono 1-800-827-6655.
Servicios de Instalaci 6n Sears
Para solicitar servicios de instalaci6n profesionales
de Sears de electrodomesticos, mandos de apertura
de puertas de garajes, calentadores de agua y otros
aparatos en los Estados Unidos, puede Ilamar a
1-800-4-MY-HOME ®
-31 -

Your Home
iiiiiiiiiiiiii
iiiiiiiiiiiiii
iiiiiiiiiiiiiiiii
For repair - in your home -of all major brand appliances,
lawn and garden equipment, or heating and cooling systems,
no matter who made it, no matter who sold it!
For,the replacement parts accessories and
owner s manuals that you need to do-it-yourself.
For Sears professional installation of home appliances
and items like garage door openers and water heaters.
1-800-4-MY-HOME ® (1-800-469-4663)
Call anytime, day or night (U.S.A. and Canada)
www.sears.com www.sears.ca
Our Home
For repair of carry-in items like vacuums, lawn equipment,
and electronics, call or go on-line for the location of your nearest
Sears Parts & Repair Center.
1-800-488-1222
Call anytime, day or night (U.S.A. only)
To purchase a protection agreement(U.S.A.)
or maintenance agreement(Canada) on a product serviced by Sears:
1-800-827-6655 (U.S.A.) 1-800-361-6665 (Canada)
Pard pedir servicio de reparaci6n Au Canada pour service en frangais:
a domicilio, y pard ordenar piezas: 1-800-LE-FOYER Mc
1-888-S U-H OG ARsM (1-800-533-6937)
(1-888- 784- 6427) www.s ear s.ca
TM SM
® Registered Trademark / Trademark / Service Mark of Sears, Roebuck and Co.
TM SM
® Marca Registrada / Marca de Fabrica / Marca de Servicio de Sears, Roebuck and Co.
MD
MCMarque de commerce / Marque depos_e de Sears, Roebuck and Co.
® Sears, RoebuckandCo,
Part No.: 3828A21007B
 Loading...