

Kenmore 72180609500, 72180604500, 72180603500, 72180602500, 72180513600 Owner’s Manual
®
Microwave Hood Combination
Combinaci6n Microondas Campana
ModelslModelos 721.80602 1721.80603
721.80604 1721.80609
3828W5A8257 Sears, Roebuck and Co., Hoffman Estates, IL 60179 www.sears.com

Table of
MicrowaveHood
Contents
Warranty ........................................................... 2
Microwave Oven Safety .................................. 3
Getting to Know Your Microwave Oven ........ 6
How your Kenmore microwave hood
combination works .......................................... 6
Radio interference .......................................... 6
Testing your microwave oven ......................... 6
Testing your dinnerware or cookware ............ 7
Operating safety precautions .......................... 7
Electrical connection ...................................... 7
Microwave oven features ............................... 8
Control panel features ..................................... 9
Microwave Cooking Tips ............................... 11
Using Your Microwave Oven ....................... 13
Audible Signals ............................................. 13
Setting time of day ........................................ 13
Interrupting Cooking ...................................... 13
Child Lock ..................................................... 13
Favorite ......................................................... 14
Kitchen Timer ................................................ 14
Exhaust Fan .................................................. 14
Cooktop Light ................................................ 14
Turntable On/Off ........................................... 15
Express Defrost ............................................ 15
Time Defrost ................................................. 15
Add 30 Sec................................................... 15
Timed Cooking .............................................. 15
Multi-stage Cooking ...................................... 16
Option ........................................................... 16
Microwave Power Levels .............................. 17
Auto Defrost .................................................. 18
Auto Defrost table ......................................... 19
Defrosting tips .............................................. 21
Hold Warm .................................................... 21
Using Sensor Cooking ............................... 22
Sensor Cooking ............................................ 22
Popcorn (Example) ....................................... 22
More/Less ..................................................... 22
Sensor Cook / Sensor Reheat / Poultry ........ 23
Sensor Cook Table / Sensor Reheat Table ..24
Poultry Table ................................................. 25
Soften / Melt .................................................. 26
Caring for Your Microwave Oven ................. 27
Caring for the filters ....................................... 28
Replacing the cooktop and oven lights ......... 29
Questions and Answers ................................ 30
Troubleshooting ............................................. 31
Master Protection Agreements ..................... 65
Service ............................................. Back cover
Combination
Warranty
FULL ONE-YEAR WARRANTY ON
MICROWAVE HOOD COMBINATION
For one year from the date of purchase, if this
Kenmore Microwave Hood Combination fails due to
a defect in material or workmanship, Sears will
repair it free of charge.
FOUR YEAR LIMITED WARRANTY ON
MAGNETRON
For the second through the fifth year from the date
of purchase, if the magnetron in this oven fails due
to a defect in material or workmanship, Sears will
supply a new magnetron, free of charge.
Safety regulations, however, require the magnetron
to be installed by Sears, and you must pay the
labor cost of installation.
WARRANTY SERVICE IS AVAILABLE BY
SIMPLY CONTACTING SEARS SERVICE AT
1-800-4-MY-HOME®
This warranty applies only while this product is in
use in the United States.
This warranty gives you specific legal rights, and
you may also have other rights which vary from
state to state.
Sears, Roebuck and Co.,
Dept. 817WA,
Hoffman Estates, IL 60179
For service call:
1-800-4-MY-HOME®
(1-800-469-4663)
Please record your model's information.
Whenever you call to request service for your
appliance, you need to know your complete model
number and serial number. You can find this
information on the model and serial number
label/plate at the upper side of cavity front in your
Microwave oven. Also, record the other information
shown below.
Model Number
Serial Number
Purchase Date
Microwave Oven Safety
Your safety and the safety of others are very important.
We have provided many important safety messages in this manual and on your appliance.
Always read and obey all safety messages.
This is the safety alert symbol.
This symbol alerts you to hazards that can kill or hurt you and others.
All safety messages will be preceded by the safety alert symbol and the word
"DANGER" or "WARNING." These words mean:
You will be killed or seriously injured
if you don't follow immediately instructions.
You can be killed or seriously injured
if you don't follow instructions.
All safety messages will identify the hazard, tell you how to reduce the chance of injury, and tell
you what can happen if the instructions are not followed.
IMPORTANT SAFETY INSTRUCTIONS
When using electrical appliances basic safety precautions should be followed, including the
following:
WARNING: To reduce the risk of burns,
electric shock, fire, injury to persons or
exposure to excessive microwave energy.
• Read all instructions before using the
microwave oven.
• Read and follow the specific
"PRECAUTIONS TO AVOID POSSIBLE
EXPOSURE TO EXCESSIVE MICROWAVE
ENERGY" found in this section.
• The microwave oven must be grounded.
Connect only to properly grounded outlet.
See "GROUNDING INSTRUCTIONS" found
at the end of this section.
• Install or locate the microwave oven only in
accordance with the provided installation
instructions.
• Some products such as whole eggs in the
shell and sealed containers - for example,
closed glass jars - are able to explode and
should not be heated in the microwave
oven.
• Use the microwave oven only for its
intended use as described in this manual.
Do not use corrosive chemicals or vapors in
the microwave oven. This type of oven is
specifically designed to heat, cook, or dry
food. It is not designed for industrial or
laboratory use.
• As with any appliance, close supervision is
necessary when used by children.
• Do not operate the microwave oven if it has
a damaged cord or plug, if it is not working
properly, or if it has been damaged or
dropped.
SAVE THESE INSTRUCTIONS
iiiiiiii¸i_ii_iiiii_iiii_iiiiii_i_iliiiiii!i¸iiilil!_ii_ii_iiil¸ii_!iiii_i_,!_i_iiiii_il_;i:iiii_ii_il_ii_ii_iiiiii_ii_i_i_111iiili_i_iiiiiii_ii_i'ii:iiiiiiiiii111_ilii_ii_ii_ii'ii_ii_ii_i!_ii_ii¸iii_il_ii_il_ii:ii_ii_ii_il_ii_ii:ililiiiiiiil¸ii_i_ii_i_i!_ii_;i_ii'ii_ii'iiii_i!_i!_iili_il_i!i_ii_i!_i!illii;ii_:i_ii!iiili_ii_ii_ii_ii_ii_ii:ii_ii_ii_i_ii_il_ii_i!_iiii_iilii__iililiii_il_i!ili_i_i_i_i_i¸ii_illil_i_ii_ilil_ii_iiii_ii_iiiiiiil¸ii_ii_il_ililliiiii¸iii_!_i!_i!_i!_i!_i!_i!_i!_i!_i!_i!_i!_i!_i!_i!_i!_i!_i!_i!_i!_i!_i!_i!_i!_i!_i!_i!_i!_i!_i!_i!_i!_i!_i!_i!_i!_i!_i!_i!_i!_i!_i!_i!_i!_i!_i!_i!_i!_i!_i!_i!_i!_i!_i!_i!_i!_i!_i!_i!_i!_i!_i!_i!_i!_i!_i!_i!_i!_i!_i!_i!_i!_i!_i!_i!_i!_i!_i!_i!_i!_i!_i!_i!_i!_i!_i!_i!_i!_i!_i!_i!_i!_i!_i!_i!_i!_i!_i!_i!_i!_i!_i!_i!_i!_i!_i!_i!_i!_i!_i!_i!_i!_i!_i!_i!_i!_i!_i!_i!_i!_i!_i!_i!_i!_i!_i!_i!_i!_i!_i!_i!_i!_i!_i!_i!_i!_i!_i!_i!_i!_i!_i!_i!_i!_i!_i!_i!_i!_i!_i!_i!_i!_i!_i!_i!_i!_i!_i!_i!_i!_i!_i!_i!_i!_i!_i!_i!_i!_i!_i!_i!_i!_i!_i!_i!_i!_i!_i!_i!_i!_i!_i!_i!_i!_i!_i!_i!_i!_i!_i!_i!_i!_i!_i!_i!_i!_i!_i!_i!_i!_i!_i!_i!_i!_i!_i!_i!_i!_i!_i!_i!_i!_i!_i!_i!_i!_i!_i!_i!_i!_i!_i!_i!_i!_i!_i!_i!_i_,_,_i!'i!_i!'i!'i!';!'i!_!,i!i!
IMPORTANT SAFETY INSTRUCTIONS
• The microwaveovenshould beservicedonly by
qualifiedservicepersonnel.Callanauthorized
servicecompanyforexamination,repair,or
adjustment.
• Seedoorsurfacecleaninginstructionsinthe "Caring
for YourMicrowaveOven"section.
• To reducethe riskoffirein the oven cavity:
- Donotovercookfood.Carefullyattendthe
microwaveovenwhenpaper,plastic,or other
combustiblematerialsareplacedinsidetheoven
tofacilitatecooking.
- Removewire twist-tiesfrompaperor plasticbags
beforeplacingbagsin oven.
- If materialsinsidetheovenignite,keepovendoor
closed,turn oven off,and disconnectthepower
cord,or shutoff powerat thefuseor circuitbreaker
panel.
- Donot usethecavityfor storagepurposes.Donot
leavepaperproducts,cookingutensils,or foodin
thecavitywhennotinuse.
• Thismicrowaveovenissuitableforuseaboveboth
gasandelectriccookingequipment.
• Thismicrowaveovenisintendedto be usedabove
rangeswithmaximumwidth of 36 inches(91cm).
• CleanVentilatingHoodsFrequently-Greaseshould
notbeallowedto accumulateonhoodor filter.
•Whenflamingfoodsunderthe hood,turnthefanon.
• Usecarewhencleaningthe vent-hoodfilter.
Corrosivecleaningagents,suchaslye-basedoven
cleaners,maydamagethefilter.
• Oversizedfoodsor oversizedmetalutensilsshould
notbeinsertedinthemicrowaveovenasthey may
createa fireor riskofelectricshock.
• Do notcleanwith metalscouringpads.Piecescan
burnoffthe pad andtouchelectricalpartsinvolvinga
riskofelectricshock.
Do not store anything directly on top of the
microwave oven when the microwave oven is in
operation.
Do not cover or block any openings on the
microwave oven.
Do not store this microwave oven outdoors. Do not
use the microwave oven near water for example,
near a kitchen sink, in awet basement, near a
swimming pool, or similar location.
Do not immerse cord or plug in water.
Keep cord away from heated surfaces.
Do not let cord hang over edge of table or counter.
Do not mount over a sink.
Do not cover racks or any other part of the oven with
metal foil. This will cause overheating of the oven.
Liquids such as water, coffee, or tea are able to
be overheated beyond the boiling point without
appearing to be boiling due to surface tension of
the liquid. Visible bubbling or boiling when the
container is removed from the microwave oven is
not always present. This could result in very hot
liquids suddenly boiling over when a spoon or
other utensil is inserted into the liquid. To reduce
the risk of injury to persons.
1) Do not overheat the liquid.
2) Stir the liquid both before and halfway through
heating it.
3) Do not use straight-sided containers with
narrow necks.
4) After heating, allow the container to stand in the
microwave oven for a short time before
removing the container.
5) Use extreme care when inserting a spoon or
other utensil into the container.
SAVE THESE INSTRUCTIONS

i!i!i!i!i!i!i!i!i!i!i!i!i!i!i!i!i!i!i!i!i!i!i!i!i!i!i!i!i!i!i!i!i!i!i!i!i!i!i!i!i!i!i!i!i!i!i!i!i!i!i!i!i!i!i!i!i!i!i!i!i!i!i!i!i!i!i!i!i!i!i!i!i!i!i!i!i!i!i!i!i!i!i!i!i!i!i!i!i!i!i!i!i!i!i!i!i!i!i!i!i!i!i!i!i!i!i!i!i!i!i!i!i!i!i!i!i!i!i!i!i!i!i!i!i!i!i!i!i!i!i!i!i!i!i!i!i!i!i!i!i!i!i!i!i!i!i!i!i!i!i!i!i!i!i!i!i!i!i!i!i!i!i!i!i!i!i!i!i!i!i!i!i!i!i!i!i!i!i!i!i!i!i!i!i!i!i!i!i!i!i!i!i!i!i!i!i!i!i!i!i!i!i!i!i!i!i!i!i!i!i!i!i!i!i!i!i!i!i!i!i!i!i!i!i!i!i!i!i!i!i!i!i!i!i!i!i!i!¸I_II_!IIII_il_ii_i!ill_i_ill¸i!iiii!i!_!i_i!_i!i!i!_!ii_!_!_!_ili!_i!_ii_il_i!_i!_i!_i!_iiiii!_i!_i_i_iii!ili_i:i'iiii_i!_!'iill¸iiiiiiiiiiii_iiii_il_ii_!i'ii_iiii!ii!i!!!¸i!_i!_ii_i!_i!:i!_i!_!_i!_i!_ii_iiiii!_i!_i!i!_i!_iiiiii_ii_i!_i_ii!!i'iiii_i!_i!_iiiiii_i!¸ii_i!_i!_!_i!_i!il¸i_iill'i!ililiiii!ii_i!_ii_i!_i!_i!'i!:i!ii_i!_i!!!iiiiii_iiiiiiil_ii_i!il;iiiiliiii'ili¸II_I!_ii_i!_i!_i!_i!_i_i!_i!iiiiili¸il¸i_iiil¸iiiiiii!_i!_i!_i!_i!_i!_i!_i!_i!_i!_i!_i!_i!_i!_i!'i!
PRECAUTIONS TO AVOID POSSIBLE
EXPOSURE TO EXCESSIVE MICROWAVE
ENERGY
(a) Do not attempt to operate this oven withthe
door open since open-door operation can
result in harmful exposure to microwave
energy. It is important not to defeat or tamper
with the safety interlocks.
(b) Do not place any object between the oven
front face and the door or allow soil or cleaner
residue to accumulate on sealing surfaces.
Electrical
requirements
Observe all governing codes and
ordinances. A 120 Volt, 60 Hz, AC only,
15 or 20 amp fused electrical supply is
required. (A time-delay fuse is recommended.)
It is recommended that a separate circuit
serving only this appliance be provided.
GROUNDING INSTRUCTIONS
• For all cord connected appliances:
The microwave oven must be grounded.
In the event of an electrical short circuit,
grounding reduces the risk of electric
shock by providing an escape wire for the
electric current. The microwave oven is
equipped with a cord having a grounding
wire with a grounding plug. The plug must
be plugged into an outlet that is properly
installed and grounded.
(c) Do not operate the oven if it isdamaged. It is
particularly important that the oven door close
properly and that there is no damage to the:
(1) Door (bent),
(2) Hinges and latches (broken or loosened),
(3) Door seals and sealing surfaces.
(d) The oven should not be adjusted or repaired
by anyone except properly qualified service
personnel.
Electrical Shock Hazard
Plug into a grounded 3 prong
outlet. Do not remove ground
prong. Do not use an adapter.
Do not use an extension cord.
Failure to follow these
instructions can result in death,
fire, or electrical shock.
WARNING: Improper use of the
grounding can result in a risk of electric
shock.
Consult a qualified electrician or
serviceman if the grounding instructions
are not completely understood, or if doubt
exists as to whether the microwave oven
is properly grounded.
Do not use an extension cord. If the power
supply cord is too short, have a qualified
electrician or serviceman install an outlet
near the microwave oven.
• For a permanently connected appliance:
The microwave oven must be connected
to a grounded, metallic, permanent wiring
system, or an equipment grounding
conductor should be run with the circuit
Ensure proper ground
exists before use
conductors and connected to the
equipment grounding terminal or lead on
the microwave oven.
SAVE THESE INSTRUCTIONS
Gettin to Know Your
Microwave Oven
This section discusses the concepts behind microwave cooking. It also shows you the basics you
need to know to operate your microwave oven. Please read this information before you use your
oven.
How your Kenmore microwave hood combination works
Microwaveenergyis not hot. Itcausesfoodto make
itsownheat,and it'sthisheat thatcooksthe food.
Microwavesarelike TV waves,radiowaves,or light
waves.You cannotseethem,butyoucanseewhat
they do.
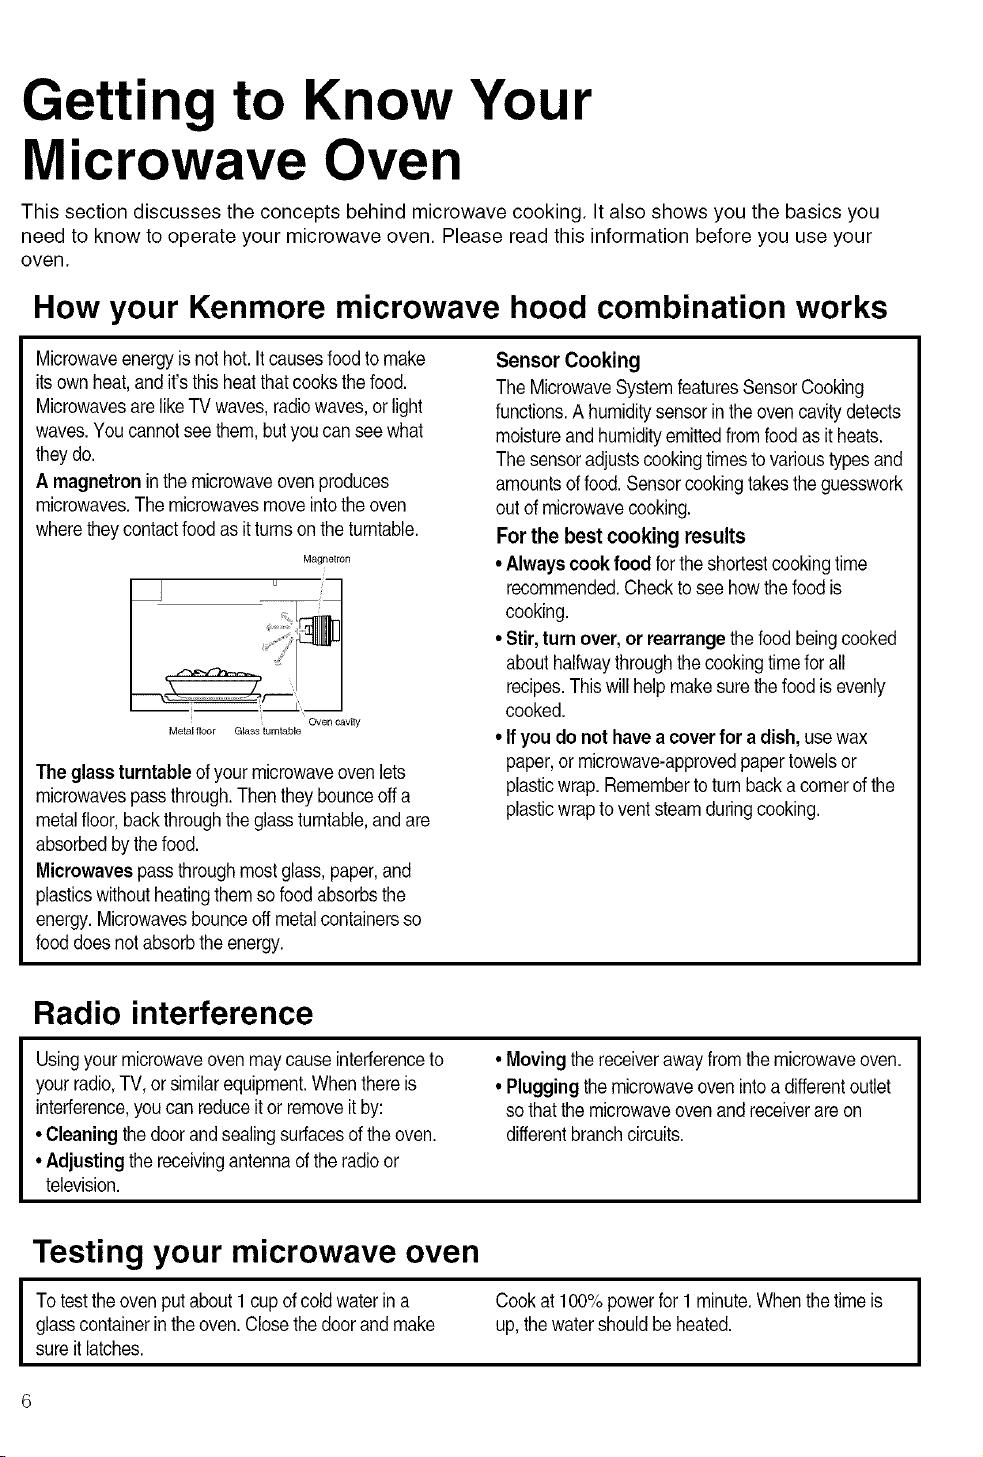
A magnetron inthemicrowaveovenproduces
microwaves.Themicrowavesmove intotheoven
wheretheycontactfood as it turnson theturntable.
Magnetron
Metallloor Glass turntable
The glass turntable ofyour microwaveovenlets
microwavespassthrough.Then theybounceoff a
metalfloor,backthroughthe glassturntable,andare
absorbedbythefood.
Microwaves passthrough mostglass,paper,and
plasticswithoutheatingthemso food absorbsthe
energy.Microwavesbounceoffmetalcontainersso
fooddoesnotabsorbthe energy.
Ovencavity
Sensor Cooking
The MicrowaveSystemfeaturesSensorCooking
functions.A humiditysensorin the oven cavitydetects
moistureand humidityemittedfrom foodas itheats.
Thesensoradjustscookingtimestovarioustypesand
amountsoffood.Sensorcookingtakestheguesswork
out ofmicrowavecooking.
For the best cooking results
•Alwayscookfood for the shortestcookingtime
recommended.Checktosee howthefood is
cooking.
• Stir, turn over, or rearrange the food beingcooked
abouthalfwaythroughthecookingtime for all
recipes.Thiswill help makesurethefood is evenly
cooked.
• If you do not havea cover for a dish, usewax
paper,or microwave-approvedpapertowelsor
plasticwrap.Remembertoturnback a cornerof the
plasticwraptovent steamduringcooking.
Radio interference
Usingyour microwaveovenmaycause interferenceto
your radio,TV,or similarequipment.Whenthereis
interference,youcan reduceitor removeit by:
• Cleaning thedoorandsealingsurfacesoftheoven.
• Adjusting the receivingantennaofthe radioor
television.
• Movingthe receiverawayfromthe microwaveoven.
• Plugging the microwaveoven into a differentoutlet
so thatthe microwaveoven andreceiverare on
differentbranchcircuits.
Testing your microwave oven
Totestthe oven put about 1 cup of cold waterin a Cook at 100%powerfor1 minute.Whenthetime is
glasscontainerinthe oven.Closethedoor andmake up,thewatershouldbe heated.
sureit latches.
6
i!i!i!i!i!i!i!i!i!i!i!i!i!i!i!i!i!i!i!i!i!i!i!i!i!i!i!i!i!i!i!i!i!i!i!i!i!i!i!i!i!i!i!i!i!i!i!i!i!i!i!i!i!i!i!i!i!i!i!i!i!i!i!i!i!i!i!i!i!i!i!i!i!i!i!i!i!i!i!i!i!i!i!i!i!i!i!i!i!i!i!i!i!i!i!i!i!i!i!i!i!i!i!i!i!i!i!i!i!i!i!i!i!i!i!i!il¸iiiiii!i!iiii_iliif'flail_;iiiii_!_i!_i!_i!!!_i!_i!_i!_ii_iliii!!i!i!i!i!i¸iiiliii!iiii_iliiiii_i!_ii_i!!¸ili_ii_ii_i:ifill!_i!_i!_i!¸ii_i!;i!;i!;i!_i!_i!_i!_i!_!iiiii_il_ii_ii_ii_ilil_!_!!!!i!iill_i!_i!_i!_i!_i!_i!_ilii:!iiiili_!_flailiiliiliiii'i!ii_i!!ii:i:i__!!!_i!_!ii:iiiii!_i!,i!iiiiiiiiii_iill_!i_iiii_i!ii!il!ii!ii!ii!ii!_ii_ii:i:iii_il_i!ii_illif!i!!!il_i!iiilli!_ii_ili!_i!_i!i!iiii!!iii¸i!:!i!_:i_iii¸i!_ii'ii'i!ii_!:i¸iii!i'iiii¸ill!_i!_!iiiii_ii_ii_ii!_i!_i!_!i_:!ii_iii_!iiii:iii:iiii_iiii_i!_i!_iiii!_i!_i!_i!_i!'il¸ii_i!_ii;_!_ii:i_iiii¸ii¸iiii:iiiiii!_i!_iiiiiiii!_illiii_i!_i!_iillii_!!'iiiiiii!!i!_i!ii_!i!!i_i!_i!_i!_!!_!!_!!_i!_i!ii_iiii_!!!i_!i_iiiiiiiiIi!_i!_iiii_iii!'ii_iiI_!ii!_il_ii:!_i!_i!ii_i_i!_i!iiiii_i!:ii_i!!ili_ii_ii_ii_ii_ii_ii_ii_ii_ii_ii_ii_ii_ii_ii
Testing your dinnerware or cookware
Test dinnerwareorcookware before using.Totest
a dish for safeuse, put itintothe ovenwith acup of
waterbesideit.Cookat 100%cookpowerforone
minute.If the dish gets hot, do not use it. Some
dishes(melamine,someceramicdinnerware,etc.)
absorbmicrowaveenergy,becomingtoohotto handle
Operating safety precautions
• Neverleanonthedoor orallowa childto swing onit
whenthedooris open.
• Usehot pads. Microwaveenergydoesnotheat
containers,buttheheatfrom thefoodcanmakethe
containerhot.
• Do not usenewspaperorotherprintedpaperinthe
oven.
• Do not dryflowers,fruit,herbs,wood,paper,gourds,
or clothesin theoven.
• Do not starta microwaveovenwhenitisempty.
Productlifemaybe shortened.Ifyoupractice
programmingtheoven,put a containerofwater in
theoven. Itisnormalfor the ovendoor tolookwavy
aftertheovenhasbeen runningfora while.
• Do not try tomelt paraffinwaxin the oven.Paraffin
wax will not meltin a microwaveovenbecauseit
allowsmicrowavesto passthroughit.
• Do not operatethe microwaveovenunlesstheglass
turntableis securelyinplaceandcan movefreely.
Theturntablecan moveineitherdirection.Make
sure the turntableis correct-sideupin the oven.
Handleyour turntable with care when removingit
fromthe ovento avoidpossiblybreakingit.Ifyour
turntablecracksor breaks,contactyour dealerfora
replacement.
•When you usea browningdish,the browningdish
bottommust beat least3/16inchabovetheturntable.
Followthedirectionssuppliedwiththe browningdish.
and slowingcookingtimes.Cookingin metal
containersnot designedformicrowaveusecould
damagethe oven, ascouldcontainerswithhidden
metal (twist-ties,foil lining,staples,metallicglazeor
trim).
• Nevercook orreheat a whole egginsidethe
shell. Steambuildupinwholeeggsmaycausethem
to burst,andpossiblydamagethe oven.Slice hard-
boiledeggsbeforeheating.Inrarecases,poached
eggshavebeenknownto explode.Cover poached
eggsand allow a standingtime ofoneminutebefore
cuttinginto them.
• For best results,stir any liquid several times
duringheatingor reheating,Liquidsheatedin
certaincontainers(especiallycontainersshapedlike
cylinders)maybecomeoverheated.Theliquidmay
splashoutwitha loudnoiseduringor afterheatingor
whenaddingingredients(coffeegranules,tea bags,
etc.).Thiscan harm the oven.
• Microwaves may not reachthe centerofa roast.
Theheatspreadsto thecenterfrom theouter,
cookedareasjust as in regularovencooking.This is
one of the reasonsfor lettingsomefoods (for
example,roastsor bakedpotatoes)standfor a while
aftercooking,or for stirringsomefoodsduringthe
cookingtime.
• Do not deepfry in the oven. Microwavableutensils
are not suitableand itisdifficultto maintain
appropriatedeep-fryingtemperatures.
• Do not overcook potatoes. At the endof the
recommendedcookingtime,potatoesshouldbe
slightlyfirmbecausetheywill continuecooking
duringstandingtime.After microwaving, let
potatoesstandfor5 minutes.Theywillfinishcooking
whilestanding.
Electrical connection
than 110volts,cookingtimesmaybe longer.
I If your electricpower lineor outletvoltageis less
Havea qualifiedelectriciancheckyourelectrical
system.
I

Microwave oven features
® ®
®
1
Your microwave oven is designed to make your
cooking experience as enjoyable and productive
as possible. To get you up and running quickly, the
following is a list of the oven's basic features:
1. Metal Shielded Window The shield prevents
microwaves from escaping. It is designed as a
screen to allow you to view food as it cooks.
2. Model and Serial Number Plate
3. Cooking Guide Label
4. Charcoal Filter (behind Vent Grille)
5. Vent Grille
1.Turntable
2. Hub
3. Support
4. Shaft
The turntable rotates in both directions to help cook food more evenly. Do not operate the microwave oven
without the turntable in place.
6. Turntable. The turntable turns food as itcooks
for more even cooking. It must be in the oven
during operation for best cooking results.
7. Cooktop Light
8. Grease Filters. See "Caring for the filters"
section.
9. Control Panel. Touch the pads on this panel to
perform all functions.
10. Cooking Rack. Use for extra space when
cooking in more than one container at the
same time.
To Install:
1. Place the support on the oven cavity bottom.
2. Place the turntable on the support.
Fit the raised, curved lines in the center of the turntable bottom between the three spokes of the hub.
The rollers on the support should fit inside the turntable bottom ridge.
i!i!i!i!i!i!i!i!i!i!i!i!i!i!i!i!i!i!i!i!i!i!i!i!i!i!i!i!i!i!i!i!i!i!i!i!i!i!i!i!i!i!i!i!i!i!i!i!i!i!i!i!i!i!i!i!i!i!i!i!i!i!i!i!i!i!i!i!i!i!i!i!i!i!i!i!i!i!i!i!i!i!i!i!i!i!i!i!i!i!i!i!i!i!i!i!i!i!i!i!i!i!i!i!i!i!i!i!i!i!i!i!i!i!i!i!__¸iiiiii!i!iill_iliiiii_ii_;iiiii_!_i!_i!_i!!!_i!_i!_i!_ii_iiiii!!i!i!i!i!i¸ililili!iiiiiiiiiii_i!_ii_i!!¸ili_ii_ii_iiiiii!_I!_I!_I!¸iii!;i!;i!;i!i!_i!_i!_i!_!iiiii_il_II_II_ii_iiii_!_!!!!i!iiii_i!_i!i!_i!_i!_i!_iiii:!iiiiii!_ii_iiiiiiiiiiii'i!iii!!iiii:i_!!!_i!_!iiiiiiii!_i!i!iiiiiiiiii_iill_!iiiii_i!ii!ii!ii!ii!ii!ii!_ii_iiiiiiiiil_i!ii_iiiii!i!!!il_i!iiiiii!_ii_iii!_I!_I!I!IIII!!Iil¸i!i!i!:iill¸I!_iiiii!ii!il¸iii!iiiii¸ill!_i!_!iiiii_ii_ii_ii!i!_i!_!i_:!ii_iii_!iiii:ili:iiii_iiiii!_i!_iiii!_i!_i!_i!_i!il¸ii_i!_ii;!_ii:iiill¸ii¸iiii:iiiiii!_i!_iiiiiili!_iiiill_i!_i!_iiiiii!!iiiiiii!!I!_I!II_!I!!I_I!_i!i!_!!_!!_!!_i!_i!ii_iiii_!!!i_!i_iiiiiillii!_i!_iiii_iii!ii_iii!ii!_ii_iii!i!_i!ii_i_i!i!iiiii_i!:ii_i!!ili_ii_ii_ii_ii_ii_ii_ii_ii_ii_ii_ii_ii_ii_ii
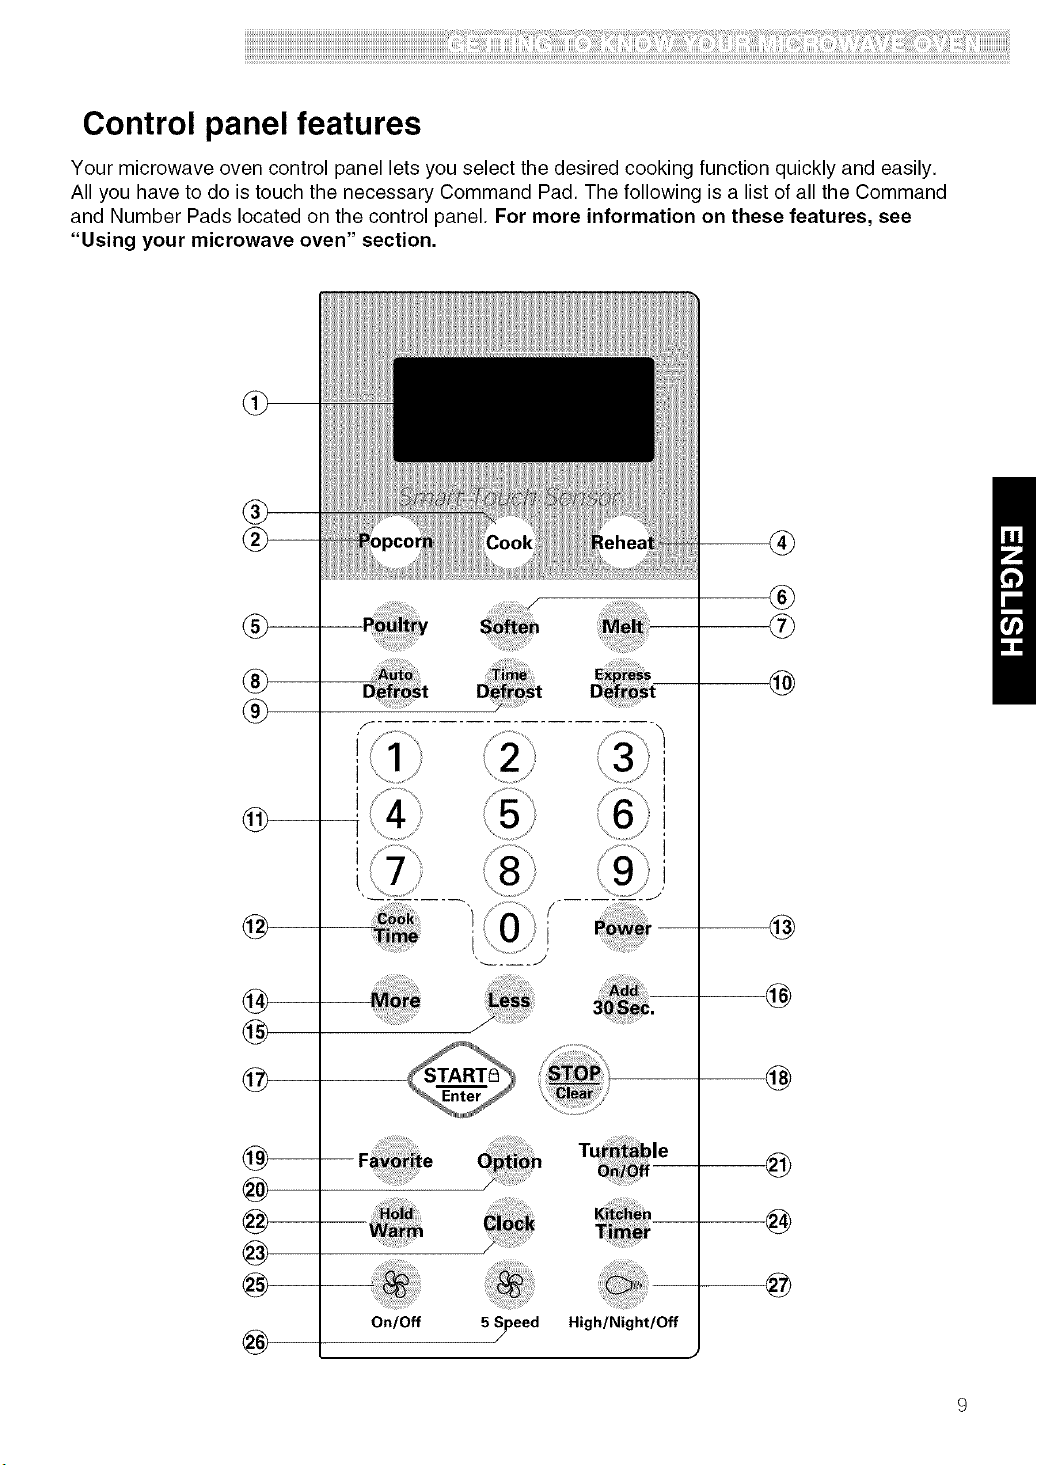
Control panel features
Your microwave oven control panel lets you select the desired cooking function quickly and easily.
All you have to do is touch the necessary Command Pad. The following is a list of all the Command
and Number Pads located on the control panel. For more information on these features, see
"Using your microwave oven" section.
®
®
®
®
®
1@
@
@
@
1@
@
@
@
@
@
@
@
@
@
@
@
@
On/Off 5 Speed High/Night/Off

1. Display. The display includes aclock and
indicators to tell you time of day, cooking time
settings, cook powers, quantities, weights and
cooking functions selected.
2. Sensor Popcorn. Touch this pad to pop
popcorn with the sensor feature. The oven's
sensor will tell the oven how long to cook
depending on the amount of humidity it detects
from the popcorn.
3. Sensor Cook. Touch this pad to cook
microwavable foods without entering a cook
time or power.
4. Sensor Reheat. Touch this pad to reheat
microwavable foods without entering a cook
time or power.
5. Poultry. Touch this pad to cook chicken wings,
chicken nuggets, Spicy Chicken and Mexican
Chicken. (See recipes on page 25)
6. Soften. Touch this pad to soften Butter, Ice
Cream, Cream Cheese and Frozen Juice.
7. Melt. Touch this pad to melt Butter/Margarine,
Chocolate, Cheese and Marshmallows.
8. Auto Defrost. Touch this pad followed by
Number Pads to thaw frozen meat by weight.
9. Time Defrost. Touch this pad to defrost most
other frozen foods.
10. Express Defrost. Touch this pad to express
defrost. "1.0 LBS TOUCH START' will appear
in the display.
11. Number Pads. Touch number pads to enter
cooking times, cook powers, quantities,
weights, or food categories.
12. Cook Time. Touch this pad followed by
Number Pads to set a cooking time.
13. Power. Touch this pad after the cook time has
been set, followed by a Number Pad to set the
amount of microwave energy released to cook
the food. The higher the number, the higher
the microwave power or "cooking speed."
14. More. Touch this pad to add 10 seconds of
cook time each time you press it.
15. Less. Touch this pad to subtract 10 seconds of
cook time each time you press it.
16. Add 30Sec. Touch this pad to cook for 30
seconds at 100% cook power, or to add extra
time at the set cook power to your cooking
cycle.
17. START/Enter. Touch this pad to start a
function. Ifyou open the door after the oven
begins to cook, retouch START/Enter.
18. STOP/Clear. Touch this pad to erase an
incorrect command, cancel a program during
cooking, or to clear the Display.
19. Favorite. Touch this pad to recall one cooking
instruction previously programmed into
memory.
20. Option. Touch this pad to change the oven's
default settings for sound, clock, display speed
and defrost weight.
21. Turntable On/Off. Touch this pad to turn off
the turntable. 'q/TABLE OFF" will appear in
the display.
22. Hold Warm. Touch this pad to keep hot,
cooked foods safely warm in your oven for up
to 90 minutes. Hold Warm can be used by
itself, or it can automatically follow a cooking
cycle.
23. Clock. Touch this pad to enter the correct time
of day.
24. Kitchen Timer. Touch this pad to set the
kitchen timer.
25. Fan (_) On/Off. Touch this pad to turn the
fan on or off.
26. Fan (_) 5 Speed. Touch this pad to choose
one of 5 fan speeds.
27. Light ((:_") High/Night/Off. Touch this pad to
turn the light on high, night or off.
NOTE: If you try to enter incorrect instructions,
you will not hear any tones. Touch STOP/Clear
and re-enter the instructions.
10
 Loading...