

Page 1

ULTRA WAVE™ Microwave Hood Combination
Combinación Microondas Campana
de ULTRA WAVE™
: I = -.==
Models/Modelos
721.64682/721.64683
721.64684/721.64689
3828W5A3631 Sears, Roebuck and Co., Hoffman Estates, IL 60179 www.sears.com
Page 2

Table of
Microwave Hood
Contents
Combination
Warranty
Warranty
Sears Service
Microwave Oven Safety
Getting to Know Your purchase, if this
Microwave Oven 7 Kenmore Microwave Hood Combination falis due to
Using Your Microwave Oven
...
.................................................... 2 FULL ONE-YEAR WARRANTY ON
....
3 MICROWAVE HOOD COMBINATION
........................................
How your kenmore ULTRA WAVE™ ^ defect in materiai or workmanship, Sears wiii
microwave hood combination works
Radio interference.............................................7
Testing your microwave oven
Testing your dinnerware or cookware
Operating safety precautions
Eiectricai connection 8 years from the date of purchase, if the
Microwave oven features
Controi pane! features........................................10 Combination faiis due to a defect in materiai or
Audible Signais............................................
Interrupting Cooking................................................................12 warranty coverage applies only to
Child Lock...........................................................12 private household purposes.
Kitchen Timer.....
Exhaust Fan ...................................................... 3 siMPLY CONTACTING SEARS SERVICE AT
.....................................
...........................
......................
....................
...
.........................8 FULL FIVE-YEAR WARRANTY ON THE
..................
............................
4 ^ ^ ^ ■
7 repair it free of charge.
8 MAPNFTRniM
8
....9 magnetron in this Kenmore Microwave Hood
....12 workmanship. Sears wiii repair it free of charge.
..12 t-. . ^ ^
^2 Microwave Hood Combinations which are used for
.13 WARRANTY SERVICE IS AVAILABLE BY
Add Minute..........................................................14 This warranty applies only while this product is in
Timed Cooking...
Multi-stage Cooking.....................................
Microwave Power Levels....................................15 This warranty gives you specific legal rights, and
Auto Defrost........................................................16 you may also have other rights which vary from
Auto defrost table......
Auto defrost table (Coni).....................................18 „ „ . .
Defrosting tips
Hold Warm..........................................................19 Dept. 817WA,
Sure Simmer
Using Sensor Cooking..
Sensor Cooking..................................................21 1-800-4-MY-HOME®
More/Less .................................................... 21 (1-800-469-4663)
Sensor Cooking Table.....................................22
Auto Cook, Auto Reheat.....................................23 Please record your model’s information.
Auto Cook Table, Auto Reheat Table
Melt, Melt Table ..........................................
Soften, Soften Table....................................
Caring for Your Microwave Oven
Caring for the filters......................................... 27 labei/plate at the upper side of cavity front in your
Replacing the cooktop and oven lights
Microwave Cooking Tips
Questions and Answers.
Troubleshooting
Service...
...........................................
..............................................
..............................
..................................................
................................................... 20 Hoffman Estates, IL 60179
..............................
................
.....................
....................................30
............................ ....32
.....................................
............
,...33
.Back cover Model Number ------------------------------------------------------
14 ys0 |p tpe United States.
14
..17 state to state.
19 Roebuck and Co.,
....21 por service call:
24 Whenever you call to request service for your
..25 appliance, you need to know your complete model
25 number and serial number. You can find this
....26 information on the model and serial number
28 Microwave oven. Also, record the other information
Serial Number
Purchase Date
-----------------------------------------------
-----------------------------------------------
Page 3

Sears Service
Master Protection Agreements
Congratulations on making a smart purchase.
Your new Kenmore®' product is designed and manufactured for years of dependable operation.
Bui like ail products, it may require preventive maintenance or repair from time to time.
That's when having a Master Protection Agreement can save you money and aggravation.
Purchase a Master Protection Agreement now and protect yourself from unexpected hassle
and expense.
The Master Protection Agreement also helps extend the life of your new product. Here’s
what’s included in the Agreement:
sf Expert service by our 12,000 professional repair specialists
Sf Unlimited service and no charge for parts and labor on all covered repairs
si “No-lemon” guarantee - replacement of your covered product if four or more product failures
occur within twelve months
gf Product replacement if your covered product can’t be fixed
sf Annual Preventive Maintenance Check at your request - no extra charge
si Fast help by phone - phone support from a Sears technician on products requiring in-home
repair, plus convenient repair scheduling
S' Power surge protection against electrical damage due to power fluctuations
S Rental reimbursement if repair of your covered product takes longer than promised
Once you purchase the Agreement, a simple phone call is all that it takes for you to schedule service.
You can call anytime day or night, or schedule a service appointment online.
Sears has over 12,000 professional repair specialists, who have access to over 4.5 million quality
parts and accessories. That’s the kind of professionalism you can count on to help prolong the life of
your new purchase for years to come. Purchase your Master Protection Agreement today!
Some limitations and exclusions apply. For prices and additional information call 1-800-827
6655.
Sears Installation Service
For Sears professional installation of home appliances, garage door openers, water heaters, and
other major home items, in the U.S.A. call
1-800-4-MY-HOME®
Page 4

Microwave Oven Safety
Your safety and the safety of others are very important.
We have provided many important safety messages in this manual and on your appliance.
Always read and obey all safety messages.
This is the safety alert symbol.
This symbol alerts you to hazards that can kill or hurt you and others.
All safety messages will be preceded by the safety alert symbol and the word
“DANGER" or “WARNING.” These words mean:
A DANGER
A WARNING
All safety messages will identify the hazard, tell you how to reduce the chance of injury, and tell
you what can happen if the instructions are not followed.
You will be killed or seriously injured
if you don’t follow immediately Instructions.
You can be killed or seriously Injured
if you don’t follow instructions.
IMPORTANT SAFETY INSTRUCTIONS
When using electrical appliances basic safety precautions should be followed, including the
following;
WARNING: To reduce the risk of burns,
electric shock, fire, injury to persons, or
exposure to excessive microwave energy;
• Read all instructions before using the
microwave oven.
• Read and follow the specific
“PRECAUTIONS TO AVOID POSSIBLE
EXPOSURE TO EXCESSIVE MICROWAVE
ENERGY” found in this section.
• The microwave oven must be grounded.
Connect only to properly grounded outlet.
See “GROUNDING INSTRUCTIONS” found
at the end of this section.
• Install or locate the microwave oven only in
accordance with the provided installation
instructions.
• Some products such as whole eggs in the
shell and sealed containers - for example,
closed glass jars - are able to explode and
should not be heated in the microwave oven.
• Use the microwave oven only for its intended
use as described in this manual. Do not use
corrosive chemicals or vapors in the
microwave oven. This type of oven is
specifically designed to heat, cook, or dry
food. It is not designed for industrial or
laboratory use.
• As with any appliance, close supervision
necessary when used by children.
• Do not operate the microwave oven if it has
a damaged cord or plug, if it is not working
properly, or if it has been damaged or
dropped.
is
SAVE THESE INSTRUCTIONS
Page 5

IMPORTANT SAFETY INSTRUCTIONS
' The microwave oven should be serviced only by
qualified service personnel. Call an authorized
service company for examination, repair, or
adjustment.
' See door surface cleaning instructions in the “Caring
for Your Microwave Oven” section.
• To reduce the risk of fire in the oven cavity:
- Do not overcook food. Careftjlly attend the
microwave oven when paper, plastic, or other
combustible materials are placed Inside the oven to
facilitate cooking.
- Remove wire twist-ties from paper or plastic bags
before placing bags In oven.
- If materials inside the oven ignite, keep oven door
dosed, turn oven off, and disconnect the power
cord, or shut off power at the ftjse or circuit breaker
panel.
- Do not use the cavity for storage purposes. Do not
leave paper products, cooking utensils, or food In
the cavity when not in use.
• Suitable for use above both gas and electric cooking
equipment.
• Intended to be used above ranges with maximum
width of 36 inches (91 cm).
' Clean Ventilating Hoods Frequently - Grease should
not be allowed to accumulate on hood or filter.
' When flaming foods under the hood, turn the fan on.
' Use care when cleaning the vent-hood filter.
Corrosive cleaning agents, such as lye-based oven
deaners, may damage the filter.
' Oversized foods or oversized metal utensils should
not be inserted in the microwave oven as they may
create a fire or risk of electric shock.
• Do not clean wi1h metal scouring pads. Pieces can
burn off the pad and touch electrical parts involving a
risk of electric shock.
• Do not store anything directly on top of the
microwave oven when the microwave oven is in
operation.
• Do not cover or block any openings on the
microwave oven.
• Do not store this microwave oven outdoors. Do not
use the microwave oven near water for example,
near a kitchen sink, in a wet basement, near a
swimming pool, or similar location.
• Do not immerse cord or plug in water.
• Keep cord away from heated surfaces.
• Do not let cord hang over edge of table or counter.
• Do not mount over a sink.
• Do not cover racks or any other part of the oven with
metal foil. This will cause overheating of the oven.
• Liquids such as water, coffee, or tea are able to
be overheated beyond the boiling point without
appearing to be boiling due to surface tension of
the liquid. Visible bubbling or boiling when the
container is removed from the microwave oven is
not always present. This could result in very hot
liquids suddenly boiling over when a spoon or
other utensil is inserted into the liquid. To reduce
the risk of injury to persons.
1) Do not overheat the liquid.
2) Stir the liquid both before and halfway through
heating it.
3) Do not use straight-sided containers with
narrow necks.
4) After heating, allow the container to stand
in the microwave oven for a short time before
removing the container.
5) Use extreme care when inserting a spoon or
other utensil into the container.
SAVE THESE INSTRUCTIONS
Page 6

PRECAUTIONS TO AVOID POSSIBLE EXPOSURE TO EXCESSIVE MICROWAVE ENERGY
(a) Do not attempt to operate this oven with the
door open since open - door operation can
result in harmful exposure to microwave
energy. It is important not to defeat or tamper
with the safety interlocks.
(b) Do not place any object between the oven
front face and the door or allow soil or cleaner
residue to accumulate on sealing surfaces.
Electrical
requirements
Observe all governing codes and
ordinances. A 120 Volt, 60 Hz, AC only,
20 amp fused electrical supply is
required. (A time-delay fuse is recommended.)
It is recommended that a separate circuit
serving only this appliance be provided.
(c) Do not operate the oven if it is damaged. It is
particularly important that the oven door close
properly and that there is no damage to the:
(1) Door (bent),
(2) Hinges and latches {broken or loosened),
(3) Door seals and sealing surfaces.
(d) The oven should not be adjusted or repaired
by anyone except properly qualified service
personnel.
A DANGER
Electrical Shock Hazard
Plug into a grounded 3-prong
outlet. Do not remove ground
prong. Do not use an adapter.
Do not use an extension cord.
Failure to follow these
%r
instructions can result in death,
fire, or electrical shock.
GROUNDING INSTRUCTIONS
* For all cord connected appliances:
The microwave oven must be grounded.
In the event of an electrical short circuit,
grounding reduces the risk of electric
shock by providing an escape wire for the
electric current. The microwave oven is
equipped with a cord having a grounding
wire with a grounding plug. The plug must
be plugged into an outlet that is properly
installed and grounded.
Ensure proper ground
exists before use
SAVE THESE INSTRUCTIONS
WARNING: Improper use of the
grounding can result in a risk of electric
shock.
Consult a qualified electrician or
serviceman if the grounding instructions
are not completely understood, or if doubt
exists as to whether the microwave oven
is properly grounded.
Do not use an extension cord. If the power
supply cord is too short, have a qualified
electrician or serviceman install an outlet
near the microwave oven.
* For a permanently connected appliance:
The microwave oven must be connected
to a grounded, metallic, permanent wiring
system, or an equipment grounding
conductor should be run with the circuit
conductors and connected to the
equipment grounding terminal or lead
on the microwave oven.
Page 7
Getting to Know Your Microwave Oven
This section discusses the concepts behind microwave cooking. It also shows you the basics you need to know
to operate your microwave oven. Please read this information before you use your oven.
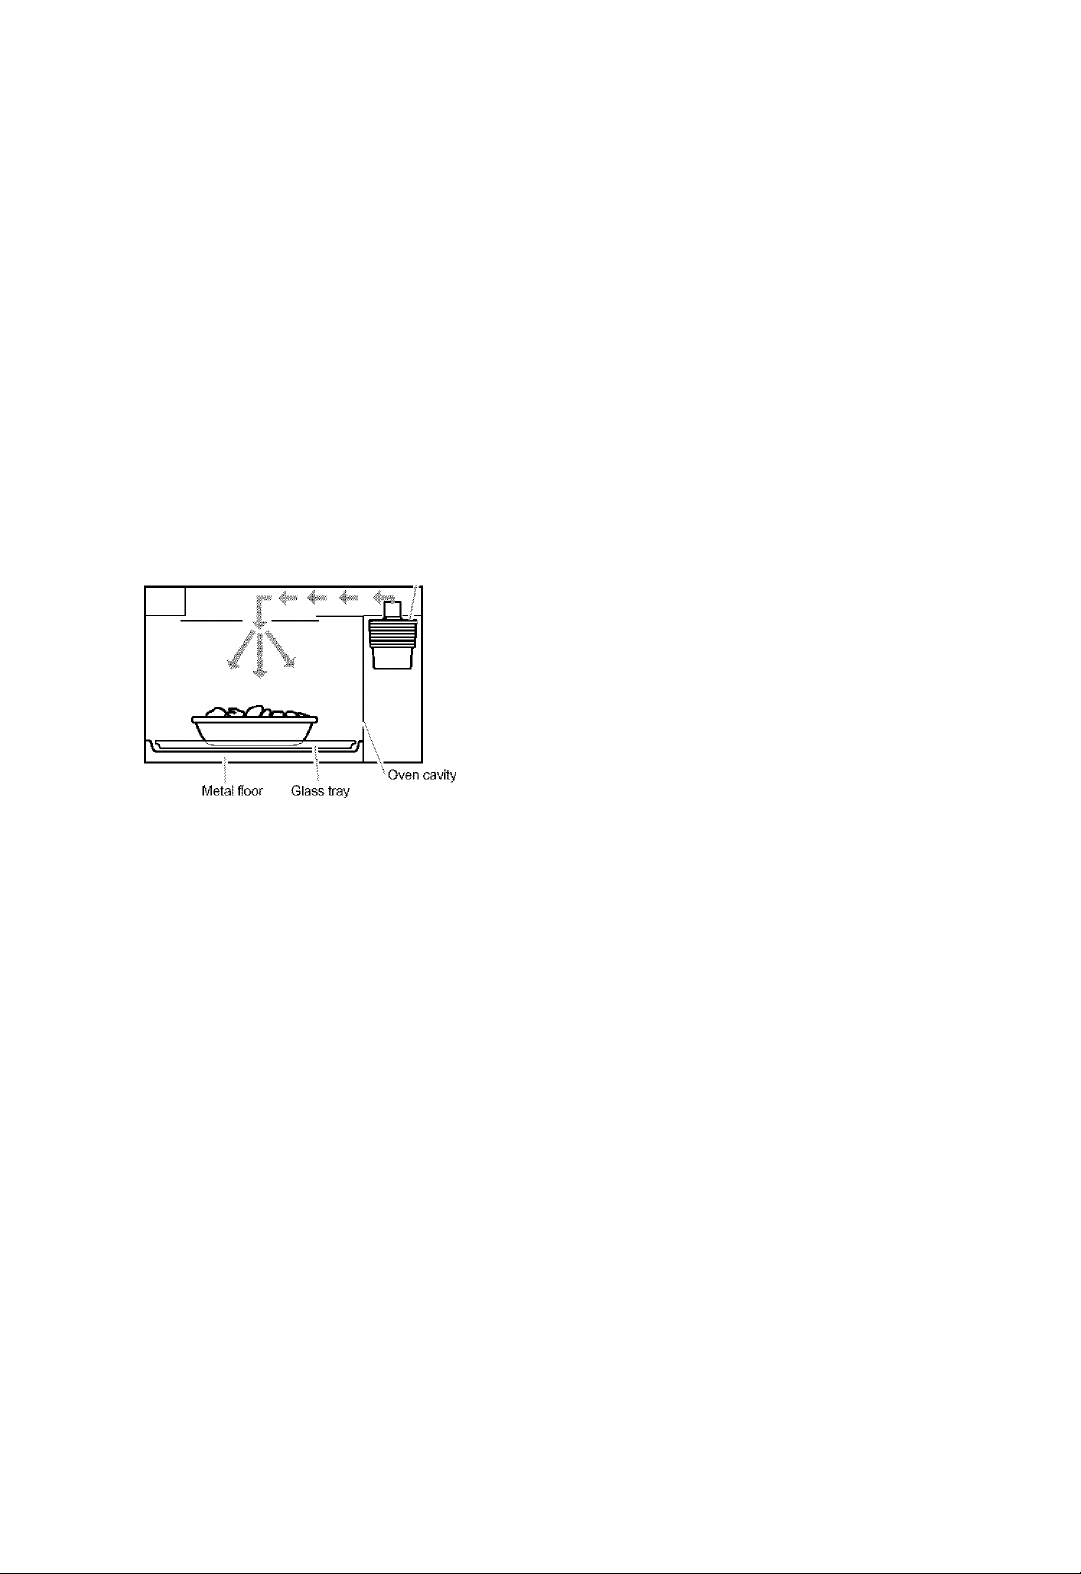
HOW YOUR KENMORE ULTRA WAVE™ MICROWAVE HOOD COMBINATION WORKS
Microwave energy is not hot. It causes food to make
its own heat, and it’s this heat that cooks the food.
Microwaves are like TV waves, radio waves, or
light waves. You cannot see them, but you can see
what they do.
A magnetron in the microwave oven produces
microwaves. The miaowaves move into the oven
where they contact food as it turns on the turntable.
Magneton
The glass turntable of your microwave oven lets
microwaves pass through. Then they bounce off a
metal floor, back through the glass turntable, and
are absorbed by the food.
Microwaves pass through most glass, paper, and
plastics without heating them so food absorbs the
energy. Microwaves bounce off metal containers so
food does not absorb the energy.
ULTRA WAVE™ Inverter Microwave System
ULTRA WAVE™ Inverter Microwave System gives
you better microwave cooking performance for
defrosting, cooking and reheating foods quickly
and uniformly.
The ULTRA WAVE™ Inverter Microwave System
is proven technology that delivers a constant
stream of microwave power - true high, medium,
and low power.
Conventional microwave ovens operate on HIGH
power only. To achieve a 70% power level in a
conventional microwave oven, the oven operates
70% of the time at HIGH power and 30% of the
time OFF.
iP*;:: 0%
The ULTRA WAVE™ Inverta" Microwave System
delivers pow^ continuously, to defrost more evenly and
minimize overcooking of food and messy food spattefs.
í:0éÉio%;:fc;
Sensor Cooking
The ULTRA WAVE™ Inverter Microwave System fea
tures Sensor Cooking functions. A humidity sensor in
the oven cavity detects moisture and humidity emitted
from food as it heats. The sensor adjusts cooking times
to various types and amounts of food. Sensor cooking
takes the guesswork out of microwave cooking.
For the best cooking results
• Always cook food for the shortest cooking time
recommended. Check to see how the food is
cooking.
• Stir, turn over, or rearrange the food being
cooked about halfway through the cooking time
for all recipes. This will help make sure the food
is evenly cooked.
• If you do not have a cover for a dish, use wax
paper, or microwave-approved paper towels or
plastic wrap. Remember to turn back a corner of
the plastic wrap to vent steam during cooking.
Radio interference
Using your microwave oven may cause interference
to your radio, TV, or similar equipment. When there is
interference, you can reduce it or remove it by;
• Cleaning the door and sealing surfaces of the oven.
• Adjusting the receiving antenna of the radio or
television.
• Moving the receiver away from the microwave oven.
* Plugging the microwave oven Into a different outlet
so that the microwave oven and receiver are on
different branch circuits.
Page 8

Testing your microwave oven
T0 test the oven put about 1 oip of cold water In a
glass container in the oven. Close the door.
Make sure it latches. Cod< at 100% power fcr 1 minute.
When the time is up, the water should be heated.
Testing your dinnerware or cookware
Test dinnerware or cookware before using. To
test a dish for safe use, put it into the oven with a
cup of water beside it. Cook at 100% cook power
for one minute. If the dish gets hot, do not use it.
Some dishes (melamine, some ceramic
dinnerware, etc.) absorb microwave energy.
becoming too hot to handle and slowing cooking
times. Cooking in metal containers not designed for
microwave use could damage the oven, as could
containers with hidden metal (twisi4ies, foil lining,
staples, metallic glaze or trim).
Operating safety precautions
‘ Never lean on the door or allow a child to swing
on it when the door is open.
‘ Use hot pads. Microwave energy does not heat
containers, but the heat from the food can make
the container hot.
‘ Do not use newspaper or other printed paper in
the oven.
• Do not dry flowers, fruit, herbs, wood, paper,
gourds, or clothes in the oven.
• Do not start a microwave oven when it is empty.
Product life may be shortened. If you practice
programming the oven, put a container of water in
the oven. It is normal for the oven door to look
wavy after the oven has been running for a while.
• Do not try to melt paraffin wax in the oven.
Paraffin wax will not melt in a microwave oven
because it allows microwaves to pass through it.
• Do not operate the microwave oven unless the
glass turntable is securely in place and can move
freely. The turntable can move in either direction.
Make sure the turntable is correct-side up in the
oven. Handle your turntable with care when
removing it from the oven to avoid possibly
breaking it. If your turntable cracks or breaks,
contact your dealer for a replacement.
•When you use a browning dish, the browning
dish bottom must be at least 3/16 inch above the
turntable. Follow the directions supplied with the
browning dish.
• Never cook or reheat a whole egg inside the
shell. Steam buildup in whole eggs may cause
them to burst, and possibly damage the oven.
Slice hard-boiled eggs before heating. In rare
cases, poached eggs have been known to
explode. Cover poached eggs and allow a
standing time of one minute before cutting into
them.
• For best results, stir any liquid several times
during heating or reheating. Liquids heated in
certain containers (especially containers shaped
like cylinders) may become overheated. The liquid
may splash out with a loud noise during or after
heating or when adding ingredients (coffee
granules, tea bags, etc.). This can harm the oven.
' Microwaves may not reach the center of a roast.
The heat spreads to the center from the outer,
cooked areas just as in regular oven cooking. This
is one of the reasons for letting some foods (for
example, roasts or baked potatoes) stand for a
while after cooking, or for stirring some foods
during the cooking time.
> Do not deep fry in the oven. Microwavable
utensils are not suitable and it is difficult to
maintain appropriate deep-frying temperatures.
> Do not overcook potatoes. At the end of the
recommended cooking time, potatoes should be
slightly firm because they will continue cooking
during standing time. After microwaving, let
potatoes stand for 5 minutes. They will finish
cooking while standing.
Electrical connection
If your electric power line or outlet voltage is
less than 110 volts, cooking times may be longer.
8
Have a qualified electrician check your electrical
system.
Page 9
Microwave oven features
® ® ®
® (g)d) (t)
Your microwave oven is designed to make your
cooking experience as enjoyabie and productive
as possible. To get you up and running quickly, the
following is a list of the oven’s basic features:
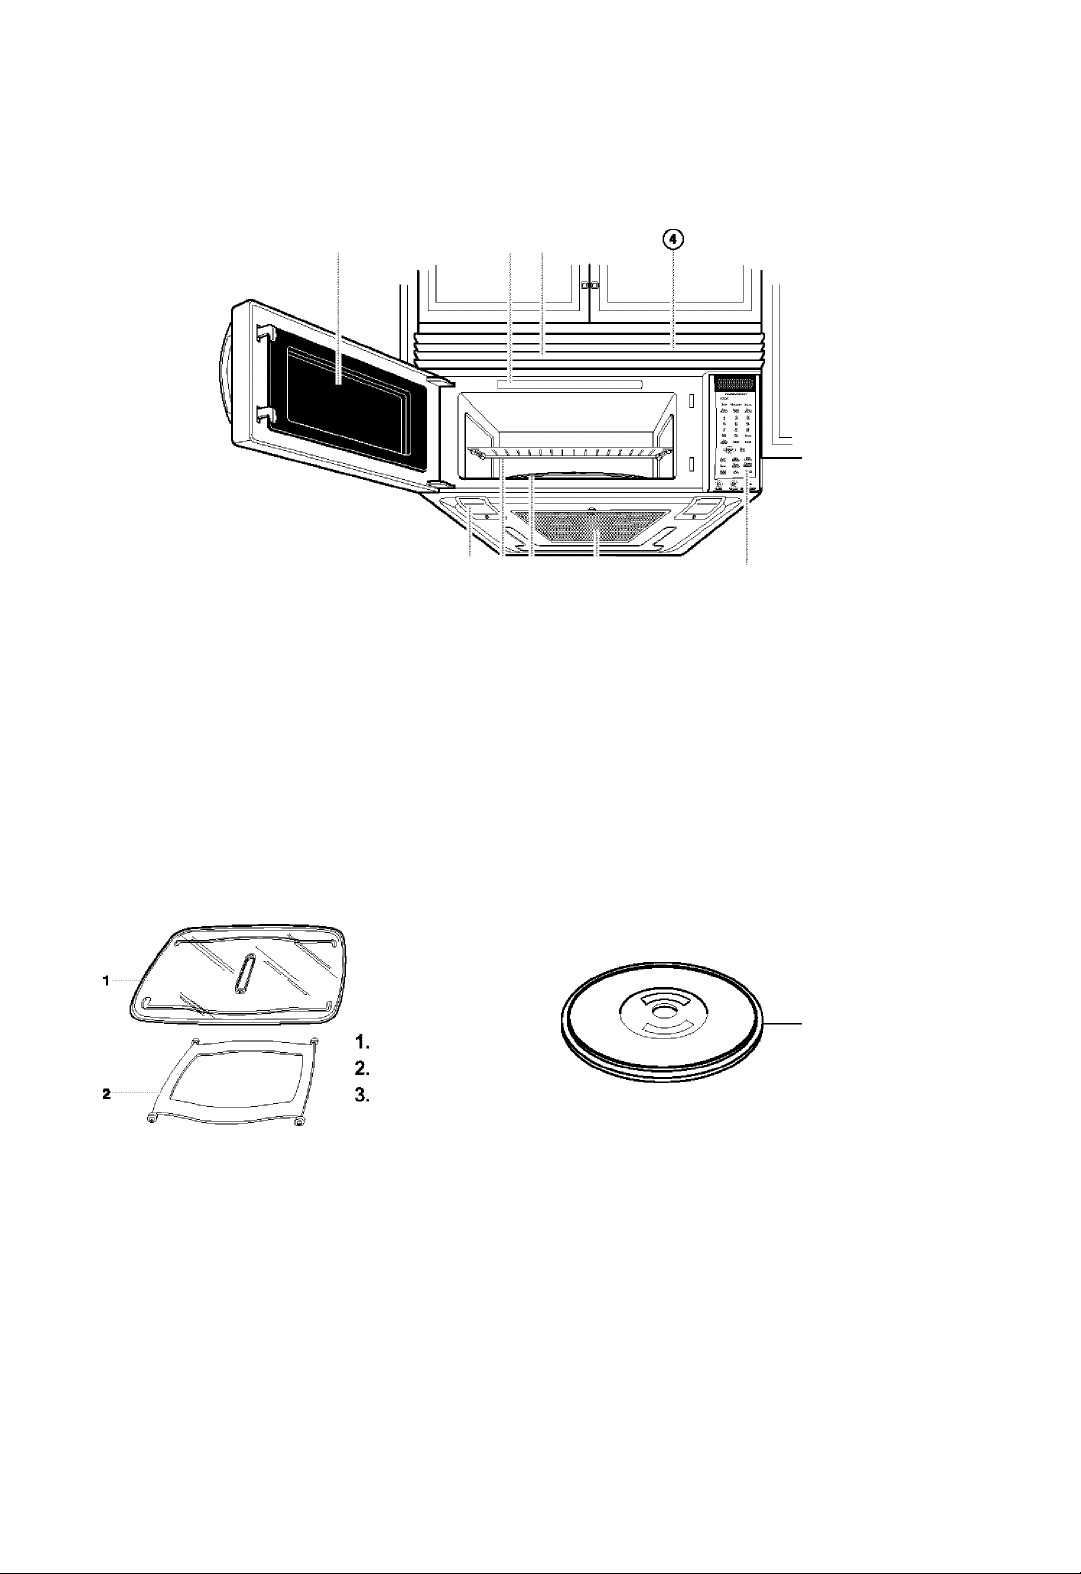
1. Metal Shielded Window. The shield prevents
microwaves from escaping. It is designed as a
screen to allow you to view food as it cooks.
2. Model and Serial Number Plate & Cooking
Guide Label
3. Charcoal Filter (behind Vent Grille)
Support
Hub
4. Vent Grille
5. Glass tray. The glass tray moves food as it
cooks for more even cooking. It must be in the
oven during operation for best cooking results.
6. Cooktop Light
7. Grease Filter. See “Caring for the filters’’
section.
8. Control Panel, Touch the pads on this panel to
perform all functions.
9. Cooking Rack. Use for extra space when
cooking in more than one container at the
same time.
Defrost Plate
Use the DEFROST PLATE provided for
complete defrosting.
The glass tray moves in both directions to help cook food more
evenly. Do not operate the microwave oven without the glass
tray in place.
To Install:
1. Place the support on the oven cavity bottom.
2. Place the glass tray on the support.
Fit the raised, hollowed groove of the glass tray bottom
between the rollers of the hub. The rollers on the support
should fit inside the glass tray bottom ridge.
Page 10
Control panel features
Your microwave oven control panel lets you select the desired cooking function quickly and easily.
All you have to do is touch the necessary Command Pad. The following is a list of all the Command
and Number Pads located on the control panel. For more information on these features, see the
“Using your microwave oven” section.
Smart Touch Sensor
(2)-
(3)--
(6>(7)--
10
@-
ÌÌ5)-
i17i-
(1^--
20
23
Wmm
PiZ» VE6EfAil£ ftSTATQ-
Fh02B*
EmiEE
1
4
7
Cfifiic
TiME
Add
MiNum
'AiTO ‘
Cook :
;ttO€Kj
'KrraEfi'1
i,TiMESi
DiSME!?
Plate
2
5
8
0
Lbs
SlAifT T
rAtm!'Y
ijEHEM:!
4..U: J p:; " : ;:* ■
T'AUK}'"
MELI
SiKMEB
CLW
mMM,
fSOFTEPl))
Sue
3
6
9
POWEK'
More
4J
'5)
C&)
-!9j
-(13)
---(Ì4Ì
16
:19)
-(2^
-(22)
25
1. Display. The display includes a clock and
indicators to tell you time of day, cooking time
settings, cook powers, quantities, weights, and
cooking functions selected.
10.
2. Popcorn. Touch this pad to pop popcorn with
the sensor feature. The oven’s sensor will tell
the oven how long to cook depending on the
amount of humidity it detects from the popcorn.
Page 11

3. Pizza. Touch this pad to reheat one or several
slices of pizza without entering a cook time or
power.
4. Vegetable. Touch this pad to cook Vegetable
without entering a cook time or power.
5. Potato. Touch this pad to cook potatoes without
entering a cook time or power.
6. Frozen Entree. Touch this pad to cook a 10- to
21- ounce frozen entree without entering a cook
time or power.
7. Dinner Plate. Touch this pad to cook without
entering a cook time or power.
8. Sure Simmer. Touch this pad to simmer soups,
casseroles, stews, and other liquid foods.
9. Number Pads. Touch number pads to enter
cooking times, cook powers, quantities, weights,
or food categories.
10. Cook Time. Touch this pad followed by
Number Pads to set a cooking time.
11. Power. Touch this pad after the cook time has
been set, followed by a Number Pad to set the
amount of microwave energy released to cook
the food. The higher the number, the higher the
microwave power or “cooking speed.”
12. Add Minute. Touch this pad to cook for 1
minute at 100% cook power, or to add extra
minutes at the set cook power to your cooking
cycle.
13. Less. Touch this pad to subtract 10 seconds of
cook time each time you press it.
14. More. Touch this pad to add 10 seconds of
cook time each time you press it.
15. Start. Touch this pad to start a function. If you
open the door after the oven begins to cook,
retouch Start.
16. Stop/Clear. Touch this pad to erase an
incorrect command, cancel a program during
cooking, or to dear the Display.
17. Auto Cook. Touch this pad to cook
microwavable foods without entering a cook
time or power.
18. Auto Reheat. Touch this pad to reheat
microwavable foods without entering a cook
time or power.
19. Hold Warm. Touch this pad to keep hot,
cooked foods safely warm in your oven for up
to 99 minutes, 99 seconds. Hold Warm can be
used by Itself, or it can automatically follow a
cooking cycle.
20. Clock. Touch ftils pad to enter the time of day.
21. Auto Defrost. Touch this pad followed by
Number Pads to thaw frozen meat by weight.
22. Express Defrost. Touch this pad to express
defrost. “GROUND BEEF 1.0 LBS TOUCH
START” will appear in the display.
23. Kitchen Timer. Touch this pad to set the
Kitchen Timer.
24. Melt. Touch this pad to melt chocolate, cheese,
butter, or marshmallows.
25. Soften. Touch this pad to soften ice cream,
cream cheese, butter, or frozen juice.
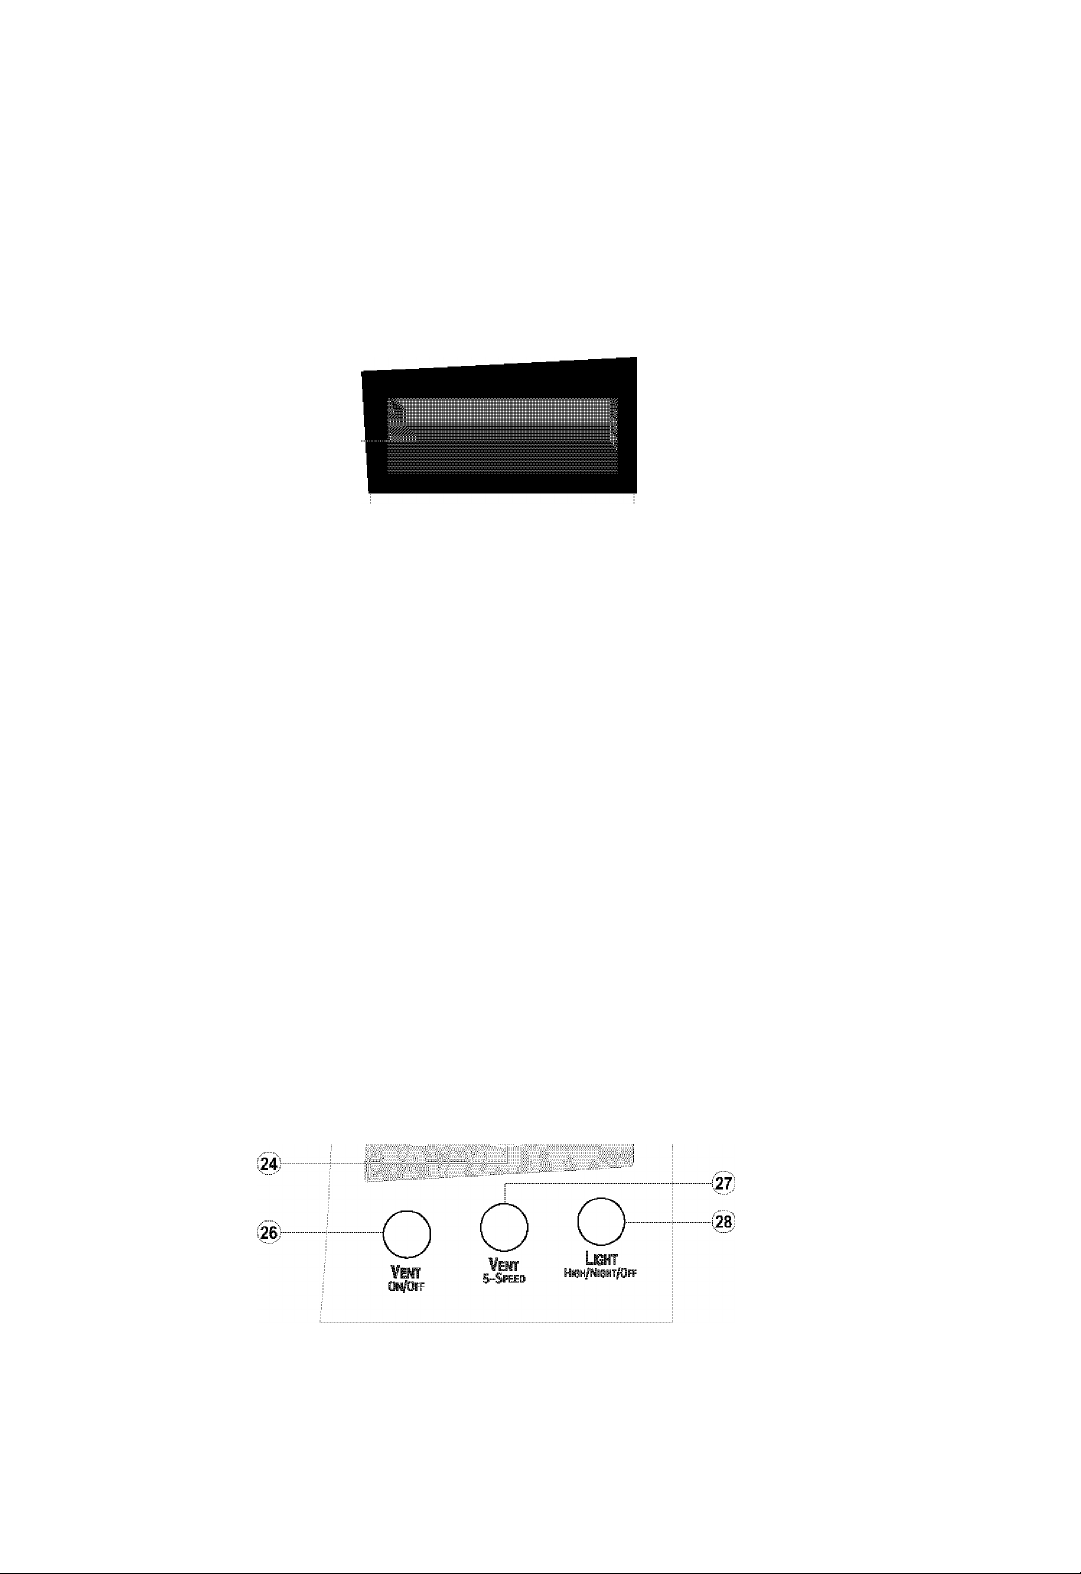
26. Vent On/Off. Touch this button to turn the fan
on or off.
27. Vent 5 Speed. Touch this button to choose
one of 5 fan speeds.
28. Light High/Night/Off. Touch this button to turn
the light on high, night, or off.
NOTE: If you try to enter incorrect instructions,
you will not hear any tones. Touch STOP/CLEAR
and re-enter the instructions.
11.
Page 12

Using Your Microwave
Oven
This section gives you instructions for operating
each function. Please read these instructions
carefully.
AUDIBLE SIGNALS
Audible signals are available to guide you when
setting and using your oven;
• A programming tone wiii sound each time
you touch a pad.
• Seven tones signal the end of a Kitchen Timer
countdown.
• Four tones signal the end of a cooking cycle.
CLOCK
When your microwave oven is first plugged in or
after a power failure, the Display will show “PLEASE
SET TIME OF DAY. ” If a time of day is not set,
will show on the Display until you touch “Clock.”
Example for 10:30(AM);
Touch:
Display Shows:
INTERRUPTING COOKING
You can stop the oven during a cycle by opening
the door. The oven stops heating and the fan
stops, but the light stays on.
To restart cooking, close the door and touch
START.
If you do not want to continue cooking,
open the door and touch STOP/CLEAR.
CHILD LOCK
Use this safety feature to lock the control panel
when you are cleaning the oven or so that children
cannot use the oven unsupervised.
To set CHILD LOCK:
Touch:
M il&Qifil:
Display Shows:
Time of day.
.> 'Sap -i'.;
■ Siaii" --
2. 'CiisCKi
3. ci;y:o)(;3;^)
4. C'Start%
xSX
5. n";:)
6. ""
NOTE: You can switch between AM and PM by
touching 1 or 2 after step 4.
y iu * Du tUULli DtrlKt
in * jn nm rni tru 1
fU
* Du fit i i UULti /
nm rm tru D
rn fUULnu
Rn in * jn rnt iru
iU * Du iUULii
SJRRT
;
EtiTER TIHEiFnHy
-w rnnru C'^QOT
in • jn
fU • Du
XX*'*’
To cancel CHILD LOCK:
Touch and hold until
LOCKED appears in
the display
(approximately
4 seconds).
Touch:
,X”X,
1 C Start 1
Touch and hold until
LOCKED
disappears in the
display
(approximately
4 seconds).
Display Shows:
12.
Page 13

KITCHEN TIMER
COOKTOP LIGHT
Your microwave oven can be used as a kitchen
timer. You can set up to 99 minutes, 99 seconds.
Example for 3 minutes;
Touch:
j /ЙТСНЕЙ',
' ■ Ч TlMEI.I
3.
Display Shows:
•
rtstTco
Time
J • nn
J
•
uu
ttsf mtKt
tn
1 fH(
- unCK nut
RtiBSEO
J * nn Tnnru CTQOT
J * uu njuLflDmK t
TIMER and time
counting down.
EXHAUST FAN
The bottom of the control panel controls the 5-speed
exhaust fan.
Example for level 4:
Touch:
О
Display Shows:
/ С/ /С/ f
LCì/CL /
The pad on the bottom right of the control pane!
controls the cooktop light.
Example for HIGH:
Touch:
1. o
Display Shows:
HIGH
LlQHr
once for HIGH light
twice for NIGHT light
2. O
OFF
Uqht
To turn off, touch button once
or twice depending on light
setting.
EXPRESS DEFROST
One express defrost sequence is preset in the oven.
The Express Defrost feature provides you with the quick
defrosting method for 1.0 pound “GROUND BEEF”
only.
Example for 1 lb of Ground beef;
Touch:
Display Shows:
This shows the last level until you
select the fan speed level.
i Ci /ct u
^•O
¥ent
s-Sfeed
Touch until Level 4.
3.0
¥iiir
on/of
Turn off fan when desired.
NOTE: If the temperature from the range or cooktop
below the oven gets too hot, the exhaust fan in the
vent hood will automatically turn on at the LEVEL 5
setting to protect the oven.
It may stay on up to an hour to cool the oven.
When this occurs, the VENT button will not turn the
fan off.
LC\/CL 1
OFF
Excess
1 ■ Defì?ost
2.
\
BRDUfW BEEF WLB5
TlMHSTm
Time counting down and
EXPRESS DEFROST
scrolls across display.
13.
Page 14

ADD MINUTE MULTI-STAGE COOKING
A time-saving pad, this simplified control lets
you quickly set and start microwave cooking at
100% power without the need to touch START.
Example for 2 minutes:
Touch:
iSlii' Twice
NOTE: Each time you touch ADD MINUTE, it will
add 1 minute up to 99 min 59 seconds.
Display Shows:
Time of day.
Time counting down
and POWER 100.
TIMED COOKING
This feature lets you program a specific cook time
and power. For best results, there are 10 power
level settings in addition to HIGH (100%) power.
Refer to the “Microwave Power Levels Table" on
page 15 for more information.
NOTE: If you do not select a power level, the oven
will automatically cook at HIGH (100%) power.
Example for 5 minutes, 30 seconds at 80%
power:
Touch:
Display Shows:
♦ ChJTCQ rnn^tKtfZ Time
* cutcK Luuntt aJ tn it
For best results, some recipes call for different cook
powers during different stages of a cook cycle. You
can program your oven to switch from one power
level to another for up to 3 stages.
Example for 2-stage cook cycle:
Touch:
2. (ЖХ§ХШ)
to set a 3-minute cook
time for the first stage.
4. Cf)
to set an 80% cook
power for the first stage.
-
........
....
6.
to set a 7-minute cook
time fer the second stage
Display Shows:
* СЫТ CO гппюыг Time
•tin tK LUUnil lO t II it
J * nn rnuru CTQQT
J • UU tUULli JinKl
no pm ICO
uK ruwtK
J * nn сыт CO om ICO
J * UU ti 11 tK ruwtK
1 Cf fCf f ТП tn
Lt\/tL I lU fU
J • nn pm ICO or
J • UU
ruwtK
UU
rnuru CTQOT
lUULn JtnKl
* сыт CO ГППЮЫГ Time
•tin tK LUUnil lO 1II it
■? • nn rnuru стррт
t • UU lUULn DlflKl
np pm icp
uK ruwtK
C * jrt rnuru CTQOT
2. ci,)ff>Cg}
3.
4.
5 C’ Start )
NOTE: After use of cook function, fan wiil run for 1
minute to cool if it senses too much heat.
D * JU tUULn DtnKt
no om ICO
uK ruuftK
r * jn rtsfTco om ICO
D » Ju ti 11 tK ruuitK
t ct tci / rn tn
Lt\/tL 1 lU iU
c • jn om ICO
D ' JU ruwtK
on rnuru CTQOT
UU tUULli JinK 1
Time counting down
and POWER 80.
14.
■? * nn СЫТСР pm ICP
t •
UU
7. rtili-
to set a 50% cook power
for the second stage.
9 /start'"")
10. When the first stage is over, you will hear two
short tones as the oven begins the second
cook stage.
ti 11 tK ruwtK
t Cf tC* f ТП tn
LtwtL t lU tu
~i • nn pm ICP cn
1 •
UU
ruwtK
JU
rnuru CTQQT
lUULn JtnKl
Time counting down
and POWER 80.
Page 15

MICROWAVE POWER LEVELS
For best results, some recipes cal! for different cook
powers. The lower the cook power, the slower the
cooking. Each number from 1 to 9 stands for a
different percentage of full cook power.
The following table gives the percentage of cook power
each number pad stands for, and the cook power
name usually used.
COOK POWER NAME WHEN TO USE IT
100% of full power
9 = 90% of full power
8 = 80% of full power
7 = 70% of full power
6 = 60% of full power
High • Quick heating many convenience foods and
Medium-High
It also tells you when to use each cook power.
Follow recipe or food package instructions if available.
foods with high water content, such as soups and
beverages
• Cooking tender cuts of meat, ground meat
• Heating cream soups
• Heating rice, pasta, or casseroles
• Cooking and heating foods that need a
Cook Power iower than high (for example,
whole fish and meat loaf) or when food is
cooking too fast
• Reheating a single serving of food
• Cooking requiring special care, such as cheese
and egg dishes, pudding, and custards
• Finishing cooking casseroles
5 = 50% of full power
4 = 40% of full power
3 = 30% of full power Medium-Low,
2 = 20% of full power
1 = 10% of full power
Medium • Cooking ham, whole poultry, and pot roasts
Defrost
Low • Keeping food warm
• Simmering stews
• Melting chocolate
• Heating pastries
• Manually defrosting foods, such as bread, fish,
meats, poultry, and precooked foods
• Softening butter, cheese, and ice cream
• Taking chill out of fruit
15.
Page 16

AUTO DEFROST
Four defrost sequences are preset in the oven.
The auto defrost feature provides you with the best
defrosting method for frozen foods. The cooking guide
will show you which defrost sequence is recommended
for the food you are defrosting. For added convenience,
the Auto Defrost includes a built-in beep mechanism
that reminds you to check, turn over, separate, or
rearrange to get best defrost results.
1. MEAT
2. POULTRY
3. FISH
4. BREAD
This table shows you food type selections and the
weights you can set for each type. For best
results, loosen or remove covering on food.
WEIGHTS YOU
CAN SET
(tenths of a pound)
FOOD
TOUCH
Auto Defrost
Meat 1 .1 to 6.0 {45g to 2722g)
Poultry 2 .1 to 6.0 {45g to 2722g)
Fish 3 .1 to 6.0 (45g to 2722g)
Bread
4
.1 to1.0{45gto450g)
Example for 1.2 lbs of ground beef;
Touch:
4 i km .
' ■ 'OEFROP'
Display Shows:
HERT TOUCH 1
POtlTRV TOUCHE
Ft5HT0t£H3
BRERBTTMIHH
2. C'l")
OSJibs
emcRiJEm
3. i .1
......
land '2,.;
to enter the weight
4 1.
......
NOTE:
When you touch the START pad, the display changes
to defrost time count down. The oven will beep during
the DEFROST cycle. At this time, open the door and
turn, separate, or rearrange the food. Remove any
portions that have thawed. Return frozen portions to
the oven and touch START to resume the defrost cycle.
I.Eij,5
TTUJCHSTRRT
Time counting down
and DEFROST.
Operating Tips
■ For best results, remove fish, sheilfish, meat, and
poultry from its originai closed paper or plastic
package (wrapper). Otherwise, the wrap will hold
steam and juice close to the foods, which can cause
the outer surface of the foods to cook.
■ For best results, shape your ground meat into the
form of a doughnut before freezing. When defrosting,
scrape off thawed meat when the beep sounds and
continue defrosting.
■ Piace foods in a shallow container or on a microwave
roasting rack to catch drippings.
Weight conversion table
You are probably used to food weights as being in
pounds and ounces that are fractions of a pound {for
example, 4 ounces equals 1/4 pound). However, in
order to enter food weight in Auto Defrost, you must
specify pounds and tenths of a pound.
If the weight on the food package is in fractions of a
pound, you can use the following table to convert the
weight to decimals.
EQUIVALENT WEIGHT
OUNCES
1.6
3.2
4.0
4'.8
6.4
8.0
9.6
11.2
12.0
12.8
14.4
16.0
DECIMAL WEIGHT
.10
.20
.25 One-Quarter Pound
.30
.40
.50 One-Half Pound
.60
.70
.75 Three-Quarters Pound
.80
.90
1.00 One Pound
16.
Page 17

AUTO DEFROST TABLE
Meat setting
FOOD SETTING AT BEEP SPECIAL INSTRUCTIONS
BEEF
Ground Beef,
Bulk
MEAT
Remove thawed portions with fork.
Turn over. Return remainder to oven.
Do not defrost less than im lb.
Freeze in doughnut shape.
Place on the DEFROST PLATE.
Ground Beef,
Patties
Round Steak
Tenderloin
Steak
Stew Beef
Pot Roast,
Chuck Roast
Rib Roast
Rolled Rump
Roast
LAMB
Cubes for
Stew
Chops
(1 inch thick)
PORK
Chops
(1/2 inch thick)
MEAT
MEAT
MEAT Turn over. Cover warm areas with
MEAT
MEAT
MEAT Turn over. Cover warm areas with
MEAT
MEAT
MEAT Separate and rearrange.
MEAT Separate and rearrange.
Separate and rearrange.
Turn over. Cover warm areas with
aluminum foil.
aluminum foil.
Remove thawed portions with fork.
Separate remainder.
Return remainder to oven.
Turn over. Cover warm areas with
aluminum foil.
aluminum foil.
Turn over. Cover warm areas with
aluminum foil.
Remove thawed portions with fork.
Return remainder to oven.
Do not defrost less than 2 oz. patties.
Depress center when freezing.
Place on the DEFROST PLATE.
Place on the DEFROST PLATE.
Place in a microwavable baking dish.
Place on the DEFROST PLATE.
Place on the DEFROST PLATE.
Place on the DEFROST PLATE.
Place in a microwavable baking dish.
Place on the DEFROST PLATE.
Place on the DEFROST PLATE.
Hot Dogs
Spareribs
Country-style
Ribs
Sausage,
Links
Sausage,
Bulk
Loin Roast,
Boneless
MEAT Separate and rearrange.
MEAT Turn over. Cover warm areas with
aluminum foil.
MEAT Separate and rearrange.
MEAT Remove thawed portions with fork.
Turn over. Return remainder to oven.
MEAT Turn over. Cover warm areas with
aluminum foil.
Place on the DEFROST PLATE.
Place on the DEFROST PLATE.
Place on the DEFROST PLATE.
Place in a microwavable baking dish.
Place on the DEFROST PLATE.
17.
Page 18

AUTO DEFROST TABLE (CONT.)
Poultry setting
FOOD SETTING AT BEEP SPECIAL INSTRUCTIONS
CHICKEN
Whole
{up to 6 lbs)
Cut-up
POULTRY Turn over {finish defrosting breast-
side down). Cover warm areas with
aluminum foii.
Separate pieces and rearrange.
Piace chicken breast-side up on the
DEFROST PLATE. Finish defrosting by
immersing in coid water. Remove giblets when
chicken is partialiy defrosted.
Piace on the DEFROST PLATE.
Turn over. Cover warm areas with
aluminum foii.
Finish defrosting by immersing in cold water.
CORNISH
HENS
Whole POULTRY
Turn over. Cover warm areas with
aluminum foii.
Piace on the DEFROST PLATE.
Finish defrosting by immersing in cold water.
TURKEY
Breast
{up to 6 lbs)
POULTRY
Turn over. Cover warm areas with
aluminum foii.
Piace on the DEFROST PLATE.
Finish defrosting by immersing in cold water.
Fish setting
FOOD SETTING AT BEEP SPECIAL INSTRUCTIONS
FISH
Fillets
Steaks
Whole
SHELLFISH
Crabmeat
Lobster tails
Shrimp
Scallops
FISH Turn over. Separate fillets when
FISH Separate and rearrange. Place in a microwavable baking dish.
FISH Turn over.
FISH Break apart. Turn over.
FISH Turn over and rearrange.
FISH Separate and rearrange.
FISH
partially thawed if possible.
Separate and rearrange.
Place in a microwavable baking dish.
Carefully separate fillets under coid
water.
Run cold water over to finish defrosting.
Place in a microwavable baking dish.
Finish defrosting by immersing in cold
water.
Place in a microwavable baking dish.
Place in a microwavable baking dish.
Place in a microwavable baking dish.
Place in a microwavable baking dish.
Bread setting
FOOD SETTING AT BEEP SPECIAL INSTRUCTIONS
Bagel
Dinner Roll
Muffin
Hamburger
Hot Dog Bun
Slices of Bread
Loaf of Bread
18.
BREAD Turn over and rearrange. Place on 3 sheets of paper towel.
Page 19

DEFROSTING TIPS
HOLD WARM
• When using Auto Defrost, the weight to be entered
is the net weight in pounds and tenths of pounds
(the weight of the food minus the container).
• Before starting, make sure you have removed any
of the metal twist-ties which often come with frozen
food bags, and replace them with strings or elastic
bands.
• Open containers such as cartons before they are
placed in the oven.
• Always slit or pierce plastic pouches or packaging.
• If food is foil wrapped, remove foil and place it in a
suitable container.
• Slit the skins, if any, of frozen food such as
sausage.
• Bend plastic pouches of food to ensure even
defrosting.
• Always underestimate defrosting time. If defrosted
food is still icy in the center, return it to the
microwave oven for more defrosting.
• The length of defrosting time varies according to
how solidly the food is frozen.
• The shape of the package affects how quickly food
will defrost. Shallow packages will defrost more
quickly than a deep block.
• As food begins to defrost, separate the pieces.
Separated pieces defrost more easily.
• For better results, let food stand after defrosting.
(For more information on standing time, see the
“Microwave Cooking Tips” section.)
• Turn over food during defrosting or standing time.
Break apart and remove food as required.
You can safely keep hot, cooked food warm in your
microwave oven for up to 99 minutes, 99 seconds
(about 1 hour, 40 minutes). You can use Hold Warm
by itself, or to automatically follow a cooking cycie.
Example for hold warm:
Touch:
.
Hold"
1.
, unt n noom
2.
At the end of the hold warm, “END" will be
displayed and four tones will sound.
To make Hold Warm
automatically follow another cycle:
• While you are touching in cooking instructions,
touch HOLD WARM before touching START.
• When the last cooking cycle is over, you will hear
two tones. "Hold Warm” will come on while the oven
continues to run.
• You can set Hold Warm to follow Auto Defrost,
Cook, or multi-cycle cooking.
NOTES:
• Hold Warm operates for up to 99 minutes, 99
seconds.
• Opening the oven door cancels Hold Warm.
Close the door and touch Hold Warm, then touch
START if additional Hold Warm time is desired.
• Food cooked covered should be covered during
Hold Warm.
• Pastry items (pies, turnovers, etc.) should be
uncovered during Hold Warm.
• Complete meals kept warm on a dinner piate
should be covered during Hold Warm.
• Do not use more than one complete Hold Warm
cycle (about 1 hour, 40 minutes). The quality of
some foods will suffer with extended time.
I nULi/
' scrolls across display.
Display Shows:
urv n tiQom
nULU wnKt (
rnnru CTQOT
tUULfl DtnK I
UiflKt i
19.
Page 20

SURE SIMMER
Your microwave oven lets you simmer soups,
casseroles, stews, and other liquid foods. Ali you do
is set a simmer time and your oven will bring your
food to a boil and then simmer it for the time you
specify.
NOTES:
• You cannot change the cook power or doneness
for Sure Simmer.
• This function uses the sensor. The sensor needs
2 minutes 30 seconds to warm up after the oven
is connected to power or after a power failure.
If you start Sure Simmer during the warm up,
microwave energy will not be turned on until the
sensor is warm.
• When cooking vegetables, increase amount of
water to 1/4 to 1/2 cup (60 to 125mi).
• Cover dish with a hard lid, i.e., the lid that comes
with the dish or a dinner plate. Do not use plastic
wrap.
Touch:
Piace the food in the oven and
1.
ciose the door.
Display Shows:
When simmering foods like pasta use a container
that can hold enough water to cover the food
completely when cooking, such as a 3-quart (12 cup)
casserole with a lid. When cooking pasta or noodles,
add 1 tbsp (15m!) oil to the water before boiling.
Use the foilowing method:
Place container with water in the oven and follow
steps 2~4, setting the simmer time at 1 second. At
the end of the signal, place the food in the water and
stir until completely covered by water. Cover. Repeat
steps 2~4, setting the simmer time you want.
Changing instructions you can change the simmering
time while simmering by repeating steps 2, 3, and 4.
• гытгп гппц)ыг Time
'Cm CK Luunii IÜ III iC
jn* nn
3.
Touch Number pads to
enter the simmer time.
Example for 30
minutes.
DU* UU
rru tru C TOOT
tUULri DtriKt
c:::j sure sinnsR
scroils across
display.
The oven will bring
the food to a boil.
The food will then simmer for the time you set.
20.
Page 21

Using Sensor Cooking
SENSOR COOKING
SENSOR OPERATING INSTRUCTIONS
Sensor Cook allows you to cook most of your favorite
foods without selecting cooking times and power
levels. The oven automatically determines required
cooking time for each food item. When the internal
sensor detects a certain amount of humidity coming
from the food, it will tell the oven how much longer to
heat. The display will show the remaining heat time.
For best results by Sensor, following these
recommendations.
• Food cooked with the sensor system should be at
normal storage temperature.
• Glass Tray and outside of container should be dry
to assure best cooking results.
• Foods should always be covered loosely with
microwavable piastic wrap, waxed paper or a lid.
• Do not open the door or touch the “STOP/CLEAR”
key during the sensing time. When sensing time is
over, the oven beeps twice and the remaining
cooking time will appear in the display window. At
this time you can open the door to stir, turn, or
rearrange the food.
SENSOR COOKING GUIDE
Appropriate containers and coverings help assure
good Sensor cooking results.
• Always use microwavable containers and cover
them with lids or vented plastic wrap.
• Never use tight-sealing plastic covers. They can
prevent steam from escaping and cause food to
overcook.
• Match the amount to the size of the container.
Fill containers at least half full for best results.
• Be sure the outside of the cooking container and
the inside of the microwave oven are dry before
placing food in the oven. Beads of moisture turning
into steam can mislead the sensor.
POTATO (EXAMPLE)
Sensor cook allows you to cook most of your
favorite foods without selecting cooking times and
power levels.
Example for Potato:
Touch:
^ ■ ■ ÌMB - 'i '
2. .
When the cook time is over, you will hear four beeps
and COOK END will be displayed.
Display Shows:
Time of day.
i
_____
scrolls across display.
onrarn
I rutiltu
MORE/LESS
By using the MORE or LESS pads all of the sensor
cook and time cook settings can be adjusted to cook
food for a longer or shorter time.
Pressing MORE will add 10 seconds of cooking time
each time you press it.
Pressing LESS will subtract 10 seconds of cooking
time each time you press it.
21.
Page 22

SENSOR COOKING TABLE
CATEGORY DIRECTION AMOUNT
Popcorn
Pizza
Frozen Entree
Dinner Plate Place foods to be heated on dinner plate or similar dish.
Fresh
Vegetable
Frozen
o
Si
Vegetable
(0
"S
D)
Popcorn lets you pop commercially packaged
microwave popcorn. Pop only one package at a time.
For best results, use fresh bag of popcorn.
Place bag of prepackaged microwave popcorn on the center of turntable.
Before popping, remove the rack from the oven (refer to Page 31).
This is reheat function for a leftover pizza.
Place on paper towel on a microwave-safe plate.
Remove from outer display package. Slit cover.
If not in microwave-safe container, place on a plate.
Cover with plastic wrap and vent the plastic film by piercing with a fork
(3 times). After cooking, allow to stand for 3 minutes.
Cover with plastic wrap and vent.
After cooking, allow to stand for 3 minutes.
Prepare as desired, wash, and leave residual water on the vegetables.
Place in an appropriately sized microwave container.
Add amount of water according to the quantity (1~2 cups: 2 tablespoons,
3~4 ojps: 4 tablespoons). Cover with plastic wrap and vent. After cooking,
stir and allow to stand for 3 minutes.
Remove from package, rinse off frost under running water.
Place in an appropriately sized microwave container.
Add amount of water according to the quantity (1~2 cups: 2 tablespoons,
3~4 cups : 4 tablespoons). Cover with plastic wrap and vent. After cooking,
stir and allow to stand for 3 minutes.
3.0~3.5 oz.
package
1~3 slices,
(5 oz. each)
10 to 21 oz.
1~2 servings
1~4 cups
1~4 cups
Potato
22.
Canned
Vegetable
Remove from the outer display can.
Place in an appropriately sized microwave container,
cover with plastic wrap, and vent.
After cooking, stir and allow to stand for 3 minutes.
Pierce each potato with a fork and place the oven tray
around the edge, at least one inch apart.
After cooking, allow to stand for 5 minutes.
1~4 cups
1~4 medium
(approx.
8 to 10 oz. each)
Page 23

AUTO COOK
AUTO REHEAT
Auto Cook lets you heat common microwave-
prepared foods without selecting cooking times and
power levels. Auto Cook has preset cook powers for
4 food categories: Casserole, Rice, Bacon, and Hot
Cereal.
Example for Rice:
Touch:
Aiffo
1.
Display Shows:
CCI CCT mcísíi t f Til U
DCLCL i í iti iu
_
ccc rnnyfttsíc cfim c
—DtC LUUntI fÜ üuiut
/ ÍU 7
c:::jr¡ce
scrolls across display.
Choose food category:
CATEGORY
Casserole (Sensor) 1 1 to 4 cups
Rice (Sensor) 2 1/2 to 2 cups
Bacon
Hot Cereal 4 1 to 6 servings
TOUCH PAD
NUMBER QUANTITY
3 2 to 4 slices
The oven will cook food automatically by sensor
system, except Bacon and Hot Cereal. When the
cook time is over, you will hear four beeps and
COOK END will be displayed.
Auto Reheat lets you heat foods without selecting
cooking times and power levels. Auto Reheat has
preset cook powers for 3 categories: Casserole,
Roll/Muffin, and Beverage.
Example for Casserole.
Touch: Display Shows:
1.
'•■'■Àuto"
cct ccT mctsft f / Til j
DCLCL t ntnu / tu J
_
ccc rnnt¿n\tc rnmc
— Dct
LUU ntt ÍÜ ÜUtUC
LZZZJ ŒSSERQLE
scrolls across display.
Choose food category:
CATEGORY
Casserole (Sensor) 1 1 to 4 cups
Roll/Muffin 2 1 to 6 pieces
Beverage
The oven will reheat only Casserole automatically
by sensor system.
When the cook time is over, you will hear four
beeps and COOK END will be displayed.
TOUCH PAD
NUMBER
3 1 to 2 cups
QUANTITY
23.
Page 24

AUTO COOK TABLE
CATEGORY
Casserole
(Sensor)
Rice
(Sensor)
Bacon
Hot Cereal
TOUCH
NUMBER PAD
1
2
3
4
DIRECTION
Assemble the ingredients per the recipe
in a 1~2- quart casserole.
Cover With plastic wrap and vent.
After cooking, stir and allow to stand for 3 minutes.
Place rice and twice as much liquid
(water, chicken, or vegetable stock) In a 2- quart
microwave dish.
Cover with plastic wrap and vent.
After cooking, allow to stand for 10 minutes.
Stir for fluffier rice.
Place bacon strips on a microwave
bacon rack for best results.
(Use dinner plate lined with paper towels
if rack is not available)
Prepare as directed on package and cook.
Stir well before eating.
Use only Instant hot cereal.
AMOUNT
1~4 cups
1/2-2 cups
Use medium or
long grain rice.
Cook instant rice
according to
directions on
the package.
2-4 slices
1-6 servings
AUTO REHEAT TABLE
CATEGORY
Casserole
(Sensor)
Roll/Muffin
Beverage
TOUCH
NUMBER PAD
1
2
3
DIRECTION AMOUNT
Cover dish containing the casserole
with plastic wrap, and vent.
After cooking, stir and allow to stand for 3 minutes.
Remove from display package and place on a plate.
Use a wide-mouth mug. Do not cover.
Remove from display package and place on a plate.
(Be careful! The beverage will be very hot! Sometimes
liquids heated in cylindrical containers will splash out
when the cup is moved.)
1-4 cups
1-6 pieces
(2-3 oz. each)
fresh
1-2 cups
(240 ml per cup)
24.
Page 25

MELT SOFTEN
The oven uses low/ power to melt foods (butter or
margarine, chocolate, marshmallows, or processed
cheese food). See the following table.
Example for 8 oz. Chocolate:
Touch:
^
2. ((meit'J)
3. (Ij
Display Shows:
Time of day.
rrt rrT it rnu -
jClCl l i tCf HJ / tu 7
_CCC rnntyttstr rumr
DCC LUUnn HJ Üun/C
runrnt QTC
LnULULntC
Tiinru t rn D
tUULil f tu C
4. Cl^) 8 OZ once and
CHOCOLATE
scrolls across display.
Time counting down.
MELT TABLE
The oven uses low power to soften foods (butter, ice
cream, cream cheese, and frozen juice)
See the foliowing table.
Example for quart of ice cream:
Touch:
^ ■ vCilffi' -
2. '(soREsé:
4. rf)
Display Shows:
Time of day.
rrt err metsti i irn u ^
JCLCL l IfCtHJ / tu 7
_CCC rnnk'ttstr rnme
DCC LUUnn HJ Uutuc
jrc rpcom
tLC LKCnn
Tnnru t rn J
tUULfl t tu J
QUART once and ICE
CREAM
scroils across display.
Time counting down.
SOFTEN TABLE
CODE CATEGORY DIRECTION
Butter or
1
Margarine
2 Chocolate
Cheese Use processed cheese
3
Marshmallows
4
Unwrap and place in
microwavable container.
No need to cover butter.
Stir at the end of cooking
to compiete meiting.
Chocolate chips or
squares of baking
chocolate may be used.
Unwrap squares and
place in microwavable
container. Stir at the end
of cycle to complete
melting.
food only. Cut into cubes.
Place in a single iayer in
microwavable container.
Stir at the end of cooking
to compiete meiting.
Large or miniature
marshmallows may be
used. Piece in
microwavable container.
Stir at the end of cycle to
complete melting.
AMOUNT
1,2or3
sticks
4 or 8 oz.
8 or 16
oz.
5 or 10
oz.
CODE
1
2
3
4
CATEGORY
Butter Unwrap and place in
Ice
cream
Cream
cheese
Frozen
juice
DIRECTION AMOUNT
microwavable container.
Butter will be at room
temperature and ready
for use in recipe.
Place container in oven.
Ice cream will be soft
enough to make
scooping easier.
Unwrap and place in
microwavable Container.
Cream cheese will be at
room temperature and
ready for use in recipe.
Remove top.
Place in oven.
Frozen juice will be soft
enough to easily mix with
water.
1,2 or 3
sticks
Pint,
Quart,
Half
gallon
3 or 8 oz.
6, 12 or
16 oz.
25.
Page 26

Caring for Your Microwave Oven
To make sure your microwave oven looks good and works well for a long time, you should
maintain It properly. For proper care, please follow these instructions carefully.
For interior surfaces: Wash often with warm, sudsy
water and a sponge or
soft cloth. Use only mild,
nonabrasive soaps or a
mild detergent. Be sure
to keep the areas clean
where the door and
oven frame touch
when closed. Wipe well
with clean cloth.
Overtime, stains can
occur on the surfaces as the result of food particles
spattering during cooking. This is normal.
For stubborn soil, boil a cup of water in the oven for 2
to 3 minutes. Steam will
soften the soil. To get rid
of odors inside the oven,
boil a cup of water with
some lemon juice or
vinegar in it.
For exterior surfeces and control panel: Use a soft
cloth with spray glass
cleaner. Apply the spray
glass cleaner to the soft
cloth; do not spray
directly on the oven.
NOTE: Abrasive
cleansers, steel wool
pads, gritty wash
cloths, some paper
towels, etc., can
damage the control pane! and the interior and exterior
oven surfaces.
To clean grass tray and support, wash in mild,
sudsy water; for heavily
soiled areas use a mild
cleanser and scouring
sponge. The glass tray
and support are
dishwasher safe.
To use of the metal rack:
The metal rack gives you extra space when cooking
in more than one container at the same time.
1. Place rack securely in the four plastic supports.
• Rack must not touch metal walls or back of
microwave oven.
2. Place equal amounts of food both above and
below rack.
To avoid risk of property damage:
1. Do not cook with rack on floor of the oven.
2. Use the metal rack when cooking equal amounts
of food at the same time.
3. Do not use rack to pop popcorn.
4. Rack must be on the four plastic supports when
used.
^//
/ [if J J A r II II B 1. I \ V
26.
Page 27

CARING FOR THE FILTERS
The grease filter should be removed and cleaned often, at least once a month.
NOTE: If your microwave hood combination is installed to recirculate air, the chacoal filter
{Part No. 5230W1A003A) available from Sears by calling 1-800-4-MY-HOME®.
The charcoal filter cannot be cleaned and should be replaced every 6 to 12 months.
Grease filter (Part No. 5230W2A004A):
1, Unplug microwave oven or disconnect power.
2. To remove grease filter, slide each filter to the side.
Pull filter downward and push to the other side.
The filter will drop out.
. Soak grease filter In hot water and a mild
detergent. Scrub and swish to remove embedded
dirt and grease. Rinse well and shake to dry. Do
not clean filter with ammonia, corrosive cleaning
agents such as lye-based oven cleaners, or place
them in a dishwasher. The filter will turn black or
could be damaged.
Charcoal filter (Part No. 5230W1A003A):
1. Unplug microwave oven or disconnect power.
2. Remove the vent grille mounting screws.
3. Push the right side lower part of the charcoal filter.
Remove the filter.
4. Lift the back of the charcoal filter. Slide the filter
straight out.
4, To replace grease filter, slide filter in the frame slot
on back of the opening. Push filter upward and
push to front side to lock into place.
5. Plug in microwave oven or reconnect power.
27.
Page 28

REPLACING THE COOKTOP
AND OVEN LIGHTS
28.
Page 29

4. Lift up the bulb holder.
5. Replace the bulb with a candelabra-base 30-watt
bulb (Part No. 3B70067A) available from Sears by
calling 1-800^-MY-HOME®'.
6. Slide the top of the vent grille into place. Push the
bottom until It snaps Into place. Replace the
mounting screws.
7. Plug in microwave oven or reconnect power.
29.
Page 30

MICROWAVE COOKING TIPS
Amount of food
• If you increase or decrease the amount of food
you prepare, the time it takes to cook that food will
also change. For example, if you double a recipe,
add a little more than half the original cooking time.
Check for doneness and, if necessary, add more
time in small increments.
Starting temperature of food
• The lower the temperature of the food being put
into the microwave oven, the longer it takes to cook.
Food at room temperature will be re-heated more
quickly than food at refrigerator temperature.
Composition of food
• Food with a lot of fat and sugar will be heated
faster than food containing a lot of water. Fat and
sugar will also reach a higher temperature than
water in the cooking process.
• The more dense the food, the longer it takes to
heat. “Very dense” food like meat takes longer to
heat than lighter, more porous food like sponge
cakes.
Size and shape
• Smaller pieces of food will cook faster than larger
pieces. Also, same-shaped pieces cook more
evenly than different-shaped pieces.
• With foods that have different thicknesses, the
thinner parts will cook faster than the thicker parts.
Place the thinner parts of chicken wings and legs in
the center of the dish.
Stirring, turning foods
• stirring and turning foods spreads heat quickly to
the center of the dish and avoids overcooking at the
outer edges of the food.
Releasing pressure in foods
• Several foods (for example: baked potatoes,
sausages, egg yolks, and some fruits) are tightly
covered by a skin or membrane. Steam can build up
under the membrane during cooking, causing the
food to burst. To relieve the pressure and to prevent
bursting, pierce these foods before cooking with a
fork, cocktail pick, or toothpick.
Using standing time
• Always allow food to stand after cooking.
Standing time after defrosting and cooking allows
the temperature to evenly spread throughout the
food, improving the cooking results.
• The length of the standing time depends on how
much food you are cooking and how dense it is.
Sometimes it can be as short as the time it takes
you to remove the food from the oven and take it to
the serving table. However, with larger, denser food,
the standing time may be as long as 10 minutes.
Arranging food
For best results, place food evenly on the plate. You
can do this in several ways:
• If you are cooking several Items of the same
food, such as baked potatoes, place them in a ring
pattern for uniform cooking.
• When cooking foods of uneven shapes or
thickness, such as chicken breasts, place the
smaller or thinner area of the food towards the
center of the dish where it will be heated last.
• Layer thin slices of meat on top of each other.
• When you cook or reheat whole fish, score the
skin - this prevents cracking.
• Do not let food or a container touch the top or sides
of the oven. This will prevent possible arcing.
Covering food
Cover food to:
• Reduce splattering
• Shorten cooking times
• Keep food moist
You can use any covering that lets microwaves pass
through. See “Getting to Know Your Microwave
Oven” for materials that microwaves will pass
through. If you are using the Sensor function, be sure
to vent.
30.
Using aluminum foil
Metal containers should not be used in a microwave
oven. There are, however, some exceptions. If you
have purchased food which is prepackaged in an
aluminum foii container, refer to the instructions on
the package. When using aluminum foil containers,
cooking times may be ionger because microwaves
will only penetrate the top of the food. If you use
aluminum containers without package instructions,
follow these guidelines:
Page 31

MICROWAVE COOKING TIPS (CONT.)
Using aluminum foil (cont.)
• Place the container in a giass bow! and add some
water so that it covers the bottom of the container,
not more than t4 in. {.64 cm) high. This ensures
even heating of the container bottom.
• Always remove the lid to avoid damage to the
oven.
• Use only undamaged containers.
• Do not use containers taller than 34 in. (1.9 cm).
• Container must be at least half filled.
• To avoid arcing, there must be a minimum 14 in.
(.64 cm) between the aluminum container and the
waiis of the oven and aiso between two aluminum
containers.
• Always place the container on the turntable.
• Shield with small pieces of aluminum foil, parts of
food that may cook quickly, such as wing tips and
leg ends of poultry.
• Heating food in aluminum foil containers usually
takes up to double the time compared to reheating
in plastic, glass, china, or paper containers.
The time when food is ready will vary depending
upon the type of container you use.
• Let food stand for 2 to 3 minutes after heating so
that heat is spread evenly throughout container.
Removing the rack
• When popping commercially packaged popcorn,
Remove the rack from the oven; Do not place
the bag of microwave popcorn on the rack or under
the rack.
• In the case of popping microwave popcorn with
rack, that can cause the fire or damage to your
microwave oven.
Cooking you should not do in your microwave oven
• Do not do canning of foods in the oven. Closed
glass jars may explode, resulting in damage to the
oven.
• Do not use the microwave oven to sterilize objects
(baby bottles, etc.). It is difficult to keep the oven at
the high temperature needed for sterilization.
31.
Page 32

Questions and Answers
QUESTIONS ANSWERS
Can 1 operate my microwave oven without the glass
tray or move the glass tray over to hold a large dish?
Can 1 use either metal or aluminum pans in my
microwave oven?
Is it normal for the glass tray to move in either
direction?
Sometimes the door of my microwave oven appears
wavy. Is this normal?
Why does the dish become hot when 1 microwave
food in it? 1 thought that this should not happen.
What does “standing time” mean?
Why does steam come out of the air exhaust vent?
No. If you remove or move the glass tray, you
will get poor cooking results. Dishes used in
your oven must fit on the glass tray.
You can use aluminum foil for shielding (use
small, flat pieces), small skewers, and shallow
foil trays (if tray is not taller than 34 in. [1.9 cm]
deep and is filled with food to absorb microwave
energy). Never allow metal to touch walls or
door.
Yes. The glass tray moves from side to side,
depending on the rotation of the motor when the
cooking cycle begins.
This appearance Is normal and does not affect
the operation of your oven.
As the food becomes hot it will conduct the heat
to the dish. Be prepared to use hot pads to
remove food after cooking.
“Standing time” means that food should be
removed from the oven and covered for
additional time to allow It to finish cooking. This
frees the oven for other cooking.
Steam is normally produced during cooking. The
microwave oven has been designed to vent this
steam out the vents.
Can 1 pop popcorn in my microwave oven?
How do 1 get the best results?
Yes. Pop packaged microwave popcorn
following manufacturer’s guidelines. Do not use
regular paper bags.
Do not repop unpopped kernels. Do not pop
popcorn in glass cookware.
32.
Page 33

Troubleshooting
Most cooking problems often are caused by little things you can find and fix without tools of any kind. Check the
lists below and on the next page before calling for assistance or service. If you stiii need help, call Sears Service
at 1-800^-MY-HOME®.
MICROWAVE OVEN DOES NOT WORK
PROBLEM CAUSE
Nothing works. • The power supply cord is not plugged Into a grounded 3 prong outlet. (See the
Electrical Requirements” section on page 6 and the “Electrical connection”
section on Page 8.)
• A household fuse has blown or a circuit breaker has tripped.
• The electric company has had a power failure.
The microwave oven will • You are using the oven as a timer. Touch STOP/CLEAR to cancel the Kitchen
not run. Timer.
• The door is not firmly closed and latched.
• You did not touch START.
• You did not follow directions exactly.
• An operation that you set earlier Is still running. Touch STOP/CLEAR to cancel
that operation.
COOKING TIMES
PROBLEM CAUSE
Food is not cooked • The electric supply to your home or wall outlets is low or lower than normal. Your
enough. electric company can tell you if the line voltage is low. Your electrician or service
technician can tell you if the outlet voltage is low.
• The cook power is not at the recommended setting.
Check the chart on Page 15.
The display shows a time
counting down but the oven• You have set the controls as a kitchen timer. Touch STOP/CLEAR to cancel the
is not cooking. Kitchen Timer.
• The oven door is not closed completely.
33.
Page 34

GLASS TRAY
PROBLEM CAUSE
The glass tray will not
move.
• The glass tray is not correctly in place. It should be correct-side up and sitting
firmly on the center hub.
• The support is not operating correctly. Remove the glass tray and restart the
oven. If the hub still does not move, call Sears Service at 1-800-4-MY-HOIVIE®.
Cooking without the glass tray can give you poor results.
TONES
PROBLEM CAUSE
You do not hear
the programming or
end-of-cycle tone.
niOOl A\A ikJICOO A
IJIwr^L./\Y IVICww/\v7lZw
PROBLEM CAUSE
The display is flashing “;’’ • There has been a power interruption. Reset the clock. {See the “Clock" section
If none of these items are causing your problem, call Sears Service at 1-800-4-MY-HOME®.
• You have not entered the correct command.
on Page 12.)
34.
Page 35

35
Page 36

Contenidos
Garantía en
Combinación
Garantía
Servicio Sears
Seguridad del horno de microondas
Aprender a conocer su horno
de microondas
Cómo funciona su combinación microondas
compana de kenmore ULTRA WAVE™
Probar su horno de microondas
Probar su vajilla o batería de cocina
Precauciones de seguridad operativa
Conexión eiéctrica ........................................ 42
Características dei horno de microondas
Funciones dei panei de controi
Usar su horno de microondas.....
Señales audibles ..............................................46
Interrumpir la cocción........................................46
Reloj
Protección de seguridad para niños
Cronómetro de cocina.......................................47
Ventilador de extracción....................................47
Luz superior de cocina.....................................
Descongelamiento rápido
Agregar minuto..................................................48
Cocción cronometrada
Cocción en etapas múltiples
Niveles de potencia de microonda....................49
Descongelamiento automático .........................50
Tabla de Descongelamiento Automático
Tabla de Descongelamiento Automático (cont.).52
Sugerencias para descongelamiento
"Mantener caliente"
Segura a fuego rento........................................54
Usar sensor de cocción
Sensor de cocción.............................................55
Papas (Ejemplo)................................................55
Mas/Menos........................................................55
Cuadro de Cocción del sensor..........................56
Cocción Automática
Recalentamiento Automático
Cuadro de Cocción Automática
Cuadro de Recalentamiento Automático............58
Fundir.....
Tabla de indicaciones para fundir....
Ablandar
Tabla de indicaciones para ablandar
Cuidar su horno de microondas
Cuidado de los filtros
Reemplazar las luces de la parte
superior y del horno...........................................63
Sugerencias para la cocina en
su microonda............................................ .65-66
Preguntas y respuestas
Solución de problemas
Servicio
...............................................
.............................................. ....37
...
..................................
..................................................................
...............................
......................................
.............................
...........................................
.....
...............................
..........................................
............................
.....
.............................................
......
...........................................
.......................................
......
......................
.....
.........................................
..............................
....36
.........
.........38
....41
...........
.......................41
.................
...
..........
........
.........................
...................
................
............
...............
........................
59
.................
..59
................
.......
...........
tapa posterior
...60
....67
41
42
42
43
44
....46
46
46
47
.47
48
48
53
53
55
57
57
58
59
59
61
68
GARANTÍA TOTAL DE LA COMBINACIÓN EN LA CAMPANA DE SU MICROONDA POR UN AÑO COMPLETO
Durante un año a partir de la fecha de compra, si esta
combinación en la campana de su microonda
Kenmore tiene un fallo debido a defecto en el material
o en la mano de obra, Sears lo repara sin cargo.
GARANTÍA TOTAL DE CINCO AÑOS SOBRE ELMAGNETRÓN
Durante cinco años a partir de la fecha de compra, si el
magnetrón de esta combinación en la campana de su
microonda Kenmore tiene un fallo debido a defecto en el
material o en la mano de obra, Sears la repara sin cargo.
La cobertura de la garantía mencionada arriba se
aplica solamente a la combinación en la campana de
su microonda que se usa sólo en casas particulares.
EL SERVICIO DE GARANTÍA ESTA DISPONIBLE
CONTACTANDO SIMPLEMENTE AL SERVICIO
SEARS A 1-800-4-MY-HOME®
Esta garantía se aplica sólo mientras este producto
está en uso en los EE.UU.
51
Esta garantía le da a usted derechos legales
específicos que varían de estado en estado.
Sears, Roebuck y Со.,
Dept. 817WA,
Hoffman Estafes, IL 60179
Por llamado de servido:
1-800-4-MY-HOME®
SM (1-800-469-4663)
Tenga a bien registrar la información de su
modelo.
En el momento en que usted llame para recibir un
servicio para su producto, necesitará saber el
número del modelo y el número serial completo.
Puede encontrar esta información en la
píaca/etiqueta del número serial y del modelo en el
lado superior de la cavidad frontal en su horno de
microondas. También, registre las otras
informaciones mostradas abajo.
Número de modelo
Número de serie
Fecha de compra .
36.
Page 37

Servicio Sears
Acuerdos Maestros de protección
Felicitaciones por haber hecho una compra inteligente
Su nuevo producto Kenmore® está diseñado y fabricado para años de operación segura.
Pero como todo producto, puede necesitar mantenimiento preventivo o reparaciones cada cierto
tiempo. Es alii cuando el tener un Acuerdo Maestro de protección le puede ahorrar dinero o evitar
que la faiia empeore.
Adquiera un Acuerdo Maestro de protección ahora y resguárdese de cualquier molestia o gastos
inesperados.
Ei Contrato de Protección Maestro ayuda también extender ia vida de su nuevo producto. Estas son
los aspectos incluidos en el Contrato :
HÍ Servicio experto, llevado a cabo por cualquiera de nuestros 12.000 profesionales especialistas en
reparaciones.
SÍ Servicio ilimitado y sin cargo alguno, por las piezas o por el trabajo en toda las reparaciones
cubiertas por el Acuerdo.
SÍ Garantía de "No-Lemon" - cambio de su producto cubierto si ocurre más de cuatro o más fallas
ai producto dentro de doce primeros meses.
SÍ Reemplazo del producto si su este asegurado no puede arreglarse.
SÍ Control anual de mantenimiento preventivo a pedido suyo sin cargo extra.
SÍ Ayuda rápida vía teléfonico - Soporte telefónico de un técnico de Sears sobre los productos que
se requiere de reparación en casa, más la programación conveniente de servicio.
SÍ Protección contra sobrecarga eléctrica, por daños eléctricos causados por fluctuaciones de
corriente.
SÍ Reembolso de alquiler si la reparación del producto asegurado toma más tiempo de lo
prometido.
Una vez que ha comprado el Acuerdo, una simple llamada telefónica es todo lo que le tomará para
agendar un servicio. Puede llamar a cualquier hora del día o de la noche o hacer un compromiso de
atención por teléfono.
Sears tiene más de 12,000 profesionales especialistas en reparaciones que tienen acceso a más de
4.5 millones de piezas de calidad y accesorios. Esa es la clase de profesionalismo con la que puede
usted contar para ayudar a prolongar la vida de su nueva adquisición en los años por venir.
¡Suscriba ya un Acuerdo Maestro de protección!
Se aplican algunas limitaciones y exclusiones. Por precios e información adicional llame al 1
800-827-6655.
Servicio de instalación Sears
Para la instalación profesional de Sears de los aparatos del hogar, dispositivos de apertura de la
puerta del garaje, calentadores de agua, y otros Ítems principales del hogar, llame en los Estados
Unidos a 1-800-4-MY-HOME®.
37.
Page 38

Seguridad del horno de
microondas
Su seguridad y la seguridad de los otros son muy importante.
Hemos dado muchos mensajes de seguridad en este manual y en su utensilio.
Lea siempre y acate todos los mensajes de seguridad.
Este es el símbolo de alerta de seguridad.
Este símbolo indica que hay peligro de muerte o de heridas graves para usted u otros.
Todos los mensajes de seguridad estarán precedidos por el símbolo de alerta de seguridad
y de la palabra "PELIGRO " o "ADVERTENCIA." Estas palabras significan:
Hay peligro de muerte o de heridas graves si no
A PELIGRO
se siguen inmediatamente las instrucciones.
A ADVERTENCIA.
Todos los mensajes de seguridad identifican el riesgo, le indican cómo reducir los riesgos de
lesiones y le dicen lo que podría pasar si las instrucciones no se siguen.
Hay peligro de muerte o de heridas graves si no se siguen las instrucciones.
INSTRUCCIONES IMPORTANTES DE SEGURIDAD
Cuando se usan dispositivos eléctricos, deben seguirse las PRECAUCIONES básicas de
seguridad incluyendo las siguientes
ADVERTENCIA: Para reducir el riesgo de
quemaduras, descarga eléctrica, incendio, lesiones
a las personas o exposición a excesiva potencia de
microondas
• Lea todas las Instrucciones antes de usar el
horno de microondas.
• Lea y siga las "PRECAUCIONES PARA EVITAR
POSIBLE EXPOSICIÓN A UNA EXCESIVA
POTENCIA DE MICROONDAS" específicas que
se encuentran en esta sección.
• El homo de microondas debe ser conectado a
tierra. Conecte solo al tomacorrientes
correctamente conectado a tierra.
Lea las "INSTRUCCIONES PARA CONECTAR A
TIERRA" que se encuentran al final de esta
sección.
• Instale o ubique el horno de microondas
solamente siguiendo las instrucciones de
instalación provistas.
- Algunos productos tales como huevos con
cáscara completa y envases herméticos por
ejemplo, recipientes cerrados de vidrio, pueden
explotar y no deben ser calentados en el horno de
microondas.
• Use el horno de microondas sólo para el fin
específico tal como está descrito en este manual.
No use productos químicos corrosivos o vapores
en el horno de microondas. Este tipo de horno
está específicamente diseñado para calentar,
cocinar o secar alimentos. No está diseñado para
uso industrial o de laboratorio.
• Como cualquier artefacto, es necesario un control
estricto cuando es usado por los niños.
• No opere el horno de microondas si tiene dañado
el cable de alimentación o el enchufe, si no está
funcionando correctamente o si ha sido dañado o
dejado caer.
38.
GUARDE ESTAS INSTRUCCIONES
Page 39

IMPORTANTES INSTRUCCIONES de SEGURIDAD
• El servido al horno de microondas debe ser hecho
solo por personal calificado. Llame a una compañía
de servicio autorizada para examinar, reparar o
hacer ajustes.
• Vea las instrucciones para la limpieza de la superficie
de la puerta en la sección "Cuidado de su Horno de
microondas".
• Para reducir el riesgo de incendio en el interior del
horno;
- No cocine de más los alimentos. Tenga cuidado si
se coloca para facilitar la cocción, papel, plástico u
otros materiales combustibles dentro del horno de
microondas.
- Quite las ataduras de alambre retorcido del papel o
bolsas de plástico antes de colocar bolsas en el
horno.
- Si los materiales dentro del horno se quemaran,
mantenga la puerta del horno cerrada, apague el
horno y desconecte el cable de alimentación o
cierre el paso de la corriente eléctrica en el ftjsible o
en el panel del disyuntor.
- No use el interior del horno para almacenamiento.
No deje elementos de papel, utensilios de cocina o
alimentos en el interior del homo cuando no esté en uso.
• Adecuado para su uso sobre elementos de cocina de
gas o eléctricos.
• Previsto para ser usado por sobre los rangos con un
ancho máximo de 36 pulgadas (91 cm).
• Limpie con frecuencia las campanas de ventilación,
no debe permitir que se acumule grasa en la
campana o en el filáo
• Cuando haya alimentos que producen llamas bajo la
campana, encienda el extractor.
• Tenga cuidado cuando limpie el filtro del extractorcampana. Los agentes corrosivos de limpieza, tales
como limpiahornos basados en lejía, pueden dañar
el filtro.
• No deben ser colocados en el homo de microondas
alimentos o utensilios de metal de gran tamaño ya
que pueden ocasionar incendio o riesgo de descarga
eléctrica.
• No limpie sobre un almohadillas ásperas de metal.
Las piezas pueden quemar la almohadilla y tocar las
partes eléctricas ocasionando riesgo de descarga
eléctrica.
• No almacene nada directamente sobre el horno de
microondas cuando esté en ftjncionamiento.
• No cubra o bloquee ninguna abertura en el horno de
microondas.
• No deje este horno de microondas a la intemperie.
No lo use cerca del agua, por ejemplo, cerca de la
pileta de la cocina, sobre una base húmeda, o cerca
de una pileta de natación o algo por el estilo.
• No sumerja el cable de alimentación o enchufe en el
agua.
• Mantenga el cable de alimentación lejos de las
superficies calientes.
• No deje el cable de alimentación colgando del borde
de la mesa o mostrador.o No lo monte sobre una
pileta.
• No cubra las rejillas o cualquier o1ra parte del horno
con láminas de metal. Esto causará
sobrecalentamiento del horno.
• Los líquidos tales como agua, café o té,’pueden
sobrecalentarse más allá del punto de hervor si estar
aparentemente hirviendo debido a su tensión
superficial. No siempre se nota el buitujeo o el
hervor al retirar el recipiente del horno. Esto puede
causar que los líquidos muy calientes hiervan
repentinamente cuando se introduce en el líquido
una cuchara o cualquier otro utensilio.
Para reducir el riesgo de producir lesiones a las
personas;
1) No recaliente líquidos.
2) Revuelva el líquido antes y mientras se calienta.
3) No use recipientes de lados rectos con cuellos
angostos.
4) Luego de calentar, permita al contenedor
permanecer en el homo de microondas por un
tiempo corto antes de quitarlo.
5) Tenga mucho cuidado cuando coloque una cuchara
u otro utensilio dentro del contenedor.
GUARDE ESTAS INSTRUCCIONES
39.
Page 40

PRECAUCIONES PARA EVITAR POSIBLE
EXPOSICIÓN A UNA EXCESIVA POTENCIA DE
MICROONDAS
(a) No intente hacer funcionar este horno con la puerta
abierta ya que el funcionamiento con puerta abierta
puede causar exposición nociva a la potencia de
microondas, Es importante no descuidar u
obstaculizar la seguridad de los endavamientos
eléctricos de interbloqueo.
(b) No coloque ningún objeto entre la cara frontal del
horno y la puerta o permita que se acumule
suciedad o residuos de limpiador sobre las
superficie de sellado.
Requisitos eléctricos
Observe todos los códigos y ordenanzas. Se
requieren en el equipo 120 Volt, 60 Hz, CA
solamente, se requieren fusibles de 20 amp
(Se recomienda fusibles de retardo).
Se recomienda que se use un circuito separado
que alimente sólo a este dispositivo.
(c) No haga ftjncionar el horno si está dañado. Es
particularmente importante que la puerta del homo
se cierre correctamente y que no haya daño en:
(1) Puerta (torcida),
(2) Bisagras y cerraduras (rotas o sueltas),
(3) Cerraduras de las puertas o superficies
selladas.
(d) Nadie excepto ei personal de servicio
calificado debe hacer ajustes o reparaciones
en el horno.
A ADVERTENCIA.
Peligro de descarga eléctrica.
Enchufe en un tomacorriente conectado
a tierra de 3 clavijas. No quite la clavija
de conexión a tierra.
No use adaptador.
No use extensión de cable de
alimentación.
%r
No seguir estas instrucciones puede
llegar a causar muerte, incendio o
descarga eléctrica.
INSTRUCCIONES PARA CONECTAR A TIERRA
* Para todos los artefactos conectados con
cable de alimentación :
El horno de microondas debe ser conectado a
tierra. En caso de corto circuito eléctrico, la
conexión reduce el riesgo de descarga eléctrica, ya
que provee un alambre de escape para la corriente
eléctrica. El horno de microondas está equipado
con un cable de alimentación que tiene un enchufe
con un cable de conexión a tierra. E! enchufe debe
estar conectado a un tomacorrientes correctamente
instalado y conectado a tierra.
Asegure que la tierra
exista antes uso
ADVERTENCIA: El uso incorrecto de la
conexión a tierra puede ocasionar peligro de
incendio o de descarga eléctrica.
Consulte a un electricista calificado o personal de
servicio si las instrucciones no son completamente
comprendidas o si hay dudas sobre si el horno está
adecuadamente conectado a tierra.
No use una extensión de cable de alimentación. Si
el cable de alimentación es demasiado corto, haga
instalar un tomacorriente por un técnico calificado
cerca del horno de microondas.
• Para un artefacto permanentemente
conectado:
El horno de microondas debe estar conectado a un
sistema metálico de cables, permanente, de
conexión a tierra o un conductor de conexión a
tierra del equipo debe ser accionado con los
conductores del circuito y conectados a la terminal
a tierra del equipo o toma de alimentación del
homo de microondas.
GUARDE ESTAS INSTRUCCIONES
40.
Page 41

Aprender a conocer su homo
de microondas
Esta sección había de los conceptos de cocción a microondas. También ie muestra los elementos básicos que
usted debe conocer para operar el homo de microondas. Por favor lea esta Información antes de usar su horno.
CÓMO FUNCIONA SU COMBINACIÓN MICROONDAS COMPANA DE KENMORE ULTRA WAVE™
La energía de microondas no produce calor. Esta
energía hace que los alimentos generen calor y éste a
su vez hace que los alimentos se cocinen. Las
microondas son como las ondas de TV, radio o luz.
Usted no las puede ver, pero puede ver ío que hacen.
Un magnetrón de produce las microondas en un
homo de microondas. Las microondas se mueven
dentro del horno donde se ponen en contacto con
los alimentos cuando giran sobre la bandeja giratoria.
Magneir n
La bandeja giratoria de vidrio de su homo de
microondas permite que las microondas pasen.
Luego, estas rebotan en el piso de metal, atraviesan
la bandeja giratoria de vidrio y son absorbidas por
los alimentos.
Las microondas pasan a través de la mayoría de
los tipos de vidrio, papel y plástico sin calentarlos,
de manera que eí alimento absorbe la energía. Las
microondas rebotan en los recipientes de metal, por
lo tanto los alimentos no absorben la energía.
Sistema de inversor de microondas
ULTRA WAVE™
El sistema de inversor de microondas ULTRA
WAVE™ le ofrece mejor rendimiento de cocción
en microondas para descongelar, cocinar y
recalentar alimentos rápida y uniformemente. La
tecnología probada del sistema de inversor de
microondas ULTRA WAVE™ entrega una
comente constante de energía de microondas -
verdadera energía alta, media y baja, a ía vez que
usa menos potencia y ahorra tiempo.
Los hornos convencionales a microondas operan
sólo en energía alta (HIGH). Para lograr un nivel de
energía de 70% en un horno convencional a
microondas, el horno opera el 70% del tiempo en
energía alta y el 30% del tiempo apagado (OFF).
:o%:yió0#iOíí,|M^
El sistema de invetsor de microondas ULTRA WAVE™
enirega energía al en forma continua, para descongelar
más uniformemente y minimizar el exceso de cocción
de los alimentos y las sucias salpicaduras.
Cocción por sensor
El sistema de inversor de microondas ULTRA WAVE'^“
cuenta con funciones de cocción por senair.
Un senair de humedad en la cavidad del horno detecta
la humedad emitida por los alimentos al calentarse.
El sensor ajusta el tiempo para diversos tipos y
cantidades de alimentos. La cocción por sensor elimina
la incertidumbre al cocinar con hornos de microondas.
Cómo obtener los óptimos resultados
de cocción
• Siempre cocine los alimentos por eí tiempo más
corto recomendado. Verifique cómo se están
cocinando los alimentos.
• Para ayudar a asegurarse de que los alimentos
están cocinados de forma pareja, revuelva, rote
o redistribuya los alimentos que se están
cocinando a la mitad deí tiempo de cocción.
• Si usted no tiene una tapa para un plato, use
papel encerado o toallas de papel aprobadas para
uso con microondas o película de plástico.
Recuerde doblar una esquina de la película de
plástico para que eí vapor salga durante la cocción.
Interferencia de radio
Usar su horno de microondas puede causar
interferencia en su radio, TV o equipo similar.
Cuando hay interferencia, puede reducirla o
quitarla de la siguiente forma:
• Limpiar la puerta y sellar las superficie del horno.
• Ajustar la antena receptora de la radio o televisor.
‘ Llevar el receptor lejos del horno de microondas.
' Enchufar el horno de microondas en un
tomacorriente diferente de modo que el horno de
microondas y receptor estén en diferentes ramas
de circuitos.
41.
Page 42

Probar su horno de microondas
Para probar el horno ponga aproximadamente 1
taza de agua fría en un recipiente de vidrio en e!
horno.
Cierre la puerta. Asegúrese que se cierra. Cocine
ai 100% de potencia por 1 minuto. A su debido
tiempo, el agua debe calentarse.
Probar su vajilla o batería de cocina
Pruebe su vajilla o batería de cocina antes de usar.
Para probar un plato y tener un uso seguro, colóquelo en
el horno con una taza de agua al lado del mismo. Si el
plato se calienta demasiado y el agua queda fría, no lo
use. Sí la vajilla se calienta, no lo use. Algunos platos
(de melanina, alguna vajilla cerámica, etc.) absorbe la
energía de las microondas, calentándose demasiado
para tomarlos con la mano y demorando los tiempos de
cocción. Cbcinar en recipientes de metel no diseñados
para uso de microondas pueden dañar el homo, ya que
podrían contener metal oculto (ataduras retorcidas,
láminas metálicas, grapas, lustre o recortes metálicos).
Precauciones de seguridad operativa
‘ Nunca se apoye en la puerta o permita a un niño
que se balancee en ella cuando la puerta está
abierta.
‘ Use protectores para objetos callentes. La
potencia microonda no calienta los envases, pero
el calor del alimento puede hacer que el recipiente
se caliente.
‘ No use papel de diarios u otro papel impreso en el
horno.
‘ No seque flores, frutas, hierbas, madera, papel,
calabacines o ropas en el horno.
‘ No encienda el homo de microondas cuando está
vacío. La vida útil del producto puede ser
acortada. Si realiza la programación del horno,
coloque un recipiente de agua en el homo. Es
normal que la puerta del horno se vea ondulada
después de que el horno ha estado funcionando
por un lapso.
■ No trate de derretir cera de parafina en el homo.
La cera de parafina no se derretirá porque permite
a las microondas pasar a través de la misma.
■ No opere el horno de microondas a menos que la
bandeja de vidrio giratoria esté segura en su lugar
y pueda mueve libremente. La bandeja giratoria
puede mueve hacia cualquier dirección.
Asegúrese de que la bandeja giratoria está
correctamente colocada en el horno. Tome su
bandeja giratoria con cuidado cuando la saque del
horno, para evitarla posibilidad de quebrarla. Si
su bandeja giratoria se rompe o se quiebra,
contacte a su proveedor para un reemplazo.
■ Cuando use un plato dorador, el fondo del plato
dorador debe ser al menos de por lo menos 3/16
pulgadas por arriba de la bandeja giratoria. Siga
¡as directivas provistas con el plato dorador.
■ Nunca cocine o recalieníe un huevo entero con
cáscara. La formación de vapor en ios huevos
enteros puede causar que revienten y
posiblemente dañen el homo. Fraccione los
huevos duros hervidos antes de calentarlos. En
raras ocasiones, los huevos poché se han
reventado. Cubra los huevos poché y deje un
tiempo de un minuto antes de cortarlos.
■ Para obtener mejores resultados, revuelva
mientras se calienta o recalienta. Los iíquidos
calentados en ciertos recipientes (especialmente
recipientes de forma cilindrica) pueden
sobrecalentarse. El líquido puede saltar hacia con
un fuerte sonido durante o después de calentarse
o cuando se agreguen los Ingredientes (gránulos
de café, saquitos de té, etc.). Esto puede dañar el
homo.
■ Las microondas pueden no llegar al centro de un
asado. El calor se difunde desde el centro hacia
afuera, áreas cocidas, tal como un horno común.
Esta es una de las razones para dejar algunos
alimentos (por ejemplo, asados o papas al horno)
permanecer por un momento después de la
cocción o en otros alimentos, revolverlos durante
el tiempo de cocción.
■ En el horno, no sumerja al freír. Los utensilios
para microondas no son adecuados para esto y
es difícil mantener temperaturas correctas para
frituras sumergidas.
■ No cocine demasiado las papas. Al final del tiempo
de cocción recomendado, las papas deberán estar
ligeramente firmes porque continuarán la cocción
durante el tiempo de permanencia. Luego de
cocinar en el homo de microondas, deje a las
papas permanecer durante 5 minutos. Se
terminarán de cocinar mientras reposan.
Conexión Eléctrica
Si su línea de conexión eléctrica o voltaje de
salida es de menos de 110 voltios, los tiempos de
42.
cocción pueden ser más largos. Haga que un
electricista calificado controle su sistema eléctrico.
Page 43

Características del horno de microondas
® ® (5) ®
Su homo de microondas está diseñado para hacer su
experiencia de cocina lo más agradable y productiva
posible. Para resumir y explicar rápidamente, la
siguiente es una lista de las características básicas del
horno:
1. Ventana con pantalla de metal evita que las
miaoondas se escapen. Está diseñada como una
pantalla para permitirle visualizar la comida mientras
se cocina.
2. Placa de modelo y número de serie y etiqueta de
guía de cocción
3. Filtro de carbón (detrás de la rejilla de ventilación)
4. Rejilla de ventilación.
5. Bandeja giratoria. La bandeja giratoria hace girar los
alimentos mientras cocina para obtener una cocción
más pareja. Debe estar en el horno durante el
funcionamiento para obtener mejores resultados de
cocción.
6. Luz auxiliar (para la mesada)
7. Filtro de grasa. Ver la sección "Cuidado del los
filtros".
8. Panel de control. Toque los pads en este panel para
realizar todas las funciones.
9. Parrilla de cocción. Utilícela para obtener espacio
extra cuando cocine en más de un recipiente a la vez.
PLACA DE LA
DESCONGELACIÓN
Utilice la PLACA DE LA DESCONGELACION
proporcionada para la descongelación completa.
La bandeja de vidrio se mueve en ambas direcciones
para ayudar a cocinar más parejamente.
No opere el horno de microondas sin la bandeja de
vidrio en su lugar.
Para instalar:
1, Coloque el soporte en la cavidad del piso del horno.
2. Coloque la bandeja de vidrio en el soporte.
Acomode el pie acanalado del piso de la bandeja de
vidrio entre los rodillos del cubo central. Los rodillos
del soporte deben calzar dentro del reborde de la
bandeja de vidrio.
43.
Page 44

Funciones del panel de control
Ei panel de control de su horno de microondas le permite seleccionar rápida y fácilmente la función
de cocción deseada. Todo lo que tiene que hacer es tocar el pad de comando. La siguiente es una
lista de todos los pads de comando y números ubicados en el panel de control. Para más
información sobre estas características, vea la sección "Usar su horno de microondas".
Smart Jmeh Sensor
C?,)-
(3>
»FtfflfW
i
¥ffiríMLl PoiHf)
(e)
(fy
(10!
(15)-
(^}-
#■
@-
%■■■
(26)-
DlfáfüÉH
EmasE PlAIE
2
5 6
8
0
Iss ■ MOSE -
/■'"X
P'feral " ;
IJEHM:::
Melt
I
Sw
r HoiB"%
mMrny
¡SofimIi
....
ftS CyjCK:
1
4
7
CstfK.
Tim e
MíNUrt
-C^STABT ')
■ '
LJílSEti
O O O
VfflT sito HranWsiHrro
OS/OFF
Smí
SlMMEl
3
9
PoíM'
üsm
LraiT
HBHÍUlSHrroFF
11J
l|:
-(í|i
■■(1^
i21)
-.22;
.25;
-Í28J
1. Pantalla. La pantalla incluye un reloj e
indicadores que le muestran la hora del día, los
programas de las horas cocinar los alimentos,
las potencias de cocción, las cantidades, pesos
y ias funciones de cocción seleccionadas.
44.
2, Palomitas de maíz. Toque este pad para
preparar las palomitas de maíz con ia
característica del sensor. El sensor del homo le
dirá al horno cuanto tiempo deberá cocinar
según la cantidad de humedad que detecta
(deserta) en las palomitas.
Page 45

3. Pizza. Toque este pad para recalentar una o
varias porciones de pizza sin introducir una
potencia o tiempo de cocción.
4. Verduras. Toque este pad para cocinar sin
introducir una potencia o tiempo de cocción.
5. Papas (patatas) al horno. Toque este pad para
cocinar papas sin introducir una potencia o
tiempo de cocción.
6. Entrada congelada. Toque este pad para
cocinar de 10 a 21 onzas de entrada congelada
sin introducir una potencia o tiempo de cocción.
7. Plato principal. Toque este pad para preparar
sin introducir un tiempo o potencia de cocción.
8. Segura a fuego rento. Toque este pad para
hervir lentamente sopas, cazuelas, estofados y
otros alimentos líquidos.
9. Pads numéricos. Toque los pads numéricos
para introducir tiempos de cocción, potencias de
cocción, cantidades, pesos, o categorías de
comidas.
10. Tiempo de cocción. Toque este pad seguido
por un pad numérico para determinar un
tiempo cocción.
11. Potencia, Toque este pad después determinar
el tiempo de cocción, seguido por un pad
numérico para instalar la cantidad de potencia
de microondas liberadas para cocinar los
alimentos. Cuando más alto el número más
alto la potencia de microondas o "velocidad de
cocción."
12. Agregar minuto. Toque este pad para cocinar
por 1 minuto, ai 100% de Potencia de cocción
o para agregar un minuto extra a la Potencia
de cocción.
13. Menos. Toque este pad para restar 10
segundos de cocción por cada vez que lo
presiona.
14. Más, Toque este pad para agregar 10
segundos de tiempo extra de cocción cada
vez que lo presiona.
15. INICIAR. Toque este pad para iniciar una
función. Si abre la puerta después que el horno
comienza a cocinar, vuelva a tocar INICIAR
(START).
16. DETENER/Limpiar (STOP/Clear), Toque este
pad para borrar un comando incorrecto,
cancelar un programa durante la cocción,
o limpiar la pantalla.
17. Cocción automática. Toque este pad para
cocinar alimentos aptos para horno de
microondas sin introducir una potencia o
tiempo de cocción.
18. Recalentamiento automático. Toque este
pad para recalentar alimentos aptos para
horno de microondas sin introducir una
potencia o tiempo de cocción.
19. "Mantener caliente". Toque este pad para
"Mantener caliente" las comidas cocinadas en
su horno hasta 99 minutos, 99 segundos. La
función "Mantener caliente" puede ser usada
por si misma o puede seguir automáticamente
el ciclo de cocción.
20. Reloj. Toque este pad para introducir la hora
del día correcta.
21. Descongelamiento automático. Toque este
pad seguido por pads numéricos para
descongelar carne según el peso.
22. Descongelamiento rápido. Toque este pad
para descongelamiento rápido.
"GROUND BEEF 1.0 LBSTOUCH START"
aparecerá en la pantalla.
23. Cronómetro de cocina. Toque este pad para
iniciar el Cronómetro de cocina.
24. Fundir, Toque este pad para fundir
chocolate, queso, mantequilla o malvavisco.
25. Ablandar. Toque este pad para ablandar
helados, cremas, queso, mantequilla o jugos
helados.
26. Ventilador On/Off. Toque este botón para
apagar o encender el ventilador.
27. Ventilador 5 Velocidades. Toque este botón
para elegir una de las 5 velocidades del
ventilador.
28. Luz Alta/Nocturna/Apagarla. Toque este
botón para encender la luz, ponerla en alta, en
nocturna o para apagarla.
NOTA: Si trata de introducir instrucciones
incorrectas, no escuchará ningún tono. Toque
DETENER/Limpiar (STOP/Clear) y reintroduzca
las instrucciones.
45.
Page 46

Usar su horno de
microondas
Esta sección contiene instrucciones para Nevar a
cabo cada función. Tenga a bien leer
cuidadosamente estas instrucciones.
SEÑALES AUDITIVAS
Las señales auditivas están disponibles para
guiarlo cuando programa y usa su horno;
• Un tono de programación sonará cada vez
que usted toque un pad.
• Siete tonos señalan el final de un conteo del
cronómetro de cocina.
• Cuatro tonos señalan la finalización de un ciclo
de cocción.
RELOJ
Luego de enchufar su homo de microondas por
primera vez o luego de una interrupción por falla
eléctrica, la pantalla mostrará el mensaje "PLEASE
SET TIME OF DAY". Si la hora del dia no está
determinada, la pantalla mostrará hasta que
usted toque "Clock".
Ejemplo para 10;30(AM):
INTERRUMPIR LA COCCION
Abriendo la puerta, puede detener el horno
durante un ciclo. El horno deja de calentar y el
ventilador se detiene, pero la luz permanece
encendida.
Para retomar la cocción, cierre la puerta y
toque START
Si no desea continuar la cocción, abra la
puerta y toque STOP/Clear.
PROTECCION DE SEGURIDAD
PARA NIÑOS
Puede usar esta función de seguridad para bloquear
el panel de control cuando se halla limpiando el
horno o que los niños no puedan utilizar el homo sin
la supervisión.
Para determinar CHILD LOCK: (Bloqueo de
protección)
Toque:
La pantalla mostrará:
Toque:
La pantalla mostrará:
iÔËàii'
2. 'Clock;
3.
.ií#**'*»*
4.
5.
6.
NOTA: Puede ir de A.M. y P.M. tocando 1 o 2 luego
del paso 4.
: £W7Ee TlñEDFBRy
in * jn rnuru CTQOT
ÍU * DU tUULfl DtrlKt
in * jn n
ÍU * DU il
nm rm tru D
rt i t
/Î? in * jn rnt tru
fU
STRRT
UULn
* Du
Rf¡ tn
\m rnuru
II lUULñ
C
tUULÌl
• jn
»
IU
JU
'mM№.
2.1
Para cancelar CHILD LOCK: (Bloqueo de
protección)
Toque y mantenga hasta
que aparezca LOCKED
en la pantalla
(aproximadamente
4 segundos).
Hora del día.
Toque: La pantalla
mostrará:
Toque y mantenga hasta
que desaparezca LOCKED
en la pantalla
(aproximadamente
4 segundos).
46.
Page 47

CRONOMETRO DE COCINA LUZ SUPERIOR DE COCINA
Su horno de microondas puede usarse como
cronómetro de cocina. Puede determinar hasta 99
minutos, 99 segundos.
Ejemplo para 3 minutos:
Toque: La pantalla
mostrará:
A iCKHEfr :
2. ^ 3 0 0
■? " Start
• r¡sí TCP Time itsf mtKt
'Oí/1A nnt m 1 m f
Qtsm ccf'
n/ iU XL
J • nn rnurU CTPOT
J * UU / UULfl D / nK /
P ' nn
J * UU
TÍMER y cuenta
regresiva.
VENTILADOR DE EXTRACCION
Los dos pads en el centro inferior del panel de control,
controlan las 5 velocidades del ventilador de extracción
Ejemplo para nivel 4;
Toque:
1
• O
ÏEirr
On/Off
Muestra el ultimo nivel que eligió
para la velocidad dei ventilador.
¥iHT
5-Speeb
Toque hasta nivel 4
La pantalla mostrará:
/ c> >C> I
lCk/Cl /
/ c> <c> u
lCk/Cl 1
El pad en ia parte inferior derecha del pane! de
control controla la luz superior de cocina.
Ejemplo para HIGH:
Toque: La pantalla
mostrará:
1. O
Liqht
Una vez para luz alta
Dos veces para luz nocturna
O
Ljqht
Hi6h/Níshí/0it
Para apagarlo, toque e! botón
una vez o dos veces
dependiendo del ajuste de ia luz.
HIGH
OFF
DESCONGELAMIENTO RAPIDO
Una secuencia de descongeiamienío rápido se halla predeterminada
en el horno. La función de descongelamiento rápido (express defrost),
provee un método de descongelamiento rápido para una pedazo de
"CARNE MOLIDA (GROUND BEEF)" solamente de 1.0 libra.
Ejemplo para 1 libra de carne molida:
Toque: La pantalla
mostrará:
ExpHBS
1.
2.
Defbosi
C Start )
EXPRESS DEFROST se
GRmiB BEEF fJDLBG
TOUCH STRRT
Cuenta regresiva de tiempo y
desplaza por la pantalla.
3.
On/Off
Apague el ventilador cuando desee
NOTA: Si la temperatura del rango o de la parte superior
de la cocina que está por debajo del horno se eleva
demasiado, el ventilador de extracción en la campana de
ventilación se encenderá automáticamente en la
VELOCIDAD 5 (LEVEL 5) predeterminada para proteger
el horno. Puede permanecer así hasta una hora para
enfriar el horno. Cuando esto ocurre, el botón "VENT"
(Ventilador) no apagará el ventilador.
OFF
47.
Page 48

AGREGAR MINUTO
COCCION EN ETAPAS MULTIPLES
Es un pad de ahorro de tiempo, este control
simplificado le permite programar rápidamente e
iniciar la cocción por microonda al 100% de potencia
sin necesidad de tocar START.
Ejemplo para 2 minutos
Toque:
La pantalla mostrará:
1.
'/MS .
2.
|Щй'Ш
NOTA: Cada vez que toque ADD MINUTE,
agregará 1 minuto hasta 99 minutos 59 segundos.
Dos
veces
Hora de! día.
Cuenta regresiva de
tiempo y POWER 100.
COCCION CRONOMETRADA
Esta función le permite programar un tiempo de cocción y
potencia especificos. Para obtener mejores resultados,
hay
10 niveles de graduación de potencia además de
ALTA (100%). Refiérase a la "Tabla de niveles de potencia
de microonda" en la pág. 49 para más información.
NOTE: Si no selecciona un nivel de potencia, el
horno automáticamente funcionará a potencia
ALTA(100%).
Ejemplo para 5 minutos, 30 segundos al 80% de
energía:
Toque:
1.
ШШ
2. "S'
La pantalla mostrará:
- rtstrrn rnnyíitsír Time
* Cut CK LUUnn fÜ t II iC
C • jn rnuru старт
J * Ju tUULli JtríKt
np pnt tep
uK ruwcK
c • pn CtsITCP pnt ICO
J • JU o f t cK ruwCK
l ct tet I ТП tn
LC\/tL t tutu
c * jn pnt icp
J * JU гишСК
n тппги стррт
S
и
tUULU
JtnKt
Para mejores resultados, algunas recetas necesitan un Ciclo
de potencia para un período de tiempo determinado y otro
Ciclo de potencia para otro período de tiempo. Su homo
puede programarse para cambiar automáticamente de uno a
otro en un total de hasta dos ciclos.
Ejemplo para un ciclo de cocción en 2 etapas:
Toque:
La pantalla mostrará:
1.
4.
iifil
Para programar una
cocción de 3 minutos para la 1 etapa.
Para programar un 80%
de la potencia de cocción.
5.
6.
Para programar una
cocción de 7 minutos para la
segunda etapa.
7.
8.
Para programar un 50%
de la potencia de cocción para la segunda etapa.
9.
♦ rtsíTcp rnnt¿tt\tr Time
* Ct ttCK LUUntl iü til IC
j * nn тппги стррт
J * UU lUULli JtnKl
np pnt tep
uK ruwcK
j * nn c*^TCO pnt tCQ
J * UU ti f t tK ruwtK
I ct Ю t ТП tn
ct\/tL f tu tu
J * nn pnt tCQ nn
J * UU ruwtK UU
тппги стррт
luucn JinKt
* СПТСР rnnttitsir Time
► ti ntK LUUnil fÜ til tt
■? • nn тппги стррт
t * UU tuucn JtnKl
np pnt tep
uK ruwtK
n * nn СЫТСР pnt tep
I * UU ti 11 tK ruwtK
i ct tcí I ТП tn
ct\/tc t tu tu
n * nn pnt tcü en
I * UU ruwtK Ju
тппги стррт
tuucn JinKt
Cuenta regresiva de
tiempo y POWER 80.
Cuenta regresiva de
tiempo у POWER 80.
NOTA: Después del uso de la función de cocción,
debe accionar el ventilador por 1 minuto para enfriar
en caso de que se sienta demasiado calor.
48.
Cuando la primera etapa termina, oirá dos tonos
10.
cortos cuando el horno comienza la segunda
etapa de cocción.
Page 49

NIVELES DE POTENCIA MICROONDA
Para obtener mejores resultados, algunas recetas requieren
diferentes potencias de cocción. Cuanto más baja es la potencia
de cocción, más baja es la cocción. Cada número de 1 a 9
representa un diferente porcentaje de potencia completa de
cocción.
La siguiente tabla muestra el porcentaje de potencia de cocción
que cada número representa y el nombre de potencia de
cocción generalmente usado.
POTENCIA DE COCCIÓN NOMBRE CUANDO USARLA
100% de potencia completa
Alta
También dice cuando usar cada potencia de cocción.
Siga las instrucciones de la receta del paquete de
comida si están disponibles.
• Calentado rápido de muchas aiimentos preparados
y alimentos con un alto contenido de agua, tales
como sopas y bebidas.
• Cocción de cortes tiernos de carne, carne molida.
9 =90% de potencia total
8 =80% de potencia total
7 =70% de potencia total Medio alta
6 =60% de potencia total
5 =50% de potencia total
Mediana • Cocinar jamón, aves enteras, y asados a la olla.
4 =40% de potencia total
3 =30% de potencia total
Medio baja,
descongelar
2 =20% de potencia total
1 =10% de potencia total
Baja • Mantener los alimentos calientes.
• Calentar sopas-crema.
• Calentar arroz, pasta o cacerolas
• Cocinar y caientar comidas que necesitan una
potencia de cocción más baja que alta (por ejemplo,
pescado entero y una pieza de carne) o cuando la
comida se cocina demasiado rápidamente.
• Recalentar una sola porción.
• La cocción que requiere cuidado especial, como
quesos y huevos y platos de huevos, budines y
flanes.
• Terminar la cocción de cacerolas
• Cocer estofados a fuego lento.
• Derretir chocolate
• Calentar pastelería
• Descongelar manualmente aiimentos, tales como
pan, pescado, carnes, aves, y alimentos precocidos.
• Ablandar manteca, queso, y helados.
• Sacar el frío de las frutas.
49.
Page 50

DESCONGELAMIENTO AUTOMATICO
Tres secuencias de descongelamiento están predeterminadas
en ei horno. La función de descongeiamíento automático ie
proporciona e! mejor método de descongeiamiento para
alimentos congelados. La guía de cocina le mostrará cuál
secuencia de descongeiamiento se recomienda para el
alimento que desea descongelar.
Para mayor conveniencia, el descongelamiento automático
incluye un mecanismo sonoro incorporado (bip)que le recuerda
que debe controlar. Dar vuelta, separar, o volver a arreglar
para obtener el mejor resultado del descongelamiento. Hay
tres diferentes niveles de descongelamiento.
1 CARNE
2 AVES
3 PESCADO
4 PAN
Ejemplo para 1.2 libra de carne molida:
Toque: La pantalla
mostrará:
4 /'AUTO'
' ■ Qefroit
HERT TOUCH!
POUTRVTTMHC
FISH TOUCH 3
BRCHB TOUCH H
Esta tabla le muestra la selección del tipo de alimento y el peso
que puede establecer para cada tipo. Para obtener mejores
resultados, afloje o quite la cubierta del alimento.
ALIMENTO TOQUE
Descong.
Automát.
PESOS QUE PUEDE
DETERMINAR
(en décimas de libra )
Carne 1 .1 a 6.0 (45g a 2722g)
Aves 2 .1 a 6.0 (45g a 2722g)
Pescado 3 .1 a 6.0 (45g a 2722g)
Pan
4
.1 a 1.0 (45g a450g)
Tabla de conversión de peso
Usted probablemente no está acostumbrado a medir los
pesos de los alimentos en libras y en onzas que son
fracciones de libra (por ejemplo, 4 onzas igual a 1/4 libra ).
No obstante, para poder introducir el peso del alimento en
"Descongelamiento automático", debe especificarlo en
libras y décimas de libra.
Si el peso en el paquete del alimento está expresado en
fracciones de libra, puede usar la siguiente tabla para
convertir el peso a fracciones decimales.
2. '"T)
OjOibS
CHTCRI^IGHT
3. C1) y
para introducir e! peso
4 Start
a
NOTA:
Cuando toque el pad START, la pantalla cambia para la
cuenta regresiva de descongelamiento. Sonará un bip en el
horno durante el ciclo de DESCONGELAMIENTO. En este
momento, abra la puerta y dé vuelta o vuelva a arreglar el
alimento. Quite cualquier porción que ya esté descongelada.
Vuelva a colocar en el horno las porciones congeladas y
toque START para retornar al ciclo de descongelamiento.
l£Lb5
TOUCH STm
Cuenta regresiva de tiempo
y DEFROST.
SUGERENCIAS PARA OPERAR
• Para obtener mejores resultados, saque el pescado, marisco,
carne o ave su paquete (envoltura) original. De otro modo la
envoltura guardará el vapor y el jugo cerca de los alimentos,
esto puede causar que la superficie externa de los alimentos se
cocine.
• Para obtener mejores resultados, dé a la carne molida la forma
de una rosca (dona) antes de congelarla. Cuando la
descongele, al sonar el bip raspe la carne ya descongelada y
continúe el descongelamiento.
• Coloque los alimentos en un recipiente plano o sobre una rejilla
de asado para microondas para recoger el goteo.
Peso equivalente
ONZAS
1.6
3.2
4.0
4.8
6.4
8.0
9.6
11.2
12.0
12.8
14.4
16.0
PESO DECIMAL
.10
.20
.25 un cuarto de libra
.30
.40
.50 media libra
.60
.70
.75 tres cuartos de libra
.80
.90
1.00 una libra
50.
Page 51

TABLA DE DESCONGELAMIENTO AUTOMATICO
Programar carnes
ALIMENTOS
CARNE DE
VACA
Carne molida,
en bulto
PRO
GRAMAR
CARNE Quite con un tenedor las porciones
descongeladas. Dé vuelta. Vuelva el
resto al horno.
SEÑAL ACÚSTICA INSTRUCCIONES ESPECIALES
No descongelar menos de 1/4 onza. Congele en
forma de rosca (dona).
Coloque sobre la PLACE DE LA
DESCONGELACIÓN.
Carne molida, en
hamburguesas
Bistec redondo
Filete de lomo CARNE Dé vuelta. Cubra las áreas calientes
Estofado de
carne
Asado a la día
Carne molida asada
Asado de
costilla
Nalga arrollada
asada
CORDERO
Cubos para
estofado
Chuletas
(de 1 pulgada de ancho)
CARNE Separe y vuelva a disponer.
CARNE Dé vuelta. Cubra las áreas calientes
CARNE Quite las porciones descongeladas
CARNE Dé vuelta. Cubra las áreas calientes
CARNE Dé vuelta. Cubra las áreas calientes
CARNE Dé vuelta. Cubra las áreas calientes
CARNE
CARNE
con hojas de papel de aluminio.
con hojas de papel de aluminio.
con tenedor.
Separe el resto. Vuelva el resto al homo.
con hoja de papel de aluminio.
con hoja de papel de aluminio.
con hoja de papel de aluminio.
Quite las porciones descongeladas con
un tenedor. Vuelva el resto al homo.
Separe y vuelva a disponer.
No descongele menos de dos onzas de hamburguesas.
Comprima el centro cuando ponga a congelar.
Coloque sobre la PLACE DE LA
DESCONGELACIÓN.
Coloque sobre la PLACE DE LA
DESCONGELACIÓN.
Coloque en un plato de horno apto para
microondas.
Coloque sobre la PLACE DE LA
DESCONGELACIÓN.
Coloque sobre la PLACE DE LA
DESCONGELACIÓN.
Coloque sobre la PLACE DE LA
DESCONGELACIÓN.
Coloque en un plato de horno apto para
microondas.
Coloque sobre la PLACE DE LA
DESCONGELACIÓN.
CERDO
Chuletas
(de 1/2 pulgada
de ancho)
Perro caliente
Costillas sueltas
Costillas estilo
country
Tira de
Salchichas,
Salchicha, en
bulto
Lomo asado
deshuesado
CARNE
CARNE
CARNE
CARNE
CARNE
CARNE
Separe y vuelva a disponer.
Separe y vuelva a disponer.
Dé vuelta. Cubra las áreas
calientes con hoja de papel de
aluminio.
Separe y vuelva a disponer.
Quite las porciones descongeladas con un
tenedor. Dé vuelta. Vuelva el resto al horno.
Dé vuelta. Cubra las áreas calientes con hoja
de papel de aluminio.
Coloque sobre la PLACE DE LA
DESCONGELACIÓN.
Coloque sobre la PLACE DE LA
DESCONGELACIÓN.
Coloque sobre la PLACE DE LA
DESCONGELACIÓN.
Coloque sobre la PLACE DE LA
DESCONGELACIÓN.
Coloque en un plato de horno apto para
Coloque sobre la PLACE DE LA
nF.qÓriNinFI A(-ÍÓM_____________________
51.
Page 52

TABLA DE DESCONGELAMIENTO AUTOMATICO (CONT.)
Programar aves
ALIMENTOS
POLLO
Entero (hasta
6 libras)
Despresado
GALLINAS
Enteras
PAVO
Pechuga
(hasta 6
libras)
Programar pescados
ALIMENTOS
PESCADO
Filetes
Bistec
Enteros
PRO
SEÑAL ACÚSTICA INSTRUCCIONES ESPECIALES
GRAMAR
AVES Dé vuelta (concluya el descongelamiento
con la pechuga hacia abajo). Cubra las
áreas calientes con hojas de papel de
aluminio.
Separe las partes y reacomode.
Dé vuelta. Cubra las áreas calientes
con hoja de papel de aluminio.
AVES Dé vuelta. Cubra las áreas calientes
con hoja de papel de aluminio.
AVES Dé vuelta. Cubra las áreas calientes
con hoja de papel de aluminio.
PRO
SEÑAL ACÚSTICA INSTRUCCIONES ESPECIALES
GRAMAR
PESCADO
Dé vuelta. Si fuera posible, separe
los filetes cuando se hallen
parcialmente descongelados.
PESCADO
PESCADO
Separe y vuelva a disponer. Coloque en un plato de horno apto para
Dé vuelta. Coloque en un plato de horno apto para
Coloque el pollo con la pechuga hada arriba qobre la
PLACE DE LA DESCONGELACION. Concluya
el descongelamienío sumergiendo en agua fría. Quite los
menudos cuando el pollo esté parcialmente descongelado.
Coloque sobre la PLACE DE LA
DESCONGELACIÓN.
Concluya el descongelamiento sumergiendo
en agua fría.
Coloque sobre la PLACE DE LA
DESCONGELACION. Concluya el descongelamiento
sumergiendo en agua fría.
Coloque sobre la place de la
DESCCNGELACIÓN. Concluya el
descongelamienío sumergiendo en agua fría.
Coloque en un plato de horno apto para
microondas. Cuidadosamente separe los
filetes bajo agua fría.
microondas. Deje correr agua fría hasta que
concluya el descongelamiento.
microondas.
Deje correr agua fría hasta que concluya el
descongelamiento.
SHELLFISH
Crabmeat
Lobster tails
Shrimp
Scallops
PESCADO
PESCADO
PESCADO
PESCADO
Programar pan
ALIMENTOS
Rosca
Dinner Roll
Muffin
Hamburguesa
Hot Dog Bun
Rebanadas de pan
Hogaza de pan
52.
PRO
GRAMAR
Sepárelos. Dé vuelta. Coloque en un plato de homo apto para microondas.
Dé vuelta y vuelva a disponerlas. Coloque en un plato de homo apto para microondas.
Sepárelos y vuelva a disponerlos Coloque en un plato de homo apto para microondas.
Sepárelos y vuelva a disponerlos Coloque en un plato de homo apto para microondas.
SEÑAL ACÚSTICA INSTRUCCIONES ESPECIALES
PAN Dar vuelta y volver a cocinar. Coloque sobre 3 hojas de toalla de papel.
Page 53

SUGERENCIAS PARA DESCONGELAMiENTO MANTENER CALIENTE
> Cuando use el Descongelamiento automático, el
peso a ser introducido es el peso neto en libras y
décimas de libras (el peso del alimento menos el
envase).
- Antes de comenzar, asegúrese de quitar cualquiera
de las hilos o ataduras de metal que a menudo
vienen con las bolsas de alimentos y reemplácelas
con hilos o bandas elásticas.
> Abra los envases tales como cartones antes de
colocarlos en e! homo.
- Siempre rompa o perfore las bolsas plásticas o
envolturas.
- Si los alimentos están envueltos, quite la hoja de
aluminio y colóquelos en un envase adecuado.
> Rompa las cáscaras si hubiera, de alimentos
congeiados tales como salchichas.
- Doble los envases plásticos de alimentos para
asegurar un descongeiamiento parejo.
> Siempre calcule en menos el tiempo de
descongeiamlento. Si el alimento descongelado
está aún helado en el centro, vuelva a colocarlo en
el horno de microondas para más
descongeiam lento.
> El tiempo que toma el descongelamiento varia de
acuerdo a la solidez de congelamiento del alimento.
- La forma del envase afecta a la velocidad con que
el alimento se descongela, descongelar.
Los envases pianos se descongelan más
rápidamente que un bloque profundo.
- Cuando el alimento comienza a descongelarse,
separare los pedazos. Los pedazos separados se
descongelan más fácilmente.
> Para obtener mejores resultados, permita
permanecer al alimento después de descongelarse.
(Para más información sobre tiempo de
permanencia, vea la sección "Sugerencias de
cocción en microondas ")
- Dé vuelta el alimento durante el descongelamiento
o tiempo de permanencia. Separe y quite el
alimento cuando sea necesario.
Puede mantener calientes y seguros los alimentos
cocinados, calentados en su homo de microondas
hasta 99 minutos, 99 segundos (aproximadamente 1
hora, 40 minutos). Puede usar "Mantener caliente"
por si mismo, o seguir automáticamente un ciclo de
cocción.
Ejemplo de “mantener caliente”:
Toque: La pantalla
mostrará:
uní n I laont
nuLij wnKi I
rniiru CTQQT
lUULn JinK I
i uní n I lapm
I
,5. ■ se desliza a través de la
Al fina! de la función "Mantener caliente",
aparecerá en la pantalla e! mensaje "END " y
se oirán cuatro tonos.
Para que "Mantener caliente" siga
automáticamente a otro ciclo:
• Mientras está tocando las instrucciones de cocina,
toque Mantener caliente antes de tocar START .
Cierre ia puerta y toque Mantener Caliente, luego
toque START si se desea un tiempo adicional de
Mantener Caliente.
• Cuando termina el último ciclo de cocción, oirá
dos tonos. "Mantener caliente" seguirá mientras el
horno continúa funcionando.
• Puede programar que "Mantener caliente" siga al
descongelamiento automático, cocción o cocción en
ciclos múltiples.
NOTAS:
• "Mantener caliente" opera hasta un total de 99
minutos, 99 segundos.
• Abrir el homo cancela "Mantener caliente".
Cierre ia puerta y toque "Mantener caliente", luego
toque START si se desea un tiempo adicional de
"Mantener caliente"
• Los alimentos ya cocinados deben ser cubiertos
durante "Mantener caliente".
• Los platos de pastelería (pasteies, empanadas, etc.)
deben estar sin cubierta durante ia función
"Mantener caliente".
• Las comidas completas que se desee mantener
calientes sobre un plato, deben cubrirse durante la
función "Mantener caliente".
• No use más de un ciclo completo de "Mantener
caliente" (aproximadamente 1 hora, 40 minutos).
La calidad de algunos alimentos se desmejorará
con un tiempo muy extendido.
nULlJ UinKl I
pantalla.
53.
Page 54

SEGURA A FUEGO RENTO
Su homo de microondas !e permite hervir lentamente
sopas, casuelas, estofados y otros alimentos
líquidos. Todo lo que debe hacer es determinar un
tiempo para hervir lentamente y su horno llevará a su
comida a romper el hervor y luego a continuar
hirviendo durante el tiempo que usted especifique.
NOTAS:
• No puede cambiar la energía o grado de cocción
para Segura a fuego rento.
• Esta función usa el sensor. El sensor necesita 2
minutos 30 segundos para calentarse después
que el horno se encienda o luego de un corte de
energía. Si inicia Segura a fuego rento durante
el calentamiento, la energía microondas no se
encenderá hasta que el sensor esté caliente.
• Cuando cocine verduras, aumente la cantidad
de agua de 1/4 a 1/2 taza (60 a 125ml).
• Cubra el plato con una tapa dura, i.e., la tapa
que está disponible con el plato o plato de mesa.
No use envolturas plásticas.
Toque: La pantalla
mostrará:
Coloque la comida en el horno y
1.
cierre la puerta.
A! cocer lentamente los alimentos como pastas use
un envase que pueda contener suficiente agua para
cubrirlos totalmente al cocinarse, (como 3-quarts -12
tazas- cazuela) con una tapa. Cuando cocine pasta o
fideos agregue 1 cucharada (15m!) de aceite a! agua
antes de hervir. Use el siguiente método: Coloque el
recipiente con agua en el horno y siga ios pasos
2~4, determinando el tiempo de cocción lenta en
Isegundo. Al final, coloque los alimentos en el agua
y remueva hasta que estén completamente cubiertos
por el agua.
Cubra. Repita ios pasos 2~4, determinando el
tiempo de cocción lenta que desea. Cambiando las
instrucciones, puede cambiar el tiempo de hervor
lento mientras hierve.
Para ello siga los pasos 2,3, y 4.
•
CMTCO m naihir Time
•un CK LUUnil lÜ III IL
ЗП* ПП
JW UU
rniiru CTQOT
Toque los pads
numéricos para entrar
START en el tiempo de
hervor lento.
Ejemplo para 30 minutos.
! UU Ln 3 I
ПК
I
c:::j sure sinnsR
El horno hará romper el
hervor de la comida.
Los alimentos hervirán lentamente durante el tiempo
que determine.
54.
Page 55

USAR SENSOR DE COCCION
SENSOR DE COCCIÓN PAPAS (EJEMPLO)
SENSOR OPERATIVA INSTRUCCIONES
El sensor de cocción le permite cocinar la mayoría de
sus comidas favoritas sin seleccionar los tiempos de
cocción y niveles de potencia. La pantalla indicará
"round shape " (forma redonda) durante el periodo
inicial del sensor. El horno automáticamente
determina el tiempo de cocción requerido para cada
artículo de cocina. Cuando el sensor interno detecta
una cierta cantidad de humedad proveniente de los
alimentos, le indicará al homo cuanto le tomará
calentarlo. La pantalla mostrará el tiempo restante de
calentamiento. Para obtener los mejores resultados
con el sensor, siga estas recomendaciones:
• Los alimentos cocinados con el sistema de sensor
deben hallarse a temperatura normal de
almacenamiento.
• La bandeja de vidrio y la parte externa del
recipiente deben estar secos para asegurar los
mejores resultados de cocción.
• Los alimentos siempre deben estar cubiertos de
modo suelto con envoltura plástica apta para
microondas, papel encerado o una tapa.
• No abra la puerta ni toque la tecla "STOP/CLEAR "
durante el tiempo correspondiente al sensor.
Cuando este tiempo termine, el horno emitirá dos
bips, y el tiempo restante para cocinar aparecerá
en la pantalla. En este momento podrá abrir la
puerta para revolver, girare redistribuir el alimento.
GUÍA DE COCINA CON SENSOR
Envases apropiados y cubiertas asegurarán buenos
resultados de cocción por medio del sensor.
• Siempre use envases aptos para microondas y
cúbralos con tapas o envolturas plásticas
ventiladas.
• Nunca use cubiertas plásticas ajustadas o selladas.
Estas pueden evitar que el vapor escape y causar
un exceso de cocción en los alimentos.
• Haga coincidir la cantidad con el tamaño del
envase. Llene los envases por lo menos hasta la
mitad para obtener mejores resultados.
• Asegúrese que el exterior del envase de horneado y
el interior del homo de microondas se hallen secos
antes de colocar el alimento en el horno. Las gotas
de humedad al transformarse en vapor pueden
confundir al sensor.
Cocción del sensor le permite cocinar sus alimentos
favoritos sin seleccionar los tiempos de cocción y
niveles de potencia.
Ejemplo para papas:
Toque:
La pantalla mostrará:
,, i- .ÌSièfe ■.
2. C
.
.....
que se desplaza a través
Cuando haya concluido el tiempo de cocción oirá
cuatro bips y aparecerá "COOK END" en la
pantalla.
Hora del día.
-----
JPuTHTu
de la pantalla.
MAS/MENOS
Usando las tedas Mas o Menos todas las cocciones
del sensor y los tiempos de cocción programados
pueden ser ajustados por el alimento de cocción en
un tiempo largo o corto.
Presionando Mas se agregará 10 segundos del
tiempo de cocción cada vez que lo presione.
Presionando Menos se restará 10 segundos del
tiempo de cocción cada vez que lo presione.
55.
Page 56

CUADRO DE COCCION DEL SENSOR
CATEGORÍA
Palomitas de
Maíz
Entrada
Congelada
Plato de Cena
Verduras
Congeladas
tfí
lU
Verdura
3
fresca
■D
№
>
Verdura
Enlatada
DIRECCIONES CANTIDAD
Popcorn le permite preparar las palomitas de maíz para horno de
microondas empacados comerdalmente. Prepare únicamente un
paquete cada vez. Para mejores resultados, use una bolsa fresca de
polomitas de maíz. Coloque el empaque de palomitas preempacado
para homo de microondas. Antes de preparar las palomitas, remueva el
separador del homo (referir a la página 65).
Este es la función de recalentamiento para una pizza sobrante.
Coloque en un papel de cocina sobre un plato de horno apto para
microondas.
Saque del empaque exterior. Divídalo.
Si no está en un plato de homo apto para microondas, colóquelo sobre
ei plato, cubra con envoltura plástica y abra unos respiraderos.
Después de la cocción, deje reposar unos 3 minutos.
Coloque los alimentos para ser calentado en el plato de cena o vajilla
similar. Cubra con el empaque plástico y abra un respiradero a la
película plástica perforando con un tenedor (3 veces). Después de la
cocción, deje reposar unos 3 minutos.
Saque del empaque, lave la escarcha bajo el agua corriente.
Coloque en un plato de homo apto para microondas del tamaño apropiado.
Agregue la cantidad del agua de acuerdo a la cantidad (1-2 vaajs; 2
cucharadas de té, 3-4 vasos: 4 cucharadas de té)
Cubra con envoltura plástica y abra unos respiraderos.
Después de la cocción, agite y deje reposar unos 3 minutos
Prepare como lo desee, limpie y quite el agua residual sobre las
verduras.Coloque en plato de horno apto para microondas del tamaño
apropiado. Agregue la cantidad del agua de acuerdo a la cantidad (1-2
vaajs; 2 cucharadas de té, 3-4 vasos: 4 cucharadas de té) Cubra con
envoltura plástica y abra unos respiraderos. Después de la cocción, agite y
deje reposar unos 3 minutos
Saque de la lata externa.
Coloque en un plato de homo apto para microondas del tamaño
apropiado, cubra con envoltura plástica y abra unos respiraderos.
Después de la cocción, agite y deje reposar unos 3 minutos.
Paquete de
3.0-3.5 onzas
1-3 tajadas
(5 onzas cada una)
De 10 a 21 onzas
1-2 porciones
M vasos
M vasos
M vasos
Papas
56.
Perfore cada papa con un tenedor y coloque sobre la bandeja del
horno al rededor del borde, apartada al menos una pulgada. Después
de la cocción, deje reposar unos 5 minutos.
M medio
(aprox. De 8 a 10
onzas cada una)
Page 57

COCCION AUTOMATICA
RECALENTAMIENTO AUTOMATICO
Cocción Automática le permite calentar los alimentos
comunes preparados por microonda sin necesidad
de selección de tiempos de cocción o niveles de
potencia. El programa "Auto Cook" tiene la potencia
de cocción predeterminada para 4 categorías de
alimentos: cacerola, arroz, tocino (bacón) y Cereal
caliente.
Ejemplo para arroz:
Toque:
La pantalla mostrará:
"àuro ■
1.
2.
Elegir la categoría de alimento.
CATEGORÍA
Cacerola (Sensor) 1 De 1 a 4 vasos
Arroz (Sensor) 2 De 1/2 a 2 vasos
Tocino (bacon)
Cereal Caliente 4 De 1 a 6 porciones
CO crr mcMt i / rn u
JClCL i ! ÍU tu i tu 7
_
CCC rnnt¿tKtr o tt^C
XC LUUniUÜ
r
.........
c::.
que se desplaza a través
de la pantalla.
TOCáREL
РЮ NÚMERO
3 De 2 a 4 tajadas
CANTIDAD
^
Recalentamiento Automático le permite calentar los
alimentos sin necesidad de selección de tiempos de
cocción o niveles de potencia.
El programa "Auto Reheat" tiene la potencia de
cocción predeterminada para 3 categorías de
alimentos:
Cacerola, Rollos/Panecillos (muffins) y Bebidas.
Ejemplo para cazuela;
Toque:
La pantalla mostrará:
Auto"
CO crr mctsff t / ТП j
jClCl t i tti tu f tu J
__
CCC rnnt¿ttsír rnmc
— DCC LUUntt fÜ йишС
LZZZJ CRSSEROLE
que se desplaza a través
de la pantalla.
Elija una categoría de alimento.
CATEGORIA
Cacerola (Sensor) 1 De 1 a 4 vasos
Rollos/Panecillos (muffins)
Bebidas 3 De 1 a 2 vasos
TOCAR EL
PAD NÚMERO
CANTIDAD
2 De 1 a 6 pedazos
El horno cocinará los alimentos automáticamente
por el sistema de sensor, excepto tocino (bacón) y
Cereal caliente. Cuando haya concluido el tiempo
de cocción oirá cuatro bips y aparecerá
"COOK END" en la pantalla.
El horno volverá a calentar automáticamente sólo
"Cacerola" por sistema de sensor.
Cuando haya concluido el tiempo de cocción oirá
cuatro bips y aparecerá "COOK END" en la
pantalla.
57.
Page 58

CUADRO DE COCCION AUTOMATICA
CATEGORÍA
Caserola
(Sensor)
Arroz
(Sensor)
Tocineta
Cereal
Caliente
TOCAR EL PAO
NÚMERO
1
2
3
4
DIRECCIONES CANTIDAD
Prepare los ingredients por recipiente en una caserola
cuarta de 1 -2. Cocine con envoltura plástica y abra
unos respiraderos. Después de la cocción, agite y
deje reposar unos 3 minutos.
Coloque arroz y líquido doble veces de su cantidad
(agua, pollo o esencia de verdura) en un plato de
homo apto para microondas de 2 cuarto.
Cubra con envoltura plástica y abra unos
respiraderos. Después de la cocción, deje reposar
unos 10 minutos. Agítelo para suavizar el arroz.
Coloque las tiras de tocineta sobre la rejilla para
mejores resultados. (Utilice un plato para cena
alineado con el papel de cocina si se dispone de la
rejilla.
Prepare como lo indica el empaque y cocine.
Agite bien antes de comer. Use únicamente los
cereales calientes instantáneo.
1-4 vasos
1/2-2 vasos
Use grano de arroz
grandes o medio.
Cocine el arroz
instantáneo de acuerdo
a las indicaciones del
paquete.
2-4 tajadas
1-6 porciones
CUADRO DE RECALENTAMIENTO AUTOMATICO
CATEGORÍA
Caserola
(Sensor)
Rolio/Paneciilos
Bebida 3
TOCAR EL PAD
NÚMERO
1
2
DIRECCIONES CANTIDAD
Cubra el plato que contiene la caserola con envoltura
plástica y abra respiraderos. Después de la cocción,
agite y deje reposar unos 3 minutos.
Saque del empaque y coloque sobre un plato.
Use una mug de boca ancha. No lo cubra.
(Tenga cuidado, la bebida puede estar muy caliente!
A veces los líquidos calientados en los contenedores
cilindricas salpicará al mover el vaso.)
1-4 vasos
1-6 pedazos
frescas
(2-3 oz. Cada una)
1-2 vasos
(240ml por vaso)
58.
Page 59

FUNDIR ABLANDAR
El horno usa baja energía para fundir alimentos
(mantequilla o margarina, chocolate, malvaviscos o
alimentos procesados con queso). Vea la tabla a
continuación:
Ejemplo para 8 onzas de chocolate:
Toque: La pantalla
mostrará:
Hora del día.
QCt cr T mcMf n ТП и .
2. (( MEiij)
3. (2;:)
4.
DtLCL i ntnu f íUn
-CCC
rnn¡¿tNr rj ímc
JCt LUUntI hj üuwt
runrnt QTC
LnULULnft
тппги t Til Jt
ÍUULñttu C
8 OZ una vez y
CHOCOLATE
que se desplaza a través
de la pantalla. Cuenta
regresiva de tiempo.
El horno usa baja energía para ablandar alimentos
(mantequilla, helados, quesos crema y jugos
helados). Vea la tabla a continuación.
Ejemplo para cuarto de helado:
Toque: La pantalla
mostrará:
.■ íffi# í:
2. SOflEfi
3- cl)
4. CT)
Hora del dia.
rrt rrT mctsíí i / rn u -
DClCL í f
_CCC
JCt LUUntl tú ÜUtUC
irc rpcom
/LC LKcnn
rnnru i rn p
tUULn f tu J
tu tu f tu
rnnt¿it\ir r¡ tmc
QUART una vez y ICE
CREAM
que se desplaza a través
de la pantalla. Cuenta
regresiva de tiempo.
1
TABLA DE INDICACIONES PARA FUNDIR TABLA DE INDICACIONES PARA ABLANDAR
Código Categoria Instrucciones
Mantequilla
1
0 margarina
Chocolate
2
3
Quesos
Desenvuélvala y colóquela
en un envase apto para
microondas. No es necesario
cubrirla mantequilla.Al
concluir la cocción revuelva
para completar la fusión.
Pueden usarse botones de
chocolate 0 cubos de
chocolate de hornear.
Desenvuelva los cuadrados
y colóquelos en un
recipiente apto para
microondas. Al fin del ciclo
revuélvalos para completar
la fusión.
Use solamente alimentos
procesados con queso.
Córtelo en cubos. Colóquelo
en una sola capa en un
envase apto para
microondas. Al concluir la
cocción revuelva para
completar la fusión.
4 MalvaviscosPueden usarse malvaviscos
grandes 0 pequeños.
Colóquelos en un envase
apto para microondas. Al
final del ciclo revuélvalos
para completar la fusión.
Cantidad
1.2o3
paciones
4o8
onzas
80I6
onzas
5o10
onzas
Código
1
2
3
4
Categoría
Mantequilla
Helados
Quesos
crema
Jugos
helados
Destape y coloque dentro de
un contenedor para
microondas. La mantequilla
estará a la temperatura del
recinto y lista para su uso en
la receta.
Coloque el envase en el
horno. Los helados serán lo
suficientemente blandos
para ser aprovechados más
fácilmente.
Desenvuelva y coloque en
un envase apto para
microondas. El queso crema
estará a temperatura
ambiente y listo para usar
según la receta.
Quite la tapa. Colóquelo en
el horno. El jugo helado será
lo suficientemente blando
para mezclarse fácilmente
con agua.
Instrucciones
Cantidad
1,2o3
porciones
Pinta,
Cuarto,
Medio
galón
З08
onzas
6,12 0
16 onzas
59.
Page 60

Cuidar su homo de microondas
Para asegurarse de que su horno de microondas se vea bien y trabaje debidamente durante mucho tiempo,
debe mantenerlo adecuadamente. Para su cuidado correcto, siga cuidadosamente estas instrucciones.
Para las superficies interiores : Lave a menudo
con agua jabonosa tibia
con esponja o paño
suave.
Use solo jabones
suaves no abrasivos o
un detergente suave.
Asegúrese de
mantener las áreas
limpias donde se
tocan la puerta y el
marco del horno cuando se cierran.
Limpie bien con un paño limpio. Con eí tiempo,
pueden aparecer manchas en la superficie como
resultado de salpicaduras de partículas de aiimento
durante la cocción. Esto es normal.
Para suciedad rebelde,
hierva una taza de agua
en el homo durante 2 o
3 minutos. El vapor
ablandará la suciedad.
Para quitar olores
dentro del horno, hierva
una taza de agua con
algo de jugo de limón o
vinagre.
Para limpiar la bandeja giratoria y el soporte de la
misma, lave las zonas
muy sucias con agua
jabonosa templada. Use
un limpiador suave y
esponja para fregar.
El soporte y la bandeja de
vidrio pueden lavarse en
lavavajillas.
UTILISATION DE LAGRILLE METALLIQUE
La grille métallique permet à l’utilisateur de disposer
de plus d’espace et déplacer simultanément plus d’un
récipientdans le four pour une cuisson.
1. Placer la grille en bon appui sur les quatresupports
de plastique.
• Il NE FAUT PAS que la grille touche les parois
métalliques ou le fond de la cavité du four.
2. Placer des quantités égales d’aliments AU-
DESSUS et AU-DESSOUS de la grille.
• Il faut que les quantités d'aliments soient
approximativement identiques, pour une bonne
répartition de l’énergie absorbée.
Para superficies exteriores y panel de control:
Use un paño suave con
limpiador de vidrios en
spray. Aplique el
limpiador de vidrios en
spray al paño suave; no
aplique el spray
directamente en el
horno.
NOTA:
Los limpiadores
abrasivos, las almohadillas de lana de acero, los
paños limpiadores ásperos, algunas toallas de
papel, etc., pueden dañar el panel de control y las
superficies interiores o exteriores del horno.
Pour éviter un risque de dommages matériels :
1. Ne pas utiliser la grille pour uneopération
d'éclatement de maïs.
2. Lors de l’utilisation, la grille doit tou-jours reposer
sur les quatre supportsde plastique.
3. Utiliser la grille uniquement pour fairecuire le
contenu de deux récipients d'aliments.
4. Ne pas effectuer une cuisson alorsque la grille
repose sur la sole du four.
60.
Page 61

Vi# i I I I« %#
Los filtro de grasa deben ser quitados y lavados a menudo, al menos una vez al mes.
NOTA: Si está instalada la combinación en la campana de su microonda para recircular el aire, el filtro de
carbón (No. De Pedazo 5230W1A003A) disponible de Sears llamando a 1-800-4-MY-HOME®.
El filtro de carbón no puede ser limpiado y debería ser reemplazado cada 6 a 12 meses.
Filtro de carbón (No. De Pedazo 5230W1A003A):
1. Desenchufe el horno de microondas o desconecte
la energía eléctrica.
2. Quíte los tornillos de montaje de la rejilla del
agujero de ventilación.
1. Desenchufe el homo de microondas o desconecte
la energía eléctrica.
2. Para quitar los filtro de grasa, deslice cada filtro
hacia el costado. Tire de los filtro hacia abajo y
empuje hacia el otro lado. El filtro caerá.
3. Embeba el filtro de grasas en agua caliente y un
detergente suave. Limpie y sacuda la suciedad
embebida y la grasa. Enjuague bien y sacuda para
secar. No limpie los filtro con amoníaco, agentes
corrosivos de limpieza tales como limpiadores de
horno basados en lejía ni los coloque en el
lavaplatos. Los filtro se volverán negros o pueden
dañarse.
4. Para reemplazar los filtro de grasa. Deslice el filtro
en la ranura del marco hacia apoye el lado de la
abertura. Empuje el filtro hacia arriba y empuje
hacia el lado anterior para bloquear en su lugar.
3. Incline la rejilla hacia delante, luego levántela para
quitarla.
4. Levante la parte posterior del filtro de carbón.
Deslice el filtro directamente hacia fuera.
5. Enchufe el horno de microondas o reconecte la
corriente eléctrica.
61.
Page 62

5. Deslice un Nuevo filtro de carbón en su lugar.
El filtro debe descansar en e! ángulo que se
muestra.
REEMPLAZAR LAS LUCES DE LA PARTE SUPERIOR Y DEL HORNO
La iuz de la parte superior para la cocina
(cooktop)
1. Desenchufe el horno de microondas o desconecte
la energía eléctrica.
2. Quite el tomillo de montar de cubierta de bombilla.
3. Reemplace la bombilla con una bombilla de base
candelabra de 20 vatios. {No. De Pedazo
6912A40002A) disponible de Sears llamando a
1-800-4-MY-HOME®.
6. Deslice el fondo de la rejilla del ventilador en su
lugar. Empuje la parte superior hasta que calce en
su lugar. Reemplace los tornillos de montaje.
7, Enchufe el homo de microondas o reconecte la
energía eléctrica.
NOTA: No opere la campana sin el filtro de grasas
en su lugar.
4. Enchufe el horno de microondas o reconecte la
energía eléctrica.
Luz del horno
1. Desenchufe el horno de microondas o desconecte
la energía eléctrica.
2. Quite los tornillos de montaje de la rejilla del
agujero de ventilación.
3. Incline la rejilla hacia delante, luego levántela para
quitarla.
62.
Page 63

SOPORTE DE
BOMBILLA
4. Levante el soporte de la bombilla.
5. Reemplace la bombilla con una bombilla de base
candelabro de 30 vatios (No. De Pedazo
3B70067A) disponible de Sears llamando a
1-800-4-MY-HOME®.
6. Desplice la parte superior de la rejilla de ventilación
dentro de su lugar. Empuje la parte inferior hasta
que encaje dentro del lugar. Recoloque los
tomillos de montaje.
7. Enchufe el horno de microondas o reconecte la
energía.
63.
Page 64

SUGERENCIAS PARA LA COCINA EN SU MICROONDA
Cantidad de alimentos
• Si aumenta o disminuye la cantidad de alimentos que prepara,
el tiempo que toma cocinar ese alimento también cambiará. Por
ejemplo, si duplica la cantidad que indica una receta, agregue un
poco más de la mitad del tiempo original indicado de cocción.
Compruebe el grado de terminación y, si fuera necesario,
agregue más tiempo en pequeños incrementos.
Liberar la presión en los alimentos
• Cortar los alimentos (por ejemplo: papas al homo, salchichas,
yemas de huevos, y algunas frutas) están ajustadamente
cubiertos por una piel o membrana. El vapor puede levantarse
bajo de la membrana durante la cocción, causando que los
alimentos revienten. Para aliviar la presión para evitar que
revienten, perfore los alimentos antes de conocer con un
tenedor, pinche de cocktail o escarbadientes.
Temperatura de inicio de la preparación
‘ Mientras más baja la temperatura de los alimentos que se
colocan en el homo de microondas, mayor será el tiempo que
tomará para cocinar. Los alimentos a temperatura de la
habitación se podrán volver a calentar más rápidamente que los
alimentos a temperatura del refrigerador.
Composición de los alimentos
• Los alimentos con mucha grasa y mucha azúcar se calentarán
más rápido que los alimentos que contienen mucha agua. La
grasa y el azúcar también alcanzan una temperatura más alta
que la del agua en el proceso de cocción.
• Mientras más densos sean los alimentos, más tiempo tomará
para calentarse. Los alimentos "Muy densos " tales como la
carne toman más tiempo para volver a calentarse que los más
livianos, más porosos como pasteles esponjosos.
Tamaño y forma
• Los pedazos más pequeños de alimentos se cocinarán más
rápido que los pedazos más grandes. También los pedazos de la
misma forma se cocinan más parejo que los pedazos de
diferentes formas.
• Con los alimentos que tienen diferente espesor, las partes
más delgadas se cocinarán más rápidamente que las partes más
gruesas. Coloque las partes más delgadas de las alas de pollo y
las piernas y patas en el centro del plato.
Revolver, dar vuelta los alimentos
• Revolver y dar vuelta los alimentos dispersa el calor rápidamente
hacia el centro del plato y evita que se cocine de más en los
bordes externos de los alimentos.
Cubrir los alimentos
Cubra los alimentos para:
• Reducir las salpicaduras
• Acortar los tiempos de cocción
• Mantener la humedad de ios alimentos
Puede usar cualquier cubierta que permita ser atravesado por las
microondas. Vea "Conocer su horno de microonda" para conocer
los materiales que las microondas atraviesan. Si está usando la
función Sensor, asegure la ventilación.
Usar el tiempo de permanencia
• Permita siempre que los alimentos permanezcan un momento
después de la cocción. E! tiempo de permanencia después del
descongelamiento y cocción permite que la temperatura se
disperse en forma pareja a través de todos los alimentos,
mejorando los resultados de la cxjcción.
• La duración del tiempo de (»rmanenda depende de la
cantidad de alimentos que está cocinando y de la densidad de
los mismos. A veces puede ser tan corto como el tiempo que le
toma sacar los alimentos del horno y llevarlos a la mesa donde
se sirven. Sin embargo, cuando se trata de alimentos de mayor
tamaño y más densos, el tiempo de permanencia puede ser
más o menos de 10 minutos.
Ordenar los alimentos
Para obtener mejores resultados, coloque los alimentos de modo
parejo en el plato. Puede hacerlo de diferentes maneras:
• Si está cocinando varios ingredientes para el mismo plato,
por ejemplo papas (patatas) horneadas, colóquelas como un
anillo para su cocimiento uniforme.
• Cuando cocine alimentos de formas o densidades
irregulares, por ejemplo pechugas de pollo, coloque la porción
más pequeña o más delgada en el centro del plato donde se
calentará al final.
• En capas de alimentos finos, coloque una sobre otra.
• Cuando cocine o vuelva a calentar un pescado entero, haga
cortes sobre la piel, esto previene el resquebrajamiento.
• No permita que los envases de los alimentos toquen la parte
superior o los costados del homo. Esto evitará la posible
formación de un arco eléctrico.
Uso de la hoja de papel de aluminio
Los envases de metal no deben usarse en un horno de
microondas. No obstante hay algunas excepciones. SI
compró alimentos que vienen embalado en una hoja de
papel de aluminio, guíese por las instrucciones que están
en el envase. Cuando use envases de hoja de papel de
aluminio, los tiempos de cocción pueden ser más largos ya
que las microondas penetrarán sólo la superficie de los
alimentos. Si encuentra que no tiene instrucciones en el
paquete, siga estos lineam ¡entos generales:
64.
Page 65

SUGERENCIAS PARA LA COCINA EN SU MICROONDA (Cont.)
Uso de la hoja de papel de aluminio (cont.)
• Coloque los envases en un cuenco de vidrio y
agregue agua hasta cubrir la parte inferior de los
envases, no más de 1/4 de pulgada (0.64 cm.) de
altura. Esto asegurará la distribución uniforme de
calor en la parte inferior de los envases.
• Siempre quite la tapa para evitar daño al homo.
• Use solamente envases no dañados.
• No use envases más altos que 3/4 de pulgada
(1.9 cm).
• Los envases deben estar llenos al menos hasta la
mitad.
• Para evitar la formación de arco eléctrico debe
haber una distancia mínima de 1/4 de pulgada
(0.64 cm) entre los envases de aluminio y las
paredes del horno y también entre dos envases de
aluminio.
• Protección con pedazos pequeños de papel de
aluminio, piezas de alimento que puede cocer
rápidamente, tales como las puntas de ala, pemiles
de aves.
• Calentar alimento de los envases de papel de
aluminio toma usualmente el doble del tiempo
comparado con el recalmentamiento en envases
plásticas. Vidrio, china o pape!. El tiempo que toma
para que un alimento esté listo variará según el tipo
de envases que use.
• Deje descansar a los alimentos de 2 a 3 minutos
luego de calentarlos de modo que el calor se
distribuya uniformemente por los envases.
Remover el separador
• Al preparar las palomitas empacadas
comercialmente, Remueva el separador del
horno; No coloque la bolsa de las palomitas para
el horno microondas sobre el separador o debajo
de! separador.
• En el caso de preparar las palomitas para el homo
microondas con el separador, puede causar
incendio o daño a su horno de microondas.
Lo que no se debe cocinar en su horno de microondas
• No enlate alimentos en el homo. Los frascos
cerrados pueden explotar causando daño al horno.
• No use el homo de microondas para esterilizar
objetos (biberones, etc.). Es difícil mantener al
homo en las altas temperaturas que se necesitan
para esterilizar.
65.
Page 66

Preguntas y Respuestas
PREGUNTAS RESPUESTAS
¿Puedo usar mi horno de microondas sin ia
bandeja giratoria o hacerla girar sosteniendo un plato
grande?
¿Puedo usar sartenes de metal o de aluminio en mi
homo de microondas?
¿Es normal que la bandeja giratoria gire en
cualquiera de las dos direcciones?
A veces la puerta de mi horno de microondas
aparece ondulada. ¿Es esto normal?
¿Por qué el plato se calienta cuando cocino con
microonda en él? Pienso que eso no debería
suceder.
¿Qué significa "tiempo de espera " ?
¿Por qué sale vapor por los agujeros de ventilación?
No. Si quita o no hace girar la bandeja giratoria,
tendrá resultados pobres. Los platos que se usan en
su homo deben encajar en la bandeja giratoria.
Puede usar una hoja de papel de aluminio para proteger (use
pedazos pequeños y planos), pequeños trozos y en bandejas
de aluminio planas (si la bandeja no es más alta que
3/4 pulg. [1.9 cm ] de profundidad y está llena con los alimentos
para absorber la potencia de microonda).
Si. La bandeja giratoria rota en sentido de las agujas
del reloj o contrario al mismo, dependiendo la rotación
del motor cuando comienza el ciclo de cocción.
Esta apariencia es normal y no afecta el
funcionamiento de su horno.
A medida que los alimentos se calientan, éstos transmiten
su calor al plato. Esté preparada para usar protección para
las manos para sacar los alimentos después de cocinar.
"Tiempo de espera" significa que los alimentos deben
ser sacados del horno y cubiertos por un tiempo
adicional para permitir que terminen de cocinarse.
Esto libera al homo para otra cocción.
El vapor se produce normalmente durante la cocción.
El horno de microondas ha sido diseñado para eliminar el
vapor de este modo, a través de los agujeros de ventilación.
¿Puedo preparar palomitas de maíz en mi horno de
microondas?
¿Cómo obtengo los mejores resultados?
66.
Si. Prepare palomitas de maíz empacado para
microonda siguiendo las indicaciones del fabricante.
No use bolsas comunes de papel. No vuelva a
colocar núcleos de maíz que no hayan explotado.
No prepare palomitas de maíz en un recipiente de
vidrio.
Page 67

Solución de problemas
La mayoría de los problemas de cocina están causados a menudo por pequeñas cosas que usted puede
determinar y solucionar sin herramientas de ningún tipo. Controle las listas de más abajo en las páginas
siguientes antes de pedir asistencia a un servicio. Si aún necesita ayuda, llame a Service Sears a
1-800-4-MY-HOME®.
EL HORNO DE MICROONDAS NO FUNCIONA
PROBLEMA CAUSA
Nada funciona. • El cable de alimentación de energía eléctrica no está enchufado a un
tomacorriente de tres clavijas. (Vea la sección "Requisitos eléctricos" en la pág.
40 y la sección "Conexión eléctrica" en pág. 42.)
• Ha saltado un fusible de la casa o un disyuntor ha interrumpido el circuito
• Ha habido una falla de alimentación en el suministro de la compañía eléctrica.
El horno de microondas no
funcionará.
• Usted está usando el horno como cronómetro.
Toque STOP/CLEéJR para cancelar el homo como cronómetro de cocina.
• La puerta no está firmemente cerrada y bloqueada.
• No tocó START.
• No siguió exactamente las instrucciones.
• Continúa funcionando una operación programada previamente.
Toque STOP/CLEAR para cancelar esa operación.
TIEMPOS DE COCCION
PROBLEMA CAUSA
Los alimentos no están
suficientemente cocidos.
La pantalla mostrará una
cuenta regresiva pero el
homo no está funcionando.
• El suministro eléctrico a su casa o a ese enchufe de pared no es suficiente o es
más bajo que lo normal. Su compañía eléctrica puede decirle si ia línea está
baja. Su electricista o técnico de servicio le puede decir si el enchufe de pared
suministra poco
• La potencia de cocción no está en ia programación recomendada. Compruebe
la tabla en la pág. 49.
• La puerta del homo no está cerrado por completo.
• Ha fijado los controles al temporalizador de cocina.
Toque STOP/CLEAR para cancelar el temporizador de cocina.
67.
Page 68

BANDEJA GIRATORIA
PROBLEMA CAUSA
La bandeja giratoria no
gira.
• La bandeja giratoria no está colocada correctamente en su lugar. Debe ser
corregida levantando un costado y presionando firmemente sobre el eje central.
• El soporte no está funcionando correctamente. Quite la bandeja giratoria y
reinicie el homo. SI aún necesita ayuda, llame a Service Sears a
1-800-4-MY-HOME®. Cocinar sin la bandeja giratoria le dará resultados pobres.
TONOS
PROBLEMA CAUSA
No se oye el tono de fin de
programa o de fin de ciclo.
• No ha introducido el comando correcto.
MENSAJES EN LA PANTALLA
PROBLEMA CAUSA
La pantalla está
centelleando "
Si ninguna de estas temas le causa problemas, llame a Service Sears a 1-800-4-MY-HOMP.
• Ha habido una interrupción de suministro de energía. Reinicie el reloj.
(Vea la sección "Reloj" en la pág. 46.)
68.
Page 69

WIB0№§MÍ?.
..
1i;;'i:;|ii:iÿ
i
Get it fixed, at your home or ours!
Your Home
For repair-in your home-of all major brand appliances,
lawn and garden equipment, or heating and cooling systems,
no matter who made it, no matter who sold it!
For the replacement parts, accessories and
owner's manuals that you need to do-it-yourself.
For Sears professional installation of home appliances
and items like garage door openers and water heaters.
1 -800-4-MY-HOME® {1 -800-469-4663)
Call anytime, day or night(U.S.A. and Canada)
www.sears.com www.sears.ca
Our Home
For repair of carry-in items like vacuums, lawn equipment,
and electronics, call or go on-line for the location of your nearest
Sears Parts & Repair Center.
1-800-488-1222
Call anytime, day or night (U.S.A. oniy)
www.sears.com
To purchase a protection agreement (U.S.A.)
or maintenance agreement (Canada) on a product serviced by Sears:
1 -800-827-6655 (U.S.A.) 1 -800-361 -6665 (Canada)
Para pedir servicio de reparación
a domiciiio, y para ordenar piezas:
1-888-SU-HOGAR«“
(1-888-784-6427)
11
©Registered Trademark/''**rгsdemark/^** Service Mark of Sears, Roebuck and Ce.
® Marca Registrada I™ Marca de Fábrica Marca da Servicio de Sears, Roebuck and Co.
Marque de commerce Marque déposée de Sears, Roebuck and Co. © Sears, Roebuck and Co.
Au Canada pour service en français:
1-800-LE-FOYER*“
(1-800-533-6937)
www.sears.ca
.
......
.
■MflÊ'
 Loading...