

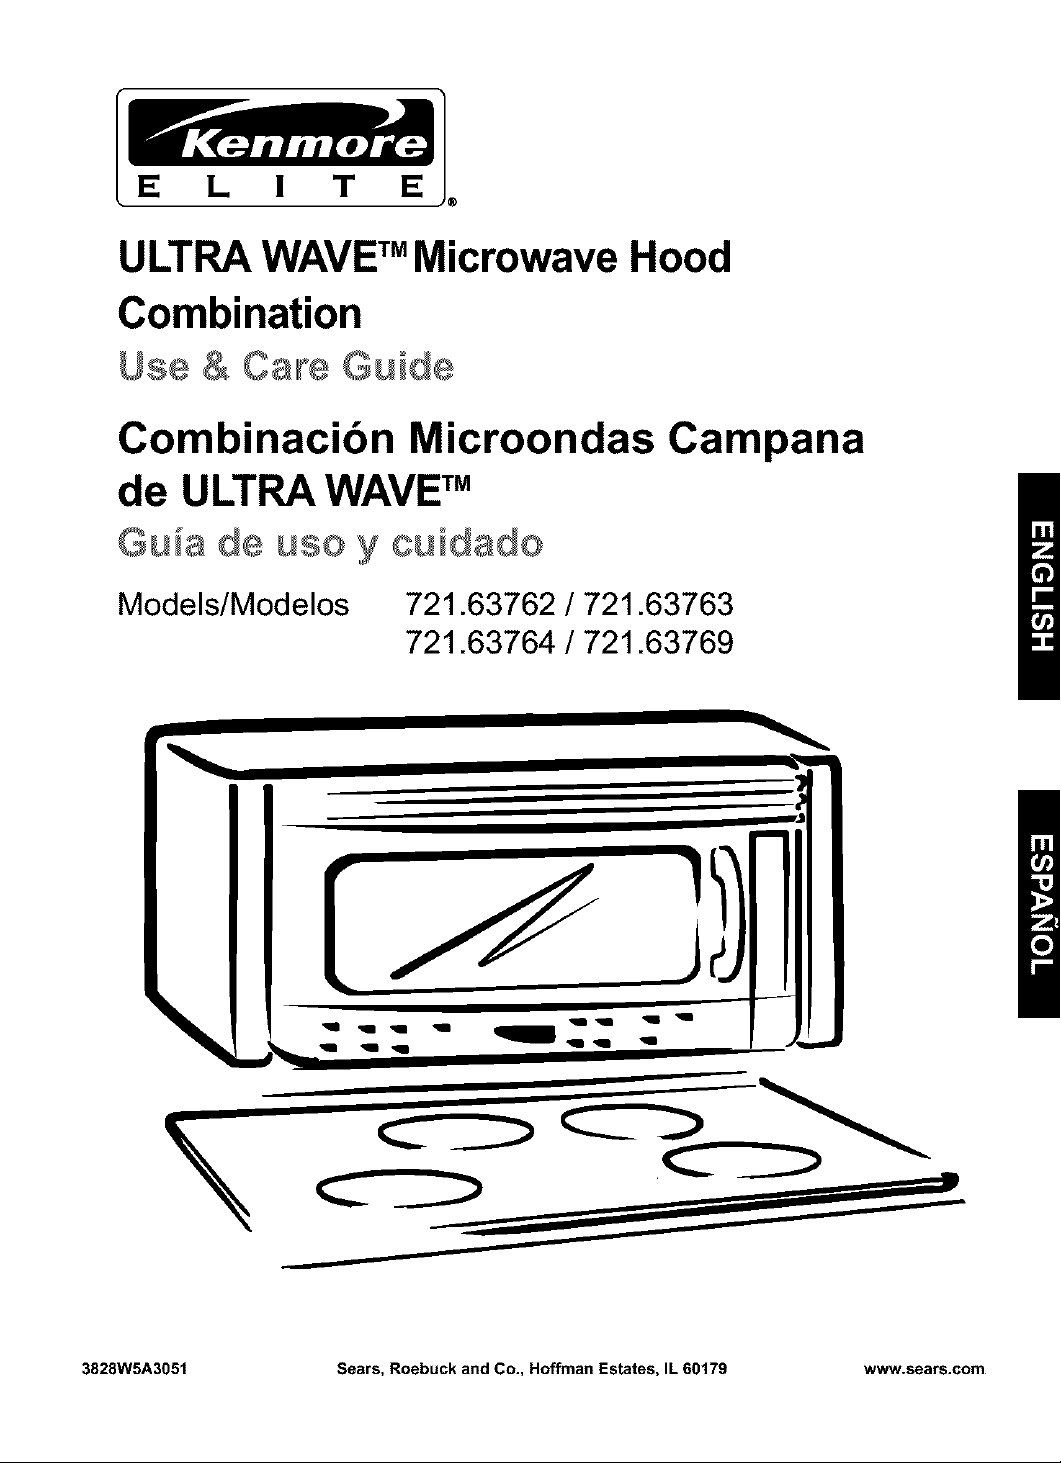
Kenmore 72163769300, 72163764300, 72163763300, 72163762300 Owner’s Manual
E L I T E
s
ULTRA WAVE TMMicrowave Hood
Combination
Use & Care Guide
Combinacibn Microondas Campana
de ULTRA WAVETM
G_a de _so y c_idado
Models/Modelos 721.63762 / 721.63763
721.63764 / 721.63769
3828W5A3051 Sears, Roebuck and Co., Hoffman Estates, IL 60179 www.sears.com
Table of
Microwave Hood
Contents
Warranty ........................................................... 2
Sears Service .................................................. 3
Microwave Oven Safety .................................. 4
Getting to Know Your
Microwave Oven .............................................. 7
How your kenmore ULTRA WAVETM
microwave hood combination works ............... 7
Radio interference .......................................... 7
Testing your microwave oven ......................... 8
Testing your dinnerware or cookware ............ 8
Operating safety precautions .......................... 8
Electrical connection ...................................... 8
Microwave oven features ............................... 9
Control panel features ................................... 10
Using Your Microwave Oven ....................... 12
Audible Signals ............................................. 12
Interrupting Cooking ...................................... 12
Clock ............................................................. 12
Child Lock ..................................................... 12
Timer ............................................................. 13
Cooktop Light................................................ 14
Exhaust Fan .................................................. 14
Add Minute .................................................... 14
Timed Cooking .............................................. 15
Multi-stage Cooking ...................................... 15
Microwave Power Levels .............................. 16
Auto Defrost .................................................. 17
Auto defrost table .......................................... 18
Auto defrost table (Cont.) .............................. 19
Defrosting tips .............................................. 20
Hold Warm .................................................... 20
Sure Simmer ................................................. 21
Using Sensor Cooking .................................. 22
Sensor Cooking ............................................ 22
Potato (Example) .......................................... 22
More/Less ..................................................... 22
Sensor Cooking Table .................................. 23
Auto Cook, Auto Reheat ............................... 24
Auto Cook Table, Auto Reheat Table ........... 25
Soften, Soften Table ..................................... 26
Melt, Melt Table ............................................ 26
Caring for Your Microwave Oven ................. 27
Caring for the filters ....................................... 28
Replacing the cooktop and oven lights ......... 29
Microwave Cooking Tips ............................... 31
Questions and Answers ................................ 33
Troubleshooting ............................................. 34
Service ............................................. Back cover
2
Combination
Warranty
FULL ONE-YEAR WARRANTY ON
MICROWAVE HOOD COMBINATION
For one year from the date of purchase,if this
Kenmore Microwave Hood Combination fails due to
a defect in material or workmanship,Sears will
repair itfree of charge.
FULL FIVE-YEAR WARRANTY ON THE
MAGNETRON
For fiveyears from the date ofpurchase, if the
magnetron in this Kenmore Microwave Hood
Combination fails due to a defect in material or
workmanship, Sears will repair itfree of charge.
The above warranty coverage applies only to
Microwave Hood Combinations which are used for
private household purposes.
WARRANTY SERVICE IS AVAILABLE BY
SIMPLY CONTACTING SEARS SERVICE AT
1-800-4-MY-HOME _
This warranty applies only while this productis in
use in the United States.
This warranty gives you specific legal rights, and
you may also have other rights which vary from
state to state.
Sears, Roebuck and Co.,
Dept. 817WA,
Hoffman Estates, IL 60179
For service call:
1-800-4-MY-HOME _
(1-800-469-4663)
Please record your model's information.
Whenever you call to request service for your
appliance, you need to know your complete model
number and serial number. You can find this
informationon the model and serial number
label/plate at the upper side of cavity front inyour
Microwave oven. Also, record the other information
shown below.
Model Number
Serial Number
Purchase Date
Sears Service
Master Protection Agreements
Congratulations on making a smart purchase.
Your new Kenmore ®product is designed and manufactured for years of dependable operation.
But like all products, it may require preventive maintenance or repair from time to time.
That's when having a Master Protection Agreement can save you money and aggravation.
Purchase a Master Protection Agreement now and protect yourself from unexpected hassle
and expense.
The Master Protection Agreement also helps extend the life of your new product. Here's
what's included in the Agreement:
Expert service by our 12,000 professional repair specialists
[_ Unlimited service and no charge for parts and labor on all covered repairs
"No-lemon" guarantee - replacement of your covered product if four or more product failures
occur within twelve months
Product replacement if your covered product can't be fixed
[_ Annual Preventive Maintenance Check at your request- no extra charge
Fast help by phone - phone support from a Sears technician on products requiring in-home
repair, plus convenient repair scheduling
[_ Power surge protection against electrical damage due to power fluctuations
[_ Rental reimbursement if repair of your covered product takes longer than promised
Once you purchase the Agreement, a simple phone call is all that it takes for you to schedule service.
You can call anytime day or night, or schedule a service appointment online.
Sears has over 12,000 professional repair specialists, who have access to over 4.5 million quality
parts and accessories. That's the kind of professionalism you can count on to help prolong the life of
your new purchase for years to come. Purchase your Master Protection Agreement today!
Some limitations and exclusions apply. For prices and additional information call 1-800-827-
6655.
Sears Installation Service
For Sears professional installation of home appliances, garage door openers, water heaters, and
other major home items, in the U.S.A. call
1-800-4-MY-HOME ®
Microwave Oven Safety
Your safety and the safety of others are very important.
We have provided many important safety messages in this manual and on your appliance.
Always read and obey all safety messages.
This is the safety alert symbol.
This symbol alerts you to hazards that can kilt or hurt you and others.
All safety messages will be preceded by the safety alert symbol and the word
"DANGER" or "WARNING." These words mean:
You will be killed or seriously injured
if you don't follow immediately instructions.
You can be killed or seriously injured
if you don't follow instructions.
Atl safety messages will identify the hazard, tell you how to reduce the chance of injury, and tell
you what can happen if the instructions are not followed.
IMPORTANT SAFETY INSTRUCTIONS
When using electrical appliances basic safety precautions should be followed, including the
following:
WARNING: To reduce the risk of burns,
electric shock, fire, injury to persons, or
exposure to excessive microwave energy:
• Read all instructions before using the
microwave oven.
• Read and follow the specific
"PRECAUTIONS TO AVOID POSSIBLE
EXPOSURE TO EXCESSIVE MICROWAVE
ENERGY" found in this section.
• The microwave oven must be grounded.
Connect only to properly grounded outlet.
See "GROUNDING INSTRUCTIONS" found
at the end of this section.
• Install or locate the microwave oven only in
accordance with the provided installation
instructions.
Some products such as whole eggs in the
shell and sealed containers - for example,
closed glass jars - are able to explode and
should not be heated in the microwave oven.
• Use the microwave oven only for its intended
use as described in this manual. Do not use
corrosive chemicals or vapors in the
microwave oven. This type of oven is
specifically designed to heat, cook, or dry
food. It is not designed for industrial or
laboratory use.
• As with any appliance, close supervision is
necessary when used by children.
• Do not operate the microwave oven ifit has
a damaged cord or plug, if it is not working
propedy, or if it has been damaged or
dropped.
SAVE THESEINSTRUCTIONS
4
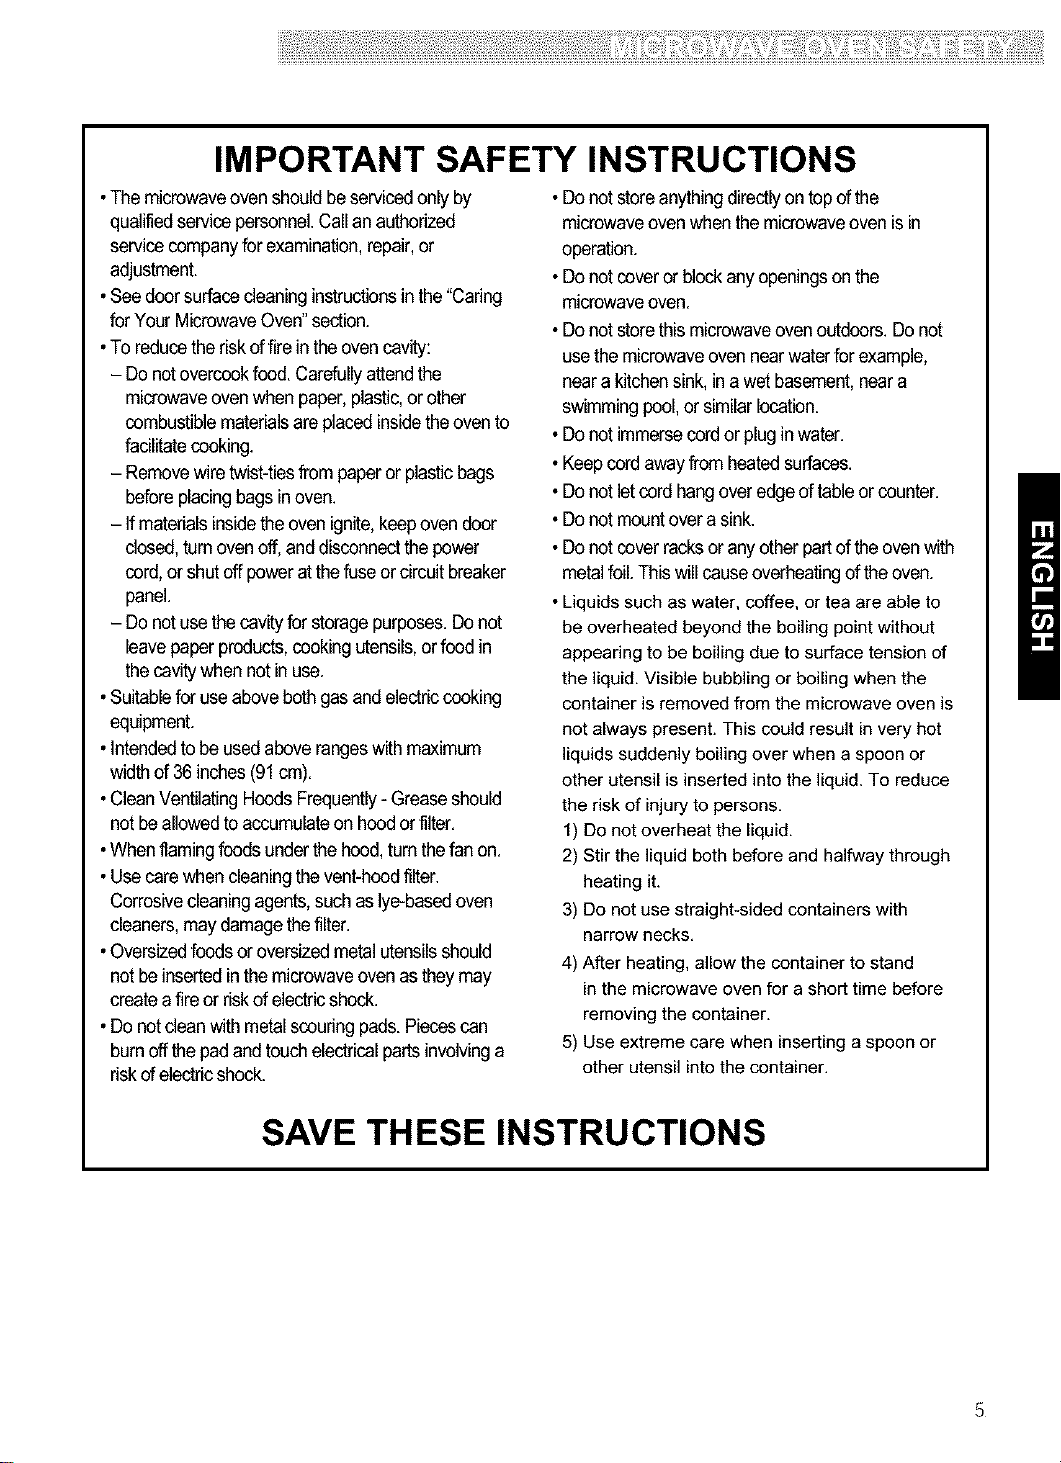
IMPORTANT SAFETY INSTRUCTIONS
• Themicrowaveoven shouldbeservicedonlyby
qualifiedservicepersonnel.Callanauthorized
servicecompanyfor examination,repair,or
adjustment.
•Seedoorsurface cleaninginstructionsinthe "Caring
forYour MicrowaveOven"section.
•Toreducethe riskoffireintheovencavity:
- Do notovercookfood.Carefullyattendthe
microwaveovenwhen paper,plastic,or other
combustiblematerialsareplacedinsidetheoven to
facilitatecooking.
- Removewiretwist-tiesfrompaperor plasticbags
beforeplacingbagsinoven.
- Ifmaterialsinsidethe ovenignite,keepoven door
dosed, tamovenoff,and disconnectthe bower
cord,or shutoffboweratthefuseorcircuit breaker
panel.
- Do notusethecavityforstoragepurposes.Donot
leavepaperproducts,cookingutensils,orfood in
thecavitywhen notinuse.
•Suitablefor useabovebothgas andelectriccooking
equipment.
•Intendedtobe usedaboverangeswithmaximum
widthof36 inches(91cm).
•CleanVentilatingHoodsFrequently-Greaseshould
notbe allowedto accumulateonhoodor filter.
•Whenflamingfoodsunderthehood,tum thefanon.
•Usecare whencleaningthe vent-hoodfilter.
Corrosivecleaningagents,suchas lye-basedoven
cleaners,maydamagethefilter.
•Oversizedfoodsor oversizedmetalutensilsshould
notbe insertedinthe microwaveovenasthey may
createafireor riskof electricshock.
•Donotdean with metalscouringpads.Piecescan
burnoffthe padandtouchelectricalpartsinvolvinga
riskofelectricshock.
• Do not store anything directly on topof the
microwave oven when the microwave oven isin
operation.
• Do not cover or block any openings on the
microwave oven.
• Do not store this microwave oven outdoors. Do not
use the microwave oven near water for example,
near a kitchen sink, in a wet basement, near a
swimming pool, or similar location.
• Do not immerse cord or plug in water.
• Keep cord away from heated surfaces.
• Do not let cord hang over edge of table or counter.
• Do not mount over a sink.
• Do not cover racks or any other part of the oven with
metal foil. This will cause overheating of the oven.
• Liquids such as water, coffee, or tea are able to
be overheated beyond the boiling point without
appearing to be boiling due to surface tension of
the liquid. Visible bubbling or boiling when the
container is removed from the microwave oven is
not always present. This could result in very hot
liquids suddenly boiling over when a spoon or
other utensil is inserted into the liquid. To reduce
the risk of injury to persons.
1) Do not overheat the liquid.
2) Stir the liquid both before and halfway through
heating it.
3) Do not use straight-sided containers with
narrow necks.
4) After heating, allow the container to stand
in the microwave oven for a short time before
removing the container.
5) Use extreme care when inserting a spoon or
other utensil into the container.
SAVE THESE INSTRUCTIONS
i!i]!Jiiii_lili!,_i_i!!ii]!!li!i!i!;i!iiiiiiii_!!:!iii!ii!_!!ii_ii_!!iiiii!i!!iiiiii!!_!;_!_!_i_!]!!_i!_:!!_ii!_!_!!!!!_]!!!i!!]!_i_:_!_!_!_!_!_!ii_ii_;_i!i_iil]i_iiiiii!iiiilfiiilli!iiii¸iiiiiiii!iiiiiii!ii_iliii;liii!iii!i_i¸ii!iii!i_i¸ii!iii!i_i¸ii!iii!i_i¸ii!iii!i_i¸ii!iii!i_i¸ii!iii!i_i¸iiii_ii_i
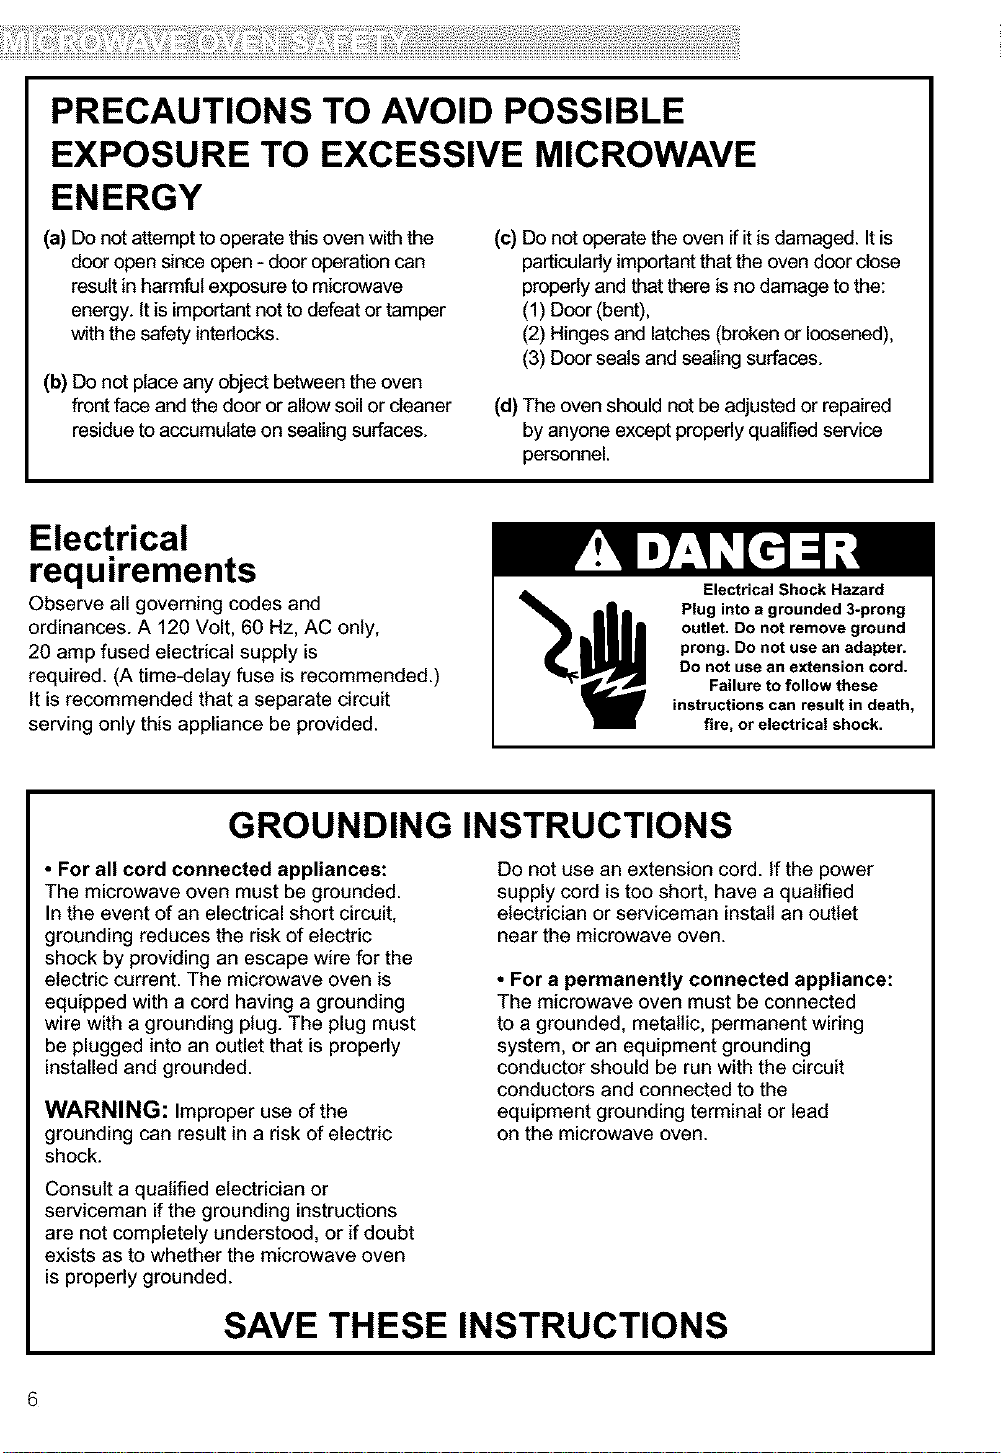
PRECAUTIONS TO AVOID POSSIBLE
EXPOSURE TO EXCESSIVE MICROWAVE
ENERGY
(a) Do not attempt to operate this oven with the
door open since open - door operation can
result in harmful exposure to microwave
energy. It is important not to defeat or tamper
with the safety interlocks.
(b) Do not place any object between the oven
front face and the door or allow soil or cleaner
residue to accumulate on sealing surfaces.
Electrical
requirements
Observe all governing codes and
ordinances. A 120 Volt, 60 Hz, AC only,
20 amp fused electrical supply is
required. (A time-delay fuse is recommended.)
It is recommended that a separate circuit
serving only this appliance be provided.
(c) Do not operate the oven if it is damaged. It is
particulady important that the oven door close
propedy and that there is no damage to the:
(1) Door (bent),
(2) Hinges and latches (broken or loosened),
(3) Door seals and sealing surfaces.
(d) The oven should not be adjusted or repaired
by anyone except properly qualified service
personnel.
Electrical Shock Hazard
Plug into a grounded 3-prong
outlet. Do not remove ground
prong. Do not use an adapter.
Do not use an extension cord.
Failure to follow these
instructions can result in death,
fire, or electrical shock.
GROUNDING INSTRUCTIONS
• For all cord connected appliances:
The microwave oven must be grounded.
In the event of an electrical short circuit,
grounding reduces the risk of electric
shock by providing an escape wire for the
electric current. The microwave oven is
equipped with a cord having a grounding
wire with a grounding plug. The plug must
be plugged into an outlet that is properly
installed and grounded.
WARNING: Improper use of the
grounding can result in a risk of electric
shock.
Consult a qualified electrician or
serviceman if the grounding instructions
are not completely understood, or if doubt
exists as to whether the microwave oven
is properly grounded.
SAVE THESE INSTRUCTIONS
6
Do not use an extension cord. If the power
supply cord is too short, have a qualified
electrician or serviceman install an outlet
near the microwave oven.
• For a permanently connected appliance:
The microwave oven must be connected
to a grounded, metallic, permanent wiring
system, or an equipment grounding
conductor should be run with the circuit
conductors and connected to the
equipment grounding terminal or lead
on the microwave oven.
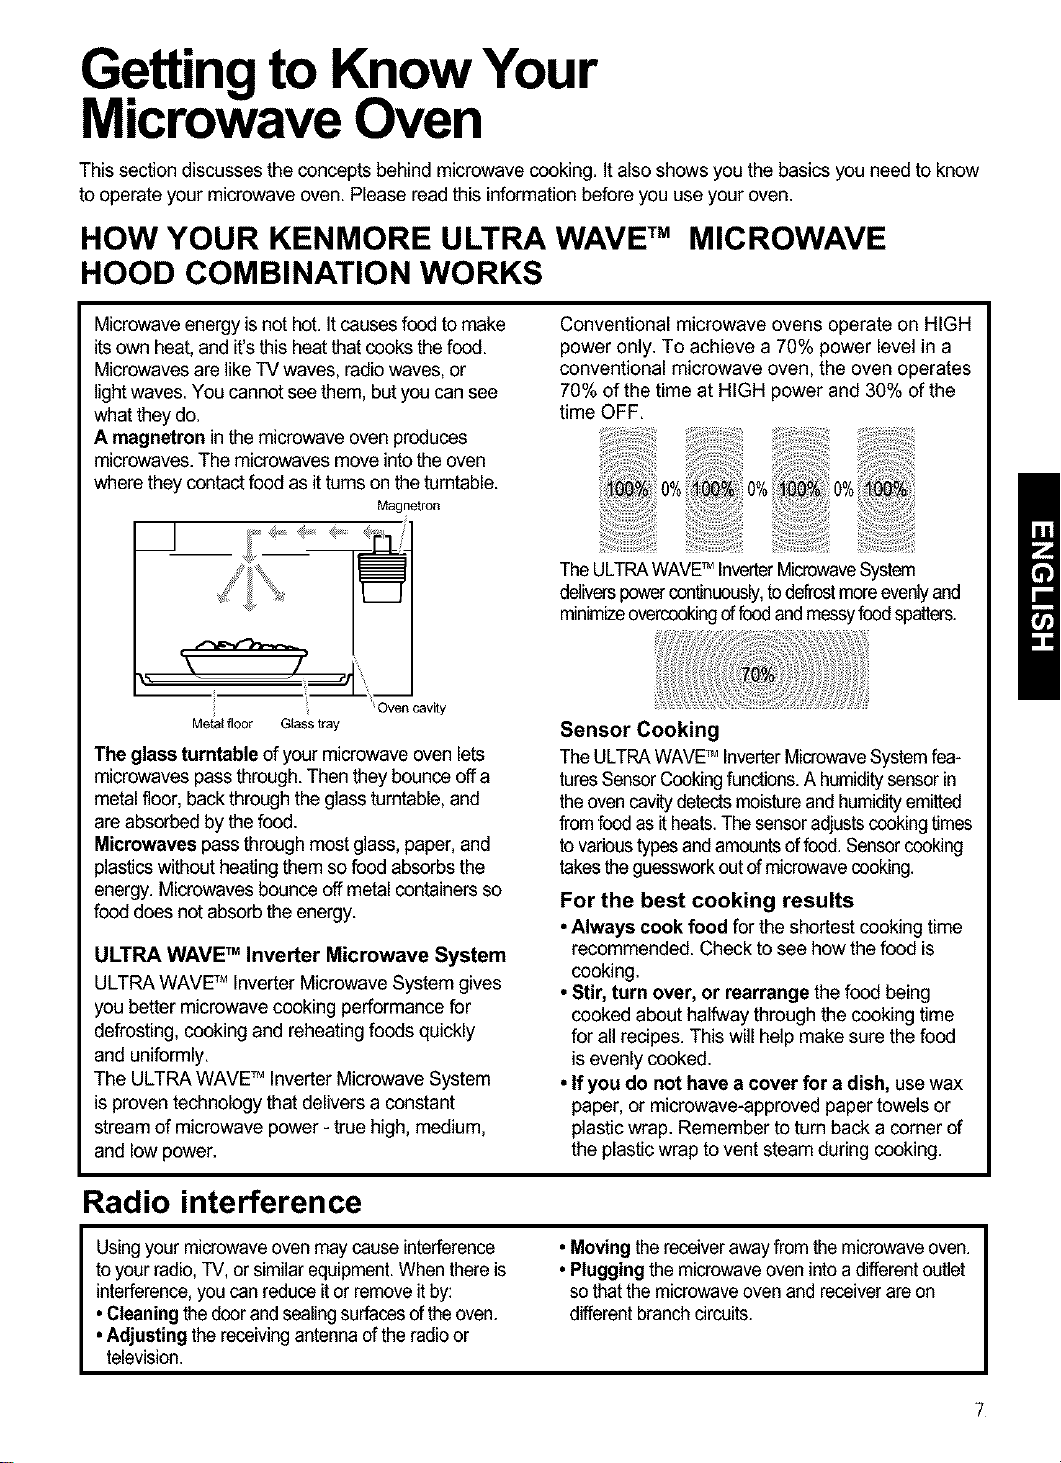
Gettingto KnowYour
MicrowaveOven
This section discusses the concepts behind microwave cooking. Italso shows you the basics you need to know
to operate your microwave oven. Please read this informationbefore you use your oven.
HOW YOUR KENMORE ULTRA WAVE TM MICROWAVE
HOOD COMBINATION WORKS
Microwave energy is not hot. It causesfood to make
itsown heat, and it'sthis heat thatcooks the food.
Microwavesare like"iV waves, radio waves, or
lightwaves. You cannotsee them, but you can see
what theydo.
A magnetron in the microwave oven produces
microwaves. The microwaves move into the oven
where they contactfood as itturns onthe turntable.
Magnetron
_m
Metal floor G{ass tray
The glassturntable of your microwave oven lets
microwaves pass through.Then theybounceoffa
metal floor,backthrough the glassturntable, and
are absorbed by thefood.
Microwaves passthrough most glass, paper, and
plasticswithout heating them so food absorbs the
energy. Microwaves bounce off metalcontainersso
food does not absorb the energy.
ULTRA WAVE TM Inverter Microwave System
ULTRA WAVETM Inverter Microwave System gives
you better microwave cooking performance for
defrosting, cooking and reheating foods quickly
and uniformly.
The ULTRA WAVETM Inverter Microwave System
is proven technology that delivers aconstant
stream of microwave power - true high, medium,
and low power.
Oven cavity
Conventional microwave ovens operate on HIGH
power only. To achieve a 70% power level in a
conventional microwave oven, the oven operates
70% of the time at HIGH power and 30% of the
time OFF.
TheULTRAWAVETM InverterMicrowaveSystem
deliverspowerccntinuously,todefrostmoreevenlyand
minimizeovercookingoffoodandmessyfoodspatters.
Sensor Cooking
The ULTRAWAVETM InverterMicrowaveSystemfea-
turesSensorCookingfunctions.A humiditysensorin
theoven cavitydetectsmoistureand humidityemitted
fromfoodas itheats.The sensoradjustscookingtimes
to varioustypesandamountsoffood. Sensorcooking
takesthe guessworkoutofmicrowavecooking.
For the best cooking results
•Always cook food for the shortest cooking time
recommended. Check to see how the food is
cooking.
•Stir, turn over, or rearrange the food being
cooked about halfway through the cooking time
for all recipes. This will help make sure the food
is evenly cooked.
•If you do not have a cover for a dish, use wax
paper, or microwave-approved paper towels or
plastic wrap. Remember to turn back acorner of
the plastic wrap to vent steam during cooking.
Radio interference
Usingyour microwaveoven may causeinterference • Movingthereceiverawayfrom themicrowaveoven.
to your radio,TV,orsimilar equipment.Whenthereis • Plugging the microwaveoven intoa differentoutlet
interference,youcan reduce itor removeitby: so thatthe microwaveovenand receiverare on
•Cleaning thedoorand sealingsurfacesoftheoven. differentbranch circuits.
•Adjusting the receivingantennaofthe radioor
television.
7
i !!!i{i!i¢!i{iii!i'{iilfi!!ii!{iiii'! !i{ii!!iiii{;!!!!!iii'iii!i!!!ii iiii;iiii:i!l;ii!i ! i!il !i!iiii ii! ! ili ii:;iii!i!i:i:iii i;!i,iii!!!i!!iii¸i!i!!i!i!i;ii:;i!iJ{i !i:;i;ii!i;i iiiii i;!i i!i!i!ii;ii!i!iii¸!!Iii!{;ii;!!iiiii{! !i!!;il;ilil!i;ii!i! i ili!i!i;i{;! iiiiii!iiiii iiiii!{ !;i; ii !i!i i i ¸ii¸iiiiiiii iii ;!;! ii;!;i!i ii;i!i ii!ili!i i ii!iii i ii!i i!i!i
Testing your microwave oven
glasscontainerintheoven.Closethe door. Whenthe timeisup,the watershouldbe heated.
I To testtheoven putabout 1cupofcoldwaterina Makesureitlatches.Cookat 100%bowerfor 1minute.
Testing your dinnerware or cookware
Test dinnerware or cookware before using.To
test a dish for safe use, putit into theoven with a
cup of water besideit.Cook at 100% cook power
for one minute.If the dish gets hot, do not use it.
Some dishes (melamine, some ceramic
dinnerware, etc.) absorb microwave energy,
Operating safety precautions
• Never lean onthe dooror allow a child to swing
on it when thedoor is open.
• Use hot pads. Microwaveenergy does not heat
containers, butthe heat from the food can make
the container hot.
• Do not use newspaperorother printed paperin
the oven.
• Do not dry flowers,fruit, herbs,wood,paper,
gourds, orclothes inthe oven.
• Do not start amicrowave oven when it isempty.
Product life maybeshortened. Ifyou practice
programming the oven,put a container ofwater in
the oven. Itis normalfor the oven doorto look
wavy after the oven hasbeen running for a while.
• Do not tryto melt paraffinwax inthe oven.
Paraffin waxwillnotmelt ina microwave oven
because it allowsmicrowaves to pass through it.
• Do not operate the microwave oven unlessthe
glass turntable is securely in place and can move
freely. The turntable can move ineitherdirection.
Make sure the turntable iscorrect-side up inthe
oven. Handle your turntable with care when
removing it fromthe ovento avoid possibly
breaking it.Ifyour turntable cracks or breaks,
contact your dealerfor areplacement.
• When you use a browning dish, the browning
dish bottommust be atleast 3/16 inchabovethe
turntable. Follow the directions suppliedwiththe
browningdish.
• Never cook or reheat a whole egg inside the
becoming too hotto handle and slowingcooking
times. Cookinginmetal containersnot designed for
microwave use could damage the oven, as could
containerswith hidden metal(twist-ties,foil lining,
staples, metallicglaze or trim).
shell. Steam buildup in whole eggs may cause
them to burst, and possibly damage the oven.
Slice hard-boiled eggs before heating. In rare
cases, poached eggs have been knownto
explode. Cover poached eggs and allow a
standing timeofone minute before cuttinginto
them.
•For best results, stir any liquid several times
during heating or reheating. Liquids heated in
certain containers (especiallycontainersshaped
likecylinders) may become overheated.The liquid
may splash outwith a loud noise duringor after
heating or when adding ingredients(coffee
granules, tea bags,etc.).This can harm the oven.
•Microwaves may not reach thecenter ofa roast.
The heat spreads to the center from the outer,
cooked areasjust as inregularoven cooking. This
isone of the reasons for letting some foods (for
example, roastsor baked potatoes)stand fora
while after cooking,or for stirring some foods
during the cookingtime.
•Do not deep fry in the oven. Microwavable
utensilsare not suitable and itisdifficult to
maintain appropriate deep-fryingtemperatures.
•Do not overcook potatoes. At the end of the
recommended cooking time, potatoes should be
slightlyfirm because theywill continuecooking
during standingtime. After microwaving, let
potatoes stand for 5 minutes.They willfinish
cooking while standing.
Electrical connection
If your electric power line or outletvoltage is
less than 110volts, cooking times may be longer.
8
Have aqualifiedelectrician check your electrical
system.
iiiiiiiii!i!iii_ili!ii_ii!!iii!i!iiiiiiiiii!iiiiii!ii!iiilii!!!!i!!ii!!ii!i!ii!i!ii!iiiiiiiiiiiiiiiii!ii!iiiiiiiiii!iii!!ii!iiiiiiiii!i!i!!!!i!!_i_!ii!!iiiiiiiiiii!iiiii!_ii;iiiii!ili;ii!!_iiiii!!!iiii!iiii!i!!ii!iiiii;!iiiiiiiiiiiii!_i!iiiiiii!!!!iiiiiiili!iiiiiii!iiiilil_iiiiiiiiiii!iiii_iii!iiii_!iiiii_iiii!!!!ii!i!ii!iiiiiii!!iiii_iiiiiiiii!iiiii!iiiiii!i!ili!ii!!!iiiiiiiiii!iiii!iiii!!!iiiiiii!!!iill!!!iiiiiii!!il;ii!!!!!iiiii!il_i_!iiiiiiii!ii_ili_i!i!ii!ii!¸iiiii!i!i;!!i!!!iiiiili'i_iii!i!!_i_!ii!ii!ii!i!iiif!_i_i!iiiiii!iiiiiiiii!i
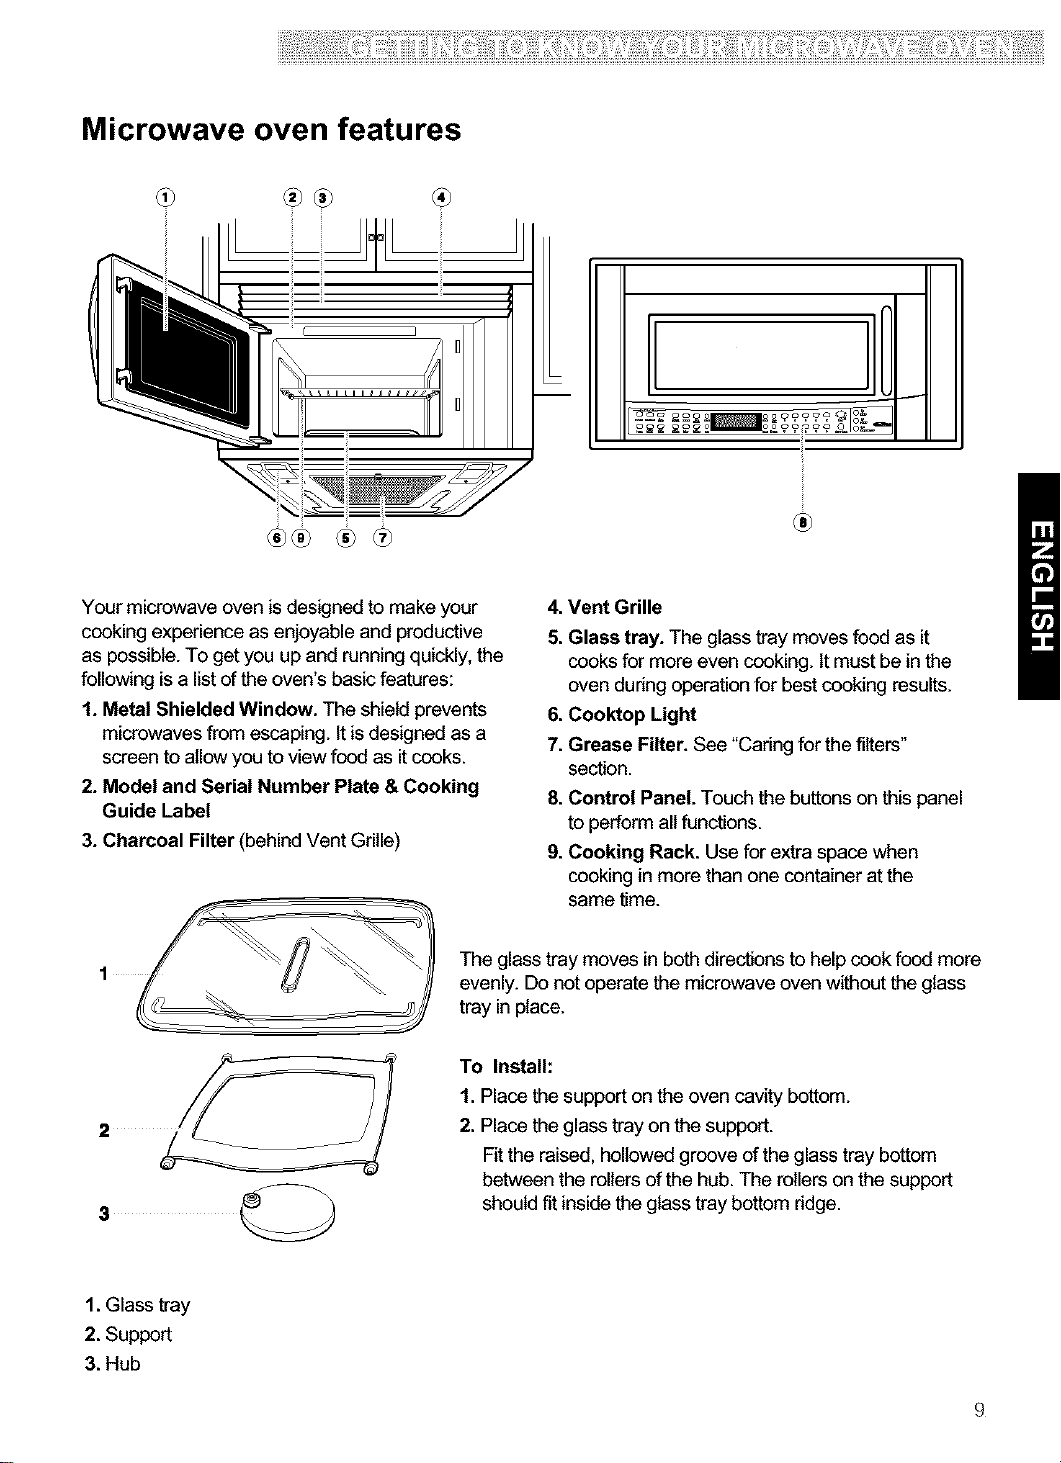
Microwave oven features
®®
I
®
Your microwave oven is designed to make your
cooking experience as enjoyable and productive
as possible. To get you up and running quickly, the
following is a list of the oven's basic features:
1. Metal Shielded Window. The shield prevents
microwaves from escaping. It is designed as a
screen to allow you to view food as itcooks.
2. Model and Serial Number Plate & Cooking
Guide Label
3. Charcoal Filter (behind Vent Grille)
1
The glass tray moves in both directions to help cook food more
evenly. Do not operate the microwave oven without the glass
tray in place.
To Install:
1. Place the support on the oven cavity bottom.
2. Place the glass tray on the support.
Fit the raised, hollowed groove of the glass tray bottom
between the rollers of the hub. The rollers on the support
should fit inside the glass tray bottom ridge.
4. Vent Grille
5. Glass tray. The glass tray moves food as it
cooks for more even cooking. It must be in the
oven during operation for best cooking results.
6. Cooktop Light
7. Grease Filter. See "Caring for the filters"
section.
8. Control Panel. Touch the buttons on this panel
to perform all functions.
9. Cooking Rack. Use for extra space when
cooking in more than one container at the
same time.
1. Glass tray
2. Support
3. Hub
iii!!iil;!il;!!!{i!i!!!!!i{i!i¢!i{iii!i{iilfi!!ii!{iiii!!i{ii!!iiii{;!!!!!iii'iiii!!!iiiiii;iiii:i!lii!i!i!il!i!iiiiii!!iiiili!ii ii!{i! !!!;ii i! iiiii!;!i ii!ii iii!!i:ii;iii!i!iiiii i!iil!Zi¸i!i!!i!i!ili:;i!IJ{i!i:;i;ii!i;iiiiiii!ii!i!i!ii;ii!i!iii¸!!l;ii!!i;ii!{;ii;! !iiiii{!! i!!;il;iiii!i;ii!i!iiii!i!i;i{;! iiiiii!iiiiiiiiii!{Zi;ii!i ii¸ii¸iiiiiiiiiil;!;!ii;!;i!iiii!iii!ili!{!ii!ii!ii!iiii i!il
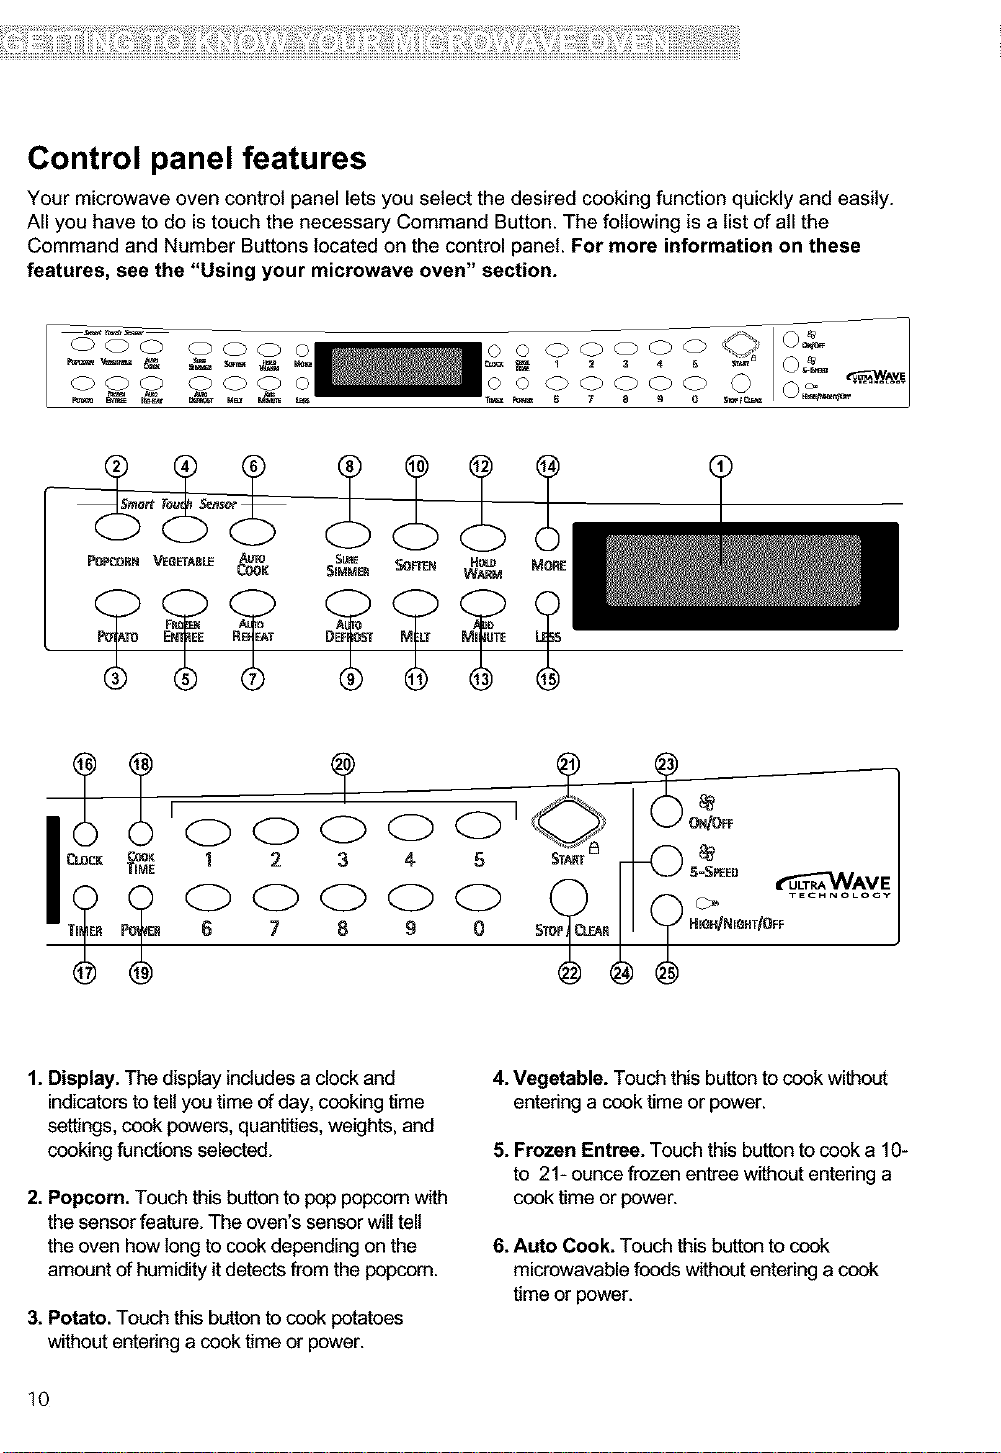
Control panel features
Your microwave oven control panel lets you select the desired cooking function quickly and easily.
All you have to do is touch the necessary Command Button. The following is a list of all the
Command and Number Buttons located on the control panel. For more information on these
features, see the "Using your microwave oven" section.
OOO
000
POPO_RN VERETA8[E A_nO SURE
oooo
O(Z) O o
C_Y_ $1_EI_ _EN Heu_ _ORE
W_M
1. Display. The display includes a clock and
indicatorsto tell you time of day, cooking time
settings, cook powers, quantities, weights, and
cooking functions selected.
2. Popcorn. Touch this button to pop popcorn with
the sensor feature. The oven's sensor will tell
the oven how long to cook depending on the
amount of humidity it detects from the popcorn.
3. Potato. Touch this button to cook potatoes
without entering a cook time or power.
10
4. Vegetable. Touch this button to cook without
entering a cook time or power.
5. Frozen Entree. Touch this button to cook a 10-
to 21- ounce frozen entree without entering a
cook time or power.
6. Auto Cook. Touch this button to cook
microwavable foods without entering a cook
time or power.
iiiiiiiii!i!iii_ili_!i_i_i_i!!iii_!i_!_iii_iiiiiii!i_iii_ii!ii!iii_iii!!!!i!!ii!!ii!i!ii!i!ii!iiiiiiiiiiiiiiiii!ii!iiiiiii_iii!iii!!ii!iiiiiiiii!i!i!!!!i!!_i_!ii!!iiiiiiiiiii!ii_iii!_i_i;iiiii!_iiiiiii!!_iiiii!!!iiii!iiii!i!_!ii!iiiii;!iiiii_iiiiiiii!_i!iiiiiii!!_!!iiiiiii_ii!iiiiiii!iiiilil_iiiiiiiiiii!iiii_iii!iiii_!iiiii_iiii!!!!ii!i!ii_!iiiiiii!!iiii_iiiiiiiii!iiiii!iiiiii!i!ili!ii!!!iiiiiiiiii_!iiii!iiii!!!_iiiiiii!!!iill!!!iiiiiii!_!iii:ii!!!!!iiiii!ii__i_!iiiiiiii!ii_ili_i!i!ii!i_i!¸iiiii!i!ii!!i!!!iiiiili'i_iii!i!!_i_!ii!ii!ii!i!_ii_ill_i_i!iiiiii_!iiiiiii_ii!i
7. Auto Reheat. Touch this button to reheat
microwavable foods without entering a cook
time or power.
8. Sure Simmer. Touch this pad to simmer soups,
casseroles, stews, and other liquidfoods.
9. Auto Defrost. Touch this button followed by
Number Buttons to thaw frozen meat by weight.
10. Soften. Touch this button to soften icecream,
cream cheese, butter, orfrozen juice.
11. Melt. Touch this button to melt chocolate,
cheese, butter, or marshmallows.
12. Hold Warm. Touch this button to keep hot,
cooked foods safely warm in your oven for up
to 99 minutes, 99 seconds. Hold Warm can be
used by itself, or it can automatically follow a
cooking cycle.
13. Add Minute. Touch this button to cook for 1
minute at 100% cook power, or to add extra
minutes at the set cook power to your cooking
cycle.
14. More. Touch this button to add 10 seconds of
cook time each time you press it.
15. Less. Touch this button to subtract 10 seconds
of cook time each time you press it.
16. Clock. Touch this button to enter the time of
day.
18. Cook Time. Touch this button followed by
Number Buttons to set a cooking time.
19. Power. Touch this button after the cook time
has been set, followed by a Number Button to
set the amount of microwave energy released
to cook the food. The higher the number, the
higher the microwave power or "cooking
speed."
20. Number Buttons. Touch number buttons to
enter cooking times, cook powers, quantities,
weights, or food categories.
21. START. Touch this button to start a function. If
you open the door after the oven begins to
cook, retouch START.
22. STOP/Clear. Touch this button to erase an
incorrectcommand, cancel a program during
cooking, or to clear the Display.
23. Fan (_) On/Off. Touch this button toturn the
fan on or off.
24. Fan (_) 5-Speed. Touch this button to
choose one of 5 fan speeds.
25. Light (_,). Touch this button to turn the light
on high, night, or off.
NOTE: If you try to enter incorrect instructions,
you will not hear any tones. Touch STOP/CLEAR
and re-enter the instructions.
17. Timer. Touch this button to change the oven's
default settings for Kitchen Timer, Light Timer
SET or CLEAR.
11
Using Your Microwave
ven
This section gives you instructions for operating
each function. Please read these instructions
carefully.
AUDIBLE SIGNALS
Audible signals are available to guide you when
setting and using your oven:
• A programming tone will sound each time
you touch a pad.
• Seven tones signal the end of a Kitchen Timer
countdown.
• Four tones signal the end of a cooking cycle.
CLOCK
Whenyour microwaveovenisfirstpluggedinor
aftera powerfailure,the Displaywillshow"PLEASE
SETTIME OF DAY". Ifa time ofdayisnotset,
":"willshow onthe Displayuntilyoutouch "Clock".
Example for 10:30 (AM).
Touch:
Display Shows:
1.
StoP/ CL_
INTERRUPTING COOKING
You can stop the oven during a cycle by opening
the door.The oven stops heating and the fan
stops,but the light stays on.
To restart cooking, close the door and Touch
START.
If you do not want to continue cooking,
open the door and touch STOP/Clear.
CHILD LOCK
Use this safety feature to lock the control panel
when you are cleaning the oven,or so that children
cannot use the oven unsupervised.
To set CHILD LOCK:
Touch:
STOP/ CL_R
Display Shows:
Time of day,
ENTER TIME OF DAY
3. OOQO TOUCH START
1 0 3 0 10 : 30
4,
Q TOUCH START
1 10 : 30 AM
6,
NOTE: You can switch between AM and PM by
touching 1 or 2 after step 4.
12
AM TOUCH 1
PM TOUCH 2
10 : 30
10 : 30 AM
2,
To cancel CHILD LOCK:
Touch and hold until
Locked appears in
the display
(approximately
4 seconds).
Touch: Display Shows:
1,
Touch and hold until
Locked disappears
in the display
(approximately
4 seconds).

TIMER
TIMER provides two modes which make using your microwave oven quite handy. You can select KITCHEN TIMER,
LIGHT TIMER SET or CLEAR.
Example for Kitchen Timer.
Touch: Display Shows:
1. (,_ Time of day.
_P / CLEAR
2.
T_E_ & SEC --- TOUCH
Once for Timer, AGAIN for LIGHT
KITCHEN TIMER
ENTER TIME MIN
TIMER
3._)_ TOUCH START
3 0 0 3:00
.
Example for Light Timer.
Touch:
1.
Stop! CLEAR
2. 0
T_NER
Twice for Timer.
KITCHEN TIMER
and Timecountingdown
Display Shows:
Time of day,
LIGHT TIMER
TO SET LIGHT
TIMER TOUCH 1 /
TO CLEAR LIGHT
TIMER TOUCH 2
Example for Light Timer.
Touch:
8. (_(_)(_ TOUCH START
4 3 0 4:30
.
_A_
Display Shows:
LIGHT TIMER
ENTER TIME OF
DAY for LIGHT OFF
AM TOUCH 1
PM TOUCH 2
4:30
10. (_ TOUCH START
1 4:30 AM
11. The display will show
"LIGHT TIMER SET"
once and then Time of
day will be appeared.
NOTE: To clear light timer, touch TIMER button twice
and touch 2 button once. The display will show "LIGHT
TIMER CLEAR" once and then Time of day will be
appeared
TIMER FUNCTION TABLE
TIMER NUMBER
BUTfON OPTION BUTTON RESULT
4. 0Q
1130
LIGHT TIMER
ENTER TIME OF
DAY for LIGHT ON
TOUCH START
11:30
AM TOUCH 1
PM TOUCH 2
11:30
TOUCH START
11:30 PM
Once Kitchen Timer Time Counting Down
1 Light Set
Twice Light Timer 2 Light Clear
13
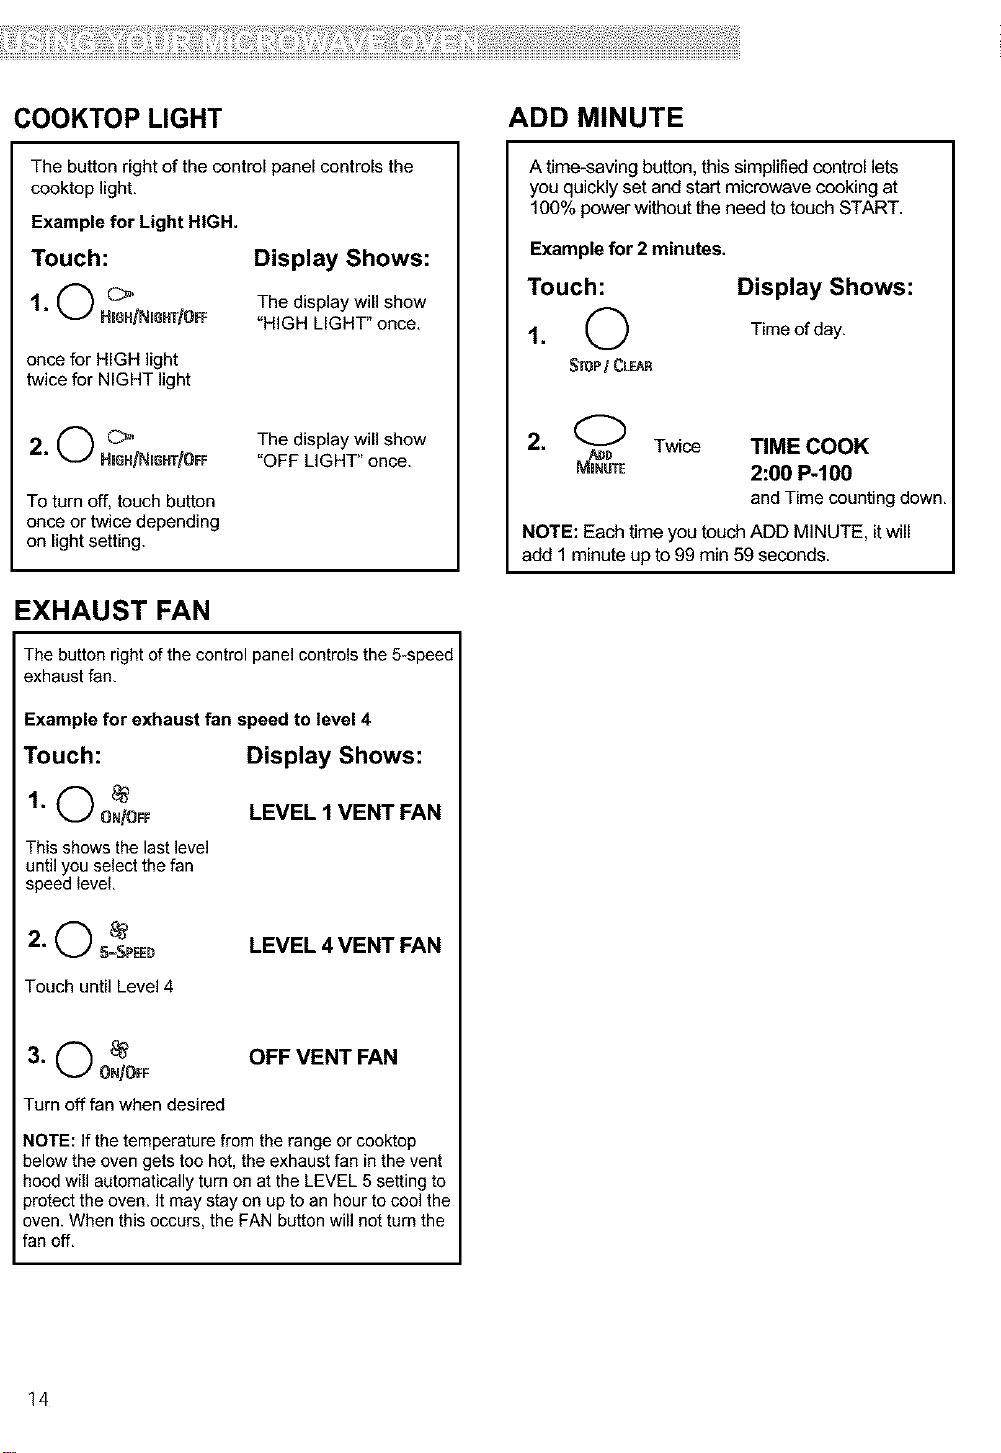
COOKTOP LIGHT
ADD MINUTE
The button right of the control panel controls the
cooktop light.
Example far Light HIGH.
Touch:
1. O HIGH_NIGHT_tOFF
once for HIGH light
twice for NIGHT light
2 ('_ c,,
• _ Hi6i-i/Nioi-iT/OfF
To turn off, touch button
once or twice depending
on light setting.
Display Shows:
The display will show
"HIGH LIGHT" once.
The display will show
"OFF LIGHT" once.
EXHAUSTFAN
The button right of the control panel controls the 5-speed
exhaust fan.
Example for exhaust fan speed to level 4
A time-saving button,thissimplified controllets
you quickly set and start microwave cooking at
100% powerwithout the need to touch START.
Example for 2minutes.
Touch: Display Shows:
1• O Time of day,
Sr_P/ CLear
2• (_ Twice
MmNUT_
NOTE: Each timeyou touchADD MINUTE, itwill
add I minute up to99 min 59 seconds.
TIME COOK
2:00 P-100
andTimecountingdown,
Touch: Display Shows:
1, O ONI%_F
This shows the last level
until you select the fan
speed level
2.0
Touch until Level 4
Turn off fan when desired
NOTE: If the temperature from the range or cooktop
below the oven gets too hot. the exhaust fan in the vent
hood will automatically turn on at the LEVEL 5 setting to
_rotectthe oven. It may stay on up to an hour to cool the
oven. When this occurs, the FAN button will not turn the
fan off.
5=SPEED
LEVEL 1 VENT FAN
LEVEL 4 VENT FAN
OFF VENT FAN
14
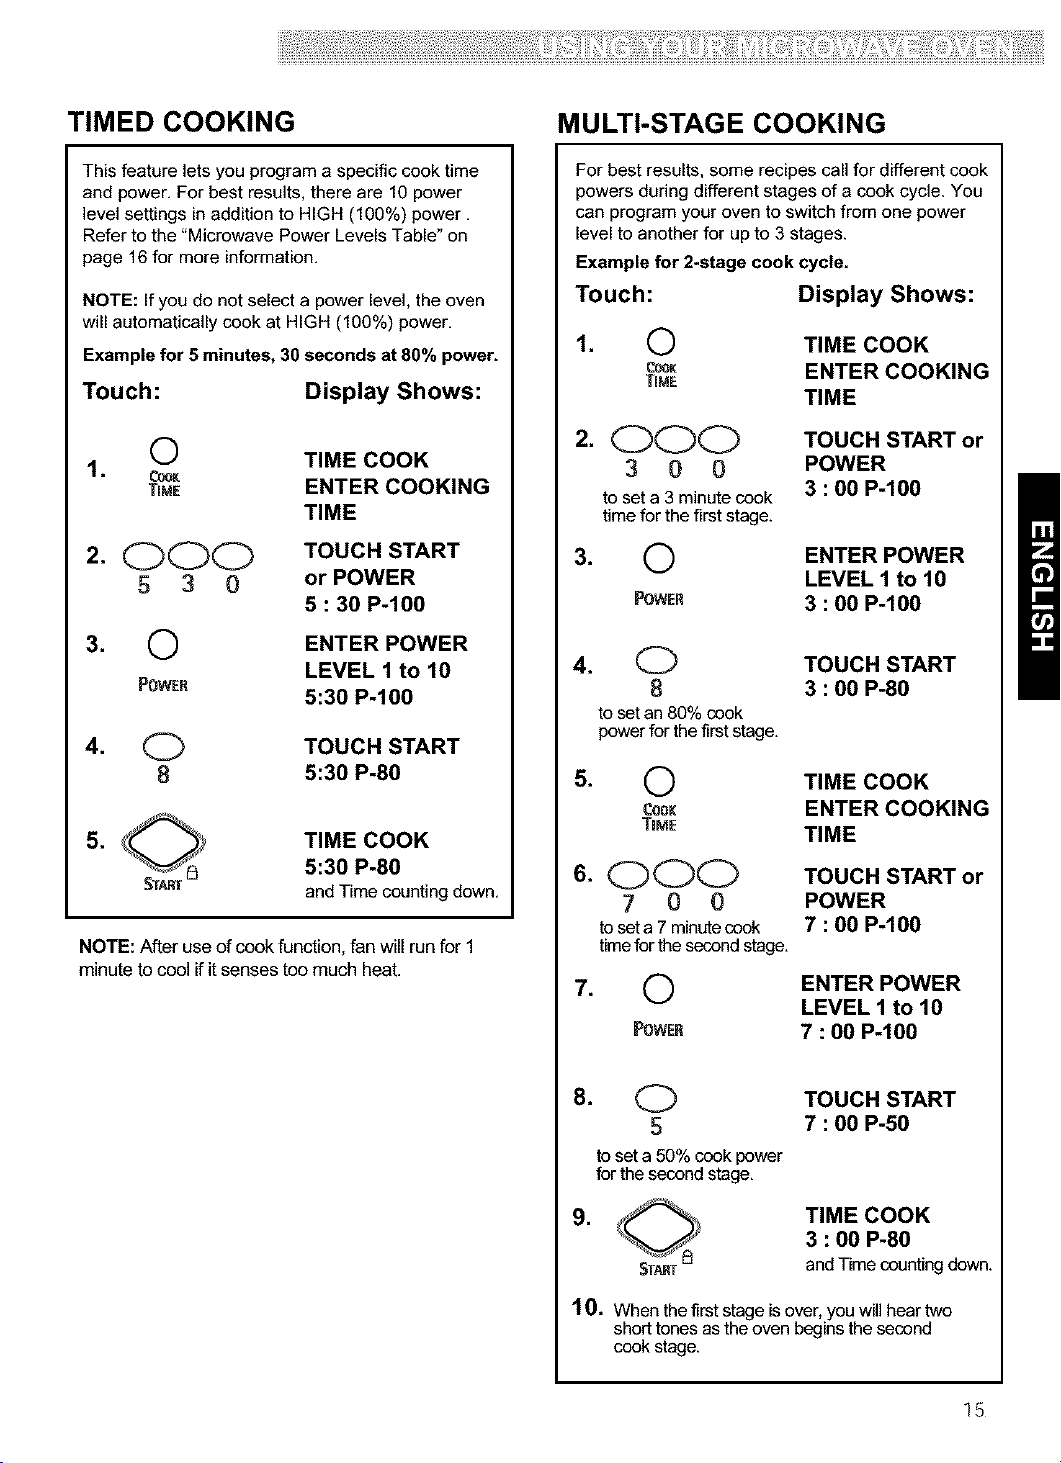
TIMED COOKING
MULTI-STAGE COOKING
This feature lets you program a specific cook time
and power, For best results, there are 10 power
level settings in addition to HiGH (100%) power,
Refer to the "Microwave Power Levels Table" on
page 16 for more information,
NOTE: If you do not select a power level, the oven
will automatically cook at HiGH (100%) power,
Example for 5 minutes, 30 seconds at 80% power.
Touch:
Display Shows:
O TIME COOK
1, ceeK
T_ME ENTER COOKING
TIME
2. OOO TOUCH START
,5 3 0 or POWER
5 : 30 P-100
3. O ENTER POWER
POWER
LEVEL 1 to 10
5:30 P-100
4. O TOUCH START
8 5:30 P-80
TIME COOK
5:30 P-80
and Timecountingdown,
NOTE: After use of cookfunction,fan will runfor1
minute to cool ifit senses too much heat.
For best results, some recipes call for different cook
powers during different stages of a cook cycle. You
can program your oven to switch from one power
level to another for up to 3 stages.
Example for 2*stage cook cycle.
Touch:
1.
0 TIME COOK
c_K ENTER COOKING
TiME
Display Shows:
TIME
2.
000 TOUCH START or
3 0 0 POWER
to seta 3minutecook 3 : 00 P-100
timefor thefirststage,
3.
0 ENTER POWER
LEVEL 1 to 10
POWER 3 : 00 P-100
4. _==J TOUCH START
8 3 : 00 P-80
to set an 80% cook
powerfor the first stage,
0 TIME COOK
cook ENTER COOKING
T_ME TIME
6. OOO TOUCH START or
7 0 0 POWER
toseta 7 minutecook 7 : 00 P-100
timefor thesecondstage,
0 ENTER POWER
LEVEL 1 to 10
POWER 7 : 00 P-100
8. O TOUCH START
,5 7 : 00 P-50
to set a 50% cook power
for the second stage,
.
TIME COOK
3 : 00 P-80
andTimecountingdown.
10. When the first stage is over, you will hear two
short tones asthe oven begins the second
cook stage.
15

MICROWAVE POWER LEVELS
For best results,some recipes callfor different cook
powers. The lower the cook power,the slower the
cooking. Each number from 1to 9 standsfor a
different percentage of fullcook power.
The following table gives the percentageof cookpower
each number pad stands for, and the cookpower
name usually used.
COOK POWER NAME WHEN TO USE IT
100% offull power High •Quick heatingmany conveniencefoods and
9 =90% of fullpower • Heatingcream soups
8 =80% of fullpower • Heating rice,pasta, or casseroles
7 =70% of fullpower Medium-High •Cooking and heatingfoods that need a
6 =60% of fullpower •Cooking requiring specialcare, such as cheese
It alsotells you when to useeach cook power.
Follow recipe orfood packageinstructions ifavailable.
foods with highwater content, such as soups and
beverages
•Cookingtender cuts of meat, ground meat
Cook Power lowerthan high (for example,
whole fish and meat loaf)orwhen food is
cooking too fast
• Reheatinga single serving offood
and eggdishes, pudding,and custards
• Finishingcooking casseroles
5 =50% of fullpower Medium •Cooking ham, whole poultry,and pot roasts
•Simmering stews
4 =40% of fullpower • Meltingchocolate
• Heating pastries
3 =30% of fullpower Medium-Low, • Manuallydefrosting foods,such as bread,fish,
Defrost meats, poultry, andprecookedfoods
2 =20% of fullpower •Softening butter,cheese,and ice cream
1 = 10% of fullpower Low • Keepingfood warm
•Takingchill out offruit
16
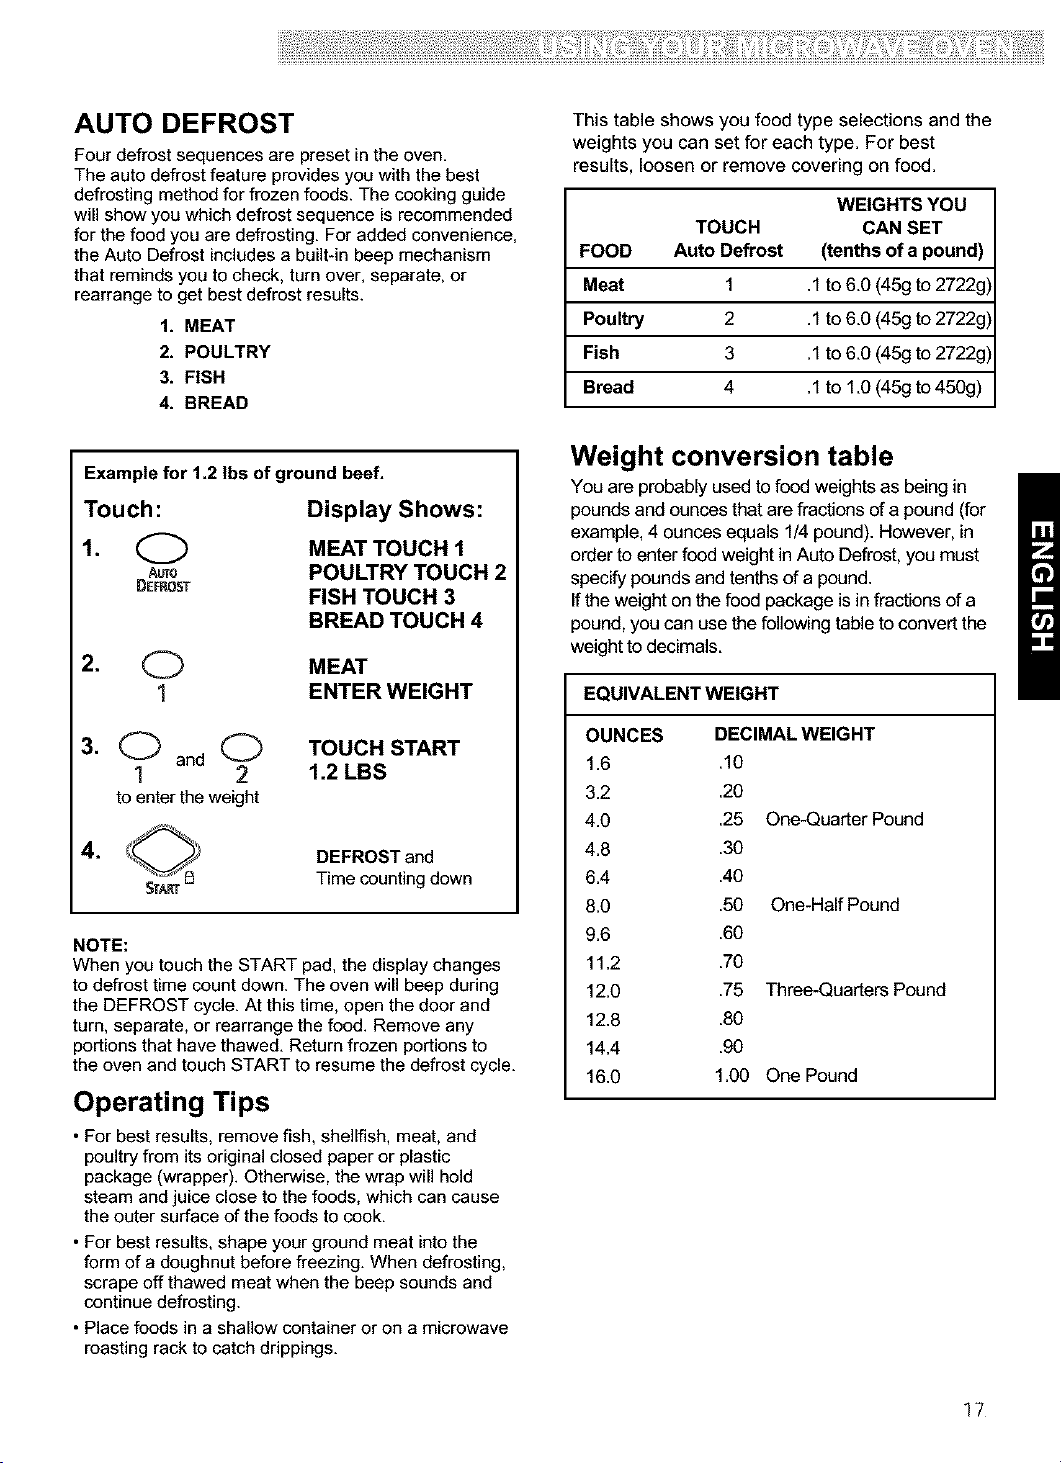
AUTO DEFROST
Four defrost sequences are preset in the oven.
The auto defrost feature provides you with the best
defrosting method for frozen foods. The cooking guide
will show you which defrost sequence is recommended
for the food you are defrosting. For added convenience,
the Auto Defrost includes a built-in beep mechanism
that reminds you to check, turn over, separate, or
rearrange to get best defrost results.
1. MEAT
2. POULTRY
3. FISH
4. BREAD
This table shows you food type selections and the
weights you can set for each type. For best
results, loosen or remove covering on food.
WEIGHTS YOU
TOUCH CAN SET
FOOD Auto Defrost (tenths of a pound)
Meat 1 .1to 6.0 (45gto 2722g)
Poultry 2 .1to 6.0 (45g to 2722g)
Fish 3 .1to 6.0 (45g to 2722g)
Bread 4 .1 to 1.0(45g to 450g)
Example for 1.2 Ibs of ground beef.
Touch:
Display Shows:
1. Q MEAT TOUCH 1
An POULTRY TOUCH 2
DEF_0ST FISH TOUCH 3
BREAD TOUCH 4
2. Q MEAT
1 ENTER WEIGHT
3. Q and (_ TOUCH START
1 2 1.2 LBS
to entertheweight
,
NOTE:
When you touch the START pad, the display changes
to defrost time count down. The oven will beep during
the DEFROST cycle. At this time, open the door and
turn, separate, or rearrange the food. Remove any
portions that have thawed. Return frozen portions to
the oven and touch START to resume the defrost cycle.
DEFROST and
Time counting down
Operating Tips
• For best results, remove fish, shellfish, meat, and
poultry from its original closed paper or plastic
package (wrapper). Otherwise, the wrap will hold
steam and juice close to the foods, which can cause
the outer surface of the foods to cook.
• For best results, shape your ground meat into the
form of a doughnut before freezing. When defrosting,
scrape off thawed meat when the beep sounds and
continue defrosting.
• Place foods in a shallow container or on a microwave
roasting rack to catch drippings.
Weight conversion table
You are probably used to food weights as being in
pounds and ounces that are fractions of a pound (for
example, 4 ounces equals 1/4 pound). However, in
order to enter food weight in Auto Defrost, you must
specify pounds and tenths of a pound.
If the weight on the food package is in fractions of a
pound, you can use the following table to convert the
weight to decimals.
EQUIVALENT WEIGHT
OUNCES
1.6
3.2
4.0
4.8
6.4
8.0
9.6
11.2
12.0
12.8
14.4
16.0
DECIMAL WEIGHT
.10
.20
.25 One-Quarter Pound
.30
.40
.50 One-Half Pound
.60
.70
.75 Three-Quarters Pound
.80
.90
1.00 One Pound
17
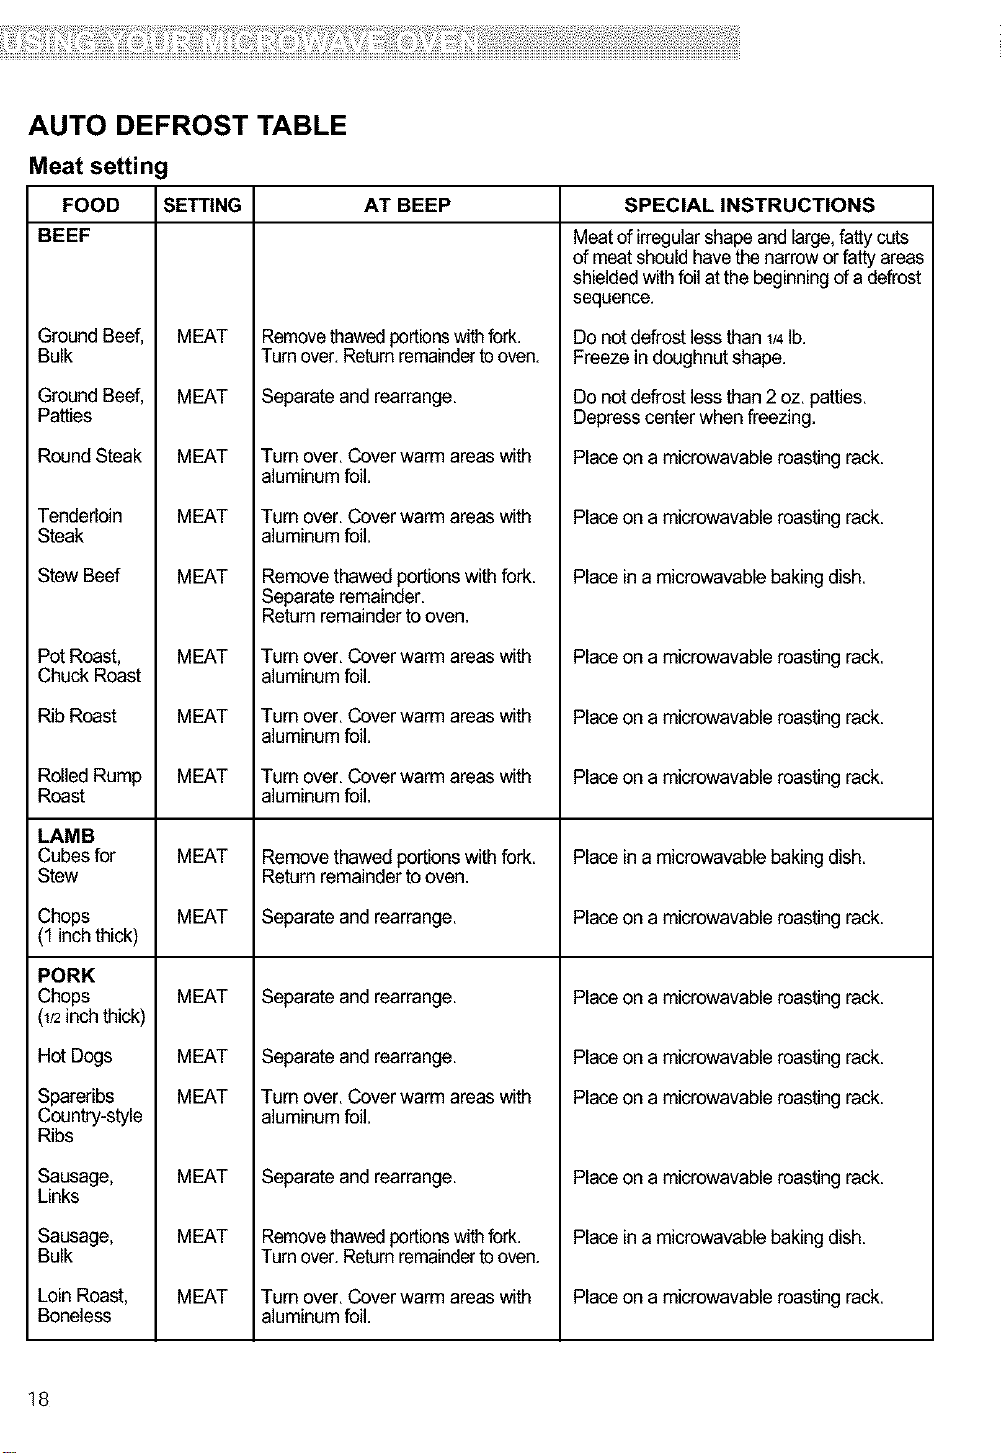
AUTO DEFROST TABLE
Meat setting
FOOD SETTING AT BEEP SPECIAL INSTRUCTIONS
BEEF
Meat of irregularshapeand large,fatty cuts
of meatshould havethenarrow orfatty areas
shieldedwithfoil atthe beginningof a defrost
sequence.
Ground Beef,
Bulk
Ground Beef,
Patties
RoundSteak
Tenderloin
Steak
Stew Beef
PotRoast,
Chuck Roast
RibRoast
RolledRump
Roast
LAMB
Cubes for
Stew
Chops
(1 inchthick)
MEAT
MEAT
MEAT
MEAT
MEAT
MEAT
MEAT
MEAT
MEAT
MEAT
Removethawedportbns withfork.
Turnover.Returnremaindertooven.
Separate and rearrange,
Turn over, Coverwarm areas with
aluminum foil,
Turn over, Coverwarm areas with
aluminum foil,
Removethawed portions withfork.
Separate remainder,
Return remainderto oven,
Turn over, Coverwarm areas with
aluminum foil,
Turn over, Coverwarm areas with
aluminum foil,
Turn over, Coverwarm areas with
aluminum foil,
Removethawed portions withfork.
Return remainderto oven.
Separate and rearrange,
Do not defrostlessthan 1/4lb.
Freeze in doughnutshape.
Do not defrostlessthan 2 oz. patties.
Depress center whenfreezing.
Place on a microwavable roasting rack.
Place on a microwavable roasting rack.
Place ina microwavable baking dish.
Place on a microwavable roasting rack.
Place on a microwavable roasting rack.
Place on a microwavable roasting rack.
Place ina microwavable baking dish.
Place on a microwavable roasting rack.
PORK
Chops
(1/2inch thick)
Hot Dogs
Spareribs
Country-style
Ribs
Sausage,
Links
Sausage,
Bulk
Loin Roast,
Boneless
18
MEAT
MEAT
MEAT
MEAT
MEAT
MEAT
Separate and rearrange.
Separate and rearrange.
Turn over. Coverwarm areas with
aluminum foil,
Separate and rearrange.
Removethawedportbns withfork.
Turnover.Returnremaindertooven.
Turn over. Coverwarm areas with
aluminum foil,
Place on a microwavable roasting rack.
Place on a microwavable roasting rack.
Place on a microwavable roasting rack.
Place on a microwavable roasting rack.
Place in amicrowavable baking dish.
Place on a microwavable roasting rack.
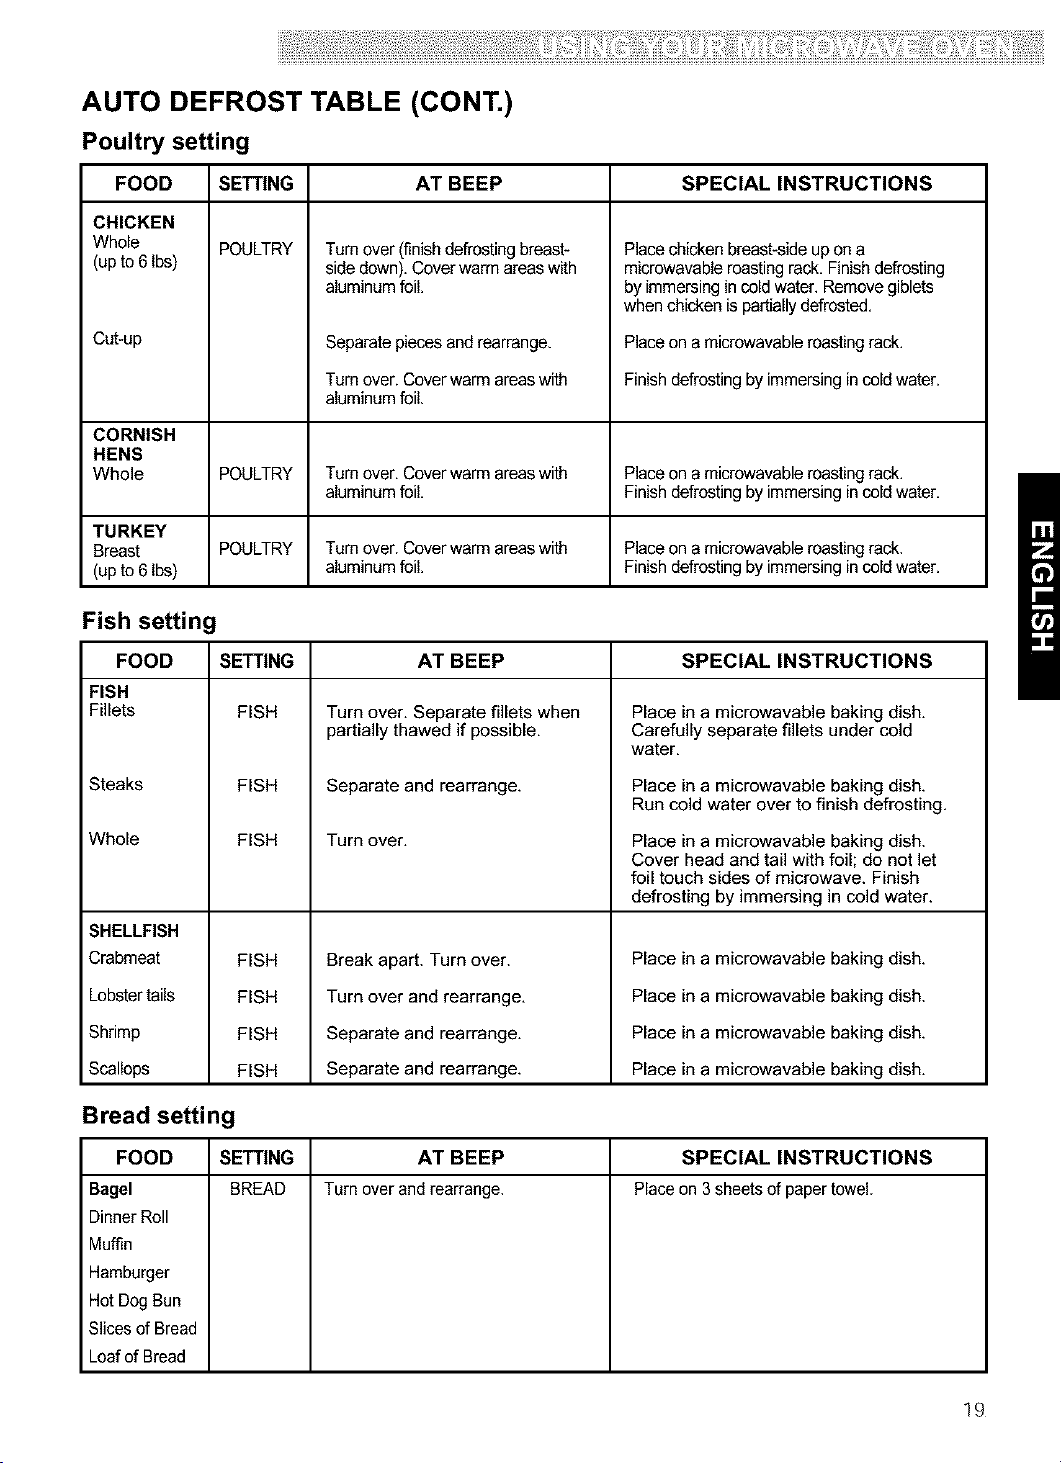
AUTO DEFROST TABLE (CONT.)
Poultry setting
FOOD AT BEEP SPECIAL INSTRUCTIONS
CHICKEN
Whole
(up to 6 Ibs)
Cutup
CORNISH
HENS
Whole
TURKEY
Breast
(up to 6 Ibs)
SETTING
POULTRY
POULTRY
POULTRY
Turn over (finish defrostingbreast-
side down). Cover warm areas with
aluminum foil.
Separate pieces andrearrange,
Turn over. Cover warm areas with
aluminum foil.
Turn over. Cover warm areas with
aluminum foil.
Turn over. Cover warm areas with
aluminum foil.
Place chickenbreast-side upona
microwavable roasting rack, Finish defrosting
byimmersing in cold water. Remove giblets
when chicken is partiallydefrosted.
Place on a microwavable roasting rack.
Finishdefrosting by immersing incold water.
Place on a microwavable roasting rack.
Finishdefrosting by immersing incold water.
Place on a microwavable roasting rack.
Finishdefrosting by immersing incold water.
Fish setting
FISH
Fillets
Steaks
Whole
SHELLFISH
Crabmeat
Lobster tails
SETTINGFOOD
FISH
FISH
FISH
FISH
FISH
Turn over, Separate fillets when
partially thawed if possible,
Separate and rearrange.
Turn over,
Break apart. Turn over.
Turn over and rearrange,
AT BEEP
SPECIAL INSTRUCTIONS
Place in a microwavable baking dish.
Carefully separate fillets under cold
water,
Place in a microwavable baking dish.
Run cold water over to finish defrosting,
Place in a microwavable baking dish.
Cover head and tail with foil; do not let
foil touch sides of microwave. Finish
defrosting by immersing in cold water.
Place in a microwavable baking dish.
Place in a microwavable baking dish.
Shrimp
Scallops
Bread setting
FOOD
Bagel
Dinner Roll
Muffin
Hamburger
Hot Dog Bun
Slices of Bread
Loaf of Bread
FISH
FISH
Separate and rearrange.
Separate and rearrange.
Place in a microwavable baking dish.
Place in a microwavable baking dish.
SETTING AT BEEP SPECIAL INSTRUCTIONS
BREAD Turnoverandrearrange, Placeon 3sheetsofpapertowel
19
•When using Auto Defrost, the weightto be entered
isthe netweight inpounds andtenths of pounds
(theweight of the food minusthe container).
• Before starting,make sure you have removed any
of the metal twist-ties whichoftencome with frozen
food bags, and replace them with strings or elastic
bands.
• Open containers such as cartons before they are
placedinthe oven.
•Always slit or pierceplastic pouchesorpackaging.
• If food is foil wrapped, remove foiland placeitina
suitable container.
• Slitthe skins, ifany,of frozenfood such as
sausage.
• Bend plasticpouchesof food to ensure even
defrosting.
•Always underestimate defrostingtime. Ifdefrosted
food is still icy inthe center, returnit to the
microwave oven formore defrosting.
•The length of defrostingtime varies accordingto
how sooidlythefood isfrozen.
•The shapeof the package affects how quickly food
willdefrost. Shallow packages will defrostmore
quicklythan adeep block.
•As food begins to defrost, separate the pieces.
Separated pieces defrostmore easily.
•Use small pieces of aluminumfoil to shield parts
offood such as chicken wings, legtips, fishtails,or
areasthat startto get warm. Make sure the foildoes
nottouch the sides,top,or bottom oftheoven.The
foOlcan damage the oven lining.
•For better results, let foodstand after defrosting.
(For more informationon standing time,see the
"Microwave CookingTips" section.)
•Turn over food during defrosting orstandingtime.
Breakapart and remove food as required.
You can safely keep hot, cookedfood warm in your
microwave oven for up to 99 minutes, 99 seconds
(about 1 hour, 40 minutes).You can use HOOdWarm
by itself,ortoautomaticallyfoolowa cooking cycle.
Example for holdwarm.
Touch:
I.Q
WArM
2. HOLD WARM
Atthe end ofthe holdwarm, four toneswill
sound.
To make Hold Warm
automaticallyfollow another cycle:
•While you are touching incooking instructions,
touch HOLD WARM before touching START.
•When the last cooking cycle is over, you will hear
two tones."HOOdWarm" will come on while the oven
continues to run.
•You can set Hold Warm to foolowAuto Defrost,
Cook, or multi-cyclecooking.
NOTES:
• Hold Warm operatesfor up to 99 minutes, 99
seconds.
•Opening the oven door cancels HoldWarm.
Close thedoor andtouch HoldWarm,then touch
START ifadditional HoldWarm timeisdesired.
• Food cooked covered should be coveredduring
HOOdWarm.
• Pastry items (pies,turnovers,etc.)should be
uncovered duringHOOdWarm.
•Complete meals kept warm on a dinner plate
should be covered during Hold Warm.
• Do not use more than onecomplete Hold Warm
cycle (about I hour, 40 minutes).The quality of
some foods will suffer with extended time.
Display Shows:
HOLD WARM
TOUCH START
2O

SURE SIMMER
Your microwave oven lets you simmer soups,
casseroles, stews, and other liquid foods. All you do
is set a simmer time and your oven will bring your
food to a boil and then simmer it for the time you
specify.
NOTES:
•You cannot change the cook power or aloneness
for Sure Simmer.
•This function uses the sensor. The sensor needs
2 minutes 30 seconds to warm up after the oven
is connected to power or after a power failure.
If you start Sure Simmer during the warm up,
microwave energy will not be turned on until the
sensor is warm.
•When cooking vegetables, increase amount of
water to 1/4 to 1/2 cup (60 to 125ml).
• Cover dish with a hard lid, i.e., the lid that comes
with the dish or a dinner plate. Do not use plastic
wrap.
Touch: Display Shows:
1, Place the food in the oven and
closethe door,
When simmering foods like pasta use a container
that can hold enough water to cover the food
completely when cooking, such as a 3-quart (12 cup)
casserole with a lid. When cooking pasta or noodles,
add 1 tbsp (15ml) oil to the water before boiling.
Use the following method:
Place container with water in the oven and follow
steps 2~4, setting the simmer time at 1 second. At
the end of the signal, place the food in the water and
stir until completely covered by water. Cover. Repeat
steps 2~4, setting the simmer time you want.
Changing instructions you can change the simmering
time while simmering by repeating steps 2, 3, and 4.
2.
O SURE SIMMER
SURE ENTER COOKING
S_MMER
TIME
3. OOOO TOUCH START
3 0 0 0 30:00
Touch Number buttons
to enter the simmer
time. Example for 30
minutes.
.
SURE SIMMER
(SENSOR)
The ovenwillbringthe
foodto aboil.
The food will then simmer for the time you set.
21
 Loading...