

Page 1

_E L ! T E_/o
ULTRA WAVETMMicrowave Hood
Combination
Use & Care Guide
Combinacibn Microondas Campana
de ULTRA WAVET.
Gu_a de uso y cuidado
Models/Modelos
\
721.63662 / 721.63663
721.63664 / 721.63669
I
I
3828W5A2894 Sears, Roebuck and Co., Hoffman Estates, IL 60179 www.sears.com
Page 2
Table of
Microwave Hood
Contents
Warranty ........................................................... 2
Sears Service .................................................. 3
Microwave Oven Safety .................................. 4
Getting to Know Your
Microwave Oven .............................................. 7
How your kenmore ULTRA WAVE TM
microwave hood combination works ............... 7
Radio interference .......................................... 7
Testing your microwave oven ......................... 8
Testing your dinnerware or cookware ............ 8
Operating safety precautions .......................... 8
Electrical connection ...................................... 8
Microwave oven features ............................... 9
Control panel features ................................... 10
Using Your Microwave Oven ....................... 12
Audible Signals ............................................. 12
Interrupting Cooking ...................................... 12
Clock ............................................................. 12
Child Lock ..................................................... 12
Timer ............................................................. 13
Cooktop Light ................................................ 14
Exhaust Fan .................................................. 14
Add Minute .................................................... 14
Timed Cooking .............................................. 15
Multi-stage Cooking ...................................... 15
Microwave Power Levels .............................. 16
Auto Defrost .................................................. 17
Auto defrost table .......................................... 18
Auto defrost table (Cont.) .............................. 19
Defrosting tips .............................................. 20
Hold Warm .................................................... 20
Sure Simmer ................................................. 21
Using Sensor Cooking .................................. 22
Sensor Cooking ............................................ 22
Potato (Example) .......................................... 22
More/Less ..................................................... 22
Sensor Cooking Table .................................. 23
Auto Cook, Auto Reheat ............................... 24
Auto Cook Table, Auto Reheat Table ........... 25
Soften, Soften Table ..................................... 26
Melt, Melt Table ............................................ 26
Caring for Your Microwave Oven ................. 27
Caring for the filters ....................................... 28
Replacing the cooktop and oven lights .........29
Microwave Cooking Tips ............................... 31
Questions and Answers ................................ 33
Troubleshooting ............................................. 34
Service ............................................. Back cover
2
Combination
Warranty
FULL ONE-YEAR WARRANTY ON
MICROWAVE HOOD COMBINATION
For one year from the date of purchase, if this
Kenmore Microwave Hood Combination fails due to
a defect in material or workmanship,Sears will
repair itfree of charge.
FULL FIVE-YEAR WARRANTY ON THE
MAGNETRON
For five years from the date ofpurchase, if the
magnetron in this Kenmore Microwave Hood
Combination fails due to a defect in material or
workmanship, Sears will repair itfree of charge.
The above warranty coverage applies only to
Microwave Hood Combinations which are used for
private household purposes.
WARRANTY SERVICE IS AVAILABLE BY
SIMPLY CONTACTING SEARS SERVICE AT
1-800-4-MY-HOME _
This warranty applies only while this product is in
use in the United States.
This warranty gives you specific legal rights, and
you may also have other rights which vary from
state to state.
Sears, Roebuck and Co.,
Dept. 817WA,
Hoffman Estates, IL 60179
For service call:
1-800-4-MY-HOME _
(1-800-469-4663)
Please record your model's information.
Whenever you call to request service for your
appliance, you need to know your complete model
number and serial number. You can find this
informationon the model and serial number
label/plate at the upper side of cavity front inyour
Microwave oven. Also, record the other information
shown below.
Model Number
Serial Number
Purchase Date
Page 3
Sears Service
Master Protection Agreements
Congratulations on making a smart purchase.
Your new Kenmore ®product is designed and manufactured for years of dependable operation.
But like all products, it may require preventive maintenance or repair from time to time.
That's when having a Master Protection Agreement can save you money and aggravation.
Purchase a Master Protection Agreement now and protect yourself from unexpected hassle
and expense.
The Master Protection Agreement also helps extend the life of your new product. Here's
what's included in the Agreement:
Expert service by our 12,000 professional repair specialists
[_ Unlimited service and no charge for parts and labor on all covered repairs
"No-lemon" guarantee - replacement of your covered product if four or more product failures
occur within twelve months
Product replacement if your covered product can't be fixed
[_ Annual Preventive Maintenance Check at your request- no extra charge
Fast help by phone - phone support from a Sears technician on products requiring in-home
repair, plus convenient repair scheduling
[_ Power surge protection against electrical damage due to power fluctuations
[_ Rental reimbursement if repair of your covered product takes longer than promised
Once you purchase the Agreement, a simple phone call is all that it takes for you to schedule service.
You can call anytime day or night, or schedule a service appointment online.
Sears has over 12,000 professional repair specialists, who have access to over 4.5 million quality
parts and accessories. That's the kind of professionalism you can count on to help prolong the life of
your new purchase for years to come. Purchase your Master Protection Agreement today!
Some limitations and exclusions apply. For prices and additional information call 1-800-827-
6655.
Sears Installation Service
For Sears professional installation of home appliances, garage door openers, water heaters, and
other major home items, in the U.S.A. call
1-800-4-MY-HOME ®
Page 4
Microwave Oven Safety
Your safety and the safety of others are very important.
We have provided many important safety messages in this manual and on your appliance.
Always read and obey all safety messages.
This is the safety alert symbol.
This symbol alerts you to hazards that can kilt or hurt you and others.
All safety messages will be preceded by the safety alert symbol and the word
"DANGER" or "WARNING." These words mean:
You will be killed or seriously injured
if you don't follow immediately instructions.
You can be killed or seriously injured
if you don't follow instructions.
Atl safety messages will identify the hazard, tell you how to reduce the chance of injury, and tell
you what can happen if the instructions are not followed.
IMPORTANT SAFETY INSTRUCTIONS
When using electrical appliances basic safety precautions should be followed, including the
following:
WARNING: To reduce the risk of burns,
electric shock, fire, injury to persons, or
exposure to excessive microwave energy:
• Read all instructions before using the
microwave oven.
• Read and follow the specific
"PRECAUTIONS TO AVOID POSSIBLE
EXPOSURE TO EXCESSIVE MICROWAVE
ENERGY" found in this section.
• The microwave oven must be grounded.
Connect only to properly grounded outlet.
See "GROUNDING INSTRUCTIONS" found
at the end of this section.
• Install or locate the microwave oven only in
accordance with the provided installation
instructions.
Some products such as whole eggs in the
shell and sealed containers - for example,
closed glass jars - are able to explode and
should not be heated in the microwave oven.
• Use the microwave oven only for its intended
use as described in this manual. Do not use
corrosive chemicals or vapors in the
microwave oven. This type of oven is
specifically designed to heat, cook, or dry
food. It is not designed for industrial or
laboratory use.
• As with any appliance, close supervision is
necessary when used by children.
• Do not operate the microwave oven if it has
a damaged cord or plug, if it is not working
propedy, or if it has been damaged or
dropped.
SAVE THESEINSTRUCTIONS
4
Page 5
IMPORTANT SAFETY INSTRUCTIONS
• Themicrowaveoven shouldbeservicedonlyby
qualifiedservicepersonnel.Callanauthorized
servicecompanyfor examination,repair,or
adjustment.
•Seedoorsurfacecleaninginstructionsinthe "Caring
forYour MicrowaveOven"section.
•Toreducetheriskof fire intheoven cavity:
- Donotovercookfood.Carefullyattendthe
microwaveovenwhen paper,plastic,or other
combustiblematerialsareplacedinsidetheoven to
facilitatecooking.
- Removewiretwist-tiesfrompaperorplasticbags
beforeplacingbagsinoven.
- Ifmaterialsinsidethe ovenignite,keepoven door
dosed, tam ovenoff,and disconnectthebower
cord,or shutoff boweratthefuseorcircuitbreaker
panel.
- Donot usethe cavityforstoragepurposes.Donot
leavepaperproducts,cookingutensils,orfood in
thecavitywhen notinuse.
•Suitablefor useabove bothgasandelectriccooking
equipment.
•Intendedto beused aboverangeswithmaximum
widthof36 inches(91cm).
•CleanVentilatingHoodsFrequently- Greaseshould
notbe allowedto accumulateon hoodor filter.
•Whenflamingfoodsunderthe hood,tum thefanon.
•Usecarewhen cleaningthe vent-hoodfilter.
Corrosivecleaningagents,suchas lye-basedoven
cleaners,maydamagethefilter.
•Oversizedfoodsor oversizedmetalutensilsshould
notbe insertedinthe microwaveovenasthey may
createafireor riskof electricshock.
•Donot dean with metalscouringpads.Piecescan
burnoffthe padandtouchelectricalpartsinvolvinga
riskofelectricshock.
• Do not store anything directly on topof the
microwave oven when the microwave oven isin
operation.
• Do not cover or block any openings on the
microwave oven.
• Do not store this microwave oven outdoors. Do not
use the microwave oven near water for example,
near a kitchen sink, in a wet basement, near a
swimming pool, or similar location.
• Do not immerse cord or plug in water.
• Keep cord away from heated surfaces.
• Do not let cord hang over edge of table or counter.
• Do not mount over a sink.
• Do not cover racks or any other part of the oven with
metal foil. This will cause overheating of the oven.
• Liquids such as water, coffee, or tea are able to
be overheated beyond the boiling point without
appearing to be boiling due to surface tension of
the liquid. Visible bubbling or boiling when the
container is removed from the microwave oven is
not always present. This could result in very hot
liquids suddenly boiling over when a spoon or
other utensil is inserted into the liquid. To reduce
the risk of injury to persons.
1) Do not overheat the liquid.
2) Stir the liquid both before and halfway through
heating it.
3) Do not use straight-sided containers with
narrow necks.
4) After heating, allow the container to stand
in the microwave oven for a short time before
removing the container.
5) Use extreme care when inserting a spoon or
other utensil into the container.
SAVE THESE INSTRUCTIONS
Page 6
PRECAUTIONS TO AVOID POSSIBLE
EXPOSURE TO EXCESSIVE MICROWAVE
ENERGY
(a) Do not attempt to operate this oven with the
door open since open - door operation can
result in harmful exposure to microwave
energy. It is important not to defeat or tamper
with the safety interlocks.
(b) Do not place any object between the oven
front face and the door or allow soil or cleaner
residue to accumulate on sealing surfaces.
Electrical
requirements
Observe all governing codes and
ordinances. A 120 Volt, 60 Hz, AC only,
20 amp fused electrical supply is
required. (A time-delay fuse is recommended.)
It is recommended that a separate circuit
serving only this appliance be provided.
(c) Do not operate the oven if it is damaged. It is
particularly important that the oven door close
properly and that there is no damage to the:
(1) Door (bent),
(2) Hinges and latches (broken or loosened),
(3) Door seals and sealing surfaces.
(d) The oven should not be adjusted or repaired
by anyone except properly qualified service
personnel.
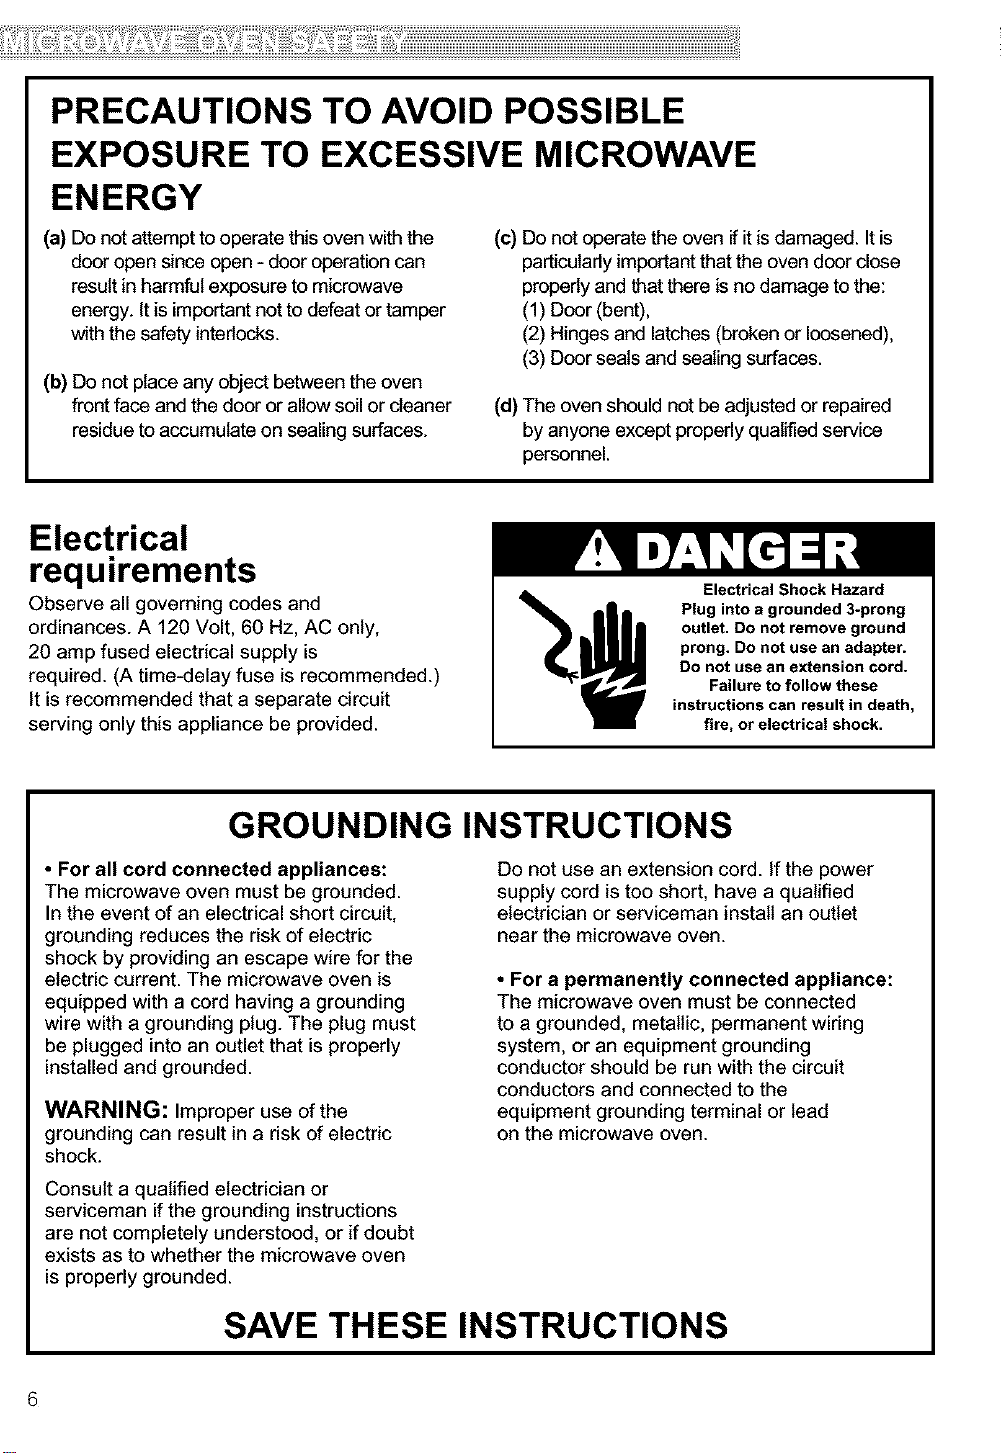
Electrical Shock Hazard
Plug into a grounded 3-prong
outlet. Do not remove ground
prong. Do not use an adapter.
Do not use an extension cord.
Failure to follow these
instructions can result in death,
fire, or electrical shock.
GROUNDING INSTRUCTIONS
• For all cord connected appliances:
The microwave oven must be grounded.
In the event of an electrical short circuit,
grounding reduces the risk of electric
shock by providing an escape wire for the
electric current. The microwave oven is
equipped with a cord having a grounding
wire with a grounding plug. The plug must
be plugged into an outlet that is properly
installed and grounded.
WARNING: Improper use of the
grounding can result in a risk of electric
shock.
Consult a qualified electrician or
serviceman if the grounding instructions
are not completely understood, or if doubt
exists as to whether the microwave oven
is properly grounded.
SAVE THESE INSTRUCTIONS
6
Do not use an extension cord. If the power
supply cord is too short, have a qualified
electrician or serviceman install an outlet
near the microwave oven.
• For a permanently connected appliance:
The microwave oven must be connected
to a grounded, metallic, permanent wiring
system, or an equipment grounding
conductor should be run with the circuit
conductors and connected to the
equipment grounding terminal or lead
on the microwave oven.
Page 7
Gettingto Know Your
MicrowaveOven
This section discusses the concepts behind microwave cooking. It also shows you the basics you need to know
to operate your microwave oven. Please read this informationbefore you use your oven.
HOW YOUR KENMORE ULTRA WAVE TM MICROWAVE
HOOD COMBINATION WORKS
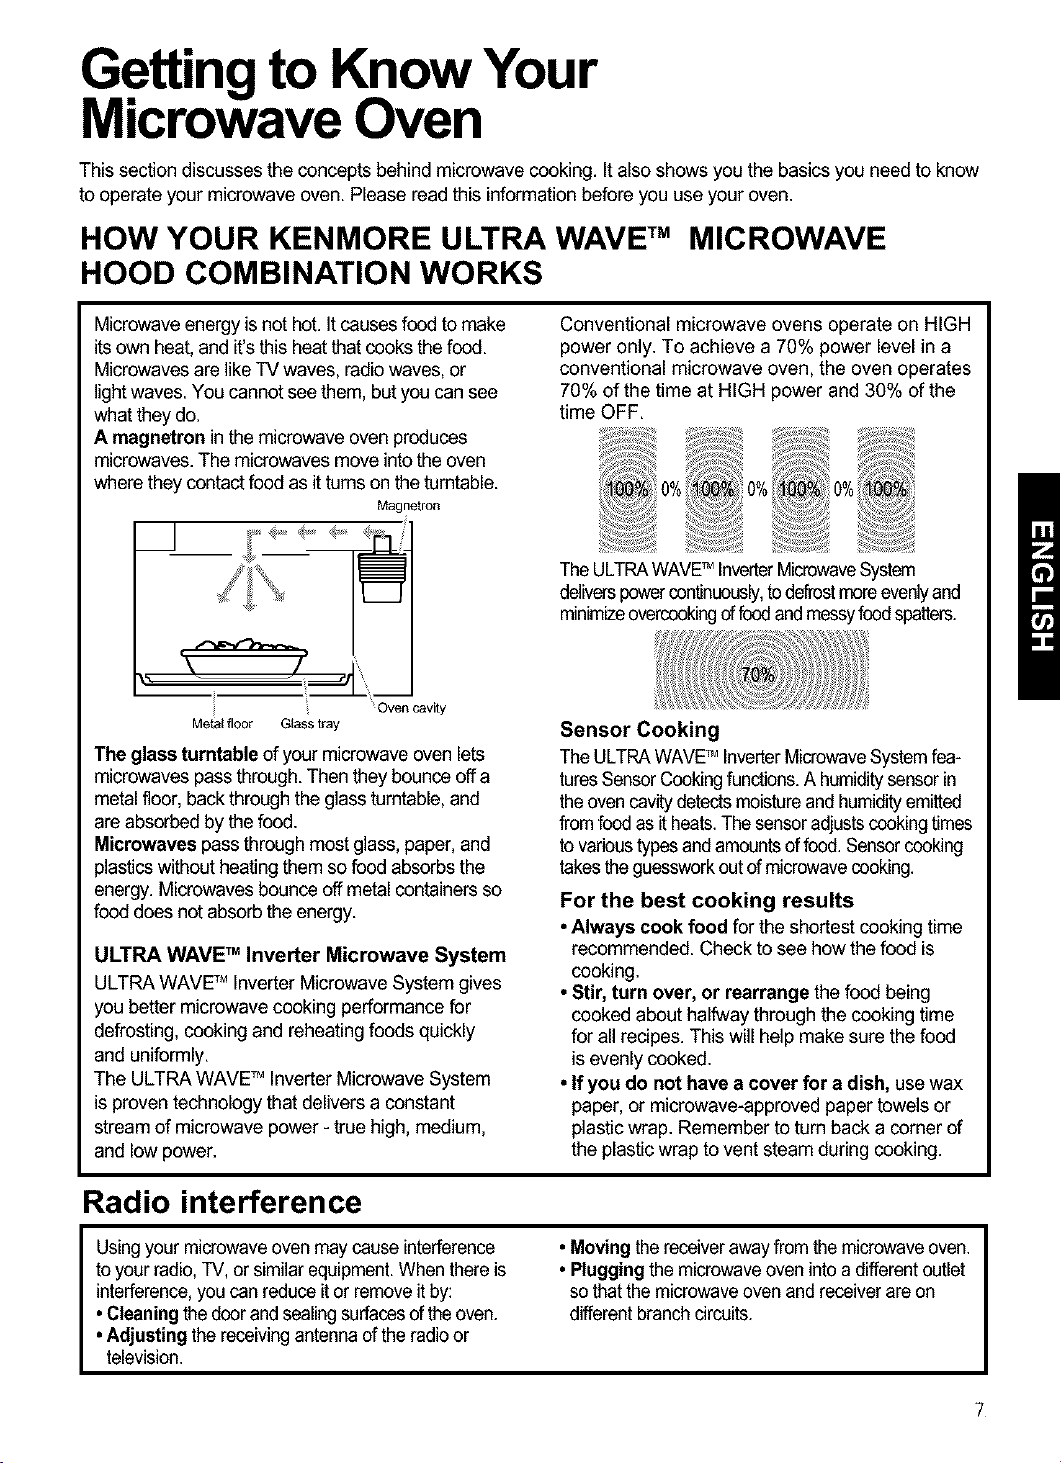
Microwave energy is not hot. It causesfood to make
itsown heat, and it'sthis heatthat cooks the food.
Microwavesare like"iV waves, radio waves, or
lightwaves. You cannot see them, but you can see
what they do.
A magnetron in the microwave oven produces
microwaves. The microwaves move into the oven
where they contact food as itturns on the turntable.
Magnetron
Oven cavity
Metal floor G_asstray
The glass turntable of your microwave oven lets
microwaves pass through. Then they bounce off a
metal floor, back through the glass turntable, and
are absorbed by the food.
Microwaves pass through most glass, paper, and
plasticswithout heating them so food absorbs the
energy. Microwaves bounce off metal containers so
food does not absorb the energy.
ULTRA WAVE TM Inverter Microwave System
ULTRA WAVETM Inverter Microwave System gives
you better microwave cooking performance for
defrosting, cooking and reheating foods quickly
and uniformly.
The ULTRA WAVETM Inverter Microwave System
is proven technology that delivers a constant
stream of microwave power - true high, medium,
and low power.
Conventional microwave ovens operate on HIGH
power only. To achieve a 70% power level in a
conventional microwave oven, the oven operates
70% of the time at HIGH power and 30% of the
time OFF.
TheULTRAWAVETM InverterMicrowaveSystem
deliverspowercontinuously,todefrostmoreevenlyand
minimizeovercookingoffoodandmessyfoodspatters.
Sensor Cooking
The ULTRAWAVETM InverterMicrowaveSystemfea-
turesSensorCookingfunctions.A humiditysensorin
theoven cavitydetectsmoistureand humidityemitted
fromfoodas itheats.The sensoradjustscookingtimes
to varioustypesand amountsoffood. Sensorcooking
takesthe guessworkoutof microwavecooking.
For the best cooking results
•Always cook food for the shortest cooking time
recommended. Check to see how the food is
cooking.
•Stir, turn over, or rearrange the food being
cooked about halfway through the cooking time
for all recipes. This will help make sure the food
is evenly cooked.
•If you do not have a cover for a dish, use wax
paper, or microwave-approved paper towels or
plastic wrap. Remember to turn back a corner of
the plastic wrap to vent steam during cooking.
Radio interference
Usingyour microwaveoven may causeinterference • Movingthereceiverawayfrom themicrowaveoven.
to your radio,TV, or similar equipment.Whenthereis • Plugging the microwaveoven into a differentoutlet
interference,youcan reduceitor removeitby: so thatthe microwaveoven and receiverare on
•Cleaning the doorand sealingsurfacesoftheoven. differentbranch circuits.
•Adjusting the receivingantenna ofthe radioor
television.
7
Page 8
Testing your microwave oven
glasscontainerintheoven.Closethe door. Whenthe timeisup,thewatershouldbe heated.
I To testtheovenputabout 1cupofcold waterina Makesureitlatches.Cookat 100%bowerfor 1minute.
Testing your dinnerware or cookware
Test dinnerware or cookware before using. To
test a dish for safe use, putit into the oven with a
cup of water besideit.Cook at 100% cook power
for one minute.If the dish gets hot, do not use it.
Some dishes (melamine, some ceramic
dinnerware, etc.) absorb microwave energy,
Operating safety precautions
• Never lean onthe door or allow a child to swing
on it whenthe door is open.
• Use hot pads. Microwave energy does not heat
containers, butthe heat from the food can make
the container hot.
• Do not use newspaper or other printed paper in
the oven.
• Do not dry flowers, fruit, herbs, wood, paper,
gourds, or clothes in the oven.
• Do not start a microwave oven when it isempty.
Product life may be shortened. Ifyou practice
programming the oven, put a container ofwater in
the oven. It is normalfor the oven door to look
wavy after the oven hasbeen running for a while.
• Do not try to melt paraffinwax in the oven.
Paraffin wax will notmelt ina microwave oven
because it allows microwaves to pass through it.
• Do not operate the microwave oven unlessthe
glass turntable is securelyin placeand can move
freely. The turntable can move in eitherdirection.
Make sure the turntable iscorrect-side up in the
oven. Handle your turntable with care when
removing it from the ovento avoid possibly
breaking it.Ifyour turntable cracks or breaks,
contact your dealer for a replacement.
• When you use a browning dish, the browning
dish bottommust be atleast 3/16 inchabovethe
turntable. Follow the directions supplied with the
browningdish.
• Never cook or reheat awhole egg inside the
becoming too hotto handle and slowing cooking
times. Cooking inmetal containers not designed for
microwave use could damage the oven, as could
containerswith hidden metal (twist-ties,foil lining,
staples, metallicglaze or trim).
shell. Steam buildup in whole eggs may cause
them to burst, and possibly damage the oven.
Slice hard-boiled eggs before heating. In rare
cases, poached eggs have been known to
explode. Cover poached eggs and allow a
standing time of one minute before cutting into
them.
•For best results, stir any liquid several times
during heating or reheating. Liquids heated in
certain containers (especiallycontainers shaped
likecylinders) may become overheated.The liquid
may splash out with a loud noiseduringor after
heating or when adding ingredients (coffee
granules, tea bags, etc.). This can harm the oven.
•Microwaves may not reach thecenter ofa roast.
The heat spreads to the center from the outer,
cooked areasjust as inregularoven cooking. This
isone of the reasons for letting some foods (for
example, roasts or baked potatoes) stand for a
while after cooking,or for stirring some foods
during the cooking time.
•Do not deep fry in the oven. Microwavable
utensilsare not suitable and itisdifficult to
maintain appropriate deep-frying temperatures.
•Do not overcook potatoes. At the end ofthe
recommended cooking time, potatoes should be
slightlyfirm because they will continue cooking
during standing time. After microwaving, let
potatoes stand for 5 minutes. They will finish
cooking while standing.
Electrical connection
If your electric power line or outletvoltage is
less than 110volts, cooking times may be longer.
8
Have a qualified electrician checkyour electrical
system.
Page 9
Microwave oven features
®® ®
oo 0 o _ooo o#-
Your microwave oven is designed to make your
cooking experience as enjoyable and productive
as possible. To get you up and running quickly, the
following is a list of the oven's basic features:
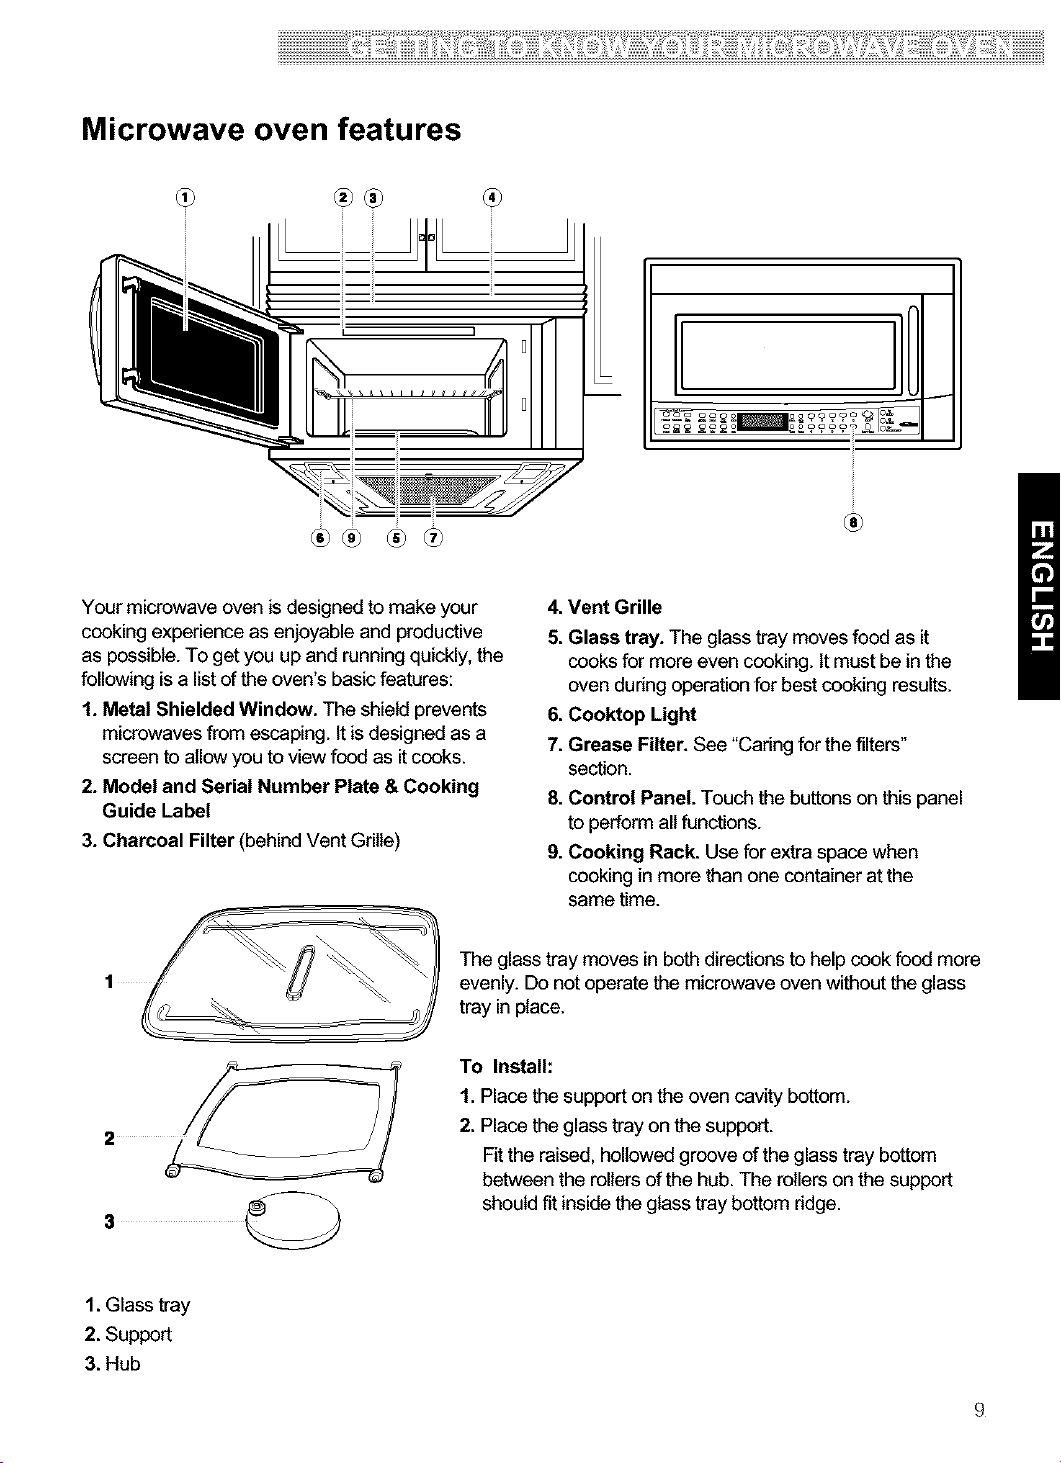
1. Metal Shielded Window. The shield prevents
microwaves from escaping. It is designed as a
screen to allow you to view food as it cooks.
2. Model and Serial Number Plate & Cooking
Guide Label
3. Charcoal Filter (behind Vent Grille)
1
The glass tray moves in both directions to help cook food more
evenly. Do not operate the microwave oven without the glass
tray in place.
To Install:
1. Place the support on the oven cavity bottom.
2. Place the glass tray on the support.
Fit the raised, hollowed groove of the glass tray bottom
between the rollers of the hub. The rollers on the support
should fit inside the glass tray bottom ridge.
4. Vent Grille
5. Glass tray. The glass tray moves food as it
cooks for more even cooking. It must be in the
oven during operation for best cooking results.
6. Cooktop Light
7. Grease Filter. See "Caring for the filters"
section.
8. Control Panel. Touch the buttons on this panel
to perform all functions.
9. Cooking Rack. Use for extra space when
cooking in more than one container at the
same time.
1. Glass tray
2. Support
3. Hub
Page 10
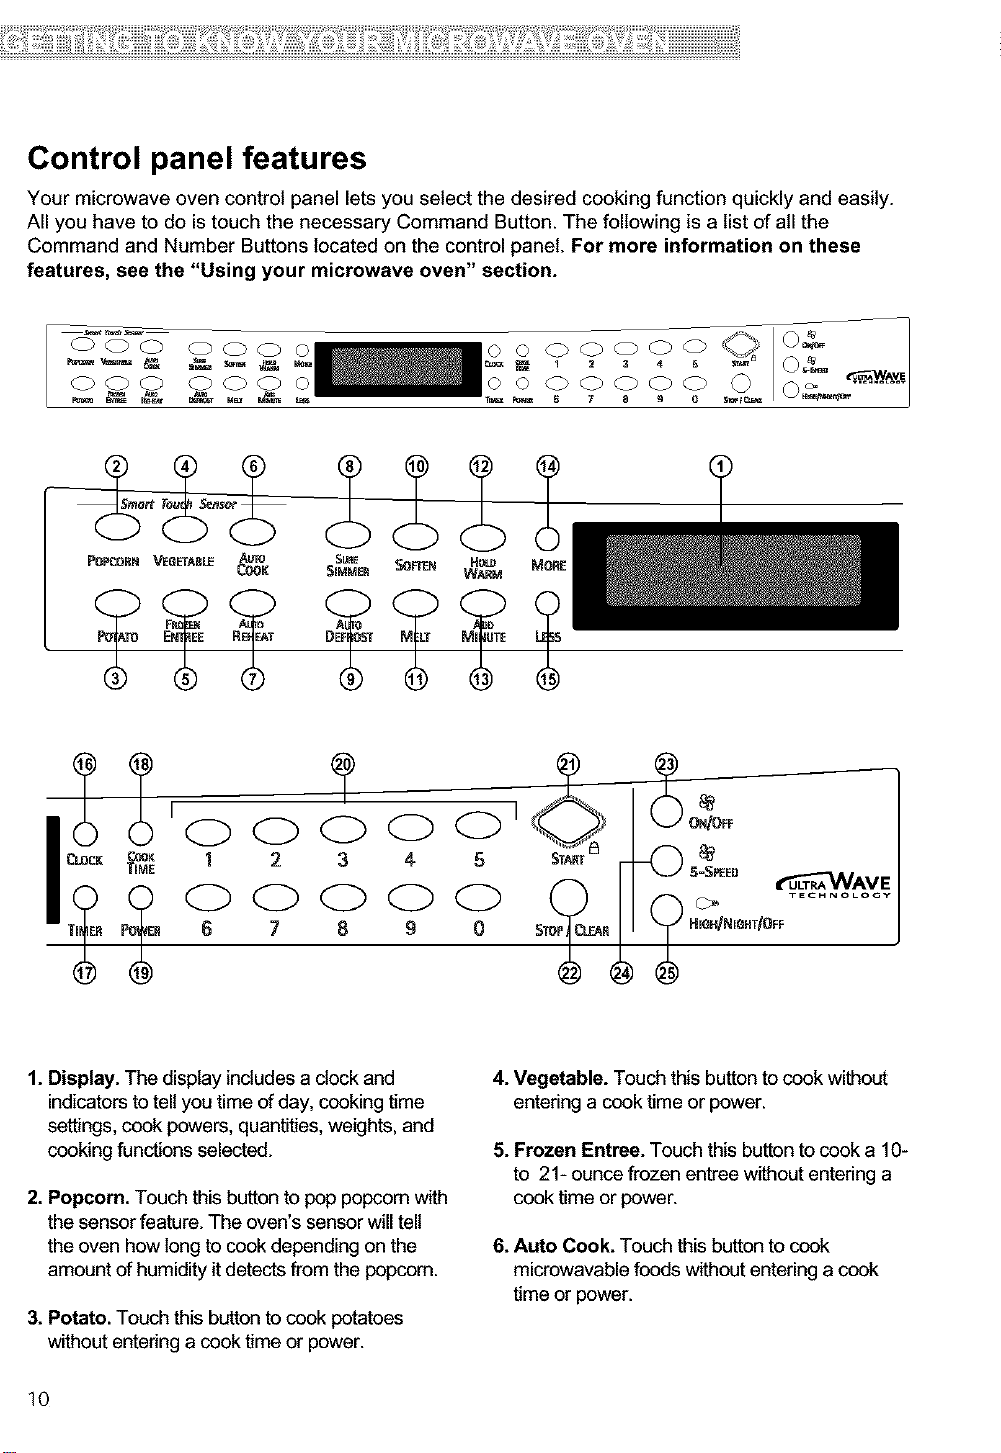
Control panel features
Your microwave oven control panel lets you select the desired cooking function quickly and easily.
All you have to do is touch the necessary Command Button. The following is a list of all the
Command and Number Buttons located on the control panel. For more information on these
features, see the "Using your microwave oven" section.
OOO
000
POPO_RN VE6ETAB[E ALnO SURE
oooo
O(Z) O o
C_Y_K SIMMER _REN Heu_ MORE
W_M
1. Display. The display includes a clock and
indicatorsto tellyou time of day, cooking time
settings, cook powers, quantities, weights, and
cooking functions selected.
2. Popcorn. Touch this button to pop popcorn with
the sensor feature. The oven's sensor will tell
the oven how long to cook depending on the
amount of humidity it detects from the popcorn.
3. Potato. Touch this button to cook potatoes
without entering a cook time or power.
10
4. Vegetable. Touch this button to cook without
entering a cook time or power.
5. Frozen Entree. Touch this button to cook a 10-
to 21- ounce frozen entree without entering a
cook time or power.
6. Auto Cook. Touch this button to cook
microwavable foods without entering a cook
time or power.
Page 11
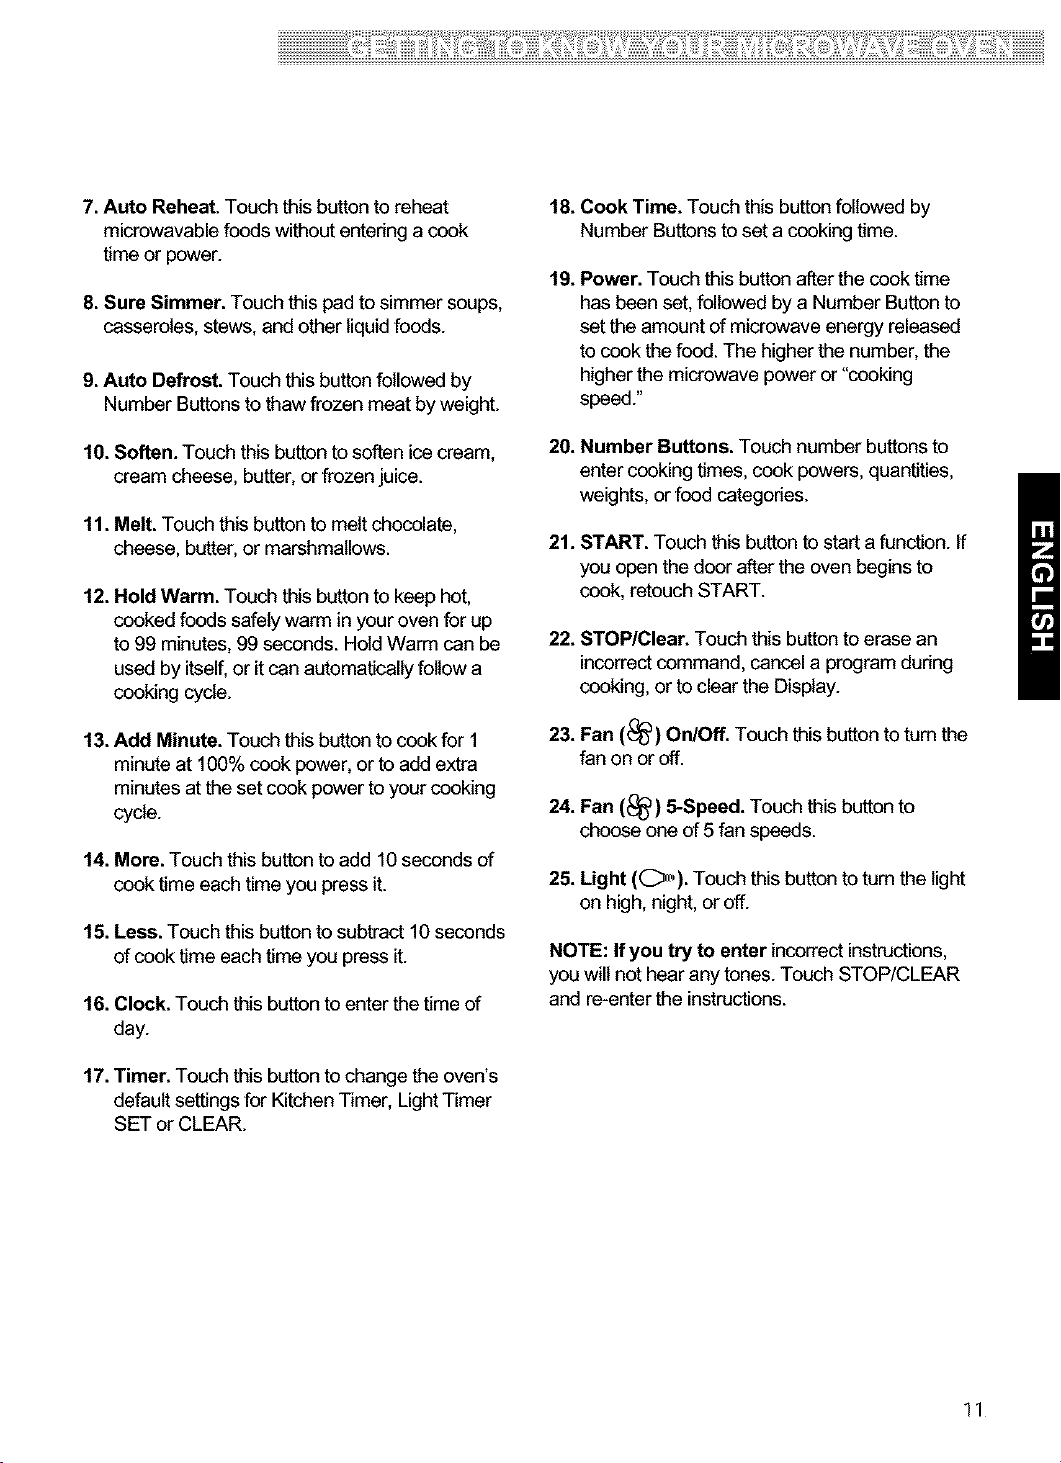
7.AutoReheat.Touchthisbuttontoreheat
microwavablefoodswithoutenteringacook
timeorpower.
8.SureSimmer.Touchthispadtosimmersoups,
casseroles,stews,andotherliquidfoods.
9. Auto Defrost. Touch this button followed by
Number Buttons to thaw frozen meat by weight.
18. Cook Time. Touch this button followed by
Number Buttons to set a cooking time.
19. Power. Touch this button after the cook time
has been set, followed by a Number Button to
set the amount of microwave energy released
to cook the food. The higher the number, the
higher the microwave power or "cooking
speed."
10. Soften. Touch this button to soften ice cream,
cream cheese, butter, or frozen juice.
11. Melt. Touch this button to melt chocolate,
cheese, butter, or marshmallows.
12. Hold Warm. Touch this button to keep hot,
cooked foods safely warm in your oven for up
to 99 minutes, 99 seconds. Hold Warm can be
used by itself, or it can automatically follow a
cooking cycle.
13. Add Minute. Touch this button to cook for 1
minute at 100% cook power, or to add extra
minutes at the set cook power to your cooking
cycle.
14. More. Touch this button to add 10 seconds of
cook time each time you press it.
15. Less. Touch this button to subtract 10 seconds
of cook time each time you press it.
16. Clock. Touch this button to enter the time of
day.
20. Number Buttons. Touch number buttons to
enter cooking times, cook powers, quantities,
weights, or food categories.
21. START. Touch this button to start a function. If
you open the door after the oven begins to
cook, retouch START.
22. STOP/Clear. Touch this button to erase an
incorrect command, cancel a program during
cooking, or to clear the Display.
23. Fan (_) On/Off. Touch this button to turn the
fan on or off.
24. Fan (_) 5-Speed. Touch this button to
choose one of 5 fan speeds.
25. Light (_,). Touch this button to turn the light
on high, night, or off.
NOTE: If you try to enter incorrect instructions,
you will not hear any tones. Touch STOP/CLEAR
and re-enter the instructions.
17. Timer. Touch this button to change the oven's
default settings for Kitchen Timer, Light Timer
SET or CLEAR.
11
Page 12
Using Your Microwave
ven
This section gives you instructions for operating
each function. Please read these instructions
carefully.
AUDIBLE SIGNALS
Audible signals are available to guide you when
setting and using your oven:
• A programming tone will sound each time
you touch a pad.
• Seven tones signal the end of a Kitchen Timer
countdown.
• Four tones signal the end of a cooking cycle.
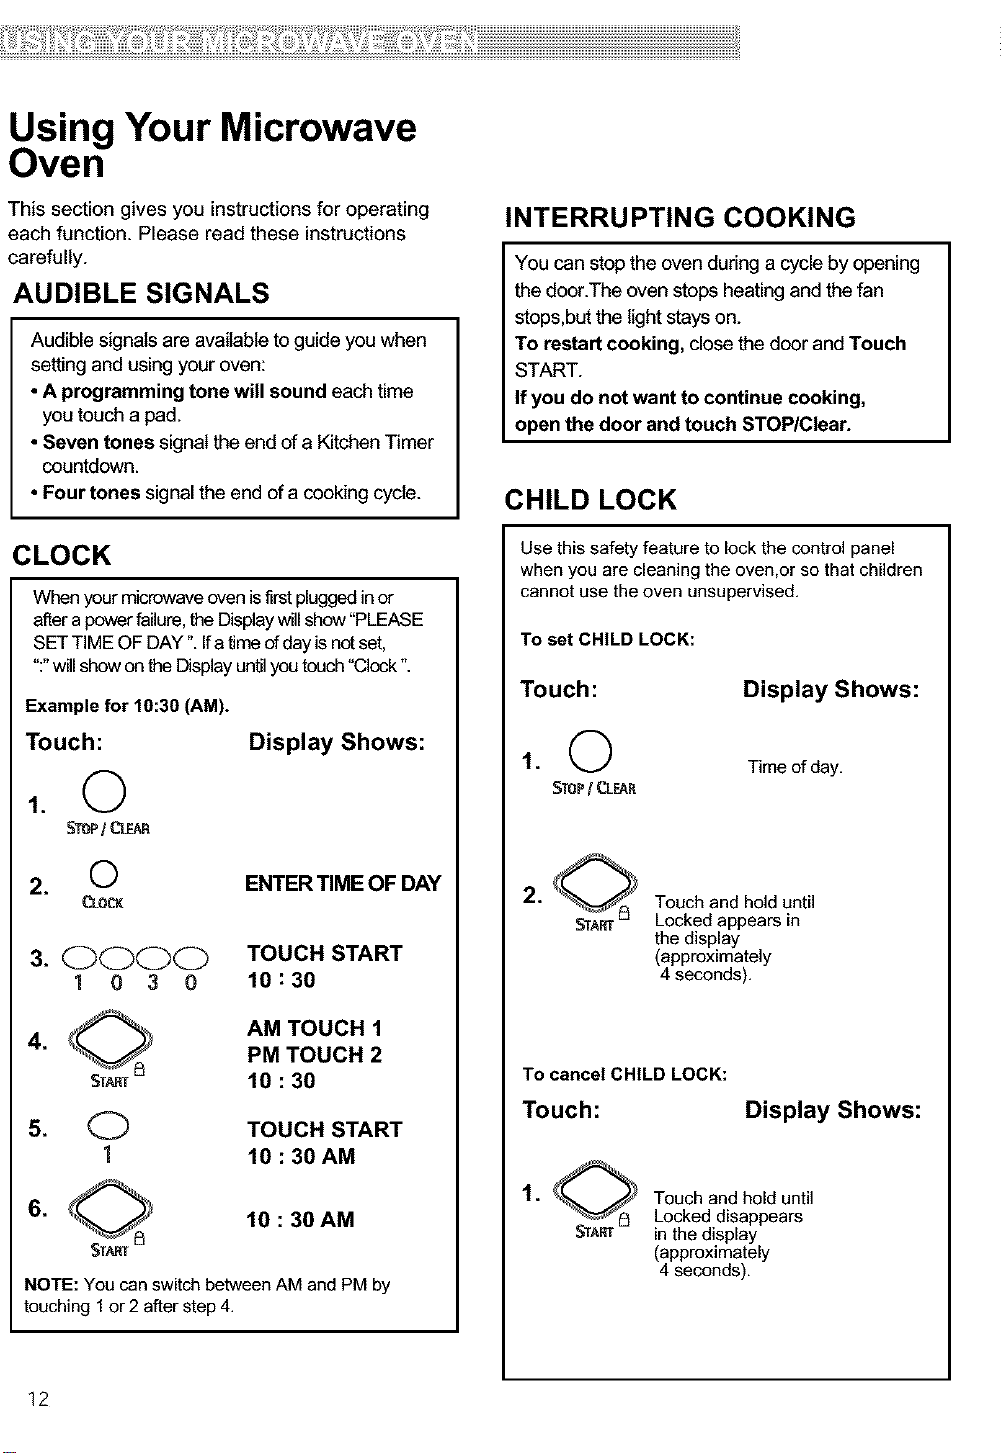
CLOCK
Whenyour microwaveovenis firstpluggedinor
aftera powerfailure,the Displaywillshow"PLEASE
SETTIME OF DAY". Ifa time of dayis notset,
":"willshow onthe Displayuntilyoutouch"Clock".
Example for 10:30 (AM).
Touch:
Display Shows:
1.
StoP/ CL_
INTERRUPTING COOKING
You can stop the oven during a cycle by opening
the door.The oven stops heating and the fan
stops,but the light stays on.
To restart cooking, close the door and Touch
START.
If you do not want to continue cooking,
open the door and touch STOP/Clear.
CHILD LOCK
Use this safety feature to lock the control panel
when you are cleaning the oven,or so that children
cannot use the oven unsupervised.
To set CHILD LOCK:
Touch:
STOP/ CL_R
Display Shows:
Timeofday,
ENTER TIME OF DAY
3. O_X_)O TOUCH START
1 0 3 0 10 : 30
4,
(_ TOUCH START
1 10 : 30 AM
6,
NOTE: You can switch between AM and PM by
touching 1or 2 after step 4.
12
AM TOUCH 1
PM TOUCH 2
10 : 30
10 : 30 AM
2,
To cancel CHILD LOCK:
Touch and hold until
Locked appears in
the display
(approximately
4 seconds),
Touch: Display Shows:
1,
Touch and hold until
Locked disappears
in the display
(approximately
4 seconds),
Page 13
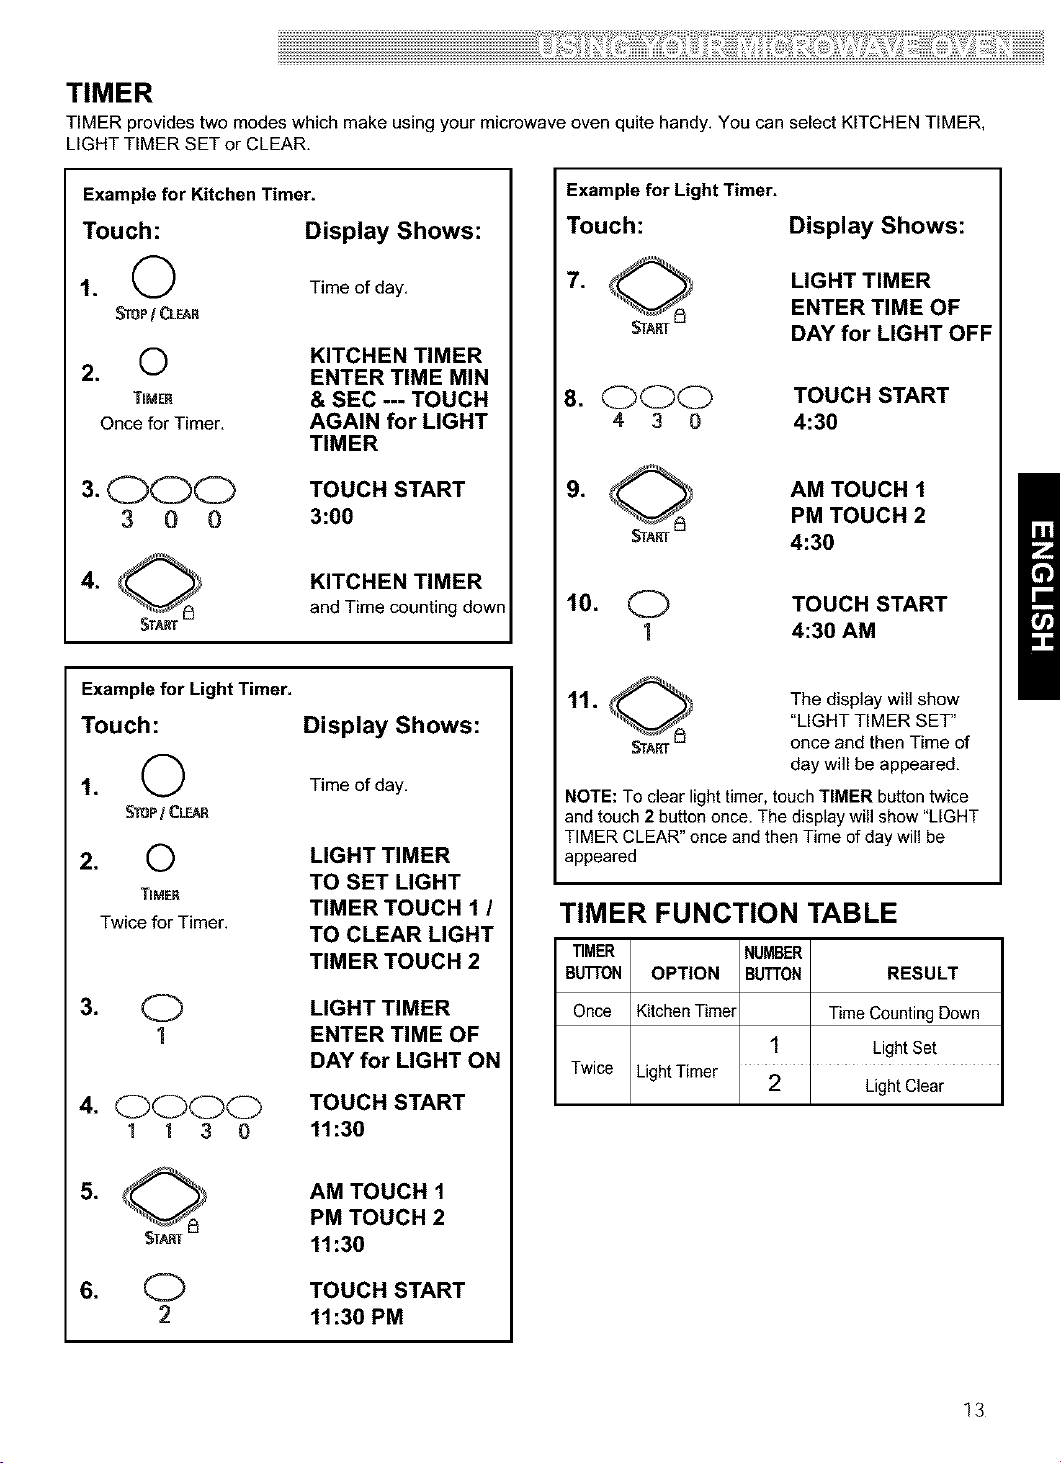
TIMER
TIMER provides two modes which make using your microwave oven quite handy. You can select KITCHEN TIMER,
LIGHT TIMER SET or CLEAR.
Example for Kitchen Timer.
Touch: Display Shows:
1. (,_ Time of day.
_P / CLEAR
2.
TIMEn & SEC --- TOUCH
Once for Timer. AGAIN for LIGHT
KITCHEN TIMER
ENTER TIME MIN
TIMER
3.O_)O TOUCH START
3 0 0 3:00
.
Example for Light Timer.
Touch:
1.
STOP! CL_R
2. 0
TINER
Twice for Timer.
KITCHEN TIMER
and Timecountingdown
Display Shows:
Time of day,
LIGHT TIMER
TO SET LIGHT
TIMER TOUCH 1 /
TO CLEAR LIGHT
TIMER TOUCH 2
Example for Light Timer.
Touch:
8. (_(_)(_ TOUCH START
4 3 0 4:30
.
_A_
Display Shows:
LIGHT TIMER
ENTER TIME OF
DAY for LIGHT OFF
AM TOUCH 1
PM TOUCH 2
4:30
10. (_ TOUCH START
1 4:30 AM
The display will show
"LIGHT TIMER SET"
once and then Time of
day will be appeared.
NOTE: To clear light timer, touch TIMER button twice
and touch 2 button once. The display will show "LIGHT
TIMER CLEAR" once and then Time of day will be
appeared
TIMER FUNCTION TABLE
TIMER NUMBER
BUTfON OPTION BUTTON RESULT
4.0000
1130
LIGHT TIMER
ENTER TIME OF
DAY for LIGHT ON
TOUCH START
11:30
AM TOUCH 1
PM TOUCH 2
11:30
TOUCH START
11:30 PM
Once Kitchen Timer Time Counting Down
1 Light Set
Twice Light Timer 2 Light Clear
13
Page 14

COOKTOP LIGHT
ADD MINUTE
The button right of the control panel controls the
cooktop light.
Example far Light HIGH.
Touch:
1. O HIGH_NIGHTstOFF
once for HIGH light
twice for NIGHT light
2 ('_ c_,
• _ Hi6i-i/Nioi-iT/OfF
To turn off, touch button
once or twice depending
on light setting.
Display Shows:
The display will show
"HIGH LIGHT" once.
The display will show
"OFF LIGHT" once.
EXHAUSTFAN
The button right of the control panel controls the 5-speed
exhaust fan.
Example for exhaust fan speed to level 4
A time-saving button, this simplified control lets
you quickly set and start microwave cooking at
100% powerwithout the need to touch START.
Example for 2 minutes.
Touch: Display Shows:
1• O Time of day,
Stop/ CLear
2• (_ Twice
MmNUT_
NOTE: Each time you touch ADD MINUTE, itwill
add I minute up to99 min 59 seconds.
TIME COOK
2:00 P-100
andTimecountingdown,
Touch: Display Shows:
1, O ONI%_F
This shows the last level
until you select the fan
speed level
2.0
Touch until Level 4
Turn off fan when desired
NOTE: If the temperature from the range or cooktop
below the oven gets too hot, the exhaust fan in the vent
hood will automatically turn on at the LEVEL 5 setting to
_rotectthe oven. It may stay on up to an hour to cool the
oven. When this occurs, the FAN button will not turn the
fan off.
5=SPEED
LEVEL 1 VENT FAN
LEVEL 4 VENT FAN
OFF VENT FAN
14
Page 15
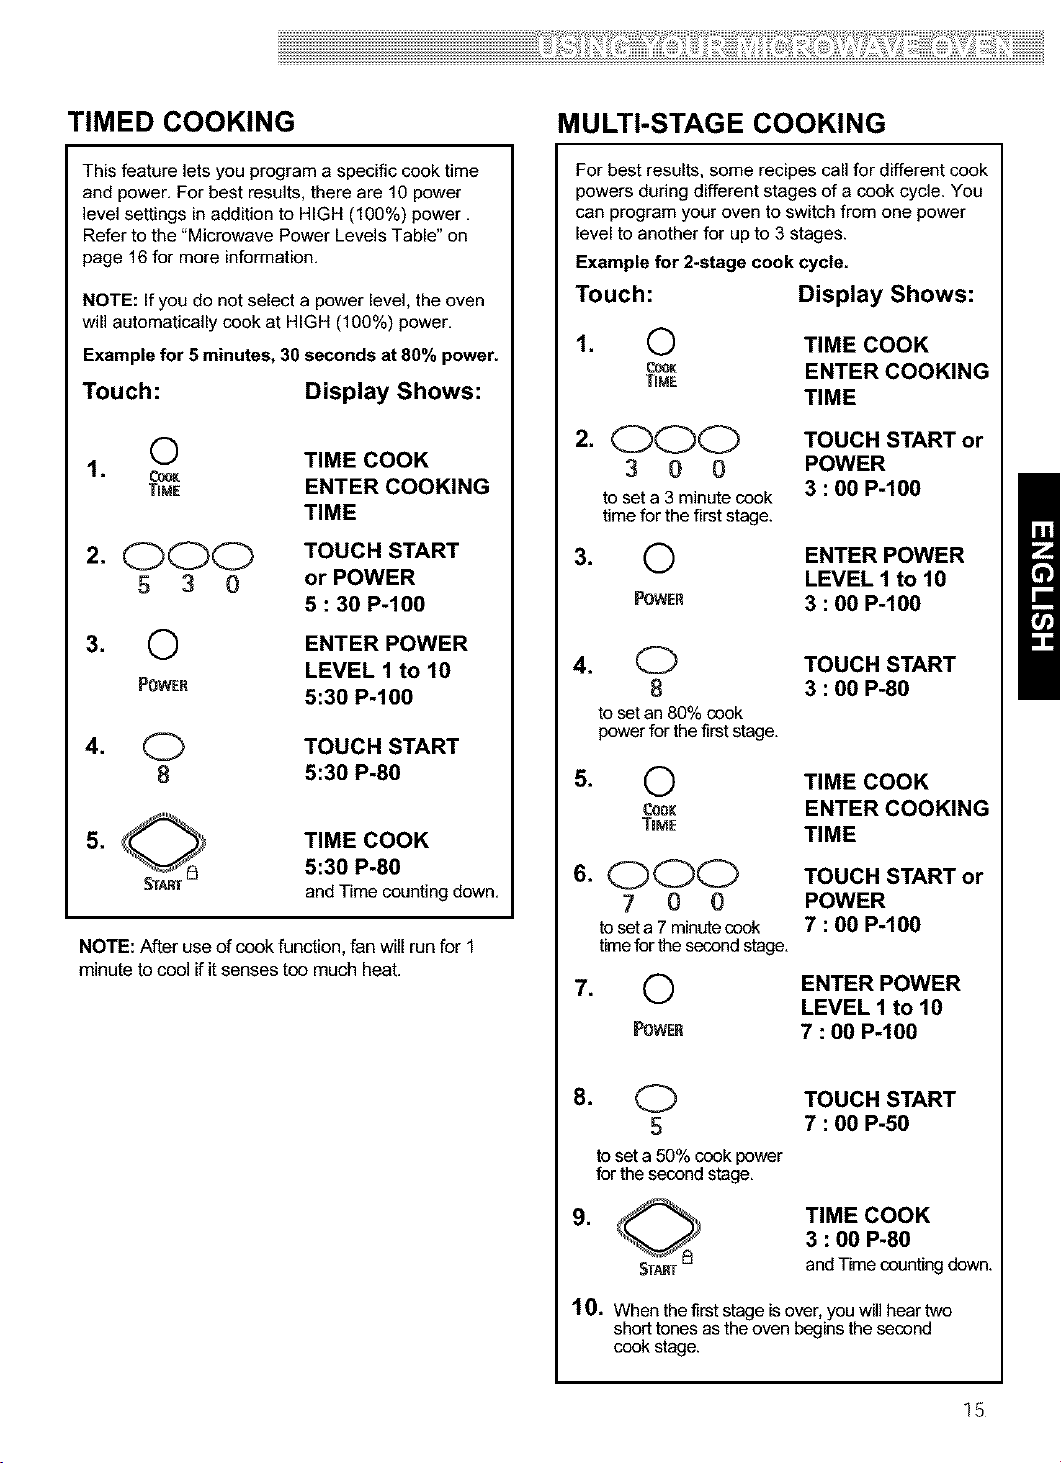
TIMED COOKING
MULTI-STAGE COOKING
This feature lets you program a specific cook time
and power, For best results, there are 10 power
level settings in addition to HIGH (100%) power,
Refer to the "Microwave Power Levels Table" on
page 16 for more information,
NOTE: If you do not select a power level, the oven
will automatically cook at HIGH (100%) power,
Example for 5 minutes, 30 seconds at 80% power.
Touch:
Display Shows:
C) TIME COOK
1, c_K
TIME ENTER COOKING
TIME
2, OOO TOUCH START
,5 3 0 or POWER
5 : 30 P-100
3. O ENTER POWER
POWER
LEVEL 1 to 10
5:30 P-100
4. O TOUCH START
8 5:30 P-80
TIME COOK
5:30 P-80
andTimecountingdown,
NOTE: After use ofcook function, fan will run for 1
minute to cool if itsenses too much heat.
For best results, some recipes call for different cook
powers during different stages of a cook cycle. You
can program your oven to switch from one power
level to another for up to 3 stages.
Example for 2-stage cook cycle.
Touch:
1.
0 TIME COOK
c_K ENTER COOKING
TIME
Display Shows:
TIME
2.
000 TOUCH START or
3 0 0 POWER
to seta 3 minutecook 3 : 00 P-100
timefor the firststage.
3.
0 ENTER POWER
LEVEL 1 to 10
POWER 3 : 00 P-100
4. _==J TOUCH START
8 3 : 00 P-80
to set an 80% cook
powerfor the first stage,
0 TIME COOK
cook ENTER COOKING
TIME TIME
6. OOO TOUCH START or
7 0 0 POWER
toseta 7 minutecook 7 : 00 P-100
timefor thesecondstage,
0 ENTER POWER
LEVEL 1 to 10
POwE_ 7 : 00 P-100
8. O TOUCH START
,5 7 : 00 P-50
to set a 50% cook power
for the second stage,
.
TIME COOK
3 : 00 P-80
andTimecountingdown.
10. When the first stage is over, you will hear two
short tones asthe oven begins the second
cook stage.
15
Page 16
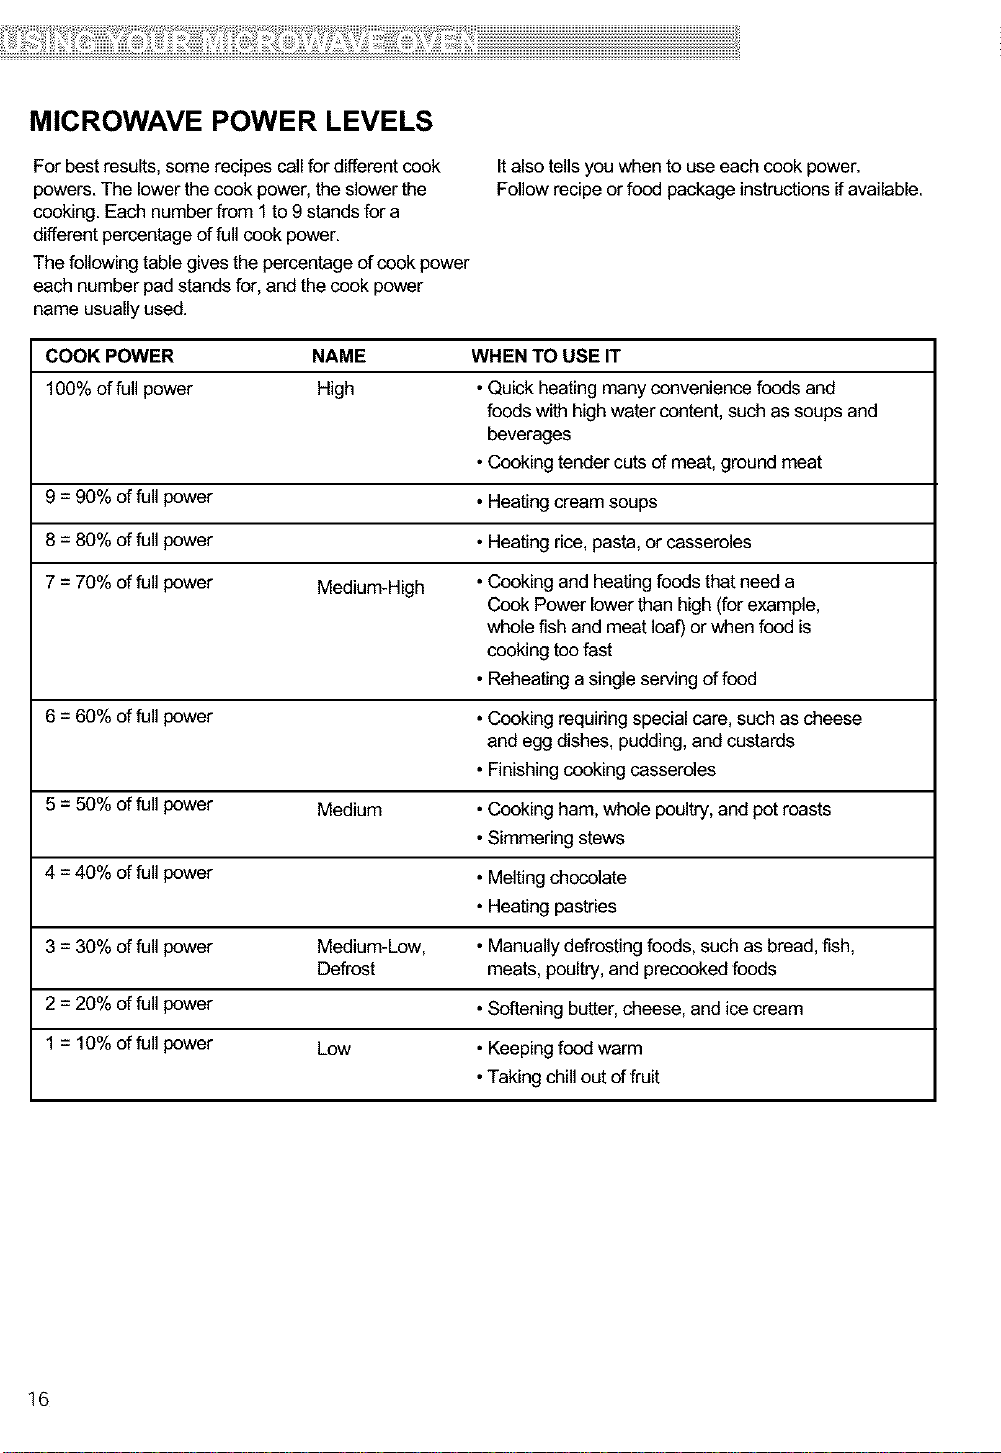
MICROWAVE POWER LEVELS
For best results, some recipes call for different cook
powers. The lower thecook power,the slower the
cooking. Each number from 1to 9 standsfor a
different percentage of full cook power.
The following table gives the percentage of cook power
each number pad stands for, and the cook power
name usually used.
COOK POWER NAME WHEN TO USE IT
100% offull power High •Quick heatingmany convenience foods and
9 = 90% of full power • Heatingcream soups
8 = 80% of full power • Heating rice,pasta, or casseroles
7 = 70% of full power Medium-High •Cooking and heating foods that need a
6 = 60% of full power •Cooking requiring specialcare, such as cheese
It alsotells you when to use each cook power.
Follow recipe or food package instructions ifavailable.
foods with highwater content, such as soups and
beverages
•Cooking tender cuts of meat, ground meat
Cook Power lowerthan high (for example,
whole fish and meat loaf) or when food is
cooking too fast
• Reheatinga single serving of food
and egg dishes, pudding,and custards
• Finishingcooking casseroles
5 = 50% of full power Medium • Cooking ham, whole poultry,and potroasts
•Simmering stews
4 = 40% of full power • Meltingchcoolate
• Heating pastries
3 = 30% of full power Medium-Low, • Manuallydefrosting foods,such as bread,fish,
Defrost meats,poultry, and precooked foods
2 = 20% of full power •Softening butter,cheese,and ice cream
1 = 10% of fullpower Low • Keepingfood warm
•Taking chill out of fruit
16
Page 17
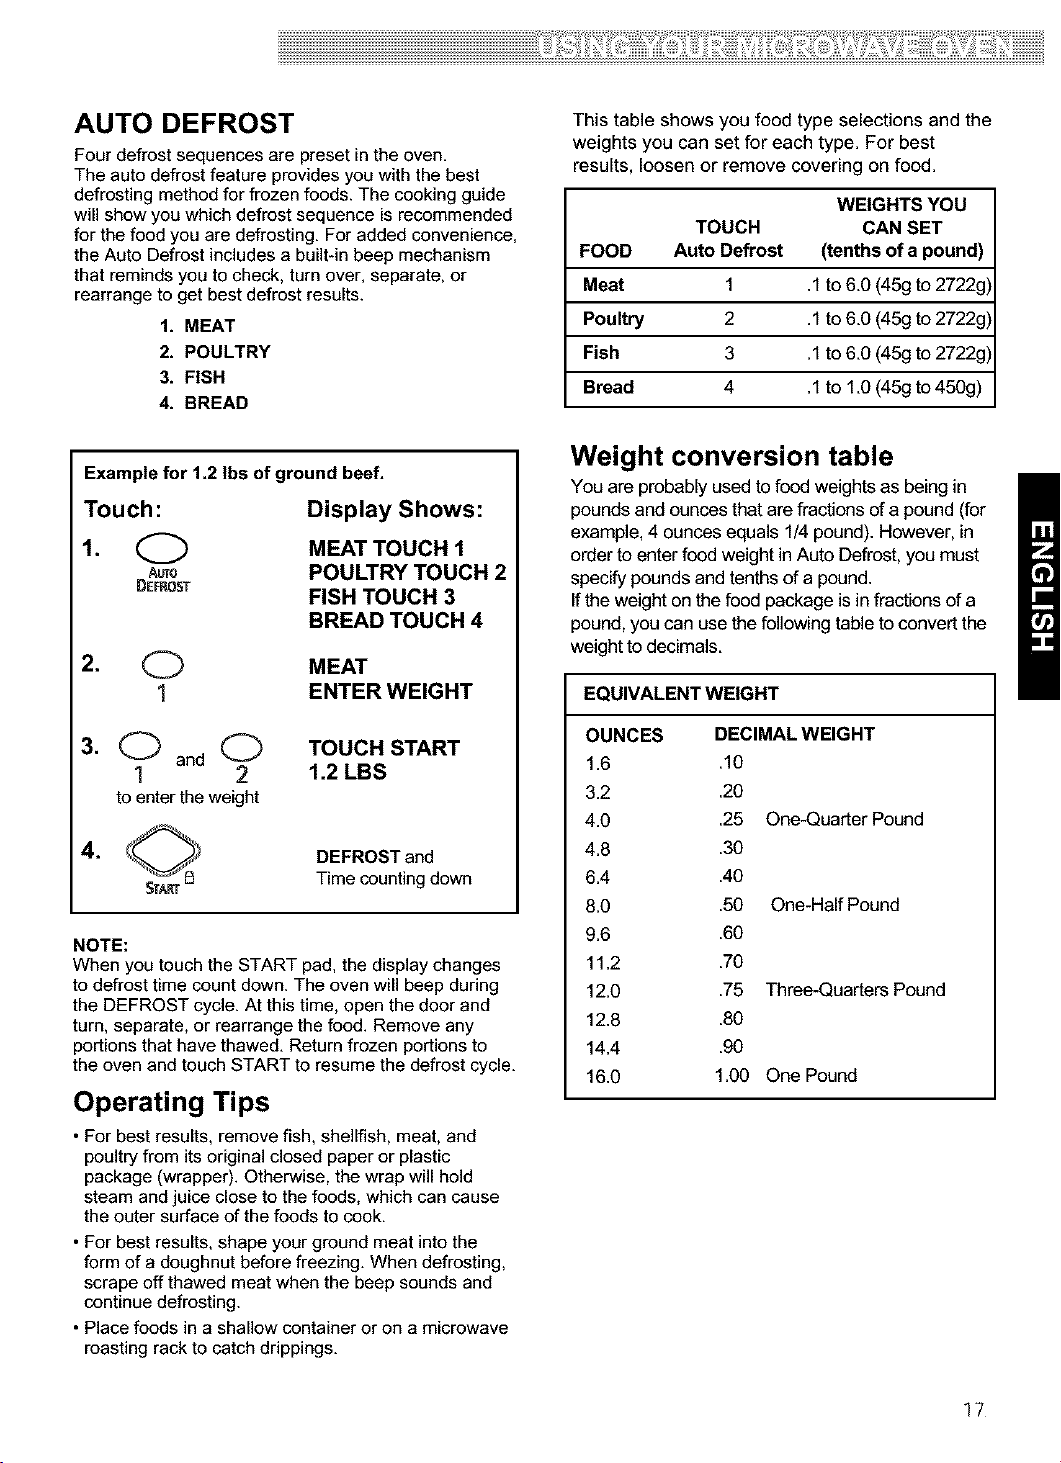
AUTO DEFROST
Four defrost sequences are preset in the oven.
The auto defrost feature provides you with the best
defrosting method for frozen foods. The cooking guide
will show you which defrost sequence is recommended
for the food you are defrosting. For added convenience,
the Auto Defrost includes a built-in beep mechanism
that reminds you to check, turn over, separate, or
rearrange to get best defrost results.
1. MEAT
2. POULTRY
3. FISH
4. BREAD
This table shows you food type selections and the
weights you can set for each type. For best
results, loosen or remove covering on food.
WEIGHTS YOU
TOUCH CAN SET
FOOD Auto Defrost (tenths of a pound)
Meat 1 .1 to 6.0 (45g to 2722g)
Poultry 2 .1to 6.0 (45g to 2722g)
Fish 3 .1to 6.0 (45g to 2722g)
Bread 4 .1to 1.0 (45g to 450g)
Example for 1.2 Ibs of ground beef.
Touch:
Display Shows:
1. Q MEAT TOUCH 1
An POULTRY TOUCH 2
DEFn0ST FISH TOUCH 3
BREAD TOUCH 4
2. (_ MEAT
1 ENTER WEIGHT
3. Q and (_ TOUCH START
1 2 1.2 LBS
to entertheweight
,
NOTE:
When you touch the START pad, the display changes
to defrost time count down. The oven will beep during
the DEFROST cycle. At this time, open the door and
turn, separate, or rearrange the food. Remove any
portions that have thawed. Return frozen portions to
the oven and touch START to resume the defrost cycle.
DEFROST and
Time counting down
Operating Tips
• For best results, remove fish, shellfish, meat, and
poultry from its original closed paper or plastic
package (wrapper). Otherwise, the wrap will hold
steam and juice close to the foods, which can cause
the outer surface of the foods to cook.
• For best results, shape your ground meat into the
form of a doughnut before freezing. When defrosting,
scrape off thawed meat when the beep sounds and
continue defrosting.
• Place foods in a shallow container or on a microwave
roasting rack to catch drippings.
Weight conversion table
You are probably used to food weights as being in
pounds and ounces that are fractions of a pound (for
example, 4 ounces equals 1/4 pound). However, in
order to enter food weight in Auto Defrost, you must
specify pounds and tenths of a pound.
If the weight on the food package is in fractions of a
pound, you can use the following table to convert the
weight to decimals.
EQUIVALENT WEIGHT
OUNCES
1.6
3.2
4.0
4.8
6.4
8.0
9.6
11.2
12.0
12.8
14.4
16.0
DECIMAL WEIGHT
.10
.20
.25 One-Quarter Pound
.30
.40
.50 One-HalfPound
.60
.70
.75 Three-Quarters Pound
.80
.90
1.00 One Pound
17
Page 18
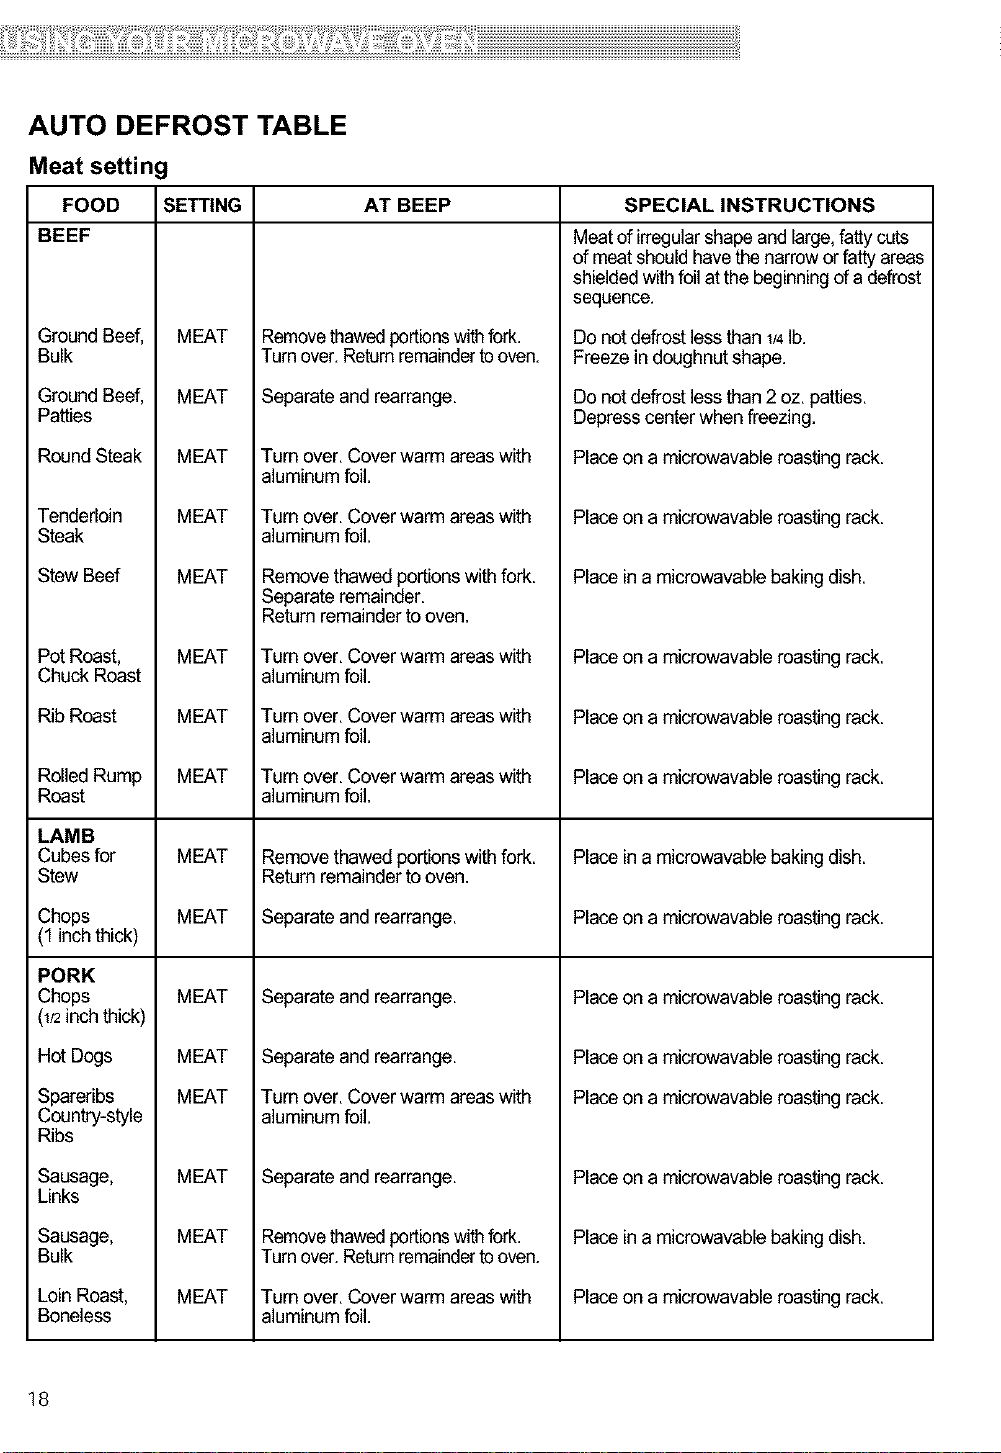
AUTO DEFROST TABLE
Meat setting
FOOD SETTING AT BEEP SPECIAL INSTRUCTIONS
BEEF
Meat of irregularshapeand large, fatty cuts
of meatshould have thenarrow orfatty areas
shieldedwithfoil atthe beginningof a defrost
sequence.
Ground Beef,
Bulk
Ground Beef,
Patties
RoundSteak
Tenderloin
Steak
Stew Beef
PotRoast,
Chuck Roast
RibRoast
RolledRump
Roast
LAMB
Cubes for
Stew
Chops
(1 inchthick)
MEAT
MEAT
MEAT
MEAT
MEAT
MEAT
MEAT
MEAT
MEAT
MEAT
Removethawedportbns withfork.
Turnover.Returnremaindertooven.
Separate and rearrange,
Turn over. Cover warm areas with
aluminum foil,
Turn over. Cover warm areas with
aluminum foil,
Removethawed portions with fork.
Separate remainder.
Return remainderto oven,
Turn over. Cover warm areas with
aluminum foil,
Turn over. Cover warm areas with
aluminum foil,
Turn over. Cover warm areas with
aluminum foil,
Removethawed portions with fork.
Return remainderto oven.
Separate and rearrange.
Do not defrost less than 1/4lb.
Freeze in doughnut shape.
Do not defrost less than 2 oz. patties.
Depress center whenfreezing.
Place on a microwavable roasting rack.
Place on a microwavable roasting rack.
Place ina microwavable baking dish.
Place on a microwavable roasting rack.
Place on a microwavable roasting rack.
Place on a microwavable roasting rack.
Place ina microwavable baking dish.
Place on a microwavable roasting rack.
PORK
Chops
(1/2inch thick)
Hot Dogs
Spareribs
Country-style
Ribs
Sausage,
Links
Sausage,
Bulk
Loin Roast,
Boneless
18
MEAT
MEAT
MEAT
MEAT
MEAT
MEAT
Separate and rearrange.
Separate and rearrange.
Turn over. Cover warm areas with
aluminum foil,
Separate and rearrange.
Removethawedportbns withfork.
Turnover.Returnremaindertooven.
Turn over. Cover warm areas with
aluminum foil,
Place on a microwavable roasting rack.
Place on a microwavable roasting rack.
Place on a microwavable roasting rack.
Place on a microwavable roasting rack.
Place in a microwavable baking dish.
Place on a microwavable roasting rack.
Page 19
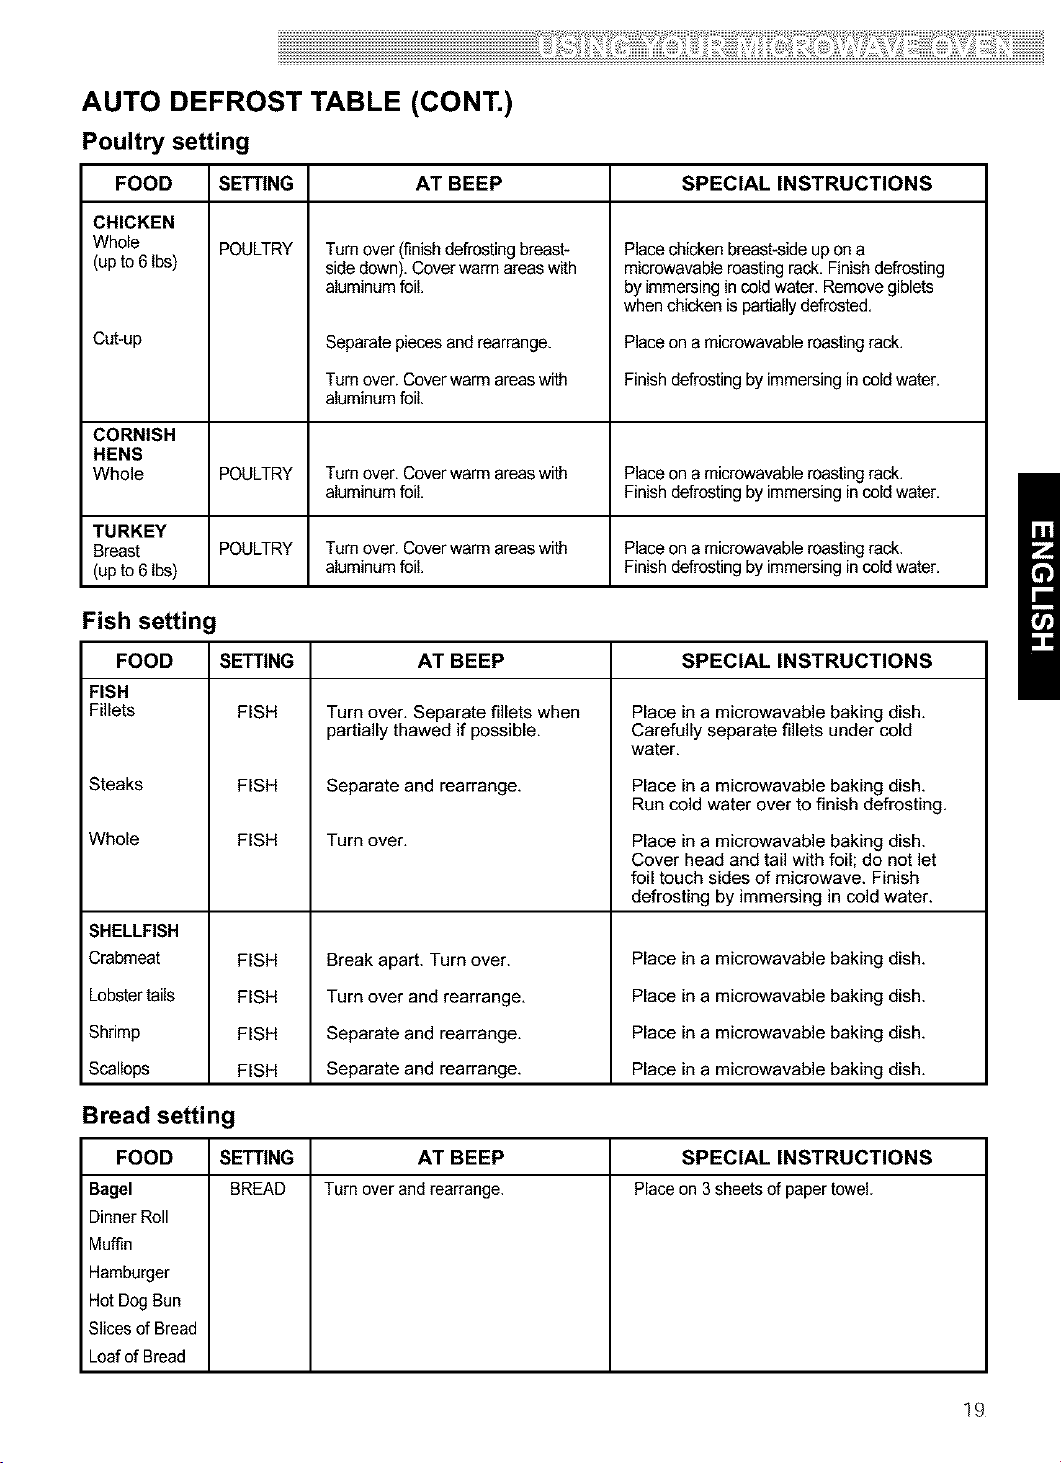
AUTO DEFROST TABLE (CONT.)
Poultry setting
FOOD AT BEEP SPECIAL INSTRUCTIONS
CHICKEN
Whole
(up to 6 Ibs)
Cutup
CORNISH
HENS
Whole
TURKEY
Breast
(up to 6 Ibs)
SETTING
POULTRY
POULTRY
POULTRY
Turn over (finish defrosting breast-
side down). Cover warm areas with
aluminum foil.
Separate pieces and rearrange,
Turn over. Cover warm areas with
aluminum foil.
Turn over. Cover warm areas with
aluminum foil.
Turn over. Cover warm areas with
aluminum foil.
Place chicken breast-side up on a
microwavable roasting rack, Finish defrosting
byimmersing in cold water. Remove giblets
when chicken is partiallydefrosted,
Place on a microwavable roasting rack.
Finishdefrosting by immersing incold water.
Place on a microwavable roasting rack.
Finishdefrosting by immersing incold water.
Place on a microwavable roasting rack.
Finishdefrosting by immersing incold water.
Fish setting
FOOD
FISH
Fillets
Steaks
Whole
SHELLFISH
Crabmeat
Lobster tails
SETTING
FISH
FISH
FISH
FISH
FISH
AT BEEP
Turn over, Separate fillets when
partially thawed if possible,
Separate and rearrange.
Turn over,
Break apart. Turn over.
Turn over and rearrange,
SPECIAL INSTRUCTIONS
Place in a microwavable baking dish.
Carefully separate fillets under cold
water,
Place in a microwavable baking dish.
Run cold water over to finish defrosting,
Place in a microwavable baking dish.
Cover head and tail with foil; do not let
foil touch sides of microwave. Finish
defrosting by immersing in cold water.
Place in a microwavable baking dish.
Place in a microwavable baking dish.
Shrimp
Scallops
Bread setting
FOOD
Bagel
Dinner Roll
Muffin
Hamburger
Hot Dog Bun
Slices of Bread
Loaf of Bread
FISH
FISH
Separate and rearrange.
Separate and rearrange.
Place in a microwavable baking dish.
Place in a microwavable baking dish.
SETTING AT BEEP SPECIAL INSTRUCTIONS
BREAD Turnoverandrearrange, Placeon3sheetsofpapertowel.
19
Page 20
DEFROSTING TIPS HOLD WARM
•When using Auto Defrost, the weight to be entered
isthe netweight in poundsand tenths of pounds
(theweight of the food minus the container).
• Before starting,make sure you have removed any
of the metal twist-ties which often come with frozen
food bags, and replacethem with strings or elastic
bands.
• Open containers such as cartons before they are
placedin the oven.
•Always slit or pierceplastic pouches orpackaging.
• If food is foil wrapped, remove foil and place itin a
suitable container.
• Slitthe skins, if any, of frozen food such as
sausage.
• Bend plasticpouches of food to ensure even
defrosting.
•Always underestimate defrostingtime. If defrosted
food is still icy in the center, return it tothe
microwave oven formore defrosting.
•The length of defrostingtime vades according to
how solidly thefood is frozen.
•The shape of the package affects howquickly food
willdefrost. Shallow packages will defrostmore
quicklythan a deep block.
•As food begins to defrost, separate the pieces.
Separated pieces defrostmore easily.
•Use small pieces of aluminumfoil to shield parts
offood such as chicken wings, leg tips, fish tails,or
areasthat startto get warm. Make sure the foildoes
nottouch the sides,top, or bottom ofthe oven. The
foOlcan damage the oven lining.
•For better results, let foodstand after defrosting.
(For more information on standing time, see the
"Microwave CookingTips" section.)
•Turn over food during defrosting or standing time.
Breakapart and remove food as required.
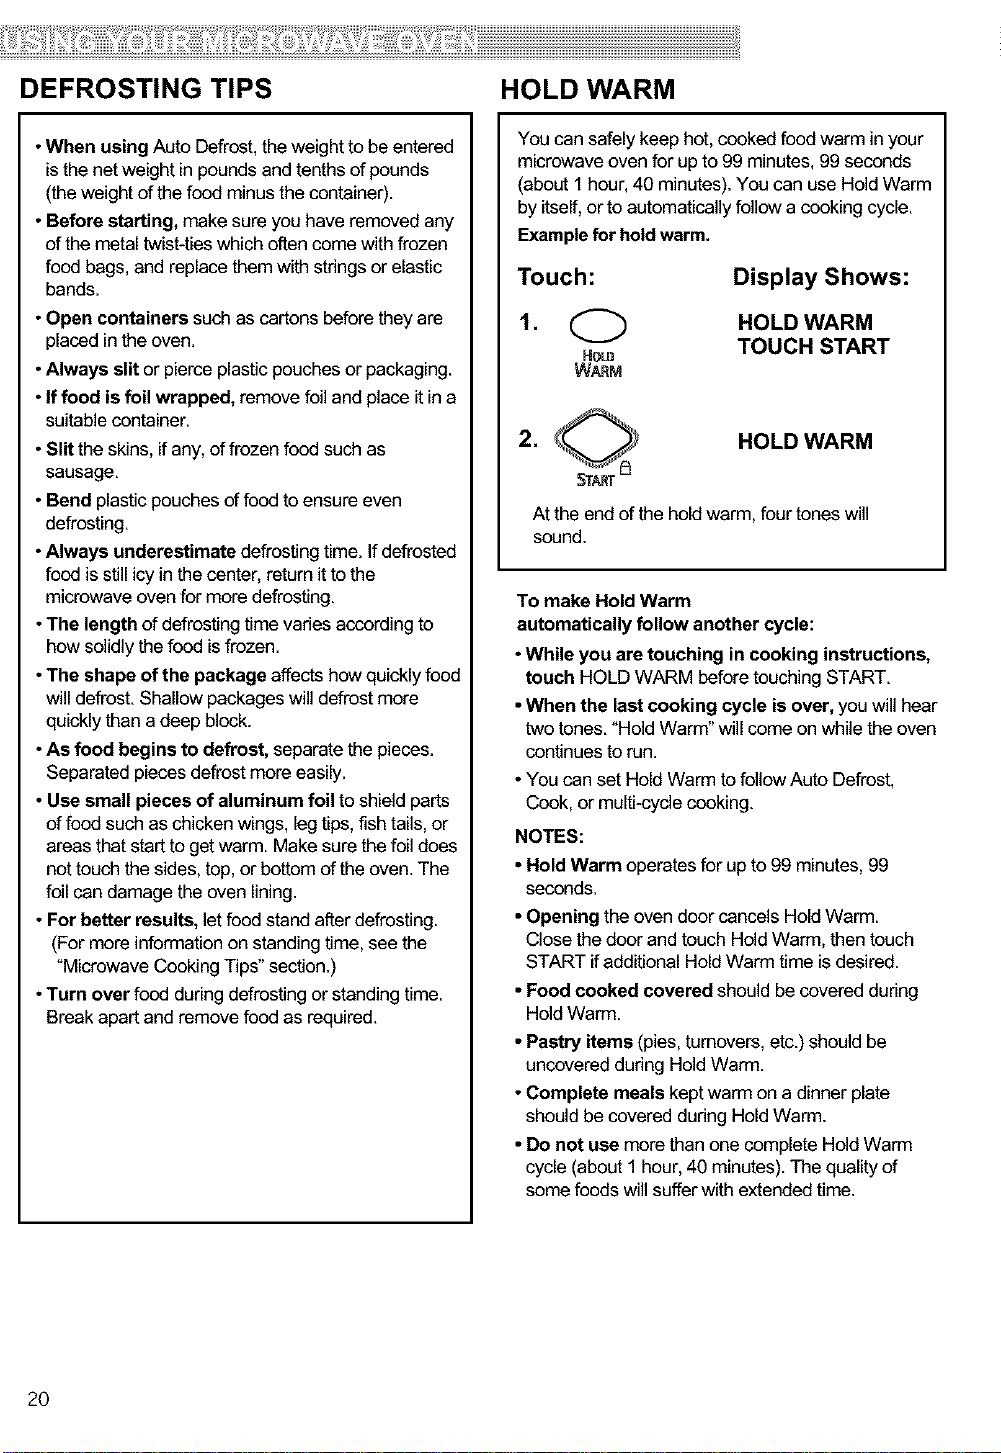
You can safely keep hot, cooked food warm in your
microwave oven for up to 99 minutes, 99 seconds
(about 1 hour, 40 minutes).You can use Hold Warm
by itself, or to automaticallyfollow a cooking cycle.
Example for holdwarm.
Touch:
I.Q
HOLD
WAF_M
2. HOLD WARM
Atthe end ofthe holdwarm, four tones will
sound.
To make Hold Warm
automaticallyfollow another cycle:
•While you are touching in cooking instructions,
touch HOLD WARM before touching START.
• When the last cooking cycle is over, you will hear
two tones."Hold Warm" will come on while the oven
continues to run.
•You can set Hold Warm to follow Auto Defrost,
Cook, or multi-cyclecooking.
NOTES:
• Hold Warm operates for up to 99 minutes, 99
seconds.
•Opening the oven door cancels HoldWarm.
Close thedoor and touch HoldWarm, then touch
START ifadditional Hold Warm time is desired.
• Food cooked covered should be covered during
HoldWarm.
• Pastry items (pies, turnovers, etc.) should be
uncovered dudng Hold Warm.
•Complete meals kept warm on a dinner plate
should be covered during Hold Warm.
• Do not usemore than one complete HoldWarm
cycle (about I hour, 40 minutes). The quality of
some foods will sufferwith extendedtime.
Display Shows:
HOLD WARM
TOUCH START
2O
Page 21

SURE SIMMER
Your microwave oven lets you simmer soups,
casseroles, stews, and other liquid foods. All you do
is set a simmer time and your oven will bring your
food to a boil and then simmer it for the time you
specify.
NOTES:
•You cannot change the cook power or aloneness
for Sure Simmer.
•This function uses the sensor. The sensor needs
2 minutes 30 seconds to warm up after the oven
is connected to power or after a power failure.
If you start Sure Simmer during the warm up,
microwave energy will not be turned on until the
sensor is warm.
•When cooking vegetables, increase amount of
water to 1/4 to 1/2 cup (60 to 125ml).
• Cover dish with a hard lid, i.e., the lid that comes
with the dish or a dinner plate. Do not use plastic
wrap.
Touch: Display Shows:
1. Place the food in the oven and
close the door.
When simmering foods like pasta use a container
that can hold enough water to cover the food
completely when cooking, such as a 3-quart (12 cup)
casserole with a lid. When cooking pasta or noodles,
add 1 tbsp (15ml) oil to the water before boiling.
Use the following method:
Place container with water in the oven and follow
steps 2~4, setting the simmer time at 1 second. At
the end of the signal, place the food in the water and
stir until completely covered by water. Cover. Repeat
steps 2~4, setting the simmer time you want.
Changing instructions you can change the simmering
time while simmering by repeating steps 2, 3, and 4.
O SURE SIMMER
.
SURE ENTER COOKING
SIMMER
TIME
3. OOOO TOUCH START
3 0 0 0 30:00
Touch Number buttons
to enter the simmer
time. Example for 30
minutes.
.
SURE SIMMER
(SENSOR)
The ovenwillbringthe
foodto a boil.
The food will then simmer for the time you set.
21
Page 22

Using Sensor Cooking
SENSOR COOKING
SENSOR OPERATING INSTRUCTIONS
Sensor Cook allows you tocook most ofyour favorite
foods withoutselecting cooking times and power
levels.The oven automatically determines required
cooking time for eachfood item. When the internal
sensor detects a certain amount of humiditycoming
from the food, itwill tell the oven how much longer to
heat. The display will show the remainingheat time.
For best resultsby Sensor, followingthese
recommendations.
• Food cooked with the sensor system should be at
normal storage temperature.
• GlassTray and outside of container should be dry
to assure best cooking results.
• Foodsshould always be covered loosely with
microwavable plastic wrap, waxed paper or a lid.
• Do not open the door or touch the "STOP/CLEAR"
key during the sensing time. When sensing time is
over, the oven beeps twice and the remaining
cooking time will appear in the display window. At
this time you can open the door tostir, turn, or
rearrange the food.
SENSOR COOKING GUIDE
Appropriate containers and coverings help assure
good Sensor cooking results.
• Always use microwavable containers and cover
them with lids or vented plastic wrap.
• Never usetight-sealing plastic covers. They can
prevent steam from escaping and cause food to
overcook.
• Match the amount to the size of the container.
Fillcontainers at least halffull for best results.
• Be surethe outside of the cooking container and
the inside of the microwave oven are dry before
placingfood in the oven. Beads of moisture turning
into steam can mislead the sensor.
POTATO (EXAMPLE)
Sensor cook allows you to cook mostof your
favodte foods without selecting cooking times and
power levels.
Example for potato.
Touch: Display Shows:
1, _._ Time of day.
STOPt CLEAR
2. Q POTATO
POTATO (SENSOR)
When the cook time isover,you will hear four beeps
and COOK END will be displayed.
MORE/LESS
Byusingthe MOREor LESSpadsallofthesensor
cook andtimecook settingscanbeadjustedtocook
foodfor a longeror shortertime.
PressingMOREwilladd 10secondsofcookingtime
eachtimeyou pressit.
PressingLESSwillsubtract10secondsofcooking
time eachtime youpressit.
22
Page 23

SENSOR COOKING TABLE
CATEGORY DIRECTION AMOUNT
Popcorn Popcorn lets you pop commercially packaged 3.0~3.5oz.
microwave popcorn. Pop only one package at a time. package
For best results, use fresh bag of popcorn.Ptace bag of
prepackaged microwave popcorn on the center of turntable.
Before popping, remove the rack from the oven (refer to Page 32).
Potato Pierce each potatowith a fork and place the oven tray 1~4 medium
around the edge, at least one inch apart. (approx.
After cooking, allow to stand for 5 minutes. 8 to 10 oz. each)
Fresh Prepareasdesired,washand leaveresidualwateron thevegetables. 1~4 cups
Vegetable Placeinan appropriatelysizedmicrowavecontainer.
Add amountof wateraccordingto the quantity.(1~2 cups:2 tablespoons,
3~4cups:4 tablespoons).Coverwithplasticwrapandvent. Aftercooking,
stirand albw to standfor 3 minutes.
_e Frozen Removefrom package,rinseofffrostunderrunningwater.
Vegetable Placeinan appropriatelysizedmicrowavecontainer. 1~4cups
.,., Add amountof wateraccordingto thequantity.(1~2 cups:2 tablespoons,
3~4cups:4 tablespoons).Coverwithplasticwrapandvent. Aftercooking,
:_ stirand albw to standfor 3 minutes.
Canned Remove from the outerdisplay can. 1~4cups
Vegetable Place inan appropriatelysized microwave container,
cover with plastic wrap and vent.
After cooking, stir and allow to stand for 3 minutes.
Frozen Entree Remove from outer display package. Slit cover. 10 to 21 oz.
Ifnot in microwave-safecontainer, place on a plate.
Cover with plastic wrap and vent the plasticfilm by piercing with a fork
(3 times). After cooking, allow to stand for 3 minutes.
23
Page 24

AUTO COOK
AUTO REHEAT
Auto Cook letsyou heat common microwave-
prepared foods without selectingcooking times and
powerlevels. Auto Cook has presetcook powersfor
4 food categories: Casserole, Rice, Bacon, and Hot
Cereal.
Example for Rice.
Touch:
Display Shows:
1. Q SELECT MENU 1 to4
_r_ -- SEE COOKING
Cook GUIDE
2. (_ RICE
2 (SENSOR)
Choose food category:
CATEGORY BUTTON QUANTITY
Casserole (Sensor) 1 to 4 cups
Rice (Sensor) 2 1/2to 2 cups
Bacon 3 2 to 4 slices
Hot Cereal 4 to 6servings
The oven will cook food automatically by sensor
system, except Bacon and Hot Cereal,
When the cook time is over, you will hear four
beeps and COOK END will be displayed,
TOUCHNUMBEF
Auto Reheat lets youheat foods without selecting
cooking times and power levels,
Auto Reheat has preset cook powers for 5
categories: Casserole, Dinner Plate, Soup/Sauce,
Roll/Muffin, and Beverage,
Example for Casserole.
Touch:
1,
Display Shows:
SELECT MENU 1 to 5
A_ -- SEE COOKING
REHEAT GUIDE
2. Q
CASSEROLE
(SENSOR)
Choose food category.
CATEGORY BUTTON QUANTITY
Casserole (Sensor) 1 1 to 4 cups
Dinner Plate (Sensor _, 2 I to2 Servings
Soup/Sauce (Sensor) 3 1 to 4 cups
Roll/Muffin 4 1 to 6 pieces
Beverage 5 1 to 2 cups
The oven will reheat food automatically by sensor
system, except Roll/Muffin and Beverage,
When the cook time is over, you will hear four
beeps and COOK END will be displayed,
TOUCHNUMBER
24
Page 25

AUTO COOK TABLE
['OUCHNUMBER
CATEGORY BUTTON DIRECTION AMOUNT
Casserole 1 Assemble the ingredientsper the recipe 1~4 cups
(Sensor) ina 1~2-quart casserole.
Cover with plasticwrap and vent.
After cooking,stir and allow to stand for 3 minutes.
Rice 2
(Sensor)
Bacon 3 Place bacon strips on a microwave 2~4slices
Hot Cereal 4 Prepareas directed on package and cook. 1~6servings
Place rice and twice as much liquid
(water,chicken, or vegetable stock) in a 2- quart
microwave dish.
Cover with plasticwrap and vent.
After cooking,allow to stand for 10minutes.
Stirfor fluffierrice.
bacon rack for best results.
(Use dinner plate lined with paper towels
ifrack isnot available)
Stirwell before eating.
Use only instanthot cereal.
1/2~2cups
Use medium or
long grain rice.
Cook instantrice
according to
directionson
the package.
AUTO REHEAT TABLE
CATEGORY BUTTON DIRECTION AMOUNT
Casserole 1 Cover dish containing the casserole 1~4cups
(Sensor) with plastic wrap and vent.
TOUCHNUMBER
After cooking, stir and allow to stand for 3 minutes.
Dinner Plate 2 Placeon a low plate. 1~2servings
(Sensor) Coverwith vented plasticwrap.
Letstand 3 minutes.
Soup/Sauce 3 Placein shallow microwavable casserole. 1~4cups
(Sensor) Coverwith vented plasticwrap.
After cooking, stir and let stand 3 minutes.
Roll/Muffin 4 Remove from display package and placeon a plate. 1~6 pieces
(2 oz. each)
fresh
Beverage 5 Use a wide-mouth mug. Do not cover. 1~2cups
Removefrom display package and placeon a plate. (240ml per cup)
(Be careful! The beverage will be very hot! Sometimes
liquids heated incylindrical containerswill splash out
when the cup is moved.)
25
Page 26

SOFTEN MELT
The oven uses low power to soften foods (butter, ice
cream, cream cheese, and frozen juice)
See the following table.
Example for quart of ice cream.
Touch:
, O
STOP/_R
2.
SOFTEN
Display Shows:
Time of day.
SELECT MENU 1 to 4
-- SEE COOKING
GUIDE
3. (_ ICE CREAM
2 TOUCH 1 to 3
4.
2 ICE CREAM
The display will show
QUART once,
ICE CREAM and
Time counting down.
When the cook time isover,you will hear four
beeps and COOK ENDwill be displayed.
SOFTEN TABLE
CODE CATEGOR_ DIRECTION AMOUNT
1 Butter Unwrap and place in 1, 2 or 3
microwavable container, sticks
Butter will be at room
temperature and ready
for use in recipe.
2 Ice Place container in oven. Pint,
cream Ice cream will be soft Quart,
enough to make Half
scooping easier, gallon
3 Cream Unwrap and place in 3 or 8 oz.
cheese microwavable Container.
Cream cheese will be at
room temperature and
ready for use in recipe.
4 Frozen Remove top. 6, 12 or
juice Place in oven. 16 oz.
Frozen juice will be soft
enough to easily mix with
water.
26
The oven uses low power to melt foods (butter or
margarine, chocolate, marshmallows, or processed
cheese food). See the following table.
Example for 8 oz. Chocolate.
Touch:
,
,
Display Shows:
Time of day.
SELECT MENU 1to 4
--- SEE COOKING
MELT GUIDE
3. O CHOCOLATE
2 TOUCH 1 to 2
4. (_ The display will show
2 CHOCOLATE 80Z
once, CHOCOLATE and
Time counting down.
When the cook time is over, you will hear four
beeps and COOK END will be displayed.
MELT TABLE
]ODE CATEGORY DIRECTION AMOUNT
1 Butter or Unwrap and place in 1, 2 or 3
Margarine microwavable container, sticks
No need to cover butter.
Stir at the end of cooking
to complete melting.
2 Chocolate Chocolate chips or 4 or 8 oz.
squares of baking
chocolate may be used.
Unwrap squares and
31acein microwavable
container. Stir at the end
of cycle to complete
melting.
3 Cheese Use processed cheese 8 or 16
food only. Cut into cubes, oz.
Place in a single layer in
microwavable container.
Stir at the end of cooking
to complete melting.
4 Marshmallows Largeor miniature 5 or 10
marshmallowsmay beused. oz.
Placeinmicrowavable
container.Stiratthe end of
cycleto completemelting.
Page 27

Caring for Your Microwave Oven
To make sure yourmicrowave oven looks good and works well for a long time, youshould
maintain itproperly.For proper care, pleasefollow these instructions carefully.
For interior surfaces: Wash often with warm, sudsy
water and a sponge or
softcloth. Use only mild,
nonabrasive soaps or a
milddetergent. Be sure
to keep the areas clean
where the door and
oven frame touch
when closed. Wipe well
with cleancloth.
Overtime, stains can
occur on the surfaces as the resultof food particles
spattering during cooking.This is normal.
For stubborn soil, boil a cup of water in the oven for 2
to 3 minutes. Steam will
softenthe soil. To get rid
ofodors inside theoven,
boila cup of water with
some lemonjuice or
vinegar in it.
To clean glass tray and support, wash in mild,
Glasstray
Support
Hub
sudsy water; for heavily
soiledareas use a mild
cleanser and scouring
sponge. The glass tray
and support are
dishwasher safe.
For exterior surfaces and
damage the control panel and the interior and exterior
oven surfaces,
control panel: Use a soft
clothwith spray glass
cleaner.Apply the spray
glass cleanerto the soft
cloth;do notspray
directJyon the oven.
NOTE: Abrasive
cleansers, steelwool
pads,gritty wash
cloths,some paper
towels, etc., can
27
Page 28

CARING FOR THE FILTERS
The grease filter should be removed and cleaned often, atleast once a month.
NOTE: Ifyour microwave hood combination isinstalled to recirculateair, the chacoal filter
(PartNo. 5230W1A003A) availablefrom Sears bycalling 1-8004-MY-HOME ®.
The charcoal filter cannot be cleaned and should be replacedevery 6 to 12 months.
Grease filter (Part No. 5230W2A004A):
1. Unplug microwave oven or disconnect power.
2.To remove grease filter,slide eachfilterto the side.
Pull filter downward and push to the other side. The
filter willdrop out.
3. Soak grease filterin hotwater and a mild
detergent. Scrub and swish to remove embedded
dirtand grease. Rinse well and shake to dry. Do
not clean filterwithammonia, corrosive cleaning
agents such as lye-based oven cleaners, or place
them ina dishwasher. The filterwill turn black or
could be damaged.
_o_ oooo ooooooo
Charcoal filter (PartNo. 5230WIA003A):
1. Unplug microwave oven or disconnect power.
2. Remove the vent gdlle mounting screws.
3. Push the rightside lower part of the charcoal filter.
Remove the filter.
4. Lift the back of the charcoal filter.Slidethe filter
straightout.
4.To replace grease filter, slidefilter in the frame slot
on back side of the opening. Push filter upward and
pushto front sideto lock into place.
5. Plug in microwave oven or reconnect power.
28
Page 29

5,Slide a new charcoal filter into place,The filter
should rest atthe angle shown,
REPLACING THE COOKTOP
AND OVEN LIGHTS
The cooktop light
1.Unplug microwave oven or disconnect power.
2. Remove the bulb cover mounting screw,
3. Replace bulbwith candelabra-base 20-watt bulb
(Part No, 6912A40002A) available from Sears by
calling 1-800-4-MY-HOME®,
6. Slide the bottom of the vent gdlle into place, Push
the top until it snaps into place, Replace the
mounting screws,
7, Plug in microwave oven or reconnectpower,
NOTE: Do not operatethe hood without the grease
filters in place.
4. Plug in microwave oven or reconnect power.
The oven light
1.Unplug microwave oven or disconnect power.
2. Remove the vent grille mounting screws.
x_
3. Tip the grille forward, then lift outto remove,
29
Page 30

Bulb holder
4.Liftupthebulbholder.
5. Replacethe bulbwith a candelabra-base 20-watt
bulb (Part No.6912A40002A) available from Sears
by calling 1-800-4-MY-HOME®.
6. Slide the top of the vent gdlle into place. Pushthe
bottom until it snaps into place, Replace the
mounting screws.
7. Plug in microwave oven or reconnect power.
30
Page 31

MICROWAVE COOKING TIPS
Amount of food
•Ifyou increase or decrease the amount of food
you prepare, the time it takes to cook that food will
also change. Forexample, if you double a recipe,
add a little more than halfthe originalcooking time.
Check for doneness and, if necessary,add more
time in small increments.
Starting temperature of food
•The lower the temperature ofthe food being put
intothe microwave oven, the longer it takesto cook.
Food at room temperature will be re-heated more
quicklythan food at refrigeratortemperature.
Composition of food
•Food with a lotof fat and sugar willbeheated
fasterthan food containing a lot of water. Fat and
sugarwill also reach a higher temperature than
water in the cooking process.
•The more dense the food, the longer it takes to
heat. "Very dense"food likemeat takes longerto
heat than lighter, more porous food likesponge
cakes.
Size and shape
•Smaller pieces of food willcookfaster thanlarger
pieces.Also, same-shaped pieces cookmore
evenly than different-shaped pieces.
•With foods that have different thicknesses, the
thinner partswill cook faster than the thicker parts.
Place the thinnerparts of chicken wings and legsin
the center ofthe dish.
Stirring,turning foods
•Stirring and turning foods spreadsheatquickly to
the center ofthe dish and avoids overceoking at the
outer edges of the food.
Releasingpressure in foods
• Several foods (forexample:baked potatoes,
sausages, egg yolks, and some fruits) are tightly
covered by a skin or membrane. Steam can build up
under the membrane during cooking, causing the
foodto burst. To relievethe pressure and to prevent
bursting,pierce these foods before cooking with a
fork,cocktail pick, or toothpick.
Using standingtime
•Always allow food to stand aftercooking.
Standingtime after defrostingand cooking allows
thetemperature to evenly spread throughout the
food, improving the cooking results.
•The length of the standing time depends on how
much food you are cooking and how dense it is.
Sometimes it can be as short as the time it takes
you to remove the food from the oven and take itto
the serving table. However, with larger, denser food,
the standing time may be as long as 10 minutes.
Arranging food
Forbest results, placefood evenly on the plate. You
cando this inseveral ways:
•If you are cooking several items of the same
food, such as baked potatoes,place them ina dng
pattern for uniform cooking.
•When cooking foods of uneven shapes or
thickness, such as chicken breasts, place the
smaller or thinner area of the foodtowards the
center of thedish where itwill be heated last.
•Layer thin slices of meat on top of each other.
•When you cook or reheat whole fish, scorethe
skin - this preventscracking.
•Do not letfood or a container touch the top or sides
ofthe oven. This will prevent possible arcing.
Covering food
Cover food to:
•Reduce splattering
•Shorten cookingtimes
•Keep food moist
You can use any coveringthat lets microwaves pass
through. See "Getting to Know Your Microwave
Oven" for materials that microwaves will pass
through. If you are using the Sensorfunction, be sure
to vent.
Using aluminumfoil
Metal containersshould not be used in a microwave
oven. There are, however, some exceptions. Ifyou
have purchased food which is prepackaged in an
aluminum foilcontainer, refer to the instructions on
the package. When using aluminum foil containers,
cooking times may be longer because microwaves
will only penetrate the top ofthe food. Ifyou use
aluminum containers withoL_package instructions,
follow these guidelines:
31
Page 32

MICROWAVE COOKING TIPS (CONT.)
Using aluminum foil (cont.)
• Place thecontainer in a glass bowl and add come
water so that itcovers the bottom of the container,
not more than 1/4in.(.64cm) high.This ensures
even heating of the container bottom.
• Always remove the lid to avoiddamage tothe
oven.
• Use only undamaged containers.
• Do not usecontainers taller than 3/4in. (1.9 cm).
• Container must beat least half filled.
•To avoid arcing, there must be a minimum 1/4in.
(.64cm) between the aluminum container end the
walls ofthe oven and also between two aluminum
containers.
• Always placethe containeron the turntable.
• Shield with small pieces of aluminum foil, parts of
food that may cook quickly, such as wing tips and
leg ends of poultry.
• Heating food inaluminum foilcontainers usually
takes up to double the time compared to reheating
inplastic,glass,china, or paper containers.
The time when food isready will vary depending
upon the type of container you use.
• Let food stand for 2 to 3 minutes after heating so
that heat is spread evenly throughout container.
Removing the rack
•When poppingcommercially packagedpopcorn,
Remove the rack from the oven; Do not placethe
bag of microwave popcorn on the rack or under the
rack.
• Inthe case of popping microwave popcorn with
rack, that can cause the fire or damage to your
microwave oven.
Cookingyou should not do in your
microwave oven
• Do not do canning offoods inthe oven. Closed
glassjars may explode, resulting indamageto the
oven.
• Do not use the microwave oven tosterilize objects
(baby bottles, etc.). It isdifficultto keep the oven at
the high temperature needed for sterilization.
32
Page 33

Questions and Answers
QUESTIONS ANSWERS
Can I operate my microwave oven without the glass No.Ifyou removeor move the glass tray, you
tray or move the glass tray over to hold a large dish? will get poor cooking results. Dishesused in
youroven must fit on theglass tray.
Can I use either metal or aluminum pans in my You can use aluminum foil for shielding (use
microwave oven? small,flat pieces), small skewers, and shallow
foil trays (if tray isnot taller than 3/4in.[1.9 cm]
deep and is filledwith food to absorb microwave
energy). Never allow metal to touch walls or
door.
Is it normalfor the glass tray to move ineither Yes. The glass tray moves from side to side,
direction? depending on the rotation of the motor when the
cooking cycle begins.
Sometimes the door ofmy microwave oven appears This appearance isnormal and does not affect
wavy. Isthis normal? the operation of youroven.
Why does the dish become hotwhen Imicrowave As the food becomes hot itwill conduct the heat
food init? Ithought that this should not happen, to the dish. Be prepared to use hot padsto
remove food after cooking.
What does "standing time" mean? "Standingtime" means that food should be
Why does steam come outof the air exhaust vent? Steam isnormally produced during cooking. The
Can I pop popcorn inmy microwave oven? Yes. Pop packaged microwave popcorn
How do I getthe best results? following manufacturer's guidelines. Do not use
removed from the oven and covered for
additionaltime to allow itto finish cooking. This
frees the ovenfor other cooking.
microwave oven has been designed to vent this
steam out the vents.
regular paper bags.
Do not repop unpopped kernels. Do not pop
popcornin glass cookware.
33
Page 34

Troubleshooting
Mostcooking problems often are caused by littlethings you canfind and fix withouttoolsof any kind. Check the
listsbelow and on the next page before callingfor assistanceor service. If you still need help,callSears Service
at 1-800-4-MY-HOME®.
MICROWAVE OVEN DOES NOT WORK
PROBLEM CAUSE
Nothing works. • The power supply cord is not plugged into a grounded 3 prong outlet. (See the
Electrical Requirements" section on page 6and the "Electricalconnection"
sectionon Page 8.)
•A householdfuse has blownor a circuit breaker has tripped.
•The electdc company has had a power failure.
The microwave oven will • You are using the ovenas a timer.Touch STOP/CLEAR to cancel the Kitchen
notrun. Timer.
•The door is not firmly closed and latched.
•You did not touch START.
•You did not follow directions exactly.
•An operation that you set earlier is still running.Touch STOP/CLEAR to cancel
that operation.
COOKING TIMES
PROBLEM CAUSE
Food is not cooked • The electric supply to yourhome or wall outlets is low or lowerthan normal.Your
enough, electriccompany can tell you if the line voltage is low. Your electricianor service
techniciancan tell you ifthe outlet voltage is low.
•The cook power is not at the recommended setting.
Check the chart on Page 16.
The displayshows a time •The oven door is not closed completely.
counting down bL_the oven • You haveset the controlsas a kitchentimer. Touch STOP/CLEAR to cancel the
isnot cooking. Kitchen Timer.
34
Page 35

GLASS TRAY
PROBLEM CAUSE
The glass tray will not •The glass tray isnot correctly in place. It should be correct-side up and sitting
move. firmly on the center hub.
•The support isnot operating correctly.Remove the glass tray and restartthe
oven. If the hub still does not move, callSears Service at 1-800-4-MY-HOME®.
Cooking withoutthe glass tray can giveyou poorresults.
TONES
PROBLEM CAUSE
You do not hear • You have not enteredthe correct command.
the programming or
end-of-cycle tone.
DISPLAY MESSAGES
PROBLEM CAUSE
The display is flashing" : ." • There has been a power interruption. Reset the clock. (See the "Clock" section
I
on Page 12.)
I
If none of these items are causing your problem, call Sears Service at 1-800-4-MY-HOME®.
35
Page 36

Contenidos
Garantia en
Combinacibn
Garantia .......................................................... 36
Servicio Sears ................................................ 37
Seguridad del horno de microondas ........... 38
Aprender a conocer su horno
de microondas ............................................... 41
C6mo funciona su combinaci6n microondas
compana de kenmore ULTRA WAVE TM .......... 41
Interferencia de radio ...................................... 41
Probar su homo de microondas ...................... 42
Probar su vajilla o bateria de cocina ............... 42
Precauciones de seguridad operativa ............ 42
Conexi6n el6ctrica ......................................... 42
Caracteristicas del homo de microondas ......43
Funciones del panel de control ....................... 44
Usar su homo de microondas ...................... 46
Se_ales auditivas ............................................ 46
Interrumpir la cocci6n ..................................... 46
Retoj ................................................................ 46
Protecci6n de seguridad para niSos ............... 46
Temporizador .................................................. 47
Ventilador de extraccidn ................................. 48
Luz superior de cocina .................................... 48
Agregar minuto ............................................... 48
Cocci6n cronometrada .................................... 49
Cocci6n en etapas m61tiples ........................... 49
Nivetes de potencia de microonda .................. 50
Descongelamiento automatico ...................... 51
Tabla de Descongelamiento Autom_tico ........ 52
Tabla de Descongelamiento Automatico (cont.).....53
Sugerencias para descongelarmiento ............ 54
"Mantener caliente". ........................................ 54
Segura a fuego rento ...................................... 55
Usar sensor de eoecidn ................................ 56
Sensor de cocci6n .......................................... 56
Papas (Ejemplo) ............................................. 56
Mas/Menos ..................................................... 56
Cuadro de Coccidn det sensor ........................ 57
Cocci6n Autom_tica ........................................ 58
Recalentamiento Autom&tico .......................... 58
Cuadro de Coccidn Automatica ...................... 59
Cuadro de Recalentamiento Automatico ........ 59
Fundir ............................................................. 60
Tabla de indicaciones para fundir .................. 60
Ablandar ......................................................... 60
Tabla de indicaciones para ablandar .............. 60
Cuidar su homo de mieroondas .................. 61
Cuidado de los filtros ..................................... 62
Reemplazar las luces de la parte
superior y det homo ........................................ 63
Sugerencias para la coeina en
su microonda ................................................. 65
Preguntas y respuestas ............................... 67
Solucibn de problemas ................................. 68
Servicio ....................................... tapa posterior
GARANT[A TOTAL DE LA COMBINACION
EN LA CAM PANA DE SU MICROONDA
POR UN ANO COMPLETO
Durante un aSoa partirde la fecha de compra,siesta
combinaci6n en la campana de su microonda
Kenmoretiene un fallo debido a defecto en el material
o en la mano de obra, Sears Iorepara sin cargo.
GARANT[A TOTAL DE CINCO ANOS
SOBRE EL MAGNETRON
Durantecinco aSosa partirde la fechade compra,si el
magnetr6nde estacombinaci6nenlacampanade su
microondaKenmoretiene unfallodebidoa defectoen el
materialo en la manode obra,Sears la reparasin cargo.
La cobertura de la garantfa mencionada ardba se
aplica solamente a la combinaci6n en la campana de
su microonda que se usa s61oencasas particulares.
EL SERVIClO DE GARANT[A ESTA DISPONIBLE
CONTACTANDO SIMPLEMENTE AL SERVICIO
SEARS A 1-800-4-MY-HOME _
Esta garantfa se aplica s61omientras este producto
esta en uso en los EE.UU.
Esta garantfa le da a usted derechos legales
especificos que varian de estado en estado.
Sears, Roebuck y Co.,
Dept. 817WA,
Hoffman Estates, IL 60179
Pot Ilamado de servicio:
1-800-4-MY-HOME _
SM (1-800-469-4663)
Tenga a bien registrar la informacibn de su
modelo.
En el momento en que usted Ilame para recibir un
servicio para su producto, necesitara saber el
nQmerodel modelo y el n6mero serial completo.
Puede encontrar esta informaci6n en la
placa/etiqueta del n0mero serial y del modelo en el
lado superior de la cavidad frontal en su homo de
microondas. Tambi6n, registre las otras
informacionesmostradas abajo.
N_mero de modelo
Nt_merode serie
Fecha de compra
36
Page 37

Servicio Sears
Acuerdos Maestros de proteccibn
Felicitaciones por haber hecho una compra inteligente
Su nuevo producto Kenmore ®esta diseSado y fabricado para afios de operaci6n segura.
Pero como todo producto, puede necesitar mantenimiento preventivo o reparaciones cada cierto
tiempo. Es alti cuando et tener un Acuerdo Maestro de protecci6n le puede ahorrar dinero o evitar
que la falla empeore.
Adquiera un Acuerdo Maestro de protecciSn ahora y resgu&rdese de cualquier molestia o gastos
inesperados.
El Contrato de Protecci6n Maestro ayuda tambi6n extender la vida de su nuevo producto. Estas son
los aspectos incluidos en et Contrato :
5( Servicio experto, Ilevadoa cabo por cualquiera de nuestros 12.000 profesionalesespecialistas en
reparaciones.
5( Servicio ilimitado y sin cargo alguno, por las piezas o por et trabajo en toda las reparaciones
cubiertas por et Acuerdo.
5( Garantia de "No-Lemon" - cambio de su producto cubierto si ocurre mas de cuatro o m_s fallas
al producto dentro de doce pdmeros meses.
5( Reemplazo del producto si su este asegurado no puede arreglarse.
5( Control anual de mantenimiento preventivo a pedido suyo sin cargo extra.
5( Ayuda r_pida via tel_fonico - Soporte tetef6nico de an t6cnico de Sears sobre los productos que
se requiere de reparaci6n en casa, m_s la programaci6n conveniente de servicio.
5( Proteccibn contra sobrecarga el_ctrica, por dafios et6ctricos causados por fluctuaciones de
cordente.
5( Reembolso de alquiler si la reparaci6n det producto asegurado toma m_s tiempo de Io
prometido.
Una vez que ha comprado el Acuerdo, una simple llamada telef6nica es todo Io que le tomar_ para
agendar un servicio. Puede Ilamar a cualquier hora del dia o de la noche o hacer un compromiso de
atenci6n por telefono.
Sears tiene m_s de 12,000 profesionales especialistas en reparaciones que tienen acceso a m_s de
4.5 millones de piezas de calidad y accesorios. Esa es la ctase de profesionalismo con la que puede
usted contar para ayudar a prolongar la vida de su nueva adquisici6n en los afios por venir.
iSuscdba ya un Acuerdo Maestro de protecci6nY
Se aplican algunas limitaciones y exclusiones. Pot precios e informacibn adicional Ilame al 1-
800-827-6655.
Servicio de instalacibn Sears
Para la instalaci6n profesional de Sears de los aparatos del hogar, dispositivos de apertura de la
puerta del garaje, calentadores de agua, y otros items pdncipales del hogar, Ilame en los Estados
Unidos a 1-800-4-MY-HOME ®.
37
Page 38

Seguridad del horno de
mlcroondas
Su seguridad y la seguridad de los otros son muy importante.
Hemos dado muchos mensajes de seguridad en este manual yen su utensilio.
Lea siempre y acate todos los mensajes de seguridad.
Este es et simbolo de alerta de seguridad.
Este simbolo indica que hay peligro de muerte o de heridas graves para usted u otros.
Todos los mensajes de seguridad estaran precedidos por el simbolo de alerta de seguridad
y de la palabra "PELIGRO "o "ADVERTENCIA." Estaspalabras significan:
Hay peligro de muerte o de heridas graves si no
se siguen inmediatamente las instrucciones.
Hay peligro de muerte o de heridas graves si no
se siguen las instrucciones.
Todos los mensajes de seguridad identifican et riesgo, le indican c6mo reducir los riesgos de
lesiones y le dicen Io que podria pasar si las instrucciones no se siguen.
INSTRUCCIONES IMPORTANTES DE SEGURIDAD
Cuando se usan dispositivos electricos, deben seguirse las PRECAUCIONES b_sicas de
seguridad inctuyendo las siguientes
ADVERTENCIA: Parareducir el riesgode
quemaduras, descarga el_ctrica, incendio,lesiones
alas personas o exposici6n a excesiva potencia de
microondas
• Lea todaslas instruccionesantes de usar el
homo de microondas.
• Lea y siga las "PRECAUCIONES PARA EVITAR
POSIBLE EXPOSICION A UNA EXCESIVA
POTENCIA DE MICROONDAS" especificas que
seencuentran en esta secci6n.
• El homo de microondas debe ser conectado a
tierra. Conecte solo al tomacorrientes
correctamenteconectado a tierra.
Lea las "INSTRUCCIONES PARA CONECTAR A
TIERRA" que se encuentran al final de esta
secci6n.
• Instaleo ubique el homo de microondas
solamente siguiendo las instruccionesde
instalaci6n provistas.
•Algunos productostales como huevos con
cascara completay envases herm_ticos por
ejemplo, recipientes cerrados de vidrio,pueden
explotar y no deben ser calentados en el homo de
microondas.
• Use el homo de microondas s61oparael fin
especifico tal como esta descrito en este manual.
No use productos quimicos corrosivos o vapores
en el homo de microondas. Este tipo de homo
esta especfficamente diseSadopara calentar,
cocinar o secar alimentos. No esta diseSado para
uso industrial o de laboratorio.
•Como cualquier artefacto, es necesario un control
estricto cuando es usado por losniSos.
• Noopere el homo de microondassi tiene daSado
el cable de alimentaci6n o el enchufe,si no esta
funcionando correctamente o si ha sido daSadoo
dejado caer.
38
GUARDE ESTAS INSTRUCCIONES
Page 39

IMPORTANTES INSTRUCCIONES de SEGURIDAD
• Elservicioalhomode microondasdebeserhecho
sob porpersonalcal_cado.Llamea unacompaS[a
deservido autorizadapara examinar,repararo
hacerajustes.
• Vealasinstruccionesparala limpiezade lasuperficie
dela puertaen la secci6n"Cuidadodesu Homode
microondas".
• Parareducirelriesgode incendioenel interiordel
homo:
- Nococinede maslos alimentos.Tengacuidadosi
secolocaparafadlitarla cocci6n,papel,plasticou
otros materialescombustiblesdentrodelhomo de
microondas.
- Quitelasatadurasdealambreretorcidodelpapelo
bolsasde plasticoantesde colocarbolsasen el
homo.
- Si losmaterialesdentrodel homose quemaran,
mantengala puertadel homocerrada,apagueel
homoy desconecteel cablede alimentad6no
cierreel pasode lacorrienteel_ctricaenel fusibleo
en el paneldeldisyuntor.
- Nouse el interiordelhomoparaalmacenamiento.
Nodejeelementosde papel,utensiliosde cocinao
alimentosenelinteriordelhomocuandonoest_enuso.
• Adecuadoparasuusosobreelementosde cocinade
gaso el_ctricos.
• Previstoparaserusadoporsobrelosrangescon un
anchomaximode 36 pulgadas(91cm).
• Limpieconfrecuencialascampanasde ventUaci6n,
nodebe permitirquese acumulegrasaenla
campanao en elfiltro
• Cuandohayaalimentosqueproducenllamasbajola
campana,enciendael extractor.
• Tengacuidadocuandolimpie elfiltrodel extractor-
campana.Losagentescorrosivesde limpieza,tales
como limpiahornosbasadosen lejia,puedendaSar
elfiltro.
• Nodebensercobcadosen el hornode microondas
alimentosoutensUiosde metalde grantamahoya
quepuedenocasionarincendbo riesgode descarga
el_trica.
• Nolimpiesobreunalmohadillasasperasde metal.
Laspiezaspuedenquemarla almohadUlaytocar las
partesel_ctricasocasionandoriesgodedescarga
el_ctrica.
•Noalmacenenadadirectamentesobreel hornode
microondascuandoest_en funcbnamiento.
•Nocubrao bloqueeningunaaberturaenel homo de
microondas.
•Nodejeestehomo de microondasa laintemperie.
NoIo usecercadel agua,porejemplo,cercade la
piletade lacocina,sobreuna basehDmeda,o cerca
deuna piletade nataciSno algo porel estilo.
•Nosumerjael cable dealimentad6no enchufeen el
agua.
•Mantengael cablede alimentaci6nlejosde las
superficiescalientes.
•Nodejeel cablede alimentaciSncolgandodelborde
dela mesao mostrador.oNoIomontesobreuna
pileta.
•Nocubralasrejinaso cualquierotrapartedelhomo
conlaminasde metal. Estocausara
sobrecalentamientodel homo.
•Losliquidostalescomoagua,caf_o t_,'pueden
sobrecalentarsemas aliadelpuntode hervorsi estar
aparentementehirviendodebidoa su tensiSn
superficial.Nosiemprese notaelburbujeoo el
hervoral retirarelrecipientedelhomo. Estopuede
causarque losliquidosmuy calienteshiervan
repentinamentecuandose introduceenel liquido
unacucharao cualquierotro utensilio.
Parareducirelriesgo de producirlesionesalas
personas;
1) Norecalienteliquidos.
2) Revuelvaelliquidoantesy mientrassecalienta.
3)No userecipientesdelados rectosconcuellos
angostos.
4) Luegode calentar,permitaalcontenedor
permaneceren elhomode microondasporun
tiempocortoantesdequitarlo.
5)Tengamuchocuidadocuandocoloqueunacuchara
u otroutensiliodentrodelcontenedor.
GUARDE ESTAS INSTRUCCIONES
39
Page 40

PRECAUCIONES PARA EVITAR POSIBLE
EXPOSICION A UNA EXCESIVA POTENCIA DE
MICROONDAS
(a) Nointentehacerfuncionarestehornoconla puerta
abiertaya queelfundonamientoconpuertaabierta
puedecausarexposici6nnocivaa la potendade
microondas.Es importantenodescuidaru
obstaculizarla seguddaddelos enclavamientos
el6ctricosde interbbqueo.
(b) Nocoloqueningt_nobjetoentrela carafrontaldel
homoy lapuertao permitaque seacumule
suciedado residuosde Impiador sobrelas
superlcie de selado.
Requisitos eldctricos
Observe todos los c6digos y ordenanzas. Se
requieren en el equipo 120 Volt, 60 Hz, CA
solamente, se requieren fusibles de 20 amp
(Se recomienda fusibles de retardo).
Se recomienda que se use un circuito separado
que alimente s61oa este dispositivo.
(c) No hagafundonarelhomosiesta daiado. Es
particularmenteimportantequela puertadelhomo
secierrecorrectamentey que nohaya daio en:
(1)Puerta(torcida),
(2)Bisagrasy cerraduras(rotaso sueltas),
(3)Cerradurasdelas puertaso superficies
seladas.
(d) Nadie excepto el personal de servicio
calificado debe hacer ajustes o reparaciones
en el homo.
Peligrode descarga el_ctrica.
Enchufeen un tomacorriente conectedo
a tierra de 3 clavijas. No quite la clavija
de conexibn a tierra.
No use adaptedor.
No use extensibn de cable de
alimentacibn.
No seguir estes instrucciones puede
Ilegara causar muerte, incendio o
descarga eldctrica.
INSTRUCCIONES PARA CONECTAR A TIERRA
• Para todos los artefactos conectados con
cable de alimentacibn :
El homo de microondas debe ser conectado a
tierra. En caso de corto circuito electrico, la
conexi6n reduce et riesgo de descarga
electrica, ya que provee un alambre de
escape para la corriente el6ctrica. El homo de
microondas esta equipado con un cable de
alimentaci6n que tiene un enchufe con un
cable de conexi6n a tierra. El enchufe debe
estar conectado a un tomacorrientes
correctamente instalado y conectado a tierra.
ADVERTENCIA: El use incorrecto de la
conexi6n a tierra puede ocasionar petigro de
incendio o de descarga el6ctrica.
Consulte a un etectricista calificado o personal
de servicio si las instrucciones no son
completamente comprendidas o si hay dudas
sobre si el homo est_ adecuadamente
conectado a tierra.
No use una extensi6n de cable de
alimentaci6n. Si el cable de alimentaci6n es
demasiado corto, haga instalar un
tomacorriente por un t6cnico calificado cerca
det homo de microondas.
• Para un artefacto permanentemente
conectado:
El homo de microondas debe estar conectado
a un sistema metalico de cables, permanente,
de conexi6n a tierra o un conductor de
conexi6n a tierra det equipo debe ser
accionado con los conductores det circuito y
conectados a la terminal a tierra det equipo o
toma de alimentaci6n del homo de
microondas.
GUARDE ESTAS INSTRUCCIONES
4O
Page 41

Aprender a conocer su horno
de microondas
Estasecd6n habla de losconceptos de cocci6namicroondas.Tambi6n le muestra loselementos basicos que
usteddebe conocerpara operar el homo de microondas. Porfavor lea esta informad6n antes de usar su homo.
COMO FUNCIONA SU COMBINACION MICROONDAS
COMPANA DE KENMORE ULTRA WAVE TM
La energia de microondas no producecalor. Esta
energiahaceque los alimentosgenerencalory 6stea
suvez hace que losalimentosse cocinen.Las
microoodasson como lasoodasde TV, radioo luz.
Ustednolaspuedever,peropuedeverb quehacen.
Un magnetrbn de producelas microondasen un
homode microondas.Lasmicroondas semueven
dentrodel homo donde se ponenen centactocon
losalimentce cuandogiransobre la bandejagiratoria.
Magnetr6n
Cavidad_del homo
Plso de metal Bandeia giratona de vidrio
La bandeja giratoria de vidrio de su homo de
microondas permite que las microondas pasen.
Luego, estas rebotan en el piso de metal, atraviesan
la bandeja giratoria de vidrio yson absorbidas por
losalimentos.
Las microondas pasan a trav6s de la mayoria de
lostipos de vidrio, papel y plastice sincalentarlos,
de manera que el alimento absorbe la energia. Las
microondas rebotan en los recipientes de metal, por
Iotanto los alimentos no absorben la energia.
Sistema de inversor de microondas
ULTRA WAVE TM
El sistema de inversor de microondas ULTRA
WAVETM le ofrece mejor rendimiento de cocci6n
en microondas para descongelar, cocinar y
recalentar alimentos rapida y uniformemente. La
tecnologia probada del sistema de inversor de
microondas ULTRA WAVETM entrega una
comente censtante de energia de microondas -
verdadera energia alta, media y baja,a la vez que
usa menos potencia y ahorra tiempo.
Los homos convencionales a microondas operan
s61oen energia alta (HIGH). Para Iograr un nivel de
energia de 70% en un homo convencional a
microondas, el homo opera el 70% del tiempo en
energia alta y el 30% del tiempo apagado (OFF).
Elsistemadeinversorde microondasULTRAWAVETM
entregaenergiaelenformacontinua,paradescongelar
masuniformementey minimizarelexcesodecocci6n
de losalimentosy lassuciassalpicaduras.
Coccibn por sensor
Elsistemade inversordemicroondasULTRAWAVETM
cuentaconfuncionesdecocci6nporsensor.
Unsensorde humedaden lacavidaddel homodetecta
lahumedademitideporlos alimentosalcalentarse.
Elsensorajustaeltiempoparadiversostiposy
cantidadesdealimentos.Lacocci6npor sensorelimina
laincertidumbreal cocinarconhornosdemicroondes.
Cbmo obtener los bptimos resultados
de coccibn
• Siemprecocinelos alimentosporel tiempomas
cortorecomendede.Verit]quec6mo se estan
cocinandelosalimentos.
•Para ayudar a aeegurarse de que los alimentos
est_ncocinadoede forma pareja, revuelva, rote
o redistribuya los alimentosquese estan
cocinandea la mitaddeltiempode cocci6n.
•Siusted no tiene una tapa para un plato, use
papelenceradeotoanasde papelaprobadaspara
usocon microondasopeliculade plastico.
Recuerdedeblarunaesquinade la peliculade
plasticoparaqueel vapor salgadurantela cocci6n.
Interferencia de radio
Usar su homo de microondas puede causar • Llevar el receptor lejos del horno de microondes.
interferencia en su radio,TV o equipo similar. • Enchufar el homo de microondas en un
Cuando hay interferencia, puede reducidao tomacorrientediferente de modoque el homo de
quitarla de la siguiente forma: microondas y receptor est6n en diferentes ramas
• Limpiar la puerta y sellar las superficie del homo. de circuitos.
•Ajustar la antenareceptora de la radio o televisor.
41
Page 42

Probar su horno de microondas
Para probar el homo ponga aproximadamente 1
taza de agua fria en un reelpiente de vidrio en el
homo.
Cierre la puerta. AsegQreseque secierra. Cocine I
a1100% de potencia por 1 minute. A su debido
Probar su vajilla o bateria de cocina
Pruebesuvajillao bateriadecocina antesdeusar. energiadelasmicroondas,celentandosedemasiade
Paraprobarunplatoytenerunusoseguro,col_ueb en paratomarbsconlamanoy dem_andolostiemposde
elhomoconunatazadeaguaalladedelmismo.Siel cocci6n.Cocinarenredpientesde metalnodiseSades
platose celientademasiadoyelaguaquedafria,noIo parausodemicrnondaspuedendafiarel homo,yaque
use.Silavajilta se calienta,noIouse.Algunosplatos podriancontenermetalcculto(atadurasretorcidas,
(demelanina,a!gunavajillaceramica,etc.)absorbela laminasmetalk:as,grapas,lustreo recortesmetalicos).
Precauciones de seguridad operativa
I
Itiempo, el agua debe calentarse.
• Nunca se apoye en la puerta o permita a un nifio
que se belancee en ella cuando la puertaesta
abierta.
• Use protectores para objetos celientes. La
potencia microonda no calienta losenvases, pero
el calordel elimento puede hacer que el recipiente
se caliente.
• No usepapel de diarios u otro papel impreso en el
homo.
• Noseque flores, frutas, hierbas, madera, papel,
calabacines o ropas en el horno.
• Noencienda el homo de microondas cuando esta
vacio. La vide Qtildel producto puede ser
acortada. Si realizalaprogramaci6n del homo,
coloque un recipiente de agua en el homo. Es
normalque la puertadel homo se vea ondulada
despu_s de que el homo ha estado funcionando
por un lapso.
• Notratede derretircera de parafinaenel homo.
La cera de parafina no se derretiraporque permite
alas microondas pasar a trav_s de la misma.
• Noopere el homo de microondas a menos que la
bandeja de vidrio giratoriaeste segura en su lugar
y pueda mueve libremente. La bandeja giratoria
puede mueve hacia cualquier direcciSn.
Asegflrese de que la bandeja giratoria esta
correctamente colocada en el homo. Tome su
bandeja giratoriacon cuidado cuando la saque del
homo, para evitar la posibilidadde quebrarla. Si
su bandeja giratoriase rompe o se quiebra,
contacte a su proveedor para un reemplazo.
• Cuando use unplatodorador, el fondo del plato
dorador debe ser al menos de por Io menos 3/16
pulgadaspor arriba de la bandeja giratoria. Siga
lasdirectivas provistas con el plato dorador.
•Nunca coelne o recaliente un huevo entero con
cascara. La formaelSnde vapor en los huevos
enteros puede causar que revienten y
poelblementedarien el homo. Fracelone los
huevos duros hervidos antes de calentados. En
rarasocasiones, loshuevos poche se han
reventado. Cubra los huevos poch6 y deje un
tiempo de un minuto antes de cortarlos.
•Para obtener mejores resultados, revuelva
mientrasse calienta o recalienta.Los liquidos
calentadosen dertos reelpientes (especialmente
recipientesde forma cillndrica) pueden
sobrecalentarse.El liquido puede saltar haelacon
un fuerte sonido durante o despues de calentarse
o cuando se agreguen los ingredientes(granulos
de caf_, saquitosde t6, etc.). Esto puede dafiar el
homo.
•Las microondas pueden no Ilegaral centre de un
asado. Elcalor se difundedesde el centro hacia
afuera, areas cocidas, tal como un homo comQn.
Esta es una de las razones para dejar algunos
alimentos (por ejemplo, asados o papas al homo)
permanecer por un momento despu_s de la
cocel6no en otros alimentos, revolverlosdurante
el tiempo de cocel6n.
•En el homo, no sumerja al freir. Los utensilios
para microondas no son adecuados para esto y
es dificil mantener temperaturas correctas para
friturassumergidas.
•Nococine demaelado las papas.AI finaldel tiempo
de cocci6nrecemendado, las papasdeber&nestar
ligeramentefirmes porquecontinuaran la cocd6n
duranteel tiempo de permanencia. Luegode
cocinaren el homo de microondas,deje alas
papaspermanecer durante 5 minutos. Se
terminarande cocinarmientrasreposan.
Conexibn El ctrica
pueden ser mas largos. Haga que un electricista calificado controle su sistema el_ctrico.
I Si su linea de conexibn el6ctrica o voltaje de salida es de menos de 110 voltios, los tiempos de cocel6n
42
Page 43

i iiiiii i!iiiiiiiijiiii!iii!iiiiiii! iiii{iiiiii!iiii!ili!iiiii!ii
Caracteristicas del horno de microondas
i i i i (_
Su homo de microondas esta diseSado para hacer
su expedencia de codna Io m_s agradable y
productiva posible. Para resumir y explicar
r_pidamente, la siguiente es una tista de las
caracteristicas basicas del homo:
1.Ventana con pantalla de metal evita que las
microondas se escapen. Esta diseSada como
una pantalla para permitide visualizar la comida
mientras se cocina.
2. Placa de modelo y n0mero de sene y etiqueta
de guia de cocciSn
3. Filtro de carbdn (detr_s de la rejilla de
ventilacidn)
La bandeja de viddo se mueve en ambas direcciones
para ayudar a cocinar m_s parejamente.
No opere el homo de microondas sin la bandeja de
viddo en su lugar.
Para instalar:
1. Co{oque el soporte en la cavidad del pisodel horno.
2. Co{oque la bandeja de viddo en el soporte.
3
4. Rejilla de ventilacibn.
5. Bandeja giratoria. La bandeja glratoria hace
girar los alimentosmientras cocina para obtaner
una cocci_n m_s pareja. Debe estar en el homo
durante el funcionamiento para obtener mejores
resultados de cocciSn.
6. Luz auxiliar (para la mesada)
7. Filtro de grasa. Ver la secciSn "Cuidado del los
filtros".
8. Panel de control. Toque los pads en este panel
para realizar todas las funciones.
9. Parrilla de coccibn. Utilicela para obtener
espacio extra cuando cocine en mas de un
recipiente a la vez.
Acomode el pie acanalado del piso de {a bandeja de
vidrio entre los rodillos del cubo central. Los rodillos
del soporte deben caLzardentro del reborde de la
bandeja de vidrio.
1. Bandeja de viddo
2. Soporte
3. Cubo central
43
Page 44

Funciones del panel de control
El panel de control de su horno de microondas le permite seleccionar rapida y facitmente la funci6n
de cocci6n deseada. Todo Io que tiene que hacer es tocar et bot6n de comando. La siguiente es una
lista de todos los bot6n de comando y nQmeros ubicados en et panel de control. Para m_s
informacibn sobre estas caracteristicas, vea la seccibn "Usar su horno de microondas".
ooo
POPL'_RN VEGE3"_L_ A_ Su_
Cgg_ $1_ _CeFTEN H_L_ _E
00000
1 2 3 4 5
00000
7 8 9 0
1. Pantalla. La pantalla inctuye un reloj e
indicadoresque le muestran la hora del dia, los
programas de las horas cocinar los alimentos,
las potencias de cocciSn, las cantidades, pesos
y lasfunciones de cocciSn seleccionadas.
2. Palomitas de maiz. Toque este botSn para
preparar las palomitas de maiz con la
caracteristica del sensor. Elsensor del homo le
dir_ al homo cuanto tiempo deber_ cocinar
segL_nla cantidad de humedad que detecta
(deserta) en las palomitas.
WArM
3. Papas (patatas) al horno. Toque este botSn
para cocinar papas sin introduciruna potencia o
tiempo de cocci6n.
4. Verduras. Toque este botSn para cocinar sin
introducir una potencia o tiempo de cocciSn.
5. Entrada congelada. Toque este botSn para
cocinar de 10 a 21 onzas de entrada congelada
sin introducir una potencia o tiempo de cocciSn.
6. Coccibn autom_tica. Toque este botSn para
cocinar alimentos aptos para homo de
microondas sin introduciruna potencia o tiempo
de cocciSn.
44
Page 45

iiiiiiiiiiiiiiiiiiiiiiiiiiiiiiiiiiiiiiiiiiiiiii!!i!!!!i!ii!!iiiiiilii_!iiliii_!_!_i!i}iiii!!!lii!!iiiiii!i!!iiiiiiii!!iiiililiiii!_i!!iiiii}}iii!!iii!__iiiiiii!!}!i!ii!!illiiiiiii;i!ii!!;i;i{_iiiiii_iifill:!i!ilj!i!!!j_i_iii!ili_i!i!_iiiiiiiliiiii!ii!iiiiii!iiiii_!iiii!i!i!i!i!ii!i_!:!_;;iiiiii_i!iiiiiiiiJiiii!iii!iiiiiii!__iiii{iiiil;;i!iiii!ii_i!ii_iii!i;i_:!i!!!i__!}i_ii:!i!i{{!}}}}}}}}}}iiii
7. Recalentamiento autombtico. Toque este
bot6n para recalentar alimentos aptos para
homo de microondas sin introducir una potencia
o tiempe de cocci6n.
8. Segura a fuego rento. Toque este bot6n para
hervir {entamente sopas, cazuelas, estofados y
otros alimentos liquidos.
9. Descongelamiento autom_tico. Toque este
bot6n seguido per bot6ns num_dcos para
descongelar came segOn el peso.
10. Ablandar. Toque este bot6n para ablandar
helados, cremas, queso, mantequilla ojugos
helados.
11. Fundir. Toque este botSn para fundir
chocolate, queso, mantequilla o malvavisco.
12. "Mantener caliente". Toque este bot6n para
"Mantener caliente" las comidas cocinadas en
su homo hasta 99 minutos, 99 segundos. La
fund6n "Mantener caliente" puede ser usada
per si misma o puede seguir autom_ticamente
el dclo de cocciSn.
18. Tiempo de coccibn. Toque este bot6n
seguido per un botSn num_rico para
determinar un tiempe cocciSn.
19. Potencia. Toque este botSn despues
determinar el tiempe de cocci6n, seguido per
un bot6n num_rico para instalar {acantidad de
potencia de microondas liberadas para cocinar
los alimentos. Cuando mas alto el n0mero mas
alto {a potenda de microondas o "velocidad de
cocci_n."
20. Pads num_ricos. Toque los botSns
num_ricos para introducir tiempos de cocci6n,
potencias de cocciSn, cantidades, pesos, o
categorias de comidas.
21. INICIAR. Toque este bot6n para iniciar una
funci6n. Si abre la puerta despues que el homo
comienza a cocinar, vuelva a tocar INICIAR
(START).
22. DETENER/Limpiar (STOP/CLEAR). Toque
este botSn para borrar un comando incorrecto,
canceiar un programadurante {a cocciSn,
o {impiar la pantalla.
13. Agregar minuto. Toque este bot6n para
cocinar per 1 minuto, a1100% de Potencia de
cocc{Sno para agregar un minuto extra a la
Potencia de cocc{Sn.
14. M_s. Toque este botSn para agregar 10
segundos de tiempo extra de cocc{Sncada vez
que Io presiona.
15. Menos. Toque este bot6n para restar 10
segundos de cocci6n per cada vez que Io
presiona.
16. Reloj. Toque este bot6n para introdudr{a hora
del dia correcta.
17. Cronbmetro de cocina. Toque este bot6n
para {niciar el CronSmetro de codna.
23. Ventilador (_) On/Off. Toque este botSn
para apagar o encender el ventilador.
24. Ventilador (_ ) 5 Velocidades. Toque este
bot6n para elegiruna de {as 5 velocidadesde{
ventilador.
25. Luz (_'). Toque este botSn para encender
la luz, ponerla en alta, en nocturna o para
apagarla.
NOTA: Si trata de introducir instrucciones
incorrectas,no escuchara ning0n tono. Toque
DETENER/Limpiar (STOP/CLEAR) y reintroduzca
las instrucciones.
45
Page 46

¸!iiiiiii:i:iiiii!i ¸iiiii!
Usar su horno de
microondas
Esta secci6n contiene instrucciones para Ilevar a
cabo cada funci6n. Tenga a bien leer
cuidadosamente estas instrucciones.
;ENALES AU DITIVAS
Las sefales auditivas estan disponibles para
guiado cuando programa y usa su homo ;
• Un tono de programacibn sonar_ cada vez
que usted toque un pad.
• Siete tonos seffalan el final de un conteo del
cron6metro de cocina.
• Cuatro tonos sefalan lafinalizad6n de un cicto
de cocci6n.
RELOJ
Luego de enchufar su homo de microondas por
primeravez o luego de una interrupci6n por falla
electrica,la pantallamostrara el mensaje "PLEASE
SETTIME OF DAY". Si la hora del aliano est_
determinada,la pantallamostrara ":" hasta que
usted toque "Reloj ".
Ejemplo para 10:30(AM):
INTERRUMPIR LA COCCION
Abriendo la puerta, puede detener el homo
durante un cicto. El homo deja de calentar y el
ventilador se detiene, pero la luz permanece
encendida.
Para retomar la cocei6n, eierre la puerta y
toque START
Si no desea eontinuar la eoecibn, abra la
puerta y toque STOP/Clear.
PROTECCII_N DE SEGURIDAD
PARA NINOS
Puede usar esta funci6n de seguridad para bloquear
el panel de control cuando se halla limpiando el
homo o que los niffos no puedan utilizar el homo sin
la supervisi6n,
Para determinar CHILD LOCK: (BIoqueo de
protecci6n)
Toque: La pantalla
mostrar&:
Toque: La pantalla
mostrar&:
ENTER TIME OF DAY
3. 0000 TOUCH START
1 0 3 0 10:30
,
O TOUCH START
1 10 : 30 AM
,
NOTA: Puede ir de AM. y P.M. tocando 1 o 2 luego
del paso 4.
AM TOUCH 1
PM TOUCH 2
10:30
10 : 30 AM
Hora del dia,
, Toque y mantenga hasta
Para cancelar CHILD LOCK: (BIoqueode
protecci6n)
que aparezca LOCKED
en la pantalla
(aproximadamente
4 segundos),
Toque: La pantalla
mostrar&:
,
Toque y mantenga hasta
que desaparezca LOCKED
en la pantalla
(aproximadamente
4 segundos),
45
Page 47

TEMPORIZADOR
El TEMPORIZADOR provee dos modos que hace el uso de su horno de microondas m_s pr_ctico.
Puede seleccionar entre TEMPORIZADOR DE COCINA, AJUSTE DEL TEMPORIZADOR DE LUZ o BORRAR.
Ejemplo del Temporizador de Cocina.
Touch: Display Shows:
1. (_ Hora del dia.
_P / CLEAR
2. ©
TIMER
Unavez para temporizador.
3, OOO TOUCH START
3 0 0 3:00
,
Ejemplo del Temporizador de Luz.
KITCHEN TIMER
ENTER TIME MIN
& SEC --- TOUCH
AGAIN for LIGHT
TIMER
Cuenta regresiva de
tiempo y KITCHEN
TIMER
Touch: Display Shows:
1. O Hora del dia.
STOP1CLEAR
2. ©
TIMER
Dos veces para
temporizador.
3. O
1
4.0000
1130
LIGHT TIMER
TO SET LIGHT
TIMER TOUCH 1 /
TO CLEAR LIGHT
TIMER TOUCH 2
LIGHT TIMER
ENTER TIME OF
DAY for LIGHT ON
TOUCH START
11:30
Ejemplo del Temporizador de Luz.
Touch: Display Shows:
LIGHT TIMER
ENTER TIME OF
START
8. OOO TOUCH START
4 3 0 4:30
, AM TOUCH 1
START 4:30
DAY for LIGHT OFF
PM TOUCH 2
10. O TOUCH START
1 4:30 AM
La pantalla mostrar
11._
NOTA: Para borrar el temporizador de luz, toque dos
veces el botOnTIMER y toque una vez el bot6n 2,
La pantalIa mostrar _ una vez "LIGHT TIMER CLEAR" y
luego aparecer& la Hora del dia.
"LIGHT TIMER SET"
una vez y luego aparecer
la Hora del dia,
TABLADE TEMPORIZADOR FUNCION
BOTONDEL BOT(_NDEL
rI_P0_.ADOROPCION NUMERO RESULTADO
Una vez
Temporizador Cuenta regresiva
de Cocina. de tiempo
Temporizador 1 Ajuste del Luz
veces
de Luz, 2 Borrar del Luz
AM TOUCH 1
PM TOUCH 2
11:30
TOUCH START
11:30 PM
47
Page 48

ii Eili!;!; !i!?? i iiiii!iiiiiiiii!i!Ii
LUZ SUPERIOR DE COCINA
El pad en la parte inferior derecha del panel de
control controla la luz superior de cocina.
Ejemplo para HIGH:
Toque:
La pantalla
mostrard:
1 c>
• O 1tl6H/Nle_/O_
Una vez para luz alta
Dos veces para luz nocturna
2. c>
Para apagado, toque el bot6n
una vez o dos veces
dependiendo del ajuste de la luz.
HIGH_NleHT,fO_ "OFF LIGHT" una vez,
El despliegue mostrar_
"HIGH LIGHT" una vez.
El despliegue mostrar_
VENTILADOR DE EXTRACCI_)N
El bot6n derecho del panel de control controla el
ventilador de escape de 5 velocidades.
Ejemplo para nivel 4:
AGREGAR MINUTO
Es un pad de ahorro de tiempo, este control
simplificado le permite programar r&pidamentee
iniciarla cocci6npor microonda a1100% de potencia
sin necesidad de tocar START.
Ejemplo para 2 minutos
Toque: La pantalla
mostrar_:
Hora del dia.
O Dos Cuenta regresivade
,
_D tiempo y TIME COOK
MINeTE veces
NOTA: Cada vez que toque ADD MINUTE,
agregar&1 minuto hasta 99 minutos 59 segundos.
2:00 P-100.
Toque: La pantalla
mostrar&:
LEVEL1 VENT FAN
Muestra el ultimo nivel que eligi6
para la velocidad del ventilador.
5=SPEED
Toque hasta nivel 4
3.
Apague el ventilador cuando desee
NOTA: Si la temperatura del rango o de la parte superior
de la cocina que est&por debajo del homo seeleva
demasiado, el ventilador de extracci6n en la campana de
ventilaci6n se encender_ autom_ticamente en la
VELOClDAD 5 (LEVEL 5) predeterminada para proteger
el homo. Puede permanecer asi hasta una hora para
enfriar el horno. Cuando ocurre esto, el bot6n FAN no
apagar& el ventilador.
0N/0FF
LEVEL 4 VENT FAN
OFFVENTFAN
48
Page 49

COCCI_)N CRONOMETRADA
COCCION EN ETAPAS MULTIPLES
Esta funci6n le permite programar un tiempo de cocci6n y
potencia especificos. Para obtener mejores resultados,
hay 10 niveles de graduaci6n de potencia adem&s de
ALTA (100%). Refi@ase a la "Tabla de niveles de potencia
de microonda" en la p_g. 50 para m_s informaci6n.
NOTE: Si no selecciona un nivel de potencia, el
homo autom_ticamente funcionar_ a potencia
ALTA(100%).
Ejemp|o para 5 minutos, 30 segundos al 80% de
energia:
Toque: La pantalla
mostrar&:
1, cook
2. OOO TOUCH START
4. O TOUCH START
NOTA: Despues del uso de la funci6n de cocci6n,
debe accionar el ventilador por I minuto paraenfdar
en caso de que se sienta demasiado calor.
O TIME COOK
TIME ENTER COOKING
TIME
5 3 0 or POWER
5 : 30 P-100
.
O ENTER POWER
POWER
LEVEL 1 to 10
5:30 P-100
8 5:30 P-80
Cuenta regresivade
tiempoy TIME
COOK 5:30 P-80
Paramejoresresultados,algunasrecetasnecesJtanun CJclo
de potenciaparaun periodode tiempodeterminadoy otto
Ciclode potenciaparaotto periododetiempo.Su homo
puede programarseparacambiarautom_ticamentede unoa
ottoen untotal de hasta dosciclos.
Ejemploparaun ciclode cocci6nen 2 etapas:
Toque: La pantalla
mostrar&:
1. O TIME COOK
c_K ENTER COOKING
TiME
2. OOO TOUCH START or
3 0 0 POWER
Para programar una 3 : 00 P-100
cocci6n de 3 minutos
para la 1 etapa.
.
O ENTER POWER
POWER 3 : 00 P-100
4. O TOUCH START
8 3 : 00 P-80
Para programar un 80%
de la potencia de cocci6n.
O TIME COOK
_oK ENTER COOKING
TIME TIME
6.OOO
7 0 0
Para programar una
cocci6n de 7 minutos
para la segunda etapa.
O ENTER POWER
POWER 7 : 00 P-100
TIME
LEVEL 1 to 10
TOUCH START or
POWER
7 : 00 P-100
LEVEL 1 to 10
.
O TOUCH START
5 7 : 00 P-50
Paraprogramarun50%
de la potenciade cocci6nparalasegundaetapa.
.
Cuenta regresivade
tiempo yTIME COOK
3 : 00 P-80
10. Cuando la primera etapa termina, oir_ dos tonos
cortos cuando el homo comienza la segunda
etapa de cocci6n.
4g
Page 50

ii Eili!;!; !i!?? i iiiii!iiiiiiiii!i!Ii¸i ii!!ii!; ii! !ii ;i!ii!iiii iii iiii i! ! !l
NIVELES DE POTENCIA MICROONDA
Paraobtenermejoresresultados,algunasrecetasrequieren
diferentespotenciasdecocci6n.Cuantomasbajaeslapotencia
decocci6n,m&sbajaeslacocci6n.Cadan_merodeI a9
representaundiferenteporcentajedepotenciacompietade
cocci6n.
Lasiguientetablamuestrael porcentajedepotenciadecocci6n
quecadan_merorepresentayelnombredepotenciade
cocci6ngeneralmenteusado.
POTENCIA DE COCCI(_N NOMBRE CUANDO USARLA
100% de potencia completa AIta • Calentado r_pido de muchas alimentos preparados
9 =90% de potencia total •Calentar sopas-crema.
8 =80% de potencia total •Calentar arroz, pasta o cacerolas
7 =70% de potenciatotal Medioalta • Cocinar y calentar comidas que necesitan una
6 =60% de potencia total •La cocci6nque requiere cuidado especial, como
5 =50% de potencia total Mediana • Cocinar jam6n, aves enteras, y asados a la olla.
4 =40% de potencia total •Derretir chocolate
Tambi_ndicecuando usar cadapotenciade cocci6n.
Siga lasinstruccionesde la receta del paquete de
comida si est&n disponibles.
y alimentos con un alto contenido de agua, tales
como sopas y bebidas.
•Cocci6n de cortes tiernos de came, came molida.
potencia de cocci6n mas baja que alta (por ejemplo,
pescado entero y una piezade came) o cuando la
comida se cocina demasiado rapidamente.
•Recalentar una sola porci6n.
quesos y huevos y platos de huevos, budines y
nanes.
•Terminar la cocci6n de cacerolas
•Cocer estofados a fuego lento.
•Calentar pasteleria
3 =30% de potenciatotal Medio baja, • Descongelar manualmente alimentos, tales como
descongelar pan, pescado, carnes,aves, y alimentos precocidos.
2 =20% de potencia total • Ablandar manteca, queso, y helados.
1 =10% de potencia total Baja • Mantener los alimentos calientes.
•Sacar el frio de lasfrutas.
5O
Page 51

DESCONGELAMIENTO AUTOMATICO
Tres secuencias de descongelamientoest_n predeterminadas
en el homo. Lafunci6n de descongelamientoautom_tico le
proporciona el mejor m6todode descongelamiento para
alimentos congelados. Laguia de cocina le mostrar_cu_l
secuencia de descongelamientose recomienda para el
alimento que desea descongelar.
Paramayor conveniencia, el descongelamiento autom_tico
incluye un mecanismo sonoroincorporado (bip)que le recuerda
quedebe controlar. Dar vuelta, separar, o volver a arreglar
para obtener el mejor resultadodel descongelamiento. Hay
tresdiferentes nivelesde descongelamiento.
1CARNE
2 AVES
3 PESCADO
4PAN
Ejemplo para 1.2 libra de came molida:
Toque: La pantalla
mostrar_:
1. O MEAT TOUCH 1
POULTRY TOUCH 2
DEFReST FISH TOUCH 3
BREAD TOUCH 4
Estatablalemuestralaselecci6ndeltipodealimentoyel peso
quepuedeestablecerparacadatipo.Paraobtenermejores
resultados,aflojeoquitelacubiertadel alimento.
ALIMENTO TOQUE PESOS QUE PUEDE
Descong. DETERMINAR
Automat. (en d_cimas de libra
Came 1 .1a 6.0 (45g a 2722g)
Ayes 2 .1a 6.0 (45g a 2722g)
Pescado 3 .1a 6.0 (45g a 2722g)
Pan 4 .1a 1.0(45g a 450g)
Tabla de conversibn de peso
Usted probablemente no est_ acostumbrado a medir los
pesos de los alimentos en libras yen onzas que son
fraeciones de libra (por ejemplo, 4 onzas igual a1/4 libra ).
No obstante, para poder introducir el peso del alimento en
"Descongelamieeto autom_tico", debe especificadoen
libras y d_cimas de libra.
Si el peso en el paquete del alimeeto est_ expresado en
fraeciones de libra, puede usar la siguiente tabla para
convertir el peso a fracciones decimales.
2. O MEAT
1 ENTER WEIGHT
3. O Y O TOUCH START
1 2 1.2 LBS
para introducirel peso
4. Cuenta regresiva de tiempo
y DEFROST.
NOTA:
Cuando toque el pad START, la pantalla cambia para la
cuenta regresiva de descongelamiento. Sonar_ un hip en el
homo durante el cielo de DESCONGELAMIENTO. En este
momento, abra la puerta y de vuelta o vuelva a arreglar el
alimento.Quite cualquier pomi6n que ya est6 desconge]ada.
Vuelva a colocar en el homo las porciones congeladas y
toque START para retornar al ciclo de descongelamiento.
SUGERENCIAS PARA OPERAR
• Paraobtener mejoresresultados,saqueel pescado,marisco,
cameo avesu paquete(enveltura)original. De otro modo la
envolturaguardar_el vapor y eljugo cercade los alimentos,
esto puedecausarquela superficieexternadelos alimentosse
cooine.
• Paraobtener mejoresresultados,d6 a la camemolida laforma
de una rosca(dona)antes decongelarla.Cuandola
descongele,alsonarel bip raspe la cameya descongeladay
contint_eel descongelamiento.
•Coloquelos alimentosenun recipientepianoo sobre unarejilla
de asadoparamicroondaspararecogerel goteo.
Pesoequivalente
ONZAS PESO DECIMAL
1.6 .10
3.2 .20
4.0 .25 uncuarto de libra
4.8 .30
6.4 .40
8.0 .50 media libra
9.6 ,60
11.2 .70
12.0 .75 tres cuartos de libra
12.8 .80
14.4 .90
16.0 1.00 unalibra
51
Page 52

ii Eili!;!; !i!?? i iiiii!iiiiiiii171!Ii
TABLA DE DESCONGELAMIENTO AUTOMATICO
Programar carries
ALIMENTOS PRO- SEI_AL ACOSTICA INSTRUCCIONES ESPECIALES
;ARNE DE
VACA
GRAMAR
Lacamedeformairregularyloscortesdecamegrandesy
grasososdebentenerlaspartesdelgadasograsosas
cubiertasyprotegidasconunaconunahojadepal:elde
aluminioalcomienzodeunasecuenciadedescongelaci6n.
Samemolida,
anbulto
3arnemolida,en
_amburguesas
8istecredondo
FitetedeIomo
Estofadode
same
_,sadoalaoila
3amemolidaasada
Asadode
costina
Nalgaarrollada
asada
CORDERO
3ubospara
_stofado
CARNE
CARNE
CARNE
CARNE
CARNE
CARNE
CARNE
CARNE
CARNE
Quiteconun tenedorlas porciones
descongeladas.D_vuelta.Vuelvael
restoal homo.
Separe y vuelva a disponer.
D_vuelta.Cubralasareascalientes
conhojasdepapeldealuminio.
D_vuelta.Cubralasareascalientes
conhojasdepapeldealuminio.
Quitelasporcionesdescongeladas
contenedor.
Separeelresto.Vuelvaelrestoalhomo.
D_vuelta.Cubralas_reascalientes
conhojadepapeldealuminio.
D_vuelta.Cubralas_reascalientes
conhojadepapeldealuminio.
D_vuelta.Cubralas_reascalientes
conhojadepapeldealuminio.
Quitelasporcbnesdescongeladascon
untenedor.Vuelvaelrestoal homo.
Nodescongelarmenos de 1/4onza.Congeleen
forma de rosca (aloha).
Nodescongelemenosdedosonzasdehamburguesas.
Comprimaelcentrocuandopongaacongelar.
Coloque sobre una parriitaparaasarapta para
microondas.
Coloque sobre una parriitaparaasarapta para
microondas.
Coloque en un platode homo apto para
microondas.
Coloque sobre una parriitaparaasarapta para
microondas.
Coloque sobre una parriitaparaasarapta para
microondas.
Coloque sobre una parriitaparaasarapta para
microondas.
Coloque en un platode homo apto para
microondas.
Chuletas
[de1pulgadadeandno)
CERDO
Chuletas
',de1/2pulgada
:Jeancho)
Perrocaliente
%stillassueltas
%stillasestilo
?,ountfy
]'irade
Salchichas,
Salchicha,en
3ulto
Lomoasado
:Jeshuesado
52
CARNE
CARNE
CARNE
CARNE
CARNE
CARNE
CARNE
Separe y vuelva a disponer.
Separe y vuelva a disponer.
Separe y vuelva a disponer.
D6 vuelta. Cubra las areas
calientescon hoja de papel de
aluminio.
Separe y vuelva a disponer.
Quitelasporcionesdescongeladasconun
tenedor.DOvuelta.Vuelvaelrestoalhomo.
DOvuelta.Cubralas&reascalientesconhoja
depapeldealuminio.
Coloque sobre una parriitaparaasarapta para
microondas.
Coloque sobre una parriitaparaasarapta para
microondas.
Cobquesobreunaparrillaparaasaraptaparamicroondas.
Coloque sobre una parriitaparaasarapta para
microondas.
Coloque sobre una parriitaparaasarapta para
microondas.
Coloque en un platode homo apto para
microondas.
Coloque sobre una parriitaparaasarapta para
microondas.
Page 53

TABI_A DE DESCONGEI-AMIENTO AUTOMATICO (CONT.)
Programar aves
_.LIMENTOS PRO-
GRAMAR
POLLO
Entero (hasta AVES
6 libras)
Despresado
SENAL ACUSTICA INSTRUCCIONES ESPECIALES
D6vuelta(concluyaeldescongelamiento
conlapechugahaciaabajo).Cubralas
areascalientesconhojasdepapelde
aluminb.
Separe las partes y reacomode.
ColoqueelpolioconlapechugahadaarribasobreunarejiIla
paraasadoaptaparamicroondas.Concluyael
descongelamientosumergiendoenaguafria.Quitelos
menudoscuandoelpolioest6parcialmentedescongelado.
Coloqueenunaparrillapareasaraptaparamicroondas.
GALLINAS
Enteras AVES
PAVO
Pechuga AVES
(hasta 6
libras)
Programarpescados
ALIMENTOS PRO-
GRAMAR
PESCADO
Filetes PESCADO
Bis_c PESCADO
Enters PESCADO
SHELLFISH
Crabmeat
Lobster tails
Shrimp
Scallops
PESCADO
PESCADO
PESCADO
PESCADO
D6 vuelta. Cubra las areas calientes
con hoja de papel de aluminio.
D6 vuelta. Cubra las areas calientes
con hoja de papelde aluminio.
D6 vuelta. Cubra las areas calientes
con hoja de papelde aluminio.
SENAL ACUSTICA
D_ vuelta. Si fuera posible, separe
los filetes cuando se hallen
3arcialmentedescongelados.
Separe y vuelva a disponer.
D6 vuetta.
Separelos. De vuelta.
D_ vuelta y vuelva a disponerlas.
Separelos y vuelva a disponerlos
Separelos y vuelva a disponerlos
Concluyael descongelamiento sumergiendo
en agua fria.
Coloqueenunaparrillapareasaraptaparamicroondas.
Concluyaeldescongelamientosumergiendoenaguafria.
Coloqueen una parrinapara asar apta para
microondas. Concluya el descongelamiento
sumergiendo en agua fria.
INSTRUCCIONES ESPECIALES
Coloqueen un platodehomoapto para
microondas.Cuidadosamenteseparelos
filetes bajoagua fria.
Coloqueen un platodehomoapto para
microondas.Dejecorrer aguafria hasta que
concluyael descongelamiento.
Coloqueen un platodehomoapto para
microondas.
Cubra la cabezay la colacon papelaluminio;
no dejeque el papelaluminiotoque loslados
del homode microondas.Dejecorrer agua fria
hastaque concluyael descongelamiento.
Coloqueenunplatodehornoaptoparamicroondas.
Coloqueenunplatodehornoaptoparamicroondas.
Coloqueenunplatodehomoaptoparamicroondas.
Coloqueenunplatodehomoaptoparamicroondas.
Programar pan
ALIMENTOS PRO- SEI_IAL ACOSTICA INSTRUCCIONES ESPECIALES
GRAMAR
Rosca PAN Darvueltay volveracocinar. Coloquesobre3 hojasdetoalladepapeL
DinnerRoll
Muffin
Hamburguesa
HotDogBun
Rebanadasdepan
Hogazade pan
53
Page 54

ii Eili!;!; !i!?? i iiiii!iiiiiiiii!i!Ii
SUGERENCIASPARADESCONGELAMIENT0
•Cuando use el Descongelamiento autom&tico,el
peso a ser introducidoes el peso netoen librasy
d6cimas de libras(elpeso delalimento menos el
envase).
•Antes de comenzar, asegQresede quitar cualquiera
de las hilosoataduras de metal que a menudo
vienen con las bolsas de alimentce y reemplacelas
con hilos o bandas el&sticas.
•Abra losenvases tales como cartones antes de
colocarlce en el homo.
•Siempre rompa o perfore lasbolsas plasticas o
envolturas.
•Si los alimentceestanenvueltos, quitela hoja de
aluminio y col6quelos en un envase adecuado.
• Rompa las cascaras si hubiera,de alimentos
congelados tales como salchichas.
• Doblelos envases plasticos de alimentos para
asegurar un descongelamiento parejo.
•Siempre calcule en menos el tiempo de
descongelamiento. Si el alimento descongelado
est&at_nhelado en el centro,vuelva a colocarlo en
el homo de microondas para mas
descongelamiento.
• Eltiempo que toma el descongelamiento varia de
acuerdo a la solidez de congelamiento del alimento.
• La forma del envase afecta a la velocidad con que
el alimento se descongela,descongelar.
Los envases pianos se descongelan m&s
rapidamente que un bloque profundo.
•Cuando el alimento comienza a descongelarse,
separare Ice pedazce. Los pedazos separados se
descongelan mas facilmente.
• UsepedazcepequeSosdehojas de papelde aluminio
paracubrirlas partesde alimentoscomoalasde polio,
extremosde patas,colasde pescado,oareas que
comienzana calentarse.Asegt_resequela hojade
aluminiono toque losladce,techo,orondodel homo.
La hojade aluminiopuededaSarelrevestimiento
interiordel horno.
• Para obtener mejores resultadce, permita
permanecer al alimento despu_s de descongelarse.
(Para m&sinformaci6n sobretiempo de
permanencia, vea la secci6n "Sugerencias de
cocci6n en microondas ")
• D_vueltael alimento durante el descongelamiento
o tiempo de permanencia. Separe yquite el
alimento cuando sea necesario.
54
MANTENER CALIENTE
Puede mantener calientes y seguros los alimentos
cocinadce, calentados en su homo de microondas
hasta 99 minutce, 99 segundos (aproximadamente 1
hora, 40 minutce). Puede usar "Mantener caliente"
por si mismo, o seguirautomaticamente un ciclo de
cocci6n.
Ejemplo de "mantener caliente":
Toque: La pantalla
mostrard:
1. (_ HOLD WARM
HOLD
WARM
,
AIfinal de la funci6n "Mantener caliente",
aparecer&en la pantallaelmensaje "END "y
se oiran cuatro tonce.
Para que "Mantener caliente" siga
automaticamente a otro ciclo:
• Mientrasesta tocando las instrucciones de cocina,
toque Mantener caliente antes de tocar START.
Cierre la puerta y toque Mantener Caliente, luego
toque START sise desea un tiempo adicionalde
MantenerCaliente.
• Cuando termina el dltimociclo de coccibn, oir&
dos tonos. "Mantener caliente" seguir&mientras el
homo contint_afuncionando.
• Puede programar que "Mantener caliente" siga a]
descongelamiento autom&tico,cocci6n o cocci6n en
ciclos mQltiples.
NOTAS:
•"Mantener caliente" opera hasta un totalde 99
minutce, 99 segundce.
•Abrir el homo cancela "Mantener caliente".
Cierre la puerta y toque "Mantener caliente", luego
toque START sise desea un tiempo adicionalde
"Mantener caliente"
• Losalimentce ya cocinadosdeben ser cubiertos
durante "Mantener caliente".
• Losplatcede pasteleria (pasteles, empanadas, etc.)
deben estar sin cubiertadurante la funci6n
"Mantener caliente".
• Lascomidas completas que se desee mantener
calientes sobre un plato, deben cubrirse durante la
funci6n "Mantener caliente".
• Nouse m&s de un ciclo completo de "Mantener
caliente" (aproximadamente I hora, 40 minutos).
Lacalidad de alguncealimentos se desmejorar&
con un tiempo muy extendido.
TOUCH START
HOLD WARM
se deslizaa trav6s de la
pantalla,
Page 55

SEGURA A FUEGO RENTO
Su homo de microondas le permite hervir lentamente
sopas, casuelas, estofados y otros alimentos
liquidos. Todo Io que debe hacer es determinar un
tiempo para hervir lentamente y su homo Ilevar_ a su
comida a romper el hervor y luego a continuar
hirviendo durante el tiempo que usted especifique.
NOTAS:
• No puede cambiar la energia o grado de cocci6n
para Segura a fuego rento,
• Esta funci6n usa el sensor, El sensor necesita 2
minutos 30 segundos para calentarse despu_s
que el homo se encienda o luego de un corte de
energia. Si inicia Segura a fuego rento durante
el calentamiento, la energia microondas no se
encender& hasta que el sensor este caliente.
• Cuando cocine verduras, aumente la cantidad
de agua de 1/4 a 1/2 taza (60 a 125ml).
• Cubra el plato con una tapa dura, i.e., la tapa
que esta disponible con el plato o plato de mesa.
No use envolturas plasticas.
Toque: La pantalla
mostrard:
1. coloque la comida en el homo y
cierre la puerta.
AI cocer lentamente los alimentos como pastas use
un envase que pueda contener suficiente agua para
cubrirlos totalmente al cocinarse, (como 3-quarts -12
tazas- cazuela) con una tap& Cuando cocine pasta o
fideos agregue 1 cucharada (15ml) de aceite al agua
antes de hervir. Use el siguiente m6todo: Coloque el
recipiente con agua en el homo y siga los pasos
2~4, determinando el tiempo de cocci6n lenta en
lsegundo. AI final, coloque los alimentos en el agua
y remueva hasta que est6n completamente cubiertos
por el agua.
Cubra. Repita los pasos 2-4, determinando el
tiempo de cocci6n lenta que desea. Cambiando las
instrucciones, puede cambiar el tiempo de hervor
lento mientras hierve.
Para ello siga los pasos 2,3, y 4.
2,
O
SURE
_IMMER
SURE SIMMER
ENTER COOKING
TIME
3, 0OOO
3000
Toque los pads
num6dcos para entrar
START en el tiempo de
hervor lento.
Ejemplo para 30 minutos.
4,
TOUCH START
30:00
SURE SIMMER
(SENSOR)
El homo har_
romperel hervor de
la comida.
Losalimentos hervir&nlentamente durante el tiempo
que determine.
55
Page 56

USAR SENSOR DE COCCION
SENSOR DE COCCI )N
SENSOR OPERATIVA INSTRUCCIONES
El sensor de cocci6n le permite cocinar la mayoria de
sus comidasfavoritas sin seleccionar los tiempos de
cocci6n y niveles de potencia. La pantallaindicara
"roundshape" (forma redonda) durante el periodo
inicialdel sensor. El homo autom&ticamente
determina el tiempo de cocci6n requerido para cada
articulo de cocina. Cuando el sensor intemo detecta
una ciertacantidad de humedad provenientede los
alimentos, le indicar&al homo cuanto le tomara
calentarlo. La pantalla mostrara el tiempo restantede
calentamiento. Para obtener los mejores resultados
con el sensor, siga estas recomendaciones:
• Los alimentos cocinadoscon el sistema de sensor
deben hallarse a temperatura normal de
almacenamiento.
• La bandeja de viddo y la parte extema del
recipiente deben estar secos para asegurar los
mejores resultados de cocci6n.
• Los alimentos siempre deben estar cubiertos de
modo suelto con envoltura pl&sticaapta para
microondas, papal encerado o una tapa.
• No abra la puerta ni toque la tecla "STOP/CLEAR"
duranteel tiempo correspandiente al sensor.
Cuando este tiempo termine, el homo emitira dos
bips, y el tiempo restante para cocinar aparecera
en la pantalla. En este momento podra abrir la
puerta para revolver,girar o redistribuirel alimento.
GUiA DE COCINA CON SENSOR
Envases apropiados y cubiertasasegurar&nbuenos
resultados de cocci6n por medio del sensor.
• Siempre useenvases aptos para microondas y
cObraloscon tapas o envolturas plasticas
ventiladas.
• Nunca use cubiertas plasticasajustadas o selladas.
Estaspueden evitar que el vapor escape ycausar
un exceso de cocci6n en los alimentos.
• Haga coinddir la cantidad con el tamaSodel
envase. Uene losenvases por Io menos hasta la
mitad para obtener mejores resultados.
•Aseg0rese que el exteriordel envase de homeado y
el interiordel homo de microondas se hallen secos
antes de colocar el alimento en el homo. Las gotas
de humedad al transformarse en vapor pueden
confundir al sensor.
PAPAS (EJEMPLO)
Cocci6n del sensor le permite cocinar sus alimentos
favoritos sin seleccionarlos tiempos de cocci6n y
niveles de potencia.
Ejemplo para papas:
Toque: La pantalla
mostrar&:
2. O POTATO
POTATO (SENSOR)
Cuando haya concluido el tiempo de cocci6n oir_
cuatro bips y aparecer& "COOK END" en la
pantalla.
MAS/MENOS
UsandolasteclasMaso Menostodaslascocciones
del sensory lostiemposde cocci6nprogramados
puedenserajustadosporel alimentode cocci6nen
un tiempolargoo corto.
PresionandoMasse agregara10segundosdel
tiempode cocci6ncadavez que Iopresione.
PresionandoMenosse restara10segundosdel
tiempode cocci6ncadavez que Iopresione.
56
Page 57

CUADRO DE COCCI N DEL SENSOR
CATEGORIA
Palomitas de
Maiz
Popcom le permite preparar las palomitas de maiz para homo de
microondasempacados comercialmente. Prepare Qnicamenteun
DIRECCIONES
paquetecada vez. Para mejores resultados, use una bolsa fresca de
)olomitas de maiz. Coloque el empaque de palomitaspreempacado
)ara homo de microondas. Antesde preparar las palomitas, remueva el
separador del homo (referira la pagina 66).
Papas
Perfore carla papa con un tenedor y coloque sobre la bandeja del
homo al rededor del borde, apartada al menos una pulgada. Despu6s
de la cocci6n, deje reposarunos 5 minutos.
Verduras
Congeladas
Saquedelempaque,lavelaescarchabajoel aguacorriente.
Coloqueen un platode homo aptoparamicroondasdeltamafioapropiado.
Agreguela cantidaddel aguade acuerdoala cantidad(1-2vasos:2
cucharadasdet& 3-4 vasos :4 cucharadasdet_)
Cubracon envolturaplasticay abra unosrespiraderos.
Despu_sde lacocci6n,agitey dejereposarunos 3 minutos
u)
•_ Verdura
fresca
>
Preparecomo Iodesee,limpiey quiteel aguaresidualsobrelas
verduras.Coloqueen platode homoapto paramicroondasdeltamafio
apropiado.Agreguela cantidaddelagua deacuerdoala cantidad(1-2
vasos:2 cucharadasdet& 3-4 vasos: 4 cucharadasde t_)Cubracon
envolturaplasticay abra unosrespiraderos.Despu_sdelacocci6n,agitey
dejereposarunos 3 minutos
Verdura Saque de la lata extema. 1-4 vasos
Enlatada Coloque en un plato de homo a _topara microondas del tamafio
apropiado, cubra con envoltura _lasticay abra unos respiraderos.
Despu6sde la coccidn, agitey ( eje reposar unos 3 minutos.
CANTIDAD
Paquete de
3.0-3.5 onzas
1-4medio
(aprox. De8 a 10
onzas cada una)
1-4 vasos
1-4 vasos
Plato de Cena Coloque los alimentos para ser calentado en el plato de cena o vajina 10-21 onzas
similar. Cubra con el empaque plasticoy abra un respiradero a la
pelicula plastica perforandocon un tenedor (3 veces). Despu_s de la
cocci6n, deje reposar unos 3 minutos.
57
Page 58

ii Eili!;!; !i!?? i iiiii!iiiiiiiii!i!Ii
COCCI_)N AUTOMATICA
Cocci6n Automatica le permite calentar los alimentos
comunes preparados por microonda sin necesidad
de selecci6n de tiempos de cocci6no niveles de
potencia. El programa "Auto Cook" tiene la potencia
de cocci6n predeterminada para 4 categorias de
alimentos: cacerola, arroz,tocino (bacSn)y Cereal
caliente.
Ejemplo para arroz:
Toque: La pantalla
mostrar_:
1. O SELECT MENU 1 to4
Aw --- SEE COOKING
Cook GUIDE
2. O RICE
2 (SENSOR)
Elegir la categoria de alimento.
TOCAREL
CATEGORiA BOTONNOMEROCANTIDAD
Cacerola (Sensor) 1 De1a4vas0s
Arroz (Sensor) 2 De1/2a 2vas0s
Tocino (bac6n) 3 De2a4tajadas
Cereal Caliente 4 De1a6 p0rcione.,
El homo cocinara los alimentos autom&ticamente
porel sistema de sensor, excepto tocino (bacOn) y
Cereal caliente. Cuando haya concluido el tiempo
de cocci6n oir& cuatro bips y aparecera
"COOK END" en la pantalla.
RECALENTAMIENTO AUTOMATICO
RecalentamientoAutom&tico le permite calentar los
alimentossin necesidad de selecci6n de tiempos de
cocei6n o niveles de poteneia.
El programa "Auto Reheat" tiene la potencia de
cocci6n predeterminada para 5 categorias de
a]imentos:
Cacerola, Plato de la cena, Sopa/Salsa,
Rollos/PaneciUos(muffins) y Bebida.
Ejemplo para cazuela:
Toque: La pantalla
mostrar&:
1. _ SELECT MENU 1 to 5
--- SEE COOKING
REHEAT GUIDE
2. O CASSEROLE
1 (SENSOR)
Elija una categoria de alimento.
TOCAREL
CATEGORiA 3OTONNOMEROCANTIDAD
Cacerola (Sensor) 1 De1a4vas0s
Platode]acena (Sensor 2 De1a2p0rci0nes
Sopa/Salsa (Sensor) 3 De1a4vas0s
Rollos/Panecillos(muffins', 4 De1a6pedaz0s
Bebida 5 De1a2vas0s
El homo recalentar a aurora aticamente la comida
por medic del sistema de sensor,
excepto Rollos/Panecillos y Bebida.
Cuando haya concluido el tiempo de cocci6n oira
cuatro bips y aparecera "COOK END" en la
pantalla.
58
Page 59

CUADRO DE COCCI N AUTOMATICA
CATEGORiA NUMER0 DIRECCIONES CANTIDAD
Caserola 1 Prepare los ingredients por recipiente en una caserola 1-4vasos
(Sensor) cuarta de 1-2.Cocine con envoltura plastica y abra
Arroz 2
(Sensor)
Tocineta 3 Coloque las tiras de tocineta sobre la rejilla para 2-4 tajadas
Cereal 4 PreparecomoIo indica el empaque y codne. 1-6porciones
Caliente Agite bien antes de comer. Use Qnicamentelos
TOCARELPAD
unos respiraderos. Despues de la cocci6n, agitey
deje reposar unos 3 minutos.
Coloquearroz y liquido doble veces de su cantidad
(agua,ponoo esencia de verdura) en un plato de
homo apto para microondas de 2 cuarto.
Cubracon envoltura plasticay abra unos
respiraderos.Despues de la cocci6n, deje reposar
unos 10 minutos. Agitelo para suavizar el arroz.
mejores resultados. (Utiliceun platopara cena
alineado con el papel de cocina sise dispone de la
rejilla.
cereales calientes instantaneo.
1/2-2vasos
Usegranodearroz
grandesomedio.
Cocineelarroz
instant_neodeacuerdo
alasindicacionesdel
paquete.
CUADRO DE RECALENTAMIENTO AUTOMATICO
TOCAREL
CATEGORiA BOT_)NNUMER0 DIRECCIONES CANTIDAD
Caserola 1 Cubrael platoque contiene la caserola con envoltura 1-4vasos
(Sensor) plasticay abra respiraderos.Despu6s de la cocci6n,
agite y deje reposarunos 3 minutos.
Plato de Cena 2 Coloque losalimentos para ser calentado en el plato 1-2 porciones
(Sensor) de cena o vajinasimilar.Cubra con envoltura plastica
y abra unos respiraderos.
Despu6s de la cocci6n, deje reposar unos 3 minutos.
SopalSalsa 3 Coloquelosalimentosa sercalentadoenunplatodehomo 1-4 vasos
(Sensor) aptoparamicrcondasdeltamaSoapropiado.Cubracon
envolturapl&sticay abraunosrespiraderos.Despu6sdela
cocci6n,agiteydejereposarunos3minutos
Rollo/Panecillos 4 Saque del empaque ycoloque sobre un plato. 1-6 pedazos
frescas (2-3 onzas
Cada una)
Bebida 5 Use una mug de boca ancha. No Iocubra. 1-2 vasos
(Tengacuidado, la bebida puede estar muy caliente! (240ml por vaso)
A veces los liquidos calientadosen loscontenedores
cilinddcas salpicara al mover el vaso.)
59
Page 60

ii Eili!! !i!??iiiiii!iiiiiiiii!i!Ii¸i ii!!ii! ii! !ili!ii!iiii iii iiiii! ! !l
ABLANDAR
El horno usa baja energia para ablandar alimentos
(mantequilla, helados, quesos crema y jugos
helados). Vea la tabla a continuaciSn.
Ejemplo para cuarto de helado:
Toque: La pantalla
mostrar&:
1. (_) Hora del dia,
STOP/ QEAR
2. _ SELECT MENU 1 to 4
SOFTEN
3. O ICE CREAM
2 TOUCH 1 to 3
4. O El despliegue
2 ICE CREAM
Cuando se termine el tiempo de la cocci6n, oir_
cuatro pitidos y ser _ visualizado COOK END.
-- SEE COOKING
GUIDE
mostrar_
QUART una vez,
cuenta regresiva de
tiempo y ICE CREAM.
FUNDIR
El horno usa baja energia para fundir alimentos
(mantequilia o margarina, chocolate, malvaviscos o
alimentos procesados con queso). Vea la tabla a
continuaci6n:
Ejemplo para 8 onzas de chocolate:
Toque: La pantalla
mostrar&:
1. (_) Hora del dia.
STOPt L%EAR
2.
MEET GUIDE
3. O CHOCOLATE
2 TOUCH 1 to 2
4. O
2
Cuando se termine el tiempo de la cocci6n, oir_
cuatro pitidos y ser _ visualizado COOK END.
SELECT MENU 1 to 4
--- SEE COOKING
El despliegue mostrar_
CHOCOLATE 80Z una
vez, cuenta regresiva de
tiempo y CHOCOLATE.
TABLADEINDICACIONESPARAABLANDAR
C6dkjo Categoria Instrucciones Cantidad
1 MantequillaDestapey coloquedentrode 1,2o3
2 Helados Coloque el envaseen el Pinta,
3 Quesos Desenvuelvay coloque en 3 o 8
crema un envaseaptopara onzas
4 Jugos el horno.Eljugo heladoser_ 6, 12 o
helados Iosuficientementeblando 16 onzas
5O
un contenedorpara )orciones
microondas. Lamantequiffa
estar_ a la temperaturadel
recintoy listaparasu uso en
la receta.
homo. Los heladosser_n Io Cuarto,
suficientemente blandos Medio
paraser aprovechados m_s gal6n
f_cilmente.
microondas.El queso crema
estar_ a temperatura
ambientey listo para usar
segOnla receta.
Quite latapa. Col6queloen
para mezclarsef_cilmente
con agua.
TABLADE INDICAClONESPARAFUNDIR
]6dk3o Categoria Instrucciones Cantidac
1 Mantequilla Desenvu61valaycol6quela 1,2o 3
o margarina en unenvaseapto para _orcbnes
2 Chocolate Pueden usarse botonesde
3 Quesos Use solamentealimentos 8 o 16
4 _alvaviscos Puedenusarsemalvaviscos 5 o 10
microondas.Noes necesark
cubrirla mantequffla.AI
concluirla cocci6nrevuelva
paracompletarlafusi6n.
chocolate o cubos de 4 o 8
chocolate de hornear.
Desenvuelva los cuadrado.' onzas
y col6quetos en un
recipiente apto para
microondas. AI fin del ciclo
revu6lvalos paracompletar
la fusi6n.
)rocesadosconqueso, onzas
C6rteloen cubos.Col6quelo
en una solacapa enun
envaseaptopara
microcodas.AIconcluir la
cocci6nrevuelvapara
completarlafusi6n.
grandes o pequeSos, onzas
Col6quelos en un envase
apto para microondas. AI
final del ciclo revu61valos
para completar la fusi6n.
Page 61

Cuidar su horno de microondas
Paraasegurarse de que su homo de microondasse vea bien y trabaje debidamente durante mucho tiempo,
debe mantenedo adecuadamente. Para su cuidadocorrecto, sigacuidadosamente estasinstrucciones.
Para las superficies interiores : Lave a menudo
conaguajabonosatibia
conesponja o paso
suave.
Use solo jabones
suaves no abrasivos o
un detergente suave.
Asegt_resede
mantener las areas
limpias donde se
tocan la puertay el
marco del homo cuando se cierran,
Limpie bien con un pa6o limpio. Con el tiempo,
pueden aparecer manchas en la superficiecomo
resultado de salpicaduras de part[culas de alimento
durante la cocci6n. Esto es normal.
Para suciedad rebelde,
hierva una taza de agua
en el homo durante 2 o
3 minutos. El vapor
ablandar&lasuciedad.
Para quitar olores
dentro del homo, hierva
una taza de agua con
algo de jugo de lim6n o
¢inagre.
Para limpiar la bandeja giratoria y el soporte de la
Bandejade vidrio
Soporte
Cubecentral
misma, lave laszonas
muy sudas con agua
jabonosa templada. Use
un limpiadorsuave y
esponja para fregar.
Elsoporte y la bandeja
de viddo puedenlavarse
en lavavajillas.
Para superficies exteriores y panelde control:
Use un pa6o suave con
limpiadorde viddos en
spray.Aplique el
limpiadorde viddos en
spray al pa6o suave; no
aplique el spray
directamente en el
homo.
NOTA:
Los limpiadores
abrasivos, las almohadillas de lana de acero, los
paSos limpiadores_speros, algunas toallas de
papel, etc., pueden da_ar el panel de control y las
superficies interioreso exteriores del homo.
61
Page 62

CUIDADO DE LOS FILTROS
Los filtro de grasa deben ser quitados y lavados a menudo, al menos una vez al mes.
NOTA: Siesta instalada la combinaci6n en la campana de su microonda para recircular el aire, el filtro de
carb6n (No. De Pedazo5230WIA003A) disponiblede Sears Ilamandoa 1-800-4-MY-HOME_.
El filtro de carbon no puede ser limpiado y deberia ser reemplazado carla 6 a 12 meses.
FUtro de grasa (No.De Pedazo 5230W2A004A):
1. Desenchufe el homo de microondas o desconecte
la energia electdca.
2. Para quitar los filtro de grasa, deslice carlafiltro
haciael costado. Tire de los filtro haciaabajoy
empuje haciael otrolado. El filtro caer&
3. Embeba el filtro de grasas en agua caliente y un
detergente suave. Limpiey sacuda la suciedad
embebida y la grasa. Enjuague bien y sacuda para
secar. No Iimpielosfiltro con amoniaco, agentes
corrosivos de limpieza tales como limpiadores de
homo basados en lejia ni loscoloque en el
lavaplatos. Losfiltro se volveran negros o pueden
daSarse.
Filtro de carbbn (No.DePedazo5230WIA003A):
1. Desenchufe el homo de microondas o desconecte
la energia electdca.
2. Quite los tomillos de montaje de la rejilladel
agujero de ventilaci6n.
3. Incline ]arejilla haciadelante, luego lev&ntelapara
quitarla.
oooo ooooo_o
4. Para reemplazar los filtro de grasa. Deslice el filtro
en la ranura del marco hacia apoye el lado de la
abertura. Empuje el filtro hacia arriba y empuje
haciael lado anteriorpara bloquear en su lugar.
5, Enchufe el homo de microondas o reconecte la
corriente electrica.
62
4. Levante la parte posterior del filtro de carb6n.
Desliceel filtro directamente haciafuera.
Page 63

5.Deslice un Nuevo filtrode carb6n en su lugar.
El filtro debe descansar en el &nguIoque se
muestra.
REEMPLAZARLAS LUCESDELA
PARTESUPERIORY DEL HORNO
La luz de la parte superior para la cocina
(cooktop)
1.Desenchufe el homo de microondas o desconecte
la energia el6ctdca.
2. Quite el torniiIode montar de cubierta de bombilla.
3. Reempiace la bombiiia con una bombiUade base
candelabra de 20 vatios. (No. De Pedazo
6912A40002A) disponibiede Sears Iiamandoa
1-800-4-MY-HOME®.
6. Deslice el rondo de la rejiiladel ventilador en su
lugar. Empuje la partesuperior hasta que calce en
su lugar. Reemplace lostomillos de montaje.
7. Enchufe el homo de microondas o reconecte la
energia ei6ctrica.
NOTA: No opere la campana sinel filtro de grasas
en su lugar.
4. Enchufe el homo de microondas o reconecte la
energia electrica.
Luz del horno
1.Desenchufe el homo de microondas o desconecte
la energia el_ctdca.
2. Quite los tomillos de montaje de la rejilladel
agujero de ventilaciSn.
3. Incline la rejilla haciadelante, luego lev&ntelapara
quitarla.
63
Page 64

SOPORTE DE
BOMBILLA
4, Levante el soporte de la bombilla.
5. Reemplace la bombilla con una bombillade base
candelabro de 20 vatios (No. De Pedazo
6912A40002A) disponible de Sears llamando a
1-800-4-MY-HOME®,
6. Desplice la parte superior de la rejilla de ventilaci6n
dentrode su lugar. Empuje la parte inferiorhasta
que encaje dentro del lugar, Recoloque los
tornillosde montaje,
7, Enchufe el homo de microondas o reconecte la
energia,
64
Page 65

iiiiiiiiiiiiiiiiiiiiiiiiiiiiiiiiiiiiiiiiii!i:!i ii ii:ili !! iiii!iii !i!iiiiii!i:ii: !!i i ii iiiiiiiii!iiii!!iliili¸!flail!!¸ ililiiiii! iii!!i il; ;!i!iiiiiii ii!!iiiiiiiiii!i!!i,iiiiiiii iii¸ i!iiiiiii!iiiiiiiiiiiiiil !iiii!iii i!iiii !!i!i!i!i!i!i!i!i!i!i!i!i!i!i!i!i
SUGERENCIAS PARA LA COCINA EN SU MICROONDA
Cantidadde alimentos Liberarlapresibnenlosalimentos
• Siaumentaodisminuyelacantidaddealimentosqueprepara,
eltiempoquetomacocinaresealimentotambieecambiar&Por
eiempio,siduplioalacontidadqueindicaunareceta,agregueun
pocom_sdelamitaddeltiempooriginalindioadodecocci6n.
Compruebeelgradodeterminaci_y,sifueranecesario,
agreguem_stiempoeepequeSosiocrementos.
Temperaturade iniciode la preparaci6n
• Mientrasrobsbajalatemperaturadelosalimentosquese
coiocanenelhomodemicroondas,mayorseraeltiempoque
tomar_paracocinar.Losalimeetosatamperaturadela
habitaci6nsepodr_nvolvera caleetarm_srapidameetaquelos
alimentosatamperaturadelreff_gerador.
Composicibn de losalimentos
• Losalimentosconmuchagrasaymuchaaz_corsecolentar_n
m_sr_pidoquelosalimentosquecontieneemuchaagua.La
grasay elazQcartambi_nalconzanunatemperaturam_salta
queladelaguaenelprocesodecocci6n.
• Mientrasm_sdensosseanlosalimentos,m_stiempotomara
paracolentarse.Losalimentos"Muydensos"talescomola
cameromanmastiempoparavotveracolentarsequelosmas
livianos,masporososcomopastalesesponjosos.
TamaSoy forma
• Lospedazosmaspeque_osdealimentossecocinar_nmas
r_pidoquelospedazosm_sgrandes.Tambienlospedazosdela
mismaformasecocinanm&sparejoquelospedazosde
d_fereetasformas.
• Conlosalimentosquetienendiferenteespesor,laspartes
m_sdelgadassecodnar_nm_srapidamentaqualaspartesm_s
gn_esas.Coloquelaspartesmasdelgadasdelasalasdepolioy
laspiemasypataseeelcentrodelplato.
Revolver,dar vuelta los alimentos
• Revolverydarvueltalosalimentosdispersaelcalorr_pidamente
hadaelcentrodelplatoyevitaquesecocioedemasenlos
bordesextamosdelosalimeetos.
Cubrir los alimentos
Cubra los alimentos para:
• Reducir lassalpicaduras
•Acortar lostiempos de cocci6n
• Mantener la humedad de los alimentos
PuedeusarcuaIquiercubiertaquepermitaseratravesadopotlas
microondas.Yea"Conocersuhomodemicroonda"paraconocer
losmaterialesquelasmicroondasatraviesan.Siest_osandola
funci6nSensor,asegurelaventilad6n.
• Cortarlosalimeet_(potejempio:papasalhomo,salchiohas,
yemasdehuevos,yalgunasftutas)estanajustadameete
cubiertospotunapielomembrana.Elvaporpoedelevantarse
bajodelamembranadurantelacoccbn,caosandoqualos
alimentosrevientee.Paraaliviarlapresi6nparaevitarqua
revieetan,perforelosalimentosantesdeconocerconun
tanedor,pinchedecocktailoescarbadientas.
Usarel tiempo de permanencia
• Permitasiemprequelosalimentospermanezconunmomenta
despoesdelacocci6n.Eltiempodepen'nanenciadespuesdel
descongelamientoycocoi6npermitaquelatamperaturase
disperseenformaparejaatravesdetodoslosalimentos,
mejorandolosresultadosdelacocci6n.
• Laduracibndeltiempodepermanenciadependedela
contidaddealimentosqueest_cocinandoydeladensidadde
losmismos.Avecespoedesettancortocomoeltiempoquele
tomasacarlosalimentasdelhomoy Ilevarlosalamesadonde
sesirven.Sinembargo,cuandosetratadealimentosdemayor
tamaSoym_sdensos,eltiempodepermanenciapuedeset
m_somenosde10mioutos.
Ordenar los alimentos
Paraobtenermejoresresuttados,coioquelosalimentosdercodo
parejoenelplato.Puedehacerbdediferentasmaneras:
• Siest_cocinandovariosingredientesparaelmismoplato,
porejempiopapas(patatas)horneadas,col6quelascomoun
anilbparasucocimientouniforme.
•Cuandococinealimentosdeforrnasodensidades
irregulares,potejempiopechugasdepolio,coloquelaporci_
m_spequeSaom_sdelgadaenelcentrodelplatodondese
colentar_alfinal.
• Encapasdealimentosfinos,coioqueunasobreotra.
•Cuandococineovuelvaacalentaronpescadoentero,haga
cortessobrelapiel,estoprevieneelresquebrajamiento.
• Nopermitaquelosenvasesdelosalimentostoquenlaparte
superioroloscostadosdelhomo.Estoevitar_laposible
formaci6ndeunarcoelectrico.
Usode la hoja de papel de aluminio
Losenvasesde metalnodebenusarseenunhomode
microondas.Noobstantehayalgunasexcepciones.Si
compr6alimentosquevienenembaladoenunahojade
papeldealuminio,guieseporlas instruccionesqueest_n
enelenvase.Cuandouseenvasesde hojadepapelde
aluminio,lostiemposdecocci6npuedenserm_slargosya
quelasmicroondaspenetrarans61olasuperficiede los
alimentos.Siencuentraquenotieneinstruccionesenel
paquete,sigaestoslineamientosgenerales:
65
Page 66

SUGERENCIAS PARA LA COCINA EN SU MICROONDA (Cont.)
Uso de la hoja de papel de
aluminio (cont.)
• Coloque los envases en un cuenco de vidrioy
agregue agua hasta cubrir la parte inferior de los
envases, no mAsde 1/4 de pulgada (0.64cm.) de
altura. Esto asegurar_tla distribuci6n uniforme de
calor en la parteinferiorde los envases.
• Siempre quite latapa paraevitar daSo al homo.
• Use solamente envases no dahados.
• No use envases mAsaltos que 3/4 de pulgada
(1.9 cm).
• Los envases deben estar Ilenosal menos hasta
la mitad.
• Para evitar la formacibn de arco el_ctrico debe
haber una distancia minima de 1/4de pulgada
(0.64 cm) entre los envases de aluminio y las
paredes del homoy tambien entredos envases de
aluminio.
• Proteccibn con pedazos peque_osde papel de
aluminio, piezas de alimento que puede cocer
rApidamente,tales como laspuntasde ala, perniles
de aves.
• Calentar alimento de los envases de papelde
aluminio toma usualmente el doble del tiempo
comparado con el recalmentamientoen envases
plAsticas.Vidrio, china o papel. El tiempo que toma
para que un alimento est_ listovariarAsegt_nel tipo
de envases que use.
• Dejedescansar a los alimentos de 2 a 3 minutos
luego de calentados de modo que el calor se
distribuya uniformemente per los envases.
Remover el separador
•AI preparar las palomitas empacadas
comercialmente, Remueva el separador del
homo; Nocoloque la bolsa de laspalomitaspare
el homo microondas sobre elseparader odebajo
del separader.
• En el caso de preparar las palomitas para el homo
microondas con el separader, puede causar
incendio o daSo a su homo de microondas.
Lo que no se debecocinar en su
horno de microondas
• No enlate alimentos en elhomo. Los frescos
cerrades pueden explotar causande daho al homo.
• No use el homo de microondas para esterilizar
objetos (biberones,etc.). Esdificil mantener al
homo en las altas temperaturas que se necesitan
para esterilizar.
66
Page 67

Preguntas y Respuestas
PREGUNTAS RESPUESTAS
&Puedo usarmi homo de microondas sin la No. Si quitao no hace girar la bandeja giratoria,
bandeja giratodao hacedagirar sosteniendo un plato tendr&resultadospobres. Los platos que se usan en
grande? su homo deben encajar en la bandeja giratoda.
&Puedo usarsartenes de metal o de aluminioen mi Puedeusarunahojadepapeldealuminioparaproteger(use
homo de microondas? pedazospequeSosy pianos),pequeSostrozosyenbandejas
dealuminioplanas(silabandejanoesm_seltaque
3/4pulg.[1.9cm]deprofundidady est#=Ilenaconlosalimentos
paraabso_r lapotenciademicroonda).
z,Es normal que la bandeja giratoria gire en Si. La bandeja giratoriarota en sentido de lasagujas
cualquiera de lasdos direcciones? del relojo contrado al mismo, dependiendo la rotaci6n
A veces la puerta de mi homo de microondas Estaapariencia es normal y no afecta el
aparece ondulada. &Es esto normal? funcionamiento de su homo.
&Porque el plato secalienta cuando cocino con A medidaquelosalimentossecalientan,estostransmiten
microonda en el? Pienso que eso no deberia sucaloral plato.Est6preparadaparausarprotecci6npara
suceder, lasmanosparasacarlos alimentosdespuesdecocinar.
del motor cuando comienza el ciclo de cocci6n.
z,Qu6 significa"tiempode espera" ? 'q'iempo de espera" significaque los alimentosdeben
&Porque salevapor por losagujeros de ventilaci6n? Elvaporseproducenormalmentedurantelacocci6n.
&Puedo preparar palomitasde maiz en mi homo de Si. Prepare palomitas de maiz empacado para
microondas? microondasiguiendo las indicacionesdel fabricante.
&C6moobtengo losmejores resultados? Nouse bolsas comunes de papel. No vuelva a
ser sacados del homo y cubiertos por un tiempo
adicional para permitir que terminen de cocinarse.
Esto liberaal homo para otracocci6n.
ElhomodemicroondashasidodiseSadoparaeliminarel
vapordeestemodo,atray,s de losagujerosdeventilaci6n.
colocar necleos de maiz que no hayan explotado.
Noprepare palomitasde maiz en un recipiente de
vidrio.
G7
Page 68

Solucibn de problemas
La mayoria de los problemas de cocina est&ncausados a menudo por pequeSas cosas que usted puede
determinar ysolucionar sin herramientas de ningt_ntipo. Controle las listasde m&sabajo en las p&ginas
siguientes antes de pedir asistencia a un servicio. Si at_nnecesitaayuda, Ilamea Service Sears a
1-8004-MY-HOME _,
EL HORNO DE MICROONDAS NO FUNCIONA
PROBLEMA CAUSA
Nadafunciona. • El cable de alimentaci6n de energia electrica no esta enchufado a un
tomacordente de tres davijas. (Vea la secci6n "Requisitos electdcos" en la p_g.
40 y la secci6n "Conexi6n el_ctdca"en p&g.42.)
•Ha saltado un fusible de la casa o un disyuntor ha interrumpidoel circuito
•Ha habido una fallade alimentaci6nen el suministro de la compafiia el6ctdca.
El homo de microondas no • Usted est&usando el homo como cron6metro.
funcionar& Toque STOP/CLEAR paracancelar el homo como cron6metro de cocina.
•La puertano est&firmemente cerrada y bloqueada.
•No toc5 START.
•No sigui6 exactamente las instrucciones.
•ContinUafuncionando una operaci6n programada previamente.
Toque STOP/CLEAR para cancelar esa operaci6n.
TIEMPOS DE COCClON
PROBLEMA CAUSA
Losalimentos no estan
suficientemente cocidos.
La pantalla mostrar&una •La puerta del homo no est&cerrado por completo.
cuenta regresiva pero el • Ha fijado loscontroles al temporalizadorde cocina.
homo no est&funcionando. Toque STOP/CLEAR para cancelar el tempodzador de cocina.
•El suministro el6ctdco a su casa o a ese enchufe de pared no es suficienteo es
m&s bajo que Ionormal. Su compafiia el_ctrica puede decide si la linea est&
baja. Su electdcistao t6cnico de servicio le puede decirsi el enchufe de pared
suministra poco
•La potencia de cocci6n no est&en la programaci6n recomendada.Compruebe
la tabla en la pag.50.
G8
Page 69

BANDEJA GIRATORIA
PROBLEMA CAUSA
La bandeja giratoria no • La bandeja giratoriano esta colocada correctamente en su lugar. Debeser
gira. corregida levantando un costado y presionandofirmemente sobre el eje central.
• El soporte no est&funcionando correctamente. Quite la bandeja giratoria y
reinicieel horno. Si aQnnecesita ayuda, Ilamea Service Sears a
1-800-4-MY-HOME®,Cocinarsin la bandeja giratoriale dara resultadospobres.
TONOS
PROBLEMA CAUSA
Nose oye el tono de finde • No ha introducidoel comando correcto.
programa o de fin de ciclo.
MENSAJES EN LA PANTALLA
PROBLEMA CAUSA
La pantallaesta • Ha habido una interrupci6nde suministro de energia. Reinicieel reloj.
centelleando" :". (Vea la secci6n "Reloj "en la p&g.46.)
Si ninguna de estas temas le causa problemas,Ilamea Service Sears a 1-8OO4-MY-HOME®,
69
Page 70

Your Home
For repair- in your home- of all major brand appliances,
lawnand garden equipment, or heating and coolingsystems,
no matter who made it, no matter who sold it!
For the replacement parts, accessoriesand
owner'smanuals that you need to do-it-yourself.
For Sears professionalinstallationof home appliances
and items likegarage dooropeners and water heaters.
1-800-4-MY-HOME ® (1-800-469-4663)
Call anytime, day or night(U.S.A. and Canada)
www.sears.com www.sears.ca
Our Home
For repairof carry-in items like vacuums, lawn equipment,
and electronics,call orgo on-line for the locationof your nearest
Sears Parts & Repair Center.
1-800-488-1222
Call anytime, day or night (U.S.A. only)
www.sears.com
To purchase a protectionagreement (U.S.A.)
or maintenance agreement (Canada) on a productservicedby Sears:
1-800-827-6655 (U.S.A.) 1-800-361-6665 (Canada)
Para pedir servicio de reparacibn
a domicilio,y para ordenar piezas:
1-888-SU-HOGAR s"
(1-888-784-6427)
Au Canada pour service en fran_:ais:
1-800-LE-FOYER "c
(1-800-533-6937)
www.sears.ca
SEARS
Registered Trademark/_Trademark / Service Mark of Seam, Roebuck and Co.
® Mama Registrade/ha Mama de F_hrica/SM Marca de Servicio de Sears, Roebuck and Co.
MCMarque de commerce/MD Marque d_pos6e de Sears, Roebuck and Co. © Sears, Roebuck and Co.
6M
 Loading...