

Kenmore 72160109000, 72160102000 Owner’s Manual
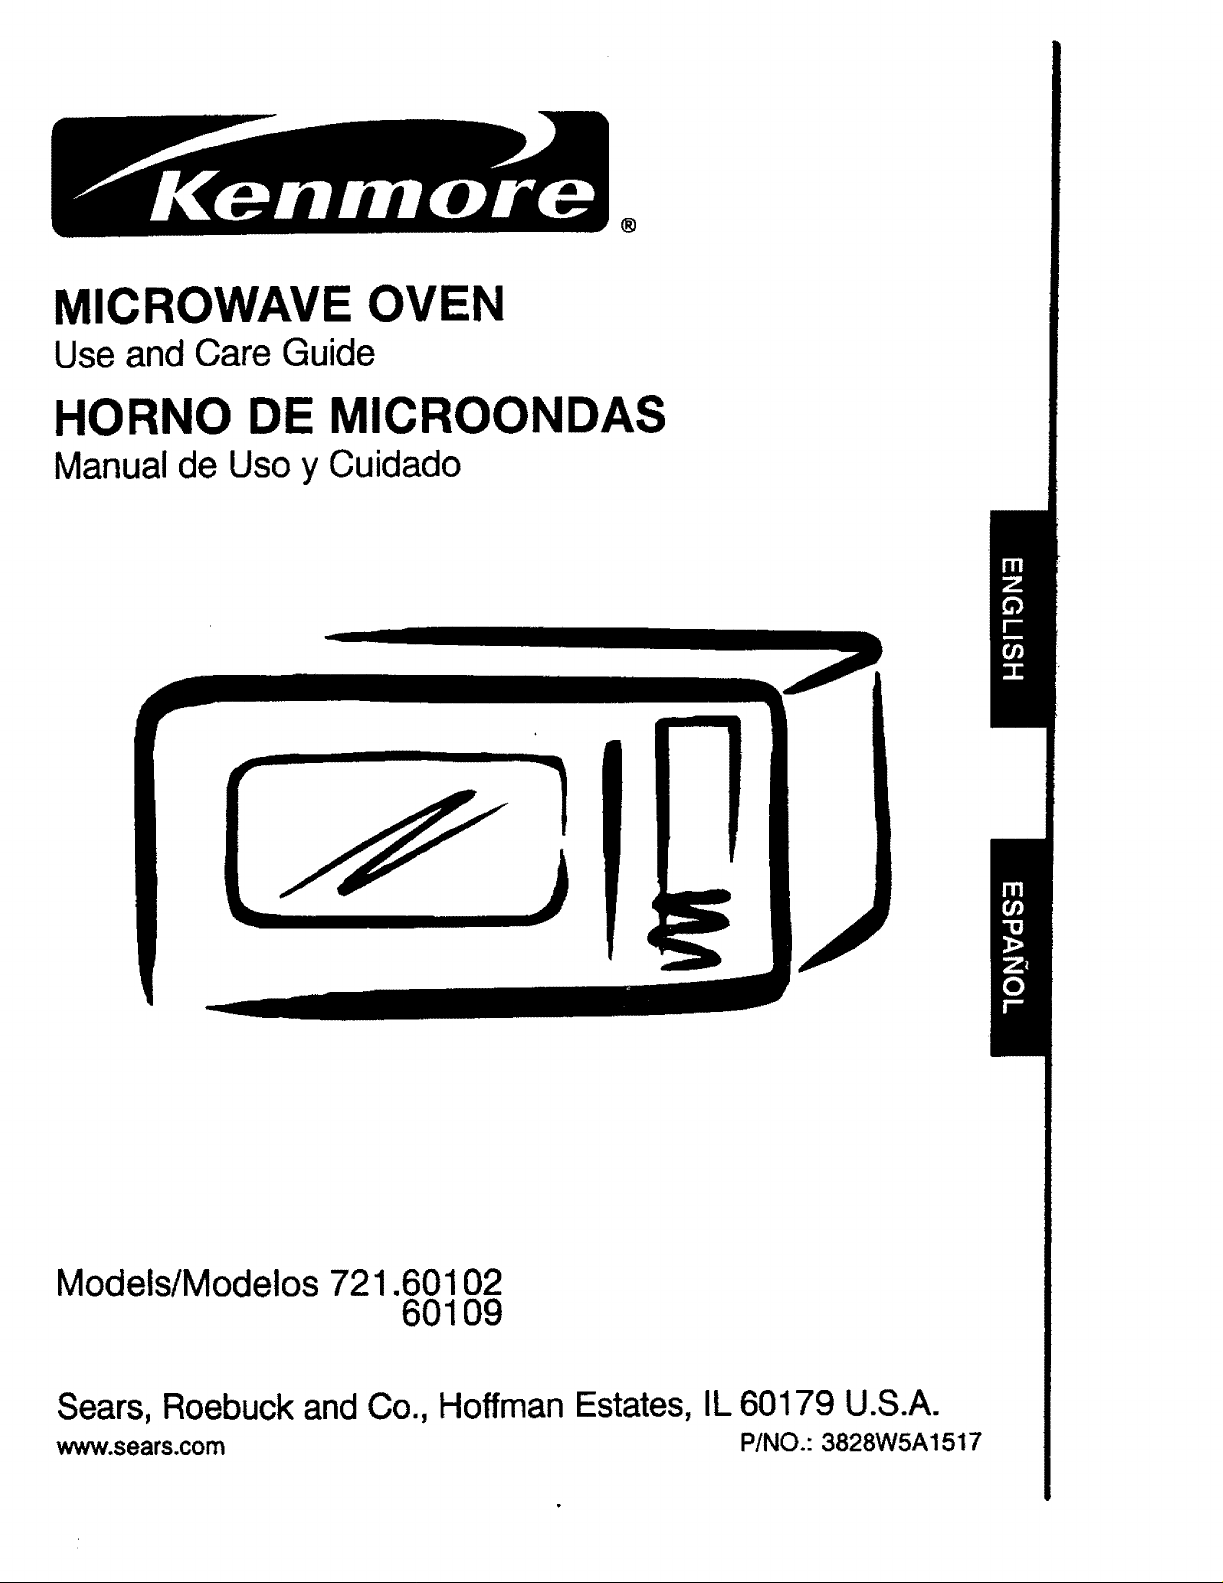
MICROWAVE OVEN
Use and Care Guide
HORNO DE MICROONDAS
Manual de Uso y Cuidado
®
Models/Modelos 721.60102
60109
Sears, Roebuck and Co., Hoffman Estates, IL60179 U.S.A.
www.sears.com P/NO.: 3828W5A1517
WARRANTY ......................................................... 2
SAFETY ............................................................. 3-4
Precautions ToAvoid Possible Exposure
To Excessive Microwave Energy ........................ 3
Grounding Instructions ........................................ 3
Important Safety Instructions .............................. 4
UNDERSTANDING YOUR
MICROWAVE OVEN ........................................ 5-8
Specifications ...................................................... 5
Installation .......................................................... 5
Parts And Accessories ........................................ 6
Control Panel ...................................................... 6
Cookware Guide ................................................ 7
Tips For Microwave Cooking .............................. 8
Cleaning .............................................................. 8
.lI_i r&_FAWl
USING YOUR MICROWAVE OVEN .............. 9-15
Setting the Clock ................................................ 9
Kitchen Timer ...................................................... 9
Child Lock .......................................................... 9
Quick On .......................................................... 10
Timed Cooking .................................................. 10
Multi-Stage Cooking .......................................... 11
Microwave Power Levels .................................. 11
Quick Touch Cooking ........................................ 12
Quick Touch Cook Chart .................................. 12
Auto Defrost ...................................................... 13
Auto Defrost Chart ............................................ 13
Cooking Tips ................................................ 14-15
TROUBLESHOOTING .................................. 16-18
Questions And Answers ................................ 16-17
Before Calling For Service ................................ 18
FULL ONE-YEAR WARRANTY ON
MICROWAVE OVEN
For one year from the date of purchase, if this
Kenmore microwave oven fails due to a defect
in material or workmanship, Sears will repair it
free of charge.
FULL FIVE-YEAR WARRANTY ON
THE MAGNETRON
For five years from the date of purchase, if the
magnetron in this Kenmore microwave oven
fails due to a defect in material or workmanship,
Sears will repair it free of charge.
WARRANTY SERVICE IS AVAILABLE
BY SIMPLY CONTACTING THE
NEAREST SEARS STORE OR
SERVICE CENTER IN THE UNITED
STATES.
This warranty applies only while this product is
in use in the United States.
This warranty gives you specific legal rights,
and you may also have other rights which vary
from state to state.
Sears, Roebuck and Co., D/817WA,
Hoffman Estates, IL. 60179 U.S.A.
PRECAUTIONS TO AVOID POSSIBLE EXPOSURE
TO EXCESSIVE MICROWAVE ENERGY ...
• Do not attempt to operate this oven with the door open, since open-door operation can result
in harmful exposure to microwave energy. It is important not to defeat or tamper with the safety
interlock.
• Do not operate the oven if it is damaged. It is particularly important that the oven door close
properly and that there is no damage to the:
- door (bent)
- hinges and latches (broken or loosened)
- door seals and sealing surfaces.
• Do not place any object between the oven front face and the door, or allow soil or cleaner
residue to accumulate on sealing surfaces.
• The oven should not be adjusted or repaired by anyone except properly qualified service
personnel.
GROUNDING INSTRUCTIONS
Thisappliancemustbe grounded!If an electricalshortcircuitoccurs,groundingreducesthe risk ofelectdc
shockbyprovidingan escapewirefor the electriccurrent.This applianceisequippedwith a cord havinga
groundingwirewith a groundingplug.
Putthe plugintoan outletthatisproperlyinstalledand grounded.
,& WARNING ,A
if you use the grounding plug Improperly, you risk electric shock.
Aska qualifiedelectricianorthe Sears Service
Departmentifyou do notunderstandthe grounding
instructionsor if youwonderwhetherthe appliance is
properlygrounded.
Thisappliancehas a shortpower supplycord to
reducetheriskofanyone's trippingoveror becoming
entangledinthecord.Youmay use an extension
cordit youare careful.
if you use an extension cord, be sure that:
• the extensioncord hasthe same electricalrating
as the appliance.
• the marked rating oftheextensioncordshallbe
equaltoor greaterthanthe electricalratingof the
appliance.
NOTE: This oven draws 13 amperes at on 120 Volts, 60 Hz.
• the extensioncord is a grounding-type3-wire cord.
• the extensioncorddoesnotdrape overa
countertoportabletop,where it can be pulledon
by childrenortdppedover accidentally.
• the electricalcord is dry and notpinchedor
crushedin any way.
Three-Pronged (Grounding) Plug
$
IMPORTANT SAFETY INSTRUCTIONS
The safetyinstructionsbelow willtell youhowto use youroven to avoidharmto yourselfor damage
to youroven.
WARNING --Toreducethe riskof bums, electricshock,fire, injurytopersons,orexposureto
excessivemicrowaveenergy:
1. Read all the instructions before using your
oven.
2. Do not allow children to use this oven without
close supervlslon!
3. Read and followthe specificPRECAUTIONS TO
AVOID POSSIBLE EXPOSURE TO EXCESSIVE
MICROWAVE ENERGY foundon page3.
4. Do not tamper wlth the built- In safetyswltchas
on the oven door! The ovenhas severalbuilt-in
safetyswitchesto make surethe poweris off
when the door isopen.
5. When cleaning the door and the surfaces that
touch the door, use only mild, nonabrasive
soaps or detergents anda sponge or softoloth.
6. If your oven Is dropped or damaged, have it
thoroughlycheckedby a qualifiedservice
technicianbeforeusingitagain.
7. To avoid a fire hazard:
a) Do not severely overoook foods. It can
causea fire inthe oven.
b) Do not use recycled paper products In your
oven. They can containparticlesthatcan
causearcingor may ignite.
c) Do not overcook potatoes. Overcooking
couldcausea fire.
d) Do not store combustible Items (bread,
cookies,etc.) In the oven, becauseiflightning
strikesthe powerlines,it maycausethe oven
to turnON.
e) Do not use wire twlst.tlea in the oven. Be
sureto removethem beforeplacingtheitem in
the oven.
f) Do not use the cavity for storage purposes.
Do not leavepaperproducts,cookingutensils,
or food in thecavitywhen notin use.
8. If a fire should start:
a) Keep the oven door closed.
b)Turn the oven off.
€) Dlsoonnect the power cord or shut off the
power at the fuse or circuit breaker panel.
9. Do not usethisoven forcommercialpurposes.
This microwaveis made for householduseonly.
10. Installor locatethisapplianceinaccordancewith
theprovidedinstallationinstructions.
11.To avoid elsotdc shock:
a) This appliance must be grounded! Connect
it onlyto a properlygroundedoutlet.(See the
Grounding Instructions onpage 3.)
b) Do not operate this appliance if it has a
damaged cord or plug, ifitisnotworking
properly,orifit has beendamaged ordropped.
c) Do not Immerse the electdcal cord or plug
in water.
d) Keep the cord away from heated surfaces.
e) This applianceshouldbeservicedonlyby
qualifiedservicepersonnel.
12.To avoid Improperly cooking some foods:
a) Do not heat any types of baby bottles or
baby food. Unevenheatingmay occurand
possiblycausepersonalinjury.
b) Do not heat small-necked containers, such
as syrup bottles.
c) Do not deep-fat fry In your microwave oven.
d) Do not attempt home canning in your
microwave oven,
e) Do not heatwhole eggs inthe shell,water with
oil or fat, andsealed containersor closed
glassjars.These items mayexplode.
13. Keep the glasstray andtheturntablerollerrestin
the ovenwhen you are cooking.
14. Do notusethe oven outdoors.Do notstorethe
oven outdoors.Do not usethisproductnear
water.
15. Do notcoveror blockany openingsinthe oven.
16. Do notrunthe microwaveovenempty.
17. Do notletthe cordhang overthe edge ofa table
or counter.
18. Do notheat glassturntableexcessively.
- Do notcook bacondirectlyontheglass
turntable.
- Do notallowthe grey filmon specialmicrowave
cookingpackagesto touchtheglassturntable.
Putthe packageon a microwave-saledish.
- Keep a browningdishat least_ieinch above
the glassturntable.If youuse the browningdish
incorrectly,youcouldbreakthe glasstumtable.
19. Be carefulnotto chipor scratchthe edgesof the
tumtable. Chipsor scratchesmaycause the
turntabletObreak dudnguse.
SAVE THESE INSTRUCTIONS!
4
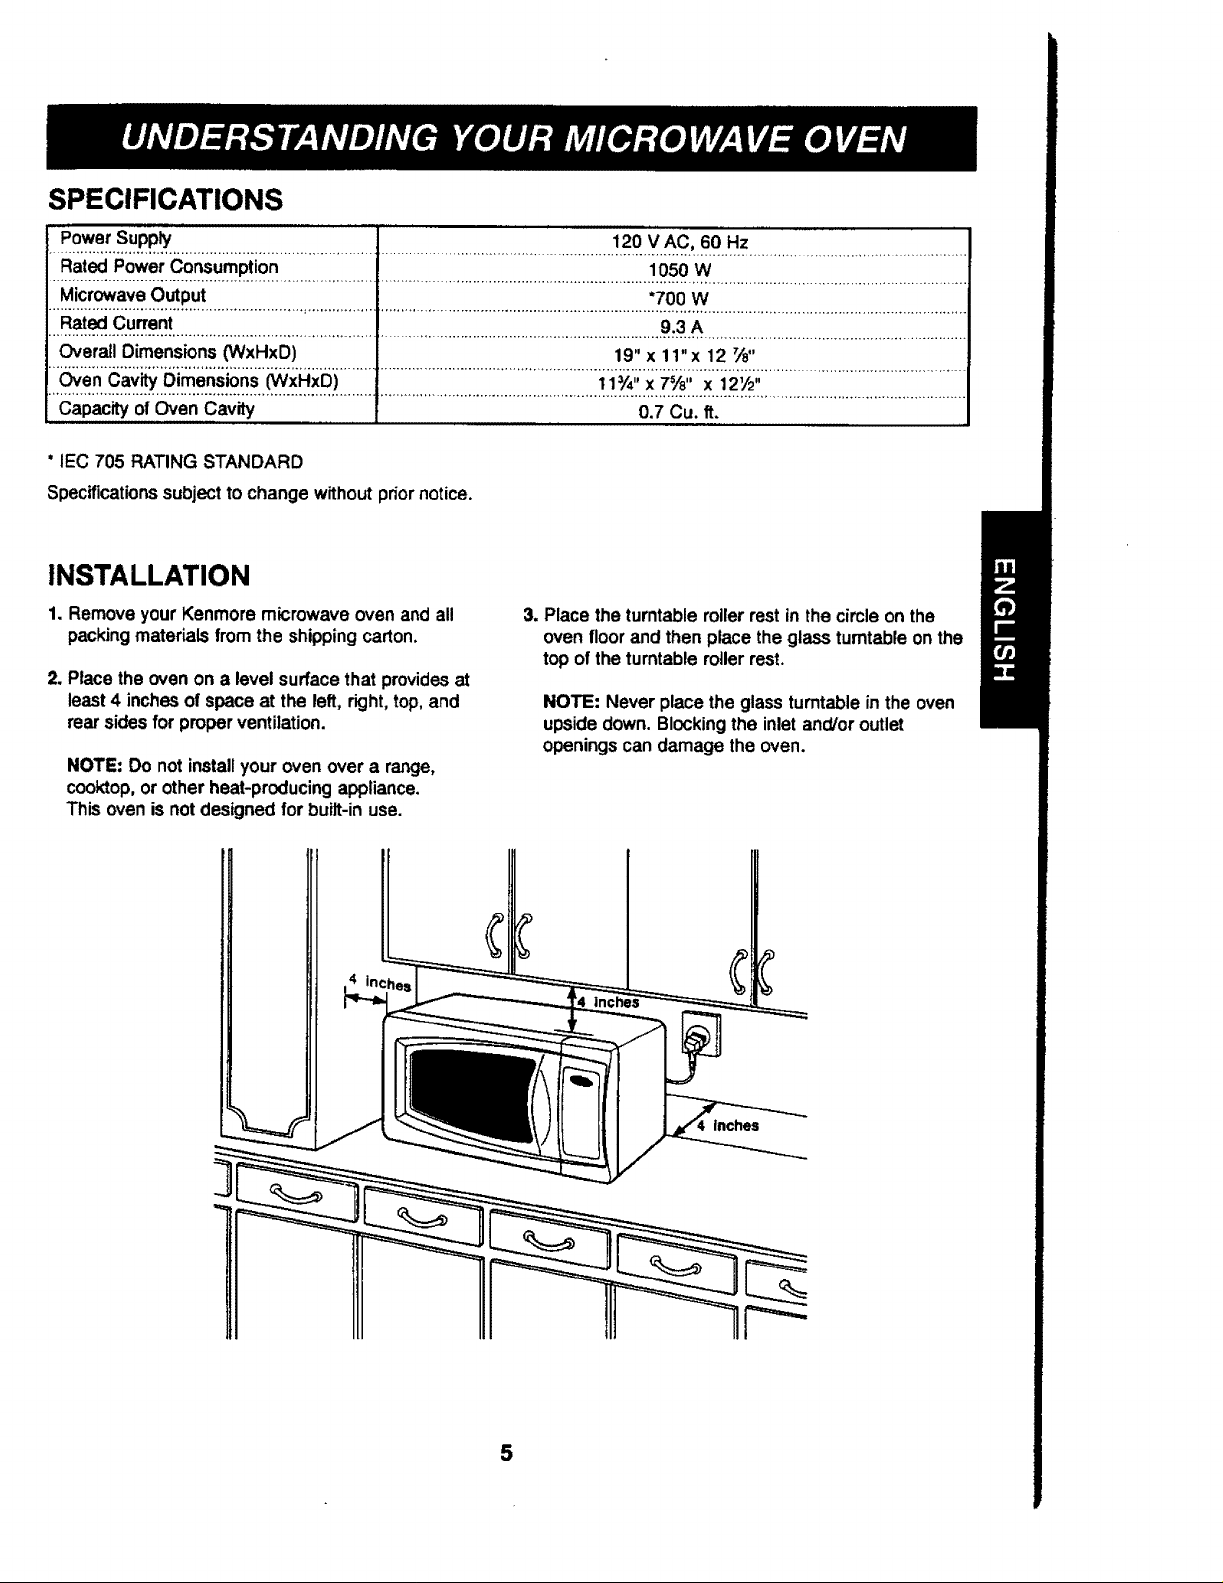
SPECIFICATIONS
PowerSupply 120 V AC, 60 Hz
RatedPowerConsumption 1050 W
MicrowaveOutput "700W
RatedCurrent 9.3 A
OverallDimensions(WxHxD) 19"x 1l"x 12 Vs"
................................................................................. e.....................................................................................................................................
Oven CavityDimensions(WxHxD) 11V4"x7%" x 121/2"
................................................................................ -II..............................................................................................................................................
Capacityof Oven Cavity 0.7 Cu. ft.
" IEC 705 RATING STANDARD
Specifications subject to change without prior notice.
INSTALLATION
1. Remove your Kenmoremicrowaveovenand all
packing materials from the shippingcarton.
2, Placetheovenon a level surfacethat providesat
least 4 inches ofspace at the left, right,top, and
rear sidesfor properventilation.
NOTE: Do not installyourovenover a range,
cooktop,orotherheat-producingappliance.
Thisovenis not designedfor built-in use.
3. Place theturntable rollerrest in thecircleonthe
oven floorand then place theglassturntableonthe
top of the turntablerollerrest.
NOTE: Never place theglass turntable in theoven
upside down.Blockingthe inlet and/oroutlet
openingscandamage the oven.
inches
5

PARTS AND ACCESSORIES
See-Through Door
J
Safety Interlock System
CONTROL PANEL
O
Quick Touch
Easy-Clean
Oven Cavity
i! ®
Yourovencomeswiththe followingaccessories:
1 Use and Care Guide
1 Glass Tumtable
1 TurntableRoller Rest
O
Oven Control
- Panel
1. DISPLAY. The Display includes a clock and
indicators that tell you time of day, cooking time
settings, and cooking functions selected.
2. QUICK TOUCH POPCORN. Touch this pad
to pop a bag of microwave popcorn without
entedng a cook power or time.
3. QUICK TOUCH BEVERAGE. Touch this pad to
heat up to 2 cups of beverage without entering
a cook power or time.
4. QUICK TOUCH POTATO, Touch this pad to
cook up to 4 potatoes without entering a cook
power or time.
5. AUTO DEFROST. Touch this pad to thaw meat,
fish, or poultry by entering a weight.
6. CLOCK. Touch this pad to enter the time of day.
7. KITCHEN TIMER. Touch this pad to use your
microwave oven as a kitchen timer.
8. QUICK ON. Touch this pad to cook at 100%
cook power for 1 to 9 minutes.
9. NUMBER PADS. Touch Number Pads to enter
cooking time, power level,quantities, or weights.
10, COOK TIME. Touch this pad to set a cocking
time.
11, POWER. Touch this pad to set a cooking power.
12. STOPtCLEAR. Touch this pad to stop the oven
or clear entdes.
13. START. Touch this pad to start all entries
(except the QUICK TOUCH and QUICK ON
functions which start automatically) and to turn
Child Lock on or off.
Glass Turntable
Turntable
Roller Rest
@
6
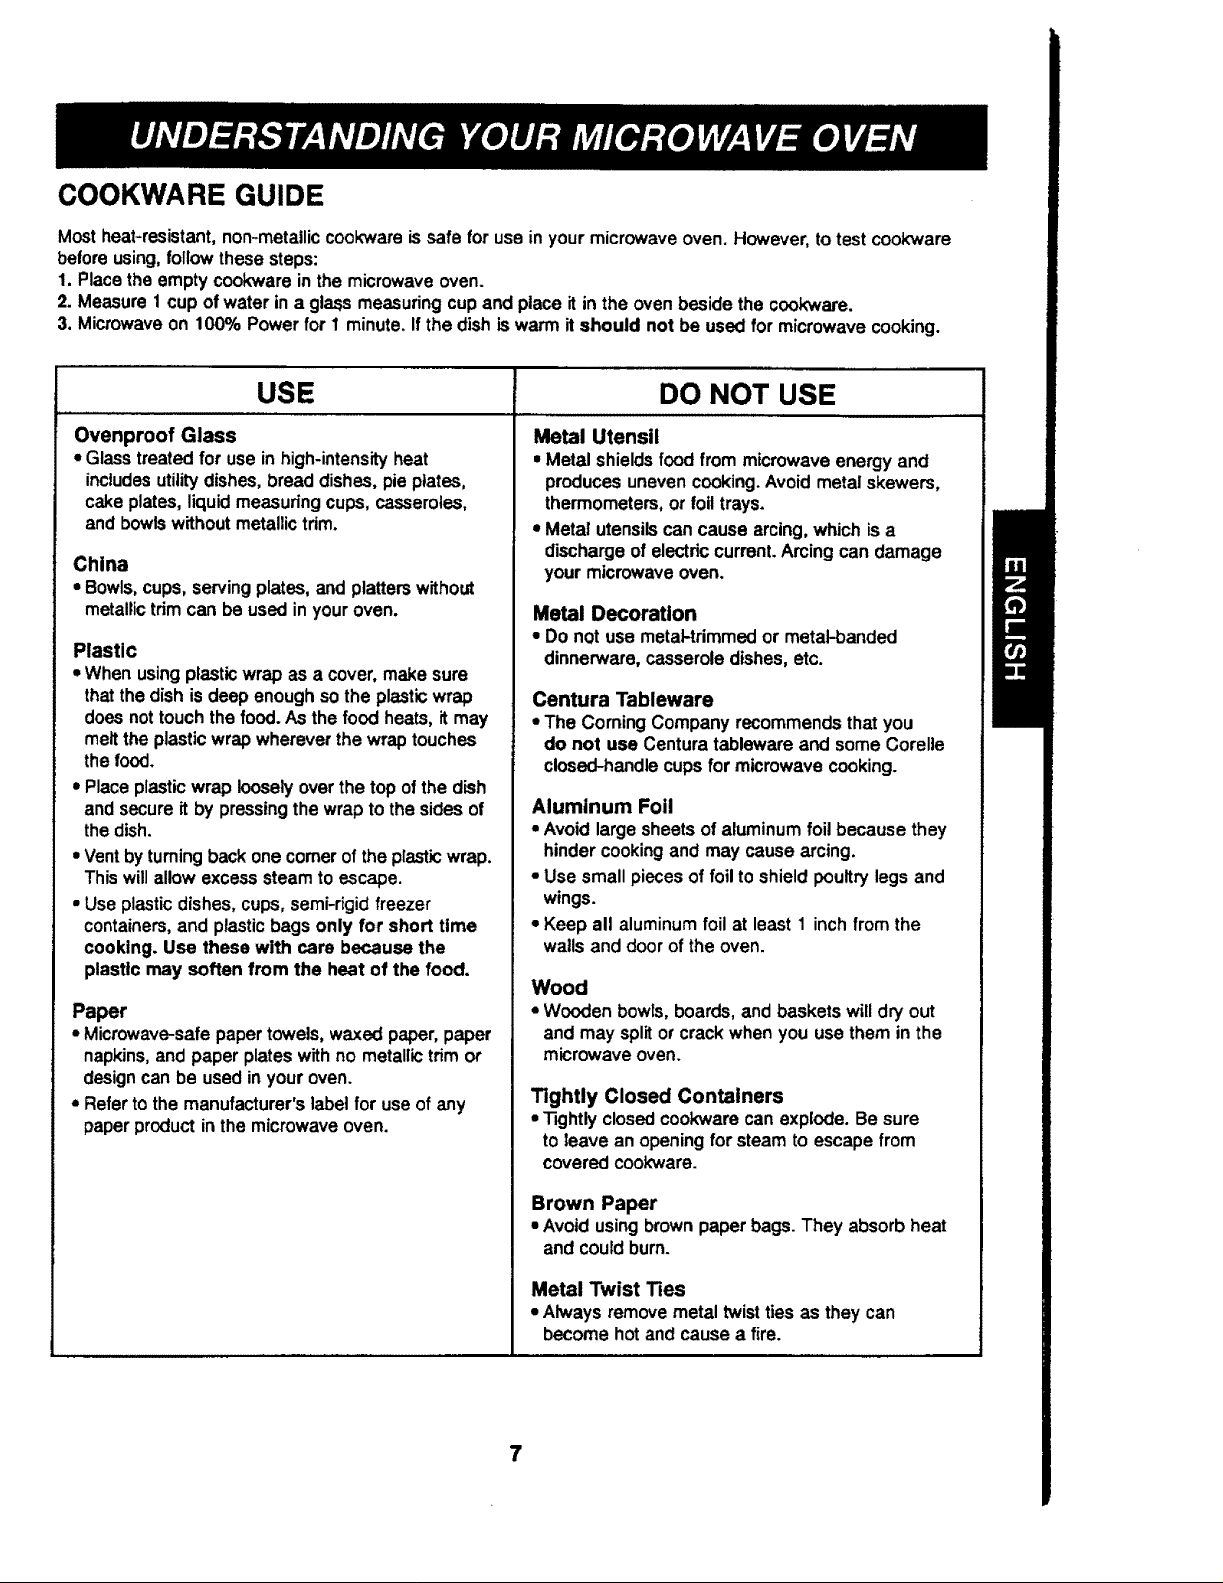
COOKWARE GUIDE
Most heat-resistant, non-metallic coekware is safe for use in your microwave oven. However, to test cook'ware
before using, follow these steps:
1. Place the empty cookware in the microwave oven.
2. Measure 1 cup of water in a glass measuring cup and place it in the oven beside the cook'ware.
3, Microwave on 100% Power for 1 minute, If the dish is warm it should not be used for microwave cooking.
USE DO NOT USE
Ovenproof Glass
• Glass treated for use in high-intensity heat
includes utility dishes, bread dishes, pie ptates,
cake plates, liquid measuring cups, casseroles,
and bowls without metallic tdm.
China
• Bowls, cups, serving plates, and platters without
metallic trim can be used in your oven,
Plastic
• When using plastic wrap as a cover, make sure
that the dish is deep enough so the plastic wrap
does not touch the food. As the food heats, it may
melt the plastic wrap wherever the wrap touches
the food.
• Place plastic wrap loosely over the top of the dish
and secure it by pressing the wrap to the sides of
the dish.
• Vent by turning back one comer of the plastk::wrap.
This will allow excess steam to escape.
• Use plastic dishes, cups, semi-rigid freezer
containers, and plastic bags only for short time
cooking. Use these with care because the
plastic may soften from the heat of the food.
Paper
• Microwave-safepapertowels,waxed paper,paper
napkins,and paper plateswithno metallictrim or
designcan be usedin youroven.
• Refertothemanufacturer's label for use of any
paperproduct in themicrowaveoven.
Metal Utensil
• Metal shields food from microwave energy and
produces uneven cooking. Avoid metal skewers,
thermometers, or foil trays.
• Metal utensils can cause arcing, which is a
discharge of electric current. Arcing can damage
your microwave oven.
Metal Decoration
• Do not use metal-trimmed or metal-banded
dinnerware,casseroledishes,etc.
Centura Tableware
• The Coming Company recommends that you
do not use Centura tableware and some Corelle
closed-handle cups for microwave cooking.
Aluminum Foil
• Avoid large sheets of aluminumfoil because they
hindercookingandmay cause arcing.
• Use small piecesof foil to shieldpoultrylegsand
wings.
• Keep all aluminumfoil at least1 inch from the
wailsand doorof theoven.
Wood
• Wooden bowls, boards, and baskets will dry out
and may split or crack when you use them in the
microwave oven.
Tightly Closed Containers
• _ghtly closed cookware can explode. Be sure
to leave an opening for steam to escape from
covered coolo,vare.
Brown Paper
• Avoidusingbrownpaperbags.They absorbheat
and couldburn.
Metal Twist Ties
• Always remove metal twist ties as they can
become hot and cause a fire.
7

TIPS FOR MICROWAVE COOKING
BROWNING
Meat and pcultry withhighfat contentthatare cooked
for 10 or 15 minutesorlongerwillbrownlightly.Foods
cookeda shortertimecan be brushedwith a browning
agent,suchas Womestershiresauce, soy sauce, or
barbecuesauce.
COVERING
A covertrapsheat andsteam andcauses the food to
cookmorequickly.Usea lid ormicrowave-safeplastic
wrapwith onecomer foiled backtoventthe excess
steam. Lidson glasscasserolescan become hot
duringcooking.Handlecarefully'.Waxedpaper will
preventthe food from splattednginthe oven and help
retainheat. When warmingbread items,use waxed
paper, napkins,or papertowels.To absorbextra
moisture,wrapsandwichesand fattyfoodsin paper
towels.
SPACING
Arrangeindividualfoods,suchas bakedpotatoes,
cupcakes,and horsd'oeuvresin a circleand at least
1 inchapart.Thiswill helpthe food cookmore evenly.
STIRRING
Stirringblends flavorsand redistributesthe heat in
foods. Alwaysstirfrom the outsidetowardthe center
ofthe dish.Foodat the outsideofthe dishheatsfirst.
TURNING
Largefoods, suchas roastsand whole poultry,should
beturned sothat the topand bottomcookevenly.Also
turnover chickenpiecesand chops.
ARRANGEMENT
Do notstack food.Arrange ina singlelayerinthe dish
for moreeven cooking.Becausedensefoodscook
more slowly,placethickerportionsofmeat, poultry,
fish, andvegetables toward the outsideofthe dish.
TESTING FOR DONENESS
Becausefoodscookquicklyina microwaveoven,you
need to test frequently foraloneness.
STANDING TIME
Food often needs to stand from 2 to t5 minutes after
you remove it from the oven. Usually, you need to
cover food during standing time to retain heat. Remove
most foods when they are slightly undercooked and
they will finish cooking during standing time. The
internal temperature of food will rise about 10 °F
dudng standing time.
SHIELDING
To prevent some portions of rectangular or square
dishes from overcooking, you may need to shield
them with small strips of aluminum foil to block the
microwaves. You can also cover poultry legs and
wing tips with foil to keep them from ovemooking.
Always keep foil at least I inch from oven walls
to prevent arcing.
PIERCING
Pierce the shell,skin,or membraneoffoods before
cookingto prevent them from bursting.Foodsthat
requirepiercinginclude:yolksand whitesof eggs,hot
dogs,clams, oysters,and wholevegetables,suchas
potatoesand squash.
CLEANING
Wipe the oven inside and outside with a soft cloth and
a mild detergent solution. Then rinse and wipe dry.
This should be done weekly or more often, if needed.
Never use cleaning powders or rough pads.
Excessive oilsplatters on the inside top will be difficult
to remove if left for many days. Wipe splatters with a
wet paper towel, especially after cooking chicken or
bacon,
REMOVABLE PARTS
The turntableand turntablerollerrestare removable.
They shouldbe hand-washedinwarm (nothot)water
witha milddetergentand a softcloth.Once they are
clean,rinsewell and drywitha softcloth.Never use
cleaningpowders,steelwool,or roughpads.
• The turntablemay be cleanedat thesink. Be careful
notto chipor scratchthe edges as thismay cause
the turntableto break duringuse.
• The turntableroller rest shouldbe cleaned regularly.
SPECIAL CARE
Forbestperformanceand safety,the innerdoorpanel
andthe oven front frame shouldbe free of foodor
grease buildup.Wipe oftenwitha milddetergent;then
rinseand wipe dry.Never usecleaningpowdersor
roughpads.
Aftercleaningthe controlpanel,touchSTOPfCLEAR
to clear any entries thatmight have been entered
accidentallywhile cleaningthe panel.
8
SETTING THE CLOCK
CHILD LOCK
When your oven is plugged in or after a power
interruption, "0" will appear on the display.
Example: To set the clock for 11:11.
Touch: Display Shows:
1, once.
2. once.
3.10 four times.
4. _ tostart
the clock.
NOTE: This is a 12 hour clock.
KITCHEN TIMER
You can use this safety feature to lock the control
panel so that children cannot use the oven when
you do not want them to and when you are
cleaning the oven,
To set CHILD LOCK:
Touch:
Display Shows:
1.0 once. "Rme of day.
andhold
untilLOCK
appearsin
thedisplay.
To cancel CHILD LOCK:
Touch:
and hold
untilLOCK
disappears
fromthe
display.
Display Shows:
"13meof day.
Your microwave oven can be used as a kitchen
timer. You can set up to 99 minutes, 99 seconds.
Example: To set 3 minutes,
Touch: Display Shows:
1, O once.
2.<1 ,ib 4b
g
tostart Timecountingdown.
thetimer.
9
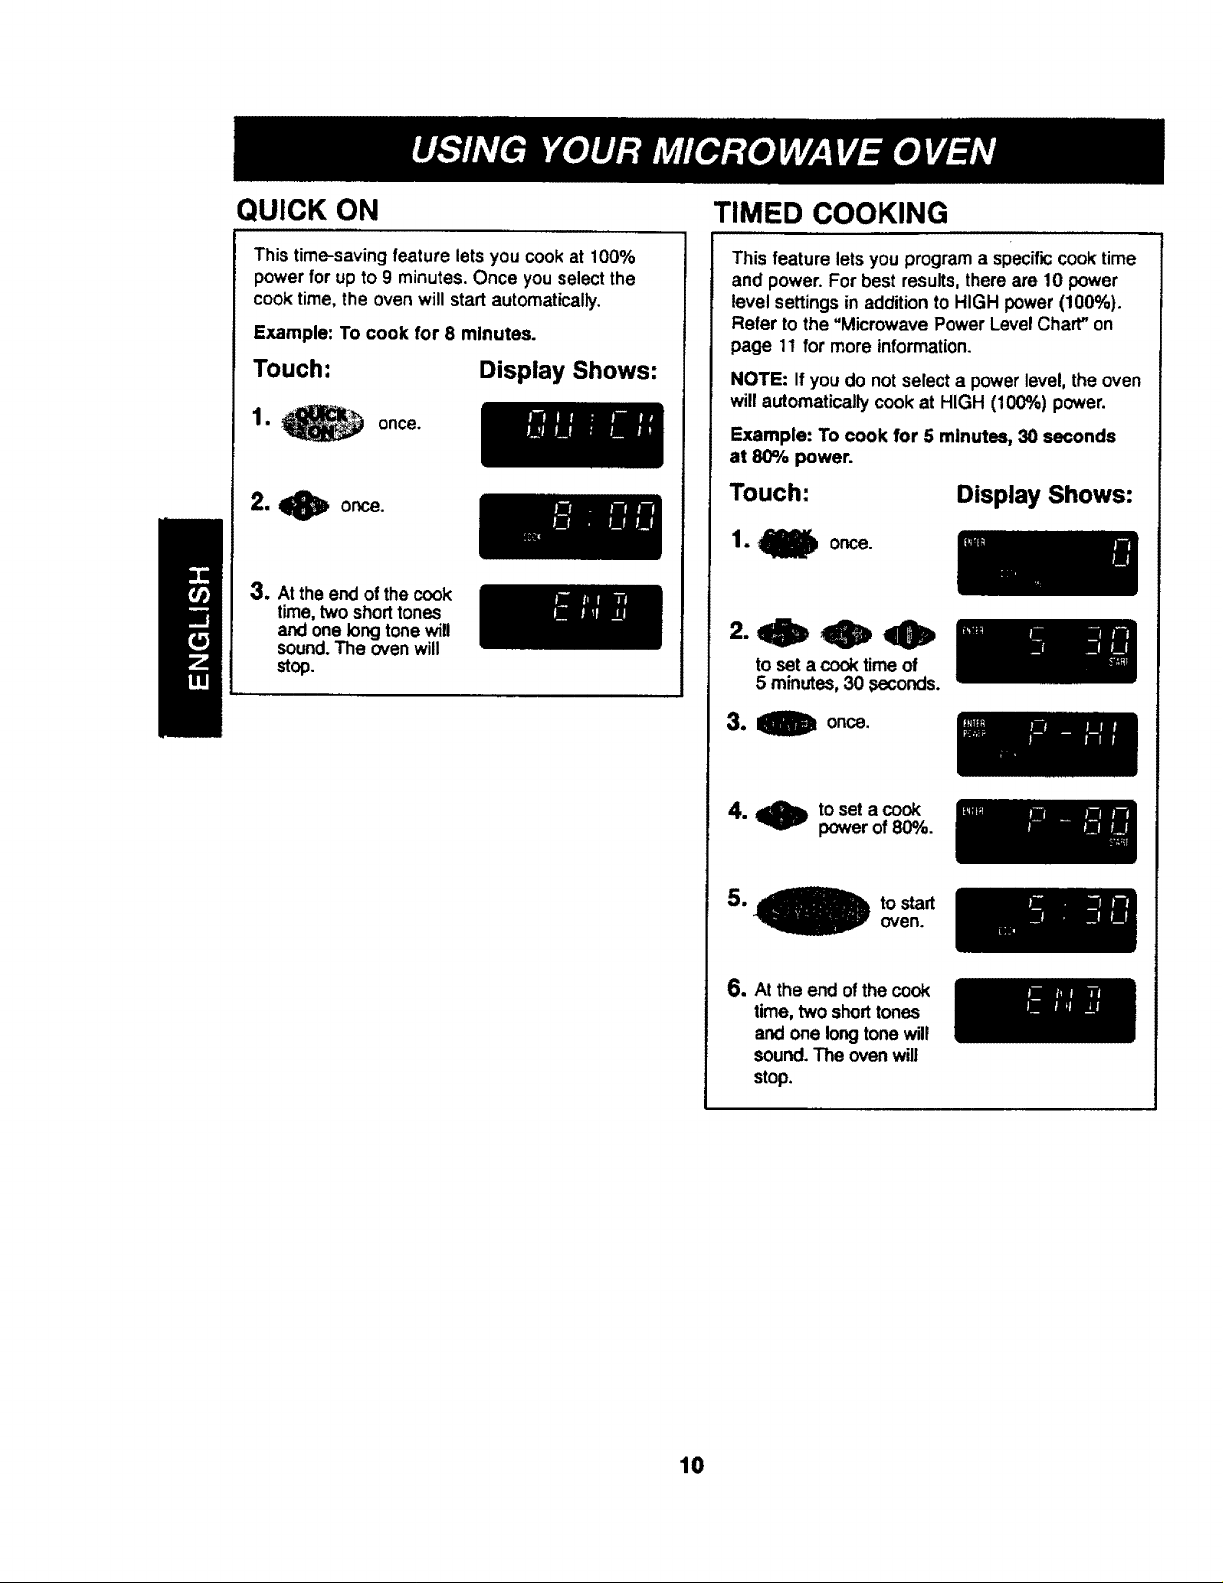
QUICK ON
TIMED COOKING
Thistime-savingfeature letsyou cookat 100%
powerfor up to 9 minutes.Once youselectthe
cooktime, theovenwill startautomatically.
Example: To cook for 8 minutes.
Touch: Display Shows:
1. once.
2. _ or_ce.
3. Attheendof the cook
time,two shorttones
and onelongtonewill
sound.Theovenwill
stop.
Thisfeature lets you programa specificcooktime
and power. Forbest results, thereare 10 power
level settingsin additionto HIGH power(100%).
Refer to the "MicrowavePowerLevelChart"on
page 11 for more information.
NOTE: If you donotselect a power level,the oven
willautomaticallycookat HIGH (100%) power.
Example: To cook for 5 minutes, 30 seconds
at 8_o power.
Touch:
1 • Q once.
toset a cooktime of
5 minutes, 30 ,seconds.
Display Shows:
3.
4. _ to set a cook
power of 80%.
5o O to start
6. At the end ofthe cook
time, two short tones
and one long tone will
sound. The oven will
stop.
10
oven.
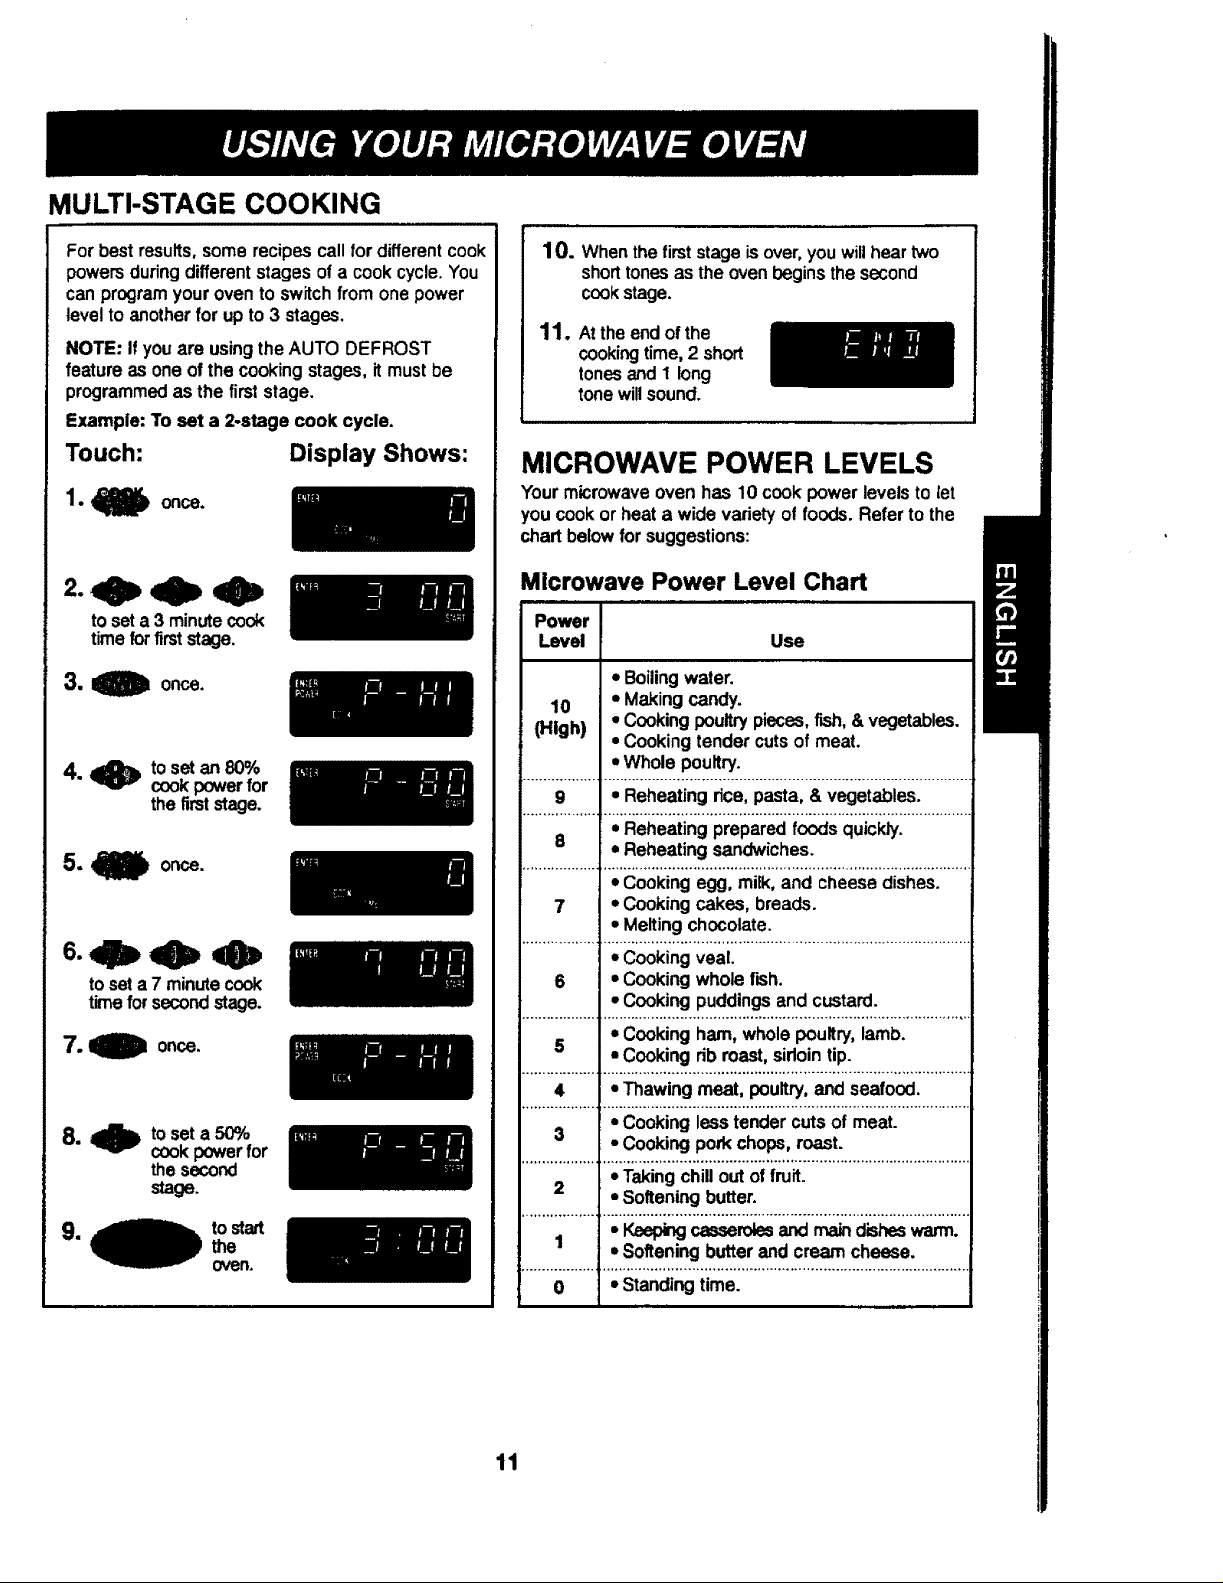
MULTI-STAGE COOKING
For best results, some recipes call for different cook
powers during different stages of a cook cycle. You
can program your oven to switch from one power
level to another for up to 3 stages.
NOTE: If you are using the AUTO DEFROST
feature as one of the cooking stages, it must be
programmed as the first stage.
Example: To set a 2.stage cook cycle.
Touch: Display Shows:
1, Q once.
2.<tD41DqD,
toseta 3 minute cook
time forfirststage.
3, O once.
4. _ toset an 80%
cook power for
the first stage.
10. When the first stage is over, you will hear two
short tones as the oven begins the second
cook stage.
11. Atthe end of the
cooking time, 2 short
tones and 1 long
tone will sound.
MICROWAVE POWER LEVELS
Your microwave oven has 10 cook power levels to let
you cook or heat a wide variety of foods. Refer to the
chart below for suggestions:
Microwave Power Level Chart
Power
Level Use
• Boiling water.
10 • Making candy.
(High) • Cooking poultry pieces, f_sh, & vegetables.
• Cooking tender cuts of meat.
• Whole poultry.
9 • Reheating rice, pasta, & vegetables.
5. O once.
toseta 7 minute cook
timefor secondstage.
7. O once,
8. _ to set a 50%
1
cook power for
thesecond
stage.
to start
the
Oven.
8 _,Reheating sandwiches.
7 • Cooking cakes, breads.
• Melting chocolate.
• Cooking veal.
6 = Cooking whole fish.
• Cooking puddings and custard.
5 = Cooking ham, whole poultry, lamb.
• Cooking rib roast, sirloin tip.
4 • Thawing meat, poultry, and seafood.
3 • Cooking less tender cuts of meat.
• Cooking pork chops, roast.
2 • Softening butter.
• Keeping casseroles and main dishes warm.
1 • Softening butter and cream cheese.
0 • Standing time.
11

QUICK TOUCH COOKING
Use this function to cook food without entering a
cook time or power. Refer to the "Quick Touch
Cook Chart" below for more information.
Example: To cook a 1.75 oz. bag of
microwave popcom.
Touch:
Display Shows:
Example 2: To cook 1 potato.
Touch: Display Shows:
1. one.
2, The ovenwillstart
,=
3 times.
automatically.
3. Atthe endof cooking
time 2 shorttones and
2. The ovenwillstart
automatically.
3. At the end of cooking
time 2 shorttonesand
1 longtonewillsound.
The ovenwillstop.
Timecountingdawn.
1 long tonewillsound.
The ovenwill stop.
Quick Touch Cook Chart
NOTE: No cover isneeded for the QUICK TOUCH foods listed in thischart.
Pad Touch keypad Serving size DirecUons
13mecountingdown.
POPCORN 1 time 3.5 oz. • Followpackageinstructions.
2 times 3.0 oz. • Use popcornpackagewhichis made
3 times 1.75 oz. especially for microwave cooking.
• Do nottryto popunpoppedkernels.
• Heat only 1 packageat a time.
• Donot leavethe microwave oven unattended
whilepoppingpopcorn.
BEVERAGE 1 time 1 cup • Use mugor microwave-safecup.
2 times 2 cups - Stirafter reheating.
2 times 2 ea (16 oz.) • Pierce potatoseveraltimeswith fork.
3 times 3 ea (24 oz.) • Aftercooking,let standfor 5 minutes.
4 Umes 4 ea (32 oz.)
When poppinga popcom;
Placecarefullybagdoes nottouch
ovenwalls.Foldeach endof the bagin half toward
thecentertopof thebag.
12
 Loading...