

Kenmore 72136078600 Owner’s Manual
Use & Care Guide
Manuat de uso y cuidado
Vacuum Cleaner
Aspiradora
Modem, Modelo
721.36078
CAUTION: Read and follow aHsafety
and operating instructions before first
use of this product,
CUIDADO: Lea y sigue todas Uas
instrucciones de operaci6n y seguridad
antes deUuso de este producto,
Sears, Roebuck and Co., Hoffman Estates, IL 60179 U.S.A
www.sears.com
PART No, :3828FU3840B Printed in China
Directions for Use
It is a violation of Federal law to use this
product in a manner inconsistent with its
labefing,
Direcciones de use
Es una vio/acidn a la ley Federal utilizar
este producto de una manera contraria
con su etiquetado.
BeforeUsingYourNewVacuum.......................2
KenmoreVacuumCleanerWarranty................2
ImportantSafetyInstructions............................3
PartsandFeatures.............................................4
AssemblyInstructions.......................................5
OperatingInstructions.......................................6
CordRelease....................................................6
Pileheight setting.............................................7
HandleReleaseandPositions..........................8
On/OffSwitch....................................................8
Attachments......................................................8
AttachmentsUseChart...................................10
VacuumingTips..............................................10
PerformanceFeatures....................................11
Please read this guide. It wil! help you assemble and operate your new Kenmore vacuum in the
safest and most effective way.
For more information about the care and operation, call your nearest Sears store.
You witt need the complete model and serial numbers when requesting information.
Your vacuum's model and serial numbers are located on the Model and Serial Number Plate.
Use the space below to record the model number and serial number of your new Kenmore vacuum.
Model No.
Serial No.
Date of Purchase
Keep this book and your sales check (receipt) in a safe place for future reference.
Vacuum Cleaner Care ....................................... 12
Vacuum Storage ............................................. 12
Oleaning Exterior and Attachments ................ 12
Dust Bag Changing .......................................... 13
Motor Safety Filter Cleaning ........................... 14
Exhaust Filter Cleaning and Replacement ..... 14
Belt Changing and Agitator Cleaning ............... 15
Agitator Servicing ............................................ 17
Agitator Assembly ........................................... 17
Clog Removal ................................................. 18
Light Bulb Changing ....................................... 19
Troubleshooting ............................................... 20
Master Protection Agreements ........................ 21
Service ................................................ Back Cover
ONE YEAR FULL WARRANTY ON KENMORE VACUUM CLEANER
When assembled, operated and maintained according to the Use and Care Guide, ifthis vacuum cleaner
fails due to a defect in material or workmanship within one year from the date of purchase, RETURN IT TO
ANY SEARS STORE OR SEARS PARTS & REPAIR CENTER FOR FREE REPAIR (or replacement if
repair proves impossible).
This warranty is void if this vacuum cleaner is ever used for commercial or rental purposes.
This warranty excludes vacuum bags, belts, light bulbs, and filters, which are expendable parts that can
wear out from normal use before the end of the warranty year.
This warranty covers only defects in material and workmanship. Sears will NOT pay for:
1.An on-site service technician to instruct the user in correct product installation, operation or maintenance.
2. A service technician to clean or maintain this product.
3. Damage to or failure of this product if it is not installed, operated or maintained according tothe Installation
Instructions and Use and Care Guide.
4. Damage to or failure of this product resulting from accident, abuse, misuse or use for other than its intended
purpose.
5. Damage to or failure of this product caused by the use of detergents, cleaners, chemicals or utensils
other than those recommended in the Use and Care Guide.
6. Damage to or failure of parts or systems resulting from unauthorized modifications made to this product.
This warranty applies only while this appliance is used in the United States.
This warranty gives you specific legal rights,and you may also have other rights which vary from state to state.
Sears, Roebuck and Co., Dept. 817WA, Hoffman Estates, IL 60179
-2-
m
I_/Al_l_l I I_1/__
U --/'_1_1_11 I_1_1 - To reduce the risk of fire, electric shock, or injury:
Your safety is important to us. To reduce the risk of fire, electric shock, injury to
persons or damage when using your vacuum cleaner, follow basic safety precautions
including the following:
Read this manual before assembling or using
¢our vacuum cleaner.
Use your cleaner only as described in this
manual. Use only with supplied attachments.
To reduce the risk of electric shock- Do not
use outdoors or on wet surfaces.
Do not vacuum up water.
Disconnect electrical supply before servicing
or cleaning out brush area. Failure to do so
could result in electric shock or brush suddenly
starting.
Always turn cleaner off before connecting or
disconnecting the hose.
Always turn cleaner off before unplugging.
Do not unplug by pulling on cord. To unplug,
grasp the plug, not the cord.
Hold plug when rewinding onto cord reel.
Do not allow plug to whip when rewinding.
Do not use with damaged cord or plug. If
cleaner is not working as it should, has been
dropped, damaged, left outdoors, or dropped
into water, return it to a Sears Service Center.
Do not pull or carry by cord, use cord as a
handle, close door on cord, or pull cord around
sharp edges or corners. Do not run cleaner over
cord. Keep cord away from heated surfaces.
De not leave cleaner when plugged in. Unplug
from outlet when not in use and before servicing.
Do not allow to be used asa toy. Close attention
is necessary when used by er near children.
Do not handle plug or cleaner with wet hands.
Do not operate the cleaner with a punctured
hose. Replace if cut or worn. Avoid vacuuming
sharp objects.
De not use withany openingblocked; keep
free of dust, lint,hairand anythingthat may
reduceair flow.
Keephair,looseclothing,fingers, and all parts
of bodyawayfrom openingsand movingparts.
De not use cleanerwithoutdust bag and/or
filters in place.
Alwayschangethe dust bag aftervacuuming
carpetcleanersor freshener,powdersandfine
dust.These productsclogthe bag, reduce
airflowandcancausethe bagto burst. Failure
to change bagcouldcause permanentdamage
to the cleaner.
Keepthe PEbag (withholes)away frombabies
andchildren,donot usein cribs,beds,carriages,
or playpens.Thisthinfilm mayclingto noseand
mouthandpreventbreathing.
De not usethe cleanerto pick upsharp hard
objects,small toys, pins,paper,etc.Theymay
damagethe cleanerordust bag.
Donotpickupanythingthatisburningorsmoking,
suchascigarettes,matches,or hotashes.
Donot usevacuumcleaner
topick upflammableorcombustibleliquids
(gasoline,cleaningfluids,perfumes,etc.),oruse
in areaswhere theymay bepresent.The fumes
fromthesesubstancescancreatea fire hazard
or explosion.
Useextra care when cleaningonstairs. Donot
put on chairs, tables,etc.Keeponfloor.
Youare responsiblefor makingsurethat your
vacuumcleaneris notusedbyanyone unable
to operate it properly.
SAVE THESE INSTRUCTIONS
Proper assembly and safe use of your vacuum cleaner are your responsibilities. Your cleaner is
intended only for household use. Read this Owner's Manual carefully for important use and
safety information. This guide contains safety statements under warning and caution symbols.
Please pay special attention to these boxes and follow any instructions given. WARNING
statements alert you to such hazards as fire, electric shock, burns and serious personal injury.
CAUTION statements alert you to such hazards as moderate personal injury and/or property damage.
-3-
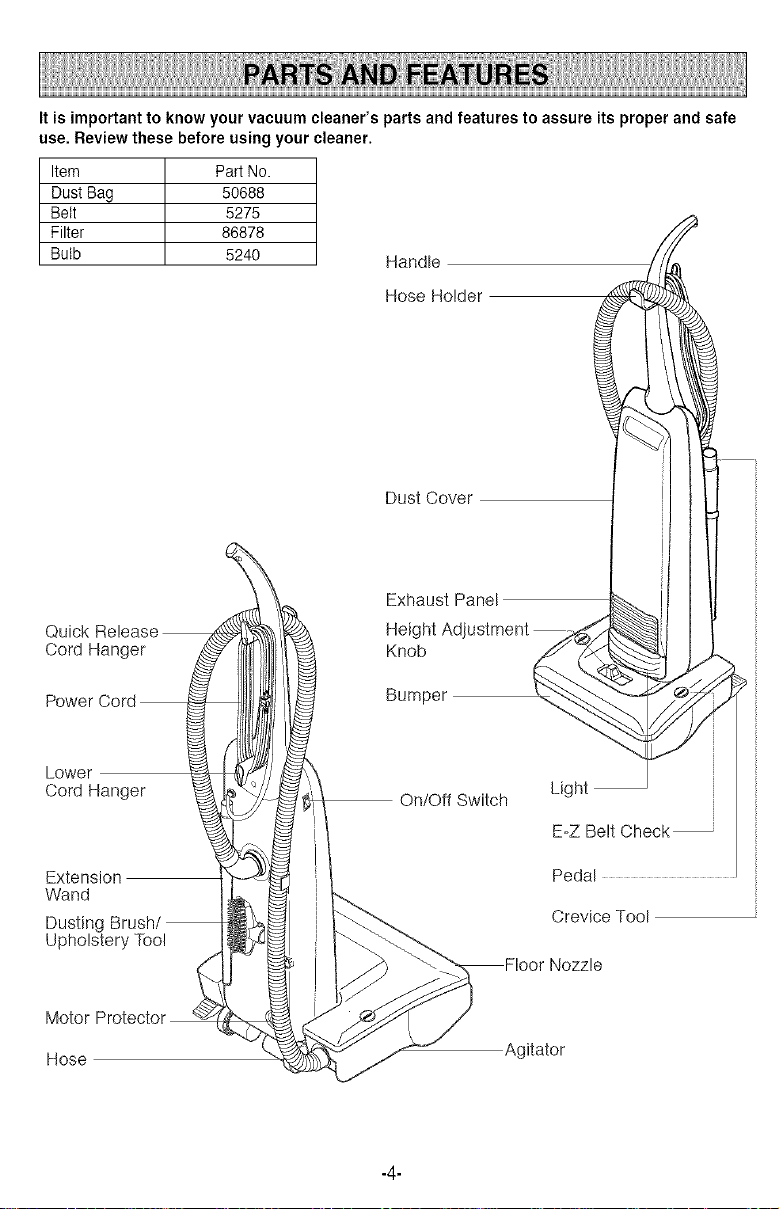
It is important to knowyour vacuumcleaner'sparts andfeatures to assureits properand safe
use, Reviewthese beforeusingyour cleaner.
Item Part No.
Dust Bag 50688
Belt 5275
Filter 86878
Butb 5240
el
Cord Hanger
Handle
Hose Holder
Dust Cover
Exhaust Panel
Height Adjustment
Lower
Cord Hanger
Extension
Wand
Dusting Brush/
Upholstery Too!
Hose
Bumper _..,_
On/Off Switch
_Floor Nozzle
/
_Agitator
9
/
-4-
Light
E-Z Belt Check
Pedal
Crevice Tool
Before assembling your vacuum, check the
carton contents against the following list.
If any parts are missing or damaged call
1-800-4-MY-HOME®.
Vacuum
Handle
Wand
Hose
OreviceTool
Dusting Brush/UpholsteryTool
Use & OareGuide
PartsList
WARNING
ElectricShockHazard
Do not plugintothe electrical supply until
the assemblyis complete,
Failureto doso could resultinelectric
shockor injury.
HANDLE ASSEMBLY
Remove the screw located just below the top
edge of the back of the vacuum.
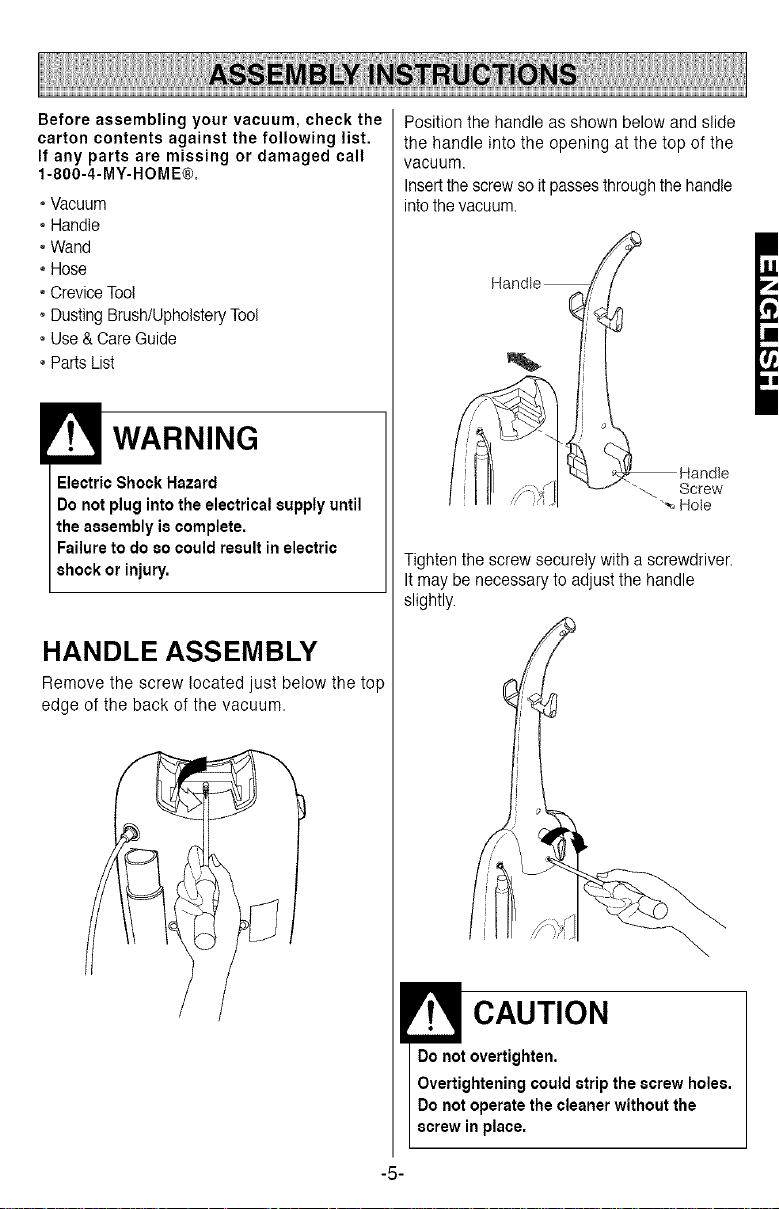
Position the handle as shown below and slide
the handle into the opening at the top of the
vacuum.
Insertthescrewso it passesthrough the handle
intothe vacuum.
Tightenthe screw securely witha screwdriver.
It may be necessary to adjust the handle
slightly.
CAUTION
overtighten,
hteningcouldstripthe screw holes,
operatethe cleanerwithoutthe
np ace,
-5-
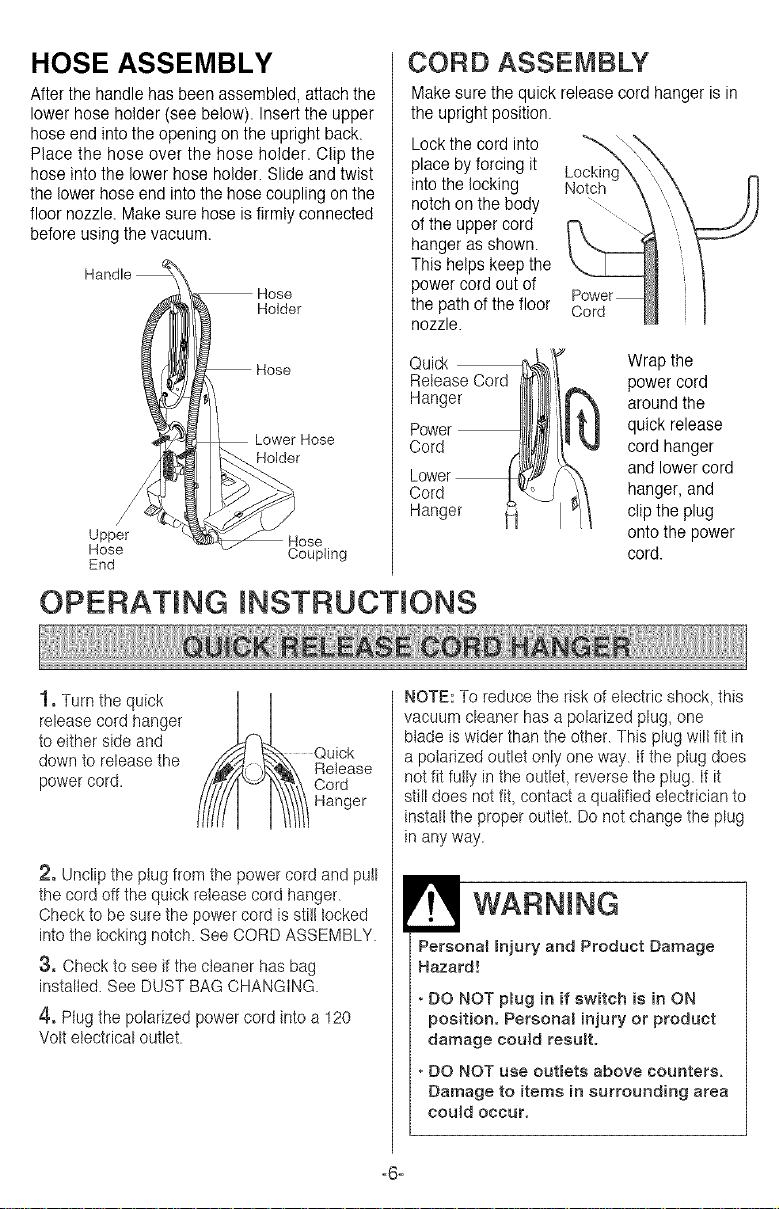
HOSE ASSEMBLY
After the handle has been assembled, attach the
lower hose holder (see below). Insert the upper
hose endinto the opening on the upright back.
Place the hose over the hose holder. Clip the
hose into the lower hose holder. Slide and twist
the lower hoseend into the hose coupling on the
floor nozzle. Makesure hose is firmlyconnected
before using the vacuum.
CORD ASSEMBLY
Makesure the quick release cord hanger is in
the upright position.
Lockthe cord into
place byforcing it
into the locking
notch on the body
of the upper cord
hanger asshown.
This helps keepthe
Hose
Holder
Lower Hose
Holder
Upper
Hose Coupling
End
power cordout of
the path of thefloor
nozzle.
OPERATING tNSTRUCTBONS
Lockinc
Notch
Cord
Wrap the
power cord
quick release
_ around the
cord hanger
and lowercord
hanger, and
clip the plug
onto the power
cord.
1,Turn the quick
release cord hanger
to either side and
down to release the
power cord.
2, Unclip the plug from the power cord and pull
the cord off the quick release cord hanger.
Check to be surethe power cord isstill locked
into the locking notch. See CORD ASSEMBLY.
3, Check to see if the cteaner has bag
installed. See DUST BAG CHANGING.
4, Hug the polarized power cord into a 120
Volt electrical outlet.
__ uick
Release
Cord
Hanger
NOTE: To reduce the riskof electric shock, this
vacuum cleaner has apolarized plug,one
blade is wider thanthe other. This plug will fit in
a polarized outlet only one way. It the ptug does
not fit futly inthe outlet, reverse the plug. if it
still does net fit, contact a qualified electrician to
instalt the proper outlet. Do not change the plug
in any way.
Persona_ Injury and Product Damage
Hazard!
DO NOT p_ug in if switch is in ON
position. Persona_ injury or product
damage could result.
DO NOT use outlets above counters.
Damage to items in surrounding area
could occur.

To select a pile height setting:
When it is necessary to raise and lowerthe
nozzle for various carpet pile heights, first turn
off your cleaner. Then tilt the vacuum cleaner __
back until the front wheels are slightlyoff the
floor and slidethe height adjustment knob to
the desired setting. _,_.
Recommended pile height settings:
High: Shag carpet, long pile, plush, scatter rugs
Med: Medium to long pile
Low: Short to medium pile
Ex Low: Very low pile
Yt
WARNING
Personal Injury Hazard!
DO NOT place hands or feet underneath the unit when changing from the
bare floor to the carpet pile height setting.
The agitator revolves rapidly when the vacuum is turned on and is in the
carpet setting.
-7-
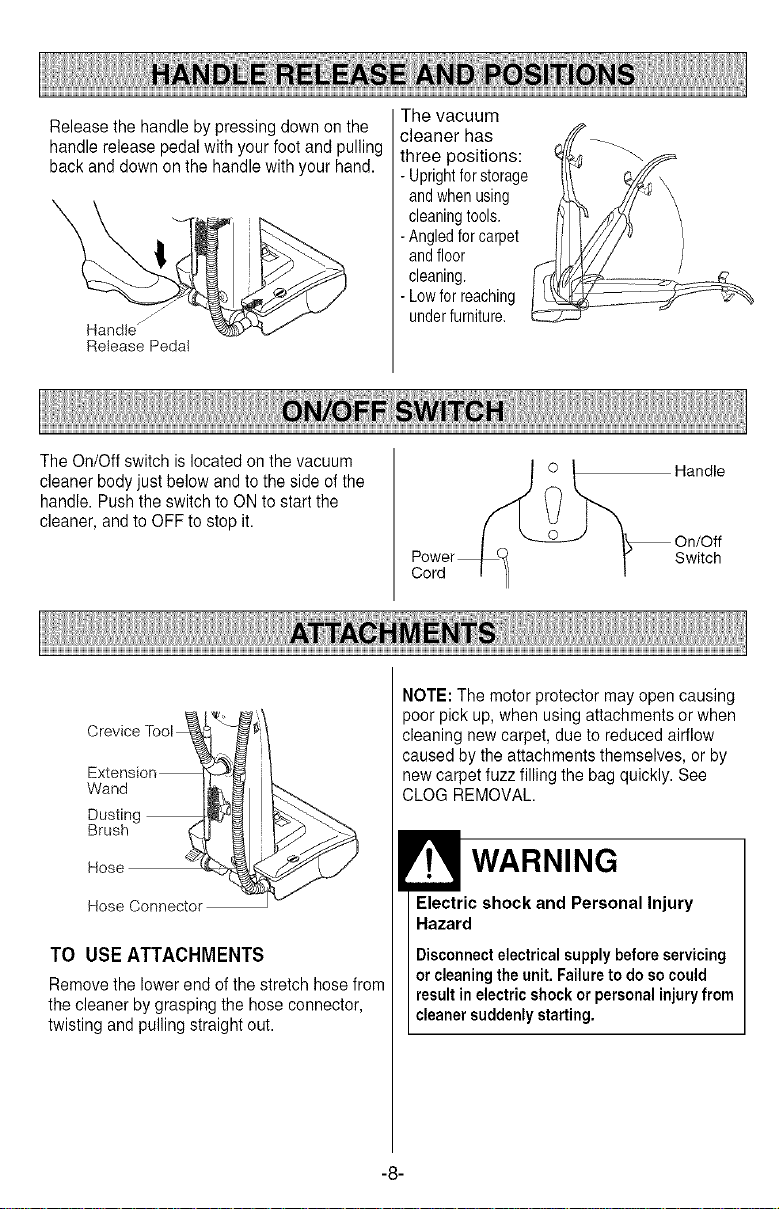
Releasethe handle by pressing down on the
handle release pedal with your foot and pulling
back and down on the handle with your hand.
/J /
Handlej
Release Pedal
The vacuum
cleaner has
three positions:
Uprightforstorage
andwhenusing
cleaningtools.
-Angledforcarpet
andfloor
cleaning.
Lowforreaching
underfurniture.
The On/Off switch is located on the vacuum
cleaner body just below andto the side of the
handle. Pushthe switch to ON to start the
cleaner, and to OFF to stop it.
Wand
Brush
Hose
HoseConnector
TO USE ATTACHMENTS
Remove the lower end of the stretch hose from
the cleaner by grasping the hose connector,
twisting and pulling straight out.
Handle
Cord
NOTE: The motorprotector may open causing
poor pick up, when using attachments orwhen
cleaning new carpet, due to reduced airflow
caused by the attachments themselves, or by
new carpet fuzz filling the bag quickly. See
CLOG REMOVAL.
Switch
WARNING
Electric shock and Personal Injury
Hazard
Disconnectelectricalsupplybeforeservicing
orcleaningtheunit.Failuretodosocould
resultin electricshockorpersonalinjuryfrom
cleanersuddenlystarting.
-8-
Extension
Wand
!=/
F.I CAUTION
When using attachments, be careful
not to overextend the stretch hose
when reaching. Trying to reach
beyond the hose stretch capability
could cause the cleaner to tip over.
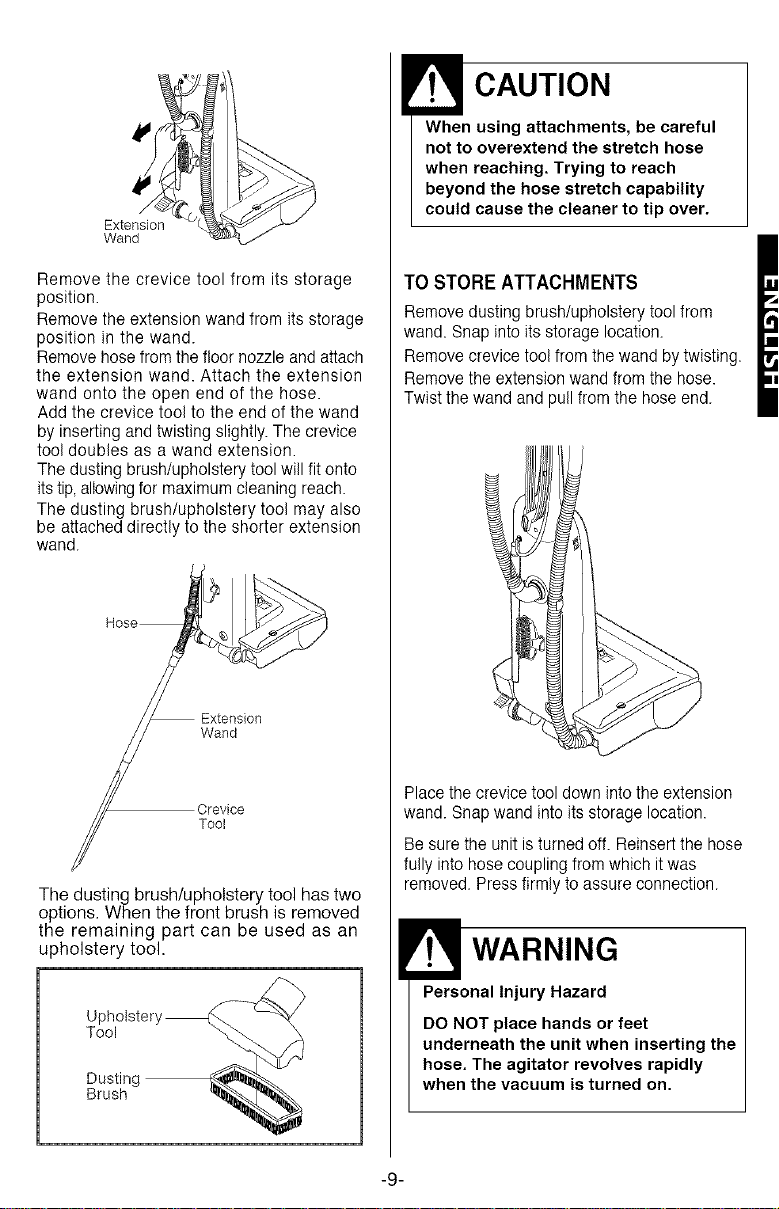
Remove the crevice tool from its storage
position.
Remove the extension wand from its storage
position in the wand.
Remove hose from the floor nozzle and attach
the extension wand. Attach the extension
wand onto the open end of the hose.
Add the crevice tool to the end of the wand
byinserting and twisting slightly. The crevice
tool doubles as a wand extension.
The dusting brush/upholstery tool will fit onto
itstip,allowingfor maximum cleaning reach.
The dusting brush/upholstery tool may also
be attached directly to the shorter extension
wand.
Wand
Orevice
Tool
The dusting brush/upholstery tool has two
options. When the front brush is removed
the remaining part can be used as an
upholstery tool.
Upholstery__
TO STORE ATTACHMENTS
Remove dusting brush/upholstery tool from
wand. Snap into its storage location.
Remove crevice tool from the wand bytwisting.
Remove the extension wand from the hose.
Twist the wand and pullfrom the hose end.
Place the crevicetool down into the extension
wand. Snap wand into its storage location.
Be sure the unit isturned off. Reinsert the hose
fully into hose coupling from which itwas
removed. Pressfirmly to assure connection.
WARNING
Personal injury Hazard
DO NOT place hands or feet
underneath the unit when inserting the
hose. The agitator revolves rapidly
when the vacuum is turned on.
Brush
-9-
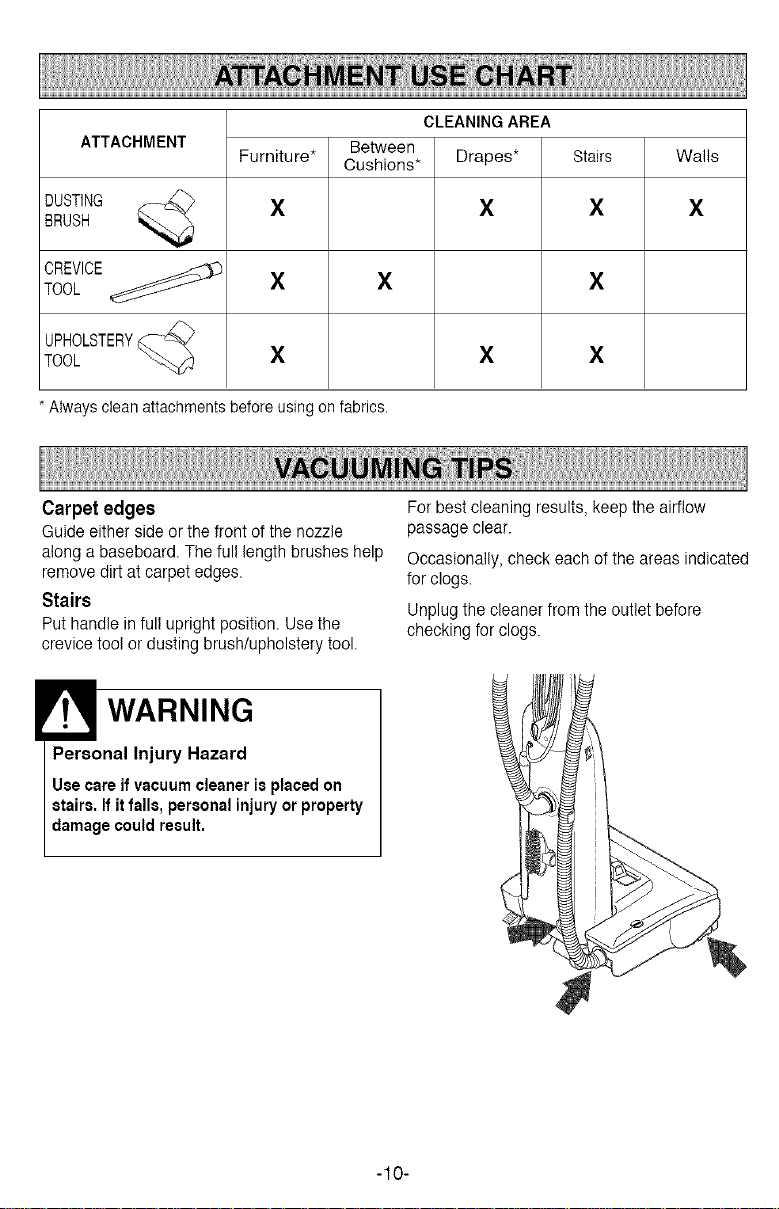
ATTACHMENT
CLEANING AREA
Furniture* Stairs Walls
Between
Cushions* Drapes*
DUSTING X X X
BRUSH
TOOL X X
CREVICE_
UPHOLSTERY_-_
TOOL _'_-_S_ X X
* Alwaysclean attachmentsbeforeusingonfabrics.
Carpet edges For best cleaning results, keep the airflow
Guideeither side orthe front of the nozzle passage clear.
along a baseboard. The full length brushes help
remove dirt at carpet edges.
Stairs
Put handle in full upright position. Use the
crevicetool or dusting brush/upholstery tool.
X
Occasionally, check each of the areas indicated
for clogs.
Unplugthe cleaner from the outlet before
checking for clogs.
X
X
WARNING
Personal Injury Hazard
Usecare if vacuumcleaner is placedon
stairs,If it falls, personalinjury orproperty
damagecouldresult.
-10-
WARNING
Electric Shock And Personal Injury
Hazard
Disconnect electrical supply before
servicing or cleaning the unit.
Failure to do so could result in
electric shock or personal injury from
cleaner suddenly starting.
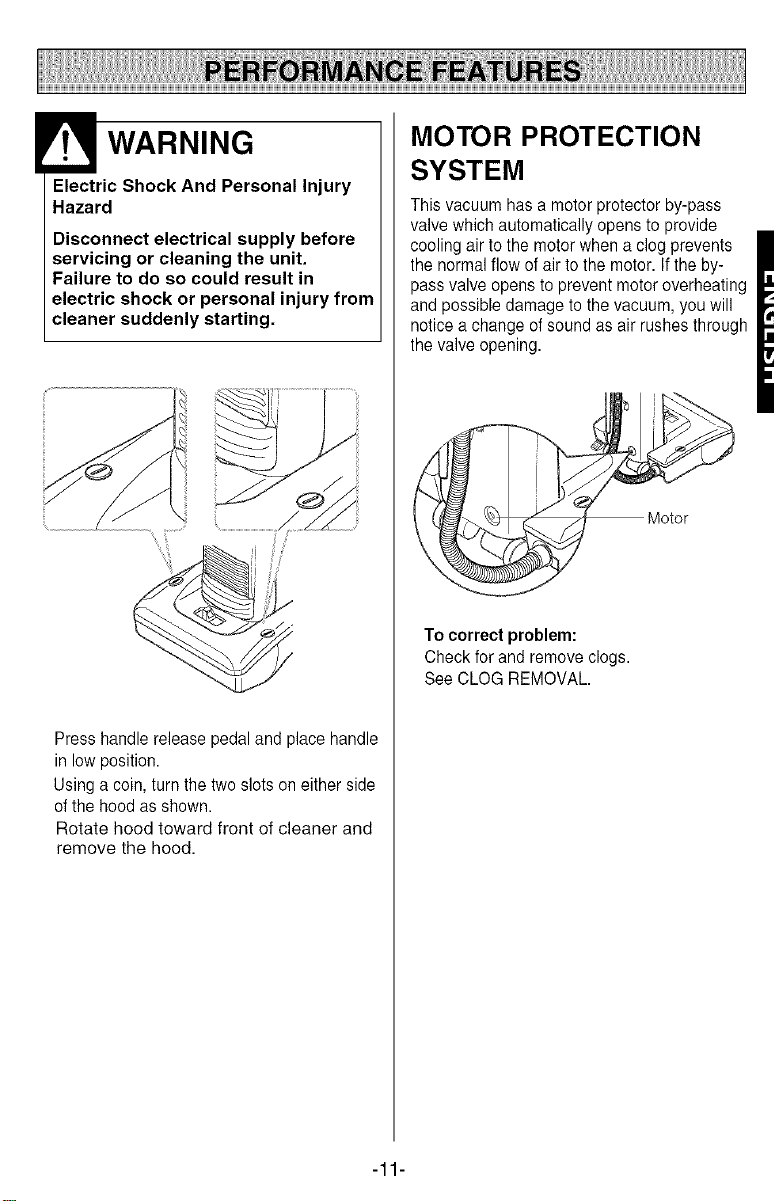
MOTOR PROTECTION
SYSTEM
This vacuum has a motor protector by-pass
valve which automatically opens to provide
cooling air to the motor when a clog prevents
the normalflow of air to the motor. If theby-
pass valve opens to prevent motor overheating
and possibledamage to the vacuum, you will
notice achange of sound as air rushes through
the valve opening.
To correct problem:
Check for and remove clogs.
See CLOG REMOVAL.
Press handle release pedal and place handle
in low position.
Usinga coin, turn the two slots on either side
of the hood as shown.
Rotate hood toward front of cleaner and
remove the hood.
-11-
VACUUM CLEANER CARE
Always follow alI safety precautions when cleaning
and servicing the vacuum cleaner.
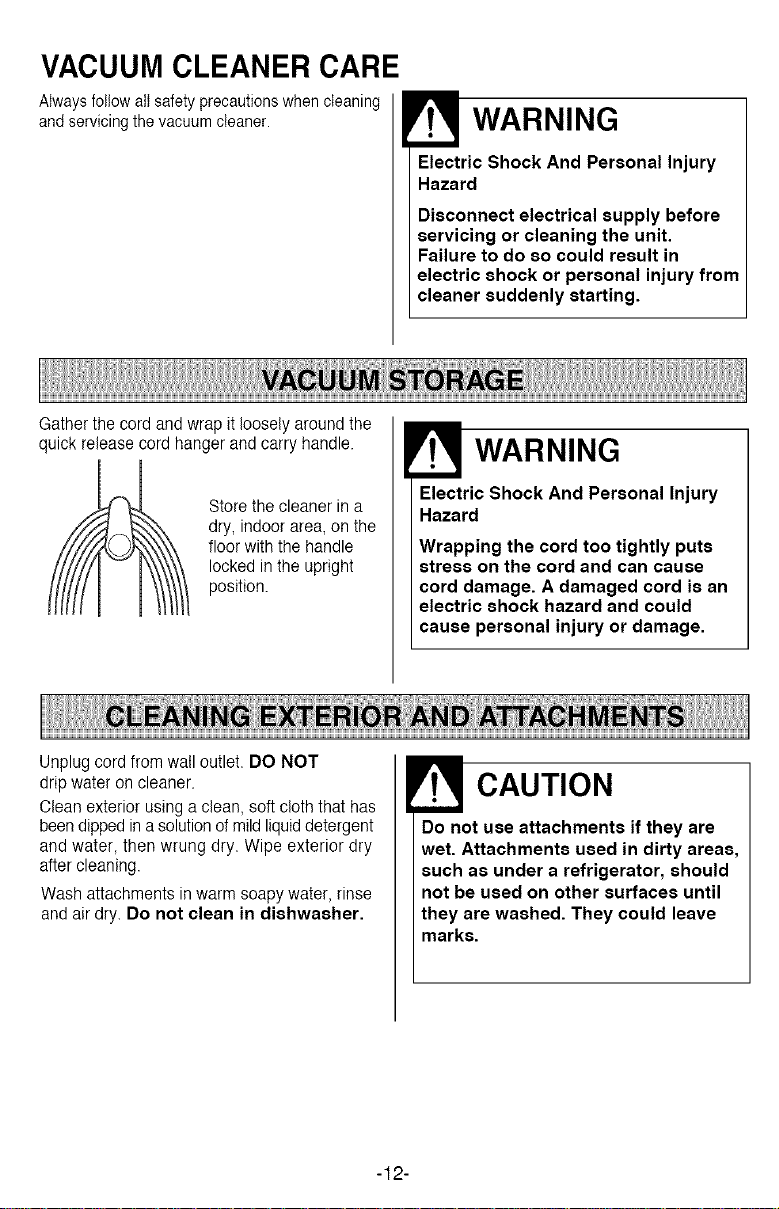
Gather the cord andwrap it loosely around the
quick release cord hanger and carry handle.
m
Store the cleaner in a
dry, indoor area, on the
floor with the handle
locked inthe upright
position.
WARNING
Electric Shock And Personal Injury
Hazard
Disconnect electrical supply before
servicing or cleaning the unit.
Failure to do so could result in
electric shock or personal injury from
cleaner suddenly starting.
WARNING
Electric Shock And Personal Injury
Hazard
Wrapping the cord too tightly puts
stress on the cord and can cause
cord damage. A damaged cord is an
electric shock hazard and could
cause personal injury or damage.
Unplug cord from wall outlet. DO NOT
drip water on cleaner.
Clean exterior using a clean, soft cloth that has
been dipped ina solutionof mild liquiddetergent
and water, then wrung dry. Wipe exterior dry
after cleaning.
Wash attachments in warm soapy water, rinse
and air dry. Do not clean in dishwasher.
CAUTION
Do not use attachments if they are
wet. Attachments used in dirty areas,
such as under a refrigerator, should
not be used on other surfaces until
they are washed. They could leave
marks.
-12-
TO REMOVE BAG
WARNING
Always unplug power cord from
electrical outlet before performing
any service on vacuum.
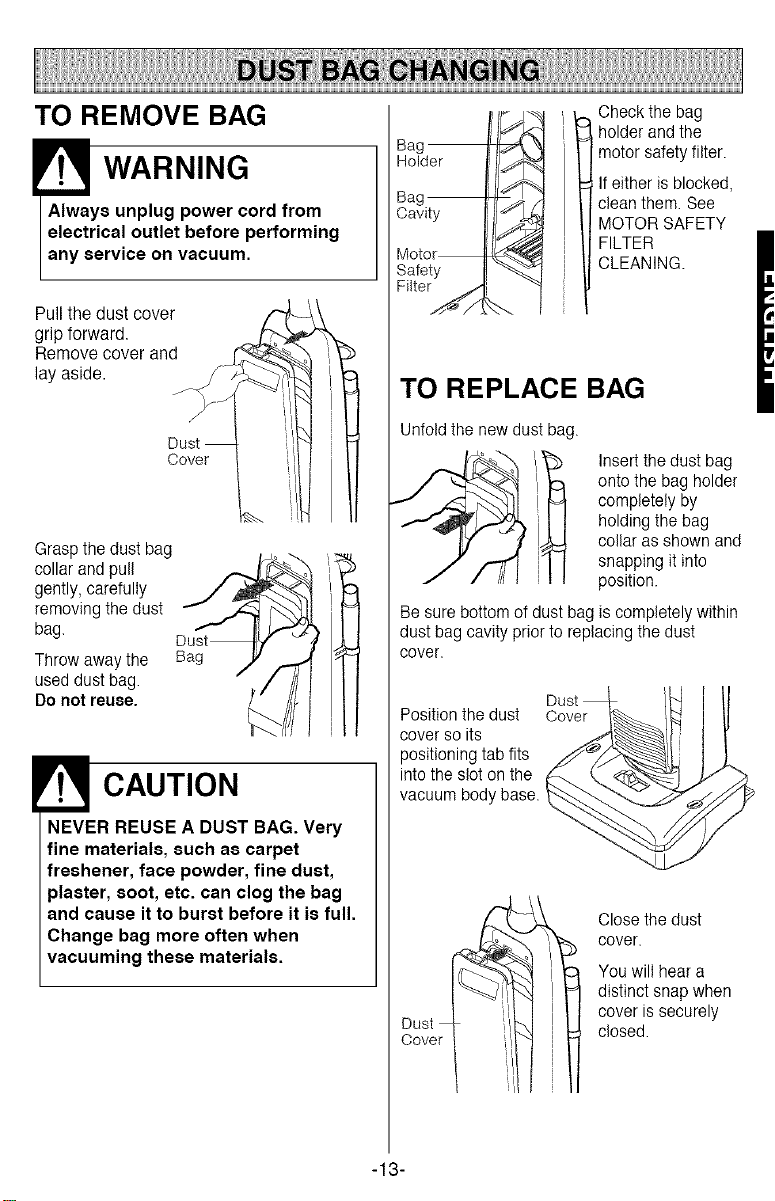
Pull the dust cover
grip forward.
Remove cover and
lay aside.
Cover
Grasp the dust bag
collar andpull
gently, carefully
removing the dust
bag.
Throw away the Bag
used dustbag.
Do not reuse.
CAUTION
NEVER REUSE A DUST BAG. Very
fine materials, such as carpet
freshener, face powder, fine dust,
plaster, soot, etc. can clog the bag
and cause it to burst before it is full.
Change bag more often when
vacuuming these materials.
Check the bag
Bag
Holder
Bag
Cavity
Motor
Safety i
Filter _
holder andthe
motor safety filter.
If either is blocked,
clean them. See
MOTOR SAFETY
FILTER
CLEANING.
TO REPLACE BAG
Unfold the new dust bag.
Insert the dust bag
onto the bag holder
completely by
holding the bag
collar asshown and
snapping it into
position.
Be sure bottom of dustbag is completely within
dust bag cavity prior to replacing the dust
cover.
Positionthe dust Cover
cover so its /,
positioning tabfits __
into the slot on the
vacuum body base.
Dust
Cover
Dust
Close the dust
cover.
You will hear a
distinct snap when
cover is securely
closed.
-13-
 Loading...