

Kenmore 72126082601 Owner’s Manual
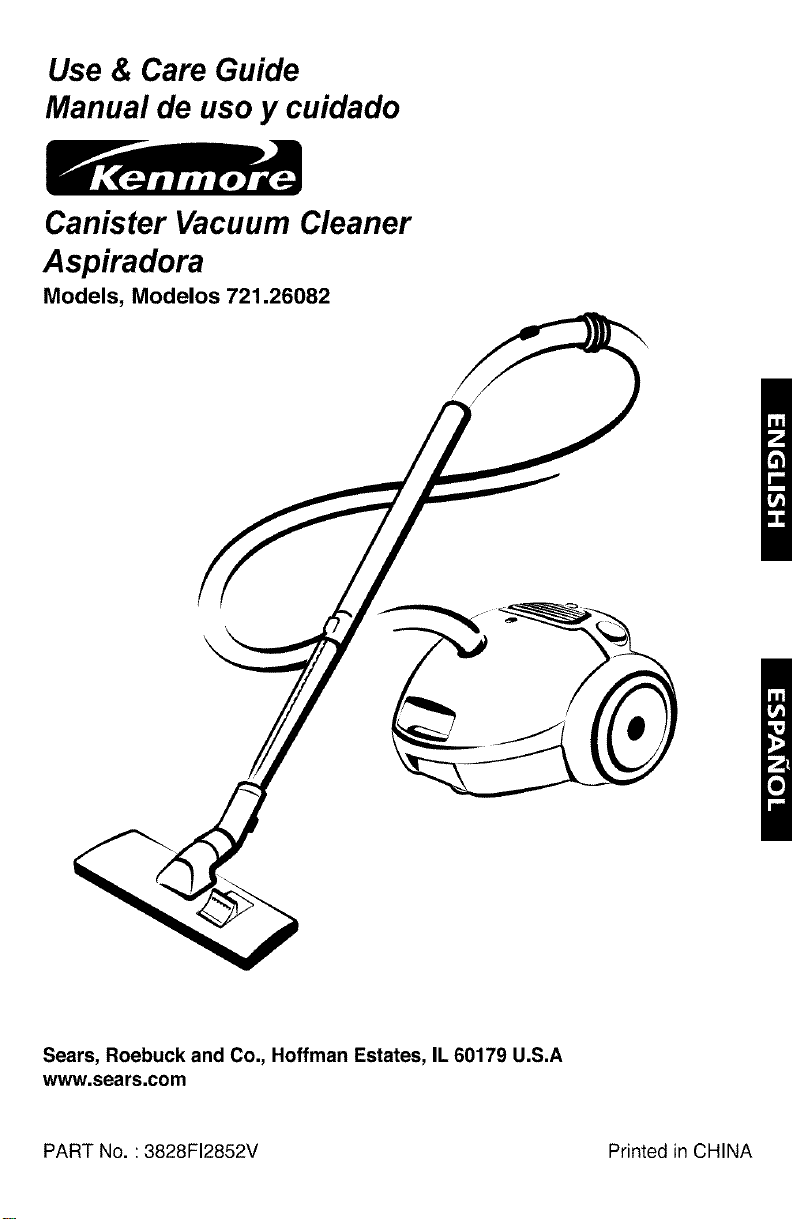
Use & Care Guide
Manual de uso y cuidado
Canister Vacuum Cleaner
Aspiradora
Models, Modelos 721.26082
Sears, Roebuck and Co., Hoffman Estates, IL 60179 U.S.A
www.sears.com
PART No. : 3828FI2852V Printed in CHINA
Before Using Your New Vacuum...................2
Kenmore Vacuum Cleaner Warranty............2
Important Safety Instructions........................3
Parts and Features .........................................4
Assembly ........................................................5
Use and Care ..................................................6
How Your Vacuum Works................................6
How to Start Your Vacuum ...............................6
Attachments .....................................................7
Vacuuming Tips ................................................ 8
Performance Features ...................................... 8
Cleaning The Dust Bin and Washable Filter ....9
Cleaning Motor Safety Filter ........................... 10
Cleaning Exterior and Attachments ................ 10
Storing Your Vacuum ..................................... t0
Troubleshooting ........................................... 11
Master Protection Agreements ................... 12
Espahol .......................................................... 13
Service ............................................ Back Cover
Attachments Use Chart ....................................7
Please read this guide. It will help you assemble and operate your new Kenmore vacuum in the
safest and most effective way.
For more information about the care and operation, call your nearest Sears store.
Your will need the complete model and serial numbers when requesting information.
Your vacuum's model and serial numbers are located on the Model and Serial Number Plate.
Use the space below to record the model number and serial number of your new Kenmore vacuum.
Model No.
Serial No.
Date of Purchase
Keep this book and your sales check (receipt) in a safe place for future reference.
ONE YEAR FULL WARRANTY ON KENMORE VACUUM CLEANER
When assembled, operated and maintained according to the Use and Care Guide, if this vacuum cleaner
fails due to a defect in material or workmanship within one year from the date of purchase, RETURN IT TO
ANY SEARS STORE OR SEARS PARTS & REPAIR CENTER FOR FREE REPAIR (or replacement if
repair proves impossible).
This warranty is void if this vacuum cleaner is ever used for commercial or rental purposes.
This warranty excludes vacuum bags, belts, light bulbs, and filters, which are expendable parts that can
wear out from normal use before the end of the warranty year.
This warranty covers only defects in material and workmanship. Sears will NOT pay for:
1.An on-site service technician to instruct the user in correct product installation,operation or maintenance.
2. A service technician to clean or maintain this product.
3. Damage to or failure of this product if it isnot installed, operated or maintained according to the Installation
Instructions and Use and Care Guide.
4. Damage to or failure of this product resulting from accident, abuse, misuse or use for other than its intended
purpose.
5. Damage to or failure of this product caused by the use of detergents, cleaners, chemicals or utensils
other than those recommended in the Use and Care Guide.
6. Damage to or failure of parts or systems resulting from unauthorized modifications made to this product.
This warranty applies only while this appliance is used in the United States.
This warranty gives you specific legal rights, andyou may also have other rights which vary from state to state.
Sears, Roebuck and Co., Dept. 817WA, Hoffman Estates, IL 60179
-2-
WARNING-Toreducetheriskoffire,electricshock,orinjury:
Your safety is important to us. To reduce the risk of fire, electrical shock, injury to
persons or damage when using your vacuum cleaner, follow basic safety precautions
including the following:
Readthis manualbeforeassemblingor using
yourvacuumcleaner.
Useyourcleaneronlyasdescribedinthis
manual.Useonlywithsuppliedattachments.
To reducetheriskofelectricalshock- Do not
useoutdoorsor on wetsurfaces.
Disconnect electricalsupplybeforeservicing
or cleaningout brusharea. Failureto do so
couldresultin electricalshock or brush
suddenlystarting.
Always turncleaner off beforeconnectingor
disconnectingthe hose.
Always turncleaner offbeforeunplugging.
Do not unplug bypullingoncord. To unplug,
graspthe plug,notthe cord.
Hold plugwhen rewindingonto cordreel.
Do not allow plugto whipwhenrewinding.
Do not use withdamagedcord orplug. If
cleaneris notworkingas it should,has been
dropped,damaged, left outdoors,or dropped
intowater,return itto a service center.
Do not pullorcarrybycord,usecordas a
handle,closedooroncord,or pullcordaround
sharpedgesor corners.Donotruncleanerover
cord.Keepcordawayfromheatedsurfaces.
Do not leavecleanerwhenpluggedin.Unplug
fromoutletwhennotin useandbeforeservicing.
Do not allowtobeusedasa toy.Closeattention
_snecessarywhenusedbyor nearchildren.
Do not handle plugor cleanerwith wethands.
Do not operatethe cleanerwith apunctured
hose.Replaceifcut or worn.Avoidvacuuming
sharpobjects.
Do not usewith any openingblocked;keep
free ofdust, lint,hair andanythingthat may
reduceair flow.
Keep hair,looseclothing,fingers, andall parts
of body away fromopeningsand movingparts.
Do not usecleanerwithout dust bag and/or
filters in place.
Always changethe dust bag aftervacuuming
carpetcleanersor freshener,powdersandfine
dust.These productsclog the bag,reduce
airflowand cancausethe bagto burst. Failure
to changebagcould causepermanentdamage
to the cleaner.
Do nat usethe cleanerto pick upsharp hard
objects,small toys, pins,paper, etc.Theymay
damagethe cleaneror dust bag.
Donot pickupanythingthatis burningorsmoking,
suchascigarettes,matches,or hotashes.
Do not usevacuumcleaner
to pick upflammableor combustibleliquids
(gasoline,cleaningfluids,perfumes,etc.),oruse
in areaswherethey maybe present.Thefumes
fromthese substancescancreatea fire hazard
orexplosion.
Use extra care whencleaning on stairs. Donot
puton chairs,tables,etc. Keeponfloor.
You are responsiblefor makingsurethat your
vacuum cleaneris notusedby anyone unable
to operate itproperly.
SAVE THESE INSTRUCTIONS
Proper assembly and safe use of your vacuum cleaner are your responsibilities. Your
cleaner is intended only for household use. Read this Owner's Manual carefully for
important use and safety information. This guide contains safety statements under warning
and caution symbols. Please pay special attention to these boxes and follow any
instructions given. WARNING statements alert you to such hazards as fire, electrical
shock, burns and serious personal injury. CAUTION statements alert you to such hazards as
moderate personal injury and/or property damage.
-3-
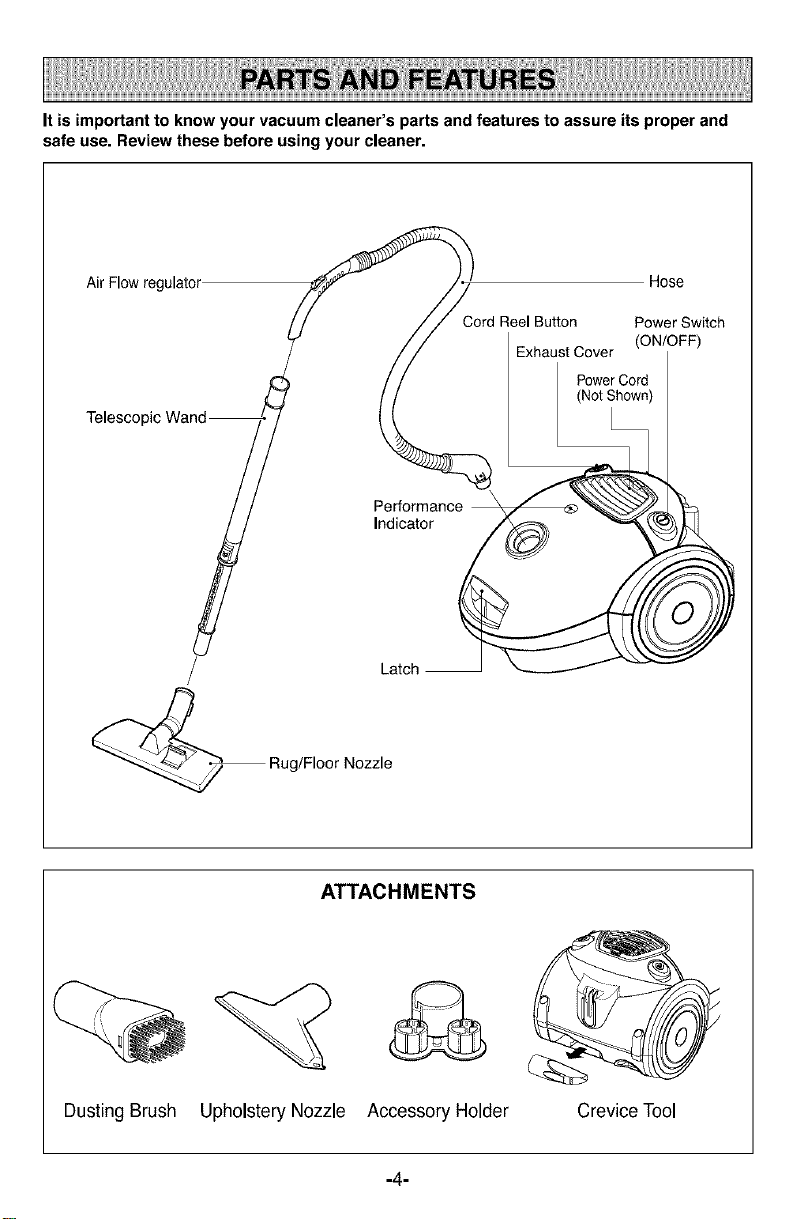
It is importantto know your vacuum cleaner's parts and features to assure its proper and
safe use. Review these before using your cleaner.
Air Flowregulator Hose
Cord Reel Button Power Switch
ExhaustCover
(ON/OFF)
PowerCord
(NotShown)
ATTACHMENTS
Dusting Brush Upholstery Nozzle Accessory Holder
-4-
Crevice Tool
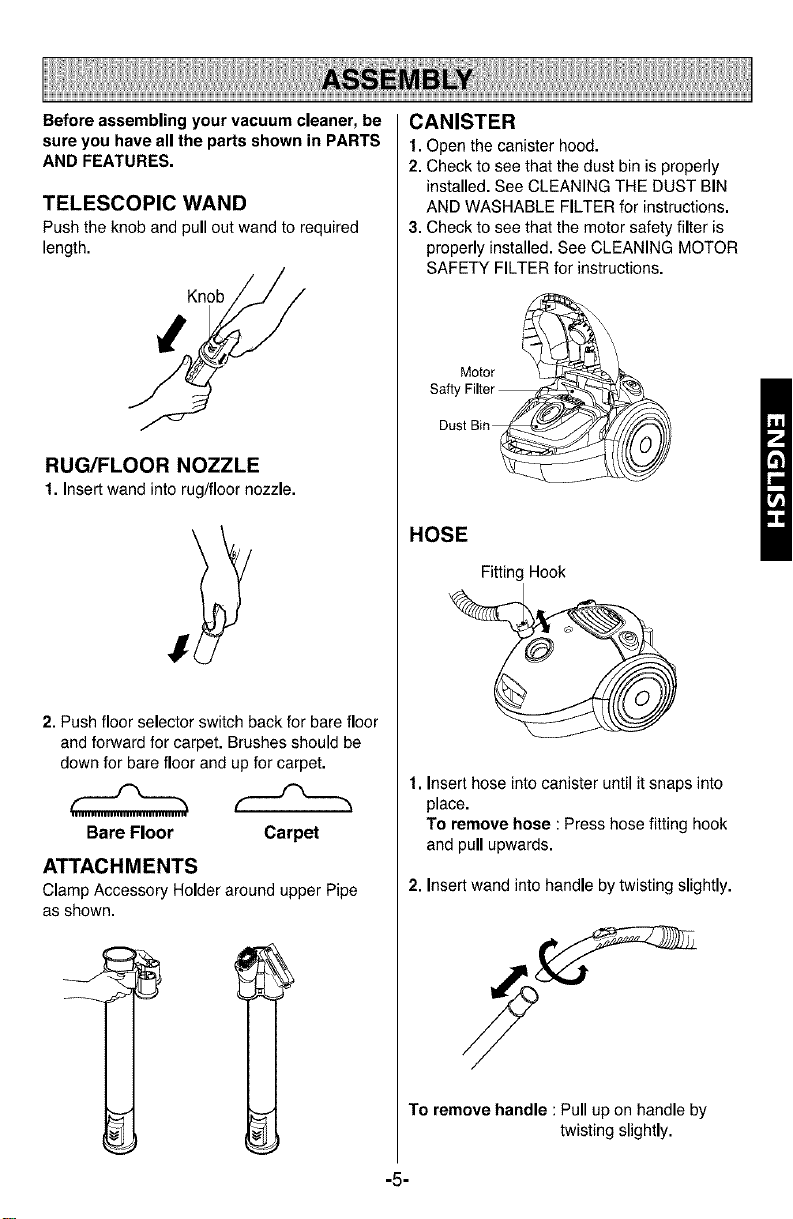
Before assembling your vacuum cleaner, be
sure you have all the parts shown in PARTS
AND FEATURES.
TELESCOPIC WAND
Push the knob and pullout wandto required
length.
Knob
CANISTER
1. Open the canister hood.
2. Check to see that the dust bin is properly
installed. See CLEANING THE DUST BIN
AND WASHABLE FILTER for instructions.
3. Check to see that the motor safety filter is
properly installed. See CLEANING MOTOR
SAFETY FILTER for instructions.
Motor
Safty Filter_\
RUG/FLOOR NOZZLE
1. Insertwand intorug/floor nozzle.
2. Push floor selector switch back for bare floor
and forward for carpet. Brushes should be
down for bare floor and up for carpet.
Bare Floor Carpet
ATTACHMENTS
Clamp Accessory Holder around upper Pipe
as shown.
Dust Bin__
HOSE
Fitting Hook
1. Insert hose into canister until it snaps into
place.
To remove hose : Press hose fitting hook
and pull upwards.
2. Insert wand into handle by twisting slightly.
To remove handle : Pull up on handle by
twisting slightly.
-5-
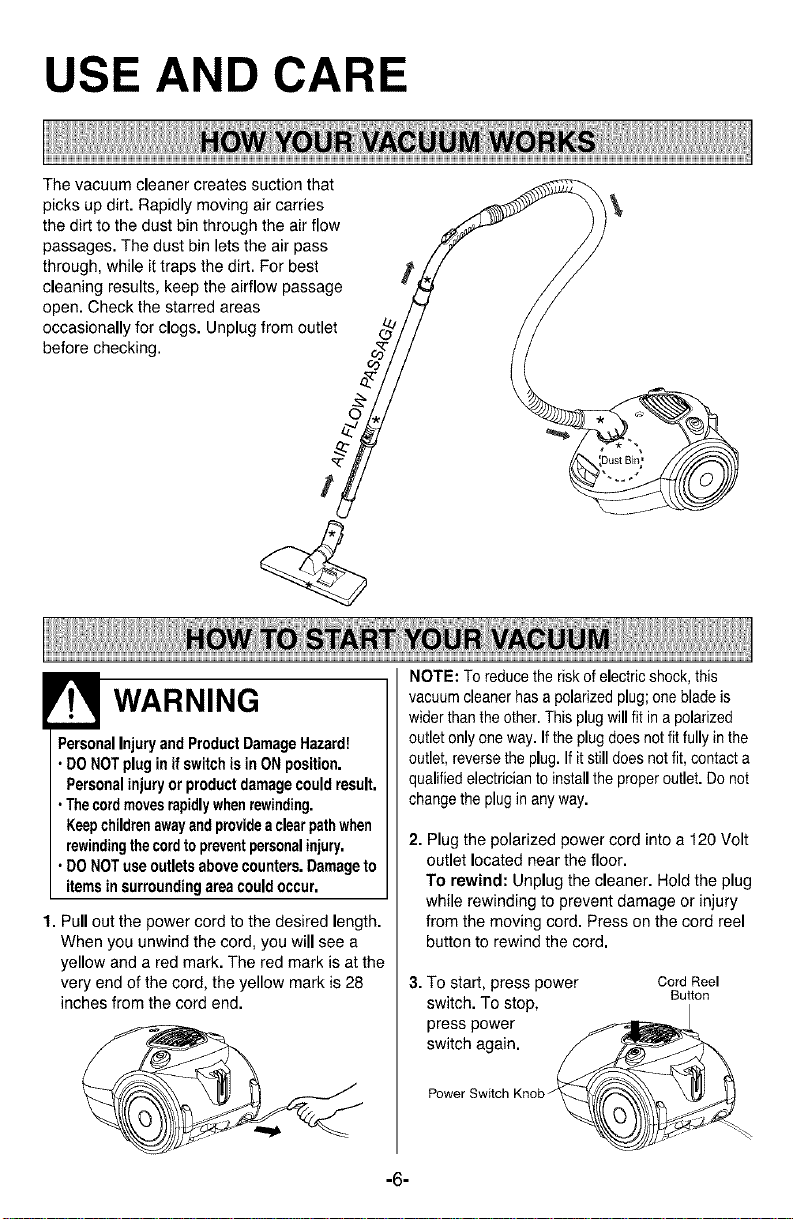
USE AND CARE
The vacuum cleaner creates suction that
picks up dirt. Rapidly moving air carries _'_ _,
the dirt to the dust bin through the air flow _,,_7 _'>" ) /
passages. The dust bin lets the air pass /7" //
through, while it traps the dirt. For best J, _// /_
cleaning results, keep the airflow passage _,f_ //
open. Check the starred areas //_ //
occasionally for clogs. Unplug from outlet 9//// / /
before checking. _'_// / /
WARNING
PersonalInjuryand ProductDamage Hazard!
• DO NOT plug inif switch is in ON position.
Personalinjury or product damagecouldresult.
• Thecordmovesrapidlywhenrewinding.
Keepchildrenawayandprovideaclearpathwhen
rewindingthe cordtopreventpersonalinjury.
• DO NOT use outlets abovecounters. Damageto
itemsin surroundingarea couldoccur.
1. Pull out the power cord to the desired length.
When you unwind the cord, you will see a
yellow and a red mark. The red mark is at the
very end of the cord, the yellow mark is 28
inches from the cord end.
NOTE: To reduce the risk of electric shock, this
vacuum cleaner has a polarized plug; one blade is
wider than the other. This plug will fit in a polarized
outlet only one way. Ifthe plug does not fit fully in the
outlet, reverse the plug. If it still does not fit, contact a
qualified electrician to install the proper outlet. Do not
change the plug in any way.
2. Plug the polarized power cord into a 120 Volt
outlet located near the floor.
To rewind: Unplug the cleaner. Hold the plug
while rewinding to prevent damage or injury
from the moving cord. Press on the cord reel
button to rewind the cord.
3. To start, press power Cord Reel
switch. TO stop, Button
press power
switch again. _j_
Power Switch Knob _(_--_rr_ _
-6-
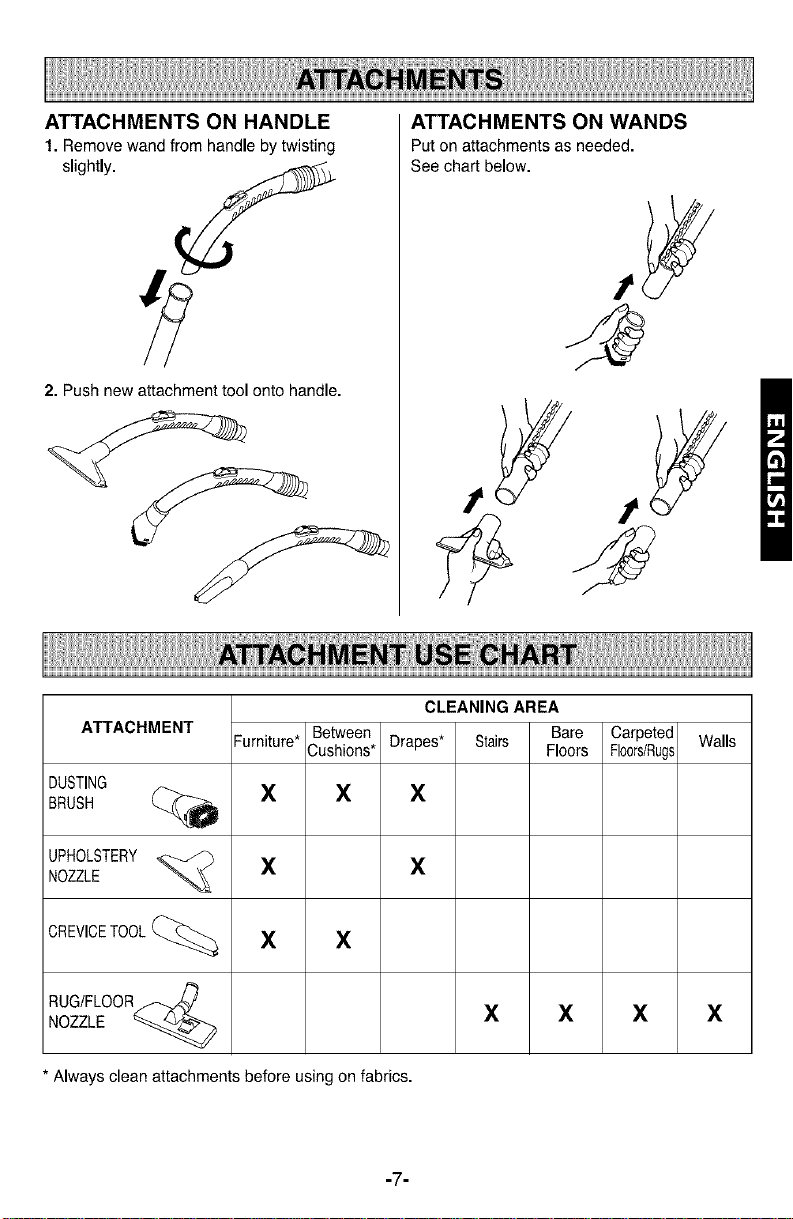
ATTACHMENTS ON HANDLE
1. Remove wand from handle by twisting
slightly.
2. Push new attachment tool onto handle.
ATTACHMENTS ON WANDS
Put on attachments as needed.
See chart below.
CLEANING AREA
ATTACHMENT --urniture* 3ushions* Floors Fio0rs/Rugs
DUSTING
BRUSH _ X X X
NOZZLE X X
UPHOLSTERY
CREVICETOOL(_ X X
RUG/FLOOR _./_
NOZZLE _ X X X X
* Always clean attachments before using on fabrics.
Between Drapes* Stairs Bare Carpeted Walls
-7-

Suggested sweeping pattern
For best cleaning action, the rug/floor nozzle
should be pushed straight away from you and
pulled straight back.
This pattern should be continued across the rug
with slow, gliding motions.
NOTE: Fast, jerky strokes do not provide
complete cleaning.
Carpeted stairs need to be vacuumed
regularly.
For best cleaning results, keep the airflow
passage open. Check occasionally for clogs.
See HOW YOUR VACUUM WORKS section.
Unplug from outlet before checking.
SUCTION CONTROL
The handle air flow regulator allows you to
change the vacuum suction for different fabric
and carpet weights.
Adjust the suction power with Air Flow
Regulator in the handle.
Oos'ef
HOSE SWIVEL
The hose swivel prevents the hose from
twisting. This is helpful for cleaning in small
areas.
PERFORMANCE INDICATOR
When the unit is running, the indicator will be
clear if there are no clogs.
When the indicator turns completely red, check
if the dust bin is full or if other areas are
clogged. See HOW YOUR VACUUM WORKS.
Indicator
NOTE: Indicator may turn red when using
attachments or when cleaning new carpet. This
is due to reduced airflow caused by the vacuum
seal between attachment and surface, or new
carpet fuzz filling the dust bin quickly. Restore
airflow by raising attachment slightly from
surface you are cleaning, or empty dust bin if it
is full.
-8-
 Loading...