

Page 1

Use & Care Guide
Manual de uso y cuidado
Guide d’utilisation et d’entretien
English / Español / Français
Models/Modelos/Modèles: 665.1329*, 665.1569*
Kenmore®
ULTRA WASH® Dishwasher
®
Lavavajillas ULTRA WASH
Lave-vaisselle ULTRA WASH
* = color number, número de color, le numéro de la couleur
P/N W10596248A
Sears Brands Management Corporation
Hoffman Estates, IL 60179 U.S.A.
www.kenmore.com
www.sears.com
Sears Canada Inc.
Toronto, Ontario, Canada M5B 2C3
www.sears.ca
®
Page 2

TABLE OF CONTENTS
PROTECTION AGREEMENTS ...................................................2
WARRANTY .............................................................................3
DISHWASHER SAFETY ............................................................ 4
WHAT’S NEW IN YOUR DISHWASHER....................................6
Energy..................................................................................................6
Performance .......................................................................................6
PARTS AND FEATURES........................................................... 7
START-UP / QUICK REFERENCE ..............................................8
®
ULTRA WASH
DISHWASHER EFFICIENCY TIPS ............................................10
DETERGENT AND RINSE AID .................................................11
Detergent ...........................................................................................11
Rinse Aid............................................................................................. 11
LOADING............................................................................... 12
Loading for Best Cleaning and Drying Performance................12
Top Rack Loading............................................................................ 13
Bottom Rack Loading...................................................................... 15
FILTRATION SYSTEM .......................................9
PROTECTION AGREEMENTS
Master Protection Agreements
Congratulations on making a smart purchase.
Kenmore
dependable operation. But like all products, it may require
preventive maintenance or repair from time to time. That’s when
having a Master Protection Agreement can save you money and
aggravation.
The Master Protection Agreement also helps extend the life of
your new product. Here’s what the Agreement* includes:
✔Parts and labor needed to help keep products operating
✔Expert service by a force of more than 10,000 authorized
✔Unlimited service calls and nationwide service, as often as
✔“No-lemon” guarantee – replacement of your covered
✔Product replacement if your covered product can’t be fixed.
✔Annual Preventive Maintenance Check at your request – no
✔Fast help by phone – we call it Rapid Resolution – phone
✔Power surge protection against electrical damage due to
®
product is designed and manufactured for years of
properly under normal use, not just defects. Our coverage
goes well beyond the product warranty. No deductibles, no
functional failure excluded from coverage—real protection.
Sears service technicians, which means someone you can
trust will be working on your product.
you want us, whenever you want us.
product if four or more product failures occur within twelve
months.
extra charge.
support from a Sears representative on all products. Think of
us as a “talking owner’s manual.”
power fluctuations.
Your new
DISHWASHER USE................................................................. 17
Cycles and Options Information (on some models) .................17
Dishwasher Control Section........................................................... 19
Dishwasher Feedback Section...................................................... 19
Canceling A Cycle .......................................................................... 19
Changing A Cycle After Dishwasher Is Started......................... 19
WASHING SPECIAL ITEMS.....................................................20
DISHWASHER CARE ...............................................................21
Cleaning.............................................................................................21
Drain Air Gap...................................................................................21
Vacation or Extended Time Without Use ..................................21
TROUBLESHOOTING............................................................. 22
SERVICE NUMBERS .............................................BACK COVER
ÍNDICE................................................................................... 25
TABLE DES MATIÈRES............................................................50
✔$250 Food Loss Protection annually for any food spoilage
that is the result of mechanical failure of any covered
refrigerator or freezer.
✔Rental reimbursement if repair of your covered product takes
longer than promised.
✔10% discount off the regular price of any non-covered repair
service and related installed parts.
Once you purchase the Agreement, a simple phone call is all
that it takes for you to schedule service. You can call anytime
day or night, or schedule a service appointment online.
The Master Protection Agreement is a risk free purchase. If you
cancel for any reason during the product warranty period, we
will provide a full refund. Or, a prorated refund anytime after
the product warranty period expires. Purchase your Master
Protection Agreement today!
Some limitations and exclusions apply. For prices and
additional information in the U.S.A. call 18008276655.
*Coverage in Canada varies on some items. For full details call
Sears Canada at 18003616665.
Sears Installation Service
For Sears professional installation of home appliances, garage
door openers, water heaters, and other major home items, in the
U.S.A. or Canada call 18004MYHOME
®
.
2
Page 3

KENMORE APPLIANCE WARRANTY
ONE YEAR LIMITED WARRANTY
When installed, operated and maintained according to all
instructions supplied with the product, if this appliance fails due
to a defect in material or workmanship within one year from the
date of purchase, call 18004MYHOME
repair.
This warranty applies for only 90 days from the date of
purchase if this appliance is ever used for other than private
family purposes.
THIS WARRANTY COVERS ONLY DEFECTS IN MATERIAL
AND WORKMANSHIP. SEARS WILL NOT PAY FOR:
1. Expendable items that can wear out from normal use,
including but not limited to filters, belts, incandescent light
bulbs, and bags.
2. A service technician to instruct the user in correct product
installation, operation or maintenance.
3. A service technician to clean or maintain this product.
4. Damage to or failure of this product if it is not installed,
operated or maintained according to all instructions
supplied with the product.
5. Damage to or failure of this product resulting from accident,
abuse, misuse or use for other than its intended purpose.
®
to arrange for free
6. Damage to or failure of this product caused by the use of
detergents, cleaners, chemicals or utensils other than those
recommended in all instructions supplied with the product.
7. Damage to or failure of parts or systems resulting from
unauthorized modifications made to this product.
DISCLAIMER OF IMPLIED WARRANTIES; LIMITATION OF
REMEDIES
Customer’s sole and exclusive remedy under this limited
warranty shall be product repair as provided herein. Implied
warranties, including warranties of merchantability or fitness for
a particular purpose, are limited to one year or the shortest
period allowed by law. Sears shall not be liable for incidental or
consequential damages. Some states and provinces do not
allow the exclusion or limitation of incidental or consequential
damages, or limitations on the duration of implied warranties of
merchantability or fitness, so these exclusions or limitations may
not apply to you.
This warranty applies only while this appliance is used in the
United States or Canada.
This warranty gives you specific legal rights, and you may also
have other rights which vary from state to state.
Sears Brands Management Corporation
Hoffman Estates, IL 60179
Sears Canada Inc.
Toronto, Ontario, Canada M5B 2C3
3
Page 4
DISHWASHER SAFETY
You can be killed or seriously injured if you don't
immediately follow instructions.
You
can be killed or seriously injured if you don't
follow instructions.
All safety messages will tell you what the potential hazard is, tell you how to reduce the chance of injury, and tell you
what can
happen if the instructions are not followed.
Your safety and the safety of others are very important.
We have provided many important safety messages in this manual and on your appliance. Always read and obey all
safety messages.
This is the safety alert symbol.
This symbol alerts you to potential hazards that can kill or hurt you and others.
All safety messages will follow the safety alert symbol and either the word “DANGER” or
“WARNING.” These words mean:
IMPORTANT SAFETY INSTRUCTIONS
WARNING:
When using the dishwasher, follow basic precautions, including the following:
SAVE THESE INSTRUCTIONS
■
Read all instructions before using the dishwasher.
■
Use the dishwasher only for its intended function.
■
Use only detergents or rinse agents recommended for
use in a dishwasher, and keep them out of the reach
of children.
■
When loading items to be washed:
1) Locate sharp items so that they are not likely to
damage the door seal; and
2) Load sharp knives with the handles up to reduce
the risk of cut-type injuries.
■
Do not wash plastic items unless they are marked
“dishwasher safe” or the equivalent. For plastic items
not so marked, check the manufacturer's
recommendations.
■
Do not touch the heating element during or
immediately after use.
■
Do not operate the dishwasher unless all enclosure
panels are properly in place.
■
Do not tamper with controls.
■
Do not abuse, sit on, or stand on the door, lid, or dish
racks of the dishwasher.
■
To reduce the risk of injury, do not allow children to
play in or on the dishwasher.
■
Under certain conditions, hydrogen gas may be
produced in a hot water system that has not been
used for two weeks or more. HYDROGEN GAS IS
EXPLOSIVE. If the hot water system has not been
used for such a period, before using the dishwasher
turn on all hot water faucets and let the water flow
from each for several minutes. This will release any
accumulated hydrogen gas. As the gas is flammable,
do not smoke or use an open flame during this time.
■
Remove the door or lid to the washing compartment
when removing an old dishwasher from service or
discarding it.
State of California Proposition 65 Warnings:
WARNING: This product contains one or more chemicals known to the State of California to cause cancer.
WARNING: This product contains one or more chemicals known to the State of California to cause birth defects or
other reproductive harm.
4
Page 5
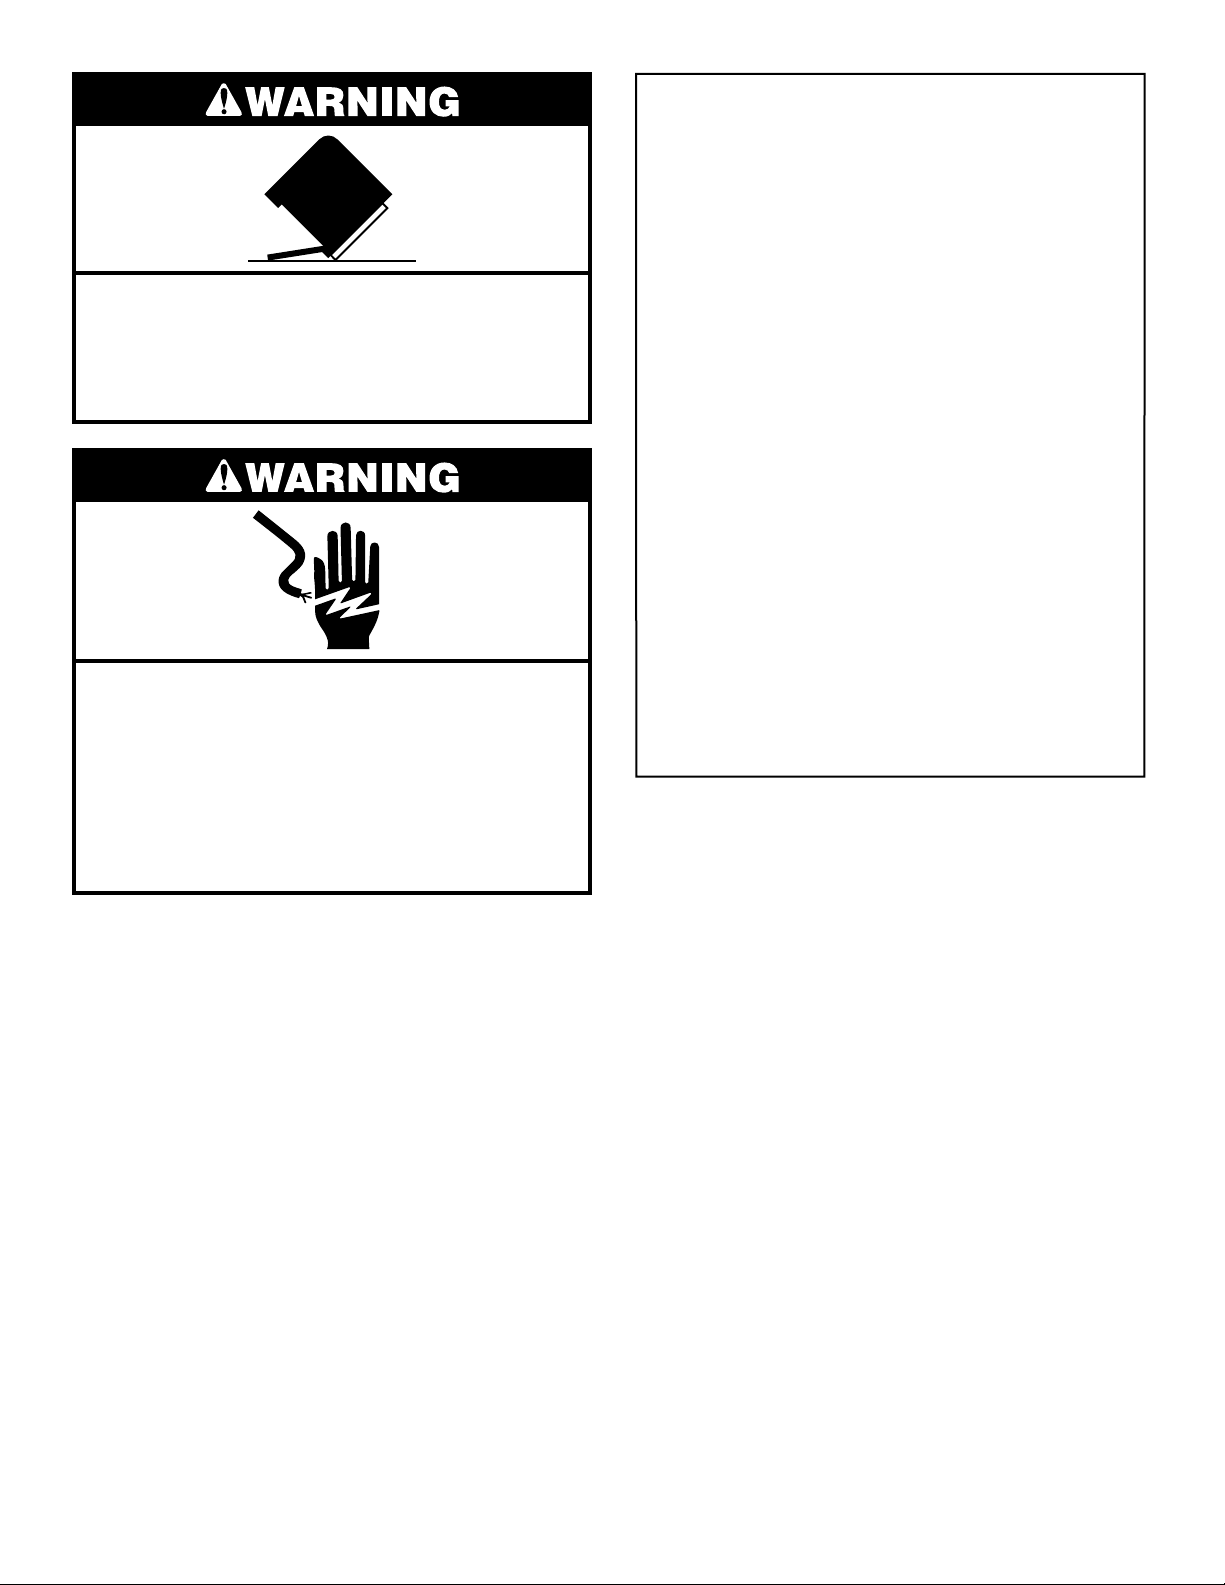
Tip Over Hazard
Do not use dishwasher until completely installed.
Do not push down on open door.
Doing so can result in serious injury or cuts.
Electrical Shock Hazard
Electrically ground dishwasher.
Connect ground wire to green ground connector
in terminal box.
Do not use an extension cord.
Failure to follow these instructions can result in
death, fire, or electrical shock.
■
For a grounded, cord-connected dishwasher:
The dishwasher must be grounded. In the event
of a malfunction or breakdown, grounding will
reduce the risk of electric shock by providing a
path of least resistance for electric current. The
dishwasher is equipped with a cord having an
equipment-grounding conductor and a
grounding plug. The plug must be plugged into
an appropriate outlet that is installed and
grounded in accordance with all local codes and
ordinances.
WARNING: Improper connection of the
equipment-grounding conductor can result in a
risk of electric shock. Check with a qualified
electrician or service representative if you are in
doubt whether the dishwasher is properly
grounded. Do not modify the plug provided with
the dishwasher; if it will not fit the outlet, have a
proper outlet installed by a qualified electrician.
■
For a permanently connected dishwasher:
The dishwasher must be connected to a
grounded metal, permanent wiring system, or an
equipment-grounding conductor must be run
with the circuit conductors and connected to the
equipment-grounding terminal or lead on the
dishwasher.
GROUNDING INSTRUCTIONS
SAVE THESE INSTRUCTIONS
■ Install where dishwasher is sheltered from the elements.
Avoid possible rupture of fill valve from freezing. Such
ruptures are not covered by the warranty. See the “Vacation
or Extended Time Without Use” section.
■ Install and level dishwasher on a floor that will hold the
weight, and in an area suitable for its size and use.
■ Remove all shipping plugs from hoses and connectors (such
as the cap on the drain outlet) before installing. See
Installation Instructions for complete information.
5
Page 6
WHAT’S NEW IN YOUR DISHWASHER
H
E
USE RINSE AID FOR
BETTER DRYING
Lock
Refill
Full
Add
P
U
S
H
D
O
W
N
&
T
U
R
N
L
O
C
K
U
N
L
O
C
K
Energy
Congratulations on purchasing your water and energy efficient dishwasher! This dishwasher cleans by spraying
the dishes with water and pauses to allow the detergent to soak into and release the soils on the dishes. The
cycles are longer due to the soak and the pauses for exceptional cleaning. Models with SmartWash
an optical water sensor. The optical water sensor is used to determine the optimum water and energy
consumption for great cleaning performance. The first cycle using the sensor will run longer to calibrate the
optical sensor.
Performance
Rinse Aid
Using rinse aid will optimize your drying and wash
performance. This dishwasher is specifically designed to be
used with rinse aid for improved drying performance and
controlling buildup of hard water deposits. Energy efficient
dishwashers use less water and energy, so they depend on the
water “sheeting” action of rinse aid for total optimal
performance.
®
contain
Detergent
The United States and Canada have passed a restriction
limiting the amount of phosphorus (phosphates) in the
household dishwasher detergents to no more than 0.5%, where
previous detergents contained 8.7%. Major manufacturers
have reformulated their dishwasher detergent for this change in
detergents as another step in eco-conscious awareness. With
these recent changes it is recommended to use tablets and
packs for convenience and improved performance.
Filtration System
Your dishwasher has the latest technology in dishwasher
filtration. This triple filtration system minimizes sound and
optimizes water and energy conservation while providing
optimal cleaning performance. Regular maintenance of your
filters will sustain peak cleaning performance. We suggest you
clean both your upper and lower filter and rinse under running
water at least once a month.
6
Page 7
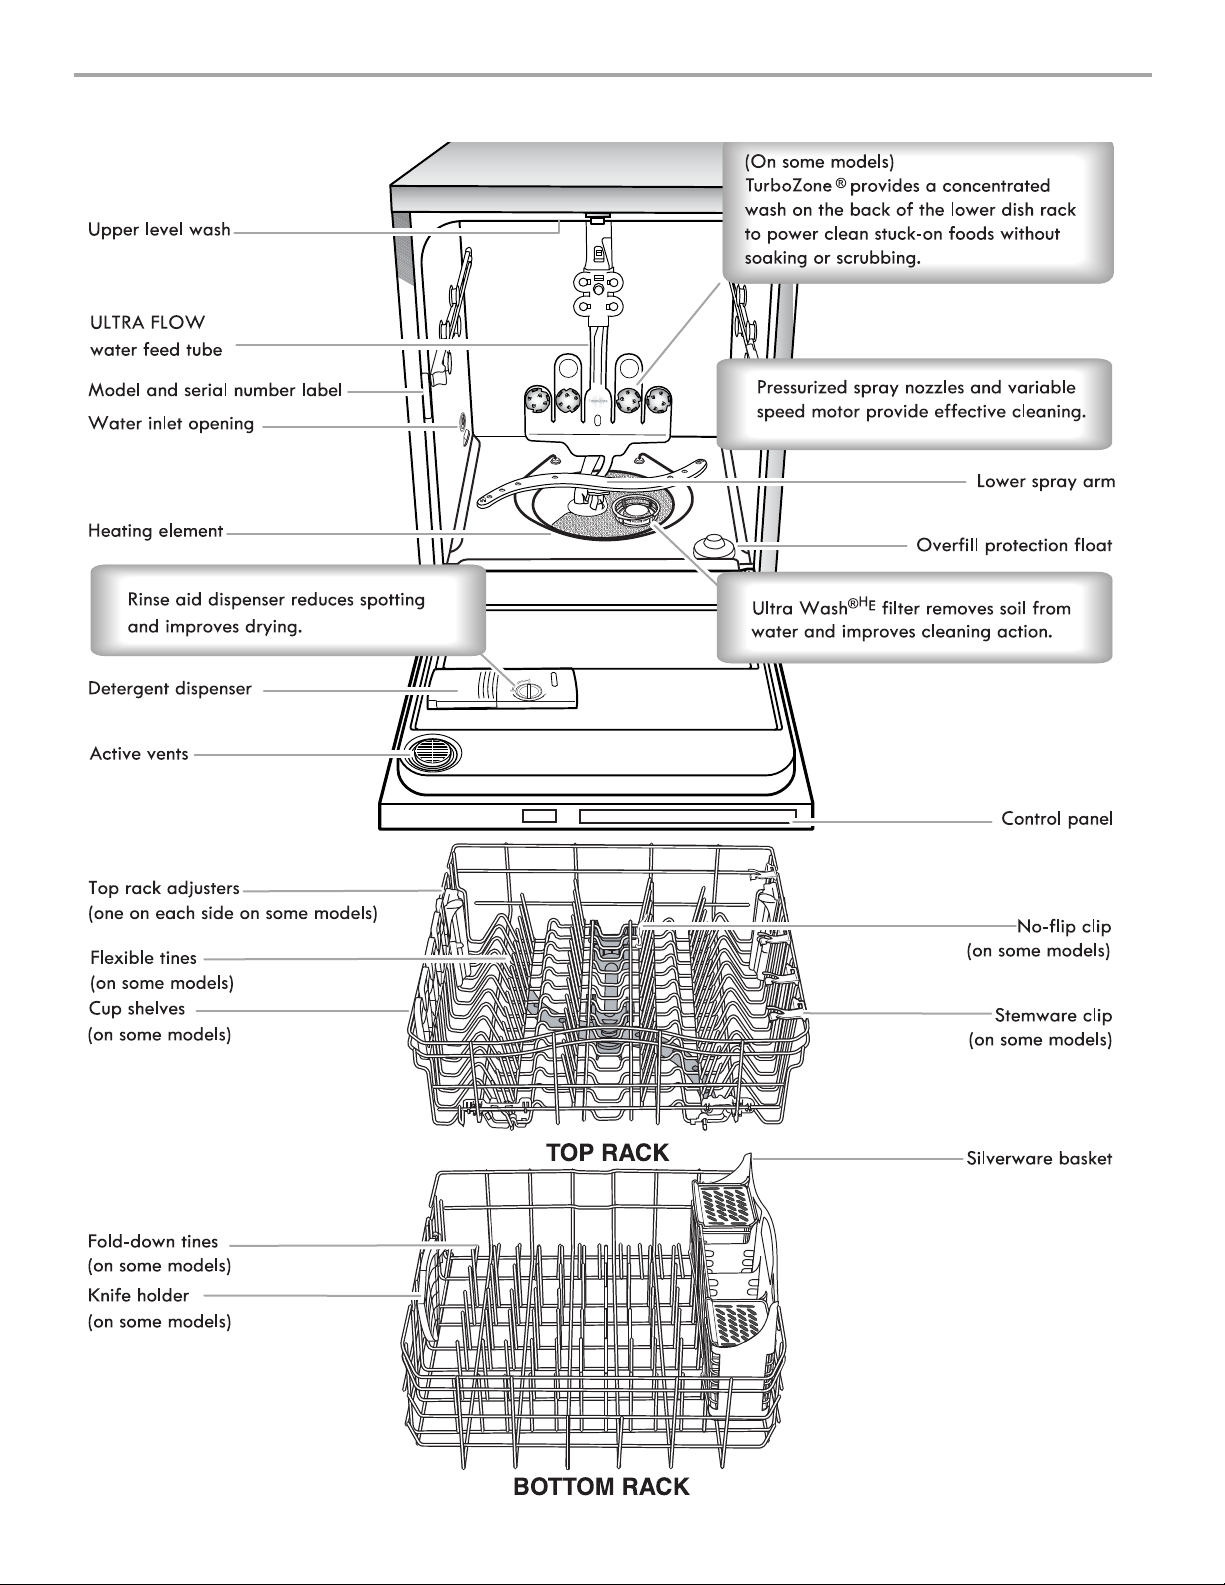
PARTS AND FEATURES
7
Page 8
START-UP / QUICK REFERENCE (VARIES BY MODEL)
H
E
H
E
P
U
S
H
D
O
W
N
&
T
U
R
N
L
O
C
K
U
N
L
O
C
K
Lock
Full
Add
H
E
H
E
H
E
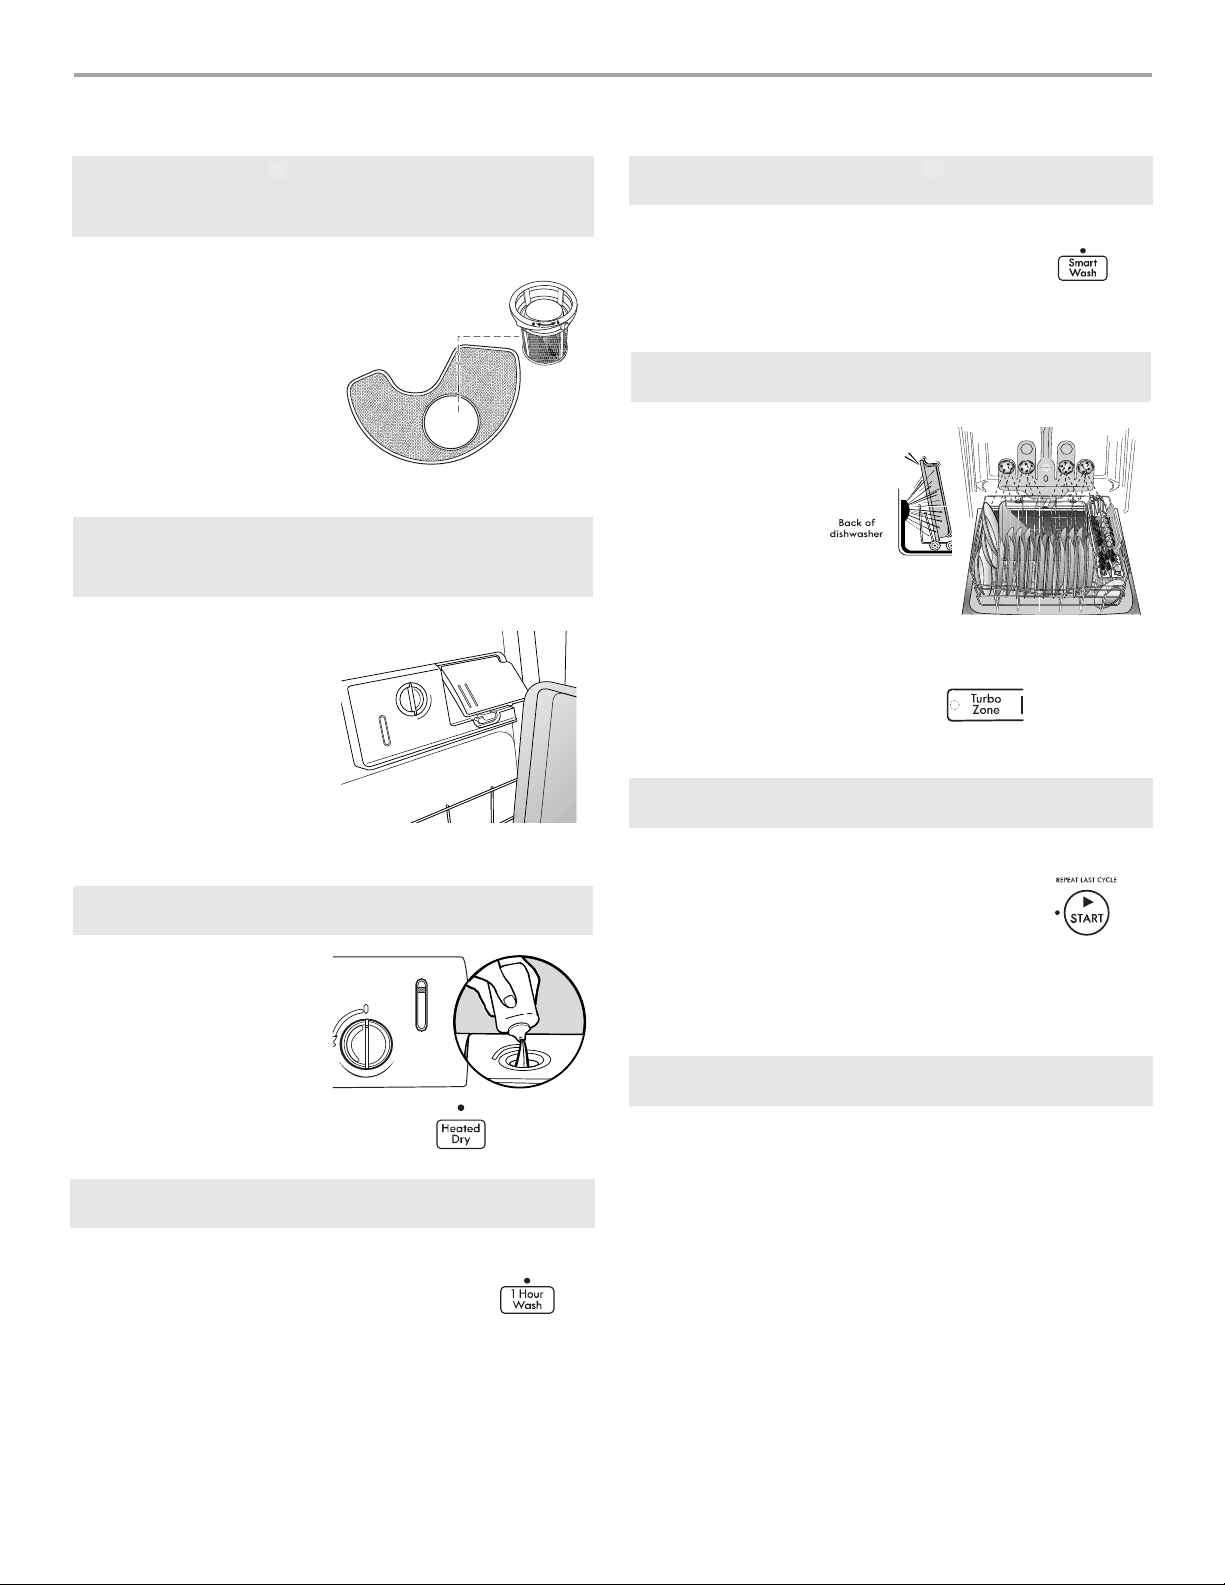
ULTRA WASH® removable filters provide
peak performance.
Cleaning the filters
periodically helps keep the
dishwasher working at peak
performance. The filters can
be found at the bottom
center of your dishwasher.
See “ULTRA WASH
®
FILTRATION SYSTEM” for
information on removing and
maintaining the filters.
IMPORTANT: Do not block detergent
dispenser.
Tall items placed in the lower
rack may block the dispenser
door. Cookie sheets and
cutting boards loaded on the
left-hand side of the
dishwasher can easily block
the dispenser. If detergent is
inside of the dispenser or on
the bottom of the tub after
the cycle is complete, the
dispenser was blocked.
Drying - Rinse Aid is essential.
You must use a drying agent
such as rinse aid for good
drying performance (sample
included). Rinse aid along
with the Heated Dry option
will provide best drying and
avoid excessive moisture in
the dishwasher interior.
1 Hour Wash - When you need fast results.
High Efficiency dishwashers run longer to
save water and energy just like driving a car
slower saves on gas. When you need fast
results, the 1 Hour Wash will clean your
dishes using slightly more water and energy.
For improved drying, select the Heated Dry
option to add additional time to dry.
SmartWash
®
cycle
SmartWash® provides optimal results
using only the amount of water and energy
needed. The SmartWash
®
and Pots &
Pans cycles are recommended for tough
soil.
TurboZone® loading (on some models)
When the
TurboZone
selected, it provides
a concentrated
wash on the back of
the lower dish rack
for hard-to-clean
dishes. Place these
dishes with the
soiled surface of the
dish toward the
TurboZone
nozzles in the lower
rack of the
dishwasher.
®
option is
®
spray
Press START every time you add a dish.
To start and resume a cycle, press START and
close the door within 3 seconds. If the door is
not closed within 3 seconds, the start button
LED will flash and the cycle will not start.
IMPORTANT: If anyone opens the door
(as, to add a dish, even during the Delay
Hours option), the START button must be
pressed each time and the door closed
within 3 seconds to resume the cycle.
Detergent Dosing
It is possible to use too much detergent in your dishwasher.
This can lead to etching of your dishes. See “Detergent and
Rinse Aid” to determine the amount of detergent needed
based on your water hardness. Using dishwasher detergent
tablets and packs have been proven better than powder,
liquid or gel detergents to reduce filming on your dishes.
8
Page 9
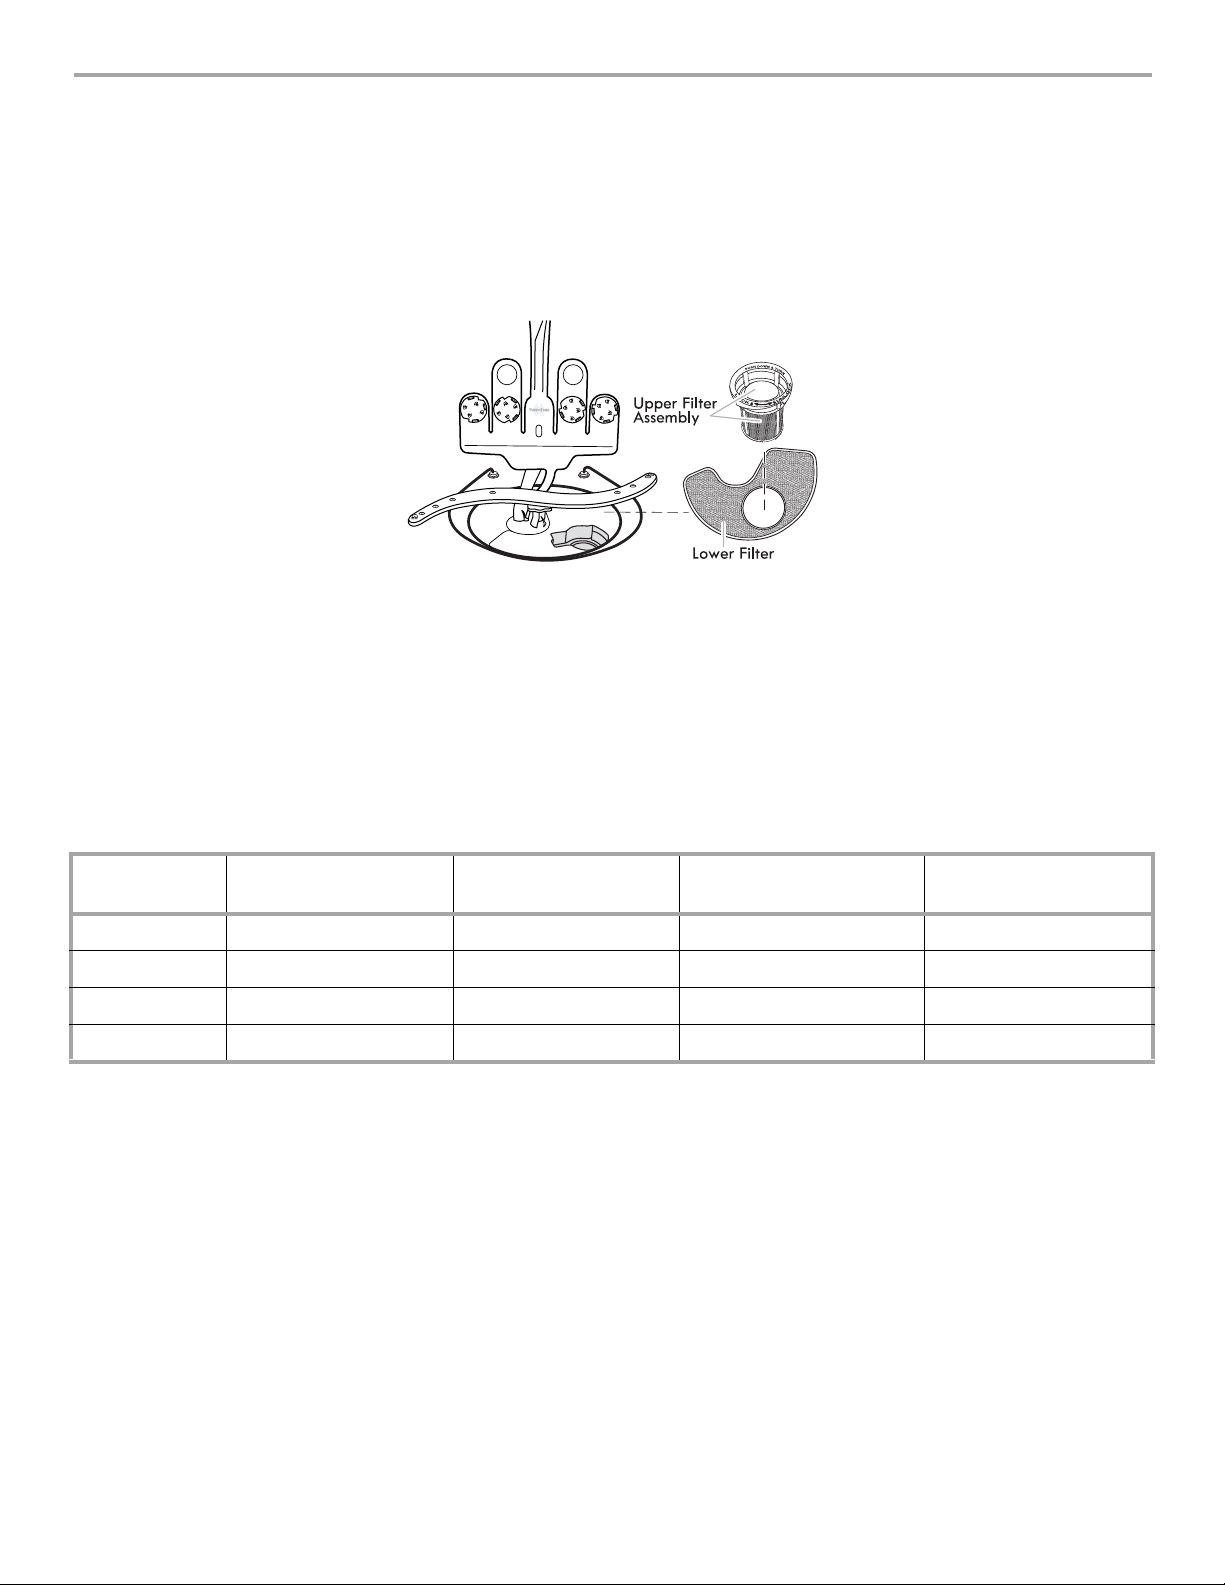
ULTRA WASH
H
E
FILTRATION SYSTEM
Your dishwasher has the latest technology in dishwasher filtration. This triple filtration system minimizes sound and optimizes water
and energy consumption while providing superior cleaning performance. Throughout the life of your dishwasher, the filter will require
maintenance to sustain peak cleaning performance.
The triple filter system consists of 2 parts, an upper filter assembly and a lower filter.
®
■ The upper filter assembly keeps oversized items and foreign objects, along with very fine food particles out of the pump.
■ The lower filter keeps food from being recirculated onto your dishware.
In order to provide optimum cleaning performance we suggest a monthly filter maintenance by removing and inspecting both the
upper and the lower filter for any soils. Based on your dishwashing habits, cleaning of the filters may be required more or less often
than what is indicated in the chart below.
The filters may need to be cleaned when:
■ Visible objects or soils are on the Upper Filter Assembly.
■ There is degradation in cleaning performance (that is, soils still present on dishes).
■ Dishes feel gritty to the touch.
Removing and maintaining the filters is very easy. The chart below shows the recommended cleaning frequency.
Recommended time intervals to clean your filter
Number of
Loads Per Week
13-14 Once per year Twice per year Every two months Once per week
8-12 Once per year Every four months Every two months Every two weeks
4-7 Once per year Once per year Every four months Once per month
1-3 Once per year Once per year Twice per year Every two months
*Manufacturer's recommendation: This practice will eliminate the water and energy that you use preparing your dishes. This will also
save you time and effort.
If you wash
before loading
If you scrape and rinse
before loading
If you only scrape before
loading*
If you do not scrape or
rinse before loading
Very Hard Water
If you have hard water (above 15 grains), clean your filter at least once per month. Building up of white residue on your dishwasher
indicates hard water. You may bring your water samples to Sears to check hardness level. For tips on removing spots and stains, see
“Troubleshooting” section.
9
Page 10

Filter Removal Instructions
P
U
S
H
D
O
W
N
&
T
U
R
N
L
O
C
K
U
N
L
O
C
K
H
E
1. Turn the Upper Filter Assembly ¼ turn counterclockwise and lift out.
2. Grasp the Lower Filter in the circular opening, lift slightly, and pull forward to remove.
3. Clean the filters as shown below.
Cleaning Instructions
IMPORTANT: Do not use wire brush, scouring pad, etc., as they may damage the filters.
Rinse filter under running water until most soils are removed. If you
have hard-to-remove soils or calcium deposits from hard water, a
soft brush may be required.
To remove Upper Filter Assembly
Filter Reinstallation Instructions
1. Noting the previous illustrations, place the Lower Filter under the Locating Tabs in the
bottom of the dishwasher so the round opening for the Upper Filter Assembly lines up with
the round opening in the bottom of the tub.
2. Insert the Upper Filter Assembly into the circular opening in the Lower Filter.
3. Slowly rotate the filter clockwise until it drops into place. Continue to rotate until the filter
is locked into place. If the filter is not fully seated (still turns freely), continue to turn the
filter clockwise until it drops and locks into place.
NOTE: The Upper Filter Assembly arrow does not have to align with the arrow in the
Lower Filter as long as the filter is locked.
To replace Upper Filter Assembly
IMPORTANT: To avoid damage to dishwasher, do not operate your dishwasher without the ULTRA WASH®filters properly installed.
Be sure the Lower Filter is securely in place and the Upper Filter Assembly is locked into place. If the Upper Filter Assembly turns
freely, it is not locked into place.
DISHWASHER EFFICIENCY TIPS
Hot water dissolves and activates the dishwasher detergent. Hot water also dissolves grease on dishes and helps glasses dry spotfree. For best dishwashing results, water should be 120°F (49°C) as it enters the dishwasher. Loads may not wash as well if the water
temperature is too low.
Additional efficiency tips
■ To save water, energy and time, only scrape dishes. Do not rinse dishes before putting them into the dishwasher.
■ Use a delay feature to run your dishwasher during off-peak hours. Local utility providers recommend avoiding heavy usage of
energy at certain times of day.
■ During the summer, run your dishwasher at night. This reduces daytime heat buildup in the kitchen.
■ Use a rinse aid to improve drying.
10
Page 11
DETERGENT AND RINSE AID
USE RINSE AID FOR
BETTER DRYING
Lock
Refill
Full
Add
3
2
-
-
-
max
fill
1
-
-
-
-
-
-
-
-
-
-
-
-
Lock
Refill
Detergent
IMPORTANT: Use only automatic dishwashing detergent. Hand
dishwashing detergent will produce excessive suds and overflow
out of the dishwasher.
Recommended Detergent Amount
Add recommended amount of detergent to each compartment
as shown and close the detergent lid.
Powders and Gels
Water
Hardness
Soft
(0-4 grains
per U.S.
gallon)
Medium
(5-9 grains
per U.S.
gallon)
Hard
(10-14 grains
per U.S.
gallon)
Soil
Level
Pre-Wash
Compartment
Main Wash
Compartment
Light None ¹⁄₂
Normal None ¹⁄₂
Heavy Full ¹⁄₂
Light None ¹⁄₂
Normal ¹⁄₂ ¹⁄₂
Heavy Full* Full*
Light ¹⁄₂ Full*
Normal Full* Full*
Heavy Full* Full*
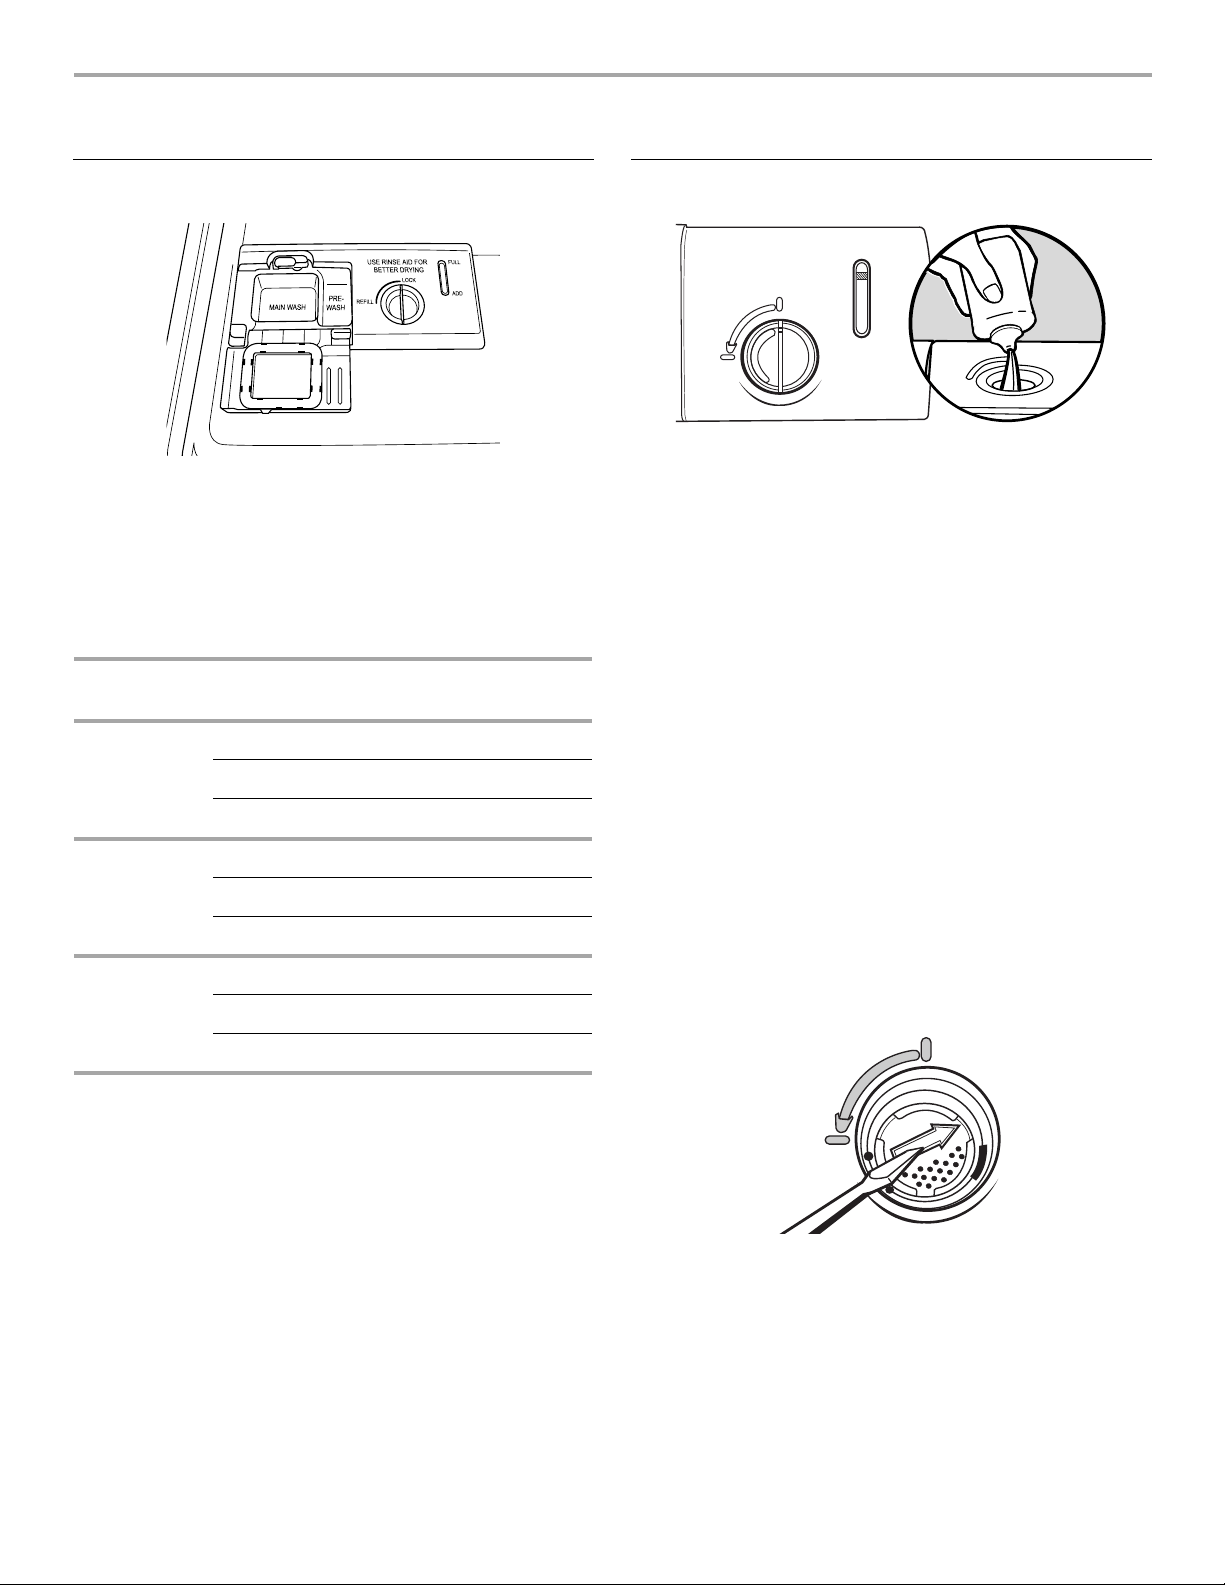
Rinse Aid
IMPORTANT: Your dishwasher is designed to use a liquid rinse
aid. The use of rinse aids greatly improves drying by allowing
water to drain from the dishes after the final rinse. They also
keep water from forming droplets that can dry as spots or
streaks.
Filling the dispenser
The dispenser holds 5 oz (150 mL) of rinse aid. Under most
conditions this will last 1 to 3 months.
1. Turn the knob to the REFILL position and remove.
2. Pour rinse aid into the opening until the indicator points to
FULL. Do not overfill.
3. Clean up any spilled rinse aid. Spilled rinse aid can create
excessive suds.
4. Replace the knob and turn to the LOCK position.
NOTE: Indicator reads correct fill level when door is completely
opened.
Rinse Aid Setting
Your rinse aid dispenser is adjustable. For most water conditions,
the factory setting of 2 will give good results. If you have hard
water and notice calcium buildup on your dishware, you may
want to try a higher setting. If you notice foam in your
dishwasher, use a lower setting.
*Full pre-wash compartment contains 7 tsp (35 mL), and full
main wash cup contains 9 tsp (45 mL).
Premeasured Detergents
Many detergents now come in premeasured forms (gel packs,
tablets, or powder packs). These forms are suitable for all
hardness and soil levels. Always place premeasured detergents
in the main compartment and close the lid.
Using dishwasher detergent tablets and packs have been
proven better than powder, liquid or gel detergents to reduce
filming on your dishes. By using these tablets and packs, over
time this will start to reduce or eliminate white film. Also, by
using a rinse aid you can minimize repeat buildup of white film.
IMPORTANT: Extremely hard water mineral deposits (15 grains
per U.S. gallon or more) can cause damage to your dishwasher
and make it difficult to achieve good results. A water softener is
recommended to avoid damage and achieve good results. You
may bring your water samples to Sears to check hardness level.
To adjust the setting
1. Turn the knob to the REFILL position and remove.
2. Turn the arrow inside the dispenser to the desired setting.
3. Replace the knob and turn to the LOCK position.
11
Page 12
LOADING
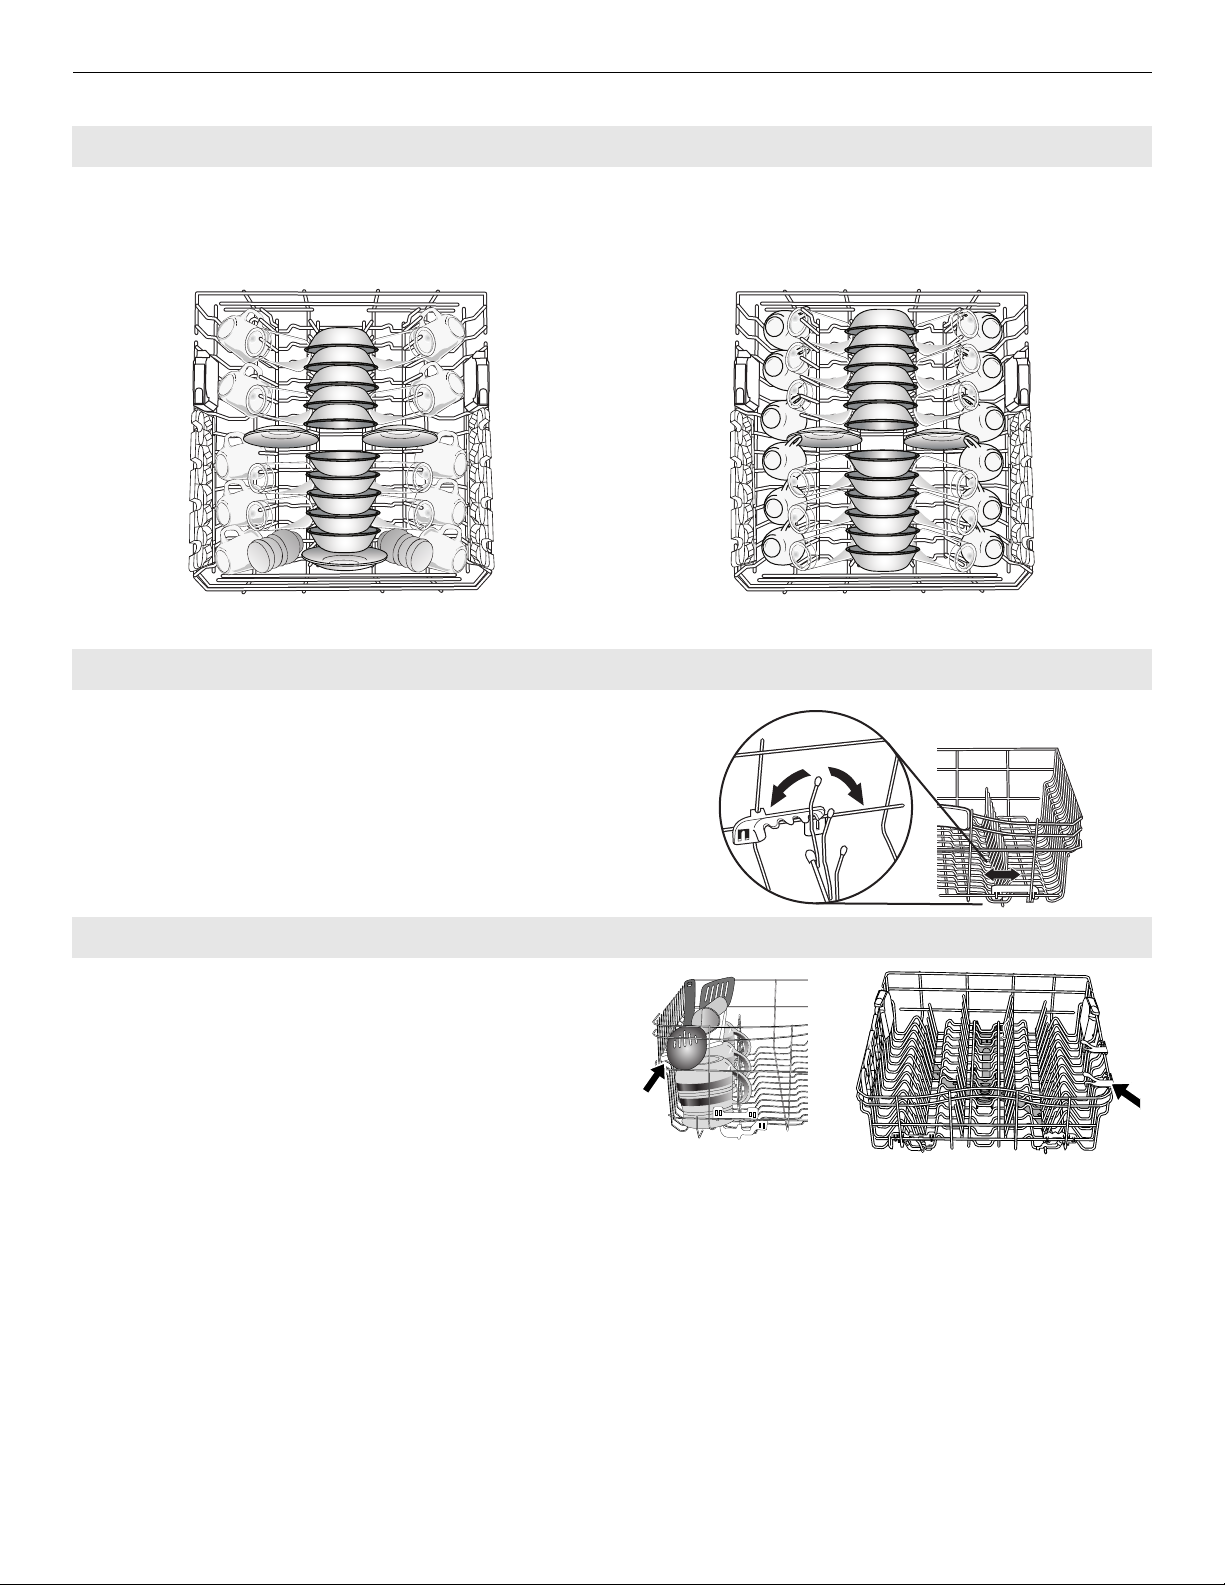
Loading for Best Cleaning and Drying Performance
1. Angle dirtiest dish surfaces downward and allow
space for water to flow up through each rack and
between dishware.
Separating allows water flow.
2. For best silverware cleaning use the slots in the covers
to keep items separated.
4. Angle concave surfaces such as the bottom of coffee
cups to allow water to drain and improve drying
performance.
Angled surfaces
5. Check that all spray arms spin freely before every
cycle.
Separated
3. Use TurboZone® (on some models) option with your
dirtiest items facing toward the lower back.
Soil facing TurboZone® spray jets
12
Spray arms spin freely.
6. Place cups and glasses in the rows between tines.
Page 13
Top Rack Loading
Loading Recommendations
Place cups and glasses in the rows between tines. Placing them over the tines can lead to breakage and water spots. To avoid
damage to your delicate items, be sure china, crystal, stemware and other similar items do not touch during dishwasher operation.
Load lightweight and dishwasher-safe plastic items only in the top rack.
10 place load 12 place load
Flexible Tines (on some models)
The row of tines on the left-hand and right-hand sides of the
top rack can be adjusted to make room for a variety of dishes.
Cup Shelves and Stem Ware Clips (on some models)
Fold down the extra shelf on either side of the top rack to hold
additional cups, stemware or long items such as utensils and
spatulas.
13
Page 14
Deluxe Adjustable 2-position Rack
Track stop closed
Track stop open
You can raise or lower the top rack to fit tall items in either the
top or bottom rack. Adjusters are located on each side of the
top rack. Raise the top rack to accommodate items up to 9"
(22 cm) in the top rack and 13" (33 cm) in the bottom rack, or
lower the top rack to accommodate items up to 11" (28 cm) in
both the top and bottom racks.
1. To raise, lift rack until both sides are at the same height and
lock.
2. To lower, depress both tabs on rack adjusters, as shown,
and lower.
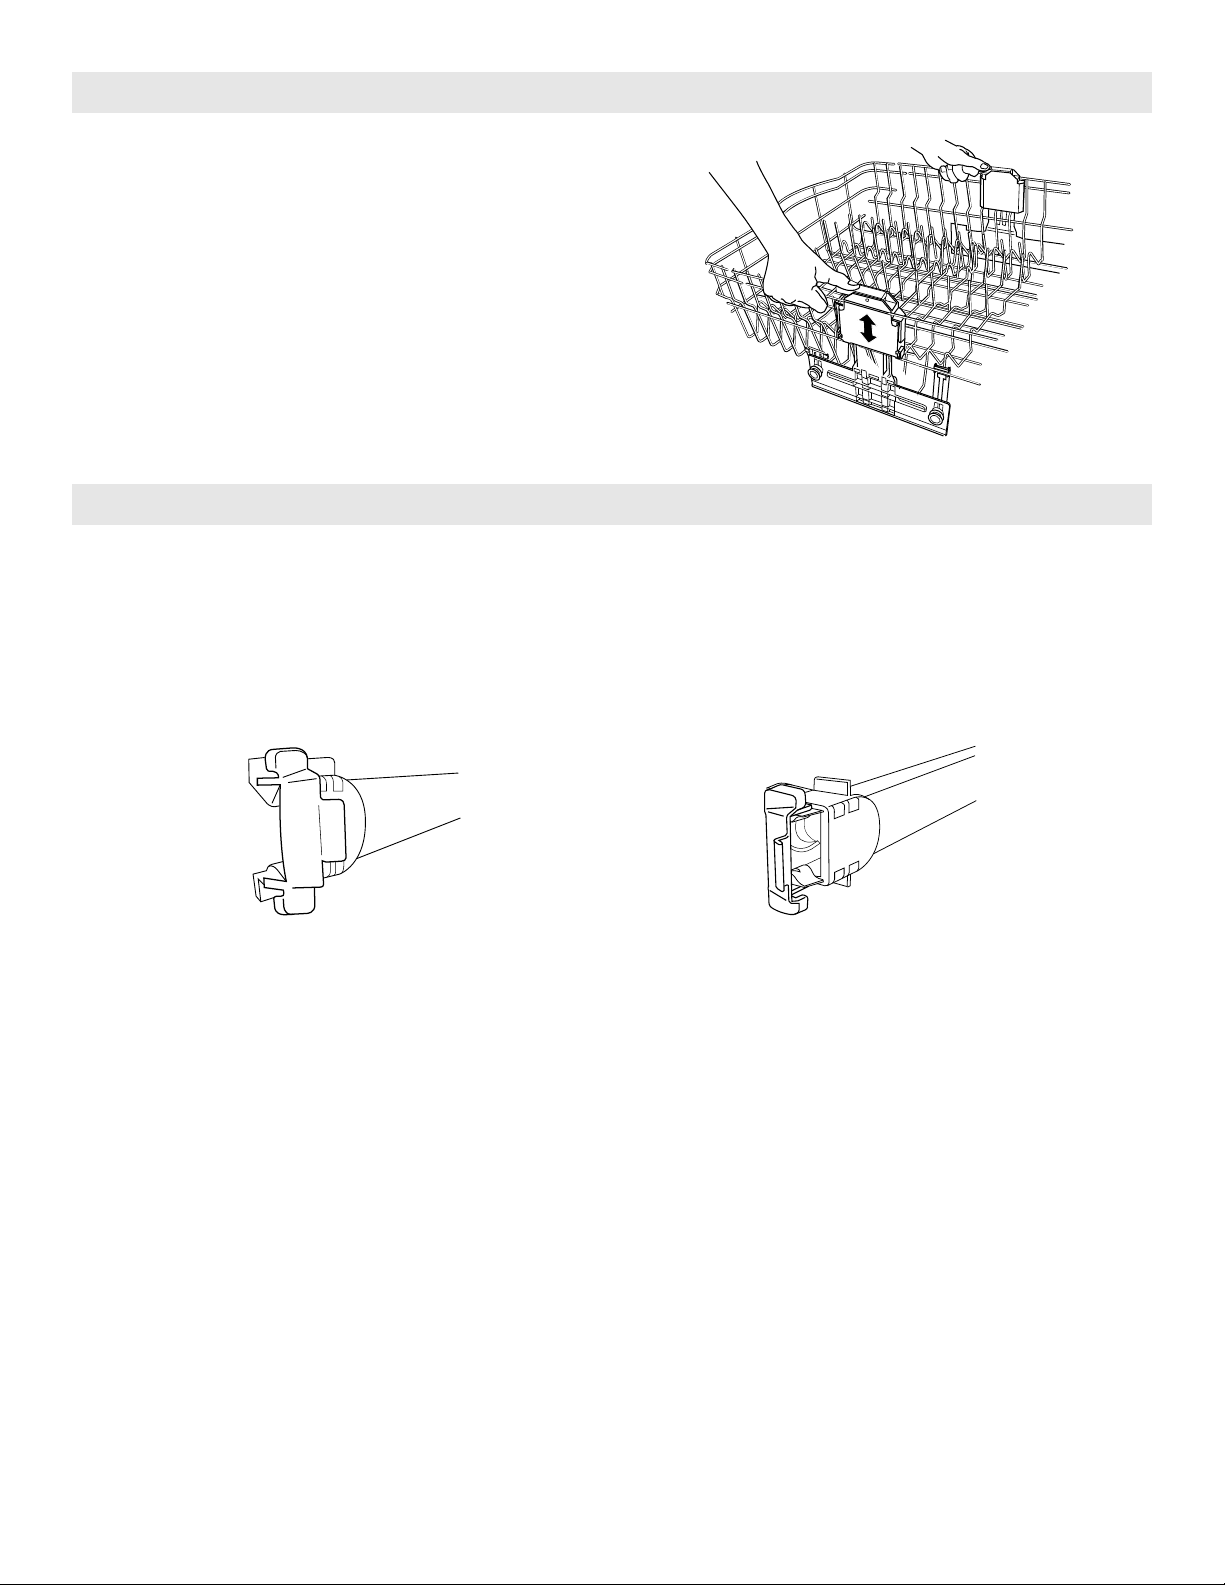
Removable Top Rack
The removable rack allows you to wash larger items such as pots, roasters, and cookie sheets in the bottom rack.
IMPORTANT: Remove dishes prior to removing the top rack from dishwasher.
To re move the rack
1. To gain access to the track stops, pull the upper rack forward about halfway out of the tub.
2. To open, flip the track stop toward the outside of the tub.
3. After opening both track stops, pull top rack out of the rails.
4. Close track stops and slide the tracks back into the dishwasher.
To replace the rack
1. Gently pull tracks forward in dishwasher until they stop. Open track stops.
2. Place the back wheels on each side of the rack into the track slot and roll them back into the tracks, but do not push the rack
all the way into the tub.
3. Insert front rack wheels on each side of the rack into the track slots.
4. Slide the rack into the dishwasher. The stops will automatically close when rack enters dishwasher.
14
Page 15

Bottom Rack Loading
Loading Recommendations
The bottom rack is best suited for plates, pans, casseroles, and utensils. (See recommended loading patterns shown.)
Load small items in the bottom rack only if they are secured in place.
Load plates, soup bowls, etc., between tines.
Load bowls securely between the rows of tines. Ensure that there is space between dishes so that the spray will reach all surfaces.
Load heavily soiled items facing the spray.
NOTE: Ensure that detergent dispenser is not blocked by tall items such as cookie sheets and cutting boards placed at the left-
hand front of rack. See “Start Up/Quick Reference” section.
10 place load 12 place load
Fold-Down Tines (on some models)
You can fold down one row of tines at the back of the bottom
rack in order to accommodate larger dishware.
Keep this tine row in the 60° position when using the
TurboZone
IMPORTANT: When moving tine row to the flat position, fold
only the tine row toward the front of the dishwasher.
®
(on some models) option.
15
Page 16
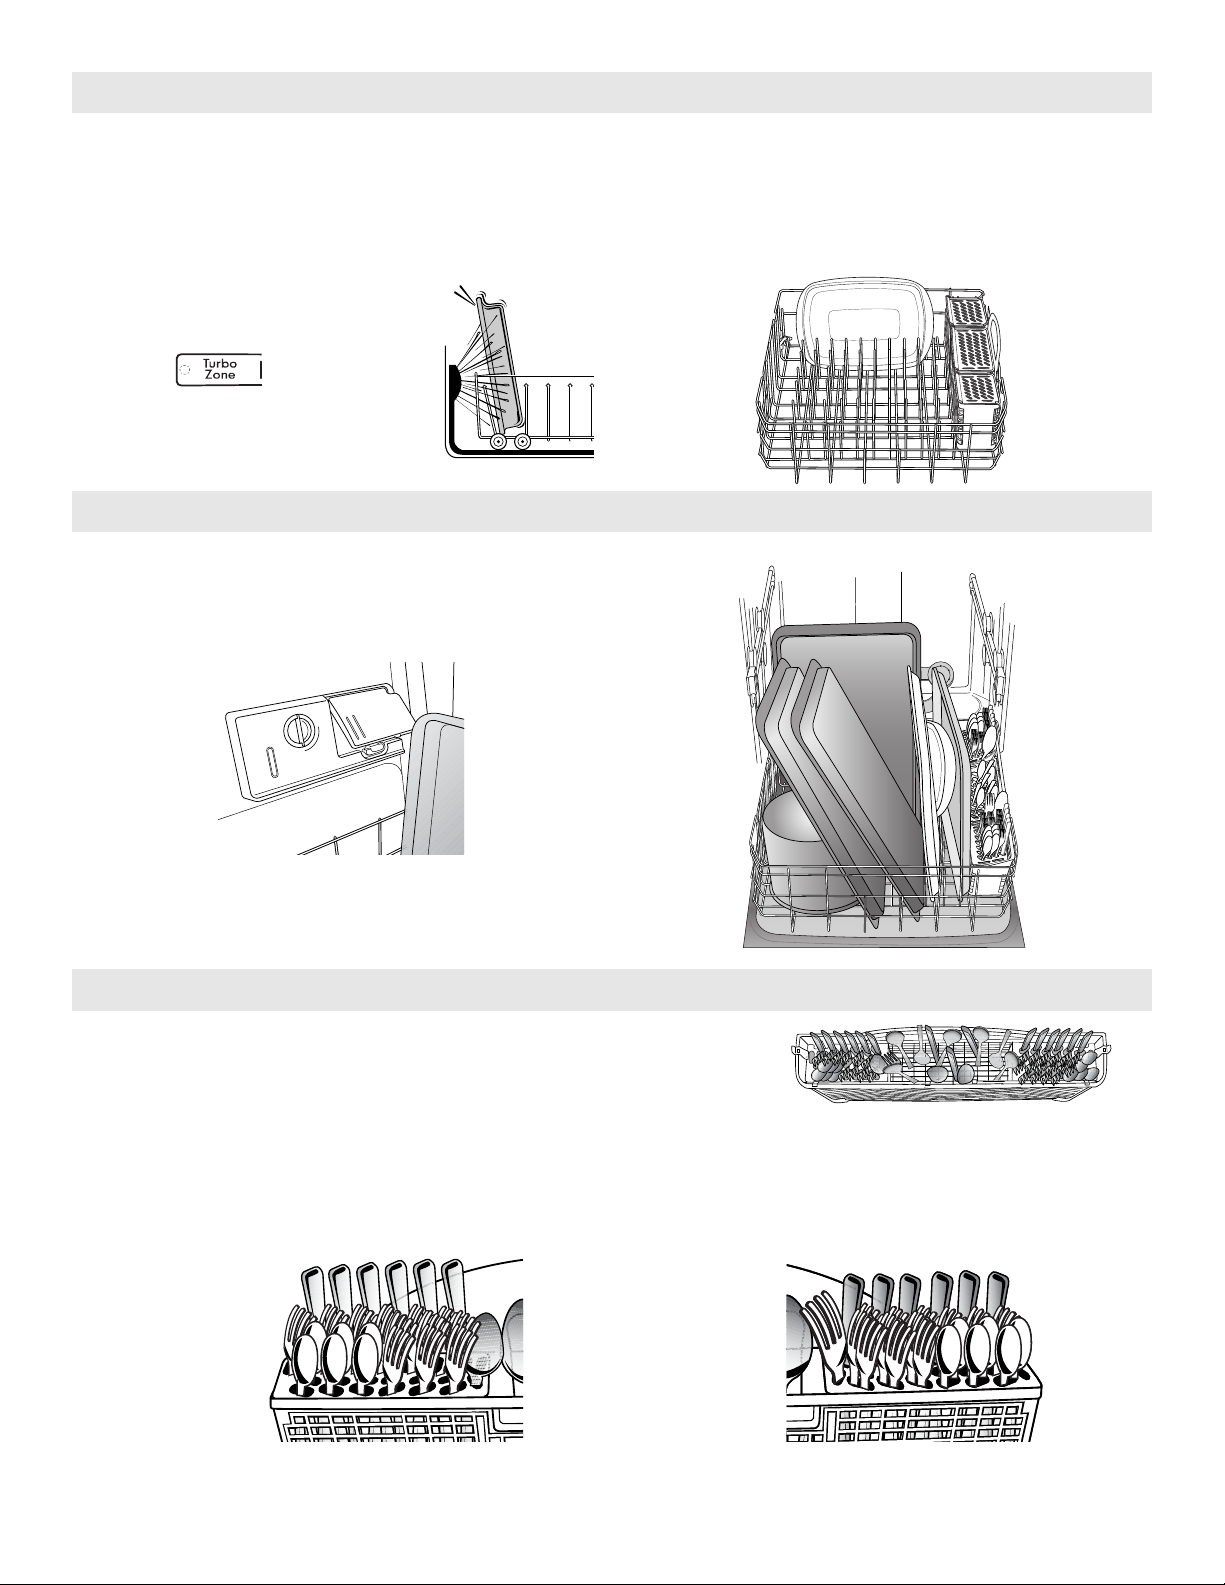
Turbo Zone® Loading (on some models)
Back of
dishwasher
IMPORTANT: For proper performance, only one row of items may face the TurboZone® spray jets.
®
You must select the TurboZone
Load pans, casserole dishes, etc., with the soiled surfaces facing the TurboZone
wash option to utilize this wash feature.
®
spray jets. TurboZone® wash area is located at the
back of the lower dish rack.
Below are the recommended loading when using the TurboZone® option.
Loading Tall Items
You can wash larger items such as pots, roasters, and cookie
sheets in the bottom rack by removing the top rack. See “Top
Rack Loading” section.
IMPORTANT: Do not block detergent dispenser.
16
Loading Silverware
Use suggested loading patterns, as shown, to better clean your silverware.
Use the slots in the covers to keep your silverware separated for optimum
wash. (See illustration, right.)
NOTE: If your silverware does not fit into the designated slots, flip the covers up and mix silverware types to keep them separated.
Load knives down, forks up, and alternate spoons as illustrated, for best cleaning results. Load taller silverware items to the back
and shorter to the front of basket.
Left-side silverware basket Right-side silverware basket
Page 17
DISHWASHER USE
H
E
Cycles and Options Information (on some models)
Cycles Soil Level
SmartWash®cycle
The most advanced and versatile cycle. This cycle senses the
load size, soil amount, and toughness of soil. This cycle is
optimized to achieve outstanding cleaning with minimal water
and energy.
Pots & Pans
Works best on your toughest items such as casseroles with
baked-on food residue. Use with TurboZone
option to get the best cleaning of baked-on soils.
Normal Wash
This cycle is recommended to completely wash a full load of
normally soiled dishes. Selecting this cycle will default to the
options recommended for normal amounts of food soil. The
energy label is based on this cycle.
®
(on some models)
Time* (mins.)
w/o Options
Typi cal** Max
Light 110 155
Medium 120 170
Tough/B ak ed -O n 160 215
Heavy 155 210
Tough/Baked-On 155 210
Light 110 155
Medium 110 155
Water
Usage
Gallons
(Liters)
3.8
(14.3)
4.0
(15.0)
5.1
(19.4)
7. 4
(28.0)
7. 4
(28.0)
2.7
(10.3)
3.9
(14.9)
Heavy 155 210
China Gentle (on some models)
Provides a light wash and gentle dry for delicate items such
as china and crystal.
Light to Medium 105 145
Heavy 120 185
1 Hour Wash
For fast results, the 1 Hour Wash will clean your dishes using
slightly more water and energy. For improved drying, select the
Heated Dry option.
Quick Rinse
Use for rinsing dishes, glasses, and silverware that will not be
washed right away. Do not use detergent.
*Adding options will add time to the cycle. See options information section.
**This is the approximate cycle time obtained with 120°F (49°C) hot water available at the dishwasher. Increase in time results from
low temperature of the incoming water.
All soil levels 60 62
All soil levels 17 18
7. 4
(28.0)
4.2
(15.2)
6.8
(25.8)
5.0
(19.0)
2.0
(7.6)
17
Page 18

Options
H
E
H
E
H
E
TurboZone® option
(on some models)
Blasts into every corner to eliminate the
need for soaking and scrubbing of dirty,
baked-on dishes. For your toughest
items, use the TurboZone
®
option with the
Pots & Pans cycle. See loading
information.
Can be selected
with
SmartWash
®
Pots & Pans
Normal Wash
What it does
Directs all of the
cleaning power of the
dishwasher to the
®
TurboZone
area
during certain times in
the wash cycle.
Added time to cycle
Typic al Max
42 55
Added
Water†
Gallons
(Liters)
0 - 3.7
(0 - 14.0)
High Temp
Raises main wash temperature to
improve cleaning for loads containing
tough, baked-on food.
SmartWash
Pots & Pans
Normal Wash
®
Raises the main wash
temperature from
105°F (41°C) to 130°F or
135°F (54°C or 57°C).
Sani Rinse
This high temperature option sanitizes
your dishes and glassware in
accordance with National Sanitation
Foundation (NSF)/ANSI Standard 184
for Residential Dishwashers. Certified
residential dishwashers are not intended
for licensed food establishments. The
Sani indicator indicates at the end of the
cycle whether the Sani Rinse option was
SmartWash
Pots & Pans
Normal Wash
Increases the main wash
®
temperature from 105°F
(41°C) to 130°F (54°C)
and the final rinse from
140°F (60°C) to 156°F
(69°C).
successfully completed. If the indicator
does not activate, it is probably due to
the cycle being interrupted.
Heated Dry
Turns the heat element on after the wash
cycle is completed. Use rinse aid with or
without the Heated Dry option for best
drying results. Plastic items are less likely
to deform when loaded in the top dish
Available with
any cycle
except
Quick Rinse
Turns the heat element
on at the end of the
wash cycle.
rack.
†
The maximum additional water used for any combination of options is 3.7 gal. (14.0 L).
35 45
60 90
0 - 3.7
(0 - 14.0)
0 - 2.6
(0 - 10.0)
52 52 0
18
Page 19
Dishwasher Control Section
Delay Hours (on some models)
Use this option to run your dishwasher during off-peak hours. Local utility providers recommend using energy during off-peak hours
when possible.
To delay t he st art
1. Select a wash cycle and options.
2. Press the delay button.
3. Press START.
NOTE: Anytime the door is opened (such as, to add a dish), the START button must be pressed again to resume the delay
countdown.
Control Lock Option
Use the Control Lock option to avoid unintended use of the dishwasher between cycles. When LOCK ON is lit, all buttons are
disabled. The dishwasher door can still be opened/closed while the controls are locked.
To turn on the Lock
Press and hold CONTROL LOCK for 3 seconds. LOCK ON will light up. If you press any pad while your dishwasher is locked, the
light flashes 3 times and an audible tone will sound.
NOTE: The dishwasher cannot start if the control is locked.
To turn off the Lock
Press and hold CONTROL LOCK for 3 seconds. The light turns off.
Dishwasher Feedback Section
Status Indicator Lights
The status lights on top of control will inform you if the dishwasher is sanitized and/or
complete. The lights on the control panel will turn blue while washing or rinsing, red while
drying, and green when complete.
Selecting Cycles and Options
1. Select the desired cycle. If you want to run the last cycle that was completed, you can simply press START once to show which
options you used, then press START again to start the cycle.
2. Select the desired options. Not all options are available for every cycle. If an invalid option is selected for a given cycle, the
lights will flash.
Turning O FF/ON the S ound
Press and hold High Temp for 3 seconds to toggle sound ON and OFF. The sound will not be deactivated for cycle interruption or
service required messages.
Canceling A Cycle
1. Open the door slightly to stop the cycle. Wait for the spraying action to stop before completely opening the door.
2. Press CANCEL/DRAIN button once. The Cancel/Drain light will light up.
3. Close the door within 3 seconds. The dishwasher starts a drain cycle (if water remains in bottom of dishwasher). Let the
dishwasher drain completely. The Cancel/Drain light turns off after 2 minutes.
Changing A Cycle After Dishwasher Is Started
You can interrupt a cycle and restart your dishwasher from the beginning using the following procedure.
1. Open the door slightly to stop the cycle. Wait for the spraying action to stop, then open the door completely.
2. Check that detergent dispenser cover is still closed. If cover is open, you will need to refill the detergent dispenser before
restarting your new cycle.
3. Press CANCEL/DRAIN twice to reset the control.
4. Select new cycles and options.
5. Press START/RESUME.
19
Page 20
WASHING SPECIAL ITEMS
If you have doubts about washing a particular item, check with the manufacturer to see if it is dishwasher safe.
Material Dishwasher Safe? Comments
Aluminum Yes High water temperature and detergents can affect finish of anodized
aluminum.
Disposable Aluminum No Do not wash disposable aluminum pans in the dishwasher. These might
shift during washing and transfer black marks to dishes and other items.
Bottles and Cans No Wash bottles and cans by hand. Labels attached with glue can loosen
and clog the wash system and reduce washing performance.
Cast Iron No Seasoning will be removed and then will rust.
China/Stoneware Yes Always check manufacturer’s recommendations before washing.
Antique, hand-painted, or over-the-glaze patterns may fade. Gold leaf
can discolor or fade.
Crystal Yes Always check manufacturer’s recommendations before washing. Some
types of leaded crystal can etch with repeated washing.
Gold No Gold-colored flatware will discolor.
Glass Yes Milk glass material yellows with repeated dishwasher washing.
Hollow-Handle Knives No Handles of some knives are attached to the blade with adhesives which
can loosen if washed in the dishwasher.
Pewter, Brass, Bronze, and
Copper
Disposable Plastics No Cannot withstand high water temperatures and detergents.
Plastics Yes Always check manufacturer’s recommendations before washing. Plastic
Stainless Steel Yes Run a rinse cycle if not washing immediately. Prolonged contact with
Sterling Silver or Silver Plate Yes Run a rinse cycle if not washing immediately. Prolonged contact with
Tin No Not recommended.
Wooden Ware No Wash by hand. Always check manufacturer’s instructions before
No High water temperatures and detergent can discolor or pit the finish.
items may vary in their ability to withstand high temperatures and
detergents. It is recommended that lightweight items such as lids and
butter dishes be placed in the upper rack only. Sturdy items such as
coolers and high-chair trays may be placed in the lower rack. When
washing plastic items in the lower rack, it is recommended not to use the
Heated Dry option.
food containing salt, vinegar, milk products, or fruit juice can damage
finish.
food containing salt, acid, or sulfide (eggs, mayonnaise, and seafood)
can damage finish.
washing. Untreated wood can warp, crack, or lose its finish.
Large Casserole Section Yes There may be certain casserole dishes that may not fit in front of the
Turb oZone
Adjust the tines as necessary to load the large dishes.
®
(on some models) feature in the back of the lower dish rack.
20
Page 21
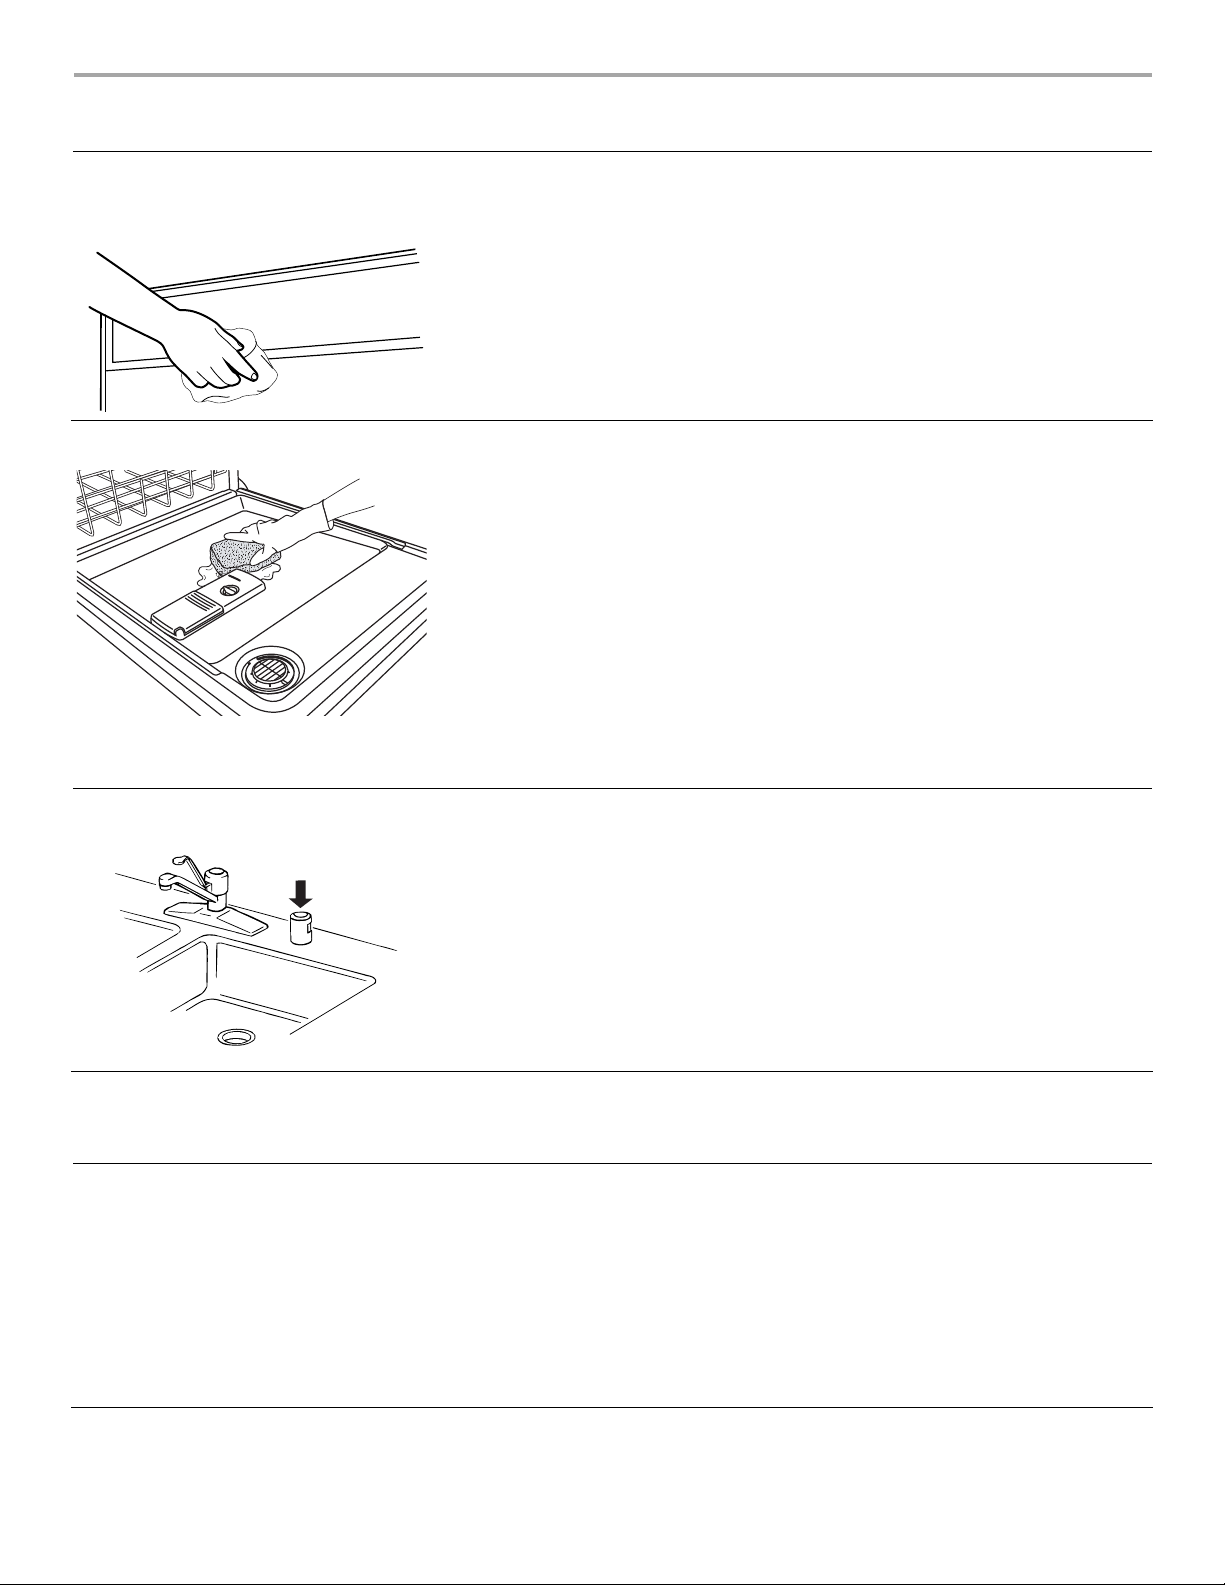
Cleaning the exterior
DISHWASHER CARE
Cleaning
In most cases, regular use of a soft, damp cloth or sponge and a mild detergent is all
that is necessary to keep the outside of your dishwasher looking nice and clean. If
your dishwasher has a stainless steel exterior, a stainless steel cleaner is
recommended.
Cleaning the interior
To clean the drain air gap
Hard water minerals can cause a white film to build up on the inside surfaces,
especially just beneath the door area.
Do not clean the dishwasher interior until it has cooled. You may want to wear rubber
gloves. Do not use any type of cleanser other than dishwasher detergent because it
may cause foaming or sudsing.
To clean interior
Make a paste with powdered dishwasher detergent on a damp sponge and clean.
OR
Use liquid automatic dishwasher detergent and clean with a damp sponge.
OR
See the vinegar rinse procedure in “Spotting and filming on dishes” in
“Troubleshooting” section.
NOTE: Run a normal cycle with dishwasher detergent after cleaning the interior.
Drain Air Gap
Some state or local plumbing codes require the addition of a drain air gap between a
built-in dishwasher and the home drain system. Check the drain air gap when your
dishwasher is not draining well.
The drain air gap is usually located on top of the sink or countertop near the
dishwasher. To order a drain air gap, please call 1-800-4-MY-HOME
Number 300096.
NOTE: The drain air gap is an external plumbing device that is not part of your
dishwasher. The warranty provided with your dishwasher does not cover service costs
directly associated with the cleaning or repair of the external drain air gap.
Clean the drain air gap periodically to ensure proper drainage of your dishwasher.
With most types, you lift off the chrome cover. Unscrew the plastic cap. Then check
for any soil buildup. Clean if necessary.
®
. Ask for Part
Vacation or Extended Time Without Use
To reduce the risk of property damage
■ If you will not be using the dishwasher during the summer months, turn off the
water and power supply to the dishwasher.
■ Make sure the water supply lines are protected against freezing conditions. Ice
formations in the supply lines can increase water pressure and damage your
dishwasher or home. Damage from freezing is not covered by the warranty.
■ When storing your dishwasher in the winter, avoid water damage by having your
dishwasher winterized by authorized service personnel.
21
Page 22

TROUBLESHOOTING
CHECK THESE POINTS TO HELP SAVE YOU TIME AND MONEY.
PROBLEM SOLUTION
DISHWASHER DOES
NOT RUN
NOTE: It is normal for the dishwasher to repeatedly pause several times during a cycle.
If the Start/Resume light is blinking, close the door and push START/RESUME.
Be sure the door is closed and latched.
Check that there is not an interference with large casserole dishes and the wash system at the
back of the dishwasher. Adjust loading as necessary to ensure door is closed and latched.
Be sure you have disabled Sleep Mode by pressing either START/RESUME or CANCEL/DRAIN,
or opening the door before selecting your cycle/option.
Be sure you have selected a cycle. (See “Cycles and Options Information.”)
Be sure there is power to the dishwasher. A circuit breaker or fuse may have tripped.
If lights other than Start/Resume blink and the unit will not run, you will need to call for service.
DETERGENT REMAINS IN THE
DISPENSER OR
TABLET IS ON BOTTOM
OF TUB
Check for dishware such as cookie sheets, cutting boards, or large containers, etc., that may be
blocking the detergent dispenser from opening properly.
Be sure your detergent is fresh and lump free.
Be sure the cycle has completed (blue light is on). If it has not completed, you will need to resume
the cycle by closing the door and pressing START/RESUME.
CYCLE RUNS TOO LONG NOTES:
■ To use less water and reduce energy consumption you will encounter cycles that typically run
for up to 3 hours.
■ A water heater setting of 120°F (49ºC) is best. The dishwasher will delay longer while heating
cooler water.
■ Some options will add time to the cycle. (See “Cycles and Options Information” section.) The
Heated Dry option adds ½ hour.
Try the 1 Hour Wash cycle.
Run the hot water at a faucet close to the dishwasher before selecting and starting the cycle.
DISHWASHER NOT DRYING NOTE: Plastic and items with nonstick surfaces are difficult to dry because they have a porous
surface which tends to collect water droplets. Towel drying may be necessary.
Use of rinse aid along with the Heated Dry option is needed for proper drying.
Proper loading of items can affect drying. (See specific loading instructions within this guide.)
Glasses and cups with concave bottoms hold water. This water may spill onto other items when
unloading.
■ Unload the bottom rack first.
■ Locate these items on the more slanted side of the rack for improved results.
WILL NOT FILL Be sure the water is turned on to the dishwasher.
Check that the float is free from obstructions. (See “Parts and Features.”)
Check for suds in the dishwasher. If foam or suds are detected, the dishwasher may not operate
properly or may not fill with water.
WATER REMAINS IN THE TUB/
WILL NOT DRAIN
Be sure the cycle has completed (the blue light is on). If it has not, you will need to resume the
cycle by closing the door and pressing START/RESUME.
If dishwasher is connected to a food waste disposer, be sure the knockout plug has been
removed from the disposer inlet.
Check for kinks in the drain hose.
Check for food obstructions in the drain or disposer.
Check your house fuse or circuit breaker.
22
Page 23

PROBLEM SOLUTION
H
E
H
E
HARD WATER
(WHITE RESIDUE ON
DISHWASHER INTERIOR OR
GLASSWARE)
NOTE: Extremely hard water mineral deposits can cause damage to your dishwasher and make
it difficult to achieve good cleaning. You may bring water samples to Sears to check your water
hardness level. A water softener is strongly recommended if your hardness is 15 grains or more. If
a water softener is not installed, the following steps may help:
Use a commercial cleaner designed for dishwashers once per month.
Clean the ULTRA WASH
®
filters at least once per month.
Always use a rinse aid.
Always use a high-quality, fresh detergent.
Use a detergent booster/water softener additive designed for dishwashers.
ODORS NOTE: If the dishwasher is not used daily, you can run a rinse cycle with the partial load until a
full load is ready to run, or use the Top Rack Only option (on some models) for partial loads.
Run a vinegar rinse through the dishwasher by putting 2 cups (500 mL) of white vinegar in an
upright glass measuring cup in the lower rack. Run a normal cycle with the Heated Dry option
turned off. Do not use detergent.
The dishwasher may not be draining properly, see “WATER REMAINS IN THE TUB/WILL NOT
DRAIN” in “Troubleshooting.”
NOISY NOTES:
■ Surging sounds can occur periodically throughout the cycle while the dishwasher is draining.
■ Normal water valve hissing may be heard periodically.
■ A normal snap sound may be heard when the detergent dispenser opens during the cycle
and when the door is opened at the end of the cycle.
■ Improper installation will affect noise levels.
Be sure the filters are properly installed.
A thumping sound may be heard if items extend beyond the racks and interfere with the wash
arms. Readjust the dishware and resume the cycle.
FOOD SOILS REMAIN
ON DISHES
Be sure the dishwasher is loaded correctly. Improper loading can greatly decrease the washing
performance (see “Loading for Best Performance”).
Check filter to ensure it is properly installed. Clean it if needed. (See “Cleaning Instructions” in
“ULTRA WASH
®
Filtration System” for details.)
Select the proper cycle and option for the type of soils. The Pots Pans cycle with the TurboZone
(on some models) option can be used for tougher loads.
Be sure the incoming water temperature is at least 120°F (49ºC).
Use the proper amount of fresh detergent. More detergent is needed for heavier-soiled loads
and hard water conditions.
Scrape food from dishes prior to loading (do not prerinse).
DID NOT SANITIZE If the sanitized light is blinking, the load is
NOT
sanitized. The cycle was interrupted in the final
rinse, or your water heater is set too low. Set your water heater to 120ºF (49ºC).
DAMAGE TO DISHWARE Improper loading can cause dishes to become chipped or damaged. (See specific loading
instructions within this guide.)
BLINKING LIGHTS If Start/Resume or any status lights are blinking and the dishwasher will not run, close the door
and push START/RESUME. If the dishwasher still will not run, call service.
®
23
Page 24

PROBLEM SOLUTION
CLOUDY OR SPOTTED
DISHWARE (AND HARD
NOTES:
■ Liquid rinse aid is necessary for drying and to reduce spotting.
WATER SOLUTION)
■ Use the correct amount of detergent.
Confirm that the cloudiness is removable by soaking the item in white vinegar for 5 minutes. If
the cloudiness disappears, it is due to hard water. Adjust the amount of detergent and rinse aid.
See “HARD WATER (WHITE RESIDUE ON DISHWASHER INTERIOR OR GLASSWARE)” in
“Troubleshooting.” If it does not come clear, it is due to etching (see below).
Be sure the incoming water temperature is set at 120°F (49ºC).
Try using the High Temp and Sani Rinse options.
To remove spotting, run a vinegar rinse through the dishwasher.
■ Wash and rinse the affected dishware and load into dishwasher. Remove all silverware and
metal items. Put 2 cups (500 mL) of white vinegar in a glass measuring cup in the lower rack.
Run a normal cycle with the Heated Dry option turned off. No detergent is needed.
ETCHING (PERMANENT
CLOUDINESS)
This is an erosion of the surface of the glassware and can be caused by a combination of: water
that is too hot, from using too much detergent with soft water or by pre-washing. Detergent
needs food soil to act upon. If etching has occurred, the glassware is permanently damaged. To
avoid further etching, adjust the detergent amount to match the water hardness, stop prewashing, and use water heating options only when incoming water temperature is below 120°F
(49ºC).
LEAKING WATER Be sure dishwasher has been installed properly and is level.
Suds can cause the dishwasher to overflow. Measure the detergent accurately and use only
detergents designed for use in a dishwasher. Less detergent is needed in soft water. Try another
brand of detergent if sudsing continues.
To avoid rinse aid leaking from the dispenser, be sure the lid is securely attached and avoid
overfilling.
TUB IS DISCOLORED NOTES:
■ High iron content in the water can discolor the tub.
■ Tomato-based foods can discolor the tub or dishware.
■ A citrus-based cleaner can be used to clean.
24
Page 25

ÍNDICE
CONTRATOS DE PROTECCIÓN.............................................25
GARANTÍA.............................................................................26
SEGURIDAD DE LA LAVAVAJILLAS.......................................27
QUÉ HAY DE NUEVO EN SU LAVAVAJILLAS........................29
Energía.............................................................................................. 29
Desempeño ...................................................................................... 29
PIEZAS Y CARACTERÍSTICAS ................................................30
PUESTA EN MARCHA/REFERENCIA RÁPIDA......................... 31
®
SISTEMA DE FILTRACIÓN ULTRA WASH
CONSEJOS PARA LA EFICIENCIA
DE LA LAVAVAJILLAS........................................................... 34
DETERGENTE Y AGENTE DE ENJUAGUE.............................. 34
Detergente ....................................................................................... 34
Agente de enjuague....................................................................... 35
CÓMO CARGAR ....................................................................36
Cómo cargar para un mejor desempeño en el lavado y el
secado .............................................................................................. 36
..............................32
CONTRATOS DE PROTECCIÓN
Cómo cargar la canasta superior............................................... 37
Cómo cargar la canasta inferior .................................................39
USO DE LA LAVAVAJILLAS ................................................... 41
Información acerca de los ciclos y las opciones
(en algunos modelos)......................................................................41
Sección de control de la lavavajillas ..........................................43
Sección de información provista por la lavavajillas................43
Cómo cancelar un ciclo .................................................................43
Cómo cambiar un ciclo después
de iniciar la lavavajillas................................................................ 44
CÓMO LAVAR ARTÍCULOS ESPECIALES .............................. 44
CUIDADO DE LA LAVAVAJILLAS..........................................45
Limpieza........................................................................................... 45
Purga de aire del desagüe........................................................... 46
Vacaciones o tiempo prolongado sin uso ................................. 46
SOLUCIÓN DE PROBLEMAS ..................................................47
NÚMEROS DE SERVICIO ............................CONTRAPORTADA
Contratos maestros de protección
¡Felicitaciones por su inteligente adquisición!
Kenmore® está diseñado y fabricado para proporcionarle años
de funcionamiento confiable. Pero al igual que todos los
productos, puede necesitar mantenimiento preventivo o
reparación de vez en cuando. Es allí donde el Contrato maestro
de protección puede ahorrarle dinero e inconvenientes.
El Contrato maestro de protección también ayuda a prolongar
la vida de su nuevo producto. He aquí lo que se incluye en el
Contrato*:
✔Piezas y mano de obra necesarias para ayudar a mantener
los productos funcionando correctamente bajo uso normal,
no sólo en caso de defectos. Nuestra cobertura va mucho
más allá de la garantía del producto. No existen deducibles
ni fallas de funcionamiento que estén excluidas de la
cobertura — protección verdadera.
✔Servicio experto a cargo de un personal de más de 10.000
técnicos de servicio autorizados por Sears, lo que significa
que su producto será reparado por alguien en quien usted
puede confiar.
✔Llamadas de servicio ilimitado y servicio en todo el país, con
la frecuencia que usted desee, cuando usted desee.
✔Garantía “sin disgustos” – reemplazo de su producto
protegido si ocurren cuatro fallas o más del producto en el
transcurso de doce meses.
✔Reemplazo del producto si su producto protegido no puede
ser reparado.
✔Revisión anual de mantenimiento preventivo a solicitud suya
– sin costo adicional.
Su nuevo producto
✔Ayuda rápida por teléfono – lo que nosotros llamamos
Solución rápida – apoyo por teléfono a cargo de un
representante de Sears para todos los productos. Piense en
nosotros como si fuéramos un “manual parlante para el
propietario”.
✔Protección de sobrevoltaje contra daños eléctricos debido a
fluctuaciones de electricidad.
✔Protección por pérdida de comida, por un valor anual de
$250, por cualquier pérdida de comida que sea como
resultado de fallas mecánicas de cualquier refrigerador o
congelador cubierto bajo la garantía.
✔Reembolso de la renta si la reparación de su producto
protegido tarda más de lo prometido.
✔10% de descuento sobre el precio común por el servicio de
reparación que no esté bajo protección, así como las piezas
relacionadas con el mismo que se hayan instalado.
Una vez adquirido el Contrato, tan sólo tiene que llamar para
fijar la visita de servicio técnico. Usted puede llamar a cualquier
hora, de día o de noche, o fijar una visita técnica en Internet.
El Contrato maestro de protección es una compra sin riesgo. Si
por algún motivo usted lo cancela durante el período de la
garantía del producto, le proveeremos un reembolso total. O un
reembolso proporcional en cualquier momento posterior a la
expiración del período de la garantía. ¡Adquiera hoy su
Contrato maestro de protección!
25
Page 26

Se aplican algunas limitaciones y exclusiones. Para obtener
precios e información adicional en EE.UU., llame al
1-800-827-6655.
*La cobertura en Canadá varía en algunos artículos. Para
obtener los detalles completos, llame a Sears Canada al
1-800-361-6665.
GARANTÍA DE LOS ELECTRODOMÉSTICOS KENMORE
Servicio de instalación de Sears
Para la instalación profesional de Sears de aparatos
electrodomésticos, abridores de puertas de garaje,
calentadores de agua y otros artículos principales del hogar, en
los EE.UU. o en Canadá llame al 18004MYHOME®.
GARANTÍA LIMITADA DE UN AÑO
Cuando este electrodoméstico haya sido instalado, operado y
mantenido según las instrucciones provistas con el producto, si
este electrodoméstico falla por defectos de material o de mano
de obra dentro de un año a partir de la fecha de compra, llame
al 18004MYHOME
cargo.
Esta garantía sólo tiene vigencia durante 90 días a partir de la
fecha de compra si este aparato se ha usado alguna vez para
fines diferentes de los privados de una familia.
ESTA GARANTÍA CUBRE SOLAMENTE LOS DEFECTOS DE
MATERIAL Y MANO DE OBRA. SEARS NO PAGARÁ POR LO
SIGUIENTE:
1. Los artículos no reutilizables que pueden gastarse por el uso
normal, incluyendo, pero sin limitación, filtros, correas, focos
incandescentes y bolsas.
2. Un técnico de servicio para enseñarle al usuario cómo
instalar, operar o mantener el producto adecuadamente.
3. Un técnico de servicio para limpiar o mantener este
producto.
4. Daños a este producto o fallas del mismo en caso de no ser
instalado, operado o mantenido conforme a todas las
instrucciones provistas con el producto.
5. Daños a este producto o fallas del mismo como resultado de
accidente, abuso, uso indebido o un uso diferente de aquel
para el cual fue creado.
®
para gestionar la reparación libre de
6. Daños a este producto o fallas del mismo causados por el
uso de detergentes, limpiadores, productos químicos o
utensilios diferentes de los recomendados en todas las
instrucciones provistas con el producto.
7. Daños a piezas o sistemas o fallas de los mismos como
resultado de modificaciones no autorizadas que se hayan
efectuado en este producto.
EXCLUSIÓN DE GARANTÍAS IMPLÍCITAS; LIMITACIÓN DE
RECURSOS
El único y exclusivo recurso del cliente según los términos de
esta garantía limitada será el de reparar el producto según se
estipula en la presente. Las garantías implícitas, incluyendo las
garantías de comerciabilidad o de capacidad para un
propósito particular, serán limitadas a un año o al período más
corto permitido por ley. Sears no se hará responsable por daños
incidentales o consecuentes. Algunos estados y provincias no
permiten la exclusión o limitación de daños incidentales o
consecuentes, o limitaciones acerca de cuánto debe durar una
garantía implícita de comerciabilidad o capacidad, de modo
que las limitaciones o exclusiones arriba mencionadas pueden
no aplicarse en su caso.
Esta garantía se aplica sólo mientras este electrodoméstico se
usa en los Estados Unidos o Canadá.
Esta garantía le otorga derechos legales específicos, y es
posible que usted tenga también otros derechos, los cuales
varían de un estado a otro.
Sears Brands Management Corporation
Hoffman Estates, IL 60179
Sears Canada Inc.
Toronto, Ontario, Canada M5B 2C3
26
Page 27

SEGURIDAD DE LA LAVAVAJILLAS
Si no sigue las instrucciones de inmediato,
usted
o sufrir una lesión grave.
Si no sigue las instrucciones,
usted puede morir
o sufrir una lesión grave.
Todos los mensajes de seguridad le dirán el peligro potencial, le dirán cómo reducir las posibilidades de sufrir
una lesión y lo que puede suceder si no se siguen las instrucciones.
Su seguridad y la seguridad de los demás es muy importante.
Hemos incluido muchos mensajes importantes de seguridad en este manual y en su electrodoméstico.
Este es el símbolo de advertencia de seguridad.
Este símbolo le llama la atención sobre peligros potenciales que pueden ocasionar la muerte o una
y de la palabra “PELIGRO” o “ADVERTENCIA”. Estas palabras significan:
PELIGRO
ADVERTENCIA
a usted y a los demás.
Lea y obedezca siempre todos los mensajes de seguridad.
Todos los mensajes de seguridad irán a continuación del símbolo de advertencia de seguridad
puede morir
lesión
INSTRUCCIONES IMPORTANTES DE SEGURIDAD
ADVERTENCIA:
Cuando use la lavavajillas siga precauciones básicas, incluyendo las siguientes:
GUARDE ESTAS INSTRUCCIONES
■ Lea todas las instrucciones antes de usar la
lavavajillas.
■ Use la lavavajillas únicamente para las funciones que
fue diseñada.
■ Use únicamente detergentes o agentes de enjuague
recomendados para ser usados en las lavavajillas y
manténgalos fuera del alcance de los niños.
■ Al introducir los artículos para lavar:
1) Coloque los artículos puntiagudos de manera que
no dañen el sello de la puerta
2) Introduzca los cuchillos filosos con los mangos
hacia arriba para reducir el riesgo de cortaduras.
■ No lave artículos de plástico que no lleven la
indicación “lavables en la lavavajillas” u otra similar.
Lea las recomendaciones del fabricante para los
artículos de plástico que no lleven tal indicación.
■ No toque el elemento de calefacción durante o
inmediatamente después de usar la lavavajillas.
■ No haga funcionar la lavavajillas a menos que todos
los paneles estén colocados debidamente en su
lugar.
■ No juegue con los controles.
■ No abuse, ni se siente ni se pare sobre la puerta, la
tapa o sobre las canastas de la lavavajillas.
■ Para reducir el riesgo de lesión, no permita que los
niños jueguen dentro ni sobre la lavavajillas.
■ Bajo ciertas condiciones, un sistema de agua caliente
que no ha sido usado por dos semanas o más puede
producir gas hidrógeno. EL GAS HIDRÓGENO ES
EXPLOSIVO. Si el sistema de agua caliente no ha
sido usado por ese período, abra todas las llaves de
agua caliente y deje que corra el agua por varios
minutos antes de usar la lavavajillas. Esto permitirá
que los gases acumulados escapen. Debido a que el
gas es inflamable, no fume ni encienda ninguna llama
cerca de la llave durante este tiempo.
■ Quite la puerta o la tapa del compartimiento de
lavado cuando remueva o deje de usar para siempre
una vieja lavavajillas.
Advertencias de la Proposición 65 del estado de California:
ADVERTENCIA: Este producto contiene una o más sustancias químicas identificadas por el estado de California
como causantes de cáncer.
ADVERTENCIA: Este producto contiene una o más sustancias químicas identificadas por el estado de California
como causantes de defectos congénitos o algún otro tipo de daños en la función reproductora.
27
Page 28

Peligro de Vuelco
No use la lavavajillas antes de estar
completamente instalada.
No se apoye en la puerta abierta.
No seguir estas instrucciones puede ocasionar
heridas serias o cortaduras.
Peligro de Choque Eléctrico
Conecte a tierra la lavavajillas.
Conecte el alambre de conexión a tierra al
conector verde de conexión a tierra en la caja de
terminales.
No use un cable eléctrico de extensión.
No seguir estas instrucciones puede ocasionar
la muerte, incendio o choque eléctrico.
■
Para una lavavajillas con cable eléctrico y
conexión a tierra:
La lavavajillas debe estar conectada a tierra. En
caso de funcionamiento defectuoso o avería, la
conexión a tierra reduce el riesgo de choque
eléctrico al establecer una ruta de menor
resistencia para la corriente eléctrica. La
lavavajillas viene equipada con un cable eléctrico
que tiene un conductor para conexión a tierra y un
enchufe con conexión a tierra. El enchufe debe ser
conectado a un contacto apropiado que esté
instalado y conectado a tierra de acuerdo con
todos los códigos y ordenanzas locales.
ADVERTENCIA: La conexión inadecuada del
conductor de conexión a tierra puede resultar en
riesgo de choque eléctrico. Pregunte a un
electricista calificado o a un agente de servicio si
no está seguro si la lavavajillas está
adecuadamente conectada a tierra. No modifique
el enchufe que viene con la lavavajillas. Si no cabe
en el contacto, pida que un electricista calificado
instale un contacto apropiado.
■
Para lavavajillas con conexión permanente:
Esta lavavajillas debe estar conectada a un
sistema de cableado de metal permanente,
conectado a tierra, o se debe tender un conducto
para la conexión a tierra del equipo con los
conductores de circuito y conectado a la terminal
de tierra del equipo o al conductor de suministro
de la lavavajillas.
INSTRUCCIONES DE
CONEXIÓN A TIERRA
GUARDE ESTAS INSTRUCCIONES
■ Instale su lavavajillas en un lugar protegido de las
inclemencias del tiempo. Evite una posible ruptura de la
válvula de llenado debida al congelamiento. Dichas roturas
no están cubiertas por la garantía. Vea la sección
"Vacaciones o tiempo prolongado sin uso".
■ Instale y nivele la lavavajillas en un piso que pueda soportar
su peso y en un área adecuada para su tamaño y uso.
■ Retire todos los tapones de las mangueras y los conectores
(como la tapa en la salida de desagüe) antes de instalarla.
Vea la información completa en las Instrucciones de
instalación.
28
Page 29

QUÉ HAY DE NUEVO EN SU LAVAVAJILLAS
H
E
USE RINSE AID FOR
BETTER DRYING
Lock
Refill
Full
Add
P
U
S
H
D
O
W
N
&
T
U
R
N
L
O
C
K
U
N
L
O
C
K
Energía
¡Felicitaciones por haber comprado la lavavajillas con bajo consumo de agua y energía! Esta lavavajillas limpia
rociando la vajilla con agua y hace pausas para permitir que el detergente remoje la vajilla y afloje la suciedad
de los platos. Para obtener una limpieza excepcional, los ciclos se hacen más largos debido al remojo y las
pausas. Los modelos con SmartWash
determinar el consumo óptimo de agua y energía para un desempeño de limpieza ideal. El primer ciclo con
sensor durará más tiempo para calibrar el sensor óptico.
Agente de enjuague
El uso del agente de enjuague hará óptimo el desempeño de
lavado y secado. Esta lavavajillas ha sido diseñada
específicamente para usarse en conjunción con agente de
enjuague, para obtener un mejor desempeño de secado y
controlar la acumulación de depósitos de agua dura. Las
lavavajillas con bajo consumo de energía usan menos agua y
energía, de modo que dependen de la acción de
desplazamiento del agua por obra del agente de enjuague
para asegurar un óptimo desempeño.
®
tienen un sensor óptico de agua. El sensor óptico de agua se usa para
Desempeño
Detergente
Estados Unidos y Canadá han aprobado una restricción que
limita la cantidad de fósforo (fosfatos) en los detergentes para
lavavajillas domésticas a no más de 0,5 %, mientras que los
detergentes previos contenían 8,7 %. Los principales
fabricantes de detergente han reformulado su detergente para
lavavajillas de acuerdo a este cambio, un paso más en la
conciencia ecológica. Con estos cambios recientes, se
recomienda usar pastillas y paquetes por conveniencia y para
mejorar el desempeño.
Sistema de filtración
Su lavavajillas cuenta con lo último en tecnología de filtración
para lavavajillas. Este sistema de filtración triple minimiza los
sonidos y optimiza el ahorro de agua y energía mientras
proporciona una limpieza óptima. El mantenimiento periódico
de los filtros traerá como resultado un rendimiento máximo de
limpieza. Le sugerimos limpiar los filtros superior e inferior y
enjuagarlos bajo agua del grifo por lo menos una vez al mes.
29
Page 30

PIEZAS Y CARACTERÍSTICAS
T
URBOZONE
30
Page 31

PUESTA EN MARCHA/REFERENCIA RÁPIDA
H
E
H
E
P
U
S
H
D
O
W
N
&
T
U
R
N
L
O
C
K
U
N
L
O
C
K
USE RINSE AID FOR
BETTER DRYING
Lock
Refill
Full
Add
H
E
H
E
H
E
(VARÍA SEGÚN EL MODELO)
Los filtros desmontables ULTRA WASH®
proporcionan un rendimiento óptimo.
El limpiar los filtros
periódicamente permite que
la lavavajillas funcione con
un rendimiento óptimo. Los
filtros se encuentran en la
parte central inferior de la
lavavajillas.
Vea “SISTEMA DE
FILTRACIÓN ULTRA
®
WASH
” para obtener
información acerca de la
remoción y el mantenimiento
de los filtros.
IMPORTANTE: No bloquee el depósito del
detergente.
Los artículos altos pueden
bloquear la puerta del
depósito si los coloca en la
canasta inferior. Los moldes
para galletas y las tablas
para cortar pueden bloquear
fácilmente el depósito si los
coloca en la parte izquierda
de la lavavajillas. Si después
de finalizado un ciclo hay
detergente dentro del
depósito o en el fondo de la
tina, el depósito quedó
bloqueado.
Secado - el agente de enjuague es
fundamental.
Deberá usar un agente de
secado, como puede ser un
agente de enjuague, para un
buen rendimiento de secado
(se incluye una muestra). El
agente de enjuague junto
con la opción de Heated
Dry (Secado con calor) le
proporcionarán el mejor
secado y evitarán que se
forme humedad excesiva en
el interior de la lavavajillas.
1 Hour Wash (Lavado de 1 hora) – cuando
necesita resultados rápidos.
Las lavavajillas de alto rendimiento
funcionan por más tiempo para ahorrar
agua y energía, de la misma manera que se
ahorra gasolina cuando se conduce un
automóvil despacio. Cuando necesite
resultados rápidos, el Lavado de 1 hora
limpiará su vajilla usando un poco más de
agua y energía. Para mejorar el secado,
seleccione la opción de Heated Dry (Secado
con calor) para agregar más tiempo al
secado.
Ciclo SmartWash
®
El ciclo SmartWash®provee resultados
óptimos usando sólo la cantidad de agua y
energía necesaria. Se recomiendan los ciclos
de SmartWash
®
y Pots & Pans (Ollas y
cacerolas) para la suciedad rebelde.
Cómo cargar en TurboZone®
(en algunos modelos)
Cuando se
selecciona la
opción TurboZone
se proporciona un
lavado concentrado
hacia la parte
posterior de la
canasta inferior
para la vajilla que
sea difícil de lavar.
Coloque estos
platos con la
superficie sucia
hacia las boquillas
de rociado
TurboZone
®
están en la canasta
inferior de la
lavavajillas.
, que
®
,
31
Page 32

Presione START (Inicio) cada vez que
H
E
agregue un plato.
Para comenzar y reanudar un ciclo, presione
START (Inicio) y cierre la puerta en menos de
3 segundos. Si la puerta no se ha cerrado en
menos de 3 segundos, el LED del botón de
inicio destellará y el ciclo no comenzará.
IMPORTANTE: Si alguien abre la puerta
(como puede ser para agregar un plato –
aún durante la opción de Delay Hours –
Horas de retraso), deberá presionarse el
botón de START (Inicio) cada vez y cerrar la
puerta en menos de 3 segundos para
reanudar el ciclo.
Dosificación del detergente
Es posible usar demasiado detergente en su lavavajillas. Esto
puede ocasionar corrosión en los platos. Vea “Detergente y
agente de enjuague” para determinar la cantidad de
detergente necesario según la dureza del agua. Está
comprobado que las pastillas y los paquetes de detergente
para lavavajillas son más eficaces que los detergentes en
polvo, líquidos o en gel, para reducir las películas de residuos
en la vajilla.
SISTEMA DE FILTRACIÓN ULTRA WASH
®
Su lavavajillas cuenta con la última tecnología de filtración para lavavajillas. El sistema de filtración triple minimiza los sonidos y
optimiza el consumo de agua y energía mientras proporciona una limpieza superior. Durante la vida útil de su lavavajillas, el filtro
necesitará mantenimiento para conservar el rendimiento óptimo de limpieza.
El sistema de filtración triple consta de 2 piezas, un ensamblaje de filtro superior y un filtro inferior.
■ El ensamblaje de filtro superior mantiene los artículos muy grandes y los objetos extraños, junto con las partículas muy pequeñas
de comida, fuera de la bomba.
■ El filtro inferior evita que la comida recircule sobre la vajilla.
Para proveer un desempeño óptimo de limpieza, sugerimos un mantenimiento mensual del filtro, removiendo e inspeccionando los
filtros superior e inferior para ver si están sucios. Según sus hábitos con la lavavajillas, deberá limpiar los filtros con más o menos
frecuencia que lo indicado en la tabla a continuación.
Es posible que sea necesario limpiar los filtros cuando:
■ Haya objetos visibles o suciedad en el ensamblaje del filtro superior.
■ Baje la calidad del rendimiento de limpieza (es decir, que los platos sigan sucios).
■ Los platos se sienten arenosos al tacto.
Es muy fácil quitar y mantener los filtros. La tabla siguiente muestra la frecuencia recomendada de limpieza.
32
Page 33

Intervalos recomendados para la limpieza del filtro.
P
U
S
H
D
O
W
N
&
T
U
R
N
L
O
C
K
U
N
L
O
C
K
Cantidad de cargas
por semana
Si lava
antes de cargar
Si raspa la comida y
enjuaga antes de cargar
Si solamente raspa la
comida antes de cargar*
Si no raspa la comida ni
enjuaga antes de cargar
13-14 Una vez por año Dos veces por año Cada dos meses Una vez por semana
8-12 Una vez por año Cada cuatro meses Cada dos meses Cada dos semanas
4-7 Una vez por año Una vez por año Cada cuatro meses Una vez por mes
1-3 Una vez por año Una vez por año Dos veces por año Cada dos meses
*Recomendación del fabricante: Esta práctica eliminará el agua y la energía que usted usa para preparar la vajilla. También le
permitirá ahorrar tiempo y esfuerzo.
Agua muy dura
Si tiene agua muy dura (más de 15 granos), limpie el filtro al menos una vez por mes. La acumulación de restos blancos en su
lavavajillas indica que el agua es dura. Puede traer sus muestras de agua a Sears para verificar el nivel de dureza. Vea la sección
“Solución de problemas” para consultar los consejos para quitar las manchas.
Instrucciones para quitar los filtros
1. Gire el ensamblaje del filtro superior ¼ de vuelta hacia la izquierda, levante y sáquelo.
2. Agarre el filtro inferior en la abertura circular, levante levemente y jale hacia adelante
para quitarlo.
3. Limpie los filtros como se muestra debajo.
Instrucciones de limpieza
IMPORTANTE: No use un cepillo de alambre, estropajo, etc., ya que pueden dañar los filtros.
Enjuague el filtro debajo del agua corriente hasta haber quitado la
mayor parte de la suciedad. En caso de suciedad difícil de sacar o
de depósitos de calcio a causa del agua dura, es posible que deba
usar un cepillo suave.
Para quitar el ensamblaje
del filtro superior
33
Page 34

Instrucciones para reinstalar los filtros
H
E
1. Consulte las ilustraciones anteriores y coloque el filtro inferior debajo de las lengüetas de
ubicación en el fondo de la lavavajillas, para que la abertura redonda para el ensamblaje
del filtro superior esté alineada con la abertura redonda en el fondo de la tina.
2. Inserte el ensamblaje del filtro superior dentro de la abertura circular en el filtro inferior.
3. Rote lentamente el filtro hacia la derecha hasta que caiga en su lugar. Continúe rotando
hasta que el filtro quede trabado en su lugar. Si el filtro no encaja completamente (sigue
girando libremente), continúe girando el filtro hacia la derecha hasta que caiga y quede
trabado en su lugar.
NOTA: No es necesario que la flecha del ensamblaje del filtro superior esté alineada con la
flecha en el filtro inferior, siempre y cuando el filtro quede trabado.
Para volver a colocar el ensamblaje
del filtro superior
IMPORTANTE: Para evitar dañar la lavavajillas, no la ponga en marcha sin que los filtros ULTRA WASH®estén adecuadamente
instalados. Asegúrese de que el filtro inferior esté seguro en su lugar y que el ensamblaje del filtro superior esté trabado en su lugar.
Si el ensamblaje del filtro superior gira libremente, no está trabado en su lugar.
CONSEJOS PARA LA EFICIENCIA DE LA LAVAVAJILLAS
El agua caliente disuelve y activa el detergente para lavavajillas. El agua caliente también disuelve la grasa que se encuentra en los
platos y ayuda a secar los vasos sin manchas. Para obtener los mejores resultados, el agua debe estar a 120°F (49°C) cuando entra
en la lavavajillas. Si la temperatura del agua está muy baja, los platos podrían quedar menos limpios.
Consejos de eficiencia adicionales
■ Para ahorrar agua, energía y tiempo, solamente raspe la comida de los platos. No enjuague los platos antes de ponerlos en la
lavavajillas.
■ Use una función de retraso para poner la lavavajillas en funcionamiento en horas no pico. Las empresas proveedoras de servicios
públicos locales recomiendan que se evite un alto consumo de energía a determinadas horas del día.
■ Durante el verano, ponga su lavavajillas en funcionamiento en la noche. Esto reduce la acumulación de calor durante el día en la
cocina.
■ Use un agente de enjuague para mejorar el secado.
DETERGENTE Y AGENTE DE ENJUAGUE
Detergente
IMPORTANTE: Use únicamente detergentes para lavavajillas
automáticas. El detergente para lavar los platos a mano
producirá espuma en exceso y ésta se desbordará fuera de la
lavavajillas.
34
Page 35

Cantidad recomendada de detergente
USE RINSE AID FOR
BETTER DRYING
Lock
Refill
Full
Add
3
2
-
-
-
max
fill
1
-
-
-
-
-
-
-
-
-
-
-
-
Lock
Refill
Agregue la cantidad recomendada de detergente en cada
compartimiento, como se muestra, y cierre la tapa del
detergente.
Polvos y geles
Compartimiento de
lavado
principal
Dureza del agua
Nivel de
suciedad
Compartimiento de
prelavado
Agente de enjuague
Suave(Soft)
(0 a 4 granos
por galón de
Ligero
(Light)
Normal Vacío ¹⁄₂
Vacío ¹⁄₂
EE.UU.)
Intenso
Lleno ¹⁄₂
(Heavy)
Media(Medium)
(5 a 9 granos
por galón de
EE.UU.)
Ligero
Vacío ¹⁄₂
(Light)
Normal ¹⁄₂ ¹⁄₂
Intenso
Lleno* Lleno*
(Heavy)
Dura(Hard)
(10 a 14 granos
por galón de
EE.UU.)
Ligero
(Light)
Normal Lleno* Lleno*
Intenso
¹⁄₂ Lleno*
Lleno* Lleno*
(Heavy)
*El compartimiento lleno para el prelavado contiene 7 cdtas
(35 mL) y el compartimiento lleno para el lavado principal
contiene 9 cdtas (45 mL).
Detergentes previamente medidos
Varios detergentes vienen ahora en formatos previamente
medidos (paquetes con gel, tabletas o paquetes con polvo).
Estos formatos son apropiados para todos los niveles de dureza
y suciedad. Coloque siempre los detergentes previamente
medidos en el compartimiento principal y cierre la tapa.
Está comprobado que las pastillas y los paquetes de detergente
para lavavajillas son más eficaces que los detergentes en polvo,
líquidos o en gel, para reducir las películas de residuos en la
vajilla. Al usar estas pastillas y paquetes, con el tiempo las
películas blancas comenzarán a reducirse o a eliminarse. Por
otro lado, al usar un agente de enjuague puede minimizar la
acumulación de películas blancas.
IMPORTANTE: Los residuos minerales del agua
extremadamente dura (15 granos por galón de EE.UU. o más)
pueden dañar su lavavajillas y hacer difícil que se obtengan
buenos resultados. Se recomienda usar un ablandador de agua
para evitar daños y obtener buenos resultados. Puede traer sus
muestras de agua a Sears para verificar el nivel de dureza.
IMPORTANTE: Su lavavajillas está diseñada para usar un
agente de enjuague líquido. El uso de agentes de enjuague
mejora en gran medida el secado, al permitir que el agua se
escurra de la vajilla después del último enjuague. También evita
que el agua forme gotitas que al secarse quedan como
manchas o rayas.
Llenado del depósito
El depósito tiene capacidad para 5 onzas (150 mL) de agente
de enjuague. En condiciones usuales, esta cantidad durará de
uno a tres meses.
1. Gire la perilla hacia la posición de REFILL (Volver a llenar) y
retírela.
2. Vierta el agente de enjuague en la abertura hasta que el
indicador esté en FULL (Lleno). No sobrellene.
3. Limpie todo el agente de enjuague derramado. El agente de
enjuague que se derrama puede crear espuma en exceso.
4. Vuelva a colocar la perilla y gírela hacia la posición de
LOCK (Bloqueo).
NOTA: El indicador mostrará el nivel de llenado correcto
cuando se abra completamente la puerta.
Ajuste de nivel del agente de enjuague
El depósito del agente de enjuague es regulable. Para casi todos
los tipos de agua, la selección de fábrica de 2 dará buenos
resultados. Si usted tiene agua dura y nota que se acumula calcio
en la vajilla, tal vez desee probar con un ajuste más alto.
Si nota
espuma en la lavavajillas, use un ajuste más bajo.
Para regular el ajuste
1. Gire la perilla hacia la posición de REFILL (Volver a llenar) y
retírela.
2. Gire la flecha que se encuentra dentro del depósito hacia el
ajuste deseado.
3. Vuelva a colocar la perilla y gírela hacia la posición de
LOCK (Bloqueo).
35
Page 36

CÓMO CARGAR
Cómo cargar para un mejor desempeño en el lavado y el secado
1. Coloque en ángulo y mirando hacia abajo las
superficies más sucias de la vajilla y deje espacio para
que el agua fluya hacia arriba, a través de cada
canasta y entre la vajilla.
Al separar la vajilla, se permite el flujo de agua.
3. Use la opción de TurboZone® (en algunos modelos)
colocando sus artículos más sucios mirando hacia la
parte posterior inferior.
Artículos sucios mirando hacia los surtidores de rociado
TurboZone
4. Coloque en ángulo las superficies cóncavas, tales
como la base de las tazas de café, para permitir que el
agua se drene y así mejorar el rendimiento del secado.
®
2. Para una mejor limpieza de los tapas, use las ranuras
que están en las cubiertas, de modo que los artículos se
mantengan separados.
Separados
Artículos con las superficies en ángulo
36
Page 37

5. Antes de cada ciclo, verifique que todos los brazos
rociadores giren libremente.
6. Coloque las tazas y vasos en las hileras entre las
puntas.
Los brazos rociadores giran libremente.
Cómo cargar la canasta superior
Recomendaciones para cargar
Coloque las tazas y los vasos en las hileras entre las puntas. Si los coloca sobre las puntas pueden romperse o terminar con
manchas de agua. Para evitar que se dañen sus artículos delicados, asegúrese de que la porcelana, cristalería y otros objetos
similares no se toquen durante el funcionamiento de la lavavajillas.
Coloque los objetos livianos y de plástico aptos para lavavajillas sólo en la canasta superior.
Carga para 10 puestos Carga para 12 puestos
Puntas flexibles (en algunos modelos)
La hilera de puntas a los lados izquierdo y derecho de la
canasta superior se puede ajustar para acomodar diversos
tamaños de platos.
37
Page 38

Estantes para tazas y sujetadores de cristalería (en algunos modelos)
Tope del riel cerrado
Tope del riel abierto
Baje el estante adicional en uno de los lados de la canasta
superior para sostener tazas adicionales, cristalería o artículos
largos como utensilios y espátulas.
Canasta ajustable de lujo de 2 posiciones
Usted puede subir o bajar la canasta superior para acomodar
artículos más altos tanto en la canasta superior como en la
inferior. Los ajustadores se encuentran a cada lado de la
canasta superior. Levante la canasta superior para acomodar
artículos de hasta 9" (23 cm) en la canasta superior y de hasta
13" (33 cm) en la canasta inferior; o baje la canasta superior
para acomodar artículos de hasta 11" (28 cm) de altura en
ambas canastas.
1. Para levantar, suba la canasta hasta que ambos lados
estén a la misma altura y trabe.
2. Para bajar, presione ambas lengüetas en los ajustadores de
la canasta, tal como se muestra, y baje.
Canasta superior removible
La canasta superior removible le permite lavar objetos más grandes tales como ollas, charolas para asar y moldes para galletas
en la canasta inferior.
IMPORTANTE: Quite los platos antes de quitar la canasta superior de la lavavajillas.
Para quitar la canasta
1. Para lograr acceso a los topes del riel, jale la canasta superior hacia adelante hasta que la mitad esté fuera de la tina.
2. Para abrir, dé vuelta el tope del riel hacia fuera de la tina.
3. Después de abrir ambos topes de los rieles, jale la canasta superior de los rieles.
4. Cierre los topes del riel y deslice los rieles hacia atrás dentro de la lavavajillas.
Para volver a colocar la canasta
1. Jale los rieles suavemente hacia delante en la lavavajillas hasta que se detengan. Abra los topes del riel.
2. Coloque las ruedas posteriores a cada lado de la canasta en la ranura del riel y deslícelas dentro de los rieles, pero no
empuje la canasta totalmente dentro de la tina.
3. Inserte las ruedas frontales de la canasta a cada lado del riel, en las ranuras del mismo.
4. Deslice la canasta dentro de la lavavajillas. Los topes se cerrarán automáticamente cuando la canasta entre en la
lavavajillas.
38
Page 39

Cómo cargar la canasta inferior
Recomendaciones para cargar
La canasta inferior es más apropiada para platos, ollas, fuentes y utensilios. (Vea los siguientes modelos recomendados de carga.)
Coloque los artículos pequeños en la canasta inferior únicamente si están seguros en su lugar.
Coloque los platos, tazones de sopa, etc., entre las puntas.
Coloque los tazones firmemente entre las hileras de puntas. Asegúrese de que hay suficiente espacio entre los platos para que el
rociador pueda alcanzar todas las superficies.
Cargue los artículos con suciedad profunda mirando hacia el rociador.
NOTA: Asegúrese de que el depósito de detergente no esté bloqueado por artículos altos, tales como charolas para galletas y
tablas para cortar colocadas en el lado izquierdo del frente de la canasta. Vea la sección “Puesta en marcha/Referencia
rápida”.
Carga para 10 puestos Carga para 12 puestos
Puntas plegables (en algunos modelos)
Usted puede plegar una hilera de puntas en la parte posterior
de la canasta inferior para hacer lugar para la vajilla más
grande.
Mantenga esta hilera de puntas en la posición de 60° cuando
use la opción TurboZone
IMPORTANTE: Cuando mueva la hilera de puntas hacia la
posición horizontal, pliegue solamente la hilera de puntas
hacia el frente de la lavavajillas.
®
(en algunos modelos).
39
Page 40

Cómo cargar en TurboZone® (en algunos modelos)
Parte posterior
de la lavavajillas
IMPORTANTE: Para un funcionamiento adecuado, solamente una hilera de artículos puede mirar hacia los surtidores de rociado
TurboZone
®.
Usted deberá seleccionar la opción de lavado TurboZone® para utilizar esta característica de lavado.
®
Cargue las sartenes, cacerolas, etc., con las superficies sucias mirando hacia los surtidores de rociado TurboZone
lavado TurboZone
A continuación se muestran las cargas recomendadas cuando se use la opción TurboZone
®
está ubicada en la parte posterior de la canasta de platos inferior.
®
.
. El área de
Cómo cargar los artículos altos
Usted puede lavar artículos más grandes, tales como ollas,
asadores y charolas para galletas en la canasta inferior,
sacando la canasta superior. Vea la sección “Cómo cargar la
canasta superior”.
IMPORTANTE: No bloquee el depósito del detergente.
Cómo cargar los cubiertos
Siga los modelos de carga sugeridos, según se muestra, para limpiar
mejor los cubiertos.
Para un óptimo lavado, use las ranuras que están en las tapas para
mantener los cubiertos separados. (Vea la ilustración a la derecha.)
NOTA: Si los cubiertos no caben en las ranuras designadas, levante las tapas y mezcle los tipos de cubiertos para mantenerlos
separados. Coloque los cuchillos hacia abajo, los tenedores hacia arriba y alterne las cucharas, como se ilustra, para obtener
mejores resultados en la limpieza. Cargue los cubiertos más largos en la parte posterior y los más cortos en la parte frontal de la
canastilla.
Canastilla para cubiertos, lado izquierdo Canastilla para cubiertos, lado derecho
40
Page 41

USO DE LA LAVAVAJILLAS
H
E
Información acerca de los ciclos y las opciones (en algunos modelos)
Ciclos Nivel de suciedad
Ciclo SmartWash
El ciclo más avanzado y versátil. Este ciclo detecta el tamaño
de la carga, la cantidad de suciedad y su resistencia. Este ciclo
ha sido optimizado para lograr una limpieza excepcional con
una mínima cantidad de agua y un mínimo consumo de energía.
Pots & Pans (Ollas y cacerolas)
Funciona mejor con los artículos más difíciles, como cacerolas
con restos de alimentos endurecidos a causa del horneado. Usar
con la opción TurboZone® (en algunos modelos) para obtener la
mejor limpieza de la suciedad endurecida por el horneado.
Normal Wash (Lavado normal)
Se recomienda este ciclo para lavar por completo una carga
llena de vajilla con suciedad normal. Al seleccionar este ciclo, se
fijarán por defecto las opciones recomendadas para cantidades
normales de suciedad. La etiqueta de energía está basada en
este ciclo.
®
Tiempo* (min.)
sin opciones
Típico** Máx.
Ligera 110 155
Media 120 170
Rebelde/
Endurecida por el
horneado
Intensa 155 210 7, 4
Rebelde/
Endurecida por el
horneado
Ligera 110 155
Media 110 155
Intensa 155 210 7, 4
160 215
155 210
Uso de
agua en
galones
(litros)
3,8
(14,3)
4,0
(15,0)
5,1
(19,4)
(28,0)
7, 4
(28,0)
2,7
(10,3)
3,9
(14,9)
(28,0)
China Gentle (Porcelana, artículos delicados) (en algunos
modelos)
Proporciona un lavado ligero y un secado suave para los
artículos delicados como pueden ser la porcelana y el cristal.
1 Hour Wash (Lavado de 1 hora)
Cuando necesite resultados rápidos, el Lavado de 1 hora
limpiará su vajilla usando un poco más de agua y energía. Para
un mejor secado, seleccione la opción Heated Dry (Secado con
calor).
Quick Rinse (Enjuague rápido)
Use este ciclo para enjuagar platos, vasos y cubiertos que no
vayan a lavarse de inmediato. No use detergente.
*El agregar opciones aumentará el tiempo del ciclo. Vea la sección de información sobre las opciones.
**Este es el tiempo aproximado del ciclo que se obtiene con agua caliente a 120°F (49°C) entrando en la lavavajillas. La baja
temperatura del agua entrante genera un aumento del tiempo.
Ligera a media 105 145
Intensa 120 185 6,8
Todos los niveles de
suciedad
Todos los niveles de
suciedad
60 62
17 18
4,2
(15,2)
(25,8)
5,0
(19,0)
2,0
(7,6)
41
Page 42

Opciones
H
E
H
E
H
E
Opción TurboZone® (en algunos
modelos)
Emite chorros a cada rincón para
eliminar la necesidad de remojar y
refregar los platos sucios y con comida
endurecida a causa del horneado. Para
sus artículos más difíciles, use la opción
Turb oZone
®
con el ciclo Pots & Pans
(Ollas y cacerolas). Vea la información
sobre cómo cargar.
Puede
seleccionarse con
SmartWash
®
Pots & Pans
(Ollas y
cacerolas)
Normal Wash
(Lavado normal)
Lo que hace
Concentra todo el poder
de lavado de la
lavavajillas en el área de
TurboZone® durante
ciertos momentos del ciclo
de lavado.
Tiempo adicional del
ciclo
Típico Máx.
42 55
Agua
adicional†
en galones
(litros)
0 - 3,7
(0 - 14,0)
High Temp (Temperatura alta)
Eleva la temperatura del lavado
principal para mejorar la limpieza en las
cargas que contienen suciedad rebelde
de los alimentos a causa del horneado.
SmartWash
Pots & Pans
(Ollas y
cacerolas)
Normal Wash
(Lavado normal)
®
Aumenta la temperatura
del lavado principal de
105°F (41°C) a 130°F o
135°F (54°C o 57°C).
35 45
Sani Rinse (Enjuague sanitario)
Esta opción de alta temperatura
higieniza sus platos y su cristalería según
el Estándar 184 de la Fundación
Nacional de la Salubridad (NSF)/ANSI
para lavavajillas domésticas. Las
lavavajillas domésticas certificadas no
han sido diseñadas para los
establecimientos con licencia para
alimentos. El indicador Sani
SmartWash
Pots & Pans
(Ollas y
cacerolas)
Normal Wash
(Lavado normal)
®
Aumenta la temperatura
del lavado principal de
105°F (41°C) a 130°F
(54°C) y la del enjuague
final de 140°F (60°C) a
156°F (69°C).
60 90
(Higienizado) indica al final del ciclo si
la opción de Sani Rinse (Enjuague
sanitario) se completó con éxito. Si no se
activa el indicador, es posiblemente
debido a que se interrumpió el ciclo.
Heated Dry (Secado con calor)
Enciende el elemento calentador
después que se termina el ciclo de
lavado. Use un agente de enjuague con
o sin la opción de Heated Dry (Secado
con calor) para obtener los mejores
resultados de secado. Es menos
Disponible con
cualquier ciclo
excepto Quick
Rinse (Enjuague
rápido)
Enciende el elemento
calentador al final del
ciclo de lavado.
52 52 0
probable que los artículos de plástico se
deformen cuando los carga en la
canasta de platos superior.
†
La cantidad máxima de agua adicional que se utiliza para cualquier combinación de opciones es 3,7 gal (14,0 L).
0 - 3,7
(0 - 14,0)
0 - 2,6
(0 - 10,0)
42
Page 43

Sección de control de la lavavajillas
Delay Hours (Horas de retraso) (en algunos modelos)
Use esta opción para poner la lavavajillas en funcionamiento durante las horas de menos consumo de energía. Las empresas
proveedoras de servicios públicos locales recomiendan consumir energía durante las horas de menos consumo de energía siempre
que sea posible.
Para retrasar el inicio
1. Seleccione un ciclo y opciones de lavado.
2. Presione el botón de retraso.
3. Presione START (Inicio).
NOTA: En cualquier momento que se abra la puerta (como puede ser para agregar un plato), deberá presionarse nuevamente el
botón de START (Inicio) para reanudar la cuenta regresiva del retraso.
Opción de Control Lock (Bloqueo de control)
Use la opción de Control Lock para evitar el uso no intencional de la lavavajillas entre un ciclo y otro. Cuando la luz de LOCK ON
(Bloqueo activado) está encendida, todos los botones están desactivados. La puerta de la lavavajillas puede abrirse y cerrarse
mientras los controles están bloqueados.
Para activar el bloqueo
Presione y sostenga CONTROL LOCK (Bloqueo de control) durante 3 segundos. Se encenderá LOCK ON (Bloqueo activado). Si
usted oprime cualquier botón mientras su lavavajillas está bloqueada, la luz se enciende y apaga 3 veces y sonará un tono
audible.
NOTA: La lavavajillas no puede funcionar si el control está bloqueado.
Para desactivar el bloqueo
Presione y sostenga CONTROL LOCK (Bloqueo de control) durante 3 segundos. La luz se apaga.
Sección de información provista por la lavavajillas
Luces indicadoras de estado
Las luces de estado en la parte superior del control le informarán si se ha higienizado la
lavavajillas y/o si se ha terminado el ciclo. Las luces en el panel de control se pondrán de
color azul mientras está lavando o enjuagando, rojo mientras está secando y verde cuando
haya terminado el ciclo.
Cómo seleccionar los ciclos y las opciones
1. Seleccione el ciclo deseado. Si desea poner a funcionar el último ciclo que se ha terminado, puede simplemente presionar
START (Inicio) una vez para mostrar qué opciones ha usado y luego presionar nuevamente START(Inicio) para comenzar el
ciclo.
2. Seleccione las opciones deseadas. No todas las opciones están disponibles para cada ciclo. Si se selecciona una opción no
válida para un ciclo determinado, las luces destellarán.
Cómo apagar/encender (OFF/ON) el sonido
Presione y sostenga High Temp (Temperatura alta) durante 3 segundos para alternar el sonido entre ON (Encendido) y OFF
(Apagado). El sonido no se desactivará para los mensajes de interrupción del ciclo o de servicio necesario.
Cómo cancelar un ciclo
1. Abra la puerta ligeramente para detener el ciclo. Espere a que la acción de rociado se detenga antes de abrir la puerta por
completo.
2. Presione una vez el botón CANCEL/DRAIN (Cancelar/Desaguar). La luz Cancel/Drain se encenderá.
3. Cierre la puerta en menos de 3 segundos. La lavavajillas comienza un ciclo de desagüe (si ha quedado agua en el fondo de la
misma). Deje que la lavavajillas complete el desagüe. La luz Cancel/Drain se apaga al cabo de 2 minutos.
43
Page 44

Cómo cambiar un ciclo después de iniciar la lavavajillas
Puede interrumpir un ciclo y volver a iniciar la lavavajillas desde el comienzo usando el siguiente procedimiento.
1. Abra la puerta ligeramente para detener el ciclo. Espere a que la acción de rociado se detenga, luego abra la puerta por
completo.
2. Verifique que la tapa del depósito de detergente esté aún cerrada. Si la tapa está abierta, necesitará volver a llenar el
depósito de detergente antes de volver a iniciar el nuevo ciclo.
3. Presione CANCEL/DRAIN (Cancelar/Desaguar) dos veces para volver a fijar el control.
4. Seleccione los nuevos ciclos y opciones.
5. Presione START (Inicio).
CÓMO LAVAR ARTÍCULOS ESPECIALES
Si tiene dudas acerca del lavado de un artículo determinado, consulte con el fabricante para ver si se trata de un artículo lavable en
la lavavajillas.
Material ¿Lavable en la
lavavajillas?
Aluminio Sí La temperatura alta del agua y los detergentes pueden afectar el acabado del
Aluminio desechable No No lave bandejas de aluminio desechables en la lavavajillas. Éstas podrían
Botellas y latas No Lave las botellas y latas a mano. Las etiquetas engomadas pueden soltarse y
Hierro fundido No Se perderá el curado y el hierro se oxidará.
Porcelana/Cerámica
de gres
Cristal Sí Consulte siempre las recomendaciones del fabricante antes de lavar. Algunos
Oro No Los cubiertos dorados perderán su color.
Vidrio Sí El material de los vasos de leche se pondrá amarillento luego de varias lavadas
Cuchillos con mango
hueco
Sí Consulte siempre las recomendaciones del fabricante antes de lavar. Los diseños
No Los mangos de algunos cuchillos están fijados a la hoja con adhesivos que pueden
Comentarios
aluminio anodizado.
moverse durante el lavado y dejar unas marcas negras en los platos y otros
objetos.
obstruir el sistema de lavado y reducir el rendimiento de lavado.
antiguos, pintados a mano o sobre glaseado se podrían desteñir. Los acabados
dorados pueden perder su color o intensidad.
tipos de cristal de sosa pueden corroerse después de varias lavadas.
en la lavavajillas.
aflojarse al ser lavados en la lavavajillas.
Peltre, latón, bronce y
cobre
Plásticos desechables No No pueden resistir las temperaturas altas del agua y los detergentes.
Plásticos Sí Consulte siempre las recomendaciones del fabricante antes de lavar. La
Acero inoxidable Sí Haga correr un ciclo de enjuague si no va a lavar de inmediato. El contacto
No Las temperaturas altas del agua y el detergente pueden decolorar o picar el
acabado.
capacidad de los objetos de plástico para resistir las temperaturas altas y los
detergentes varía. Es recomendable colocar los objetos livianos, tales como tapas
y mantequeras, sólo en la canasta superior. Objetos duros tales como
refrigerantes y bandejas de sillas para bebés pueden colocarse en la canasta
inferior. Cuando lave objetos de plástico en la canasta inferior, no es
recomendable usar la opción de Heated Dry (Secado con calor).
prolongado con los alimentos que contienen sal, vinagre, productos lácteos o
jugos de fruta puede dañar el acabado.
44
Page 45

Material ¿Lavable en la
lavavajillas?
Comentarios
Plata de ley o con
baño de plata
Hojalata No No se recomienda.
Artículos de madera No Lávelos a mano. Consulte siempre las recomendaciones del fabricante antes de
Sección de cacerolas
grandes
Sí Haga correr un ciclo de enjuague si no va a lavar de inmediato. El contacto
prolongado con los alimentos que contienen sal, ácido o sulfuro (huevos,
mayonesa y mariscos) puede dañar el acabado.
lavar. La madera no tratada puede deformarse, agrietarse o perder el acabado.
Sí Es posible que haya ciertas fuentes que no encajen enfrente de la característica
TurboZone
inferior. Regule las puntas según sea necesario para cargar los platos grandes.
®
(en algunos modelos) en la parte posterior de la canasta de platos
CUIDADO DE LA LAVAVAJILLAS
Limpieza
Limpieza del exterior
En la mayoría de los casos, todo lo que se debe hacer es usar periódicamente un
paño suave y húmedo o una esponja con un detergente suave para que el exterior de
su lavavajillas se vea limpio y reluciente. Si el exterior de la lavavajillas es de acero
inoxidable, se recomienda un limpiador de acero inoxidable.
Limpieza del interior
Los residuos minerales del agua dura pueden causar la acumulación de una película
blanca en las superficies interiores, sobre todo inmediatamente debajo del área de la
puerta.
No limpie el interior de la lavavajillas hasta que se haya enfriado. Quizás sea
necesario usar guantes de hule. No utilice ningún tipo de limpiador que no sea el
detergente recomendado para lavavajillas, debido a que puede producir espuma en
exceso.
Para limpiar el interior
Haga una pasta con el detergente en polvo de lavavajillas sobre una esponja
húmeda y limpie.
O BIEN
Use detergente líquido para lavavajillas automáticas y limpie con una esponja
húmeda.
O BIEN
Consulte el procedimiento de enjuague con vinagre en la sección “Solución de
problemas” bajo “Vajilla turbia o con manchas (y solución de agua dura)”.
NOTA: Ponga a funcionar un ciclo normal con detergente para lavavajillas después
de limpiar el interior.
45
Page 46

Para limpiar la purga de aire del
desagüe
Vacaciones o tiempo prolongado sin uso
Para disminuir el riesgo de daños a la
propiedad
Purga de aire del desagüe
Algunas normas de plomería locales o estatales exigen que se instale una purga de
aire del desagüe entre una lavavajillas empotrada y el sistema de desagüe de la
casa. Revise la purga de aire del desagüe cuando su lavavajillas no esté desaguando
bien.
La purga de aire del desagüe está por lo general ubicada encima del fregadero o en
el mostrador, cerca de la lavavajillas. Para pedir una purga de aire del desagüe,
llame al 1-800-4-MY-HOME
NOTA: La purga de aire del desagüe es un dispositivo de plomería externo que no
forma parte de su lavavajillas. La garantía proporcionada para su lavavajillas no
cubre los costos de servicio técnico directamente asociados con la limpieza o
reparación de una purga de aire del desagüe externa.
Limpie la purga de aire del desagüe periódicamente para asegurar un desagüe
apropiado de su lavavajillas. Para la mayoría de tipos de purgas, usted tiene que
levantar la tapa de cromo. Destornille la tapa de plástico. Luego revise si hay
acumulación de suciedad. Limpie si es necesario.
■ Si no va a utilizar la lavavajillas durante el verano, apague el agua y el suministro
eléctrico a la lavavajillas.
■ Asegúrese de que las líneas de suministro de agua estén protegidas contra las
temperaturas bajo cero. Las formaciones de hielo en las líneas de suministro
pueden aumentar la presión del agua y dañar la lavavajillas u ocasionar daños
en la casa. El deterioro a causa de las temperaturas bajo cero no está cubierto
por la garantía.
■ Cuando guarde la lavavajillas durante el invierno, evite los daños ocasionados
por el agua al acondicionar para el invierno la lavavajillas por parte de personal
de servicio autorizado.
®
. Pida la pieza número 300096.
46
Page 47

SOLUCIÓN DE PROBLEMAS
VERIFIQUE ESTOS CONCEPTOS PARA AYUDARLO A AHORRAR TIEMPO Y DINERO.
PROBLEMA SOLUCIÓN
LA LAVAVAJILLAS
NO FUNCIONA
QUEDA DETERGENTE EN EL
DEPÓSITO O
LA PASTILLA ESTÁ EN EL
FONDO DE LA TINA
EL CICLO SE PROLONGA
DEMASIADO
NOTA: Es normal que la lavavajillas haga varias pausas repetidamente durante un ciclo.
Si está destellando la luz de Start/Resume (Inicio/Reanudar), cierre la puerta y empuje START/
RESUME (Inicio/Reanudar).
Cerciórese de que la puerta esté cerrada y asegurada.
Cerciórese de que no haya interferencia con fuentes grandes y el sistema de lavado en la parte
posterior de la lavavajillas. Ajuste la carga según sea necesario, para cerciorarse de que la
puerta esté cerrada y asegurada.
Cerciórese de haber desactivado Sleep Mode (Modo de dormir), ya sea presionando START/
RESUME (Inicio/Reanudar) o CANCEL/DRAIN (Cancelar/Desaguar) o abriendo la puerta antes
de seleccionar el ciclo o la opción
Asegúrese de haber seleccionado un ciclo. (Vea “Información sobre ciclos y opciones (en
algunos modelos)”.)
Asegúrese de que haya suministro de energía a la lavavajillas. Es posible que se haya disparado
un cortacircuitos o un fusible.
Si están destellando otras luces que no sean la de Start/Resume (Inicio/Reanudar) y la unidad
no funciona, deberá llamar para solicitar servicio técnico.
Fíjese si hay artículos tales como charolas para galletas, tablas de cortar o recipientes grandes,
etc., que pudieran impedir que el depósito de detergente se abra como es debido.
Cerciórese de que el detergente esté fresco y sin grumos.
Asegúrese de que se haya terminado el ciclo (la luz azul está encendida). Si no se ha terminado,
deberá reanudar el ciclo cerrando la puerta y presionando START/RESUME (Inicio/Reanudar).
NOTAS:
■ Para usar menos agua y reducir el consumo de energía, usted verá que algunos ciclos en
general funcionan hasta por 3 horas.
■ Lo mejor es fijar el calentador de agua a 120°F (49°C), ya que la lavavajillas demorará más
mientras calienta el agua que esté más fría.
■ Algunas opciones aumentarán el tiempo al ciclo. (Vea la sección “Información sobre los
ciclos y opciones (en algunos modelos)”.) La opción de Heated Dry (Secado con calor)
agregará ½ hora.
Pruebe con el ciclo de 1 Hour Wash (Lavado de 1 hora).
Antes de comenzar el ciclo, haga correr agua caliente de un grifo que esté cerca de la
lavavajillas.
LA LAVAVAJILLAS NO SECA NOTA: Los objetos de plástico y los artículos con superficies antiadherentes son difíciles de
secar, ya que tienen una superficie porosa que tiende a retener las gotas de agua. Puede ser
necesario secar con un paño de cocina.
Se necesita usar el agente de enjuague junto con la opción de Heated Dry (Secado con calor)
para un secado adecuado.
El cargar los artículos adecuadamente puede tener un efecto en el secado. (Vea las
instrucciones de carga específicas dentro de este manual.)
Los vasos y las tazas con base cóncava retienen el agua. Esta agua puede derramarse sobre
otros artículos al descargarlos.
■ Vacíe primero la canasta inferior.
■ Ubique estos artículos en el lado más inclinado de la canasta, para obtener mejores
resultados.
NO SE LLENA Asegúrese de que la llave de agua a la lavavajillas esté abierta.
Verifique que el flotador esté libre de obstrucciones. (Vea “Piezas y características”.)
Revise si hay espuma en la lavavajillas. Si se detecta espuma, es posible que la lavavajillas no
funcione correctamente o que no se llene de agua.
47
Page 48

PROBLEMA SOLUCIÓN
H
E
H
E
QUEDA AGUA EN LA TINA/
NO DESAGUA
Asegúrese de que se haya terminado el ciclo (la luz azul está encendida). Si no se ha terminado,
deberá reanudar el ciclo cerrando la puerta y presionando START/RESUME (Inicio/Reanudar).
Si la lavavajillas está conectada a un recipiente de desechos alimenticios, asegúrese de haber
quitado el tapón del disco removible de la entrada del recipiente de desechos.
Revise si la manguera de desagüe está retorcida.
Revise si hay obstrucciones de comida en el desagüe o en el recipiente de desechos.
Revise el fusible o el cortacircuitos de la casa.
AGUA DURA
(RESIDUO BLANCO EN EL
INTERIOR DE LA
LAVAVAJILLAS O EN LA
CRISTALERÍA)
NOTA: Los residuos minerales del agua extremadamente dura pueden causar daños en su
lavavajillas y hacer difícil que se obtenga una buena limpieza. Puede traer sus muestras de agua
a Sears para verificar el nivel de dureza del agua de su casa. Se recomienda enérgicamente un
ablandador de agua si el agua tiene una dureza de 15 granos o más. Si no se instala un
ablandador de agua, pueden ayudar los pasos siguientes:
Use un limpiador comercial diseñado para lavavajillas, una vez por mes.
Limpie los filtros ULTRA WASH
®
por lo menos una vez por mes.
Use siempre un agente de enjuague.
Siempre use un detergente fresco de alta calidad.
Use un aditivo para realzar el detergente/ablandador de agua que esté diseñado para
lavavajillas.
OLORES NOTA: Si la lavavajillas no se utiliza diariamente, puede poner en marcha un ciclo de enjuague
con la carga parcial hasta que llene una carga completa o utilice la opción Top Rack Only (Sólo
la canasta superior) (en algunos modelos) para las cargas parciales.
Ponga a funcionar un enjuague con vinagre en la lavavajillas, colocando 2 tazas (500 ml) de
vinagre blanco en una taza medidora de vidrio en posición vertical, en la canasta inferior. Haga
funcionar un ciclo normal con la opción de Heated Dry (Secado con calor) apagada. No use
detergente.
Es posible que la lavavajillas no esté desaguando como es debido; vea “QUEDA AGUA EN LA
TINA/NO DESAGUA” en “Solución de problemas”.
RUIDOS NOTAS:
■ Se pueden escuchar periódicamente sonidos de gorgoteo a lo largo del ciclo, mientras se
desagua la lavavajillas.
■ Puede escucharse periódicamente el silbido normal de la válvula de agua.
■ Puede escucharse un sonido normal de chasquido cuando se abre el depósito de detergente
durante el ciclo y cuando se abre la puerta al final del mismo.
■ La instalación incorrecta afectará los niveles de ruido.
Asegúrese de que estén bien instalados los filtros.
Puede escucharse un golpeteo si los artículos se extienden más allá de las canastas e interfieren
con los brazos de lavado. Reacomode la vajilla y reanude el ciclo.
QUEDA SUCIEDAD DE LOS
ALIMENTOS EN LOS PLATOS
Asegúrese de cargar correctamente la lavavajillas. Una carga indebida puede disminuir en gran
proporción el rendimiento de lavado (vea “Cómo cargar para un mejor desempeño en el lavado
y el secado”).
Verifique el filtro para asegurarse de que está instalado correctamente. Límpielo de ser
necesario. (Vea “Instrucciones de limpieza” en “Sistema de filtración ULTRA WASH
obtener detalles.)
Seleccione el ciclo y la opción adecuados para el tipo de suciedad. Puede usarse el ciclo de Pots
& Pans (Ollas y cacerolas) con la opción TurboZone
sucias.
Cerciórese de que la temperatura de entrada de agua sea de por lo menos 120°F (49°C).
Use la cantidad adecuada de detergente fresco. Se necesitará más detergente para las cargas
con suciedad pesada y condiciones de agua dura.
Quite los restos de comida de los platos antes de ponerlos en la lavavajillas (no los enjuague
previamente).
®
” para
®
(en algunos modelos) para las cargas más
48
Page 49

PROBLEMA SOLUCIÓN
NO HA HIGIENIZADO Si la luz de higienizado está destellando, la carga NO ha sido higienizada. Se ha interrumpido
el ciclo en el enjuague final o el calentador de agua se ha fijado en una temperatura muy baja.
Fije el calentador de agua en 120ºF (49ºC).
DAÑOS EN LA VAJILLA Una carga inapropiada puede hacer que los platos se desportillen o se dañen. (Vea las
instrucciones de carga específicas dentro de este manual.)
LUCES DESTELLANDO Si está destellando Start/Resume (Inicio/Reanudar) u otras luces de estado y la lavavajillas no
funciona, cierre la puerta y presione START/RESUME (Inicio/Reanudar). Si la lavavajillas
todavía no funciona, llame para solicitar servicio.
VAJILLA TURBIA O CON
MANCHAS (Y SOLUCIÓN DE
AGUA DURA)
CORROSIÓN (TURBIDEZ
PERMANENTE)
NOTAS:
■ Es necesario un agente de enjuague líquido para secar y reducir las manchas.
■ Use la cantidad adecuada de detergente.
Confirme que se pueda quitar la turbidez remojando el artículo en vinagre blanco durante
5 minutos. Si desaparece la turbidez, ésta se debe a agua dura. Regule la cantidad de
detergente y agente de enjuague. Vea “AGUA DURA (RESIDUO BLANCO EN EL INTERIOR DE
LA LAVAVAJILLAS O EN LA CRISTALERÍA)”, en “Solución de problemas”. Si no se aclara, es
debido a la corrosión (vea a continuación).
Cerciórese de que la temperatura de entrada de agua esté fijada a 120°F (49°C).
Pruebe usar las opciones de High Temp (Temperatura alta) y Sani Rinse (Enjuague sanitario).
Para quitar las manchas, haga correr un enjuague con vinagre en la lavavajillas.
■ Lave y enjuague la vajilla que esté afectada y cárguela en la lavavajillas. Quite todos los
objetos metálicos y cubiertos. Ponga 2 tazas (500 mL) de vinagre blanco en una taza
medidora de vidrio en la canasta inferior. Haga funcionar un ciclo normal con la opción de
Heated Dry (Enjuague con calor) apagada. No se necesita detergente.
Esto es una erosión de la superficie de la cristalería y puede ser causada por una combinación
de lo siguiente: agua muy caliente, el uso de demasiado detergente en agua blanda o el lavado
previo. El detergente necesita de la suciedad de la comida para actuar. Si ha habido corrosión,
la cristalería está permanentemente dañada. Para evitar que continúe ocurriendo la corrosión,
regule la cantidad de detergente de manera que coincida con la dureza del agua, deje de lavar
previamente y use opciones de calentamiento de agua solamente cuando la temperatura del
agua de entrada sea menor de 120°F (49°C).
FUGAS DE AGUA Asegúrese de que la lavavajillas esté instalada correctamente y de que esté nivelada.
La espuma puede hacer que se desborde la lavavajillas. Mida el detergente con precisión y use
solamente detergentes diseñados para ser usados en una lavavajillas. Se necesita menos
detergente en agua blanda. Si continúa el exceso de espuma, pruebe otra marca de detergente.
Para evitar que se salga el agente de enjuague del depósito, cerciórese de que la tapa esté bien
sujeta y evite el sobrellenado.
SE HA DECOLORADO LA TINA NOTAS:
■ El alto contenido de hierro en el agua puede decolorar la tina.
■ Los alimentos a base de tomate pueden manchar la tina o la vajilla.
■ Puede usarse un limpiador a base de cítricos para limpiarla.
49
Page 50

TABLE DES MATIÈRES
CONTRATS DE PROTECTION ................................................50
GARANTIE ..............................................................................51
SÉCURITÉ DU LAVE-VAISSELLE .............................................52
QUOI DE NEUF DANS VOTRE LAVE-VAISSELLE ...................54
Énergie.............................................................................................. 54
Rendement .......................................................................................54
PIÈCES ET CARACTÉRISTIQUES.............................................55
DÉMARRAGE / GUIDE RAPIDE..............................................56
®
SYSTÈME DE FILTRATION ULTRA WASH
CONSEILS D’EFFICACITÉ POUR LE LAVE-VAISSELLE ............59
DÉTERGENT ET AGENT DE RINÇAGE....................................59
Détergent ......................................................................................... 59
Agent de rinçage............................................................................60
CHARGEMENT....................................................................... 61
Chargement pour un nettoyage et un séchage idéaux............ 61
.............................57
CONTRATS DE PROTECTION
Contrats principaux de protection
Nous vous félicitons d'avoir fait un achat judicieux.
appareil Kenmore® est conçu et fabriqué pour vous procurer des
années de fonctionnement fiable. Mais comme pour tous les
produits, il pourra à l'occasion nécessiter un entretien préventif
ou une réparation. Le cas échéant, un Contrat principal de
protection peut vous épargner de l'argent et des soucis.
Le Contrat principal de protection contribue aussi à prolonger la
vie utile de votre nouvel appareil ménager. Le Contrat* inclut :
✔Pièces et main-d'œuvre nécessaires pour conserver les
appareils en état de fonctionnement correct pendant une
utilisation normale, pas uniquement les défaillances. Notre
couverture va bien au-delà de la garantie du produit.
Aucune franchise, aucune anomalie de fonctionnement ne
sont exclues de ce contrat - protection réelle.
✔Un service d'expert proposé par plus de 10 000 techniciens
d'entretien Sears autorisés, ce qui signifie que quelqu'un de
confiance prendra soin de votre produit.
✔Appels de service illimités et service national, aussi souvent
que vous en avez besoin et quand vous en avez besoin.
✔Garantie “Anti-citron” - remplacement de votre produit
couvert si plus de quatre pannes se produisent en deçà de
douze mois.
✔Remplacement du produit si votre produit couvert ne peut
être réparé.
✔Vérification annuelle d'entretien préventif sur demande -
sans frais supplémentaires.
✔Aide rapide par téléphone - nous appelons cela Résolution
rapide - soutien téléphonique d'un agent de Sears sur tous les
produits. Considérez-nous comme un “manuel d'utilisateur
parlant”.
Votre nouvel
Chargement du panier supérieur .................................................62
Chargement du panier inférieur.................................................. 64
UTILISATION DU LAVE-VAISSELLE .......................................66
Informations sur les programmes et les options
(sur certains modèles).....................................................................66
Section module de commande du lave-vaisselle......................68
Section commentaires sur l'utilisation du lave-vaisselle...........68
Annulation d’un programme .........................................................68
Modification d'un programme après la
mise en marche du lave-vaisselle ................................................69
LAVAGE D’ARTICLES SPÉCIAUX ...........................................69
ENTRETIEN DU LAVE-VAISSELLE ..........................................70
Nettoyage........................................................................................70
Dispositif de brise-siphon...............................................................71
Vacances ou longue période d'inutilisation ............................... 71
DÉPANNAGE.........................................................................72
NUMÉROS DE SERVICE ....................... COUVERTURE ARRIÈRE
✔Protection contre les sautes de puissance pour prévenir les
dommages électriques attribuables aux fluctuations de
courant.
✔Couverture pour la perte de nourriture de 250 $ par an sur
tout aliment altéré en raison d'une défaillance mécanique sur
tout réfrigérateur ou congélateur couvert.
✔Remboursement de location si la réparation du produit
couvert prend plus de temps que promis.
✔10 % de réduction sur le prix courant de toute intervention
de réparation non couverte et pièces de rechange.
Dès que vous achetez le Contrat, il suffit d'un appel
téléphonique pour obtenir un rendez-vous de service. Vous
pouvez appeler en tout temps jour et nuit ou prendre un rendezvous de service en direct.
Le Contrat principal de protection constitue un investissement
sans risque. Si vous annulez pour une quelconque raison pendant
la période de garantie du produit, nous vous rembourserons
intégralement ou nous vous verserons un remboursement au
prorata après l'expiration de la période de garantie. Achetez
votre Contrat principal de protection aujourd'hui même!
Certaines limitations et exclusions s'appliquent. Pour des prix et
renseignements supplémentaires aux États-Unis, composez le
18008276655.
*Le contrat de couverture au Canada varie pour certains
articles. Pour des informations détaillées, appelez Sears
Canada au 18003616665.
Service d'installation Sears
Pour l'installation professionnelle garantie par Sears d'appareils
ménagers et d'articles tels que les ouvre-portes de garage,
chauffe-eau, et autres gros appareils ménagers, aux É.U. ou au
Canada, composez le 18004MYHOME
®
.
50
Page 51

GARANTIE DES APPAREILS MÉNAGERS KENMORE
GARANTIE LIMITÉE DE UN AN
Lorsqu'il est installé, utilisé et entretenu conformément à toutes
les instructions fournies avec le produit, si cet appareil ménager
fait défaut par suite d'un vice de matériau ou de fabrication au
cours de l'année qui suit la date d'achat, composer le
18004MYHOME
La présente garantie s'applique seulement pendant 90 jours à
compter de la date d'achat si l'appareil est utilisé à d'autres fins
que l'utilisation domestique privée.
LA PRÉSENTE GARANTIE COUVRE UNIQUEMENT LES VICES
DE MATÉRIAUX ET DE FABRICATION. SEARS NE PAIERA PAS
POUR :
1. Les pièces courantes qui peuvent s'user suite à une utilisation
normale, notamment les filtres, courroies, ampoules à
incandescence et sacs.
2. L'intervention d'un technicien pour montrer à l'utilisateur
comment installer, utiliser et entretenir correctement le
produit.
3. L'intervention d'un technicien pour nettoyer ou entretenir ce
produit.
4. L'endommagement ou les défauts du produit si celui-ci n'est
pas installé, utilisé ou entretenu conformément à toutes les
instructions fournies avec le produit.
®
pour obtenir une réparation gratuite.
5. L'endommagement ou les défauts du produit résultant
d'accident, usage impropre ou abusif ou utilisation autre que
celle pour laquelle il est destiné.
6. L'endommagement ou les défauts du produit causés par
l'utilisation de détergents, agents de nettoyage, produits
chimiques ou ustensiles autres que ceux recommandés dans
toutes les instructions fournies avec le produit.
7. L'endommagement ou les défauts des pièces ou systèmes
résultant d'une modification non autorisée faite au produit.
CLAUSE D'EXONÉRATION DE RESPONSABILITÉ AU TITRE DES
GARANTIES IMPLICITES; LIMITATION DES RECOURS
Le seul et exclusif recours du client dans le cadre de la présente
garantie limitée consiste en la réparation prévue ci-dessus. Les
garanties implicites, y compris les garanties applicables de
qualité marchande et d'aptitude à un usage particulier, sont
limitées à un an ou à la plus courte période autorisée par la loi.
Sears n'assume aucune responsabilité pour les dommages
fortuits ou indirects. Certains États ou certaines provinces ne
permettent pas l'exclusion ou la limitation des dommages
fortuits ou indirects, ou la limitation de la durée des garanties
implicites de qualité marchande ou d'aptitude à un usage
particulier, de sorte que cette exclusion ou limitation peut ne pas
être applicable dans votre cas.
Cette garantie s'applique seulement lorsque cet appareil
ménager est utilisé aux États-Unis ou au Canada.
Cette garantie vous confère des droits juridiques spécifiques et
vous pouvez également jouir d'autres droits qui peuvent varier
d'un État à l'autre.
Sears Brands Management Corporation
Hoffman Estates, IL 60179
Sears Canada Inc.
Toronto, Ontario, Canada M5B 2C3
51
Page 52

SÉCURITÉ DU LAVE-VAISSELLE
Risque possible de décès ou de blessure grave si
Risque possible de décès ou de blessure grave
si vous ne suivez pas les instructions.
Tous les messages de sécurité vous diront quel est le danger potentiel et vous disent comment réduire le risque de
Votre sécurité et celle des autres est très importante.
Nous donnons de nombreux messages de sécurité importants dans ce manuel et sur votre appareil ménager.
Ce symbole d’alerte de sécurité vous signale les dangers potentiels de décès et de blessures graves
Tous les messages de sécurité suivront le symbole d’alerte de sécurité et le mot “DANGER” ou
“AVERTISSEMENT”. Ces mots signifient :
DANGER
AVERTISSEMENT
Assurez-vous de toujours lire tous les messages de sécurité et de vous y conformer.
à vous et à d’autres.
Voici le symbole d’alerte de sécurité.
vous ne suivez pas immédiatement les instructions.
blessure et ce qui peut se produire en cas de non-respect des instructions.
IMPORTANTES INSTRUCTIONS DE SÉCURITÉ
AVERTISSEMENT :
Lors de l’utilisation du lave-vaisselle, suivre les précautions élémentaires dont les suivantes :
CONSERVEZ CES INSTRUCTIONS
■
Lire la totalité des instructions avant d’utiliser le
lave-vaisselle.
■
N’utiliser le lave-vaisselle que pour laver la vaisselle.
■
Utiliser les détersifs ou agents de rinçage
recommandés pour lave-vaisselle et les garder hors
de la portée des enfants.
■
Lorsque vous chargez le lave-vaisselle :
1) Placer les objets coupants de façon qu’ils ne
puissent endommager le joint de la porte; et
2) Placer les couteaux le manche vers le haut de
façon à ne pas vous couper.
■
Ne pas laver d’articles en plastique à moins qu’ils ne
soient marqués “Peut aller au lave-vaisselle” ou
l’équivalent. Si l’article ne porte aucune indication,
vérifier auprès du fabricant.
■
Ne pas toucher l’élément chauffant pendant le
fonctionnement ou immédiatement après.
■
Ne pas faire fonctionner le lave-vaisselle si tous les
panneaux de l’enceinte ne sont pas en place.
■
Ne pas jouer avec les commandes.
■
Ne pas abuser, vous asseoir ni monter sur la porte,
le couvercle ou les paniers du lave-vaisselle.
■
Pour éviter tout risque d’accident, ne pas laisser les
enfants jouer dans ou sur le lave-vaisselle.
■
Sous certaines conditions, de l’hydrogène peut se
former dans un réseau d’eau chaude inutilisé depuis
deux semaines ou plus. L’HYDROGÈNE EST UN
GAZ EXPLOSIBLE. Si le système d’eau chaude n’a
pas été utilisé depuis un certain temps, laisser couler
l’eau chaude des robinets pendant quelques minutes
avant de faire fonctionner le lave-vaisselle. Cette
mesure permettra à l’hydrogène de s’évaporer. Ce
gaz étant inflammable, ne pas fumer ni utiliser de
flamme nue pendant cette période.
■
Enlever la porte ou le couvercle du compartiment de
lavage lorsque vous remplacez ou mettez au rebut
un vieux lave-vaisselle.
Avertissements de la proposition 65 de l'État de Californie :
AVERTISSEMENT : Ce produit contient au moins un produit chimique connu par l’État de Californie pour être à
l’origine de cancers.
AVERTISSEMENT : Ce produit contient au moins un produit chimique connu par l’État de Californie pour être à
l’origine de malformations et autres déficiences de naissance.
52
Page 53

Risque de basculement
Ne pas utiliser le lave-vaisselle jusqu’à ce qu’il
soit complètement installé.
Ne pas appuyer sur la porte ouverte.
Le non-respect de ces instructions peut causer
des blessures graves ou des coupures.
Risque de choc électrique
Relier le lave-vaisselle à la terre d’une méthode
électrique.
Brancher le fil relié à la terre au connecteur vert
relié à la terre dans la boîte de la borne.
Ne pas utiliser un câble de rallonge.
Le non-respect de ces instructions peut causer
un décès, un incendie ou un choc électrique.
■
Pour un lave-vaisselle relié à la terre, branché
avec un cordon :
Le lave-vaisselle doit être relié à la terre. En cas
d'un mauvais fonctionnement ou d'une panne, la
mise à terre réduira le risque d'un choc électrique
en fournissant le moins de résistance pour le
courant électrique. Le lave-vaisselle est équipé
d'un cordon avec un conducteur pour relier les
appareils à la terre. La fiche doit être branchée
sur une prise appropriée, installée et reliée à la
terre conformément aux codes et règlements
locaux.
AVERTISSEMENT : La connexion
incorrecte du conducteur pour relier les appareils
à la terre peut causer le risque de choc électrique.
Vérifier avec un électricien compétent ou un
représentant de service si vous avez des doutes
si le lave-vaisselle est correctement relié à la
terre. Ne pas modifier la fiche fournie avec le lavevaisselle; si elle n'entre pas dans la prise, faire
installer une prise appropriée par un électricien
compétent.
■
Pour un lave-vaisselle branché en permanence :
Le lave-vaisselle doit être branché à un système
d'installation électrique permanent en métal relié
à la terre, ou un conducteur pour relier les
appareils à la terre doit être relié avec les
conducteurs du circuit et branché à une borne
pour relier les appareils à la terre ou au cordon
d'alimentation électrique avec le lave-vaisselle.
INSTRUCTIONS DE MISE À LA TERRE
CONSERVEZ CES INSTRUCTIONS
■ Installer le lave-vaisselle à l'abri des intempéries. Éviter de
l'exposer au gel; cela pourrait entraîner une rupture de
l'électrovanne de remplissage. De telles ruptures ne sont pas
couvertes par la garantie. Voir la section "Vacances ou
longue période d'inutilisation".
■ Effectuer l'installation et le nivellement du lave-vaisselle sur
un plancher qui pourra en supporter le poids, et dans un
espace adéquat pour ses dimensions et son utilisation.
■ Enlever tous les bouchons d'expédition des tuyaux et des
raccords (tel que le capuchon sur l'ouverture de vidange)
avant l'installation. Voir les instructions d'installation pour
des renseignements complets.
53
Page 54

QUOI DE NEUF DANS VOTRE LAVE-VAISSELLE
H
E
USE RINSE AID FOR
BETTER DRYING
Lock
Refill
Full
Add
P
U
S
H
D
O
W
N
&
T
U
R
N
L
O
C
K
U
N
L
O
C
K
Énergie
Félicitations pour l’achat de votre lave-vaisselle éconergique à faible consommation d’eau! Pour nettoyer les
articles, ce lave-vaisselle asperge la vaisselle d’eau puis fait une pause pour permettre au détergent d'imprégner
et de dissoudre les saletés. Les périodes de trempage et de pause prolongent la durée des programmes pour un
nettoyage exceptionnel. Les modèles équipés de SmartWash
d’eau. Le capteur optique d’eau détermine le niveau de consommation d’eau et d’énergie optimal pour un
meilleur nettoyage. Le calibrage du capteur optique entraînera l’allongement du premier programme qui l’utilise.
Agent de rinçage
Utiliser un agent de rinçage pour une performance de lavage
et de séchage optimale. Afin d’améliorer la performance de
séchage et de limiter l’accumulation de dépôts d’eau dure, ce
lave-vaisselle est conçu pour être utilisé avec un agent de
rinçage. Les lave-vaisselle éconergiques consomment moins
d’eau et d’énergie. Ils dépendent donc de l’effet “nappe d’eau”
d’un agent de rinçage pour une performance optimale.
®
comportent également un capteur optique
Rendement
Détergent
Les États-Unis et le Canada ont voté une restriction limitant la
quantité de phosphore (phosphates) présents dans les
détergents domestiques pour lave-vaisselle à un maximum de
0,5 %. Avant cette mesure, les détergents en contenaient
8,7 %. Suite à ce changement concernant les détergents, les
plus gros fabricants de détergent ont reformulé leurs détergents
pour lave-vaisselle, ce qui représente un pas de plus vers la
prise de conscience environnementale. En raison de ces récents
changements, il est recommandé d’utiliser des pastilles et
sachets pour lave-vaisselle qui offrent à la fois un aspect
pratique et une meilleure performance.
Système de filtration
Ce lave-vaisselle est équipé de la toute dernière technologie en
matière de filtration. Ce système de triple filtration minimise le
niveau sonore et optimise le niveau de consommation d’eau et
d’énergie tout en procurant un nettoyage optimal. Pour un
nettoyage optimal, entretenir régulièrement votre lavevaisselle. Nous vous suggérons de nettoyer les filtres supérieur
et inférieur et de rincer le système sous le robinet au moins une
fois par mois.
54
Page 55

PIÈCES ET CARACTÉRISTIQUES
55
Page 56

DÉMARRAGE / GUIDE RAPIDE (VARIE SELON LE MODÈLE)
H
E
H
E
P
U
S
H
D
O
W
N
&
T
U
R
N
L
O
C
K
U
N
L
O
C
K
USE RINSE AID FOR
BETTER DRYING
Lock
Refill
Full
Add
H
E
H
E
H
E
Les filtres amovibles ULTRA WASH
®
offrent
une performance de pointe.
Un nettoyage régulier des
filtres permettra au lavevaisselle de maintenir une
performance maximale. Les
filtres se trouvent dans le
fond du lave-vaisselle, au
centre.
Voir “SYSTÈME DE
FILTRATION ULTRA
®
WASH
” pour plus de
renseignements sur le retrait
et l’entretien des filtres.
IMPORTANT : Ne pas obstruer le distributeur
de détergent.
De grands articles placés
dans le panier inférieur
pourraient entraver
l’ouverture du clapet du
distributeur. Des tôles à
biscuits ou planches à
découper qui seraient
chargées sur la gauche
peuvent facilement entraver
l’ouverture du distributeur. Si
l’on remarque du détergent
dans le distributeur ou au
fond de la cuve après la fin
d’un programme, cela
signifie que le distributeur
était bloqué.
Séchage - L’emploi d’un agent de rinçage est
essentiel.
Il faut utiliser un agent de
séchage (tel un agent de
rinçage) pour obtenir un bon
séchage (échantillon fourni).
Un agent de rinçage
combiné à l’option Heated
Dry (séchage avec chaleur)
offrira une performance de
séchage idéale et permettra
d’éviter une humidité
excessive à l’intérieur du
lave-vaisselle.
Lavage en 1 heure - Pour des résultats rapides.
Les lave-vaisselle à haute efficacité
fonctionnent plus longtemps pour économiser
de l’eau et de l’énergie, tout comme une vitesse
de conduite réduite permet d’économiser du
carburant. Pour des résultats rapides, le lavage
en 1 heure nettoie votre vaisselle en utilisant
légèrement plus d’eau et d’énergie. Pour un
meilleur séchage, sélectionner l’option Heated
Dry (séchage avec chaleur) pour prolonger le
temps de séchage.
Programme SmartWash
®
SmartWash®fournit des résultats optimaux
en utilisant uniquement la quantité d’eau et
d’énergie nécessaire. Les programmes
SmartWash
®
et Pots & Pans (casseroles et
poêles) sont recommandés pour les saletés
tenaces.
Chargement TurboZone
®
(sur certains modèles)
Lorsque l’option
TurboZone
sélectionnée, elle
offre un lavage
concentré à l’arrière
du panier inférieur
pour les plats
difficiles à nettoyer.
Placer ces plats en
orientant la surface
sale du plat vers les
orifices d’aspersion
TurboZone
panier inférieur du
lave-vaisselle.
®
est
®
dans le
56
Page 57

Appuyer sur START chaque fois que l’on
H
E
ajoute un plat.
Pour démarrer ou poursuivre un programme,
appuyer sur START (mise en marche) et fermer
la porte dans les 3 secondes qui suivent. Si on
ne ferme pas la porte dans les 3 secondes qui
suivent, le bouton de mise en marche DEL
clignote et le programme ne démarre pas.
IMPORTANT : Si l’on ouvre la porte (par
exemple pour ajouter un plat, même pendant
le fonctionnement de l’option Delay Hours
[mise en marche différée de plusieurs heures]),
il faut à chaque fois appuyer sur le bouton
START (mise en marche) et fermer la porte
dans les 3 secondes qui suivent pour poursuivre
le programme.
Dosage du détergent
Il est possible que certains utilisateurs emploient trop de
détergent dans le lave-vaisselle. Cela peut attaquer les plats.
Voir “Détergent et agent de rinçage” pour déterminer la
quantité de détergent nécessaire en fonction de la dureté de
l’eau. Il est prouvé que les détergents en pastilles ou en sachets
réduisent plus efficacement la formation de pellicule sur la
vaisselle que les détergents liquides, en poudre ou en gel.
SYSTÈME DE FILTRATION ULTRA WASH
®
Ce lave-vaisselle est équipé de la toute dernière technologie en matière de filtration. Ce système de triple filtration minimise le niveau
sonore et optimise la consommation d’eau et d’énergie tout en offrant une performance de nettoyage supérieure. Le filtre doit être
entretenu tout au long de la durée de vie du lave-vaisselle pour pouvoir continuer à fonctionner au mieux de sa performance.
Le système de triple filtration comporte 2 parties, un filtre supérieur et un filtre inférieur.
■ Le filtre supérieur permet de tenir des articles surdimensionnés ou des objets étrangers ainsi que les particules alimentaires très
fines à l’écart de la pompe.
■ Le filtre inférieur empêche les aliments de se redéposer sur la vaisselle.
Pour une performance de nettoyage optimale, nous suggérons d’entretenir les filtres tous les mois en retirant et en inspectant les filtres
inférieur et supérieur pour vérifier leur état de saleté. En fonction de la fréquence d’utilisation du lave-vaisselle, la fréquence de
nettoyage des filtres peut différer de celle indiquée dans le tableau ci-dessous.
Les filtres devront peut-être être nettoyés lorsque :
■ On remarque des objets ou saletés sur le filtre supérieur.
■ La performance de nettoyage se dégrade (c.-à-d. présence de saletés sur les plats).
■ Les plats sont rugueux au toucher.
Le retrait et l’entretien des filtres sont très faciles. Le tableau ci-dessous indique la fréquence de nettoyage recommandée.
57
Page 58

Intervalles de nettoyage recommandés pour le nettoyage du filtre
P
U
S
H
D
O
W
N
&
T
U
R
N
L
O
C
K
U
N
L
O
C
K
Nombre de
charges par
semaine
Si vous lavez avant le
chargement
Si vous grattez et rincez
les plats avant le
chargement
Si vous vous contentez de
gratter les plats avant le
chargement*
Si vous ne grattez ou ne
rincez pas les plats
avant le chargement
13-14 Une fois par an Deux fois par an Tous les deux mois Une fois par semaine
8-12 Une fois par an Tous les quatre mois Tous les deux mois Toutes les deux semaines
4-7 Une fois par an Une fois par an Tous les quatre mois Une fois par mois
1-3 Une fois par an Une fois par an Deux fois par an Tous les deux mois
*Conseil du fabricant : Ceci permet d’économiser l’eau et l’énergie utilisées pour la préparation des plats. Cela vous épargne
également du temps et des efforts.
Eau très dure
Si l’eau du domicile est très dure (au-delà de 15 grains), nettoyer le filtre au moins une fois par mois. L’accumulation de résidus blancs
dans le lave-vaisselle est le signe d’une eau dure. Vous pouvez apporter des échantillons d’eau à Sears pour contrôler le degré de
dureté de votre eau. Pour des conseils sur l’élimination de taches, voir la section “Dépannage”.
Instructions de retrait du filtre
1. Tourner le filtre supérieur d’un quart de tour dans le sens antihoraire et le soulever.
2. Saisir le filtre inférieur situé dans l’ouverture circulaire, le soulever légèrement et le tirer
vers l’avant pour le retirer.
3. Nettoyer les filtres tel qu’indiqué ci-dessous.
Retrait du filtre supérieur
Instructions de nettoyage
IMPORTANT : Ne pas utiliser de brosse métallique, de tampon à récurer, ou d’objets similaires car ils peuvent endommager les filtres.
Rincer le filtre sous l’eau courante jusqu’à ce que la plupart des
saletés soient éliminées. Si l’on remarque la présence de saletés
difficiles à retirer ou de dépôts de calcaire causés par l’eau dure,
l’emploi d’une brosse douce sera peut-être nécessaire.
58
Page 59

Instructions de réinstallation du filtre
H
E
1. En s’aidant des illustrations précédentes, placer le filtre inférieur sous les onglets de
positionnement situés au fond du lave-vaisselle de sorte que le filtre supérieur soit aligné
avec l’ouverture circulaire du fond de la cuve.
2. Insérer le filtre supérieur dans l’ouverture circulaire du filtre inférieur.
3. Faire pivoter lentement le filtre dans le sens horaire jusqu’à ce qu’il s’insère dans le
logement. Continuer à faire pivoter le filtre jusqu’à ce qu’il s’emboîte. Si le filtre n’est pas
complètement installé (continue de tourner librement), continuer à tourner le filtre dans le
sens horaire jusqu’à ce qu’il s’insère dans le logement et s’emboîte.
REMARQUE : Du moment que le filtre est bien emboîté, il n’est pas nécessaire que la flèche du
filtre supérieur soit alignée avec celle du filtre inférieur.
Réinstallation du filtre supérieur
IMPORTANT : Afin d’éviter d'endommager le lave-vaisselle, ne pas faire fonctionner le lave-vaisselle sans que les filtres ULTRA
®
WASH
ne soient correctement installés. S’assurer que le filtre inférieur est bien en place et que le filtre supérieur est bien emboîté.
Si le filtre supérieur tourne librement, cela signifie qu’il n’est pas bien emboîté.
CONSEILS D’EFFICACITÉ POUR LE LAVE-VAISSELLE
L’eau chaude dissout et active le détergent pour lave-vaisselle. L’eau chaude dissout également la graisse sur la vaisselle et contribue
au séchage des verres sans taches. Pour obtenir de meilleurs résultats de lavage, l’eau doit être à 120°F (49°C) à son entrée dans le
lave-vaisselle. Les charges peuvent ne pas être lavées aussi bien si la température de l’eau est trop basse.
Conseils d’efficacité supplémentaires
■ Pour économiser de l’eau, de l’énergie et du temps, se contenter de gratter la vaisselle. Ne pas rincer les plats avant de les placer
dans le lave-vaisselle.
■ Utiliser la caractéristique de mise en marche différée pour faire fonctionner votre lave-vaisselle en dehors des heures de pointe.
Les services publics locaux recommandent d’éviter l’emploi intense d’énergie à certaines heures de la journée.
■ Pendant l’été, faire fonctionner le lave-vaisselle la nuit. Cela permet de réduire l’accumulation de chaleur dans la cuisine pendant
la journée.
■ Utiliser un agent de rinçage pour améliorer le séchage.
DÉTERGENT ET AGENT DE RINÇAGE
Détergent
IMPORTANT : Utiliser uniquement du détergent pour lavevaisselle automatique. Un produit à vaisselle pour nettoyage
manuel produirait une quantité excessive de mousse et
déborderait du lave-vaisselle.
59
Page 60

Quantité de détergent recommandée
USE RINSE AID FOR
BETTER DRYING
Lock
Refill
Full
Add
3
2
-
-
-
max
fill
1
-
-
-
-
-
-
-
-
-
-
-
-
Lock
Refill
Ajouter la quantité de détergent recommandée tel qu'indiqué
dans chaque compartiment et fermer le couvercle de détergent.
Produits sous forme de poudre ou de gels
Compartiment de
lavage
principal
Dureté de l'eau
Niveau
de saleté
Compartiment de
prélavage
Agent de rinçage
Douce
(0 à 4 grains
Léger Vide ¹⁄₂
Normal Vide ¹⁄₂
par gallon US)
Élevé Plein ¹⁄₂
Moyenne
(5 à 9 grains
par gallon US)
Léger Vide ¹⁄₂
Normal ¹⁄₂ ¹⁄₂
Élevé Plein* Plein*
Dure
(10 à 14 grains
par gallon US)
Léger ¹⁄₂ Plein*
Normal Plein* Plein*
Élevé Plein* Plein*
*La capacité du compartiment de prélavage est de 7 cuillerées
à thé (35 mL) et celle du compartiment de lavage principal de
9 cuillerées à thé (45 mL).
Détergents pré-mesurés
Beaucoup de détergents sont vendus en format pré-mesuré
(sachets de gel, pastilles ou sachets de poudre). Ces formats
sont idéaux quelle que soit la dureté de l'eau et de saleté.
Toujours placer les détergents pré-mesurés dans le
compartiment principal et fermer le couvercle.
Il est prouvé que les détergents pour lave-vaisselle en pastilles
ou en sachet réduisent plus efficacement la formation de
pellicule sur la vaisselle que les détergents liquides, en poudre
ou en gel. Au fil de l’utilisation régulière de ces pastilles et
sachets, la pellicule blanche commencera à diminuer ou à
disparaître. L’utilisation d’un agent de rinçage peut aussi vous
aider à réduire la fréquence de la formation de cette pellicule
blanche.
IMPORTANT : Les dépôts minéraux provenant d'une eau très
dure (au moins 15 grains par gallon U.S.) peuvent endommager
le lave-vaisselle et rendre un bon nettoyage difficile. On
recommande l'emploi d'un adoucisseur d'eau pour éviter tout
dommage et obtenir de bons résultats. Vous pouvez apporter
des échantillons d'eau à Sears pour contrôler le degré de dureté
de votre eau.
IMPORTANT : Votre lave-vaisselle est conçu pour utiliser un
agent de rinçage liquide. L'utilisation d'agents de rinçage
améliore nettement le séchage en permettant à l'eau de
s'écouler de la vaisselle après le rinçage final. Ils empêchent
aussi l’eau de former des gouttelettes qui peuvent laisser des
taches ou des coulées en séchant.
Remplissage du distributeur
La capacité du distributeur d’agent de rinçage est de
5 oz (150 mL). Dans la plupart des cas, cette quantité devrait
durer environ 1 à 3 mois.
1. Tourner le bouton à la position REFILL (remplissage) et le
retirer.
2. Verser l'agent de rinçage dans l'ouverture jusqu'à ce que
l'indicateur soit sur FULL (plein). Ne pas remplir
excessivement.
3. Nettoyer les éventuelles coulées d'agent de rinçage. Des
coulées d'agent de rinçage peuvent entraîner une
production excessive de mousse.
4. Réinstaller le bouton et le tourner à la position LOCK
(verrouillage).
REMARQUE : L'indicateur indiquera le niveau de remplissage
correct lorsque la porte est complètement ouverte.
Réglage de la quantité d’agent de rinçage
Le distributeur d'agent de rinçage est réglable. Pour une
majorité de types d'eau, le réglage effectué à l'usine à 2
donnera de bons résultats. Si l'eau utilisée est dure ou si l'on
observe dépôts de calcaire sur la vaisselle, il peut être judicieux
d'essayer un réglage plus élevé. Si l'on remarque de la mousse
dans le lave-vaisselle, utiliser un réglage inférieur.
60
Ajustement du réglage
1. Tourner le bouton à la position REFILL (remplissage) et le
retirer.
2. Pointer la flèche à l'intérieur du distributeur sur le réglage
désiré.
3. Réinstaller le bouton et le tourner à la position LOCK
(verrouillage).
Page 61

CHARGEMENT
Chargement pour un nettoyage et un séchage idéaux
1. Orienter les surfaces les plus sales vers le bas et laisser
suffisamment d’espace entre les articles pour que l’eau
puisse circuler entre chaque panier et entre les plats.
Le fait de séparer les articles permet à l’eau de circuler.
3. Utiliser l’option TurboZone® (sur certains modèles) pour
les articles les plus sales en les orientant vers l'arrière du
panier inférieur.
Jets d’aspersion TurboZoneR) concentrés sur la saleté
4. Incliner les surfaces creuses tels les fonds de tasses à
café pour permettre à l’eau de s’écouler et pour
améliorer les résultats de séchage.
2. Pour un meilleur nettoyage des couverts, utiliser les
encoches des couvercles pour séparer les articles.
Séparés
Surfaces inclinées
61
Page 62

5. Vérifier que les bras d’aspersion tournent librement
avant chaque programme.
Les bras d’aspersion tournent librement.
6. Placer les tasses et les verres dans les rangées entre les
tiges.
Chargement du panier supérieur
Recommandations concernant le chargement
Placer les tasses et verres dans les rangées entre les tiges. Le fait de placer ces articles sur les tiges peut entraîner des dommages
et l’apparition de taches d’eau. Pour éviter d’endommager les articles délicats comme les articles en porcelaine, en cristal, les
verres à pied ou autres articles similaires, veiller à ce qu’ils ne se touchent pas pendant le fonctionnement du lave-vaisselle.
Charger les articles en plastique légers et lavables au lave-vaisselle uniquement dans le panier supérieur.
Disposition pour 10 couverts Disposition pour 12 couverts
Tiges flexibles (sur certains modèles)
La rangée de tiges de chaque côté du panier supérieur peut
être réglée pour faire de la place pour divers articles de
vaisselle.
62
Page 63

Tablettes à tasses et attaches pour verres à pied (sur certains modèles)
Rabattre la tablette supplémentaire sur un côté du panier
supérieur pour y placer des tasses, des verres à pied ou de
longs articles supplémentaires tels des ustensiles ou des
spatules.
Panier de luxe réglable à 2 positions
On peut élever ou abaisser le panier supérieur pour pouvoir
charger de grands articles dans le panier supérieur ou inférieur.
Les régleurs sont situés de chaque côté du panier supérieur.
Élever le panier supérieur pour pouvoir charger des articles
jusqu’à 9" (22 cm) dans le panier supérieur et jusqu’à 13"
(33 cm) dans le panier inférieur, ou abaisser le panier supérieur
pour pouvoir charger des articles jusqu’à 11" (28 cm) dans les
paniers supérieur et inférieur.
1. Pour élever le panier, le soulever jusqu’à ce que les deux
côtés se trouvent à la même hauteur et s’emboîtent.
2. Pour l’abaisser, appuyer sur les deux onglets des régleurs de
panier tel qu'indiqué et abaisser le panier.
Panier supérieur amovible
Le panier supérieur amovible permet de laver des articles plus grands tels que casseroles, rôtissoires et tôles à biscuits, dans le
panier inférieur.
IMPORTANT : Retirer la vaisselle avant de retirer le panier supérieur du lave-vaisselle.
Pour enlever le panier
1. Pour accéder aux butées de glissière, tirer le panier supérieur vers l’avant pour l’extraire de la cuve de presque la moitié.
2. Pour ouvrir, rabattre la butée de glissière vers l’extérieur de la cuve.
3. Après avoir ouvert les deux butées de glissière, tirer la glissière supérieure hors des rails.
4. Fermer les butées de glissière et réinsérer les glissières dans le lave-vaisselle en les faisant glisser.
Pour réinstaller le panier
1. Tirer doucement les glissières du lave-vaisselle vers l’avant jusqu’à ce qu’elles s’arrêtent. Ouvrir les butées de glissière.
2. Placer les roulettes arrière de chaque côté du panier dans l’encoche de glissière et les réinsérer dans les glissières en les faisant
rouler, sans replacer la panier complètement dans la cuve.
3. Insérer les roulettes avant du panier de chaque côté du panier, dans les fentes des glissières.
4. Faire glisser la glissière pour la réinstaller dans le lave-vaisselle. Les butées se ferment automatiquement lorsque la glissière
pénètre dans le lave-vaisselle.
63
Page 64

Chargement du panier inférieur
Recommandations concernant le chargement
Le panier inférieur est idéal pour les assiettes, casseroles, plats pour mets en sauce et ustensiles. (Voir les modèles de chargement
recommandés dans les illustrations.)
Ne charger de petits articles dans le panier inférieur que s’ils sont bien calés.
Charger les assiettes, bols à soupe, etc., entre les tiges.
Charger les bols solidement entre les rangées de tiges. S’assurer que les plats sont espacés de manière à ce que le jet d'aspersion
puisse atteindre toutes les surfaces.
Charger les articles très sales en les orientant vers le jet d’aspersion.
REMARQUE : S’assurer que le distributeur de détergent n’est pas obstrué par de grands articles telles des tôles à biscuits ou des
planches à découper placées sur le côté avant-gauche du panier. Voir la section “Démarrage / guide rapide”.
Disposition pour 10 couverts Disposition pour 12 couverts
Tiges rabattables (sur certains modèles)
Il est possible de rabattre une rangée de tiges à l’arrière du
panier inférieur pour libérer de la place pour des plats de plus
grande taille.
Garder cette rangée de tiges inclinée à 60° lorsqu’on utilise
l’option TurboZone
IMPORTANT : Lorsqu’on place une rangée de tiges en position
allongée, replier la rangée de tiges vers l’avant du lavevaisselle.
®
(sur certains modèles).
64
Page 65

Chargement TurboZone® (sur certains modèles)
IMPORTANT : Pour une performance idéale, seule une rangée d’articles doit être orientée face aux jets d’aspersion TurboZone®.
®
Pour utiliser cette option de lavage, l’option de lavage TurboZone
Charger les poêles, plats à mets en sauce, etc., en orientant les surfaces sales vers les jets d’aspersion TurboZone
lavage TurboZone
®
se trouve à l’arrière du panier à vaisselle inférieur.
On trouve ci-dessous une description du chargement recommandé pour l’utilisation de l’option TurboZone
doit être sélectionnée.
®
. La zone de
®
.
Chargement de grands articles
Il est possible de laver des articles plus grands tels que
casseroles, rôtissoires ou tôles à biscuits dans le panier inférieur
en retirant le panier supérieur. Voir la section “Chargement du
panier supérieur”.
IMPORTANT : Ne pas obstruer le distributeur de détergent.
Chargement des couverts
Utiliser les modèles de chargement suggérés (voir les illustrations) pour
améliorer le nettoyage des couverts.
Utiliser les encoches des couvercles pour séparer les couverts et obtenir
un lavage optimal (voir l’illustration à droite).
REMARQUE : Si vos couverts ne conviennent pas aux encoches prévues, relever les couvercles et mélanger les types de couverts
pour les tenir séparés. Pour de meilleurs résultats de lavage, charger les couteaux vers le bas, les fourchettes vers le haut et
alterner la position des cuillers tel qu’illustré. Placer les couverts longs à l’arrière du panier du lave-vaisselle et les couverts courts
à l’avant.
Panier à couverts de gauche Panier à couverts de droite
65
Page 66

UTILISATION DU LAVE-VAISSELLE
H
E
Informations sur les programmes et les options (sur certains modèles)
Programmes Niveau de saleté
Programme SmartWash
®
Programme le plus avancé et le plus polyvalent. Ce programme
détecte la taille de la charge, la quantité de saletés et
l'adhérence des saletés. Ce programme est optimisé pour
atteindre un nettoyage maximal avec un minimum d'eau et
d'énergie.
Pots & Pans (casseroles et poêles)
Idéal pour les articles les plus difficiles à nettoyer tels les plats
pour mets en sauce comportant des résidus alimentaires ayant
adhéré à la cuisson. Utiliser l'option TurboZone
®
(sur certains
modèles) pour le nettoyage idéal des saletés ayant adhéré à la
cuisson.
Normal Wash (lavage normal)
Ce programme est recommandé pour entièrement laver une
charge complète de vaisselle présentant un degré de saleté
normal. Le choix de ce programme s'accompagne de la
sélection par défaut des options recommandées pour le
nettoyage de quantités normales de saletés alimentaires.
L'étiquette-énergie est basée sur ce programme.
Durée* (min)
sans options
Typique** Max
Léger 110 155 3,8
Modéré 120 170 4,0
Difficile/Adhérant
160 215 5,1
aux surfaces après
cuisson
Élevé 155 210 7, 4
Difficile/Adhérant
aux surfaces après
155 210
cuisson
Léger 110 155 2,7
Modéré 110 155 3,9
Élevé 155 210 7, 4
Consom-
mation
d’eau
Gallons
(litres)
(14,3)
(15,0)
(19,4)
(28,0)
7, 4
(28,0)
(10,3)
(14,9)
(28,0)
China Gentle (douceur pour porcelaine)
(sur certains modèles)
Offre un programme de lavage léger et un séchage en douceur
pour les articles délicats comme la porcelaine/le cristal.
Léger à modéré 105
Élevé 120 185 6,8
145
4,2
(15,2)
(25,8)
1 Hour Wash (lavage en 1 heure)
Pour des résultats rapides, le lavage en 1 heure nettoie votre
vaisselle en utilisant légèrement plus d'eau et d'énergie. Pour un
meilleur séchage, sélectionner l'option Heated Dry (séchage
Tous les niveaux de
saleté
60 62
5,0
(19,0)
avec chaleur).
66
Page 67

Quick Rinse (rinçage rapide)
H
E
H
E
H
E
Utiliser ce programme pour rincer la vaisselle, les verres et les
couverts qui ne seront pas lavés immédiatement. Ne pas utiliser
Tous le s niveaux
de saleté
17 18
2,0
(7,6)
de détergent.
*Certaines options prolongeront le programme. Voir la section d'information sur les options.
**Durée de programme approximative obtenue avec de l'eau chaude à 120°F (49°C) fournie au lave-vaisselle. Si les durées sont plus
longues, cela signifie que l'eau d'arrivée est moins chaude.
Options
Option TurboZone® (sur certains
modèles)
Projection d'eau dans tous les recoins, ce
qui élimine le besoin de trempage et
récurage des articles très souillés ou
avec résidus de cuisson. Pour les articles
les plus difficiles à laver, utiliser l'option
Turb oZone
®
avec le programme Pots &
Pans (casseroles et poêles). Voir
l'information sur le chargement.
High Temp (température élevée)
Augmente la température de lavage
principale pour améliorer le nettoyage
des charges comportant des charges
difficiles à nettoyer ou des résidus ayant
adhéré pendant la cuisson.
Sani Rinse (rinçage sanitaire)
Cette option à haute température
assainit la vaisselle et la verrerie
conformément à la norme 184 NSF/
ANSI pour lave-vaisselle résidentiels. Les
lave-vaisselle résidentiels certifiés ne
sont pas destinés aux établissements
alimentaires autorisés. À la fin du
programme, le témoin Sani indique si
l'option Sani Rinse (rinçage avec
assainissement) a fonctionné
correctement. Si le témoin ne s'active
pas, c'est probablement parce que le
programme a été interrompu.
Peut être
sélectionnée avec
SmartWash
®
Pots & Pans
Normal Wash
SmartWash
®
Pots & Pans
Normal Wash
SmartWash
®
Pots & Pans
Normal Wash
Description
Emploi de toute la
puissance de lavage de
l'appareil dans la zone
TurboZone® durant
certaines phases du
programme de lavage.
Fait passer la température
du lavage principal de
105°F (41°C) à 130°F ou
135°F (54°C ou 57°C).
Fait passer la température
du lavage principal de
105°F (41°C) à 130°F
(54°C) et celle du rinçage
final de 140°F (60°C) à
156°F (69°C).
Durée supplémentaire
du programme
Typique Max
42 55
35 45
60 90
Eau
ajoutée
Gallons
(litres)
0 - 3,7
(0 - 14,0)
0 - 3,7
(0 - 14,0)
0 - 2,6
(0 - 10,0)
†
-
Heated Dry (séchage avec chaleur)
Active l'élément de chauffage une fois le
programme de lavage terminé. Pour un
meilleur séchage, utiliser de l'agent de
rinçage avec ou sans l'option Heated
Dry (séchage avec chaleur). Les articles
en plastique sont moins susceptibles de
Disponible pour
tous les
programmes, sauf
pour Quick Rinse
(rinçage rapide)
Active l'élément de
chauffage à la fin du
programme de lavage.
52 52 0
se déformer si on les place dans le
panier à vaisselle supérieur.
†
Le maximum de quantité d'eau supplémentaire que l'on peut utiliser pour n'importe quelle combinaison d'options est de
3,7 gal. (14,0 L).
67
Page 68

Section module de commande du lave-vaisselle
Delay Hours (mise en marche différée de plusieurs heures) (sur certains modèles)
Utiliser cette option pour faire fonctionner le lave-vaisselle en dehors des heures de pointe. Les fournisseurs d'électricité locaux
recommandent de limiter la consommation d'énergie aux périodes situées en dehors des heures de pointe autant que possible.
Pour différer la mise en marche
1. Choisir un programme de lavage et des options.
2. Appuyer sur le bouton de mise en marche différée.
3. Appuyer sur START (mise en marche).
REMARQUE : Chaque fois que l'on ouvre la porte (pour ajouter un plat, par exemple), il faut de nouveau appuyer sur le bouton
START pour que le compte à rebours reprenne.
Option verrouillage des commandes
Activer le verrouillage des commandes pour prévenir l'utilisation non intentionnelle du lave-vaisselle entre les programmes. Lorsque
l’indicateur LOCK ON (verrouillage) est allumé, tous les boutons sont mis hors d’état. On peut encore ouvrir/fermer la porte du
lave-vaisselle alors que les commandes sont verrouillées.
Pour enclencher le dispositif de verrouillage
Appuyer sur CONTROL LOCK (verrouillage des commandes) pendant 3 secondes. Lorsqu’on appuie sur une touche alors que les
commandes du lave-vaisselle sont verrouillées, l’indicateur lumineux clignote 3 fois et un signal sonore retentit.
REMARQUE : Le lave-vaisselle ne peut pas démarrer si le module de commande est verrouillé.
Pour déverrouiller les commandes du lave-vaisselle
Appuyer sur CONTROL LOCK (verrouillage des commandes) pendant 3 secondes. L’indicateur lumineux s’éteint.
Section commentaires sur l'utilisation du lave-vaisselle
Témoins lumineux de statut
Les témoins lumineux de statut situés au sommet du module de commande informent
l'utilisateur du succès de l'assainissement et (ou) de la fin d'un programme. Les témoins
lumineux du tableau de commande virent au bleu durant le lavage ou le rinçage, au rouge
durant le séchage et au vert une fois le programme terminé.
Sélection des programmes et options
1. Sélectionner le programme désiré. Si l'on souhaite faire fonctionner le même programme que le dernier programme effectué, il
suffit d'appuyer une fois sur START (mise en marche) pour indiquer les options utilisées, et d'appuyer de nouveau sur START
pour démarrer le programme.
2. Sélectionner les options désirées. Toutes les options de séchage ne sont pas disponibles sur tous les programmes. Si l'on
sélectionne une option invalide pour un programme donné, les témoins clignotent.
ACTIVATION/DÉSACTIVATION du son
Appuyer sur High Temp (température élevée) pendant 3 secondes pour alterner entre ON (activation) et OFF (désactivation). Le
son ne sera pas désactivé en cas de messages d'interruption de programme ou de dépannage nécessaire.
Annulation d’un programme
1. Ouvrir légèrement la porte pour arrêter le programme. Attendre que l’action d’arrosage s’arrête avant d’ouvrir complètement la
porte.
2. Appuyer une fois sur le bouton CANCEL/DRAIN (annulation/vidange). Le témoin lumineux CANCEL/DRAIN (annulation/
vidange) s’allume.
3. Fermer la porte dans les 3 secondes qui suivent. Le lave-vaisselle entame un programme de vidange (s'il reste de l'eau au fond
du lave-vaisselle). Laisser le lave-vaisselle évacuer l'eau complètement. Le témoin CANCEL/DRAIN (annulation/vidange)
s'éteint après 2 minutes.
68
Page 69

Modification d'un programme après la mise en marche du lave-vaisselle
On peut interrompre un programme et recommencer le programme depuis le début en respectant la procédure suivante.
1. Ouvrir légèrement la porte pour arrêter le programme. Attendre que l’action d’arrosage s’arrête avant d’ouvrir la porte
complètement.
2. Vérifier que le couvercle du distributeur de détergent est bien fermé. Si le couvercle est ouvert, il faut remplir à nouveau le
distributeur de détergent avant de redémarrer un nouveau programme.
3. Appuyer deux fois sur CANCEL/DRAIN (annulation/vidange) pour réinitialiser le module de commande.
4. Choisir un nouveau programme et les options.
5. Appuyer sur START (mise en marche).
LAVAGE D’ARTICLES SPÉCIAUX
En cas de doute au sujet du lavage d’un article particulier, consulter le fabricant pour déterminer si l’article est lavable au lavevaisselle.
Matériau Article lavable au
lave-vaisselle?
Aluminium Oui L’eau chaude et les détergents peuvent affecter le fini de l’aluminium
Aluminium jetable Non Ne pas laver de plats en aluminium jetables dans le lave-vaisselle. Ils
Bouteilles et cannettes Non Laver manuellement les bouteilles et cannettes. Les étiquettes fixées par
Fonte Non La patine sera éliminée et rouillera ensuite.
Porcelaine/grès Oui Toujours consulter les recommandations du fabricant avant le lavage.
Cristal Oui Toujours consulter les recommandations du fabricant avant le lavage.
Or Non Les couverts dorés subiront un changement de couleur.
Commentaires
anodisé.
risquent de se déplacer durant le lavage et de transférer des marques
noires à la vaisselle et à d’autres articles.
de la colle peuvent se détacher et obstruer le système de lavage,
réduisant ainsi la performance de lavage.
La décoration des articles d’antiquité, peints à la main ou l’émaillage
peut se détériorer. Les dorures peuvent se dissiper ou changer de
couleur.
Certains types de cristal au plomb peuvent se détériorer après plusieurs
lavages.
Verre Oui Le verre opaque jaunit après de nombreux lavages au lave-vaisselle.
Coutellerie à manche creux Non Les manches de certains couteaux sont fixés à la lame au moyen d’un
adhésif qui peut se dégager lors du lavage au lave-vaisselle.
Étain, laiton, bronze et
cuivre
Plastiques jetables Non Ce matériau ne peut résister aux effets de l’eau chaude et des
Plastiques Oui Toujours consulter les recommandations du fabricant avant le lavage.
Non L’eau chaude et les détergents peuvent décolorer ou attaquer le fini.
détergents.
La résistance des articles de plastique aux températures élevées et aux
détergents est variable. Il est recommandé de placer les articles légers
tels les couvercles et les beurriers uniquement dans le panier supérieur.
Les articles résistants comme les glacières ou les plateaux de chaise
haute peuvent être placés dans le panier inférieur. Lorsqu’on lave des
articles en plastique dans le panier inférieur, il est recommandé de ne
pas utiliser l’option Heated Dry (séchage avec chaleur).
69
Page 70

Matériau Article lavable au
lave-vaisselle?
Acier inoxydable Oui Si le lavage n’est pas effectué immédiatement, exécuter un programme
Argent sterling ou plaqué Oui Si le lavage n’est pas effectué immédiatement, exécuter un programme
Fer blanc Non Non recommandé.
Articles en bois Non Laver manuellement. Toujours consulter les recommandations du
Commentaires
de rinçage. Le contact prolongé avec des résidus alimentaires contenant
sel, vinaigre, produits laitiers ou jus de fruit peut endommager le fini.
de rinçage. Le contact prolongé avec des résidus alimentaires contenant
sel, acide ou sulfide (
endommager le fini.
fabricant avant le lavage. Le bois non traité peut se déformer, se
fissurer ou perdre son fini.
œuf, mayonnaise et fruits de mer) peut
Section pour grandes
casseroles
Nettoyage de l'extérieur
Nettoyage de l’intérieur
Oui Il est possible que certains plats à mets en sauce ne conviennent pas à
l'espace réservé à la caractéristique TurboZone
à l'arrière du panier à vaisselle inférieur. Si nécessaire, ajuster les tiges
pour pouvoir charger des grands plats.
®
(sur certains modèles)
ENTRETIEN DU LAVE-VAISSELLE
Nettoyage
Dans la plupart des cas, un nettoyage régulier au moyen d'un linge doux ou d'une
éponge humide et d'un détergent doux suffit pour la préservation de l'esthétique et de
la propreté des surfaces extérieures du lave-vaisselle. Si la finition extérieure du lavevaisselle est faite d'acier inoxydable, on recommande l'emploi d'un produit de
nettoyage pour acier inoxydable.
Les composés minéraux présents dans l’eau dure peuvent provoquer l’accumulation
d’un film blanchâtre sur les surfaces intérieures, particulièrement juste au-dessous de
la porte.
Ne pas nettoyer les surfaces internes du lave-vaisselle avant qu’elles aient refroidi.
Vous voudrez peut-être porter des gants en caoutchouc. Ne pas utiliser un produit de
nettoyage autre que le détergent pour lave-vaisselle car cela pourrait provoquer un
excès de mousse.
Nettoyage des surfaces internes
Faire une pâte avec un détergent pour lave-vaisselle en poudre sur une éponge
humide et nettoyer.
OU
Utiliser un détergent liquide pour lave-vaisselle automatique, et nettoyer avec une
éponge humide.
OU
Voir la méthode de rinçage au vinaigre dans “Vaisselle contenant des traces ou des
taches” de la section “Dépannage.”
REMARQUE : Effectuer un programme de lavage normal avec détergent pour lavevaisselle après avoir nettoyé l’intérieur.
70
Page 71

Nettoyage du dispositif de
brise-siphon
Dispositif de brise-siphon
Certains codes de plomberie provinciaux ou locaux exigent l’installation d’un
dispositif de brise-siphon entre un lave-vaisselle encastré et le système de vidange du
domicile. Inspecter le dispositif de brise-siphon lorsque votre lave-vaisselle ne se
vidange pas bien.
Le dispositif de brise-siphon se trouve généralement sur le dessus de l’évier ou du
comptoir près du lave-vaisselle. Pour commander un brise-siphon, composer le
1-800-4-MY-HOME
®
. Demander la pièce n° 300096.
REMARQUE : Le dispositif de brise-siphon est un article de plomberie externe qui ne
fait pas partie de votre lave-vaisselle. La garantie fournie avec le lave-vaisselle ne
couvre pas les coûts de réparation directement associés au nettoyage ou à la
réparation d’un dispositif de brise-siphon externe.
Nettoyer le dispositif de brise-siphon périodiquement pour assurer une vidange
adéquate du lave-vaisselle. Pour la plupart des brise-siphons, il faut soulever le
couvercle chromé. Dévisser le couvercle en plastique. Vérifier ensuite qu'il n'y a pas
accumulation de saletés. Nettoyer au besoin.
Vacances ou longue période d'inutilisation
Pour réduire le risque de dommages
matériels
■ Si le lave-vaisselle n'est pas utilisé pendant l'été, couper l'arrivée d'eau et
l'alimentation électrique du lave-vaisselle.
■ S'assurer que les tuyaux d'alimentation en eau sont protégés contre le gel.
La formation de glace dans les canalisations d'arrivée d'eau peut entraîner une
élévation de la pression en eau et endommager le lave-vaisselle ou le domicile.
La garantie de l'appareil ne couvre pas les dommages imputables au gel.
■ Lors du remisage du lave-vaisselle pendant l'hiver, éviter tout dommage
lié à l'eau en faisant hivériser le lave-vaisselle par un dépanneur agréé.
71
Page 72

CONTRÔLER LES POINTS SUIVANTS POUR GAGNER DU TEMPS ET FAIRE DES ÉCONOMIES
PROBLÈME SOLUTION
DÉPANNAGE
LE LAVE-VAISSELLE NE
FONCTIONNE PAS
IL RESTE DU DÉTERGENT
DANS LE DISTRIBUTEUR OU LA
PASTILLE EST RESTÉE AU FOND
DE LA CUVE
REMARQUE : Il est normal que le lave-vaisselle fasse des pauses répétées au cours d’un
programme.
Si le témoin lumineux Start/Resume (mise en marche/reprise) clignote, fermer la porte et
appuyer sur START/RESUME.
Vérifier que la porte est fermée et verrouillée.
Vérifier que le fonctionnement du système de lavage à l’arrière du lave-vaisselle n’est pas
entravé par de grands plats à mets en sauce. Ajuster le chargement si nécessaire pour que la
porte puisse se fermer et se verrouiller.
Vérifier que Sleep Mode (mode veille) est désactivé en appuyant soit sur START/RESUME (mise
en marche/reprise) ou CANCEL/DRAIN (annulation/vidange) soit en ouvrant la porte avant de
choisir le programme/l'option.
Vérifier qu’un programme a été sélectionné. (Voir “Informations sur les programmes et les
options”.)
Vérifier que le lave-vaisselle est branché. Un disjoncteur ou un fusible peut s’être déclenché.
Si des témoins lumineux autres que le témoin Start/Resume clignotent et que l’appareil ne
fonctionne pas, faire un appel de service.
Vérifier que des articles comme les plaques à biscuits, les planches à découper ou les grands
récipients, etc. n’empêchent pas le distributeur de détergent de s’ouvrir correctement.
Vérifier que le détergent est frais et ne contient pas de grumeau.
Vérifier que le programme est terminé (le témoin lumineux bleu doit être allumé). Si le
programme n’est pas terminé, il faudra le faire reprendre en fermant la porte et en appuyant sur
START/RESUME.
LE PROGRAMME
FONCTIONNE TROP
LONGTEMPS
REMARQUES :
■ Pour utiliser moins d’eau et réduire la consommation d’énergie, il existe des programmes qui
fonctionnent en général jusqu’à 3 heures.
■ Un réglage du chauffage de l’eau à 120°F (49°C) est idéal. Le lave-vaisselle mettra plus
longtemps à démarrer le programme s'il doit chauffer une eau de température inférieure.
■ Certaines options prolongeront le programme. (Voir la section “Informations sur les
programmes et les options”.) L’option Heated Dry (séchage avec chaleur) ajoute ½ heure.
Essayer le programme 1 Hour Wash (lavage en 1 heure).
Faire couler l’eau chaude au niveau d’un robinet proche du lave-vaisselle avant de démarrer le
programme.
LE LAVE-VAISSELLE NE SÈCHE
PAS
REMARQUE : Le plastique et les articles à surface anti-adhésive sont difficiles à sécher car leur
surface est poreuse et a tendance à accumuler les gouttelettes d’eau. Un séchage au torchon
peut être nécessaire.
L’utilisation d’un agent de rinçage avec l’option Heated Dry (séchage avec chaleur) est
nécessaire pour un séchage correct.
Un bon chargement des articles peut affecter le séchage. (Voir les instructions spécifiques de
chargement dans ce guide.
Les verres et les tasses à fond concave retiennent l’eau. Cette eau peut éclabousser d’autres
articles lors du déchargement.
■ Décharger le panier inférieur en premier.
■ Placer ces articles sur le côté le plus incliné du panier pour obtenir de meilleurs résultats.
PAS DE REMPLISSAGE Vérifier que le robinet d’eau d’alimentation du lave-vaisselle est ouvert.
Vérifier l’absence d’obstruction du flotteur. (Voir “Pièces et caractéristiques”.)
Vérifier l’absence de mousse dans le lave-vaisselle. En cas de présence de mousse, le lave-
vaisselle peut ne pas fonctionner correctement ou ne pas se remplir d’eau.
72
Page 73

PROBLÈME SOLUTION
H
E
H
E
IL RESTE DE L’EAU DANS LA
CUVE/PAS DE VIDANGE
Vérifier que le programme est terminé (le témoin lumineux bleu doit être allumé). Si le
programme n’est pas terminé, il faut le faire reprendre en fermant la porte et en appuyant sur
START/RESUME.
Si le lave-vaisselle est relié à un broyeur de déchets, vérifier que le bouchon d’obturation a été
retiré de l’orifice du broyeur.
Vérifier l’absence de déformation sur le tuyau de vidange.
Vérifier l’absence d’obstructions par des aliments dans le système d’évacuation ou le broyeur.
Vérifier le fusible ou le disjoncteur du domicile.
EAU DURE (RÉSIDU BLANC
SUR L’INTÉRIEUR DU LAVEVAISSELLE OU SUR LA
VERRERIE)
REMARQUE : Des dépôts minéraux d’une eau très dure peuvent endommager le lave-vaisselle et
rendre un bon nettoyage difficile. Vous pouvez apporter des échantillons d’eau à Sears pour
vérifier le degré de dureté de votre eau. Un adoucisseur d’eau est vivement recommandé si la
dureté est de 15 grains ou plus. En l’absence d'un adoucisseur d’eau, les étapes suivantes peuvent
aider :
Utiliser un nettoyant commercial conçu pour les lave-vaisselle une fois par mois.
Nettoyer les filtres ULTRA WASH
®
au moins une fois par mois.
Toujours utiliser un agent de rinçage.
Toujours utiliser un détergent frais de haute qualité.
Utiliser un stimulant de détergent/adoucisseur d’eau conçu pour les lave-vaisselle.
ODEURS REMARQUE : Si le lave-vaisselle n'est pas utilisé quotidiennement, on peut effectuer un cycle de
rinçage avec une charge partielle jusqu'à ce qu'on ait une charge complète à laver, ou utiliser
l'option Panier supérieur uniquement (sur certains modèles) pour des charges partielles.
Effectuer un rinçage au vinaigre au lave-vaisselle en mettant 2 tasses (500 mL) de vinaigre blanc
dans un verre à mesurer placé debout dans le panier inférieur. Exécuter un programme normal
après avoir désactivé l’option Heated Dry (séchage avec chauffage). Ne pas utiliser de
détergent.
Le lave-vaisselle peut ne pas se vidanger correctement, voir “IL RESTE DE L’EAU DANS LA
CUVE/PAS DE VIDANGE” à la section “Dépannage”.
BRUYANT REMARQUES :
■ Des bruits de pompage peuvent se produire régulièrement pendant le programme alors que
le lave-vaisselle se vidange.
■ On peut entendre régulièrement un sifflement du robinet d’eau; ceci est normal.
■ On peut entendre un bruit d'enclenchement lorsque le distributeur de détergent s’ouvre
pendant le programme et lorsque la porte est ouverte à la fin du programme; ceci est
normal.
■ Une installation incorrecte affectera les niveaux de bruit.
Vérifier que les filtres sont bien installés.
On peut entendre un bruit sourd si des articles dépassent des paniers et touchent les pales de
lavage. Réajuster la vaisselle et reprendre le programme.
IL RESTE DES SALETÉS
ALIMENTAIRES SUR LA
VAISSELLE
Vérifier que le lave-vaisselle est correctement chargé. Un chargement incorrect peut réduire
considérablement la performance de lavage (voir “Chargement pour un nettoyage et un
séchage idéaux”).
Inspecter le filtre pour s’assurer qu’il est bien installé. Nettoyer au besoin. (Voir “Instructions de
nettoyage” dans “Système de filtration ULTRA WASH
Sélectionner le programme et les options appropriés au type de saletés. Le programme Pots &
Pans (casseroles et poêles) avec l’option TurboZone
les charges plus difficiles à nettoyer.
Vérifier que la température d’eau entrante est d'au moins 120°F (49ºC).
Utiliser la bonne quantité de détergent frais. Un supplément de détergent est nécessaire pour les
charges très sales et en présence d’une eau dure.
Éliminer les aliments sur la vaisselle en la grattant avant de la charger (ne pas pré-rincer).
®
” pour plus de détails.)
®
(sur certains modèles) peut être utilisé pour
73
Page 74

PROBLÈME SOLUTION
PAS D’ASSAINISSEMENT Si le témoin lumineux d’assainissement clignote, la charge n’est
PAS
assainie. Le programme a
été interrompu lors du rinçage final, ou le dispositif de chauffage de l’eau est à un réglage trop
faible. Régler le dispositif de chauffage de l'eau à 120ºF (49ºC).
DOMMAGES À LA VAISSELLE Un chargement incorrect peut écailler ou endommager la vaisselle. (Voir les instructions
spécifiques de chargement dans ce guide.)
TÉMOINS LUMINEUX
CLIGNOTANTS
Si le témoin Start/Resume (mise en marche/reprise) ou un autre témoin clignote et que le lavevaisselle ne fonctionne pas, fermer la porte et appuyer sur START/RESUME. Si le lave-vaisselle
ne fonctionne toujours pas, appeler le service de dépannage.
VAISSELLE CONTENANT DES
TRACES OU DES TACHES (ET
SOLUTION POUR L’EAU DURE)
REMARQUES :
■ Un agent de rinçage liquide est nécessaire pour le séchage et pour réduire les taches.
■ Utiliser la bonne quantité de détergent.
Confirmer que les traces peuvent s’enlever en trempant l’article dans du vinaigre blanc pendant
5 minutes. Si les traces disparaissent, ceci est dû à l’eau dure. Ajuster la quantité de détergent et
d’agent de rinçage. Voir “EAU DURE (RÉSIDU BLANC SUR L’INTÉRIEUR DU LAVE-VAISSELLE OU
SUR LA VERRERIE)” dans la section “Dépannage”. Si les traces ne disparaissent pas, elles sont
dues à des attaques (voir ci-dessous).
Vérifier que la température d’eau entrante est réglée à 120°F (49ºC).
Essayer d’utiliser les options High Temp (température élevée) et Sani Rinse (rinçage par
assainissement).
Pour enlever les taches, effectuer un rinçage au vinaigre dans le lave-vaisselle.
■ Laver et rincer la vaisselle affectée et la charger dans le lave-vaisselle. Enlever tous les
couverts et les articles métalliques. Mettre 2 tasses (500 mL) de vinaigre blanc dans un verre
à mesurer dans le panier inférieur. Exécuter un programme normal après avoir désactivé
l’option Heated Dry (séchage avec chauffage). Aucun détergent n’est nécessaire.
ATTAQUES (TRACES
PERMANENTES)
Il y a une érosion de la surface de l’article en verre, qui peut être provoquée par un mélange : de
l’eau trop chaude, de l’utilisation de trop de détergent avec une eau douce ou par un prélavage.
Le détergent a besoin de saletés d’aliments pour agir. En cas d’attaque, l’article en verre est
définitivement abîmé. Pour éviter d’autres attaques, ajuster la quantité de détergent selon la
dureté de l’eau, arrêter le prélavage et utiliser des options de chauffage de l’eau uniquement
lorsque la température de l’eau entrante est inférieure à 120°F (49°C).
FUITES D’EAU Vérifier que le lave-vaisselle a été correctement installé et qu’il est d’aplomb.
La mousse peut faire déborder le lave-vaisselle. Mesurer le détergent précisément et utiliser
uniquement des détergents conçus pour lave-vaisselle. Moins de détergent est nécessaire dans
de l’eau douce. Essayer une autre marque de détergent si l’excès de mousse persiste.
Pour éviter les fuites d’agent de rinçage du distributeur, vérifier que le couvercle est bien fixé et
éviter de trop le remplir.
LA CUVE EST DÉCOLORÉE REMARQUES :
■ Une teneur en fer importante dans l’eau peut décolorer la cuve.
■ Les aliments à base de tomate peuvent décolorer la cuve ou la vaisselle.
■ Un produit à base d’agrumes peut être utilisé pour le nettoyage.
74
Page 75

7576777879
Page 76

Page 77

Page 78

Page 79

Page 80

W10596248A
© 2013 Sears Brands, LLC
® Registered Trademark /
TM
Trademark of KCD IP, LLC in the United States, or Sears Brands, LLC in other countries
® Marca registrada /
TM
Marca de comercio de KCD IP, LLC en Estados Unidos, o Sears Brands, LLC en otros países
MC
Marque de commerce /
MD
Marque déposée de Sears Brands, LLC
5/13
Printed in U.S.A.
Impreso en EE.UU.
Imprimé aux É.-U.
 Loading...