

Kenmore 66513849K602, 66513844K602, 66513843K602, 66513842K602, 66513749K604 Owner’s Manual
...
®
ULTRA WASH ®Dishwasher
Lavavajillas ULTRA WASH ®
Manua (Seuso y cu c£acio
Lave-vaisselle ULTRA WASH®
Gc_c!e cl _xt! sat on et c; e_q_eI: en
Models/Modelos/Modeles 665.13485, 665.13745, 665.13845
= color number, nOmero de color, num@o de couleur
W10253606A Sears Canada Inc., Toronto, Ontario, Canada M5B 2B8 www.sears.ca
Sears Roebuck and Co., Hoffman Estates, IL 60179 U.S.A. www.sears.com

TABLEOF CONTENTS
PPROTECTION AGREEMENTS .................................................... 2
WAR RANTY .................................................................................... 3
DISHWASHER SAFETY ................................................................. 4
Before Using Your Dishwasher .................................................... 5
PARTS AN D EEATU RES................................................................ 6
ULTRA WASH ®Soil Removal System ......................................... 7
Featuring smartwash TM cycle and
TURBOZONE TM wash option ....................................................... 7
START-UP GUIDE .......................................................................... 7
Using Your New Dishwasher ....................................................... 7
DISHWASHER LOADING ............................................................... 8
Loading Suggestions ................................................................... 8
Loading Top Rack ........................................................................ 8
Loading Bottom Rack ................................................................ 10
Loading Silverware Basket ........................................................ 12
DISHWASHER USE ...................................................................... 13
Detergent Dispenser .................................................................. 13
Rinse Aid Dispenser ................................................................... 14
PROTECTION AGREEMENTS
Dishwasher Efficiency Tips ........................................................ 14
Cycle Selection Charts ............................................................... 15
Canceling a Cycle ....................................................................... 16
Changing a Cycle or Setting ...................................................... 16
Adding Items During a Cycle ..................................................... 16
Option Selections ....................................................................... 16
Cycle Status Indicators .............................................................. 18
Active Vent .................................................................................. 18
Overfill Protection Float .............................................................. 18
WASHING SPECIAL ITEMS ......................................................... 19
DISHWASHER CARE ................................................................... 20
Cleaning ...................................................................................... 20
Drain Air Gap .............................................................................. 20
Storing ........................................................................................ 20
TROUBLESHOOTING .................................................................. 21
SERVICE NUMBERS ............................................... BACK COVER
Master Protection Agreements
Congratulations on making a smart purchase. Your new
Kenmore ®product is designed and manufactured for years
of dependable operation. But like all products, it may
require preventive maintenance or repair from time to time.
That's when having a Master Protection Agreement can
save you money and aggravation.
The Master Protection Agreement also helps extend the
life of your new product. Here's what the Agreement*
includes:
Parts and labor needed to help keep products
operating properly under normal use, not just defects.
Our coverage goes well beyond the product warranty.
No deductibles, no functional failure excluded from
coverage-- real protection.
Expert service by a force of more than 10,000
authorized Sears service technicians, which means
someone you can trust will be working on your product.
Unlimited service calls and nationwide service, as
often as you want us, whenever you want us.
"No-lemon" guarantee - replacement of your covered
product if four or more product failures occur within
twelve months.
Product replacement if your covered product can't be
fixed.
Annual Preventive Maintenance Check at your
request - no extra charge.
Fast help by phone - we call it Rapid Resolution -
phone support from a Sears representative on all
products. Think of us as a "talking owner's manual."
Power surge protection against electrical damage due
to power fluctuations.
i/$250 Food Loss Protection annually for any food
spoilage that is the result of mechanical failure of any
covered refrigerator or freezer.
Rental reimbursement if repair of your covered product
takes longer than promised
i/10% discount off the regular price of any non-covered
repair service and related installed parts
Once you purchase the Agreement, a simple phone call is
all that it takes for you to schedule service You can call
anytime day or night, or schedule a service appointment
online
The Master Protection Agreement is a risk free purchase If
you cancel for any reason during the product warranty
period, we will provide a full refund Or, a prorated refund
anytime after the product warranty period expires
Purchase your Master Protection Agreement today!
Some limitations and exclusions apply. For prices and
additional information in the U.S.A. call
1-800-827-6655.
*Coverage in Canada varies on some items. For full
details call Sears Canada at 1-800-361-6665.
Sears Installation Service
For Sears professional installation of home appliances,
garage door openers, water heaters, and other major
home items, in the U.S.A. or Canada call
1-800-4-MY-HOME ®
2

KENMORE APPLIANCE WARRANTY
ONE YEAR LIMITED WARRANTY
When installed, operated and maintained according to all
instructions supplied with the product, if this appliance
fails due to a defect in material or workmanship within one
year from the date of purchase, call 1-800-4-MY-HOME ®
to arrange for free repair.
If this appliance is used for other than private family
purposes, this warranty applies for only 90 days from the
date of purchase.
THIS WARRANTY COVERS ONLY DEFECTS IN
MATERIAL AND WORKMANSHIP. SEARS WILL NOT
PAY FOR."
1. Expendable items that can wear out from normal use,
including but not limited to filters, belts, light bulbs, and
bags.
2. A service technician to instruct the user in correct
product installation, operation or maintenance.
3. A service technician to clean or maintain this product.
4. Damage to or failure of this product if it is not installed,
operated or maintained according to all instructions
supplied with the product.
5. Damage to or failure of this product resulting from
accident, abuse, misuse or use for other than its
intended purpose.
6. Damage to or failure of this product caused by the use
of detergents, cleaners, chemicals or utensils other
than those recommended in all instructions supplied
with the product.
7. Damage to or failure of parts or systems resulting from
unauthorized modifications made to this product.
DISCLAIMER OF IMPLIED WARRANTIES; LIMITATION
OF REMEDIES
Customer's sole and exclusive remedy under this limited
warranty shall be product repair as provided herein.
Implied warranties, including warranties of merchantability
or fitness for a particular purpose, are limited to one year
or the shortest period allowed by law. Sears shall not be
liable for incidental or consequential damages. Some
states and provinces do not allow the exclusion or
limitation of incidental or consequential damages, or
limitations on the duration of implied warranties of
merchantability or fitness, so these exclusions or
limitations may not apply to you.
This warranty applies only while this appliance is used in
the United States and Canada.
This warranty gives you specific legal rights, and you may
also have other rights which vary from state to state.
Sears, Roebuck and Co.
Hoffman Estates, IL 60179
Sears Canada Inc.
Toronto, Ontario, Canada M5B 2B8
PRODUCT RECORD
Record your complete model number, serial number, and
purchase date. You can find this information on the model
and serial number label located on the product.
Have this information available to help you obtain
assistance or service more quickly whenever you contact
Sears concerning your appliance.
Model number ....
Serial number
Purchase date
Save these instructions and your sales receipt for
future reference.

DISHWASHER SAFETY
Your safety and the safety of others are very important.
We have provided many important safety messages in this manual and on your appliance. Always read and obey all safety
messages.
This is the safety alert symbol.
This symbol alerts you to potential hazards that can kill or hurt you and others.
All safety messages will follow the safety alert symbol and either the word "DANGER" or "WARNING."
These words mean:
You can be killed or seriously injured if you don't immediately
follow instructions.
You can be killed or seriously injured if you don't follow
instructions.
All safety messages will tell you what the potential hazard is, tell you how to reduce the chance of injury, and tell you what can
happen if the instructions are not followed.
IMPORTANT SAFETY INSTRUCTIONS
WARNING: When using the dishwasher, follow basic precautions, including the following:
m Read all instructions before using the dishwasher.
m Use the dishwasher only for its intended function.
m Use only detergents or rinse agents recommended for use
in a dishwasher, and keep them out of the reach of children.
m When loading items to be washed:
1) Locate sharp items so that they are not likely to damage
the door seal; and
2) Load sharp knives with the handles up to reduce the risk
of cut-type injuries.
m Do not wash plastic items unless they are marked
"dishwasher safe" or the equivalent. For plastic items not so
marked, check the manufacturer's recommendations.
m Do not touch the heating element during or immediately
after use.
m Do not operate the dishwasher unless all enclosure panels
are properly in place.
SAVE THESE INSTRUCTIONS
m Do not tamper with controls.
m Do not abuse, sit on, or stand on the door, lid, or dish racks
of the dishwasher.
m To reduce the risk of injury, do not allow children to play in
or on the dishwasher.
m Under certain conditions, hydrogen gas may be produced in
a hot water system that has not been used for two weeks or
more. HYDROGEN GAS IS EXPLOSIVE. If the hot water
system has not been used for such a period, before using
the dishwasher turn on all hot water faucets and let the
water flow from each for several minutes. This will release
any accumulated hydrogen gas. As the gas is flammable,
do not smoke or use an open flame during this time.
m Remove the door or lid to the washing compartment
when removing an old dishwasher from service or
discarding it.

Tip Over Hazard
Do not use dishwasher until completely installed.
Do not push down on open door.
Doing so can result in serious injury or cuts.
Electrical Shock Hazard
Electrically ground dishwasher.
Connect ground wire to green ground connector in
terminal box.
Do not use an extension cord.
Failure to follow these instructions can result in death,
fire, or electrical shock.
ng sY(u D shwas
GROUNDING iNSTRUCTiONS
For a grounded, cord-connected dishwasher:
The dishwasher must be grounded. In the event of a
malfunction or breakdown, grounding will reduce the
risk of electric shock by providing a path of least
resistance for electric current. The dishwasher is
equipped with a cord having an equipment-grounding
conductor and a grounding plug. The plug must be
plugged into an appropriate outlet that is installed and
grounded in accordance with all local codes and
ordinances.
WARNING: Improper connection of the
equipment-grounding conductor can result in a risk of
electric shock. Check with a qualified electrician or
service representative if you are in doubt whether the
dishwasher is properly grounded. Do not modify the
plug provided with the dishwasher; if it will not fit the
outlet, have a proper outlet installed by a qualified
electrician.
For a permanently connected dishwasher:
The dishwasher must be connected to a grounded
metal, permanent wiring system, or an equipment-
grounding conductor must be run with the circuit
conductors and connected to the equipment-
grounding terminal or lead on the dishwasher.
SAVE THESE iNSTRUCTiONS
Install where dishwasher is sheltered from the
elements. Avoid possible rupture of fill valve from
freezing. Such ruptures are not covered by the
warranty. See "Storing" section for winter storage
information.
Install and level dishwasher on a floor that will hold the
weight, and in an area suitable for its size and use.
Remove all shipping plugs from hoses and connectors
(such as the cap on the drain outlet) before installing.
See Installation Instructions for complete information.
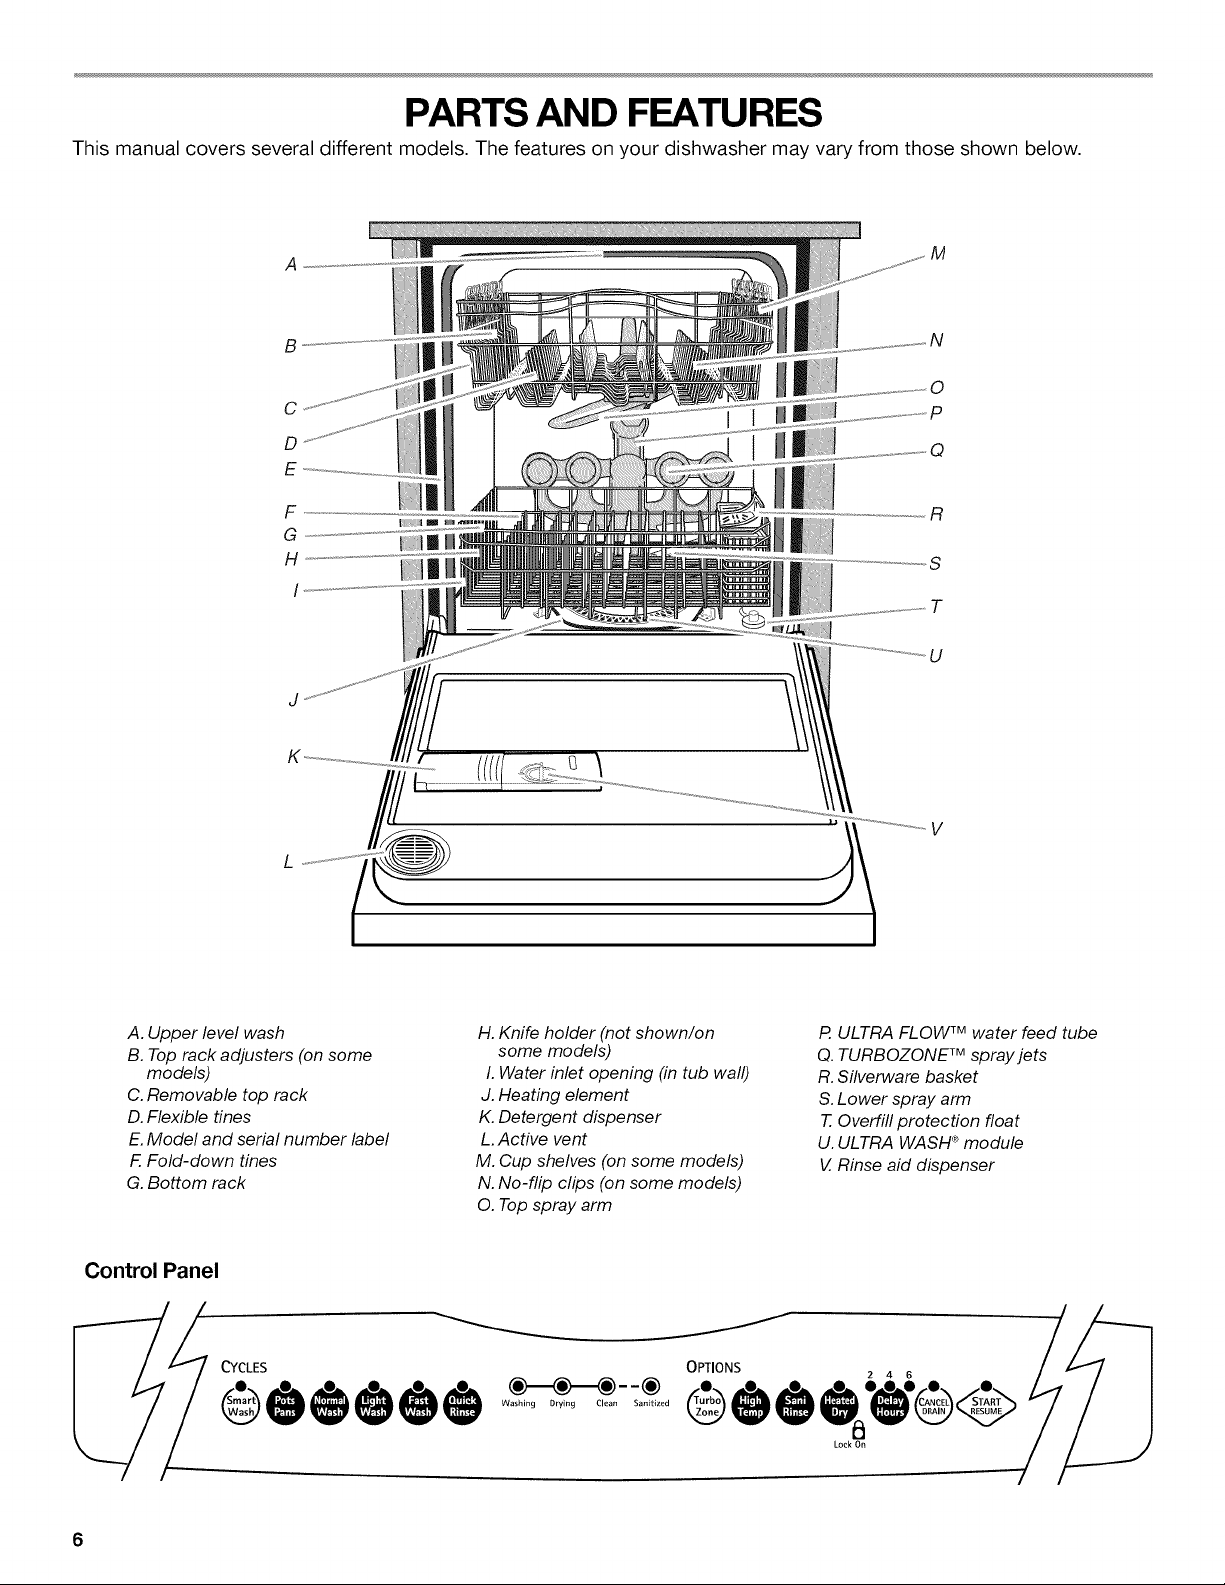
PARTS AND FEATURES
This manual covers several different models. The features on your dishwasher may vary from those shown below.
M
N
0
C
D
E
P
Q
F
G
H l_iiiiiiii11_
I
A. Upper level wash
B. Top rack adjusters (on some
models)
C. Removable top rack
D. Flexible tines
E.Model and serial number label
F. Fold-down tines
G.Bottom rack
_iiiiiii!iiiiiiiii!m
H. Knife holder (not shown/on
some models)
I. Water inlet opening (in tub wall)
J. Heating element
K. Detergent dispenser
L.Active vent
M. Cup shelves (on some models)
N. No-flip clips (on some models)
O. Top spray arm
R
S
T
U
P.ULTRA FLOW TM water feed tube
Q.TURBOZONE TM spray jets
R. Silverware basket
S.Lower spray arm
T.Overfill protection float
U. ULTRA WASH ®module
V.Rinse aid dispenser
Control Panel
__ CYCLES
6
OPTIONS
Washing Drying Clean Sanitized _urbo_
z°k_
•

TheULTRAWASH®SoilRemovalSystemgivesyou •
sparklingcleandishes,whileusinglessenergyandtime.
TheULTRAWASH®SoilRemovalSystemincludes:
• ATripleActionFiltrationsystemthatintermittently •
filterssoilfromthewashwater,thuseliminatingthe
needtoscrapedishes.
How the smartwash TM cycle works your home will be adjusted to include an additional 2
WhenthesmartwashTM cycle is selected, it saves energy
and water by adjusting the wash cycle as needed.
• Sensors detect the size of the dish load, the soil level,
and the water temperature in the dishwasher.
• Sensors automatically adjust the temperature and the
amount of water used for the load.
This dishwasher will automatically calibrate the sensor
approximately once a year to your water quality.
AnULTRAWASH®opticalsoilsensorthatdetectssoil
levelanddetergentquantityappearinginthewash
waterandadjuststhecyclesasneeded.
AnAutomaticTemperatureControl(ATC)thatensures
theproperwatertemperaturefortheselectedwash
cycle,dishloadsize,andsoilleveloftheload.
IMPORTANT: The very first wash cycle after installation in
rinses for optical soil sensor calibration. For proper
calibration, the first cycle should not be interrupted. If this
calibration cycle is canceled or stopped before the Clean
light comes on at the end of the cycle, the next wash cycle
will repeat this sensor calibration.
How the TURBOZONETM wash option works
When the TURBOZONETM option is selected, it provides a
concentrated wash to a specific zone in the back of the
lower dish rack for large, hard-to-clean dishes.
• 4 rotating spray jets on the TURBOZONETM manifold are
periodically activated at the back of the tub throughout
the wash cycle.
• Intensified cleaning is provided only to this specific
wash area, allowing you to gently clean the rest of the
dish load.
START-UP GUIDE
Before using your dishwasher, remove all packaging materials. Read this entire Use and Care Guide. You will find
important safety information and useful operating tips.
,
Rinse aid is essential for good drying. Be sure to fill the
dispenser before you use your new dishwasher. Each
filling will last about 1 to 3 months depending on your
usage.
.
Scrape large food soil and hard items (toothpicks or
bones) from dishes.
3.
Properly load the dishwasher. (See "Dishwasher
Loading.") Load dishes with space in between so water
will reach the soiled surfaces. Make sure nothing keeps
the spray arm(s) from spinning freely.
4. Add detergent. Always use a high-quality brand
detergent. (See "Dishwasher Use.")
5. Push door firmly closed. The door latches
automatically.
6. Run hot water at the sink nearest your dishwasher until
the water is hot. (See "Dishwasher Efficiency Tips.")
Turn off water.
7
7. Pressthedesiredcycleandoptionselections.(See 8.
"DishwasherUse.")
O
DISHWASHER LOADING
Press START/RESUME, or press START/RESUME to
repeat the same cycle and options as the previous
cycle.
IMPORTANT: The Start/Resume light will flash if the
door is opened during a cycle. Power interruptions
during a cycle may also cause the Start/Resume light
to flash. Press START/RESUME to continue a cycle.
Remove leftover food, bones, toothpicks and other
hard items from the dishes. To conserve water and
energy and save time, it is not necessary to rinse
dishes before putting them into the dishwasher.
NOTE: Prerinsing dishes soiled with tomato-based
products is recommended to avoid staining the
dishware.
The wash module removes food particles from the
water. The module contains a triple action filtration
system that intermittently filters soil from the water.
NOTE: If hard items such as fruit seeds, nuts, and
eggshells enter the wash module, you might hear
grinding, crunching, or buzzing sounds. These sounds
are normal when hard items enter the module. To avoid
damage to the dishwasher, do not let metallic items
(such as pot handle screws) get into the wash module.
For best drying, water must be able to drain from all
surfaces.
It is important for the water spray to reach all soiled
surfaces.
Load dishes so they are not stacked or overlapping if
possible.
Load heavy pots and pans gently. Heavy items can
damage the interior of the door if they are dropped or
bumped.
Make sure pot lids and handles, pizza pans, cookie
sheets, etc., do not interfere with the spray arm
rotation.
Conserve water and energy and save time over hand
rinsing by running a rinse cycle to keep dishes moist if
you do not plan to wash them soon. Foods such as
eggs, rice, pasta, spinach, and cooked cereals may be
hard to remove if they are left to dry over a period of
time.
Place items so open ends face down for best cleaning
and draining.
Quiet operating tips
To avoid thumping/clattering noises during operation:
• Make sure lightweight load items are secured in the
racks.
• Make sure pot lids and handles, pizza pans, cookie
sheets, etc., do not touch interior walls or interfere with
the rotation of the spray arm(s).
• Load dishes so they do not touch one another.
NOTE: For built-in models, keep sink drain plugs closed
during dishwasher operation to avoid noise transfer
through drains.
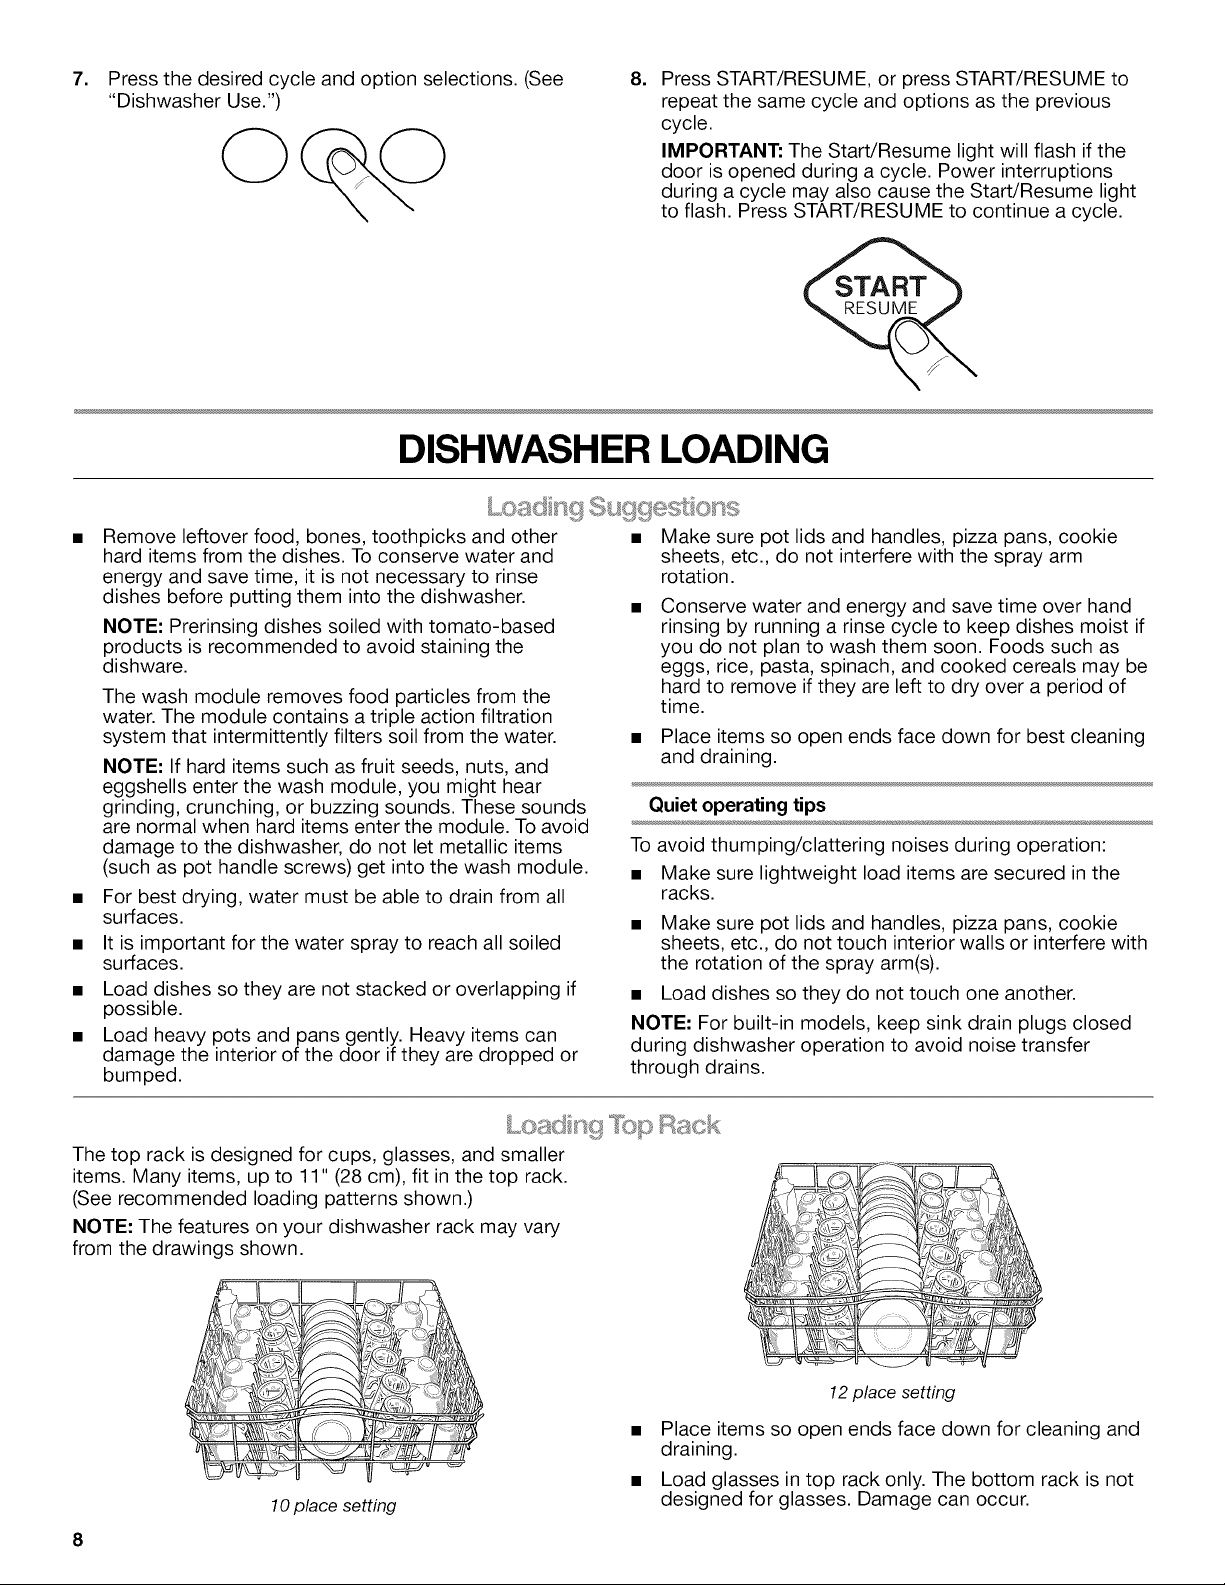
The top rack is designed for cups, glasses, and smaller
items. Many items, up to 11" (28 cm), fit in the top rack.
(See recommended loading patterns shown.)
NOTE: The features on your dishwasher rack may vary
from the drawings shown.
10 place setting
8
12 place setting
Place items so open ends face down for cleaning and
draining.
Load glasses in top rack only. The bottom rack is not
designed for glasses. Damage can occur.

Placecupsandglassesintherowsbetweentines.
Placingthemoverthetinescanleadtobreakageand
waterspots.
China,crystal,andotherdelicateitemsmustnottouch
eachotherduringdishwasheroperation.Damagemay
occur.
Loadlightweightplasticitemsinthetoprackonly.Only
plasticitemsmarked"dishwashersafe"are
recommended.
Loadplasticitemssotheforceofthespraydoesnot
movethemduringthecycle.
Toavoidchipping,donotletstemwaretouchother
items.
Smallbowls,pans,andotherutensilscanbeplacedin
thetoprack.Loadbowlsinthecentersectionforbest
stability.
Cupshelves (on some models)
Fold down the extra shelf on the left-hand or right-hand
side of the top rack to hold additional cups, stemware or
long items such as utensils and spatulas.
NOTE: The features on your dishwasher may vary from
those shown below.
Removable top rack
The removable top rack allows you to wash larger items
such as stock pots, roasters, and cookie sheets in the
bottom rack.
IMPORTANT: Remove dishes prior to removing the rack
from the dishwasher.
To remove the top rack
1. Pull the rack forward slightly to access clips.
2. While pressing the ridges in, push back on the clip until
the outer side releases. Slide the clip to the inside of
the track edge to remove the clip.
3. After removing both clips, pull rack out.
To replace the top rack
1. Place the rollers on each side of the rack into the rack
tracks and push the rack back.
2. Align the open side of the clip with the inside edge of
the rack track.
3. Push the ridges and slide the clip toward the outside
rack edge until it locks into place.
4. Repeat on the other side.
5. Pull the rack out all of the way to ensure clips are fully
seated.
Deluxe adjustable 2-position top rack (on some models)
You can raise or lower the top rack to fit tall items in either
the top or bottom rack. Raise the top rack to
accommodate items up to 9" (22 cm) in the top rack and
13" (33 cm) in the bottom rack, or lower the top rack to
accommodate items up to 11" (28 cm) in both the top and
bottom racks. Adjusters are located on each side of the
top rack.
i i¸ , _i)i
To raise the top rack
Lift the rack on both sides until the rack is level.
NOTE: The top rack must be level.
To lower the top rack
Depress both tabs on rack adjusters, as shown above, and
slide the rack back to its original position.
Flexible tines
The row of tines on the left-hand and right-hand sides of
the top rack can be adjusted to make room for a variety of
dishes.
To adjust the flexible tines
1. Grasp the tip of the tine that is inthe tine holder.
2. Gently push the tine out of the holder.
3. Lay the tines down, toward the center of the rack.
9

No-flip clips (on some models)
The no-flip clips hold lightweight plastic items such as
cups, lids, or bowls in place during washing.
To move a clip
1. Pull the clip up and off the tine.
2. Reposition the clip on another tine.
Load cookie sheets, cake pans, and other large items
at the sides and back. Loading such items in front can
keep the water spray from reaching the detergent
dispenser.
Secure heavily soiled cookware face down in the rack.
If using TURBOZONETM wash option, load cookware in
TURBOZONETM wash area. (See "TURBOZONETM wash
area.")
• Make sure pot handles and other items do not stop
rotation of the spray arm(s). The spray arm(s) must
move freely.
• Do not load items between the bottom rack and the
side of the dishwasher tub because they might block
the water inlet opening.
TURBOZONETM wash area
The bottom rack is designed for plates, pans, casseroles,
and utensils. Many items, up to 13" (33 cm) tall, fit in the
bottom rack. (See recommended loading patterns shown.)
NOTE: The features on your dishwasher rack may vary
from the drawings shown.
10 place setting
Do not load glasses, cups, or lightweight plastic items
in the bottom rack. Load small items in the bottom rack
only if they are secured in place.
Load plates, soup bowls, etc., between tines.
Overlap the edges of plates for large loads.
Load soup, cereal, and serving bowls in the rack in a
variety of ways depending upon their size and shape.
Load bowls securely between the rows of tines. Do not
nest bowls because the spray will not reach all
surfaces.
The TURBOZONETM wash area is located at the back of the
lower dish rack.
NOTE: You must select the TURBOZONETM wash option to
utilize this wash feature. Do not face items toward the rear
of the dishwasher if you are not using this wash option.
TURBOZONETM wash area
• Load pans, casserole dishes, etc. in the back of the
lower dish rack with the soiled surfaces facing the
TURBOZONETM spray jets. Make sure items do not
interfere with the water feed tube, spray arms, or
TURBOZONETM spray jets.
• Tip items toward the rear of the dishwasher between
the back two rows of tines to maximize coverage.
IMPORTANT: Only one row of items may face the
TURBOZONETM spray jets. Load items so they do not
interfere with the rotation of the TURBOZONETM spray
jets. Stacking, overlapping, or nesting items will keep
the TURBOZONETM spray jets from reaching all of the
surfaces.
10
TURBOZONETM wash area side view
12 place setting

Suggested 10 place setting loading patterns
TURBOZONETM 10place setting top rack load
! j
TURBOZONETM 10place setting bottom rack load
Knife holder (onsome models)
Use the knife holder on the left side of the bottom rack to
hold knives that are too large for the silverware basket.
Place knives in the holder as shown.
To remove the knife holder
1. Slide up to release the hooks over the rack wire.
2. Lift knife holder out of rack.
To install the knife holder
1. Align the knife holder with the bottom rack as shown in
the illustration below.
2. Place the bottom slotted guide over the vertical wire in
the side of the rack.
3. Place the hooks, located on the back of the knife
holder, over the center rack wire and gently push down
to lock into place.
Fold-down tines
You can fold down one row of tines at the back of the
bottom rack.
1. Grasp the tip of the tine that is in the tine holder.
2. Gently pull the tine out of the tine holder.
3. Lay the row of tines down in the rack to make room for
larger dishes, bowls, pots, pans or roasters.
NOTE: When using the TURBOZONE TM option, position
the rear fold down tines in the 60 ° location for best
performance.
A. Top alignment
B.Bottom slotted guide
C. Knife holder hooks
11

©ve_ _wSnc_4_ 8sl<{_}
Load the silverware basket while it is in the bottom rack or
take the basket out for loading on a counter or table. To remove a small basket Ion some models}
IMPORTANT: Always load items (knives, skewers, etc.)
pointing down.
• Place small items such as baby bottle caps, jar lids,
corncob holders, etc., in a covered section. Close the
cover to hold small items in place.
Use suggested loading patterns, as shown, to increase
washability of your silverware. Load items using the
slots with the covers down to avoid silverware nesting.
• Some silverware baskets can be separated and placed
into the bottom rack in several locations. Load
silverware in all sections or just one, depending upon
your load.
• If your silverware basket does not have covers or when
covers are up, mix items in each section of the basket
with some pointing up and some down to avoid
nesting. Spray cannot reach nested items.
1. Hold the center basket and one small basket. Slide the
small basket forward to release the tabs from the
corresponding slots.
2. Pull the baskets apart.
NOTES:
• Do not load silver or silver-plated silverware with
stainless steel. These metals can be damaged by
contact with each other during washing.
• Some foods (such as salt, vinegar, milk products, fruit
juices, etc.) can pit or corrode silverware. Run a rinse
cycle if you do not have a full load to wash immediately.
• Unload or remove the basket before unloading the
racks to avoid spilling water droplets onto the
silverware.
12

DISHWASHER USE
The detergent dispenser has two sections. The smaller
Pre-Wash section empties detergent into the dishwasher
when you close the door. The larger Main Wash section
automatically empties detergent into the dishwasher
during the wash. (See the "Cycle Selection Charts.")
B
A. Cover latch
B.Main Wash section
C. Pre-Wash section
C
Use automatic dishwashing detergent only. Other
detergents can produce excessive suds that can
overflow out of the dishwasher and reduce washing
performance.
Add detergent just before starting cycle.
Store tightly closed detergent in a cool, dry place.
Fresh automatic dishwasher detergent results in better
cleaning.
NOTE: Do not use detergent with a Quick Rinse cycle.
Fillingthe dispenser
1. If the dispenser cover is closed, open the cover by
moving the cover latch to the right.
!
2. Add the correct amount of detergent to the Main Wash
section of the dispenser according to the the chart
below. If you are using a tablet detergent, it must be
placed in the Main Wash section. (See "How much
detergent to use.")
3. Add the correct amount of detergent to the Pre-Wash
section of the dispenser, if needed, according to the
chart below.
4. Close the dispenser cover and secure by pressing on
the cover directly above the cover latch.
It is normal for the cover to open partially when dispensing
detergent.
NOTE: See the "Cycle Selection Charts" for which section
to fill depending on the cycle selected.
How much detergent to use
• The amount of detergent to use depends on the soil level of your dishes, hardness of your water, and the type of
detergent. If you use too little, dishes will not be clean. If you use too much in soft water, glassware will etch.
• Water hardness can change over a period of time. Find out your water's hardness by asking your Sears Sales
Associate, local water department, water softener company, or county extension agent.
Detergent Dispenser fill recommendations per dish load soil level and water hardness
section
Fill cup
Normal Soil
2 tsp (10 mL)
4 tsp (20 mL)
7 tsp (35 mL)
Pre-Wash
section
Fill to Soft
Water line
Fill to Hard
Water line
Fill cup
completely
Heavy Soil
Main Wash
secti on
9 tsp (45 mL)
Fill cup
completely
9 tsp (45 mL)
Fill cup
completely
9 tsp (45 mL)
Fill cup
completely
Pre-Wash
secti on
7 tsp (35 mL)
Fill cup
completely
7 tsp (35 mL)
Fill cup
completely
7 tsp (35 mL)
Fill cup
completely
Water Hardness
Soft
(0-2 grains per
U.S. gallon)
Medium
(2-6 grains per
U.S. gallon)
Hard
(7 grains per U.S.
gallon and
above)
Light Soil or Prerinsed
Main Wash
section
4 tsp (20 mL)
Fill to Soft
Water line
6 tsp (30 mL)
Fill above the
Soft Water line
8 tsp (40 mL)
Fill to Hard
Water line
Pre-Wash
section
Empty
2 tsp (10 mL)
Fill to Soft
Water line
4 tsp (20 mL)
Fill to Hard
Water line
Main Wash
6 tsp (30 mL)
Fill above the
Soft Water line
6 tsp (30 mL)
Fill above the
Soft Water line
9 tsp (45 mL)
completely
NOTE: Fill amounts shown are for standard powdered detergent. Amounts may vary if ,ou use liquid or concentrated
powdered detergent. Tablet detergents should be placed in the main wash section of the detergent dispenser with the
cover closed. Follow instructions on the package when using liquid dishwasher detergent, concentrated powdered
detergent or tablet detergent.
13

IMPORTANT:Yourdishwasherisdesignedto usealiquidrinseaid.Theuseofrinseaidsgreatlyimprovesdryingby
allowingwatertodrainfromthedishesafterthefinalrinse.Theyalsokeepwaterfromformingdropletsthatcandryas
spotsorstreaks.Donotuseasolidorbar-typerinseaid.
4. Clean up any spilled rinse aid with a damp cloth.
Fillingthe dispenser 5.
The rinse aid dispenser holds 5 oz (150 mL) of rinse aid.
Under normal conditions, this will last for about 1 to
3 months.
1. Make sure the dishwasher door is fully open.
2. Turn the dispenser knob to "Open" and lift it out.
I¸useR,NsEA,OFOR
B
lBETTEROR ..........
C
Place the knob back into the opening and turn to the
"Lock" position.
Rinse aid setting
The amount of rinse aid released into the final rinse can be
adjusted. For most water conditions, the factory setting of
2 will give good results. If you have hard water or notice
rings or calcium spots on your glasses or dishes, try a
higher setting.
Lock
( u::.............................
/ Openc::_.,!......1] ))J
Open
A. Dispenser knob
B. Indicator
C. Indicator window
.
Pour rinse aid into the opening until the indicator points
to "Full." Do not overfill. (When the rinse aid indicator
drops to the "Add" level, add more rinse aid.)
Full
Add
Hot water dissolves and activates the dishwashing detergent. Hot water also dissolves grease on dishes and helps
glasses dry spot-free. For best dishwashing results, water should be 120°F (49°C) as it enters the dishwasher. Loads may
not wash as well if the water temperature is too low. Water that is too hot can make some soils harder to remove and
cause certain detergent ingredients not to function. If your water heater is located far from the dishwasher, it may be
necessary to run the hot water at the faucet closest to the dishwasher to minimize the amount of cold water in the water
line.
To check water temperature Additional efficiency tips
1. Run hot water at the faucet closest to your dishwasher
for at least 1 minute.
2. Place a candy or meat thermometer in a glass
measuring cup.
.
Check the temperature on the thermometer as the
water is running into the cup.
14
To adjust the setting
1. Remove the dispenser knob.
2. Turn the arrow adjuster inside the dispenser to the
desired setting by either using your fingers or inserting
a flat-blade screwdriver into the center of the arrow and
turning.
3. Replace the dispenser knob.
• Tosave water, energy and time, do not rinse dishes
before putting them into the dishwasher.
• Use a delay feature to run your dishwasher during off-
peak hours. Local utilities recommend avoiding heavy
usage of energy at certain times of day.
• During the summer, run your dishwasher at night. This
reduces daytime heat buildup in the kitchen.
• Use a rinse aid to improve drying.
• Use cycles or options that add extra heat to the wash
or rinse portion of the cycle only when needed.
• If your home is equipped with a water softener, you
may want to avoid starting the dishwasher during the
regeneration of the softener, since this may contribute
to poor wash performance.

Selectthewashcycleandoptionsdesired.Orpress
START/RESUMEtousethesamecycleandoptionsasthe
previouscycle.
NOTE:Ifthelastcycleyoucompletedwasarinsecycle,
thedishwasherwillrunthelastfullwashcycleandoptions
thatyouselectedwhenyoupressSTART/RESUME.
A"O"showsthestepsthatareineachcycle.
WaterusageisshowninU.S. gallons/liters.
These models meet the ENERGY STAR®guidelines for
energy efficiency.
Cycle time includes dry time. An asterisk ( * ) by the cycle
time, Main Wash, and Final Rinse indicates the cycle time
might be longer depending on the temperature of the
water entering the dishwasher.
IMPORTANT: These sensor-based cycles may take
several hours depending on cycle selected, water
temperature, soil level, and dish mass sensed.
Smart Wash
Use this cycle for all day-to-day soil types when washing
full to partial dish loads. During the cycle, the sensors will
determine water temperature, wash time, and water
amount based on the soil level and the dish load size.
During the main wash, the wash action will repeatedly
pause for several seconds.
Use both detergent dispenser sections when
washing a full soiled dish load.
Use one detergent dispenser section when
washing lightly soiled, partial dish loads.
Dish Soil Pre- Main Rinse Final Dry Average Water
load Level Wash Wash* or Rinse* Time* Usage
Sensed Purge (rain) (gal/L)
Heavy • • • • • 145* 6.6-7.5/
Full Nominal • • • • • 115" 5.6/21.2
145°F Rinse 140°F 25.0-28.4
(63°C) (60°C)
119°F Purge 140°F
(48oc) (60oc)
Light • • • • 105* 4.3/16.3
Heavy • • • • • 130* 5.6-6.5/
Partial Nominal • • • • • 105" 5.6/21.2
Light • • • • 105* 4.3/16.3
115°F Purge 140°F
(46°C) (60°C)
145°F Purge 140°F 21.2-24.6
(63°C) (60°C)
119°F Purge 140°F
(48oc) (60oc)
115°F Purge 140°F
(46°C) (60°C)
t
Pots Pans
Use this cycle for heavily soiled pots, pans, casseroles,
regular tableware and hard** water conditions.
Use both detergent dispenser sections.
Pre- Main Pre- Final Dry Average Water
Wash Wash* Rinser Rinse* Time* Usage
• • • • • 125* 6.9-7.8/
140°F 140°F 26-30
(rain) (gal/L)
(60oc) (60oc)
Normal Wash
Use this cycle for loads with normal amounts of food soil.
(The energy-usage label is based on this cycle.) During
the wash cycle, the wash action will repeatedly pause for
several seconds.
Use both detergent dispenser sections.
Pre- Main Pre- Final Dry Average Water
Wash Wash* Rinser Rinse* Time* Usage
• • • • • 110* 4.3-7.8/
115°F 140°F 16-30
(46°C) (60°C)
(rain) (gal/L)
Light Wash
Use this cycle for china and crystal. This cycle uses a
light wash and gentle dry. During the heated dry, the
heating element cycles on and off.
Use main detergent dispenser section.
Pre- Main Pre- Final Dry Average Water
Wash Wash* Rinser Rinse* Time* Usage
• • • • • 105* 4.6-6.8/
115°F 135°F 17-26
(46°C) (57°C)
(rain) (gal/L)
Fast Wash
Use this cycle for a quick wash to clean dishes prior to
entertaining. Towel drying may be needed. This cycle
takes exactly 30 minutes.
Use main detergent dispenser section.
Pre- Main Rinse Final Dry Time Water
Wash Wash Rinse (rain) Usage
• • • • 30 6.9/26
(gal/L)
15

QuickRinse
Use this rinse cycle for rinsing dishes, glasses, and
silverware that will not be washed right away.
Do not use detergent with this cycle.
Wash Main Rinse Final Dry Time Water
-A small amount of water is run through the pump to
remove soil particles between the main wash and final
rinse.
*If the incoming water temperature is less than the
recommended temperature or food soils are heavy, the
cycle will automatically compensate by adding time,
heat, and water as needed.
**Hard water is defined as 7 grains per U.S. gallon and
above.
NOTE: The sensor in your dishwasher monitors the soil
level. Cycle time and/or water usage can vary from the
numbers above as the sensor adjusts the cycle for the
best wash performance.
.
Press CANCEL/DRAIN. The Cancel/Drain light glows.
2.
The dishwasher starts a 2-minute drain (if needed). Let
the dishwasher drain completely. The light turns off
after 2 minutes. The door must be closed for the
dishwasher to drain.
To stop the drain
You can press CANCEL/DRAIN again to stop the drain. Be
sure to drain the dishwasher before starting a new cycle.
To clear the indicators
Press CANCEL/DRAIN before starting the dishwasher to
clear all options and cycles.
During the first minute of a cycle
1. Select a new cycle and/or options.
2. Check the detergent dispensers. They must be filled
properly for the new cycle.
3. The Start/Resume light will flash when the door is
opened. Make sure the door is closed.
4. Press START/RESUME.
Wash or Rinse (rain) Usage
Purge (gal/L)
• 10 1.8-2.2/
Rinse 6.8-8.3
After the first minute of a cycle
1. Press CANCEL!DRAIN. The Cancel/Drain light glows.
Your dishwasher starts a 2-minute drain (if needed). Let
the dishwasher drain completely.
2. Check the detergent dispensers. They must be filled
properly for the new cycle.
3. Make sure the door is closed. The Start/Resume light
will flash.
4. Select a new cycle and/or options.
5. Press START/RESUME.
You can add an item anytime before the main wash starts.
Open the door and check the detergent dispenser. If the
cover is still closed, you can add items.
To add items
1. Open the door slightly to stop the cycle. Wait for the
spraying action to stop before opening the door. The
Start/Resume light will flash.
2. Open the door. Ifthe detergent dispenser cover is still
closed, add the item.
3. Close the door firmly until it latches. The Start/Resume
light will flash.
4. Press START/RESUME.
IMPORTANT: If Lock On is selected, turn off the lock (see
Lock On section in "Option Selections"), or the Start/
Resume light will continue to flash.
O on ect
You can customize your cycles by pressing an option. If
you change your mind, press the option again to turn the
option off, or select a different option if desired.
You can change an option anytime before the selected
option begins. For example, you can press an unheated
drying option anytime before drying begins.
Press START/RESUME to use the same cycle and
option(s) as the previous wash cycle.
NOTE: If the last cycle you completed was a rinse cycle,
when you press START/RESUME, the dishwasher runs the
last full wash cycle and options.
16
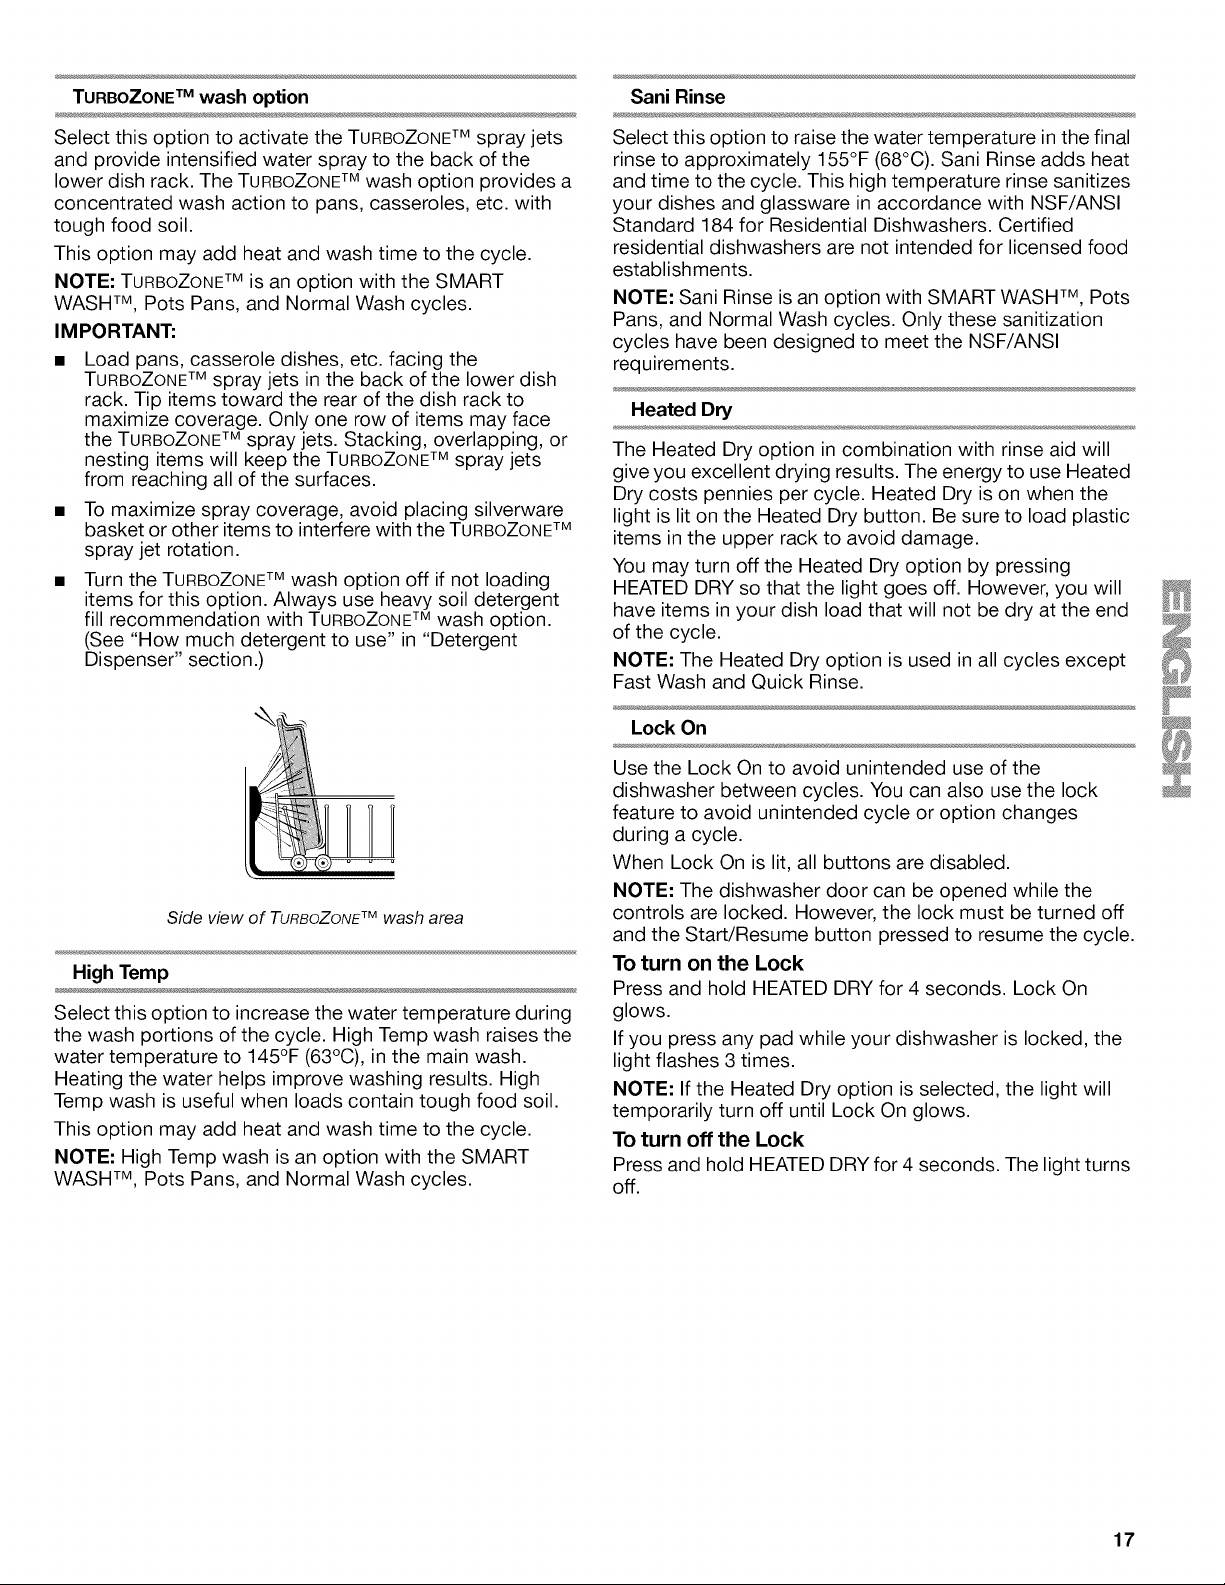
TURBOZONETM wash option
Sani Rinse
Select this option to activate the TURBOZONETM spray jets
and provide intensified water spray to the back of the
lower dish rack. The TURBOZONETM wash option provides a
concentrated wash action to pans, casseroles, etc. with
tough food soil.
This option may add heat and wash time to the cycle.
NOTE: TURBOZONETM is an option with the SMART
WASH TM, Pots Pans, and Normal Wash cycles.
IMPORTANT:
Load pans, casserole dishes, etc. facing the
TURBOZONETM spray jets in the back of the lower dish
rack. Tip items toward the rear of the dish rack to
maximize coverage. Only one row of items may face
the TURBOZONETM spray jets. Stacking, overlapping, or
nesting items will keep the TURBOZONETM spray jets
from reaching all of the surfaces.
• Tomaximize spray coverage, avoid placing silverware
basket or other items to interfere with the TURBOZONETM
spray jet rotation.
Turn the TURBOZONETM wash option off if not loading
items for this option. Always use heavy soil detergent
fill recommendation with TURBOZONETM wash option.
(See "How much detergent to use" in "Detergent
Dispenser" section.)
Select this option to raise the water temperature in the final
rinse to approximately 155°F (68°C). Sani Rinse adds heat
and time to the cycle. This high temperature rinse sanitizes
your dishes and glassware in accordance with NSF/ANSI
Standard 184 for Residential Dishwashers. Certified
residential dishwashers are not intended for licensed food
establishments.
NOTE: Sani Rinse is an option with SMART WASH TM, Pots
Pans, and Normal Wash cycles. Only these sanitization
cycles have been designed to meet the NSF/ANSI
requirements.
Heated Dry
The Heated Dry option in combination with rinse aid will
give you excellent drying results. The energy to use Heated
Dry costs pennies per cycle. Heated Dry is on when the
light is lit on the Heated Dry button. Be sure to load plastic
items in the upper rack to avoid damage.
You may turn off the Heated Dry option by pressing
HEATED DRY so that the light goes off. However, you will
have items in your dish load that will not be dry at the end
of the cycle.
NOTE: The Heated Dry option is used in all cycles except
Fast Wash and Quick Rinse.
Side view of TURBOZONETM wash area
High Temp
Select this option to increase the water temperature during
the wash portions of the cycle. High Temp wash raises the
water temperature to 145°F (63°C), in the main wash.
Heating the water helps improve washing results. High
Temp wash is useful when loads contain tough food soil.
This option may add heat and wash time to the cycle.
NOTE: High Temp wash is an option with the SMART
WASH TM, Pots Pans, and Normal Wash cycles.
Lock On
Use the Lock On to avoid unintended use of the
dishwasher between cycles. You can also use the lock
feature to avoid unintended cycle or option changes
during a cycle.
When Lock On is lit, all buttons are disabled.
NOTE: The dishwasher door can be opened while the
controls are locked. However, the lock must be turned off
and the Start/Resume button pressed to resume the cycle.
To turn on the Lock
Press and hold HEATED DRY for 4 seconds. Lock On
glows.
If you press any pad while your dishwasher is locked, the
light flashes 3 times.
NOTE: If the Heated Dry option is selected, the light will
temporarily turn off until Lock On glows.
To turn off the Lock
Press and hold HEATED DRY for 4 seconds. The light turns
off.
17

Delay Hours
Clean
Select this option to run your dishwasher at a later time or
during off-peak hours. You can add items to the load
anytime during the delay. After adding items, firmly close
the door until it latches and press START/RESUME, or the
delay will not continue.
To delay the start
1. Press the delay button to choose the number of hours
delayed.
2. Select a wash cycle and options.
3. Press START/RESUME.
The dishwasher starts the cycle in the selected number of
hours.
NOTES:
• Tocancel the delay and cycle, press CANCEL/DRAIN.
• To cancel the delay and start the cycle, press START/
RESUME.
Follow the progress of your dishwasher with the Cycle
Status indicators.
Washing Drying Clean Sanitized
NOTE: The features on your dishwasher may vary from
those shown here.
Clean glows when a cycle is finished. The light turns off
when you press any button or close the door.
Sanitized
If you select the Sani Rinse option, Sanitized glows when
the Sani Rinse cycle is finished. If your dishwasher did not
properly sanitize your dishes, the light flashes at the end of
the cycle. This can happen if the cycle is interrupted or the
incoming water temperature is too low. The light turns off
when you press any button or close the door.
The active vent reduces the sounds from your dishwasher.
The vent closes, after the cycle starts, to lock in sound.
The active vent opens when wash action ends and vapor
is vented into room. Between cycles, the vent stays open
for airflow, reducing the buildup of odors.
NOTE: There is a slight noise when the cover closes or
opens. This is normal.
IMPORTANT: The vapor is hot. Do not touch the vent
during drying.
.--:'-i<',::
• % •
O, ;,AII P ion
The overfill protection float (in the front right corner of the
dishwasher tub) keeps the dishwasher from overfilling. It
must be in place for the dishwasher to operate.
Check under the float for objects that may keep the
protector from moving up or down.
18

WASHING SPECIAL ITEMS
If you have doubts about washing a particular item, check with the manufacturer to see if it is dishwasher safe.
Aluminum Yes High water temperature and detergents can affect finish of anodized
Disposable No Do not wash throwaway aluminum pans in the dishwasher. These might
Aluminum shift during washing and transfer black marks to dishes and other items.
Bottles and Cans No Wash bottles and cans by hand. Labels attached with glue can loosen and
Cast Iron No Seasoning will be removed, and iron will rust.
China/Stoneware Yes Always check manufacturer's recommendations before washing. Antique,
Crystal Yes Always check manufacturer's recommendations before washing. Some
Gold No Gold-colored flatware will discolor.
Glass Yes Milk glass yellows with repeated dishwasher washing.
Hollow-Handle No Handles of some knives are attached to the blade with adhesives which
Knives can loosen if washed in the dishwasher.
Pewter, Brass, No High water temperatures and detergent can discolor or pit the finish.
Bronze
Disposable Plastics No Cannot withstand high water temperatures and detergents.
aluminum.
clog the spray arms or pump and reduce washing performance.
hand-painted, or over-the-glaze patterns may fade. Gold leaf can discolor
or fade.
types of leaded crystal can etch with repeated washing.
Plastics Yes Always check manufacturer's recommendations before washing. Plastic
items may vary in their ability to withstand high temperatures and
detergents. It is recommended that light items such as lids and butter
dishes be placed in the upper rack only. Sturdy items such as coolers and
high-chair trays may be placed in the lower rack. When washing plastic
items in the lower rack, it is recommended that an air dry be used.
Stainless Steel Yes Run a rinse cycle if not washing immediately. Prolonged contact with food
containing salt, vinegar, milk products, or fruit juice can damage finish.
Sterling Silver or Yes Run a rinse cycle if not washing immediately. Prolonged contact with food
Silver Plate containing salt, acid, or sulfide (eggs, mayonnaise, and seafood) can
damage finish.
Tin No Can rust.
Wooden Ware No Wash by hand. Always check manufacturer's instructions before washing.
Untreated wood can warp, crack, or lose its finish.
19

DISHWASHER CARE
Cleaning the exterior
In most cases, regular use of a soft, damp cloth or sponge
and a mild detergent is all that is necessary to keep the
outside of your dishwasher looking nice and clean. If your
dishwasher has a stainless steel exterior, a stainless steel
cleaner is recommended.
Cleaning the interior
Hard water minerals can cause a white film to build up on
the inside surfaces, especially just beneath the door area.
Do not clean the dishwasher interior until it has cooled.
You may want to wear rubber gloves. Do not use any type
of cleanser other than dishwasher detergent because it
may cause foaming or sudsing.
To clean interior
Make a paste with powdered dishwasher detergent on a
damp sponge and clean.
OR
Use liquid automatic dishwasher detergent and clean with
a damp sponge.
OR
See the vinegar rinse procedure in "Spotting and filming on
dishes" in "Troubleshooting."
NOTE: Run a normal cycle with detergent after cleaning
the interior.
Check the drain air gap anytime your dishwasher isn't
draining well.
Some state or local plumbing codes require the addition of
a drain air gap between a built-in dishwasher and the
home drain system. If a house drain is clogged, the drain
air gap keeps water from water backing up into
dishwasher.
The drain air gap is usually located on top of the sink or
countertop near the dishwasher. To order a drain air gap,
please call 1-800-4-MY-HOME ®.Ask for Part Number
300096.
NOTE: The drain air gap is an external plumbing device
that is not part of your dishwasher. The warranty provided
with your dishwasher does not cover service costs directly
associated with the cleaning or repair of the external drain
air gap.
To clean the drain air gap
Clean the drain air gap periodically to ensure proper
drainage of your dishwasher. Follow the cleaning
instructions provided by the manufacturer. With most
types, you lift off the chrome cover. Unscrew the plastic
cap. Then check for any soil buildup. Clean
if necessary.
Storing for the summer
20
Turn off the water supply and power supply to the
dishwasher during the summer to avoid damage to your
dishwasher.
Winterizing your dishwasher
Avoid water damage to your dishwasher and home due to
freezing water lines. If your dishwasher is left in a seasonal
dwelling or could be exposed to near freezing
temperatures, have your dishwasher winterized by
authorized service personnel.

TROUBLESHOOTING
First try the solutions suggested here and possibly avoid the cost of a service call...
Dishwasher is not operating properly
• Dishwasher does not run or stops during a cycle
Is the door closed tightly and latched?
Is the right cycle selected? Refer to the "Cycle
Selection Charts."
Is there power to the dishwasher? Has a household
fuse blown, or has a circuit breaker tripped? Replace
the fuse or reset the circuit breaker. If the problem
continues, call an electrician.
Has the motor stopped due to an overload? The motor
automatically resets itself within a few minutes. If it
does not restart, call for service.
Is the water shutoff valve (if installed) turned on?
It is normal for certain cycles to repeatedly pause for
several seconds during the wash cycle.
• START/RESUME light is flashing
Was the door opened during the cycle, or was the
power interrupted? The Start/Resume light will flash
when the door is opened during a cycle, or may flash if
the power is interrupted. Press START/RESUME to
resume the cycle. Make sure the door is fully closed
and latched.
NOTE: On top control models, if the door is not closed
within 3 seconds of pressing Start/Resume, press
START/RESUME again.
Clean light is flashing
The dishwasher has malfunctioned. Call for service.
Dishwasher will not fill
Is the overfill protection float able to move up and
down freely? Press down to release.
Dishwasher seems to run too long
Is the water supplied to the dishwasher hot enough?
The dishwasher runs longer while heating water. Refer
to the "Dishwasher Efficiency Tips" section.
A delay automatically occurs in some wash and rinse
cycles until the water reaches the proper temperature.
• Water remains in the dishwasher
Is the cycle complete?
Was the disposer knockout plug removed during
installation? (See "Install the drain hose" in the
Installation Instructions.)
• Detergent remains in the covered section of the
dispenser
Is the cycle complete?
Is the detergent lump-free? Replace detergent if
necessary.
Is the bottom rack installed properly with the bumpers
(on some models) in the front? Refer to the "Parts and
Features" section. Reinstall the rack if necessary.
• White residue on the front of the access panel
Was too much detergent used? Refer to the "Detergent
Dispenser" section.
Is the brand of detergent making excess foam? Try a
different brand to reduce foaming and eliminate
buildup.
• Odor in the dishwasher
Are dishes washed only every 2 or 3 days? Run a rinse
cycle once or twice a day until you have a full load.
Does the dishwasher have a new plastic smell? Run a
vinegar rinse as described inthe section "Spotting and
filming on dishes."
Condensation on the kitchen counter (built-in
models)
Is the dishwasher aligned with the countertop?
Moisture from the vent in the dishwasher console can
form on the counter. Refer to the Installation
Instructions for more information.
• Bottom rack does not fully slide into the dishwasher
Check to see if items loaded for TURBOZONETM wash
option have shifted. Reload to keep items from
interfering with spray jets or spray arm. (See "Loading
Bottom Rack.")
21

Dishesare not completely clean Spots and stains on dishes
• Food soil left on the dishes
Is the dishwasher loaded correctly? Refer to the
"Dishwasher Loading" section.
Is the water temperature too low? For best
dishwashing results, water should be 120°F (49°C) as it
enters the dishwasher. Refer to the "Dishwasher
Efficiency Tips" section.
Did you use the correct amount of fresh detergent? Use
recommended dishwasher detergents only. Refer to the
"Detergent Dispenser" section. Detergent must be
fresh to be effective. Store detergent in a cool, dry area.
Heavy soil and/or hard water generally require extra
detergent.
Do you have hard water? You may need to increase the
amount of detergent you are using. Refer to the
"Detergent Dispenser" section. Also, you may need to
switch to a detergent with a phosphorus content of
8.7%.
Is detergent caked in dispenser? Use fresh detergent
only. Do not allow detergent to sit for several hours in a
wet dispenser. Clean dispenser when caked detergent
is present.
Is the pump or spray arm clogged by labels from
bottles and cans?
Is the home water pressure high enough for proper
dishwasher filling? Home water pressure should be 20
to 120 psi (138 to 828 kPa) for proper dishwasher fill. If
you have questions about your water pressure, call a
licensed, qualified plumber.
Are high suds slowing the wash arm? Do not use soap
or laundry detergents. Use recommended dishwasher
detergents only.
• Dishes in the TURBOZONETM wash area are not clean
Are the dishes loaded to face the TURBOZONETM spray
jets? Load soiled dish surfaces to face the back of the
dishwasher toward the TURBOZONETM spray jets. Tilt the
dishes toward the back so water can drain from
surfaces, and the lower spray arm can wash the item
from below.
NOTE: Loaded items may shift when dish racks are
pushed into the dishwasher. Make sure dishes do not
interfere with the spray arms, water feed tube, or
TURBOZONETM spray jets.
Are items loaded so they do not overlap? Load items
only one row deep without any overlap so that the
TURBOZONETM spray jets can reach all surfaces.
Are the TURBOZONETM spray jets free to rotate? Make
sure that no loaded items are interfering with the spray
jets' rotation.
• Spotting and filming on dishes
Is your water hard or is there a high mineral content in
your water? Conditioning the final rinse water with a
liquid rinse aid helps eliminate spotting and filming.
Keep the rinse aid dispenser filled.
Is the water temperature too low? For best
dishwashing results, water should be 120°F (49°C) as it
enters the dishwasher. Refer to the "Dishwasher
Efficiency Tips" section.
Did you use the correct amount of effective detergent?
Use recommended dishwasher detergents only. Refer
to the "Detergent Dispenser" section. Detergent must
be fresh to be effective. Store detergent in a cool, dry
area. Heavy soil and/or hard water generally require
extra detergent.
Is the home water pressure high enough for proper
dishwasher filling? Home water pressure should be 20
to 120 psi (138 to 828 kPa) for proper dishwasher fill. If
you have questions about your water pressure, call a
licensed, qualified plumber.
NOTE: To remove spots and film from dishes, try a
white vinegar rinse. This procedure is intended for
occasional use only. Vinegar is an acid, and using it too
often could damage your dishwasher.
1. Wash and rinse dishes. Use an air-dry or an energy
saving dry option. Remove all silverware or metal
items.
2. Put 2 cups (500 mL) white vinegar in a glass or
dishwasher-safe measuring cup on the bottom
rack.
3. Run the dishwasher through a complete washing
cycle using an air-dry option. Do not use detergent.
Vinegar will mix with the wash water.
Silica film or etching (silica film is a milky, rainbow-
colored deposit; etching is a cloudy film)
Sometimes there is a water/chemical reaction with
certain types of glassware. This is usually caused by
some combination of soft or softened water, alkaline
washing solutions, insufficient rinsing, overloading the
dishwasher, and the heat of drying. It might not be
possible to avoid the problem, except by hand
washing.
To slow this process use a minimum amount of
detergent per load. Refer to the "Detergent Dispenser"
section. Use a liquid rinse aid and underload the
dishwasher to allow thorough rinsing. Silica film and
etching are permanent and cannot be removed. Do not
use heated drying.
22
 Loading...