

Kenmore 66513605790, 66513603000, 66513601790 Owner’s Manual

Note to You
Pleaseread and save thismanual This
informationwill make installing and using
your new Sears compactor easie_ Ifyou
need helpor have questions, call your
Searsstore or service cente_ When you
call you will need the model and serial
numbers and purchase date. Youcan find
these numberson a rating label located
behind the drawer on the front of
compactor opening. Keep thismanual
and your sales sliptogether forreference
in caseyou ever need warrantyservice,
model
qerial
purchase date
Also, please complete and mail the
enclosed Product Registration Card.
Important Safety Instructions.. 2
Compactor Features ......... 3
Installation instructions ..... 4-8
Tools and materials needed ,.. 4
Compactor dimensions ...... 4
Cabinet opening dimensions ,. 4
Clearance dimensions ....... 4
Electrical requirements ....... 5
Installing compactor ....... 5-8
Adjusting toe plate .......... 8
Custom-made panels ........ 8
Using Your Compactor ....... 9
Puffing trash into compactor.., g
Starting/stopping compactor.. 10
How your compactor works ., 10
EXTRA PACTM cycle ....... 10
Removing a filled bag ....... 11
Installing a new bag ........ 12
Liquid deodorizer system .... 12
Cleaning Tips .............. 13
Troubleshooting ........... 14
If you need assistance
or service ................ 14
Accessories ............... 15
Index .................... 15
Warranty ................. 16
PART NO. 9871460

Your safety and the safety of
others is very important.
We have provided many important
safety messages in this manual and
on your appliance. Always read and
obey all safety messages.
symbol.
[_J his is the safety alert
This symbol alerts you to
hazards that can kill or hurt you and
others. All safety messages will be
preceded by the safety alert symbol
and the word "DANGER" or
"WARNING". These words mean:
You will be killed or seriously
injured if you don't follow
instructions.
You can be killed or seriously
injured if you don't follow
instructions.
All safety messages will identify the
hazard, tell you how to reduce the
chance of injury, and tell you what
can happen if the instructions are
not followed.
IMPORTANT SAFETY INSTRUCTIONS
To reduce the risk of fire,
electrical shock, or injury when
using your compactor, follow
basic precautions including the
following:
Read this guide for important
use and safety instructions
before using the compactor.
Close supervision of children is
necessary when compactor is
used near children.
Do not allow compactor to be
used as a toy, or to run
unattended at any time. Remove
Key-Knob and store it in a safe
place out of children's reach.
Do not touch moving parts.
Have compactor examined,
repaired, or adjusted by an
authorized service contractor.
Do not compact:
- lighted cigarettes, cigars, or
other hot or burning items.
- any container or aerosol can
containing insecticide, hair
spray, paint, engine starting
fluid, or other poisonous,
toxic, or explosive products.
- volatile flammable material
such as oily rags, thinner,
etc., which would create a fire
hazard or explosion.
Do not take apart this compactor.
Incorrect reassembfy can cause
electric shock when subsequently
used.
Use only for intended use as
described in this manual. Do
not use attachments other than
those recommended by
manufacturer.
Never lift bag by the sides.
Broken glass or other sharp
objects in the bag can cause
injury.
This compactor is designed for
household use only.
Do not install compactor where
it will be exposed to the weather.
Unplug compactor from
electrical outlet before servicing.
The compactor must be
electrically grounded. See
grounding instructions.
Do not overload trash bag with
heavy materials such as glass.
Do not use hands or feet to push
things into compactor.
Never operate compactor if:
- it is not working right.
- it is damaged.
- parts are missing.
- handle is removed.
- cord set, plug, or motor is
damaged in any manner.
Never use or store flammable
fluids (dry cleaning solvents,
gasoline, kerosene, etc.) in or
near your compactor. These
substances give off vapors that
can create a fire hazard or
explosion.
Wipe ram cover to remove any
glass before touching ram cover.
See Installation Instructions
section.
SAVE THESE INSTRUCTIONS
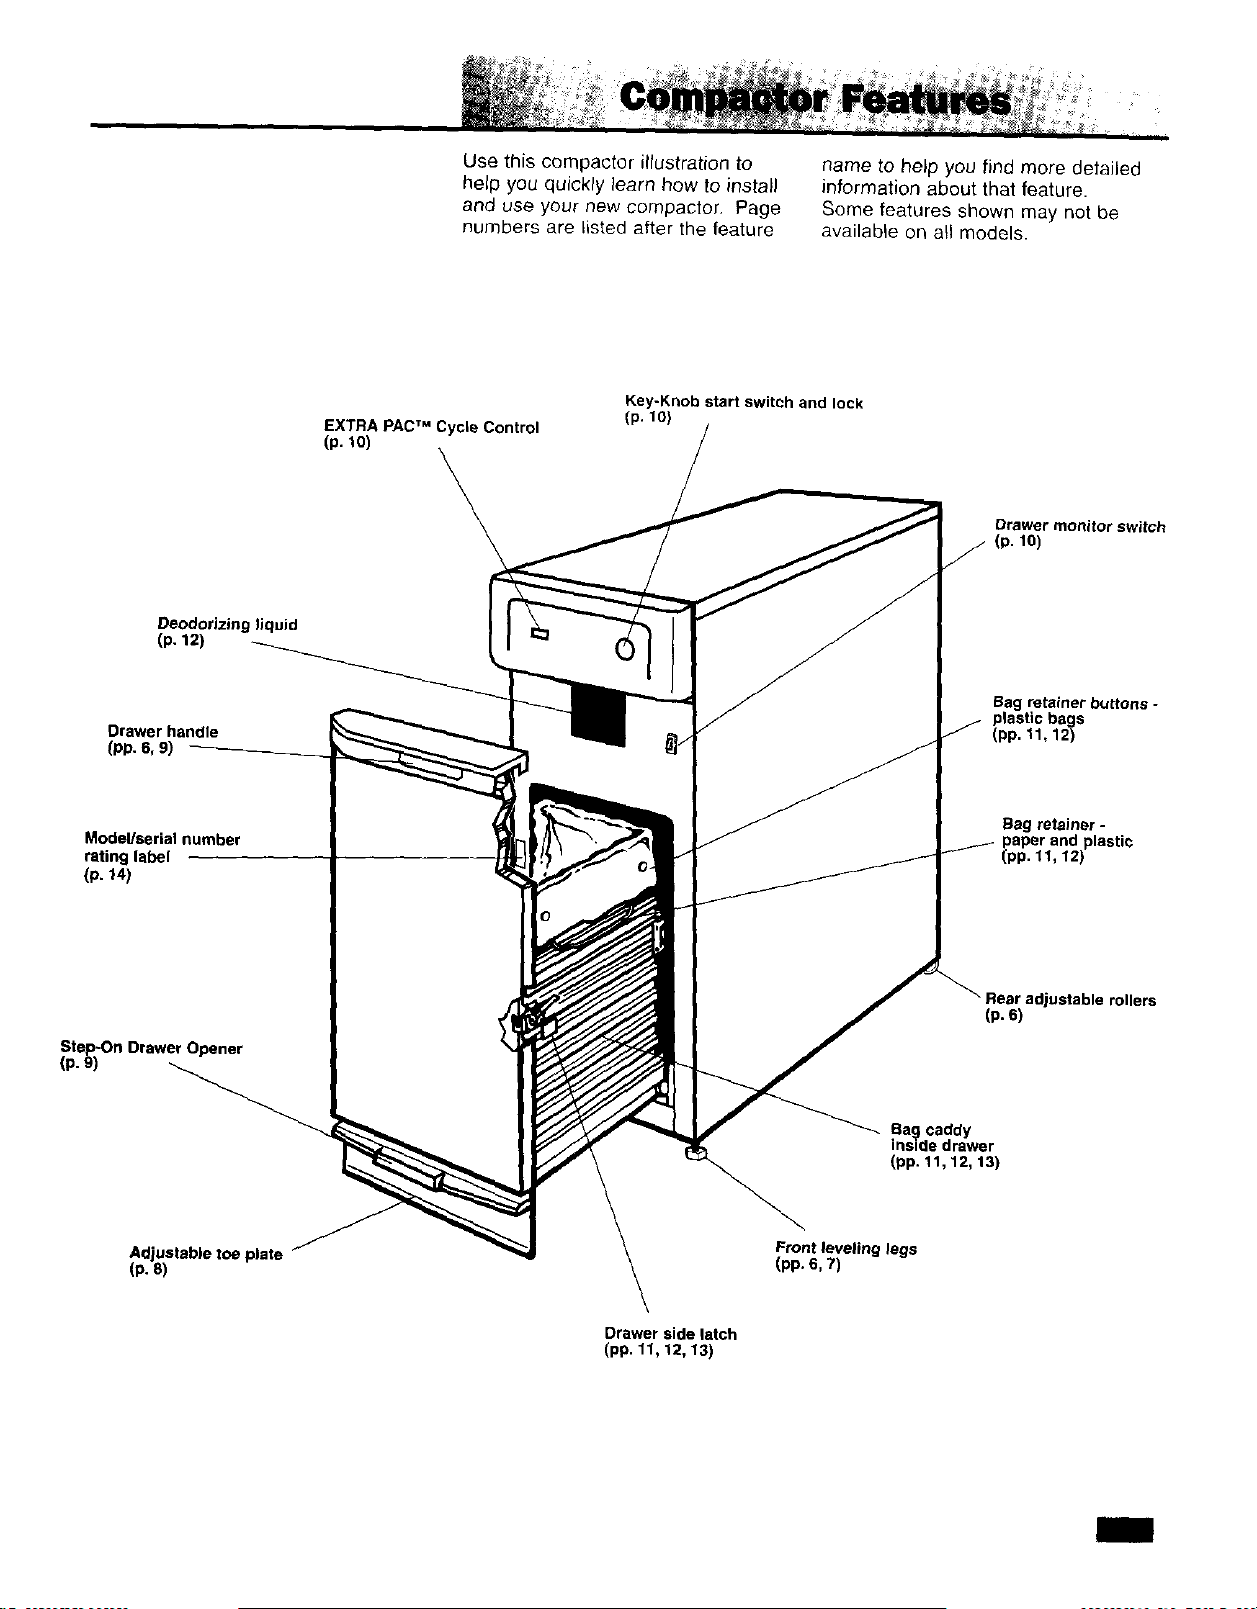
Deodorizing liquid
(p. 12)
Drawer handle
(pp. 6, 9)
Use this compactor illustration to
help you quickly learn how to install
and use your new compactor. Page
numbers are listed after the feature
EXTRA PACTM Cycle Control
(p. 10)
name to help you find more detailed
information about that feature.
Some features shown may not be
available on all models.
Key-Knob start switch and lock
(p. 10)
Drawer monitor switch
(p. 10)
Bag re_iner buttons -
plastic bags
(pp. 11,12)
Model/serial number
rating label
{p. 14)
Step-On Drawer Opener
(p. 9)
Adjustable toe plate
(P. 8)
Drawer side latch
(pp. 11, 12, 13)
Ba_ caddy
instde drawer
(pp. 11,12,13)
Front leveling legs
(pp.6, 7)
Bag retsJner -
paper and plastic
(pp. 11, 12)
Rear adjustable rollers
_p.6)

You need to:
Tools and materials needed
• observe all governing codes and
Freestanding compactor tools
ordinances.
• install this compactor as specified
5/16" box_nd__
in these instructions.
• have everything you need to
properly install compactor.
_o wrench
scissors
r _gloves
• contact a qualified installer to
insure that compactor is installed to
meet all national and local codes and
level
ordinances•
Undefoounter compactor tools;
Check location where compactor will
be installed. The location must provide:
screwdriver _ pliers
• square opening for proper
operation and appearance.
• a cabinet front that is perpendicular
to the floor.
• level floor front to back. If floor at
_o 5/16" box_;;;;;;;_
r wrench
front of opening is not level with floor at _rs _giovn
rear of opening, shims may be needed _ ,,
to level compactor..
• 6 inches (15.2 cm) of clearance to le_ : _ ruler or
the right side of compactor to be able ._
I_) measuringtape
to remove bag.
• 23 inches (58.4 cm) in front of P_ requured for undercoun_ :
34-1/8"
(86.7 cm)
compactor to remove drawer. Ur_unter Bracket Kit, Part__.,_
987_18
14-15/16" 24"
(..0 cm)

Electrical requirements
If codes permit and a separate
grounding wire is used, it is
recommended that a qualified
electrician determine that the
grounding path is adequate.
Important: Observe all governing
codes and ordinances.
3-prong
grounding-type
wall receptacle _ J=_,
, _PqL J
3-prong
grounding i _._
Plug ......_.._
grounding
prong
power
supply cord
Electrical Shock Hazard
Plug into a grounded 3-prong
outlet.
Do not remove ground prong.
Do not use an adapter.
Do not use an extension cord.
Failure to follow these
instructions can result in
death, fire, or electrical shock.
Recommended grounding method
For your personal safety, compactor
must be grounded. This compactor
is equipped with a power supply cord
having a 3-prong grounding plug. To
minimize possible shock hazard, the
cord must be plugged into mating,
3-prong, grounding-type wall
receptacle, grounded in accordance
Do not modify power supply cord
plug.
Do not have a fuse in the neutral
or grounding circuit.
You must have:
• 120-volt, 60-Hz, AC-only, 15- or
20-amp., fused electrical supply.
We recommend:
• a time-delay fuse or circuit breaker.
• a separate circuit.
with all national and local codes and
ordinances. If a mating wall
receptacle is not available, it is the
personal responsibility and obligation
of the customer to have a properly
grounded, 3-prong, wall receptacle
installed by a qualified electrician.
Installing compactor
Do not grasp console to move
compactor.
Slide compactor onto cardboard
or hardboard before moving
compactor across floor to prevent
damaging floor covering.
Excessive Weight Hazard
Use two or more people to
move and install compactor.
Failure to do so can result in
back or other injury.
= Remove all protective
packaging materials such as tape
and shipping pads. Remove waxy
Do not allow the rear frame of
the compactor to touch the floor
covering when lifting or moving
compactor.
residue caused by protective shipping
material with a mild solution of
dishwashing liquid and water.
 Loading...