

Kenmore 665.1313* Owner's Manual
®
E
E
E
H
ULTRA WASH
®
Dishwasher
Use & Care Guide
H
Lavavajillas ULTRA WASH
®
Manual de uso y cuidado
H
Lave-vaisselle ULTRA WASH
®
Guide d’utilisation et d’entretien
Models/Modelos/Modèles 665.1313✼
✼ = color number, número de color, numéro de couleur
W10082927A Sears Canada Inc., Toronto, Ontario, Canada M5B 2B8 www.sears.ca
Sears Roebuck and Co., Hoffman Estates, IL 60179 U.S.A. www.sears.com

TABLE OF CONTENTS
E
PROTECTION AGREEMENTS.......................................................2
WARRANTY ....................................................................................3
DISHWASHER SAFETY .................................................................4
PARTS AND FEATURES................................................................6
START-UP / QUICK REFERENCE................................................7
ULTRA WASH
Dishwasher Efficiency Tips ..........................................................9
DETERGENT AND RINSE AID.....................................................10
Detergent....................................................................................10
Rinse Aid ....................................................................................10
LOADING.......................................................................................11
Loading For Best Performance..................................................11
Top Rack Loading......................................................................12
Bottom Rack Loading ................................................................13
DISHWASHER USE......................................................................15
Cycles and Options Information ................................................15
Canceling A Cycle......................................................................17
Changing A Cycle After Dishwasher Is Started.........................17
Adding A Dish After Dishwasher Is Started...............................17
WASHING SPECIAL ITEMS.........................................................18
DISHWASHER CARE ...................................................................19
Cleaning......................................................................................19
Drain Air Gap..............................................................................19
Storing........................................................................................19
TROUBLESHOOTING ..................................................................20
SERVICE NUMBERS............................................... BACK COVER
H
®
FILTRATION SYSTEM .....................................8
PROTECTION AGREEMENTS
Master Protection Agreements
Congratulations on making a smart purchase. Your new
Kenmore
of dependable operation. But like all products, it may
require preventive maintenance or repair from time to time.
That’s when having a Master Protection Agreement can
save you money and aggravation.
The Master Protection Agreement also helps extend the
life of your new product. Here’s what the Agreement*
includes:
✔ Parts and labor needed to help keep products
operating properly under normal use, not just defects.
Our coverage goes well beyond the product warranty.
No deductibles, no functional failure excluded from
coverage— real protection.
✔ Expert service by a force of more than 10,000
authorized Sears service technicians, which means
someone you can trust will be working on your product.
✔ Unlimited service calls and nationwide service, as
often as you want us, whenever you want us.
✔ “No-lemon” guarantee – replacement of your covered
product if four or more product failures occur within
twelve months.
✔ Product replacement if your covered product can’t be
fixed.
✔ Annual Preventive Maintenance Check at your
request – no extra charge.
✔ Fast help by phone – we call it Rapid Resolution –
phone support from a Sears representative on all
products. Think of us as a “talking owner’s manual.”
✔ Power surge protection against electrical damage due
to power fluctuations.
✔ $250 Food Loss Protection annually for any food
spoilage that is the result of mechanical failure of any
covered refrigerator or freezer.
✔ Rental reimbursement if repair of your covered product
takes longer than promised.
✔ 10% discount off the regular price of any non-covered
repair service and related installed parts.
Once you purchase the Agreement, a simple phone call is
all that it takes for you to schedule service. You can call
anytime day or night, or schedule a service appointment
online.
The Master Protection Agreement is a risk free purchase. If
you cancel for any reason during the product warranty
period, we will provide a full refund. Or, a prorated refund
anytime after the product warranty period expires.
Purchase your Master Protection Agreement today!
Some limitations and exclusions apply. For prices and
additional information in the U.S.A. call
1-800-827-6655.
*Coverage in Canada varies on some items. For full
details call Sears Canada at 1-800-361-6665.
Sears Installation Service
For Sears professional installation of home appliances,
garage door openers, water heaters, and other major
home items, in the U.S.A. or Canada call
1-800-4-MY-HOME
®
product is designed and manufactured for years
®
.
2

KENMORE ELITE® APPLIANCE WARRANTY
ONE YEAR LIMITED WARRANTY
When installed, operated and maintained according to all
instructions supplied with the product, if this appliance
fails due to a defect in material or workmanship within one
year from the date of purchase, call 1-800-4-MY-HOME
to arrange for free repair.
TWO-YEAR LIMITED WARRANTY ON ELECTRONIC
CONTROL AND POWER SUPPLY BOARD
For two years from the date of purchase, when this
dishwasher is installed, operated and maintained
according to all instructions supplied with the product,
Sears will replace any part of the electronic module and
power supply board that fails due to defective materials or
workmanship. After the first year, customer assumes any
labor costs associated with replacement of these parts.
TWO-YEAR LIMITED WARRANTY ON THE ULTRA
WASH WASH SYSTEM
For two years from the date of purchase, when this
dishwasher is installed, operated and maintained
according to all instructions supplied with the product,
Sears will replace any part of the Ultra Wash wash system
(motor, pump, spray arms, spray tower, motor seals and
pump gasket) that fails due to defective materials or
workmanship. After the first year, customer assumes any
labor costs associated with replacement of these parts.
FIVE-YEAR LIMITED WARRANTY ON UPPER AND
LOWER RACKS
For five years from the date of purchase, when this
dishwasher is installed, operated and maintained
according to all instructions supplied with the product,
Sears will replace parts for the upper or lower dish rack if
the rack rusts due to defective materials or workmanship.
After the first year, customer assumes any labor costs
associated with dish rack replacement.
LIMITED WARRANTY FOR THE LIFE OF THE
DISHWASHER, ON KENMORE ELITE STAINLESS
STEEL TUB MODELS, AGAINST LEAKS IN THE TUB
AND INNER DOOR PANEL
For the life of the dishwasher, if a leak should occur as a
result of rust-through of the stainless steel tub or inner
door panel, Sears will replace the tub or inner door panel
free of charge.
If this appliance is used for other than private family
purposes, this warranty applies for only 90 days from the
date of purchase.
THIS WARRANTY COVERS ONLY DEFECTS IN
MATERIAL AND WORKMANSHIP. SEARS WILL NOT
PAY FOR:
1. Expendable items that can wear out from normal use,
including but not limited to filters, belts, light bulbs, and
bags.
2. A service technician to instruct the user in correct
product installation, operation or maintenance.
®
3. A service technician to clean or maintain this product.
4. Damage to or failure of this product if it is not installed,
operated or maintained according to all instructions
supplied with the product.
5. Damage to or failure of this product resulting from
accident, abuse, misuse or use for other than its
intended purpose.
6. Damage to or failure of this product caused by the use
of detergents, cleaners, chemicals or utensils other
than those recommended in all instructions supplied
with the product.
7. Damage to or failure of parts or systems resulting from
unauthorized modifications made to this product.
DISCLAIMER OF IMPLIED WARRANTIES; LIMITATION
OF REMEDIES
Customer’s sole and exclusive remedy under this limited
warranty shall be product repair as provided herein.
Implied warranties, including warranties of merchantability
or fitness for a particular purpose, are limited to one year
or the shortest period allowed by law. Sears shall not be
liable for incidental or consequential damages. Some
states and provinces do not allow the exclusion or
limitation of incidental or consequential damages, or
limitations on the duration of implied warranties of
merchantability or fitness, so these exclusions or
limitations may not apply to you.
This warranty applies only while this appliance is used in
the United States and Canada.
This warranty gives you specific legal rights, and you may
also have other rights which vary from state to state.
Sears, Roebuck and Co.
Dept. 817WA, Hoffman Estates, IL 60179
Sears Canada Inc.
Toronto, Ontario, Canada M5B 2B8
PRODUCT RECORD
In the space below, record your complete model number,
serial number, and purchase date. You can find this
information on the model and serial number label located
on the product.
Have this information available to help you obtain
assistance or service more quickly whenever you contact
Sears concerning your appliance.
Model number __ __ __. _____________________________
Serial number ______________________________________
Purchase date _____________________________________
Save these instructions and your sales receipt for
future reference.
3

DISHWASHER SAFETY
Your safety and the safety of others are very important.
We have provided many important safety messages in this manual and on your appliance. Always read and obey all
safety messages.
This is the safety alert symbol.
This symbol alerts you to potential hazards that can kill or hurt you and others.
All safety messages will follow the safety alert symbol and either the word “DANGER” or
“WARNING.” These words mean:
You can be killed or seriously injured if you don't
immediately follow instructions.
can be killed or seriously injured if you don't
You
follow instructions.
All safety messages will tell you what the potential hazard is, tell you how to reduce the chance of injury, and tell you
what can
happen if the instructions are not followed.
IMPORTANT SAFETY INSTRUCTIONS
WARNING:
■ Read all instructions before using the dishwasher.
■ Use the dishwasher only for its intended function.
■ Use only detergents or rinse agents recommended for
When using the dishwasher, follow basic precautions, including the following:
use in a dishwasher, and keep them out of the reach
of children.
■ When loading items to be washed:
1) Locate sharp items so that they are not likely to
damage the door seal; and
2) Load sharp knives with the handles up to reduce
the risk of cut-type injuries.
■ Do not wash plastic items unless they are marked
“dishwasher safe” or the equivalent. For plastic items
not so marked, check the manufacturer's
recommendations.
■ Do not touch the heating element during or
immediately after use.
■ Do not operate the dishwasher unless all enclosure
panels are properly in place.
SAVE THESE INSTRUCTIONS
■ Do not tamper with controls.
■ Do not abuse, sit on, or stand on the door, lid, or dish
racks of the dishwasher.
■ To reduce the risk of injury, do not allow children to
play in or on the dishwasher.
■ Under certain conditions, hydrogen gas may be
produced in a hot water system that has not been
used for two weeks or more. HYDROGEN GAS IS
EXPLOSIVE. If the hot water system has not been
used for such a period, before using the dishwasher
turn on all hot water faucets and let the water flow
from each for several minutes. This will release any
accumulated hydrogen gas. As the gas is flammable,
do not smoke or use an open flame during this time.
■ Remove the door or lid to the washing compartment
when removing an old dishwasher from service or
discarding it.
4
Tip Over Hazard
Do not use dishwasher until completely installed.
Do not push down on open door.
Doing so can result in serious injury or cuts.
GROUNDING INSTRUCTIONS
■
For a grounded, cord-connected dishwasher:
The dishwasher must be grounded. In the event
of a malfunction or breakdown, grounding will
reduce the risk of electric shock by providing a
path of least resistance for electric current. The
dishwasher is equipped with a cord having an
equipment-grounding conductor and a
grounding plug. The plug must be plugged into
an appropriate outlet that is installed and
grounded in accordance with all local codes and
ordinances.
WARNING: Improper connection of the
equipment-grounding conductor can result in a
risk of electric shock. Check with a qualified
electrician or service representative if you are in
doubt whether the dishwasher is properly
grounded. Do not modify the plug provided with
the dishwasher; if it will not fit the outlet, have a
proper outlet installed by a qualified electrician.
■
For a permanently connected dishwasher:
The dishwasher must be connected to a
grounded metal, permanent wiring system, or an
equipment-grounding conductor must be run
with the circuit conductors and connected to the
equipment-grounding terminal or lead on the
dishwasher.
SAVE THESE INSTRUCTIONS
5
Upper level wash
ULTRA FLOW
water feed tube
TM
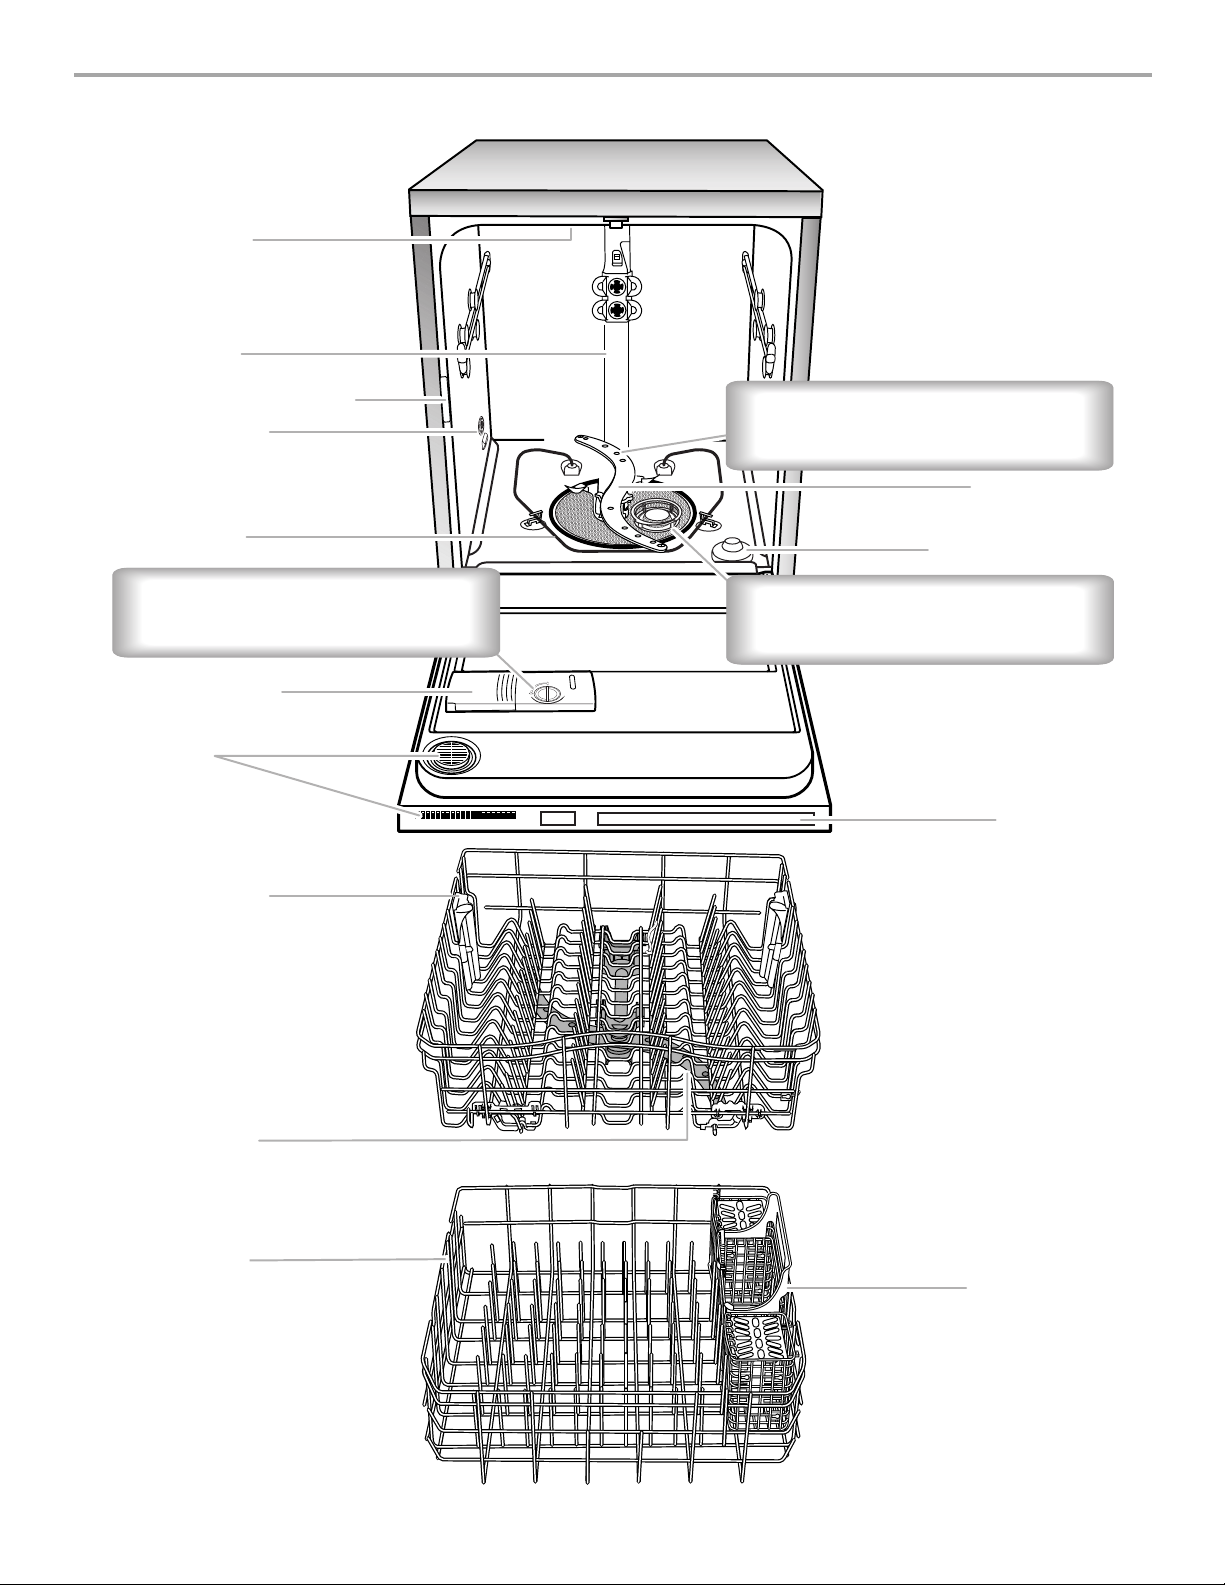
PARTS AND FEATURES
Model and serial number label
Water inlet opening
Heating element
Rinse aid dispenser reduces spotting
and improves drying.
Detergent dispenser
Active vents
Top rack adjusters
(one on each side)
Pressurized spray nozzles and variable
speed motor provide effective cleaning.
Lower spray arm
Overfill protection float
® H
Ultra Wash
water and improves cleaning action.
E
filter removes soil from
Control panel
Middle spray arm
Fold-down tines
6
TOP RACK
Silverware basket
BOTTOM RACK
START-UP / QUICK REFERENCE
E
H
H
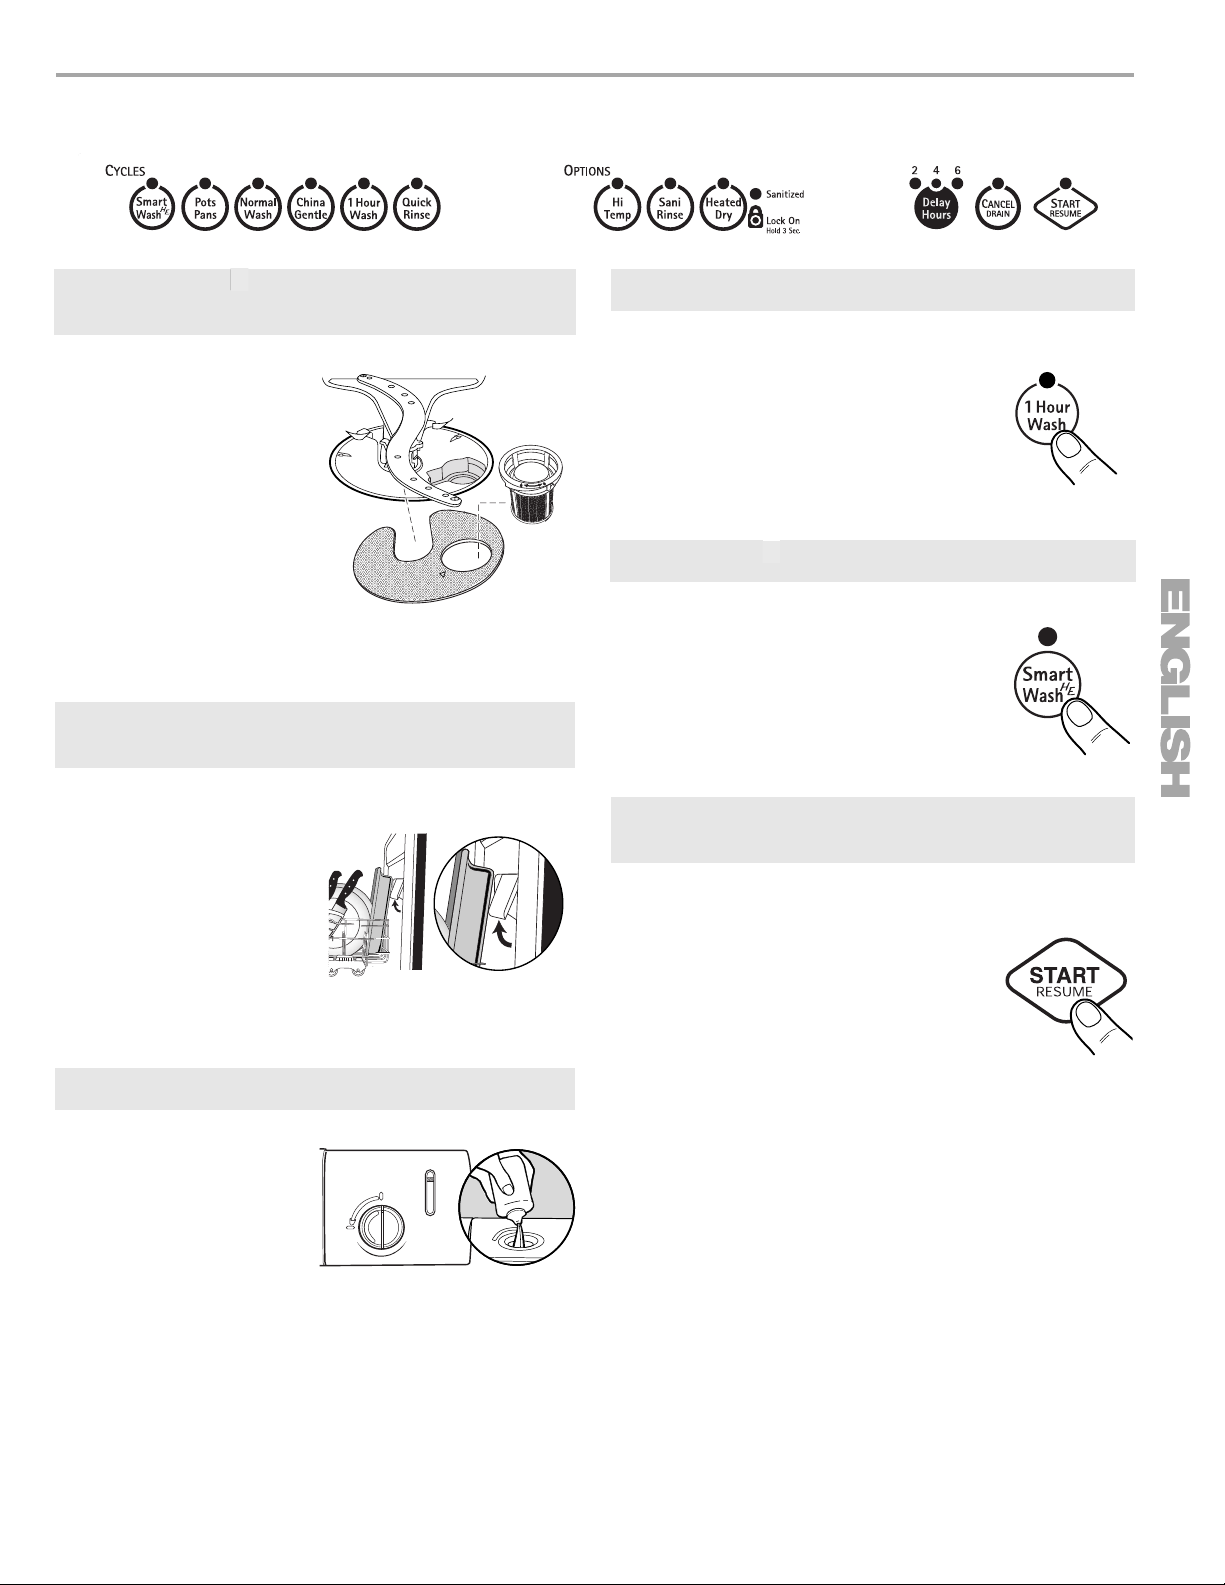
ULTRA WASH® removable filters provide
peak performance.
The triple filter system has
a Coarse Filter to keep
oversized items and
foreign objects out of the
pump, a Fine Filter to keep
food from being
recirculated onto your
dishware, and a Micro
Filter to capture very fine
food particles.
See “ULTRA
WASH
H
®
FILTRATION
SYSTEM” for information
on removing and
maintaining the filters.
Important: Do not block detergent
dispenser.
Tall items placed in the
lower rack may block the
dispenser door. Cookie
sheets and cutting boards
loaded on the left-hand
side of the dishwasher can
easily block the dispenser.
If detergent is inside of the
dispenser or on the
bottom of the tub after the
cycle is complete, the
dispenser was blocked.
Drying - Rinse Aid is Essential.
You must use rinse aid for
good drying performance
(sample included). Rinse
aid along with the Heated
Dry option will provide
best drying and avoid
excessive moisture in the
dishwasher interior.
E
H
S
U
P
L
O
C
K
USE RINSE AID FOR
BETTER DRYING
Lock
Refill
Full
Add
1 Hour Wash - When you need fast results.
To save water and energy, High Efficiency
dishwashers use advanced filtration
which may result in longer cycle times (in
some cases over 2 hours). When you
need fast results, the 1 Hour Wash will
W
N
O
&
D
T
U
R
N
K
C
O
L
N
U
clean your dishes using slightly more
water and energy. For improved drying,
select the Heated Dry option, adding
½hour.
SmartWash® cycle
E
Optical soil sensors are used twice in the
cycle to provide optimal energy and
water consumption based on load size,
soil amount and toughness of soil. The
sensors also automatically calibrate
throughout the life of your dishwasher to
maintain cleaning performance based
on your water conditions.
Press START/RESUME every time you
add a dish.
To start and resume a cycle, press
START/RESUME and close the door
within 3 seconds. If the door is not
closed within 3 seconds, the start button
LED will flash and the cycle will not start.
IMPORTANT: If anyone opens the door
(such as, to add a dish, even during the
Delay Hours option), the START/
RESUME button must be pressed each
time and the door closed within
3 seconds to resume the cycle.
7
H
E
ULTRA WASH
®
FILTRATION SYSTEM
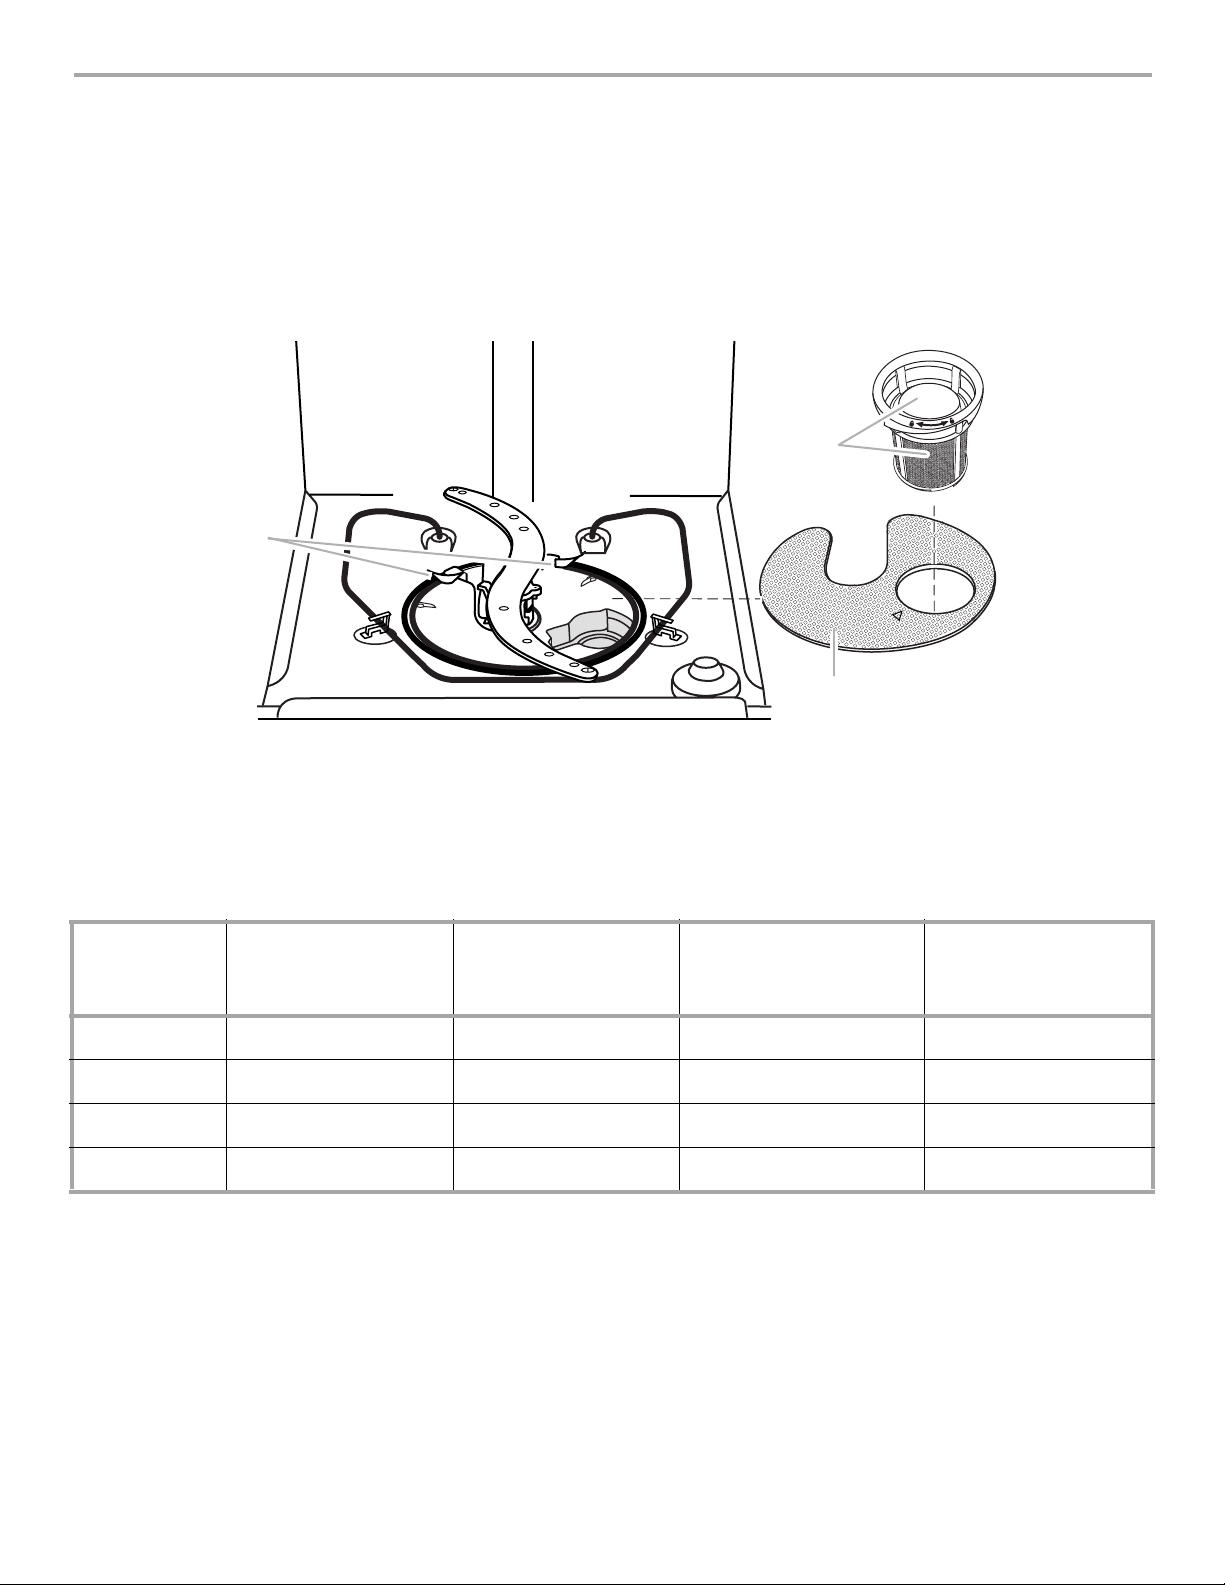
Your dishwasher has the latest technology in dishwasher filtration. This triple filtration system minimizes sound and
optimizes water and energy consumption while providing superior cleaning performance. Throughout the life of your
dishwasher, the filter will require maintenance to sustain peak cleaning performance.
The triple filter system consists of 2 parts, an upper filter assembly and a lower filter.
■ The upper filter assembly keeps oversized items and foreign objects, along with very fine food particles out of the
pump.
■ The lower filter keeps food from being recirculated onto your dishware.
W
N
O
&
D
T
H
U
S
R
U
N
K
C
O
L
N
U
K
Locating
Tabs
Upper Filter
Assembly
P
L
O
C
Lower Filter
The filters may need to be cleaned when:
■ Visible objects or soils are on the Upper Filter Assembly.
■ There is degradation in cleaning performance (that is, soils still present on dishes).
■ Dishes feel gritty to the touch.
Removing and maintaining the filters is very easy. The chart below shows the recommended cleaning frequency.
Recommended time interval to clean your filter.
Number of
Loads Per
Week
1-3 Once per year Once per year Twice per year Every two months
4-7 Once per year Once per year Twice per year Once per month
8-12 Once per year Twice per year Every three months Every two weeks
13-14 Once per year Twice per year Every three months Once per week
*Manufacturer's recommendation: This practice will eliminate the water and energy that you use preparing your dishes.
This will also save you time and effort.
If you wash
before loading
If you scrape and
rinse before loading
If you only scrape
before loading*
If you do not scrape
or rinse before
loading
Very Hard Water
If you have hard water (above 15 grains), clean your filter at least once per month. Building up of white residue on your
dishwasher indicates hard water. You may bring your water samples to Sears to check hardness level. For tips on
removing spots and stains, see “Troubleshooting” section.
8
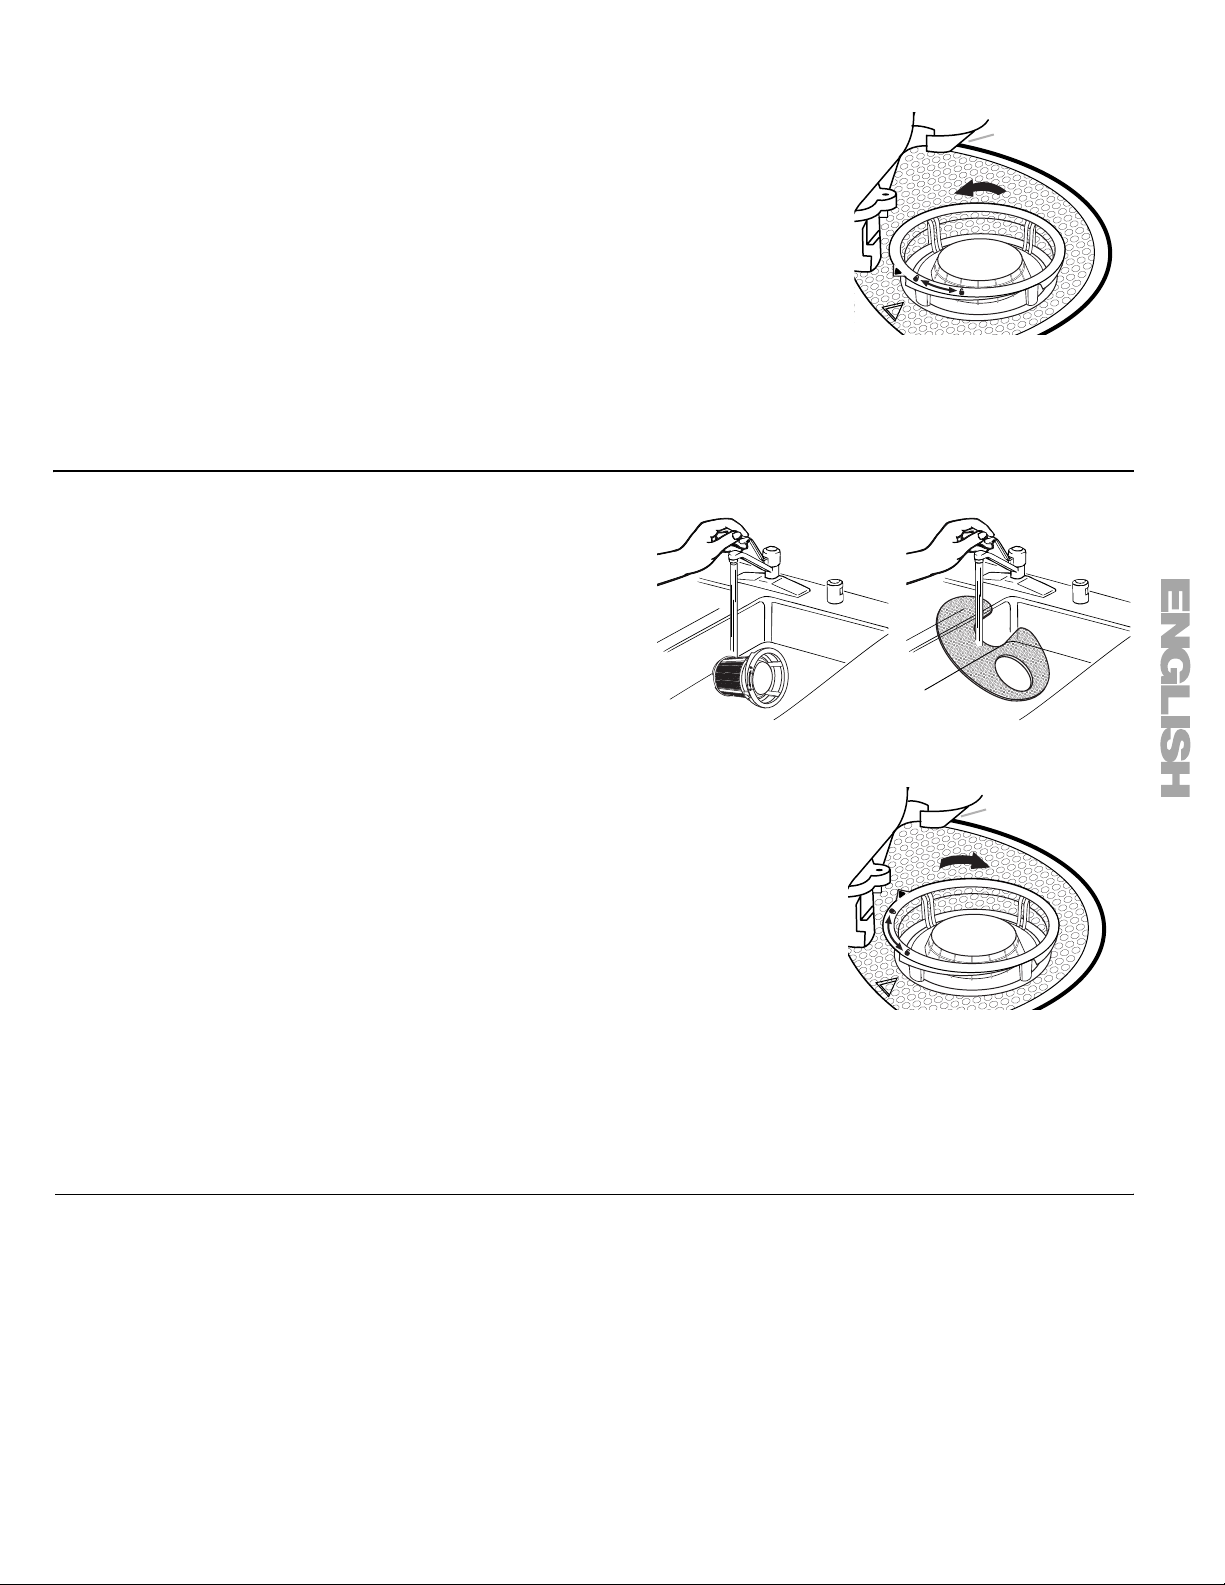
Filter Removal Instructions
E
1. Turn the Upper Filter Assembly ¼ turn counterclockwise and lift out.
2. Grasp the Lower Filter in the circular opening, lift slightly, and pull forward to
remove.
3. Clean the filters as shown below.
Cleaning Instructions
IMPORTANT:
Do not use wire brush, scouring pad, etc. as they may damage the filters.
Rinse filter under running water until most soils are removed.
If you have hard-to-remove soils or calcium deposits from
hard water, a soft brush may be required.
U
Locating tab
D
H
O
S
W
U
N
P
L
O
C
K
&
T
U
R
N
K
C
U
O
L
N
To remove Upper Filter Assembly
L
O
C
K
P
U
S
H
D
O
W
N
&
T
U
R
N
N
L
O
C
K
Filter Reinstallation Instructions
1. Noting the previous illustrations, place the Lower Filter under the Locating Tabs in
the bottom of the dishwasher so the round opening for the Upper Filter Assembly
lines up with the round opening in the bottom of the tub.
2. Insert the Upper Filter Assembly into the circular opening in the Lower Filter.
3. Slowly rotate the filter clockwise until it drops into place. Continue to rotate until the
filter is locked into place. If the filter is not fully seated (still turns freely), continue to
turn the filter clockwise until it drops and locks into place.
NOTE: The Upper Filter Assembly arrow does not have to align with the arrow in
the Lower Filter as long as the filter is locked.
L
O
C
K
U
N
L
To replace Upper Filter Assembly
O
C
K
Locating tab
P
U
S
H
D
O
W
N
&
T
U
R
N
IMPORTANT:
To avoid damage to dishwasher, do not operate your dishwasher without the ULTRA WASH® filters properly installed.
Be sure the Lower Filter is securely in place and the Upper Filter Assembly is locked into place. If the Upper Filter
Assembly turns freely, it is not locked into place.
H
Dishwasher Efficiency Tips
Hot water dissolves and activates the dishwasher detergent. Hot water also dissolves grease on dishes and helps glasses
dry spot-free. For best dishwashing results, water should be 120°F (49°C) as it enters the dishwasher. Loads may not
wash as well if the water temperature is too low.
Additional efficiency tips
■ To save water, energy and time, only scrape dishes. Do not rinse dishes before putting them into the dishwasher.
■ Use a delay feature to run your dishwasher during off-peak hours. Local utility providers recommend avoiding heavy
usage of energy at certain times of day.
■ During the summer, run your dishwasher at night. This reduces daytime heat buildup in the kitchen.
■ Use a rinse aid to improve drying.
9
DETERGENT AND RINSE AID
MAIN WASH
PREWASH
Soft Water
Hard Water
Soft Water
Hard Water
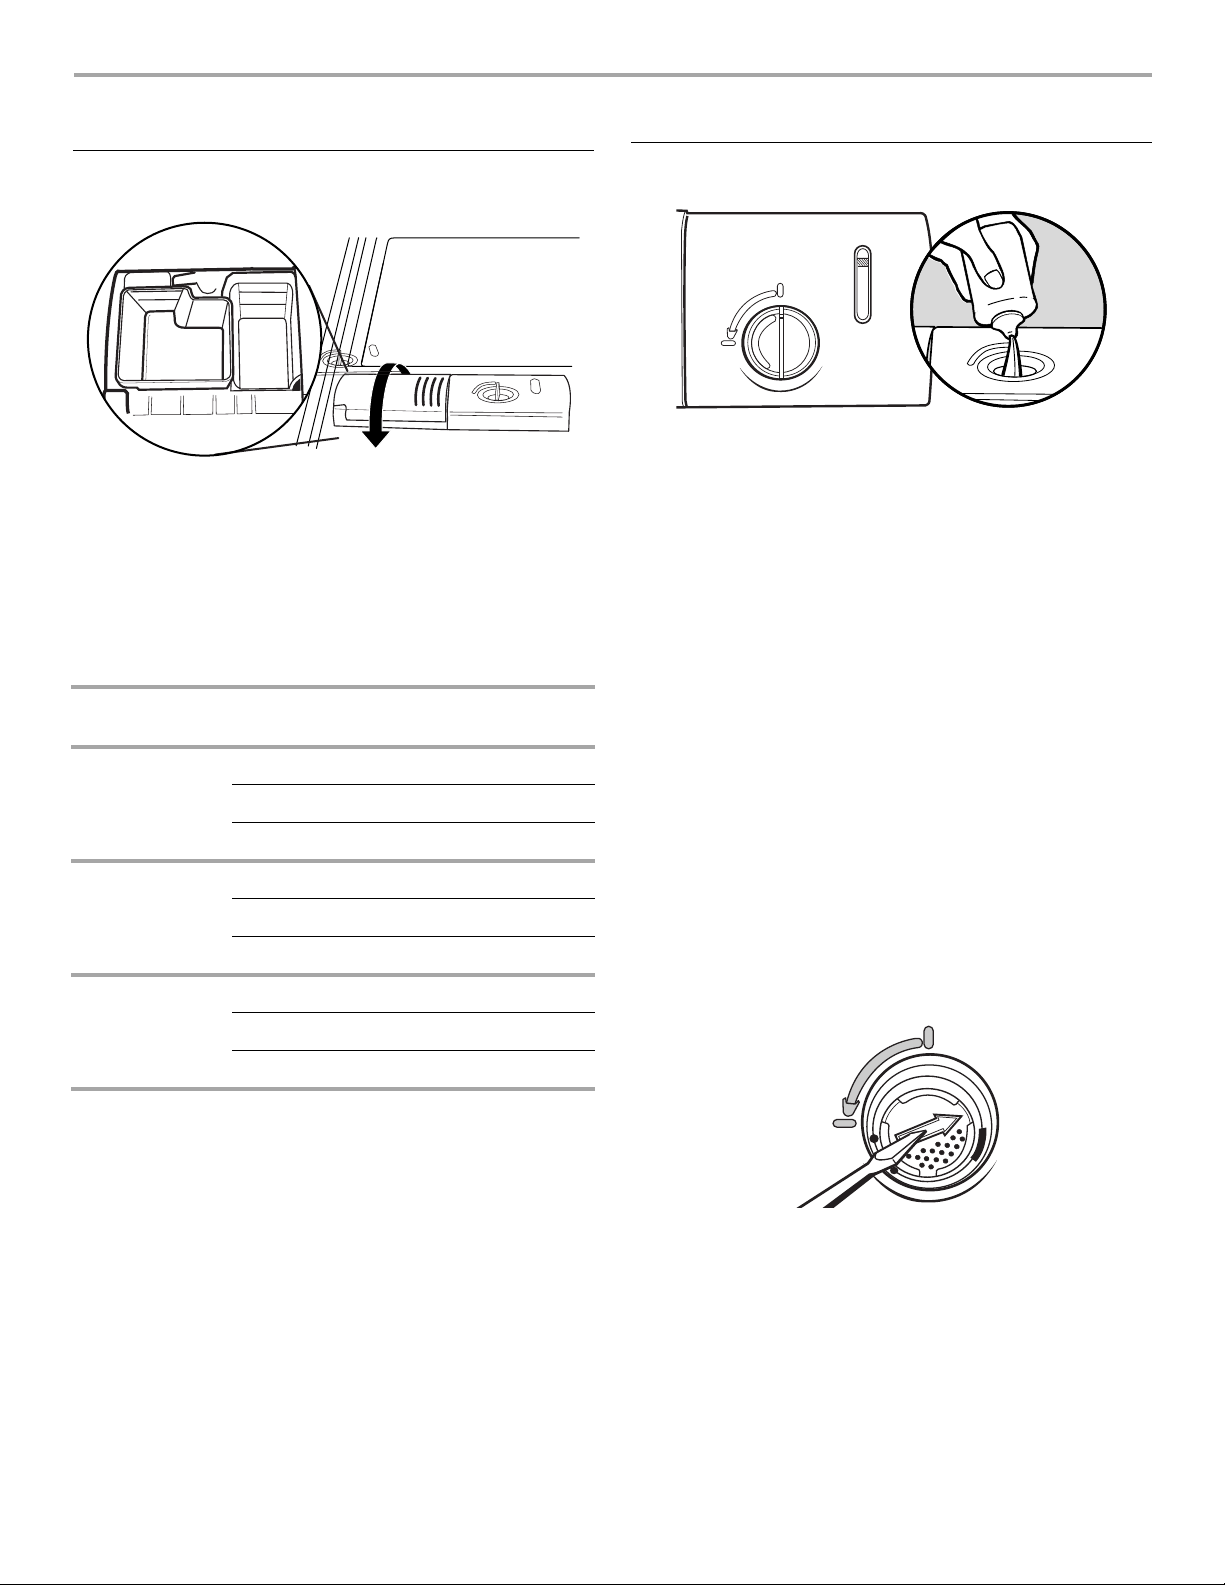
Detergent
IMPORTANT:
Use only automatic dishwashing detergent. Hand
dishwashing detergent will produce excessive suds and
overflow out of the dishwasher.
Recommended Detergent Amount
Add recommended amount of detergent to each cup as
shown and close the detergent lid.
Powders and Gels
Water
Hardness
Soft
(0-4 grains
per U.S.
gallon)
Soil
Level
Pre-Wash
Cup
Main Wash
Cup
Light None ¹⁄₂
Normal None ¹⁄₂
Heavy Full ¹⁄₂
Rinse Aid
USE RINSE AID FOR
BETTER DRYING
Refill
Lock
IMPORTANT:
Your dishwasher is designed to use a liquid rinse aid. The
use of rinse aids greatly improves drying by allowing water
to drain from the dishes after the final rinse. They also keep
water from forming droplets that can dry as spots or
streaks.
Filling the dispenser
The dispenser holds 5 oz (150 mL) of rinse aid. Under most
conditions this will last 1 to 3 months.
1. Turn the knob to the REFILL position and remove.
2. Pour rinse aid into the opening until the indicator points
to FULL. Do not overfill.
3. Clean up any spilled rinse aid. Spilled rinse aid can
create excessive suds.
4. Replace the knob and turn to the LOCK position.
NOTE: Indicator reads correct fill level when door is
completely opened.
Full
Add
Medium
(5-9 grains
per U.S.
gallon)
Hard
(10-14 grains
per U.S.
gallon)
Light None ¹⁄₂
Normal ¹⁄₂ ¹⁄₂
Heavy Full* Full*
Light ¹⁄₂ Full*
Normal Full* Full*
Heavy Full* Full*
*Full pre-wash cup contains 7 tsp (35 mL), and full main
wash cup contains 9 tsp (45 mL).
Premeasured Detergents
Many detergents now come in premeasured forms (gel
packs, tablets, or powder packs). These forms are suitable
for all hardness and soil levels. Always place premeasured
detergents in the main cup and close the lid.
IMPORTANT:
Extremely hard water mineral deposits (15 grains per U.S.
gallon or more) can cause damage to your dishwasher and
make it difficult to achieve good results. A water softener is
recommended to avoid damage and achieve good results.
You may bring your water samples to Sears to check
hardness level.
Rinse Aid Setting
Your rinse aid dispenser is adjustable. For most water
conditions, the factory setting of 2 will give good results. If
you have hard water and notice calcium buildup on your
dishware, you may want to try a higher setting.
Lock
-
6
5
-
4
-
fill
Refill
max
-
-
-
-
-
To a dj ust th e s et ting
1. Turn the knob to the REFILL position and remove.
2. Turn the arrow inside the dispenser to the desired
setting.
3. Replace the knob and turn to the LOCK position.
3
2
1
-
-
-
-
-
-
-
10
LOADING
Loading For Best Performance
1. Angle dirtiest dish surfaces downward and allow
space for water to flow up through each rack
and between dishware.
Separating allows water flow.
2. For best silverware cleaning use the slots in the
covers to keep items separated.
3. Angle concave surfaces such as the bottom of
coffee cups to allow water to drain and improve
drying performance.
Angled surfaces
4. Check that all spray arms spin freely before
every cycle.
Separated
Spray arms spin freely.
11
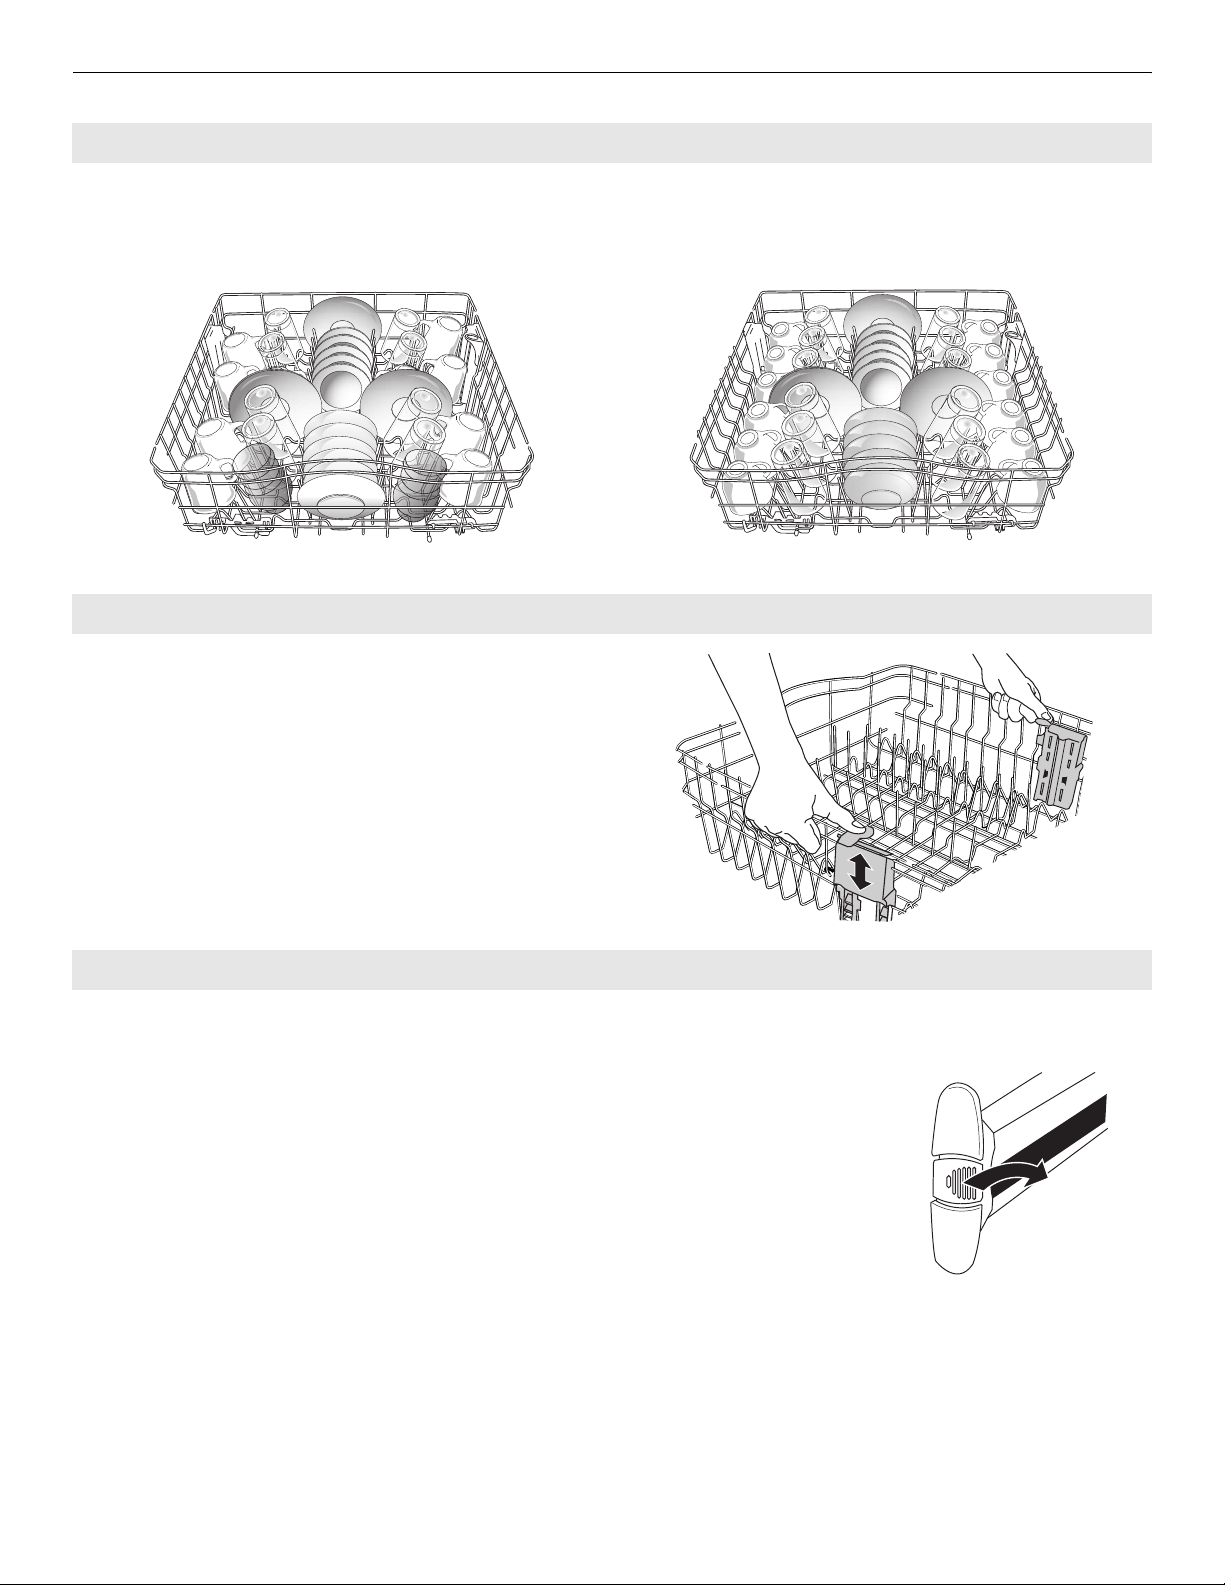
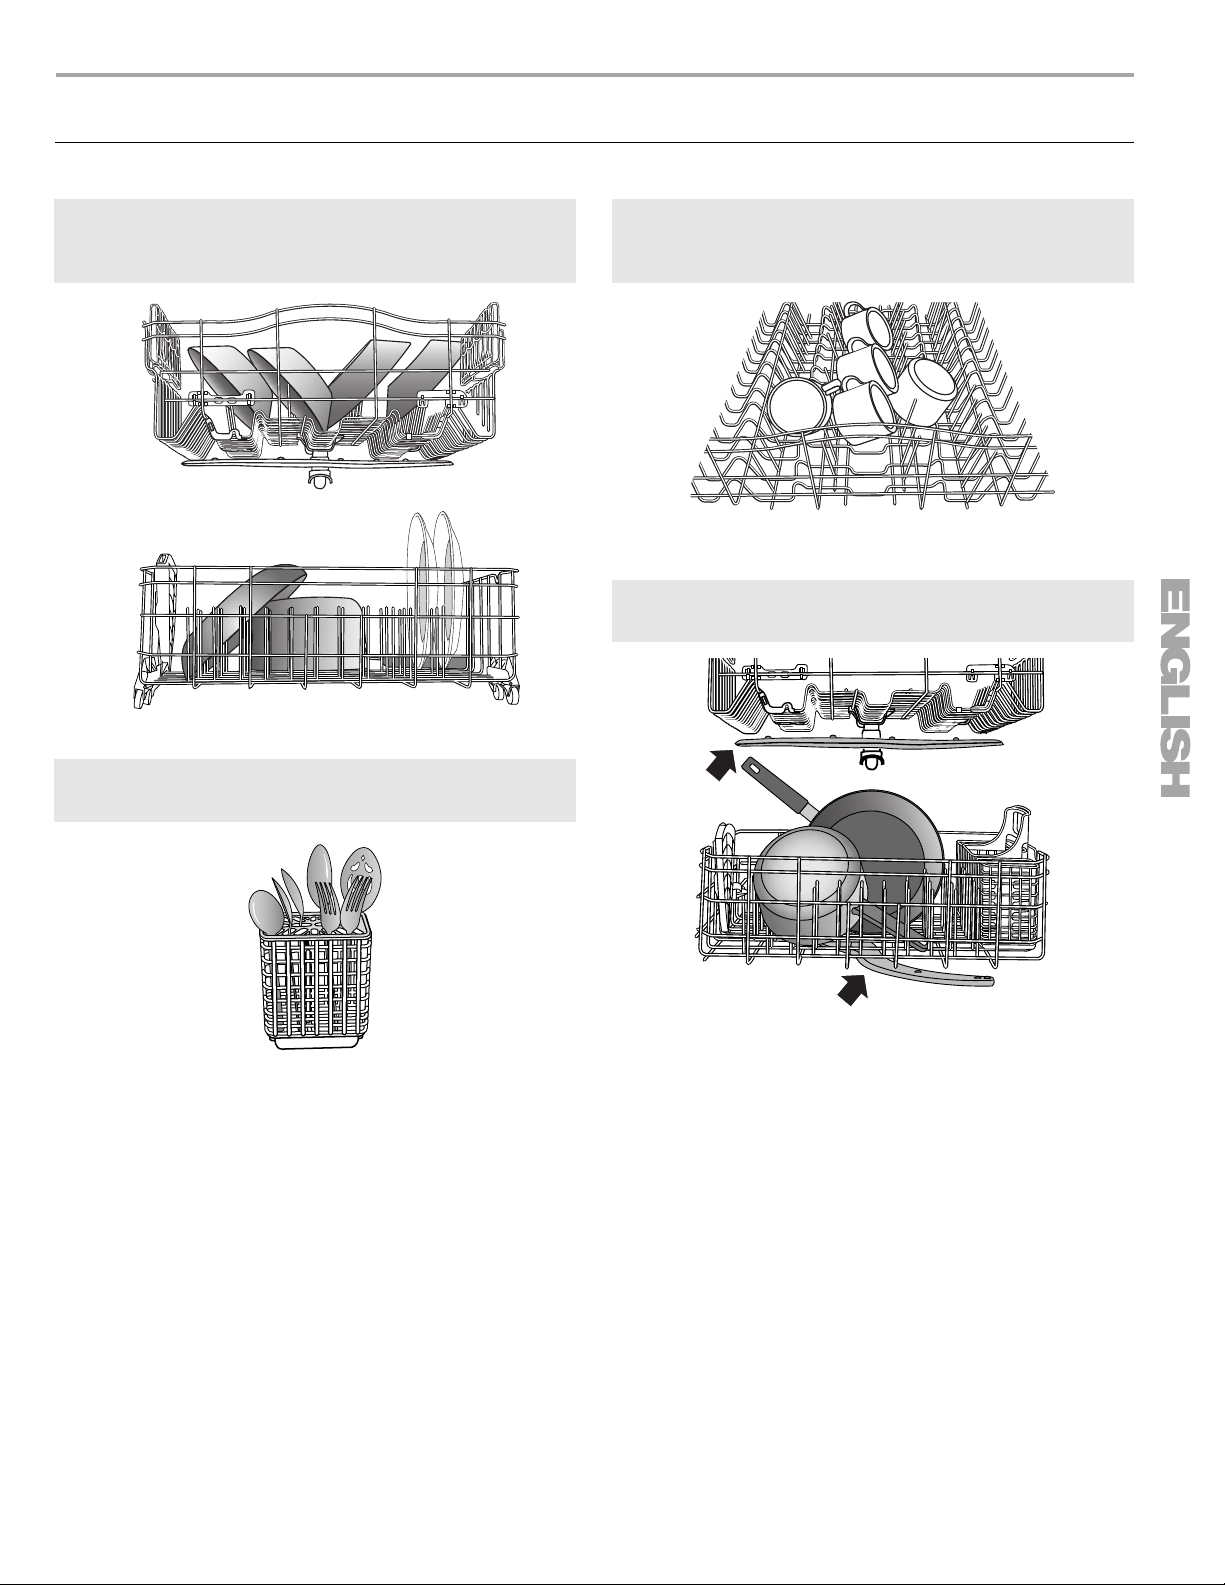
Top Rack Loading
Loading Recommendations
Place cups and glasses in the rows between tines. Placing them over the tines can lead to breakage and water spots.
To avoid damage to your delicate items, be sure china, crystal, stemware and other similar items do not touch during
dishwasher operation.
Load lightweight and dishwasher-safe plastic items only in the top rack.
10 place load 12 place load
Deluxe Adjustable 2-position Rack
You can raise or lower the top rack to fit tall items in either
the top or bottom rack. Adjusters are located on each side
of the top rack. Raise the top rack to accommodate items
up to 9" (22 cm) in the top rack and 13" (33 cm) in the
bottom rack, or lower the top rack to accommodate items
up to 11" (28 cm) in both the top and bottom racks.
1. To raise, lift rack until both sides are at the same height
and lock.
2. To lower, depress both tabs on rack adjusters, as
shown, and lower.
Removable Top Rack
The removable top rack allows you to wash larger items such as pots, roasters, and
cookie sheets in the bottom rack.
IMPORTANT: Remove dishes prior to removing the top rack from dishwasher.
To remove the top rack
1. Pull the rack forward slightly to access clips.
2. While pressing the ridges in, push back on the clip until the outer side releases. Slide
the clip to the inside of the track edge to remove the clip.
3. After removing both clips, pull rack out.
To replace the top rack
1. Place the rollers on each side of the rack into the rack tracks and push the rack back.
2. Align the open side of the clip with the inside edge of the rack track.
3. Push the ridges and slide the clip toward the outside rack edge until it locks into
place.
4. Repeat on the other side.
5. Pull the rack out all of the way to ensure clips are fully seated.
12
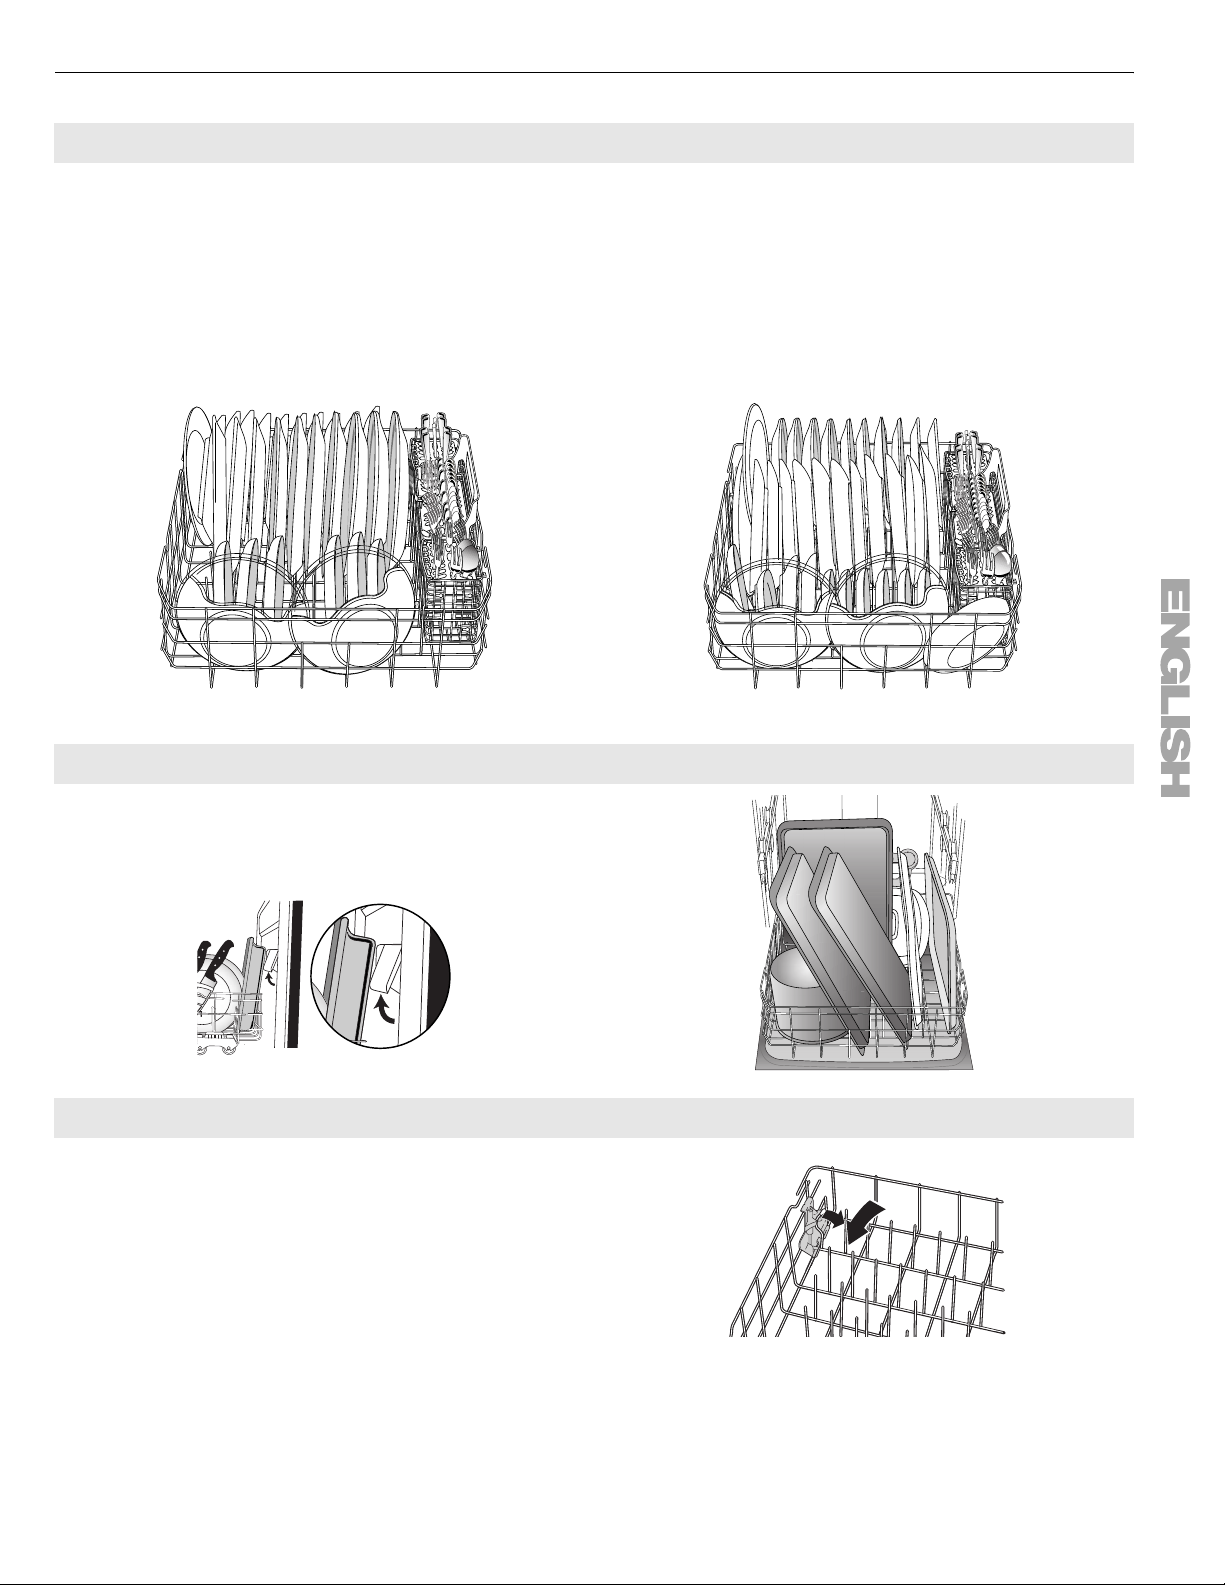
Bottom Rack Loading
Loading Recommendations
The bottom rack is best suited for plates, pans, casseroles, and utensils. (See recommended loading patterns shown.)
Load small items in the bottom rack only if they are secured in place.
Load plates, soup bowls, etc., between tines.
Load bowls securely between the rows of tines. Ensure that there is space between dishes so that the spray will reach
all surfaces.
Load heavily soiled items facing the spray.
NOTE: Ensure that detergent dispenser is not blocked by tall items such as cookie sheets and cutting boards placed at
the left-hand front of rack. See “Start Up/Quick Reference” section.
10 place load 12 place load
Loading Tall Items
You can wash larger items such as pots, roasters, and
cookie sheets in the bottom rack by removing the top
rack. See “Top Rack Loading” section.
IMPORTANT: Do not block detergent dispenser.
Fold-down tines
You can fold down one row of tines at the back of the
bottom rack.
1. Grasp the tip of the tine that is in the tine holder.
2. Gently pull the tine out of the tine holder.
3. Lay the row of tines down in the rack to make room for
larger dishes, bowls, pots, pans or roasters.
13
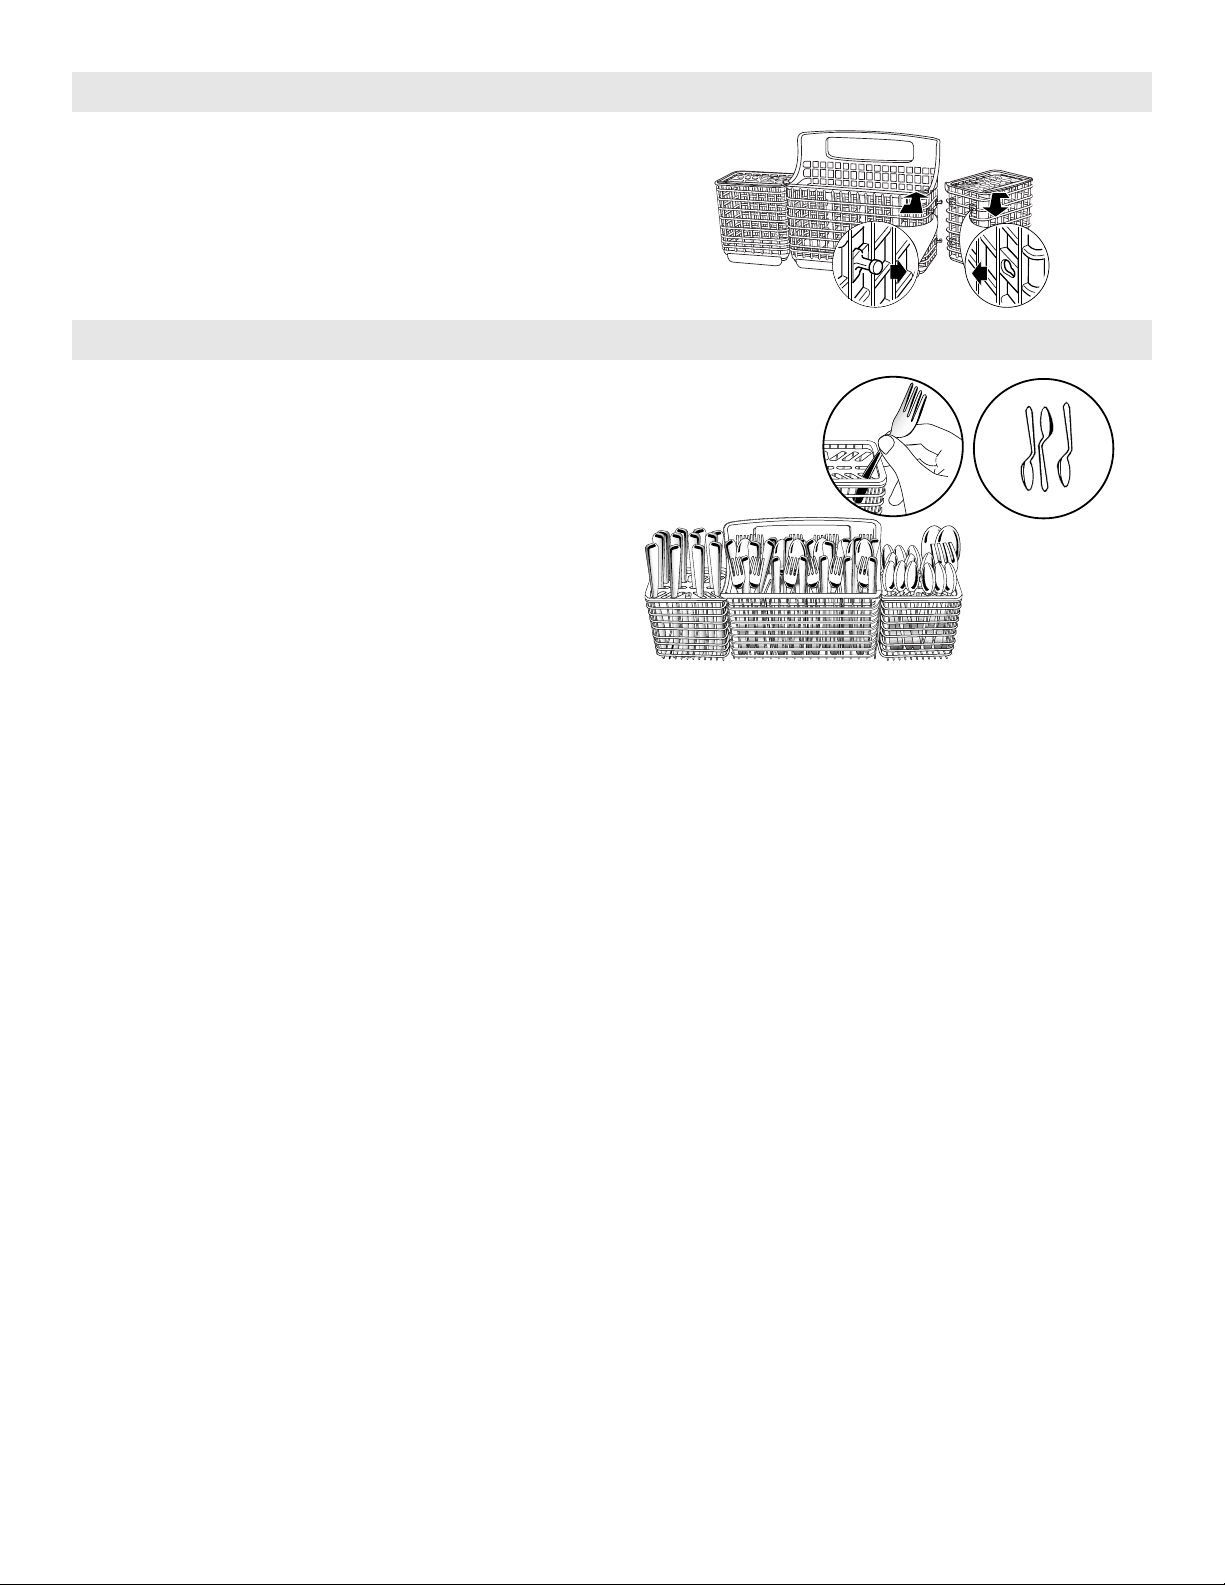
Splittable Silverware Basket
Your new silverware basket can be split into three
segments.
You can remove the covered side baskets to place in the
top rack to use for small delicate items such as baby
bottle caps, nipples, small baking utensils.
Loading Silverware
Use suggested loading patterns, as shown, to better
clean your silverware.
Use the slots in the covers to keep your silverware
separated for optimum wash. (See illustration, right.)
NOTE: If your silverware does not fit into the designated
slots, flip the covers up and mix silverware types to keep
them separated. Load knives down, forks up, and
alternate spoons as illustrated, for best cleaning results.
14
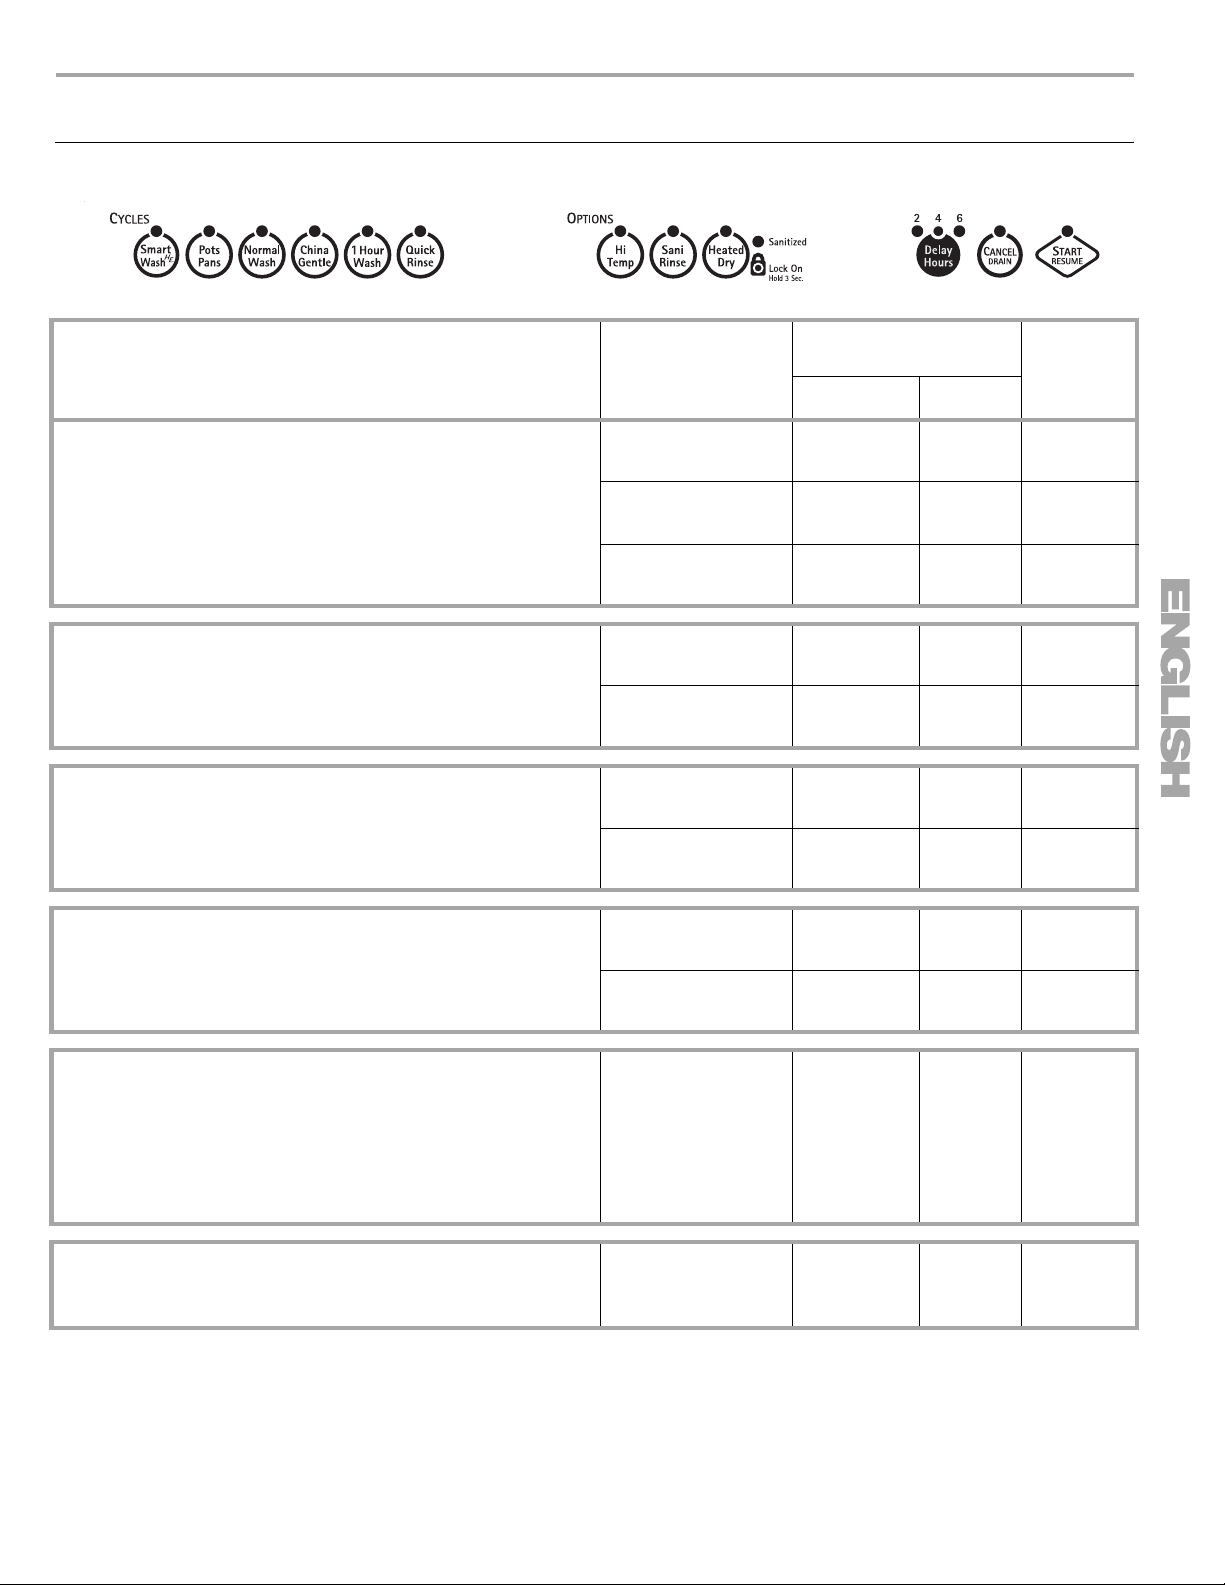
DISHWASHER USE
E
Cycles and Options Information
Cycles Soil Level
SmartWash®cycle
The most advanced and versatile cycle. This cycle senses
the load size, soil amount, and toughness of soil. This cycle
is optimized to achieve outstanding cleaning with minimal
water and energy.
Pots Pans
Works best on your toughest items such as casseroles with
baked-on food residue.
Normal Wash
Senses the soil level and makes adjustments in the water
and energy used. The Energy Guide information is based
on this cycle.
H
Time* (mins.)
w/o Options
Typ ic al ** Max
Light to Medium 110 163
Tough/Baked-On 135 194
Heavy 135 194
Light to Medium 140 202
Heavy/
Baked-On
Light to Medium 110 161
Heavy 130 193
150 203
Water
Usage
Gallons
(Liters)
4.2
(15.9)
4.8
(18.2)
6.9
(26.1)
4.8
(18.2)
6.9
(26.1)
4.2
(15.2)
6.9
(26.1)
China Gentle
Provides a light wash and gentle dry for delicate items
such as china and crystal.
1 Hour Wash
To save water and energy, High Efficiency dishwashers use
advanced filtration which may result in longer cycle times (in
some cases over 2 hours). When you need fast results, the
1 Hour Wash will clean your dishes using slightly more
water and energy. For improved drying, select the Heated
Dry option, adding ½ hour.
Quick Rinse
A 15-minute rinse for reducing food odor and keeping food
residue from drying. Do not use detergent.
*Adding options will add time to the cycle. See options information section.
**This is the approximate cycle time obtained with 120°F (49°C) hot water available at the dishwasher. Increase in time
results from low temperature of the incoming water.
Light to Medium 105 161
Heavy 125 194
All soil levels 58 58
All soil levels 15 16
4.2
(15.2)
6.9
(26.1)
8.0
(30.3)
2.1
(7.9)
15

Options
E
E
Hi Temp
Raises the main wash temperature
to improve cleaning. When used
with the Normal Wash cycle this will
provide a little extra tough cleaning
capability, but not as much as the
Pots Pans cycle.
Sani Rinse
This high temperature option
sanitizes your dishes and glassware
in accordance with National
Sanitation Foundation (NSF)/ANSI
Standard 184 for Residential
Dishwashers. Certified residential
dishwashers are not intended for
licensed food establishments. The
green sanitized light indicates that
the Sani Rinse option was
successfully completed.
Can be
selected with
SmartWash
Pots Pans
Normal Wash
SmartWash
Pots Pans
Normal Wash
What it does
H
®
Raises the main wash
temperature from 105°F
(41°C) to 120°F (49°C).
Increases the main
H
®
wash temperature from
105°F (41°C) to 120°F
(49°C) and the final
rinse from 140°F (60°C)
to 155°F (68°C).
Added time to cycle Added
Water
Typ ic al Max
22 37
37 57
Gallons
(Liters)
0 - 2.1
(0 - 7.9)
0 - 2.1
(0 - 7.9)
†
Heated Dry
Turns the heat element on after the
wash cycle is completed. Use rinse
aid with or without the Heated Dry
option for best drying results.
Plastic items are less likely to
Available with
any cycle
except
Quick Rinse
Turns the heat element
on at the end of the
wash cycle.
26 32 0
deform when loaded in the top dish
rack.
†
The maximum additional water used for any combination of options is 2.1 gal. (7.9 L).
Delay Hours
Use this option to run your dishwasher during off-peak hours. Local utility providers recommend using energy during
off-peak hours when possible.
To delay the start
1. Select a wash cycle and options.
2. Press the delay button to choose the number of hours to be delayed.
3. Press START/RESUME and firmly close the door within 3 seconds. The dishwasher starts in the selected number of
hours.
NOTE: Anytime the door is opened (such as, to add a dish), the START/RESUME button must be pressed again, within
3 seconds of closing the door, to resume the delay countdown.
Control Lock Option
Use the Control Lock option to avoid unintended use of the dishwasher between cycles. When LOCK ON is lit, all
buttons are disabled. The dishwasher door can still be opened/closed while the controls are locked.
To turn on the Lock
Press and hold HEATED DRY for 3 seconds. LOCK ON will light up. If you press any pad while your dishwasher is
locked, the light flashes 3 times.
NOTE: The dishwasher cannot run if the control is locked.
To turn off the Lock
Press and hold HEATED DRY for 3 seconds. The light turns off.
16
Status Indicator Lights
ABC
A.Wash cycle
B.Dry cycle
C.Clean light
Front Panel Lights - The left light indicates the dishwasher is in the
wash cycle. The middle light indicates the dishwasher is in the dry cycle.
The right-hand, green Clean light indicates the cycle is complete and
ready to unload. If the Clean light is blinking, see “Troubleshooting”
section.
Canceling A Cycle
1. Open the door slightly to stop the cycle. Wait for the spraying action to stop before completely opening the door.
2. Press CANCEL/DRAIN button once. The Cancel/Drain light will light up.
3. Close the door within 3 seconds. The dishwasher starts a drain cycle (if water remains in bottom of dishwasher). Let
the dishwasher drain completely. The Cancel/Drain light turns off after 2 minutes.
Changing A Cycle After Dishwasher Is Started
You can interrupt a cycle and restart your dishwasher from the beginning using the following procedure.
1. Open the door slightly to stop the cycle. Wait for the spraying action to stop, then open the door completely.
2. Check that detergent dispenser cover is still closed. If cover is open, you will need to refill the detergent dispenser
before restarting your new cycle.
3. Press CANCEL/DRAIN twice to reset the control.
4. Select new cycles and options.
5. Press START/RESUME and firmly close the door within 3 seconds.
NOTE: If the door is not closed within 3 seconds of pressing Start/Resume, press START/RESUME again.
Adding A Dish After Dishwasher Is Started
1. Open the door slightly to stop the cycle. Wait for the spraying action to stop, then open the door completely.
2. Check whether the detergent dispenser cover is still closed. If it is open, the wash cycle has already started and
adding a dish is not recommended.
3. If detergent has not yet been used (detergent dispenser cover is closed), you may add a dish.
4. Press START/RESUME and firmly close the door within 3 seconds.
17
WASHING SPECIAL ITEMS
If you have doubts about washing a particular item, check with the manufacturer to see if it is dishwasher safe.
Material Dishwasher Safe? Comments
Aluminum Yes High water temperature and detergents can affect finish of
anodized aluminum.
Disposable Aluminum No Do not wash disposable aluminum pans in the dishwasher. These
might shift during washing and transfer black marks to dishes and
other items.
Bottles and Cans No Wash bottles and cans by hand. Labels attached with glue can
loosen and clog the wash system and reduce washing
performance.
Cast Iron No Seasoning will be removed and then will rust.
China/Stoneware Ye s Always check manufacturer’s recommendations before washing.
Antique, hand-painted, or over-the-glaze patterns may fade. Gold
leaf can discolor or fade.
Crystal Yes Always check manufacturer’s recommendations before washing.
Some types of leaded crystal can etch with repeated washing.
Gold No Gold-colored flatware will discolor.
Glass Yes Milk glass material yellows with repeated dishwasher washing.
Hollow-Handle Knives No Handles of some knives are attached to the blade with adhesives
which can loosen if washed in the dishwasher.
Pewter, Brass, Bronze,
and Copper
Disposable Plastics No Cannot withstand high water temperatures and detergents.
Plastics Yes Always check manufacturer’s recommendations before washing.
Stainless Steel Yes Run a rinse cycle if not washing immediately. Prolonged contact
Sterling Silver or Silver
Plate
Tin No Not recommended.
Wooden Ware No Wash by hand. Always check manufacturer’s instructions before
No High water temperatures and detergent can discolor or pit the
finish.
Plastic items may vary in their ability to withstand high
temperatures and detergents. It is recommended that lightweight
items such as lids and butter dishes be placed in the upper rack
only. Sturdy items such as coolers and high-chair trays may be
placed in the lower rack. When washing plastic items in the lower
rack, it is recommended not to use the Heated Dry option.
with food containing salt, vinegar, milk products, or fruit juice can
damage finish.
Yes Run a rinse cycle if not washing immediately. Prolonged contact
with food containing salt, acid, or sulfide (eggs, mayonnaise, and
seafood) can damage finish.
washing. Untreated wood can warp, crack, or lose its finish.
18
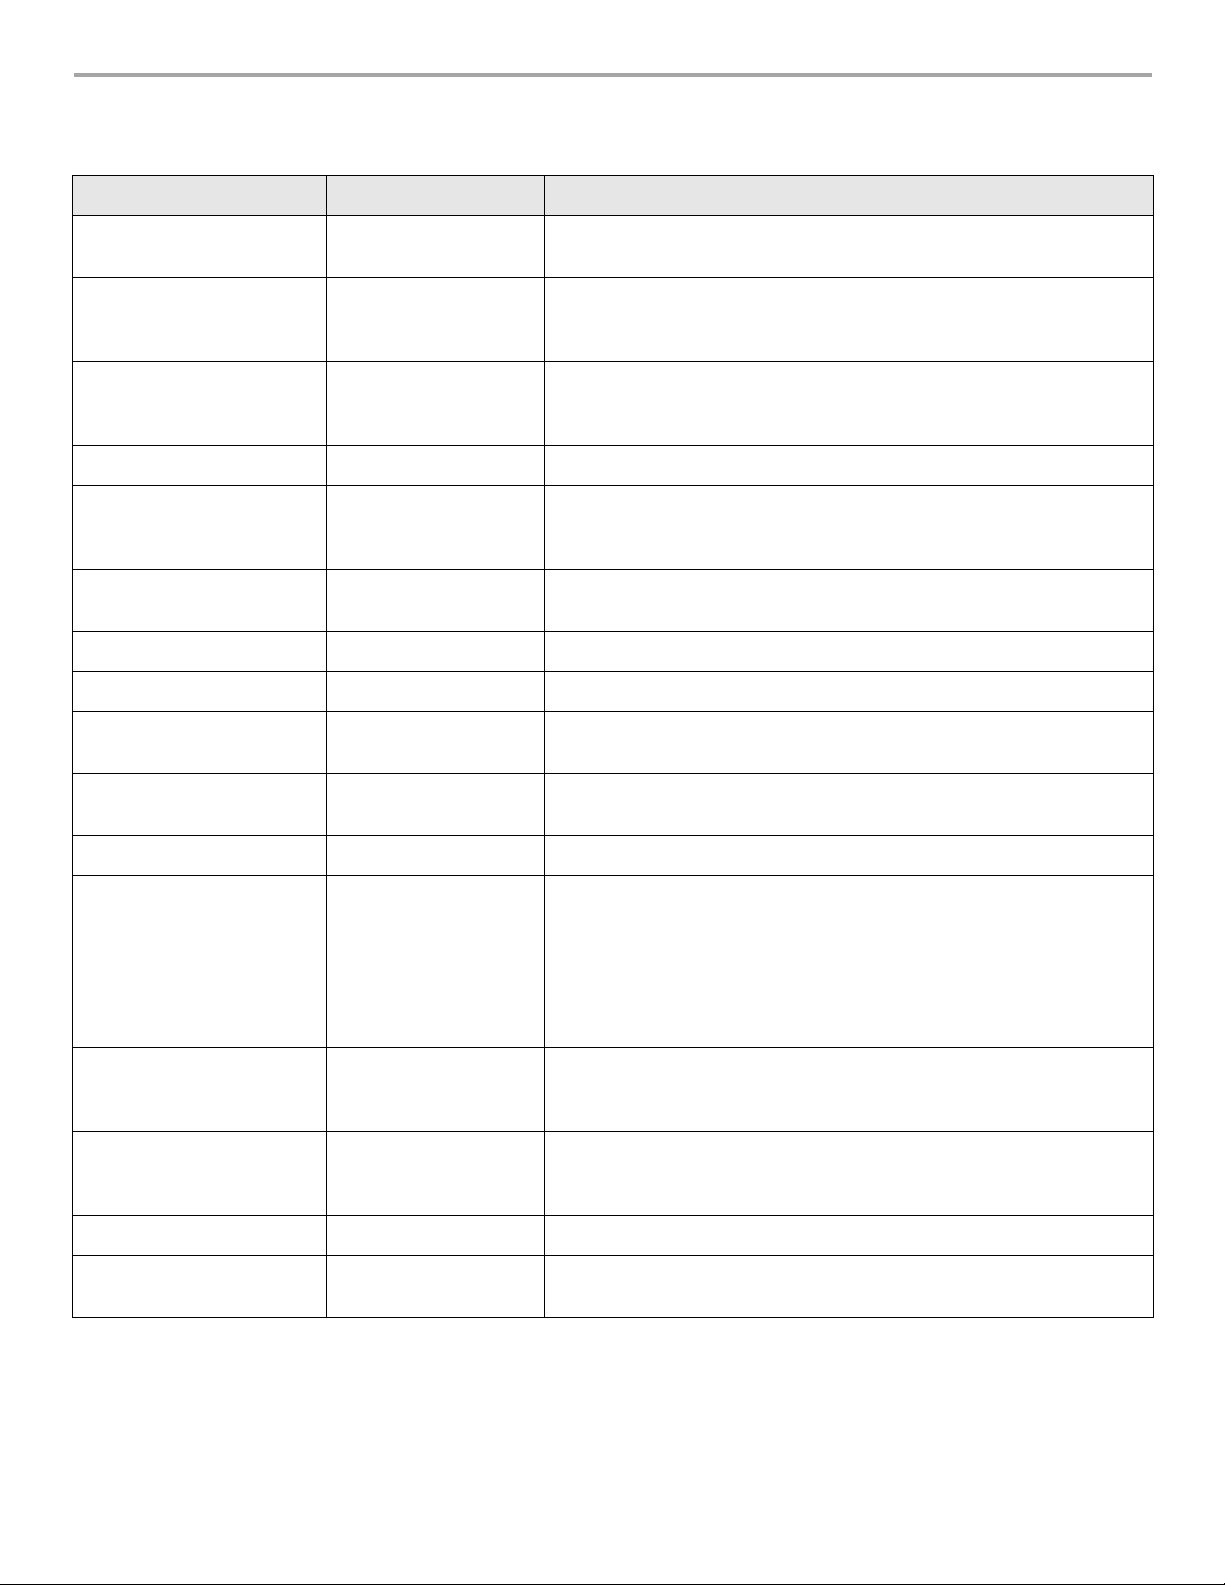
Cleaning the exterior
DISHWASHER CARE
Cleaning
In most cases, regular use of a soft, damp cloth or sponge and a mild
detergent is all that is necessary to keep the outside of your dishwasher
looking nice and clean. If your dishwasher has a stainless steel exterior, a
stainless steel cleaner is recommended.
Cleaning the interior
Hard water minerals can cause a white film to build up on the inside surfaces,
especially just beneath the door area.
Do not clean the dishwasher interior until it has cooled. You may want to wear
rubber gloves. Do not use any type of cleanser other than dishwasher
detergent because it may cause foaming or sudsing.
To clean interior
Make a paste with powdered dishwasher detergent on a damp sponge and
clean.
OR
Use liquid automatic dishwasher detergent and clean with a damp sponge.
OR
See the vinegar rinse procedure in “Spotting and filming on dishes” in
“Troubleshooting” section.
NOTE: Run a normal cycle with dishwasher detergent after cleaning the
interior.
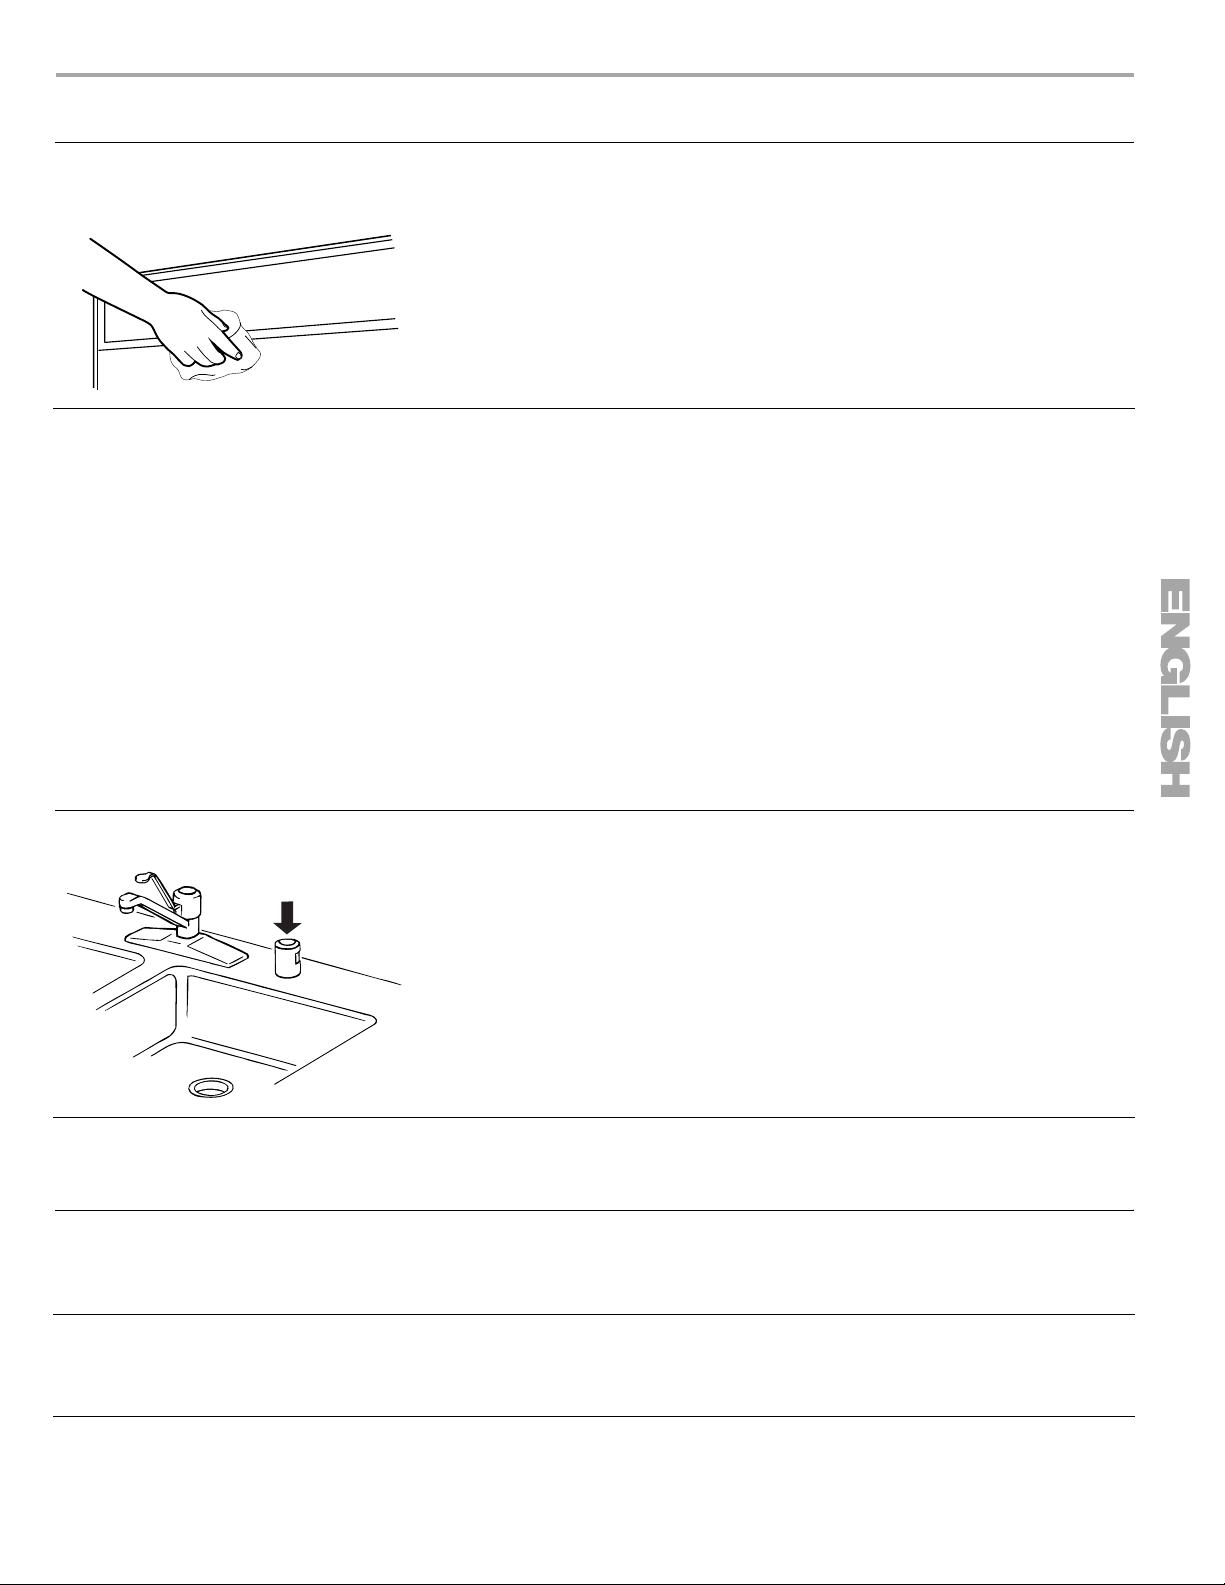
Drain Air Gap
Some state or local plumbing codes require the addition of a drain air gap
between a built-in dishwasher and the home drain system. Check the drain air
gap when your dishwasher is not draining well.
The drain air gap is usually located on top of the sink or countertop near the
dishwasher. To order a drain air gap, please call 1-800-4-MY-HOME
Part Number 300096.
NOTE: The drain air gap is an external plumbing device that is not part of your
dishwasher. The warranty provided with your dishwasher does not cover
service costs directly associated with the cleaning or repair of the external
drain air gap.
®
. Ask for
To clean the drain air gap
Storing for the summer
Storing for the winter
Clean the drain air gap periodically to ensure proper drainage of your
dishwasher. With most types, you lift off the chrome cover. Unscrew the plastic
cap. Then check for any soil buildup. Clean if necessary.
Storing
If your dishwasher is not in use during the summer months, turn off the water
supply and power supply to the dishwasher.
Avoid possible water damage to your home and dishwasher due to freezing
water lines. If your dishwasher is left in a seasonal dwelling or could be
exposed to near freezing temperatures, have your dishwasher winterized by
authorized service personnel.
19

TROUBLESHOOTING
First try the solutions suggested here and possibly avoid the cost of a service call...
Dishwasher is not operating properly
■ Dishwasher does not run or stops during a cycle
Is the door closed tightly and latched?
Is the right cycle selected? Refer to the “Cycles and
Options Information” section.
Is there power to the dishwasher? Has a household
fuse blown, or has a circuit breaker tripped? Replace
the fuse or reset the circuit breaker. If the problem
continues, call an electrician.
Has the motor stopped due to an overload? The motor
automatically resets itself within a few minutes. If it
does not restart, call for service.
Is the water shutoff valve (if installed) turned on?
It is normal for certain cycles to repeatedly pause for
several seconds during the wash cycle.
■ START/RESUME light is flashing
Was the door opened during the cycle, or was the
power interrupted? The Start/Resume light will flash
when the door is opened during a cycle, or may flash if
the power is interrupted. Press START/RESUME to
resume the cycle. Make sure the door is fully closed
and latched.
NOTE: On top control models, if the door is not closed
within 3 seconds of pressing Start/Resume, press
START/RESUME again.
■ Clean light is flashing
Check the following:
■ Is the overfill protection float able to move up and
down freely? Press down to release.
■ Be sure the water supply is turned on to the
dishwasher. (This is very important following the
new installation of your dishwasher.)
■ Check for suds in the dishwasher. If foam or suds
are detected by the dishwasher sensing system, the
dishwasher may not operate properly or may not fill
with water.
Suds can come from:
1. Using the incorrect type of detergent, such as
dish detergent for hand washing dishes,
laundry detergent, or hand soap.
2. Forgetting to replace the rinse aid dispenser
cap after filling (or refilling) the rinse aid.
3. Using an excessive amount of dishwasher
detergent.
■ Dishwasher will not fill
Be sure the water supply is turned on the to the
dishwasher. (This is very important following the new
installation of your dishwasher.)
Check for suds in the dishwasher. If foam or suds are
detected, the dishwasher may not operate properly or
may not fill with water. (See “Clean light is flashing”
section for more information.)
Is the overfill protection float able to move up and
down freely? Press down to release.
■ Dishwasher seems to run too long
Try 1 Hour Wash cycle (on some models).
When selecting cycles that are more energy efficient
and use less water, the duration of the cycle typically
will be as long as 3 hours.
Some options will add time to the cycle. See “Cycles
and Options Infromation” section. The Heated Dry
option adds ½ hour.
Run the hot water at a faucet close to the dishwasher
before starting the cycle.
Is the water supplied to the dishwasher hot enough?
The dishwasher runs longer while heating water. To
avoid longer delays while the dishwasher heats water
that is too cool, make sure that the water is 120°F
(49°C) as it enters the dishwasher. Refer to the
“Dishwasher Efficiency Tips” section.
A delay automatically occurs in some wash and rinse
cycles until the water reaches the proper temperature.
■ Water remains in the dishwasher
Is the cycle complete?
Was the disposer knockout plug removed during
installation? (See “Install the drain hose” in the
Installation Instructions.)
■ Detergent remains in the covered section of the
dispenser
Check for items such as cookie sheets, cutting boards,
or large containers that may be blocking the detergent
dispenser from opening properly.
Be sure the cycle has finished (green light is on). If it
has not finished, you will need to resume the cycle by
pressing START/RESUME and closing the door within
3seconds.
Is the detergent lump-free? Replace detergent if
necessary.
Is the bottom rack installed properly with the bumpers
(on some models) in the front? Refer to the “Parts and
Features” section. Reinstall the rack if necessary.
■ White residue on the front of the access panel
Was too much detergent used? Refer to the
“Detergent” section.
Is the brand of detergent making excess foam? Try a
different brand to reduce foaming and eliminate
buildup.
20

■ Odor in the dishwasher
Are dishes washed only every 2 or 3 days? Run a rinse
cycle once or twice a day until you have a full load.
Does the dishwasher have a new plastic smell? Run a
vinegar rinse as described in the section “Spotting and
filming on dishes.”
■ Condensation on the kitchen counter (built-in
models)
Is the dishwasher aligned with the countertop?
Moisture from the vent in the dishwasher console can
form on the counter. Refer to the Installation
Instructions for more information.
■ Bottom rack does not fully slide into the dishwasher
Check to see if items have shifted. Reload to keep
items from interfering with spray arm. (See “Bottom
Rack Loading” section.)
Dishes are not completely clean
■ Food soil left on the dishes
Is the dishwasher loaded correctly? Refer to the
“Loading” section.
Is the water temperature too low? For best
dishwashing results, water should be 120°F (49°C) as it
enters the dishwasher. Refer to the “Dishwasher
Efficiency Tips” section.
Did you use the correct amount of fresh detergent? Use
recommended dishwasher detergents only. Refer to the
“Detergent” section. Detergent must be fresh to be
effective. Store detergent in a cool, dry area. Heavy soil
and/or hard water generally require extra detergent.
Do you have hard water? You may need to increase the
amount of detergent you are using. Refer to the
“Detergent” section. Also, you may need to switch to a
detergent with a phosphorus content of 8.7%.
Is detergent caked in dispenser? Use fresh detergent
only. Do not allow detergent to sit for several hours in a
wet dispenser. Clean dispenser when caked detergent
is present.
Is the wash system clogged by labels from bottles and
cans? Be sure to remove all labels from bottles and
cans before washing.
Is the home water pressure high enough for proper
dishwasher filling? Home water pressure should be
20 to 120 psi (138 to 828 kPa) for proper dishwasher
fill. If you have questions about your water pressure,
call a licensed, qualified plumber.
Are high suds slowing the wash arm? Do not use soap
or laundry detergents. Use recommended dishwasher
detergents only.
Spots and stains on dishes
■ Spotting and filming on dishes
Is your water hard or is there a high mineral content in
your water? Conditioning the final rinse water with a
liquid rinse aid helps eliminate spotting and filming.
Keep the rinse aid dispenser filled.
Is the water temperature too low? For best
dishwashing results, water should be 120°F (49°C) as it
enters the dishwasher. Refer to the “Dishwasher
Efficiency Tips” section.
Did you use the correct amount of effective detergent?
Use recommended dishwasher detergents only. Refer
to the “Detergent” section. Detergent must be fresh to
be effective. Store detergent in a cool, dry area. Heavy
soil and/or hard water generally require extra detergent.
Is the home water pressure high enough for proper
dishwasher filling? Home water pressure should be
20 to 120 psi (138 to 828 kPa) for proper dishwasher
fill. If you have questions about your water pressure,
call a licensed, qualified plumber.
NOTE: To remove spots and film from dishes, try a
white vinegar rinse. This procedure is intended for
occasional use only. Vinegar is an acid, and using it too
often could damage your dishwasher.
1. Wash and rinse dishes. Use an air-dry or an energy
saving dry option. Remove all silverware or metal
items.
2. Put 2 cups (500 mL) white vinegar in a glass or
dishwasher-safe measuring cup on the bottom
rack.
3. Run the dishwasher through a complete washing
cycle using an air-dry option. Do not use detergent.
Vinegar will mix with the wash water.
■ Silica film or etching (silica film is a milky, rainbow-
colored deposit; etching is a cloudy film)
Sometimes there is a water/chemical reaction with
certain types of glassware. This is usually caused by
some combination of soft or softened water, alkaline
washing solutions, insufficient rinsing, overloading the
dishwasher, and the heat of drying. It might not be
possible to avoid the problem, except by hand
washing.
To slow this process use a minimum amount of
detergent per load. Refer to the “Detergent” section.
Use a liquid rinse aid and underload the dishwasher to
allow thorough rinsing. Silica film and etching are
permanent and cannot be removed. Do not use heated
drying.
■ White spots on cookware with nonstick finish
Has the dishwasher detergent removed cookware
seasoning? Reseason cookware after washing in the
dishwasher.
■ Brown stains on dishes and dishwasher interior
Does your water have high iron content? Rewash
dishes using 1-3 tsp (5-15 mL) of citric acid crystals
added to the covered section of the detergent
dispenser. Do not use detergent. Follow with a Normal
wash cycle with detergent. If treatment is needed more
often than every other month, the installation of an iron
removal unit is recommended.
■ Black or gray marks on dishes
Are aluminum items rubbing dishes during washing?
Disposable aluminum items can break down in the
dishwasher and cause marking. Hand wash these
items. Remove aluminum markings by using a mild
abrasive cleaner.
21

■ Orange stains on plastic dishes or dishwasher
interior
Are large amounts of tomato-based foods on dishes
placed in the dishwasher? Stains gradually fade over
time. Regular use of heated drying will slow fading.
Stains will not affect dishwasher performance. Regular
use of a rinse cycle and an air-dry or energy-saving dry
option will reduce the likelihood of staining.
Dishes do not dry completely
■ Dishes are not dry
Did you load your dishwasher to allow proper water
drainage? Do not overload. Refer to the “Loading”
section. Use a liquid rinse aid to speed drying.
Are the plastics wet? Plastics often need towel drying.
Is the rinse aid dispenser empty? Refer to the “Rinse
Aid Dispenser” section.
Did you use an air-dry option? Use a heated drying
option for dryer dishes.
Dishes are damaged during a cycle
■ Chipping of dishes
Did you load the dishwasher properly? Load the dishes
and glasses so they are stable and do not strike
together from washing action. Minimize chipping by
moving the rack in and out slowly.
NOTE: Antiques, feather-edged crystal, and similar
types of china and glassware might be too delicate for
automatic dishwashing. Wash by hand.
Noises
■ Grinding, grating, crunching or buzzing sounds
A hard object has entered the wash module (on some
models). When the object is ground up, the sound
should stop. If the noise persists after a complete
cycle, call for service.
Dishwasher exterior is dirty or marked
■ Marks, smudges or residue on dishwasher exterior
Did you clean the dishwasher with a mild detergent and
cloth or use a stainless steel cleaner on models with a
stainless steel exterior? In most cases, regular use of a
soft, damp cloth or sponge and a mild detergent is all
that is necessary to keep the outside of your
dishwasher looking fresh and clean. If your dishwasher
has a stainless steel exterior, a stainless steel cleaner is
recommended.
22
 Loading...