

Kenmore 665.11073322 Owner's Manual
Dishwasher
Use & Care Guide
Lave-vaisselle
Guide d’utilisation et d’entretien
Model/Modèle 665.11073322
8542598
Sears Canada, Inc., Toronto, Ontario, Canada M5B 2B8
www.sears.ca

TABLE OF CONTENTS
MAINTENANCE AGREEMENTS....................................................3
WARRANTY.....................................................................................3
DISHWASHER SAFETY..................................................................4
Before Using Your Dishwasher ....................................................5
PARTS AND FEATURES ................................................................6
Soil Removal System ...................................................................7
START-UP GUIDE ..........................................................................7
Using Your New Dishwasher........................................................7
Stopping Your Dishwasher ..........................................................7
DISHWASHER LOADING..............................................................8
Loading Suggestions....................................................................8
Loading Top Rack ........................................................................8
Loading Bottom Rack ..................................................................8
Loading Silverware Basket...........................................................9
DISHWASHER USE .......................................................................9
Detergent Dispenser.....................................................................9
Rinse Aid Dispenser .................................................................. 10
Dishwasher Efficiency Tips ....................................................... 10
Cycle Selection Charts.............................................................. 11
Canceling a Cycle...................................................................... 12
Changing a Cycle or Setting ..................................................... 12
Adding Items During a Cycle..................................................... 12
Option Selections...................................................................... 12
Drying System ........................................................................... 12
Overfill Protection Float............................................................. 12
WASHING SPECIAL ITEMS........................................................ 13
DISHWASHER CARE................................................................... 14
Cleaning..................................................................................... 14
Drain Air Gap ............................................................................. 14
Storing ....................................................................................... 14
TROUBLESHOOTING.................................................................. 15
SERVICE NUMBERS ............................................... BACK COVER
2

MAINTENANCE
WARRANTY
AGREEMENTS
Your purchase has added value because you can depend on
Sears HomeCentral
Technicians and access to over 900,000 parts and accessories,
we have the tools, parts, knowledge and skills to back our
pledge: We Service What We Sell.
Sears Maintenance Agreements
You r Ke n more® appliance is designed, manufactured and tested
to provide years of dependable operation. Yet any major
appliance may require service from time to time. The Sears
Maintenance Agreement offers you an outstanding service
program, affordably priced.
The Sears Maintenance Agreement
■
Guarantees tomorrow’s service at today’s price.
■
Eliminates repair bills resulting from normal wear and tear.
■
Covers non-technical and instructional service calls.
■
Provides an annual Preventive Maintenance Check, at your
request, to ensure that your appliance is in proper running
condition.
Some limitations apply. For information concerning Sears
Home Central
1-800-361-6665.
®
for service. With over 2,400 Service
®
Maintenance Agreements, call
FULL ONE-YEAR WARRANTY ON THIS KENMORE
DISHWASHER
For one year from the date of purchase, when this dishwasher is
installed and operated according to instructions provided in the
Installation Instructions and Use & Care Guide, Sears will repair
this dishwasher, free of charge, if defective in material or
workmanship.
FULL WARRANTY FOR THE LIFE OF THE DISHWASHER,
ON ULTRA LIFE™ TUB MODELS, AGAINST LEAKS IN THE
TUB AND INNER DOOR PANEL
For the life of the dishwasher, if a leak should occur as a result of
failure of the polypropylene tub or inner door panel due to
cracking, chipping or peeling, Sears will replace free of charge
the tub or inner door panel.
WARRANTY RESTRICTION
If the dishwasher is subject to other than private family use, the
above warranty coverage is effective for only 90 days.
WARRANTY SERVICE
WARRANTY SERVICE IS AVAILABLE BY CONTACTING THE
NEAREST SEARS SERVICE CENTER IN CANADA. This warranty
applies only while the product is in use in Canada.
This warranty gives you specific legal rights and you may also
have other rights which vary from province to province.
For Sears Warranty information in Canada, please reference the
service numbers located on the back page of this manual.
Sears Canada, Inc.
Toronto, Ontario, Canada M5B 2B8
PRODUCT RECORD
In the space below, record your complete model number, serial
number, and purchase date. You can find this information on the
model and serial number label, located as shown in the Parts and
Features section of this book. Have this information available to
help you quickly obtain assistance or service when you contact
Sears concerning your appliance.
Model number 665.______________________________________________
Serial number___________________________________________________
Purchase date __________________________________________________
Save these instructions and your sales receipt for future
reference.
3
DISHWASHER SAFETY
Your safety and the safety of others are very important.
We have provided many important safety messages in this manual and on your appliance. Always read and obey all
safety messages.
This is the safety alert symbol.
This symbol alerts you to potential hazards that can kill or hurt you and others.
All safety messages will follow the safety alert symbol and either the word “DANGER” or
“WARNING.” These words mean:
You can be killed or seriously injured if you don't
immediately follow instructions.
can be killed or seriously injured if you don't
You
follow instructions.
All safety messages will tell you what the potential hazard is, tell you how to reduce the chance of injury, and tell you
what can
happen if the instructions are not followed.
4
Before Using Your Dishwasher
Tip Over Hazard
Do not use dishwasher until completely installed.
Do not push down on open door.
Doing so can result in serious injury or cuts.
Electrical Shock Hazard
Electrically ground dishwasher.
Connect ground wire to green ground connector
in terminal box.
Do not use an extension cord.
Failure to follow these instructions can result in
death, fire, or electrical shock.
■
Install where dishwasher is protected from the elements.
Protect against freezing to avoid possible rupture of fill valve.
Such ruptures are not covered by the warranty. See “Storing”
in the “Dishwasher Care” section for winter storage
information.
■
Install and level dishwasher on a floor that will hold the
weight, and in an area suitable for its size and use.
■
Remove all shipping plugs from hoses and connectors (such
as the cap on the drain outlet) before installing. See
Installation Instructions for complete information.
5
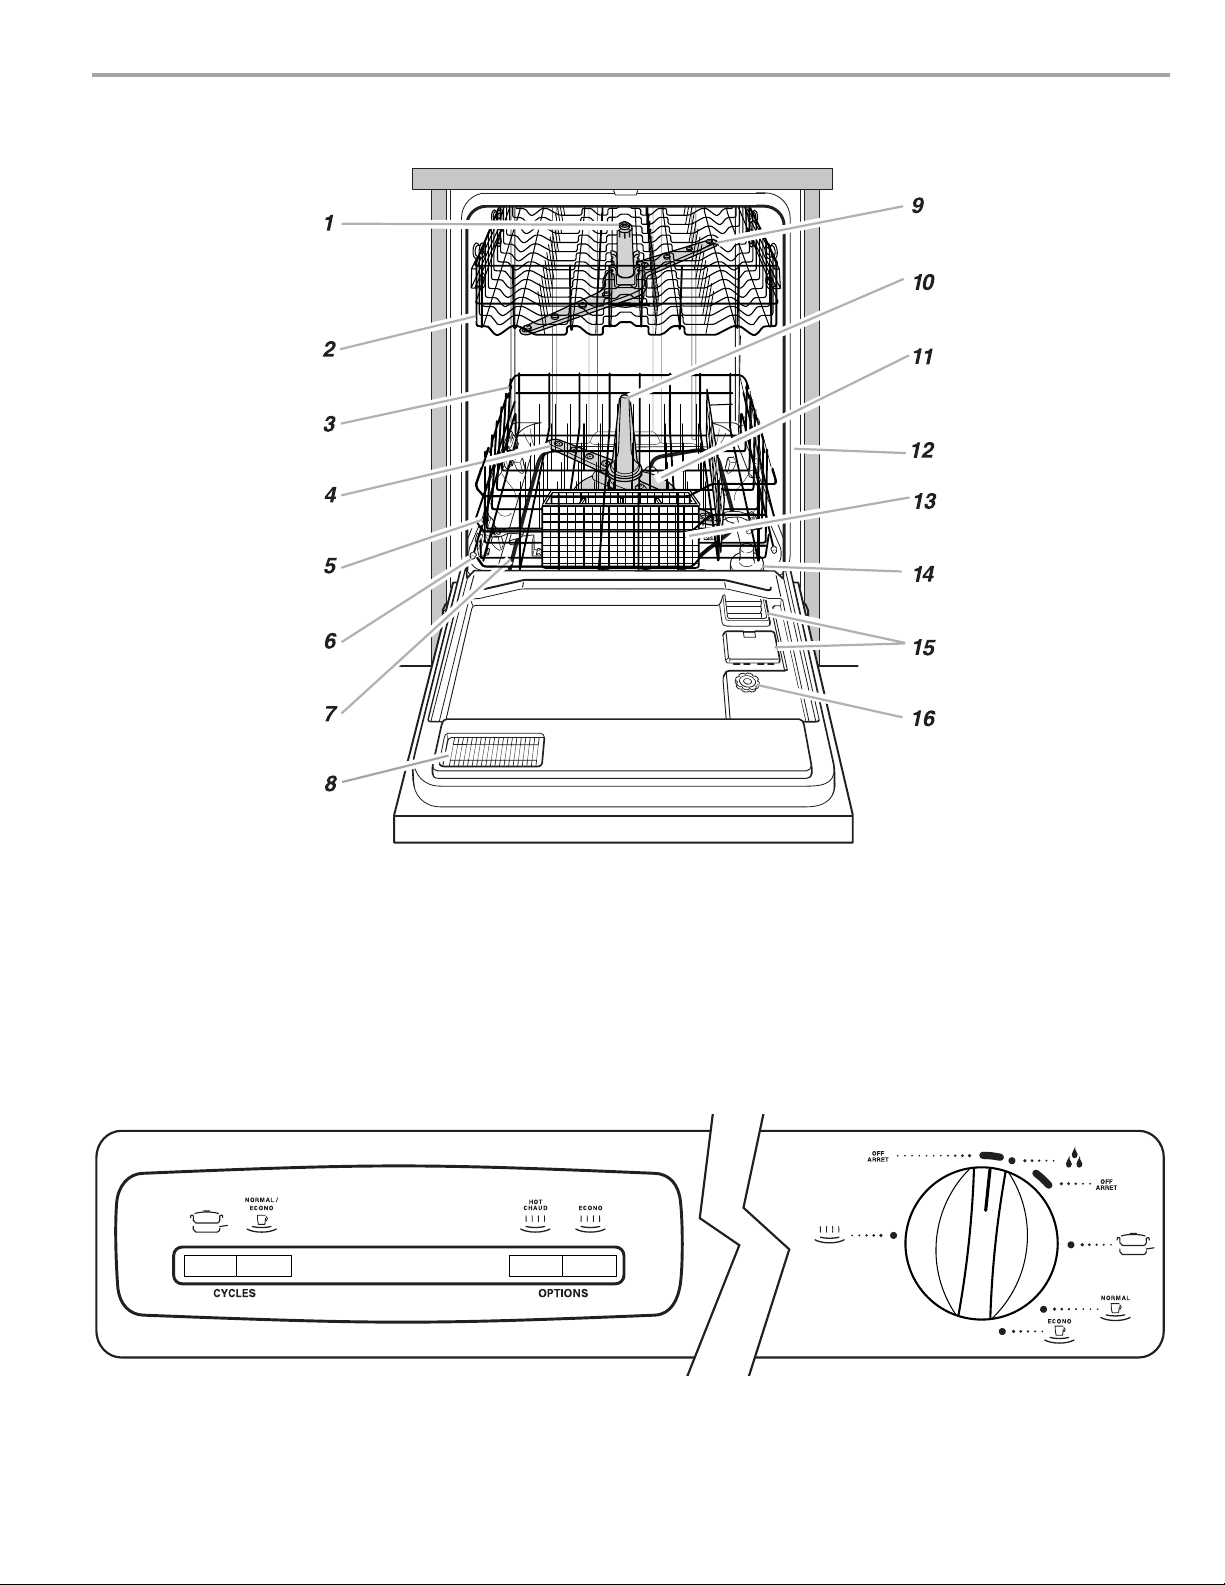
PARTS AND FEATURES
1.
Upper level wash
2.
Top rac k
3.
Bottom rack
4.
Lower spray arm
5.
Water inlet opening [in tub wall]
Control Panel
6.
Rack bumper
7.
Heating element
8.
Vent
9.
Top spray arm
10.
Spray tower
11.
Wash module
12.
Model and serial number label
13.
Silverware basket
14.
Overfill protection float
15.
Detergent dispenser
16.
Rinse aid dispenser
6
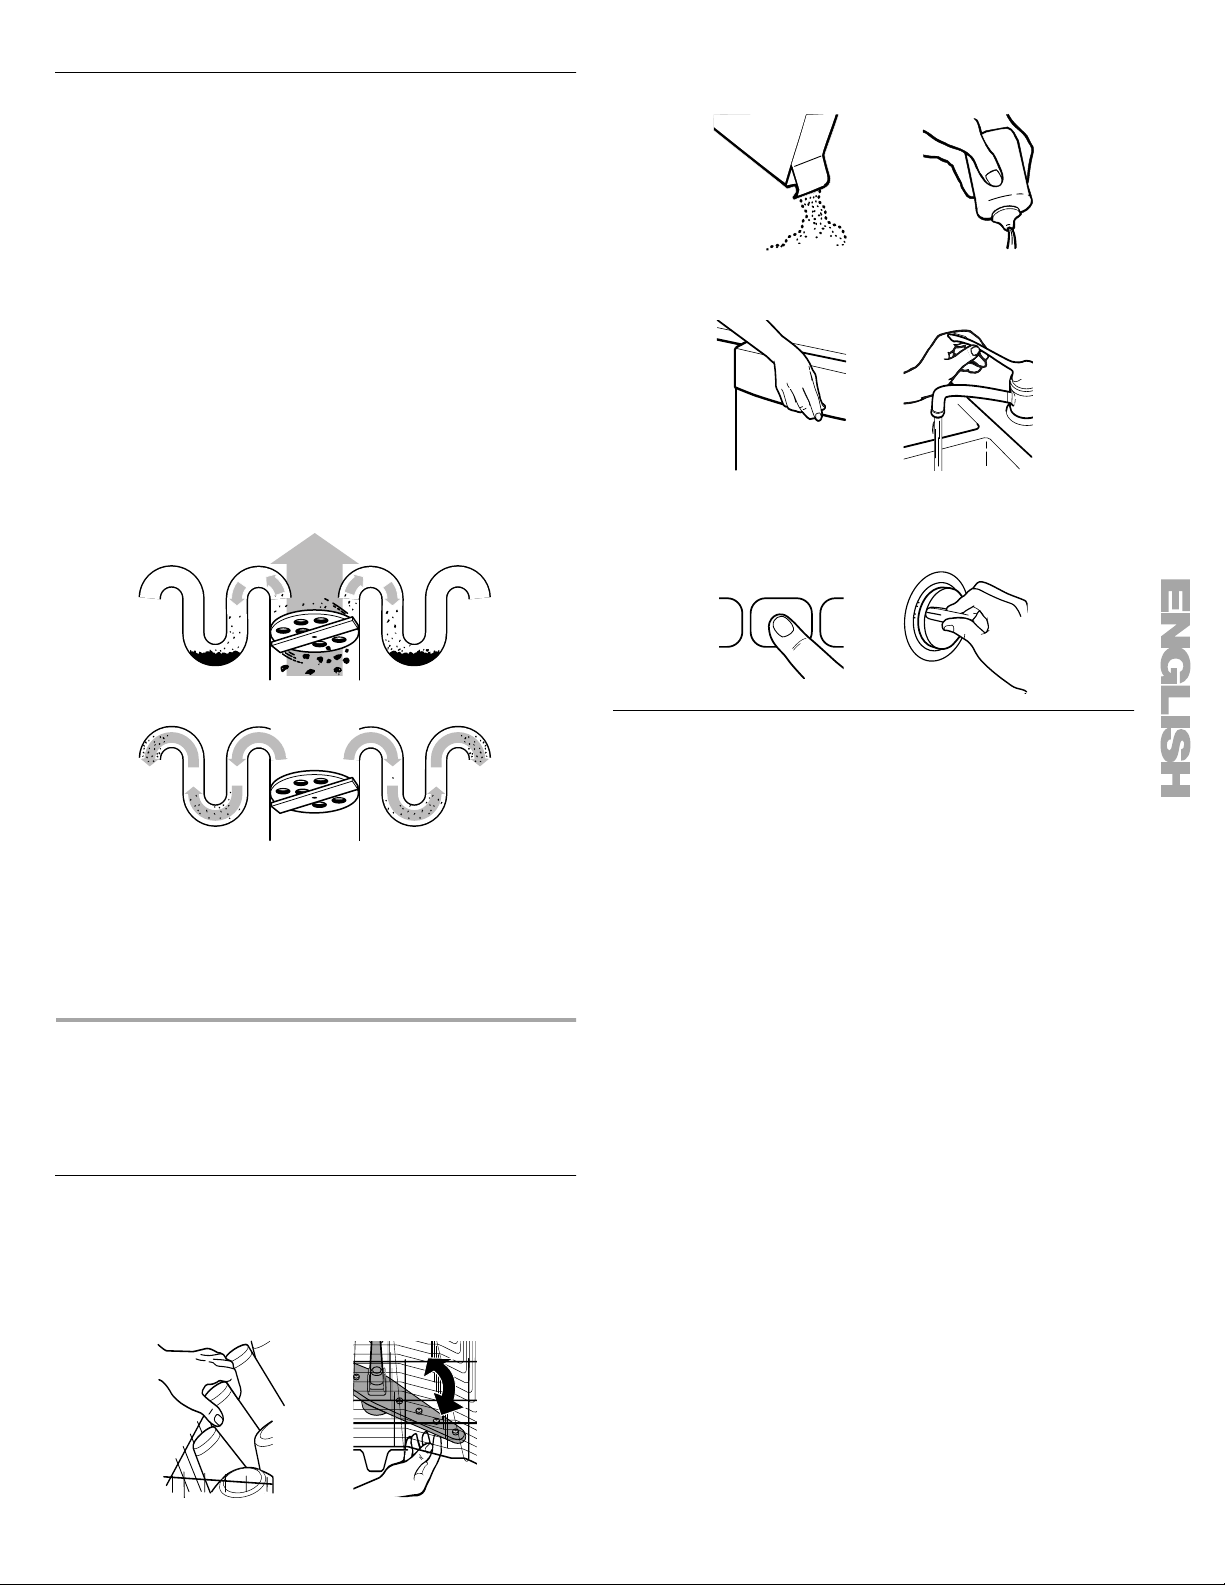
Soil Removal System
The soil removal system gives you sparkling clean dishes, while
using less energy and time. The soil removal system includes:
A heavy-duty grinder that acts as a food disposer to grind and
dispose of large food particles.
How the soil removal system works
1.
Load the dishwasher. Remove bones, large chunks or
burned-on food. No rinsing is necessary. Any remaining food
soil will be ground up and disposed down the drain with the
rinse water.
2.
Hot water fills the dishwasher to a level near the bottom of
the overfill protection float.
3.
Detergent from the detergent dispenser is dispensed at the
correct cycle times and hot water is pumped through the
pump.
4.
Hot water and detergent sprays against the soiled surfaces of
the load and removes food particles.
5.
Food soil is held in an accumulating chamber.
3.
Add detergent and check the rinse aid dispenser. Add rinse
aid if needed. (See “Dishwasher Use.”)
4.
Push door firmly closed. The door latches automatically. Run
hot water at the sink nearest your dishwasher until the water
is hot. (See “Dishwasher Efficiency Tips.”) Turn off water.
5.
Press the desired cycle and option selections. (See
“Dishwasher Use.”) Turn the cycle control knob to the desired
cycle to start.
6.
Food soil is disposed down the drain with the wash water.
7.
Fresh, hot water enters the dishwasher and sprays on the
dishes. The rinse water is then pumped through the soil
removal system and remaining soil is removed.
8.
The food soil that is held in the soil removal system is
disposed down the drain with the rinse water.
9.
The final rinse water is heated. The rinse aid is added to the
water for the final rinse to prepare the dishes for drying.
START-UP GUIDE
Before using your dishwasher, remove all packaging materials.
Read this entire Use and Care Guide. You will find important
safety information and useful operating tips.
Using Your New Dishwasher
1.
Scrape large food soil and hard items (toothpicks or bones)
from dishes.
2.
Properly load the dishwasher. (See “Dishwasher Loading.”)
Make sure nothing prevents the spray arm(s) from spinning
freely.
Stopping Your Dishwasher
You can stop your dishwasher anytime during a cycle.
1.
Open the door slightly.
2.
Wait for the spraying action to stop. Then open the door all
the way, if needed.
3.
Close the door to continue the cycle.
OR
1.
Turn the cycle control knob slowly clockwise until you hear
water draining. Let the dishwasher drain completely.
2.
Open the door.
3.
Turn the cycle control knob to Off/Arret.
7
DISHWASHER
LOADING
Loading Suggestions
■
Remove leftover food, bones, toothpicks and other hard
items from the dishes. It is not necessary to rinse the dishes
before putting them into the dishwasher.
NOTE:
Dishes soiled with tomato-based products should be
pre-rinsed to avoid staining.
The wash module removes food particles from the water. The
module contains a chopping device which will reduce the size
of food items.
NOTE:
If hard items such as fruit seeds, nuts, and egg shells
enter the wash module, you might hear chopping, grinding,
crunching, or buzzing sounds. These sounds are normal
when hard items enter the module. Do not let metallic items
(such as pot handle screws) get into the wash module.
Damage can occur.
■
It is important for the water spray to reach all soiled surfaces.
■
Load dishes so they are not stacked or overlapping, if
possible. For best drying, water must be able to drain from all
surfaces.
■
Make sure pot lids and handles, pizza pans, cookie sheets,
etc., do not interfere with the spray arm rotation.
■
Run a rinse cycle to keep dishes moist if you do not plan to
wash them soon. Foods such as eggs, rice, pasta, spinach,
and cooked cereals may be hard to remove if they are left to
dry over a period of time.
Quiet operating tips
To avoid thumping/clattering noises during operation:
■
Make sure lightweight load items are secured in the racks.
■
Make sure pot lids and handles, pizza pans, cookie sheets,
etc., do not touch interior walls or interfere with the rotation of
the spray arm.
■
Load dishes so they do not touch one another.
NOTE:
For built-in models, keep sink drain plugs closed during
dishwasher operation to prevent noise transfer through drains.
12 place setting
■
Place items so open ends face down for cleaning and
draining.
■
Load glasses in top rack only. The bottom rack is not
designed for glasses. Damage can occur.
■
Place cups and glasses in the rows between tines. Placing
them over the tines can lead to breakage and water spots.
■
China, crystal, and other delicate items must not touch each
other during dishwasher operation. Damage may occur.
■
Load plastic items in the top rack only. Only plastic items
marked “dishwasher safe” are recommended.
■
Load plastic items so the force of the spray does not move
them during the cycle.
■
To avoid chipping, do not let stemware touch other items.
■
Small bowls, pans, and other utensils can be placed in the
top rack. Load bowls in the center section for best stability.
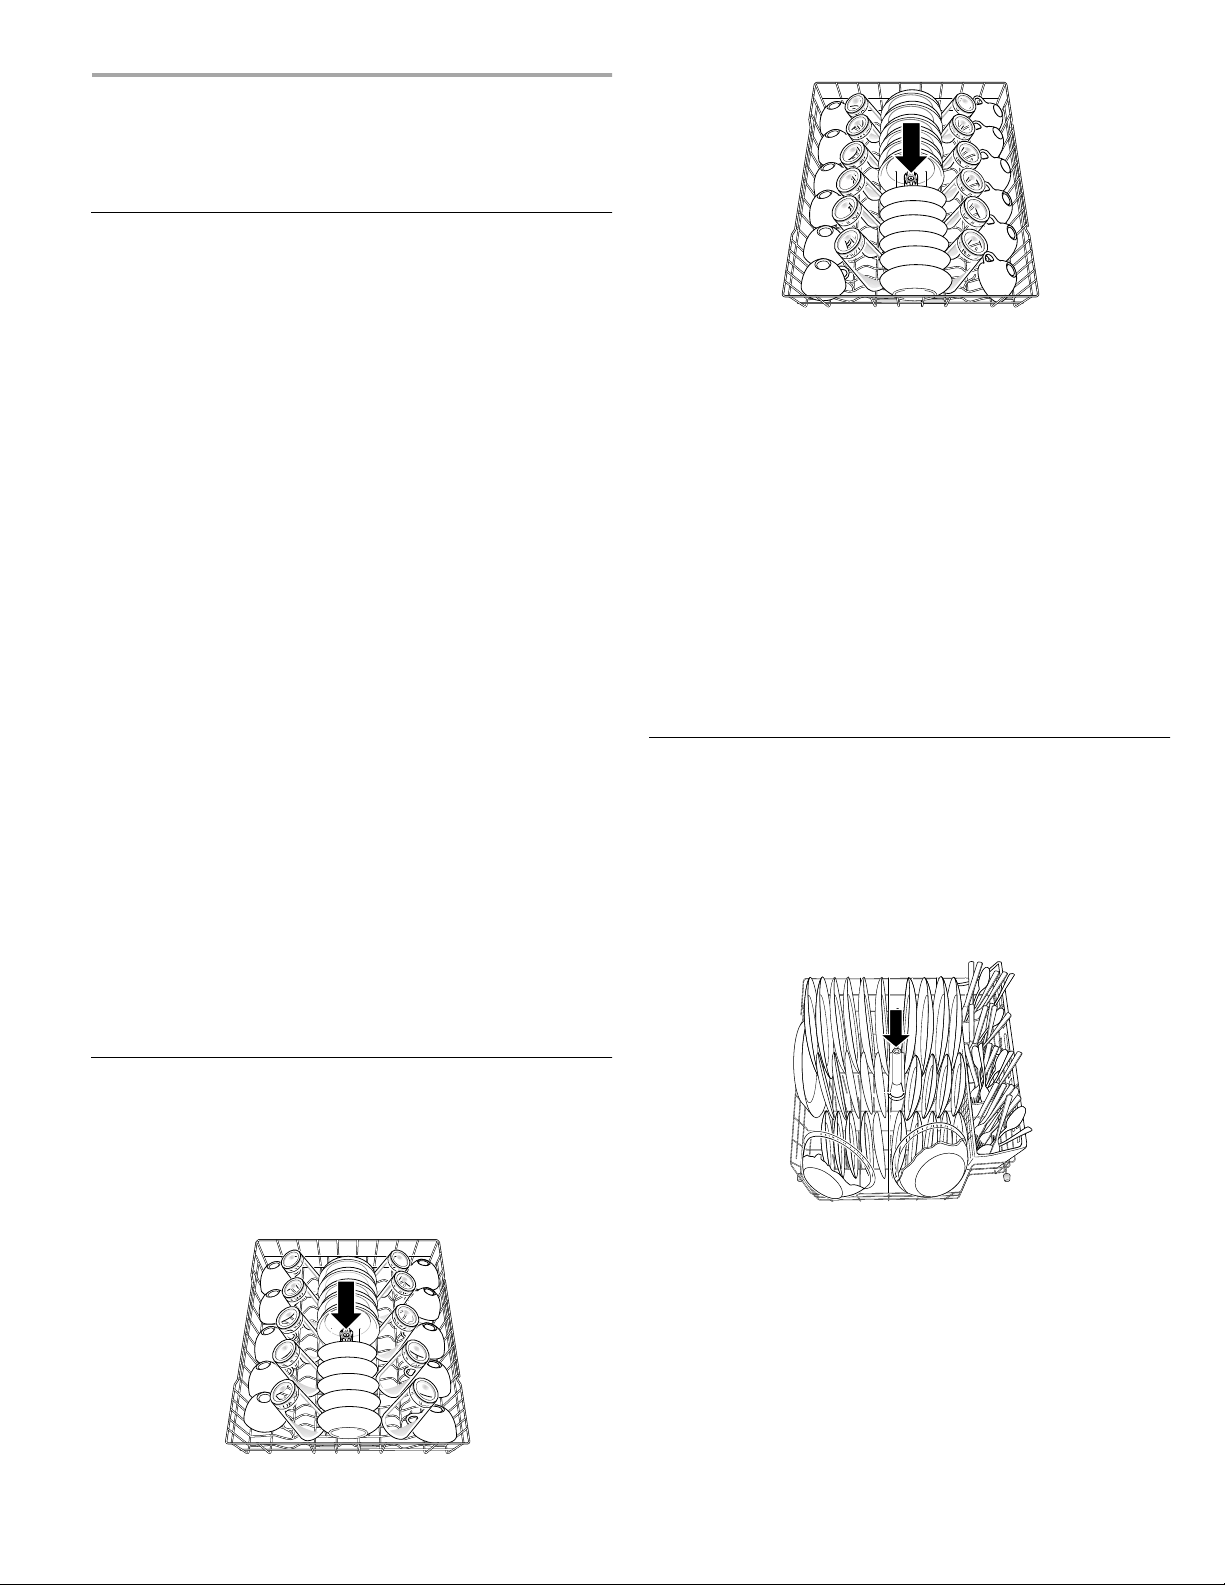
Loading Bottom Rack
The bottom rack is designed for plates, pans, casseroles, and
utensils. Items with cooked-on or dried-on food should be loaded
with soiled surfaces facing inward to the spray. (See
recommended loading patterns shown.)
NOTE:
The features on your dishwasher rack may vary from the
drawings shown.
Do not cover spray tower. See arrow.
Loading Top Rack
The top rack is designed for cups, glasses, and smaller items.
(See recommended loading patterns shown.)
NOTE:
The features on your dishwasher rack may vary from the
drawings shown.
Do not cover upper level wash. See arrow.
10 place setting
8
10 place setting
■
Do not load glasses, cups, or plastic items in the bottom
rack. Load small items in the bottom rack only if they are
secured in place.
■
Load plates, soup bowls, etc., between tines and facing
inward to the spray.
■
Overlap the edges of plates for large loads.
■
Load soup, cereal, and serving bowls in the rack in a variety
of ways depending upon their size and shape. Load bowls
securely between the rows of tines. Do not nest bowls
because the spray will not reach all surfaces.
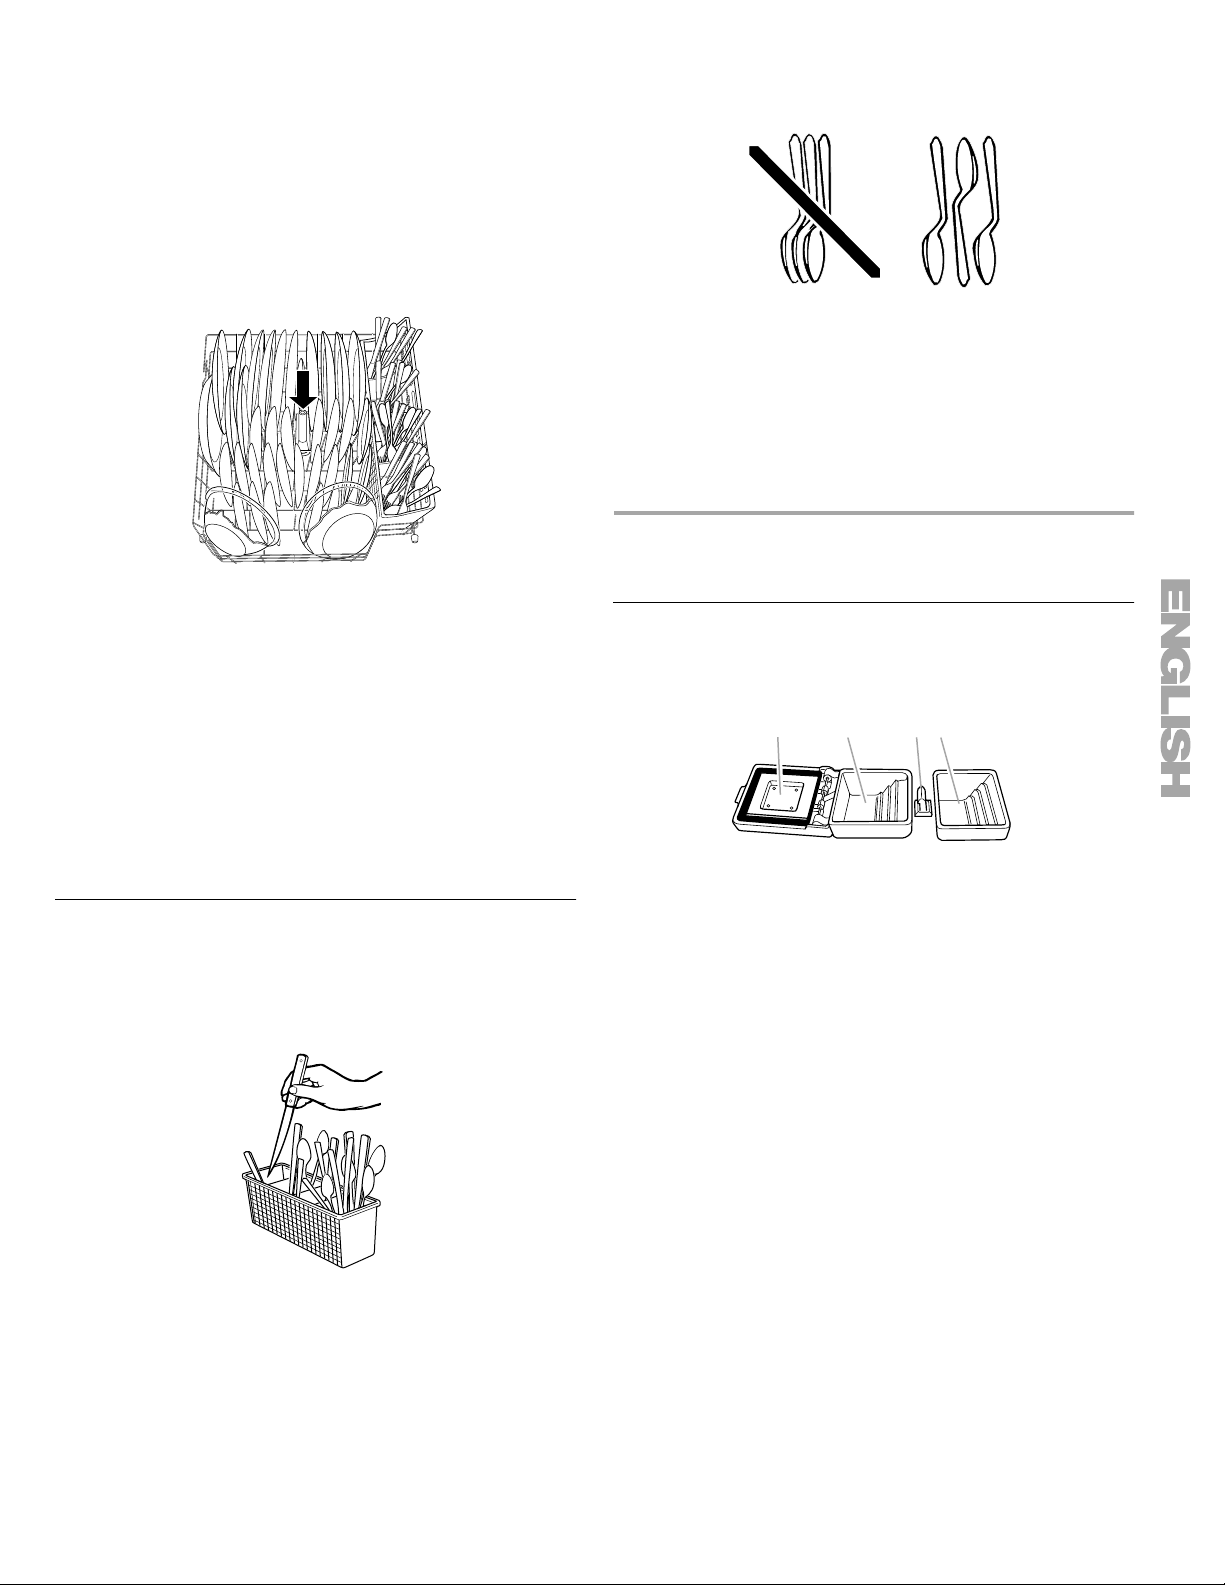
Mix items in each section of the basket with some pointing up
and some down to avoid nesting. Spray cannot reach nested
items.
IMPORTANT:
Always load sharp items (knives, skewers, etc.)
pointing down.
NOTES:
■
Do not load silver or silver-plated silverware with stainless
steel. These metals can be damaged by contact with each
other during washing.
■
Some foods (such as salt, vinegar, milk products, fruit juices,
etc.) can pit or corrode silverware. Run a rinse cycle if you do
not have a full load to wash immediately.
12 place setting
■
Load cookie sheets, cake pans, and other large items at the
sides and back. Loading such items in front can keep the
water spray from reaching the detergent dispenser and
silverware basket.
■
Secure heavily soiled cookware face down in the rack.
■
Make sure pot handles and other items do not stop rotation
of the spray arm(s). The spray arm(s) must move freely.
■
Do not load items between the bottom rack and the side of
the dishwasher tub because they might block the water inlet
opening.
NOTE:
If you have removed the bottom rack for unloading or
cleaning, replace it with the bumpers in front.
Loading Silverware Basket
Load the silverware basket while it is in the bottom rack or take
the basket out for loading on a counter or table.
NOTE:
Unload or remove the basket before unloading the racks
to avoid spilling water droplets on the silverware.
DISHWASHER USE
Detergent Dispenser
The detergent dispenser has 2 sections. The Pre-Wash section
empties detergent into the dishwasher when you close the door.
1
The larger Main Wash section automatically empties detergent
into the dishwasher during the main wash. (See the “Cycle
Selection Charts.”)
■
Use automatic dishwashing detergent only. Other detergents
can produce excessive suds that can overflow out of the
dishwasher and reduce washing performance.
■
Add detergent just before starting a cycle.
■
Store tightly closed detergent in a cool, dry place. Fresh
automatic dishwasher detergent results in better cleaning.
NOTE:
Do not use detergent if you have selected a rinse cycle.
23
1. Cover
2. Main Wash section
3. Cover latch
4. Pre-Wash section
4
Filling the dispenser
1.
If the dispenser cover is closed, open the cover by pushing
the Cover latch.
2.
Fill the Main Wash section with detergent. See “How much
detergent to use.”
3.
Fill the Pre-Wash section if needed. (See “Cycle Selection
Charts.”)
4.
Close the dispenser cover.
The cover will open during the cycle to dispense the detergent.
9
How much detergent to use
■
The amount of detergent to use depends on the hardness of
your water and the type of detergent. If you use too little,
dishes won’t be clean. If you use too much in soft water,
glassware will etch.
■
Water hardness can change over a period of time. Find out
your water’s hardness by asking your local water department,
water softener company, or county extension agent.
Where to fill
Top of 3rd step (9 tsp or 45 mL)
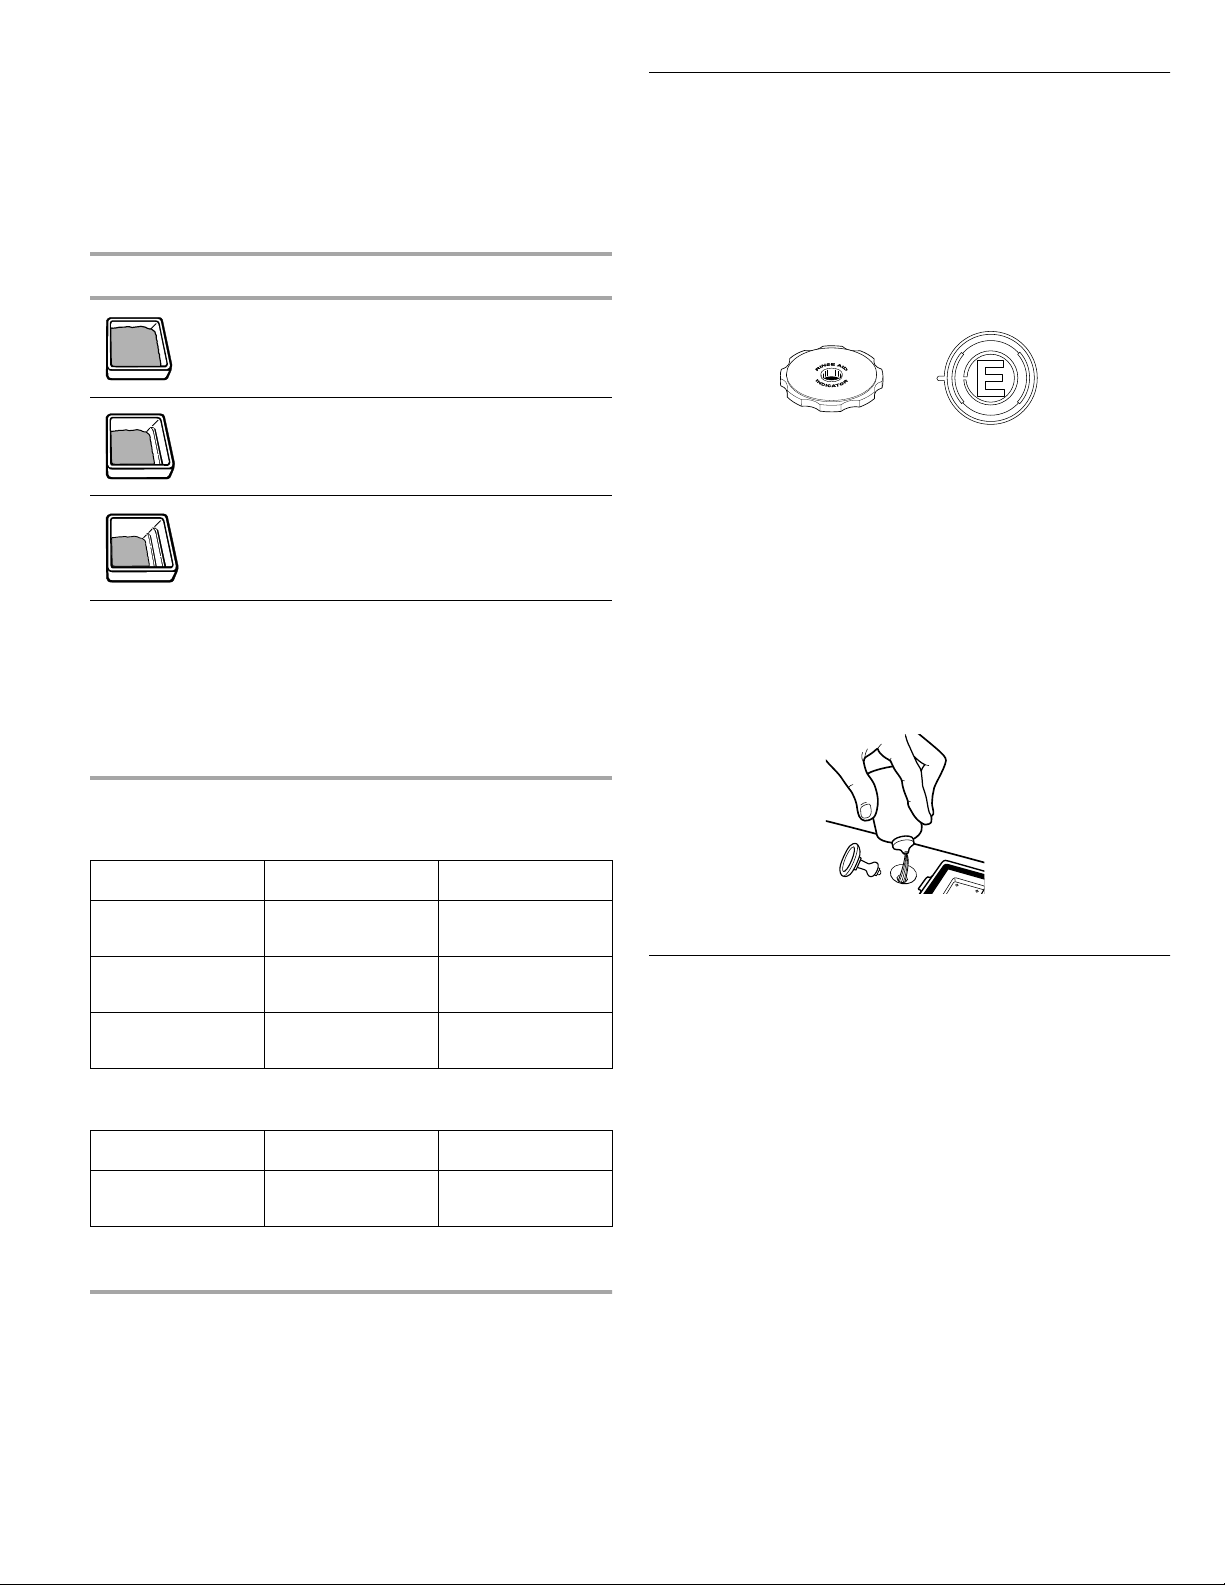
Rinse Aid Dispenser
Rinse aids prevent water from forming droplets that can dry as
spots or streaks. They also improve drying by allowing water to
drain off of the dishes during the final rinse by releasing a small
amount of the rinse aid into the rinse water. Your dishwasher is
designed to use a liquid rinse aid. Do not use a solid or bar-type.
Checking the dispenser
Check the center of the Fill Indicator cap. Clear means it needs
filling.
OR
Top of 2nd step (6 tsp or 30 mL)
Top of 1st step (3 tsp or 15 mL)
NOTE:
Fill amounts shown are for standard powdered detergent.
Amounts may vary if you use liquid or concentrated powdered
detergent. Tablet detergents should be placed in the main wash
section of the detergent dispenser with the cover closed. Follow
instructions on the package when using liquid dishwasher
detergent, concentrated powdered detergent or tablet detergent.
IMPORTANT:
See “Cycle Selection Charts” for which detergent
dispenser sections to use with each cycle.
Soft to Medium Water (0-6 grains per gallon)
[typical water softener water and some city water]
Soil Level Main Wash Section Pre-Wash Section
Lightly-soiled/Prerinsed dishloads
Normally-soiled
dishloads
Heavily-soiled
dishloads
Medium to Hard Water (7-12 grains per gallon)
3 tsp (15 mL)
[top of 1st step]
6 tsp (30 mL)
[top of 2nd step]
9 tsp (45 mL)
[top of 3rd step]
3 tsp (15 mL)
[top of 1st step]
6 tsp (30 mL)
[top of 2nd step]
6 tsp (30 mL)
[top of 2nd step]
†
[well water and some city water]
Soil Level Main Wash Section Pre-Wash Section
All soil types 9 tsp (45 mL)
[top of 3rd step]
6 tsp (30 mL)
[top of 2nd step]
Or you can remove the Fill Indicator cap. If an “E” is visible, the
dispenser is empty.
Filling the dispenser
The rinse aid dispenser holds 6 oz (175 mL) of rinse aid. Under
normal conditions, this will last for about three months. You do
not have to wait until the dispenser is empty to refill it. Try to keep
it full, but be careful not to overfill it.
1.
Make sure the dishwasher door is completely open.
2.
Remove the Fill Indicator cap.
3.
Add rinse aid. Fill to the smallest opening in the lower part of
the dispenser. Overfilling can cause the rinse aid to leak out,
and could cause oversudsing.
4.
Clean up any spilled rinse aid with a damp cloth.
5.
Replace the Fill Indicator cap. Close tightly.
Dishwasher Efficiency Tips
Hot water dissolves and activates the dishwashing detergent.
Hot water also dissolves grease on dishes and helps glasses dry
spot-free. For best dishwashing results, water should be 120°F
(49°C) as it enters the dishwasher. Loads may not wash as well if
the water temperature is too low. Water that is too hot can make
some soils harder to remove and cause certain detergent
ingredients not to function. If your water heater is located far from
the dishwasher, it may be necessary to run the hot water at the
faucet closest to the dishwasher to minimize the amount of cold
water in the water line.
†
Turn the rinse aid dispenser to a higher setting as needed. (See
“Rinse Aid Dispenser” section.)
10
 Loading...