

Kenmore 6289398491 Owner’s Manual
CAUTION:
Read Rules for
Safe Operation,
Operating
instructions,
and Installation
Carefully.
O
[]
C
KENMORE
ELECTRIC RANGE
_::i: Record in space provided
below 'the ,Serial and
i :_Model :Numbers of this
i :appliance. The Serial and
_:,_Model : Numbers are
_: _ located on the plate above
_:_i:the top left corner of the
)ers for
[]
g
Kenmore. Solid as SeaFs Sol_bySEARS,ROEaUCKA.OCO,Chicago,_t6_
Part No 5010913 Rev A
minL
that you can get the best resultsl
V safety tips
1_ PROPER INSTALLATION -- Be sure your range is
properly installed and electrically grounded by a skilled
technician
2. NEVER use your range for warming or heating the
room,
3. DO NOT TOUCH HEATING ELEMENTS OR AREAS
NEAR ELEMENTS -- Heating elements may be hot even
though they are dark in color Areas near heating
elements may become hot enough to cause burns
During and right after use, do not touch or tet clothing
touch heating elements or areas near heating elements,
For example: Oven vent opening and areas near these
openings, oven doors, windows of oven doors, etc.
4o DO NOT LEAVE CHILDREN ALONE -- Children
should not be left alone in the area where range is in
use Never aliow them to sit or stand on any part of the
range.
5o WEAR PROPER APPAREL -- Don't wear Ioose fit-
ting or hanging garments while using the range, They
may get in the way and catch on fire.
6o USER SERVICING -- Do not repair or replace any
part of the range unless it tells you to in this manuai_
Refer servicing to a skilled technician,
7, STORAGE IN OR ON RANGE -- Don't store flam-
mable materials in or near your range,
8o DO NOT USE WATER ON GREASE FIRES
Smother fire or' flame with pan tid or use baking soda or
foam type extinguisher
9. USE ONLY DRY POTHOLDER -- Moist or damp
potholders on hot surfaces may result in bums from
steam,. Do not let pothotder touch heating elements Do
not use a towel or bulky cloth
10. CAUTION DO NOT -- store items of interest to
children in cabinets above a range or on the back of a
range, Children climbing on the range to reach items
could be seriously injured,.
2. NEVER LEAVE SURFACE UNITS UNATTENDED AT
HIGH HEAT SETTINGS -- Boilover causes smoking and
greasy spillovers that may catch fire
3. MAKE SURE REFLECTOR PANS OR DRIP BOWLS
ARE IN PLACE -- Absence of these pans or bowls dur-
ing cooking may cause damage to wiring or com.,
ponents underneath.
4o PROTECTIVE LINERS -- Do not use aluminum foil
to line surface unit drip bowts,
5. GLAZED COOKING UTENSILS -- Only certain types
of glass, glasslceramics, ceramics, earthenware, or
other glazed utensils are suitable for range-top use
without breaking due to the sudden change in
temperature
6. UTENSIL HANDLES _ should be turned in and not
extend over other surface units. This will prevent burns,
fiamable materials catching on fire and spills due to ac-
cidental contact with the utensil
7o DO NOT SOAK REMOVABLE SURFACE UNITS --
Unit will clean itself when heated during normal
cooking use
OVENS
1. USE CARE WHEN OPENING DOOR -- Let hot air
escape before removing or replacing food
2. DO NOT HEAT UNOPENED FOOD CONTAINERS
Build up of pressure may cause container to explode
and result in injury,
3. KEEP OVEN VENT DUCTS UNCOVERED,
4o PLACEMENT OF OVEN RACKS _ Only move oven
racks when the oven is cool if rack must be moved
while oven is hot do not tet potholder touch oven
heating element,
5. PROTECTIVE LINERS -- Use aluminum foil liners in
the oven and bottom only as suggested in this manual
See page 11
SURFACE UNITS
1. USE PROPER PAN SIZE -- This range has one or
more surface units of a different size Select utensils
having flat bottoms large enough to cover the surface
unit The use of undersized utensils will expose a poc-
tion of the heating element to direct contact and may
result in clothing catching on fire. Proper fit of utensil to
the unit will allow the unit to do a better job of heating
your utensi! and saving energy
SELF- CLEAN OVENS
1. DO NOT' CLEAN DOOR GASKET -- The door gasket
is important for a good seal, Take care not to rub,
damage or move the gasket
2. DO NOT USE OVEN CLEANERS _ Never use com-
mercial oven cleaner or oven liner protective coating of
any kind in or around any part of the oven_
3. CLEAN only parts listed in manual,
4o BEFORE SELF.CLEANING THE OVEN _ Remove
oven racks, broiler pan and other utensils
tabJe of conten
Before Using Your New Range .................... 2
Safety Tips ......................................... 2
Know Your Kenmore Range ................... 4.5
'The Module Accessories ......................... 10
I. HOW TO USE YOUR RANGE TOP
Setting the Controls .......................... 6
Control Setting Guide ....................... 6
Coil Module Removal ........................... 7
Surface Unit Removal ...................... 7
Installing and Removing
Plug-in Steak Grill .......................... 8
Grill Cooking Time ........................ 9
II. HOW TO USE YOUR OVEN
Setting the Controls ....................... 1t
Timing the Oven ........................ t 1
III.
HELPFUL COOKING INFORMATION
Using Your Oven ................ 12
Rack and Pan Placement .......... !2
Oven Utensils ............... 13 14
Hofd-Warm ............ 14
Baking Tips ............ 15
IV. CLEANING AND
MAINTENANCE FEATURES
Oven Door Removal ................... 18
Replacing Oven Light ............... 18
Removing Oven Rack .................. 18
V. MODULE ACCESSORIES
Installing and Removing
Plug-in Griddle ............................. t9
Cooking with the Teflon"' Griddle ............ 19
Griddle Control Setting Guide ............... t9
Installing Rotisserie .................... 20
installing Shish Kebab ................. 2t
Rotisserie Cooking Timetable .............. 22
Vl. CARING FOR YOUR RANGE
How to Clean Your Range ..............
Set Self Clean Oven ..............
Before Calling Service ..........
INSTALLATION INSTRUCTIONS ......
SEARS WARRANTY ......
SEARS SERVICE
. Back Cover
23
24
25
.26 27 28
29 30
Back Cover
Roasting Tips .............. 16
Broiling Tips ..................... I7
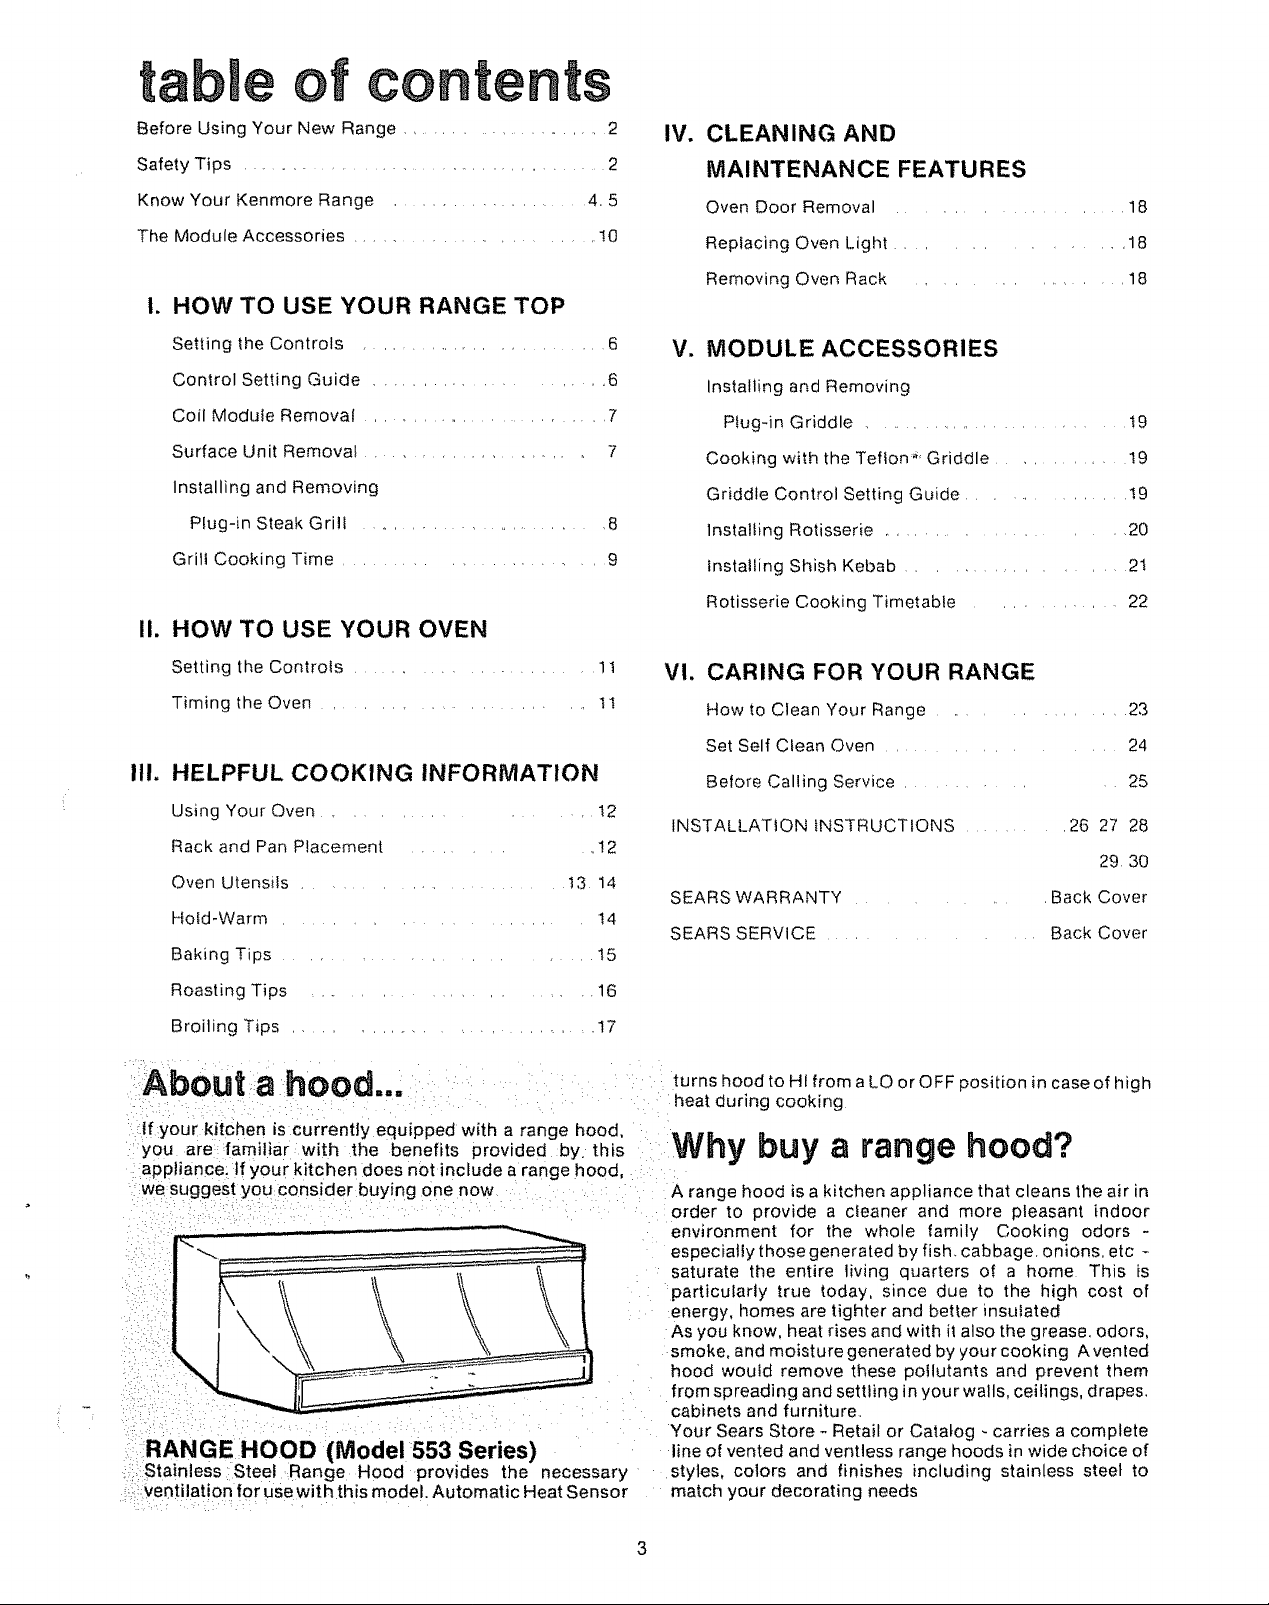
About ahood...
If :your kitchen is currently equipped with a range hood,
you are familiar:with the benefits provided by. this
appliance: If your kitchen does not inctude a range hood,
we suggest you consider buying one now
RANGE HOOD (Model 553 Series)
Stainless Steel Range Hood provides the necessary
ventilation for use with this model. Automatic Heat Sensor
turns hood to Ht from aLO or OFF position in case of high
heat during cooking
Why buy a range hood?
A range hood is a kitchen appliance that cleans the air in
order to provide a cfeaner and more pleasant indoor
environment for the whole family Cooking odors -
especially those generated by fish. cabbage, onions, etc
saturate the entire living quarters of a home This is
particularly true today, since due to the high cost of
energy, homes are tighter and better insulated
As you know, heat rises and with it also the grease, odors,
smoke, and moisture generated by your cooking A vented
hood would remove these pollutants and prevent them
from spreading and settling in your walls, ceilings, drapes.
cabinets and furniture
Your Sears Store _ Retail or Catalog - carries a complete
line of vented and ventless range hoods in wide choice of
styles, colors and finishes including stainless steel to
match your decorating needs

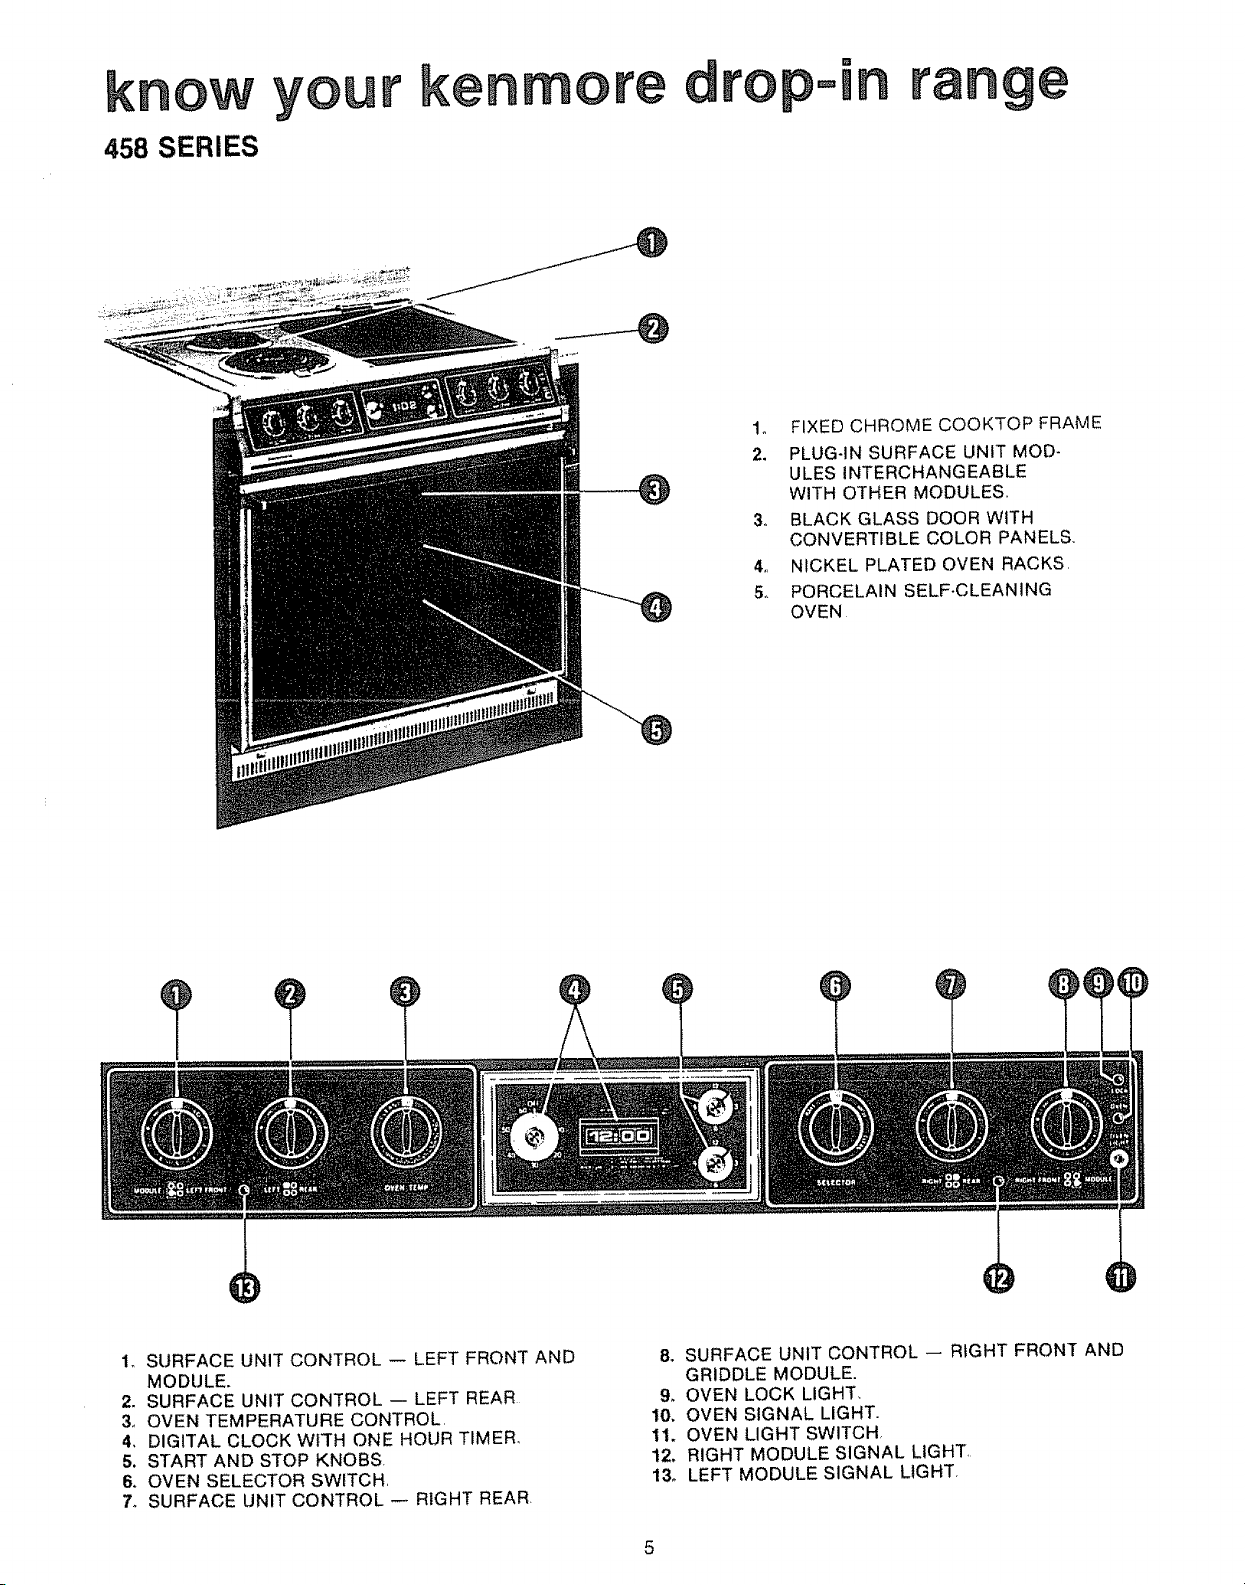
know your
939 SERIES
kenmore slide=in
1o FIXED CHROME COOKTOP FRAME
2. PLUGqN SURFACE UNIT MODULES
INTERCHANGEABLE WITH OTHER MODULES
& REMOVABLE BLACK GLASS DOOR WITH
VISA-BAKE _' WINDOW
4. NICKEL PLATED OVEN RACKS
5, PAINTED SIDE PANELS
6,, PAINTED STORAGE DRAWER
range
1,, SURFACE UNIT CONTROL -- LEFT FRONT AND
GRIDDLE MODULE
2. SURFACE UNIT CONTROL -- LEFT REAR
3. OVEN TEMPERATURE CONTROL
4. DIGITAL CLOCK WITH ONE HOUR TIMER
5. START AND STOP KNOBS
6, OVEN SELECTOR SWITCH
7. SURFACE UNIT CONTROL -- RIGHT REAR
& SURFACE UNIT CONTROL -- RIGHT FRONT
AND GRIDDLE MODULE
9o OVEN LOCK LIGHT
10o OVEN SIGNAL LIGHT
11,, OVEN LIGHT SWITCH
12,, RIGHT MODULE SIGNAL LIGHT
13. LEFT MODULE SIGNAL LIGHT
kenmore
m
rop=mnrange
1,, FIXED CHROME COOKTOP FRAME
2. PLUG-IN SURFACE UNIT MOD*
ULES INTERCHANGEABLE
WITH OTHER MODULES
3, BLACK GLASS DOOR WiTH
CONVERTIBLE COLOR PANELS,,
4,, NICKEL PLATED OVEN RACKS
5o PORCELAIN SELF-CLEANING
OVEN
1, SURFACE UNIT CONTROL -- LEFT FRONT AND
MODULE,
2, SURFACE UNIT CONTROL -- LEFT REAR
3o OVEN TEMPERATURE CONTROL
4, DIGITAL CLOCK WITH ONE HOUR TIMER
5. START AND STOP KNOBS.
6. OVEN SELECTOR SWITCH,
7, SURFACE UNIT CONTROL -- RIGHT REAR.
8o SURFACE UNIT CONTROL -- RIGHT FRONT AND
GRIDDLE MODULE.
9_ OVEN LOCK LIGHT,
10, OVEN SIGNAL LIGHT..
11, OVEN LIGHT SWITCH,
12, RIGHT MODULE SIGNAL LIGHT,
13o LEFT MODULE SIGNAL LIGHT,
5
how to use
your ran e models)
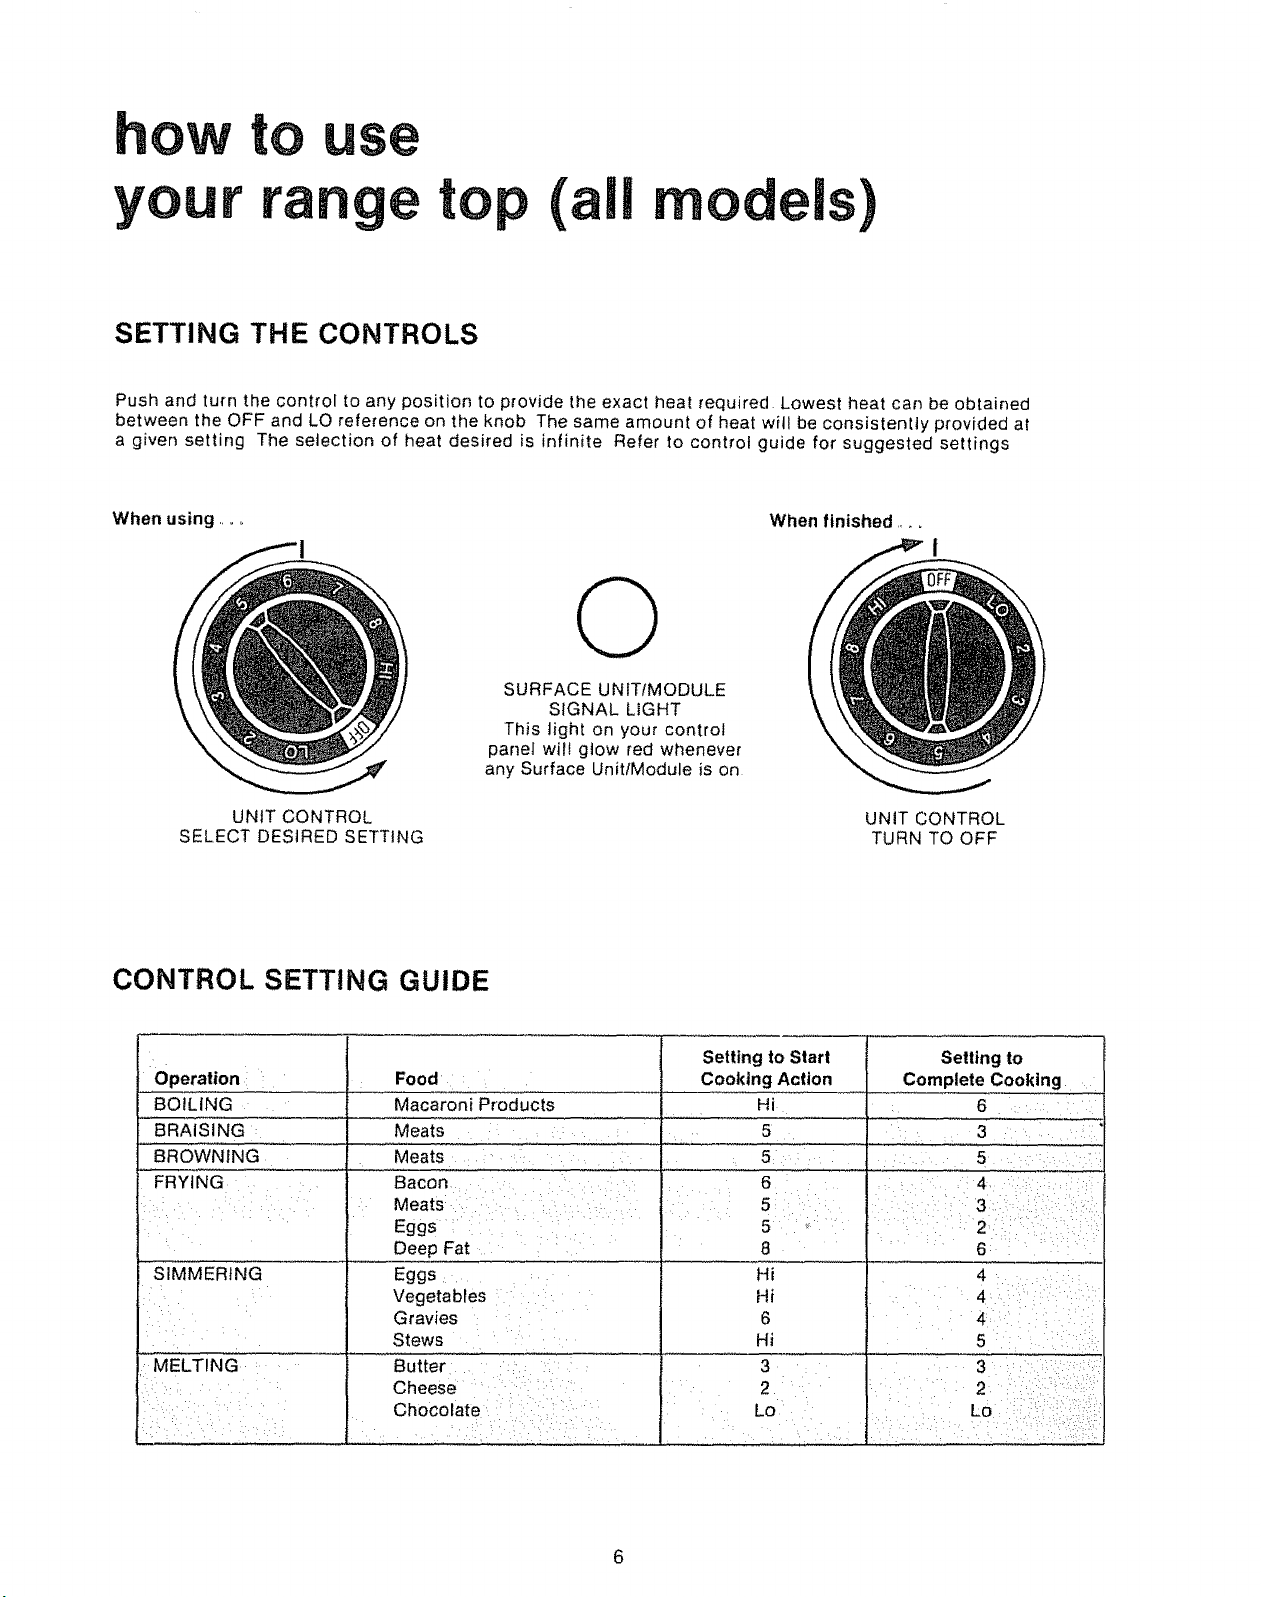
SETTING THE CONTROLS
Push and turn the control to any position to provide the exact heat required Lowest heat can be obtained
between the OFF and LO reference on the knob The same amount of heat wil! be consistently provided at
a given setting The selection of heat desired is infinite Refer to controt guide for suggested settings
When using .... When finished ....
I
O
SURFACE UNITIMODULE
SIGNAL LIGHT
This light on your control
panel wilt gtow red whenever
any Surface UnitlModule is on
UNIT CONTROL
SELECT DESIRED SETTING
CONTROL SETTING GUIDE
;Operation Food
BOILING Macaroni Products
BRAISING "...... Meats " : : :. I
BROWNING Meats : ....
FRYING .... Bacon '
Meats: i :
...... Eggs .....
Deep Fat
SIMMERING
!
_:MELTING ......
Eggs
Vegetables
Gravies
Stews
Butter : _i
Cheese
Chocolate ]
• ,. ]
UNIT CONTROL
TURN TO OFF
Setting to Start Setting to
Cooking Action Complete Cooking ,....
Hi , 6 ....
5 3 :
5 5
6
• 5•¸••:•i• ¸
!
Lo
8
Hi
Hi
6
Hi
, , u
3
2
•• • 4••¸•••:••••••¸•;••:/
4,:
4•¸•••• i•• •
5 •• • •:•••/!•/
• 3 ••:•: i_•:=•••:••:•
2• /:/(i••••• •••_i•
6
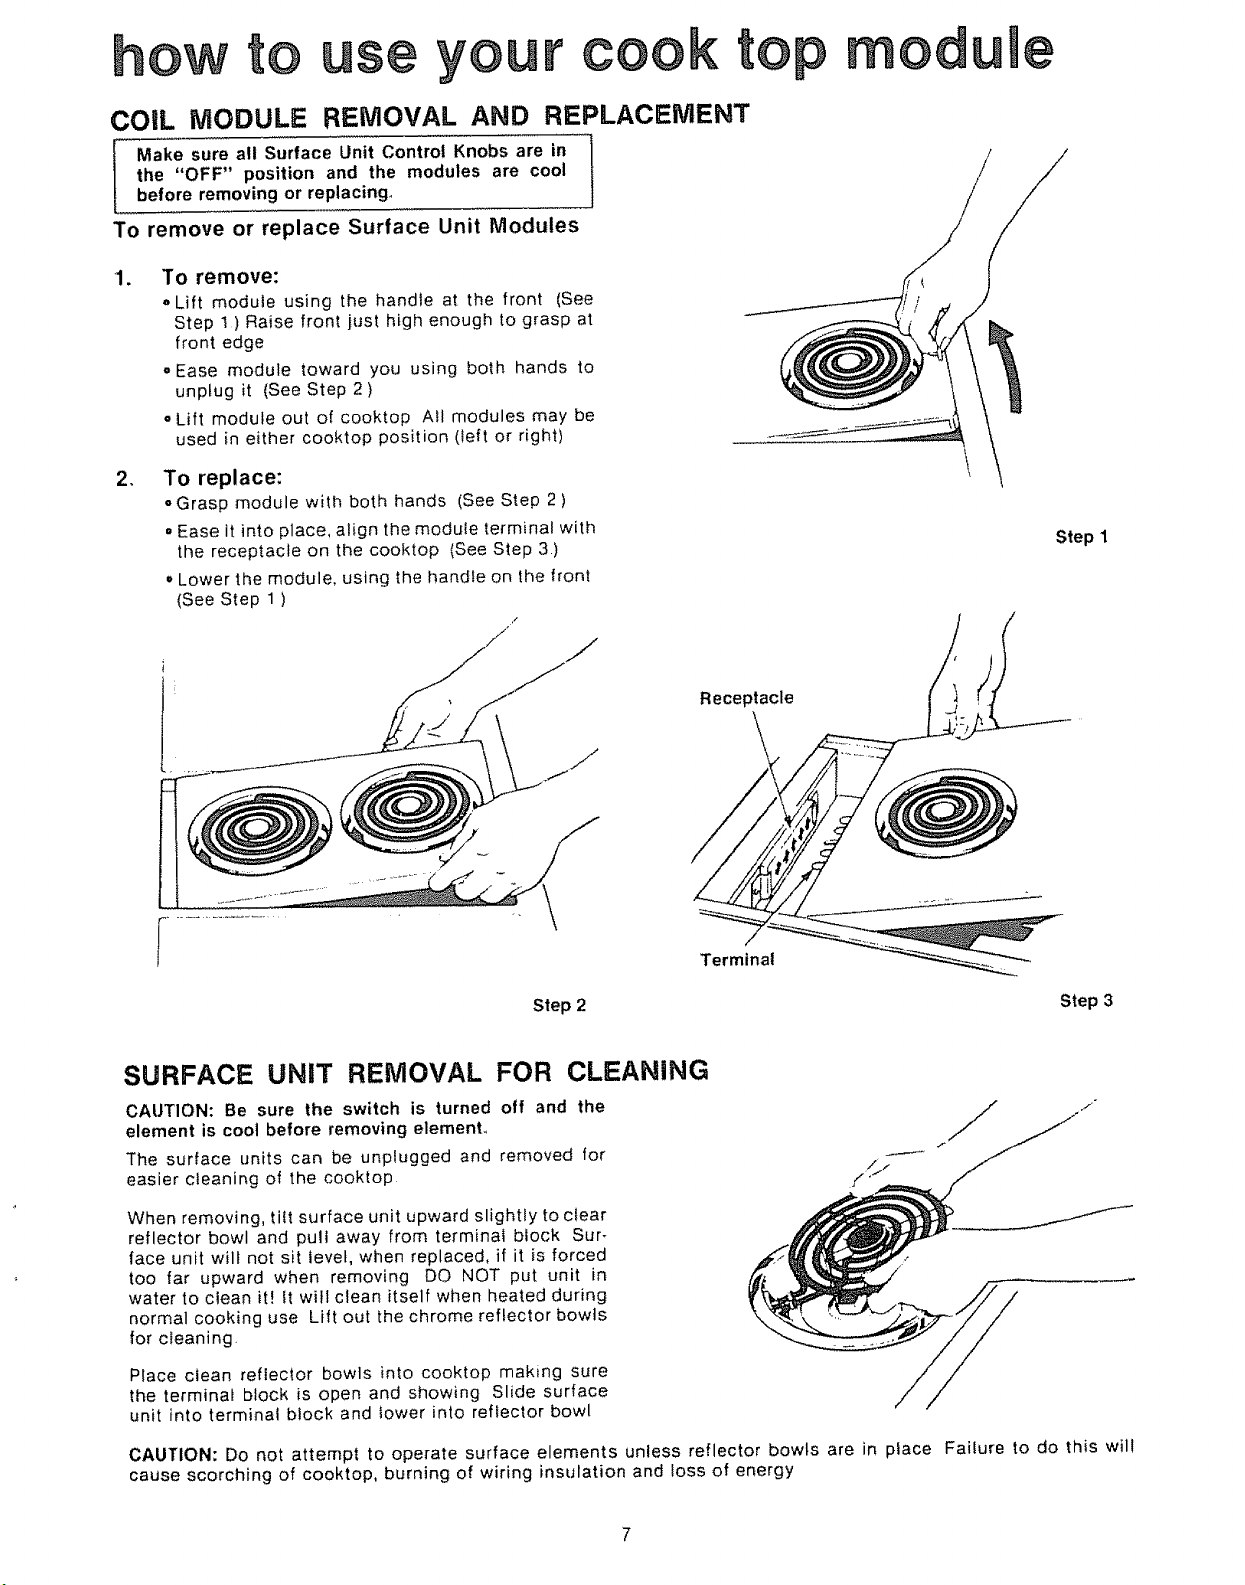
COiL MODULE REMOVAL AND REPLACEMENT
the "OFF" position and the modules are cool
Make sure all Surface Unit Control Knobs are in l
To remove or replace Surface Unit Modules
.
To remove:
oLift module using the handle at the front (See
Step t) Raise front just high enough to grasp at
front edge
oEase module toward you using both hands to
unplug it (See Step 2 )
oLift module out of cooktop All modules may be
used in either cooktop position (_eft or right)
,
To replace:
°Grasp module with both hands (See Step 2)
• Ease it into place, align the module terminal with
the receptacle on the cooktop (See Step 3.)
= Lower the module, using the handle on the front
(See Step 1 )
bbefore removing or replacing.,
modume
Step I
/
Step 2
SURFACE UNiT REMOVAL FOR CLEANING
CAUTION: Be sure the switch is turned off and the
element is cool before removing elemenL
The surface units can be unplugged and removed for
easier c_eaning of the cooktop
When removing, tilt surface unit upward slightly to clear
reflector bowl and pull away from terminal block Sur-
face unit will not sit level, when replaced, if it is forced
too far upward when removing DO NOT put unit in
water to clean it! It will clean itself when heated during
normal cooking use Lift out the chrome reflector bowis
for cleaning,
Receptacle
Terminal
Step 3
Place ciean reflector bowls into cooktop making sure
the terminal block is open and showing Slide surface
unit into terminal block and lower into reflector bowl
CAUTION: Do not attempt to operate surface elements unless reflector bowls are in place Failure to do this will
cause scorching of cooktop, burning of wiring insulation and toss of energy
cooking on top o
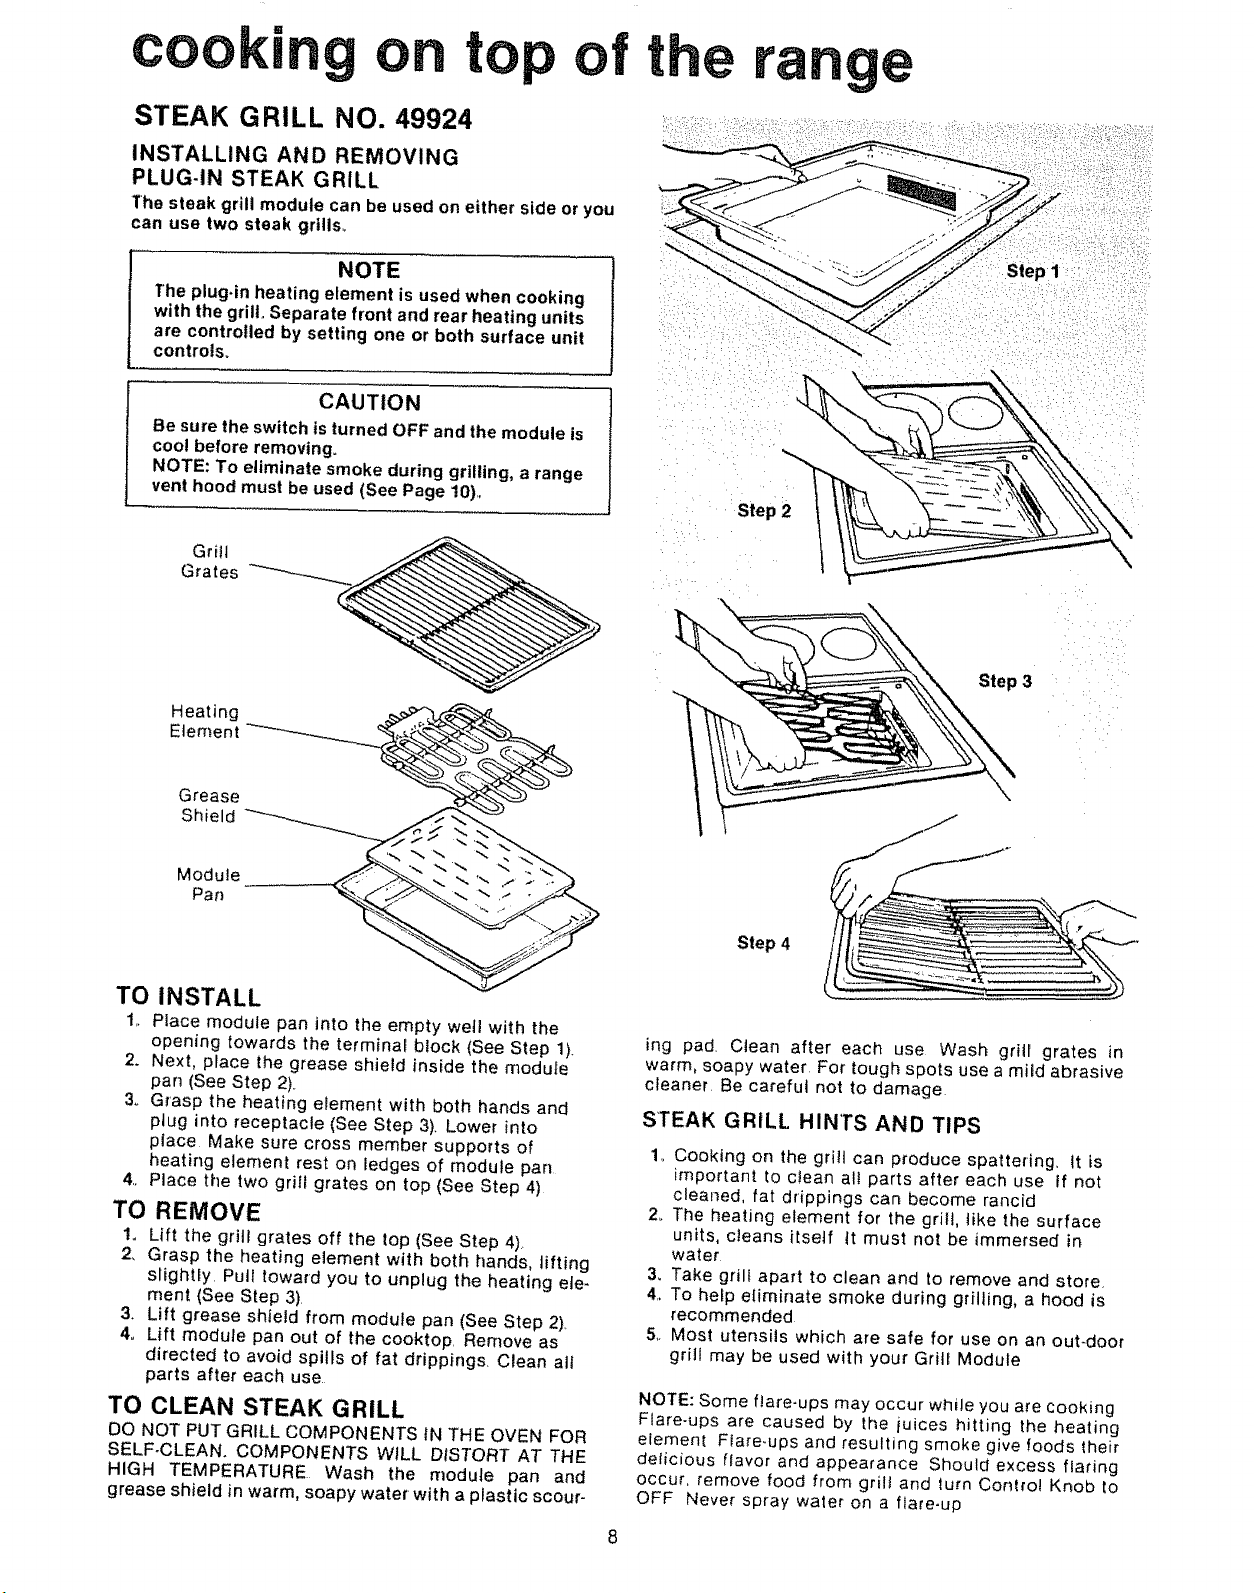
STEAK GRILL NO. 49924
INSTALLING AND REMOVING
PLUGJN STEAK GRILL
The steak grill module can be used on either side or you
can use two steak grills,,
NOTE
The plug-in heating element is used when cooking
with the grill, Separate front and rear heating units
are controlled by setting one or both surface unit
controls_
CAUTION
Be sure the switch is turned OFF and the module is
coo! before removing.
NOTE: To eliminate smoke during grilling, a range
vent hood must be used (See Page 10),
Grill
Grates
e
Step1
Step
Heating
Etement
Grease
Shield
Module
Pan
TO INSTALL
1_ Place module pan into the empty wetl with the
opening towards the terminat block (See Step 1).
2. Next, place the grease shield inside the module
pan (See Step 2).
3o Grasp the heating element with both hands and
ptug into receptacle (See Step 3), Lower into
place Make sure cross member supports of
heating element rest on ledges of module pan
4, Place the two grill grates on top (See Step 4)
TO REMOVE
1. Lift the grill grates off the top (See Step 4)
2, Grasp the heating element with both hands, Jifting
slightly Pull toward you to unplug the heating ele-
ment (See Step 3)
3. Lift grease shield from module pan (See Step 2)
4o Lift module pan out of the cooktop Remove as
directed to avoid spills of fat drippings Clean all
parts after each use
TO CLEAN STEAK GRILL
DO NOT PUT GRILL COMPONENTS IN THE OVEN FOR
SELF-CLEAN. COMPONENTS WiLL DISTORT AT THE
HIGH TEMPERATURE Wash the module pan and
grease shield in warm, soapy water with a plastic scour-
Step 3
Step 4
ing pad Clean after each use Wash grill grates in
warm, soapy water For tough spots use a mild abrasive
cleaner Be careful not to damage
STEAK GRILL HINTS AND TIPS
1o Cooking on the grill can produce spattering, It is
important to c_ean a_l parts after each use If not
cleaned, fat drippings can become rancid
2. The heating element for the grill, tike the surface
units, cleans itself It must not be immersed in
water
3. Take grill apart to clean and to remove and store
4, To help eliminate smoke during grilling, a hood is
recommended
5, Most utensils which are safe for use on an out-door
grill may be used with your Grill Module
NOTE: Some f]are.ups may occur while you are cooking
Flare-ups are caused by the iuices hitting the heating
element Flare-ups and resulting smoke give foods their
deliciOUS flavor and appearance Should excess flaring
occur, remove food from grilt and turn Control Knob to
OFF Never spray water on a flare-up
cooking on top of the range (alUmodels)
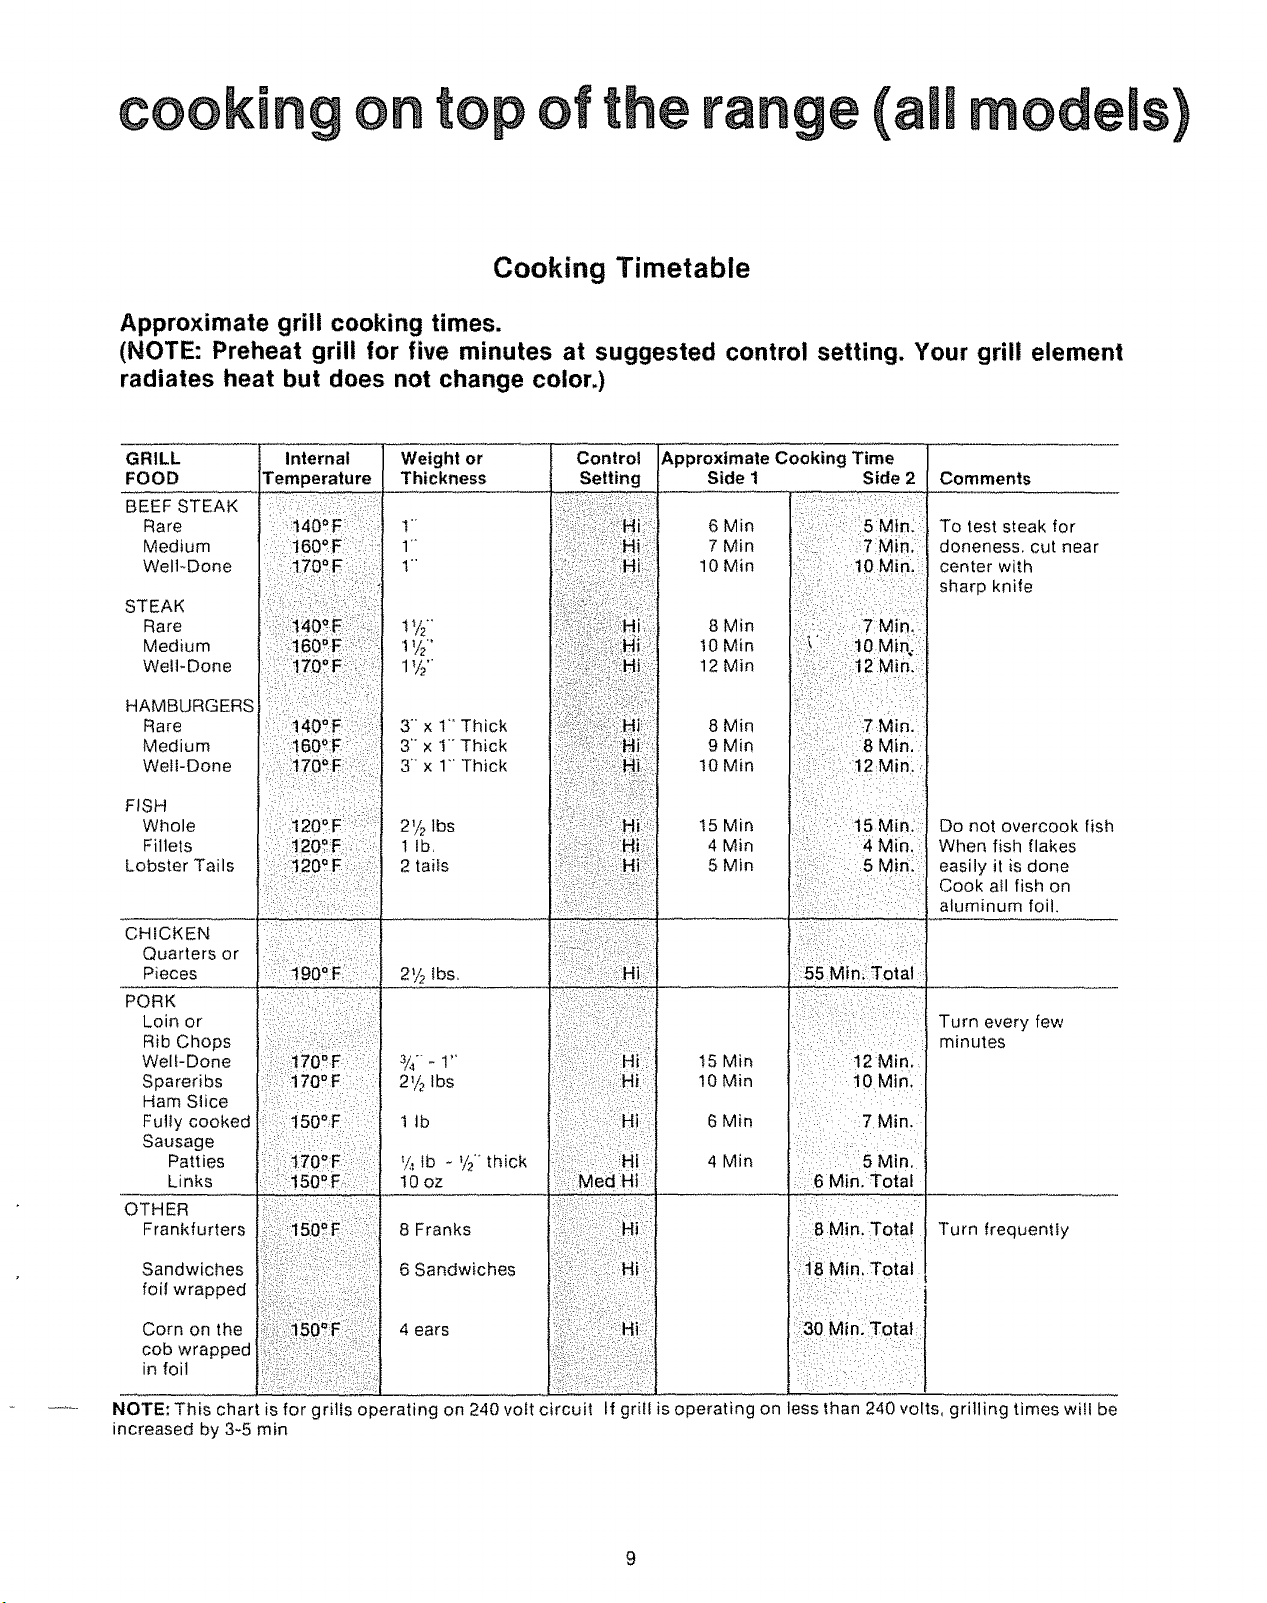
Cooking Timetable
Approximate grill cooking times.
(NOTE: Preheat grill for five minutes at suggested control setting. Your grill element
radiates heat but does not change color.)
GRILL
FOOD
BEEF STEAK
Rare
Medium
Well-Done
STEAK
Rare
Medium
WelFDone
HAMBURGERS
Rare
Medium
Welf-Done
FISH
Whole
Fillets
Lobster Tails
CHICKEN
Quarters or
Pieces
PORK
Loin or
Rib Chops
Well-Done
Spareribs
Ham Slice
Fully cooked
Sausage
Patties
Links
OTHER
Frankfurters
Internal
Temperature
Weight or
Thickness
1'"
1V2-
tY2"
ly2'
3- x 1"" Thick
3" x 1" Thick
3" x 1"' Thick
21/2lbs
1lb,
2 tails
2t/2lbs,
21/2Ibs
t tb
I/,_lb - t/2" thick
I0 oz
8 Franks
Control
Setting
Approximate Cooking Time
Side 1 Side 2
6 Min
7 Min
10 Min
8 Min
10 Min
12 Min
8Min
9 Min
t0 Min
t5 Min
4 Min
5 Min
15 Min
10 Min
6 Min
4 Min
::8 Min. Total
Comments
To test steak for
doneness, cut near
center with
sharp knife
Do not overcook fish
When fish flakes
easily it is done
Cook all fish on
aluminum foil.
Turn every few
minutes
Turn frequently
Sandwiches
foil wrapped
Corn on the
cob wrapped
in foil
NOTE: This chart is for grills operating on 240 volt circuit If grill is operating on less than 240 volts, grilling times will be
increased by 3-5 rain
6 Sandwiches
4 ears
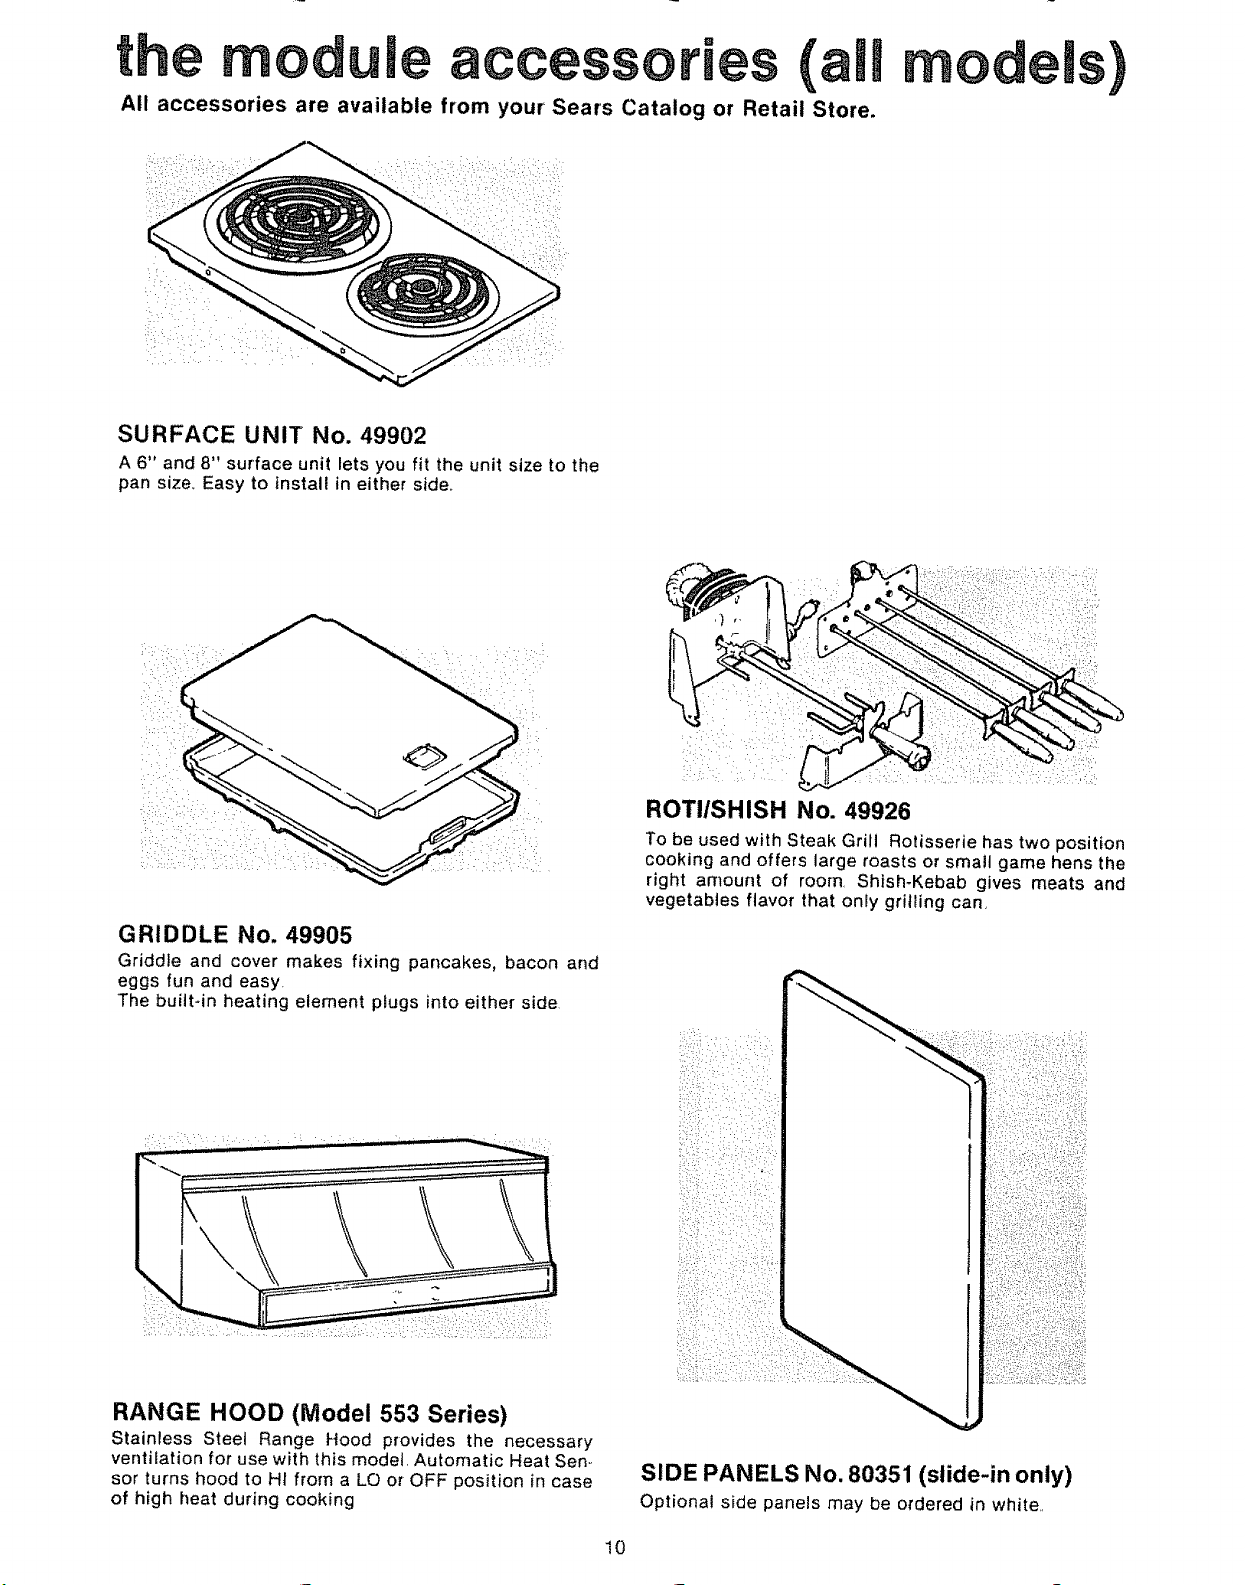
the module accessories (all
All accessories are available from your' Sears Catalog or Retail Store.
SURFACE UNIT No. 49902
A 6" and 8" surface unit lets you fit the unit size to the
pan size° Easy to install in either side_
GRIDDLE No. 49905
Griddle and cover makes fixing pancakes, bacon and
eggs fun and easy.
The buitt-in heating element plugs into either side
ROTI/SHISH No. 49926
To be used with Steak Grill Rotisserie has two position
cooking and offers large roasts or small game hens the
right anlount of room, Shish-Kebab gives meats and
vegetables flavor that only grilling can,
RANGE HOOD (Model 553 Series)
Stainless Steel Range Hood provides the necessary
ventitation for use with this model. Automatic Heat Sen_
sor turns hood to Ht from a LO or OFF position in case
of high heat during cooking
SIDE PANELS No. 80351 (slide-in only)
Optional side panels may be ordered in white,,
10
 Loading...