

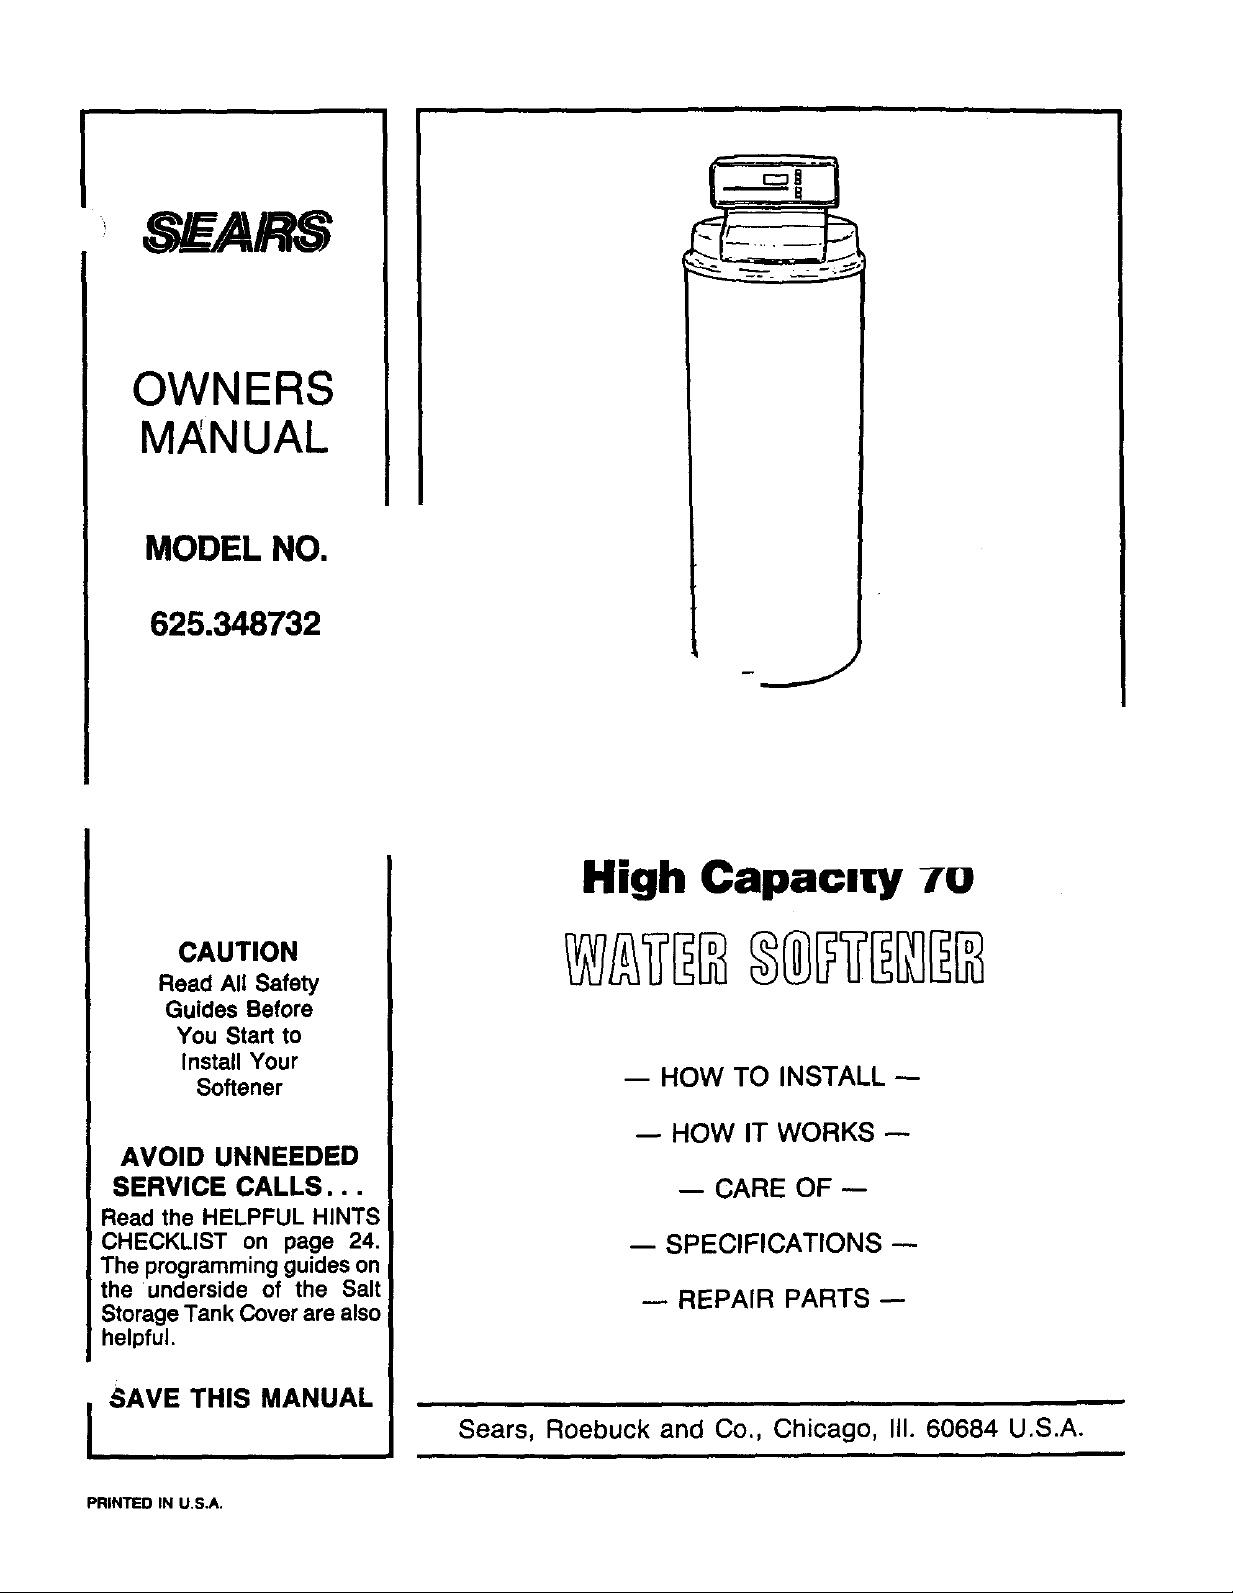
Kenmore 625348732 Owner’s Manual
I
4 _A/RS
OWNERS
MANUAL
MODEL NO.
625.348732
-j
CAUTION
Read All Safety
Guides Before
You Start to
Install Your
Softener
AVOID UNNEEDED
SERVICE CALLS...
Read the HELPFUL HINTS
CHECKLIST on page 24.
The programming guides on
the underside of the Salt
Storage Tank Cover are also
helpful.
SAVE THIS MANUAL
I
High Capac,ty zo
-- HOW TO INSTALL
HOW IT WORKS
-- CARE OF
-- SPECIFICATIONS --
REPAIR PARTS
Sears, Roebuck and Co., Chicago, III. 60684 U.S.A.
PRINTED IN U.S.A.
I WARRANTY
For one year from the date of purchase, when this water softener is installed and maintained
in accordance with our instructions, Sears will repair, free of charge, defects in material
or workmanship in this water softener.
J
For ten years from the date of purchase, Sears will furnish and install a new current model
water softener tank or salt storage drum, free of charge, if either the tank or drum develop
a leak.
TO OBTAIN WARRANTY SERVICE, SIMPLY CONTACT THE NEAREST SEARS SERVICE
CENTER THROUGHOUT THE UNITED STATES, This warranty applies only while this pro-
duct is in use in the United States.
This warranty gives you specific legal rights, and you may have other rights which vary from
state to state.
Sears, Roebuck and Co., Dept. 731-CR-W, Sears Tower, Chicago, IL 60684
SEARS RESIDENTIAL WATER SOFTENER
FULL ONE YEAR WARRANTY ON WATER SOFTENER
FULL TEN YEAR WARRANTY AGAINST LEAKS
If you want your water softener professionally installed, talk to your Sears Salesman. He will arrange for
a prompt, quality installation by Sears Authorized Installers.
SEARS INSTALLATION POLICY
All installation labor arranged by Sears shall be per-
formed in a neat, workmanlike manner in accordance
with generally accepted trade practices. Further, all
installations shall comply with all local laws, codes,
regulations and ordinances. Customer shall also be
protected, during installation, by insurance relating
to Property Damage, Workman's Compensation and
Public Liability.
SEARS INSTALLATION WARRANTY
In addition to any warranty extended to you on the
Sears merchandise involved, which warranty
becomes effective the date the merchandise is in-
stalled, should the workmanship of any Sears
arranged installation prove faulty within one year,
Sears will, upon notice from you, cause such faults
to be corrected at no additional cost to you.
2
I TABLE OF CONTENTS
SECTION 1
ii
Unpacking The Softener ....................................... 4
Safety Guides ............................................... 4
Before You Start To Install Your Softener ......................... 5-9
Water System Tests ......................................... 5
Where To Install The Softener ................................. 6
Plan How You Will Install The Softener ......................... 7-8
Tools, Pipe, Fittings and Other Materials Needed ................. 7
r
PAGE
NO.
SECTION 3
Step By Step Guides To Install Your Softener ..................... 9-14
Install Sears Plastic Bypass Valve ............................. 9
Connect In and Out Pipes To Softener .......................... 10
Fasten Drain Hoses To Softener ............................... 11-12
Check Your Plumbing Work For Leaks .......................... 12
Connect Softener To Electrical Power .......................... 13
Check List of Step By Step Installing Guides .................... 14
Softener Start-Up ............................................ 16-17
Setting The Timer ................................................ 16
Filling The Storage Tank With Salt ................................. 17
SECTION 5 How Your Water Softener Works ..................................... 18-21
RECHARGE NOW and VACATION Face Plate Controls .............. 18
Service and Regeneration, or Recharge ............................ 19-20
Automatic Bypass ................................................ 21
Care of Your Softener ......................................... 21-24
Checking The Salt Storage Level .............................. 21
Breaking a Salt Bridge ....................................... 21
Cleaning The Outer Covers ................................... 22
Cleaning The Nozzle and Venturi .............................. 22
Cleaning Iron From The Resin Bed ............................ 23
Keep Softener From Freezing ................................. 23
Check List Before You Call For Service ......................... 24
SECTION 7
Other Things To Know ......................................... 25-30
How To "Fine-Tune" Your Softener ............................ 25-27
Dimensions and Specifications ................................ 28
Sweat Soldering Tips ........................................ 29
Wiring Connection Diagram ................................... 30
Repair Parts ................................................. 32-35
How To Order Repair Parts .............................. Back Cover
3
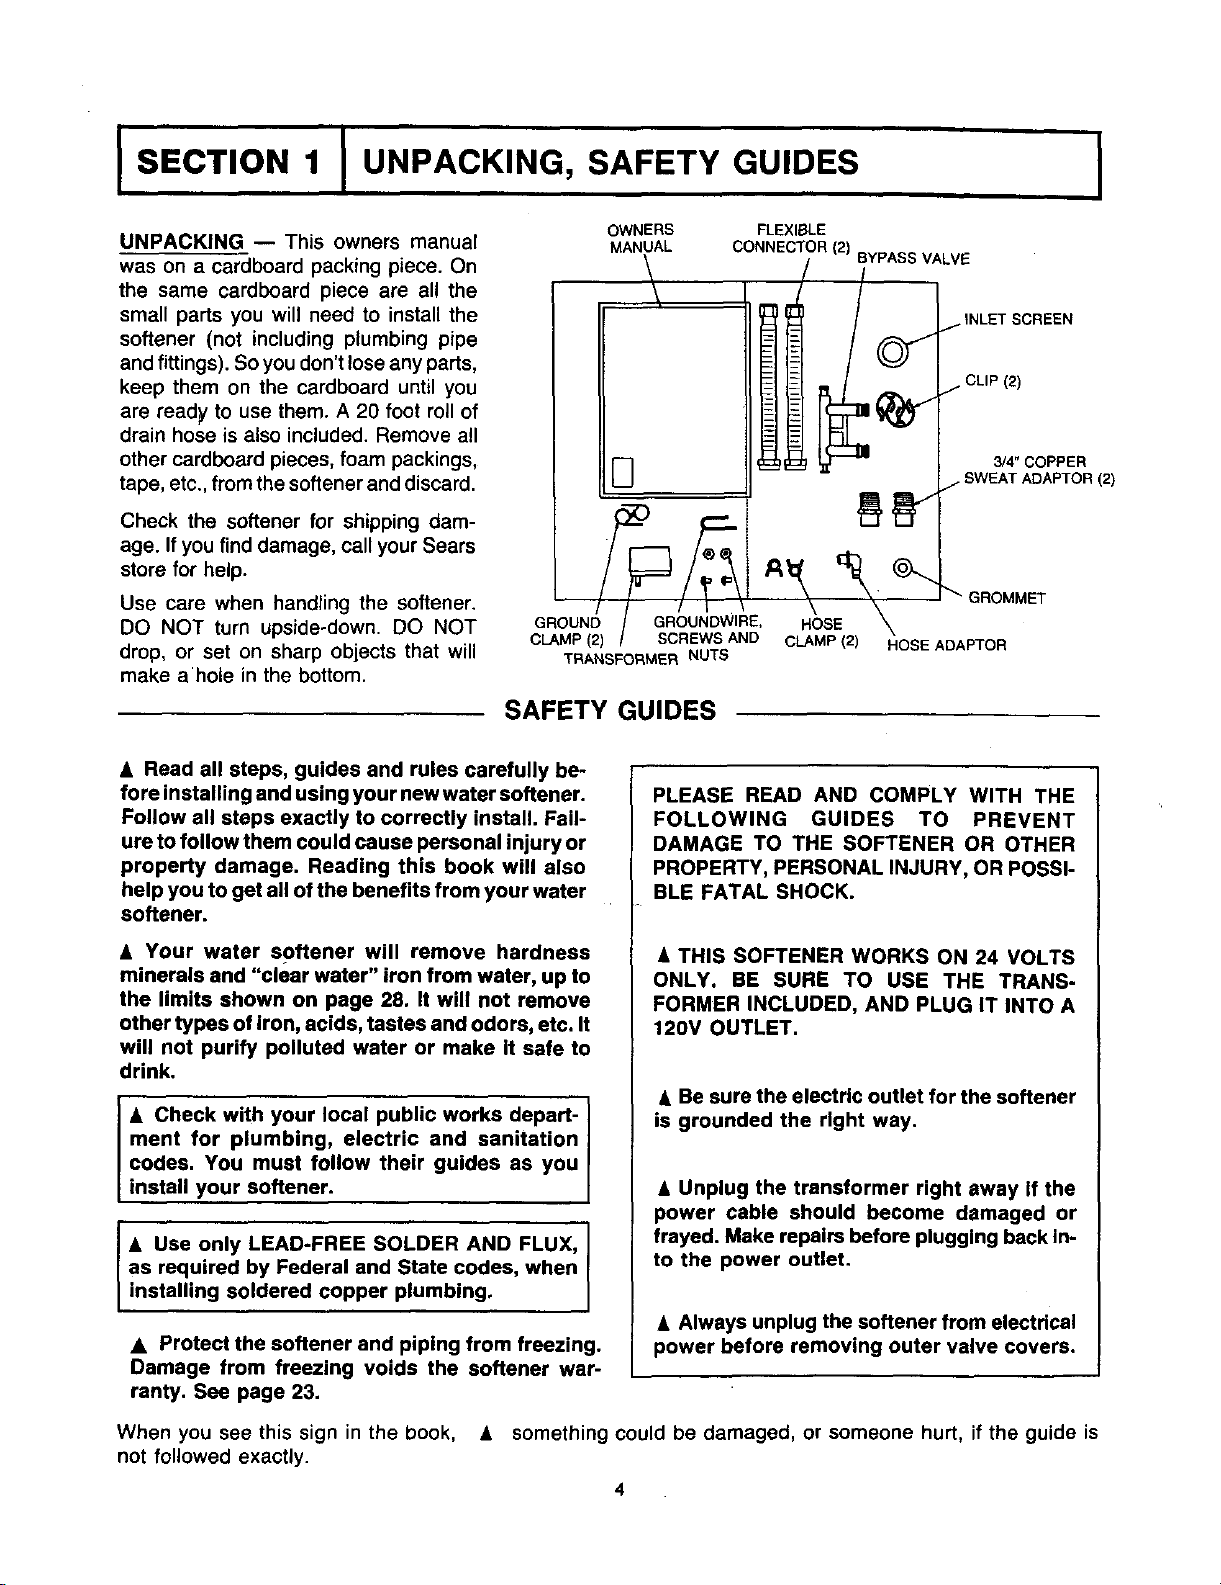
SECTION 1
UNPACKING, SAFETY GUIDES
I
UNPACKING -- This owners manual
was on a cardboard packing piece. On
the same cardboard piece are all the
small parts you will need to install the
softener (not including plumbing pipe
and fittings). So you don't lose any parts,
keep them on the cardboard until you
are ready to use them. A 20 foot roll of
drain hose is also included. Remove all
other cardboard pieces, foam packings,
tape, etc., from the softener and discard.
Check the softener for shipping dam-
age. Ifyou find damage, call your Sears
store for help.
Use care when handling the softener,
DO NOT turn upside-down. DO NOT
drop, or set on sharp objects that will
make ahole in the bottom.
GROUND GROUNDWIRE,
CLAMP(2) SCREWS AND
TRANSFORMER NUTS
SAFETY GUIDES
• Read all steps, guides and rules carefully be-
fore installing and using your new water softener.
Follow all steps exactly to correctly install. Fail-
ure to follow them could cause personal injury or
property damage. Reading this book will also
help you to get all of the benefits from your water
softener.
OWNERS
MANUAL
\
GROMMET
HOSE
CLAMP(2) HOSE ADAPTOR
PLEASE READ AND COMPLY WITH THE
FOLLOWING GUIDES TO PREVENT
DAMAGE TO THE SOFTENER OR OTHER
PROPERTY, PERSONALINJURY, ORPOSSI-
BLE FATAL SHOCK.
• Your water softener will remove hardness
minerals and "clear water" iron from water, up to
the limits shown on page 28. It will not remove
other types of Iron, acids, tastes and odors, etc. It
will not purify polluted water or make it safe to
drink.
• Check with your local public works depart-
ment for plumbing, electric and sanitation
codes. You must follow their guides as you
install your softener.
• Use only LEAD-FREE SOLDER AND FLUX, J
as required by Federal and State codes, when
nsta ng so dered copper p umbing.
• Protect the softener and piping from freezing.
Damage from freezing voids the softener war-
ranty. See page 23.
When you see this sign in the book, • something could be damaged, or someone hurt, if the guide is
not followed exactly.
& THIS SOFTENER WORKS ON 24 VOLTS
ONLY. BE SURE TO USE THE TRANS-
FORMERINCLUDED, AND PLUG ITINTO A
120V OUTLET.
• Be sure the electric outlet for the softener
is grounded the right way.
• Unplug the transformer right away if the
power cable should become damaged or
frayed. Make repairs before plugging back in-
to the power outlet.
• Always unplug the softener from electrical
power before removing outer valve covers.
4

I SECTION 2 I BEFORE YOU START TO INSTALL
HELPFUL INFORMATION
basics of plumbing. You can get a low cost book
If you know little about plumbing skills, we sug-
gest you get a book on the subject. There are
many good books for do-it-yourselfers on the
from Sears Plumbing and Heating departments
that will help you. Some basic sweat soldering tips
are on page 29 of this manual.
]
WATER SYSTEM TESTS
HAS YOUR WATER SUPPLY HAD A CHEMICAL
ANALYSIS? Sears has many kinds of water
treating units (see page 6) to correct different
water problems. To know the kind and size of unit
you need, you must first know what elements are
in your house water supply. A chemical analysis
shows the type and amounts of elements inwater.
If your water needs analysis, call or write your
nearest Sears store for help.
CHECK YOUR WATER PRESSURE -- For your
softener to work right, a water pressure of no lower
than 20 pounds per square inch (psi) is needed
in the house water pipes. The highest pressure
,&allowed in the water pipes is 120 psi. If pressure
is over 120 psi, buy and install a pressure reduc-
ing valve in the water inlet pipe to the softener.
NOTE: If water pressure during the day is 100 psi
or more, pressure during the night may go over
120 psi.
If you have a well water system, look at the
pressure gauge to find the water pressure. Call
your local water department if you have city water.
They willtell you what the water pressure is where
you live.
CHECK YOUR WATER FLOW RATE -- A water
flow of at least 3 gallons per minute is needed.
A lower flow will keep your softener from working
as well as it should. To make an easy check of
your flow rate, do the following. You will need a
1 gallon container (can; jar, pail, etc.).
1.
Fully open 2 cold water faucets close to the point
water enters the house.
.
With both faucets open, fill the gallon container
at ! faucet while looking at a watch or clock to
see how many seconds it takes.
.
Empty the container and go to the second faucet
(be sure BOTH faucets are still on). Fill the gallon
container at the second faucet and see how many
seconds it takes.
4.
Turn off both faucets. Now add the number of
seconds it took to fill the container at both faucets.
5.
A total of 80 seconds, or less, means the system
flow rate is good.
FACTS AND FIGURES TO KEEP
Fill in the blanks below and keep this book in a safe place so you always have these facts.
Water Softener Model No. t"
Serial Number
Date Installed
Water Hardness. Grains Per Gallon
SODIUM INFORMATION: Water softeners using to consume 335 milligrams of sodium. That is
sodium chloride for regeneration add sodium to the equivalent to eating 21/2 slices of white bread.
water. Persons who are on sodium restricted diets
should consider the added sodium as part of their Persons who are concerned about their drinking
overall sodium intake, water should consider a Sears Drinking Water
For example, if your water supply is 15 grains hard, System that will remove or reduce in excess of 90%
you would have to drink 3 quarts of softened water of the sodium and other drinking water contaminants.
Iron Content Parts Per Million
*pH Taste And/Or Odor
Water Pressure Pounds/Square Inch
Water Flow Rate_ Gallons Per Minute
5
I SECTION 2 I BEFORE YOU START TO INSTALL I
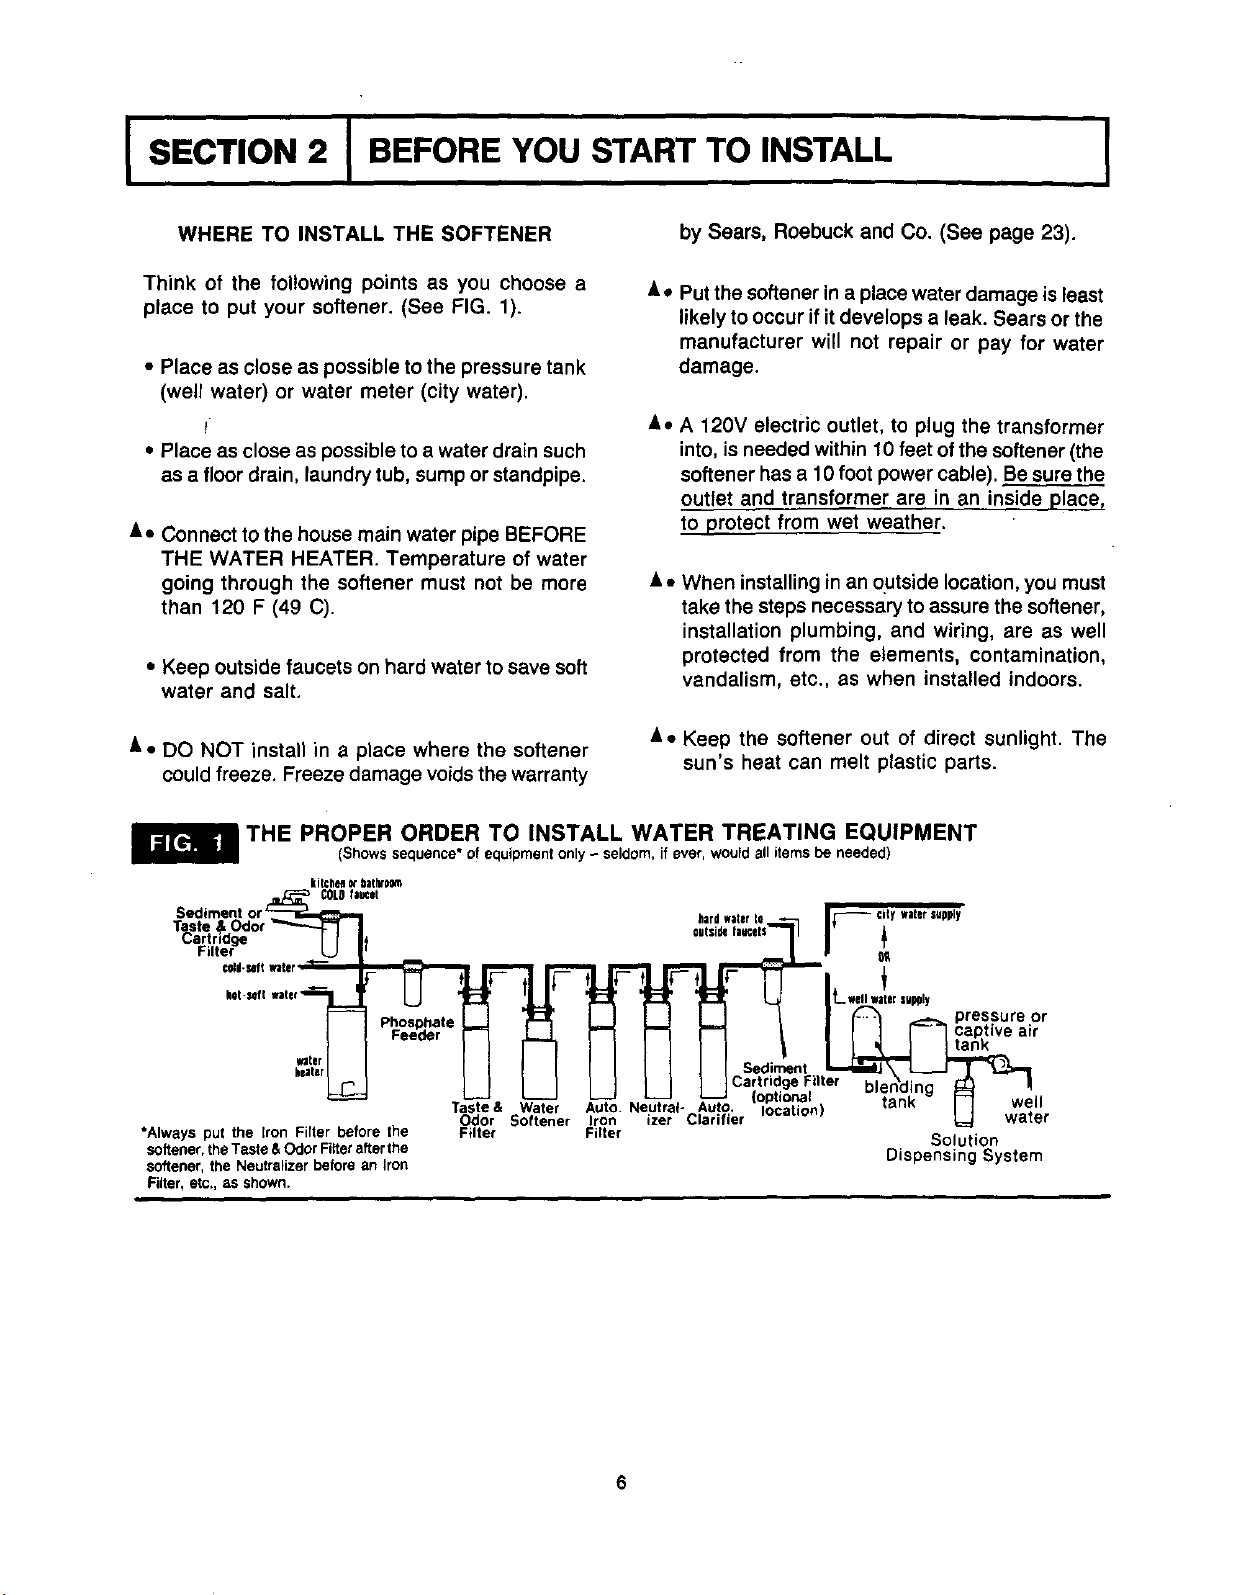
WHERE TO INSTALL THE SOFTENER
Think of the following points as you choose a
place to put your softener. (See FIG. 1).
• Place as close as possible to the pressure tank
(well water) or water meter (city water).
• Place as close as possible to a water drain such
as a floor drain, laundry tub, sump or standpipe.
A, Connect to the house main water pipe BEFORE
THE WATER HEATER. Temperature of water
going through the softener must not be more
than 120 F (49 C).
• Keep outside faucets on hard water to save soft
water and salt.
,k • DO NOT install in a place where the softener
could freeze. Freeze damage voids the warranty
by Sears, Roebuck and Co. (See page 23).
&• Put the softener in a place water damage is least
likely to occur if it develops a leak. Sears or the
manufacturer will not repair or pay for water
damage.
A•
A 120V electric outlet, to plug the transformer
into, is needed within 10 feet of the softener (the
softener has a 10 foot power cable). Be sure the
outlet and transformer are in an inside place,
to protect from wet weather.
&• When installing in an outside location, you must
take the steps necessary to assure the softener,
installation plumbing, and wiring, are as well
protected from the elements, contamination,
vandalism, etc., as when installed indoors.
A = Keep the softener out of direct sunlight. The
sun's heat can melt plastic parts.
THE PROPER ORDER TO INSTALL WATER TREATING EQUIPMENT
(Showssequence* of equipment only- seldom, if ever, would all items be needed)
kitchegn_bathroom
water
heater
COLDfacet
Phosphate
Feeder
Sediment
T_3ste &
artricige
Filter
*Always put the Iron Filter before the
softener,the Taste & Odor Filterafterthe
softener, the Neutralizer before an Iron
Filter, etc,, as shown.
Taste & Water
Odor Softener
Filter
hardwater J_-- CityWaterSUpply
iL wollwaterslJpDly
| _ _ pressure or
I I I F--7 captive air
Sediment I _
Iron izer Clarifier _ water
Filter Solution
Dispensing System
I SECTION 2
i
BEFORE YOU START TO INSTALL
I
PLAN HOW TO INSTALL YOUR SOFTENER
You must first decide how to run in and out pipes to
the flexible connectors* included with your softener.
Look at your house main water pipe at the point you
will connect the softener. Isthe pipe soldered copper,
glued plastic, or threaded galvanized or brass? What
is the pipe size? What kind of pipe and fittings is it
easiest f(_ryou to work with, and what tools do you
have?
Now look at FIG. 2 on page 8 and use it as a guide to
plan what materials you will need. As you plan your in
and out piping, keep in mind the following check list.
Then get all the materials you will need before you
start.
TOOLS, PIPE, FI'I-rlNGS AND
OTHER MATERIALS YOU WILL NEED
P' In and out pipes to the softener must be at least
3/4 in. size. Some local codes may tell you to use
no less than 1 in. pipe size (See Note on page 8).
I," Use copper, brass, or galvanized pipe and fittings.
Some codes may also allow CPVC plastic pipe.
_' Copper and galvanized pipe corrode fast when
connected together. Use pipe and fittings of the
same material.
P' ALWAYS install the bypass valve, which allows
you to turn off water to the softener, but still have
water in the house pipes.
Drain hose (7/16 in. inside diameter)is needed for
valve and salt tank drains. Twenty feet of hose is
included. If more hose is needed, you can buy it at
most Sears stores, or through Sears catalog,
Stock No. 42-3433.
If a rigid valve drain is needed to comply with
plumbing codes, you can buy the parts needed
(See page 11) to change the softener to a 1/2 in.
copper tubing drain.
i,,' TOOLS NEEDED: - Common and cross point
(Phillips) screw drivers, slip-joint pliers and atape
measure or rule. ALSO...
• . .for SOLDERED COPPER - tubing cutter,
propane torch, solid-core LEAD-FREE solder,
paste flux, emery cloth, sandpaper or steel wool.
...for THREADED PIPE- hacksaw or pipe cutter,
pipe wrenches, pipe threading tool, pipe joint
compound approved for use on potable water.
...for CPVC Plastic - hacksaw, adjustable
wrench, solvent cement approved for use on
potable water, primer.
_" You can buy adapiors to go from a copper or
threaded to CPVC.
*Flexible connectors are not allowed in some localities. Check your local plumbing codes.
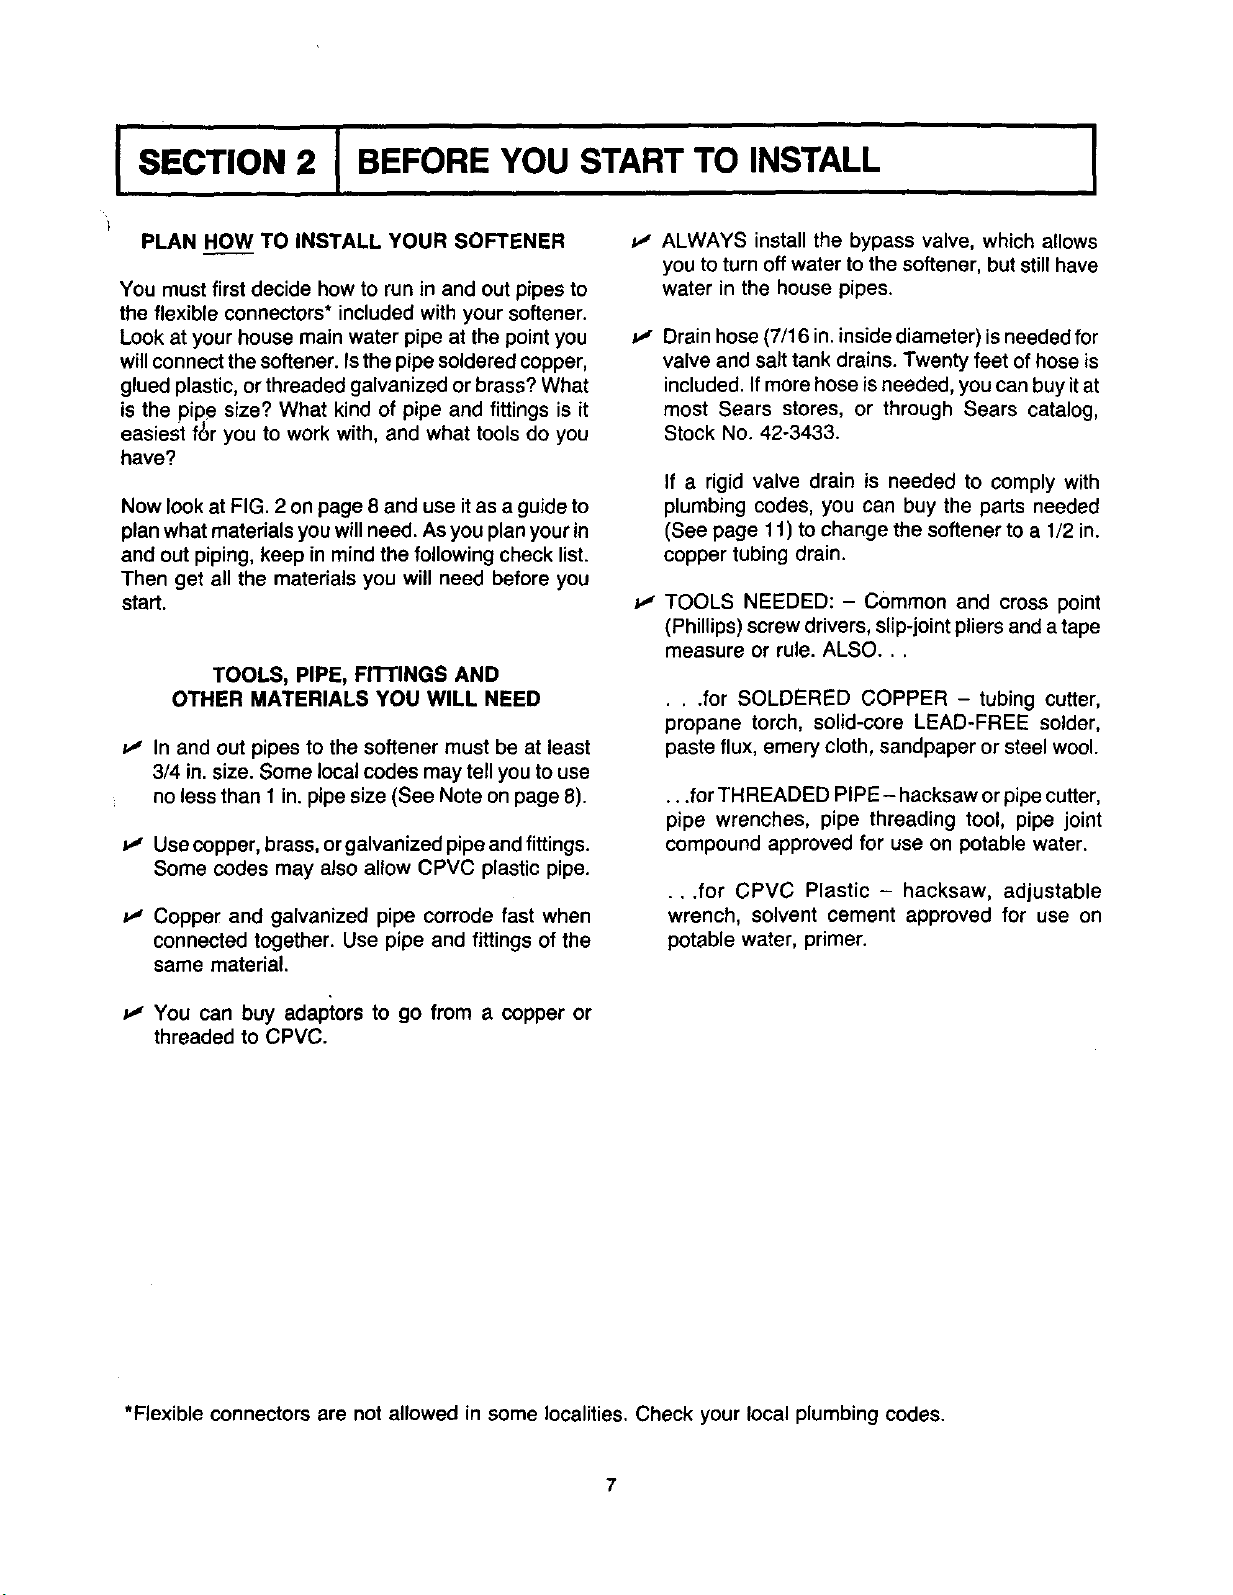
I SECTION 2 I BEFORE YOU START TO INSTALL
Idl[_lgP_I
SOLDERED COPPER, OR CPVC
THREADED GALVANIZED OR BRASS PIPE
I
SOFT
WATER
MAIN Hard water to
_OFT
WATER
3/4" Copper (or
CPVC_ p_e 314"Threaded
Hard water to
Softener inlet
I.,,.---Adaptor* (2) Hard watsr to
_ I Softener inlet
3/4" pipe I
120V thread -_.-_ -L__ NOTE:The includedflexibleconnectorsare for3/4
ouTrI.tET , _ I_ in.plumbingconnection,ForI in._ion, do not
--_ ...... _ F: L_e the flexible concectors.From your k_ hard-
"_ __e ._ / _ / ware store, buy 2 sweat adapto_ (1 in. lernale
I(_11 Co_nector" (2)/ _ _ thread x 1 in. swe_d,or I in. threaded)ar',dplumb
I'_._":l "_"_,' I I1 dimcttytothebypassvatve-Threadsontheb) AYP_LL
24V _...1--_1__.__2j.__ , i _ ,I SOLDERING BEFORE CONNECTING FLEXIBLE
Transforrt_r _' • / / _ / CONNECTORS TO SWEAT ADAPTORS.
._._IL(4J_I[ / I _/ valve are 1 in. pipe thread. CAUTION: DO A
, 1 pipe : - ''
Clip_(._2) _ thread _; _Gasket* (2: CROSS-OVER
outsidefaucets
Pipe
HARD
WATER
_.- _,(_ _t_ _,_/ Use ifwatersupplyflowsfromtheleft.
- Bypass Valve" _'_ _
O Flexible connectorsare not allowed in all TO
localities.Cheek your local plumbingcedes. INLET
8
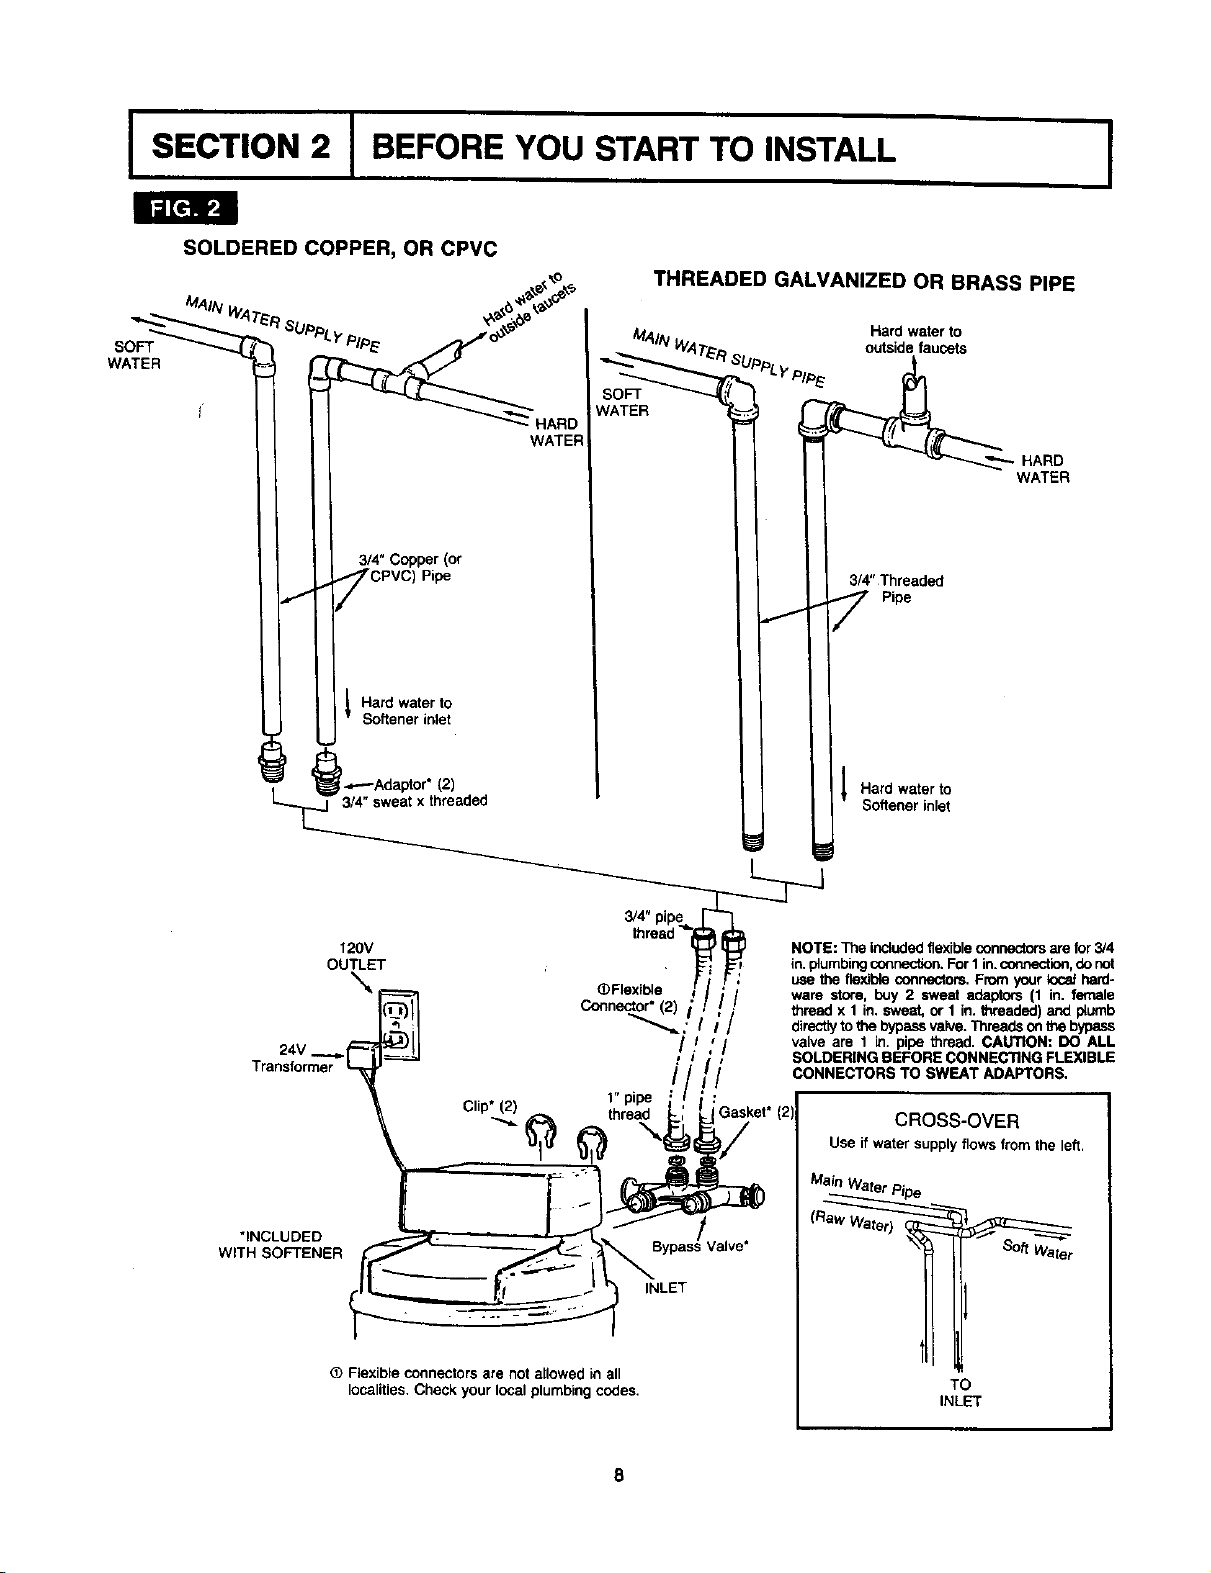
JSECTION 3 J STEP BY STEP GUIDES TO INSTALL
Shutoff Shutoff Pressure
Close the shut-off valve on the house main
= 1. water pipe, near the water meter or pressure
tank, to turn off the water.
-- " Water Well/_
Meter Pump
A 2, heater.
SIhut off the gas or electric supply to the water
Open the highest and lowest water faucets
A 3. in your house to let water drain from the
pipes. Close faucets after water has drained.
If not already done, remove all cardboard or
4. plastic packing pieces from inside the
softener. Set the cardboard liner (with parts
for installing fastened to it) where you can easily
see it, and get to parts as you need them.
INSTALL THE INLET SCREEN, AND
1
SEARS BYPASS VALVE, STOCK NO. 65/
42-3437.
a.
INLET SCREEN - The inlet screen (FIG. 4) is
on the cardboard liner with the other small
parts. This screen, put in the softener valve
inlet, stops dirt and other sediments from
getting inside the softener. To install it, put it
into the valve inlet with the pointed end facing
outward, toward incoming water.
_ INSTALLING INLET SCREEN AND
BYPASS VALVE
OUTLET
O-RING SEALS
PLACED IN
OUTER GROOVES
ONLY, CLIP SNAPS
INTO INNER GROOVES
(SEE FIG. 6)
b.BYPASS VALVE, STOCK NO. 65/42-3437
- If not already done, put a light coating of
silicone grease or Vaseline on the bypass
valve o-rings.
Push the bypass valve intothe softener valve as far
as it will go (FIG. 4, 5 and 6). If the main water supply
pipe is at or below floor level, turn the bypass valve
downward (FIG. 5) for easy connection.
- Continued --
BYPASS VALVE TURNED
DOWNWARD
O_U TURN BYPASS VALVE
UPSIDE DOWN TOT CONNECT TO FLOOR
IN LEVEL PLUMBING
I SECTION 3 I STEP BY STEP GUIDES TO INSTALL
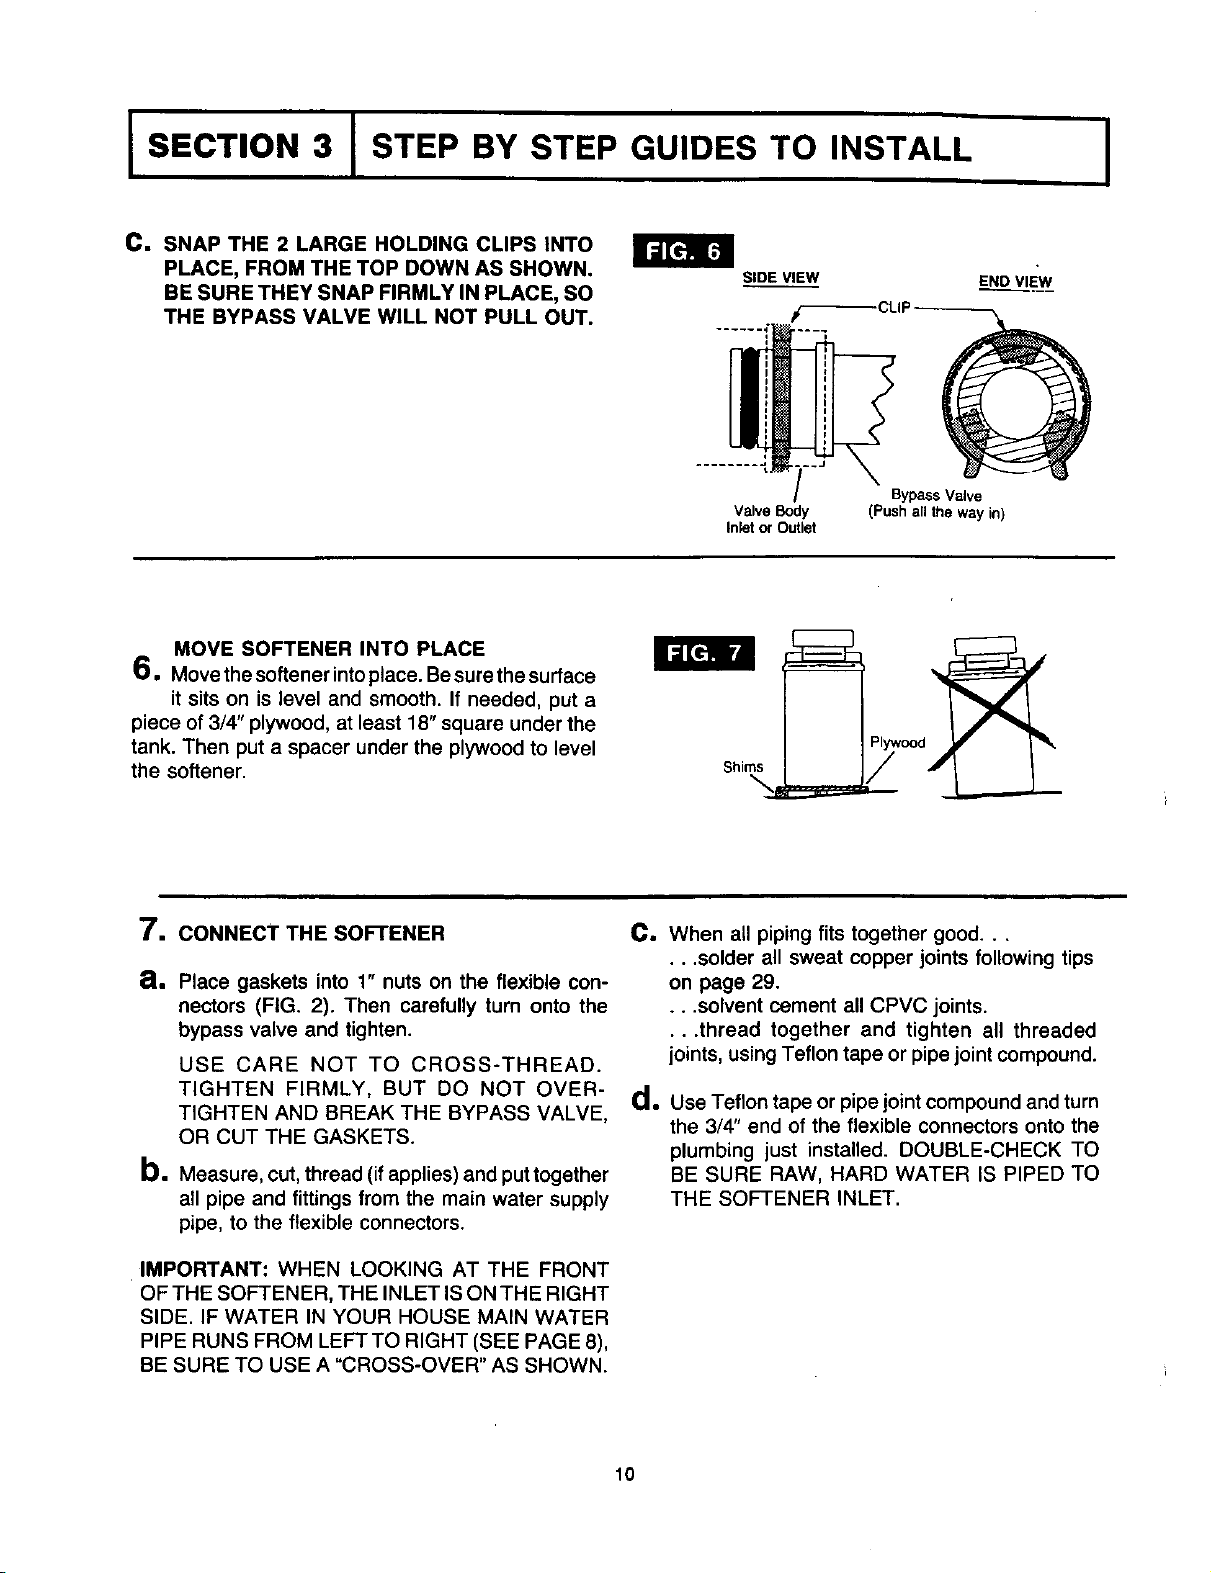
C. SNAP THE 2 LARGE HOLDING CLIPS INTO
PLACE, FROM THE TOP DOWN AS SHOWN.
BE SURE THEY SNAP FIRMLY IN PLACE, SO
THE BYPASS VALVE WILL NOT PULL OUT.
SIDE VIEW
/_CLIP
I
END VIEW
MOVE SOFTENER INTO PLACE
6. Movethesoftenerintoplace. Besurethesurface
it sits on is level and smooth• If needed, put a
piece of 3/4" plywood, at least 18" square under the
tank. Then put a spacer under the plywood to level
the softener.
7. CONNECT THE SOFTENER
a. Place gaskets into 1" nuts on the flexible con-
nectors (FIG. 2). Then carefully turn onto the
bypass valve and tighten•
USE CARE NOT TO CROSS-THREAD.
TIGHTEN FIRMLY, BUT DO NOT OVER-
TIGHTEN AND BREAK THEBYPASSVALVE,
OR CUT THE GASKETS.
b.Measure, cut, thread (if applies) and put together
all pipe and fittings from the main water supply
pipe, to the flexible connectors•
Valve Body (Push all the way in)
Inlet or Outlet
Ca
When all piping fits together good...
•..solder all sweat copper joints following tips
on page 29.
•..solvent cement all CPVC joints.
...thread together and tighten all threaded
joints, using Teflon tape or pipe joint compound.
dll
Use Teflon tape or pipe joint compound and turn
the 3/4" end of the flexible connectors onto the
plumbing just installed. DOUBLE-CHECK TO
BE SURE RAW, HARD WATER IS PIPED TO
THE SOFTENER INLET.
Bypass Valve
IMPORTANT: WHEN LOOKING AT THE FRONT
OF THE SOFTENER, THE INLET IS ON THE RIGHT
SIDE. IF WATER IN YOUR HOUSE MAIN WATER
PIPE RUNS FROM LEFT TO RIGHT (SEE PAGE 8),
BE SURE TO USE A "CROSS-OVER" AS SHOWN.
10
JSECTION 3 J STEP BY STEP GUIDES TO INSTALL
I
DRAIN HOSES SEESTEP8
Drain Hose
Filtin The drain fitting "Adaplor
Drain Hose
"Overflow LAUNDRY
Drain Hose 1-1/2" TUB
tie or wire
down
"7/16" I.D. Hose, J FLOOR / I''-
available from Sears, DRAIN
Item No. 65/42-3433 or 65/42o3434
8. CONNECT THE VALVE DRAIN HOSE
Take a length of the 7/16" inside diameter drain
hose and attach I end tothe drain fitting (FIG. 8).
Use a hose clamp to hold itin place. Putthe other
end of the hose (cut to length needed) over a
floor drain, into a laundry tub, sump, standpipe,
or other suitable drain. CHECK YOUR LOCAL
CODES.
IMPORTANT NOTES:
Leave an air gap of about 1-1/2" between the end
of the hose and the drain. This gap is needed so
you don't get a back-flow of sewer water into the
softener. DO NOT put the end of the hose into
the drain or connect without the air gap.
Grommet
turns 3600 for
running drain hose Hose
in any direction.
Hose
SUMP 1-1/2"
SEE STEP 9
f
air gap
Place and support the hose so itdoes not kink or
have sharp bends. Tie or wire the hose in place
so water pressure will not make it "whip." Do not
pinch the hose shut. THE SOFTENER WILL
NOT WORK IF THIS DRAIN HOSE IS
PINCHED, PLUGGED OR CLOSED IN ANY
WAY.
Keep the hose lower than the drain fitting. (In
some homes, to get to a drain you must raise the
hose and run it over-head. If you need an over-
head drain, do not raise the hose more than 8'
above the floor. A copper drain tube is best to
use...see below.)
COPPER DRAIN TUBE: The plumbing codes where
you live may say that you must use a copper valve
drain tube. A copper tube is also best to use for an
over-head drain. Use a copper drain tube if the soft-
ener is installed outside, or in the sunlight. Heat from
the sun makes many kinds of rubber or plastic hose to
soften and close up,
To adapt a copper drain tube to the softener, use a
hacksaw to cut the barbed end from the drain fitting
as FIG. 9 shows. Buy a compression fitting (1/4 in.
female pipe threads x 1/2 in. O.D. tube) and tube from
Sears, or your local hardware store.
11
COPPER DRAIN TUBE
_/,_ 1,; NPbTaTh_eads
.... Copper Tube
t ,no o,sbod,
CUt barbs L. _,/(/_f_ =__ n
from drain fitting _ _(._L_'_ /
x 11_in oe _ube -" ' _J _ _"
(noI furnished)
 Loading...