

Page 1
CONTENTS
SAFETY
.... ,,.*.°...,,..,o°ooo*..,.,°,o°*,°...,°,,°ooo,,,,,..,*.o.,,.°o,°,..,.,.°.. 1-4
USE AND CARE
Your Range end its Features ..................................... 5
Cooktop Control ........................................................ 6
Oven Control ............................................................... 6
Burner Ignition ............................................................ 6
Oven Cooking ............................................................. 7
Broiling ........................................................................ 8
Cleaning 11p$ .............................................................. 9
Removable Parts ................................................. 10-12
Removal of Peokaglng Tepe .................................... 12
BEFORE CALLING FOR SERVICE
Whet to Do Before Calling for Service .............. 13, 14
Temperature Adjustments ....................................... 14
WARRANTY
MODEL 61091
8 _A/R8
Kenmore
USE •CARE •SAFETY
MANUAL
Page 2
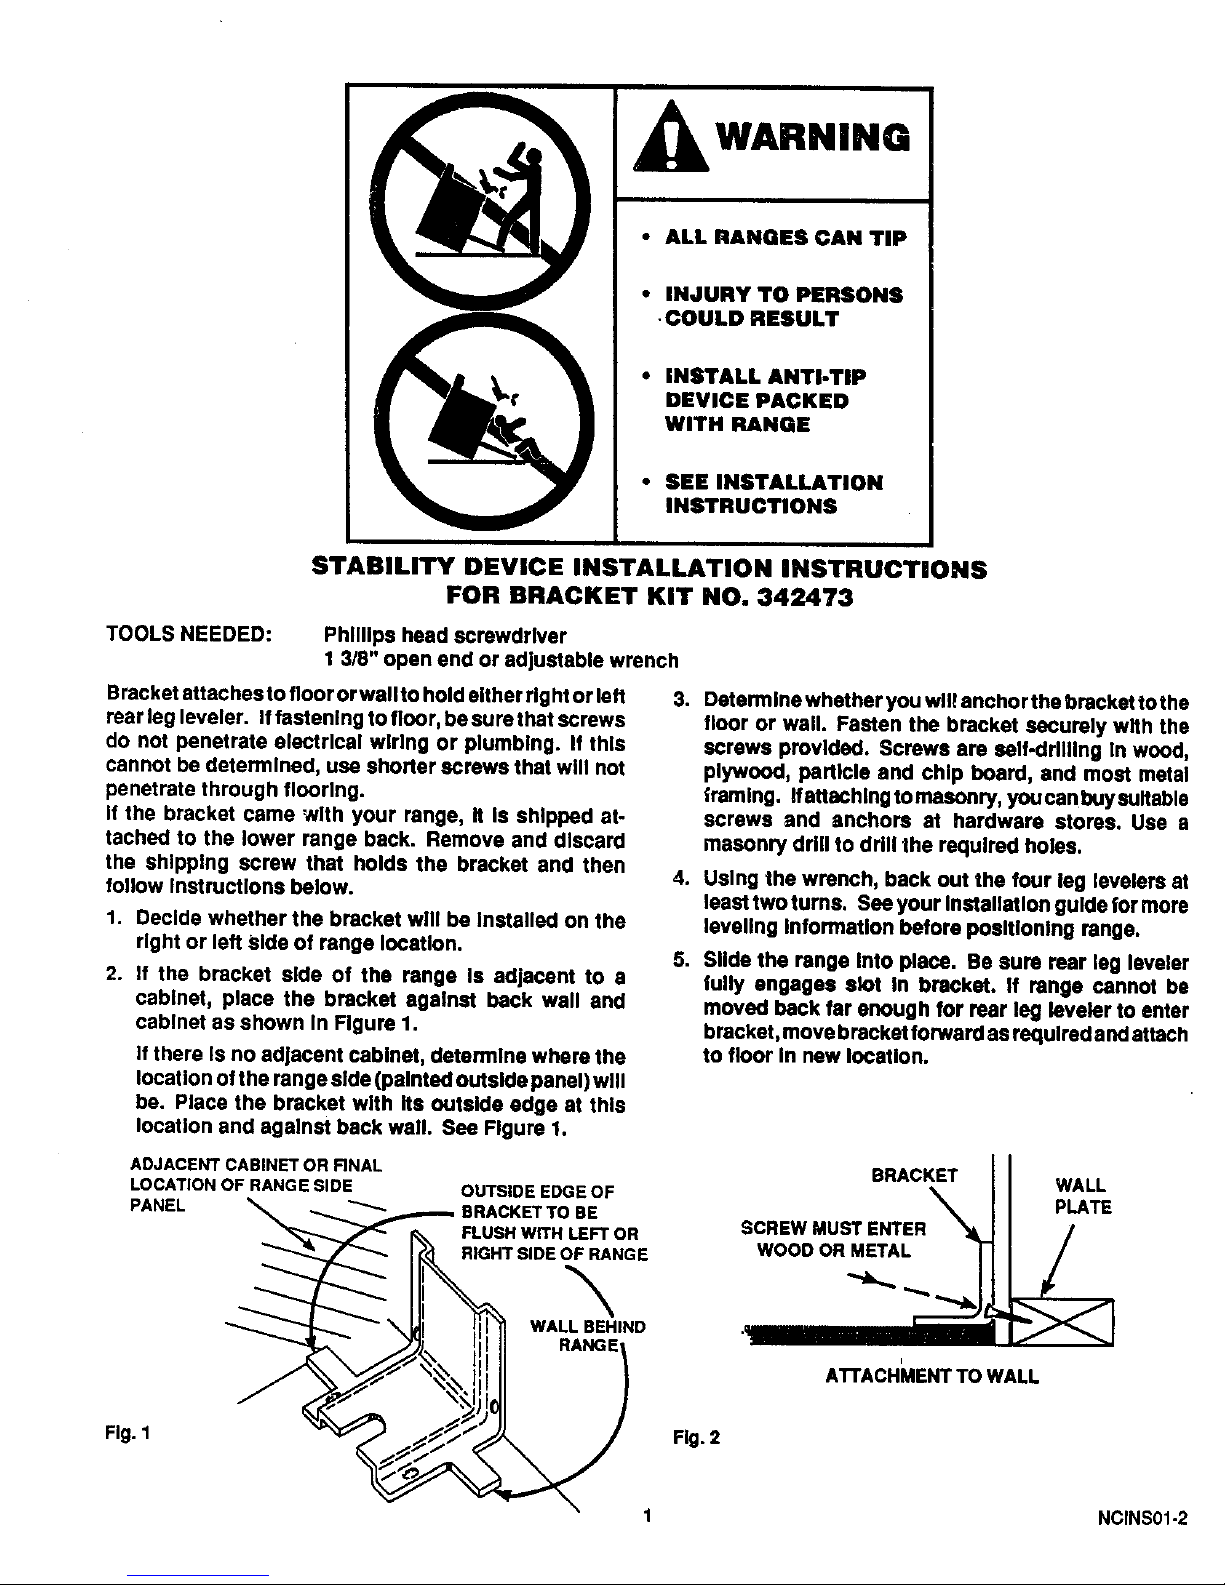
I WARNING
• ALL RANGES CAN TiP
• INJURY TO PERSONS
•COULD RESULT
• iNSTALL ANTI-TIP
DEVICE PACKED
WITH RANGE
• SEE INSTALLATION
INSTRUCTIONS
STABILITY DEVICE INSTALLATION INSTRUCTIONS
FOR BRACKET KIT NO. 342473
TOOLS NEEDED:
Phillips head screwdriver
1 3/8" open end or adjustable wrench
Bracket sttachee to floor or wallto hold either rightor left
rear leg leveler. If fastening to floor, be surethat screws
do not penetrate elsctrlcal wiring or plumbing. If this
cannot be determined, use shorter screws that will not
penetrate through flooring.
If the bracket came with your range, It Is shlppad at-
tached to the lower range back. Remove and discard
the shipping screw that holds the bracket and then
follow Instructions below.
.
1. Decide whether the bracket will be Installed on the
right or left Side of range location.
2. If the bracket side of the range Is adjacent to a
cabinet, place the bracket against beck wall and
cabinet as shown In Figure 1.
If there Is no adjacent cabinet, determlne where the
location of the range side (painted outside panel) will
be. Place the bracket with Its outside edge at this
location and against back wall. See Figure 1.
Dsterm Ine whether you wll! anchor the bracket to the
floor or wall. Fasten the bracket securely wIth the
screws provided. Screws are self-drilling In wood,
plywood, particle and chip board, and most metal
framing. Ifattachlng tomasonry, youcanbuysultable
screws and anchors at hardware stores. Use a
masonry drill to drill the requlrad holes.
4. Using the wrench, back out the four leg levelers at
least twotums. Sse your Inatallatlon guide for more
leveling Information before positioning range.
5. Slide the range Into place. Be sure rear leg leveler
fully engages slot In bracket. If range cannot be
moved beck far enough for rear leg leveler to enter
bracket, move bracket forward as required and attach
to floor In new Iocstlon.
ADJACENT CABINET OR FINAL
LOCATION OF RANGE SIDE
PANEL
OUTSIDE EDGE OF
BRACKET TO BE
FLUSH WITH LEFT OR
RIGHT SIDE OF RANGE
\
WALL BEHIND
RANG
BRACKET
\
SCREW MUST ENTER "_,
WOOD OR METAL |
WALL
PLATE
A'I'rACHMENT TO WALL
Fig. 1
Fig. 2
1 NCINS01-2
Page 3
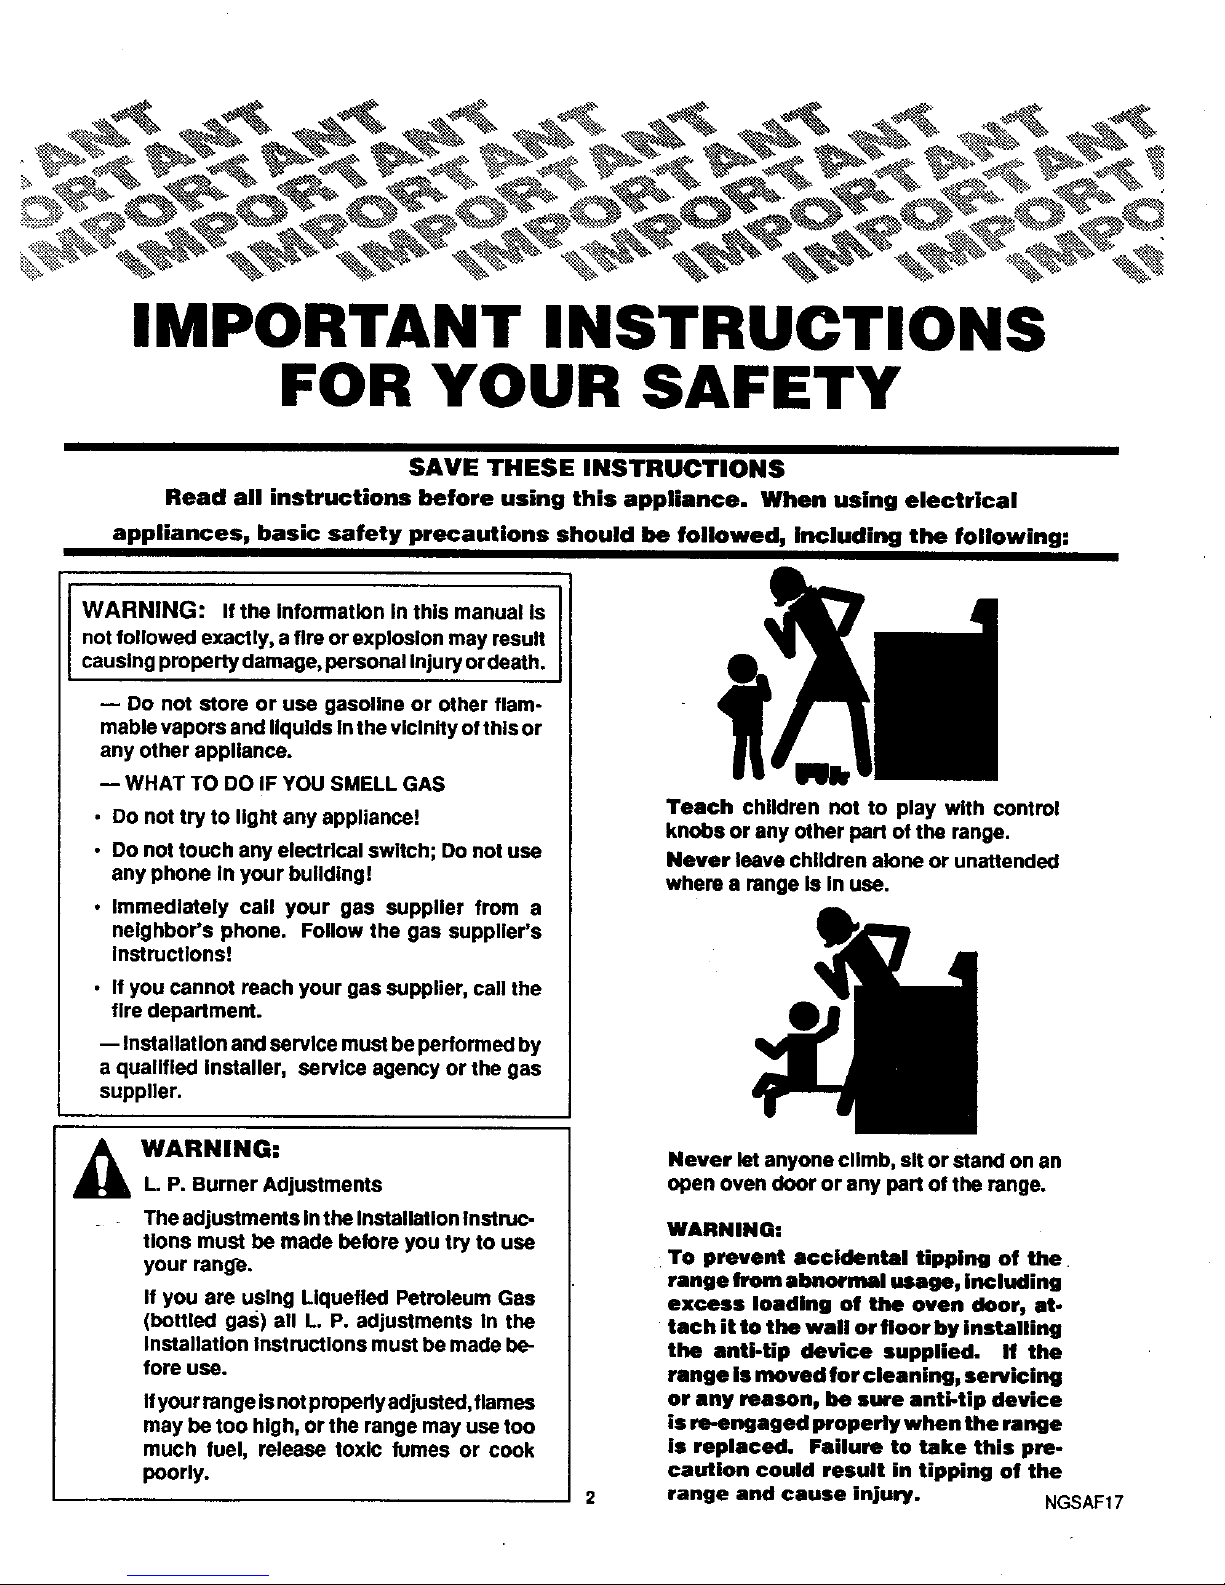
IMPORTANT INSTRUCTIONS
FOR YOUR SAFETY
SAVE THESE INSTRUCTIONS
Read all instructions before using this appliance. When using electrical
appliances, basic safety precautions should be followed, including the following:
I
WARNING: If the Information In this manual Is I
not followed exactly, a fire or explosion may result
Icausing property damage, personal Injury or death.
-- Do not store or use gasoline or other flam-
mable vapors and liquids in the vicinity of this or
any other appliance.
-- WHAT TO DO IF YOU SMELL GAS
• Do not try to light any appliance!
• Do not touch any electrlcel switch; Do not use
any phone In your bulldlng!
• Immediately call your gas supplier from a
neighbor's phone. Follow the gas suppller's
Instruction!!
• If you cannot reach your gas supplier, call the
fire department.
-- Installation and service must be performed by
a qualified Installer, service agency or the gas
supplier.
Teach children not to play with control
knobs or any other part of the range.
Never leave children alone or unattended
where a range Is In use.
_ ARNING:
L. P. Burner Adjustments
_ _ The adjustments Inthe Inatallatlon Instruc-
tions must be made before you try to use
your rang-e.
If you are using Liquefied Petroleum Gas
(bottled gas) all L. P. adjustments In the
Installation Instmctlona must be made be-
fore use.
Ifyour range Isnotproparlyadjusted, flames
may be too high, or the range may use too
much fuel, release toxic fumes or cook
poorly.
Never let anyone climb, sit or stand on an
open oven door or any part of the range.
WARNING:
To prevent accidental tipping of the
range from abnorml usage, including
excess leading of the even doer_ at.
tach it to the wall or floor by installing
the anti-tip device supplied. If the
range is moved for cleaning, servicing
or any reason, he sure anti.tip device
is re-engaged properly when the range
is replaced. Failure to take this pre.
caution could result in tipping of the
range and cause injury. NGSAF17
Page 4
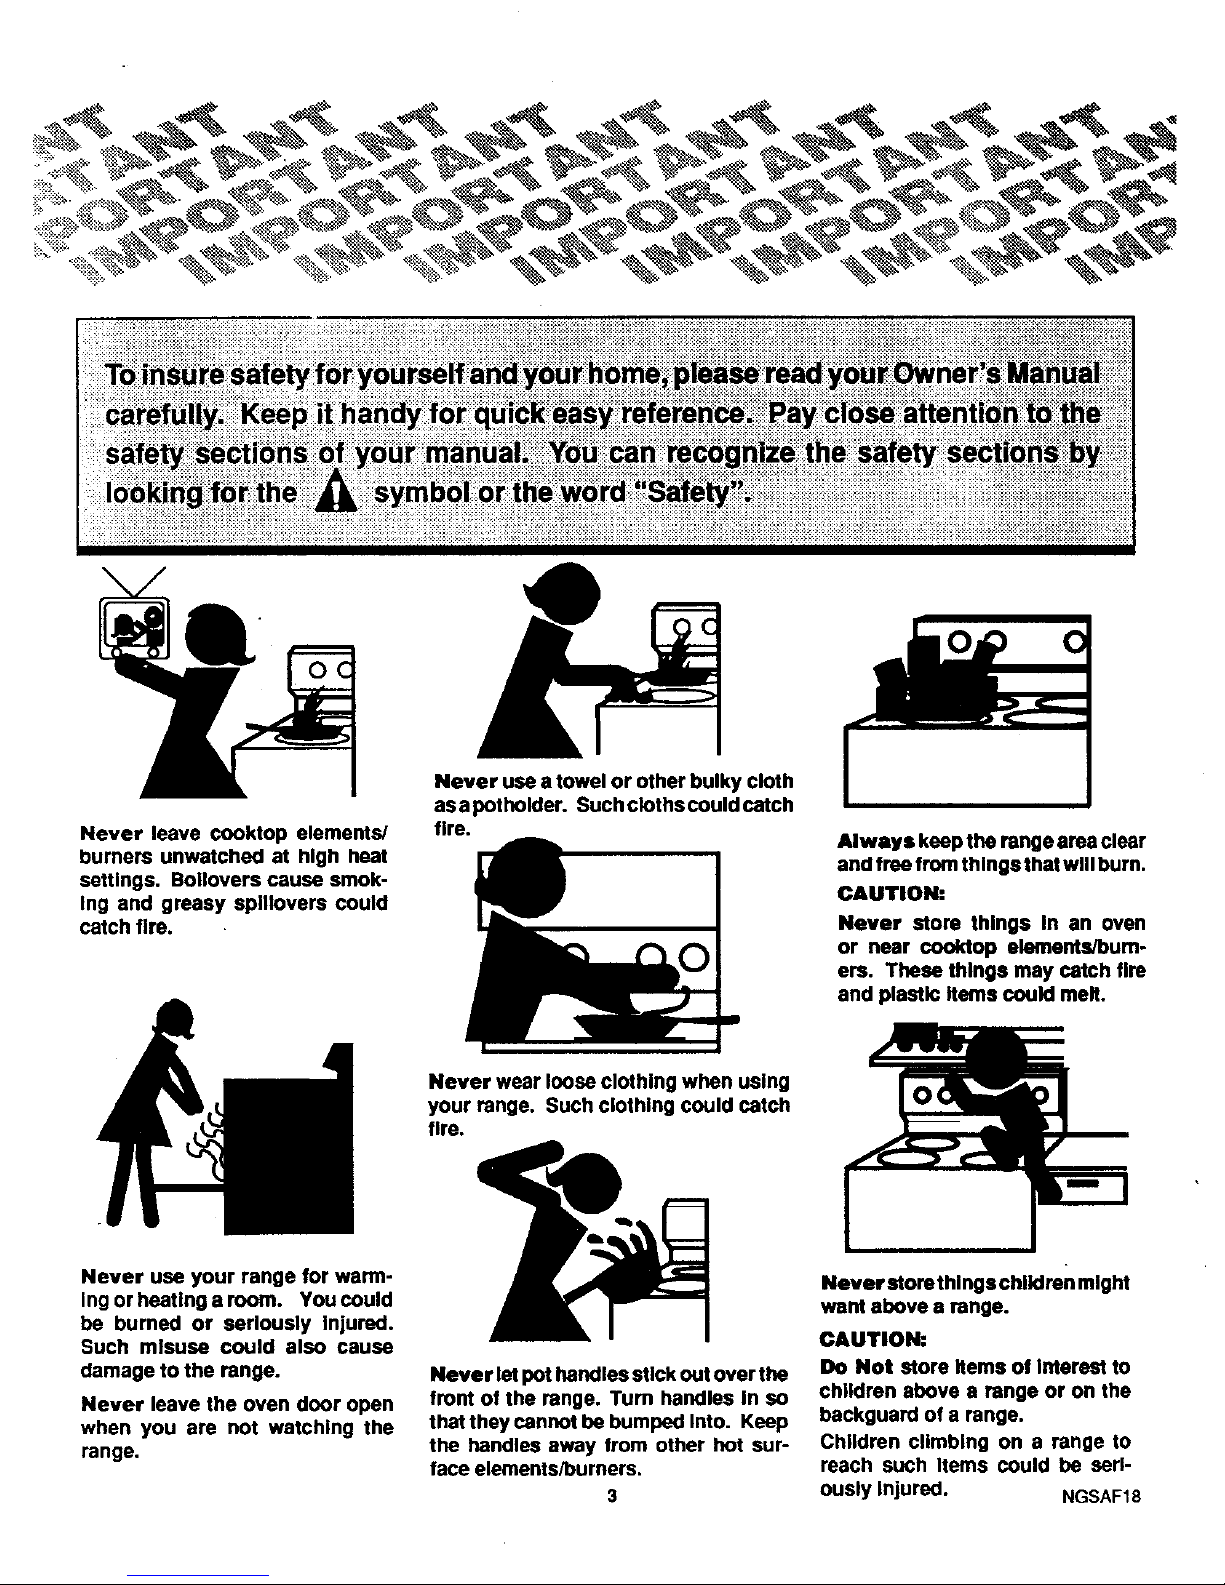
Never leavecooktopelements/
burnersunwatchedat high heat
settings.Bolloverscausesmok-
Ingandgreasysplitoverscould
catchfire.
Neveruseatowelorotherbulkycloth
asapotholder. Such clothscould catch
fire.
Always keep the range area clear
and free from things that will burn.
CAUTION:
Never store things In an oven
or near cooklop elements/bum-
ers. These things may catch flra
and plaatlc Items could melt.
Never wear loose clothing when using
your range. Such clothing could catch
fire.
Never use your range for warm-
Ing or heating a room. You could
be burned or seriously Injured.
Such misuse could also cause
damage to the range.
Never leave the oven door open
when you are not watching the
range.
Never let pot handles stick out over the
front of the range. Turn handles in so
that they cannot be bumped Into. Keep
the handles away from other hot sur-
face elements/burners.
Never atorethlngs chlldrsn might
want above a range.
CAUTION:
Do Not store Items of Interest to
children above a range or on the
beckguard of a range.
Children climbing on a range to
reach such Items could be serf
ously Injured. NGSAF18
Page 5
IMPORTANT SAFETY INSTRUCTIONS
Keep this book for later use.
Be sure your range Is Installed and grounded properly
by a qualified tachniclan.
Always keep the range area clear and free from things
that will burn, gasoline and other flammable vapors and
liquids.
Only some kinds of glass or ceramic pans can be used
for cooktop cooking. Be sure that the pan you use will
not break when heated on the cooktop burners.
After broiling, always take the broiler pan out of the
oven and clean It. Leftover grease In the broiler pan can
catch on fire next time you Use the pan.
Always use dry potholders when removing pans from
the oven or cooklop. Moist or damp potholders can
cause steam burns.
Always use care when opening oven door. Let hot air
and steam out before moving food.
Never try to repair or replace any part of the oven
unless Instructions are given In this book. All other
work should be done by a quallfied technlcisn.
Never heatunopened food containers. Pressure buildup
may make container burst and cause Injury.
Never leave jars or cans of fator drippings on or near
the oven. Never let grease build up on your oven. You
can keep grease fires from starting If you clean up
grease and spills after each oven use.
Never use aluminum foil to line oven bottoms. Ira-
proper use of fell could start a fire and cause Incomplete
combustion.
Never block the flow of combustion and ventilation air
through oven vents and cooldop burners.
Never try to move • pan of hot fat, especially a deep fat
fryer. Walt until the fat has cooled.
Always keep the range and oven clean by following
Instructions In this book. Food and grease are easy to
Ignite. Clean the range, oven and vent hood regularly.
Always keep combustible wall coverings, curtains or
drapes, wooden utensils, plastic Utenells or canned
food a safe distance away from your range.
Place oven racks In desired position while oven Is cool.
Never clean cootdop surface when It Is hot. Some
cleaners produce noxious fumes and wet cloths could
cause steam burns If used on a hot surface.
Always use care when touching the cooktop.
Always keep dish towels, dish cloths, potholders and
other linens a safe distance away from your range.
Never store such Items on your range.
Do not Use a wok on the cooking surface If the wok has
a round metal ring which Is placed over the burner grate
to support the wok. This ring acts as a heat trap which
may damage the burner grate and burner head. Also, It
may cause the burner to work Improperly. This may
cause a carbon monoxide level above that allowed by
current standards, resulting In a health hazard. Expo-
sure to carbon monoxide may cause birth defects or
other reproductive harm according to the California
safe Drinking Water and Toxic Enforcement Act.
Be sure everyone in your home knows
what to do in case of fire!!
Read and understand this information
NOW! Should you ever need it, you will
not have time for reading.
Never use water on a grease fire D it will
only spread the flames.
COOKTOP GREASE FIRE
Never pick up a flaming pan...Inetead:
1. Turn off the burner.
2. Smother the flrewlth a UghUy fitUng pan lid, baking
soda orwit hadrychemlcalor foam type exUnguisher.
OVEN FIRE
Do not try to move the pan.
1. Close oven door and turn controls off.
2. Iffire contlnuas,throw baking soda on the fire or use
a dry chemical foam or halon type extinguisher.
IMPORTANT SAFETY NOTICE
The California Safe Drinking Water and Toxic Enforcement Act requires the Governor of California to publish a list
of substances known to the state to cause cancer, blrlh defects, or other reproducUve harm and requires businesses
to warn customers of potenUal exposure to such substances. Gas appllancas can cause minor exposure to four of
these substances, namely benzene, carbon monoxide, formaldehyde and soot, caused primarily by the Incomplete
combustion of natural gas or L.P. fuels. Properly adjusted ranges, Indicated by a bluish rather than a yellow flame,
will mlnlmlze Incomplete combustion. Exposure to these substances can be mlnlmlzed further by venting with an
open window or using a ventilation fan or hood.
4 NGSAF25
Page 6

IMPORTANT:
REMOVABLE
(See pages6, 9, 10, &
YOUR RANGE
The model and serial number of your oven can be found on a tag, on the left
side of the front frame behind the z_movable broner drawer panel.
OVENVENT
(mayget hotduring oven
use; DONOT blockvent)
(See page7)
COOKTOP CONTROL
(See pages 6, 9)
OVENCONTROL
(Sea pages6, 14)
REMOVABLEGRATES
(see page9)
LIFT-UP/OFF COOKTOP
(See pages 9, 10)
REMOVABLE
OVENRACKS
(See pages 9, 11)
REMOVABLE
OVENBoI-rOM
(See pages9, 11)
REMOVABLE
OVEN DOOR
(seepage12)
REMOVABLE
ROLL-OUT BROILER
(See pages 8, 9, 11)
BROILERPAN & GRID
(See page 8, 9)
5 NGFSF04-1
Page 7

TO START THINGS COOKING
COOKTOP
The sign near each cooktop control knob shows which
burner Is turned on by that knob.
eO O0 Oe O0
O0 eO O0 Oe
Left Left Right Right
Rear Front Rear Front
To operate cooktop controls:
1. Push to turn knob left to LITE.
2. After the burner lights, turn knob to desired flame
setting.
COOKTOP
CONTROL
If acooktop burner falls to light within five seconds, turn
the knob to OFF and wait one minute before trying
again.
Ifthe burner still will not light, check the sep_lce section
In this manual.
As a safety precaution you should set
controls so flame heats pan bottom
only and does not lick pan sides.
Flames licking pan sides are unsafe
and waste heat.
OVEN
To use your oven or broiler.
1. Push in and set the OVEN CONTROL to desired
temperature or to BROIL. When broiling, be sure to
set the knob to the mark In the BROIL section of the
knob.
2. When finished, turn OVEN CONTROL to OFF.
OVENCONTROL
BURNER IGNITION
When you turn a control knob to LITE, gas flows
to the burner and is ignited by a pilot flame. The
pilot flame bums constantly.
TO LIGHT COOKTOP PILOTS:
1. Turn all control knobs to OFF and wait one minute.
2. Remove the burner grates and drip bowl liners (on
some models). Raise the cooktop (grasp at front and
lift). Raise the support rod to hold cooktop.
3. The pilots are located between the front and rear
burner on each side of the cooktop. Light pllots with
a match.
WOK COOKING
We recommend that you use only a flat-bottomed wok.
Flat-bottomed woks are available at your local retail
store.
Do not use woks which have support rings. Use of these
types of woks, with or without the ring in place, can be
dangerous. Placing the ring over the burner grate may
damage the burner grate and burner head. Also, placing
the Hng over the burner grate may cause the burner to
w()rk Improperly resulting In carbon monoxide levels
above allowable_urrent standards. This could be dan-
gerous to your health. Sea the Safety Section of this
manual. DO not try to use such woks without the ring.
You could be seriously burned if the wok tipped over.
.... ,',',', 6
TO LIGHT OVEN PILOTS:
1. Turn oven control to OFF and walt one minute.
2.
Open the lower broiler cornpartment and pullthe door
down flat. Put the broiler pan In the lowest position.
Slide the drawer back into the range so you can reach
to the beck of the compartment easier.
.
The tube running from front to back at the top of the
broiler compartment Is the burner. The pilot Isat the
beck of the compartment, about one Inch below the
burner. Light the pilot with a match.
II
NGMTC22
Page 8

OVEN COOKING
When cooking a food for the first time In your new
oven, use time given on recipes as a guido.
Your new oven has been set correctly at the factory
and Is more apt to be accurate than the oven It
replaced.
After you have used your oven for awhile, If you feel
your oven should be hotter or COoler,you can adjust
It yourself. See TEMPERATURE ADJUSTMENTS In
this manual.
Always follow recipe carefully.
Measure Ingredients properly.
Use proper pen placement.
Place pans on the oven racks with 1" to I 1/2" of air
space on all sides of each pan. Avoid overcrowding
the oven.
Pans too close to each other, to oven walls or to the
oven bottom, block the free movement of air. Im-
proper air movement causes uneven browning and
cooking.
2 cake layers
4 cake layers
When baking several Items stagger pans so that no
pan Is direcUy above another.
Let the oven preheat thoroughly before cooking
baked products. Allow !0 m!nutes for preheating.
Opening the dour too often to check food during
baking will allow heat loss and may cause poor
baking results.
Cakes, cooklea, muffins, and quick breads should
be baked In shiny pans -- to reflect the heat --
because they should have a light golden crust.
Yeast breads and pie crusts should be baked In
glass or dull (non-shiny) pans -- to absorb the heat
-- because they should have a brown, crisp crust.
Be sure the underside of the pan Is shiny, too.
Darkened undorsldes will absorb the heat and may
cause over browning on the bottom of your food.
Oven temperatures should be reduced 25 degrees
below recommended temperatures If exterior of pan
Is pradarkenad, darkened by age or oven proof
glass.
There may be some odor when the oven Is flrat used.
This Is caused by the heating of new parts and
Insulation.
Do not cover an entire oven rack with loll. The foil
can block normal heat flow and cause poor baking
results. Do not place any foil directly on the oven
bottom. Foil used on the oven bottom may damage
the oven surface; therefore, It should not be used.
Cookies should be baked on flat cookie sheets
without sides to allow the air to circulate properly.
When recipes require preheating, have food nearby
before you open the oven door. If the oven door is
ailowad to remain open for more than a brief time,
the preheat temperature will be lost.
OVEN VENT
When the oven Is on, heated air moves through a vent In
or below the backguard behind the cooktop. On the
cooktop, this hot air may make pot handles hot or melt
plastic Items left too near the vent.
The vent Is necessary for proper air circulation In the
oven and good baking results. Do not block this
vent. Doing so may cause cooking failurej fire or
damage to the range.
MOISTURE
As your oven heats up, the temperature change of the air
in the oven may cause water droplats to form on the door
or door glass. To prevent this, open the oven door for
the first minute of oven heat up to let the moist air out.
7 NGOVC07-3
Page 9

BROILING
• Broiling Is cooking by direct heat from the broil
burner. Tender cuts of meat or marinated meat
should be selected for broiling. For best results
steaks and chops should be at least 3/4" thick.
After placing food on the broiler pan, put the pan on
the rack In the lower broiler compartment. The
recommended rack position and cooking time can
he found In the chart at right.
The closer the food Is to the broil burner, the faster
the meat browns on the outside, yet stays red to pink
In thecenter. Moving the meat farther away from the
burner lets the meat cook to the center while brown-
Ingoutside. Sldaone should becooked I - 2 minutes
longer than side two.
iA I
completely closed while broiling.
Usa only the broiler pan and grid that came with your
range for broiling. They are designed for proper
drainage of fat and liquids and help prevent spefter,
smoke or fire.
Do not preheat when broiling. Preheating may
cause the thermostat to cycle the broil burner off
and on. For even broiling on both sides, start the
food on a cold pan.
Trim the outer layer of fat from steaks and chops.
Slit the fatty edges to keep the meat from curling.
For maxlmum juiciness, salt the fl rat side just before
turning the meat. Salt the second side Just before
sarving.
Brush chicken and fish with butter several tlmea as
they broil When broiling fish, grease the grid to
prevent sticking and broil with skin side down. It Is
not necessary to turn fish.
Never leave a soiled broiler pan In the range. Grease
In the pan may smoke or burn the next time the oven
is used.
Be sure you know the correct procedure for putting
out a grease fire. See the section on safety.
The removable roll-out broiler drawer should never
be used as a storage compartment. Cookware,
bakeware, plastics, flammable materials, or any
other Items, could catch flre resulting In serious
burns.
Do cot cover the entire broiler grid
with foil. Poor drainage of hot fat
may cause a broiler fire.
If a fire starts, close the oven door
and turn controls off. If fire contin.
ues, throw baking soda on the fire.
Do not put water on the fire.
POSITIONING BROILER PAN
After piecing food on the broiler pen, slide the pan Into
the proper rack position In the lower broiling compart-
ment.
Be sure the su m (grease well) in the pan is to the
front of the range.
1. BOTTOM RACK POSITION
(DIRECTLY
3. THIRD RACK
POSITION
2. SECOND RACK
POSITION
(GREASEWELL)
Rack
PosiUon Total Time
Food 3 ,, Highest (minutes)
t - Lowest
Steak - 1" Thick
Rare
Medium
Well Done
Ground Beef Patties
Medium
Well Done
Lamb Chops - 1" Thick
Pork Chops - 1" Thick
Pork Shoulder Steaks
Ham Slice - 1/2" Thick
Fish (Fillets)
Chicken (Halves)
Frankfurters
Bacon
Open-face Sandwiches
3
3
2
3
3
2
2
2
3
2
1
2
2
2
10-12
14-16
20-22
11-13
13-15
16-20
20-25
15,20
14-16
10-15
40-60
10-15
5,7
5,10
This chart Is a general guide. The size, weight, thick-
nasa, and starting tsmperature of the food, as well as
your own personal preference, will affect the cooking
time. Times In the chart are based on the food being st
refrigerator temperature.
8 NGBRL09
Page 10

CLEANING TIPS
Refer also to next page when cloanlng your range.
Warm water, a mild detergent and a soft cloth are sate to use on all claaneblo parts of your range. Do net use metal
scouring pads, except where recommended.
Cooktop finlshes wlll be either porcelaln enamel or brushed chrome. Porcelaln enamel looks like a palnted surface.
Brushed chrome has a metalllc appearance.
PART CLEANING MATERIALS REMARKS
Control panel and knobs Detergent, warm water, soft cloth Do not use abrasive cleaners. Knobs pull
off for sasler cleaning.
Porcelain enameled
cooktop, chrome drip
bowls (some models),
burner grates
Cooktop burners
Detergent, warm water, plastic or
nylon scouring pad
Detergent, warm water, plastic or
nylon scouring pad or boll In Dip-
It® solution to remove stubborn
soil
Clean after each splllover. Rub chrome
bowls (some models) gently with scour-
log pad. Soak stubborn soil. Bowls can
be removed dudng burner use to keep
clean and to avoid discoloration caused
by excesalve heat. Clean acid splllovere
quickly.
Do not usa all-purposa cleaners, ammo-
nla, powder cleansers or oven cleaners.
Such products can scratch or discolor
the burners. To Usa Dip-It® solution,
remove burners and boll for 20minutes in
2 tbsp. Dip-It® granules per quart of wa-
ter. Boll with burner head down. Rinse
thoroughly, drain and completely dryburn-
ere In a 200_F oven for 1/2 hour. After
cleaning or a splllover, light the burners
and make sure that no ports are clogged
(see next page).
Porcelalnenamelovenfln- Detergent, warmwater, scourlng When using oven cleaner, follow
ish, broiler compartment pad or soap-filled steel wool pad manufacturer's Instructions. Oven bet-
or oven cleaner tom can he removed for easier cleaning.
Rinse thoroughly after cleaning.
Oven racks Detergent, warm water, scouring Remove from oven to clean. Rinse thor-
pad or soalPfllled steel wool pad oughly.
Broiler pan and grid
Detergent, water, soap-filled
scouring pad, commerolal oven
cleaner (pan only)
Detergent, warm water
Soap and water, a mild abrasive
cleaner, soap.filled scouring pad
or commercial oven cleaner
Burner box loottom (area
under cooktop)
Porcelain oven bottom
Remove solled pan from oven to cool.
Drain fat or drlpplngs. Fill pan wlth warm
water. Sprinkle grid wlth detergent and
cover wlth damp cloth or paper towels.
Let pan and grld soak for a few mlnufos.
Rlnsa or scour as needed. Dry well. Grid
and pan may be washed In a dlahwasher.
Clean after each splllover with detergent
and warm water. Dry well.
Splllovers of hot fruit fillings orfoodswlth
scldlc content (such as tomatoes, milk,
vinegar or lemon juice) may cause pitting
to the porcelain enamel surface. Allow
oven to cool. Remove oven bottomfor
cleaning.
9 NGCCH 10
Page 11

LIFT-UP COOKTOP
The cooktop can be raised or removed so the area
underneath can be cleaned.
To raise cooktop:
1. Remove the burner grates.
2. Grasp the cooktop and lift up.
To remove cooktop:
1. Remove the burner grates.
2. Grasp the cooktop and lift the front a little.
3. Grasping the cooktop at the sides, held It nearly flat
while you lift it up and oft.
Porcelain enamel can chip. Handle porcelain enameled
cooktops carefully.
HOLD COOKTOP FLAT TO REMOVE
SUPPORT ROD
REMOVABLE COOKTOP BURNERS
The cooktop burners on your range may be removed for
cleaning. Be sure all cooktop knobs are turned to
OFF and burners are cool, then remove or raise
the cooktop.
If shipping screws were not removed from the burner
when the range was Installed, do so now (see your
Installation asctlon for Instructions).
To replace burners,
1. Slip the air shutter over the gas valve orifice (Fig. A).
2. Lower the burner assembly and hook the tab in the
slots In the burner support (Fig. A).
3. Besure both tabs are In their slots, that the burner sits
level and straight and that the flash tube forms a
straight line from the Igniter to the burner (Fig. B).
BURNER GAS VALVE
ORIFICE
IGNITER BRACKET
DO NOT REMOVE SCREWS
FROM IGNITER BRACKET
To remove burners:
1. Grasp the burner head and tilt if to the right to release
the two tabs from the burner support (A In Fig. A).
2. Lift the end of the burner assembly, then pull away
from the front of the range to free the air shutter from
the gas valve orifice (Fig0 B). If they are clogged, use
a wire or needle to clear them.
See the Cleaning Chart.
Be careful not to disturb the air shutter setting
while cleaning. If you need to readjust the air shutter,
see the Installation Section.
TAB AIR
SHUTTER
BURNER FLASH
PORTS TUBE
LIGHTER
PORTS
Fig. A
BURNER
SUPPORT
Fig. a
GNRER
10 NGMNT28-1
Page 12

REMOVABLE OVEN RACKS
Be careful not to scratch the oven finish when
installing or removing even racks.
To install:
1. Set the raised back edge Of the rack on a pair of rack
guides.
2. Push the rack In until you reach the bump In the rack
guide, then !lft the front of the rack a bit and push the
rack all the way In.
To remove:
1. Pull the oven rack out, then up.
The racks are designed with stop locks so when
placed correctly on the shelf support, they will
stop when extended item the oven and will not
tilt when food is removed from or placed on them.
BUMP
GUIDE
REMOVABLE OVEN BOTTOM
The oven bottom In your range can be removed for
easier cleaning.
Be careful not to scratch the oven finish when
removing or replacing the oven bottom.
To remove:
1. Grasp oven bottom at finger slots on each side.
2. Lift the front edge of the oven bottom enough to raise
the tabs from the slots In the front frame.
3. Push the oven bottom back about 1/4" to release the
flange from the front frame, then pull out.
To replace:
1. Slide the oven bottom into the oven so the back tabs
fit Into the slots in the oven back.
2. Grasp at finger slots and push the oven bottom back
and then down to hook the flange under the front
frame.
3. Fit the front tabs into the slots in the front frame.
SLOT IN
OVEN BACK
FLANGE
RNGER
SLOTIN
FRONTFRAME
REMOVABLE ROLL-OUT BROILER
To remove the roll-out broiler for easier clean.
ing:
1. Pull broilerout until It stops, then push back In about
1 Inch.
2. Grasp handle, lift, and pull broiler out (lift the rollers
under the broiler over the roller guide stops In the
range).
To replace brenen
1. Put the milers under the broiler behind the miler
guide stops In the range.
2. Hold broiler in the raised position as you slide It part
way Into the range, then lower broiler and push
completely closed.
11
ROLLER GUIDE
STOP
FRONTFRAME
BROILER
COMPARTMENT
NGMNT09-2
Page 13

REMOVABLE OVEN DOOR
To remove:
1. Open the door to the stop position (see IIIustreUon).
2. Grasp the door at each side and rift up and off the
hinges.
NOTE: When the door is remved and hinge anlts
arc at stop posiUon, do not bump or try to rove
the hinge arms. The hinges could snap back
causing an injury to the bands or damage to the
porcelain on the front of the range. Cover the
hinges with toweling or empty towel rolls while
working in the oven area.
To replace:
1. Hold the door over the hinges with the slots at the
bottom edge of the door ,ned up with the hinges.
The hinge arms must still he in the stop
posiUon.
2. Slide the door down onto the hinges as tar as it will
go and close the door.
STOP (BROIL) POSITION
_ HINGE
REMOVAL OF PACKAGING TAPE:
When packaging tape is removed from your appliance, you may find some adhesive still on the product. To remove
thead heslve and assure you do not damage the finish, use an application of household liquid dIahweshlng detergent,
mineral o11,orcooking oit. Apply with a soft cloth. DO NOT use a plastic pad or equivalent. Wipe dry and then apply
an appliance polish tothoroughly clean and protect the surface. This procedure Is also sate for the face of microwave
doors and other plasUc parts.
NOTE: The piasUc tape that is not removed from chrome trim on range parts CANNOT he removed If baked on.
12 NEMNT93
Page 14

BEFORE CALLING FOR SERVICE
Save time and money D Check this list before you call for service.
To eliminate unnecessary service calls, first, read all the Instructions In this manual carefully. Then, If you have a
problem, always check thle list of common problems and possible solutions before you call for service.
If you do have a problem you cannot fix yourself, call your nearest Sears Store or Servlca Center for help. When
calling, have this manual handy with the model number, the Repair Parts list, model number, serial number and
purchase date.
DON'T CALL FOR SERVICE
PROBLEM UNTIL YOU CHECK
• Cooktop burners and oven
burners do not work
• Cooktop burner does not
work; oven OK
Foods do not bake properly
POSSIBLE CAUSE
• Gas supply not connected or
not turned on. If using L.P.
gas, tank may be empty.
• Range not properly grounded
or polarized. This can affect
spark Ignition (spark IgnlUon
models only).
• Controls not set correctly
• Burners not adjusted properly
• Soil clogging holes (ports) In
burner or burner assembly
mlsallgned
• Improper operation of control
• Burners notadjusted properly
• Oven not preheated long
enough
• Improper rack or pan place-
ment
• Oven vent blocked or covered
• Improper temperature set-
tlng for utensil used
• Recipe not followed
• Improper thermostat calibra-
tion
• Range and oven rack not
level
• Using Improper cookware
• To check If the gas Is fumed on, light the
cooktop burners with a match by follow-
Ing the steps in the Ignition section of this
manual, itthe burners do not light, check
the shut-off valve below the lift-up
cooktop (see valve to be sure that It Is In
the open position).
Ifusing L.P. gas, Isthere any gas Inthe L.P.
tank?
• Check Installation Instructions.
• Sss burner Ignition ssctlon In this manual.
• See the Installation Instructions.
• Check Installation Instructions
• See the removable co'Jktop burner sec-
tion and the cleaning tips In this manual.
• Be sure to push knob In while turning.
• See the Installstlon Instructions.
• Be sureto preheat:
10 minutes
• Maintain uniform air space around pans
and utensils; see oven cooking section.
• Be sure oven vent (in panel behind
cooktop) Is not blocked.
• Reduce temperature 25 degrees for glass
or dull/darkened pans.
• Is reclpo tested and rsllable?
• Check oven temperature adjustment pro-
cadurss (next page).
• Check the Inatalletlon Instructions for lev-
eling instructions.
• See oven cooking section.
13 NGSER10-2
Page 15

BEFORE CALLING FOR SfRVICE
PROBLEM
Foods do not bmll
properly
POSSIBLE CAUSE
Improper rack posltlon
Oven preheated
Improper utensil used
DON'T CALL FOR SERVICE
UNTIL YOU CHECK
Improper brolllng tlme
Oven door open
Oven smokes Dlrty oven Check for heavy spnlovero
Broiler pan full of grease left Clean pan and grid after each use.
in oven Be sure that sump grease well is to the
front of the range when brolllng.
Burners have yellow or
yellow-tlpped flames
A
Yellow flames --
Call for service.
tf burner flames look like (A),
call for service. Normal
burner flames should look
like (B) or (C), depending on
the type of gas you use.
With L.P. Gas, _ome
yellow Upping on outer
cones Is normal.
Check broll pen placement; see Brolllng
seotlon.
DO not preheat when brolllng.
Use broller pan and grld supplied with
range.
Check brolllng chart In brolllng section.
Close door.
B
Yellow tips on
outer cones --
c
_ft bl_ flames --
Normal for Naturel Gas
Normal for L.P. Gas
"DO-IT-YOURSELF" TEMPERATURE ADJUSTMENTS
You may feel that your new oven cooks differently than
the oven It replaced. We recommend that you use your
new oven a few weeks to become more familiar with It,
following the times given In your recipes as a guide.
If you think your new oven Istoo hot (burnlng foods) or
not hot enough (foods are under-cooked) you can adjust
the temperature yourself. The appearance and ;exture
of foods are better Indicators of oven accuracy than
Inexpensive oven thermometers, such asthose found In
;he grocery stores, to check the temperature setting of
your new oven. These thermometers can vary by 20-
40°F. In addition, the oven door must be opened to read
these thermometers. Opening the door will change the
temperature of the oven.
3. Use a screwdrlver to carefully loosen both screws.
4. To make your oven temperature HOTTER, hold the
knob by the handle and turn the knob skirt so the top
screw moves toward the word hotter° As you turn the
skirt you will hear clicks and feel notches or teeth.
Each click or notch will adjust the temperature 15°F
# hotter.
TOPSCREWMOVES
TOWARDHOTTER
To decide how much to change the temperature, set the
oven temperature 25°F lower (If foods are burning) than
the temperature In your recipe, then bake. The result of
this "test" should give you an Idea of how much the
temperature should be changed.
TO MAKE THE TEMPERATURE ADJUSTMENT:
1. Make sure the oven control knob Is In the OFF
[_osltlon. Remove the knob by pulling It straight off.
2. Look at the back of the knob. The pointer In the
center Indicates the orlglnal temperature setting.
POtNTER
5. To make your oven temperature COOLER, hold the
knob by the handle and tum the knob skirt so that the
top screw moves toward the word cooler. As you
turn the skirt you will hear clicks and feel notches or
teeth. Each click or notch will adjust the temperature
15°F cooler.
TOP SCREWMOVES
TOWARD COOLER
14
6. When you have made the desired temperature ad-
justment, re-tighten both SCrews and rstum the oven
control knob to your range.
NGSFR24-1
Page 16

KENMORE GAS RANGE WARRANTY
Dear Customer:
Our constant efforts are
directed toward making
sure your new Kenmors
Range will arrive st your
home In perfect condition
and will give you proper
performance. As part of
these efforts, we feel It Is
our responsibilIty to pro-
vide you with thlswarranty
for your range,
FULL ONE YEAR WARRANTY ON THE FUNCTIONING OF ALL
PARTS EXCEPT GLASS PARTS
If,within one year from the date of Inetallation, any part, other than a glass
part, falls to function properly due to a defect In material or workmanship,
Sears will repair or replace It, free of charge.
FULL 30.DAY WARRANTY ON GLASS PARTS AND FINISH OF FORCE-
LAIN ENAMEL, PAINTED OR BRIGHT METAL FINISHED PARTS
If, within 30 days from the date of Installstlon, any glass part or the finish
on any porcelain enamel, painted or bright metal part Is defective In
material or workmanship, Sears will replace the part, free of charge.
FULL 90-DAY WARRANTY ON MECHANICAL ADJUSTMENTS
For90 days from the date of Installation, Sears will provide, free of charge,
any mechantcal adjustments necessary for proper operation of the range,
except for normal maintenance.
If the range Is subjected to other than private family use, the above
warranty coverage Is effecUve for only 90 days.
WARRANTY SERVICE IS AVAILABLE BY CONTACTING THE
NEAREST SEARS SERVICE CENTER/DEPARTMENT IN THE
UNITED STATES
This warranty applies only while this product Is In use In the UnIted States.
This warranty gives you specific legal rights, and you may also have other
rlghts which vary from state to state. SEARS, ROEBUCK and CO.
Dept. 731 CR-W
Sears Tower
Chicago, IL 60684
WE SERVICE WHAT WE SELL
"We Service What We Sell" Is our assurance to you that you can depend on Sears for service because Sears
service Is nationwide. "
Your Kenmore Range has added value when you consider that Sears has a service unit near you staffed by
Sears trained technicians.., professional technicians specifically trained on Sears appliances, having the
parts, tools and equipment to ensure that we meet our pledge to you -- "We Service What We Sell!"
TO FURTHER ADD TO THE VALUE OF YOUR RANGE, BUY A SEARS MAINTENANCE AGREEMENT.
Kanmora Ranges are designed, manufactured and
tested for years ofdependable operation. Yet,any
modern appliance may require service from time
to time. The Sears Warranty plus the Sears Main-
tenance Agreement provides protection from un-
expected repair bills and assures you of enjoying
maximum range efficiency.
Here's a comparative warranty and Maintenance
Agreement chart showing you the benefits of a
Sears Range Maintenance Agreement.
YearsofOwnershlpCoverage lstYear 2ndYNr 3rdYear
Replacement of Defective
1 PartsntherthanPorcelaln W MA MA
or Glass
90 DAYS
2 .._.._,AdJ..m.. W MA MA
3O DAYS
3 po_.i°..dO_.,P.., W MA MA
Annual Preventive Malnten-
4 .°_.ch._,_,r,.q,._ MA MA MA
w-wm_y _t_.Manta Agn.m_
CONTACT YOUR SEARS SALESPERSON OR LOCAL SEARS SERVICE
CENTER TODAY AND PURCHASE A SEARS MAINTENANCE AGREEMENT.
Id_IE_I"1 I'11 O I'IE_ ® America's Best Selling Appliance Brand
Sold by SEARS, ROEBUCK AND CO., Chicago, IL 60684
Printed in LaFayette, Georgia --
 Loading...