

Kenmore 60572 - 3/4 HP Food Waste Disposer, 6010, 6012, 6011, 6013 Installation And Use Manual
...
®
FOOD WASTE DISPOSERS
Installation, Care & Use Manual
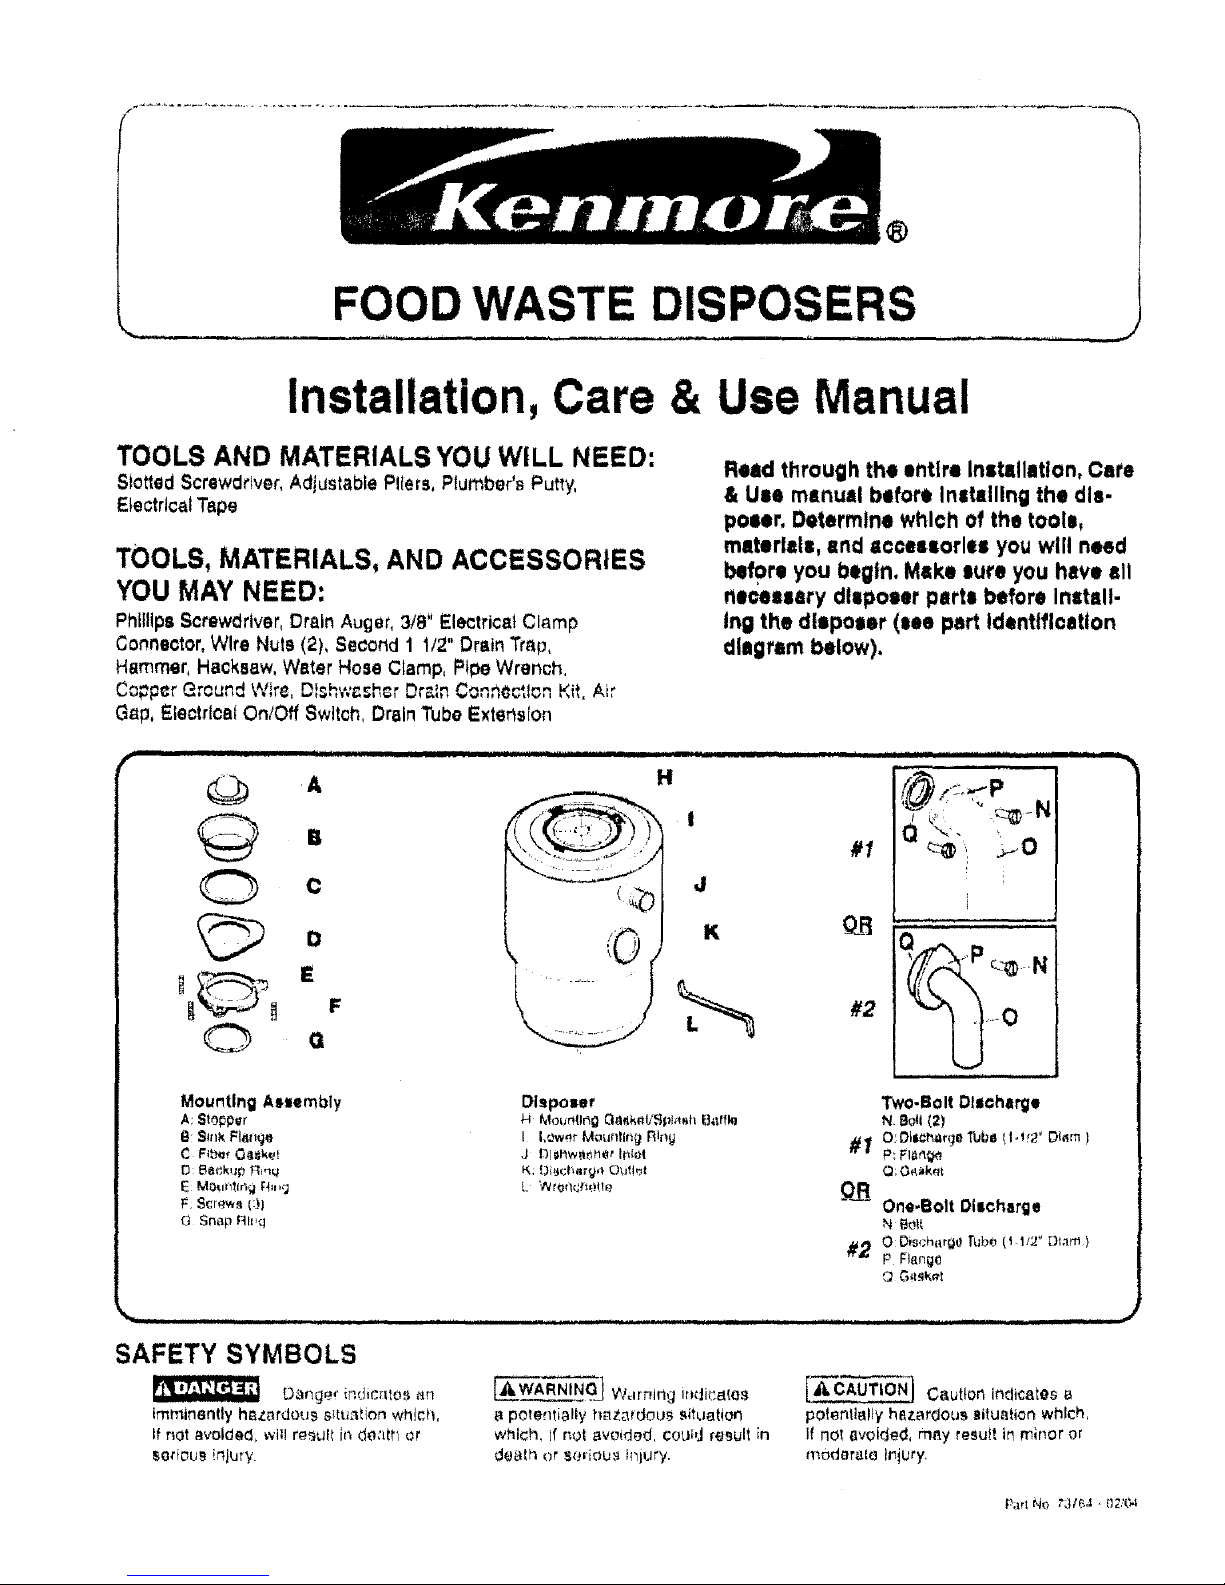
TOOLS AND MATERIALS YOU WILL NEED:
Stott0dScrewdriver,AdjustablePl(ers, P{umber'_Putty,
ElectricalTape
TOOLS, MATERIALS, AND ACCESSORIES
YOU MAY NEED:
PhiIlipsScrewdriver,Drain Auger, 3/8" ElectricatCl_mp
Connector,Wire Nuts (2), Secorld1 1/2"Drain Trap,
Hammer, Hacksaw, Water Hose Cramp, Pipe Wrench.
Co;'p¢r Ground Wire, DI=hw¢=h=rbr_In Connoc',I_,nKit, Air
G_tp,Electr(ca{On/Off Switch, Drain Tube Extension
Reid through the entire Instillation, Care
& UIB manual before InttiIIIng the dis-
polar. Determine which of the toolm,
materlalB, and t¢¢eiiorlel you will need
befor! you begin. Make tou!! you have all
rleceu=ry dlepoiet patte before Install-
Ing the dlapoler (lee part identification
diagram below).
r
O A H
I
B
F
0
'' K
0
#1
#2
Mout_tlng Asiembly DIspoler
A;Stopper _ MourIIlng Q_t_.k_ti,_pl_shB_trf!_
S:SinkFIs(lgo I I,_w_r Mountm_ Rlrlg
C F!b_r O_tlket J 13I_l_w_tmCtIrdo! #_
E Mo,An'_lng_qu,g L Wron_;_'_e_te _Q__
{3 Snap RII,g
#2
.... ,ira
_ /:-_P
_ ': ._.-0
)
Two-Bolt Dl/¢hlrge
W S_(I(2)
O;OiilChil_'gl}_bil I I,I'Y Dlam }
Q;O_km
One-Bolt Discharge
O Oist;h(_rOtf _klbo (i 1/2" Diam)
P Frtang()
SAFETY SYMBOLS
Dange¢ ir;dic,qtos _n
immin6ntly h_zardou_ _tu_l(on which,
If not avold_d_ will rg_u(t in do_t_h or
_oriou_ !njury
[_I=WARNINOJ Warning Ir_dicatos
potentially hazardous situalion
which, If not avoided, cotJlrJresult ;n
dealh or Sc+riOU,_h_jury.
C6utton indicates a
polentiaIIyhl_zardous Bilu_tionwhich,
ff not a_olded, mt_y resutt ir_minor or
modera.Ie I_iut Y
Part NO r316& , 02,_,_t
O
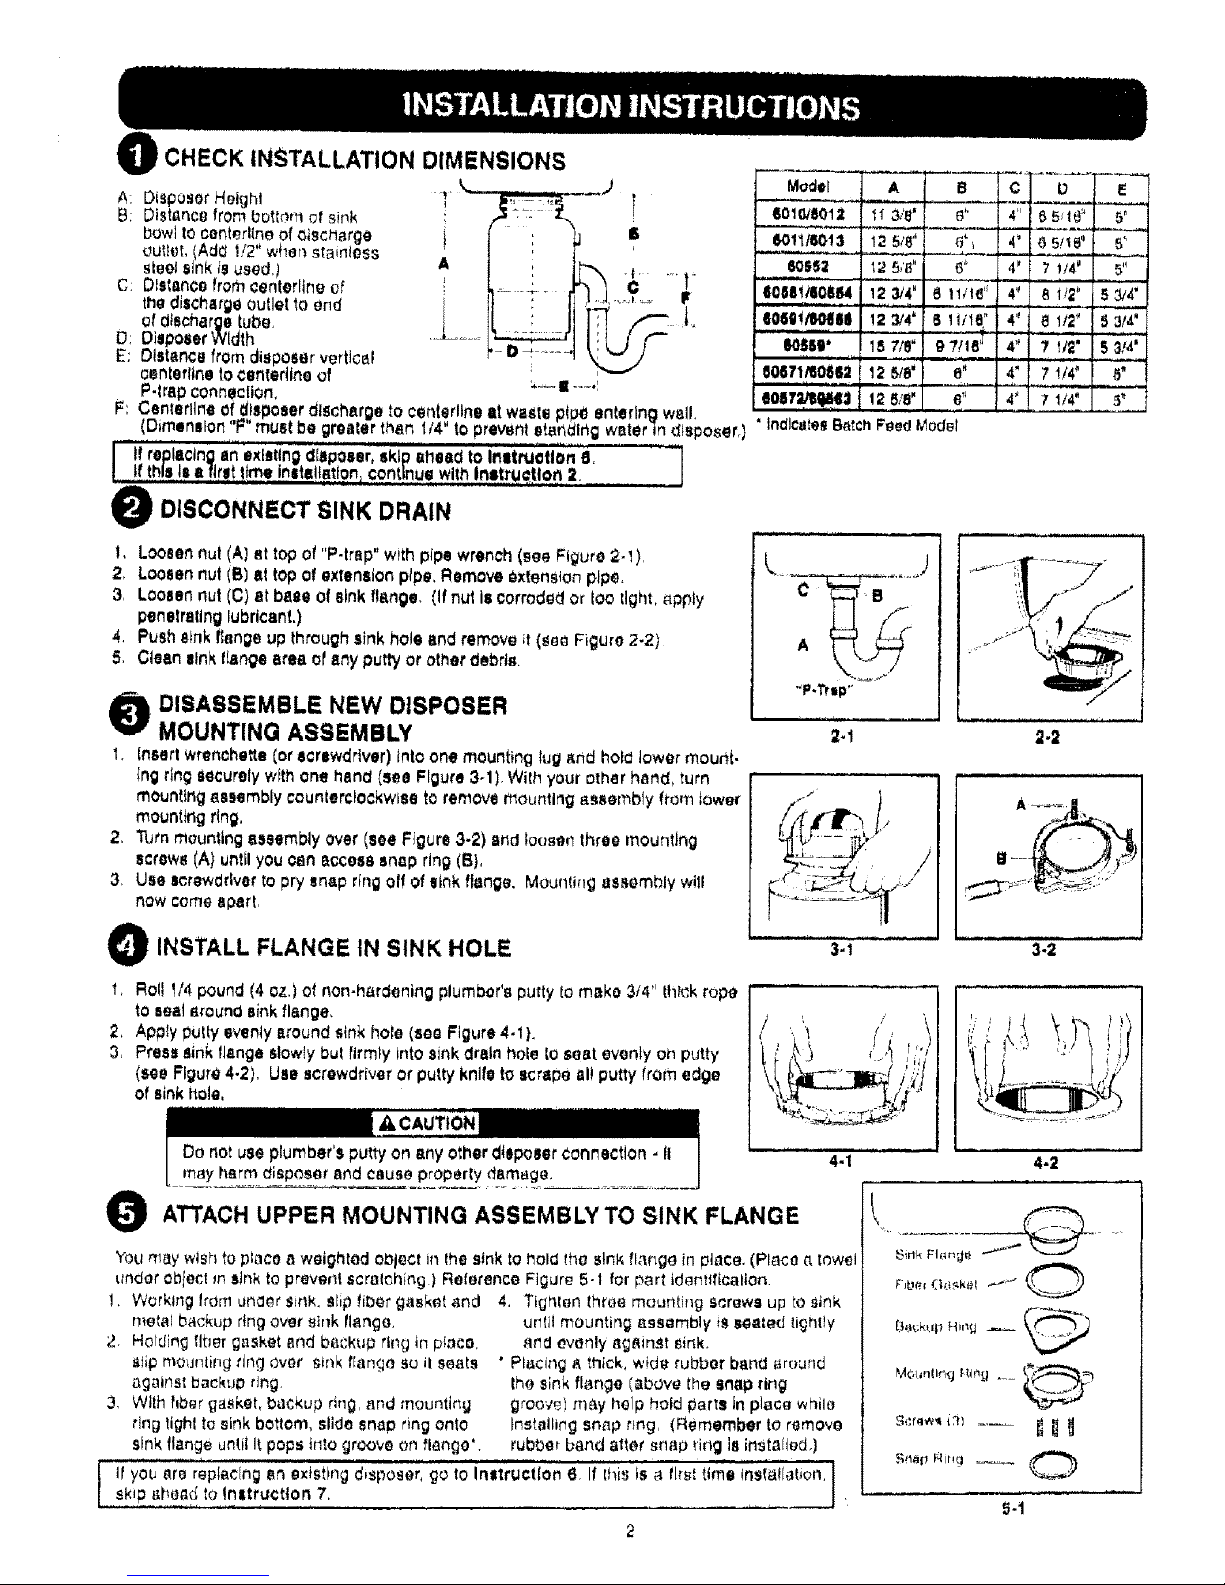
iCHECK INSTALLATION DIMENSIONS
A: Di,_posorHeight I'
B: Distance from bottom at sink
bowt to centerline of oiscnargg i
gutter. (Ad_ 1/2" wher_stainless
steel _lnk is used.] A
C: Distance fromeenterltne of
the dischargeoutlet to end
of discharge tube,
D: Disposer Width
E: Distance from disposer vertical
contorting to ¢enterttne of
P.lrap connection, _---|---.I eol!T=,,!_tlllil3!2 8/8" a"
F: Centerflneof disposer dlsche.rgeto ¢enterllne lit waste p pO enter ng we ....
(Dimension "F" muet be greater ther_t!4" 1opreventetendlr_g water]n dlsposer,l ' IndicatesB_tchFeedModel
If rgpleclng an exfstlng dfJpOeer skip atleed to IrtllttUollon 8 '_
! !_this Is eflrwt !_t_e!nail=lib(fen=¢9_nt!r!uQw th Irtstru_!lorl 2 ......
DISCONNECT SINK DRAIN
t, Looeen nul (A) el top ot "P-trap" with pipe wrench (see Figure 2-1),
2, Loosennut (B) at topof extension pipe. Remove _xtenSion plp_,
3, Loosen nut (C) at base of eink fie.nee. (if nut Is corroded or Ioo tight, _pply
penetrating lubricant,)
4. Push s_nkf_engeup throughsink hole and remove it (_g_ Figure 2-2)
5. Ctean sinkflange area of arty puttyor ati_erdebris,
O ISASSEMBLE NEW DISPOSER
MOUNTING ASSEMBLY
t, [near( wrenohe_e (or ecrewdrlver) into one mounting lug _nd hof_ tower mou_{,
{ng rin_ securely with one hand (see Figure 3-1) With your other hand, turn
mounting _.embly countercfockwma to remove mounting assembly from tower
mounting ring,
2. Turn mounting assembty over (seeFigure 3-2) and loosen three mounttng
screws (A) until you oan I_ccess snap ring (B),
3, Use screwdriver to pry sn_p ring off of sink flange. Moui"tlirlg assembly wit(
now come apart
O INSTALL FLANGE IN SINK HOLE
t, Roll I/4 pound (4 oz.) of non-hardening plumber's putty [omake 314"thick rope
to ,,eel 8round sink flange,
2, Apply putty evenly around sink hofe (sea Figure4.1 ).
3, Press sink flange slowty bul firmly into sink drain bole to seat evonty on putty
(see Figure 4.2). Use screwdriver or putty knlN to scrape eli putty from edge
of sinkftole,
Model
.m_o.= _ _' ie" _',,,,Z_/f "'_' ......
4" 7 1/4" 5_
O
Do notuse plumber's putty on any otherdteposerConnection. It
m_y h_rm d_sposer _nd ceu_e property damage,
ATTACH UPPER MOUNTING ASSEMBLY TO SINK FLANGE
,_ .... _ _ • _ i ,,,,,,,,,,,,,,,,,,,,.
2*1 2-2
You may wish to place _ weighted o_lect in the stnk to hol_ (he sink flange in piece. (Place 0,towel
under obtect m sink to prever_t scml_hing ) Reference Figure 5-1 for part identtflcallon.
4, Tig_',_en three meurtting screw-, up to sir_k
u_{it mounting _9sombly _ssee_ed lightly
_r_ evenly _,g_inet _tnk.
• Placing _, thick, wide rubber band mound
the sink flange (_b'Ove the SnSp ring
grOOV_t rrl_y help hold _arts in place while
tnstalli_g snap rmg, (Remember to remove
rubber band alter snap ring le installed,)
1. Working IrOn under sink, sIip fiber gasket and
metal backup ring over _ink flange,
2, Holding tiber gasket and b_.ckup rtr_g in piece.
_fip mounli_g ring over e!r'_kflange} au il seeI,,i
8galnst i_acku0 ring,
3, With hber gasket, backup rmg, and mounting
rlng_ighl to sinkbottom, elid_sn_p ringonto
sink flange un!.il Itpops tr_to groove on flange'.
3-1 3-2
t If you _re repfe,clng 8n extstlng disposer, go to Instruction 6.I! [hisis _ f[rs_time tnst_.t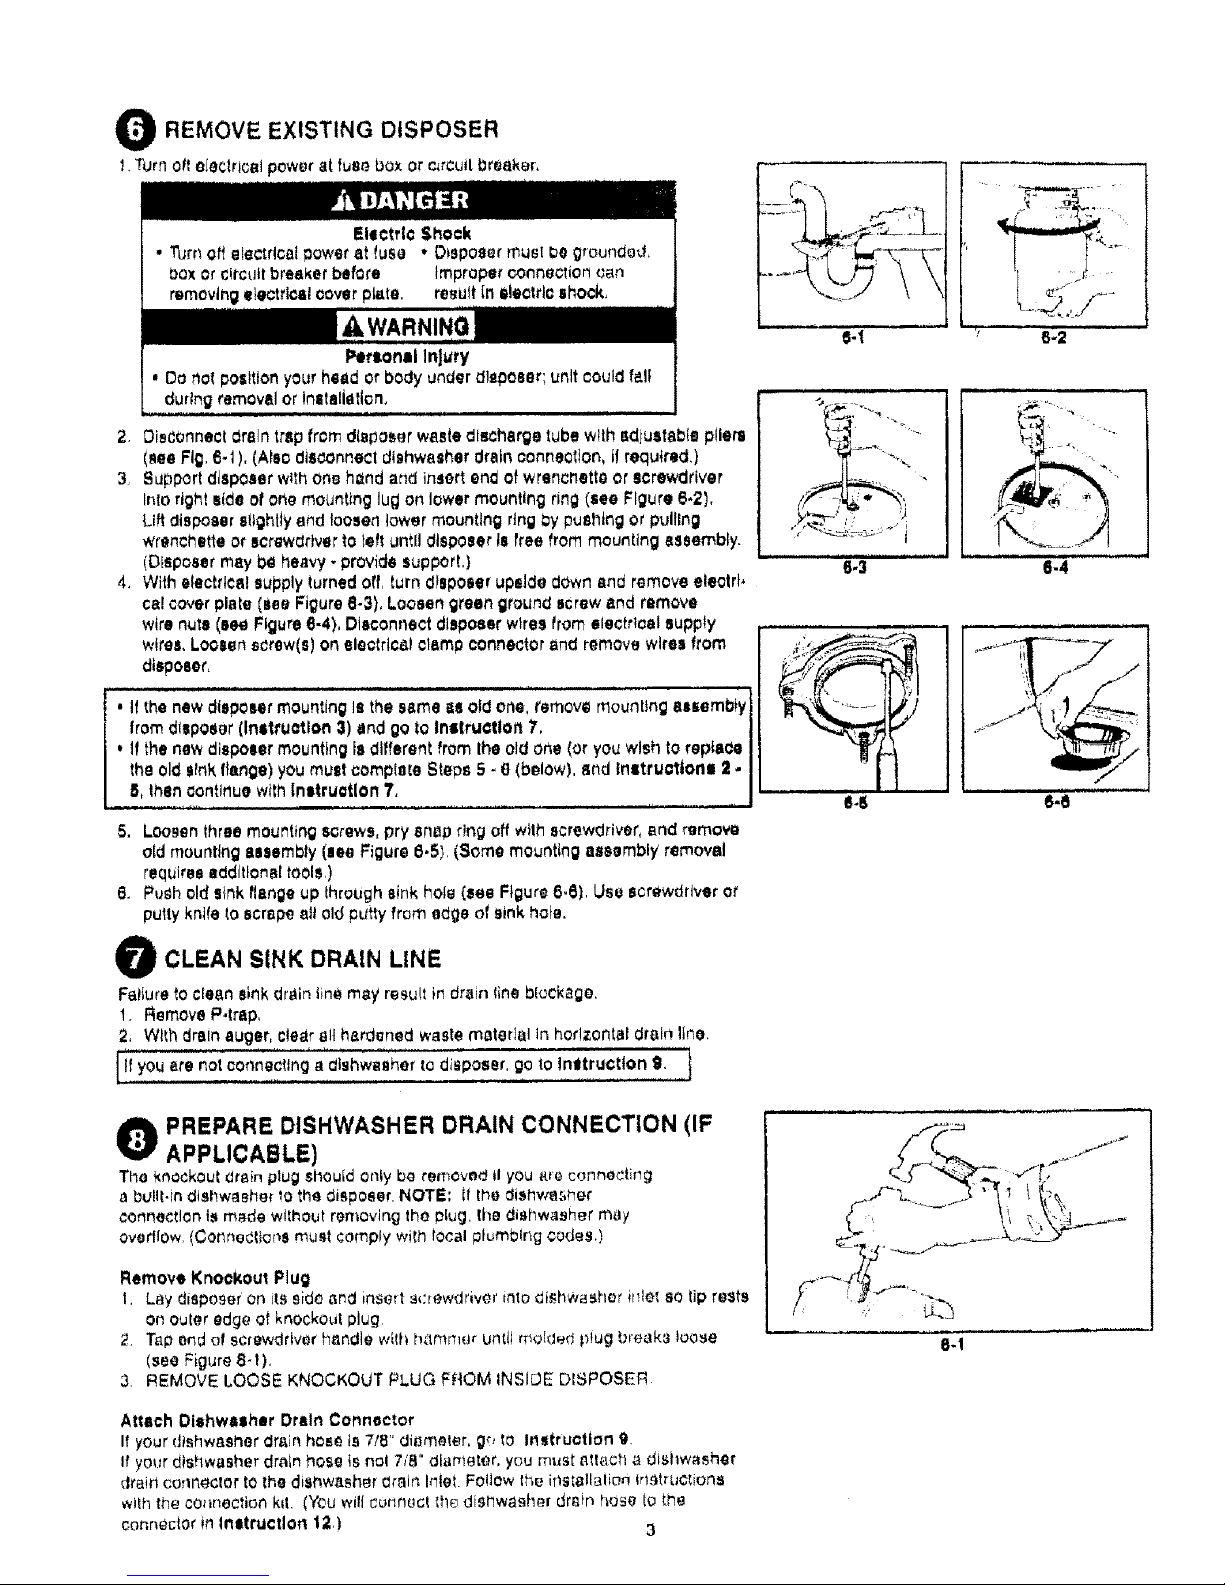
O REMOVE EXISTING DISPOSER
t. Turn O_telectrical power st fuse box or e=rcuitgrea_er.
2 DisCOnnectdraintrapfrom disposerwaste discharge tube with adjustable pliers
(_ea Fig 6-1), (Also disconnectdlshwe=;har drainconnection, t| required.)
3. _upport disposer w=thOneh=nd and insert =nOof wrench=tie cr screwdriver
into rightside of one mounting lug on lower mounting ring (see Figure 6-2},
Lift disposer stightiy af_d loosen lower mounting ring_y pushing or pulling
wrench=tie or screwdriver to left until disposer is free from mounting assembly.
(Disposer m=y be heavy - provide support,)
4, Withelectrical supply turnedoff turn disposer upside down and remove eleotrt.
cal cover plate (sea Figure 6-3), Loosen green ground screwand remove
wire nuts(see Figure6-4), Disconnect disposerwlres from siectdoel auppiy
wire=,Loosen screw(s) on electrical cramp connectorand remove wires from
disposer,
,.......,,., : ....
• II the new disposer mounting Is the same i_sOldor_e,remove mounting a=seml_y
from disposer (Instruction 3) and go to Ins!;ructlott 7,
. If the new disposer mounting is different from Ihe ol_ one (or you wish to repta_e
the old =Ink flange) you must compiate Steps 5- (] (below), snd Inatruottone 2.
5, then aontlrtue with Instruction ?,
5. Loosenthree mourting sorews, pry snap ring eft with screwdriver,and r_move
oid mounting assembly (Jee Figure e,5), (Some mounting assembly removal
requires additional tOOlS,)
6. PuShold sink flange up throughsink hole (see Flour= 6,8), Use acrewdriver or
putty knife to scrape air Didputty from edge of Sinkhole.
CLEAN SINK DRAIN LINE
Fattureto clean sink drain tins may resutt in drain fineblockage.
t. Remove P4rap,
2, Wl_hdrain auger, clearall h_rdened waste materiel in horizontal drain line.
tit not dtshwel_her te dO=poser, to Imttructfon 9 t
d
you
are oorlnacting
a
go
O REPARE DISHWASHER DRAIN CONNECTION (IF
APPLICABLE)
The knockout drain plug shoutd only be removed il you are c_JnneCtir_g
a bu!lt-in dishwasher to the disposer. NOTE; ft the dishwa.',her
¢onnecflon i,_made without removing the #tuO the dishwasher may
ovedfOw,(Coltnedtig¢,s must comply wifh local plumbing ¢odes,)
Remove Knockout Plug
1. Lay disposer on its side arid insert s_:rewdriver into dishwasher iMlet so tip rests
on outer edge of knockout plug
2. Tap end of screwdriver handle wkh h,ttmme_ unti4 me[dad piug break'3 teose
(see Figure 8-t),
3. REMOVE LOOSE KNOCKOUT PLUG FROM INSll3E DISPOSEIq
Attach Dishwaahsr Drain Connector
It your dtshwesi'ter drain hose is 7/8" diameter, g_, to Instruction 9.
If your dishwasher drain hose is nol 718" diameter, you must attach a distlwashor
drain cenRector to the diehwa.sher drain Inlet Follow the iTtstallalion IrlStrliCtions
wtlh the co,inaction k_l. (You will c_nr_ecl the di_,hwa_her drain hose to the
connector in Inst_ctlort 123 3
6-2
i ii i i ,,
8-3 8-4
8-S 8-8

O CONNECT DISPOSERTO ELECTRICAL SUPPLY
Electric Shock
.lrrlproper connection of the eqdlpment-ground_r_g
conductor con result in o ri_k ofelectric ,=hock
Check with• qualified electrician or serv,ceman if
you are indoubt as to whether the Appliance te
properly grounded Do not modify the plug provtd{id
with the appliance - if Itwill nol fit the outlet, hove a
proper outlet Inatolted by o qualified electrician,
, Thisdisposer must be properly grounded,
• IL3on01altach groundwire to gos supply pipe.
. Disconnect power before installing or sorvicingde.
poser,
• If threo*prong, grounded prug isu,,ed, plug mu=_tbe
in=erred IP,tothree.hole, groundedrecept=lle.
. All wiring mull comply with local electrical codes,
• Do not roconnect electrical currentat meln _ervlce
ponel until proper gropnds ore lnstolled,
,,,,,,,,, .... , ..............................................
There ate two w=ye to connect electdeol power to your disposer'
I,) Directwire
2,) Piug in cord. In,=lalled at Factory,or Iron KenrilOre Kit _'80686 (for eli models tistec} in this manual)
Disposer Circu|t Requirement=
Ensure the followingetectrl¢ol roqulrements are mot bo!Ote connecting
wired electrical circuitcl_agram):
•Removo luse (oropen Ihe circuit bre_l<er) before connecting *
dtsposor to circuit.
, BatCh feed dtspoeorsdo not require o eeperale walt Switch
- uwttuhis built Into disposer_nd dlepc_sert_wtre_ directly
into clr;uit.
• If jun¢lionbox is used, conneclthe junction box to the switch
on a separate !5 or 20 Amp, 115 Vottcircuitwith theappropri-
ate cable. (U_e 14gauge wirewith 15 Amp circuit,end 12
gauge wire with20 Amp ctrcuit !,
disposor Io owttch (see Figure g-f for typical dfrect
if you Inetoil e doubts recoptacle tohandle other smell kitchen
appliances, Include o w_,il==witchIndtsposer receptacle circull
and wire other receptoolo directly topower source,
Thisdisposer requires 8 Switch wlth Omarked "Off'* position
(wired to dtl¢onnect atl ungrounded suppiyconductors]
Insl_lted wilhtn ,debt of the disposer sink opening {1 HP mini.
mum rating),
Connect Disposer tO Eloctrlcel 8upplytGtound Ollpooer
Followthese Instruct!one to direct wire the dlsposar. (If adding e cordend plug, follow
Ihe directions included with the cord ond plug),
1. Remove electrical cover plotsfrom bottom of dl_poser ond pull out black and white
wlrea (see Ftgure_)-1],DO NOT REMOVE CARDBOARD INSULATION SHtELD
2. Run electrical cab_ethrough access hole (A) on bottom ofdtspo,=er(with 1!2"
conduit or 318"flex) _md securewith clamp connector.
3, Strip wires book approximately 1/2 inch, Connect w_tte (neutral)
electrical wire to white disposer wire, and bleok (hot) eleclrtcsl wi_eto black
disposer wire (may have colored stripe) wish wire nuts (sag Figure g.t ). Insulate
wire connections withelectrlc_l tope. and pushconnections into disposer housing
without displacing cordboard insulation shield. Do not rein,stall olectrtcP.Iplate unll!
disposer is properlygrounded.
Once the Circuit you ore using ls grounded al the service panoL attach the groudd
wiro to the green ground scrow (B) tn the electrical cover piers opening and ,._ecure tt_e
electrical plate IC) (see Figure g-!).
Grounding tnltrUctlono for Direct Wirod Unite
This oppJtance must De connected to a grounded, metal, pornlar_onl wiring sygtem; or #,n equ pmen_..;Fo_nding
conductor must be run with ihe circuit conductors and connocled to the oquipment-groundi_g tormlnai or lead
on the appliance.
Grounding ln,=tructtor_s for Cord Connooted Untt_
Thls ,;._ppfiancu must be grounded In tt_o evgnl of ,Elttlalfuncl]on or brea,kt:t_wr_ grounding providos a path of least
resistance {or elating current to roduce tits risk of electric shock The appliances is oqutpped with a cord having
an equIpmenbgrounding conductor and _:1groundlr_g plug, The ptug mu.'_t be plugged into an appr_pda'te outlet
t_at ts proporfy inslalted and grounded in accordance with all local code,_ and ordinances,

e CONNECT DISPOSER TO MOUNTING ASSEMBLY B C
/
1, Posltlon disposer with three mounting tabs (A) aligned inposition to s_ideover mounting
tracks[B) {see Figure tO.i),
2. Liftdisposer, Insert lop end (mounting gasket) Into mounting assembly, and turn tower
mounting ring to right(with wrenchetteor screwdriver] -hill mounting tabs iock over ridges
(C) on mounting ring tracks (see Figure t0-2). (MAKE SURE ALL THREE MOUNTING TABS
ARE LOOKED OVER RIDGES.] Disposer will now h_ng by ttserf,
O ATTACH DISCHARGE TU BE TO WASTE DRAIN LINE
Determine appropriate Installation based upon new tr'retallation or plumbing configuration: Two.
Bolt Discharge Tube orOne.Bolt Discharge Tube.
Two-Bolt Ola¢harge Tuba Instillation (Preferred Two.Bolt Instillation)
q I is,
,f ,e.L_,ng ex,=.,ng _,.,.._€,, ,¢m.'_e _n_ d,,.._rd _xlst,nu d....... =,.,_"_' "'_'_
not seal properly withold discharge tube.)
1, Sllde metal flange (A) overdteChe,rge tube (B) (see Figure 11.1),
2, Insert rubbergasket (C) intodischarge Outlet, Secure mota_ fl=tnge and discharge tube to
disposerwith two bolts (C),
3, Rotate disposer so thai discharge_gbeis aligned With drain trap, (To prever_tleaks, do not
pull or bend discharge tube todrain Imp,} If discharge tube is too Ior_g,out off e= much of
tubo u necessary wttt_hacksaw(frisks sure cut testraight and clean,} If dl_lchirgo tube is
too short, you can purchase sn exler_slon from e hardware store. (Disposer must remain It_
vertical position topreventv!_r=_tlon,)
4 Place P-treI_ nut,then beveled washer (noI supplied) on bottom ofdisch_trgeWoe end tfghten
on drain trap,(If you have adouble nit,k, u._eseparate drain traps forboth sides,)
5 Ensure Iowsr mounting ring is securely locked over mounting flange ridges,
Although the euppltedDischarge Tube is preferred, a straighI discharge may be used (see Figure
1-2), Slide metal flange (A) over straightdischarge tube (B. not supplied}, install rubber gasket
(C) Into discharge outlet,and secure metal flange and straightdischarge fube to_leposer with
two bolts CO)
One.Bolt Dtiottarge Tube Installation (Preferred One-Bolt Initslletlon)
t. Slide m_tai flange (A) over discharge tube (B) (see Figure ! 1.3),
2 RUbber gasket tO) must be installed on top end of discharge tu_g. Secure metal ftango and
discharge tube todisposer withbolt (D),
3 Rot_!e dif_poser so the=discharge tube J,_aflgned with drain trap, (To preventteaks, do not
putJ_r bend discharge tube to drain trap,) if d_acharge kJbeis too long, cut oft aSmuch of
tubea_ necessary wltt_hacksaw (make sure cut Is slraighl and clean,) If discharge tube is
too short, you _an purchase an exlenslon lram a hardware store, (Disposer musl remain in
vedtcef posltlorl to prevent vibration.)
4 Piece P-trap nut, then bevelod washor (nol supplied) on bottom of discharge tube _lnd tighten
on drain trap. (I! you have s double sir_k,use sgpar;_te dr_tn traps for both Bides,)
5 Ensure lower mounting ring is securetylocked over mounling flange ridges.
AIthOugh _he suppfied Discharge Tube is preterred, a Straigh_ discharge may be use_, Slide
metal flange over straight discharge tube (not suppfled), install rubt_er gaskel onto discharge
rude, an_ secure metal flange and strafghl discharge tube to d_sposer with one bolt (reference
Figure t 1-2).
_I0-I
l 1
t0"2
11-1
C
.... / A
1%2
/
D
t !-3

O CONNECT DISHWASHER DRAIN {IF APPLICABLE)
COqn_J_t!h_._dl:;hw;J.shel Io Lh.j_'ftspc_crtfvough ar_air 9_lp (A) (Moll
dishwasher m_nufecturarS _'ecomPnen_tt_t the discharge water rune through
an [f!r g_p to prevent backtiew andi{)r dlshwast_et contaminet!on,) IEn_ure
k_ockoul plug IS _en!oved (,_eoinstruction 1) Pfumbtn,q connection8 nt_st
comply Wr#ltOC_qlpktttlbing codes.
• If you have a ?/8" diameter dishwasher drair_hose, use a hose clamp to
attach the drain hose Io :he dishwasher inlet, (Verify that hose you are
using ls rated for dishwasher use)
. If you have already attached e dishwasher drain connector to your d_sh-
washerdrain hose (for drain hcee other th_n 7/8" diameter), usa a hose
clamp to attach fho drain ho_e/conneotor to the dLshwasherInfer on the
dtsposer
O ATTACH SPECIFICATION DECAL
The dteposr_r_peciflcatton decal h_s e removable portion to place on the front
aideof theinstalled disposer, containing lmportan| informationIn the event
service 18required,
1, Detach perforate'dportion of speclficatior_ decal from lower portion Of
disposer
2, Apply _feca! to disposer wt_ereit carl be easily read,
Figura12.l
The disposer Installation il complete. Using the stopper, fill the link with water. Remove
the ¢tcppcr, turn d_=po¢¢r cn, _nd ¢h©ck und¢," €tnk for leak€, R¢_d ALL SAFETY INSTRUC-
TIONS on the next pegs before operltlng the disposer.
_,WARNING
W_en ustng ate€trio eppliancas, basic pre_tuttone are always to be followed, including:
• Read all Instructions before using the appliance. . This productIsdesigned to dispose of normal houaet}old
• Toreduce the risk ofInjury ¢tose supervisionis re_ui_ad when _n foodwe|e; inserting msleriels other _an foo_ waste
_pPltance Is used near ch}ldron. Irlto disposer could cause personat _njuryanolor property
. t3o riot putfingers or hands into s waste disposer, damage,
. Turn the power Swltch tOthe off position before attempting to clear a '* TOreduce the risk of injury,do not use the sink containing
Jam, removtrlg an oDjact fromthe disposer, orpressing reset button, the disposer forputposel_ot_sr than foodprepar_.tion {such
• When attemptingto loosen s am in e waster disposer, use4he self, o_s baby birthingor washing hair)
service wranoheffeor s tong wooden ol3lectsuch es a wooden spoon L)Onot d_lpon of the following t_ the disposer:paints.
or the wooden handte of a broomor tool& sotverffil, hOUSeholdcleaners and chorales,Is, automotive
, When attempting 1oremove objects from a waste disposer usa _ fluid=t,ptalltlcwrap, or whole COrnhuSk_,
Iong-_andle¢l tongs or pliers. For a ¢tlsposer that Is magnetically • Replace anti-splash baffle when worn Io help prever_t entry
actuated_ use nonmagnetic tool& or etectton of material and water,
o T_reduce the risk of injuryby materials that are expellable by a * Ft_E HAZARO: Do not store flammable Item_ such as rags,
waste J_sposer,do not put ihe following into a disposer: Clam of paper, oraerosol can_ near dtae_ser, Do no_ store or use
eys_etshells, caustic drain cleaners or similarproducts glass cherts, gasoline or other flammable vapors and Ifquid_ [n vicinity
or Dlastic, large (whole} bones, metal (such as bottle caps, _lnc_r_s, ot disposer.
or uterisiis), hot greese or other hot liquids

CONTINUOUS FEED DISPOa£RS
I, RO_OVe )topp_._( from slrlk opentn_ and run ntrorlg flow of cold v'_'_(er
2, Turnon wall switchto start d_spos_r,
3, SlOWlyInsert food waste i{_tod_eposer and positton stopper tO mlnlmhtc possible eject_o_ of
mater_alwhile grinding (_ee Figure AS,
4. AfIer grin0tng Is temples, turn disposer off _nd run water for st least f5 eecdnde to flush
dra(n line.
BATCH FEED DISPOSERS
Batch f_ed disposer differ from¢omtnuouafee€ models In thEtthe batch feed ell/oH switch L,_
builttn(o the disposer end act(vated 13ythe _topper, (See Inmtruetton t, In._tal/atlon Dimensions
¢harL for mode! reference,) ,,
1. Read Important safety Instructions contained in the Inmallation, Care & Usa manual,
2, Remove stopper from sink opening and place foodw_ste tnto dlsposer grindchamber, Do
notpack chamber with waste, Plade stopper back in stnkopening, Run a strong flow
ofcold water,
3. Turnon d_sposerby lifting stopper=ll_ghtlyand lurrHng to left or right until dtapcser starls.
(See Figure B; Seal. Completelyin, Drain. Lift t/4 inch end turn, Start * Turnfully left
or right,)
4, After grin_lng te complete, turn disposer off Dyremovlrlg the stopper and allow water to run
f_r at least 15 seconds to flush drairmline,
, Flrstturnon _1moderate to strong
ftowof cold water and then turn
onthe disposer, Continue running
¢o_ water for t5 s_cond_ at_ef
grinding is _umplated to flush the
drainline.
, Grind hard m_iterlals such as smal!
bones,fruit pRs,_nd ice, A scour.
Ing action tacreated by the par.
t_clasinside the grtnd chamber,
* Grtndpeelings trom citrusfruits to
fresher! _p draingdletl_,
. Usa a diSpOser Claimer, degreaser,
or do(_dorizer_e necessary to
relieve objectionable odors c_used
I_ygrea_ build.up.
DON'T..,
• Don'( pour grease or f_t clownyour disposer or any
drain, Itcan buildup tnptpee and cause drain
Plockegea. Put grease In a Jaror can and dispose
Inthe trash.
• Don't uee ho_ water when grinding foo_ WaSte. It
teOK todrain hot water into the disposer beh,,'een
grindingperiods,
• Don't flit disposer with a lot of vegetate peele aHet
once, Instead, turn the water and disposeron ftrsl
and then feed the peels in gradually.
• Don't grind extremely fibrous materlel_ like corn
husk& _rtlch_kee, etc., to avoid possible drain
blockage
• Dan't iurt_ off disposer until grinding Is completed
and on}y sound el motor and water te heard.
• Don't be alarmed If a brown dis¢otorallon appears
on the facee_ lhe grindingdisc. This tertermal. It is
surface discoloration only _nd will not affect _holifo
ot performance of the disposer.
Figure A
k
Figure B
CAUTION
I-3egutatlytnspectdtsgosar
anct plumblng fittings for
water }elks, aswater leaks
cart cause property
damage, MantJfe.cturer
cannot be headresponsible
for propertydamage as a
result of water _eeke,
CLEANING DISPOSER
Overtlm_,foodparricidemay8_¢umult_totnth_grind_._ambetaItdbaffle, Anodor ftorrtthedisposer
I_u_u_liy_ilionofgre_ts_,_r_dfOO_Ouildup,C_ul_edby _n_uffldentw_torttowduring_nd slier disposer
use. Tgcleandigpo_er:
t, _rrl O_|_ _nddl_.carlnec!powersuPpty.
2 _ea(_1{h_h$Ink``_p_ingand_1_nu_1g@rt_d_fapIa_hba_e_n_Jin_id_uP}_t_i#_1g_¢_t_e_
with _#.o_rin_ pad.
3, Pl_Ce _to_per i_t8ink opening _r_ flit _lrtk hot{Way wHh w_m water,
4, Mix ti4 Cup b_k_t_g soda wHh w_tot Turn _l_,as_r of! Brld tertl_Jve .'HOpp_r Jr_lm _mk _t _rr_a b_te
tow_shitwaylooseparticle9
RELEASING DISPOSER JAM
If Ihe m_tor stops during operallon, the 0ispo_er may be jammed Toreto_'_sejam;
_, !ur_n...ofU.b.e._tsp_:sarand water,
2. tnae_t one end of the self-service wronchet_e trite the center hoie on _he bottom ofthe
disposer (see Fig_JroC) Work the wrenchelte back and forth u_tll it lurn_ one furlrev_luI_on
Flemove wrencaette,
3r Reaci_Into the Otspo_erwith to_gs and remove,abject(el. Allow the disposer motor tocoot
for3 - 5 rninu_esand tightlypush red reset butlon on the disposer bottom (see Figure
C). Ill the motor rommns irtoperattve, check the service panel for _ripped circutl breakers
or blown fuses )
Figure C

KENMORE FOOD WASTE DISPOSER WARRANTY
Model 6010
Model 6011
Model 11012
Model 6013
Model 60552
Model 1105_4
Model 80556
One Year Full Warranty Model 8055g
One Year Full Warranty Model 00662
One Year Full Warranty Model/t0563
One Year Full Warranty Model 110S71
Three Yur Full Warranty Model 110572
Seven Year Full Warranty Model 605111
Nine Year Full Warranty Model e06111
Five Year Full Warranty
Four Year Full Warra_nty
Five Year Full Warranty
Four Year Full Warranty
Five, Year Full Warranty
8even Year Full Warranty
Nine Year Full Warranty
For the duration of the warranty from the date of purchase, Sears wilt
repair or replace, free of charge, defects in material or workmanship which
appear in this disposer.
WARRANTY SERVICE IS AVAILABLE BY SIMPLY CONTACTING THE
NEAREST SEARS SERVICE CENTER/DEPARTMENT IN THE UNITED
STATES, This warranty applies only while this product Is in use in the
United States,
Thts warranty gives you specific legal rights, and you may, also have other
rights,which vary from state to state. This warranty applies only while this
product is In use in the United States.
Sears, Roebuck and Co.
Dept. 817WA
Hoffman Estates, IL 60179
To call for repair service:
Call 24 hours a day, 7 days a week
1-800-4-MY-HOME * (1-8oo.469-4663)
SEARS
 Loading...