

Kenmore 59670003990, 59670002000, 59670003002, 59670003000, 59670004000 Use & Care Manual
...
E L ! T
E
Bottom-Mount Refrigerator
Use & Care Guide
Refrigerador con montaje inferior
Manual de uso y cuidado
Refrigerateur a compartiment inferieur
Guide d'utilisation et d'entretien
I'll
r"
I
I11
O!
"11
10937034 Sears, Roebuck and Co., Hoffman Estates, IL60179 U.S.A. www.sears.com
Sears Canada, lnc, Toronto, Ontario, Canada M5B 2B8 Au Canada, www.seare.ca
I
\
_ Recognize symbol as a safety precaution.
this
Electrical Requirements
_WARNING
To avoid electrical shock which could cause severe personal injury or death, do not cut or remove round grounding prong
from plug. Do not remove warning tag from power cord.
Do not use a two-prong adapter. Do not use an extension cord.
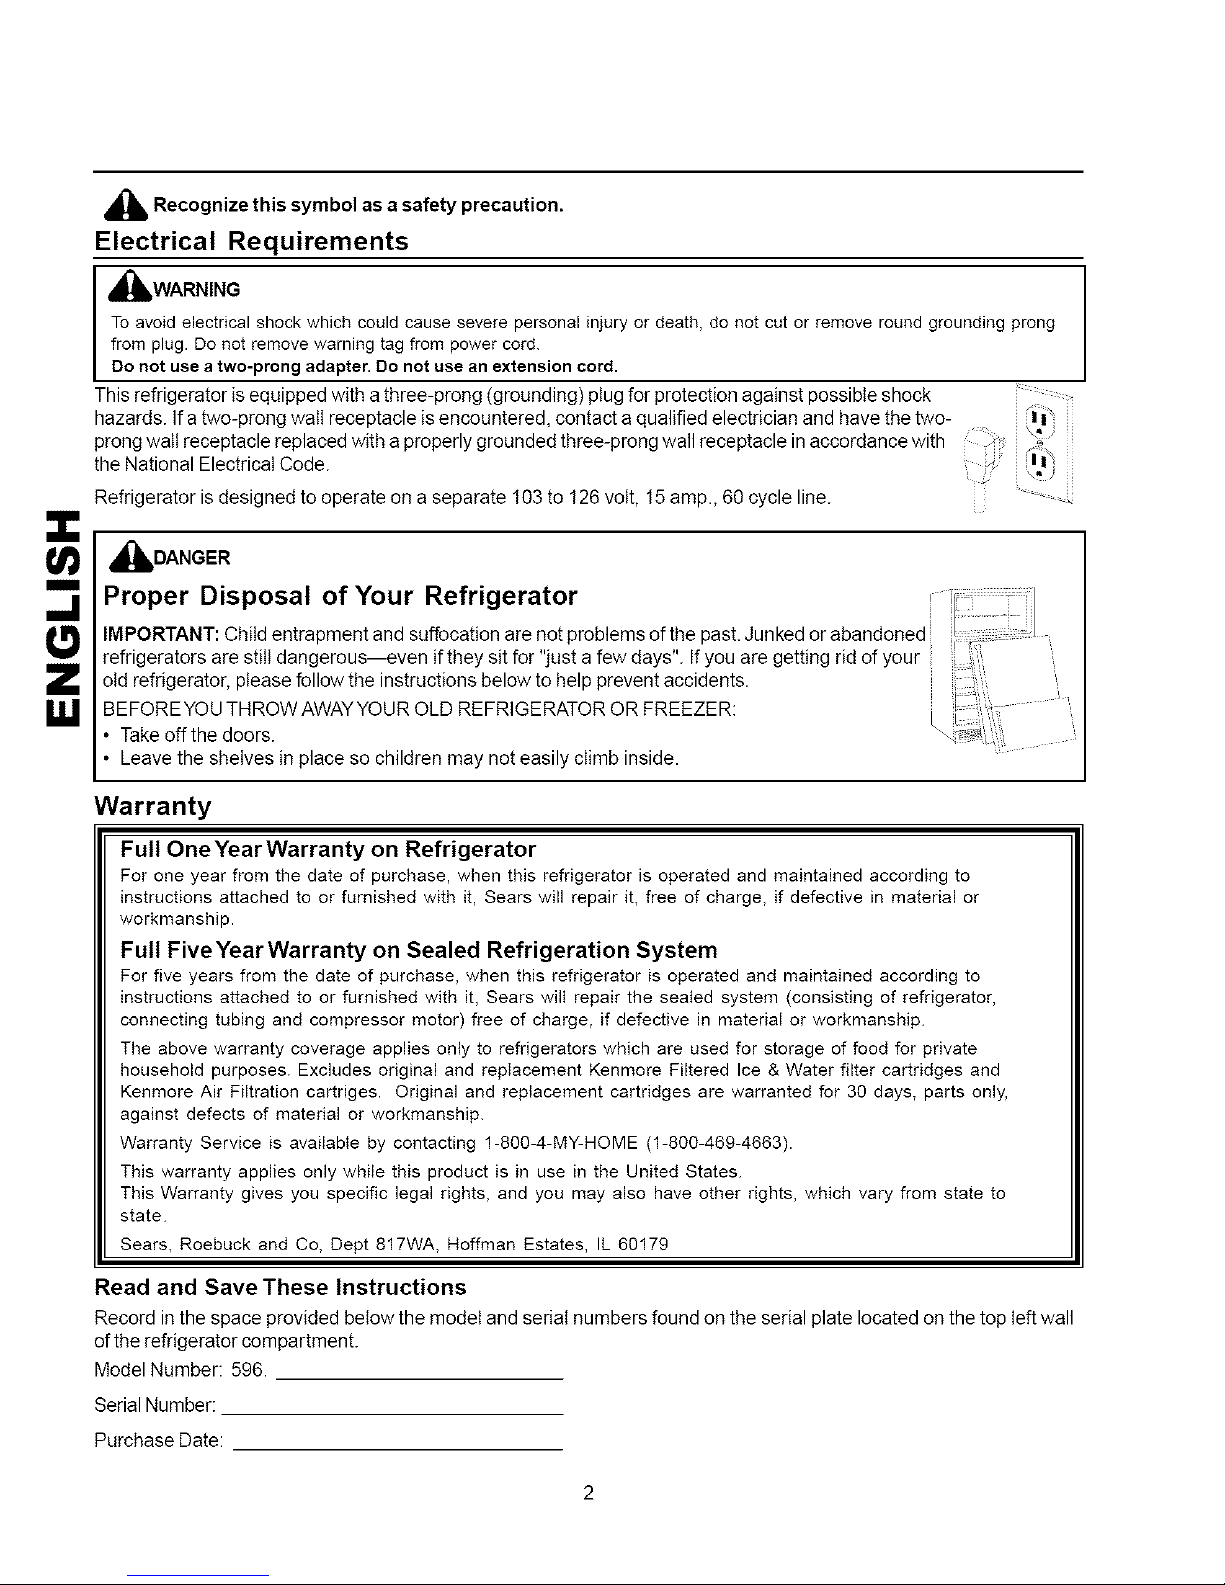
This refrigerator is equipped with a three-prong (grounding) plug for protection against possible shock ....................
hazards. If a two-prong waII receptacle is encountered, contact a qualified electrician and have the two- !"
prong wait receptacle replaced with a properly grounded three-prong wall receptacle in accordance with :> ._
the National Electrical Code. 'l I"
Refrigerator is designed to operate on a separate 103 to 126 volt, 15 amp., 60 cycle line.
_bDANGER
m
Proper Disposal of Your Refrigerator
IMPORTANT: Child entrapment and suffocation are not problems of the past. Junked or abandoned
refrigerators are still dangerous--even if they sit for "just a few days". If you are getting rid of your
old refrigerator, please follow the instructions below to help prevent accidents.
BEFOREYOU THROW AWAY YOUR OLD REFRIGERATOR OR FREEZER:
g,I
• Take off the doors.
• Leave the shelves in place so children may not easily climb inside.
i
i \" }
Warranty
Full OneYear Warranty on Refrigerator
For one year from the date of purchase, when this refrigerator is operated and maintained according to
instructions attached to or furnished with it, Sears will repair it, free of charge, if defective in material or
workmanship.
Full FiveYear Warranty on Sealed Refrigeration System
For five years from the date of purchase, when this refrigerator is operated and maintained according to
instructions attached to or furnished with it, Sears will repair the sealed system (consisting of refrigerator,
connecting tubing and compressor motor) free of charge, if defective in material or workmanship.
The above warranty coverage applies only to refrigerators which are used for storage of food for private
household purposes. Excludes original and repIacement Kenmore Filtered Ice & Water filter cartridges and
Kenmore Air Filtration cartriges. Original and replacement cartridges are warranted for 30 days, parts only,
against defects of material or workmanship.
Warranty Service is available by contacting 1-800-4-MY-HOME (1-800-469-4663).
This warranty applies only while this product is in use in the United States.
This Warranty gives you specific legal rights, and you may also have other rights, which vary from state to
state.
Sears, Roebuck and Co, Dept 817WA, Hoffman Estates, IL 60179
Read and Save These Instructions
Record in the space provided below the model and serial numbers found on the serial plate located on the top left wall
ofthe refrigerator compartment.
Model Number: 596.
Serial Number:
Purchase Date:
Contents
EIectrical Requirements.....................................................2
Proper Disposal ofYourRefrigerator..................................2
Warranty.............................................................................2
Mode[ Identification ............................................................2
InstallationChecklist ..........................................................3
InstalIationInstructions.......................................................3
Leveling Refrigerator..................................................3
Door Removal.............................................................4
Door Reversal.............................................................5
InstallWater FiltrationCartridge..................................5
InstallAir FiltrationCartridge.......................................5
Connect icemaker water supply line ..........................5
ControIs..............................................................................6
Fresh Food and FreezerControls................................6
Setting Controls ..........................................................6
Fresh Food Features..........................................................6
SpiIIproofShelves .......................................................6
Slide Out Shelves........................................................6
Adjustable Position Drawer.........................................6
Drawers.......................................................................7
Covered Utility Bin ......................................................7
Dairy Compartment .....................................................7
Door Buckets...............................................................7
Door Shelf ...................................................................7
Adjustable Dividers .....................................................8
Tail Package Retainer.................................................8
FreezerFeatures................................................................8
Automatic IceMaker....................................................8
Slideout Shelf..............................................................8
Vertical Shelf Divider ...................................................8
Tiff-OutBin ..................................................................9
Care and Cleaning.............................................................9
General .......................................................................9
Odor Removal.............................................................9
Adhesives ...................................................................9
DoorGaskets ..............................................................9
Condenser Coils .........................................................9
Glass Shelves .............................................................9
Light Bulbs ................................................................10
EnergyTips ......................................................................10
VacationTips ....................................................................10
Normal Operating Sounds ...............................................11
Before CallingFor Service ...............................................12
Espaffol............................................................................13
Frangais............................................................................25
Note: Translationmay sometimes cause variationsin mean-
ing. Inall cases where meaningvaries,the mostaccurate
meaningwilI be the Englishversion of this document.
Installation Checklist
Verify the following has been completed to ensure proper
operation of your refrigerator.
Doors
• Handles are solidly attached.
• Handle side of door is _/8 higher than hinge side of
door. (See installation instructions.)
• Doors seal completely to refrigerator cabinet.
Leveling
• Refrigerator is tilted ¼" (6mm) from front to rear and
level side to side.
Ice Maker
• Water supply to refrigerator is attached and turned on.
• Water leaks are not present at connection between
household water supply and refrigerator. (After 24 hours
check connection for water leaks.)
• Ice maker arm is in on position for ice production. (It
may take up to 24 hours for first harvest d ice.)
Electrical
• Properly ground 3-prong wall receptacle is used to plug
in refrigerator.
Water Filter
• Bypass cartridge is shipped with refrigerator has been
removed and water filter is installed (See water filter
installation and operating instruction shipped with water
filter.)
• Verify there are no water leaks around water filter head.
• Ifwater filter is installed water pressure to refrigerator
must be a minimum of 35 psi.
• Retain bypass cartrdige for use if water filter cartridge
becomes clogged before a replacement can be
purchased.
Air Filter
Air filter assemblies are installed over the each air
return in the fresh food section. This assembly is
shipped with filter cartridge already in place.
Installation Instructions
Proper installation wili ensure that this refrigerator
operates most efficiently.
Keep flammable materialsand vapors, suchas gasoline, [
I WARNING I
awayfrom refrigerator. Failureto do so can result in death,
expos on_ fre_ or burns.
• To ensure proper ventilation for your refrigerator, allow
for a 1" (2.5 cm) space at the top of your refrigerator.
• Make sure you leave some extra space at the back to
allow for the water line connection.
NOTE: Do not install the refrigerator near an oven,
radiator, or other heat source. Do not install the
refrigerator in a location where the temperature wili fal[
below 55°F (13°C).
Leveling Refrigerator
Some installation may require door reversal to achieve
full door swing. If so proceed to Door Reversal section
before leveling your refrigerator.
Ifyour refrigerator requires ice maker water supply
connection_proceed to Connect Ice Maker Water Supply
section before leveling refrigerator.
1. Plug in power cord.
2. Move refrigerator into fina[ location.
3. Leve[ refrigerator using a level placed on top of the
refrigerator.
• Remove toe grille bygrasping both ends and pulling
straight out from unit. Grille snaps free.
3
m
r-
mmmm
m
ill
• The teft and right corners of front cabinet base
contain screws to allow individual adjustment of all
four corners. Adjust the front and rear of each
corner untiI leveling iscomplete.
• Turn rolteradjustment screws(Aor B)tothe right to
raise cabinet, or to the left to lower cabinet. Front of
refrigerator must be 1A.(6 mm), or ½ bubble on your
level, higher than the back of your refrigerator.
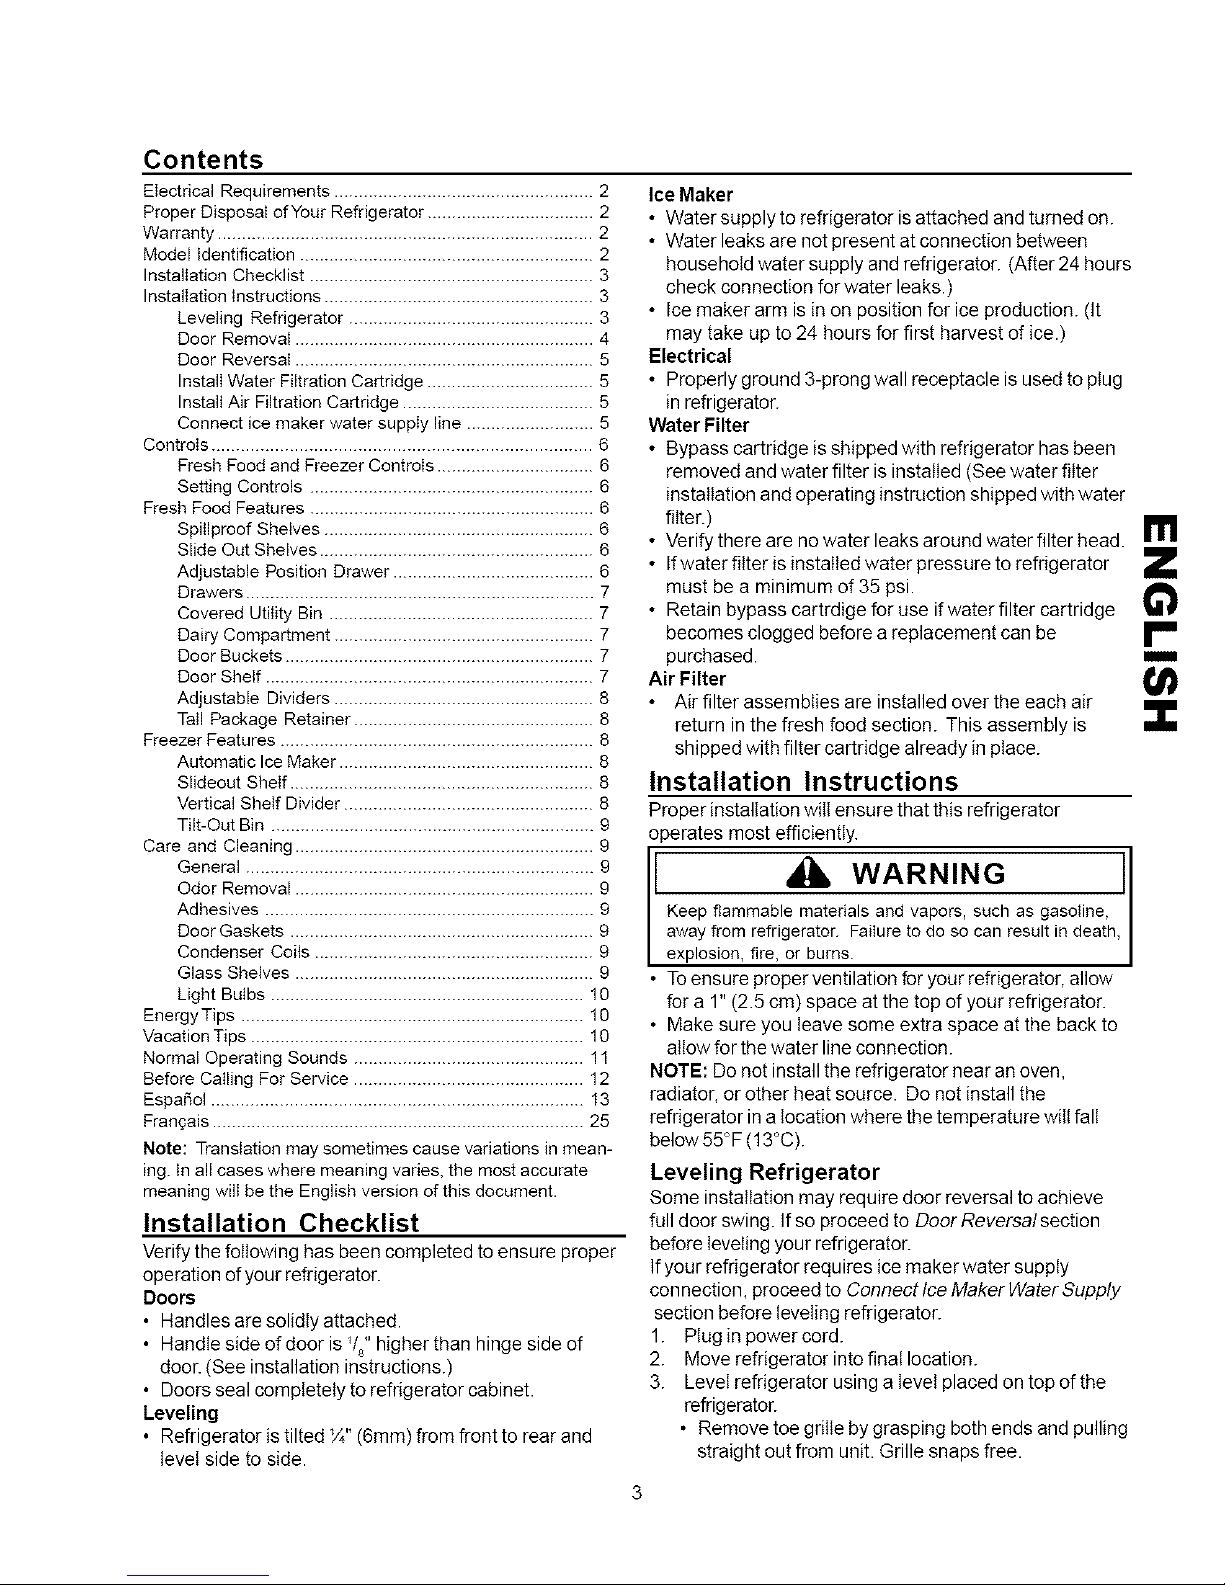
• After leveling, turn stabilizing leg(C -some
models) to the right until firmly against floor.
• Locate metal clips(A) mounted to inside of toe grille
assembly. Hook bottom set of clips inside metal
molding beneath freezer. Press forward on upper
part of grille until top portion snaps into place.
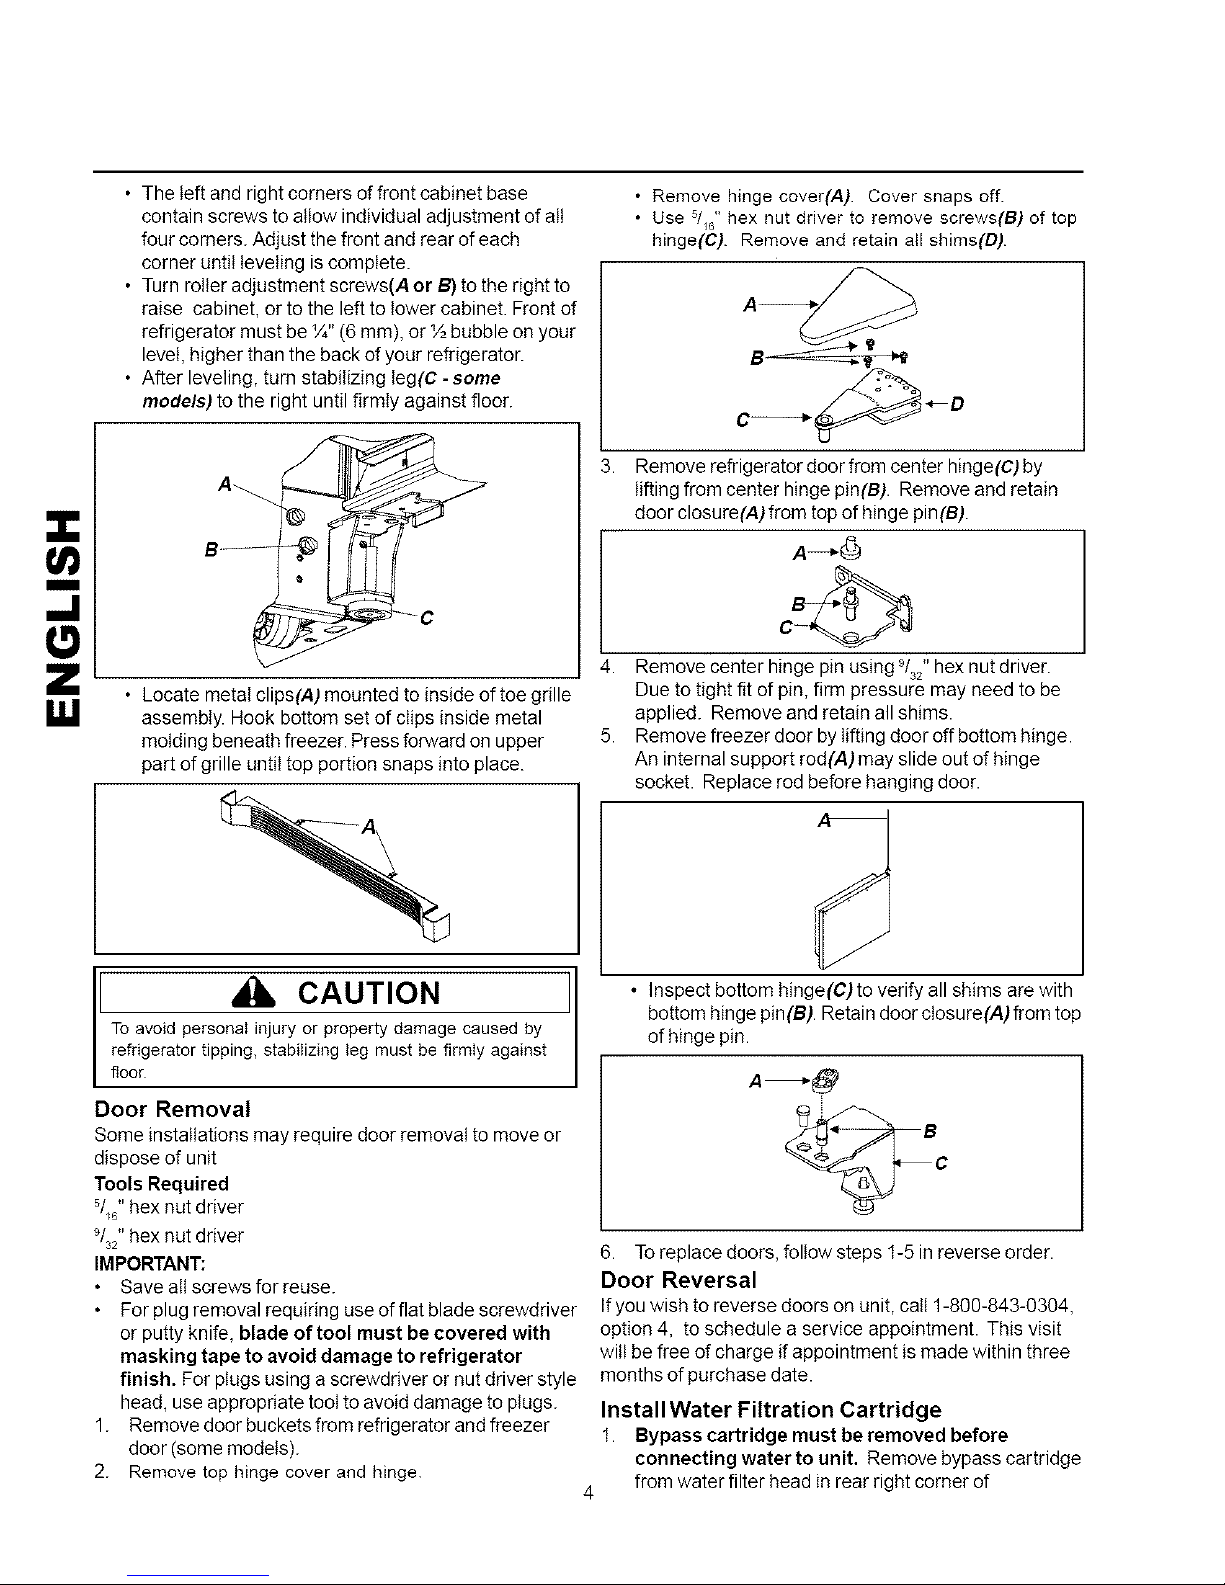
• Remove hinge cover(A). Cover snaps off.
• Use 5116"hex nut driver to remove screws(B) of top
hinge(C). Remove and retain all shims(D).
3. Remove refrigerator door from center hinge(C) by
lifting from center hinge pin(B). Remove and retain
door closure(A)from top of hinge pin(B).
A--*6
4. Remove center hinge pin using 9/32"hex nut driver.
Due to tight fit of pin, firm pressure may need to be
applied. Remove and retain all shims.
5. Remove freezer door by lifting door off bottom hinge.
An internal support rod(A) may slide out of hinge
socket. Replace rod before hanging door.
Toavoid personalinjury or propertydamage caused by
refrigeratortipping, stabiIizingleg must be firmly against
[ CAUTION ]
floor
Door Removal
Some installations may require door removat to move or
dispose of unit
Tools Required
5/_,,hex nut driver
9/32"hex nut driver
IMPORTANT:
• Save all screws for reuse.
For plug removal requiring use of flat blade screwdriver
or putty knife, blade of tool must be covered with
masking tape to avoid damage to refrigerator
finish. For plugs using a screwdriver or nut driver style
head, use appropriate tool to avoid damage to plugs.
1. Remove door buckets from refrigerator and freezer
door (some models).
2. Remove top hinge cover and hinge.
• Inspect bottom hinge(C)to verify all shims are with
bottom hinge pin(B). Retain door closure(A)from top
of hinge pin.
A_
6. Toreplace doors, follow steps 1-5 inreverse order.
Door Reversal
If you wish to reverse doors on unit, call 1-800-843-0304,
option 4, to schedule a service appointment. This visit
will be free of charge if appointment is made within three
months of purchase date.
Install Water Filtration Cartridge
1 Bypass cartridge must be removed before
connecting water to unit. Remove bypass cartridge
from water filter head in rear right corner of
refrigeratorsection.Twistcartridgeleft¼turnand
pulldowntoremove.Savebypassforuseatalater
date.
2. SeeWater Filtration System Installation and
Operation Instructions provided with water filter
cartridge for filter installation and operation.
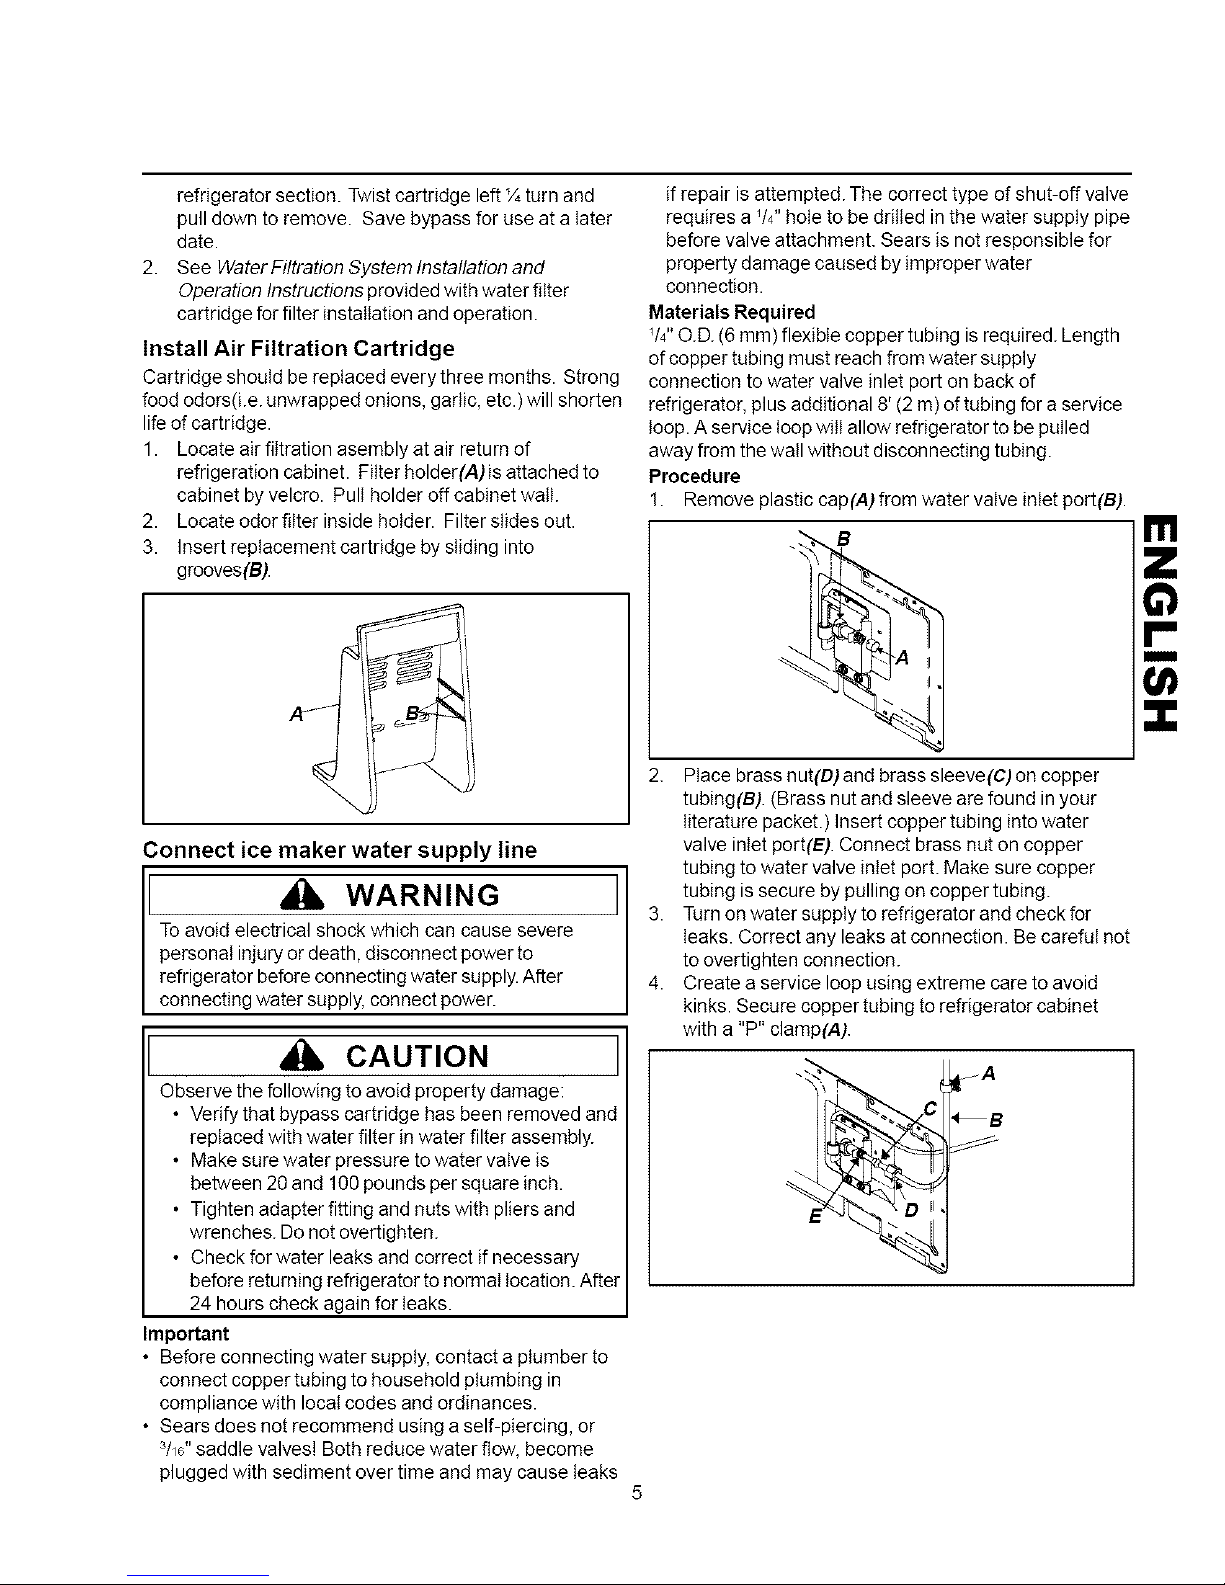
Install Air Filtration Cartridge
Cartridge should be replaced every three months. Strong
food odors(ke, unwrapped onions, gartic, etc.) will shorten
life of cartridge.
1. Locate air filtration asembly at air return of
refrigeration cabinet. Fitterholder(A)isattachedto
cabinet by velcro. Pull holder off cabinet watt.
2. Locate odor fitter inside hotder. Filter stides out.
3. Insert replacement cartridge by stiding into
grooves(B).
if repair is attempted. The correct type of shut-off valve
requires a V4"hole to be drilled in the water supply pipe
before valve attachment. Sears is not responsible for
property damage caused by improper water
connection.
Materials Required
1/4"O.D.(6 mm) flexible copper tubing is required. Length
of copper tubing must reach from water supply
connection to water valve inlet port on back of
refrigerator, plus additional 8' (2 m) of tubing for a service
loop. A service loop wilt allow refrigerator to be pulled
away from the wall without disconnecting tubing.
Procedure
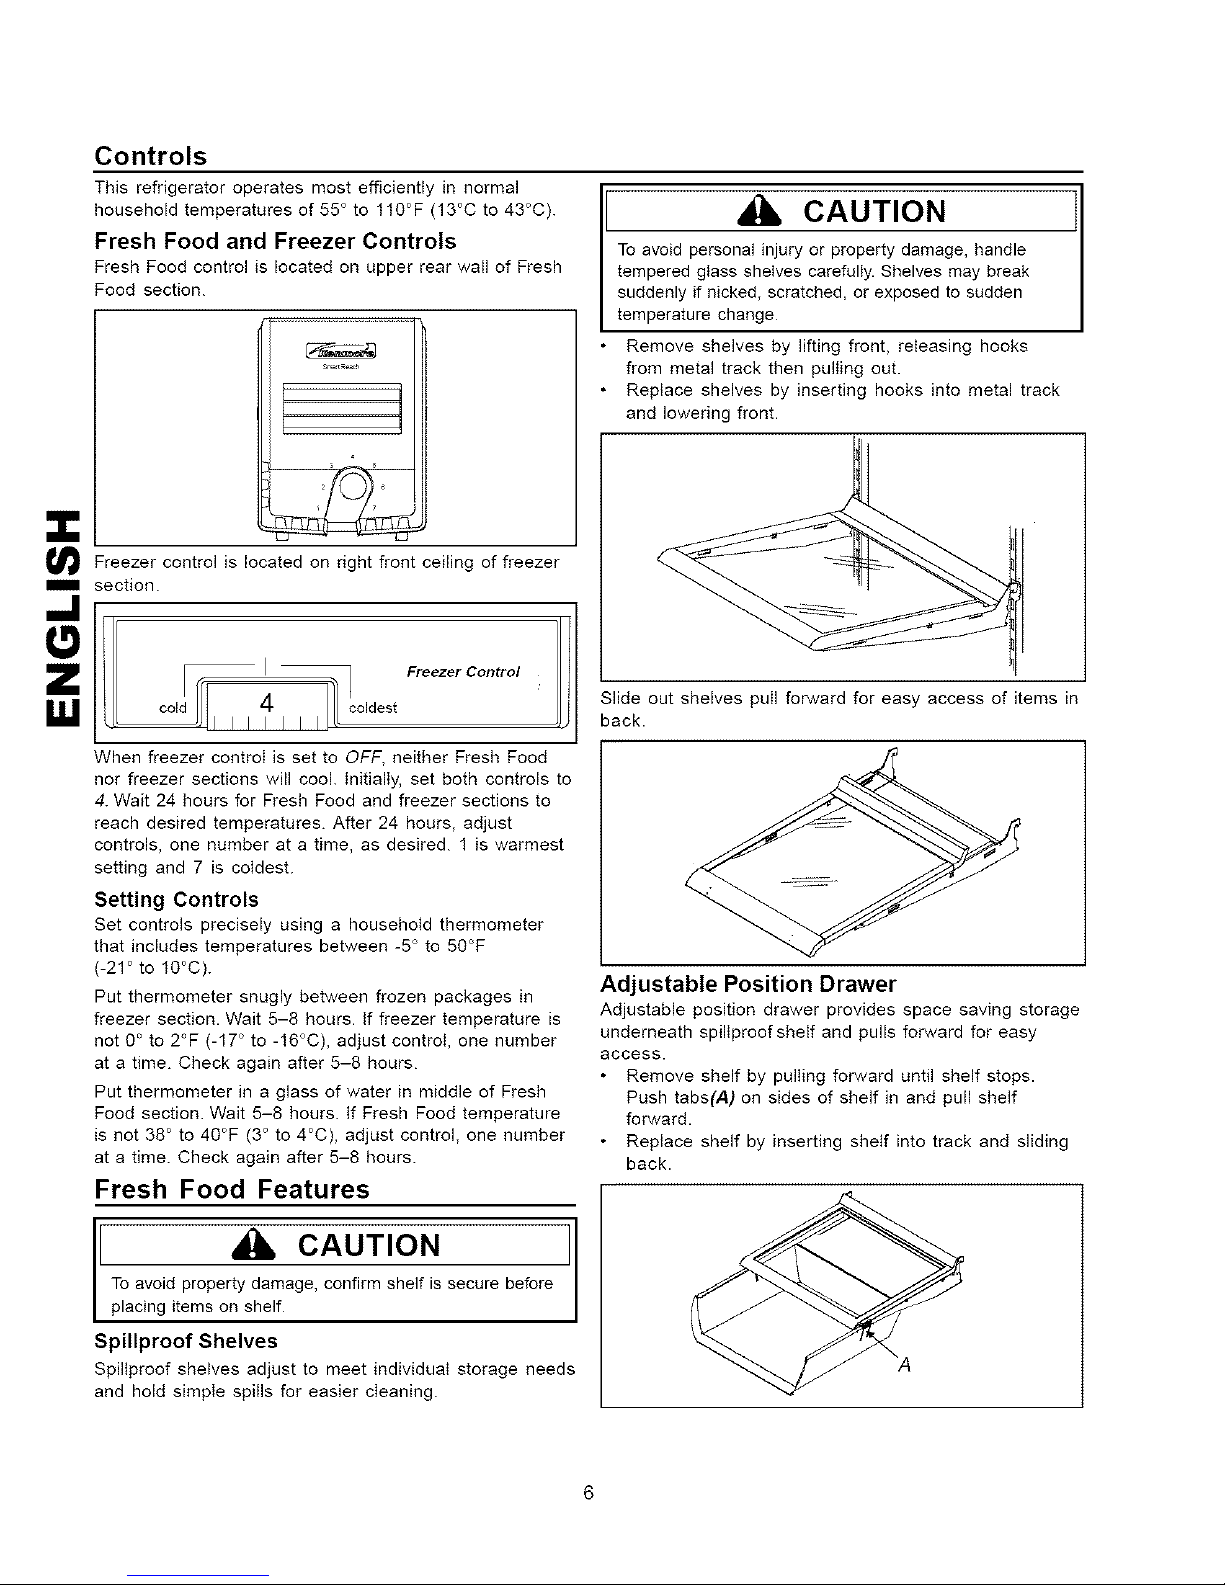
1. Remove plastic cap(A) from water valve inIet port(B).
B
II'1
¢3
I'"
m
Connect ice maker water supply line
WARNING I
To avoid electrical shock which can cause severe
personal injury or death, disconnect power to
refrigerator before connecting water supply. After
connecting water supply, connect power.
CAUTION
Observe the following to avoid property damage:
• Verify that bypass cartridge has been removed and
replaced with water filter in water filter assembly.
• Make sure water pressure to water valve is
between 20 and 100 pounds per square inch.
• Tighten adapter fitting and nuts with pliers and
wrenches. Do not overtighten.
• Checkforwaterleaksand correct if necessary
before returning refrigerator to normal location. After
24 hours check again for leaks.
Important
• Before connecting water supply, contact a plumber to
connect copper tubing to household plumbing in
compliance with local codes and ordinances.
• Sears does not recommend using a self-piercing, or
3h6"saddle valves! Both reduce water flow, become
plugged with sediment over time and may cause leaks
2. Place brass nut(O) and brass sleeve(C) on copper
tubing(B). (Brass nutand sleeve are found in your
literature packet.) Insert copper tubing into water
valve inlet port(E). Connect brass nut on copper
tubing to water valve inlet port. Make sure copper
tubing is secure by pulling on copper tubing.
3. Turn on water supply to refrigerator and check for
leaks. Correct any leaks at connection. Be careful not
to overtighten connection.
4. Create a service loop using extreme care to avoid
kinks. Secure copper tubing to refrigerator cabinet
with a "P" clamp(A).
i
<
5
Controls
This refrigerator operates most efficiently in normal
household temperatures of 55 ° to 110°F (13°C to 43°C).
Fresh Food and Freezer Controls
Fresh Food control is located on upper rear wail of Fresh
Food section.
Freezer control is located on right front ceiling of freezer
'_' section.
Freezer Control
° 11
4 coldest
To avoid personal injury or property damage_ handle
tempered glass shelves carefully. Shelves may break
suddenly if nicked, scratched, or exposed to sudden
temperature change
Remove shelves by lifting front, releasing hooks
from metal track then pulling out.
Replace shelves by inserting hooks into metal track
and lowering front.
Slide out shelves pull forward for easy access of items in
back.
CAUTION
When freezer control is set to OFF, neither Fresh Food
nor freezer sections will cool. InitialIy, set both controls to
4. Wait 24 hours for Fresh Food and freezer sections to
reach desired temperatures. After 24 hours, adjust
controls, one number at a time, as desired. 1 is warmest
setting and 7 is coldest.
Setting Controls
Set controls precisely using a household thermometer
that includes temperatures between -5° to 50°F
(-21° to 10°C).
Put thermometer snugly between frozen packages in
freezer section. Wait 5-8 hours, tf freezer temperature is
not 0 ° to 2°F (-17 ° to -16°C), adjust control, one number
at a time. Check again after 5-8 hours.
Put thermometer in a glass of water in middle of Fresh
Food section. Wait 5-8 hours, if Fresh Food temperature
is not 38 ° to 40°F (3° to 4°C), adjust control, one number
at a time. Check again after 5-8 hours.
Fresh Food Features
To avoid property damage, confirm shelf is secure before
[ CAUTION ]
placing items on shelf
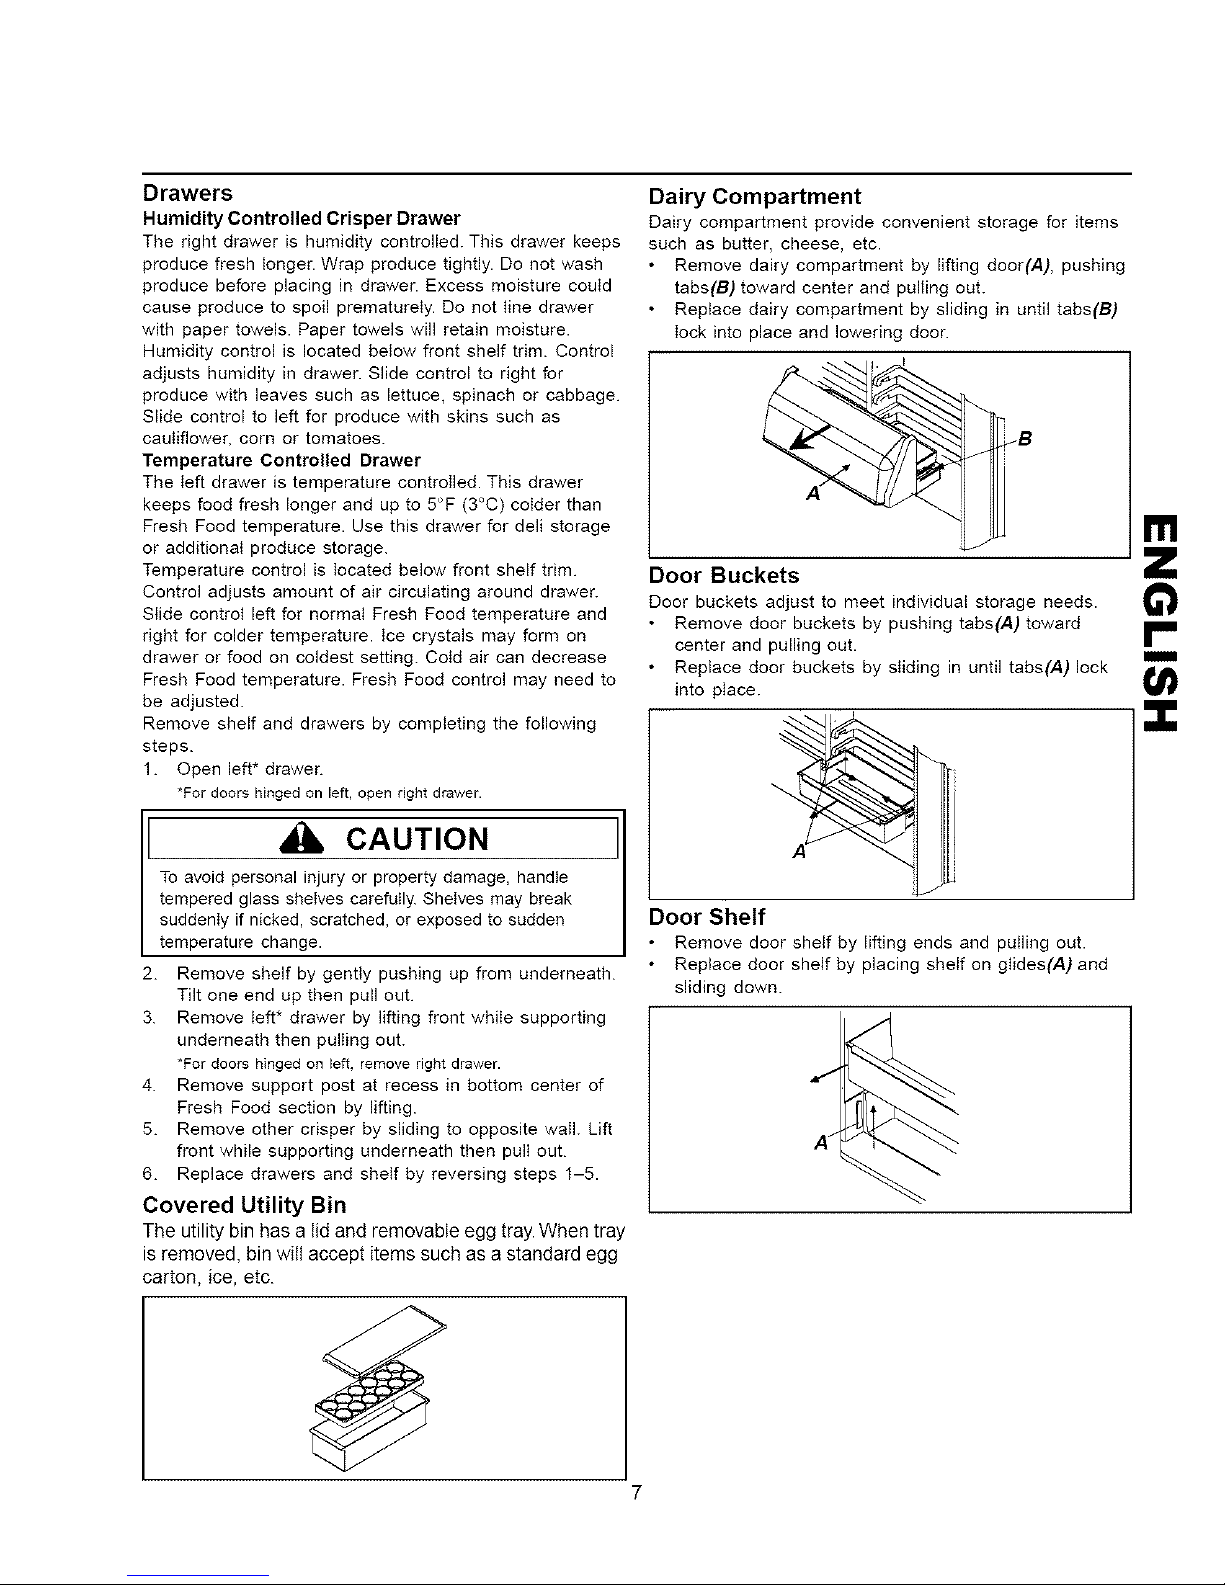
Adjustable Position Drawer
Adjustable position drawer provides space saving storage
underneath spillproof shelf and pulls forward for easy
access.
Remove shelf by palling forward until shelf stops.
Push tabs(A) on sides of shelf in and pull shelf
forward.
Replace shelf by inserting shelf into track and sliding
back.
Spillproof Shelves
Spillproof shelves adjust to meet individual storage needs
and hold simple spills for easier cleaning.
Drawers
Humidity Controlled Crisper Drawer
The right drawer is humidity controlled. This drawer keeps
produce fresh longer. Wrap produce tightly. Do not wash
produce before placing in drawer. Excess moisture could
cause produce to spoil prematurely. Do not line drawer
with paper towels. Paper towels will retain moisture.
Humidity control is located below front shelf trim. Control
adjusts humidity in drawer. Slide control to right for
produce with leaves such as lettuce, spinach or cabbage.
Slide control to left for produce with skins such as
cauliflower, corn or tomatoes.
Temperature Controlled Drawer
The Ieft drawer is temperature controlled. This drawer
keeps food fresh longer and up to 5°F (3°C) colder than
Fresh Food temperature. Use this drawer for dell storage
or additional produce storage.
Temperature control is located below front shelf trim.
Control adjusts amount of air circulating around drawer.
Slide control left for normal Fresh Food temperature and
right for colder temperature, tce crystals may form on
drawer or food on coldest setting. Cold air can decrease
Fresh Food temperature. Fresh Food control may need to
be adjusted.
Remove shelf and drawers by completing the following
steps.
1. Open left* drawer.
*For doors hinged on left, open right drawer.
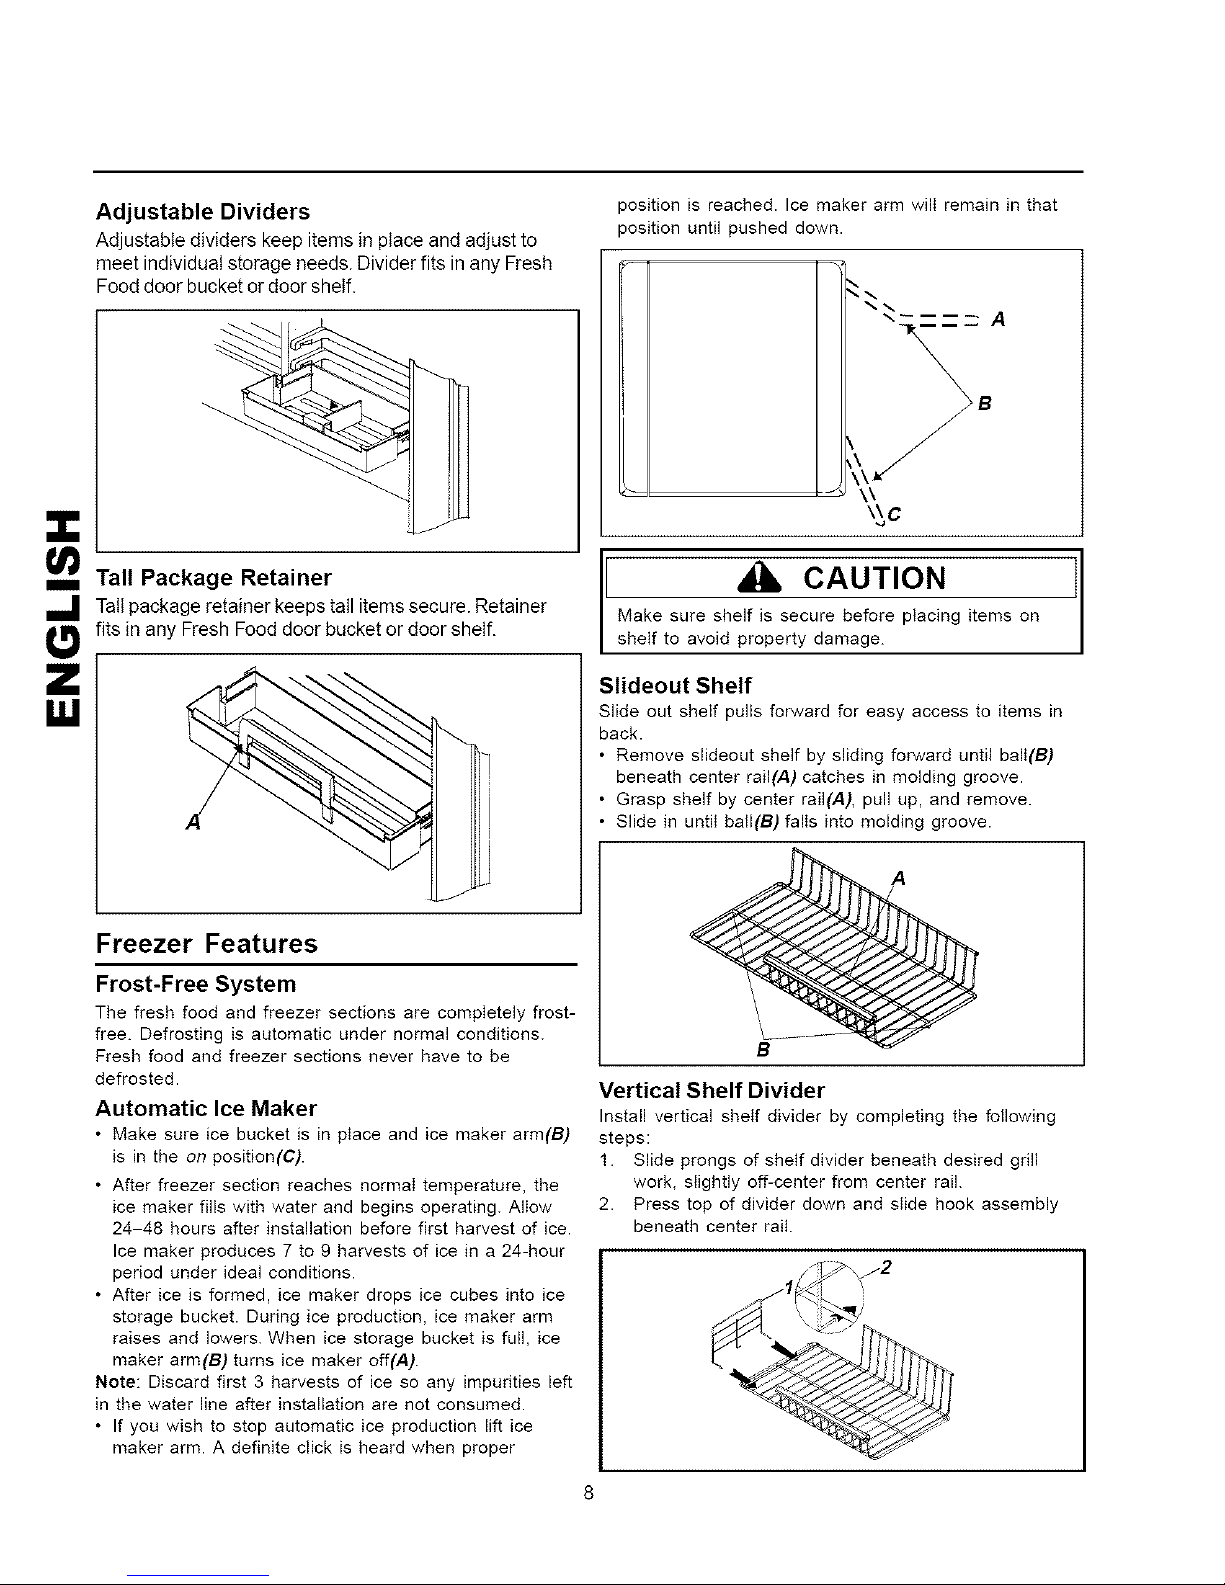
Dairy Compartment
Dairy compartment provide convenient storage for items
such as butter, cheese, etc.
Remove dairy compartment by lifting door(A), pushing
tabs(B) toward center and pulling out.
Replace dairy compartment by sliding in until tabs(B)
lock into place and lowering door.
Door Buckets
Door buckets adjust to meet individual storage needs.
Remove door buckets by pushing tabs(A) toward
center and pulling out.
Replace door buckets by sliding in until tabs(A) lock
into place.
I11
r-
m
CAUTION
To avoid personal injury or property damage, handle
tempered glass shelves carefully. Shelves may break
suddenly if nicked, scratched, or exposed to sudden
temperature change.
2. Remove shelf by gently pushing up from underneath.
Tilt one end up then pull out.
3. Remove left* drawer by lifting front while supporting
underneath then pulling out.
*For doors hinged on left remove right drawer.
4. Remove support post at recess in bottom center of
Fresh Food section by lifting.
5. Remove other crisper by sliding to opposite wail. Lift
front while supporting underneath then pull out.
6. Replace drawers and shelf by reversing steps 1-5.
Covered Utility Bin
The utility bin has a lid and removable egg tray. When tray
is removed, bin witt accept items such as a standard egg
carton, ice, etc.
Door Shelf
Remove door shelf by lifting ends and pulling out.
Replace door shelf by placing shelf on glides(A) and
sliding down.
Adjustable Dividers
Adjustable dividers keep items in place and adjust to
meet individual storage needs. Divider fits in any Fresh
Food door bucket or door shelf.
Tall Package Retainer
position is reached. Ice maker arm will remain in that
position until pushed down.
%" mm_ A
\.
\_c
J.J Tatl package retainer keeps tail items secure. Retainer
_1_ fits in any Fresh Food door bucket or door shelf.
U,I
J
Freezer Features
Frost-Free System
The fresh food and freezer sections are compIetely frost-
free. Defrosting is automatic under normal conditions.
Fresh food and freezer sections never have to be
defrosted.
Automatic Ice Maker
• Make sure ice bucket is in place and ice maker arm(B)
is in the on position(C).
• After freezer section reaches normal temperature, the
ice maker fills with water and begins operating. Allow
24-48 hours after installation before first harvest of ice.
Ice maker produces 7 to 9 harvests of ice in a 24-hour
period under ideal conditions.
• After ice is formed, ice maker drops ice cubes into ice
storage bucket. During ice production, ice maker arm
raises and lowers. When ice storage bucket is full, ice
maker arm(B) turns ice maker off(A).
Note: Discard first 3 harvests of ice so any impurities left
in the water line after installation are not consumed.
• If you wish to stop automatic ice production lift ice
maker arm. A definite click is heard when proper
Make sure shelf is secure before placing items on
I A CAUTION I
shelf to avoid property damage.
Slideout Shelf
Slide out shelf pulls forward for easy access to items in
back.
• Remove slideout shelf by sliding forward until bali(B)
beneath center rail(A) catches in molding groove.
• Grasp shelf by center rail(A), pull up, and remove.
• Slide in until ball(B) falls into molding groove.
A
B
Vertical Shelf Divider
Install vertical sheIf divider by completing the following
steps:
1. Slide prongs of shelf divider beneath desired grill
work, slightly off-center from center rail.
2. Press top of divider down and slide hook assembly
beneath center rail.
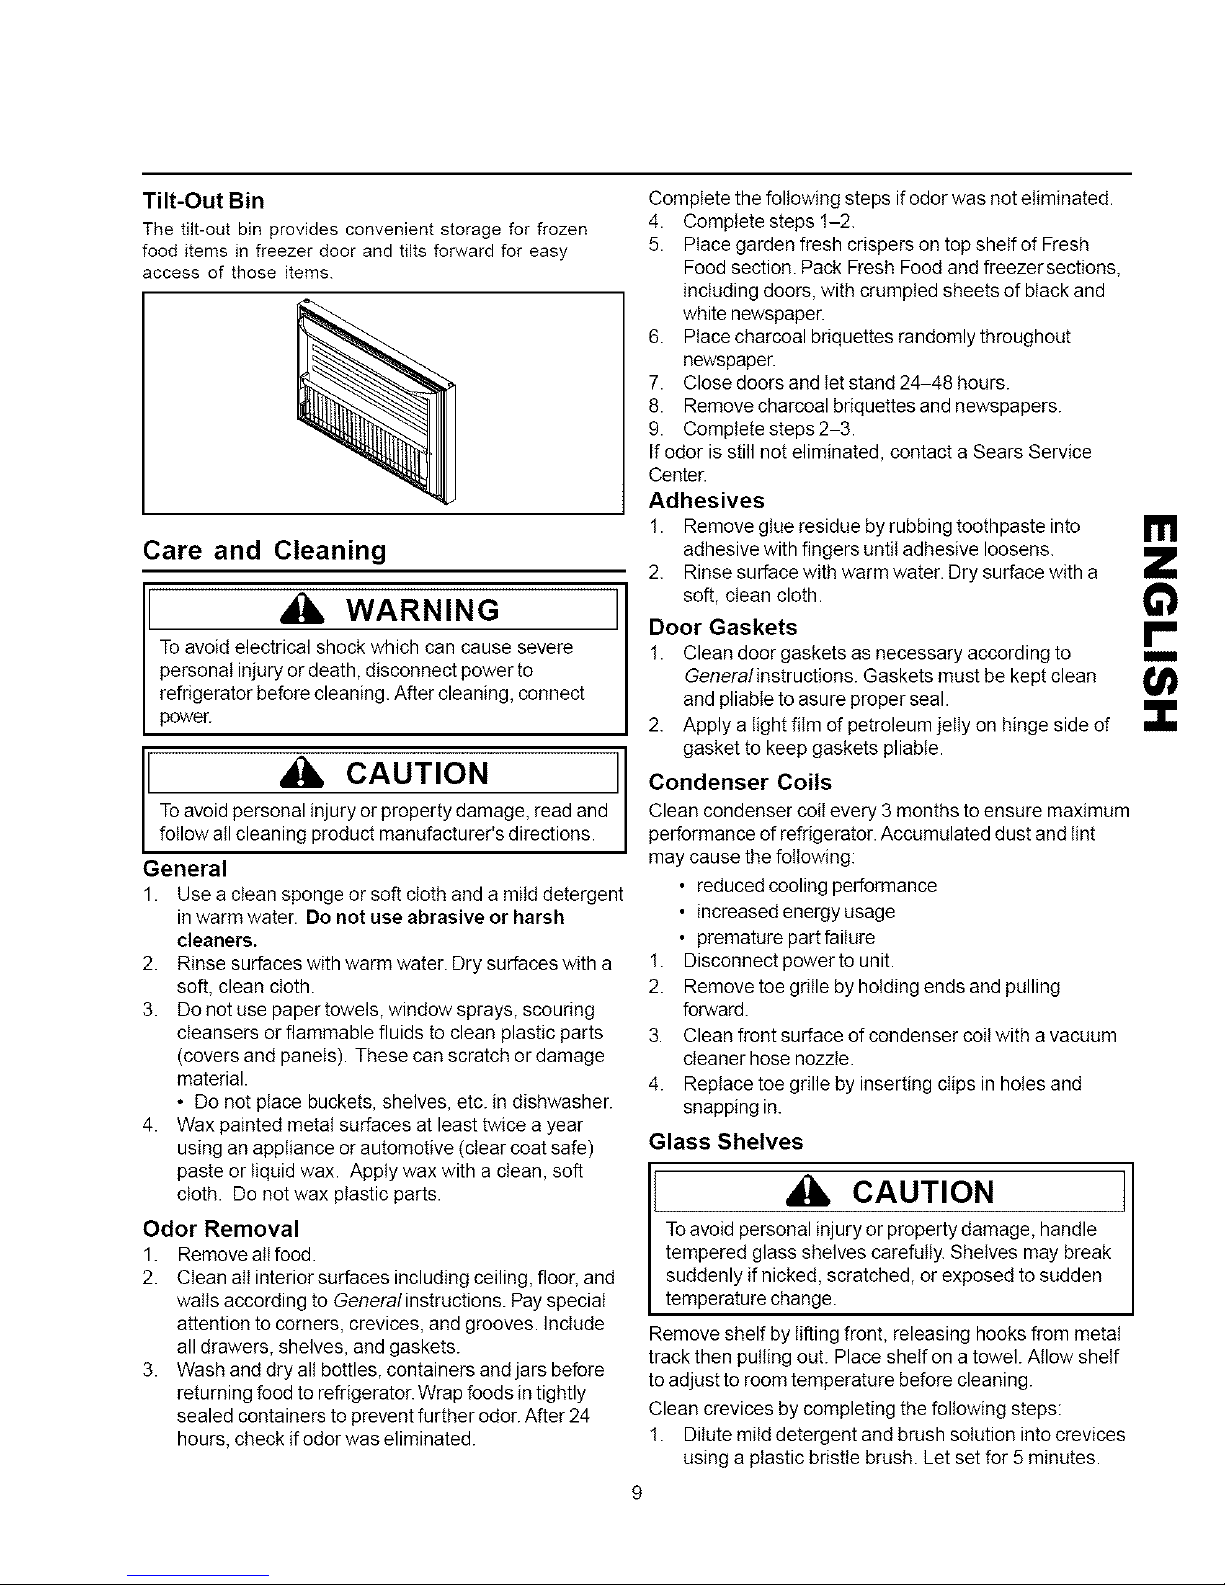
Tilt-Out Bin
The tilt-out bin provides convenient storage for frozen
food items in freezer door and tilts forward for easy
access of those items.
Care and Cleaning
WARNING I
To avoid electrical shock which can cause severe
personal injury or death, disconnect power to
refrigerator before cleaning. After cleaning, connect
power.
Toavoid personal injury or property damage, read and
follow atlcleaning product manufacturer's directions.
General
1. Use a clean sponge or soft cloth and a mitd detergent
in warm water. Do not use abrasive or harsh
cleaners.
2. Rinse surfaces with warm water. Dry surfaces with a
soft, clean cloth.
3. Do not use paper towels, window sprays, scouring
cleansers or flammable fluids to clean plastic parts
(covers and panels). These can scratch or damage
material.
• Do not place buckets, shelves, etc. in dishwasher.
4. Wax painted metal surfaces at least twice a year
using an appliance or automotive (clear coat safe)
paste or liquid wax. Apply wax with a clean, soft
cloth. Do not wax plastic parts.
Odor Removal
1. Remove attfood.
2. Clean att interior surfaces including ceiling, floor, and
walls according to General instructions. Pay special
attention to corners, crevices, and grooves. Include
all drawers, shelves, and gaskets.
3. Wash and dry all bottles, containers and jars before
returning food to refrigerator. Wrap foods in tightly
sealed containers to prevent further odor. After 24
hours, check if odor was eliminated.
CAUTION I1
Complete the following steps if odor was not eliminated.
4. Complete steps 1-2.
5. Place garden fresh crispers on top shelf of Fresh
Food section. Pack Fresh Food and freezersections,
including doors, with crumpled sheets of black and
white newspaper.
6. Place charcoal briquettes randomly throughout
newspaper.
7. Close doors and let stand 24-48 hours.
8. Remove charcoal briquettes and newspapers.
9. Complete steps 2-3.
If odor is still not eliminated, contact a Sears Service
Center.
Adhesives
1. Remove glue residue by rubbing toothpaste into
adhesive with fingers until adhesive loosens.
2. Rinse surface with warm water. Dry surface with a
soft, clean cloth.
Door Gaskets
1. Clean door gaskets as necessary according to
General instructions. Gaskets must be kept clean
and pliable to asure proper seal.
2. Apply a light film of petroleum jelly on hinge side d
gasket to keep gaskets pliable.
Condenser Coils
Clean condenser coil every 3 months to ensure maximum
performance of refrigerator. Accumulated dust and tint
may cause the following:
• reduced cooling performance
• increased energy usage
• premature part failure
1. Disconnect power to unit.
2. Remove toe grille by holding ends and pulling
forward.
3. Clean front surface of condenser colt with a vacuum
cleaner hose nozzle.
4. Replace toe grille by inserting clips in holes and
snapping in.
Glass Shelves
CAUTION I
Toavoid personal injury or property damage, handle
tempered glass shelves carefully. Shelves may break
suddenly if nicked, scratched, or exposed to sudden
temperature change.
Remove shelf by lifting front, releasing hooks from metal
track then pulling out. Place shelf on a towel. Allow shelf
to adjust to room temperature before cleaning.
Clean crevices by completing the following steps:
1. Dilute mild detergent and brush solution into crevices
using a plastic bristle brush. Let set for 5 minutes.
9
ITI
6"t
r"
m
2. Spray warm water into crevices using faucet spray
attachment.
3. Dry shelf thoroughly and replace shelf by inserting
hooks into metal track and lowering front.
Light Bulbs
WARNING
To avoid electrical shock which can cause severe
personal injury or death, disconnect power to
refrigerator before replacing light bulb. After repIacing
light bulb, connect power.
CAUTION
Toavoidpersonalinjuryorpropertydamage,observe
m
ILl
the following:
• Allow light bulb to cool.
• Wear gloves when replacing light bulb.
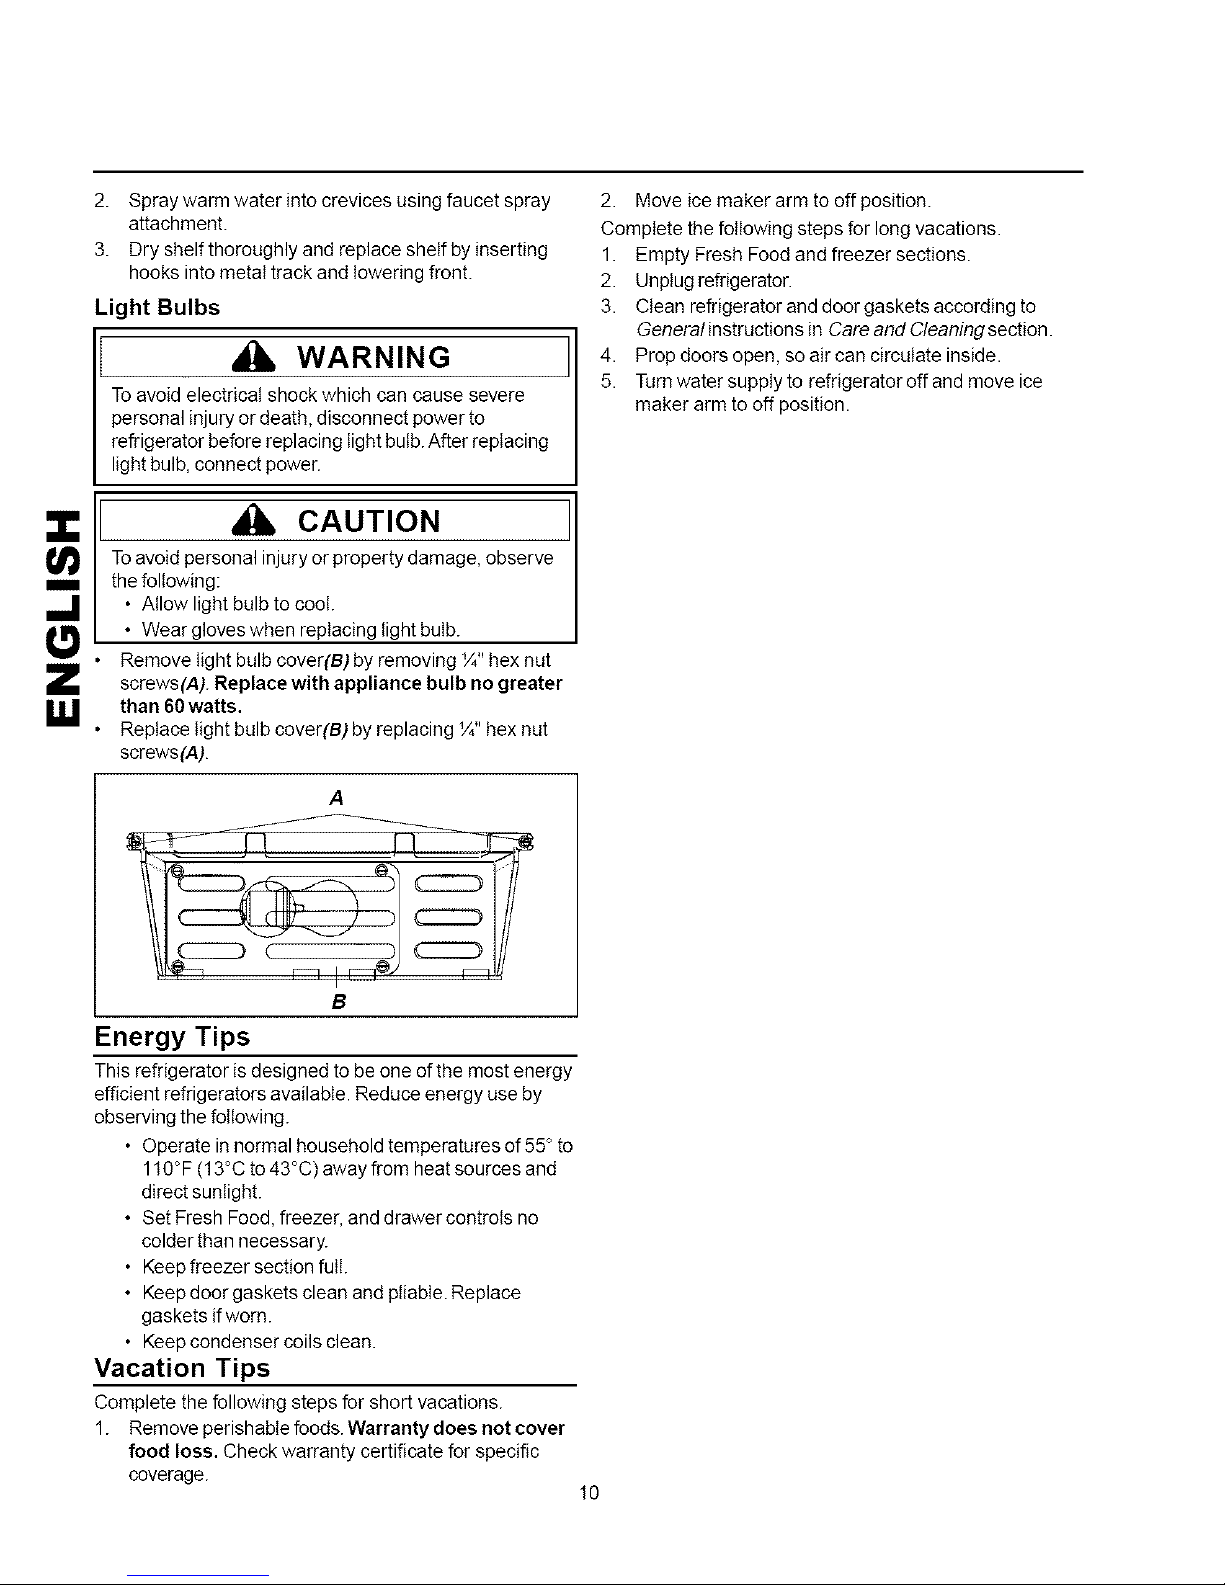
Remove light bulb cover(B) by removing ¼" hex nut
screws(A). Replace with appliance bulb no greater
than 60watts.
Replace light bulb cover(B) by replacing IA,,hex nut
screws(A).
2. Move ice maker arm to off position.
Complete the following steps for long vacations.
1. Empty Fresh Food and freezer sections.
2. Unplug refrigerator.
3. Clean refrigerator and door gaskets according to
General instructions in Care and Cleaning section.
4. Prop doors open, so air can circulate inside.
5. Turn water supply to refrigerator off and move ice
maker arm to off position.
A
l!j
B
Energy Tips
This refrigerator is designed to be one of the most energy
efficient refrigerators available. Reduce energy use by
observing the following.
• ©perate in normal household temperatures of 55° to
110°F (13°C to 43°C) away from heat sources and
direct sunlight.
• Set Fresh Food, freezer, and drawer controls no
colder than necessary.
• Keepfreezer section full.
• Keep door gaskets clean and pliabIe. Replace
gaskets ifworn.
• Keep condenser coils clean.
Vacation Tips
Complete the following steps for short vacations.
1. Remove perishable foods. Warranty does not cover
food loss, Check warranty certificate for specific
coverage.
10
Normal Operating Sounds
This new refrigerator may be replacing a differently
designed, less efficient or smaller refrigerator. Today's
refrigerators have new features and are more energy
efficient. As a result, certain sounds may be unfamiliar.
These sounds are normal and wilI soon become familiar.
These sounds also indicate refrigerator isoperating and
performing as designed.
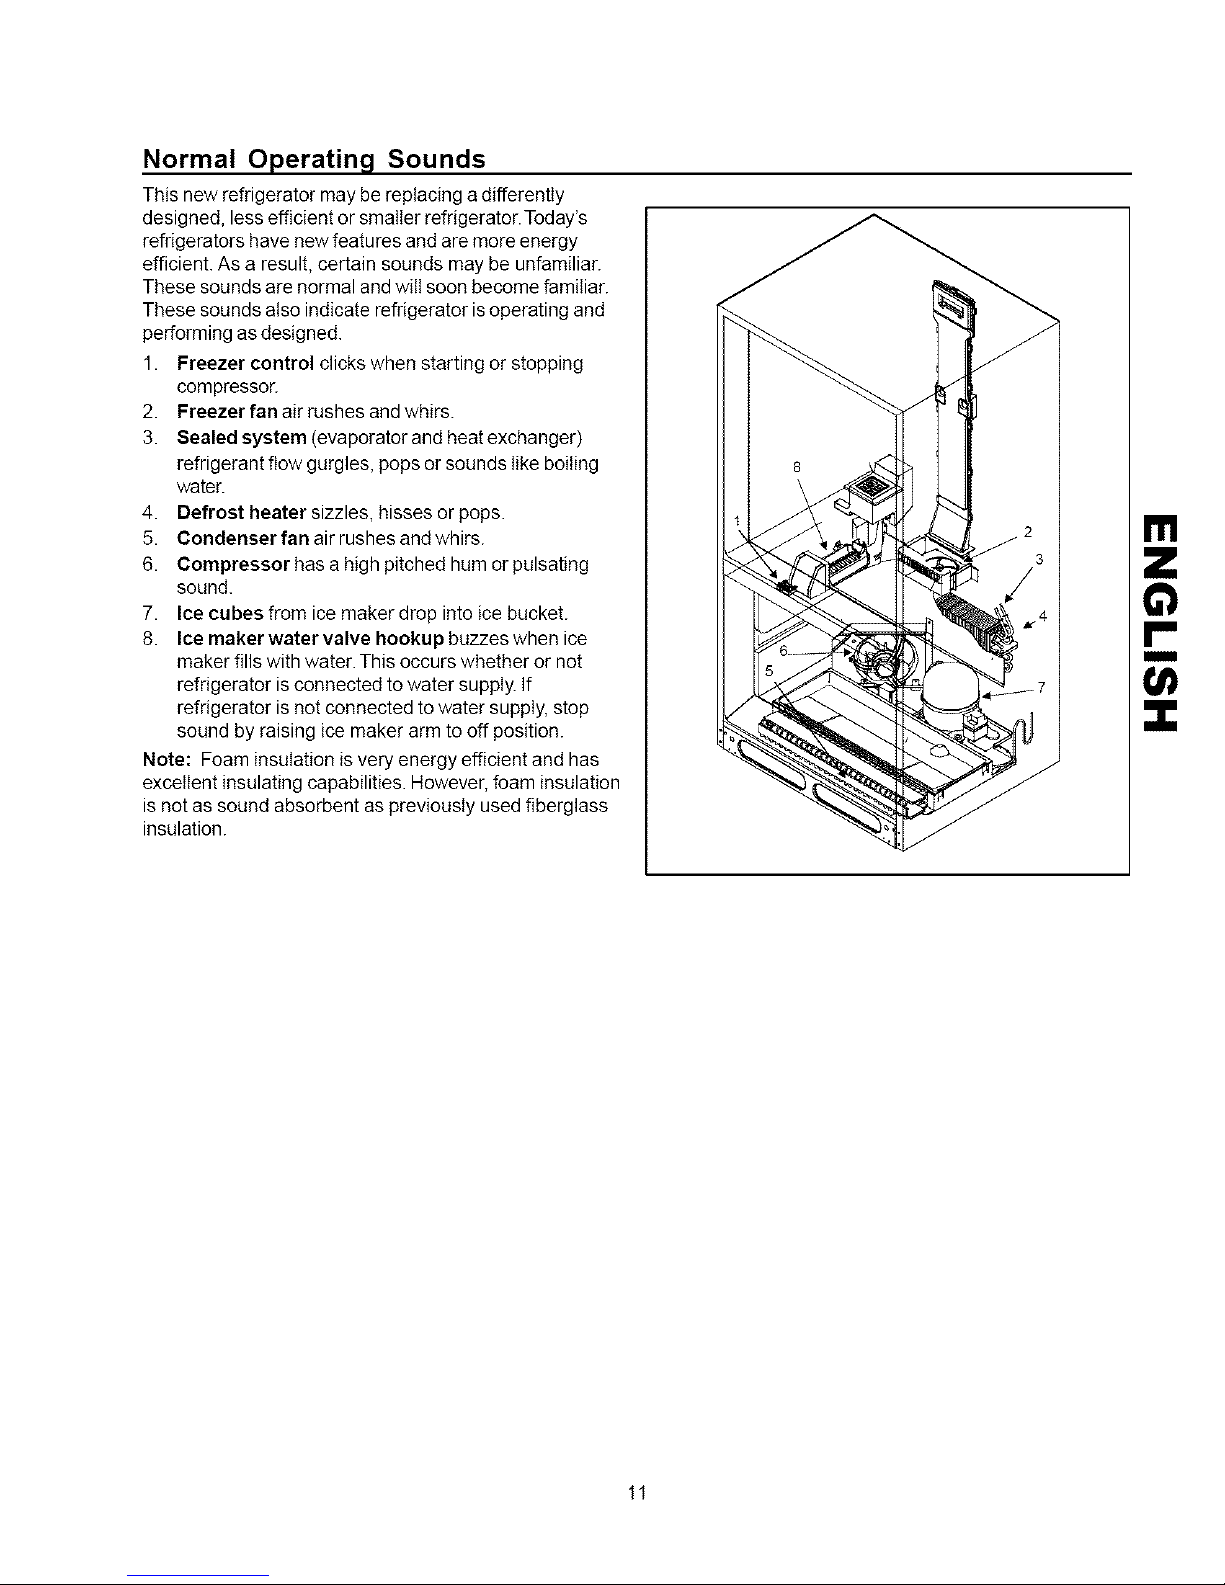
1. Freezer control clicks when starting or stopping
compressor.
2. Freezer fan air rushes and whirs.
3. Sealed system (evaporator and heat exchanger)
refrigerant flow gurgles, pops or sounds tike boiling
water.
4. Defrost heater sizzles, hisses or pops.
5. Condenserfan air rushes and whirs.
6. Compressor has a high pitched hum or pulsating
sound.
7. Ice cubes from ice maker drop into ice bucket.
8. Ice maker water valve hookup buzzes when ice
maker fills with water. This occurs whether or not
refrigerator isconnected to water supply. If
refrigerator is not connected to water supply, stop
sound by raising ice maker arm to off position.
Note: Foam insulation is very energy efficient and has
excellent insulating capabilities. However, foam insulation
is not as sound absorbent as previously used fiberglass
insulation.
Ili
6"t
r=,
iiiiiiiii
11
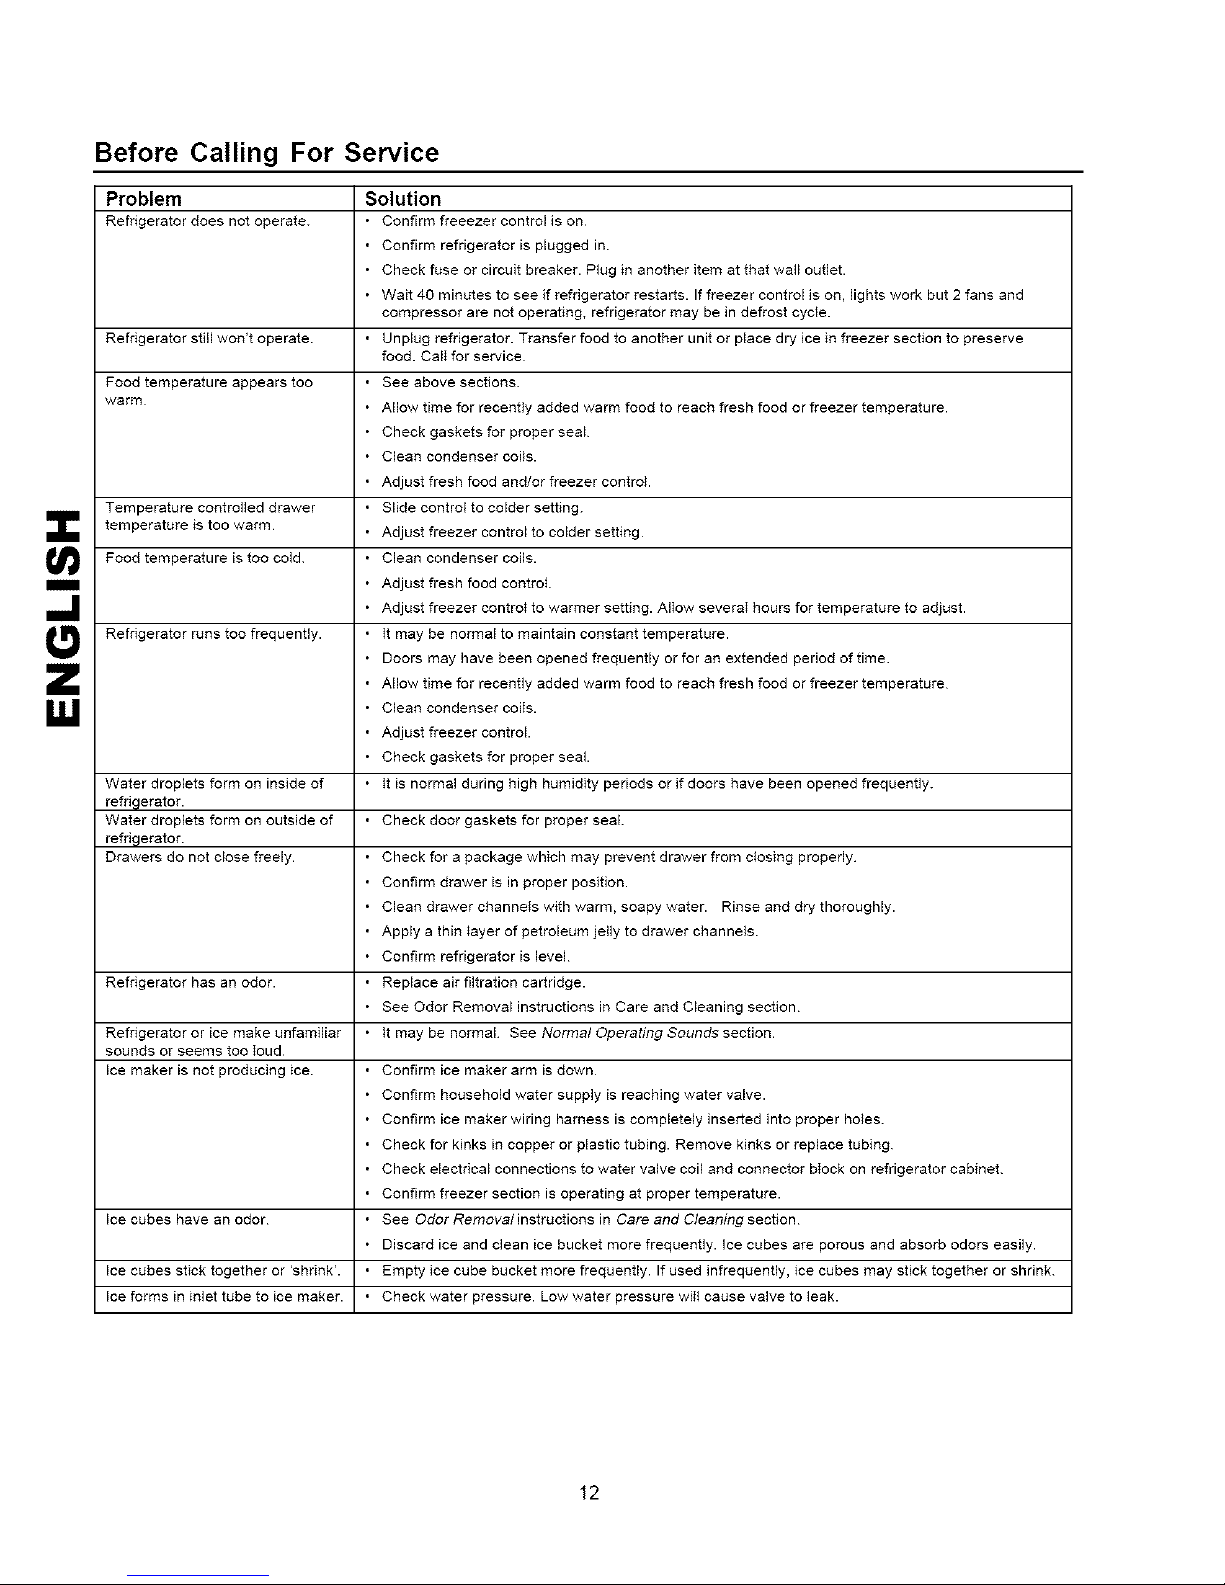
Before Calling For Service
Problem Solution
Refrigerator does not operate. • Confirm freeezer control is on
Refdgeratorsfillwon'toperate. • Unplugrefrigerat_r_ Transferf__dt_an_therun_t_rp_acedryiceinfreezersecti_nt_preserve
Food temperature appears too • See above sections.
warm • Allow time for recently added warm food to reach fresh food or freezer temperature.
Temperature confrofled drawer • Slide control to colder setting.
temperature is too warm • Adjust freezer control to colder setting
Food temperature is too cold • Clean condenser coils.
e}
m
Refdgerator runs too frequently. • It may be normal to maintain constant temperature.
g,I
Water droplets form on inside of • it is normal during high humidity periods or if doors have been opened frequenfiy.
refrigerator.
Water droplets form on outside of • Check door gaskets for proper seal.
refrigerator.
Drawers do not close freely. • Check for a package which may prevent drawer from closing properly
Refrigerator has an odor. • Replace air filtration cartridge.
Refrigerator or ice make unfamiliar • it may be normal See Normal Operating Sounds section.
sounds or seems too Ioud
ice maker is not producing _ce. • Confirm ice maker arm is down
Ice cubes have an odor • See Odor Removalinstructions in Care and Cleaning section
Ice cubes stick together or 'shrink'. • Empty ice cube bucket more frequently. If used infrequently, ice cubes may stick together or shrink.
Ice forms in inlet tube to ice maker. • Check water pressure. Low water pressure wili cause valve to leak.
• Confirm refrigerator is plugged in.
• Check fuse or circuit breaker. Plug in another item at that wall outlet.
• Wait 40 minutes to see if refrigerator restarts. If freezer control Js on, lights work but 2 fans and
compressor are not operating, refrigerator may be in defrost cycle.
food. CalI for service
• Check gaskets for proper seal
• Clean condenser coils.
• Adjust fresh food and/or freezer control.
• Adjust fresh food control
• Adjust freezer oontroHo warmer setting. AlIow severaI hours for temperature to adjust.
• Doors may have been opened frequently or for an extended pedod of time.
• Allow time for recently added warm food to reach fresh food or freezer temperature
• Clean condenser coiIs.
• Adjust freezer control
• Check gaskets for proper seal
• Confirm drawer is in proper position.
• Clean drawer channeis with 'warm, soapy water. Rinse and dry thoroughly.
• Apply a thin _ayer of petroleum jelly to drawer channels
• Confirm refrigerator is level
• See Odor Removal instructions in Care and Cleaning section
• Confirm household water supply is reaching water valve.
• Confirm ice maker wiring harness is completely inserted into proper holes.
• Check for kinks in copper or plastic tubing. Remove kinks or replace tubing
• Check electrical connections to water valve coil and connector bIock on refrigerator cabinet.
• Confirm freezer section is operating at proper temperature.
• Discard ice and clean ice bucket more frequently, ice cubes are porous and absorb odors easily.
12
 Loading...