

Kenmore 59675519400, 59675514400, 59675513400, 59675512400, 59675509400 Owner’s Manual
...
®
Bottom Freezer Refrigerator
use&_ureGuide
Refrigerador con congelador inferior
GuiudeUsoyCu_dudoop_o 30
RGfrigGrateur _ compartiment congGlateur infGrieur
Guided°u_H_su_one_d°÷n_re_ienopu_e59
"-trio
\
596.75502400,
596.75512400,
Part No. 12828111 Sears, Roebuck and Co., Hoffman Estates, IL 60179 U.S.A. www.seais.com
Foml No. B/05/04 Sears Canada, hlc., Toronto, Ontario, Canada M5B 2B8 Au Canada, www.sears.ca
596.75503400,
596.75513400,
596.75509400,
596.75519400,
Litho U.S.A.
=
Jnstamlation
Location
Measuring the Opening
Transporting Your Refrigerator
Leveling
Drawer Removal
................................................... 7-13
Pullout Freezer Drawer
Reinstallation of the Doors
Door Reversal
Handles
Connecting the Water Supply
Opening and Closing Your Fresh Food Doors
Temperature Controls ............................................ 14
Touch Temperature Controls
Fresh Food Features ........................................... 15-16
Shelves
Door Storage
Storage Drawers
Food Storage Tips
............................................ 18-20
Fresh Food Storage
Frozen Food Storage
Food Storage Chart
Care and Cleaning ............................................ 21-24
Refrigerator Cleaning Chart Replacing Light Bulbs
Removing Odors From Refrigerator Preparing for Vacation
Energy Saving Tips Preparing to Move
ImportnntSnfetyInstructions
Installer: Please leave this guide with this appliance.
Consumer: Please read and keep this Use & Care
Guide for future reference, it provides the proper use
and maintenance information.
In our continuing effort to improve the quality and
performance of our appliances, it may be necessary
to make changes to the appliance without revising
this guide.
To reduce risk of injury or death, follow basic
precautions, including the following:
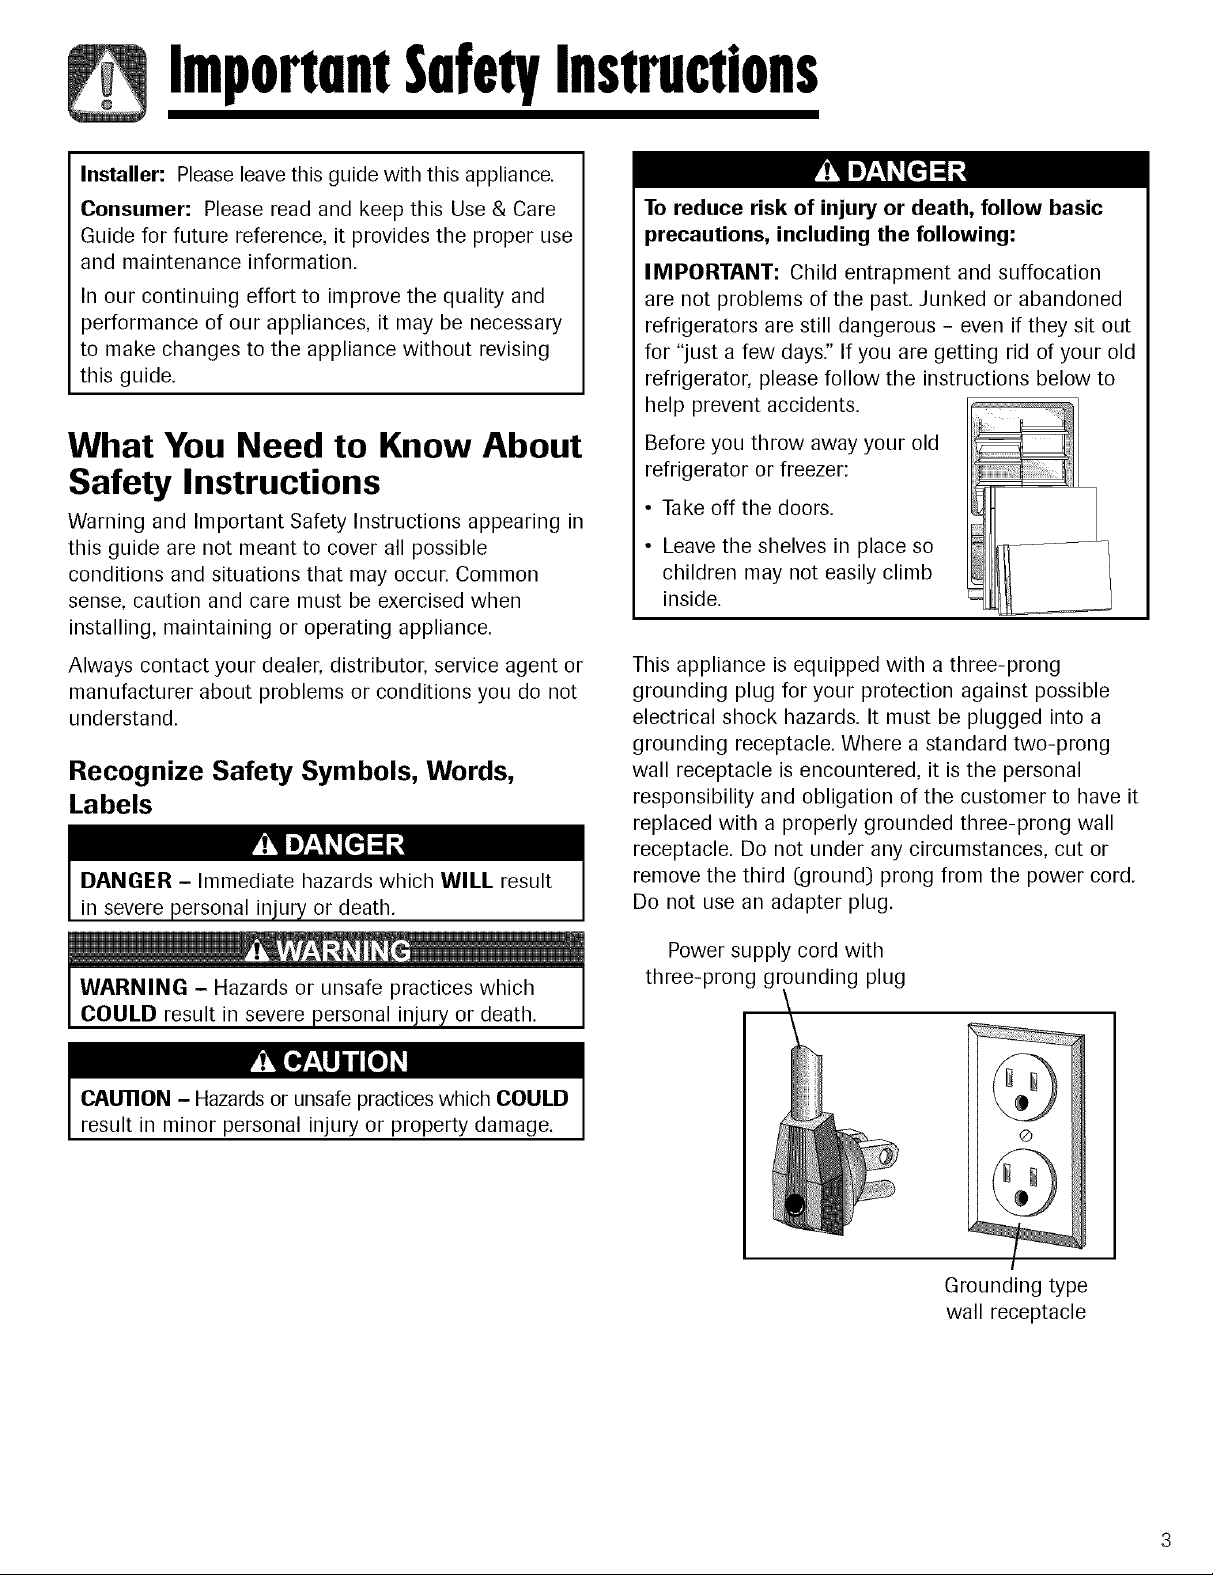
IMPORTANT: Child entrapment and suffocation
are not problems of the past. Junked or abandoned
refrigerators are still dangerous - even if they sit out
for "just a few days." If you are getting rid of your old
refrigerator, please follow the instructions below to
help prevent accidents.
What You Need to Know About
Safety Instructions
Warning and Important Safety Instructions appearing in
this guide are not meant to cover all possible
conditions and situations that may occur. Common
sense, caution and care must be exercised when
installing, maintaining or operating appliance.
Always contact your dealer, distributor, service agent or
manufacturer about problems or conditions you do not
understand.
Recognize Safety Symbols, Words,
Labels
DANGER - Immediate hazards which WILL result
in severe personal injury or death.
WARNING - Hazards or unsafe practices which
COULD result in severe personal injury or death.
Before you throw away your old
refrigerator or freezer:
• Take off the doors.
• Leave the shelves in place so
children may not easily climb
inside.
This appliance is equipped with a three-prong
grounding plug for your protection against possible
electrical shock hazards. It must be plugged into a
grounding receptacle. Where a standard two-prong
wall receptacle is encountered, it is the personal
responsibility and obligation of the customer to have it
replaced with a properly grounded three-prong wall
receptacle. Do not under any circumstances, cut or
remove the third (ground) prong from the power cord.
Do not use an adapter plug.
Power supply cord with
three-prong grounding plug
CAUTION - Hazards or unsafe practices which COULD
result in minor personal injury or property damage.
Grounding type
wall receptacle
ImportnntSnfetyInstructions
To reduce risk of fire, electric shock, serious
injury or death when using your refrigerator,
follow these basic precautions, including the
following:
1. Read all instructions before using the refrigerator.
2. Observe all local codes and ordinances. 14.
3. Be sure to follow grounding instructions.
4. Check with a qualified electrician if you are not
sure this appliance is properly grounded.
5_ Do not ground to a gas line_ 15_
6. Do not ground to a cold-water pipe.
7. Refrigerator is designed to operate on a separate
115 volt, 15 amp., 60 cycle line.
8. Do not modify plug on power cord. If plug does 16.
not fit electrical outlet, have proper outlet installed
by a qualified electrician. 1Z
9. Do not use a two-prong adapter, extension cord
or power strip.
10. Do not remove warning tag from power cord.
11. Do not tamper with refrigerator controls. 19.
12. Do not service or replace any part of refrigerator
unless specifically recommended in Use & Care 20.
Guide or published user-repair instructions. Do
13.
18.
not attempt service if instructions are not under-
stood or if they are beyond personal skill level
Always disconnect refrigerator from electrical
supply before attempting any service. Disconnect
power cord by grasping the plug, not the cord.
Install refrigerator according to Installation
Instructions. All connections for water, electrical
power and grounding must comply with local
codes and be made by licensed personnel when
required.
Keep your refrigerator in good condition. Bumping
or dropping refrigerator can damage refrigerator
or cause refrigerator to malfunction or leak. If
damage occurs, have refrigerator checked by
qualified service technician.
Replace worn power cords and/or loose plugs.
Always read and follow manufacturer's storage
and ideal environment instructions for items being
stored in refrigerator.
Your refrigerator should not be operated in the
presence of explosive fumes.
Children should not climb, hang or stand on any
part of the refrigerator.
Clean up spills or water leakage associated with
water installation.
SAVE THESE INSTRUCTIONS
Harranty
Warranty
Full One Year Warranty on Refrigerator
For one year from the date of purchase, when this
refrigerator is operated and maintained according to
instructions attached to or furnished with it, Sears will
repair it, free of charge, if defective in material or
workmanship.
The ice and water filter cartridge is an extendable part,
which Sears will only replace free of charge for 30 days
from date of purchase, if defective in material or
workmanship.
Full Five Year Warranty on Sealed
Refrigeration System
For five years from the date of purchase, when this
refrigerator is operated and maintained according to
instructions attached to or furnished with it, Sears will
repair the sealed system (consisting of refrigerant,
connecting tubing and compressor moto0 free of
charge, if defective in material or workmanship.
The above warranty coverage applies only to
refrigerators which are used for storage of food for
private household purposes. It excludes original
Kenmore ice and water filter cartridges, which Sears
will replace, free of charge, for only 30 days from the
date of purchase, if defective in material or
workmanship.
Reverse Osmosis Water Systems
• Some Reverse Osmosis home water systems cause
low water pressure. Low water pressure can affect
the water and ice dispensing system by causing
small or hollow ice cubes and slow water flow
from the dispenser. Service problems related to the
home's Reverse Osmosis water system are not
covered by the warranty.
Product Record
In the space below record the model and serial
numbers and purchase date of your refrigerator. You
will find the model and serial number sticker inside the
refrigerator section on the left wall.
Model Number: 596.
Serial Number:
Purchase Date:
Keep this booklet and your Sears sales receipt in
a safe place for future reference.
Warranty service is available by contacting Sears at
1-800-4-MY-HOME "_0-800-469-4663).
This warranty applies only while this product is in use
in the United States.
This warranty gives you specific legal rights, and you
may also have other rights, which vary from state to
state.
Sears, Roebuck and Co.
Dept. 817WA
Hoffman Estates, IL 60179
ProtectionAgreements
in the U.S.A°
Master Protection Agreements
Congratulations on making a smart purchase. Your new
Kenmore _ product is designed and manufactured for
years of dependable operation. But like all products, it
may require preventive maintenance or repair from
time to time. That's when having a Master Protection
Agreement can save you money and aggravation.
Purchase a Master Protect.ion Agreement now and
protect yourseff from unexpected hassle and expense.
The Master Protection Agreement also helps extend
the life of your new producL Here's what's included in
the Agreement:
E_Expert service by our 12,000 professional repair
specialists
d Unlimited service and no charge for parts and
labor on all covered repairs
d "No-lemon" guarantee - replacement of your
covered product if four or more product failures
occur within twelve months
E_Product replacement if your covered product can't
be fixed
d Annual Preventive Maintenance Check at your
request - no extra charge
d Fast help by phone - phone support from a Sears
technician on products requiring in-home repair, plus
convenient repair scheduling
d Power surge protection against electrical damage
due to power fluctuations
E_Rental reimbursement if repair of your covered
product takes longer than promised
Once you purchase the Agreement, a simple phone
call is all that it takes for you to schedule service. You
can call anytime day or night, or schedule a service
appointment online.
Sears Installation Service
For Sears professional installation of home appliances,
garage door openers, water heaters, and other major
home items, in the U.S.A. call 1-800-4-MY-HOME _
(1-800-/469-4663).
In Canada
Maintenance Agreements
Your purchase has added value because you can
depend on Sears HomeCentraP for service. With over
2,400 Service Technicians and more than a million
parts and accessories, we have the tools, parts,
knowledge and skills to back our pledge: We Service
What We Sell.
Your Kenmore _ product is designed, manufactured and
tested to provide years of dependable operation. But
like all products, it may require service from time to
time. The Sears Maintenance Agreement offers you an
outstanding service program, affordably priced.
Sears Maintenance Agreement
• Is your way to buy tomorrow's service at today's price
• Eliminates repair bills resulting from normal wear and
tear
• Provides phone support from a Sears technician on
products requiring in-home repair
• Even if you don't need repairs, provides an annual
Preventive Maintenance Check, at your request, to
ensure that your product is in proper running
condition
Some limitations apply. For information about
Sears Canada Maintenance Agreements, call
1-800-361-6665
Sears has over 12,000 professional repair specialists,
who have access to over 4.5 million quality parts and
accessories. That's the kind of professionalism you
can count on to help prolong the life of your new
purchase for years to come. Purchase your Master
Protection Agreement today!
Some limitations and e×clusions apply, For prices
and additional information, call 1-800-827-8855o
Installation
Your refrigerator was packed carefully for shipment.
Remove and discard shelf packaging and tape. Do not
remove the serial plate.
Location
• Do not install refrigerator near oven, radiator or other
heat source. If not possible, shield refrigerator with
cabinet material.
• Do not install where temperature falls below 55° F
(13° C) or rises above 110° F (43° C). Malfunction may
occur at this temperature.
• Refrigerator is designed for indoor household
application only.
Measuring the Opening
When installing your refrigerator, measure carefully.
Allow 'f2" space at top and '/2"space behind the machine
compartment cover (located in the rear) for proper air
circulation.
Subflooring or floor coverings (i.e. carpet, tile, wood
floors, rugs) may make your opening smaller than
anticipated.
Some clearance may be gained by using the leveling
procedure under Leveling.
Important: If refrigerator is to be installed into a recess
where the top of the refrigerator is completely covered,
use distance from floor to top of hinge cap to verify
proper clearance.
Leveling
To protect property and refrigerator from damage,
observe the following:
• Protect vinyl or other flooring with cardboard, rugs,
or other protective material.
• Do not use power tools when performing leveling
proced ure.
To enhance the appearance and maintain performance,
the refrigerator should be level.
Note
• Complete any required door reversal, panel
installation and/or a water supply connection,
before leveling.
Materials Needed
• 3/8"hex head driver
• Carpenter's level
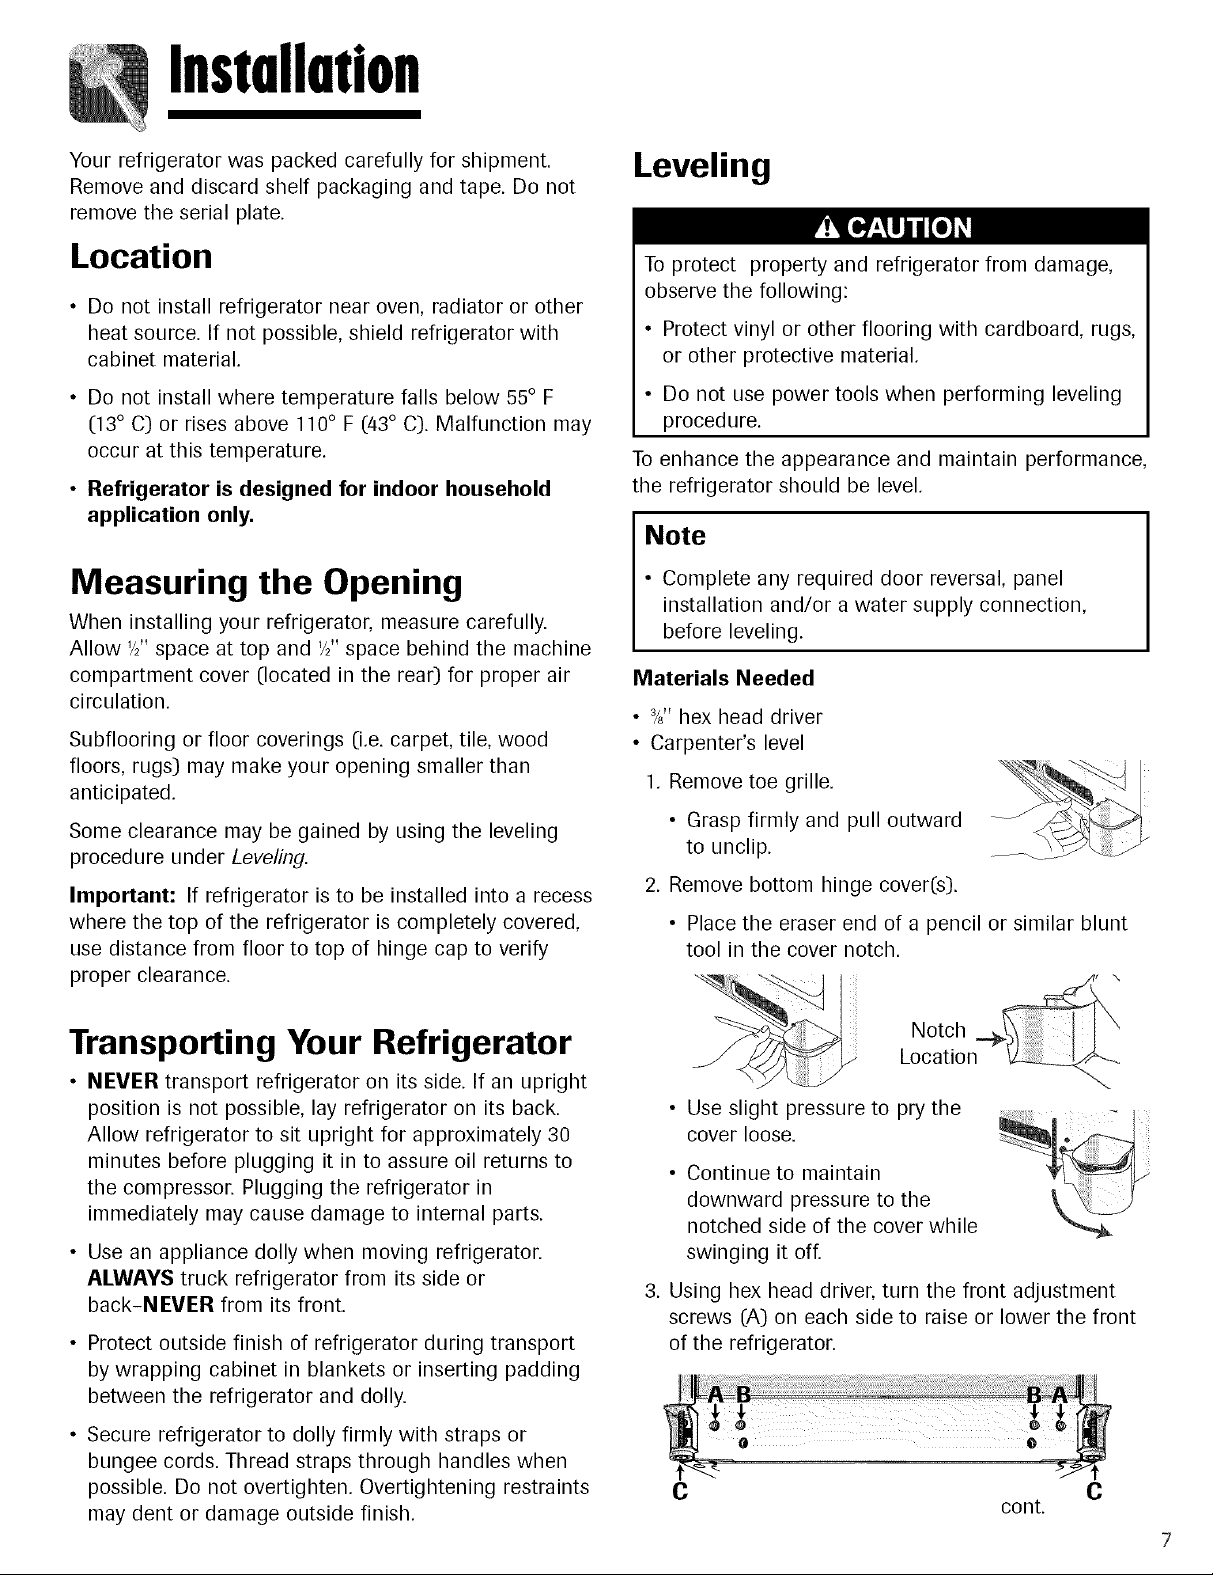
1. Remove toe grille.
• Grasp firmly and pull outward
to unclip.
2. Remove bottom hinge cover(s).
• Place the eraser end of a pencil or similar blunt
tool in the cover notch.
Transporting Your Refrigerator
• NEVER transport refrigerator on its side. If an upright
position is not possible, lay refrigerator on its back.
Allow refrigerator to sit upright for approximately 30
minutes before plugging it in to assure oil returns to
the compressor. Plugging the refrigerator in
immediately may cause damage to internal parts.
• Use an appliance dolly when moving refrigerator.
ALWAYS truck refrigerator from its side or
back-NEVER from its front.
• Protect outside finish of refrigerator during transport
by wrapping cabinet in blankets or inserting padding
between the refrigerator and dolly.
• Secure refrigerator to dolly firmly with straps or
bungee cords. Thread straps through handles when
possible. Do not overtighten. Overtightening restraints
may dent or damage outside finish.
Notch
Location
• Use slight pressure to pry the
cover loose.
• Continue to maintain
downward pressure to the
notched side of the cover while
swinging it off.
3. Using hex head driver, turn the front adjustment
screws (A) on each side to raise or lower the front
of the refrigerator.
C cont. C
Installation
.
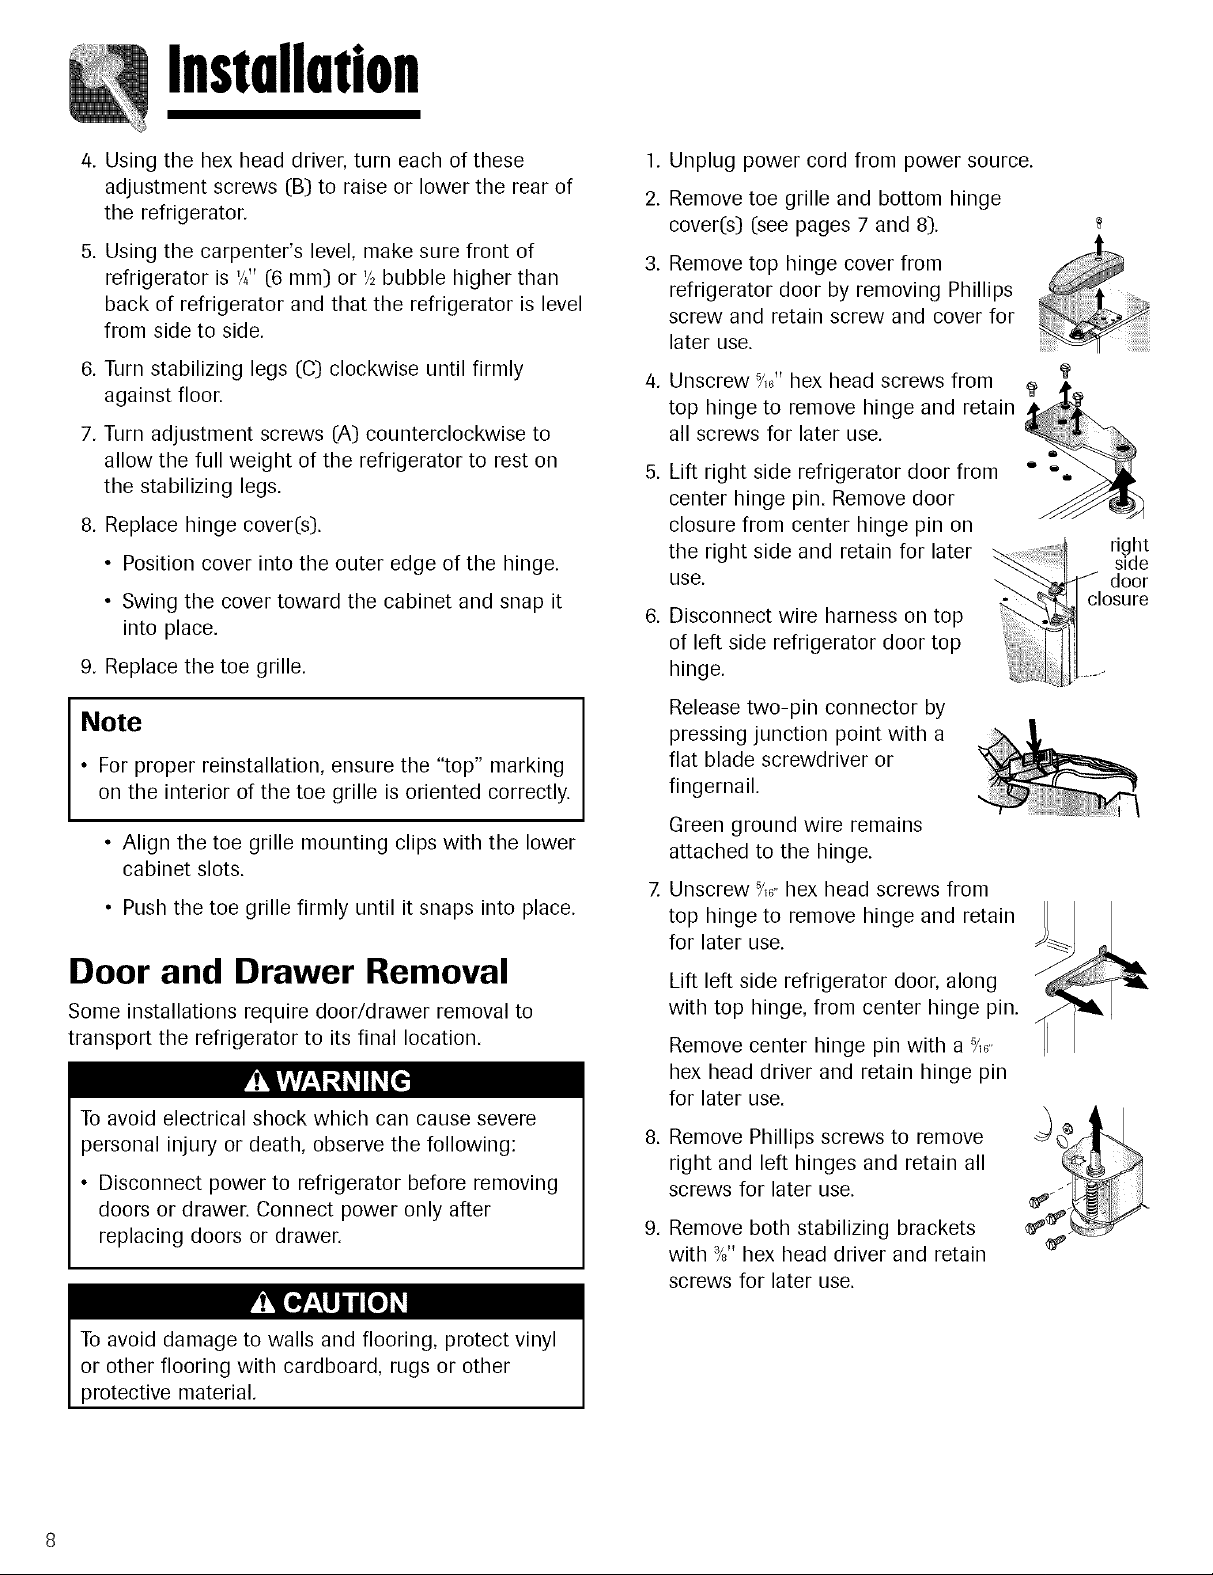
Using the hex head driver, turn each of these
adjustment screws (B) to raise or lower the rear of
the refrigerator.
.
Using the carpenter's level, make sure front of
refrigerator is '/4"(6 ram) or '/2bubble higher than
back of refrigerator and that the refrigerator is level
from side to side.
6. Turn stabilizing legs (C) clockwise until firmly
against floor.
7. Turn adjustment screws (A) counterclockwise to
allow the full weight of the refrigerator to rest on
the stabilizing legs.
8. Replace hinge cover(s).
• Position cover into the outer edge of the hinge.
• Swing the cover toward the cabinet and snap it
into place.
9. Replace the toe grille.
Note
• For proper reinstallation, ensure the "top" marking
on the interior of the toe grille is oriented correctly.
• Align the toe grille mounting clips with the lower
cabinet slots.
• Push the toe grille firmly until it snaps into place.
Door and Drawer Removal
Some installations require door/drawer removal to
transport the refrigerator to its final location.
To avoid electrical shock which can cause severe
personal injury or death, observe the following:
• Disconnect power to refrigerator before removing
doors or drawer. Connect power only after
replacing doors or drawer.
.
Unplug power cord from power source.
2.
Remove toe grille and bottom hinge
cover(s) (see pages 7 and 8).
Remove top hinge cover from
refrigerator door by removing Phillips
screw and retain screw and cover for
later use.
Unscrew %6"hex head screws from
top hinge to remove hinge and retain
all screws for later use.
Lift right side refrigerator door from = =
center hinge pin. Remove door
closure from center hinge pin on
the right side and retain for later
use.
Disconnect wire harness on top
of left side refrigerator door top
hinge.
Release two-pin connector by
pressing junction point with a
flat blade screwdriver or
fingernail.
Green ground wire remains
attached to the hinge.
Unscrew %6,,hex head screws from
top hinge to remove hinge and retain
for later use.
Lift left side refrigerator door, along
with top hinge, from center hinge pin.
Remove center hinge pin with a _/,_..
hex head driver and retain hinge pin
for later use.
Remove Phillips screws to remove
right and left hinges and retain all
screws for later use.
Remove both stabilizing brackets
with %" hex head driver and retain
screws for later use.
right
side
J door
closure
To avoid damage to walls and flooring, protect vinyl
or other flooring with cardboard, rugs or other
protective material.
Installation
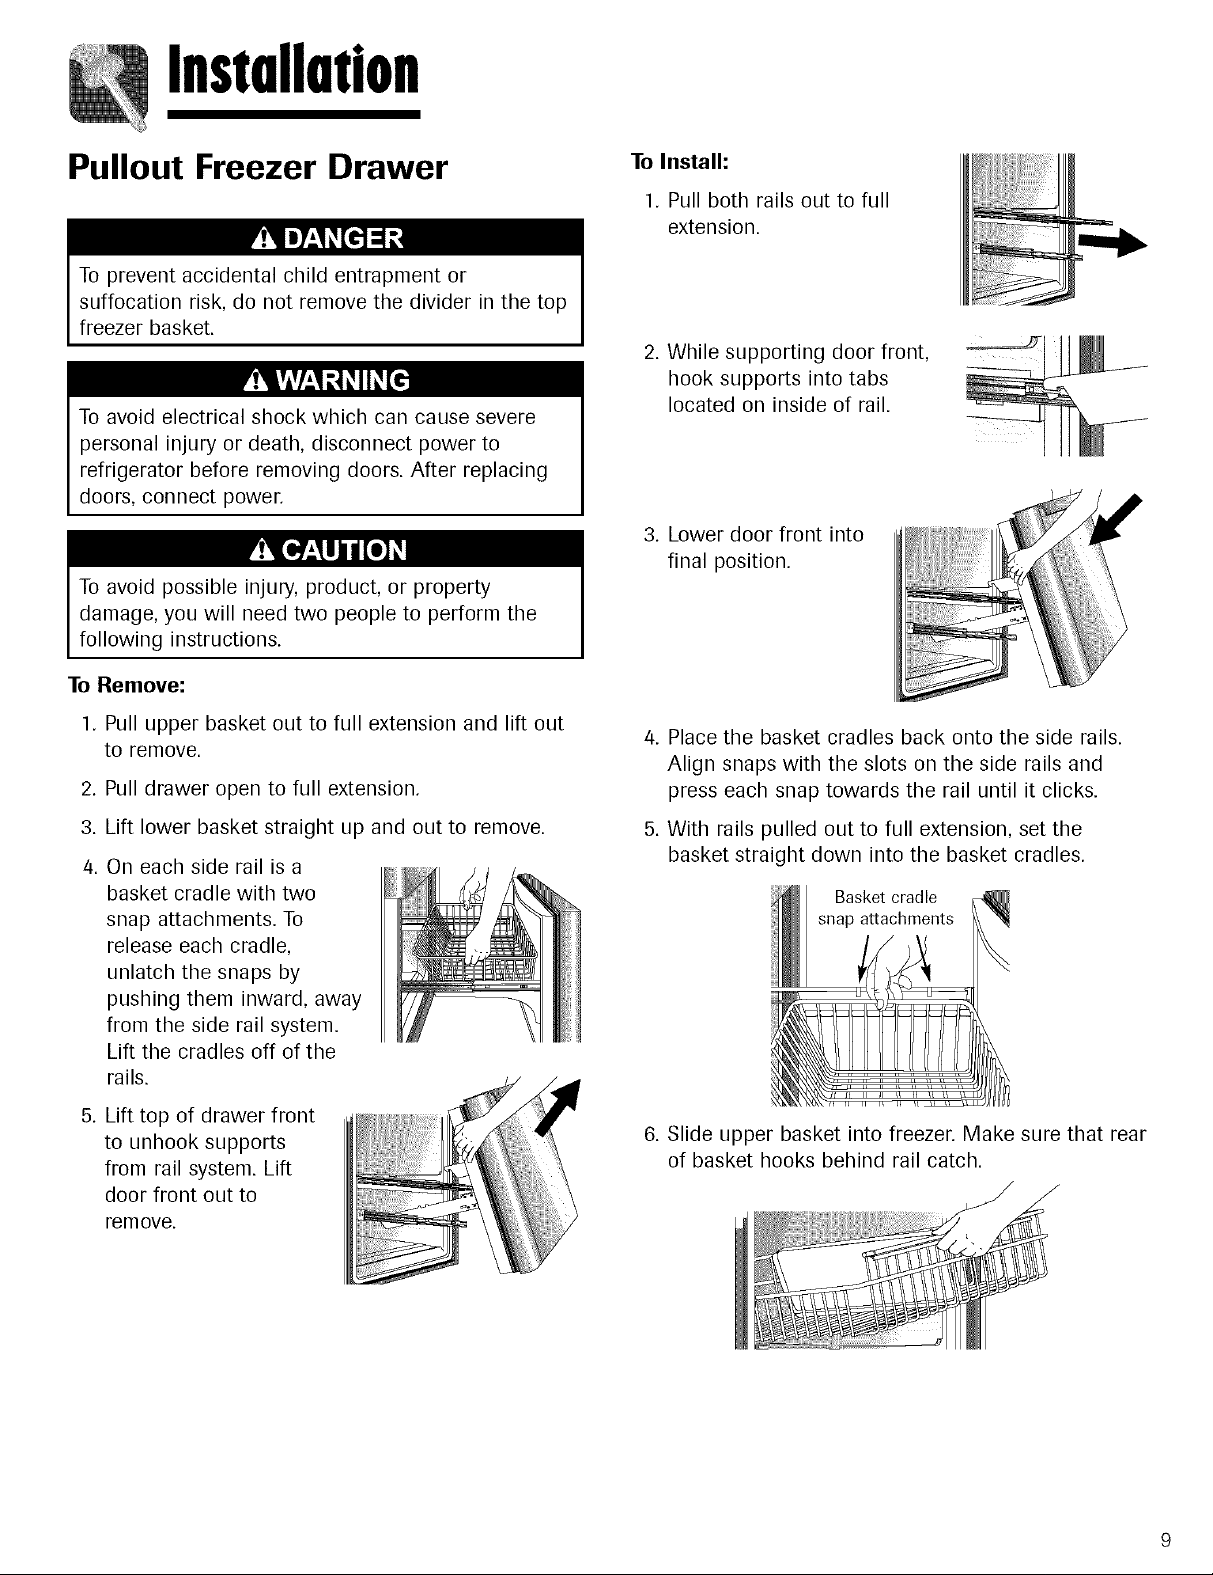
Pullout Freezer Drawer
To prevent accidental child entrapment or
suffocation risk, do not remove the divider in the top
freezer basket.
To avoid electrical shock which can cause severe
personal injury or death, disconnect power to
refrigerator before removing doors. After replacing
doors, connect power.
To avoid possible injury, product, or property
damage, you will need two people to perform the
following instructions.
To Remove:
1. Pull upper basket out to full extension and lift out
to remove.
2. Pull drawer open to full extension.
To Install:
1. Pull both rails out to full
extension.
2. While supporting door front,
hook supports into tabs
located on inside of rail.
3. Lower door front into
final position.
4. Place the basket cradles back onto the side rails.
Align snaps with the slots on the side rails and
press each snap towards the rail until it clicks.
3. Lift lower basket straight up and out to remove.
4. On each side rail is a
basket cradle with two
snap attachments. To
release each cradle,
unlatch the snaps by
pushing them inward, away
from the side rail system.
Lift the cradles off of the
rails.
5. Lift top of drawer front
to unhook supports
from rail system. Lift
door front out to
remove.
5. With rails pulled out to full extension, set the
basket straight down into the basket cradles.
Basket cradle
snap attachments
6. Slide upper basket into freezer. Make sure that rear
of basket hooks behind rail catch.
 Loading...