

Kenmore 59668142890, 59668142891, 59668147890, 59668147891 Installation Guide

IC7 Bottom
Freezer
Refrigerator Ice
Maker Kit
Installation and
Operating
Instructions

2
Contents Safety Instructions
Introduction ............................................................... 3
Safety Instructions .................................................... 3
Materials Required .................................................. 3
Parts ....................................................................... 4
Procedure ............................................................... 6
Operating Instructions ............................................... 9
Before Calling for Service ......................................... 9
Warranty ................................................................. 10
Introduction
Recognize this symbol as a safety
precaution
Caution
To avoid personal injury or property damage,
observe all safety instructions.
Read entire manual before installing kit. All necessary
tools and materials must be available prior to
installation. Verify all listed parts are included in kit. If
parts are missing, contact source from whom kit was
purchased.
Mechanical experience is required to install kit.
Depending on installer's knowledge and skill,
installation can take from 3 to 6 hours.
If unable to solve a problem during installation,
contact an authorized Amana ®technician. Locate a
Factory Service Center or independent authorized
Amana ®technician by calling 1-800-628-5782 inside
U.S.A. and 1-319-622-5511 outside U.S.A. Service
is at owner's expense.
WARNING
To avoid electrical shock which can cause
severe personal injury or death, disconnect
power to refrigerator before installing kit.
After installing kit, connect power.
Caution
To avoid property damage, observe the
following:
• Confirm water pressure to water valve is
at least 20 pounds per square inch.
• Start nuts by hand to avoid cross
threading. Finish tightening nuts using an
adjustable wrench. Do not overtighten.
• Check carefully for water leaks prior to
returning refrigerator to normal location
and 24 hours after connection.
Materials Required
Important
• Before connecting ice maker, contact a plumber to
connect copper tubing to household plumbing in
compliance with local codes and ordinances.
• Amana Refrigeration, Inc. recommends using a
saddle valve. Do not use self-piercing valve. Amana
Refrigeration, Inc. is not responsible for property
damage due to improper installation or water
connection.
1/4" (6 mm) flexible copper tubing*.
*Length of copper tubing must reach from water supply
connection plus an additional 8' (2 m) for service loop
behind refrigerator. Tubing should be soft instead of
rigid and ends should be free of burrs.
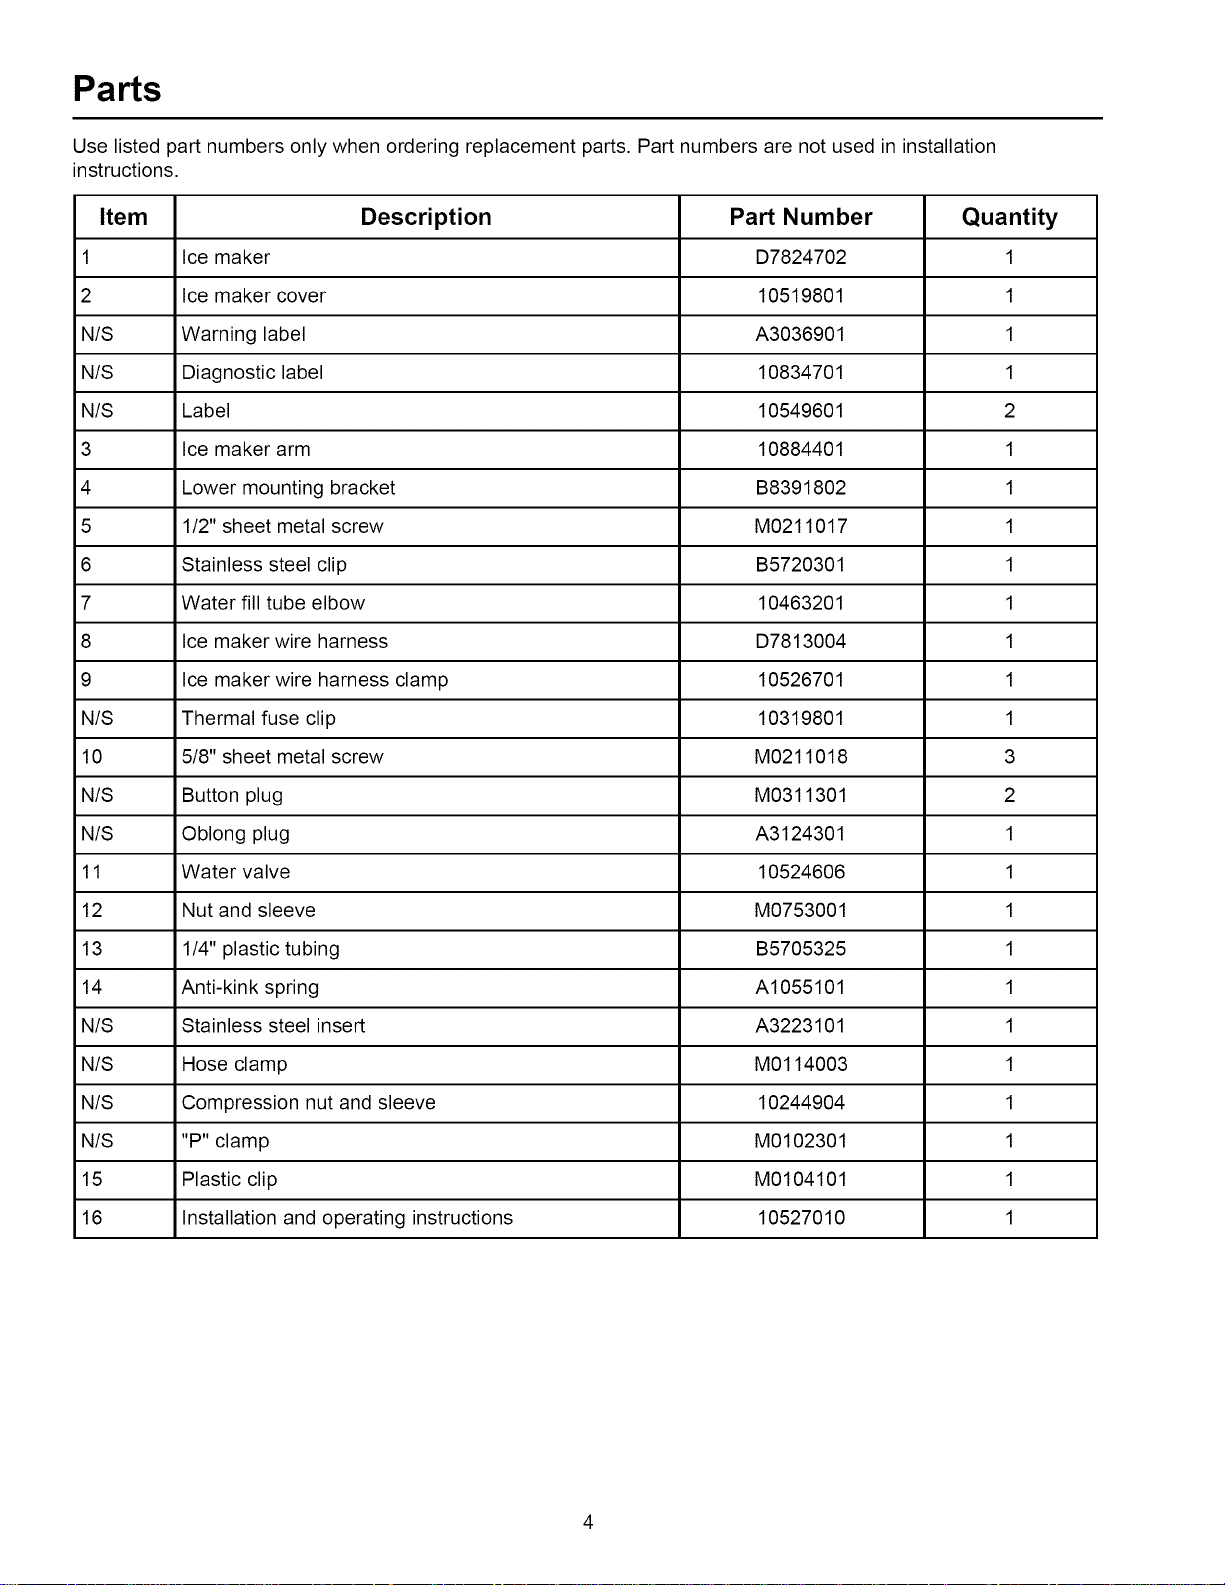
Parts
Use listed part numbers only when ordering replacement parts. Part numbers are not used in installation
instructions.
Item Description Part Number Quantity
1 Ice maker D7824702 1
2 Ice maker cover 10519801 1
N/S Warning label A3036901 1
N/S Diagnostic label 10834701 1
N/S Label 10549601 2
3 Ice maker arm 10884401 1
4 Lower mounting bracket B8391802 1
5 1/2" sheet metal screw M0211017 1
6 Stainless steel clip B5720301 1
7 Water fill tube elbow 10463201 1
8 Ice maker wire harness D7813004 1
9 Ice maker wire harness clamp 10526701 1
N/S Thermal fuse clip 10319801 1
10 5/8" sheet metal screw M0211018 3
N/S Button plug M0311301 2
N/S Oblong plug A3124301 1
11 Water valve 10524606 1
12 Nut and sleeve M0753001 1
13 1/4" plastic tubing B5705325 1
14 Anti-kink spring A1055101 1
N/S Stainless steel insert A3223101 1
N/S Hose clamp M0114003 1
N/S Compression nut and sleeve 10244904 1
N/S "P" clamp M0102301 1
15 Plastic clip M0104101 1
16 Installation and operating instructions 10527010 1
4
 Loading...