

Kenmore 59666259400, 59666254400, 59666252400, 59666253400 Owner’s Manual
®
Bottom Freezer Refrigerator*
Use & Care Guide
Rdfrigdrateur_ compartiment congdlateur infdrieur*
Guide d'utilisation et d'entretien
Refrigerador con congelador inferior*
Gufa de Uso y Cuidado
I'll
m
t_
"!I
* See model numbers on inside back cover for models referenced
* Voir sur troisieme de couverture les numeros de modele auxquels il est fait reference.
* Ver los nt_merosde modelos en el interior de la contraportada para los modelos respectivos.
m
t_
Z!
O
r,=
PartNo. 12828180 Sears, Roebuck and Co., Hoffrnan Estates, IL 60179 U.S.A. www.sears.com
FormC/12/06 Sears Canada, Inc., Toronto, Ontario, Canada M5B2B8 Au Canada, www.sears.ca
Warning and Important Safety
Instructions appearing in this manual are
not meant to cover all possible
conditions and situations that mayoccur.
Common sense, caution, and care must
be exercised when installing,
maintaining, or operating refrigerator.
Always contact your dealer, distributor,
service agent, or manufacturer about
problems or conditions you do not
understand.
RECOGNIZE SAFETY
SYMBOLS, WORDS,
LABELS
2
THESEiNsTiONs
IN THE U.S.A.
Congratulations on making a smart
purchase. Your new Kenmore®
appliance is designed and manufactured
for years of dependable operation. But
like all products, it may require
preventive maintenance or repair from
time to time. That is when having a
Master Protection Agreement can save
you money and aggravation.
Purchase a Master Protection
Agreement now and protect yourself
from unexpected hassle and expense.
The Master ProtectionAgreement also
helps extend the life ofyour new
appliance. Here is what is included in
the agreement:
> Expert service by our 12,000
professional repair specialists.
> Unlimited service and no charge for
parts and labor on all covered
repairs.
> "No-lemon" guarantee- replacement
of your covered product if more than
three product failures occur within
twelve months.
> Product replacement if your covered
product cannot be fixed.
> Annual Preventive Maintenance
Check at your request- no extra
charge.
> Fast help by phone - non-technical
and instructional assistance on
products repaired in your home, plus
convenient repair scheduling.
> Power surge protection against
electrical damage due to power
fluctuations.
> Rental reimbursement if repair of
your covered product takes longer
than promised.
Once you purchase the Agreement, a
simple phone call is all that it takes for
you to schedule service. You can call
anytime day or night, or schedule a
service appointment online.
Sears has over 12,000 professional
repair specialists, who have access to
over 4.5 million quality partsand
accessories. That is the kind of
professionalism you can count on to
help prolong the life of your new
purchase foryears to come. Purchase
your Master ProtectionAgreement
today!
Some limitations and exclusionsapply.
For prices and additional information,
call 1-800-827-6655.
Sears Installation Service
For Sears guaranteed professional
installation of home appliances and
items like garage door openers and
water heaters, in the U.S.A. call
1-800-MY-HOME®.
(E
IN CANADA
Your purchase has addedvalue because
you can depend on Sears HomeCentraP
for service. With over 2,400 service
technicians and access to over 900,000
parts and accessories, we have the
tools, parts, knowledge and skills to _11_
ensure our pledge: We Service What
We Sell.
Your Kenmore®appliance is designed,
manufactured and tested to provide
years of dependable operation. Yet any
major appliance may require service
from time to time. The Sears
MaintenanceAgreement offers you an
outstanding service program, affordably
priced.
Sears Maintenance Agreement
>- Is your way to buy tomorrow's service
at today's price.
>- Eliminates repair bills resulting from
normal wear and tear.
>- Provides for non-technical and
instructional assistance.
Even if you don't need repairs,
provides an annual Preventive
Maintenance Check, at your request,
to ensure that your appliance is in
proper running condition.
Some limitations apply. For information
concerning Sears Canada Maintenance
Agreements, call 1-800-361-6665.
3
TY
One Year Limited Warranty
When installed, operated and
maintained according to all
instructions supplied with the
product, if this appliance fails due to
a defect in material or workmanship
within one year from the date of
purchase, call 1-800-4-MY-HOME ®
to arrange for free repair.
If this appliance is used for other
than private family purposed, this
warranty applies for only 90 days
from the date of purchase.
This warranty covers only defects
in material and workmanship.
Sears will NOT pay for:
1. Expendable items that can wear
out from normal use, including
but not limited to filters, belts,
light bulbs, and bags.
2. A service technician to instruct
the user in correct product
installation, operation or
maintenance.
3. A service technician to clean or
maintain this product.
4. Damage to or failure of this
product if it is not installed,
operated or maintained according
to all instructions supplied with
the product.
5. Damage to or failure of this
product resulting from accident,
abuse, misuse or use for other
than its intended purpose.
6. Damage to or failure of this
product caused by the use of
detergents, cleaners, chemicals
or utensils other than those
recommended in all instructions
supplied with the product.
7. Damage to or failure of parts or
systems resulting
from unauthorized modifications
made to this
product.
Disclaimer of implied warranties;
limitation of remedies
Customer's sole and exclusive
remedy under this limited warranty
shall be product repair as provided
herein. Implied warranties, including
warranties of merchantability or
fitness for a particular purpose, are
limited to one year or the shortest
period allowed by law. Sears shall
not be liable for incidental or
consequential damages. Some
states and provinces do not allow
the exclusion or limitation of
incidental or consequential
damages, or limitations on the
duration of implied warranties or
merchantability or fitness, so these
exclusions or limitations may not
apply to you.
This warranty applies only while this
appliance is used in the United
States and Canada.
This warranty gives you specific
legal rights, and you may also have
other rights which vary from state to
state.
Sears, Roebuck and Co., Dept.
817WA, Hoffman Estates, IL 60179
Sears Canada Inc., Toronto,
Ontario, Canada
M5B 2B8
Reverse Osmosis
Water Systems
Some Reverse Osmosis home
water systems cause low water
pressure. Low water pressure
can affect the water and ice
dispensing system by causing
small or hollow ice cubes and
slow water flow from the
dispenser. Service problems
related to the home's Reverse
Osmosis water system are not
covered by the warranty.
TODUCTRECORD
In the space below record the model
and serial numbers and purchasedate
of your refrigerator.Youwill find the
model and serial number sticker inside
the refrigerator section on the leftwall.
Model Number: 596.
Serial Number:
Purchase Date:
Keep this booklet and your Sears
sales receipt in a safe place for future
reference.
4
Important Safety Information ......................................................................................2
What You Need to KnowAbout Safety Instructions...................................................2
Protection Agreements ................................................................................................3
Master Protection Agreements - U.S.A.....................................................................3
MaintenanceAgreements - Canada .........................................................................3
Warranty.....................................................................................................................4
Product Record..........................................................................................................4
Installing Your Refrigerator ....................................................................................6-11
Measuring the Opening .............................................................................................6
Transporting Your Refrigerator...................................................................................6
Selecting the Best Location.......................................................................................6
How to Installand Remove Handles.........................................................................7
How to Remove the Hinges,Doors and Drawer .......................................................8
How to Reverse the Hinges,Doors and Drawer .......................................................9
How to Replacethe Hinges,Doors and Drawer........................................................9
Howto Connect the Water Supply...........................................................................10
How to LevelYour Refrigerator................................................................................11
Setting and Maintaining Proper Temperatures........................................................12
InitialControl Settings ..............................................................................................12
Adjusting theControls..............................................................................................12
Fresh Food Storage .................................................................................................12
FrozenFoodStorage ...............................................................................................12
Fresh Food Features .............................................................................................13-14
InteriorShelves........................................................................................................13
Door Storage............................................................................................................13
Climate-Controlled Drawers.....................................................................................14
Storage Drawers......................................................................................................14
Freezer Features.........................................................................................................15
Automatic Ice Maker................................................................................................15
Shelves ....................................................................................................................15
Drawers....................................................................................................................15
Door Storage............................................................................................................15
Hints and Care .......................................................................................................16-17
Howto Clean Your Refrigerator...............................................................................16
How to Remove Odors from Refrigerator................................................................17
Energy Saving Ideas................................................................................................17
How to Remove and Replace Light Bulbs...............................................................17
Normal Operating Sounds .........................................................................................18
Troubleshooting ....................................................................................................19-20
Operation............................................................................................................19-20
Ice and Water...........................................................................................................20
I'!I
Fran£ais .......................................................................................................................21
EspaSol ........................................................................................................................41
Service ..........................................................................................................Back Cover
5
Your refrigerator was packed carefully
for shipment. Remove and discard shelf
packaging and tape. Do not remove the
serial plate.
tGTHEOPEG
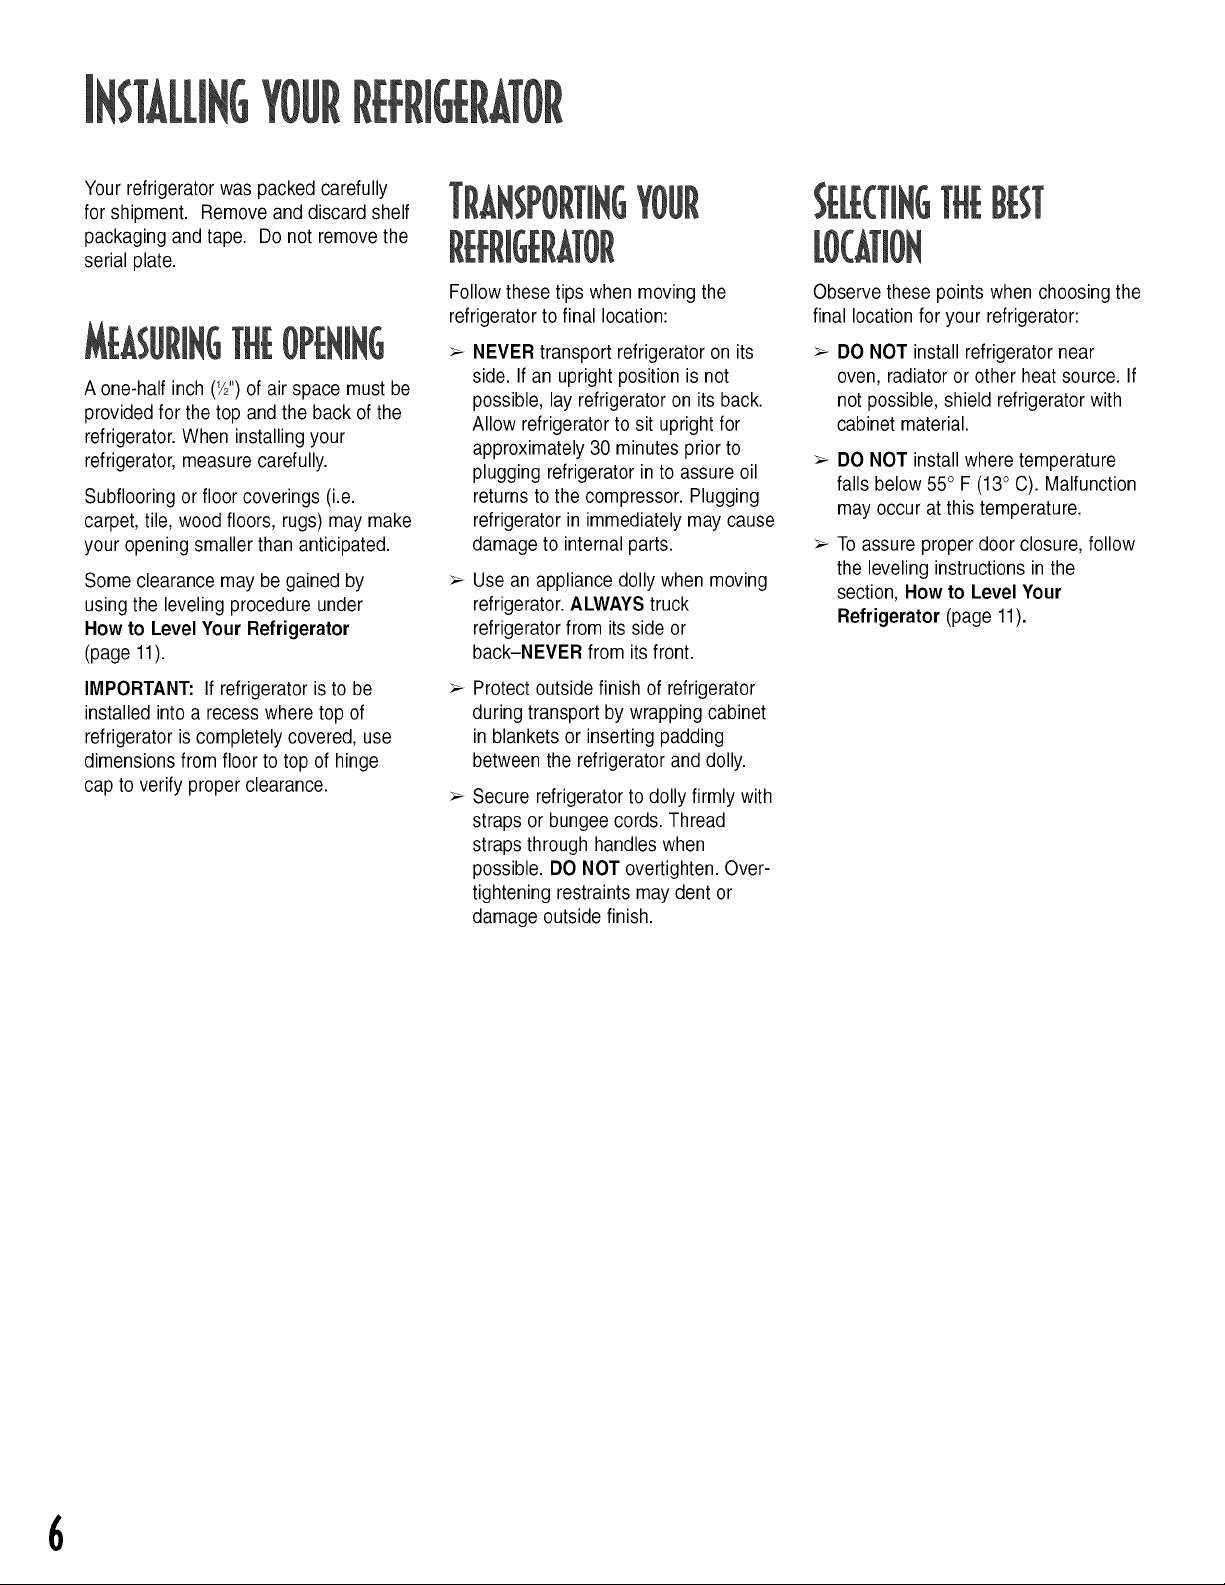
A one-half inch (1/2")of air space must be
provided for the top and the back of the
refrigerator.When installing your
refrigerator, measure carefully.
Subflooring or floor coverings (i.e.
carpet, tile, wood floors, rugs) may make
your opening smaller than anticipated.
Some clearance may be gainedby
using the leveling procedure under
How to Level Your Refrigerator
(page 11).
IMPORTANT: If refrigeratoris to be
installed into a recess where top of
refrigerator is completely covered, use
dimensions from floor to top of hinge
cap to verify properclearance.
SPORTINGYOUR
Follow these tips when moving the
refrigerator to final location:
NEVER transport refrigerator on its
side. If an upright positionis not
possible, lay refrigerator on its back.
Allow refrigerator to sit upright for
approximately 30 minutes prior to
plugging refrigerator in to assureoil
returns to the compressor. Plugging
refrigerator in immediately may cause
damage to internal parts.
Use an appliance dolly when moving
refrigerator.ALWAYS truck
refrigerator from its side or
back-NEVER from its front.
Protect outside finish of refrigerator
during transport by wrapping cabinet
in blankets or inserting padding
between the refrigerator and dolly.
Secure refrigerator to dolly firmly with
straps or bungee cords. Thread
straps through handleswhen
possible. DO NOT overtighten. Over-
tightening restraints may dent or
damage outside finish.
MGTHEBEST
Observe these points when choosing the
final location for your refrigerator:
DO NOT install refrigeratornear
oven, radiator or other heat source. If
not possible, shield refrigerator with
cabinet material.
DO NOT install where temperature
falls below 55° F (13° C). Malfunction
may occur at thistemperature.
Toassure proper doorclosure, follow
the leveling instructions inthe
section, How to Level Your
Refrigerator (page 11).
6
For easier installation, some
refrigerators may have been delivered
with the handles off. Please see the
interior of the fresh food section to
locate the handle assembly.
Handle design may vary from
refrigerator to refrigerator. Please
reference the instructions for the
appropriate handle design below.
Before handle installation, remove all
packaging and tape.
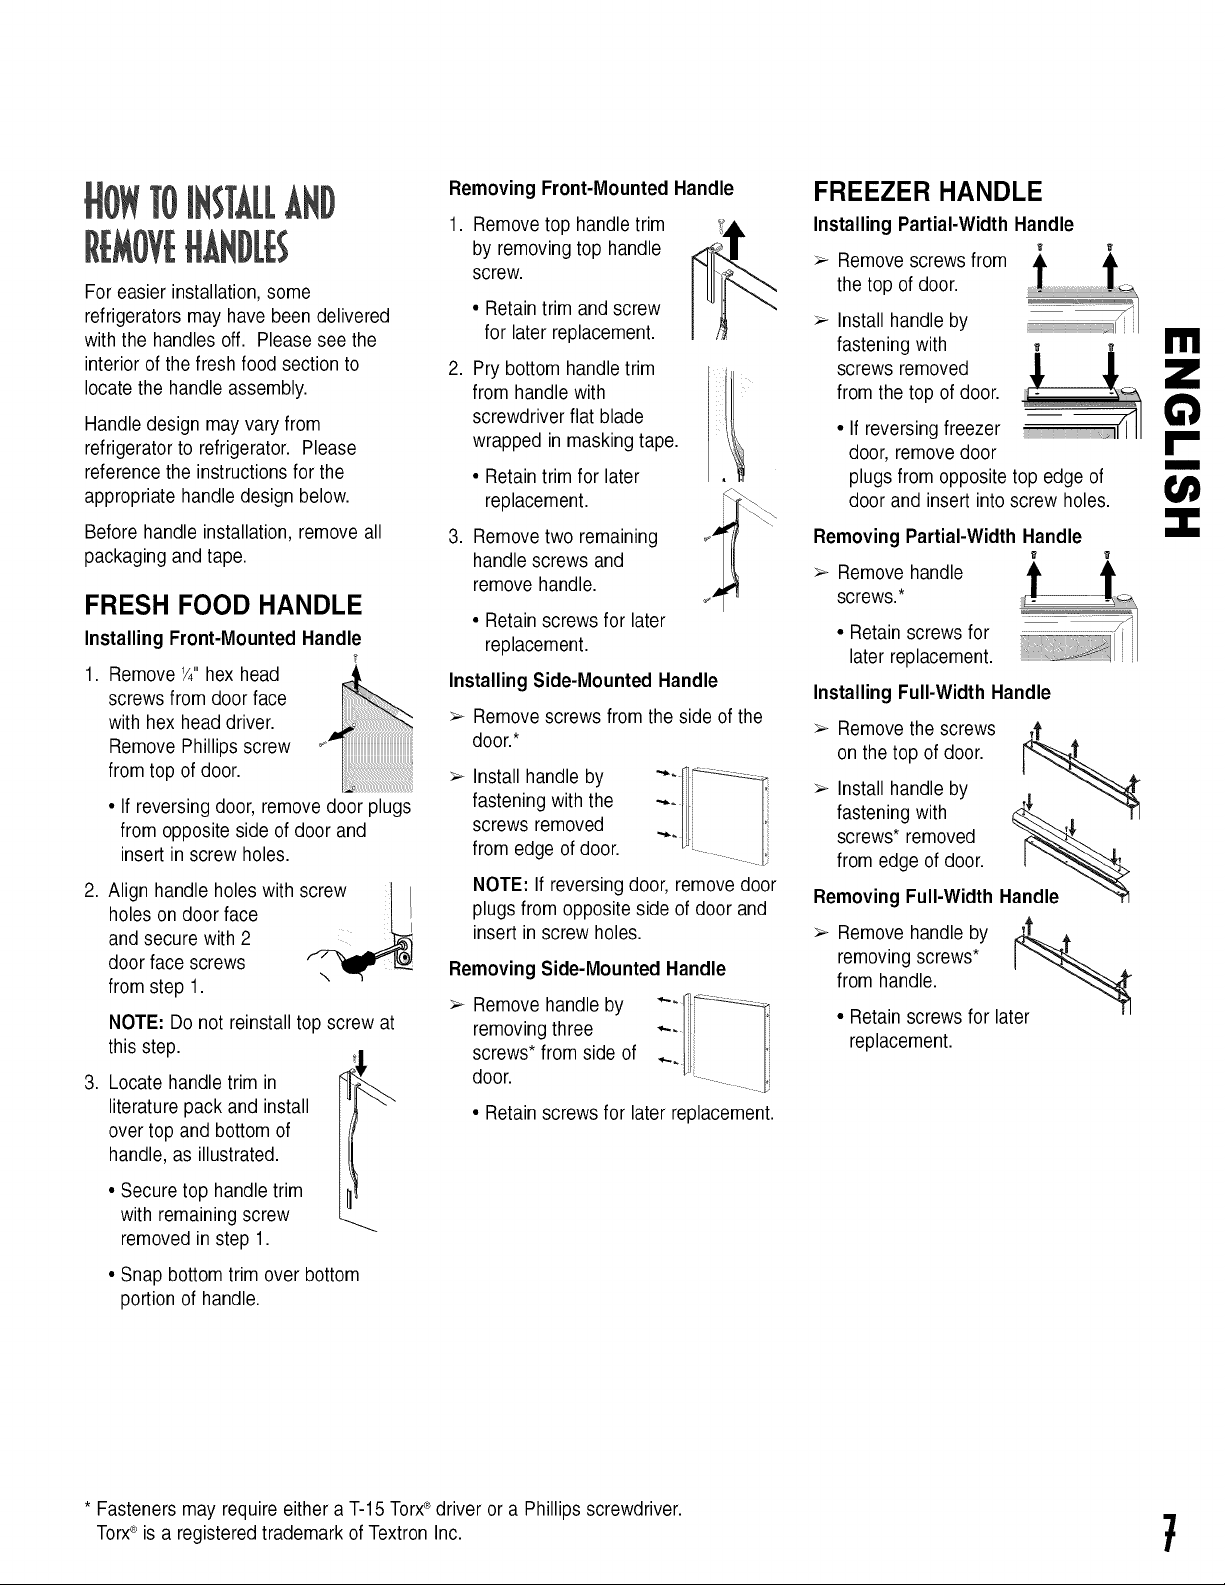
FRESH FOOD HANDLE
Installing Front-Mounted Handle
1. Remove _4"hex head
screws from door face
with hex head driver.
Remove Phillips screw
from top of door.
• If reversing door, remove door plugs
from opposite side of door and
insert in screw holes.
2. Align handle holes with screw
holes on door face
and secure with 2
door face screws
from step 1.
NOTE: Do not reinstall top screw at
this step.
3. Locate handletrim in
literature pack and install
over top and bottom of
handle, as illustrated.
\
Removing Front-Mounted Handle
1. Remove top handletrim
by removing top handle
screw.
• Retaintrim and screw
for later replacement.
2. Pry bottom handletrim
from handle with
screwdriver flat blade
wrapped in masking tape.
• Retaintrim for later
replacement.
3. Remove two remaining
handle screws and
remove handle.
• Retainscrews for later
replacement.
Installing Side-Mounted Handle
> Remove screws from the side of the
door.*
Install handle by
fastening with the
screws removed
from edge ofdoor.
NOTE: If reversing door, remove door
plugs from opposite side of door and
insert in screw holes.
Removing Side-Mounted Handle
> Remove handle by
removing three
screws* from side of
door.
• Retainscrews for later replacement.
i \,.
i j_. _i_
FREEZER HANDLE
Installing Partial-Width Handle
Removescrews from
the top of door.
Install handle by
fastening with _
from the top of door.
screws removed [_ _
• If reversing freezer ......................................................
door, remove door
plugs from opposite top edge of
door and insert into screw holes.
Removing Partial-Width Handle
> Remove handle
screws.*
• Retain screws for
later replacement.
Installing Full-Width Handle
> Remove the screws ,t
on the top of door. __,"--_
> Install handle by
fastening with
screws* removed
from edge of door.
Removing Full-Width H
> Remove handle by 'J4_ ,_
removing screws*
from handle.
• Retain screws for later
replacement.
m
• Secure top handle trim
with remaining screw
removed in step 1.
• Snap bottom trim over bottom
portion of handle.
* Fasteners may requireeither a T-15 Torx®driver or a Phillips screwdriver.
Torx®is a registered trademark of Textron Inc.
7
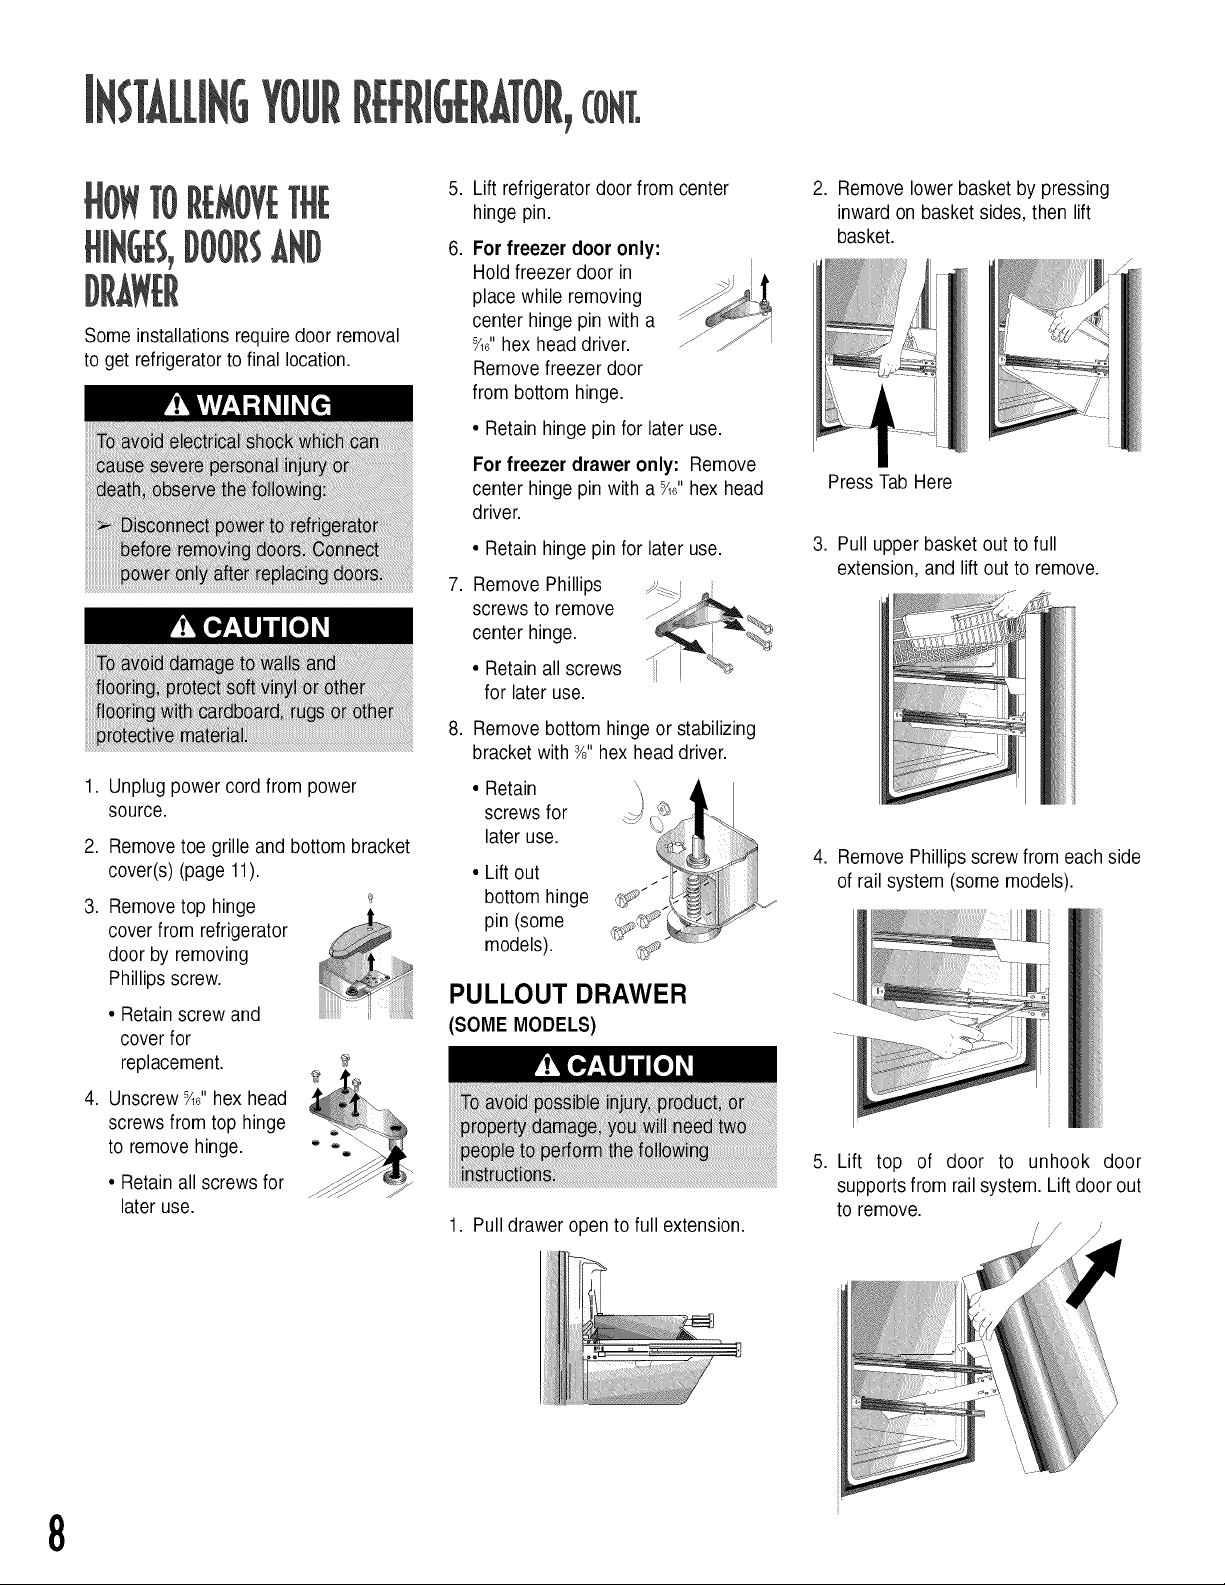
Some installations requiredoor removal
to get refrigerator to final location.
,
Lift refrigerator door from center
hinge pin.
,
For freezer door only:
Hold freezer door in
place while removing
center hinge pin with a
_6"hex head driver.
Remove freezer door
from bottom hinge.
• Retain hingepin for later use.
,
Remove lower basket by pressing
inward on basket sides, then lift
basket.
1. Unplug power cord from power
source.
,
Remove toe grille and bottom bracket
cover(s) (page 11).
,
Remove top hinge
cover from refrigerator
door by removing
Phillips screw.
• Retain screw and
cover for
replacement.
4. Unscrew _6"hex head
screws from top hinge
to remove hinge.
• Retain all screws for
later use.
For freezer drawer only: Remove
center hinge pin with a _6" hex head
driver.
• Retain hingepin for later use.
,
Remove Phillips _---_-i
screws to remove ....J
center hinge.
• Retain all screws
for later use.
,
Remove bottom hinge or stabilizing
bracket with %"hex head driver.
• Retain .t, _
screws for __
later use.• Lift out
pin (some
bottom hinge _"
models).
PULLOUT DRAWER
(SOME MODELS)
1. Pull drawer open to full extension.
Press TabHere
,
Pull upper basket out to full
extension, and lift out to remove.
,
RemovePhillips screw from eachside
of rail system (some models).
,
Lift top of door to unhook door
supports from railsystem. Liftdoor out
to remove.
8
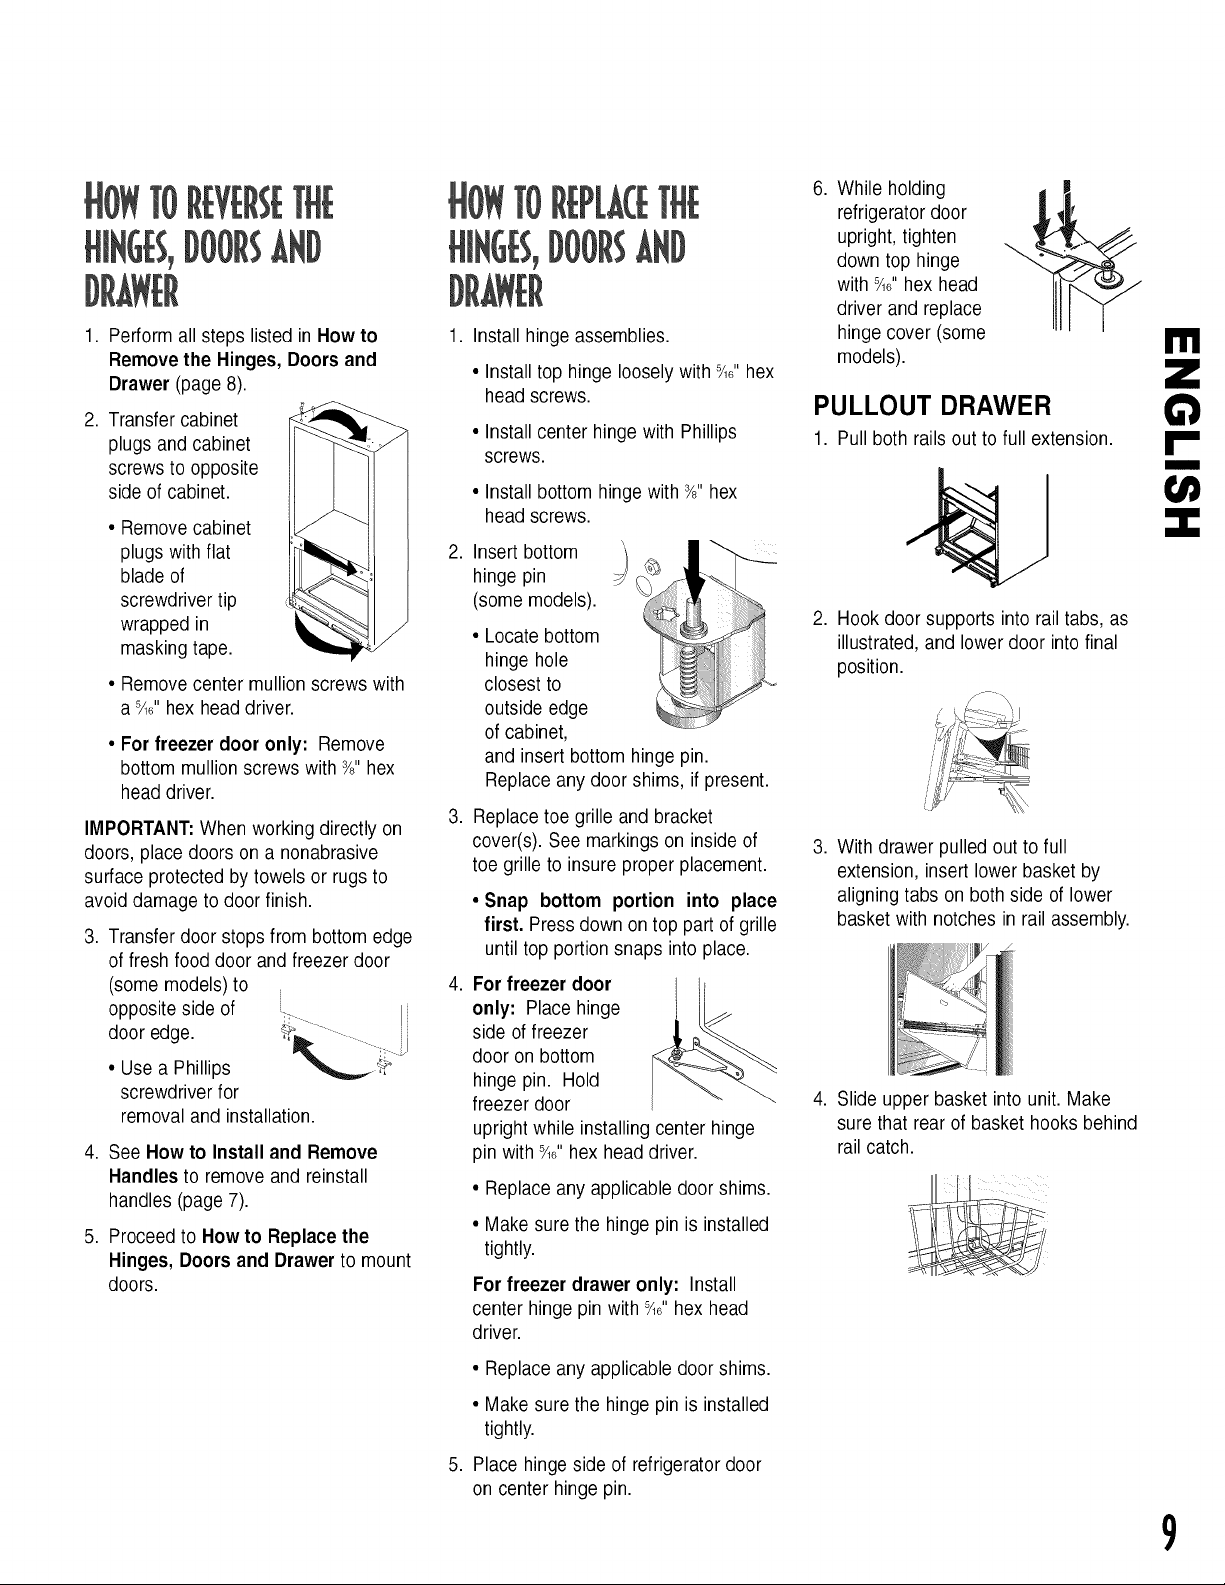
1. Perform allsteps listed in How to
Remove the Hinges, Doors and
Drawer (page 8).
2. Transfer cabinet
plugs and cabinet
screws to opposite
side of cabinet.
• Remove cabinet
plugs with flat
blade of
screwdriver tip
wrapped in
masking tape.
• Remove center mullion screws with
a 5/_,,hex headdriver.
• For freezer door only: Remove
bottom mullion screws with _/8"hex
head driver.
IMPORTANT:When working directly on
doors, place doors on a nonabrasive
surface protected by towels or rugs to
avoid damage to door finish.
3. Transfer door stops from bottom edge
of fresh food door and freezer door
(some models) to
opposite side of
door edge.
• Use a Phillips
screwdriver for
removal and installation.
4. See How to Install and Remove
Handles to remove and reinstall
handles (page 7).
5. Proceed to How to Replace the
Hinges, Doors and Drawer to mount
doors.
.
Install hinge assemblies.
• Install top hinge loosely with %6"hex
head screws.
• Install center hinge with Phillips
screws.
• Install bottom hinge with %"hex
head screws.
.
hinge pin
(some models). _)_
• Locate bottom
,nsertbottom
closest to
hinge hole
outside edge
of cabinet,
and insert bottom hinge pin.
Replace any door shims, if present.
.
Replace toe grille and bracket
cover(s). See markings on inside of
toe grille to insure properplacement.
• Snap bottom portion into place
first. Press down on top part of grille
until top portion snaps into place.
.
For freezer door
only: Place hinge
side of freezer
door on bottom
hinge pin. Hold
freezer door
upright while installing center hinge
pin with %6"hex head driver.
• Replace any applicable door shims.
• Make sure the hinge pin is installed
tightly.
For freezer drawer only: Install
center hinge pin with %6"hex head
driver.
.
refrigerator door r
upright, tighten
down top hinge "_
with _6" hex head
Whehodng
driver and replace
hinge cover (some
models).
!'!I
PULLOUT DRAWER
1. Pull both rails out to full extension.
2. Hook doorsupports into rail tabs, as
illustrated, and lower door into final
position.
3. With drawer pulled outto full
extension, insert lower basket by
aligning tabs on both side of lower
basket with notches in rail assembly.
.
Slide upper basket into unit. Make
sure that rear of basket hooks behind
rail catch.
• Replace any applicable door shims.
• Make sure the hinge pin is installed
tightly.
.
Place hinge side of refrigeratordoor
on center hinge pin.
9
MATERIALS NEEDED
> ¼"outer diameter flexible copper
tubing
Brass compression nut andsleeve for
¼"outer diameter copper tubing.
Shut-off valve (requires a ¼"holeto
be drilled into watersupply before
valve attachment)
> Adjustable wrench
> ¼"hex nut driver
NOTE: Add 8' to tubing length needed to
reach water supply for creation of
service loop.
1. Create service loop with tubing using
care to avoid kinks in tubing.
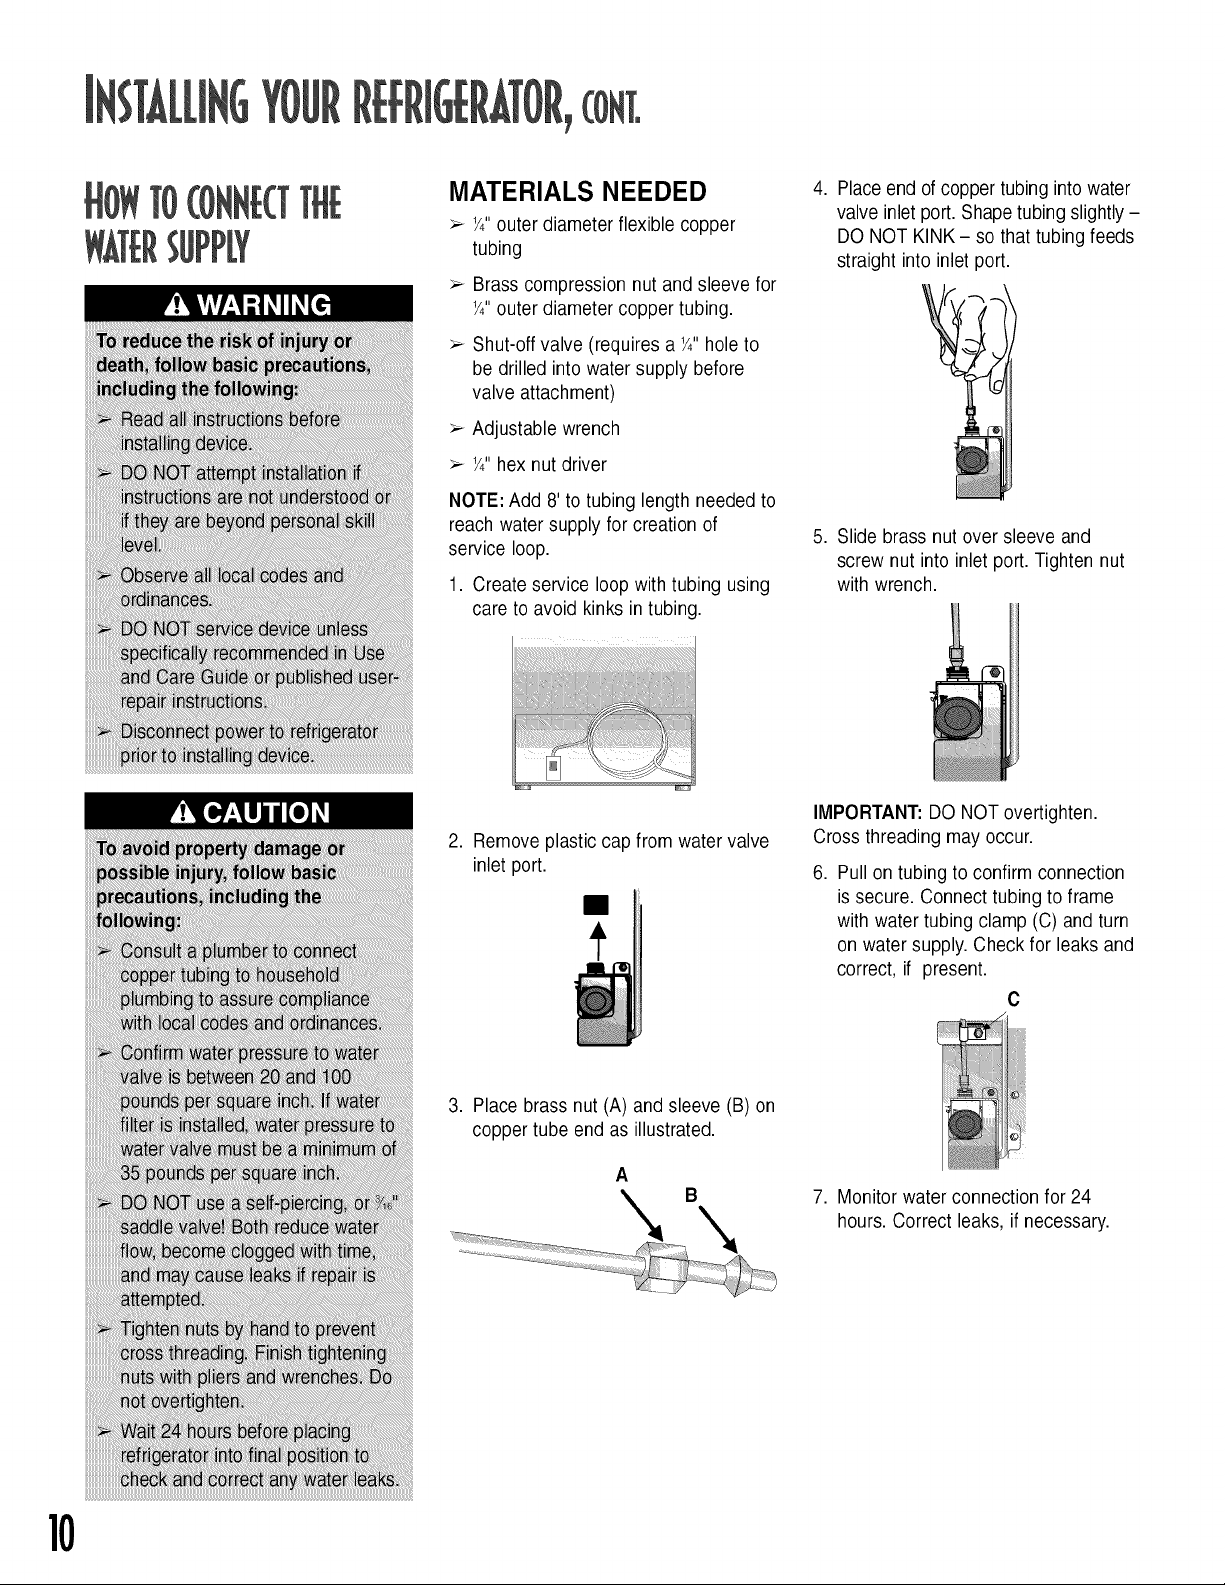
,
Place end of coppertubing into water
valve inlet port.Shapetubingslightly -
DO NOT KINK - so that tubing feeds
straight into inlet port.
5. Slide brass nut over sleeve and
screw nut into inlet port. Tighten nut
with wrench.
2. Remove plastic cap from water valve
inlet port.
3. Place brass nut (A) and sleeve (B)on
copper tube end as illustrated.
A
IMPORTANT: DO NOT overtighten.
Cross threading may occur.
,
Pull on tubing to confirm connection
is secure. Connect tubing to frame
with water tubing clamp (C) and turn
on water supply. Check for leaks and
correct, if present.
C
7. Monitor water connection for 24
hours. Correct leaks, if necessary.
10
TOLEVELYOUR
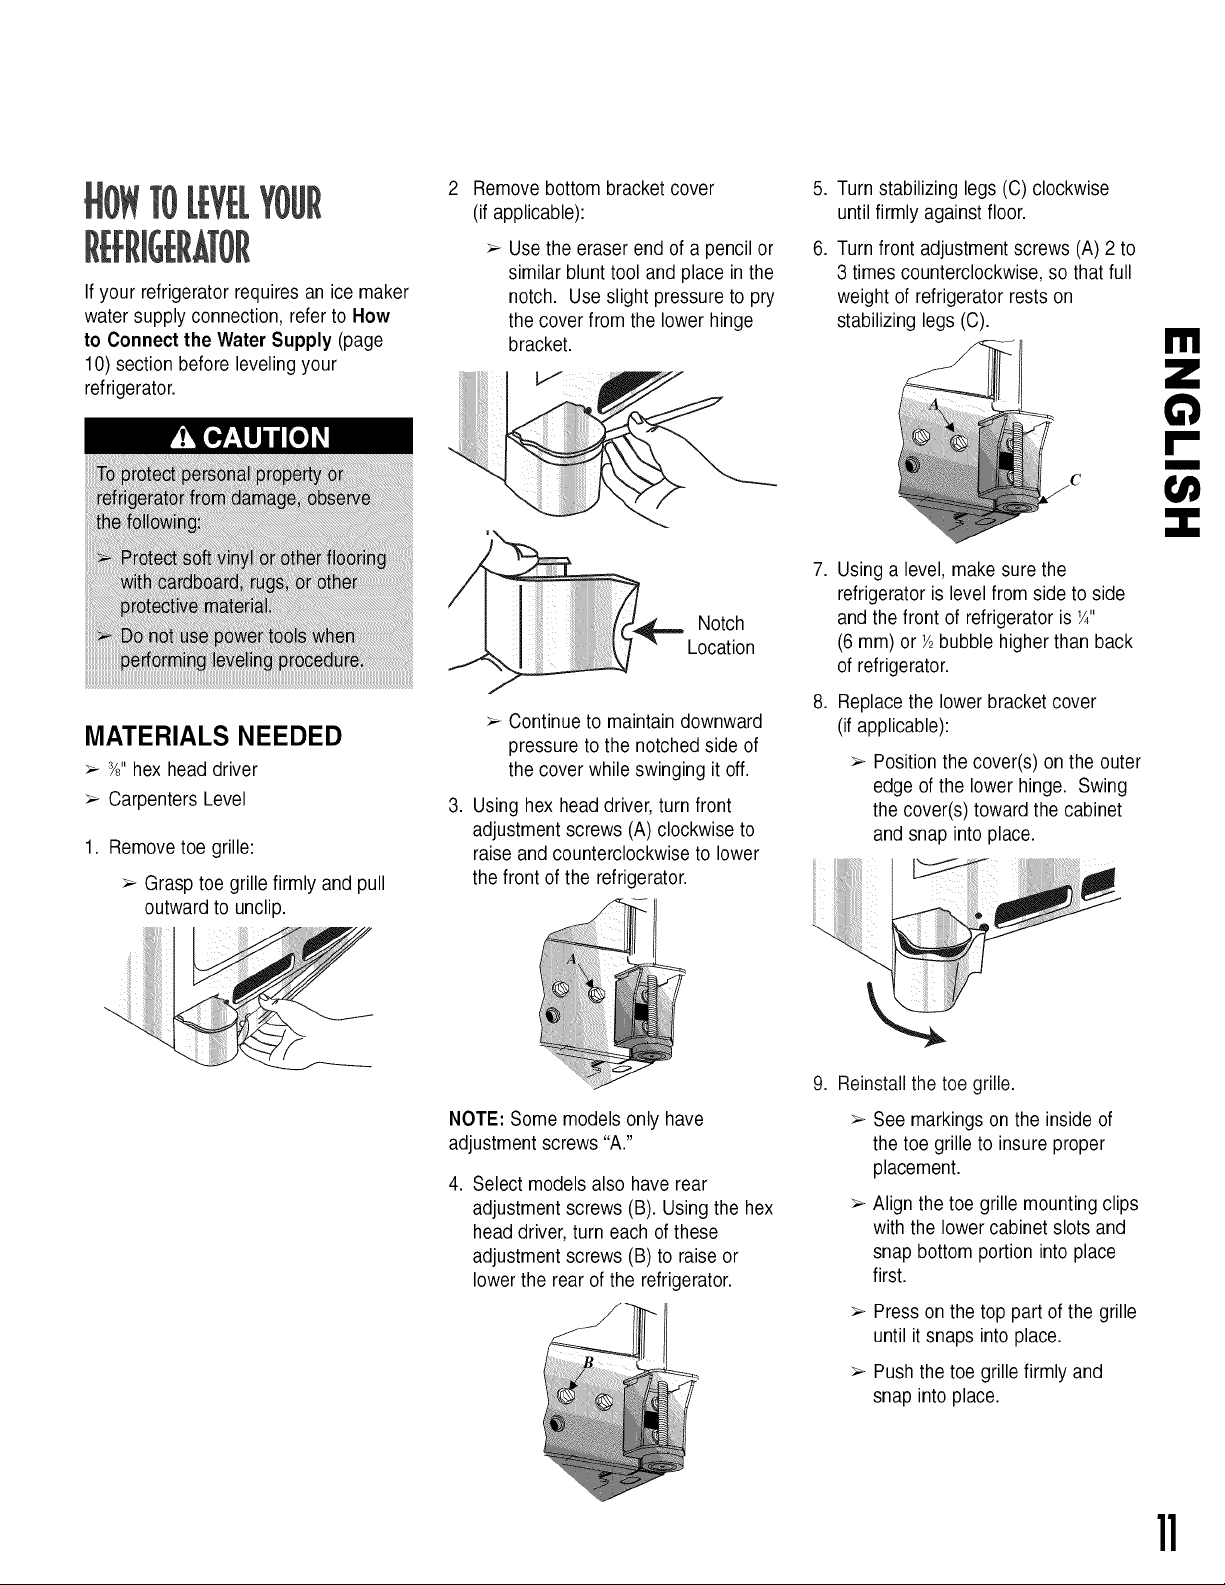
Remove bottom bracket cover
(if applicable):
5. Turn stabilizing legs (C) clockwise
until firmly against floor.
If your refrigerator requires an ice maker
water supply connection, refer to How
to Connect the Water Supply (page
10) section before levelingyour
refrigerator.
MATERIALS NEEDED
> _" hex headdriver
> Carpenters Level
1. Remove toe grille:
> Grasp toe grille firmly and pull
outward to uncli ).
> Usethe eraser end of a pencil or
similar blunt tool and place inthe
notch. Use slight pressure to pry
the cover from the lower hinge
bracket.
Notch
Location
> Continue to maintain downward
pressure to the notched side of
the cover while swinging it off.
3. Using hex head driver, turn front
adjustment screws (A) clockwise to
raise and counterclockwise to lower
the front of the refrigerator.
6. Turn front adjustment screws (A) 2 to
3 times counterclockwise, so that full
weight of refrigerator rests on
stabilizing legs (C).
.
Using a level, make sure the
refrigerator is level from side to side
and the front of refrigerator is ¼"
(6 mm) or Y2bubble higherthan back
of refrigerator.
8. Replace the lower bracket cover
(if applicable):
> Positionthe cover(s) on the outer
edge of the lower hinge. Swing
the cover(s) toward the cabinet
and snap into place.
"_
!'!I
.... 9. Reinstall the toe grille.
NOTE: Some models only have
adjustment screws "A."
4. Select modelsalso have rear
adjustment screws (B). Usingthe hex
head driver, turn each ofthese
adjustment screws (B) to raise or
lower the rear of the refrigerator.
See markings on the inside of
the toe grille to insure proper
placement.
Align the toe grille mounting clips
with the lower cabinet slots and
snap bottom portion into place
first.
Press on the top part of the grille
until it snaps into place.
> Push the toe grille firmly and
snap into place.
11
The controls are located at the top front of the refrigerator and freezer compartments. NOTE: The freezer control turns the cooling
system on. Neither section will cool if freezer control is set to off.
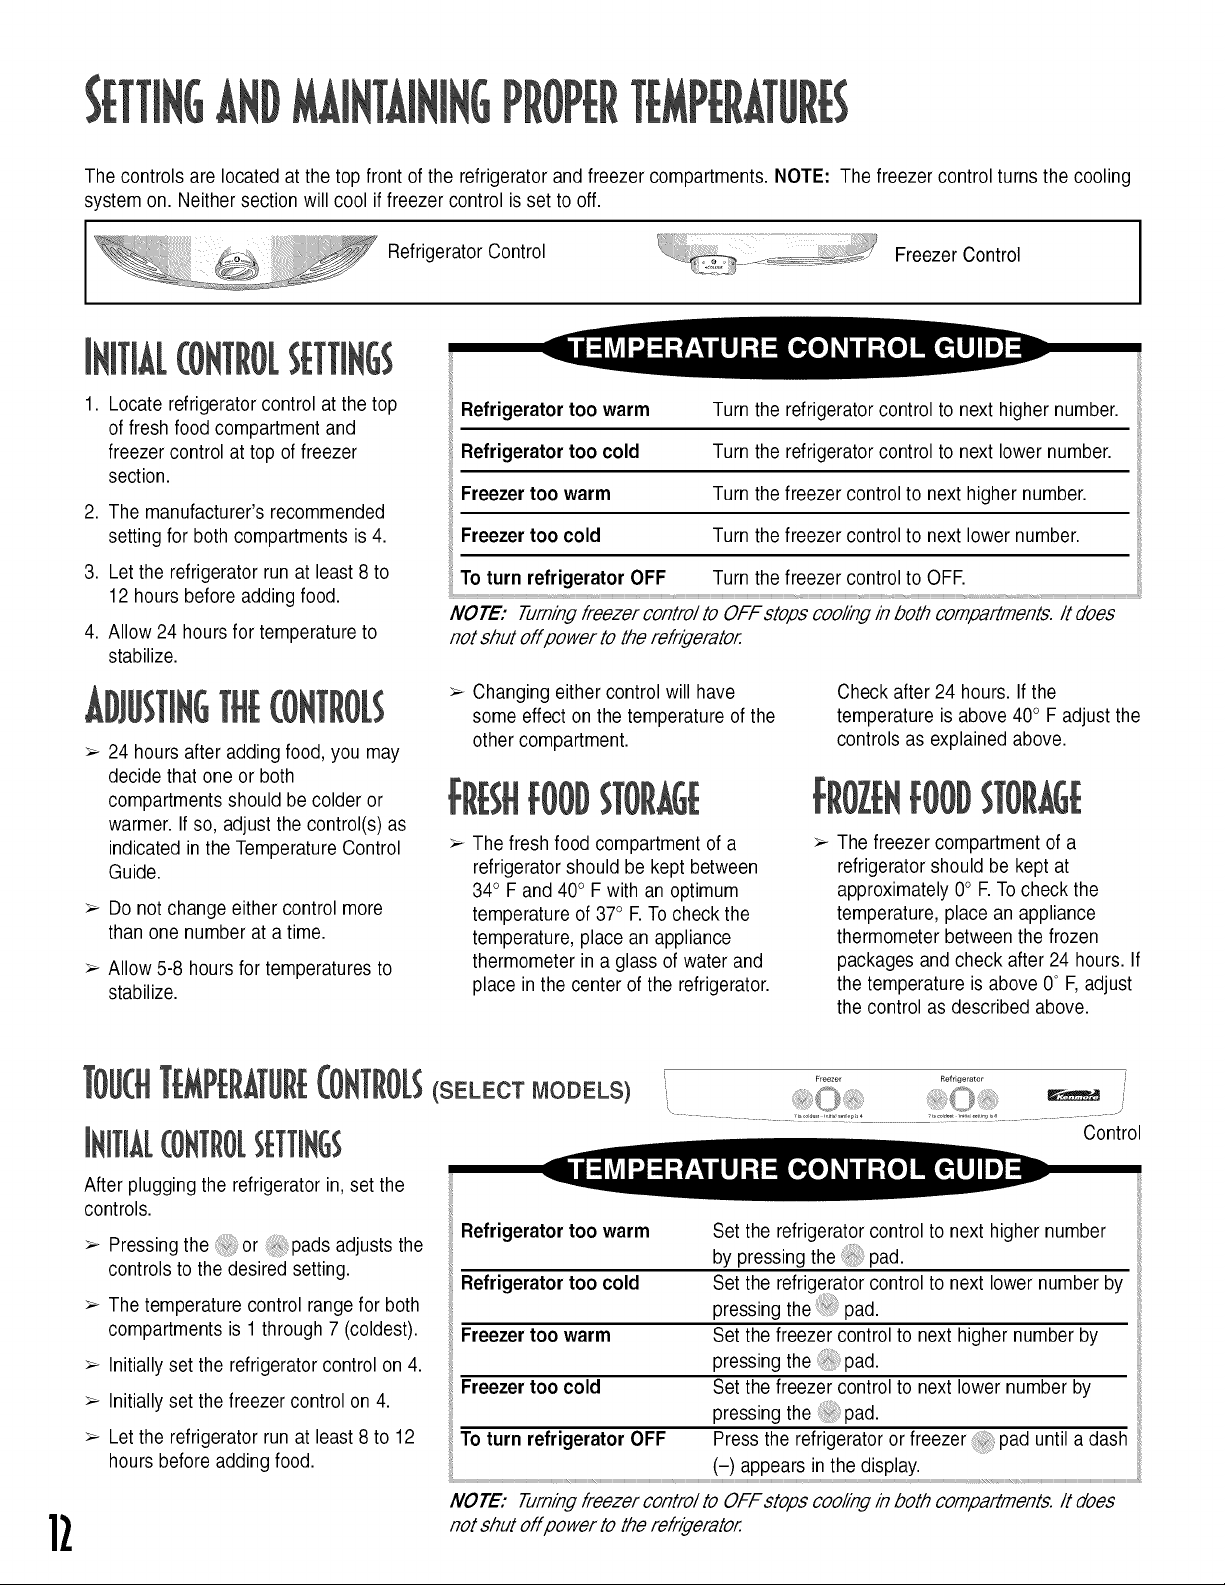
Refrigerator Control Freezer Control
iTiA[RO[SETTiNGS
,
Locate refrigerator control at the top
of fresh food compartment and
freezer control at top of freezer
section.
2. The manufacturer's recommended
setting for both compartments is 4.
_or too warm
Refrigerator too cold
Freezer too warm
Freezer too cold
Turn the refrigerator control to next higher number.
Turn the refrigerator control to next lower number.
Turn the freezer control to next higher number.
Turn the freezer control to next lower number.
3. Let the refrigerator runat least 8 to
12 hours before adding food.
4. Allow 24 hours for temperature to
stabilize.
THE[ONTR(}[S
24 hours after addingfood, you may
decide that one or both
compartments should be colder or
warmer. If so, adjust the control(s) as
indicated in the Temperature Control
Guide.
Do not change either control more
than one number at atime.
Allow 5-8 hours for temperatures to
stabilize.
TROIS(SELECT mODELS)
....To turn refrigerator OFF Turn the freezer control to OFF. ::
NOTE: Turningfreezer contro/ to OFF stops cooling inboth compartments. It does
not shut off power to the refrigerator
> Changingeither control will have
some effect on the temperature of the
other compartment.
1BHFOODSTORA6E
> The fresh food compartment of a
refrigerator should be kept between
34° F and 40° F with an optimum
temperature of 37° E To check the
temperature, place an appliance
thermometer in a glass of water and
place in the center of the refrigerator.
Check after 24 hours. Ifthe
temperature is above40° F adjust the
controls as explained above.
IOZENTOO#STORA6E
The freezer compartment of a
refrigerator should be kept at
approximately 0° E Tocheck the
temperature, place an appliance
thermometer between the frozen
packages and check after 24 hours. If
the temperature is above 0° F,adjust
the control as described above.
Freezer Refrigerator /
Control
After plugging the refrigerator in,set the
controls.
> Pressingthe @or @pads adjusts the
controls to the desired setting.
> The temperature control rangefor both
compartments is 1 through 7 (coldest).
> Initially set the refrigerator control on4.
> Initially set the freezer control on4.
> Let the refrigerator run at least 8 to 12
hours before adding food.
1l
Refrigerator too warm
Refrigerator too cold
Freezer too warm
Freezer too cold Set the freezer control to next lower number by
_ig--_'ator OFF _oTf _ 7 a-dash
NOTE: Turningfreezer contro/ to OFF stops cooling inboth compartments. It does
not shut off power to the refrigerator
Set the refrigerator control to next higher number
by pressing the @ pad.
Set the refrigerator control to next lower number by
pressing the@ pad.
Set the freezer control to next higher number by
pressing the @ pad.
pressing the pad.
(-) appears in the display. ...........
[RmORSH[LV[$
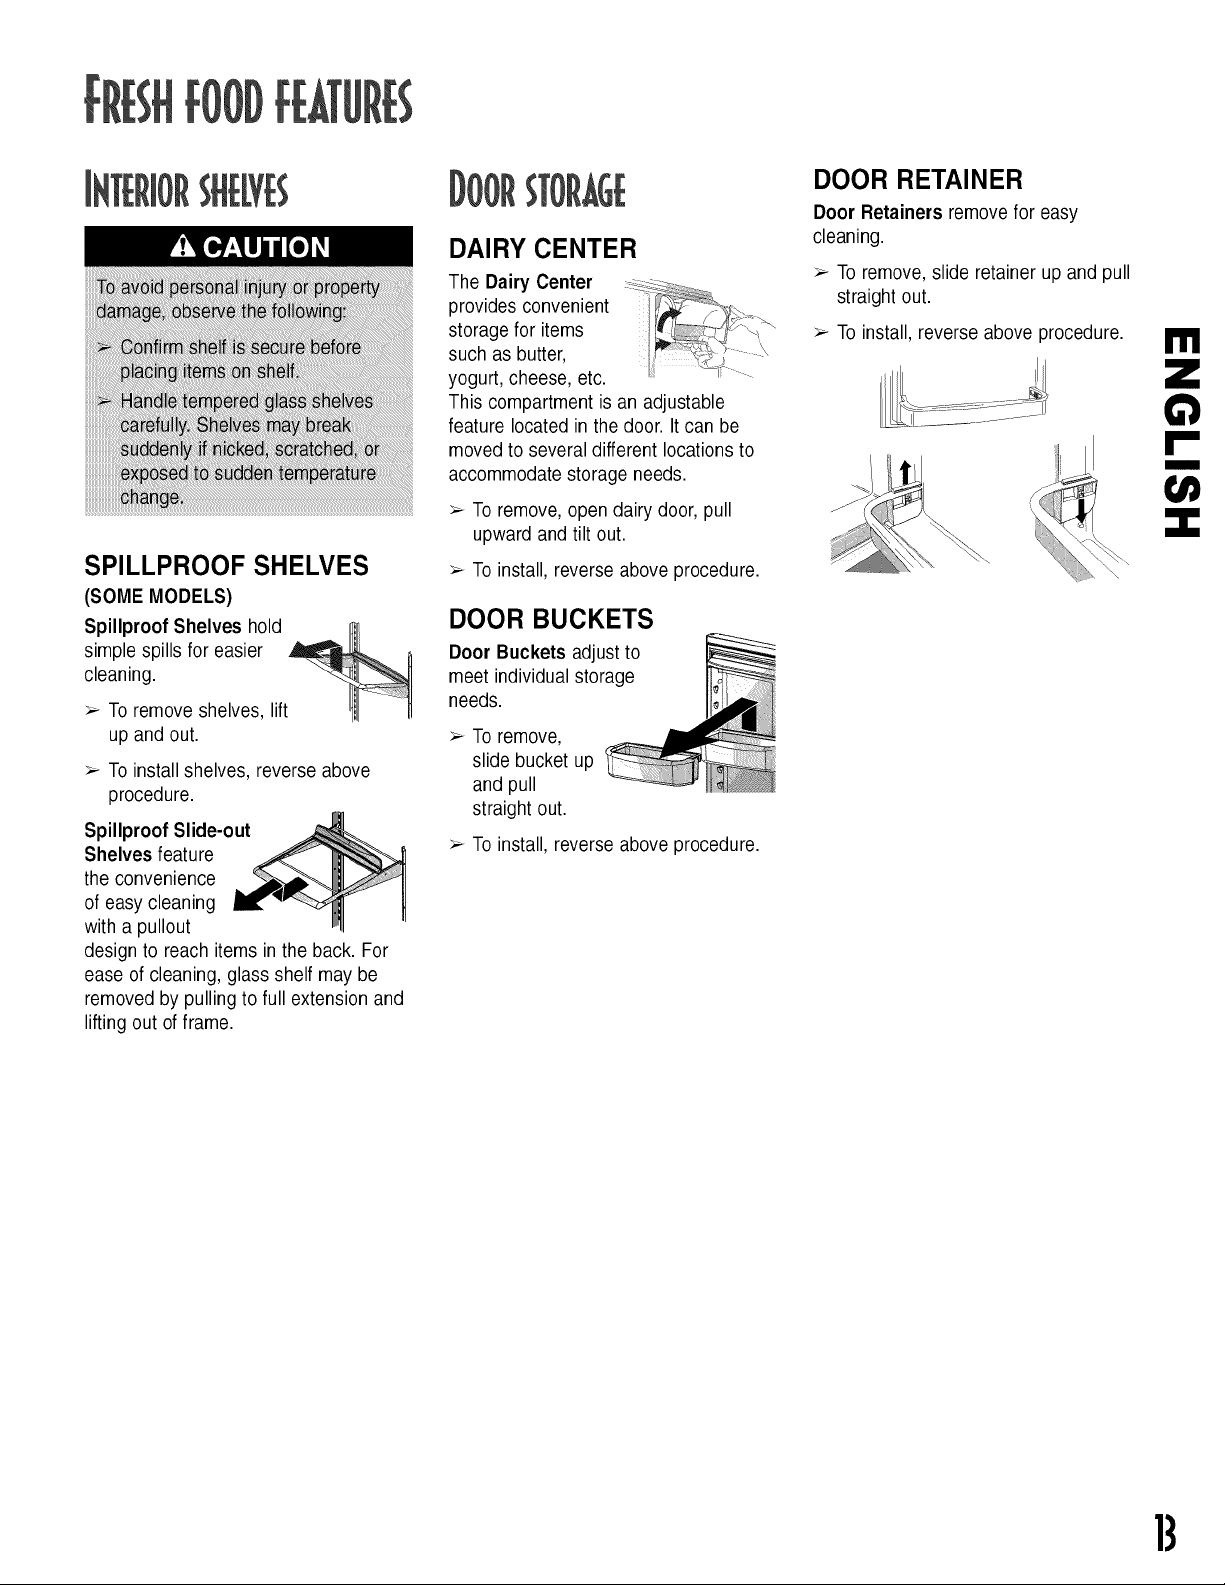
SPILLPROOF SHELVES
(SOME MODELS)
Spillproof Shelves hold
simple spills for easier
cleaning.
> Toremove shelves, lift
up and out.
> Toinstall shelves, reverse above
procedure.
Spillproof Slide-out
Shelves feature
the convenience
of easy cleaning
with a pullout
design to reach items in the back. For
ease of cleaning, glass shelf may be
removed by pulling to full extension and
lifting out of frame.
:}ORST
DAIRY CENTER
The Dairy Center
provides convenient
storage for items
such as butter,
yogurt, cheese, etc.
This compartment is an adjustable
feature located in the door. It can be
moved to several different locations to
accommodate storage needs.
> Toremove, open dairy door, pull
upward and tilt out.
> Toinstall, reverseabove procedure.
DOOR BUCKETS
Door Buckets adjust to
meet individual storage
needs.
> Toremove,
slide bucket up
and pull
straight out.
> Toinstall, reverseabove procedure.
DOOR RETAINER
Door Retainers remove for easy
cleaning.
> To remove,slide retainer up and pull
straight out.
> To install, reverse above procedure.
m
13
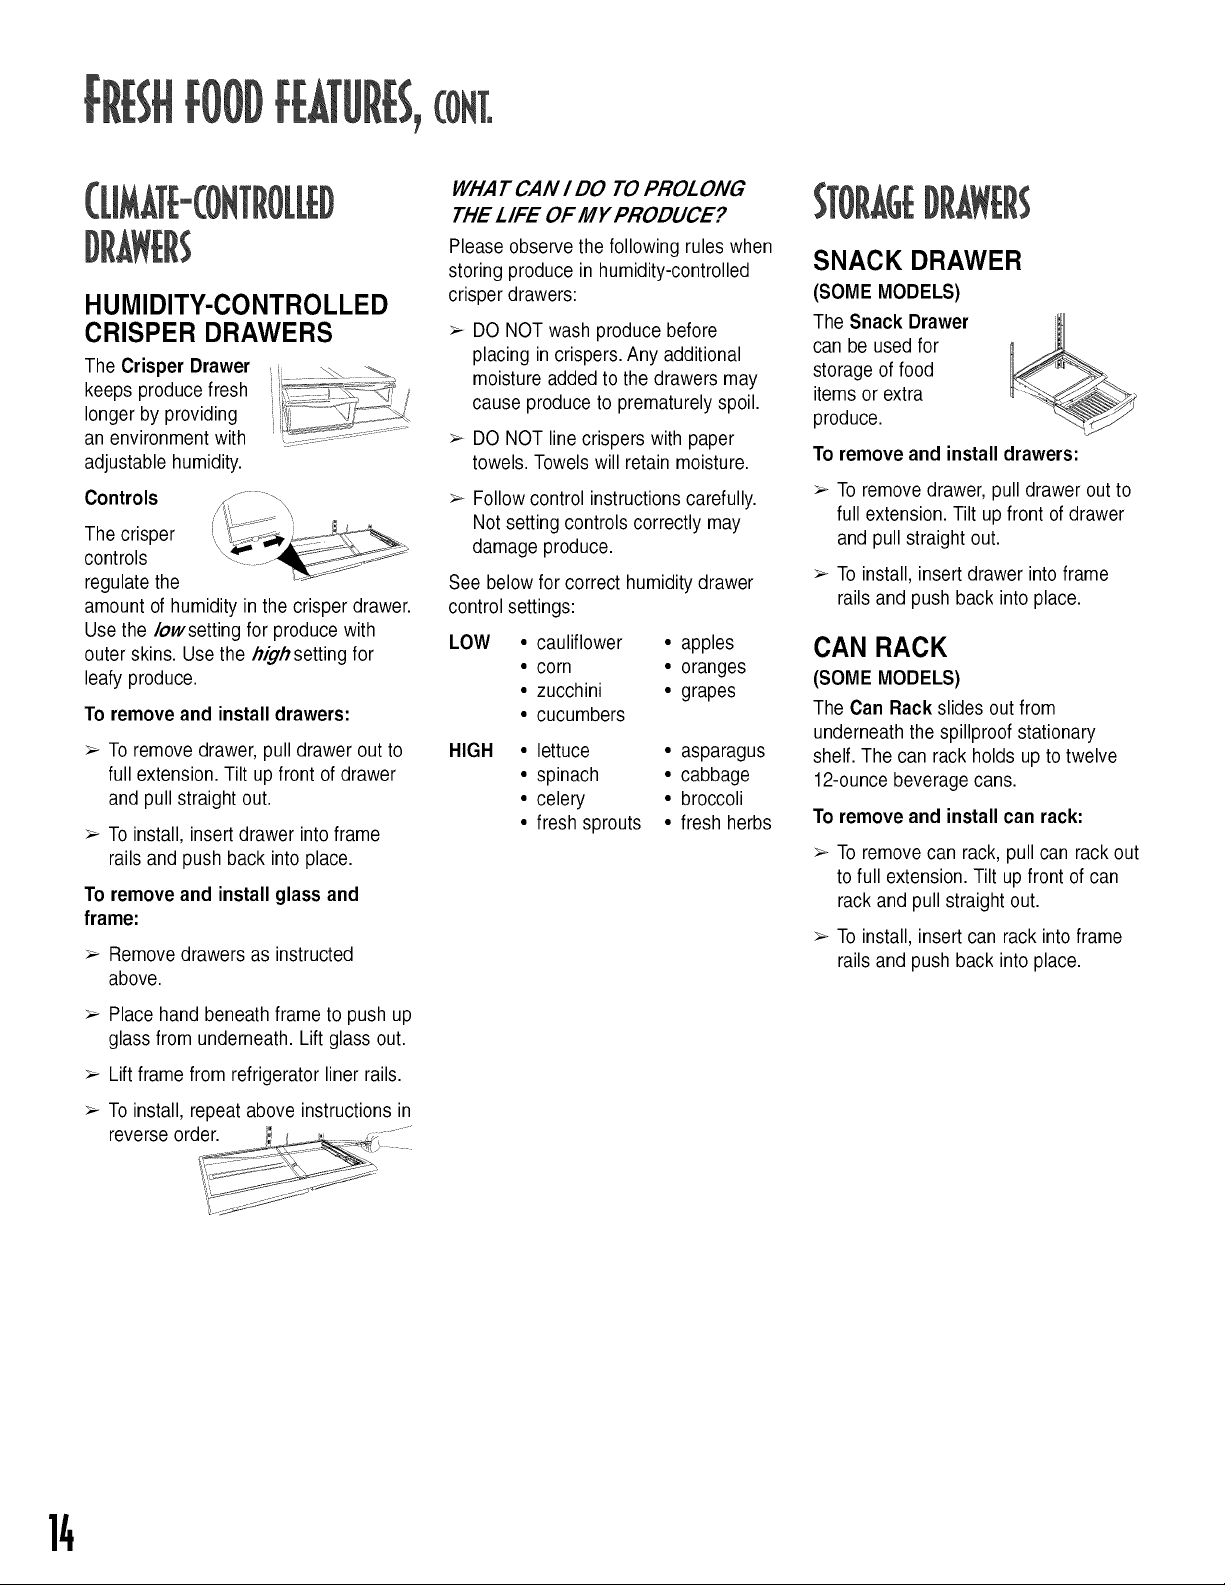
HUMIDITY-CONTROLLED
CRISPER DRAWERS
The Crisper Drawer
keeps produce fresh
longer by providing
an environment with
adjustable humidity.
Controls ...... _
The crisper
controls
regulate the
amount of humidity in the crisper drawer.
Use the/owsetting for produce with
outer skins. Use the high setting for
leafy produce.
To remove and install drawers:
> Toremove drawer, pull drawer out to
full extension. Tilt up front of drawer
and pull straight out.
> Toinstall, insertdrawer into frame
rails and push back into place.
To remove and install glass and
frame:
> Remove drawers as instructed
above.
WHAT CAN I DO TO PROLONG
THE LIFE OF MY PRODUCE?
Please observe the following rules when
storing produce in humidity-controlled
crisper drawers:
> DO NOT wash produce before
placing in crispers. Any additional
moisture added to the drawers may
cause produce to prematurely spoil.
> DO NOT line crispers with paper
towels. Towels will retain moisture.
> Followcontrol instructions carefully.
Not setting controls correctly may
damage produce.
See below for correct humiditydrawer
control settings:
LOW • cauliflower
• corn
• zucchini
• cucumbers
HIGH • lettuce
spinach
celery
fresh sprouts
• apples
• oranges
• grapes
• asparagus
• cabbage
• broccoli
• f_sh herbs
SNACK DRAWER
(SOME MODELS)
The Snack Drawer
can be used for
storage of food
items or extra
produce.
To remove and install drawers:
> To remove drawer, pull drawer out to
full extension. Tilt upfront of drawer
and pull straight out.
> To install, insert drawer into frame
rails and push back into place.
CAN RACK
(SOME MODELS)
The Can Rack slides out from
underneath the spillproof stationary
shelf. The can rack holds up to twelve
12-ouncebeverage cans.
To remove and install can rack:
> To remove can rack, pull can rack out
to full extension. Tilt up front of can
rack and pull straight out.
> To install, insert can rack intoframe
rails and push back into place.
> Place hand beneath frame to push up
glass from underneath. Lift glass out.
> Lift frame from refrigerator liner rails.
> Toinstall, repeat above instructions in
reverse order, i_ ,_ _ ......
14
m(E
(SOME MODELS)
Using Ice Maker for the First Time
1. Confirm icebin is in
place and ice maker
arm is down.
2. After freezersection reaches
between 0° to 2° F (-18° to -17° C),
ice maker fills withwater and begins
operating.
3. Allow approximately 24 hours after
installation to receive first harvest of
ice.
4. Discard icecreated within first 12
hours of operation to verify system is
flushed of impurities.
Operating Instructions
1. Confirm icebin is inplace and ice
maker arm is down.
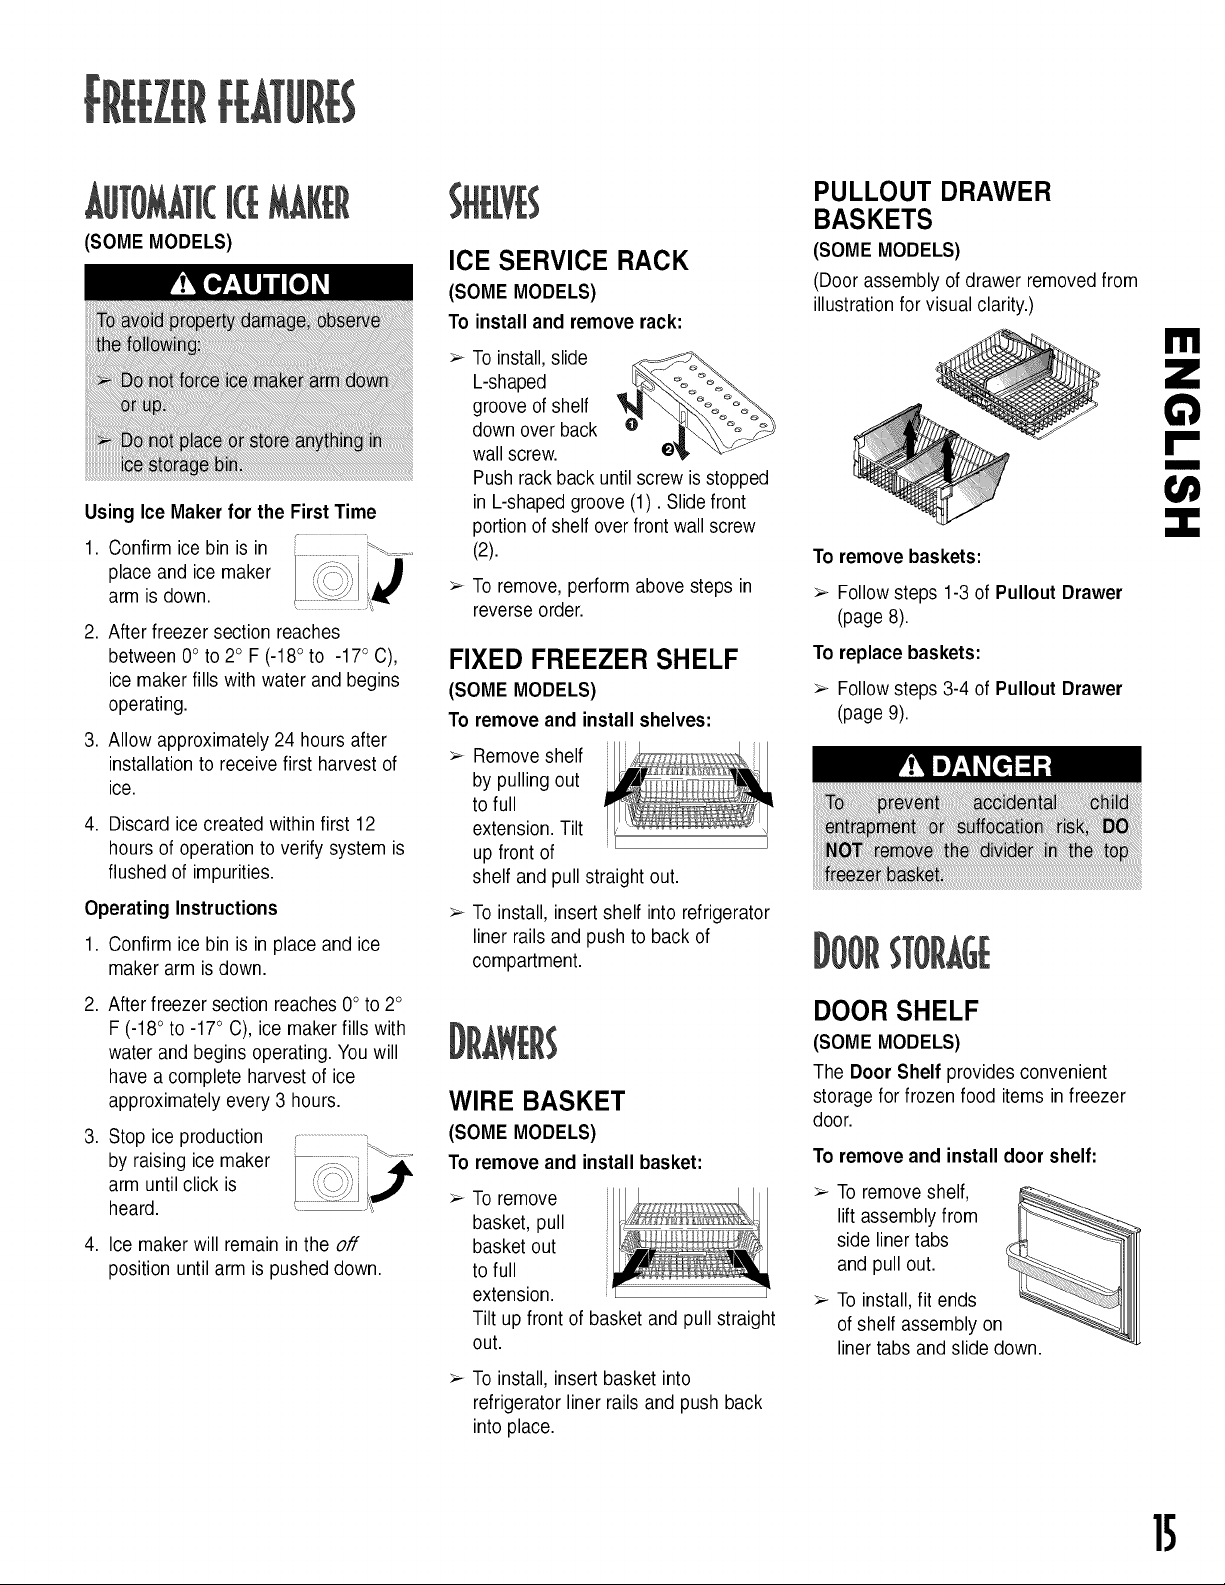
ICE SERVICE RACK
(SOME MODELS)
To install and remove rack:
Toinstall,slide
L-shaped
groove of shelf
down over back
wallscrew.
Push rack back untilscrew isstopped
in L-shapedgroove (1). Slidefront
portionof shelf overfrontwall screw
(2).
Toremove, perform above steps in
reverse order.
FIXED FREEZER SHELF
(SOME MODELS)
To remove and install shelves:
Remove shelf
by pulling out
to full
extension. Tilt
up front of I
shelf and pull straight out.
Toinstall, insert shelf into refrigerator
liner rails and push to back of
compartment.
PULLOUT DRAWER
BASKETS
(SOME MODELS)
(Door assembly of drawer removedfrom
illustration for visual clarity.)
m
!-
To remove baskets:
> Followsteps 1-3 of Pullout Drawer
(page 8).
To replace baskets:
> Followsteps 3-4 of Pullout Drawer
(page 9).
)0RSTORAGE
2. After freezer section reaches 0° to 2°
F (-18° to -17° C), ice maker fillswith
water and begins operating. Youwill
have a complete harvest of ice
approximately every 3 hours.
3. Stop ice production
by raising ice maker
arm until click is
heard.
4. Ice makerwill remain in the off
position until arm is pushed down.
WIRE BASKET
(SOME MODELS)
To remove and install basket:
Toremove
basket, pull
basket out
to full
extension.
Tilt up front of basket and pull straight
out.
> Toinstall, insertbasket into
refrigerator liner rails and push back
into place.
DOOR SHELF
(SOME MODELS)
The Door Shelf provides convenient
storage for frozen food items in freezer
door.
To remove and install door shelf:
lift assembly from
side liner tabs
and pull out.
Tore oveshe,f,
> To install,fit ends
of shelf assembly on
liner tabs and slide down.
15
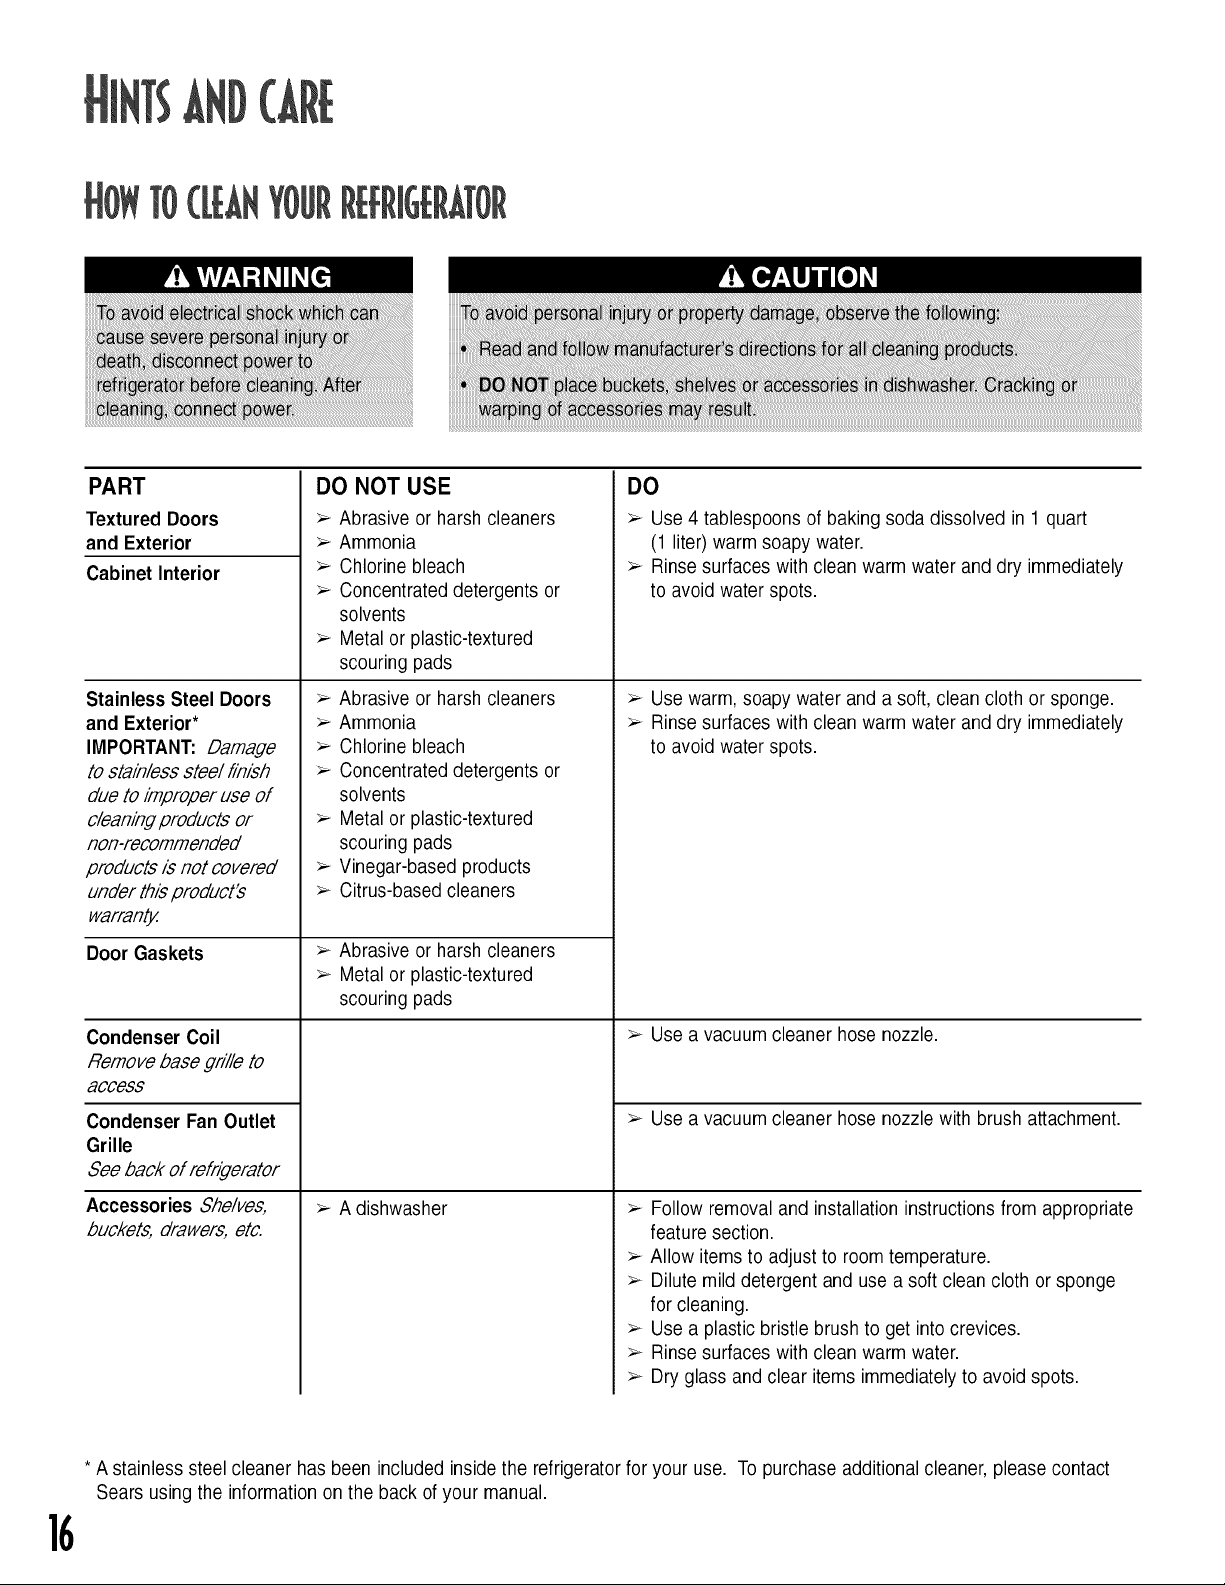
l)WTo([BNYOURREFRIGERATOR
PART
Textured Doors
and Exterior
Cabinet Interior
Stainless Steel Doors
and Exterior*
IMPORTANT: Damage
to stainless steel hnish
due to improper use of
cleaningproducts or
non-recommended
products is not covered
under this product's
warranty.
Door Gaskets
Condenser Coil
Remove base gdlle to
access
Condenser Fan Outlet
Grille
See back of refrigerator
Accessories Shelves,
buckets, drawers, etc.
DO NOT USE
> Abrasive or harsh cleaners
> Ammonia
> Chlorine bleach
> Concentrated detergents or
solvents
> Metalor plastic-textured
scouring pads
Abrasive or harsh cleaners
> Ammonia
> Chlorine bleach
> Concentrated detergents or
solvents
Metal or plastic-textured
scouring pads
Vinegar-based products
Citrus-based cleaners
> Abrasive or harsh cleaners
> Metalor plastic-textured
scouring pads
> A dishwasher
DO
> Use4 tablespoons of baking soda dissolved in 1 quart
(1 liter) warm soapy water.
> Rinsesurfaces with clean warm water and dry immediately
to avoid water spots.
> Usewarm, soapy water and a soft, clean cloth or sponge.
> Rinsesurfaces with clean warm water and dry immediately
to avoid water spots.
> Use a vacuum cleaner hose nozzle.
> Use a vacuum cleaner hose nozzle with brush attachment.
> Follow removal and installation instructions from appropriate
feature section.
> Allow items to adjust to room temperature.
> Dilute mild detergent and use asoft clean cloth orsponge
for cleaning.
> Use a plastic bristle brushto get into crevices.
> Rinsesurfaces with clean warm water.
> Dry glass and clear items immediatelyto avoid spots.
* A stainless steelcleaner has been included insidethe refrigerator for your use. To purchase additional cleaner, please contact
Sears using the information on the back of your manual.
16
1.Removeallfood.
2.Disconnectrefrigerator.
3.Cleanthefollowingitems-paying
specialattentiontocrevices-using
theappropriateinstructionsinHowto
CleanYourRefrigerator:
• Walls,floorandceilingofcabinet
interior.
• Drawers,shelvesandgaskets.
4.Washanddryallbottles,containers
andjars.Discardspoiledorexpired
items.
5.Wraporstoreodor-causingfoodsin
tightly-sealedcontainerstoprevent
reoccurringodors.
6.Connectpowertorefrigeratorand
returnfood.
7.After24hours,checkifodorhas
beeneliminated.
Ifodorisstillpresent...
1.Removedrawersandplaceontop
shelfofrefrigerator.
2.Packrefrigeratorandfreezer
sections-includingdoors-with
crumpledsheetsofblackandwhite
newspaper.
3.Placecharcoalbriquettesrandomly
oncrumplednewspaperinboth
freezerandrefrigerator
compartments.
4.Closedoorsandletstand24-48hours.
5.Repeatsteps5through7above.
Ifodorwasnoteliminated,contact
SearsServiceCenter.Refertobackof
manualforphonenumber.
ERGYS INGIDBS
> Avoid overcrowding refrigerator
shelves. This reduces effectivity of air
circulation around food and causes
refrigerator to run longer.
> Avoid adding too much warmfood to
refrigerator at one time. This
overloads compartments and slows
rate of cooling.
> Do not use aluminum foil, wax paper,
or paper toweling as shelf liners. This
decreases air flow andcauses
refrigerator to run less efficiently.
> A freezer that is _/3full runs most
efficiently.
> Locate refrigerator in coolest part of
room. Avoid areas of directsunlight,
or near heating ducts, registers,or
other heat producing appliances. If
this is not possible, isolateexterior by
using a section of cabinet or an
added layer of insulation.
> Referto section in Use andCare
Guide on temperature controls for
recommended control settings.
> Clean door gaskets every three
months according to Use and Care
Guide instructions. This will assure
that door seals properly and
refrigerator runs efficiently.
> Taketimeto organize items in
refrigerator to reduce time that door
is open.
> Be sure your doors are closing
securely by leveling refrigerator as
instructed in your Use andCare
Guide.
> Clean condenser coils off as
indicated in the Use and Care Guide
every 3 months. This will increase
energy efficiency and cooling
performance.
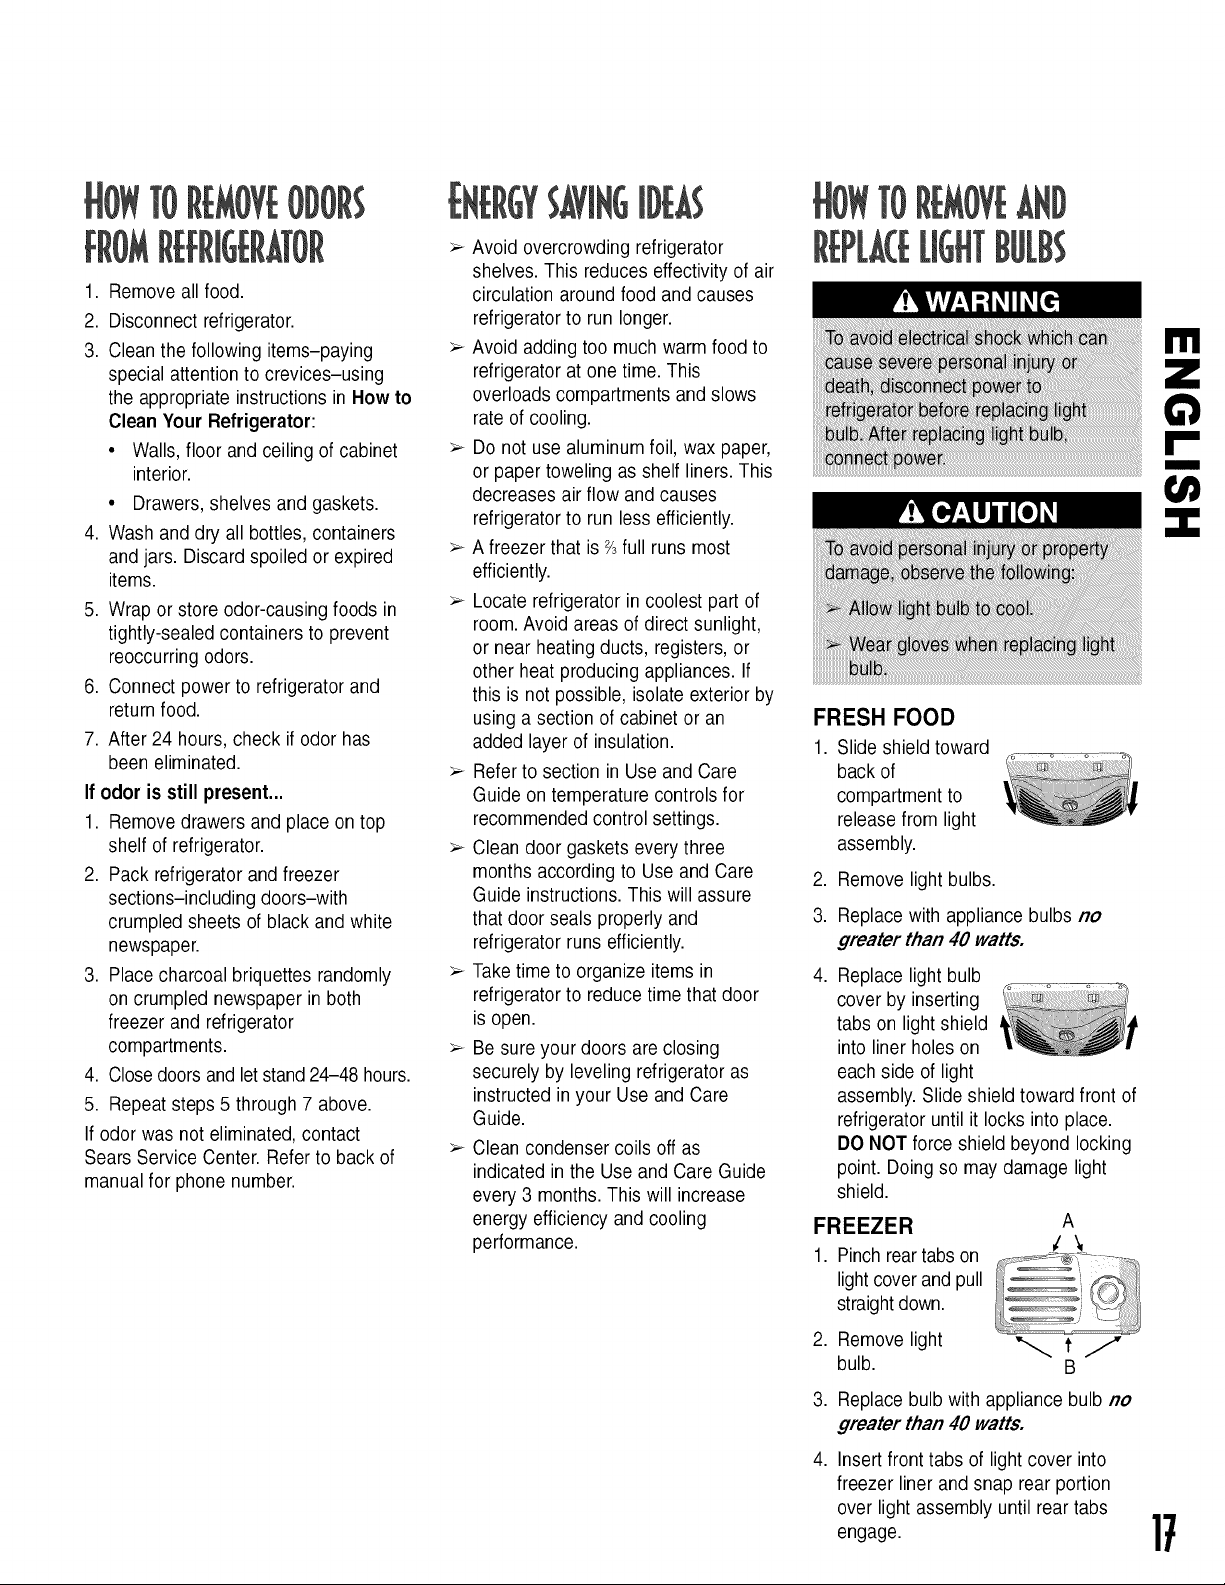
FRESH FOOD
1. Slide shield toward
back of
compartment to
release from light
assembly.
2. Remove light bulbs.
3. Replace with appliance bulbs no
greater than 40 watts.
,
Replace light bulb
cover by inserting
tabs on lightshield
into liner holes on
each side of light
assembly. Slide shield toward front of
refrigerator until it locks into place.
DO NOT force shield beyond locking
point. Doing so may damage light
shield.
FREEZER
1. Pinch reartabs on
lightcoverandpull
straightdown.
A
I'!I
2. Remove light _ t 17
bulb. B
3. Replace bulb with appliance bulb no
greater than 40 watts.
,
Insert front tabs of light cover into
freezer liner and snap rearportion
over light assembly until reartabs
engage.
17
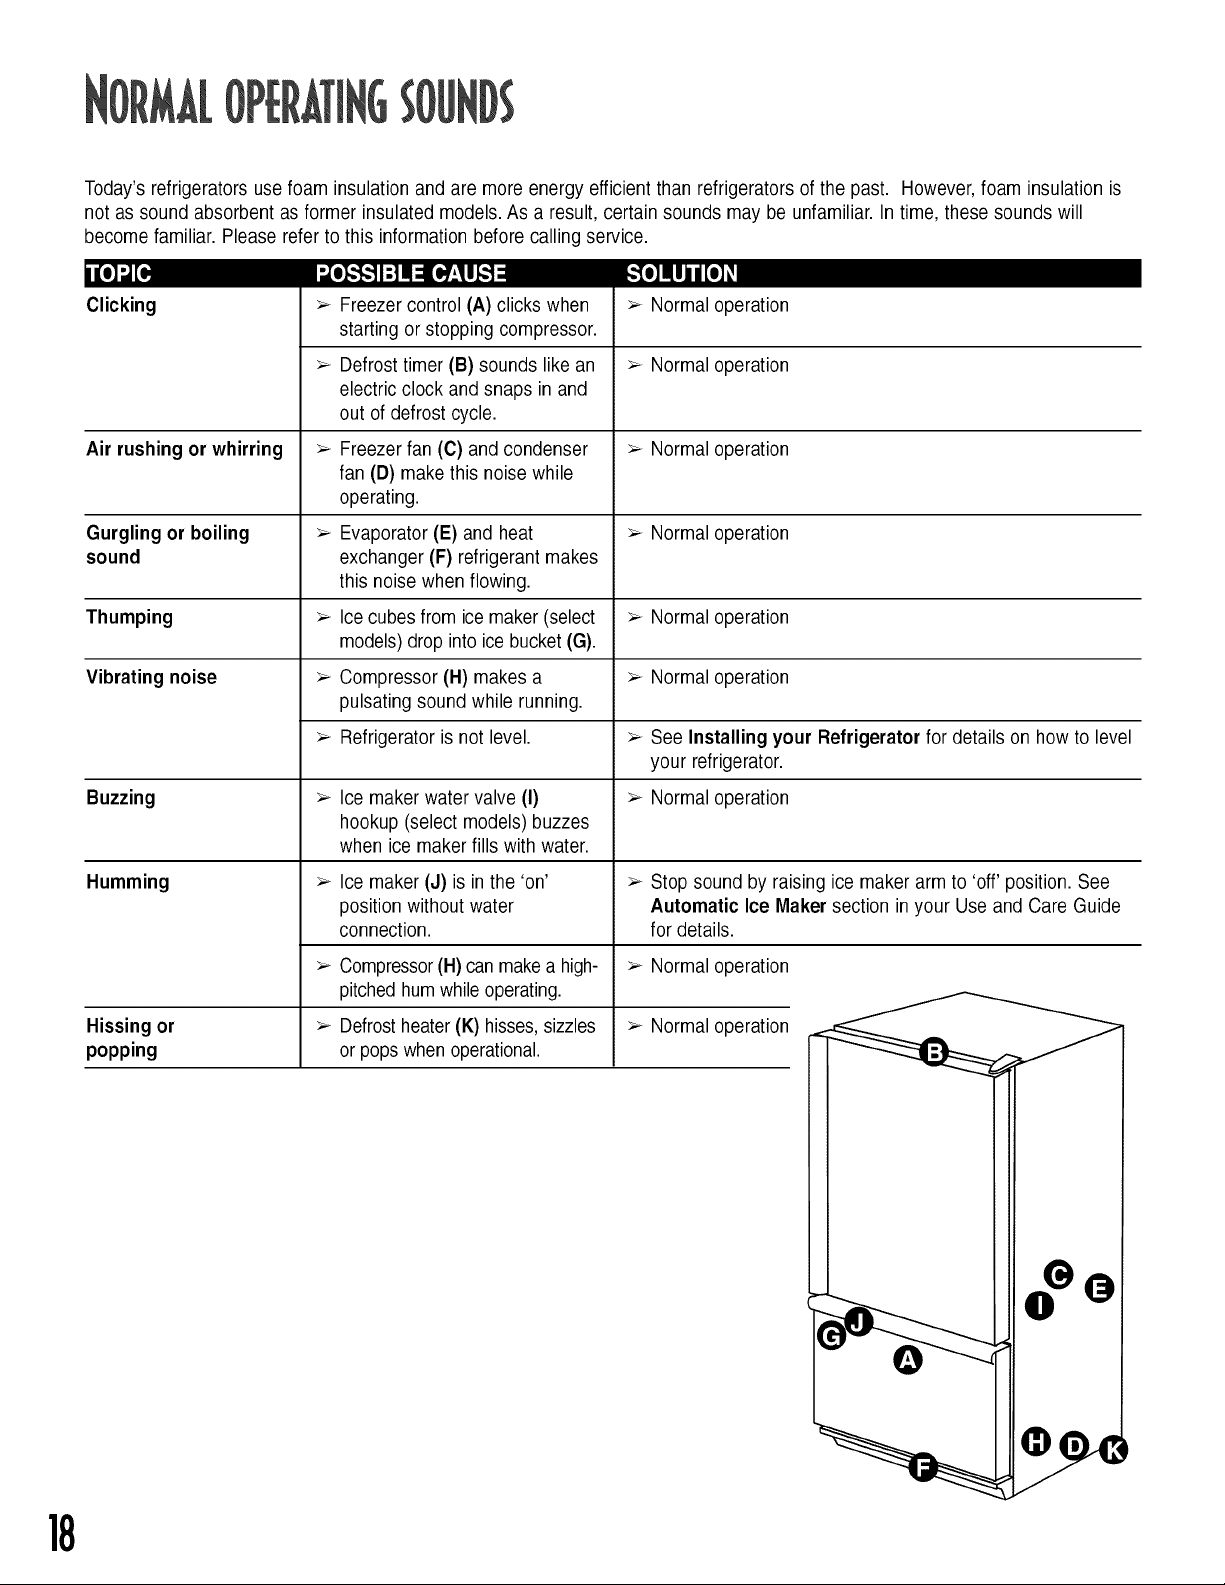
Today'srefrigerators use foam insulation and are more energy efficient than refrigerators of the past. However, foam insulation is
not as sound absorbent as former insulated models. As a result, certain sounds may be unfamiliar.In time, these sounds will
become familiar. Please refer to this information before calling service.
ill]ll[i
Clicking
Air rushing or whirring
Gurgling or boiling > Evaporator(E) and heat > Normal operation
sound exchanger (F) refrigerant makes
Thumping > Icecubesfrom icemaker (select > Normal operation
Vibrating noise > Compressor (H) makes a > Normal operation
Buzzing > Ice maker water valve (I) > Normal operation
".,le].,,!,,ll:til=lle,l:liJ,.l
> Freezercontrol (A) clicks when
starting or stopping compressor.
> Defrosttimer (B) sounds like an
electric clock and snaps in and
out of defrost cycle.
> Freezerfan (C) andcondenser
fan (D) make this noise while
operating.
this noise when flowing.
models) drop into icebucket (G).
pulsating sound while running.
> Refrigerator is not level. > See Installing your Refrigerator for details on how to level
hookup (select models) buzzes
when ice maker fills with water.
_o]lll//[o]l
> Normal operation
> Normal operation
> Normal operation
your refrigerator.
Humming > Icemaker (J) is in the 'on' > Stopsound by raising ice maker arm to 'off' position. See
position without water Automatic Ice Maker section in your Use and Care Guide
connection, for details.
> > Normal operationCompressor(H) can makea high-
pitched humwhile operating.
Hissing or > Defrostheater(K) hisses,sizzles > Normal operation
popping or popswhen operational.
18
PROBLEM
Food temperature
appears too warm
Refrigerator has an odor Compartment is dirty or has odor-causing
Water droplets form on Check gaskets for properseal. See section on Hints and Care-How to Clean Your
outside of refrigerator Refrigerator for instructions.
Water droplets form on Humidity levels are high or door has been See Setting and Maintaining Proper Temperatures-
inside of refrigerator opened frequently. Adjusting the Controls section on howto adjustyour controls.
Refrigerator or ice maker Normal operation. Refer to Normal Operating Sounds.
make unfamiliar sounds
or seems too loud
Crisper drawers do not Contents of drawer, or positioning of items in Reposition food items and containers to avoid interference
close freely the surrounding compartment could be with thedrawers.
Refrigerator runs too
frequently
POSSIBLE CAUSE
Door is not closing properly.
Controls need to be adjusted.
Condenser coils are dirty.
Rear air grille is blocked.
Door has been opened frequently, or has
been opened for long periods.
Food has recently been added.
food.
Humidity levels are high. See Setting and Maintaining Proper Temperatures-
Controls require adjustment. See Setting and Maintaining Proper Temperatures-
Check gaskets for properseal. See section on Hints and Care-How to Clean Your
obstructing drawer.
Drawer is not in proper position.
Refrigerator is not level.
Drawer channels are dirty or need treatment.
Doors have been opened frequently or have
been opened for long periods of time.
Humidity or heat in surrounding area is high.
Food has recently been added.
Refrigerator is exposed to heat by
environment or byappliances nearby.
Condenser coils are dirty.
SOLUTION
See Installing Your Refrigerator-How to Level Your
Refrigerator section on how to properly level refrigerator.
Check gaskets for properseal. Clean, if necessary,according
to cleaning instructions.
Check for internal obstructions that are keeping door from
closing properly (i.e. improperly closed drawers, ice buckets,
oversized or improperly stored containers or foodstuffs, etc.)
See Setting and Maintaining Proper Temperatures-
Adjusting the Controls section on how toadjust your controls.
See section on Hints and Care-How to Clean Your
Refrigerator for instructions.
Check the positioning of food items in refrigerator to make
sure grille is not blocked. Rear air grilles are located under
crisper drawers.
Reduce time door is open. Organize food items efficiently to
assure door is open for as short a time as possible.
Allow interior environment to adjust for period the door has
been open.
Allow time for recently added food to reach refrigerator or
freezer temperature.
See section on Hints and Care for instructions.
Adjusting the Controls section on howto adjustyour controls.
Adjusting the Controls section on howto adjustyour controls.
Reduce time door is open. Organize food items efficiently to
assure door is open for as short a time as possible.
Refrigerator for instructions.
See section on Fresh Food Features-Climate-Controlled
Drawers to verify drawer positioning.
See Installing Your Refrigerator-How to Level Your
Refrigerator section on how to properly level refrigerator.
Clean drawer channels with warm, soapy water. Rinseand
dry thoroughly.Apply a thin layer of petroleum jelly to drawer
channels.
Reduce time door is open. Organize food items efficiently to
assure door is open for as short a time as possible.
Allow interior environment to adjust for period the door has
been open.
Normal operation.
Allow time for recently-added food to reach refrigerator or
freezer temperature.
Evaluate your refrigerator's environment. Refrigerator may
need to be moved to run more efficiently.
See section on Hints and Care-How to Clean Your
Refrigerator for instructions.
I'!I
]9

(ON[.
PROBLEM
Refrigerator runs too
frequently continued
AND
Refrigerator is leaking
water
Ice forms in inlet tube to
ice maker
Water flow is slower than
normal
POSSIBLE CAUSE
Controls need to be adjusted.
Door is not closing properly.
Plastic tubing was used to complete water
connection.
Improper water valve was installed.
Water pressure is low.
Freezer temperature is too high.
Water pressure is low.
Improper water valve was installed.
SOLUTION
See Setting and Maintaining Proper Temperatures-
Adjusting the Controls section on howto adjustyour controls.
See Installing Your Refrigerator-How to Level Your
Refrigerator section on how to properly level refrigerator.
Checkgasketsfor properseal.Clean,ifnecessary.Seesectionon
Hints and Care-How to CleanYour Refrigerator for instructions.
Check for internal obstructions that are keeping door from
closing properly (i.e. improperly closed drawers, ice buckets,
oversized or improperly stored containers or foodstuffs, etc.)
Sears recommends using copper tubing for installation.
Plastic is less durable and can cause leakage. Sears is not
responsible for property damage due to improper
installation or water connection.
See section on Installing Your Refrigerator-How to
Connect the Water Supply for instructions. Self-piercing and
¾_"saddle valves cause low water pressure and may clog the
line over time. Sears is not responsible for property
damage due to improper installation or water connection.
Water pressure must be between 20 to 100 pounds per
square inch to function properly.A minimum pressure of
35 pounds per square inch is recommended for refrigerators
with water filters.
See Setting and Maintaining Proper Temperatures-
Adjusting the Controls section on how to adjust your
controls. Freezer is recommended to be between 0 to 2° F
(-18 to -17° C).
Water pressure must be between 20 to 100 pounds per
square inch to function properly.A minimum pressure of
35 pounds per square inch is recommended for refrigerators
with water filters.
See section on Installing Your Refrigerator-How to
Connect the Water Supply for instructions. Self-piercing and
¾_"saddle valves cause low water pressure and may clog the
line over time. Sears is not responsible for property
damage due to improper installation or water connection.
}0
 Loading...