

Kenmore 596.534623, 596.53462301, 596.53463301, 596.53464301, 596.53469301 Use And Care Manual
...
ORDER # 67003379
Side-by-Side Refrigerator
Use & Care Guide
Refrigerador D(=plex
Gufa para el Uso y Cuidado
R_frig_rateur b Compartiments Juxtaposes
Guide D'utilisation et D'entretien
Models:
596.53462301, 596.53463301, 596.53464301, 596.53469301,
596.52672201, 596.52673201, 596.52674201, 596.52679201,
596.50002100, 596.50003100, 596.50004100, 596.50009100,
596.50012100, 596.50013100, 596.50014100, 596.50019100
fft
Z
I"'
m
"!I
Z
I
I11
Z_
r-
PartNo,12591320 Sears, Roebuckand Co., Hoffman Estates,tL 60179U,S,A wwwosears.com
FormA/04103 Sears Canada, Inc, Toronto,Ontario, Canada MSB 2B8 Au Canada, www.searsoca
BMPORTAHTSAFETYINFORMATIOH
WHATYOUHEEDTOKHOW
ABOUTSAFETY
IHSTROCTiONS
Warningand ImportantSafety
Instructionsappearingin this manualare
not meant to cover aii possible
conditions and situationsthatmay occur.
Common sense, caution,and care must
be exercisedwhen installing,
maintaining,or operating refrigerator,
Always contact your dealer;distributor,
serviceagent, or manufacturerabout
problemsor conditionsyou do not
understand,.
RECOGNIZE SAFETY
SYMBOLS, WORDS,
LABELS
DANGER- Immediatehazards
whichWILLresultin severepersonal
injuryor death, .... :
WARNING- HazardsorUnsafe
practiceswhichCOULDresultin
severe personalinjuryor death: :
CAUTION- Hazardsor unsafe
practicesWhichCOULD resutin
minorpersonalinjurY. ; ,i
To reduce risk of injuryor death,,:
follow basic precautions,including
the following:
IMPORTANT:Child entrapmentand
suffocationare notproblemsof the
past.Junked or abandoned
refrigeratorsare stilldangerous-
evenif they sit out for "justa few
days" I[you are getting rid of your
old refrigerator;piease foll0wthe
instructionsbelowto heipprevent
accidents...........
Beforeyouihrow away your0id
Takeoffthe doorsl
"_. Leavethesheivesin
place s° chiidren I_ !_. _
may noteasily climb
inside.
To reducerisk of fire, electricshock, serious injuryor deathwhen using yourrefrigerator,follow these basic
precautions,includingthe following:
1 Read atl instructionsbeforeusingthe refrigerator, user-repairinstructionsDO NOTattemptserviceif
2. Observeall localcodesandordinances, instructionsare notunderstoodor iftheyarebeyondpersonal
skilllevel.
3_Besureto foIIowgroundinginstructions.
.................................................................................. 12. Always disconnectrefrigeratorfrom electricalsupply
4. Checkwith a qualifiedelectrician ifyou are notsure this
applianceisproperlygrounded.
5. DO NOT groundto a gas line.
6. DO NOT groundtoa cold-waterpipe,
7. Refrigeratorisdesignedto operateon a separate 103to
126volt. 15 amp., 60 cycle line.DO NOT modify plugon
beforeattempting any service. Disconnectpowercord by
graspingthe plug,not thecord.
13. Installrefrigerator accordingto InstallationInstructions.Alt
connectionsfor water, electricalpowerand grounding
mustcomplywith localcodes and be madeby licensed
personnelwhen required.
power cord.Ifplug does not fit electricaloutlet, have 14. Keepyourrefrigerator ingood conditi0n_Bumpingor
properoutletinstalledby a qualified electrician droppingrefrigeratorcandamage refrigeratoror cause
8. DONOT use a two-prongadapter,extensioncord or
powerstrip.
9. DO NOTremovewarningtag from power cord°
10. DO NOTtamper with refrigeratorcontrols°
11.DO NOTserviceorreplaceanypartof refrigeratorunless
specificallyrecommendedinUse&CareGuideorpublished
refrigeratorto malfunctionor leak if damageoccurs, have
refrigeratorchecked by qualifiedservicetechnician°
15. Replaceworn power cords and'or loose plugs,
I6, Alwaysreadandfollowmanufacturer'sstorageand ideal
environmentinstructionsfor itemsbeingstoredin
refrigerator,
2
SAVETHESEIHSTflUCTIOH5
PROT[CTIONAGR[[M[HT ;
IN THE U.S.A.
Congratulationson making a smart
purchase. Yournew Kenmore_'
applianceis designedand manufactured
for years ofdependable operation. But
likeall products,it may require
preventivemaintenanceor repair from
timeto time That is whenhaving a
MasterProtectionAgreementcan save
you money andaggravation..
Purchasea MasterProtection
Agreementnowand protectyourseff
fromunexpectedhassleand expense
TheMasterProtectionAgreementalso
helpsextendthe life ofyour new
appliance. Hereis what is included in
the agreement:
> Expertserviceby our 12,000
professionalrepair specialists
> Unlimited serviceand no chargefor
parts and laboron all covered
repairs_
> "No-lemon"guarantee- replacement
of your coveredproduct if morethan
threeproductfailures occur within
twelvemonths.
> Productreplacementffyour covered
productcannotbe fixed.
>' Annua_PreventiveMaintenance
Checkat yourrequest- no extra
charge
> Fasthelp by phone- non4echnicat
and instructionatassistance on
productsrepairedinyour home, plus
convenientrepair scheduling
> Power surgeprotectionagainst
electricaldamage due to power
fluctuations
>. Rentalreimbursementif repair of
yourcoveredproducttakeslonger
thanpromised.
Onceyou purchasetheAgreement,a
simpfephonecallis all thatit takes for
youtoscheduleservice Youcancall
anytimeday or night,or schedulea
serviceappointmentonline.
Searshas over 12,000professional
repairspecialists,who have accessto
over4 5 millionquality padsand
accessories Thatis the kindof
professionalismyoucan count on to
help prolongthe lifeof your new
pumhasefor yearsto come Purchase
yourMasterProtectionAgreement
today!
Somelimitationsand exclusionsapply,
Forpricesand additionalinformation,
call1-800-827-6655
SearsInstallationService
ForSearsguaranteedprofessional
installationof homeappliancesand
itemslike garagedoor openersand
waterheaters,in the US.A call
t -800-MY-HOME_'
il l]'E IANCli, GREEMEHT$
IN CANADA
Yourpurchasehasaddedvalue because
you can depend on Sears HomeCentraP
for service° With over2,400 Service
Techniciansand accessto over 900,000
parts and accessories,wehave the
tools, parts, knowledgeand skills to
ensureour pledge:We ServiceWhat
WeSell. ii
YourKenmore_applianceis designed,
manufacturedand testedto provide
yearsof dependableoperation. Yetany
majorappliancemayrequireservice
from time to time. The Sears
MaintenanceAgreementoffers you an
outstandingservice program,aflordably
priced
SearsMaintenanceAgreement
> Is yourway to buy tomorrow'sservice
attoday's price
> Eliminatesrepairbillsresulting from
normalwear and tear.
> Providesfor non-technicaland
instructionalassistance.
Evenif youdon't need repairs,
providesanannual Preventive
MaintenanceCheck,atyour request,
toensurethat yourappliance is in
properrunningcondition.
Somelimitationsapply Forinformation
concerningSearsCanadaMaintenance
Agreements,call 1-800-361-6665.
Z
3
RRANTY
Full One YearWarranty on
Refrigerator
Forone year from thedate of purchase,
whenthis refrigeratorisoperatedand
maintainedaccordingto instructions
attachedto or furnishedwith it,Sears
wilt repair it,free of charge,if defective
in materialor workmanship
Full Five Year Warranty on Sealed
Refrigeration System
Forfive years from the date of purchase,
whenthis refrigeratoris operatedand
maintainedaccordingtoinstructions
attachedto or furnishedwith it, Sears
will repair the sealed system(consisting
of refrigerant, connectingtubingand
compressormotor)freeof charge, if
defective inmaterial or workmanship.
The above warrantycoverageapplies
only to refrigeratorswhichare usedfor
storage offood for privatehousehold
purposes It exctudesoriginaland
replacementKenmore ice& water filter
cartridges, Original and replacement
cartridgesare warrantedfor 30 days,
parts only,against defects in materialor
workmanship
Warrantyserviceisavailableby
contacting 1-800-4-MY-HOME_
(1-800-469-4663)
This warrantyapplies only whilethis
productisin use in the United States..
This warrantygives you specificlegal
rights,and you may also haveother
rights,whichvary from state to state
Sears,Roebuckand Co., Dept.817WA,
HoffmanEstates,IL60179
NOTE: Some ReverseOsmosis home
water systems cause lowwater
pressure Lowwater pressurecanaffect
the water and icedispensing systemby
causing small or hollowice cubesand
slow water flow from the dispenser.
Serviceproblemsrelatedto the home's
ReverseOsmosis watersystem are not
covered bythe warranty.
PRODUCTRECORD
Inthespace belowrecord the model
and serialnumbersand purchasedate
ofyour refrigerator'You will find the
modeland serial numbersticker inside
therefrigeratorsectiononthe leftwall.
ModelNumber: 596.
Serial Number:
PurchaseDate:
Keepthis booklet and yourSears
salesreceipt in a safe placefor future
reference.
4
Important Safety Information .............................................................................................. 2
What You Need to Know About Safety instructions............................................... 2
Protection Agreements ................................................................................ 3
Master Protection Agreements - U SA .............................................................. 3
Maintenance Agreements - Canada ............................................ 3
Warranty ..................................................................................................................... 4
Product Record ....................................................................................... 4
Installing Your Refrigerator........................................................................... 6-10
Measuringthe Opening................................................................................................ 6
TransportingYour Refrigerator..................................................................................6
Selectingthe Best Location....................................................................................... 6
How to Install and RemoveHandles.......................................................................7
Removingthe Doorsand Hinges.................................................................. 8
Replacingthe Doors......................................................................................... 8
How to Installand RemovePanels......................................................................... 9
How to Connectthe WaterSupply.......................................................................10
How toLevel Your Refrigerator.................................................................................1!
Settingand MaintainingProperTemperatures ......................................................12
DialTemperatureControls.....................................................................................12
ElectricTemperatureControls....................................................................................12
Fresh Food Storage................................................................................................ 12
Frozen FoodStorage ...................................................................................... 12
AboutYourWater Filter.......................................................................................13-14
Water Filter Installationand Removal....................................................................13
Water FilterData................................................................................. 14
FreshFood Features................................................................................. 15-16
interior Shelves................................................................................................ 15
Door Storage................................................................................................ 15
Climate-ControlledDrawers........................................................................................I6
Storage Drawers.......................................................................................... 16
Freezer Features......................................................................................................17
Automatic Ice Maker...............................................................................................17
InteriorShelves.................................................................................................. 17
StorageDrawers..................................................................................................17
DoorStorage.................................................................................................... 17
DispenserFeatures .................................................................................. 18-22
DispenserLight ................................................................................................. !8
DispenserPad....................................................................................................18
RemovableTray.......................................................................................................18
WaterDispenserOperation................................................................................ 18
Five-ButtonControlFeatures......................................................................................19
ElectronicControlFeatures........................................................................... 20-21
HiddenElectronicControlFeatures........................................................................... 22
Hintsand Care.....................................................................................................23-24
Howto CleanYourRefrigerator........................................................................... 23
How to RemoveOdors from Refrigerator...............................................................24
EnergySavingideas.......................................................................................... 24
How to Removeand ReplaceLightBulbs..................................................................24
Normal Operating Sounds .................................................................................... 25
Troubleshooting.................................................................................................26-27
Operation......................................................................................................... 26
iceand Water................................................................................................ 27
Fran_ais .................................................................................................................29
Espafiol........................................................................................................ 57
Service ..........................................................................................................Back Cover
t11
Z
r"
m
:3:
5
IHSTAU.IHGYOURR[I:RIG[RATOR
These instructionswereprovidedto aid
you inthe installationofyour
refrigerator
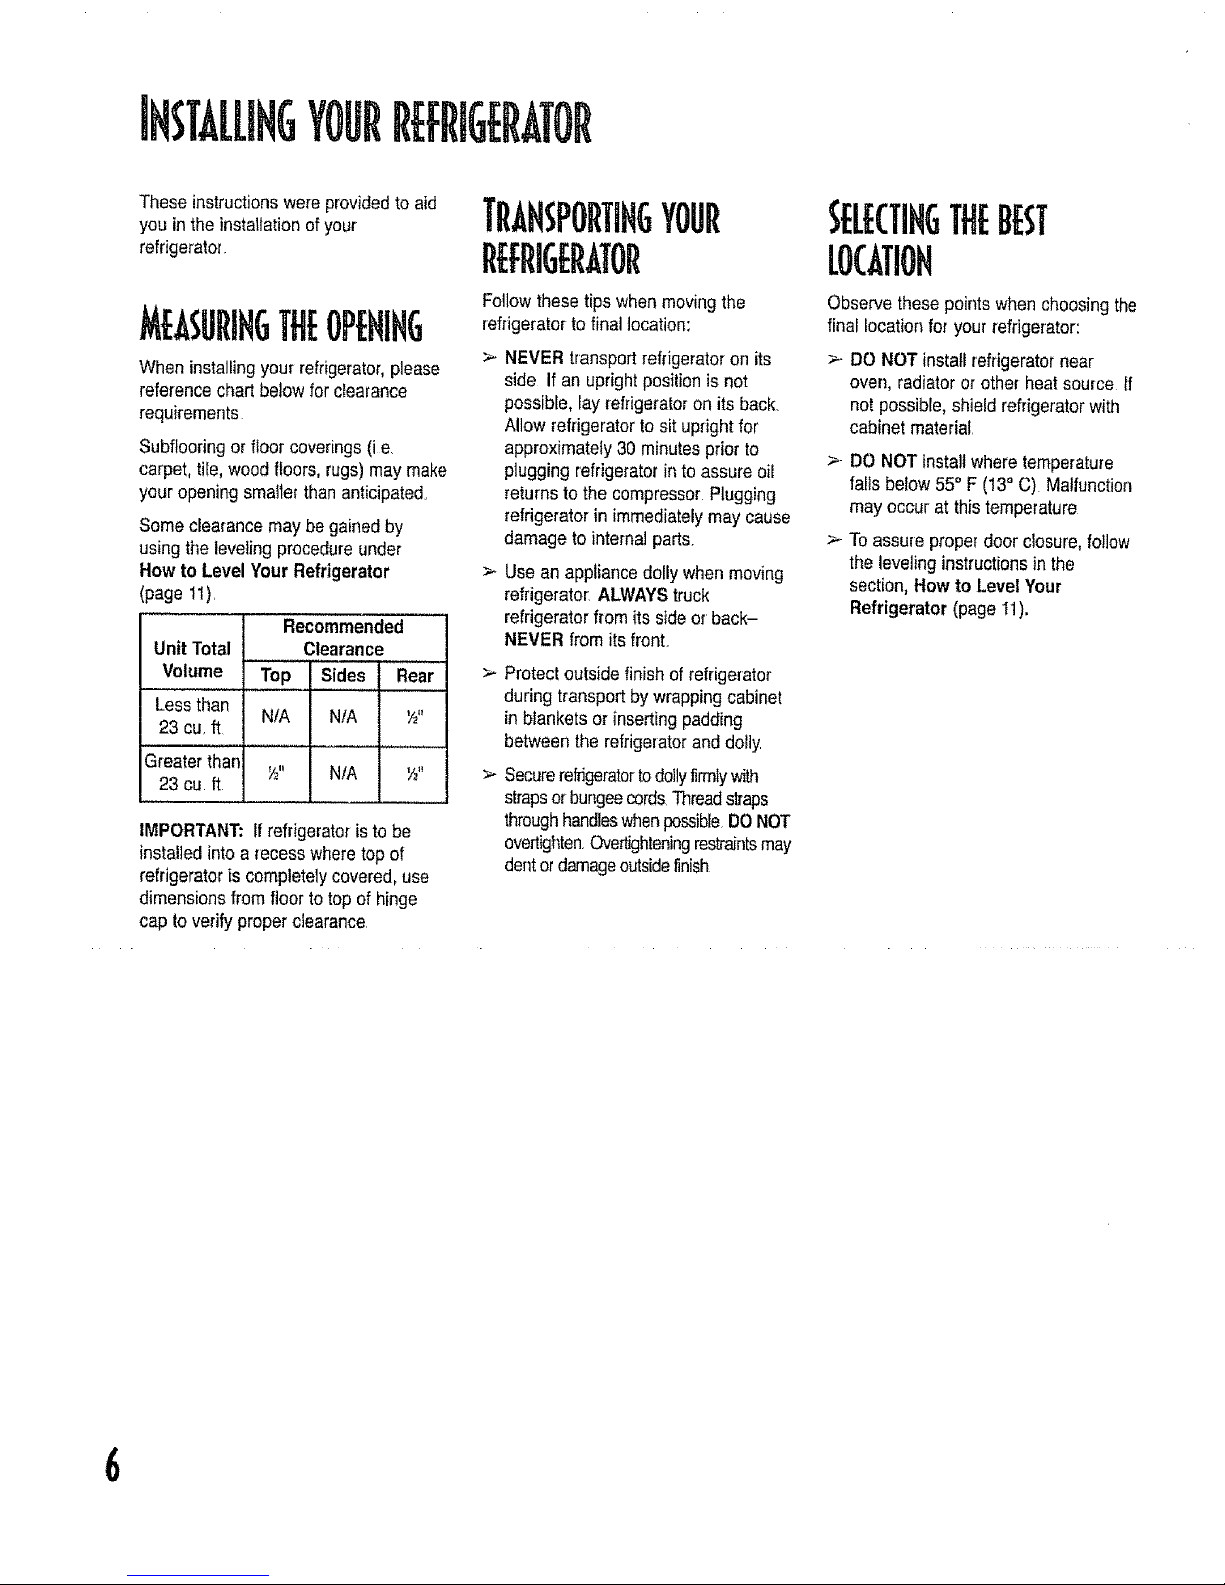
MBSUEIHGTileOPENING
When installingyour refrigerator,please
referencechartbelow forclearance
requirements
Subftooringorfloor coverings(i e
carpet,tile, wood floors,rugs)may make
your openingsmaller than anticipated.
Some clearancemay be gainedby
using theleveling procedureunder
How to Level YourRefrigerator
(page 11).
Recommended
UnitTotal Clearance
Volume Top Sides Rear
Lessthan
N/A N/A Y£"
23 cu. ft
Greater'than
Y_" N/A _"
23 cu it
IMPORTANT:ffrefrigeratoristo be
installedinto a recess wheretop of
refrigeratoris completelycovered, use
dimensionsfrom floor to top of hinge
cap to verify proper clearance
TRAHsPORTixGYOUr
REFRIGERATOR
Followthesetips whenmovingthe
refrigeratorto finai location:
Observe thesepointswhenchoosingthe
final locationfor your refrigerator:
>- NEVER transportrefrigeratoron its >-
side If an uprightposition is not
possible,lay refrigeratoron its back.
Allow refrigeratorto sit uprightfor
approximately30 minutespriorto
plugging refrigeratorin to assure oil
returns to the compressor Plugging
refrigeratorin immediatelymay cause
damageto internalparts. >
Use an appliancedolly when moving
refrigerator:ALWAYStruck
refrigeratorfromits side or back-
NEVER from its front.
Protectoutside finish of refrigerator
during transportby wrappingcabinet
in blankets or insertingpadding
between therefrigeratorand dolly
Securerefrigeratortodoilyfirmlywith
strapsorbungeecordsThreadstraps
throughhandleswhenpossibleDONOT
overtightenOve_ghteningresb'aintsmay
dentordamageoutsidefinish
DO NOTinstati refrigeratornear
oven, radiatoror other heatsource If
notpossible,shield refrigeratorwith
cabinet material
DO NOTinstall where temperature
fallsbelow55° F (13° C) Malfunction
may occur at this temperature
Toassure properdoor closure,follow
the levelinginstructionsinthe
section, How to Level Your
Refrigerator (pageI1).
6
For easier installation,some
refrigeratorsmay havebeen delivered
with the handles ofl P_easesee the
intedorof the fresh food section to
locate the handle assembly, In case
futuretransportof the refrigeratoris
necessary,the removal instructionshave
been includedherefor your
convenience
Handledesignmay vary from
refrigeratorto refrigerator Please
referencethe instructionsfor the
appropriate handle designbelow
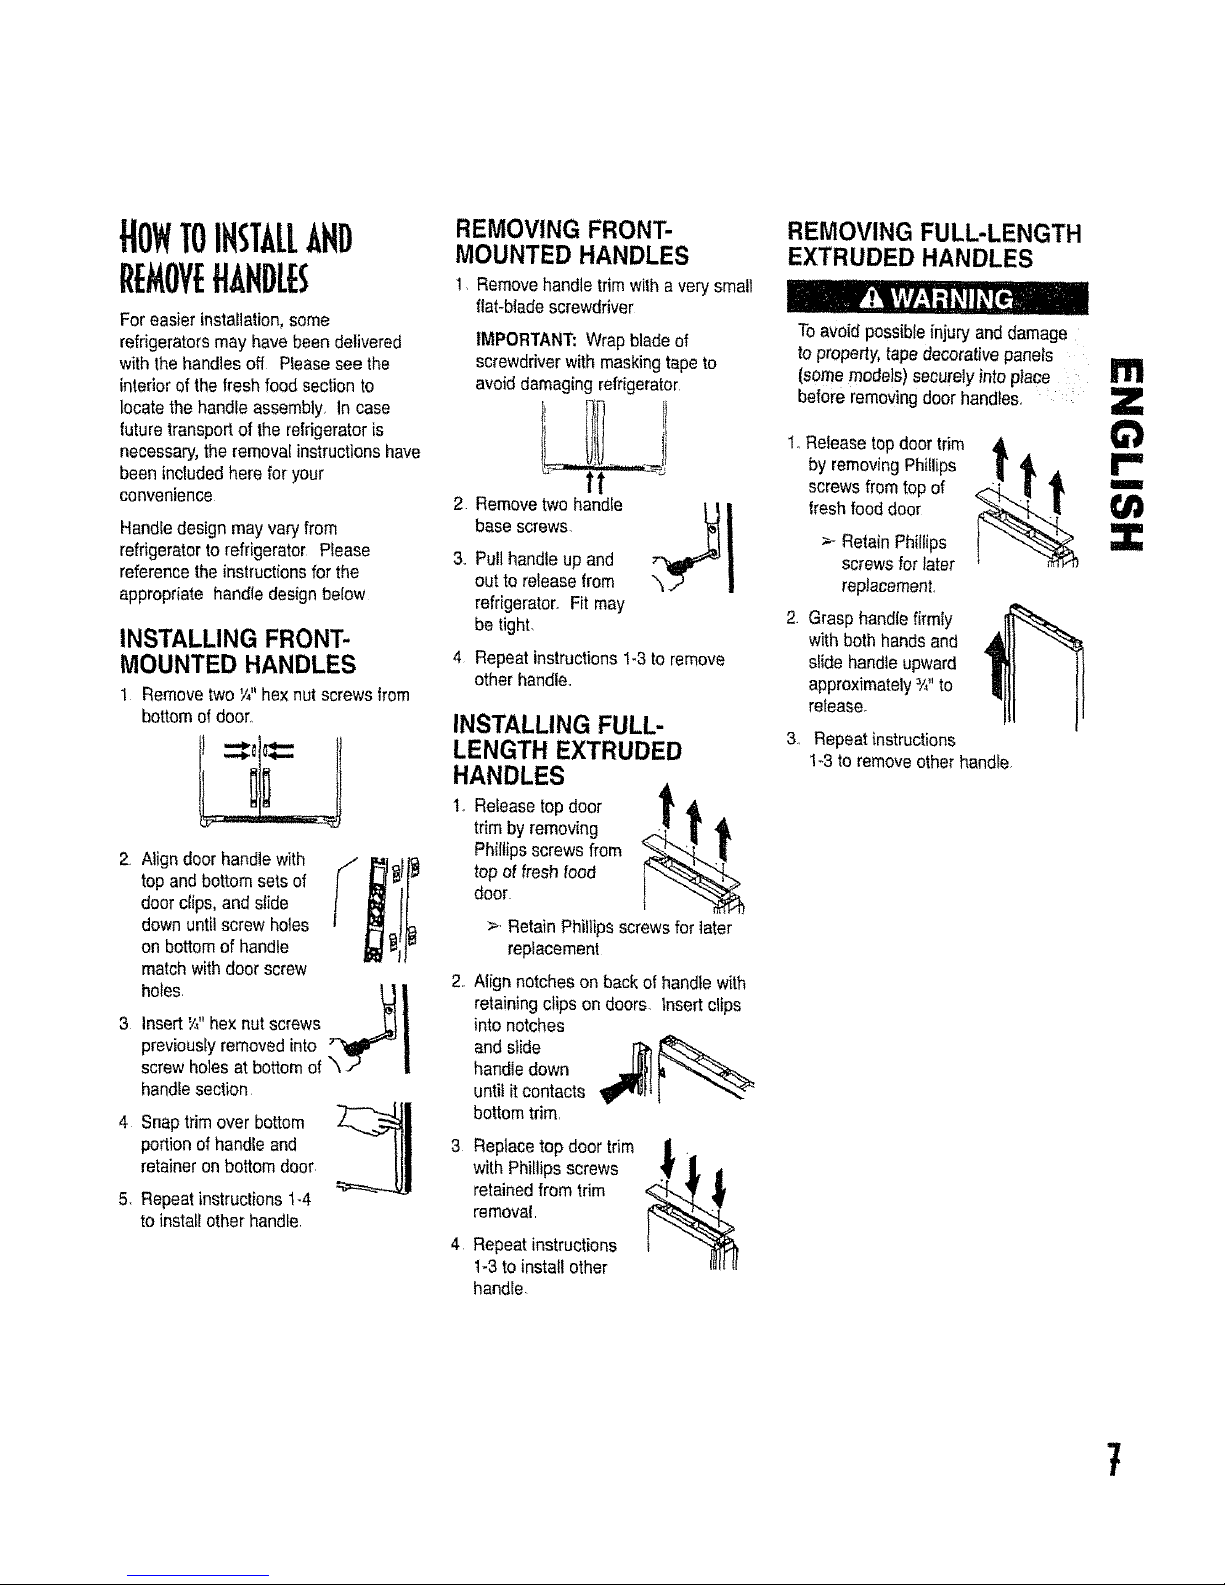
INSTALLING FRONT-
MOUNTED HANDLES
1 Removetwo V_"hexnut screwsfrom
bottomof door,,
2 Align doorhandlewith j
top and bottom setsof
l
doer clips,and siide
down until screwho_es
on bottomof handle
matchwith door screw
holes. _I
3 InsertW'hex nut screws _ _._ |
previouslyremovedinto "_ |
screwholesat bottomof _ .P |
handEesection
4 Snap trim over bottom
portionof handleand
retaineron bottom door
5 Repeatinstructions1-4
to install other handle,
REMOVING FRONT-
MOUNTED HANDLES
1, Removehandle trim with a very small
f_at-bl_descrewdriver
2
3_
IMPORTANT:Wrapblade of
screwdriverwith maskingtapeto
avoiddamagingrefrigerator
base screws
Pull handleup and
out to releasefrom
refrigerator. Fit may
be tight.
Repeat instructions!-3 to remove
otherhandle.
INSTALLING FULL-
LENGTH EXTRUDED
HANDLES
1, Releasetopdoor
trim byremoving
Phillipsscrews from
top offresh food
door
>, Retain Phillips screwsfor later
replacement
Nigh notcheson back of handlewith
retainingclips on doors, insert clips
into notches
and slide _
handle down
until it contacts
bottomtrim,
Replacetop door trim
with Phillipsscrews
retainedfrom trim
removal,
Repeat instructions
1-3to install other
handle.
REMOVING FULL-LENGTH
EXTRUDED HANDLES
Toavoid possibleinjuryand damage
to property, tapedecorativepanels
(somemodels)securelyinto place :
beforeremovingdoor handles. :
1,,Releasetop door trim
by removingPhillips
! AI
screwsfromtop of "
flesh fooddoor
!
_--RetainPhillips
screwsfor later
replacement,
2. Grasphandlefirmly
with bothhands and
slide handleupward
approximately3/,.to
release.
3, Repeat instructions
1-3 to remove other handle.
m
Z
¢1
m
Z
7

IHSTALLIHGYOURR[fRIG[RATOR,(OHT
REMOVIHGTHEDOORS
AHDfllHGES
Someinstallations requiredoor remova]
toget refrigeratorto final Iocation
Toavoid severe personatinjuryor
death, observe thefollowing:
• Disconnectpowerto refrigerator
beforeremoving doors.Connect
power only after replacingdoors.
Greengroundwire mustbe :
attachedto top hingewhile
performingdoorremovaland
replacement. _ : :
• Tapedecorativepanels(select
models) securelyinto placebefore
removingdoor handles_
Toavoid propertydan'iage,observe
the following: _ ....
ProteCtSoftvinylor otherflooring
with cardboard,rugsor other ......
protectivematerial,prior to moving
refrigerator:.....
>- Toavoid damageOrbreakage to
.........a_dj0Stingbolt;do notuse powei-i
tools to correctleveling.
_- DO NOT adjust refrigeratorto be
anyshorterthan 68',2"tall (minus
hinge and cap)_Doingso may
damageUndersidecomponents i
1. Removetoe grilteandbottomhinge
covers
> Open both doors 180 degrees,or
as wide as possible toremove
2 Whilepinching white collar (A) to the
blue connector(B), pull water line
from connector
B
IMPORTANT: When reconnectingwater
line, cut off tubing atfirst available
scored line before insertinginto
connectorcollar.
3. Removetop hinge cover byremoving
Phillipsscrew. _,
%
4. Close doors.
5. Unscrew_',_"hexhead screws from
tophinges
DONO]' remove eithergreen
groundwire or wire connecting
center screw.
6 Detachmain wire connectorharness
and red wireharness
_- Todetach mainwire harness, use
a flat bladescrewdriver or finger-
nail to pressjunction point
betweentwoconnectors to
release
_- Todetachredwire harness, press
tabon undersideof connectorto
release°
7. Removetop hingesalongwithdoors
8 Removebottom hingeswith a _/_"hex
head driver.
REPLACIHGTHEDOORS
_- To replacethe doors, followthe steps
in Removing the Doors and Hinges
in reverseorder_
IMPORTAN'I_:Whenreconnectingwater
line,cut offtubing at first available
scored finebefore insertinginto
connectorcollar:.
8
TOIHSTALLAHD
REMOVEPAFIELS
Toavoidpossibleinjury and damage
to property,tape decorativepanels
(somemodels)securelyinto place
whendoor handlesare removed.
To avoidpersonal injuryor
propertydamage, observethe
following: ....
> Refrigeratorpanelsshouldnot
weigh more than30 pounds (14
kilograms)and freezerpanels
should not weighmore than 15
pounds(7 kil0grams),
> Protectsoftvinyl or otherflooring
with cardboard,rugsor other
protectivematerial.
>- Protecthands and arms by
wearinggToves,
NOTE:
> To protectdoor surfacesfrom being
scratched,cover back edgesof
decoratorpanelsby placingmasking
tapealong back edges
>- Saveall screwsand reusein original
locations
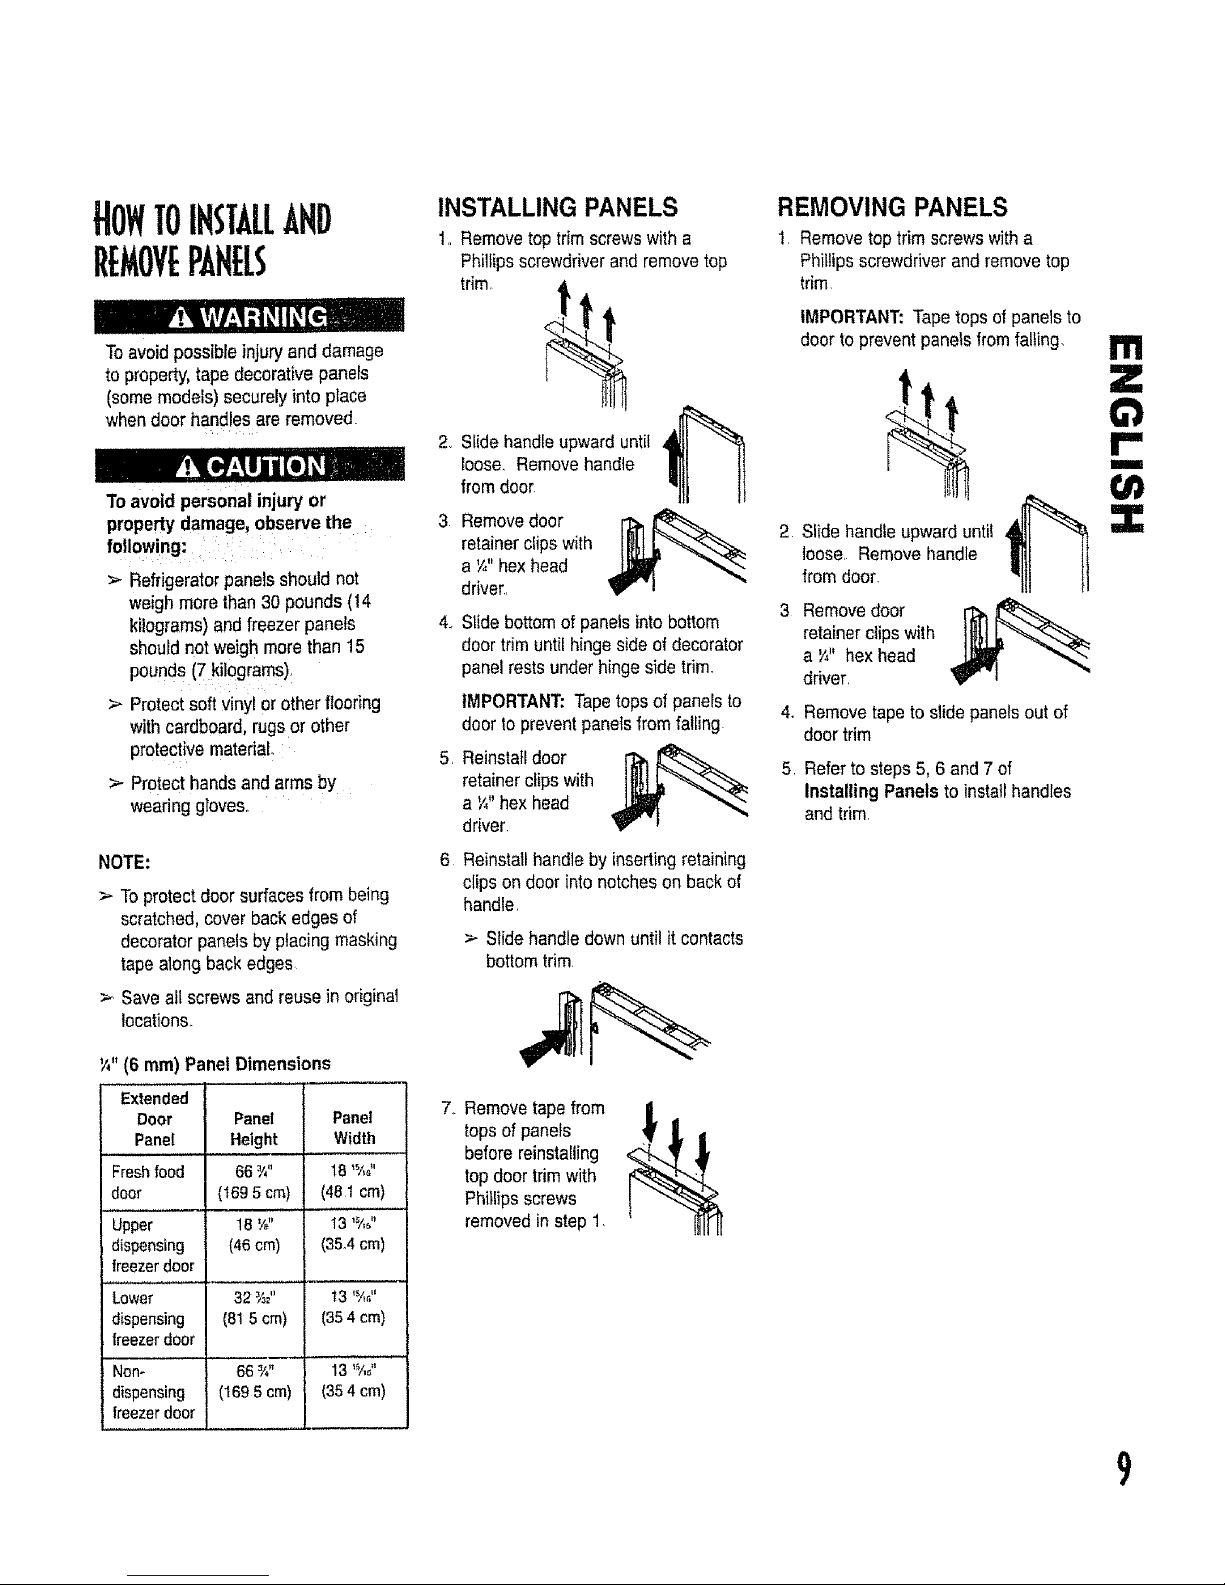
1/2'(6 ram) PanelDimensions
Exte. ed
Door Panel Panel
Pane[ Height Width
Freshfood 66_/," 18'_/,_'
door (I69 5cm) (481 cm)
Upper t8 V_" 13'_/,_"
dispensing (46 cm) (35.4 crn)
freezerdoor
Lower 32_/3_" t3 '_/,_"
dispensing (815cm) (35 4 cm)
freezerdoor
Non-' 66%" 13'_/,_"
dispensing (1695cm) (35 4 cm)
lreezerdoor
INSTALLING PANELS
t.. Removetoptrimscrewswitha
Phillipsscrewdriverand removetop
trim°
2_
4_
Slide handleupwarduntil _Jl "_
loose. Removehandle
from door
Removedoor
retainerclipswith
a 7,"hexhead
driver.
Slidebottomof panelsintobottom
door trim until hingesideof decorator
panelrestsunder hingeside trim.
IMPORTANT:Tape topsof panels to 4.
doortopreventpane{sfrom fatiing
Reinstalldoor [_ _-_ 5
retainerclips with
a ¼"hexhead
driver.
Reinstallhandleby insertingretaining
clips on door intonotcheson backof
handle.
> Slidehandle downuntil it contacts
bottomtrim
7. Removetape from
tops ofpanels
beforereinstalling
topdoor trim with
Phillipsscrews
removedinstep 1,
REMOVING PANELS
l Removetoptrimscrewswitha
Phillipsscrewdriverand removetop
trim.
IMPORTANT:Tapetops of panelsto
door to prevent panelsfromfalling.
Slide handteupward until
loose. Removehandle
from door
Removedoor
retainerclips with
a ¼" hex head
driver.
Removetapeto slide panelsout of
door trim
Referto steps 5, 6 and 7 of
Installing Panels to instatlhandles
andtrim.
I'll
Z
!"'
m
Z
9
ImmtmYourrmmmmr,cont.
To reducethe risk of injury or
death,follow basic precautions,
includingthefollowing:
> Read allinstructionsbefore
installingdevice. ........
:_.DONOT attemptinsta}lationif
instructionsare not understoodor
ifthey are beyondpersonal skill
level;
ObserveaiiiOcaic0de a"d
: ordinances.............
._-DO NOT servicedeviceUnless
specificallyrecommendedin
owner+smanua!or published
user-repairinstructions, ....
_--Disconnectpowerto refrigerator
prior to installingdevice.
To avoid propertydamageor
possibleinjury,followbasic
precautions,includingthe
following:
>- Consulta plumbertoconnect
coppertubingto household
plumbingto assure compliance
with local codes andordinances.
>- Confirmwater pressureto water
valve is between20 and 1co
poundspersquareinch,If water
filter is installed,water pressure to
water vaive mustbe a m_nimumof
35 poundsper squareinch.
_- DO NOT usea self+piercing,or _,_"
saddlevalve!Both reducewater
flow,becomecloggedwith time,
and may cause leaksif repair is
attempted,
>. Tighten nutsby handto prevent
crossthreading. Finishtightening
nutswith pliersand wrenches. DO
NOT overtighten°
> Wait 24 hoursbefore plating
refrigeratorintofinalposition to
check andcorrect any water leaks.
MATERIALS NEEDED
>. ¼"outer diameterftexiblecopper
tubing
_--Brasscompressionnut and sleeve for
¼"outerdiametercopper tubing
>. Shut-off valve (requiresa Y+"hole to
be drilled intowatersupplybefore
valve attachment)
._.Adjustable:wrench
_- '/+"hex nut driver
NOTE:Add 8' to tubinglength needed to
reachwater supplyfor creationof
serviceloop
1 Create serviceloopwith tubing using
careto avoidkinks in tubing,
2 Removeplastic cap from watervalve
inlet port+
II
3 Placebrass nut (A) andsleeve (B) on
copper tube end as illustrated
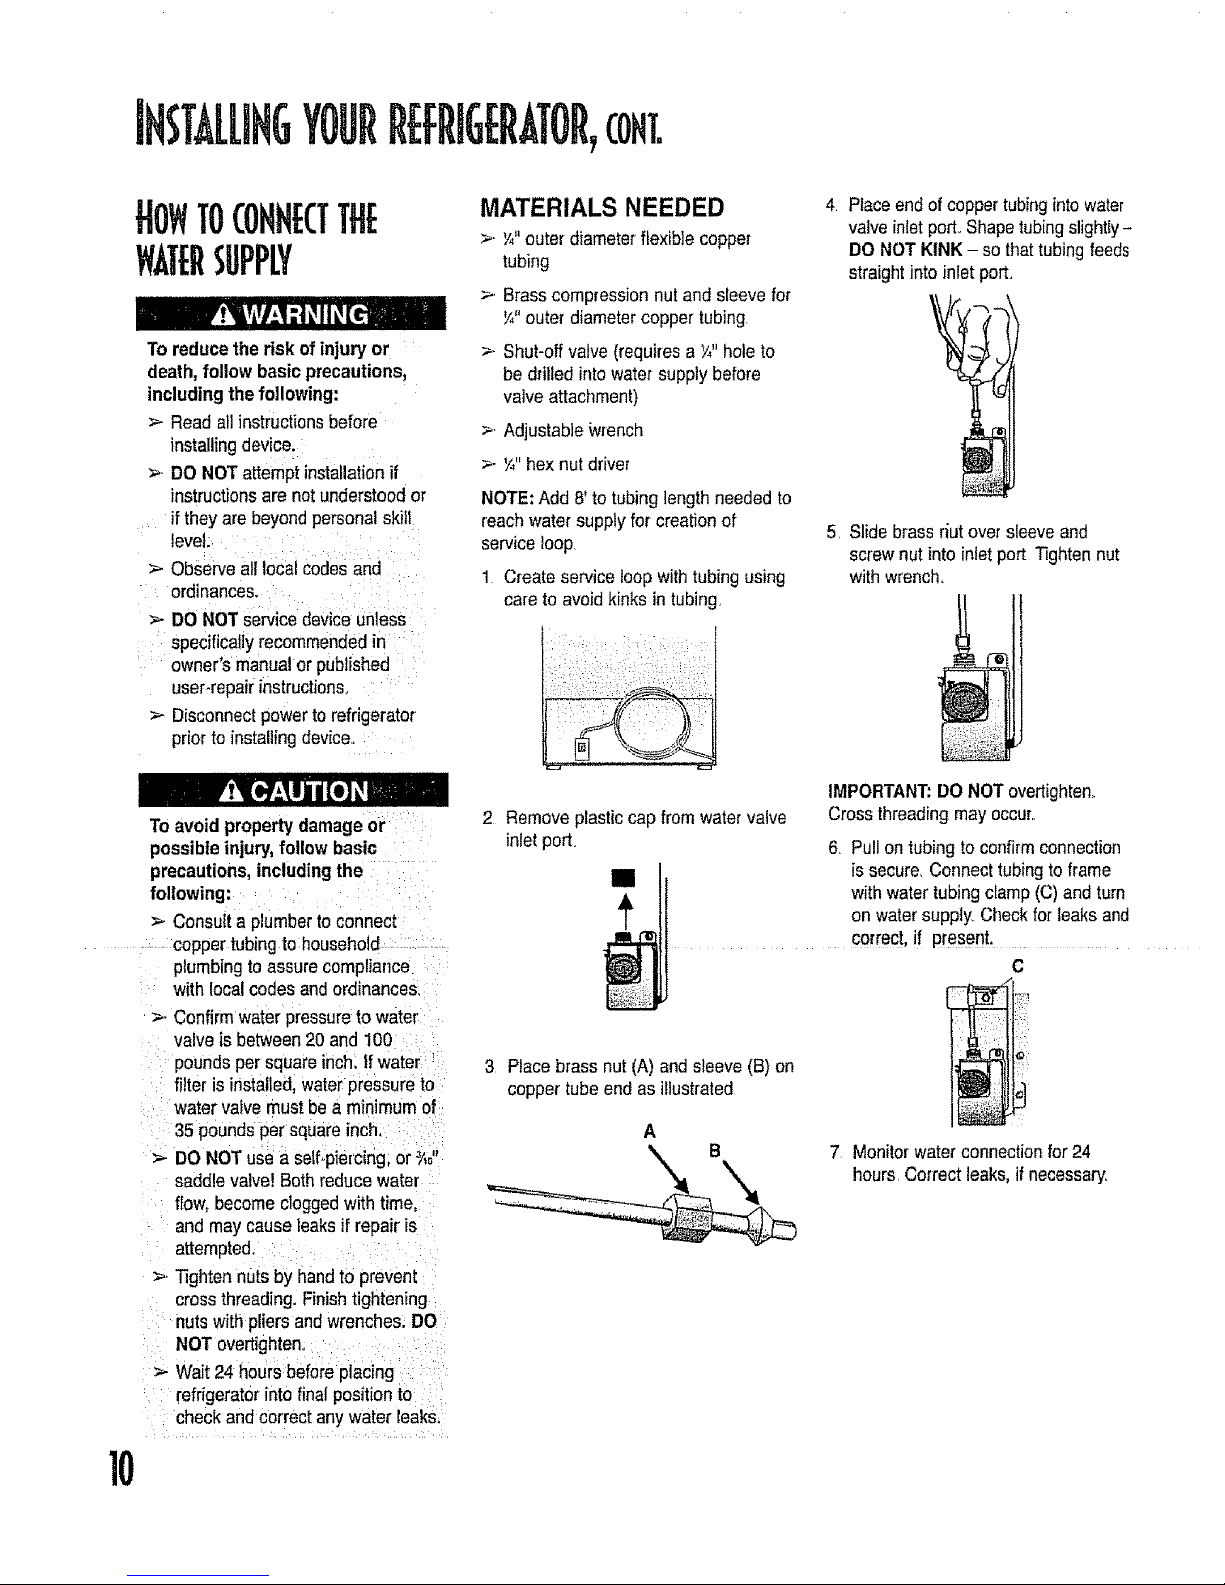
4, Placeendofcopper'tubingintowater
valveinletport,.Shapetubingslightly-
DO NOT KINK - so thattubingfeeds
straightintoinletport.
5, Slide brassr_utoversleeveand
screwnut intoinletport Tightennut
with wrench,,
I
IMPORTANT:DO NOTovertighten,
Crossthreadingmay OCOU_r,
6, Pull ontubing to confirm connection
issecure.Connecttubingto frame
with water tubingclamp (C)and turn
on watersupply.Checkfor leaks and
correct, if present.
C
7 Monitorwaterconnectionfor24
hours Correct leaks,ifnecessary.
10
If your refrigeratorrequiresan ice maker
watersupplyconnection,referto How
to Connect the Water Supply (page
I0) beforelevelingyourrefrigerator
Toprotectpersonalproperty or
refrigeratorfromdamage,observe
thefollowing:
_,-Protectsoftvinyl or other flooring
with cardboard,rugs, or other
protectivematerial.
_- DO NOT usepowertools when
performinglevelingprocedure.
MATERIALS NEEDED
-.__/_"hexheeddriver
>- Lever
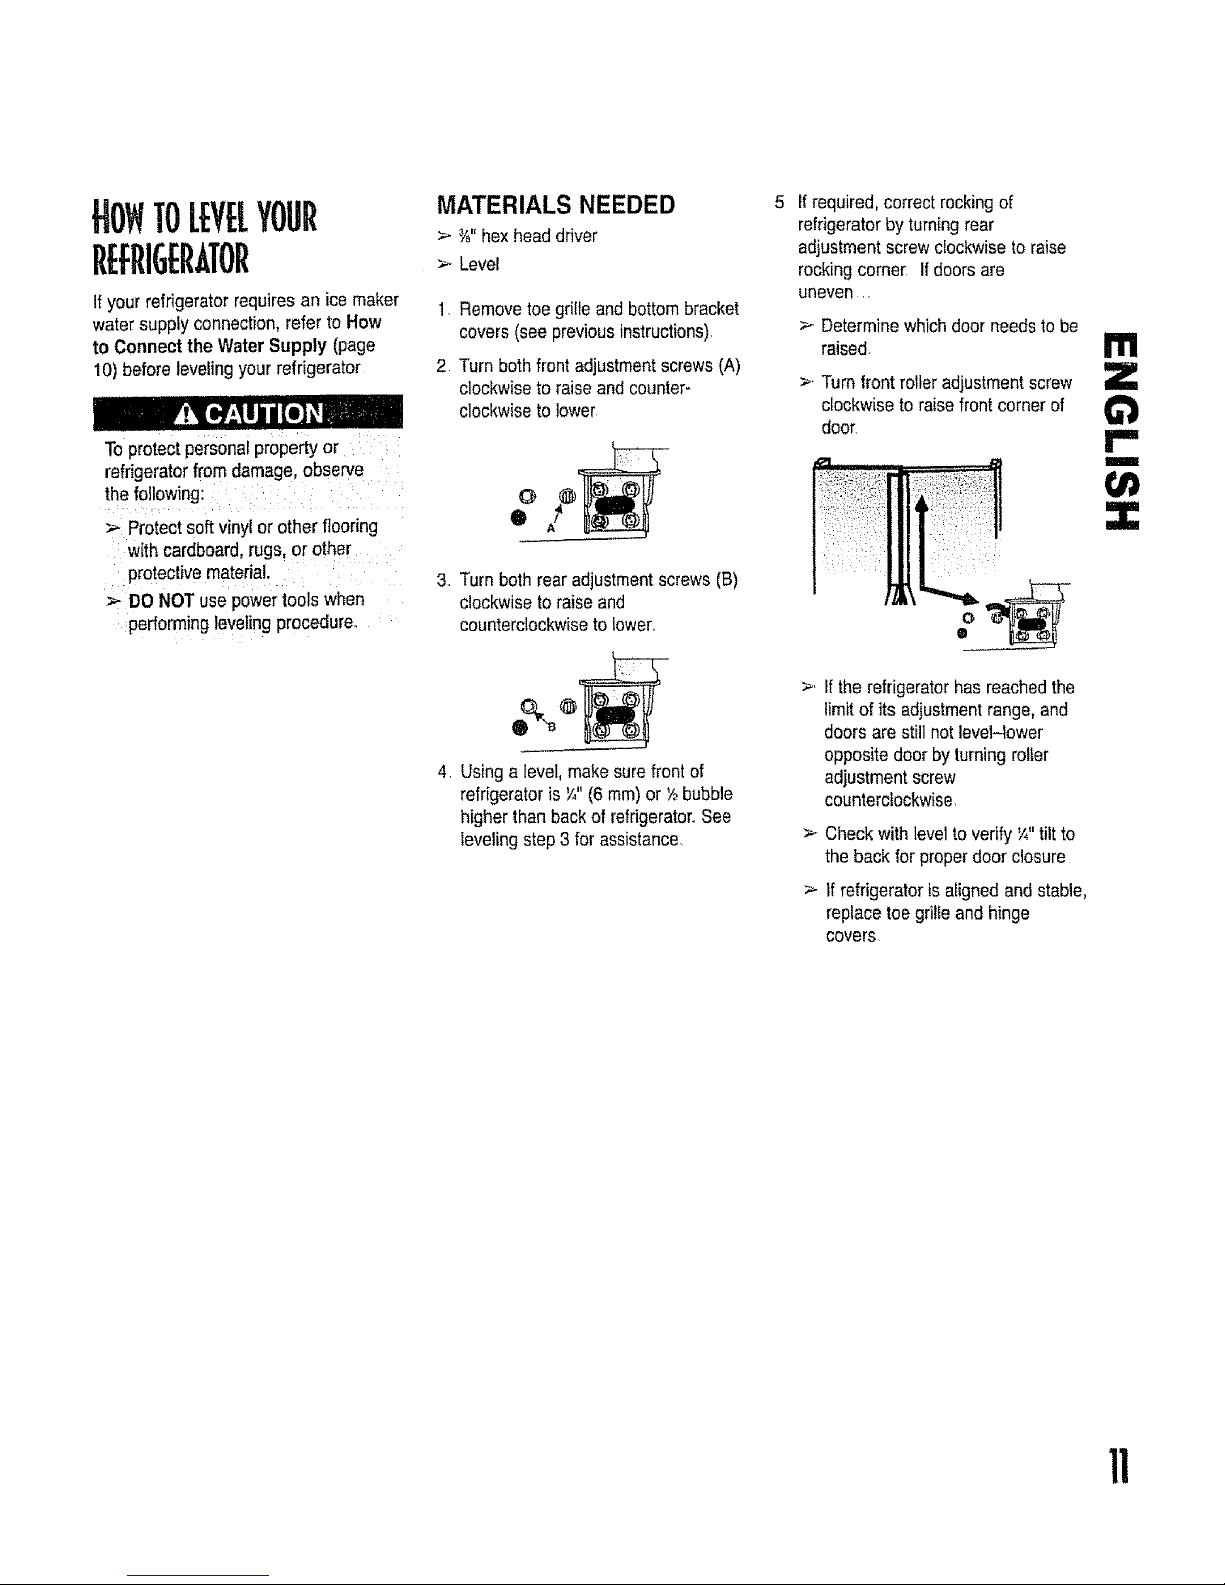
1. Removetoe grilleand bottombracket
covers(seepreviousinstructions).
2 Turn bothfront adjustmentscrews(A)
clockwiseto raiseandcounter-
clockwiseto lower
3 Turn both rearadjustmentscrews (B)
clockwisetoraiseand
counterclockwiseto lower,
®
4 Usinga level,makesurefront of
refrigeratoris Y,"(6 ram)or_ bubble
higherthan backof refrigerator.See
levelingstep 3 forassistance.
Ifrequired,correctrockingof
refrigeratorbyturningrear
adjustmentscrewclockwiseto raise
rockingcorner If doors are
uneven ..
> Determinewhichdoor needsto be
raised
>. Turn front rolleradjustmentscrew
clockwiseto raisefrontcorner of
door,
Iftherefrigeratorhas reachedthe
limitof its adjustmentrange,and
doorsare still notlevel-lower
oppositedoorbyturningroller
adjustmentscrew
counterclockwise,
>- Checkwithlevel toverify ¼"tiltto
the back forproperdoor closure
>- tf refrigeratoris alignedand stable,
replacetoe grilleand hinge
covers
!11
Z
r-
t
3:
11

ETTtNGAND TEMPERATURES
This refrigeratorisdesignedto operate at a householdtemperatureof 55" to 1O0° F (13° to 43° C),,
rlr.,"T_o r,f_t i_11
i, ;1 I ,I
Dial
Temperature
Control
Electronic Temperature Control
OFF
ON
A
DISPENSER LIGHT
gHIB_ _
ITIALCOHTROLS[TTIHGS
DIAL CONTROLS
1 Locate refrigerator _, , ,
and freezercontrol _. (_
on upper-leftwallof ' ' '_
fresh foodsection .
2 Themanufacturer's ..... , ,
recommendation ,'(_"_',)I,
settingfor both "_," /,_,/
compartmentsis 3_.
3 Letthe refrigeratorrun at least 8 to
12 hoursbefore addingfood,
4_ Nlow 24 hours fortemperature to
stabilize,
ELECTRONIC CONTROLS
1, Toset,temperatureof thefreezer,use
the""_ buttonsnext to the
v
button,.
>- Use the 7. to raisethe
temperatureof the freezer section,
or the =v to lowerit,
_. Pressthe P.L_Jbutton to confirm
thesettings
2, Toset temperatureofthe fresh food
section,usethe v buttons nextto
the _ button,.
> Usethe -"- buttonto raisethe
temperatureofthefreshfood
section,or the v buttontolowerit
>- Pressthe _ buttontoconfirm
the settings
3 Allow 24 hoursfortemperaturesto
stabilize,
NOTE:
> The temperaturedisplayon the LED
screenmayfluctuateafterbeing set
asthe refrigeratorcyclestomaintain
theset temperature
HOWTOADJUSTTHE
TEMPERATURE€OHTROLS
After24 hoursfromaddingfood,you
may decidethat one or both
compartmentsshouldbe colder or
warmer, Followthe instructionsbelow
for propertemperatureadjustment.
NOTE;
>- Dueto design of refrigeratoqalways
starttemperatureadjustmentswith
freezer section
>- DONOT change eithercontrolmore
thanone numberat a time
> Allow 5-8 hours for temperaturesto
stabilize
> Changingeithercontrolwillhave
some effecton thetemperatureof the
other compartment,.
tf freezer orrefrigeratoristoo cold:
>- Changecontrolto next lowest number
Iffreezeror refrigeratoristoo warm:
Changecontrolto next highest
number
fOODSTOrAG[
FRESH FOOD STORAGE
> Thefreshfoodcompartmentof a
refrigeratorshouldbe kept between
34° F and 40_F with an optimum
temperatureof 37° E Tocheckthe
temperature,place an appliance
thermometerin a glass of water and
place inthe centerof the refrigerator.
Checkafter 24 hours If the
temperatureis above40° F adjustthe
control.
FROZEN FOOD STORAGE
> The freezercompartmentof a
refrigeratorshouldbe keptat
approximately0° E Tocheckthe
temperature,placean appliance
thermometerbetweenthefrozen
packagesand check after 24 hours If
thetemperatureis above0° F,adjust
thecontrol
12
To avoid serious illnessor death, DO
NOT use refrigeratorwhere wateris
unsafe or of unknownqualitywithout
adequatedisinfection before or after
use of filter. ....
>- Bypass cartridgeDOES NOTfilter
water. Be sure to have
replacementcartridge available
when filter change is required.
> If water filtration systemhas been
allowedto freeze,replacefilter
cartridge,,
> If systemhas notbeen usedfor
several months, and waterhas an
unpleasanttaste or odor, flush
system by dispensing 2-3 glasses
of water, If unpleasanttaste or
odor persists,change filter
cartridge.
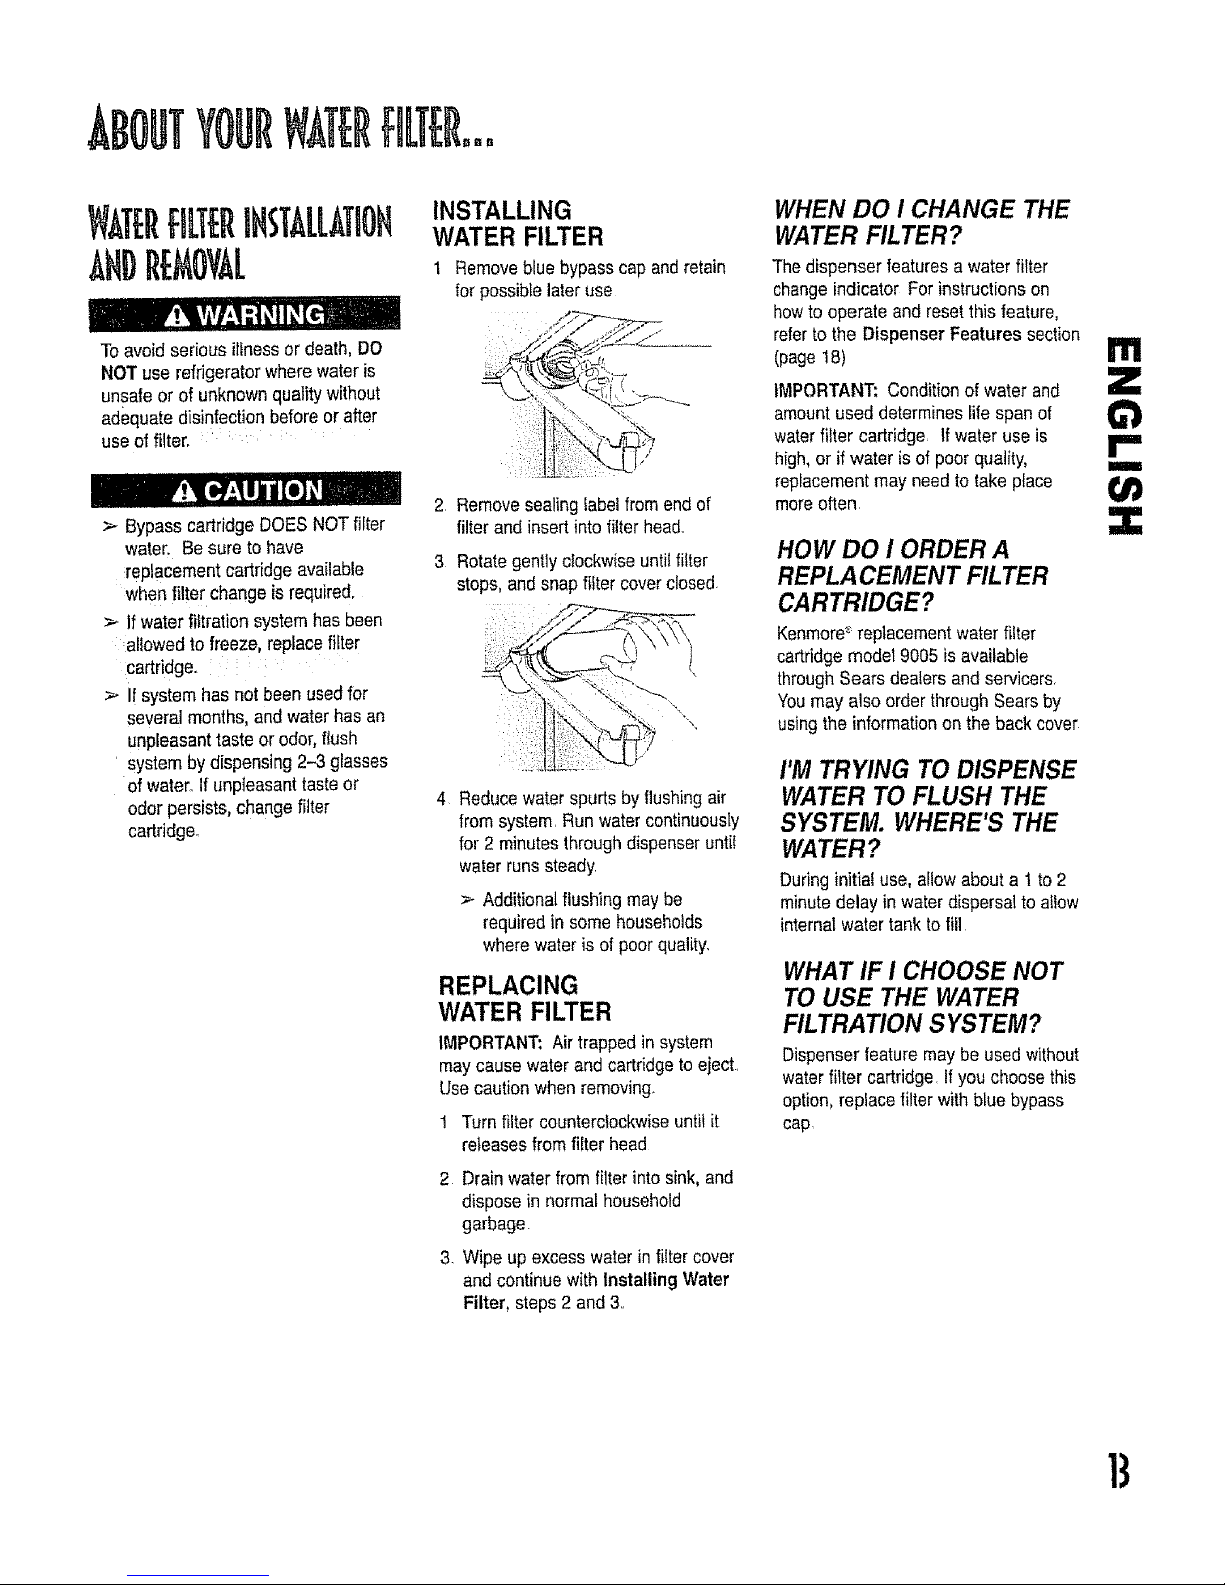
INSTALLING
WATER FILTER
1 Removeblue bypasscap andretain
forpossible later use
2 Removesealing label from end of
filter and insertinto filter head.,
3 Rotategentlyclockwiseuntilfilter
stops, and snapfilter coverclosed.
4 Reducewater spurts by flushing air
from system.Run water continuously
for 2 minutesthroughdispenseruntie
water runssteady
>- Additionalflushing may be
requiredin some households
wherewater is of poor quality.
REPLACING
WATER FILTER
IMPORTANT:Air trappedinsystem
maycausewater and cartridgetoeiect.
Use cautionwhen removing.
1 Turn filter counterclockwiseuntil it
releasesfromfilter head
2 Drainwaterfrom filter into sink,and
disposein normalhousehold
garbage.
3. Wipe up excess water in filter cover
and continue with Installing Water
Filter, steps2 and 3.
WHEN DO I CHANGE THE
WATER FILTER?
Thedispenser features a water filter
changeindicator Forinstructions on
howto operate and reset this feature,
referto the Dispenser Features section
(page18)
IMPORTANT: Conditionof water and
amountused determines life spanof
waterfilter cartridge. If water use is
high,or ifwater is of poor quality,
replacementmay need to lake place
moreoften.
HOW DO i ORDER A
REPLACEMENT FILTER
CARTRIDGE?
Kenmore_replacementwater filter
cartridge model9005 is available
throughSears dealersand servicers.
Youmayalso orderthrough Searsby
usingthe informationon the back cover
I'M TRYING TO DISPENSE
WATER TO FLUSH THE
SYSTEM. WHERE'S THE
WATER?
Duringinitialuse,allowabouta 1 to 2
minute delayin water dispersalto allow
internalwater tank to fill
WHAT IF I CHOOSE NOT
TO USE THE WATER
FILTRATION SYSTEM?
Dispenserfeature may be usedwithout
water filter cartridge. If youchoosethis
option,replacefilter with blue bypass
cap
m
Z
G"}
r-
m
Z
13
HLTER.oo,(ONT.
]4
fiLERDATA
GENERAL USE
CONDITIONS
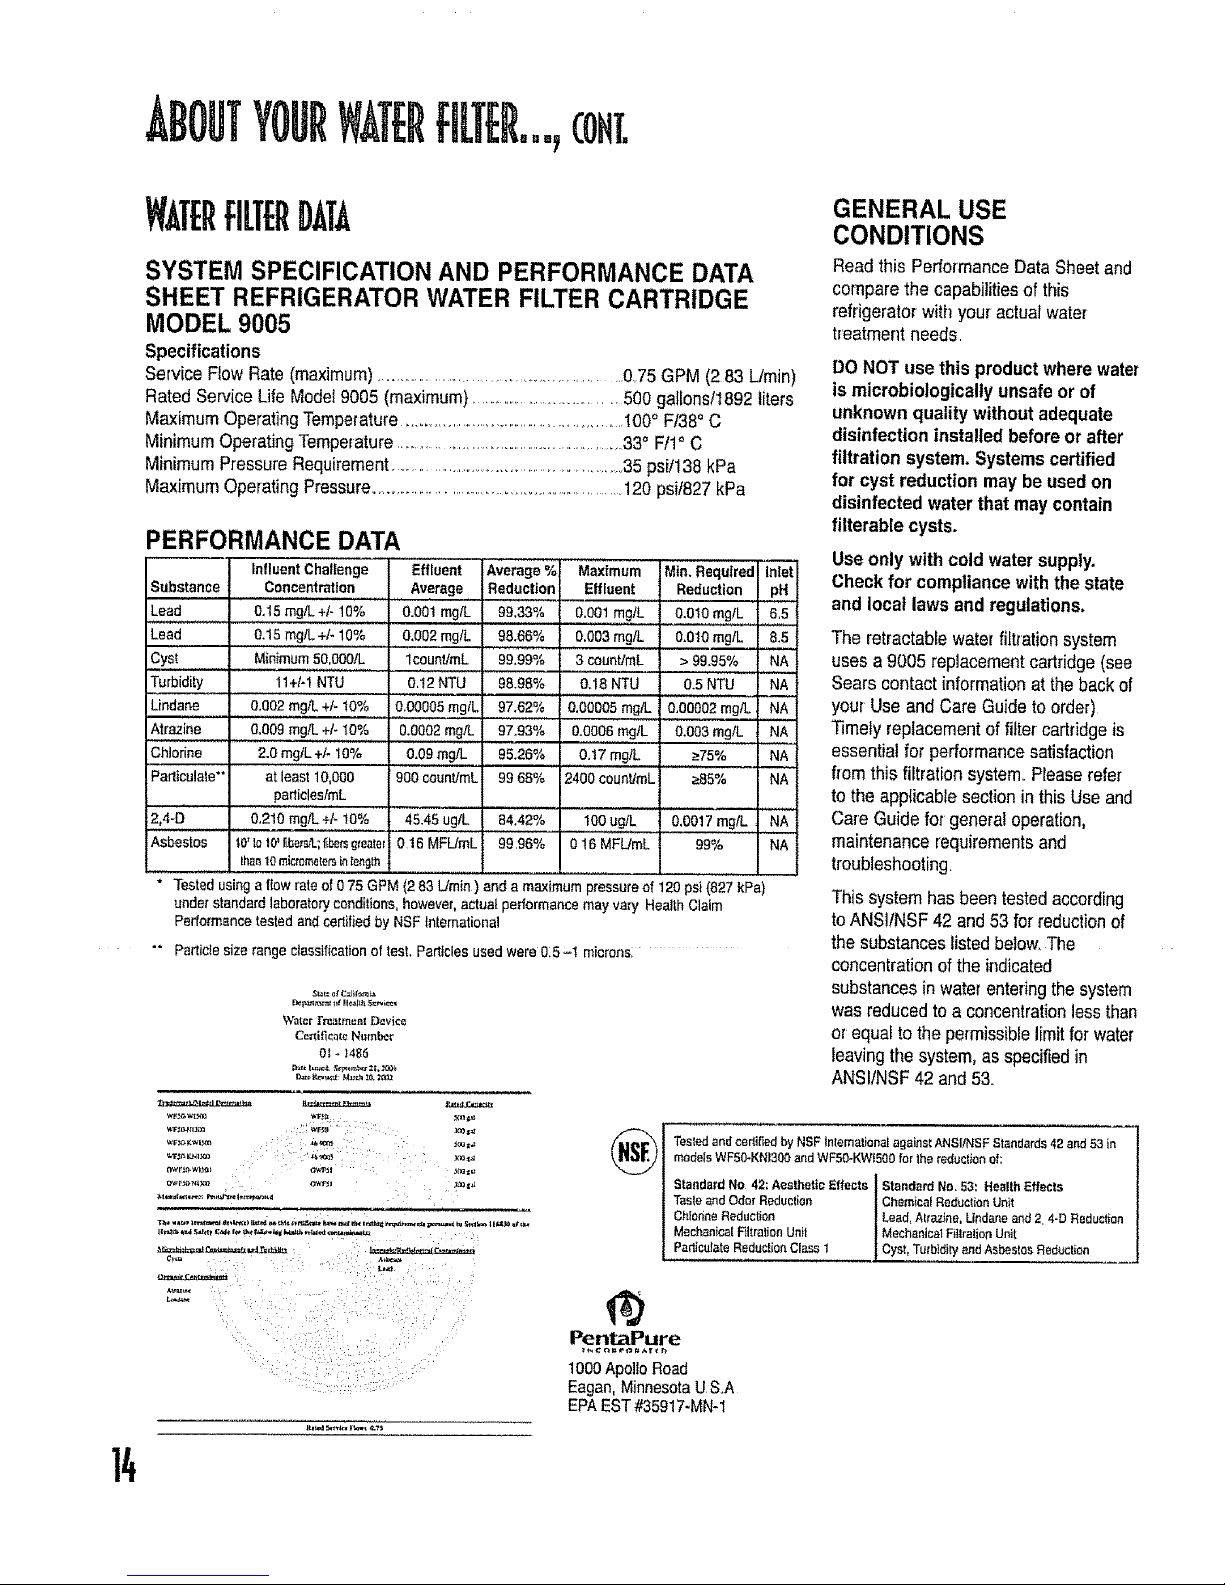
SYSTEM SPECIFICATION AND PERFORMANCE DATA
SHEET REFRIGERATOR WATER FILTER CARTRIDGE
MODEL 9005
Specifications
Service Flow Rate (maximum).................................................0,75 GPM (2 83 L/rain)
RatedServiceLife Model9005 (maximum)..................................500gaHonst1892liters
MaximumOperatingTemperature...................................................100° Ft38° C
MinimumOperatingTemperature......................................................33° F/1°C
MinimumPressureRequirement.........................................................35 ps[1138kPa
MaximumOperatingPressure.................................................................120 psif827kPa
PERFORMANCE DATA
Influent Challenge
Substance Concentration
Lead & 15mg/L +/.-19%
Lead 0.15 rag&.+k 10%
Cyst Minimum50,O001L
Turbidity 11+hl NTU
Lindane 0.002 rag& +!- t0%
Atrazine 0+009mgiL +/- 10%
Chlorine 2.0 mglL +/- 10%
Particulate" at least 10.000
paFff,c!es/mL
2,4-D' 0.210 mgiL +/- 10%
Effluent Average% Maximum Mira Required Inlet
Average Reduction Effluent Redaction pH
0.001 mg/L 99.33% 0,001mgiL 0+0t0mg/L 6.5
,0,002 mgiL 98.66% 0.003 mgfL 0.010 mgtL &5
lcount/mL 99.99% 3 coanUmL > 99,95% NA
&i2 NTU 98.98% O.18NTU 0.5 NTU NA
,0,00005mg/L 97.62% 0.00005 mgiL 0.00002 mgiL NA
0.0002 mg/L 97.93% &0006 mgtL 0.003mg/L NA
0+09rng/L 95.26% 0.17 mg/L _75% NA
900cauntimL 99 68% 2400 ceanttmL _85% NA
45,45 ugtL 84.42% 100 ugiL 0.0017mg/L NA
9996% 015 MFUmL 99% NA
Asbestos 1,0'1o10'rLbersfL;t;bersgteater016 MFUmL
than10mi_motetsmlength
";" Tesied Usinga flow rate of 0 75 GPM (2 83 L!rain ) and a maximum pressureof 120psi(827 kPa)
undo+"standard laboratoryconditions, however, actual performance may vav] HealthClaim
Performancetested and certified by NSFInternational
"° Particte size range ctassificationof test+Parttcles used were 0:5+t microns:
Water i'rcaltn_nl D_vic_
Certificate Number
ol+ 1486
Readthis PerformanceData Sheet and
comparethe capabilities ofthis
refrigeratorwithyour actualwater
treatmentneeds
DONOT use this product wherewater
ismicrobiologicallyunsafeor of
unknownquality withoutadequate
disinfectioninstalled beforeor after
filtration system,Systemscertified
for cyst reductionmay be usedon
disinfectedwater that may contain
filterablecysts.
Useonly with cold watersupply.
Check for compliancewiththe state
and local lawsand regulations,
The retractable waterfiLh'ationsystem
uses a 9005 replacementcartridge(see
Sears contactinformation atthe backof
yout Use and Care Guideto order)
Timelyreplacementoffilter cartridgeis
essentialfor performancesatisfaction
from this filtrationsystem+Pleaserefer
to the applicable sectionin this Useand
Care Guidefor genera!operation,
maintenancerequirementsand
troubleshooting.
This systemhas been testedaccording
toANSI/NSF42 and 53for reductionof
the substanceslistedbelow,The
concentrationof the indicated
substancesin water enteringthe system
was reducedto a concentrationlessthan
or equal tothe permissiblelimitforwater
leavingthe system,as specifiedin
ANSItNSF42 and 53+
@
Tesledand codifiedby NSF internationalagainst ANSI/NSF Standards 42 and 53 in
modelsWF50+KNI3Ogand WFS0-KW_500forthe redaction o_:
Standard No 42: Aesthetic t_ffeata Standard No, 53: Health Effects
Tasteand Odor Reduction Chemical Redaction Unit
Chledne Reduction [ Lead, A{razJne,Lindane and 2 4-D Rsdae ion
Mechanical FiltrationUnit Mechanical Filtration Unit "
Purlieu]ate Reduc ionClass 1 Cyst, Turbidity and Asbestos Redaction
@
PentaPure
1000ApolloRoad
Eagan,MinnesotaUS+A
EPAEST#35917*MN-I
FflESHFOODFEATURES
SHELVES
Toavoid personalinjury or property
damage,observethe following:
>- Confirmshelf is securebefore
p!acingitems on shelf.
>- Handletemperedglass shelves
carefully.Sheives may break
suddenlyif nicked, scratched,or
exposedto sudden temperature
change,
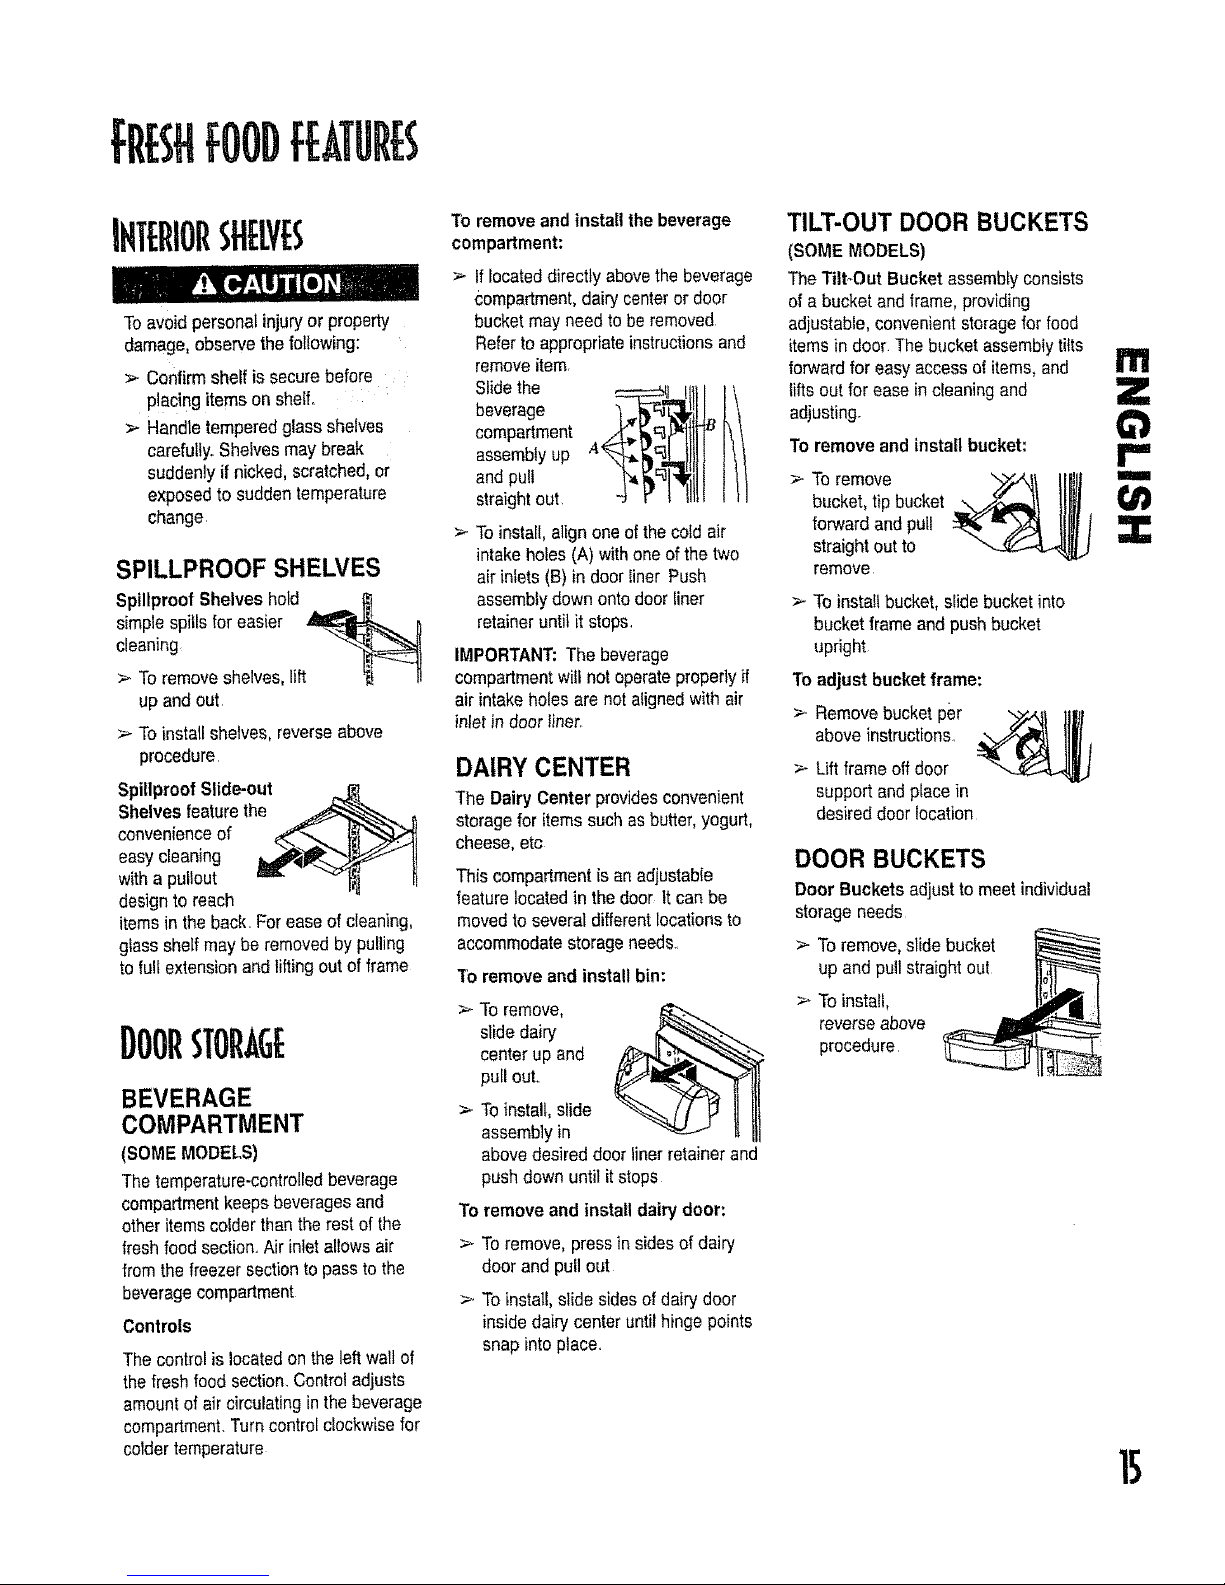
SPILLPROOF SHELVES
Spillproof Shelves hold . _ 1_
simplespillsfor easier _ 1)
cleaning
>. To removeshelves, lift _j 11
up and out
_- Toinstall shelves,reverseabove
procedure
Spillproof Slide-out
Shelvesfeaturethe _:_.._"_..
convenienceof _"._..,._ }}f_>_
easycleaning II_I_ _-_ II
witha pullout m v I_ II
designto reach
itemsin theback, Forease of cleaning,
glass shelf maybe removedby pulling
to full extensionandliftingoutof frame
I)0011STOflAGE
BEVERAGE
COMPARTMENT
(SOMEMODELS)
The temperature-controlledbeverage
compartmentkeepsbeveragesand
other items colderthan therest of the
fresh foodsection.,Air inletallows air
from the freezer sectionto passto the
beveragecompartment
Controls
Thecontrol is locatedon theleft wall of
thefresh food section.Controladjusts
amountof air circulatingin the beverage
compartment.Turncontrolclockwisefor
coldertemperature
TOremove and install the beverage
compartment:
If locateddirectly abovethebeverage
c;ompartment,dairy centeror door
bucketmay needto be removed
Referto appropriateinstructionsand
removeitem,
Slide the
beverage
compartment
assemblyup
andpull
straightout,
Toinstall,align one of thecold air
intake holes(A) with oneof the two
air inlets (B) in door liner Push
assemblydownontodoor liner
retaineruntilit stops.
IMPORTANT:The beverage
compartmentwilt not operateproperlyif
air intake holesare not alignedwith air
inletin doorliner,
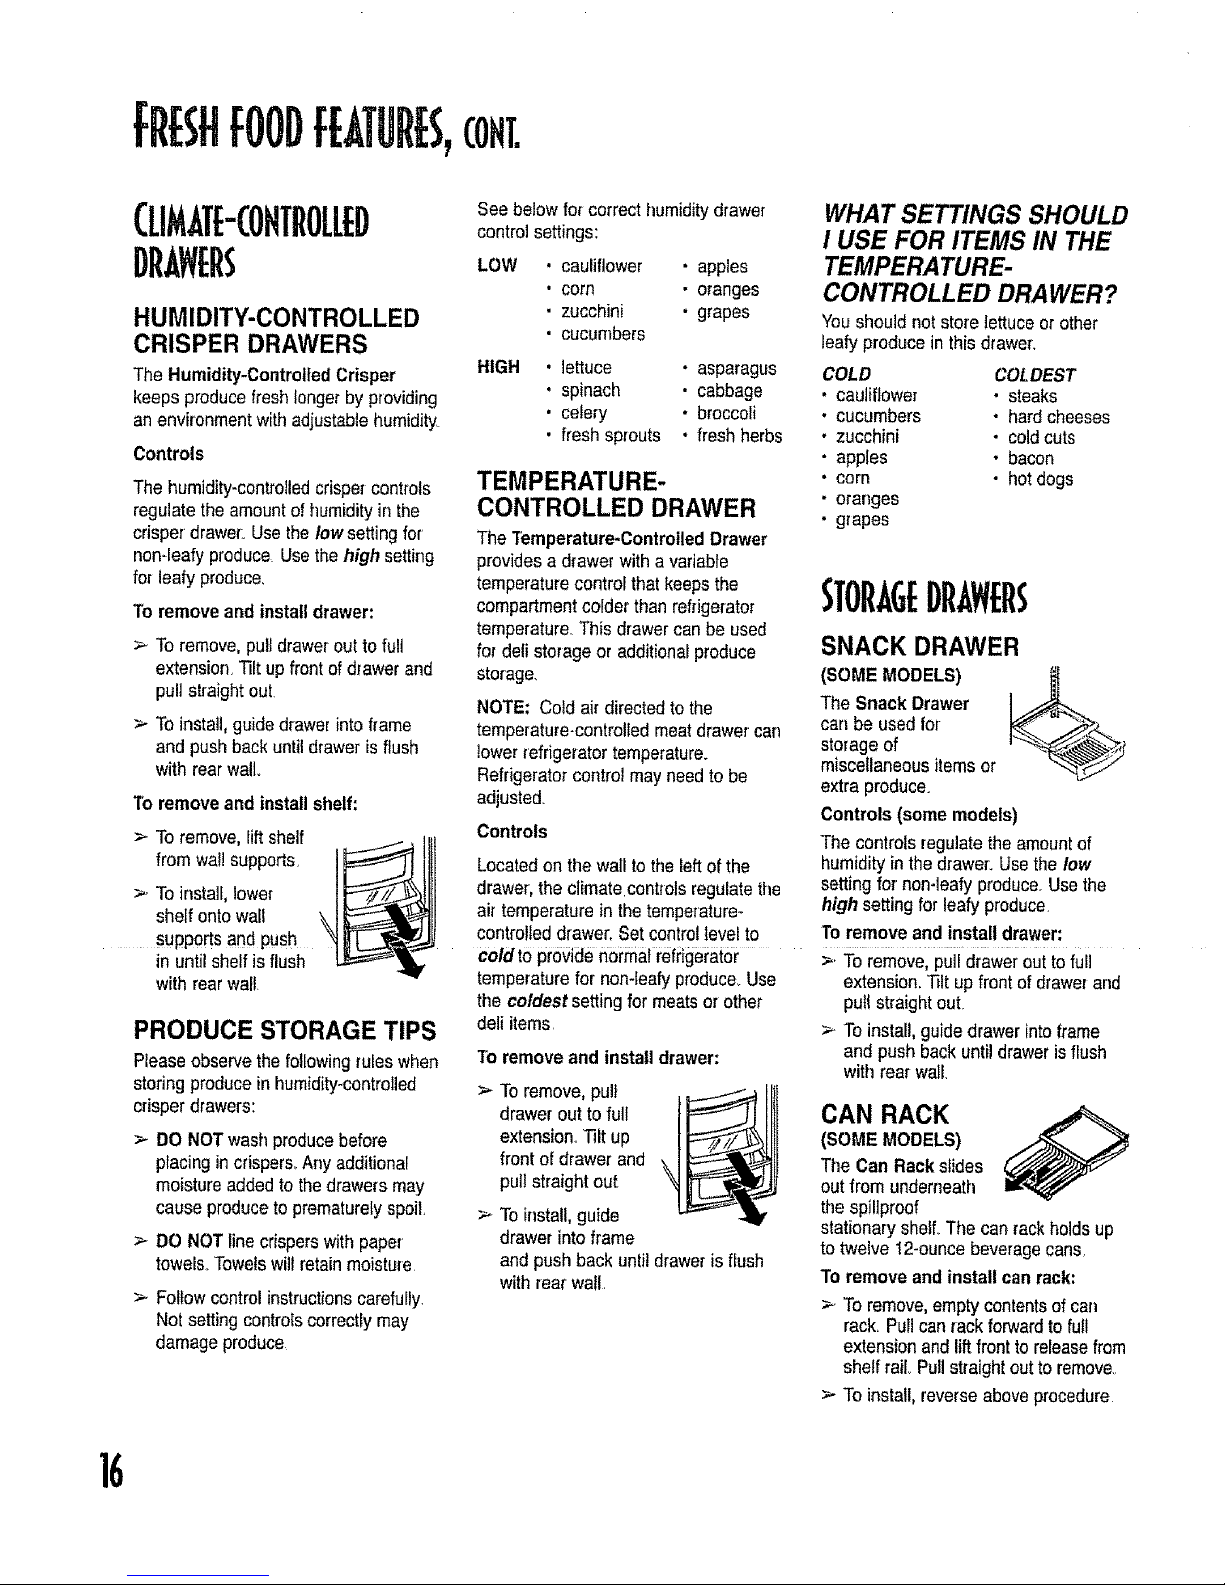
DAIRY CENTER
The DairyCenter providesconvenient
storagefor items such asbutter, yogurt,
cheese,etc
This compartmentis an adjustable
featurelocatedin the door tt can be
movedtoseveral differentlocationsto
accommodatestorageneeds.,
To remove and install bin:
._ To remove,
slidedairy
center up and
pull out..
> Toinstall,slide
assembly in
abovedesired door linerretainerand
push down until it stops
To removeand install dairydoor:
> To remove,pressin sidesof dairy
door and pull out
>. To install,slide sidesof dairydoor
insidedairy center untilhingepoints
snap into place..
TILT-OUT DOOR BUCKETS
(SOME MODELS)
TheTitFOut Bucketassemblyconsists
ofa bucketand frame,providing
adjustable,convenient storagefor food
itemsin door. The bucket assemblytilts
forwardfor easy accessof items, and
liftsout for easein cleaning and
adjusting.
To remove andinstall bucket:
tl'l
Z
r=
remove
> To installbucket, slidebucket into
bucketframe and push bucket
upright
To adjust bucket frame:
>. Removebucketper "bY.,,-"€IIl_l
above instructions.
>- Lift frame oif door
support andplacein
desireddoor location
DOOR BUCKETS
Door Bucketsadjustto meet individual
storage needs
> To remove,slide bucket
up and pullstraightout
> Toinstali,
reverse above
procedure
To remove V_f_ IIBIIt i
bucket,tip bucket _
forward and pull
straightout to
fRESHFOODfBTUflES,cont.
CLIMATE-COHTROLED
DR. Wt rS
HUMIDITY-CONTROLLED
CRISPER DRAWERS
The Humidity-ControlledCrisper
keeps producefresh longerby providing
an environmentwith adjustablehumidity.
Controls
The humidity-controlledcrispercontrols
regulatethe amountof humidityinthe
crisper drawer: Usethe low setting for
non-leaty produce.Usethe high setting
for leafy produce,
To remove and install drawer:
>. Toremove,putl drawerout to full
extension,Tiltup frontof drawer and
pull straightout.
> To install,guidedrawer into frame
and push backuntildrawer isflush
with rear wall.
"l'bremove and installshelf:
>- Toremove,lift sheif
from wallsupports,
>. Toinstall,lower
shelf ontowall
supportsand push
in untilshelf is flush
with rear wall,
PRODUCE STORAGE TIPS
Pleaseobservethe followingruleswhen
storing produceinhumidity-controlled
crisper drawers:
>- DO NOTwash producebefore
placingincrispers.Anyadditional
moistureaddedto thedrawers may
cause produceto prematurelyspoil,
> DO NOT linecrispers with paper
towel& Towelswill retain moisture
> Follow controlinstructionscarefully.
Not settingcontrotscorrectlymay
damageproduce
See below forcorrect humiditydrawer
control settings:
LOW . cauliflower • apples
• corn • oranges
• zucchini • grapes
' cucumbers
HIGH
, lettuce • asparagus
' spinach • cabbage
• celery • broccoli
• fresh sprouts • freshherbs
TEMPERATURE-
CONTROLLED DRAWER
The Temperature-ControlledDrawer
provides a drawerwith a variable
temperaturecontrofthatkeepsthe
compartmentcolder thanrefrigerator
temperature.Thisdrawercanbe used
for deftstorageor additionalproduce
storage.
NOTE: Cold air directedto the
temperature-controlledmeatdrawercarl
lowerrefngeratortemperature_
Refrigeratorcontrol mayneed to be
adjusted.
Controls
Locatedon the wail tothe left ofthe
drawer,the climate controlsregulate the
air temperaturein the temperature-
controlleddrawer.Set controltevei to
cold tOprovide normalrefrigerator
temperaturefor non-leafyproduce..Use
the coldest settingfor meats orother
deli items
To removeand installdrawer:
>- Toremove,pull ___._.1_j
drawerout to full
extension,,Tilt up
front of drawerand
pull straightout
> To install,guide
drawerinto frame
and pushback untildrawer is flush
with rear wail,
WHAT SETTINGS SHOULD
I USE FOR ITEMS IN THE
TEMPERATURE-
CONTROLLED DRAWER?
You shouldnot store fettuceor other
leafy producein thisdrawer:
COLD COLDEST
cauliflower • steaks
cucumbers • hard cheeses
zucchini • coldcuts
apples . bacon
corn • hot dogs
oranges
grapes
STORAGEDR. wERs
SNACK DRAWER
(SOMEMODELS)
The SnackDrawer
carl be usedfor
storage of
miscellaneousitemsor
extra produce.
Controls (some models)
The controls regulatethe amountof
humidityinthe drawer: Usethe low
settingfor non-leafy produce,Usethe
high setting for leafy produce,
Toremove and install drawer;
>, To remove,pull drawerout tofull
extension.Tilt up frontof drawerand
pull straightout.
>. To install,guide drawer into frame
and pushback until draweris flush
withrearwall.
CAN RACK
(SOMEMODELS)
The Can Rackslides
outfromunderneath
thespiliproof
stationaryshell The can rack holdsup
to twelve 12-ouncebeveragecans,
To remove and install canrack:
> To remove,empty contentsofcan
rack,Pull can rackforwardto full
extensionand liftfront to releasefrom
shelf rail,,Pullstraightout to remove.
> To install, reverseabove procedure
fiiEEZEllFE UflES
AUTOMATICICEMAKEfl
Toavoid propertydamage, observe
the following:
:_ Be NOTforce ice maker arm
down or up....
>-00 NOT place or store anythingin
ice storage bin,
This ice maker createsthe ice usedin
the dispensingsystem.
UsingIce Maker for the FirstTime
> Confirm ice bin isin _------------_._
place and icemaker
arm is down
> Afterfreezer section reaches
between0° to 2°F (-t8° to -17oC),
icemaker filfs with water and begins
operating,
> Allow approximately24 hoursafter
installationto receive first harvestof
ice°
>- Discardice createdwithinfirst 12
hours ofoperationto verifysystem is
flushedof impurities.
Operating Instructions
>- Confirmicebin is in placeand ice
makerarm is down.
> After freezersection reaches0° to
2°F(-18° to -17° C), icemakerfills
with waterand beginsoperating.You
will have a completeharvestof ice
approximatelyevery 3 hours
> Stop iceproduction
byraisingicemaker
armuntilclick is
heard.
> Ice makerwill remain inthe off
positionuntilarm ispusheddown.
IMPORTANT: IceCream Sheffshould
notbe instafledif ice makerarm is in
"off"position
SHELVES
FREEZER SHELF
To remove and install _4t_ A
clip-mounted
shelves:
> Toremove,pull shelffrom wall
mountingclips and pull [eftsideof
shelfout of walt mountingholes
>. Toinstall,placeshelfin mountinghole
andattachtowall mountingc?ips.
To removeand Jnsta?lrail-mounted
shelves:
> To remove,snap
rightsideof shelf
from cabinetrailing
and removefromwall mountingclips
Toinstall,replaceshelf in wall
mountingclips Be sure backedge of
shelf isflushwith backof cabinetand
snapshelf into cabinetrailing
ICE CREAM SHELF
providesaspace for
itemstobechilledor -
frozen quickly
Toremove, lift ice creamshelf from
icebin railsand pull straightout.
_ Toinstall,fit shelf over topofice
makerandlowerontoicebucketrails.
IMPORTANT:Ice CreamShelf should
notbe installed if ice makerarmis in
"off"position.
To avoid possible injury, including
death, do not pIace glass items in ice
cream shelf. Glass objects may
shatter or explode if exposed to
extremecold.
FREEZER BASKET
'Toremoveand install
basket" __
=nil n=_llnnt In it_ fitll _t__n,_inn
Lift up front of basketand remove
> To install,slide basketinto railsat
bottomof freezersection..Lift up front
of basket,and slideto the backof
refrigerator
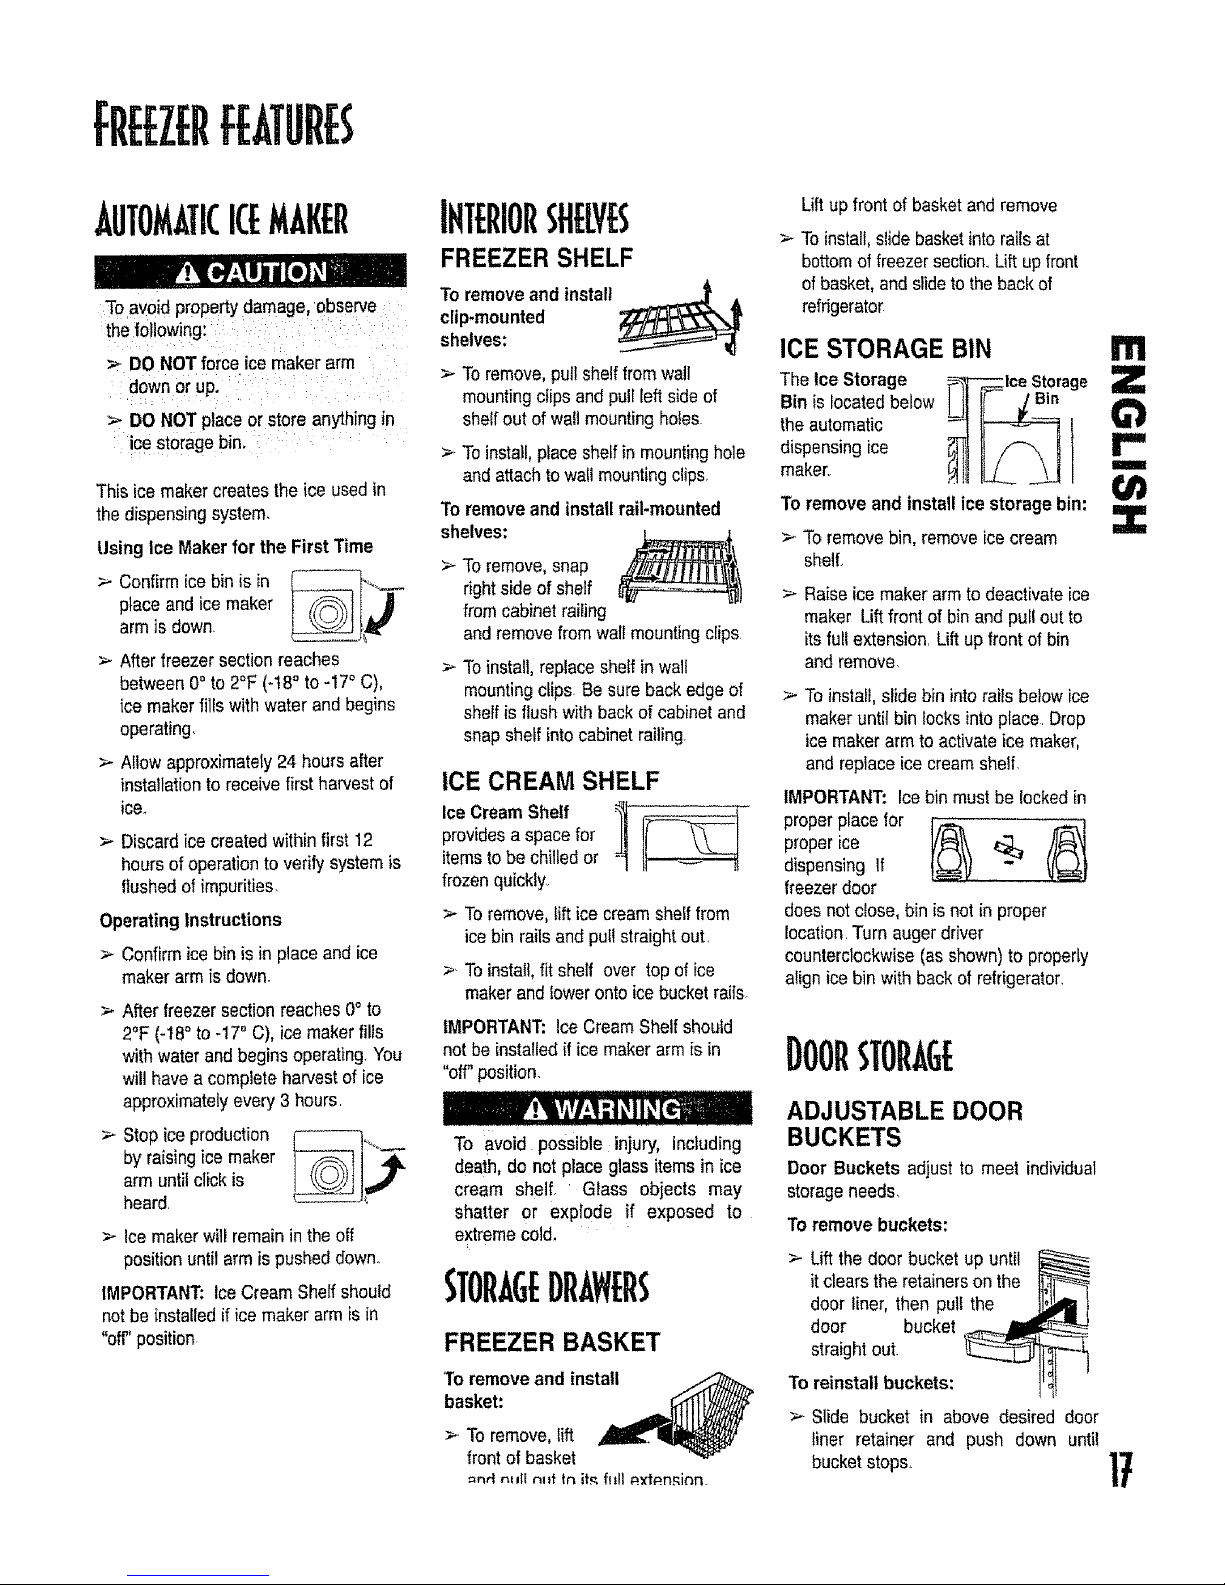
ICE STORAGE BIN
TheIce Storage
Bin is locatedbelow
the automatic
dispensingice
maker_
To removeand installice storagebin:
;-- To removebin, removeice cream
shelf.
Raiseicemaker arm to deactivateice
maker Lift front of bin and pull outto
itsfull extension. Lift upfront of bin
andremove
>-To install,slidebin intorailsbelowice
makeruntil bin locks intoplace. Drop
icemakerarm to activateice maker,
and replaceice creamshelf.
IMPORTANT: Ice bin mustbe lockedin
properplace lot r'_ _
proper ice
dispensing If
freezerdoor
does not close,bin isnot in proper
location.Turn auger driver
counterclockwise(as shown)to properly
alignice bin with back of refrigerator.
ADJUSTABLE DOOR
BUCKETS
Door Buckets adjustto meet individual
storageneeds,
Toremove buckets:
>- Lift the door bucket up until
itclearsthe retainersonthe
door liner, then pull the
door bucket
straightout.
To reinstall buckets:
> Slide bucket in above desired door
liner retainer and push down until
bucketstops.
!'11
Z
r"
m
Z
17
DHP[HSERF[ATURES
DISPEHSERLIGHT
A lightactivateswithfflthedispenser
area at full power whendispensingice
or water,
Thedispenser pad is locatedon the
back wa!l of thedispensingarea.When
the dispenser pad ispressed,the
selectionchosenon the dispenser
control panel wiltdispense
Dispenser
Pad
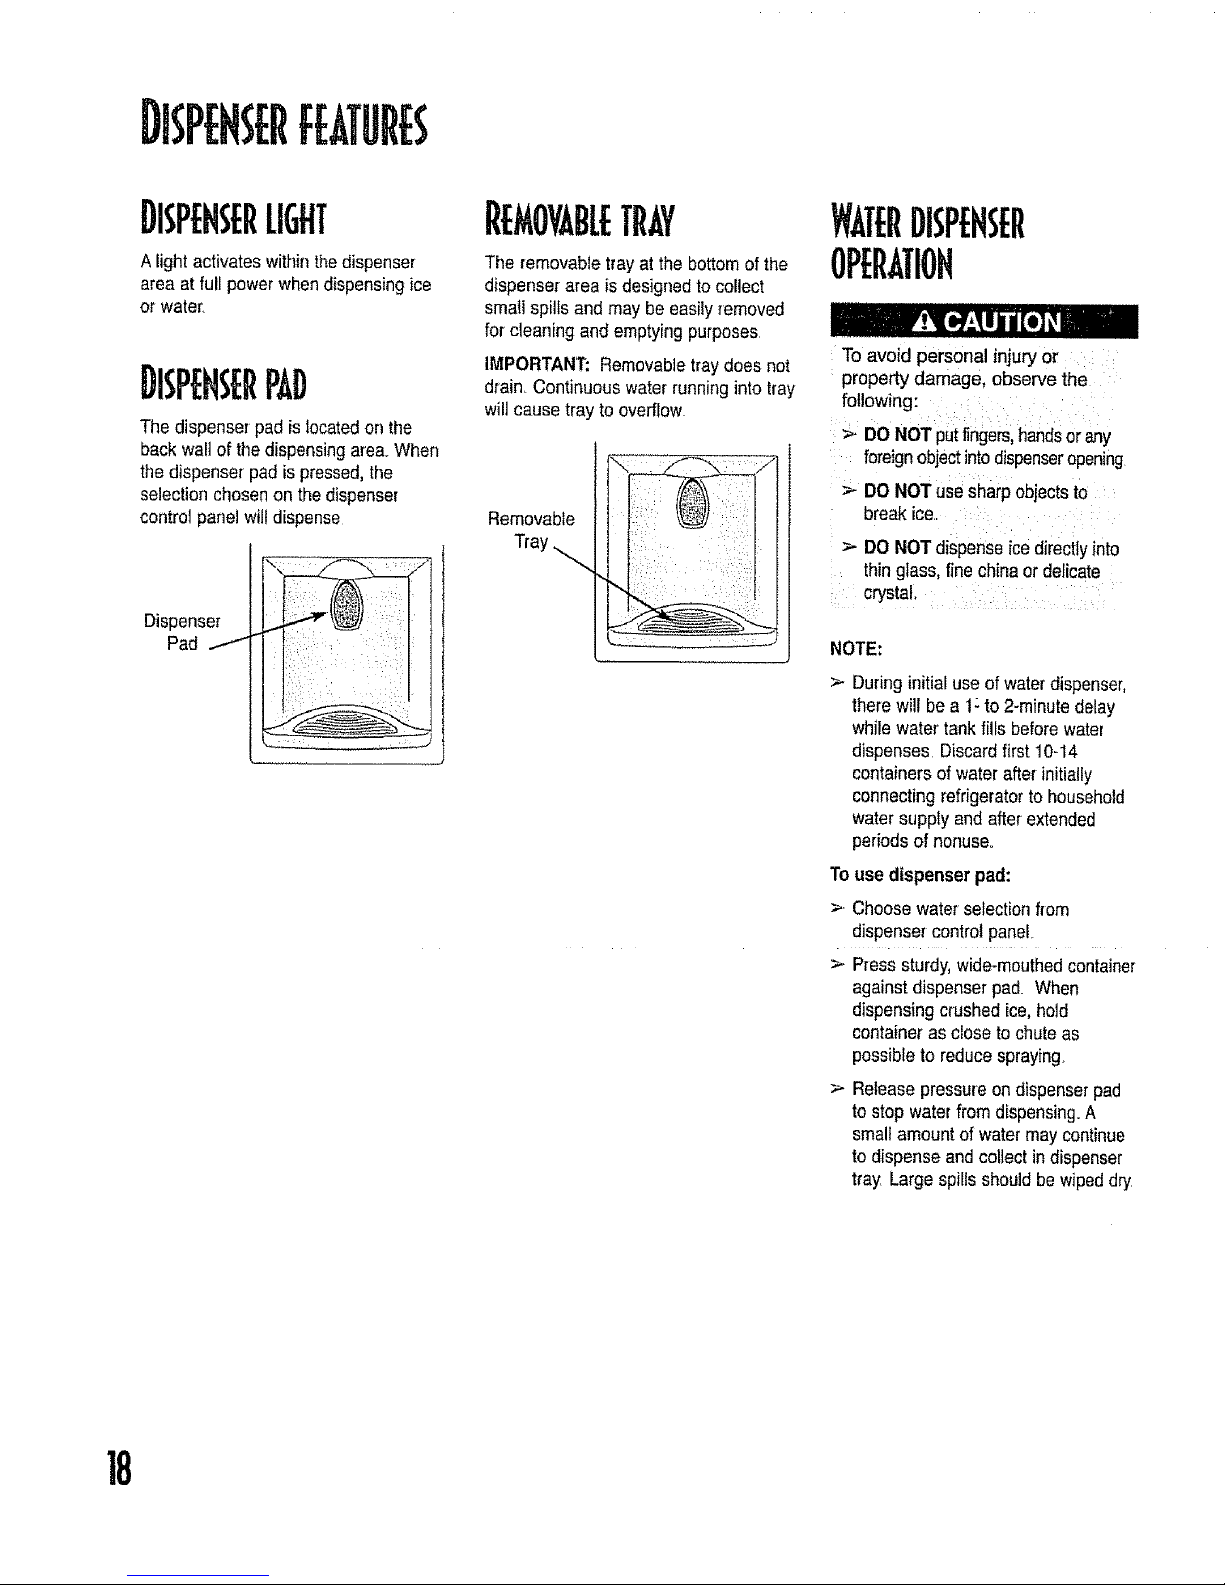
R MOYABLETrAY
The removabletray at the bottomof the
dispenser area is designedto col]ect
small spilIsand may be easilyremoved
for cleaning and emptyingpurposes
IMPORTANT: Removab]etraydoes not
drain. Continuouswater runningintotray
will cause tray to overflow
Removable
Tray
To avoid personal injury or
property damage, observe the
following:
>. DO NOTputfingers,handsor any
foreignobjectintodispenseropening
DO NOTuse sharp objectsto
breakice.....
> DO NOTdispenseicedirectly into
thingiass,fine chinaor delicate
crystal,
NOTE:
> During initial use of waterdispenser,
therewill be a t: to 2-minutedelay
whilewater tank fills beforewater
dispenses Discardfirst 10-14
containersofwater after initially
connectingrefrigeratorto household
water supply and afterextended
periodsof nonuse.
To use dispenser pad:
>- Choosewater selectionfrom
dispensercontrolpanel
>. Press sturdy,wide-mouthedcontainer
againstdispenserpad. When
dispensingcrushedice,hold
containeras dose to chuteas
possibleto reducespraying.
Releasepressureon dispenserpad
tostop waterfrom dispensing°A
smallamountof water may continue
to dispense and collectin dispenser
tray Large spillsshould bewipeddry.
18
fiVE-BUTTOHCONTROLFEATUflES
O 0
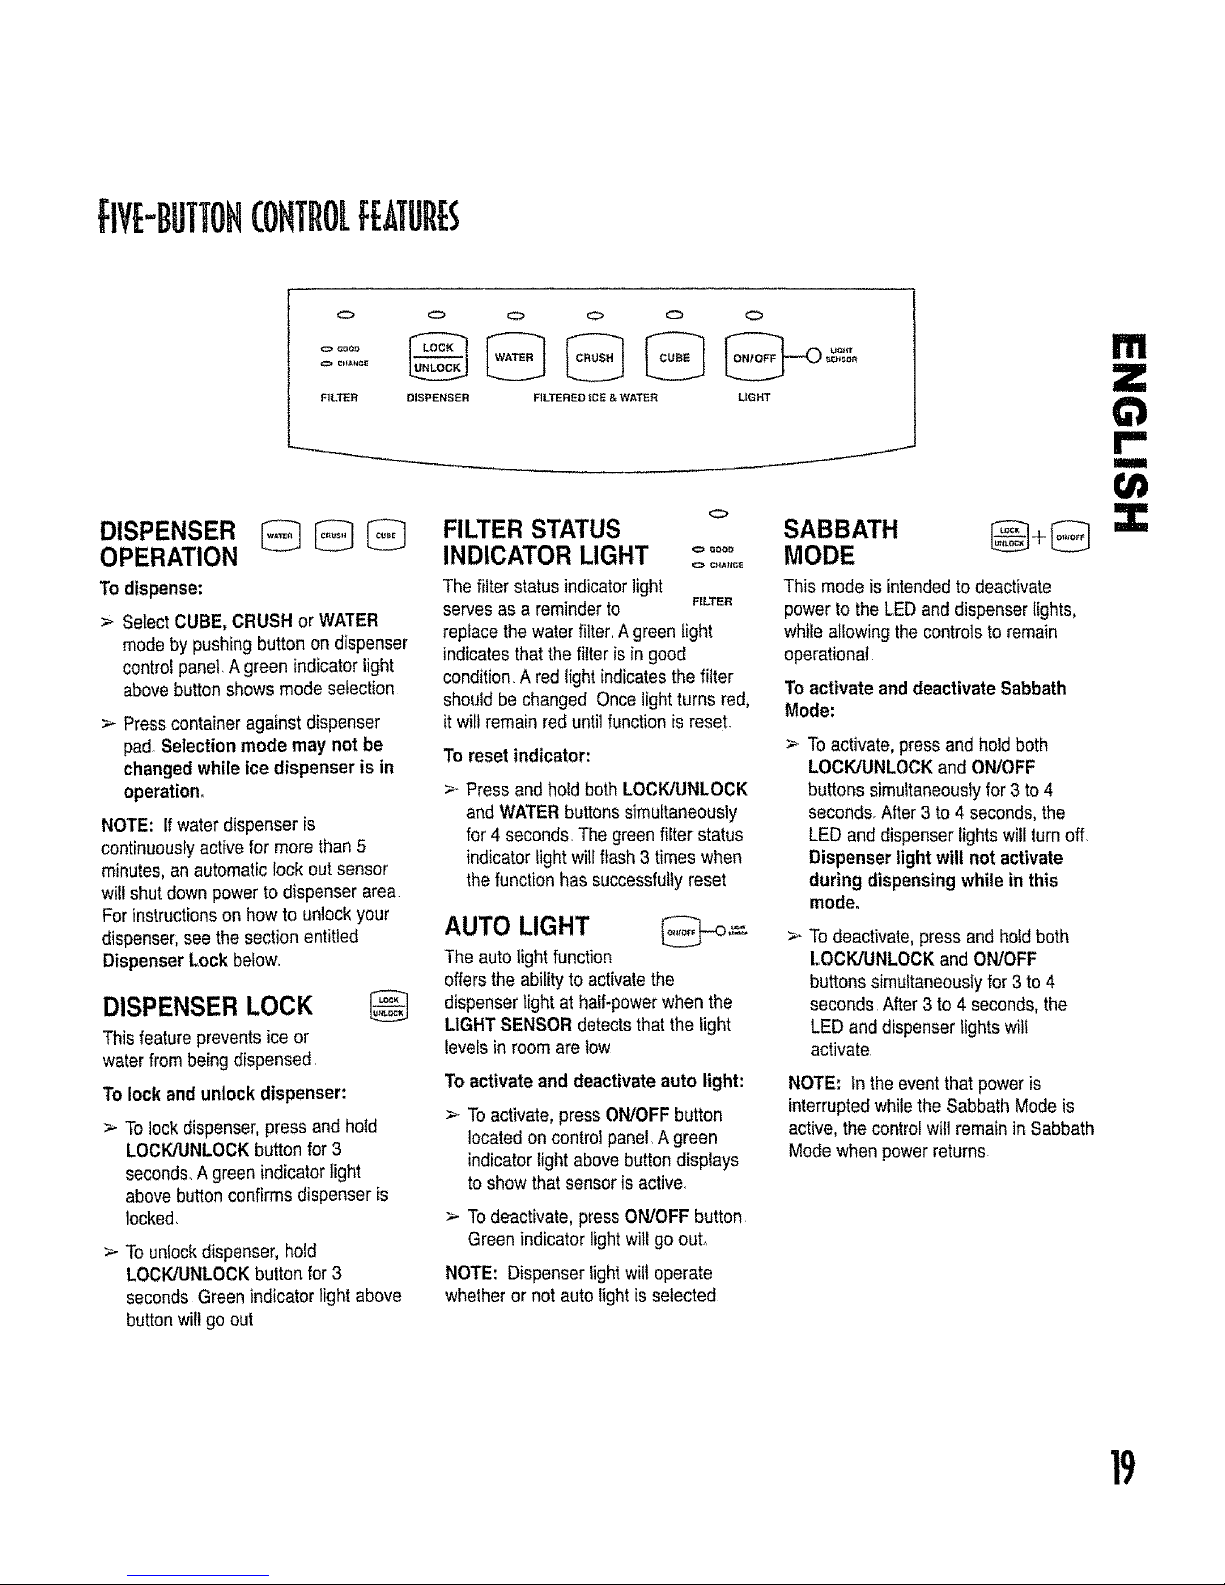
F1LTER DISPENSER
DISPENSER
OPERATION
To dispense:
> SelectCUBE, CRUSHor WATER
modeby pushingbuttonondispenser
controipanel.A green indicatorlight
abovebuttonshows modeselection
Presscontaineragainstdispenser
pad Selectionmode may not be
changedwhileice dispenser is in
operation,
NOTE: Ifwaterdispenseris
continuouslyactivefor morethan 5
minutes,anautomaticlockout sensor
wi!l shutdownpowerto dispenserarea
Forinstructionson how to unlockyour
dispenser,see the sectionentitled
Dispenser Lock below..
DISPENSER LOCK
Thisfeatureprevents iceor
waterfrombeingdispensed.
To lock and unlock dispenser:
Tolockdispenser,pressand hotd
LOCK/UNLOCKbutton for 3
seconds.A green indicatortight
abovebuttonconfirms dispenseris
iocked.
> To unlockdispenser,hold
LOCK/UNLOCKbutton for3
seconds Green indicatorlightabove
buttonwillgo out
O O O O
FILTERED iCE & WATER UGHT
J
O
FILTER STATUS
INDICATOR LIGHT °°°°°
The filter statusindicatorlight
servesas a reminderto _t_..TER
repfacethewaterfilter.Agreen light
indicatesthat the tilteris in good
condition.A red lightindicatesthetilter
shouldbe changed Once lightturns red,
it will remainred untilfunction is reset.
To reset indicator:
>_Pressand hold bothLOCK/LJNLOCK
andWATERbuttonssimultaneously
for4 seconds.The greenfilter status
indicatorlightwillflash 3 times when
thefunctionhas successfullyreset
AUTO LIGHT
The autolight function
offersthe abilityto activatethe
dispenserlight at halt-powerwhen the
LIGHTSENSORdetectsthat the light
levelsin roomare tow
Toactivate and deactivateauto light:
>- Toactivate, pressON/OFFbutton
located on control panel.Agreen
indicatorlight abovebuttondisplays
to show that sensoris active.
> To deactivate,pressON/OFF button
Green indicator lightwill go out,
NOTE: Dispenserlightwil_operate
whetheror not autolight is selected
SABBATH
MODE
This mode isintendedto deactivate
powerto the LEDand dispenserlights,
while allowing thecontrolsto remain
operational
To activate and deactivate Sabbath
Mode:
Toactivate,pressandhold both
LOCK/UNLOCKandOWOFF
buttons simultaneouslyfor3 to 4
seconds.After3 to4 seconds,the
LEDand dispenserlightswill turnoff.
Dispenserlight wilt not activate
during dispensing while in this
mode.
To deactivate,press and hotdboth
LOCK/UNLOCKand ON/OFF
buttonssimultaneouslyfor 3 to 4
seconds After3 to 4 seconds,the
LEDand dispenserlightswilf
activate
NOTE: In theeventthatpoweris
interruptedwhilethe SabbathMode is
active, thecontrolwi{Iremainin Sabbath
Modewhenpowerreturns
I11
!""
I
:3::
19

DISP[N ;[R[[ATILIR[$,(ONT.
[L[CTRONICCONTROLfEATUR[ ;
OFF
A
D_SpENSER
FILTER @
L{GHT
J
D,SPENSER
OPERATION
To dispense water:
>- SelecttheWATERbutton ___
>- Presscontainer againstdispenser
pad,
To dispenseice:
>- Selectthe CUBE button for __
cubedice
v
-_ Pressthe CRUSH buttonfor
crushedice.
>. Presscontainer againstdispenser
pad°
NOTE: if waterdispenser is
continuouslyactive for morethan 2
minutes,anautomatic lockout sensor
will shut down power to dispenserarea.
Forinstructionson how tounlock your
dispenser,see the sectionentitled
Dispenser Lock below.
DISPENSER LOCK
Thisfeaturepreventsice or
waterfrombeing dispensed
To lock and unlock dispenser:
•_.Tolock dispenser,press and hold the
LOCK/UNLOCKbuttonfor 3
seconds..A green indicatorlight
above buttonconfirmsdispenser is
locked.
> To unlockdispenser,hold the
LOCK/UNLOCKbuttonfor 3
seconds.Green indicatorlightabove
button wiltgo out°
u_rt
LIGHT FUNCTION
Oh
Thelight functionofferstwo
settings:OFF andAUTO.
The OFF settingwill turnoffthe
dispensercavitylight
TheAUTO setting allowsthe SENSOR
to measurethe surroundinglight levels
and adjustthe powerof the cavity light
accordingly.Whenthe sensor registers
lowerlight levels (nighttime,darkened
kitchen),the cavity light will respondat
50'/opower.When the sensor registers
high lightlevels (lightedkitchen, direct
sunlight),the cavity lightwill not activate.
NOTE: Dispenserlight wilt operate at
full power wheniceor waterfunctions
are in use.
To activate auto setting:
> Pressthe ON/OFF button locatedon
controlpanel. Whenthegreen
indicatorlight abovethe button
display ison, the cavitydispenser
lightwill use theAUTOsetting.
To deactivateauto setting.
>- Pressthe ON/OFFbutton locatedon
controlpanel Greenindicator light
abovebutton will go out.
FILTER STATUS F,L .
GOOO
INDICATOR °.',,°°°
LIGHT
The filter status indicatorlight serves as
a remindertoreplacethe waterfilter A
green light indicatesthat the filter is in
good condition A red light indicatesthe
filter should be changed Once light
turns red, it wilt remain
red untilfunction is +
reset
To reset indicator:
> Press and hold beththe LOCK/
UNLOCKand the WATERbuttons
simultaneouslyfor 4 seconds The
green filter status indicatorlightwill
flash 3 times whenthe function ...
has successfullyreset "_=
V
TEMPERATURE KEYS
These keyswilllower or raisethe
freezer or fresh food compartment
temperature.
NOTE: See the section HowtoAdjust
the TemperatureControls (page12)
for instructionson howtoset food
compartmenttemperatures.

ELECTflOF!ICCOHTflOLFEATUflES,COHT.
OFF
A
t3H
A
D_SPENSER
LIGHT
MAX COOL
Thfsfunctioncausesthefresh
foodtemperatureto drop to the
minimumrefrigeratortemperaturesetting
available This settingremains in effect
for approximately10 hours_
To activateand deactivateMax Cool:
>_Toactivate,pressthe MAXCOOL
button.The green lightabovethe
button will indicateactivestatus,
>- To deactivate,pressthe MAX COOL
button.The green lightabovethe
buttonwillgo out
NOTE: Thetemperaturesettingcannot
be changedif Max Cooi or Max Freeze
settingis active..
MAX FREEZE @
This functioncauses the freezer
temperatureto drop to theminimum
freezertemperaturesettingavailable
This setting remainsineffectfor
approximately24 hou_s_
To activate anddeactivateMax
Freeze:
> Toactivate,presstheMAX FREEZE
button.Thegreen light abovethe
button wilt indicateactivestatus.
>_Todeactivate,pressthe MAX
FREEZEbutton..Thegreen light
abovethe buttonwill go out
NOTE: Thetemperaturesettingcannot
be changedif Max Cool or MaxFreeze
settingis active.
DISPLAY ON/OFF @
The DisplayOnfOffswitch
controlspower to theLED display
Toactivateand deactivatedisplay:
>- Toactivate,press theDISPLAY
ON/OFF button The displaywilllight.
> To deactivate,presstheDISPLAY
ON/OFF button.The displaywill go
out
VACATION MODE
This key,if enabled,causesless
frequent defrostcycles.Thisconserves
energy.
Toactivate and deactivate Vacation
Mode:
>_Toactivate,pressthe VACATION
MODEbutton The green lightabove
thebuttonwill indicateactivestatus.
>_To deactivate,pressthe VACATION
MODE button,oropen either
refrigeratordoor.
ALARM OFF
Thiskey is used to turn the H_
TEMP WarningIndicatorand audio
alarm,as wellas theOPEN DOOR
audioalarm off This will also deactivate
alarmspresentlyin progress.
Toturn the alarm off:
>. Pressthe ALARM OFF button
I11
Z
I""
I
Dt PEH ERFEA[URES,[oN].
SABBATH
MODE
This mode isintendedto deactivate
powerto the LEDand dispenserlights,
while allowingthe controlsto remain
operational.Novisual or audio alarms
wittbe available whileinthis mode
3'oactivateand deactivateSabbath
Mode:
> To activate,pressandhold both the
LOCK/UNLOCKandON/OFF
buttonssimultaneouslyfor 3 seconds
Atter 3 seconds,theLED and
dispensel lights w{llturnoff
Dispenser light will not activate
during dispensingwhile in this
mode.
> To deactivate,pressand hold both
LOCK!UNLOCKand ON/OFF
buttonssimultaneouslyfor 3 seconds
After 3 seconds,the LEDand
dispenser lightswillactivate
NOTE: In the event thatpowemis
interruptedwhile the SabbathModeis
active,the controlwitl remain in Sabbath
Modewhen powerreturns
AUTO DISPLAY
The auto display controlstheillumination
ofthe LED displaybased on the light
readingsreceivedfrom the SENSOR. If
the SENSORindicates _owfightrevels,
the displaywitl bedimmer than if
displayingduringweiI4itperiods
To set the power level of the display:
> Press and hold both the -_,7 i
ON/OFF button andthe
freezer v button for 3 seconds The
current active statewillshow in the
display by usingAL O for on,AL A
for auto
> Use the refrigerator-=,"_'_,button to
scrollthrough the displaystates.
> Activate the chosensettingby
pressingtheCONFIRM
SE'N'INGS button
NOTE: The lettersALwillalwaysshow
in freezer temperaturedisplaywhile in
this mode
TEMPERATURE
CONVERSION MODE
Thismode isavailableto change
thetemperaturedisplaybetween
FahrenheitandCelsiu&
oF
°C
Tochangecurrent temperature
reading:
> Pressthe DISPLAYON/OFFand _.
buttonssimultaneouslyfor 3 seconds
HIDDEN
LOCKOUT FOR
UPPER KEYPAD
The purpose ofthis modeis to prevent
tampering with theupperset of
dispensercontrols. Thisincludesthe
DisplayOnlOff, Max Freeze, MaxCool,
VacationMode,and TemperatureSet
functions
To activate and deactivateHidden
DispenserLockout:
> To activate,press the LOCK/
UNLOCK and DISPLAYOFFbuttons
simultaneouslyfor 3 seconds.
> To deactivate,pressthe LOCK/
UNLOCKand DISPLAYOFF buttons
simultaneoustyfor 3 seconds
ON/OFF FUNCTION
TheONIOFF function turnsoffcoo_ingto
the fresh foodand freezersectionswhile
allowingthe lights and electronicdisplay
tostay on The dispenserfunctionswitl
notbe availablewhile in this mode.
To deactivateandactivaterefrigerator:
> To deactivate,press the freezer -_-
button untitthe readoutregisters
beyondthe maximumallowable
freezertemperature.At this point,the
LEDwill read OFF. Press the
CONFIRMSETTINGSbuttonto
contirmthe seleclion._
> To reactivate,pressthe freezer
button Pressthe CONFIRM
SETTINGSbuttonto confirmthe
selection.
NOTE: Atter reactivation,thedisplay
willshowtemperaturesettingpreviously
in use. See the sectionHowto Adjust
the TemperatureControls(page 12)
for instructionson how to set food
compartmenttemperatures.
TOavoidelectricalshockwhich
: causesevere persOnaiinjuryo_ :,
death;DO NOT performmaintenance
orserviceon refrigeratorUnless
refrgerator Sunplugged:: :: :
ZZ
fllN AND(ARE
TOCLEANYOURREFRIGERATOR
Toavoid electdcal shockwhich can
causesevere personalinjury or
death, disconnect powerto
refrigerator beforecleaning.After
cleaning, connectpower.
Toavoid personalinjuryorpropertydamage,observethe following: :
• Read and foflowmanufacturer'sdirectionsfor all cleaningproducts.
• DO NOT place buckets,shelvesor accessoriesin dishwasher Cracking or
warpingof accessoriesmayresult.
Ill
Z
r"'
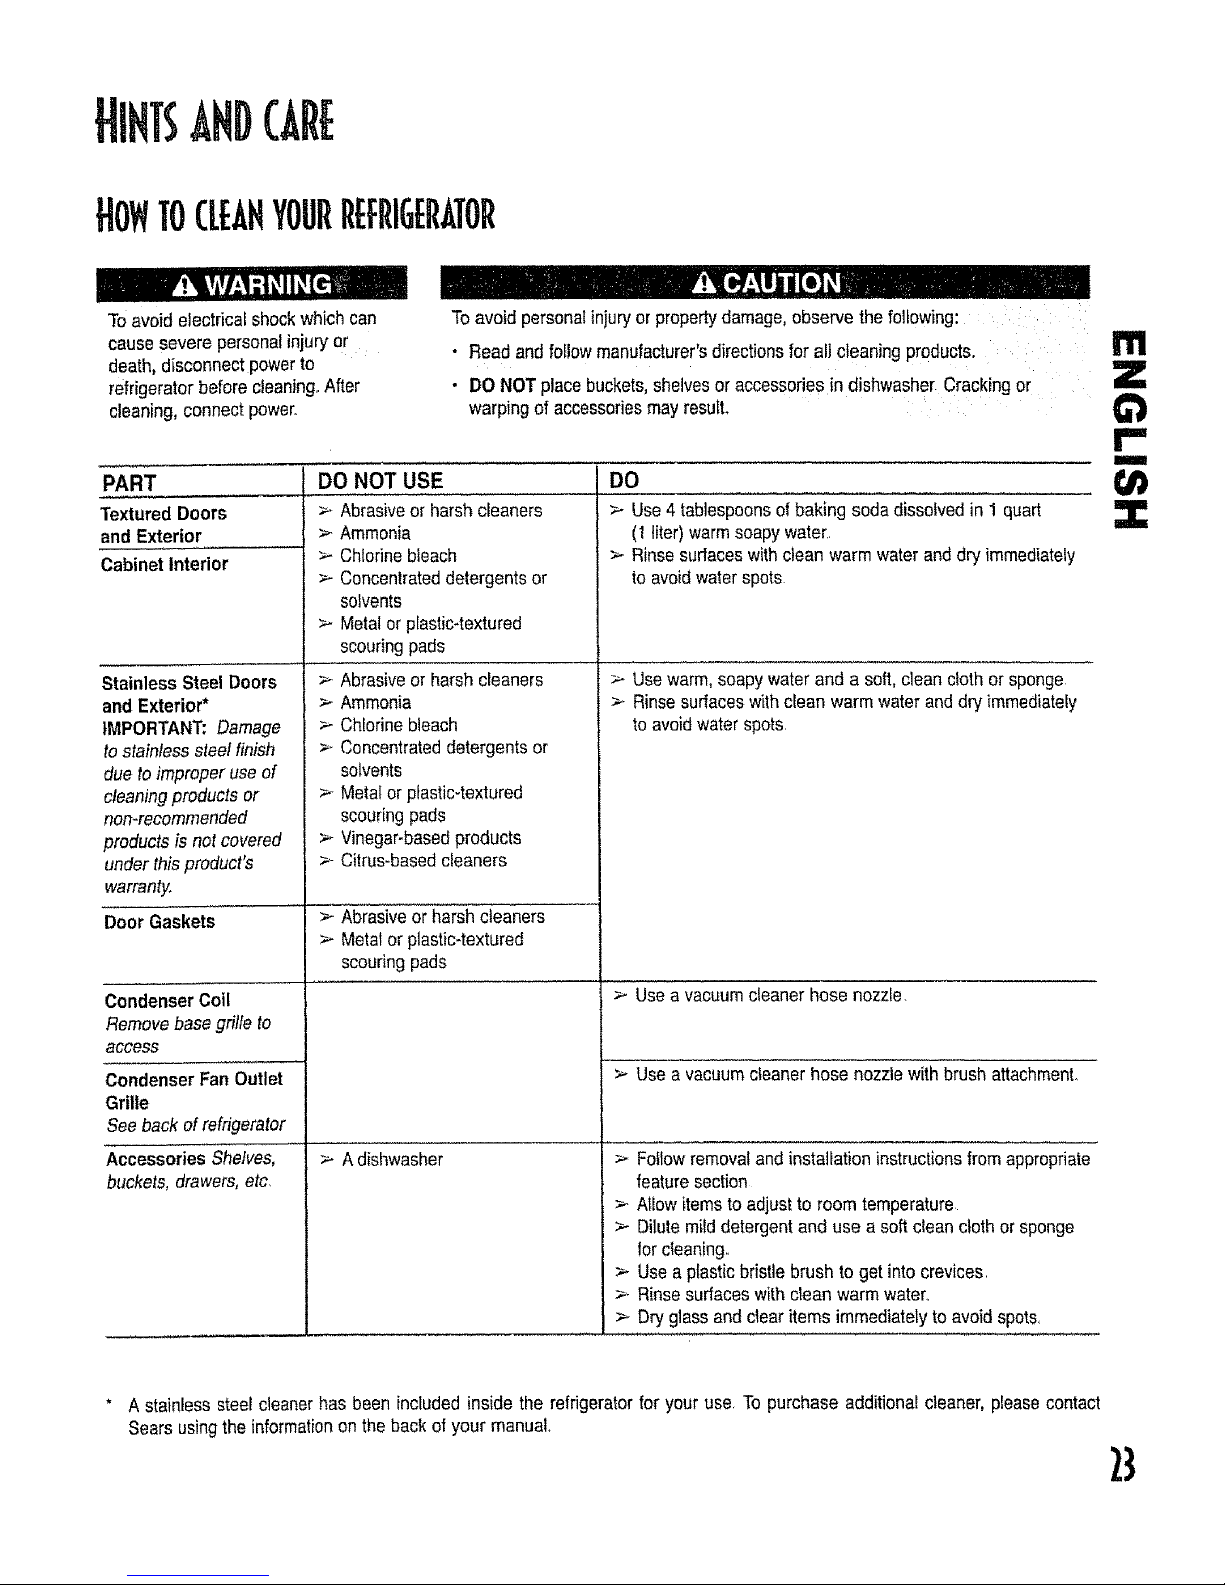
PART
Textured Doors
and Exterior
Cabinet Interior
StainlessSteel Doors
and Exterior*
IMPORTANT: Damage
to stainless steelfinish
due toimproperuse of
cleaningproducts or
non-recommended
productsis not covered
under thisproduct's
warranty.
Door Gaskets
Condenser Coil
Removebasegrille to
access
Condenser Fan Outlet
Grille
See back ofrefrigerator
Accessories Shelves,
buckets,drawers,etc
DO NOT USE
> Abrasiveor harshcleaners
> Ammonia
> Ch!orinebleach
>- Concentrateddetergentsor
solvents
>- Metalor plastic4extured
scouringpads
> Abrasiveor harshcleaners
> Ammonia
_- Chlorinebteach
>- Concentrateddetergentsor
solvents
>Metat or plastic-textured
scouringpads
>_Vinegar_basedproducts
>- Citrus-basedcleaners
> Abrasiveor harsh cleaners
> Metalor plastic-textured
scouringpads
> A dishwasher
I
DO
> Use4 tablespoonsof baking soda dissofvedin1 quart
(1 liter)warmsoapywater,.
> Rinsesudaceswithclean warm water and dry immediately
to avoidwater spots
> Usewarm,soapy waterand a soft, dean cloth or sponge
Rinse surfaceswith clean warm water and dry immediately
to avoid waterspots
> Usea vacuum cleanerhose nozzle
> Use a vacuum cleanerhose nozzlewithbrush attachment.
>. Followremovaland installationinstructionsfrom appropriate
featuresection
>- Allowitems to adjustto room temperature
> Dilutemild detergentand use a soft dean cloth or sponge
forcleaning.
Usea pfasticbristlebrush to get intocrevices
> Rinsesurfaceswith clean warm water..
> Dry glassand dear items immediatelyto avoid spots,
* Astainless steel cleanerhas been includedinside the refrigeratorfor youruse. To purchase additiona! cleaner,pleasecontact
Searsusingthe informationon theback of your manual,
2}
TOREMOVEODORS
FROMREFRIGERATOR
,
2
3,
6
7
Removeall food,
Disconnectrefrigerator,
Cleanthe followingitems-paying
specialattentiontocrevices-using
the appropriateinstructionsin How to
CleanYour Refrigerator:
• Walls,floor,andceilingof cabinet
interior.
• Drawers,shelves,and gaskets.
Wash and dry all bottles,containers,
arrdjar& Discardspoiledor expired
items
Wrapor store odor-causingfoods in
tightly-sealedcontainersto prevent
reoccurringodors
Connectpower to refrigeratorand
returnfood.
After24 hours,checkif odor has
beeneliminated,
Ifodor is still present,.,
1, Removedrawers and placeon top
shelfof refrigerator,
2, Packrefrigeratorandfreezer
sections-includingdoors-with
crumpledsheetsof black andwhite
newspaper._
3 Placecharcoalbriquettesrandomly
on crumplednewspaperinboth
freezerandrefrigerator
compartments.
4_ Closedoorsand letstand24-48 hours.
5 Repeatsteps 5 through7 above.
If odor was noteliminated,contact
SearsServiceCenter:Referto back of
manualfor phone number:.
SAVIH5IDEAS
> Avoidovercrowdingrefrigerator
shelves This reduceseffectivityof air
circulationaround food and causes
refrigeratorto run longer.
>- Avoidaddingtoo much warm food to
refrigeratorat one time.This
overloadscompartmentsandslows
rateofcooling
24
> DO NOTusealuminumfoil,waxpaper,
or papertowelingasshelfliners.This
decreasesair flowandcauses
refrigeratorto runlessefficiently. 1
>- Afreezer that is %full runsmost
efficiently
>- Locaterefrigerator in coolest partof
room.Avoidareas ofdirect sunlight,
or near heatingducts, registers,or
otherheat producingappliances.If
this is not possible,isolate exteriorby
usinga section of cabinet or an
addedlayerof insulation.
> Refer tosection in Use and Care
Guideontemperaturecontrolsfor
recommendedcontrolsettings
> Clean door gasketsevery three
monthsaccordingto useand care
guide instructions This will assure
that door seals properlyand
refrigeratorrunsefficiently
>- Taketime to organizeitemsin
refrigeratorto reducetime that door
is open.
>- Be sure yourdoors are closing
securelybyleveling refrigeratoras
instructedinyour use andcare guide.. 4
>- Cleancondensercoils off as
indicatedinthe Useand Care Guide
every 3 months.This will increase
energyefficiencyand cooling
performance.
TOP,EMOVEAHD
REPLACELIGHTBULBS
Toavoid electricalShoCkwhich Can
:Cau:seseverepersonalinjuryor death,
disconnectpowerto refrigerator
beforereplacinglight bulboAfter
replacinglightbulb;connectpower,
iToavoid personalinjUryor property
damage;observethe following:
Wea;gio es:whenrepiaC,,g
bu]& : :
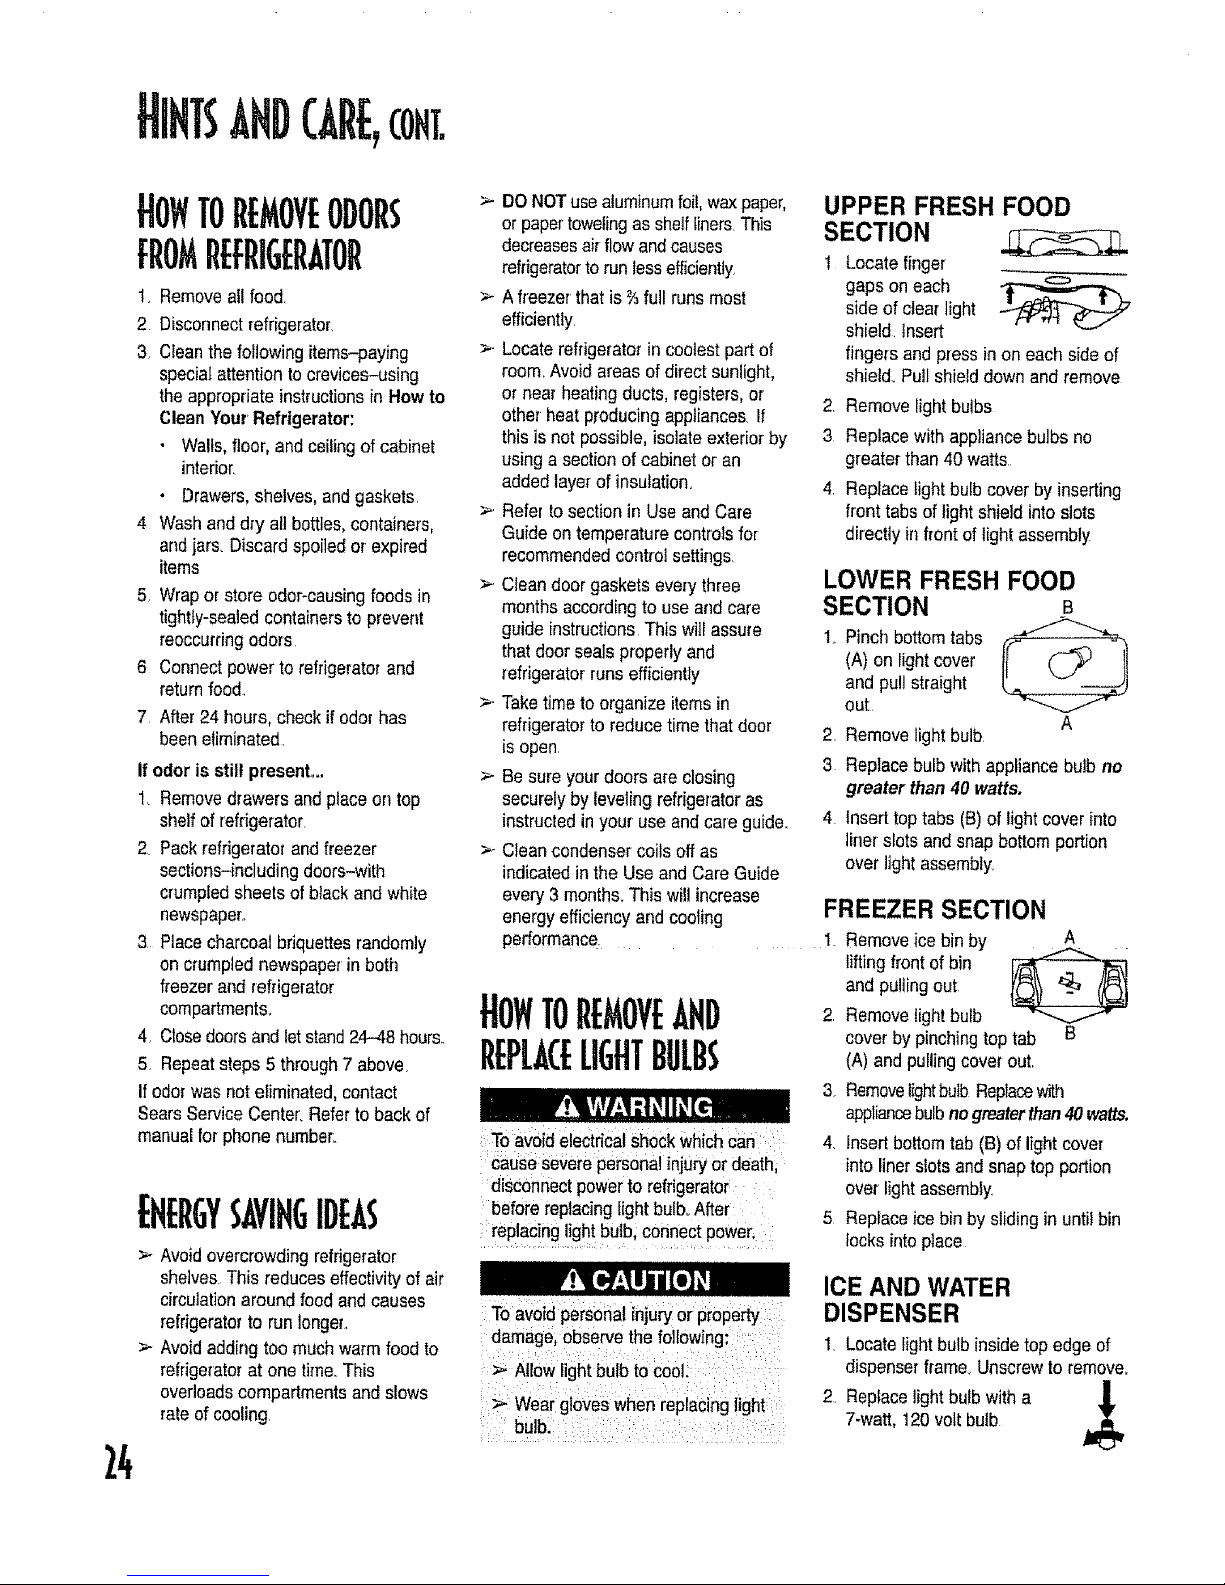
UPPER FRESH FOOD
SECTION
Locate finger
gaps on each
side of clear light
shield Insert
fingers and pressin on eachside of
shiel& Pull shielddown and remove
2, Remove lightbulbs
3 Replace with appliancebulbs no
greaterthan 40 watts,
4 Replace lightbulb cover by inserting
front tabs of light shieldinto slots
directly in #ent of light assembly
LOWER FRESH FOOD
SECTION B
I. Pinch bottomtabs
(A) on light cover
and pullstraight
out
A
2. Removelight bulb
3 Replace bulbwith appliancebulbno
greater than 40 watts.
Inserttop tabs (B)of light cover into
liner slots and snapbottom portion
over light assembly.
FREEZER SECTION
1_Removeice bin by
A
lifting front of bin _'_'1
and pulling out
2 Remove lightbulb
cover by pinchingtop tab B
(A) and pullingcover out.
3. RemovelightbulbReplacewith
appliancebulbnogreaterthan40 watts.
4. Insertbottomtab (B) of light cover
into liner slotsand snap top portion
over light assembly
5 Replaceice bin by sliding in untilbin
locks into place
ICE AND WATER
DISPENSER
1, Locate lightbulb inside top edge of
dispenserframe,Unscrewtoremove,
2 Replacelight bulb witha 1
7-watt, 120 volt bulb
HORMA[OP[RAHHG$08HB
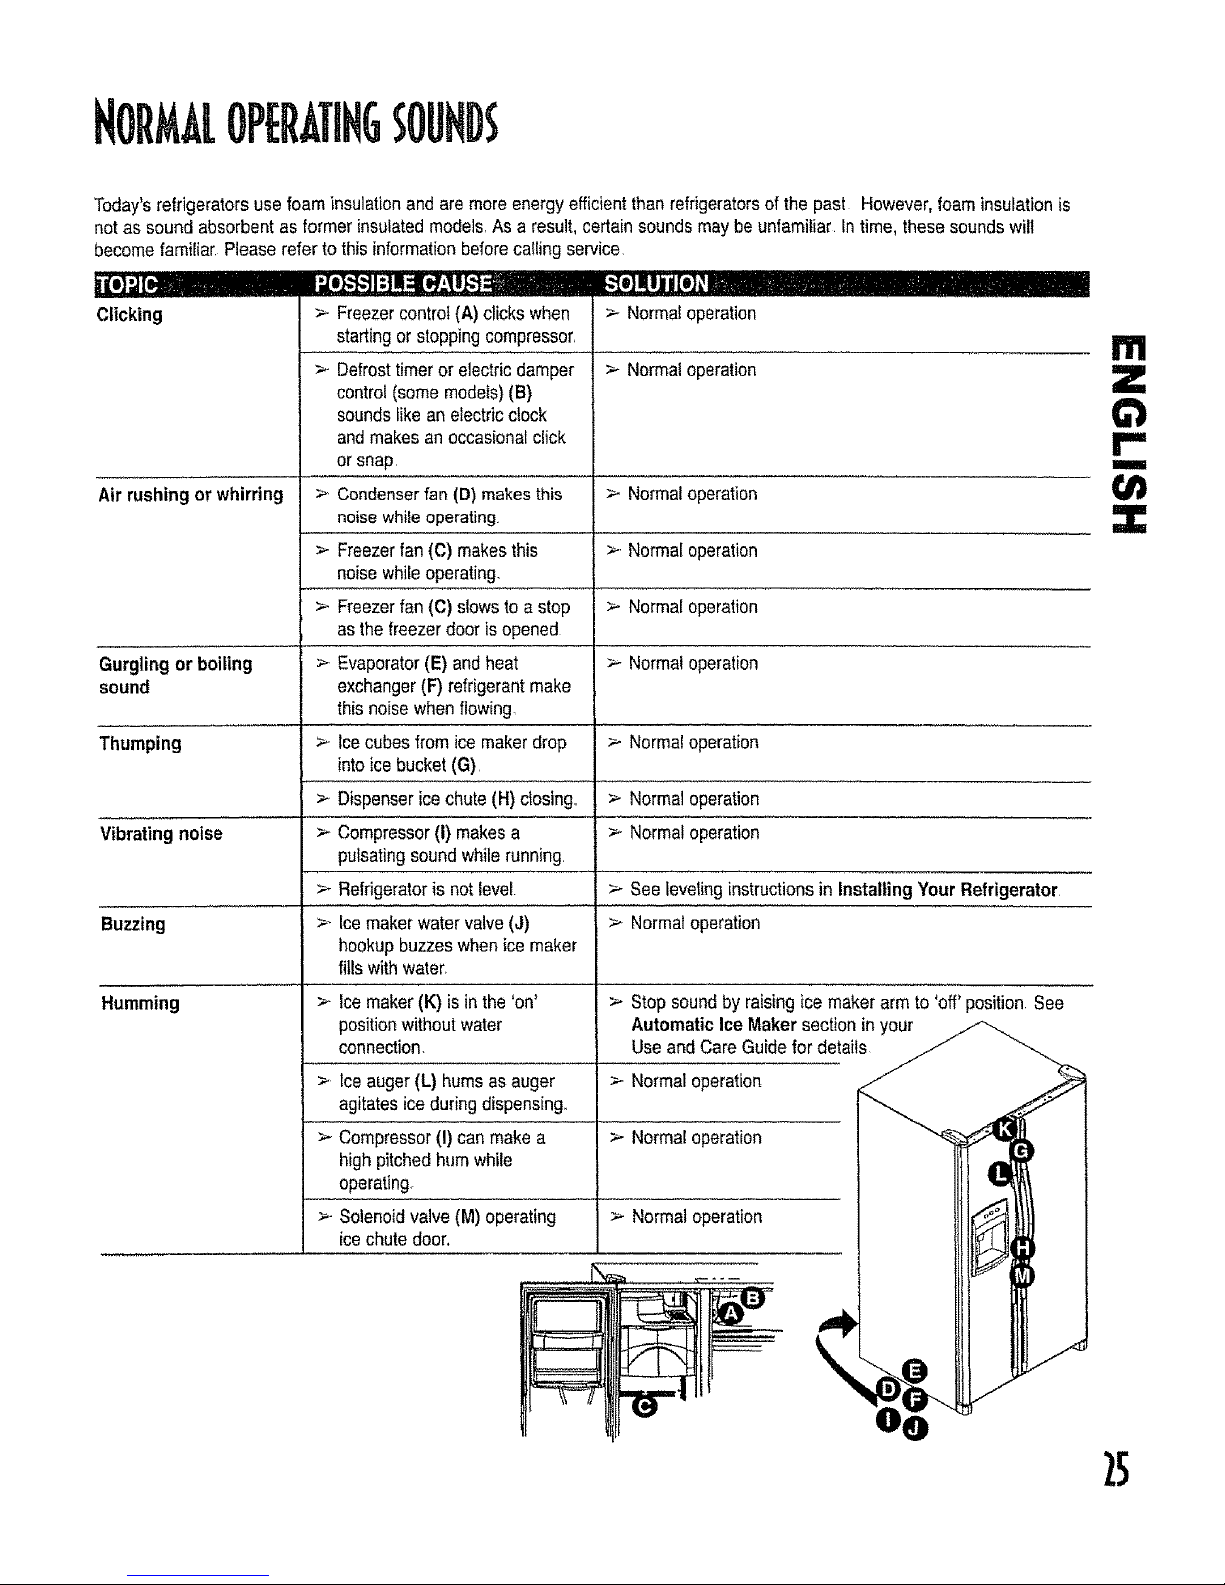
Today'srefrigeratorsusefoam insulationand are moreenergy efficientthanrefrigeratorsof the past However,foaminsulationis
notas sound absorbentasformerinsulatedmodels,As a result, certainsoundsmaybe unfamiliar In time, thesesoundswill
becomefamiliar,Pleasereferto this informationbeforecatling service,
Clicking
>- Freezercontrol(A) clicks when
startingor stoppingcompressor,
>. Defrosttimeror electricdamper
control(somemodels)(B)
soundstikeanelectricclock
and makesan occasionalclick
or snap
> Condenser fan (D) makes this
noise while operating
> Freezerfan(C) makesthis
noisewhileoperating.
>. Freezerfan (C) slowsto a stop
asthe freezerdoor is opened
> Evaporator(E) andheat
exchanger(F) refrigerantmake
this noisewhen flowing
>. Icecubesfrom ice makerdrop
into ice bucket(G)
Dispensericechute(H) dosing.
> Compressor(i) makesa
pulsatingsoundwhilerunning,
Refrigeratoris not level
> Ice makerwater valve(J)
hookupbuzzeswhenice maker
fills with water.
> Normaloperation
> Normaloperation
Air rushing or whirring > Normaloperation
> Normaloperation
> Normaloperation
Gurgling or boiling > Normal operation
sound
Thumping > Norma!operation
> Normaloperation
Vibrating noise > Normaloperation
See levelinginstructionsin Installing Your Refrigerator
Buzzing > Normaloperation
Humming
>- Ice maker(K) isin the 'on'
positionwithout water
connection.
> Ice auger(L) hums as auger
agitatesiceduring dispensing,,
Compressor(I) can makea
high pitchedhumwhile
operating,
>- Solenoidvalve (M)operating
ice chutedoor.
> Stop soundby raisingice maker arm to 'off' position See
Automatic Ice Makersection inyour
UseandCare Guidefor details
> Normaloperation
> Normaloperation
> Normaloperation
I11
Z
r"
m
:3:
5

TROUBLESHOOTING
OPEflATIOH
PROBLEM
Freezercontrol and lights
are on, but compressors
are not operating
Environment-controlled
drawers aretoo warm
Refrigerator'doesnot
operate
Refrigerator still won't
operate
Electronic controls (some
models)read EO_ES, or
ERRORin display.
Temperatureof food is
too cold
Foodtemperature
appears too warm
Refrigeratorhas an odor
Water droplets form on
outside of refrigerator
..... ,,,,,, ,,
Water dropletsform on
inside of refrigerator
Refrigerator or ice maker
makeunfamiliar sounds
or seems too loud
POSSIBLECAUSE
Refrigeratorisindefrost mode
Controi se_ings are too tow. '......
Freezer controls are set too low
Draweris improperly positioned
Refrigeratorisnot piuggedin.
Dial control in freezer is set to off (some
.,models)
Electronictemperaturecontrols(some
models),havebeen turnedoff.
Fuseis blown, or circuitbreaker needsto be
reset.
Power outaqehi'Is 0 CO" _ 4 Ii ill ii ZI i
Unit is malfunctioning
SOLUTION
Normal operationWait 40 minutes to see if unitrestarts
So,_ drawer sectioninRefrigeratorFeaturesto adiu,stContro!sl
See temperaturecontrotssection in Installing Your
Refrigeratorto adjust your'controls,
See drawersectionin RefrigeratorFeaturestoproperlyinstall
drawers,
........._ ,,, ,,,,,, ,,,
Plug in unit.
'_ temperaturecontrols section in Installing Your
Refrigeratorto adjust your controls.
See hiddenelectronic control section under Dispenser
Features.
Replaceany blownfuses Check circuit breaker and resetit
necessary.
.........Call loca.!.,powercompany listing to report ou.!age.
Unplugrefrigeratorand transfer foodto anotherunit If
another unitis not available,placedry ice in freezersection to
preservefood Warrantydoes not cover food loss Contact
serviceIor assistance.
, ,,,,_,,,
Contact servicerfar assistance
Clean accordingto cleaninginstructionsin Hints and Care.
See temperaturecontrolsectionin Installing Your
Refrigerator:to adiustyourcontrols.
See leveling instruction.s.inlnsta!ling Your Refrigerator.
Checkfor internalobstructionsthat are keeping door from
closingproperlyfie. improperlyclosed drawers,ice buckets,
oversizedor irnpropedY..storedcon!a.inersor foodstuffs,etc.). _
Clean accordingto cleaninginstructions in Hintsand Care,
See temperaturecontrolssection in installing Your"
RefrigeratortOadjustyour controls.
........Clean accordingto cleaninginstructions in Hints and Care.
Check the positloningoffood items in refrigeratorto make
suregrille is notblocked. Rear air grille is locatedbehind
crisper drawers:....
Reducetimedoor is open Organize food items efficiently to
assure dooris ape.nfor asshorta time as possible.
Atlowinteriorenvironmentto adjust for periodthedoor has
been open,
AIrowtime for recently-addedfood toreach refrigeratoror
freezer temperature.
Referto odor removalsectionin Hints and Care.
Check for internalobstructionsthatare keepingdoor from
closing properly(ieoimproperlyclosed drawers, ice buckets,
oversizedorimproperlystoredcontainer.s.orfoodstuffs,etc.).
See levelinginstructionsinInstalling YourRefrigerator:
Cleanaccordingto cleaninginstructionsin Hints and Care,
Normalduring timesof high humidity.
See temperaturecontrolssection in Installing Your
Refrigeratorto.adjustyourcontrols.
Reducetimedoor isopen Organizefood itemseffficientlyto
assure doorisopenfor as shorta time as possible, ....
Cteanaccording toclean,!,nginstruc!!o,n.s,in Hints and Care_
Referto noisesectionof Troubleshooting for details.
Controls havedetectedfunctional problems
andwill aftempttoregulate temperature until
serviceis obtained,
Condensercoilsaredirty.
ReIiigeratoror freezercor_troisare eel too
high,
Dooris not closingproperly
Doorgaskets are not sealing properly. ....
Controlsneedto be adiusted.
. CondenserCOilsare dirty.
Rearoil grilleis blocked.
Doorhas beenopenedfrequently,or has
been openedfor long periods of time
Food has recentlybeenadded,
,,,,, ,,,...................., _ ,
Compartmentisdirty or hasodor-causingfood
Dooris not closingproperly
Doorgaskets are not sealing properly.
Humiditylevelsare high.
Controlsrequireadjustment
Humiditylevelsare highor door has been
openedfrequently,
Doorgaskets arenot sealing prope.rl.y...........
Normaloperation
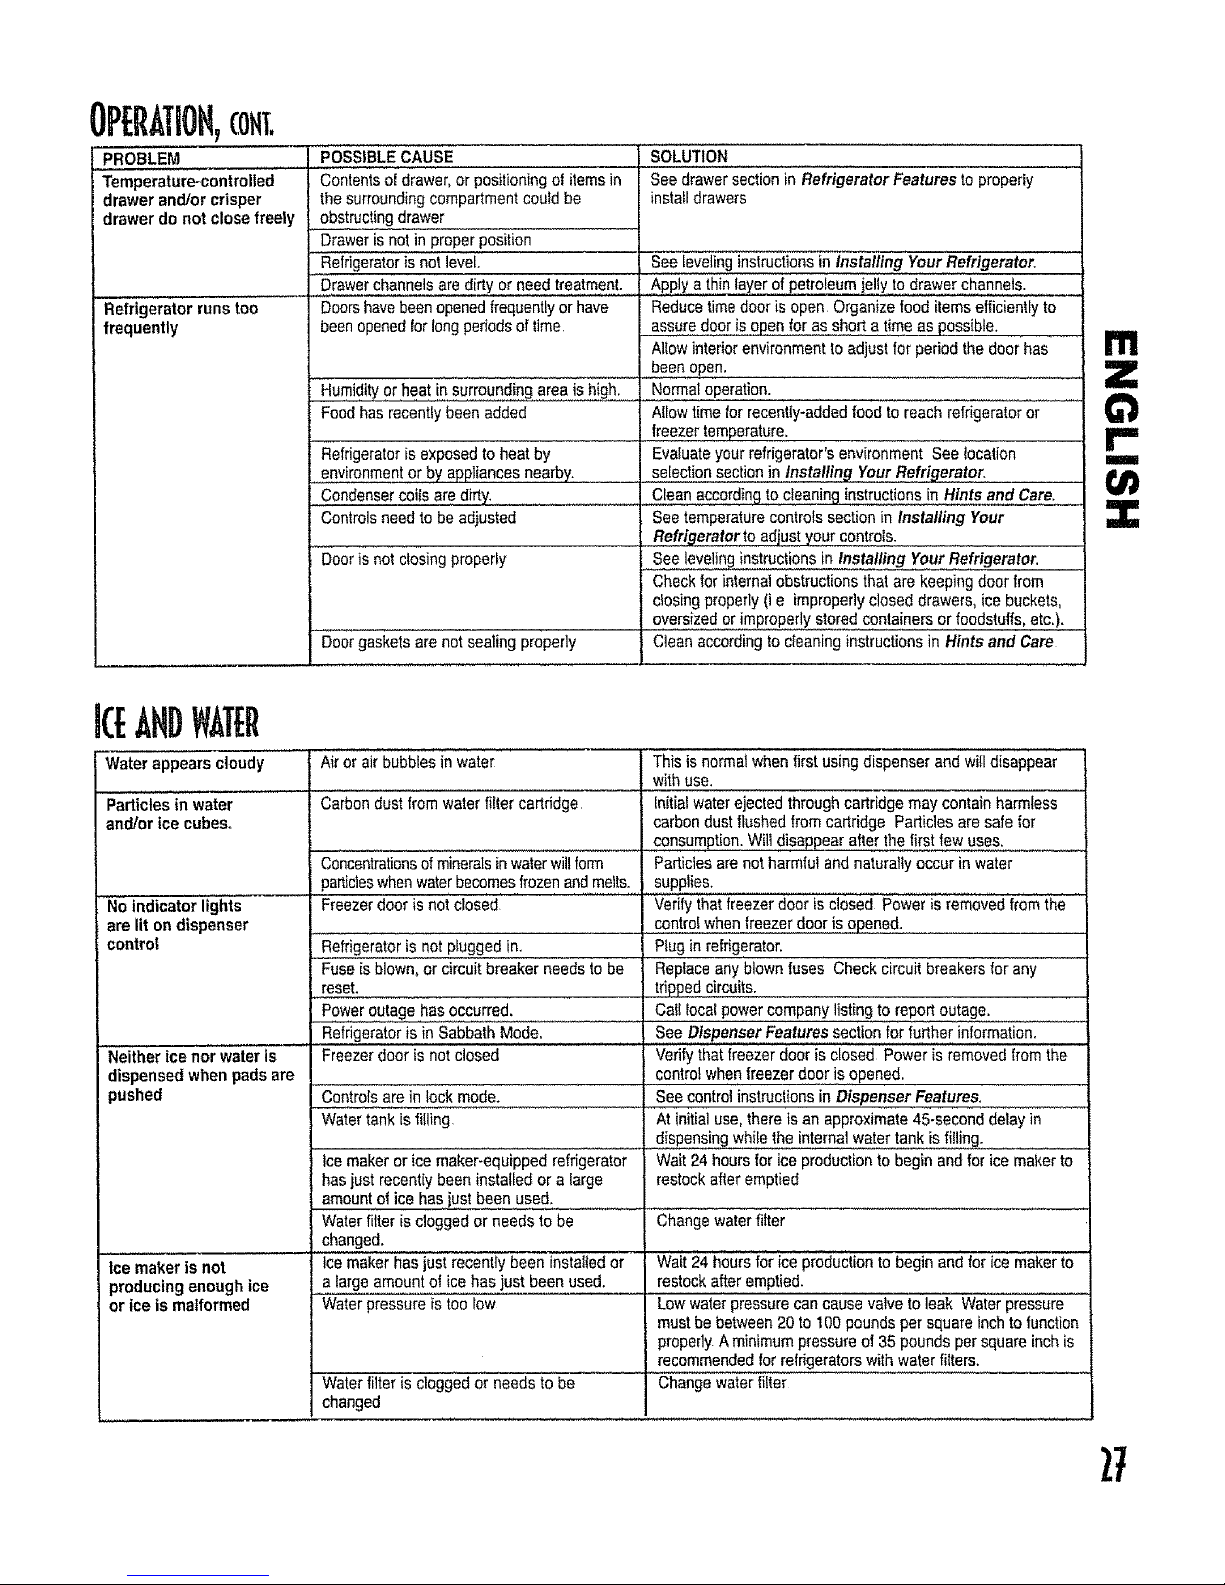
OPERATION,coNl.
PROBLEM
Temperature-controlled
drawer and/or crisper
drawer do not close freely
I
Refrigerator runs too
frequently
POSSIBLECAUSE
Contentsof drawer,or positioningst itemsin
thesurroundingcompartmentcould be
obstructingdrawer
Drawerisnot in proper position
Refrigeratoris not level.
Drawerchannelsare dirty or need treatment.
Doorshavebeenopened frequentlyor have
beenopenedIor longperiodsoftime,
Humidityor heat insurrounding aiea ish!gh_
Foodhas recentlybeen added
Refrigeratoris exposed to heat by
environmentor by appffancesnearby.
Condensercoltsare dirty.
Controlsneed to be adjusted
Dooris not closingproperly
SOLUTION
See drawer sectionin RefrigeratorFeatures to properly
installdrawers
Doorgaskeis arenot sealing properly
See levelinginstructions ininstalling Your Refrigerator.
Apply athinlayerof petroleumjellyto drawer channels.
Reducetime dooris open Organizefood itemsefficiently to
assuredooris openfor as sho_ta timeaspossible.
I AHowinterior environmentto adjust for periodthe door has
beenopen.
Normaloperation.
AIIowtime for recently-addedfood to reach refrigeratoror
freezertemperature,
Evaluateyourrefrigerator'senvironment See tocation
select!onsec!!on!n #tsta!!!ngYourRefriqerator,
Cleanaccordingto cleaninginstructionsinHints and Care.
See temperaturecontrofssectionin instalfing Your
• Refri_eratorto adjust your controls.
see leveling instructionsin Installing YourRefrigerator.
Checkforinternalobstructionsthatare keeping doorfrom
closingproperly (i e improperlyclosed drawers,ice buckets,
oversized or improperlystored containersor foodstuffs,etc.).
Cleanaccordingto cleaninginstructionsin Hints and Care
m
Z
r"
mira
:3::
IcEANDWATEr
Water appears cloudy
Particiesin water
and/or ice cubes°
No indicator lights
are lit on dispenser
control
Neither ice nor wateris "
dispensedwhen pads are
pushed
Airorair bubblesin water
Carbondustfromwater filtercartridge
Concentrationsof mineralsinwaterwillform
particleswhenwaterbecomesfrozenandmelts.
Freezerdoor is not closed
Refrigeratorisnot pluggedin.
Fuseisblown, orcircuit breaker needs to be
reset.
POwerOutagehas occurred.
Refrigeratoris inSabbath Mode.
This isnormal whenfirstusing dispenser and wi!ldisappear
with use.
Initialwaterejected through cartridgemaycontain harmless
carbondust flushed fromcartridge Particles aresafe for
consumption.Willdisappearafterthefirst fewuses.
Particlesarenot harmful and naturallyoccur in water
supplies. .....
Verifythat freezerdoor is closed Powerisremovedfromthe
controlwhen |raezerdooris opened.
Ptugin refrigerator.
Replaceany blownfuses Check circuitbreakers for any
trippedcircuits.
Call local powercompanylistingto reportoutage.
See Dispenser Features section for further information.
Freezerdoor is notclosed _ Verifythat fieezei dooi is ciosed PoweriSiem0ved fromthe
controlwhenfreezerdoor is opened,
Controlsarein lock mode. See controlinstruclions in Dispenser Features,
Watertankisfilling, At initial use,thereis an approximate45-second delayin
dispensingwhifethe internalwater tank istiffing.
Icemaker or ice maker-equippedrefrigerator Wait 24 hoursfor ice productionto beginand for icemakerto
hasjustrecentlybeen installedora targe restockafter emptied
amountof ice hasjust been used.
Waterfilter is cloggedor needsto be
changed.
Icemaker hasjustrecently been installed or
alarge amountofice has justbeen used.
Waterpressureistoo low
Change water filter
, ,, ,, , ,,, ,_ , , ,, , , ,,, ,
Ice maker is not Wait24 hoursfor iceproductionto beginand for ice maker to
producing enough ice restockafter emptied.
or ice is malformed Lowwaterpressurecancause valve to leak Waterpressure
mustbebetween 20 to 100poundspersquareinchto function
properly A minimumpressureof 35 pounds persquare inchis
recommendedforrefrigeratorswith water filters.
Waterfilter is clogged or needs to be Changewater _ter
changed
27
 Loading...