

®
Side-by-Side Refrigerator
Use & Care Guide
ORDER # 67003291
Refrigerador D_plex
Guia para el Usoy Cuidado
R_frigerateur _ Compartiments Juxtaposes
Guide D'utilisationet D'entretien
Models:
596.53462300,
596.52672200,
596.50002100,
596.50012100,
596.53463300,
596.52673200,
596.50003100,
596.50013100,
596.53464300,
596.52674200,
596.50004100,
596.50014100,
596.53469300,
596.52679200,
596.50009100,
596.50019100
II'1
I
I
PartNo.12591318 Sears, Roebuck and Co., HoffmanEstates, IL 60179 U.S.A. www.sears.com
FormA/3/03 Sears Canada, Inc.,Toronto,Ontario, Canada M5B 2B8 Au Canada, www.sears.ca
Zi
O
r"'
IMPORTANTSAFETYIHFORMATIOH
YOUHEEDTOKHOW
ABOUTSAFETY
IHSTflUCTIOHS
Warningand ImportantSafety
Instructionsappearing in this manual are
not meantto cover all possible
conditions and situations that may occur.
Common sense, caution, and care must
be exercisedwhen installing,
maintaining,or operating refrigerator.
Always contact your dealer, distributor,
service agent, or manufacturerabout
problems or conditions you donot
understand.
RECOGNIZE SAFETY
SYMBOLS, WORDS,
LABELS
DONOT attemptserviceif
understoodor f they arebeyondpersona
skilllevel.
the cord.
Repace worn power cords and/or oose 13ugs.
manufacturer'sstorageandideal
'" "nentinstructionsfor items beingstoredin
SAVETHESEIHSTRUCTIOHS
toInstallationInstructions.All
2
PROTECTION
INTHE U.S.A.
Congratulationson makinga smart
purchase.Your new Kenmore®
applianceis designed and manufactured
foryears of dependable operation. But
likeall products, it may require
preventivemaintenance or repair from
timeto time. That is when havinga
MasterProtection Agreement can save
youmoney and aggravation.
Purchasea Master Protection
Agreementnow and protect yourself
fromunexpected hassle and expense.
TheMaster Protection Agreementalso
helpsextend the life of your new
appliance. Here is what is included in
theagreement:
> Expert service by our 12,000
professional repair specialists.
> Unlimited service and no charge for
parts and labor on all covered
repairs.
I
> "No-lemon" guarantee - replacement
of your covered product if more than
three product failures occur within
twelve months.
> Product replacement if your covered
product cannot be fixed.
> Annual Preventive Maintenance
Check at your request- no extra
charge.
> Fast help by phone- non-technical
and instructional assistanceon
products repaired in your home, plus
convenient repair scheduling.
> Power surge protection against
electrical damage due to power
fluctuations.
> Rental reimbursement if repair of
your covered product takes longer
than promised.
Once you purchase the Agreement, a
simple phone call is all that it takes for
you to schedule service. Youcan call
anytime day or night, or schedule a
service appointment online.
Sears has over 12,000 professional
repair specialists, who have access to
over 4.5 millionquality parts and
accessories. That is the kind of
professionalism you can count on to
help prolong the life of your new
purchase for years to come. Purchase
your Master Protection Agreement
today!
Some limitations and exclusions apply.
Forprices and additional information,
call 1-800-827-6655.
Sears Installation Service
ForSears guaranteed professional
installationof home appliances and
itemslike garage door openers and
water heaters, in the U.S.A. call
1-800-MY-HOME®.
TEFtAF!CEAGflEEMEHTS
IN CANADA
Your purchase has added value because
you can dependon Sears HomeCentral®
for service. With over 2,400 Service m
Techniciansand access to over 900,000
parts and accessories,we have the
tools, parts, knowledge and skillsto _=11]!
ensure our pledge: We ServiceWhat
We Sell. ,_
Your Kenmore®appliance is designed,
manufactured and tested to provide
years of dependable operation. Yet any
major appliance may require service
from time to time. The Sears
MaintenanceAgreement offers you an
outstanding service program, affordably
priced.
Sears Maintenance Agreement
> Isyour way to buy tomorrow's service
at today's price.
> Eliminates repair bills resulting from
normal wear and tear.
> Providesfor non-technicaland
instructional assistance.
> Even if you don't need repairs,
provides an annual Preventive
Maintenance Check, at your request,
to ensure that your applianceis in
proper running condition.
Some limitations apply. For information
concerning SearsCanada Maintenance
Agreements, call 1-800-361-6665.

WARRAHTY
PRODUCTRECORD
Full One YearWarranty on
Refrigerator
For one year from thedate of purchase,
whenthis refrigerator is operatedand
maintained accordingto instructions
attachedto or furnished with it, Sears
will repair it, free of charge, if defective
in materialor workmanship.
Full Five YearWarranty on Sealed
RefrigerationSystem
Forfive years from the date of purchase,
when this refrigerator is operatedand
maintainedaccording to instructions
attached to or furnished with it, Sears
will repairthe sealed system (consisting
of refrigerant,connectingtubing and
compressor motor) free of charge, if
defective in material or workmanship.
The above warranty coverage applies
only to refrigerators which are used for
storage of food for private household
purposes. It excludesoriginaland
replacement Kenmore ice & water filter
cartridges. Originalandreplacement
cartridges are warranted for 30days,
parts only, against defects in material or
workmanship.
Inthe space below recordthe model
and serial numbers and purchase date
of your refrigerator.Youwill find the
modeland serial number sticker inside
the refrigerator sectionon the left wall.
Model Number: 596.
Serial Number:
Purchase Date:
Keep this booklet and your Sears
sales receipt in a safe place for future
reference.
Warrantyservice is availableby
contacting 1-800-4-MY-HOME*
(1-800-469-4663).
This warranty appliesonly while this
product is in use in the UnitedStates.
This warranty gives you specificlegal
rights, and you may also have other
rights,which vary from state to state.
Sears, Roebuck and Co., Dept. 817WA,
Hoffman Estates, IL60179
NOTE: Some Reverse Osmosis home
water systems cause low water
pressure.Low water pressure can affect
the water and ice dispensing system by
causing small or hollow ice cubes and
slow water flow from the dispenser.
Service problems relatedto the home's
ReverseOsmosis water system are not
covered bythe warranty.
4

(OHTEHTS
Important Safety Information......................................................................................2
WhatYou Needto KnowAboutSafety Instructions...................................................2
ProtectionAgreements ................................................................................................3
MasterProtectionAgreements- U.S.A.....................................................................3
MaintenanceAgreements - Canada.........................................................................3
Warranty ........................................................................................................................4
Product Record.............................................................................................................4
Installing Your Refrigerator ....................................................................................6-10
Measuring the Opening .............................................................................................6
TransportingYour Refrigerator...................................................................................6
Selecting the Best Location.......................................................................................6
How to Installand RemoveHandles.........................................................................7
Removingthe Doors and Hinges...............................................................................8
Replacing the Doors ..................................................................................................8
How to Installand RemovePanels............................................................................9
How to Connect the Water Supply...........................................................................10
How to LevelYourRefrigerator................................................................................11
Setting and MaintainingProper Temperatures ........................................................12
Dial TemperatureControls.......................................................................................12
ElectricTemperature Controls..................................................................................12
Fresh FoodStorage.................................................................................................12
Frozen FoodStorage...............................................................................................12
About YourWater Filter ........................................................................................13-14
Water Filter Installationand Removal......................................................................13
Water Filter Data......................................................................................................14
Fresh Food Features.............................................................................................15-16
InteriorShelves........................................................................................................15
Door Storage............................................................................................................15
Climate-ControlledDrawers.....................................................................................16
Storage Drawers......................................................................................................16
Freezer Features .........................................................................................................17
Automatic Ice Maker................................................................................................17
InteriorShelves........................................................................................................17
Storage Drawers......................................................................................................17
DoorStorage............................................................................................................17
DispenserFeatures ...............................................................................................18-22
DispenserLight........................................................................................................18
DispenserPad .........................................................................................................18
RemovableTray.......................................................................................................18
Water DispenserOperation.....................................................................................18
Five-ButtonControl Features...................................................................................19
ElectronicControl Features................................................................................20-21
HiddenElectronic Control Features.........................................................................22
Hints and Care.......................................................................................................23-24
Howto CleanYourRefrigerator...............................................................................23
Howto RemoveOdors from Refrigerator................................................................24
EnergySaving Ideas................................................................................................24
Howto Removeand Replace Light Bulbs...............................................................24
Normal Operating Sounds.........................................................................................25
Troubleshooting ....................................................................................................26-27
Operation.................................................................................................................26
Ice and Water...........................................................................................................27
Fran£ais .......................................................................................................................29
EspaSol........................................................................................................................57
Service ..........................................................................................................Back Cover
m
5
IHSTALLIHGYOURREFRIGERATOR
These instructionswere providedto aid
you in the installation ofyour
refrigerator.
IGTileOPEHIHG
When installing your refrigerator, please
referencechart below for clearance
requirements.
Subflooring or floor coverings (i.e.
carpet, tile, wood floors, rugs) may make
your opening smaller than anticipated.
Some clearance may be gained by
using the leveling procedure under
How to Level Your Refrigerator
(page 11).
Recommended
Unit Total
Volume Rear
Less than
23 cu. ft.
Greaterthan
23 cu. ft.
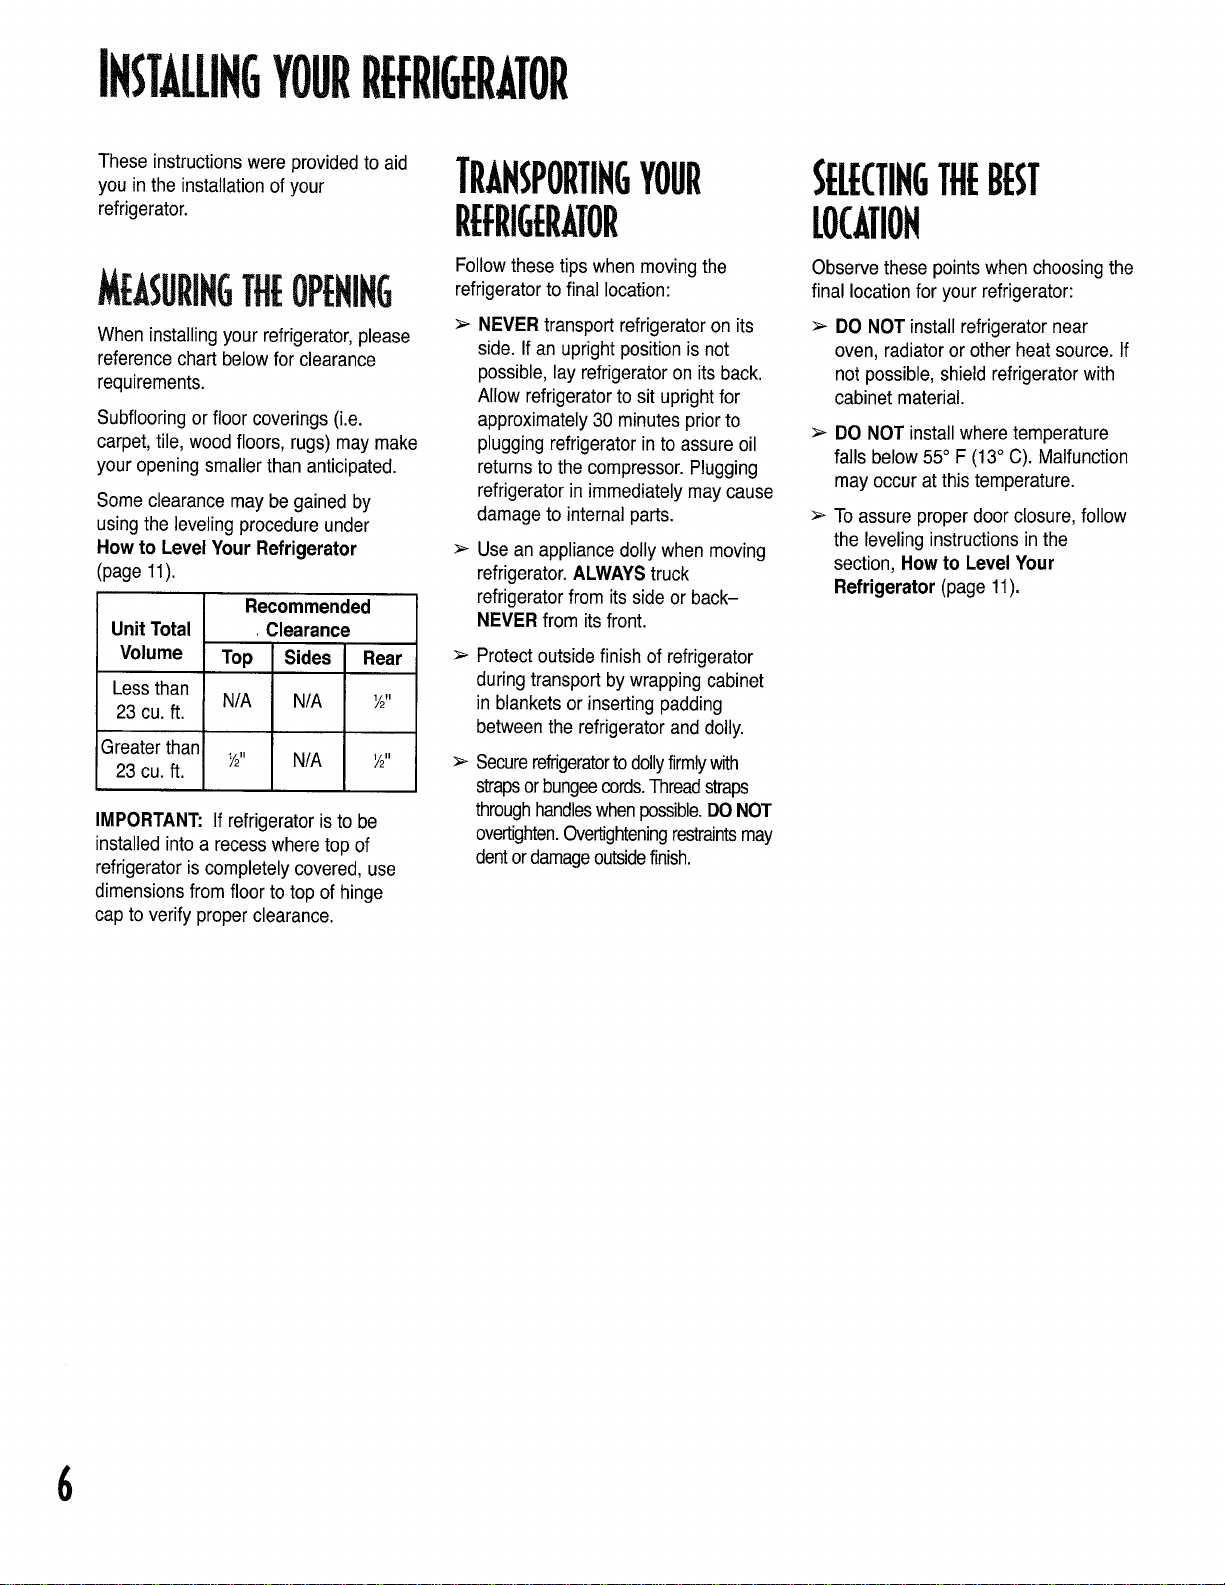
IMPORTANT: If refrigeratoris to be
installed intoa recesswhere top of
refrigeratoris completely covered, use
dimensionsfrom floor to top of hinge
cap to verify proper clearance.
.Clearance
Top Sides
N/A N/A _"
_" N/A _"
TRAHSPORTIHGYOUR
REFRIGERATOR
Followthese tips when movingthe
refrigeratorto final location:
NEVERtransport refrigerator on its
side. If an upright position is not
possible,lay refrigerator on its back.
Allow refrigerator to sit uprightfor
approximately 30 minutes prior to
plugging refrigeratorin to assure oil
returnsto the compressor. Plugging
refrigerator in immediatelymay cause
damageto internalparts.
Usean appliance dolly when moving
refrigerator.ALWAYStruck
refrigeratorfrom its sideor back-
NEVER from its front.
Protectoutside finish of refrigerator
during transport bywrapping cabinet
in blankets or inserting padding
betweenthe refrigerator and dolly.
Securerefrigeratortodollyfirmlywith
stropsor bungeecords.Threadstraps
throughhandleswhenpossible.DONOT
overtighten.Overtighteningrestraintsmay
dentordamageoutsidefinish.
Observe these points when choosingthe
final location for your refrigerator:
DO NOT install refrigerator near
oven, radiatoror other heat source. If
not possible, shield refrigerator with
cabinet material.
DO NOT install where temperature
falls below 55° F (13° C). Malfunction
may occur at this temperature.
To assure proper door closure, follow
the levelinginstructionsin the
section, How to Level Your
Refrigerator (page 11),
6
HOWTOINSTALLAND
RE, OVEHANDLES
Foreasier installation, some
refrigeratorsmay have been delivered
withthe handles off. Please see the
interiorof the fresh food sectionto
locatethe handle assembly. In case
futuretransport of the refrigerator is
necessary,the removal instructions have
beenincluded here for your
convenience.
Handledesign may vary from
refrigeratorto refrigerator. Please
referencethe instructions for the
appropriate handle design below.
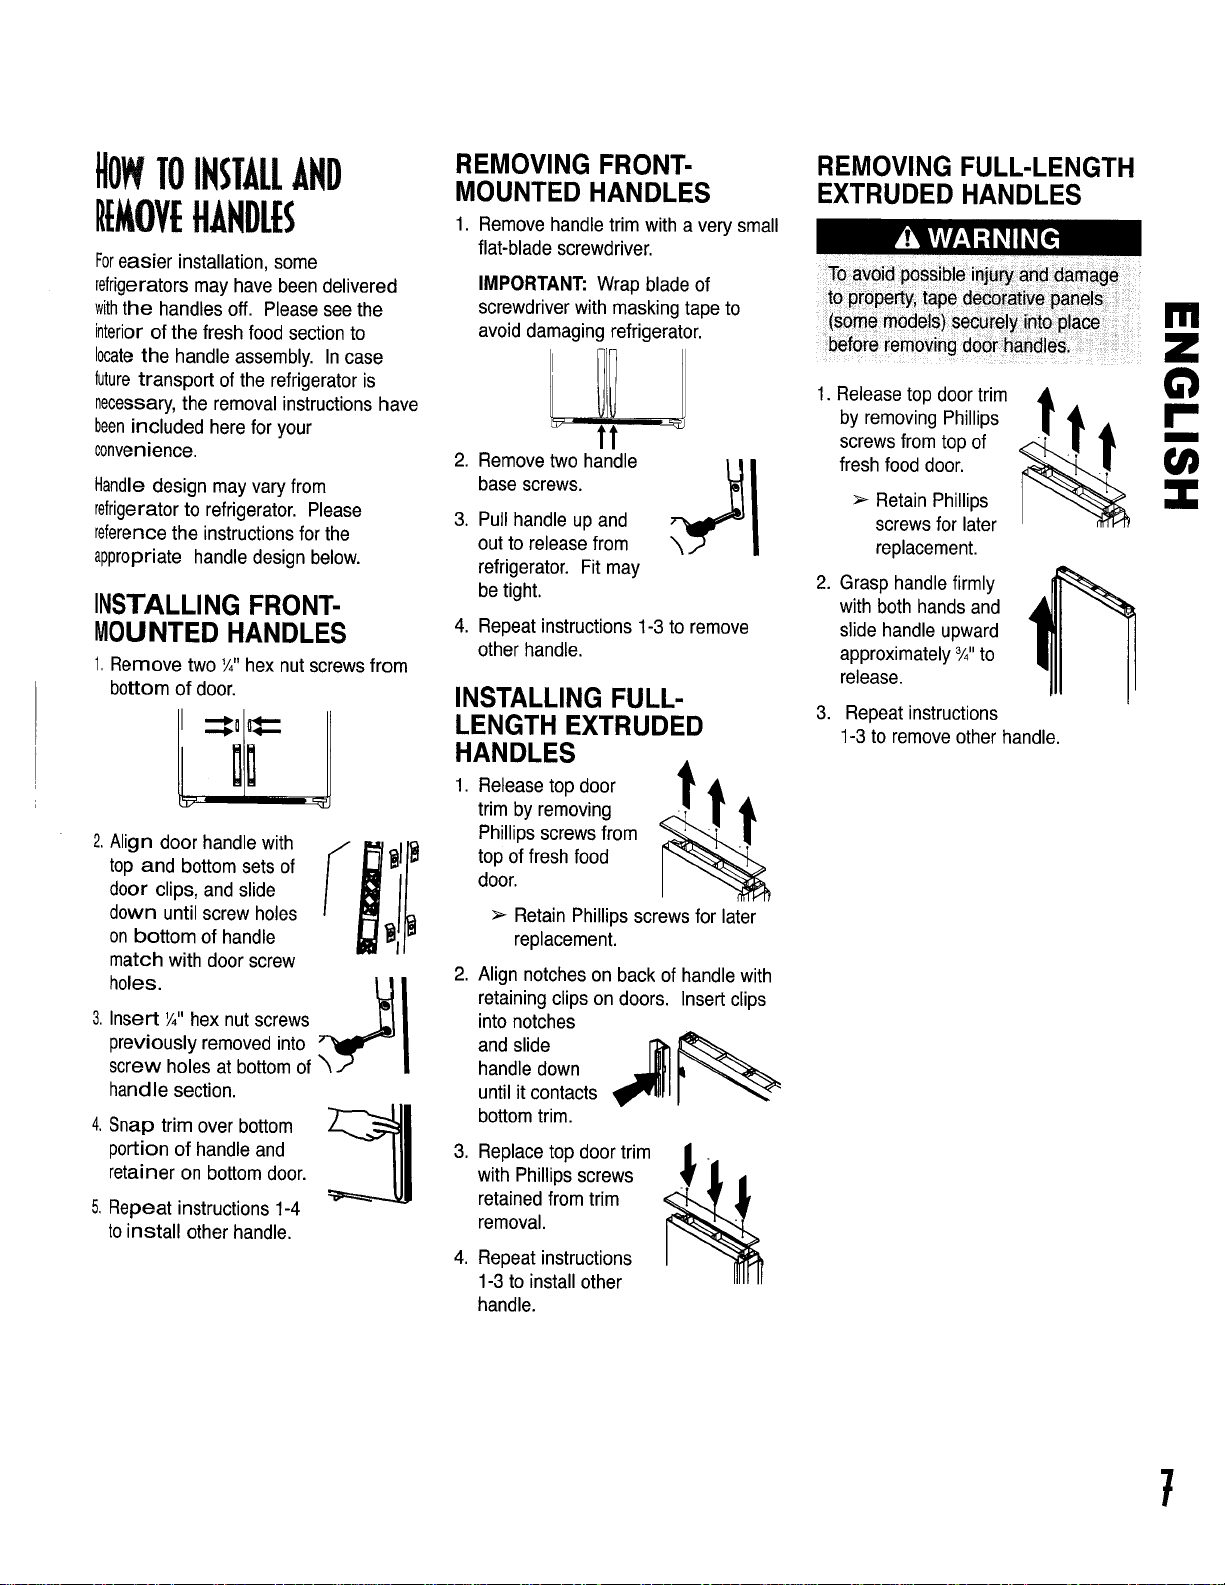
INSTALLING FRONT-
MOUNTED HANDLES
1,Remove two V,"hex nutscrewsfrom
bottom of door.
Align door handle with
top and bottom sets of
door clips, and slide
down until screw holes
on bottom of handle
match with door screw
Insert ¼" hex nut screws
holes.
previously removed into
screw holes at bottom of
handle section.
Snap trim over bottom
portion of handle and
retainer on bottom door.
,
Repeat instructions 1-4
toinstall other handle.
REMOVING FRONT-
MOUNTED HANDLES
1. Remove handle trim with a very small
flat-blade screwdriver.
IMPORTANT: Wrap blade of
screwdriver with masking tape to
avoid damaging refrigerator.
tt
.
Removetwo handle It
base screws.
.
Pull handle up and
outto release from
refrigerator. Fit may
be tight.
,
Repeat instructions 1-3 to remove
other handle.
INSTALLING FULL-
LENGTH EXTRUDED
HANDLES
1. Release
trim by removing
Phillips screws from
top of fresh food
door.
,
Align notches on back of handle with
retaining clips on doors. Insert clips
into notches
handle down
and slide _
until it contacts
bottomtrim.
,
Replace top door trim
with Phillipsscrews
retainedfrom trim
removal.
,
Repeat instructions
1-3 to install other
handle.
top door 1Ik
> Retain Phillipsscrews for later
replacement.
,A
q
t
REMOVING FULL-LENGTH
EXTRUDED HANDLES
b ai old possible inju_ _d d_m_ge
to _o_y, t_pe de_iat _#paSels
(so_e moael_)_e_Ore_ __c_
1. Release top door trim • _w
by removing Phillips [
screws from top of _"
fresh food door.
Retain Phillips
screws for later
replacement.
2. Grasp handlefirmly
with both hands and
slide handle upward
approximately _/4"to
release.
3. Repeat instructions
1-3 to remove other handle.
7
IHSTALLIHG
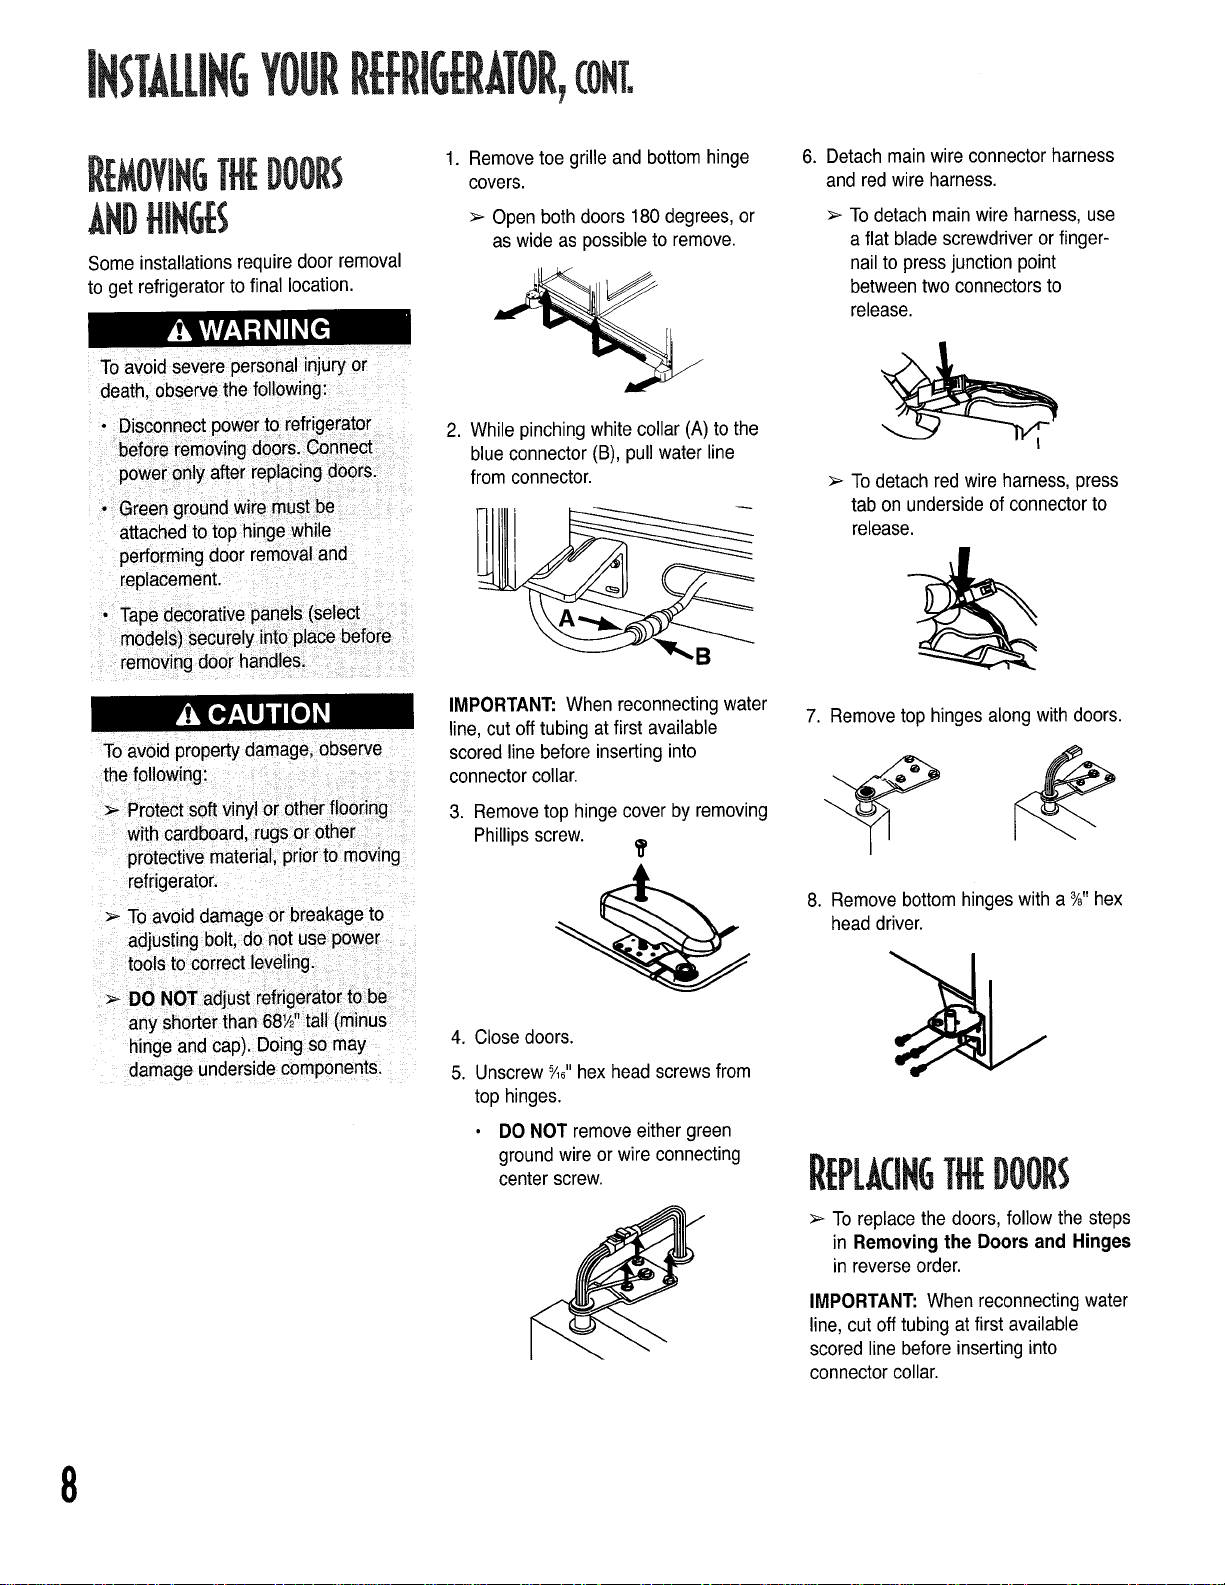
riNGTHEDOOflS
ANDHINGES
Some installationsrequiredoer removal
to get refrigeratorto final location.
Toavoid Severe pers0nai i or
' Discon
i
attached
Toavoid propertydamage, observe
1. Remove toe grille and bottom hinge
covers.
> Openboth doors 180 degrees, or
as wide as possibleto remove.
2. While pinching white collar (A) to the
blue connector (B),pull water line
from connector.
B
IMPORTANT:When reconnecting water
line, cut off tubing atfirst available
scored line before inserting into
connectorcollar.
6. Detach mainwire connector harness
and red wire harness.
> To detach mainwire harness, use
a flat blade screwdriveror finger-
nail to press junction point
betweentwo connectorsto
release.
> To detach red wire harness, press
tab on undersideof connector to
release.
7. Remove top hingesalongwith doors.
protective material,priorto moving
refrigerator.
> To avoiddamage or breakageto
adjusting bolt, do not use power
tools to correct leveling.
> DO NOT adjust refrigeratorto be
any shorter than 68Y2tall (minus
hingeand cap). Doing so may
damage underside components.
3. Removetop hinge cover by removing
Phillipsscrew.
4. Close doors.
5. Unscrew %6"hex head screws from
top hinges.
• DO NOT remove either green
ground wire or wire connecting
center screw.
8. Remove bottom hingeswith a ¾"hex
head driver.
16THEDOORS
> To replace the doors, follow the steps
in Removing the Doors and Hinges
in reverseorder.
IMPORTANT: When reconnectingwater
line, cut off tubing atfirst available
scored line before inserting into
connector collar.
8
into place
when d6or handlesareremove&
property
following:
> Refrigeratorpanelsshould not
weigh more than
kilograms)and fr_
should not weigh
pounds(7 kilogra
> Protectsoft vinyl
with cardboard, n
protective material.
> Protecthands and arms by
wearing gloves.
NOTE:
> Toprotectdoor surfaces from being
scratched,cover back edges of
decorator panels by placing masking
tape along back edges.
>- Save all screws and reuse in original
locations.
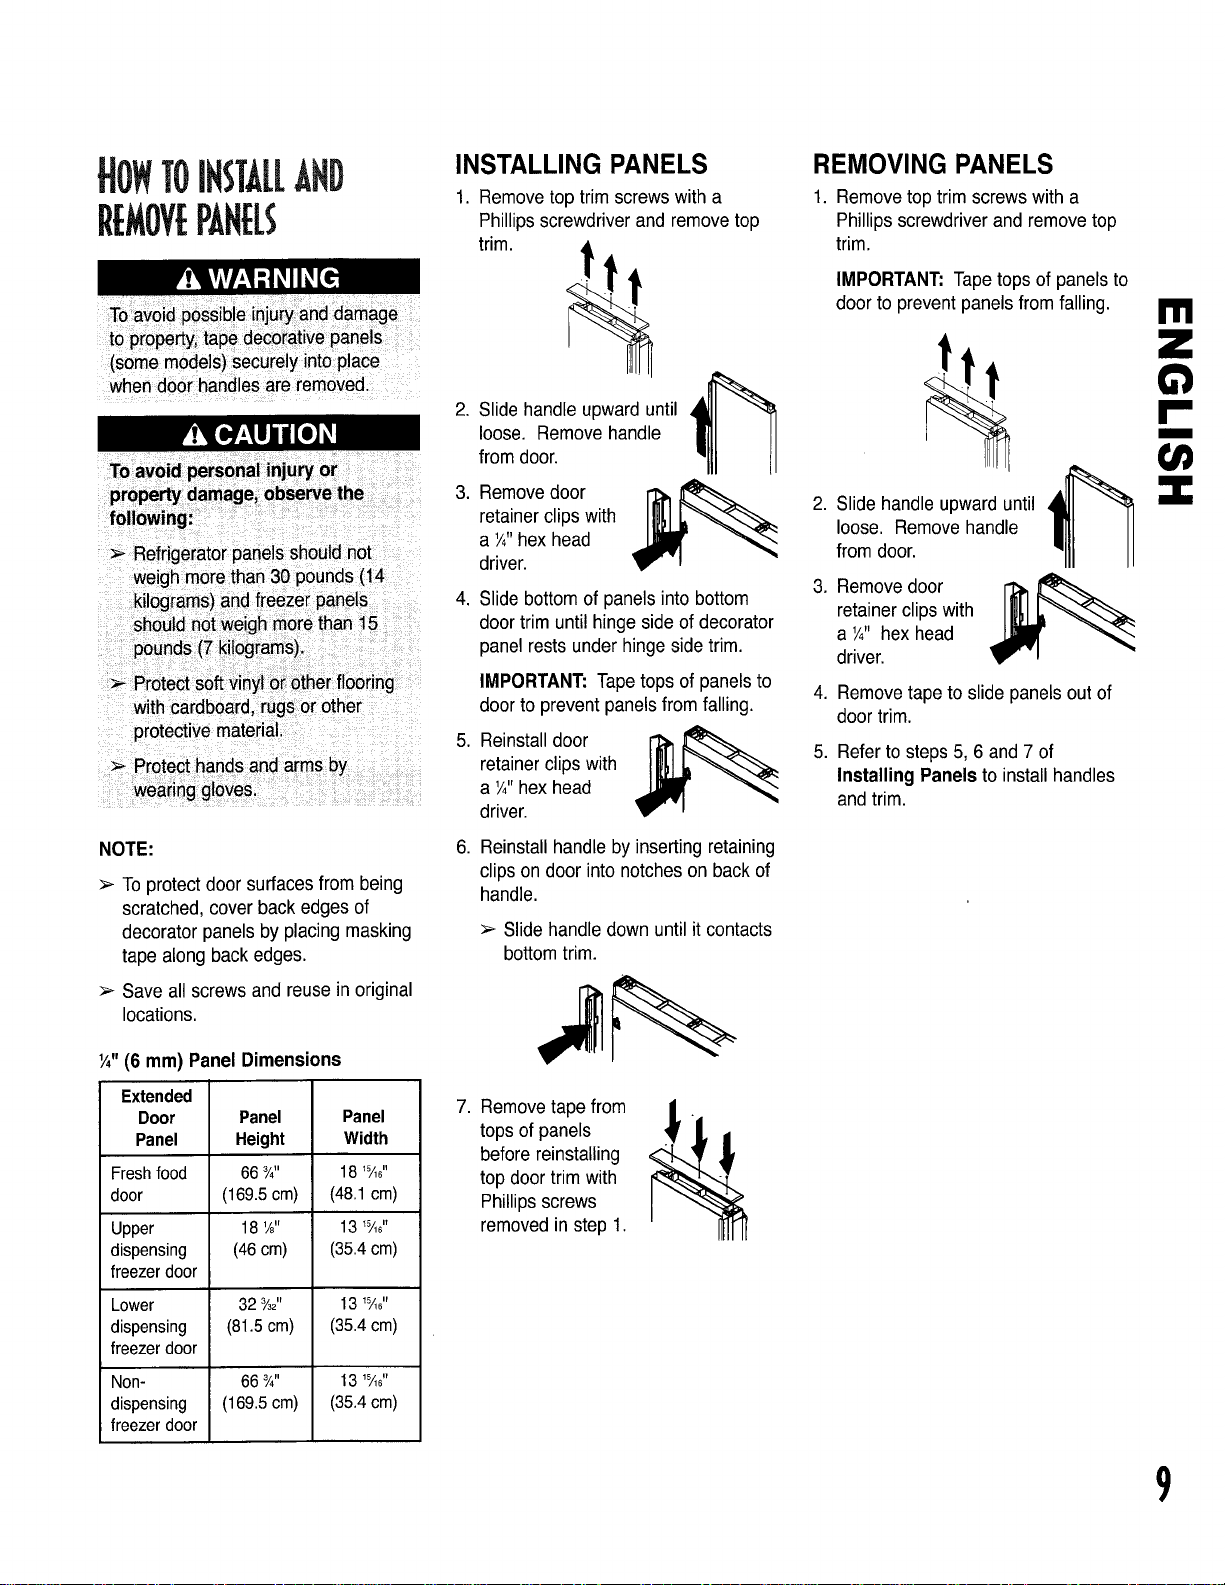
INSTALLING PANELS
1. Removetoptrimscrews with a
Phillips screwdriverandremovetop
trim.
.
Slide handle upward until
loose. Remove handle
from door.
,
Removedoor
retainerclips with
a ¼"hex head
driver.
.
Slide bottomof panels into bottom
door trim until hinge side of decorator
panel rests under hinge sidetrim.
IMPORTANT:Tapetops of panels to 4.
door to prevent panelsfrom falling.
,
Reinstalldoor r__ 5.
retainerclips with
a ¼"hex head
driver.
.
Reinstallhandle by inserting retaining
clips on door into notcheson back of
handle.
> Slidehandledown until it contacts
bottomtrim.
REMOVING PANELS
1. Remove top trim screws with a
Phillipsscrewdriver and remove top
trim.
IMPORTANT:Tape tops of panels to
door to prevent panelsfrom falling.
.
Slide handle upward until
loose. Removehandle
from door.
.
Removedoor
retainerclips with
a ¼" hex head
driver.
Removetape to slide panels out of
door trim.
Refer to steps 5, 6 and 7 of
Installing Panels to install handles
and trim.
m
Y4"(6 mm) Panel Dimensions
Extended
Door
Panel
Fresh food
door
Upper
dispensing
freezer door
Lower
dispensing
freezer door
Non-
dispensing
freezer door
Panel Panel
Height Width
66 T'4" 18 _'A6"
(169.5 cm) (48.1 cm)
18 1/8" 13 _sAs"
(46 cm) (36.4 cm)
32 %2" 13 1_/i,"
(61.5 cm) (35.4 crn)
66 ¾" 13 1_,6"
(169.5 cm) (35.4 cm)
7. Remove tape from
tops of panels
beforereinstalling
top door trim with
Phillipsscrews
removed in step 1.
9
YOURREFRIGERATOR,e,T.
)WTOCONNECTTHE
WATER$11PPL¥
MATERIALS NEEDED
> Y4"outer diameterflexible copper
tubing
Brass compression nut and sleeve for
Y4"outer diameter copper tubing.
Shut-offvalve (requiresa Y4"hole to
be drilled into water supply before
valve attachment)
> Adjustable wrench
> Y4"hex nut driver
NOTE:Add 8' to tubing length neededto
reachwater supply for creation of
service loop.
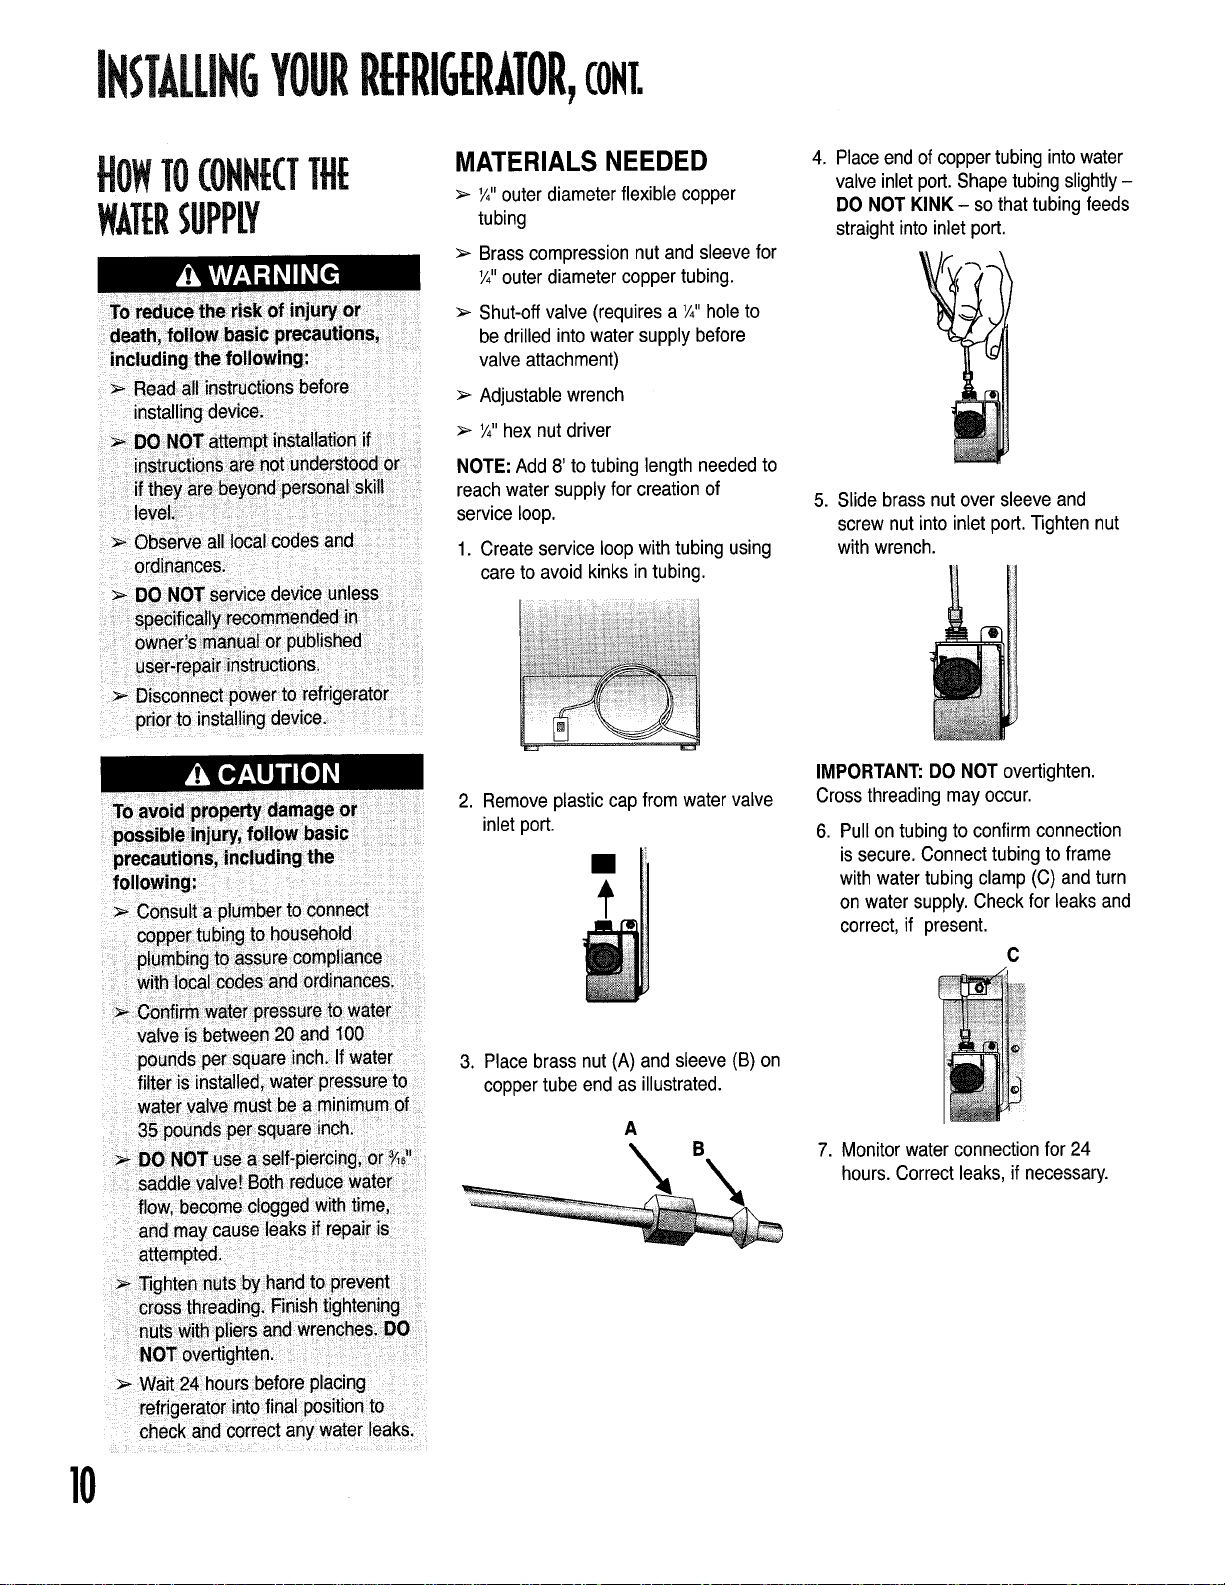
1. Create service loopwith tubing using
careto avoid kinksin tubing.
4. Placeend of copper tubingintowater
valve inletport.Shapetubing slightly-
DO NOT KINK - so that tubingfeeds
straight into inlet port.
5. Slide brass nut oversleeve and
screw nut into inlet port. Tighten nut
with wrench.
the
2. Remove plastic capfrom water valve
inlet port.
3. Placebrass nut (A) and sleeve (B) on
copper tube end as illustrated.
A
IMPORTANT:DO NOT overtighten.
Cross threading may occur.
6. Pull on tubingto confirmconnection
issecure. Connect tubing to frame
with water tubing clamp (C) and turn
on water supply. Check for leaks and
correct, if present.
C
7. Monitor water connectionfor 24
hours. Correct leaks, if necessary.
10
!/ iii ii /C ¸i
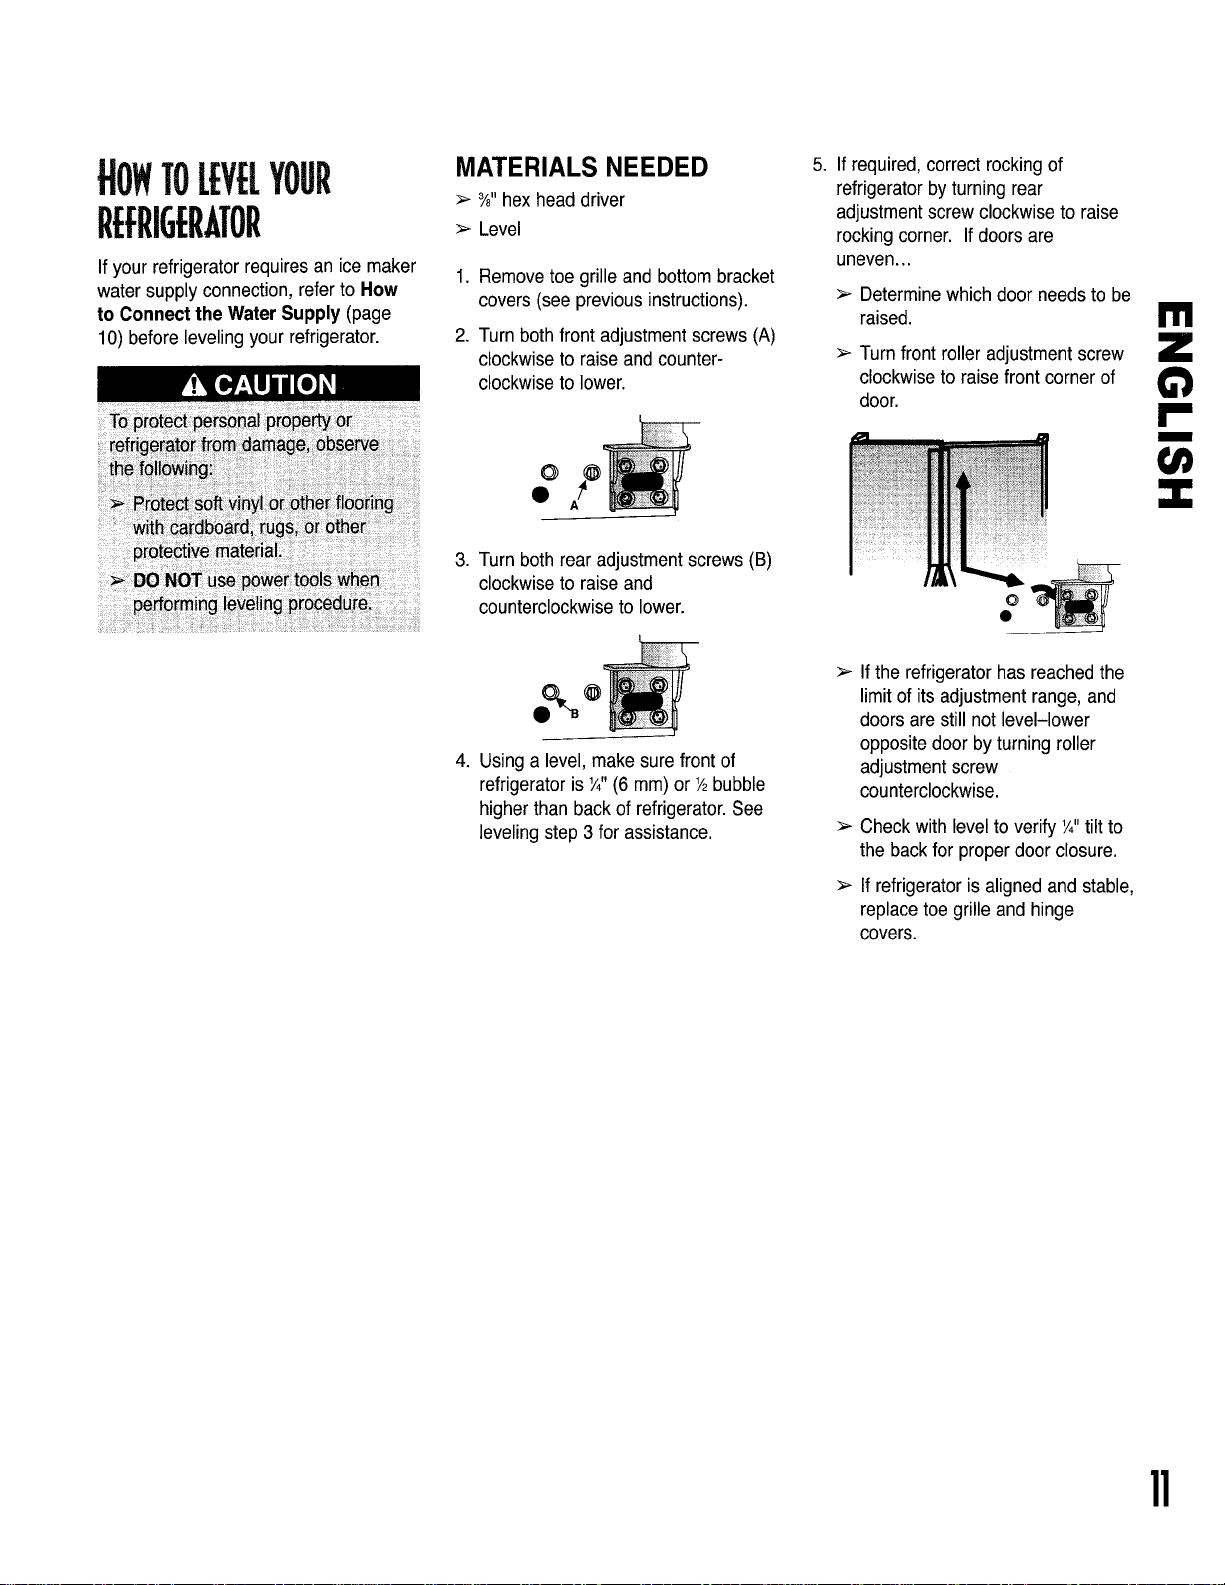
)WTOLEYELYOUR
REFRIGERATOR
If your refrigerator requiresan ice maker
water supply connection, refer to How
to Connect the Water Supply (page
10) before levelingyour refrigerator.
MATERIALS NEEDED
>_¾"hex head driver
:_ Level
,
Removetoe grille and bottom bracket
covers (see previous instructions).
,
Turnboth front adjustmentscrews (A)
clockwiseto raiseand counter-
clockwiseto lower.
o
3. Turn bothrear adjustmentscrews (B)
clockwiseto raiseand
counterclockwiseto lower.
.
Usinga level, make sure front of
refrigeratoris _'4"(6 mm)or Y2bubble
higher than back of refrigerator.See
leveling step 3 for assistance.
.
If required,correct rocking of
refrigeratorby turning rear
adjustmentscrew clockwiseto raise
rocking corner. If doors are
uneven...
>_Determinewhich door needs to be
raised.
>_Turn front roller adjustment screw
clockwiseto raisefront cornerof
door.
If the refrigerator has reachedthe
limit of its adjustment range, and
doors are still not level-lower
opposite door by turning roller
adjustment screw
counterclockwise.
Check with leveltoverify Y,"tilt to
the back for proper door closure.
>>
If refrigerator is aligned and stable,
replacetoe grille and hinge
covers.
I11
Z
O
m
11
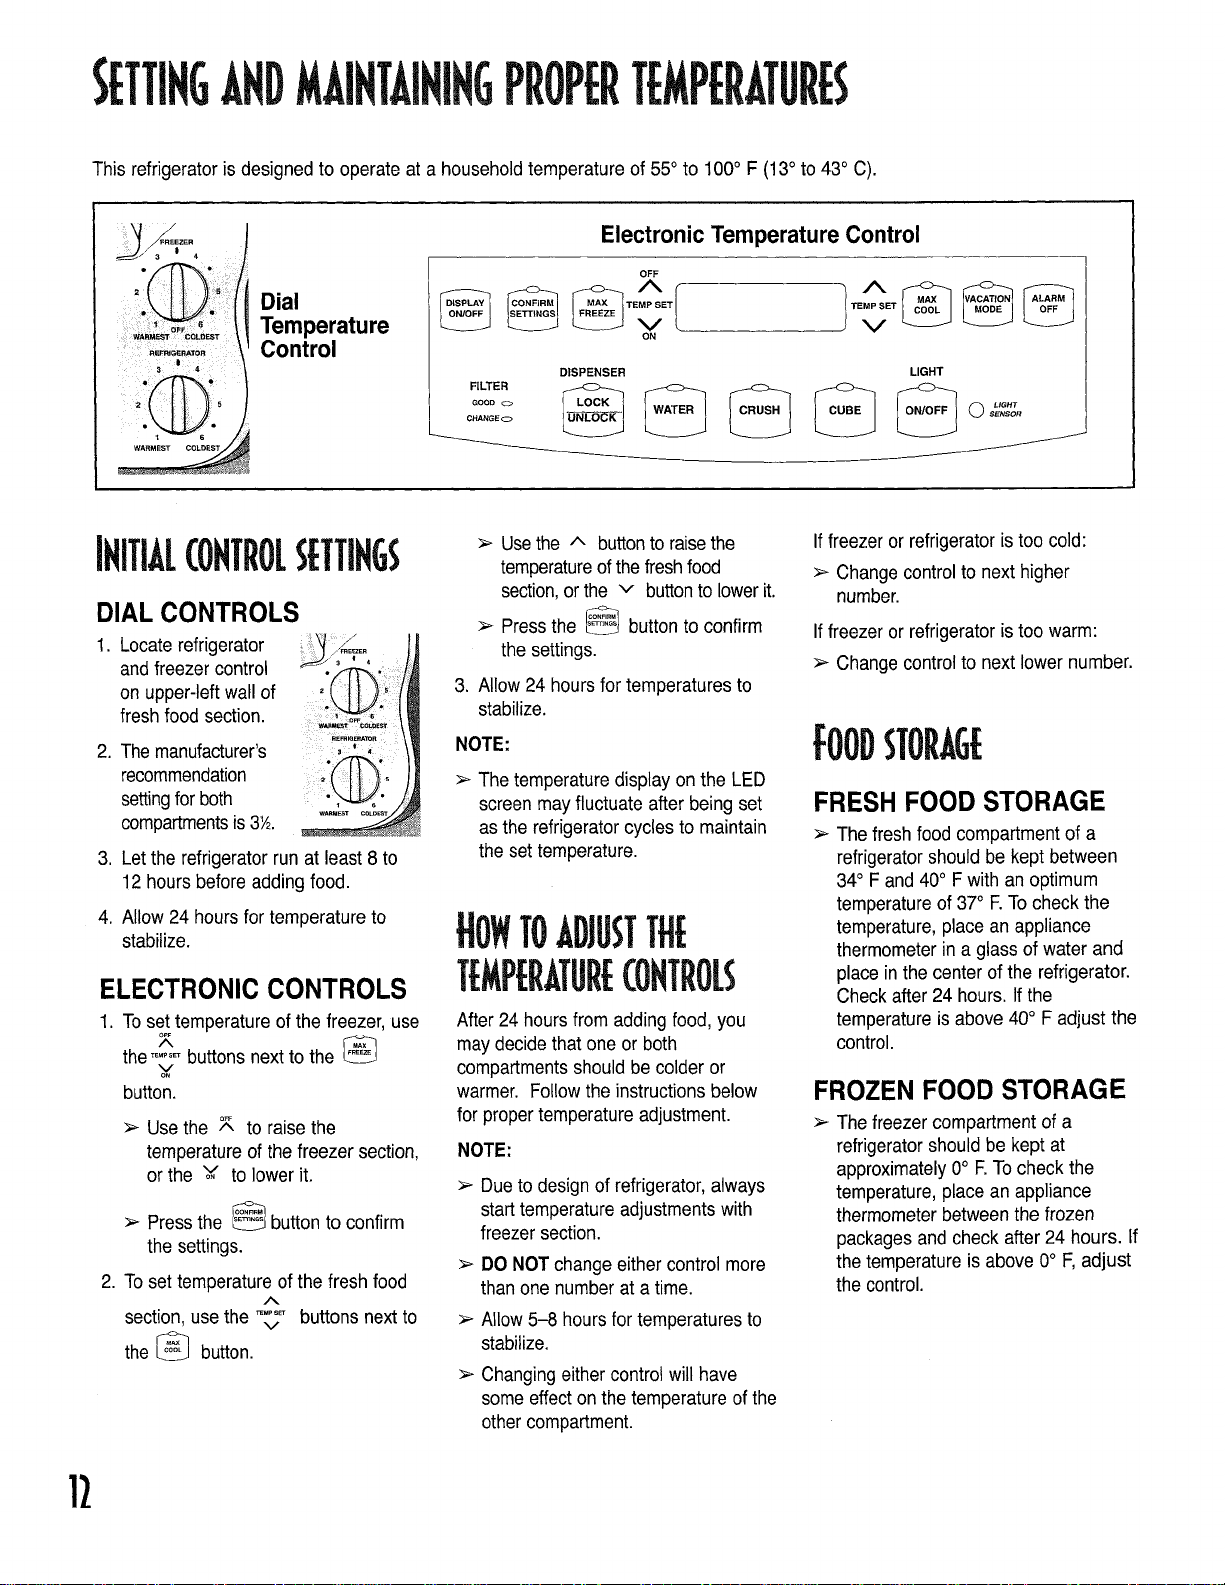
This refrigerator is designed to operate at a householdtemperature of 55° to 100° F (13° to 43° C).
I 4 i
Temperature
Control
ITIAL(OHTROLSETTIHGS
DIAL CONTROLS
1. Locate refrigerator _--__"
and freezer control •
on upper-left wall of
fresh food section.....
2. The manufacturer's ,' ,
recommendation
settingfor both
compartmentsis 3_.
3. Let the refrigerator run at least 8 to
12 hours before adding food.
4. Allow 24 hoursfor temperature to
stabilize.
ELECTRONIC CONTROLS
1. Toset temperatureofthefreezer, use
7`
the...... buttons next tothe
Y
button.
> Usethe 7, to raise the
temperatureof the freezer section,
or the Y to lower it.
> Pressthe _ button to confirm
the settings.
2. To set temperatureof the fresh food
section, usethe v buttons next to
the _ button.
/%,
_Mws_
Y
_m_Tor
Electronic Temperature Control
OFF
_ tEnEt I
DISPENSER LIGHT
GOOD 0 LIGHT
CHANGE o SENSOR
Usethe ^ buttonto raisethe
temperatureofthe freshfood
section,or the v buttonto lowerit.
> Press the _ button to confirm
the settings.
3. Allow 24 hours for temperatures to
stabilize.
NOTE:
Thetemperature display on the LED
screen may fluctuate after being set
as the refrigerator cycles to maintain
the set temperature.
After 24 hours from adding food, you
may decidethat one or both
compartmentsshould be colder or
warmer. Followthe instructions below
for proper temperatureadjustment.
NOTE:
Dueto design of refrigerator,always
starttemperature adjustments with
freezer section.
DO NOTchange either control more
thanone numberat a time.
Allow 5-8 hours for temperatures to
stabilize.
Changingeither control will have
some effect on the temperature ofthe
other compartment.
ON
If freezer or refrigerator istoo cold:
> Changecontrol to next higher
number.
If freezer or refrigerator istoo warm:
> Changecontrol to next lower number.
FRESH FOOD STORAGE
Thefresh food compartmentofa
refrigeratorshould be keptbetween
34° F and40° F withanoptimum
temperatureof 37° F.Tocheckthe
temperature,placean appliance
thermometerin a glass of waterand
placeinthe centerofthe refrigerator.
Checkafter 24 hours. Ifthe
temperatureis above40° F adjustthe
control.
FROZEN FOOD STORAGE
Thefreezer compartment ofa
refrigeratorshould be kept at
approximately0° F.Tocheckthe
temperature,placean appliance
thermometerbetween the frozen
packagesand checkafter 24 hours. If
thetemperatureisabove0° F, adjust
thecontrol.
ABOUtyourw terfIlTER...
WATERfIlTERINSTALLATION
ANDREMOVAl
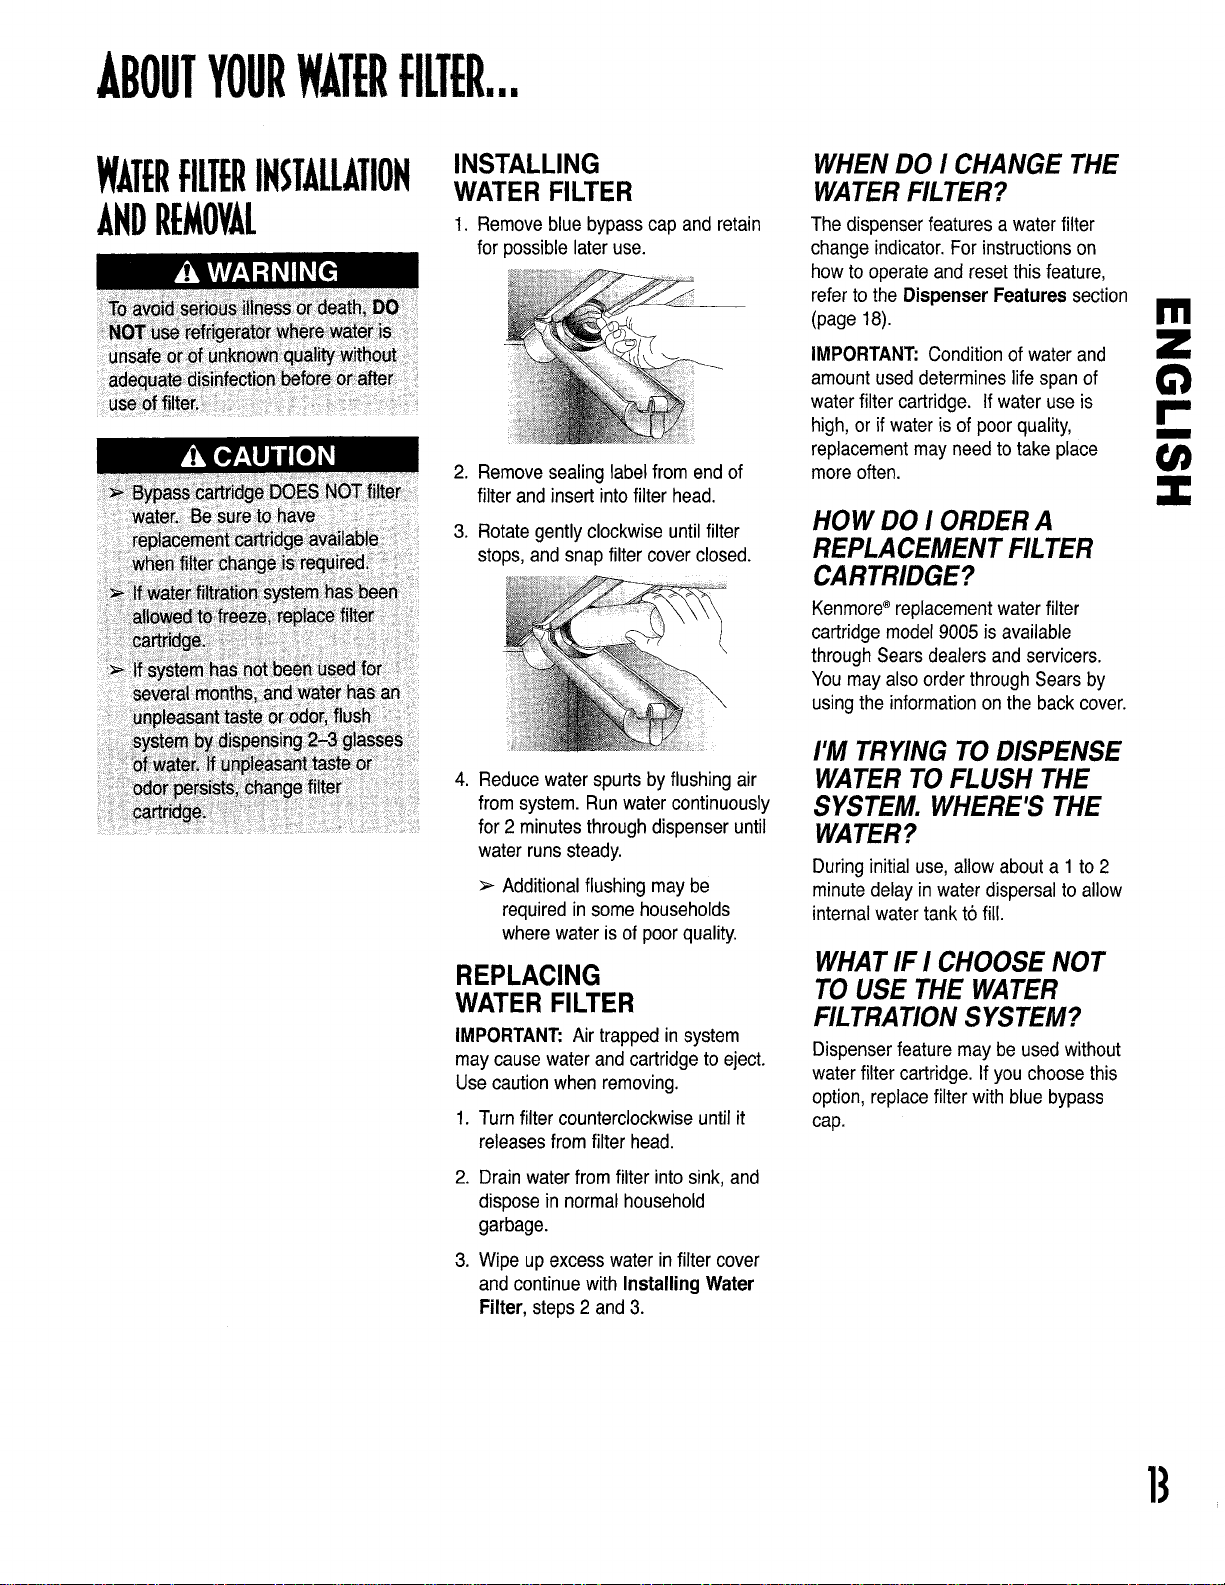
INSTALLING
WATER FILTER
1. Removebluebypasscap andretain
for possiblelateruse.
2. Removesealing labelfrom end of
filter and insert intofilter head.
3. Rotategentlyclockwise until filter
stops,and snap filter cover closed.
WHEN DO I CHANGE THE
WATERFILTER?
The dispenserfeatures a water filter
change indicator. For instructionson
how to operate and reset this feature,
refer to the DispenserFeatures section
(page 18).
IMPORTANT:Condition of water and
amountused determineslife span of
water filter cartridge. If water use is
high, or ifwater isof poor quality,
replacementmay need to take place
more often.
HOW DO I ORDER A
REPLACEMENT FILTER
CARTRIDGE?
Kenmore®replacementwater filter
cartridge model 9005 is available
through Sears dealers and servicers.
You may also order through Sears by
using the information on the back cover.
II'1
m
4. Reduce waterspurts by flushingair
from system. Run watercontinuously
for 2 minutes through dispenser until
waterruns steady.
Additionalflushing may be
required insome households
wherewater is of poor quality.
REPLACING
WATER FILTER
IMPORTANT: Airtrappedinsystem
maycausewater andcartridgetoeject.
Usecautionwhenremoving.
1. Turnfilter counterclockwiseuntil it
releases from filter head.
.
Drain water from filter into sink,and
dispose in normal household
garbage.
.
Wipe up excess waterinfilter cover
and continue with Installing Water
Filter, steps 2 and3.
I'M TRYING TO DISPENSE
WATER TO FLUSH THE
SYSTEM. WHERE'S THE
WATER?
Duringinitial use, allow about a 1 to 2
minute delayinwaterdispersal to allow
internalwater tank to fill.
WHAT IF I CHOOSE NOT
TO USE THE WATER
FILTRATION SYSTEM?
Dispenserfeature may be usedwithout
water filter cartridge. If you choose this
option, replacefilter with blue bypass
cap.
13
FI[T[RDATA
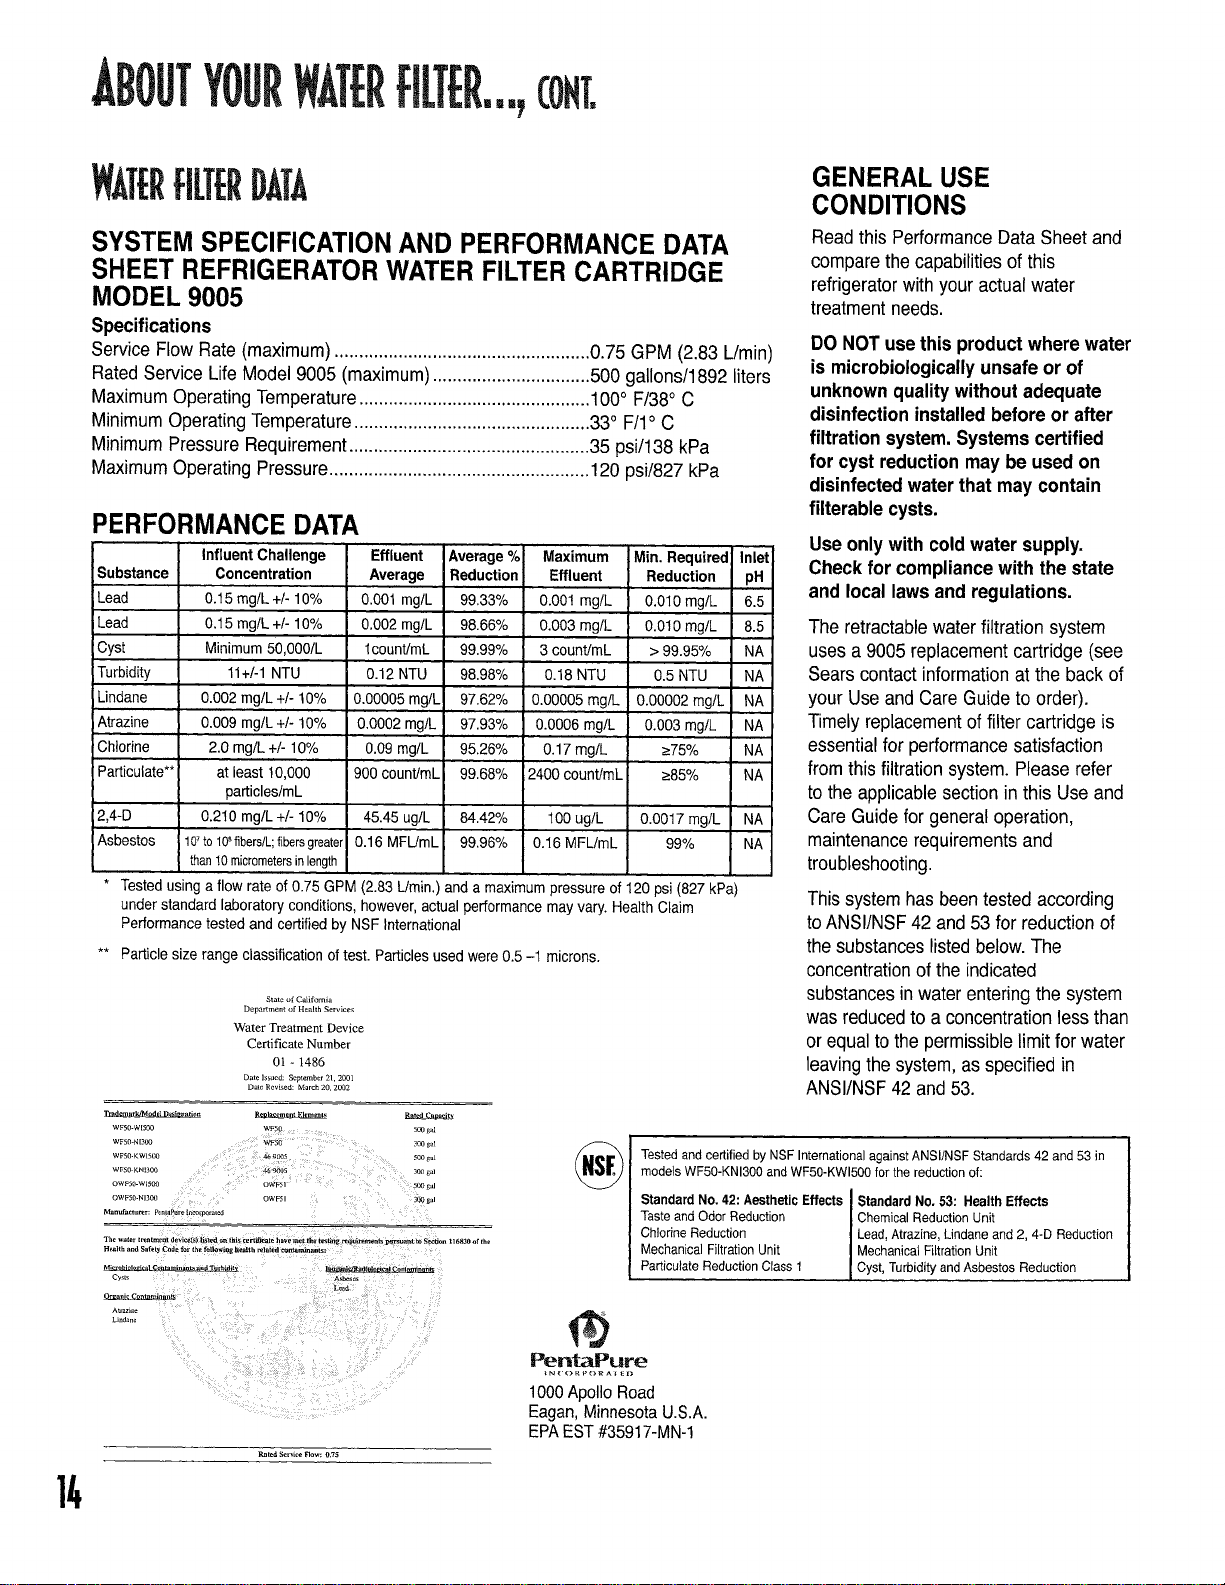
SYSTEM SPECIFICATION AND PERFORMANCE DATA
SHEET REFRIGERATOR WATER FILTER CARTRIDGE
MODEL 9005
Specifications
Service Flow Rate (maximum) ....................................................0.75 GPM (2.83 L/min)
Rated Service Life Model 9005 (maximum)................................500 gallons/1892 liters
MaximumOperating Temperature...............................................100° F/38° C
MinimumOperating Temperature................................................33° F/l° C
MinimumPressure Requirement.................................................35 psi/138 kPa
MaximumOperating Pressure.....................................................120 psi/827 kPa
PERFORMANCE DATA
Substance
'Lead
Lead
Cyst
Turbidity
Lindane
Atrazine
Chlorine
Particulate**
2,4-D
Asbestos
Tested using a flow rate of 0.75 GPM (2.83 L/rain.) and a maximum pressure of 120 psi (827 kPa)
under standard laboratory conditions, however, actual performance may vary. Health Claim
Performance tested and certified by NSF International
** Particle size range classification of test. Particles used were 0.5-1 microns.
Influent Challenge
Concentration
0.15 mg/L +/- 10%
0.15 mg/L +/- 10%
Minimum50,000/L
11+/-1NTU
0.002 mg/L +/- 10%
0.009 mg/L +/- 10%
2.0 mg/L +/- 10%
at least 10,000
particles/mL
0.210 mg/L +/- 10%
107to 10Sfibers/L;fibersgreaterI
than !0 micrometersin length
State of California
Department of Health Sewices
Water Treatment Device
Certificate Number
01 - 1486
Date Issued: September 21. 2001
Date Revised: March 20, 2O02
Effluent Average%J Maximum
Average Reduction Effluent
0.001 mg/L 99.33% 0.001 mg/L
0.002 mg/L 98.66% 0.003 mg/L
lcount/mL 99.99% 3 count/mL
0.12 NTU 98.98% 0.18 NTU
0.00005 mg/L 97.62% 0.00005 mg/L
0.0002 mg/L 97.93% 0.0005 mg/L
0.09 mg/L 95.26% 0.17 mg/L
900 count/mL 99.66% 2400count/mL
45.45 ug/L 84.42% 100 ug/L
i
0.16 MFL/mL 99.96% 0.16 MFL/mL
Min. Required Inlet
Reduction pH
0.010 mg/L 6.5
0.010 mg/L 8.5
> 99.95% NA
O.5 NTU NA
0.00002 mg/L ! NA
0.003 mg/L NA
>75% NA
>85% NA
0.0017 mg/L NA
99% NA
I
GENERAL USE
CONDITIONS
Read this PerformanceData Sheetand
compare the capabilitiesof this
refrigeratorwith your actual water
treatment needs.
DO NOT usethis productwhere water
is microbiologicallyunsafeor of
unknownqualitywithout adequate
disinfection installed beforeor after
filtration system. Systemscertified
for cyst reduction may be used on
disinfectedwater that may contain
filterable cysts.
Use only with cold water supply.
Check for compliancewith the state
and local laws and regulations.
The retractablewaterfiltration system
uses a 9005 replacement cartridge (see
Searscontact information at the back of
your Use and Care Guide to order).
Timely replacement offilter cartridge is
essential for performance satisfaction
from this filtration system. Please refer
to the applicable section in this Use and
Care Guide for general operation,
maintenancerequirements and
troubleshooting.
This systemhas been tested according
toANSI/NSF 42 and 53 for reduction of
the substances listed below. The
concentrationof the indicated
substancesin water enteringthe system
was reducedto a concentration less than
or equal to the permissiblelimit for water
leavingthe system, as specified in
ANSI/NSF42 and 53.
wFso-wl500 wFso 500gal
WFS0-N[3CO WFSO 300 gat
WFS0-KWlSO( 40 9005 300g_l
WFS0-KNI3CO 4__O05 300g_l
OWF_0-WlSO0 JVmS 5(__al
OWFSO-_I30a OWF5 J_Ogal
Manuf_ctu_r: PeriL.pure{a_q,o=,=o
3he water z_a=ment device,s) IJs_ _ this certW_te have met the tt_thtg _qui_¢nts pbrsua_t to Section 116830 of the
Health _.d Safety Caaa for th_ foLly*tug Ueaah _lated _ma_n_ts:
_L_3&t,_J_ IJ_9_f.2RaSl_ei_lConl_tnan_
Cysls Asb_
Llndan_
14
Tested and certified by NSF International against ANSI/NSF Standards 42 and 53 in
models WF50-KNI300 and WF50-KWl500 for the reduction of:
Standard No. 42: Aesthetic Effects
Taste and Odor Reduction
Chlorine Reduction
Mechanical Filtration Unit
Particulate Reduction Class 1
@
PentaPure
INI ()_[)RAI_I)
1000ApolloRoad
Eagan, Minnesota U.S.A.
EPAEST#35917-MN-1
Standard No. 53: Health Effects
Chemical Reduction Unit
Lead, Atrazine, Lindane and 2, 4-D Reduction
Mechanical Filtration Unit
Cyst, Turbidity and Asbestos Reduction
TERIORSHELVES
>- Hande tempered glass shelves
carefully.Shelves may break
suddenly if nicked;scratched,or
expOsedto suddentemperature
change.
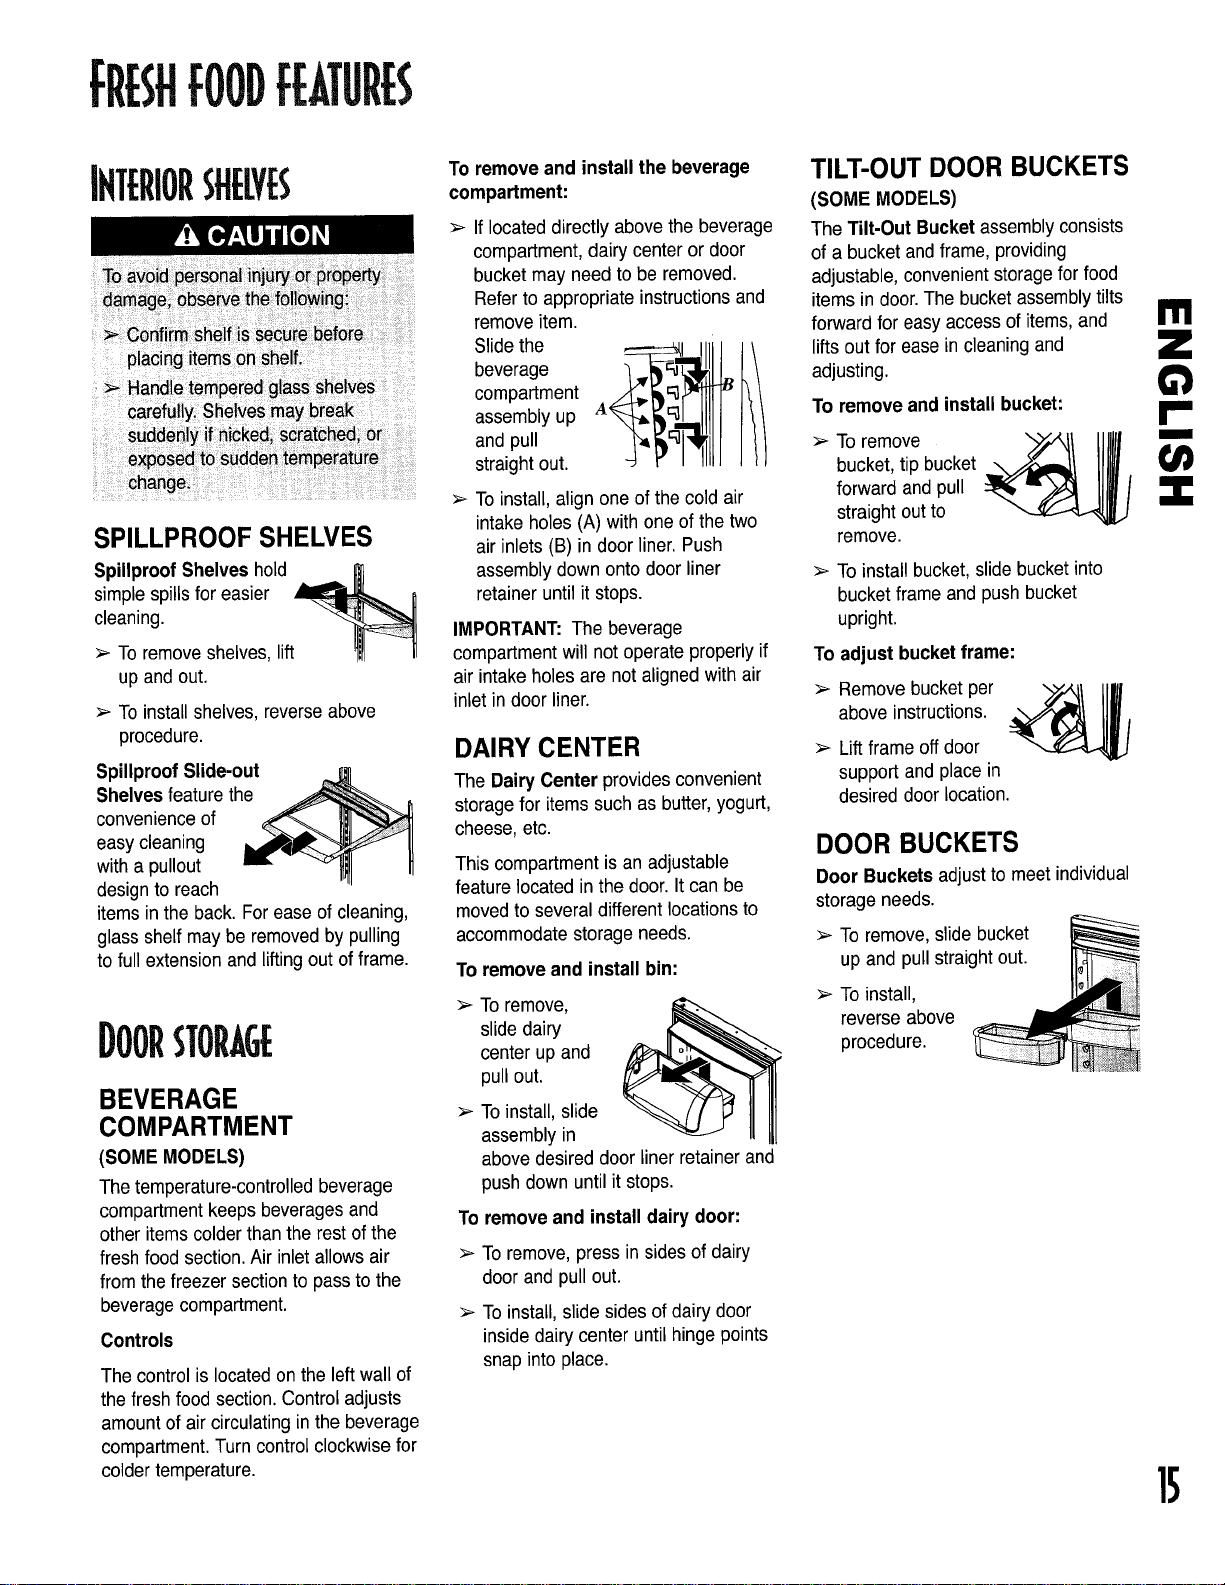
SPILLPROOF SHELVES
SpillproofShelves hold , _
simple spills for easier _ n
cleaning.
Toremove shelves, lift 'I_11 II
up and out.
Toinstall shelves, reverseabove
procedure.
SpillproofSlide-out
Shelves feature the
convenienceof
easy cleaning
with a pullout "" '_ _III
design to reach
items in the back. Forease of cleaning,
glass shelf may be removed by pulling
to full extension and lifting out of frame.
STORAGE
BEVERAGE
COMPARTMENT
(SOME MODELS)
The temperature-controlledbeverage
compartmentkeepsbeveragesand
other items colder than the rest of the
fresh food section. Air inlet allows air
from the freezer section to pass to the
beveragecompartment.
Controls
The control is located on the left wall of
the fresh food section. Control adjusts
amount of air circulating inthe beverage
compartment. Turn control clockwisefor
colder temperature.
To remove and install the beverage
compartment:
If located directly abovethe beverage
compartment, dairy center or door
bucket may need to be removed.
Refer to appropriate instructions and
remove item.
Slide the
beverage
compartment
assembly up
and pull
straight out.
To install, align one of the cold air
intake holes (A) with one of the two
air inlets (B) in door liner. Push
assembly down onto door liner
retainer until it stops.
IMPORTANT: The beverage
compartment will not operate properly if
air intake holes are notaligned with air
inlet in door liner.
DAIRY CENTER
The Dairy Center provides convenient
storage for items such as butter, yogurt,
cheese, etc.
This compartment is an adjustable
feature located in the door. It can be
moved to several different locations to
accommodatestorage needs.
To remove and install bin:
Toremove,
slide dairy
center up and
pull out.
Toinstall, slide
assembly in
above desired door liner retainer and
push down until it stops.
To remove and install dairy door:
To remove, press in sides of dairy
door and pull out.
Toinstall, slide sides of dairy door
inside dairy center until hinge points
snap into place.
TILT-OUT DOOR BUCKETS
(SOME MODELS)
The Tilt-Out Bucketassemblyconsists
ofa bucket andframe, providing
adjustable,convenientstorage for food
itemsindoor.The bucketassemblytilts
forward for easyaccessofitems,and
lifts out for ease in cleaningand
adjusting.
To remove and install bucket:
To remove
bucket, tip bucket
forward and pull
straight out to
remove.
Toinstall bucket, slide bucketinto
bucket frame and push bucket
upright.
To adjust bucket frame:
Remove bucket per ">Y_I I1|11
above instructions.
Lift frame off door
support and place in
desired door location.
DOOR BUCKETS
Door Buckets adjust to meet individual
storageneeds.
To remove, slide bucket
up and pull straightout.
To install,
reverse above
procedure.
I11
]5
(L[MATP(ONTROLL[D
DRAW[R$
See belowfor correct humidity drawer
control settings:
LOW
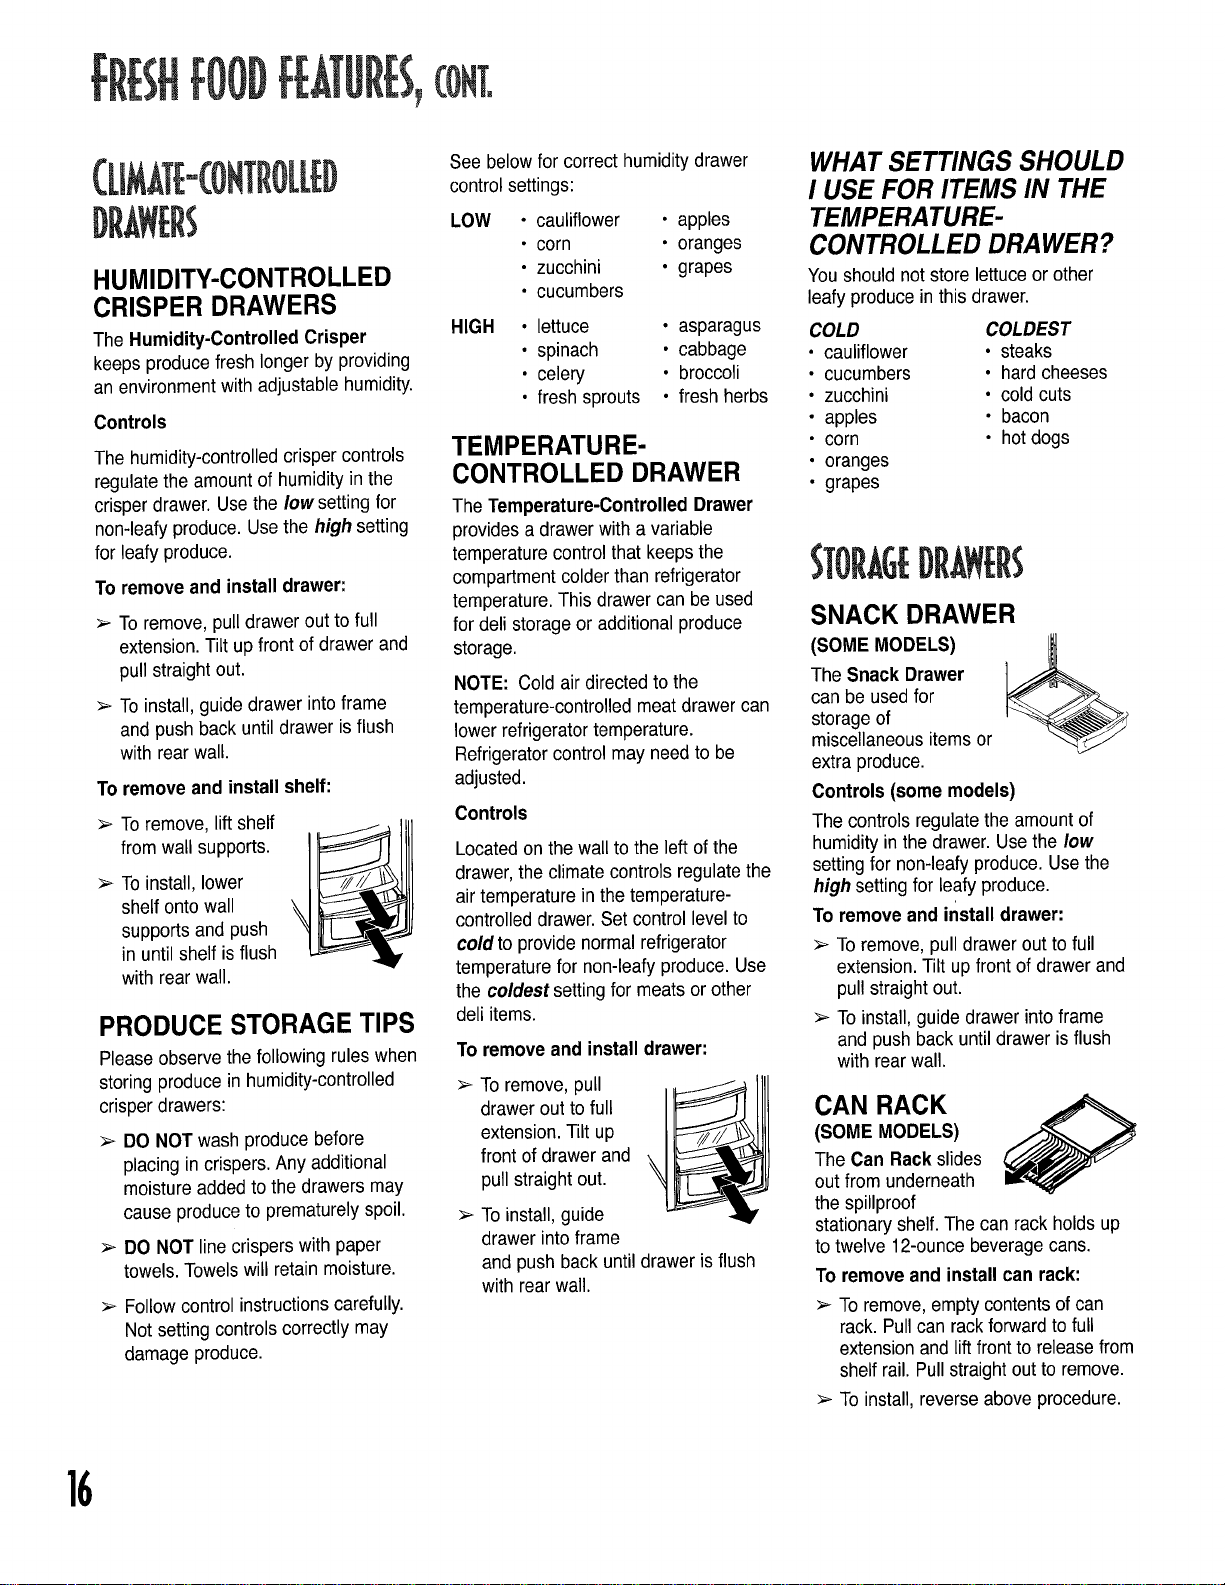
HUMIDITY-CONTROLLED
CRISPER DRAWERS
The Humidity-Controlled Crisper
keeps producefresh longer by providing
an environmentwith adjustable humidity.
Controls
The humidity-controlledcrisper controls
regulatethe amount of humidityin the
crisper drawer. Use the low settingfor
non-leafy produce. Usethe high setting
for leafy produce.
remove and install drawer:
To
To remove, pull drawer out to full
extension. Tilt up front of drawer and
pull straight out.
Toinstall, guide drawer intoframe
and push back until drawer is flush
with rear wall.
To remove and install shelf:
Toremove, lift shelf
from wall supports.
Toinstall, lower
shelf onto wall
supports and push
in until shelf isflush
with rear wall.
PRODUCE STORAGE TIPS
Pleaseobservethefollowing rules when
storing producein humidity-controlled
crisper drawers:
> DO NOTwash produce before
placing in crispers.Any additional
moistureadded to the drawers may
cause produceto prematurelyspoil.
DO NOT line crispers with paper
towels. Towelswill retain moisture.
Follow control instructions carefully.
Not setting controls correctly may
damage produce.
HIGH
TEMPERATURE-
CONTROLLED DRAWER
The Temperature-ControlledDrawer
providesa drawer witha variable
temperaturecontrolthatkeepsthe
compartmentcolder than refrigerator
temperature.This drawer can be used
for dell storage or additional produce
storage.
NOTE: Cold air directed to the
temperature-controlledmeat drawer can
lower refrigeratortemperature.
Refrigeratorcontrol may need to be
adjusted.
Controls
Locatedon the wall to the left of the
drawer,the climatecontrols regulate the
air temperaturein thetemperature-
controlled drawer. Set control level to
cold to provide normal refrigerator
temperature for non-leafy produce. Use
the coldest setting for meats or other
dell items.
To remove and installdrawer:
• cauliflower • apples
• corn • oranges
• zucchini • grapes
• cucumbers
• lettuce • asparagus
• spinach • cabbage
• celery • broccoli
• fresh sprouts • fresh herbs
Toremove, pull
drawer out to full
extension.Tilt up
front of drawer and
pull straightout.
Toinstall, guide
drawer into frame
and push back until drawer isflush
with rear wall.
WHAT SETTINGS SHOULD
I USE FOR ITEMS IN THE
TEMPERATURE-
CONTROLLED DRAWER?
You should notstore lettuceor other
leafy producein this drawer.
COLD COLDEST
• cauliflower • steaks
• cucumbers • hard cheeses
• zucchini • cold cuts
• apples • bacon
• corn • hot dogs
• oranges
• grapes
STORAG[DRAWERS
SNACK DRAWER
(SOME MODELS)
The Snack Drawer
can be usedfor
storage of
miscellaneous itemsor
extra produce.
Controls (some models)
The controls regulate the amount of
humidityin the drawer. Usethe low
settingfor non-leafyproduce. Usethe
high setting for leafy produce.
To remove and install drawer:
> Toremove,pull drawerout to full
extension.Tilt up front of drawer and
pull straight out.
> Toinstall, guide drawer intoframe
and pushback untildrawer is flush
with rear wall.
CAN RACK
(SOME MODELS)
The Can Rack slides
outfrom underneath
the spillproof
stationary shelf.The can rack holds up
to twelve 12-ounce beveragecans.
To remove and install can rack:
Toremove, empty contentsof can
rack. Pull can rackforwardto full
extensionand liftfront to release from
shelf rail.Pull straightout to remove.
> To install,reverseabove procedure.
16
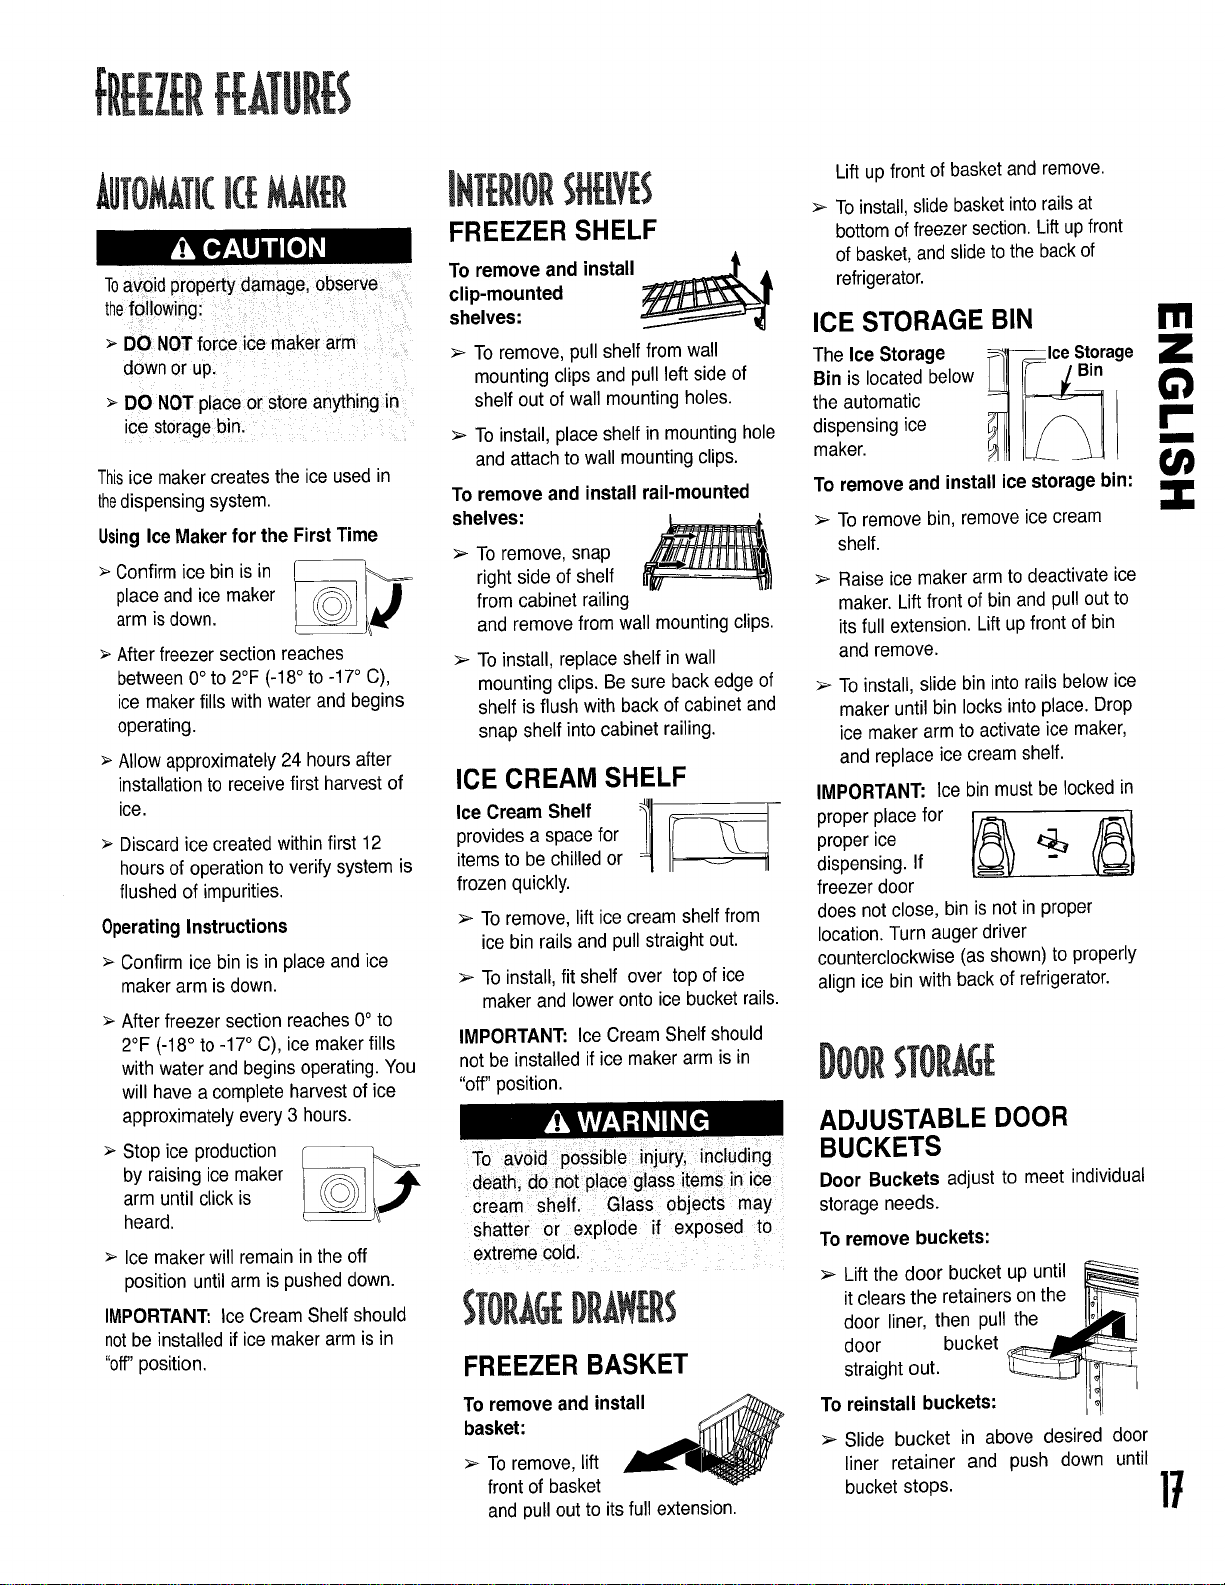
AUTOMATICICEMAKER
Toavoid propertydamage, observe
thefollowing:
> DO NOTforce ice maker arm
down or up....
> DO NOTplace or store anything in
tce storagebin.
Thisice makercreates the ice usedin
thedispensing system.
UsingleeMaker for the First Time
> Confirm icebin isin
placeand ice maker
arm is down.
> After freezer section reaches
between0°to 2°F (-18° to -17° C),
ice makerfills with water and begins
operating.
> Allow approximately24 hoursafter
installationto receive first harvest of
ice.
> Discard icecreated within first 12
hoursof operationto verify system is
flushed of impurities.
OperatingInstructions
> Confirm ice bin is in place and ice
maker arm is down.
> Afterfreezer sectionreaches0°to
2°F (-18° to -17° C), ice maker fills
with water and begins operating. You
will have a completeharvest of ice
approximately every 3 hours.
> Stopice production
by raising ice maker
arm until clickis
heard.
> Ice maker will remaininthe off
position until armis pushed down.
IMPORTANT: Ice Cream Shelf should
notbe installed if ice maker arm is in
"off"position.
FREEZER SHELF
To remove and install ._-_ A
clip-mounted
shelves:
> Toremove, pull shelffrom wall
mountingclipsand pull left side of
shelf out of wall mounting holes.
> Toinstall,place shelf in mounting hole
and attach to wall mounting clips.
To remove and install rail-mounted
shelves: _!
> To remove, snap
r,0 ts,deo,s,e, t,,/
from cabinet railing
and remove from wall mounting clips.
To install, replace shelf in wall
mounting clips. Be sure back edge of
shelf is flush with back of cabinet and
snap shelf into cabinet railing.
ICE CREAM SHELF
Ice Cream Shelf
provides a space for
items to be chilled or
frozen quickly.
> Toremove, lift ice cream shelf from
ice bin rails and pull straight out.
> Toinstall, fit shelf over top of ice
maker and lower onto ice bucket rails.
IMPORTANT: Ice Cream Shelf should
not be installed if ice maker arm is in
"off" position.
To: a_oid p_ssi:b!e inju_i :including
deathi do not place g!ass items inice
Cream shelf: Glass objects may
shatter or explode if exposed to
extreme €old:
STORAG[DR#qEB
FREEZER BASKET
To remove and install
basket:
> Toremove, lift
front of basket
and pull out to its full extension.
Liftup front of basketand remove.
> Toinstall,slidebasket intorailsat
bottom of freezersection. Liftup front
of basket,andslideto the backof
refrigerator.
ICE STORAGE BIN
The Ice Storage
Bin is locatedbelow
the automatic
dispensing ice
maker.
To
remove and install ice storage bin:
To remove bin, remove ice cream
shelf.
Raise ice maker arm to deactivate ice
maker. Lift front of bin and pull out to
its full extension. Lift up front of bin
and remove.
Toinstall, slide bin into rails below ice
maker until bin locks into place. Drop
ice maker arm to activate ice maker,
and replace ice cream shelf.
IMPORTANT: Ice bin must be locked in
proper ice
proper place for }_ ___
dispensing. If
freezer door
does not close, bin is notin proper
location. Turn auger driver
counterclockwise (as shown) to properly
align ice bin with back of refrigerator.
_rage
STORAGE
ADJUSTABLE DOOR
BUCKETS
Door Buckets adjust to meet individual
storage needs.
To remove buckets:
Lift the door bucket up until
it clears the retainers on the
door liner, then pull the
door bucket _
straight out.
To reinstall buckets:
> Slide bucket in above desired door
liner retainer and push down until
bucket stops.
II'1
17
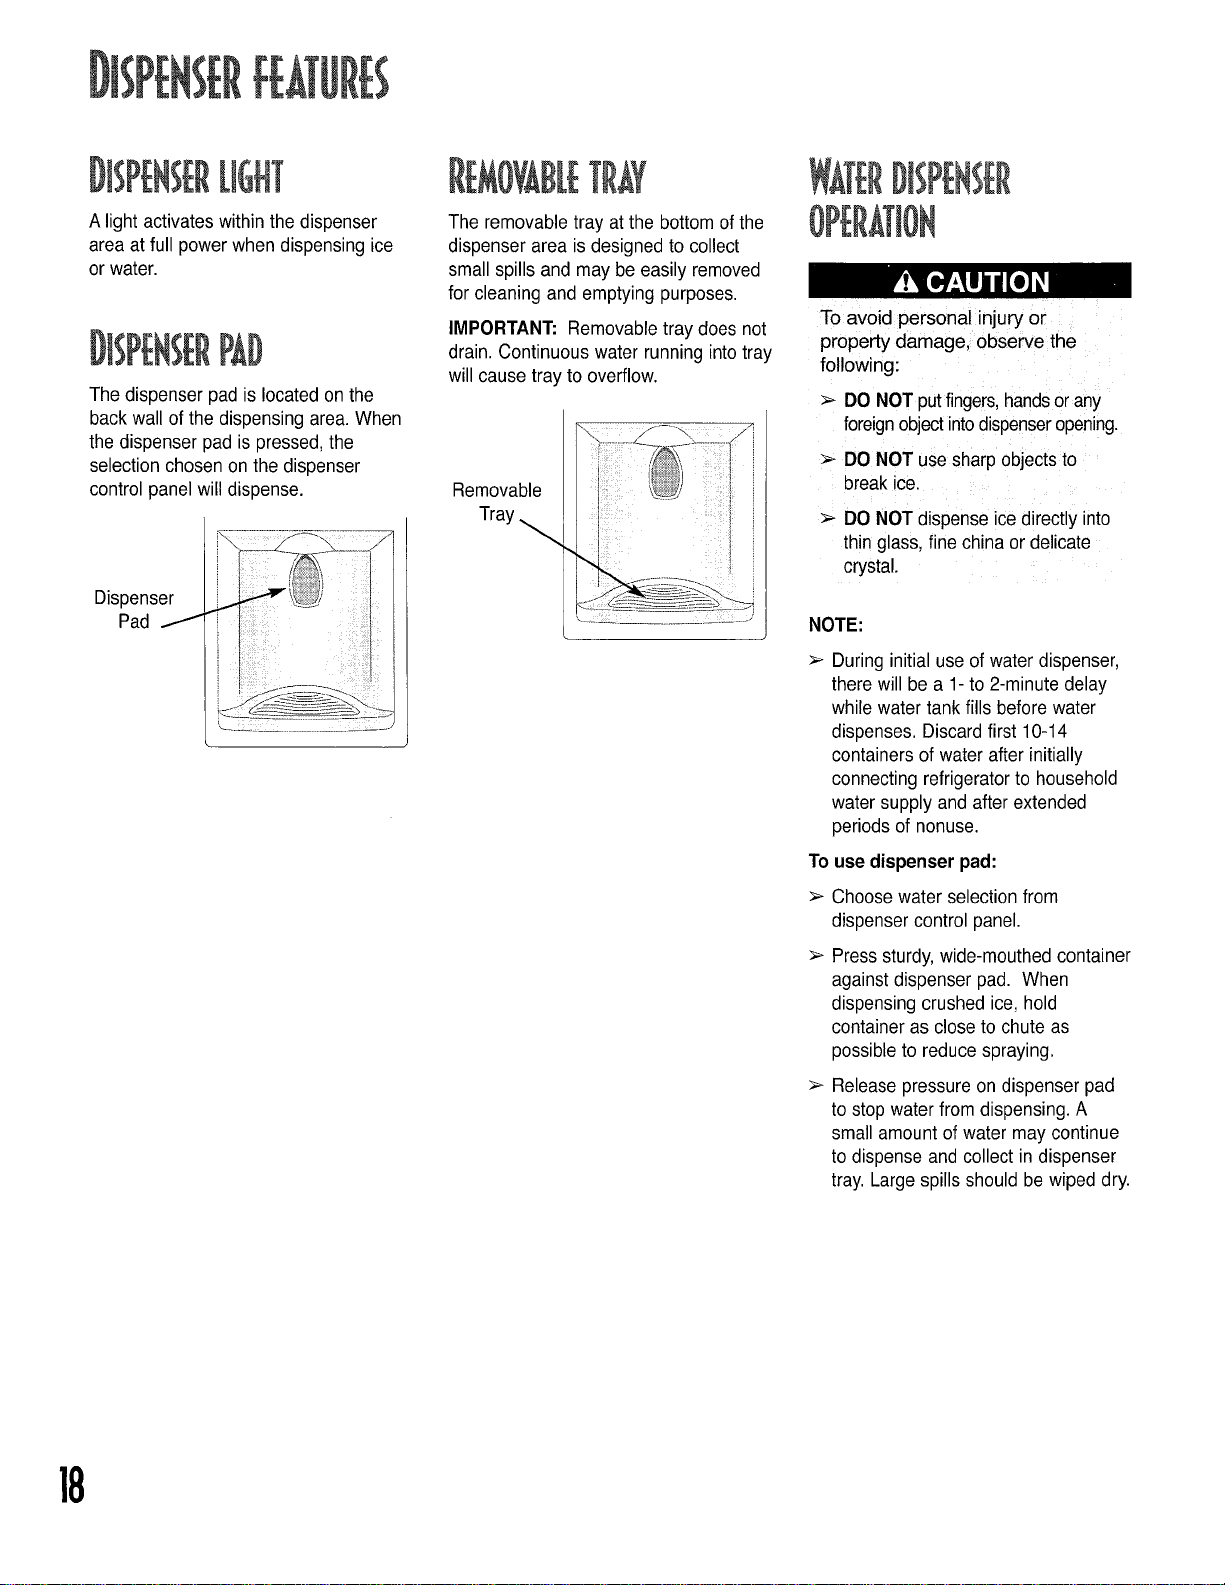
t ER[IGHT
A light activates within the dispenser
area atfull power when dispensing ice
or water.
The dispenser pad is located on the
back wall of the dispensing area.When
the dispenser pad is pressed, the
selectionchosen on the dispenser
control panel will dispense.
Dispenser
Pad
The removable tray at the bottom of the
dispenser area is designed to collect
small spills and may be easily removed
for cleaning and emptying purposes.
IMPORTANT: Removable tray does not
drain. Continuous water running intotray
will cause tray to overflow.
Removable
Tray
To avoid personal injury or
property damage, observe the
following:
> DO NOTput fingers,handsor any
foreignobjectintodispenseropening.
> DONOT usesharp objectsto
break ice.
> DONOT dispenseice directly into
thin glass, fine china ordelicate
crystal.
NOTE:
Duringinitial use of water dispenser,
there will be a 1- to 2-minute delay
while water tank fills before water
dispenses. Discardfirst 10-14
containers of water after initially
connecting refrigerator to household
water supply and after extended
periods of nonuse.
To use dispenser pad:
Choose water selection from
dispenser control panel.
Press sturdy,wide-mouthed container
against dispenser pad. When
dispensing crushed ice, hold
container as close to chute as
possible to reducespraying.
Releasepressure on dispenser pad
to stop water from dispensing. A
small amount of water may continue
to dispense and collect in dispenser
tray. Large spills should be wiped dry.
18
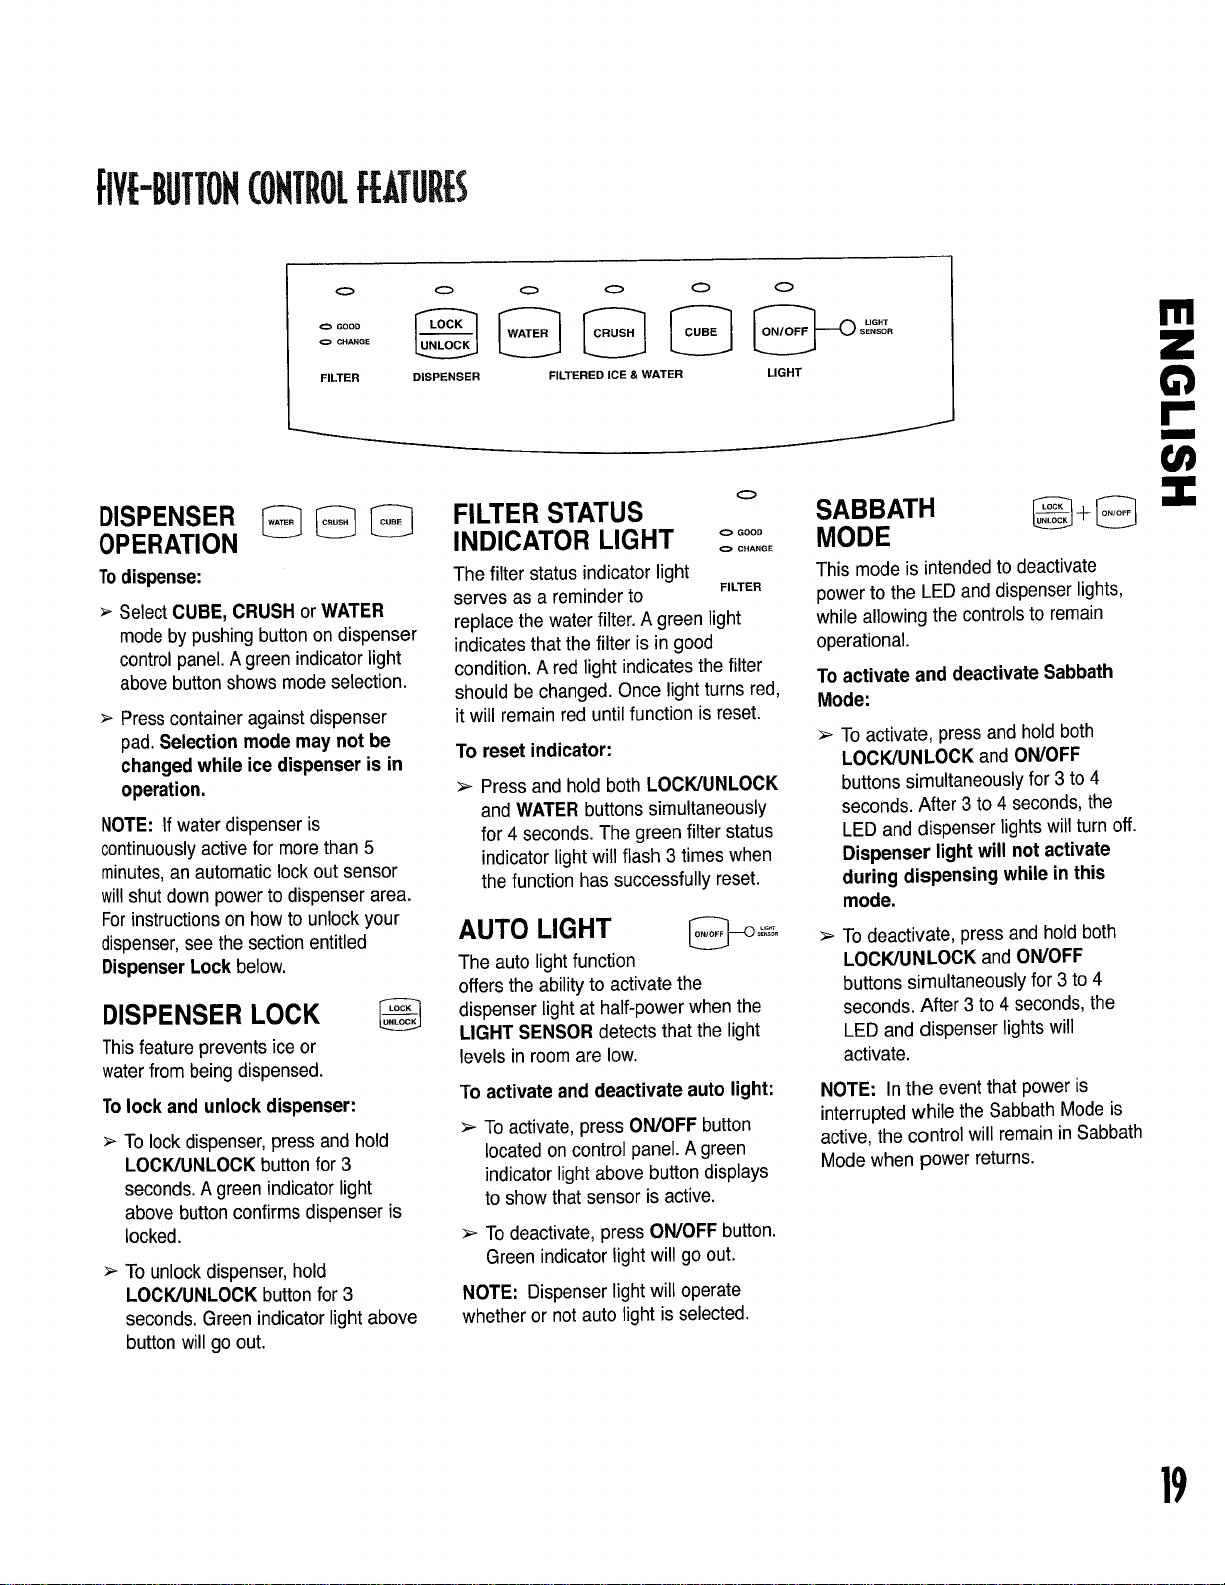
fiYPBUTTOH(OHTROLFEATURES
0 0
O CHANGE
<=>GOOD
FILTER DISPENSER
DISPENSER
OPERATION
Todispense:
> SelectCUBE, CRUSHor WATER
modeby pushing buttonon dispenser
control panel.Agreenindicator light
abovebutton shows mode selection.
Presscontainer againstdispenser
pad.Selection mode may not be
changedwhile ice dispenser is in
operation,
NOTE: If waterdispenser is
continuouslyactivefor more than 5
minutes,an automatic lock out sensor
willshut down powerto dispenser area.
Forinstructions on how to unlock your
dispenser,see the sectionentitled
DispenserLock below.
DISPENSER LOCK
Thisfeature preventsiceor
waterfrom being dispensed.
Tolock and unlock dispenser:
> To lock dispenser,press and hold
LOCK/UNLOCKbutton for 3
seconds.A green indicator light
above button confirms dispenser is
locked.
> To unlock dispenser,hold
LOCK/UNLOCKbutton for 3
seconds. Green indicator light above
button will go out.
o o c)
FILTERED ICE & WATER
o
FILTER STATUS
INDICATOR LIGHT o°ooo
The filter status indicator light
serves as a reminderto FILTER
replace the water filter.Agreen light
indicates that the filter is in good
condition. A red light indicates the filter
should be changed. Once light turns red,
it will remain red until function is reset.
To reset indicator:
> Pressand hold both LOCK/UNLOCK
and WATERbuttons simultaneously
for 4 seconds. The green filter status
indicator light will flash 3 times when
the function has successfully reset.
€_ CHANGE
AUTO LIGHT
The auto lightfunction
offers the ability to activate the
dispenser light at half-power when the
LIGHT SENSOR detects that the light
levels in room are low.
To activate and deactivate auto light:
To activate, press ON/OFF button
located on control panel. A green
indicator light above button displays
to show that sensor is active.
>- To deactivate,press ON/OFF button.
Green indicator light will go out.
NOTE: Dispenser light will operate
whether or notauto light is selected.
o
SENSOR
LIGHT
LIGHT
SABBATH _+_
MODE
This mode is intendedto deactivate
power to the LED and dispenser lights,
while allowing the controls to remain
operational.
To activate and deactivate Sabbath
Mode:
Toactivate, press and hold both
LOCK/UNLOCK and ON/OFF
buttons simultaneously for 3 to 4
seconds. After 3 to 4 seconds, the
LED and dispenser lights will turn off.
Dispenser light will not activate
during dispensing while in this
mode.
Todeactivate, press and hold both
LOCK/UNLOCK and ON/OFF
buttons simultaneously for 3 to 4
seconds. After 3 to 4 seconds, the
LED and dispenser lights will
activate.
NOTE: Inthe event that power is
interrupted while the Sabbath Modeis
active, the control will remain in Sabbath
Modewhen power returns.
II'1
B
]9
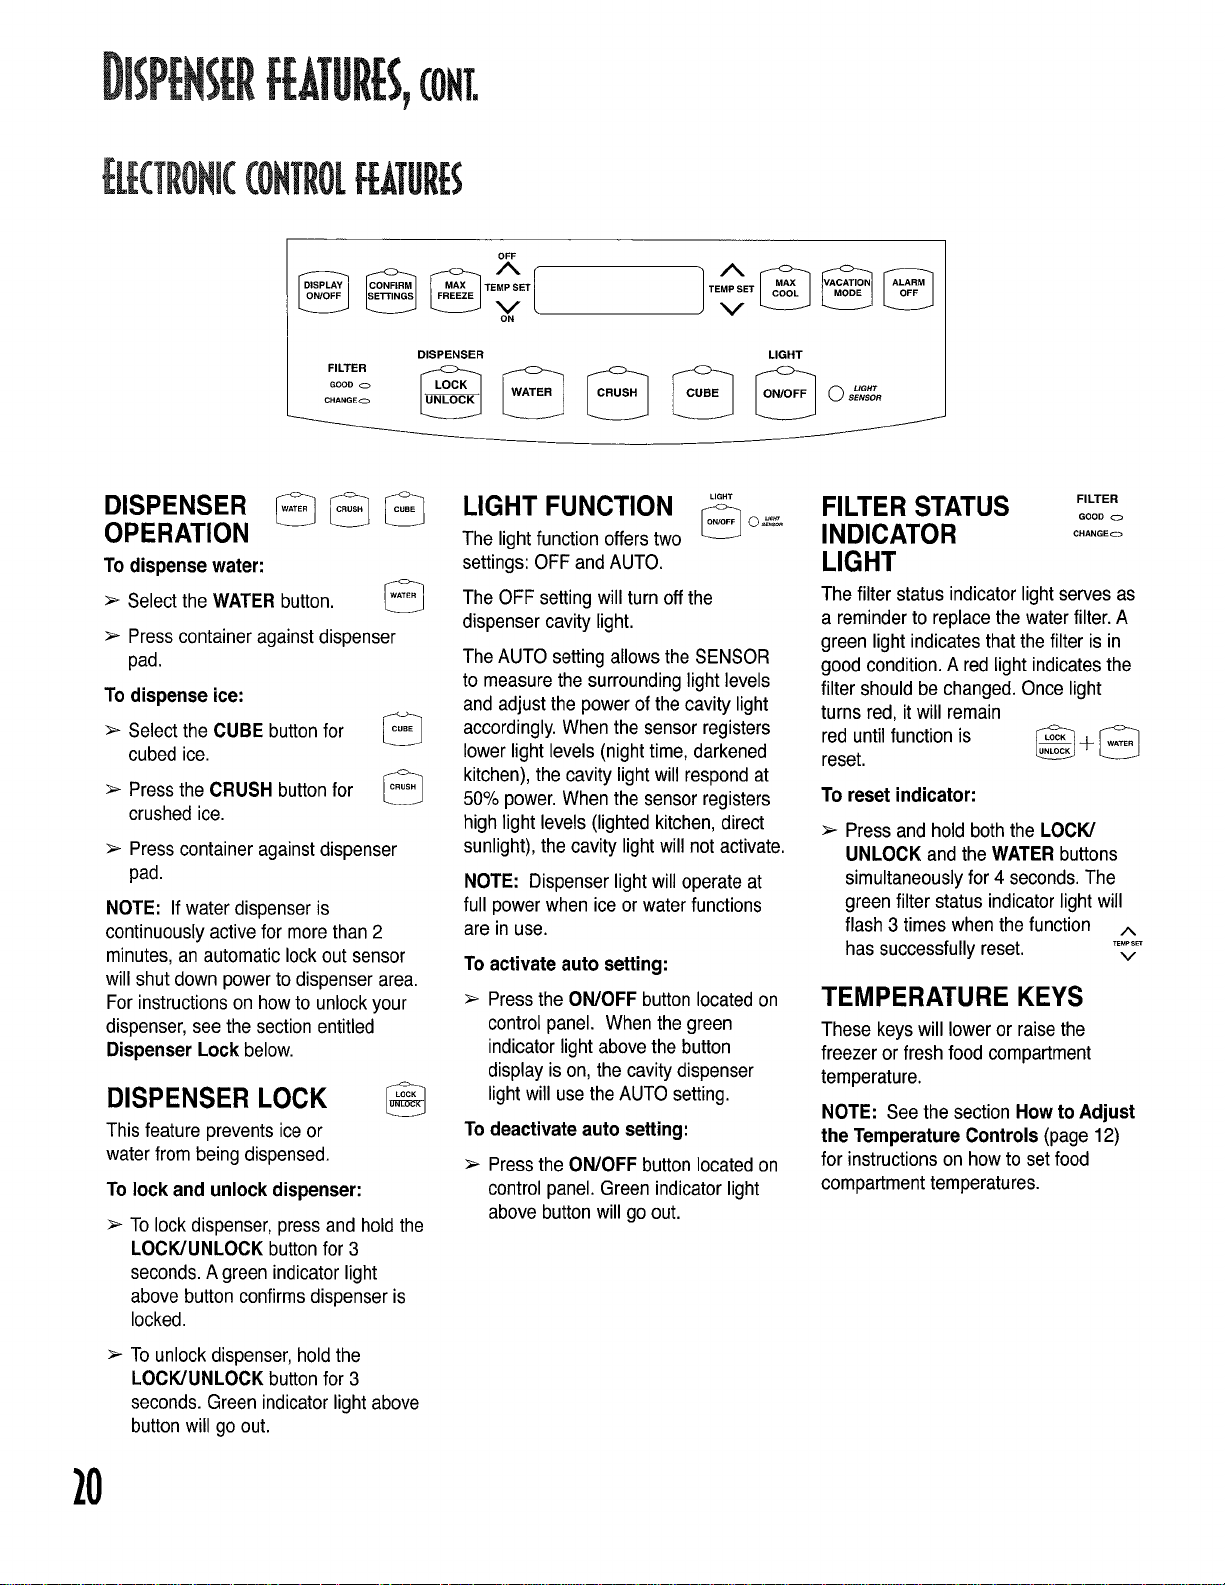
DISPENSERf[ATIJRt S,(oNt.
[i[(TRONi((OHTROL[[ATUR[$
OFF
ON
GOOD
DHANGEO
FILTER _
DISPENSER
OPERATION
To dispense water:
> Selectthe WATERbutton. _j
> Presscontaineragainst dispenser
pad.
To dispense ice:
> SelecttheCUBE button for
cubedice.
> PresstheCRUSH button for _]
crushedice.
> Presscontaineragainst dispenser
pad.
NOTE: If water dispenser is
continuously active for morethan2
minutes, an automatic lock out sensor
will shut down powerto dispenser area.
For instructions on how to unlock your
dispenser,see the sectionentitled
Dispenser Lock below.
DISPENSER LOCK
Thisfeature preventsiceor
waterfrom being dispensed.
To lock and unlock dispenser:
Tolock dispenser,press and hold the
LOCK/UNLOCK button for 3
seconds.A green indicator light
above button confirms dispenser is
locked.
DISPENSER
LIGHT FUNCTION
The lightfunction offerstwo
settings:OFF andAUTO.
The OFF setting will turn off the
dispenser cavity light.
TheAUTO setting allows the SENSOR
to measure the surroundinglight levels
and adjust the power of the cavity light
accordingly. Whenthe sensor registers
lower light levels (nighttime, darkened
kitchen), the cavity light will respond at
50% power. When the sensor registers
high light levels (lighted kitchen, direct
sunlight), the cavity lightwill not activate.
NOTE: Dispenser lightwill operate at
full powerwhen ice or water functions
are in use.
To
activateauto setting:
Press the ON/OFF button located on
control panel. When the green
indicator light abovethe button
display is on, the cavity dispenser
lightwill usethe AUTO setting.
To
deactivateauto setting:
Press the ON/OFF button located on
control panel. Green indicator light
above button will go out.
LIGHT
SENSOR
FILTER STATUS FILTER
INDICATOR c.,.G o
LIGHT
The filter status indicator light serves as
a reminderto replacethe water filter. A
green light indicatesthatthe filter is in
good condition. A red light indicatesthe
filter should be changed. Once light
turns red, itwill remain
red untilfunction is @ 4- [_
reset.
To reset indicator:
> Press and hold both the LOCK/
UNLOCK and the WATERbuttons
simultaneouslyfor 4 seconds.The
green filter status indicator light will
flash 3 times when the function /,,
has successfully reset, v
TEMPERATURE KEYS
These keyswill loweror raisethe
freezer or fresh food compartment
temperature.
NOTE: Seethe section How to Adjust
the Temperature Controls (page 12)
for instructions on howto set food
compartmenttemperatures.
GOOD
_Mps_
Tounlock dispenser,hold the
LOCK/UNLOCKbutton for 3
seconds. Green indicator light above
button will go out.
10
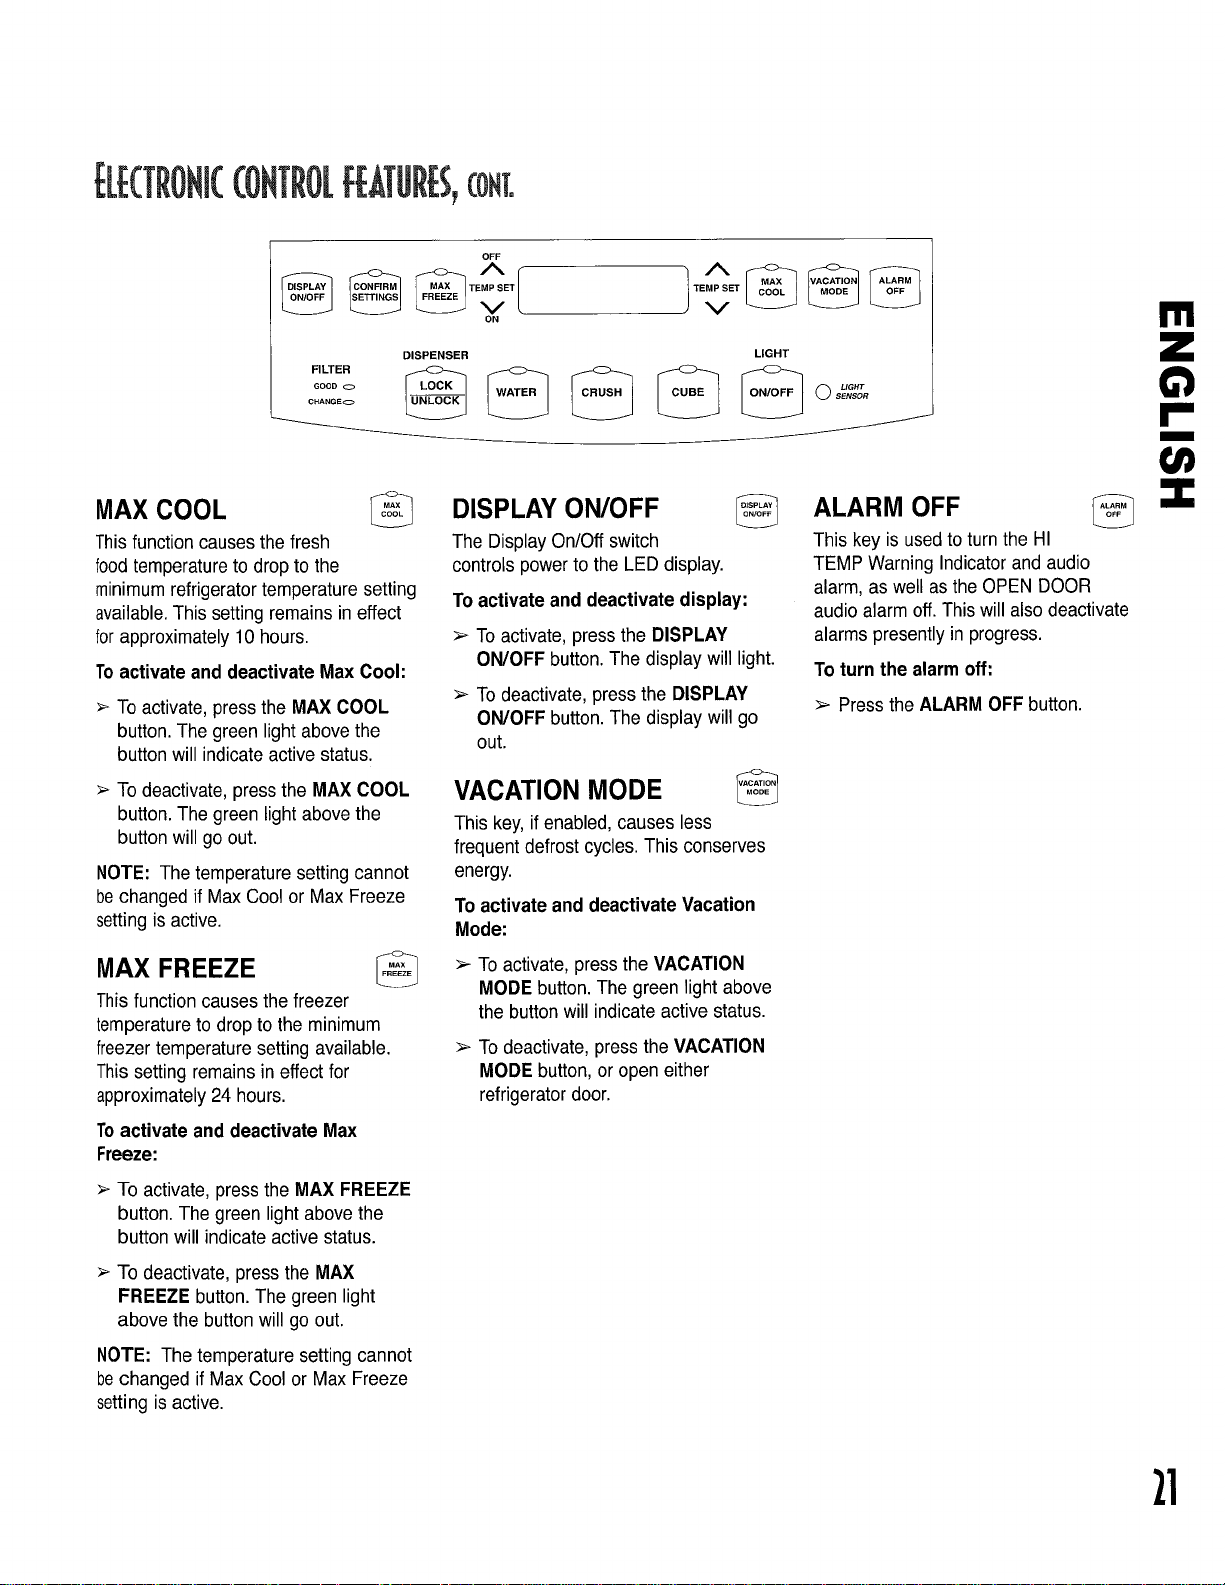
[LE(TRONI((ONTROLFEATURES,(ONT.
OFF
GOOD
CHANGE_
FILTER @ [_
MAX COOL
Thisfunction causesthefresh
foodtemperature to drop to the
minimumrefrigeratortemperature setting
available.This settingremains in effect
forapproximately 10 hours.
Toactivate and deactivate Max Cool:
> To activate,press the MAX COOL
button. The green lightabove the
button will indicate active status.
> To deactivate,press the MAX COOL
button.The green lightabove the
button will go out.
NOTE: The temperature setting cannot
bechanged if Max Cool or Max Freeze
settingis active.
ON
DISPENSER
DISPLAY ON/OFF
The DisplayOn/Off switch
controls power to the LEDdisplay.
To activateand deactivate display:
> To activate, press theDISPLAY
ON/OFF button.The display will light.
> Todeactivate, press the DISPLAY
ON/OFF button.The display will go
out.
VACATION MODE
Thiskey, ifenabled,causesless
frequent defrost cycles.Thisconserves
energy.
To activate and deactivate Vacation
Mode:
Ili
LIGHT
SENSOR
m
ALARM OFF
This key is used to turn the HI
TEMP Warning Indicatorand audio
alarm, as well asthe OPENDOOR
audio alarm off.Thiswill also deactivate
alarms presentlyin progress.
To turn the alarm off:
> Pressthe ALARM OFF button.
MAX FREEZE
Thisfunction causes the freezer
temperatureto drop to the minimum
freezertemperature setting available.
This setting remains in effect for
approximately24 hours.
Toactivate and deactivate Max
Freeze:
> To activate, press the MAX FREEZE
button. The green light above the
button will indicate active status.
> To deactivate, press the MAX
FREEZE button.The green light
above the button will go out.
NOTE: The temperature setting cannot
bechanged if Max Cool or Max Freeze
setting is active.
>- To activate, press the VACATION
MODE button. The green light above
the button will indicate active status.
> To deactivate, press the VACATION
MODE button,or open either
refrigerator door.
21

SABBATH
MODE
This mode is intended to deactivate
powerto the LED and dispenser lights,
while allowing the controls to remain
operational. No visual or audio alarms
will be available while in this mode.
To activate and deactivate Sabbath
Mode:
> To activate, press and hold both the
LOCK/UNLOCKand ON/OFF
buttonssimultaneously for 3 seconds.
After 3 seconds,the LEDand
dispenser lights will turn off.
Dispenser light will not activate
during dispensing while in this
mode.
> To deactivate, press and hold both
LOCK/UNLOCK and ON/OFF
buttonssimultaneously for 3 seconds.
After 3 seconds, the LEDand
dispenser lights will activate.
NOTE: Inthe event that power is
interrupted whilethe Sabbath Modeis
active, the control will remainin Sabbath
Modewhen power returns.
AUTO DISPLAY
The auto display controls the illumination
of the LED display basedon the light
readings receivedfrom the SENSOR. If
the SENSORindicates lowlight levels,
the display will be dimmer than if
displaying during weINit periods.
To set the power level of the display:
Pressand hold both the
ON/OFFbutton and the
freezer Y button for 3 seconds.The
current activestate will show in the
display by usingAL O for on, AL A
for auto.
> Usethe refrigerator _,__" button to
scroll through the display states.
Activate the chosen setting by
pressingthe CONFIRM
SETTINGSbutton.
NOTE: The lettersAL will always show
in freezer temperature display while in
this mode.
TEMPERATURE
CONVERSION MODE
Thismode is availabletochange
thetemperaturedisplaybetween
Fahrenheitand Celsius.
To changecurrenttemperature
reading:
Press theDISPLAYON/OFF and
buttons simultaneouslyfor 3 seconds.
oF
oc
HIDDEN
LOCKOUT FOR
UPPER KEYPAD
The purposeof this modeis to prevent
tampering with the upper set of
dispenser controls. This includesthe
DisplayOn/Off, Max Freeze, Max Cool,
Vacation Mode,and TemperatureSet
functions.
To activateand deactivate Hidden
Dispenser Lockout:
Toactivate, press the LOCK/
UNLOCK and DISPLAY OFF buttons
simultaneouslyfor 3 seconds.
Todeactivate, press the LOCK/
UNLOCK and DISPLAYOFF buttons
simultaneouslyfor 3 seconds.
ON/OFF FUNCTION
The ON/OFF function turns offcooling to
the fresh food and freezer sections while
allowing the lights and electronicdisplay
to stayon. The dispenser functions will
not be availablewhile in this mode.
Todeactivateand activate refrigerator:
To deactivate, press the freezer -_
button until the readout registers
beyondthe maximum allowable
freezer temperattJre.At this point, the
LED will read OFF. Press the
CONFIRM SETTINGS button to
confirm the selection.
Toreactivate, press the freezer v
button. Press the CONFIRM
SETTINGS button to confirm the
selection.
22
NOTE: After reactivation,the display
will show temperaturesetting previously
in use. See the section How to Adjust
the Temperature Controls (page12)
for instructions on how to set food
compartmenttemperatures.
Toa_oid electrical ShockWhiChCan
Causesevere personalinju_or
death, DO NOTperform maintenance
or service on refrigeratorunless
refrigerator is unplugged.
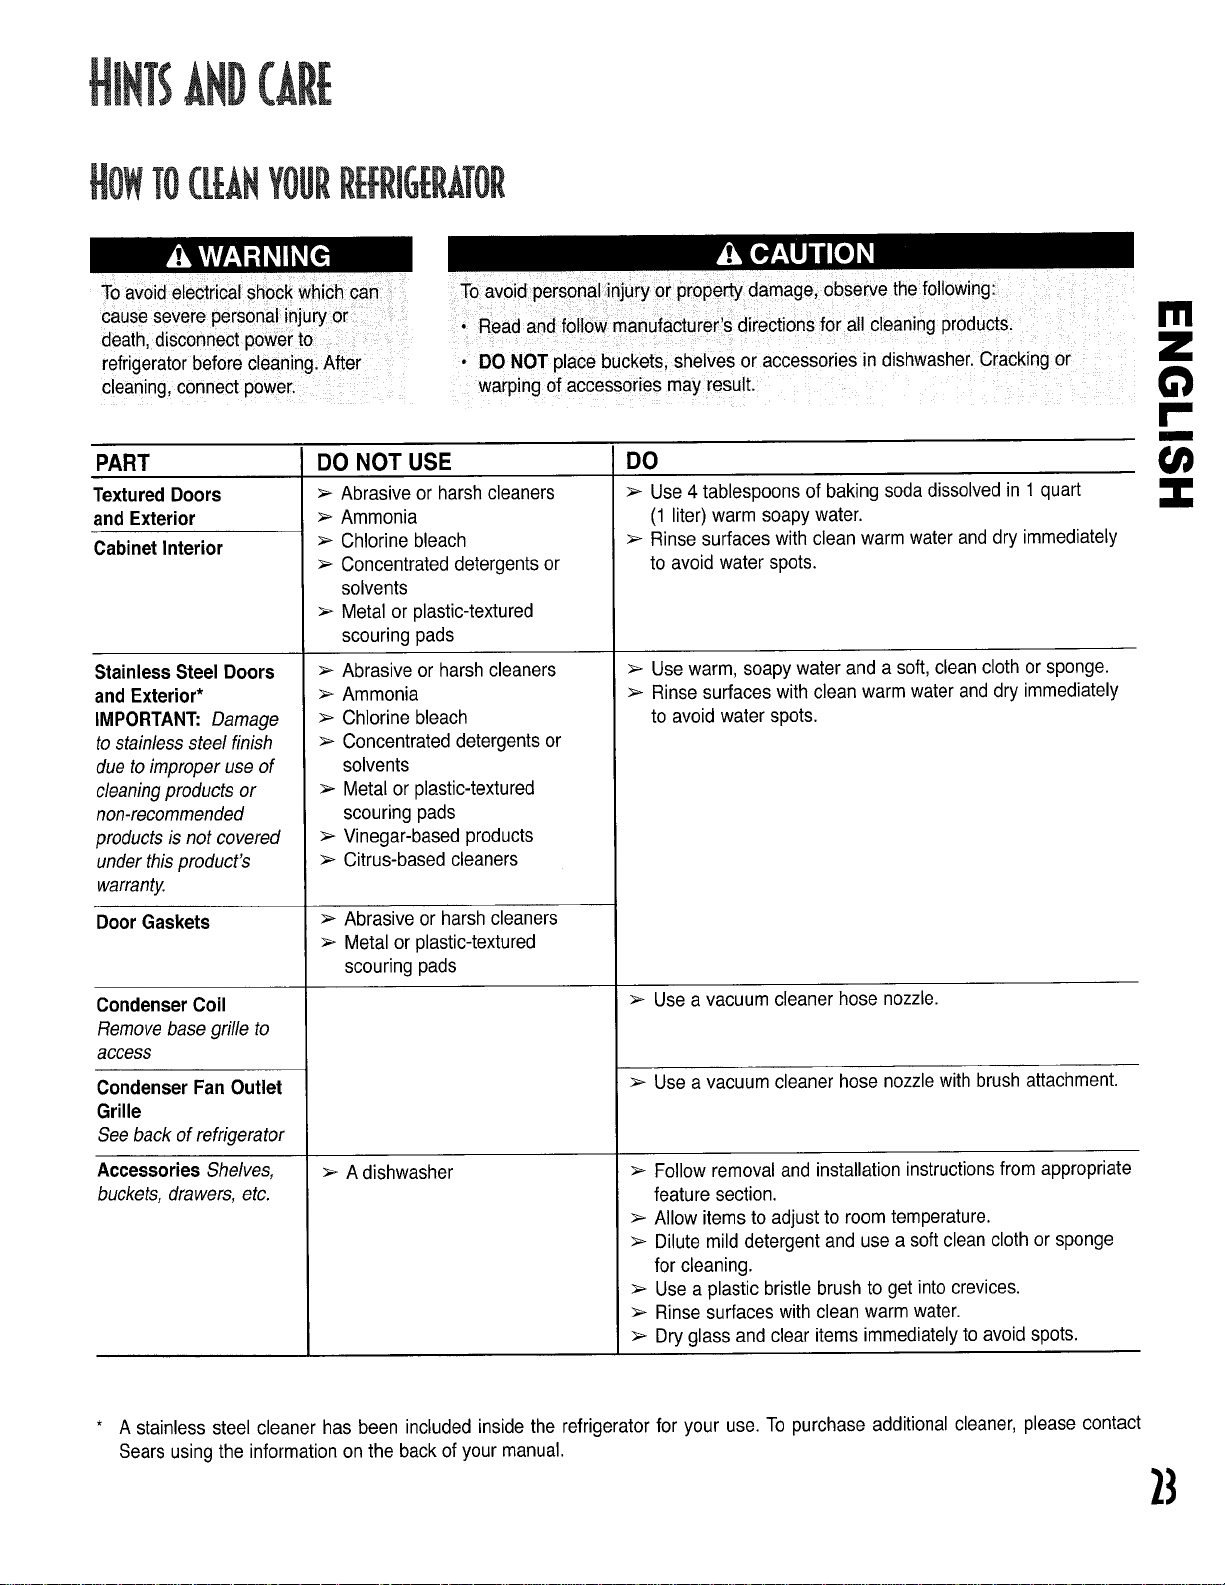
TO(LBNYOURR[FRIG[RATOR
ToaVoideleciricalshock WhiChCan
cause severe personal injuryo_
death, disconnect power tO
refrigeratorbeforecleaning:After
cleaning, connect poweri
PART
TexturedDoors
and Exterior
Cabinet Interior
StainlessSteel Doors
and Exterior*
IMPORTANT: Damage
tostainless steel finish
due toimproper use of
cleaningproducts or
non-recommended
products is not covered
under thisproduct's
warranty.
Door Gaskets
Condenser Coil
Removebase grille to
access
CondenserFan Outlet
Grille
Seeback of refrigerator
Accessories Shelves,
buckets, drawers, etc.
DO NOT USE
> Abrasive or harsh cleaners
> Ammonia
> Chlorine bleach
> Concentrated detergentsor
solvents
Metal or plastic-textured
scouring pads
> Abrasiveor harsh cleaners
> Ammonia
> Chlorine bleach
> Concentrated detergentsor
solvents
Metal or plastic-textured
scouring pads
> Vinegar-based products
Citrus-based cleaners
> Abrasiveor harsh cleaners
> Metal or plastic-textured
scouring pads
> Adishwasher
To avoid peis6nal ;injuryo_:prope_ damagei obseive the following
Read and foll5w manuf_ctureis" diiections for all cleaningproducts:
• DO NOT place bucketsi shelves or accessories in dishwasher.Cracking or
warp ngof accessories may resu L
DO
Use 4 tablespoons of baking sodadissolved in 1 quart
(1 liter)warm soapy water.
> Rinsesurfaces with clean warm water and dry immediately
to avoid water spots.
Use warm, soapy water and a soft, cleancloth or sponge.
Rinse surfaces with clean warm water and dry immediately
to avoid water spots.
> Use a vacuum cleaner hose nozzle.
> Use a vacuum cleaner hose nozzle with brush attachment.
> Followremoval and installation instructionsfrom appropriate
feature section.
Allow items to adjust to room temperature.
> Dilute mild detergent and use a soft clean cloth or sponge
for cleaning.
> Use a plastic bristle brush to get into crevices.
> Rinse surfaces with clean warm water.
> Dryglass and clear items immediately to avoid spots.
II'1
i
A stainless steel cleaner has been included inside the refrigerator for your use. To purchase additional cleaner, please contact
Sears using the information on the back ofyour manual.
23
1. Remove all food.
2. Disconnect refrigerator.
3. Clean the following items-paying
special attentionto crevices-using
the appropriate instructions in How to
CleanYour Refrigerator:
• Walls,floor,and ceiling of cabinet
interior.
• Drawers, shelves, and gaskets.
4. Wash and dry all bottles, containers,
and jars. Discard spoiledor expired
items.
5. Wrap or store odor-causingfoods in
tightly-sealed containersto prevent
reoccurring odors.
6. Connect power to refrigerator and
returnfood.
7. After 24 hours, check if odor has
been eliminated.
Ifodor is still present...
1. Remove drawers and place on top
shelf of refrigerator.
2. Pack refrigerator and freezer
sections-including doors-with
crumpled sheetsof black and white
newspaper.
3. Place charcoal briquettes randomly
on crumpled newspaperin both
freezer and refrigerator
compartments.
4. Closedoors andlet stand24-48 hours.
5. Repeat steps 5 through 7 above.
If odor was not eliminated,contact
Sears Service Center. Referto back of
manualfor phone number.
ERGYSAVINGIDEAS
> Avoid overcrowding refrigerator
shelves.This reduces effectivity of air
circulationaround food and causes
refrigeratorto run longer.
> Avoid addingtoo much warm food to
refrigerator at one time. This
overloads compartmentsand slows
rate of cooling.
> DONOT use aluminumfoil,wax paper,
or papertowelingas shelfliners.This
decreasesairflow andcauses
refrigeratorto run lessefficiently.
> A freezer that is 73full runs most
efficiently.
> Locaterefrigeratorin coolest part of
room.Avoid areasof direct sunlight,
or near heating ducts, registers, or
otherheat producing appliances. If
this is not possible, isolate exterior by
usinga sectionof cabinet or an
added layer of insulation.
> Referto section in Use and Care
Guide on temperature controlsfor
recommendedcontrol settings.
> Clean door gaskets every three
monthsaccording to use and care
guide instructions.This will assure
that door seals properly and
refrigeratorruns efficiently.
> Taketimeto organize items in
refrigeratorto reducetimethat door
is open.
> Besure your doors are closing
securely by leveling refrigerator as
instructed in your useand care guide.
> Clean condenser coils off as
indicated in the Use and Care Guide
every 3 months. This will increase
energy efficiency and cooling
performance.
To avoid electricalshockwhich can
cause seVeiepersonalinjuryor deaihl
disconnectpower to refrigerator
before replacing lightbulb,After
replacinglight bulb, connect power.
To avoid personal injuryor property
damage, observe the following:
> Allow light bulb to cool.
> Wear gloves when re;)lacing light
bulb.
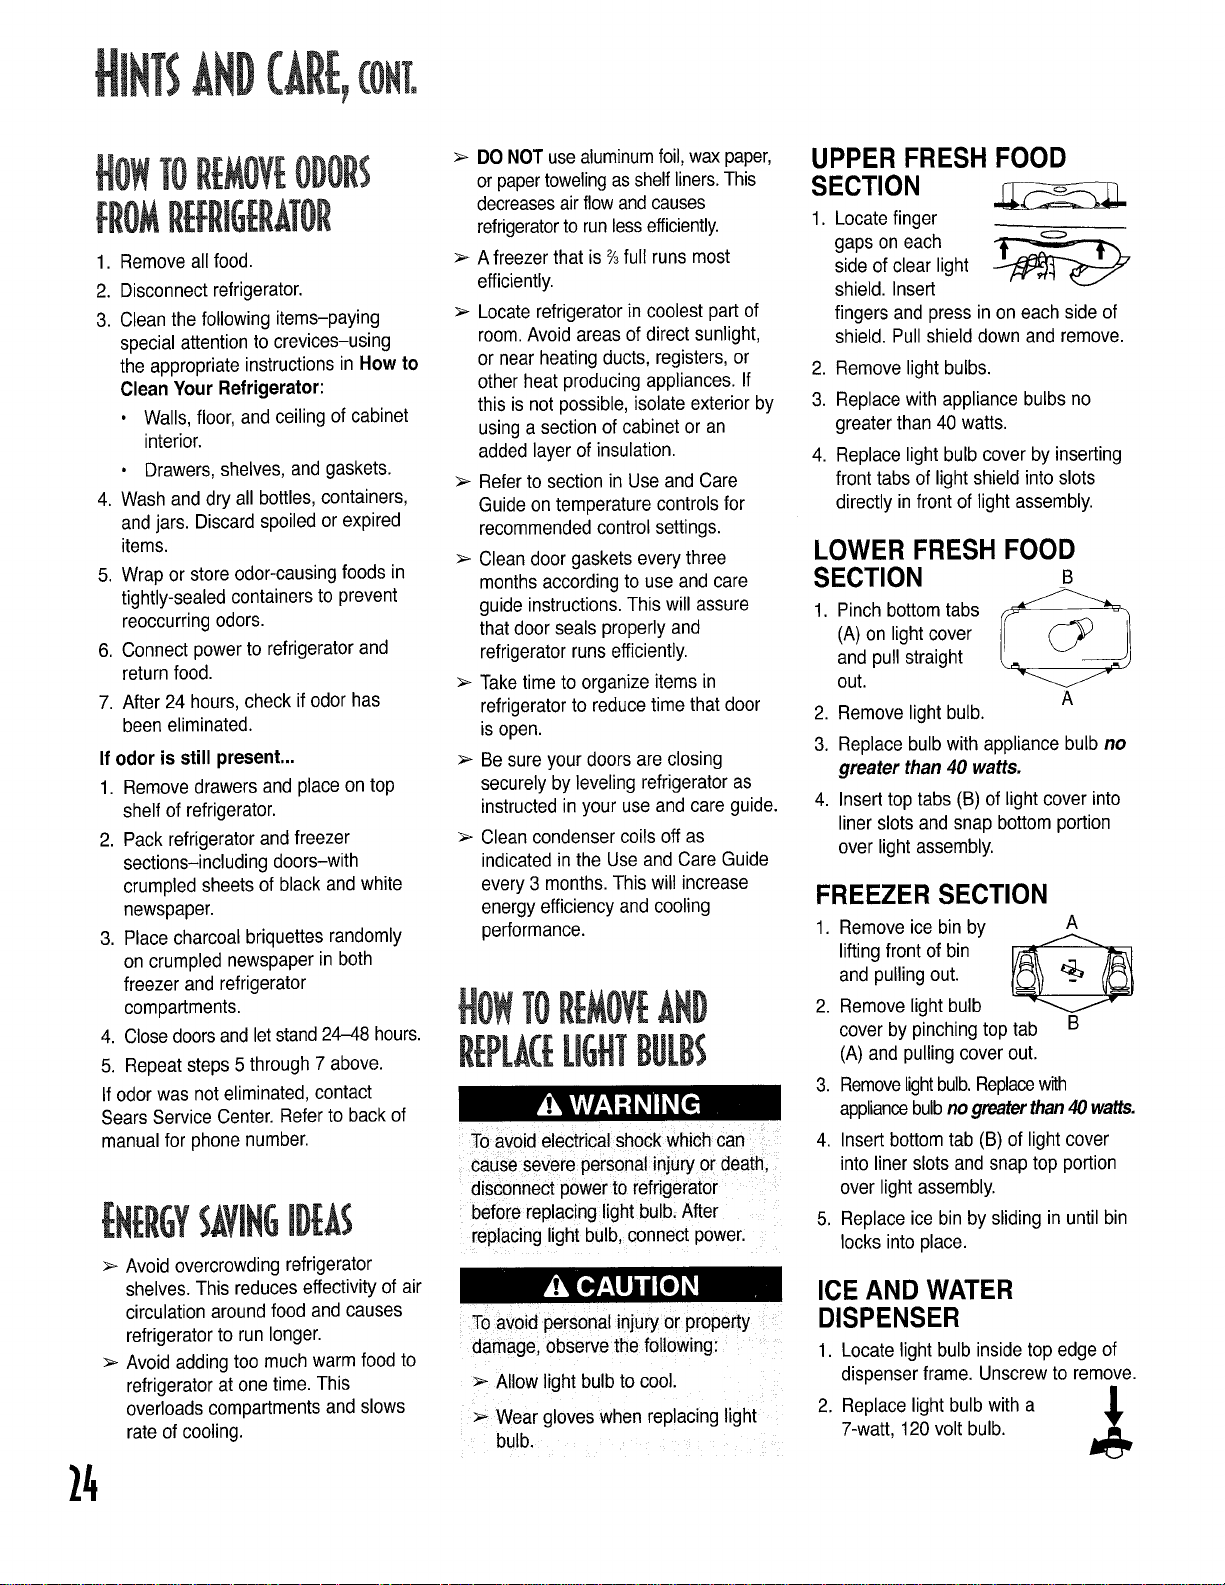
UPPER FRESH FOOD
SECTION
1. Locatefinger
gaps on each
side of clear light
shield. Insert
fingers and press in on each side of
shield. Pullshield down and remove.
2. Remove light bulbs.
3. Replacewith appliance bulbs no
greater than 40 watts.
4. Replace lightbulb cover by inserting
front tabs of light shield into slots
directly in front of light assembly.
LOWER FRESH FOOD
SECTION B
1. Pinch bottomtabs _- --_-_
(A) on light cover
and pull straight
out.
2. Remove light bulb.
3. Replace bulb with appliance bulb no
greater than 40 watts.
4. Insert top tabs (B) of light cover into
liner slots and snap bottom portion
over light assembly.
A
FREEZER SECTION
1. Removeicebin by
lifting front of bin i/_"f _,,_,1
and pullingout.
2. Removelight bulb
cover by pinchingtop tab B
(A) and pulling cover out.
3. Removelightbulb.Replacewith
appliancebulbnogreaterthan40watts.
4. Insert bottom tab (B) of lightcover
into liner slots and snap top portion
over light assembly.
5. Replace ice bin by sliding in until bin
locks into place.
A
ICE AND WATER
DISPENSER
1. Locate light bulb inside top edge of
dispenser frame. Unscrewto remove.
2. Replace light bulb with a _,
7-watt, 120 volt bulb.
lira
24

Today'srefrigeratorsusefoaminsulationandaremoreenergyefficientthanrefrigeratorsofthepast.However,foaminsulationis
not as sound absorbent as former insulated models. As a result, certain sounds may be unfamiliar. In time,these sounds will
becomefamiliar. Pleaserefer to this information beforecalling service.
Clicking
Air rushing or whirring
Gurgling or boiling > Evaporator(E) and heat
sound exchanger (F) refrigerant make
Thumping > Ice cubes from ice maker drop > Normal operation
Vibrating noise > Compressor (I) makes a > Normal operation
Freezer control (A) clicks when
starting or stopping compressor.
Defrost timer or electricdamper
control (some models) (B)
sounds like an electric clock
and makes an occasional click
or snap.
Condenser fan (D) makes this
noise while operating,
> Freezerfan (C) makes this
noise while operating.
> Freezerfan (C) slows to a stop
as the freezer door is opened.
this noise when flowing.
into ice bucket (G).
Dispenserice chute (H) closing. > Normal operation
pulsating sound while running.
>- Normal operation
> Normal operation
> Normal operation
> Normaloperation
> Normal operation
> Normal operation
m
> Refrigerator is not level. > See leveling instructions in Installing Your Refrigerator.
Buzzing > Icemaker water valve (J) > Normal operation
hookup buzzes when ice maker
fills with water.
Humming
> Ice maker (K) is in the 'on'
position without water
connection.
> Ice auger (L) hums as auger > Normaloperation
agitates iceduring dispensing.
> > Normal operationCompressor (I) can make a
high pitched hum while
operating.
Solenoid valve (M) operating
ice chute door.
> Stop sound by raising ice maker arm to 'off' position. See
Automatic Ice Maker section in your
Use and Care Guide for details.
> Normal operation
25
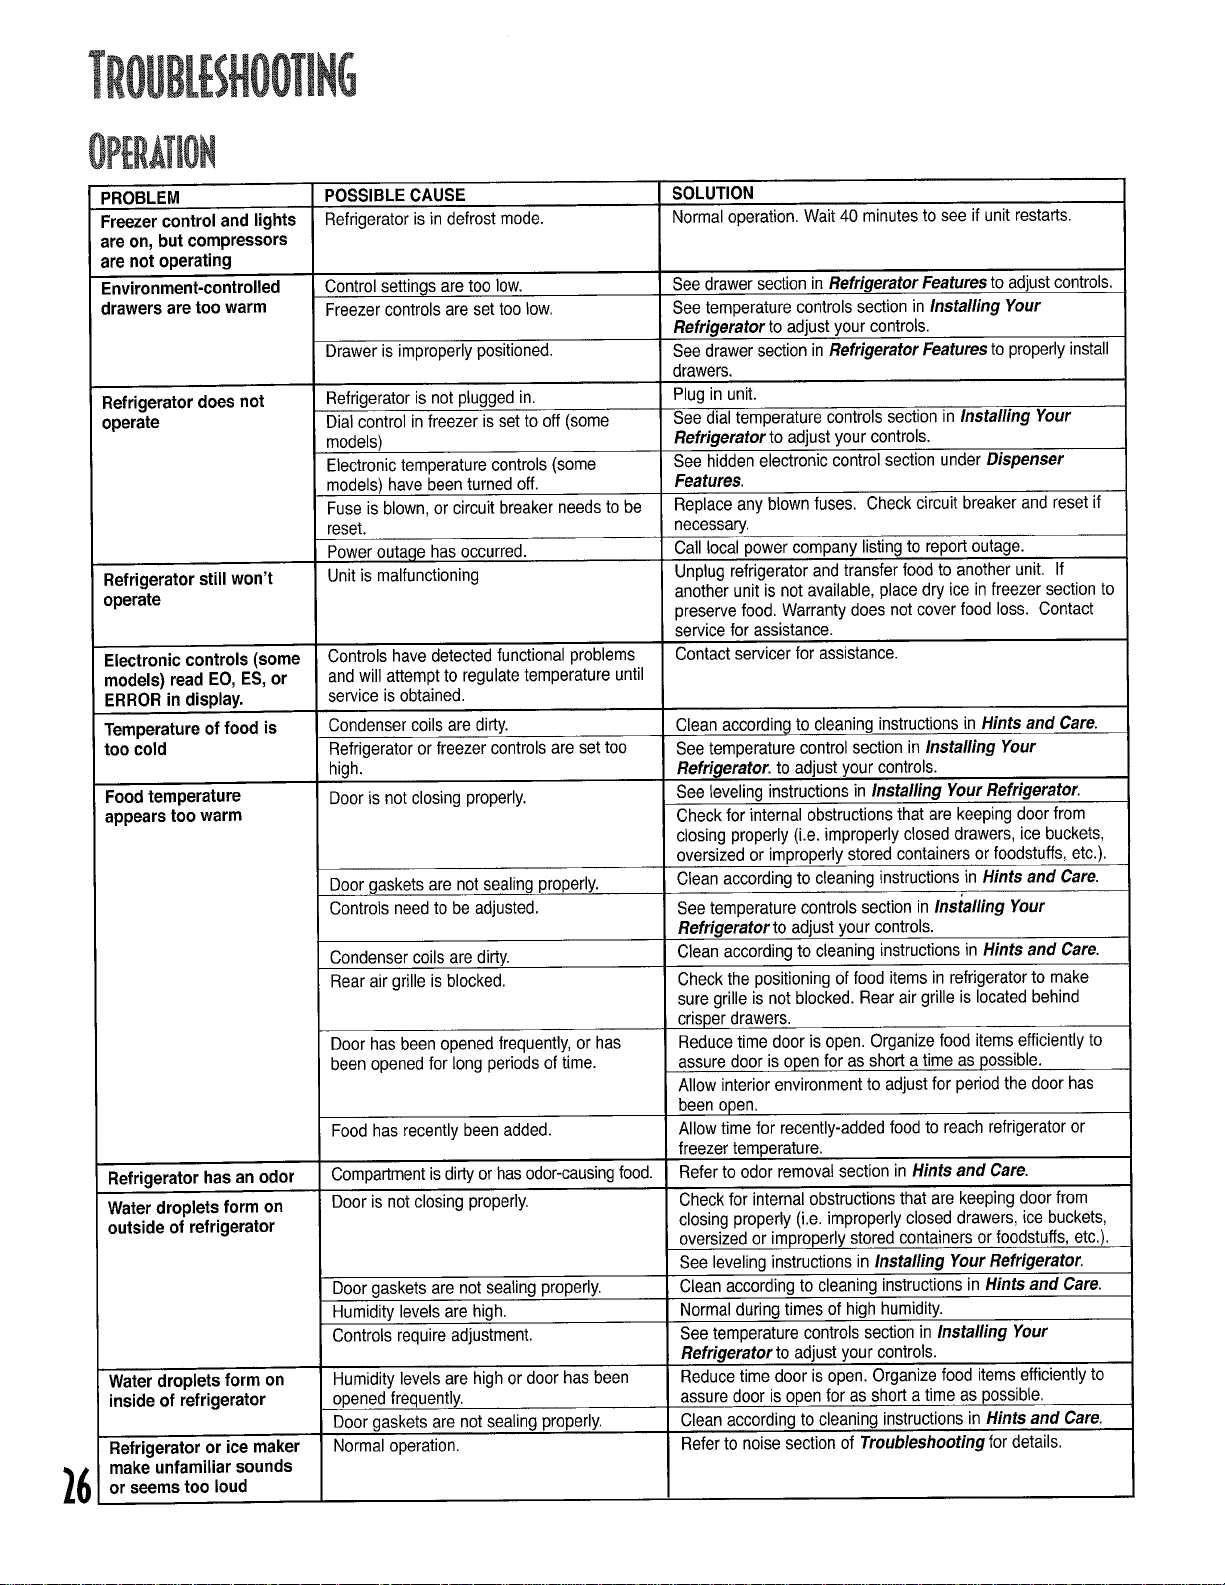
PROBLEM
Freezer control and lights
are on, but compressors
are not operating
Environment-controlled
drawers are too warm
Refrigeratordoes not
operate
Refrigeratorstill won't
operate
Electroniccontrols (some
models) read EO, ES, or
ERROR in display.
Temperatureof food is
too cold
Food temperature
appears too warm
Refrigerator hasan odor
Water dropletsform on
outsideof refrigerator
Water droplets form on
inside of refrigerator
Refrigerator or ice maker
make unfamiliar sounds
or seems too loud
16
POSSIBLECAUSE
Refrigerator is indefrost mode.
Control settings are toolow.
Freezer controls are set too low.
Drawer is improperlypositioned.
Refrigerator is not plugged in.
Dial control infreezer isset to off (some
models)
Electronic temperature controls (some
models) havebeen turned off.
Fuse is blown, or circuit breaker needs to be
reset.
Power outage has occurred.
Unit is malfunctioning
Controls have detected functional problems
andwill attempt to regulatetemperature until
service isobtained.
Condenser coils are dirty.
Refrigerator or freezer controls are set too
high.
Door is not closing properly.
Doorgaskets are not sealing properly.
Controls need to be adjusted.
Condenser coils are dirty.
Rearair grille is blocked.
Door has been opened frequently, or has
been opened for long periods of time.
Food has recently been added.
Compartmentis dirty or hasodor-causingfood.
Dooris not closing properly.
Doorgaskets are not sealing properly.
Humidity levels are high.
Controls require adjustment.
Humidity levels are high or door has been
opened frequently.
Door gaskets are not sealing properly.
Normaloperation.
SOLUTION
Normaloperation. Wait 40 minutes to see if unit restarts.
See drawersection in RefrigeratorFeaturesto adjustcontrols.
See temperature controls section in Installing Your
Refrigerator to adjustyour controls.
See drawersection in Refrigerator Features to properlyinstall
drawers.
Plug in unit.
See dialtemperature controls section in Installing Your
Refrigerator to adjust your controls.
See hidden electronic control section under Dispenser
Features.
Replaceany blown fuses. Check circuit breaker and reset if
necessary.
Call local power company listing to report outage.
Unplug refrigerator andtransferfood to another unit. If
another unit is not available, place dry ice in freezer section to
preserve food. Warranty does not cover food loss. Contact
servicefor assistance.
Contact servicer for assistance.
Clean according to cleaning instructionsin Hints and Care.
See temperature control section in Installing Your
Refrigerator.to adjust your controls.
See leveling instructionsin Installing Your Refrigerator.
Checkfor internal obstructions that are keeping door from
closing properly (i.e. improperly closed drawers, ice buckets,
oversized or improperly stored containers or foodstuffs, etc.).
Clean according to cleaning instructions in Hints and Care.
See temperature controls section in Installing Your
Refrigerator to adjust your controls.
Clean according to cleaning instructions in Hints and Care.
Check the positioning of food items in refrigerator to make
sure grille is not blocked. Rear air grille is located behind
crisper drawers.
Reducetime door is open. Organize food items efficiently to
assure door is open for as short a time as possible.
Allow interior environment to adjustfor period the door has
been open.
Allow time for recently-addedfood to reach refrigeratoror
freezer temperature.
Referto odor removal section in Hints and Care.
Check for internal obstructions that are keeping door from
closing properly (i.e.improperlyclosed drawers, ice buckets,
oversized or improperly stored containers or foodstuffs, etc.).
See leveling instructions in Installing Your Refrigerator.
Clean according to cleaning instructions in Hints and Care.
Normalduring times of high humidity.
See temperature controls section in Installing Your
Refrigeratorto adjust your controls.
Reducetime door is open. Organize food items efficiently to
assure door is open for as short a time as possible.
Clean according to cleaning instructions in Hints and Care.
Referto noise section of Troubleshooting for details.

@NT,
PROBLEM
Temperature-controlled
drawer and/or crisper
drawer do not close freely
Refrigerator runs too
frequently
POSSIBLECAUSE
Contents of drawer, or positioning of items in
the surrounding compartment could be
obstructing drawer
Drawer is not in proper position
Refrigerator is not level.
Drawer channels aredirty or needtreatment.
Doorshave beenopenedfrequently or have
been openedforlong periodsof time.
Humidity or heatin surrounding area is high.
Food has recently been added.
Refrigerator is exposed to heat by
environment or by appliances nearby.
Condenser coils are dirty.
Controls need to be adjusted.
Door is not closing properly
Doorgaskets are not sealing properly.
SOLUTION
See drawersectionin Refrigerator Features to properly
install drawers.
See leveling instructions in Installing Your Refrigerator.
Apply a thin layer of petroleumjelly to drawer channels.
Reducetime door is open. Organize food items efficientlyto
assure door is open for as short a time as possible.
Allow interior environment to adjust for periodthe door has
been open.
Normal operation.
Allow time for recently-added foodto reach refrigerator or
freezer temperature.
Evaluate your refrigerator's environment. See location
selection section in Installing YourRefrigerator.
Clean according to cleaning instructions in Hints and Care.
See temperature controls section in Installing Your
Refrigerator to adjust your controls.
See leveling instructions in Installing Your Refrigerator,
Check for internal obstructions that are keeping door from
closing properly (i.e. improperlyclosed drawers, ice buckets,
oversized or improperly stored containers or foodstuffs, etc.).
Clean according to cleaning instructions in Hints and Care.
m
I(EANDWATER
Water appears cloudy
Particles in water
and/or ice cubes.
Noindicator lights
are lit on dispenser
control
dispensedwhen padsare
pushed Controls are in lock mode.
Ice maker is not Ice maker hasjust recently been installed or Wait 24 hours for ice production to begin and for ice maker to
producing enough ice a large amount of ice has just been used. restock after emptied.
or ice is malformed Waterpressure is too low. Low water pressure can cause valve to leak. Water pressure
Air or air bubbles in water.
Carbon dust from water filter cartridge.
Concentrationsof mineralsinwater willform
particleswhenwaterbecomesfrozen and melts.
Freezer door is not closed.
Refrigerator is not plugged in.
Fuse is blown, or circuit breaker needs to be
reset.
Power outage has occurred.
Refrigerator is in Sabbath Mode.
Freezer door is not closed.Neither ice nor water is
Water tank isfilling.
Ice maker or ice maker-equipped refrigerator
hasjust recently been installed or a large
amount of ice has just been used.
Water filter isclogged or needsto be Changewater filter.
changed.
Waterfilter is clogged or needs to be Change water filter.
changed.
This is normal when first using dispenser andwill disappear
with use.
Initialwater ejected through cartridge may contain harmless
carbon dust flushed from cartridge. Particlesare safe for
consumption.Will disappear after the first few uses.
Particles are not harmful and naturally occur inwater
supplies.
Verifythat freezer door is closed. Power is removed from the
control when freezer door is opened.
Plug in refrigerator.
Replace any blown fuses. Check circuit breakers for any
tripped circuits.
Call local power company listingto report outage.
See Dispenser Features section for further information.
Verifythat freezer door is closed. Power is removed from the
control when freezer door is opened.
See control instructions in Dispenser Features.
At initial use, there is an approximate 45-second delay in
dispensing while the internal water tank isfilling.
Wait 24 hours for ice productionto begin and for ice maker to
restock after emptied.
must be between 20 to 100 pounds per square inch to function
properly.A minimumpressureof 35 pounds per square inch is
recommended for refrigerators with waterfilters.
2t

AND
Ice maker is not
_roducing ice
Water filter indicator light
is red
Refrigerator is leaking
water
Ice forms in inlettube
to ice maker
@NT.
Waterflowisslower
thannormal
Dispenserwateris not
cold
Ice maker arm is not in correct position.
Household water supply is not reaching
water valve
Copper or plastic tubing has kinks.
Water pressure is too low.
Checkfreezer temperature.
Ice bin is not installedproperly
Improper water valve was installed.
Waterfilter needs to be replaced.
Filter indicator sensor needs to be reset.
Plastictubing was used to completewater
connection.
Improper water valve was installed
Water pressure is low.
Freezertemperature istoo high.
Waterpressureis too low.
Improper water valve was installed.
Copper or plastic tubing has kinks.
Water filter is clogged or needs to be
changed.
Refrigerator has been recently installed.
Water supply in holding tank has been
depleted.
Waterhas settled into water lines outside
holding tank and has warmed to room
temperature.
Confirm ice maker arm is down. See Freezer Features
section in your owner's manual for details
Checkwater connection procedurewritten in Installing Your
Refrigerator.
Turn off water supply and remove kinks. If kinks cannot be
removed,replace tubing.
Waterpressuremust be between20 to 100poundsper square
inchto function properly.A minimumpressureof35 pounds per
squareinch is recommendedfor refrigeratorswith water filters.
See temperature controls section in Installing Your
Refrigerator to adjust your controls.Freezer must be
between 0to 2° F (-18 to -17 ° C) to produce ice.
See ice bin section for proper installation and alignment.
Check water connection procedure in your Installation
Instructions. Self-piercing and %" saddle valves cause low
water pressure and may clog the line over time. The
manufacturer is not responsible for property damage due
to improper installation or water connection.
Iffilter is not available, replace with bypassfilter. See
Dispenser Features section for directions.
See Dispenser Features section for directions.
The manufacturer recommends using copper tubing for
installation. Plastic is less durable and can cause leakage.
The manufacturer is not responsible for property damage
due to improper installation or water connection.
Check waterconnectionprocedure in yourInstallation
Instructions. Self-piercing and %" saddle valves cause low
water pressure and may clogthe line over time. The
manufacturer is not responsible for property damage due
to improper installation or water connection.
Water pressure must be between 20 to 100 pounds per
squareinch to function properly.A minimum pressure of 35
pounds per square inch is recommended for refrigerators with
waterfilters.
See temperature controls section in Installing Your
Refrigerator to adjust your controls. Freezer must be
between 0 to 2° F (-18 to -17 ° C) to produce ice.
Water pressure must be between 20 to 100 pounds per
square inch to function properly.A minimumpressureof 35
pounds per square inch is recommendedfor refrigerators with
water filters.
Check water connection procedure in your Installation
Instructions. Self-piercing and _,6"saddlevalves cause low
water pressure and may clogthe line over time. The
manufacturer is not responsible for property damage due
to improper installation or water connection.
Turnoff water supply andremove kinks. If kinks cannot be
removed,replace tubing.
Change water filter.
Allow approximately 12 hours for water in holding tank to chill.
Discardfirst glass of water and refill.
Z8

p
REHSEIGNEMENTSIMPORTAHTS
(EoU'IIFAUTSAYOIRSUR APPRENEZA RECONNA]TRE
, , CESSYMBOLES,MOTS.ET _u
LES (ONSJGNE_ DE SE(ORJTE I_T.IQUETTES RELATIFS A LA ded_sl prendrelespr_autions
Lesmisesengardeetlesconsignesde
s6curit6indiqu6esdartscemanuelnevisent IMPORTANT: Lesrisq_esd!emprSon:
pas&couvrirtouteslessituationset ¿ER I nementet desuffocatonCheZeSenfant_
conditionssusceptiblesdesepr6senter.IIest 8 iLTE
indispensabledefairepreuvedebonsens, '_ edi enc0redange_euxm_m_Silssbnt
service,I'entretienouI'utilisationdu enirepos6sp_Uriiquelque_]Ou_s
r6frig_rateur.
de prudenceetd'attentiondansla miseen
Contacteztoujourslemagasino0rappareila dessousafind_vitertesaccidentS.
6t6achete,ledistributeur,leserviceapr6s- r6sOltei !e
venteoulefabrioantencasdeprobl6mesou Avanldejete_unvieu__e_rigerai6u!o_
desituationsquevousnecomprenezpas. c0_g_lateuri_D_monteiles po_es :
SECURITE
suivantes: ........ ......
neso_tpasph_nom_oesdepass6,ues
iiii!ii_iii_SSEMENT DangersoUpratiq_es seuiementi;iPou_sed_fairedUnvieux
;i!_N_ON Da_gers0upiati_ues_on Lasser es tabettese II_/t/ /
r_frig_rateurllir,e lesinsi_uCtonscii
placepourquees Ill /
enfants_epUissent { Ill ///
p_s_aciemententrei_ _ I_r i//// /
de
'appare
vore dedecesaucoursde Iubhsationdur6frigdrateur,
ded utllisat_onetd entretienou lesconsgnesdereparationa
Iintentionde rutilisateur.NEPASchercher_ r_parerrappareitsi
lesoonsignesnesontpascomprisesousi celavaauLdel&des
competences
12.ToujoursdObrancherler_frigOrateuravantdeproc_der_ une
r" ......
eparatlon.Debrancherlecordondahmentatonensa=sssanlla
ficheetnon lecordon.
installerte r_frig_rateurconform_mentauxconsignesdemseen
service:Touslesraccordementsdeau deectrct6 etdemse
laterred0iventOtreconformesaux codesIocauxeteffectu_spar
dupersonnelqualifi6si n_cessaire.
14. Garderler_frgerateuren bon_tatdefonctionnement.Lorsqu'ila
Ot__chapp_ouheurt_,e refrig6rateurpeutOtreendommageou
il peuts ensuivreunefuteou unmauvas fonctionnement.En
casdedommagesdemander&untechnicienquaif_ dev_rifier
Ietatdu_frig_rateur.
15. Remplace_lescordonsdalimentationuseset/oulesfiches
desserr_es.
16.Toujourslireet suivrelesconsignesd_aesderangementdu
fabricantpourlesarticlesa.rangerdansle r_frig_rateur.
m
(0NSE Etl
(;E$(OI',ISI6 ES
19

AUX I=TATS-UNIS
Nousvousf61icitonspourvotreachat.Depar
saconceptionet safabrication,votrenouvel
appareilKenmore_vousfournirade
nombreusesarmiesde servicefiable.Mais,
commetoutautreproduit,ilpourrait
necessiterdesr6parationsoutravaux
d'entretiende tempsa autre.C'estdansces
circonstancesqu'uncontratdeprotection
principalvouspermettrad'evitersouciset
d@enses.
Souscrivezmaintenantuncontratde
protectionprincipalpourvousprotegercontre
lesprobl_mesetd6pensesinattendues.
Lecontratdeprotectionprincipalvous
permettra_galementde maximiserla
Iong6vit6devotrenouvelappareil.Voicice
qu'ilinclut:
> Serviceapr6s-ventedispensepar12,000
professionnels,specialistesdes
r_parationsdesappareilsm6nagers.
> Serviceapr_s-venteillimit_,etgratuit_
(pieceset main-d'oeuvre)detoutesles
reparationsceuvertes.
> Garantiedeperformance- remplacement
du produitcouverts'ilsubitplusdetrois
d6faillancespendantunep6riodede
douzetools.
> Remplacementdu produitcouverts'ilne
peut6trer6par6.
> ContrSleannueld'entretienpr6ventifsur
demandedePutilisateur- sansfrais
additionnel.
> Acc#sinstantaneaunserviced'aidepar
tel6phone- fournitured'instructionet
d'informationnontechniquesurles
produJtsr6par#s&domicile,etfixationde
rendez-vouspourtouteintervention.
> Protectioncontrelessurtensionset les
dommagesimputablesauxfluctuationsde
I'alimentation61ectrique.
> Remboursementdesfraisdelocationd'un
appareildanslecasot_le produitr_par6
n'estpasdisponible&ladatepromise.
Lorsquevous_tesprotegeparlecontratde
protection,il suffitd'unappeltel6phonique
pourdemanderuneintervention.Vous
pouveztelephonera toutmomentdujourou
de lanuit,oufixerunrendez-vousenligne.
Searsdisposed'une6quipede12,000
professionnelsspecialistesdesreparations
quiontacces&plusde4,5millions
d'accessoiresetdepi_cesdequalit6.C'estle
genredeprofessionnalismesurlequelvous
pouvezcompter,et quivousaidera&
maximiserla Iong6vit_devotrenouvel
appareilpendantdesann6es.Souscrivez
sansattendrevotrecontratdeprotection.
Certaineslimitationset exclusionssont
applicables.Pourlesprixet deI'information
additionnelle,composezle 1-800-827-6655.
Serviced'installationSears
PourI'installationgarantieparles
professionnelsSearsdetoutappareil
menageroude produitcommesyst_me
d'ouverturedeportedegarageou
chauffe-eau,auxI_.-U.composezle
1-800-4-MY-HOME*.
CONTRATSI)'EHTRETIEN
AU CANADA
Votreachata unevaleursuppl_mentaire
parcequevouspouvezcomptersurle
HomeCentraPdeSearspourunservice
apres-vente.Avecplusde2,400sp_cialistes
formes&I'entretienetunacc_s&plusde
900,000piecesetd'accessoires,nousavons
lesoutJls,lespieces,lesavoiretletalent
pourrepondre&votredemande:nous
r6paronscequenousvendons.
VotreappareilKenmore_estcon£u,fabrique
etessayepourvousassurerdesarmiesd'un
fonctionnementfiable.Cependant,comme
toutappareilm6nager,il peutn_cessiterun
entretiende temps&autre.Lecontrat
d'entretienSearsvousoffreunremarquable
programmedeservice&unprixabordable.
Contratd'entretienSears
Estvotremani6red'acheterunservice
pourdemainauprixd'aujourd'hui.
> €:liminefacturesder@arationr_sultant
d'usurenormale.
> Fournituneassistancenontechniqueet
informative.
> M_mesivousn'avezpasbesoinde
r_paration,vousfournituncontr61e
d'entretienpr_ventifannuel&votre
demande,pourvousassurerquevotre
appareilestenbonetatdemarche.
Certaineslimitess'appliquent.Pourdeplus
amplesinformationssur lescontrats
d'EntretienSearsCanada,composezle
1-800-361-6665.
30

Garantiecompleted'uneanneesurle
refrig6rateur
Durantunep6rioded'unanb.compterde la
datedeI'achatinitial,Searsr6parera
gratuitementce r6frig6rateurencasdevice
dematiereoudefabrication,quandcet
appareilestutilis6etentretenuselonles
directivesapposeessurcetappareilou
fourniesavec.
Garantiecompletedecinqanssurle
systemede rdfrig_rationscell_
Durantunep6riodedecinqansacompterde
ladatedeI'achatinitial,Searsr6parera
gratuitementlesyst_mescelI6(quicomprend
lerefrig6rant,la tuyauterieetlemoteurdu
compresseur)encasdevicedemati_reou
defabrication,quandcetappareilestutilis6
etentretenuselonlesdirectivesappos_es
surcetappareiloufoumiesavec.
Lagarantieci-dessuscouvreseulementles
refrig6rateursquisontutilisespour
I'entreposaged'aiiments&desfins
domestiquesseuiement.Lescartouchesde
filtration(poureauetglagons)Kenmore,de
rechangeetd'origine,nesontpascouvertes
parcettegarantie.Lescartouchesd'origineet
de rechangesontgarantiespendant30jours,
piecesseulement,contrelesvicesdemati6re
oudefabrication.
Leserviceapres-venteenvertudela
garantieestdisponibleencomposantle
1-800-4-MY-HOME®(1-600-469-4663).
Cettegarantienes'appliquequesi ceproduit
est utiliseauxI_tats-Unis.
CettegarantievousconDredesdroits
juridiquesspecifiqueset vouspouvez
_galementjouird'autresdroitsvariablesd'un
etat&unautre.
Sears,RoebuckandCo.,Dept.817WA,
HoffmanEstates,IL60179
REMARQUE:Certainssyst_mesd'eau
domestiques&osmoseinverseprovoquent
unebaissedelapressiond'eau.Une
pressiond'eaubassepeutaffecterle syst6me
dedistributiond'eauetdeglagonsen
produisantdesglagonspetitsou creuxet
ralentitled6bitd'eauaudistributeur.Les
problemesdefonctionnementliesausyst_me
d'eau&osmoseinversenesontpascouverts
parlagarantie.
Veuillezinscriredansl'espaceci-dessousle
numerodemoduleetIenum6rodes6rie
ainsiqueladated'achatdu r_frig6rateur.
VoustrouverezI'etiquettecomportantle
num6rodemod6Ieet le num6rodes6rie&
I'int6rieurdurefrig6rateursurla paroigauche.
Num_rodemodele•596.
Num6rodes_rie•
Dated'achat•
Conservezceguideet le reguSearsdans
unendroits_rpourvousy reporter
ult_rieurement.
"N
m
t,R
]1

Renseignementsimportantsconcernantvotresecuritd.........................................................29
Cequ'ilfautsavoirsurlesconsignesdes6curit_....................................................................29
Contratsde protection................................................................................................................30
Contratsdeprotectionprincipaux- aux6tas-UNIS.................................................................30
Contratsd'entretien- auCanada............................................................................................30
Garantie.........................................................................................................................................31
Enregistrementduproduit..........................................................................................................31
installationdur_frig_rateur...................................................................................................33-38
Mesurede I'ouverture...............................................................................................................33
Transportdu r_frigerateur.........................................................................................................33
Choixdumeilleuremplacement...............................................................................................33
D_poseetposedespoign_es..................................................................................................34
Retraitdesporteset descharnieres........................................................................................34
Flemontagedesportes.............................................................................................................35
Posedepanneauxdeportedecoratits....................................................................................36
RaccordementdeI'alimentationeneau...................................................................................37
Mised'aplombdur6frig6rateur.................................................................................................38
Reglageet maintiendesbonnestempdratures........................................................................39
R6glageinitial...........................................................................................................................39
Reglagedescommandes.........................................................................................................39
Conservationdesaliments.......................................................................................................39
Filtre_ eau...............................................................................................................................40-41
D_poseet installationdufiltrea.eau........................................................................................40
Caract6ristiquesdesfiltres&eau.............................................................................................41
Caracteristiques- compartimentr_frigerateur...................................................................42-43
I_tag_resint6rieures.................................................................................................................42
Rangementdanslacontre-porte..............................................................................................42
Tiroirsetbats &r#glagehygrom#trique...................................................................................43
Bacsderangement..................................................................................................................43
Caract_ristiques- compartimentcong_lateur.........................................................................44
Machine&gla(;onsautomatique...............................................................................................44
Clayettesetpaniers..................................................................................................................44
Bacderangement....................................................................................................................44
Balconnetrangement...............................................................................................................44
Caract_ristiquesdudistdbuteur...........................................................................................45-49
Lumi_redudistributeur.............................................................................................................45
Touchedu distributeur..............................................................................................................45
Plateauamovible......................................................................................................................45
Fonctionnementdudistributeurd'eau......................................................................................45
Contr01ezlesdispositifsdescinqboutons...............................................................................46
Dispositifselectroniquedecommande...............................................................................47-49
Conseilset entretien..............................................................................................................50-51
Nettoyagedur6frig6rateur........................................................................................................50
Desodorisationdu r6frig6rateur................................................................................................51
ConseilspourI'economied'6nergie.........................................................................................51
Remplacerlesampoules61ectriques.......................................................................................51
Bruits normaux............................................................................................................................52
Diagnostic................................................................................................................................53-54
Fonctionnement...................................................................................................................53-54
Gla?onseteau....................................................................................................................54-55
Espafiol.........................................................................................................................................57
Service.........................................................................................................Derni_redecouverture
32

# #
Oesinstructionssontdestin6es&vousaider
installercorrectementvotrerefrig6rateur.
iREDE['OUV{RTURE
Eninstallantvotrer_frig_rateur,employezsi'l
vousplaftle diagrammeci-dessouspourdes
conditionsd'espacement.
Lesrev_tementsde sol(tapis,carreaux,bois)
peuventdiminueriesdimensionsde
I'ouverture.
Und_gagementsupplementairepeut_tre
obtenuen ayantrecours&la m6thode
pr6sent6edanslasectionMised'aplombdu
r6frig_rateur(page38).
Volume Ddgagement
totalde recommandd
I'appareil Haut C6tes Arri_re
Moinsde
6,5m2
Plusde
6,5m2
IMPORTANT: Sile r_frig_rateurdoit6tre
install6dansuneenceinteo0sapartie
superieuresetrouveraitcompletement
recouvert,mesurezladistanceentrele
plancheretle hautducache-charni_repour
v_rifierlebondegagement.
s.c. s.c. 13mm
13mm s.o. 13mm
TRAHsPORTD!J
# #
R{FRI6{RAT{gR
Suivezcesconseilspourdeplacerle
refrig_rateur_,sonemplacementd_finitif.
NEtransportezJAMAISlerefrigerateur
surlec6t&S'iln'estpaspossibledele
mettre&la verticale,posez-lesur I'arriere.
Laissezler6frig6rateur&laverticale
pendantenviron30minutesavantdele
brancherpour_tresir queI'huilerevienne
au compresseur.Lebranchement
imm6diatdu r6frig6rateurpourrait
endommagerlespiecesinternes.
Servez-vousd'unchariotoudiablepour
deplacerler6frig6rateur.Faites
TOUJOURSfairereposerlec6t6ou
sondos,JAMAISde sonavant.
Prot_gezlefiniexterieurdu refrig6rateur
Iorsdutransportenenveloppantlacaisse
decouverturesouenajoutantdu
rembourrageentrelerefrig6rateuret le
diable.
Assujettissezfermementler6frigerateurau
diablearaidedesanglesoudecordons
_lastiques.Faitespasserlessanglesparles
poignees,sipossible.NEserrezPAStrop.Un
serrageexcessifpourraitendommager
I'exterieurdufini.
RespectezcesconsignesIorsde las61ection
de I'emplacementd_finitifdur_frig6rateur•
N'installezPASle r_frig_rateurprosd'un
four,radiateurou d'uneautresourcede
chaleur.Sicelan'estpaspossible,
protegez-leavecdumat_riaude I'armoire.
NEI'instaliezPASdansunendroito_la
temperaturedescendendessousde
13°C (55°F).,&,cettetemperature,il
pourraitrealfonctionner.
Suivezlesinstructionssur laraise
d'aplombfourniesdanslasectionMise
d'aplombdur6frig_rateurpourqueles
portessefermentcorrectement(page38).
=1'!
m
33

IHSIA[[AIION
PourlafacilitedeI'installation,quelques
modelesder6frigerateurontpuavoir6t6
embarqu6slespoign6es_tantcoup6es.A
veuillezse r6fererI'int6rieurdelasectionde
nourriturefraTche,ouI'arrieredevotre
r6frig6rateur,pourplaclapoignee6quip6e.Au
caso0lefuturtransportdurefrig6rateurserait
exig&ouquelespanneauxdeportepeuvent
devoiretreenlev6souremplac_s,les
instructionsded6placementpourlespoign6es
ont6t_inclusesicipourvotreconvenance.
Laconceptiondelapoign_epeutchangeren
raisondela conceptionmodule.Veuillezse
r6f6rerauxinstructionsci-dessouspourles
instructionspourlaconceptionapproprieede
poignee.
POSE D'UNE POIGNI:!:EDE
COMPARTIMENT POUR
PRODUITS. FRAIS
MONTEE A L'AVANT
1. Enleverles deuxvis_sixpansde6mm
dubasde laporteducong_lateuretdu
refrig6rateur.
,
Alignerlespoign6esde
porteaveclesclipsde
retenuedeportesuperieurs
etinferieurset lesfaire
glisserjusqu'&cequeles
trousdesvisse trouvantau
basdespoigneescorrespondentaux
trousdesvis deporte.
Insererlesvisretirees&
,
1'6tape1danslestrous
perc_s&ceteffetau bas
delapoign6e.
,
Embofterlesgarnituressur
la partieinf6rieuredes
poign6esetdesdispostifs
de retenuedubasdela
porte.
DI_MONTAGE D'UNE
POIGNEE DE
COMPARTIMENT POUR
PRODUtTS.FRAIS
MONTEE A L'AVANT
1. Retirerlapartieinf_rieuredespoign_es&
I'aided'untr_spetittournevis&lame
plate.
IMPORTANT: Couvrirla lamedu
tournevisde ruban-cachepour6viter
d'abfmerI'appareil.
it
,
Retirerlesdeuxvisde
labasedelapoign6e.
Trera o, ,everse,jI
,
hautpourlad6gager
deI'appareil.IIestpossiblequ'ellesoit
difficile_.enlever.
.
Precederde m6mepourla posedeI'autre
poign6e.
INSTALLEZ LES
POIGN_ES QUI SONT
MONTES DU C()TI_ DE LA
PORTE
1. Degagerlagarnituredu
hautdela porteen
retirantlesvis
cruiciformesduhaut
desportesdes
compartiments
cong_lateuret produitsfrais.
> Mettrelesvisdec6t_pourle
remontage.
Alignerlesencochesaudosde lapoign_e
suresclipsde _
retenuedela I!1,1
porte. InsUrerles
clipsdansles
encochesetglisserlapoign6eversle bas
jusqu'&ce qu'ellebutesurla garniture
inf6rieure.
t
t
,
Remplacez1'6quilibre
sup6rieurdeportepar
lesvis cruciformes
maintenuesde
I'enl_vementd'equilibre.
,
Proc_derdem_mepour
laposedeI'autrepoignee.
RETIREZ LES POIGNI_E
QUI SONT MONTI_S DU
COTE DE LA PORTE
Pour6viieidesdommageset
d_endommagerpoSsibleslapropri#t6
enregstreZes panneauxsuf bande
d_coiatifssolidementdansi'endroita_ant
deieiife_de_p6ign_esdeportel
1.Degagerlagarnituredu •
hautdela porteen
retirantlesvis
cruciformesdu hautdes
portesdes
compartiments
cong_lateuret produits
frais.
> Mettrelesvisdec6tepourle
remontage.
,
Saisissezla poignee
fermementavecles
deuxmainsetglissez
la poignCeversle haut
approximativement_/4"
&laversion.R_p_tez
le proced6pourretirer
I'autrepoignee.
,
Proc_derde m6mepourlaposedeI'autre
poignee.
[
Procederdem6mepourlaposedeI'autre
poign6e.

Certainesinstallationsexigentleretraitdes
portesavantded6placerle refrig6rateur&son
emplacementfinal.
PoUr#viterdesbleSsuresgraves;voi#eie
1. Retirerlagrilleet lescouvre-charnieres
inf6rieurs.
Ouvrirlesdeuxportes&180°, ouaussi
grandquepossible,pourlesd_monter.
6. Detacherleharnaisde raccordementdu
filprincipal.D#tacherleharnaisde
c&blagerouge.
> Utiliseruntournevisa lameplateouun
onglepourappuyersurlepointde
jonctionentrelesdeuxconnecteurs
afinde lesd_gager.
d_C_slobSeiveileSpoinissui_ants:
d mo,t nort s;Le; ebra,che
f6i§ie_p_rte_rern0nt_eS :
, uniquement: ::
Le fi!demise&
: led_mo_iagee{ieiemo_tagedes
i
mo_iesi en pace&laidede tuban
adh6siiavantde d_mont_les
voire ed6c_s,observerlespoints
suivants:
> Prot6gertespanchersenvinye
soupe ouautrerev6ternentdesol
avecdu:cartonuntapisou autre
rnat6rieldeprotectionavant{:le
d_ptacerlei6frig6rateur.
>- Nepasutiiserd'outils6ectrqueslots
detam sede niveauafindenepas
isquerdendommagerni brserle
ulonder6glage.
>_NEPASregler_appare&unehauteur
inf_reure& 1,74m(charni6reet
:ouvre-charni_renoncompris)car les
:omposantsdudessous.deIapparel
risqueraientdesetrouver
endommag6s.
2. Toutenserrantlecollierblanc(A)au
connecteurbleu(B),tirezlalignepour
I'eauduconnecteur.
IMPORTANT: Avantd'ins6rerialignepour
I'eaudansle connecteur,d6coupezla
tuyauterie&la premierelignedisponiblesur
latuyauterie.
3. Retirerlecouvre-charni_resup_rieur
apresavoirenlev_lavis cruciforme.
4. Fermerlesportes.
5. D6visserlesvis&sixpans_,,podes
charni_ressup6rieures.
• NEPASenleverlefilde mise&la
terrevertou laviscentralede
raccordementdufil.
Appuyersurlapattesetrouvantsurle
dessousduconnecteurpourdegager
celui-ci.
"11'1
7. Enleverlescharnieressup_rieuresen
m6metempsquelesportes.
8. Enleverlescharnieresinfefieuresavecun
tourne-_crouhexagonalde_/,po.
Pourremonterlesportes,suivredans
I'ordreinverseiesetapesindiqu_essous
la sectionRetraitdesPorteset des
Charnieres.
IMPORTANT: Avantd'insererlalignepour
I'eaudartsleconnecteur,d6coupezla
tuyauteriea.lapremierelignedisponiblesur
latuyauterie.

t J
IHSTALLATIOHDUREFRI6ERATEUR,SUITE
11".11
Afind
(certainSmod_i_
ruban adh_sifal
poign6e_:
REMARQUE:
> Poureviterquela surfacedela portene
setrouve6rafice,recouvrirI'arrieredes
rebordsdespanneauxd6coratifsderuban
cache.
> Mettretouteslesvisdec6t6et les
reutiliserb,leuremplacementd'origine.
POSE DES PANNEAUX
1. Retirerlesvisdelagarnituresup_rieure
delaporteaI'aided'untournevis
cruiciformeet laretirer,
,
Faireglisserlapoign6evers
lehautjusqu'acequ'ellese
degage.Tirerpourlaretirer
delaporte.
3. Retirerlesattaches ,.,_ e_,_
dela porte_.I'aide
d'untourne-6crou
hexagonalde_/4po.
4. Faireglisserlebasdespanneauxdansla 2.
garnituredu basdelaportejusqu'ace
quelec5t6charni_resdupanneau
d6coratifreposesousla garnitureduc6t_
charni_res. 3.
IMPORTANT: Fixerle hautdes
panneaux_.laportea I'aidederuban-
cachepouremp6cherlespanneuxde
tomber.
,
attachesde laporte
_.I'aidedutourne-
Remonterles
6crouhexagonalde
V_po.
,
Remonterlapoigneeen ins6rantles
attachesdelaportedanslesencochesau
dosdela poignee.
DI MONTAGE DES
PANNEAUX
1. Retirerlesvisdelagarnituresup6rieure
de laportea I'aided'untournevis
cruciformeetla retirer.
IMPORTANT: Fixerlehautdes
panneaux_.laporte_.I'aidederuban-
cachepourempecherles panneuxde
tomber.
Faireglisserlapoign_evers
lehautjusqu'acequ'ellese
d_gage.Tirerpourlaretirer
dela porte.
Retirerlesattaches i_ih_
dela porte_.I'aide
d'untourne-_crou
Y4po.
Enleverlerubancacheafinde pouvoir
sortirlespanneauxdelagarnitureen les
faisantcoulisser.
.
Continuerensuivantles_tapes5, 6et7
pourremettrelapoign_eet lagarnitureen
place.
Dimensionsde panneauxde6 mm
d'_paisseur
ModUlesaporte
surdimensionn_e
Portedu
compartimentpour
produitsfrais
Portede
conge.lateur
superleur a
distdbuteurd'eau
etdeglagons
Portede
cong61ateur
inferieur&
distributeurd'eau
etdeglagons
Portede
cong61ateursans
distributeur
Hauteurdu Largeurdu
panneau panneau
169,5cm 48,1cm
46,0cm 35,4cm
81,5cm 35,4 cm
169,5cm 35,4cm
}6
Fairecoulisserlapoign6eversle bas
jusqu'acequ'ellefassecontactavecla
garnitureinf6rieure.
7. Enleverleruban-cache
du hautdespanneanx
avantderemonterla
garniturede porte
sup6rieurea.I'aidedes
viscruciformesretirees
&1'6tape1.

d'installerla machine&gla_nsi
NessayezPASdinstal!drla mach!nea
: gia_onsSilesinstruction_nesoStpas
_pr sesousieilesd_passentes
c_:_6tencesde lapersonnel
Observezt0uslescodeset tegiements
Iocauxl
> NEr6parezPASlamachine_.ga£ons
I_si_strUctiensdestinees_IUtilisaieur:
D_b_anchezle i6frig6fateuravant
diinstailerlamachine&gia£onsl
guideou danS
MATI=RIEL NI CESSAIRE
> Tubeencuivreflexiblede6,4 mm(¼po)
de diametreext6rieur.
> Bagueet6crou&compressionen laiton
pourtubeen cuivrede6,4 mm(¼po)du
diametreext_rieur.
Robinetd'arr_t(necessiteuntroude6,4
mm[¼po]&percerdansletuyau
d'alimentationeneauavantdefixerle
robinet).
> CI6_.molette
> Tourne-ecrou&tetehexagonalede¼po
REMARQUE:Ajoutez2,50m (8pi)&la
Iongueurdetubenecessairepouratteindre
I'alimentationeneauafind'obtenirune
Iongueursuffisanteencasdereparation.
1. Cr6ezcetteIongueursupplementaireen
prenantsoind'eviterd'entortillerletube.
, PlacezI'extremitedutubedecuivredans
I'orificed'arriv6edurobinetd'eau.
Fa£onnezleg_rementletube- SANS
L'ENTORTILLER- pourqu'ilp_netredans
I'orificed'arrivee.
CoulissezI'_crouen lait0npar-dessusla
bagueetvissezI'ecroudansI'orifice
d'arriv_e.SerrezI'_crou_.lacl&
Pour_viterdesdommagesmatdriels
> Consultezunplombierpourraccorderle
tubedecuivreaureseaudelamaison
afind'assurerlaconformit_del'installation
auxcodesetr_glementsbcaux.
> ConfirmezquetapressiondeI'eauau
robinetd'eauestsitu6eentre20et 100
livres/po_.Site filtred'eauestinstall&
la pressiond'eauaurobinetd'eaudoit
6treauminimumde35livres/po_.
> N'utilisezPASde robineta bridesde
_,po ou robinetautoperceur!Lesdeux
r6duisentle debitd'eaus'engorgent
avecle temps,etpeuventcauserdes
fuitesencasdereparation
> Serrezles_crous_,lamainpour
empecherdefausserlefiletage.
Finissezleserragedesecrous&laide
de pincesetdeties.Neserrezpastrop.
> A_endez24 heuresavantdemettrele
r6frigerateur&sonemplacement
d_finti! puisv6rifiezetcorrigeztoute
fuitedeau
2. Retirezle capuchonenplastiquede
I'orificed'arriveedurobinetd'eau.
3. Placezlabague(B)et I'_crouenlaiton(A)
surI'extr_mitedutubedecuivrecommeil
estillustr&
A
IMPORTANT: NEserrezPAStrop.IIyrisque
sinondefausserlefiletage.
6. Tirezsurletubepourconfirmerquele
raccordementestbienfait. Raccordezle
tubeauch&ssis&I'aided'uncollier(C)et
ouvrezI'eau.VerifiezI'absencedefuiteet
corrigezlasituation,lecasech_ant.
O
7. SurveillezleraccordementdeI'eau
pendant24heures.Corrigezlesfuites,le
cas_ch6ant.
3/

IN$1ALBTIOH
DU
S'ilfautraccorderI'alimentationen eauau
refrig6rateur,voyezlasectionRaccordement
de I'alimentationeneau, avantdemettrele
r6frig6rateurd'aplomb(page38).
Pourprot6gerlesbiensmat6rielsoule
rUrigerateurdetoutdomrnage,observez
lesr_glessuivantes:
Prot_gezte vinylesoupleouautres
rev_tements&I'aidedecarton,tapis
ouautresmat6riauxdeprotection.
N'utilisezpasd'outilselectriquespour
mettrele r_frig_rateurd'aplomb.
MATI RIEL NI CESSAIRE
> Tournevis&t6tehexagonalede%po
> Niveau
Retirezlagrilleinf6rieureetlescaches
inf_rieurs.(Voyezlesinstructions
ant6rieures.)
.
Tournezlesdeuxvisde reglageavant(A)
&droitepourreleverle r6frig6rateurou&
gauchepourlebaisser.
3. Tournezlesdeuxvisder6glagearriere
(B)&droitepourreleverle r6frig6rateurou
&gauchepourlebaisser.
,&,I'aided'unniveau,assurez-vousque
I'avantdur_frigerateurestrelevede6 mm
(7_po)oud'72bulleparrapport&I'arri_re
du r_frig6rateur.Voyez1'6tape3, dansla
colonnedegauche.
5. Si I'appareilestbancale,tournerlavisde
r6glagearrieredanslesenshorairepour
releverlecoin bancal.Siles portesne
sontpasdansI'alignementI'unede
I'autre...
> D_terminerlaquelledes deuxportes
dolt_trerelevee.
Tournerlavisder6glageavantdansle
senshorairepourreleverlecoinavant
dela porte.
Si lavisde r6glageestvissee_.fond
dansunsensoudansI'autreetque
lesportesnesonttoujourspasde
niveau,abaisserlaporteoppos6een
tournantlavisde r6glageavantdans
lesensantihoraire.
V6rifiera I'aideduniveauquela porte
estbieninclineede6mmversI'arriere
afinquelaporteseferme
correctement.
Si I'appareilest aligneetstable,
remettrelagrilleet lescouvre-
charnieresen place.

Cerefrig6rateurestcongupourfonctionner&unetemperatureambiantede13o&43°C.
4
• ,il
Commandede
temperature
REFRIGERATOR
3 ! 4
avecle cadran
oZT
R[:GLAGEiNiTiAL
COMMANDE DE
TEMPI_RATURE AVEC LE
CADRAN _U,:°°
1. Reperezles
commandesdu _,
refrigerateur&lapartie
superieuredu
compartimentdes
alimentsfraisetles
commandesdu
congelateur&tapartie
superieureducompartimentcongelateur.
2. Lereglagerecommandeparlefabricant,
pourlesdeuxcompartiments,est3½.
3. Laissezle refrigerateurfonctionner
pendantaumoins8&12heuresavantd'y
placerdesaliments.
4. Attendez24 heurespourquela
temperaturesestabilise.
MODELES
I_LECTRONIQUES DE
COMMANDE DE
TEMPI_RATURE
1. Pourplacerlatemperaturedu X
congelateur,util_ezlesboutons....... &
c6tedubouton_. °v"
> Utilisezlebouton_. poursouleverla
temperaturede lasectionde
congelateur,oulebouton ov. pour
I'abaisser
> Utilisezlebouton_ pourconfirmer
lesarrangements.
wariest co_
r_
ModUlesI_lectroniquesde Commandede Temperature
OFF
DISPENSER LIGHT
GOOD 0 LIGHT
CHANGE 0 SENSOR
,
Pourplacerlatemperaturedu A
refrigerateur,utilisezles boutons_o,
&c6tedubouton_.
> Utilisezlebouton^ poursouleverla
temperaturedelasectionde
refrigerateur,ouleboutonv pour
I'abaisser.
> Utilisezlebouton_ pourconfirmer
lesarrangements.
3. Accordez24 heurespourqueles
temperaturesstabilisent.
REMARQUE:
> Lestemperaturesdecompartiment
peuventchangerlegerementpendantque
I'unitemet&jourlestemperaturesde
positionnement.
REGLAGE[ ES(OMMAHDES
Vingt-quatreheuresapr_sI'addition
d'aliments,il estpossiblededeciders'il
convientd'ajusterlatemperaturedansI'unou
I'autreoulesdeuxcompartiments.Dansce
cas,modifiezlapositionduoudesboutons
decommande,selonlesindicationsduguide
pourle reglagede latemperature.
REMARQUE:
> EnraisondelaconceptiondeI'appareil,
toujourscommencerlereglagedela
temperatureparle compartiment
congelateur.
> NechangezpaslapositiondeI'unou
I'autredesboutonsdecommandedeplus
d'uneunite#,lafoisIorsdu reglagedes
commandes.
> Laissezlestemperaturessestabiliser
pendant5 &8 heures.
> Unemodificationdureglagede I'unou
I'autredesboutonsde commande
entra;neunemodificationde la
temperaturedansI'autrecompartiment.
Compartimentderefrigerationaucongelation
tropfroid:
> Tournezla commandeverslechiffre
inferieur.
Compartimentderefrigerationaucongelation
tropchaud:
> Tournezlacommandeversle chiffre
superieur.
PRODUITS FRAIS
> Ondevraitmaintenirlatemperaturedans
lecompartimentrefrigerateurentre1 °Oet
4 °O(34°F et40 °F)(lavaleuroptimale
est3 °O[37°F]).Pourcontr61erla
temperature,placezunthermometredans
unverred'eau,aucentredu
compartimentrefrigerateur.Notez
I'indicationduthermometreapr6s24
heures.Si latemperatureestsuperieurea.
4 °C(40°F),ajustezlacommande,selon
lesinstructionsci-dessus.
ALIMENTS SURGELI_S
> Latemperaturedanslecompartiment
congelateurd'unrUrigerateurdoitetre
maintenue&18°C(0°F).Pourcontr61er
latemperature,placezunthermom_tre
pourappareilsmenagersentreles
paquetsd'alimentssurgeles.Notez
I'indicationduthermom6treapr_s24
heures.Silatemperatureestsuperieurea.
18°C (0°F),ajustezlacommande,selon
lesinstructionsci-dessus.
m
39

entmi_eilamO_,n!utilisezpasdartsle :
r6fi!g_iateU_Uneeaudequa it_boiogique
inconnuesansavor install6
avanteuap_s lefiltieundispositifde
> Lacartouchedelad6rivationNE
FILTREPASreau.Vousdevez
toujoursavoirunecartouchede
rechangedisponibleIorsqu'un
remplacementest necessaire.
> Advenantqu'onaitlaisseseproduire
unecongelationducircuitdefiltration.
remplacezla cartouchedefiltration.
Sile syst_men'apaseteutilise
pendantplusieursmoiset siI'eau
manifesteuneodeurouungo0t,
puisez2-3verresd'eaupourrincerle
circuit.Si uneodeurouungo0t
desagreabtepersiste,changezta
cartouchedefiltration.
INSTALLATION DU
FILTRE A EAU
1. Enlevezle bouchonbleudela derivation
etconservez-lepourle reutiliserplustard.
2. EnlevezI'etiquettede protection&
I'extremitedufiltre;inserezlefiltredansla
basedeconnexion.
3. Faitestournerdoucementdanslesens
horaire,jusqu'&la positiondebutee,et
emboitezlesdeuxpartiesducorpsde
filtrepourlafermeture.
ExpulsezI'airducircuitpourqueI'eau
puissecoulerlibrement:laissezI'eau
coulersansinterruptionpendant2
minutesparledistributeur,jusqu'&ceque
le debitsoitstable.
> Unepurgeadditionnellepeut_tre
necessairesilaqualitedeI'eauest
mediocre.
QUAND FAU.T-ILCHANGER
LE FILTRE A EAU?
Ledistributeurcomporteun indicateurde
changementde filtredeI'eau. Pourdes
instructionssurlafa£ondontactionneret
remettre&I'etatinitialcedispositif,referez-
vous&lasectiondeDispositifsde
Distributeur(pg.45).
IMPORTANT: LaIongevitedelacartouche
defiltrationdependdelaqualitedeI'eau&
filtreretdeiaquantited'eaupuisee.Sion
pulseunequantited'eauimportanteousila
qualitedeI'eauestmediocre,il sera
n_cessairederemplacerla cartouchede
filtrationplusfrequemment.
POUR COMMANDER UNE
CARTOUCHE DE
FILTRATION
LacartouchedefiltrationKenmore_de
rechangemodele9005estdisponibleaupr_s
desdepanneurset concessionnairesSears.
Vouspouvezegalementlacommander
aupr_sdeSearsenvousreportant
I'informationfourniesurladerni_rede
couverture.
J'ESSAIE DE PULSER DE
L'EAU POUR RINCER LE
SYST_cME. L 'EAU NE
COULE PAS...
LorsdeI'utilisationinitiale,prevoyezune
perioded'attentede 1&2minutespourque
I'eaupuisseremplirle reservoirinternede
I'appareil.
4O
REMPLACEMENT DU
FILTRE A EAU
IMPORTANT: L'airr_sidueldu systemepeut
provoquerI'ejectiond'eauetde lacartouche.
Procedezprudemmentpourladepose.
Faitestournerlefiltredanslesens
antihoraire,jusqu'&cequ'ilseseparede
labase.
LaissezI'eauresiduelledufiltres'ecouler
dansI'evier;jetezlefiltre&lapoubelle.
EnlevezI'excesd'eaudanslecorpsdu
filtreetprocedezensuivantlesetapes2
et3 delasectionInstallationdufiltre
eau.
ET SI JE N'UTILISE PAS
LE SYSTE'MEINTERNE DE
FILTRATION D'EAU?
Vouspouvezutiliserledistributeurd'eausans
yinstallerunecartouchedefiltration.Dansce
cas,remplacezlefiltreparlebouchonbleu
d'obturationdelabasedufiltre.

GRACI RISIIOL! SDESflLIRESAEAU
SPECIFICATIONS DU SYSTI ME ET CARACTI RISTIQUES
DE PERFORMANCE CARTOUCHE DE FILTRATION D'EAU
POUR RI FRIGI RATEUR- MODELE 9005
Specifications:
D6bitmaximalenservice...................................................................2,83L/ran(0,75GPM)
Longbvit6maximale- modele9005..................................................1,892litres/500gallons
Temp6raturedeservicemaximale.....................................................38°G/100°F
Temp6raturedeserviceminimale......................................................1°C/33°F
Pressiond'alimentationminimale.......................................................138kPaJ35Ib/po2
siond'alimentationmaximale.............................................................827kPa/120Ib/po2
CARACTERISTIQUES DE PERFORMANCE
Substance b I'entr_ lasortie tion moyen max.bla sortie rnin.ndcessaireI'entr_e
Plomb 0,16mg/l_+/- 10% 0,001mg/L 99,33% 0,001mg/L 0,010mg/L 6,5
Plomb 0,15mg/L+/- 10% 0,002mg/L 98,66% 0,003mg/L 0,010mg/L 8,5
Spore Min.50 000/L 1/mL 99,99% 3/mL > 99,95% NA
Turbidit_ 11+/-1NTU 0,12NTU 98,98% 0,18 NTU 0,5 NTU NA
Lindane 0,002mg/L+/- 10% 0,00005mg/L 97,62% 0,00005mg/L 0,00002mg/L NA
Atrazine 0,009mg/L+k 10% 0,0002mg/L 97,93% 0,0006mg/L 0,003mg/L NA
Chlore 2,0mg/L+/-10% 0,09mg/L 95,26% 0,17mg/L >75% NA
Particules** Au moins10000 900/mL 99,68% 2,400count/mL >85% NA
2,4-D 0,210mg/L+/- 10% 45,45ug/L 84,42% 100ug/L 0,0017mg/L NA
Amiante lO7to108fibres/L-fibresde 0,16MFL/mL 99,96% 0,16MFL/mL 99% NA
* Mesureavecd_bitde2,83L/mn(0,75GPM)etpressionmaximalede827kPa(120Ib/po2)danslesconditionsde
laboratoirestandard;cependant,la performancereelleestvariable.Performancedeprotectionde lasant6testeeet
certifi6eparNSFInternational.
** Utilisationde particulesde0,5- 1 micron.
O_siSnatlonoemcae[e/
oeamarqueoecommerce Elernents_e hsn e
V_50-W1500 WFSO 5O0gzd¢1.8925li_
WF50-NI3( V_FSO 300_1(_.!35 51i_
WFSO-KWlS00 4_9OO5 5OOg_ t.892.5h_
WFSO-KNI300 469OO5 300_ I.]35.511_)
OWF50-W[5OO OWF5! 50O_J (1.89Z.5]i_
OWFS0_NI300 OWF51 3OO_ (1.1_ 1,_
Fabdcant: Pen_._Pu_I=eorpor_
Le s) d_s£ositil(s) de traiternent de I eau _num_r_(s) s_r ce eert_Scat re4_ondent.aux normes d'essa_ de
rarticle 116830 du Code de la sant_ et de a securitY;
Contaminants m_or_:d_oloqlquesetturbidt6 Cocdarninantsin oreP_i_uestradioloalaues
Contaminates oroantoues
a_
Lmdane
Concentration Moyenneh % derdduc- Concentration Tauxder_uction pH
particules/m
Iongueur10microm_tresouplus
Etat de la Californie
Minist_re des se_ices desant6
Dispositif de traitement de l'eau
Num6ro de certificat
01 - 1486
Inltlale soumission:21 septembr¢2001
R_v_s_:21 M_ 2OO2
Cartouchesde filtrationWF50-KNI300etWF50-KWI500test_eset certifi_esparNSFInternational
sur lebasedes normesANSI/NSF42 et 53,pour la retentiondescontaminantssuivants:
Norrneno42 : Effetseeth_tiques I Norme no53 : Effetssur laeant_
l,_emb
R_ductionde la concentrationdechlore R_ductionde la concentrationde plomb,atrazine,
Filtrationmecanique lindaneet 2,4-D
Retentiondes particules- ClasseI Filtrationm_canique
Rbductionsur goOtetodeur I R_tentiondescontaminantschimiques
CONDITIONS GI NI RALES
D'UTILISATION •
Lisezcettefichetechniqueetcomparezles
caract_ristiquesde I'appareilavecles besoins
detraitementdeI'eau.
N'utilisezPASceproduitenpresence
d'uneeaudequalit_microbiologique
d_ficienteouinconnuesansinstallerun
dispositifded_sinfectionad_quatavant
ouapr_slesyst_mede filtration. Vous
pouvezutiliserunsystemescertifi_pour
lar_tentiondessporesenpresenced'une
eaud_sinfect_equipeutcontenirdes
sporesfiltrables.
Utilisezce produituniquementavecune
sourced'eaufroide.V_rifiezle respectdes
dispositionsdesloisetr_glementsIocaux
etprovinciaux.
Lesyst_medefiltrationd'eauretractable
utiliseunecartouchedefiltrationrempla£able
9005(voyezI'informationsurles _a
coordonneesdeSearspr_senteessurla
dernieredecouvertureduguided'utilisation
etd'entretienpourplacerunecommande).Le
remplacemententempsopportundela
cartoucheestunfacteuressentielpourune
performancesatisfaisantedece syst_mede _-,
filtration.Consultezla sectionapplicablede
ceguideausujetdes instructionspour
utilisationgbnbrale,entretienetdiagnostic.
Cesyst_mea6tetestesurlabasedes
normesANSI/NSF42et 53pourlaretention
dessubstancesmentionneesci-dessous.La
concentrationdessubstancesindiqu_esdans
I'eauhI'entr6edusystemea _tereduite&
unevaleurinferieureoubgale&la limite
admissiblespbcifi_eparlesnormes
ANSI/NSF42et53pourI'eauquittantle
syst_me.
R_ductionsur spores,turbiditeetamiante
i"O
PentaPure
1000ApolloRoad
Eagan,MinnesotaU.S.A.
EPAEST#35917-MN-1
41

P
INI[RI[URB
Poureviterblessureoudommage
materiel,observeziespointssuivants:
> Assurez-vousque1'6tag_reestbien
fix6eavantd'yplacerdesarticles.
> Manipulezsoigneusementlesetageres
enverretremp&Ellespeuventse
brisersoudainementsiellessont
entaill_es,egratign6esouexpos_es&
debrusqueschangementsde
temperature.
ETAGI RES DE RETENUE
LesF:tag_resdeRetenue
deFlaqueretiennentles
DE FLAQUE
petitsdeversements,ce qui
facilitelenettoyage.
> Pourenleverles6tag_res,soulevez-les
pourlessortir.
> Pourinstallerlesetageres,procedez
inversement.
LesF:tag_resdeRetenuede 8q
FlaqueQuiGlissent _..____
Dehoursse _ _'-"_
caracterisentpar ,.,_"--l___J :-_
leurfacilit6de II_'_
nettoyagegr&ce& ,",1
leurconceptionquipermetdelestirerpour
atteindrelesarticlessitu_s&I'arriere.
L'6tagereenverrepeutaussi_treenlev_een
latirant&fondet enla soulevantdeson
cadre,pour_trenettoy6e.
COMPARTIMENT DE
BOISSON
(CERTAINSMODI_LES)
Lecompartiment&temp6ratureoontr61eede
boissongardentlesboissonsetautresarticles
&unetemperaturejusqu'&3°Cplusfroide
quele restedur6frig6rateur.L'arriveed'air
permet& I'airducongelateurdepasserdans
lecompartimentdeboisson.
Commandes
Lacommandesetrouvesurla paroigauche
du r6frig_rateur.Cettecommandepermetde
r6glerlaquantit6d'aircirculantdansle
compartiment&beverage.Tournezla
commandedanslesensdesaiguillesd'une
montrepourlatemperatureplusfroide.
PourreUrerlecompartimentde boisson
et leremettreenplace :
Sile casierpourproduitslaitiersou le
balconnetse trouvedirectementau-
dessusducompartimentdeboisson,il
pourrafalloirleretirer.Suivreles
explicationsquiconviennentpourretirer
I'article.Fairecoulisserlecompartiment
deboissonverslehautetI'enlever.
Pourleremettre
d'arri%ed'air A
I'undesorifices \_-n,---,HH_
enplace,aligner tll
froid(A)du
compartiment __ _[_I_iIl
deboissonsur
I'unedesdeuxarri%esd'air(B)situees
danslacuveint_rieuredela porte.
Pousserle compartimentdansle dispositif
deretenuede I'habillageinterieurde la
portejusqu'&cequ'ilbute.
IMPORTANT:Lecompartmentdeboissonne
fonctionnepassi lesorificesd'arriv6ed'airne
sontpasalign6ssurI'arriv_ed'airdans
I'habillageinterieurdelaporte.
CASIER POUR PRODUITS
LAITIERS
Cecompartimentprocureunespacede
rangementpratiquepourlebeurre,les
yogourts,lefromage,etc.
IIestreglableetsetrouvedanslaporte.II
peut_treplac_&diff_rentsendroitsdela
portepourmieuxI'adapterauxbesoinsde
rangement.
Pourretirerlecasierpourproduitslaitiers
et leremettreenplace:
> PourI'enlever,le
fairecoulisser
versle hautet le
retirer.
> Pourleremettreenplace,glisserlecasier
dansledispositifde retenuedeI'habillage
int6rieurde laportedudessuset pousser
versle basjusqu'&cequ'ilbute.
Pourretirerlaporteducasieret la
remettreen place:
> Pourlaretirer,poussersurlesc6tesdela
porteducasieret I'enlever.
> Pourlaremettreenplace,glisserles
cSt_sde laporteducasierdanscelui-ci
jusqu'&ce quelespointescharni_res
s'enclenchentenplace.
BALCONNETS
INCLINABLES
(CERTAINS MOD#LES)
LeBalconnetInclinablesecomposed'un
casieretd'unencadrementetprocureun
espacede rangementpratiqueet reglable
pourlesalimentsdanslaporte.Lebalconnet
peut_treinclin_versI'avantpourfaciliter
I'accesauxarticlesetenlevepourfaciliterle
nettoyageetler_glage.
Pourretirerlebalconnetet le remettreen
place :
> Pourretirerle
balconnet,I'incliner
versI'avantet
I'enlever.
> Pourremettrelebalconnetenplace,le
faireglisserdanssonencadrementet le
pousser&laverticale.
PourreglerI'encadrementdubalconnet:
> Retirerlebalconneten ,.._/ ll_l
suivantlesindications
ci-dessus.
> SouleverI'encadrementhorsdusupport
dela porteet leplacer&I'emplacement
desir6.
BALCONNETS
LesBalconnetsse r_glent
selonlesbesoinsparticuliersde
rangement.
> Pourlesretirer,
coulissez-tes
verslehautettirez-lestoutdroit.
> Pourlesinstaller,proc_dezinversement.
41

ltROIBETBA(sA
R{GLAGEHYGROMETRi(IUE
BAC A LI GUMES A
HUMIDITI CONTR6LI E
LeBac_ Legumespermetdegarderles
produitsfraisplusIongtempsgraceaun
milieu00le niveaud'humiditeestr6glable.
Commandes
Cescommandespermettentdecontr61er
I'hygrometriedanslebac.Utilisezler_glage
baspourles 16gumes&peau.Utilisezun
r6glage61ev6pourleslegumesfeuilles.
D_poseetinstallationdesbacsa Idgumes:
> Pourretirerunbac,tirez-leaumaximum.
SoulevezI'avantdubacverslehautet
tirezlebactoutdroit.
> PourI'installer,introduisezlebacdansles
railsduch&ssiset poussez-leenplace.
Pourenleverla tabletteet le mettreen
place:
> SouleverI'encadrementdesrailsdela
cuveint_rieuredu
refrigerateuret le
retirer.
> Pourremettreces
616mentsenplace,
I'inserersurlesrailset
lepousseren place.
AIDE DE CONSERVATION
DE PRODUIT
IIestrecommanded'observerlesregles
suivantespourlerangementdefruitsetde
legumesdanslesbacsa_environnement
contr61e:
> NEPASlaverlesfruitsetleslegumes
avantdelesmettredanslebaccartoute
humiditeadditionnellepeutfairepourrirle
contenudubacplusrapidement.
> NEPAStapisserlebacd'essuie-toutcar
ceux-ciretiennentI'humidit&
> Suivreattentivementlesconsignesde
r_glagedescommandes.Avecun
mauvaisr6glage,lesfruitsetleslegumes
pourrontsetrouverabfm6s.
Vealatablasiguienteparaquele asistacon
loscontroles:
LOW(Faible)
• chou-fleur . ma'is
, courgettes • oranges
• pommes • pepinos
• raisin • concombres
HIGH(Elevd)
• laitue . 6pinards
• c61eri • poussesfrafches
• asperges ° chou
• brocolis • finesherbesfrafches
BAC A TEMPI RATURE
CONTRC)LI E
LeBac_TemperatureContr61eecomprend
untiroirdot6d'unecommandede
temperaturevariablequigardele
compartimentplusfroidquele refrig6rateur.
Cetiroirpeutetreutilis6pourrangerles
viandesfroidesoulesautresalimentsfrais.
REMARQUE:L'airfroidpropuls6versle
systemeviandesfroides/16gumespeutdiminuer
latemp6raturedurefrig6rateur.Lacommande
dur6frig6rateurdoitalors6trer6gl_e.
Commandes
Situ_esurla paroi&lagauchedubac,la
commandedetemp6raturer_glela
temp6raturedeI'airdansletiroir
charcuterie/legumes.R_glerlacommande&
cold(froid)pourr_glerlerefrig6rateur&une
temp6raturenormalepourles I_gumesnon
feuillus.Utiliserlereglagecoldest(plus
froid)pourlesviandesoula charcuterie.
Pourenleverunbacetlemettreenplace :
Pourenleverlebac,
I'ouvrircompl_tement,
releverI'avantetle
retirer.
Pourmettrelebac en
place,I'inserersurles
railset lepousseren
place.
QUEL RE-GLAGE DOIS-JE
UTILISER POUR LES ARTICLES
DANS MON BAC A
TEMPERATURE CONTROLEE?
Vousnedevezpasmettredesaladeou
d'autresI_gumesfeuillesdanscetiroir.
FROID PLUSFROID
chou-fleur ' bifteck
concombre • fromagesdurs
courgette • charcuterie
potatoes • bacon
mai's • hotdogs
oranges
raisins
DER. NGE EHT
BAC COLLATIONS
(CERTAINSMODI_LES)
Cebacpeut_treutilis_
pourrangerdesaliments
oudesfruitset I_gumes.
Commandes
(certainsmodeles)
CescommandespermettentdecontrSler
I'hygrometriedanslebac.Utilisezlereglage
baspourles I_gumes&peau.Utilisezun
r_glage_lev_pourlesI_gumesfeuilles.
Pourenleverunbacet lemettreen place:
> Pourenleverle bac,I'ouvrircornpletement
etle retirer.
> Pourmettrelebacenplace,I'inserersur
lesrailsetlepousserenplace.
PLATEAU A CANETTES
(CERTAINS MODF=LES)
Ceplateaucoulissedu
dessousd'unetablette
anti-gouttesfixe.IIa
unecapacit_de 12
canettesde 35cl.
Retireret installerplateaua canettes:
> Pourenleverle bac,rouvrir
compl_tement,releverI'avantetle retirer.
> Pourmettrelebacenplace,I'inserersur
lesrailsetlepousserenplace.
/
43

!
(ARACTERI TIOUE -
(LAYETTE PANli R
Poureviterdesdommagesmat6riels,
oDservezlespointssuivants:
Neforcezpaslebrasdela machine
gla(_onsversle basouversle haut.
Neplaceznin'entreposezriendartsle
bacagla£ons.
Cettemachine&glacefabriquelesgla(;ons
utilisesdansle syst_mededistribution.
Utilisationdela machine_ glagonsla
premierefois :
Assurez-vousquele baca' _iJ, ......
gla(_onsestenplaceetque __.k"
lebrasded_tectionestvers
lebas.
> Apresquelecompartimentcongelateur
atteintunetemperaturesitu6eentre
-18°Cet-17 °C(0 °Fet2 °F),la
machine&gla(_onsseremplitd'eauetse
metenmarche.
> Attendez24heuresenvironapr_s
I'installationpourrecueillirlepremierlot
degla(_ons.
> Jetezlesgla(_onsobtenusles12
premieresheuresdefonctionnementpour
v6rifierquelesyst_menecomportepas
d'impuret6s.
Instructionsdefonctionnement
Assurez-vousquelebaca gla?onsesten
placeetquelebrasded6tectionesten
bas.
Unefoisquelecompartimentcongelateur
atteintunetemperaturesitueeentre-18°C
et-17°C(0°Fet2 °F),lamachine
gla(_onsseremplitd'eauetsemeten
marche.IIestpossiblede _._
recueillirunlotcompletde ........ ,,
gla(_onsenvirontoutesles3
heures.
Arr_tezlaproductionde gla(_onsen
relevantle brasjusqu'&cequ'undeclicse
fasseentendre.
Lamachinea_gla(_onsreste&I'arr_ttant
quele brasn'estpaspouss_versle bas.
IMPORTANT: N'installezpas1'6tag_rede
tablettea.cr_meglac6esilebrasdemachine
gla(_onsautomatiqueestenpositiondela
desactivation.
44
CLAYE.'rTE DE
CONGELATEUR FIXE
Retraitetinstallationdesclayettesavec
attachesmurales:
Pourlaretirer,enclencher
lec5t6droitde laclayette
a.partirdelacremaill_refix_eauxparois
deI'appareilet la retirerdesattaches
murales.
_- PourI'installer,placerlaclayettedansle
troudefixationetlafixeravecdes
attachesmurales.
Retraitet installationdesclayettesavec
cr_maillere:
Pourretirerlaclayette,
enclencherlecStedroitde
laclayette&partirdelacremaill_refix_e
auxparoisdeI'appareilet la retirerdes
attachesmurales.
Pourinstallerlaclayette,la remettreen
placedanslesattachesmurales.
S'assurerquele rebordarrieredela
clayettese trouvevis-_.-visI'arrierede
I'appareilet enclencherlaclayettedansla
cr_maillere.
TABLETTE A CREME
LaTablette_Cr_me _
GLACI E !
Glac_eprocureun
espacede rangementpourlesarticlesqui
doiventrefroidirou_trecongel_srapidement.
_- Pourretirerlatablette&cremeglacee,la
souleverhorsdelacr_maill_redubac
gla(_onsetlatirerverssol.
Pourinstallerlatablette&cr_meglacee,
placerlatablettesurledessusde la
machinea_glaceetI'abaisserdansla
cremaill_reduseau&glace.
IMPORTANT: N'installezpasI'etag_rede
tablettea cremeglac_esilebrasdemachine
&gla(_onsautomatiqueestenpositiondela
desactivation.
Poui
v0i_eded6c_Slnepasplacerd a_iclesen
ver£edans atabiette_,cr6meglac_eiLes
objetse5verre,peu_entse fiacasSer0U
_!0se! _i_quil__0ntexposes_ des
temp_raiu_esext_me_enif_ides:
BAC DE CONGELATEUR
Retraitet installationdubac :
Pourretirerlebac,souleverledevantde
celui-cietletirerjusqu'aubout.._
Souleverledevantdubac
et leretirer. ,i_P'_
Pourinstallerlebac,le
faireglisserdanslacr_maill_resitu_edans
lapartieinf_rieureducong_lateur.Soulever
ledevantdubacetlefaireglisservers
I'arrieredeI'appareil.
BAC GLA( ONS Bac
LeBac_lGla(;onsse trouve _
sousla machine&glace
automatique.
Retraitet installationdu bac
gla_ons:
Pourretirerlebac,retirerlatablette_.
cr_meglacee.Souleverlebrasdela
machinea glacepourd_sactivercelle-ci.
Souleverledevantdubacetletirer
completementverssoi. Souleverle
devantdu bacet leretirer.
Pourinstallerlebac,lefaireglisserdansla
cr_maill_resouslamachine&glacejusqu'&
cequelebacseverrouilleenplace.Laisser
tomberlebrasdelamachine&glacepour
activercelle-cietremettrelatablettea.
cremeglaceeenplace.
IMPORTANT: Lebaca I,m-_ ,r._-_l
gla(_onsdolt_tre
verrouille&I'endroit
appropriepours'assurerquelesgla_onssont
distribuesad_quatement.Si laportedu
cong_lateurnefermepas,celasignifiequele
bacn'estpas_.I'endroitapproprie.Tournerle
dispositifd'entrainementdeforetdansle
sensinversedes aiguillesd'unemontre(tel
qu'indiqu_)pouralignercorrectementle bac
gla(;onsavecI'arri_redeI'appareil.
_l_rnn_
BALCONNETS RI GLABLES
Lesbalconnetssontr_glablespourmieux
r_pondreauxbesoinsderangement.
Pourretirerunbalconnetet le remettreen
place :
_- Souleverlebalconnetjusqu'_.
cequ'ilsedegagedes
dispositifsde retenuede
I'habillageint_rieur
de laporte,puis
I'enlever.
Pourle remettreenplace:
Leglisserdansledispositifderetenuede
I'habillagedelaportedudessuset
pousserverslebasjusqu'acequ'ilbute.

LUMtERE#U[}ISTRIBUTEUR
AMOVIBLE
Unelumieres'allume&proximitedu
distributeurIorsquecelui-cifournitde t'eauou
delaglace.
DUDISTRtBUTEUR
Latouchedudistributeursetrouve_.I'arriere
de lazonededistribution.Lorsquelatouche
du distributeurestenfonc_e,las61ection
effectueesurle panneaudecommandedu
distributeurseraactivee.
Touchede
Distributeur
Leplateauamoviblesetrouvantaufondde la
zonededistributionestcon£upourrecueillir
lespetiteseclaboussureset peutetre
facilementretire&desfinsdenettoyageetde
vidange.
IMPORTANT: Leplateauamoviblen'estpas
undrain.Leplateaupeutdebordersi I'eau
couledefa£oncontinue.
Plateau
Amovible
Pour_vitertoutrisquedeblessuresoude
deg&tsmateriels,respecterlesconsignes
suivantes-
> Ne pasmettrelesdoigts,lesmainsou
toutobjetclansI'ouverturedu
distributeur.
> Ne Dasutiliserd'objetspointuspour
concasserla glace.
> Nepasfairetomberlaglace
directementdansun recipientenverre
mince,en 3orcelaineouencristal
delicat.
REMARQUE
LorsdeI'utilisationinitialedudistributeur
d'eau,laissercoulerI'eaupendantenviron mm_m
1&2 minutespourlaisserlereservoir
d'eauseremplir.Jeterlespremiers10&
14r6cipientsd'eauapresavoirbranchele
r6frig6rateur&I'alimentationeneauet
apresdeIonguesperiodesdenon-
utilisation. _Im
m
Pourutiliserlatouchedu distributeur:
> Choisirlafonctiondedistributiond'eau&
partirdupanneaudecommandedu
distributeur.
> Appuyerun recipientrobuste&beclarge
contrelatouchedudistributeur.
Rel&cherlatouchedudistributeurpour
arreterI'_coulementd'eau.Unepetite
quantited'eaupeuts'ecoulerdansle
plateaududistributeur.Essuyerles
grosseseclaboussures.
45

(ARACT ITISTiQUB
A
TRO[[ZL[SDISPOsiTiFSDEsCiNQBOUTONs
FILTER DISPENSER FILTERED ICE & WATER
o
LIGHT
SENSOR
LIGHT
FONCTIONNEMENT DE LA
MACHINE A GLACE
Pourdistribuerla I_ _ I_
glace:
S61ectionnerle modegla;onsCUBE(en
cubes),CRUSH(broyes)ouWATER
(eau)enappuyantsurle panneaude
commandedu distributeur.Unvoyant
lumineuxvertau-dessusdubouton
indiquela s61ectiondu mode.
Appuyersur latouchedudistributeuravec
ler6cipient.Pendantquela machine
distribuedelaglaceconcass_e,tenirle
recipientaussipresquepossiblede la
chutepourreduireles_claboussures.Le
modedes61ectionnepeutetremodifie
pendantquela machine&glace
fonctionne.
REMARQUE: Sile distributeurfonctionne
pendantplusde3minutes,uncapteurde
verrouillageautomatiquecoupera
I'alimentationversledistributeur.
VERROUILLAGE DU
DISTRIBUTEUR
Cettecaract_ristiqueempecheI'eauoula
glaced'etredistribuee.
Pourverrouilleroud_verrouiller:
Pourverrouillerledistributeur,appuyersur
le boutonLOCK/UNLOCK(Verrouillage/
D6verrouillage)et le maintenirenfonc6
pendant3 secondes.Unvoyantlumineux
vertau-dessusdu boutonconfirmequele
distributeurestverrouill6.
Pourd6verrouillerle distributeur,maintenir
leboutonLOCK/UNLOCK(Verrouillage/
Deverrouillage)enfonc6pendant3
secondes.Levoyantlumineuxvert
s'6teindra.
VOYANT
O
LUMINEUX DU .....
_ CHANG_
STATUT DU FILTRE
LevoyantlumineuxdeI'etatdu
filtreindique&quelmomentlefiltre&eaudoit
etreremplac6.Unelumi6reverteindiqueque
lefiltreestenbenetat.Unelumi_rerouge
indiquequelefiltredoitetreremplace.Une
foisquela lumi_retourneau rouge,il faut
reinitialiserlafonctionpour1'6teindre.
Pourrdinitialiserlevoyantlumineux:
> AppuyersurlesboutonsLOCK/UNLOCK
(Verrouillage/D_verrouillage)et WATER
(eau)simultanementpendant4 secondes.
LevoyantlumineuxvertindiquantI'etatdu
filtreclignotera3 foisIorsquelafonctiona
etereinitialis_eavecsucc_s.
FILTER
LUMII RE
AUTOMATIQUE
Lafonctionlumiereautomatiquepermet
d'activerlalumieredudistributeur&demi-
intensit6Iorsquelecapteurde LIGHT
SENSOR(luminosit6detecte)queI'intensit6
dela lumieredansla pi6ceestfaible.
Pouractiveretddsactiverlafonction
lumiereautomatique:
Pouractiver,appuyersurlebouton
ON/OFF(Marche/Arr6t)setrouvantsurle
panneaudecommande.Unvoyant
lumineuxvertau-dessusdubouton
s'allumepourindiquerquelecapteurest
enmarche.
Pourdesactiver,appuyersurlebouton
ON/OFF(Marche/Arret).Levoyant
lumineuxverts'eteindra.
REMARQUE: Lalumi_redudistributeur
fonctionneram_mesilafonctionlumiere
automatiquen'apas6t6s61ectionn6.
MODE SABBAT
Cemodesert_d_sactiver
I'alimentationduvoyantDELetdeslumi_res
dudistributeurtouten permettantaux
commandesdedemeurerfonctionnelles.
Pouractiverle modesabbat:
Appuyersimultan_mentsurlestouches
LOCK/UNLOCK(Verrouillage/
Deverrouillage)etON/OFF(Marche/Arret)
lesmaintenirenfonc_espendant3 ou4
secondes.Apr6s3 ou 4 secondes,les
lumi_resdudistributeuret le voyant
DELs'_teignent.Lalumi_redu
distributeurnes'allumerapaspendant
la distributionIorsquecemodeest
active.
Pourd_sactiverle modesabbat:
> Appuyersimultan_mentsurlestouches
LOCK/UNLOCK(Verrouillage/
D_verrouillage)et ON/OFF(Marche/Arret)
et lesmaintenirenfonceespendant3 ou4
secondes.Apr_s 3 ou4secondes,les
lumieresdudistributeuretle voyantDEL
s'allumeront.
REMARQUE: dansI'_ventualiteoele
courantseraitinterrompuIorsqueI'appareil
estenmodesabbat,lacommande
demeureraenmodesabbatIorsquele
courantserar_tabli.
46

! ITi ;EL (TRONIQU COMMANDE
OFF
ON
GOOD O
CHANGE_
FILTER _ [_
FONCTION.NEMENT DE LA
MACHINEA
GLAGE
PourdistribuerI'eau:
> ChoisissezleboutonWATER.
> Appuyezle rCcipientcontrelagarniturede
distributeur.
Pourdistribuerglacd:
> ChoisissezleboutonCUBEpour
desblocsdeglace.
> ChoisissezleboutonCRUSH
pourlaglace6crasCe.
> Appuyezle rCcipientcontrelagarniturede
distributeur.
REMARQUE: Sieaudistributeurcontinuen
activit6pendantplusde2minute,un
automatiqueverrouillerdehorscapteurarr_ter
puissancedistributeurzone.Pourdes
instructionssurla fa£ondontdeverrouiller
votredistributeur,voyezlasectionintitulee
"serrurededistributeur"ci-dessous.
VERROUILLAGE DU
DISTRIBUTEUR
Cettecaracteristiqueemp6cheI'eauoula
glaced'etredistribute.
Pourverrouilleret d_verrouillerle
distributeur:
> Pourverrouillerle distributeur,la presseet
tenirle boutonLOCK/UNLOCKpendant3
secondes.Unvoyantdesignalisationvert
au-dessusdeboutonconfirmele
distributeurestverrouill&
> Pourdeverrouillerledistributeur,tenezle
boutonLOCK/UNLOCKpendant3
secondes.Levoyantvertdesignalisation
au-dessusduboutons'Cteindra.
DISPENSER
• • LIGHT
LEGERE
FONCTION o
Lafonctioniegereoffre&desoffresdeux
configurations:OUTREDEetAUTOMOBILE.
HORSFONCTIONle rCglagearrCterala
lumieredecavitededistributeur.La
configurationd'cAutomobilepermetau
CAPTEURde mesurerles niveauxlegers
environnantsetd'ajusterla puissancede la
lumi_redecavit6enconsCquence.Quandle
senserregistredesniveauxdelumi_re
infCrieure(tempsdenuit,cuisineobscurcie),
la lumieredecaviterepondra&lapuissance
50%.Quandlesenserregistrelesniveaux
legerseleves(cuisineallumee,lumi_redu
soleildirecte),lalumiCredecavitene lancera
pas,
REMARQUE: Lalumi_rededistributeur
fonctionneraaupleinpouvoirquandles
fonctionsde glaceoudeI'eausonten
service.
Pourlancerla configurationautomatique:
> Appuyezsurle boutonON/OFFsituesur
lepupitredecommande.
> Pourlancerlaconfiguration
AUTOMATIQUE,appuyezsurlebouton
ON/OFF.Quandlevoyantdesignalisation
vertau-dessusde I'affichagedebouton
estallum&lalumierededistributeurde
caviteutiliseralaconfiguration
AUTOMATIQUE.
Pourmettrelalumi_rehorsfonction:
> AppuyezsurleboutonON/OFFsituesur
lepupitrede commande.Levoyantvert
designalisationau-dessusdubouten
s'Cteindra.
LIGHT
SENSOR
VOYANT
LUMINEUX DU .......
STATUT DU FILTRE
Lalumi_red'indicateurde filtresertderappel
poursubstituerle filtredeI'eau.Unfeuvert
indiquequelefiltreestenbonetat.Une
lumiererougeindiquequelefiltredevrait_tre
change.Unefoisquela lumi_retournele
rouge,eriedemeurerarougejusqu'&ceque
la fonctionsoitremise&
I'etatinitial.
Pourremettre_ I'dtatinitialI'indicateur:
> Appuyezetjugezlesetboutons
LOCK/UNLOCKetWATER
simultan6mentpendant4 secondes.La
lumiereverted'indicateurdefiltreflashera
3loisot_lafonctionaavecsuccesremis
&I'etatinitial.
CL¢:SDE LA ^
TEMPI RATURE v
Cesclesabaisserontousoul6verontla
temperaturedecompartimentdecongelateur
oudenourriturefrafche.
REMARQUE: Voyezlasectioncomment
ajusterlescommandesdetemperatureaux
instructionssurlafa_;ondontplacerles
temperaturesdecompartimentdenourriture.
> Utilisezleboutonpoursouleverla
temperaturede lasectionderefrigerateur,
oule boutonpourI'abaisser.
> Appuyezsurle bouton_ pour
confirmerlesconfigurations.
GOOD o
"1'1
/
TE_PS_
4t

[]SITIf ELECTRC}NIQUEDEC(}MMANDE,SUJT
DISPENSER LIGHT
GOOD O LIGHT
CHANGEo SENSOR
MAX COOL
(MAXIMUM FRAIS)
Cettefonctioncauselatemperaturede
nourriturefraiche&labaisse&latemp6rature
minimumderefrig6rateurpla£antdisponible.
Cetteconfigurationdemeureeneffetpendant
approximativement10heures.
Pourlanceret mettre horsfonction Max
Cool:
Pourlancerlafonction,appuyezsurle
boutonMAXCOOL.Lefeuvertau-
dessusduboutonindiqueralemodeactif.
Pourmettretafonctionhorsfonction,
appuyezsur leboutonMAXCOOL.Le
feuvertau-dessusduboutons'6teindra.
REMARQUE: Laconfigurationde la
temperaturene peutpas_trechang_esila
configurationdeMaxCooloudeMaxFreeze
esten activitY.
MAX FREEZE
(MAXIMUM GEL)
Cettefonctioncauselatemperaturede
cong61ateur&la baisse&laplusbasse
temp6raturedecong61ateurquiestplacee.
Cetteconfigurationdemeureeneffetpendant
approximativement24 heures.
Pourlanceret mettrehorsfonction Max
Freeze:
Pourlancerlafonction,appuyezsurle
boutonMAXFREEZE.Lefeuvertau-
dessusduboutonindiquerale modeactif.
Pourmettrelafonctionhorsfonction,
appuyezsurle boutonMAXFREEZE.Le
feuvertau-dessusdu boutons'eteindra.
REMARQUE: Laconfigurationdela
temp6raturenepeutpas_trechang6esi la
configurationdeMaxCooloudeMaxFreeze
estenactivit6.
OFF
ON
A
DISPLAY ON/OFF
(AFFLCHAGE ACTIF/
ARRETE)
Lecommutateurde I'affichageOn/Off
contr61elapuissance&I'affichage&LED.
Pourlanceret mettreI'affichagehors
fonction :
> Pourlancerlafonction,appuyezsurle
boutonDISPLAYON/OFF.L'affichage
illuminera.
> Pourmettrela fonctionhorsfonction,
appuyezsurleboutonDISPLAYON/OFF.
L'affichageobscurcira.
VACATION MODE
(MODE DE VACANCES)
Cettecl6,si permise,causemoinsfr6quent
d6givrentdescycles.Ceci_conomise
1'6nergie.
ToactivateanddeactivateVacationMode:
Pourlancerlafonction,appuyezsur le
boutonVACATIONMODE.Lefeu vert
au-dessusduboutonindiquerale mode
actif.
Pourmettrela fonctionhorsfonction,
appuyezsurleboutonVACATIONMODE,
ououvrezI'uneouI'autreportede
r_frig6rateur.
ALARM OFF
(ARR_:T D'ALARME)
Cettecl_estemploy6epourarr6ter
WELCOMEI'indicateurd'avertissementdela
temp6ratureetI'alarmesonore,aussibien
queI'alarmesonoredeDOOROPEN.Ceci
mettra_galementdesalarmeshorsfonction
actuellementenmarche.
Pours'_teindrealarmez:
> Appuyezsurle boutonALARMOFF.
48

DiSPO$ffif$[[E(TRONiOUE
AFFICHAGE DE CAPTEUR
Lescommandesd'affichageautomatiques
DE[OMMAHI)[,SUnE
MODE SABBAT _ +
Cemodeestdestinepourmettrela
puissancehorsfonctJonauxlumieresdeDEL
etdedistributeur,toutenpermettantaux
commandesdedemeureroperationnelles.
Aucunealarmevisueneousonorenesera
dJsponJblealorsqu'encemode.
Pourlanceret mettrele modehors
fonctiondeSabbath:
> Pouractionner,appuyersurettenirles
deuxboutonsLOCK/UNLOCKet
ON/OFFApr_s3 ensecondlieu,les
lumi_resdeDELetdedistributeur
s'6teindront.Lalumi_rede distributeur
ne lancerapas pendantladistribution
alorsqu'en cemode.
> Pourmettre,appuyeretjugerlesdeux
boutonsLOCK/UNLOCKetON/OFF
simultanementpendant3 secondes.
Apres3ensecondlieu,leslumieresde
DELetdedistributeurlanceront.
REMARQUE:AucasoQlapuissanceserait
interrompuetandisquele modedeSabbath
estenactivit&la commandedemeureradans
lemodedeSabbathquandlapuissance
retourne.
queI'illuminationde I'affichage&LEDAbas6
surleslectureslegeresontregudu
SENSOR.Si leSENSORindiquedes
niveauxdebasselumi_re,I'affichagesera
plusfaiblequesiaffichantpendantdes
p6riodesbienallumees.
Pourplacerleniveaudepuissancede
I'affichage:
> Appuyezsurettenezle bouton
> Utilisezle boutonde refrig6rateur......
REMARQUE: ALmontreratoujoursdans
I'affichagedelatemp6raturede cong_lateur
tandisqu'encemode.
MODE DE oF
CONVERSION DE LA oc
TEMPI RATURE
Cemodeestdisponiblepourchanger
I'affichagedelatemperatureentreFahrenheit
etCelsius.
Pourchangerla lectureactuellede
latemperature:
> Pourlancerla fonction,appuyezsurles
ON/OFFet le boutonde
cong61ateurY pendant3 secondes.
L'etatactifactuelmontreradans
I'affichageenutilisantALOpouren
fonction,ALA pourI'automatique.
X
pourfairedefilerparles6tatsd'affichage.
Lancezlaconfigurationchoisieen
appuyantsurle boutonCONFIRM
SETTINGS.
boutonsDISPLAYON/OFFet _,
simultan_mentpendant3 secondes.
SERRURE CACHF_.EPOUR
SUPI RIEUR LE BLOC DE
TOUCHES _+@
Lebutdecemodeest
d'emp6chertrifouillerI'ensemblesup_rieurde
commandesdedistributeur.Ceciinclutle
DisplayOn/Off,MaxFreeze,MaxCool,
VacationMode,etfonctionsr6gl6esdela
temp6rature.
Pourlanceret mettrele verrouillagehors
fonction cach_dedistributeur:
> Pourlancerlafonction,appuyezsurles
boutonsLOCK/UNLOCKet DISPLAY
OFFsimultan6mentpendant3 secondes.
> Pourmettrela fonction,appuyezsurles
boutonsLOCK/UNLOCKet DISPLAY
OFFsimultan6mentpendant3 secondes.
FONCTION D'ACTIF/
ARRETE "11'11
Lafonctiond'actif/arr_ttournerefroidiraux
sectionsde nourriturefrafcheet de
congelateurtoutenpermettantauxlumieres
et&lavisualisation_lectroniquede resteren
fonction.Lesfonctionsdedistributeurne
serontpasdisponiblesalorsqu'encemode.
Pourmettreet lancerI'unit_horsfonction:
PourmettreI'unitehorsfonction,appuyez
surle boutondecongelateur_ jusqu'&
cequeI'afficheurregistreaude&dela
temp6raturemaximalepermisede
congelateur.Encemoment,la DELlira
OFF.Appuyezsur le bouton
CONFIRMSETTINGSpour
confirmerlaselection.
Pourreactiver,appuyezsurle boutonde
congelateurY Appuyezsur lebouton
CONFIRMSETTINGSpourconfirmerla
s_lection.
REMARQUE: Apresreactivation,I'affichage
montreralatemp6raturepla(_antprec6demment
enservice.Voyezlasectioncommentajuster
lescornmandesdetemperatureauxinstructions
surlafa_ondontplacerlestemperaturesde
compartimentdenourriture.
Poureviterle choc_lectriquequipeut
causerdesblessuresoula mortgraves,
ned6pannezpasI'entretienoule
r6frig_rateur_.moinsqueI'unit_soit
debranchee:
49

COHSEiLSET
NETTOYAGEDUR[:fRIGERATEUR
iteito i
ent_ai_e_degra_esbiessure_eume_e la
mort g_atea_avantde
!e nettoyer.Ap[6Slenettoyage, :
rebranchezie refrigerateur:
COMPOSANTS
Ext_rieuret portes
textur_es
Int_rieurdelacaisse
Ext_rieuret portesen
acierinoxydable*
IMPORTANT:Les
dommagesdufinienacier
inoxydabledus_ une
utilisationincorrectedes
produitsdenettoyageou
deproduitsnon
recommand6snesontpas
couvertsparla garantiede
ceproduito
i
NE PASUTILISER
> Nettoyantsabrasifsou6nergiques
> Ammoniaque
> Javellisant
> Solvantsoudetergentsconcentr6s
> Tamponsder6curageenmetalou
plastique
> Nettoyantsabrasifsouenergiques
> Ammoniaque
> Javellisant
> Solvantsoud_tergentsconcentr6s
> Tamponsderecurageenm6talou
plastique
> Produits_.basedevinaigre
> Nettoyants&based'agrumes
POui6:_ii_id§que blesSere_u_om:_g__i_ilel; _bse_eziespointssuivantsi
LiSe_et suivezlesiSstiuctio_d_:f_biiCanide ie_prodaiisdenettoyage
avezaucunbac t roir access0re 6tag_re0uCayetteauave_Vassee Ceux,oi
squentdesefissure_oudeSed6formeri
UTILISER
> Utiliser4 cuilleresa soupedebicarbonatedesodiumparlitre
(1pinte)d'eautiedesavonneuse.
> Rincerlessurfaces&I'eautilde etpropreet s_cherimm_diatement
pour_viterlesmarquesdues&I'eau.
> Utiliseruneepongeou unlingepropreetsoupleavecdeI'eauti#de
etsavonneuse.
> Rincerlessurfaces&I'eautilde et propreetsecherimm_diatement
poureviterlesmarquesduesa I'eau.
Jointsdeporte
Serpentinsde
condenseurRetirerlagrille
inf6rieurepouracc6deraux
serpentins.
Grilledesortiedu
ventilateurde
condenseur
Voirarrieredur#frig#rateur.
Accessoires: Clayettes,
6tag#res,bacs,tiroirs,etc.
* Unnettoyant pour acierinoxydablea _te ajoute pour votre usage, _.I'interieurdu r_frigerateur.Si vous voulez acheter d'autres
> Nettoyantsabrasifsou6nergiques
> Tamponsder6curageenmetalou
plastique
> Lave-vaisselle
> Utiliserunebused'aspirateur.
> Utiliserunebused'aspirateuravecbrosse.
>- Suivrelesinstructionsdedeposeetd'installationdanslasection
appropri_e.
> Laisserlesarticless'ajuster&latemperatureambiante.
Diluerdudetergentdouxet utiliserune_pongeouunlingesoupie
etproprepourlenettoyage.
> Utiliserunebrosse&filamentsen plastiquepourallerdansles
interstices.
> Rincerles surfaces&I'eautiedeetpropre.
> S_cherimm_diatementlesarticlestransparentsetenverrepour
6vitertoutesmarques.
0 produitsde nettoyage,veuillez prendrecontactavecSears en utilisant les renseignementsdonnes au dos de couverture de ce
nnli_€_

1. Retireztoutela nourriture.
2. Debranchezle refrig6rateur.
3. Nettoyezlesarticlessuivantsenfaisant
surtoutattentionaux interstices;suivezles
directivesappropriees,pr6sent6esdansla
sectionNettoyagedu r6frig6rateur:
• Patois,pattieinferieureetplafondde
I'interieurdelacaisse.
Bacs,tiroirs,clayettes,6tag_reset
joints,conform_mentauxinstructions
donneesdanscettesection.
4. Lavezet s6cheztouslesflacons,
r6cipientset bocaux.Jetezlesarticles
dontla datede peremptionestexpir6eou
quisesontg&t6s.
5. Enveloppezlesalimentsgen6rateurs
d'odeurou mettez-lesdansdes
contenantsbienfermespour_viterque
lesodeursner6apparaissent.
6. Branchezler_frig6rateuret remettrela
nourriture&I'interieur.
7. Apr6s24heures,v6rifiezsi lesodeursont
et661imin6es.
Silesodeurssonttoujourspr_sentes:
1. Retirezlesbacsettiroirsetplacez-lessur
ladayettesup_rieuredu refrig6rateur.
2. Remplissezlessectionsr6frig6rateuret
cong61ateurycomprislescontre-portes,de
feuillesfroisseesdejournauxennoiretblanc.
3. Placezdesbriquettesdecharbondebois
auhasardsurlejournalfroissedansles
deuxcompartiments.
4. Fermezlesportesetlaissezagirpendant24
&48heures.
5. R6p_tezles etapes5&7 ci-dessus.
Si uneodeuresttoujourspr_sente,contactez
leCentreder@arationSears.Reportez-vous
ladernieredecouverturedeceguidepour
obtenirlenum6rodetel@hone.
> I_vitezde surchargerles_tageresdu
refrig6rateur.CecireduitI'efficacit6deI'air
circulantautourdesalimentsetentrafne
unfonctionnementprolong6du
refrig6rateur.
> Evitezd'ajoutertropdenourrituretiede
dansler6frig6rateurenm6metemps.
Cecisurchargelescompartimentset
diminuelavitessederefroidissement.
> N'utilisezpasdepapieraluminium,papier
cireoupapieressuie-toutpourrecouvrir
lesclayetteset6tag_res.Cecidiminuela
circulationdeFairetentravele
fonctionnementefficacedurefrig6rateur.
> Uncong61ateurquiestauxF3plein
fonctionneplusefficacement.
> Installezler_frig_[ateur&I'endroitle plus
fraisdelapiece.Evitezleszonesen
contactaveclalumi_redirectedusoleil
ou prosdesbouchesdechaleur,conduits
de chauffageouappareilsgen6rateursde
chaleur.Sicecin'estpaspossible,isolez
I'ext6rieurenutilisantunesectionde
I'armoireouunecouched'isolant
suppl6mentaire.
> Reportez-vous&lasectionsur les
commandesdetemperaturedansce
guidepourobtenirlesreglages
recommandes.
> Nettoyezlesjointsdeportetouslestrois
moisselonlesinstructionsde ceguide.
Ceciassureunebonnefermeturedes
jointsdeporteet uneefficacitede
fonctionnementdurefrig_rateur.
> Prenezletempsd'organiserlerangement
desarticlesdansler_frig_rateurpour
r_duireletempsd'ouverturedesportes.
> Assurez-vousquelesportessontbien
ferm6esenmettantler@igerateur
d'aplomb,selonlesinstructionsde ce
guide.
> Nettoyezlesserpentinsducondenseur
commeilest indiquedansceguide,tous
les3 mois.CeciaugmenteI'efficacit6
energ_tiqueetlesperformancesde
refroidissement.
ELE(TltlIIllES
Pou!6viteiiout risqued!61ectro_utionlde
:blessuresgravesvoireded6o_s,
d6brancher'a mentatondurefrg6rateur
avantde remplacerFampoule.Apr6savoir
remisI'ampouleen place,rebrancher
I'appareil.
Poureviterlerisquedeblessuresoude
deg&tsmateriels,proc_dercommesuit:
> Laisserl'ampoulerefroidir.
> PorterdesgantsIorsduremplacement
de I'ampoule.
PARTIE UPI RIEURE DU
REFRIGERATEUR
1. Rep_rerles espaces _q-_-_------.,,_-!
pourlesdoigtsde
chaquecSt_du ..,...__o
couvre-ampoule.
InsUrerlesdoigtset
appuyerde chaque
c6t_ducouvre-ampoule.Tirerlecouvre-
ampouleversle baset leretirer.
2. Retirerlesampouleselectriques.
3. Lesremplacerpardesampoulesd'une
intensit_maximumde40watts.
4. Replacelightbulbcoverbyinsertingfront
tabsof lightshieldintoslotsdirectlyin
frontof lightassembly.
PARTIE I.NFI RIEURE DU
REFRIGERATEUR B
1. Pincerlesattaches
inf_rieures(A)du
couvre-ampouleet
lestirerverssoi.
2. RetirerI'ampoule
61ectrique.
3.
Laremplacerparuneampouled'une
intensitemaximumde40watts.
4.
Insererlesattachessuperieures(B)du
couvre-ampouledartsla cuveint_rieure
durefrig_rateuretenclencherlapartie
inferieuredansI'espaceprevupour
I'ampoule.
A
CONGI LATEUR DU
MODELE AVEC
DISTRIBUTEUR A
1. Retirerlebac_ glace
ensoulevantle t/_ ,__ _-_J
devantdubacet en
letirant.
2. Retirerlecouvre-ampouleen B
pin£antI'attachesuperieure(A)et en
tirantlecouvre-ampoulehorsdelacuve
int_rieure.
3. RetirerI'ampoule.Laremplacerparune
ampouled'uneintensit_maximumde40
watts.
4. InsererFattacheinf_rieure(B)du couvre-
ampouledansla cuveinterieureet
enclencherla partiesuperieuredans
I'espaceprevupourI'ampoule.
5. Remettrelebac&glaceenplaceenle
faisantglisserjusqu'_,cequ'ilse
verrouille.
DISTRIBUTEUR
1. RepererI'ampoule&I'interieurdurebord
sup_rieurdela structuredudistributeur.
LadevisserpourI'enlever. _,
2. Laremplacerparuneampoule
m
de7W, 120V. 51

Lesr6frig6rateursd'aujourd'huicomportentuneisolationenmousseetsontplusefficacesdupointdevue_nerg6tiquequelesanciensmodeles.
Cependant,cetteisolationenmoussen'estpasaussiefficacepourI'absorptiondessons.IIenresultequecertainsbruitspeuventvoussembler
inhabituels.D,laIongue,cesbruitsdeviendrontfamiliers.Veuillezvousreporterautableauci-dessousavantdefaireappelauserviceapr_s-vente.
i'i _1_ LitT_l[,,,__o_,_'_I-'1i _1 _,'_o_m[uii[o_
Clic
L'airestpropulsd
eouillonnementou
gargouillement
Bruitsourd
Vibration
Lacommandeducong61ateur(A)6metun
clioIorsquelecompresseurs'arr_touse
metenmarche.
Laminuteriedudegivreur(B)6metleson
d'unehorloge61ectriqueets'enclencheet
sedesenclencheducycleded6givrage.
Leventilateurducong_lateur(C)et le
ventilateurducondensateur(D)6mettent
cebruitpendantlefonctionnement.
Ler6frig6rantdeI'_vaporateur(E)etde
1'6changeurdechaleur(F)6metcebruit
Iorsqu'ils'ecoule.
Lesgla_nstombentdelamachine&glace
(certainsmodules)dansleseau&gla_ns(G).
Lachutedudistributeurdeglace(H)se
ferme.
Lecompresseur(I)emetunbruitde
pulsationpendantlefonctionnement.
> Fonctionnementnormal
> Fonctionnementnormal
Fonctionnementnormal
> Fonctionnementnormal
> Fonctionnementnormal
> Fonctionnementnormal
> Fonctionnementnormal
Bourdonnement
Murmure
> Ler6frig6rateurn'estpasdeniveau.
Leraccorddurobinetdelamachine&
glace(J)(certainsmodules)6metun
bourdonnementIorsquela machine&glace
seremplitd'eau.
Lamachine&glace(K)est&laposition
<<on,>sansleraccordd'eau.
> Lefuret(L)(certainsmodules)_metun > Fonctionnementnormal
murmureIorsqu'ilagitelaglacedurantla
distribution.
> Lecompresseur(I)_metunmurmure > Fonctionnementnormal
pendantlefonctionnement.
> Lasoupapedusolenoi'de(M)fat > Fonctionnementnormal
fonctionnerlaportedelachute.
Voirlesconsignesd'installationpoursavoircommentmettre
I'appareilde niveau.
Fonctionnementnormal
Pourarr_terce bruit,souleverlelevier&la position,,off>>.Arr_terle
bruitensoulevantlelevierdelamachine&glace&laposition,,off,,
(arr_t).VoirlarabriqueMachine&glaceautomatiquedansle
manuelduproprietaire.
52

TYPE
Lacommandeducongdlateuret
lesiumi_resfonctionnent,mais
lescompresseursne
fonctionnentpas
Latemperaturedusyst_me
viandesfroids/Idgumesesttrop
chaude
Lerdfrigerateurnefonctionne
pas
Ler6frigerateurnefonctionne
toujourspas
Lanourritureesttrop froide
Lanourrituresembletrop
chaude.
Uneodeursed_jagedurefrigerateur
Desgouttelettesd'eause
formentbI'exterieurdu
rdfrig_rateur
Desgouttelettesd'eause
formentbI'interieur du
r_frigerateur
Lerefrigerateurou la machine
glaceemetdes sonsnon
familiers outropbruyants
Lebacbtemperature
contr61de/oulesbacsb legumes
nefermentpaslibrement.
CAUSEPOSSIBLE
Lerefrigerateurestenmodededegivrage.
Lescommandessontr6glees& unetemperaturetrop
basse.
Lescommandesdu congelateursontreglees_.une
temperaturetropbasse.
Letiroirestmalplace.
Lerefrigerateurn'estpasbranch&
Lacommandeducongelateurn'estpas&,,on,,.
Lefusiblea sauteou ledisjoncteurdoltetrereenclench&
Pannedecourant.
L'apareilfonctionnemal.
Lesbobinesdu condensateursontsales.
Lescommandesdurefrigerateuroudu congelateursont
regl6es&unetemperaturetrop froide.
Laportenefermepascorrectement.
Verifiersi lesjointsd'etancheit6sonthermetiques.
Lescommandesdoiventetreregl6es.
Lesbobinesducondensateursontsales.
Lagrilled'aerationarriereestobstruee.
Laportea et6ouvertefr6quemmentouIongtemps.
Dela nourriturea r6cemment6reajout6e.
L'interieurestsaleou lanourriturede£ageuneodeur.
Laportene fermepascorrectement.
Verifiersi lesjointsd'etancheitesonthermetiques.
V6rifiersi lesjointsd'etancheitesonthermetiques.
Letauxd'humidit6est elev&
Lescommandesdoiventetrer6glees.
Letauxd'humiditeest61ev6ou la porteaet6ouverte
frequemment,
Verifiersi lesjointsd'etancheitesonthermetiques.
Ceciestnormal.
Lecontenudutiroirou la positiondesarticlesdansle
compartmentvoisinobstruepeut-_treletiroir.
Letiroir n'estpasbienplac&
Lerefrigerateurn'estpasde niveau.
Lesfentesdutiroirsontsalesoudoivent6tretraiees.
SOLUTION
Fonctionnementnormal.Attendre40minutesquelerefrigerateurse remetteen
marche.
Voirla rubriquetraitantdusystemeviandesfroidespoursavoircommentregler
lescommandes.
Voirla rubiquesurlescommandesdartslemanuelduproprietairepoursavoir
commentreglerlescommandes.
Voira rubriquetraitantdusyst6meviandesfroidespourverifierlapositiondu
tiroir.
BrancherI'appareil.
Voirlarubriquesurlescommandesdanslemanuelduproprietaire.
Remplacerlesfusiblesquiont saut& Verifierlesdisjoncteursetles reinitialiser
sinecessaire.
Appelerlacompagnielocald'electricitepoursignalerlapanne.
Debrancherle refrigerateur.Transfererla nourrituredansunautrerefrigerateur
ouplacerde laneigecarboniquedansle congelateurpourconserverla
nourriture.Lagarantienecouvrepas laperte denourriture.Appelerle service
apresvente.
Nettoyerconformementauxconsignesdenettoyagepresent6esdansle
manuelduproprietaire.
Voirla rubriquesur lescommandesdansle manueldu proprietairepoursavoir
commentreglerlescommandes.
Lerefrigerateurn'estpasdeniveau.Voirlesconsignesd'installationpour
apprendrecommentmettrerappareilde niveau.
Verifiers'ilexistedesobstructionsinternesqui empechentlaportede fermer
correctement(c.-&-d.destiroirsoudesseaux&glacemalfermes,des
recipientsmalrangesoudetro9,grandedimension,etc.)
Si necessaire,nettoyerconformementauxconsignesde nettoyageenonc6es
dansle manuelduproprietaire.
Voirla ribriquedescommandesdartslemanueldu proprietairepourapprendre
commentreglerlescommandes.
Nettoyerconformementauxconsignesdenettoyageenonceesdanslemanuel
duproprietaire.
Verifierlapositiondesarticlesdansle refrigerateurpours'assureerquela grille
n'estpsobstruee.Lagrilled'aerationarrieresetrouvederriere]esbacsa
legumes.
OuvrirlaportemoinsIongtemps.Rangerlanourrituredefa£onefficacepourgarder
laporteouvertelemoinesIongtempspossible.
LaisserI'environnementinterieurs'adapterpendantquelaportea ereouverte.
Laisserlanourriturerecemmentajout_eatteindrelatemperaturedu
refrigerateurou ducon_elateur.
VoirlarubriqueSuppressiondesodeursdansle manueldu proprietaire.
V_rifiers'il existedesobstructionsinternesquiempechentla portede fermer
correctement(c.-&-d.destiroirsoudes seaux&glacemalfermes,des
recipientsmalrangesoudetrop9randedimension,etc.)
Ler_frigerateurn'estpasdeniveau.Voirlesconsignesd'installationpour
apprendrecommentmettreI'appareilde niveau.
Si necessaire,netloyerconformementauxconsignesdenettoyageenoncees
danslemanueldu proprietaire.
Si necessaire,nettoyerconform_mentauxconsignesde nettoyage_noncees
danslemanueldu proprietaire.
CeciestnormalIorsqu'ilfaittres humide.
Voirla rubriquedescommandesdansle manuelduproprietairepourapprendre
commentre_lerlescommandes.
Voirla rubriquedescommandesdansle manuelduproprietairepourapprendre
commentreglerlescommandes.
Si n_cessaire,nettoyerconformementauxconsignesdenettoyageenoncees
danslemanueldu proprietaire.
Voirla rubriqueDiagnosticdansle manueldupropri_taire.
Voirla rubriquebac&temperaturecontrelee/ouBacs&legumespour
apprendrecommentplacerle tiroir.
Voirles consignesd'installationpourapprendrecommentmettreI'appareilde
niveau.
Appliquerunemincecouchedevaselinesurlesfenlesdutiroir.
Z
m

DIAGNO;TIC,SUITE
CTiONNEMENT,SUITE
TYPE
Le r_frig_rateur se met en
marche trop fr_quemment.
CAUSE POSSIBLE
Les portes ont et6 ouvertes souvent ou pendant
Iongtemps.
L'humiditeou la chaleurest6leveedansla piece.
Dela nourriturear_cemmenteteajoutee.
L'appareilest expose&la chaleurde
I'environnementoudes appareils&proximite,
Lesbobinesdu condesateursontsales,
Lescommandesdoiventetrereglees.
Laportene fermepascorrectement.
Verifiersi lesjointsd'etancheit6sonthermetiques,
SOLUTION
Ouvrir la porte moins Iongtemps. Ranger la nourriture de fa£:onefficace pour garder la
porte ouverte le moines Iongtemps possible.
Laisser I'environnement interieur s'adapter pendant que la porte a et_ ouverte.
Ceci est normal.
Laisser la nourriture recemment ajoutee atteindre la temperature du refrigerateur ou du
congelateur.
Evaluer I'environnement de I'appareil. Deplacer I'appareil pour qu'il fonctionne de fa?on
plus efficace.
Nettoyer conformement aux consignee nettoyage enoncees dans le manuel du
proprietaire.
Voir la rubrique des commandes dans le manuel du proprietaire pour apprendre
comment regler leecommandes.
Le refrigerateur n'est pas de niveau. Voir les consignes d'installation pour apprendre
comment mettre I'appareil de niveau.
Verifier s'il existe des obstructions internes qui empechent la porte de fermer
correctement (c.-&-d. des tiroirs ou des seaux &glace real fermes, des recipients mal
ranges ou de trop grande dimension, etc.)
Si necessaire, nettoyer conformement aux consignes de nettoyage enoncees dans le
manual propri_taire.
GLAC]ETBU
L'eausemblebrumeuse.
IIy a des psrticulesdans I'eauet/ou
laglace.
Aucunvoyantlumineux n'estallume
sur lepanneaude commandedu
distributeur(certainsmodeles)
NiI'eauni la glacene sent distribues
Iorsque lestouchessonenfonc_s
(certainsmodules)
Lamachine_glacene produitpas
assexde giagonsou lesglagonsont
uneforme bizarre(certainsmodules)
La machine&glaceneproduitpasde
glace(certains modeles)
ya deI'airou desbuilesd'airdansI'eau.
Dela poussieredecarbonesed6gagede la cartouche
du filtre #,eau.
Leeconcentrationsde minerauxdanel'eau seforment
IorsqueI'eaug_leetfond.
La porteducong_lateurn'estpas fermee.
Le refrigerateurn'estpasbranche.
Le fusibleasauteoule disjoncteurdolt_trereinitialise.
Unepannede courants'estproducite.
La porteducongelateurn'est pasfermee.
Lereservoird'eause remplit.
La machine&glaceouI'appareildoted'unemachine&
glacevienttoutjuste d'etreinstalleou une grandquantite
de glacevientd'etre utilisee.
Le filtre&eauest obstru_ou doit6tre change.
La pressiond'eauest tropfaibte.
La machine&glacevientd'etreinstalleeou une trop
grandequantitede gla?onsont6t6utinses.
La pressiond'eau esttropfaible.
Lafiltre&eauestobstrueou dolt 6trechange.
Le levierde la machine&glacen'estpasen bonne
position.
L'ailmentatondomestiqueen eaune rejointpaslee robinets.
Letuyau encuivreou en plastiqueeettordu.
La pressiond'eauest tropfaible.
Verifierla temperaturedu congelateur.
Le bac&glacen'estpas installecorrectement.
Unrobinetd'eau inad6quata eteinstalle.
CeciestnormalIorsqueledistributeurestutilis6pourla premierefoisetdisparaftavect'usage.
La premierequantited'eausorantde lacartouchepeutcontenirdela poussieredecarbone
evacueede lacartouche.Leeparticulesnesontpasdangereuses&consornmer.EllesdisparaTtront
apr_squeiquesutilisations.
Lesparticulesne sentpasdangereusesetse retrouventnatureltementdansI'eau.
Verifiersila porteducongelateurestfermee.Lescommandesnefonctionnentplus Iorsquelaporte
du congelateurestouverte.
BrancherI'appareil.
Remplacerlesfusiblesquiontsaute.Verifierles disjoncteursetleereinitialisersinecessalre.
Appelervotrecompagnied'electricitepoursignalerlapanne.
V_rifierquela portedu congelateurestfermee.LacommandenefonctionnepasIorsquelaportedu
congelateurestouverte.
Lorsde lapremiereutilisation,ily a undelai d'environ45secondsavantla distributionpendantque
le reservoirinterned'eauseremplit.
Attendre24 heurespourquela machine&glacese remplisseapr_savoir etevidee.
Changerlefiltrea eau.
Verifierla procedurederaccordementd'eaudanelesconsignesd'installation.Lessoupapesautoper_ntes
oude3/16popeuventdiminuerlapressiond'eauetobstruerle tuyauapr_suncertaintemps.Le
fabricantsn'estpasresponsabledesdeg_tsmaterielscausespar uneraiseenserviceou un
reaccordementd'eauincorrect.
Attendre24 heuresquelaproductiondegla(;onsdbbute etquela mchineseremplissede nouveu
prosavoir etevidee.
Unepresiond'eautropfaiblepeutcauserunefuited'eau.La pressiond'eaudoitse situerentre20et
100Ib/po_pourassureerle bonfonctionnement.Unepressionminimumde35 Ib/po_estrecommandee
pourlesappareilsavecfiltresd'eau.
Changerle filtre&eau.
Verifierquele levierde lamachine&glaceesttire verslehas.Voirla rubriquemachine&glace
automatiquedartslemanueldu propri_taire.
V_rifierlaprocedurederacoordementd'eaudansles consignesd'installation.
FermerI'eaueteiiminerleeplis.Siles plisnepeuvent_treelimin_s,remplacerle tuyau.
Lapressiond'eaudolt se situerentre20 et 100Ib/po_pourassurerle bonfonctionnement.Une
pressionminimumde 35 Ib/po=estrecommandeepour lee appareilsavecfiltresd'eau.
Voir la rubriquedescommandedanslemanueldu proprietairepour apprendrecommentregler les
commands.Latemperaturedu congelateurdoltse situerentre0 et2° F (-18et-17° C) pour
produirede la glace.
Voirlarubriquedubac>acepoursavoircommentinstalleretalignerle bac&glace.
Verifierla procL=durederaccordementd'eaudanelesconsigneed'installation.Lessoupapesautoper_ntes
oude3/16popeuventdiminuerla pressiond'eauetobstruerletuyauapresuncertaintemps.Le
fabricantsn'estpasresponsabledesd_ts materielscausesparunemiseen serviceouun
reaccordementd'eauincorrect.
54

ETEAU,SUtT
Le voyant de signalisation defilter de Lefilterde I'eaudolt_treremplac_, Silefiltern'estpasdisponible,remplacezparlefilterde d6viation.Voyezlasectiondedispostifsde
I'eauest rouge (certains rnotl_les) distributeurpourinformation.
Ily des fuites d'eau Untayauen plastiquea 6t6utilisepourraccorderI'eau. LefabrieantsrecommandeI'utilisationd'untuyauencuivrepourlamiseen service.Leplastiqueestmoines
Bela glace se forrnedana letuyau La pressond'eauesttropfaible, Lapressiond'eaudoitse situerentre20et 100Ib/po2pourassurerlePOnfonctionnement.Unepression
d'arriv6e de la machine&glace minimumde 35Ib/po2estrecommand6epourleeappareilsavecfiltresd'eau,
Le debit d'eau est plus lent que- La pressiond'eauesttrop faible. Lapressiond'eaudoltsesituererie 20et100Ib/po_pourassurerlebonfonc'donnement.Unepressionminimum
normal de35Ib/po_estrecommandeepourleeappareilsavecfil#esd'eau.
L'eauqui couledudistributeurn'est
pasfroide
Lefonctionexigele rajustement. Voyezlasectionde dispositifsde distributeurpourinformation,
r6sistantetpeutcauserdesfuites.Lefabricantsn'est pasresponsabledesd_ts materielscauses
par unemiseenserviceou unreaccordementd'eauincorrect.
Unrobinetd'eauinad6quata _t6install6. Verifierla proc6durede raccordementd'eaudaneleeconsigneed'insta!lation.Leesoupapesautoperc,,antes
Laternperatureducongelateuresttrop61ev6e. Voirlarubriquedescommandesdanelemanueldupropri6tairepourapprendrecommentr_ter lescommandes.
Un robinetd'eauinadequata 6t6installe. Verifierlaproc6durederaccordementd'eaudanelesconsigneed'instaIlation.Lessoupapesautoper£antes
Le tuyauencuivreou enplastiqueesttordu,
Le filtre&eau est obstrueoudolt 6trechange.
Le refrig6rateuraet6 recemmentinstallS.
II neresteplusd'eaudans le reservoir,
L'eaurestecoinceedans lestuyaux& I'ext6rieurdu
reservoiret ser6chauffe&la temp6ratureambiante,
oude3/16popeuventdiminuerla pressiond'eauetobstruerletuyauapr_suncertaintemps.Le
fabricantsn'est pasrespensabledesdeg&tsmaterielscausesparunerniseen serviceou un
resccordernentd'eauincorrect.
Latem_ratureducong61ateurdoltsesituerewe Oet2_F(-18et17° C)pourproduiredelaglace,
ou de3/16po peuventdiminuerlapressiond'eauetobstruerletuyauapr_suncertaintemps.Le
fabricantsn'est pasresponsabledesd_ts mat6rielscausesparunemiseen serviceouun
reaccordementd'eauincorrect.
FermerI'eauet61iminerleepile.Sileeplisne peuvent6treelimin6s,remplacerletuyau,
Changerlefiltre&eau.
Laisserenviron12heuresa I'eaudur6servoirpourrefroidir.
Jeterlepremierverred'eauetlerernplir.
"11'1
m
55

_MARQU_
56

Lasadvertenciasy lasinstrucciones
importantesdeseguridadqueaparecenen
estemanualnotienenelprop6sitodecubrir
todaslascondicionesposiblesquepodrian
ocurrir.Debeusarsesentidocom_n,
precauciony cuidadocuandoseinstale,se
realicemantenimientooseopereel
refrigerador.
Siemprecomuniqueseconeldistribuidor,
concesionario,agentede servicioo fabricante
paralosasuntosrelacionadosconproblemas
o condicionesquenoentienda.
RECONOZCALOSSiMBOLOS,
LASPALABRASY LAS
ETIQUETASDESEGURIDAD
PELIGRO-Riesgosinminentesque
CAUSARANlesionespersonalesgraves
o lamuerte.
ADVERTENClA-Riesgoso pr£cticas
insegurasquePODRiANcausarlesiones
personalesgravesola muerte.
PRECAUCION-Riesgosopr_tcticas
insegurasquePODRiANcausarlesiones
personalesmenoresodafiosmaterialeso
delproducto.
Parareducirel riesgode lesionesola
muerte,sigalas precaucionesb_sicas,
incluyendolassiguientes:
IMPORTANTE:Losniios atrapadosy
asfixiadosenrefrigeradoresnoescosa
detpasado.Losrefrigeradoresquese
arrumbano abandonan;auncuandosea
%61operunoscuantosdias",continQan
representandounpeligro.Sidesechaun
refrigeradorviejo,sirvaseseguirlas
siguientesinstruccionesparaayudara
prevenirunaccidente.
Anesdetirarsurefrigeradorocongelador
viejo:
> Quitelelaspuertas.
> Dejelelasrepisas
puestasparaquelos
nifiosnopuedan
meterseconfacilidad.
Paraevitarel riesgodeincendio,descargael_ctrica,lesionesgraveso lamuertecuandouseel refrigerador,sigaestasprecauciones
b_sicas:
1. Leatodaslasinstruccionesantesdeusarel refrigerador.
2. Observetodosloscodigosy reg_amentosmocates.
3. AsegQresedeseguirlasinstruccionesdeconexi6na tierra.
4. Consultea unelectricistacalificados_noest&seguroqueel
aparatoest&conectadoatierracorrectamente.
5. NOIoconecteatierraenunatuberiade gas.
6. NOIoconecteatierraenunatuberiade aguafda.
7. El refrigeradorest,,diseiadoparafuncionarenunalinea
separadade103a 126voltios,60ciclos.NOmodifiquelaclavija
detcord6nelectrico.Silaclavijanocabeenel tomacorriente,
hagaqueunelectricistacalificadoinstaleunoapropiado.
8. NO useunadaptadordedosclavi)as,uncord6ndeextensionn_
unatirade enchufesdeenergia.
9. NOquitela etiauetadeadvertenciadelcord6nel6ctrico.
10. NOaltereloscontrolesdelrefrigerador.
11.NOrepareni reemplacenlngunaplezadel refrigeradornitrate
realizarningt)ntipodeserwc_o,a menosqueserecomiende
especificamenteen lasinstruccionesde manualdeusoy
cuidado.NOintentedarleserviciosi noentiendelasinstrucciones
o siserequiereun mayorniveldedrestezapersonal.
12. Siempredesconecteel refrigeradordelsuministroelectricoantes
de realizaralgOntipodeservicio.Desconecteelcord6nelectrico
sujetandola clavija,noel cord6n.
13. Instaleel refrigeraoordeacuerdoconlasinstruccionesde
instalaci6n.Todastasconexionesdeagua,energiaelectricay
conexi6natierradebencumolircor_loscodigoslocalesy debe
realizarlaspersonalconlicenciacuandosereouiera.
14.Mantengaelrefrigeradorenbuenascondiciones.Elgolpearo
dejarcaerelrefrigeradorpuededafiarlaunidado causarunreal
funcionamientoo goteras.Si sedafla,hagaqueuntecnico
calificadode servicioIorewse.
15. Reemplacelasclavijasy loscordoneselectricosdesgastados.
16. Siempreleay siga_asinstruccionesdelfabricantede
almacenamientoyambienteidealparalosart[culosquese
almacenaranenelrefrigerador.
II'1
Z
O
!""
IITIIIIIIII([IIIII

Iii ?IOTIi{{I}£
IIII(IIAIi;
EN LOS EE.UU.
Lofelicitamosporsusabiadecisionde
compra.Su nuevoelectrodom6stico
Kenmore®hasidodisefiadoyfabricadopara
ofrecerlemuchosafiosde rendimiento
seguro.Pero,aligualquetodoslos
productos,devezencuandopuedenecesitar
mantenimientopreventivoo reparacion.En
talmomentoescuandounContratode
Protecci6nlepuedeahorrarpreocupaciones
y gastos.
AdquieraunContratodeProtecci6nPrincipal
ahoray protejasecontraincertidumbresy
gastosinesperados.
El Contratode Protecci6nPrincipaladem£s
le ayudaaprolongarlavidaitil desunuevo
electrodom6stico.ElContratoincluyeIo
siguiente:
> Servicioposventapornuestros12000
profesionalesespecializadosen
reparaciones.
> Servicioposventailimitadoy gratisde
piezasy manodeobraparatodaslas
reparacionescubiertasporelcontrato.
> Garantade rendimiento-reemplazodel
productobajocontratosiocurrenm£sde
tresfallasdelproductodentrodedoce
meses.
> Reemplazodesuproductosielproducto
bajocontratonopuedeserreparado.
> Revisi6nAnualde Mantenimiento
PreventivocuandoIosolicite- sin costo
adicional.
> Ayudar_.pidaportelefono- ayudae
informaci6nnotecnicaparalosproductos
reparadosensuhogar,adem&sde
fijaci6ndefechasconvenientesparalas
reparaciones.
> Protecci6ncontraarremetidasel6ctricas
debidoa fluctuacionesde lacorriente
el_ctrica.
> Reembolsodecostosdearriendosi las
reparacionesde su productobajocontrato
demoranmastiempoqueIoprometido.
UnavezqueustedhacompradoelContrato,
solamentenecesitaunaIlamadaportelefono
parafijarlafechadelservicio.PuedeIlamara
cualquierhora,duranteeldiao enla nocheo
puedefijarlafechaparaelservicioatrav6s
de lacomputadora.
Searstienemasde12000profesionales
especializadosen reparaciones,quetienen
accesoa ma.sde4,5millonesderepuestosy
accesoriosdecalidad.Esteesel tipode
profesionalismoalqueustedpuederecurrir
paraprolongarlavidaQtildesunuevo
electrodomesticodurantemuchosaios.
iComprehoymismosuContratode
Protecci6nPrincipal!
Existenciertaslimitacionesy exclusiones.
Parapreciosy mayorinformaci6n,Ilameal
1-800-827-6655.
Serviciode instalaci6nSears
Parainstalaci6nprofesionalgarantizadade
electrodomesticosSearsyart[culostales
comesistemadeaperturadepuertasde
cocherasy calefactoresdeagua,enlos
EE.UU.Ilameal 1-800-4-MY-HOME®
(1-800-469-4663).
EN CANADA
Sucompratienemayorvalorpuesusted
puededependerde SearsHomeCentral®
paraservicio.Conm£sde2400t6cnicosde
servicioyaccesoa masde900.000
repuestosy accesorios,tenemoslas
herramientas,los repuestos,los
conocimientosy lasdestrezasparacumplir
nuestrapromesa:ReparamosIoque
Vendemos.
SuelectrodomesticoKenmore®hasido
diseiado,fabricadoyprobadoparaofrecerle
muchosaios defuncionamientoseguro.Sin
embargo,cualquierelectrodomesticopuede
requerirserviciodevezencuando.El
Contratode MantenimientoSearsleofrece
unprogramadeserviciosobresalientey
economico.
ElcontratodemantenimientoSears
Significaqueustedest£comprandoel
serviciodehoya lospreciosdemaiana.
Eliminalos gastosenreparaciones
resultantesdeusoydesgastenormal.
Leofreceayudaeducacionale
informaci6nnot6cnica.
Ain siustednonecesitareparaciones,le
ofreceunarevisi6nanualde
mantenimientopreventivo,cuandoIo
solicit&afin deasegurardequesu
electrodomesticoest6siempreenbuenas
condicionesdeuso.
Existenciertaslimitaciones.Parainformacion
sobrelosContratosde Mantenimientode
SearsCanada,Ilameal1-800-361-6665.
51

J
GAR, NIIA
Garantiacompletade unahoparael
refrigerador
Duranteuna5odesdelafechadecompra,
cuandoesterefrigeradores usadoy
mantenidode acuerdoconlas instrucciones
adjuntaso entregadasconelproducto,Sears
Ioreparar&,gratuitamente,si tienedefectos
dematerialo defabricaci6n.
Garantiacompletadecincoa5osparael
sistemaderefrigeraci6nsellado
Durantecincoa5osdesdelafechade
compra,cuandoesterefrigeradoresusadoy
mantenidodeacuerdoconlas instrucciones
adjuntaso entregadasconelproducto,Sears
repararagratuitamenteelsistemasellado
(compuestoporel refrigerante,tuberiade
conexi6ny motordelcompresor),sitiene
defectosde materialo defabricaci6n.
Lasgarantiasdescritasanteriormente
solamentesonv&lidasparalosrefrigeradores
queseanusadosparaconservaci6nde
alimentosdestinadosal consumodelhogar.
Noincluyeloscartuchosfiltrantesoriginalesy
derepuestodelsistemaautom&ticodeagua
y hieloKenmore.Loscartuchosoriginalesy
derepuestosongarantizadosdurante30
dias,encuantoalas piezasmismas
solamente,contradefectosde materialo de
fabricaci6n.
Elserviciobajola garantiaestadisponible
Ilamandoal 1-800-4-MY-HOME÷
(1-800-469-4663).
Estagarantiaes v&tidasolamentecuandoel
productoestasiendousadoenlos Estados
Unidos.
Estagarantialeotorgaderechoslegales
especificosyustedadema.spuedetener
otrosderechosquevafiandeunestadoa
otro.
Sears,RoebuckandCo.,Dept.817WA,
HoffmanEstates,IL60179
NOTA:Algunossistemasdetratamientode
aguaporosmosisinversacausanunabaja
dela presi6ndelagua.Lapresi6nbajadel
aguapuedeafectarelsistemadel distribuidor
deaguayhieloproduciendocubosdehielo
peque_oso huecosy flujodeagualentodel
distribuidor.Losproblemasdeservicio
relacionadosconel sistemadetratamiento
de aguaporosmosisinversadelhogarno
estancubiertosporla garantia.
REGISTRODEI.PRODLICTO
Enelespacioprovistoacontinuaci6n,anote
el n_merodemodeloyelnQmerodeseriey
lafechadecompradesurefrigerador.El
nQmerode modeloy deserieseencuentran
dentrodelrefrigeradorenla paredizquierda.
N6merodeModelo:596.
NQmerodeSerie:
FechadeCompra:
Conserveestefolletoy surecibode
compradeSearsenunlugarseguropara
referenciafutura.
II'
Z
C
I"
59

Informaci6nimportantesobreseguridad..................................................................................57
Loqueneeesitasaberacercade lasinstruccienesdeseguridad...........................................57
ContratosdeProteccibn.............................................................................................................58
Centratosde Proteeci6nPrincipales- en losEE.UU..............................................................58
Contratosde Mantenimiento- enCanada...............................................................................58
Garantia.........................................................................................................................................59
Registrodelproducto..................................................................................................................59
Instalaci6ndelrefrigerador...................................................................................................61-66
Medici6ndela eavidad.............................................................................................................61
Transportedelrefrigerador.......................................................................................................61
Selecei6ndelamejorubicacbn...............................................................................................61
C6moinstalary quitarlasasas................................................................................................62
Quitarlaspuertasy lasbisagras..............................................................................................63
C6rnovolvera colocarlaspuertas...........................................................................................63
C6moinstalarequitarlospanelesdelaspuertas...................................................................64
Conexbndelsuministrodeagua.............................................................................................65
Nivelaci6ndelrefrigerador........................................................................................................66
Ajustey mantenimientode lastemperaturasapropiadas.......................................................67
Ajustesinicialesde loscontroles..............................................................................................67
Ajustede loscontroles.............................................................................................................67
ConservaciSndealimentos......................................................................................................67
Informaci6nsobreelfiltrode agua......................................................................................68-69
Instalaciony desmontajedelfiltrodeagua..............................................................................68
Datesdelfiltrodeagua............................................................................................................69
Caracteristicasdelcompartimientodelrefrigerador..........................................................70-71
Bandejasinteriores...................................................................................................................70
Almacenamientoenla puerta...................................................................................................70
Caj6ncontroladodelclima.......................................................................................................71
Caj6nesdealmacenamiento....................................................................................................71
Caracteristicasdelcongelador...................................................................................................72
M&quinaautom_.ticadehacerhielo.........................................................................................72
Repisas.....................................................................................................................................72
Cajones.....................................................................................................................................72
AImacenamientoenlapuerta...................................................................................................72
Caracteristicasdelsurtidor ...................................................................................................73-77
Focodelsurtidor.......................................................................................................................73
Almohadilladesurtido..............................................................................................................73
Funcionamientodelsurtidorde agua.......................................................................................73
Caracteristicasdelcontrolconcincobotones..........................................................................74
CaracteristicaselectrSnicodelcontrol................................................................................75-77
Consejosy cuidado................................................................................................................78-79
Limpiezadesu refrigerador......................................................................................................78
Elirninaci6ndelosoloresdelrefrigerador................................................................................79
Sugerenciasparaahorrode energia........................................................................................79
Quitary reemplazarlosfeces...................................................................................................79
Sonidosnormalesdefuncionamiento.......................................................................................80
Localizaci6ny Soluci6ndeAverias......................................................................................81-83
Funcionamiento...................................................................................................................81-82
Hieloy agua........................................................................................................................82-83
Servicio.....................................................................................................................Contraportada
6O

Estasinstruccionessonproporcionadaspara
ayudarlea instalarsurefrigerador.
[t {,&
AIinstalarsu refrigerador,utiliceporfavorla
cartaabajoparalosrequisitosde
espaciamiento.
Losrevestimientosdelsubsueloodel piso
(esdecir,alfombras,baldosas,pisosde
madera,tapetes)puedendisminuireltamafio
dela cavidad.
Sepuedeobtenerm£sespacioIbre usando
el procedimientode nivelacionincluidoenla
secci6nNivelaciondelrefrigerador(pagina
66).
Volumen
total de la
unidad
Menos de
23 pies
ct3bicos
(7 m3)
M_.sde
23 pies
cQbicos
(7 m3)
IMPORTANTE:Siel refrigeradorvaaser
instaladoen unacavidadenquela parte
superiordelrefrigeradorquedar£
completamentecubierta,uselas dimensiones
desdeel pisohastala partesuperiordela
tapadela bisagraparaverificarel espacio
libreapropiado.
Espacio libre
recommendado
En la
parte
superior
N/A
/2 II
A los Por
lados detrbs
N/A Y2"
N/A Y2"
Sigaestosconsejoscuandomuevael
refrigeradorasulugardefinitivo.
NUNCAtransporteel refrigeradorde
costado.Sinoesposibletransportarloen
posicionvertical,transp6rtelohaci6ndolo
descansaren lapartetrasera.Dejeel
refrigeradorenposici6nverticaldurante
aproximadamente30minutesantesde
enchufarloafin deasegurardequeel
aceitevuelvaal compresor.Siel
refrigeradorseenchufainmediatamente,
sepuedecausardafioalas piezas
internas.
Useunacarretillaparaelectrodomesticos
cuandomuevala unidad.SlEMPRE
transportela unidadsobreunladonila
parteposterior,NUNCAperelfrente.
Protejaelacabadoexteriordel
refrigeradorduranteel transporte
envolviendoelgabineteenfrazadaso
insertandoacolchadoentreelrefrigerador
y la carretilla.
Asegureelrefrigeradorfirmementeenla
carretillademane,conflejeso cuerdas
elasticas.Paselosflejesatrav6sdelas
maniascuandoseaposible.NOapriete
demasiadolosmaterialesdesujeci6npues
puedenhendirodafiarelacabadoexterior.
Tomeencuentalospuntosindicadosa
continuacioncuandoseleccioneel lugar
definitiveparasurefrigerador:
NOinstaleelrefrigeradorcercadelhorno,
radiadoru otrafuentedecalor.Siestono
esposible,protejaelrefrigeradorcon
materialde losarmarios.
NOinstaleel refrigeradorenunlugar
dondelatemperaturadescender£a
menosde 130C(550F).Aesta
temperaturapuedeocurrirmal
funcionamiento.
Paraasegurarunbuencierrede la
puerta,sigalasinstruccionesde
nivelacbndescritasenlaseccbn
Nivelaci6ndelrefrigerador(pagfna66.)
II'1
ZI
O
r"'
6]

Paralafacilidaddelainstalaci6n,algunos
refrigeradoresse pudieronhaberentregado
conlas asasquitadas.Localiceporfavorlas
asasrefiriendoal interiordelasecci6ndel
alimentofresco,olaparteposteriordesu
refrigerador.Puedeser necesarioqueel
refrigeradorseavueltoa poner,olospaneles
de laspuertasquesequitarano substituidas.
Lasinstruccionesparaelretirede lasasas
sehanincluidoparasuconveniencia.
Eldisefiode laasadesurefrigeradorpuede
variardependiendodelmodelo.Refierapor
favoralas instruccionesapropiadasabajo.
INSTALAClON DE LAS
ASAS MONTADA POR EL
FRENTE DE LA SECCION
DEL ALIMENTOS
FRESCOS
1. QuitelostornilloshexagonalesdeY4"dela
caradela puertaconundestomillador
hexagonal.
PARA QUITAR LAS ASAS
MONTADAS POR EL
FRENTE DE LA SECClON
DEL ALIMENTOS
FRESCOS
1. Quitelaporci6ninferiordelasasascon
undestornilladormuypequefiodehoja
plana.
IMPORTANTE:Envuelvela hojadel
destornilladorconcinta"masking"para
evitardafiarlaunidad.
,
Quitelosdostornillos I!
de labasedelasa.
,
Tiredelasahacia
arribayhaciaafuera
parasacarlade launidad.Podriaestar
muyajustada.
,
Repitalasinstrucciones1-3paraquitarla
otraasa.
PARA QUITAR LAS ASAS
EXTRUIDAS DE LARGO
COMPLETO
Paraevitarposibleslesi0nesydaSoS
materiaieS,coloque5intaadh_sivaen los
panelesdecorativos(enalgunosrnodelos)
paraasegurarlosensulugarantesde
quitarlasasasde laspuertasi
1. Quiteeladornode la •
puertaquitandotornillos
Phillips.
> Conservetodos
lostornillospara
usarlosdespu6s.
2. Sujeteelasa
firmementeconambas
manosydeslicela
haciaarriba
approximadamente_'4"
(19mm)paraliberarla.
3. Repitalasinstrucciones
1-2paraquitarlaotraasa.
I"
t
,
Alineelasasasdelas
puertasconlosjuegos
superiore inferiorde
sujetadoresdepuertay
deslicehaciaabajohasta
quelosorificiosdetornillo
enla parteinferiordelasaestejuntoa los
orificiosdelostomillosepuerta.
,
Insertelostornillosque
quitoenel paso1dentro
delosorificiosdetomillo
enla parteinferiorde la
secci6ndelasa.
Coloqueapresi6nel
adornosobrelaperci6n
inferiordelasasasy los
sujetadoresenlaparte
inferiorde lapuerta.
Repitalasinstrucciones1-4parainstalar
laotraasa.
6Z
PARA INSTALAR LAS
ASAS EXTRUIDAS DE
LARGO COMPLETO
1. Quiteeladornode la •
puertasuperior
sacandolostornillos -,
Phillips.
> Conservetodos
lostornillospara
usarlosdespu_s.
,
muescasde la
Alineelas ,_
parteposterior
delasaconlos
sujetadoresdelaspuertas.Insertelos
sujetadoresdentrode lasmuescasy
desliceelasahaciaabajohastaque
toqueeladornoinferior.
3. Cotoquede nuevoel
adornosuperiordela
puertaconlostornillos
Phillipsqueconserv6
cuandoquit6eladorno.
4. Repitalasinstrucciones
1-3paraquitarlaotraasa.
r
t

QUITARLA;PUERTA YLA;
Ba;AGRA$
Algunasinstalacionesrequierenel retirode la
puertaconseguirel refrigeradora la
Iocalizaci6nfinal.
Paraevitarlesionespersonalesgraveso
la muerte,observeIosiguiente:
• Desconectelaenergiadelreffigerador
antes dequitarlaspuertas.Conectela
energ[aso!amentedespu_sde haber
colocadolaspuertasdenuevo.
• El cableverdedeconexi6natierra
debeestarsujetoa la bisagrasuperior
mientrasrealiZalaremoci6nyel
reempla2odela puert&
• Coioqueciniaadhesivaenlospaneles
decorativos(ena!gunosmode!os)para
asegurarlosensulugarantesde
quitarJasasasdela puerta.
1. Quitelaparrillainferiory lascubiertasde
lasbisagrasinferiores.
> Abraambaspuertas180°,o tanto
comoseaposibleparaquitarlas.
2. Presioneel collarblanco(A)alconectador
azul(B)paralanzarlalineadelagua.
B
IMPORTANTE:AIconectorlalineadelagua,
cortelatuberiaenlaprimeralineaen la
tuberia. Inserteenel collardelconector.
3. Quitelacubiertade labisagrasuperior
quitandoeltornilloPhillips.
6. Desprendaelconectordelarnesprincipal
dealambre.Desprendeelconectordel
arnesrojodelalambre.
> Useundestornilladorpianoola usa
paraoprimirel puntodeuni6nentre
losdosconectoresparasoltarlos.
> Paradesenchufarelarn6sdelcable
rojo,oprimalalengL]etadela parte
inferiordelconectorparaliberaria.
7. Quitelasbisagrassuperioresjuntocon
laspuertas.
ParaevitardaSosmateriales,ooserveIo
siguiente:
> Protejaelvinilosuaveuotto tipode
pisoconcartones,tapetesuotros
materialesprotectores,antesdemover
elrefrigerador.
> ParaevitardaSoso quebradurasal
pernodeajuste,nouseherramientas
el6ctricasparacorregirlanivelacion.
> NOajustela unidadhastaquequede
masbajade68_" (1.74m)dealtura
(menoslabisagray eltapon).Hacerlo
podriadaSarloscomponentes
inferiores.
,
Cierrelaspuertas.
5.
Destornillelostornilloshexagonalesde
_,6"delasbisagrassuperiores.
, NOquiteelcableverdedetierraniel
cablequeconectaeltomillocentral.
,
Quitelasbisagrasinferioresconun
destornilladorhexagonalde_8".
> Paravolvera colocartaspuertas,sigaen
orden inversolos pasosde Guitar las
Puertasy lasBisagras.
IMPORTANTE:AIconectorlalineadelagua,
cortelatuberiaenlaprimeralineaenla
tuberia. Inserteenelcoltardelconector.
m
Z!
O
I"
63

Paraevita[poSibislesi0nsodafi0s
materials,co!oquecintaadhesivaeni0S
panelsdecoratiVoS(enaigunosmodelos)
paraaseguar!osfirmementeen sulugar
cuandose vayana quitarlasasasde la
puerta. :
Paraevitarposibleslesionso daSos
materials,respeteIo siguiente:
Lospanelesdelrefrigeradornodeben
pesarm__sde30libras(14kilogramos)
y losdelcongeladornodebenpesar
m_.sde 15libras(7kilogramos),
Protejaelvinilosuaveu otrospesos
concartones,tapetesuotrosmaterials
protectors.
Prot6jaselamanosy losbrazos
usandoguantes.
NOTA:
> Paraprotegerlassuperficiesdelas
puertascontraralladuras,cubralos
hordesde lospanelesdecorativoscon
cintamaskingaIo largodelosbordes
posteriors.
> Conservetodoslostornillosy vuelvaa
usarlosenloslugaresdondelosquit6
originalmente.
Dimensionesdel panelde Y,"(6mm)
Modelos
de puerta
extendida
Puertadel
refrigerador
Puertasuperior
delcongelador
consurtidorde
hieloy agua
Puertainferior
delcongelador
consurtidorde
hieloy agua
Pueffadel
congeladorsin
sudidordehielo
y agua
Alturadel
panel
66¾"
(169.5cm)
18Ys"
(46cm)
32_32"
(81,5cm)
66¾"
(169.6cm)
Anchuradel
panel
18'_6"
(48.1cm)
13_%6"
(35.4cm)
13_6"
(35.4cm)
13_¾_"
(35.4cm)
COMO INSTALAR LOS
PANELES
1. Quitelostornillosdeladorno
superiorconun
destornilladorPhillipspara
poderquitareladorno
superior.
2. Desliceelasahaciaarriba
hastaquesesuelte. Quiteel
asadelapuerta.
, Quitelos
sujetadoresdeia
puertacon un
destornillador
hexagonalde_".
,
Deslicelospanelsinferioresdentrode los
adornosinferiorsde lapuertahastaqueel
ladedelabisagradelpaneldecorative
quededebajodeladornodelladode la
bisagra.
IMPORTANTE:Coloquecintaadhesiva
enla partesuperiordelospanelesa la
puertaparaevitarquesecaiganlos
paneles.
5. Instaledenuevolos
sujetadoresdela
puertaconun
destornillador
hexagonalde¼".
6. Instaledenuevoelasainsertandolos
sujetadoresdentrodelas muescasdela
puertaen laparteposteriordelasa.
Desliceelasahaciaabajohastaque
toqueeladornoinferior.
7. Quitelacintadela
partesuperiorde los
panelesantesdevolver
a instalarel adornode
lapuertaconeltornillo
Phillipsquesequit5en
elpaso1.
COMO QUITAR LOS
PANELS
1. Quitelostornillosdeiadornosuperiorcon
undestornilladorPhillipsparapoderquitar
eladornosuperior.
IMPORTANTE:Coloquecintaadhesiva
enla partesuperiordelospanelesa la
puertaparaevitarquese caiganlos
paneles.
.
Desliceelasa haciaarriba
hastaquesesuelte.Quiteel
asadela puerta.
.
Quitelos
sujetadoresdela
puertaconun
destornillador
hexagonaldeY4".
4. Quitelacintaalospanelesdela
diapositivadeladornodela puerta.
5. Refieraalosinstrucciones5-7delComo
InstalarlosPanelesparainstalarlas
asasyel adorno,de puerta.
64

MATERIALES
NECESARIOS
>_Tuberiadecobreflexiblede6,4mm(_/_")
dedi&metroexterior.
> Manguitoytuercadecompresi6nde laton
paralatubefiadecobrede 6,4mm(Y,")
dedi&metroexterior.
4. Coloqueelextremodelatuberiadecobre
enelorificiodeadmisi6ndelavalvutadel
agua.Deunapequefiaformaalatuberia-
EVITETORCERLA-demodoqueIlegue
directamenteal orificiodeadmisi6n.
> Leatodaslasinstruccionesantesde
instalareldispositivoi
> NOintentelainstalaci6nsino
oomprendeiasinstrucci0nes0sis0n
demasiad6_omp!icadas_ra_Ss
con6cmehtos:
> Obse eioaos1osc6aigos
reglamentoSlocaleS:
>N5 reparee dspoSt£oa menOsque
serecomiendeespecfficamenteenel
o enlas
: instru_cionesescritassobre :
ieparacionesporel usuariol
Desc0necieiaenergiael6ciricaal
refiige_adorantesde inSialarel
dispositivo,
Paraevitardafiosmaterialesoposible
Consultea unplomeroparaconectar
latuberiadecobreal sistemade
tubefiasdel hogarafin deasegurar
cumplimientode losc6digosy
reglamentoslocales.
Verifiquequelapresi6ndelaguahacia
lav_.lvuladelaguaseaentre20y 100
librasporpulgadacuadrada.Sise
instalaunfiltrode agua,lapresi6ndel
aguaa lav_.lvuladelaguadebeser
porlomenosde35 libraspotpulgada
cuadrada.
> NOuseunav&lvulaautoperforanteo
anav_,lvulade asientode_6"!Ambas
reducenelflujodelagua,seobstruyen
conel pasardeltiempoy pueden
causarescapess=seintenta
repararlas,
Aprietelastuercasa manoparaevitar
dafiaras roscas.Terminedeapretar
lastuercasconpinzasyIlaves,Nolas
aprietedemasiado.
> Espere24 norasantesdecolocarel
refrigeradorensulugardefinitivoa fin
deverificary corregircualquierescape
deagua.
V&lvuladecierre(requierequesetaladre
unagujerode6,4mm(Y,")en latuberia
desuministrodelaguaantesdeinstalarla
v&lvula).
> Llaveajustable
Llavedetuercashexagonalde_A"
NOTA:Agregue2,5m (8')allargonecesario
delatubefiaparaIlegaralsuministrodel
aguaafindecrearunbucledeservicio.
1. Hagaelbucledeservicioconlatuberia
teniendocuidadodeevitartorcedurasen
latuberia.
2. Retirelatapade pl_,sticodelorificiode
admisi6ndelav_.lvuladelagua.
f
3. Coloquelatuercadelat6n(A)y el
manguito(B)en elextremodelatuberia
decobrecomosemuestraenla
ilustraci6n.
A
\°
5. Insertelatuercadelat6nenelmanguitoy
atornillelatuercaenetorificiode
admisi6n.AprietelatuercaconunaIlave.
IMPORTANTE:NOaprietedemasiado.Se
puedendafiarlasroscas.
6. Tiredelatuberiaparacomprobardeque
la conexi6nest,.firme.Conecte[atuberia
al marcoconla abrt_zaderadelatubefia
delagua(C)y abraelsuministrodel
agua.Verifiquesi hayescapesy
reparelos,si loshubiere.
C
7. Superviselaconexi6ndelaguadurante
24 horas.Reparelosescapes,sies
necesario.
m
Z _
O
T"
65

Sisurefrigeradornecesitaunaconexi6npara
elsuministrodelaguadelam_.quinade
hacerhielo,consultelasecci6nConexi6n
del SuministrodeAgua,antesdenivelarel
reffigerador(pagina65).
Afineeprotegersusbienesmaterialeso
el refrigeradorcontradafio,sigalas
siguientesinstrucciones:
MATERIALESNECESARIOS:
> Destornilladorhexagonalde_8"
> Nivel
Quitelaparrillainferiorylascubiertasde
lasbisagrasinferiores(vealas
instruccionesanteriores).
,
Girelosdostornillosde ajustedelanteros
(A)enel sentidodelasmanecillasdel
relojparaelevarloyen el sentido
contrarioal delasmanecillasdelreloj
parabajarlo.
Si esnecesario,corrijael balanceode la
unidadgirandoeltomillodeajusteenel
sentidode lasmanecillasdelrelojpara
elevarlaesquinaquebaile. Silas
puertasest&ndisparejas...
> Determinecualpuertanecesita
elevarse.
> Gireeltornillodeajustedelanteroenel
sentidodelasmanecillasdelrelojpara
elevarla esquinadelanteradela
puerta.
> Protejael vinilosuaveuotros
revestimientosdelpisoconcart6n.
alfombrasu otrosmateriales
protectores.
> Nouseherramientasel_ctricascuando
est6nivelandoelelectrodomestico.
, Girelosdostomillosposterioresde ajuste
(B)enel sentidodelasmanecillasde1
relojparaelevarloyen elsentido
contrarioaldelasmanecillasdelreloj
parabajarlo.
4. Usandounnivel,asegQresedequela
partedelanteradelrefrigeradorest66 mm
(Y4")o Y2burbujam&saltaquelaparte
traseradelrefrigerador.Veaelpaso3de
lasinstruccionesdenivelaci6npara
obtenerayuda.
/i iiiii ¸
Sila unidadhaIlegadoal Ifmitedel
rangode ajuste,y laspuertassiguen
desniveladas,bajelapuertadellado
opuestogirandoeltornilloderodilloen
sentidocontrarioaldelasmanecillas
del reloj.
Verifiqueconunnivelqueeste
inclinado'/4"haciaatra.sparaquela
puertacierre,correctamente.
Sila unidadest,.bienalineaday
estable,coloquede nuevola rejilla
inferiory lascubiertasdelasbisagras.
66

Y
Esterefrigeradorest&diseSadoparafuncionara temperaturasdom_sticasde 55oa 110° F(130a 430C).
I
4
Controlde la
temperatura
REFRIGERATOR
I
s 4
del dial
AjBTBIHl(lkLESDE[0S
(ONTROLB
CONTROL DE LA
TEMPERATURA DEL DIAL
1. Loscontrolesdel '_
refrigeradorest_.nenla
partesuperiordel
compartimientodel
refrigeradorylos .........
controlesdel
congeladorestanenla
partesuperiordel
compartimientodel
congelador.
2. Elfabricanterecemiendaquelos
controlesen amboscompartimientossean
colocadosenel nt]mero372.
3. DejefuncionarelrefrigeradorperIo
menosde8 a 12horasantesdecolocar
losalimentos.
4. Espere24 horasparaquelatemperatura
seestabilice.
CONTRO.LES
ELECTRONICOS DE LA
TEMPERATURA
1. Parafijarlatemperaturadelcongelador,
utilicelosbotones...... al ladedelbot6n
Y
_. Unaconfiguracbnde 0°a 2° F
(-170a -160C)se recomienda.
> Utiliceelbot6n_ paralevantarla
temperaturadela secci6ndel
congelador,o el bot6nY, bajarla.
FR_E _ 4
w_rMes_ coLoest
3 i 4
Controleselectr6nicosde la temperatura
OFF
Y
DISPENSER LIGHT
CHANGEO
/X
t_MPSET
r_
> Presioneelbot6n_ paraconfirmar
lasconfiguraciones
2. Parafijarlatemperaturadelrefrigerador,
utilicelosbot6nes v al ladedel bot6n
> Utiliceelbot6n^ paralevantarla
temperaturadelasecci6ndel
refrigerador,oelbot6n v bajarla.
> Presioneel bot6n_ para
confirmarlasconfiguraciones.
3. Dejequepasen24horasparaquelas
temperaturasseestabilicen.
NOTA:
> Lastemperaturesdelcompartimiento
puedenviriarlevementecomelosciclos
de launidadparamantenerlas
temperaturesdelconjunto.
Siel congeladoro elrefrigeradores
demasiadofrfo:
> Gireelcontrolalsiguientenumeromas
Siel congeladoro el refrigeradores
demasiadocaliente:
> Gireelcontrolalsiguienten0merom_.s
AL#4EHTO;
ALIMENTOS FRESCOS
AJLIST[DELOS(O TROLE$
Si24horasdespu6sdecolocarlosalimentos
observaqueunooamboscompartimientos
deberianestarmasfriesomascalientes,
ajusteel(los)control(es)segt)nseindicaen
/asinstrucciones.
NOTA:
> DebidoaldiseSodela unidad,siempre
comiencelosajustesde latemperatura
conlasecci6ndelcongelador.
> NOcambieningunodeloscontrolesm&s
deunn0meroalavez.
> Espere5-8horasparaquelas
temperaturasse estabilicen.
> Cualquiercambioen unodeloscontroles
afectar#,la temperaturadelotro
compartimiento.
ALIMENTOS
CONGELADOS
> Elcompartimientodelcongeladordeun
bajo.
alto.
DE
Latemperaturadelcompartimientode
a]imentosfrescosdelrefrigeradorse debe
mantenerentre1°C y4oC(34oFy
400F). Latemperaturaidealesde3oC
(37oF). Paraverificarla temperatura,
coloqueunterm6metropara
electrodom6sticosenunvasedeaguaen
elcentredelrefrigerador.Espere24
horasantesdeverificarlatemperatura.
Silatemperaturasobrepasa4oC(40oF),
ajusteelcontrolcomeseexplic6
anteriormente.
refrigeradordebesermantenido
aproximadamentea-18oC (0°F).Para
verificarlatemperatura,coloqueun
termSmetroparaelectrodom6sticosentre
lospaquetescongeladosy espere24
horasantesde verificarla.Sila
temperaturaessuperiora -18° C (0°F),
ajusteelcontrolcomesedescribi6
anteriormente.
Z !
0
r-
6/

Afindeevitarunaenfermedadgraveo
mortal,nouseel refrigeradordondeel
aguanoseasegurao sedesconozcasu
calidad,sindesinfecci6nadecuadaantes
o despuesdepasarporelfiltro.
INSTALACION DEL FILTRO
DE AGUA
1. Retirelata)a dederivaci6nazuly
cons6rvela)arausoposterior.
iii'
Z,CUANDO DEBO
CAMBIAR EL FILTRO DEL
AGUA?
Ciertosmodelosdesurtidorescuentancon
unindicadorparacambiodefiltro. Para
obtenerlasinstruccionesacercade c6rno
operary reajustarestacaracteristica,
consultelasecci6nde lascaracteristicasdel
surtidorenel manual.
Elfiltrodelaguadebecambiarse
aproximadamentecada6meses.
> Elcartuchodederivaci6nNOfiltrael
agua.AsegQresedetenercartuchos
filtrantesderepuestocuandoelfiltro
necesitesercambiado.
> Sielsistemadefiltraci6ndeagua
estuvocongelado,reemplaceel
cartuchofiltrante.
>- Siel sistemano hasidousadodurante
variosmesesy el aguatieneunsabot
yolordesagradable,laveelsistema
haciendosalir2o3vasosdeagua.Si
el oloro sabordesagradablepersiste.
cambieel cartuchofiltrante.
2. Retirelaetiquetadeseladodelextremo
delfiltroe ins_rteloenla cabezadelfiltro.
3. Giresuavementeala derechahastaque
el filtrosedetengay cierrelacubiertadel
filtro.
4. Reduzcaloschorrosrepentinosdeagua
purgandoel airedelsistema.Dejecorrer
el aguacontinuamentedurante2minutos
atravesdeldispensadorhastaqueel
aguasalgauniformemente.
> Sepuederequerirpurgaadicionalen
loshogaresenqueel aguaesdemala
calidad.
REEMPLAZO DEL FILTRO
DE AGUA
IMPORTANTE:Elairequepermanece
atrapadoenelsistemapuedecausar
eyecci6ndeaguayde1cartucho.Tenga
cuidadocuandoretireelcartucho.
Gireelfiltroa laizquierdahastaquese
desenganchede lacabeza.
Desagieel aguadelfiltroenelfregadero
ydescarteloenlabasuranormaldel
hogar.
IMPORTANTE:Lacalidaddelaguayla
cantidadusadadeterminanladuraci6ndela
vida_tildelcartuchofiltrante.Siconsume
muchaaguao siel aguaesde malacalidad,
puedequeseanecesarioreemplazarelfiltro
m£sa menudo.
4COMO HACER PEDIDOS
DE CARTUCHOS DE
REPUESTO?
E!cartuchofiltrantederepuestoKenmore®
modelo9005est£disponibleatrav6sdelos
distribuidoresycentrosde reparaci6nSears.
Ustedtambi6npuedehacerpedidosa trav6s
deSearsusandola informaci6nqueaparece
enla cubiertatrasera.
4DONDE SE ENCUENTRA
EL AGUA QUE SE USA
PARA PURGAR EL
SISTEMA ?
Duranteel usoinicial,esnecesarioesperar
de1 a2 minutoshastaqueelaguacomience
a salirpueseldep6sitodelaguainternodebe
tenertiempodeIlenarse.
i.,ESNECESARIO USAR EL
SISTEMA DE FILTRACION
DEL AGUA ?
Eldispensadorpuedesetusadosinel
cartuchofiltrantedelagua.Siusteddecide
estaopci6n,reemplaceelfiltroconlatapade
derivaci6nazul.
68
Limpieelexcesode aguaacumuladaen
la cubiertadelfiltroycontinieconla
Instalacibndelfiltro de agua,paso2y
3.

DELrll.TrODEAGUA
ESPEClFICAClONES DEL SISTEMA Y DATOS DE
FUNClONAMIENTO CARTUCHO FILTRANTE DE AGUA
PARA REFRIGERADOR - MODELO 9005
Especificaciones
MedidadelgastomAximoenservicio................................................2,83L/min(0,75GPM)
Vida0tilmaxima- modelo9005........................................................1892litros/500galones
Temperaturadeoperaci6nmaxima....................................................380C/100°F
Temperaturadeoperaci6nminima....................................................1oC/33° F
Presi6ndeoperaci6nminima............................................................138kPa/35Ib/pulg2
Presi6ndeoperaci6nmaxima............................................................827kPa/120Ib/pulg2
DATO.€ DE FUNCIONAMIENTO
Substancia
Plomo
PIomo
Quistes
Turbiedad
Lindano
Atrazina
Cloro
Part[culas**
2,4-D
Asbesto
Probadoconunamedidadegastode 0,75GPM(2,83IJmin)y unapresionm_ima de 120Ib/pulg2(827kPa)bajo
condicionesdelaboratorioestandar;sin embargo,elrendimientorealpuedevariar.Rendimientodeprotecci6nde
lasaludprobadoycertificadoporNSFInternational.
Utilizaci6ndeparticulasde0,5- 1micr6n.
Marca v desianaci6n de rnodelo E lementosde teemplazo _d nominal
WFS0-WISOO WFS0 500 galon_ (I,8925 litros
WF50 NI300 WF50 300 galon_ (I,135.5 li_os)
WFS0-KWISO[ ,46_9OO_ 500 galon_ (I,892.5 h_os)
WF50-KNI300 469005 30QgalOne_ 1.135.5 hgos)
OX3OF50-WI500 OWF51 500 gaines (I,892 5 liras}
OWFS0-Nt300 OWF5] 30Oga_=s (I.135.5 li_s"
Fabficnta: PentaPare/ncarpo_ted
Los disposiUvos de tmtam_ento de agua listado_ en este certificado hart curnpll_o con _s mqulstos de
prueba de acuatdo con la Seeck_n 116830 de C6d go de _eguddad y Sa_d para los siguientes
contaminates relacionades con la satud:
Contammanres v turbledad m_croblo!6qi¢os _dnJcos o radJoMolcos
Espo_ Asbestos
Contaminates orqamco_
AL,azme
Lindano
Concentracibna
laentrada
0,15mg/L+/-10%
0,15mg/L+/-10%
Minimum50,000/L
11+/-1NTU
0,002mg/L+/- 10%
0,009mg/L+k 10%
2,0mg/L+/-10%
PorIomenos10.000
particulas/mL
0,210mg/L+/-10%
lO'a 108fibras/L;fibrasde
10micr6metrosom_.sdelargo
Deparmmento de Salubridad
del Estadode CaIifomia
Dispositivo de tratamiento de agua
Certificado Ntimero
01- 1486
Fechz de er_si6n: 21 de sepdembre de12001
Fecha revisada: 21 de M_ha de12002
FlulO de sen6cio nominal: 0,75
Promedioa reduccion
lasalida delpromedio
0,001mg/L 99,33%
0,002mg/L 98,66%
1/mL 99,99%
0,12NTU 98,98%
0,00005mg/L 97,62%
0,0002mg/L 97,93%
0,09mg/L 95,26%
900/mL 99,68%
45,45,ug/L 84,42%
0,16MFL/mL 99,96%
P]ot,-,o
% de
Concentracion Reducci6n
mbxima minima
a lasalida requerida
0,001mg/L 0,010mg/L
0,003mg/L 0,010mg/L
3/mL > 99,95%
0,18NTU 0,5NTU
0,00005mg/L 0,00002mg/L
0,0006mg/L 0,003mg/L
0,17mg/L >75%
2400/mL >85%
100pg/L 0,0017mg/L
0,16MFUmL 99%
CartuchosfiltrantesWF50-KNI300yWF50-KWI500probadosycertificadospor NSF
Internationalen basealas normasANSI/NSF42y53 para la reducci6ndelas siguientes
substancias:
NormeNo 42: EfectosEst_ticos
Reducci6ndel saboryolor
Reducci6nde [aconcentraci6ndecloro
Unidadde Filtraci6nMecanica
Reducci6nde Particulas- ClaseI
@
PentaPure
1000ApolloRoad
Eagan,MinnesotaU.S.A.
EPAEST#35917-MN-1
PHa
iaent-
rada
6,5
8,5
N/C
N/C
N/C
N/C
N/C
N/C
N/C
N/C
CONDICIONES DE USO
GENERALES
LeaestaFichadeDatosdeFuncionamiento
ycomparelacapacidaddeestedispositivo
consusnecesidadesrealesdetratamiento
deagua.
NOuseesteproductodondeel aguasea
microbiolbgicamentepeligrosao de
calidaddesconocidasinhaberinstalado
desinfecci6nadecuadaantesodespu6s
delsistemade filtraci6n. Lossistemas
certificadosparareducci6ndequistes
puedenser usadosen aguadesinfectada
quepuedacontenerquistesfiltrables.
Usesolamenteconel suministrodeagua
fria. Verifiqueelcumplimientodetodos
losreglamentosy leyeslocalesy
estatales.
Elsistemadefiltraci6ndeaguaretractilusa
el cartuchofiltrantederepuesto9005.(verla
informaci6nparacontactarSearsyhacer
pedidos,alfinaldelaGuiadeUsoy
Cuidado).Es esencialelreemplazooportuno
delcartuchoparaobtenerunrendimiento
satisfactoriodeestesistemadefiltraci6n.Por
favorconsultelasecci6ncorrespondientede
estaGuiade Usoy Cuidadoparalos
requerimientosgeneralesdefuncionamiento,
mantenimientoy reparaci6ndeaverias.
Estesistemahasidoprobadodeacuerdocon
lasnormasANSI/NSF42y 53 parala
reducci6ndelassubstanciasmencionadasa
continuaci6n.Laconcentraci6nde las
substanciasindicadasenelaguaqueentraal
sistemase redujoa unaconcentraci6ninferior
o igualallimitepermisibleindicadoperlas
normasANSI/NSF42y53paraelaguaque
saleatrav6sdelsistema.
NormaNo53: Efectossobrela Salud
Unidadde ReduccionQuimica
ReducciondePlomo,Atrazina,Undanoy2,4-D
Unidadde Filtraci6nMecanica
Reducci6ndeQuistes,TurbiedadyAsbesto
Z!
O
r=.
69

/
CARACTERISTICASDELCOMPARTIMIEHTODELREfRIGERADOR
DEJ ,SIHTERIORES
ella,
>- Manipuleconcuidadolasbandejasde
BANDEJAS A PRUEBA DE
DERRAMES
LasBandejasa Pruebade _
Oerramesrecogenlos _1
derramespequefiospara lll l
facilidaddelimpieza.
Pararetirarla bandeja,levanteytirede
ellahaciaafuera.
>- Parareinstalarla bandeja,inviertael
procedimientoanterior.
LasBandejasa Pruebade Derrames
Deslizablespuedenlimpiarse
confacilidadpuesson
deslizableshacia
afuerapara
alcanzarlos
art[culosque
est_.nen partetrasera.Parafacilitarla
limpieza,la bandejadevidriopuedeser
retiradadesliz&ndolahaciaafueraentodasu
extensi6ny levant_.ndolafueradelmarco.
ALMACEHAMIEHTOEH
PUERTA
COMPARTIMIENTO DE LA
BEBIDA
(ENALGUNOS MODELOS)
Elcompartimientodetemperaturacontrolada
dela bebidamantienenlasbebidasyotros
articulosa unaternperaturadehasta5° F
(3oC)m_,sffiaqueelrestodelasecci6ndel
refrigerador.Laentradadeairepermiteque
elairedelasecci6ndelcongeladorpaseal
compartimientodelabebida.
7O
Controles
Elcontrolseencuentraubicadoenla pared
izquierdadelasecci6ndelrefrigerador.El
controlajustalacantidaddeairequecircula
enelcompartimientode labebida. D_vuelta
alcontrolensentidode lasagujasdelreloj
paraunatemperaturamilsffia.
Paraquitareinstalarel compartimientode
labebida:
Siesta.ubicadodirectamenteencimadel
compartimientode labebida,podriaser
necesarioquitarelcentrode productos
I&cteosoel recipientede I a puerta.
Consultelasinstruccionesapropiadasy
quiteelarticulo.Desliceel compartimiento
delabebidahaciaarribays_.queloen
formarecta.
alineeunode __
losorificiosde .4
Parainstalarlo, r_41tll t
entradadeaire _'-_
del
compartimientode la bebida(A)en una
de las dos entradas de aire(B) de la
puerta. Empujeel compartimientohacia
abaio dentrodel suietador del
recubfimientode la puerta hasta que se
detenga.
IMPORTANTE:Elcompartimientodela
bebidanofuncionaraapropiadamentesilos
orificiosdelaentradadeairenoest&n
alineadosconlosorificiosdelaentradade
airedelrecubrimientodela puerta.
CENTRO DE PRODUCTOS
LACTEOS
ElCentrodeProductosLbcteosofrece
almacenamientoconvenienteparatales
articuloscomomantequilla,yogur,queso,etc.
Estecompartimientoesajustableyse
encuentraen lapuerta.Puedemoversea
varioslugaresdiferentesparaacomodarlas
necesidadesdeconservaci6ndealimentos.
Paraquitare instalarel compartimiento:
Paraquitarlo,deslice_'_...
elcentrodelacteos
haciaarribayhacia
afuera.
Parainstalarlo,
desliceelensambleenelsujetadorque
deseedelrecubrimientodela puertay
empujehaciaabajohastaquetope.
Paraquitareinstalarla puertadelcentre
deI_cteos:
>- Paraquitarla,oprimaambosladosdela
puertadeIflcteosysfiquela.
Parainstalarla,deslicelosladosdela
puertaadentrodelcentrodeI_.cteoshasta
quelospuntosdebisagraentrenensu
lugar.
RECIPIENTES
INCLINABLES DE LA
PUERTA
(EN ALGUNOS MODELOS)
LosRecipientesInclinablesdelaPuerta
consistendeunrecipientey unbastidor,
proporcionanunalmacenamiento
conveniente,ajustableparaarticulosenla
puerta,Losrecipientesseinclinanhacia
afueraparaofrecerunaccesofacil,y se
sacanparafacilitarla limpiezay elajuste.
Paraquitare instalarelrecipiente:
> Paraquitarel
recipiente,inclineel
recipientehacia
adelanteyjalelo
haciaafuera.
Parainstalarelrecipiente,desliceel
recipientedentrodelbastidordelrecipiente
yempujeelrecipientehaciaarriba.
Paraajustarel bastidordelrecipiente:
Quiteelrecipientede
acuerdocon las
instrucciones
anteriores.
> Levanteel bastidordelsoportedela
puertay col6queloenlaubicaci6n
deseada.
CONTENEDORES DE LA
PUERTA
LosContenedoresdelaPuerta
seajustanparaadaptarsea sus
necesidadesde
almacenamiento.
> Pararetirarlos,
desliceel
contenedorhacia
arribaytire deelderechohaciaafuera.
Parareinstalarlo,inviertael procedimiento
anterior.

Glil (llYllblll II
({Iiii
CAJONES DE LAS
VERDURAS CON
CONTROL DE HUMEDAD
ElCajUnde lasVerdurasmantienelas
verdurasfrescasdurantemastiempo
ofreciendounambienteconcontrolde
humedad.
Controles
Loscontrolesdelcajondelasverduras
regulanlacantidadde humedadenel cajOn.
Useelajusteinferiorparaverdurascon
cascaras.Useelajustealtoparaverduras
conhojas.
Desmontajee instalaci6ndelos cajones
delasverduras:
>_Pararetirarelcajon,abraelcaj6nentoda
suextensi6n.Levantelapartedelantera
delcaj6nytiredeelderechohacia
afuera.
>_Parareinstalarelcaj6n,inserteelcajon
enlosrielesdelmarcoy empujehacia
atras asulugar.
Paraquitare instalarlarepisa:
> Paraquitarla,levantelarepisadelos
soportesdela pared.
> Parainstalarla repisa,
bajelarepisahasta
quequedeadentrode
lossoportesdela
paredyempijela
hastaquequedeal
rasconla pared
posterior.
COMO PROLONGAR LA
DURACION DE LAS VERDURAS
Porfavorsigalas reglassiguientescuando
guardeproductosenloscajonesdelas
verdurasconcontroldehumedad:
> NOlavelosproductosantesdecolocarlos
enelcaj6n.Cualquierhumedadadicional
queseagreguea loscajonespuede
causardeterioroprematurodelos
productos.
> NOforreloscajonesde lasverdurascon
toallasdepapel.Lastoallasretienen
humedad.
> NOcoloqueverdurasconhojasenel
caj6nconcontroldetemperatura.Las
temperaturasmAsfriaspuedendafiarlos
productosconhojas.
> Sigacuidadosamentelasinstruccionesde
control.Losajustesdecontrolincorrectos
puedendafiarlosproductos.
Veaa continuaci6nlosajustescorrectosdel
controlde humedaddelcaj6n:
'LOW' coliflor
(Bajo) maiz
calabacines
pepinos
'HIGH' lechuga
(Alto) espinaca
apio
coles
• manzanas
• naranjas
" uvas
• esparragos
• repollo
• br6coli
• hierbasfrescas
CAJON CON
TEMPERATURA
CONTROLADA
ElCaj6nconTemperaturaControlada
ofreceuncaj6nconuncontrolde
temperaturavariablequemantieneel
compartimientomasfrioquelatemperatura
delrefrigerador.Estecaj6npuedeusarse
paraalmacenarbocadillosofrutasyverduras
adicionales.
NOTA:Elairefrio dirigidoal Sistemapuede
reducirla temperaturadelrefrigerador.Podria
sernecesariotenerqueajustarelcontroldel
refrigerador.
Controles
Loscontrolesde clima,ubicadosenla pared
a la izquierdadelcaj6n,regulanla
temperaturadelairedelcaj6ncon
temperaturacontrolada.Ajustelapalancade
controlencold (frfo)paraproporcionar
temperaturanormalal refrigeradorparalas
frutasyverdurasconcascara.Useelajuste
coldest(m#sfrfo) paracamesuotros
arficulosdeembutidos.
Paraquitare instalarel ca'on:
> Paraquitarlo,jaleel I_ Ill!
caj6nhaciaafuera
completamente.
Inclineelfrentedel
cajonysaqueloen
linearecta.
> Parainstalarlo,guieelcaj6ndentrodel
bastidory empQjelohaciaatrAshastaque
el caj6nestealrasconlaparedposterior.
AJUSTES DE LA TEMPERATURA
PARAARTICULOS CONSERVADOS
EN EL CAJON CON TEMPERATURA
CONTROLADA
Ustednodebeguardarlechuganiotras
verdurasconhojasenestedespensa.
'COLD'(FRIO) 'COLDEST'(MASFRIO)
coliflor • biftecs
pepinos , quesosduros
calabacines • fiambres
manzanas • tocino
maiz , salchichas
naranjas
uvas
CAJON DE BOCADILLOS
(EN ALGUNOS MODELOS)
Estecaj6npuedeusarse _ _
paraalmacenararticulos
de comida o verduras
adicionales.
Controles(en algunosmodelos)
Loscontrolesregulanlacantidadde
humedadenelcaj6n.Useelajusteinferior
paraverdurasconcascaras.Useel ajuste
altoparaverdurasconhojas.
Paraquitare instalarel cajon:
> Paraquitarel caj6n,saqueelcajonhasta
dondetope.Inclinela partedelanteradel
caj6ny saqueloenformarecta.
> Parainstalarlo,inserteel caj6ndentrode
losrielesdelmarcoyempQjeloensulugar.
ORGANIZADOR
PARA BEBIDAS
(ENALGUNOS
MODELOS)
ElOrganizadorpara
Bebidassedeslizahaciaafuerapordebajo
dela repisasfijasa pruebadederrames.Le
caben12latasde12onzasal organizador.
[orElorganizadortienecapacidadpara
12latasde12onzas.]
Paraquitare instalarel organizador:
> Paraquitarlo,vadeel contenidodel
organizador.Jalelohaciaafuera
completamentey levAnteloparaliberarlo
delosrielesdela repisa.Jalelohacia
adelanteparaquitarlo.
> Parainstalarlo,inviertael procedimiento
anterior.
m
Z_
O
r'-
7]

Paraevitardafiosmateriales,observeIo
siguiente:
> Nofuercetamanecitladetam£quina
dehacerhielohaciaarribani hacia
abajo,
> Nocoloqueniguardenadaenel
dep6sitodelbielo.
Estam&quinade hielohaceloshielosquese
usanenel sistemadesurido.
Usoinicialdela MaquinadeHacerHielo
> Cerci6resedequeel
dep6sitodelhieloeste ____
ensulugary que m
maneciiladelam£quina
est6dirigidahacia _ -- -
abajo.
> Despu_sdequeel compartimientodel
congeladoralcanzaentre-180a -170C
(0°a 20F),lam£quinade fabricarhielose
lena conaguay comienzaafuncionar.
> Espereaproximadamente24horas
despuesdelainstalaci6npararecibirel
primerIotede hielo.
> Descarteelhielocreadodurantelas
primeras12horasdeoperaci6npara
verificarqueel sistemanotenga
impurezas.
Instruccionesde Funcionamiento
> Cercioresedequeeldepositodelhielo
esteen sulugary quelamanecillade la
m&quinaest6dirigidahaciaabajo.
> Despuesdequeelcompartimientodel
congeladoralcanzaentre-180a -170C
(0° a 2° F),lam£quinadefabricarhielose
lenaconaguay comienzaa funcionar.
Ustedcomenzar£aobtenerhielo
aproximadamentecada3horas.
> Detengalaproducci6n ....... _.
dehielolevantandola --'
manecillade la I
m_,quinahastaquese
escucheunchasquido.
>--Lamaquinadehacerhieloseguir£
desactivadohastaqueel brazoseempuja
haciaabajo.
IMPORTANTE:Larepisaparaheladosno
debeserinstaladosiel brazodela maquina
dehieloest£.
7l
REPISA FIJA DEL
CONGELADOR
Paraquitare instalarlas repisas
montadasenpresillas: _.._,
> Quitelarepisadelos
sujetadoresdemontajede
laparedyjalelahastaquesesalgade los
orificiosdemontajedelladoizquierdo.
> Parainstalarla,inviertaelprocedimiento
anterior.
Paraquitare instalarrepisasmontadasen
rieles:
> Paraquitarlas,saquea
presi6nel ladoderechode
la repisadel rieldelgabinetey sep£rela
delaspresillasdemontajedelapared.
Parainstalarlas,vuelvaacolocarlarepisa
en laspresillasde montajedelapared.
AsegOresedequela parteposteriordela
repisaestealrasconlaparteposterior
delgabinetee introduzcaa presi6nla
repisaenel rieldelgabinete.
REPISA PARA HELADOS
La RepisaParaHelados
ofreceunespacioparalos ]F__-}
articulosquetienenque
congelarseo enfriarsecon
rapidez.
> Paraquitarla,levantela repisapara
heladosdelosrielesdelrecipientede
hieloyj£1elahorizontalmentehacia
afuera.
> Paraquitarelrecipiente,quitelarepisa
parahelados,levanteel brazodela
m£quinadehielosparadesactivarla.
IMPORTANTE:Larepisaparaheladosno
debeserinstaladosi elbrazodela m£quina
dehieloest£.
Paraevitarposibleslesiones,inclusola
muerte,nocoloquearticulosdevidrioen
elcompartimientorepisaparahelados.
Losobjetosdevidriopuedequebrarseo
explotarsi seexponenafrioextremo.
CANASTA DE ALAMBRE
Paraquitare instalarla canasta:_
> Paraquitarla .,L[1;_I_
canasta,saquela ,_ll_i_ _
canastahastaaue_ "_
tope.Inclineel frentedela canastay
s£quelaen formarecta.
> Parainstalarla,insertela canastaen los
rielesdelrecubrimientodelrefrigeradory
empujeloensulugar.
RECIPIENTE DE
ALMACENAJE DE HIELO
El Recipientede Hielo _---I_ DeHielo
seencuentraIocalizado
debajo del surtidor
autom£ticodehielo.
Para quitar e instalar
el recipientede hielo:
> Paraquitarelrecipiente,quitelaseccidn
repisaparahelados.Levanteel brazode
lamaquinadehieloparadesactivarla.
> Levanteel recipienteyjalehaciaafuera
completamente.Levantelaparte
delanteradelrecipientey s£quelo.
> Parainstalarlo,desliceelrecipienteenlos
rielesdebajodelam£quinaautomaticade
hieloshastaquesetrabeensulugar.Baje
elbrazodelam£quinadehielospara
activarlaycoloquedenuevolasecci6n
repisaparahelados.
recipientedehielo
IMPORTANTE:El
debeestarasegurado
ensulugarparaquelamaquinasurtahielos
apropiadamente.Silapuertadelcongelador
nocierra,elrecipientenoestaenel lugar
correcto.Girele impulsorcomose muestra
paraalinearcorrectamenteel recipientede
hieloconla parteposteriorde launidad.
CONTENEDORES DE LA
PUERTA
LosContenedoresdela Puerta
seajustanparaadaptarsea
susnecesidadesde
almacenamiento.
> Pararetirarlos,deslice
el contenedorhaciaarribay
tiredeel derechohaciaafuera.
> Parareinstalarlo,inviertael procedimiento
anterior.

O,RA( II[ TiC, S
FO(ODELSURTIDOR
Laluzsoactivaenel_readelsu_idoratoda
potenciacuandosesurtehielooagua.
AI.MOHADILI.ADESURTIDO
Laalmohadilladesurtidoseencuentra
Iocalizadaenlaparedposteriordelareade
surtido.Cuandose oprimelaalmohadillade
surtido,lamodalidadde hieloquehaya
elegidoenelpaneldecontrolser&laque
surta.
Almohadiila
de
Surtido
Labandejadesmontabledelfondodel_.rea
desurtidoest_diseSadapararecolectar
pequeSosderramesypuedesacarsecon
facilidadparalimpiarlayvaciarla.
IMPORTANTE:Labandejadesmontableno
tienedrenaje.Elaguacorriendo
continuamentehar_.quelabandejase
rebose.
Desmotable
IDEJADESMONTABLE
Bandeja
{::UNCIOH .MIENTODEL
SgflTIDOflDEAGUA
Paraevitarlesionespersonaleso daSos
materiales,observelasinstrucciones
siguientes:
> NOcoloqueosdedos,lasmanosni
ningOnobjetoextraSoenelorificiodel
surtidor.
> NOuseobjetosaf adosparaquebrar
elhielo.
> NOsurtaelhielodirectamenteenlos
vasosdelgadosdevidrio,porcelanani
cristaldelicado.
NOTA:
> Duranteelusoinicialdelsurtidordeagua
habr_,unretrasode1a 2 minutosenel
surtidodelaguaparapermitir_ueseIlene
eltanquede aguainterno.Desechelas
primeras10a14racionesde agua
despu6sdeconectarelrefrigerador
inicialmentealsuministrodom6sticode
aguaydelosperiodosextendidossin
usar.
Parausarlaalmohadilladesurtido:
> Elijalaselecci6ndeaguaenel panelde
controldelsurtidor.
> Oprimaconfirmeza,unrecipientede
bocaanchacontralaalmohadillade m
surtido.
Retirela presi6ndelaalmohadillade
surtidoparaqueelflujodeaguase
detenga.UnapequeSacantidaddeagua Zl I
podriacontinuarsaliendo,y quedar
atrapadaenlabandejadesurtido.Los O
derramesgrandesdebensecarse.
73

(ARACTER[STICASDELSUflTIDOR,com.
CAflAC[Efl[SHCASDELCOHIflOI.COH(iNCOBOTOMES
o _ o o o
CHANGE
FILTER DISPENSER FILTERED ICE & WATER
OPERACION
DEL DISPENSADOR
Operaci6ndeldispensadoradispensar:
ModoselectodelCUBED(cubo),del
CRUSHED(agolpamiento),odelWATER
(agua)empujandoel bot6nenpanelde
controldeldispensador.Unaluzde
indicadorverdesobreel bot6nmuestrala
selecci6ndemodo.
Presioneelenvasecontralapistadel
dispensador.Elmododelaselecci6nno
puedeset cambiadomientrasque el
dispensadordelhieloest_en la
operacibn.
NOTA:Siel dispensadordelaguaes
continuamenteactivopormasde5 minutos,
unautom&ticobloqueahaciafueraelsensor
cerrar_,potenciaal &readeldispensador.
Paratasinstruccionesenc6moabrirsu
dispensador,vealasecci6ntituladaTraba
del Surtidorabajo.
TRABA DEL SURTIDOR
Estacaracteristicaimpidequese @
surtahieloo agua.
Paratrabary destrabarel surtidor:
Paratrabarelsurtidor,oprimay mantenga
oprimidoelbot6nLOCK/UNLOCK
(trabar/destrabar)durante3segundos.Un
focoverdeindicadorubicadoencimadel
bot6nconfirmaqueel surtidorse
encuentratrabado.
Paradestrabare] surtidor,mantenga
oprimidoel bot6nLOCK/UNLOCK
(trabar/destrabar)durante3segundos.El
focoverdeindicadorubicadoencimadel
bot6nseapagara.
74
LIGHT
O
FOCO INDICADOR
DEL ESTADO DEL ;oo °
FILTRO
Elfocoindicadordelestadodel
filtrosirvecomorecordatorioparareemplazarel
filtrodeagua.Elfocoverdeindicaqueelfiltro
seencuentraenbuenascondiciones.Unfoco
rojoindicaqueelfiltrodebecambiarse.Unavez
queelfocorojoseencienda,permanecera.
iluminadohastaquelafunci6nsereajuste.
Parareajustarel indicador:
:_ Oprimay mantengasimult&neamente
oprimidoslosbotonesLOCK/UNLOCK
(trabar/destrabar)y WATER(agua)
durante4 segundos.Elfocoverde
indicadordelestadodelfiltrodestellar_.3
vecescuandolafunci6nsereajuste
correctamente.
FILTER
FOCO AUTOMATICO
Lafunci6ndelfoco _,_,_._o
autom&ticoofrecelahabilidad
deactivarel focodelsurtidora media
potenciacuandoel LIGHTSENSOR(sensor
deluz)detectaquelosnivelesdeluzde la
habitaci6nestanbajos.
Paraactivary desactivarel foco
autom_tico:
Paraactivarlo,oprimael bot6nON/OFF
(apagar/encender)ubicadoen eltablero
decontrol.Unfocoverdeindicador
ubicadoencimadelbotSnmuestraqueel
sensorest&activado.
_- Paradesactivarlo,oprimaelbot6n
ON/OFF(apagar/encender).Elfocoverde
indicadorseapagar&.
NOTA:Elfocodelsurtidorfuncionar_,tanto
sise seleccionao noseseleccionael foco
automatico.
o
SENSOR
LIGHT
MODALIDAD
SABBATH
Estamodalidadtienelafinalidadde
desactivarlaenergiael6ctricade lasluces
LEDy delsurtidor,ala vezquepermitedejar
funcionalesloscontroles.
Paraactivarla modalidadSabbath:
Oprimay mantengaoprimidoslosbotones
LOCK/UNLOCK(trabar/destrabar)y
ON/OFF(apagar/encender)
simultaneamentedurante3 a 4 segundos.
Despu_sde3 a 4segundos,se
apagar_nlaslucesLEDy lasdel
surtidor.Laluzdelsurtidornose
activar_mientrassurtecuandoestden
estamodalidad.
Paradesactivarla modalidadSabbath:
Oprimay mantengaoprimidoslos botones
LOCK/UNLOCK(trabar/destrabar)y
ON/OFF(apagar/encender)
simult_.neamentedurante3 a4 segundos.
Despuesde3 a 4 segundos,se activar&n
laslucesLEDylasdelsurtidor.
NOTA:Encasodequeseinterrumpala
energiaelectricamientrasseencuentre
activalamodalidadSabbath,elcontrol
permanecer&enestamodalidadcuandose
restablezcalaenergiael_ctrica.

GRACIERiSIICASELECTfl6NICODE[COHIRO[
OFF
ON
GOOD
CHANGEo
OPERACION _ _
DEL
DISPENSADOR
Paradispensarel agua:
> Seleccioneel botondelWATER.
> Presioneelenvasecontrala pistadel
dispensador.
Paradispensarel hielo:
> Seleccioneel botCndeCUBE
parahielode bloque.
> Seleccioneel botCndeCRUSH [_
paramachacadohielo
> Presioneel envasecontrala pistadel
dispensador.
NOTA:Siel dispensadordelaguaes
continuamenteactiveporm&sde2 minutos,
unautomaticobloqueahaciafueraelsensor
cerrarapotenciaal &readeldispensador.
ParalasinstruccionesencCmoabrirsu
dispensador,yealasecciCntituladaTraba
delSurtidorabajo.
TRABA DEL
SURTIDOR
Estacaracterfsticaimpidequesesurtahielo
o agua.
Paratrabary destrabarelsurtidor:
> Paratrabarelsurtidor,oprimay mantenga
oprimidoel botCnLOCK/UNLOCKdurante
3 segundos.Unfocoverdeindicador
ubicadoencimadelbotCnconfirmaqueel
surtidorseencuentratrabado.
DISPENSER
FUNCION LIGERA
DEL
DISPENSADOR
LafunciCnligeraofrecea ofertasdos
configuraciones:DEyAUTOMOVIL.
APAGADOelfijardaravueltaapagadoa la
luzdelacavidaddeldispensador.La
configuracbndelAUTOMOVlLpermitequeel
SENSORmidalosnivelesligeros
circundantesy ajustela potenciadela luzde
lacavidadpotconsiguiente.Cuandoel
sensercolocalosnivelesdela luzcorta
(tiempodelanoche,cocinaobscurecida),la
luzdelacavidadresponder_,enlapotencia
50%.Cuandoelsensercolocalosaltos
nivelesligeros(cocinaencendida,luzdelsol
directa),la luzdela cavidadnoactivar&
NOTA:Elfocodelsurtidorfuncionaratanto
sise seleccionao nose seleccionael foco
automatico.
Paraactivarlo:
> Oprimael botCnON/OFFubicadoenel
tablerode control. Laluzdeindicador
verdesobreel botCncontinuar&
Paradarvueltaala luzapagado:
> Oprimael bot6nON/OFFubicadoen el
tablerode control.Laluzdeindicador
verdesobreel bot6nsaldr&
LIGHT
SENSOR
FOCO INDICADOR _,,T_.
DEL ESTADO DEL .......
FILTRO
Elfocoindicadordelestadodelfiltrosirve
comerecordatorioparareernplazarelfiltrode
agua.Elfocoverdeindicaqueelfiltrose
encuentraenbuenascondiciones.Unfoco
rojoindicaqueelfiltrodebecambiarse.Una
vezqueel focorojoseencienda,
permanecerailuminadohastaquelafunciCn
sereajuste.
Parareajustarel _+_
indicador:
> Oprimay mantengasimult_.neamente
oprimidoslosbotonesLOCK/UNLOCKy
WATERdurante4 segundos.Elfoco
verdeindicadordelestadodelfiltro
destellar_.3 vecescuandolafunci6nse
reajustecorrectamente.
CONFIGURACIC)N DE .....
LA TEMPERATURA
Estosclavesbajarano levantar_.nla
temperaturadelcompartimientodel
congeladorodelalimentofresco.
NOTA:Vealasecci6nComoAjustarlos
Controlesdela Temperatura(pagina67)
paraquehayainstruccionesenc6mofijar
temperaturasdetcompartirnientodel
alimento.
GOOD o
v I'!1
Zl
O
Iff=
> Paradestrabarelsurtidor,mantenga
oprimidoel botCnLOCK/UNLOCKdurante
3 segundos.Elfocoverdeindicador
ubicadoencimadelbotchseapagar&
tS

CARACTERISTKASDE[SURTIDOR,cont.
(ARA(TERISTICASELE(TrOHI(Oi)ELCONTROL,(oNt.
OFF
/%
_ _ tE_'ET I
ON
DISPENSER
GoOD _,
CHANGEC_
LIGHT
SENSOR
MAX COOL
(MAXIMO FRiO)
Estafuncioncausala temperaturadel
alimentofrescoa lagotaa latemperatura
minimadelrefrigeradorquefijadisponible.
Siguehabiendoestaconfiguraci6nenefecto
poraproximadamente10horas.
Paraactivary paradesactivarMaxCooh
> Paraactivar,presioneel bot6nMAX
COOL.Laluzverdesobreelbot6n
indicaraestatusactivo.
> Paradesactivar,presioneelbot6nMAX
COOL.Laluzverdesobreel bot6nsaldr&.
NOTA:Laconfiguraci6nde latemperaturano
sepuedecambiarsi esm&ximoserefrescao
laconfiguraci6nmaximade laheladaes
activa.
MAX FREEZE
(MAXIMO HELADO)
Estafunci6ncausalatemperaturadel
congeladora lagotaalatemperaturaminima
delcongeladorquefijadisponible.Sigue
habiendoestaconfiguraci6nen efectopor
aproximadamente24 horas.
Paraactivary paradesactivarMaxFreeze:
> Paraactivar,presioneel bot6nMAX
FREEZEbutton.Laluzverdesobreel
bot6nindicaraestatusactivo.
DISPLAY ON/OFF
(VISUALIZACION
ACTIVO/INACTIVO)
Elinterruptorcontrolalapotenciade la
visualizaci6n.
Paraactivary paradesactivarla
visualizaci6n:
Paraactivar,presioneelbot6nDISPLAY
ON/OFF.Lavisualizaci6nseencender_.
paraarriba.
> Paradesactivar,presioneelbot6n
DISPLAYON/OFF.Lavisualizaci6nir_.
d_vil.
VACATION MODE
(MODO DE LA
VACAClONES)
Estemodo,siestaactivado,harael
refrigeradornodescongelarcomeamenudo.
Estoconservaenergia.
Paraactivary paradesactivarmododelas
vacaciones:
> Paraactivar,presioneel bot6nVACATION
MODE.Laluzverdesobreelbot6n
indicar_lestatusactivo.
> Paradesactivar,presioneel bot6n
VACATIONMODE,o abracualquier
puertadelrefrigerador,
ALARM OFF
(DESACTIVE EL
ALARMAR)
Esteclaveseutilizaparadarvueltaal
indicadoramonestadordealtatemperatura,
elalarmaraudio,tanbiencomoel alarmar
audiodela" puertaabierta"apagado.Esto
tambiendesactivar&losalarmarquesuenan
actualmente.
Paradarvueltaalalarmarapagado:
Presioneel bot6nALARMOFF.
Paradesactivar,presioneel bot6nMAX
FREEZE.La luzverdesobreel bot6n
saldr&.
NOTA'.Laconfiguraci6nde latemperaturano
sepuedecambiarsi esmaximoserefrescao
laconfiguraci6nm&ximadela heladaes
activa.
76

(ARA(iER TI(, S
/,
ELE(TROHI{ODEL
(OHTROL,COHT.
MODALIDAD
SABBATH
Estamodalidadtienelafinalidadde
desactivarlaenergiael_ctricadelasluces
LEDy delsurtidor,a lavezquepermitedejar
funcionalesloscontroles.
Paraactivary paradesactivarModalidad
Sabbath:
> Optimay mantengaoprimidoslosbotches
LOCK/UNLOCKy ON/OFF
simult&neamentedurante3 a4 segundos.
Despuesde3 a 4 segundos,se apagaran
laslucesLEDy lasdelsurtidor.Laluzdel
surtidorno seactivar_mientrassurte
cuandoestaen estamodalidad.
> Oprimay mantengaoprimidoslosbotones
LOCK/UNLOCKyON/OFF
simult_.neamentedurante3 a 4 segundos.
Despuesde 3segundos,las lucesde la
visualizaci6ny deldispensadoractivar&n.
NOTA:Encasodequeseinterrumpala
energiael_ctricamientrasse encuentre
activalamodalidadSabbath,elcontrol
permanecer_en estamodalidadcuandose
restablezcala energ[aelectrica.
AUTO VISUALIZAClON
Loscontrolesdevisualizaci6nautoquela
iluminaci6ndelavisualizaci6nde LEDbas6
en laslecturasligerasrecibierondel
"SENSOR".Siel "SENSOR"indicaniveles
dela luzcorta,lavisualizaci6nseram_.sd6vil
quesivisualizaduranteperiodosbien
iluminados.
Parafijar elnivel dela potenciade
la visualizacibn:
> OprimidoslosbotonesON/OFFy
congeladorY ara3segundos.La
actividadactualmostrar&enla
visualizaci6nmostrandoel"AL O" para
encendido,el "AL A" parael autom6vil.
%,
> Utiliceel bot6ndelrefrigerador...... para
seleccionaropcionesde una
visualizaci6n.
Elijalaopci6npresionandoel
bot6nCONFIRMSETTINGS.
NOTA:Theponeletrasal"AL" mostrara
siempreenlavisualizaci6ndelatemperatura
delcongeladormientrasqueenestemodo.
SELECCION DE LA oF
MEDIDA DE LA °C
TEMPERATURA
Estemodoestadisponibleparacambiarla
visualizaciondelatemperaturaentre
Fahrenheity centigrado.
Paracambiarla lecturaactualdela
temperatura:
> Presionelosbot6nesDISPLAYON/OFFy
%, simult__neamentedurante3
segundos.
BLOQUEO
OCULTADO
PARA SUPERIOR EL
TELCLADO NUMI RICO
El prop6sitodeestacaractefisticaesevitarel
tratardeforzarconelconjuntosuperiorde
controlesdeldispensador.Estoincluyelas
funcionessiguientes:DisplayOn/Off
(Visualizaci6nActivo/Inactivo),MaxFreeze
(M,_ximoHelado),MaxCool(M_.ximoFrio),
VacationMode(Mododelavacaciones),y
Configuraci6ndela temperatura.
Paraactivary paradesactivarBloqueo
ocultado:
Paraactivar,los bot6nesLOCK/
UNLOCKy DISPLAYOFF
simult&neamentedurante3 segundos.
Paradesactivar,losbot6nesLOCK/
UNLOCKy DISPLAYOFFbuttons
simult&neamentedurante3 segundos.
FUNOION ACTIVO/
INACTIVO
Lacaracteristicadavueltaapagadoa
refrescarsealas seccionesdelalimento
frescoydelcongeladormientrasquepermite
quelaslucesy lavisualizaci6nelectr6nica
permanezcanencendido.Lasfuncionesdel
dispensadornoestara.ndisponiblesmientras
queen estemodo.
Paraactivary paradesactivarrefrigerador:
Paradesactivar,resioneelbot6n %-
hastaquela lecturasecoiocam&saliade
latemperaturam&ximapermitidadel
congelador.Aestepunto,lavisualizaci6n
teeraOFE Elijalaopcionpresionandoel
bot6nCONFIRMSETTINGS. _Paraactivar,presioneelbot6ndel
congeladorY. Elijalaopci6npresionando Z=
elbot6nCONFIRMSETTINGS.
NOTA:Despu_sdelareactivaci6n,la O
visualizaci6nmostrar&latemperaturaquefija r ==
previamenteenuso.Vealasecci6n,"Chino
ajustarlos controlesde la temperatura"
(pagina67),paraquehayainstruccionesen
c6mofijartemperaturasdelcompartimiento
delalimento.
puede
77

COHSEJOSY
[IMPIEZADESUREFRIG{RADOR
se
PIEZA
PuertasTexturadas
y Exterior
InteriordelGabinete
Puertasde Acero
Inoxidabley Exterior*
IMPORTANTE:La
garantfadeesteproducto
nocubreda#oalacabado
deaceroinoxidable
causadoporusoincorrecto
deproductosdelimpiezao
deproductosno
recomendados.
JuntasdelasPuertas
BobinadelCondensador
Retirelarejillainferiorpara
teneracceso
Rejilladela Salidadel
Ventiladordel
Condensador
Vealapartetraserade/
refrigerador
AccesoriosBandejas,
compartimientos,cajones,
etc.
NO USE
> Limpiadoresabrasivoso _.speros
> Amoniaco
> Blanqueadordecloro
> Detergenteso solventes
concentrados
> Esponjasde restregar de metal
o pl&sticotexturado
> Limpiadoresabrasivos o
asperos
> Amoniaco
> Blanqueadordecloro
> Solventes o detergentes
concentrados
> Esponjasde restregar de metal
o pl&sticotexturado
> Productosa base de vinagre
> Limpiadoresabase de iim6n
> Limpiadoresabrasivoso
asperos
> Esponjasde restregar de metal
o pl&sticotexturado
> Unlavavajillas
USE
> Use4 cucharadasde bicarbonato disuelto en 1 cuarto de
gal6n (1 litro) de agua tibia conjabon.
> Enjuague lassuperficiescon agua tibia limpiay seque
inmediatamente para evitar las manchas.
> Useaguatibiacon jab6n y un patio suave limpio o una
esponja.
> Enjuaguelas superficies con agua tibia limpia y seque
inmediatamente para evitar las manchas.
> Usela boquilla de una manguerade aspiradora.
> Use la boquilla de una manguerade aspiradoracon
escobilla.
> Sigalas instrucciones de desmontaje e instalaci6n indicadas
en la secci6n correspondientea cadaaccesorio.
> Espere hastaque los articulos se ajusten a la temperatura
ambiente.
> Diluyadetergentesuave y use un patio limpioy suave o una
esponjapara limpiarlos.
> Useuna escobillacon cerdas de plastico para limpiar las
hendiduras.
> Enjuaguelas superficiescon agua tibia limpia.
> Seque inmediatamentelos articulos de vidrio y los
transparentespara evitar las manchas.
8 * En el interiordel refrigeradorse ha incluido un limpiadorde acero inoxidable para su uso. Para comprar limpiadoradicional,
nnr f_,/nr n&nrt_ea an r, nnf_r,fn Pnn .q_,_rq l lq€_nt'ln I_ infnrm_ni&n inclin_d_ p.n 13 ¢.nntrannrtada alp.£1l manual.

1. Retiretodoslosalimentos.
2. Desenchufeel refrigerador.
3. Limpielossiguientesarticulos- prestando
especialatenci6nalas hendiduras-
usandolasinstruccionesapropiadas
indicadasenlasecci6nLimpiezade su
refrigerador:
• Paredes,pisoy techodelinteriordel
gabinete.
• Cajones,bandejasyjuntas.
4. Lavey sequetodaslasbotellas,envases
yfrascos.Descartelosalimentosafiejoso
deteriorados.
5. Envuelvaoguardelosalimentosque
causanoloresenenvaseshermeticos
paraevitarquelosoloresvuelvana
ocurrir.
6. Enchufeel refrigeradory vuelvaacolocar
losalimentosensuslugares.
7. Despuesde24horas,verifiquesi sehan
eliminadolosolores.
Siel olorat_npersiste...
1. Retireloscajonesy col6quelosenla
bandejasuperiordelrefrigerador.
2. Lleneelcompartimientodelrefrigeradory del
congelador- incluyendolaspuertas-con
hojasdeperi6dicosarrugadasnegrasy
blancas.
3. Coloquebriquetasdecarb6ndispersasen
losperi6dicosarrugadosenel
compartimientodelrefrigeradory del
congelador.
4. Cierreiaspuertasydejereposardurante
24-48horas.
5. Repitadesdeelpaso5al7indicados
anteriormente.
Sielo!orat_npersiste,p6ngaseencontacto
conelCentredeServicioSears.Elnt)merode
telefonoseencuentraenlacontraportadadel
manual.
> Evitecolocardemasiadosarticulosen las
bandejasdelrefrigerador.Estoreducela
eficaciade lacircutaci6ndelaire
alrededordelosalimentosy el
refrigeradorrealizar_,ciclosde
funcionamientomasfrecuentes.
> Evitecolocardemasiadosalimentostibios
en el refrigeradordeunasolavez.Esto
sobrecargaloscompartimientosy
disminuyelavelocidaddeenfriamiento.
Nousepapeldealuminio,papelencerado
o toallasdepapelparaforrarlas
bandejas.Estodisminuyeelflujodeairey
el refrigeradorfuncionar&menos
eficientemente.
> Uncongeladorllenohasta%desu
capacidadfuncionar&m&seficientemente.
Ubiqueel refrigeradorenlapartem__s
frescadelahabitacion.Evitelas&reas
querecibenluz directadelsolocercade
tuberiaso rejillasdecalefacci6nuotros
electrodomesticosqueproducencalor.Si
estonoesposibleaisleelexteriorusando
unasecci6ndelosarmarioso unacapa
adicionaldeaislamiento.
> Consultelaseccionsobrecontrolesde la
temperaturaenla Guiade Usoy Cuidado
paraobtenerlosajustesdecontrol
recomendados.
Limpielasjuntasdelapuertacadatres
mesesdeacuerdoconlasinstrucciones
de limpiezaindicadasenlaGuiadeUsoy
Cuidado.Estoasegurar&quelapuerta
cierreherm_ticamenteyqueel
refrigeradorfuncionecon mayor
eficiencia.
> Organicelosarticulosenel refrigerador
de modequesereduzcaeltiempoquela
puertaest_abierta.
Aseg0resedequelaspuertasqueden
biencerradasnivelandoel refrigerador
comoseindicaenlaGuiade Usoy
Cuidado.
Limpielasbobinasdelcondensadorcada
3 mesescomose indicaenlaGuiade
Usey Cuidado.Estocontribuir&alahorro
deenergiay al rendimientodel
enfriamiento.
e
les
giaveso lamue_edes_onectelaene_gia
delrefrgeradoiantesdeoambiarlosfocos.
Despu_sae hacerlo5onectelaenergfa
dafios
materiaes,ObserveIos guient_:
aej_ queseenfrieeiioco:
> Useguantescuandocambieelfoco:
SECCION SUPERIOR DEL
REFRIGERADOR
1. Localicelos
sujetadoresen
cadaladedela
pantalladelfoco.
Insertelos dedosy
optimaencada
ladedela pantalta,j&lelay quftela.
2. Quitelosfocos.
3. Reempl&celoconunoparaelectro-
domesticosquenoseamayorde40vatios.
4. Reemplacelacubiertadelfocoinsertando
lascuatroleng0etasdelapantalladelfoco
enlosorificiosenelrecubrimiento
directamenteenfrentedelensambledelfoco.
SECCION INFERIOR DEL
REFRIGERADOR Y
SECClON DEL
CONGELADOR EN LOS
MODELOS SIN SURTIDOR
1. Oprimalasleng0etasinferiores(A)dela
cubiertadelfocoyjalelaenformarecta.
,
Quiteelfoco.
3.
Reemplaceel fococonunopara
electrodom6sticosquenoseamayorde
40 vatios.
,
InsertelaslengfJetassuperiores(B)dela
cubiertadelfocoenel B
recubrimientodel
introduzcaa presi6nla
porci6ninferiorsobre
refrigeradore I_
elensambledelfoco.
SECCION DEL A
CONGELADOR DE LOS
MODELOS CON SURTIDOR
1. Quiteelrecipientedelhielelevantandola
partedelanteray jalandelohaciaafuera.
2. Quitelacubiertadelfocooprimiendolas
leng0etassuperiores(A)yjalandola
cubiertahaciaafueradelrecubrimiento.
3. Quiteel foco.Reempl_.celoconunopara
electrodom6sticosquenoseamayorde
40 vatios.
4. Insertelaleng0etainferior(B)dela
cubiertadelfocoenel recubrimientoe
introd0zcalaa presi6nsobreelensamble
delfoco. A
,
Coloquedenuevoel __
recipientedelhielo
desliz&ndolohasta
quesetrabeensu
lugar. B
SURTIDOR DE AGUA Y
1. Localiceelfocoadentrodel
HIELOS
bordesuperiordelbastidordel
surtidor.Desenrosquepara
quitarlo.
2. Reemplaceel fococonunode7vatios,
120voltios.
I111
Z i
O
I"
!9

Losrefrigeradoresmodernosusanaislamientodeespumay ahorranmasenergiaquelosrefrigeradoresantiguos.Sinembargo,el aislamientode
espumanoesamortiguadorde sonidostaneficazcomoelde losmodelosantiguos.Comoresultado,escuchar&ciertossonidosquepueden
parecerleextrafios.Coneltiempoustedsefamiliarizaraconellos. Porfavorconsulteestainformaci6nantesdesolicitarservicio.
it'_ag'T_df[e]_t.,1"]q= #['i]![ll[_]_
Golpeteo
Airecorrienteo
circulando
Gorgoreoo > Elrefrigerantedelevaporado(E)y del > Funcionamientonormal
sonidosde intercambiadordecalor(F)haceesteruido
ebullici6n cuandofluye.
Topes > Cubosdehielo(enalgunosmodelos) > Funcionamientonormal
Sonidosde > Elcompresor(I)haceunsonidopulsante > Funcionamientonormal
vibraci6n cuandofunciona.
Elcontrol(A)delcongeldorhaceunsonido
degolpeteocuandoarrancao detieneel
compresor.
Elcron6metrodedescongelaci6noelcontrol
delamortiguadorelectrico(enalgunos
modelos)(B)suenacomounrelojelectrico
y ocasionalmentehaceunclicogolpeteo,
Elventiladordelcongelador(C)yel
ventiladordelcondensador(D)haceneste
sonidocuandofuncionan.
cayendoen elrecipientedeloshielos(G).
> Dispensericechute(H)closing. > Funcionamientonormal
> Elrefrigeradornoestanivelado. > YealasInstalaci6ndel Refrigeradorparaencontrarlosdetalles
> Funcionamientonormal
> Funcionamientonormal
Funcionamientonormal
acercadec6moniveiarlaunidad.
Zumbante >- Laconexi6ndelav__lvulade aguade la > Funcionamientonormal
maquinadehielos(J)(enalgunos
modelos)cuandolama,quinadenielosse
Ilenaconaqua.
Murmullo > Lam&quinadehielo(K) est&enla > Sedetieneelsonidosi selevantael brazodela m_.quinadehielosa
posici6n'on'sinlaconexi6ndeagua. laposici6n'off'deapagado.Vealasecci6nM_quinaAutom_ticade
HacerHieloenel manualdelpropietarioparaobtenerm_.sdetalles.
Lasondadel hielo(L) produceun
murmulloconformelasondaseagitaal
surtirloshielos.
Elcompresor(I)puedeproducirun
murmulloagudocuandoestafuncionando.
Lav_.lvuladelselenoide(M)cuandoopera
eltirodehielodela puerta.
:_ Funcionamientonormal
Funcionamientonormal
Funcionamientonormal
80

t
LOCALIZACiOHY
CiOHAMEHTO
TEMA
El controldel congeladory losfocos
estbnencendidos,perolos
compresoresnoest_nfuncionando.
Latemperaturadelsistemade
embutidosy frutasy verd.urasno
estbIo suficientementefrla
El refrigeradornofunciona
Elrefrigeradorcontin'asin funcionar
Latemperaturaestbdemasiadofria
Latemperaturade los alimentos
nopareceeetarIosuficientemente
ffia
Elrefrigeradortiene realolor
Seformangotas de aguaafuera
delrefrigerador
Seformangotas de aguaadentro
delrefrigerador
El refrigeradorolamdquinadehielos
hacenun ruidoextrafioo queparece
muyfuerte
Loscajonesdelsistemade
embutidosy frutas y verdurasno
cierranconlibertad
CAUSAPROBABLE
Elrefrigeradorest&enla modalidaddedescongelaci6n.
Losajustesdel controlest&ncolocadosmuybajos.
Loscontrolesdelcongeladorest_tncolocadosmuybajos.
Elcaj6n noestabiencolocado.
El refri_eradornoestaconectado.
Elcontrol delcongeladornoestaactivado.
Un fusibleesta.fundido,oel cortacircuitonecesitareajustarse.
Ha sucedidounafalla de energia.
La unidadest&fallando.
Los serpentinesdelcondensadorest_.nsucios.
Loscontrolesde!refrigeradoro del congeladorest&najustados
muyaltos.
Lapuerta nocierracorrectamente.
Loscontrolesnecesitanajustarse.
Losserpentinesdel condensadorest&nsucios.
La rejillaposteriordelaireest,.obstruida.
La puerta se ha abiertomuyfrecuentemente,ose haabiertoper
periodosde tiempoprolongados.
Se haaSadidoalimentosrecientemente.
El compartimientoestasucio o tiene alimentosque causanreal
olor,
Elfiltro de aire(enal_unosmodelsos)necesitacambiarse,
Reviselosempaquesparaversisellan bien.
Losnivelesde humedadest_naltos.
Loscontrolesrequierenajuste.
Losnivelesde humedadest&nmuyaltoso lapuertaseha abierto
muyfrecuentemente.
Reviselosempaquesparaversi sellanbien.
Funcionamientonormal
El contenido de los cajones, o la manera en que est&n
acomodadoslos articulosenel compartimientopodrianobstruirel
caj6n.
Elcaj6n no estaen la posici6ncorrecta.
El refrigeradornoestanivelado.
Loscanalesdel caj6nestbnsucioso necesitantratamiento.
SOLUCION
Funcionamientonormalespere40 minutosparaversielrefrigeradorvuelvea arrancar.
Vea lasecci6ndel sistemadeembutidosy frutasy verdurasparaajustarloscontroles.
Vea la secci6ndeloscontrolesen el capituloIlamadoInstalaciondel Refrigerador para
saberc6moaiustarlos controles.
Veala secci6ndelCajSnControlado del Clima en elcapituloIlamadoCaractedsticaa
delRefrigerador paraverificarlacolocaci6ndelcaj6n.
Conectelaunidad.
Veala secci6ndeloscontrolesene] cap{tuloIlamadoInstalaciSn delRefrigeradorpara
saberc6moajustar loscontroles.
Reemplaceel fusiblefundido.Reviseel cortacircuitoy reaj0stelosies necesario.
i Llameala compaSialocaldeenergiaparainformaracercadelafalla.
Desconecteel refrigeradorytransfieralosalimentosaotraunidad.Si notiene una
disponible,coloquehielosecoen la secci6ndelcongeladorparaconservarlosalimentos.
La garantianocubrela p6rdidadealimentos.Comunfqueseconeldepartamentode
servicioparaobtenerayuda.
Veala guiade limpiezaenel capituloIlamadoConsejosy Cuidadopara saberc6mose
limpianlos serpentinesdelcondensador.
Yeala secciondeloscontrolesen elcapituloIlamadoInstalaci6n del Refrigeradorpara
saberc6mo ajustarloscontroles.
Elrefrigeradornoest&bien nivelado.Veael capituloIlamadoInstalaci6ndel Refrigerado
paraobtenerdetallesdec6mo nivelarla unidad.
Reviselosempaquesparaverificarquesellen bien.Veala guiade Iimpiezaen el capftelo
]lamadoConsejosy Cuidadoparasaberc6molimpiarlosempaques.
Revisesi existenobstruccionesinternasqueestenhaciendoquelapuertanocierrebien(per
ejemplo,cajonesreal cerrados,recipientesdehielodernasiadograndeso recipientesreal
almacenadosde alimentos,etc.)
Veala secci6nde loscontrolesen el capituloIlamadoInstalaciSndel Refrigerador para
saberc6moaiustarlos controles.
Veala guiade limpiezaenel capituloIlamadoConsejosy Cuidadoparasaberc6molimpiar
losserpentinesdel condensador.
Reviselacolocaci6ndelos articulosalimenticiosen el refrigeradorparaasegurarsequela
rejillano este obstruida.La rejilla posteriorde aire se encuentraubicadadetr&sde los
cajonesde frutasy verduras.
Reduzcael tiempoque tienelapuertaabierta.Organicelosarticulosdealimentodemanera
eficienteparaasegurarsequela puertaest6abiertaelmenortiempoposible.
Permitaque el mediointeriorse ajustepor el periododetiempoquese abrela puerta.
Dejequepase suficientetiempopara que losalimentosquerecientementeseafiadieronaal
refrigeradoro alcongeladorse enfrien.
VealasinstrucclonesparaeliminarlosmalosoloresenelcapituioIlamadoConsejosyCuidado.
Cambieelfiltro de aire.
Vealaguia de limpiezaenelcapftuloIlamadoConsejosy Cuidadoparasabercomolimpiar
los empaques.
Esnormalduranteepocasde muchahumedad
Vea la secci6nde los controlesen el capitulo IlamadoInstalaciSn del Refrigerador para
saberc6moajustarloscontroles.
Vea la secci6nde los controlesen el capituloIlamadoInstalaeion del Refrigerador para
saberc6moajustarloscontroles.
Reduzcael tiempoque la puertapermaneceabierta.Organicelos artfculosde alimento
eficientementeparaasegurarsequela puertaest6 abiertael menortiempoposible.
Veala guiadelimpiezaenel capituloIlamadoConsejosy Cuidadoparasaberc6molimpiar
losempaques.
Vea lasecci6nde ruidosenel capftuloIlamadoDiagnSsticode Averias.
Vea lasecci6ndelCajSnControladodelClimaen lasecci6ndelcaj6ndefrutasy verduras
(crisper) en el capitulo I]amado Caraeterfstieas del Refrigeradorpara verificar la
colocaci6ndelcaj6n.
Yea el capitulo IlamadoInstalaciSn del Refrigeradorpara encontrarlos detallessobre
c6mo nivelarlaunidad.
Apliqueunacapadelgadadejaleade petr61eoenloscanalesde loscajones.
m
Z !
O
81

J
[OCAIlZA(IOHY
TEMA
El refrigeradorfuncionacon
demasiadafrecuencia
Y
El aguapareceturbia
Hayparticulasen elaguao en los
hielos
Nohayfocosindicadoresencendidos
enelcontroldel surtidor(enalgunos
modelos)
Nosale ni agua nihielo del surtidor
cuandoseoprimenlas almohadillas
(enalgunosmodelos)
Lam_quinade hielo no estd
produciendo suficienteshieloso
estosest_ndeformes(enalgunos
rnodelos)
Lambquinadehielosno esta
produciendohielo (en algunos
modelos)
CAUSAPROBABLE
Laspuertasse hartabiertomuyfrecuentementeopor periodosde
tiempoprolongados.
La humedadoel calorenel areadeairededoresta muyaltos.
Se hanafiadidorecientementealimentos.
La unidad est& expuestaal cam medianteel ambiente o por
eleetrodomesticosqueest_.ncercanos.
Losserpentinesdel condensadorestansucios.
Loscontrolestienenque ajustarse.
La puertano cierrabien.
Aireo burbujasde aire enel aQua.
Polvodecarb6ndelcartuchodel filtro de agua.
Concentracion de minerales en el ague formaran partfculas
cuandoel aguasecongelay sederrite.
La puertadel congeladornoestacerrada.
La puertadel con,qeladornoest,.cerrada.
Est&fundido unfusible,o elcortacircuitonecesitareaiustarse.
Ha ocerridounafalladeenergia.
La puertadel congeladornoeat&cerrada.
Se est&Ilenandoeltanquedeague.
Lam&quinadehielosola unidadcon equipoparahacerhielosse
hainstaladorecientementeose hausadorecientementeuna gran
cantidadde hielos.
Elfiltro de aguaest&obstruidoo necesitacambiarse.
Se instalo recientemente ia m&quina de hielos o se us6
recientementeunagrancantidaddehieIos.
La presi6ndel aguaest&muybaja.
El filtrodel aguaestAobstruidoo necesitacambiarse.
El brazodela m#,quinanoest&en Iaposici6ncorrecta.
Elsuministrode aguedom6sticano est&IIegandoa lav&lvuladeI
agua.
Latuberiade cobreo plasticoest&torcida.
La presi6ndelagueesmuy baja.
Reviselatemperaturadelcongelador.
El recipientedelhielonoest&instatadocorrectamente.
Se instal6lav&lvuladeaguaincorrect&
SOLUCION
Reduzca el tiempo que la puerta permanece abierta. Organice los alimentos mas
eficientementepare garantizarquela puertaest_abiertael menortiempoposible.
Permitaque pase tiempopara quelosalimentosreci_nafiadidosalcancenla temperature
delrefrigeradoro delcongelador.
Funcionamientonormal.
Permitaque pasetiempo paraque los alimentosreci6nafiadidosalcancenla temperature
delrefrigeradoro delcongelador.
Evale el ambientede la unidad.La unidadpodrianecesitarcambiarsede Iugarpareque
funcionemejor.
Vea la guia de limpiezaen el capitulo IlamadoConsejos y Cuidado para saber c6mo
limpiarlos serpentinesde[condensador.
Vea la secci6ndelos controlesen el capituloIlamadoInstalaoibn del Refrigeradorpara
saberc6moajustarlos controles.
Elrefrigeradorno esta biennivelado.Vea el capitulo Instalaei6ndel Refrigerador pare
saberlosdetallessobrec6monivelarbien la unidad.
Revisesihay obstruccionesinternesque estencausandoquela puertanocierrebien(por
ejemplo,cajenesreal cerrados,recipientesdehielo demasiadograndeso recipientesde
alimentosmalguardados,etc.).
Reviselos empaquespare comprobarque sellan bien. Vea la guia de limpiezaen el
capftuloIlamadoConsejosy Cuidadopara saberc6molimpiarlosempaques.
Estoes normalcuandoseusa porprimeravez el surtidor,7desaparecer&conel uso.
Eiagua que fluye inicialmentea tray,s del cartuehopodrfacontenerel polvoinoeuode
carb6nque liberael eartucho.Lasparticulasson segurasparaconsumoy desaparecer&n
despuesde unoscuantosusos.
Lasparticulasnoson dafiinasyocurrennaturalmenteenlos suministrosde agua.
Verifiqueque la puerta delcongeladorest6cerrada.Laenergfase interrumpedel control
cuandolapuertadel congeladorse abre.
Conectelaunidad.
Reemplacelos fusiblesfundidos.Revisesi elcortacircuitoestabotado.
Llamea lacompafiialocalde energiapara informaracercadela falla.
Verifiqueque la puertadelcongeladorest6cerrada.Laenergia seinterrumpeenel control
cuandola puertadelcongeladorseabre.
Enel usoinicial,hayunretrasoaproximadode 45 segundosparasurtirlosmientrasse Ilena
ei tanquede agueinterno.
Espere24 horasparaquecomiencelaproducci6ndehieloo paraque lamaquinadehielos
vuelvaa surtirsedespuesde usarlostodos.
Cambieel fiitrode a£ua.
Espere24 horaspara quecomiencela produeci6ndehieloy para quelamaquinavuelva
asurtirsedespu6sdevaciarla.
Lapresi6nbajadelaguapuedeeausarquelavalvulagotee.Lapresi6ndelaguadebeestar
entre20a 100 libraspor pulgadacuadradapara que funcionecorrectamente.Unapreston
mfnimade 35libraspotpulgadacuadradasereeomiendapara las unidadesconfiltrosde
agua.
Cambieel filtrodel a£ua.
Confirmeque el brazo de la m&quinade hielos este hacia abajo. Vea la secci6n
Caractedsticasdel Congeladeren su manualdel propietariopareobtenerlosdetalles.
Reviseelprocedimientode laconexi6nde agueen lasInstalaci6n del Refrigerador.
Cierreelsuministrodeaguaydeshagalastorceduras.Si no puedehacerlo,reemplacela
tuberia.
La presi6ndel ague debeester entre 20 a 100libras por pulgadacuadradapara que
funcionecorrectamente.Se recomiendauna presi6nminima de 35 libras per pulgada
cuadradaparalasunidadescon filtrosde a,qua.
Vea lasecci6ndelos controlesen el manualdel propietarioparaobtenerayudaacercade
c6mo ajustar los controles.El congeladordebe estarentre 0° a 2°F (-18 a -17°C) para
producirhielo.
Vea la secci6n del recipiente de hielo para encontrar la instalaci6n y la alineaci6n
adecuadas.
Reviseel procedimientodela conexi6nde aguaen Instalaei6n del Refrigerador. Las
valvulasautoperforanteso de sillinde 3/16" causanuna presi6nba a de agua y podrian
obstruirla linea conel tiempo.Fabricantesnoes responsablepor losdaSos materaes
debidosa lainstalaci6nincorrectade la conexi6nde aqua,
8l

Y
Laluzde indicadordelfiltro delagua
es roja(algunosmodelos).
Launidadestdgoteando
"Se formahieloenla tuberiade
entradaa lamdquinade hielo
Elflujo de aguaestd mdslentode Io
normal
El aguadel surtidorno est_muy_a
Elfiltrodel aguanecesitaset substituido.
Elindicadordel |iltronecesitaser reajustado.
Seus6tuberiadepl_.sticopara completar[aconexi6nde agua.
Se instalolav&vulade agua incorrecta.
La presi6ndelaguaest&baja.
La temperaturadelcongeladorestamuyalta,
La presi6ndelaguaesta.muybaja.
Seinstal6 la v_lvulaincorrecta.
Latuberiade cobreo de pl&sticotienetorceduras.
Elfiltro de aguaest._obstruidoo necesitacambiarse.
Seinstal6 recientementeel refrigerador.
Elsuministrodel aguaen el tanquede almacenamientoseacabo.
Elagua se qued6 en las tuberiasde aguaafuerade[tanquede
almacenamientoyse hacalentadoa temperaturaambiente.
Si elfiltro no est&disponible,substituyapor el filtro de puente. Vea la secd6n de las
Caracteristicasdel Dispensadorpara las clirecciones.
Veala secci6ndelasCaracteristicas del Dispensadorparalasdirecciones.
Fabricantesrecomiendausartubefiade cobreparala instalaci6n.Lade pl&sticoesmenos
duraderaypuedecausargoteras.Fabricantesno esresponsableporlosdafios materiales
porla instalaci6nincorrectade la conexi6nde agua.
Reviseelprocedimientode laconexi6nde agua en lasInstalaci6n del Refrigerador.Las
v&lvulasautoperforanteso de sillinde 3/16"causanunapresi6nbajade aguay podrian
obstruirla linea conel tiempo.Fabricantesnoes responsablepor losdafios materiales
debidosa lainstalaci6nineorrectade la conexi6nde agua.
La presion delagua debe estar entre 20 a 106libras pot pulgadacuadrada paraque
funcionecorrectamente.Se recomiendauna presi6n minima de 35 libras por pulgada
cuadradaparalasunidadescon filtrosdeagua.
Yeala secci6ndeloscontrolesen el capituloIlamadoInstalaci6ndel Refrigeradorpara
saberc6mo ajustar los controles.Se recomiendaqueel congeladoresteentre 0 a 2° F
(-18a -17°C),
La presi6ndel agua debe estar entre 20 a 100libras por pulgadacuadradapara que
funcione correctamente.Se recorniendauna presi6n minima de35 libras por pulgada
cuadradaparalasunidadescon filtrosdeagua.
Reviseelprocedimientode laconexionde aguaen lasInstalaci6n del Refrigerador.Las
v_.lvulasautoperforanteso de sillinde 3/16"causanunapresi6nbajade agua y podrian
obstruirla linea con el tiempo.Fabricantesno es responsablepotlos dafiosmateriales
debidosa lainstalaci6nincorrectade la conexi6nde agua.
Cierreelsuministrodel aguay deshagalastorceduras.Sinopuedehacerlo,reemplacela
tubefia.
Cambieel filtrode agua.
Deje que pasen aproximadamente 12 horas para que el agua en el tanque de
almacenamientose enfrie.
Desecheel primervasode aguay vuelvalo aIlenar.
I'111
Z _
O
I"
83

84

85

86

III
0
I"
87

Your Home
For repair-in your home-of all major brand appliances,
lawn and garden equipment, or heating and cooling systems,
no matter who made it, no matter who sold it!
For the replacement parts, accessories and
owner's manuals that you need to do-it-yourself.
_i_ i
:_i!i!i_ii_!_!_ii_
For Sears professional installation of home appliances
and items like garage door openers and water heaters.
1-800-4-MY-HOME ® (1-800-469-4663)
Call anytime, day or night (U.S.A. and Canada)
www.sears.com www.sears.ca
Our Home
For repair of carry-in items like vacuums, lawn equipment,
and electronics, call or go on-line for the location of your nearest
Sears Parts & Repair Center.
1-800-488-1222
Call anytime, day or night (U.S.A. only)
www.sears.com
To purchase a protection agreement (U.S.A.) or
maintenance agreement (Canada) on a product serviced by Sears:
_i_iiii_ii_:ii_i'i
i!_'ii_iii_ii_!i_i_il
i_i_ii!_i_i!_!_i_
i!_ _ii ¸
_iii!_i_!i_iii_i
_iiiiii_i_!_i_;il_
®Registered Trademark / TMTrademark / SMService Mark of Sears, Roebuck and Co.
®Marca Registrada / TM Marca de Fabrica / SMMarca de Servicio de Sears, Roebuck and Co.
MCMarque de commerce / MDMarque d_posee de Sears, Roebuck and Co.
PartNo. 12591318
FormA/3/03
1-800-827-6655 (U.S.A.)
Para pedir servicio de reparacion
a domicilio, y para ordenar piezas:
1-888-SU-HOGAR sM
(1-888-784-6427)
1-800-361-6665 (Canada)
Au Canada pour service en fran(_ais:
1-800-LE-FOYER Mc
(1-800-533-6937)
www.sears.ca
i_iiii_i!iiiii_!_i_iiiiii_iiii_i_!ii_iiii_!iii!i_i_!iiiiiiiii_!ii!_!i__ii_ii_ii_i_i_ili__!_!ii_ii,_iii!ili!_!_
© Sears, Roebuck and Co,
i!iii
_ii_ii_ii!i!_!i_iil_
 Loading...