

Kenmore
Side-by-Side Refrigerator
Use & Care Guide
Refrigerador Dúplex
Guía para el Uso y Cuidado
Réfrigérateur à Compartiments Juxtaposés
Guide D’utilisation et D’entretien
O
r
596.52672200, 596.52673200,596.52674200, 596.52679200,
596.50002100,596.50003100,596.50004100,596.50009100,
596.50012100,596.50013100, 596.50014100,596.50019100
№
(A
Kg
>
Z>
O
il
s
Z
t
12591310
Sears. Roebuck and Co., Hoffman Estates, it 60179 USA
Sears Canada, Inc., Toronto, Ontario, Canada MSB 2B8
www.searsxom
Au Canada,
www.searsxa
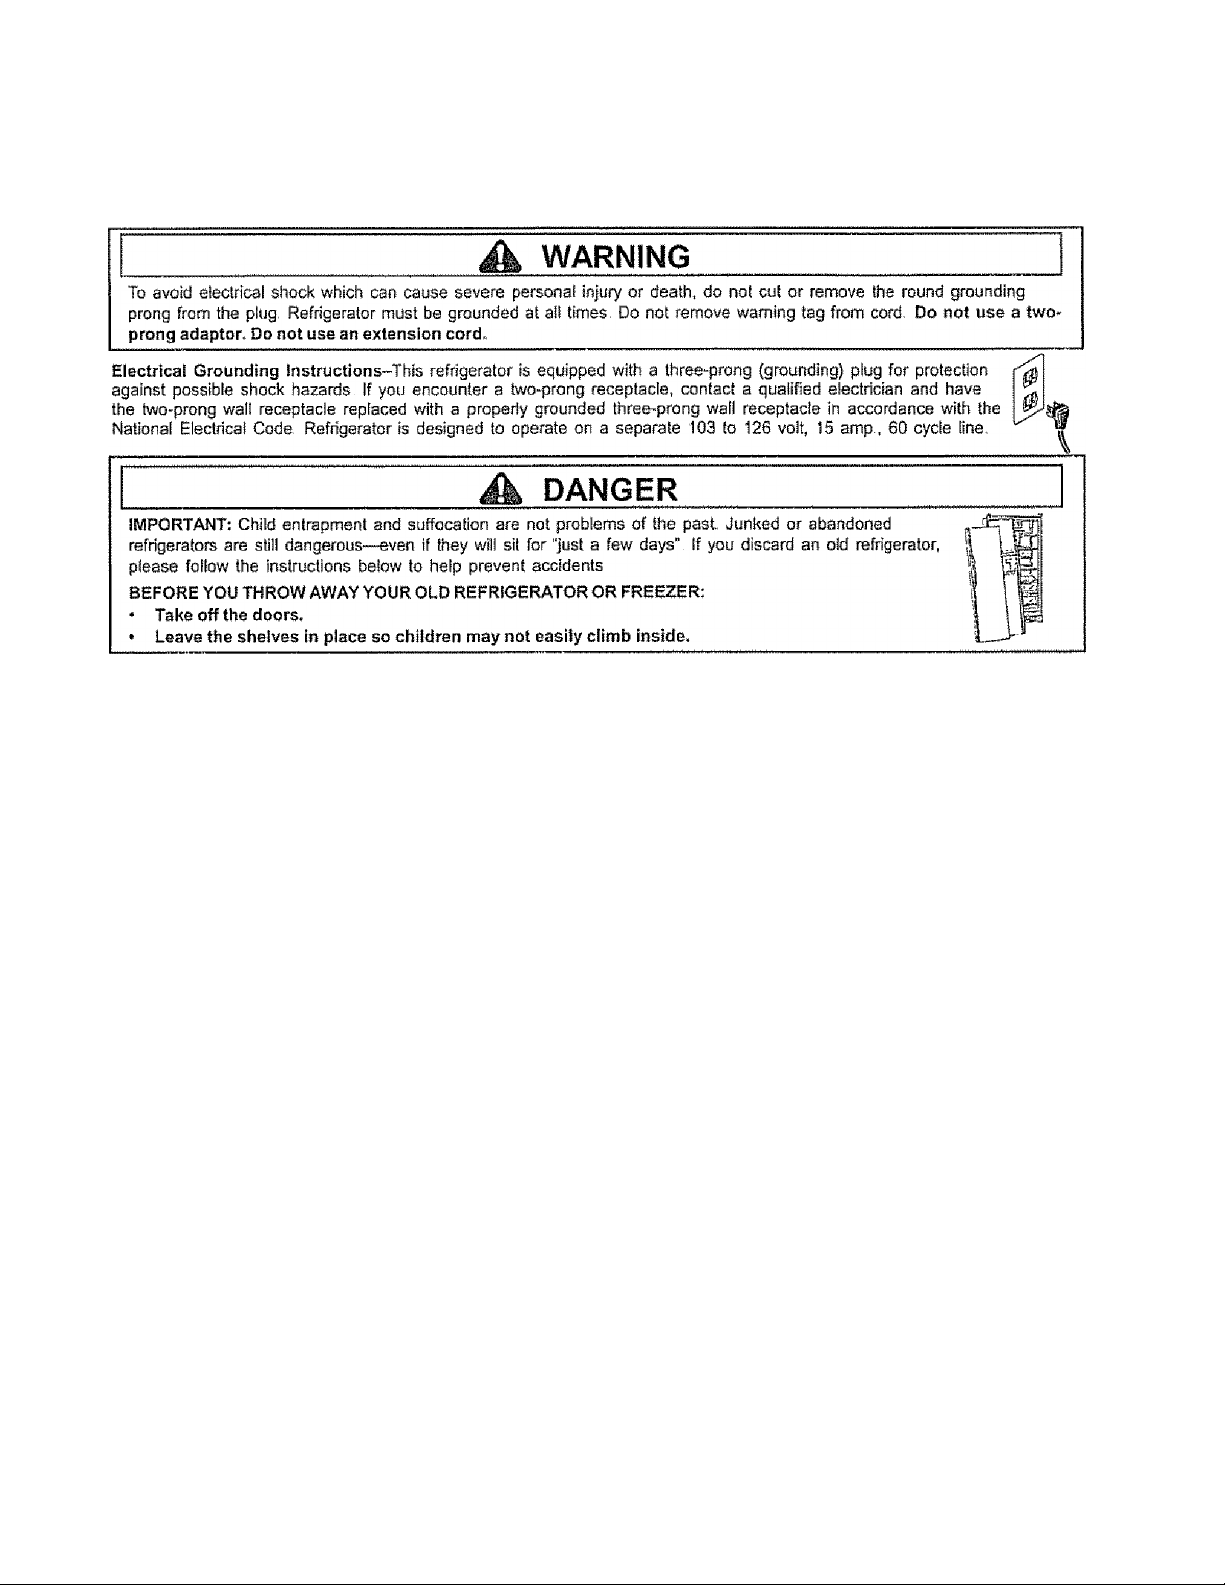
Electrical Requirements
¿^Recognize this symbol as a safety alert indicator.
Maintenance Agreement
We Service What We Sell
Your purchase has added value because you can depend on Sears HomeCentral® for service. With over 12,000 trained
repair specialists and access to over 4 2 mililon parts and accessories, we have the tools, parts, and knowledge and skiIJs
to ensure our pledge: We Service What We Sell,
Sears Maintenance Agreements
Your Kenmore appliance is designed, manufactured and tested to provide years of dependable operation. Yet arry major
appliance may require service from time to time The Sears Maintenance Agreement offers you an outstanding service
program, affordabiy priced
The Sears Maintenance Agreement
• is your way to buy tomorrow's service at today’s price,
• Eliminates repair bills resulting from normal wear and tear
• Provides for nontechfilcal and instructionai assistance,
• Even if you don’t need repairs, provides an annual Preventative
Maintenance Check, at your request, to ensure that your appliance
Is in proper running condition.
Warranty
Full Оле Year Warranty on Refrigerator
For one year from the date of purchase, when this rafrigerator is operated and maintained according to instructions
attached to or furnished with It. Sears will repair it, free of charge, if defective in material or workmarrship
Full Five Year Warranty on Sealed Refrigeration System
For five years from the date of purchase, when this refrigerator is operated and maintained according to instructions
attached to or furnished With it, Sears will repair the sealed system (consisting of refrigerator, connecting tubing and
compressor motor) free of charge, if defective in material or workmanship,
The above warranty coverage applies only to refrigerators which are used for storage of food for private household
purposes it excludes original and replacement Kenmore Ice & water filter cartridges {if equipped with the filter system).
Original and replacement cartridges are warranted for 30 days, parts only, against defects of material or workmanship,
Warranty service is available by contacting 1-800-4-MY-HOME {1-800-469-5811),
This warranty applies only whiie this product is in use in the United States,
This warranty gives you specific isga! rights, and you may also have other rights, which vary from state to state.
Sears, Roebuck and Co., Dept 817WA, Hoffman Estates, IL 60179
United States
Some iimitations apply., For more information ,
caii 1^800-361-6665.
For information concerning Sears Canada
Maintenance Agreements, call 1-800-361-6665,

W af fatity
Ciinada-limited Warriiaty.
Full One Year Warranty on Refrigerator
For one year from the date of purchase, when this refrigerator is operated and rnainfained according to instructiorss
attached to or furnished with if. Sears wi repair it, free of charge, if defective in material or workmanship.
Full Five Year Warranty on Sealed Refrigeration System
For five years from the date of purchase, when this refrigerator Is operated and maintained according to instmctions
attached to or furnished with it, Sears will repair the sealed system (consisting of refrigerant, evaporator, and condenser)
free of charge, If defective in material or workmanship
Ten Year Parts Warranty on Compressor
For ten years from the date of purchase, when this refrigerator is operated and maintained according to instructions
attached to or furnished with it. Sears wilî replace any compressor part, if defective in material or workmanship.
The above warranty coverage applies only to refrigerators which are used for storage of food for private household
purposes., it excludes original and replacement Kenmore filtered Ice & water filter cartridges (If equipped with the filter
system) Original and replacement cartridges are warranted for 30 days, parts only, against defects of material or
workmanship.
Warranty service is available by contacting 1-600-4-MY-HOME or (1-800-4B9-5811)„
Sears Canada, Inc, Toronto, Canada, M5B 2B8
Product Record
In the space below record the model and serial numbers and
purchase date of your refrigerator You will find the model and
seriai number sticker inside the unit on the left wall of
refrigerator section
Model Number: 596
Serial Number:
Purchase Date:
Keep this booklet arid your Sears sales receipt in a
safe place for future reference.
________
_____________________
______
_
o
E
Important Safety Information
Recognize Safety Symbols, Words, Labels
DANGER
DANGER—Immediate hazards which WILL result In severe personal injury or
death,
WARNING
WARNING—Hazards or urisafe practices which GOULD result in severe persona!
injury or death.
À CAUTION
CAUTION—Hazards or Unsafe practices which COULD resutt in minor personal
injury or product or property damage
What You Need to Know
about Safety Instructions
Warning and important Safety
Instructions appearing in this manual
are not meant to cover all possible
conditions and situations that may
occur. Common sense, caution, and
care must be exercised when installing,
maintaining, or operating refrigerator,
Always contact your dealer, distributor,
service agent, or manufacturer about
problems or conditions you do not
Understand

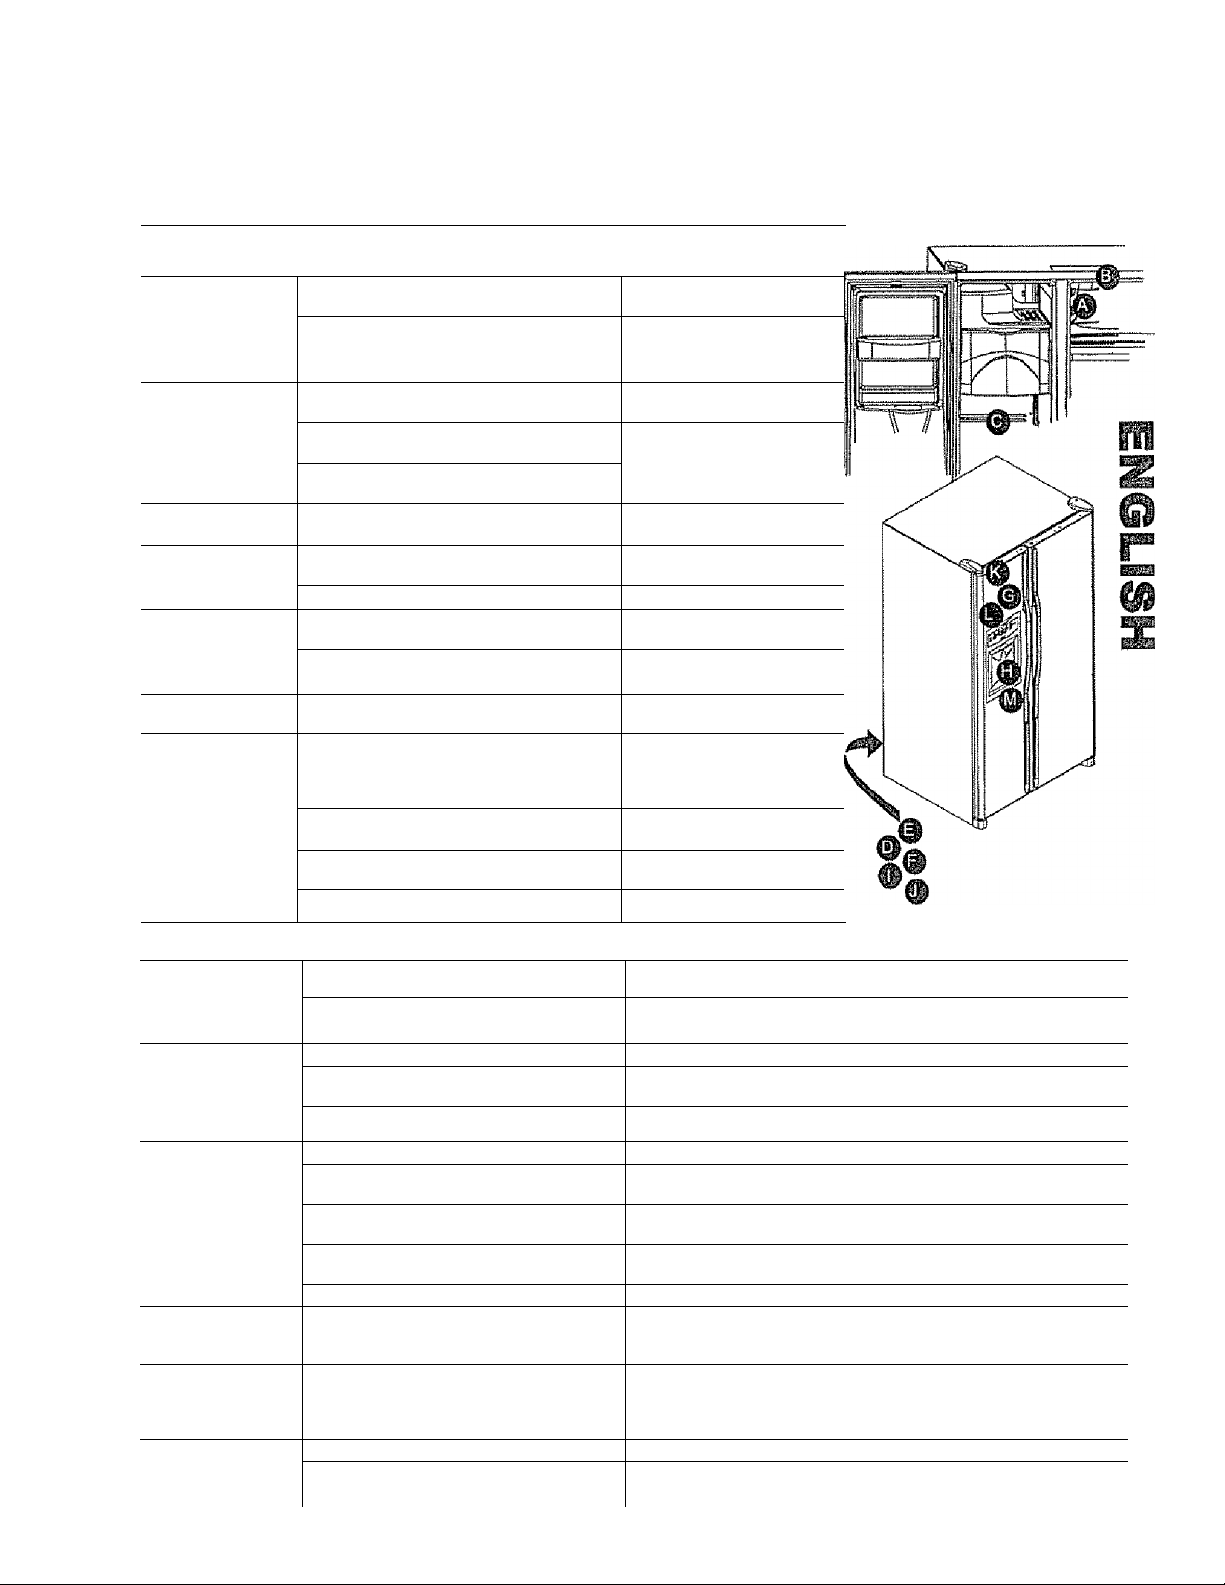
Contents
.. ,
Electrical Require merits ..
Maintenance Agreement...................................... ,2
Warranty
Warranty-Canada
Product Record .................................................... 3
Important Safety Information
Installing Your Refrigerator -
About Your Filtration System
Refrigerator Features
Freezer Features
Dispenser Features , . ..
Hints and Care
Troubleshooting.......................................
Water Filter Data................................................ 25
Español................................................................. -28
Français ..................
Service
...............- .
..................................................
How to Transport Your Unit..
How to Select the Best Location...........
How to Remove the Doors and Hinges
How to Install and Remove Handles
How to Level Your Refrigerator
How to Connect the Water Supply ........................
How to Adjust the Temperature Controls
Door Storage.............
Shelves .............................................................. 11
Drawers
Primary Features
Drawers ......................................................... 13
Door Storage
Shelves ............................. .... ... — ............ -.. 13
Water Dispenser Operation
Control Features
How to Clean Your Unit
How to Remove and Replace Light Bulbs
..............................................................
..............................................
...................................................
.......................................
......................................................
...........................
...............................
......... .
....................
.....
.............
...
..............................
................
......... .
........
................................................
......
........-..........
..............................
.............
............... . , -
............
....................................14
..........................
........
..............................
...................
....
................
......
... .............
...
- ......................- 5
...
...
............. . , 6
..........
........... ,. 9
...
............ ,19
....... . ... 21
......... - 53
Back Cover
3
........... S
.............
...........
.....
.......
11
13
.........
13
, 14
..........
2
6
10
t1
11
13
15
19
.7
20
IP
iilsMaws«
2
3
5
8
■■■-. - .-■ -J-.'
a-vjiaaraa':.
il
avai;>,aàî;-;
й;Ш

Installing Your Refrigerator
These Instrucüons were provided to atd you in the installation of your unit
inslaSiation
How to Transport Your Unit
Follow these lips when moving the unit to final location;
• NEVER transport unit on its side if an upright position is not possible, lay
unit on its back Ailow unit to sit upright for approximateiy 30 minutes prior
to plugging unit In to assure oii return to the compressor, Plugging unit in
immediately may cause damage to internal parts,
• Use an appliance dolfy when moving unit ALWAYS track unit from its
side-NEVER from its front or back,
• Protect outside finish of unit during transport by wrapping cabinet in
blankets or inserting padding between the unit and dolly
' Secure unit to dolly firmly with straps or bungee cords. Thread straps
through handles when possible, DO NOT overtighten. Overtightening
restraints may dent or damage outside finish.
How to Select the Best Location
Observe these points when choosing the final location for your unit:
• DO NOT install refrigerator rtear oven, radiator, or other heat source If
that is not possible, shield refrigerator with cabinet material
• DO NOT install where temperature falls below 55T (Î3°C), Malfunction
may occur at this temperature,
• Make sure floor is levei. if floor is not level, shim rear wheels of unit with a
piece of plywood or other shim material.
• To assure proper door closure, verify that the unit is leveled with a %" tilt
to the back-
How to Remove and Install Panels (some models)
Reference the sheet entitled Decorator Door Panel Installation instructions
shipped on the front of your unit
Sears cannot be responsible for improper
How do I measure an opening
to insure proper fit?
This refrigerator was designed to fit a 69" tail
opening to allow for proper ventilation,
leveling, and door adjustments
Please also take into account, when
measuring space for your unit, that some
models require a certain amount of
clearance around it to allow for proper air
flow Proper air flow is key to keep your unit
running a optimum efficiency To determine
measurements, please reference the table
below.
Subflooring or floor coverings (i e, carpet, tile, |
wood floors, rugs) may make your opening |
smaller than anticipated ■■
Some clearance may be gained by Using the (0
leveilng procedure under "How to Level Your Wp
Refrigerator".
Unit Total
Volume
Less Than 23
cu. ft.
Greater
Than 23 cu. ft.
IMPORTANT: if unit is to be installed into a
recess where top of unit is completely
covered, use dimensions from floor to top of
hinge cap to verify proper clearance
Recommended
Clearance
Top Sides Rear
N/A N/A N/A
N/A
Vi”
o
___
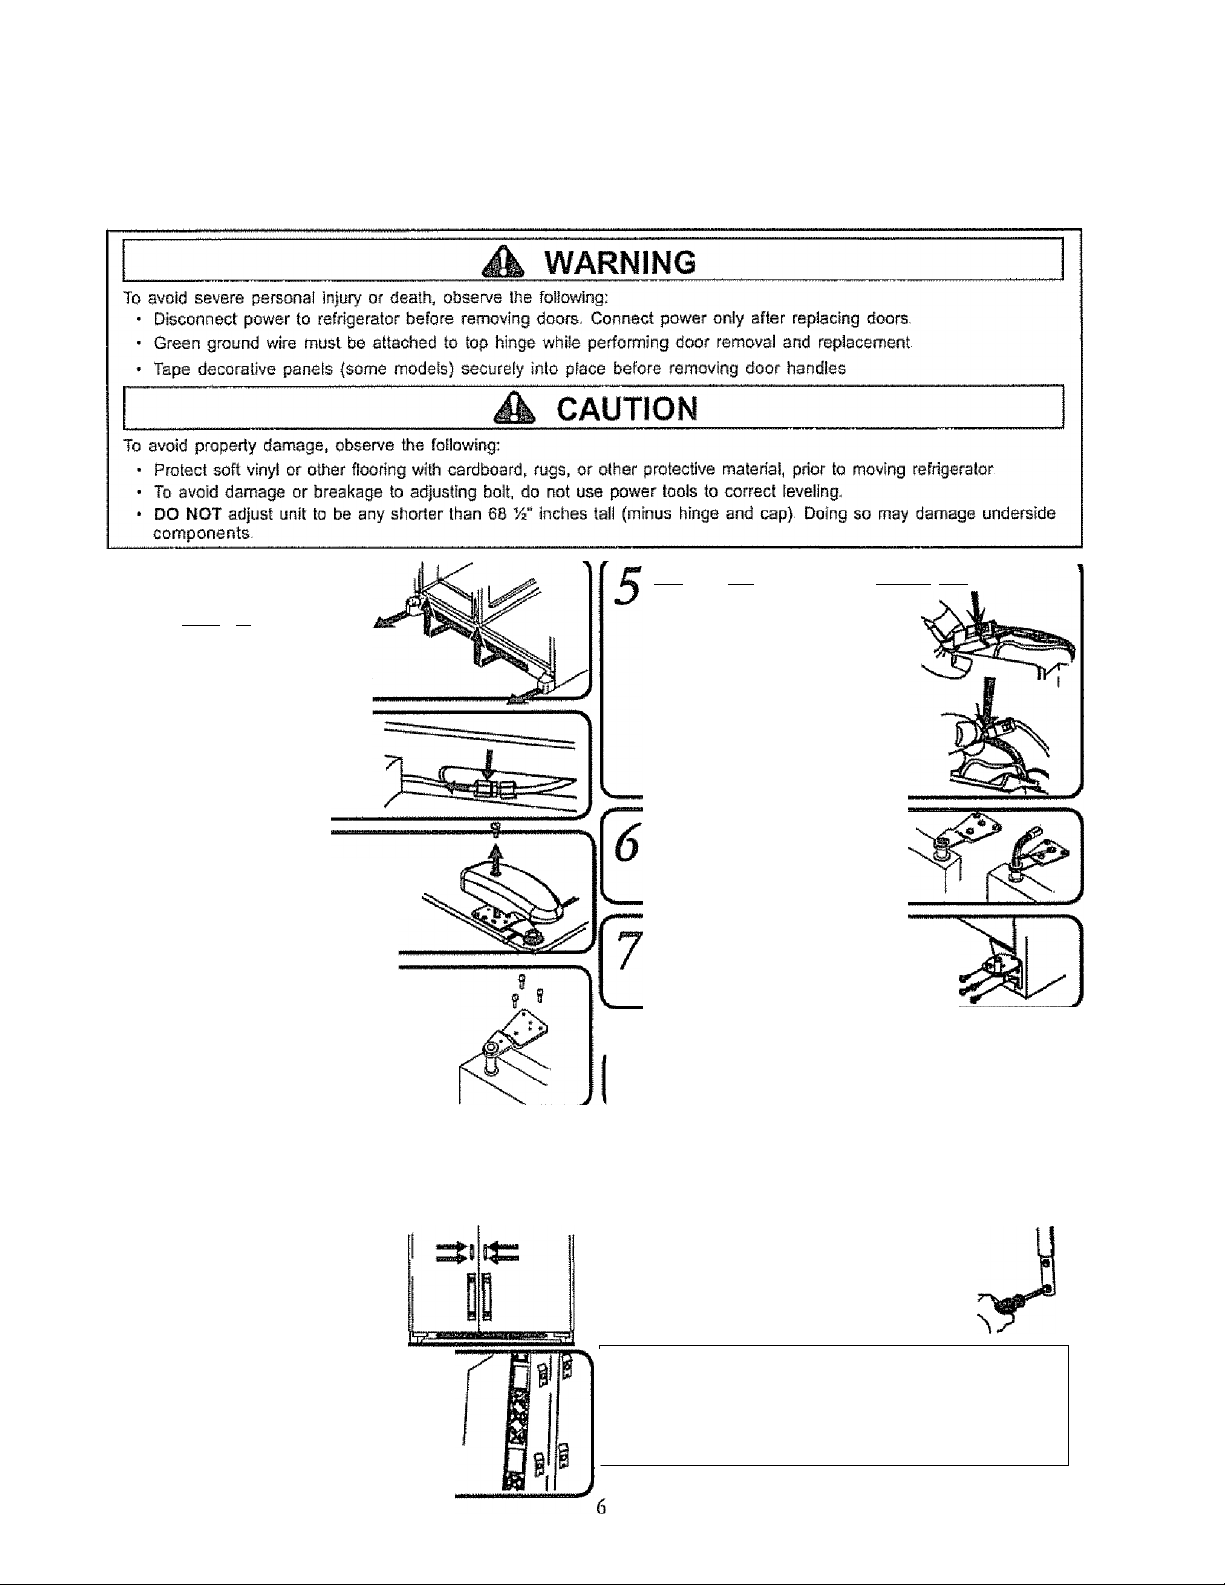
Installing Your Refrigerator
How to Remove the Doors and Hinges
Some instailations require door removal to get refrigerator to finai location.
Remove toe grille and
M- i M. i.i -i.A \0 CjC. J V CblX- O a
• Open both doors 180°, or as
wide as possible, to remove
) Unscrew uaioa nut
I to detach water tube,
(dispensing modds oaly)
J?pfTimri* f/iD hfnp’f* hv
removing Phillips screw.
4„
Close doors. Unscrew hex
bead screws bom top binges.
DO NOT remove either green ground
wire or wire connecting center screw
■ ■•A.... JrCC I, ¿S i .1../ i Ji.S. ¿Ji Va ji ^ .A.i. i.rM. J -A -A-A.
• Use a fiat blade screwdriver
or fingernail to press junction
point betvreen two connectors
to release.
Detach red wire harness.
• Press tab on underside of
connector to release.
Remove top binges along
with doors.
Remove bottom hinges with s
Y„" hex bead driver.
How to Replace the Doors
To replace doors, follow the steps itt How to
Remove the Doors and Hinges in reverse order
D
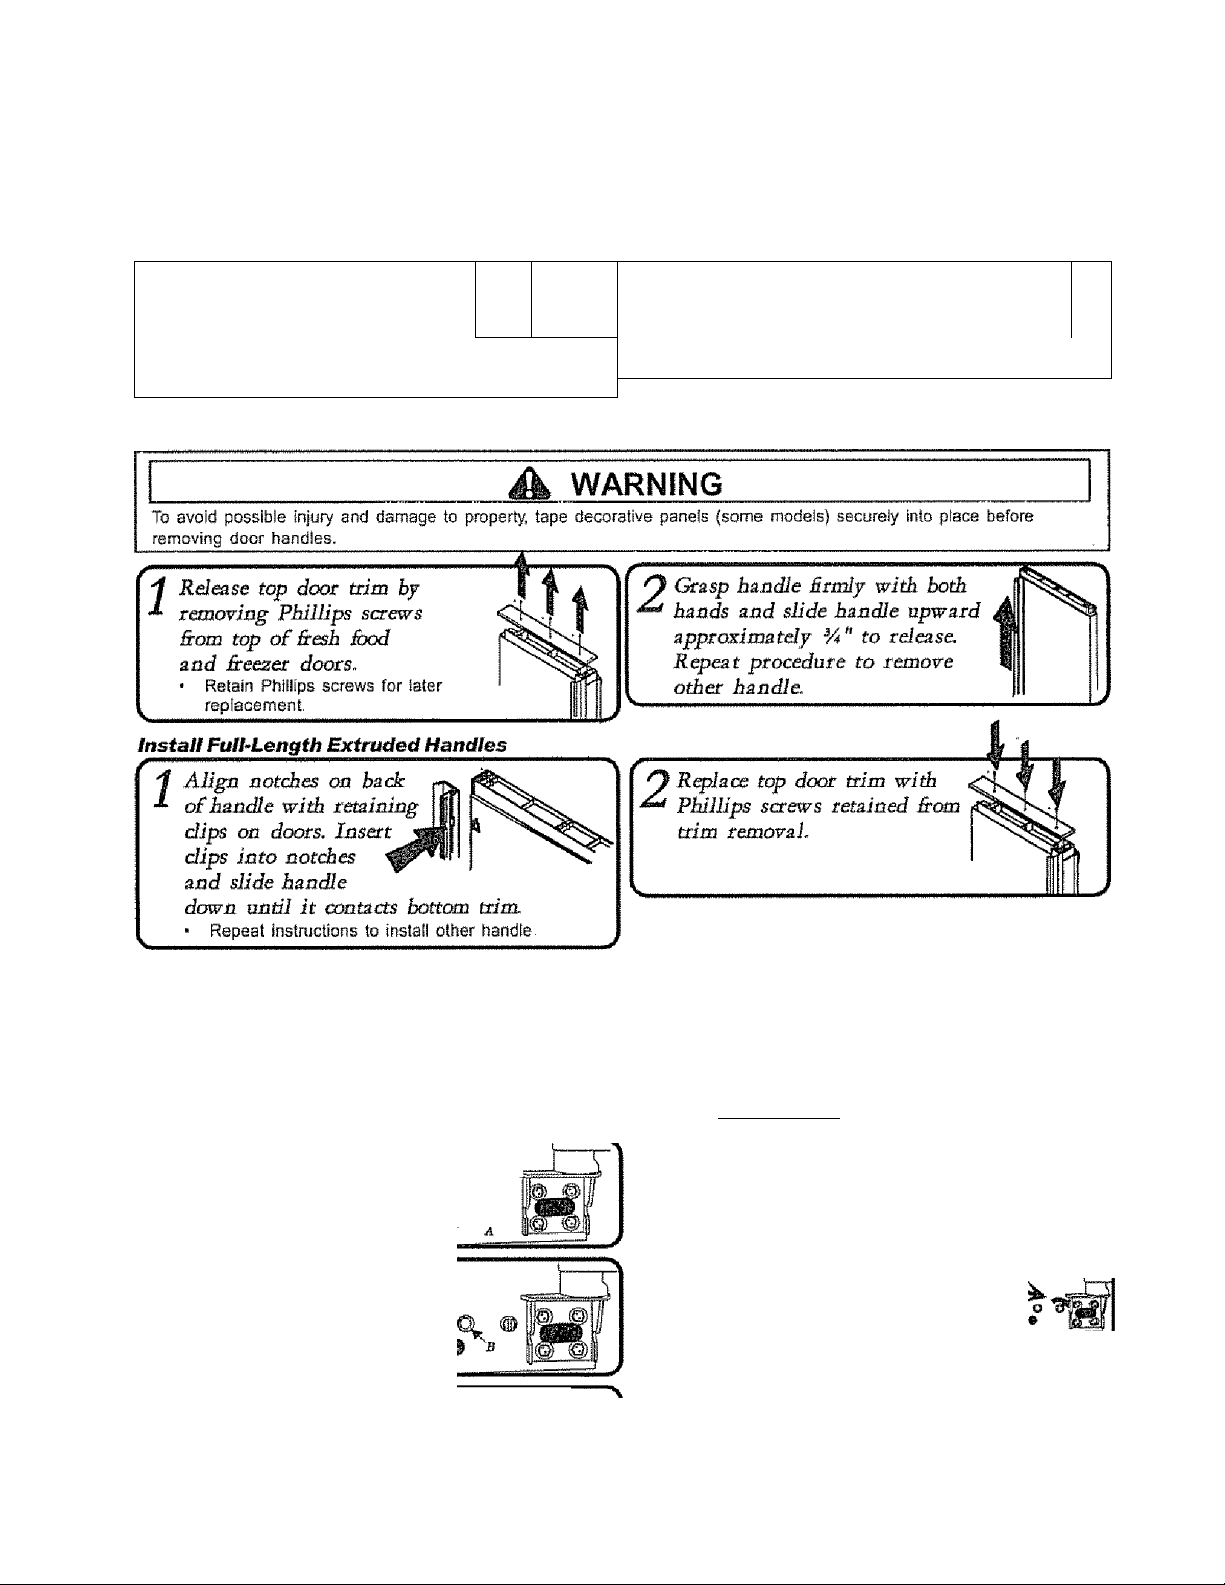
How to Install and Remove Handles
installing Front-Mounted Handles
If installing handles for the first time, the fresh food handles can be located within the fr esh food section. The handle trim will
be located in the literature pack
r
..................
Remove
1
screws bom bottom of
rebigerator and beezer
door.
iw o
bes nut
Insert screws removed in st^ 1
3
into screw boles at bottom of
HyjfiWj/a rifi
Align door bandies with top
and bottom sets of door dips,
and slide down until screw
b.oles on bottom of bandies
match with door screw bales.
4 bottom portion
* ot bandies and retainers on
bottom of door.
V
........................
T— ^
Installirig Youf Refrigerator
How to Install and Remove Handles continued
Removing Front-Mounted Handles
Removing handles may be necessary when transporting unit through tight spaces..
1
'f
Memove bottom portion of
handle trim with a very
small £at-blade screwdriver,
IMPORTANT: Wrap blade of screwdrivt
........
..............................................................................................
sr it
Removing Full-Length Extruded Handles
Removing handles may be necessary when transporting unit through tight spaces, or installing or replacing decorative panels.
'
1
O
Remove two handle base
^
screws, Pall handle up and
nnC fn rdpufte frnm unit. n.
!•
P
Fit may be tight,
1
1
o
r
How to Level Your Refrigerator
Matenals Needed
hex head driver
Memove toe grille and bottom binge
1
(see previous instmcdons).
Tnrn both &ont adjustment screws
(A) clockwise to raise and q_ ^
counterclockwise to lower,
Turn both rear adjustment
screws (B) clockwise to
raise and counterclockwise
to lower.
Giedc
with level to verify tilt to the
back Gar proper door dosute
• If unit is aligned and stable, replace toe grilie
V.
and hinge covers
Level
@
f
covers
If required, correct roddng of unit by
turning rear adjustment screw dockwise
f-j-%
<3. .1. €..j ./ .j j** ^
If doors are uneveOr.,
• Determine which door needs to be raised.
Turn front roller adjustment
screw clockwise to raise
front corner of door
If the unit has reached the
limit of its adjustment range,'
and doors are still not levellower opposite door by turning roUer
adjustment screw counterciookwise.
Check with level to verify Vi tiit to the back for proper
door closure
If unit is aligned and stable, replace toe grills and
hinge covers
I
Installing Yout Refrigerator
How to Connect the Water Supply
WARNING
To avoid electrical shock which cao cause severe personal Injury or death, disconnect power to refrigerator before
connecting water supply- After connecting water supply, connect power.
A CAUTION
To avoid property damage, observe the following;
■ Consult a plumber to connect copper tubing to household plumbing to assure compliance with local codes and
ordinances
■ Confirm water pressure to water valve is between 20 and 100 pounds per square inch If water Ritsr is installed, water
pressure to water valve must be a minimum of 35 pounds per square inch.
■ DO NOT use a self^piercing, or ’i,/ {4 8 mm) saddle valve. Both reduce water flow, become clogged with time, and may
cause teaks if repair is attempted
• Tighten nuts by hand to prevent cross threading Finish tighterring nuts with pliers and wrenches Do not overtighten.
' Wait 24 hours before placing unit into final position to check and correct any water leaks
Materials Needed
• (6 mm) outer diameter flexible
copper tubing
• Brass nut and sleeve (see
literature pack)
• Shut-off valve (requires a or 6
mm hole to be drilled into water
supply before valve attachment)
• Adjustable wrench
Create service loop with mbing using care to
1
SYOid kinks in tubing.
NOTE: Add 8' (2 m) to tubing length needed to reach
water supply for creation of service loop.
Memore plastic cap
port
£гош
water valve inlet
Place brass nut and sleeve on capper tube
end
as
J
A Place end of copper mbing into water valve inlet
»
port. Shape tubing slightly—DO NOT KJNK-so
7
illustrated,
that tabiag Beds straight into inlet port
Slide brass nut over sl&ve and screw nut into inlet
port Tigbtm nut with wrench. Pull on mbing to
conErm connection Is secure.
IMPORTANT: DO NOT overtighten Cross threading may occur.
Locate water tubing damp and install with !4" hex
head screw, as illustrated. Turn on water supply
and correct any leaks, if
Monitor water connection Sjr 24 bouts. Correct leaks, if
necessary.
present
>r—.
Installing Your Refrigetatof
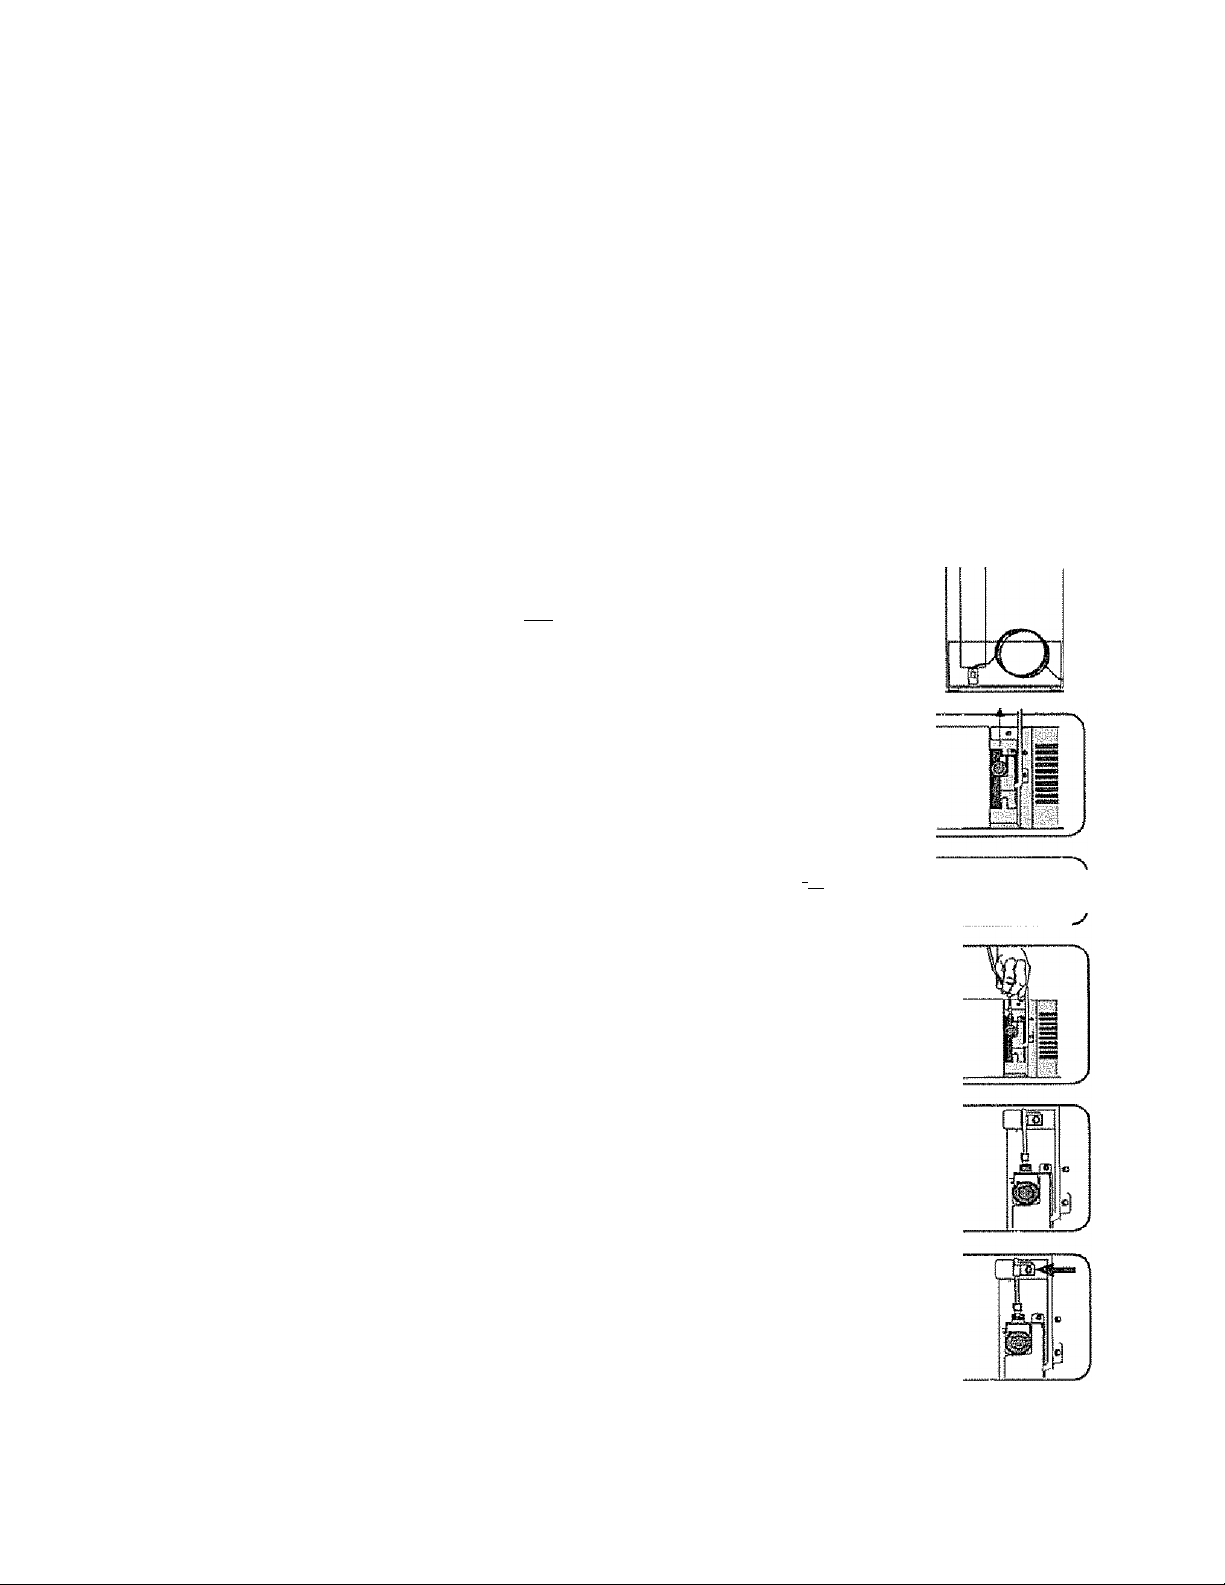
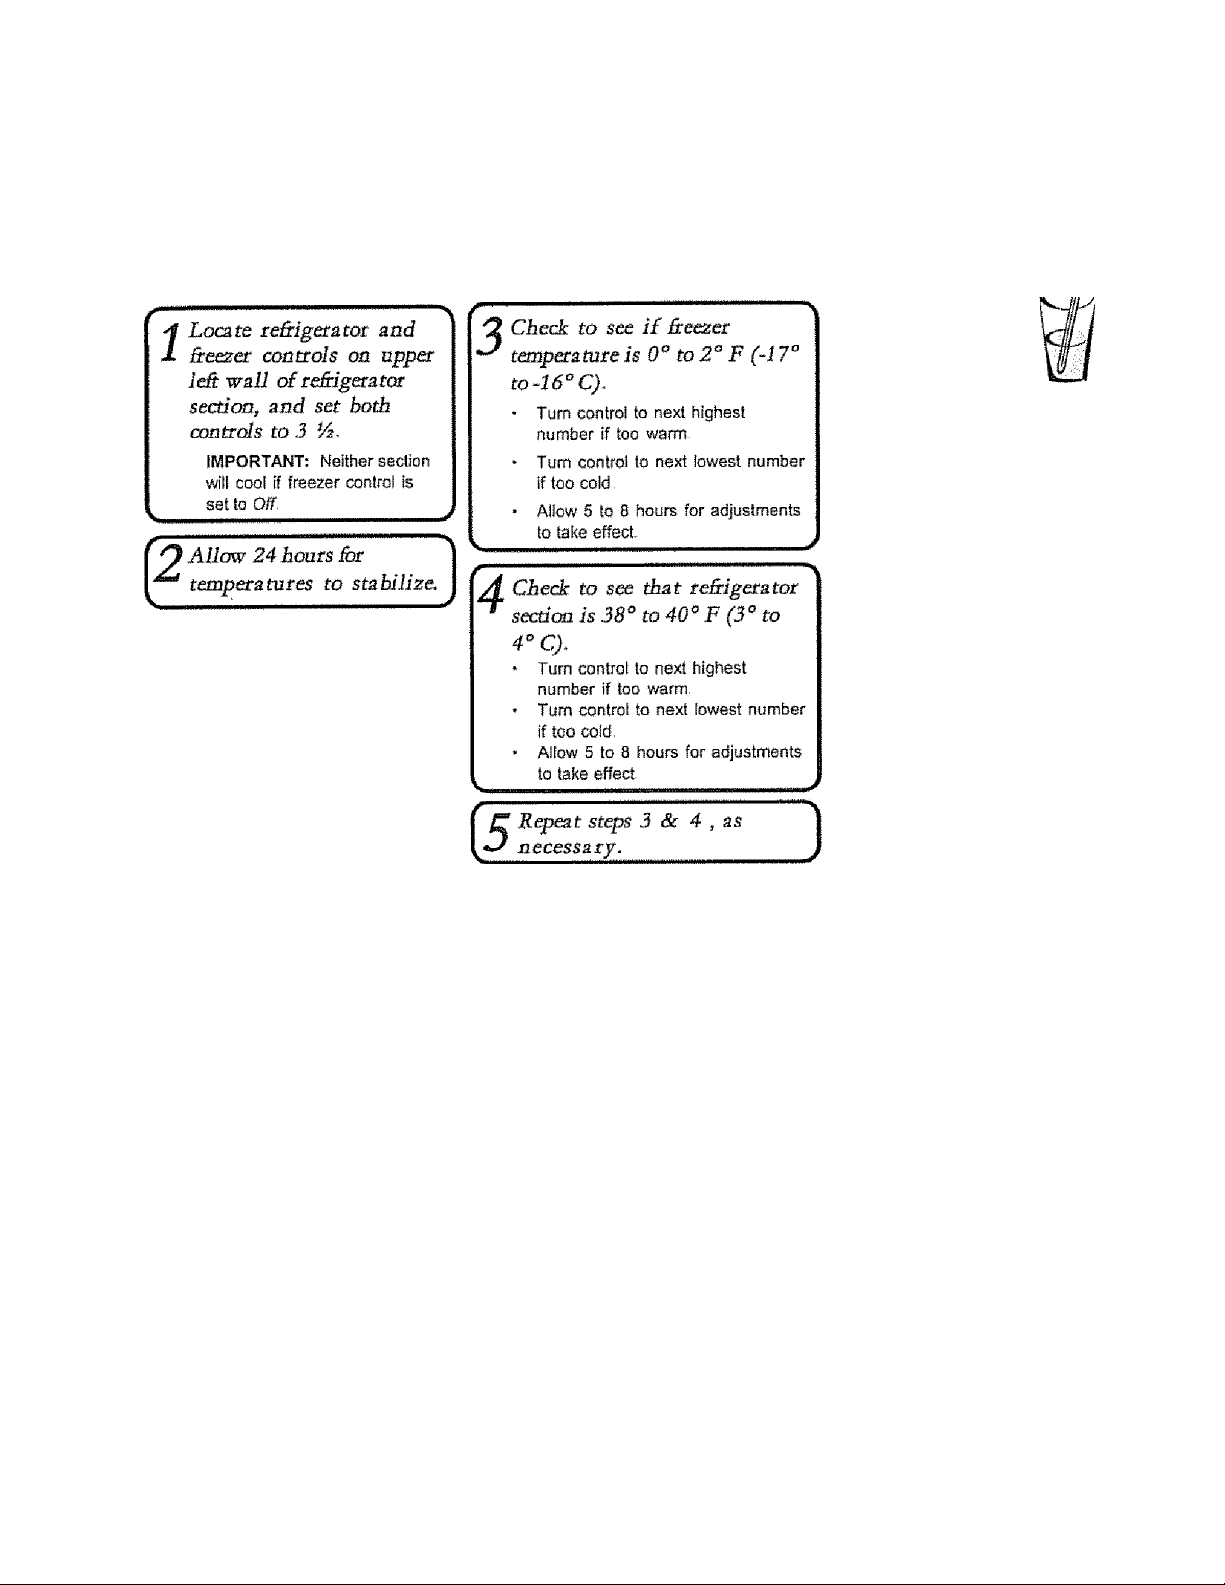
How to Adjust the Temperature Controls
This refrigerator Is designed to operate at a household temperature of 55“ to HO^F (13° to 43° C)-
Dtal Temperature Control Models
For initta! temperature setting, follow ali five steps iisted below. If doing a simple
temperature modiflcatioff for an operational unit, only steps 3 through 5 are required.
HoTV do I perform a
temperature test n
with my dial
temperature
cotrtrois?
IIVIPORTANT: These instructions
apply to dial temperature controls
only Electronic control models
constantly monitor unit
temperature on the controls
M a te ri a ls n e e d e d
• 2 thermometers measuring -S°
to 50°F (-21° to 10°C)
• 2 drinking glasses
For Freezer
• Place thermometer In gfass of
vegetable oil in middle
of freezer and continue
with step 3 of How to Adjust
the Temperature Controls
section,
IMPORTANT: Due to design of
unit, always start temperature
adjustments with freezer section
For Refrigerator
' Place thermometer in glass of
water in middle of unit and
continue with step 3 of How to
Adjust the Temperature
Q
r
m
Controls section
Blectronic Temperature Control Models
To set temperature of the ûeezer, use the ¿uiioas next to the
1
battoli. A setting of 0° to 2° F (~17° to -16'^ C) is recommmded.
• Use the x button to raise the temperature of the freezer section, or the Y to
lower it
• Press the Êi button to confirm the settings.
To set the temperature of the ûesb food section, use the
buttons next to the button. A setting of 38^ to 40° F
(3° to 4° C) is reommended.
• Use the ,v. button to raise the temperature of the fresh food section, or the v
to lower it,
• Press the button to corrRrm the settings.
Allow 24 hours for temperatures to stabilize
NOTE: if adjusting the temperature of an operational unit, only 5 to 8 hours is
required for temperatures to take effect
Why do the
temperatures on my
liED display
fluctuate after they
have been set?
The compartment temperatures
may vary slightly as the unit cycles
to maintain the set temperatures
ntt» m

About Yout Filtfation System...
Water Filter Removal and Installation
Initial Install of Water Filter
When do I chan^ the
water filter?
The dispenser features a water
filter change indicator For
Instructions on how to operate and
reset this feature, refer to the
Dispenser Features ssction
IMPORTANT: Condition of water
and amount used determines tife
span of water filter cartridge If
water use is high, or if water is of
poor quality, replacement may need
to take place more often
How do I order a
replacement filter
cartridge?
Kenmore® replacement water filter
cartridge model 900S
is available through Sears dealers
and servicers You may also order
through Sears by using the
information on the back cover
I’m trying to dispense
water to flush the
system. Where's
the water?
During Initial use, allow about a 1 to
2 minute delay in water dispersai to
allow internal water tank to fill-
What if I choose not to
use the water filtration
Oispenser feature may be used
without water fitter cartridge. If you
choose this option, repface filter
with blue bypass cap
^
Remove blue bypass cap and
retain
ibf
later
use
iJSatrioTC sealing'
' end of Elter and insert into
Biter bead.
Rotate gently clockwise until filter stops
and snap filter cover closed
Reduce water spurts by Rushing air &om
system Run water condnuously hr 2
minutes through dispenser until water runs
steady.
Additional flushing may be required in some households
where water is of poor quality.
label &om
Replacing Water Filter
IMPORTANT: Air trapped in system may cause water and
cartridge to eject Use caution when removing
Turn Rlter counterclockwise until it releases
1
Rom Biter head.
Drain water Bom Biter into sink, and
dispose in normal household garbage.
Q Wipe up exœs$ in Sltar œvet and
J condnue with
initial itistaii of Water
Filter, steps 2 and 3,
10
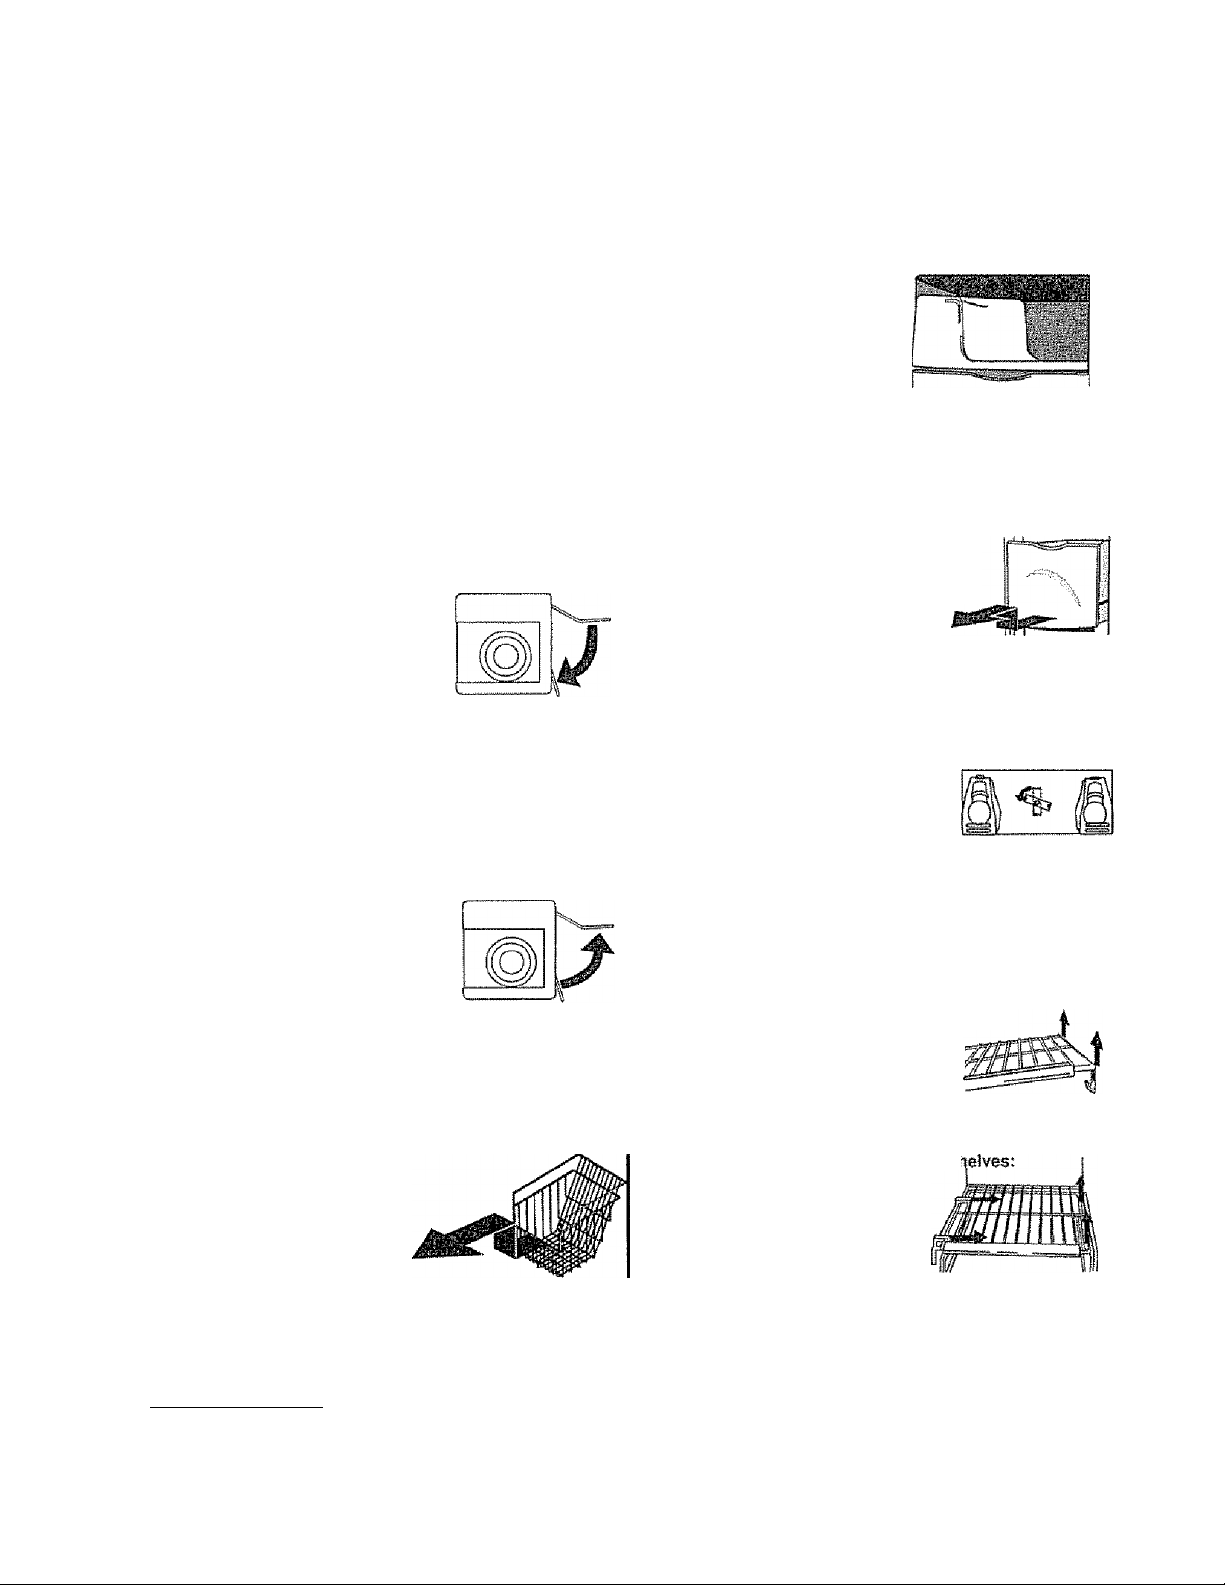
À CAUTION
To avoid pKjpefty damage or injury, observe the following;
• Confirm shelf is secure before placing items on shelf.
> Handle tempered glass shelves carefuliy. Shelves may
break suddenly if nicked, scratched, or exposed to sudden
temperature change
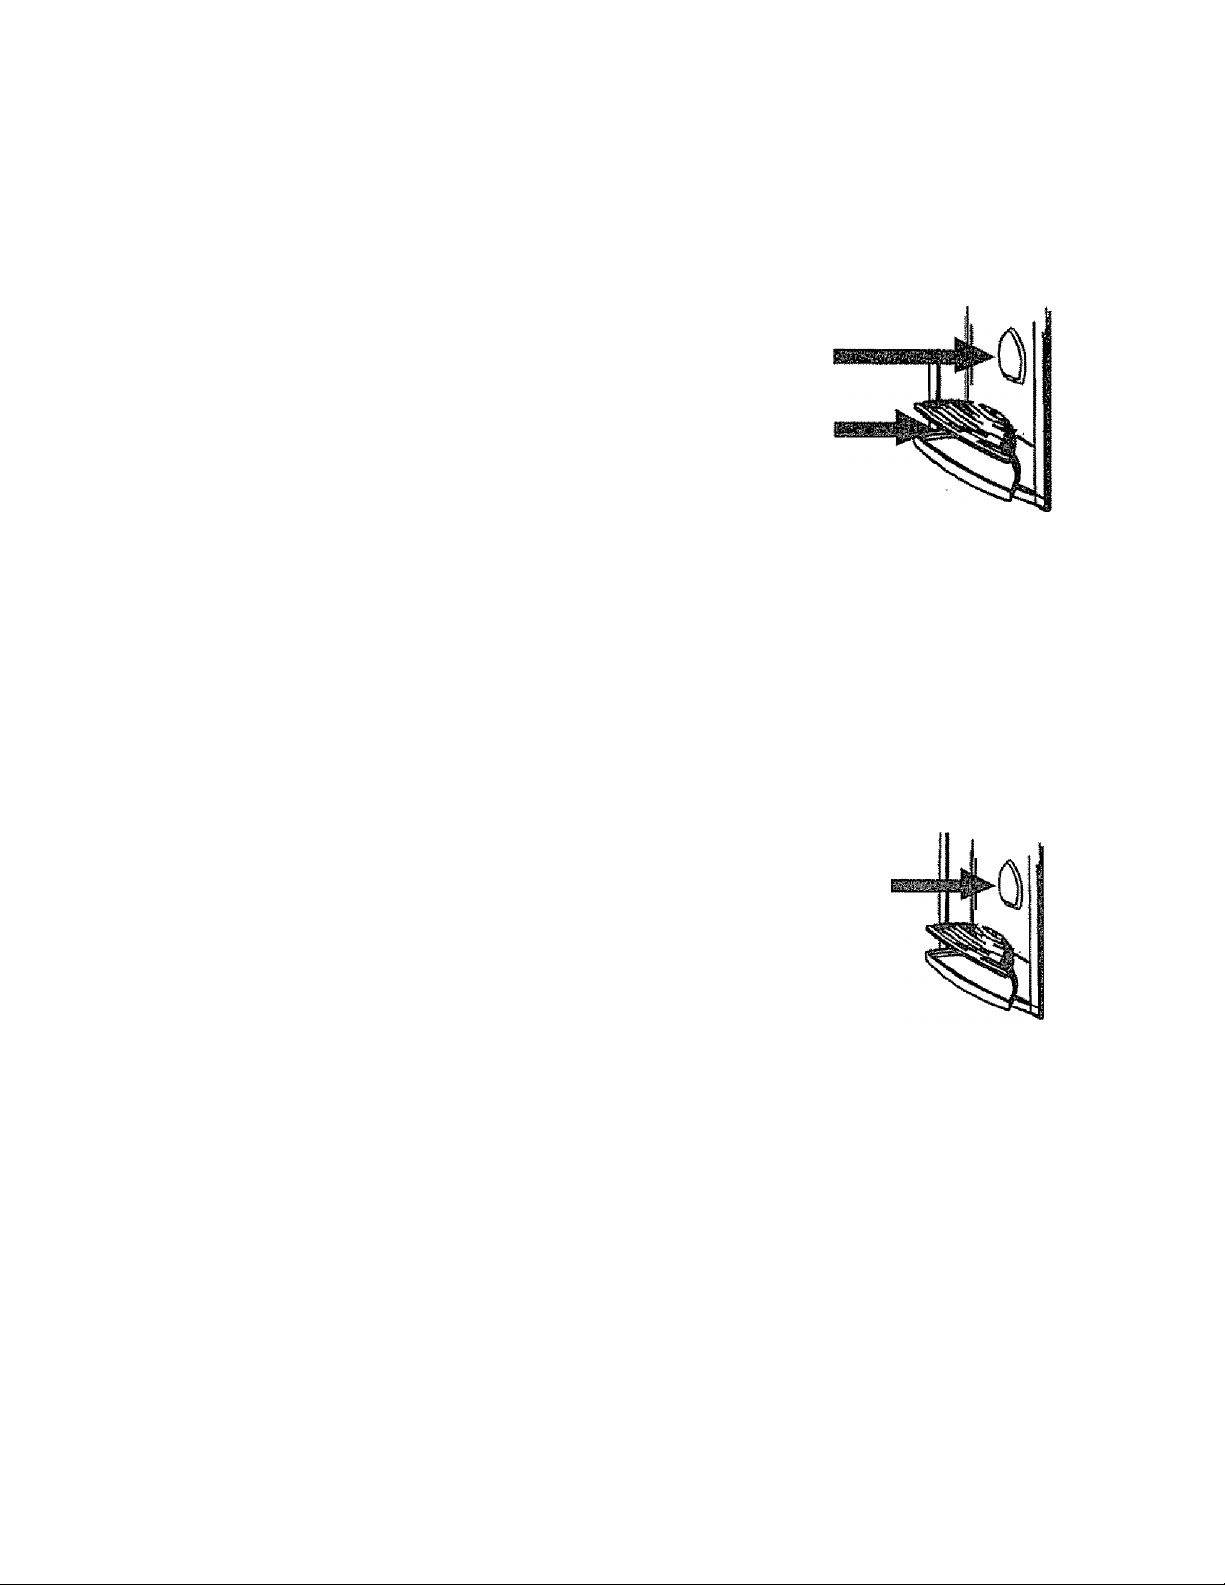
Poor storage
Milk Savor™ (some models)
The temperature-controlled Milk Savor™
keeps beverages and other items up to 5* F
(3° C) colder than the rest of the fresh food
section Air inlet allows air from the freezer
section to pass to Milk Savor™,
The Milk Savor™ control is located
on the left wall of fresh food section
Control adjusts amount of air circulating in
Milk Savor™. Turn control clockwise for colder
temperature
To remove and install Miik Savor™
■ if located directly above Miik
Savor™, dairy center or door
bucket may need to be removed
Refer to appropriate instnjcUons
and remove item. Slide Miik Savor'^'assembly up and puil straight out,
• To install, aitgn one of the
Miik Savor™ cold air intake
holes (A) with one of the two
air Inlets (B) in door liner.
Push assembly down onto
door liner retainer until it stops
IMPORTANT: Milk Savor™ will not operate properly if
air intake holes are not aligned with air Intet in door
liner.
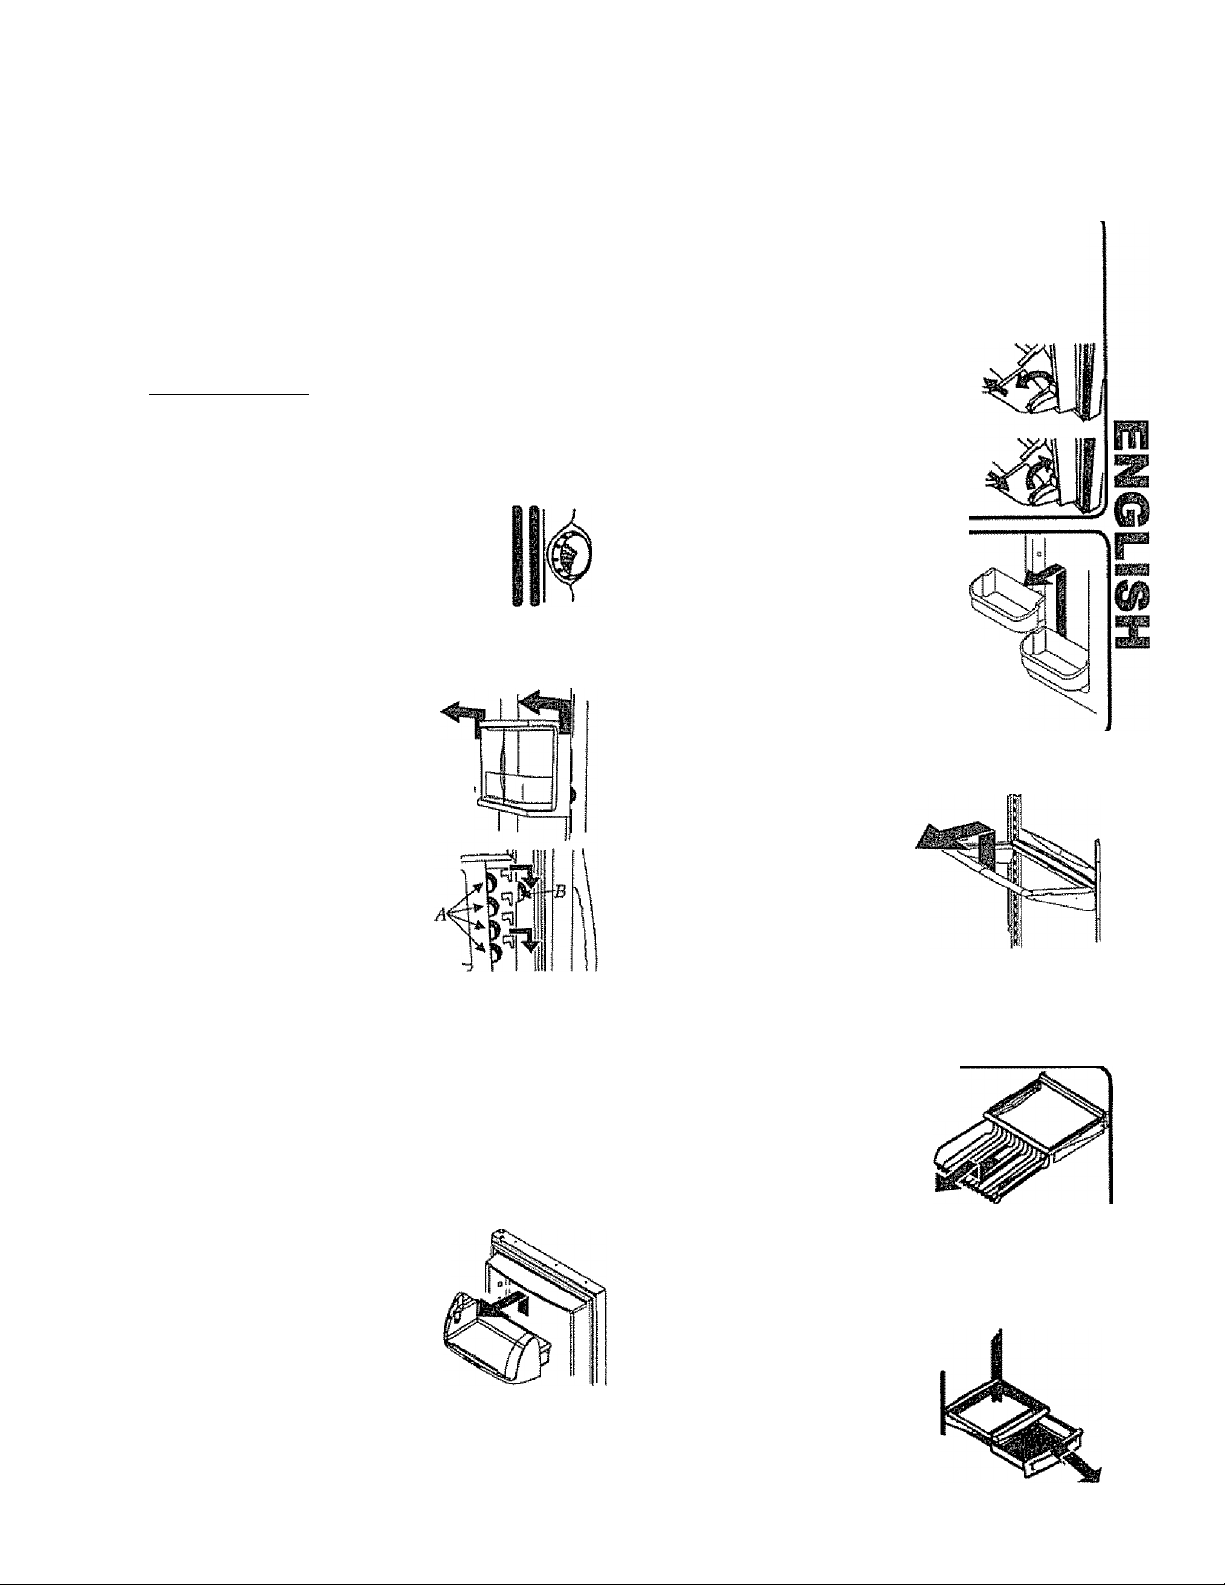
Refrigerator Features
Door Storage {Oiitiiiiied
Tilt»Out Door Buckets (some models)
The Tilt-Out Bucket assembly consists of a bucket and frame,
providing adjustable, convenient storage for food items in door
The bucket assembly tiSts forward for easy access of items, and
lifts out for ease in cleaning and adjusiing.
To remove and install bucket:
• To remove bucket, Up bucket forward
and puil straight out to remove,
■ To install bucket, side bucket into bucket
frame and push bucket upright
To adjust bucket frame:
• Remove bucket per above instactions
• Ut IramB off door support and place in
desired door location.
Door Buckets
Door buckets adjust to meet Individual
storage needs
To remove and Install buckets:
• Lift the dcrer bud<et up until it dears (he
retainers on the door liner, then puil the door
bucket straight out-
• To install, slide bucket in above desired door
liner retainer and push down uni bucket stops
Shelves
Spiilproof Shelves
Spillproof stationary shelves hold
simple spills for easier deaning
To removeatid instai! shelves:
' To remove shelves, lift front of sheif to
release shelf hooks from metal track
and pull out to remove
• To install shelves, select point in malat tradì for replacement
and insert shelf hooks. Raise front of shelf uni hroks lock
into place. Lower sheif front
Drawers
Dairy Center
The dairy center provides convenient storage for items
such as butter, yogurt, cheese, etc.
This compartment is an adjustabie feature located in
the door. It can be moved to several different locations
to accommodate storage needs
To remove and install bin:
• To remove, slide dairy center up
and puil out
• To install, slide assembly in
above desired door liner
retainer and push down until it
stops
To remove and install dairy door;
• To remove, press In sides of dairy door and pull out,
• To install, slide sides of dairy door inside dairy
center until hinge points snap into place
Can Rack (some models)
The Can rack slides out from
underneath the spillproof stationary
shelf. The can rack holds up to
twelve 12-ounce beverage cans
To remove and instail can rack:
• To remove, empty contents of can rack - Pull can rack
forward to full extension and lift front to release
from shelf rail. Pull straight out to remove.
• To instali, reverse above procedure.
Snack Drawer
This drawer can be used for storage of
food items or erdra produce
To remove and install snack drawer;
• To remove, pull drawer out to fuil
extension. Tilt up font of dravrer and
puil straight out
• To instali, reverse above procedure.
11
Refrígefatof Features
What setting should I use for items in
my temperature-controlled drawer?
You should not store lettuce or other leafy produce in this
drawer
> steaks
■hard cheeses
■cold cuts
• bacors
■hot dogs
COI+0
• cauliflower
•cucumbers
• zucchini
•apples
•corn
• oranges
• grapes
COLDEST
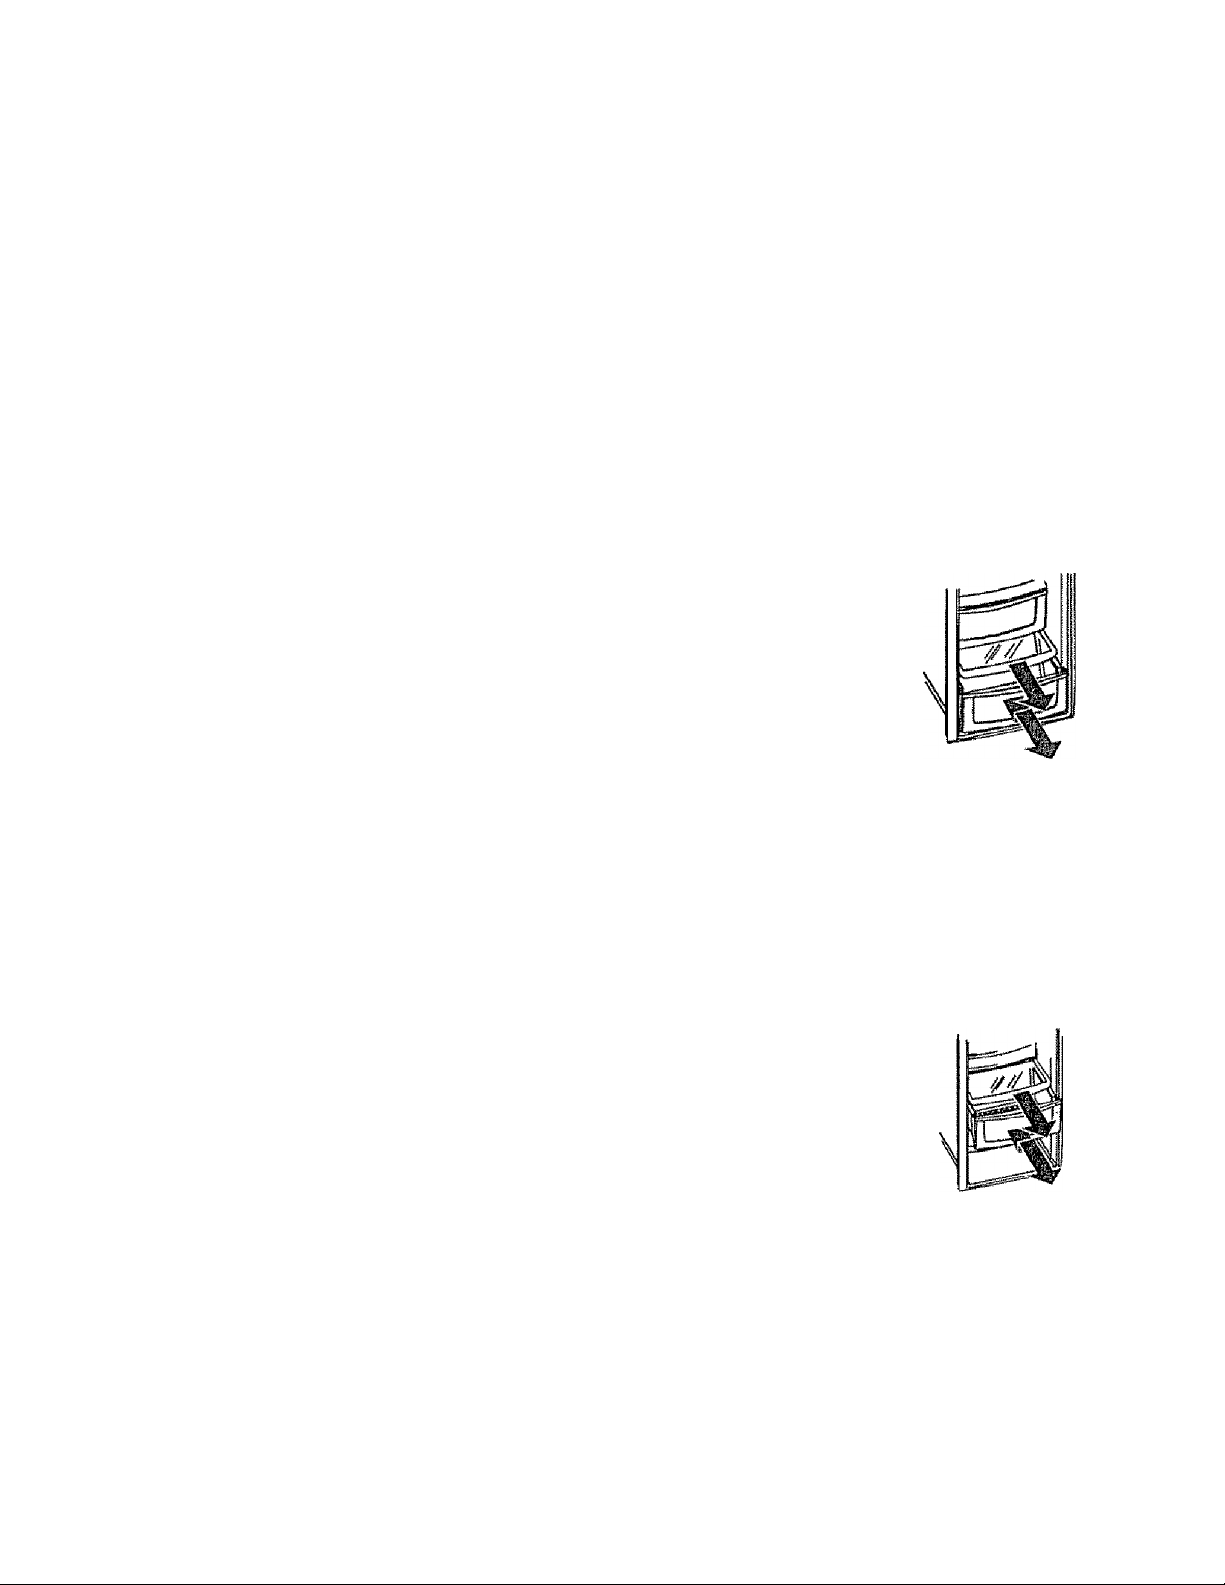
Drawers
Temperature-Controlled Meat Drawer
The tefTiperalure-controlied meat drawer provides a drawer
with a variable temperature control that keeps the
compartment up to 5°F (a'C) colder than refrigerator
temperature. This drawer cart be used for deli storage or
additional produce storage
NOTE: Cold air directed to the temperature-controlled
meat drawer can lower refrigerator temperature
Refrigerator control may need to be adjusted
Controls
Located on the wall to the left of the drawer, the climate
controls regulate the air temperature in the temperatitre
controlled meat drawer Set control level to
normal refrigerator temperature for non-leafy produce
Use the coldest setting for meats or other
deli items,
To remove and Install drawer:
• To remove, pull drawer out
to full extension. Tilt up front of
drawer and pull straight out
• To install, guide drawer into
frame and push back until drawer
is flush with rear wall
cold to provide
What setting should I use for items in
my humidity-controlled drawers?
LOW
HIGH
• cauliflower • oranges
* apples
• corn
• cucumbers
• lettuce
• ÏSC !*ia t^t i<i
f cl
• spinach
• zucchini
• cabbage • fresh
• celery
• broccoli • fresh herbs
• grapes
sprouts
What can I do to prolong the life of my
oroduce?
Please observe the followtrrg, rules when storing produce in
humidity-controlled crispers:
• DO NOT wash produce before placing in crispers Any
additional moisture added to the crispers may cause
produce to prematurely spoil.
• DO NOT tine crispers with paper towels,. Towels will
retain moisture.
• Foilow control instructions carefully. Incorrect control
settings may damage produce
Humidity-Controlled Crisper
The humidity-controlled crisper keeps produce fresh
longer by providing an environment with adjustable
humidity.
Controls
The humidity-controlled crisper controls regulate the
amount of humidity in the crisper drawer Use the tow
setting for non-ieafy produce Use the high setting for leafy
produce.
To remove and install drawer:
• To remove, pull drawer out
to full extension Tilt up front of
drawer and pull straight out.
• To install, guide drawer Into
frame and push back until drawer
is flush with rear wall
To remove and iostatl shelf;
• To remove, lift shelf from wall supports
* To install shelf, lower shelf onto wall supports and
push In until shelf is flush with rear wall,.
12
CAUTION
To avoid property damage, observe the following:
» Do not force ice maker arm down or up
• Do not place or store anything in loe storage bin.
WARNING
To avoid possible injury, including death, do not place glass
items in Ice cream sheSf Glass objects may shatter or
explode if exposed to extreme cold.
Primary Features
Automatic Dispensing icte Rfliaicer
This Ice maker creates the ice used in the dispensing
system
Using Ice Maker for the First Tims
• Confirm ice bin Is in place
and ice maker arm ts down.
• After freezer section reaches
between 0° to 2°F (-18° to
-17° C), ice maker fitte with
water and begins operating.
• Allow approximately 24 hours after instailaiion to
receive first harvest of ice
• Discard ice created within first 12 hours of operation to
verify system is flushed of impurities.
Operating Instructions
• Confirm ice bin is in place and ice maker arm is down
• After freezer section reaches 0" to 2°F (-18° to -17° C).
ice maker fills with water and
begins operating You will have a
complete harvest of Ice
approximately every 3 hours
• stop ice production by raising ice
maker arm until click is heard
• Ice maker will remain in the off position until arm is
pushed down
Drawers
Freezer Basket
To remove and instati basket:
• To remove, lift front of basket
and putì out to its full
extension Lift Up front of
basket and remove
• To install, slide basket into rails at bottom of freezer
section Lift up front of basket, and slide to the back of
unit
Ffeezef Features
ice cream shelf provides a space for Items to be
chiSied or frozen quickly
» To remove, lift ice cream shelf
from ice bin rails and pull
straight out
• To instail, fit shelf over lojs of
ice maker and lower onto ice
bucket rails.
Ice Storage Bin
The ice storage bin Is located below the automatic
dispensing ice maker.
To remove and insiail ice storage bin:
• To remove bln, remove ice cream shelf.
Raise ice maker arm to deactivate ice
maker. Lift front of fain and puli out
to its full extension, Lift up front of
bin and remove.
• To Instail, slide bln into rails below ice maker until bin
locks into place. Drop ice maker arm to activate ice
maker, and replace toe cream shelf.
IMPORTANT: Ice bin must be
locked in proper place for proper
ice dispensing. If freezer door
does not close, bin is not in proper
location Turn auger driver counterclockwise (as shown)
to property align ice bin with back of unit,.
Shelves
Freezer Shelf
To remove and install clip-mounted shelves:
• To remove, pull shelf from wall
mounting clips and pull left side
of shelf out of wall mounting
holes
• To install, place shelf in mounting hole and attach to
wall mounting dips
To remove and install rail-mounted si
' To remove, snap right side of
shelf from cabinet railing and
remove from wall mounting
clips
• To install, replace shelf in
wall mounting clips Be sure back edge of shelf Is
flush witli back of cabinet arsd snap shelf into cabinet
railing
Q
Poor storage
Door Buckets
• Refer to refrigerator section for instructions
13
Features
Dispenser Light n o t s h o w n
A light activates within the dispenser area at full power when dispensing Ice or water
Dispenser Pad
The dispenser pad is located on the back wall of the dispensing area- When the dispenser
pad is pressed, the selection chosen on your dispenser control panel will dispense.
Removable Tray
The removable tray at the bottom of the dispenser area is desigrsed to collect small spills
and may be easily removed for cleaning and emptying purposes
IMPORTANT: Removable tray does not drain Continuous water running into tray will cause tray to overflow
Wafer Dispenser Operation
CAUTION
To avoid personal Injury or property damagej observe following instructions:
• Do not put fingers, hands, or any foreign object into dispenser opening
• Do not use sharp objects to break Ice
■ Do not dispense ice directly into thin glass, fine china, or delicate crystal.
NOTE: During initial use of water dispenser, there will be a 1 to 2 minute delay while water tank
fills before water dispenses Discard first 10-14 containers of water after initially connecting
refrigerator to household water supply and after extended periods of nonuse.
To use dispenser pad:
• choose water selection from dispenser control panel.
• Press sturdy, wide-mouthed container against dispenser pad. When dispensing crushed ice,
hold container as close to chute as possible to reduce spraying.
• Release pressure on dispenser pad to stop water from dispensing. A small amount of water
may continue to dispense, and collect in dispenser tray Large spills should be wiped dry,
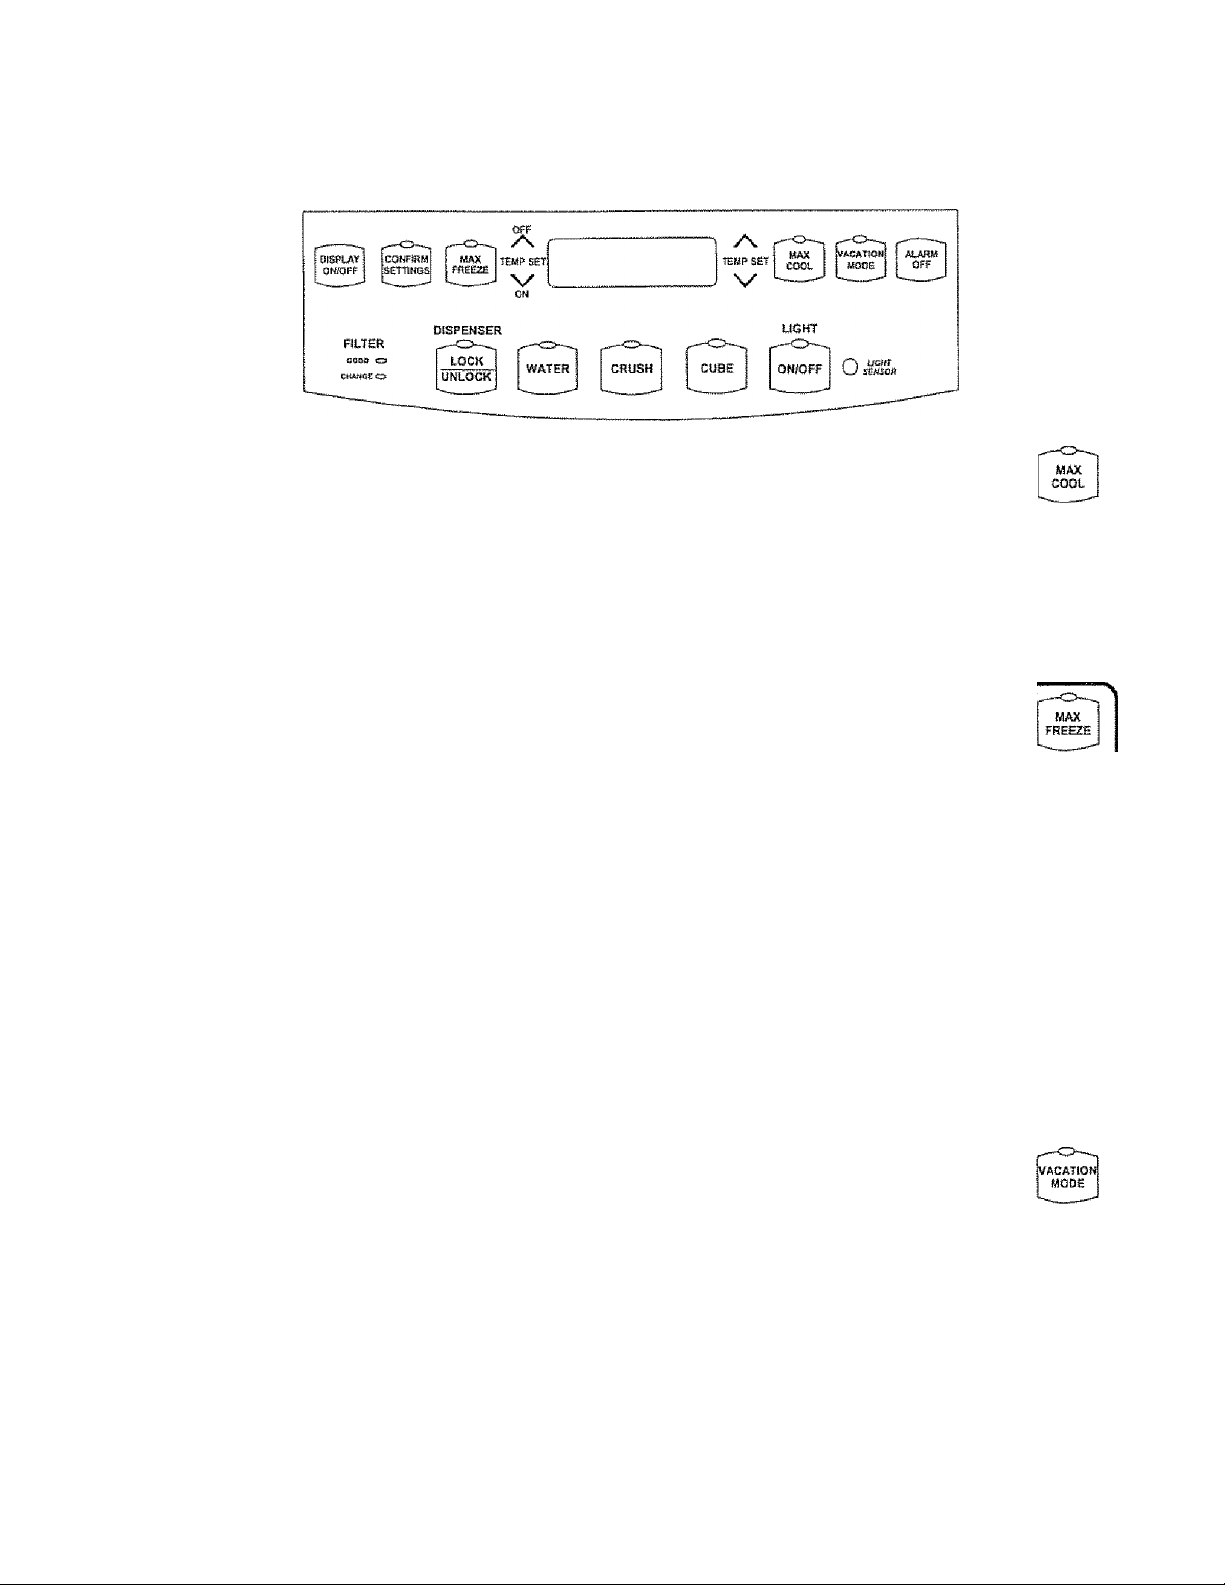
Fi¥e-B«tton Control Features
Dispetisef Features
15
Dispenser Features
Electronic Control Features
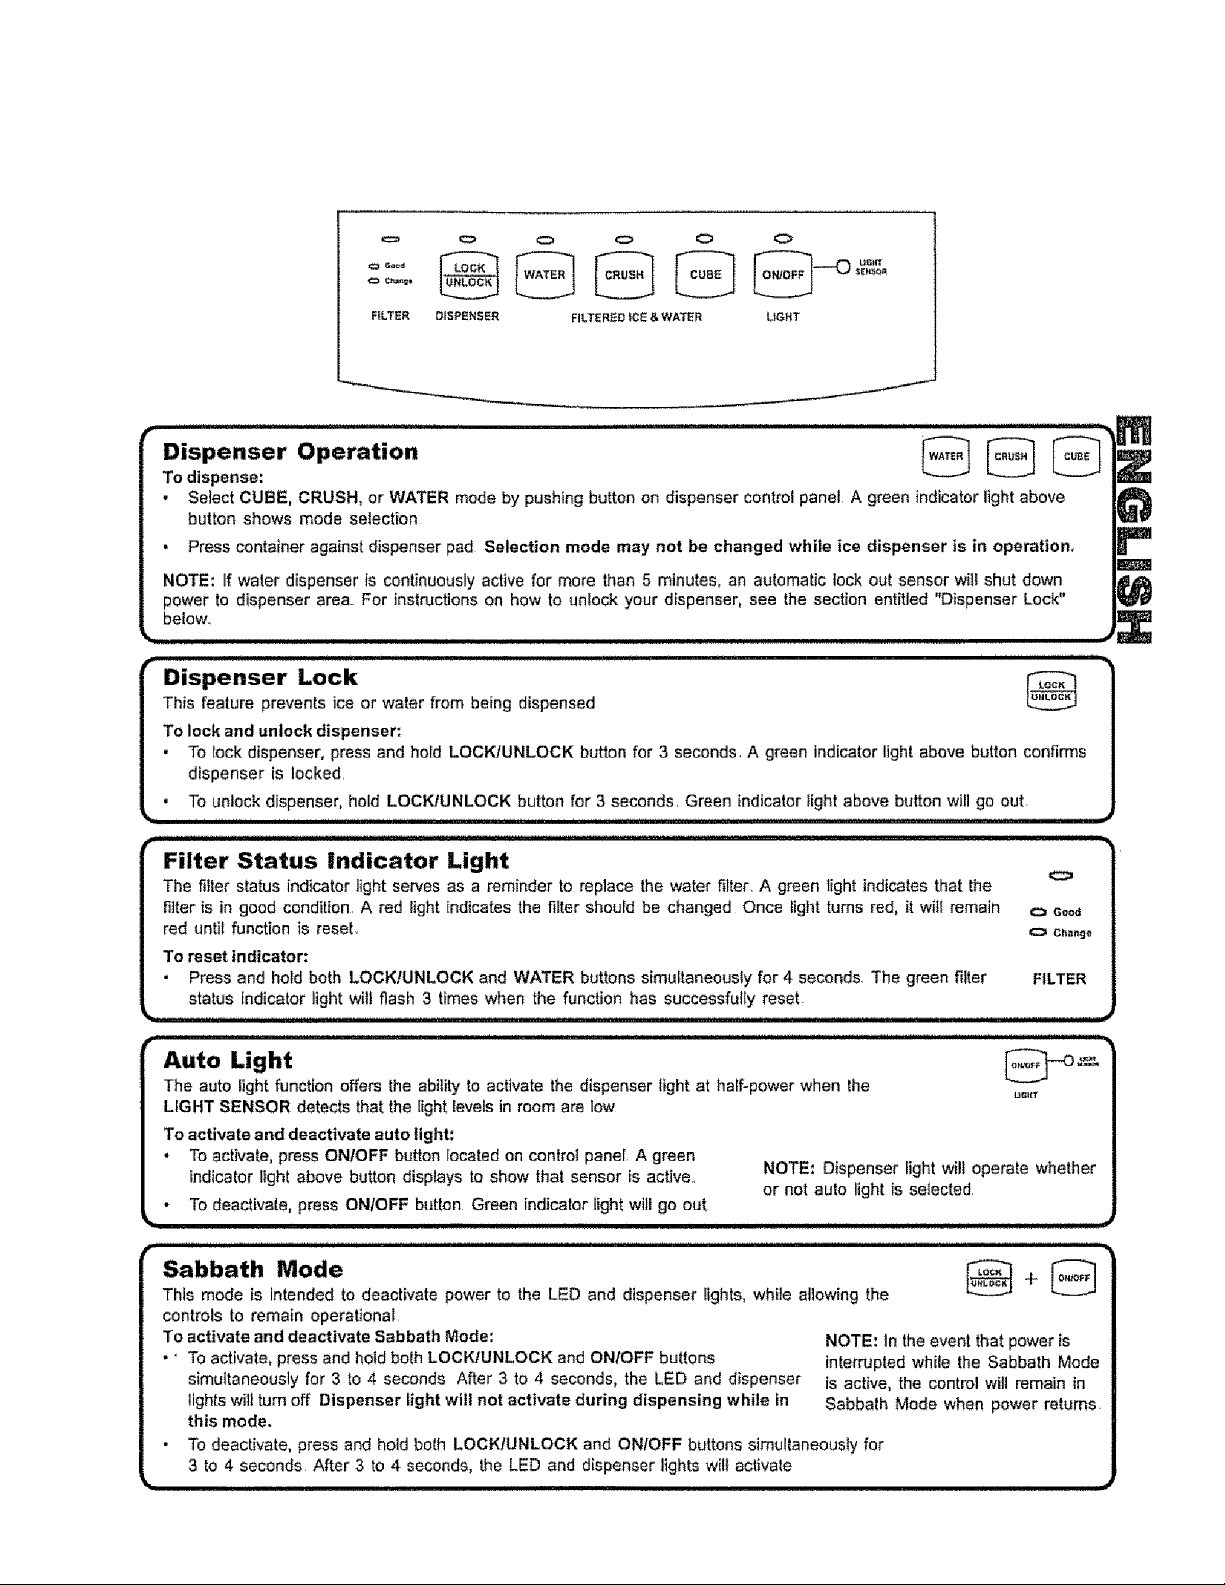
Dispenser Operetion
To dispense water: To dispense Ics:
• Select the button,
• Press container against
dispenser pad-
Select the \j^^j button for cubed ice
Press the button for crushed ice.
Press container against dispenser pad.
NOTE: If water dispenser is continuously active
for more than 2 minutes, an automatic lod< out
sensor will shut down power to dispenser areaFor instiuctions on how to unlock your dispenser,
see the section entitled “Dispenser Lod<" below.
I WATER [ CRUSH
Dispenser Lock
This feature prevents ice or water from being dispensed
T0 lock and unlock dispenser: „
• To lock dispenser, press and hold the fiffl button for 3 seconds, A green indicator light above button confirms
dispenser is locked
To unlock dispenser, hold the
Light Function
The light function offers offers two settings: OFF and AUTO
The OFF setting will turn off the dispenser cavity light.
The AUTO setting allows the SENSOR to measure the surrounding light levels and adjust the power of the cavity light
accordingly. When the senser registers lower light levels {night time, darkened kitchen), the cavity light will respond at
50% power, When the senser registere high light levels (lighted kitchen, direct sunlight), the cavity light wifi not activate.
To activate auto setting:
• Press the button located on contrd^ne),
• To activate the AUTO setting, press the [““J button.
When the green indicator light above the button display
Is on, the cavity dispenser light will use the AUTO setting
button for 3 seconds. Green indicator light above button will go out
NOTE: Dispenser light will operate at full power
when ice or water functions are in use.
To deactivate light;
• Press the UmrJ button located on controi pane!. Green
indicator light above button wHS go out.
Filter Status Iniiicator Light
The fitter status indicator light serves as a reminder to replace the water filter, A green light indicates that the
filter is in good condition, A red light indicates the filter should be changed Once tight turns red, It will remain
red until function is reset
To reset indicator: „ _
light wiil flash 3 times when the function has successfully reset.
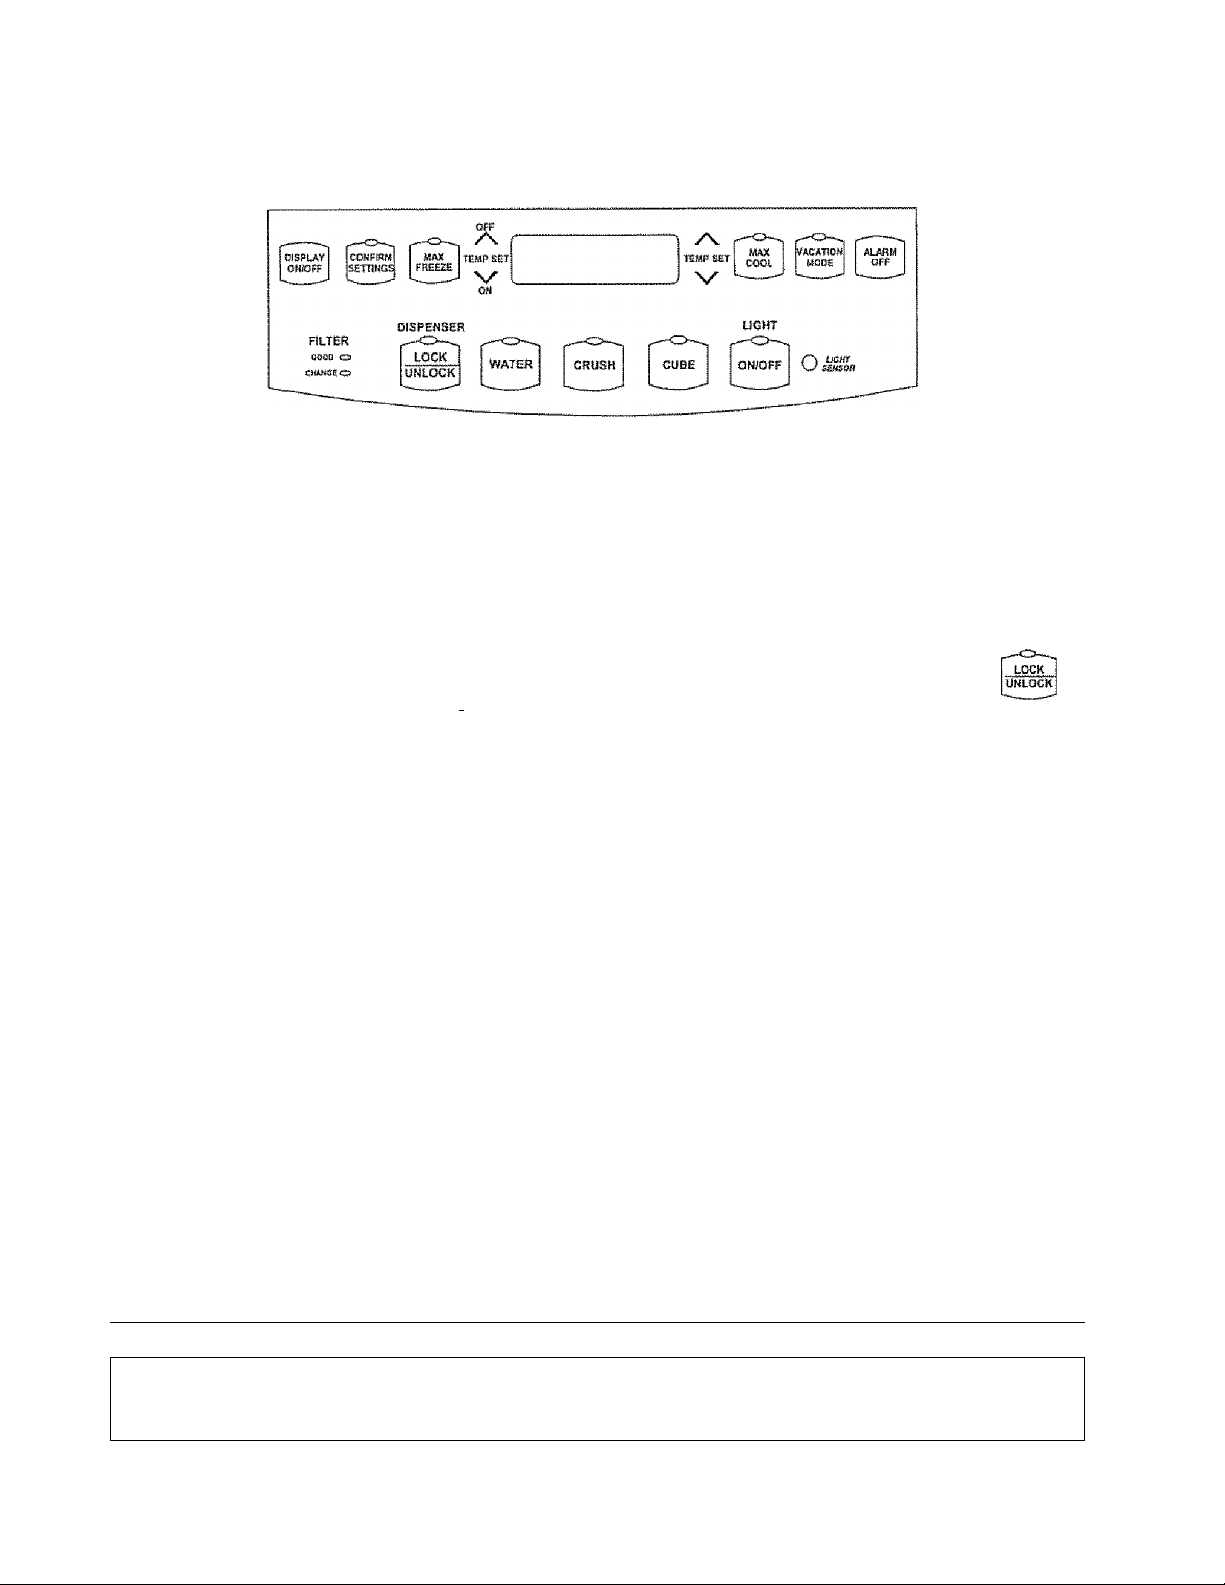
^ Temperatura Keys
These keys wl!i lower or raise the freezer or fresh food
compartment temperature.
NOTE: See thè sedian How to Adjust thè Temperature
Controls for Instruclions on how lo set food Ctompartment
temparalures.
16
FILTER
GOOD O
CHANGE O
.
/\ '
TEMP SET
Dispenset Features
Electronic Control Featyres coatíaued
Max Cool
This function causes the fresh food temperature to drop to the minimum refrigerator
temperature setting available. This setting remains in effect for approximately to
hours.
_ , NOTE: The temperature setting cannot be
To actlvste and deactivate litlax Cool: changed if Max Cool or Max Freeze
• To activate, press the [s] button. The green light above the button will indicate setting is active
active status
To deactivate, press the i
Max Freeze
This function causes the freezer temperature to drop to the minimum freezer
temperature setting available. This setting remains in effect for approximately 24
hours-
To activaf© and deactivate Max Freeze:
• To activate, press the button. The green light above the button will indicate
active status
• To deactivate, press the [¡5^ button. The green light above the button will go out.
button The green light above the button will go out
NOTE: The temperature setting cannot
be changed if Max Cool or Max Freeze
setting is active
o
r
m
Ptsfilay On/Off
The Display On/Off switch controls power to the LED display
To activate and deactivate display:
■ To activate, press the button. The display wiil light,
• To deactivate, press the S] button The display will go out
Vacation Mode
This key. if enabled, causes less frequent defrost cycles This conserves energy.
To activate and deactivate Vacation Mode:
• To activate, press the buUor?. The green light above the button will indicate
active status,
* To deactivate, press the pS button, or open either refrigerator door.
Alarm Off
This key is used to turn the HI TEMP Warning Indicator and audio alarm,
as well as the OPEN DOOR audio alarm off. This will also deactivate
alarms presently in progress.
17
To turn the alarm off:
• Press the ¡^0 button.
D1SPLAY
ONÍOFF
ALARM
CPF
Dispensef Features
Hidden Electronic Control Features
Sabbath Mode
This mode is intended to deactivate power to the LED and dispenser lights, while allowing the
controls to remain operational Ho visual or audio alarms wiii be available whiie in this mode.
To activate and deactivate Sabbath Mode:
To activate, press and bold both the and buttons simultaneously for 3
seconds After 3 seconds, the LED and dispenser lights wilS turn off, Dispenser light
wilt not activate during dispensing while in this mode-
To deactivate, press and hold both and Uwetf] buttons simultaneously for 3
seconds, After 3 secortds, the LED and dispenser lights will activate.
...................
^
..
NOTE; in the event that power
is interrupted vdiite the Sabbath
Mode is active, the control wit
remain in Sabbath Mode when
power returns
Auto Display
The auto display controls the illuminatton of the LED display based on the light readings received from the SENSOR. If
the SENSOR indicates low light levels, the display will be dimmer than If displaying during well-tit periods.
To set the power level of the display;
* Press and hold both the Uwtf button and the freezer Y button for 3 seconds The current active state will show In the
display by using AL Oforon, AL A for auto .
• Use the refrigerator ««'•«*' button to scroll through the display states
• Activate the chosen setting by pressing the button
L . ..........................................
шшшшшшш
....................................
..........
......................
KOTE:The letters AL will always show in freezer
temperature display while in this mode.
. . .
.
......................................... ,j
Temperature Cotiversiori Mode
This mode is available to change the temperature display between Fahrenheit and Celsius,
To change current temperature reading:
• Press the and ^ buttons simultaneously for 3 seconds.
LOCK
UNLOCK
ON/OFF
■■
r
Hideien Lockout for Upper Keypad
The purpose of this mode is to prevent tampering with the upper set of dispenser controls.
This inciudes the Display On/Off, Max Freeze, Max Cooi, Vacation Mode, and Temperature Set
functions
To activate and deactivate Hidden Dispenser Lockout:
* To activate, press the fiS and ISS buttons sirraiitaneousiy for 3 seconds.
To deactivate, press thé and
V-
buttons simultaneously for 3 seconds.
ON/OFF Function
The ON/OFF function turns oft cooling to the fresh food and
freezer sections while allowing the lights and electronic
display to stay on. The dispenser functions will not be
available while in this mode.
To deactivate and activate unit:
• To deactivate, press the freezer x button until the readout registers
beyond the maximum allowable freezer temperature. At this point, the
LED will read off. Press the button to confirm the selection,
* To reactivate, press the freezer Y button. Press the button to
confirm the selection.
To avoid electrical shock which can cause severe personal
injury or death, do not perform maintenance or service on
refrigerator unless unit is unplugged.
18
LOCK
UNLOCK
A WARNING
NOTE: After reactivation, the display vwll
show temperature setting previously in
use. See the section How to Adjust the
Temperature Controls for Instructions
or: how to set food compartment
temperatures..
How to Clean Your Unit
AREA
Textured Doors
and Exterior
Cabinet interior
Stainless Steel Doors
and Exterior»
IMPORTANT:
Damage ¡o slsinless s/ee!
to'sft doe Í0 improper use
of cleaning products or
nan-mcommencfed
producís IS nal covered
under any vramnty
Dispenser Cordrols
Door Gaskets
Condenser Coll Remava
roe grille lo access
Condenser Fan Outlet
Grille
Sec back of refrigerator
Accessories Shelves,
buckets, tlmmrs. etc
DONCT USE
Abrasive or harsh cieanars
Ammonia
Chlorine bleach
Concentrated detergents or
solvents
Metal or piastie-lextured
scouring pads
? Abrasive or harsh cleaners
? Ammonia
? Chlorine bleach
7 CoDGentrated detergents or
solvents
7 Metal or pjastic-lexturad
Ecouririg pacts
7 Vinegar-based product
7 CItfus-based cteaners
7 Abrasive or harsh cleaners
7 Ammonia
? Chiorine bleach
? Coneenirsted detergents or
soivenls
? Metal or piastic-iextured
scouring pads
? Abrasive or harsh cleaners
? Metal or plastic-lextured
scouring pads
A Dishwasher
N/A
@ o®
DO...
Use 4 tablespoons of
baking soda dissolved in 1
quart (1 liter) warm soapy
water
Rinse surfaces with clean
warm water and dry
immediately to avoid water
spots
Use warm, soapy water and
a soft, clean doth or
sponge
Rinse surfaees with dean
warm water and dry
immediately to avoid water
spots
Use a vacuum cleaner hose
nozzle
? Use a vacuum cleaner hose
nozzle with brush
atischment.
? Follow removal and
Installation instructions from
appropriate feature section.
7 Allow items to adjust to
room temparature,
7 Dilute mild detergent arrd
use a soft clean cloth or
sponge lor cleaning
? Use a plastic bristta brush
to get into crevices
7 Rinse surfaces with clean
warm mater
7 Dry glass and dear items
immediately to avoid spots
Hints and Cate
How do I remove
an odor from my^Sjj)«^
refrigerator?
1. Remove all food
2 Disconnect power from refrigerator
3 Clean the following items using the
appropriate instructions in How to
Clean Your Unit :
> Walls, floor, and ceiling of cabinet
interior.
• Drawers, shelves, and gaskets..
4 Pay special attention to ail crevices
by completing the foilowing steps:
• Dilute mild detergent and brush
solution into crevices using a
plastic bristle brush .
• Let stand for 5 minutes
• Rinse surfaces with warm water.
Dry surfaces with a soft, dean
cloth.
5 Wash and dry al! bottles, |
containers, and jars Discard
spoiled or expired items.
6 Wrap or store odor-causing foods in
tightly-sealed containers to prevent
reoccurring odors.
7 Connect power to refrigerator and
return food to unit
8 After 24 hours, check if odor has
been eliminated.
If odor Is stilt present...
1 Remove drawers and place on top
sheif of refrigerator,
2 Pack refrigerator and freezer
sections-incfuding doors-with
crumpled sheets of black and white
newspapef.
3. Place charcoal briquettes randomly
on crumpled newspaper in both
freezer and refrigerator
compartments.
4. Close doors and iet stand 24-48
hours
5. Repeal steps 5 through 7.
If odor was not eliminated, contact
Sears Service Center Refer to back of
manual for phone number.
A stainless steel cleaner has been included inside the refrigerator for your use. To purchase
additional cleaner, please contact Sears using the information on the back of your manual
19
Hints and Care
A \ How to Get the
^ J Most Out of
^ Your Energy
Dollar
Avoid overcrowding refrigerator
shelves. This reduces effeciivity of
air circulation around food and
causes refrigerator to run longer.
Avoid adding too much warm food
to unit at one time. This overloads
compartments and slows rate of
cooling
Do not use alunninurri foil, wax
paper, or paper toweling as shelf
liners This decreases air flow and
causes Unit to run less efficiently,
A freezer that is full runs most
efficientty
Locale refrigerator in coolest part of
room. Avoid areas of direct sunlight,
or near heating ducts, registers, or
other heat producing appliances If
this Is not possible, isolate exterior
by using a section of cabinet or an
added layer of insulation
Refer to this Use and Care Guide
section on temperature controls for
recommended control settings
Clean door gaskets every three
months according to this Use and
Care Guide’s cleaning instructions.
This will assure that door seáis
property and Unit runs efficientiy
Take time to organize items in
refrigerator to reduce time that door
is open.
Be sure your doors are dosing
securefy by leveling unit as'
instructed in this Use and Care
Guide.
Clean condenser coils as indicated
in the Use and Care Guide every 3
months. This will increase energy
efficiency and cooling performance.
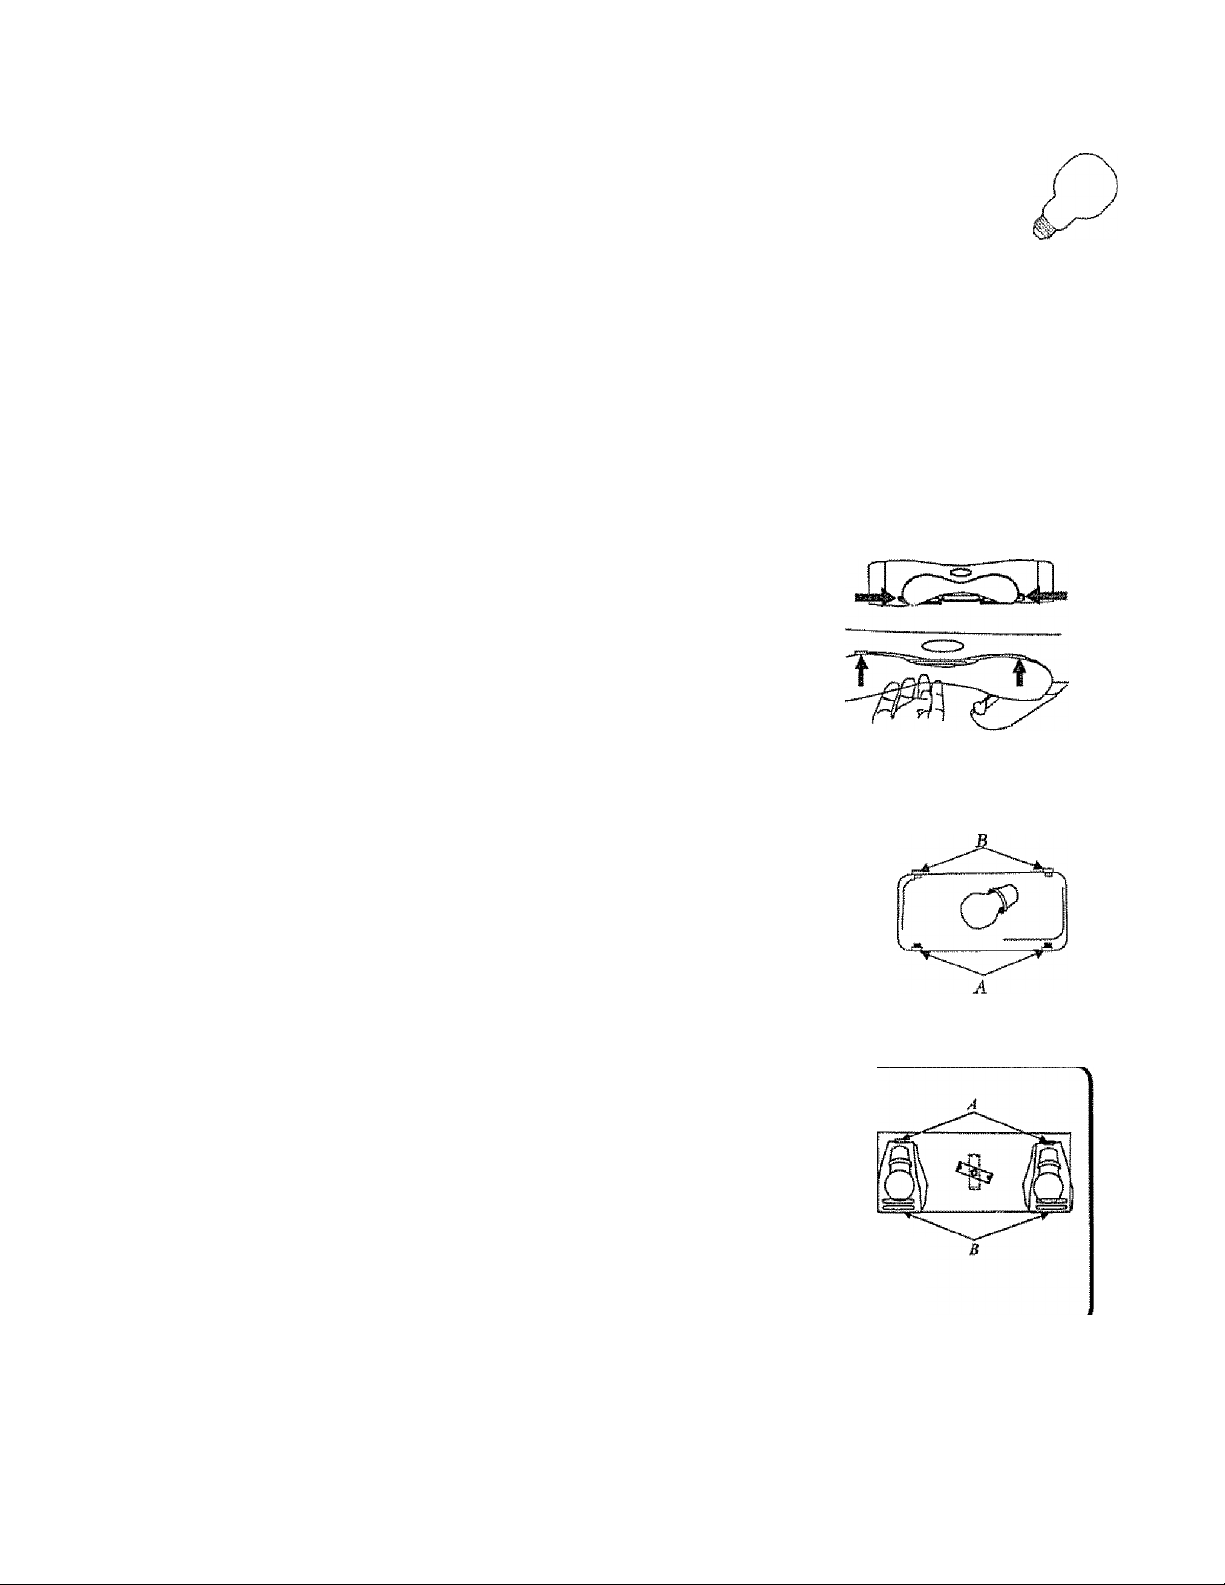
How to Remove and Replace Light Bulbs
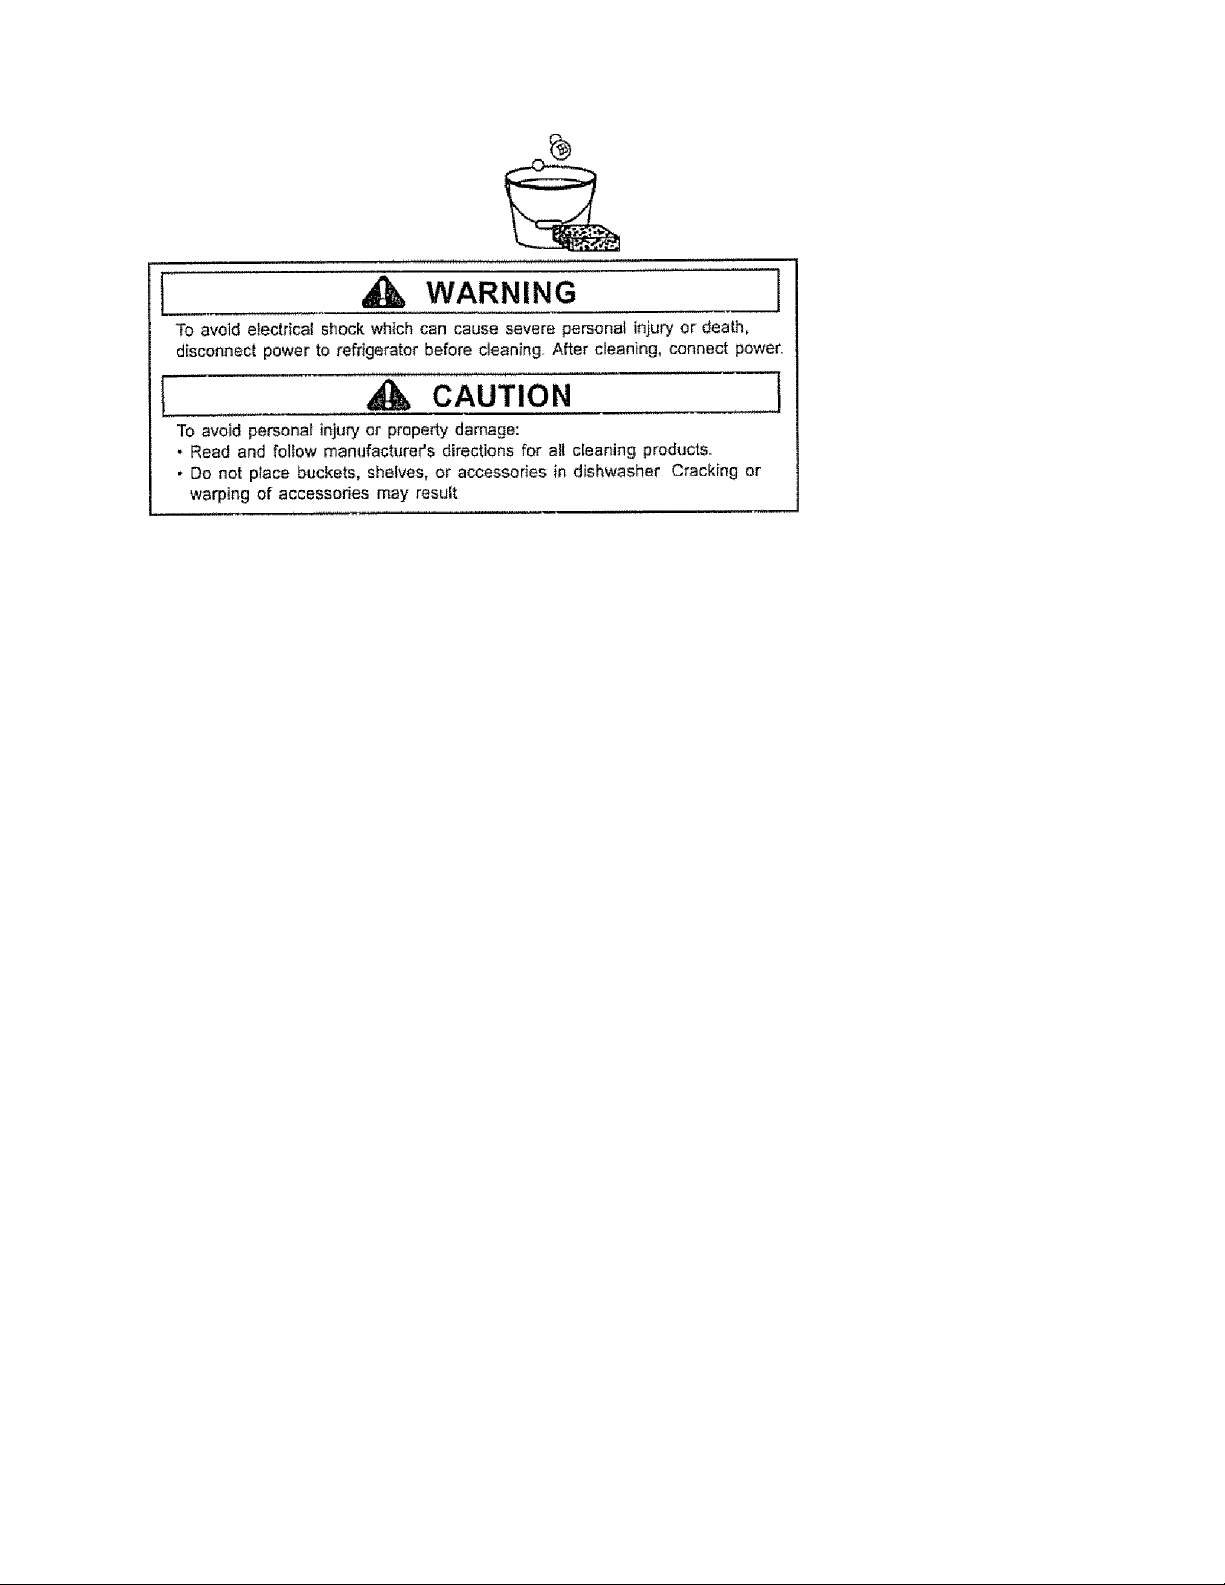
WARNING
To avoid eiectrical shock which can cause severe personaJ injury or death,
disconnect power to refrigerator before replacing light bulb- After replacing light
bulb, connect power
To avoid persona! injury or property damage, observe the foiiowing;
• Allow light bulb to cooi
• Wear gloves when replacing light buib.
Upper refrigerator section
1. Locate finger gaps on each side of clear light
shield, insert fingers and press in on each side
of shield Pull shield down and remove
2, Remove light bulbs.
3. Replace with appliance bulbs no greater titan
40 waffs,
4, Replace light buib cover by inserting front tabs of
light shield into slots directly in froni of light assembly.
Lower refrigerator section
t Pinch bottom tabs (A) on light cover and puli straight
out,
2- Remove light bulb,
3 Replace buib with appliance bulb no greater than 40
watts.
4, insert lop tabs (B) of light cover into liner slots and
snap bottom portion over light assembly
Freezer section
1 Remove tee bin by lifting front of bin and pulling out
2, Remove light bulb cover by pinching top tab (A) and
puiiing cover out.
3 Remove light bulb. Replace with appliance bulb
no greater than 40 watts.
4- Insert bottom tab (B) of light cover into liner slots and snap
top portion over iight assembly
5, Replace ice bin by sliding in until bin focks into place
Ice and water dispenser
1, Locate light bulb iriside top edge of dispenser frame. Unscrew
to re move-
2, Replace light buib with a 7-watt, 120 volt bulb
20
I
NOISE »
TOPIC
CItcklitg
A)r rushing or
whirring
Gurgling or boiling
sound
Thumping
Vibrating noise
Buzzing
Humming
Today’s refrigerators have new fesiures, such as foam ¡rtsu(a!lon> and are more energy efficient Shan past^
Troubleshooting
refrigerators Foam insulation is very energy efficient and has excellent insulating capabiiities; however, it is
not as sound absorbent as former insulating materials As a result, certain sounds may be unfamiliar In time,
' V ihese sounds will become familiar Please refer to this information before calling service
T>l^ C C TTIT TT A T TCT7
1 1| _ * ^ ^ J *i,.J ^ SOLUTION
Freezer controi (A) clicks when starting or
stopping compressor.
Defrost timer or electric damper control (some
models) (B) sounds litre an eieclric clock and
makes an occasional click or snap
Condenser fan (D) makes this noise while
operating.
Freezer fan (C) makes this noise while
operating.
Freezer fan (C) slows to a stop as the freezer
door is opened.
Evaporator (E) and heat exchanger (F)
refrigerant make this noise when flowing.
ice cubes from ice maker drop info Ice bucket
(G)-
Dispenser ice chute (H) closing.
Compressor (i) makes a pulsating sound white
running.
Refrigerator Is not level
tea maker water valve (J) hookup buzzes
when ice maker fills with water.
Ice maker (K) is in the on' position without
water connection
Ice auger (L) hums as auger agitates ice
during dispensing.
Compressor (}) can make a high pitched
hum while operating.
Solenoid valve {M} opefaling ice chute door
Norma! operation
Normal operation
Normal operation
Norma! operation
Norma! operation
Normal operation
Normal oparalion
Normal opefatlon
See leveling instructions In
"Instailing Your Refrigerator"
Normal opBtBiion
Stop sound by raising ice
maker arm to 'ofT position
See ice maker section in
“Freezer Features' for detaiis.
Normal operafion
Normat operation
Normal operation
Freezer control and
lights are on, but
compressors are not
operating.
Environment
controlled drawers
are toe warm
Refrigerator does
not operate
Refrigerator still
won't operate
etGGtronIc controls
(some models) read
EO, ES. or ERROR
in display.
Temperature of
food is too cold
Refrigeratof is In defrost mode
Refrigerator with digital temperature control
has just been plugged in
Control settings are too low.
Freezer controls are sel too low
Drawer is impropefiy positioned
Refrigerator is not plugged in.
Diai control in freezer is set to off (some
models).
Electronic temperalura controls (some
models) have been fumed off.
Fuss is blown, or drcuH breaker needs lo be
res@b
Power outage has occurred
Unit is maSfurretioning
Controls have detected functiorta! problems
and will attempt to reguiate temperature until
service is obtained.
Condenser coils are dirty.
Refrigerator or freezer controis are set too
high
Normal operatiof!. Wail 40 minutes to see if unit restarts
Normal operation Wait 60 seconds to see If unit starts
See drawer sectiorr in "Refrigerator Features” to adjust controls.
See temperature coniiols section in “installing Voitr Refrigerator" to
adjust your controls.
See drawer section in “Refrigerator Features“ to property install drawers.
Plug in unit.
See dial temperature controls sectlorr in “InstBliing Your Refrigerafor* to
adjust your controls,
See hidden electronic control section under “Dispenser Features"
Replace arry blown fuses. Check circuit breaker and reset if necessary.
Call local power company listing to report outgga.
Unplug refrigerator and transfer food to another unit If another unit Is not
available, place dry Ice to freezer section to preserve food, Warranty
does not cover food loss. Contact service for assistance.
Contact service for assistance
Clean according to cleaning instructions In "Hints and Care'.
See temperature controls section In "Installing Your Refrigerator* to
adjust your contfola
21
Troubleshooting
OPERATION^^#^
TOPIC
Food temperaturo
appears too warm
Refrigerator has an
odor
Water droplets form on
outside of refrigerator
Water droplets form On
inside of refrigerator
Refrigerator or ice
maker make unfamiliar
sounds or seems too
loud.
TemperaturecontfoHed meat drawer
and/or crisper drawer
do not close freely.
Refrigerator runs too
frequently.
POSSIBLE CAUSE
Door is not closing property
Door gaskets are not sealing property
Conkois need to be adjusted
Condenser coils are dirty.
Bear air griife Is blocked
Door has been opened frequently, or has been
opened for Song periods of time
Food has recently been added.
Compartmem is dirty or has odor-causing food
Door is not closing propsfiy
Door gaskets are not sealing property.
Humidity levels are high.
GonSrais require adjustment
Humidity levels are high or door hss been
opened frequently.
Door gaskets are not sealing properiy.
Norraai operation Refer to noise section of “Troubleshooting” for details.
Contertts of drawer, or positioning of items in
the surrounding compartment could be
obstrucitig drawer
Drawer is not in proper position
Refrigerator is not level.
Drawer channeis are dirty or need treatment Apply a thin layer of petroleum Jelly to drawer channels.
Doors have been opened frequently or have
been opened for torrg periods of time
Humidity or heat In surrounding area is high.
Food has recently beer» added
Unit is exposed to heat by environment or by
appliances nearby.
Condenser coils are dirty Clean according to cleaning (nstructfons in “Hints and Care".
Controls need to be adjusted
Door is riot closing properiy See leveling irrstruettorts in "installing Your Refrigerator".
Door gaskets are not sealing property
SOLUTION
See ieveiing instructions in “irrstaing Your Refrigerator^.
Check for Internal obstructions that are keeping door from
closing properiy (s e improperSy closed drawers, ice buckets,
oversized or impropariy stored containers or foodstuffs, etc.).
Clean according to cleaning insiruofions in “Hints and Care"
See temperature controls section in “Installing Your
Refrlgeralor* to adjust your controls.
Clean according to cleaning instructioris in "Hints and Care”.
Check the positioning of food items in refrigerator to make sure
grilie is not blocked Rear air grilis is located behind crisper
drawers.
Reduce time door is open. Organize food items efficiently to
assure door Is open for as short a time as possible.
Allow interiof environment to adjusí tor peiiod the door has
been open*
Allow time for recenUy-added food to reach refrigerator or
freezer temperature.
Refer to odor removal section in "Hints and Cars'
Check for intemat obstructions that are keeping door from
closing properly (i e. improperly closed drawers, ice buckets,
oversized or improperly stored containers or foodstuffs, ate.}.
See leveling instructions in “installing Your Refrigerator”.
Clean according to cleaning insiructions in “Hints and Care".
Normal during limes of high humidity.
See temperature controls section in “Installing Your
Refrigeraior* to adjust your controte.
Reduce time door is open,. Organize food items efticienlly to
assure door Is open for as short a time as possible.
Glesn according to cleaning instructions in 'Hints and Cars'.
See drawer section in ‘Refrigerator Features" to properly
instaii drawers
Safi leveling instructions In “Installing Your Rfifrigeraíort.
Reduce time door is open. Organize food items efficiently to
assure door Is open for as short a lime as possible.
Ailow interior environment to adjust for period the door has
been open.
Normal operation
Allow lime for recently-added food to reach rafrigerator or
freezer temperature.
Evaluate your unit's environment See location selection
section in 'instalilng Your Refrigeralar".
See temperature controls section in “Installing Your
RefrigaraloY to adjust your controls.
Check for Internal obstructions that are keeping door from
dosing properly (i e improperly dosed drawers. Ice buckets,
oversized or improperly stored containers or foodstuffs, etc.).
Clean according to cleaning insfruelions in “Hints and Care*
22

Troubleshooting
OPERATI
TOPIC
Refrigerator runs too
frequently {continuedj
ICE & WATER
Water appears cloudy
Parlicies in water andíor ica
No Indicator lights are lit on
dispensar control (some
models)
Neither ice nor water ts
dispensed whert pads are
pushed (some models)
ice maker Is not producing
enough ice or ice ts malformed
{sEjETiB modsis)
Ice maker is not producing toe
(some models)
(continued)
"possible CAUSE
Controls need So be 0d[uste¡i
Door is not dosing properly
Air Of air bubbles In water
Carbon dust from water filter eaiiiidga
Concentratians of minerals in water will form
particles when water becontes frozen and
melts.
Freezer door is not closed.
Refrlgeralor is not plugged in.
Fuse is btown. or circuit breaker needs to be
reset.
Power outage has occurred.
Refrigeralor is In Sabbath Mode.
Freezer door Is not closed
Controls are In lock mode.
Water tank is filling
Ice maker or Ice maker-equipped unit has just
fecenlly beetr Installed or a large amount of Ice
has just been used.
Water filter Is clogged or needs to be changed.
ice maker has just recently been installed or a
large amount of Ice has Just been used.
Water pressure is too low
Water niter ts dogged or needs to be changed.
ice maker arm is not in correct pasiiion
Household water supply Is not reaching water
valve
Copper or plastic tubirrg has kinks
Water pressure Is too tow
Check freezer temparatufs.
(00 bin Is not Installed properly
SOLUTION
See controls section in chapter called Installing Your
Refrigerator On how to adjust your controls.
Refrigerator is not level See chapter called installation
Insiructians for details on how to level your unit.
Check for Internal obstructions that are keepirtg door from
dosing properly (! a Improperly dosed drawers, ice buckets,
oversized or Improperly stored containers or foodstuffs, elc.).
Ghack gaskets for proper seal. See cleaning guide in
chapter called Hints and Care on how to clean gaskets,
This is norma! when first usirrg dispenser end will disappear
with use.
Initial water ejected through cartridge troy contsin harmless
carbon dust flushed frotn csflridge, Parttofas are safa for
consumption. Win disappear after Ihe first few uses.
Rartlctes are not harmful and naturally occur In water supplies
Verify that freezer door is Closed Rower Is removed fmm Iris
eorttoi when freezer door is opened.
Plug in unit.
Replace any blown fuses Check circuit breakers for any
tripped circuits.
Call iocat power corrspany listing to report outage.
See Dispenser Features section for further information.
Verify that freezer door is closed Power Is removed from the
contfol when freezer door is opened.
Sae Dispenser Features section for further information.
At initial use. there is an approximete 45-second delay in
dispensing while the Interngl water tank is flltlng.
Wait 24 hours for Ice production la begin and tor lea maker to
restock after emptied.
Change water filter
Walt 24 hours for ice produciioh to begin and for ice maker to
restock after emptied.
Low water pressure can cause valve to leak Water pressure
must be between 20 lo 100 pounds per square inch to function
property A mltrimum pressure of 3S pounds per square Inch Is
recommended for unite with water filters.
Change water filler.
Confirm ice maker arm is down See Freezer Features section
In your owner's íTtanuai for details.
Check water соппесИвп procedure In your Installatlan
Instructions.
Turn off water supply and remove kinks. If kinks cannot be
removed, replace tubing.
Water pressure must be between 20 to 100 pounds per square
inch to funGlian properly, A minimum pressure of 35 pounds
per square Inch is recornmerMied for units with water filters.
See the controls section In your owner's manual for assistance
on how to adjust your controls Freezer must be between 0 to
2"F (-18 to-irc) to produce ice.
See Ice bin section for proper Installation and alignment
О
r
№
X
2.3

Troubleshooting
ICE & WATER
TOPIC
Water appears cloudy
Particles In water and/or Ice
cubes.
No Indicator iights are lit on
dispenser
Neither ice nor water is
dispensed when pads are
pushed
ice maker is not producing
enough ice or lea is
malformed
Ice maker is not producing
ice
POSSIBUE CAUSE
Air or air bubbles in water
Carbon dust from waler filter cartridge
Conesntralions of minerals In water will form
particles when water becomes frozen and
melts.
Freezer door is not closed
Refrigerator is not plugged in. Plug in unit.
Fuse is blown, or drcuit breaker needs to be
reset.
Power outage has occurred
Freezer door is not closed
Controls are in lock mode. See oontro! instructions in 'Dispenser Features"
Water lank is fling
Ice maker or ice maker-equipped unit has
Just recently been inslalied or a large amount
of ice has just been used.
Water fitter Is clogged or needs to be
changed.
Ice maker has just recently been installed or
a large amount of ice has just been used.
Water pressure is too low.
Water filter is clogged or needs to be
changed.
Household water supply Is not reaching
water valve
Copper or plastic tubing has kinks
Waler pressure is too low.
Check freezer temperatufe
Ice bin is not installed properly See ice bin secUon for proper inslallation and atignment.
Improper water valve was insiatled
SOLUTION
This is normal when first using dispenser and will
disappear with use.
initia! water ejected through cartridge may contain
hanmiess carbon dust flushed from cartiidga Partldes are
safe for consumption Will disappear after the first few
Particles are not harmful and naturaily occur in water
suppiias
Verify that freezer door 1s dosed Power is removed from
the control when freezer door Is opened.
Replace any blown fuses Check circuit breakers for any
tripped circuits.
Caii local power company listing to report outage.
Verify that freezer door is dosed Power is removed from
the control when freezer door is opened,
At initial use. there is an approximate 4S-second delay irr
dispensing while the internal water iank is ffliirrg.
Wait 24 hours for ice production to begin and for ice maker
to restock after emptied .
Change water filter
Wait 24 hours for ice production to begirt artd for ice maker
to restock after emptied.
Low water pressure can cause valve to leak Water
pressure must be between 20 to 100 pounds per square
inch to function properly. A minimum pressure of 35
pounds per square inch is recomniandsd for units with
water filters.
Change Water filter.
Check water connection procedure written in 'Insialííng
Your Refrigerator”.
Turn off water suppty and remove kinks If kinks cannot be
removed, repiace tubing,
Wafer pressure must be between 20 to 100 pounds per
square inch to function properly A minimum pressure of 35
pounds per square inch is recommended for urrits with
water filters.
See temperature controls seciiort in "Instafling Your
Refrigerator” to adjust your controls Freezer must be
between 0 to 2°F {-18 to -IT’C) to produce ice.
Check water connection procedure written in Installing
Your Refrigerator' Seif-piercing and saddie valves
cause low waler pressure and may clog the line over time
Sears is not responsible for property damage due to
Improper instaKation or wafer connection.
24

System Specification and Performance Data Sheet
im
S Refrigerator Water Filter Cartridge Model 9005
Specifications
Service Flow Rate (Maximum),
Rated Service Life Model 900S (Maximum).
Maximum Operating Temperature
Minimum Pressure Requirement.......
Maximum Operating Pressure.......................
I
.
Water Filter Data
075 GPM (2 ,83 L/min)
500 gallons/ 1892 liters
100“ F/38“ C
35 psi/ 138 kPa
120 psI/ 827 kPa
General Use Conditions: Read this Performance Data Sheet and compare the capabilities of this unit with your actual
water treatment needs ,
DO NOT use this product where water is microbiologicaliy unsafe or of unknown quality without adequate disinfection
before or after the system. System certified for cyst reduction may be used on disinfected water that may contain
filterable cysts.
USE ONLY W!TH COLD WATER SUPPLY. CHECK FOR COMPLIANCE WITH THE STATE AND LOCAL LAWS AND REOULATIONS-
The retractable water filtratiorr system uses a 9005 reptacernent cartridge (see Sears contact information at the front of your
manual to order), Timely replacement of filter cartridge is essential for performance satisfaction from this filtration system.
Please refer to the applicable section in this Use and Care Guide for general operation, maintenance requirements and
troubleshooting,
This systems has been tested according to ANSi/NSF 42 and 53 for reduction of the substances listed
below The concentration of the indicated substances in water entering the system was reduced to a
concentration less than or equal to the permissible limit for water leaving the system, as specified in
ANSI/NSF 42 and 53,,
Performance Data*
Average
influent chalienge
Substance
L©sd 0.1Smpi+/10% 0.001 mg/L 99.33%
Lesci 0.15тз1_+/Ю%
Cyst
Turbidity
Lindane O.OffimaiL+MO% 0,00005 mfl/L 97.62%
Atrazine 0.009 mqL+/-10% 0.0002 mg/L 97.93%
Chlorine
Parilcuiate**
2,4-0 07t0moL+/10% 45,45 uq/L
Asbestos
Tested using a flow rate of 0,75 GPM (2,83 L/min ) and a maximum pressure of 120 psi (827 kPa)
under standard laboratory conditions, however, actual performance may vary Health Claim
Performance tested and certified by NSF International
Particle size range classification of test Particles used were 0 5-1 microns
concentrslfon
№mimS0.CX)QL Icount/mL 99.99%
T1+/-1NTU
20mg/L+/-lO% 0.09 mg/L 95.26% 0,17 mfl/L
at least 10,000
particles/mL
itf b К/ЛнзЬЬазд®!?!!»
lOtrtcntììs'nisreii
Effluent
Average
0.002 mq/L 98.66% 0.003 ma/L 0.010 mcj/L 8,5
0.12 NTU 38,98% 0.18 NTU 0.5 NTU NA
900 count/mL 99.68% 2400 count/mL
O.IOMFUmL 99.96% O.I6MFL/mL 99%
%
Reduction
84.42%
Maximum
Effluent
0.001 mg/L 0.010 mg/L 6.5
3 count/mL
O.Q00Q5 mq/L 0.00002 mq/L NA
0.0006 mfl/L 0.003 mg/L NA
100 ufl/L 0.0017 mq/L NA
Min, Required
Reduction
> 99.95% NA
?75%
?85%
Inlet
pH
NA
NA
NA
Q
r
m
Pentapure, incorporated
WOO Apollo Road
Eagan, Minnesota USA.
BPA ESTm89l7-MN-1
TEEted and CatSisEii by NSF Intenìattobsì agatet ANSi/NSF SiaiKjaitìs
42 à 53 în models ШР50^КН)ЗШ and WFSO-KWiSOO icc Ш of:
sancËrd No. 4Z iesSierfflc Etfeds
Teste &. Odor ReciudSon
Chkxtne Reduction
Mechanical Fiteton Unit
Partivate Reduction Class t
Stantfani Mo, 53; HeaSb EfTecfe
Ghemica) Reducilon Unit
Lead, Airszsœ» liTi^aneài 2.4C)
Fîlti^îlQn Ubil
Cyst Turtiîdîy- & Asbestos Redudfon
25

State of Cáifoiisia
DepartrflSEt cf Heáltíi Services
\a/í^T<ü+'^ I ^¿2, iT%f’f'Y'fZí 4^1" I i/3,*í ? 4/>¿2t
VY <íU*Ci i i c clt lile 111 L^cViee
Certifícate Number
01 -1486
Data Issmd; SaptiíJia 21s 2001
DíteRewssd: hlmúiTO, 2002
I radanark/ModgJ DffiianatioTi
WFS:)-WI500
WF50-NI200
WF5O-KMS0O
WFS)-EHÍ300
owso-wsoo .
owso-Kisoo :
.......
Manutacíurer:;^ReiitóPu® ficoapoiated
”1 : .yy r
■;-4'
....
-:'i . "
:;: "y.
:- •' - . “•
V' ^
‘ '’y ':'- :;! i< yy i y ,
Organic Contaminants'^ '■
Átezmsí
.........
'' 'iíiyVi
-r r :.- '■ ;,u:, ..
;; ;r^:.■;
íi-, i ;
■'■ y-, ,y . " 'y
"■.u %
,:.j ■
‘ :y '''i ’■
^ p cfc^ I
Rataj Capad ti/
500 gal
200 ^al
'-■«1005
■Vr:.'
«9^5, , , -
,;pfF5L "
ÓW5Í- ■ ^
y;::;;, c.
' M. ir,'
-y
,..,r
, ... .
■'•■ ir t' : í
...
' . ,r.'i'
yy- :-
. .y ;,” ’
y-'y yr
...
:.;
!:yyy-: :yy='
' ; ;;' ;r; :■
...........
, 'V;:, _
;:i.'
,-iii .
........
-'::y "v i.
' C I.; ■ ■ .1 ■ . .1 .', '
■ ■
...
.............................
•■ • ;■ : ;í ■ " j’' .
y' y _-/ " í := :......................................:yr iyy j:i! í;'' '■
..... . . ■
, : -y yy y ir- y :
y y H: r " . .
'■y..
M.'. ■; ;.
y-t
SOO^al
200 ^át
:;', 500 gal
;‘.‘'.':;L 300 gal
í:: :" ;
.1:'
yy
Rated -Sffv te F !cw; 0.2 5


Requefimientos eléctricos
^^Reconozca este símbolo como precaución de seguridad.
ADVERTENCIA
No corte ni elimine, bajo ninguna circunstancia, la punta redonda de conexión a tierra del enchufe. El refrigerador debe
estar conectado a tierra en lodo momento. No quite el rótulo de advertencia del cordón eléctrico No utiiice un adaptador
de dos puntas. No utilice un cable de extensión.
Instrucciones para conexión-Este refreigerador está equipado con un enchufe de tres puntas (para conexión a
tierra) para proveer protección contra posibles riesgos de descargas eléctricas Si tiene un tomacorriente de dos
orificios, comuniqúese con un electricista calificado para que reemplace este tomacorriente de pared de dos
orificios por otro de tres orificios correctamente conectado a tierra, en conformidad con el Código Eléctrico
Nacional El refrigerador está diseñado para funcionar en una linea independiente ds 103 a 126 voltios, 15
amperios, 60 ciclos.
PELIGRO
IMPORTANTE: Los niños atrapados y asfixiados en refrigeradores no es cosa del pasado. Los refrigeradores
que se arrumban o abandonan, aun cuando sea por "sólo unos cuantos días", continúan siendo un peligro.
Si desecha un refrigerador viejo, sírvase seguir las siguientes instrucciones para ayudar a prevenir un accidenti
ANTES DE TIRAR SU REFRIGERADOR O CONGELADOR VIEJO:
• Quítele las puertas,
• Déjele las repisas puestas para que los niños no puedan meterse fácilmente.
Acuerdo de mantenimiento
Mantenemos lo que vendemos
Su compra tiene un valor agregado porque puede confiar en e! servicio HomeCentral® de Sears. Con más de 12.000 especialistas
capacitados de reparación y con acceso a más ds 4 2 millones de piezas y accesorios, contamos con las herramientas, las piezas, ai
conocimiento y las habilidades para garantizar nuestro compromiso: Mantenemos lo que vendemos
Acuerdos de mantenimiento de Sears
Su etecfrodoméstico Kenmore está diseñado, fabricado y probado para ofrecer años de fundanamiento confiable, Aún así, todo
electrodoméstico podría requerir que se le de servicio de vez en cuando El acuerdo de mantenimiento de Sears te ofrece un programa de
servido superior, a muy buen precio
El acuerdo de mantenimiento de Sears
• Es la manera en la que puede adquirir servicio futuro ai precio actual
' Elimina las cuentas de reparación que son consecuencia efe! desgaste normal
• Provee asistencia que no sea técnica e instructiva
• Incluso s! no necesita reparaciones, le ofrece una revisión preventiva de
mantenimiento anualmente, a petición suya, para garantizar que su electrodoméstico
esté en condiciones apropiadas de fundortamiento,
Se aplican ciertas restricciones.
Para obtener más información, llame
al 1-800-361-6665.
Para obtener información
mantenimiento Sears en Canadá,
llame al l-BOO-SSI-GSBS.
Garantía Eataíto.s Unidos
Garantía completa de un afio en el refrigerador
Por urt año a partir de ia fecha de compra, cuando a este refrigerador se le da el funcionamiento y el mantenimiento
indicados en las instrucciones adjuntas o proporcionadas con él, Sears reparará este refrigerador, sin cargo alguno, por
defectos de fabricación y materiales.
Garantía completa de cinco años en el sistema de refrigeración sellado
Por drtco años a partir de ia fecha ds Compra, cuarsdo a este refrigerador se le da el funcionamiento y el mantenimiento
indicados en las instrucciones adjuntas o proporcionadas con éi, Sears reparará el sistema sellado (que consiste de!
refrigerador, tuberia de conexión y motor dei compresor) sin cargo alguno, por defectos de fabricación y materiales.
La cobertura de garantía anterior se aplica sólo a los refrigeradores que se usan para almacenar alimentos en hogares
particulares. Exluye e( cartucho original y el de reemplazo dei filtro de agua y hielo Kenmore. El cartucho original y el de
reemplazo están garantizados por 30 días (piezas solamente)
El servicio de garantía está a su disposición comunicándose al 1-800-46Э-5811
Esta garantía se aplica solamente rnientras este producto se use en los Estados Unidos.
Esta garantía otorga derechos legales específicos y usted puede tener también otros derechos, los cuates pueden variar
en distintos estadosSears, Roebuck y Co, Depto, B17WA, Hoffman Esíates, ¡L 60179 EE,U,U,
28 ......................................................................................

Registro del producto
En el espacio que aparece a coníinuadón, regístre el número da
modelo y serie y la fecha de compra del refrigerador Enconírará la
etiqueta con et número de rnodefo y de serle adentro de la unidad,
en la pared derecha del refrigerador
Número de modelo; 596
Número de serie:
Fecha de compra;..
__________________________ _____
_____________________________________
_______________________________
_
Conserve este folleto y su recibo de compra de Sears
en un lugar seguro para usarlo como referencia futura.
Información importante de seguridad
Reconozca ios símbolos, las palabras y las etiquetas de
seguridad
PELIGRO
PELIGRO—Riesgos inminentes que CAUSARAN lesiones personales graves o
la muerte.
A ADVERTENCIA
ADVERTENCIA—Riesgos o prácticas inseguras que PODRIAN causar lesiones
personales graves o la muerte.
PRECAUCIÓN
PRECAUCIÓN—Riesgos o prácticas inseguras que PODRÍAN causar lesiones
personales menores o daflos materiales o del producto.
Contenido
Requerimientos eléctricos . 28
Acuerdo de mantenimiento
Garantía ..................................................................... 28
Registro del producto
Información Importante de seguridad ........................ 29
Instalación def refrigerador ,
Cómo transportar la unidad.................................... 30
Cómo selecctOftar la ubicación ideai ,. . 30
Cómo quitar las puertas y tes bisagras 31
Cómo volver a colocar tea puertas ,, , 31
Cómo instalar y quitar las asas ,31
Cómo nivelar el refrigerador................................... 32
Cómo conectar el suministro de agua . . 33
Cómo ajustar los controles de temperatura , 34
Sistema de filtración
Caraotóristicas de la sección del refrigerador , 36
Almacenaje en la puerta .........................................36
Repisas
...................................................................
Cajones.................................................................. 37
Características del congelador .
Primarias Caraoíertsticas
Cajones
..................................
Almacenamiento en la puerta -. . ,,.,38
Repisas 38
Características def surtidor , ,,. . , ., ... 39
Fursdonamiento cfeí surtidor de agua ,, 39
Características del control......................................... 40
Consejos y cuidado
Cómo limpiar la unidad , 44
Cómo quitar y reemplazar los focos
Diagnóstico de averias
Dalos del filtro de agua
Servicio
.......................................
.........................................
................. ...........
.......................................
..................................................
.......................................
.................................................
.......................
.............................................
„ ... 29
............
..................
......
.......... .. , , 38
.......................
, ,, ,,,
.............
Portada posterior
2S
30
35
36
38
38
44
4S
46
50
29
ho que necesita saber acerca
de las instrucciones de
seguridad.
Las advertencias y las instrucciones
importantes de seguridad que aparecen
en este manual no tienen el propósito de
cubrir todas las condiciones posibles que
podrían ocurrir. Debe usarse el sentido
común, precaución y cuidado cuando se
ínstale, se realice mantenimiento o se
opere el congelador
Siempre comuniqúese con el distribuidor,
concesionario agente de servicio o
fabricante para los asuntos relacionados
con problemas o condlclortes que no
entienda.
m
5

Instaladóii del refrigerador
Estas instrucciones se ofrecen para ayudarlo con ia irrstalaciórt de su unidad Sears no puede ser responsable por la
Instatación Incorrecta-
¿Cómo mido el hueco para
garantizar que ajuste bien?
£ste refrigerador se diseñó para caber en
un hueco de 69" de altura para permitir
una ventilación, nivelación y ajuste de
puerta apropiadas.
También tome en cuenta, cuando mida el
espacio para ía unidad, que algunos
modelos requieren cierto espacio libre
alrededor de ellos para permitir que e¡ aire
fluya adecuadamente. E! flujo de aire
adecuado es clave para mantener al
unidad funcionando con eficiencia óptima.
Para determinar las medidas, consulte la
tabla a continuación,
Ei piso o los recubrimientos del piso (por
ejemplo, alfombras, azulejo, pisos de
madera, tapetes) podrían hacer el hueco
más pequeño de lo esperado.
Podría obtenerse algo de espacio sí se
sigue el procedimiento de nivelación que
se encuentra en ia sección "Cómo nivelar
ei refrigerador".
Espacio Ubre
Volumen tota!
do la unidad
Menos de 23 pies
cúbicos (7 rrf)
Más de 23 píes
cúbicos (7 til)
IMPORTANTE: Si la unidad se va a
instalaren un hueco en donde la parte
superior de ia unidad estará completamente
cubierta, use las dimensiones de pisca ia
parte superior de la tapa de ia bisagra para
garantizar el espacio apropiado.
recomendado
En la
parís
superior
WA №A
A los
iados
й” N/A
Por
detrás
N/A
Cómo transportar la unidad
Siga estos consejos cuando mueva ía unidad a ia ubicación definitiva;
• NO transporte horizontalmente la unidad Si no es posibie de otra
manera, deje que la unidad permanezca verticalmente durante 30
minutos para asegurar que ei aceite vueíva al compresor Si conecta la
unidad inmediatamente podría causarle daños a ías partes internas,
• Use Una carretilla para electrodomésticos cuando mueva la unidad,
SIEMPRE transporte la unidad por un iado NUNCA sobre la parte trasera
o delantera
• Proteja e! acabado exterior de la unidad durante la irartsporlación
envolviendo el gabinete con mantas o Insertando algo acolchado entre la
unidad y la carretiiia.
• Asegure con firmeza la unidad a la carretilla con correas o cordones
elásticos. Pase las correas a través de las asas cuando sea posible NO
las apriete de más Si ío hace podría abollar o dañar bI acabado exterior
Cómo seleccionar ia ybicación ideal
Observe estos puntos al elegir la localizaGÍón final para SU unidad;
■ NO instale el refrigerador cerca del homo, del radiador, o de ia otra
fuente del calor. Si es no posible, blinde el refrigerador con ei materfaí
del gabinete,
< NO lo instale en donde la temperatura baje a menos de 5S°F (13“C), A
esa temperatura podría funcionar mal
• Asegúrese de que el piso esté bien nivelado. Si no es así, coloque una
cuña en las ruedas posteriores de ia unidad con un pedazo de madera u
otro material para cuñas,
• Para asegurar ei encierro apropiado de la puerta, verifique que la unidad
está nivelada con inclinación de un ’A" a la parte posteriora,
Cófiic quitar e iiistaiar ios paneles (en algunos modelos)
Consulte la hoja titulada Instrucciones de instalación de ios paneles
decorativos de la puerta que se embarca en la parte delantera de la unidad.
.30

Instalación del refrigeradot
Cómo quitar las puertas y las bisagras
Algunas instalaciones requieren el retiro de ia puerta conseguir e! refrigerador a la localización final.
ADVERTENCIA
Pana avilar lesiones personales graves o la muerte, observe lo siguiente: ^
• Desconecte la energía del refrigerador antes de quitar las puertas Conecte la energía solamente después de haber colocado ia
puertas de nuew,
• 9 cable verde de conexión a tierra debe estar sujeto a ia bisagra superior mientras realiza la remoción y el reemplazo de la puerta
• Coloque cinta adhesiva en los paneles decorativos (en algunos modelos) para asegurarlos en su Jugar antes de quitar las
asas de la puerta.
PRECAUCION
Para evitar daños materiales, observe lo siguiente; _
• Proteja el vínilo suave u ofro tipo de piso con cartones, tapetes u otras materiales protectores, antes de mover ai refrigerador,
• Para evitar daños o quebraduras al perno de ajuste, no use herramientas eléctricas para corregir la nivelación, _
• NO ajuste ia unidad basta que quede más baja de 68 54” (1.74 m) de altura (menos ia bisagra y et tapón). Hacerlo podría
dañar los componentes inferiores, _______________
_
Qxkeh psxrilla ia&riac p las
cutáactas de las bisagras
1
inferiores.
Abra ambas puertas 180°, o tanto como
sea posible para quitarlas
Destornille la merca
jCi de unión para separar
»WWW ^
Ja tubería de agua •
(solamente Jos aicxiácxs coa surtídar)
Qixte la aibiera superior de
la bisagra guiando d tornillo
Í3
Phillips. ^
___
^yé Cierre las pueras. Ifesíca-iuiie Im
^ tornillos hesagomles de de las
bisagras superiores.
• NO quite ei cable verde de tierra ni el
cable que conecta el tomillo ceritral,
V
...........................................
...................
?
.
>
J
' Desprenda d arnés príndpal
de los conectares de los
cables,
• Use un destornillador plano o la
uña para oprimir el punto de unión
entre los dos conectares para soilarfos
Desprenda el arnés dd caUe raja
• Oprima la lengüeta de la parte inferior
del conectar para liberarla.
Qaite las bisagras
superiores junto coa
las puertas.
Qiite las bisagras In&daces am
tm destornillador bcragcxial de
7
Cólíio volver a colocar las puertas
Para volver a colocar las puertas, siga en orien inverso
los pasos de Cómo quitar las puertas y las bisagras.
Cómo instalar y quitar las
Instalando las manijas que instalan en el delantero
Las asas se encuentran ubicadas derrtro de la sección de alimentos frescos del refrigerador (fresh food). El adorno en el
paquete de materiales impresos
>f QtHíe dos torailloB besagcmales
»iiiiiiiiifc il
J. de 14 ” de la parte inÉtícr Je la
puera dd r^geradœ y dd
...
Alinœ las asas de hs pueras coa los /
Ju^cs supedor e in&dar de sujetadœesj
de pueria y dœUœ bada abajo basa j
que los csdSdœ de tonÆo m la p^rte I
Jufiacr dd asa esté ;unio a las csdSüos de
los tarmllos e puera.
1
R
y
í$= ^
H
i
31
lasarte las tomillos que quitó en é paso 1
dentro de ios adSdas de tornillo en la
parte ixtfedof de la secdàn dd asa.
____________________
Coloque a presión é adorno 7~ "5::^
sobre la pardon in&dor de hssobre la pardon in&dar ae las
4
asas f lœ sajeadores en h parte
in&dor de h puera.
)

Instalación del refrigerador
Cómo instalar y quitar las asas continnadán
Para quitar las tnanijas que instalan en e! delantero
•i QlitE la pordm iaJkdor de las
À asas coa un destarníJJadar nmy
pequeño de hoja plana.
IMPORTANTE: Ertvueíve la hoja de!
evitar dañar la unidad,
s
............................
destornillador con cinta "masking" para '
.....................
^ ff ^
.
.......
j
Qaite los dos tatalllos de Is base
del asa. Tire del asa hada arriba y
2
bada añisra para sacarla de la
unidad Podría estar muy ajustada.
Para quitar asas extraídas de largo completo
Podffa ser necesario tener que quitar las asas cuando se transporto la unidad a través de espacios estrechos, o cuando instale o quíte
los paneles decorativos.
^ ADVERTENCIA
Para evitar posibles lesiones y dafios materiales, coloque cinta adhesiva en los panelea decorativos (en algunos modelos^
para asegurarlos en su lugar antes de quitar las asas de las puertas.
■f Qute d adorno de la paata superior
Á sacando los tarnllJas Phillips de Ja
parte superior de las puertas dd
reSdgaador j dd cmgdadar.
• Conserve los tornillos Phillips para
V., .........................................................
volver a colocarlos más adelante.
ti ,
Ai i
V .................................................................—
instalación de asas extruidas de largo completo
Alinee las muescas de la
parte posíedcx' dé asa coa
1
los sajetadcres de las
puertas. Inserte los
sujebidores dentro de las muescas y dedios d asa
bada abajo basta que toque d adamo Jn&rlar.
• Repita las instrucciones para irtstalar la otra asa
^ /y Sujete d asa tirmerrmte coa ambas t
manos y desUeda bada ardba
Mbetarla. Rqtita d prootxMxdmta I
pnra quitarla aOa asa.
/
Coloque de nuevo d adorno
superior de la puerta cm los
tornillos PMIUps que
conservó cuando quitó d
a dorn o.
Cómo nivelar el refrigerador
Materhlcs necesarios
• Oestomiliador hexagonal de %" • Nivei
Qdte la parrilla InÉáor y las catíertas de las
bisagras in&dores (vea las instmcdoaes anteriores).
a
Gire les dos tianHlcs de ajuste ddantsros (A
m d sentido de las agujas dd rdcj
al aumento y eofente de las ®
agujas dd rdoj de bajar.
Ore les dos tacoMos efe la parte pcsíedac (B) h
dd ajuste en é sentido de las agujas si
dd réq al aumento y en&mte Q ®
délas agujas dé rdcj de bajar. ® b
Verítique can d nlvd que haya una Indmadáa
de ‘A" bada atrás para que derre bien la puerta,
• Si la unidad está bien alineada y estable, coloque de
nuevo !a rejilla interior y ias cubiertas de ¡as bisagras.
SI es aecesadq corrija d balanao de la
unidad girando d tornillo de ajuste ai d
sentido de Jas maaedllas dd rdcj para
devar la esqiina que baile.
Si las puertas están disparejas...
Determine cuál puerta necesita elevarse.
Gire el tomillo de ajuste
delantero en el sentido de
las manecillas del reloj
para elevar la esquina
delantera de la puerta
Si la unidad ha llegado ai
límite del rango de ajuste,
y las puertas siguen desniveladas, baje
la puerta de) lado opuesto girando el tomillo de rodillo
en sentido contrario al de las martecillas del reloj,
Verifique con un nivel que esté Indinado %“ hacia
atrás para que la puerta cierre correcíamente.
Si la unidad está bien alineada y estable, coloque de
nuevo la rejilla inferior y las cubiertas de las bisagras.

bistaladón del tefrigerador
Cómo conectar el suministro de agua
^
___________________
Para evitar descargas eléclricas que pudieran causar iesiones personales graves o !a muerte, desconecte !a energía de
refrigerador antes de conectar el suministro de agua. Después de conectarlo, conecte ia energía
A ADVERTENCIA
________________________
A PRECAUCIÓN
Para evitar el riesgo de daños materiales, siga las instrucciones a continuación: ^
• Consulte a un plomero para conectar la tubería de cobre a la tubería doméstica a fin de garantizar que se cumpla
con los códigos y los reglamentos ¡ocales
• Confirme que la presión de! agua de la válvula esté entre 20 y 100 libras por pulgada cuadrada, SI se ínslaia un
filtro de agua, la presión del agua de ia válvula deberá estar cuando menos a 35 libras por pulgada cuadrada,
• NO use una válvula autoperforante ni de sillín de (4 8 mm). Ambas reducen al flujo de agua, se obstruyen con
el tiempo y pueden causar goteras si tratan de repararse. _ _
• Apriete las tuercas manualmente para evitar que se barra la rosca. Termine de apretar ias tuercas con pinzas y
llaves No las apriete de más _ _
• Espere 24 horas antes de cotocar la unidad en el lugar definitivo pera revisar y corregir las goteras que pudieran
MataJaJes necesarios
Forme un anillo de servido coa h tubería can
1
cuidado para que no haya dobleces en la tubería.
NOTA: Añada 8' (2 m) de tubería cuando se necesite^
para llegar al suministro del agua para formar un anio
de servicio
r ' ...........................................................................................................-,
cy Quite la tapa de plástico dd puerto de entrada
^ dé la válvula de agua.
if
P)h
g.: !jf '
-------
HlilIHI
ИВИЮ1И1
-отю
• Tubería flexible de cobre de
Vi" (6mm) de diámetro
exterior
■ Brass nut and sleeve (see
literature pack)
■ Válvula de cierre (requiere
que se taladre un orificio de
Ч
j
14" ó 6mm sn el suministro
de agua antes de sujetar la
válvula)
♦ Llave ajuslsble
(fi
H
>
V ........................................................................................
Coloque la tuerca de bronce j d таща!to en
d extremo de h tubería de cobre según se Ilustra. -ЦРЗ
3
Coloque d extremo de la tubería de cobre dentro dd
puerto de entrada de la válvula de agua. Dde Arma
a la tubería levemente, NO LA TUERZA, de manera
que la tubería entre m áMma rœia en d puerta de
entrada.
Desdes la tuerca de bronce sobre d manguito f
atornille la tuerca dentro dd puerta de entrada.
Apriete la tuerca can una llave. Tire de la tubería para
rnnfítmar que Ы conexión esté segura.
¡¡¡/¡PORTANTE: NO LO APRIETE DE MÁS ya que podría bamrse la rosca.
Localice la abrazadera de la tubería de agua e
6
instálda coa un tomillo hexagonal de se
ilusaa. Abra d suministro de agua y mrrtja las
goteras, si las hubiera.
................
—1
Vigile la conexión de agua durante 24 berras. Corrija las
7
goteras, si hay alguna.
M

Instalación del refrigerador
Cómo ajustar los controles de temperatura
Este Tefrigeradof está diseñado para funcionar a temperaturas domésticas de 55° a }iO“F (13° a 43°C).
Cómo realizo ima
prueba de la
temperatura con mis
(xmtroíes de ia
temperatura del dial?
IMPORTANTE: Estas inslnjcdones se
aplican a tas controles de fa
temperatura del dial sotamente Los
modelos dei control electrónico vigilan
constantemente temperatura de la
unidad en los controles-
Mato-ialcíí accesarios
* 2 termómetros que midan de -5“ a
50°F (-2Г a 10°C)
* 2 vasos de agua
Para el congelador
* Coloque el termómetro en un vaso
de seste vegetal en el ceniro del
congelador y continúe con e) paso 3
de ia sección Cómo ajustar los
controles de temperatura
IMPORTANTE; Debido al diseño de
la unidad, siempre comience los
ajustes de la temperatura con la
sección del congelador
Para el refrigerador
' Coloque el termómetro en un vaso
de agua en el centro de la unidad y
continúe con el paso 3 de la
sección Cómo ajustar los
controles de temperatura
Control de ia temperatura dei dial
Para e! ajuste Srticial de la temperatura, siga los cinco pasos a continuación- Si
realiza solamente una modificación a la temperatura en una utridad operativa, se
necesitarán los pasos 3 al 5 únicamente-
Por qué las temperaturas
en mi cambio de la,
visualizadón de LED
después de que ellas se
han fijado?
Las temperaturas del
compartimiento pueden variar
ievements como los ciclos de ía
unidad para mantener las
temperaturas del conjunto
Controles electrónicos de la temperatura
Я
Jf Para Sjax h íEtcperaaira dd cocgefacfcr, utiUce Ies botmes "i;;;;'’ ai hdo dá
hrtán . Um oceáffMadáa de O °s2 ^F (4 7° s -16° C) se teocmm<k.
• Utilice el botón x levantar la temperatura de ia sección de! congelador,
o el botórr Y bajarla.
• Presione e¡ botón (Si para confirmar las configuraciones
^ Para £jar к teopetaíura dd rHrigmehr^ atíHcelas htímes ai kdo cM
któi[^. Um ccúígmsdm ck38^a 40”F(3‘*a. 4‘^Q isexaximeack.
• Uitce el botón xv para levantar la temperatura de ia sección del refrigeradoi;
o el botón s/' bajarta,,
para confirmar las configuraciones
Deje epe pasen 24 botas para pe las tetxperatmas se estaHlicai.
NOTA: Si ajustan la temperatura de una unidad opracional, las solamente 5 a 8 horas
se requieren para las temperaturas para tomar efecto-
.34

Sistema de filttadóti...
Remoción e instalación del filtro de agua
A ADVERTENCIA
Para evitar enfermedades graves o la muerte, no use la unidad en donde el agua es Insegura o de calidad desconocida
sin desinfectada adecuadamente antes o después del uso del filtro
PRECAUCION
Et cartucho de desviación NO filtra el agua. Asegúrese de tener un cartucho de reemplazo disponible cuando sea
necesario cambiar eí cartucho
Si et sistema de filtración de agua se congela, cambie el cartucho dei filtro.
Si no se usa a! sistema durante varios meses, y el agua tiene mal sabor u olor, enjuague el sistema surtiendo 2 a 3
vasos de agua, Si persiste el mal sabor u olor, cambie e! cartucho del filtro..
___________
Instalación inicial del filtro de agua
Qiitc d t&pón azul dé desviad^
j coüsérvdo para usarle^
1
más ad da at c.
QjJts Ja edqjea de sélaáo dé
estremi dd £Itro e InsáMo ea
cábese dd ñltra
• Gire suavemente en el sentido de ias
manecillas del reloj hasta que el itro se
detenga y la cubierta a presión del Bto se derre,
Reduzca Jas salpicaduras de agua purgando todo
d aire dd asterm. Ik^e gtie Suya d agita
coatinuameate durante 2 rakmtcs a travÁ dd
sorador hasta que d agua corra amSmnemaiís.
• Podría requerirse un enjuague adicional en algunos
fugares en donde ei agua es de mala calidad.
Reemplazo del filtro de agua
IMPORTANTE E! aire atrapado en ei sistema podría causar que
se saliera e! agua y eí cartucho. Tenga cuidado cuando lo quite
(Sre d Sltxo ea d sentido contrada al de las
1
manecillas dd rdq basta que se sudte la cabeza
dd Sltro.
Drene d agua dd Sltro dmtro dd lavabo o
2
dd inodoro, y deséebdo en la basura
doméstica normal.
¿Cuándo debo cambiar el
filtro?
Ciertos modelos de surtidores cuentan con
un indicador para cambio de fliíro Para
obtener las instrucciones acerca de cómo
operar y reajustar esta característica,
consulte la sección de las características de)
auílidor en el manual, o eí íolieto de! surtidor
LCD para los surtidores LCD.
Para tas unidades que no cuentan con un
indicadar, el filtro debe cambiarse cada 6
meses aproximadamente
IMPORTANTE Las condiciones dei agua y ía
cantidad que se use, determinarán ia
duración deí cartucho dei filtro de agua Si e!
uso de agua es alto, o si el agua es de mala
calidad, podría ser necesario reemplazarlo
más seguido
¿Cómo puedo pedir un
cartucho de reemplazo del
filtro?
Los cartuchos del filtro de agua de reemplazo
Amana® (modelo Vt/F 50) están disponibles a
través de los distribuidores y centros de
servicio Amana* También puede pedirlos
mediante el departamento de Asuntos del
Cliente de Amana® usando la información que
se encuentra en la portada de este manual.
Estoy tratando de surtir
agua para enjuagar el
sistema. ¿En dónde está
el agua?
Durante el uso inicial, permita un retraso de
hasta 1 a 2 minutas deí surtido del agua
para permitir que e! tanque interno se llene.
Limpie d exceso de agua de la cubierta
dd Sltro y continúe coa Instalación
inicial del filtro de agua, pasos 2 j 3,
¿Qué sucede si deddo no usar el
sistema de filtración del agua?
La característica de surtido puede usarse slrí el
cartucho de filtrado de agua. Si elige esta opción,
vuelva a colocar el filtro con la tapa azul del
desviador.
,35

Características de la sección del refrigerador
A PRECAUCIÓN
Para evitar Isaiones personales o daños maiBriales, dsserve lo siguiente;
■ Verifique que la repisa esté segura antes de colocar artícotos ereima de
lamlsna-
■ Maneje cuidadosamenle las repisasde vidrio templado. Las repisas
pueden quebrame íepenfinamenle si se golpean, rayan o se exponen a
cambiossúbtosdeSempefatura.
Almacenaje en la puerta
Milk Savor^*® ea aiguflos xacxiefos
Los comparttmientas de temperatura controlada
Milk Savor™ mantienen las bebidas y oíros
artículos a una lemperaiura de hasta 5®F {3“C)
más fría que ei resto de la sección del reftígetador
La enteda de ate permite que ei aíre da la
sección del oongebdor pase al Mlk Savor™
a control del Mik Savor™ se enarentra
ubicado en la pared izquierda de la sección
del refiigeiador, El control ajusta la cantidad
de aire que cteula en el Mik Savor™ Dé vuete al
control en senado de las agujas del rseioj para una
fempeiBtura más tris.
Para quitare ¡nstafarel Milk Savor™
• Si está ubicado dtectemente endma del
Milk Saw™, podna ser necesario quitej
centro de productos lácteos o
el tedpiente de i a puerta. Consulte fes
instrucciones apropiadas y quita e!
artículo- Deslice el compart'miento Mik
Savor™ hada arriba y sáquelo en forma
recta
• Para instalarlo, alinee uno de los oriBdQ§_
de entrada de ate del MSk Savor™ (A)
en una de las dos entradas de
de la puerta. Empuje el
compatlirpiento hada abajo dentro
del sujetador áé recubrimiento de la
puerta hasta que se detenga.
IMPORTANTE E! compartimienlo Milk Savor™ no liiticionará
apnopiadamenle si los orificios de la entrada de aire no están
alineados con los orificios de la entrada de aire del
recubrimfento de la puerta.
Centro de productos lácteos
El centro de productos lácteos proporciona un almacén
conveniente para arttculos tales como mantequia, yogur,
queso, etc
Este compartimienlo es una caraderistica ajustabls ubicada en
la puerta. Puede mowrse a varios lugares diferentes para
safefacer las necesidades de almacenaje.
Para quitare instalar eí compartimiento;
• Para quiíario, deslice ei centro de lácteos
hada arriba y hada atoera.
• Para instBlaiio. deslice el ensamble
en el sujetador que desee del
recubrirráenlo de la puerta y empuje
hada abajo hasta que tope,
Para quitar e testaiar la puerta del centro de lácteos:
• Para quitarte, oprima ambos bdos de la puerta de tóeteos y
saquéis.
• Para instalaría, desice los lados de la puerta adento del centro
de iáoteos hasta que ios puntos de fcfeagra entren en su tugar.
__________
______
II
Almacenaje en ia pyerta (BnáiUiaaón
Recipientes inciinables de la puerta
en algunos moddas
Los recipientes inclinabies de ia puerta consisten de
un recipiente y un bastidor, proporcionan un aimacenamiento
corívenienle, ajustabie para artículos en la puerta. Los
recipientes se inclinan hacia afuera para ofrecer un acceso
fácil, y se sarao para facilitar la limpieza y el ajuste
Para quitar e instalar el recipiente:
• Para quitar el recipiente, Indine el
recipiente hada adelante y jálelo hacia
afuera-
• Para instalar ei recipiente, deslice el recipiente dentro del
bastidor del redpíertte y empuje ei recipiente hada arriba
Para ajustar ei bastidor del recipiente;
• Quite el recípierrte de acuerdo con las instrucciones
anterioras.
• Levante ei bastidor del soporte de Ib puerta
y cdóqueio en la ubicación deseada.
Recipientes de la puerta
Para quitar e instalar los recipientes:
• Levante e! recipiente de ia puerta hasta que
pase de los sujetadores del recubrimiento
de la puerta, después fe del recipiente de la
puerta hacia atoera.
• Para instalarlo, deslice el recipiente por endma de
los sujetadores deseados del recubrimiento de la
puerta y empuje hacia abajo hasta que el redpiente
tope,
___ __
Repisas
Repises e prueba de derrames
Las repisas fijas a prueba de
derrames controlan los derrames
pequeños para facilitar la limpieza
Para quitar e Instalar las repisas:
• Pana quitar las repisas, levante la parle del
frente de la repisa para que se suelten de
tos ganchos del risi metálico y jale para sacaría
• Para instaiar las repisas, seleccione el punto en el riel
metálico para volver a coiocarlo e insertar los ganchos.
Levante el frente de la repisa hasta que los ganchos se
traben en su lugar Baje el frente de !a repisa.
.36

Características de la secdón del refrigerador
Cajones
Organizador para bebidas
en algunos ¡aoddos
El organizador para bebidas se desliza
hacia afuera por debajo de la repisas
fijas a prueba de derrames Le caben
12 latas de 12 onzas al organizador,
[or El organizador tiene capacidad para 12 latas de 12 onzas ]
Para quitar e instalar el organizador:
• Para quitarlo, vacíe el contenido dei organizador Jálelo hacia
aluera cornpistamente y levántelo para liberarlo de los rieles
de la repisa. Jálelo hacia adelante para quitarlo,
• Para instalarlo, invierta el procedimiento anterior.
Cajón con temperatura controlada para carnes
El cajón con temperatura conírolada para carnes ofrece un cajón
con un conlrol de temperatura variable que manllene el
comparfiraianto hasta a 5°F (3°C) más trio que la temperalura del
refrigerador Este cajón puede usarse para almacenar bocadillos
o frutas y verduras adictonales
NOTA В aire frió dirigido ai Sistema para embutidos y frutas y
verduras puede reducir la temperatura del refrigerador. Podría ser
necesario tener que ajustar e! aanfro! de1 refiigsrador
Controles
Los controles de clima, ubicados en la pared a la Izquierda dei
cajón, regulan la temperatura del aire del cajón оэп temperalura
controlada para carnes. Ajuste la palanca de control en cotí (frío)
para proporcionar temperatura поппв! al refrigerador para las
frutas y verduras con cáscara Use el ajuste cotíest (rws MoJ
para carnes и otros artículos de embutidos
Para quitar e instalar el cajón:
• Para quitarlo, jale el cajón hacia afuera
completamente. Indine el frente del cajón y
saquete en linea reda
• Para nsíalarto, guíe el cajón dentro del bastidor
empújelo hacia atrás hasia que el cajón esté al ^
fas con la pared posterior
Cajón de bocadillos
Este cajón pueda usarse para almacenar artículos alimenticios o
frutas y verduras adídonates
Para quitar e instaiarel cajón:
• Para quitarlo, Jale el cajón hada altiera
completamente- Indine la parte delantera
del cajón y jálelo hacia afuera.
• Para instalarlo, invierta el procedimiento
anterior.
¿Qué afuste debo usar para ios
artículos del cajón con temperatura
controlada?
No se recomienda que se almacenen en este
cajón lechugas n¡ otro tipo de vegetales con
hojas,
COLD
(frió)
COLDEST
{más frío)
• Coliflores • Manzarras
• Elotes * Naranjas
• Calabacitas • Uvas
• Pepinos
Bistecs
Tocino
Carnes frías
Salchichas
Quesos
duros
¿Qué afuste debo usar para los artículos
dei cajón de humedad controlada?
LOW (bajo)
Confiar
Elote
Calabacita
Pepinos
Manzanas
Naranjas
Uvas
Cajón de frutas y verduras
El cajón para frutas y verduras manBerre frescas las frutas y
verduras durante más tiempo proporcionándoles un medio
con humedad corítrolada
Controles
los controles regulan la cantidad de humedad en el cajón de
embutidos, Use el ajuste ¡ow (baja) para los vegetales con
cáscara. Use e! ajuste high (alto) para tes vegetales con hojas
Para quitar e ínstafar et cajón:
• Para quilario, jale el cajón hada afuera
completamente Incline el frente dei cajón y
saquete en línea íBcta,
• Para inslalarto, guie ei cajón dentro dei
bastidor y empújelo hada atrás hasta que el
cajón esté al ras con la pared posterior
Para quitar e Instalar ia repisa:
• Para quiíaiia, levante la repisa de los soportes de la pared
• Para instalar la repisa, baje la repisa hasta que quede
adentro de los soportes de la pared y empújela hasta que
quede a! ras con la pared posterior.
HIGH (alto)
Lechuga
Espinacas
Apio
Raíces
frescas
Espárragos
Repollo
Brócoii
Hierbas frescas
¿Qué puedo hacer para prolongar la
duración de las frutas y las verduras?
Observe (as reglas siguientes cuando almacene en los
cajones de humedad conírolada:
• NO lave tas frutas y verduras antes de colocarlas en
los cajones La humedad adicional en los cajones
puede causar que las frutas y verduras se estropeen
prematuramente,
• NO recubra los cajones con toallas de papel, Éstas
retienen la humedad.
• Siga las instrucciones de control cuidadosamente. El
no ajustar ¡os controles correctamente puede
estropear las frutas y verduras.
37

Características del congelador
A PRECAUCIÓN
Рага evitar danos matenaies, observe los puntos siguientes:
• No ñjsr№ el brazo de la máquina de hielos hada arriba ni hacia
abajo
* No mioque ni almacene nada en !a tina de hielos.
ADVERTENCIA
Para eviiar posibles lesiones, incluso la muerte, no coloque
aáículos de vidrio en el compartimiento Quick Chill Zone™- Los
objetos de vidrio puede quebrarse o explotar si sa exponen a frío
extremo,
Primarias Características
Máquina automática de hielos
Esta máquina de hielo hace tos hielos que sa usan en el
sistema de surtido.
Uso de la máquina de hielos por primera vez
• Verifique que la ina de hielos esté en su lugar y que el brazo
de la máquina esté hada abajo
• Después de que la sección del
congelador llegue a una temperatura
enlreO°a2T(-18°a-17'C),¡a
máquina de hielos se llena de agua y
comienza a tortcionar
• Permita que Iranscurtan 24 horas aproximadamente
después de ta instaíaciórt para recibir la primera ración de
hielos
•• Deseche los hielos que se formen durante las primeras 12
horas de operación para veiiflcar que el sistema esté limpio
de impurezas-
instrucciones de operación
• Verifique que el compartimiento de hielo
esté en su lugar y que el brazo de la
máquina de hielo esté hacia abajo
‘ Después de que la sección del
congelador llegue a 0° a 2°F {-18° a -17®C), la máquina de
hielo se tona con agua y empieza a frindonar, Se frodudrá
una ración completa de hielos cada 3 horas aproximadamente.
• Detenga la producciófi de hielo levantando e1 brazo de la
máquina de hielo hasta que se escudie un clic,
• La máquina de hieto petmanecera en la posición off (apagada)
hasta que se levante el brazo
Cajones
-----------
Recipiente del congelador
Para quitar o colocar el recipiente:
• Para quitarío, levante la parte delantera del
• Para instalarlo, desifcelo en ¡os rieles en la parte inferior de la
-
redpiente y jálelo hada afuera
CBmptetameníe-Levante la parte _
delantera del recipiente y sáquelo.
sKctón del congelador. Levante la parte delantera, y desifceto
hada atras de la unidad.
La repisa para helados ofrece un espacio para los artículos que
llenen que congelarse o enfriarse con rapidez,
> Para quitarla, levante la repisa
para helados de los rieles del
redpiente de hielo y jálela
horizontalmente hacia atoeta-
• Para quitar el reaplente, quite la
repisa pBíH helados, levante el
brazo de la máquina de hielos para desacUvarta,
i Ji# *t!Sf * i ЩДИЗ» СЯЯ mi И
Е1 recipiente de hielo sB encuentra localizado debajo del
surtidor automáüco de hielo.
Para quitar e Instalar el recipiente de hielo:
* Para quitar el redpiente, quite la repisa para
helados, levante el brazo de la máquina de
hielos para desactivarla Levante eí recipiente
y jale hada afuera completamente
levante Ib parte delantera del
recipiente y sáquelo-
• Para instalarlo, deslice el recipiente en los ríeles debajo de
la máquina automática de hielos hasta que se trabe en su
lugar. Baje el brazo de la máquina de hielo para activarla, y
coloque de nuevo ia repisa para helados.
IMPORTANTE E! recipiente de hielo
debe estar asegurado en su lugar
para que la máquina surta hielos
apropiadamente Si la puerta del congelador no cierra, el
recipiente no está en el lugar correcto. Gire e! accionador en
sentido contrario al ds las manecillas del reloj (según se
muestra) para alienar correctamente el recipiente de hielo
con la parte posterior de ía unidad
Repisas
Repisa fija del cotigelador
Para quitar e instalar las repisas montadas en presillas
• Quite ia repisa de tos sujetadores de montaje 4
de la pared y jálela hasta que se salga *—^
de los orificios de montaje del lado
izquierdo,
■ Para instalaria, Invierta el procedimiento anterior.
Para quitar e instalar repisas montadas
en neiss:
• Para quitarlas, saque a presión el
lado derecho de la repisa del riel del
gabinete y sepárela de las presiltes
de montaje de la pared
• Para instalarias, vuelva a colocar ta repisa en las presillas de
montaje de la pared Asegúrese de que la parte posterior de ía
repisa esté al ras con la parte posterior del gabinete e
introduzEa a presión ta repisa en eí riel del gabinete
Almacenamiento en la puerta
Recipientes de la puerta
• Gonsuite !a sección deí fBftlgeíBdor para ver las instaicdones
38

Características del surtidor
Características principaies
Foco del SUrtÍdor/30 5en3Eiesto
La Iu2 se adiva en el área del surtidor a toda potencia cuando se surte hielo o agua
Altfiohadilia de surtido
La almohadilla de surtido se encuentra localizada en la parad posterior del área de surtido. Cuando se oprime la
almohadilla de surtido, !a modalidad de hielo que haya elegido en el parte! de contol será la que surta,
Bandeja desmontable
La bandeja desmontable de! fondo del área de surtido está diseñada para racoleclar pequeños
derrames y puede sacarse con facilidad para limpiada y vaciarlB,
IMPORTANTE La bandeja desrrontabte no tiene drenaje. El agua oarrlendo contínuameníe hara
que la bandeja se rebose.
Funcionamiento del surtidor de agua
PRECAUCIÓN
Para evitar lesiones personales o daños materiales, observe las Instniccfones
siguientes: ^ ^ _
• No coloque ios dedos, las manos ni ningún objeto extraño en el orifido del surtidor
• No use objetos afilados pata quebrar el hielo ,
■ No surta el hielo diíEctamenle en los vasos delgados de vidrio, porcelana ni crista!
delicado
NOTA: Durante el uso itricial del surtidor de agua, habrá un retraso de 1 a 2 minutos en el surtido
del agua para permitir que se tiene el tanque de agua interno. Deseche las primeras 10 a 14
raciones de agua después de correctar el refrigerador inicialmente al suministro doméstico de
agua y de ios períodos extendidos sin usar
Para usar ta almohadilia de surtido:
• Elija la selección de agua en el pane! de control de1 surtidor,
• Oprima con firrrteza, un recipiente de boca ancha contra la almohadilla de surtido, Al dispensar
el hielo machacado, sostenga el envase como cerca det cana! inclinado como posible para
reducir el rociar
' Retire la presión de la almohadilla de surtido para que el flujo de agua se detenga. Una
pequeña cantidad de agua podría continuar saliendo, y quedar atrapada en la bandeja de
surtido Los derrames grandes deben secarse
(A
■9
>
,39

Características del surtidor
Características del control con cinco botones
’'Óperaclón del dispensador
Operación del dispensador a dispensan L,—J k_ J
• Modo selecto de! CUBED (cubo), de! CRUSHED (agolpamiento), o del WATER (agua) empujando el botón en panel de rantol
del dispensador Una luz de indicador verde sobre el botón muestra ia selección de modo.
• Presione el envase contra la pista de! dispensador. B modo de ia selección no puede ser cambiado mientras que el dispensador
del hielo está en la operadón.
NOTA; SI el dispensador de! agua es ¡xintasmente activo por más de 5 minutos, un automático bloquea hada fuera el sensor
cerrará potencia al área del dispensador. Para las instrucdones en cómo abrir su dispensador, vea la sección Btubcfa “ bloqueo dei
dispensador “ abajo.
I Wcí^ícL Cl^»l WülCW3»
Esta caracleristiGa impide que se surta hielo o agua
para trabar y destrabar el surtidor:
• Para trabar et surtidor, oprima y mantenga oprimido el botón LOCKfUNLOCK (tebar/deslrabar) durante 3 segundos Un foco varde
indicador ubicado encima dei botón confirma que el surtidor se encájente tebacío.
• Para destrabare! surtidor, mantenga oprimido el botónUOCK/UNLOCK (trabar/destrabar) durante 3 segundos. El f<x» verde
indicador ubicado encima dei botón se apagará..
r~~i
^■1
r~~'i
.
Foco indicador dei estado del filtro
El foco indicador del estado del fiitro sirve corno recordatario para reemplazar el filtro de agua. El foco verde indica que el iStro se
ertcuente en buenas condiciones. Un foco rojo indica que e! filtro debe cambiarse. Una vez que el foco rojo se encienda,
permanecerá iluminado hasta que ta función se reajuste
Para reajustar el indicador:
• Oprima y mantenga simultàneamente oprimidos tos botones LOCKftJNLOCK (tebar/destebar) y WATER durante 4
segundos. El foco vercle Indicador dei estado del filtro destellara 3 veces cuando !a función se reajuste coirerdamente.
CRUSH
g-3
O Gobd
FILTER
Foco automático ^ ¿Sai
La (unción dei foco automático oftece la habidad de activar ei foco del surtidor a media potenda cuando el SENSOR DE J
LUZ detecta que los niveles de luz de ia habiíadón están bajos.
Para activar y desactivar el foco automático:
• Para actwario, oprima el botón ON/OFF (apagsr/encsnder) ubicado en
el tablero de control Un foco verde indicador ubicado encima del botón NOTA: El foco del surtidor funcionará tanto
muestra que e! sensor está activado si se selecciona o no se selecciona e) foco
• Para desactivarlo, oprima el botón ONfOFF (apagar/encender) E! foco automático.
verde indicador se apagará.
Modalidad Sabbath
Esta modsldad tiene la finalidad de desactivar la energía eléctrica de las luces LED y del surtidor, a la vez que
permite dejar fundonales tos controles,
Para activar la modalidad Sabbaiht
• Oprima y mantenga oprimidos tos bolones UOCK/UNLOCK (trabar/destebar) y
ON/OFF (apagar/encender) sirauiíáneamente durante 3 a 4 segundos. Después
de 3 a 4 segundos, se apagarán las luces LED y ias del surtidor. La te del
surtidor no se activara mientras surte cuando está en esta modalidad.
Para desactivar !a modalidad Safcbafft;
• Oprima y mantenga oprimidos los botones LOCK/UNLOCK (trabar/destrabar) y OWOFF (apagar/encender) simultáneamente durante
3 a 4 segundos. Después de 3 a 4 segundos, se activarán tas luces LED y las del surtidor.
------------------------------------------------------------------------------------ H
-----------------------------------------------------------------------------------
NOTA' En caso de que se irtterrumpa la eneipía
eléctrica mientras se encuentre activa !a
modalidad Sabbath, el control permanecerá en
esta modaitdad cuando se restablezca la energía
eléctrica.
______
_
4. joTO j

Características Electrónico Del Control
Características del sufridor
Operación del dispensador
Para dispensar el agua: Para dispensar el hlelc^
• SeteGcione el botón del
• Presione e! envase contraía
pista del dispensador.
SeleOTone el bolón de I
Seleccione eí botón de[
hielo
Presione el envase contra !a pista i
dispensador
j para hielo de bloque-
para machacado
ШТА' S el dspensadcf dei agua es aDnSnuamerte
adivD pormás de 2 mhios, un autcrnálico Moquea
hada fljera el sertsQT cenrará poterida al área dd
dispensador, Para las hstnjodones en cárno abrir su
cispensador, даа b seodcn Ululada" isioquao de!
dispensador* abajo.
I CRUSH I CU0S
.
.....
Traba del surtidor
Esta caracteristica impide que se surta hielo o agua
Para trabar y destrabar el surtidor:
• Para tobar el surtidor^ oprima y mantenga oprimido el botón durante 3 segundos Un foco verde indicador ubicado encims det
botón confirma que el síirtidor se encuentra trabado
■ Para ei surtidor, mantenga oprimido el bolóndurante 3 segundos. El foco verde indicador ubicado encima del botón
S6 2p300rác
Función tijera del dispensador
La fundón ligera ofrece a ofertas rios configuraciones: DE y
AUTOMÓVIL
APAGADO el fijar dará vuelta apagado a la luz de la cawdad del dispensador. La configuraaon del AUTOMÓVIL permite que ei SENSOR
mida los niveles ligeros circundantes y ajuste la potencia de la luz de la cavidad por ronsiguíente Cuando ei senser coloca los títveles
de la luz corta {tiempo de la noche, cocina obscuiBcida). la luz de la cavidad r^^ponderá en la potencia 50%, Cuando el senser coloca
tas altos niveles ligeros (cocina encendida, luz dei sol direcia), la luz de la cavidad no activara.
Para activar!« Para dar vu alta a la iuz a pagado:
Optima el botón Q ubicado en e) tablero de control.
La luz de indicador verde sobre al botón continuará.
NOTA; El foco del surtidor funcionará
tanto si se selecciona o no se selecciona
el foco automático..
Oprima el botón ubicado en eí tablero de control
La luz de indicador verde sobre el botón saldrá
ON/OFf
m
s
Foco indicacior del estado del filtro filtep
El foco indicador d^ estado dei filtro sirve como recordatorio para teemplazar el filtro de agua. El foco verde indica que el filtro
se encuentra en buenas condidones Un foco rojo indica que eí filtro debe cambiarse. Una vez que ei foco rojo se encienda, chamgso
permanecerá iluminado hasta qua la fijndón se reajuste
Para reajustar el mdicadon ^
• Oprima y mantenga simuiláneamente oprimidos ios botones y durante 4 segundos E! foco verde indicador del
estado del filtro destellará 3 veces cuando la función se reajuste conectamente.
Coiifigyración de ta temperatura
Estos claves bajarán o tevantarán la temperatura del
compartirniento dei congelador o del alimento fresco.
NOTA: Vea la sección cómo ajustar los corríroles de
ta temperatura para que haya instrucciones en cómo temí* set
fijar temperaturas del compartimiento del aiimento
41

Características del surtidor
Características Electrónico Del Control Ó OH
Ш&К Cool (Máximo Frío)
Esta función causa la temperatura del alimento fresco a la gota a la temperatura
mínima del refrigerador que fija disponible. Sigue habiendo esta configuración en
efecto por aproximadamente 10 horas
Para activar y para desactivar Max Cool:
• Para activar, presione ei botónos]- La luz verde sobre el botón indicará estatus
activo
Para desactivar, presione el botón í
La luz verde sobre e1 botón saldrá.
Max Freeze (Máximo Helado)
Esta función causa la temperatura del congelador a la gata a la temperatura
mínima del congelador que fija disponible. Sigue habiendo esta configuración en
efecto por aproximadamente 24 horas,,
Para activar y para desactivar Max Freeze;
• Para activar, presione e! botón bulton La luz verde sobre ai botón indicará
estatus activo.
Para desactivar, presione el botón
La iuz verde sobre el botón saldrá.
Dispiay On/Off (Visualizaelón Activo/laactivo)
E! interruptor controla ia potencia de la vtsuaíizatíón.
Para activar y para desactivar la visualízación:
• Para activar, presione el botón [ж]. La visuatízaciófí se encenderá para arriba.
NOTA: La configuración de ia
temperatura no se puede cambiar si
es máximo se refresca o la
configuración máxima de la heiada
es activa..
NOTA: La configuración de la
temperatura no se puede cambiar
si es máximo se refresca o la
configuración máxima de la heiada
es activa.
«AX
COOL
• Para desactivar, presione el botón S]., La visuatizaclórí Irá dévli.
Vacatíon Mode (Modo de la vacaciones)
Este modo, si está activado, hará el refrigerador no descongelar como a menudo. Esto conserva
energía.
Para activar y para desactivar modo de las vacaciones:
* Para activar, presione el botón La luz verde sobre ei botón indicará estatus activo,
• Para desactivar, presione el botón fS, o abra cualquier puerta del refrigerador
L,
....................................
^ Aiarm Off (Desactive el alarmar)
Este clave se uBtea para dar vuelta al indicador arrsonestador de alta temperatura,
el alarmar audb, tan bien como el alarmar audio de la “ puerta abierta ” apagado
Esto también desactivará los alarmar que stisnan actualmente.
...........................................................................................................
Para dar vuelta al alarmar
apagado:
* Presione el botón
42
ALARM
OFF
>
.
^

Características del surtidor
Características Ocultadlas Electrónico Del Control
Modlalidafl Sabbath
Esía modalidad Sene (a finalidad de desacSvar la energía eléctrica de las luces LED y del surtidor, a la vez
que psfmite dejar fundotiaies ios controles
Para activar y para desactivar Modalidad Sabbath:
Oprima y mantenga oprimidos los tsotones
y simultáneamente durante 3 a 4
mgjD±s.I3^i« efe 3 a4 ssgxflbe,
del surtidor no se activará mientras surte cuando está en esta modalidad.
Oprima y manterrga oprinÁdos los ixitones ¡
segundos. Después de 3 segundos, las luces de la visualizadón y de! dispensador aclivarán.
I y símulténeamente durante 3 a 4
NOTA; En caso de que se
interrumpa la energía elécirica
mientras se encuentre activa la
modalidad Sabbalh, el control
permanecerá en asía modalidad
cuando se restablezca la energía
eléctrica
LOCK
UNLOCK
ONÍOFF
Auto Visusilizacióti
Los cíJnWes de visualizadón auto que la ¡luminadón de la visuaizaclón de LED basó en las lecturas ligeras reabíeron del " SENSOR ‘
Si el " SENSOR “ indica niveles de ia luz corta, la visuairación será más dévil que si visuafES durante perfodc® bier? ilurriinadoa
Para fijar el nivel de la potencia de la visualizadón:
* Oprimidos ios bolones рЭ y congelador para 3 segundos, La actMdad actual mosiiBrá en la visualización mostrartelo el ’
AL O " para encendido, ei “ AL A “ para el automóvil.
* Utilice el botón del refrigerador para seleccionar opciones de una
visualizadón.
Elija la opción presionando el botón
/Ч ,
Selección de la medida de la temperatura
Este modo está disponible para cambiar la visualizadón de la temperatura entre Fahrenheit y centígrado.
Para cambiar la lectura actual de la temperatura:
Presione tos botones
y X simuiíáneamenle durante 3 segundos
NOTAThe pone letras a! “AL “
mostrará siempre en la visualizadón
de la temperatura del congelador
mientras que en este modo.
O
“C
m
Bloqueo ocultado para superior el telclado numérico
El propósito de esta caracterislica es evitar el tratar de forzar con el canjunto superior de controles del
dispensador. Esto incluye las funciones siguientes: Display On/Off (Visuaizaclón Activo/inacfivo), Max Freeze
(Máximo Helado), Max Coat{Máximo Frío), Vacation Mode (Modo de la vacaciones), y Configuradón de la
temperatura
Para activar y para desactivar Bloqueo ocultado:
Para activar, los botones
Para desactivar, los botones
Función Activo/lnactivo
La caracterfeiiea da vuelta apagado a refrescarse a las
secciones de! alimento fresco y del congelador mientras
que permite que las luces y la visualizadón electrónica
permanezcan encendido. Las fundones de! dispensador
no estarán disponibles mientras que en este modo.
Para activar y para desactivar refrigerador:
• Para desactivar, restone ei botón x hasta que la lectura se coloca más allá de la
temperatura máxima permitida del congelador, A este punto, la visualizadón leerá
OPF Elija la opción presionando el botón^^.
‘ To reactivate, press toe freezer y button. Elija la opción presionando el botón^a
simultáneamente durante 3 segundos
simultáneamente durante 3 segundos
ADVERTENCIA
Para evSar el choque eléctrico que puede causar daños corporales
o muerte severos, no realice é mantenlmienta o ei serVdo en ei
refrigerador a menos que se desenchufe la unidad
NOTA: Después de ía reaeSvadón, la
visualizadón mostrará la temperatura que
fija previamente en uso. Vea !a sección,
“Cómo ajustar los controles de la
temperatura ", para que haya instrucciones
en cómo fijar temperaturas del
comparlimieríto del alimento
LOCK
UNLOCK
+
_____________
4.3

Consejos у cuidado
@ o®
¿Cómo puedo eliminar
el mal olor de mi
refrigerador?
! Saque todos los aíimsntos,
2 Desconecte !a energía del refrigerador,
3 Limpie los articutos siguientes usando
las instrucciones correspondientes de
Cómo limpiar su unidad:
• Paredes, piso y techo del interior del
gabinete,,
• Cajones, repisas y empaques de
acuerdo con las instrucciones de
esta sección.
4 - Preste atención especia! ai limpiar
todos los huecos siguiendo los pasos
siguientes:
• Diluya un detergente suave y ceple
la solución en los huecos usando un
cepiilo con cerdas de plástico ,
■ Deje que repose durante 5 minutos.
• Enjuague ías superficies con agua
tibia. Seque las superficies con un
paño suave y limpio
5- Lave y seque todas las botellas,
recipientes y frascos Deseche todos
los artículos vencidos o echadas a
perder.
6, Envuelva o almacene los alimentas que
causan el olor en recipientes herméticos
para evitar que vuelva el mal olor
7, Conecte !a energía al refiigarador y
coloque los alimentos de nuevo,
e, Después de 24 horas, revisa si se ha
eliminado el mal olor.
Si el mai olor persiste ...
1 Quite ios cajonea y coióqueíos en la
repisa superior del refrigerador.
2. Llene las secciones del refrigerador y
de! congeíador, incluyendo las puertas,
con hojas arrugadas de periódico en
blanco y negro
3, Coloque carbones ai azar en los
periódicos arrugados en los
compartimientos de! refrigerador y del
congelador,
4 Cierre ias puertas y déjelas reposar
durante 24 a 48 horas
5 Repita los pasos 5 al 7
Si no se eliminan los malos olores,
comuniqúese con un centro de servicio de
Sears, Consulte ia parte posterior del manuai
para encacnírar los números telefónicos,
Cómo limpiar la yaldad
^ ADVERTENCIA
Para evitar descargas eléctricas que pudieran causar lesiones personales
graves o la muerte, desconecte la energía del refrigerador antes de limpiarlo.
Después de la limpieza, conecte la energía,
PRECAUCION
Para evitar ieslones personajes o daños materiales;
• Lea y siga las instrucciones dej fabricante con todos los productos limpiadores _
• No coloque los recipientes, las repisas ni los accesorios en la lavavajiílas Podrían
estrellarse o deformarse.
ÁREA
Ptiertss y extarlor
tóxlurtzados
intertor del gabinete
Puertas y exterior de
acero fnoxidabta
IMPORTANTE:
Los daños si acabado de
acero inoxidabla debidos ai
uso ¡neameío de producios
de Smpieia a producios no
iwcomendsdos no esldn
cubiertos por ninguna
oarantía
Controtas de surtido
Empaques de fa puerta
Safpetiííti ds!
condensador Quite la
pgnWa fnfetfarpara tener
Parritla det escape de!
venüiadof del
condensador Vea ia parte
posterior del refrkierador
Accesorios Repisas,
mdpierrles, cajones, sto
HO USE
^ Limpiadores abrasivos rsi ásperos
7 Amonfeco
7 Blanqueador de doto
7 Delergenies ni solventes
conceríirados
7 Almohadillas para tallar de
DlásOcDO aluminio
? limpiadores abrasivos ni ásperos
7 Amoníaco
? Blanqueador de cloro
7 oetergentes ni solventes
oorreentrados
? Almohadillas para tallar de
plástico 0 aluminio
7 Productos con base de vinagre
7 Limpiadores con base cítrica
7 Limpiadores abrasivos ni ásperos
7 Amoníaco
7 Blanqueador de cloro
7 OetergEnles ni solventes
concentrados
7 Atmohadlllas para talar de
olásiicoo aluminio
1 Limpiadoras abrasivos ni ásperos
7 Aimohadíüas para tallar de
piásticoo aluminio
N/C
? Levavajilías
LLEVE A C A BO ...
? Use 4 cucharadas (60 mi) de
btearbonato da sodiodisuetes an 1
liiro da agua jabonosa tibia
7 Enjugue las superficies con agua tibia
limpia y seque inmediatamente para
evitar que se formen manchas
? Use agua jabonosa tibia y una
esponja 0 paflo suave y limpio,
7 Enjuague tas superficies con agua
tibia y limpia y seque Inmediatamente
para evitar que se formen manches
? Use el aditamento delgado da ia
mangueta de una aspiradora.
? Use b\ cepiiíQ la rnSfigueta de una
aspirsd0f3-
7 Siga tas instructíones de remoción e
instalBdón de la sección déla
característica correspondiente
7 PsrmIlB que los artíCUtos se ajusten a
la temperatura de la habitación.,
7 Dituya detergente suave y use un
paño Q una esponja suaves para
limpiar
? Usa un ceplüo con cerdas de piásBto
para alcanzar ios huecos
? Enjuague las superficies con agua
tibia y Impla
? Seques! vidrio y los artículos
transparentes inmedatatnenie para
evitar quB formen manchas
Un producto ds fimpieza de discos de! acero moxidatíe se ha induido dentro dei refrigerador para su uso
Para compra' ei producto de limpeza de áseos adicional, entre en contacto con por fevor se chatnusca
con la BTformac»ft sebre la parís posteriora de su manual

Sección superior del refrigerador
1 Localice los sujetadoíBS en cada lado de la
pantalla dei foco inserte los dedos y oprima en
cada lado de la pantalla, jálela y quítela-
2. Quite los focos,
3, Reemplácelo con uno para eteclrodomésücos
que rto sea mayor de 40 vatios.
4. Reemplace la cubierta dei foco insertando las
cuatro lengüetas de ¡a pantalla del foco en tos
orifidos en el recubrimiento directamente enfrente
det ensamble del foco
5, Presione la cubierta con seguridad en fugar
Sección de! congelador de los modelos con surtidor
1. Quite ei redpieníe del Helo levantando ia parte delantera
y jalándolo hacia afoera
2., Quite la cubierta del foco oprimiendo tes lengüetas
superiores (A) y jalando te cubierta hada afuera
del recubrimiento.
3 Quite el foco Reemplácelo con uno para
elediodoméstícos que no sea mayor de 40 vaffos.
4 inserte la lengiiela inferior (B) de la cubierta del foco en el reaibrimiento e inbodúzcala a
presión sobre el ensamble dei foco
S. Coloque de fiuevo el recipierite del hielo deslizándob hasta que se trabe en su lugar.
Surtidor de agua y hielos
1. Localice et foco adentro dei borde superior del bastidor del
surtidor. Desenrosque para quitarlo,
2-Reemplace el foco con uno de 7 vatios, 120 voltios.
Consejos y cuidado
calientes a la vez. Esto sobrecarga el
compartimiento y hace más lento el
proceso de enfriamiento.
No use papel aluminio, de cera ni
toallas de pape! para recubrir las
repisas. Esto retrasa la circulación de
ate y hace que ta unidad fondone
menos eficazmente
Un congelador que está % lleno
futídona más eficientemente..
Coloque el refrigerador en la parte
más fría de ta habitación. Evite las
áreas que reciban ios rayos solares
directamente, las que estén cerca de
los ductos de calefacción,
registradoras u otos
electrodomésticos que gerteren calon
Si esto no es posible, aísle el exterior
usando una sección de gabinete o una
capa adicional de aislante.
Consulte la sección de! manual del
propteíario de Sos controles de
temperatura para ver los ajustes de
control recomendados.
Limpie los empaques de la puerta
cada tres meses de acuerdo con las
instrucciones de limpieza del Manual
del propietario. Esto garantizará que
los empaques sellen apropiadamente
y la unidad funcione más
eficientemente.
Dedique tiempo a organizar los
artículos de! refrigerador para reducir el
tiempo que ta puerta permanece
obrería.
' Asegúrese de que las puertas estén
cerrando correctamente nivelando la
unidad como se Instruye en e! Manual
del propietario ,
> Limpie e! serpentín del condensador
como se indica en el manual del
propietario cada tos meses. Esto
aumentará la eficiencia de energía y ei
desempeño de enfriamiento
♦
m
■s
>
45

Diagnóstico de averías
w lûs mñiasfactess dé to tíenen nuevas
Loa fetigsfadores de hoy S®ien nuevas caracteisficas, táes como afeíarte cte 5a espuma, y son más enagía eSasnEe que más di
de ios íEÍwjeracfcres. Eí aisíante cíe ¡a espuma es mismo enagia efiœnte y fe» capaddades aidadores ssxfenEes; ski emfcBigo,
E» K tan absofisenis de los sorídos aano tos matenales astadores antaioras, ConsecuentBnentB, dettes swttíos pueden ser
SONIDOS
destanocsdotes En fenpc, estos sonidos Ste^tán a ser famiaES. Refiera por fa\w a nfonnacton antes de Samar ærvido.
TEMA
Qolpatóo
Airó cdíTientó 0
drculándo
Gorgoreo o sonidos de
ebullición
Topes
Sonidos de vibración
Zumbante
Mutmulto
CAUSA PROBABLE
El contrai dal congelador haca un sonido da
gotpBleo cuando arranca o detiene el compresor
Descongele el lemporlzador o ¡os sonldos eléctricos
(Jal control (B) {algmos modetos) del apagador com
un fBÍoJ eléctrico y marcas un tecleo ocasional o
encájese a presión.
ËI ventilador del congalador (C) y e! ventilador del
condensadcf (D} hacen este sonido cuando
funcionan
Si ventilador del congelador (C) reltasá a ona parada
mientras qys ss abre la puerta del congelador.
El refrigerants del evaporador (ñ) y del
Intercambiador da calor (f) hace este raido cuando
líuye
Cubos da hteio (en algunos modelos) cayendo en el
recipiente de los hielos (G),
Cierre de! canal Inclinado deí hielo {H} dal díspensadc
El compresor (fí hace un sonido pulsante cuando
funciona
El refrigerador no está nivelado-
Ice mater water valve (J¡ hookup bustes
when ice makEr nils with water.
La máquina de hieta (K} está an la posición 'on' sin la
conexión de agua
La sonda del hielo fi) produce un murmuíto
ciMsforme la sonda se eolia eí surtir tos hielos
El compresor fi| puede producir un murmullo agudo
cuando está funcionando.
La válvula del selenolde (M) cuando opera el tiro
de hielo de la puerta.
SOLUCION
Funcionamiento normal
Fundonamiersto normal
Fundonamienlo nonnai
Fundonamienlo normal
Funcionamiento normal
Funclonatnienlo normal
Funcionamiento normal
Funcípnafnisnío normal
Vea la nivelación do Instaicciones
sn Instalación tía! refrtgeradof"
Funcionamiento normal
Pare a! sonido tevantando el brazo
del fabricante del hielo a la
posición del "ofr, Vea la sección
del fabricante de! hielo en las
Xaracteristicss del congslsdor'
para los detalles,
Funcionamiento normal
Funcionamiento normal
Funcionatnienlo norma!
FUNCIONAIVIIENTO^--^
Eí control y las lucas de
congelador están
Bncendldo, pero lüS
compresores no están
funcf(3nando.
Los cajonos ambiente*
controlados son
domaslado caílonles
ei refrigerador no
funciona
£i refrigerador
continúa sin funcionar
Los Eonimios
«teotrqnicos (en algunot
modelos) comunican el
EO,
#1 ES, 0 a! ERROR.
La lampe ralura del
alltnenlo es
demasiado fría
E! refrigerador es aüaníra descongela modo
El refriferador con cortlroS de la temperatura digital
acsbB (ía enchufarse
Las configuraciones del controí son demasiado
bajas.
Las configuratíonss del control congelador son
demasisdo bajas.
El caíófi se coloca incorrectamente
a ratrlgerador no está conectado.
Él control dal congelador no está activado.
Un tosibla está fundido, o el cortocircuito necesita
reajustarse.
Ha sucedido una talla de energía
Et refrigerador no ealá conectado.
Ls unidad está faltanda
Los cqhlrotos han deíedladb al maifuncionamlento y
procurarán regular temperatura hasta que se obliene
el servido
Las bobmas tíel cortdenasdor son sudas.
Los conlroles cfsl retrlgsrador o del congelador se
filan demasiado altos
Operación normal Espete 40 minutos para ver si los relanzar de fa unidad
Operación normal Espere 60 segundos para ver si ía unWad comienza a trabajar
Vea (a sección deí cajón en "Ceraclerisllcas de! reírlgeradar' para ajustar
controles.
Ves la sección de ios controles de ía temperatura m 'Instalación del refrigerador"
para ajustar sus cDniroíss,
Vea la sección deí cajón en “Caracterisllcas det refrigerador" para Insíalladon del
cajones.
ConectB la unidad
Vea la sección da confroies en su manual del propietario.
Reemplace eí fusible fundido. Revise st corlacircuiio y resjústelo si es necessrics
Llama a la compañía ¡ocal de energía para informar acerca de ía falla
Conecte la unidad.
Desconecte el refrigeratfor y transilefa ios eiiirtenlos a oira unidad Si no llena una
disponibie, coloque hieío seco ert !a sección del congelador para conservar los
alimenios La garanlla no cubre la pérdida de alifnentos Camutíquesa con si
departamento de servicio para obtener ayuda.
Servicto del conledo para la ayuda
Limpie segúrs Instrucdonas ds la limpieza en 'Consejos V cuidado".
Vea la sección de fundonamienlo del manusl c!el propietario para saber cómo
ajustar tos cantrotes
46

FUNCIONAMIENTO'^^M^
TEMA
La temperatura de los
alimentos no parees
estar ío suflolanlemente
fría
Ё! refrigerador tiene mal
olor
Se forman gotas de
agua afuera dei
refrigerador
Se forman gotas de
agua adentro del
refrigerador
Et refrigerador o la
máquina de hielos
hacen un ruido extraño
o que parece muy fuerte
Los cajemes del cajón
con temperatura
controlada para carnes y
frutas y verduras no
cierran con libertad
El refrigerador funciona
muy frecUEníemente
CAUSA PROBABLE
La puerta no darra corracíament©
Los Eonifoles necesitan ajustarse
Los serpentines del condansador están
sucios.
La rejilia posterior del aire está obstruida
La puerta se ha abierto muy
frecuentemente, o se ha abierto por
períodos de tiempo protongasJos
Sa ha añadido atimentos recteníemenle
El compartimiento está sudo o tiene
alimentos Que causan mal olor.
El filtro de aire ÍSh algunos modelos)
necesita cambiarse.
Revise los empaques para ver si sellan
bien.
Los niveles ds hurnedact están sitos.
Los controles requieren ajuste
Los niveles de humedad están muy altos a
la puerta se ha abierto muy
frecuentemente.
Revisa tos empaques para ver si sellan
bien
Funcionamiento norma!
El contsrrldo de los cajones, o la mane'a en
que están ócomodados tos articulas en el
compartimiento podrían obstruir el cajón.
Ei cajón no está ert la posición correcta
El refrigerador rto está nivelado
Los canatas dei cajón estái sucios o
necesitan tratamiento
Las puertas se han abierto muy
frecuenteríisníe o por pertodos de tiempo
prolongados -
La humedad o eí calor en el área de
alrededor está muy altos.
$a han añadido recientemente Bllmentos,
La unidad está expuesta at calor mediante
el afflbiartie a por eleclradomésycos que
están carcanos, ________
______
Diagnóstico de averías
SOLUCION
El refrigerador гю es estable Vea la sección Instaíactórt del refrigerador*
para tos detallas en córre nivelar su unidad
Revise ios empaques para comprobar que ssHen bien Límpieios. si es
necBsario, de acuerdo con las instrucciones de limpieza dei manual
del propietario.
Revise si existen obstrucciones internas que estérr haciendo que ía
puerta no cierre bien {por ejemplo, cajones mal cerrados, recipientes
de hiaio demasiado grandes o recipientes mal aímacenados ds
atIrTreritos, etc.)
Vea la sección da los corrtroles en el manual del propietario para
obteftsr ayuda sobre cómo ajustar tos controles
Limpíelos de acuerdo con las Instrucciones de limpieza del manual dei
propietarÍQ.
Revise la colocación de ios artículos alimenticios en el refrigerador
para asegurarse que la rejilla no esté obstruida La rejilla posterior de
aire sa encuenlra ubicada detrás de ios cajones de frutas y verduras.
Reduzca ei tiempo que llene la puerta abierta. Organice los aríícuíos
de alimento de manera ©ficieniE para asegurarse que ia pueda esté
abierta el menor Ивтро posible. ______
Permita que el medio Interior se ajuste por e! periodo de tiempo queso
abre la puerta
Deje que pase suffotante tiempo para que los alimentos que
recientemente se añadíerona al refrigerador o al congelador se
enfrien.
Consulte tas instrucciones para eliminar malos olores en el manual del
propietario.
Cambie eí filtro de aire
Limpíelos, si es necesario, de acuerdo con tas tastrucciones del
manual de! propietario,
Es normal durante épocas da mucha hurTtedad.
Vea ia sección de ios controlas en e! manual dsi propíetarto para
obtener ayuda sobre cómo ajustar los controles.
Vea la sección de los corjtroles del nranuai del propietario para obtener
ayuda sobre cómo ajustar los controles
Reduzca ai tiempo que la puerta permanece abierta, Organice los
arttoulos de alimento Eficiantemenle para aseguarseque la puerta
esté abierta el menor tiempo posible.______________________
LEmpteto. si as necesario, de acuerdo con las instrucciones da
limpieza del manual del propiatarlo.
Consulte la sección da sonidos de la guia de diagnòstico da averias an
eí manual de! propieísfio
Vueiva a acomodar los Bllmerrtos y los recipientes para avilar Is
Inlerfarencia con los cajones
Vea la sección del cajón con temperatura controlada para camas
o para frutas y verduras para verificar 1a colocadán correcta.
Vea la seccióti Instaladórs del refiigeradort para ios detalles en cómo
nivelar su unidad.
Limpie ios canales de ios cajones cor? agua tibia y jabonosa Enjuague
y seque completamente.
Aplique una capa delgada de jalea de petróleo en ios canales ds los
cajones. __________________________
Reduzca el tiempo que la puerta permarrece abierta - Organice tos
alimentos més eficientemente para garantizar que la puerta esté
abierta ei menor tiempo posible.
Permita que pase tiempo para que tos alimsntos recién añadidos
alcarscen la temperatura del refrigerador o del congelador.
Funcionamienta normal
Perrnte que pasa tiempo para que tos ailmentos recién añadidos
aicancen la temperatura dei refrigerador o del congeiador.
Evalúe el ambiente de la unidad. La unidad podría necesitar cambiarse
lugar para que funcione mejor
_________
........................
_______
______ _________________________
_________________________
.................................................
___
___________________________
_____________________
_
_____________
_____
______________
_
______
_
_

Diagnòstico de averías
FUNCIONAMIENTO (continuadón)
ТЕМА
EÎ refrigerador funciona
con domasíada
frecuencia
(continuación)
HIELO Y AGUA
£1CÍ0UB p^rses turbia
Hay partículas en el
agua o en tus hielos
No hay focos
indicadores encendidos
en al conifoi det surtidor
No sale ni agua ni hielo
del surtidor cuando se
oprimen las
aimohaditias
La máquina de hielo no
está produciendo
suficientes hielos o
éstos están deformes
Г*ЛТ1ЧА РТ?ПКАШР
Vw'Xx.LvwAi. А a_IxAJIíIJLwJL,í
Los controles tienen que ajustarse
La puerta no cierra Cíen
Concentración de fnineralss en e¡ agua formará
partículas cuando el agua se congela y sa
derrite.
La puerta del congelador no está cerrada.
La puerta de! congelador na está cerrada.
Está fundido un fusíbís. o ei cortaclrcuito necesita
reajustarse.
Ha ocurrido ung fatta da energía,
La puerta del cangaiador no está cerrada
Lös conifoteB están en la mocfelidad de cerrado.
Se está llsnando el tanque de agua
La máquina ds hielos o la unidad con equipo
pera hacer hielos se ha Instalado recientemente
0 se ha usado reciantsments una gran cantidad
de hisfos.
El nitro de agua está obstruido o necesita
cambiarse.
Se Insteió recientemente la máquina de hielos o
se usó recientemersíe una gran cantidad de
hielos.
La pmsiáfl del agua esíá muy baja
Él fitíro del agua está obstruido o necesita
cambiarse.
El suministro ds agua doméstica no esté
llegando a la válvula dei agua.
La tubería de cobre o plástico está torcida
La presión dsi agua es muy baja
Revise ía tampefalura det cangetador.
El recipiente del hiato no está Instalado
Eorrectamento
SOLUCION
Vea' la sección de las controles err ei manuel del propielario para
obtener ayuda acerca de cómo ajustar los conirotes
Ei refrigerador no esíá bien nlveiado. Vea ¡nslalación efe/
re/ngerador para encontrar los detalles de cómo niveler la unidad.
Revise si hay obstrucciones internas que estén causando que ia
puerta no cierre bien (por ejemplo, cajones mal cerrados, recipientes
de hielo demasiado grandes o recipientes de aíirnsníos mal
guarciados, ato.}.
Revise los empaques para asegurarse que seiien Dian, Ltmpietos, si
es necesario, de acuerdo con las tnslruccionasde limpieza det
manual det propietario.
Esto es rsorma) cuando se usa por primera vez ei surtidor, y
desaparecerá con el uso.
Et agua que fluye Inícialment® a través de! cariucho podría contener
el polvo Inocuo de carbón que libera el cartucho. Las partíoutas son
seguras para consumo y desaparecerán después de unos cantos
usos.
Las partículas no son dañinas y ocurren naturatrnente an ios
suministros de agua
Verifique que ia puerta del congelador esté cerrada. La energía se
Interrumpe del eontraf cuando la puerta de! congelador se abre.
Conecte ia unidad.
Reemplace los fusibles fundidas Revise si el Bortacircuito está
botado.
Llame a ís compañía local da snergia para Informar acerca de la
falía.
Verifique que ía puerta del corígeíador esté cerrada. La energía se
frrterrumpe en el cantro! cuando la puerta det congelador se abre.
Ves las instruedones de control del surtidor.
En el uso Iniqiel. hay un retraso aproximado da 45 segundos para
surtirlos mientras ss (lena el tanque de agua interno.
Espere 24 ñoras para que comience la producción de hielo o para
que la máquina de hielos vuelva a surtirse después de usarlos
todos
Cambie a! filtro de agua
Espere 24 horas para que comience !a producción de hieSo y para
que la máquina vuelva в surtirse después de vaciarla.
La presión baja deí agua puede causar que la válvula gatee. Le
presión det agua debe estar entre 20 a 100 libras por pulgada
cuadrada para que funcione cofrectarriente Una presión mínima de
35 libras por pulgada cuadrada se recomienda para las unidades
con nitros de agua.
Cambíe el filtro deí agua
Revise et procedimiento de la conexión del agua en hsíaladán del
refrígemdor.
Cierre el suministro da agua y deshaga las torceduras SI no pueda
hacerio, reemplace la tubería.
La presión de! agua debe estar entre 20 a 100 libres por pulgada
cuadrada para que funcione corractameríte Se recomienda una
presión mínima de 35 libres por pulgada cuadrada para las unidades
con íiltrps do agua.
Vea la sección de los controles en el manual del propietario para
obtener ayuda sesrea de cómo ajustar tos controles El congelador
debe estar entre Q“a 2*F (-18 a -17“C) para producir hielo.
Vea ía sscciórs del recipiente de hielo para encontrar ia Inslaledón y
Ib BlInBadón adecuadas.
48

HIELO Y AGUA
Diagnóstico de averías
TEMA
La máquina de htelos no está
produciendo hielo
La unidad está goteando
Se forma hielo an la tubería de
enírada a la máquina de hielo
EJ flujo de agua está más lenta
de lo normal
El agua de! surtidor no está
muy fría
CAUSA PROBABLE
Se Inslaió una váhula incorrecta
Se usó tubería de plástico para completar la
conexión de agua
Se Instaló 1a válvula de agua Incorrecta
La presión deí agua está baja
La temperatura del congelador está muy alta
La praslón ds! agua está muy baja
Sa instaló la válvula incoFrecla
La tubería de cobre o de plástico tiene
torceduras.
B\ fiKro de agua esté odstniido o necesita
C8fnbíars0T
Se Irrstaló rectenlsmente el refrigerador
Ei suminlslTD del agua en e1 tanque de
almacenamiento se acabó.
Ei agua se quedó en tas tuberías ds agua
afuera del tanque de aimacenamienta y se ha
calentado a Semperalura ambiente-
SOLUCION
Revise eí procedimiento de la conexión del agua en
IrjslaladQn dei refrigeractór Las válvulas autoparforanles y ds
siin de %í" eausart una presión baja da agua y podrían
obstruir la tubería con eí tíafnpo Sears no es responsable de
daños maíartaies debidos a la instalación o a !a conexión
de agua IncorrectáS.
Sears recomienda usar tubería de cobre para la fnstaiactófi- La
de plástico 8s menos duradera y puede causar goteras Sears
no es responsable de dañes maleríales debidos a la
Instalación o a la conexión de agua incorrectas.
Revise el procedimiento de la conexión de agua sn Instalación
del refrigerador" Las válvulas auíoperíorantes o de sillín de
causan una presión baja de agua y podrían obstruir la
línea con ei tiempo Sears no es responsable de daños
materiales debidos a la instalación o a la conexión de
agua Incorrectas.
La presión de) agua debe estar antre 20 a CQ libras por
puígada cuadrada para que funcione correctamente Se
recomienda una presión mínima de 35 libras por pulgada
cuadrada para las unidades con filtros de agua.
Vea la sección de ios controles ®n el manual deí propietario
para obtener ayuda acerca de cómo ajustar ¡os controles. Se
recomienda que el congelador esté entre 0° a 2"F f18 a 17'Gj,
La presión del agua debe estir entre 20 a ÍOO libras por
pulgada cuadrada para que íunctone correctamente Se
recomienda una presión mínima de 35 libras par pulgada
cuadrada para las urtldades con filtros de agua.
Revise el pracedimtertto de la conexión de agua en
‘Instaiaclón del refrigerador”., Las válvulas auíoperforantea y
tes de sillín da Vio" causan presión baja del agua y podrían
obstruir la tubería con el tiempo Sears no es responsable de
los daños materiales debidos a la inslaiacíón o a la
conexión de agua incorrectas.
Cierra eí suministro def agua y deshaga las torceduras Si no
puede hsceííQ, reemplace te tubería.
Cambie e! IBlro de agua
Deja que pasan aproxlmadamenia 12 horas para que si agua
en el tanque da almacenamiento se enfríe
Deseche e! primer vaso de agua y vuélvalo a (leñar
m
s
49

Datos del filtro de agua
Hoja de datos dei desempeño y especificaciones del sistema
UáL
Especificaciones
Clasificación de flujo de servicio (Máxima^....
Vida nominal de servicioModel 9005 (Máxima)
Temperatura máxima de operación
Requisitos mínimos de presión.
Temperatura mínimos de operación.
Presión máxima de operación.................
Condiciones generales de uso; Lea esta hoja de datos de rendimiento y compare las capacidades de esta unidad con sus
necesidades reales de tratamiento de agua
NO use este producto en donde ei agua sea microbiológicamerste insegura o de calidad desconocida sin una
desinfección adecuada antes o después del sistema. El Sistema certificado para la reducción de quistes podría usarse
en agua desinfectada que podría contener quistes flltrables.
UTILICE SOLAMENTE CONLA FUENTE DE LA AGUA FRIA, COMPRUEBE PARA SABER SI HAY CONFORMIDAD CON EL
ESTADO Y LOS LEYES Y LAS REGULACIONES LOCALES.
El sistema retractable de filtración de agua usa el cartucho de reemplazo 9005 (vea la información para comunicarse con
Sears en la parte posterior del manual para hacer un pedido). El reemplazo puntual del cartucho del filtro es esencial para
tener un rendimiento satisfactorio de este sistema de filtrado. Consulte la sección correspondiente de este manual del
propietario para oblerter información sobre el funcionamiento genera!, ios requisitos de mantenimiento y el diagnóstico de
averias.
Este sistema ha sido probado en conformidad con ANSI/NSF 42 y 53 para !a reducción de las substancias indicadas más
adelante La concentración de las substancias indicadas en el agua que entra al sistema se redujo a una concentración
menor o igual a( límite permisible para el agua que sale del sistema, según se especifica en ANSI/NSF 42 y 53
Datos de Rendimiento*
Agua
Substancia
Plomo 0.15 mg/L
Plomo
Quiste
Turbiedad 11.8 NTU
Ltndano
Atrazine
Ghloro
Partícula**
2,4-D 291.6667 ug/L 45,45 ug/L
Asbestos
Las pruebas se realizaron usando una tasa de flujo de 0.75 GPM (2.83
Umirt.) y una presión máxima de 120 psi (827 kPa) bajo condiciones
estándar de laboratorio, sin embargo, el rendimiento real podría variar.
El Rendimiento de declaración de salud ío probó y certificó NSF
International.
Clasificación de la tasa de tamaño de ias partículas de prueba. Las
partículas usadas fueron de 0 5 a 1 micrones
Pentapur0, Incorporated
1000 Apollo Road
Eagan, Minnesota USA
EPAESTm5917^MN-1
afluente
0.15 mg/L
25000 Cont.
máx. /mL
0.00063 mg/L 0.00005 mg/L
0.0097 mg/L
1.9 mg/L , 0.09 mg/L
286667 coni
máx. /mL
Í0’l0^1ibra/L; fibras
>10 micromElfos en
lonailud
R Cartucho dei filtro de agua del refrigerador modelo 9005
,0,75 GPM (2-83 Umin)
500 gallones/ 1892 litros
..100“ F/38“ C
„35 psi/138 kPa
.33° F/r C
Afluente
msxiniQ
3 cont.
,.Í20 psi/ 827 kPa
Nivel de
acción máx
cont.
0.010 mg/L 8,5
> 99.95% NC
0.0002 mg/L NC
?75% NC
?85% NC
0.0017 mg/L NC
99% NC
PHde
sntr^dB
............
Promedio
afluente
0.001 mg/L 99.33%
0.002 mg/L 98.68% 0.003 mg/L
1 coni,
máx. Imi
0.12 NTU 98.98%
0.0002 mg/L 97.93%
900 coni,
máx. /mL 99.68%
0.16 MFUmL 99.90%
% de
reducción
promedio
99.99%
97.62% 0.00005 mg/L
95.26%
84.42% too ug/L
.
0.001 mg/L 0,010 mg/L 6.5
máx. /mL
0.1 a NTU 0.5 NTU NC
0.0006 mg/L 0.003 mg/L NC
0.17 mg/L
2400 cont
máx./mL
0.16 MFL/mL

DápartsEiáítlD de 5 áutxrid ad
del &taáode Cdifooiia
Dispositivo de tratamiento de agua
Certificado Número
01 -1486
Feqibadeerasián: 21 de s^ieirèiadfil 2001
F«¿a re visada; £1 ífe Míiráia. íM 2002
Marea v d^'angcicn da mcd^o
WFS0-WI5D0
W50-NI100 ,- * - '
W50-KWI500^.^
WFSO*KNEaOO '
OWSO-WiSOO
O1WFS0-HIW _ 1 ■
Fabricante , PéntaS^ualicorparated
con ¡aSaxicn 1l6S3 0 .ddCód!gociaS^uridad-yr
Esporas - "■ r' ' .i. -;C
Contami ha ntMjaaàms^ ^ „ ..,4.
Àtiasìia :-i ■: .■ 4.
lirdai» '^s_ ; '.4 -■
Elemenlcsdé rgem piaz»
-■■-■
” ■ WF50
Í69005
46 ecos '
■ ' . .^ ■ -500 galcavas (!> 8025 Etsios)
' ■■ ^\:;;-v200gdc¿ss(ijI35-SHfros)
OWF5Í "i,
0’v¥FSlC ;
Cc^htenijnaDl^iDQr(^.msss.aíMi£Í£gi.SB
■ /.|^¿bSS't3CS“ ' ^ '* j'’. ■
V -, Hddcid
...
' ,: 500 gak«ñs(l, 8025 Etíos)
,BOO¿sJí3tes(l>BSSlÍK3s)
' . 5005abnas(l|,8025Ktos)
' '200sabn£s(id25.5Íitos)
-■i f1,!
1 '
. r'
-i"r
'C-T
'í í' /■
v'
■■■. .-1 !-• '
',"1 ,-■- ’ ' 1 ,■•'V'-™.—’i 'V-4.■■■•(-.--.< -■--t'J 1 ' • ',t..' .-'
' - - ■■■■ ■■■ ' ■ ■■
^ a,, .:kíT'r-''-
■'4, ,r-i';:*vr -i _á . v4.
v’4v; /
Fiujods^n/idonomiiiat; 0,75


Î^Ipf mes Electriques
Ce symbole signale une mesure de sécurité.
àk
A ATTENTION
Ne jamais couper ou enlever ia broche ronde de mise à la terre de la fiche. Le réfrigérateur doit être mis à la terre en tout
temps Ne jamais enlever l'étiguette d'avertissement du cordon d'alimentation. Ne jamais utiliser d’adaptateur à deux
broches. Ne jamais utiliser de rallonge, _________________________
Instructions de mise à la terre-Ce réfrigérateur est muni d'une fiche à 3 broches_pour prévenir les risques
d'étectrocution. Si la prise de courant disponible convient urtiquement à une fiche à 2 broches, contacter un
électricien qualifié et la faire remplacer par une prise de courant à orifices correctement reliée à la terre,
conformément au Code rrational de l'électricité Le réfrigérateur est conçu pour fonctionner sur une ligne
séparée de 60 Hz, 15 A, de 103 à 126 V,
DANGER
Mise au rebut du réfrigérateur
IMPORTANT : Les enfanta qui ae trouvent enfermés dans urr réfrigérateur et y meurent d’asphyxie ne sont
pas un problème du passé Les réfrigérateurs mis au rebut ou abandonnés sont encore dangereux, ^
même s’ils ne sont là que « pour quelques jours » Lors de la mise au rebut d'un réfrigérateur, veiller à
suivre les indications ci-dessous pour éviter les accidents,
AVANT DE JETER VOTRE VIEUX RÉFRIGÉRATEUR OU CONGÉLATEUR :
* Enlever les portes. _ _ ....
• Laisser les étagères en place de façon à ce que les enfants aient des difficultés à se glisser à i'mtérieur,
1
Contrat entretien
filoys réparons ce c|we noys vendons
Vous avez acheté un produiî à valeur ajouiée car vous pouvez complar sur Sears HoPieCentraP pour le service après-vente. Grâce à nos
12 OCO spécialistes qualifiés et à un invenlaîre de plus de 4,2 millions de pièces et accessoires, nous possédons Ses outils, les pièces, tes
connaissances et tes compétences pour respecter notre promesse : Nous réparons ce que nous vendons.
Contrats d'entretion Sears
Voire appareil Kenmore est conçu, fabriqué et mis à fessai pour vous procurer un rendement fiable pendant des années Par contre, tout appareil
domestique doit être entretenu de temps à autre Le contrat d'eniretiert Sears vous offre un programme de service après-vente exceptionnel à un
prix raisonnable
Le contrat d’erttratien Sears
• Vous permet d'acheter un service d'entretien pour l'avenir au prix d'aujourd'hui
• Élimine les factures de réparation résultant de l'usure normale
• Permet d'obferrir de l'assistance technique et nort techrrique
• Permet d'obtenir, sur demande, urte vérification préventive annuella même si fappareil ne nécessita aucune
réparation, pour assurer que votre appareil est en bon état de marche
Garantie™
Garantie limitée au Canada
Garantie totale d’un an du réfrigérateur
Pendant un an à compter de ia date d'achal, lorsque ce réfrigérateur est utilisé et entreianu d après ies instructions fournies ou jointe
au produit, Sears réparera ce réfrigérateur sans frais, si la défectuosité provient des matériaux ou de la febricaUon
Garantie complète de cinq ans du système scellé du réfrigérateur
Pendant cinq ans à compter de la date d'achat, lorsque ce réfrigérateur est utilisé et maintenu d'après ies instructions fournies ou _
jointes au produit, Sears réparera te système scellé (comprenant te réfrigérant, l'évaporateur et te condensateur) sans frais, s’il existe
une défectuosité des matériaux ou de fabrication '
Garantie de dix ans des pièces du compresseur
Pendant dix ans à compter de fa date d'achat, lorsque ce réfrigérateur est utilisé et entretenu d'après les insîfuclions fournies ou
jointes su produit. Sears remplacera les pièces du compresseur sans frais, si la défectuosité provient des matériaux ou de la
fabrication ^ ^
La couverture de garantie ci-dessus ne s'applique qu'aux réfrigérateurs otifisès pour l'entreposage d'aliments dans tes foyers privés
seulement- La garantie n'inclut pas les cartouches de filtre d'eau et de glace de rechange Kenmore {si le réfrigérateur ©n est équipé)
Les cartouches d'origine et de rechange sont garanties pour 30 Jours, pièces seuSemsnl, cortire tout défaut de matériau ou de
fabrication
Pour obtenir le service de garsrttie, composer le 1-800-LE-FOYER"*® {1-800-533-6937)
Sears Canada. lno„ Toronto, Canada, MSB 2B8
5.3
__________________________________
Certaines restrictions
s'appliquent Pour de plus
amples renseignements,
appeler le 1-800-361-666S.
Pour des informations
cortcernant les contrats
d'entretien Sears Canada,
appeler le 1-800*361-6663.
Tl
S
Z
?
la

pp^registiem du ptod^ît
Veuiez ïiscriiH dans l'espace prévu à œi effel te numéro de série, te
numéro de modèle et la date d'achat de voire refngérateur, \/ais
irouverez te élic|uetes comprenant le numéro de modèle et te numéro
de série à llnlérieur de l'apparei sur la paroi droite du réfirgérateur.
Numéro de modèle :596,
Numéro de série :
Date d’achat :
________________________________
_____ __________________________________
...............
......
__
VeuilFez conserver cette brochure ainsi que votre
récépissé de vente Sears dans un endroit sûr pour
référence ultérieure.
Importantes consignes de sécurité
Apprenez à reconnaître ces symboles, mots et étiquettes relatifs à la sécurité
Â-ds concernant les
consignes de sécurité
Les mises en garde et tes consignes de
sécurité importantes énoncées dans œ
manuel ne œuvrent pas toutes les
situations susceptibles de se présenter
Il faut dorrc faire preuve de bon sens, de
prudence et d'attention lors de la mise en
setvice. l'entretien ou la mise en marche
du réfrigérateur l^n cas de problème
difficile à résoudre, lou|ous
communiquer avec le détaillant, le
distributeur, 1s prestataire de service
après-vente ou le fabricant
Table des matiêtes
Normes Électriques
Garantie . . 53
Enregistrement du produit
importantes consignes de sécurité
înstallaiiûrt du réfrigérateur
Transport de l'appareil
Sélection du meilleur emplacement
Retrait des portes et des charnières
Remontage des portes
Démontage et pose d^ poEgneesMise de niveau du réfrigérateur ..
Raccordement de ralimentafion en eau.
Réglage des thermostats
A propos du système de fitlration...............
Caractéristiques du réfrigérateur
Rangements de ta porte , .. , ...
Tablettes..................................................
Tiroirs
Caractéristiques du oongêlaieof
Caractéristiques du distributeur
Conseils et entretien
Dépannage............................................. .. 71
Dorrnées sur ie filtra à eau
Service après-vente
............................. .........................
Primaires Dispositifs..................... . ,.,
Tiroirs
.............
Rangement de la porte
Clayettes
Fonctionnement du distributeur d'eau ,,
Contrôlez les dispositifs des cinq boutons
Dispositifs Étectronique De Commande ,
Comment nettoyer i'appareii
Comment enlever et remplacer les
ampoules électriques.................................70
.....................................
............................
...........................
..............................
.............................
....................
.......................................
....................................
.....................
................
.............
..................
.................. . - 75
............................. . Verso
..............
..........
.......
.........
...............
...
.............
.
. -.
............
.
À DANGER
DANGER—Dangers immédiats qui RESULTERONT en de graves blessures, voire le
A AVERTISSEMENT
AVERTISSEMENT—Dangers ou pratiques non-sécuritalres qui POURRAIENT résulter
en de graves blessures, votre le décès
ATTENTION
ATTENTION—Dangers ou pratiques non sécuritaires qui POURRAIENT résulter en
des blessures mineures ou des dégâts matériels
53
54
54
55
55
55
56
55
58
57
56
59
60
61
61
61
62
63
63
63
63
63
64
. 64
66
55
69
69
54

Installation du féfrigéfateuf
Ces consignes ont pour l'objet de faciliter i’instaliation de rapparell, Sears n’est
installation Inadéquate-
Transport de l’appareil
Suivre ces conseils pour dépiacer l’appareil à son emplacement
final t
• NE PAS transporter l'appareil à l'horizontale SI aucune autre option n'est
disponible, laisser l'appareil à la verticale pendant environ 30 minutes pour
s'assurer que l’huile retourne dans le compresseur Le branchement
immédiat de l'appareil peut endommager les pièces interrtes-
• Utiliser un chariot pour déplacer l'appareil. TOUJOURS indtner l'appareil sur
te côté - JAMAIS sur la partie avant ou arrière
• Protéger le fini extérieur de l'appareil durant le transport en recouvrant
l'appareil de couvertures ou en Insérant un coussin entre ¡'appareil et le
chariot
• Fixer fermement l'appareil au chariot avec des courroies ou des sandows
Enfiler les courroies à travers les poignées si possible. NE PAS trop serrer
car cala peut bosseler ou endommager le fini extérieur
Sélection du meilleur emplacement
Respecter ces consignes avant de choisir l'emplacement final du
réfrigérateur :
• NE PAS installer le réfrigérateur près du four, du radiateur ou de toute autre
source de chaleur. Si cela est Impossible, protéger l’extérieur de l’appareil-
• NE PAS installer l’appareil lorsque la température est inférieure à 55 *F
(Î3 ‘’G) car son fonctionnement pourrait être affecté,
• S’assurer que le plancher est de niveau Si le plancher n'est pas de niveau,
caler tes roulettes arrière de l’appareil avec un morceau de contreplaqué ou
autre matériel de calage,
• Pour assurer que ta porte ferme bien, vérifier que l'appareil est nivelé à une
IncHnaison de % po vers l'arrière
Démontage et pose des panneaux
certuins modèles
Se reporter à la fiche intitulée Pose de panneaux de porte décoratifs
apposée sur le devant de l'appareil.
pas responsable d’une
Comment mesurer une
ouverture pour s’assurer que
le réfrigérateur est bien
installé ?
Ce réfrigérateur est conçu pour une ouverture de
1,76 ГП de hauteur fraur assurer une venfflailon, une
mise de niveau et un réglage des portes adéquats.
Dans la mesure de i'espacæ nécessaire, il faut
également prendre en consldérralion la fait que
certains modèles exigent un certain dégagement
sur toute leur périphérie pour assurer une
drculstion de l’air ssrisante. Une bonne drculaton
de l'a'r est la dé d'un foncfionnement oplinrium sur
te plan de la consommation d’éledridté Pour
déterminer les dimensions de l’espace nécessaire
pour Гаррагей, se référer au iableau cWessous
Un support de revêtement de sol ou un revêtement
de sol (moquette, carrelage, plancher, tapis)
pourront rendre l’ouverture plus petite que prévu
Il est possible de gagner de i’espaœ en uilisant la
métoode de mise de niveau indiquée sous Mise
de niveau du réfrigérateur.
Volume total de
l’appareil
Moins de 6,5 m’
Plus de 6,5 m’
IMPORTANT ; SI l’appareil doit être installé
dans un coin où te dessus de l'appareil est
entièrement recouvert, utiliser tes
dimensions à partir du plancher Jusque sur
le dessus du couvre-charnière pour vérifier
si l’espace de dégagement esi adéquat.
Dégagement recoramandé
Côtés
s,o. so
13 mm
s.o.
Arrière
S.D,
13 mm
Щ
55

Installatioii du réfrigérateur
Retrait des portes et des charnières
Certaines instalfations exigent ie retrait des portes avant de déplacer le réfrigérateur à son emplacement final.
A AVERTISSEMENT
Pour éviter des blessures graves, voire le décès, observer les poinfs suivants :
' Débrancher le réfrigérateur avant de démonter tes portes Le rebrancher une fois les portes remontées uniquement
• Le fil de mise à la terre vert doit être fixé à fa charnière supérieure pendant te démontage et te remontage des portes
* Fixer les panneaux décoratifs (certains modèles) en place à i'alde de aiban adhésif avant de démonter les poignées
A ATTENTION
Pour éviter les dégâts matériels, observer les points suivants :
• Protéger les planchera en vinyie souple ou autre revêtement de sol avec du carton, un tapis ou autre matériel de pretection avant de
déplacer le réfrigérateur.
• Ne pas ufiiiser d'oufils électriques lots de la mise de niveau afin de ne pas risquer d’endommager ni briser le boulon de réglage
• NE PAS régler l’appareil â une hauteur inférieure à 1,74 m (charnière et coiMêchamièie non compris) car les composante du dessou ;
de l'appareil risqueraient de se trouver endommagés.
Redret la. ffilJe et les axjvte-
*
dbamlères infídears,
• Ouvrir les deux portes à 18CP,
ou aussi grand que passible,
pour les démonter.
^ IMvissec r&xau de
racxx3tdetneat pouf
déîadiet h tubulure:
modèles arec disaUxtear seulemcat
Retirer le couvre-cbarnlère
supérieur âprès avoir enlevé
h vis crudform&
Fetmer les partes. Dévisser
pans 8 mm des cbarmères supérieures.
/es
* NE PAS enlever le fil de mise à la terre 'œrt ou
la vis œntele de rraccorderrrent du i.
vis à six
Détacher le barnais de taccntderaeat du
âl laauapaJ.
5
• Uiiser un tournevis à lame plate ou
un ongle pour appuyer sur le point de
jonction entre les deux connecteurs
afin de Ibs dégager
Ltàacber le harnais de câblage rouge
* Appuyer sur la patte se trouvant
sur le dessous du corrnsdeur
pour dégager celui-ci
Hnlever les charnières
supérieures en même
temps que les portes.
Enlever les charnières iaEriearæ
avec un tourne-écrou hexagonal de
mm.
Remontage des portes
Pour remonter les portes, suivre dans l’ordre inverse fes étapes
indiquées sous la section Démontage des portes et des
charnières
Démontage et pose des poignées
S'il s'agit d'une perse de poignées iniale, fa poignée du œmpartfment pour produits frais se trouve dans œ compartiment La garniture de la
poignée se trouve dans te sac de documentation.
Enleva: les deux vis à dx tvins
cfe
ô mm du bas de la perte du
ccmgâatmr et du réRigératem.
AUffier les pdgaæs de perte avec les ^
dips de retenue de porte supêdears
2
et in&imrs et les ¿ire 0sset
œ ope
i<s fitsus
des vis se trouvant au ^
bas des peignées œrrespædeat axtx
..
ttaus des vis departe.___
__
/usquS I
__ __
I
_________
54=
1
1
y
•<
Insérer les vis retirée à Fêtape î
dam les trous percés
bas de la poignée.
À Emhdiec les
J*
in&ieure des poignées et des tMsposîiiÉ
de rétamé du bas de la pxts.
gaiMiiui-es
à
cet effet au
sur h partie
'56

Installation du réfrigérateur
Démontage et pose des poignées coadaué
Retirant des traitements d’avant
Retirer des traitements peut être nécessaire en transportant le réfrigérateur par les espaces étroits.
Jîdirer is
tartie inSüwtc dss
Î
pdgnêss à Ikide dhn très petit
tairnepis à Mmepiâtà,
IMPORTANT : Couvrir la feme du toumevr
njban-cache pour éviter d’abîmer rapparaii.
1—I
П
Retirez les poignées qui sont montés du côté de la porte
Retirer des poignée peut être nécessaire en transportant le réfrigérateur par les espaces étroit, s’installant ou les panneaux de retirer.
A AVERTISSEMENT
Pour éviter des dommages et d’endommager possibles la propn’été, enregistrez les panneaux sur bande déœraüfs solidement dans
fendrolt avant de retirer des poignées de porte.
Digería
garaitaredu bsntdeh
1
perte
ea rakant les vis audSxmes <ht
haut des portes des cœparümmts
cpBgdatsir a ptcdults £nis,
■ Mettre tes vis de côté pour le remontage,
installez les poignées qui sont montés du côté de la porte
U^gaîa garnituiedu baatdela
Î
pcjrte ea retirant les vis aud&itnies
du haut des partes des arnparüineais
caagâatmr apredaits feus.
• Mettre les vis de côté pour 1e remontage!
Remplsœz 1ЩиШЬге supédeat de
parte par les vis cmdÊwmes
maintenues de Ibilèvement
d'egtïiJibfe
Retira: les
pûignæ Tira h pdgaée vas Je hâîit
pær k dé^ga de Fapparél. JJ est
possiUe (p’dle sdt diÆdJe à ealeva.
deux
vis de h base de h
>
'
cy Saiâssez la poignée &rmanæt
dU les dam mains a ^ssez la pcsgaêe
vers le haut appmdmativanmt
k versiati R^âez le pracâié pour
retira l’antre poignée.
_
Aligna les eaooches au dos de
k pdgpêe sur les dlps de
retenue de k pcxùe. Inséra
les dlps (hns les eacxxiiGS
a^ssa k pdgnée vas
le bas
/iîsguS œ
cpWe kite sur k garniture kÆàeare
• Procéder de même pour la pose de l'autre poignée.
^
—
------
avec f
ж
%" à Ш
Щ
,
■h
---------
11^
Mise de tiïveay du réfrigérateur
Mûtérid üâesssiie ' Tbume-éoBu hexagonal de 10 mm ' Niveau
Retira la grille a les axivre-chamiàes
voir tes iacficaaofls doanœs préœdcamair J
Q
^
Tourna les cha vis de r^age avant (A)
' chas Je
Tapparél a dans leseas ^ ^
ânübaraiee pour là baissa. ^
^
Tourna les vis ds r^lage ardàe (B)
JJ dans Je sens bœake раж soaleva
IhwardJ et chas Je sens
mtibacaiïe pour l’abaissa.
4
sens
horaire petar souleva
4
ri
VéMa à Mde da nhma à IkffBmî est indité de 6 mm
vets Ikmàs a£n giek paie &tme armtfmmt.
' Si l’appareil est aligné et stable, remettre la grille et les
couvrechamières en place.
iû£ri«ïrs: |
Si
î’apparéî
ardàe dans le sens hacaire раж ideva le œia
bancal.
Si les porta ne
Tautreu
^ Détenminer laquelle des deux
portes do'il être ге1еад,
• Tojmer la vis de réglage avant
dans ie sens horaire pour
relever le coh aérant de ta porte-
" Si la vis de réglage est vissée a fond
Hiiniî t ïfi ejeii^eî t l’isi ibxs «bS ta lcs<£ yv^rfiac
CiSns иГ1 5€ilw uIhI Uqi I oUlfwi, ^
ne sont toujours pas ds niveau, abasser la porte
opposée en tournant la vis de réglage avant dans le sens
anlihoraire-
• Vérifer à faide du niveau que la porte est bien Indhée de 6
mm vers farriére aiïn que la porte se ferme correctement,
• Si fapparel est aligné et stable, remette la grie et tes
couvréchamières en place.
57
est
baaal^ tourna k vis de i^age
sont
pas dam IMgnmxat lime de

Installation du téffigétateut
Raccordement à Palimentation en eay
AVERTISSEMENT
Pour éviter tout risque d’éiecirocution, qui pourrait provoquer des btessures graves, voire te décès, débrancher ie téftigéraîeur avant
d’effectuer te raccordement de l'alimentation en eau. Rebrancher l'appareil une fois !e raccordement à ralîmentation an eau terminé,
A ATTENTION
Pour éviter tout risque de dégâts malérieis, respecter ies points suivants :
* Consulter un plombier pour raccorder la tubulure en cuivre à la canalisation d'eau du logement afin d’assurer la conformité aux
codes et règlements locaux.
■ Vérifier que la pression d'eau à l'éiectrovarrne se situe entre 138 et 889 kPa, Avec un fite à eau, ia pression dort être d’un
minimum de 241 kPa,
• NÊ PAS utiliser de vannes à étrier de 4,8 mm ni autoperœuses. Elles réduisent le débit d'eau, se bouchent au fti du temps et
peuvent provoquer des fuites lorsqu'on essaie de tes réparer
* Serrer les écrous à la main pour éviter de foirer le filelage Finir de les serrer à faide de pinces et de clés Ne pas trop serrer.
• Attendre 24 heures avant de mettre i'appareil à son emplacement finaí aiin de pouvoir vérifier s’il y a des fuites et de tes réparer
Matériel nécessaire
• Tubulure en cuÎw b ftexibfs d’un
diamètre extérieur de 6 mm.
• Écrou et manchon en laiton (voir
te sac de documentation)
• Robinet tfatrêt (I faudra perœr
un bmi de 6 mm dans la
canaisatlon d’eau pour ie fixer
en plaœ)
■ Cié à molette
Créer une boucle de service avec la tubulure en
1
véllaat à ne pas la plier.
REMARQUE ; Ajouter 2,5 m à la longueur de tubulure
nécessaire pour permettre de créer une boucle de service
Enlever le capuchon en plastique de Votìfìce
d’arrivée d’eau de l’électrovarme.
Mettre l’écrou en laiton et le wancbon sur
l’extrémité de la tubulure de cuivre tel quillustré.
3
Insérer l’extrémité de la tubulure en cuivre dans
îbriûce d’arrivée d’eau de l’éîectrovanne. Façonner
l^èremeat la tubulure SANS PLIER, de &çoa à ce
que la tubulure aille directement dans l’ori&ce
d’arrivée d’eau.
' Glisser l’éctou en laiton sur le manchon et
dam l’oriûœ d’arrivée d’eau. Serrer l’écrou à la dé Tirer
sur la tubulure pour conSrmer qu’elle est solidement en.
place,
IMPORTANT ; NE PAS trop serrer sous peine ds foirer le
filelage.
visser l’écrou
Localiser le colUet destiné à la tubulure et le âxer en
place à l’aide dîme vis à six pans de 6 mni, tel
6
quIllustré CXivrlr l’eau et réparer toute âxite
éventuelle.
Surveiller les raccords pendant 24 heures. Réparer les
7
ñutes sil y a lieu.
58

InstaHation du réfrigérateur
Réglage des thermostats
Ce réfrigérateur est conçu pour fonctionner â une température ambiante de 13° à 43 °C
Commande de température avec le cadran
Pour le régfage de température initial, suivre ies cinq étapes cWessous, Pour faire une simple
modificaïon du nsgiage de la température d'un réftigéraieur déjà en fonction, seules ies étapes 3 à 5
sont nécessaires.
Localiser Je thetmostat da
1
té&Jgétstear et da
cœgifateir sur la parcs
supédeure gauche da
féûJgêtateat et t^let ces
detzx theanostats sur 3i4.
lltSPÛRTANT : Ni i’un ni l'autre
Gomparôment ne fonctionne si le
theimostat du congélateijr est sur Off
{arrêt)
f P Laisser la température se
staldlisec pendant 24 heures.
^erijBer si la temperature
du congélateur se situe
entre -17 et -16 ^C.
• Tourner le Ihenmostat sur le chiiîre
suivant si la production de foid est
insuffisante.
• Tourner le thermostai sur !e chiffra
precedent si fa production do froid
est trop importante
• Prévoir 5 à 8 heures avant que le
: ne prenne effet
Védâer sf la tetnpécatute du
réâdgérateur se situe entre 3 et
4°C.
• Tourner le thermostat sur le chiffre
suivant si la production de froid est
Insuffisante
• Tourner le thermostat sur le chiffre
précédenl si la production de froid est
trop importante.
■ Prévoir 5 à 8 heures avant que ie
réglage ne prenne effet
Répéter les étapes 3 et 4 en
fonction, des besoins.
d
Comment vérifie^:oti la tempéfatufe à
l’fflde des
thermostats ?
Matériel Bécessatts
* 2 thermornètres d'une capacité
His mcicf 11*0 Hct i® jïa IA
• 2 verres
CoBgélateut
- Mettre le thermomètre dans un
verre d'huiie végétale au milieu
du congélateur et passer à
i'étape 3 de la section Réglage
des thermostats
IMPORTANT : En raison de la
conception de t'appareil, toujours
commencer le réglage de la
température par le compartiment
congélatour.
Réfrî^ateor
■ Mettre le thermomètre dans un
verre d’eau au milieu du
réfrigérateur et passer à l’étape 3
tfn» la l^cirtlrtnCi rime
î et »Iv^l I tir iCi viti tî
thermostats
Modèles Électroniques De Commande De Température
Pour placer la température du congélateur, utilisez les boutons
1
à côté du bouton Une conBguration de 0° à 2° F (-17° à -î 6° C)
est recommajTtJé.
• Utilisez te bouton x pour soulever la fempérattire de la section de congélateur«
ou le bouton Y pour l'abaisser.
♦ Press the Ë3 button to confirm the settings
»T« ^ #‘irsAa trv\/4 cr»r*Fir^rì
j. {Jt sCL LilC i.cil.i.M£Jcll Л
buttons next to the button, A setting of 38° to 40° P
(3° to 4° C) is leommended.
Accordez 24 heures pour que les températures stabilisent
NOTE: Si ajustant la température d’une unité opérationnelle, seulement des 5 à 8
heures est exigées pour les températures pour entrer en vigueur.
t- ÍJ./. CT
{j£
LtdEw
JJLC%f£l ivJL/Ll ncL.i.l
59
t.ji
1Л1эС LUC
- - ™ ^
Pourquoi les
temoératures sur mon
atochage a LMi)
Hottent-elles après
qu^elles |»ur avoir été
placées?
Les températures de
compartiment peuvent changer
légèrement pendant que l'unité
rrtdkj’ dj if»c fía>TEÉ"i¿)t‘aíi ifde
l f Itî \ c# j%# Lî I i >r* • r r d vL»l Crfw
positionnement.
md
"S
Щ
?
m

À propos du systèrae de filtration...
Démontage et pose du filtre à eau
Quand le fíltre doÍt41 être
changé ?
Le distributeur comporte un indicateur
de changement de filtre de i'eau- Pour
des inslnjctions sur la façon dont
adonner et remettre à i'état Initial ce
dispositif, référez-vous à ta section de
disposltlis de dîstilbuleur
IMPORTANT : Le type d'eau et sa
consommation détenminent la durée de
vie de la cartouche du filtre à eau. Si une
grande quantité d'eau est uülisée, ou si
feau est de piètre qualité, il pourra faitoir
changer la cartouche plus souvent
Comment se ptocore-t-
on une cartouche de
rechange ?
Le model 90Û5 de cartouche filtrante de
teau de rechange de Kenmone® est
disponible par des marchands et des
servicera de Sears Vous pouvez
également passer commande
dessèche à travers en utisant
rinformation sur la couverture arrière.
Comment fait-on couler
l’eau dans le système ?
Où est l’eaii?
Lors de la première ulisaSon, prévoir 1
à 2 minutes pour que le réservoir
interne se remplisse d'eau avant de
pouvoir faire couler t'eau,
Qu’arrive-t-il si le
systèrae de filtration
d’eau n’est pas utilisé?
Le distributeur peut être utilisé sans la
cartouche de filtration d'eau 11 faut alors
remplacer le filtre par le capuchon de
dértvafon bleu
Mise en service initiale du filtre à eau
Enlever Je capuchon de
1
dérivation bleu et le
conserver pour usage
ultérieur.
Enlever J’étiquette de ^xUage de
lixtréntité du âltre et Hasérer
dans la tcùe dn dltre
Faire tourner doucement dans le sens
horaire jusqu'à ce que le filtre arrête et
enclencher te couvsrcte du fllbe pour le fermer
Réduire les éclaboussures en éliminant Fait
du sfstême Paire couler Peau sans arrêt
dans le distributeur pendant 2 minutes
jusqu’à ce qu’elle coule de &.çon stable
Il pourra faitoir faine couler l'eau plus longtemps si
ralimentation en eau est de piètre qualité.
Rem placement du filtre à eau
IMPORTANT : L'air qui demeure coincé dans le système
peut déloger la cartouche et faire gicler l’eau. Agir avec
prudence su moment du démontage.,
Tourner le ûltre dans le sms antiboraire
1
jusqu’à ce qu’il se d^age de la tête du Ültrc.
Faire écouler Peau du âltre dans l’évier et
mettre au rebut.
Essuyer l’excédent d’eau dans le couvercle
du âltre et procéder aux étapes 2 et 3 de la
Mise en service initiale du fíltre à
eau.
60

Caractéfistiques du réfrigérateuf
Rangements de la porte
Wlîlk Savor"'^ certains modèles
be Gonpartiinent à iempéiaiure contrôlée Mik Saw)^* gardent
les bossons et aute arlides à Une température Jjscjj’à
pfus ftoicte que !e reste du éfrigéiateur L’arôée d'ar periîieE à
fair du ojngélafeur de passer dans le compartiment Milk
Sa\oî*‘®^
La comrrHnde Wk Savoi^*® se touve sur ta
paroi gauche du réftigéraleur. Celte commande
permet de régler la quanié d’air drculant dans le
œmpaîfment Mît Savot“'^. Tournez !a oommancfe
dans le sens des aiguibs d'une montre pour la
température plus froide
Pour retirer le compartiment Mîlk Savoi“^ et !e
remettre en place ;
• Si le casier pour produits laitiers
ou te balconnet se trouve ctifEctement
au-dessus du comparttment Miik Savoi*'®,
il pourra falloir le reffrer Suivre les
explications qui cor^viennent pour retirer
i'articie Fare coulisser le compartiment
Milk Savor*® vers le haut et l'enlever
• Pour le remettre en place, aligner l’un
des orifices d’arrivée d'air froid (A) du
œmpariirrœnt Milk Savor*® sur t’uns
des deux arrivées d'air (B) situées
dans la aive inléfieure de la porte
Pousser le compartiment dans 1e
dispositif de retenue de l’habillage
intérieur de la porte jusqu’à ce qui bute.
IMPORTANT : Ire compaÉ'ment MIk Savot“^ ne fonctionne
pas si les arifiœs d'arrh/ée d’air ne sont pas alignés sur
ratrivée d'air dans l’habillage intérieur de la porte
Casier pour produits laitiers
Ce comparOment procure un espace de rangement pratique
pour te beuno, tes yogourts, le fromage, etc
It est régiafate et se trouve darrs la p«te. îf peut être plaœ à
différents endroits de fa porte pour mieux l'adapter aux besoins
de rangement-
Pour retirer le casier pour produits
laitiers et îe remettre en place :
• Pour l'enlever, le faire couSsser vers
te haut et le retirer
• Pour le remettre en place, glisser !e
casier dans le dispositif de retenue de
fhabiage intérieur de la porte du dessus
et pousser vers le bas jusqt/à ce qu'il bute.
Pour retirer la porte du casier et la remettre en place:
• Pour la retirer, pousser sur les côtés de fa porte du casier
et ! enlever.
• Pour la remettre en place, glisser tes côtés de ia porte du
casier dans celui-ci jusqu'à ce que tes pointes charnières
s'enctenchent en place.
___________________________
jg ■y I g g g ]yj g |y| Y
Pour éviter tout risque de blessures ou de dégâts matérieis, prendre
tes précautions suivantes :
•- Vérifier que la tablette est soMement en place avant dV mattre de
la nouiritufe.
• Manipuler les tablettes en verre trempé avec prudence car elles
peuvent se briser brusquement si elles sont ébréchées, éraflées
ou exposées à des changements brusques de température.
Rangements de la porte
Balconnets inclinables
certains mcxicles
Le baîconnet inclinable se compose d’un casier et d’un
encadrement et procure un espace de rangement
pratique et réglable pour tes aliments dans la porte. Le
balconnet peut être incliné vers l'avant pour faciliter
l’accès aux articles et enlevé pour faciliter te nettoyage et
le réglage.
Pour retirer te balconnet et le remettre en place :
• Pour retirer le balconnet, l'incliner vers l'avant et _
renlever.
• Pour remettre Îe balconnet en place,
le faire glisser dans son
encadrement et !e pousser à fa verticale
Pour régler l’encadrement du bakonnet :
* Retirer le balconnet en suivant les indications ei
de SS us
* Soulever l’encadrement hors du
support de la porte et le placer à
^c4(T3rkîîSi*'ïisfYiiiiiî^Î
I
Balconnets réglables
Les balconnets sont réglables pour mieux^
répondre aux besoins de rangement,
Pour retirer un balconnet et ie remettre
en place ;
* Soulever le balconnet jusqu’à ce qull se
dégage des dispositifs de retenue de l’habillage
intérieur de la porte, puis l'enlever.
* Pour te remette en place, te glisser dans le dispositif de
retenue de lîiabillage de la porte du dessus et pousser vers
le bas jusqu’à ce qu'il bute
Tablettes
Tablettes anti-gouttes
ccrtàins inoae/es
Les tabfetlfôs fixes anti-gouttes
facilitent le rteltoyage en retenant les petites
quantités de liquide qui pourraient s'écouler.
■ Pour retirer ia tablette, la souiever et la sortir
■ Pouf remettre la tablette en place, proceder a
('inverse.
yi
I
?
61

Caractéristiques du réfrigérateur
1
Tiroirs
Plateau à canettes
certBÎjas modèles
Ce plateau coulisse du dessous d'une
tablette anti^uites te. li a une capacité
de 12 canettes de 35 cl.
Retirer et installer Plateau à canettes:
' Pour enlever fe bac fouwcÊJtTfiêlemerit, fëeverfavant et b fEiier
• Pour mettre le bac en place, l’insérer sur les rails et le pousser
en place.
Ce bac peut être uiisé pour ranger
des aliments gu des fruits et ieyymes
• Pour {Efirer le Wr, le Srer à fond vers soi.
Indher le dsvani du Stoir et fenlever
Pour le tsmettre en
rinvefse
, pnxéder à
Quel rérfase doit être utilisé pour les
aliments rangés dans les tiroirs à
humidité contrôlée ?
Il n’est pas recommandé de ranger ta laïtye ou autre
légume à feuilles dans ce tiroir.
• Chou-fleur ♦ Pomrne
• Mats • Orange
LOW (faibisj ' Courgette » Raisins
HIGH (élevé)
‘ Concombre
Laitue
Épinard
Céleri
Germes
Asperge
Chou
Brocoli
Herbes fraîches
Quel réglage doit être utilisé pour les
aliments rangés dans les tiroirs à
température contrôlée =
COLD (froid)
(plus
COLDEST froid)
^ Chou-fleur
' Maïs
Courgette
- Concombre
' Steak
' Bacon
' Viande
froide
Pomme
Orange
Raisins
Saucisse
à hot-dog
Fromage
dur
Quel réalaae doit être utilisé pour les
aliments rangés dans les tiroirs à
température contrôlée ?
Respecter les consignes suivantes lors du rangement des
fruits et légumes dans les tiroirs à humidité contrôlée :
• NE PAS laver les fruits et légumes avant de les mettre
dans les tiroirs car toute humidité ajoutée dans les
tiroirs peut faire en sorte que les fruits et légumes se
gâteront plus rapidement
• NE PAS recouvrir les bacs à légumes d’essule-tout car
ceux-ci retiennent l'humidité,
• Suivre attentivement les consignes relatives aux
commandes car un réglage Inadéquat de celles-ci peut
nuire à la qualité des fruits et légumes.
Tiroir à viandes froides/légumes
Le système pour viarrdes froides/légumes comprend urr
tiroir doté d'une commande de température variable qui
garde ie compartiment jusqu'à 5 “F (3 “C) plus froid que le
réfrigérateur Ce tiroir peut être utiîisé pour ranger les
viandes froides ou les autres aliments frais,
REMARQUE : L'air froid propulsé vers le système viandes
froides/légumes peut diminuer la température du
réfrigérateur La commande du réfrigérateur doit alors être
réglée
Commandes
Située sur la paroi à la gauche du bac, la commande de
température règle la température de l'air dans le tiroir
charcuterie/iégumes. Régler la commande à cold (froid)
pour régler le réfrigérateur à une température normale pour
les légumes non feuillus. Utiliser le réglage
froid) pour les viandes ou la charcuterie
Pour eniever un bac et te mettre en place ;
• Pour enlever te bac, rouvrir complètement,
relever favanl et 1e retirer
• Pour mettre le bac en plaœ, l'insérer sur
les rails et le pousser en place
coldest (plus
Bacs à légumes à humidité
contrôlée
Le bac à légumes garde les fruits et tes légumes frais plus
longtemps en assurant un environnement à humidité réglable
Gomrtiatjdos
La commande du bac à légumes contrôle ie niveau d'humidiîé à
fintérieur du bac, UtiSser te régbge hw (feibîe) pour tes légumes
noft feuillus et te réglage high (élevé) pour les légumes feuüus
Pourefîiever un bac et te mettre en place :
• Pour enlever le bac, l'ouvrir complètement,
relever ¡'avant at le reîirer
• Pour mettiB le bac en placæ, l’insérer sur
tes rails et I0 poussar an plaça,
Pour eniever la tablette en verre
et l'encadrement !
• Enlever les bacs tel quindiqué d-dessus
• Mettre une main sous l'encadremenî pour
pousser la tabfelte an verte \ærs le haut
à pafflr du dessous Sorlever la tablette
et la æb'per
» Soulever fencadiEment des rails de la cuve inléileure du
lé&fgératajr et le reSrer
• Pour remsttre css alsments en place, proceder à linvsr^.
62

Caractéristiques du conœlateur
.....................................I
ATTENTION
Pour éviter tous cfégâls matériels, respeder tes consignes suivantes ;
‘ Ne pas forcer le levier de la machine à glace vers le haut ou le bas
■ Ne rien placer ou ranger dans le bac à glaçons
A AVERTISSEMENT
Pour éviter tout risque de blessute, voire de décès, ne jarots placer
d'atïcies en vens sur la tablette à crème ^cée Les objets en verre
peuvent se briær ou estploser slls sont exposés à des conditions de
fcid externe.
___________X ______________________O_____________
Tablette à crème glacée
î ia íiaHíísHta à í'^fxsmjCi rtlsa/saía rjinir'f snci i iri fiacrscir^ Ha rítjf^/TfiUTTiiísrií’
Ua «áUftíUU U vftínití yidiAitJ piijvuicí Uif Uv |dilytt-ltitiisi
pour les articles qui doivent refroidir
QU être congeles rapidement,
• Pour retirer la tablette à cfèroe
glacée, la soulever hors de la
crémaillère du bac a glaçons et la[
tirer vers sd-
■ Pour instaler la tablette à crème gbcée, placer la tablette sur te
dessus de la machine à glace et rabaisser dans la crémaillère
du seau à glace.
Primaires Pîspositifs
Machine à glace automatique
r'itïWo tnía/’HtfTía à füiKiHntiís lci<ï Hcatií: îîïj
WtíUtí Iîfc? d yldiJt; IdUIiLjUW icis yidyMUÎs UUíiístío U-d-íto iW
système de distribution-
utilisation initiale de la machíne à glace
• S'assurer que la machine à glace
est en place et que le levier de la
machine à glace est abafesé
• Lorsque la tempéralune du
compartiment congélateur atteint 0
à 2 8 à 47 »C), la machine à
glace commence à se rampïr d'eau et se met en marche-
• Il faut environ 24 heures à la machine à glace pour produire des
glaçons
• Jeter tous les glaçons produits dans Iss 12 premières heures
de fonctionnement pour vérSer si reste des impuretés dans le
système
Mûds d’emploi
• S’assurer que te bac à glace est
bien en place et que te levier est
abaissé,
• Lorsque la température du
compartiment congélateur atteint 0 a 2 (-18 à -17 °C), la
machine à glace commence à se remplir d'eau et se met en
marche, il faut environ trois heures à la machine à glace pour
produire des glaçons
• Cesser la production de glaçons en soulevant le levier jusqu'à
C0 quun dedic se fasse entendre.
• La machine à glace demeure à la poslort off (arrêt) jusqu'à ce
que le levier soit abaissé
J
Tiroirs
Bac de congélateur
Retràit et installation du bac
' Pcxirreier le bac, soulever le devant
de ceU-d et le tirer jisqu’au bout
Soileverte devant du bac et le rete’
• Pour instaler b bac, te faire gfisser
dans la crémaillère située dans la partie inférieure du congélateur
Soulever te devant du bæ et le fete gSsser vers farrière de fapparel
Bac à glaçons
Le bac à glaçons se irouve sous la rrachins à glace automatique
Retrait et installation du bac à glaçons :
' Pour retirer le bac, retirer Is tablette a crerr^ glacee. Soulever le
bras de la machine à glace pour désactiver ' ' '
celieci. Soulever le devant du bac et te tirer
complètement vers soi.
Soulever te devant du bac et le lelirer
» Pour instsiler le bac, !e faire glisser dans
crémaiilêfB sous la machine à glace jusqu’à ce que le Ьзс se
verrouie en place. Laisser tomber le bras de ia machine à
glace pour activer оеНечз et remettre la teblette s oème giscfée
en place.
IMPORTANT : Le bac à glaçons dort
ête veiroulê à fendroï approprié
pour s'assurer que les glaçons sont
disMbués adéquatement St te porte
du con^Bteur ne ferme pas, cete sgntfe que le bæ n'est pas à
iendrol approprié. Tourner te disposlf d’entraînement de foret dans
le sens inverse des aiguilles d’une montre (tel qulndîqué) pour
ürwictt“ rvTPtïvHctfTwanf Lsk К:ал èt rHtüfVffVi; ttartiâ-fïa Hja
a
tlyx iCtl VA*ri itwSirtiiiie* I Kwtl IL itirr fr»VvivV# IÇIM ftiifl vJ'w füSfl-
Clayettes
Clayette de congélateur fixe
Retrait et Instailatïon des dayettesavec attaches
murales i
• Pour la retirer, enclencher te côté droit
Hd /'^os/cîiHia ia fitarHi* Hm Iss ♦'‘rómíaillÁnsi
Ut» tCrt widyttvMwJ C" Ml v-lt» i-ttl wl tftî lïtjliitfrtî
fixée aux parois de l'appareil et la retirer
des attaches muiHles
• Pour linsteller, placer la dayelie dans îe trou de fbslion et la
fixer avec des attaches murales ,
Retrait et mstallation des clayettes
avec crémaillère :
. Pour retirer la clayette, enclencher
le côté droit de la clayette à partir
de Is cremsiilere fixes aux paróte
de l’appareil et la reirer des attaches murales
• Pour installer la dayette, la remettre en place dans les
attaches murales. S’assurer que le rebord arrière de la
dayette se trouve vis-à-vis farrière de fapparell et
enclencher la dayette dans la crêmaillête.
m
s
Z
?
Rangement de ia porte
Casiers de porte
• Voir la rubrique Réfrigérateur pour connaître la procédure.
63

Caractétistiques du distributeur
Lumière du distributeur non ii/uiirte
Une lumière s’allume à proximité du distributeur lorsque celui-d fournit de l’eau ou de ia glace
Touche du distributeur
La touche du distributeur se trouve à l'arrièæ de la zone de distribution Lorsque la touche du distributeur est
enfoncée, la séiection effectuée sur le panneau de œmmande du distributeur sera activée.
Piateau amovible
le plateau amovible se trouvant au fond de ia zone de distribution est conçu pour recueillir
iss petites édaboussures et peut être facilement retiré s des fins de nettoyage et de vidange,
IMPORTANT : Le priateau amovible n’est pas un drain Le plateau peut déboider si l’eau coule de façon ¡xinBnue
Ponctionnement du distributeur d’eau
Á ATTENTION
Pour éviter tout risque de bleœures ou de dégâts matériels, respecter lesconsignes
suivantes :
• Ne pas mette les doigts, les mains ou tout objet dans touverfure du distributeur
• Ne pas uiiser d’objets pointus pour concasser !a glace,
• Ne pas faire tomber la ÿaœ directement dans un lédpient en wne mince, en porcelaine
ou en cristal délicat
REMARQUE : Lorsque le distributeur d'eau est utiiisé pour la première fois, il faut attendre 1 à 2
minutes avant que l'eau ne coule car le réservoir d’eau se remplit Jeter les 10 à 14 premiers verres
d’eau après avoir branché le réfrigérateur à l’alimentation en eau domestique et après de longues
périodes d'inactivité
Pour utiliser la touche du distributeur :
' Choisir la fonction de distribution d'eau à partir du panneau de commande du disWbuteuf,
• Appuyer un récipient robuste à bec large contre la touche du distributeur.
• Relâcher ia touche du distributeur pour arrêter l'écoulement d'eau. Une petite quantité d'eau peut
s'écouler dans le plateau du distributeur Essuyer les grosses éclaboussures
64

Caractétistiques du distributeuf
Contrôlez les dispositifs des cinq boutons
Foncfionnement de ia machine à glace
Pour distribuer la glace :
• Sélectionner le mode glaçons CUBE (en cubes), CRUSH (broyés) ou WATER (eau) en appuyant sur le panneau de
commande du distributeur Un voyant lumineux vert au-dessus du bouton indique la sélection du mode.
• Appuyer sur la touche du distributeur avec le récipient, Pendant que la machine distribue de la glace concassée, tenir
le récipient aussi près que possible de la chute pour réduire les éclaboussures Le mode de sélection ne peut être
modifié pendant que la machine à glace fonctionne,
REMARQUE : Si le distributeur fonctionne pendant plus de 3 minutes, un capteur de verrouiage automatique œupera faimentalion
vers le distributeur.
r 1
wAtes
^Verrouillage du distributeur'
Cette caractéristique empêche l'eau ou la glace d'être distribuée.
Pour verrouiller QU déverrouiller;
• Pour verrouiler le dislributeur, appuyer sur le boulon LOCfOUNLOCK (Verrouillage/Déveiroulllage) et le maintenir enfoncé pendant 3
secondes. Un \oyanl lumineux vert au-dessus du bouton confirme que le dislributeur est verrouié-
• Pour déveiTDUilter le distributeur, maintenir le bouton LOCK/UNLOCK (Verrouillage/Déverrouillage) enfoncé pendant 3 secondes. Le
wvant lumineux vert s’éteindra.
____________________________
.
.............
Voyant lumineux du statut du filtre
Le voyant lumineux de l’état du filtre indique à quel moment le fíltre à eau doit être remplacé. Une lumière verte
indique que le filtre est en bon état. Une lumière rouge indique que le filtre doit être remplacé. Une fois que la
lumière tourne au rouge, il faut réinitialiser la fonction pour ¡’éteindre
Pour réinitialiser te voyant lumineux :
• Appuyer sur tes boulons LOCKAJNLOCK (VeriDuia^CléverFDuiage) st WATER (eau) simultanément pendant 4
seœndes. Le vo^nt lumineux vert indiquant l'êlat du Bire dignoteta 3 fois toisqus la fonction a élé téiniaDséo avec succès
^
0
«S Good
CD Chatiga
FILTER
Lumière automafigue
La fondon lumière automatique permet d'activer la lumière du distributeur à demHntensilé lorsque le capteur de
LIGHT SENSOR (luminosité détecte) que llntensité de la lumière dans la pièce est feîble..
Pour activer et désactiver la fonction fuinière automatique :
• Pour activer, appuyer sur le bouton ON/OFF (Marche/Arrêt) se trouvant sur
le panneau de commande Un voyant lumineux vert au-dessus du bouton
s'allume pour indiquer que le capteur est en marche.
• Pour désactiver, appuyer sur le bouton ON/OFF (Marche/Arrêt), Le voyant lumineux vert s'étefndra
REMARQUE : La lumière du distributeur
foncfionnera même si la fonction lumière
automatique n’a pas été séiecionné.
Mode ssibbst
Ce mode sert à désactiver l'alimentation du voyant DEL et des lumières du distributeur tout en
permettant aux commandes de demeurer fonctionnelles.
Pour activer le mode sabbat:
• Appuyer simullanément sur les touches LOCK/UNLOCK (VeirouiHage/Dévetrouillage) et
LOCK/UNLOCK (Veirouiage/DévetTOuiage) et les maintenir enfoncées pendant 3 ou 4 secondes.
Après 3 ou 4 secondes, les lumières du distributeur et le voyant DEL s’éteignent La lumière du
distributeur ne s'aflumera pas pendant la distributiorî lorsque ce mode est activé.
Pour désactiver fe mode sabbat:
■ Appuyer simultanément sur les touches LOCK/UNLOCK (VerTDUiageOévsrtDullage) et LOCK/UNLOCK (Verouilage/Déverrajlla^) et tes
maintenir enfoncées pendant 3 ou 4 secondes, Après 3 ou 4 secondes, les lumières du dsiributeur et le voyant DEL s'aBumeronL
-
-------------------------------------------------------------m
-------------------------------------------------------
REMARQUE : dans l’êveniuBrÉé
OÙ la courant serait interrompu
lorsque l'appareil est en mode
sabbat, la commande
demeurera err mode sabbat
lorsque le courant sera létabl.

Caractéristiques du distributeur
Dispositifs Électronique De Commande
FonctionneiTient de la machine à glace
Pour distribuer l’eau:
• Choisissez le bouton,
• Appuyez te Fédpient conte b
^amiiuuâ de distfibulBur
Verrouillage du distributeur
Cette caractéristique empêche l’eau ou la glace d'être distribuée
Pour verrouiller et déverrouiller Je distributeur:
• Pour venouilter te distributeur, la presse et tenir 1e boutonfeSq pendant 3 secondes. Un Voyant de signalisation vert au-dessus de boutai
confirme le distributeur est verrouillé.
• Pour dêverouiler le dtsttuteur, tenez te boutonp^ pendant 3 secwides. Le voyant vert de signaiisatkm aïKJessus du batton s'éteindra.
Pour distribuer glacé:
’ Choisissez le bouton pour des blocs de
glace ^
Choisissez le bouton »«« pour la glace écrasée
Appelez le teespient conte la garniture de
distributeur.
NOTÉ: Si eau distributeur œniinu en acSviié
pendant plus de 2 minute, un automatique
vetTDuier dehors capteur arrêter puissance
distributeur znne, Ptwr des instruefions sur la far^r
dont dévsToiiter vote dlslrtajteur, voyez ia secSort
Mlulée “ semjne de distributeur “ ci-dessous. ,
Legerc Fonction note; La lumière de distributeur fonctionnerB
La fonction légère oBîb à des affres derjx configuiafions; OUTRE DE au plein pûîjvotr quand les fonctions de glace
et AUTOMOBILE. HORS FONCTION te æÿage arrêtera la lumière de ou de l'eau sont err service,
cavité de disiributeur. La configuraSon d’cAutomobile perrret au CAPTEUR
de mesurer les niveaux légers environnants et d’ajuster la puissance de la lumière de ravfté en conséquenœ. Quand le senser registre des
niveaux de lirmière infétieutB {temps de nuit, cuisine otscurae), la lumière de cawte répondra à la puisance 50%. Quand le senser legisire
les riœaux légers éler^ (cuisine alumée, lumere du soleil directel, la lurriièiB de cavité ne tancera pas.
Pour iancer ta configuration automatique. pour mettre la lumière hors fonction:
■ Appyez sur le boutonQ situé sur ie pupitre de commande,
■ I® conliguratiorr AUTOMATIQUE, appuyez sur le bouton
Quand le wyant de signafeaSon vert au-dessus de
liimage de boulon est allumé, la îumiète de distributeur de
cavSé uiüsera la configuraton AUTOMATIQUE
Appuyez sur le boutoi
voyant vert de signal
sàié sur te pupitre de commande. Le
au-dessus du bouton s'éteindra
Voyant lumineux du statut du filtre
La liiTïèiB dTndfcateur de ilis sert de rappel pour ajbdiuer le fïire de feau. Un feu vat Wique qœ le ite est œ bon état Une Iumiète °
rojge Wlqiie que te fltre devrai ête changé. Une fcfe cf.re b lumëiB tourne le rouge, elle demeurera rouge jjsqu’à ce que Sa foncSni
soi remisB a Îstsl lirtlsL
Pour remettre à l’état initial l’indicate^:
• Appuyez et jugez tes et boutons [slS et simultanément pendant 4 secondes, La lumière verte d'indicateur de
filtre flashera 3 fois où ia fonction a avec succès remis à l'état initial
Clés De la Température
Ces ciés abaisseront ou soulèveront la température f® terppératuiB aux insbucUons sur la fa^n dont plaœr tes temp set
de compartiment de congélateur ou de nourriture fraicfig temperatures de comparameni de nournturB.
• Utilisez le bouton pour soulever la température de la section de réfrigérateur, ou le bouton v pour l'abaisser.
Appuyez sur le bouton pour confirmer les configurations.
--------------------------------------
NOTE: Voyez la seefion comment ajuster tes commandes
^
ueHT
foworr O s“™
FILTER

Caractéristiques du distributeur
Dispositifs Électronique De Commande coüÜMüé
№lax Cool (Maximum Frais)
Ceite fonction cause la température de nourriture fraîche à la baisse a la température
minimum de réfrigérateur plaçant disponible- Cette configuration demeure en effet
pendant approximativement 10 heures.
Pour lancer et mettre hors fonction Max Cool;
• Pour lancer la fortcUon, appuyez sur le bouton [s] Le feu vert au-dessus du
bouton indiquera le mode actif
• Pour mettre la fonction hors fonction, appuyez sur le boutonLe feu vert audessus du bouton s’éteindra
y»"—
NOTE: La configuration de la
température ne peut pas être
changée si la configuration de Max
Cool ou de Max Freeze est en
activité-
Max Freeze (Maximum Gel)
Cette fonction cause la température de congélateur à la baisse à la plus basse
température de congélateur qui est placée. Cette configuration demeure en effet
pendant approximativement 24 heures
Pour lancer et mettre hors fonction Max Freeze:
*- Pour lancer la fonction, appuyez sur le bouton , Le feu vert au-dessus du
bouton Indiquera le mode actif
• Pour mettre la fonction hors fonction, appuyez sur le bouton Ciül, Le fau Vert au-dessus du boulon s'éteindra.
NOTE; La configuration de la
température ne peut pas être
changée si la configuration de Max
Cool ou de Max Freeze est err
activité.
Display On/Off (Affichage actif/arrête)
Le commutateur de l'affichage On/Off contrôle la puissance à l'affichage à LED
Pour lancer et mettre l'affichage hors fonction:
• Pour lancer la fonction, appuyez sur le bouton , L'affichage iiiuminera,
' Pour mettre la fonction hors fonction, appuyez sur le bouton(œl , L'affichage obscurcira.
MAX
COOL
S
Z
Vacation Mode (Mode De Vacances)
Cette clé, si permise, cause moins fréquent dégivrent des cycles Ceci économise l’énergie,
To activate and deactivate Vacation Mode:
■ Pour lancer la fonction, appuyez sur le bouton Le feu vert au-dessus du bouton indiquera le mode actif.
• Pour mettre la fonction hors fonction, appuyez sur le bouton , ou ouvrez l'une ou l'autre porte de réfrigérateur.
Aiarm Off (Arrêt d'alarme)
Cette dé est employée pour arrêter WËLCOMÊ Undicaîeur
d’avertissement de la température et l'alarme sonore, aussi bien que
l'alarme sonore de DOOR OPEN. Ceci mettra également des alarmes
hors fonction actuellement en marche.
67
Pour s'éteindre aiarmez:
• Appuyez sur te bouton[^]
ALARM
OFF
?
m

Caractéristiques du distributeur
Dispositifs Cachés Électronique De Coitimande
Mode sabbat
Ce mode est destiné pour meUiB fa puissance hors fortcion aux lumières ds DEL et de distributeur, tout en
petmetlant aux commandes de demeurer opéraBonneiles Aucune aiaime Trisuelle ou sonore ne sera disponible afots cju'en ce mode.
Pour lancer et mettre le mode hors fonction de Sabbath:
• Pour actionner, appuyer sur et tenir tes deux iMUtortî^^^ et Après 3 en second lieu, tes
lumières de DEL eide distributeur s'éteindront La lumière de distributeur ne lancera pas
pendant la distribution alors qu’en ce mode.
• Pour mettre, appuyer et juger ¡es deux boutons sif^iutenêment pendant 3
secondes. Aptes 3 en second leu, tes lumières de DEL et de distributeur ianceront
Affichage De Capteur
Les commandes d’affichage automatiques que rilluminallon de l'affichage à LED A basé sur las lectures légères ont
reçu du SENSOR Si ie SENSOR indique des niveaux de basse tumière, l'affichage sera plus faibie que si affichant
pendant des périodes bien allumées
Four placer le niveau de puisses de l’affichage: NOTE; AL montrera toujours dans l'affichage
• Appuyez suret tenez le bouton[=^ et le bouton de congéiateury de ia température de corîgélateur tandis
pendant 3 secondes L'état adfirtue! montrera dans i'affichaga ers qu’en ce mode,
uiisant AL O pour en fonction, AL A pour l'autorrafique
• Utilisez le boulon de réfrigérateur pour faire défiler par les états d'affîchaga
/N
NOTE: Au cas où la puissance
serait interrompue tandis que le
mode de Sabbath est en activité, la
commande demeurera dans le
mode de Sabbath quand la
puissance retourne
• lancez la configuration choisie en appuyant sur ie bouton fea
58

® o®
Conseils et entretien
Comment nettoyer ¡’appareil
AVERTISSEMENT
Pour éviter tout risque d’électrocution, de blessures graves voire de décès,
débrancher l'alimentation du réfrigérateur avant de remplacer t’ampouîe- Après
avoir remis l'ampoule en place, rebrancher rapparelL
Á ATTENTION
Pour éviter tout risque de blessure ou de dégâts matériels, procéder comme suit
• Lire et suivre toutes les consignes du fabricant concernant les produits de nettoyage
• Ne jamais placer de bacs, tablettes ou accessoires dans le lave-vaisselle car cela
pourrait les faire craquer ou gauchir
ZONE
Portes EÍ BjElériour
(wlurés
lotérleur (ÍB r'eppereir
Portes Bt extérieur an
acier Inoxydahle
tMPÛBTANT'les
dommagei causés au fini
en geler InoxydeUe en
mison d'un usage
Ingdéqugt d& produits de
nalloyage ou de produits
non meammandés ne
sont pas couverts par la
ggmntie
Cammattdes du
distributeur
Joints d'étanchéité
Bobine du condenseteuf
Rettmrte grille pour y
accéder
Grille de sortie du
ventilateur de
condensateur
Votrl'aftiém du
réfrigérateur
Accessoires
Clayettes, casiers, l/rairs,
etc
Un décapant d'ader inoxydable a été indus à Slnfârieur du féigérateur pour vote usage. Pour acheter
le décapant supplémentaire, entfez en contact si vous plaît desssdie en uiisant IWormation sur !a fin
de vote manuet.
2pjiQSCñIS£
?î Produits de nettoyage abrasifs
77 Amieaniaqua
77 JsveKsanI
7? Oétergents ou solvants
concanirés
7? Tampons à récurer en métal ou
en plastiqua textiifé
Ï7 Produits de nettoyage abresif
7? Ammoniaque
77 Javellisant
7? Oétergents ou solvants
concentrés
7? Tampons à récurer en métal ou
en plastiqua taxturé
77 Produit à base de vinaigre
7? Produite de nettoyage à base
ds citron
77 Produits de netloysge abrasifs
JIAmraontequs
7?Jerellîs8!it
7? Détergents ou solvants
concentrés
nTamponsè récurer en métal ou
en plastiqua laxturé
7 Produits de nettoyage abrasif
! Tampons à récurer en métal ou
en plastiqua texture
____________
SIO
71 Lave-vaisselle
UTIUSER
71 Utiliser 4 c à table (eO mil da
bioarbonate dâ soude dissout
dans un 1 pinîa (1 litre) d'eau
chaude savonneuse
?? Rincer tes surfaces avec de
l’eau chaude prspre si
sécher immédiatement pour
éviter les taches d'eau.
11 UtlUssr de l'eau chauds
savonneuse et un linge doux
et propre, ou une éponge
77 Rincer tes surfaces avec de
l'eau chaude propre et
sécher Immédiatement pour
éviter les taches d'eau
71 Utiilsar un embout de tuyau
daspiralaur
11 ütlllser un embout de tuyau
d'aspirateur avec une
brasse
7? Suivra tes consignes da
retrait et dlnstallation de la
rubrique appropriée
7? Laisser tes articles s’adapter
à la lempératurs ambiante
7? Diluer un détergent doux
dans Iteau et utiliser un linge
doux et propre ou une
éponge pour le nettoyage.
77 UOilser uns brosse à poils en
plastique pour relolndre las
ferttes
??Rlncerles surfaces avec de
l'eau chaude et propre
?? Sécher le verre et les srtictes
transparentspour éviter les
taches d'eau
69
Comment supprimer
une odeur dans
le réfrigérateur?
1, Enlever toute la nourriture
2, Dsmontsz ta putssBnee du
réfrigérateur
3, Nettoyer les éléments suivants
selon les consignes enoncees
sous la rubrique Comm&nt
neffoyer l'apparsil :
• Parois, plancher et plafond de
l'intérieur de l'appareil,
■ Tiroirs, clayettes et joints
d étanchéité selon les
consignes énoncées sous cette
rubrique
4, Porter une attention particulière pour
nettoyer toutes les fentes en
comptétant tes étapes suivantes :
• Diluer un détergent doux dans
’ûitbit Kl’ACfiïfiif' ÍÜ3C fiSinJiaiï tawjïsA
Ol Lrl Iww lOili'ww ctlvtlvw
I
une brosse à poils en piastique,
■ Laisser reposer pendant 5
minutes
• Rincer ies surfaces avec de
l'eau chaude. Sécher les
surfaces avec un linge doux et
proprs
5- Laver et sécher toutes les
bouteilles, récipients et jarres. Jeter
tous (es articles périmés ou gâtés
6, Emballer ou ranger tous les
aliments ayant une odeur dans des
récipients scellés hermétiquement
AAttj* jïïiïtiaÆaKîsî^ aHcuéî'-c: ría ces
dégager
7. Brancher le réfrigérateur et remettre
la nourriture dans ceiui-ct,
8 Après 24 heures, vérifier si l'odeur a
ets Supprimée,
Si l'odeur persiste,..,
1, Retirer les tiroirs et ies placer sur la
tablette supérieure du réfrigérateur,
2 Recouvrir te réfrigérateur et !e
congélateur, dont tes portes, de
papier journal noir et blanc
chiffonné.
3 Placer des briquettes de charbon
sur le joumal dans le réfrigérateur et
le congélateur
4, Fermer ies portes et stlendre 24 a
48 heures,
5 Répéter ies étapes 5 à 7
Si on n'éliminait pas i’odeur, le contact
ffiaccÀAHjïïk îiü r’iaA¡í‘í!> í~-Aihr*íiTtiaá*i“*Í24l ait
U-wWWwwMw tw wwMirw Vwi I il > Iwl wlwi du
Sears si on n'éliminait toujours pas
l’odeur. Référez-vous en arrière du
manue! pour le numéro de téléphone.
m
s
Z
t
m

Conseils et entretien
Comment enlever et remplacer les ampoules eiectric|ifes
Comment utiliser
Fénergie au
tTïiivtmiiïTï
lit (ir Д dl 1^*1^ Д Д Д ДД Д Д Д
Éviter de top remplir les tablettes du
réfrigérateur car cela réduit l’efflcacité
de la circulation d'air autour de la
nourriture et empêche le réfrigérateur
de fonctionner plus longtemps
Éviter d'ajouter trop de noumîure
chaude à la fois car cela surcharge
les compartiments et réduit le taux de
refroidissement,
Ne pas utiliser de papier
d'aluminium, de papier ciré ou
d'essirietoul pour recouvrir tes
tablettes car cela diminue la
drculatiort d’air et empêche ГаррагеН
de fonctionner efficacement
Un congélateur rempli au deux tiere
est plus efficace.
Installer le réfrigérateur dans le coin le
plus frais de la pièce. Éviter tes zones
ensoleillées, les conduits de
chauffage ou tout autre appareil de
chauffage. Si cela est impossible,
isoler l’extérieur en utilisant une
section de matériel ou en ajoutant
une couche supplémentaire d'isolant,.
Consulter le manuel du propriétaire
pour savoir à quelle température
régler les commandes.
Nettoyer tes joints d'étanchéité de la
porte tous les trois mois selon les
consignes présentées dans le Guide
d'uiilisatfon et d'entretien pour
assurer la fermeture étanche de la
porte et le bon fonctionnement de
l'appareil.
Prendre le temps de ranger les
articles dans te réfrigérateur pour ne
pas laisser la porte ouverte trop
longtemps.
S'assurer que les portes ferment bien
en mettant l'appareil de niveau te! que
décrit dans le manuel du propriétaire.
Nettoyer les bobines du
condensateur tel qu'indiqué dans le
manuel du propriétaire tous tes trois
mois car cela permettra d'améliorer
le rendement de l'appareil et
d’économiser de l’énergie
avertissement
Pour éviter tout risque d'étectrocution susceptible de causer des blessures graves voire
ie décès, débrancher le réfrigérateur avant de changer l'ampoule électrique. Une fois
l'ampoule remplacée, brancher l'appareil.
attention
Pour éviter tout risque de blessures ou dégâts matériels, respecter les consignes
suivantes :
• Laisser l'ampoute refroidir
• Porter des gants lors du remplacement de l’ampoule
Partie supérieure du réfrigérateur
1 Repérer les espaces pour tes doigte de (irsque côté
du couvre-ampoule Insérer les doigte et appuyer de
chaque côté du œuvre-ampoule Tirer le couvr&oute
vers te bas et b refer .
2, Retirer les ampoules électriques
3 Les remplacer par des ampoules d'une intensité
maximum de 40 watts
4 Pour remettre ie couvre-ampouie en p!aœ, insérer les
afâches avant de celufct dans les ouvertures süuées dîpectement en avant de la lumière
Partie inférieure du réfrigérateur et congélateur du
я R ■чмГ'чИК%г1>%1Р vil R IR# <И1 ■кчрЧМСЯ
1 Pincer les attaches inférieures (A) du couvre-ampoule et tes tirer
vers soi
2 Retirer l'ampoule électrique
3 La remptacer par une ampoule d'une Intensité maximum de
40 watts
4 insérer les attaches supérieuiBs{B) du couvierampoule dans A
les ouvertures du revêtement de la porte et endandier la partie Wêriorre par-dessus fampoute.
Congélateur
1, Retirer te bac à glace en soulevant te devant du bac et en te
tirant
2 Pour retirer le cctMe-ampoule, pincer l'attache supérieure (A)
et fer le oxjvteampffiule vers soi,
3 Rellner l’ampoule. La remplacer par une ampoule d'une
inîenalté maximum de 40 watts
4, Insérer l’attache Inférieure (B) du couvre-ampoule dans ta
cuve intérieure et encterrcher te partie supérieufs dans l'espace prévu pour l’ampoule.
5 Remette ie bac à glace en place en le faisant glisser jusqu'à ce qu’il se veirouie.
Distributeur Ice *N Water
1 Repérer l’ampoule à l'Intérieur du rebord supérieur de la
structure du distributeur. La dévisser pour l'enlever
2 La remplacer par une ampoule de 7 W, 120 V,.
70

Les réfrigéiateurs modemes comportent ds nouvelles caractéristiques et ulsent mieux
réfiergie- la mouæe isolante psmiet d'économiser de S'énergie et ses capadiés isolantes
sont excstientss, cependant, Es mousse isolante n'sbsorbe pas les sons. Il sn results dcxic
BRUIT )»^
que œrtetns sons ne semblent pas famlers. Avec le temiæ. iis le deviendront Prière de lire œ
qui suit avant d’appeler le service de dépannage.
XYPE CAUSE POSSIBLE SOLUTION
Clic
L'eir est propulsé
Bouillonnefflent
ou gargouiüemenl
Bruit sourd
Vibration Le compresseur f/J émet un bruit de pulsation
Bourdannemertl
Murmure iB machine à gîsce {K} est à la position «on»
La commande du congélateurémet un elle
lorsque îe compresseur s'arrête ou se met en
marche.
La mitiuierie du efégivreyr (B) émet te son
d’une horloge électrique et s'enctenche et sa
dèsencienoiie du cycle de déqîvraqs.
Le ventilateur du congélateur fC/ et le
ventilateur du condensateur (D) smelienl ce
bruit pendant le fonctionnemerrî.
Le réfrigérant de i'évaporateur (E) et da
l’échangeur de chaieur (F) émet ce bruit
lorsQu'il s’écoule.
Les glaçons tombant da la machine à glace
(certains modèles) dans le seau à glaçonafG),
La chute du distributeur de glace (H¡ se ferme.
perdant le fonctSonrtemeni.
Le réfrigérateur n'est pas de niveau Voir la rubrique Instatialion du
Le raccQfd du robinet de la machine à giace
(J) (certains modèles) émet un
boutdonnement lorsque la machine à giace
se reffloiit d’eau.
sans le fsccofd d eau
Le foret ft) (certains modèles) émet un
murmure lorsqu'il agite la glace durant la
distribution.
Le compresseur f/J émet un murmurs pendant
te tonctiorinment.
La soupape du solértoïdefM) fait foncUanner
ta porta de la chute.
Fonctionnement rrorrtiai
Fonctionnement rsormai.
Fonctionnement normal
Fonctionnement rroriuat
Fonctionnemanî normal
Fonctionnement iîormaL
Fonctionnement tjortnal
réfrigérsieur pour savoir
comment mattre l'appareil de
niveau,
Fonctionnement normal
Pour faire cesser le murmurs,
soulever le bras de la machine à
glace à la position « off » Voir la
rubrique Machine à glace
BUtomatiqm dans la section
Caractéristiques du congélateur
du Guide d utiiisaiion et
d'anlretieri.
Fonctionnement normet
FondJonnement normal
Fooclionnennenî normal
Dépannage
fonctionnement
La commande du
congélataur et les
lumières
fonctionnent, mais
ies compresseurs ne
fonctionnant pas.
La tsmpérattira du
système viandes
froldes/léQumes est
trop chaude
Le rêfrlgéraiaür ne
fonctionne pas
te réfrigérateur ne
fonctionne
tou|ours pas.
La nouitîture est
trop froids.
Le réfrigérateur est en mode de dégivrage
Les commandes sont réglées à une
température trop basse.
Les commandes du congélateur sont
féafées à une température trop basse.
te tiroir así matpiacé.
Le fêfriqéraleur n'esi pas branché. Brancher l'appareil.
La commande du congéialeur n'esî pas à
son».
Le fusible a sauté ou le disjoncteur doit être
réendenché.
Panne de courant.
L'appareil fonctionne mal
tes bobines du condensateur sont sales
Les commandes du réfrigérateur ou du
congélateur sont réglées à uns température
trop froide
Foridionnement normal Attendre 40 minutes que te réfrigérateur ss remette en
marche
Voir la rubrique traitant du système viandes froldes/iégumes pour sawir
comment régler ies commandes
Voir la rubrique sur les commandes dans le manual du propriâtaire pour savoir
comment réqler las commandes
Voir la rubrique traitant du système viandes froSdes/lêgumes pour vérifier la
position du tiroir.
Voir la rubrique sur les commandes dans le manuel du propriétaire
Remplacer les íusíbles qy1 ont sauté Vérifier les disjoncteurs et les réinitfsiiser si
iiécessaire.
Âpoeler la compsqnie tocaîe d’éiedrfclté pour signaler !a panne.
Débrancher le réfrigérateur. Transférer la nourriture dans un autre réfrigérateur
ou piacer de la neige carbonique dans le congélateur pour corrserver la
nourriture La garantie ne couvre pas la perte de nourriture Appeler le service
après-vente.
Nettoyer conformément aux consignes de nettoyage présentées dans le manuel
du propriétaire.
Voir ta rubrique sur les commandes dans ie manuel du praprlélslra pour savoir
COiTiinenl régler les commandas
71
ИЦ
I
I
m

Dépan ti a£e
x o
FONCTIONNEMENT
TYPE
La n<wfriture semble trop
chaude
Une odeur se dégage du
réfrigérateur
Des gouttelettes d’eau se
forment à ¡'extérieur du
réfrigérateur
DfiS QOUttsISttBS CÎ'SËLU S0
forment à ilmérieur du
réfrigérateur
le réfrigérateur ou ta
machine à giacs émet des
sons non familiers ou trop
bruyants
Le tiroir à légumes et/ou le
tiroir 3 visncle 3 lempereturs
contrôlée ne ferment pas.
SOLUTION
La porte ns fentis pas corrademafit
Les commandes doivent être réglées Voir la rubrique des eainmandes dans le manuel du propriétaire
Les bobines du condensateur sont
sstsSi
La grille d'aération atrière est obstruée Véfifief ta position des articles dans !e réfrigérateur pour s'assurer
La porte a été ouverte trêquemmant ou
longtemps
De la nournÈure a récemment été
ajoutes-.
l'lníérteurestsaíe ou ta nournture
doQagB une odeur.
Vérifier si les joints d’êlanchêité sont
îiemietic]yes.
Le taux d'humidité ast élevé. Ceci est normal lorsqu'il fait très hurttlde.
Les commandes doivent êire réglées Voir la fubrique des commandefi dans le manuel du propriétaire
Le taux d'humidUé est élevé ou la porte a
été ouverte fféguemmenî.
Vérifier si tes Joinis d'étanchéité sont
herméîîques
Ceci est normal Voir ta rubrique Dépannage dans lemanuel du propriétaire.
Le contenu du tiroir ou la position des
articles dans le compartimanl voisin
obstrue peut-être le tiroir.
Le réfrigéralsur n’est pas de niveau Voir la rubrique /nstaf/alion du
férrigérstwr pour savoir comment mettre l'appareil de niveau-
vérifier fil les joints d'étanchéité sont herméllques - SI nécessairensltoyer confarmément aux consignes de nettoyage énoncées dans
le manuel du propriétaire.
Vérifier s'il existe des obstructions Internes qui empêchent ta porte
de fermer correctement (c.4-d des tiroirs ou des seaux à glace mal
fermés, des récipienis mal rangés ou de trop grartde dimension,
etc.).
pour apprerfdre comment régler les commandes.
Nettoyer conformémenl aux consignes de nettoyage énoncées dans
le martuel du propriétaire.
que ta gritie n'est pas obstruée La grie d’aération arrière se trouve
derrière tes bacs à légumes.
Ouvrir la porte moins iongtemps Ranger Ig nourriture de façon
efficace pour garder la porte ouvsrfe le moins longtemps possible.
laisser l'environnement intérieur s’adapter pendant que ta porte a
été ouverte
Laisser ta nourriture récemment sfouiée atteindre la température du
réfrigérateur OU du conBêlaieur.
Voir la rubrique Suppression des odeurs dans le manuel du
proprisîeire.
Si nécessairs, nettoyer coriforrnéiTisni aux consignes de nettoyage
énoncées dans te manuel du propriétaire.
pouf apprersdre comment régler tes commandes.
Voir ¡9 rubripUB dss commsndos dsns lo msnusl du propriélsirs
pour apprendre commenl régler les commandes.
Ouvrir la porte moins iorrgtsmps Ranger la nourriture de façon
efficace pour garder la porte ouverle le rnoins longtemps posstoîe,
Si nécessaire, nettoyer conformément aux consigrres de nettoyage
énoncées dans le manuel du propriétaire.
Replacer les articles et tes récipienis pour éviter toute interférence
avec tes tiroirs
72

Dépannage
FONCTIONNEMENT
XYPK
Le réfrigérateur se met en
marche trop frègueroment (aUHe).
GLACE ET EAU
L’eau semble brumeuse.
if ÿ a des particules dans i’eau
et/ou ta glace.
Aucun voyant lumineux n’est
attumô sur le panneau de
commanda du distributeur
Ni l'eau ni la glace ne sont
distribués lorsque les touches
son enfoncées
La machina à giace n© produit
pas assez de glaçons ou las
glaçons ont une forme bizarre
La maciiine à giac^ ca produit
pas de place
(suite)
CAUSE POSSIBLE
Les commandes doivent êtr© réglées
La porte ne ferme pas correclemeni.
Il y a de l'air ou des bulles d'air dans l'sau
De la poussière de carbone ss dégage de la
eatiQuche du fiitre à eau
Les concentrations de minéraux dans l'eau
se formsnl lorsqu© l'eau gèle et fond.
La porte du congélateur n'est pas fermée
Le réfrigérateur n'ast pas branché.
Le fusibie a sauts ou le disjoncteur doit être
réînitiafisâ.
Une panne de courant s'est produite.
La porte du oongéiateur n'est pas fermée
Les commandes sont en mode verrouillage
Le réservoir d’sau se rampiit
La machina à glace ou l’appareil doté d'une
machine à giace vient tout juste d'élre
installé ou une grande quantité de glace vient
d'être utilisée.
iB fïüre à eau est obstrué ou doit être
changé*
La machine à glace vient d'être installée ou
une top grande quantité de glaçons ont été
utilisés.
La pression d'eau est trop faibie.
Le itré à eau est obstrué ou doit être
changé.
L'alimentation domesllque en eau ne rejoint
pas les robinets.
Le tuyau en cuivre ou en plastique est tordu.
La pression d'eau est trop faibie
Vérifier ia température du congélateur
Le bac à glace n'est pas Installé
correctement
73
SOLUTION
Voir !a rubrique des comsnandss dans la manuel du
propriétaire pour apprendra comment régler tes commsn(tes.
Le réfrigérateur rr'est pas de niveau - Voir la rubrigus
ImtalisUoa du réfrigémldUf pour savoir comment mettre
l‘spDarei1 de niveau.
Vérifier s'il existe des obstructions internes qui empêchent la
porte de fermar corredemeni {o.-à-d, des tiroirs ou des seaux
à glace mal fermés, des récipients mal rangés ou de trop
pranda dimension, etc.).
Vérifier si les Joinis d'éïançbôîtê sont hermétiques Si
nécessaire, nettoyer conformément aux consignes ds
netîovaae énoncées dans te manuel du proRfislairB,
Ceci est normal lorsque te distributeur est utilisé pour la
oremière fois et disparaît avec l'usage.
La première quantité d'aau sortant de ta cartauche peut
contenir do ta poussière de carbotre évacuée de is cartouche
Les particules ne sont pas dangereuses à consommer Elfes
disparaïîrorii après quelques utilisations.
Les particules ne sont pas dangereuses et se retrauvanl
naîureilement dans léau.
Vérifier si ia ports du congéisteur est fermée Les commandes
ne fortctiofinenî plus lorsque ta porte du congélateur est
ouverte.
Sranchet i'sppâfeii.
Remplacer les fusibles qui ont sauté. Vérifier les disjonctsurs
et ias réinitialiser si nécessaire.
Appeler votre compagnie d'électridié pour signaler la paons.
Vérifier que la porte du congélateur est fermée La commande
ne fonctionne pas lorsqu© la porte du congélateur est ouverte.
Voir les consignes d'uMlÎsâîlon des commandes du
distributeur.
Lors de la première utilisatiort. it y a un délai d'environ 45
secondes avant ia distribution persdant que te réservoir interne
d'eau se remplit.
Attendre 24 heures pour que is machineà glace s« remplisse
après avoir été vidée.
Changer le filtre à eau.
Attendre 24 héüfés que la production de glaçons débute et
que la machins se remplisse de nouveau après avoir été
video.
Uns pression d'eau trop faible peut causer unqfuite d'eau, La
pression d'eau doit se situer antre 20 et 1Q0 !b/pcï pour
assurer ia bon fonctionnement. Une prassion mínimum de 35
!b/oo^ est reGommandé© pour Ses appareils avec titres d'eeu,
Ghangsf le ffltra à ©au
Vérifier ia procédure d© raccordement d'eau dans les
Consignes d’Instaüation.
Fermer feau et éliminer les plis SI Iss plis ne peuvent être
éiîmtnés. remplacer le tuyau.
La pression d'eau doit sè situer antre 20 et 100 Ib/pcf pour
assurer le bon fonctionnement Une pression minimum de 35
îb/po® est recommandé© pour les soRsreils avec filtres d'eau.
Voir ta rubrique des commandes dans le manuel du
propriétaire pour apprendre comment régler les oommandes-
La tempêrafure du congéleteur doit se situer entre 0 et 2T
(-18 et -17 °CÎ pour produire de la glace.
■Voir S rubrique du bac à glace pour savoir comment Installer
et aligner le bac à glace.
1
m

Dépannage
GLACE ET EAU
TYPE CAUSE POSSIBLE SOLUTION
La iTiachlna à glace ne produit
pas de glace {suite)
Il y a des fuites d’eau
De la gîace sa forme dans le
tuyau d’arrivée de la maciiîne
à glace.
Le débit d’eau est plus lent
que normai.
L’eau qui coule du distributeur
n’est pas froide.
Un robinet d'eau inadéquat a été installé
Un tuyau en plastique a été uiiiisé pour
raccorder i’eau
Un robinet d'eau inadéquat a été installé
La pression d’eau est trop faible
La ÈempêTalure du congélateur est trop élevée
La pression d'eau est trop faible
Un robinet d'eau inadéquat a été inslalîé.
Le tuyau en cuivre ou en piaâique est tordu
Le flltre à eau est obstrué ou doit être changé.
Ls réfriQérstsuf 3 6ÎS fEcfirnnisnl fnslslis
il П0 reste plus d'eau dans Je réservoir.
L’eau reste coincée dans les tuyaux à i'extériaur
'du réservoir et se réchauffe à la température
ambiante
Vérifier ta procédure de raccordement de i'alimsntaîion en
eau sous la rubrique InsMaf/on du rSfiigêraiôur Les
soupapes autopsrçanîes ou de robinetvannecfe po
peuvent réduire le débit d'eau et obstruer le tuyau au fil du
temps. Sears n’est pas responsable des dégâts matériets
causés par une inataitation ou un raccordement de
i’alimentation en eau inadéquat.
Le fabricant recommande ¡'utilisation d'un tuyau en cuivre
pour la mise en service. Le plastique est moins résistant et
peut causer des fuites Le fabricant n'est pas responsable
des dégâts matérJeis causés par une miss en service ou
Un raccordement d’eau incorrect.
Vérifier la procédura da raccordement de l’aiimentation en
88U sous la rubrique ¡rtstalíaíion du réfrigérateur- Les
soupapes autoperçantes ou de rabinetvanne de po
peuvent réduire le débit d'eau et obstruer le tuyau au fi! du
temps Sears n’est pas responsable des dégâts irtatériets
causés par une Installation ou un raccordement de
raiimantatlofi en eau inadéquat.
La pression d'eau doit se situer antre 20 et 100 Ib/pti pour
assurer le bon fonctionnement Une pression minimum de 3S
Ib/po“ est recommaiidée pour les appareils avec fillrss d’eau.
Voir la rubrique des commandes dans ie manuel du
propriétaire pour apprendre comment régler les commandes
La température du congélateur doit sa situerentre D et 2
(-18 et -17 "C) pour produire de la glace.
La pression d’eau doit se situer entre 20 et 100 ibipâ peur
assurer Je bon fonclionnemen! Une pression minimum de 35
Ib/po® est recommandée pour les appareils avec fîlîrss d'eau.
Vérifier la procédure de raccordement de i'allmentaiian en
eau sous la rubrique InstaJIalion du réfrigérateur. Las
soupapes atitopwçantes ou de roBnet-vanns de po
peuvent réduira le débit déau et obstruer )e tuyau au fii du
temps Sears n’est pas responsable des dégâts matériels
causés par une instaiîatian ou un raccordement de
ralïmentafioq etî eau inadéquat.
Fermer l’eau ai éliminer les plis $i tes plis ne peuvent être
éîiffltnés, remplacer te tuyau.
Changer le fiiire à eau*
Laisser environ 12 heures à l’eau du réservoir pour refroidir
Jeter ie premiar verre d'eau st te remplir
74

Données sut le filtre à ean
Fiche technique et données de rendement du système
Cartouche de filtre d’eau pour réfrigérateur modèle 900S
Fiche technique
Débit #eau (Maximum) D.75 GPM (2.83 L/min)
ÜJtiîT©© VI©" du iuod©l© 900S (max^ioinui) 500 gallons/ 1892 liters
Température maximum de fonctionnement
Pression minimum exigée .......................................... 35 psi/ 138 kPa
Pression maximum de fonctionnement ......... 120 psf/ 827 kPa
Conditions générales d'utilisation : Lire les données de rendement et comparer la capacité de cet apparsîl à vos besoins
actuels en matière de traitement d'eau
NE PAS utiliser ce produit où l’eau est microbioiogiquement dangereuse ou de qualité inconnue sans désinfection
adéquate avant ou après le système. Un système homologué pour la réduction de spore peut être utüîsé pour désinfecter
l’eau contenant des spores.
EMPLOYEZSEULa/IÊNTAVECL'OFFREDmimOIDEVERIFiLACONFORMrrÉAVECrâ'ATETUESLOlSETLESRÈGlSVIENTSLDCAlJX,
Le système de filtration d’eau rétractable utilise une cartouche de rechange 8005 (voir ies coordonnées de Sears à la
dernière page du manuel pour commander). Le remplacement opportun d’une cartouche de filtre est essentiel au bon
fonctionnement du système de filtration. Prière de consulter la rubrique applicable dans le marrusl du propriétaire pour
apprendre le fonctionnement, l'entretien et le dépannage du système.
Des tests ont été effectués sur cet appareil en vertu des normes ANSi/NSF 42 et 53 relativement à la réduction des
substances énumérées ci-dessous. La concentration des substances indiquées dans l’eau entrant dans le système a été
réduite à une concentration moindre ou égale à la limite permlssible dans i'eau quittant te système, te! que spécifié par ANSi/
NSF 42 et 53,
.......... 100“ F/as“ c
Données de rendement*
Moyenne de
Débit d'arrivée
Substance
Plomb 0.15mg/L
Plomb 0,15 mg/L
Spores 25000 coünî/mL
Turbiditê 11,8 NTU
Lindsiis
Atrazîne 0,0097 mg/L 0,0002 mg/L
Chlore
Particule** 286667 count/mL
2,4-D
Amiante
Tests effectués à un débit de 0,75 GPM {2,83 L/min.) et une pression
maximale de 120 Ib/po^ {827 kPa) dans des conditions normales de
laboratoire, par contre, la performance actuelle peut varier.
Performance d’allusion à la santé testée et certifiée par NSF
International.
Intervalle de classement granutométrique du test Les particules
utilisées étaient de 0,5-1 microns
Pentapure, Incorporated
1000 Apollo Road
Eagan, Minnesota U.SA
EPAEST#35917-MN-1
d’eau
0,00063 mg/L 0,00005 mg/L 97,62%
1,9 mg/L
291,6667 ug/L 45,45 ug/L
lO’lo'fibta/L; fibres
>10 micfsfflèlras fongs
débit de sortie
d'eau
0,001 mg/L
0,002 mg/L
1 count/mL 99,99% 3 count/mL
0,12 NTU 98,98% 0,18 NTU
0,09 mg/L 95,26%
900 count/mL 99,88% 2400 count/mL
0,16 MFL/mL 99,96% 0,16 MFL/mL 99%
% de
réduction
moyen
99,33% 0,001 mg/L
98,66% 0,003 mg/L
97,93% 0,0006 mg/L 0,003 mg/L
84,42% 100 ug/L
Niveau
Sortie d'eau
maximum
0,00005 mg/L 0,0002mg/L s/0
0,17 mg/L 776% s/0
ExaiTÎré ei Œstlfé р«зг NSF IriSarafenai «rtm tes rotmes 42 et 53 dgns tfANSb
NSF dans tes mocSes V¥FS0-KN13iX) andWFSOKWISGO pour la Édücsîm de:
Niveau üe 4Z Effets Estlfftiques
Réduction de goût et d’odeur
Réduction de chlore
Unité mécanique de filtration
Classe 1 de Réductlori de Pariîqal
d’action
minimumpHd'arrivée
0,010 mg/L
0,010 mg/L 8,5
> 99,95% S/0
0,5 NTU S/0
?85% s/0
0,0017 mg/L
6,6
s/0
s/0
s/0
Niveau de 53: Effets Oe Santé
Unilé Chimique de Réiucüon
Réductloi dePiatîh, AlraaEss, Undane &2
Unité mécanique de filtralion
Réduction de Kyste. TurtjSdité et
RédiKitond'aiTtlanie
s
Z
?
75

État de la Califomie
Miïiiiiteredfls sm'w^es de ^aata
Dispositif de traitement de l'eau
Numéro de certificat
01 -1486
soonxiss3i3iK 21 sspt0infeïH SDOl
Eàviss: Zi Msjs 2002
Dèignatîco de mcdâ^dâ te nnarqüâdscxiiDîinerDô
wsÔ^wSôô '4^7.
WFS0-M30O - “
WF50-KW500 ■
Vi/FSO-KNîÎOû' '
OW%W500'. '
ov-iFso-moo..''
Fabricant-: ftiïÈàï^jîcissïpo ..~:';î5::ïî.';
IteriîcleilCB’SOdu Ccdëdëlasantêd de te rite
Ç:oniamintentsrnic'rêbblcciÎQÜ^dturbid'itë. ;
Kjs'tes, ■ ' • ■■
Oofi te min^n'teOrcr^ nielles.
Âtjasire S"''), ’-i'-v.
lindaisé--'
ËjgnentsdQræhangQ
............
■.46a005; . . ,
"46^05 ■
QW51
OWF51 ' "V-- '
' .'V-i ...
, , 300gd(l,B5 5iit3s)
Capadlâncminalê!
500 gai (ljSSîZ5îite)
300 gai (1,125 5 Etîs)
■ 5Û0 gd (1, 5 îitia)
-"-.soogai(1 ,»25lira)
■■ 300gal(U355iité)
..^Coô té m I nà Bits' i »ôregn i étt^ràdidmidu^
..
;
■\Âifiiœîe . ' • ' •
Débit d’utllisatto ncininal: 075

Get it f ixi^, at your home or outs!
Your Home
For repair-In your homo ~ot all major brand appliances,
lawn and garden equipment, or heating and cooling systems,
no matter who made It, m matter who sold It!
For the replacement parts, accessories and
owners manuals that you need to do-it-yourself.
For Sears professional installation of home appliances
and items like garage door openers and water heaters-
1 -800-4-MY-HOM E® (1-800-469-4663)
Cali anytime, day or night (U, S. A. and Canada)
wwwjsesffsjoowi wwwjsears.ca
Our Home
For repair of carry-in items like vacuums, lawn equipment,
and electronics, call or go on-line for the location of your nearest
^ars Parts It Repair Cfenter.
1-800-488-1222
C^ii anytime, day or night (U S A only)
www^earsjcaan
To purchase a protection agreement on a product serviced by Sears
1-800-827-6655 (U S A.) 1-800-361-6665 (Canada)
Pam pedir servicb de repamcbn
adombilb, y para ordenar piezas;
w O wW • ri w
(1 -e6d-764-6427J
©RcgsíefsdTFípckíftwkr^Tríicíaisackí^ SínioüMvSfkoíSesfft RodbwdíwdCo
lEíW»» R«gíití3Kla /^fffercaífcRfcficaí “Marcacfe SinicfodfiSiaí’ii R^titkardCo
**>Marqyt<fc cwftM««/“^M5fq^i::<iépo3é*cfcSsas. Roíttwkirel Co-
I.LIAfwAD^
Au Canada pour servbe en frangais;
1-800-LE-FOYER**=^
(i “^OO"'B33r09i3 7]
iftiWW v9.
OSstSks. Roebuck wid Oo.
12591310
Printed in U,S-A 04/02
 Loading...