

Kenmore 5871744590, 58717245990, 5871429990, 58714249990 Owner’s Manual

Product Registration ............................................... Cover
Safety Instructions .......................................................... 2
Features ........................................................................... 3
Operating Instructions ..................................... ;..... ;..;.; 4-5
preparing and Loading Dishes ._................................ -.;5-7
Dishwasher Dispenser and Detergents ..........................8
Factors Affecting Performance ....................................... g
Care and Cleaning ............................................. ......... 9- I 0
Connecting Portable Dishwasher ................................. I I
Changing Color Pane!s .................................................. 12
Common Dishwasher Problems and Solutions ....... 13-14
Troubleshooting ............................................................ 14
Canadi__n Warranty, ........................................................ !6
Sears Service ................................................................. 17
lead and Save These Instructions
!is Owner's Guide provides specific operating instructions for your model. Use the dishwasher only as instructed
this guide These instructions are not meant to cover every possible condition and situation that may occur
_mmon sense and caution must be practiced when installing, operating and maintaining any appliance.
ecord Your Model and Serial Numbers
;cord in the space provided below _he model and serial numbers found on the serial label on the right side of tub
_del Number:
Hal Number:
rchase Date:
rs, Roebuck and Co.
h'man Estates, IL 60179
U.S.A.
Sear3 Canada, Inc.
Toronto, Ontario, Canada MS;B 2B8
P/N 154354501 (9901)
Important Safety Instructions
To reduce the risk of ftre, electrical shock,
or injury when using your dishwasher,
follow basic precautions-including-the
following:
• Read alI instructions before using your
dishwasher.
• Use your dishwasher only as instructed in
this Owner's Guide.
• This Guide does not cover every possible
condition and situation that may occur. Use
common sense and caution when installing,
operating and maintaining any appliance.
• DISI-DggASHER MUST BE ELECTRICAIiY
GROUNDED. Read the Installation
Instructions for details.
This dishwasher is designed to operate on
regular house current (120 V,,60 Hz)o Use a
circuit equipped with a i 5 ampere fuse o_
circuit breaker. Use a 20 ampere fuse ff
dishwasher is connected with a food waste
disposer.
Do not operate dishwasher unless all
enclosure panels are in their proper place,
Dispose of discarded appliance and
shipping or packing material properTy.
To avoid entrapment and/or suffocation,
remove door or' doo_ latch mechanism from
any dishwasher that is discarded or not in
use.
Keep young children and infants away from
dishwasher when it is operating.
Do not let children abuse, sit, stand or play
on door or racks of a dishwasher,_
.,'-Use only detergents and rinse agents .........
recommended for use in a dishwashet:_
. Store dishwasher detergent and rinse
agents out of the reach of children.
• Do not wash plastic items unless marked
"dishwasher safe" or the equivalent. Check
with manufacturer for recommendations, ff
not marked. Items that are not dishwasher "'
safe may melt and Ci'date a potential fire
hazard.
° If the dishwasher drains into a food
disposer/make suredisposer is cornpletely
empty before running dishwasher.
. Disconnect electrical p0wer_.to dishwasher_.
before servicing.
. Repairs should be done by a qualified
technician.
• Do not tamper with controls.
• Do not touch the heating element during or
immediately after use.
• When ioading items to be washed:
Locate sharp items and knives so that they
are not likely to damage the door seal or
tub-. -
Load sharp items and knives with the
handles up to reduce the risk of cut-type
injuries.
Under certain cond{tions, hydrogen gas
may bepr6duced-in:'a hot_wa_ier 'system-that--
has not been used for 2 weeks or more.
HYDROGEN GAS IS EXPLOSIVE, If hot
water system has not been used for such a
period, before using dishwasher, turn on all
hot water faucets and let water flow from
each for several minutes° This will release
any accumulated hydrogen gash
HYDROGEN GAS IS FLAMMABLE. Do not
smoke or use an open flame during this
time.
Do not store or use combustible materials,
gasoline or other flammable vapors and
liquids in the vicinity of this or any other
appliance.
SAVE THESE
INSTRUCTIONS
Printed in USA.
. i
Dishwasher
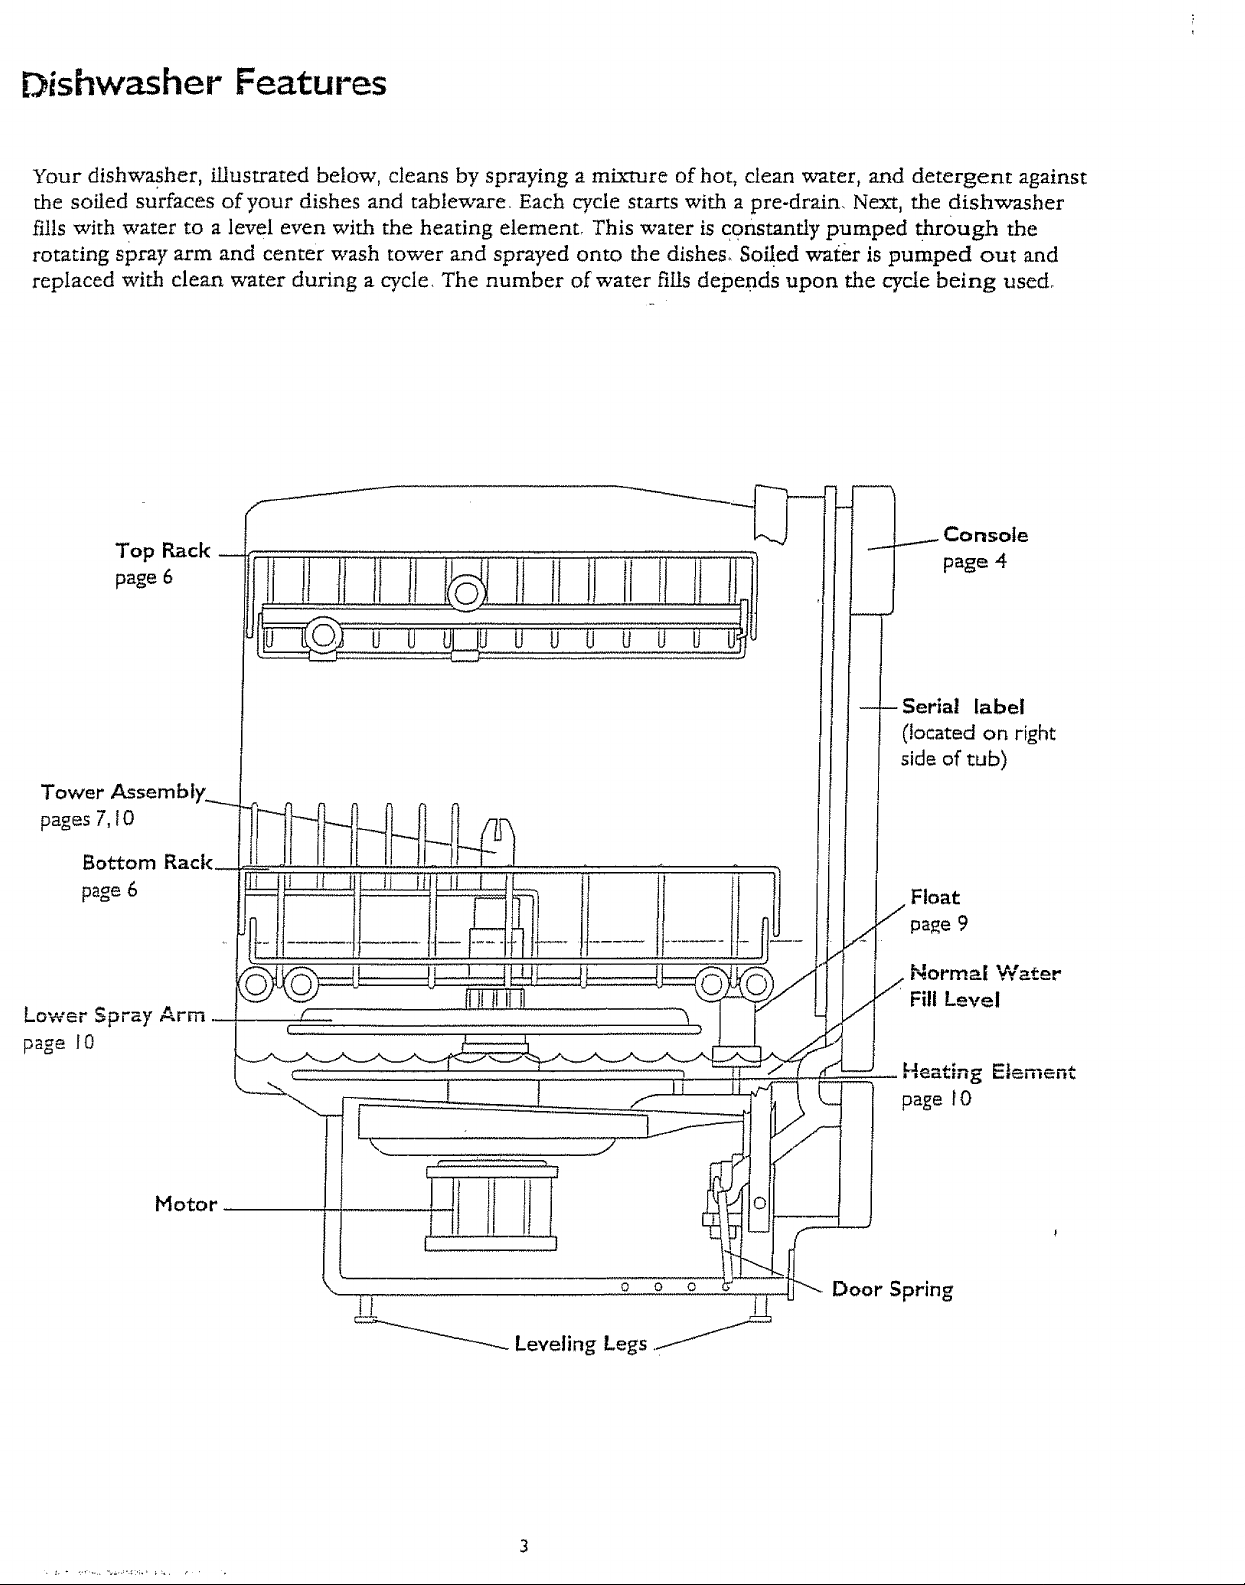
Your dishwasher, illustrated below, cleans by spraying a mixture of hot, clean water, and detergent against
the soiled surfaces of your dishes and tableware, Each cycle starts with a pre-drain, Next, the dishwasher
fills with water to a level even with the heating element, This water is constantly pumped through the
rotating spray arm and center wash tower and sprayed onto the dishes_ Soiled water is pumped out and
replaced with clean water during a cycle_ The number of water fills depends upon the cycle being used_
Top Rack
page 6
Features
Tower Assembly..._.
pages 7, {0
Bottom Rack_
page 6
Lower Spray Arm ....
page I0
Motor
O
O
I
Door Spring
Operating Instructions
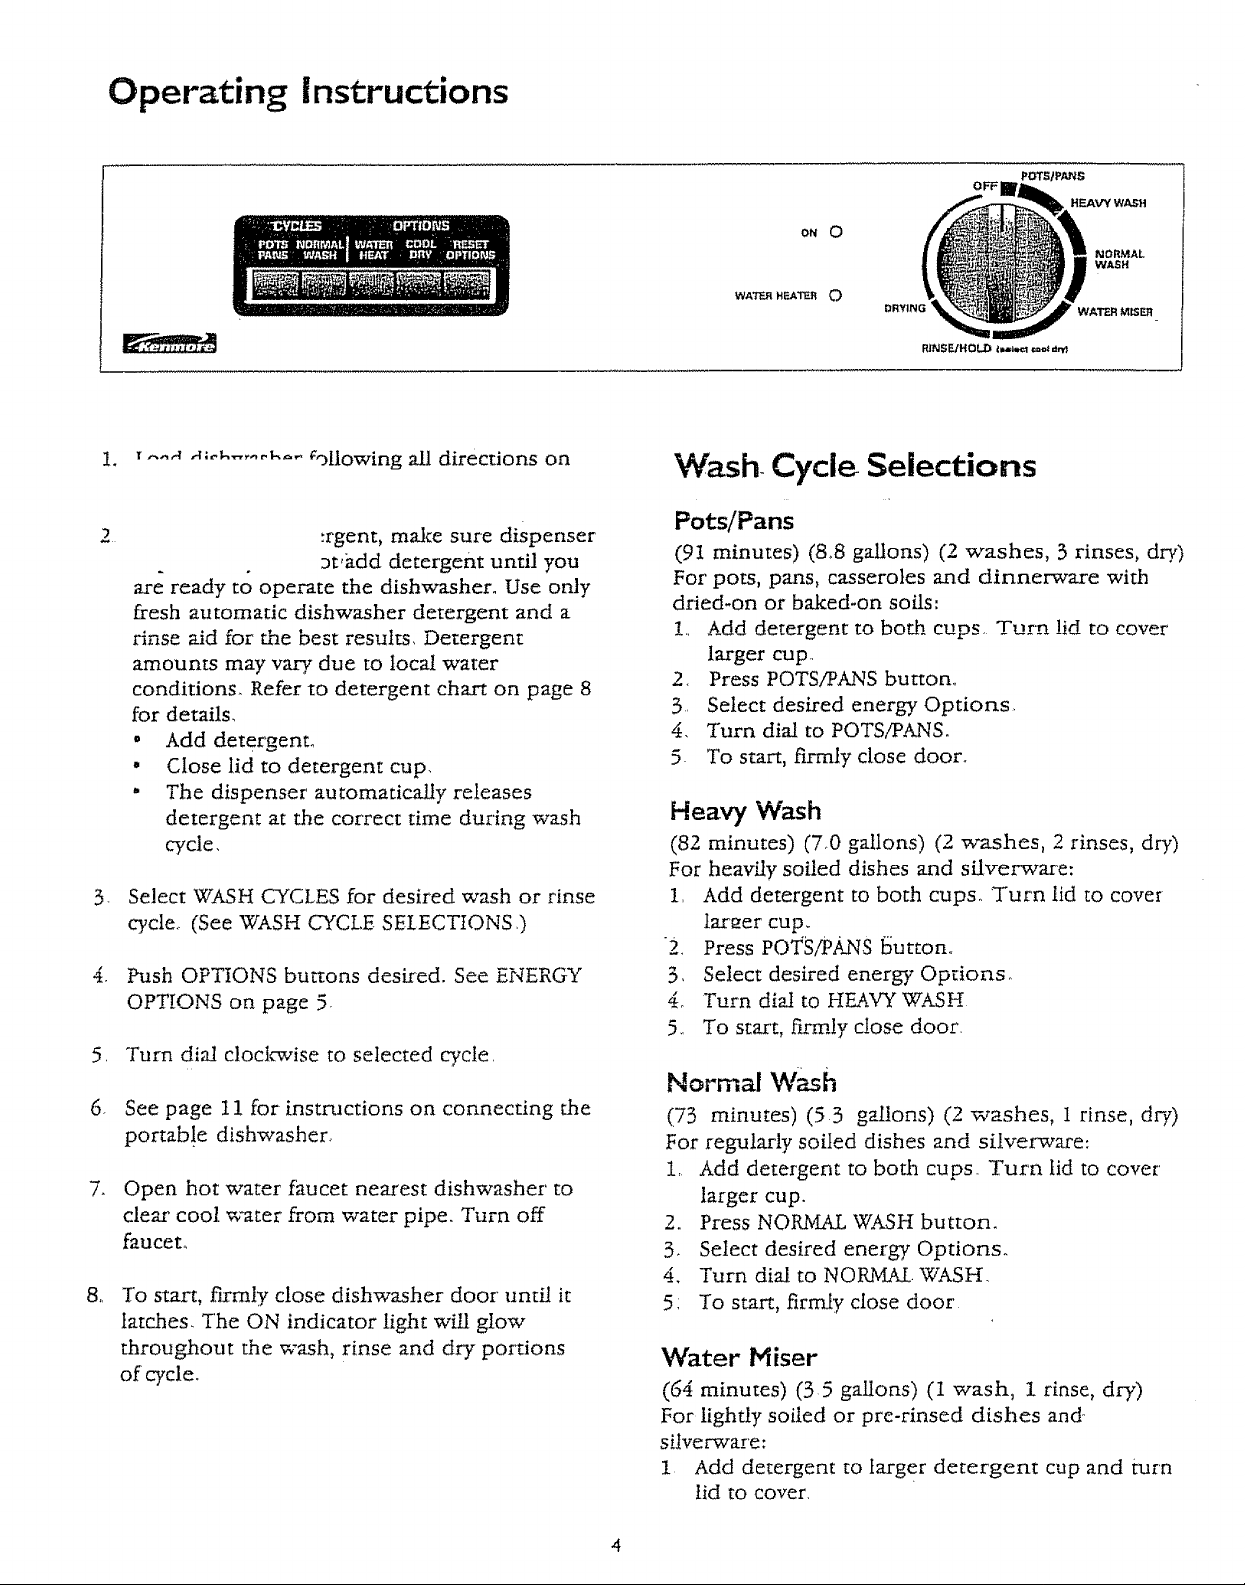
OFF
ON 0
WAT_ H_'rER 0
RINSEIHOL,D tM*=_-I r.=Dt dn¢
1. T.._._ .4:o_..... _'_" _ollowing all directions on
:rgent, make sure dispenser
_t,i_dd detergent until you
are ready to operate the dishwasher. Use only
fresh automatic dishwasher detergent and a
rinse aid for the best results. Detergent
amounts may vary due to local water
conditions. Refer to detergent chart on page 8
for details,
• Add detergent_
• Close lid to detergent cup.
" The dispenser' automatically releases
detergent at the correct time during wash
cycle.
Select WASH CYCLES for desired wash or rinse
cycle_ (See WASH CYCLE SELECTIONS.)
,
Push OPTIONS buttons desired. See ENERGY
OPTIONS on page 5_
,
Turn dial clockwise to seiected cycte.
6.
See page 11 for instructions on connecting the
portab!e dishwasher_
7_
Open hot water faucet nearest dishwasher to
clear cool water from water pipe. Turn off
faucet_
8_
To start, firmly close dishwasher door' until it
latches. The ON indicator light will gIow
throughout the wash, rinse and dry portions
of cycle.
Wash Cycle Selections
Pots/Pans
(91 minutes) (&8 gallons) (2 washes, 3 rinses, dry)
For pots, pans, casseroles and dinnerware with
dried-on or baked-on soils:
!,. Add detergent to both cups, Turn lid to cover'
larger cup.,
2. Press POTS/PANS button.
3. Select desired energy Options.
4. Turn dial to POTS/PANS.
5. To start, firmly close door.
Heavy Wash
(82 minutes) (7°0 gallons) (2 washes, 2 rinses, dry)
For heavily soiled dishes and silverware:
1. Add detergent to both cups,. Turn lid to cover
iar_er cup.
Press POTS/PANS t_uttono
3. Select desired energy Options,
4_ Turn dia! to HEAVY W.&SH
5,. To start, firmly close door.
Normal Wash
(73 minutes) (53 gal!ons) (2 washes, 1 rinse, dry)
For regularly soiled dishes and silverware:
1, Add detergent to both cups. Turn lid to covet'
larger cup.
2. Press NORMAL WASH button.
3. Select desired energy Options.
4. Turn dial to NORMAL. WASH.
5: To start, firmly close door
Water Miser
(64 minutes) (35 gallons) (1 wash, 1 rinse, dry)
For lightly soiled or pre-rinsed dishes and-
silverware:
1 Add detergent to larger detergent cup and turn
lid to cover.
Operating instructions
continued
2 Press NORMAL WASH button.
3. Select desired energy Options,
4 Turn dial to WATER MISER
5. To start, firmly close door
Rinse/Hold
(14 minutes) (1.6 gallons) (1 rinse)
For rinsing dishes that will be washed iater:
i. DO NOT USE detergent.
_. Press NORM_aI WASH button.
5. Select COOL DRY Option
JyTurn- di-a:I-to-RINS'E-iHO LD
;: To. start; firmly close door
Preparing and
Dishes
Loading
=nergy Options
_'a{:er ' ' ' " ""
7hen WATER HEAT Option is selected, the
eating element in bottom of tub will raise the
lain wash water temperatuz
40°F. W_h action wi!l cont
ot advance until this water temperature has De _
:ached, The hotter water provided by this optJ
elps activate dishwasher detergent to clean fo,
"ease and soil from dishes. WATER HEAT Opti
_n be used with any cycle except RINSE,ff-IOLD
_e.Water Heatez' light wi_ glow unti/the water
mperamre reaches 140°F. To turn off option
ess RESET OPTIONS,
_oI Dr! Option
_OL DRY Option saves electricity.. The heating
:ment stays off during drying portion of cycle.
ditional drying time may be required, with door
en, to completely air dry dishes Some water
_ptets may remain on door and in areas where
hes touch dishwasher basket or rack
r_ea_ up_on
Dish Preparation
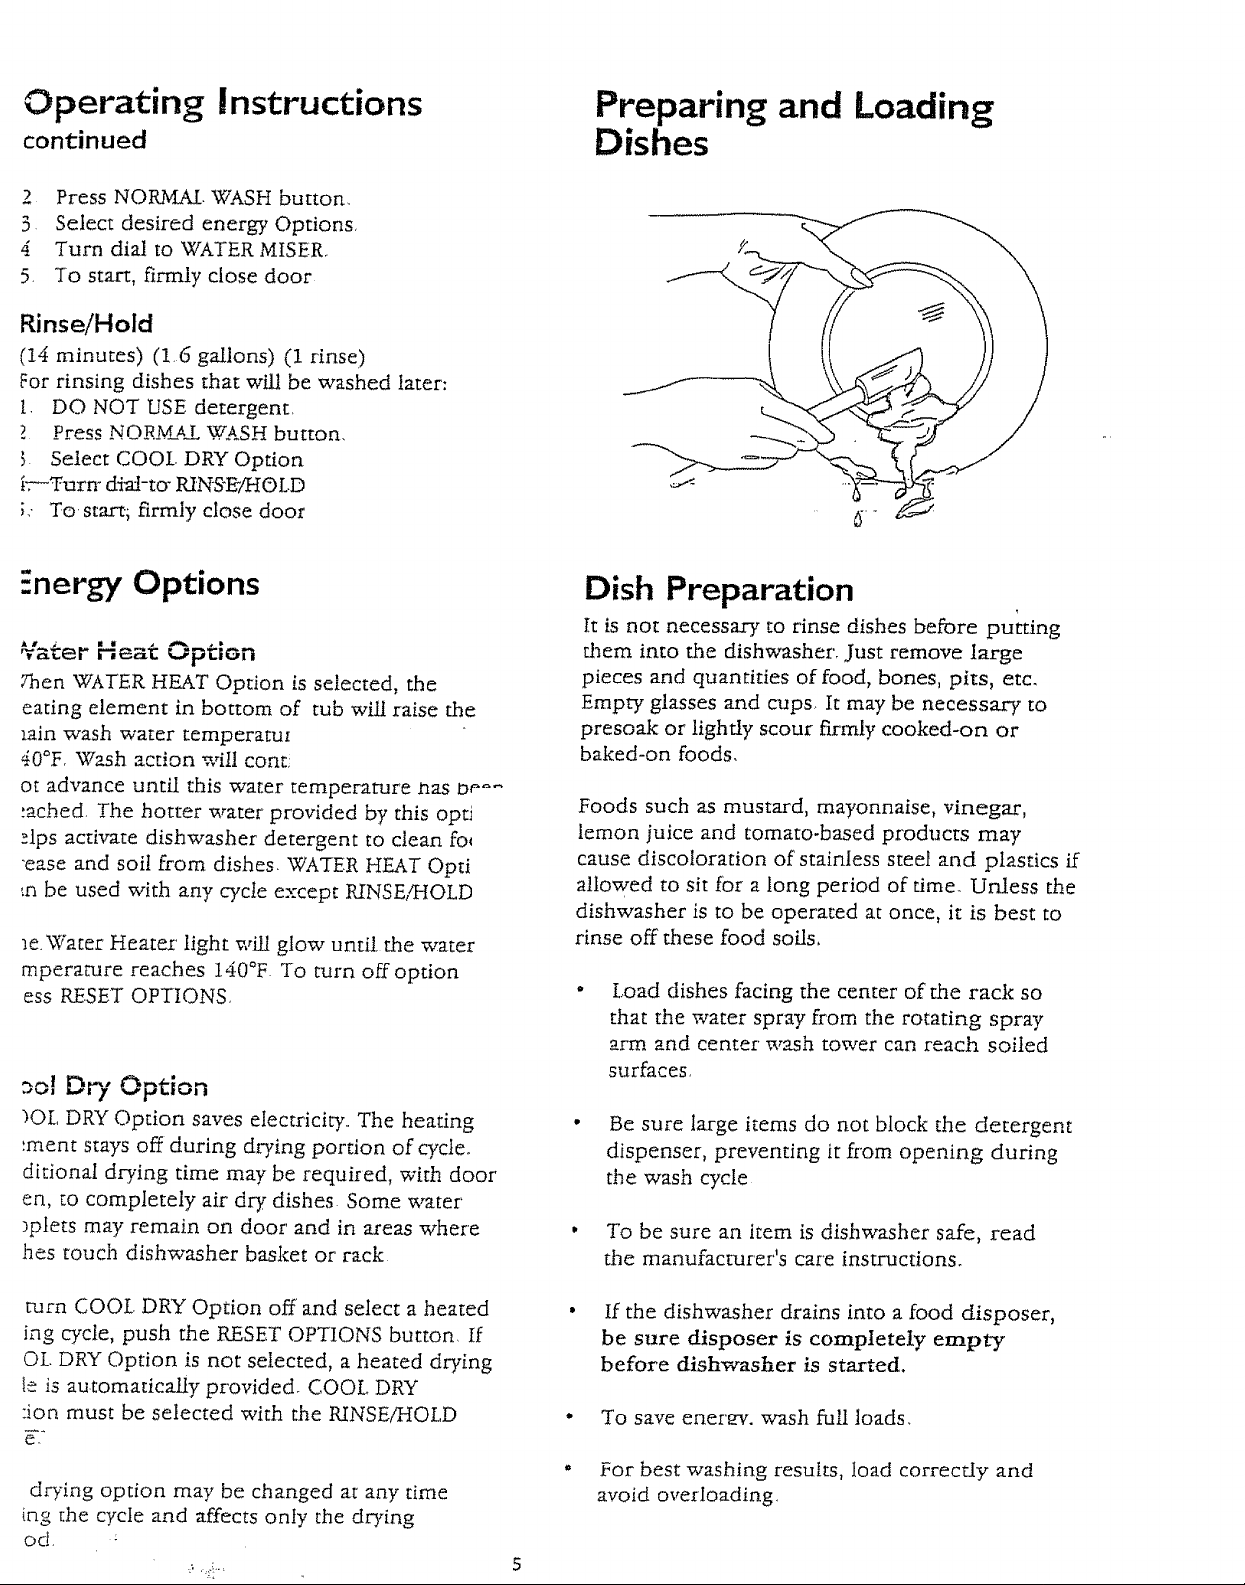
It is not necessary to rinse dishes before pu['ting
them into the dishwasher, just remove large
pieces and quantities of food, bones, pits, etc.
Empty glasses and cups, It may be necessa W to
presoak or lightly scour firmly cooked-on or
baked-on foods.
Foods such as mustard, mayonnaise, vinegar,
lemon juice and tomato-based products may
cause discoIoration of stainless steel and plastics ff
allowed to sit for a long period of time. Unless the
dishwasher is to be operated at once, it is best to
rinse off these food soils,
Load dishes facing the center of the rack so
that the water spray from the rotating spray
arm and center' wash tower can reach soiled
surfaces,
• Be sure large items do not block the detergent
dispenser, preventing it from opening during
the wash cycle
To be sure an item is dishwasher safe, read
the manufacturer's care instructions.
turn COO[. DP?f Option off and select a heated
ing cycle, push the RESET OPTIONS button. If
OL DRY Option is not selected, a heated drying
le is automatically provided. COO[. DRY
:ion must be selected with the RINSE/HOLD
e.
drying option may be changed at any time
ing the cycle and affects onty the dwing
od,
Ifthe dishwasher drains into a food disposer,
be sure disposer is completely empty
before dishwasher is started.
To save enerm,, wash full loads.
For best washing resutts, load correctly and
avoid overloading
Preparing and Loading Dishes continued
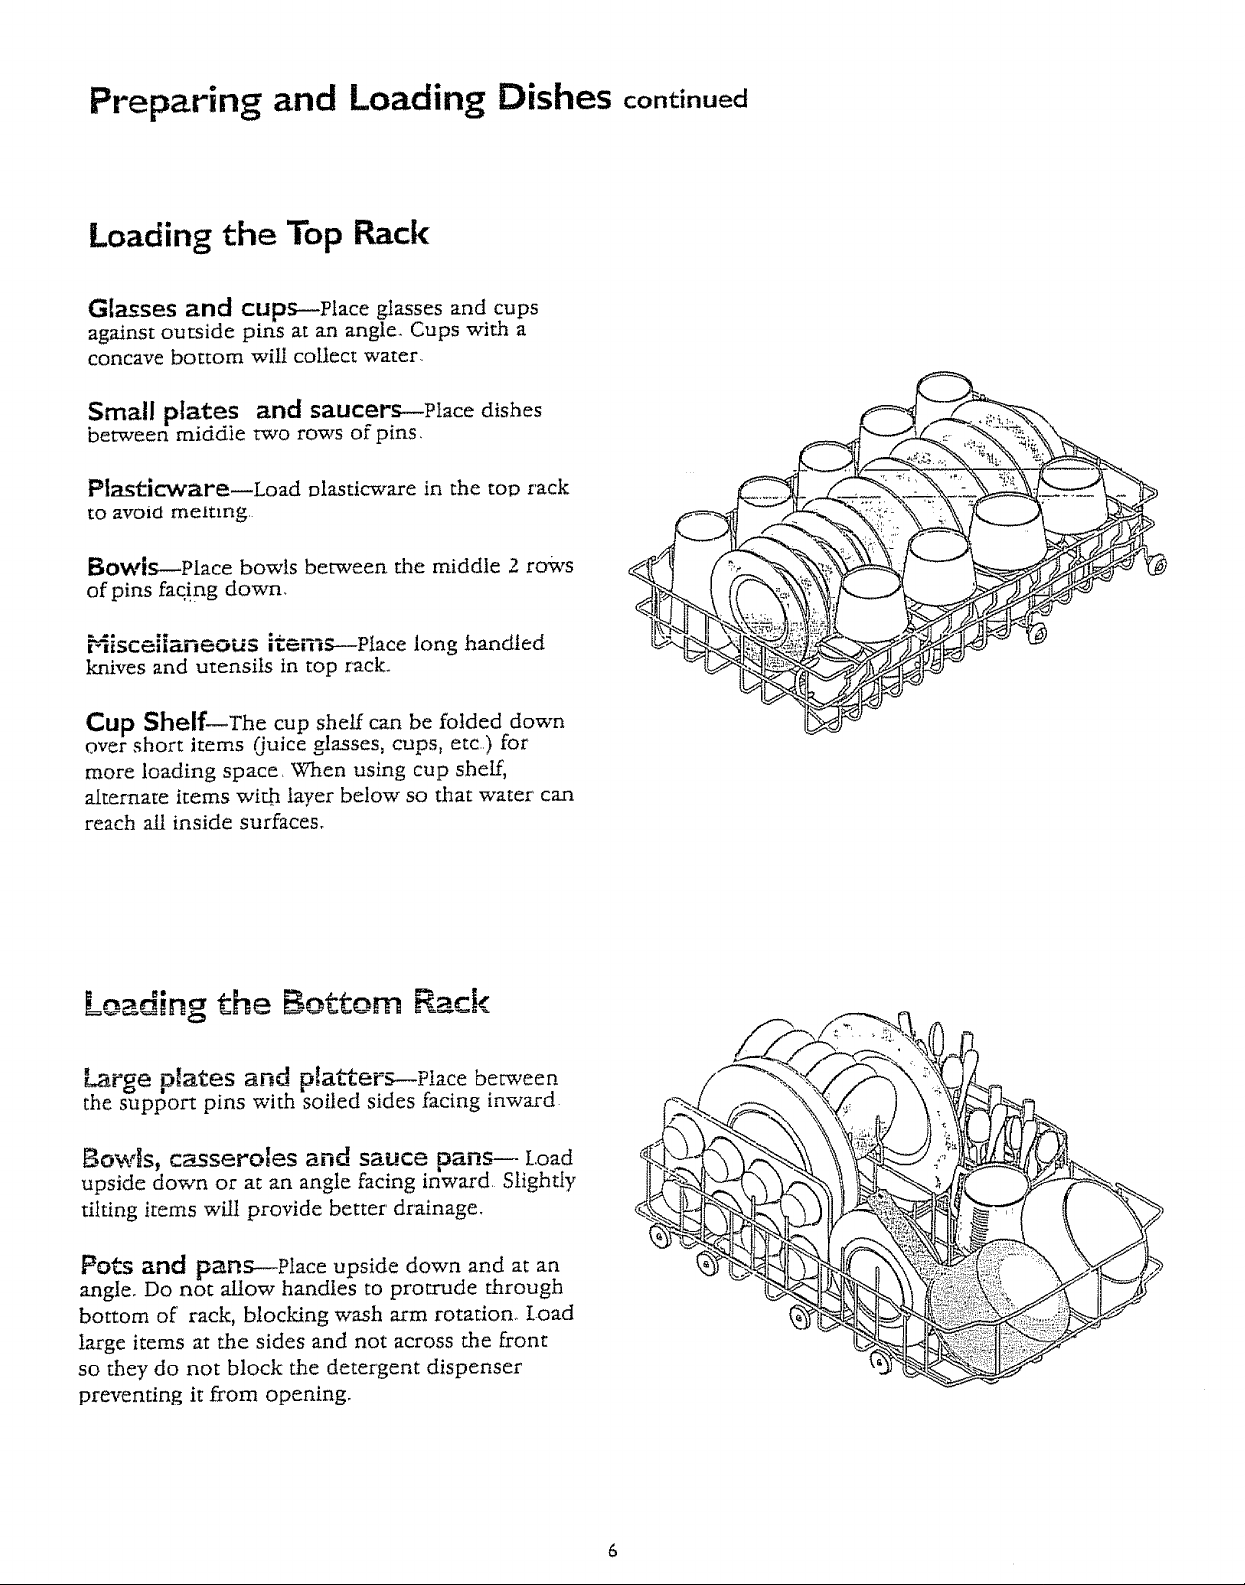
Loading the Top Pack
Glasses and cups--Place glasses and cups
against outside pins at an angle. Cups with a
concave bottom wilI collect water..
Small plates and saucers--place dishes
between middie two rows of pins_
Pl_ticvcare--Load Dlasticware in the top rack
to avoid memng
Bowis--Place bowls between the middle 2 rows
of pins fac!ng down,
Hisceiianeous iten'i_--place long handled
knives and utensils in top rack.
Cup Shelf--The cup shelf can be folded down
over short items (.juice glasses, cups, etc..) for
more loading space. When using cup shelf,
alternate items wi_ layer below so that water can
reach all inside surfaces.
Loading the Bottom Rack
Large plates and platters--Place between
the support pins with soiled sides facing inward
Bowts, ca__sseroIes and sauce pans-- Load
upside down or at an angle facing inward Slightly
tilting items will provide better' drainage.
Pots and parts--Place upside down and at an
angle. Do not allow handles to protrude through
bottom of rack, blocking wash arm rotation_ load
large items at the sides and not across the front
so they do not block the detergent dispenser
preventing it from opening.
Preparing and Loading Dishes continued
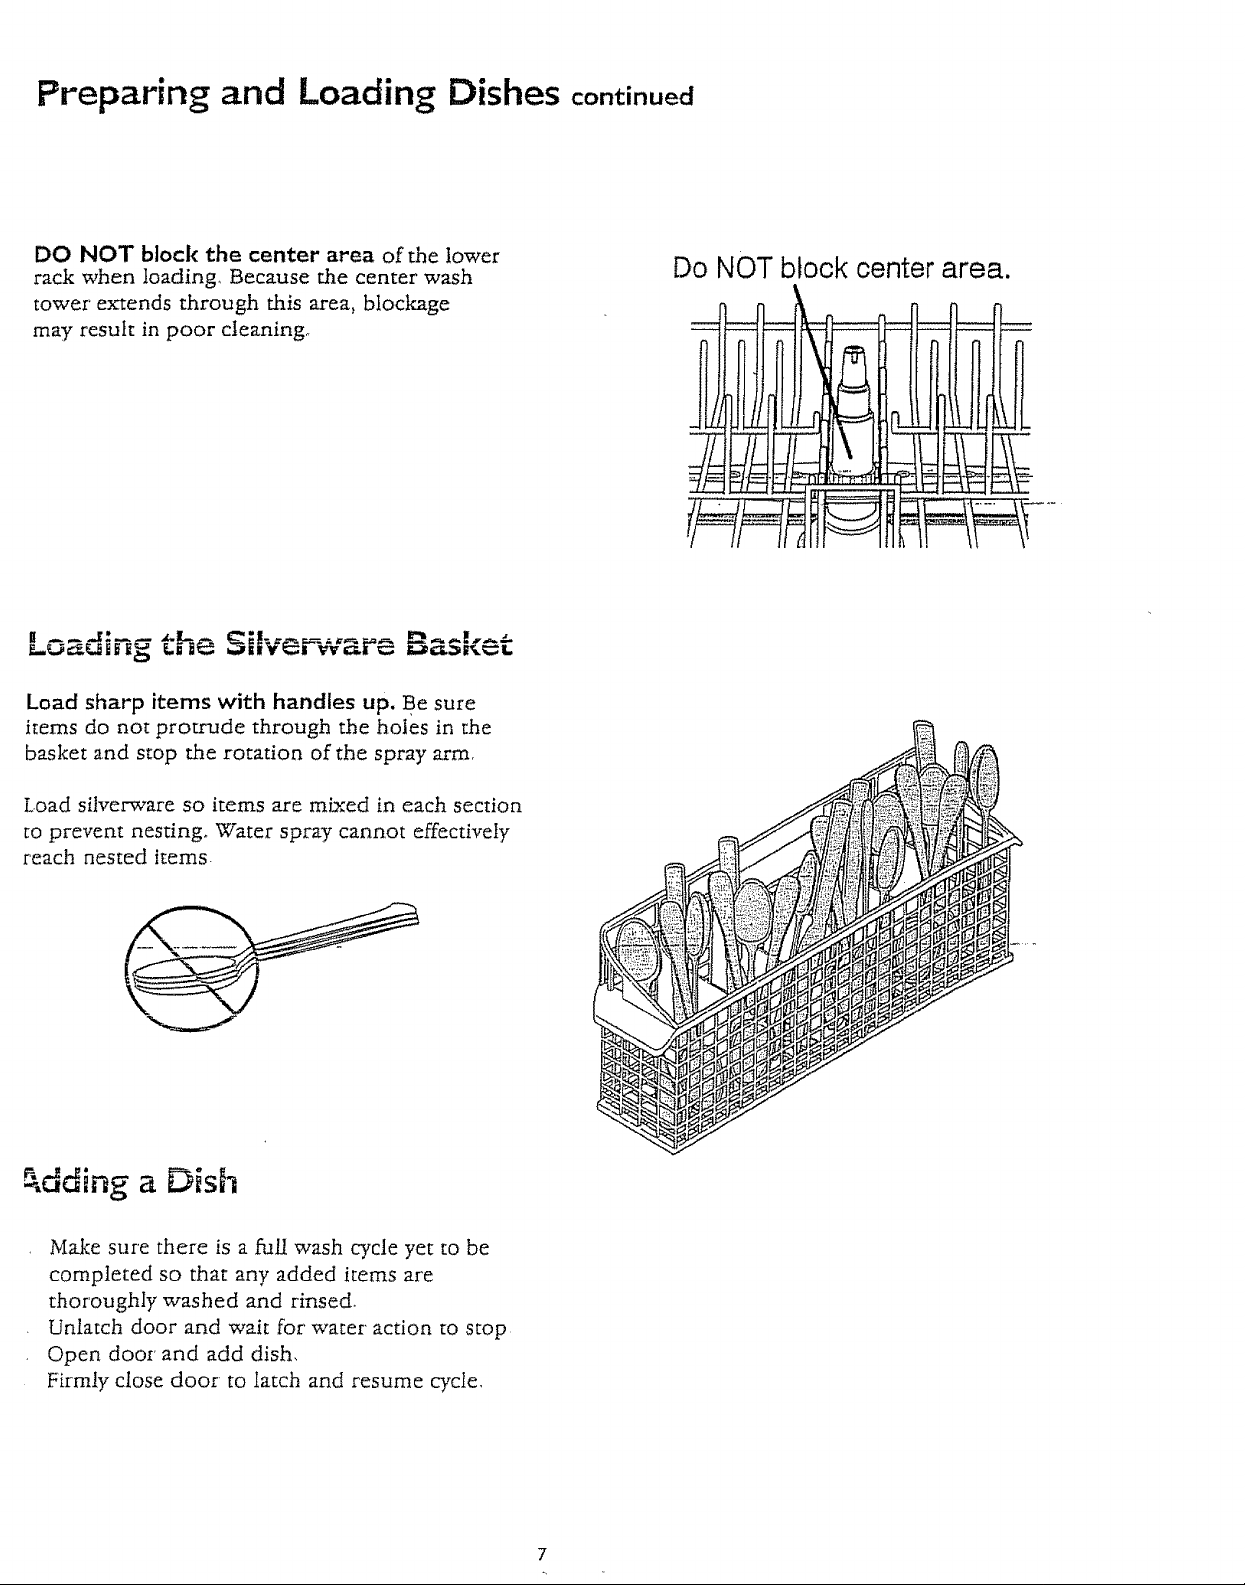
DO NOT block the center area of the lower
rack when loading, Because the center wash
tower' extends through this area, bloclcage
may result in poor cleaning°
_._u._g the Silver€care ,.,,_,_,_L°o'4-'-_
Load sharp items with handles up. Be sure
items do not protr_ade through the holes in the
basket and stop the rotation of the spray arm,
Load silverware so items are mNed in each section
to prevent nesting. Water spray cannot effectively
reach nested items
Do NOT block center area.
M
_.dding a Dish
Make sure there is a full wash cycle yet to be
completed so that any added items are
thoroughly washed and rinsed.
Unlatch door and wait for water' action to stop
Open door and add dish,
Firmiy close door to latch and resume cycle,
DishwaSher Dispenser & Detergents
° Use oMy fresh automatic dishwashing
detergent. Other types will cause
oversudsing.
" Add detergent just before starting cycle.
° Store detergent in a cool, dry location_
Moist or caked detergent will not dissolve
properly.
Filling the Detergent Dispenser
The detergent dispenser has one covered and
one uncovered cup: Detergent in the -_
un _cov_ere.dcup falls into the dishwasher when
the door is closed. The covered cup ol3ens
a-fit_hT___gTnain w-a_ .............
Fill both cups for
RA _ ......,_._
PRE WASH ._
Pots & Pans,
Heavy and
Normal Wash.
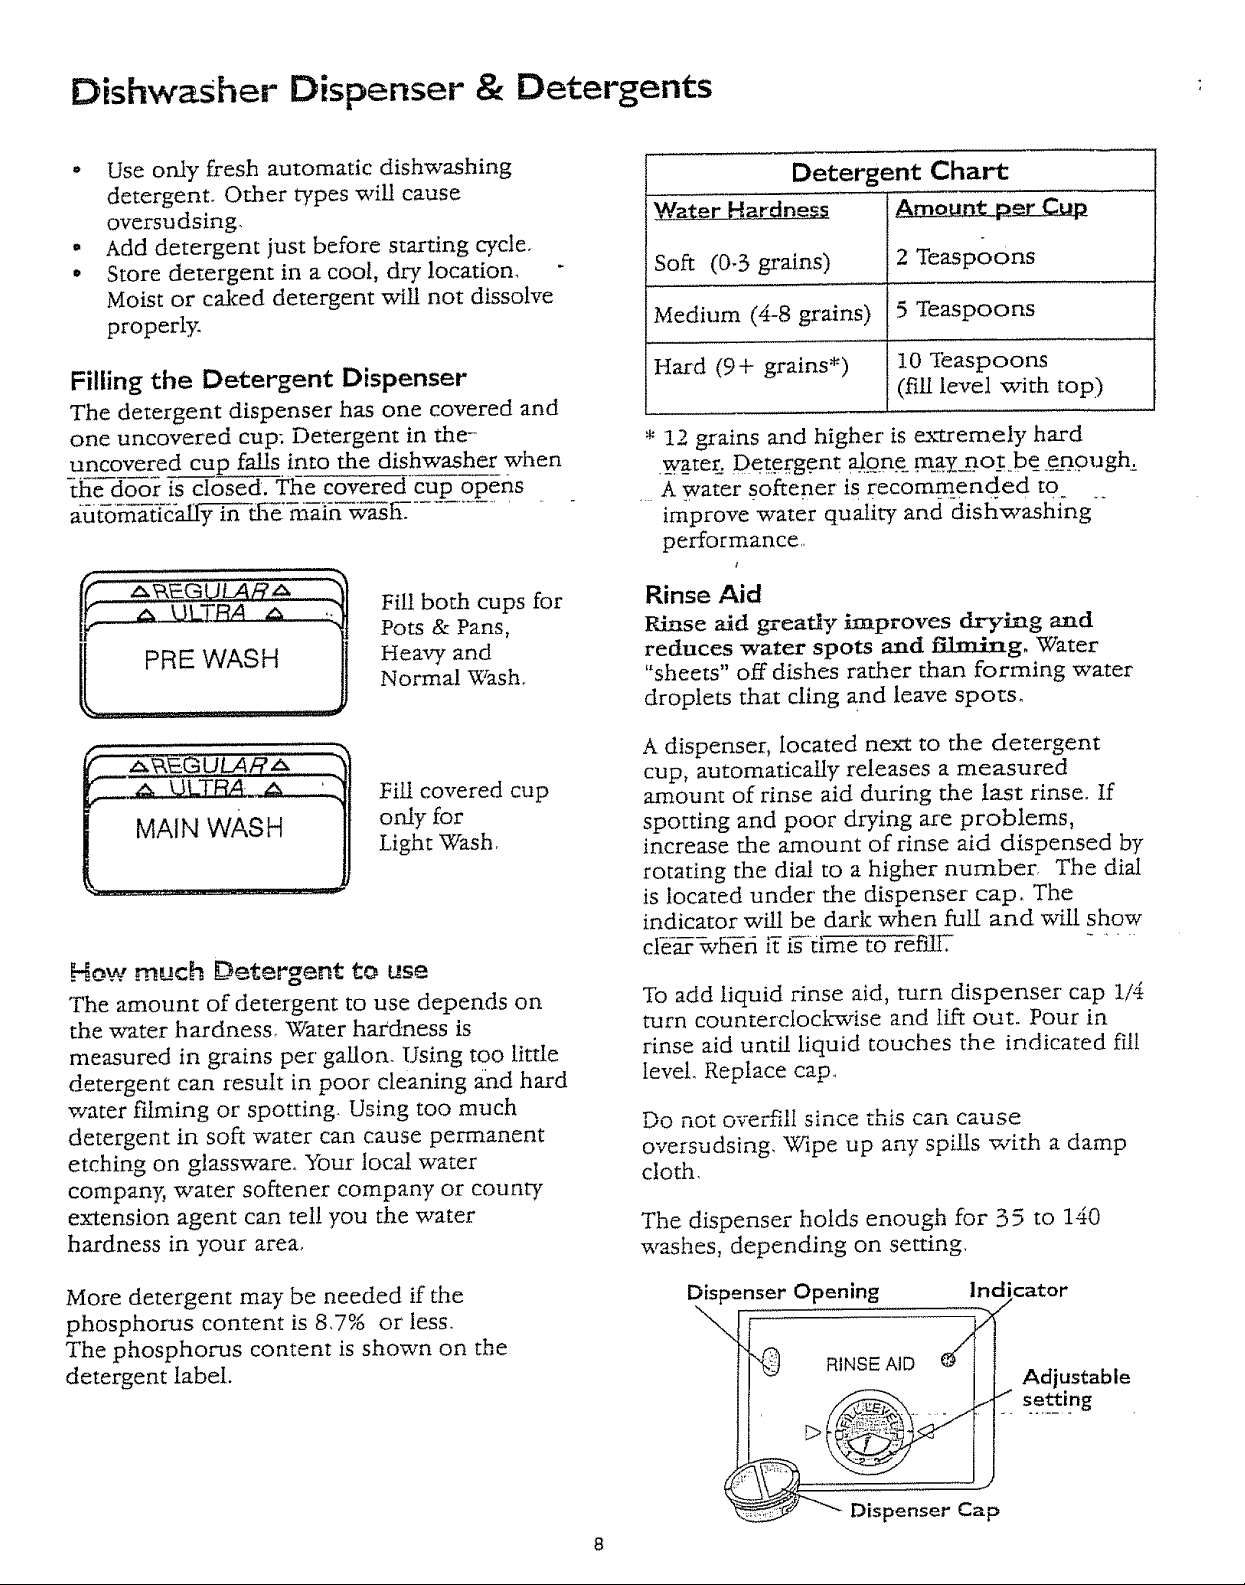
Detergent Chart
Soft (0-3 grains)
Medium (4-8 grains) 5 Teaspoons
Hard (9+ grains*) 10 Teaspoons
(flu leve! with top)
* 12 grains and higher is extremely hard
._w_ater.Det...erg.ent Oone m.az=no_t be_..enough..
......A water s.oftener is recommended tO_
improve water quality and dishwashing
performance.,
t
Rinse Aid
Rinse aid greatly improves drying and
reduces water spots and ffdm_iztg. Water
"sheets" off dishes rather than forming water
droplets that cling and leave spots,
LARz_ _
Fill covered cup
only for
Light Wash,
How much Detergent to use
The amount of detergent to use depends on
the water hardness. Water hardness is
measured in grains per gallon. Using too little
detergent can result in poor cleaning and hard
water filming or spotting_ Using too much
detergent in soft water can cause permanent
etching on glassware. Your local water
company, water softener company or county
extension agent can tel! you the water
hardness in your area,
More detergent may be needed if the
phosphorus content is 8,7% or less,
The phosphorus content is shown on the
detergent label.
A dispenser, located next to the detergent
cup, automatically releases a measured
amount of rinse aid during the last rinse. If
spotting and poor drying are problems,
increase the amount of rinse aid dispensed by
rotating the dial to a higher number, The dial
is located under' the dispenser cap, The
indicator will be dark when full and will show
clga-_7_h_fi ff igtime to refflE ......
To add liquid rinse aid, turn dispenser' cap 1/4
turn counterclock-wise and lift out. Pour in
rinse aid until liquid touches the indicated ill!
level. Replace cap..
Do not overfill since this can cause
oversudsing, Wipe up any spills with a damp
cloth,
The dispenser holds enough for 35 to 140
washes, depending on setting
Dis _enser Opening
cator
\
_0 RINSE AID
_ Dispenser Cap
.actors Affecting
Performance
?Cater Pressure
rater pressure should be between 15 and 120
_ounds per square inch. Low water pressure
recurs most often during periods of high water
onsumption, such as when laundry or showers
.re being done To determine ffyou have enough
cater pressure, put a 2 quart container under
ally opened hot water faucet neaxest the
ishwasher, It should fill in less than 14 seconds,
;e sure all other faucets axe turned offduring
_.st
Care and Cleaning
Burn HazEd
Allow heating element to cool
before cleaning the interior.
Failure to do so can resuIt in
burns.
Ou_ide--Occasionally wash with a mild
nonabrasive detergent and water. Rinse and dry_
riSid -:-rheifiside0iq£- :a shw s eT-tggeU
cleaning with normal use.
If hard water causes lime deposit buildup, dean
using the following instructions:
1. After dishwasher begins to fdi, open door and
pour 2 cups of white vinegar into dishwasher.
Do not add dishes or detergent.
2. Run through any full wash cycle,
later Temperature
_t water is needed for best dishwashing and
ying results. Water entering dishwasher must be
least !20°F to give satisfactory results. Improved
:rformance may be obtained by raising water .....
nperamre to I40°F. Water temperature should
,t exceed 160°F. Check your water heater for
aper temperature.
check water temperature entering dishwasher,
n on hot water faucet nearest dishwasher for'
,eral minutes to clear cool water from water
ms. Place a glass under faucet and use a candy
meat thermometer to check temperature of the
tar co!lected
porta-
ter D,
not o
er he_
Mug
If it is felt that further interior cleaning is needed,
general household spray cIeansers are
recommended.. Follow manufacturer's directions.
Important: The dishwasher motor is
permanently lubricated at the factory and
does not need to be oiled.
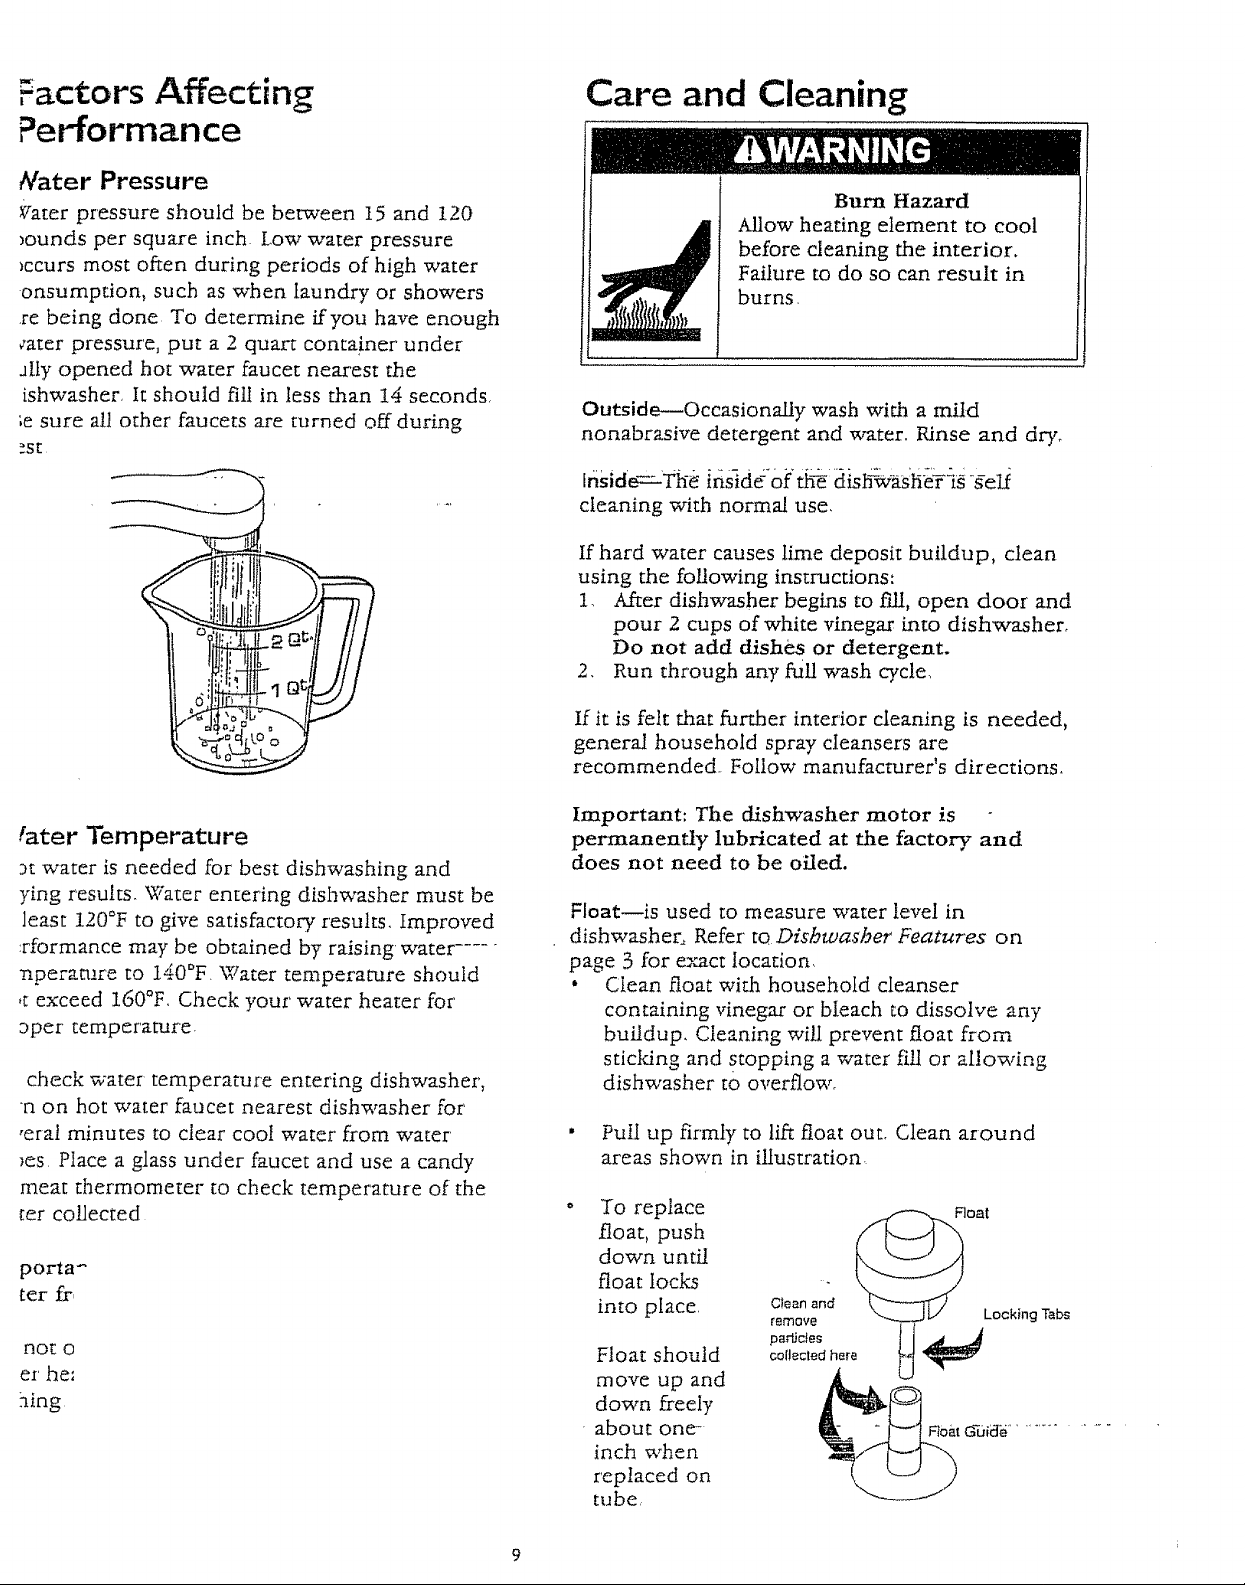
Float_is used to measure water level in
dishwasher, Refer to Dishwasher Features on
page 3 for e,-mct location,
' Ctean float with household cleanser
containing vinegar or bieach to dissolve any
buildup. Cleaning will prevent float from
sticking and stopping a water fill or allowing
dishwasher to overflow°
• Puli up firmly to lift float out. Clean around
areas shown in illustration.
float, push
down until
To replace _loat
float locks --
into place. Cleanand
remove Locking Tabs
particles
Float should collected here
move up and
down freely
• about one-
inch when
replaced on
tube,
Care and Cleaning continued
Vacation Time
If your dishwasher will not be used for more than
one week, turn off water supply to dishwasher° "
Turn dishwasher circuit breaker to "OFF"
position,
Care of Drain Air Gap
If a drain air gap was installed for your built-in
dishwasher, check to make sure it is clean so the
dishwasher will drain properly, Drain air gaps are
usually mounted on counte_op_ar_d can be
inspected by removing the cover, A drain air gap is
not part of your dishwasher' and is not covered by
this warranty.
Burn Hazard
5- Replace spray arm and securely tighten lock-
nuL Spray arm should rotate freely,
6, Replace tower base,
Winterizing
A dishwasher that wiIl not be used for an
extended length of time or is located where
temperatures may fall below freezing must be
winterized,
Winterizing. the. Built-in Dishwasher,.
1, Turn off water supply ...............
2,, Pour one gabon of nontoxic RV or Marine
water system antifreeze (available from a
hardware or recreational_vehicle store)
into bottom of tub.
3. Set for any wash cycle, Close door, Allow
dishwasher to run for 3 minutes to distribute
antifreeze into dishwasher's water system.
Before unit is put back into use, antifreeze must
be removed To remove, fill both detergent cups
with dishwasher detergent and operate through a
complete normal cycle without dishes.
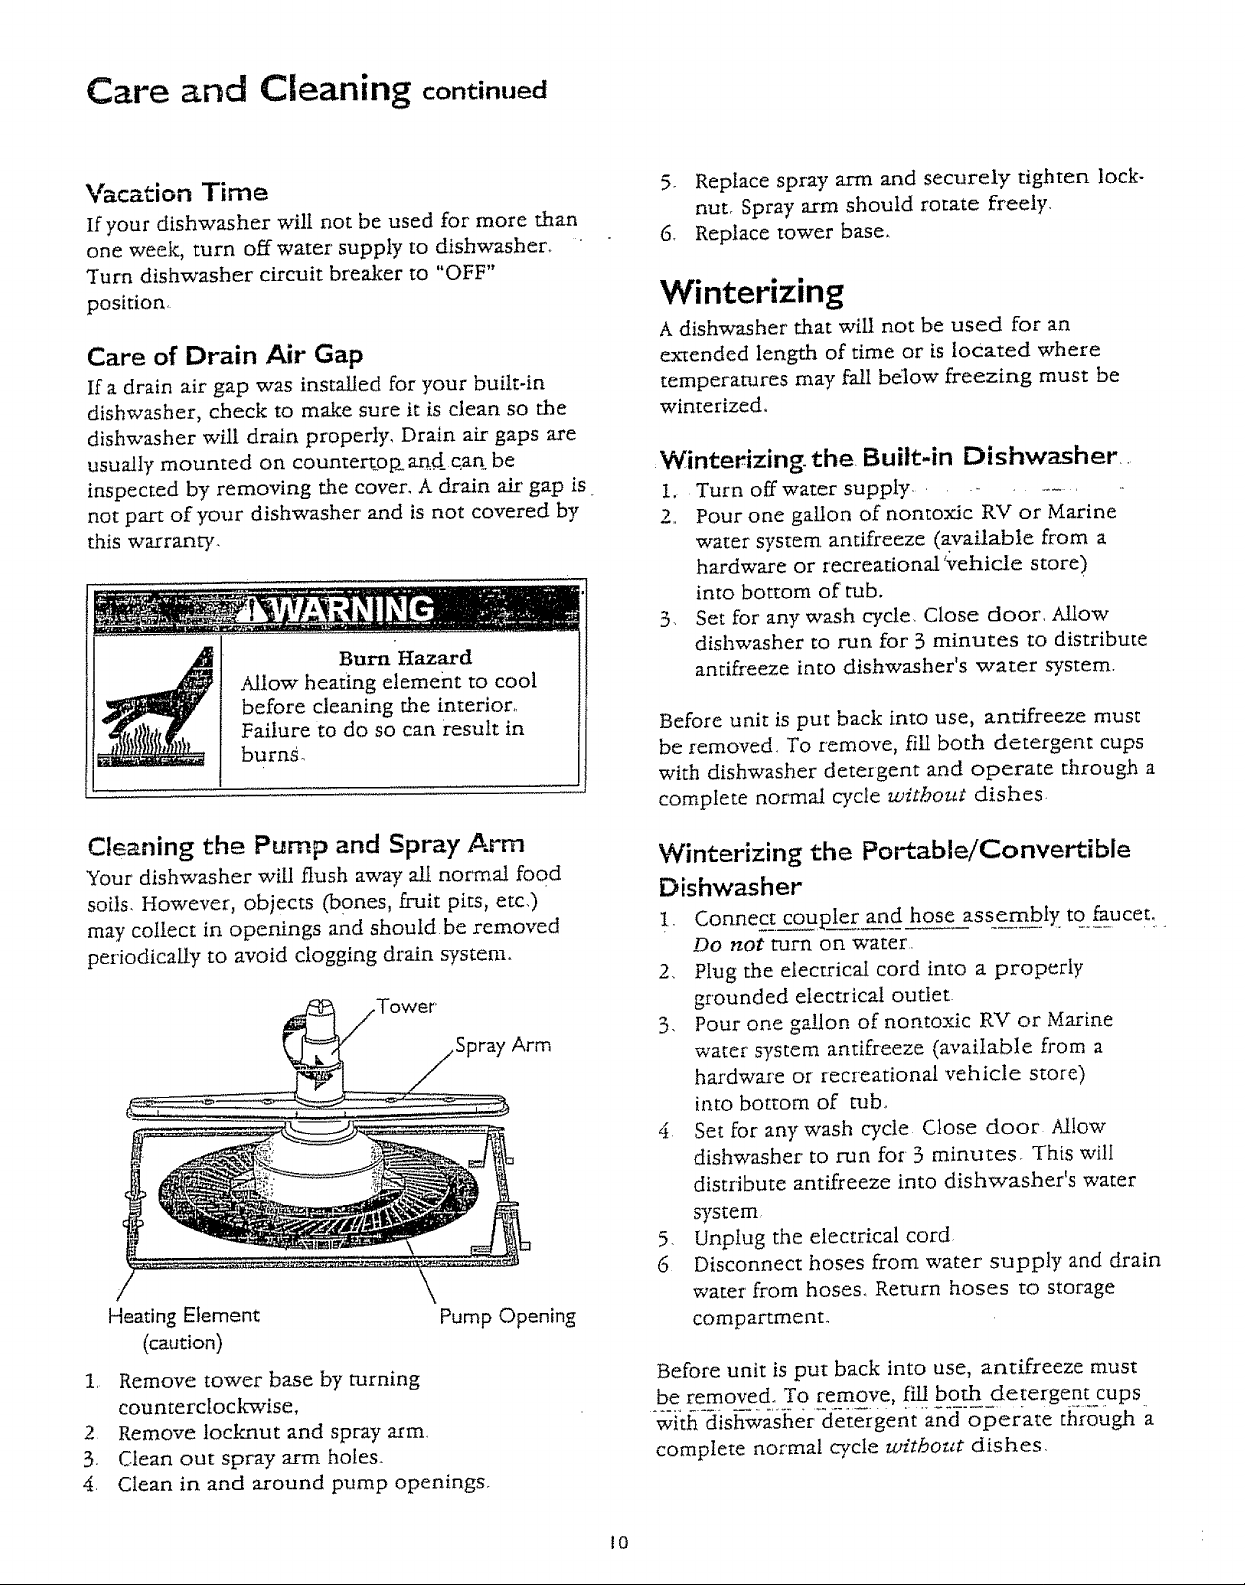
Cleaning the Pump and Spray Arm
Your dishwasher will flush away all normal food
soils. However, objects (bones, fruit pits, etc.)
may collect in openings and should, be removed
per'iodically to avoid clogging drain system°
Heating Element
(caution)
1. Remove tower base by turning
counterclockwise,
2. Remove loc!*nut and spray arm
3. Clean out spray arm holes.
4. Clean in and around pump openingsr
Pump Opening
Winterizing the Potable/Convertible
Dishwasher
1, Connec_t coupler and hose assembly tq faucet:,.
Do not turn on water.
2. Plug the electrical cord into a properly
grounded electrical outlet.
3. Pour one gallon of nontoxic R¥ or Marine
water system antifreeze (available from a
hardware or recreational vehicle store)
ir_to bottom of tub.
4 Set for anywash cycle Close door A!tow
dishwasher' to run for3 minutes, This will
distribute antifreeze into dishwasher's water
system
5. Unplug the electrical cord
6 Disconnect hoses from water supply and drain
water' from hoses, Return hoses to storage
compartment_
Before unit is put back into use, antifreeze must
b_e remqved:, r 0 r__moye, fi_ bp__r.h_derergentcups
with dishwasher' detergent and operate through a
complete normal cycle wftbOUg dishes.
10
Connecting and Disconnecting the Portable!Convertible
Dishwasher
The portable/convertible dishwasher must be connected to a faucet and etectricM outlet each time it is used,
Follow directions on this page to properly connect dishwasher,
IMPORTANT: Make sure door is latched before moving dishwasher.
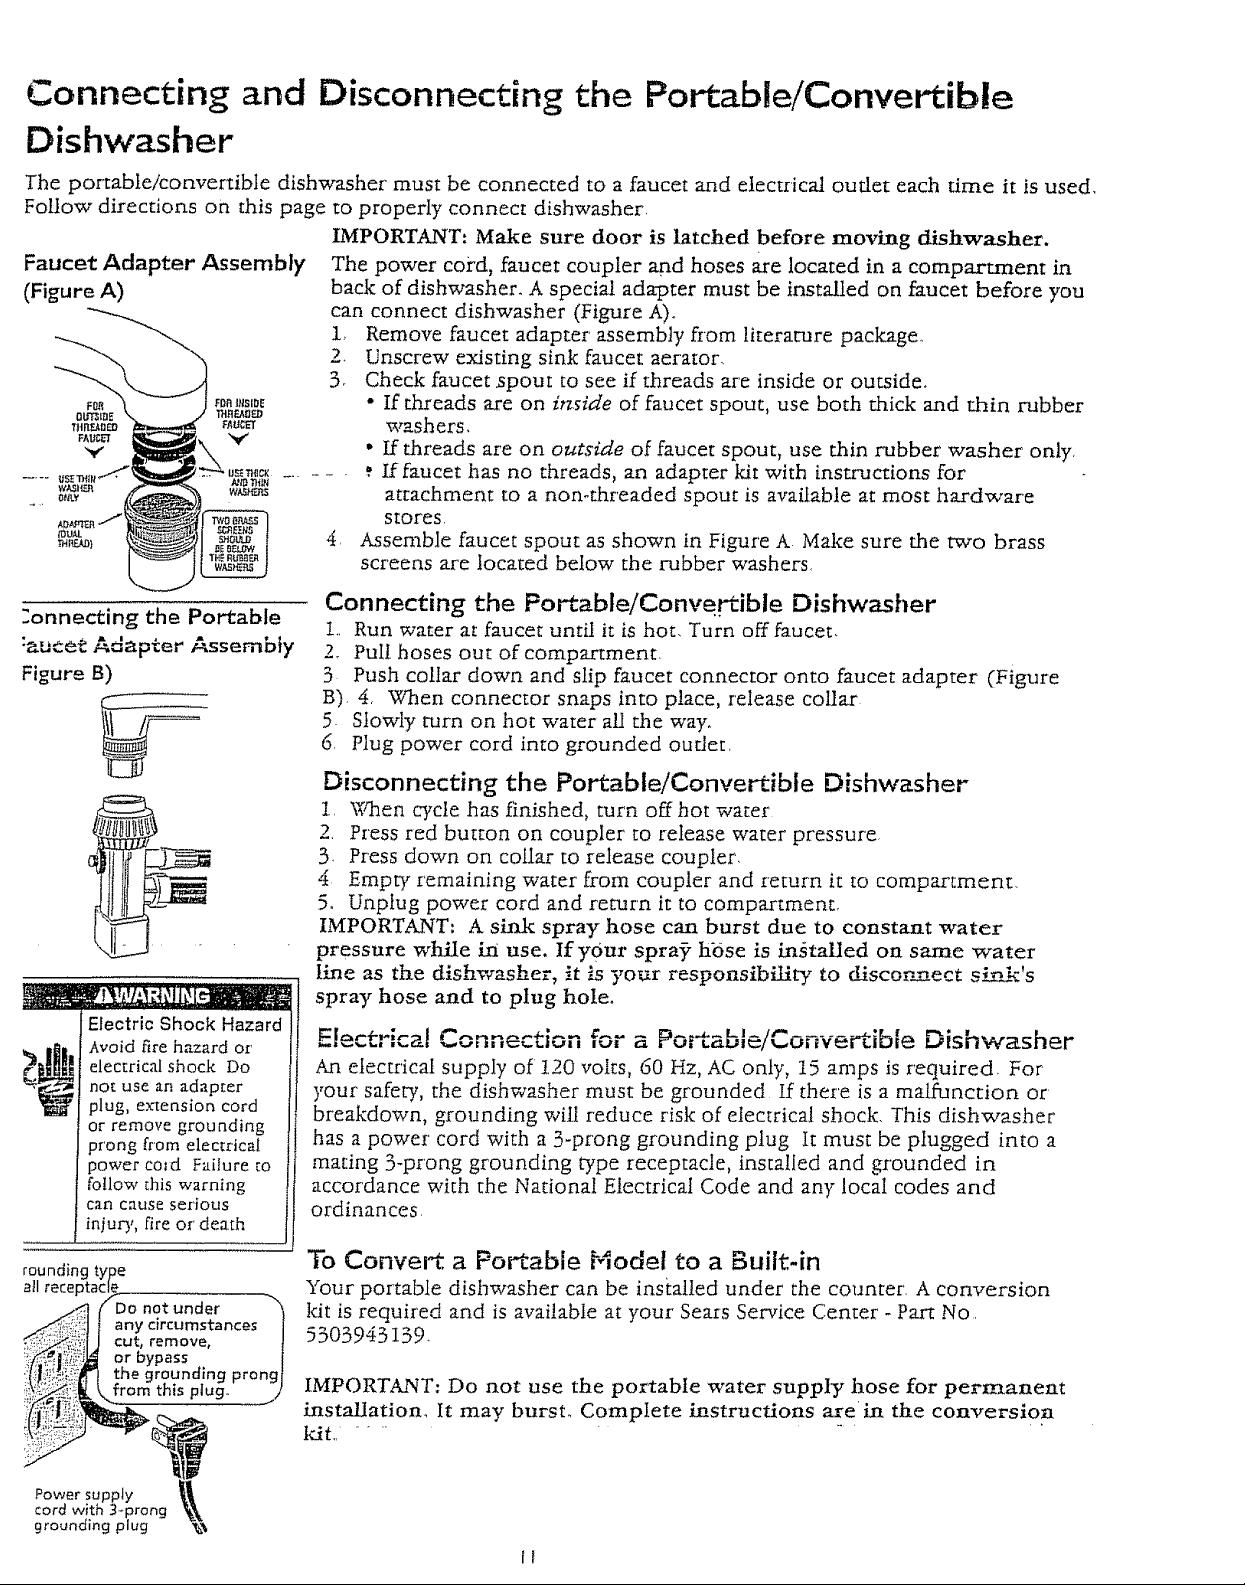
Faucet Adapter Assembly
(Figure A)
The power cot'd, faucet coupler and hoses are located in a compartment in
back of dishwasher. A specia! adapter must be installed on faucet before you
can connect dishwasher (Figure A)o
1. Remove faucet adapter' assembly from limramre package.
2_ Unscrew existing sink faucet aerator.
3_ Check faucet spout to see if threads are inside or outside.
• If threads are on inside of faucet spout, use both thick and thin rubber
washers,
• I£threads are on outside of faucet spout, use thin rubber washer only,
K faucet has no threads, an adapter kit with instructions for
attachment to a non-threaded spout is available at most hardware
stores.
4. Assemble faucet spout as shown in Figure A Make sure the two brass
screens are located below the rubber washers,
:onnecting the Portable
:aueee Adapter Assembly
Figure B)
Electric Shock Hazard
Avoid fire hazard or'
electrical shock Do
not use an adaptor
plug, extension cord
or remove grounding
prong from electrical
power coId Failure m
follow this warning
can cause serious
injur3,, fire or' death
Connecting the Portable/Conve_ible Dishwasher
!,, Run water at faucet until it is hot, Turn off faucet.
2_ Pull hoses out of compartment.
3 Push collar down and slip faucet connector onto faucet adapter' (Figure
B). 4, When connector snaps into place, release collar
5. Slowly t-urn on hot water all the way.
6. Piug power cord into grounded outlet.
Disconnecting the Portable/Convertible Dishwasher
1. When cycle has finished, turn off hot water
2. Press red button on coupler' to release water pressure,
3 Press down on collar to release coupler,
4 Empty remaining water from coupler and return it to compartment.
5. Unplug power cord and ret_arn it to compartment,
IMPORTANT: A sink spray hose can burst due to constant water
pressure while in use. If your spra9 hbse is in,tailed on same water
l;me as the dishwasher, it _s your responsibility to discor.mect s_:'s
spray hose and to plug hole.
_:l_rq-4,-_l C',-..,-.-_,-+.;.--- ,r^_ _ _._ i_ t" ..... ' {
,-........ , ,..,.,,,,,=,._,_,,, ,_,, a Pu_ L,_b,=/_oi_vertlb_e Dishwasher
An electrical suppiy of I20 voits, 60 Hz, AC only, 15 amps is required_ For
)'our safer,!, the dishwasher must be grounded If there is a malfunction or
breakdown, grounding will reduce risk of electrical shock. This dishwasher
has a power cord with a 3-prong grounding plug It must be plu_ed_ into a
mating 3-prong grounding type receptacle, installed and grounded in
accordance with the National Electrical Code and any local codes and
ordinances.
rounding type
atl receptacle/_ --.
_iii! (Do not under ",
_I any circumstancesi
J cut, remove, |
or bypass |
"_ the groundlng prongl
_. from this plug. J
Power supply
cord with 3_prong
grounding plug %\
To Convert. a Portable L4odel to a Built-in
",'our portable dishwasher can be insta!ied under the counmr, A conversion
ldt is required and is available at your Sears Service Center - Part No.
5303943 I39.
IMPORTANT: Do not use the portable water supply hose for permanent
installation, It may burst_ Complete instructions areha the conversion
kit,, ............
{1
Changing Color Panels
mnstalling Reversible Door and Access Panels
Some models are equipped with reversible door and access panel inserts that offer three decorative colors,
Electrical Shock Hazard
Tc_prevent electrical shock,
disconnect electrical power supply
to dishwasher before changing
panel,
Metal door panels are sharp
and shouid be handled with
care. Wear gloves to protect
hands.
Cut Hazard
Failure to do so can result in
injury.
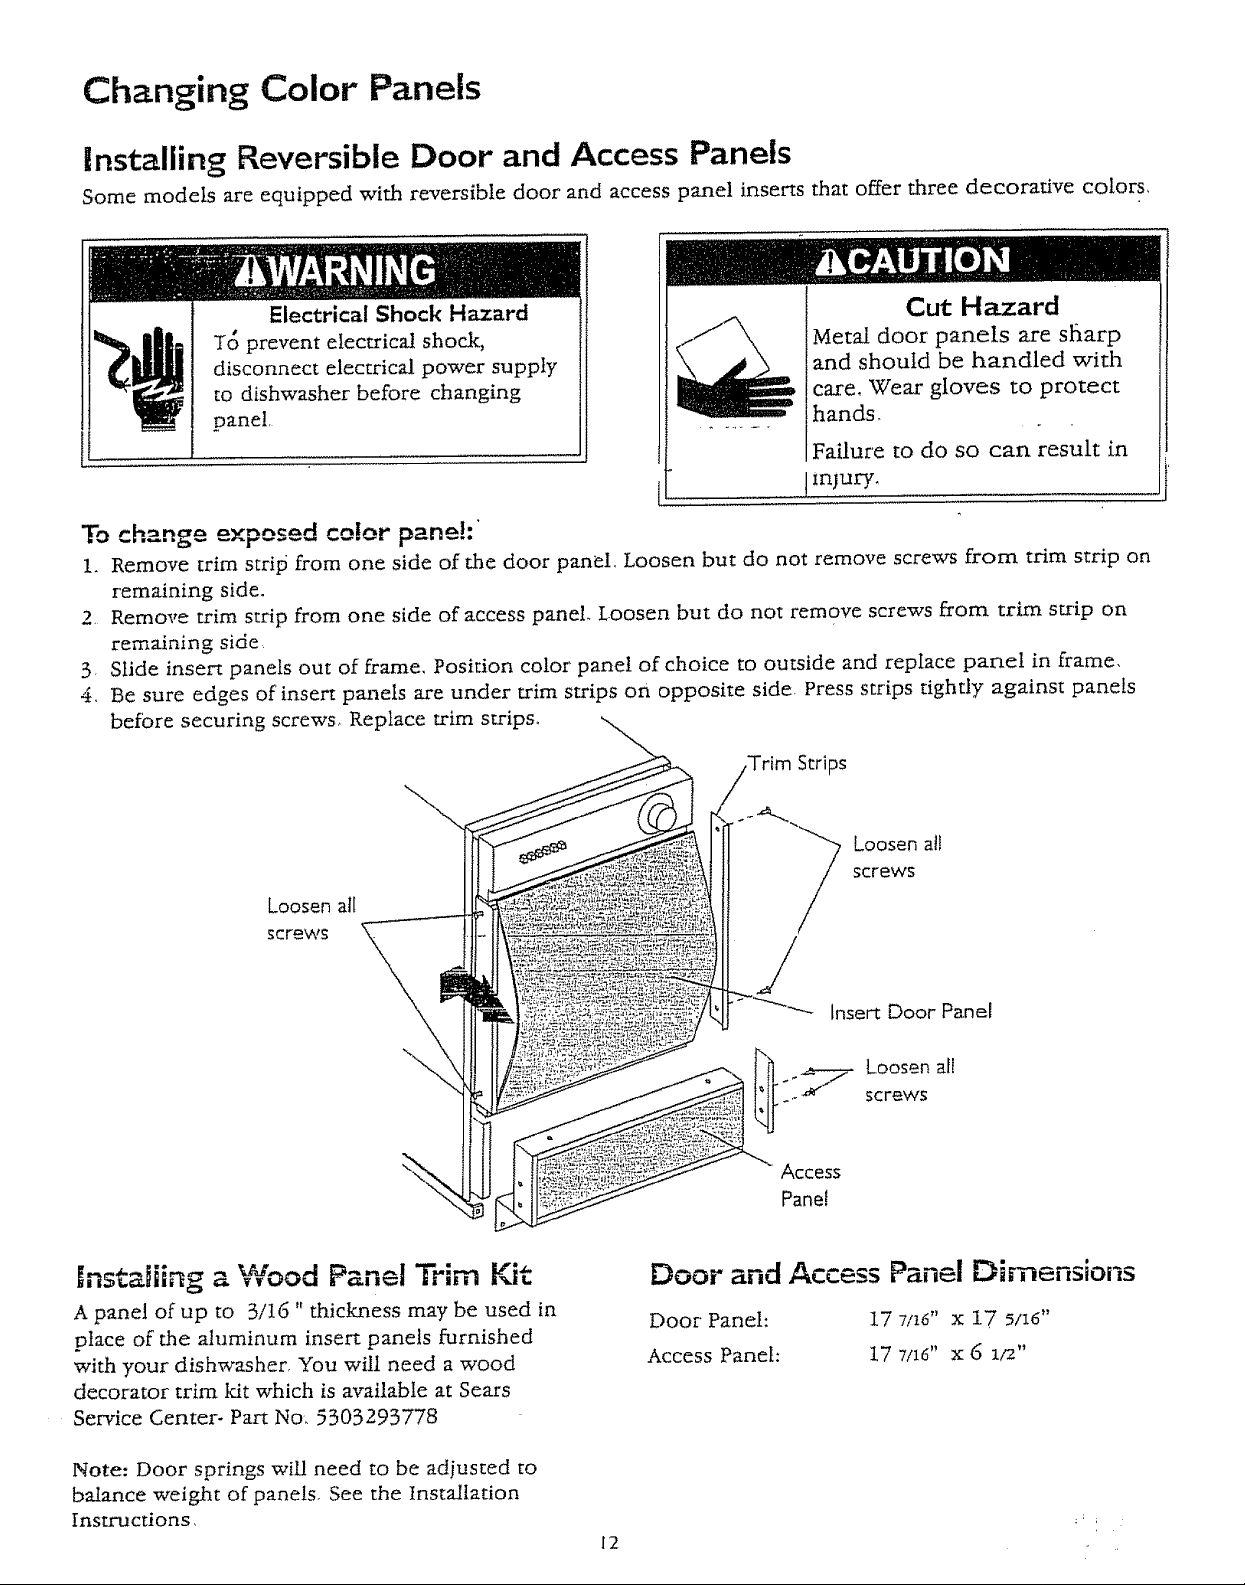
To change exposed co!orpane!:"
1. Remove trim strip from one side of the door panel. Loosen but do not remove screws from trim strip on
remaining side.
2. Remove trim strip from one side of access panel. Loosen but do not remove screws from trim strip on
remaining side,
3 Slide insert panels out of frame, Position color panel of choice to outside and replace panel in frame,
4, Be sure edges of insert panels are under trim strips on opposite side. Press strips tightly against panels
before securing screws, Replace trim strips,
Trim Strips
Loosen all
Loosen all
screws
Enstaiii_ga Wood Panel Trim Kit
A panel of up to 3/16 " thickness may be used in
place of the aluminum insert panels furnished
with your dishwasher, "You will need a wood
decorator trim Idt which is availabIe at Sears
Service Center- Part Nor 5303293778
Note: Door springs will need to be adjusted to
balance weight of panels, See the Installation
Instru cti ons,
screws
Insert Door Panel
Loosen all
screws
Door and Access Panel Dimensions
Door' Panel: 17 7/26" x I7 5I_6"
Access Panel: 17 7/16" x 6 1/2"
I2
Common Dishwashing Problems and Solutions
Dishes not clean--Check pages 4 to 9 for
information on correct wash cycle, proper loading,
water temperature, water' pressure_ hard water,
amount of detergent, old and ineffective detergent,
and dish placement,
Dishes not drying can be greatly improved by
using a rinse aid and very hot water. Hot water
raises temperature of dishes to speed up drying.
When loading, invert cups and bowls so that water
can run off. Avoid nesting of articles. If dishes are
n9t co_m_le rely_dry_a3te _nd_.__o__._cy_cl_e. (vchi__qh=.may.
occury¢hen COOL DRY setting is used), open door,
roll out racks, and allow dishes to air dry.
Spotting--Spots form when hacd water droplets
evaporate leaving a deposit. Low phospham
detergents increase the proble_ i.n hard water', To
prevent, use hot water and a detergent with a
higher leveI of phosphates (preferably 8°7% or
higher), or use more of a tow phosphate detergent.
Be sure to use a rinse aid. If water is very hard, it
:nay be necessary to install a water softener Load
_iasses and plates so they have minimum contact
vith racks and pins. Avoid overloading, Spotting
vLUoccur where dishes and glasses touch.
:loud]/films and streaking are usually
:aused by a combination of hard water and an
C_su_cient amount of detergent, Low p_hgsphate
!etergents are also a factor, To correct, increase
mount of detergent, check water temperature and
Iways use a rinse aid If water is very hard, it may
e necessary to install a water softener
!tched film on glassware is caused by using
)o much detergent in soft or softened ware> This
tm cannot be removed, It is more likely to occur'
n soft leaded glass or expensive crystal .am eazty
aming of this condition is a cloudy iridescent
)pearance on glasses. To prevent, be sure
shwasher is getting a full fill ofwater_ Water
_ould reach base of heating element. If water
vel is low-, have water' pressure checked by a
umber'. Use less detergent and make sure water
mperatur'e is not higher than 150°F (66°C),
_derload to assure thorough rinsing. Use the
)OL DRY Option. ...................
Chipped dishes and glasses can result from
rough handling and improper loading. Do not put
glasses in direct contact with other items° Place
glasses securely against pins_
Crazing of older china andpottery
happens when items are subjected to very hot
water. Once crazing (fine cracks in the glaze)
appears, it cannot be removed,. Do not machine
wash again or condition may worsen.
Coffee and-tea-stains .can occur when water-
contains traces of iron_ To avoid stains, rinse cups
our immediately after use Increase amount of
detergent and use a rinse aid, Water temperature
should be approximately 140°F (60°C). If problem
persists, install a water' softener with an k'on
removal unit, To remove stains, hand wash cups in
solution of 1/2 cup (120 ml) bleach and a quart
(1 L) of warm water, Pdnse thoroughly.
Gray-black stains on dishes are caused by
manganese in water supply, To correct, install a
manganese faltering system into house vcater
supply.
Reddish-brown stains on dishes, glasses
and interior are caused by iron in water, To
avoid iron stain, increase detergent, use water
heated £o app_rpxLmatety_ !..4.02E(60.°C) and a rinse .......
aid. It may be necessary to install a water softener
with an iron removal unit. To improve appearance,
use a commercial rust and lime scale remover.
Plastic items can lose their shape due to high
temperatures of automatic dishwashing, Read
labeIs before washing. Place washable items in top
rack away from heating element.
Discoloration of plasticware by some foods,
such as tomato sauce, can stain plasticware, If
stained, soak item in solution of 1 tablespoon
dishwasher detergent and a quart of hot water or
in a solution of I12 cup (120 ml) bleach and a
quart of hot water'
Fading of patterns and metallic trim
is .due to_ many wa_shiings,...detergent and h.ot water.
Most of today's china is dishwasher safe. Antique,
handpainted china, and handpainted pottery
should be washed by hand
t3
Common
Problems
continued
Dishwashing
and Solutions
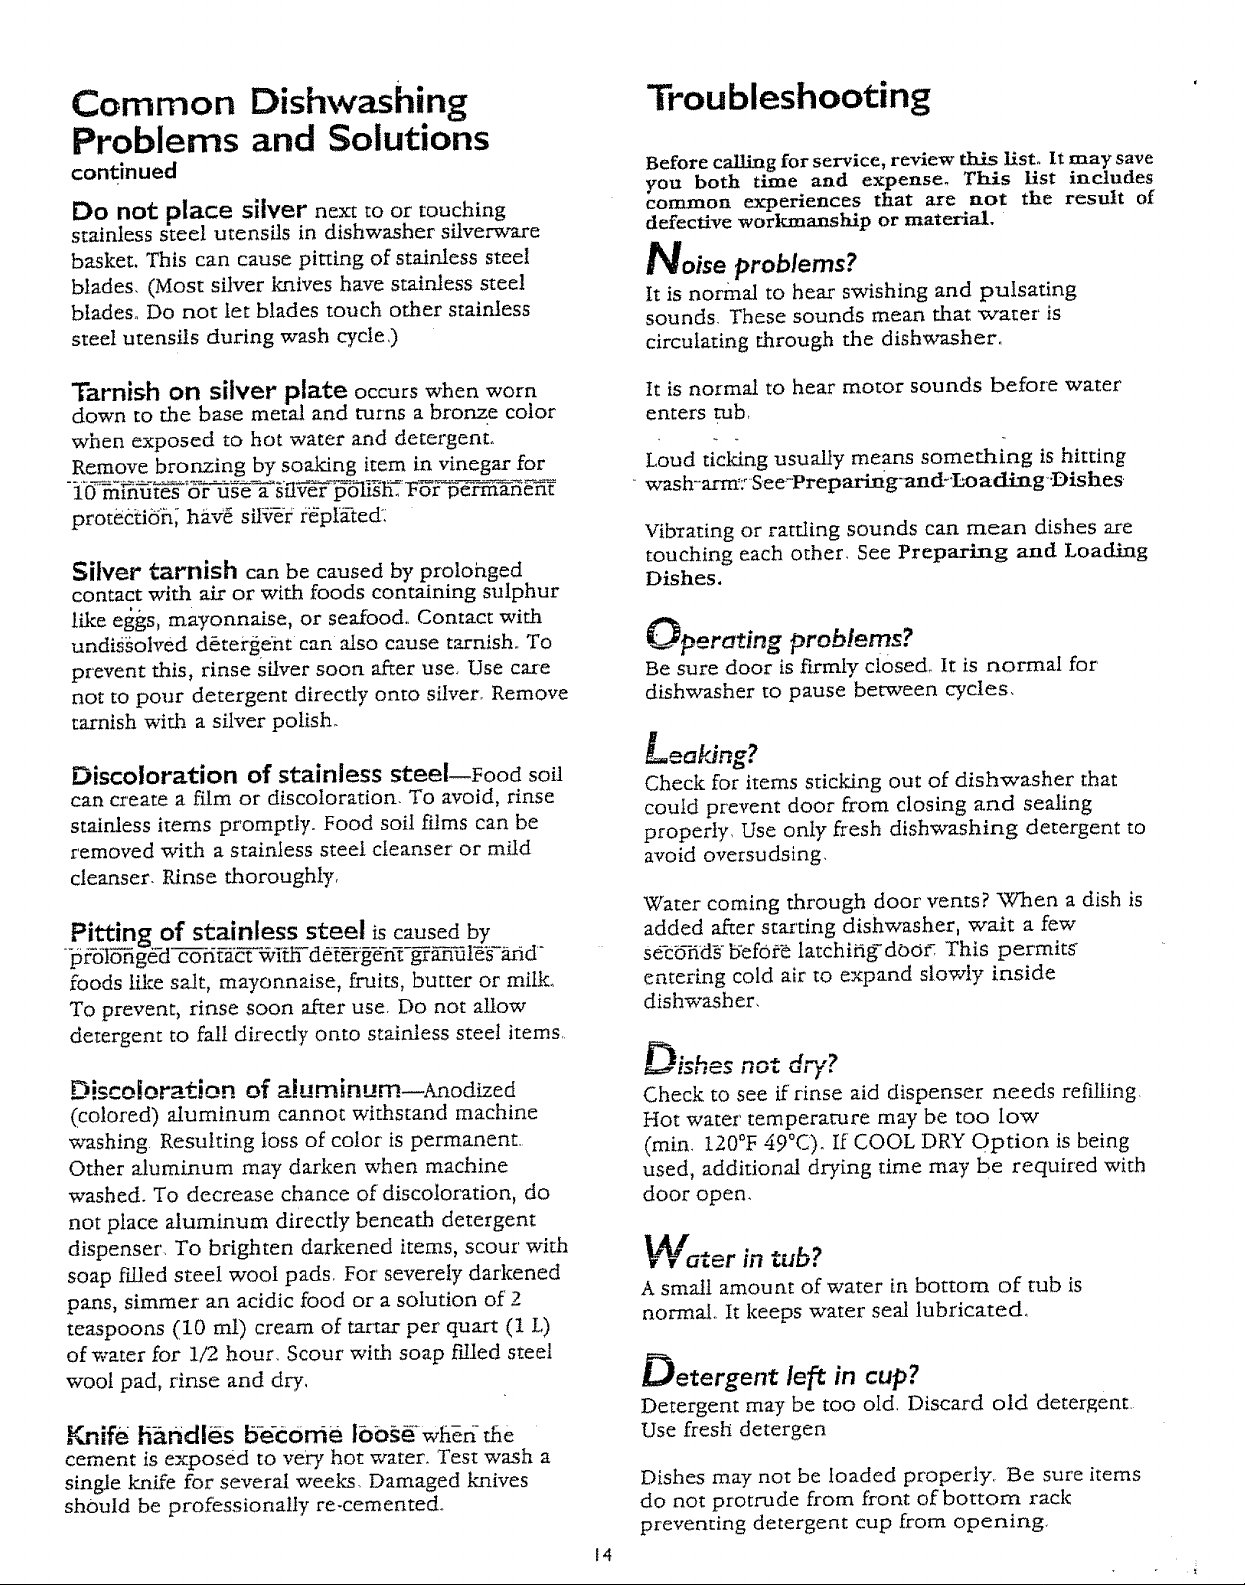
Do not place silver next to or touching
stainless steel utensils in dishwasher silverw-_e
basket. This can cause pitting of stainless steel
blades. (Most silver knives have stainless stee!
blades° Do not let blades touch other stainless
steel utensils during wash cycle,)
Troubleshooting
Before railing for service, review this list. It may save
you both time and expense. This list includes
common experiences that are not the result of
defective workmanship or material,
_oise problems?
It is normal to hear swishing and pulsating
sounds. These sounds mean that water' is
circulating through the dishwasher.
Tarnish on silver plate occurswhen worn
down to the base metal and turns a bronze color
when exposed to hot water and detergent.
Remove bronzing by soaMng item in vinegar for
proteetiSh; ha--¢£ siI_r r:_pta-ted:
Silver tarnish can be caused by prolonged
contact with air or with foods containing sulphur
like eggs, mayonnaise, or seafood. Contact with
undissolved dfitergeht can also cause tarnish. To
prevent this, rinse silver soon after use, Use care
not to pour detergent directly onto silver. Remove
tarnish with a silver polish_
Discoloration of stainless steel--Food soil
can create a film or discoloration. To avoid, rinse
stainless items promptly. Food soil fiJms can be
removed with a stainless steel cleanser or mild
cleanser. Rinse thoroughly,
foods 1Lkesalt, mayonnaise, fruits, butter or milk.
To prevent, rinse soon after use. Do not allow
detergent to fall directly onto stainless steel items,
Discoloration of aJuminum--anod_ed
(colored) aluminum cannot withstand machine
washing Resulting loss of color' is permanent.
Other aluminum may darken when machine
washed. To decrease chance of discoloration, do
not place aluminum directly beneath detergent
dispenser'. To brighten darkened items, scour with
soap filled steel wool pads, For' severely darkened
pans, simmer an acidic food or a solution of 2
teaspoons (10 ml) cream of tar,at per quart (1 L)
of water for 1/2 hour_ Scour with soap Fflled steel
wool pad, rinse and dry,
Vmife h_ndl_s biecOm_ ibb_'wli_ri-tfie
cement is exposed to ve'ry hot water. Test wash a
single lmife for several weeks. Damaged -knives
should be professionally re-cemented.
tt is normal to hear motor sounds before water
enters rub
Loud ticking usually means something is hitting
..wash-arm7 See_Preparing-and..£oadixtg_.Dishes
Vibrating or rattling sounds can mean dishes are
touching each other, See Prepari_ng and Loading
Dishes.
Operating problems?
Be sure door is firmly close& It is normal for
dishwasher to pause between cycles.
Leaking?
Check for items sticking out of dishwasher that
coutd prevent door from closing and sealing
property_ Use only fresh dishwashing detergent to
avoid oversudsing,
Water coming through door vents? When a dish is
added after starting dishwasher, wait a few
se-cSfidg befOt_ latchif_ffdoor_ This permits _
entering cold air to expand slowly inside
dishwasher,
_ishes not dry?
Check to see if rinse aid dispenser needs refilling.
Hot water temperature may be too low
(rain. 120°F 49°C). If COOL DRY Option is being
used, additional drying time may be required with
door open.
Water in tub?
A small amount of water in bottom of tub is
normal It keeps water seal lubricated.
Detergent left in cup?
Detergent may be too old, Discard old detergent.
Use fresh detergen
Dishes may not be loaded properly. Be sure items
do not protrude from front of bottom rack
preventing detergent cup from opening
14
Full One Year VCarrant_y on Dishwashers
For one year from the first day of installation, Sears will repair, free of charge, defects in materials or
workmanship.
Panel "
For ten years from the first day of installation, ff a leak should occur as a result of failure of the
polypropylene tub or inner door' paneI due to cracking, chipping or peeling, Sears will replace, free
of charge, the rub or inner door panel..
If the dishwasher is subject to other than private family use, the above warranty coverage is effective
for only 90 days,
"v%'arrant-I gem:ice is avaiJabBe by contacting the nearest
Sears Service Center in the United States,
This warranty applies only while the product is in use in the United States,
This warranty gives you specific legal rights, and you may also
have other rights which vary from state to state.-,
SEARS, ROEBUCK AND CO.
DEPT. 817WA
Hoffman EsmL..s, IL 60179
Full One "fear Warranty on Dishwashers
For one year from the first day of installation, Sears will repair, free of charge, defects in materials or
workmanship,,
Ten-Yea PWarrantT- Agai nst-L-eaks, in-,t he_Tub:and- in net-- Door= Panel
For ten years from the first day of instaUatior_, ff a leak should occur _ a result of failure of the
polypropylene tub or inner' door panel due to cracking, chipping or peeldng, Sears will replace, free
of charge, the tub or inner door panel. Note: Year two through ten parts only coverage for tub or
inner door panel.
No v_-ranry for ,._,,,m,, ct_ usage.
Warranty Service is available by contacting the nearest
Sears Service Center in Canada.
For parts and service call toil flee 1-800-4-MY-HOME sM(1-800-469-4663).
This warranty appiies onIy while the product is in use in Canada
This warran_ g_.gs yQu sp_ecff!.C!¢gal _righ_.tS,and you n?.ay also
have other rights which vary from province to province,
SEA_RS CANADA iNC.
222 Jarvis Street
Toronto, Ontario M5B 2B8
16
For in-home major brand repair service:
Call 24 hours a day, 7 days a week
1-800-4-MY-HOME'" (1-800-469-4663)
Para pedir servicio de reparaci6n a domicilio - 1-800-676-581 1
In Canada for all your service and parts needs call
Au Canada pour tout le service ou tes pi_ces
-For ,h.. repair or replacement partsyou need:
Cal! 6 am - 11 pm CST, 7 days a week
- 1-800-665-4455
PartsDirect
1-800-366-PART (1-800-366-7278)
Para ordenar piezas con entrega a domicilio - 1-800-659-7084
For the location of a Sears Parts and Repair Center in your area:
Call 24 hours a day, 7 days a week
1-800-488-1222
For information on purchasing a Sears Maintenance "
' Agreemen_
A _kr'" ,r."
ur to inquire about an e...IsLmg Agreement:
Call 9 am - 5 pro, Monday- Saturday
i
HomeCentral"
J
17

Notes
18
 Loading...