

Kenmore 58717245991, 58714249991, 58714242100 Owner’s Manual
Dishwasher
Use & Care Guide
®
Lavavajillas
Manual de uso y cuidado
Lave-vaisselle
Guide de I'utilisation et d'entretien
Model/Modelo/Modele 587.14242, 587.14249, 587.17242, 587.17245
II1
D
I"'
m
r.
154399101 Sears Roebuck and Co., Hoffman Estates, IL 60179 U.S.A. www.sears.com
Sears Canada, inc., Toronto,Ontario, Canada MB5 2B8 www.sears.ca
m
f/)
Table of Contents
U.S.Warranty ................................................................... 2
Safety Instructions ......................................................... 3
Dishwasher Features ..................................................... 4
Operating Instructions ................................................... 5
Preparing and Loading Dishes ............................ 6-7
Dishwasher Dispenser and Detergents ..................... 8-9
Factors Affecting Performance ...................................... 9
Care and Cleaning ................................................... 10-11
Connecting Portable Dishwasher ................................ 12
Changing Color Panels ................................................ 13
Common Dishwasher Problems and Solutions .... 14-15
Troubleshooting ................................................. 15
Canadian Warrenty ....................................................... 16
Service ........................................................... Back Cover
Sears Dishwasher Warranty
FULL ONE -YEAR WARRANTY ON DISHWASHER
For one year from the first day of use in your home, Sears will repair, free of charge, defects in material
or workmanship which appear in this dishwasher.
FULL TEN-YEAR WARRANTY AGAINST LEAKS IN THE TUB AND INNER
DOOR PANEL
For ten years from the first day of use in your home, if a leak should occur as a result of failure of the tub or
inner door panel due to cracking, chipping, or peeling, Sears will replace, free of charge, the tub or inner
door panel.
fll
D
IIIII
If the dishwasher is subjected to other than private family use, the above warranty coverage is effective for
only 90 days.
Warranty service is available by contacting the nearest Sears Service Center/Department in the United
States. This warranty applies only while this product is in use in the United States.
This warranty gives you specific legal rights, and you may also have other rights which vary from state to
state.
Sears, Roebuck and Co.,
Dept. 817WA,
Hoffman Estates, IL 60179
The model number of your automatic dishwasher is found on the serial plate fastened to the tub wall just
inside the dishwasher door.
All repair parts are available for immediate purchase or special order when you visit your nearest Sears
Service Center, or the Service Department at most Sears Stores. To request service or order parts by
phone, call the toll free numbers listed on the back cover.
When requesting service or ordering parts, always provide the following information:
• Product Type
• Part Number
• Model Number
• Part Description
2
Important Safety Instructions
This symbol will help alert you to such
dangers as personal injury, burns, fire and
electrical shock.
To reduce the risk of fire, electrical shock, or
injury when using your dishwasher, follow
basic precautions including the following:
Do not wash plastic items unless marked
"dishwasher safe" or the equivalent. Check
with manufacturer for recommendations, if
not marked. Items that are not dishwasher
safe may melt and create a potential fire
hazard.
If the dishwasher drains into a food
disposer, make sure disposer is completely
empty before running dishwasher.
Disconnect electrical power to dishwasher
before servicing.
Repairs should be done by a qualified
technician.
r
m
• Read all instructions before using your
dishwasher.
• Use your dishwasher only as instructed in
this Use & Care Guide.
• This Guide does not cover every possible
condition and situation that may occur. Use
common sense and caution when installing,
operating and maintaining any appliance.
• DISHWASHER MUST BE ELECTRICALLY
GROUNDED. Read the Installation
Instructions for details.
• This dishwasher is designed to operate on
regular house current (120 V, 60 Hz). Use a
circuit equipped with a 15 ampere fuse or
circuit breaker. Use a 20 ampere fuse if
dishwasher is connected with a food waste
disposer.
• Do not operate dishwasher unless all
enclosure panels are in their proper place.
• To avoid entrapment and/or suffocation,
remove door or door latch mechanism from
any dishwasher that is discarded or not in
use.
• Keep young children and infants away from
dishwasher when it is operating.
• Do not let children abuse, sit, stand or play
on door or racks of a dishwasher.
• Use only detergents and rinse agents
recommended for use in a dishwasher.
• Store dishwasher detergent and rinse
agents out of the reach of children.
Do not tamper with controls.
Do not touch the heating element during or
immediately after use.
When loading items to be washed:
- Locate sharp items and knives so that
they are not likely to damage the door
seal or tub.
- Load sharp items and knives with the
handles up to reduce the risk of cut-type
injuries.
Under certain conditions, hydrogen gas may
be produced in a hot water system that has
not been used for 2 weeks or more.
HYDROGEN GAS IS EXPLOSIVE. If hot
water system has not been used for such a
period, before using dishwasher, turn on all
hot water faucets and let water flow from
each for several minutes. This will release
any accumulated hydrogen gas.
HYDROGEN GAS IS FLAMMABLE. Do not
smoke or use an open flame during this
time.
Do not store or use combustible materials,
gasoline or other flammable vapors and
liquids in the vicinity of this or any other
appliance.
SAVE THESE
INSTRUCTIONS
3
Printed in U.S.A.
Dishwasher Features
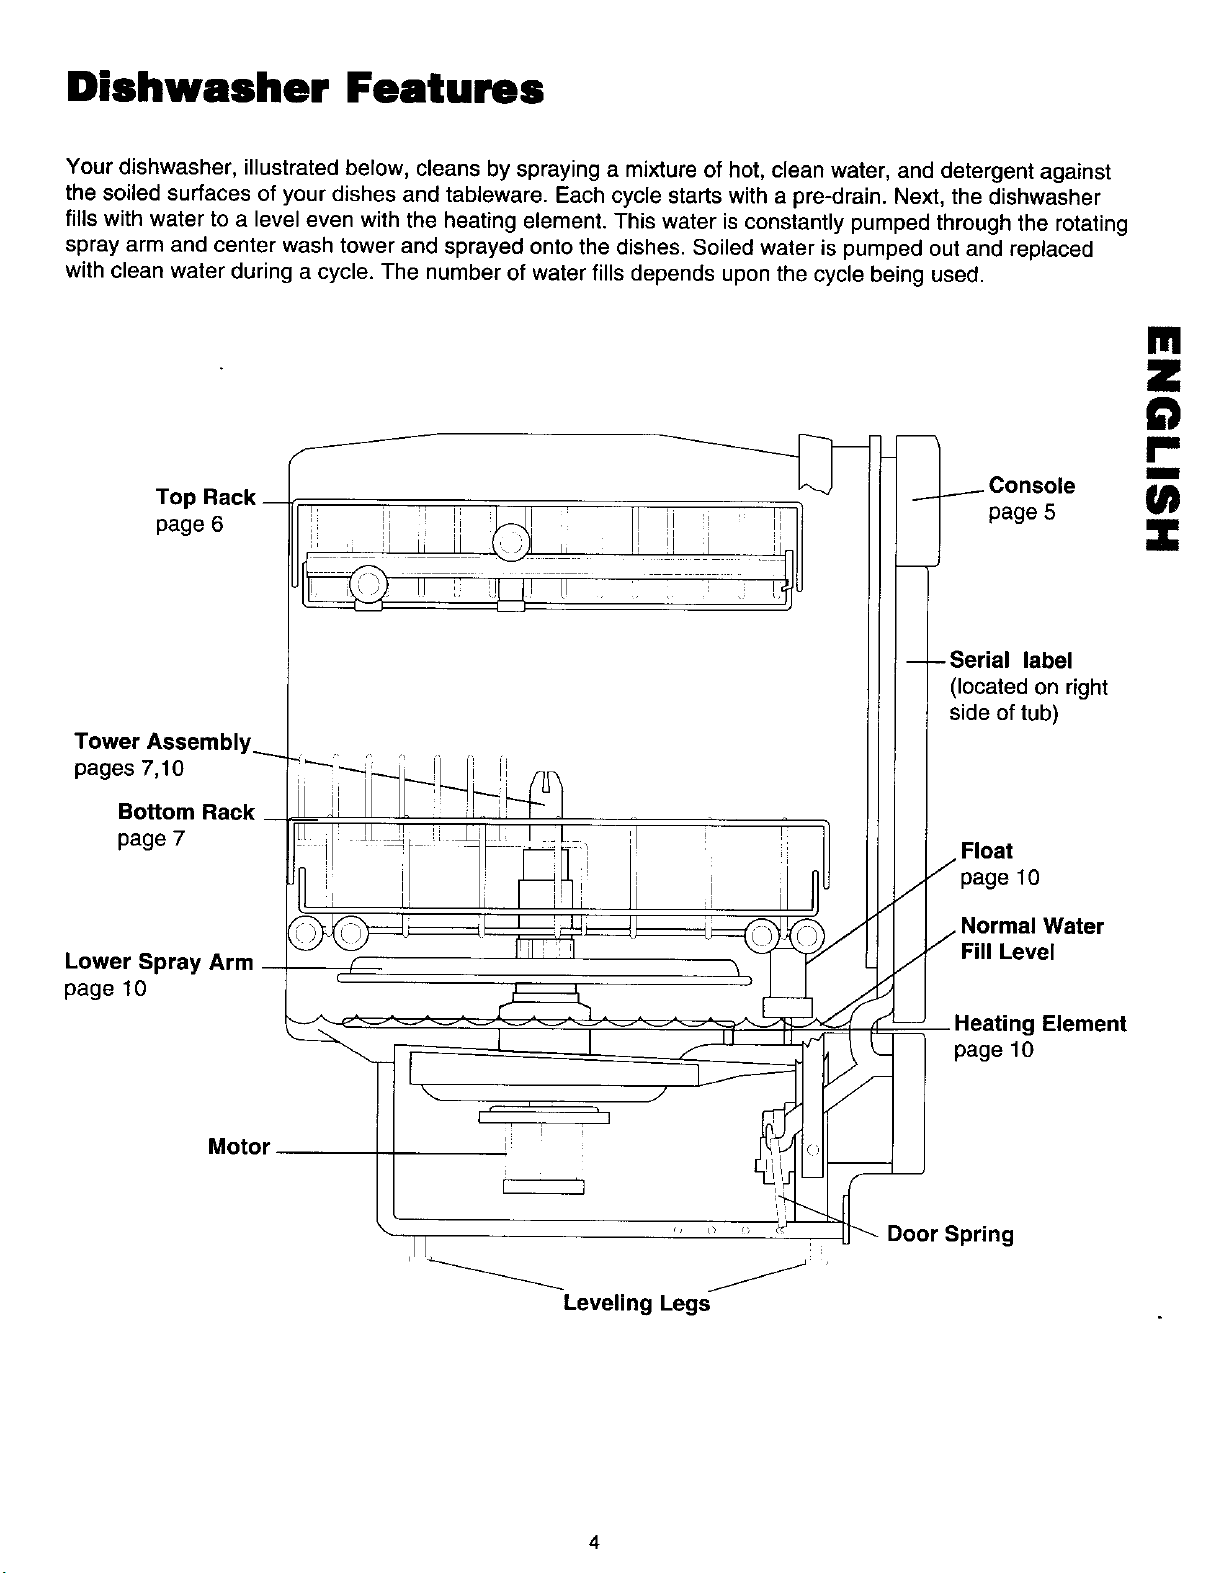
Your dishwasher, illustrated below, cleans by spraying a mixture of hot, clean water, and detergent against
the soiled surfaces of your dishes and tableware. Each cycle starts with a pre-drain. Next, the dishwasher
fills with water to a level even with the heating element. This water is constantly pumped through the rotating
spray arm and center wash tower and sprayed onto the dishes. Soiled water is pumped out and replaced
with clean water during a cycle. The number of water fills depends upon the cycle being used.
m
D
Top Rack __
page 6
Tower Assembl,
pages 7,10
Bottom Rack
page 7
Lower Spray Arm
page 10
il :1 _i I i i i1
I Console
page 5
- - Serial label
located on right
side of tub)
Float
j Jpage 10
. Normal Water
7 j Fill Level
Heating Element
page 10
m
Motor
Door Spring
j
Leveling Legs
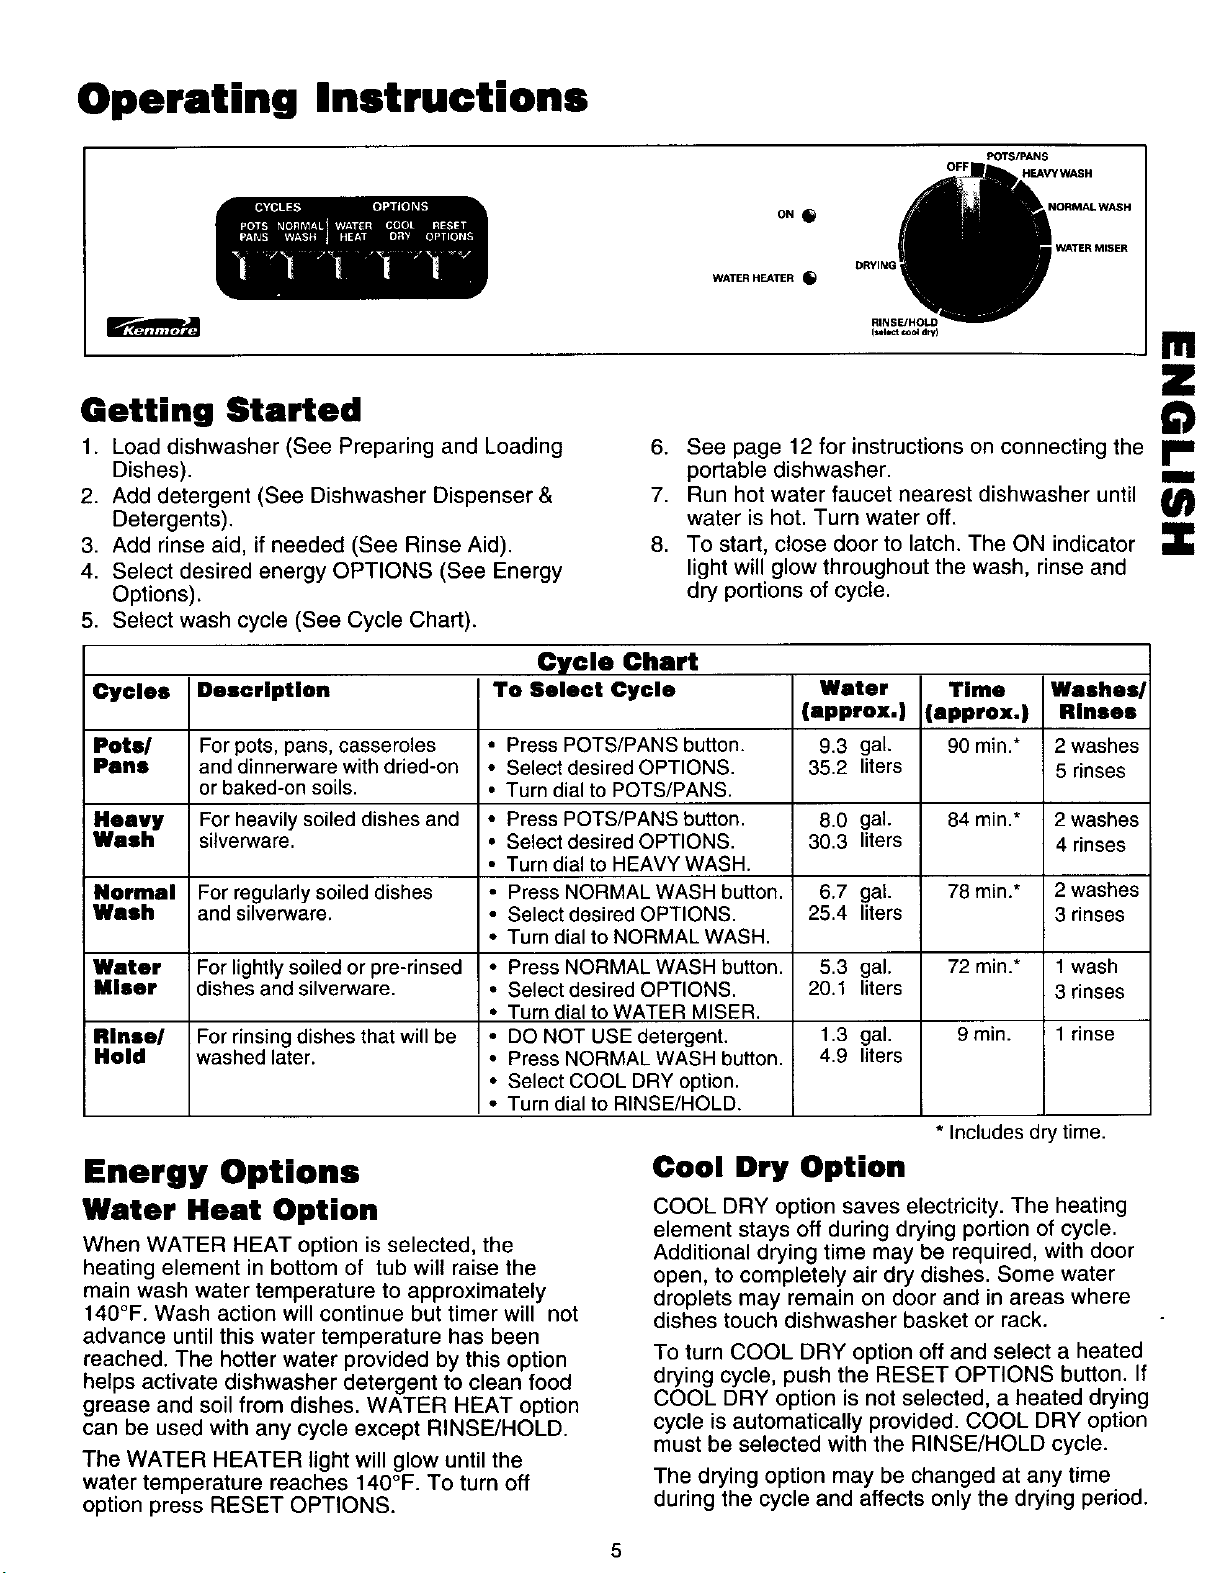
Operating Instructions
ON
WATER HEATER
DRYING I
OFF
POTS/PANS
HEAVY WASH
NORMALWASH
WATER MISER
m
Getting Started
1. Load dishwasher (See Preparing and Loading
Dishes).
2. Add detergent (See Dishwasher Dispenser &
Detergents).
3. Add rinse aid, if needed (See Rinse Aid).
4. Select desired energy OPTIONS (See Energy
Options).
5. Select wash cycle (See Cycle Chart).
Cycles
Pots/
Pens
Heavy
Wash
Normal
Wash
Water
Miser
Rinse/
Hold
Description
For pots, pans, casseroles
and dinnerware with dried-on
or baked-on soils.
For heavily soiled dishes and
silverware.
For regularly soiled dishes
and silverware.
For lightly soiled or pre-rinsed
dishes and silverware.
For rinsing dishes that will be
washed later.
To Select Cycle
• Press POTS/PANS button.
• Select desired OPTIONS.
• Turn dial to POTS/PANS.
• Press POTS/PANS button.
• Select desired OPTIONS.
• Turn dial to HEAVY WASH.
• Press NORMAL WASH button.
• Select desired OPTIONS.
• Turn dial to NORMAL WASH.
• Press NORMAL WASH button.
• Select desired OPTIONS.
• Turn dial to WATER MISER.
• DO NOT USE detergent.
• Press NORMAL WASH button.
• Select COOL DRY option.
• Turn dial to RINSE/HOLD.
6. See page 12 for instructions on connecting the r m
7. Run hot water faucet nearest dishwasher until
8. To start, close door to latch. The ON indicator
Cycle Chart
D
portable dishwasher, am
water is hot. Turn water off.
light will glow throughout the wash, rinse and
dry portions of cycle.
Water
(approx.)
9.3 gal.
35.2 liters
8.0 gal.
30.3 liters
6.7 gal.
25.4 liters
5.3 gal.
20.1 liters
1.3 gal.
4.9 liters
Time
(approx.)
90 min.*
84 min.*
78 rain.*
72 min.*
9 min.
* Includes dry time.
Washes/
Rinses
2 washes
5 rinses
2 washes
4 rinses
2 washes
3 rinses
1 wash
3 rinses
1 rinse
Energy Options
Water Heat Option
When WATER HEAT option is selected, the
heating element in bottom of tub will raise the
main wash water temperature to approximately
140°F. Wash action will continue but timer will not
advance until this water temperature has been
reached. The hotter water provided by this option
helps activate dishwasher detergent to clean food
grease and soil from dishes. WATER HEAT option
can be used with any cycle except RINSE/HOLD.
The WATER HEATER light will glow until the
water temperature reaches 140°F. To turn off
option press RESET OPTIONS.
Cool Dry Option
COOL DRY option saves electricity. The heating
element stays off during drying portion of cycle.
Additional drying time may be required, with door
open, to completely air dry dishes. Some water
droplets may remain on door and in areas where
dishes touch dishwasher basket or rack.
To turn COOL DRY option off and select a heated
drying cycle, push the RESET OPTIONS button. If
COOL DRY option is not selected, a heated drying
cycle is automatically provided. COOL DRY option
must be selected with the RINSE/HOLD cycle.
The drying option may be changed at any time
during the cycle and affects only the drying period.
Preparing and Loading Dishes
Dish Preparation
It is not necessary to rinse dishes before putting
them into the dishwasher. Just remove large
pieces and quantities of food, bones, pits, etc.
Empty glasses and cups. It may be necessary to
presoak or lightly scour firmly cooked-on or
baked-on foods.
Foods such as mustard, mayonnaise, vinegar,
lemon juice and tomato-based products may
cause discoloration of stainless steel and plastics
if allowed to sit for a long period of time. Unless
the dishwasher is to be operated at once, it is best
to rinse off these food soils.
• Load dishes facing the center of the rack so
that the water spray from the rotating spray
arm and center wash tower can reach soiled
surfaces.
• Be sure large items do not block the detergent
dispenser, preventing it from opening during
the wash cycle.
• To be sure an item is dishwasher safe, read
the manufacturer's care instructions.
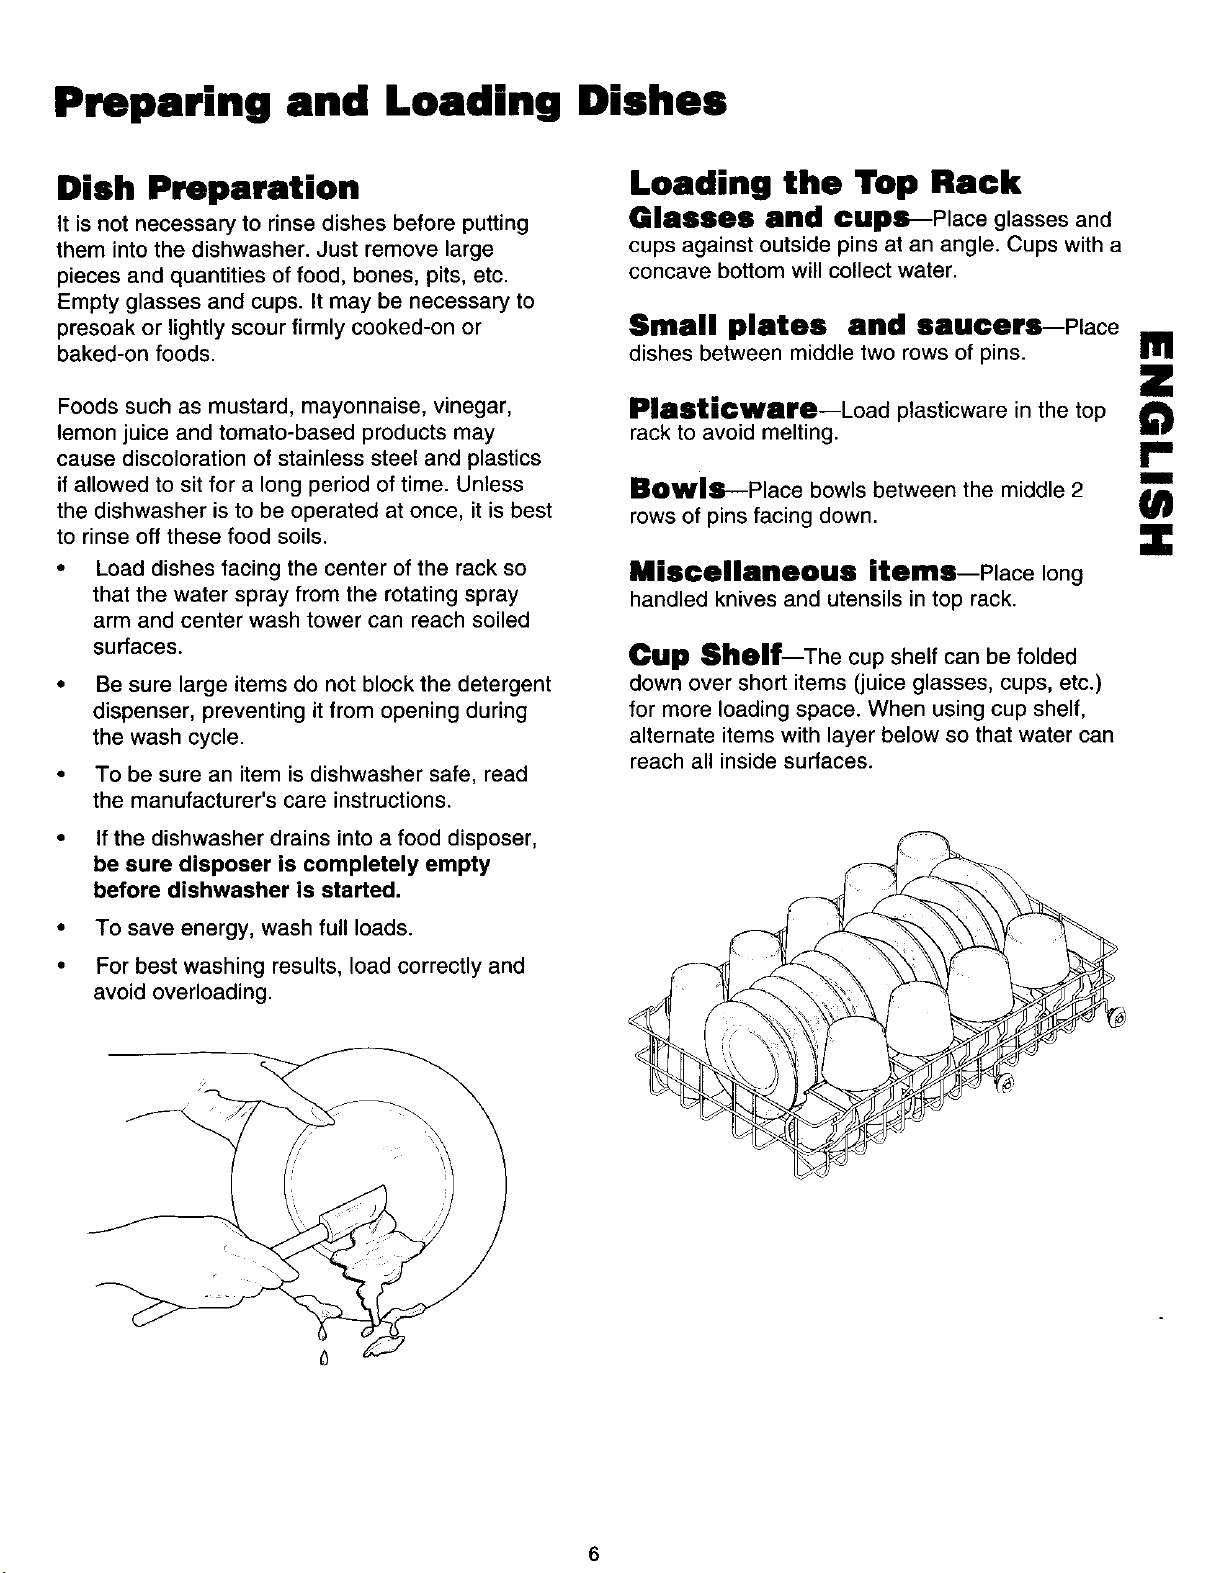
Loading the Top Rack
Glasses and cups--Place glassesand
cups against outside pins at an angle. Cups with a
concave bottom will collect water.
Small plates and saucers--Place
dishes between middle two rows of pins. _!
Plasticware--Load plasticware in the top
rack to avoid melting.
P
Bowls--Place bowls between the middle 2 m
rows of pins facing down. €_
Miscellaneous items--Place long
handled knives and utensils in top rack.
Cup Shelf The cup shelf can be folded
down over short items (juice glasses, cups, etc.)
for more loading space. When using cup shelf,
alternate items with layer below so that water can
reach all inside surfaces.
• If the dishwasher drains into a food disposer,
be sure disposer is completely empty
before dishwasher is started.
• To save energy, wash full loads.
• For best washing results, load correctly and
avoid overloading.
 Loading...