

Kenmore 58714402400, 58714403400, 58714409400 Installation Guide
Built-In
Installation
Dishwasher
Instructions
ff youhave questions, call 1-800-4-MY-HOME® (1-800-469-4663)or visit our website at:
www.sears.com
BEFORE YOU BEGIN
Readtheseinstructionscompletelyand
carefully.
IMPORTANT - Observeallgoverning
codesandordinances.
• Note to Installer - Besureto leavetheseinstructionsfor
theconsumer'sandlocalinspector'suse.
• Note to Consumer - Keeptheseinstructionswith your
Owner'sManualfor future reference.
• Skill Level - Installationof thisdishwasherrequiresbasic
mechanicalandelectricalskills. Proper installation is the
responsibility of the installer. Product failure due to
improper installation is not covered under the
SEARS Appliance Warranty.
• Completion Time - 1 to 3 Hours. New installationsrequire
moretime than replacementinstallations.
IMPORTANT- ThedishwasherMUST
beinstalledto allow for future removalfrom the enclosureif
serviceis required.
If youreceiveda damageddishwasher,youshouldimmediately
contactyourdealeror builder.
Optional Accessories - Seethe Owner'sManualfor
availablecustompanelkits.
FOR YOUR SAFETY
Read and observe all CAUTIONS and WARNINGS
shown throughout these instructions. While
performing installations described in this booklet,
gloves, safety glasses or goggles should he worn.
To reducetherisk of electrical shock,fire, or
injuryto persons,the installermustensurethat
the dishwasheris completelyenclosedat the
WARNING
time of installation.
READ CAREFULLY.
KEEP THESE INSTRUCTIONS.
Installation Preparation
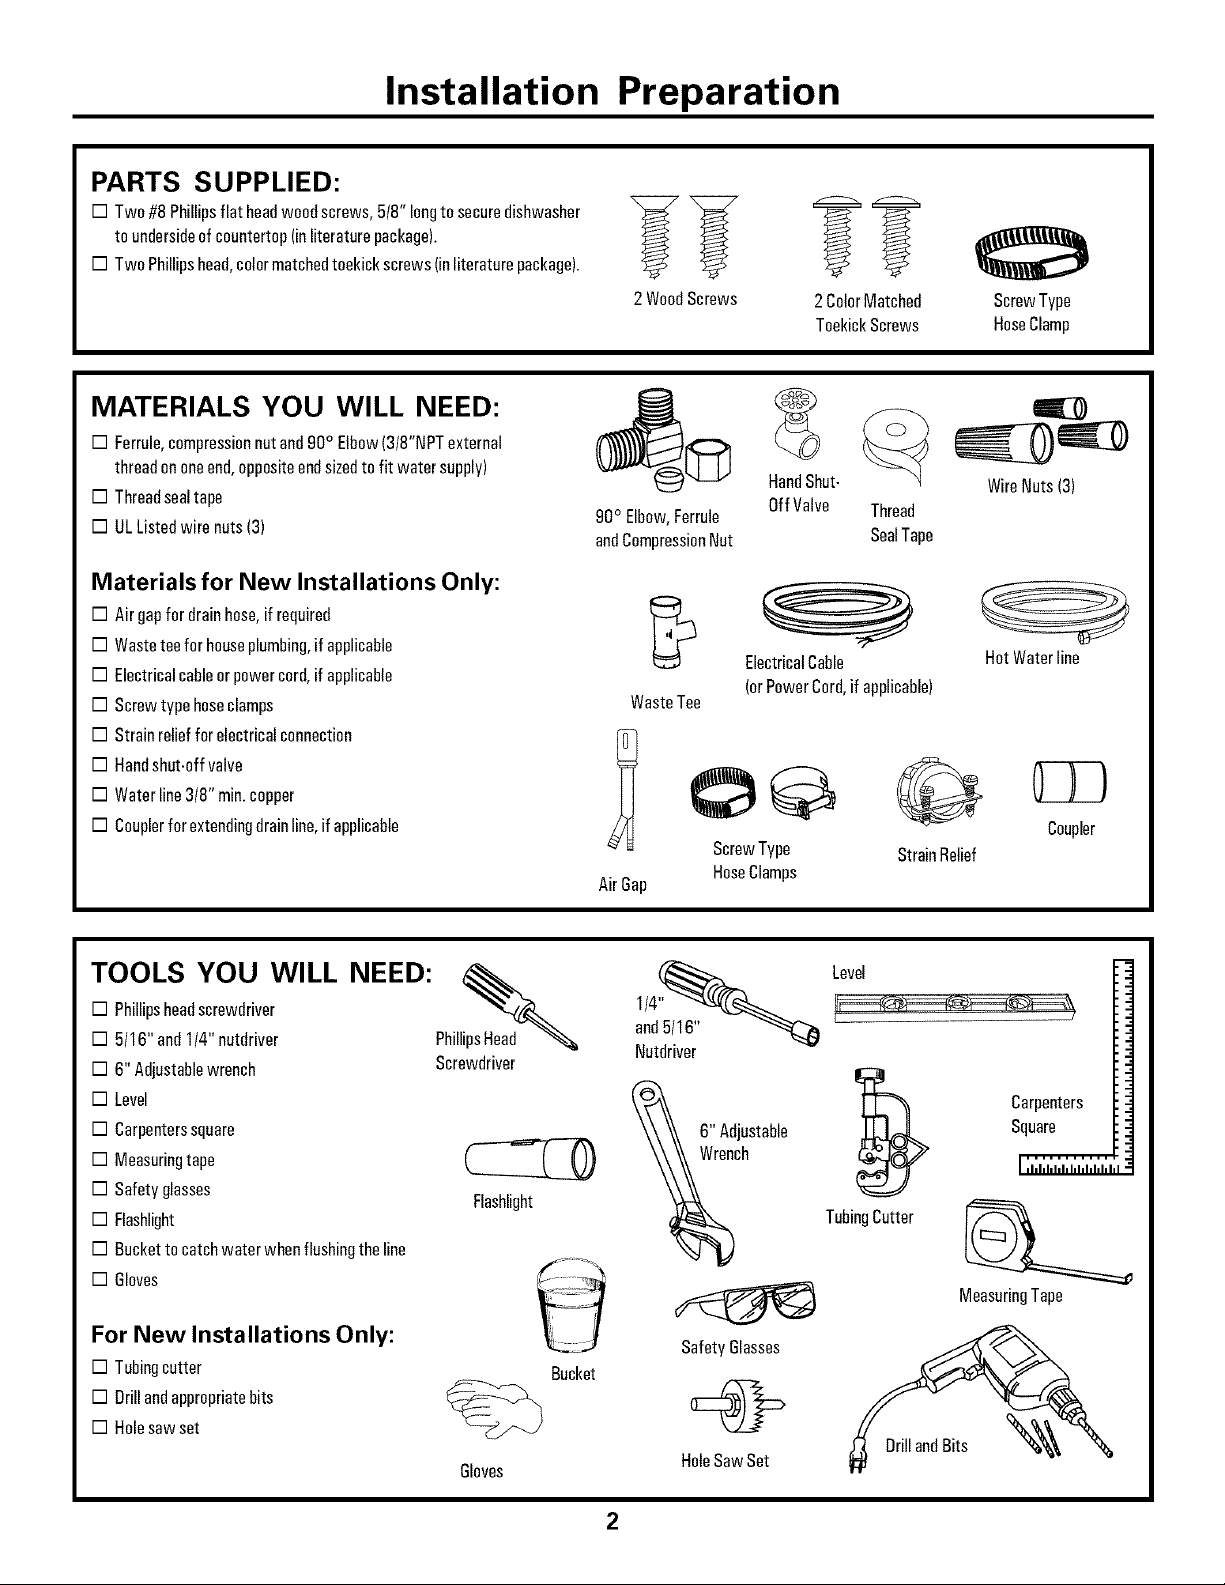
PARTS SUPPLIED:
[] Two#8 Phillipsflat headwoodscrews,5/8" longtosecuredishwasher
toundersideofcountertop(inliteraturepackage).
[] Two Phillipshead,colormatchedtoekickscrews(inliteraturepackage).
MATERIALS YOU WILL NEED:
2 WoodScrews
2ColorMatched
ToekickScrews
ScrewType
HoseClamp
[] Ferrule,compressionnutand90° Elbow(3/8"NPTexternal
threadononeend,oppositeendsizedto fit watersupply)
[] Threadsealtape
[] ULListedwire nuts(3)
Materials for New Installations Only:
[] Air gapfor drainhose,ifrequired
[] Wasteteefor houseplumbing,if applicable
[] Electricalcableorpowercord,ifapplicable
[] Screwtypehoseclamps
[] Strainreliefforelectricalconnection
[] Handshut-offvalve
[] Waterline3/8" min.copper
[] Couplerfor extendingdrainline,if applicable
TOOLS YOU WILL NEED:
[] Phillipsheadscrewdriver
[] 5/16" and 1/4" nutdriver
[] 6" Adjustablewrench
[] Level
[] Carpenterssquare
[] Measuringtape
[] Safetyglasses
[] Flashlight
[] Bucketto catchwater whenflushingtheline
[] Gloves
Phill_
Screwdriver
Flashlight
90° Elbow,Ferrule
andCompressionNut
WasteTee
ScrewType
AirGap
1/4"
and5/t6"
Nutdriver
HoseClamps
6" Adjustable
Wrench
,an,S ut
OffValve
ElectricalCable
(orPowerCord,if applicable)
Thread
SealTape
©
StrainRelief
Level
TubingCutter
WireNuts (3)
HotWaterline
Coupler
Carpenters
Square
........... i
i ,hhl,hhhhhhhhl
MeasuringTape
For New Installations Only:
[] Tubingcutter
[] Drillandappropriatebits
[] Holesawset
Gloves
SafetyGlasses
Bucket
HoleSawSet
Installation Preparation
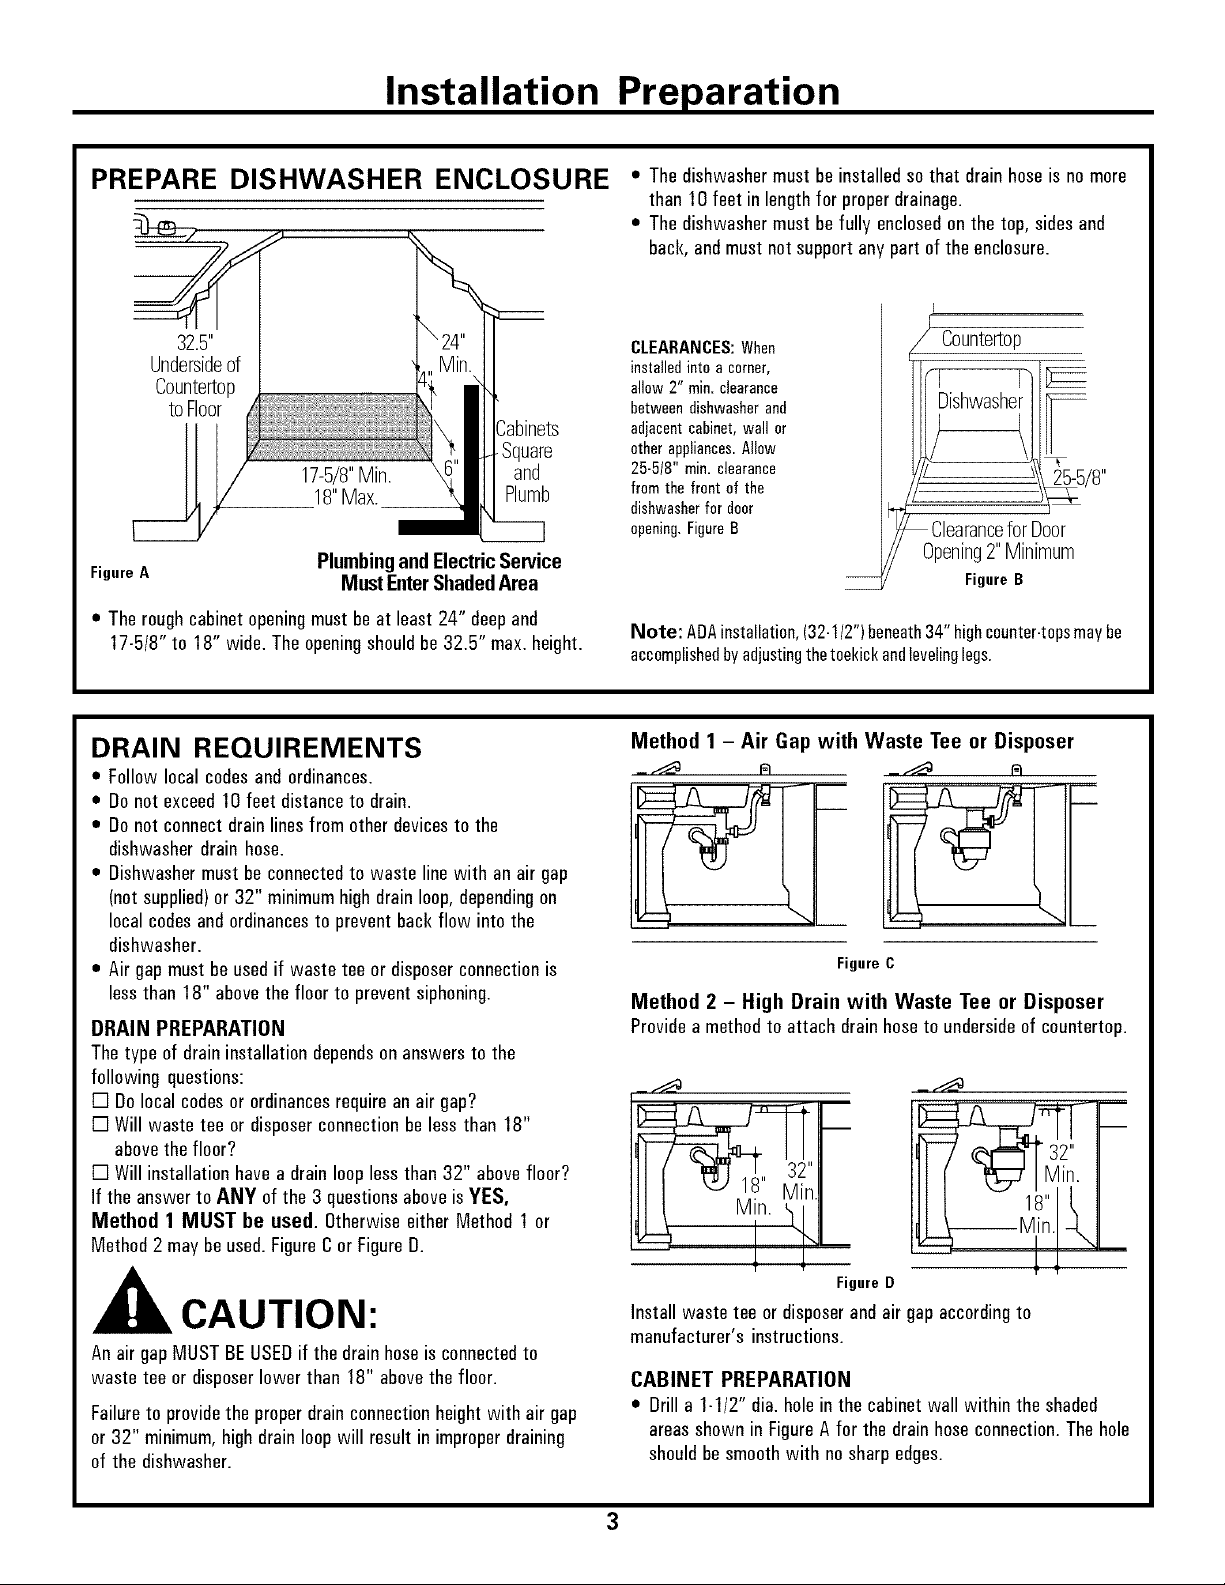
PREPARE DISHWASHER ENCLOSURE
32.5"
Undersideof
Countertop
toFloor
Square
17-5/8"Min. and
18"Max. Plumb
Figure A
PlumbingandElectricService
Must EnterShadedArea
• Theroughcabinetopeningmustbeat least 24" deepand
17-5/8"to 18" wide.The openingshouldbe32.5" max.height.
DRAIN REQUIREMENTS
• Followlocalcodesandordinances.
• Donotexceed10feet distanceto drain.
• Donotconnectdrainlinesfrom otherdevicesto the
dishwasherdrain hose.
• Dishwashermustbeconnectedto waste linewith anairgap
(notsupplied)or32" minimumhighdrainloop,dependingon
localcodesandordinancestopreventbackflow intothe
dishwasher.
• Airgap must beusedif wastetee or disposerconnectionis
lessthan 18" abovethe floor to preventsiphoning.
DRAIN PREPARATION
Thetypeof draininstallationdependsonanswerstothe
following questions:
[] Dolocalcodesor ordinancesrequireanairgap?
[] Willwastetee ordisposerconnectionbelessthan18"
abovethe floor?
[] Willinstallationhavea drainlooplessthan32" abovefloor?
If theanswerto ANY of the 3 questionsaboveisYES,
Method 1 MUST be used. Otherwiseeither Method 1 or
Method2 may beused.FigureCor FigureD.
• Thedishwashermustbe installedsothat drainhoseis nomore
than 10feet in lengthfor properdrainage.
• Thedishwashermustbe fully enclosedonthe top, sidesand
back,andmust not supportanypart of theenclosure.
F
CLEARANCES: When
installed into a corner,
allow 2" rain. clearance
between dishwasher and
adjacent cabinet,wall or
other appliances.Allow
25-5/8" rain. clearance
from the front of the
dishwasher for door
opening.FigureB
/[ Countertop
25-5/8"
}_ ClearanceforDoor
Opening2 Minimum
Figure B
Note: ADAinstallation,(32-I/2") beneath34" highcounter-topsmaybe
accomplishedby adjustingthetcekick andlevelinglegs.
Method 1 - Air Gap with Waste Tee or Disposer
Figure C
Method 2 - High Drain with Waste Tee or Disposer
Provideamethodto attach drainhoseto undersideof countertop.
_f__
_2"
in.
\
Mn.III ',..fJ.1.8" _i
_Mlin.-%.
CAUTION:
An air gapMUSTBEUSEDifthe drainhoseisconnectedto
waste tee or disposerlower than 18" abovethefloor.
Failureto providethe properdrainconnectionheightwith air gap
or 32" minimum,highdrainloopwill result in improperdraining
of the dishwasher.
Figure D
Installwaste tee or disposerandair gapaccordingto
manufacturer'sinstructions.
CABINET PREPARATION
• Drilla 1-1/2" dia.holeinthe cabinetwall within the shaded
areasshownin FigureA for the drainhoseconnection.Thehole
shouldbesmoothwith nosharpedges.

Installation Preparation
PREPARE ELECTRICAL WIRING
FORPERSONALSAFETY:Removehousefuse
or opencircuit breakerbeforebeginning
installation.Oonot usean extensioncordor
WARNING
adapterplugwith this appliance.
Electrical Requirements
= This appliancemustbesuppliedwith 120V, 60 Hz.,and
connectedto anindividualproperlygroundedbranchcircuit,
protectedby a 15 or 20 amperecircuit breakeror timedelay
fuse.
• Wiringmustbe 2 wire with ground.
• If the electricalsupplydoesnot meetthe aboverequirements,
call a licensedelectricianbefore proceeding.
Grounding Instructions - Cable Direct
Thisappliancemustbeconnectedto a groundedmetal,permanent
wiring system,oranequipmentgroundingconductormustberun
with the circuitconductorsandbeconnectedtothe equipment
groundingterminalorleadonthe appliance.
Grounding Instructions - Power Cord Models
Thisappliancemustbegrounded.In theeventof amalfunctionor
breakdown,groundingwill reducetherisk of electricalshock by
providinga pathof least resistancefor electric current.The plug
mustbe pluggedinto anappropriateoutletthat is installedand
groundedin accordancewith localcodesandordinances.
WARNING
Theimproperconnectionof theequipment
groundingconductorcanresult in a risk of
electric shock.Checkwith a qualified
electricianor servicerepresentativeif you
arein doubtthat the applianceis properly
grounded.
I
/ I
I
1-1/2" Dia.
Hole(Max.)
Figure E
Cabinet Preparation & Wire Routing
• Thewiring mayentertheopeningfrom eitherside,rearor the
floor within theshadedarea.
• Cuta 1-1/2" max.dia.holeto admitthe electricalcable.The hole
mustbefree of sharpedges.If the cabinetwall is metal,the
holeedgemust becoveredwith a bushing.
• Cabledirectconnectionsmaypassthrough thesameholeasthe
drainhoseandhot water line, if convenient.If cabinetwall is
metal,the hole edgemust becoveredwith a bushing.
NOTE: Powercordswith plugmust passthrougha separate
hole.
Electrical Connection to Dishwasher
Electricalconnectionis onthe right front of dishwasher.
• Forcabledirectconnectionsthecablemustberoutedasshown
in FigureE.Cablemustextenda minimumof 24" from the rear
wall.
• Forpower cordconnections,install a 3-pronggroundingtype
receptacle.Thepower-supplyreceptaclefor the applianceshall
beinstalledin a cabinetor ona wall adjacentto the
undercounterspacein whichthe applianceis to beinstalled.
I \
I \
I \\
from
Cabinet
White
4
 Loading...