

Kenmore 58712339F01B, 58712339510A, 58712333F01B, 58712333510A, 58712332510A Owner’s Manual
...
Use & Care Guide
Guía de uso y cuidada
English / Español
Models/Modèles: 587.1233*
Kenmore
®
Dishwasher
Lavavajillas
* = Color number, numéro de color
P/N:6710008840RevB
Artwork:6710008840Rev002
Sears Brands Management Corporation
Hoff man Estates, IL 60179 U.S.A.
www.kenmore.com
www.sears.com
Sears Canada Inc.
Toronto, Ontario, Canada M5B 2C3
www.sears.ca
®
Record Model/Serial
Numbers
Important Safety
Instructions
Please read and save these
instructions
This Use & Care Guide provides specifi c
operating instructions for your model.
Use your unit only as instructed in this
guide. These instructions are not meant
to cover every possible condition and
situation that may occur. Common sense
and caution must be practiced when
installing, operating, and maintaining any
appliance.
Please record your model and serial
numbers below for future reference. This
information is found on the serial plate
located inside the Dishwasher.
Model Number:
Serial Number:
Purchase Date:
587.
Table of Contents
Record Model/Serial Numbers ..........2
Important Safety Instructions ............2-3
Warranty Information ......................4
Master Protection Agreements ..........5
Dishwasher Features ........................6
Operating Instructions .....................7-9
Preparing and Loading Dishes ...........10-12
Dishwasher Dispenser & Detergents ...13
Factors Affecting Performance...........14
Care & Cleaning ..............................15-16
Solutions to Common Dishwashing
Problems .......................................16-18
Service Numbers ......................Back Cover
Safety Precautions
Do not attempt to install or operate
your unit until you have read the safety
precautions in this manual. Safety items
throughout this manual are labeled with
a Danger, Warning, or Caution based on
the risk type.
Defi nitions
This is the safety alert symbol. It is
used to alert you to potential personal
injury hazards. Obey all safety messages
that follow this symbol to avoid possible
injury or death.
DANGER
DANGER indicates an imminently
hazardous situation which, if not
avoided, will result in death or serious
injury.
WARNING
WARNING indicates a potentially
hazardous situation which, if not avoided,
could result in death or serious injury.
CAUTION
CAUTION indicates a potentially
hazardous situation which, if not avoided,
may result in minor or moderate injury.
IMPORTANT
Indicates installation, operation, or
maintenance information which is
important but not hazard-related.
2
Important Safety Instructions
WARNING
Please read all safety instructions
before using your new appliance.
For Your Safety
• Use your dishwasher only as instructed
in this Use and Care Guide.
• Use only detergents or rinse agent
recommended for use in a dishwasher,
and keep them out of reach of children.
• When loading items to be washed:
• Locate sharp items and knives
so that they are not likely to
damage the door seal or tub.
• Load sharp items and knives with
the handles up to reduce the risk
of cut-type injuries.
• Do not wash plastic items unless
marked “dishwasher safe” or the
equivalent. Check with manufacturer
for recommendations, if not marked.
Plastic Items that are not dishwasher
safe may melt and create a potential
fi re hazard.
• Do not touch the heating element
during or immediately after use.
• Do not operate your dishwasher unless
all enclosure panels are properly in
place.
WARNING
These guidelines must be followed to
ensure that safety mechanisms in this
unit will operate properly.
• If the dishwasher drains into a food disposer,
maker sure disposer is completely empty
before running dishwasher.
• Disconnect electrical power to dishwasher
before servicing.
• Do not tamper with controls.
• Do not let children abuse, sit, stand or play on
door or racks of a dishwasher.
• Keep young children and infants away from
dishwasher when it is operating.
• Under certain conditions, hydrogen gas may
be produced in a hot water system that
has not been used for two weeks or more.
HYDROGEN GAS IS EXPLOSIVE. If the hot
water system has not been used for such a
period, before using the dishwasher turn on
all the hot water faucets and let the water
fl ow from each for several minutes. This will
release any accumulated hydrogen gas. As
the gas is fl ammable, do not smoke or use an
open fl ame during this time.
• Remove the door to the washing
compartment when removing an old
dishwasher from service or discarding it.
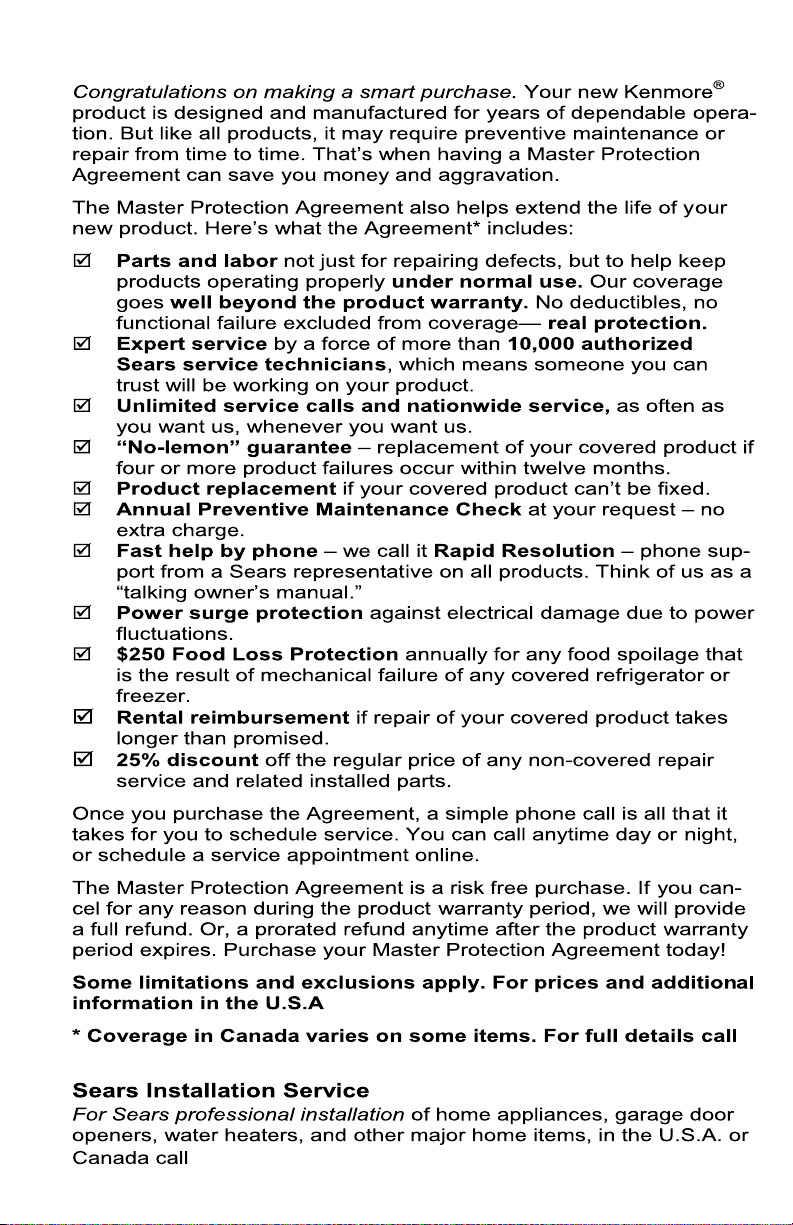
Tip Over Hazard
Do not use dishwasher until
completely installed.
Do not push down on open door.
Doing so can result in serious injury or
cut.
3
3

Warranty Information
KENMORE APPLIANCE WARRANTY
FOR ONE YEAR from the date of sale this appliance is warranted against defects in material or
workmanship when it is correctly installed, operated and maintained according to all supplied
instructions.
WITH PROOF OF SALE, a defective appliance will receive free repair or replacement at option
of seller.
For warranty coverage details to obtain free repair or replacement, visit the web page: www.
kenmore.com/warranty
This warranty applies for only 90 DAYS from the sale date in the United States, and is void in
Canada, if this appliance is ever used for other than private household purposes.
This warranty covers only defects in material and workmanship. Sears will NOT pay
for:
1. Expendable items that can wear out from normal use, including but not limited to fi lters,
belts, bags or screw-in base light bulbs.
2. A service technician to clean or maintain this appliance, or to instruct the user in correct
appliance installation, operation and maintenance.
3. Service calls to correct appliance installation not performed by Sears authorized service
agents, or to repair problems with house fuses, circuit breakers, house wiring, and plumbing
or gas supply systems resulting from such installation.
4. Damage to or failure of this appliance resulting from installation not performed by Sears
authorized service agents, including installation that was not in accord with electrical, gas
or plumbing codes.
5. Damage to or failure of this appliance, including discoloration or surface rust, it it is not
correctly operated and maintained according to all supplied instructions.
6. Damage to or failure of this appliance, including discoloration or surface rust, resulting
from accident, alteration, abuse, misuse or use for other than its intended purpose.
7. Damage to or failure of this appliance, including discoloration or surface rust, caused by
the use of detergents, cleaners, chemicals or utensils other than those recommended in all
instructions supplied with the product.
8. Damage to or failure of parts or systems resulting from unauthorized modifi cations made
to this appliance.
9. Service to an appliance if the model and serial plate is missing, altered, or cannot easily
be determined to have the appropriate certifi cation logo.
Disclaimer of implied warranties; limitation of remedies
Customer’s sole and exclusive remedy under this limited warranty shall be product repair or
replacement as provided herein. Implied warranties, including warranties of merchantability or
fi tness for a particular purpose, are limited to one year or the shortest period allowed by law.
Seller shall not be liable for incidental or consequential damages. Some states and provinces do
not allow the exclusion or limitation of incidental or consequential damages, or limitations on
the duration of implied warranties of merchantability or fi tness, so these exclusions or limitations
may not apply to you.
This warranty applies only while this appliance is used in the United States and Canada*.
This warranty gives you specifi c legal rights, and you may also have other rights which vary
from state to state.
*In-home repair service is not available in all Canadian geographical areas, nor will this
warranty cover user or servicer travel and transportation expenses if this product is located in a
remote area (as defi ned by Sears Canada Inc.) where an authorized servicer is not available.
Sears Brands Management Corporation, Hoff man Estates, IL 60179
Sears Canada Inc., Toronto, Ontario, Canada M5B 2C3
4
Master Protection Agreements
. call 1-844-553-6667.
Sears Canada at 1-800-469-4663.
1-844-553-6667.
5
5
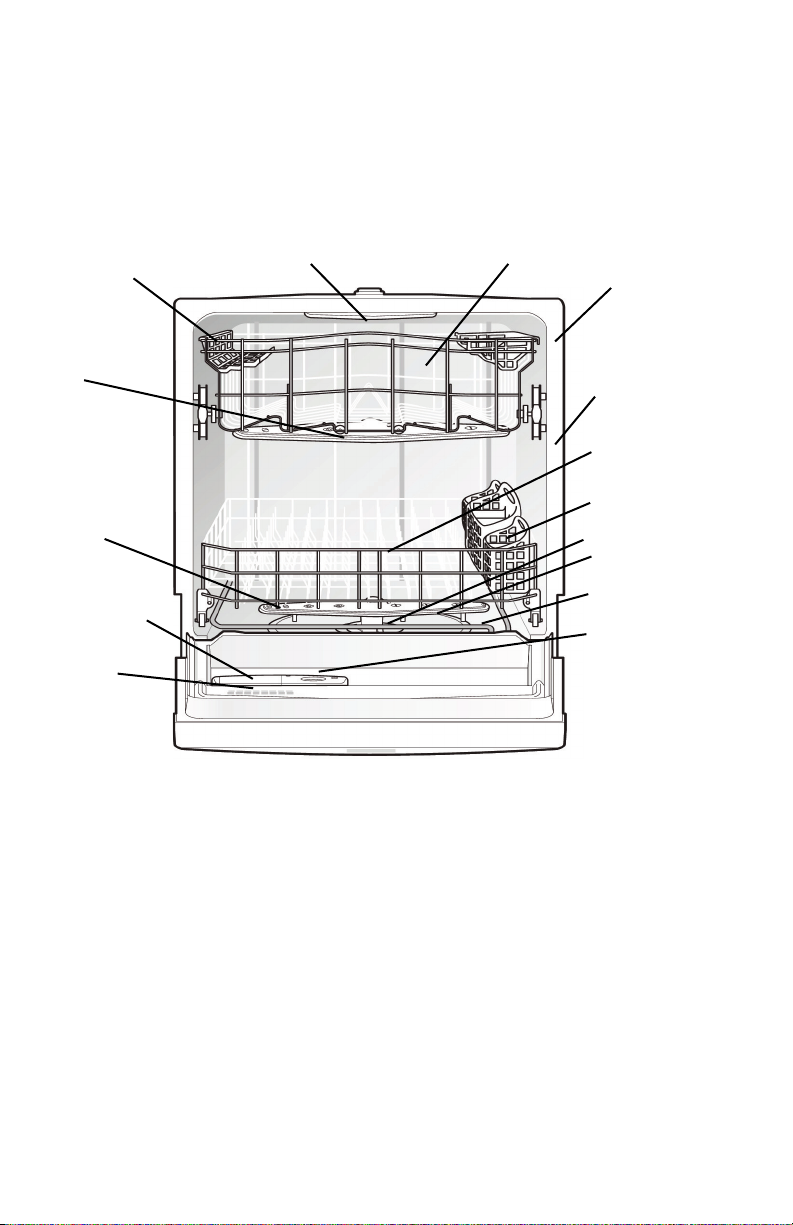
Dishwasher Features
Your dishwasher cleans by spraying a mixture of hot water and detergent through the
spray arms against soiled surfaces. Each cycle begins by fi lling with water covering the
fi lter area. Water is then pumped through the fi lter and spray arms. Soil particles go
down the drain as the water is pumped out and replaced with clean water. The number
of water fi lls will vary with the cycle being used.
Cup Shelf
Middle Spray Arm
Upper Rack Upper Spray Arm
Tub Gasket
Serial Label
(located on
right side of
tub)
Bottom Rack
Silverware
Basket
Lower Spray
Arm
Detergent
Dispenser
Vent
Glass Trap
Filter
Heating
Element
Rinse Aid
Dispenser
GETTING STARTED
1. Load dishwasher (See Preparing and Loading Dishes).
2. Add detergent (See Dishwasher Dispenser & Detergents).
3. Add rinse aid, if needed (See Rinse Aid).
4. Completely close the door so that it is latched shut.
5. Select desired CYCLE (See Cycle Chart). The indicator light above the pad will
glow when selected.
6. Select desired OPTIONS (See Energy Options). The indicator light above the pad
will glow when selected.
7. Run hot water faucet nearest dishwasher until water is hot. Turn water off .
8. To start, press START/CANCEL pad.
6

Operating Instructions
Wash Cycle Selections
Cycle times are approximate and will
vary with options selected. Hot water is
necessary to activate dishwasher detergent
and melt fatty food soils. An automatic
sensor will check the incoming water
temperature and, it is is not hot enough, the
timer will be delayed for automatic water
heating in the main wash of all cycles.
This happens even when HI-TEMP WASH
option has not been selected. When HITEMP WASH is selected, an even higher
temperature will be guaranteed to handle
heavier soil loads.
Hi-Temp Wash
When HI-TEMP WASH option is selected,
the dishwasher heats water in the main
wash to approximately 1400F (600C).
This increase in water temperature helps
dishwasher detergent remove food grease
and soil from dishes more eff ectively and
aids in drying. HI-TEMP WASH option
can be used with all cycles except CHINA
GENTLE and RINSE ONLY. HI-TEMP
WASH is automatically provided when
POTS PANS cycle is selected.
When HI-TEMP WASH option is selected,
the light above the pad will come on and
remain on until end of cycle. To turn off
the HI-TEMP WASH option, press the pad
a second time. The light above the pad
will turn off .
NOTE
The dishwasher is programmed to
remember your last cycle so you do not
have to reset each time. To start the
dishwasher using the same cycle and
options selected on the previous wash,
just press the START/CANCEL pad.
Air Dry
The unit defaults to heated dry when it
is started with any cycle selected. This
drying uses a combination of heated dry
with rinse aid that achieves enhanced
drying performance. If you prefer to only
have AIR DRY for dishes, you will select
AIR DRY and the unit will not energize the
heating element. This will reduce energy
consumption, but will also reduce drying
performance.
7
7

Operating Instructions
Delay Start
The DELAY START option allows you to
automatically delay starting your dishwasher
from 1-24 hours.
To start 1-24 hour delay, press the DELAY
START pad until the desired delay time shows
in the STATUS window after press the START
pad. A light will come on indicating the
delay start hours and will remain on until
cycle start.
To cancel the DELAY START option and begin
the cycle before the delay period is over,
Child Lock Controls
To Prevent children from accidently
changing the dishwasher cycle or starting
the dishwasher, lock the dishwasher controls
by pressing and releasing the AIR DRY pad
for 3 seconds while the door is latched.
An indicator light on the lock graphic pad
will illuminate when the controls are locked
and no new selections can be made until
the lock is released. To unlock the controls,
press the AIR DRY pad until the indicator
light goes out.
press the START/CANCEL pad.
To Cancel a Cycle
You can cancel a cycle anytime during the
cycle. Press START/CANCEL pad and the
dishwasher will start a 60 second drain. At
the end of the drain, select the desired cycle.
Cycle time will also vary based on the options selected and the incoming water temperature.
Not all cycles available on all models.
Cycle Chart
Cycle
Pots Pans
For pots, pans,
casseroles and
dinnerware with driedon or baked-on soils.
Normal Wash
For regularly soiled
dishes and silverware.
China Gentle
For lightly soiled China
and Crystal.
ECO Wash
For lightly soiled or
pre-rinsed dishes and
silverware.
Rinse Only
For rinsing dishes that
will be washed later.
To Select Cycle
Select POTS PANS
and desired OPTIONS.
HI-TEMP WASH will
automatically be provided.
Select NORMAL WASH
and desired OPTIONS.
Select CHINA GENTLE
and desired OPTIONS.
Select ECO Wash and
desired OPTIONS.
Select RINSE ONLY.
DO NOT USE detergent.
Water
(Approx.)
6.5 gal.
24.5 Liters.
5.4 gal.
11.8 Liters.
3.1 gal.
14 Liters.
3.1 gal.
14 Liters.
1.9 gal.
7.3 Liters.
Time*
(Approx.)
Washes/
Rinses
135 mins*
150 mins*
90 mins*
85 mins* 2 Washes
25 mins*
4 Washes
3 Rinses
2 Washes
2 Rinses
2 Washes
2 Rinses
2 Rinses
2 Rinses
*Includes dry time.
8

Operating Instructions
Status Indicator Lights
The WASHING light comes on at the
beginning of cycle and remains on until the
end of the main wash.
The DRYING light indicates the drying
portion of the cycle. The light will come on
when either drying option is selected.
The LOW RINSE light comes on at the end
of a cleaning cycle when the rinse agent
reservoir is low. The light will remain on
throught 5 successive cyles or until the
reservoir is fi lled.
The CLEAN light will come on at the end of
cycle and remain on until door is opened.
Status Window
The STATUS window, indicates the
following activity:
1H-24H .......... Number of delay start
hours. The Last hour will count down
in minutes.
CL ................... Close dishwasher door.
The status indicator lights will also
fl ash to indicate current cycle status.
Hd................... Incidates a water heat
delay.
MINUTES....... Number of minutes left
in cycle (1-99). If cycle is longer than
99 minutes, a small light will appear in
the lower right corner and remain on
until time counts below 99.
PF..................... Appears in window
when dishwasher is fi rst installed, or
when power has been interrupted. HITEMP WASH and AIR DRY indicator
lights will also fl ash. To clear, touch
START/CANCEL pad.
LO.................... Appears in window
when the rinse aid dispenser is low and
needs to be refi lled.
9
9
Preparing and Loading Dishes
Dish Preparation
Scrape away large pieces of food, bones, pits,
toothpicks, etc. The continuous fi ltered wash
system will remove remaining food particles.
Burned-on foods should be loosened before
loading. Empty liquids from glasses and cups.
Foods such as mustard, mayonnaise, vinegar,
lemon juice and tomato based products may
cause discoloration of stainless steel and
plastics if allowed to sit for a long period of
time. Unless the dishwasher is to be operated
at once, it is best to rinse off these food soils.
• Load racks so that large items do not
prevent the detergent dispenser from
opening.
• Check manufacturer’s recomendations
before washing items in question.
• If the dishwasher drains into a food
disposer, be sure disposer is completely
empty before starting dishwasher.
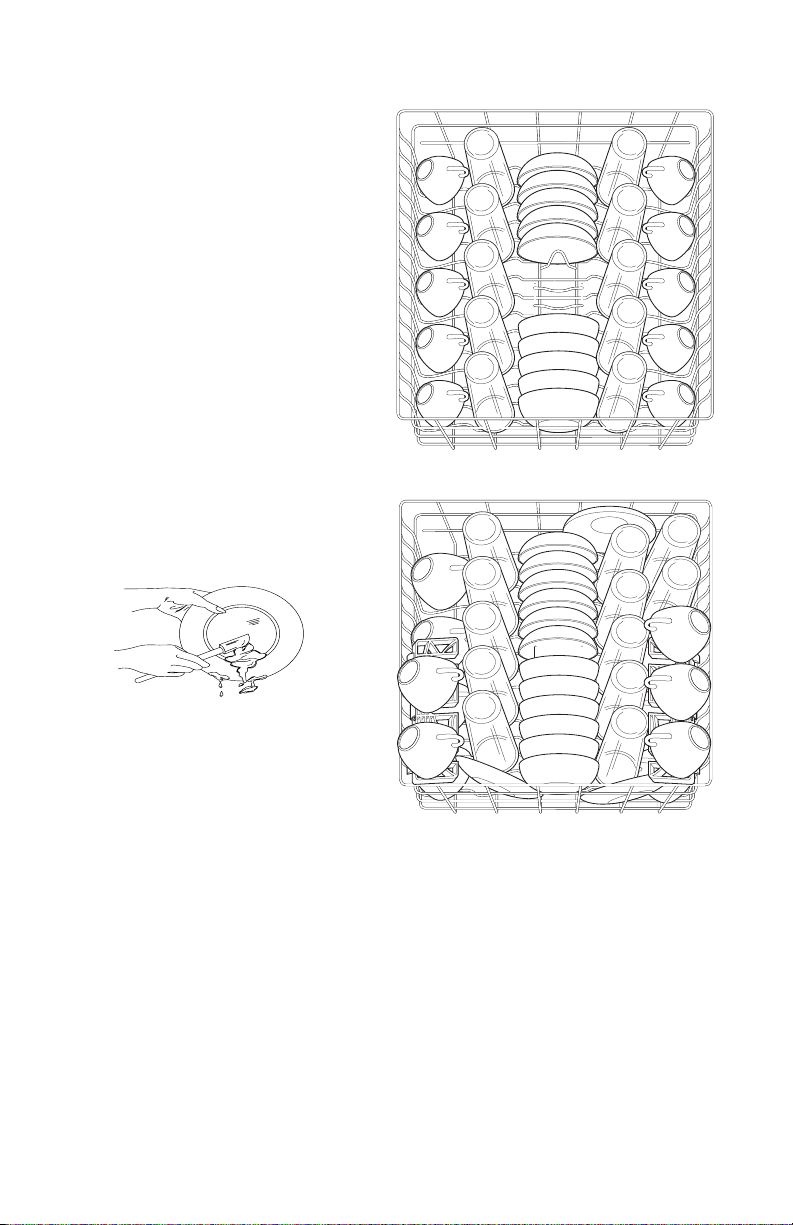
10 place settings standard loading pattern
Loading the Upper Rack
Features and appearance of racks and
silverware basket may vary from your model.
The upper rack is designed for fl exibility in
loading a wide variety of items including cups,
glasses, stemware, small plates, bowls, etc.
Load glasses in upper rack. Damage may
occur if placed in bottom rack.
Load plastic items in upper rack only. Melting
may occur if placed in bottom rack.
Load items with open ends facing down for
better cleaning and draining.
Damage may occur if delicate items touch
each other during dishwasher operation.
Be sure nothing protrudes through the bottom
of the rack to block the rotation of the middle
spray arm.
12 place settings standard loading pattern
Some models have a fold-down cup shelf or a
cup shelf/stemware holder. They can be used
to load two levels of cups, juice glasses, and
other short items. Stagger items on upper level
so that water can reach all inside surfaces.
Fold up to load tall glasses.
10
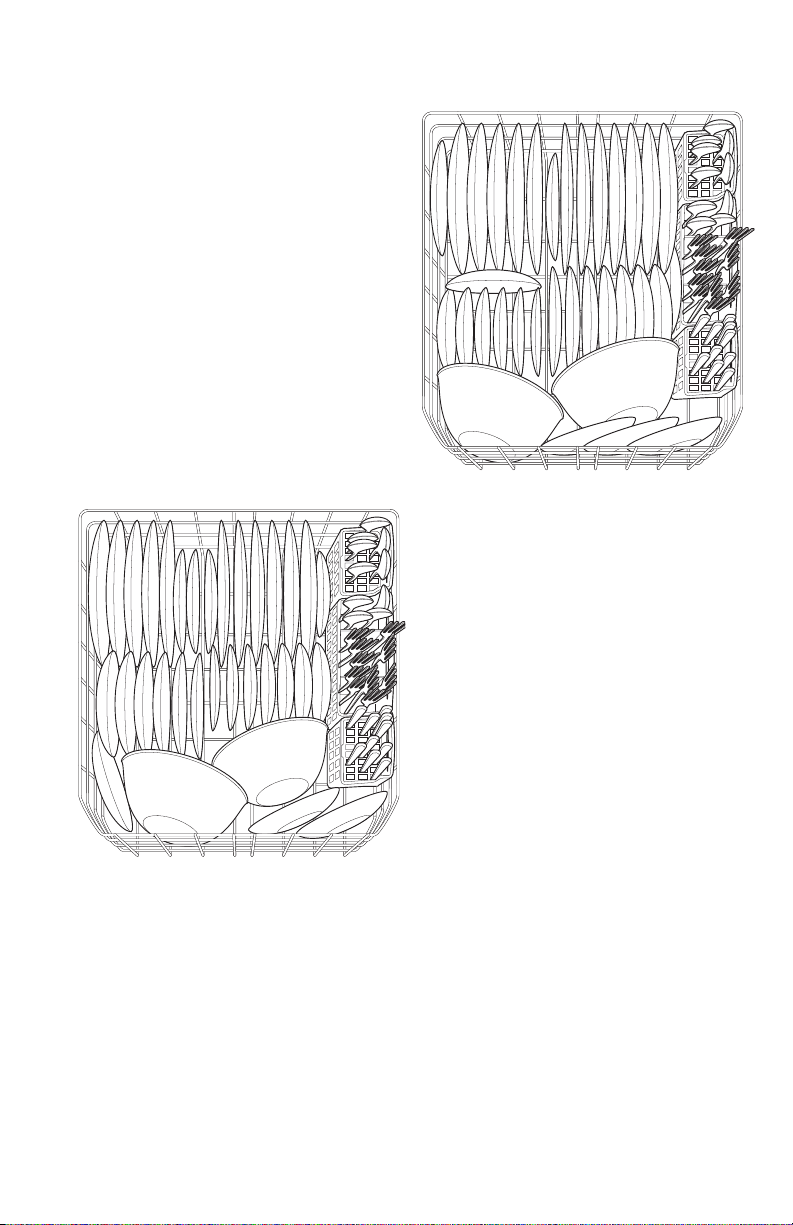
Preparing and Loading Dishes
Loading the Bottom Rack
Features and appearance of racks and
silverware basket may vary from your model.
The lower rack is best for plates, saucers,
bowls, and cookware. Large items should be
placed along the edge so they do not block
the spray arm rotation. For best results, place
bowls, casseroles, and sauce pans with soiled
surface facing down or toward the center. Tilt
slightly for better drainage.
Make sure tall items do not block the rotation
of the spray arm.
Be sure pan handles do not protrude through
the bottom of the rack and block the rotation
of the spray arm.
12 place settings standard loading pattern
Loading the Silverware Basket
Features and appearance of racks and
silverware basket may vary from your model.
10 place settings standard loading pattern
Load the silverware basket while it is in the
bottom rack or take the basket out for loading
on the counter or table.
Place small items like baby bottle caps, jar
lids, corn cob holders, etc., in a covered
section. Close the cover to hold small items
in place.
Use suggested loading patters, as shown, to
increase washability of your silverware.
Be sure nothing protrudes through bottom of
basket or rack to block the spray arm.
Do not mix silver and stainless to avoid
damaging the silver fi nish.
The silverware basket can be separated and
placed in several locations in the bottom rack.
Load silverware in all sections or just one,
depending on your load.
11
11
 Loading...