

Kenmore 5648744881, 5648744880, 5648744781, 5648744780 Owner’s Manual
R
USE& CARE
MANUAL
STOCK NOS.
87447/87448
KNOW YOUR UNIT
Read this booklet so
you will be able to
enjoy all the features
in your Kenmore
Microwave Oven.
Record in space
provided below the
Model No. and the
Serial No. found on
the labels on the
inner left side of
control panel_
Model No..
Serial No,
Retain this information
for future reference,.
Kenmore
MICRO
Use and Care
E OVEN
Sears, Roebuck and Co_, Chicago, II_ 60684, UoS.A. 13728
YOUR SAFETY FIRST
The Sears Kenmore Microwave Oven, though simple to use, is not atoy° Respect it as an electric cooking
appliance. Become familiarwith microwave energy, its usesand limitations.
PRECAUTIONS TO AVOID POSSIBLE EXPOSURE
TO EXCESSIVE MICROWAVE ENERGY
(a) DO NOT ATTEMPT to operate this oven with the door open since open-door operation can
result in harmful exposure to microwave energy. It is important not to defeat or tamper with the
safety interlocks.
(b) ' DO NOT PLACE any object between the oven front face and the door or allow soil or cleaner
residue to accumulate on sealing surfaces.
(c) DO NOT OPERATE the oven if it is damaged. ]t is particularly important that the oven door
close properly and that there is no damage to the:
(!) DOOR (bent)
(2) HINGES AND LATCHES (broken or loosened)
(3)DOOR SEALSAND SE.AL.INGSURFACES.
(d) THE OVEN SHOULD NOT BE ADJUSTED OR REPAIRED BY AhP!ONE EXCEPT
PROPERLY QUAE!FIED SERVICE PERSONNEL
IMPORTArffr--FOR PROPER AND SAFE USE OF YOUR OVEN
• The oven mustbe level,
• The glasstray must be in the oven during cooking,
• Place the cookware gently on the glass tray and handle the tray carefullyto avoid pasta'alebreakage._
• When a browning d_shis used, the browning dish bottom mustbe at least3/16 in_above cooking tray°
Carefully read and follow the instructions for the brown_ins dish. incorrect usagemay cause the glass tray
to break.
• The oven should be thoroughly checked by a trained service technician, should it be dropped or
damaged, before it is operated asain_
• The electrical power cord must be kept dry and must not be pinched or crushed in any way_
• The oven has severalbuilt-in safetyswitchesto make sure the power remains offwhen the door is open.
DO NOT try to defeat these switches°
DON'TS
* DO NOT attempt to operate this oven with the door open.
- DO NOT run the oven empty without food in it.
, DO NOT cook bacon directly on the slags tray to avoid excessive local heating of the glass tray.
, DO NOT ieave the temperature probe unplugged in the cavity when operating the oven_
, DO NOT let the temperature probe touch the side walls, glass tray or door of the cavity when in use.
o DO NOT plug the pointed end of the temperature probe into the socket inside the cavity_
, DO NOT use the temperature probe in a regular oven,. 'This probe is designed for microwave oven
only,
= DO NOT store burnable material, such as food, in your microwave oven_
, DO NOT heat any types of baby bottles or baby food,, Uneven heating may occur and possibly cause
personal injury.
o DO NOT heat small-necked containers, such as syrup bottles, in the microwave oven..
" DO NOT use this microwave oven for commercial purposes. This Sears Kenmore Microwave Oven is
made for household use only,
SAFETY CERTIFICATION
The Sears Kenmore Microwave Oven is designed and thoroughly tested to meet exactin 9 safety standards,. It
2
meets UL and FCC requirements and complies with safety performance standards of the U,S Department of
Health and Human Services.,
IMPORTANT SAFETY INSTRUCTIONS
When using electrical appliances basic safety precautions should be followed, includin9 the following:
I 17A'r111_ TTI_ T,I"_
W._I_INII'NL.3--To reduce the risk of
bums, electric shock, fire, injury to persons or
exposure to excessive microwave energy:
io Read all instructions before using the appliance_
2. Read and follow the specific "PRECAUTIONS
TO AVOID POSSIBLE EXPOSURE TO EX
CESSIVE MICROWAVE ENERGY" found on
Page 2o
3,. As with most cooking appliances, close
supervision is necessary to reduce the risk of a
fire in the oven cavity.
NOTE: If a fire should start:
*KEEP THE OVEN DOOR CLOSED
*TURN THE OVEN OFF
*AND DISCONNECT THE POWER CORD
OR SHUT OFF POWER AT THE FUSE OR
CIRCUIT BREAKER PANEL..
a,, Do NOT grossly overcook foods_ As many
grossly overcooked foods will cause fires in
the oven cavity, carefully attend the oven;
especially, if paper, plastic, or other
combustibles are placed inside the oven.
Do NOT store combustible items such as,
b_
bread, cookies, etc. inside the oven because if
lightning strikes the power lines it may cause
the oven to turn ON.
5, Install or locate this appliance only in
accordance with the provided installation
instructions.
6_
Some products such as whole eggs, water with
oil or fat, sealed containers and closed glass jars
for example may explode and should not be
heated in this oven_
7 Use this appliance only for its intended use as
described in this manua!.
8, As with any appliance, dose supervision is
necessary when used by children.
9. Do not operate thisappliance if it has a damaged
cord or plug, if it is not working properly, or if it
has been damaged or dropped.
]'his appliance should be serviced only by
qualified service personnel. Contact nearest
authorized service facility for examination,
repair or adjustmenL
Ii. Do not cover or block any openings on the
appliance.
12 Do not use outdoors,
13. Do not immerse cord or plug in water°
14. Keep cord away from heated surfaces.
Do not use wire twist-ties in the oven. Be sure
C_
to inspect purchased items for wire twist-ties
and remove them before the item is placed in
the ovem
4. ]'his appliance must be grounded Connect only
to properly 9rounded out]eL See "GROUND.
tNG INSTRUC'['IONS" found on Page 6.
SAVE THESE INSTRUCTIONS
15,,
Do not let cord hang over edge of table or
counter.
16.
Whe_l cleaning surfaces of door and oven that
come together on closing the door, use only.
mild, nonoabrasive soaps or detergents applied
with a sponge or soft cloth. (See "Care and
Cleaning" instructions on Page 3!0)
3
TABLE OF CONTENTS
General Instructions
[] Location of Model Number Label 5
S IMPORTANT -- Electrical Grounding Instructions ............................................................ 6
Ill Installation .................................................................................................... 7
n Setting "Time of Day" .......................................................................................... 7
[] Names of Oven Paris ........................................................................................... 8
II Oven Control Panel................................................................................................ 9
Use Instructions
[]EasyUseChart...................................................................................................10
[] Recall and Change of Settings........................................................................................ II
[] Pause Between Stages........................................................................................... 11
[] Regular Timer ....................................................................... .,........................ 12
[] Hold Warm ..................................................................................................................... 12
Detailed Directions
n Cooking Guide for "Multi-Power" Settings......................................................................... 13
HI "Hi-Power"/"Mutti-Power" Cooking ............................................................................... !4
[] '¢Temperature Controlled" Cooking .......................................................................... 15--]7
m Temperature Controlled "HI-PoweF'/"Malti-Power" Cooking ............................................ 18
[] Automatic Defrost ................................................................................................... 19--20
II Mtdti,Stage Cooking ............................................................................................. 21--22
[]Delay Start Cooking...................................................................................................23
[]Whole Meal Cooking .................................................................................................23
[] Preset Recipe Cooking ...................................................................................................24--25
*Use of Quantity Key ................................................ ;.......................................................... 24
[] Programming Blew Recipes ................................................................................ 26--29
Utensils ..................................................................................................................... 30
Care and Cleaning .............................................................................................. 31
Questions and Answers............................................................................................... 32--33
Before Calling for Service................................................................................................. 34
Sears Service .............................................................................................................................. 35

SEARS KENMORE MICROWAVE OVEN
"USE AND CARE MANUAL"-
MICROWAVE OVEN USE INSTRUCTIONS
Enjoy a new cooking experience from Sears. Please read this booklet. It takes
only a few minutes - time well spent to learn how to use all of the features.
Aduice on the use and care of Sears appliances is always available at your nearest
Sears store. When seekT"nginformation, be sure you haue the complete model
number which is located on the plastic label. See below for its location.
MODEL NUMBER
To make a request for service, information or replacement of parts, Sears ,,viii require the complete model
number of your microwave oven. The number is on the inner left side of the control panel. (You must open the
door to see the number).
The number will took like this:564.8000000.
Model Number Label
|
IMPORTANT--
ELECTRICAL GROUNDING INSTRUCTIONS
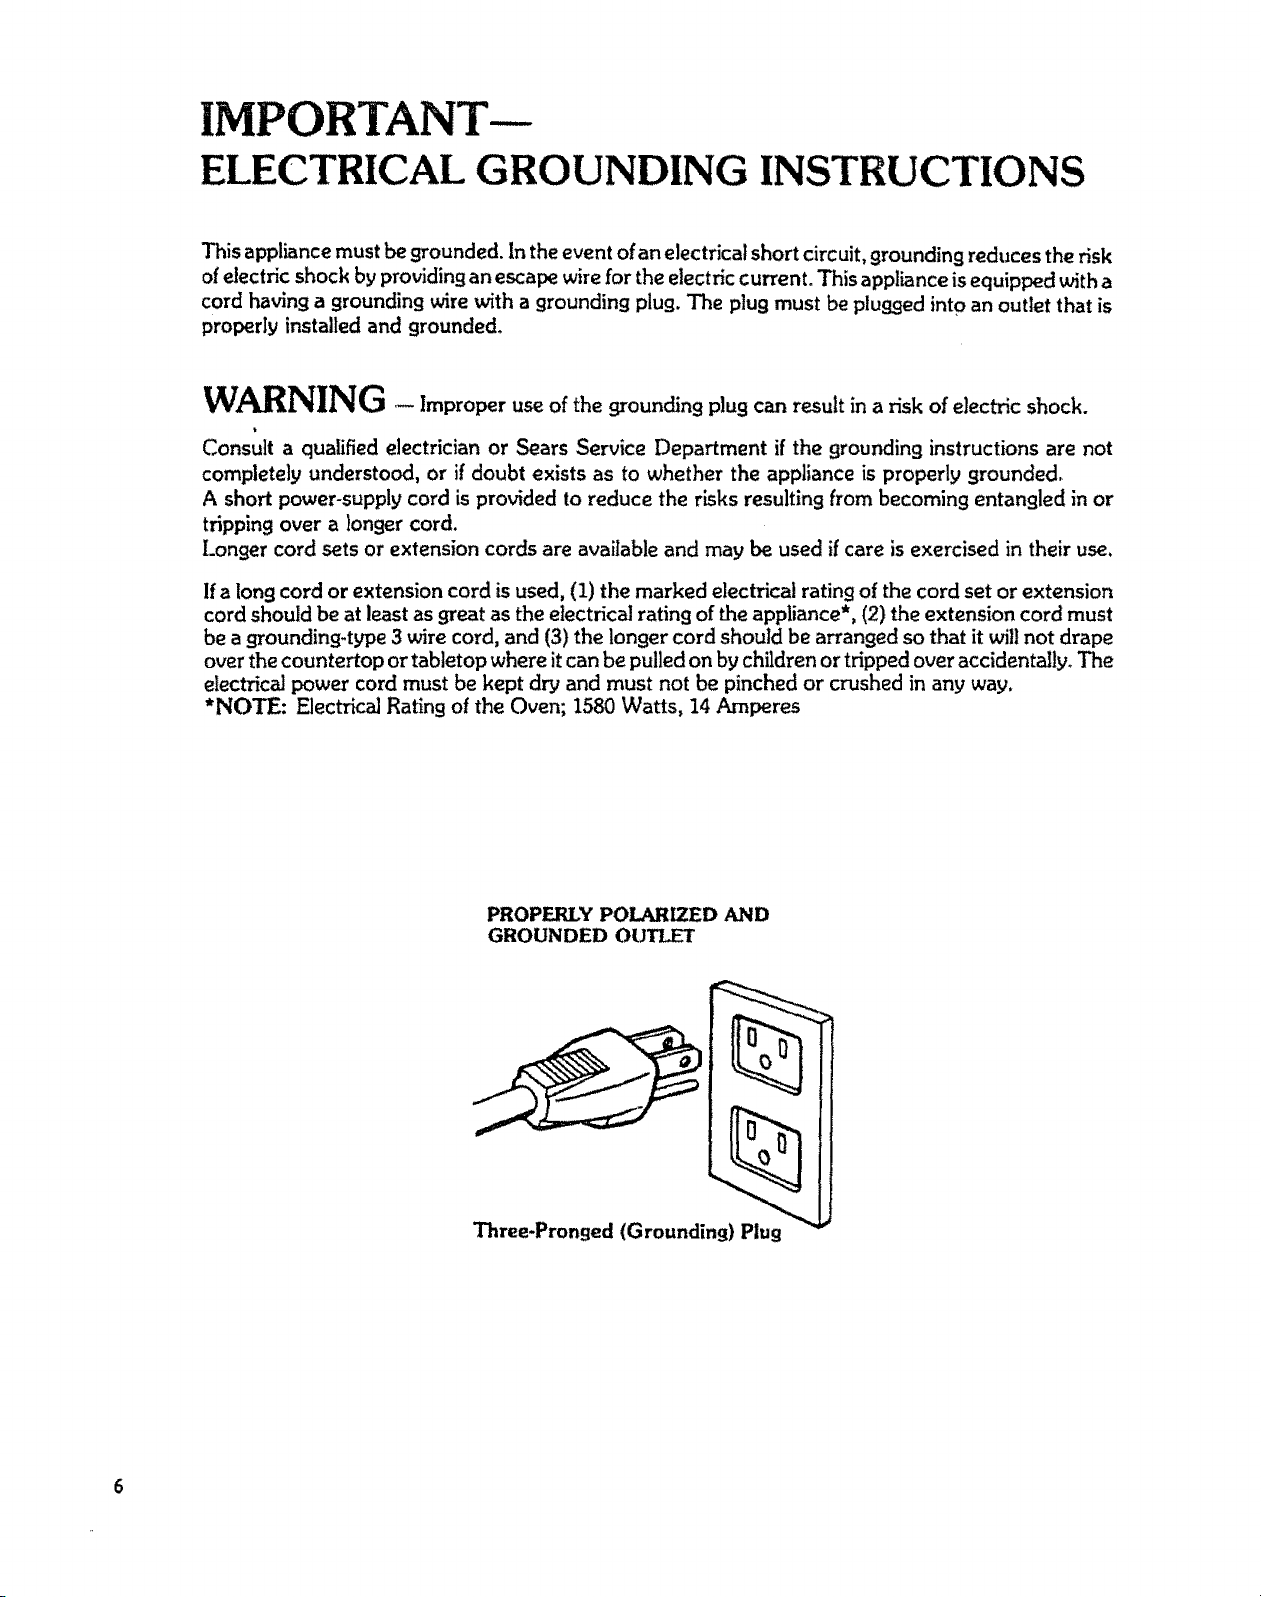
This appliance must be grounded. In the event of an electrical short circuit, grounding reduces the risk
of electric shock by providing an escape wire for the electric current° This appliance is equipped with a
cord having a grounding wire with a grounding plug. The plug must be plufl.qed into an outlet that is
properly installed and grounded°
WARNING - Improper use of the grounding plug can result in a risk of electric shock.
Consult a qualified electrician or Sears Service Department if the flrounding instructions are not
completely understood, or if doubt exists as to whether the appliance is properly grounded_
A short power-supply cord is provided to reduce the risks resulting from becoming entangled in or
tripping over a longer cord.
Longer cord sets or extension cords are available and may be used if care is exercised in their use.
Ifa long cord or extension cord is used, (1) the marked electrical rating of the cord set or extension
cord should be at least as great as the electrical rating of the appliance*, (2) the extension cord must
be a grounding4!,rpe 3 wire cord, and (3) the longer cord should be arranged so that it will not drape
over the countertop or tabletop where it can be pulled on by children or tripped over accidentally_ The
electrical power cord must be kept dry and must not be pinched or crushed in any way.
*NOTE: Electrical Rating of the Oven; 1580 Watts, 14 Amperes
PROPERLY POLARIZED AND
GROUNDED OUTLET
Three-Pronged (Grounding) Plug
INSTALLATION
Install your oven by following these four simple steps:
Step i: Remove all packing material and accessories
Step 2: Place the oven in the level location of your choice, but make sure there is at least one inch of space on
the top and at the rear for proper ventilation. The top of the oven should be kept clear and the plastic
feet must be kept on the oven so there is air flow for ventilation. An exhaust outlet is at the rear of the
oven, Blocking the outlet can damage the oven.
Step 3: Plug your oven into aStandard 120 volt/60 Hz household outlet. Be sure the electricai drcuit is at least
15 amp and that your microwave oven is the only appliance on the circuit.
Step 4: When your microwave oven is plugged in for the first time or when power resumes after a power
interruption, the numbers in the display window will show "0:00" plusthe hours and minutes that have
elapsed since the oven was plugged in or the power was restored° This means that theTLMEOF DAY
clock must be seL Refer to "Setting T_me of Day" below
NOTE: If your oven does not operate properly unplug the oven from the 120 volt/60 Hz household outlet and
then plug it back in.
This unit is not designed for 50 Hz or any circuit other than a 120 volt/60 Hz AC circuit°
SETTING TIME OF DAY
* Touch CLEAR
* Touch TIME OF DAY
* Touch numbers indicating the correct time
= Touch TIME OF DAY
(This is also explained in the "Easy Use Chart" Time of Day Section on Page I0.)
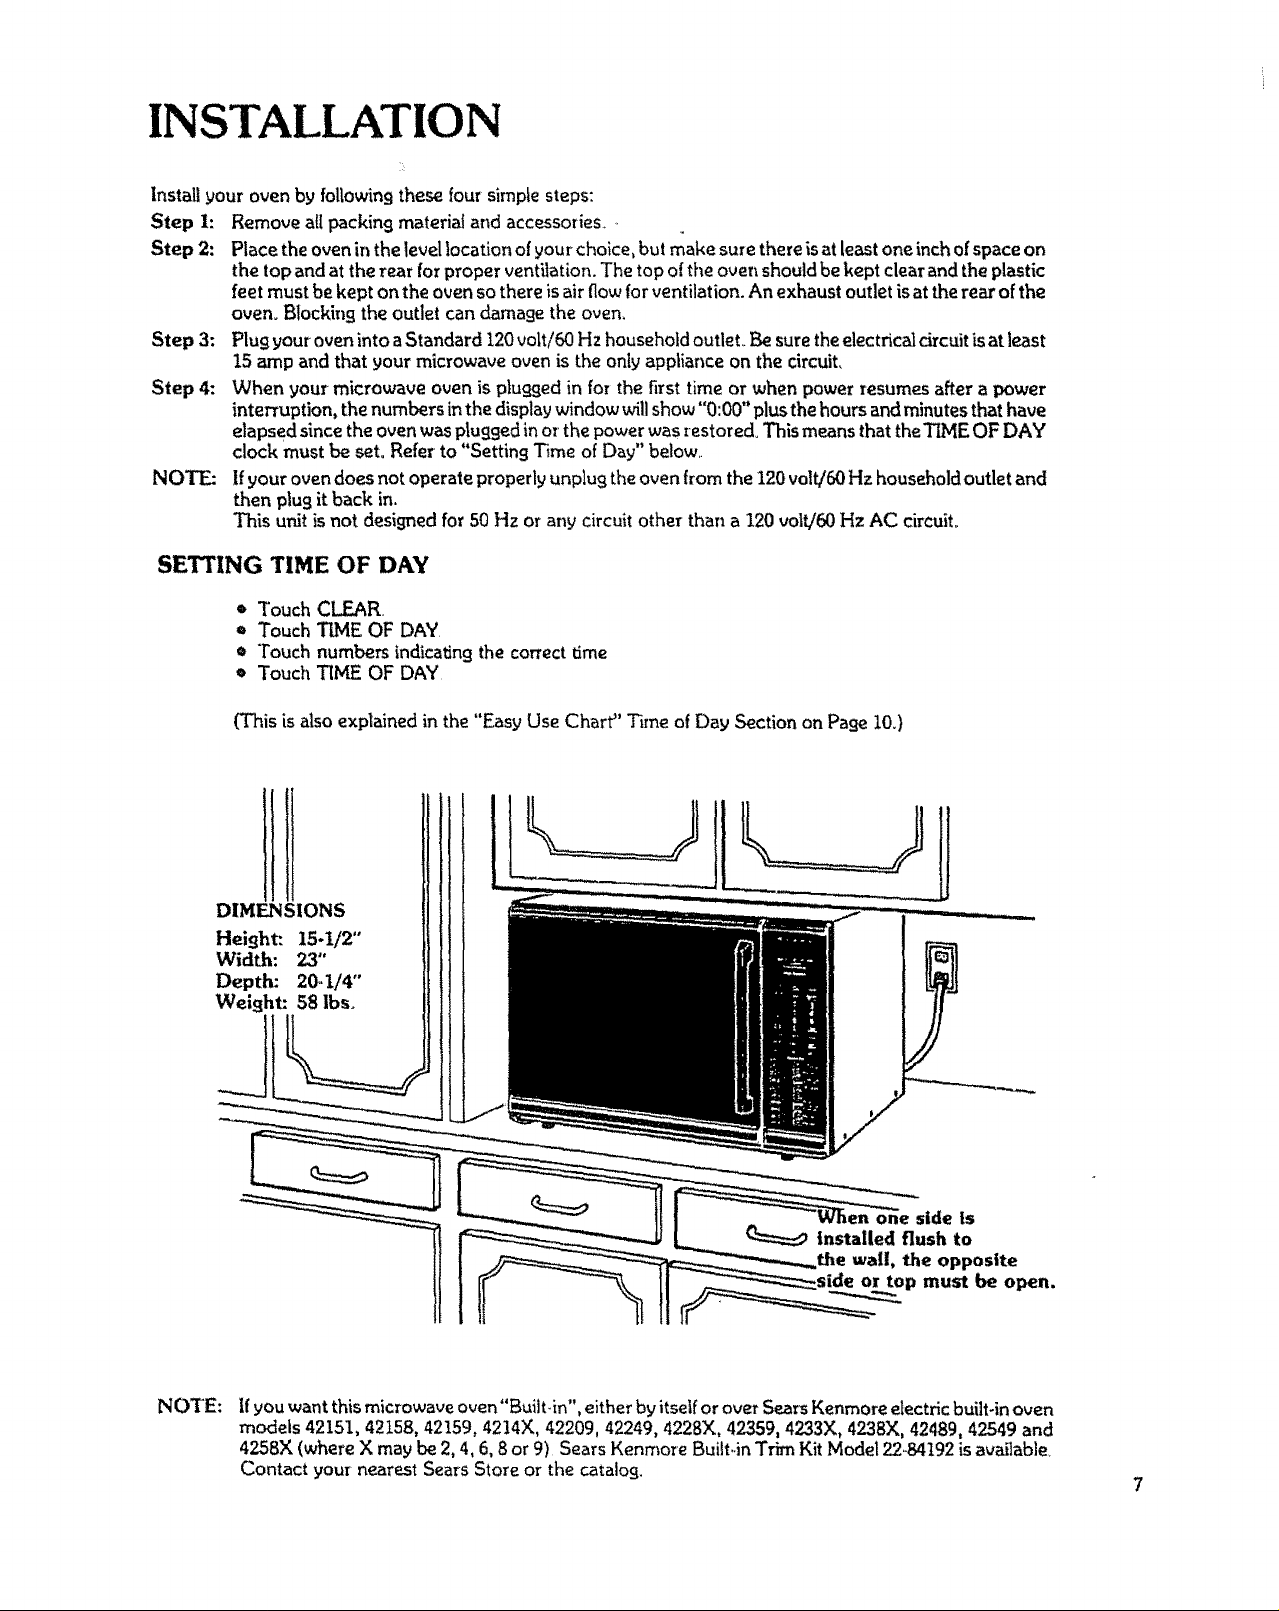
DIMENSIONS
Height:. 15-1/2"
Width: 23"
Depth: 20_1/4"
Weight: 58 lbs.
NOTE:
If you want this microwave oven"Built-in", either by itsetf or over Sears Kenmore electric built-in oven
models 42151, 42158, 42159, 4214X, 42209, 42249, 4228X, 42359, 4233X, 4238)(, 42489, 42549 and
4258X (where X may be 2, 4, 6, 8 or 9) Sears Kenmore Built-in Trim Kit Model _9,84t92 is available_
Contact your nearest Sears Store or the catalog.
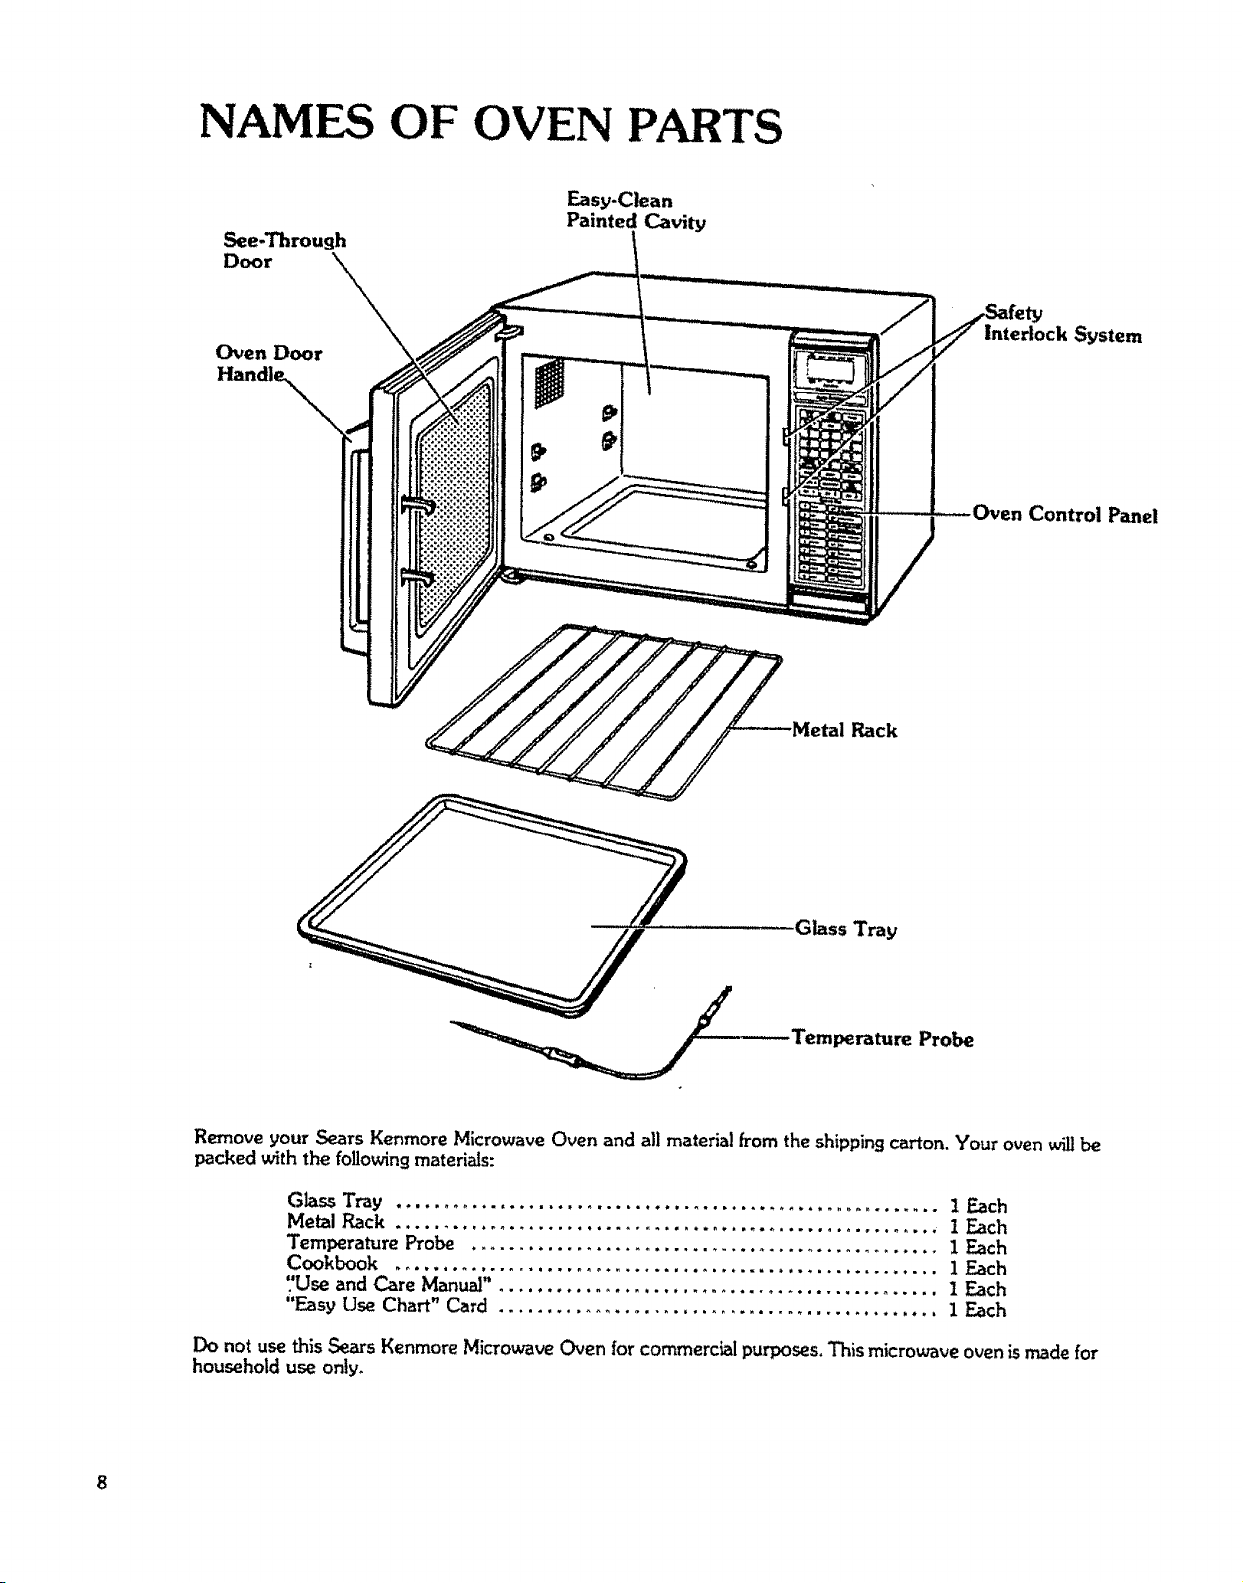
NAMES OF OVEN PARTS
Easy-Clean
See-Through
Painted Cavity
Door X_
Oven Door
Interlock System
Control Panel
_ _Metal Rack
Glass Tray
Temperature Probe
Remove your Sears Kenmore Microwave Oven and all material from the shippingcarton. Your oven willbe
packed with the followingmaterials:
Glass Tray ......................................................... t Each
Metal Rack ......................................................... I Each
Temperature Probe ................................................. I Each
Cookbook ......................................................... i Each
7Use and Care Manual". ............................................. 1 Each
"Easy Use Chart" Card .............................................. 1 Each
Do not use this Sears Kenmore Microwave Oven for commercial purposes. This microwave oven is made for
household use only.
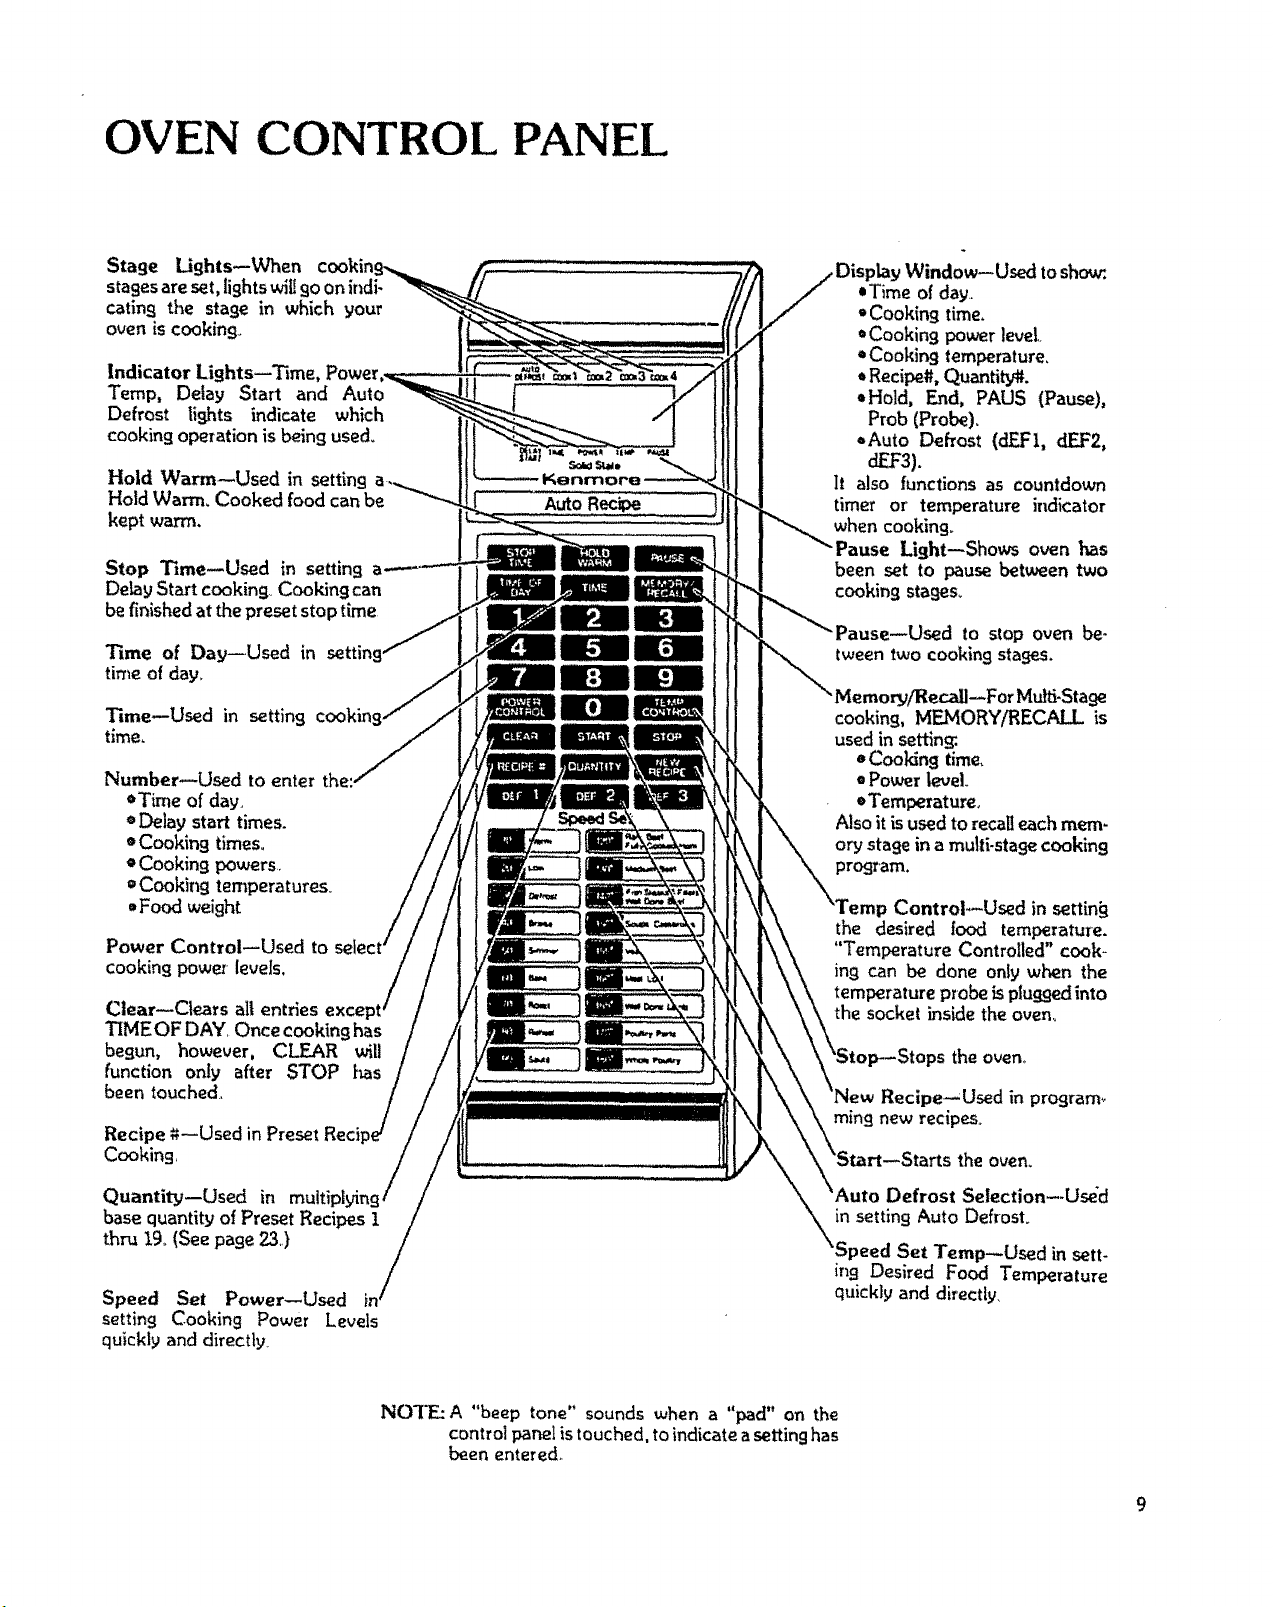
OVEN CONTROL PANEL
Stage Lights--When co,kin
stages are set, lights wiUgo on indi-
cating the stage in which your
oven is cooking.
Indicator Lights--Time,
Temp, Delay Start and Auto
Defrost lights indicate which
cooking operation is being used.
Hold Warm--Used in setting
Hold Warm. Cooked food can be
kept warm.
Stop Time--Used in setting
Delay Start cooking, Cooking can
be finished at the preset stop time
Time of Day--Used in settin
time of day°
Time--Used in setting
time,
Number--Used to enter the..
• Time of day.
¢ Delay start times.
• Cooking times.
o Cooking powers
=Cooking temperatures,
, Food weight
Power Control--Used to
cooking pow_ levels,
Clear--Clears all entries
TIMEOF DAY Once cooking has
begun, however, CLEAR will
function only after STOP has
been touched.
Recipe *t--Used in Preset Reci
Cooking,
Quantity--Used in multi
base quantity of Preset Recipes 1
thru 19.(See page 23,)
Speed Set Power--Used
setting Cooking Power Levels
quickly and directly
AutoRecipe )
[0]
,Window--Used to sh_.
,Time of day
"Cooking time.
*Cooking power love[
, Cookin9 temperature,
, Recipe#. Quantity_.
,Hold, End, PAUS (Pause),
Prob (Probe).
_,Auto Defrost (dEF1, dEF2,
dEF3).
It also functions as countdown
timer or' temperature indicator
when cooking_
Light--Shows oven has
been set to pause between two
cooking stages_
z--Used to stop oven be-
tweentwo cooking stages.
ForMulfi-Stafle
cooking, MEMORY/RECALL is
used in setting:.
=Cooking time,
• Power level.
=Temperature,
Also it is used to recall each mere-
or,,/stage in a multi-stage cooking
JControl--Used in settin_
the desired |ood temperatme.
"Temperature Controlled" cook-
ing can be done onlyw_'anthe
temperatureprobeispluggedinto
the socket inside the oven,,
the oven_
Recipe--Used in program_
rain9 new recipes
theoven,
Defrost Selection--Used
in setting Auto Defrost
'Speed Set Temp_Osed in sett-
in9 Desired Food Temperature
quickly and directly.
NOTE: A "beep tone" sounds when a "pad" on the
control panel is touched, to indicate a setting has
been entered.
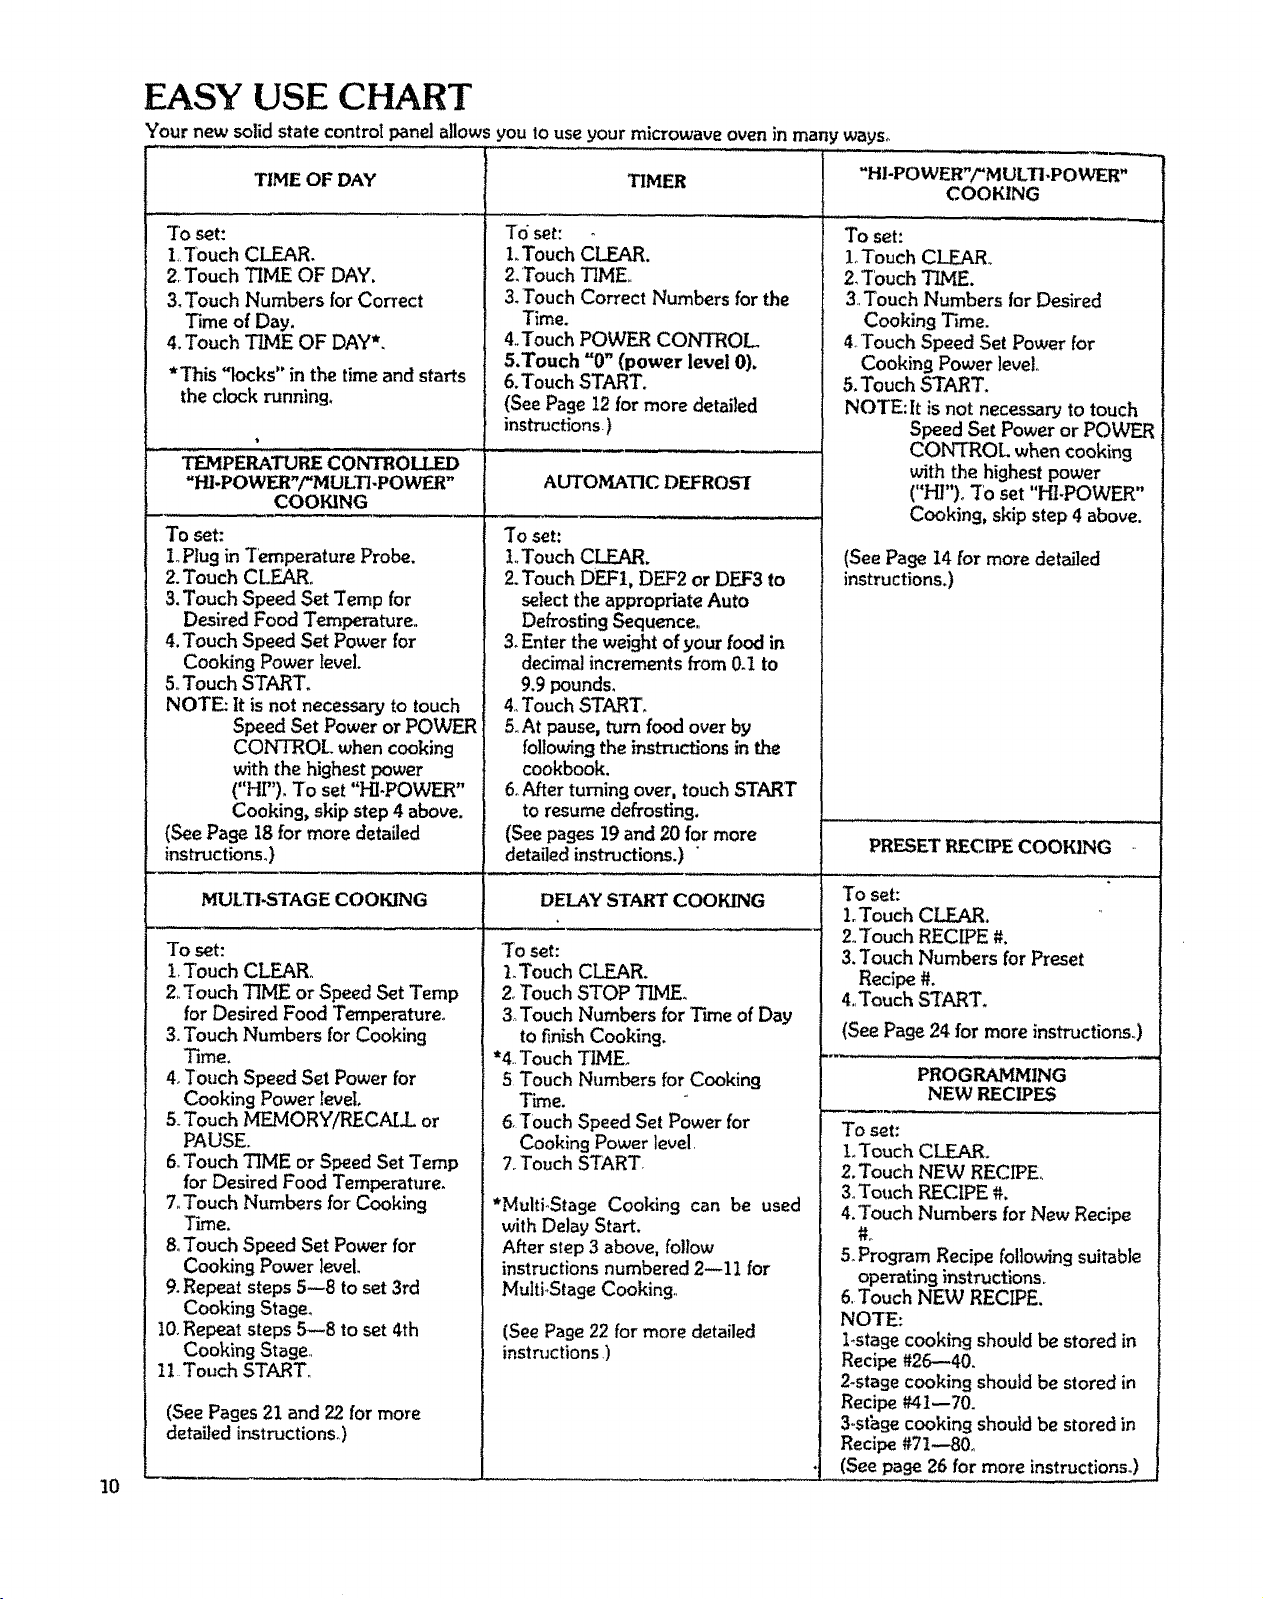
EASY USE CHART
Your new solid state controlpanelallows you to use your microwave oven in manyways_
TIME OF DAY
To set:
1,Touch CLEAR,
2.Touch TBALEOF DAY.
3,Touch Numbers for Correct
Time of Day.
4,Touch TIME OF DAY*,
*This "locks" in the time and starts
the clock running.
TEMPERATUP_ECONTROLLED
"HLPOWF_"/"MUKTLPOWER"
COOKING
To set:
1oPlug in Temperature Probe.
2.Touch CLEARo
3.Touch Speed Set Temp for
Desired Food Temperature,,
4. Touch Speed Set Power for
Cooking Power level.
5.,Touch START.
NOTE: It is not necessary to touch
Speed Set Power or POWER
CONTROL when cooking
with the highest power
("HF'), To set "HI-POWER"
Cooking, skip step 4 above.
(See Page 18for more detailed
instructions.)
TIMER
To set:
1.Touch CLEAR,
2,Touch TIME,
3,Touch Correct Numbers for the
Time.
4.,Touch POWER CONTROL
5,Touch "0" (power level 0).
6.Touch START.
(SeePage 12for more detailed
instructions.)
AUTOMATIC DEFROS'I
To set:
l..TouchCLEAR.
2.Touch DEF1, DEF2 or DEF3 to
selectthe appropriate Auto
Defrosting Sequence.
3.Enter the weight of your food in
decimal increments from0d to
9.9 pounds.
4.Touch START,
5,At pause,turn food over by
following the inst-mctions in the
cookbook.
6oAfter turning over, touch START
to resume defrosting.
(See pages19 and 20 for more
detailed instructions.) "
"HI-POWER"/"M ULTI-POWER"
COOKING
To set:
1oTouch CLEAR..
2, 'TouchTIME,
3 Touch Numbers for Desired
Cooking Time.
4_Touch Speed SetPower for
CookingPower level,
5. Touch START,
NOTE: It is not necessary to touch
Speed Set Power or POWER
CONTROL whencooking
with the highest power
("HP')o7'o set "HI-POWER"
Cooking,skip step 4 above.
(See Pa_e 14 for more detailed
instructions,)
PRESET R_ECIPE COOKING
MULTI-STAGE COOKING
To set:
1.Touch CLEAR°
2,,Touch "lIME or Speed Set Temp
for Desired Food Temperature.
3.Touch Numbers for Cooking
Time.
4.Touch Speed Set Power for
CookingPower level
5.Touch MF-MORYARECALL or
PAUSE.
6.Touch TIME or SpeedSet Temp
for Desired Food Temperature.
7_Touch Numbers for Cooking
TLme.
8.Touch Speed Set Power for
CookingPower level.
9.Repeat steps5--8 to set 3rd
Cooking Stage.
10.Repeat steps 5--8 to set 4th
Cooking Stage.,
11 Touch START.,
(See Pages 21 and 22 for more
detailed instructions°)
10
DELAY START COOKING
"Toset:
1.Touch CLEAR.
2,Touch STOP 3_VIE,
3 Touch Numbers for Time of Day
to finish Cooking.
*4.Touch TIME,
5 Touch Numbers for Cooking
Time.
6,Touch Speed Set Power for
Cooking Power level.
7. Touch START,
*MultioStage Cooking can be used
with Delay Start.
After step 3 above, follow
instructions numbered 2--11 for
MultioStageCooking..
(See Page22 for more detailed
instructions )
To set:
L Touch CLEAR.
2, Touch RECIPE #.
3. Touch Numbers for Preset
Recipe#.
4,,Touch START,
(See Page 24 for more instructions.,)
PROGRAMJ_ING
NEW PJECIPES
To set:
L Touch CLEAR,
2,Touch NEW RECIPE,
3,Touch RECIPE #.
4,Touch Numbers forNew Recipe
5_Program Recipe following suitable
operating instructions,
6, Touch NEW RECIPE.
NOTE:
Lstage cooking should be stored in
Recipe #26--40.
2-stage cooking shouldbe stored in
Recipe #41--70.
3,,sthgecooking should be stored in
Recipe#71--80_
(See page 26 for more instructions.)

RECALL AND CHANGE OF SETTINGS
To Recall a Setting
To recall(check) a setting before you start the oven follow the directionsbelow_,"
* To check the setting for a given stage,touch MEMORY/RECALL one or more times until the correct stage
light and indicator lightturns on. The setTIME or TEMP CONTROL for that stage will show in thedisplay
window
* To check the Cooking power level, touch POWER CONTROL
To recall (check) a setting while the oven Is operating, follow the directions below,
* To check settings while the oven is operating, touch the desired pad to recall the retting for the operating
stage,
o To recall a future stage, touch STOP. follow the directions above for recalling (checking} a setting before
starting the oven. and then _ouch START to continue cooking
* To recall TIME OF DAY while the oven is running touch TIME OF DAY.It will show momentarily in the
display window.
= To recall Recipe number (s) while the oven is running, touch RECIPE #. and it will show momentarily in
the display window
To Change a Setting
Recall the setting to be changed by following the directions above and make the change as follows:
= Tobch STOP ............................... The oven will stop cooking..
* Touch 'rIME ................................... Then touch "0 °' until only one "0"" shows in the display
* Touch TEMP CONTROL .................
* Touch POWER CONTROL .............
window. Set the cooking time.
Set food temperature_
Set cooking power level. To reset to "HI"_ set "99",
maximum power.
PAUSE BETWEEN STAGES
Some recipes require stirring, turning and adding or removing of foods between stages. To set the oven to stop
between stages, touch PAUSE rather than MEMORY/RECALL when setting the oven. If pause is set, the oven
will automatically stop and the word "PAUS" will flash in the display window.. After the pause, to restart the
oven,,touch START
11
 Loading...