

Page 1
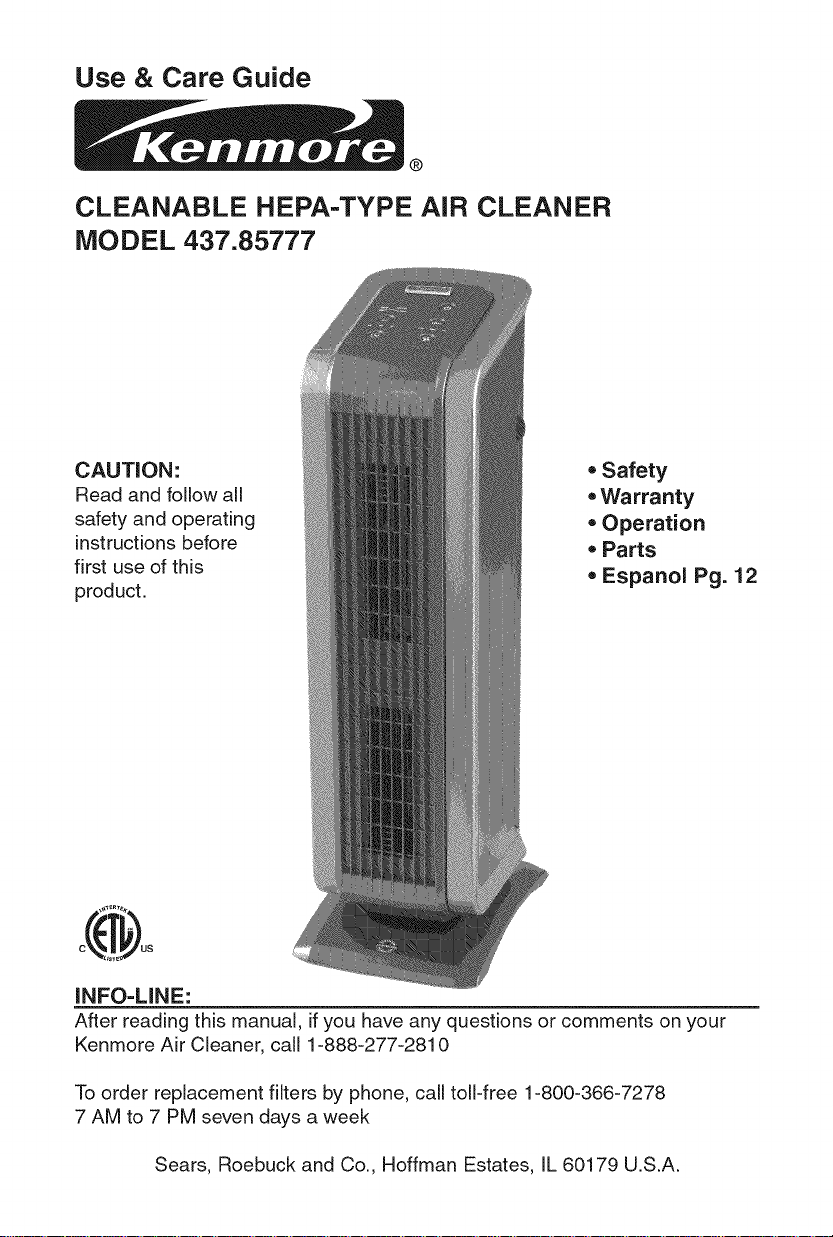
Use & Care Guide
®
CLEANABLE HEPA=TYPE AiR CLEANER
MODEL 437.85777
CAUTION:
Read and follow all
safety and operating
instructions before
first use of this
product.
INFO-LINE:
After reading this manual, ifyou have any questions or comments on your
Kenmore Air Cleaner, call 1-888-277-2810
• Safety
Warranty
• Operation
• Parts
• Espanol Pg. 12
To order replacement filters by phone, call toll-free 1-800-366-7278
7 AM to 7 PM seven days a week
Sears, Roebuck and Co., Hoffman Estates, IL 60179 U.S.A.
Page 2
iMPORTANT SAFETY iNSTRUCTiONS
Please read all instructions before using this product. Save these instructions
for easy reference. When using electrical appliances basic precautions
should always be followed to reduce breakage, risk of fire, electric shock and
injury to persons including the following:
Read all instructions before operating the air cleaner.
Place the air cleaner where it is not easily knocked over by persons in the
household.
ALWAYS unplug air cleaner when not in use.
DO NOT use any product with a damaged cord or plug, or if product
malfunctions, is dropped or damaged in any manner.
Keep the power cord away from heated surfaces.
DO NOT use air cleaner outdoors.
NEVER use the air cleaner unless it is fully assembled.
DO NOT run power cord under carpets and DO NOT cover with throw rugs.
Arrange cord so it will not be tripped over.
DO NOT use air cleaner where combustible gases or vapors are present.
DO NOT expose the air cleaner to rain, or use near water, in a bathroom,
laundry area or other damp locations.
To disconnect air cleaner, first press Power Button to turn air cleaner OFF
and remove plug from outlet.
DO NOT allow foreign objects to enter ventilation or exhaust opening, as
this may cause electric shock or damage to the air cleaner.
Place air cleaner near a power outlet and avoid using an extension cord.
DO NOT block air outlets or intakes.
To reduce the risk of electrical shock, this equipment has a grounding type
plug that has a third (grounding) pin. This plug will only fit into a grounding
type power outlet. If the plug does not fit into the outlet, contact qualified
personnel to install the proper outlet. Do not alter the plug in any way.
The air cleaner has a 3-prong (grounded) plug for safe operation. The
3-prong plug should be plugged directly into a properly grounded 3-prong
electrical outlet. DO NOT, FOR ANY REASON WHATSOEVER, CUT OR
REMOVE THE GROUNDING PRONG FROM THE PLUG. Removing the
grounding plug may result in electrical shock or create unsafe condition.
Contact a qualified electrician to be sure the outlet is properly grounded.
=A loose fit between the plug and the AC outlet (receptacle) may cause
overheating and distortion of the plug. Contact a qualified electrician to
replace loose or worn receptacles.
=DO NOT sit, stand on, or place heavy objects on the air cleaner.
=ALWAYS disconnect power supply before servicing.
DO NOT use this product with any solid-state speed
WARNING! To reduce the risk of fire or electric shock,
control device.
2
Page 3
KENMOREONEYEARFULLWARRANTY
IfthisKenmoreproductfailsduetoa defectinmaterialorworkmanship
withinoneyearfromthedateofpurchase,returnittoanySearsstoreor
otherKenmoreoutletintheUnitedStatesforfreereplacement.
Thiswarrantyappliesforonly90daysfromthedateofpurchaseifthis
productiseverusedforotherthanprivatehouseholdpurposes.
Thiswarrantydoesnotincludethepre-filter,whichisanexpendablepart.
Thiswarrantygivesyouspecificlegalrights,andyoumayalsohaveother
rightswhichvaryfromstateto state.
Sears,RoebuckandCo.,HoffmanEstates,IL60179
INTRODUCTION
CongratulationsonyourchoiceoftheKenmoreCleanableHEPA-TypeAir
Cleaner.Yournewaircleanerquicklyandeffectivelycleansandrevitalizes
indoorairutilizingathreestagecleaningsystemto reducetheamountof
commonlyfoundpollutantssuchastobaccosmoke,pollen,householddust,
petdander,andevenmoldspores.
Designedforoutstandingownerconvenience,thisaircleanerfeatures
acleanableHEPA-Typefilter,whicheliminatestheneedtoreplaceand
purchaseexpensivefilters.Italsohasafiltercleanindicatorthattakesthe
guessworkoutofknowingwhentocleanthefilter.Threecleaninglevelsand
programmabletimerfunctionsletyoumatchtheaircleaner'sperformanceto
yourspecialneeds.Alloperatingfunctionsareeasilysetandadjustedwith
convenientpushbuttonelectroniccontrolsandLEDlightdisplay.
Formaximumperformance,wehighlyrecommendthatyouoperatethe
CleanableHEPA-TypeAirCleanerinthefollowingmanner:
24hoursaday
IonizerONforthefirstday.
IonizerOFFafterthefirstday.
IonizerONwhenyourequirequickcleaningandextrarefreshingofroomair.
Page 4
SETUP
YourCleanableHEPA-TypeAirCleanerwasthoroughlyinspectedandtested
atthefactorypriortopackaging.Visuallyinspectituponremovalfromitsbox.
Removeanddiscardanypackagingmaterial.Returntheunitifitshowsany
signsofdamageormishandling.
ELECTRICALHOOKUP
PlugtheCleanableHEPA-TypeAirCleanerintoaproperlygrounded,3-prong
householdACoutlet.Ifyouarenotsurewhethertheoutletisproperly
grounded,haveitcheckedoutbyaqualifiedelectrician.
WARNING! To avoid the risk of electric shock
hazard, the Cleanable HEPA-Type Air Cleaner
should ONLY be plugged into a properly
grounded 3-prong, 120-volt AC outlet.
CAUTION: NEVER operate the Cleanable
HEPA-Type Air Cleaner until it is completely and
fully assembled. Permanent damage could result
to the motors and controls.
Page 5
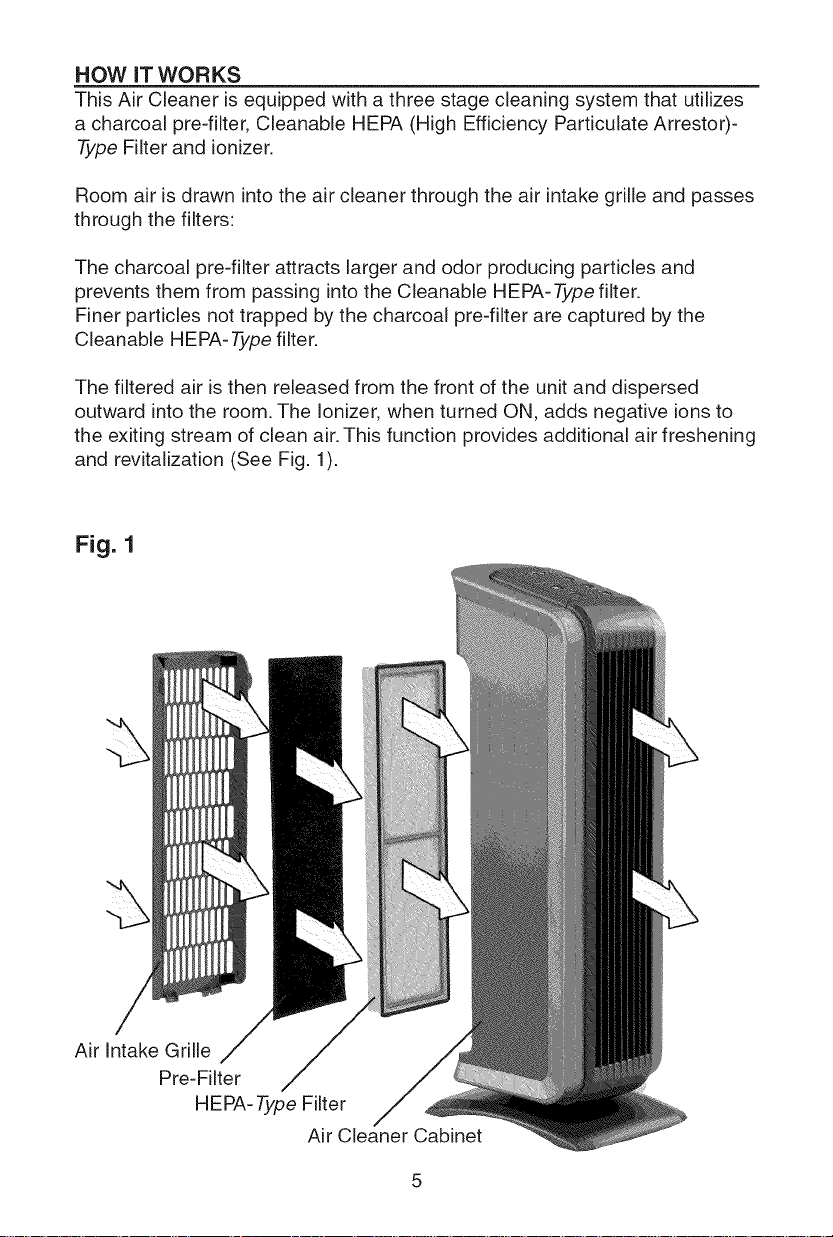
HOW IT WORKS
This Air Cleaner is equipped with a three stage cleaning system that utilizes
a charcoal pre-filter, Cleanable HEPA (High Efficiency Particulate Arrestor)-
Type Filter and ionizer.
Room air is drawn into the air cleaner through the air intake grille and passes
through the filters:
The charcoal pre-filter attracts larger and odor producing particles and
prevents them from passing into the Cleanable HEPA-Type filter.
Finer particles not trapped by the charcoal pre-filter are captured by the
Cleanable HEPA-Type filter.
The filtered air is then released from the front of the unit and dispersed
outward into the room. The Ionizer, when turned ON, adds negative ions to
the exiting stream of clean air. This function provides additional air freshening
and revitalization (See Fig. 1).
Fig. 1
Air Intake Grille
Pre-Filter
HEPA- Type Filter
Air Cleaner Cabinet
Page 6
OPERATION
Fig. 2
A. Clean HEPA-
TypeFilter
Indicator Light
Let'syou know
when it's time to
cleanthe HEPA-
Typefilter
B. Change Pre-
Filter indicator
Light
Let'syou know
it's timeto change
Pre-Filter
C. Filter Clean/
Change Reset
Button
POWER ON/OFF TO START AiR CLEANER (SEE Fig. 2E)
Press the Power Button.
The control buttons and LED lights will light up.
The air cleaner starts in Low speed with the Ionizer ON and the Timer OFF.
There will be a short beep anytime a control button is pressed.
D. Timer Button Allows you to set time of
desired operationto one,two, or four hours
E. Power ON/OFF
Button
Whenthe unit is
on, all buttons are
lit up in blue
F. ionizer0N/0FF
Button
G. Speed Button
Setdesired
cleaning level
TO SET SPEED (SEE Fig. 2G)
1.The air cleaner is at LOW speed.
2. For MEDIUM speed, press button.
3. For HiGH speed, press button again.
4. For LOW speed, press button again.
SPEEDS
Hi
MED
LO
Maximum Operation ................ Fast Cleaning
Daytime Operation ................... Normal Cleaning
Nighttime Operation ................. Quieter Cleaning
Page 7
OPERATION cont.
Each time you start your Air Cleaner, we recommend that you run it at HI
speed for a few minutes for fast initial cleaning. Then set it to MED or LO
as desired. The ionizer, when turned ON, adds negative ions to the exiting
stream of clean air. This function provides additional air freshening and
revitalization.
TO TURN IONIZER ON/OFF (See Fig. 2F)
The ionizer is on when the air cleaner is turned ON.
The LED light above the ION button will light up.
To turn Ionizer OFF, press button.
To turn Ionizer back ON, press button again.
TO SETTliVlER BUTTON (See Fig. 2D)
Your air cleaner has a timer function that allows you to select from three
pre-programmed periods of operation (one, two or four hours) for which you
would like the air cleaner to run and then shut itself off automatically.
Press Timer button once and the air cleaner will run for one hour. The LED
light will light up below 1H indicating it has been programmed to run for one
hour.
Press Timer button again and the air cleaner will run two hours. The LED light
will light up below 2H indicating it has been programmed to run for two hours.
Press Timer button again and the air cleaner will run for four hours. The LED
light will light up below 4H indicating it has been programmed to run for four
hours.
Press Timer button again to turn OFF timer operation.
Page 8
MAINTENANCE
CLEANABLE HEPA=TYPE FILTER
CLEAN / PRE=FILTER CHANGE SCHEDULE
Your air cleaner also has built-in reminders to let you know when to change
the charcoal pre-filter and when to clean HEPA-Type filter.
The charcoal pre-filter will need to be replaced and the H EPA-Type filter will
need to be cleaned periodically in order to allow the air cleaner to operate at
peak efficiency. The frequency of charcoal pre-filter replacement and HEPA-
Type filter cleaning will depend on the environment in which the air cleaner is
used. LED lights on the control panel will alert the user when to change the
charcoal pre-filter and clean the HEPA-Type filter.
After running approximately 14 weeks, 24 hours a day, the LED light below
Clean HEPA-Type filter will light up and a short beep will follow reminding you
the HEPA-Type filter should be cleaned.
After running approximately 8 weeks, 24 hours a day, the LED light below
Change Pre-filter will light up and a short beep will follow reminding you the
charcoal pre-filter should be replaced.
Please note that these pre-set cleaning and changing schedules are based
on factory recommended times under normal use. The HEPA-Type filter may
need to be cleaned or the charcoal pre-filter may need to be replaced earlier
depending on the environment. You should occasionally give the pre-filter a
visual check.
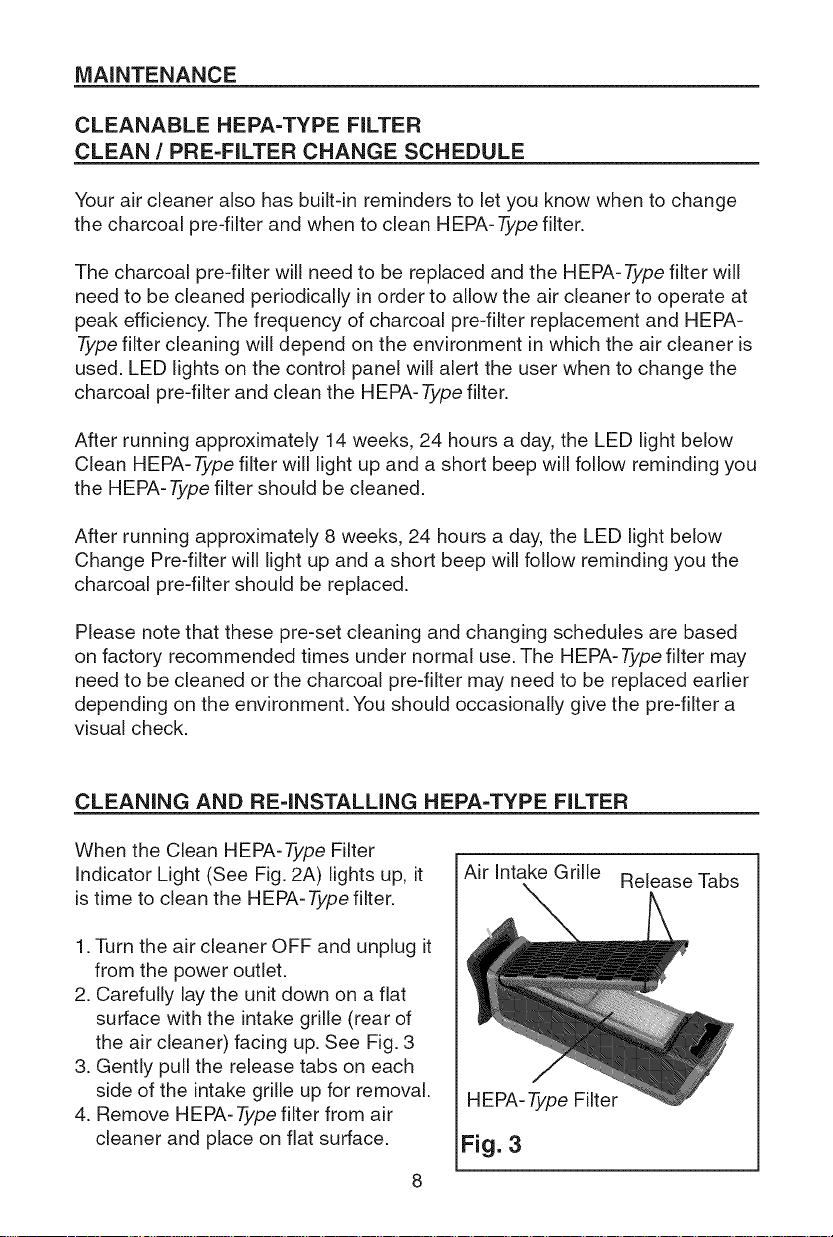
CLEANING AND RE=INSTALLING HEPA=TYPE FILTER
When the Clean HEPA-Type Filter
Indicator Light (See Fig. 2A) lights up, it
is time to clean the HEPA- Type filter.
1.Turn the air cleaner OFF and unplug it
from the power outlet.
2. Carefully lay the unit down on a flat
surface with the intake grille (rear of
the air cleaner) facing up. See Fig. 3
3. Gently pull the release tabs on each
side of the intake grille up for removal.
4. Remove HEPA-Type filter from air
cleaner and place on flat surface.
Air Intake Grille Release Tabs
HEPA- Type Filter
Fig. 3
Page 9

CLEANING AND RE=INSTALLING HEPA=TYPE FILTER cont.
5. Clean HEPA-Type filter by vacuuming entire surface area of filter using a
soft brush attachment from an upright or canister household vacuum.
NOTE: THIS FILTER IS NOT WASHABLE. USING LIQUIDS TO CLEAN
HEPA-Type FILTER WILL DESTROY IT.
6. Place HEPA-Type filter back into air cleaner. Make sure the pleated side of
the filter is facing up.
7. Place intake grille back into air cleaner so that the bottom tabs engage into
the slots at the base of the unit
8. Gently push the intake grille forward until it snaps in place.
9. Plug the air cleaner back into a properly grounded 3-prong outlet.
10. Press the power button ON
11. Press and hold Filter Change/Clean Reset button (see Fig. 2C) for up to
10 seconds to reset it.
REPLACING THE PRE=FILTER
When the Change Pre-Filter Indicator Light (See Fig. 2B) lights up, it is time
to replace the charcoal pre-filter.
1.Turn the air cleaner OFF and unplug it from the Intake Grille
power outlet.
2. Carefully lay the unit down on a flat surface
with the intake grille (rear of the air cleaner)
facing up. (See Fig. 3.)
3. Gently pull the release tabs on each side on
the intake grille up for removal.
4. Turn the intake grille around and place on a flat
surface so that the entire surface of the pre-
filter is visible.
5. Pre-filter is attached to four adhesive pads on
the interior of the intake grille. Detach pre-filter
and discard it. (See Fig. 4.) Adhesive
6. Wipe off the outside and inside of the intake
grille with a soft, damp cloth to remove any
visible dust.
7. Remove and discard any plastic protective wrapping from the new pre-
filter.
8. With the adhesive pads visible, lay pre-filter inside intake grille and gently
push down to attach.
9. Place intake grille back into air cleaner so that the bottom tabs engage into
the slots at the base of the unit.
10. Gently push the intake grille forward until it snaps in place.
11. Plug the air cleaner back into a properly grounded 3-prong outlet.
12. Press the power button ON.
13. Press and hold Filter Change/Clean Reset button (see Fig. 2C) for up to
10 seconds to reset it.
Fig. 4
Pads
Page 10

CLEANING GRILLE AND CABINET
WARNING: To avoid serious injury from electric
shock ALWAYS turn the air cleaner OFF and
disconnect the plug from the outlet BEFORE
cleaning.
1.Turn Air Cleaner OFF and unplug from outlet.
2. Use a soft damp, cloth to gently wipe dirt away from external surfaces. DO
NOT pour or splash water on the unit or use abrasive cleaners.
NOTE: DO NOT attempt to clean the pre-filter or HEPA-Type filter with
liquids. They ARE NOT washable. Any attempts to wash them will damage
the filters.
STORAGE
1.Turn OFF air cleaner by pressing Power button. Then unplug the unit from
the electrical outlet.
2. Remove charcoal pre-filter. Store in air tight plastic bag to ensure optimal
future performance.
3. Clean and re-install HEPA-Type filter.
4. Cover air cleaner and store in a suitable clean and dry environment.
To restore Air Cleaner back to service:
1. Unwrap air cleaner.
2. Replace pre-filter as directed in Replacing the Pre-filter.
10
Page 11

TECHNICALSPECIFICATIONS
Length 10-4/8in. (26.5cm)
Width 7-7/8in. (19.8cm)
Height 25-3/8 in. (64.5cm)
Weight 12.57 Ibs.(5.7kg)
Input Voltage 120 Volts AC, 60 Hz
REPLACEMENT PARTS
Pre-Filter 85778
Cleanable HEPA-Type Filter 85779
CUSTOMER ASSISTANCE LINE
If you experience a problem, please see the warranty for information. DO
NOT attempt to repair this unit yourself. Doing so will void the warranty, and
could cause serious personal injury to yourself, or damage the air cleaner.
If you have any questions concerning this appliance please call toll-free:
1-888-277-2810.
Monday - Friday 8:30 AM to 5:00 PM Central Standard Time.
HOW TO ORDER REPLACEMENT PARTS
To order replacement parts call toll-free 1-800-366-7278.
7 AM - 7 PM Seven days a week.
11
Page 12

Guia de uso y mantenimiento
®
PURIFICADOR DE AIRE TIPO HEPA LIiVIPIABLE
Modelo 437.85777
PRECAUCION:
Lea y observe todas
las instrucciones
de seguridad y
operaci6n antes de
usar este producto
por primera vez.
LJNEA DE INFORMACI()N:
Despu6s de leer este manual, haga sus preguntas o comentarios acerca del
purificador de aire Kenmore a trav6s del nQmero 1-888-277-2810.
Seguridad
Garantia
• Operaci6n
Piezas
Espa_ol, p_g. 12
Para pedidos telef6nicos de filtros de repuesto, Ilame al nQmero gratuito
1-800-366-7278 de 7 a.m. a 7 p.m. los siete dias de la semana.
Sears, Roebuck and Co., Hoffman Estates, IL 60179, EE.UU.
Page 13

INSTRUCCIONES llVlPORTANTES DE SEGURIDAD
Lea todas las instrucciones antes de usar este producto. Conserve a mano estas
instrucciones como referencia. Cuando use artefactos el6ctricos siga siempre las
normas de precauci6n b_sicas para reducir las averias, el riesgo de incendios,
choque el6ctrico y lesiones personales,
incluidas las siguientes:
• Lea todas las instrucciones antes de hacer funcionar el purificador de aire.
• Coloque el puriflcador de aire lejos del trAflco de personas para evitar que 6stas
tropiecen continuamente con la unidad.
• Mantenga SlEMPRE desconectado el purificador de aire cuando no est6 en uso.
• NO use artefactos con cables o cordones dafiados o, en caso de fallas, si se caen o
presentan algQn tipo de daSo.
• Mantenga el cable de alimentaci6n lejos de superficies calientes.
• NO use el purificador de aire al aire libre.
• NUNCA use el purificador de aire a menos que est6 completamente armado.
• NO coloque el cable de alimentaci6n debajo de alfombras NI Io cubra con tapetes.
Disponga el cable de manera que nadie tropiece con 61.
• NO use el purificador de aire cuando haya gases o vapores de combustible
presentes en el ambiente.
• NO exponga el purificador de aire a la Iluvia, no Io use cerca del agua, dentro del
bafio, en el Area de lavanderia u otros ambientes hQmedos.
• Para desconectar el purificador de aire, oprima primero el bot6n de alimentaci6n del
purificador de aire para apagarlo y retire el enchufe del tomacorriente.
• NO permita la entrada de objetos extraSos por la abertura de ventilaci6n o de salida
pues podria sufrir un choque el6ctrico o producir dafios al purificador de aire.
• Coloque el puriflcador de aire cerca del tomacorriente para evitar el uso de
extensiones.
• NO bloquee las salidas o entradas de aire.
• Para reducir el riesgo de choque el6ctrico, el equipo cuenta con un enchufe de
conexi6n a tierra que tiene un tercer terminal (de conexi6n a tierra). Este enchufe
encaja Qnicamente en tomacorrientes equipados con terminal de conexi6n a tierra.
Si el enchufe no encaja en el tomacorriente, acuda a personal calificado para
instalar el tomacorriente apropiado. No altere de ninguna manera el enchufe.
• El purificador de aire tiene un enchufe de 3 terminales (con terminal de conexi6n a
tierra) disefiado para un funcionamiento seguro. El enchufe de tres terminales debe
conectarse directamente al tomacorriente con una conexi6n a tierra adecuada. POR
NINGUN IVlOTIVO CORTE O ELIMINE ELTERIVIlNAL DE CONEXION ATIERRA
DEL ENCHUFE. De retirar el terminal de conexi6n a tierra, puede provocar un
choque el_ctrico o crear condiciones no seguras de funcionamiento. Acuda a un
electricista calificado para asegurarse de que el tomacorriente est_ debidamente
conectado a tierra.
• De haber un huelgo entre el enchufe y el tomacorriente (receptaculo) de corriente
alterna puede producirse sobrecalentamiento y distorsi6n del enchufe. Acuda a un
electricista califlcado para reemplazar los receptaculos holgados o desgastados.
• NO se siente o pare ni coloque objetos pesados sobre el purificador de aire.
• Desconecte SIEMPRE la fuente de alimentaci6n antes de efectuar el mantenimiento
[_J DVERTENClA Para reducir el riesgo de incendio o de
choque electrico, NO use este producto con dispositivos
de control de velocidad de estado s61ido.
13
Page 14

GARANTJA TOTAL KENIVIORE DE UN ANO
De fa[[ar este producto Kenmore por defectos de materia[es o de mano de
obra en e[ transcurso de un aSo a parfir de [a fecha de compra, devue[va[o a
cua[quier fienda Sears u otro punto de ventas Kenmore en Estados Unidos a
cambio de otro nuevo sin costo alguno.
Esta garantia es va[Jda _nJcamente durante 90 dias a parfir de [afecha de
compra de este producto si alguna vez se usara para fines diferentes al uso
domesfico particular.
Esta garantia no inc[uye e[ prefi[tro por tratarse de una pieza consumib[e. La
garantia le otorga derechos [egales especificos; usted puede tenet tambien
otros derechos que varian de un estado a otro.
Sears, Roebuck and Co., Hoffman Estates, IL 60179, EE.UU.
INTRODUCClON
Fe[JcJtacJonespor haber e[egido un purificador de aire tipo HEPA [impiab[e
Kenmore. E[ nuevo purificador de aire [impJay revita[Jza de manera rapida
y eficaz e[ aJre de los espacios interiores gracias a un sistema de [impieza
de tres etapas que reduce [a cantJdad de contamJnantes comunes como,
por ejemp[o, humo de tabaco, po[en, po[vo domesfico, caspa de mascotas e
Jnc[uso esporas de hongos.
DiseBado para brindar la maxima comodidad al usuario, este purificador de
aire cuenta con un filtro tipo HEPA limpiab[e que elimina [a necesidad de
cambiar y adquirir costosos filtros. Ademas, tiene un indicador de limpieza
del filtro que le permite saber exactamente cuando se debe limpiar e[ filtro.
Los tres nive[es de limpieza y las funciones programables de[ temporizador
le permitiran adaptar el funcionamiento de[ purificador de aire a sus
necesidades especiales. Todas las funciones se configuran faci[mente y
se ajustan mediante contro[es electr6nicos de botones pu[sadores y LED
indicadores.
Para un maximo rendimiento, le recomendamos encarecidamente hacer
funcionar su purificador de aire tipo HEPA limpiable de la manera siguiente:
24 horas a[ dia
Con el ionizador encendido durante el primer dia.
Con e[ ionizador apagado despues de[ primer dia.
Con el ionizador encendido cuando se requiera una limpieza rapida y un
refrescamiento adiciona[ de[ aire de[ recinto.
14
Page 15

CONFIGURACI6N
Elpurificadordeairetipo HEPA Nmpiable fue sometido a rigurosas
inspecciones y pruebas de fabrica antes de su embalaje. Inspecci6nelo
visualmente despues de sacarlo de la caja. Retire y deseche el material del
empaque. Devuelva la unidad si observa alguna seSal de daSo o manejo
indebido.
CONEXI6N ELC:CTRICA
Enchufe el purificador de aire tipo HEPA Nmpiable a un tomacorriente de
corriente alterna domestico de 3 terminales con una conexi6n a tierra
adecuada. Si no est& seguro de que el tomacorrientes tiene la conexi6n a
tierra adecuada, acuda a un electricista calificado para que Io inspeccione.
ADVERTENCIA Para evitar el peligro de choque
electrico, conecte el purificador de aire tipo HEPA
limpiable UNICAIVIENTE a tomacorrientes de corriente
alterna de120 voltios de 3 terminales con una conexi6n
a tierra adecuada.
PRECAUCI6N: NUNCA haga funcionar el purificador de
aire tipo HEPA limpiable sin antes armarlo
completamente. De Io contrario, podrfa producir da_os
permanentes a los motores y controles.
15
Page 16

COMOFUNCIONA
Estepurificadordeaireest&dotadodeunsistemadelimpiezadetres
etapasquetrabajaconunprefiltrodecarb6n,unfiltrotipo HEPA (supresor
de particulas de alta eficiencia) limpiable y un ionizador.
El purificador de aire atrae el aire del recinto hacia la rejilla de admisi6n de
aire y el aire atraviesa los filtros:
El prefiltro de carb6n atrae las particulas de mayor tama_o y aquellas que
producen olor, y les impide el paso hacia el filtro tipo HEPA limpiable. Las
particulas m,;4.sfinas que escapan del prefiltro de carb6n son capturadas por
el filtro tipo HEPA limpiable.
Seguidamente, se libera el aire filtrado por la parte delantera de la unidad
y se dispersa hacia el recinto. Cuando esta encendido, el ionizador
agrega iones negativos a la corriente de aire limpio saliente. Esta funci6n
proporciona un refrescamiento y revitalizaci6n adicional del aire (ver Fig. 1).
Fig. 1
Rejilla de
admisi6n
de aire
Prefiltro
Filtro tipo HEPA
Gabinete del purificado
de aire
16
Page 17

IViODO DE ElVlPLEO
Fig. 2
A. Indicadorde
lirnpiarei fiJtro
tipoHEPA
Indica cudndo se
debe limpiar ei
filtro tipo HEPA
B. Luzindicadora
de cambiarel
prefiitro
Indica cu_ndo se
debe cambiar el
prefiltro
C. Bot6nde G. Bot6nde
reiniciaiizaci6n velocidad
traslimpiar/ D. Bot6nde temporizadorPermitefijar Fijael nivel de
carnbiarfiltros el tiempo de funcionamiento deseadoen limpieza deseado
una, dos o cuatro horas
ENCENDIDO/APAGADO DEL LllViPIADOR DE AIRE (ver Fig. 2E)
Oprima el bot6n de encendido.
Se iluminan los botones de control y los LED indicadores.
El purificador de aire se inicia en la velocidad baja con el ionizador
encendido y el temporizador apagado.
Cada vez que se oprime un bot6n de control la unidad emite un tono corto.
E. Bot6nde
encendido/
apagado
Cuandoia unidad
est_ encendida,
todos los botones
aparecen
iluminados
de color azul.
F. Botdnde
encendido/
apagado dei
ionizador
FIJACI6N DE VELOCIDAD (ver Fig. 2G)
1. Purificador de aire a velocidad baja ("Low").
2. Para seleccionar la velocidad media ("Med"), oprima el bot6n.
3. Para seleccionar la velocidad alta ("Hi"), oprima nuevamente el bot6n.
4. Para seleccionar la velocidad baja ("Low"), oprima el bot6n una vez mas.
VELOCIDADES
Hi MAxima capacidad ................... Limpieza rapida
Med Funcionamiento diurno ............ Limpieza normal
Lo Funcionamiento nocturno ........ Limpieza silenciosa
17
Page 18

FUNCIONAIVllENTO (cont.)
Cada vez que encienda el purificador de aire, recomendamos que Io haga
funcionar a velocidad alta ("Hi") durante algunos minutos para una limpieza
inicial rapida. Posteriormente, fijelo en la velocidad media ("Med")o baja
("Low") segQn convenga. Cuando esta encendido, el ionizador agrega iones
negativos a la corriente de aire limpio saliente. Esta funci6n permite el
refrescamiento y revitalizaci6n adicional.
PARA ENCENDER/APAGAR EL IONIZADOR (vet Fig. 2F)
El ionizador se enciende cuando se enciende el purificador de aire.
Se enciende el LED indicador ubicado encima del bot6n "ion".
Para apagar el ionizador, oprima el bot6n.
Para volver a encender el ionizador, optima nuevamente el bot6n.
PARA FIJAR EL BOT(_N DEL TEiVlPORIZADOR (vet Fig. 2D)
El purificador de aire tiene una funci6n que permite seleccionar entre tres
periodos de funcionamiento previamente programados (una, dos o cuatro
horas), equivalentes al tiempo que usted desea que funcione la unidad antes
de apagarse autom,;4.ticamente.
Oprima una vez el bot6n del temporizador para que el purificador de aire
funcione durante una hora. Se enciende el LED indicador ubicado debajo de
1H para indicar que se ha programado un funcionamiento de una hora.
Oprima nuevamente el bot6n del temporizador para que el purificador de aire
funcione durante dos horas. Se enciende el LED indicador de 2H para indicar
que se ha programado un funcionamiento de dos horas.
Oprima una vez m&s el bot6n del temporizador para que el purificador de
aire funcione durante cuatro horas. Se enciende el LED indicador de 4H para
indicar que se ha programado un funcionamiento de cuatro horas.
Oprima nuevamente el bot6n del temporizador para desactivar el
funcionamiento con temporizador.
18
Page 19

MANTENIMIENTO
PROGRAMA DE LIMPIEZA/CAMBIO DE PREFILTRO DEL FILTRO
TIPO HEPA LIMPIABLE
El purificador de aire cuenta tambi6n con recordatorios incorporados que avisan cu_.ndo
se debe cambiar el prefiltro de carb6n y cu_.ndo se debe limpiar elfiltro tipo HEPA.
Es necesario cambiar peri6dicamente el prefiltro de carb6n y limpiar el filtro tipo
HEPA para que el purificador de aire pueda funcionar a su maxima eficiencia. La
frecuencia de cambio del prefiltro de carb6n y de la limpieza del filtro tipo HEPA
dependerA del ambiente en el cual se use el purificador de aire. Los LED indicadores
ubicados en el panel del control avisan al usuario cu_.ndo es necesario cambiar el
filtro de carb6n y limpiar el filtro tipo HEPA.
Despu6s de un funcionamiento de aproximadamente 14 semanas durante 24 horas
al dia, se enciende el LED indicador de limpiar filtro tipo HEPA ("Clean HEPA type
Filter") acompafiado de un tono corto para recordarle que es necesario limpiar el filtro
tipo HEPA.
Despu6s de un funcionamiento de aproximadamente 8 semanas durante 24 horas
al dia, se enciende el LED indicador de cambiar prefiltro ("Change Pre-Filter")
acompafiado de un tono corto para recordarle que es necesario cambiar el prefiltro
de carb6n.
Cabe destacar que estos programas previamente prestablecidos de limpieza y
cambio de filtros se basan en recomendaciones de fabrica para un uso normal del
producto. Dependiendo del ambiente, puede set necesario adelantar la limpieza del
filtro tipo HEPA o el cambio del prefiltro de carb6n. Conviene hacer peri6dicamente
una inspecci6n visual del prefiltro.
LIMPIEZAY REINSTALACION DEL FILTRO TIPO HEPA
Cuando se enciende el LED indicador de limpiar filtro tipo HEPA ("Clean HEPA type
Filter") (vet Fig. 2A) es el momento de limpiar
el filtro tipo HEPA.
1.Apague el purificador de aire y
desenchOfelo del tomacorriente.
2. Coloque la unidad cuidadosamente sobre
una superficie plana de manera que la rejilla
de admisi6n (parte trasera del purificador
de aire) quede hacia arriba. Ver Fig. 3
3. Tire suavemente de las leng0etas de
sujeci6n de cada lado de la rejilla de
admisi6n hacia arriba para retirarla.
4. Retire el filtro tipo HEPA del purificador
de aire y col6quelo sobre una superficie
plana.
Rejilla de
admisi6n de
aire
Filtro tipo
HEPA
Fig. 3
19
LengOetas de
sujeci6n
Page 20

LIIVIPIEZAY REINSTALACION DEL FILTRO TIPO HEPA co_con_.
5. Limpie con aspiradora toda la superficie del filtro tipo HEPA; use un accesorio de
aspiradora dom6stica vertical o de tanque que incorpore un cepillo suave.
NOTA: ESTE FILTRO NO ES LAVABLE. EL USO DE LJQUJDOS DE LIIVIPIEZA
DESTRUYE LOS FJLTROS TIPO HEPA.
6. Coloque nuevamente el filtro tipo HEPA en el purificador de aire. AsegSrese de que
el lado blindado del filtro quede hacia arriba.
7. Coloque nuevamente la rejilla en el purificador de aire de modo que las leng0etas
de sujeci6n inferiores coincidan con las ranuras en la base de la unidad.
8. Empuje suavemente la rejilla de admisi6n hacia adelante hasta que encaje en su
sitio.
9. Enchufe el purificador de aire nuevamente en el tomacorriente de tres terminales
con la conexi6n a tierra adecuada.
10. Optima el bot6n de encendido.
11. Mantenga oprimido el bot6n de reinicializaci6n de cambio/limpieza de filtro (ver
Fig. 2C) por hasta 10 segundos para reinicializar la unidad.
REEMPLAZO DEL PREFILTRO
Cuando se encienda el LED indicador de cambiar prefiltro ("Change Pre-Filter) (ver
Fig. 2B) es el momento de cambiar el prefiltro de
carb6n. Rejilla de admisi6n
1.Apague el purificador de aire y desench0felo del
tomacorriente.
2. Coloque la unidad cuidadosamente sobre una
superficie plana de manera que la rejilla de admisi6n
(parte trasera del purificador de aire) quede hacia
arriba. (Vet. Fig. 3).
3. Empuje suavemente las lengOetas de sujeci6n
ubicadas a cada lado de la rejilla de admisi6n para
retirarla.
4. D_ vuelta a la rejilla de admisi6n y col6quela sobre
una superficie plana de modo que se vea toda la
superficie del prefiltro.
5. El prefiltro esta unido a cuatro almohadillas Fig, 4 AJmohadillas
adhesivas pot la parte interna de la rejilla de adhesivas
admisi6n. Desprenda el prefiltro y des6chelo. (Ver
Fig. 4).
6. Limpie la parte externa e interna de la rejilla de admisi6n con un paso suave y
h0medo para eliminar cualquier suciedad visible.
7. Retire y deseche la envoltura protectora plastica del prefiltro nuevo.
8. Manteniendo visibles las almohadillas adhesivas, coloque el prefiltro dentro de la
rejilla de admisi6n y oprima suavemente hacia abajo para instalarlo.
9. Coloque nuevamente la rejilla en el purificador de aire de modo que las leng0etas
de sujeci6n inferiores coincidan con las ranuras en la base de la unidad.
10. Empuje suavemente la rejilla de admisi6n hacia adelante hasta que encaje en su sitio.
11. Enchufe el purificador de aire nuevamente en el tomacorriente de tres terminales
con la conexi6n a tierra adecuada.
12. Optima el bot6n de encendido.
13. Mantenga oprimido el bot6n de reinicializaci6n de cambio/limpieza de filtro (ver
Fig. 2C) por hasta 10 segundos para reinicializar la unidad.
2O
Page 21

LIMPIEZA DE LA REJILLAY DEL GABINETE
ocasionadas por cheque electrico SlEMPRE apague
[__.J DVERTENCIA: Para evitar lesiones graves
1. Apague el purificador de aire y desenchQfelo del tomacorriente.
2. Con un paso suave y hQmedo, retire suavemente la suciedad de las
superficies externas. NO vierta o salpique agua sobre la unidad ni use
limpiadores abrasivos.
NOTA: NO intente limpiar el prefiltro o el filtro tipo HEPA con liquidos. Estos
filtros NO SON lavables. Cualquier intento de lavado daSara los filtros.
ALIVlACENAIVllENTO
1. Apague el purificador de aire; para ello optima el bot6n de encendido/
apagado. Seguidamente desenchufe la unidad del tomacorriente.
2. Retire el prefiltro de carb6n. Guardelo en una bolsa hermetica de pl&stico
para asegurar su 6primo funcionamiento futuro.
3. Limpie y vuelva a instalar el filtro tipo HEPA.
4. Cubra el purificador de aire y guardelo en un lugar adecuado que se este
limpio y seco.
el purificador de aire y desenchufe la unidad del
tomacorriente ANTES de realizar la limpieza.
Para volver a usar el purificador de aire:
1. Saque el purificador de aire de su envoltura.
2. Vuelva a colocar el prefiltro segOn las instrucciones de reinstalaci6n del
prefiltro.
21
Page 22

ESPECIFICACIONES TECNICAS
Largo 10-4/8pulg. (26.5cm)
Ancho 7-7& pulg. (19.8cm)
Alto 25 -3& pulg. (64.5cm)
Peso 12.57 libras.(5.7kg)
Voltaic de entrada 120 voltios CA, 80 Hz
PIEZAS DE REPUESTO
Prefiltro 85778
Filtro limpiable tipo HEPA 85779
LiNEA DE ASISTENCIA AL CLIENTE
De surgir algL_nproblema, consulte la informaci6n incluida en la garanfia. NO
intente reparar esta unidad por sus propios medios. De hacerlo anularia la
garanfia y podria sufrir graves lesiones personales o da5ar el purificador de
aire.
Si tiene preguntas relacionadas con este aparato, Ilame al nOmero telef6nico
gratuito: 1-888-277-2810.
Lunes a viernes de 8:30 a.m. a 5:00 p.m., hora estandar del centro de
EE.UU.
COIVlO PEDIR PIEZAS DE REPUESTO
Para pedidos de piezas de repuesto Ilame al nQmero gratuito
1-800-366-7278.
7 a.m. a 7 p.m. los siete dfas de la semana.
22
Page 23

Notes:
23
Page 24

Your Home
For expert troubleshooting and home solutions advice:
www.managemyhome.com
For repair - in your home - of all major brand appliances,
lawn and garden equipment, or heating and cooling systems,
no matter who made it, no matter who sold it!
For the replacement parts, accessories and
owner's manuals that you need to do-it-yourself.
For Sears professional installation of home appliances
and items like garage door openers and water heaters.
1-800-4-MY-HOME ® (1-800-469-4663)
Call anytime,dayor night(U.S.A. and Canada)
www.sears.com www.sears.ca
Our Home
For repair of carry-in items like vacuums, lawn equipment,
and electronics, call anytime for the location of your nearest
Sears Parts & Repair Service Center
1-800-488-1222 (U.S.A.) 1-800-469-4663 (Canada)
To purchase a protection agreement on a product serviced by Sears:
1-800-827-6655 (U.S.A.) 1-800-361-6665 (Canada)
Para pedir servicio de reparaci6n Au Canada pourservice en fran£:ais:
a domicilio, y para ordenar piezas: 1-800-LE-FOYER Mc
1-888-SU-HOGAR ® (1-800-533-6937)
www.sears.com www.sears.ca
(1-888-784-6427) SesIr_ www.sears.ca
® Registered Trademark / Trademark / Service Mark of Sears Brands, LLC
® Marca Registrada / Marca de Fabdca / " Marca de Servicio de Sears Brands, LLC
_tc Marque de commerce / _o Marque deposee de Sears Brands, LLC © Sears Brands, LLC
TM SM
1_ SM
 Loading...