

Page 1
Use & Care Guide
Manual de Uso y Cuidado
English / Espa_ol
I<e
M,, _ M,, 's 43 3394,_1_] 43 33954_] 43Y_ 33 64_]
, ,t; ;, / , ,t; .....
®
Customer Assistance / Asistencia al Cliente
1-888-277-2810
Sears Brands Management Corporation
HofJ:man Estates, IL 60179 U,S,A,
www, kenmore.com
www, sears, com
Page 2
Before Using Your New Air Purifier. ..................................................................................... 2
Important Safety Instructions ......................................................................................... 2 - 3
Parts and Features .................................................................................................................. 4
Operating Instructions ............................................................................................................ 5
Care and Maintenance .................................................................................................. 6 - 8
Technical Specifications ........................................................................................................ 8
Troubleshooting ...................................................................................................................... 8
Warranty ............................................................................................................... Back Cover
Please read this guide. It will help you to operate your new Kenmore Air Purifier
in the safest and most effective way.
Keep this book and your sales check (receipt) in a safe place for future reference.
Read all instructions in this guide before using your Air Purifier. This product is
intended for indoor residential use only, not for industrial or other commercial
applications. Use only with electrical wiring that is in good working order and
that meets applicable codes and ordinances. If you have questions regarding your
wiring, consult a qualified electrician.
While using your Air Purifier, you should follow the IMPORTANT SAFETY
INSTRUCTIONS listed below. As part of these instructions, we have used the
word '_¢LWARNING" to indicate the level of hazard: _WARNING: indicates a
hazard which, if not avoided, could result in injury or death.
IMPORTANT INSTRUCTIONS
When using electrical appliances, basic precautions should always be followed to
reduce the risk of fire, electric shock, and injury to persons, including the following:
1. Read all instructions before using this Air Purifier.
2. Use this Air Purifier only as described in this manual. Any other use not
recommended by the manufacturer may cause electric shock, fire, or injury
to persons.
3. Do not operate the Air Purifier with a damaged power cord or after the Air
Purifier malfunctions or has been dropped in any manner.
4. This appliance is not intended for use by persons (including children) with
reduced physical, sensory or mental capabilities, or lack of experience and
knowledge, unless they have been given supervision or instruction concerning
the use of the appliance by a person responsible for their safety.
5. Do not place the Air Purifier on a small, unlevel or uneven surface, or any
surface which might allow the Air Purifier to tip, fall, or get knocked over.
6. For proper operation, the Air Purifier should be placed on a smooth, non-
combustible surface.
7. The Air Purifier requires a level surface at least 6" (15.2 cm) from heat
sources such as ranges or heaters.
8. Do not sit, stand or place heavy objects on the Air Purifier.
9. Always unplug the Air Purifier when not in use, and before servicing.
10. Do not operate the Air Purifier with any safety devices removed.
Page 3
11. Keep the power cord away from heated surfaces.
12. Do not run power cord under carpeting. Do not cover cord with throw rugs,
runners, or the like. Arrange cord away from traffic area where it will not be
tripped over.
13. Avoid the use of extension cords due to risk of fire. If an extension cord must
be used, the cord must be a minimum 14AWG and rated not less than 1875
watts.
14. Do not insert or allow any object to enter any openings on the Air Purifier.
Doing so may cause electric shock and/or fire hazard.
15. Do not block air openings or place Air Purifier on a soft surface such as a
bed or sofa.
16. Do not use the Air Purifier where combustible gases or vapors are present.
17. This product is intended for indoor residential use only, not for industrial or
other commercial applications. Do not operate outdoors. This warranty is
void if the product is ever used for other than private household purposes.
18. The Air Purifier should be connected to a 120 V, 60 Hz outlet.
19. The Air Purifier has a polarized plug (one blade is wider than the other). To
reduce the risk of shock, this plug is intended to fit in a polarized outlet only
one way. If the plug does not fit fully in the outlet, reverse the plug. If it still
does not fit, contact qualified personnel to install the proper outlet. DO NOT
try to alter the plug in any way.
20. A loose fit between the plug and the AC outlet (receptacle) may cause
overheating and distortion of the plug. Contact a qualified electrician to
replase loose or worn outlets.
21. The use of a time-delay fuse or time-delay circuit breaker is recommended.
,WARNING: SHOCK HAZARD
Use your Air Purifier only in dry environments. This Air Purifier is not intended
for use in a bathroom, laundry area, or similar locations near sinks, washing
machines, swimming pools, or other sources of water. Never locate the Air Purifier
where it may fall into a bathtub or other water receptacle. Do not use in damp
environments such as flooded basements.
,I WARNING: FIRE HAZARD
Air Purifiers have arcing or sparking parts inside. Do not use near combustible
materials or flammable gases or sources of heat. DO NOT USE in areas where
gasoline, paint or flammable materials are used or stored. To prevent a possible
fire, do not block air intakes or exhaust in any manner. Do not insert or allow
foreign objects to enter any intakes or exhaust openings as this may cause an
electric shock, fire, or damage to the fan.
WARNING: HOT SURFACES
Do not touch the Air Purifier motor when in use. This motor is hot when in use. To
avoid burns, do not let bare skin touch hot surfaces.
SAVE THESE iNSTRUCTiONS!
3
Page 4
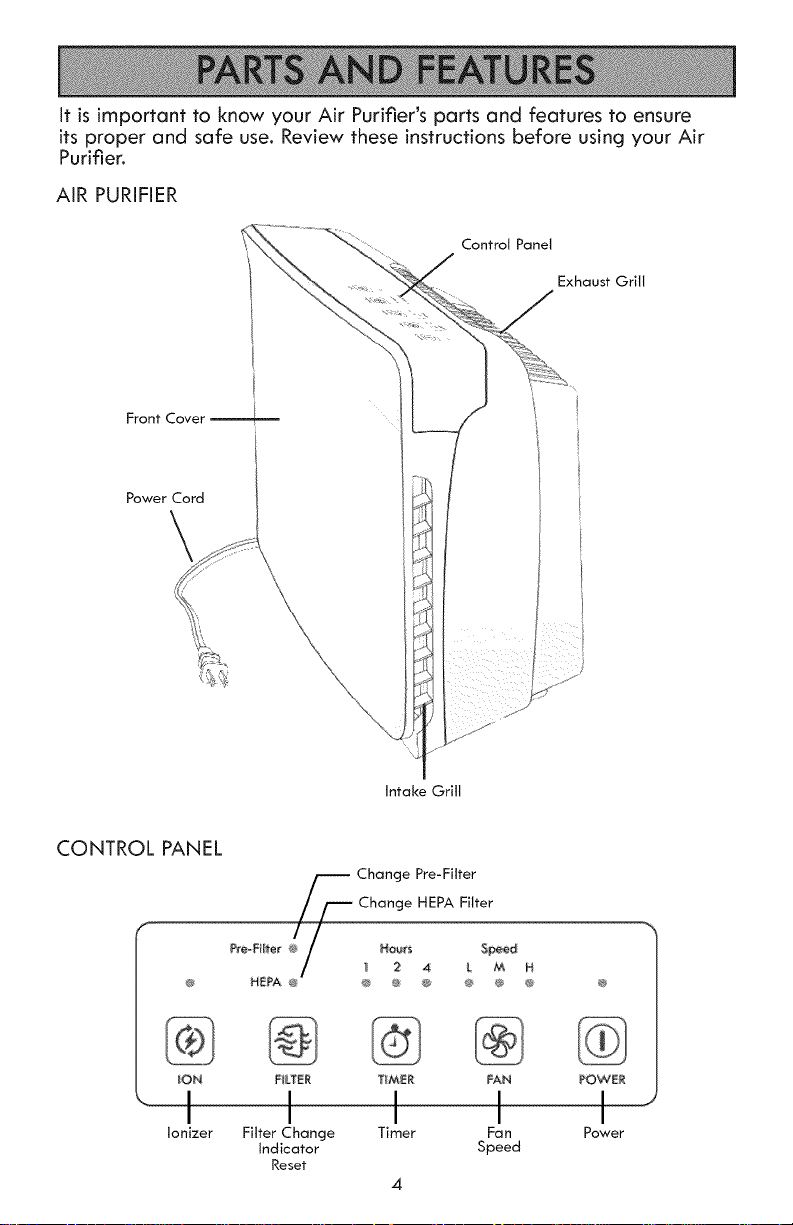
It is important to know your Air Purifier's parts and features to ensure
its proper and safe use. Review these instructions before using your Air
Purifier.
AIR PURIFIER
Control Panel
Exhaust Grill
Front Cover
Power Cord
\
CONTROL PANEL
_ON
I
Ionizer
intake Grill
------Change Pre-Fitter
7_//--- Change H EPA FiJteZ
i _ 2 4 L M
HEPA @ @ @ @ @ _
FILTER TIMER FAN POWER
I I I I..............
I I I I
Filter Change Timer Fan Power
indicator Speed
Reset
4
Page 5
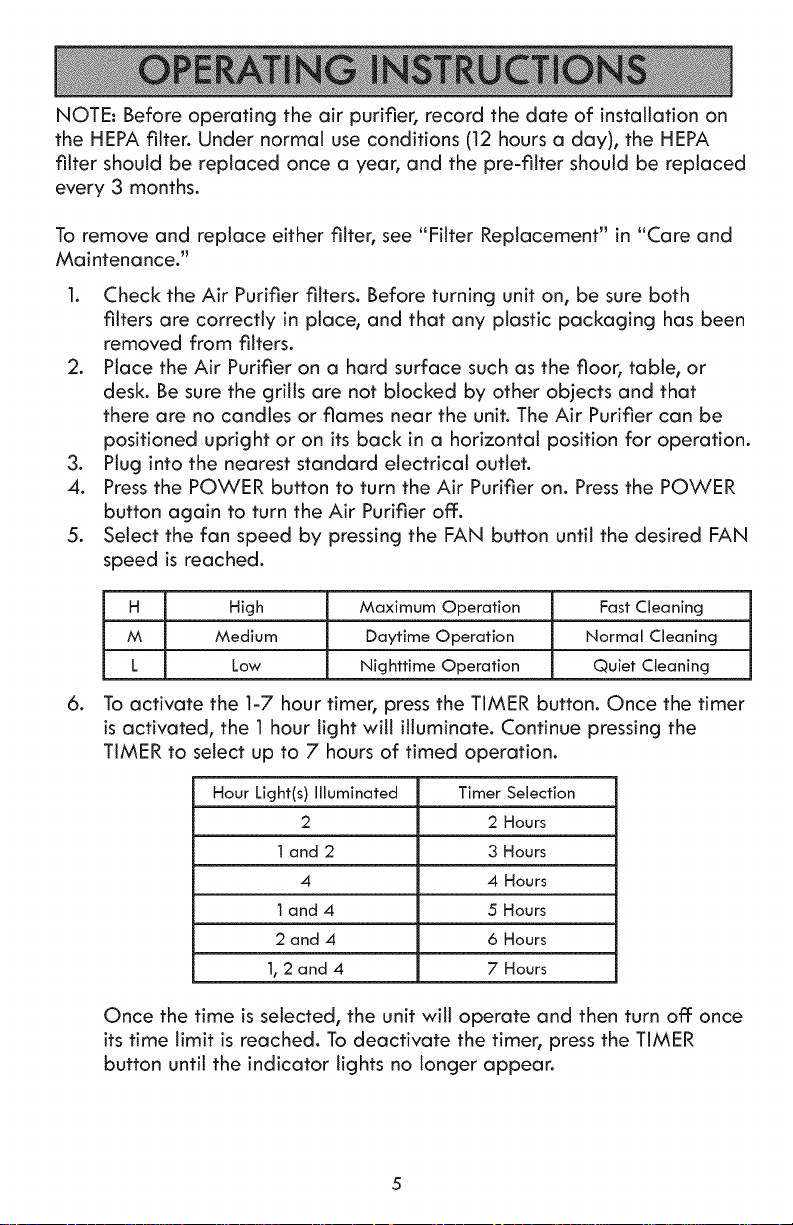
NOTE: Before operating the air purifier, record the date of installation on
the HEPA filter. Under normal use conditions (12 hours a day), the HEPA
filter should be replaced once a year, and the pre-filter should be replaced
every 3 months.
To remove and replace either filter, see "Filter Replacement" in "Care and
Maintenance."
1. Check the Air Purifier filters. Before turning unit on, be sure both
filters are correctly in place, and that any plastic packaging has been
removed from filters.
2. Place the Air Purifier on a hard surface such as the floor, table, or
desk. Be sure the grills are not blocked by other objects and that
there are no candies or flames near the unit. The Air Purifier can be
positioned upright or on its back in a horizontal position for operation.
3. Plug into the nearest standard electrical outlet.
4. Pressthe POWER button to turn the Air Purifier on. Pressthe POWER
button again to turn the Air Purifier off.
5. Select the fan speed by pressing the FAN button until the desired FAN
speed is reached.
H High Maximum Operation Fast Cleaning
M Medium Daytime Operation Normal Cleaning
L Low Nighttime Operation Quiet Cleaning
.
To activate the 1-7 hour timer, press the TIMER button. Once the timer
is activated, the 1 hour light will illuminate. Continue pressing the
TIMER to select up to 7 hours of timed operation.
Hour Light(s) Illuminated Timer Selection
2 2 Hours
1 and 2 3 Hours
4 4 Hours
1 and 4 5 Hours
2 and 4 6 Hours
1, 2 and 4 7 Hours
Once the time is selected, the unit will operate and then turn off once
its time limit is reached. To deactivate the timer, press the TIMER
button until the indicator lights no longer appear.
5
Page 6

7. Use the FILTER button to reset the HEPA or Pre-Filter Change Indicators.
Each Indicator will illuminate when each of the filters may need to be
replaced. To reset, press and hold the FILTERbutton until the Change
Indicator Light no longer appears. If both Lights are on at the same
time, and only one of the filters is changed, pressing the FILTER button
will turn off and reset both Indicator Lights.
NOTE: When both Indicators illuminate, replace the HEPA Filter and
Pre-Filter at the same time.
8. Choose to activate or deactivate the Ionizer. The Ionizer provides
additional air freshness through the release of negative ions. To
activate, press the ION button. To deactivate, press the ION button
again and the light no longer appears.
FILTERREPLACEMENT
WARNING: To avoid serious injury
from electrical shock_ ALWAYS turn the
Air Purifier OFF and unplug BEFORE
performing filter replacement procedure.
NOTE: The Change Filter Indicator
Lights will illuminate when it is time to
replace the HEPA or Pre-Filtero Under
conditions of normal use (12 hours a
day), this will occur approximately
every 3 months for the Pre-Fitter and
once a year for the HEPA filter. The
filters may need to be changed more
often with continuous operation or use
in smoky or dusty environments. See
Filter Replacement Table.
.
Turn the Air Purifier OFF and
unplug from outlet.
2.
Place the unit on its back on a
hard fiat surface with the front
cover facing up. To remove the
front cover, insert fingers of each
hand into the intake grill openings
on each side of cover and gently
putt cover up towards you.
Exhaust _- ....................--_--:_
Grill / _ _, \
Fa n
Housing
Chamber
HEPA
Filter
Locking
Tabs
Front
Cover
'i
f
6
Page 7

3. Remove all plastic packaging from new filters. Remove filters
indicated for replacement.
4. With a dry soft cloth, wipe visible dust from exposed fan housing
chamber.
5. Install a new HEPA filter with its Pre-Fitter Locking Tabs facing up as
shown.
6. Install a new Pre-Fitter by securing it onto the Pre-Filter Locking Tabs.
NOTE: Do not try to wash and reuse either a HEPA or Pre-Filter.
Z To reinstall front cover, insert tabs on bottom into slots at base of
unit. Rotate front cover up and gently press top corners down until
cover snaps securely in place.
CLEANING
_WARNING: Toavoid serious injury from electrical shock°ALWAYS turn the
Air Purifier OFF and unplug BEFOREcleaning.
1.
Turn the Air Purifier OFF and unplug from power outlet.
2.
Clean exterior surfaces with a damp soft cloth only. DO NOT pour
or splash water on the unit. Do not use any abrasive-type cleaner on
it. Wipe all surfaces free from dust and grime, especially the grill
intake and exhaust openings. Remove front cover to improve access
to cleaning intake openings. See front cover removal instructions in
FILTER REPLACEMENT section.
.
Once all surfaces are completely dry, plug unit back into power
outlet for operation.
STORAG E
If you store your Air Purifier for more than 30 days, you should:
1. Remove both the HEPA filter and the pre-filter from the unit.
2. Discard the pre-fitter.
3. Wrap the HEPA filter in an air-tight plastic bag or plastic wrap.
Be sure that the filter is totally sealed to protect it from its storage
environment.
4. DO NOT put the plastic-wrapped HEPA filter back into the Air
Purifier; remove plastic wrap completely before re-installing.
To set up the Air Purifier after storage:
5. Unwrap the HEPA filter completely.
6. Install a new pre-fitter.
Z Install filter assembly in the Air Purifier. See "Filter Replacement _
section for proper installation.
I
7
Page 8

FILTER REPLACEMENT
Kenmore Air Purifier
Model Number
437.83394410
437.83395410
437.83396410
Filter Description Filter _tem Number
Carbon Pre-Filter, 2 Pack
HEPA Filter, Single Pack
Carbon Pre-Filter, 2 Pack
HEPA Filter, Single Pack
Carbon Pre-Filter, 2 Pack
HEPA Filter, Single Pack
032-83153
032-83187
032-83156
032-83190
032-83157
032-83195
Length 12.12 in (30.8 cm) 17 in (43.2 cm) 22 in (55.9 cm)
Width Z4 in (18.8 cm) Z6 in (19.5 cm) 9.4 in (24.1 cm)
Height 14.4 in (36.6 cm) 15.9 in (40.5 cm) 18.5 in (4Z2 cm)
Weight 8.16 [b (3.7 kg) 11.0 [b (5.0 kg) 1ZO [b (Z7 kg)
Input Voltage 120 volts AC, 60 Hz
Problem
Unit does not
operate
Decreased airflow
Excessive noise
Unit still does not •
operate properly •
Solution
• Check if the unit is properly plugged in, and the outlet
is energized.
• Make sure the unit is turned ON.
• Make sure the front cover is securely fastened.
• Make sure the unit has all filters properly installed.
• Make sure that nothing is blocking the air flow through
the Intake or Exhaust grill openings.
• Check condition of the filters and replace if necessary.
• Check filters and remove any plastic wrapping or
packaging.
Check condition of the filters and replace if necessary.
e
Check filters and remove any plastic wrapping or
packaging.
Check all points above.
Contact customer service. See the front page of the
manual for contact information.
8
Page 9

Antes de usar su nuevo Purificador de Aire ................................................................................ 9
Instrucciones Importantes de Seguridad ............................................................................. 9 - ]0
Partes y Caracter[sticas .................................................................................................................. 11
Instrucciones de Funcionamiento ................................................................................................. 12
Cuidado y Mantenimiento .................................................................................................... 13 - 15
Especiflcaciones T_cnicas ............................................................................................................. 15
Soluci6n de Problemas .................................................................................................................. 15
Garant[a ................................................................................................................... Contraportada
Por favor lea este manual. Lo ayudar6 a operar su nuevo Purificador de Aire t<enmore
en la forma m6s segura y eficiente.reference.
Conserve este manual y su factura de venta (recibo) en un lugar seguro para futuras
consultas.
Lea todas las instrucciones en este manual antes de usar su Purificador de Aire. Este
producto est6 destinado 6nicamente para uso residencial en espacios interiores y no
para uso industrial u otros usos comerciales. Use Onicamente con cables el6ctricos que
se encuentran en buenas condiciones de funcionamiento y que cumplen con los c6digos
y ordenanzas vigentes. Si desea formular preguntas respecto a su cableado, consulte a
un electricista calificado.
Mientras use su Purificador de Aire, usted debe seguir las INSTRUCCIONES
IMPORTANTES DE SEGURIDAD indicadas a continuaci6n. Hemos utilizado la palabra
_"ADVERTENCIA" como parte de estas instrucciones, para indicar el nivel de riesgo:
_*_ ADVERTENCIA: Indica un riesgo que si no es evitado puede ocasionar lesiones o la
muerte.
INSTRUCCIONES IMPORTANTES
Cuando use electrodom6sticos_ para reducir el riesgo de incendio_ descargas el6ctricas y
lesiones a personas_ siempre debe seguir precauciones b6sicas_ que incluyen las siguientes:
1. Lea todas las instrucciones antes de usar este Purificador de Aire.
2. Use este Purificador de Aire Onicamente en la forma descrita en este manual.
Cualquier otro uso no recomendado por el fabricante puede causar descargas
el@ctricas_ incendio o lesionar personas.
3. No opere el Purificador de Aire con un cable de alimentaci6n da_ado o luego de
que el Purificador de Aire ha funcionado defectuosamente o se ha ca[do de alguna
manera.
4. Este electrodom6stico no est6 destinado para ser usado por personas (incluyendo
ni_os) con capacidades fisicas_ sensoriales o mentales reducidas_ o que les falta
experiencia y conocimiento salvo que una persona responsable por su seguridad les
haya proporcionado supervisi6n o instrucciones respecto al uso del electrodom6stico.
5. No coloque al Purificador de Aire sobre una superflcie peque_a_ desnivelada o
irregular que pueda causar que el Purificador de Aire caiga_ se vuelque o sea
derribado.
6. Para que el funcionamiento sea adecuado, el Purificador de Aire debe ser ubicado
sobre una superflcie regular e incombustible.
7. El Purificador de Aire debe estar alejado por Io menos 6" (15_2cm) de fuentes de
calor tal como estufas o calentadores.
8. No apoye, pare o coloque objetos pesados en el Purificador de Aire
9. Siempre desconecte el Purificador de Aire cuando no est6 en uso y antes de realizar
el mantenimiento.
10. No opere el Purificador de Aire si se le ha removido algOn dispositivo de seguridad.
9
Page 10

11. Mantenga el cable de alimentaci6n alejado de superficies calientes.
12. No extienda el cable de alimentaci6n por debajo de alfombras, No cubra el cable
de alimentaci6n con tapetes, camineros o similares. Ubique el cable de alimentaci6n
fuera del 6rea de tr6fico para evitar tropiezos.
13. Evite utilizar cables de extensi6n debido al riesgo de incendios. Si debe utilizarse un
cable de extensi6n_ el mismo debe ser como mfnimo de 14AWG y calificado no
menos de 1875 watts.
14. No inserte ning0n objeto en el Purificador de Aire ni permita que los mismos ingresen
por ninguna abertura del mismo.Esto puede causar riesgos de descargas el_ctricas
y/o incendio.
15. No bloquee las aberturas de aire ni coloque al Purificador de Aire sobre superficies
suaves tal como camas o sof6s.
16, Do not use the Air Purifier where combustible gases or vapors are present.
17. Este producto est6 destinado 0nicamente para uso residencial en espacios interiores
y no para uso industrial u otros usos comerciales. No Io opere en exteriores. Esta
garanfia no tendr6 validez si el producto se usa alguna vez con otro destino que no
sea dom_stico privado.
18. El Purificador de Aire debe estar conectado a un tomacorriente 120 V_60 Hz
19. El Purificador de Aire tiene un enchufe polarizado (una clavija es m6s ancha que
la otra). Para reducir el riesgo de descargas_ este enchufe est6 hecho para ajustar
en un tomacorriente polarizado 0nicamente de una forma. Si el enchufe no se ajusta
totalmente en el tomacorriente_ gire el enchufe. Si a0n no encaja_ p6ngase en
contacto con personal calificado para que instale el tomacorriente adecuado. NO
intente alterar el enchufe de ninguna manera.
20. Si el ajuste del enchufe y el tomacorriente AC (recept6culo) queda suelto_ puede
causar sobrecalentamiento y la distorsi6n del enchufe. Contacte a un electricista
calificado para sustituir los tomacorrientes fiojos o gastados.
21. Se aconseja el uso de un fusible de retardo o un interruptor autom6tico de retardo.
ADVERTENCIA: PELIGRO DE DESCARGA
Use su Purificador de AJre 0nJcamente en ambJentes secos. Este Purificador de Aire no
est_l destJnado para ser usado en un ba_o_ lavaderos o lugares sJmJlares cerca de lavabos_
lavadoras_ albercas u ofras fuentes de agua. Nunca ubique al Purificador de Abe donde
pueda caerse dentro de una tina u otro recept6culo de agua. No Io utilice en ambientes
h0medos tal como s6tanos inundados.
ADVERTENCIA: PELIGRO DE INCENDIO
Los Purificadores de Aire tienen piezas que producen arcos el_ctricos o chispas adentro. No
los utilice cerca de materiales combustibles o gases infiamables o fuentes de calor. NO LOS
UTILICE en _reas donde se usa o almacena gasolina I pintura o materiales infiamables. Para
evJtar posibles incendios_ no bloquee de ninguna forma las tomas de aJre o escapes. No
inserte nJpermJta que ingresen objetos extra_os en alguna abertura de toma o escape dado
que pueden causar descargas el@ctricas_ incendio o da_ar el ventilador.
ADVERTENCIA: SUPERFICIES CALIENTES
No toque el motor del Purificador de Aire cuando est6 siendo usado. El motor est6 caliente
cuando est6 en uso. No permJta que la pJel descubJerta entre en contacto con las superficies
calientes para evJtar quemaduras.
iCONSERVE ESTAS INSTRUCCIONES!
I0
Page 11

EsimportantequeustedconozcalaspartesycaracteristicasdelPurificadorde
Aireparaasegurarqueei mismo se use de forma adecuada y segura. Repase
estas instrucciones antes de usar su Purificador de Aire.
PURIFICADOR DE AIRE
Panel de Control
Rejitla de expulsi6n
Cubierta frontal_ m
Cable de alimentaci6n
\
PANEL DE CONTROL
P_'e_Fiber @j H_urs Spe_d
_ON
J
I
Ionizador
Rejitla de entrada
_ Cambie prefiltro
Cambie filtro HEPA
l/
/
HEPA @ ® @ @ @ _
P_LT_R TIMER FAN
I I I
2 4 L M
I I I
Restablecer Temporizador Velocidad
ndicador de del ventitador
cambio de
filtro
11
H
@
POWER
J...................J
I
Encendido
Page 12

NOTA: Antes de operar el purificador de aire, registre la fecha de instalaci6n en el
filtro HEPA. Bajo condiciones de uso normal (12 horas por dfa), el filtro HEPA debe
ser sustituido una vez por aBo, el pre-filtro debe ser sustituido cada 3 meses.
Para quitar y sustituir ambos filtros, vea "Sustituci6n de Filtro" en "Cuidado y
Mantenimiento".
1. Revise los filtros del Purificador de Aire. Antes de encender Ja unidad,
asegOrese de que ambos filtros est6n correctamente en su lugar y que se ha
quitado de los filtros todo embalaje de pl6stico.
2. Coloque el Purificador de Aire sobre una superficie dura tal como el suelo o
una mesa. AsegOrese que las rejillas no est6n bloqueadas por otros objetos
y que no haya velas o llamas cerca de la unidad. El Purificador de Aire
puede ser operado en posici6n vertical o sobre su parte posterior en posici6n
horizontal.
3. EnchOfelo en el tomacorriente el6ctrico est6ndar m6s cercano.
4. Presione el bot6n de ENCENDIDO (POWER) para encender el Purificador de
Aire. Presione el bot6n de ENCENDIDO (POWER) una vez m6s para apagar el
Purificador de Aire.
5. Seleccione la velocidad del ventilador presionando el bot6n de VENTILADOR
(FAN) hasta que se Ilegue a la velocidad de VENTILADOR deseada.
H Alia Funcionamiento M_ximo Limpieza R_pida
M Media Funcionamiento Diurno Limpieza Normal
L Baja Funcionamiento Nocturno Limpieza Normal
6.
Para acfivar el temporizador de 1-7 horas, presione el bot6n TIMER
(TEMPORIZADOR). Una vez que el temporizador ha sido activado, se
iluminar6 la luz de 1 hora. ContinOe presionando TIMER para seleccionar hasta
7 horas de funcionamiento programado.
Luces de Horas lluminadas Sele¢¢i6n de Temporizador
2 2 Horas
1y 2 3 Horas
4 4 Horas
1 y 4 5 Horas
2 y 4 6 Horas
1, 2 y 4 7 Horas
Una vez que haya sido seleccionado el tiempo, la unidad funcionar6 y luego
se apagar6 una vez que se alcance el I[mite de tiempo. Para desacfivar el
temporizador, presione el bot6n TIMER hasta que las luces indicadoras ya no
apa rezca n.
12
Page 13

Z Useelbot6ndeFILTER(FILTRO)parareprogramarlosIndicadoresde
CambiodeHEPAo Pre-Filtro.CadaIndicadorse ibminar6 cuando sea
necesario sustituir cada filtro. Para restablecer, presione y mantenga
presionado el bot6n FILTERhasta que la Luz Indicadora de Cambio ya no
aparezca. Si ambas Luces est6n encendidas al mismo tiempo y se cambia
uno solo de los filtros, presione el bot6n FILTER para apagar y restablecer
ambas Luces Indicadoras.
NOTA: Cuando se ibminen ambos Indicadores, sustituya el filtro HEPA y el
Pre-Filtro al mismo tiempo.
8. Elija activar o desactivar el Ionizador. Ei Ionizador hace que el aire se
vuelva m6s fresco a trav6s de la liberaci6n de iones negativos. Para activar,
presione el bot6n ION. Para desactivar, presione el bot6n ION una vez m6s
y la luz ya no aparecer6.
SUSTITUCiON DE FiLTRO
ADVERTENCIA: Para evitar iesiones
_raves de descarcjas eiSctricas,
Reji ade
expulsi6n
_IEMPRE apague el Purificador de Aire
I/' descon6ctelo ANTES de realizar el
_orocedimiento de sustituci6n de fiitro.
NOTA: Las Luces Indicadoras de Cambio
de Fiitro se iiuminar6 cuando sea ei
momento de sustituir ei fiitro HEPA o
Pre-Fiitro. En condiciones normales de
C6mara
de la
caja del
ventilador
uso (12 horas por dia), esto suceder6
aproximadamente cada 3 meses para ei
Pre-Fiitro y una vez ai a_o para ei fiitro
HEPA. Puede suceder que los filtros deban
Filtro
HEPA
ser cambiados con m6s frecuencia debido
ai funcionamiento continuo o uso en
LengOetas
ambientes con humo o polvo. Vea la Tabla de fij ""
de Sustituci6n de Filtros. del Pre-
1. APAGUE el Purificador de Aire y
Filtro
descon_ctelo del tomacorriente.
2. Coloque la unidad sobre la parte
posterior sobre una superficie plana
y dura con la cubierta frontal hacia
arriba. Para quitar la cubierta frontal,
inserte los dedos de cada mano
dentro de las aberturas de la rejilla de
entrada en los costados de la cubierta
y jale suavemente la cubierta hacia
usted.
Cubierta
frontal
1 s
1 i
J
i
13
', f
J
. ........ J
Page 14

3. Quite todo el embalaje pl_stico de los filtros nuevos. Quite los filtros que
se indica requieren sustituci6n.
4. Con un paso suave y seco, limpie el polvo visible de la c6mara de la caja
del venfilador expuesta.
5. Instale un nuevo filtro HEPA con sus leng0etas de fijaci6n del Pre-Filtro
hacia arriba como se muestra.
6. Instale un nuevo Pre-Filtro asegur6ndolo sobre las Leng0etas de Fijaci6n del
Pre-Filtro.
NOTA: No intente lavar ni volver a usar ni el Filtro HEPA ni el Pre-Filtro.
Z Para reinstalar la cubierta frontal, inserte las lengiJetas en la parte de abajo
dentro de las ranuras en la base de la unidad. Rote la cubierta frontal
hacia arriba y presione suavemente las esquinas superiores hasta que la
cubierta encaja a presi6n de forma segura en su lugar.
LIMPIEZA
I_, ADVERTENClA.. Para evitar lesiones graves de descargas el6ctricas, SIEMPRE
lapague el Purificador de Aire y descon6ctelo ANTES de IJmpiar. j
1. APAGUE el Purificador de Aire y descon6ctelo del tomacorriente.
2. Limpie las superficies exteriores Onicamente con un pa_o suave hOmedo. NO
vierta ni salpique agua sobre la unidad. No use ningOn tipo de limpiador
abrasivo sobre la misma. Quite todo el polvo y suciedad de todas las
superficies, en especial la rejilla de entrada y las aberturas de escape.
Quite la cubierta frontal para mejorar el acceso alas aberturas de entrada
para su limpieza. Vea las instrucciones para quitar la cubierta frontal en la
secci6n SUSTITUCION DE FILTRO.
3. Una vez que todas las superficies est6n completamente secas, vuelva a
enchufar la unidad en el tomacorriente para funcionamiento.
ALMACENAMIENTO
Si usted va a guardar su Purificador de Aire durante m6s de 30 dfas, usted
debe:
1. Retirar el filtro HEPA y el pre-filtro de la unidad.
2. Desechar el pre-filtro.
3. Envolver el filtro HEPA en una bolsa de pl6stico herm6tica o envoltorio
pl6sfico herm6tico. AsegOrese de que el filtro est6 totalmente sellado para
protegerlo de su ambiente de almacenamiento.
4. NO instale de nuevo el filtro HEPA envuelto en pl6stico dentro del
Purificador de Aire; quite totalmente el envoltorio pl6stico antes de volver a
instalarlo.
Para volver a instalar el Filtro de Aire despu6s de haber estado guardado:
5. Desenvuelva el filtro HEPA completamente.
6. Instale el pre-filtro nuevo.
Z Instale en el ensamblado de filtro en el limpiador de aire. Vea la secci6n de
"Susfituci6n de Filtro" para la instalaci6n adecuada.
i
14
Page 15

SUSTITUCION DE FILTRO
Purificador de Aire N0mero de Artfculo del
Kenmore NOmero de Descripci6n del Fittro
Modelo
Pre-filtro de carbono, Paquete de 2
43Z83394410
Fittro HEPA, Paquete de una unidad
Pre-filtro de carbono, Paquete de 2
43Z83395410
Fittro HEPA, Paquete de una unidad
Pre-filtro de carbono, Paquete de 2
43Z83396410
Fittro HEPA, Paquete de una unidad
unidades
unidades
unidades
Largo 12.12" (30.8 cm) 17" (43.2 cm) 22" (55.9 cm)
Ancho . 7.4" (18.8 cm) . 7.6" (19.5 cm) _ 9.4" (24.1 cm)
Aitura 14.4" (36.6 cm) 15.9" (40.5 cm) 18.5" (47.2 cm)
Peso 8.16 Ib (3.7 kg) 11.0 Ib (5.0 kg) 17.0 Ib (7.7 kg)
Voltaje de
Entrada
120 volts AC, 60 Hz
Fittro
032-83153
032-83187
032-83156
032-83190
032-83157
032-83195
Probtema
La unidad no
funciona
Flujo de aire
reducido
Ruido excesivo
La unidad sigue
sin funcionar
correctamente
Soluci6n
Revise si la unidad est6 enchufada correctamente y si hay energia en
el tomacorriente.
o
AsegOrese de que ]a unidad est6 ENCENDJDA.
o
AsecjOrese de que ]a cubierta frontal est6 ajustada de forma secjura.
o
AsegOrese de que todos los filtros de la unidad est6n instalados
correcta mente.
* Aseg0rese de que nada est6 bloqueando el flujo de aire a trav6s de
las aberturas de rejilla de entrada o escape.
* Revise el estado de los filtros y sustitOyalos si es necesario.
* Revise los fiJtros y quite cuaiquier envoitorio o empaque pi6stico.
Revise el estado de los fiitros y sustitOyalos si es necesario.
Revise los fiJtros y quite cuaiquier envoitorio o empaque pi6stico.
Reviste todos los puntos anteriores.
P6ngase en contacto con el servicio de atenci6n al ciiente. Vea Ja
tapa del manual para la informaci6n de contacto.
15
Page 16

KENMORELIMITEDWARRANTY
FOR ONE YEAR from the date of sale, this appliance is warranted against defects in
material or workmanship when it is installed operated and maintained according to all
supplied instructions.
WITH PROOF OF SALE, return a defective appliance to the retailer from which it was
purchased for free replacement.
This warranty does not cover filters, which are expendable parts that can wear out from
normal use within the warranty period.
This warranty is void if this appliance is ever used for other than private household purposes.
This warranty gives you specific legal rights, and you may also have other rights which vary
from state to state.
Sears Brands Management Corporation, Hoffman Estates, IL 60179
GARANTJA LIMITADA KENMORE
Este electrodomSstico est6 garantizado POR UN A_IO desde la fecha de la venta contra
defectos del material o mano de obra cuando ha sido instalado, operado y mantenido de
acuerdo a todas las instrucciones proporcionadas.
Devuelva el electrodomSstico defectuoso CON EL COMPROBANTE DE COMPRA a la
tienda al por menor donde fue comprado para que sea sustituido sin costo.
Esta garantM no cubre filtros, que son piezas de desgaste que pueden gastarse por el uso
normal dentro del periodo de la garanffa.
Esta garantM no tendr6 validez si el producto se usa alguna vez con otro destino que no sea
domSstico privado.
Esta garantM le otorga a usted derechos especfficos legales y usted tambiSn puede tener
otros derechos que varMn de estado a estado.
Sears Brands Management Corporation, Hoffman Estates, IL 60179
16
 Loading...