

Kenmore 41794252500, 41794152500, 41794092500, 41794052500, 41784252500 Owner’s Manual
...
®
Read all instructions before using this
appliance. This book contains valuable
information about the operation, care and
service of your dryer. Keep it in a safe place
Sears, Roebuck and Co., Hoffman Estates, IL 60179 U.S.A.
wvv_A/.sears.com
%_}];ii
P/N 134464000A (0412)
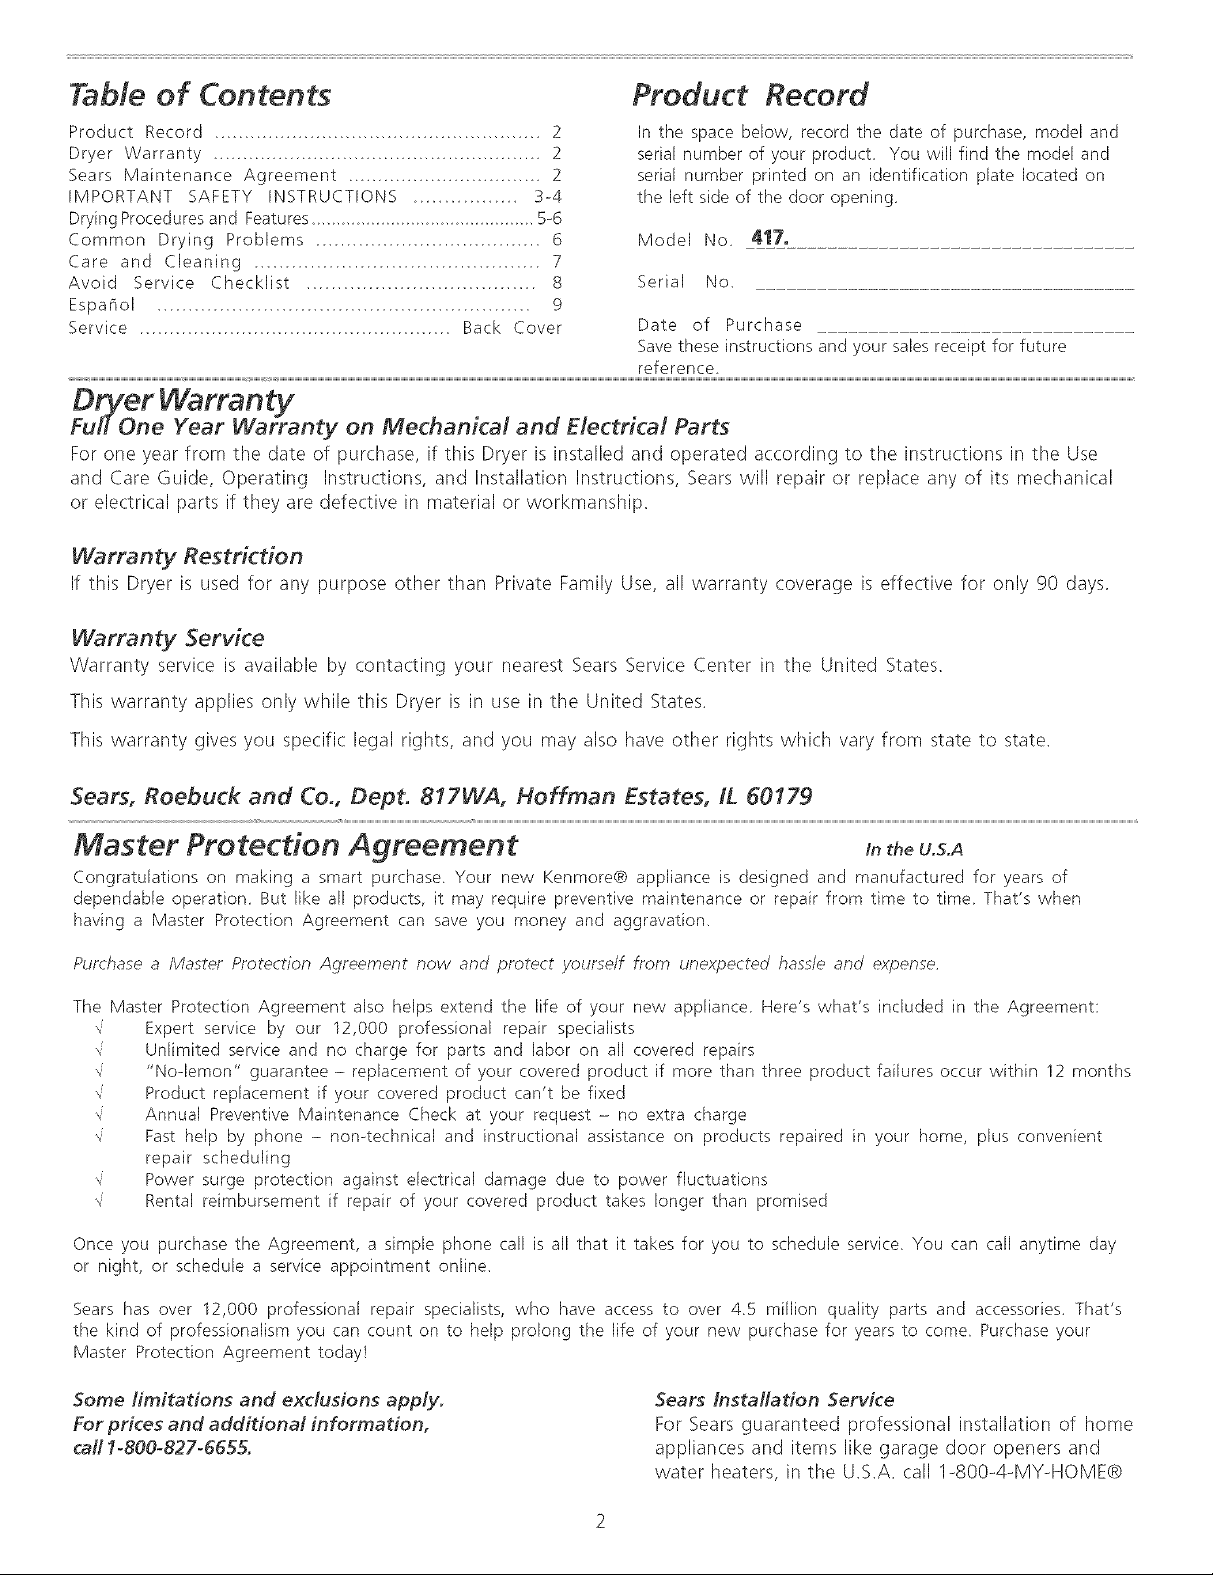
Table of Contents Product Record
Product Record 2
Dryer Warranty 2
Sears Maintenance Agreement 2
IMPORTANT SAFETY INSTRUCTfONS 3-4
Drying Procedures and Features 5-6
Common Drying Problems 6
Care and Cleaning 7
Avoid Service Checklist 8
Espaflo[ .............................. 9
Service Back Cover
Warranty Restriction
If this Dryer is used for any purpose other than Private Family Use, all warranty coverage is effective for only 90 days.
Warranty Service
Warranty service is available by contacting your nearest Sears Service Center in the United States.
In the space below, record the date of purchase, model and
serial number of your product You will find the model and
serial number printed on an identification plate located on
the left side of the door opening
Model No 417.
Serial No,
Date of Purchase
Save these instructions and your sales receipt for future
reference
This warranty applies only while this Dryer is in use in the United States.
This warranty gives you specific legal rights, and you may also have other rights which vary from state to state.
Sears, Roebuck and Co., Dept. 817WA, Hoffman Estates, IL 60179
Master Protection
Congratulations on making a smart purchase Your new Kenmore® appliance is designed and manufactured for years of
dependable operation. But like all products, it may require preventive maintenance or repair from time to time That's when
having a Master Protection Agreement can save you money and aggravation.
Purchase a Master Protection Agreement now and protect yourself from unexpected hassle and expense.
The Master Protection Agreement also helps extend the life of your new appliance Here's what's included in the Agreement:
Expert service by our 12,000 professional repair specialists
Unlimited service and no charge for parts and labor on all covered repairs
"No-lemon" guarantee - replacement of your covered product if more than three aroduct failures occur within 12 months
_' Product replacement if your covered product can't be fixed
Annual Preventive Maintenance Check at your request - no extra charge
Fast help by phone - non4echnica[ and instructional assistance on products repaired in your home, plus convenient
repair scheduling
Power surge protection against electrical damage due to power fluctuations
Rental reimbursement if repair of your covered product takes longer than promised
Once you purchase the Agreement, a simple phone call is all that it takes for you to schedule service, You can call anytime day
or night, or schedule a service appointment online_
Agreement theU.S.A
Sears has over 12,000 professional repair specialists, who have access to over 45 million quality parts and accessories_ That's
the kind of professionalism you can count on to help prolong the life of your new purchase for years to come, Purchase your
Master Protection Agreement today!
Some limitations and exclusions apply.
For prices and additional information,
call 1-800-827-6655.
Sears Installation Service
For Sears guaranteed professional installation of home
appliances and items like garage door openers and
water heaters, in the U.S.A. call 1-800-4-MY-HOME@

Foryoursafety,theinformationinthismanualmustbefollowedtominimizetheriskoffireor
explosionorto preventpropertydamage,personalinjuryorlossoflife.
Donotstoreorusegasolineorotherflammablevaporsandliquidsinthevicinityofthisoranyotherappliance.
WHAT TO DO IF YOU SMELL GAS:
Do not try to light any appliance.
Do not touch any electri(al switch; do not use any phone in your building.
Clear the room, building or area of all occupants.
Immediately call your gas supplier from a neighbor's phone. Follow the gas supplier's instructions.
If you cannot reach your gas supplier, call the fire department.
Installation and service must be performed by a qualified installer, service agency or the gas supplier.
Important Safety Instructions
Your safety and the safety of
others is very important.
We have provided many important
safety messages in the Use and
Care Guide, Operating Instructions,
Installation Instructions and on your
appliance. Always read and obey all
safety messages.
This is tile safety alert symbol.
This symbol alerts you to hazards
that can kill or hurt you or others. All
safety messages will be preceded by
the safety alert symbol and the word
"DANGER" or "WARNING ". These
words mean:
You will be killed or
seriously injured if you don't follow
instructions.
You (:an be killed or
seriously injured if you don't follow
instructions.
All safety messages will identify
the hazard, tellyou how to reduce
the chance of injury, and tell you
what can happen if the
instructions are not followed.
Read all instructions before using this dryer.
To reduce the risk of fire, electrical shock, or injury to persons
when using this dryer, comply with the basic warnings listed below.
Failure to comply with these warnings could result in serious personal
injuries.
Prevent Fire
Do not dry items that have been previously cleaned in soaked
in, or spotted with gasoline, cleaning solvents, kerosene, waxes, etc. Do not
store these items on or near tile dryer. These substances give off vapors that
could ignite or explode.
Do not place items exposed to cooking oils in your dryer. Items
contaminated with cooking oils may contribute to a chemical reaction that could
cause a load to catch fire.
To prevent fire, do not use heat to dry items containing plastic,
foam rubber or similarly textured rubberqike materials, or items containing
feathers or down. Use Air Fluff (No Heat) only.
Clean the lint screen before or after each load. The interior of
the dryer, lint screen housing and exhaust duct should be cleaned
approximately every 18 months by qualified service personnel. An excessive
amount of lint build-up in these areas could result in inefficient drying and
possible fire. SeeCare and Cleaning, page 7.
Do not operate the dryer if the lint screen is blocked, damaged
or missing. Fire hazard, overheating and damage to fabrics can occur. If your
dryer has a drying rack, always replace the lint screen when finished using the
drying rack.
Pedestal
A pedestalaccessory,ModelNo. 46262,
specifically designed for this dryer may
be used to elevate the dryer for easeof
use. Failureto useaccessoriescertified
by the manufacturer could result in
personal injury, property damage or
damage to tile dryer.
Keep area around the exhaust opening and surrounding areas
free from the accumulation of lint, dust and dirt.
Do not obstruct the flow of ventilating air. Do not stack or place
laundry or throw rugs against the front or back of the dryer.
Do not spray any type of aerosol into, on or near dryer at any
time.
Do not use fabric softeners or products to eliminate static
unless recommended by the manufacturer of tile fabric softener or product.
Failureto comply with these warnings could result in fire, explosion, serious
bodily injury and/or damage to the rubber or plastic parts of the dryer.
3 Printed in US.A
ThisUseandCareGuideprovides
generaloperatinginstructionsforyour
dryer.Italsocontainsinformation
aboutfeaturesforseveralother
models.Yourdryermaynothave
everyfeatureincluded.
Usethedryeronlyasinstructedin
thisUse&CareGuideandthe
Operating instructions included with
your dryer.
Protect Children
Do not allow children to play on or in the dryer. Close
supervision of children is necessary when the dryer is used near children. As
children grow, teach them the proper, safe use of all appliances.
Destroy the carton, plastic bag and other packing materials after
the dryer is unpacked. Children might use them for play. Cartons covered with
rugs, bedspreads or plastic sheets can become airtight chambers.
Keep laundry products out of children's reach. To prevent
personal injury, observe all warnings on product labels.
Avoid fire hazard or
electrical shock. Do not use an
adaptor plug or extension cord or
remove grounding prong from
electrical power cord. Failure to
follow this warning can cause
serious injury, fire or death.
ELECTR/C DRYERS:
14-30R
DRYER
FUSED 30 AMP
120/240 V OR
120/208 V
WALL DRYER
RECEPTACLE S E R V C E
CORD
CORRECT
Use this way ONLY
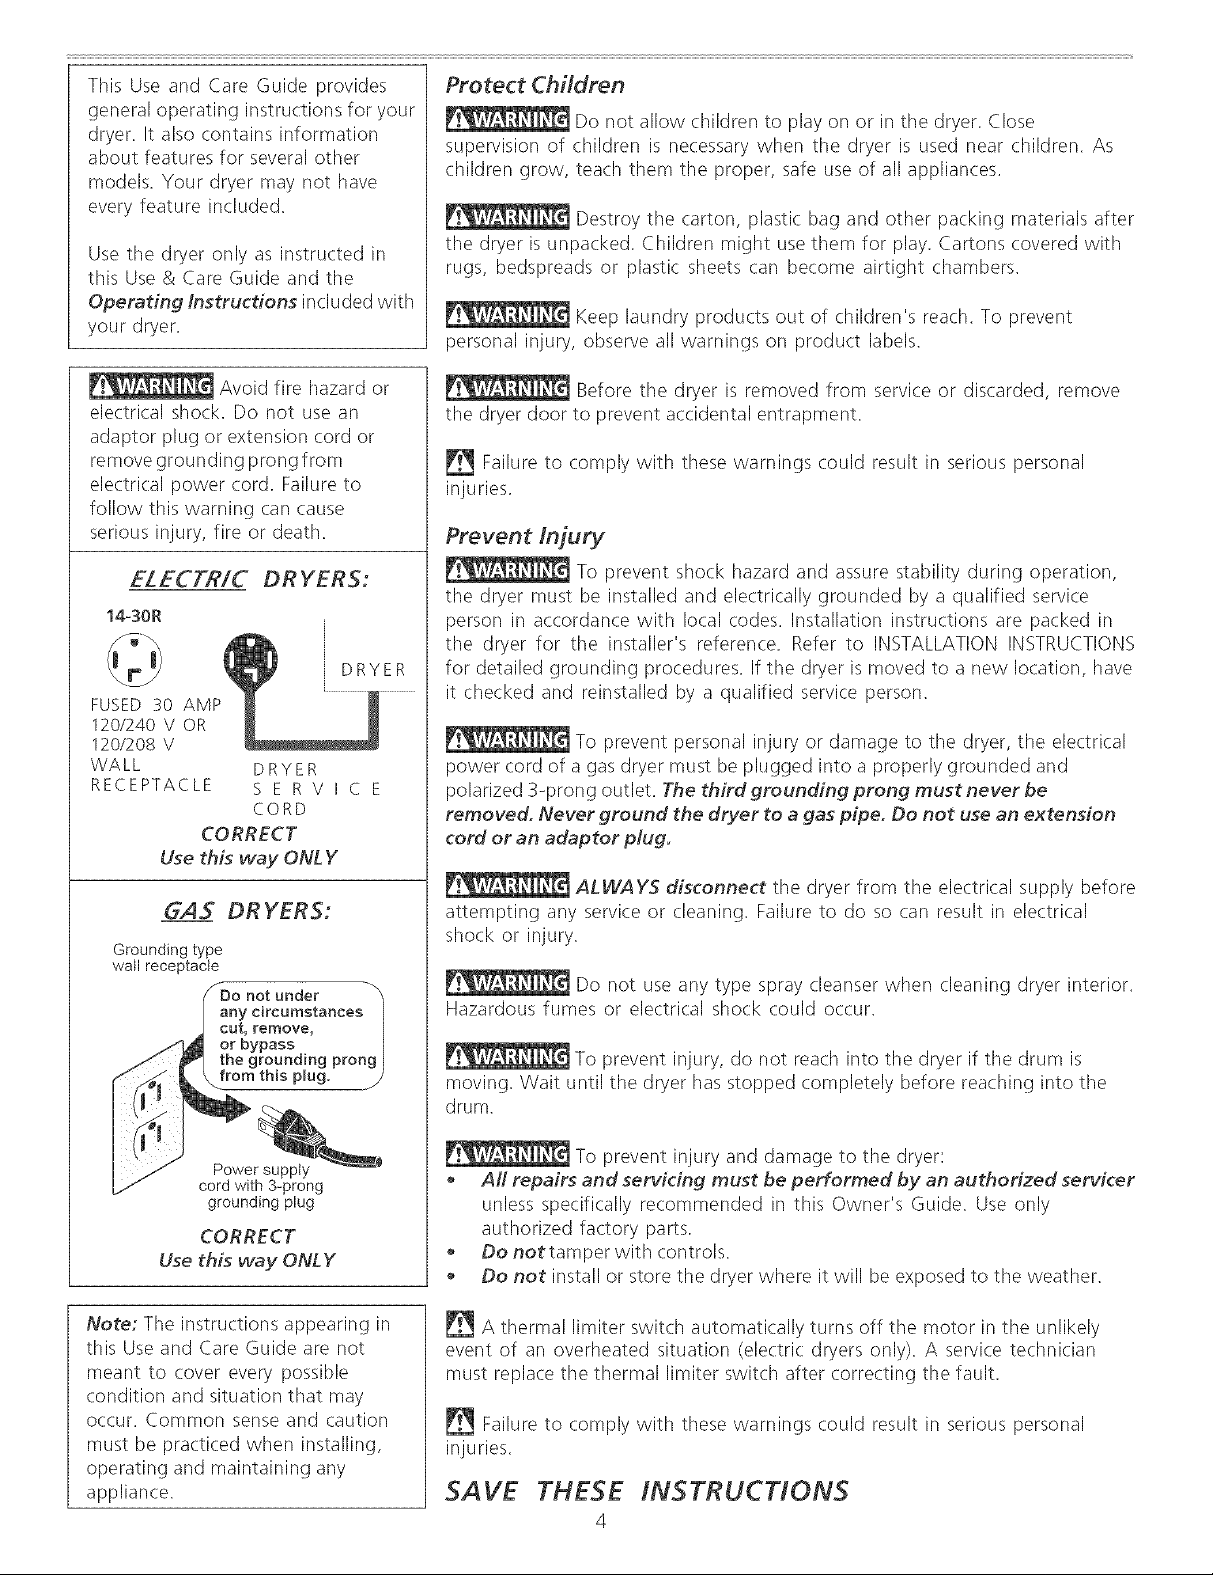
GAS DRYERS:
Grounding type
wall receptacle
not under
any circumstances 1
cut, remove,
or bypass 1
the grounding prong I
,,from this plug. .J
Before the dryer is removed from service or discarded, remove
the dryer door to prevent accidental entrapment.
Failure to comply with these warnings could result in serious personal
injuries.
Prevent Injury
To prevent shock hazard and assure stability during operation,
the dryer must be installed and electrically grounded by a qualified service
person in accordance with local codes. Installation instructions are packed in
the dryer for the installer's reference. Refer to INSTALLATION INSTRUCTIONS
for detailed grounding procedures. If the dryer is moved to a new location, have
it checked and reinstalled by a qualified service person.
To prevent personal injury or damage to the dryer, the electrical
power cord of a gas dryer must be plugged into a properly grounded and
polarized 3-pron g outlet. The third grounding prong must never be
removed. Never ground the dryer to a gas pipe. Do not use an extension
cord or an adaptor plug.
ALWAYS disconnect the dryer from the electrical supply before
attempting any service or cleaning. Failure to do so can result in electrical
shock or injury.
Do not use any type spray cleanser when cleaning dryer interior.
Hazardous fumes or electrical shock could occur.
To prevent injury, do not reach into the dryer if the drum is
moving. Wait until the dryer has stopped completely before reaching into the
drum.
Power supply
cord with 3-prong
grounding plug
CORRECT
Use this way ONLY
Note: Tile instructions appearing in
this Use and Care Guide are not
meant to cover every possible
condition and situation that may
occur. Common sense and caution
must be practiced when installing,
operating and maintaining any
appliance.
To prevent injury and damage to the dryer:
All repairs and servicing must be performed by an authorized servicer
unless specifically recommended in this Owner's Guide. Use only
authorized factory parts.
Do not tamper with controls.
Do not install or store the dryer where it will be exposed to the weather.
A thermal limiter switch automatically turns off the motor in the unlikely
event of an overheated situation (electric dryers only). A service technician
must replace the thermal limiter switch after correcting the fault.
Failure to comply with these warnings could result in serious personal
injuries.
SAVE THESE INSTRUCTIONS
4
Drying Procedures
Follow fabric care label instructions.
• Readthe Operating Instructions for operating your specific model.
• Always read and follow fabric care labels and laundry product labels.
To reduce the risk of fire, electrical shock, or injury to persons,
read Important Safety Instructions, pages 3-4, before operating this dryer.
.
Prepare items for drying.
• Dry items of similar fabric, weight and construction in the same load.
• Separate dark items from light-colored items. Separate items that shed
lint from those that attract lint. If an item sheds lint, turn it inside out.
• Be sure buckles, buttons and trim are heatproof and won't damage the
drum finish. Close zippers, fasten hooks and Velcro@-Iike fasteners.
Tie strings and sashesto prevent snagging and tangling.
• If possible, turn pockets inside out for even drying.
• Check for stains which may not have been removed in washing. Dryer
heat may permanently set some stains. Repeat stain removal process
before drying.
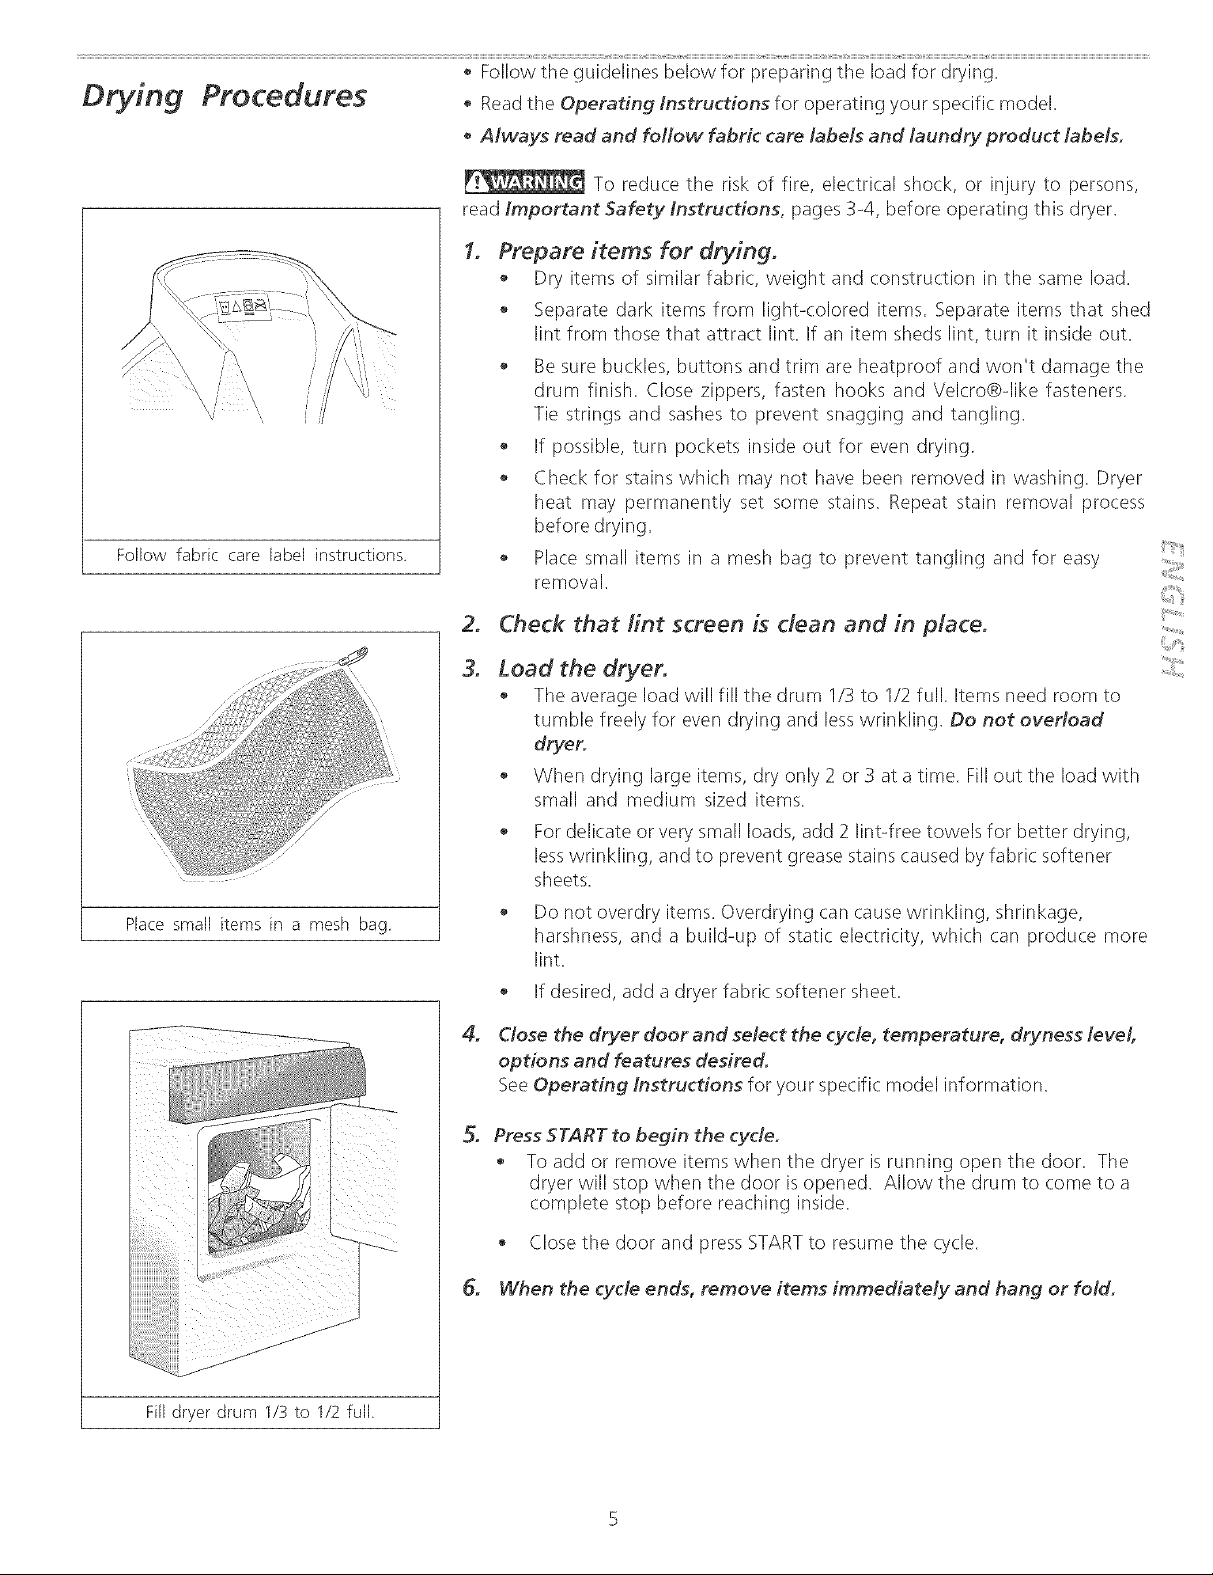
• Place small items in a mesh bag to prevent tangling and for easy
removal.
2. Check that lint screen is clean and in place.
J 3. Load the dryer.
: i.i_' • The average load will fill the drum 1/3 to 1/2 full. Items need room to
:, tumble freely for even drying and lesswrinkling. Do not oveHoad
,J__
When drying large items, dry only 2 or 3 at a time. Fillout tile load with
._:,,_:u,',.,;,_,_,.:_+_"_.........._/ small and medium sized items.
,:_,,,_:_s,u:_v,,,.:,._,_...... • For delicate or very small loads, add 2 lint-free towels for better drying,
lesswrinkling, and to prevent grease stains caused by fabric softener
• Do not overdry items. Overdrying can cause wrinkling, shrinkage,
Placesmall items in a mesh bag. harshness, and a build-up of static electricity, which can produce more
lint.
• If desired, add a dryer fabric softener sheet.
.
Close the dryer door and select the cycle, temperature, dryness level
options and features desired.
SeeOperating Instructions for your specific model infornqation.
5.
Press START to begin the cycle.
• To add or remove items when the dryer isrunning open the door. The
dryer will stop when the door is opened. Allow the drum to come to a
complete stop before reaching inside.
• Close the door and press STARTto resume tile cycle.
6. When the cycle ends, remove items immediately and hang or fold.
Fill dryer drum 1/3 to 1/2 fulk
 Loading...