

Kenmore 415.162090 User Manual
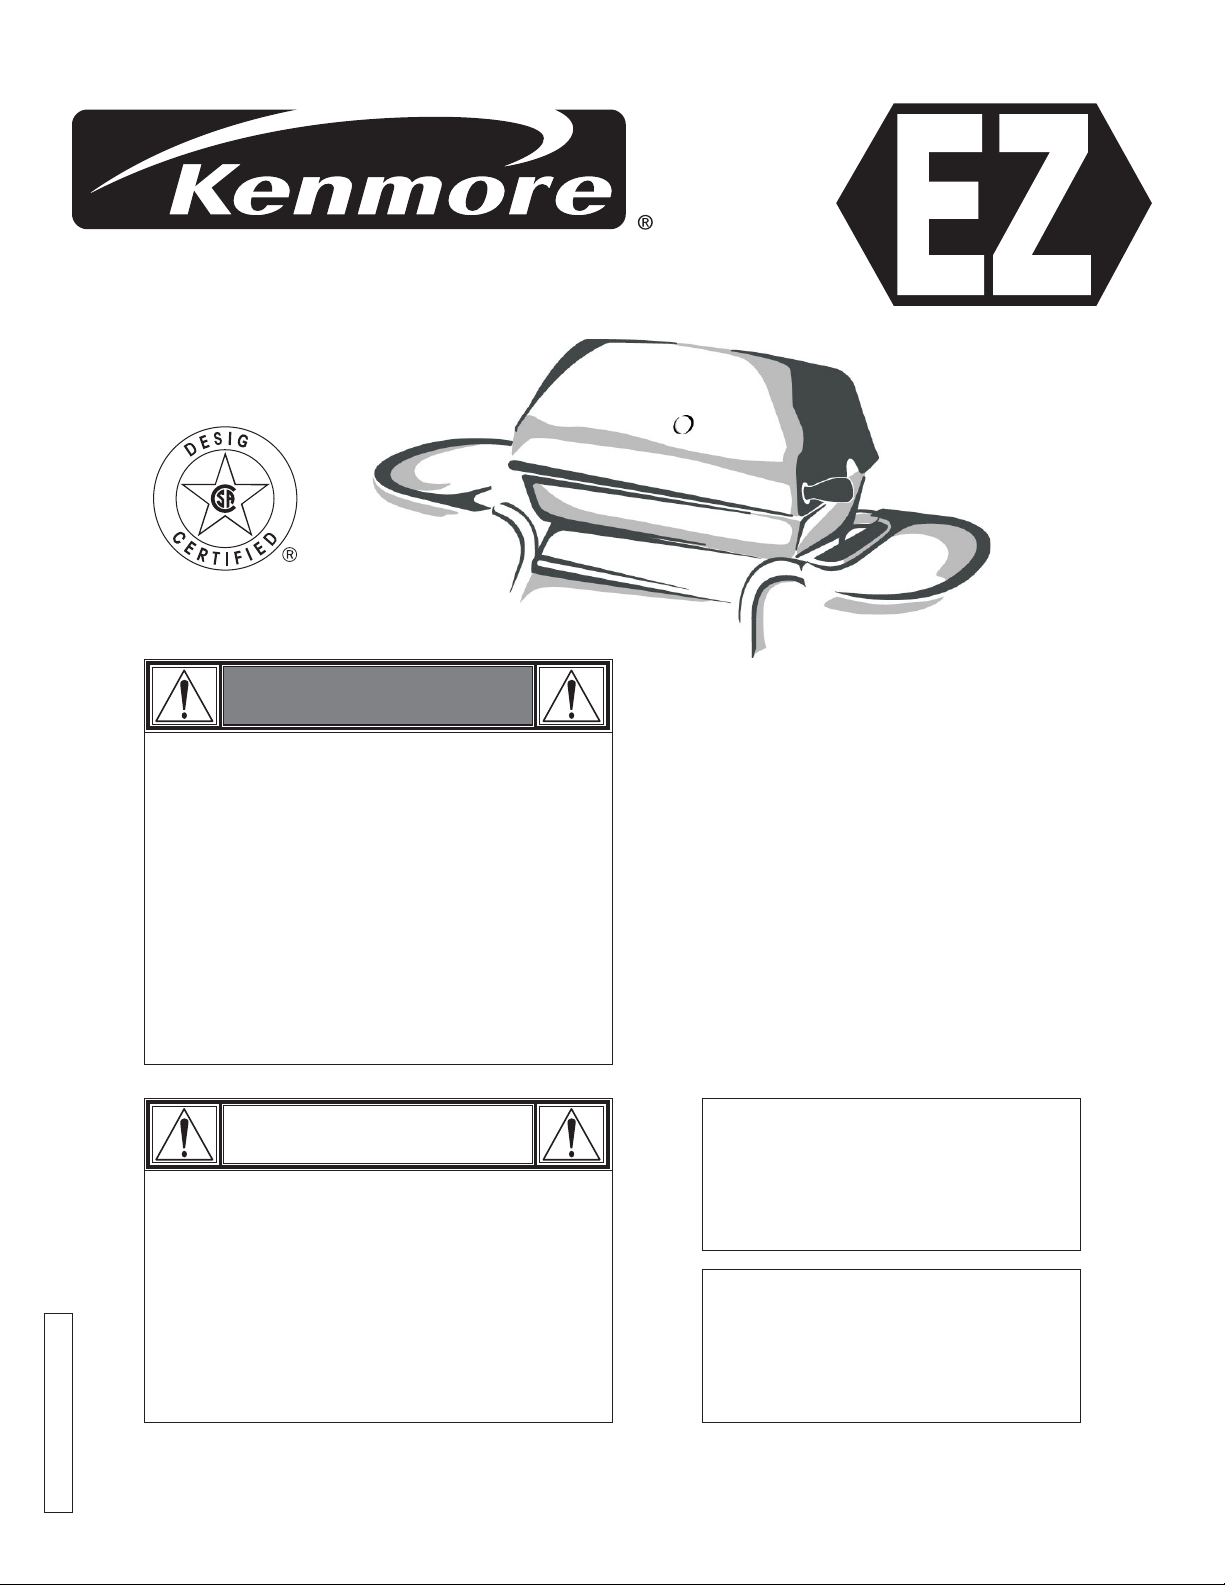
Assembly Instructions/Use and Care Manual
Liquid Propane Gas Grill
Model No. 415.162090
This Grill Is For
Outdoor Use Only
N
NO TOOLS
ASSEMBLY
WARNING
• Read this manual before cooking on
grill. Failure to follow all
manufacturers’ instructions could
result in fire or explosion which could
cause property damage, personal
injury or death.
• Combustion by-products produced
when using this product contain
chemicals known to the State of
California to cause cancer, birth
defects, or other reproductive harm.
CAUTION
• Read and follow all Safety
Statements, Assembly Instructions
and Use & Care Directions before
attempting to assemble and cook.
• Some parts may contain sharp edges,
especially as noted in these
instructions. Wear protective gloves
if necessary.
• Parts
• Assembly
• Safety Rules
Assembly Questions?
Call 1-800-241-7548
Parts Ordering:
Call 1-800-4-MY-HOME
To Installer/Assembler: Leave
these instructions with
consumer.
To Consumer: Keep this
manual for future reference.
• Use and Care
• Troubleshooting
• Español, p. 33
®
463350505 / 0-7000955 (12-13-04)
Sears, Roebuck and Co., Hoffman Estates, IL 60179 U.S.A.
Printed in USA
WARNING
FOR YOUR SAFETY
1. Do not store or use gasoline or other
flammable vapors and liquids in the
vicinity of this or any other appliance.
2. An LP tank not connected for use shall
not be stored in the vicinity of this or any
other appliance.
FOR YOUR SAFETY
If you smell gas:
1. Shut off gas to the appliance.
2. Extinguish any open flame.
3. Open lid.
4. If odor continues, immediately call your
gas supplier or your fire department.
Safety Symbols
The symbols and boxes shown below explain what each heading
means. Read and follow all of the messages found throughout
the manual.
DANGER
DANGER: Indicates an imminently hazardous situation
which, if not avoided, will result in death or serious injury.
WARNING
WARNING: Be alert to the possibility of serious bodily injury
if the instructions are not followed. Be sure to read and
carefully follow all of the messages.
CAUTION
Call Grill Service Center For Help And Parts
If you have questions or need assistance during assembly,
please call . You will be speaking to a
representative of the grill manufacturer and not a Sears
employee. To order new parts call Sears at .
1-800-241-7548
1-800-4-MY-HOME
Product Record
IMPORTANT: Fill out the product record information below.
Model Number
Serial Number
See rating label on grill for serial number.
Date Purchased
CAUTION
CAUTION: Indicates a potentially hazardous situation which,
if not avoided, may result in minor or moderate injury.
®
Installation Safety Precautions
•
Use grill only with LP (propane) gas and the regulator/valve
assembly supplied.
•
Grill installation must conform with local codes, or in their
absence with
Z223.1
LP Gas Code Grill is not for use in or on
recreational vehicles and/or boats.
• All electrical accessories (such as rotisserie) must be
electrically grounded in accordance with local codes, or
National Electrical Code, ANSI / NFPA 70.
electrical cords and/or fuel supply hoses away from any hot
surfaces.
• This grill is safety certified for outdoor use in the United States
only. Do not modify for use in any other location. Modification
will result in a safety hazard.
National Fuel Gas Code, NFPA 54 / ANSI
. Handling and storage of LP cylinders must conform to
NFPA/ANSI 58.
Keep any
For residential use only. Do not use for commercial
cooking.
2 • 463350505

TABLE OF CONTENTS WARRANTY
For Your Safety ......................................2
Grill Service Center...................................2
Product Record Information ............................2
Safety Symbols......................................2
Installation Safety Precautions ..........................2
Kenmore Grill Warranty ...............................3
Parts List...........................................4
Parts Diagram.......................................5
Assembly ........................................6-15
Use and Care ...................................16-25
Cooking Table...............................24
Troubleshooting .............................25
Repair Protection Agreements
Congratulations on making a smart purchase.
Kenmore product is designed and manufactured for years of
®
dependable operation. But like all products, it may require repair
from time to time. That’s when having a Repair Protection
Agreement can save you money and aggravation.
Purchase a Repair Protection Agreement now and protect
yourself from unexpected hassle and expense.
Here’s what’s included in the Agreement:
Expert service
by our 12,000 professional repair specialists
Unlimited service and no charge
covered repairs
Product replacement
Discount of 10%
if your covered product can’t be fixed
from regular price of service and servicerelated parts not covered by the agreement; also, 10% off
regular price of preventive maintenance check
Fast help by phone
– phone support from a Sears
technician on products requiring in-home repair, plus
convenient repair scheduling
Once you purchase the Agreement, a simple phone call is all that
it takes for you to schedule service. You can call anytime day or
night, or schedule a service appointment online.
Sears has over 12,000 professional repair specialists, who have
access to over 4.5 million quality parts and accessories. That’s
the kind of professionalism you can count on to help prolong the
life of your new purchase for years to come. Purchase your
Repair Protection Agreement today!
Some limitations and exclusions apply.
For prices and additional information call 1-800-827-6655.
Your new
for parts and labor on all
KENMORE GRILL WARRANTY
Full 1-Year Warranty on Grill
For one year from the date of purchase Sears will repair or
replace, at our option, any grill part (except for paint finish)
that is defective in material or workmanship.
Limited Warranty on Selected Grill Parts
From one year after the date of purchase for the designated
time periods listed below, Sears will replace the following grill
parts if they are defective in material or workmanship. You
will be charged for labor.
• Lifetime of Grill: Aluminum Top and Bottom Castings
(except for paint finish)
• 2 years: Burner Assembly
WARRANTY SERVICE
Warranty service is available by contacting Sears at
®
1-800-4-MY-HOME
WARRANTY RESTRICTIONS
This warranty is void if grill is used for commercial or rental
purposes.
This warranty applies only when the grill is used in the United
States.
This warranty gives you specific legal rights, and you may
also have other rights which vary from state to state.
Sears, Roebuck and Co., Dept. 817WA,
Hoffman Estates, IL 60179
.
Sears Installation Service
For Sears professional installation
door openers, water heaters, and other major home items, in the
U.S.A. call
1-800-4-MY-HOME
of home appliances, garage
®
463350505 • 3

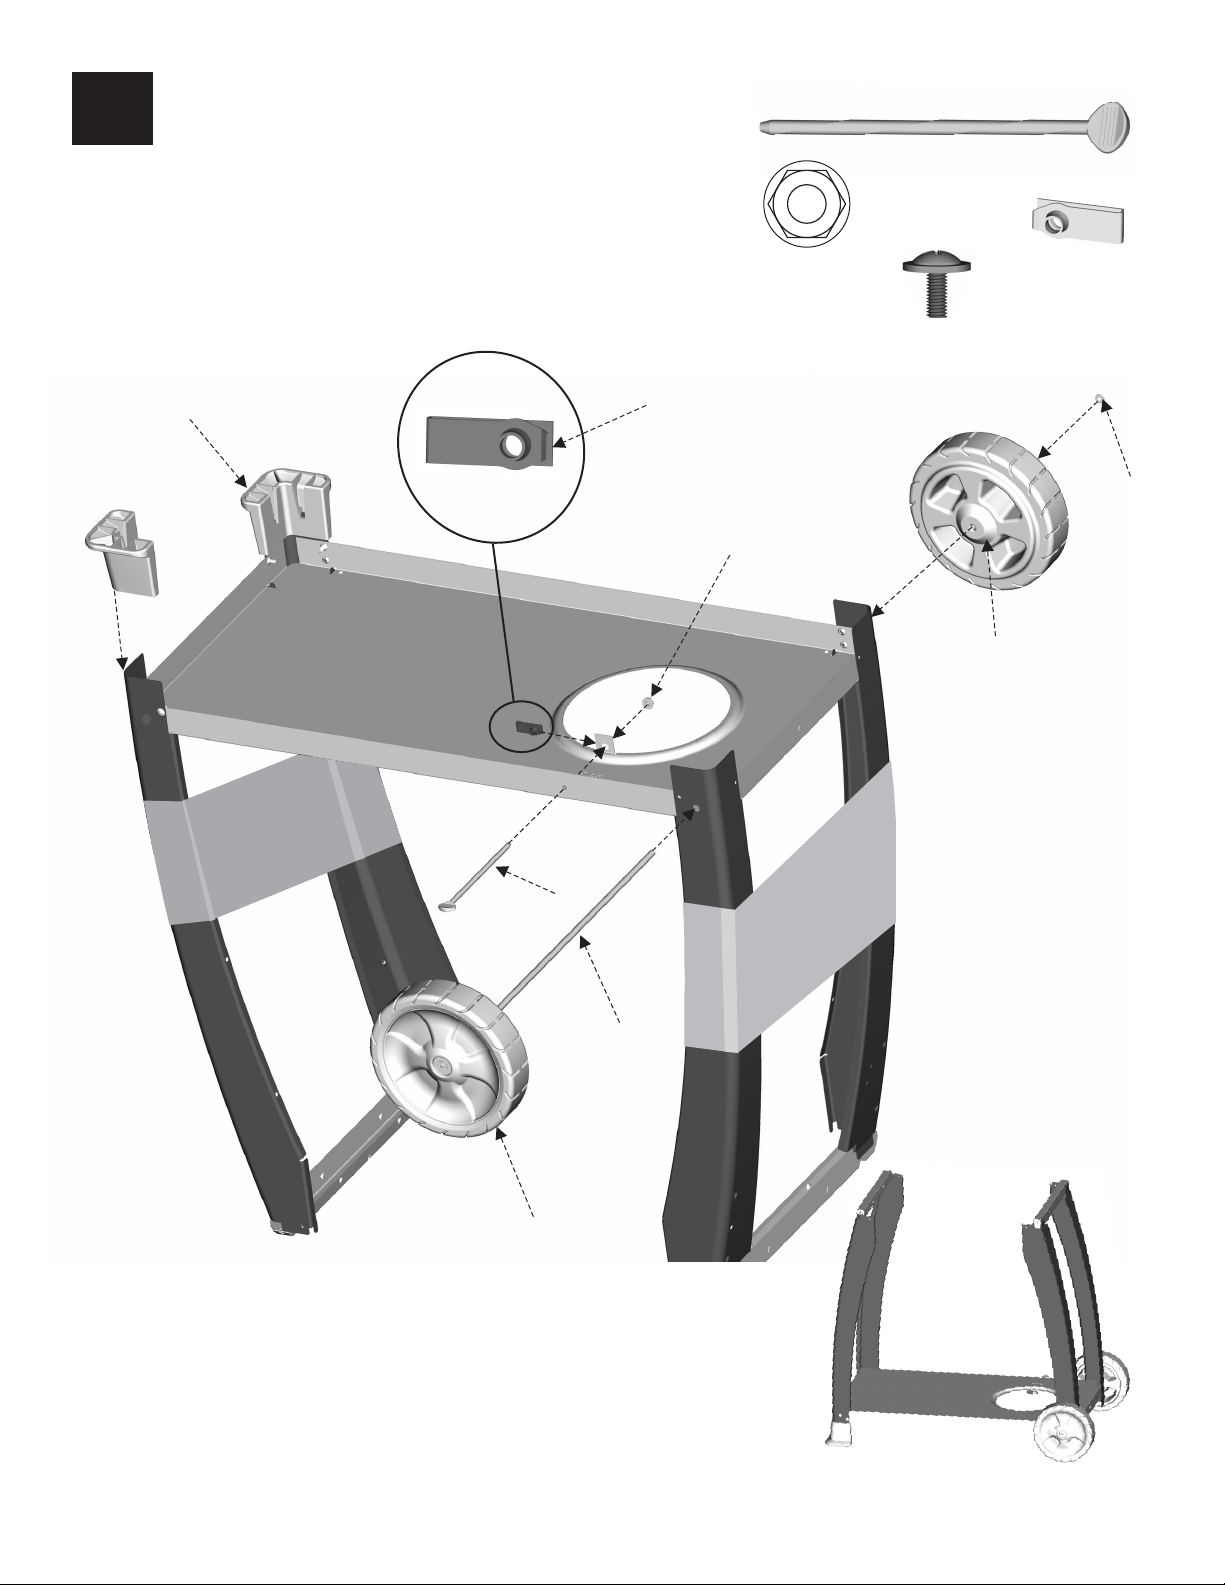
PARTS LIST – Model No. 415.162090
Key Qty Description Part #
1 1 Right Leg Assembly w/ Match Holder. 7000622
2 1 Left Leg Assembly................7000621
3 1 Bottom Shelf ....................7000612
4 23 #10-16x1/2” Self-Tap Screw ........7000737 STD611005
5 1 Match Holder w/Chain.............7000364
6 1 Push Fastener...................4080112
7 2 Leg Extender....................7000320
8 3 “U” Nut 1/4-20 ...................7000185
9 1 1/4-20 x 6” Tank Thumbscrew.......7000355
10 1 1/4-20 Flanged Hex Nut ...........7000394
11 2 #10-24x1/2” Washer Head Screw....7000829
Key Qty Description Part #
21 1 Ignitor .........................4153713
22 1 Ignitor Wire .....................4153196
23 2 Burners ........................7000083
24 1 Control Panel ...................7000619
25 1 Valve/Hose/Regulator Assembly.....7000062
26 2 Shelves ........................7000351
27 1 Top Casting .....................7000615
28 1 Logo Plate Assembly .............4157167
29 1 Bezel Temperature Gauge .........4157169
30 1 Temperature Gauge w/Wing Nut.....4157171
31 2 Shoulder Bolt ...................7000186
12 1 Axle Rod .......................7000265
13 2 Wheel .........................7000262
14 4 Rail ...........................7000480
15 1 Grill Bottom .....................7000842
16 4 #10-1” Self-Tap Screw ............4080716
17 1 Carry-Over Tube.................7000277
18 2 3/16 Pal Nut ....................7000132
19 2 Casting Bumper .................7000184
20 1 Electrode w/Wing Nut .............7000378
32 1 Handle.........................7000199
33 2 #10-24 Wing Nut.................4080063 STD541610
34 2 Control Knob....................7000312
35 2 Vaporizer Tents ..................7000044
36 1 Cooking Grid....................7000023
37 1 Warming Rack ..................7000180
38 1 Grease Tray ....................7000042
39 1 Grease Pan.....................7000046
4 • 463350505
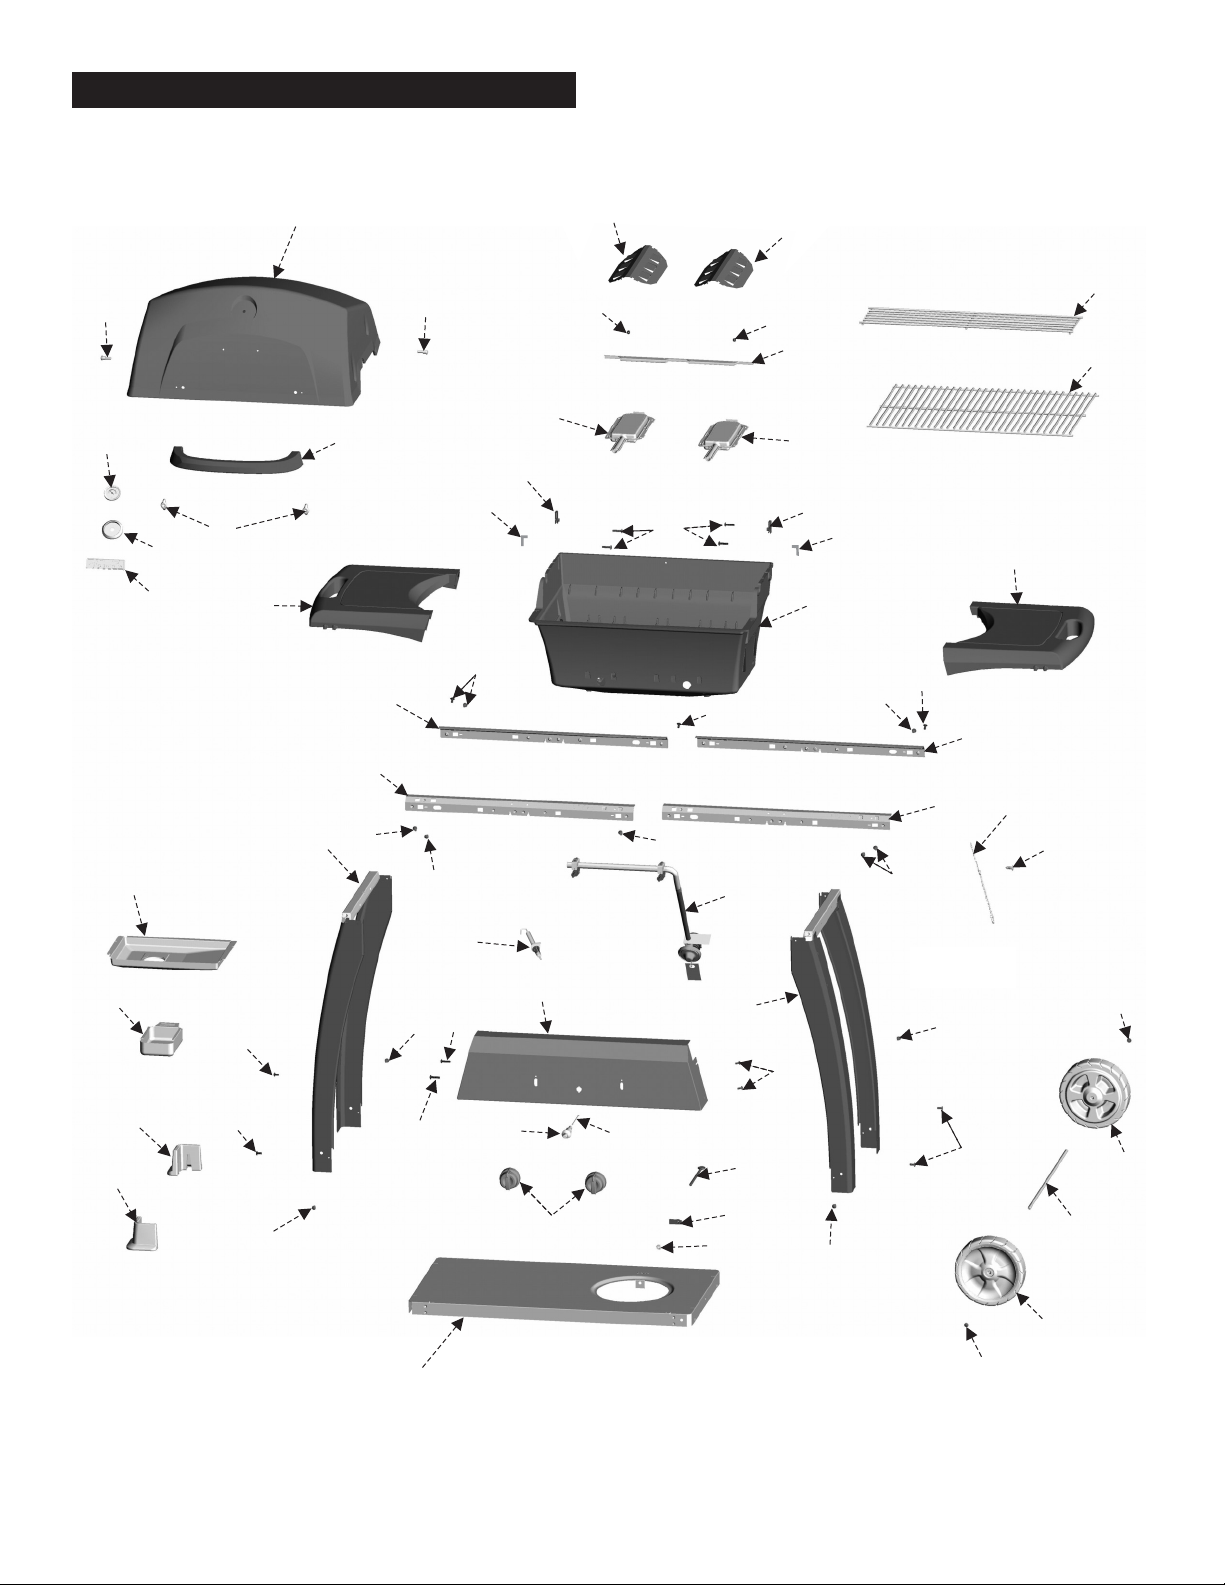
PARTS DIAGRAM – Model No. 415.162090
31
30
28
29
33
26
27
32
14
14
31
19
35
18
23
8
16
4
4
18
35
17
37
36
23
8
19
26
15
4
4
14
39
14
4
2
38
4
7
7
4
4
4
20
24
4
4
4
3
21
34
22
4
4
4
10
25
1
4
9
8
4
5
6
11
4
13
11
13
12
463350505 • 5
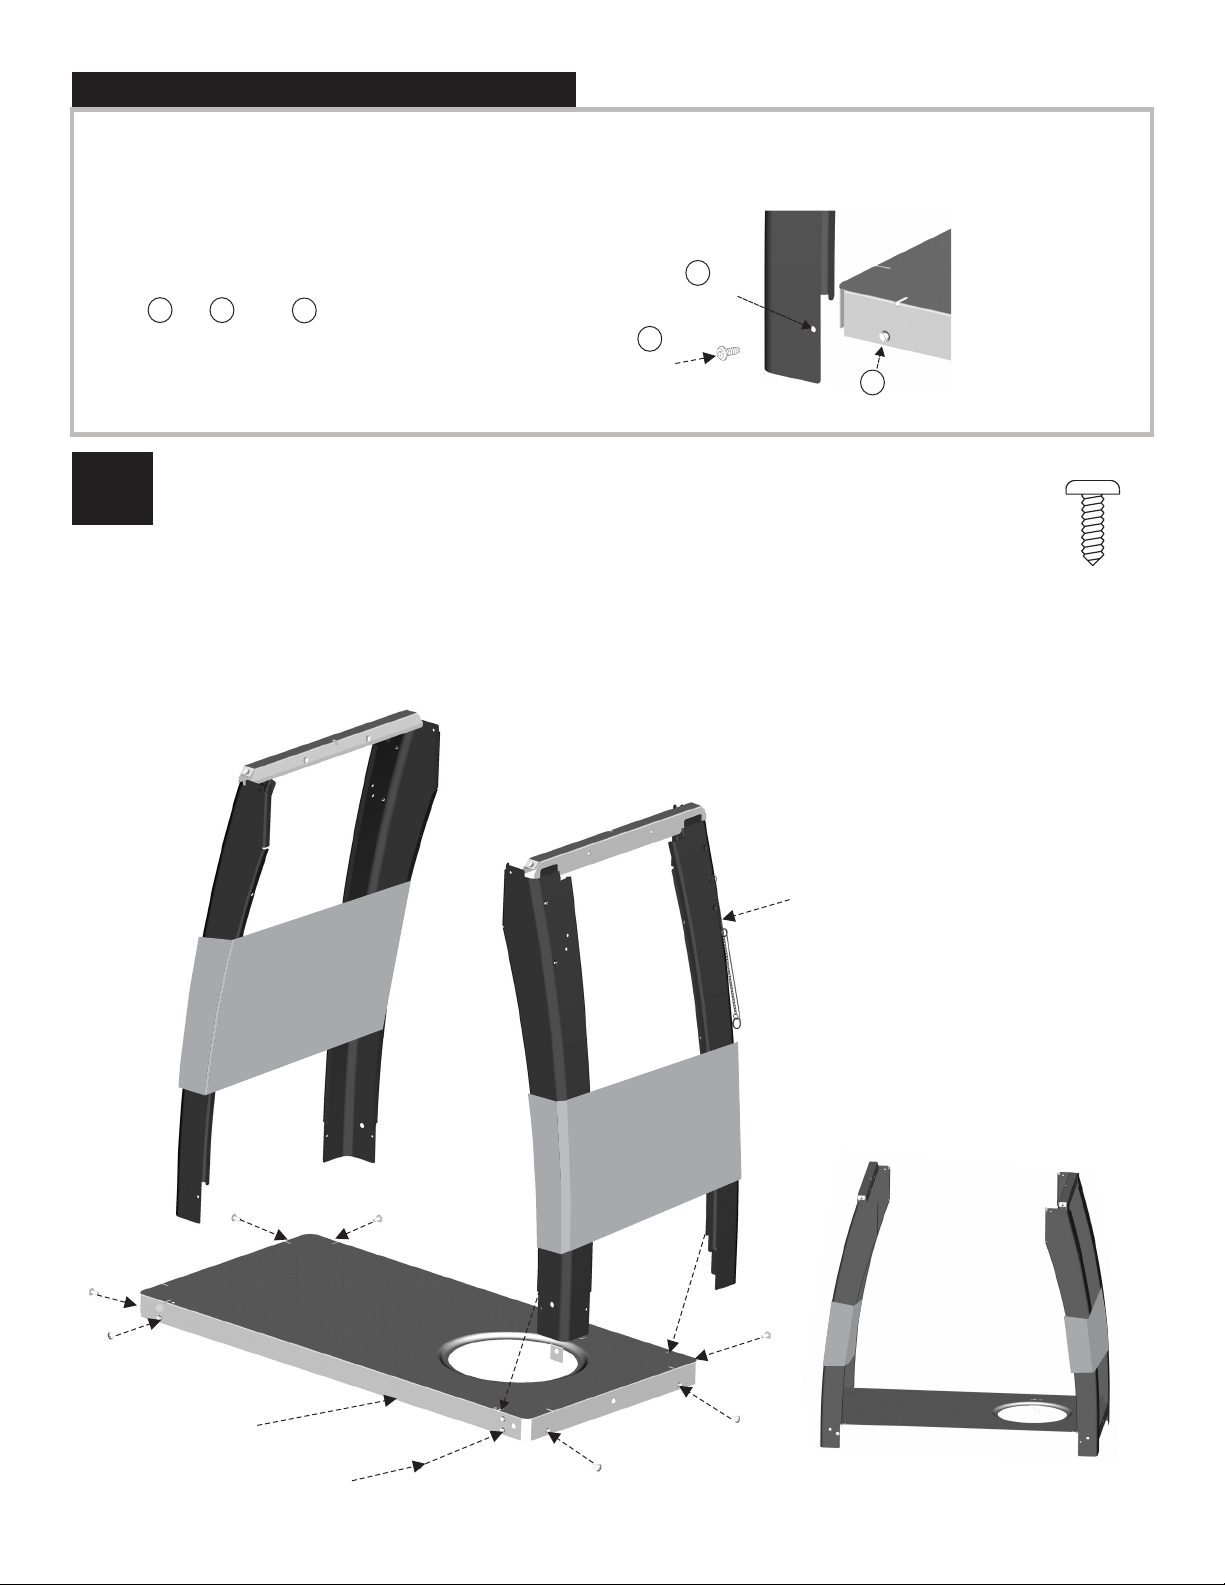
ASSEMBLY – Model No. 415.162090
Use included Phillips head screwdriver to assemble your grill.
Size and type of hardware used in assembly of your grill may vary, but will not affect grill integrity, performance or assembly.
“NEW”
T. L. M. - Torque Locking Method
1
Screw + Thru Part + Formed Lock =
The cart assembly utilizes the new T.L.M. fastening method.
•
No need for the old style “Bolt & Nut” combination
•
1
2
Cart Assembly
Place bottom shelf on table or grill container.
Insert tabs on leg assembly with into right side of bottom shelf.
Attach leg assembly with one screw on each side.
Insert tabs on leg assembly into left side of bottom shelf.
Attach leg assembly with one screw on each side.
3
Solid Lock Cart Structure
Screw
match lighting chain
without match lighting chain
2
Thru Part
1
3
Formed Locking System
4
Qty:8
Bottom Shelf
Right Leg Assembly w/Match Lighting Chain
6 • 463350505
4
Correctly assembled legs
2
Leg Extenders, Axle Rods, Wheels and Tank Thumbscrew
Turn cart upside down.
Insert leg extenders. Check to make sure leg extender is all the way
into the leg.
Attach u-nut to tab. See enlargement of u-nut for correct position.
Thread tank thumbscrew into hole and u-nut. Screw flanged hex
nut onto end of tank thumbscrew.
Attach washer head screw to axle rod. Slide wheel on axle rod.
Insert axle rod/wheel into large hole in bottom shelf. Attach other
wheel and washer head screw.
10
Qty: 1
9
Qty: 1
Not to scale
8
Qty: 1
Not to scale
11
Qty: 2
Leg Extender
Correct position
8
11
10
Hub on wheel faces
into grill bottom
9
Wheel
Axle Rod
Stand cart upright and remove
cardboard sleeves
463350505 • 7
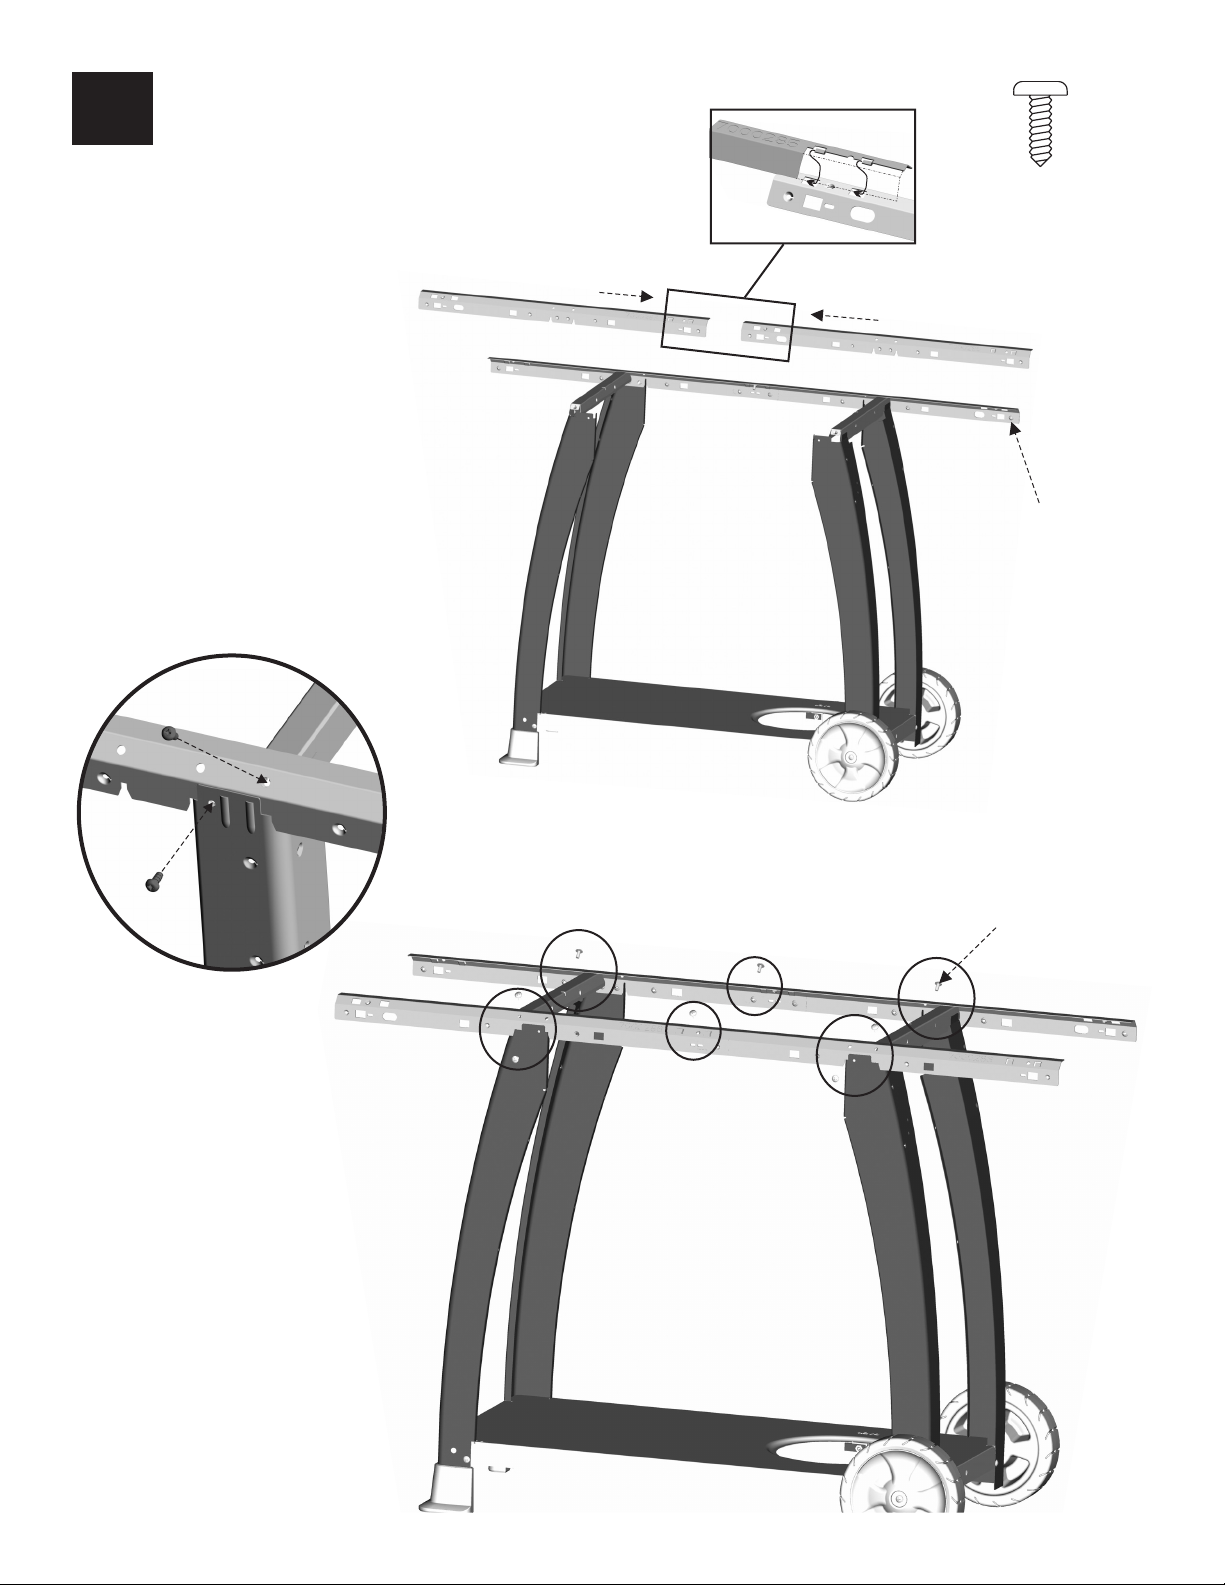
3
Rail Assembly
Overlap rails and hook tabs into slots. Pull rails
to latch.
Attach rail to legs with two screws in each corner.
HINT:
Firmly push rail down into leg notches. Attach lower screw first.
Attach one screw in center of each rail.
(all identical)
4
Qty:10
Rail
4
8 • 463350505
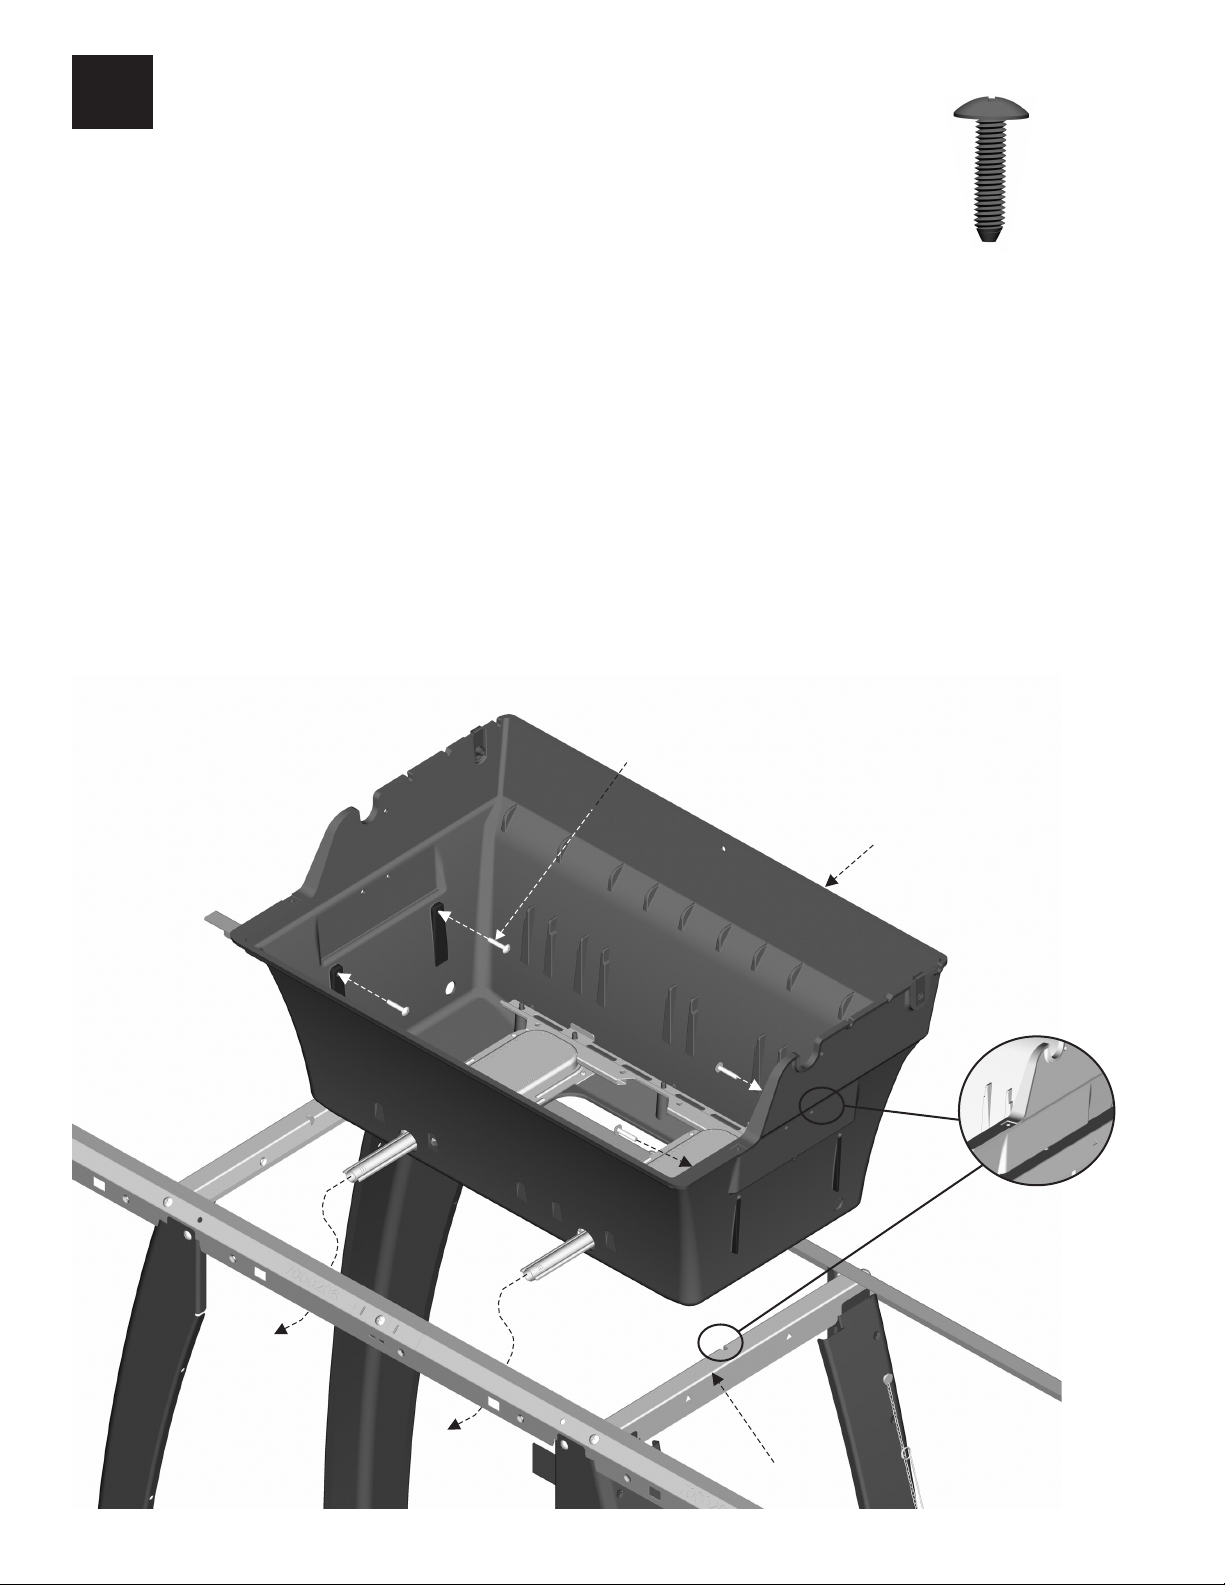
4
Grill Bottom Assembly
Angle grill bottom assembly around and under the rails.
Make sure ribs on each side of bottom casting are nestled
into notches on casting seat.
Attach four screws inside grill bottom and into casting seat.
16
Qty: 4
16
Grill Bottom
Casting Seat
463350505 • 9
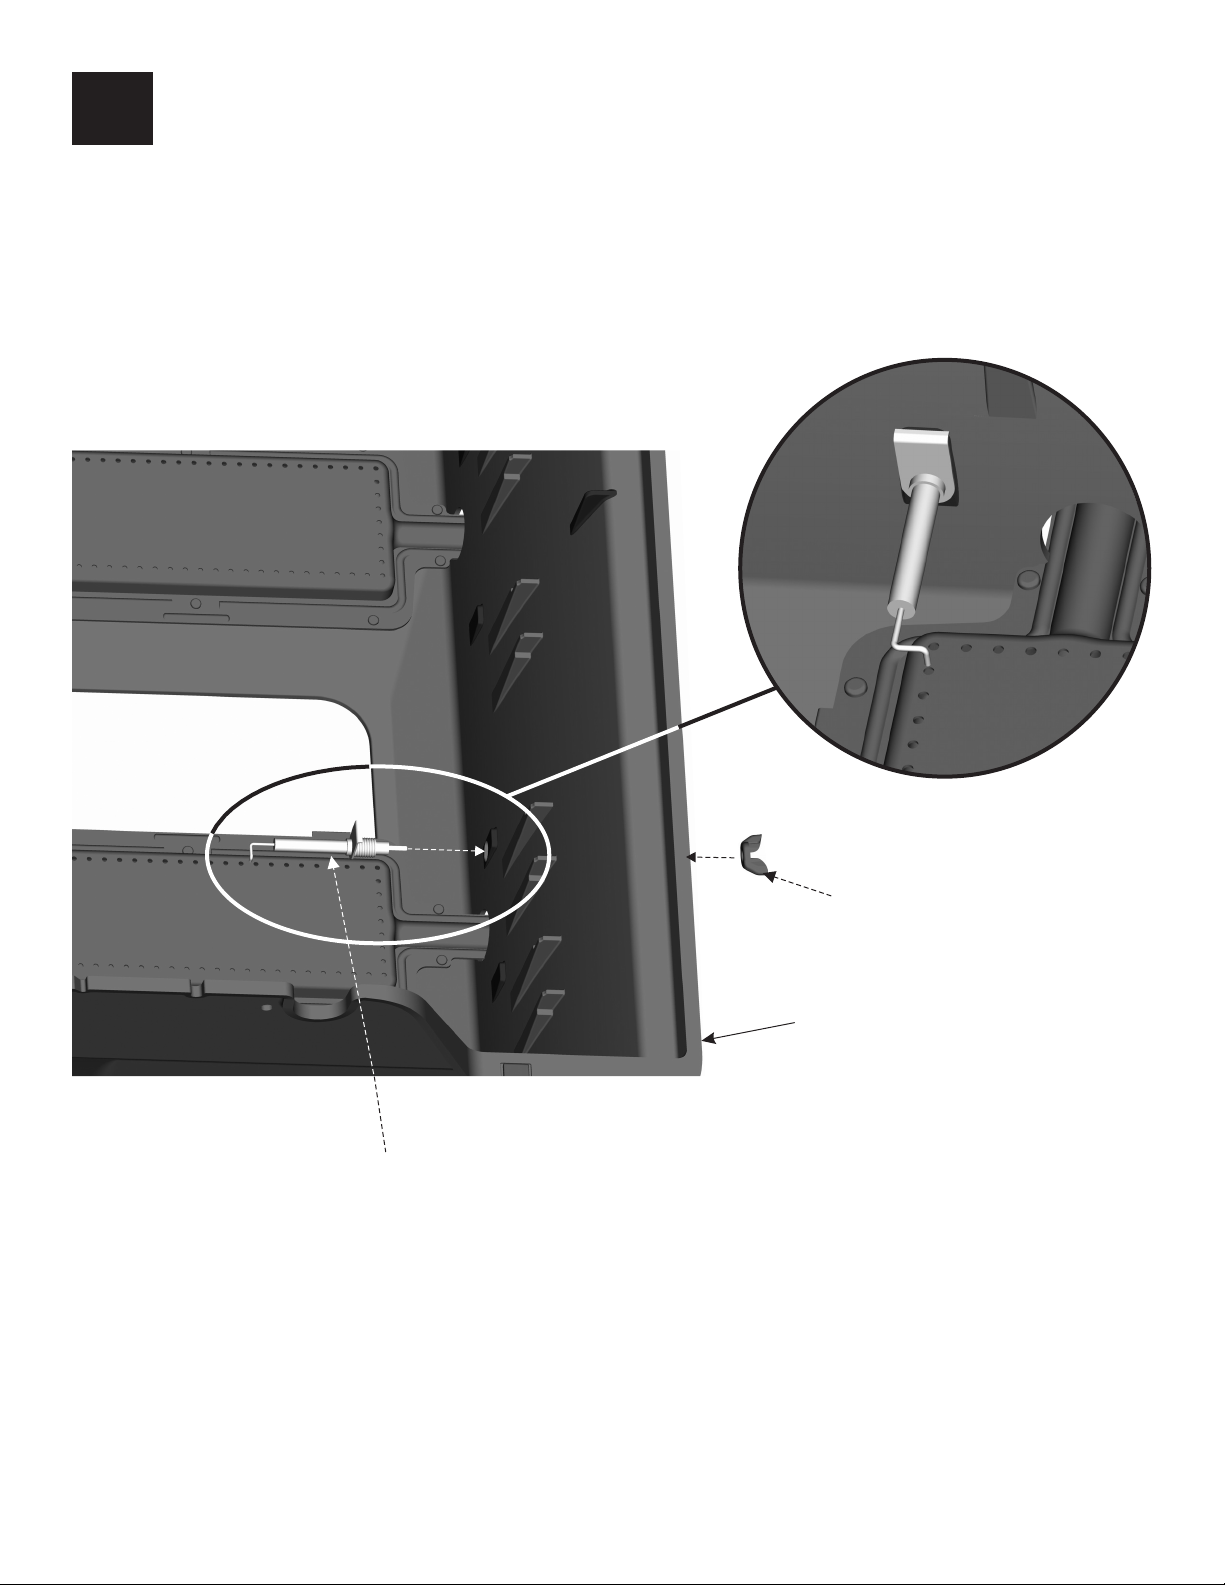
5
Electrode with Wing Nut or Nut
Inside bottom casting insert electrode and attach
with wing nut or nut.
View of electrode attached and aligned
with a porthole in the burner.
Electrode
Wing Nut
Finger tighten only
Front
Or Nut
10 • 463350505
 Loading...