

Kenmore 415.162040 Assembly Instructions/use And Care Manual

Assembly Instructions/Use and Care Manual
Liquid Propane Gas Grill
with VapoRISER Smoking Tray
Model No. 415.162040
This Grill Is For
Outdoor Use Only
NO TOOLS
ASSEMBLY
WARNING
• Read this manual before cooking on
grill. Failure to follow all
manufacturer's instructions could
result in fire or explosion which could
cause property damage, personal
injury or death.
• Combustion by-products produced
when using this product contain
chemicals known to the State of
California to cause cancer, birth
defects, or other reproductive harm.
CAUTION
• Read and follow all Safety
Statements, Assembly Instructions
and Use & Care Directions before
attempting to assemble and cook.
• Some parts may contain sharp edges,
especially as noted in these
instructions. Wear protective gloves
if necessary.
• Parts
• Assembly
• Use and Care
• Troubleshooting
• Safety Rules
Assembly Questions?
Call 1-800-4-MY-HOME
Parts Ordering:
Call 1-800-366-PART (7278)
To Installer/Assembler: Leave
these instructions with
consumer.
To Consumer: Keep this
manual for future reference.
®
463834703 / 0-4165219 (11-18-02)
Sears, Roebuck and Co., Hoffman Estates, IL 60179 U.S.A.
WARNING
FOR YOUR SAFETY
1. Do not store or use gasoline or other
flammable vapors and liquids in the
vicinity of this or any other appliance.
2. An LP tank not connected for use shall
not be stored in the vicinity of this or any
other appliance.
FOR YOUR SAFETY
If you smell gas:
1. Shut off gas to the appliance.
2. Extinguish any open flame.
3. Open lid.
4. If odor continues, immediately call your
gas supplier or your fire department.
Call Grill Service Center For Help And Parts
If you have questions or need assistance during assembly,
please call . You will be speaking to a
representative of the grill manufacturer and not a Sears
employee. To order new parts call Sears at .
Product Record
IMPORTANT: Fill out the product record information below.
1-800-241-7548
1-800-4-MY-HOME
Installation Safety Precautions
•
Use grill only with LP (propane) gas and the regulator/valve
assembly supplied.
•
Grill installation must conform with local codes, or in their
absence with
Z223.1
LP Gas Code Grill is not for use in or on
recreational vehicles and/or boats.
• All electrical accessories (such as rotisserie) must be
electrically grounded in accordance with local codes, or
National Electrical Code, ANSI / NFPA 70.
electrical cords and/or fuel supply hoses away from any hot
surfaces.
• This grill is safety certified for use in the United States only. Do
not modify for use in any other location. Modification will result
in a safety hazard.
Safety Symbols
The symbols and boxes shown below explain what each heading
means. Read and follow all of the messages found throughout
the manual.
®
DANGER: Indicates an imminently hazardous situation
which, if not avoided, will result in death or serious injury.
National Fuel Gas Code, NFPA 54 / ANSI
. Handling and storage of LP cylinders must conform to
NFPA/ANSI 58.
Keep any
DANGER
Model Number
UPC (on carton) Label Lot # GG
Serial Number
Date Purchased
CAUTION
For residential use only. Do not use for commercial
cooking.
WARNING
CARBON MONOXIDE HAZARD
Burning charcoal releases carbon monoxide which has no
odor and can cause serious injury or death. Never burn
charcoal inside homes, vehicles or tents.
WARNING
WARNING: Be alert to the possibility of serious bodily injury
if the instructions are not followed. Be sure to read and
carefully follow all of the messages.
CAUTION
CAUTION: Indicates a potentially hazardous situation which,
if not avoided, may result in minor or moderate injury.
2 • 463834703

TABLE OF CONTENTS WARRANTY
For Your Safety ......................................2
Grill Service Center...................................2
Product Record Information ............................2
Installation Safety Precautions ..........................2
Safety Symbols......................................2
Kenmore Grill Warranty ...............................3
Parts List...........................................4
Parts Diagram.......................................5
Assembly ........................................6-16
Use and Care ...................................17-27`
VapoRISER Smoking Tray .....................23
Cooking Chart...............................25
Troubleshooting...........................26-27
KENMORE GRILL WARRANTY
Full 1-Year Warranty on Grill
For one year from the date of purchase Sears will repair or
replace, at our option, any grill part (except for paint finish)
that is defective in material or workmanship.
Limited Warranty on Selected Grill Parts
From one year after the date of purchase for the designated
time periods listed below, Sears will replace the following grill
parts if they are defective in material or workmanship. You
will be charged for labor.
• Lifetime of Grill: Aluminum Top and Bottom Castings
(except for paint finish)
• 2 years: Burner Assembly
WARRANTY SERVICE
Warranty service is available by contacting Sears at
®
1-800-4-MY-HOME
.
WARRANTY RESTRICTIONS
This warranty is void if grill is used for commercial or rental
purposes.
This warranty applies only when the grill is used in the United
States.
This warranty gives you specific legal rights, and you may
also have other rights which vary from state to state.
Sears, Roebuck and Co., Dept. 817WA,
Hoffman Estates, IL 60179
463834703 • 3

PARTS LIST – Model No. 415.162040
Key Qty Description Part #
1 2 Leg Assembly.......................4502443
2 1 Base ..............................4503192
3 1 Midshelf ...........................4151035
4 11 #10-24x2” Carriage Bolt ...............4080064
5 12 #10-24 Plastic Tee Knob...............4080091
6 2 Wheel Assembly.....................4310003
7 4 1” Hitch Pin.........................4080062 STD624001
8 2 Leg Extender .......................4154556
9 1 Upper Front Panel ...................4154426
10 1 Lower Front Panel ...................4154557
11 1 Upper Panel Wire ....................4156095
12 1 Condiment Wire .....................4151039
13 1 Grill Bottom.........................4580488
14 1 Burner Assembly ....................4505078
15 1 Collector Box .......................4500278
16 1 #10-16x1/2” Self-Tap Screw ............4080059 STD611005
17 1 Electrode ..........................5156119
18 1 Control Panel .......................4526145
19 4 #10x1/2”, T-20, Self-Tap Screw .........4080043
20 1 Valve/Hose/Regulator Assembly ........4524171
21 1 Electronic Ignition Module .............4153189
22 1 Ignition Module Locking Ring ...........4157145
23 1 Ignitor Wire .........................4153720
24 1 Sideburner Ignitor Wire................5156109
25 2 Control Knob........................4154559
26 2 Valve Clip ..........................4156172
27 2 1/4-20x1-1/4” Carriage Bolt ............4080615 STD532512
28 2 1/4-20 Wing Nut .....................4080221 STD541625
Key Qty Description Part #
29 2 #10-24x1-1/4” Carriage Bolt ............4080074
30 1 Tank Wire ..........................4151019
31 1 VapoRISER Bar Wire .................4151041
32 2 VapoRISER Bar .....................4500306
33 4 EndCap...........................4080065
34 1 Side Shelf ..........................4154373
35 4 #10-12x1-7/8” Wing Screw.............4080096
36 1 Tool Holder .........................4154377
37 1 Sideburner Body.....................4526146
38 1 #10-12x2-1/4” Wing Screw.............4080093
39 1 Sideburner Frame....................4501705
40 4 #10-24 Wing Nut.....................4080063 STD541610
41 1 Sideburner .........................5068018
42 1 Sideburner Knob.....................4154471
43 1 Sideburner Grate ....................4156376
44 1 Grill Lid ............................4580117
45 1 Heat Indicator with Bracket.............4156800
46 1 #10-24 Hex Nut (keps) ................4080208 STD541410
47 1 Logo Plate .........................4157122
48 2 3/16” Pal Nut........................4153096
49 2 1/4x1-1/8” Hinge Pin..................4156513
50 1 Handle ............................4154473
51 2 #10-24x1” Machine Screw .............4080302 STD511010
52 1 SwingAway.........................4152125
53 1 Cooking Grate ......................4152741
54 1 Grease Clip.........................5156607
55 1 AAA Battery ........................4153177
56 1 Ignition Button Assembly ..............4157156
4 • 463834703

PARTS DIAGRAM – Model No. 415.162040
44
53
32
32
43
31
41
4
40
39
37
24
42
4
36
49
6
15
14
7
27
13
1
40
33
4
16
17
49
7
54
3
28
5
5
5
38
40
50
27
28
4
5
46
51
33
35
35
5
4
5
48
47
45
52
34
19
18
35
19
19
29
21
55
1
23
11
4
25
22
29
19
25
26
20
26
56
9
7
4
30
5
5
5
2
5
4
4
6
7
8
4
12
10
463834703 • 5
ASSEMBLY – Model No. 415.162040
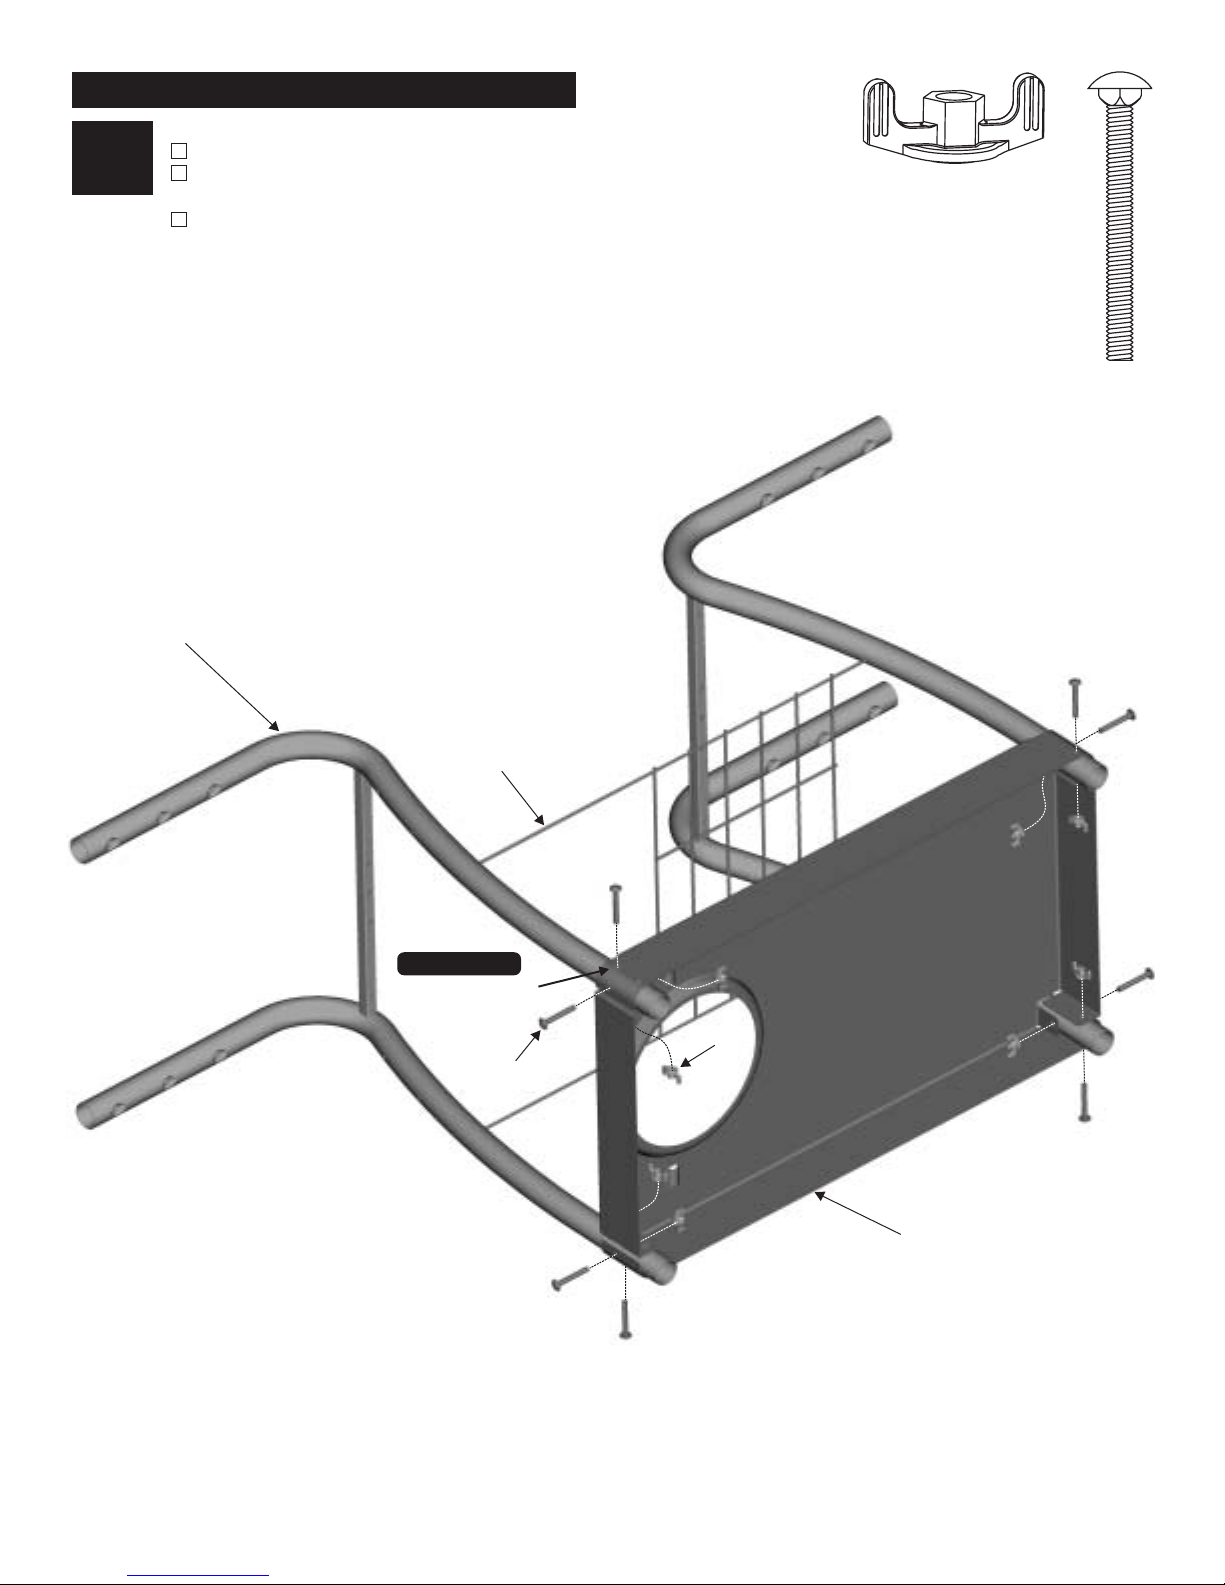
Cart Assembly Step 1
Position base on edge with tank hole to left side.
1
Leg Assembly
Insert legs into base and attach with carriage bolts
and plastic wing nuts. DO NOT FULLY TIGHTEN.
Insert midshelf into holes on insides of legs, long
wires toward left side. Fully tighten carriage bolts
and plastic wing nuts.
5
Qty. 8
4
Qty. 8
Long midshelf wire
to left side.
IMPORTANT!
USE TOP HOLE
4
5
Base
6 • 463834703
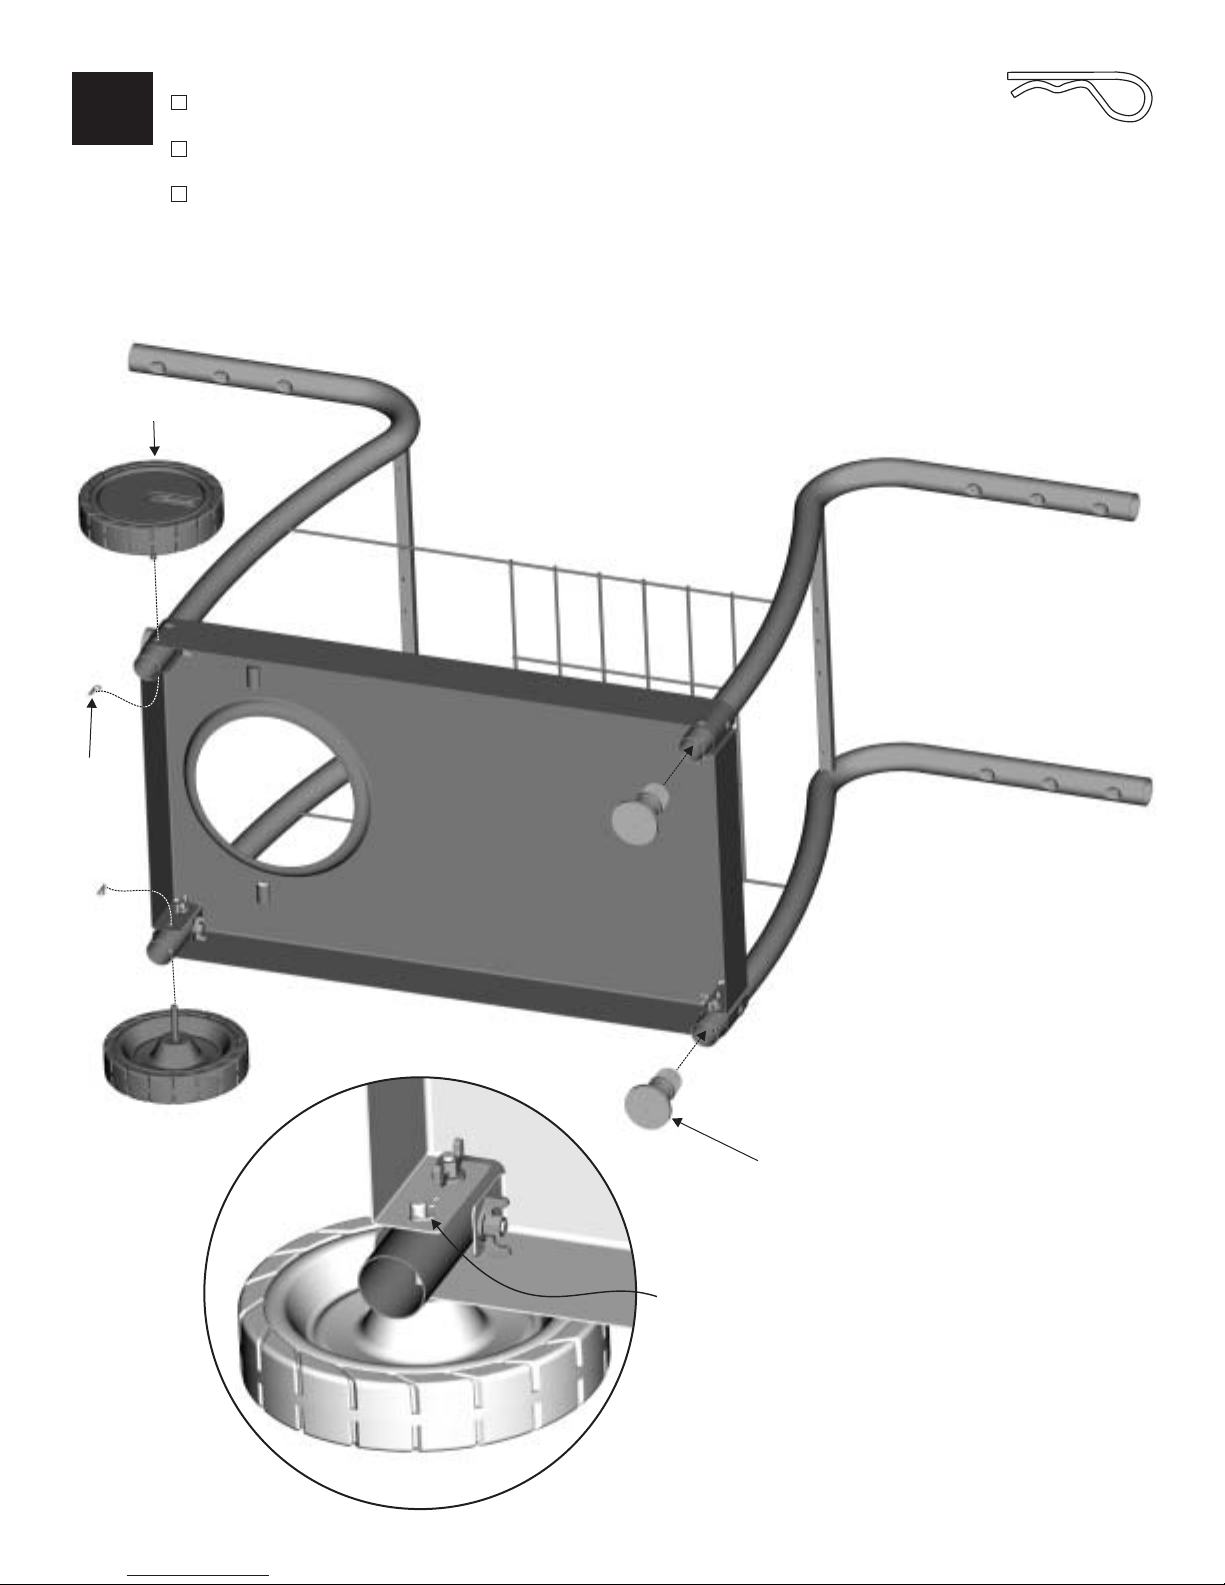
Cart Assembly Step 2
Insert wheel/hubcap assemblies into
2
Wheel/Hubcap Assembly
bottom holes on left legs.
Secure beneath base with hitch pins.
See inset below.
Push leg extenders into right legs.
7
Qty. 2
7
Leg Extender
Completed assembly with
hitch pin in axle bolt.
463834703 • 7
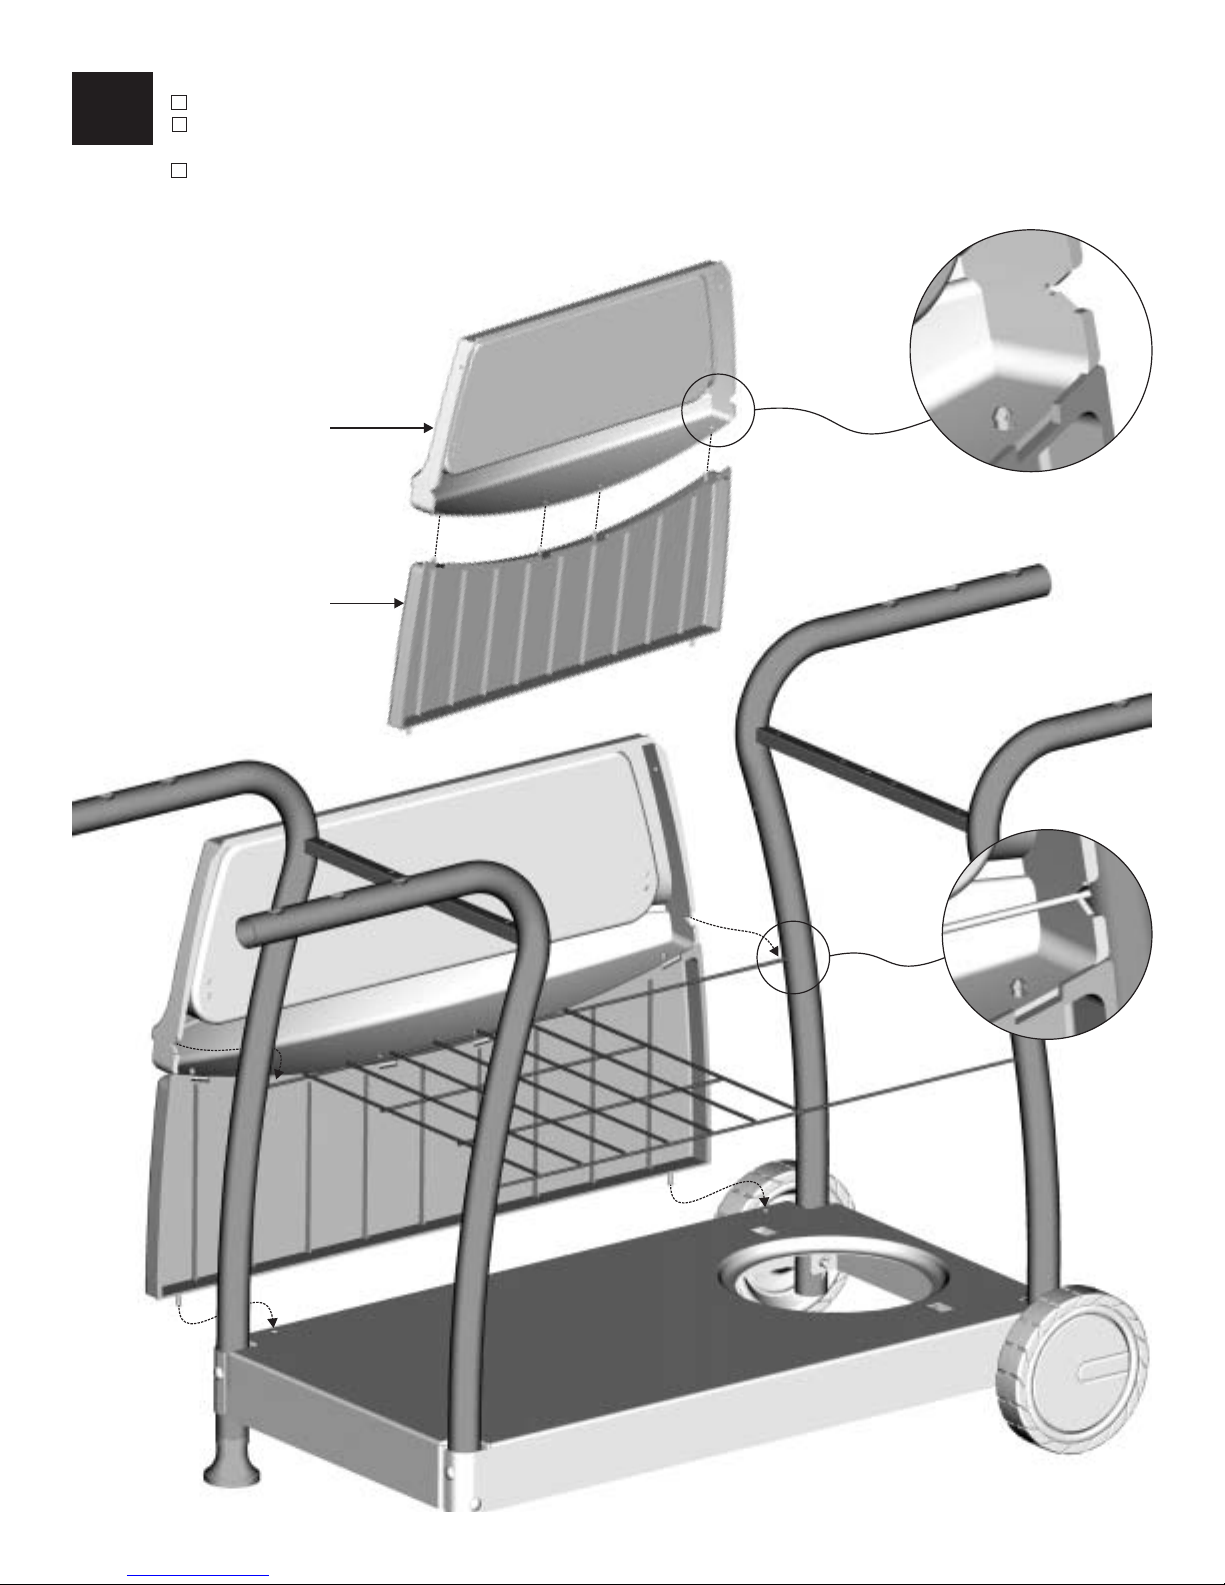
3
Upper And Lower Front Panel Assembly
Snap the upper and lower front panels together.
Insert the two pins on lower panel into holes in
front of cart base.
Snap the upper panel over the midshelf wire.
Upper Front Panel
Lower Front Panel
Upper panel
snaps onto
midshelf wire.
8 • 463834703
NOTE: Rear view of cart.
Wheels are to right side.
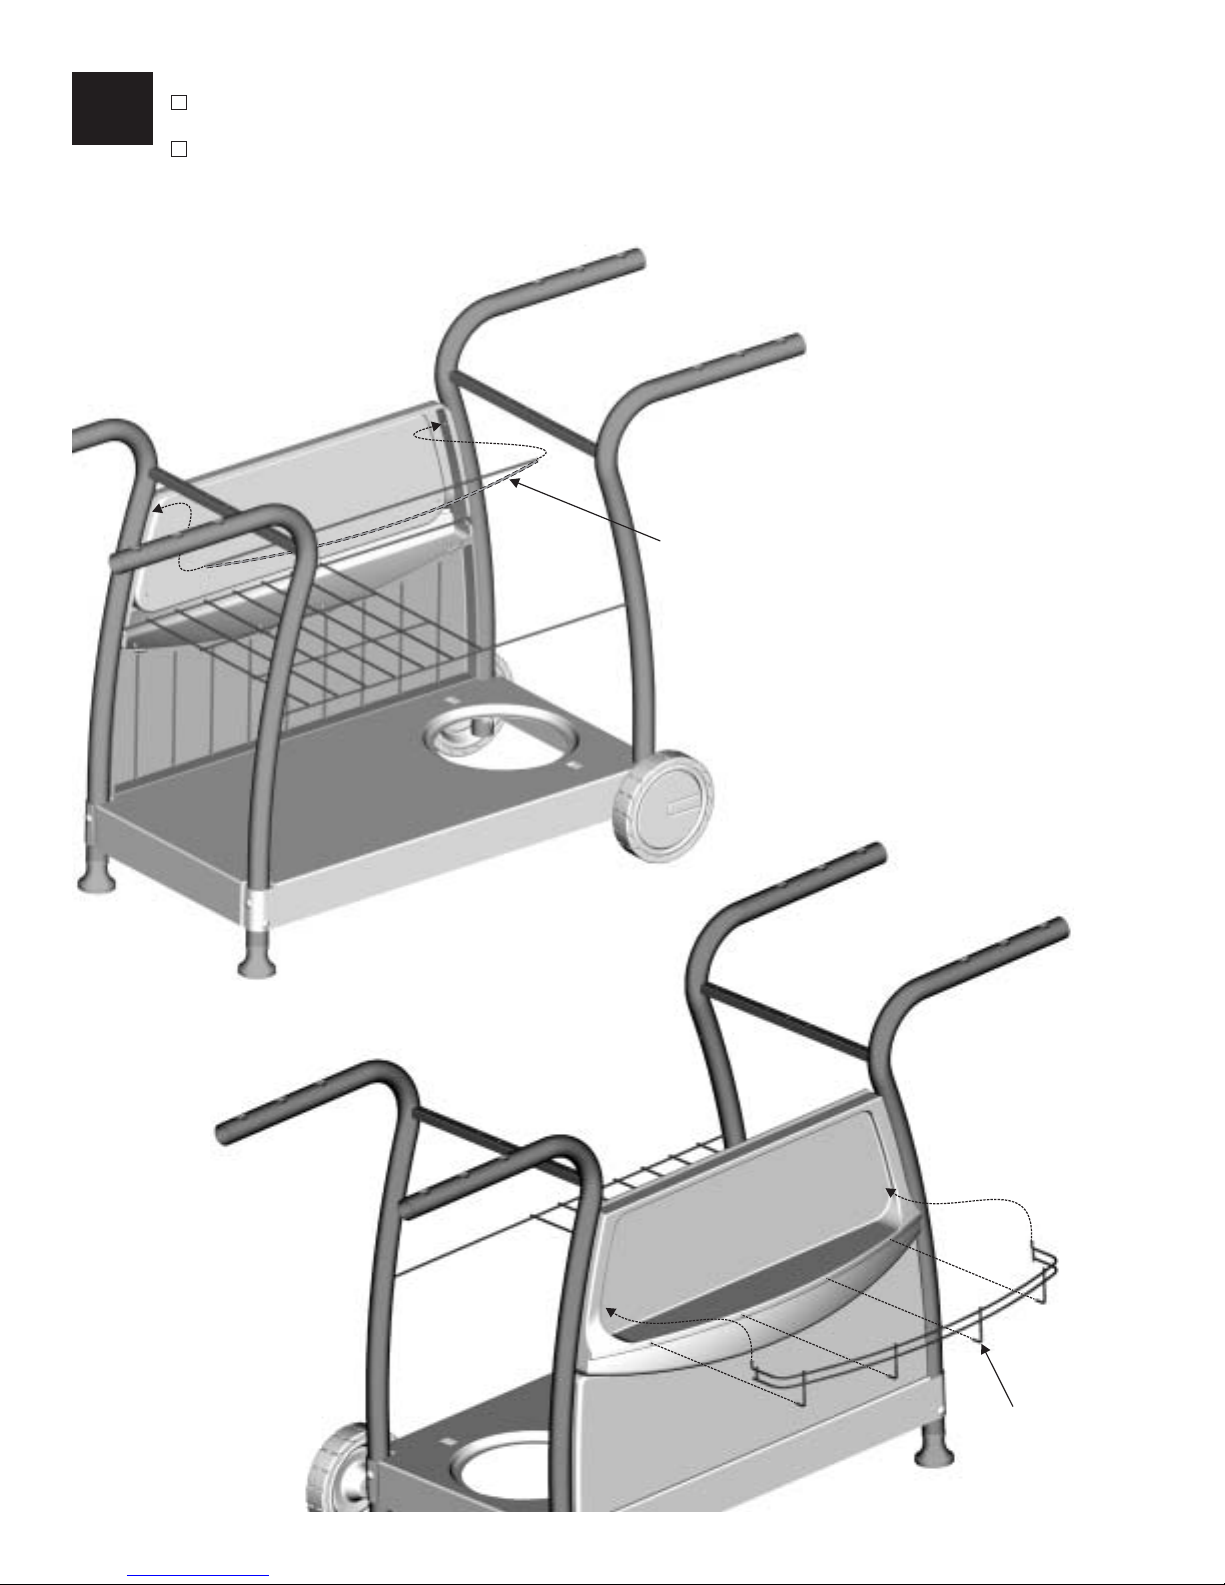
4
Upper Panel Wire And Condiment Wire Assembly
Insert panel wire through upper panel and into leg,
then bend wire slightly to insert opposite end.
Hook the outer condiment wires into the top holes
on front of upper panel, then slide remaining wires
into panel holes below the condiment shelf.
Upper Panel Wire
(Bend slightly to insert)
NOTE: Rear view of cart.
Wheels are to right side.
NOTE: front view of cart.
Wheels are to left side.
Condiment Wire
463834703 • 9
 Loading...