

Kenmore 407.83126 Use & Care Manual

Use & Care Guide
Manual de Uso-y Cuidado
English/Espafiol
Kenmoreo
Po_°t®b)eAi_°Conditione_"
De!_umid_@e__w_th Remote Cont_o_
_ _ _ _ 2 _ ._ @
A0__®Acond_caon®do Pot °
D_um_a_;ador con Cont_o! Remo'_a
Mode_siModebs_
407,83126 o-12_000 BTU
Sears Brands Management Corporation
Hoffman Estates, IL 60179 U.S.A.
www.kenmore.com
www.sears.com
www.kmart.com
BeforeUsingYour New Air Conditioner.......2
Important Safeguards.....................................3-5
Kenmore Air Conditioner Warranty .............6
Master ProtectionAgreement........................7
Unpacking instructions....................................8
Air Conditioner Parts.......................................8
Accessories.................................................... 9
Installation................................................... 9,10
Safety Plug........................................... :.11
Control Panel........................... ................11
Remote Control ............................................I2-14
Operating Instructions................................15t16
Cleaning & Maintenance .............................17,18
TechnicalSpecifications..............................19
Troubleshooting..........................................20,21
Error Codes...................................................22
SearsService.....................................Back Cover
READTHIS USE & CARE GUIDE CAREFULLYAND THOROUGHLY BEFOREINSTALLING AND OPERAT-
iNG YOUR AIR CONDITIONER.
RETAIN THIS USE & CAREGUIDE FOR FUTUREREFERENCE.
2
To prevent injury to the user or other people and property damage,
the following instructions must be followed.
Use this appliance only as described in this Use & Care Guide. As with
any electrical appliance, the instructions aim to cover as many eventuali-
ties as possible. Caution and common sense should be used when operat-
ing and installing this air conditioner.
This appliance has been manufactured to cool and dehumidify domestic
environments and should not be used for other purposes.
The appliance should not be installed where the atmosphere may contain
combustible gases, oil or sulfur, or near heat sources.
Always install the portable air conditioner properly. Incorrect assembly
or installation may cause failure to operate including injury, fire and
electric shock hazards.
Do not place the power cord near a heater. It may cause fire or electric
shock.
Do not use the power cord near flammable gas or combustibles such as
gasoline, benzene, thinner, etc. It may cause explosion or fire.
Do not operate or stop the unit by inserting or pulling out the power
plug. It may cause fire or electric shock.
Do not damage or use an unspecified power cord. It may cause fire or
electric shock.
Do not modify the length of the power cord. It will cause fire or electric
shock due to heat generation.
Use the air conditioner on a single outlet circuit. Do not share the outlet
with other appliances. It may cause circuit failure.
Changing the outlet without making the appropriate wiring changes will
create an unsafe condition that could result in fire or electric shock. Refer
all such work to a licensed and qualified electrician.
WARNING: This appliance must be properly grounded. The power cord
of this appliance is equipped with a three-prong LCD1 (Leakage Current
Detection and Interruption) plug. To minimize the risk of electric shock,
use the plug with a standard three-slot grounding wall power outlet. If
power outlet does not include a grounding siot_ have a qualified electri-
cian replace the outlet before you use your room air conditioner. Do not
cut or remove the grounding prong from the power plug. If you have
doubt whether the air conditioner is properly grounded, have the wall
receptacle and circuit checked by a qualified electrician.
Do not disassemble or modify this appliance. Doing so may cause failure
and electric shock.
° DO NOT USEEXTENSIONCORDS.Do not usean extensioncord dueto
potential safety hazards.Fortemporary situations,useonly CSAand UL
certified 3-prong grounded extensioncords designedand approved spe-
cifically for air conditioners.
• To prevent injury from handling sharp objects, do not touch the metal
parts of the unit when removing the filter.
• Do not block the air inlet or air outlet. It may cause failure of the appli-
ance.
• Always store and transport the air conditioner upright to maintain the
compressor in a proper condition. Prior to installation, allow air condi-
tioner to stand upright for 12 hours. This ensures all lubricating oil has
settled to the bottom of the compressor, avoiding damage to internal
parts.
• Only operate the unit on an even horizontal surface to ensure no water
leaks.
° This appliance is not intended for use by persons (including children) with
reduced physical, sensory or mental capabilities, or lack of experience
and knowledge, unless they have been given supervision or instruction
concerning use of the appliance by a person responsible for their safety.
Children should be supervised to ensure that they do not play with the
appliance.
• Do not insert the power plug into a wall outlet if either is loose or dam-
aged. It may cause fire and electric shock.
• Unplug the unit if strange sounds, odors or smoke come from it.
• Hold the plug by the head when unplugging the unit. Do not pull on the
cord.
• Unplug the air conditioner if it will not be used for a long period to pre-
vent accidental startup and the possibility of injury.
• Do not place heavy objects on the power cord, and take care so that the
cord will not be damaged.
• Clean the air filters regularly. A contaminated air filter reduces capacity.
• Use a soft cloth to clean. Do not use wax, thinners or a strong detergent.
The appearance of the air conditioner may deteriorate, change color or
develop surface flaws.
• Do not use water to clean inside the air conditioner. Exposure to water
can destroy the insulation, leading to possible electric shock.
• If water enters the product, unplug the power cord from the wall. Leave
unplugged until dry.
• Being exposed to direct airflow for an extended period of time could be
hazardous to your health.
4
Do not use this air conditioner for refrigeration purposes (e.g. preserving
precision devices, food, pets, plants and art objects).
Due to the possibility of oxygen deficiency within the room, ventilate the
room when used together with stoves or other heating devices.
The air conditioner is a consumer comfort appliance, not a precision cli-
mate control system.
Always insert the filter securely. Never operate without a filter.
Do not drink water drained from air conditioner. It contains contaminants
that may make you sick.
This air conditioner has an ambient operating range of 5]°F - 95°F (16°C -
35°C),
5
Kenmore One Year Limited Warranty
When installed, operated and maintained according to all supplied instruc-
tions, if this appliance fails due to a defect in material and workmanship
within one year from the date of purchase, call 1-800-4-MY-HOME® to ar-
range for free repair.
If this appliance is ever used for other than private family purposes, this war-
ranty applies for only 90 days from the date of purchase.
This warranty covers ONLY defects in material and workmanship, and will
NOT pay for:
1. Expendable items that can wear out from normal use, including but not
limited to filters, belts, light bulbs, and bags.
2. A service technician to instruct the user in correct product installation,
operation or maintenance.
3. A service technician to clean or maintain this product.
Damage to or failure of this product if it is not installed, operated or
maintained according to the all instructions supplied with the product.
5. Damage to or failure of this product resulting from accident, abuse, mis-
use or use for other than its intended purpose.
6. Damage to or failure of this product caused by the use of detergents,
cleaners, chemicals or utensils other than those recommended in all in-
structions supplied with the product.
7. Damage to or failure of parts or systems resulting from unauthorized
modifications made to this product.
Disclaimer of Implied warranties; limitation of remedies
Customer's sole and exclusive remedy under this limited warranty shall
be product repair as provided herein. Implied warranties, including war-
ranties of merchantability or fitness for a particular purpose, are limited
to one year or the shortest period allowed by law. Sears shall not be lia-
ble for incidental or consequential damages. Some states and provinces
do not allow the exclusion or limitation of incidental or consequential
damages, or limitation on the duration of implied warranties of mer-
chantability or fitness, so these exclusions or limitations may not apply to
you.
This warranty applies only while this appliance is used in the United States.
This warranty gives you specific legal rights, and you may also have other
rights which vary from state to state.
Sears Brands Management Corporation, Hoffman Estates, IL 60179
6
Master Protection Agreements
Congratulations on making a smart purchase. Your new Kenmore ® product is
designed and manufactured for years of dependable operation. But like all
products, it may require preventive maintenance or repair from time to time.
That's when having a Master Protection Agreement can save you money and
aggravation.
The Master Protection Agreement also helps extend the life of your new
product. Here's what the Agreement _ includes:
[] Parts and labor not just for repairing defects, but to help keep products operat-
ing properly under normal use. Our coverage goes well beyond the product
warranty. No deductibles, no functional failure excluded from coverage-real
protection.
[] Expert service by a force of more than 10,000 authorized Sears service techni-
cians, which means someone you can trust will be working on your product.
[] Unlimited service calls and nationwide service, as often as you want us, whenev-
er you want us.
[] "No-lemon" guarantee-replacement of your covered product if four or more
product failures occur within twelve months.
[] Product replacement if your covered product can't be fixed.
Annual Preventive Maintenance Check at your request-no extra charge.
[] " Fast help by phone-we call it Rapid Resolution-phone support from a Sears rep-
resentative on all products. Think of us as a "talking owner's manual".
[] Power surge protection against electrical damage due to power Fluctuations.
[] $250 Food Loss Protection annually for any food spoilage that is the result of
mechanical failure of any covered refrigerator or freezer.
[] Rental reimbursement if repair of your covered product takes longer than prom-
ised.
[] 10% discount off: the regular price of any non-covered repair service and relat-
ed installed parts.
Once you purchase the Agreement, a simple phone call is all that it takes for you
to schedule service. You may call anytime, day or night, or schedule a service
appointment online.
The Master Protection Agreement is a risk free purchase. If you cancel for any
reason during the product warranty, we will provide a full refund. Or, a prorated
refund anytime after the product warranty period expires. Purchase your Master
Protection Agreement today!
Some limitations and exclusions apply. For prices and additional information in the
U.S.A. call 1-800-827-6655.
Sears Installation Service
For Sears professional installation of home appliances garage door openers water
heaters, and other home items, call 1-800-4-MY-HOME ®.
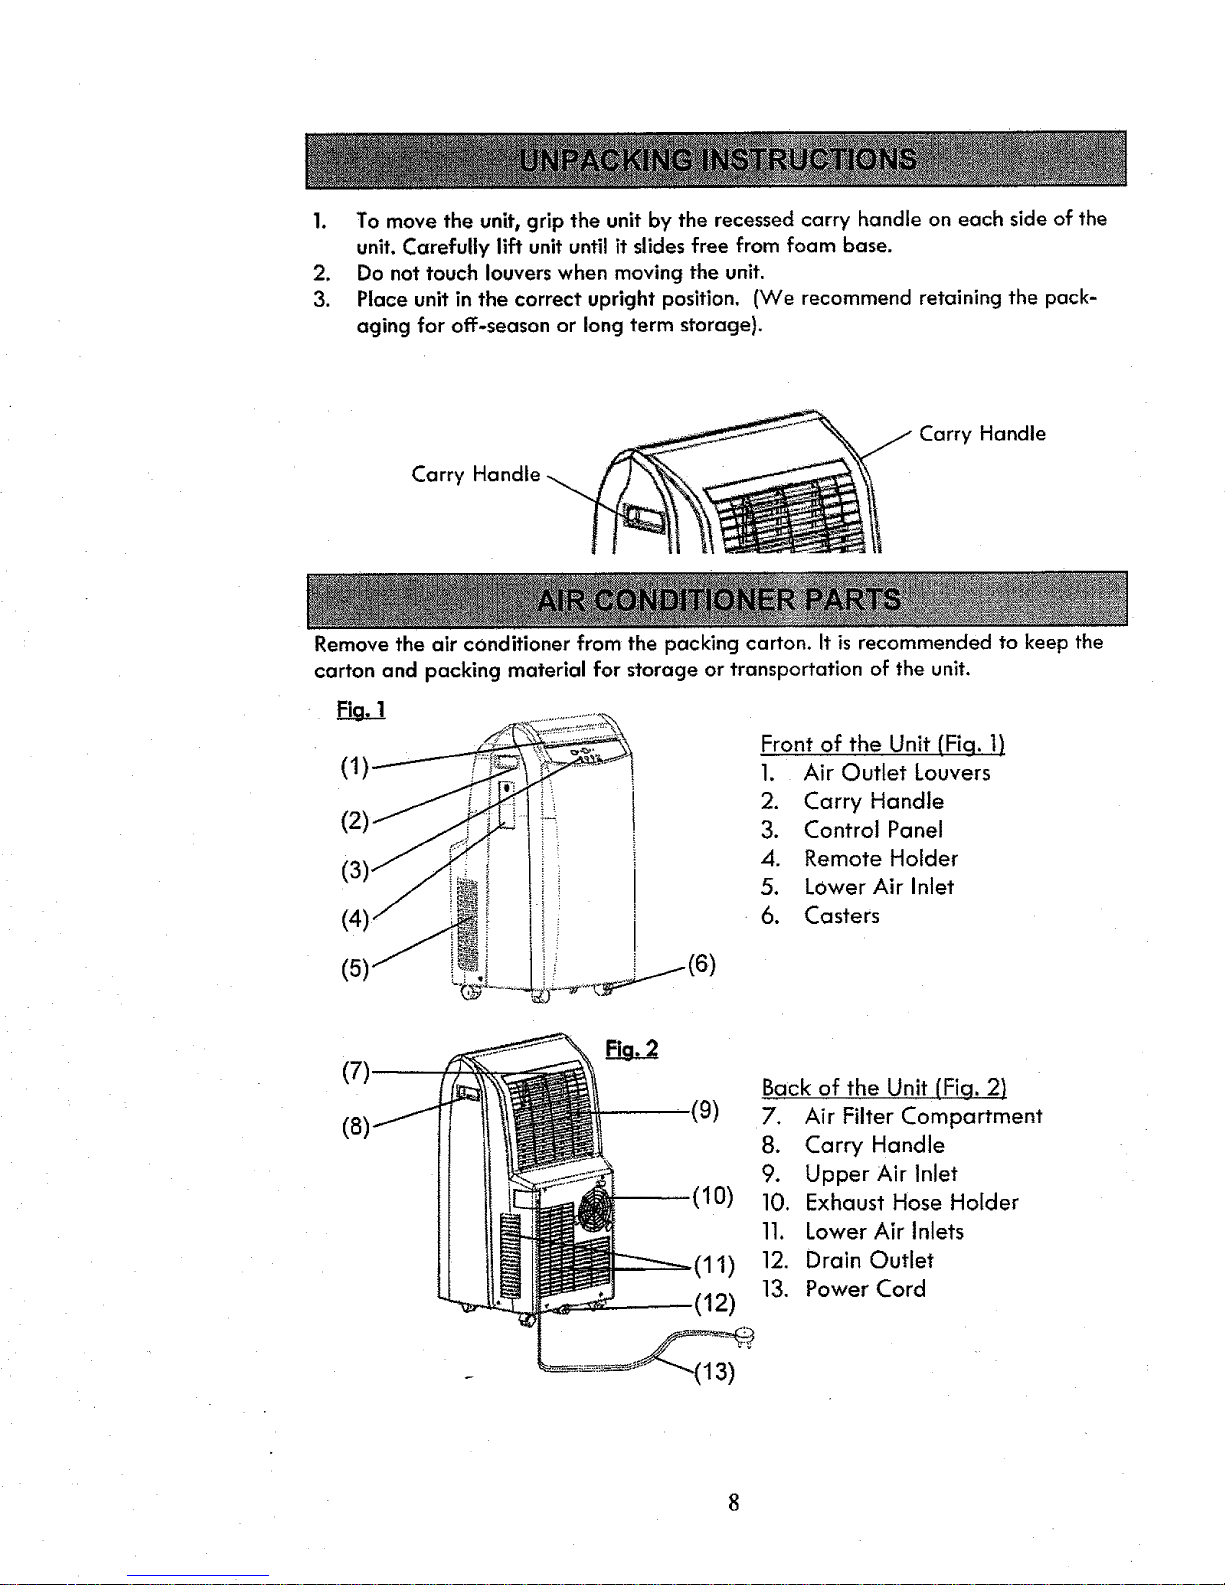
1. To move the unit, grip the unit by the recessed carry handle on each side of the
unit. Carefully lift unit until it slides free from foam base.
2. Do not touch louvers when moving the unit.
3. Place unit in the correct upright position. (We recommend retaining the pack-
aging for off-season or long term storage).
Carry Handle
Carry Handle
Remove the air conditioner from the packing carton. It is recommended to keep the
carton and packing material for storage or transportation of the unit.
Fia, 1
(1)
(2)
(4)
(5)
_, ,i ii (6)
Front of the Unit (Fig. ])
1. Air Outlet Louvers
2. Carry Handle
3. Control Panel
4. Remote Holder
5. Lower Air Inlet
6. Casters
(9)
(10)
(11)
(12)
Back of the Unit(Fiq, 2)
7. Air Filter Compartment
8. Carry Handle
9. Upper Air Inlet
10. Exhaust Hose Holder
11. Lower Air Inlets
12. Drain Outlet
13. Power Cord
-(13)
8
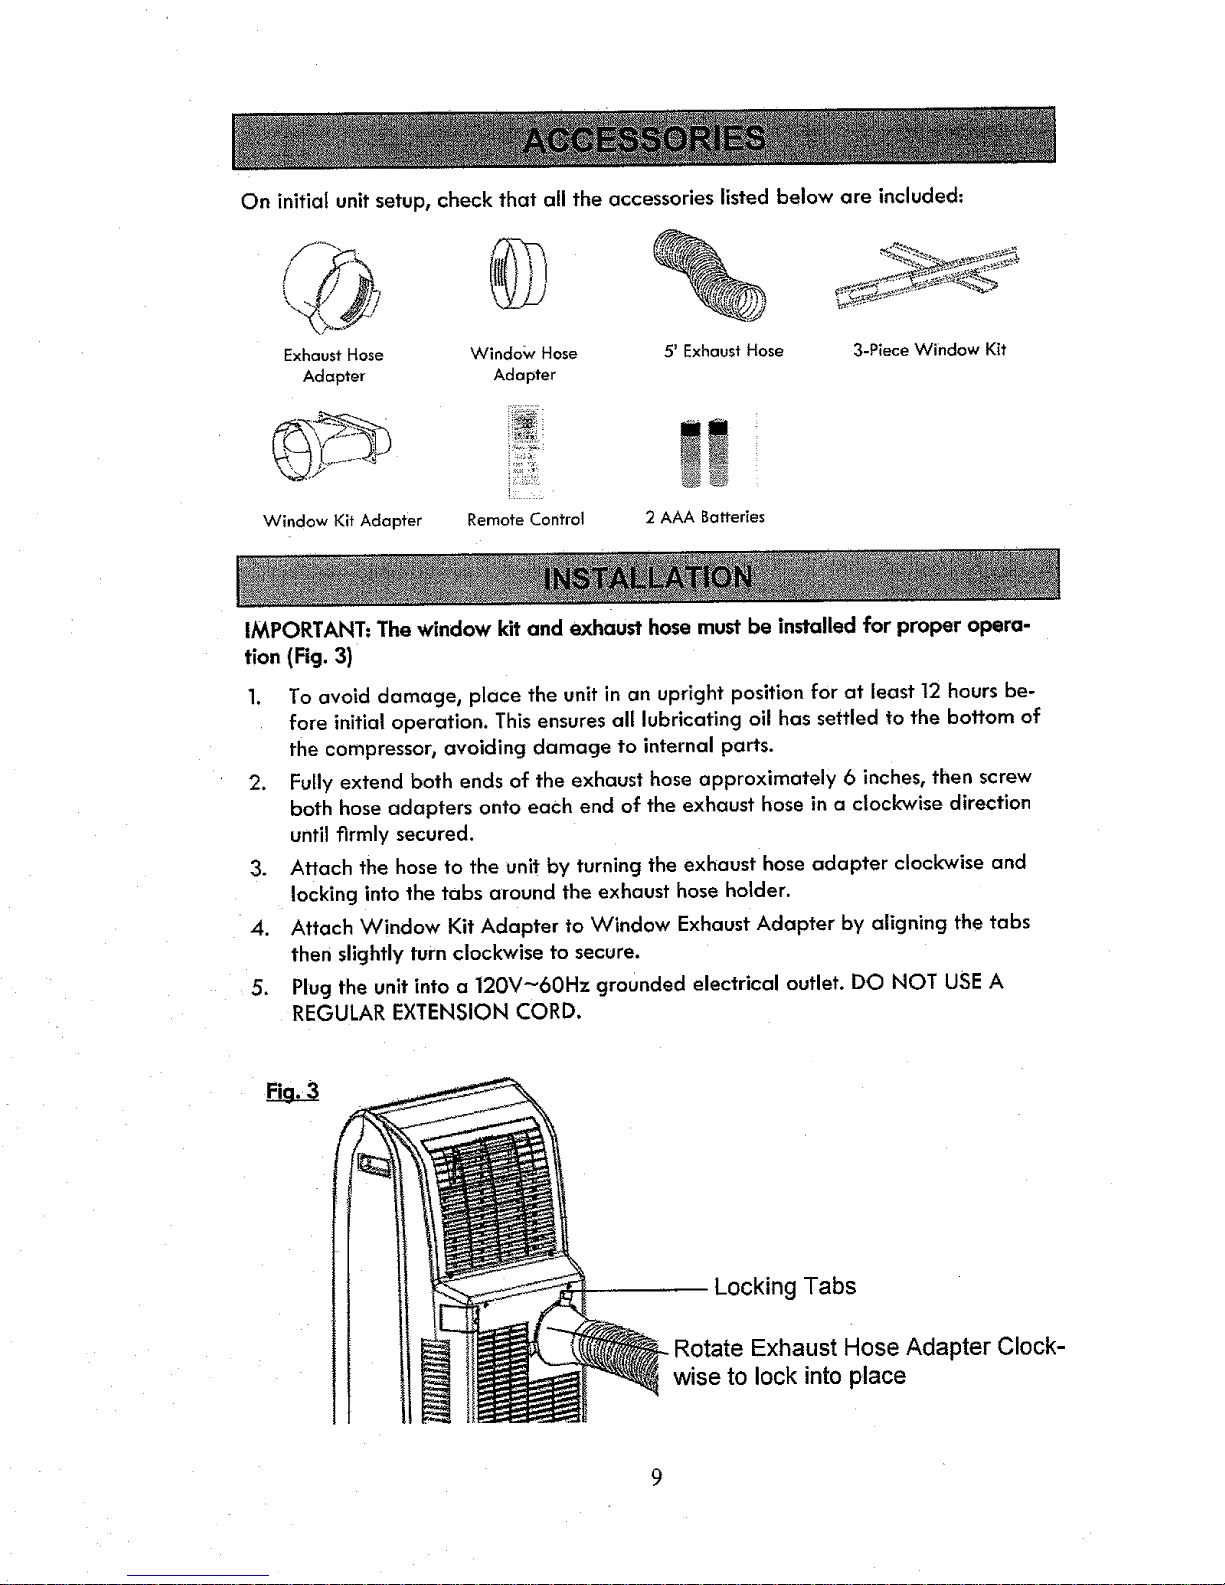
On initial unit setup, check that all the accessories listed below are included:
Exhaust Hose Windo_v Hose 5' Exhaust Hose
Adapter Adapter
3-Piece Window Kit
Window Kit Adapter Remote Control
2 AAA Batteries
IMPORTANT: The window kit and exhaust hose must be installed for proper opera-
tion (Fig. 3)
1. To avoid damage, place the unit in an upright position for at least 12 hours be-
fore initial operation. This ensures all lubricating oil has settled to the bottom of
the compressor, avoiding damage to internal parts.
2. Fully extend both ends of the exhaust hose approximately 6 inches, then screw
both hose adapters onto each end of the exhaust hose in a clockwise direction
until firmly secured.
3. Attach the hose to the unit by turning the exhaust hose adapter clockwise and
locking into the tabs around the exhaust hose holder.
4. Attach Window Kit Adapter to Window Exhaust Adapter by aligning the tabs
then slightly turn clockwise to secure.
5. Plug the unit into a 120V_60Hz grounded electrical outlet. DO NOT USE A
REGULAR EXTENSION CORD.
Locking Tabs
Rotate Exhaust Hose Adapter Clock-
wise to lock into place
9
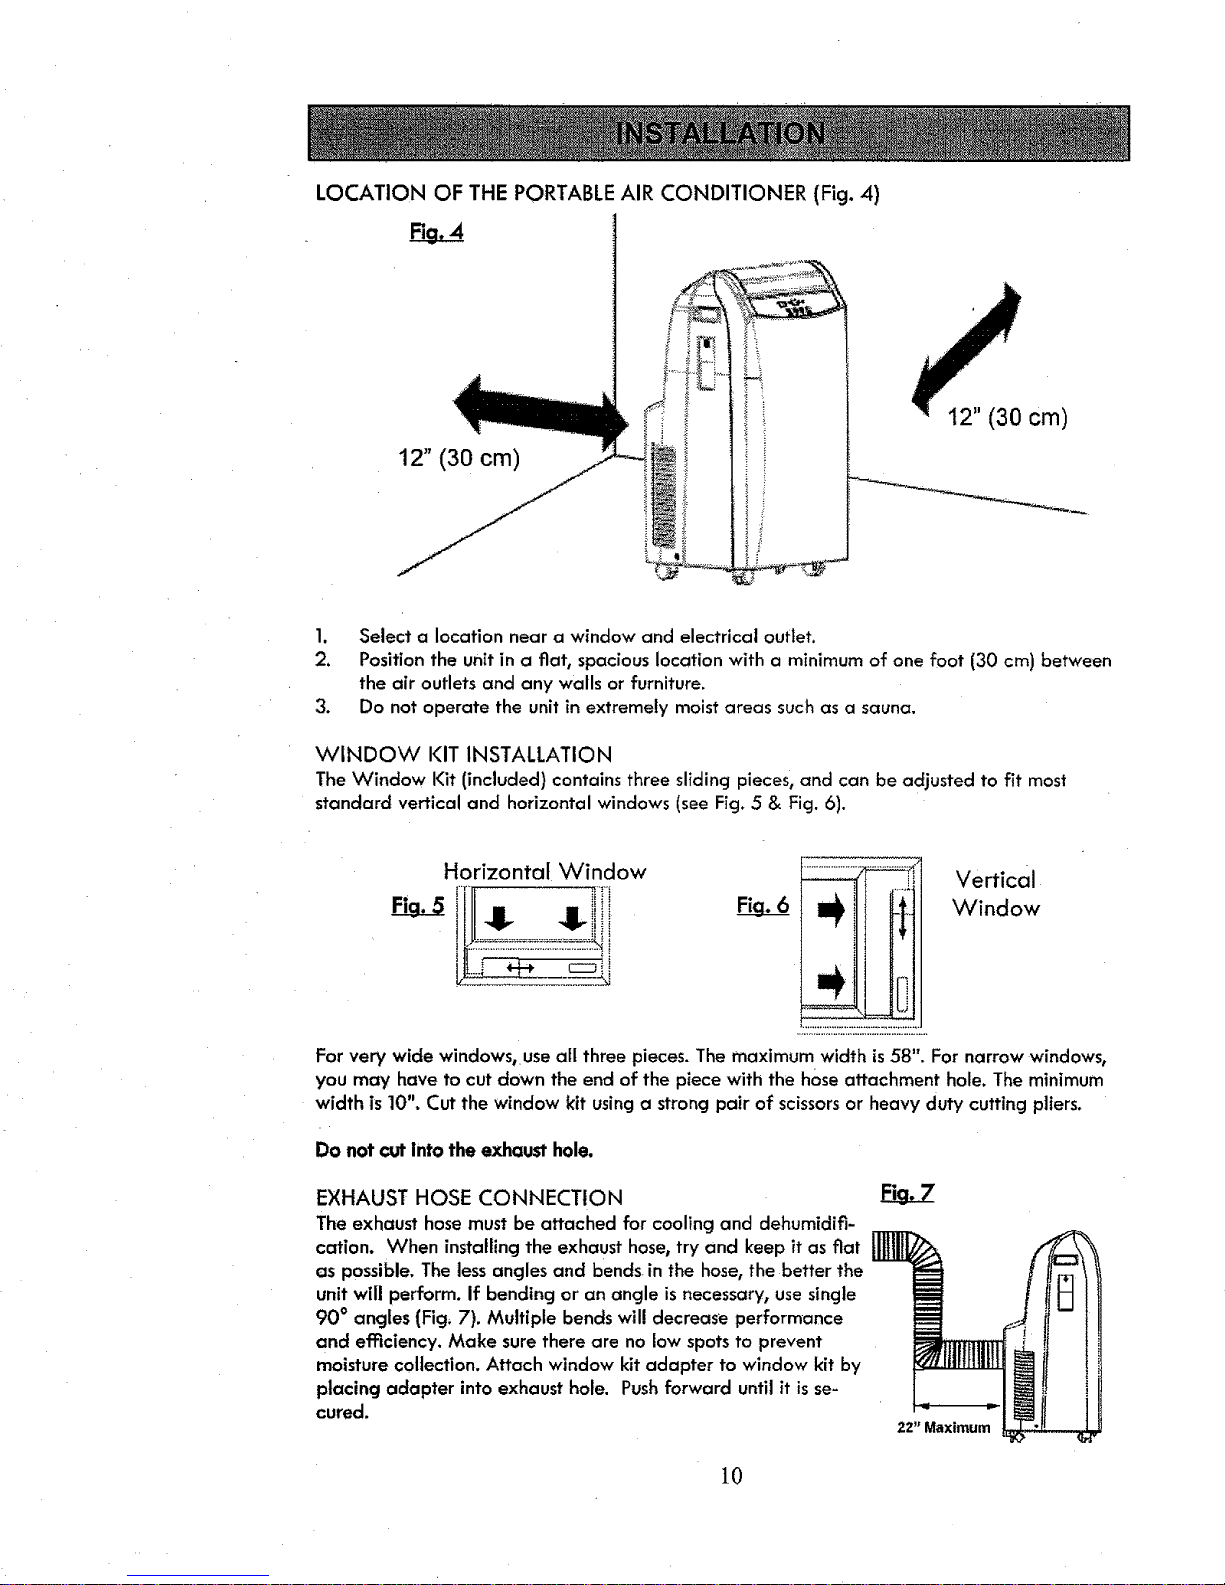
LOCATION OF THE PORTABLE AIR CONDITIONER (Fig. 4)
12" (30 cm)
12" (30 cm)
1. Select a location near a window and electrical outlet.
2. Position the unit in a fiat, spacious location with a minimum of one foot (30 cm) between
the air outlets and any walls or furniture.
3. Do not operate the unit in extremely moist areas such as a sauna.
WINDOW KIT INSTALLATION
The Window Kit (included) contains three sliding pieces, and can be adjusted to fit most
standard vertical and horizontal windows (see Fig. 5 & Fig. 6).
Horizontal Window
i r!_ iii i
Vertical
Window
For very wide windows, useall three pieces. The maximum width is 58". For narrow windows,
you may have to cut clown the end of the piece with the hose attachment hole. The minimum
width is 10". Cut the window kit using a strong pair of scissorsor heavy duty cutting pliers.
Do not cut into the exhaust hole.
EXHAUST HOSE CONNECTION
The exhaust hose must be attached for cooling and dehumidifi-
cation. When installing the exhaust hose,try and keep it as fiat
as possible. The tessangles and bends in the hose, the better the
unit will perform. If bending or an angle Is necessary, usesingle
90 ° angles (Fig, 7). Multiple bends wil! decrease performance
and efficiency. Make surethere are no low spots to prevent
moisture collection. Attach window kit adapter to window kit by
placing adapter into exhaust hole. Pushforward until it is se-
cured.
iEL Z
22" Maximum
10
Thisproduct isequipped with an LCDI (Leakage Current Detection and Interruption} safety
plug. If powershutsoff, unplug from the electrical outlet and make surethe cord isundam-
aged. If the cord is damaged, call 1-800-469-4663 to arrange for repair.
TO TESTTHESAFETYPLUG
t. Connect the power plug to an electrical outlet.
2. The power plug has two buttons located on the top, One button is marked "TEST"and the
other ismarked "RESET'Pressthe "TEST" button; you will hear a click as the "RESET"
button pops out.
3, Pressthe "RESET"button; you will hear a click as the button engages.
4. The power supply cord is now energized and supplying electricity to the air conditioner (it
isindicated by a light on the plug head).
• Under no circumstances should the LCDI Safety Plug be used to turn the unit on or off.
• The "RESET"button must always be pushedin (engaged} for correct operation.
° The power supply cord must be replaced if it fails to reset when the "TEST" button is
pushed in,
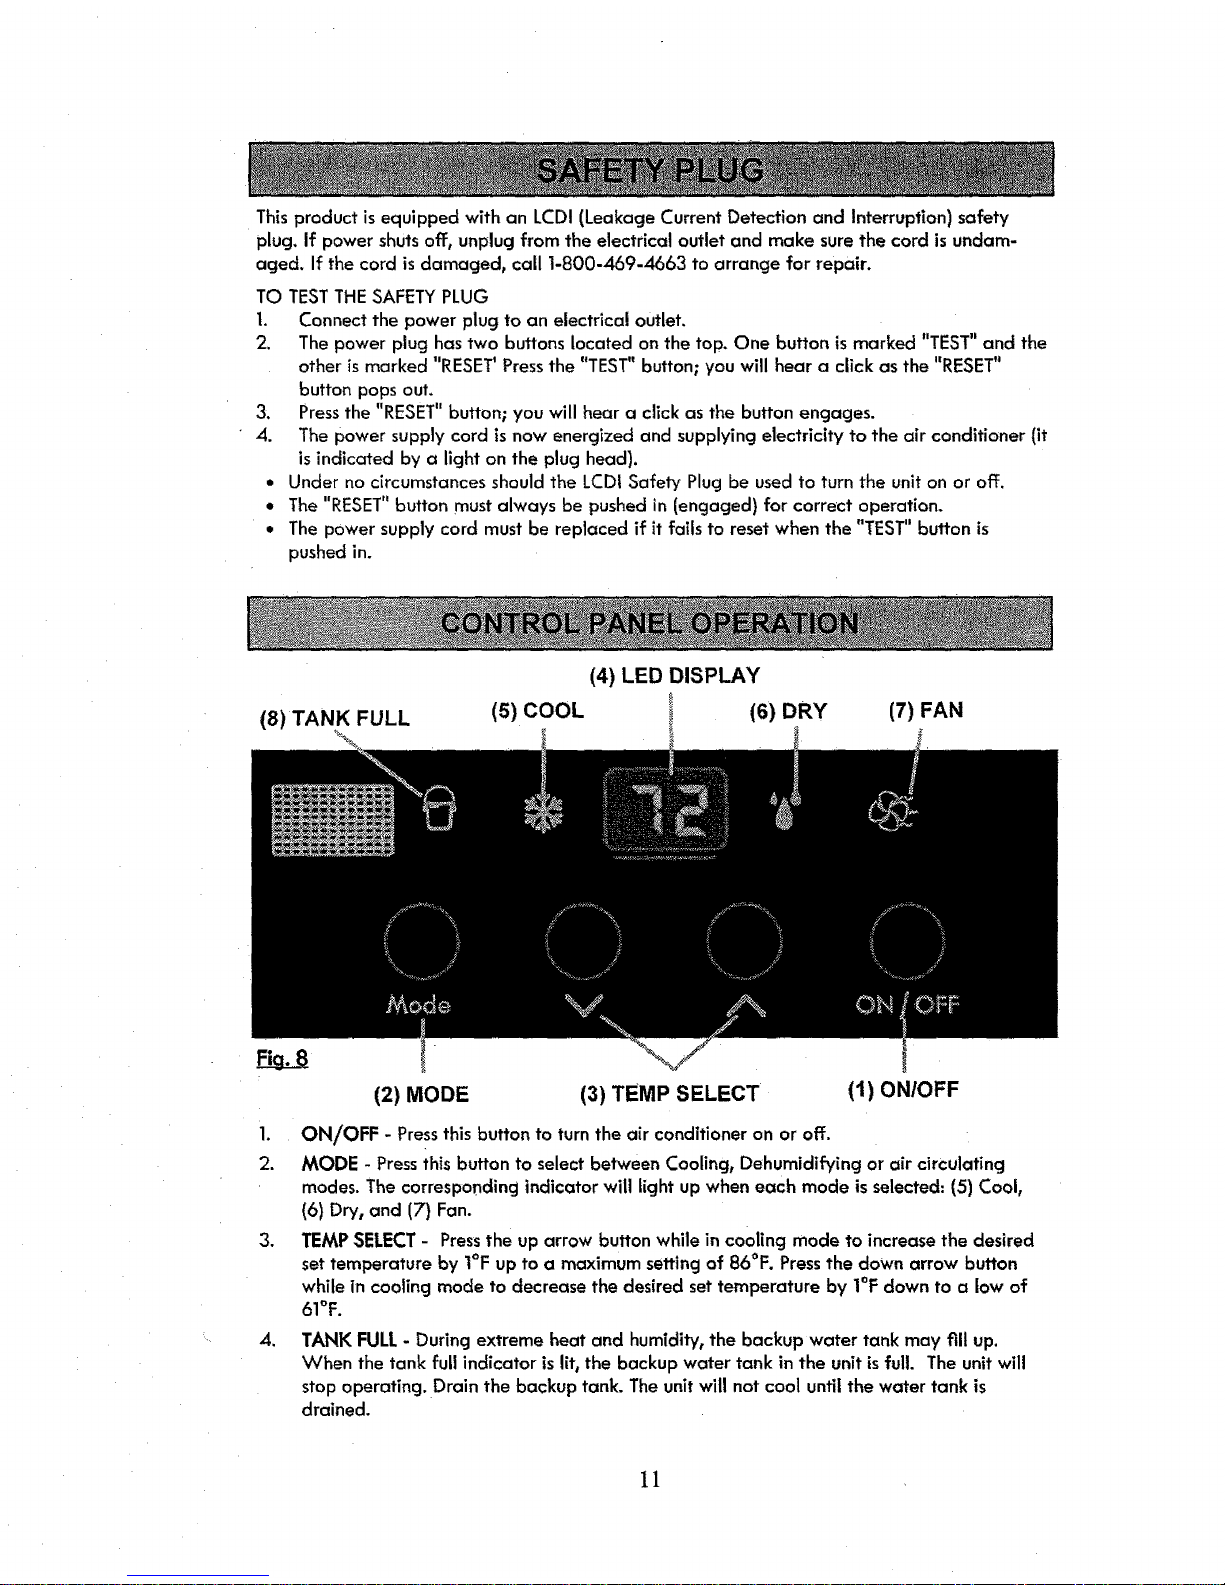
(4) LED DISPLAY
(8) TANK FULL (5) COOL
I (6) DRY (7) FAN
(2) MODE (3) TEMP SELECT (1) ON/OFF
1. ON/OFF - Pressthis button to turn the air conditioner on or off.
2. MODE - Pressihis button to selectbetween Cooling, Dehumidifying or air circulating
modes.The correspondingindicator will light upwhen each mode isselected:(5) Cool,
(6) Dry, and (7} Fan.
3. TEMPSELECT- Pressthe up arrow button while in cooling mode to increasethe desired
settemperature by I°F up to a maximumsettingof 86°F. Pressthe down arrow button
while in cooling mode to decreasethe desired set temperature by I°F down to a low of
61°F.
=
TANK FULL- During extreme heat and humidity, the backup water tank may fill up.
When the tank full indicator islit, the backup water tank in the unit is full. The unit will
stop operating. Drain the backup tank. The unit will not cool until the water tank is
drained.
11
(1)
(4)
(6)
REMOTE CONTROL BUTTONS (Fig.9)
1. Press the ON/OFF button once to manu-
ally turn the unit on. Press the button once
more to turn the unit off.
2. Press the MODE button repeatedly to
cycle between the operating modes:
cool, dry, fan or auto mode.
NOTE: Remote control must be in cool,
dry, fan or auto mode to control unit.
While in Fan Mode, press MODE button
twice to advance to Auto mode.
3. While in cool mode, press the - or + but-
tons to select your desired set tempera-
ture. The set temperature on the remote
control and unit will increase or decrease
accordingly. Hold the - and + buttons for
2 seconds to rapidly increase or decrease
the set temperature. Temperature range is
61°F---86°F.
NOTE: When in dry, auto or fan mode,
the set temperature does not appear on
the unit display and pressing the - or +
buttons on the remote will not adjust its
set temperature.
4. While incool mode, pressthe FAN button
repeatedly to adjust fan speed from Auto,
Low, Medium or High. While in Fan or
Auto (when it selects Fan) mode, pressthe
FAN button repeatedly to adjust fan
speed from Auto, Low, Medium or High.
.
6,
See Fig. 10 on page 14
for remote control
display descriptions.
(2)
(3)
(5)
(7)
(8)
NOTE: At] white but-
tons are non-functional
on this unit.
While in cool, dry, fan or auto mode,
press the oscillation button _1 to have the
unit automatically lift the louvers up and
down continuously, to vary the direction
of the air.
While in cool mode, pressthe SLEEPbut-
ton to engage this feature. It reduces
compressor usage and enhances energy
savings by slightly increasing the set tem-
perature while you are sleeping.
When the sleep feature is enabled, the set
temperature will automatically increase
2°F after 1hour. After another hour, the
set temperature will increase another 2°F
for a total increaseof 4°F.
Press the SLEEP button once more or the
Mode button to disable this feature. Sleep
is only available while in cooling mode.
12
REMOTECONTROL BUTTONS Cont. (Rg. 9)
7. Auto-on Timer: When the air conditioner
is off_it can be set to automatically turn
on in 30 minutesto 24 hoursat the previ-
oussetting.To setthe Auto-on Timer;
while the unitis off_point the remote con-
trol toward the air conditioner and press
the TIMER button. Then pressthe + or -
buttons to adjustthe timer setting in 30
minuteincrements (,5 hours). Once de-
sired settingis reached_ pressTIMER but-
ton again. An audio alert will sound, and
the TIMER ON indicator will stopflashing
to indicate the settinghas been saved and
the timer has been activated. To cancel
the auto-on timer, pressthe TIMER button
again.
Auto-off Timer: When the air conditioner
is on, it can be set to automatically turn
off in 30 minutes to 24 hours. To set the
Auto-off Timer; while the unitison, point
the remote toward the air conditioner and
pressthe TIMER button. Then press the +
or - buttons to adjust the timer setting in
30 minute increments (.5 hours). Once
desired setting is reached, press TIMER
button again. An audio alert will sound,
and the TIMER OFF indicator will stop
flashing to indicate the setting has been
saved and the timer has been activated.
To cancel the auto-off timer, pressthe
TIMER button again.
8. Pressthe LIGHT button to turn the air
conditioner control panel indicator lights
on and off.
REMOTE CONTROL LOCK
Pressthe + and - buttonssimultaneouslyto
lock the buttons on the remote control.
When Iockedsthe remote control may not
be usedto operate the unit. Pressthe + and
- buttons simultaneouslyonce more to unlock
the remote control,
CHANGE TEMP READING °C & °F
When the unit is powered off, pressthe
MODE and - buttons simultaneously to
change the temperature reading from °F to
°C. Pressthe MODE and - buttons simultane-
ously once more to change the temperature
reading from °C to °F.
INSERTINGBATTERIES- The included re-
mote control usestwo AAA batteries.
1) Remove the back cover of the re-
mote control
2) Insert two AAA 1.5V batteries, mak-
ing sure they are in the correct posi-
tion.
3) Replace the cover.
DO NOT mix old and new batteries. DO
NOT mix together Alkaline, Standard
(Carbon-Zinc), or Rechargeable (Nickel-
Cadmium) batteries. Dispose of batteries
properly. DO NOT leave batteries in they
remote if it will not be usedfor longer than
2 months.
13
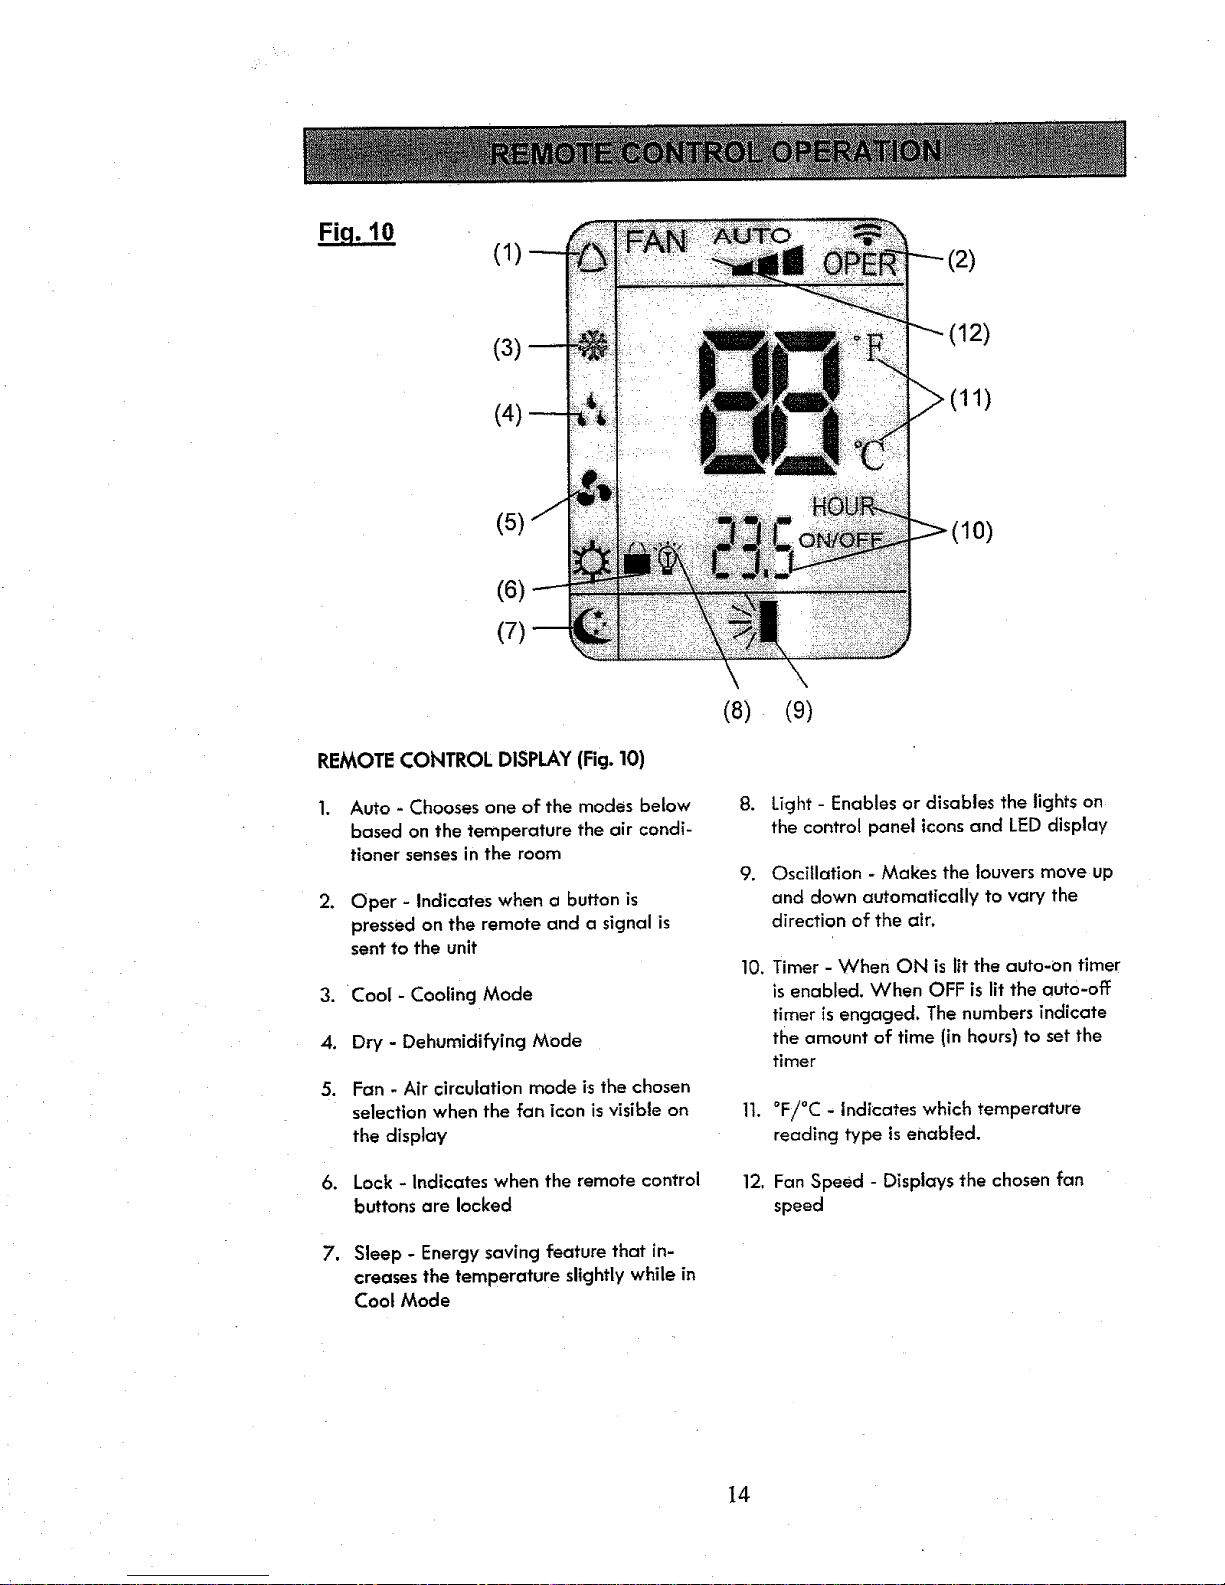
Fiq. 10
(1)
(3)
(4)
2)
(11)
(5)
(6)
(7)
(10)
REMOTE CONTROL DISPLAY(Fig. 10)
1. Auto - Chooses one of the modes below
based on the temperature the air condi-
tioner senses in the room
.
Oper - Indicates when a button is
pressed on the remote and a signal is
sent to the unit
3. Cool - Cooling Mode
4. Dry - Dehumidifying Mode
.
Fan - Air circulation mode is the chosen
selection when the fan icon is visible on
the display
6. Lock - Indicates when the remote control
buttons are locked
7. Sleep - Energy savingfeature that in-
creasesthe temperature slightlywhile in
Coot Mode
(8)
.
(9)
,
10.
!t.
12.
Light - Enables or disables the lights on
the control panel icons and LED display
Oscillation - Makes the louvers move up
and down automatically to vary the
direction of the air.
Timer - When ON is lit the auto-on timer
isenabled. When OFF is lit the auto-off
timer is engaged. Thenumbers indicate
tl_e amount of time (in hours) to set the
timer
°F/°C - Indicates which temperature
reading type is enabled.
Fan Speed - Displays the chosen fan
speed
]4
 Loading...