

Kenmore 40752301210 Owner’s Manual
Use & Care Guide
Manual: de Uso y Cuidado
English / Espa_ol
Models, Modelos: 407.52301
i<enmo
Dehum°difier
Deshumidificador
Sears Brands Management Corporatlon
Hoffman Estates, IL 60179 U.S.A.
www.sears.com
www.kenmore.¢om
Package Contents ........................................ 2
Warranty ....................................................... 2
Safety Instructions ........................................ 3
Electrical Requirements ............................... 4
Installation ................................................. 5-7
Key Features ................................................ 7
Control Panel ............................................... 8
• Kenmore Dehumidifier * 4 Casters • Use and Care Guide
Kenmore Limited Warranty
When installed,operated and maintained according to all supplied instructions,if this appliance
fails due to a defect in material and workmanship withinone year from the date of purchase,
call 1-800-4-MY-HOME® to arrange for free repair.
If this appliance is ever used for other than private family purposes, this warranty applies for
only 90 days from the date of purchase.
This warranty covers only defects in material and workmanship, Warranty coverage
does NOT include:
1, Expendable itemsthat can wear outfrom normal use, includingbut not limited to filters,
belts, light bulbs, and bags.
2. A service technician to instructthe user in correct productinstallation,operation or
maintenance.
3. A service technician to clean or maintain this product.
4, Damage to or failure of this productif it is not installed, operated or maintained accord-
ing to the all instructions supplied with the product.
5. Damage to or failure of this product resulting from accident, abuse, misuse or use for
other than its intended purpose.
6, Damage to or failure of this product caused by the use of detergents, cleaners, chemi-
cals or utensils other than those recommended in all instructions supplied with the product.
7. Damage to or failure of parts or systems resulting from unauthorized modifications
made to this product.
Disclaimer of implied warranties; limitation of remedies
Customer's sole and exclusive remedy under this limited warranty shall be product repair as
provided herein. Imptied warranties, including warranties of merchantability or fitness for a
particular purpose, are limited to one year or the shortest period allowed by law. Sears sha]l
not be liable for incidental or consequential damages. Some states and provinces do not allow
the exclusion or limitation of incidental or consequential damages, or limitation on the duration
of implied warranties of merchantability or fitness, so these exclusions or limitations may not
apply to you.
This warranty applies only while this appliance is used in the United States.
This warranty gives you specific legal rights, and you may also have other rights whichvary
from state to state.
Sears Brands Management Corporation, Hoffman Estates, IL 60179
Water Disposing Options ..................... _........9
Care and Maintenance ............................... 10
Troubleshooting ..................................... 11,12
Product Specification ................................... t3
Master Protection Agreement ...................... 14
Spanish Section ................................ e......15
Sears Service .............................. Back Cover
IMPORTANTCAUTIONSFORUSINGYOURDEHUMIDIFIER.
Toreducetheriskoffire,electrical shock, injury, or damage to the
dehumidifiers, these safet'j precautions must be followed:
Safety
• Do not place the power cord near a heater.
• Do not use an electrical outlet near flam-
mable or combustible materials such as
gasoline, propane, paint thinners, etc.
• Do not disassemble or modify dehumidifier
parts or components. It may cause electdc
shock and failure.
• Plug in the power cordproperly.
• Do not turn the unit on and off by inserting
or pulling out the power plug.
• Do not damage the power cord or use an
unspecified power cord.
• Do not modify power cord length.
• Do not share the outlet with another appli-
ance.
•Always plug into a grounded outlet. Not
grounding unit may cause electrical shock.
oUnplug the unit ifit emits strange sounds,
odors, or smoke.
- Do not use an electrical cutlet if itis loose
or damaged.
• Do not operate or plug in unit with wet
hands or in a wet environment.
• Ventilate area before operating dehumidi-
tier. Check for the presence d natural gas
or the buildup d other combustible vapors.
• Do not clean the dehumidifier with water.
Water may enter the unit and degrade the
insulation resulting in an electrical shock.
• If water enters the product, turn offthe de-
humidifier's power switch, then unplug the
unit. Do not plug in unit until it has been
inspected by an authorized repair service.
, Because the fan rotates at high speed dur-
ing operation, always unplug dehumidifier
before attempting any recommended main-
tenance or cleaning,
• Do not block the inlet or outlet. It may
cause unit to fail or to operate inefficiently.
• Do not remove plug from outlet by pulling
on the cord.
• When not in use, turning the unit off will
save energy. Unplug the dehumidifier
when not using for long periods of time.
• When removing the filter, be aware that
some metal parts may have sharp edges
and may cause injury.
• Do not use the water collectedin the
bucket for drinking purposes. It is not
sanitary and could cause illness.
• Do not allow children to play with this
product.
Tips
. Make sure the dehumidifier isthe correct
size for the area you want to dehumidify.
It is not designed to dehumidify the entire
house.
• For proper operation, the dehumidifier
should only be placed on a level floor.
• Close all doors, windows and other
openings to the room. The dehumidifier
must operate inan enclosed area to be
effective.
•To clean, use a soft cloth; do not use
wax, thinners, or strong detergents as
they may change the color of the unit or
cause surface damage.
• Be sure to replace the bucket properly
after emptying to prevent water from col-
lecting on the floor causing damage to
some types of flooring.
° Do not put a pet or house plant where it
will be exposed to direct air flow. This
could injurethe pet or plant.
• Operation without filter will cause unit
failure. Insert the filter securely. Clean it
every two weeks. (See Care and Mainte-
nance section in thismanual.)

OBSERVE ALL LOCAL CODES AND
ORDINANCES.
DO NOT, UNDER ANY CIRCUMSTANCES,
REMOVE THE POWER SUPPLY CORD
GROUND PRONG.
ELECTRICAL GROUND IS REQUIRED ON
THIS APPLIANCE
A 11S-VOLT 60Hz, AC ONLY, 15A FUSED
AND PROPERLY GROUNDED ELECTRI-
CAL SUPLLY IS REQUIRED.
A time delay fuse or time delay circuit
breaker is recommended. Use a dedi-
cated circuit serving only this appliance.
3-prong grounded plug
Power supply cord Grounded 3-prong
electrical outlet
DO NOT USE AN EXTENSION CORD.
RECOMMENDED GROUNDING METHOD
For your personal safety, this appliance
must be grounded. This appliance has a
power supply cord with a 3-prong'
grounded plug. To minimize possible
shock hazard thecord must be plugged
into a matching grounded electrical out-
let that complies with the latest edition
of the National Electrical Codes and all
local codes and ordinances.
If a grounded 3-prong electrical outlet is
not available, it isthe personalresponsi-
bility and obligation of the customer to
have one installed by a qualified electri-
cian.
_" WARNING
ELECTRICAL SHOCK HAZARD
* Plug intoa grounded3-prong outlet,
• Do not remove the ground pin from
the plug
• Do not use an adapter
• Do not use an extension cord.
e Failureto follow these instructions
can result indeath, fire or electrical
shock.
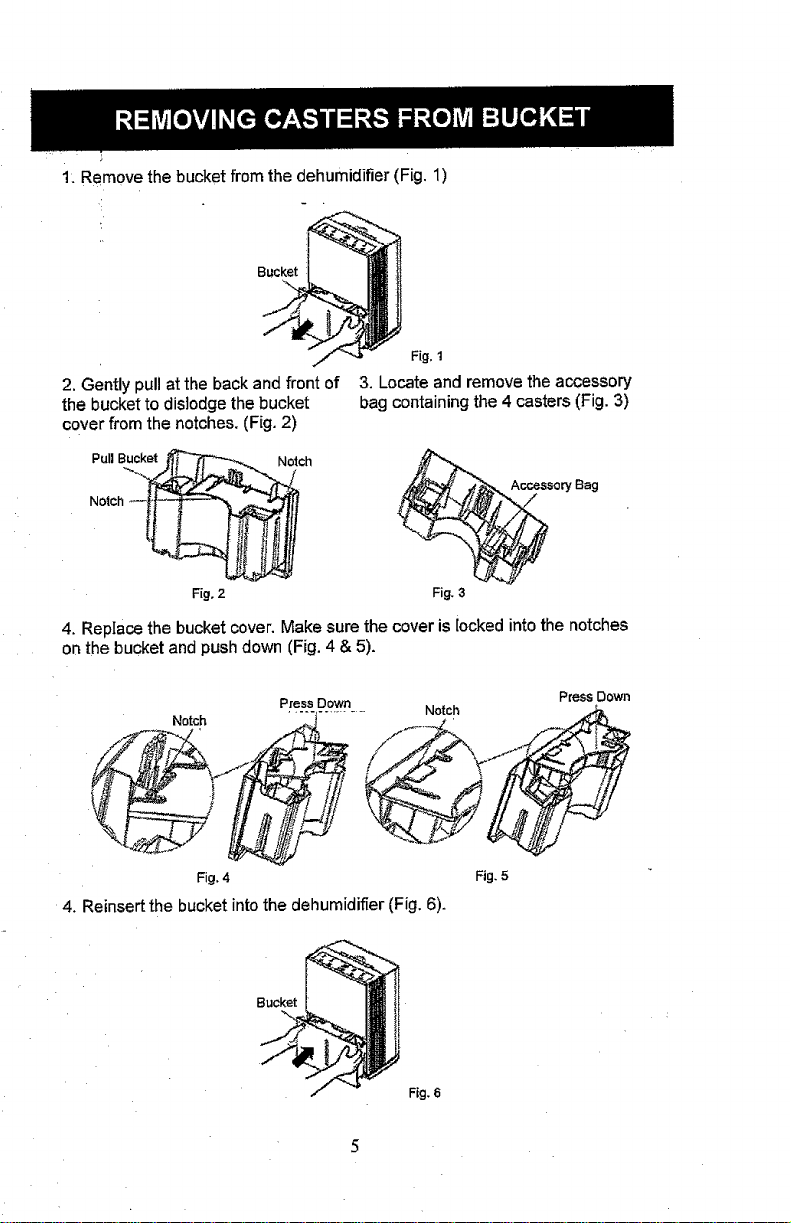
1.Removethebucketfromthedehumidifier(Fig.1)
Fig. 1
2,Gentlypullatthebackand front of
the bucket to dislodge the bucket
cover from the notches. (Fig. 2)
Pull Bucket Notch
3. Locate and remove the accessory
bag containing the 4 casters (Fig. 3)
__sory Bag
Fig. 2
Fig, 3
4. Replace the bucket cover. Make sure the cover is locked into the notches
on the bucket and push down (Fig. 4 & 5).
Press Down Press Down
Notch .................. ,,_. Notch_ ..$'=
Fig. 4 Fig. 5
4. Reinsert the bucket intothe dehumidifier (Fig, 6).
Bucket
Fig, 6
 Loading...