

Kenmore 405.84086, 405.84106 Use & Care Manual

Use & Care Guide
Manual de Uso y Cuidado
Kenmore
Portable Air Conditioner
®
Aire Acondicionado Portatil
Models/Modelos: 405.84086 , 405.84106
Sears Brands Management Corporation
Hoffman Estates, IL 60179 U.S.A.
www.kenmore.com
ww
w.sears.com
www. kmart.com

TABLE OF CONTENTS
Before Using Your New Air Conditioner.................................................................................2
Warranty........................................................................................................................................2
Important Safety Instructions.................................................................................................3-5
Electrical Requirements...............................................................................................................6
Parts and Features........................................................................................................................7
Installation Instructions............................................................................................................8-12
Operation.................................................................................................................................13-16
Using Remote Control...................................................................................................17-25
The
Care And Maintenance............................................................................................................26
Troubleshooting..........................................................................................................................27
Master Protection Agreement.................................................................................................28
BEFORE USING YOUR NEW AIR CONDITIONER
Read this guide. It will help you operate your new Kenmore Air Conditioner in the
safest and most effective way.
Keep this book and your sales check (receipt) in a safe place for future reference.
WARRANTY
Kenmore One Year Limited Warranty When installed, operated and maintained according to all
supplied instructions, if this appliance fails due to a defect in material and workmanship within
one year from the date of purchase, call 1-800-4-MY-HOME
appliance is ever used for other than private family purposes, this warranty applies for only 90
days from the date of purchase.
This warranty covers ONLY defects in material and workmanship, and will NOT pay for:
1. Expendable items that can wear out from normal use, including but not limited to filters, belts,
incandescent light bulbs and bags.
2. A service technician to instruct the user in correct product installation, operation or maintenance.
3. A service technician to clean or maintain this product.
4. Damage to or failure of this product if it is not installed, operated or maintained according to all
instructions supplied with the product.
5. Damage to or failure of this product resulting from accident, abuse, misuse or use for other than
its intended purpose.
6. Damage to or failure of this product caused by the use of detergents, cleaners, chemicals or
utensils other
7. Damage to or failure of parts or systems resulting from unauthorized modifications made to this
product.
Disclaimer of implied warranties; limitation of remedies Customer’s sole and exclusive remedy
under this limited warranty shall be product repair as provided herein. Implied warranties,
including warranties of merchantability or fitness for a particular purpose, are limited to one year
or the shortest period allowed by law. Sears shall not be liable for incidental or consequential
damages. Some states and provinces do not allow the excl
consequential damages, or limitation on the duration of implied warranties of merchantability or
fitness, so these exclusions or limitations may not apply to you.
This warranty applies only while this appliance is used in the United States.
This warranty gives you specific legal rights, and you may also have other rights which vary from
state to state.
Sears Brands Management Corporation, Hoffman Estates, IL 60179
than those recommended in all instructions supplied with the product.
2
®
to arrange for free repair. If this
usion or limitation of incidental or

IMPORTANT SAFETY INSTRUCTIONS
Read all instructions in this guide before using your Air Conditioner. This product is
intended for indoor residential use only, not for industrial or other commercial
applications. Use only with electrical wiring that is in good working order and
that meets applicable codes and ordinances. If you have any questions whether
your wiring is adequate, consult a qualified electrician.
While using your Air Conditioner, you should follow the IMPORTANT
INSTRUCTIONS listed below. As part of those instructions, we have used the
word ” “ to indicate the level of hazard:
indicates a hazard which, if not avoided, could result in injury or death.
WARNING
WARNING:
SAFETY
IMPORTANT INSTRUCTIONS
When using electrical appliances, basic precautions should always be followed to
reduce the risk of fire, electric shock, and injury to persons, including the following:
1. Read all instructions before using this Air Conditioner.
2. Use this Air Conditioner
recommended by the manufacturer may cause electrical shock, fire, or injury
to persons.
3. Do not operate the Air Conditioner with a damaged power cord or after the
Air Conditioner malfunctions or has been dropped in any manner.
4. This appliance is not intended for use by persons (including children) with
reduced physical, sensory or mental capabilities, or lack of experience and
knowledge, unless they have been given supervision or
use of the appliance by a person responsible for their safety.
5. Do not place the Air Conditioner on a small, unlevel, uneven or any surface
which might allow unit to tip or fall.
6. For proper operation, Air Conditioner should be placed on a smooth,
non combustible surface.
7. Always unplug Air Conditioner when not in use.
8. Do not operate Air Conditioner with any safety devices removed.
9. Do not run power cord under carpeting. Do not cover cord with throw rugs,
runners, or the like. Arrange cord away from traffic area where it will not be
tripped over.
10. Avoid the use of extension cords due to risk of fire. If an extension cord must
be used, the cord must be a minimum 14AWG and rated not less than 1875 watts.
11. Do not insert or allow any object to enter any openings on the Air Conditioner.
Doing so may cause electric shock and/or fire hazard.
12. This product is intended for indoor residential use only, not for industrial or
other commercial applications. This warranty is void if this product is ever
used for other than private household purposes.
13. You will need a level surface at least 6" (15.2 cm) from heat sources such as
ranges or heaters.
14. Do not block air openings or place Air Conditioner on a soft surface such as a
bed or sofa.
only as described in this manual. Any other use not
instruction concerning
3

15. The Air Conditioner should be connected to a 115 V, 60 Hz, 15- or 20-amp
fused 3 prong grounded outlet.
16. Always insert the filters securely. Clean them every two weeks. Operation without
filters may cause failures.
OPERATING CONDITION
• The Air Conditioner must be operated within the temperature range
indicated below:
MODE ROOM TEMPERATURE
COOL 62ºF 5ºF
DRY 55ºF (13ºC) ~ 95ºF (35ºC)
(17ºC) ~ 9 (35ºC)
Suggested tools for window kit installation:
1. Screwdriver (medium size Phillips)
2. Tape measure or ruler
3. Knife or scissors
4. Saw (In the event the window kit needs to be cut down in size because
the window is too narrow for direct installation)
WARNING:
For Your Safety:
• Do not store or use gasoline or other flammable vapors and liquids in the vicinity of
this or any other appliance.
• Avoid fire hazard or electric shock. Do not use an extension cord or an adaptor plug.
Do not remove any prong from the power cord.
WARNING:
Electrical Information:
• Be sure the electrical service is adequate for the model you have chosen. This
information can be found on the serial plate, which is located on the side of the
cabinet and behind the grille.
• Be sure the Air Conditioner is properly grounded. To minimize shock and fire hazards,
proper grounding is important. The power cord is equipped with a three-prong
grounding plug for protection against shock hazards.
• Your Air Conditioner must be used in a properly grounded wall receptacle. If the
wall receptacle you intend to use is not adequately grounded or protected by a tim
delay fuse or circuit breaker, have a qualified electrician install the proper receptacle.
• Ensure the receptacle is accessible after the unit installation.
e
4

WARNING: SHOCK HAZARD
Never place Air Conditioner where it may fall into a bathtub, sink,
flooded area, or any receptacle or pool of water.
WARNING: FIRE HAZARD
Air Conditioners have arcing or sparking parts inside. Do not use near combustible
materials or flammable gases or sources of heat. DO NOT USE in areas where
gasoline, paint or flammable materials are used or stored. To prevent a possible
fire, do not block air intakes or exhaust in any manner. Do not insert or allow
foreign objects to enter any intakes or exhaust opening as this may cause an
electric shock, fire, or damage the fan.
WARNING: HOT SURFACES
Do not touch Air Conditioner motor when in use. This motor is hot when in use
avoid burns, do not let bare skin touch hot surfaces.
. To
SAVE THESE INSTRUCTIONS!
5
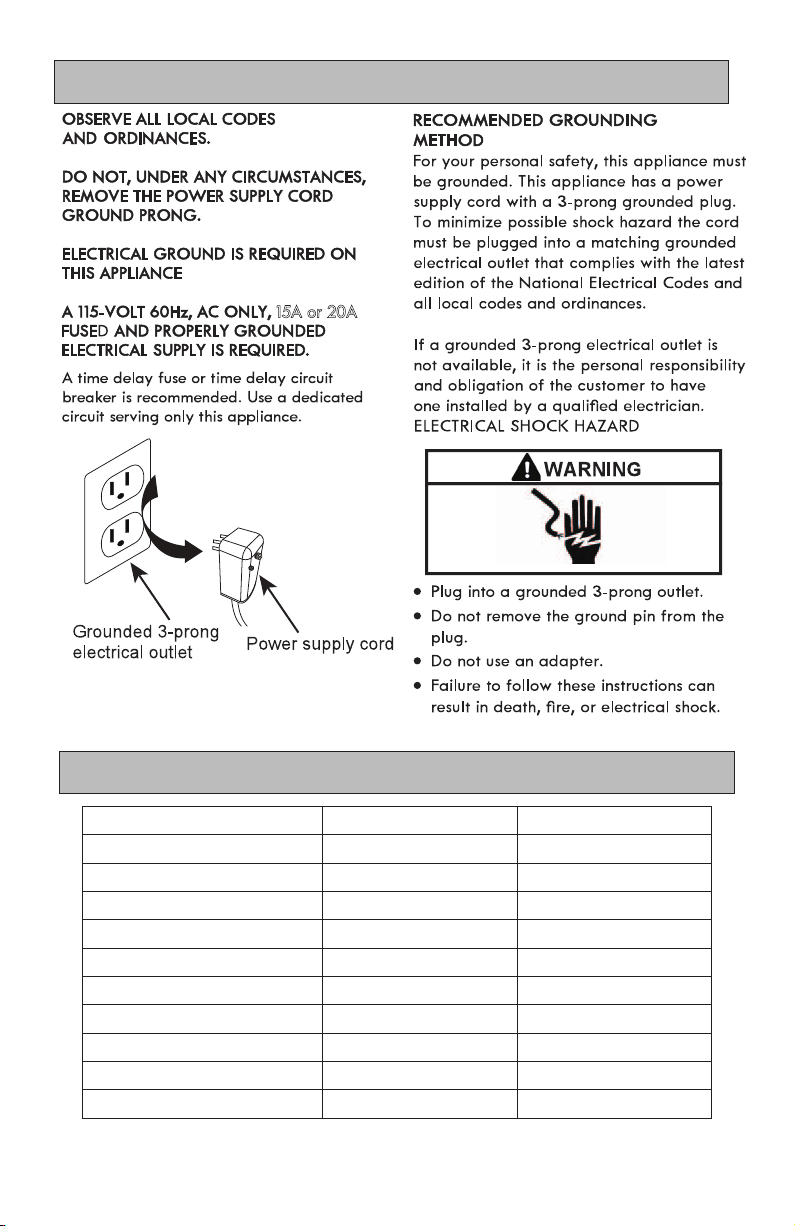
ELECTRICAL REQUIREMENTS
15A or 20A
3-prong grounded LCDI plug
If an extension cord must be used, the cord
must be a minimum14AWG and rated not
less than 1875 watts.
PRODUCT SPECIFICATIONS
MODEL 84086
Voltage 115V~60Hz
Amperage:
Cooling
Power Consumption:
Cooling
Cooling Capacity
Dehumidifying Capacity
"Noise" Level dB(A) (H)
Air Circulation (CFM)
Remote Control
Dimensions (W x H x D)
Net Weight
8.0 Amps
905 Watts
8,000BTU/h
46 Pints / Day
(21.6 Liters / Day)
INCLUDED
14.72''x 30.28'' x 14.57''
53.57Lbs
6
57.5
250
84106
115V~60Hz
10.0 Amps
1130 Watts
10,000BTU/H
56 Pints / Day
(26.4 Liters / Day)
58
244
INCLUDED
14.72''x 30.28'' x 14.57''
56.22 Lbs
FRONT
REAR
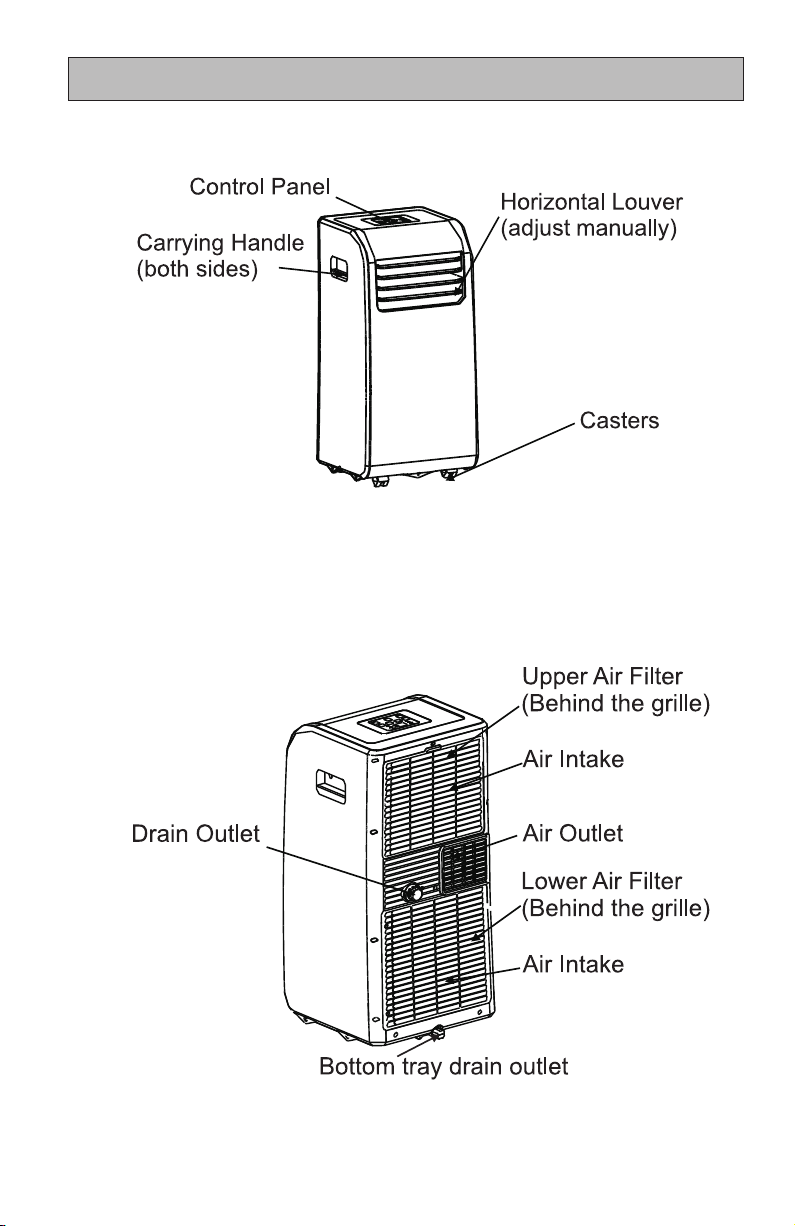
PARTS AND FEATURES
7
INSTALLATION INSTRUCTIONS
LOCATION
The Air Conditioner should be placed on a firm
foundation to minimize noise and vibration. For safe
and secure positioning, place the unit on a smooth,
level floor strong enough to support the unit.
The unit has casters to aid placement, but it should
only be rolled on smooth, flat surfaces. Use caution
when rolling on carpet surfaces. Do not attempt to
roll the unit over
objects.
The unit must be placed within reach of a properly
rated grounded socket.
Never place any obstacles around the air inlet or
outlet of the unit.
Allow at least 12'' of space from the wall
for maximum performance.
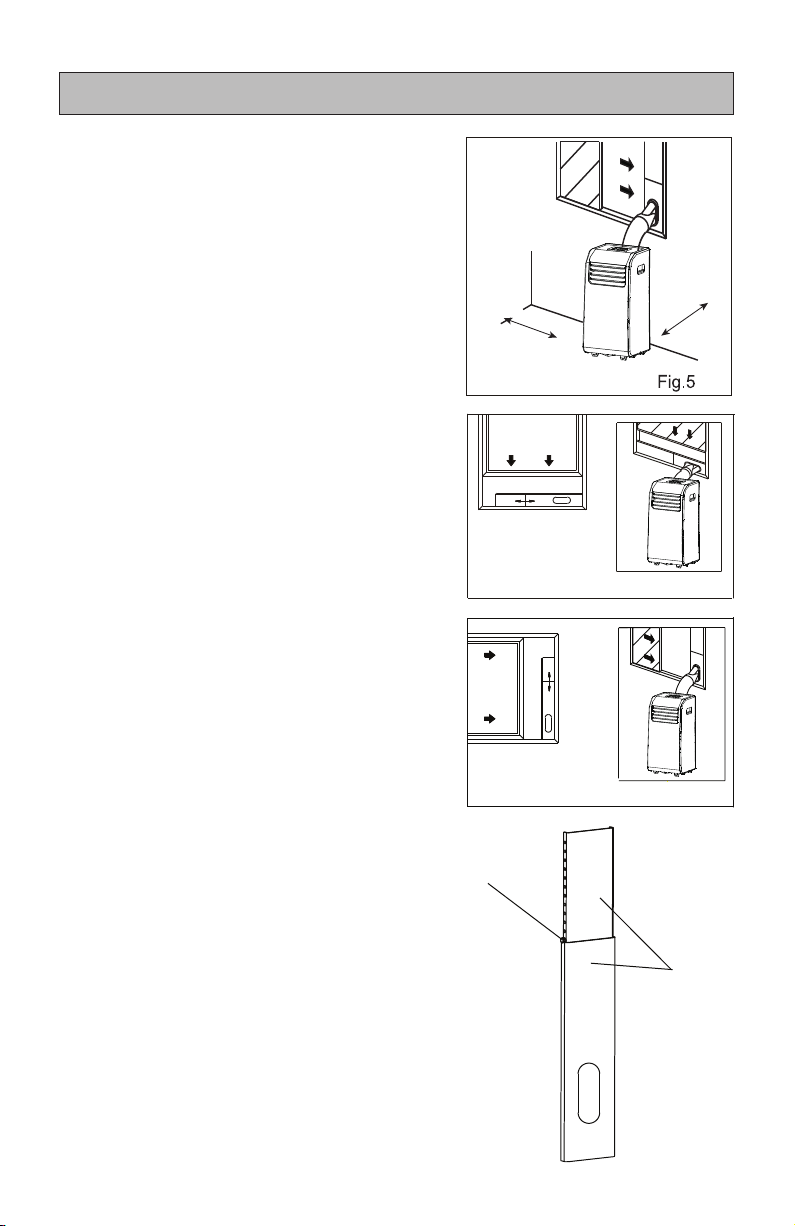
WINDOW SLIDER INSTALLATION
Your window slider has been designed to fit
most standard vertical and horizontal window
applications. However, it may be necessary
for you to modify some aspects of the installation
procedures for certain types of windows. Refer to
Fig. 6 and Fig. 7 for minimum and ma
ximum
window openings.
12 Inch
Vertical
Window
Window Slider
Minimum:26.57 Inch(67.5cm)
Maximum: 48.43Inch(123cm)
Vertical
Window
12 Inch
Fig.6
Once your window slider is opened to the correct
width, insert the supplied screw to secure the
window in place(see Fig. 7a).
NOTE: If the window opening is less than the
minimum length of the window slider, only use
the window slider section with the hole. Cut from
the end that is furthest from the section hole.
Do not cut any material from the end that is
nearest hole.
8
Window Slider
Minimum:26.57 Inch(67.5cm)
Maximum: 48.43Inch(123cm)
Bol t
Fig.7
Window slider sections
Fig.7a
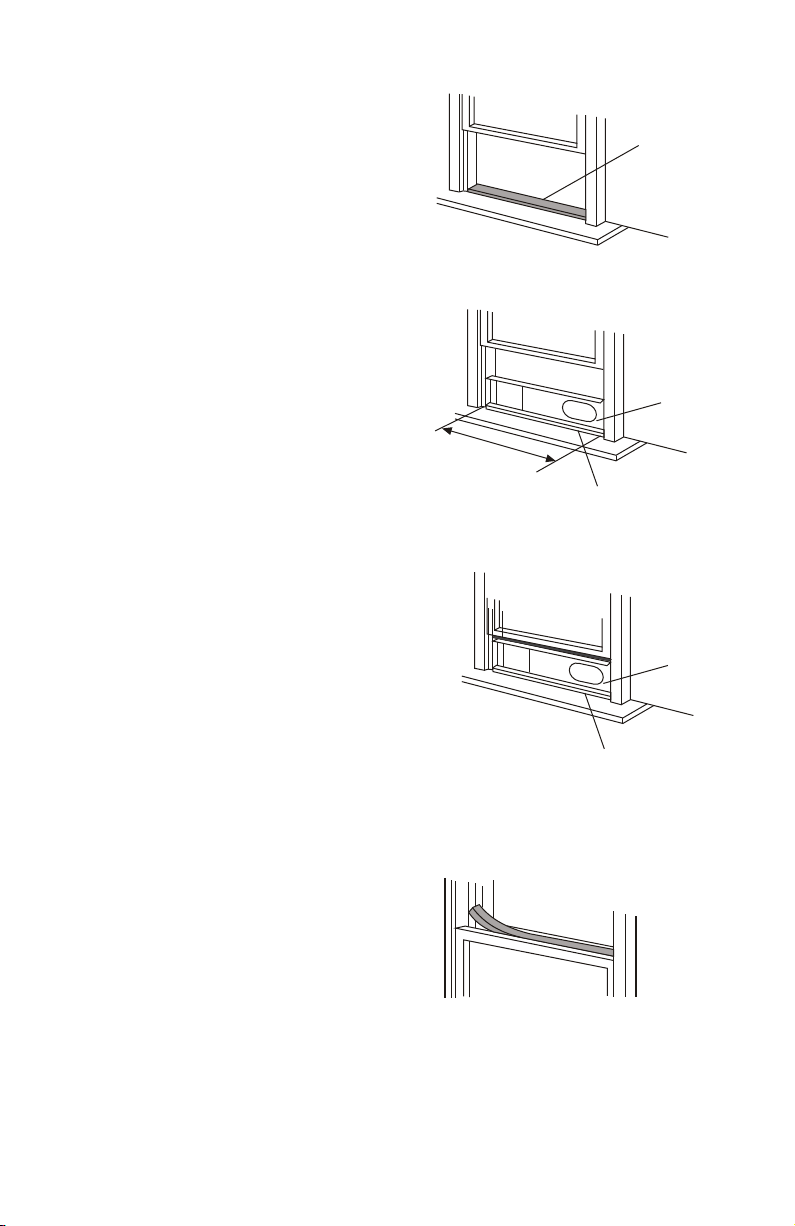
Installation in a double-hung sash window
1. Cut a length of adhesive foam seal the
width of the window and attach it to the
window stool (see Fig. 8).
2. Place the window slider onto the adhesive
foam seal (see Fig. 9). Adjust window
slider width according to the instructions
on page 8.
Adhesive Foam Seal
3. Cut another length of adhesive foam seal
and attach it to the bottom of the window
sash. Close the window sash securely onto
the window slider (see Fig. 10).
4. Cut the non-adhesive thick foam seal to
window width and insert into the open
gap between the inner window and outer
window sash (see Fig. 11).
Fig.8
"Window Slider"
26.57''-48.43''
Window stool
Fig.9
"Window Slider"
"Window stool"
Fig.10
"Non-adhesive Thick Foam Seal"
Fig.11
9
 Loading...