

Kenmore 405.34036310 Use & Care Manual

Use & Care Guide
Manual de Uso y Cuidado
English/Español
Kenmore
®
36’’ Tower Fan
3 Speeds, Oscillation Switch
Ventilador Tipo Torre de 36 pulgadas
3 Velocidades, Oscilación Interruptor
Model/Modelo: 405.34036310
Customer Assistance /Asistencia al Cliente
1-855-438-7899
Sears Brands Management Corporation
Hoffman Estates, IL 60179 U.S.A.
www.kenmore.com
www.sears.com
www.kmart.com
®

CAUTION
Read and follow all instructions before operating fan. Do not use fan if any part
are damaged or missing.
WARNING
1. To reduce the risk of fire or electrical shock, do not use this fan with any
solid-state speed control device.
2. If the supply cord is damaged, it must be replaced by the manufacturer or its
service agent or other qualified person in order to avoid a hazard.
3. This appliance has a polarized plug (one blade is wider than the other). To
reduce the risk of electric shock, this plug is intended to fit in a polarized outlet
only one way. If the plug does not fit fully in the outlet, reverse the plug. If it
still does not fit, contact a qualified electrician. Do not attempt to defeat this
safety feature.
4. Do not leave the fan running unattended.
5. Keep electrical appliances out of reach of children. Do not let them use the
appliances without supervision.
RULES FOR SAFE OPERATION
1. Never insert fingers or any other objects through the fan housing when the
tower fan is running. Unplug the fan when moving it from one location to
another.
2. Disconnect the fan before cleaning.
3. To avoid overturning, be sure the fan is on a stable surface when operating it.
4. To reduce the risk of electric shock, DO NOT use the fan by a window.
5. The rules about cord and plug as below:
(1) This product employs overload protection (fuse). A blown fuse indicates an
overload or short-circuit situation. If the fuse blows, unplug the product from the
outlet. Replace the fuse as per the user servicing instructions (follow product
marking for proper fuse rating) and check the products. If the replacement fuse
blows, a short-circuit may be present and the product should be discarded or
returned to an authorized service facility for examination and/or repair.
(2) Do not operate any fan with a damaged cord or plug. Discard fan or or call
the following customer assistance number for possible repair: 1-855-438-7899.
(3) Do not run cord under carpeting.Do not cover cord with throw rugs, runners, or
similar coverings. Do not route cord under furniture or appliances. Arrange cord
away from traffic area and where it will not be tripped over.
(4) This appliance is for private household use only.
1
READ AND SAVE THESE INSTRUCTIONS
2
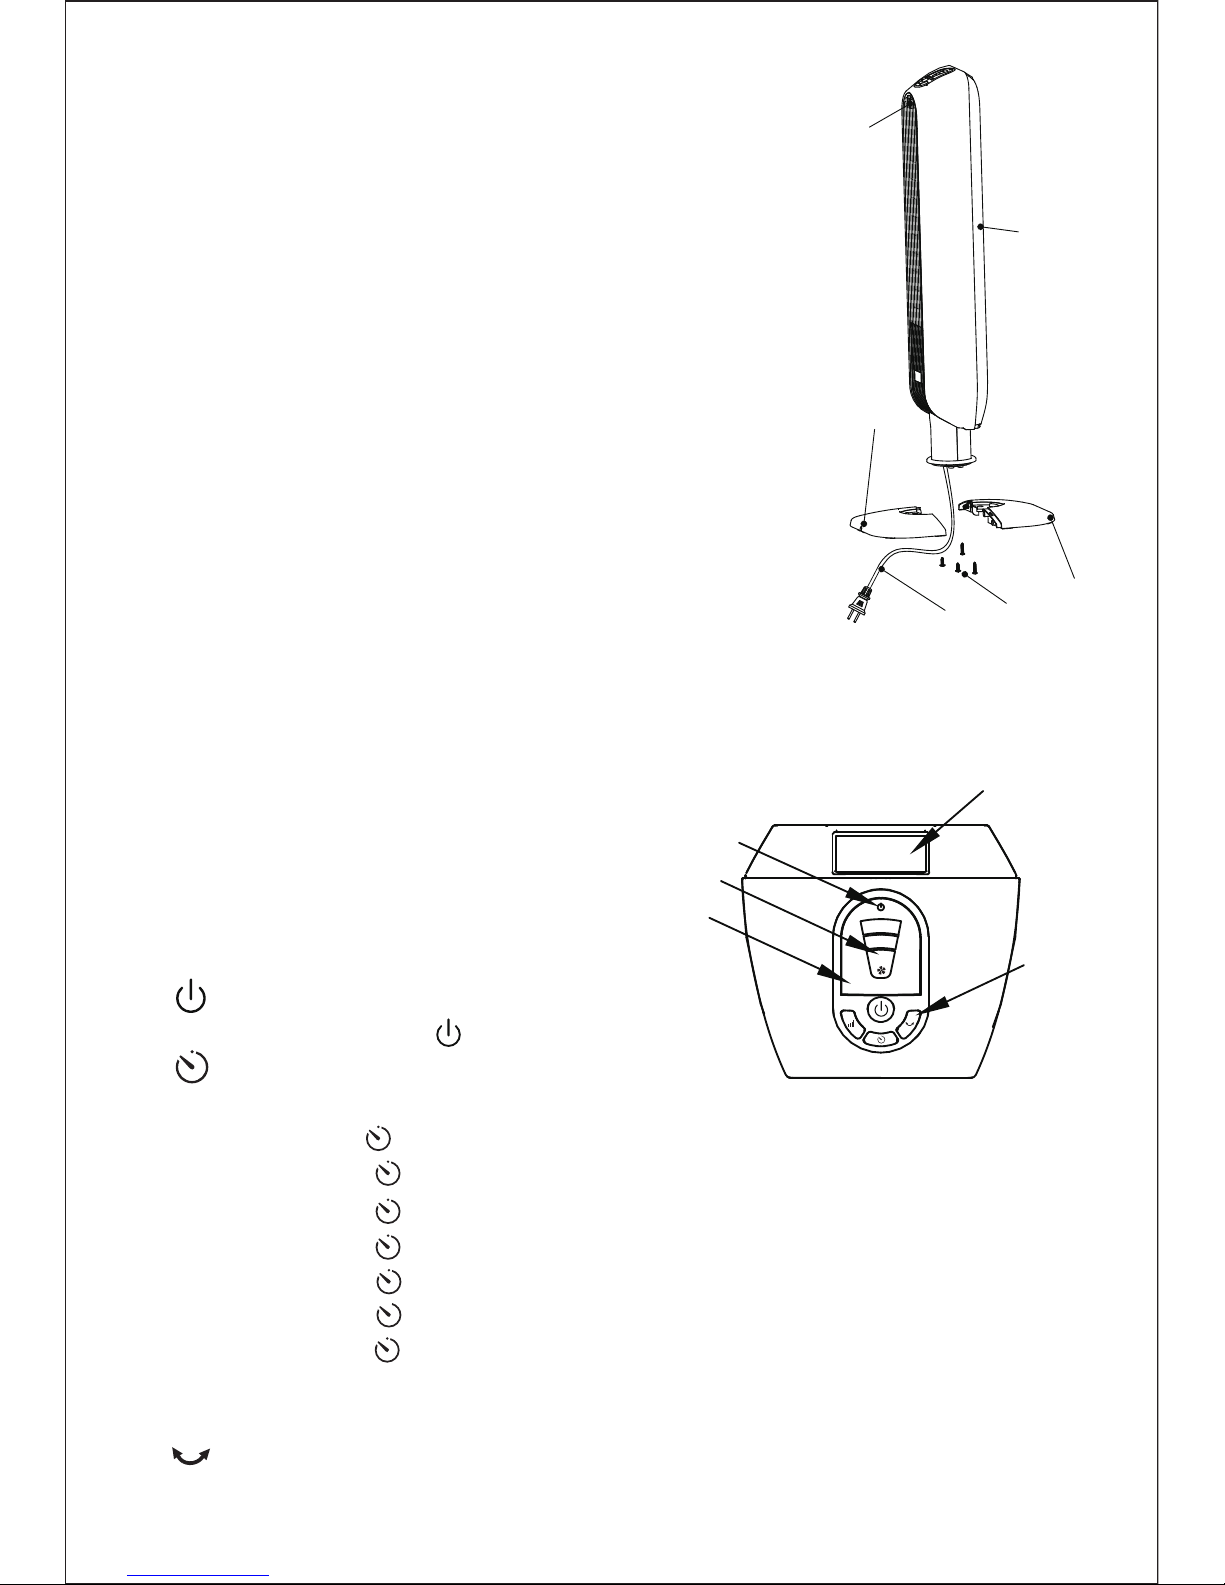
PARTS ASSEMBLY
1. Pull power cord (3) all the way out.
2. Attach rear base half (2) and front base half (5)
together by inserting the two posts on front half into
the two holes on rear half and insert the two posts
on rear half into the two holes on front half.
3. Insert the power cord through the center hole in
the base assembly. Insert the 4 posts at the bottom
of the fan body into the 4 holes on the base
assembly. Carefully turn the fan and base upside down.
Insert the four screws into the base post holes and
tighten. Fit the power cord into the three hooks on the
underside of either the front or rear base half and
through the slot in the base edge. Turn the fan upright for operation.
1. Fan Body 2. Rear Base Half 3. Power cord
4. Screws 5. Front Base Half 6. Receiver
Remark: Rear base half and front base half are same.
PARTS (see Figure 1)
OPERATING INSTRUCTIONS
I. CONTROLS (Figure 2)
1. Remote Control Holder
2. Control Panel Keys
3. Power On/Off Indicator Light
4. Speed Indicator Lights
5. Timer Set Indicator Lights
II. CONTROL PANEL
1. “ ” ON/OFF
To turn fan on, press the “ ”
2. “ ” TIMER
Choose from 1 to 7 hour setting as follows:
• 1 hour: Press the “ ” Timer key once. The indicator “1H” will be lit.
• 2 hours: Press the “ ” Timer
• 4 hours: Press the “ ” Timer
• 7 hours: Press the “ ” Timer
Press the Timer key an eighth time to turn the Timer feature off.
3. “ ” OSC
To activate the Oscillation feature, press the Oscillatio
5
1
6
3
4
2
Figure 1
key.
KEY:
n key once.
key twice. The indicator “2H” will be lit.
key four times. The indicator “4H” will be lit.
• 3 hours: Press the “ ” Timer
key three times. The indicators “1H” & “2H” will be lit.
• 5 hours: Press the “ ” Timer
key five times. The indicators “1H” & “4H” will be lit.
• 6 hours: Press the “ ” Timer
key six times. The indicators “2H” & “4H” will be lit.
key seven times. The indicators “1H”,”2H” & “4H” will
be lit.
1
2
3
4
5
1H 2H 4H
Figure 2
 Loading...