

Page 1
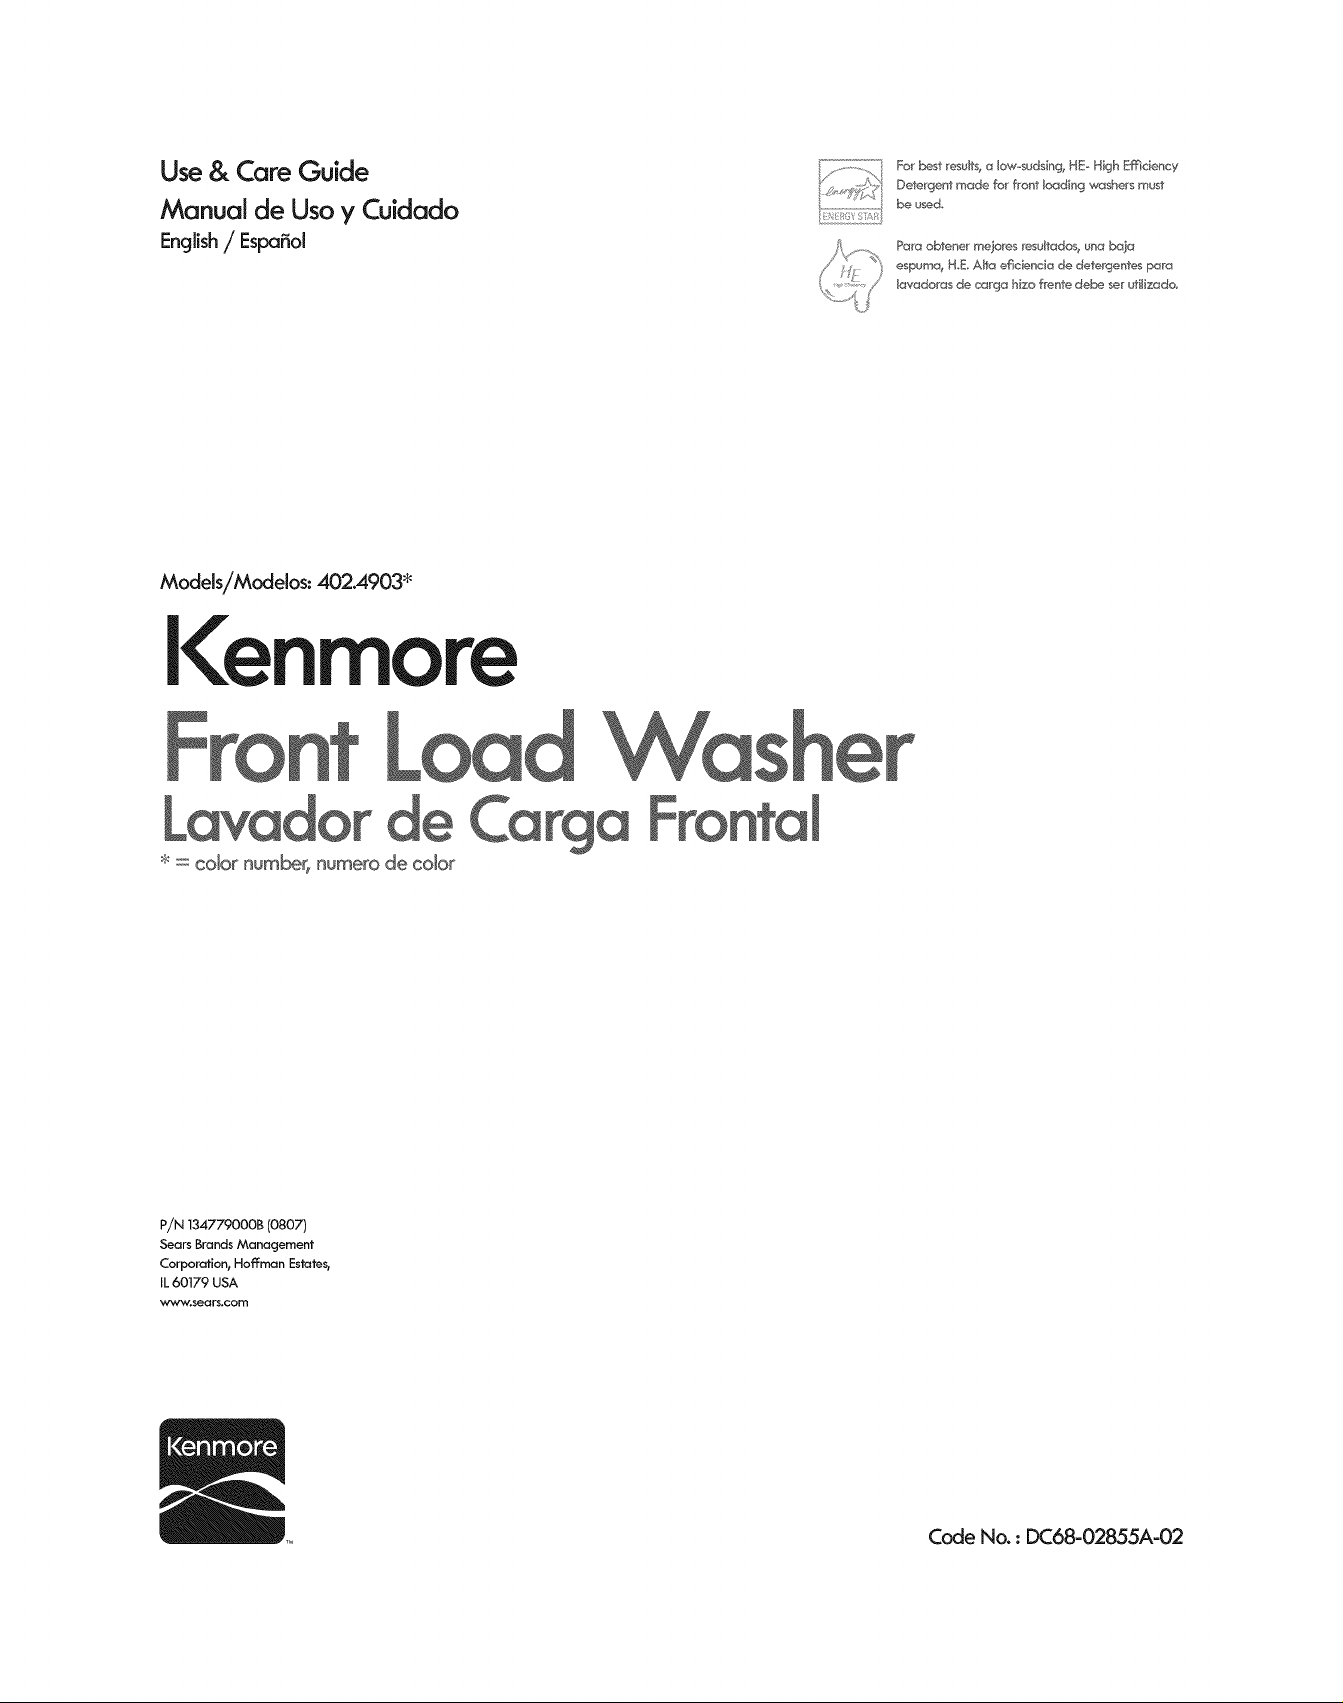
Use & Care Guide
Manual de Usa y Cuidado
English/ Espafiol
Models/Modelos: 402.4903*
Kenmore
For _t results,a Iow+suds_ng,HE° High Emdency
Detergent r_ade Jbr fror_tI_ding washers must
be u_d
Par_ obtener mejores r_ultados, una baja
espuma+HE AItd eficbnda de deter9entes pard
lavadoras de carga h_zaf_ente debe set ufillzado.
* = cobr num_r+ numero de cobr
P/N 134779000B (0807)
Sears Brands Management
Corporation_ Hoffman Estates+
iL 60179 USA
W-w'w_s_ol$.eorfl
Code No. : DC68=02855A-02
Page 2
SAFETY M ESSAG ES
iMPORTANT SAFETY iNSTRUCTiONS
GROUNDING REQUIREMENTS
FEATURES AND BENEFITS
Key Parts and Components .......................................... 6
iNSTALLATiON REQUIREMENTS
Key dimensions and specifications .................................... 7
Choose the proper location .......................................... 7
Flooring ......................................................... 7
Clearances ...................................................... 7
iNSTALLATiON iNSTRUCTiONS
Unpacking and removing shipping bolts ................................ 8
Connecting the water lines........................................... 8
Connecting the drain hose ........................................... 9
Connect to the power supply ........................................ 10
Leveling the washer ............................................... 10
HOW TO USE
Control panel f_atures ............................................. 11
Operating the washer ............................................. 12
Cycle guide ..................................................... 13
Sorting wash loads ............................................... 14
About the dispenser .............................................. 15
Detergent and dispenser use ........................................ 16
Time and status display ............................................ 17
Cycle modifier buttons ............................................. 18
Cycle option buttons .............................................. 19
DELAY S 17_RT................................................. 19
Special functions ................................................. 19
CONTROL LOCK ............................................... 19
CLEAN WASHER ............................................... 20
MY CYCLE .................................................... 20
CARE AND CLEANING
Regular cleaning ................................................. 21
Cleaning the exterior ............................................. 21
Cleaning the interior ............................................. 21
Cleaning the door seal ........................................... 21
Storing your washer ............................................. 21
Cleaning the dispenser ........................................... 22
Maintenance .................................................... 23
Cleaning the water inlet filters ...................................... 23
Cleaning the debris filter .......................................... 24
TROUBLESHOOTING GUIDE
Normal sounds you may hear ....................................... 25
Before calling for service ........................................... 25
In the space below, record the date of purchase, model, and serial
number of your product. You will find the model and serial number
printed on an identification plate located inside the washer door.
Have these items of information available whenever you contact
Sears concerning your product.
Model No.
Date of Purchase
Serial No.
Save these instructions and your sales receipt for future reference.
Master Protection Agreements
Congratulations on making a smart purchase. Your new
Kenmore@ product is designed and manufactured for years
of dependable operation. But like all products, it may require
preventive maintenance or repair from time to time. That's when
having a Master Protection Agreement can save your money and
aggravation.
The Master Protection Agreement also helps extend the life of your
new product. Here's what the Agreement* includes:
• Parts and labor needed to help keep products operating
properly under normal use, not just defects.
Our coverage goes well beyond the product warranty. No
deductible, no functional failure excluded from coverage - real
protection.
• Expert service by a force of more than 10,000 authorized
Sears service technicians, which means someone you can
trust will be working on your product.
• Unlimited service calls and nationwide service, as often as
you want us, whenever you want us.
• "No=lemon" guarantee - replacement of your covered product
if four or more product failures occur within twelve months.
• Product replacement ifyour covered product can't be fixed.
• Annual Preventive Maintenance Check at your request -no
extra charge.
• Fast help by phone - we call it Rapid Resolution. Phone
support from a Sears representative on all products. Think of us
as a "talking owner's manual."
• Power surge protection against electrical damage due to
power fluctuations.
• $250 food loss protection annually for any food spoilage that
is the result of mechanical failure of any covered refrigerator or
freezer.
• Rental reimbursement if repair of your covered product takes
longer than promised.
• 10% discount off the regular price of any non-covered repair
service and related installed parts.
Once you purchase the Agreement, a simple phone call is all that
it takes for you to schedule service. You can call anytime day or
night or schedule a service appointment online.
The Master Protection Agreement is a risk-free purchase. If you
cancel for any reason during the product warranty period, we will
provide a full refund, or a prorated refund anytime after the product
warranty period expires.
Purchase your Master Protection Agreement today!
Some limitations and exclusions apply.
For prices and additional information in the U.S.A. call
1=800=827=6655.
•Coverage in Canada varies on some items.
For full details call Sears Canada at 1=800=361=6885.
Sears Installation Service
For Sears professional installation of home appliances, garage
door openers, water heaters, and other major home items, in the
U.S.A. or Canada call
1-800-4-MY-HOME®.
Page 3
We have provided many important safety messages in this manual and on your appliance, Always read and
obey all safety messages,
This is the safety alert symbol,
This symbol alerts you to potential hazards that can result in property damage and/or serious
bodily harm or death,
All safety messages will follow the safety alert symbol and either the word DANGER or
WARNING, These words mean:
Failure to follow these safety instructions may result in property damage
and/or serious bodily harm or death,
Failure to follow these safety instructions may result in property damage
and/or serious bodily harm or death,
All safety messages will tell you what the potential hazard is, tell you how to
reduce the chance of injury, and tell you what can happen if the instructions
are not followed,
To reduce the risk of fire, electric shock, or injury to persons
when using this appliance, follow basic precautions,
including the following.
Before use, the washer must be properly installed as described
in this manual
,, Do not wash articles that have been previously cleaned in,
washed in, soaked in, or spotted with gasoline, dry cleaning
solvents, or other flammable or explosive substances, as they
give off vapors that could ignite or explode.
,, Do not add gasoline, dry cleaning solvents, or other flammable
or explosive substances to the wash water. These substances
give off vapors that could ignite or explode.
,, Under certain conditions, hydrogen gas may be produced in a
hot water system that has not been used for 2 weeks or more.
HYDROGEN GAS IS EXPLOSIVE.
,, If the hot water system has not been used for such a period,
before using the washer, turn ON all hot water faucets and let
the water flow from each for several minutes. This will release
any accumulated hydrogen gas. As the gas is flammable, do not
smoke or use an open flame during this time.
Do not allow children to play on or in the washer. Close
supervision of children is necessary when the washer is used
near children.
Before the washer is removed from service or discarded, remove
the door to prevent children from climbing inside.
,, Do not install or store the washer where it will be exposed to the
weather or freezing temperatures.
,, Do not tamper with controls.
Do not repair or replace any part of the washer or attempt any
servicing other than as described in this manual. We strongly
recommend that any service be performed by a qualified
individual.
,, See Installation Instructions for grounding requirements.
,, ALWAYS follow the fabric care instructions supplied by the
garment manufacturer.
Do not place items exposed to cooking oil inyour washer. Items
contaminated with cooking oils may contribute to a chemical
reaction that could cause a load to catch fire.
,, Use fabric softeners or products to eliminate static only as
recommended by the manufacturer.
This washer is not designed for maritime use or for mobile
installations such as in RVs, aircraft, etc.
,, Turn OFF the water taps and unplug the washer if the machine
is to be left tor an extended period of time, such as during
vacations.
,, Packaging material can be dangerous for children.
There is a risk of suffocatio!! Keep all packaging from children.
Always check the inside of the washer for foreign objects before
loading laundry. Keep the door closed when not in use.
Kemnole-Washe1-02855A-02 EN.indd 3 2010-07-13 Z- 5:29:12
Page 4
To reduce the risk of fire, electric shock, or injury to persons
when using this appliance, follow basic precautions,
including the following.
• Unplug the washer before cleaning to avoid the risk of
electric shock.
Never use harsh chemicals, abrasive cleaners, or solvents
to clean the washer. They will damage the finish.
• Do not put oily or greasy rags or clothing on top of the
washer. These substances give off vapors that could ignite the
materials.
Do not wash items that are soiled with vegetable or
cooking oil. These items may contain some oil after laundering
and may catch fire.
Disconnect this appliance from the power supply before
attempting any user maintenance. Turning the controls to
the OFF position does not disconnect this appliance from
the power supply. Failure to follow this warning carscause
serious injury, fire, electrical shock, or death.
Do not combine detergents, fabric softeners, and other
laundry products from different manufacturers for use in
one load unless specified on the label.
Do not mix chlorine bleach with ammonia or acids such
as vinegar. Follow package directions when using laundry
products. Incorrect usage cars produce poisonous gas,
resulting in serious injury or death.
Do not reach into the washer while parts are moving.
Before loading, unloading, or adding items, push in the
cycle selector knob and allow the drum to coast to a
complete stop before reaching inside.
Failure to follow this warning carscause serious injury, fire,
electrical shock, or death.
• Refer to INSTALLATION INSTRUCTIONS for detailed
grounding procedures. Installationinstructionsare packed in
the washer for installer's reference. If the washer is moved to
a new location, have it checked and reinstalled by a qualified
service person. Failure to follow this warning can cause serious
injury, fire, electrical shock, or death.
• Do not, under any circumstances, cut or remove the third
(ground) prong from the power cord. Failure to follow this
warning cars cause serious injury,fire, electrical shock, or death.
For personal safety, this appliance must be properly
grounded. Failure to follow this warning can cause serious
injury, fire, electrical shock, or death.
The power cord of this appliance is equipped with a
3-prong (grounding) plug which mates with a standard
3-prong (grounding) wall outlet to minimize the possibility of
electric shock hazard from this appliance.
• This washer must be plugged into a 120VAC, 6OHz
grounded outlet. Failure to follow this warning cars cause
serious injury, fire, electrical shock, or death.
• Have the wall outlet and circuit checked by a qualified
electrician to make sure the outlet is properly grounded.
Failure to follow this warning carscause serious injury, fire,
electrical shock, or death.
• Where a standard 2-prong wall outlet is encountered, it
is your personal responsibility and obligation to have it
replaced with a properly grounded 3-prong wall outlet.
Failure to follow this warning carscause serious injury, fire,
electrical shock, or death.
• Do not install on carpet. Install washer on a solid floor.
Failure to follow this warning carscause serious leak damage.
• Do not remove grounding prong. Do not use an adapter
or extension cord. Plug into a grounded 3-prong outlet.
Failure to follow these warnings carscause serious injury, fire,
electrical shock, or death.
The washer should always be plugged into its own
individual electrical outlet which has a voltage rating that
matches the rating plate. This provides the best performance
and also prevents overloading house wiring circuits which could
cause a fire hazard from overheated wires.
Never unplug your washer by pulling on the power cord.
Always grip plug firmly and pull straight out from the outlet.
Failure to follow this warning can cause serious injury, fire,
electrical shock, or death.
Immediately repair or replace all power cords that have
become frayed or otherwise damaged. Do not use a cord
that shows cracks or abrasion damage along its length or
at either end. Consult with a qualified service person. Failure to
follow this warning can cause serious injury, fire, electrical shock,
or death.
When installing or moving the washer, be careful not to
pinch, crush, or damage the power cord. Failure to follow
this warning cars cause serious injury, fire, electrical shock, or
death.
• The washer must be installed and electrically grounded by
a quNified service person in accordance with Iocalcodes
to prevent shock hazard and assure stability during operation.
Washer is heavy. Two or more people may be needed to
install and move the appliance. Failure to do so can result in
back or other injury.
Store and install the washer where it will not be exposed
to temperatures below freezing or exposed to outdoor
weather conditions. Failure to follow this warning can cause
serious leak damage.
• To reduce the risk of electric shock, do not install the
washer in humid spaces. Failure to follow this warning cars
cause serious injury, fire, electrical shock, or death.
Kenmore-Washer-02855A-02 EN.indd 4 2010-07-13 _ 5:29:12
Page 5
Do not allow children to play on or in the washer. Close
supervision of children is necessary when the washer
is used near children. As children grow, teach them the
proper, safe use of all appliances. Failure to comply with
these warnings could result in serious personal injuries.
Destroy the carton, plastic bag, and other packing
materials after the washer is unpacked. Children
might use them for play. Cartons covered with rugs,
bedspreads, or plastic sheets can become airtight
• Keep laundry products out of children's reach. To prevent
personal injury, observe all warnings on product labels.
Failure to comply with these warnings could result in serious
personal injuries.
Remove the door to the washing compartment to avoid
the danger of children or small animals getting trapped
inside before your washer is removed from service or
discarded. Failure to do so car] result in serious personal injury
or death.
chambers. Failure to comply with these warnings could result in
serious personal injuries.
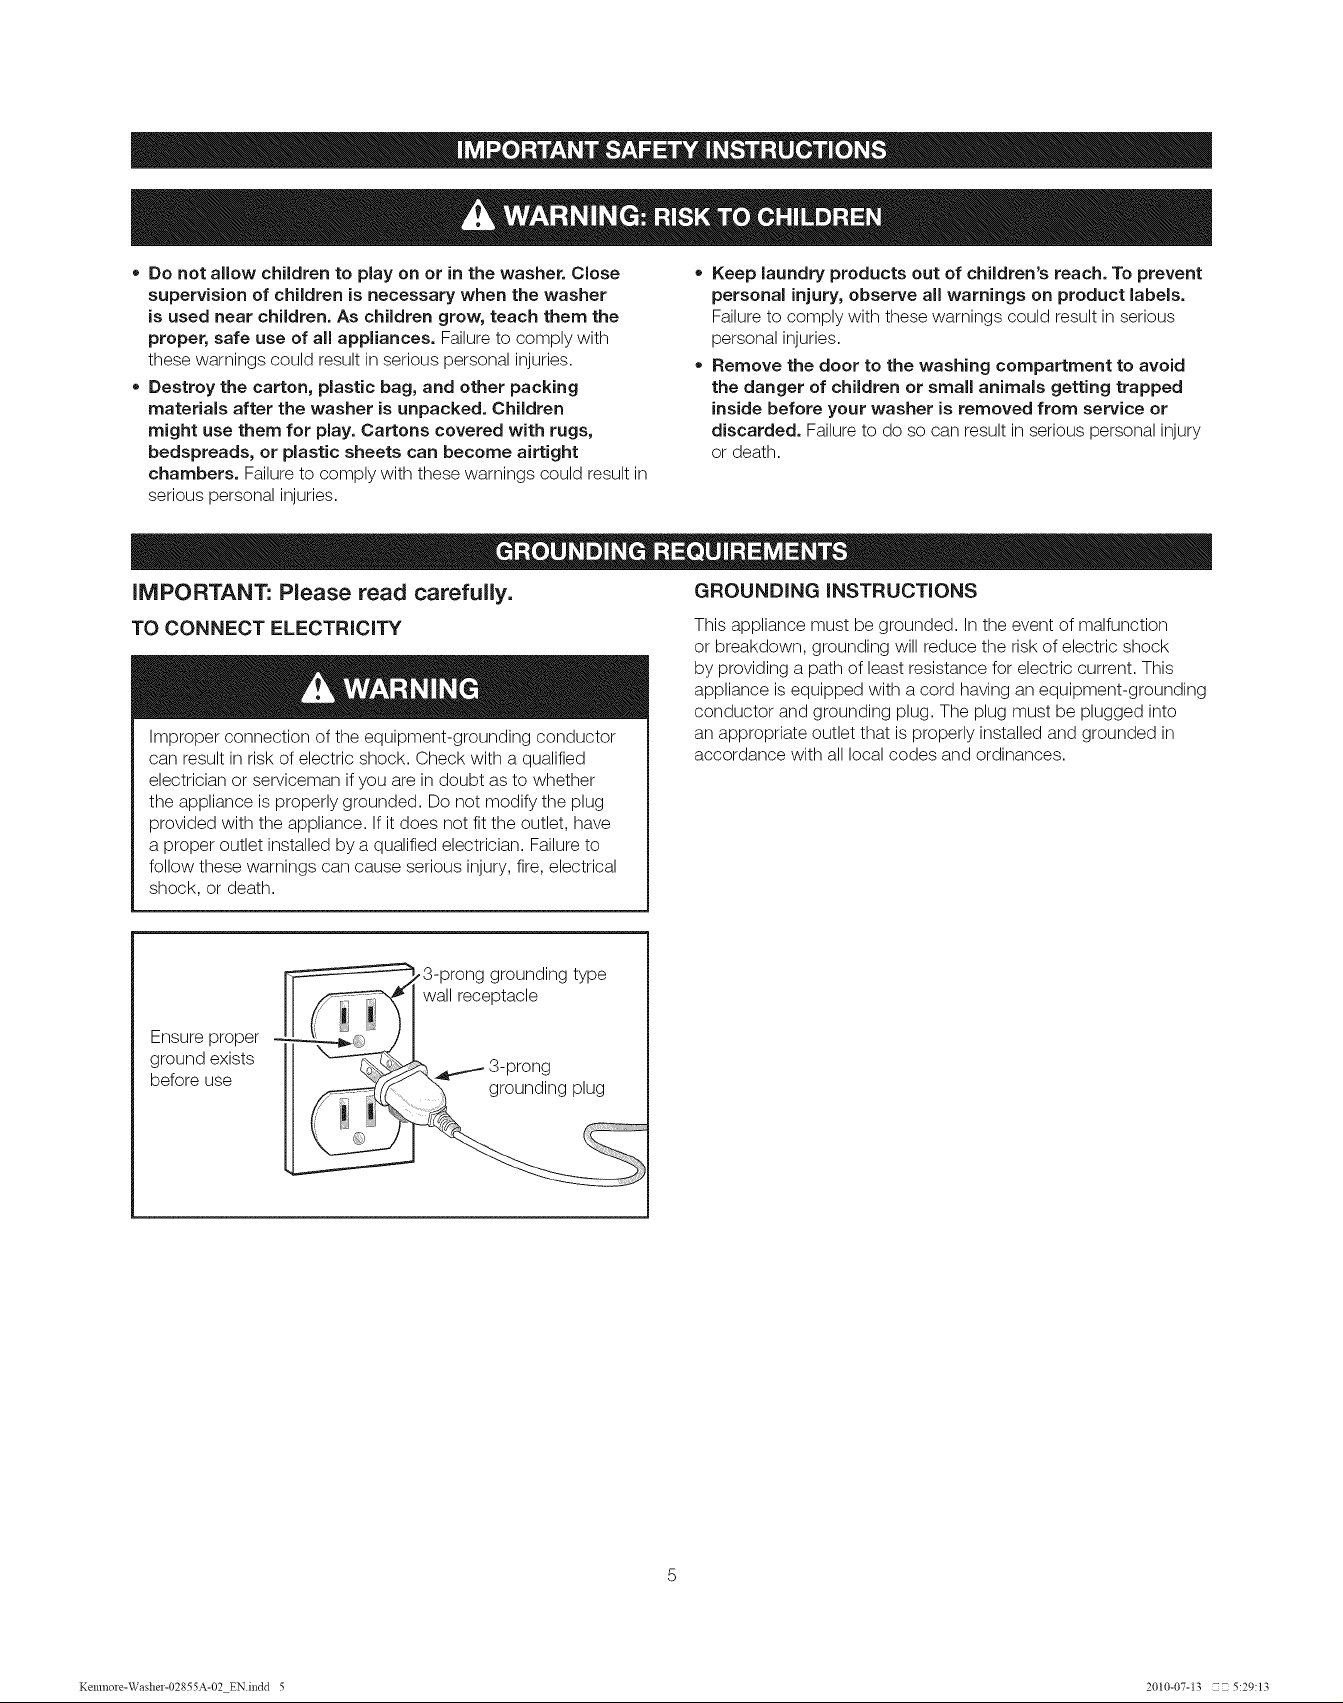
IMPORTANT: Please read carefully. GROUNDING iNSTRUCTiONS
TO CONNECT ELECTRiCiTY
Improper connection of the equipment-grounding conductor
can result in risk of electric shock. Check with a qualified
electrician or serviceman if you are in doubt as to whether
the appliance is properly grounded. Do not modify the plug
provided with the appliance. If it does not fit the outlet, have
a proper outlet installed by a qualified electrician. Failure to
follow these warnings can cause serious injury, fire, electrical
shock, or death.
This appliance must be grounded. In the event of malfunction
or breakdown, grounding will reduce the risk of electric shock
by providing a path of least resistance for electric current. This
appliance is equipped with a cord having an equipment-grounding
conductor and grounding plug. The plug must be plugged into
an appropriate outlet that is properly installed and grounded in
accordance with all local codes and ordinances.
Ensure proper -
ground exists
before use
,3-prong grounding type
wall receptacle
_. _...._ 3-prong
Kenmore-Washer-02855A-02 EN.indd 5 2010-07-13 _ 5:29:13
Page 6

KEY PARTS AND COMPONENTS
A=
DETERGENT DISPENSER
There are four compartments, one each for prewash (not
used on this model) main wash, liquid bleach, and liquid fabric
softener.
B=
CONTROL PANEL WITH LED DISPLAY
The easy-to-read LED display shows cycle options, settings,
cycle status, and estimated time remaining during operation.
NOTE: Sensors in the washer automatically detect the size
of the wash load to optimize washing time, based on the
selected cycle and options.
C=
DIRECT-DRIVE MOTOR
The direct-drive motor provides improved performance and
reliability while increasing energy efficiency.
(Motor is not visible.)
D=
LARGE-CAPACITY STAINLESS STEEL DRUM
The ultra-large stainless steel drum offers extreme durability
and is tilted to improve efficiency and allow easier access for
large items.
E=
EASY-ACCESS LOCKING DOOR
The extra-large door locks during operation and has a delay
feature to prevent the door from being opened until it is safe
to do so.
F.
FILTER ACCESS PANEL
Provides easy access to the drain pump filter, which allows
you to clean the filter or retrieve lost items without a service
call,
G=
LEVELING FEET
Four leveling feet (two in the front and two in the back) adjust
to improve washer stability on uneven floors. Feet are adjusted
and locked in place using the adjusting wrench included with
the washer.
Hot and cold water inlets
Drain hose
Power cord
Shipping Bolts/Retainers (4)
NOTE: Bolts/retainers MUST be removed prior to
operation. Keep for future use. See page 8.
Included Accessories
©©©
Hot and Cold Water Hoses
Wrench (for User Manual Elbow Bracket
removing shipping (for securing drain
bolts and adjusting hose)
and locking
leveling feet)
Kenmole-Washe1-02855A-02 EN.indd 6 2010-07-13 Z-5:29:15
Oaps (6) (for covering
shipping bolt holes)
Optional Accessories
Pedestal Stacking kit (For Drain Hose
dryer) Extension
WE357A7W/XAA P/N DC82-
J
,., (white) 01012A
SK-BA!XAA
Page 7

KEY DiMENSiONS AND SPECiFiCATiONS
Description Front-Loading Washer
Rated Voltage/Frequency 120 VAC @60 Hz.
Dimensions 27" (W) X 31.1" (D)X 38" (H) X 50.8" (D. door open)
68.6 cm (W) X 80 cm (D) X 96.5 cm (H)X 129 cm(D. door open)
Net Weight 179 Ibs (81 kg)
CHOOSE THE PROPER LOCATION
WARNING
Washer is heavy! Two or more people are required when
moving and unpacking the washer. Failure to do so may
result in damage to property or serious bodily harm.
Store and install the washer where it will not be exposed
to temperatures below freezing or exposed to outdoor
weather conditions. Failure to follow this warning can cause
serious injury, fire, electrical shock, or death.
• Properly ground washer to conform with all governing
codes and ordinances. Failure to follow this warning can
cause serious injury, fire, electrical shock, or death.
To reduce the risk of electric shock, do not install the
washer in humid spaces. Failure to follow this warning can
cause serious injury, fire, electrical shock, or death.
The base opening must not be obstructed by carpeting when
the washer is installed on a carpeted floor.
• Do not remove ground prong. Do not use an adapter
or extension cord. Plug into a grounded 3-prong outlet.
Failure to follow this warning can cause serious injury, fire,
electrical shock, or death.
Power Outlet
The power outlet must be within 60 in. (1.5 m) of either side of
the washer.
The appliance and outlet must be positioned so that the plug is
easily accessible.
Do not overload the outlet with more than one appliance.
The outlet must be grounded in accordance with current wiring
codes and regulations.
Time-delay fuse or circuit breaker is recommended,
NOTE: It is the personal responsibility and obligation of the
product owner to have a proper outlet installed by a qualified
service person.
CLEARANCES
21V8"
(54.2 cm)
m
298/4" 1_'21 1/8"
(75.6cm_ (54.2cm)
/
51V8"
(129.8cm)
MINIMUM CLEARANCES FOR CLOSET AND ALCOVE
iNSTALLATiONS:
Sides - 1 In. (2.5 cm)
Rear - 4 In. (10.2 cm)
If the washer and dl'yer are installed together, the closet front must
have at least 72 in2 (465 cm2)of an unobstructed air opening. Your
washer alone does not require a specific air opening.
Top - 17 In. (43.2 cm)
Closet Front - 2 In. (5.1 cm)
Ti
CB
FLOORING
For best performance, your washer must be installed on a solidly
constructed floor. Wood floor may need to be reinforced to
minimize vibration and/or unbalanced load situations. Carpeting
and soft tile surfaces are contributing factors in vibration and may
cause your washer to move slightly during the spin cycle.
CAUTION: Never install your washer on a platform or weakly
supported structure.
Kemnole-Washe1-02855A-02 EN.indd 7 2010-07-13 Z- 5:29:16
NOTE: Please note that the floor must be strong and rigid
enough to support the weight of the washer, when fully loaded,
without flexing or bouncing, If your floor has too much flex in it,
you may need to reinforce it to make it more rigid. A floor that is
adequate for a top-loading washer may not be rigid enough for a
front loading washer, due to the difference in the spin speed and
direction. If the floor is not solid, your washer may vibrate and you
may hear and feel the vibration throughout your house.
1"__ 27" __1"
(2.5 cm) (68.6 cm) (2.5 cm)
Page 8
UNPACKING AND REMOVING
SHiPPiNG BOLTS
Before you installthe washer, make sure the location:
,, Has a hard, levelsurface without carpeting or flooring that may
obstruct ventilation.
Has no dust, oil and detergent etc.
,, Is away from direct sunlight.
,, Has adequate ventilation.
Will not be freezing (below 32 °For 0 °C).
,, Is away from heat sources such as oil or gas.
,, Has enough space so that the washer doesn't stand on its
power cord.
Before using your Washer, you must remove the four shipping
bolts from the back of the unit.
1,Loosen all the bolts with the supplied wrench.
2oSlide the bolt and spacer up and remove the bolt with the
spacer through the hole in the rear wall of your washer. Repeat
for each bolt.
3oFill the holes with the supplied plastic covers.
4,Keep the shipping bolts and spacers for future use.
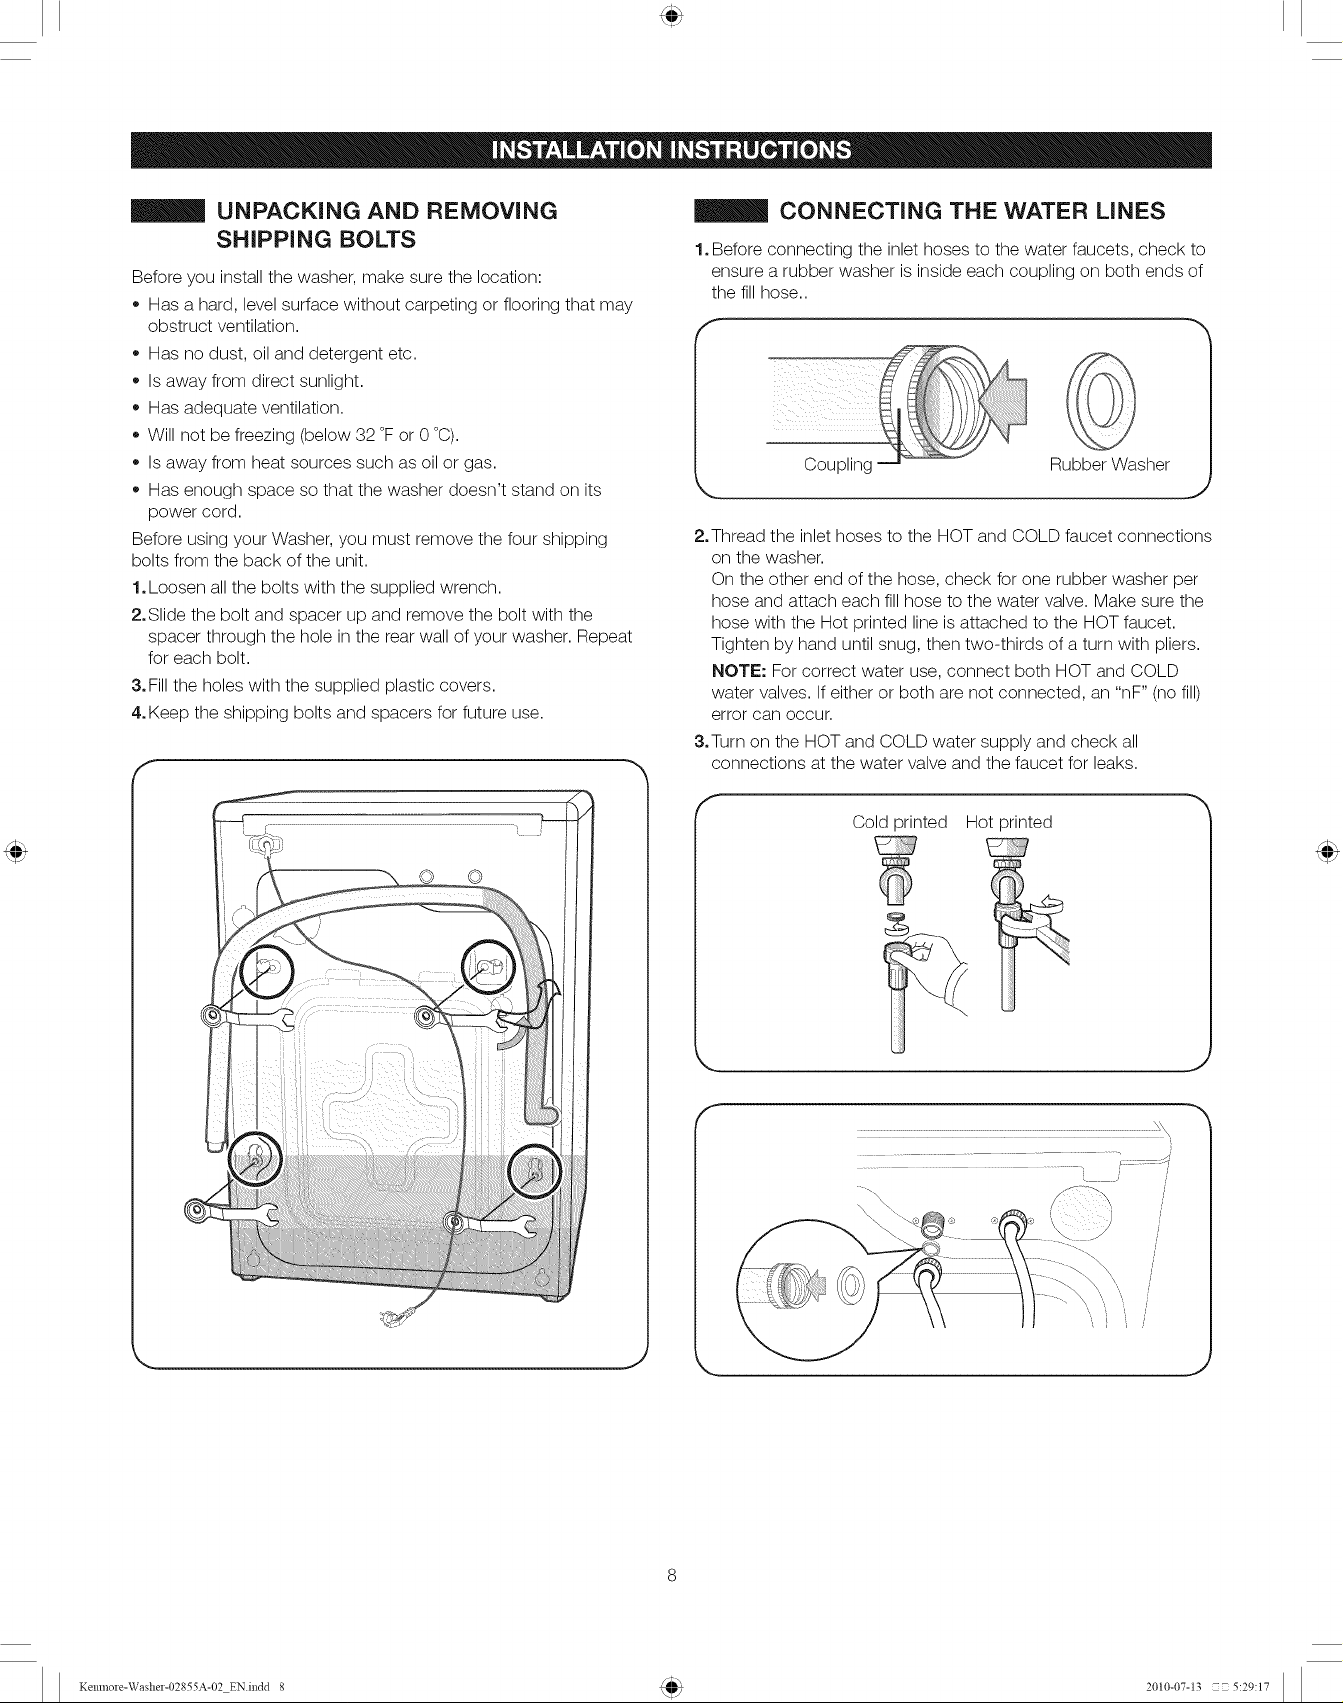
CONNECTING THE WATER LINES
1, Before connecting the inlet hoses to the water faucets, check to
ensure a rubber washer is inside each coupling on both ends of
the fill hose..
f
Rubber Washer
2oThread the inlet hoses to the HOT and COLD faucet connections
on the washer.
On the other end of the hose, check for one rubber washer per
hose and attach each fill hose to the water valve. Make sure the
hose with the Hot printed line is attached to the HOT faucet.
Tighten by hand until snug, then two-thirds of a turn with pliers.
NOTI=: For correct water use, connect both HOT and COLD
water valves. If either or both are not connected, an "nF" (no fill)
error can occur.
3,Turn on the HOT and COLD water supply and check all
connections at the water valve and the faucet for leaks.
© ©
f
Cold printed Hot printed
Kemnole-Washe1-02855A-02 EN.indd 8 2010-07-13 Z- 5:29:17
Page 9
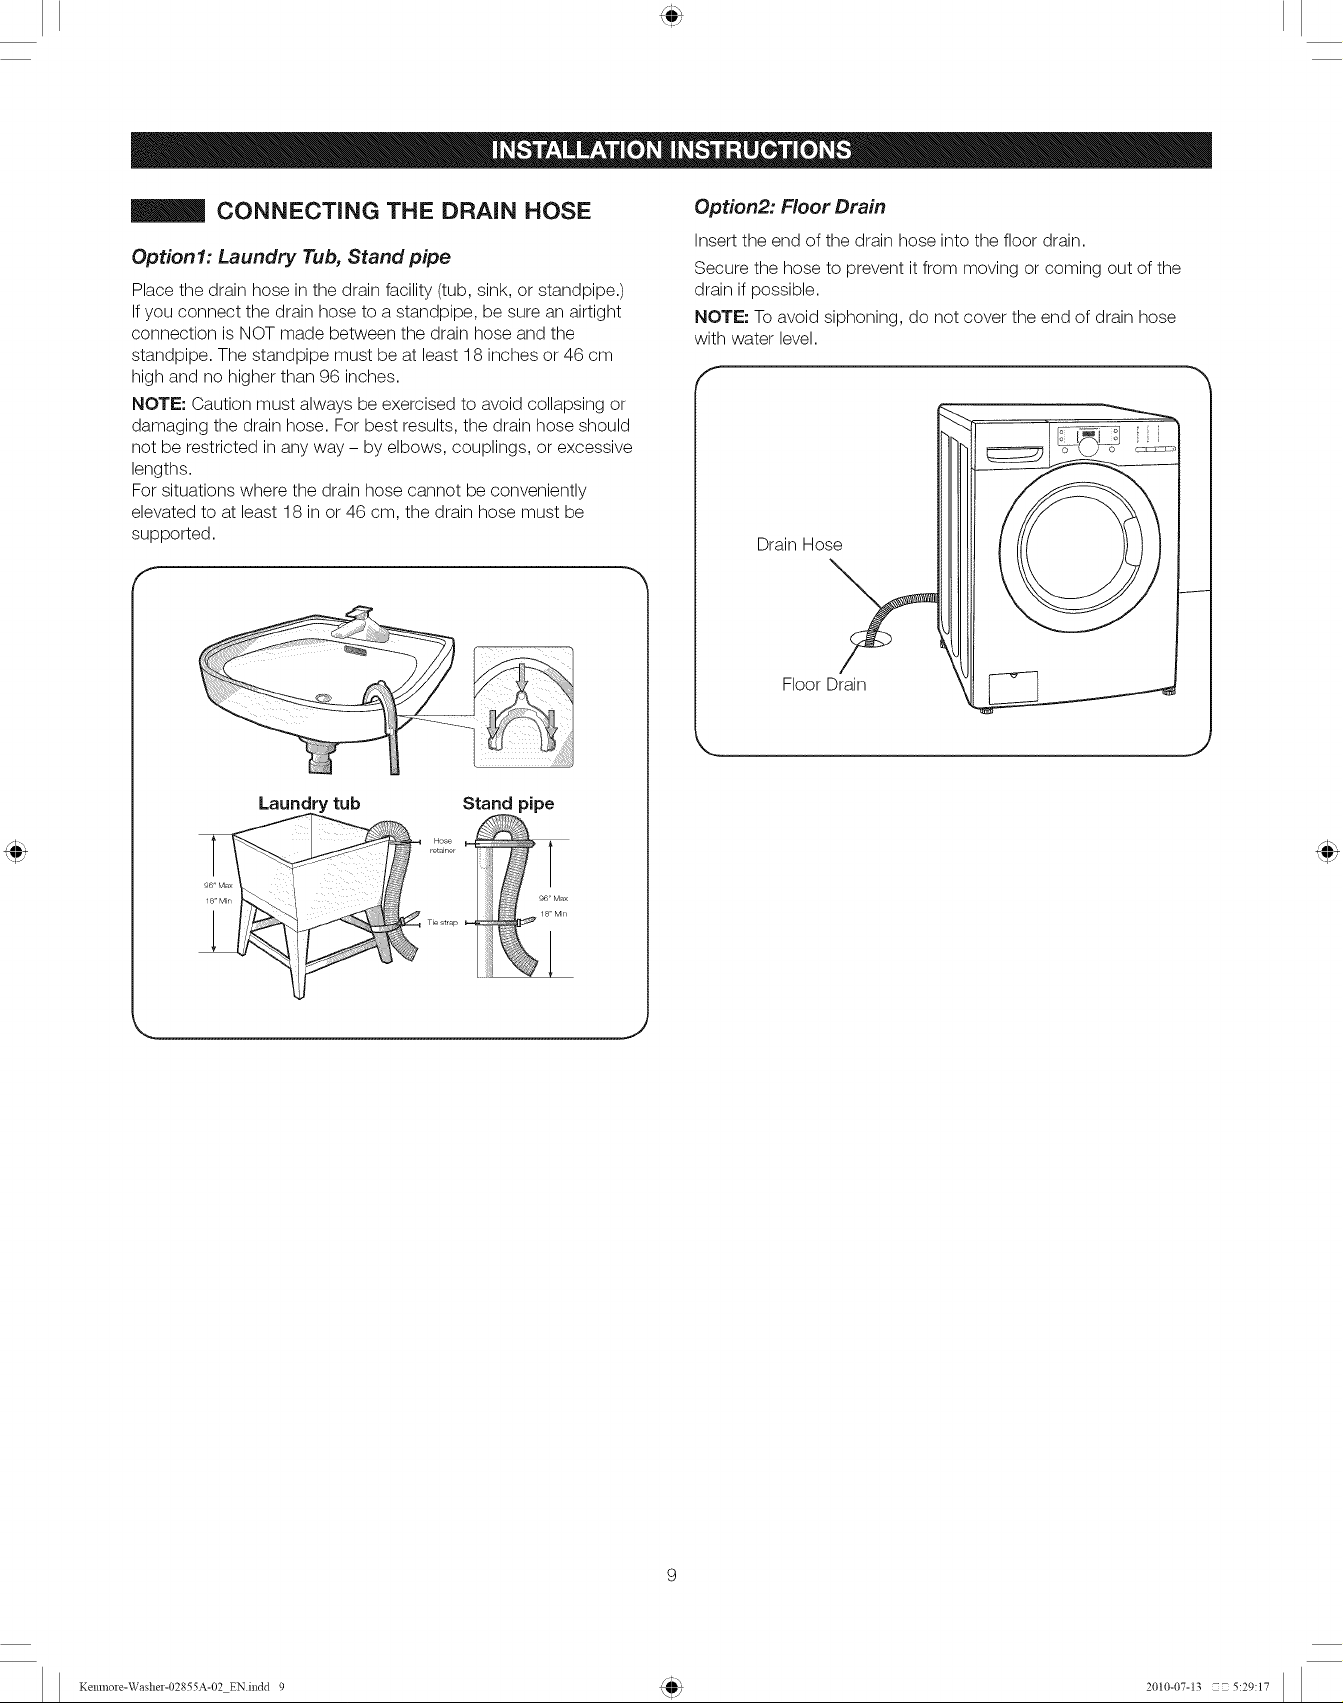
CONNECTING THE DRAIN HOSE
Option1: Laundry Tub, Stand pipe
Place the drain hose in the drain facility (tub, sink, or standpipe.)
Ifyou connect the drain hose to a standpipe, be sure an airtight
connection is NOT made between the drain hose and the
standpipe. The standpipe must be at least 18 inches or 46 cm
high and no higher than 96 inches.
NOTE: Caution must always be exercised to avoid collapsing or
damaging the drain hose. For best results, the drain hose should
not be restricted in any way - by elbows, couplings, or excessive
lengths.
For situations where the drain hose cannot be conveniently
elevated to at least 18 in or 46 cm, the drain hose must be
supported.
Option2: Floor Drain
Insertthe end of the drain hose into the floor drain.
Secure the hose to prevent it from moving or coming out of the
drain if possible.
NOTE: To avoid siphoning, do not cover the end of drain hose
with water level.
f
Drain Hose
Floor Drain
J
Laundry tub Stand pipe
Tie strap
J
Kemnole-Washe1-02855A-02 EN.indd 9 2010-07-13 Z- 5:29:17
Page 10
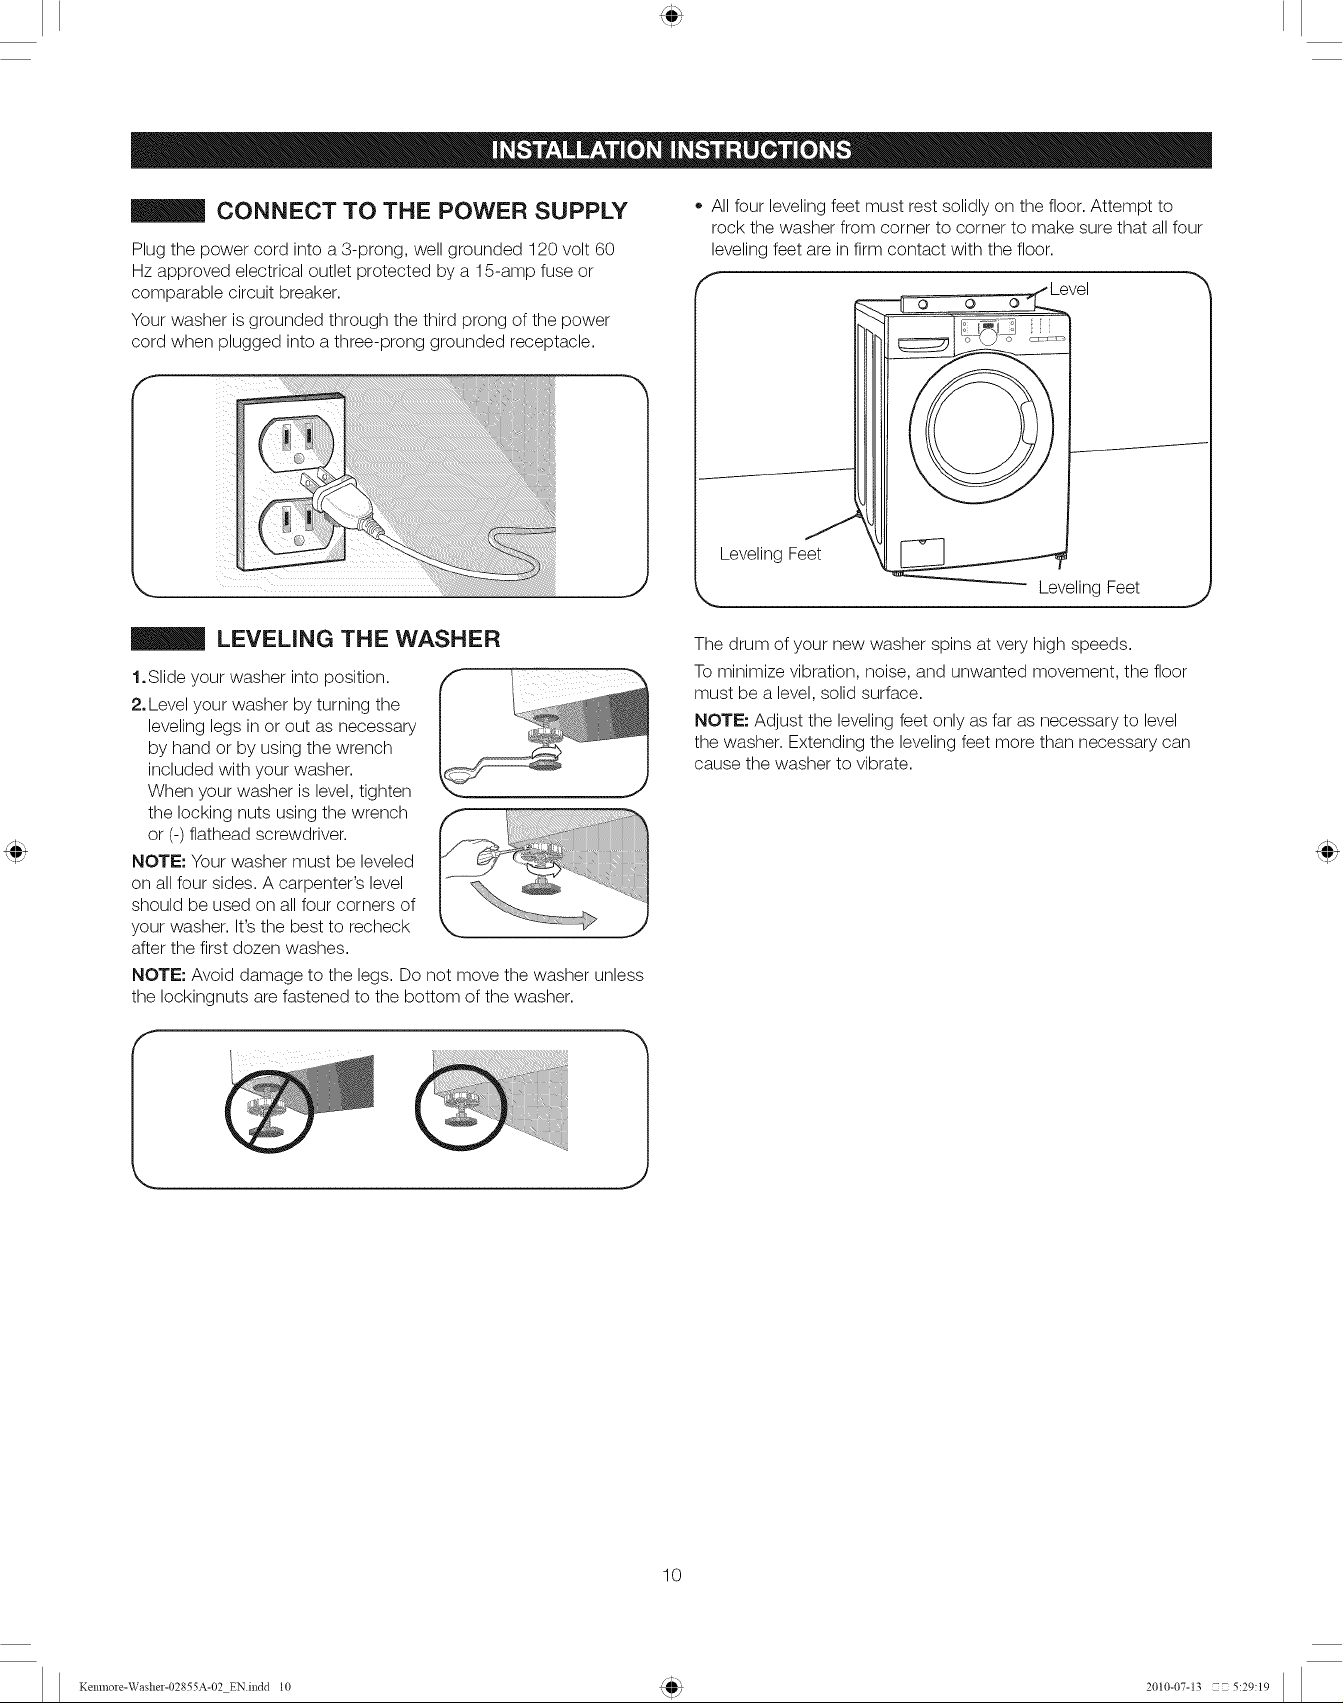
CONNECT TO THE POWER SUPPLY
Plug the power cord into a 3-prong, well grounded 120 volt 60
Hz approved electrical outlet protected by a 15-amp fuse or
comparable circuit breaker.
Your washer is grounded through the third prong of the power
cord when plugged into a three-prong grounded receptacle.
,, All four leveling feet must rest solidly on the floor. Attempt to
rock the washer from corner to corner to make sure that all four
leveling feet are in firm contact with the floor.
Leveling Feet
Leveling Feet
LEVELING THE WASHER
1.Slide your washer into position.
2, Level your washer by turning the
leveling legs in or out as necessary
by hand or by using the wrench
included with your washer.
When your washer is level, tighten
the locking nuts using the wrench
or (-) flathead screwdriver.
NOTE: Your washer must be leveled
on all four sides. A carpenter's level
should be used on all four corners of
your washer. It's the best to recheck
after the first dozen washes.
NOTE: Avoid damage to the legs. Do not move the washer unless
the Iockingnuts are fastened to the bottom of the washer.
The drum of your new washer spins at very high speeds.
To minimize vibration, noise, and unwanted movement, the floor
I 1
must be a level, solid surface.
NOTE: Adjust the leveling feet only as far as necessary to level
the washer. Extending the leveling feet more than necessary can
cause the washer to vibrate.
10
Kemnole-Washe1-02855A-02 EN.indd 10 2010-07-13 Z- 5:29:19
Page 11
WARNING: To reduce the risk of fire, electric shock, or injury to persons, read and follow this entire manual,
including the Important Safety Instructions, before operating this washer.
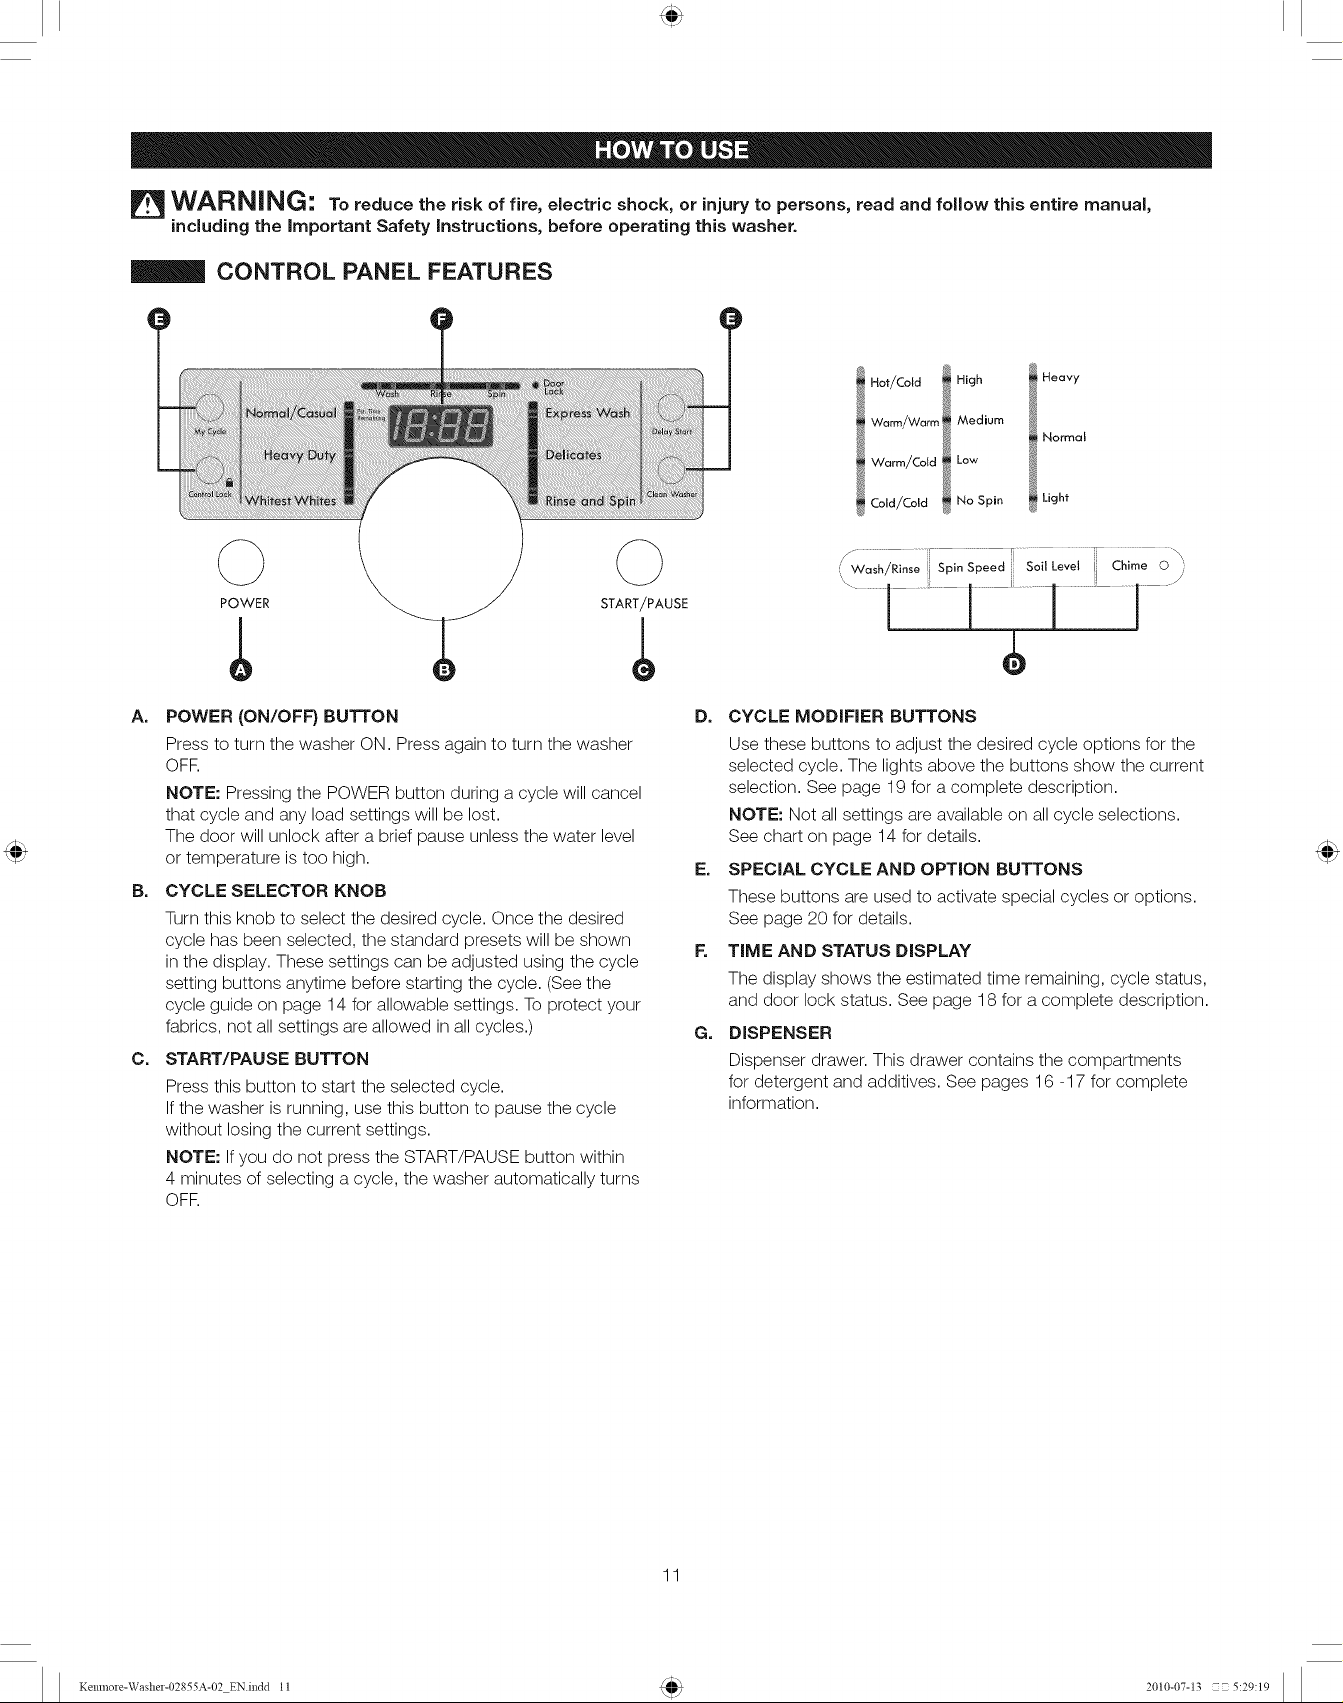
CONTROL PANEL FEATURES
POWER START/PAUSE
A. POWER (ON/OFF) BUTTON D.
Press to turn the washer ON. Press again to turn the washer
OFR
NOTE: Pressing the POWER button during a cycle will cancel
that cycle and any load settings will be lost.
The door will unlock after a brief pause unless the water level
or temperature is too high.
B.
CYCLE SELECTOR KNOB
Turn this knob to select the desired cycle. Once the desired
cycle has been selected, the standard presets will be shown
in the display. These settings can be adjusted using the cycle
setting buttons anytime before starting the cycle. (See the
cycle guide on page 14 for allowable settings. To protect your
fabrics, not all settings are allowed in allcycles.)
C.
START/PAUSE BUTTON
Press this button to start the selected cycle.
Ifthe washer is running, use this button to pause the cycle
without losing the current settings.
NOTE: Ifyou do not press the START/PAUSE button within
4 minutes of selecting a cycle, the washer automatically turns
OFR
Hot/Cold
Warm/Warm
Warm/Cold
Cold/Cold
Wash/Rnse j Spin Speed So Leve i Chime 0
\ .........- i].................._ .........../
High
Medium
Low
No Spin
Heavy
Normal
Light
$
CYCLE MODIFIER BUTTONS
Use these buttons to adjust the desired cycle options for the
selected cycle. The lights above the buttons show the current
selection. See page 19 for a complete description.
NOTE: Not all settings are available on all cycle selections.
See chart on page 14 for details.
E.
SPECIAL CYCLE AND OPTION BUTTONS
These buttons are used to activate special cycles or options.
See page 20 for details.
TIME AND STATUS DISPLAY
The display shows the estimated time remaining, cycle status,
and door lock status. See page 18 for a complete description.
G.
DISPENSER
Dispenser drawer. This drawer contains the compartments
for detergent and additives. See pages 16 -17 for complete
information.
11
Kenmole-Washe1-02855A-02 EN.indd 11 2010-07-13 Z- 5:29:19
Page 12
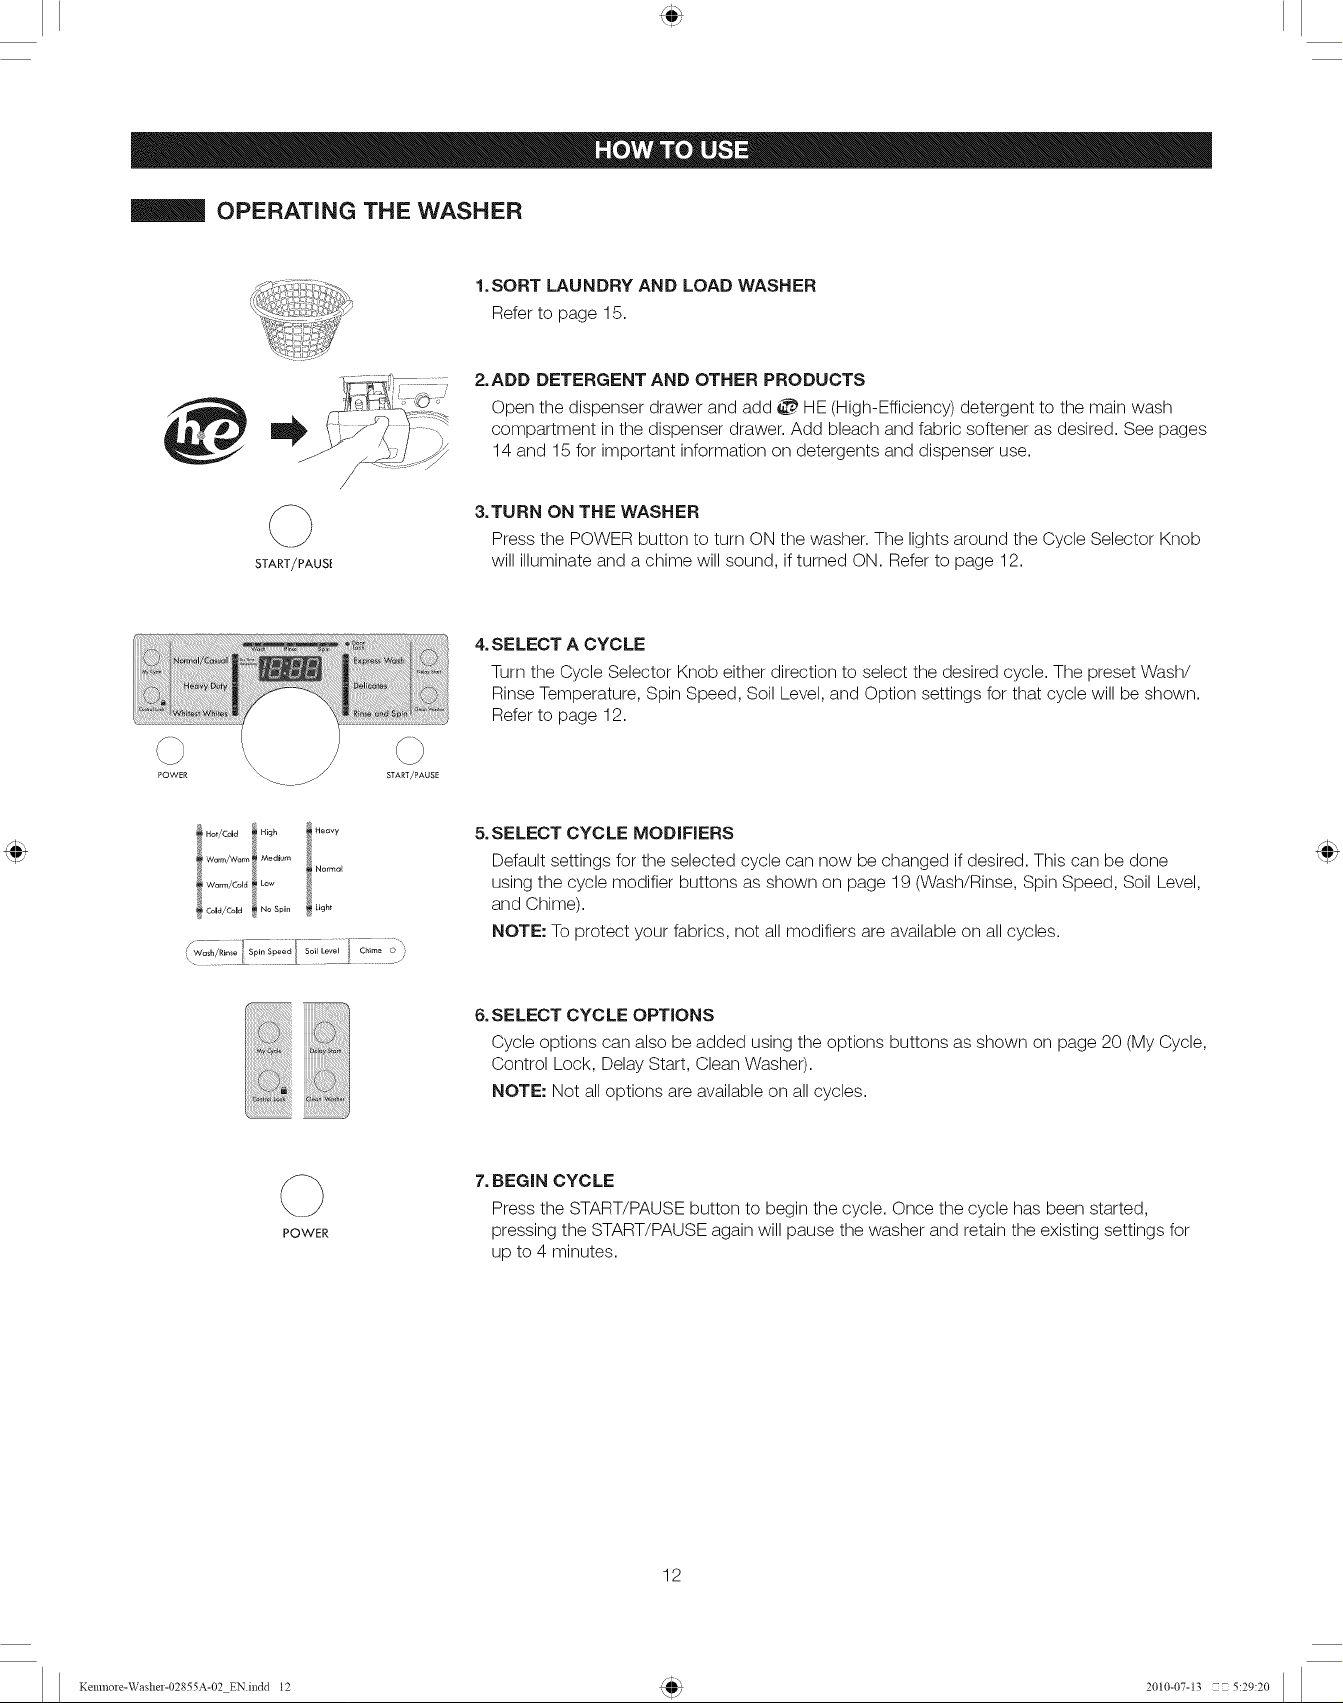
OPERATING THE WASHER
1.SORT LAUNDRY AND LOAD WASHER
2.ADD DETERGENT AND OTHER PRODUCTS
/
&TURN ON THE WASHER
START/PAUSf
4.SELECT A CYCLE
Refer to page 15.
Open the dispenser drawer and add _ HE (High-Efficiency) detergent to the main wash
compartment in the dispenser drawer. Add bleach and fabric softener as desired. See pages
14 and 15 for important information on detergents and dispenser use.
Press the POWER button to turn ON the washer. The lights around the Cycle Selector Knob
will illuminate and a chime will sound, if turned ON. Refer to page 12.
Turn the Cycle Selector Knob either direction to select the desired cycle. The preset Wash/
Rinse Temperature, Spin Speed, Soil Level, and Option settings for that cycle will be shown.
Refer to page 12.
iHo,jI........1.....
wW_pm/W_rm_/( Id LMedium ! Normal
iiiiiiiiiiiiiiii_;'ii!iii_ii_ii_ii_iii_!!i!iii!i!!i!!i!!i!i_il
iiiiiiiiiii@iiii!i!!ii!iii!il¸
POWER
5.SELECT CYCLE MODIFIERS
Default settings for the selected cycle cars now be changed ifdesired. This cars be done
using the cycle modifier buttons as shown ors page 19 (Wash/Rinse, Spin Speed, Soil Level,
and Chime).
NOTE: To protect your fabrics, not all modifiers are available on all cycles.
6.SELECT CYCLE OPTIONS
Cycle options cars also be added using the options buttons as shown orspage 20 (My Cycle,
Control Lock, Delay Start, Clean Washe0.
NOTE: Not all options are available on all cycles.
7. BEGIN CYCLE
Press the START/PAUSE button to begin the cycle. Once the cycle has been started,
pressing the START/PAUSE again will pause the washer and retain the existing settings for
up to 4 minutes.
12
Kemnole-Washe1-02855A-02 EN.indd 12 2010-07-13 C- 5:29:20
Page 13
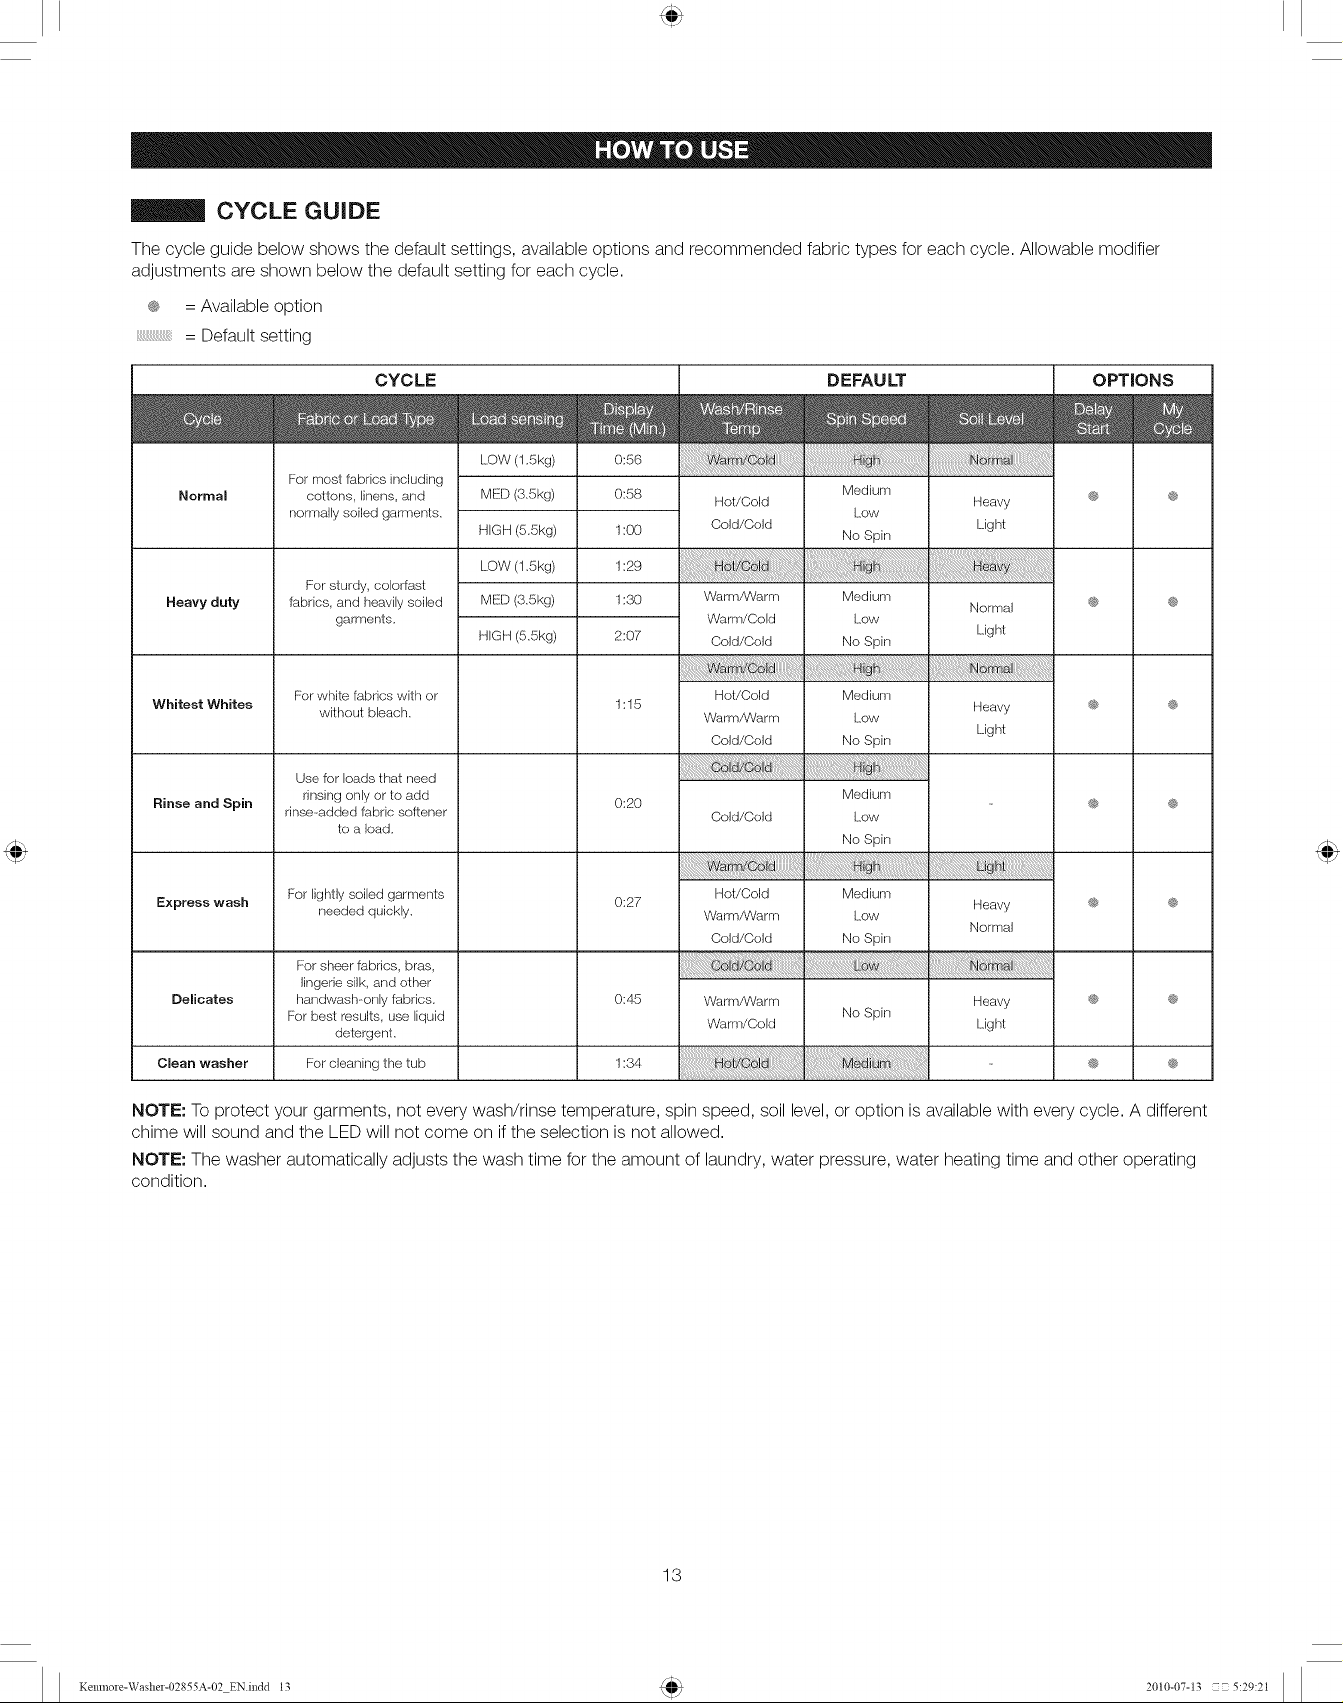
CYCLE GUIDE
The cycle guide below shows the default settings, available options and recommended fabric types for each cycle. Allowable modifier
adjustments are shown below the default setting for each cycle.
® = Available option
= Default setting
CYCLE DEFAULT OPTIONS
N
L.OW(_,Sk_j) 0:56
Normal
Heavy duty
For most fabrics including
cottons, linens, and
normally soiled garments.
For sturdy, colorfast
fabrics, and heavily soiled
garments.
MED (3.5kg)
HIGH (5.5kg)
LOW (1.5kg)
MED (3.5kg)
HIGH (5.5kg)
0:58 Medium
1:00 Cold/Cold No Spin Light
1:29
1:30 Warm/Warm Medium Normal ® ®
2:07 Cold/Cold No Spin
Hot/Cold Heavy ® @
Warm/Cold Low
Low
Light
Whitest Whites
Rinse and Spin
Express wash
Delicates
For white fabrics with or
without bleach.
Use for loads that need
rinsing only or to add
nnse added fabric softener
to a load.
For lightly soiled garments
needed quickly.
For sheer fabrics, bras,
lingerie silk, and other
handwash-only fabrics.
For best results, use liquid
detergent.
For cleaning the tub
1:15 Heavy @ @
0:20 @ @
0:27 Heavy @ @
0:45 Warm/Warm Heavy @ @
1:34 ® @Cmean washer
Hot/Cold Medium
Warm/Warm Low
Cold/Cold No Spin
Medium
Cold/Cold Low
No Spin
Hot/Cold Medium
Warm/Warm Low
Cold/Cold No Spin
Warm/Cold Light
No Spin
Light
Normal
NOTE: To protect your garments, not every wash/rinse temperature, spin speed, soil level, or option is available with every cycle. A different
chime will sound and the LED will not come on if the selection is not allowed.
NOTE: The washer automatically adjusts the wash time for the amount of laundry, water pressure, water heating time and other operating
condition.
13
Kemnole-Washe1-02855A-02 EN.indd 13 2010-07-13 Z- 5:29:21
Page 14
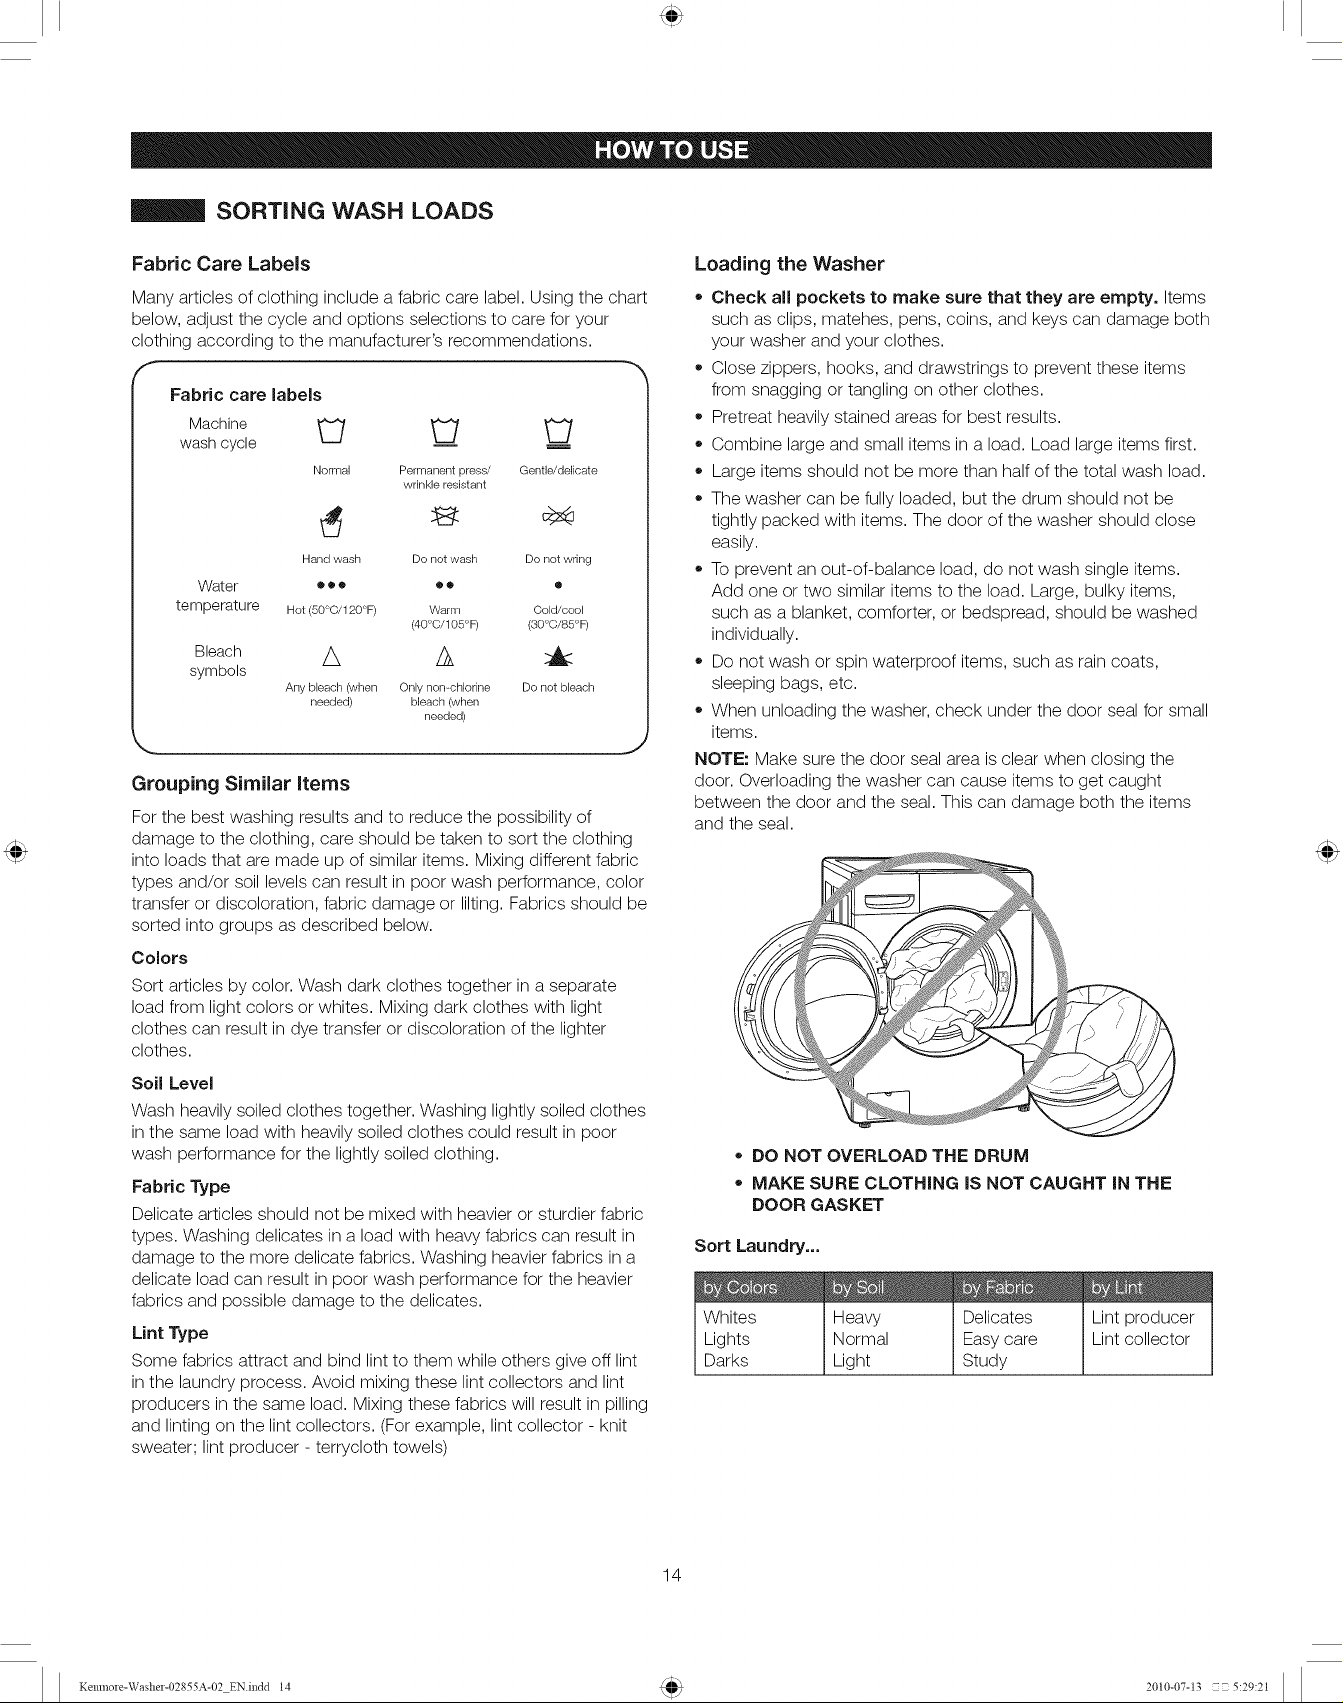
SORTING WASH LOADS
Fabric Care Labels
Many articles of clothing include a fabric care label. Using the chart
below, adjust the cycle and options selections to care for your
clothing according to the manufacturer's recommendations.
f m
Fabric care labels
Machine,_ _ _
wash
cyc,e --
Normal Permanent press/ Gentle/delicate
Hand wash Do not wash Do not wring
Water
temperature
Bleach
symbols
O00 00 ®
Hot (50°O/120°F) Warm Cold/cool
A A
Arly bleach (when Only not>chlorine Do not bleach
needed) bleach {when
Grouping Similar items
For the best washing results and to reduce the possibility of
damage to the clothing, care should be taken to sort the clothing
into loads that are made up of similar items. Mixing different fabric
types and/or soil levels can result in poor wash performance, color
transfer or discoloration, fabric damage or lilting. Fabrics should be
sorted into groups as described below.
Colors
Sort articles by color. Wash dark clothes together in a separate
load from light colors or whites. Mixing dark clothes with light
clothes can result in dye transfer or discoloration of the lighter
clothes.
Soil Level
Wash heavily soiled clothes together. Washing lightly soiled clothes
in the same load with heavily soiled clothes could result in poor
wash performance for the lightly soiled clothing.
Fabric Type
Delicate articles should not be mixed with heavier or sturdier fabric
types. Washing delicates in a load with heavy fabrics can result in
damage to the more delicate fabrics. Washing heavier fabrics in a
delicate load can result in poor wash performance for the heavier
fabrics and possible damage to the delicates.
Lint Type
Some fabrics attract and bind lint to them while others give off lint
in the laundry process. Avoid mixing these lint collectors and lint
producers in the same load. Mixing these fabrics will result in pilling
and linting on the lint collectors. (For example, lint collector - knit
sweater; lint producer - terrycloth towels)
wrinkle resistant
(40°O/105°F) (30°0/85°F)
needed)
J
Loading the Washer
• Check all pockets to make sure that they are empty. Items
such as clips, matehes, pens, coins, and keys can damage both
your washer and your clothes.
Close zippers, hooks, and drawstrings to prevent these items
from snagging or tangling on other clothes.
Pretreat heavily stained areas for best results.
Combine large and small items in a load. Load large items first.
Large items should not be more than half of the total wash load.
The washer can be fully loaded, but the drum should not be
tightly packed with items. The door of the washer should close
easily.
To prevent an out-of-balance load, do not wash single items.
Add one or two similar items to the load. Large, bulky items,
such as a blanket, comforter, or bedspread, should be washed
individually.
Do not wash or spin waterproof items, such as rain coats,
sleeping bags, etc.
When unloading the washer, check under the door seal for small
items.
NOTE: Make sure the door seal area is clear when closing the
door. Overloading the washer can cause items to get caught
between the door and the seal. This can damage both the items
and the seal.
DO NOT OVERLOAD THE DRUM
MAKE SURE CLOTHING IS NOT CAUGHT IN THE
DOOR GASKET
Sort Laundry...
Whites
Lights
Darks
Heavy
Normal
Light
Delicates
Easy care
Study
Lint producer
Lint collector
14
Kemnole-Washe1-02855A-02 EN.indd 14 2010-07-13 Z- 5:29:21
Page 15
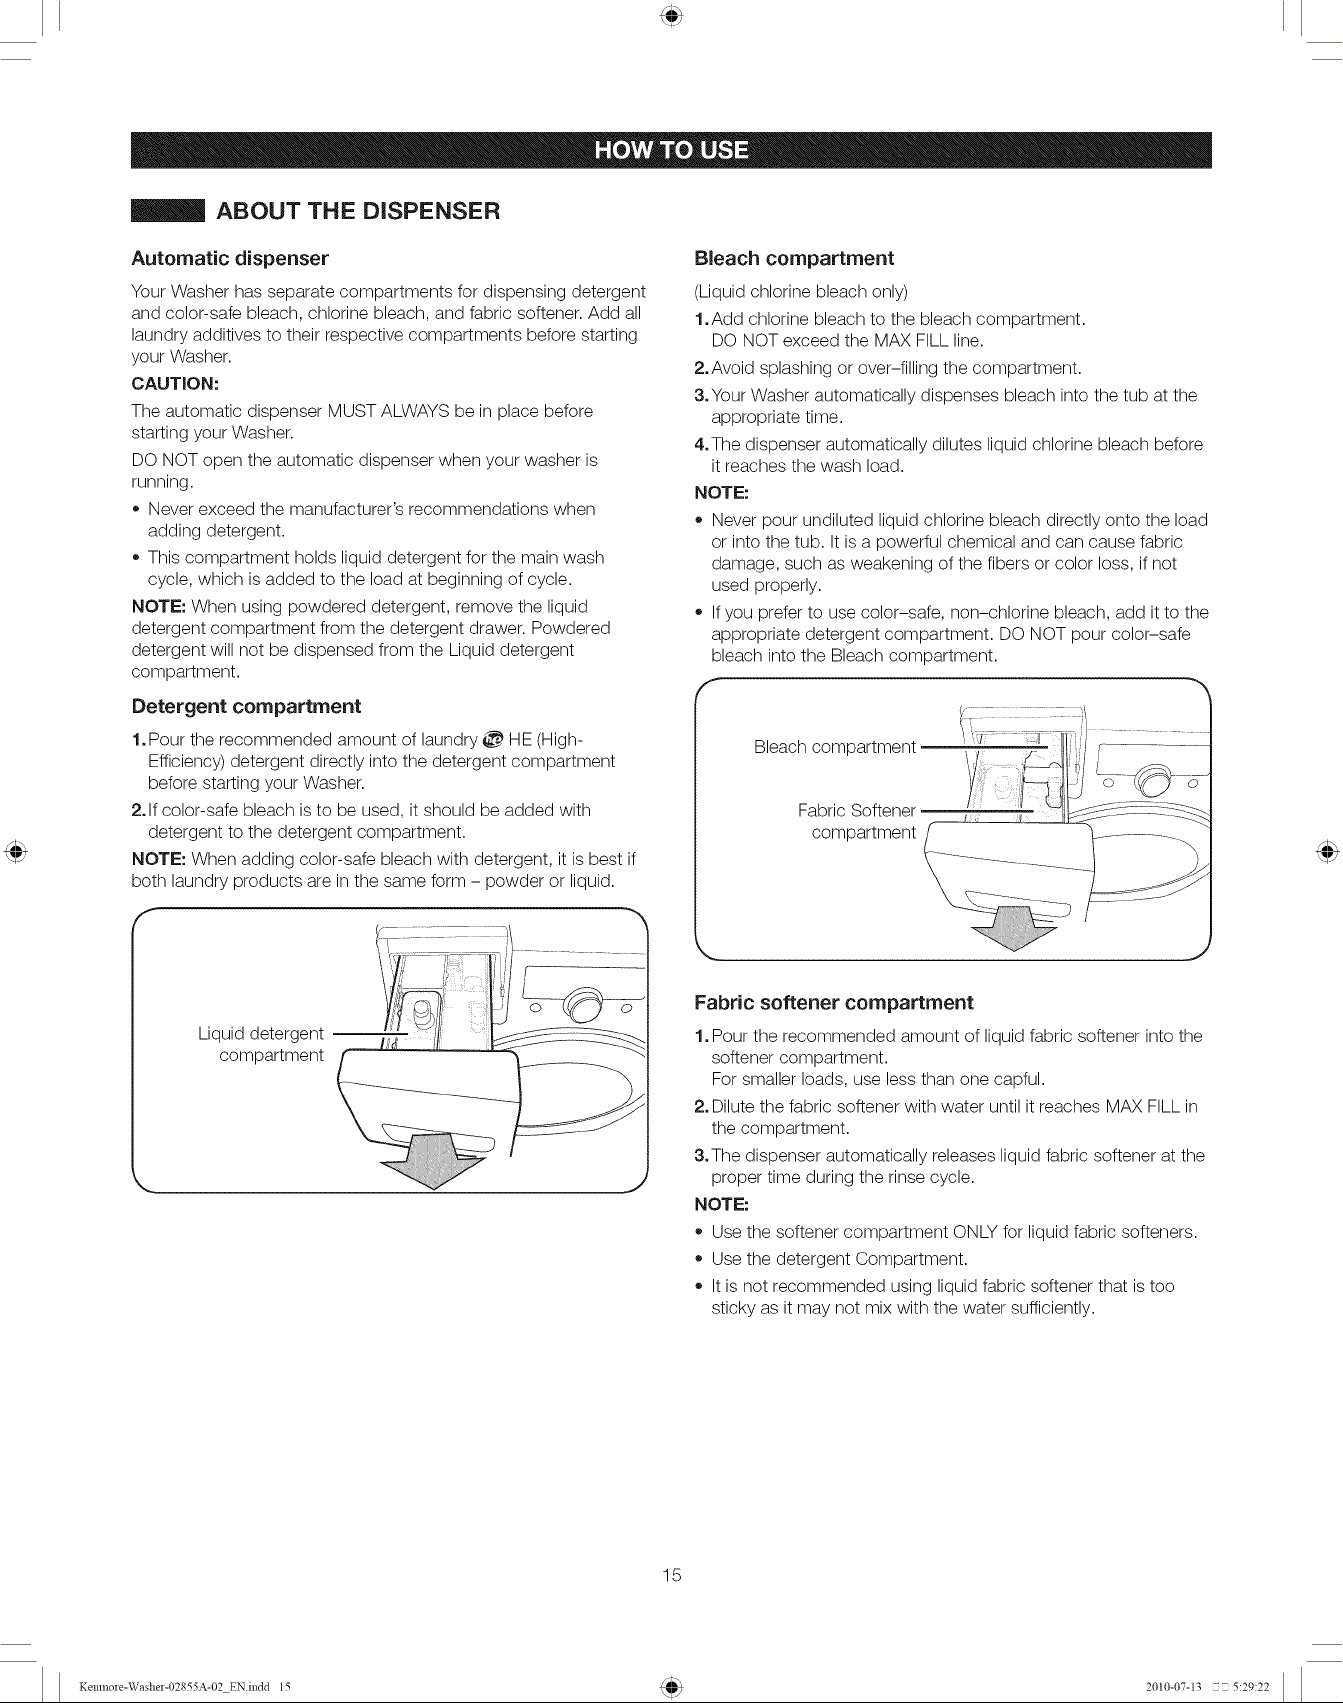
ABOUT THE DISPENSER
Automatic dispenser
Your Washer has separate compartments for dispensing detergent
and color-safe bleach, chlorine bleach, and fabric softener. Add all
laundry additives to their respective compartments before starting
your Washer.
CAUTION:
The automatic dispenser MUST ALWAYS be in place before
starting your Washer.
DO NOT open the automatic dispenser when your washer is
running.
Never exceed the manufacturer's recommendations when
adding detergent.
This compartment holds liquid detergent for the main wash
cycle, which is added to the load at beginning of cycle.
NOTE: When using powdered detergent, remove the liquid
detergent compartment from the detergent drawer. Powdered
detergent will not be dispensed from the Liquid detergent
compartment.
Detergent compartment
1.Pour the recommended amount of laundry _ HE (High-
Efficiency) detergent directly into the detergent compartment
before starting your Washer.
2. If color-safe bleach is to be used, it should be added with
detergent to the detergent compartment.
NOTE: When adding color-safe bleach with detergent, it is best if
both laundry products are in the same form - powder or liquid.
f
Bleach compartment
(Liquid chlorine bleach only)
1.Add chlorine bleach to the bleach compartment.
DO NOT exceed the MAX FILL line.
2.Avoid splashing or over-filling the compartment.
3.Your Washer automatically dispenses bleach into the tub at the
appropriate time.
4.The dispenser automatically dilutes liquid chlorine bleach before
it reaches the wash load.
NOTE:
Never pour undiluted liquid chlorine bleach directly onto the load
or into the tub. It is a powerful chemical and can cause fabric
damage, such as weakening of the fibers or color loss, if not
used properly.
Ifyou prefer to use color-safe, non-chlorine bleach, add it to the
appropriate detergent compartment. DO NOT pour color-safe
bleach into the Bleach compartment.
Bleach compartment
Fabric Softener
compartment
k.
Liquid detergent --
compartment
Fabric softener compartment
1. Pour the recommended amount of liquid fabric softener into the
softener compartment.
For smaller loads, use less than one capful.
2.Dilute the fabric softener with water until it reaches MAX FILL in
the compartment.
3.The dispenser automatically releases liquid fabric softener at the
proper time during the rinse cycle.
NOTE:
• Use the softener compartment ONLY for liquid fabric softeners.
Use the detergent Compartment.
Itis not recommended using liquid fabric softener that is too
sticky as it may not mix with the water sufficiently.
15
Kemnole-Washe1-02855A-02 EN.indd 15 2010-07-13 Z- 5:29:22
Page 16
DETERGENT AND DISPENSER USE
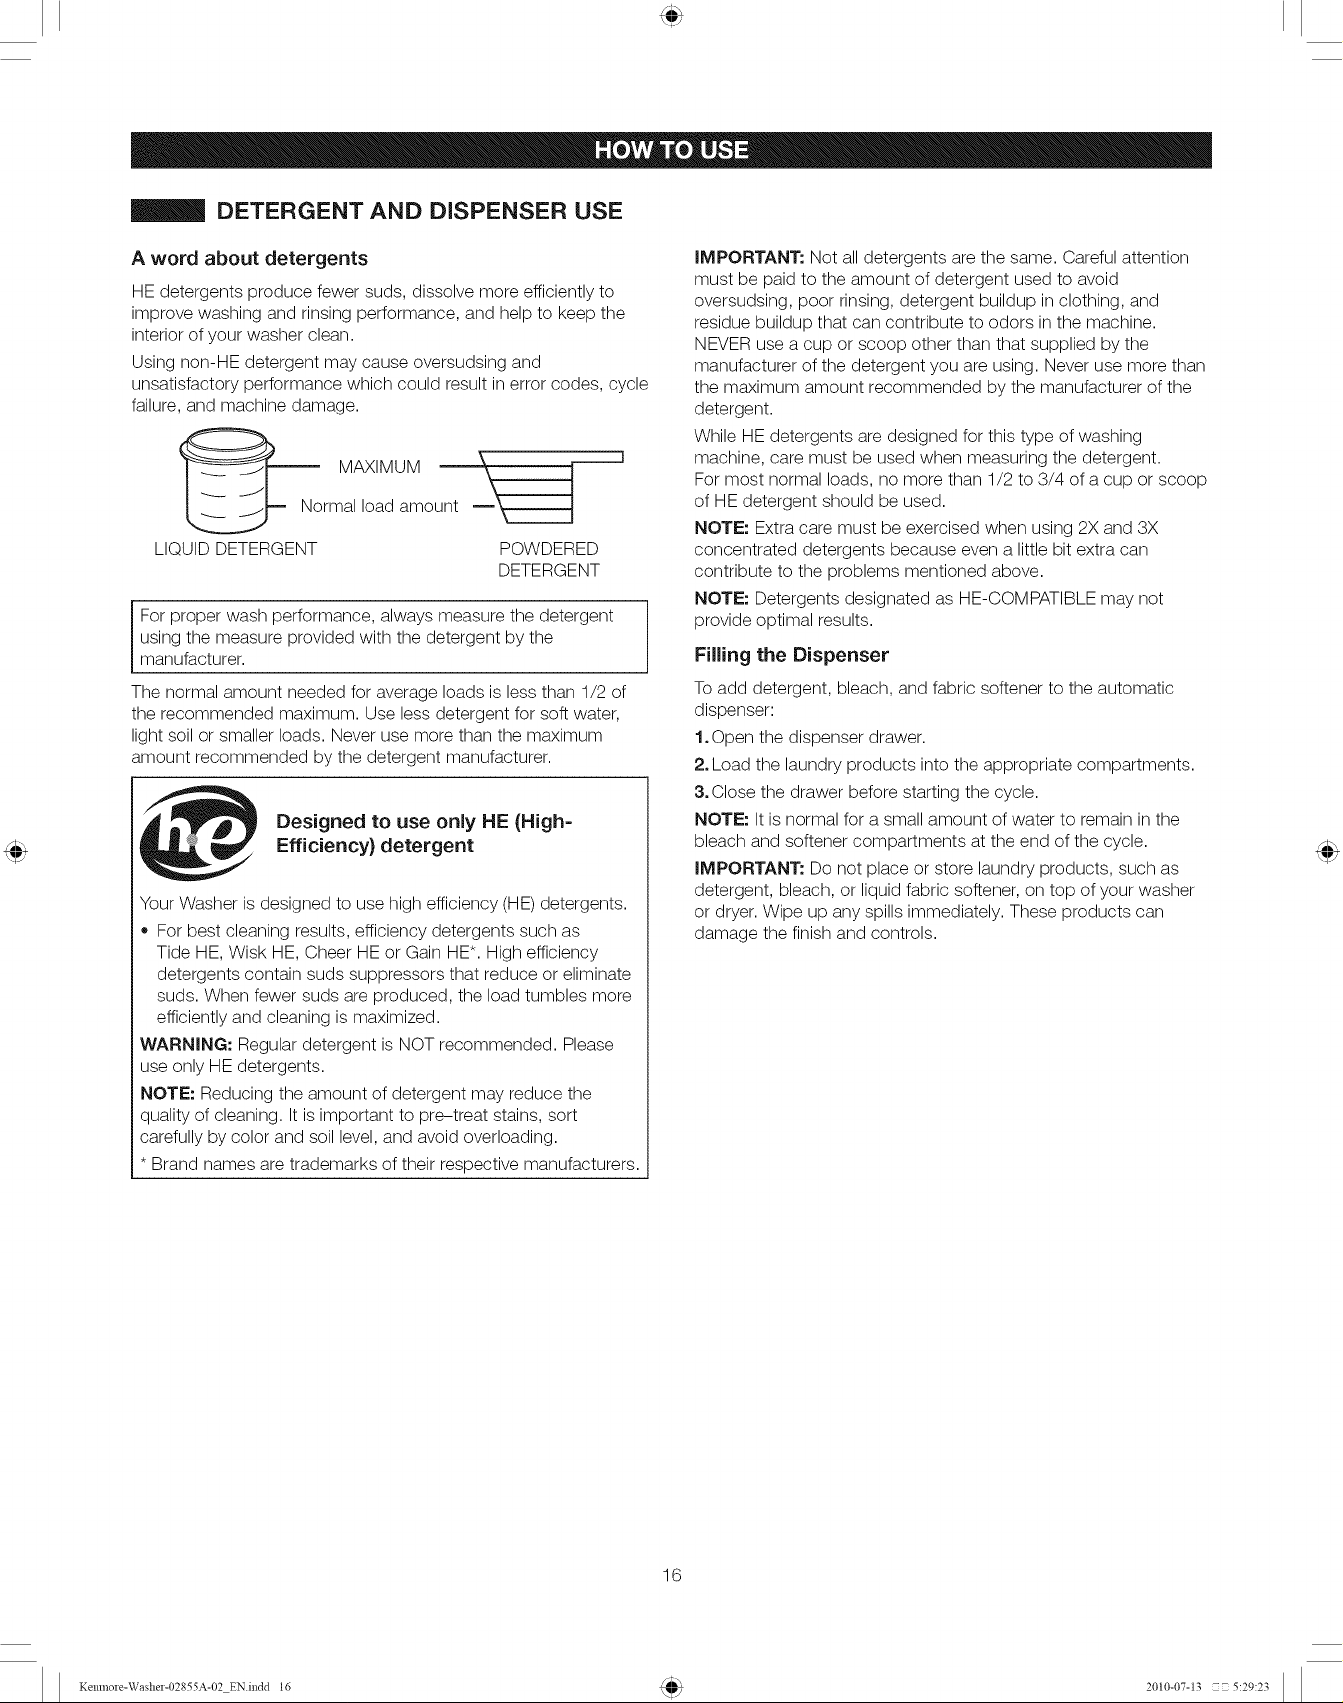
A word about detergents
HE detergents produce fewer suds, dissolve more efficiently to
improve washing and rinsing performance, and help to keep the
interior of your washer clean.
Using non-HE detergent may cause oversudsing and
unsatisfactory performance which could result in error codes, cycle
failure, and machine damage.
Normal load amount
LIQUID DETERGENT POWDERED
DETERGENT
For proper wash performance, always measure the detergent
using the measure provided with the detergent by the
manufacturer.
The normal amount needed for average loads is less than 1/2 of
the recommended maximum. Use less detergent for soft water,
light soil or smaller loads. Never use more than the maximum
amount recommended by the detergent manufacturer.
Designed to use only HE {High-
Efficiency) detergent
Your Washer is designed to use high efficiency (HE) detergents.
,, For best cleaning results, efficiency detergents such as
Tide HE, Wisk HE, Cheer HE or Gain HE*. High efficiency
detergents contain suds suppressors that reduce or eliminate
suds. When fewer suds are produced, the load tumbles more
efficiently and cleaning is maximized.
WARNING: Regular detergent is NOT recommended. Please
use only HE detergents.
NOTE: Reducing the amount of detergent may reduce the
quality of cleaning. It is important to pre-treat stains, sort
carefully by color and soil level, and avoid overloading.
* Brand names are trademarks of their respective manufacturers.
IMPORTANT: Not all detergents are the same. Careful attention
must be paid to the amount of detergent used to avoid
oversudsing, poor rinsing, detergent buildup in clothing, and
residue buildup that can contribute to odors in the machine.
NEVER use a cup or scoop other than that supplied by the
manufacturer of the detergent you are using. Never use more than
the maximum amount recommended by the manufacturer of the
detergent.
While HE detergents are designed for this type of washing
machine, care must be used when measuring the detergent.
For most normal loads, no more than 1/2 to 3/4 of a cup or scoop
of HE detergent should be used.
NOTE: Extra care must be exercised when using 2X and 3X
concentrated detergents because even a little bit extra can
contribute to the problems mentioned above.
NOTE: Detergents designated as HE-COMPATIBLE may not
provide optimal results.
Filling the Dispenser
To add detergent, bleach, and fabric softener to the automatic
dispenser:
1,Open the dispenser drawer.
2,Load the laundry products into the appropriate compartments.
3,Close the drawer before starting the cycle.
NOTE: It is normal for a small amount of water to remain in the
bleach and softener compartments at the end of the cycle.
IMPORTANT: Do not place or store laundry products, such as
detergent, bleach, or liquid fabric softener, on top of your washer
or dryer. Wipe up any spills immediately. These products can
damage the finish and controls.
16
Kemnole-Washe1-02855A-02 EN.indd 16 2010-07-13 Z- 5:29:23
Page 17
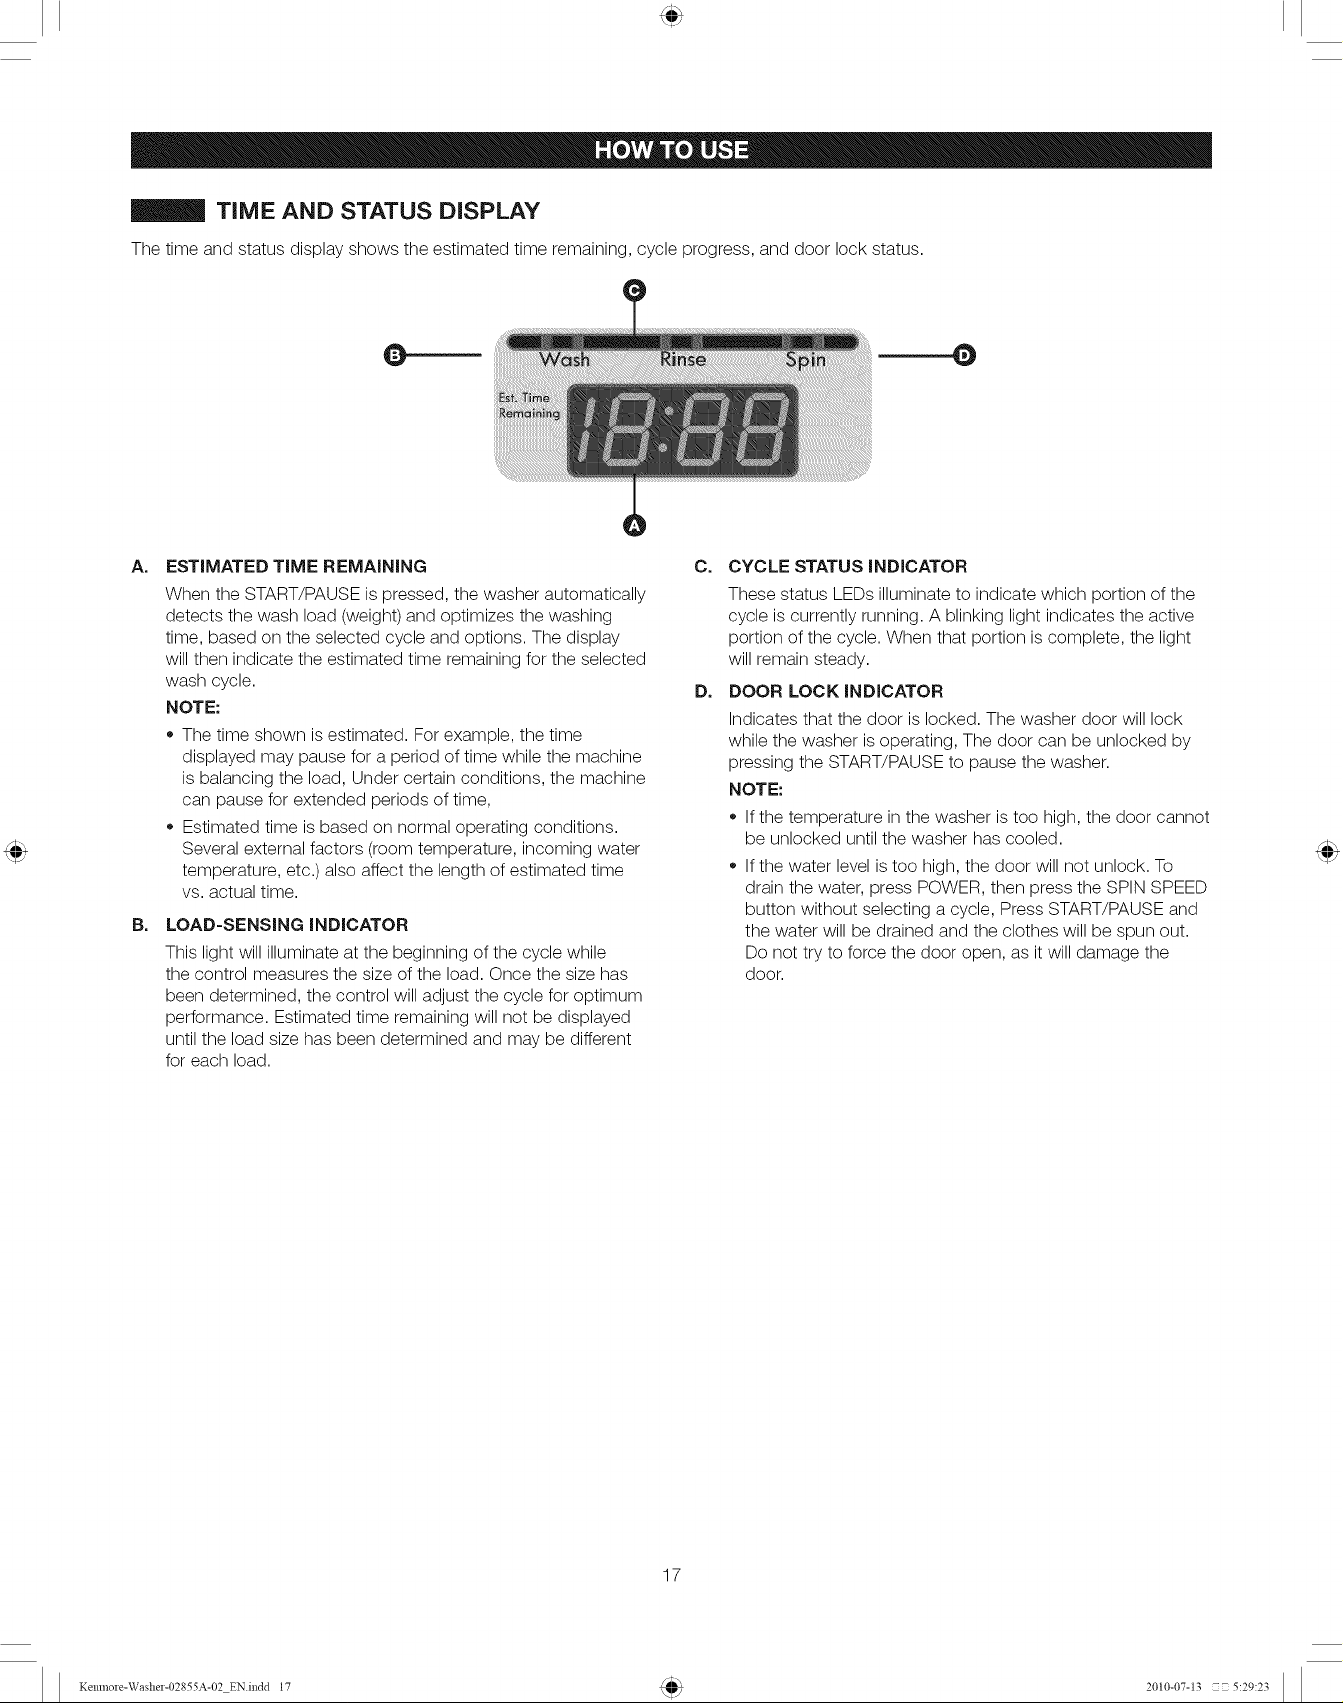
TiME AND STATUS DISPLAY
The time and status display shows the estimated time remaining, cycle progress, and door lock status.
m m@
A. ESTIMATED TiME REMAiNiNG C.
When the START/PAUSE is pressed, the washer automatically
detects the wash load (weight) and optimizes the washing
time, based on the selected cycle and options. The display
will then indicate the estimated time remaining for the selected
wash cycle.
NOTE:
The time shown is estimated. For example, the time
displayed may pause for a period of time while the machine
is balancing the load, Under certain conditions, the machine
can pause for extended periods of time,
Estimated time is based on normal operating conditions.
Several external factors (room temperature, incoming water
temperature, etc.) also affect the length of estimated time
vs. actual time.
B= LOAD-SENSING INDICATOR
This light will illuminate at the beginning of the cycle while
the control measures the size of the load. Once the size has
been determined, the control will adjust the cycle for optimum
performance. Estimated time remaining will not be displayed
until the load size has been determined and may be different
for each load.
CYCLE STATUS INDICATOR
These status LEDs illuminateto indicate which portion of the
cycle is currently running. A blinking light indicates the active
portion of the cycle. When that portion is complete, the light
will remain steady.
D=
DOOR LOCK INDICATOR
Indicates that the door islocked. The washer door will lock
while the washer is operating, The door can be unlocked by
pressing the START/PAUSE to pause the washer.
NOTE:
If the temperature in the washer is too high, the door cannot
be unlocked until the washer has cooled.
If the water level is too high, the door will not unlock. To
drain the water, press POWER, then press the SPIN SPEED
button without selecting a cycle, Press START/PAUSE and
the water will be drained and the clothes will be spun out.
Do not try to force the door open, as it will damage the
door.
17
Kemnole-Washe1-02855A-02 EN.indd 17 2010-07-13 Z- 5:29:23
Page 18
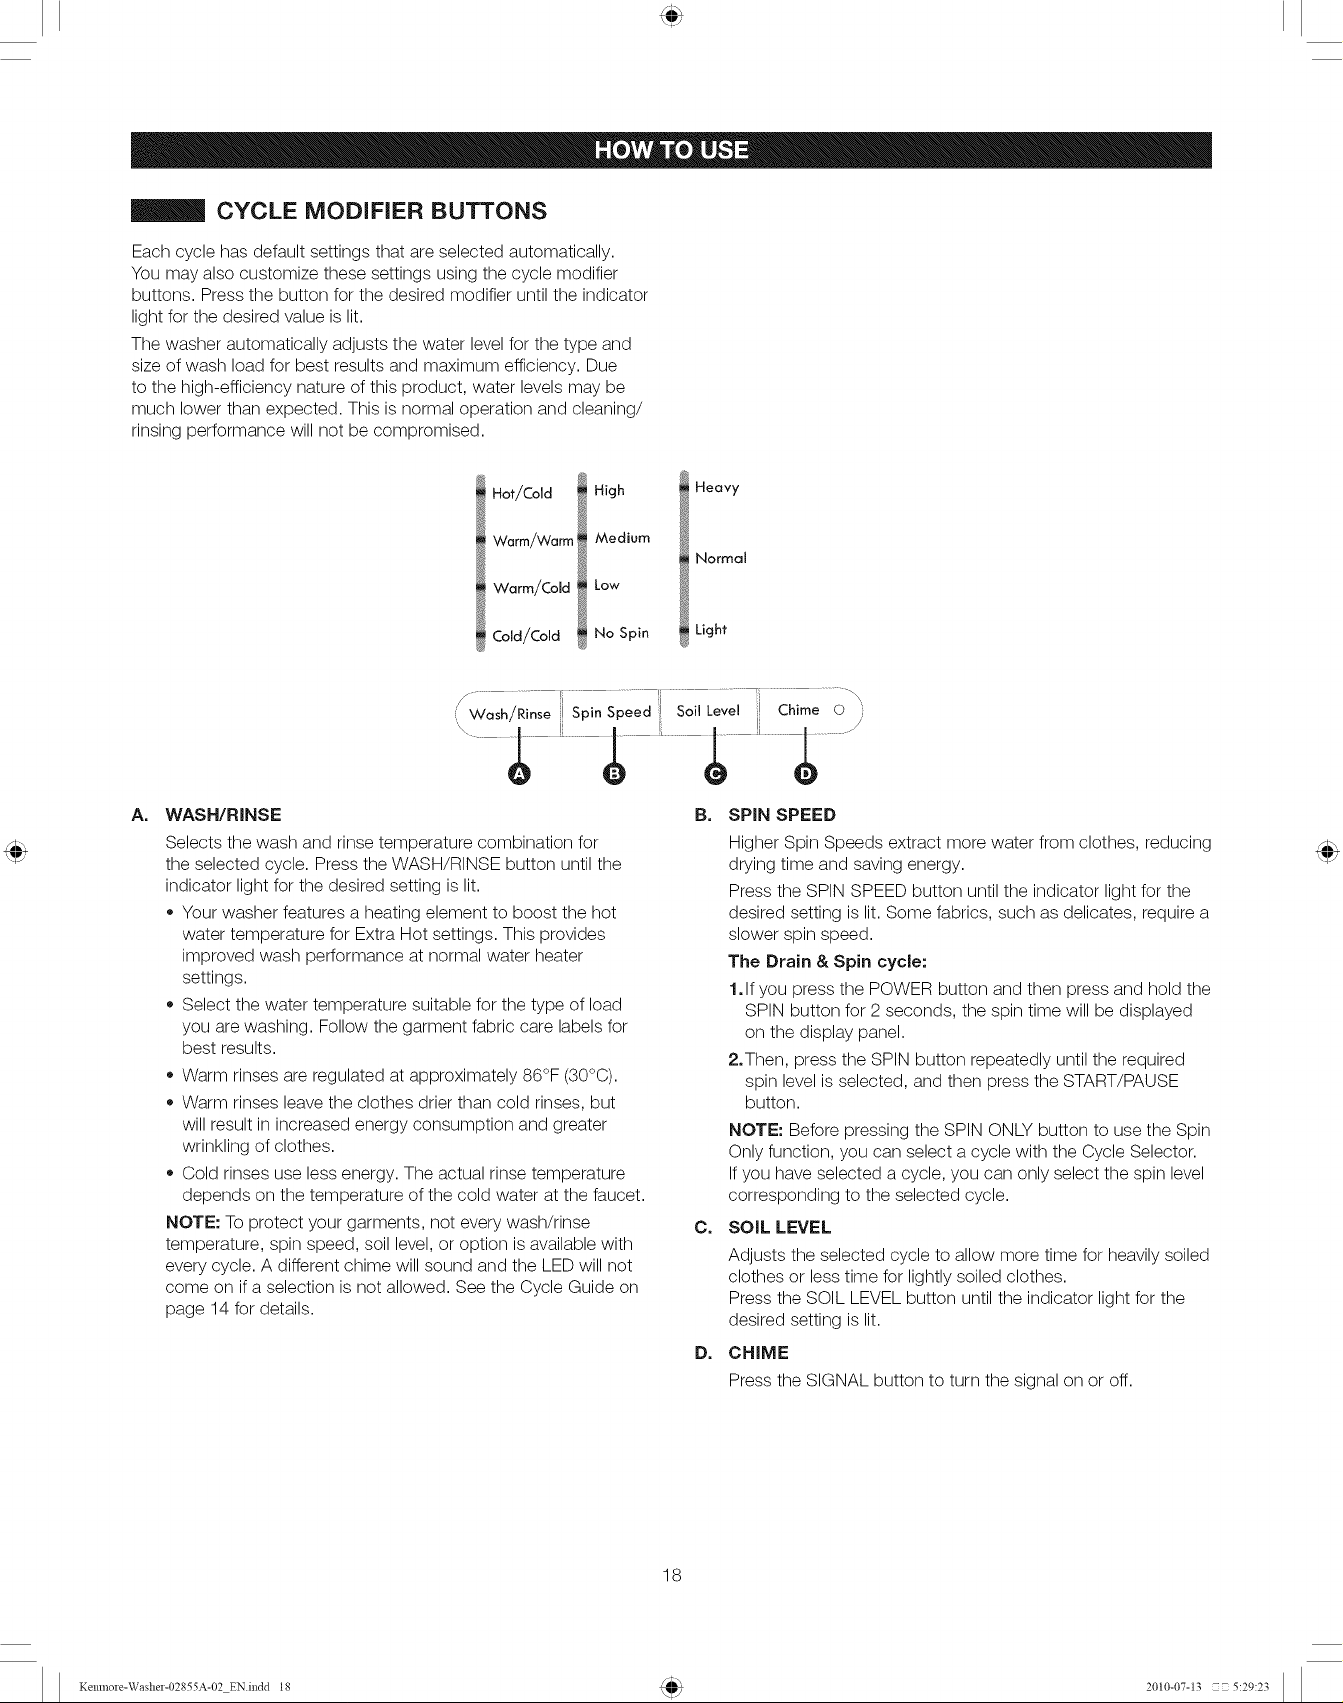
CYCLE MODiFiER BUTTONS
Each cycle has default settings that are selected automatically.
You may also customize these settings using the cycle modifier
buttons. Press the button for the desired modifier until the indicator
light for the desired value is lit.
The washer automatically adjusts the water level for the type and
size of wash load for best results and maximum efficiency. Due
to the high-efficiency nature of this product, water levels may be
much lower than expected. This is normal operation and cleaning/
rinsing performance will not be compromised.
High I Heavy
Warm/Warm
Medium _t Normal
Warm/Cold
_1 Hot/Cold
Cold/Cold
(/Wash!Rinse i Spin Speed [ SoilLevel ]I Chime 0 :
Low
No Spin _ Light
,; ......;, .........; ..................
A=
WASH/RINSE
Selects the wash and rinse temperature combination for
the selected cycle. Press the WASH/RINSE button until the
indicator light for the desired setting is lit.
Your washer features a heating element to boost the hot
water temperature for Extra Hot settings. This provides
improved wash performance at normal water heater
settings.
Select the water temperature suitable for the type of load
you are washing. Follow the garment fabric care labels for
best results.
Warm rinses are regulated at approximately 86°F (30°C).
Warm rinses leave the clothes drier than cold rinses, but
will result in increased energy consumption and greater
wrinkling of clothes.
Cold rinses use less energy. The actual rinse temperature
depends on the temperature of the cold water at the faucet.
NOTE: To protect your garments, not every wash/rinse
temperature, spin speed, soil level, or option is available with
every cycle. A different chime will sound and the LED will not
come on if a selection is not allowed. See the Cycle Guide on
page 14 for details.
B=
SPIN SPEED
Higher Spin Speeds extract more water from clothes, reducing
dITing time and saving energy.
Press the SPIN SPEED button until the indicator light for the
desired setting is lit. Some fabrics, such as delicates, require a
slower spin speed.
The Drain & Spin cycle:
1.If you press the POWER button and then press and hold the
SPIN button for 2 seconds, the spin time will be displayed
on the display panel.
2.Then, press the SPIN button repeatedly until the required
spin level is selected, and then press the START/PAUSE
button.
NOTE: Before pressing the SPIN ONLY button to use the Spin
Only function, you can select a cycle with the Cycle Selector.
Ifyou have selected a cycle, you can only select the spin level
corresponding to the selected cycle.
C=
SOIL LEVEL
Adjusts the selected cycle to allow more time for heavily soiled
clothes or less time for lightly soiled clothes.
Press the SOIL LEVEL button until the indicator light for the
desired setting is lit.
D=
CHIME
Press the SIGNAL button to turn the signal on or off.
18
Kemnole-Washe1-02855A-02 EN.indd 18 2010-07-13 Z- 5:29:23
Page 19

CYCLE OPTION BUTTONS
Your washing machine features several additional cycle options to
customize cycles to meet your individual needs.
1,Turn on the washer and turn the cycle selector knob to select
the desired cycle.
ZUse the cycle modifier buttons to adjust the settings for that
cycle.
3,Press the cycle option button(s) for the option(s) you would like
to add. The button will light when that option is selected.
If the selected option is not allowed for the selected cycle, the
chime will sound twice to inform you that it is not allowed.
4, Press the START/PAUSE button to start the cycle. The washer
will start automatically after a brief delay for locking the door.
NOTE: To protect your garments, not every option is available with
every cycle. See the CYCLE GUIDE on page 14 for details.
NOTE: If the START/PAUSE button is not pressed within 4
minutes, the control will shut off and the settings will be lost.
DELAY START
O nce you have selected the cycle and other
Delay Start the delay time by one hour, for up to 19 hours.
START/PAUSE button to start the delay time.
settings, press this button to delay the start of the
wash cycle. Each press of the button increases
Once the desired delay time is set, press the
SPECIAL FUNCTIONS
CONTROL LOCK
This function prevents children from playing with
your washer.
Coatirol Lock
Activating the Control Lock function
Press and hold the CONTROL LOCK button simultaneously for
approximately 3 seconds.
When you activate the Control Lock function, the door locks and
the "Control Lock" lamp illuminates.
,, Ifyou press the START/PAUSE button after you have activated
the Control Lock function, none of the buttons will work except
for the POWER button.
,, Ifyou press a button when the buttons are locked, the "Control
Lock" lamp blinks.
Pausing the Control Lock function
When the door is locked or the buttons are locked by the Control
Lock function, you can pause the Control Lock operation for 1
minute by pressing and holding the CONTROL LOCK button
simultaneously for approximately 3 seconds.
Ifyou pause the Control Lock mode temporarily, the door lock is
released for 1 minute for user convenience. During this period,
the "Control Lock" lamp blinks.
Ifyou open the door after the minute is over, an alarm sounds for
up to 2 minutes.
Ifyou close the door within the 2 minutes, the door is locked
and the Control Lock function is reactivated. Ifyou close the
door after the 2 minutes, the door is not locked automatically
and no alarm sounds.
Deactivating the Control Lock function
Press and hold both the CONTROL LOCK button simultaneously
for approximately 6 seconds.
When you deactivate the Control Lock function, the door is
unlocked and the "Control Lock" is turned off.
WARNING:
The Control Lock function prevents children or the infirm from
accidently operating the washer and injuring themselves.
,, If a child enters the washing machine, the child may become
trapped and suffocate.
CAUTION:
Once you have activated the Control Lock function, it continues
working even if the power is turned off.
Opening the door by force can result in injury due to damage to
the product.
NOTE: To add laundry after you have activated the Control Lock
function, you must first pause or deactivate the Control Lock
function.
NOTE: If you want to open the door of the washing machine when
the Control Lock function is activated:
,, Pause or deactivate the Control Lock function.
,, Turn the washing machine off and then on again.
19
Kemnole-Washe1-02855A-02 EN.indd 19 2010-07-13 Z- 5:29:24
Page 20

SPECIAL FUNCTIONS (CONT.)
CLEAN WASHER
O A buildup of detergent residue can occur in the
CleGn Wc_sh®_ specially designed to remove this buildup using
cleaning front load washers.
The CLEAN WASHER cycle should be run once a month, or more
often under heavy use conditions or if odor is present.
1,Turn ON the washer and press the CLEAN WASHER button.
Selecting any other cycle after CLEAN WASHER has been
selected will cause the CLEAN WASHER cycle to be cancelled.
2,Fill the bleach dispenser to the MAX line with liquid chlorine
bleach. Do not overfill the bleach dispenser. Overfilling will cause
the bleach to be dispensed immediately.
3, Press the START/PAUSE to start the cycle.
4,After the cycle has ended, open the door and allow the drum
interior to dry completely.
NOTE: Do NOT use this cycle with clothes, and do NOT add
detergent or fabric softener.
* For powdered tub cleaners, add the cleaner to the main wash
compartment of the dispenser drawer. Place tablet cleaners
directly into the tub. Always follow the cleaner manufacturers
instructions and recommendations.
wash tub over time and can lead to a mildewy
or musty smell. The CLEAN WASHER cycle is
bleach or other cleaners designed specifically for
MY CYCLE
O llows you to activate your custom wash
/_y Cycl® By pushing the MY CYCLE button, you activate
"My Cycle" Ilight indicates activation.
You can select all options as follows in the My Cycle mode.
1,Select cycles using the Cycle Selector.
2,After cycle selection, set each option.
3,Then, you can store the cycle and options you select by
pressing the START/PAUSE button in the My Cycle mode. The
cycle and options you select are displayed the next time you
choose the My Cycle function.
NOTE:
• You can change the My Cycle settings by repeating the process
above. The last used setting is displayed the next time you
choose the My Cycle function.
,, If washing is completed in My Cycle mode, the washing machine
automatically enters My Cycle mode when you turn the power
on by pressing the POWER button.
(temperature, spin, soil level, etc.) with one-button
convenience.
the settings used during the My Cycle mode. The
2O
Kenmole-Washe1-02855A-02 EN.indd 20 2010-07-13 Z- 5:29:24
Page 21

WARNING: TO reduce the risk of fire,electric shock, or injury to persons, read and follow thisentire manual,
including the important Safety instructions, before operating this washer.
Unplug the washer before cleaning to avoid the risk of electric shock. Failure to follow thiswarning can cause serious injury,fire, electrical
shock, or death.
,, Never use harsh chemicals, abrasive cleaners, or solvents to clean the washer. They will damage the finish.
REGULAR CLEANING
Cleaning the exterior
Turn off the water faucets after finishing the day's washing.
This will shut off the water supply to your Washer and prevent the
unlikely possibility of damage from escaping water. Leave the door
open to allow the inside of your Washer to dry out. Use a soft cloth
to wipe up all detergent, bleach, or other spills as they occur.
Clean the following as recommended:
Control Panel - Clean with a soft, damp cloth. Do not use abrasive
powders or cleaning pads. Do not spray cleaners directly on the
panel.
Cabinet - Clean with soap and water.
Cleaning the interior
Clean the interior of your Washer periodically to remove any dirt,
soil, odor, mold, mildew, or bacterial residue that may remain in
your Washer as a result of washing clothes.
Failure to follow these instructions may result in unpleasant
conditions, including odors and/or permanent stains on your
Washer or laundry.
Hard water deposits may be removed, if needed. Use a cleaner
labeled "Washer safe".
Read these instructions carefully before beginning the
CLEAN WASHER cycle.
1.Open the door and remove any clothing in the wash drum.
2.Open the dispenser drawer. Add liquid chlorine bleach or tub
cleaner.
Some powder or tablet tub cleaners which are manufactured for
this purpose can be used.
(NOTE: Do not add any laundry detergent or fabric softener to
the drawer when using CLEAN WASHER.)
Ifusing liquid chlorine bleach
Add liquid chlorine bleach to the bleach compartment of the
drawer.(NOTE: Do not exceed the maximum fill line and do not
pour undiluted liquid bleach directly into the wash drum.)
Ifusing powder cleaner
Remove the liquid detergent cup and add powder cleaner to
the main wash compartment of the dispenser drawer.
Ifusing tablet cleaner
Add tablet cleaner to the wash drum directly. (NOTE: Do not
add tablet cleaner to the dispenser drawer.)
3. Close the drawer and washer door.
4. Select CLEAN WASHER and press START.
NOTE: It is recommended that CLEAN WASHER should be
repeated monthly. If mildew or musty smell already exists, run
CLEAN WASHER for 3 consecutive weeks. After CLEAN WASHER
is complete or when the washer is not used, leave the washer
door open for better ventilation and drying inside of the washer.
Cleaning the door seal
1.Open the washer door and remove any clothing or items from
the washer.
2. Inspect the gray colored seal/
bellow between the door opening
and the basket for stained areas.
Pull back the seal/bellow to
inspect all areas under the seal/
bellow and to check for foreign
objects.
3. Ifstained areas are found, wipe down these areas of the seal/
bellow, using the procedure that follows.
a}Mix a dilute solution containing s4cup (177 mL) of liquid
chlorine bleach and 1 gal. (3.8 L) of warm tap water.
b}Wipe the seal/bellow area with the dilute solution using a
damp cloth.
c)Let stand 5 minutes.
d}Wipe down area thoroughly with a dry cloth and let the washer
interior air dis! with the door open.
iMPORTANT:
,, Wear rubber gloves when cleaning for prolonged periods.
Refer to the bleach manufacturer's instructions for proper use.
Storing your washer
Washers can be damaged if water is not removed from hoses and
internal components before storage.
Prepare your washer for storage as follows:
,, Select the Quick Wash cycle and add bleach to the automatic
dispenser. Run your washer through the cycle without a load.
,, Turn the water faucets off and disconnect the inlet hoses.
Unplug your washer from the electrical outlet and leave your
washer door open to let air circulate inside the tumbler.
Ifyour washer has been stored in below-freezing temperatures,
allow time for any leftover water in your washer to thaw out
before use.
21
Kemnole-Washe1-02855A-02 EN.indd 21 2010-07-13 Z- 5:29:25
Page 22

REGULAR CLEANING (CONT.)
Cleaning the dispenser
The Automatic Dispenser may need to be cleaned periodically due to laun@7 additive buildup.
1.Pull out the detergent liquid holder from the detergent 3.Wash all of the parts under running water.
compartment. 4.Clean the dispenser recess with a soft brush.
_,. j
2. Remove the Siphon Cap from the fabric softener and bleach
compartments.
f
M J
5. Reinsert the Siphon Cap, and push it firmly into place.
6. Push the dispenser back into place.
7. Run a Rinse and Spin cycle without any load in your Washer.
22
Kemnole-Washe1-02855A-02 EN.indd 22 2010-07-13 Z- 5:29:25
Page 23

MAINTENANCE
Cleaning the water inlet filters
Ifthe washer detects that water is not entering the dispenser, an error message will show on the display. Inlet valve filter screens could be
plugged by hard water scale, sediment in the water supply, plumbing scale, etc.
NOTE: The inlet screens protect the delicate parts of the fill valve from being damaged by particles that may get into the valves with the
water supply. Operating the washer with the filters removed could cause a valve fail to open resulting in flooding and/or property damage.
Inlet filte_
1.Turn OFF both water taps completely. Unscrew the hot and cold
water lines from the back of the washer.
iMPORTANT: Use ONLY the inlet hoses provided with this laundry
product. Aftermarket hoses are not guaranteed to fit or function
correctly. Other hoses may not tighten correctly and could cause
leaks. Subsequent damage to product or property wilt not be
covered under the terms of the product warranty.
2.Carefully remove the filters from the water valves and soak
them in white vinegar or a time scale remover, following the
manufacturer's instructions. Rinse thoroughly before reinstalling.
Press the filters back into place and reattach the water lines.
23
Kemnole-Washe1-02855A-02 EN.indd 23 2010-07-13 Z- 5:29:26
Page 24

MAINTENANCE (CONT.)
Cleaning the debris filter
We recommend cleaning the debris filter when water does not drain well or the "nd" error message is displayed.
1=Open the filter cover by pressing and pulling the handle of the 6=Wash any dirt or other material from the debris filter. Make sure
filter cover with your finger, the drain pump propeller behind the debris filter is not blocked.
f
w
j
2.Holding the drain cap, pull the drain tube that is hooked on the
guide hook to the front. Do not pull the drain tube with excessive
force.
3.Place a bowl under the washing machine to catch any remaining
water. Then, hold the drain tube with one hand, and turn the
emergency drain cap counter clockwise with the other hand to
separate it from the drain tube.
4. Drain the remaining water completely.
f "m
CaD
_,. j
5. Pull out the debris cap and debris filter assembly.
f
Debris filter cap _t.'_5 _Debris filte
7.When you have finished cleaning the filter, insert the debris cap
and filter assembly back into the washer. Turn the debris filter
cap clockwise until the indicator on the debris filter cap is in the
12 o'clock position, pointing to the indicator on the washer.
f
8. Re-attach the emergency dl'ain cap to the drain tube, and then
hook the tube to the hook guide.
9. Re-install the filter cover.
Debris filter cap
24
Kemnole-Washe1-02855A-02 EN.indd 24 2010-07-13 E- 5:29:27
Page 25

NORMAL SOUNDS YOU MAY HEAR
The following sounds may be heard while the washer is operating. They are normal.
Clicking:
Door lock relay when the door locks and unlocks.
Spraying or hissing:
Water spraying or circulating during the cycle.
Winding up:
Drum spinning for balancing routine at the spin-dry cycle.
Humming or gurgling:
Drain pump pumping water from the washer at the end of a cycle.
Splashing:
Clothes tumbling inthe drum during the wash and rinse cycles.
BEFORE CALLING FOR SERVICE
Your washing machine isequipped with an automatic error-monitoring system to detect and diagnose problems at an early stage. If your
washer does not function properly or does not function at all, check the following before you call for service.
PROBLEM SOLUTION
Make sure the door isfirmly closed.
Make sure your Washer is plugged in.
Make sure the water source faucets are open.
will not start..
has no water or not enough * Straighten the water inlet hoses.
water..
detergent remains in the
automatic dispenser after the
wash cycle is complete. * Make sure the Detergent Selector dial is in the upper position when using granular detergent.
vibrates or is too noisy. * Make sure that the shipping bolts are removed.
stops • Before your Washer starts to fill, it will make a series of clicking noises to check the door lock and do
Make sure to press the Start/Pause Button to start your Washer.
Make sure the Child Lock is not activated. See page 14.
Before your Washer starts to fill, it will make a series of clicking noises to check the door lock and do
a quick drain.
Check the fuse or reset the circuit breaker
Turn both faucets on fully.
Make sure the door is tightly closed.
Disconnect hoses and clean screens. Hose filter screens may be plugged.
Open and close the door, then press the Start/Pause Button.
Make sure your Washer is running with sufficient water pressure.
Make sure your Washer is set on a level surface. If the surface is not level, adjust your Washer feet to
level the appliance.
Make sure your Washer is not touching any other object.
Make sure the laundry load is balanced.
Plug the power cord into a live electrical outlet.
Check the fuse or reset the circuit breaker.
Close the door and press the Start/Pause Button to start your Washer.
For your safety, your Washer will not tumble or spin unless the door is closed.
a quick drain.
There may be a pause or soak period in the cycle. Wait briefly and it may start.
Check the screens on the inlet hoses at the faucets for obstructions.
Clean the screens periodically.
25
Kemnole-Washe1-02855A-02 EN.indd 25 2010-07-13 Z- 5:29:27
Page 26

BEFORE CALLING FOR SERVICE (CONT.)
PROBLEM
fills with the wrong temperature
water.
door locked or will not open.
does not drain and/or spin.
load is too wet at the end of
the cycle.
leaks water.
has excessive suds.
SOLUTION
,, Turn both faucets on fully.
,, Make sure the temperature selection is correct.
,, Make sure the hoses are connected to the correct faucets. Flush water lines.
,, Check the water heater. It should be set to deliver a minimum 120° F (49° C) hot water at the tap.
Also check the water heater capacity and recovery rate.
,, Disconnect the hoses and clean the screens. The hose filter screens may be plugged.
,, As your Washer is filling, the water temperature may change as the automatic temperature control
feature checks incoming water temperature. This is normal.
While your Washer is filling, you may notice just hot and/or just cold water going through the
dispenser when cold or warm wash temperatures are selected. This is a normal function of the
automatic temperature control feature as your Washer determines the temperature of the water.
Press the Start/Pause Button to stop your Washer.
Your Washer door will remain locked during the heating portion of the Sanitize Cycle
,, It may take a few moments for the door lock mechanism to disengage.
,, Check the fuse or reset the circuit breaker.
,, Straighten the drain hoses. Eliminate kinked hoses. If there is a drain restriction, call for service.
Close the door and press the Start/Pause Button. For your safety, your Washer will not tumble or spin
unless the door is closed.
,, Make sure the debris filter is not clogged.
Use the High or Extra High spin speed.
,, Use high efficiency detergent to reduce over-sudsing.
Load is too small. Very small loads (one or two items) may become unbalanced and not spin out
completely.
Make sure the door is firmly closed.
,, Make sure all hose connections are tight.
,, Make sure the end of the drain hose is correctly inserted and secured to the drainage system.
Avoid overloading.
,, Use high efficiency detergent to prevent over-sudsing.
,, Use high efficiency detergent to prevent over-sudsing.
,, Reduce the detergent amount for soft water, small or lightly soiled loads.
,, Non-HE detergent is NOT recommended.
Information codes
CODE SYMBOL MEANING SOLUTION
Too many suds are detected during the washing
session.
The unit is put on hold until the suds are
reduced. Then, the unit will go back to the
operation.
Run a Clean Washer cycle.
To prevent, reduce the amount of detergent.
When it finishes washing, End and Sd codes will
blink in turn.
I_C Unbalanced load prevented your Washer from
dS Close the door tightly and restart the cycle.
spinning. Redistribute the load, press the Start/Pause Button.
Door is open when Washer is running. Ifthe code reappears, call for service.
I--I Close the door tightly and restart the cycle.
i--tin Your Washer failed to lock the door. Ifthe code reappears, call for service.
26
Kemnole-Washe1-02855A-02 EN.indd 26 2010-07-13 Z- 5:29:28
Page 27

BEFORE CALLING FOR SERVICE (CONT.)
t I Water temperature control problem.
i--iF (Heater Control problem) Call for service.
I Im Your Washer has tried to fill but has not reached
!,_1_ the proper water level.
--! The door will not unlock.
I_l
FCI
C J Motor not running properly.
Your washer is not draining.
n,:l
It can also mean that the unit senses a small
clog while draining.
Your Washer has tried to fill but was
unsuccessful.
,-,i--
checkif the hot water supply hose is
connected.
Call for service.
Make sure the door is firmly closed.
Push the Power button to turn off your Washer, then turn it on
again. If the code reappears, call for service.
Restart the cycle pressing the Start/Pause Button. Ifthe code
reappears, call for service.
Before calling for service, check the following.
1,Turn off the unit and turn it on again.
2,Select only the Spin Cycle.
3, Press the Start/Pause to drain the water.
4,Clean the debris filter.
Ifit still does not drain, call for service.
Make sure the water faucets are open all the way. Check for
kinked hoses.
Check the inlet screens on the fill hoses.
You must connect the hot water supply hose because hot water
is supplied by the Auto Temperature Control (A.T.C.) function if
the temperature of the cold water is lower than 59°F.
r l The hot/cold water hose connection is not Please connect the hot/cold water hose connection correctly.
i--Iiml correct.
O1_ Electric service was lost when Washer was Restart the cycle by pressing the Start/Pause Button.
I i-- running.
_-H-- A fault is detected in the water level sensor. Call for service
LIE
UQ
L-C Jammed Key. Call for service
I I- Motor speed sensor problem. Restart the cycle.
Or
I i- Restart the cycle.
L-i-_ Temperature sensor problem.
-U- Restart the cycle.
_iC High current detected.
_1- Call an electrician to check for electrical issues within the home
I_ C High/Low voltage detected.
Ifthe code reappears, call for service.
Ifthe code reappears, call for service.
Ifthe code reappears, call for service.
Restart the cycle.
before calling service.
Ifthe code reappears, call for service.
27
Kemnole-Washe1-02855A-02 EN.indd 27 2010-07-13 C- 5:29:30
Page 28

Kenmore Limited Warranty
When installed, operated and maintained according to all instructions supplied with the product, if this appliance fails due to
a defect in material and workmanship within one year from the date of purchase, call 1-800-4-MY-HOME eto arrange for free
repair.
If this appliance is ever used for other than private family purposes, this warranty applies for only 90 days from the date of
purchase.
This warranty covers only defects in material and workmanship. Sears will NOT pay for:
1. Expendable items that can wear out from normal use, including but not limited to filters, belts, light bulbs, and bags.
2.A service technician to instruct the user in correct product installation, operation or maintenance.
3.A service technician to clean or maintain this product.
4.Damage to or failure of this product if it is not installed, operated or maintained according to the all instructions supplied
with the product.
5. Damage to or failure of this product resulting from accident, abuse, misuse or use for other than its intended purpose.
6. Damage to or failure of this product caused by the use of detergents, cleaners, chemicals or utensils other than those
recommended in all instructions supplied with the product.
7. Damage to or failure of parts or systems resulting from unauthorized modifications made to this product.
Disclaimer of implied warranties; limitation of remedies
Customer's sole and exclusive remedy under this limited warranty shall be product repair as provided herein. Implied
warranties, including warranties of merchantability or fitness for a particular purpose, are limited to one year or the shortest
period allowed by law. Sears shall not be liable for incidental or consequential damages. Some states and provinces do not
allow the exclusion or limitation of incidental or consequential damages, or limitation on the duration of implied warranties of
merchantability or fitness, so these exclusions or limitations may not apply to you.
This warranty applies only while this appliance is used in the United States or Canada.
This warranty gives you specific legal rights, and you may also have other rights which vary from state to state.
Sears Brands Management Corporation, Hoffman Estates, IL 60179
Sears Canada Inc., Toronto, Ontario, Canada M5B 2B8
28
Kenmole-Washe1-02855A-02 EN.indd 28 2010-07-13 Z- 5:29:30
Page 29

29
Kenmole-Washe1-02855A-02 EN.indd 29 2010-07-13 Z- 5:29:30
Page 30

iiiiiiiiiiiiiiiiiii.....
iiiiiiiiiiiiiiiii
iiiiiiiiiiiiiiiii
iiiiiiiiiiiiiiiii
Your Home
For troubleshooting, product manuals and home solutions advice:
manag ife
www.managemylife.com
For repair - in your home - of all major brand appliances,
lawn and garden equipment, or heating and cooling systems,
no matter who made it, no matter who sold it!
For the replacement parts, accessories and
owner's manuals that you need to do-it-yourself,
For Sears professional installation of home appliances
and items like garage door openers and water heaters,
1-800-4-MY-HOME ®(1-800-469-4663)
Call anytime, day or night (U.S.A. and Canada)
..................................................................................................................................................................................www, sears,com www.sears.ca
iiiiiiiiiiiiiiiiiiii
iiiiiiiiiiiiiiiiiiii
iiiiiiiiiiiiiiiiiiii
iiiiiiiiiiiiiiiiiiii
iiiiiiiiiiiiiiiiiiii
iiiiiiiiiiiiiiiiiiii
iiiiiiiiiiiiiiiiiiii
iiiiiiiiiiiiiiiiiiii
iiiiiiiiiiiiiiiiiiii
iiiiiiiiiiiiiiiiiiii
iiiiiiiiiiiiiiiiiiii
iiiiiiiiiiiiiiiiiiii
iiiiiiiiiiiiiiiiiiii
iiiiiiiiiiiiiiiiiiii
iiiiiiiiiiiiiiiiiiii
iiiiiiiiiiiiiiiiiiii
iiiiiiiiiiiiiiiiiiii
iiiiiiiiiiiiiiiiiiii
iiiiiiiiiiiiiiiiiiii
iiiiiiiiiiiiiiiiiiii
iiiiiiiiiiiiiiiiiiii
iiiiiiiiiiiiiiiiiiii
iiiiiiiiiiiiiiiiiiii
iiiiiiiiiiiiiiiiiiii
iiiiiiiiiiiiiiiiiiii
iiiiiiiiiiiiiiiiiiii
iiiiiiiiiiiiiiiiiiii
iiiiiiiiiiiiiiiiiiii
iiiiiiiiiiiiiiiiiiii
iiiiiiiiiiiiiiiiiiii
iiiiiiiiiiiiiiiiiiii
iiiiiiiiiiiiiiiiiiii
iiiiiiiiiiiiiiiiiiii
iiiiiiiiiiiiiiiiiiii
iiiiiiiiiiiiiiiiiiii
iiiiiiiiiiiiiiiiiiii
iiiiiiiiiiiiiiiiiiii
iiiiiiiiiiiiiiiiiiii
iiiiiiiiiiiiiiiiiiii
iiiiiiiiiiiiiiiiiiii
iiiiiiiiiiiiiiiiiiii
iiiiiiiiiiiiiiiiiiii
iiiiiiiiiiiiiiiiiiii
iiiiiiiiiiiiiiiiiiii
iiiiiiiiiiiiiiiiiiii
iiiiiiiiiiiiiiiiiiii
_i!i!i!i!i!i!i!i!i!i!i!i!i!i!i!_i!,!!,!!,!!,
To purchase a protection agreement on a product serviced by Sears
For repair of carry-in items like vacuums, lawn equipment,
and electronics, call anytime for the location of your nearest
1-800-488-1222 (U.S.A.) 1-800-469-4663 (Canada)
1-800-827-6655 (U.S.A.) 1-800-361-6665 (Canada)
Para pedir servicio de reparaci6n a Au Canada pour service en fran_ais:
domicilio, y para ordenar piezas:
Sears Parts & Repair Service Center
www.sears.com www.sears.ca
1-888-8U -H OGAR ® 1-800-LE-FOYER Mc
(1-888- 784-6427) (1-800- 533-6937)
www.sears.com www.sears.ca
Our Home
iiiiiiiiiiiiiiiii
iiiiiiiiiiiiiiiii
iiiiiiiiiiiiiiiii
iiiiiiiiiiiiiiiii
iiiiiiiiiiiiiiiii
iiiiiiiiiiiiiiiii
iiiiiiiiiiiiiiiii
iiiiiiiiiiiiiiiii
® Registered Trademark / Trademark of KCD IP,LLC in the United States, or Sears Brands, LLC in other countries
® Marca Registrada / rMMarca de F_ibrica de KCD IP,LLC en Estados Unidos, o Sears Brands, LLC in otros paises
Kemnole-Washe1-02855A-02 EN.indd 30 2010-07-13 2- 5:29:30
TM
McMarque de commerce / Marque deposee de Sears Brands, LLC
MD
Page 31

Use& Care Guide
Manual de Uso y Cuidado
English/ Espafiol
Models/Moddos: 402.4903*
I(enmore
For _t results,a Iow-suds_ng,HEoHigh E@dency
Detergent made for front I_d_ng washers must
be _ed
Pare obtener mejores r-_ultados, una baja
espuma_HE Alta efidenda de detergentes pare
lavadoras de carga Nzo fren1_ede_ set utlIizado,
= cobr number, numero de cobr
P/N 134779000B (0807)
Sears Brands Management
Corporatlon_ Hoffman Estate%
IL60179 USA
W'C_V_Se_[$.COm
Kemnoye-Wasl_e_-02855A-02MES.md4 1 \,_wj
Code No. : DC68-02855A-02
2010-07-13 _--5:29:42
Page 32

MENSAJES DE SEGURIDAD
INSTRUCCIONES DE SEGURIDAD IMPORTANTES
REQUISITOS DE LA CONEXION A TIERRA
CARACTERiSTICAS Y FUNCIONES
Piezas y componentes claves ........................................ 6
REQUISITOS DE LA INSTALACION
Dimensiones y especificacior_es claves ................................. 7
Elija una ubicaci6n adecuada ......................................... 7
Piso ............................................................ 7
Espacios libres .................................................... 7
INSTRUCCIONES DE INSTALACION
Desembalaje y remoci6n de los tornillos de transporte ...................... 8
Conexidn de las mangueras de agua ................................... 8
Conexi6n de la manguera de drenaje ................................... 9
Conexi6n del suministro eiectrico ..................................... 10
Niveiado de la lavadora ............................................ 10
COMO UTILIZAR
Funciones del panel de control ...................................... 11
Funcionamiento de la lavadora ...................................... 12
Gu{a de ciclos ................................................... 13
Clasificacidn de las cargas de lavado .................................. 14
Acerca del dosificador ............................................. 15
Detergente y use del dosificador ..................................... 16
Display de tiempo y estado ......................................... 17
Botones modificadores de ciclos ..................................... 18
Botones de opciones de los ciclos ................................... 19
DEL.ZkYSTART (INICIO RETrARDADO) ................................ 19
Funciones especiales .............................................. 19
CONTROL LOCK (BLOQUEO CONTROLES) .......................... 19
CLEAN WASHER (LIMPIAR I..._VADORA) ............................. 20
MY CYCLE (MI CICLO) ........................................... 20
CUIDADO Y LIMPIEZA
Limpieza peri6dica ................................................ 21
Limpieza del exterior ............................................. 21
Limpieza del interior ............................................. 21
Limpieza del sello de la puerta ..................................... 21
C6mo guardar la lavadora ......................................... 21
Limpieza del dosificador .......................................... 22
Mantenimiento ................................................... 23
Limpieza de los filtros de entrada de agua ............................ 23
Limpieza del filtro de residues ...................................... 24
GUJA DE SOLUCION DE PROBLEMAS
Sonidos normales ................................................ 25
Antes de comunicarse con el servicio tecnico ........................... 25
En este espacio, registre la fecha de la compra, el modelo y
el n0mero de serie de su producto. Encontrar_ el modelo y el
n0mero de serie impresos en la placa de identificacidn del interior
de la puerta de la lavadora. Tenga esta informaciOn disponible
cuando contacte con Sears en relacidn con su producto.
N° de modelo
Fecha de compra
N° de serie
Guarde estas instrucciones y el recibo de la venta para consultas
futuras.
Acuerdos principales de proteccion
Enhorabuena per realizar una compra inteligente. Su nuevo
producto Kenmore@ esta diseBado y fabricado para aBos de un
use fiable. Pete come todos los productos, puede requerir un
mantenimiento preventive o alguna reparaci0n peri0dica. Si tiene un
Acuerdo principal de protecci6n podra ahorrarse dinero y molestias.
El Acuerdo principal de protecciOn tambien ayuda a ampliar la vida
0til de su nuevo producto. ElAcuerdo* incluye:
• Las piezas y la mane de obra necesarias para mantener el
correcto funcionamiento de los productos con un use normal,
no s61o los defectos.
Nuestra cobertura va touche m_s all_ de la garantJa del
producto. Se excluyen de lacobertura lasfallas no deducibles,
no funcionales - protecci6n real.
• Servicio experto per un equipo de m_s de 10.000 t_cnicos
de servicio de Sears autorizados, Io que significa que su
producto estar_ en buenas manes.
• No hay limite en las liamadas de servicio y _ste incluye
toda la naci6n, tantas veces come desee, siempre que nos
necesite.
• Garantia para eJementos defectuosos - Se cubre el
reemplazo del producto si se producen cuatro o m4s fallas del
producto en un periodo de 12 meses.
• Reemplazo del producto si este no se puede reparar.
• Comprobaci6n de mantenimiento preventivo anual a
solicitud del usuario sin cargos extras.
• Ayuda r4pida per tel_fono - Lo Ilamamos ResNuci6n r4pida.
Ayuda telef6nica de un representante de Sears para todos los
productos. Somos come un "manual del usuario con voz"o
• Protecci6n de sobrecargas de energJa contra daFios
derivados de las fluctuaciones electricas.
• Protecci6n anual de 250 $ per aJimentos que se hayan
descompuesto debido a una falla mecanica de un refrigerador o
un congelador cubiertos per el acuerdo.
• Reembolso per alquiler si la reparacidn del producto cubierto
tarda mas tiempo del prometido.
• Descuento del 10% del precio normal de cualquier servicio de
reparaciOn no cubierto y de las piezas relacionadas.
Unavez adquiride el Acuerdo, basta con una simple Ilamada telefdnica
para ebtener el servicie planificado. Puede Ilamaren cualquier
memento de d(a o de noche o programar un servicio en I(nea.
El Acuerdo principal de protecciOn es una adquisiciOn sin riesgo.
Si Io cancela per cualquier razOn durante el periodo de garantia del
producto, se Io reembolsaremos completamente; si el periodo de
garantia ha expirado el reembolso ser_ prorrateado.
iContrate hey su Acuerdo principal de protecciOn!
Se aplican algunas limitaciones y exclusiones.
Para obtener informaci6n adicional y sobre los precios en
Estados Unidos, Ilame a 1-800-827-6655.
•En Canad_ la cobertura de algunos elementos varia.
Para obtener una informaci6n completa llame a Sears
Canada al numero 1-800-361-6665.
Sears installation Service
Para la instalacidn profesional per parte de Sears de
electrodomesticos, controles de puertas de garajes, calentadores
de agua y otros productos del hogar, en Estados Unidos o
Canada, Ilame a
1-800-4-MY-HOME®.
Kenmole-Washe1-02855A-02 MES.indd 2 2010-07-13 Z- 5:29:42
Page 33

Le hemos proporcionado mensajes de seguridad importantes en este manual yen su electrodomestico.
Lealos y dgalos siempre.
Este es el dmbolo de alerta de seguridad.
Avisa de riesgos potenciales que pueden causar daflos a la propiedad, lesiones corporales
graves o la muerte.
Todos los mensajes de seguridad siguen al dmbolo de alerta de seguridad y alas palabras
PELIGRO o ADVERTENCIA. Estas palabras significan:
El incumplimiento de estas instrucciones de seguridad puede causar daflos
a la propiedad, lesiones corporales graves o la muerte.
El incumplimiento de estas instrucciones de seguridad puede causar daflos
a la propiedad, lesiones corporales graves o la muerte.
Todos los mensajes de seguridad advierten de cual es el peligro potencial,
aconsejan sobre la manera de reducir el riesgo de lesiones y avisan de Io
que puede ocurrir si no se siguen las instrucciones.
Para reducir el riesgo de incendio, descargas el_ctricas
o lesiones fisicas cuando usa este electrodom_stico,
siga las instrucciones de seguridad b_sicas que figuran a
continuaci6n.
,, Antes de utilizar la lavadora, debe estar adecuadamente
instalada como se explica en este manual.
No lave prendas que han sido previamente limpiadas, lavadas,
remojadas o salpicadas con gasolina, solventes de limpieza en
seco u otras sustancias inflamables o explosivas, ya que emiten
vapores que pueden prenderse fuego o explotar.
,, No agregue gasolina, solventes de limpieza en seco u otras
sustancias inflamables o explosivas al agua del lavado. Estas
sustancias emiten vapores que se pueden prender fuego o
explotar.
,, En ciertas circunstancias, se puede producir gas hidrogeno
en un sistema de agua caliente que no se ha usado durante 2
semanas o m&,s.EL GAS HIDROGENO ES EXPLOSIVO.
,, Si el sistema de agua caliente no fue utilizado durante dicho
perl_odo,antes de usar la lavadora abra las Ilaves de agua
caliente y deje correr el agua por varios minutos. De esta
manera, se eliminar&,el gas hidrogeno acumulado. Dado que
el gas es inflamable, no fume ni use una llama abierta en ese
momento.
No permita que los nifios jueguen sobre la lavadora o dentro de
ella. Se requiere de supervision cuando la lavadora es utilizada
cerca de los nir'ios.
,, Antes de descartar la lavadora o de trasladarla para que se le
efectLie el servicio tecnico, retire la puerta para impedir que los
nir'ios queden atrapados dentro.
,, No instale o guarde esta lavadora donde quede expuesta a los
factores clim&,ticos o a temperaturas de congelacion.
No modifique los controles.
,, No repare ni reemplace ninguna pare de la lavadora, ni intente
efectuar ning0n servicio tecnico salvo los recomendados
especfficamente en este manual Recomendamos firmemente
que los servicios tecnicos los realice el personal calificado.
,, Consulte las instrucciones de instalacion para efectuar la
conexion a tierra.
,, Siga SIEMPRE las instrucciones de la etiqueta de indicaciones
suministrada por el fabricante de la prenda.
,, No coloque elementos expuestos a aceites de cocina en la
lavadora. Los elementos contaminados con aceites de cocina
pueden contribuir a que se produzca una reaccion qdmica que
ocasione queen la carga de ropa se prenda fuego.
Utilice solo los suavizantes de ropa o los productos para eliminar
la est_,tica recomendados por el fabricante.
,, Esta lavadora no est&,disefiada para uso marftimo ni en
instalaciones moviles como veh(culos recreativos, aviones, etc.
,, Cierre los grifos del agua y desenchufe lalavadora, siva a estar
desatendida durante mucho tiempo, por ejemplo, durante las
vacaciones.
Los materiales de embalaje pueden ser peligrosos para los
nir'ios.
,, Existe riesgo de asfixia. Mantenga los materiales del embalaje
fuera del alcance de los nifios.
Compruebe siempre que no haya objetos extrai'ios dentro de la
lavadora antes de cargar la colada. Mantenga la puerta cerrada
cuando no utilice la lavadora.
Kenmoie-Washei-02855A-02 MIZS.indd 3 2010-07-13 Z- 5:29:42
Page 34

Para reducir el riesgo de incendio, descargas el_ctricas
o lesiones fisicas cuando usa este electrodom_stico,
siga las instrucciones de seguridad b_sicas que figuran a
continuaci6n.
Desenchufe la lavadora antes de la limpieza para evitar el
riesgo de descargas electricas.
Nunca utilice productos quimicos fuertes, limpiadores
abrasivos ni disolventes para limpiar la lavadora. Podffa
dar'iar el acabado.
No ponga toallas ni ropas sucias de aceites o grasas
encima de la lavadora. Estas sustancias emiten vapores que
pueden prender fuego en los materiales.
• No lave prendas que tengan manchas de aceite vegetal o
aceite de cocina. Dichas prendas pueden tener vestigios de
aceite despues del lavado y se pueden prender.
• Desconecte este electrodom_stico de la fuente de
suministro el6ctrico antes de intentar realizar alguna tarea
de mantenimiento. Colocar los controles en la posici6n de
apagado no desconecta el electrodom_stico de la fuente
de suministro el_ctrico. Si no sigue estas advertencias se
pueden producir lesiones personales graves, un incendio, una
descarga electrica o la muerte.
No combine detergentes, suavizantes de telas ni otros
productos de lavado de diferentes fabricantes para lavar
una carga a menos que se especifique en la etiqueta.
No mezcle lejia que contenga cloro, amoniaco o &cidos,
como vinagre. Siga las indicaciones del envase cuando utilice
productos para el lavado. El use incorrectopuede producir gases
venenosos con resultado de lesienesgraves o muerte.
No introduzca la mano en la lavadora cuando algunas
partes est_n en movimiento. Antes de cargar, descargar
o agregar prendas presione el dial del selector de ciclos y
deje que el tambor de detenga completamente.
Si no sigue estas advertencias se pueden producir lesiones
personales graves, un incendio, una descarga electrica o la
muerte.
Consulte las INSTRUCCIONES DE INSTALACION para
conocer los procedimientos detallados de cone×i6n a
tierra. Las instrucciones de instalaciOn se proporcionan con la
lavadora para que el instalador las pueda consultar. Si la lavadora
se ha de mover a una nueva ubicacion, la ha de comprobar y
volver a instalar personal de servicio calificado. Si no sigue estas
advertencias se pueden producir lesiones personales graves, un
incendio, una descarga electrica o la muerte.
• Bajo ninguna circunstancia se debe cortar ni retirar el
tercer pin (conexi6n a tierra) del cable de alimentaci6n.
Si no sigue estas advertencias se pueden producir lesiones
personales graves, un incendio, una descarga electrica o la
muerte.
• Para su seguridad personal, esta lavadora debe
conectarse a tierra correctamente. Si no sigue estas
advertencias se pueden producir lesiones personales graves, un
incendio, una descarga electrica o la muerte.
El cable de alimentaci6n de este aparato est_ equipado
con un enchufe de 3 pines (conexidn a tierra) que
combina con un tomacorriente de pared de 3 pines
(conexi6n a tierra) para minimizar la posibilidad de descarga
electrica desde este electrodomestico.
Esta lavadora debe estar conectada a una toma 120 V CA,
60 Hz con conexi6n a tierra adecuada. Si no sigue estas
advertencias se pueden producir lesiones personales graves, un
incendio, una descarga electrica o la muerte.
Se ha de disponer de una toma y un circuito
comprobados pot un electricista calificado que asegure
que la cone×i6n a tierra es la adecuada. Si no sigue estas
advertencias se pueden producir lesiones personales graves, un
incendio, una descarga electrica o la muerte.
• Cuando el tomacorriente sea de 2 pines, es su
responsabilidad y obligaci6n reemplazarlo pot el
adecuado de 3 pines con conexi6n a tierra. Si no sigue
estas advertencias se pueden producir lesiones personales
graves, un incendio, una descarga electrica o la muerte.
• No instale la lavadora sobre una alfombra. Inst_lela sobre
una superficie s61ida. Si no sigue estas advertencias se
pueden producir dar'ios graves por fugas de agua.
• No retire el terminal de conexi6n a tierra. No utilice
un adaptador ni un cable prolongador. Enchufe en un
tomacorriente de 3 pines con conexi6n a tierra. Sino sigue
estas advertencias se pueden producir lesiones personales
graves, un incendio, una descarga electrica o la muerte.
La lavadora siempre se debe conectar una toma propia
individual cuya tensi6n coincida con la marcada en la
plaqueta de voltaje. Asl_se consigue el mejor rendimiento
y se evita sobrecargar los circuitos de los fusibles de la
casa, Io que podffa provocar riesgo de incendio en la cables
sobrecalentados.
No desenchufe la lavadora tirando del cable de
alimentaci6n. Sujete siempre el enchufe firmemente y tire
de el en linea recta. Si no sigue estas advertencias se pueden
producir lesiones personales graves, un incendio, una descarga
electrica o la muerte.
• Repare o reemplace inmediatamente todos los cables de
alimentaci6n que est_n raidos o presenten cualquier otto
daSo. No utilice un cable que muestre grietas o desgaste
en toda su Iongitud o en alguno de los extremos.
Consulte a un tecnico de servicio calificado. Si no sigue estas
advertencias se pueden producir lesiones personales graves, un
incendio, una descarga electrica o la muerte.
Cuando instale o mueva la lavadora, procure no pinchar,
aplastar ni daSar el cable de alimentaci6n. Si no sigue
estas advertencias se pueden producir lesiones personales
graves, un incendio, una descarga electrica o la muerte.
Un t_cnico de servicio calificado debe instalar y conectar
a tierra la lavadora de acuerdo con los c6digos locales
para prevenir los riesgos de descarga electrica y asegurar la
estabilidad durante el funcionamiento.
• La lavadora es pesada. Se necesitan dos personas o m&s
para mover e instalar el electrodom_stico. No hacerlo
puede causar lesiones en la espalda o de otro tipo.
• No instale ni guarde esta lavadora donde quede expuesta
a los factores clim_ticos exteriores y a temperaturas
por debajo del punto de congelaci6n. Si no sigue estas
advertencias se pueden producir dar'ios graves por fugas de
agua.
• Para reducir el riesgo de descargas el_ctricas, no instale
la lavadora en entornos humedos. Si no sigue estas
advertencias se pueden producir lesiones personales graves, un
incendio, una descarga electrica o la muerte.
Kenmoie-Washei-02855A-02 MES.indd 4 2010-07-13 Z- 5:29:43
Page 35

No permita que los ni_os jueguen sobre la lavadora o
dentro de ella. Se requiere de supervisi6n cuando la
lavadora es utilizada cerca de los ni_os. Cuando los ni_os
crezcan, ens_eles a utilizar con seguridad todos los
electrodom_sticos. No seguir estas advertencias puede tener
como resultado lesiones personales graves.
• Destruya los cartones, las bolsas de pl&stico y cualquier
otro material del embalaje de la lavadora. Los nihos
podrian utilizarlos para jugar. Los cartones cubiertos
con alfombras, cubrecamas o laminas de pl&stico se
pueden convertir en c_maras herm_ticas. No seguir estas
advertencias puede tenet como resultado lesiones personales
graves.
• Mantenga los productos de lavado fuera del alcance de
los niSos. Respete todas las advertencias de las etiquetas
del producto para evitar lesiones personales. No seguir
estas advertencias puede tenet como resultado lesiones
personales graves.
Antes de descartar la lavadora o de retirarla del servicio,
extraiga la puerta del compartimiento de lavado para
evitar que los ni_os y las mascotas peque_as corran
peligro de quedar atrapados dentro de la lavadora. De no
hacerlo asi se puede provocar lesiones personales graves o la
muerte.
IMPORTANTE: Lea las siguientes instrucciones INSTRUCCIONES DE CONEXION A TIERRA
con detenimiento.
PARA CONECTAR LA ELECTRICIDAD
La conexiOn inadecuada del conductor de conexiOn a tierra
del equipo puede generar una descarga electrica. Consulte a
un electncista o tecnico calificado si le surgen dudas acerca
de si la conexiOn a tierra del electrodomestico es adecuada.
No modifique el enchufe provisto con el aparato. Si no
entra en el tomacorriente, solicite a un electricista calificado
que instale el tomacorriente adecuado. Si no sigue estas
advertencias se pueden producir lesiones personales graves,
un incendio, una descarga electrica o la muerte.
Este electrodomestico debe conectarse a tierra. En caso de que el
electrodomestico funcione mal o se descomponga, laconexion a
tierra reducir&,el riesgo de descarga electrica al ofrecer una via de
menos resistencia a la corriente electrica. Este electrodomestico
est,. equipado con un cable que incluye un conductor y un
enchufe de conexion a tierra. El enchufe debe conectarse a
un tomacorriente adecuado que este correctamente instalado
y conectado a tierra en conformidad con todos los codigos y
ordenanzas locales.
AsegOrese
de que haya
una conexidn
a tierra
adecuada
antes de usar
la lavadora.
,Tomacorriente con
conexiOn a tierra de 3
pines
_..._ Enchufe con
conexion a tierra
Kenmoie-Washei-02855A-02 MES.indd 5 2010-07-13 Z- 5:29:43
Page 36

PIEZAS Y COMPONENTES CLAVES
A=
DOSIFICADOR DE DETERGENTE
Hay cuatro compartimientos: para prelavado (no se utiliza en
este modelo), lavado principal, lejia liquiday suavizante de
telas liquido.
B=
PANEL DE CONTROL CON DISPLAY DE LED
El display de LED de f&.oillectura muestra durante el
funcionamiento las opciones del ciclo, la configuraci6n, el
estado del ciclo y el tiempo restante estimado.
NOTA: Los sensores de la lavadora detectan
autom&.ticamente el tamafio de la carga para mejorar
el tiempo de lavado, segOn el ciclo y las opciones
seleccionadas.
C=
MOTOR DE ACCIONAMIENTO DIRECTO
El motor de accionamiento directo proporciona rendimiento
y fiabilidad mejorados al tiempo que incrementa la eficiencia
energetica.
(Elmotor no es visible.)
D. TAMBOR DE ACERO INOXlDABLE DE GRAN
CAPACIDAD
El tambor de acero inoxidable de gran tamafio tiene una gran
durabilidad y est,. inclinado para mejorar la eficacia y permitir
la carga de prendas grandes m4s f&.cilmente.
E. PUERTA DE BLOQUEO DE FACIL ACCESO
La gran puerta se bloquea durante el funcionamiento y tiene
una funci6n de retardo para impedir que se pueda abrir hasta
que sea seguro hacerlo.
F.
PANEL DE ACCESO DEL FILTRO
Proporciona un f&.cilacceso al filtro de la bomba de drenaje, Io
que facilita la limpieza del filtro o la recuperacion de elementos
perdidos sin que sea necesario Ilamar al servicio tecnico.
G=
PATAS NIVELADORAS
Cuatro patas niveladoras (dos delante y dos detrb.s) que
permiten nivelar la lavadora en superficies inclinadas.
Las patas de ajustan y se fijan mediante una Ilave que se
suministra con la lavadora.
f
Accesorios incluidos
Entradas de agua caliente
y frfa
Manguera de
drenaje
Cable de
alimentaci6n
Tornillos de transporte/Retenedores (4)
NOTA: Los tornillos/retenedores se DEBEN retirar
antes de poner en funcionamiento la lavadora.
Conservelos para usos futuros. Consulte la pb.gina
8.
h
©©©
Mangueras de agua frfa y
caliente
Llave (para retirar los
tornillos de transporte
y ajustar y bloquear
/as patas niveladoras)
Kenmoie-Washei-02855A-02 MES.indd 6 2010-07-13 Z- 5:29:45
Tapas(6)(paracubrirlos orificios
para lostornillosde transporte)
Manual del
usuario
Mensula de codo
(para asegurar
la manguera de
drenaje) .i,
Pedestal
WE357A7W/XAA
,., (blanco)
Accesorios opcionales
Kit de apilamiento
(para la secadora)
SK-5A!XAA
Prolongaci6n de
la manguera de
drenaje
P/N DC82-
01012A
Page 37

DIMENSIONES Y ESPECIFICACIONES CLAVES
Descripci6n Lavadora de carga frontal
Voltaje nominal/frecuencia 120 V CA a 60 Hz.
Dimensiones 27" (ancho) x 31,1" (profundidad) x 38" (alto), 50,8" (profundidad con la puerta abierta)
68,6 (ancho) x 80 (profundidad) x 96,5 cm (alto), 129 cm (profundidad con la puerta abierta)
Peso neto 179 Ibs (81 kg)
ELIJA UNA UBiCACION ADECUADA
ADVERTENCIA
* La lavadora es pesada. Se necesitan dos o m_s personas
para mover y desembalar la lavadora. De no hacerlo se
puede causar daFios a la propiedad o lesiones corporales
graves.
* No instale ni guarde esta lavadora donde quede expuesta
a los factores clim_ticos exteriores y a temperaturas
per debajo del punto de congelaci6n. Si no sigue estas
advertencias se pueden producir lesiones personales graves, un
incendio, una descarga electrica o la muerte.
* Conecte adecuadamente a tierra la lavadora en
conformidad con todos los c6digos y ordenanzas locales.
Si no sigue estas advertencias se pueden producir lesiones
personales graves, un incendio, una descarga electrica o la
muerte.
* Para reducir el riesgo de descargas el_ctricas, no instale
la lavadora en entornos humedos. Si no sigue estas
advertencias se pueden producir lesiones personales graves, un
incendio, una descarga electrica o la muerte.
* Cuando la lavadora se instala sobre una superficie alfombrada,
los orificios de ventilaci6n no deben quedar obstruidos.
* No retire el terminal de conexi6n a tierra. No utilice
un adaptador ni un cable prolongador. Enchufe en un
tomacorriente de 3 pines con conexi6n a tierra. Si no sigue
estas advertencias se pueden producir lesiones personales
graves, un incendio, una descarga electrica o la muerte.
Tomacorriente
* El tomacorriente debe estar a menos de 60 pulgadas (1,5 m) de
cualquier lade de la lavadora.
* El aparato y el tomacorriente se deben instalar de manera que el
enchufe sea f_cilmente accesible.
* No sobrecargue el tomacorriente con m_s de un aparato.
* El tomacorriente debe estar conectado a tierra de acuerdo con
los c0digos de cableado y las normativas actuales.
* Se recomienda un fusible de retardo inmediato o un disyuntor.
NOTA: Es obligaci6n y responsabilidad personal del propietario
del producto tener una instalaciOn del tomacorriente adecuada y
realizada per un tecnico de servicio calificado.
PISO
Para un mejor desempeFio, la lavadora debe estar instalada
sobre un piso de construcci6n sOlida. Posiblemente los pisos de
madera necesiten reforzarse para minimizar la vibraci6n y/o los
desequilibrios de la carga. Las superficies alfombradas
o con revestimiento sintetico son factores que contribuyen a la
vibraci6n y pueden provocar que la lavadora se mueva levemente
durante el oielo de centrifugado.
PRECAUClON: Nunca instale la lavadora sobre una plataforma o
sobre una estructura con soportes poco resistentes.
ESPACIOS LIBRES
211/:¢ d_
(54,2 cm)
!
29 /4" I 1_'21 1/3"
(75,6cm_ (54,2cm)
/
511/8"
(129,8cm)
DEJE UN ESPAClO LiBRE MINIMO CUANDO INSTALE EL
ELECTRODOMI_STICO EN UN GABINETEO EN UN HUECO:
Laterales- 1 pulg.(2,5cm)
Parteposterior- 4 pulg.(10,2cm)
Si la lavadora y la secadora se instalan una junto a la otra, el
frente del gabinete debe contar per Io menos con una abertura sin
obstrucciones de 72 pulg2 (465 cm2). La lavadora sola no requiere
una abertura de aire espec(fica.
I"_L 27" J_l"
(2,5 cm) (68,6 cm) (2,5 cm)
NOTA: Tenga en cuenta que el piso debe set Io bastante
resistente para soportar el peso de la lavadora, completamente
cargada, sin que se flexione ni abombe; si el piso oscila se deber_
reforzar para hacerlo m_s rfgido. Un piso adecuado para una
lavadora de carga superior puede no serlo para una lavadora
de carga frontal, debido alas diferencias entre la velocidad y la
direcci6n del centrifugado. Siel piso no es s61ido, la lavadora
puede vibrar y las vibraciones se pueden oft y notar per toda la
casa.
Partesuperior- 17pulg.(43,2cm)
Frentedel gabinete- 2 pulg.(5,1cm)
,,i
Kenmoie-Washei-02855A-02 MES.indd 7 2010-07-13 Z- 5:29:45
Page 38

DESEMBALAJE Y REMOCION DE
LOS TORNILLOS DE TRANSPORTE
CONEXION DE LAS MANGUERAS DE
AGUA
Antes de instalar la lavadora, aseg0rese de que la ubicacion:
,, Tenga una superficie resistente y nivelada sin alfombras ni
revestimientos para pisos que puedan obstruir los orificios de
ventilacion.
,, No contenga polvo, aceites, detergentes, etc.
Este alejada de la luz solar directa.
,, Tenga una ventilacion adecuada.
No corra riesgos de congelamiento (menos de 32 °Fo 0 °C).
,, Este alejada de las fuentes de calor, tales como el aceite o el
gas.
,, Tenga suficiente espacio como para que la lavadora no quede
apoyada sobre su cable de alimentacion.
Antes de utilizar la lavadora, debe quitar los cuatro tornillos de
transporte de la parte posterior de la unidad.
1.Afloje todos los tornillos con la Ilave provista.
2.Deslice el tornillo y elseparador hacia arriba y retire el tornillo
con la arandela a traves del orificio de la parte posterior de la
lavadora. Repita el proceso para cada tornillo.
3. Cubra los orificios con los tapones de pl_.stico suministrados.
4. Conserve los tornillos de transporte y las arandelas en caso de
que los necesite en el futuro.
© ©
1.Antes de conectar las mangueras de entrada en las tomas de
agua, compruebe que haya una arandela de goma en cada una
f
Arandela de goma
de las uniones de ambos extremos.
2.Enrosque las mangueras de entrada alas conexiones de las
Ilaves de agua CALIENTE y FR[A de la lavadora.
En el otto extremo de la manguera, verifique que haya una
arandela de goma pot manguera y conecte cada manguera de
carga a la vb.lvula de agua. Aseg0rese de conectar la manguera
con la leyenda impresa que dice "HOT" (Caliente) a la Ilave de
agua CALIENTE. Ajuste a mano hasta que quede cefiido, y a
continuacion de dos tercios de giro con la pinza.
NOTA: Para usar el agua correctamente, conecte tanto la
vb.lvula de agua CALIENTE como la de agua FR[A. Si alguna de
elias o ambas est_.n desconectadas, aparecer_, el error "nF" (no
hay carga).
3.Abra el suministro de agua CALIENTE y FR[A y controle todas
las conexiones a la v&.lvulay a la Ilave de agua para verificar si
hay perdidas.
Leyenda impresa Leyenda impresa
"Frfa.... Caliente"
Kenmo:e-Washe:-02855A-02 MES.indd 8 2010-07-13 Z- 5:29:46
Page 39

CONEXION DE LA MANGUERA DE
DRENAJE
Option 1: Tina, tomb de agua
Coloque la manguera de drenaje en el drenaje (tina, fregadero,
toma de agua). Si conecta la manguera de drenaje a una toma de
agua, asegOrese de que NO haya una conexion hermetica entre la
manguera de drenaje y la toma de agua. La toma de agua debe
estar a una altura de 18 pulgadas o 46 cm como mfnimo y a no
m_.sde 96 pulgadas.
NOTA: Siempre se debe tener la precaucion de evitar plegar o
dafiar la manguera de drenaje. Para obtener mejores resultados, la
manguera de drenaje no debe presentar obstrucciones de ninguna
fndole: codos, acoplamientos o longitudes excesivas.
En caso de que no se pueda colocar la manguera de drenaje
convenientemente a una altura de 18 pulg. o 46 cm., coloquele un
soporte.
Option 2: Drenaje de suelo
Inserte el extremo de la manguera de drenaje en el orificio del
suelo.
Asegure la manguera para impedir que se mueva o se salga del
drenaje, si es posible.
NOTA: Para evitar el sifonamiento, el nivel del agua no debe cubrir
el extremo de la manguera.
"o! _-_ iil
Manguera de
drenaje
Drenaje de suelo
Tambor de lavado
Toma de agua
1
Kenmo:e-Washe:-02855A-02 MES.indd 9 2010-07-13 Z- 5:29:47
Page 40

CONEXION DEL SUMINISTRO
ELECTRiCO
Enchufe el cable de alimentacion a un tomacorriente aprobado de
tres pines, 120 voltios, 60 Hz y con conexion a tierra, protegido
por un fusible o un disyuntor de 15 A.
La lavadora est&.conectada a tierra a traves del tercer pin del
cable de alimentacion cuando se Io enchufa a un tomacorriente de
tres pines con conexion a tierra.
NIVELADO DE LA LAVADORA
1.Deslice la lavadora hasta dejarla en
su lugar.
2. Nivele lalavadora girando
manualmente las patas niveladoras
hacia adentro o hacia afuera seg0n
sea necesario o para ello use la
Ilave incluida con la lavadora.
Cuando la lavadora este nivelada,
ajuste las tuercas usando la Ilave o
un destomillador de cabeza plana
(-).
NOTA: Las cuatro caras de la
lavadora deben quedar niveladas. Se
debe usar un nivelador de carpintero en las cuatro esquinas de
la lavadora. Es mejor hacer otra comprobacion despues de una
docena de lavados.
NOTA: Evite el dafio de las patas. No mueva la lavadora a menos
que las tuercas de bloqueo se encuentren sujetas a la parte
inferior de la misma.
,, Las cuatro patas niveladoras deben apoyarse firmemente
en el piso. Balancee la lavadora de esquina a esquina para
asegurarse de que las cuatro patas se asientan firmemente en
el piso.
o o
Patas niveladoras
Patas niveladoras
El tambor de esta lavadora centdfuga a velocidades muy elevadas.
Para minimizar las vibraciones, los ruidos y los movimientos
indeseados, el piso debe ser una superficie solida nivelada.
NOTA: Ajuste las patas niveladoras s01o Io necesario para nivelar
la lavadora. Extender las patas niveladoras m&.sde Io necesario
puede hacer que la lavadora vibre.
I
10
Kemnoie-V, iashei-02855A-02 MES.indd 10 2010-07-13 Z- 5:29:48
Page 41

ADVERTENCIA: Parareduoi e= iesgodeincenaio,desoa gae= ot ioao =esionespersonales,=eaestemanua=
en su totalidad, incluidas las instrucciones de seguridad importantes, antes de poner en funcionamiento la lavadora.
FUNCIONES DEL PANEL DE CONTROL
POWER START/PAUSE
A=
BOTON POWER (ENCENDIDO (encender/apagar))
Presionar para poner en funcionamiento la lavadora. Volver a
presionar para apagar la lavadora.
NOTA: Presionar el boton Power (Encendido) durante un ciclo
cancela este y se pierde cualquier configuracion de carga.
La puerta se desbloquearb, luego de una breve pausa a
menos que el nivel del agua o de la temperatura sean
demasiado elevados.
B. DIAL SELECTOR DE CICLOS
Gire este dial para seleccionar el cicIo deseado. Una vez
seleccionado el ciclo deseado, se muestra en el display la
preselecci6n est_.ndar. Esta configuraci6n se puede ajustar
con los botones de configuraci6n del oiolo en cualquier
momento antes de iniciarse el ciclo. (Consulte la gala de ciclos
de la pb.gina 14 para ver las configuraciones permitidas. Para
proteger la ropa, no se permiten todas las configuraciones en
todos los ciclos.)
C. BOTON START/PAUSE (INICIO/PAUSA}
Presione este bot6n para inioiar el oicIo seleccionado.
Si la lavadora est&.funcionando, utilice este boton para hacer
una pausa sin que se pierda la configuraci6n actual.
NOTA: Si no presiona el bot6n START/PAUSE (INICIO/
PAUSA) antes de 4 minutos despues de seleccionar un ciclo,
la lavadora se apaga autom4ticamente.
Hot/Cold
Warm/Warm
Warm/Cold
Cold/Cold
Wash/Rnse j Spin Speed So Leve i Chime 0
\ .........- i].................._L .........../
High
Medium
Low
No Spin
Heavy
Normal
Light
$
D=
BOTONES MODIFICADORES DE CICLOS
Utilice estos botones para ajustar las opciones del ciclo
seleccionado. La luces sobre los botones indican laselecci6n
actual. Consulte la pagina 19 para obtener una descripci6n
completa.
NOTA: No todas las configuraciones est4n disponibles en
cada cicIo. Consulte la tabla de la pagina 14 para obtener
m&.sdetalles.
E=
BOTONES DE OPCIONES Y DE CICLOS ESPECIALES
Estos botones se utilizan para activar opciones y cicIos
especiales. Consulte la pb.gina 20 para conocer m4s detalles.
DISPLAY DE TIEMPO Y ESTADO
Este display muestra el tiempo restante estimado, el estado
del ciclo y el estado del bloqueo de la puerta. Consulte la
pb.gina 18 para obtener una descripci6n completa.
G=
DOSIFICADOR
Cajon dosificador. Esta cajon contiene compartimientos para
el detergente y los aditivos. Consulte las pb.ginas 16-17 para
obtener una informaci6n completa.
11
Kenmoie-Washei-02855A-02 MES.indd 11 2010-0%13 Z- 5:29:49
Page 42

FUNCIONAMIENTO DE LA LAVADORA
1.CLASIFIQUE LA ROPA Y CARGUE LA LAVADORA
Consulte la pagina 15.
22_ ........
/
START/PAUS[
POWER _ ..... START/PAUSE
_Hot/Cold _ H_gh _ H_ow
_ Warm/W_Im t .....
'_ d ! Normal
2.AGREGUE DETERGENTE Y OTROS PRODUCTOS
Abra el caj6n del dosifieador y agregue _ un detergente de alta efieacia (HE) en el
compartimiento del lavado principal del caj6n del dosificador. Agregue la cantidad que
desee de lejia y suavizante de telas. Consulte las pb.ginas 14 y 15 para obtener informaci6n
importante sobre los detergentes y el use del dosificador.
3. PONGA EN FUNCIONAMIENTO LA LAVADORA
Presione el boton POWER (ENCENDIDO) para poner en funcionamiento la lavadora. Se
iluminan los indicadores alrededor del dial selector de ciclos y se eye una seFialsonora, si
est&.activada. Consulte la pb.gina 12.
4.SELECCIONE UN CICLO
Gire el selector de cicIos en cualquier direcciOn para seleccionar el ciclo deseado. Se
muestran las configuraciones preseleccionadas de la temperatura de Wash/Rinse (Lavar/
Enjuagar), Spin Speed (Velocidad de centrifugado), Soil Level (Nivel de suciedad) y Option
(Opciones) de cada ciclo. Consulte la pb.gina 12.
5.SELECCIONE LOS MODIFICADORES DE CICLOS
Si se desea, se puede cambiar la configuraciOn predeterminada del cicIo seleccionado. Esto
se puede hacer con los botones modificadores de cicIos come se muestra en la pb.gina 19
(Wash/Rinse (Lavar/Enjuaga0, Spin Speed (Velocidad de centrifugado), Soil Level (Nivel de
suciedad) y Ohime (Serial sonora)).
NOTA: Para proteger la ropa, no se permiten todos los modificadores en todos los ciclos.
POWER
6.SELECCIONE LAS OPCIONES DEL CICLO
Mediante losbotones de opciones se pueden a_adir opeiones al eielo, come se muestra
en la p_gina 24 (My Cycle (Mi eielo), ©ontrol Lock (Bloqueo controles), Delay Start (Inieio
retardado), Clean Washer (Limpiar lavadora)).
NOTA: No todas las opciones est&.ndisponibles en todos los delos.
7. INICIE EL CICLO
Presione el bot6n START/PAUSE (INICIO/PAUSA) para iniciar el ciclo. Una vez iniciado el
cielo, vuelva a presionar el boton START/PAUSE (INICIO/PAUSA) para hacer una pausa y
mantener la configuracion actual durante 4 minutos.
12
Kenmoie-Washei-02855A-02 MES.indd 12 2010-07-13 Z- 5:29:50
Page 43

GUiA DE ClCLOS
La siguiente gufa de ciclos muestra las configuraciones predeterminadas, las opciones disponibles y los tipos de tela recomendados para
cada ciclo. Los ajustes de los modificadores disponibles se muestran debajo de la configuraci6n predeterminada de cada ciclo.
® = Opci6n disponible
= Opoi6n predeterrninada
ClCLO PREDETERMINADO OPClONES
Normal (Normal)
Heavy Duty
(Potencia extra)
Whitest Whites
(Blanco extra)
Rinse and Spin
(Enjuagar y
centrifugar)
Para la mayor parte de
telas, incluido algoddn, lino
y prendas moderadamente
la oarga suavizante de telas
suoias,
Para telas resistentes que
no desti_ien y prendas muy
suoias,
Para telas blancas con o
sin lejia,
0selo para cargas que
necesitan unicamente
enjuague o para agregar a
que se atiade durante el
enjuague,
BAJA (1,5 kg)
MED (3,5 kg)
ALTA(5,5kg)
BAJA (1,5 kg)
MED (3,5 kg)
ALTA(5,5kg)
0:56
0:58
1:00
1:29
1:30 Tibia/Tibia Medium
2:07 Cold/Cold No Spin suoia)
1:15 (Caliente/Fria) Medium Heavy (Muy
0:20 (Mediana) @ @
Hot/Cold (Mediana) (Muy suoia)
(Caliente/Fria)
Cold/Cold
(Fria/Fria) No Spin (Ligeramente
Warm/Cold (Mediana) Normal (Normal)
(Tibia/Fria) Low (Baja) Light
(Fria/Fria) (Sin oentrifugado)
Hot/Cold
Warm/Warm
(Tibia/Tibia)
Cold/Cold No Spin (Ligeramente
(Fria/Fria) (Sin oentrifugado) suoia)
Cold/Cold
(Fria/Fria)
Medium Heavy
Low (Baja) Light
(Sin oentrifugado) suoia)
(Ligeramente
(Mediana) suoia) @ @
Low (Baja) Light
Medium
Low (Baja)
No Spin
Sirs centrifugado)
@ @
@ @
Express Wash
(Lavado r_pido)
Oelicates
(Delicada)
Clean Washer
(Limpiar lavadora)
Para prendas ligeramente
sucias que se necesitan
con urgenoia,
Para telas finas, brassieres,
lenceria de seda y otras
telas que deben lavarse
Onicamente a mano. Para
obtener mejores resultados,
use detergente I{quido,
Para limpiar el tambor,
0:27 (Caliente/Fria) (Mediana) Heavy @ @
0:45 Warm/Warm Heavy
Hot/Cold
Warm/Warm
(Tibia/Tibia)
Cold/Cold No Spin Normal (Normal)
(Fria/Fria) (Sin oentrifugado)
(Tibia/Tibia) No Spin
Warm/Cold (Sin oentrifugado) Light
(Tibia/Fria) suoia)
Medium
Low (Baja) (Muy suoia)
(Muy sucia) @ @
(Ligeramente
NOTA: Para proteger las prendas, en cada ciclo no est&.ndisponibles todas las temperaturas de lavado y enjuague, velocidad de
centrifugado, nivel de suciedad y opciones. Se oye una seFialsonora diferente y el LED no se ilumina si la seleccion no est&.disponible.
NOTA: La lavadora ajusta autom&.ticamente el tiempo de lavado segOn la cantidad de ropa, la presion del agua, el tiempo de calentamiento
del agua y otras condiciones de funcionamiento.
13
Kenmoie-Washei-02855A-02 MES.indd 13 2010-07-13 Z- 5:29:50
Page 44

CLASIFICACION DE LAS CARGAS DE LAVADO
Etiquetas de indicaciones de la teia
La mayoffa de las prendas Ilevan una etiqueta con instrucciones
sobre el cuidado adecuado. Mediante la tabla siguiente, ajuste
las selecciones de ciclos y opciones para cuidar la ropa segOn las
recomendaciones del fabricante.
f *,
Etiquetas de indicaciones de la tela
Ciclo de
lavado en
maquina
u u_
Normal Plancha permanente/ Suave/Del[cada
Lavado a mano No lavar No retorcer
ant[arrugas
Temperatura ®co ®= e
del agua Oaliente Tibia Fria
Srmbolosd÷ A
lejfa
(50SDgrC/120°F) (40SDgrC/105°F) (30SDgrC/85°F)
Cualquier lejia Solo bjia sin cloro No usar bjia
(cuando sea (cuando sea
necesaria) necesaria)
Agrupamiento de las prendas similares
Para obtener los mejores resultados del lavado y reducir las
posibilidades de daflar la ropa, clasifique las cargas de lavado pot
prendas similares. Combinar diferentes tipos de tela y niveles de
suciedad puede reducir el desempeflo del lavado, transferir colores,
decolorar las telas, daflar las prendas o crear pelusa. La colada se
debe clasificar en grupos como se explica a continuacion.
Ropa de color
Clasifique la ropa segOn el color. Lave las prendas de color oscuro
separadas de las blancas o de colores claros. Combinar prendas
de colores oscuros con otras de colores claros puede generar una
transferencia de tintura alas de colores claros o una decoloracion
de estas.
Nivel de suciedad
Lave juntas las prendas m&.ssucias. Lavar prendas poco sucias y
muy sucias en la misma carga puede reducir la calidad del lavado
en las prendas poco sucias.
Tipo de tejido
Las prendas delicadas no se deben lavar junto a prendas de
tejidos m_s pesados y resistentes. Si lava prendas delicadas junto
a las de tejidos m&.sresistentes, aquellas se pueden dafiar. Lavar
juntas prendas de tejidos m_s resistentes y prendas delicadas
puede reducir la calidad del lavado de las prendas m&.sresistentes
y dafiar las delicadas.
Tipo de pelusa
Algunas telas atraen la pelusa mientras que otras la generan en
el proceso de lavado. No mezcle en la misma carga ropas que
atraen la pelusa con las que la generan. Lavar juntos ambos tipos
de prendas puede hacer que los filtros se obstruyan con la pelusa.
(Por ejemplo, telas que atraen pelusa - sueteres; telas que generan
pelusa - telas de felpa)
Carga de la lavadora
• Asegurese de que los bolsillos est_n ratios. Los objetos
como clips, bolfgrafos, monedas y Ilaves puede dafiar la
lavadora y las prendas.
• Cierre cremalleras, ganchos y cordones para evitar que se
enreden con otras prendas.
• Trate previamente las zonas m&.ssucias para obtener los
mejores resultados.
• En una carga combine prendas grandes y pequefias. Cargue en
primer lugar las prendas grandes.
• Las prendas grandes no deben set m&.sde la mitad de la carga
total.
• La lavadora se puede cargar totalmente, pero el tambor no
se debe abarrotar. La puerta de la lavadora se debe cerrar
f&.cilmente.
• Para evitar un desequilibrio en la carga, no lave una sola
prenda. Agregue una o dos prendas similares. Las prendas
grandes y voluminosas, como las frazadas, los edredones o los
cubrecamas, se deben lavar individualmente.
• No lave ni centrifugue elementos impermeables, como ponchos
de Iluvia, bolsas de dormir, etc.
• Cuando vacfe la lavadora, compruebe si debajo del sello de la
puerta hay alguna prenda pequdia.
NOTA: Aseg0rese de queen la zona del sello de la puerta no
quede ninguna prenda cuando cierre esta. Sobrecargar la lavadora
puede hacer que algunas prendas queden atrapadas entre la
puerta y el sello. Esto puede dafiar las prendas y el sello.
• NO SOBRECARGUE EL TAME}OR
• ASEGURESE DE QUE LA ROPA NO QUEDE
ATRAPADA EN LAS JUNTAS DE LA PUERTA
Clasificaci6n de la ropa...
Blanca Muy sucia
Clara Normal
Oseura Poeo sucia
Delicada
Sin plancha
Resistente
Generan pelusa
Atraen pelusa
14
Kenmole-Washe1-02855A-02 MIZS.indd 14 2010-07-13 Z- 5:29:51
Page 45

ACERCA DEL DOSIFICADOR
Dosificador automatico
La lavadora cuenta con compartimientos separados para dosificar
el detergente y la lejfa con protecciOn para ropa de color, la lejfa
que contenga cloro y el suavizante de telas. Coloque todos los
aditivos de lavado en su compartimiento respectivo antes de
poner en funcionamiento la lavadora.
ADVERTENCIA:
El dosificador automfitico SIEMPRE DEBE estar en su sitio antes
de poner en funcionamiento la lavadora.
NO abra el dosificador automfitico cuando la lavadora estfi en
funcionamiento.
Cuando vierta detergente nunca sobrepase las
recomendaciones del fabricante de la lavadora.
Este compartimiento contiene el detergente Ifquido durante el
ciclo de lavado principal, que se vierte a la carga al inicio del
ciclo.
NOTA: Cuado utilice detergente en polvo, quite el compartimiento
del detergente Ifquido del cajon para detergente. El detergente en
polvo no se dispensa desde el compartimiento para el detergente
Ifquido.
Compartimiento para el detergente
1.Vierta la cantidad recomendada de detergente de @ alta
eficacia (HE) para ropa directamente en el compartimiento para
el detergente antes de poner en funcionamiento la lavadora.
2.Si se usa lejfa con proteccidn para ropa de color, debe
agregarse con el detergente en el compartimiento para el
detergente.
NOTA: Cuando agregue lejfa con proteccidn para ropa de color
junto con el detergente, Io mejor es que ambos productos tengan
la misma consistencia: en polvo o Ifquida.
f
Compartimiento para la lejia
(S01olejfa Ifquida que contenga cloro)
1.Agregue lejfa que contenga cloro en el compartimiento para la
lejra.
NO exceda la Ifnea MAX FILL (Llenado m_.ximo).
2.Evite salpicar o rebasar el compartimiento.
3.La lavadora dosificarfi automfiticamente la lejfa dentro del
tambor en el momento apropiado.
4.El dosificador diluye autom_.ticamente la lejfa Ifquida que
contenga cloro antes de que Ilegue a la carga para lavar.
NOTA:
Nunca vierta lejfa Ifquida que contenga cloro sin diluir
directamente sobre la carga o dentro del tambor. Se trata de un
qdmico potente y puede set perjudicial para la tela, pot ejemplo
desgastando las fibras o causando decoloraciOn, si no se usa
correctamente.
Si prefiere usar lejfa sin cloro, con proteccidn para ropa de color,
agreguela al compartimiento para el detergente apropiado.
NO vierta lejfa con proteccion para ropa de color en el
compartimiento para la lejfa.
Compartimiento para
la lejfa
Compartimiento para el
suavizante de telas
'I .............;I
Compartimiento
para el detergente
\
Ifquido
Compartimiento para el suavizante de telas
1.Vierta la cantidad recomendada de suavizante Ifquido para telas
en el compartimiento para el suavizante.
Para cargas mils pequefias, use menos del contenido de una
tapa.
2.Diluya el suavizante de telas con agua hasta que alcance la Ifnea
MAX FILL (Llenado mfiximo) del compartimiento.
3.El dosificador libera automfiticamente el suavizante de telas
Ifquido en el momento correcto durante el ciclo de enjuague.
NOTA:
Use el compartimiento para el suavizante SOLO para
suavizantes de telas Ifquidos.
Use el compartimiento para el detergente.
NO es aconsejable utilizar suavizante de telas Ifquido ya que
es demasiado pegajoso y quizfis no se mezclarl_acon el agua
suficientemente.
15
Kenmoie-Washei-02855A-02 MES.indd 15 2010-07-13 Z- 5:29:51
Page 46

DETERGENTE Y USO DEL DOSIFICADOR
Consideraciones acerca de los detergentes
Los detergentes HE producen menos espuma y se disuelven
con m_.seficacia, Io que mejora el rendimiento del lavado y del
enjuagado y mantiene limpio el interior de la lavadora.
El uso de detergentes que no sean HE puede producir un
espuma excesiva y un desempeFio poco satisfactorio, Io que
podrfa generar cOdigos de error, fallas en los ciclos y daFios en la
m_.quina.
Mi_XIMO \ [_]
_LII iL J
Carga normal m
DETERGENTE
L[QUIBO
Para conseguir un desempeFio adecuado, mida siempre el
detergente de acuerdo con las especificaciones del fabricante
de este.
La cantidad normal que se necesita para una carga mediana es
menos de 1/2 del m&.ximo recomendado. Utilice menos detergente
con agua blanda, ropa poco sucia y cargas m&.spequeFias. No
utilice nunca m_.s cantidad que el m_.ximo recomendado por el
fabricante del detergente.
DETERGENTE EN
POLVO
Dise_ada para utilizar solo detergente
de alta eficacia {HE)
La lavadora fue diseFiada para usar detergentes de alta eficacia
(HE, por su sigla en ingles).
,, Para obtener un lavado de 6ptima calidad, use detergentes
eficaces, por ejemplo: Tide HE, Wisk HE, Cheer HE o Gain
HE*. Los detergentes de alta eficacia contienen supresores
de la espuma que reducen o eliminan la espuma. Cuando
se produce menos espuma, la carga se mueve con mayor
eficacia y el lavado se maximiza.
ADVERTENCIA: NO se recomienda un detergente
convencional. Use Linicamente detergentes de alta eficacia.
NOT.C: Reducir la cantidad de detergente puede reducir
la calidad del lavado. Es importante tratar las manchas
sreviamente, clasificar las prendas con cuidado por color y nivel
de suciedad, y evitar sobrecargar la lavadora.
* Los nombres de las marcas son marcas comerciales de sus
respectivos fabricantes.
IMPORTANTE: Todos los detergentes no son iguales. Preste
atenci6n a la cantidad de detergente utilizada para evitar una
formaci6n excesiva de espuma, un mal enjuagado, restos de
detergente en las prendas y acumulaci6n de residuos que pueden
originar malos olores en la lavadora. NUNCA utilice un medidor
distinto al proporcionado por el fabricante del detergente que
est&.utilizando. No utilice nunca m&.scantidad que el m&.ximo
recomendado por el fabricante del detergente.
Ya que los detergentes HE est6.n diseFiados para este tipo de
lavadora, tenga cuidado cuando mida la cantidad de detergente.
En cargas normales, no se debe usar m_.s de 1/2 a 3/4 del
medidor del detergente HE.
NOTA: Sea mucho m&.scuidadoso cuando utilice detergentes
concentrados 2x y 3x ya que una pequeFia cantidad extra puede
contribuir a crear los problemas antes mencionados.
NOT.C: Los detergentes diseFiados como COMPATIBLES HE
pueden no producir 6ptimos resultados.
Llenado del dosificador
Para agregar detergente, lejfa y suavizante de telas al dosificador
autom&.tico:
1.Abra el caj6n del dosificador.
2oPonga los productos de lavado en los compartimientos
correspondientes.
3.Cierre el caj6n antes de iniciar el ciclo.
NOT.C: Es normal que al final de ciclo quede una pequeFia
cantidad de agua en los compartimientos de la lejfay el
suavizante.
IMPORTANTE: No ponga ni almacene productos del lavado,
como detergentes, lejfas o suavizantes Ifquidos, en la parte
superior de la lavadora o la secadora. Limpie cualquier derrame
inmediatamente. Estos productos pueden daFiarel acabado y los
controles.
16
Kenmo:e-Washe:-02855A-02 MES.indd 16 2010-07-13 Z- 5:29:52
Page 47

DISPLAY DE TIEMPO Y ESTADO
Este display muestra el tiempo restante estimado, el progreso del ciclo y el estado del bloqueo de la puerta.
__ --@
A. TIEMPO RESTANTE ESTIMADO
Cuando se presiona el boton START/PAUSE (INICIO/PAUSA),
la lavadora detecta autom_.ticamente la carga (peso) y
establece el tiempo de lavado optimo, seg0n el ciclo y las
opciones seleccionadas. El display indicar&, a continuacion el
tiempo restante estimado del ciclo de lavado seleccionado.
NOTA:
,, El tiempo que se muestra es estimado. Por ejemplo, se
puede hace una pausa en el tiempo estimado mientras la
m&.quina balancea la carga; en algunas circunstancias la
m_.quina puede hacer una pausa durante periodos largos.
,, El tiempo estimado se basa en el funcionamiento normal.
Algunos factores extemos (temperatura ambiente,
temperatura del agua entrante, etc.) tambien pueden afectar
a la duraciOn del tiempo estimado frente al tiempo real.
B. INDICADOR DE DETECCION DE LA CARGA
Este indicador se iluminaal iniciodel ciclo mientras el control
mide el tamaflo de la carga. Una vez determinado el tamaflo,
el control ajusta el ciclo para conseguir el mejor desempeflo.
El tiempo restante estimado no se mostrar&, hasta que se
determine el tamafio de la carga, y puede variar seg0n la
carga.
C=
INDICADOR DEL ESTADO DEL CICLO
Estos LED de estado se iluminanpara indicar la parte del ciclo
que se est&.ejecutando. Un indicador que parpadea indica
la parte activa del ciclo. Una vez completada esta parte, el
indicador deja de parpadear.
D=
INDICADOR DEL BLOQUEO DE LA PUERTA
Indica que la puerta est&.bloqueada. La puerta de la lavadora
se bloquea mientras est,. funcionando. La puerta se puede
desbloquear presionando el boton START/PAUSE (INICIO/
PAUSA) para detener la lavadora.
NOTA:
,, Si la temperatura del agua es demasiado alta, la puerta no
se puede desbloquear hasta que la lavadora no se haya
enfriado.
,, Si el nivel del agua es demasiado alto, la puerta no se
desbloquear&.. Para drenar el agua, presione el boton
POWER (ENCENDIDO) y, a continuacion, SPIN SPEED
(VELOCIDAD DE CENTRIFUGADO) sin seleccionar ning0n
ciclo. AI presionar el boton START/PAUSE (INICIO/PAUSA),
se vaciar_, el agua y la ropa dejar_, de girar. No intente forzar
la puerta ya que podffa dar'iarla.
17
Kenmoie-Washei-02855A-02 MES.indd 17 2010-07-13 Z- 5:29:52
Page 48

BOTONES MODIFICADORES DE ClCLOS
Cada ciclo tiene una configuracion predeterminada que se
seleeeiona autom&.tieamente. Con los botones modificadores de
cielos se puede cambiar esta configuracion. Presione el boton
modifieador que desee hasta que se ilumine el indieador del valor
deseado.
High
Medium
Low
No Spin
A=
WASH/RINSE (LAVAR/ENJUAGAR)
Warm/Warm
Warm/Cold
I ot/Cold
Cold/Cold
[_Wash/Rin'e_ SPin speed_ S0il Lev:; 7 (_hime ;%";
Seleccione la combinacion de la temperatura de lavado y
enjuague del ciclo seleccionado. Presione el boton WASH/
RINSE (LAVAR/ENJUAGAR) hasta que se ilumine el indicador
de la configuraci0n deseada.
,, Esta lavadora tiene un elemento de calentamiento para
elevar la temperatura del agua en la configuracion Muy
caliente. Se mejora ad el rendimiento del lavado en las
configuraciones normales del calentador del agua.
,, Seleccione la temperatura del agua adecuada al tipo de
carga. Siga las instrucciones de la etiqueta de la prenda
para conseguir los mejores resultados.
,, El enjuague tibio se regula aproximadamente a una
temperatura de 86 °F (30 °C).
,, El enjuague tibio deja la ropa m&.sseca que el enjuague en
fifo, pero aumenta el consume de energfa y la ropa queda
m_.sarrugada.
,, El enjuague en fifo gasta menos energfa. La temperatura
real del enjuague depende de la temperatura del agua frfa
suministrada.
NOTA: Para proteger las prendas, en cada oicIo no est&.n
disponibles todas las temperaturas de lavado y enjuague,
velocidad de centrifugado, nivel de suciedad y opciones. Se
eye una serial sonora diferente y el LED no se ilumina si una
seleccion no est&.disponible. Consulte la gufa de ciclos de la
pb.gina 14 para obtener m_.sdetalles.
La lavadora ajusta autom&.ticamente el nivel del agua segOn el tipo
y el tamafio de la carga para proporcionar los mejores resultados y
la m&.ximaeficacia. A causa de la naturaleza de este producto de
alta eficiencia, los niveles del agua pueden set mucho menores de
Io esperado. Este es el funcionamiento normal y el rendimiento de
la limpieza y el aclarado no resulta comprometido.
Heavy
Normal
Light
B= VELOClDAD DE CENTRIFUGADO
Las velocidades de centrifugado m&.saltas extraen m&.sagua
de la ropa, per Io que reducen el tiempo de secado y ahorran
energfa.
Presione el boton SPIN SPEED (VELOCIDAD DE
CENTRIFUGADO) hasta que se ilumine el indicador de la
configuracion deseada. Algunas prendas, come las delicadas,
requieren una velocidad de centrifugado m&.slenta.
Ciclo de drenaje y centrifugado:
1.Si presiona el boton POWER (ENCENDIDO) y luego
mantiene presionado el boton SPIN (CENTRIFUGADO)
durante 2 segundos, se indica el tiempo de centrifugado en
el display.
2.Luego vuelva a presionar el boton SPIN (CENTRIFUGADO)
hasta que se seleccione el nivel de centrifugado requerido y
presione el boton START/PAUSE (INICIO/PAUSA).
NOTA: Antes de pulsar el boton SPIN ONLY (SOLO
CENTRIFUGADO) para utilizar esta funcion, puede seleccionar
un ciclo con el Selector de ciclos. Si ya ha seleccionado
un ciclo, s01o puede seleccionar el nivel de centrifugado
correspondiente al oielo seleccionado.
C. SOIL LEVEL (NIVEL DE SUCIEDAD)
Ajusta el ciclo seleccionado para proporcionar m&.stiempo
de lavado alas ropas muy sucias o menos tiempo a la ropas
ligeramente sucias.
Presione el boton SOIL LEVEL (NIVEL DE SUCIEDAD) hasta
que se ilumine el indicador de la configuracion deseada.
D. CHIME (SEI_IAL SONORA)
Presione el bot6n CHIME (SEI(JALSONORA) para encender o
apagar la serial.
18
Kenmoie-Washei-02855A-02 MES.mdd 18 2010-07-13 Z- 5:29:52
Page 49

BOTONES DE OPClONES DE LOS
ClCLOS
La lavadora permite configurar opciones adicionales de los delos
para personalizar algunos ciclos seg0n sea necesario.
1,Ponga en funcionamiento la lavadora y gire el dial selector de
ciclos para seleccionar el ciclo deseado.
2,Utilice los botones modificadores de los ciclos para ajustar la
configuraci6n de cada ciclo.
3oPresione el botOn de la opciOn del ciclo que desee agregar. Este
botOn se ilumina una vez seleccionada la opciOn.
Si la opciOn seleccionada no est4 disponible para el ciclo
seleccionado, se eye dos veces la seFialsonora.
4,Presione el bot6n START/PAUSE (INICIO/PAUSA) para iniciar
el ciclo. La lavadora se inicia autom4ticamente tras una breve
demora para bloquear la puerta.
NOTA: Para proteger las prendas, en cada ciclo no estd_n
disponibles todas las opciones. Consulte la GU[A DE CICLOS de
la pb,gina 14 para obtener m_,sdetalles.
NOTA: Si el bot6n START/PAUSE (INICIO/PAUSA) no se
presiona antes de 4 minutes, el control se apaga y se pierde la
configuraci6n.
DELAY START (INIClO RETARDADO)
O na vez seleccionado el cicIo y otras opciones,
Delay Start incrementa el tiempo de retardo en una hera,
presione el bot6n START/PAUSE (INICIO/PAUSA) para iniciar el
tiempo de retardo.
presione este bot6n para retardar el inicio del
oiolo de lavado. Con cada presi6n del bot6n se
hasta 19 horas. Una vez establecido el tiempo,
FUNCIONES ESPECIALES
CONTROL LOCK (BLOQUEO CONTROLES)
Esta funci6n evita que los niFios jueguen con la
lavadora.
Co_'ttrd Lock
Activaci6n de la funci6n de bioqueo de los controles
Mantenga presionado el bot6n CONTROL LOCK (BLOQUEO
CONTROLES) durante aproximadamente 3 segundos.
,, Cuando se activa la funci6n de bloqueo de los controles, la
puerta se bloquea y se enciende la 14mpara "Control Lock
(Bloqueo controles)".
Si se presiona el bot6n START/PAUSE (INICIO/PAUSA) despues
de activar la funci6n de bloqueo de los controles, no funciona
ning0n bot6n, excepto POWER (ENCENDIDO).
,, Si se presiona un bot6n cuando los botones est4,n bloqueados,
la 14mpara de "Control Lock (Bloqueo controles)" parpadea.
Pausa en la funci6n de bioqueo de los controies
Cuando la puerta est4_bloqueada o los botones est&.n bloqueados
per la funci6n de bloqueo de los controles, puede hacer una
pausa en la funci6n de bloqueo de los controles durante 1 minute
al mantener presionado el bot6n CONTROL LOCK (BLOQUEO
CONTROLES) durante aproximadamente 3 segundos.
Si pone en pausa el mode de bloqueo de los controles, el
bloqueo de la puerta se libera durante 1 minute para comodidad
del usuario. Durante este tiempo, la 14mpara de "Control Lock
(Bloqueo controles)" parpadea.
,, Si se abre la puerta transcurrido el minute, suena una alarma
durante 2 minutes.
,, Si se cierra la puerta antes de transcurrir los 2 minutes, esta se
bloquea y lafunci6n de bloqueo de los controles se reactiva. Si
se cierra la puerta despues de transcurrir los 2 minutes, esta no
se bloquea autom4ticamente y la alarma no suena.
Desactivaci6n de la funci6n de bioqueo de los controles
Mantenga presionado el bot6n CONTROL LOCK (BLOQUEO
CONTROLES) durante aproximadamente 6 segundos.
,, Si se desactiva la funci6n de bloqueo de los controles, la
puerta se desbloquea y la14mpara de "Control Lock (Bloqueo
controles)" se apaga.
ADVERTENCIA:
,, La funci6n de bloqueo de los controles impide que los niFios
o las personas discapacitadas pongan en funcionamiento la
lavadora accidentalmente y se lesionen.
,, Si un niFio entra a la lavadora, puede quedar atrapado y
asfixiarse.
ADVERTENCIA:
,, Una vez activada la funci6n de bloqueo de los controles, esta
contin0a funcionando aunque la lavadora este apagada.
Abrir la puerta per la fuerza puede daFiarel producto y causar
lesiones personales.
NOTA: Para agregar ropa cuando la funci6n de bloqueo de
los controles est,, activada, primero se debe poner en pausa o
desactivar dicha funci6n.
NOTA: Si desea abrir la puerta de la lavadora cuando la funci6n
de bloqueo de los controles est4 activada:
,, Ponga en pausa o desactive la funci6n de bloqueo de los
controles.
Apague la lavadora y enciendala de nuevo.
19
Kenmoie-Washei-02855A-02 MES.indd 19 2010-07-13 E- 5:29:53
Page 50

FUNC[ONES ESPEC[ALES (CONT.)
CLEAN WASHER {LIMPIAR LAVADORA)
O Con el tiempo se pueden acumular residues
CleGn _¢7_sh®r CLEAN WASHER (LIMPIAR LAVADORA) se ha
residues mediante el use de lejfay otros limpiadores disefiados
espec(ficamente para la limpieza de las lavadoras de carga frontal.
El ciclo CLEAN WASHER (LIMPIAR LAVADORA) se debe ejecutar
una vez al mes, o con m&.sfrecuencia si se ha utilizado mucho la
lavadora o esta huele mal.
1.Ponga en funcionamiento la lavadora y presione el boton CLEAN
WASHER (LIMPIAR LAVADORA). Si selecciona cualquier otro
ciclo tras seleccionar CLEAN WASHER (LIMPIAR LAVADORA),
este eiclo de limpieza se cancelar&..
2.Llene el dosificador de lejfa hasta la marca MAX con lejfa Ifquida
que contenga cloro. No Ilene en exceso el dosificador de lejfa.
La lejfa se podffa dispensar inmediatamente.
3.Presione el boton START/PAUSE (INICIO/PAUSA) para iniciar el
ciclo.
4.Una vez finalizado el ciclo, abra la puerta y deje que el tambor se
seque completamente.
NOTA: NO utilice este ciclo con ropa; NO agregue detergente ni
suavizante.
* Para limpiadores de tambor en polvo, agregue el limpiador en
el compartimiento de lavado principal del cajon del dosificador.
Ponga los limpiadores en tableta directamente dentro del tambor.
Siga siempre las instrucciones y recomendaciones del fabricante.
MY CYCLE {MI CICLO)
de detergente en el tambor que pueden
provocar olores desagradables. El ciclo
disdiado especialmente para eliminar estos
O e permite activar el lavado a su medida
My Cycle AI presionar el boton MY CYCLE (MI CICLO),
ciclo. La luz de "My Cycle (Mi ciclo)" indicar_, que est,. active.
Puede seleccionar todas las opciones en el mode Mi ciclo de la
siguiente manera:
1.Seleccione elciclo utilizando el Selector de ciclos.
2.Despues de seleccionar el ciclo, elija una opcion.
3.Puede almacenar el ciclo y las opciones presionando el boton
START/PAUSE (INICIO/PAUS_ en el mode Mi ciclo. El ciclo y
las opciones que seleccione a _arecer&.nla proxima vez que elija
la funcion Mi ciclo.
NOTA:
,, Puede cambiar la configuracion de esta funcion repitiendo el
proceso descrito m_.sarriba. La proxima vez que elija My Cycle
(Mi ciclo), aparecerb, la 01timaconfiguracidn usada.
Si ha completado el lavado en el mode My Cycle (Mi ciclo), la
lavadora autom&.ticamente accede a este mode cuando se
enciende con el boton POWER (ENCENDIDO).
(temperatura, centrifugado, nivel de suciedad, etc.)
con la practicidad de presionar un solo boton.
activa las opciones usadas durante el mode Mi
2O
Kemno:e-Washe:-02855A-02 MES.indd 20 2010-07-13 Z- 5:29:53
Page 51

ADVERTENCIA: Parareauoi e= iesgodeincendio,desoa gae= ot ioao=esionespersonales,=eaestemanua=
en su totalidad, incluidas las instrucciones de seguridad importantes, antes de poner en funcionamiento la lavadora.
Desenchufe la lavadora antes de la limpieza para evitar el riesgo de deseargas eleetricas. Si no se sigue estas advertencias se pueden
producir lesiones personales graves, un incendio, una descarga electrica o la muerte.
Nunca utilice productos qufmicos fuertes, limpiadores abrasivos ni disolventes para limpiar la lavadora. Podn_adafiar el acabado.
LIMPIEZA PERiODICA
Limpieza del exterior
Cierre las Ilaves de agua despues de finalizar el lavado del dia.
Esto cerrarb, el suministro de agua a la lavadora y evitar&,la
improbable posibilidad de que se produzcan dafios a causa
del derrame de agua. Deje la puerta abierta para permitir que el
interior de la lavadora se seque. Use un pafio suave para limpiar
todo el detergente, la lejia u otros derrames a medida que ocurran.
Limpie Iosiguiente tal como se recomienda:
Panel de control: limpie con un pafio suave y h0medo. No
use polvos abrasivos ni pafios de limpieza. No rode el panel
directamente con limpiadores en aerosol.
Gabinete: lave con agua y jab6n.
Limpieza del interior
Limpie el interior de la lavadora peri6dicamente para eliminar todo
vestigio de suciedad, polvo, olor, moho, hongos o bacterias que
pueda permanecer en la lavadora como consecuencia del lavado
de ropa.
El incumplimiento de estas instrucciones puede dar como
resultado situaciones poco satisfactorias, tales como olores y/o
manchas permanentes en la lavadora o en la ropa para lavar.
Se pueden retirar los dep0sitos de agua dura si fuera necesario.
Use un limpiador con el rOtulo "Washer safe" (Seguro para
lavadoras).
Lea estas instrucciones atentamente antes de iniciar el
ciclo CLEAN WASHER (LIMPIAR LAVADORA).
l=Abra la puerta y retire cualquier prenda del tambor.
2.Abra el caj6n del dosificador. Agregue lejia liquida que contenga
cloro o un limpiador de tambores.
Se pueden utilizar algunos limpiadores para tambores en polvo
o en tabletas fabricados con este proposito.
(NOTA: No agregue detergente de lavado ni suavizante en el
dosificador cuando se usa el ciclo CLEAN WASHER (LIMPIAR
LAVADORA.)
Si se utiliza lejia liquida que contenga cloro
Agregue lejia que contenga cloro en el compartimiento para la
lejia. (NOTA: No supere la marca de Ilenado m_.ximo ni ponga
lejia liquida sin diluir directamente en el tambor.)
Si se utiliza limpiador en polvo
Retire el medidor de detergente liquido y agregue el limpiador
en polvo en el compartimiento de lavado principal del caj6n
del dosificador.
Si se utiliza limpiador en tableta
Agregue el limpiador en tableta directamente en el tambor.
(NOTA: No ponga el limpiador en tableta en el caj6n
dosificador.)
3. Cierre el caj6n y la puerta de la lavadora.
4.Seleccione CLEAN WASHER (LIMPIAR LAVADORA) y presione
START/PAUSE (INICIO/PAUSA).
NOTA: Se recomienda repetir el ciclo CLEAN WASHER (LIMPIAR
LAVADORA) mensualmente. Si en la lavadora ya hay moho y olor a
humedad, ejecute el ciclo CLEAN WASHER (LIMPIAR LAVADORA)
3 semanas consecutivas. ]?as completar el oiolo CLEAN WASHER
(LIMPIAR LAVADORA) o cuando la lavadora no se utilice, deje la
puerta abierta para que se ventile y se seque el interior.
Limpieza del sello de la puerta
1.Abra la puerta de la lavadora y saque la ropa o cualquier otro
objeto.
2. Inspeccione el sello/fuelle de
color gris entre la apertura de la
puerta y la canasta para buscar
zonas manchadas. Hale el sello/
fuelle para inspeccionar todas
las _.reas debajo del sello/fuelle
y comprobar si hay objetos
extrai'ios.
3.Si hay manchas en el _.readel sello/fuelle, limpielas siguiendo
este procedimiento.
a}Mezcle una soluci6n diluida de s_ de taza (177 mL) de lejia
liquida que contenga cloro y 1 gal. (3,8) de agua corriente
tibia.
b}Limpie el _.readel sello/fuelle con esta soluci6n mediante un
pafio h0medo.
c) Deje reposar durante 5 minutos.
d}Limpie meticulosamente el _.reacon un pafio seco y deje la
puerta abierta para que se seque el interior de la lavadora.
IMPORTANTE:
P0ngase guantes de goma cuando vaya a realizar una limpieza
prolongada.
Consulte las instrucciones del fabricante del blanqueador para
un uso adecuado.
Como guardar la lavadora
Las lavadoras se pueden dafiar si no se extrae el agua de las
mangueras y de los componentes intemos antes de guardarla.
Prepare la lavadora para guardar de la siguiente manera:
Seleccione el ciclo Quick Wash (Lavado r_.pido) y agregue lejia
al dosificador autom&.tico. Ejecute ese ciclo en la lavadora sin
carga.
Cierre las Ilaves de agua y desconecte las mangueras de
entrada.
Desenchufe la lavadora del tomacorriente y deje la puerta de la
lavadora abierta para que circule aire por el tambor.
Si su lavadora ha estado guardada en lugares con temperaturas
por debajo del punto de congelaci6n, deje transcurrir un tiempo
para que los restos de agua se derritan antes de usarla.
21
Kenmoie-Washei-02855A-02 MES.indd 21 2010-07-13 Z- 5:29:53
Page 52

LIMPIEZA PERIODICA (CONT.}
Limpieza del dosificador
Posiblemente, el dosificador autom&,tico necesite una limpieza peri6dica debido a la acumulaci6n de aditivos del lavado.
1,Extraiga el recipiente para el detergente Ifquido del 3, Lave todas las partes con agua corriente.
compartimiento del detergente. 4,Limpie el hueco del dosificador con un cepillo suave.
_,. j
2. Retire la tapa del sif6n de los compartimientos para el suavizante
de telas y la lejfa.
f
J
5oVuelva a colocar la tapa del sifon y ajOstelacon firmeza.
6, Introduzca de nuevo el dosificador en su sitio.
7, Ejecute un ciclo de enjuagado y centrifugado sin ninguna carga
en la lavadora.
22
Kenmole-Washe1-02855A-02 MES.indd 22 2010-07-13 Z- 5:29:54
Page 53

MANTENIMIENTO
Limpieza de los filtros de entrada de agua
Si la lavadora detecta que no entra agua en el dosificador, el display muestra un mensaje de error. El filtro de la vb.lvulade entrada se puede
obstruir por la cal del agua dura, los sedimentos en el suministro del agua, la cal de las tuberfas, etc.
NOTA: Los filtros de entrada protegen las partes delicadas de la vb.lvula de Ilenado de los dafios que pueden causar las partfculas que
vienen con el suministro del agua. El funcionamiento de la lavadora sin los filtros instalados puede causar una falla en la vb.lvula,Io que
podrfa provocar una inundacion o dafios en la propiedad.
Filtro d da
1.Cierre completamente los grifos. Desenrosque las mangueras
de agua caliente y frl_ade la parte posterior de la lavadora.
IMPORTANTI=: Utilice SOLO las mangueras de entrada
proporcionadas junto con este producto. No se garantiza
que otras mangueras se ajusten o funcionen correctamente.
Otras mangueras puede que no ajusten correctamente y
provoquen fugas de agua. La garantfa del producto no cubre los
subsiguientes dafios al producto o la propiedad.
2.Retire cuidadosamente los filtros de las vb.lvulas de agua y
sumerjalos en vinagre blanco o un anticalcb.reo, de acuerdo con
las instrucciones del fabricante. Antes de volverlos a instalar
enju&.guelos bien.
Vuelva a poner los filtros en su lugar y conecte las mangueras.
23
Kemnoie-Washei-02855A-02 MIZS.indd 23 2010-07-13 Z- 5:29:54
Page 54

MANTENIMIENTO (CONT.)
Limpieza del filtro de residuos
Recomendamos limpiar el filtro de residuos cuando el agua no drena correctamente o cuando aparece en el display el mensaje de error
"nd".
loAbra la tapa del filtro presionando y tirando de la tapa del filtro
con los dedos.
6. Limpie la suciedad u otros materiales que hubieran quedado
en el filtro de residuos. AsegOrese de que no este bloqueada la
bomba de drenaje ubicada detr_.s del filtro de residuos.
f
2.Sosteniendo la tapa del drenaje, tire del tubo de drenaje que
est&.conectado al gancho gufa en elfrente. No tire del tubo de
drenaje con demasiada fuerza.
3. Coloque un recipiente debajo de la lavadora para recuperar
cualquier agua restante. Sostenga el tubo de drenaje con una
mano y con la otra gire el tapon de drenaje de emergencia hacia
la izquierda y sepb.relo.
4.Drene el resto de agua por completo.
f m
)a se
_. _renaje
5.Saque el tapon y elconjunto del filtro de residuos.
f
......... _:_I:II:S_:i
j I
i¸ iiii:!i:ili!ii_:_,_,_T:¸.................
j
Tapa del filtro de Filtro de
7. Una vez realizada la limpieza del filtro, inserte de nuevo el
tapon y el conjunto del filtro de residuos en la lavadora. Gire el
tapon del filtro de residuos en el sentido de las agujas del reloj
hasta que el indicador del tapon del filtro de residuos se sitOe
en la posicion de las 12 horas; el indicador debe apuntar a la
lavadora.
8oVuelva a montar el tapon del desagOe de emergencia en el tubo
de drenaje y cuelgue el tubo en el gancho gufa.
9oVuelva a instalar la tapa del filtro.
residuos residuos
Tapa delr_ilstirdOudoe
24
Kenmo:e-Washe:-02855A-02 MES.indd 24 2010-07-13 Z- 5:29:56
Page 55

SONIDOS NORMALES
Durante el funcionamiento de la lavadora se pueden ofr lossiguientes sonidos. Es algo normal.
Clics:
Bloqueo y desbloqueo de la puerta.
Sibilante:
Pulverizaci6n y circulaci6n del agua durante el ciclo.
Traqueteo:
Giro del tambor en la rutina de balanceo en el cielo de
centrifugs
Zumbido:
Bombeo del agua de drenaje al final de un cielo.
Chapoteo:
Bamboleo de la ropa en el tambor durante los cielos de lavado y
enjuagado.
ANTES DE COMUNiCARSE CON EL SERVICIO Tl_CNiCO
Esta lavadora est&.equipada con un sistema de supervisi6n de fallas para detectar y diagnosticar los problemas tempranamente. Si la
lavadora no funciona adeeuadamente o, sencillamente, no funciona, consulte la tabla siguiente antes de Ilamar al teenieo de servieio.
PROBLEMA SOLUCI()N
AsegOrese de que la puerta este bier] cerrada.
Verifique que la lavadora este enchufada.
AsegOrese de que las Ilaves de agua esten abiertas.
no enciende...
no tiene agua o no tiene • Endereee las mangueras de entrada de agua.
sufieiente agua... • Deseoneete las mangueras y limpie los filtros. Posiblemente los filtros de las mangueras esten
hay detergente en el
dosifieador autom&.tieo
despues de finalizar el cielo de • AsegOrese de que el disco selector de detergente se encuentre en la posiei6n superior cuando usa
lavado, detergente en polvo.
vibra o hace demasiado ruido. • AsegOrese de que se hayan retirado los tornillos de transporte.
se detiene "clie" para controlar la traba de la puerta y que se efectLie un drenaje r&.pido.
AsegOrese de presionar el bot6n Start/Pause (Inieio/Pausa) para encender lalavadora.
AsegOrese de que la funciOn Seguro para niFios no este activada. Consulte la pb.gina 14.
Antes de que la lavadora eomienee a Ilenarse, se eseuchar&, una serie de sonidos semejantes a un
"clie" para controlar la traba de la puerta y que se efectLie un drenaje r&.pido.
Controle el fusible o reinieie el disyuntor.
Abra las dos Ilaves completamente.
AsegOrese de que la puerta este bien cerrada.
tapados.
Abra y cierre la puerta y, a eontinuaci6n, presione el bot6n Start/Pause (Inicio/Pausa).
AsegOrese de que la lavadora funcione con sufieiente presi6n de agua.
Compruebe que la lavadora este ubieada sobre una superfieie nivelada. Si lasuperfieie no est&.
nivelada, ajuste las patas de la lavadora para nivelar el eleetrodomestieo.
AsegOrese de que la lavadora no toque ningOn otro objeto.
Verifique que la earga de ropa sea equilibrada.
Enchufe el cable de alimentaci6n a un tomacorriente que funcione.
Controle el fusible o reinieie el disyuntor.
Cierra la puerta y presione el bot6n Start/Pause (Inieio/Pausa) para encender la lavadora.
Pot su seguridad, la lavadora no lavar&,ni centrifugar&, salvo que la puerta este cerrada.
Antes de que la lavadora eomienee a Ilenarse, se eseuchar&, una serie de sonidos semejantes a un
Se puede produeir una pausa o un perlbdo de remojo en el cielo. Espere un instante para ver si
comienza a funcionar.
Controle que los filtros de las mangueras de entrada a la altura de las Ilaves no presenten
obstrucciones.
Limpie los filtros peri6dieamente.
25
Kenmoie-Washei-02855A-02 MES.indd 25 2010-07-13 Z- 5:29:56
Page 56

ANTES DE COMUNiCARSE CON EL SERVIClO TECNiCO (CONT.)
PROBLEMA
se Ilena con agua a una
temperatura incorrecta.
tiene la puerta trabada o no se
abre.
no drena y/o no centrifuga.
deja la carga demasiado
hOmeda al finalizar el ciclo.
pierde agua.
tiene espuma en exceso.
SOLUCI6N
Abra las dos Ilaves completamente.
AsegOrese de que la selecci6n de temperatura sea la correcta.
AsegOrese de que las mangueras esten conectadas alas Ilaves correctas. Purgue las caFierfas.
Controle el calentador de agua. Deberfa estar configurado para proveer agua caliente en la salida de
agua a una temperatura mfnima de 120 °F (49 °C). Asimismo, verifique la capacidad del calentador
de agua y la velocidad de recuperaci6n.
Desconecte las mangueras y limpie los filtros. Posiblemente, los filtros de lasmangueras esten tapados.
A medida que la lavadora se Ilena, la temperatura del agua puede variar debido a que la funci6n
autom_ttica de control de latemperatura controla la temperatura del agua que ingresa. Esto es normal.
Mientras la lavadora se Ilena, es posible que observe que pot el dosificador pasa s61oagua caliente y/o
s61oagua frfa cuando se seleccionan las temperaturas de lavado frfao tibia. Esta es una funci6n normal
que cumple el control de temperatura automb.tico dado que la lavadora determina la temperatura del agua.
Presione el bot6n Start/Pause (Inicio/Pausa) para detener la lavadora.
La puerta de la lavadora permanecer_t trabada durante la fase de calentamiento del ciclo Sanitize
(Desinfecci6n).
Puede Ilevar algunos minutos que el mecanismo de cierre de la puerta se desconecte.
Controle el fusible o reinicie el disyuntor.
Enderece las mangueras de drenaje. Elimine las mangueras enroscadas. Si existe alguna restricci6n
en cuanto al drenaje, comunfquese con el servicio tecnico.
Cierre la puerta y presione el bot6n Start/Pause (Inicio/Pausa). Por su seguridad, la lavadora no lavar_t
ni centrifugar&, salvo que la puerta este cerrada.
Compruebe que el filtro de residuos no este obstruido.
Use la velocidad de centrifugado Alta o Muy alta.
Use un detergente de alta eficacia para reducir la formaci6n de espuma en exceso.
La carga es demasiado pequeFia. Las cargas muy pequeFias (una o dos prendas) se pueden
desequilibrar y no centrifugarse en absoluto.
AsegOrese de que la puerta este bien cerrada.
AsegOrese de que todas las conexiones de las mangueras esten ajustadas.
AsegOrese de que el extremo de la manguera de drenaje este correctamente conectado y asegurado
al sistema de drenaje.
Evite sobrecargar la lavadora.
Use un detergente de alta eficacia para evitar la formaci6n de espuma en exceso.
Use un detergente de alta eficacia para evitar la formaci6n de espuma en exceso.
Reduzca la cantidad de detergente para el agua blanda, las cargas ligeramente sucias o pequeFias.
NO se recomienda un detergente de baja eficacia.
Codigos de informacion
SiMBOLO DEL
C6DIGO SIGNIFICADO SOLUCI6N
Detect6 demasiada espuma durante la sesi6n
de lavado.
El Ij
J U U
-- Redistribuya la carga y presione el bot6n Start/Pause (Inicio/
Kenmoie-Washei-02855A-02 MES.mdd 26 2010-07-13 C- 5:29:56
La unidad ingresar_t en estado de espera hasta
que disminuya la espuma. A continuaci6n, la
unidad volver&,a funcionar.
Cuando termine el lavado, por su parte, los
c6digos End y Sd se iluminar_.n.
Un desequilibrio en la carga impidi6 que la
lavadora centrifugara.
Ejecute el ciclo Clean Washer (Limpiar lavadora).
Como prevenci6n, reduzca la cantidad de detergente.
Pausa).
26
Page 57

ANTES DE COMUNiCARSE CON EL SERVIClO TI_CNiCO (CONT.)
dS La puerta est&,abierta cuando la lavadora est&, Cierre la puerta firmemente y reinicie el ciclo.
I--I Cierre la puerta firmemente y reinicie el ciclo.
i--t_ No se Iogra cerrar la puerta de la lavadora.
! I Problema con el control de la temperatura del agua.
i--il-- (Problema con el control del calentador.) Comunfquese con el servicio tecnico.
1-- La lavadora intent6 Ilenarse, pero no alcanz6 el
LI_ nivel de agua adecuado. Comunfquese con el servicio tecnico.
i n
jj La puerta no se puede abrir.
I-" J Elmotor no funciona correctamente.
,-8
nF
en funcionamiento. Si elcOdigo vuelve a aparecer, comunfquese con el servicio tecnico.
Si el cOdigo vuelve a aparecer, comunfquese con el servicio tecnico.
AsegOrese de que la puerta este bien cerrada.
Presione el boton Power (Encendido) para apagar la lavadora
y, a continuacion, vuelvala a encender. Si el codigo vuelve a
aparecer, comunl_quese con el servicio tecnico.
Reinicie elciclo presionando el boton Start/Pause (Inicio/Pausa).
Si el codigo vuelve a aparecer, comunl_quese con el servicio
tecnico.
Antes de comunicarse con el servicio tecnico, verifique Io
siguiente:
La lavadora no est&.drenando.
Tambien puede significar que la unidad percibe
una pequeFia obstrucci6n mientras drena.
La lavadora intent6 Ilenarse pero no Io Iogro.
Verifique si la manguera de suministro de agua
caliente est&,conectada.
1,Apague la unidad y vuelvala a encender.
2, Seleccione sOlo el ciclo Spin (Centrifugado).
3, Presione Start/Pause (Inicio/Pausa) para que el agua drene.
4,Limpie el filtro de residuos.
Si no drena, comunl_quese con el servicio tecnico.
AsegOrese de que las Ilaves de agua esten completamente
abiertas. Controle que no haya mangueras enroscadas.
Controle los filtros interiores de las mangueras de carga.
Se debe conectar la manguera de suministro de agua caliente ya
que si la temperatura del agua frl_aes inferior a 59 °F la funcion
de control autom&,tico de la temperatura (A.T.C)suministra agua
caliente.
t--I La conexi6n de la manguera de agua caliente/ Conecte la manguera de agua caliente/frfa correctamente.
I-I i--I frfa no es oorreota.
CII_ Elservicio electrico se interrumpi6 cuando la Reinicie el ciclo presionando el bot6n Start/Pause (Inicio/Pausa).
i i-- lavadora estaba en funcionamiento.
_-H-- Se detecta una falla en el sensor del nivel de Comunfquese con el servicio tecnico.
IJL- agua.
rq
iZC Teola atasoada. Comunfquese con el servioio teonioo.
I i- Problema con el sensor de la velocidad del Reinicie elciclo.
CIC motor. Si el c6digo vuelve a aparecer, comunfquese con elservicio tecnico.
I I- Reinicie el ciclo.
C IX Problema con el sensor de temperatura.
-U- Reinicie elciclo.
_-ilX Se detect6 alta corriente.
_i- Llame a un electricista para comprobar si hay problemas
I_ C Se detect6 alto/bajo voltaje.
Si el c6digo vuelve a aparecer, comunfquese con elservicio tecnico.
Si el c6digo vuelve a aparecer, comun(quese con el servicio tecnico.
Reinicie elciclo.
electricos en el domicilio antes de Ilamar al servicio tecnico.
Si el c6digo vuelve a aparecer, comuniquese con el servicio tecnico.
27
Kenmoie-Washei-02855A-02 MES.indd 27 2010-07-13 C- 5:29:58
Page 58

Garantia limitada Kenmore
Si se han seguido unas pautas de instalacion, funcionamiento y mantenimiento del producto de acuerdo con las
instrucciones suministradas, en caso de detectar fallas en este aparato debidas a defectos de material y mano de obra
ocurridas en el plazo de un ar'io a partir de la fecha de compra, Ilame al 1-800-4-MY-HOME epara repararlas sin coste
alguno.
Si este electrodomestico se ha utilizado para un proposito distinto al domestico, esta garantfa se aplica solo hasta 90 dfas a
partir de la fecha de la compra.
Esta garantia cubre s61o defectos de los materiales y la mano de obra. Sears NO cotter& con los gastos de:
1. Elementos consumibles desgastados por uso normal, incluidos, aunque no con car_.cter taxativo, filtros, correas,
bombillas de luz y bolsas.
2.Un tecnico de servicio para instruir al usuario sobre la correcta instalacion, funcionamiento o mantenimiento del producto.
3.Un servicio tecnico de limpieza o mantenimiento del producto.
4.Dafios o fallas del producto si no se han seguido unas pautas de instalacion, funcionamiento y mantenimiento de acuerdo
con las instrucciones suministradas con el producto.
5. Dar'ios o fallas del producto derivados de accidentes, abusos, uso incorrecto o uso distinto para el proposito al que est&.
destinado.
6. Dafios o fallas del producto causados por el uso de detergentes, limpiadores, productos qdmicos o utensilios distintos a
los recomendados en las instrucciones suministradas con el producto.
7. Dar'ios o fallas en las piezas del sistema derivados de modificaciones no autorizadas hechas en el producto.
Responsabilidad limitada de la garantias implicadas; limitaci6n de reparaci6n
Es 0nica y exclusiva reparacidn del cliente bajo esta garantia limitada el arreglo del producto como se establece en la
presente garantia. Las garantias implicadas, incluidaslas de aptitud para la venta o para fines especificos, se limitana un
aflo o al periodo m_s corto permitido por la ley. Sears no ser_ responsable de daflos imprevistoso derivados. Algunos
estados o provincias no permiten laexclusion o limitacionde daflos imprevistoso derivados, o la limitacion de la duracion
de garantias limitadas de aptitud para la venta o fines espedficos, en cuyo caso las limitacioneso exclusiones antedichas
pueden no aplicarse en su caso.
Esta garantia se aplica solo si el electrodomestico se utiliza en Estados Unidos o Canadb..
Esta garantia le otorga derechos legales espedficos, y asimismo puede que tenga otros derechos que varl_ansegOn el
Estado en el que se encuentre.
Sears Brands Management Corporation, Hoffman Estates, IL 60179
Sears Canada inc., Toronto, Ontario, Canada M5B 2B8
28
Kenmoie-Washei-02855A-02 MES.indd 28 2010-07-13 Z- 5:29:58
Page 59

29
Kenmo:e-Washe:-02855A-02 MES.indd 29 2010-07-13 Z- 5:29:58
Page 60

iiiiiiiiiiiiiiiiiii.....
iiiiiiiiiiiiiiiii
iiiiiiiiiiiiiiiii
iiiiiiiiiiiiiiiii
Your Home
For troubleshooting, product manuals and home solutions advice:
manag ife
www.managemylife.com
For repair - in your home - of all major brand appliances,
lawn and garden equipment, or heating and cooling systems,
no matter who made it, no matter who sold it!
For the replacement parts, accessories and
owner's manuals that you need to do-it-yourself,
For Sears professional installation of home appliances
and items like garage door openers and water heaters,
1-800-4-MY-HOME ®(1-800-469-4663)
Call anytime, day or night (U.S.A. and Canada)
..................................................................................................................................................................................www, sears,com www.sears.ca
iiiiiiiiiiiiiiiiiiii
iiiiiiiiiiiiiiiiiiii
iiiiiiiiiiiiiiiiiiii
iiiiiiiiiiiiiiiiiiii
iiiiiiiiiiiiiiiiiiii
iiiiiiiiiiiiiiiiiiii
iiiiiiiiiiiiiiiiiiii
iiiiiiiiiiiiiiiiiiii
iiiiiiiiiiiiiiiiiiii
iiiiiiiiiiiiiiiiiiii
iiiiiiiiiiiiiiiiiiii
iiiiiiiiiiiiiiiiiiii
iiiiiiiiiiiiiiiiiiii
iiiiiiiiiiiiiiiiiiii
iiiiiiiiiiiiiiiiiiii
iiiiiiiiiiiiiiiiiiii
iiiiiiiiiiiiiiiiiiii
iiiiiiiiiiiiiiiiiiii
iiiiiiiiiiiiiiiiiiii
iiiiiiiiiiiiiiiiiiii
iiiiiiiiiiiiiiiiiiii
iiiiiiiiiiiiiiiiiiii
iiiiiiiiiiiiiiiiiiii
iiiiiiiiiiiiiiiiiiii
iiiiiiiiiiiiiiiiiiii
iiiiiiiiiiiiiiiiiiii
iiiiiiiiiiiiiiiiiiii
iiiiiiiiiiiiiiiiiiii
iiiiiiiiiiiiiiiiiiii
iiiiiiiiiiiiiiiiiiii
iiiiiiiiiiiiiiiiiiii
iiiiiiiiiiiiiiiiiiii
iiiiiiiiiiiiiiiiiiii
iiiiiiiiiiiiiiiiiiii
iiiiiiiiiiiiiiiiiiii
iiiiiiiiiiiiiiiiiiii
iiiiiiiiiiiiiiiiiiii
iiiiiiiiiiiiiiiiiiii
iiiiiiiiiiiiiiiiiiii
iiiiiiiiiiiiiiiiiiii
iiiiiiiiiiiiiiiiiiii
iiiiiiiiiiiiiiiiiiii
iiiiiiiiiiiiiiiiiiii
iiiiiiiiiiiiiiiiiiii
iiiiiiiiiiiiiiiiiiii
iiiiiiiiiiiiiiiiiiii
_i!i!i!i!i!i!i!i!i!i!i!i!i!i!i!_i!,!!,!!,!!,
To purchase a protection agreement on a product serviced by Sears
For repair of carry-in items like vacuums, lawn equipment,
and electronics, call anytime for the location of your nearest
1-800-488-1222 (U.S.A.) 1-800-469-4663 (Canada)
1-800-827-6655 (U.S.A.) 1-800-361-6665 (Canada)
Para pedir servicio de reparacidn a Au Canada pour service en fran_ais:
domicilio, y para ordenar piezas:
Sears Parts & Repair Service Center
www.sears.com www.sears.ca
1-888-8U -H OGAR ® 1-800-LE-FOYER Mc
(1-888- 784-6427) (1-800- 533-6937)
www.sears.com www.sears.ca
Our Home
iiiiiiiiiiiiiiiii
iiiiiiiiiiiiiiiii
iiiiiiiiiiiiiiiii
iiiiiiiiiiiiiiiii
iiiiiiiiiiiiiiiii
iiiiiiiiiiiiiiiii
iiiiiiiiiiiiiiiii
iiiiiiiiiiiiiiiii
® Registered Trademark / Trademark of KCD IP,LLC in the United States, or Sears Brands, LLC in other countries
® Marca Registrada / TMMarca de Fabrica de KCD IP, LLC en Estados Unidos, o Sears Brands, LLC in otros paises
Kenmoie-Washei-02855A-02 MES.indd 30 2010-07-13 2- 5:29:58
TM
McMarque de commerce / Marque deposee de Sears Brands, LLC
MD
 Loading...