


/ _ Contents
!1_ ° English Version .............................. 2
. Version francaise .......................................... 17
° Versi6n en espa_ol .......................... 35
oSafely Instructions ............................................. 2
ll_ _ Grounding Requirements ................ 2, 3
l J_ o Starting the Refrigerator .................................. 3
I Adjusting the Controls .............................. 3
f/# .FoodS.o,o e ............................4,s
, Shelves ......................................................... 5, 6
, Storage Drawers ............................................. 6
IIH . iceService ........................................... 7, 8
Ifa . Features ................................................... 9
UI ° Care and Cleaning .................................... 1O, I 1
° Vacation and Moving Precautions .................. I 1
" Before You Call for Service ........................ 12
;' Reversing Door Swing ........................ 13-1 5
* Warranty ......................................... Back Cover
Your old refrigerator has a cooling system that used
CFCs (chlorofluorocarbons) CFCs are believed to harm
stratospheric ozone
If you are throwing away your old refrigerator, make sure the
CFC refrigerant is removed for proper disposal by a qualified
"_, __. _'-"='_ servicer. Ifyou intentionally release this CFC refrigerant you
i X • can be subject Iofines and imprisonment under provisions of
: the federal Clean Air Act
::]:please record them0del number, serial number and date you purchased your Kenmore refrigerator in the space
;:;:be owl Seepage 9 for modet and serial number location.
::::{::i i : : : :]SeriaINumber Date of Purchase
::::: : :::: :SEARS: ROEBUCK AND CO., Hoffman Estates,1L60179 USA
Top Freezer, No-Frost 14 & 16 cu. ft, Models
IMPORTANT SAFETYINSTRUCTIONS
Read all instructions before using
this appliance.
WARNING--When using thisappliance, always
exercise basic safety precautions, including the
following:
" Use this appliance only for its intended purpose as
described in thisOwner's Manual_
"This refrigerator must be properly installed in
accordance with the Attention Installer Instructions
before it is used. See grounding requirements in
this book
" Never unplug your refrigerator by pulling on the
power cord. Always grip plug firmly and pull straight
out from the outlet
• Repair or replace immediately all electric service
cords that have become frayed or otherwise
damaged. Do not use a cord that shows cracks or
abrasion damage along its length or at either the plug
or connector end
• When moving your refrigerator away from the
,,,vail, be careful not to roll over or damage the
power cord.
• After your' refrigerator is in operation, do not
touch the cold surfaces in the freezer compartment,
particularly when hands are damp or wet. Skin
may adhere to the extremely cold surfaces
• If your refrigerator has an icemaker, do not place
fingers or hands on the automatic icemaking
mechanism while the refrigerator is plugged in. This
will help protect you from possible injury Itwill also prevent
interference with themoving parts of theejector mechanism,
or with the heating element that releases thecubes.
- Do not store or use gasoline or other flammable
vapors and liquids in the vicinity of this or any
other appliance.
• Don't refreeze frozen foods which have thawed
completely. The United States Department of
Agriculture in Home and Garden BUlletin No. 69 says:
".You may safely refreeze frozen foods that have
thawed if they still Contain ice crystals or if they are still
cold-below 40°F, (4°C.).
".._Thawed ground meats, poultry or fish that have any
off-odor or off-color should not be refrozen and should
not be eaten. Thawed ice cream should be discarded. If
the odor or color of any food is poor or questionable, get
rid of it. The food may be dangerous to eat.
"Even partial thawing and refreezing reduce the eating
quality of foods, particularly fruits, vegetables and
prepared foods. The eating quality of red meats is
affected lessthan that of many other Foods. Use refrozen
foods as soon as possible to save as much of their eating
quality as you can."
" If your old refrigerator is still around the house
but not in use, be sure to remove the doors.This
will reduce the possibility of danger to children.
. Do not allow children to climb, sit, stand or hang
on the shelves in the refrigerator. They could
damage the refrigerator and seriously injure
themselves.
• Unplug your refrigerator before cleaning and
making repairs. NOTE: We strongly recommend that
any servicing be performed by a qualified individuak
- Before replacing a burned-out light bulb, Unplug: I
the refrigerator or turn off power at the circuit breaker I
or fuse box in order to avoid contact with a live wire i I
filament. (A burned-out light bulb may break when: i }
being replaced,) NOTE. Turning control to OFF:
position does not remove power to the light circuit, ii
SAVETHESEINSTRU
: i i
Grounding Requirements Important-Please read carefully.
To Connect Electricity
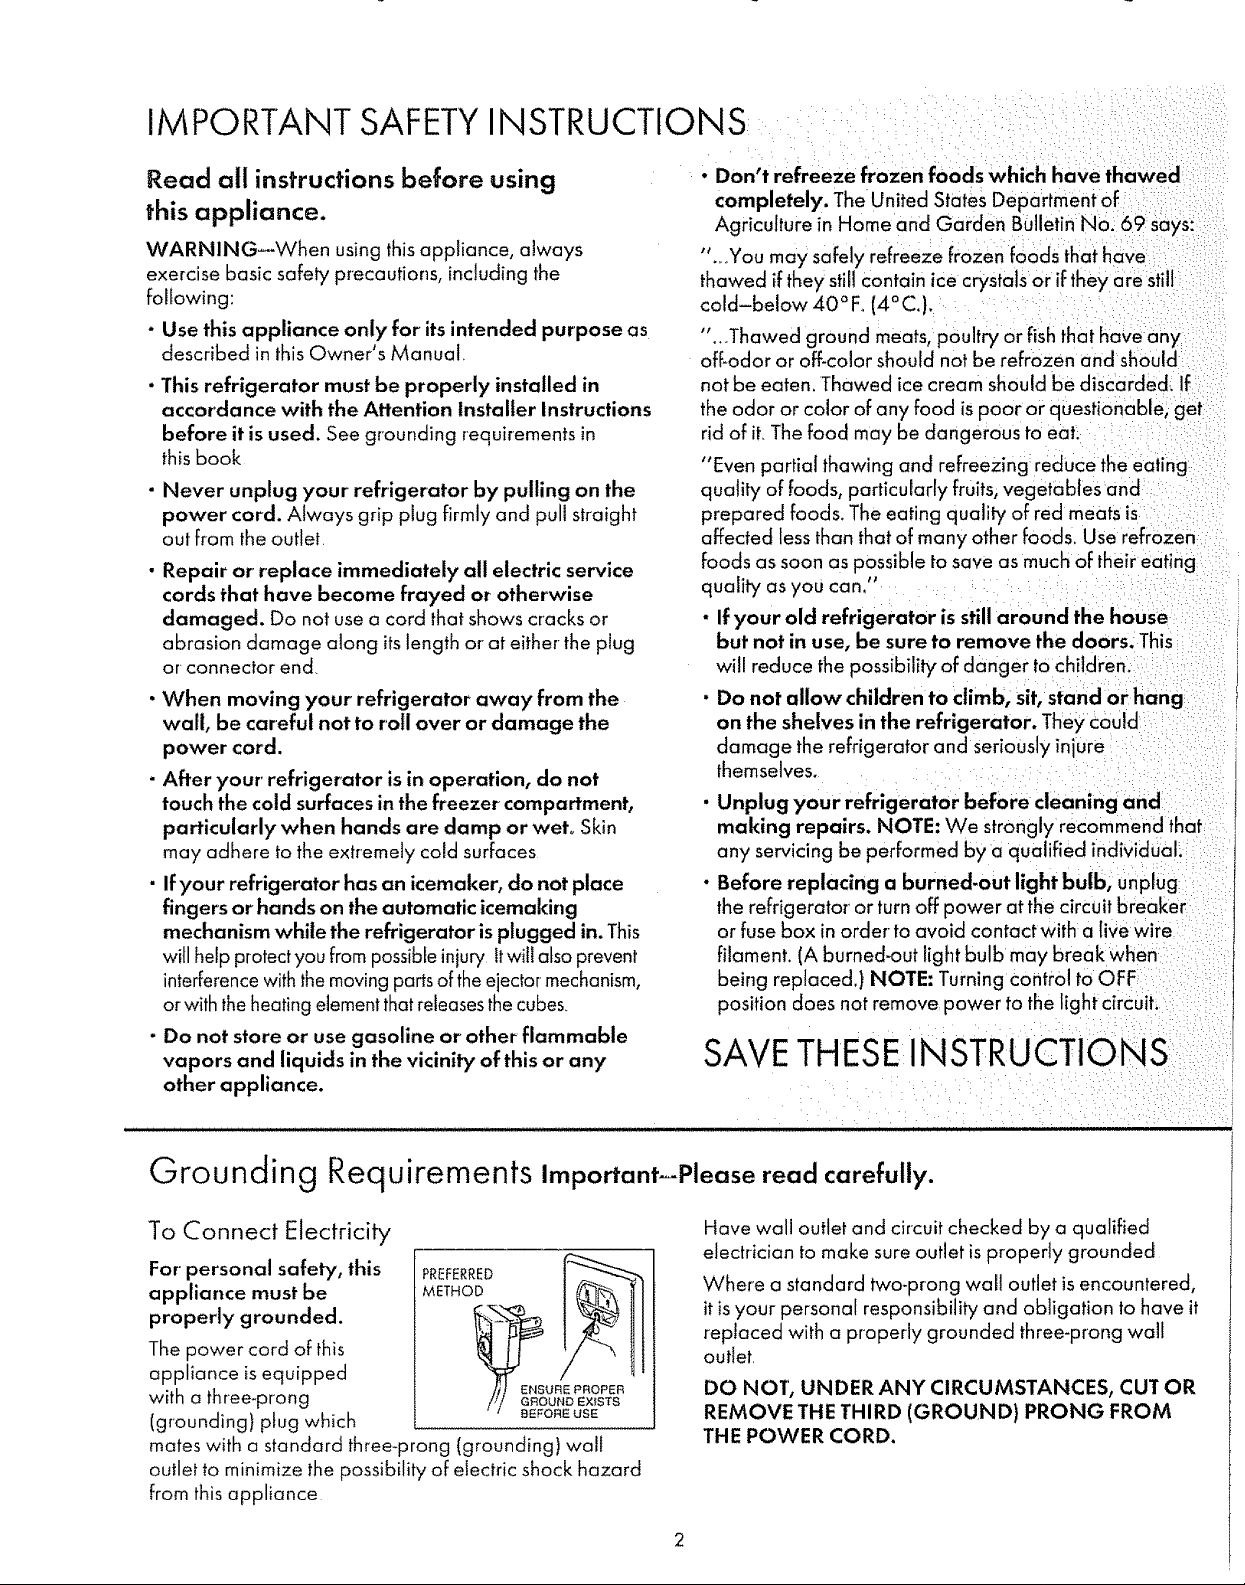
For' personal safety, this
appliance must be
properly grounded.
The power cord of this
appliance is equipped
with a three-prong
(grounding) plug which
mates with a standard three-prong (grounding) wal!
outlet to minimize the possibility of electric shock hazard
from this appliance
PREFERRED
MET.°° I
/j] ENSURE PROPER
/// GROUND EXfST$
' _ BEFOFtE USE
Have wall outlet and circuit checked by a qualified
electrician to make sure outlet is properly grounded
Where a standard two-prong wall outlet is encountered,
it isyour personal responsibility and obligation to have it
replaced with a properly grounded three-prong wall
outfet
DO NOT, UNDER ANY CIRCUMSTANCES, CUT OR
REMOVE THE THIRD (GROUND) PRONG FROM
THE POWER CORD.
Starting the Refrigerator
Use of Adapter Plug
Because of potential safety hazards under certain
conditions, we strongly recommend against use of an
adapter ptug_ However, if you still elect to use an
adapter, where local codes permit, a TEMPORARY
CONNECTION may be made to a properly grounded
two-prong wall outlet by use of a UL listed adapter
available at most local hardware stores,
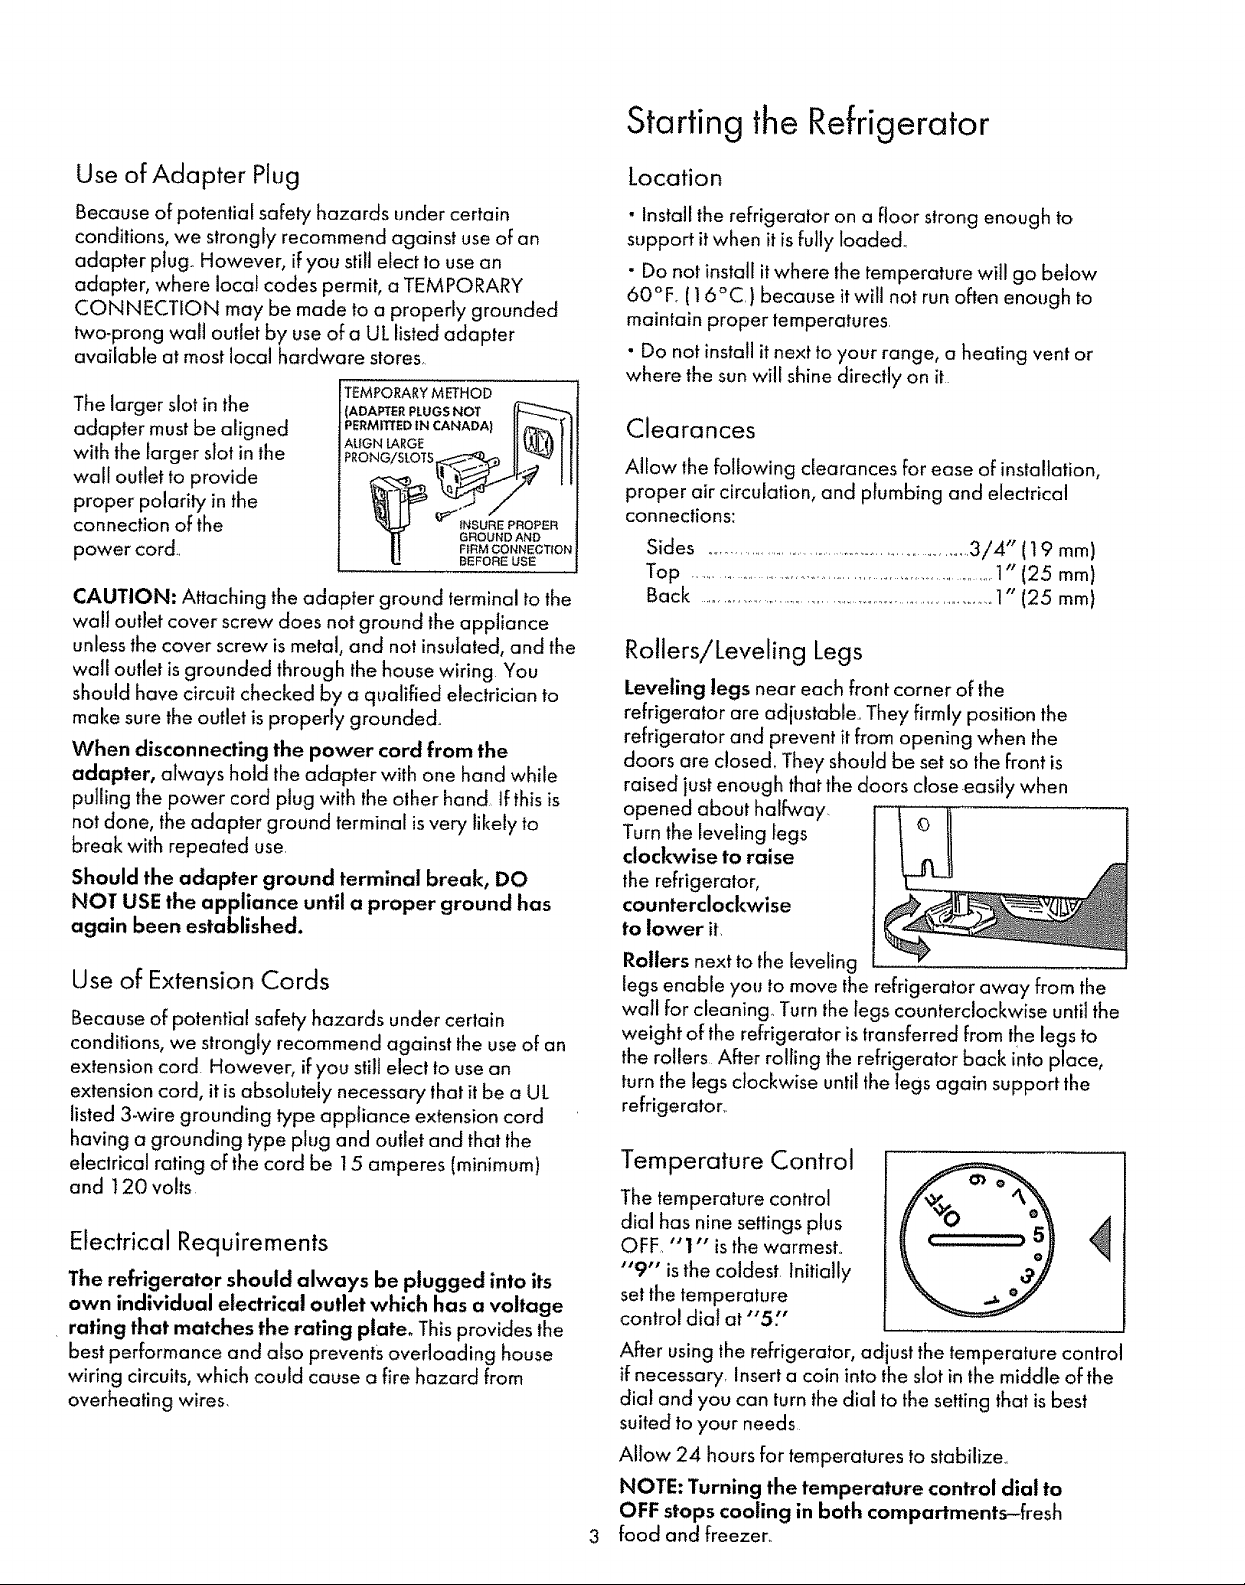
The larger slot in the
adapter must be aligned
with the larger slot in the
wall outlet to provide
proper polarity in the
connection of the
power cord.
CAUTION: Attaching the adapter ground terminal to the
wall outlet cover screw does not ground the appfiance
unless the cover screw is metal, and not insulated, and the
wall outlet is grounded through the house wiring You
should have circuit checked by a qualified electrician to
make sure the outlet is properly grounded_
When disconnecting the power cord from the
adapter, always hold the adapter with one hand while
pulling the power cord plug with the other hand. If this is
not done, the adapter ground terminal isvery likely to
break with repeated use.
Should the adapter ground terminal break, DO
NOT USE the appliance until a proper ground has
again been established.
TEMPORARYMETHOD
(ADAPTERPLUGSNOT
P rM,.E ,NCAn OA II Y
AUGN LARGE IJ_JlJ(I I
|NSURE PROPER
GROUND AND
F|RM CONNECTfON
BEFORE USE
Location
- Install the refrigerator on a floor strong enough to
support it when it is fully loaded..
o Do not install itwhere the temperature will go below
60°E (! 6°C.) because itwill not run often enough to
maintain proper temperatures.
• Do not install it next to your range, a heating vent or
where the sun will shine directly on it
Clearances
Allow the following clearances for ease of installation,
proper air circulation, and plumbing and electrical
connections:
Sides .......................................................................3/4" (19 mm)
Top ........................................................................ 1" (25 mm)
Back .............................................................................. 1" (25 mm)
Rollers/Leveling Legs
Leveling legs near each front corner of the
refrigerator are adjustable, They firmly position the
refrigerator and prevent it from opening when the
doors are closed. They should be set so the front is
raised just enough that the doors close easily when
opened about halfway,
Turn the leveling legs
clockwise to raise
the refrigerator,
counterclockwise
to lower it.
Use of Extension Cords
Because of potential safety hazards under certain
conditions, we strongly recommend against the useof an
extension cord. However, if you still elect to use an
extension cord, it is absolutely necessary that it be a UL
listed 3-wire grounding type appfiance extension cord
having a grounding type plug and outlet and that the
electrical rating of the cord be 15 amperes (minimum)
and t 20 volts
Electrical Requirements
The refrigerator should always be plugged into its
own individual electrical outlet which has a voltage
rating that matches the rating plate° Thisprovides the
best performance and also prevents overloading house
wiring circuits, which could cause a fire hazard from
overheating wires,
Rollers next to the leveling
legs enable you to move the refrigerator away from the
wall for cleaning Turn the legs counterclockwise until the
weight of the refrigerator is transferred from the legs to
the rollers After rolling the refrigerator back into place,
turn the legs clockwise until the legs again support the
refrigerator,_
Temperature Control
The temperature control
dial has nine settings plus
OFF, "I" is the warmest..
"9" isthe coldest Initially
set the temperature
control dial at "5"
After using the refrigerator, ad ustthe temperature control
if necessary, Insert a coin into the slot in the middle of the
dial and you can turn the dial to the setting that is best
suited to your needs
Allow 24 hours for temperatures to stabilize,.
NOTE: Turning the temperature control dial to
OFF stops cooling in both compartments-fresh
food and freezer°
Food Storage Suggestions
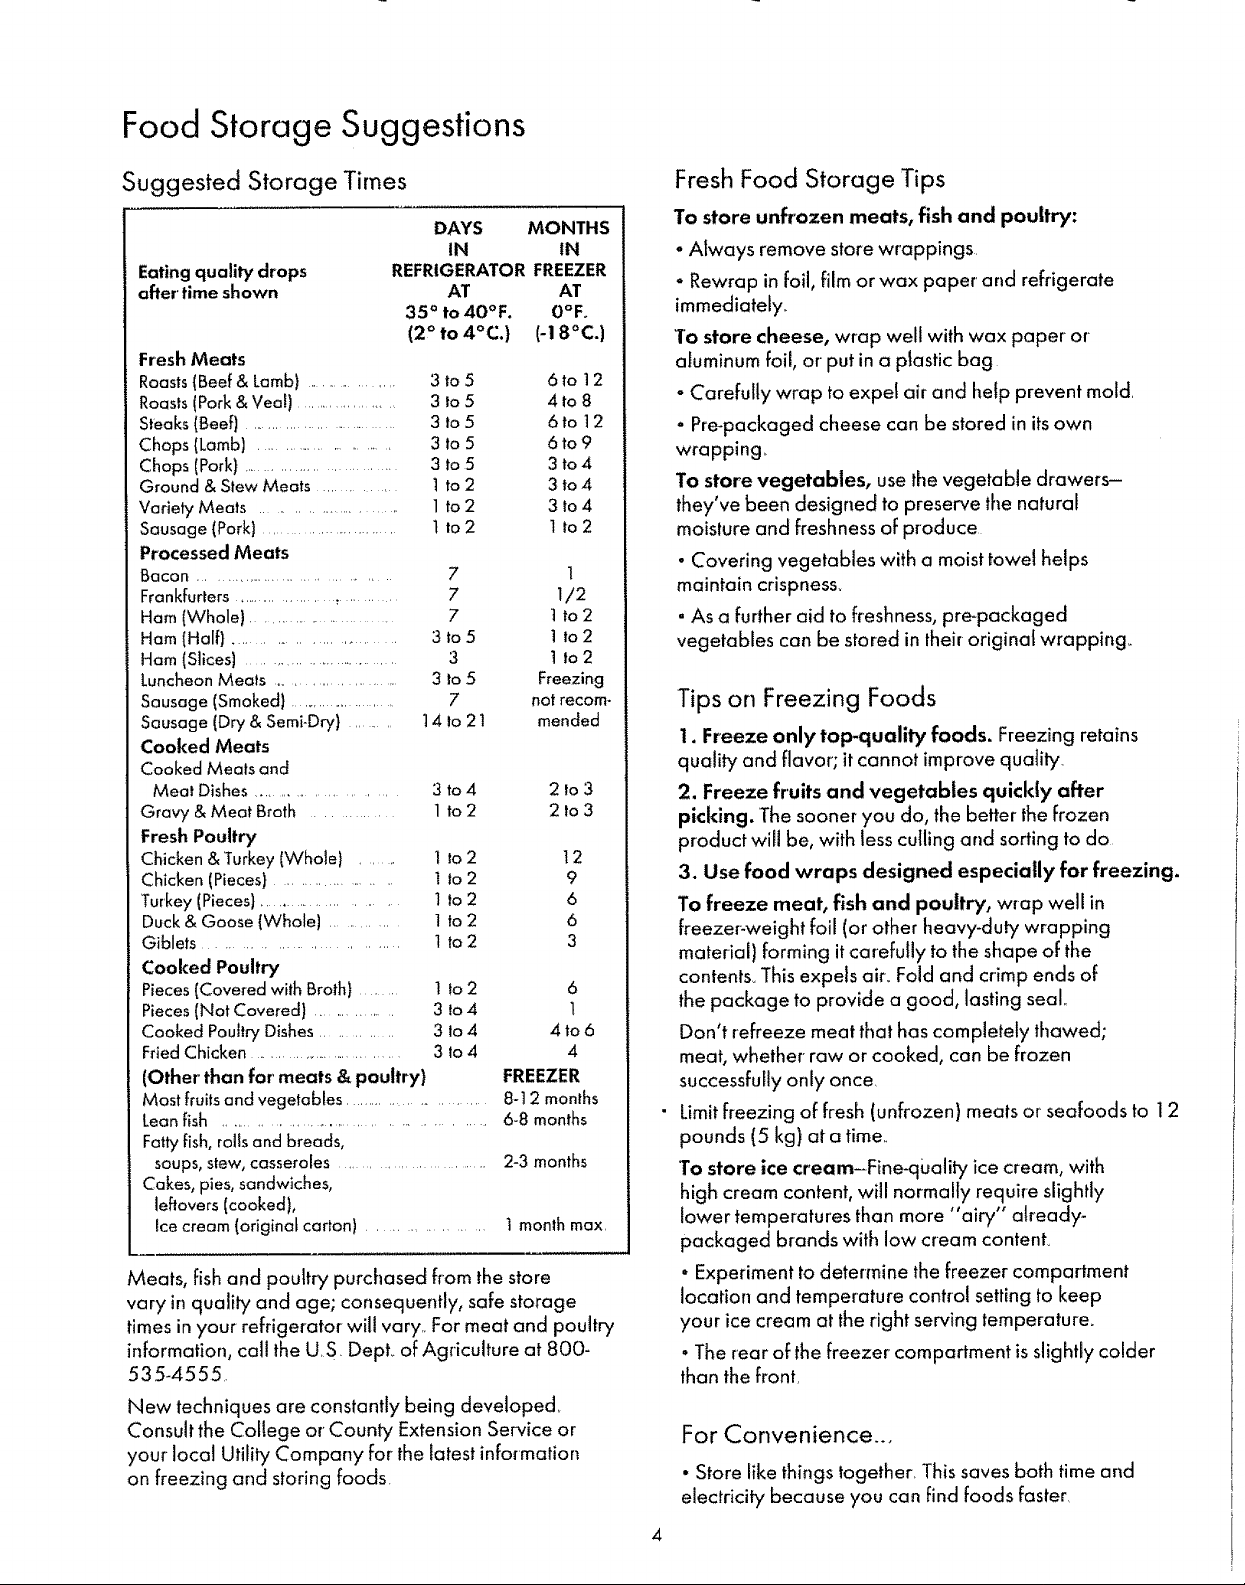
Suggested Storage Times
DAYS MONTHS
IN IN
Eating quality drops
after time shown
Fresh Meats
Roasts (Beef & Lamb) ............... 3 to 5 6 to 12
Roasts(Pork & Veal) .................... 3 to 5 4 to 8
Steaks (Beef) ................................... 3 to 5 6 to t 2
Chops (Lamb) ........................... 3 to 5 6 to 9
Chops (Pork} ........................... 3 to 5 3 to 4
Ground & Stew Meats ................. 1 to 2 3 to4
Variety Meals ....................... 1to 2 3 to 4
Sausage (Pork) ............................... 1 to 2 1to 2
Processed Meats
Bacon ..................................... 7 1
Frankfurters..................................... 7 I/2
Ham (Whole) ............................ 7 t to 2
Ham (Half) ........................... 3 to 5 1Io 2
Ham (Slices) ............................... 3 t lo 2
Luncheon Meats ..................... 3 to 5 Freezing
Sausage (Smoked) ...................... 7 not recom-
Sausage (Dry & Semi-Dry) ....... 14 lo 2 ! mended
Cooked Meats
Cooked Meals and
Meat Dishes ..................... 3 to 4 2 to 3
Gravy & Meat Broth ............... 1 to 2 2 to 3
Fresh Poultry
Chicken & Turkey (Whole) ....... I to 2 12
Chicken (Pieces) ...................... 1 to 2 9
Turkey (Pieces) ........................... 1to 2 6
Duck & Goose (Whole) .............. 1to 2 6
Giblets ................................ t to 2 3
Cooked Poultry
Pieces (Covered with Broth) ...... ] lo 2 6
Pieces (Not Covered) .................. 3 to 4 1
Cooked Poultry Dishes ............ 3 lo 4 4 to 6
FriedChicken ................................. 3 lo 4 4
(Other' than for' meats & poultry} FREEZER
Most fruitsand vegetables ......................... 8-12 months
Leon fish ................................................... 6-8 months
Fatty fish, rolls and breads,
soups, stew, casseroles ....................... 2-3 months
Cakes, pies, sandwiches,
leftovers (cooked),
Ice cream (original carton) .................. 1 month max.
Meats, fish and poultry purchased from the store
vary in quality and age; consequently, safe storage
times in your refrigerator will vary.. For meat and poultry
information, call the U.S. Dept.. of Agriculture at 800-
535-4555.
New techniques are constantly being developed
Consult the College or County Extension Service or
your local Utility Company for the latest information
on freezing and storing foods.
REFRIGERATOR FREEZER
AT AT
35 ° to 40°F. O°F.
(2° to 4°c.) (-18°c.)
Fresh Food Storage Tips
To store unfrozen meats, fish and poultry:
- Always remove store wrappings.
- Rewrap in foil, film or wax paper' and refrigerate
immediately..
To store cheese, wrap well with wax paper or
aluminum foil, or put in a plastic bag
• Carefully wrap to expel air and help prevent mold.
- Pre_packaged cheese can be stored in its own
wrapping
To store vegetables, use the vegetable drawers-
they've been designed to preserve the natural
moisture and freshness of produce
• Covering vegetables with a moist towel helps
maintain crispness_
"As a further aid to freshness, pre-packaged
vegetables can be stored in their originaf wrapping.
Tips on Freezing Foods
1. Freeze only top-quality foods. Freezing retains
quality and flavor; itcannot improve quality.
2. Freeze fruits and vegetables quickly after
picking. The sooner you do, the better the frozen
product will be, with less culling and sorting to do
3. Use food wraps designed especially for freezing.
To freeze meat, fish and poultry, wrap well in
freezer_weight foil (or other heavy-duty wrapping
material) forming it carefully to the shape of the
contents_.Thisexpels air. Fold and crimp ends of
the package to provide a good, lasting seal..
Don't refreeze meat that has completely thawed;
meat, whether raw or cooked, can be frozen
successfully only once.
Limit freezing of fresh (unfrozen) meats or seafoods to 12
pounds (5 kg) ata time..
To store ice cream-Fine-quality ice cream, with
high cream content, will normally require slightly
lower temperatures than more "airy" already-
packaged brands with low cream content.
* Experiment to determine the freezer compartment
location and temperature control setting to keep
your ice cream at the right serving temperature.
. The rear of the freezer compartment isslightly colder
than the front,
For Convenience._
• Store like things together. This saves both time and
electricity because you can find foods faster
4
Shelves
• Place the oldest items up front so they can be used up
promptly
" Use door shelves for most often useclitems
To save money in energy and food costs,
• Cover moist foods with tight lids,plastic film or foil
• Leaf vegetables and fruits placed in drawers will last
longer when stored in closed plastic containers or
wrapped in plastic film_
• Do not overload your fresh food or freezer
compartment with a lot of warm food at once
"Open the doors the fewest times possible to save
electrical energy.
• When going out of town for several days, leave
as few perishables as possible in the refrigerator. If your
refrigerator has an icemaker, move the icemaker feeler
arm to the STOP (up) position and shut off water to the
refrigerator.
Adjustable Shelves
Shelf supports at various levels enable you to reposition
the shelves from time to time to better accommodate your
variable inventory of refrigerated foods
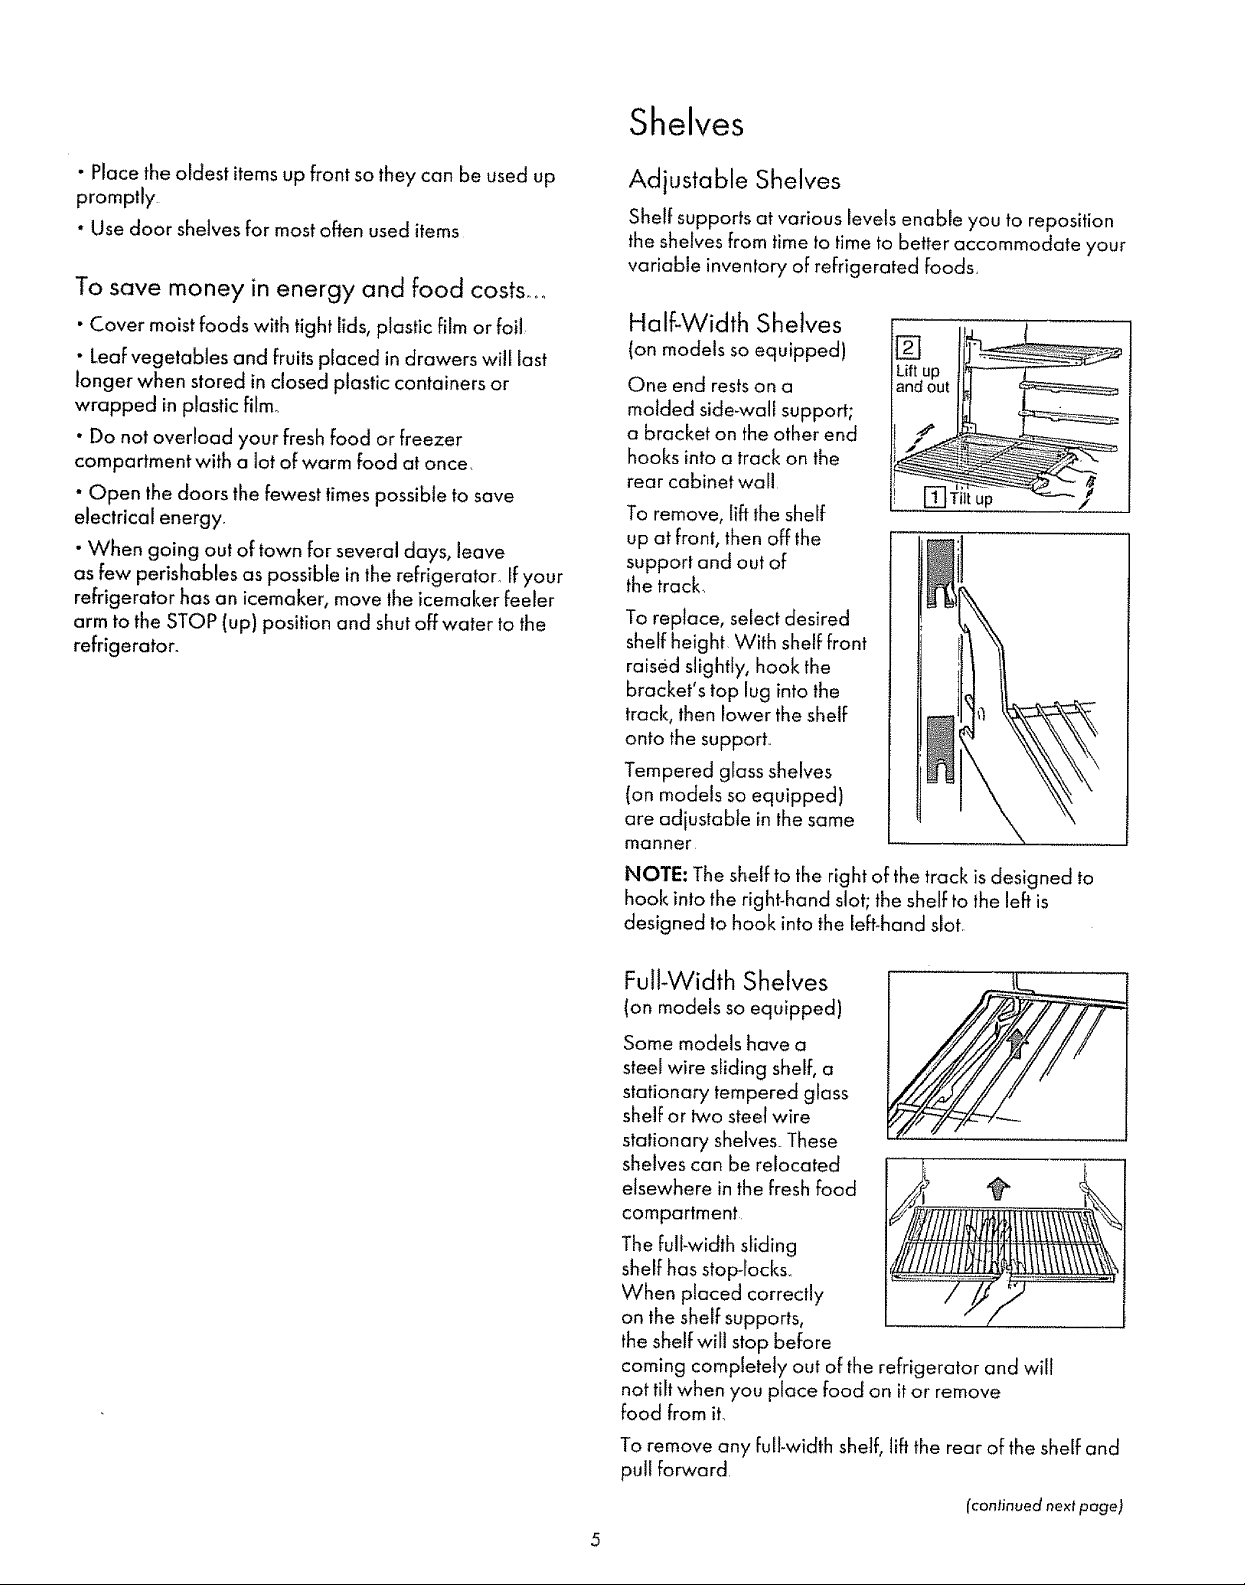
Half-Width Shelves
(on models so equipped)
One end restson a
molded side-wall support;
a bracket on the other end
hooks into a track on the
rear cabinet wall
To remove, lift the shelf
up at front, then off the
support and out of
the track,
To replace, select desired
shelf height With shelf front
raised slightly, hook the
bracket's top lug into the
track, then lower the shelf
onto the support
Tempered glass shelves
(on models so equipped)
are adjustable in the same
manner.
%
Lift
and
Tilt up
NOTE: The shelf to the right of the track is designed to
hook into the right-hand slot; the shelf to the left is
designed to hook into the left-hand slot
Full-Width Shelves
(on models so equipped)
Some models have a
steel wire sliding shelf, a
stationary tempered glass
shelf or two steel wire
stationary shelves These
shelves can be relocated
elsewhere in the Freshfood
compartment
The full-width sliding
shelf has stop-locks.
When placed correctly
on the shelf supports,
the shelf will stop before
coming completely out of the refrigerator and wil!
not tilt when you place hod on it or remove
food from it.
To remove any Full-width shelf, lift the rear of the shelf and
pull forward
(continued next page)
Shelves(continued)
Storage Drawers
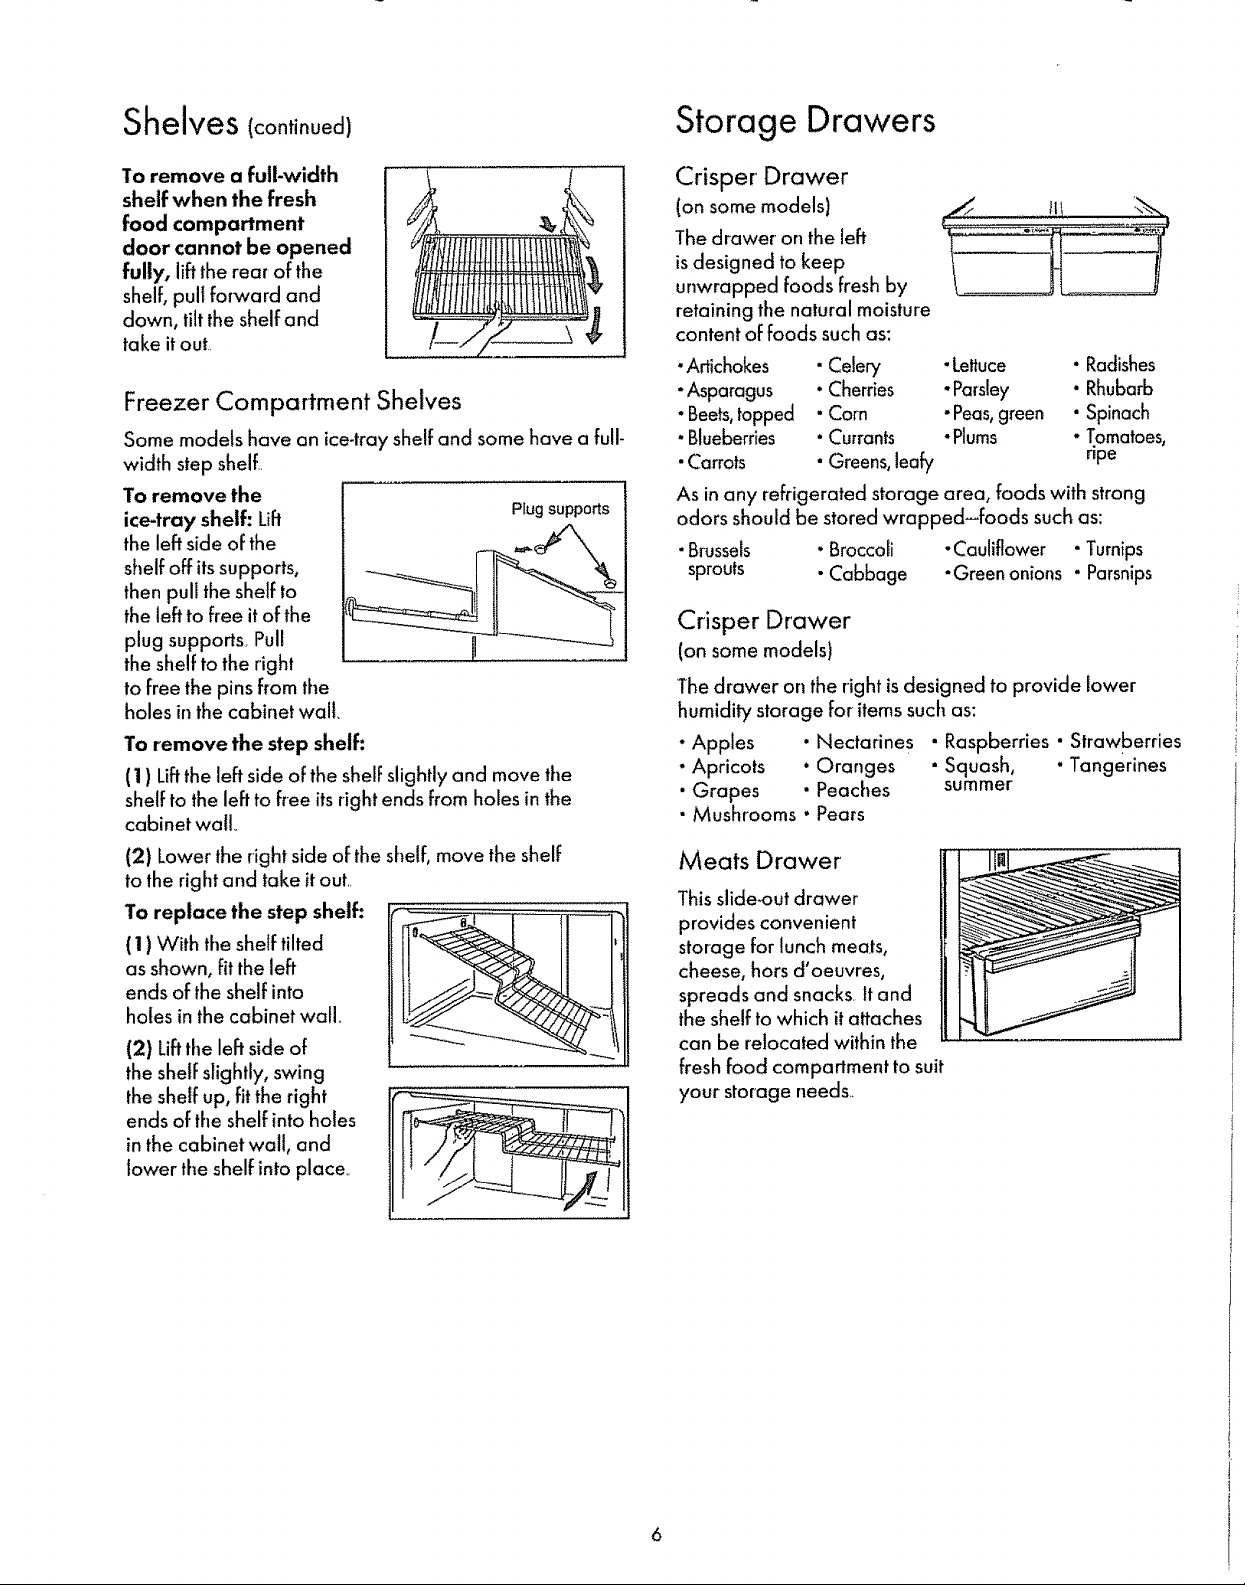
To remove a full-width
shelf when the fresh
food compartment
door cannot be opened
fully, liftthe rear of the
shelf, pult forward and
down, tiltthe shelf and
take it out
Freezer Compartment Shelves
Some models have an ice-tray shelf and some have a full-
width step shelf
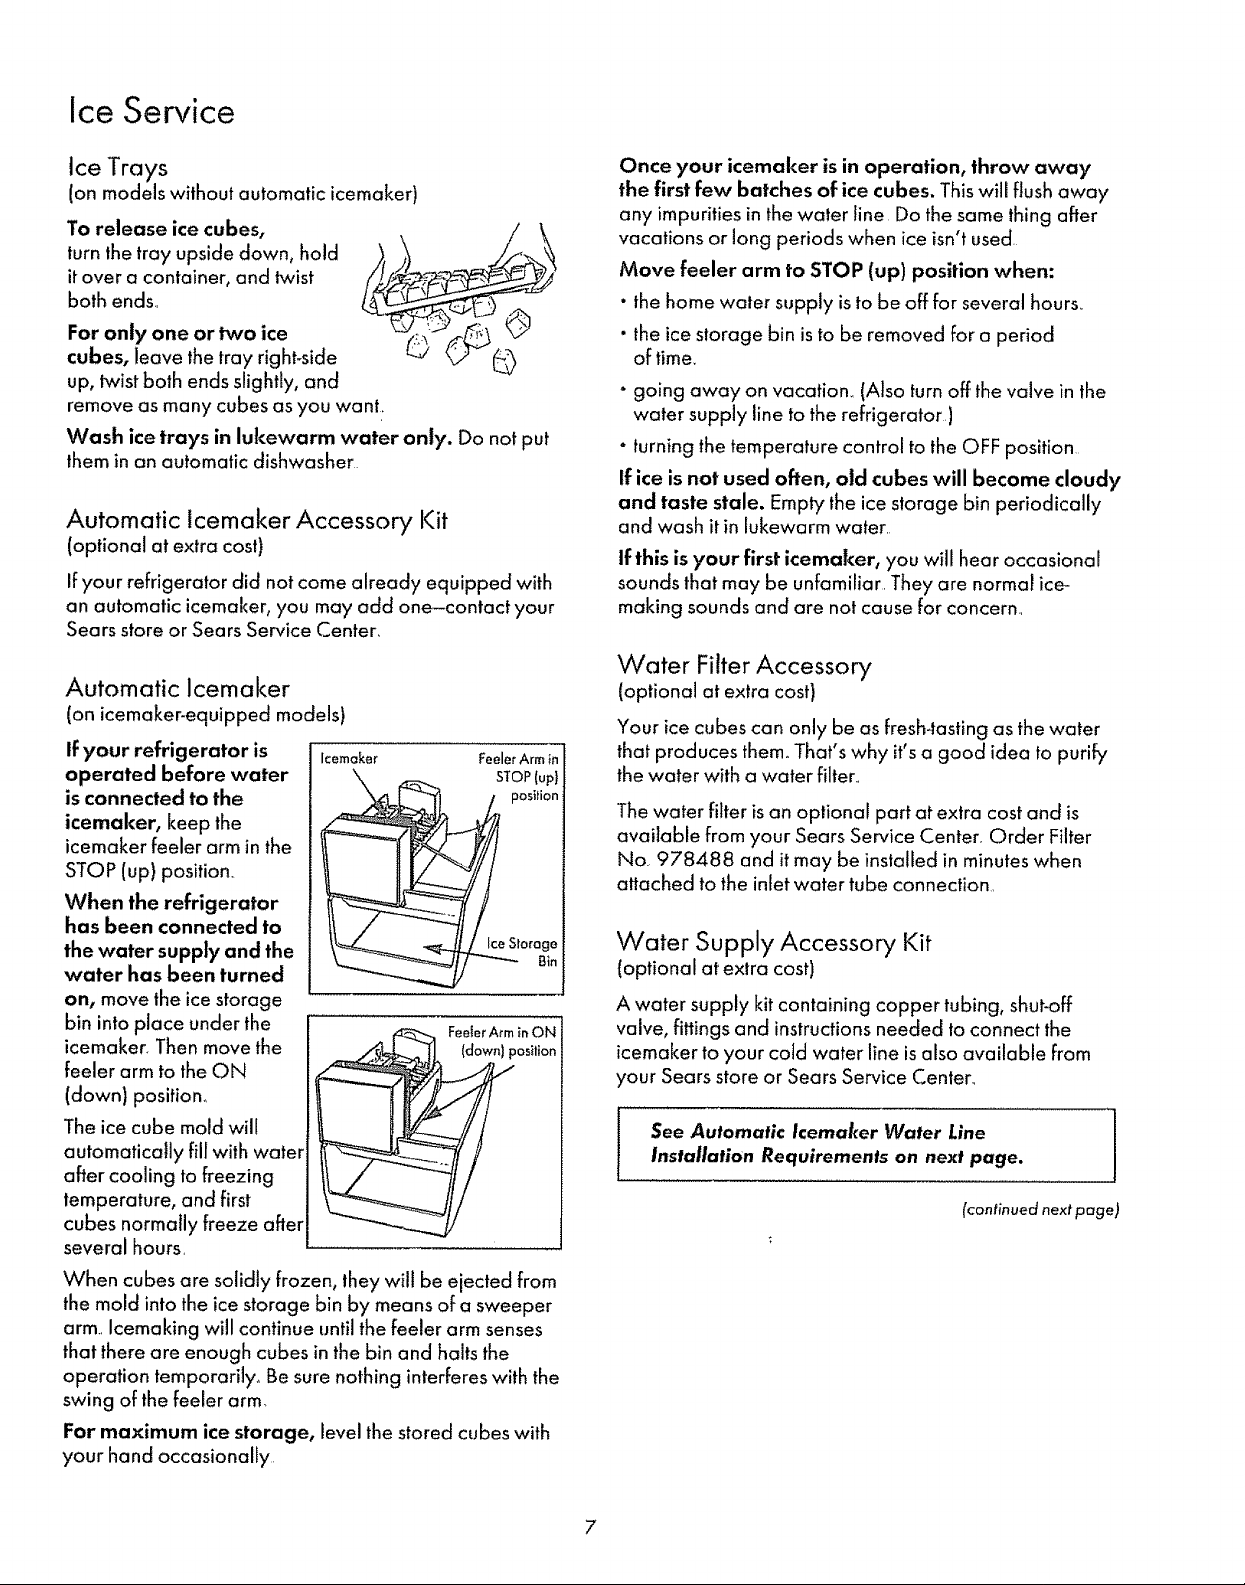
To remove the
ice-tray shelf: Lift Plugsupports
the left side of the
shelf off itssupports,
then pull the shelf to
the left to free it of the
plug supports Pull !
the shelf to the right
to free the pins from the
holes in the cabinet wail,
To remove the step shelf:
(1) Liftthe left side of the shelf slightly and move the
shelf to the left to free its right ends from holes in the
cabinet wall
(2) Lower the right side of the shelf, move the shelf
to the right and take it out
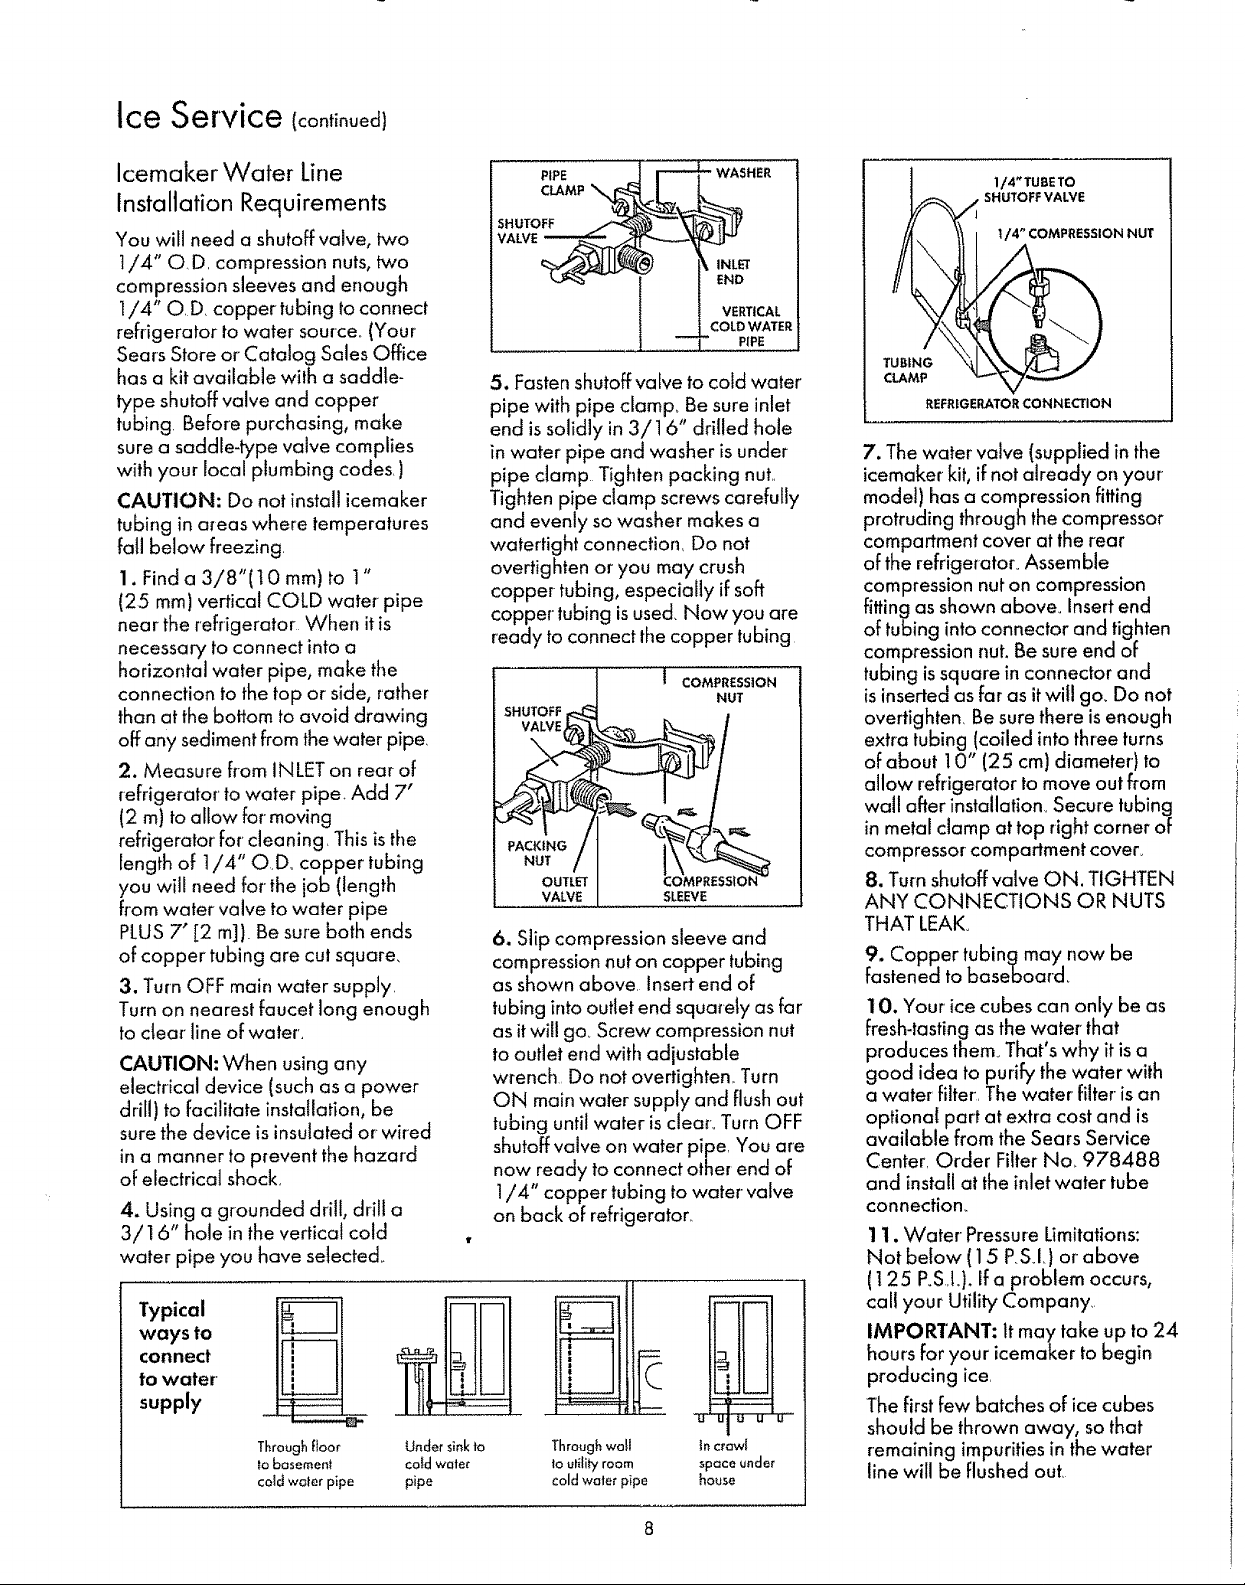
To replace the step shelf:
( 1) With the shelf tilted
as shown, fit the left
ends of the shelf into
holes in the cabinet wall
(2) Liftthe left side of
the shelf slightly, swing
the shelf up, fit the right
ends of the shelf into holes
in the cabinet wall, and
lower the shelf into place,
Crisper' Drawer
(on some models)
The drawer on the left
is designed to keep
unwrapped foods fresh by
retaining the natural moisture
content of foods such as:
•Artichokes • Celery • Lettuce • Radishes
- Asparagus • Cherries - Parsley • Rhubarb
. Beets,topped • Corn - Peas,green • Spinach
"Blueberries • Currants . Plums " Tomatoes,
•Carrots • Greens,leafy npe
As in any refrigerated storage area, foods with strong
odors should be stored wrapped-foods such as:
-Brussels . Broccoli -Cauliflower •Turnips
sprouts • Cabbage -Green onions "Parsnips
Crisper Drawer
(on some models)
The drawer on the right isdesigned to provide lower
humidity storage for items such as:
• Apples • Nectarines • Raspberries • Strawberries
- Apricots • Oranges • Squash, "Tangerines
• Grapes • Peaches summer
• Mushrooms • Pears
Meats Drawer
This slide-out drawer
provides convenient
storage for lunch meats,
cheese, hors d'oeuvres,
spreads and snacks tt and
the shelf to which it attaches
can be relocated within the
fresh food compartment to suit
your storage needs
I
6
Ice Service
Ice Trays
(on models without automatic icemaker)
To release ice cubes,
turnthe tray upside down, hold
it over a container, and twist
both ends
For only one or two ice
cubes, leave the tray right-side
up, twistboth ends slightly, and
remove as many cubes as you wanL
Wash ice trays in lukewarm water only. Do not put
them in on automatic dishwasher
Automatic lcemaker Accessory Kit
(optional at extra cost)
If your refrigerator did not come already equipped with
an automatic icemaker, you may add one-contact your
Sears store or Sears Service Center,
Automatic Icemaker
(on icemaker-equipped models)
if your refrigerator is
operated before water
is connected to the
icemaker, keep the
icemaker feeler arm in the
STOP (up) position
When the refrigerator
has been connected to
the water supply and the
water has been turned
on, move the ice storage
bin into place under the
icemaker Then move the
feeler arm to the ON
(down) position°
The ice cube mold will
automatically fill with water
after cooling to freezing
temperature, and first
cubes normally freeze after
several hours,
Jcemoker FeelerArm in
STOP(up}
position
Ice Storoge
FeelerA_rninON
(down) position
8in
Once your icemaker isin operation, throw away
the first few batches of ice cubes. This will flush away
any impurities in the water line Do the same thing after
vacations or long periods when ice isn't used
Move feeler arm to STOP (up) position when:
• the home water supply isto be off for several hours
• the ice storage bin isto be removed for a period
of time
- going away on vacation (Also turn off the valve in the
water supply line to the refrigerator )
- turning the temperature control to the OFF position
If ice is not used often, old cubes will become cloudy
and taste stale. Empty the ice storage bin periodically
and wash it in lukewarm water
If this is your first icemaker, you will hear occasional
sounds that may be unfamiliar They are normal ice-
making sounds and are not cause for concern
Water Filter Accessory
(optional at extra cost)
Your ice cubes can only be as fresh-tasting as the water
that produces them°That's why it'sa good idea to purify
the water with a water filter
The water filter is an optional part at extra cost and is
available from your Sears Service Center Order Filter
No 978488 and it may be installed in minutes when
attached to the inlet water tube connection
Water Supply Accessory Kit
(optional at extra cost)
A water supply kit containing copper tubing, shut-off
valve, fittings and instructions needed to connect the
icemaker to your cold water line isalso available from
your Sears store or Sears Service Centen
i See Automatic Icemaker Water LineInstallation Requirements on next page.
(continued next page)
I
When cubes are solidly frozen, they will be ejected from
the mold intothe ice storage bin by means of a sweeper
arm Icemaking will continue until the feeler arm senses
that there are enough cubes in the bin and halts the
operation temporarily_ Be sure nothing interferes with the
swing of the feeler arm,
For maximum ice storage, level the stored cubes with
your hand occasionally
7
Ice Service (continued)
icemaker Water Line
Installation Requirements
You will need a shutoff valve, two
1/4" O.D. compression nuts, two
compression sleeves and enough
1/4" O.D copper tubing to connect
refrigerator to water source. (Your
Sears Store or Catalog Sales Office
has a kit available with a saddle-
type shutoff valve and copper
tubing. Before purchasing, make
sure a saddle-type valve complies
with your local plumbing codes. )
CAUTION: Do not install icemaker
tubing in areas where temperatures
fall below freezing.
1. Find a 3/8"(t 0 mm) to 1"
(25 mm) vertical COLD water pipe
near the refrigerator When it is
necessary to connect into a
horizontal water pipe, make the
connection to the top or side, rather
than at the bottom to avoid drawing
off any sediment from the water pipe_
2. Measure from INLET on rear of
refrigerator to water pipe. Add 7'
(2 m) to allow for moving
refrigerator' for cleaning. This is the
length of 1/4" OD., copper tubing
you will need for the job (length
from water valve to water pipe
PLUS7" [2 m]). Be sure both ends
of copper tubing are cut square,
3. Turn OFF main water supply.
Turn on nearest faucet long enough
to clear line of water',
CAUTION: When using any
electrical device (such as a power
drill) to facilitate installation, be
sure the device is insulated or wired
in a manner to prevent the hazard
of electrical shock.
4. Using a grounded drill, drill a
3/16" hole in the vertical cold
water pipe you have selected._
Typical
ways to
connect
to water
supply
Throughfloor Under sinkto Throughwall tnc_awi
to basement co_d water to utility room space under
cold woler pipe pipe cold water pipe house
PIPE
CLAMP\
SHUTOFF
VALVE
VERTICAL
COLDWATER
t PIPE ..
5. Fasten shutoff valve to cold water
pipe with pipe clamp° Be sure inlet
end is solidly in 3/16" drilled hole
in water pipe and washer is under
pipe damp Tighten packing nut.
Tighten pipe clamp screws carefully
and evenly so washer makes a
watertight connection, Do not
overtighten or you may crush
copper tubing, especially if soft
copper tubing isused Nov,, you are
ready to connect the copper tubing
i COMPRESSION
SHUTOFF F::_
NUT
:2
PACK_NGNuT/
OUTLET
VALVE
SLEEVE
6. Slip compression sleeve and
compression nut on copper tubing
as shown above. Insert end of
tubing into outlet end squarely as far
as itwill go_ Screw compression nut
to outlet end with adjustable
wrench. Do not overtighten.. Turn
ON main water supply and flushout
tubing until water is clear.. Turn OFF
shutoff valve on water pipe You are
now ready to connect other end of
1/4" copper tubing to water valve
on back of refrigerator_
u ulu u u
1/4"TUBE TO
/ SHUTOFF VALVE
1/4" COMPRESSION NUT
TUBING
CLAMP
REFRIGERATORCONNECTION
7. The water valve (supplied in the
icemaker kit, if not already on your
model) has a compression fitting
protruding through the compressor
compartment cover at the rear
of the refrigerator_ Assem ble
compression nut on compression
fitting as shown above_ insert end
of tubing into connector and tighten
compression nut, Be sure end of
tubing issquare in connector and
isinserted as far as it will go_ Do not
overtighten Be sure there is enough
extra tubing (coiled into three turns
of about 10" (25 cm) diameter)to
allow refrigerator to move out from
wall after installation Secure tubing
in metal clamp at top right corner of
compressor compartment cover_
8, Turn shutoff valve ON. TIGHTEN
ANY CONNECTIONS OR NUTS
THAT LEAK°
9. Copper tubingmay now be
fastened to baseboard_
10. Your ice cubes can only be as
fresh-tasting as the water' that
produces them That's why it is a
good idea to purify the water with
a water filter, The water filter is an
optional part at extra cost and is
available from the Sears Service
Center, Order Filter No, 978488
and install at the inlet water tube
connection,
11. Water Pressure Limitations:
Not below (15 P.SI_) or above
(125 PoS,I.).If a problem occurs,
call your Utility Company,
IMPORTANT: it maytake up to 24
hours Foryour icemaker to begin
producing ice.
The first few batches of ice cubes
should be thrown away, so that
remaining impuritiesin the water
line will be flushedout.

Features
FLEXIBLE ICE CUBE TRAYS
Twist both ends of these trays and
ice cubes empty into a container
or cubes can be lifted out one by
one. Available only on models
without an automatic icemaker
AUTOMATIC ICEMAKER
OR PROVISION FOR
If your refrigerator has an
automatic icemaker0 see
page 7 for operating
instructions If not, you
may add one_ An automatic
icemaker accessory kit is
available from your Sears
store or Sears Service Center_
USE AND CARE LABEL
Information you'll want to
know is right on the
refrigerator, including
everyday care
TEMPERATURE CONTROL
Set control at "5." It may need
adjusting later. See page 3.
FREEZER CONVENIENCE
SHELVES
Some models have an ice tray
shelf that holds trays up, out of
lhe way. Some have a tower-
level shelf to the right of the ice
tray shelf, and others
have a fulbwidth step shelf
for extra storage flexibility.
UTILITY BIN
Dual-usage bin holds two
dozen eggs in their cartons,
or stores an extra supply of
ice cubes in the freezer for
special occasions.
DAIRY BIN
Covered compartment helps
keep butter and similar
products at the right
consistency for easy
spreading.
MODEL AND SERIAL
NUMBER LOCATION
You'll find these numbers
here. To order repair parts,
see the parts list that came
with your refrigerator, or take
these numbers to your nearest
Sears Service Center and they
will help you
MEATS DRAWER
Drawer provides convenient
storage for snacks, hors d'oeuvres,
lunch meat, bacon, cheese and
spreads
NO DEFROSTING
It is not necessary to defrost the
freezer or fresh food compartments.
Your refrigerator isdesigned and
equipped to defrost itself
automatically
CRISPER DRAWER
The right drawer is designed
_to allow higher air flow to
provide lower humidity levels
for most fruits.
- CRISPER DRAWER
The left drawer isdesigned to
maintain higher humidity levels
for unwrapped foods and most
vegetables. An adjustable humidity
control on some models lets you
regulate the amount of coid air
entering the drawer°
HANDI BIN
Door stays open while bin is
in use, provides easy access
to dairy products
SHELVES
:These shetves let you arrange-and
rearrange-the interior of your
refrigerator to meet your
eyerchanging food storage needs_
MAGNETIC DOOR GASKETS
Doors close quietly, and gaskets
seal tightly when the refrigerator is
level-see page 3_
TEXTURED STEELDOORS
Touch the textured doors; they
:won't show fingerprints
*All features not on att models
Care and Cleaning
Outside
The door handles and trim can be cleaned with a cloth
dampened with a solution of mild liquid dishwashing
detergent and water_. Dry' with a soft cloth Don't wax
handles or trim..
Keep the finish clean. Wipe with a dean cloth lightly
dampened with kitchen appliance wax or mild liquid
dishwashing detergent Dry and polish with a clean, soft
cloth_ Do not wipe the refrigerator with a soiled
dishwashing cloth or wet towel They may leave a
residue that can harm the paint° Do not use scouring
pads, powdered cleaners, bleach or cleaners containing
bleach because these products can scratch and weaken
the paint finish
Protect the paint finish. Tile outside of the refrigerator
has a high quality, boked_on paint finish._With proper
care, it will stay new-looking and rustofree Foryears_
Apply a coat of kitchen appliance wax when the
refrigerator isnew and then at least twice a year_
Inside
Clean the inside of the fresh food and freezer
compartments at least once a year. Unplug the
refrigerator before cleaning. IFthis is not practical, wring
excess moisture out of sponge or cloth when cleaning
around switches, lights or controls..
Apply an appliance wax/polish to the inside surface
between the doors
Use warm water and baking soda solution-about a
tablespoon ( 15 ml) of baking soda to a quart (I L)of
water_ This both cleans and neutralizes odors_ Rinse
thoroughly with water and wipe dry_
Other parts of the refrigerator-including door gaskets,
vegetable drawers, ice trays and all plastic parts-can be
cleaned the same way After cleaning door gaskets,
apply a thin layer of petroleum jelly to the door gaskets at
the hinge side, This helps keep the gaskets from sticking
and bending out of shape.. Do not use cleansing powders
or other abrasive cleaners,
Avoid cleaning cold glass shelves (on some models)
with hot water because the extreme temperature
difference may cause them to break.
To help prevent odors, leave an open box of baking
soda in the rear of the refrigerator, on the top shelf.
Change the box ever':,,three months, An open box of
baking soda in the freezer will absorb stale odors..
Behind Refrigerator
Be careful moving your refrigerator away from the wall.
All types of floor coverings can be damaged, particularly
cushioned coverings and those with embossed surfaces.
Turn the leveling legs counter-clockwise until the rollers
support the refrigerator_
Pull the refrigerator straight out and push it straight back-
moving it in a side direction may damage your floor
covering or refrigerator°
After rolling the refrigerator back into place, turn the legs
clockwise until the legs again bear the weight of the
refrigerator_.
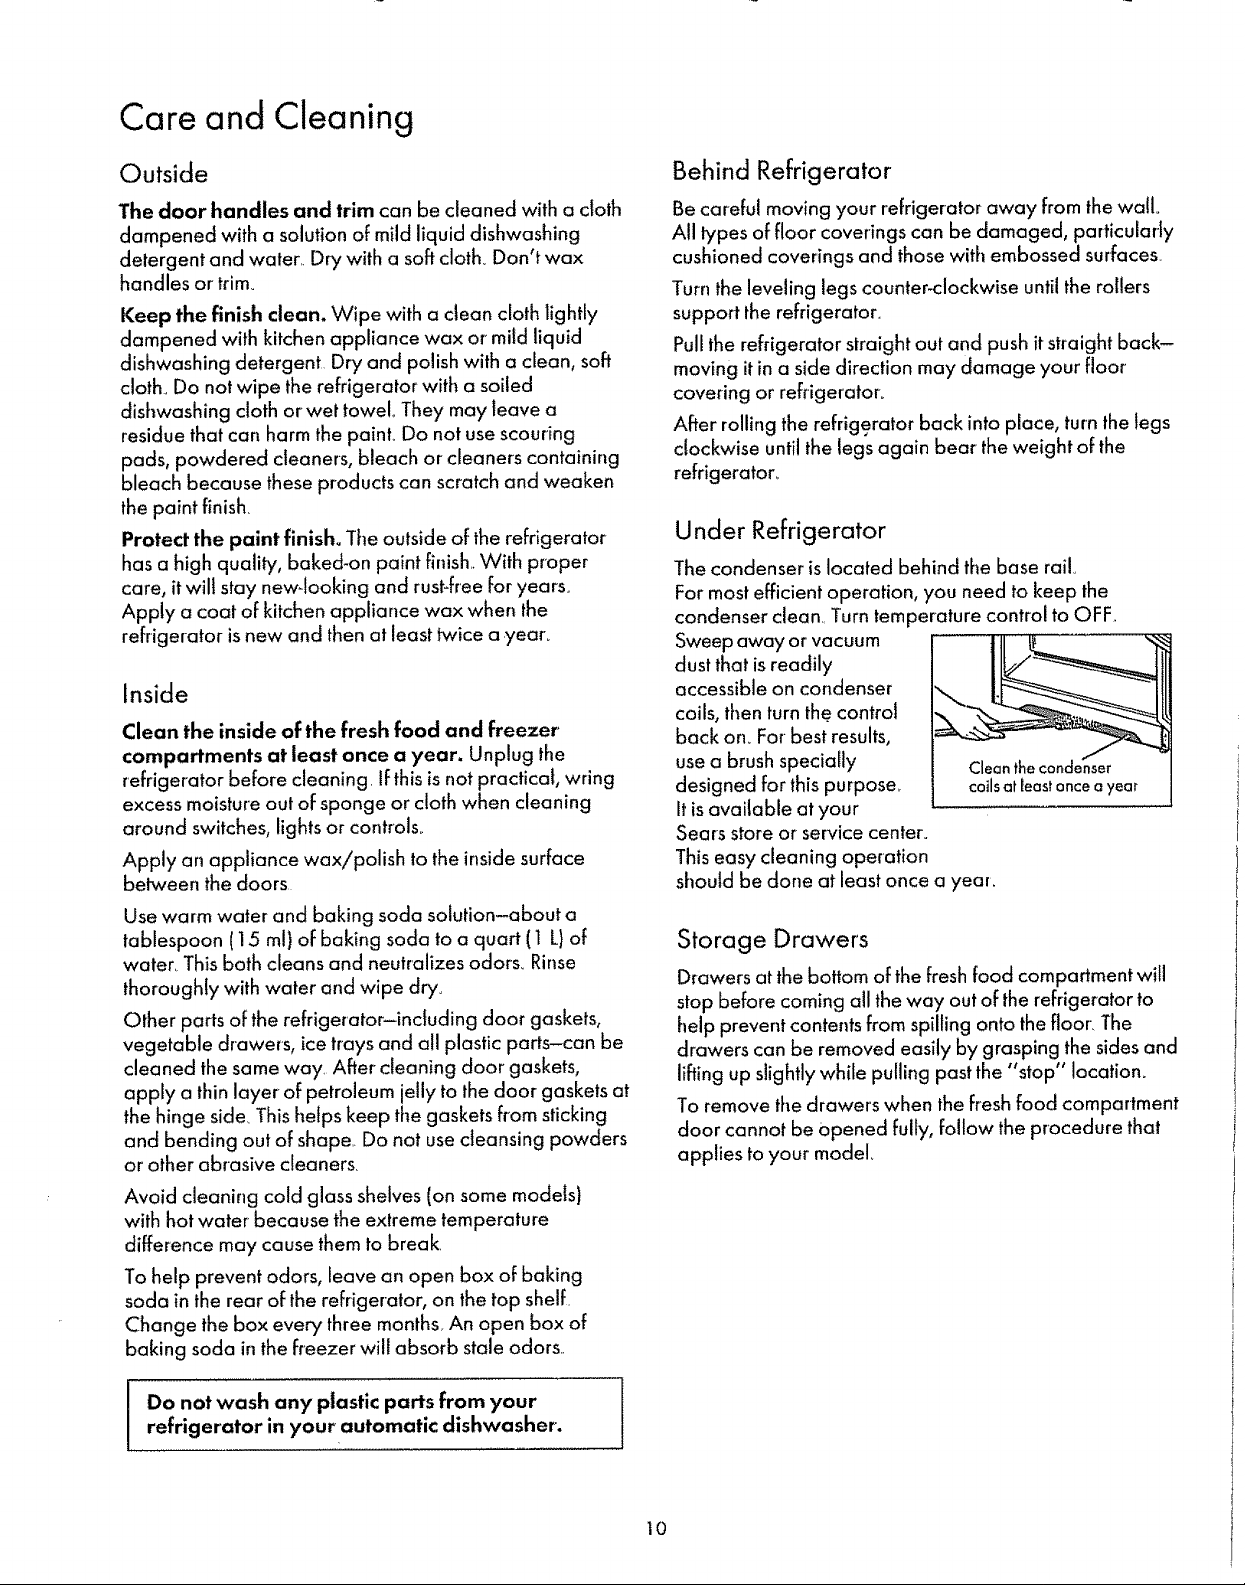
Under Refrigerator
The condenser islocated behind the base railo
For most efficient operation, you need to keep the
condenser clean._Turn temperature control to OFF.
Sweep away or vacuum
dust that is readily
accessible on condenser
coils, then turn the control
back on_ For best results,
use a brush specially
designed for this purpose_
Itis available at your
Gears store or service center.
This easy cleaning operation
should be done at leastonce a year.
Cleanthe condenser
coilsat leastoncea year
Storage Drawer's
Drawers at the bottom of the fresh food compartment will
stop before coming all the way out of the refrigerator to
help prevent contents from spilling onto the floor_ The
drawers can be removed easily by grasping the sides and
lifting up slightly while pulling past the "stop" Iocation_
To remove the drawers when the Freshfood compartment
door cannot be opened fully, follow the procedure that
applies to your model
Do not wash any plastic parts from your
refrigerator in your automatic dishwasher.
I
I0
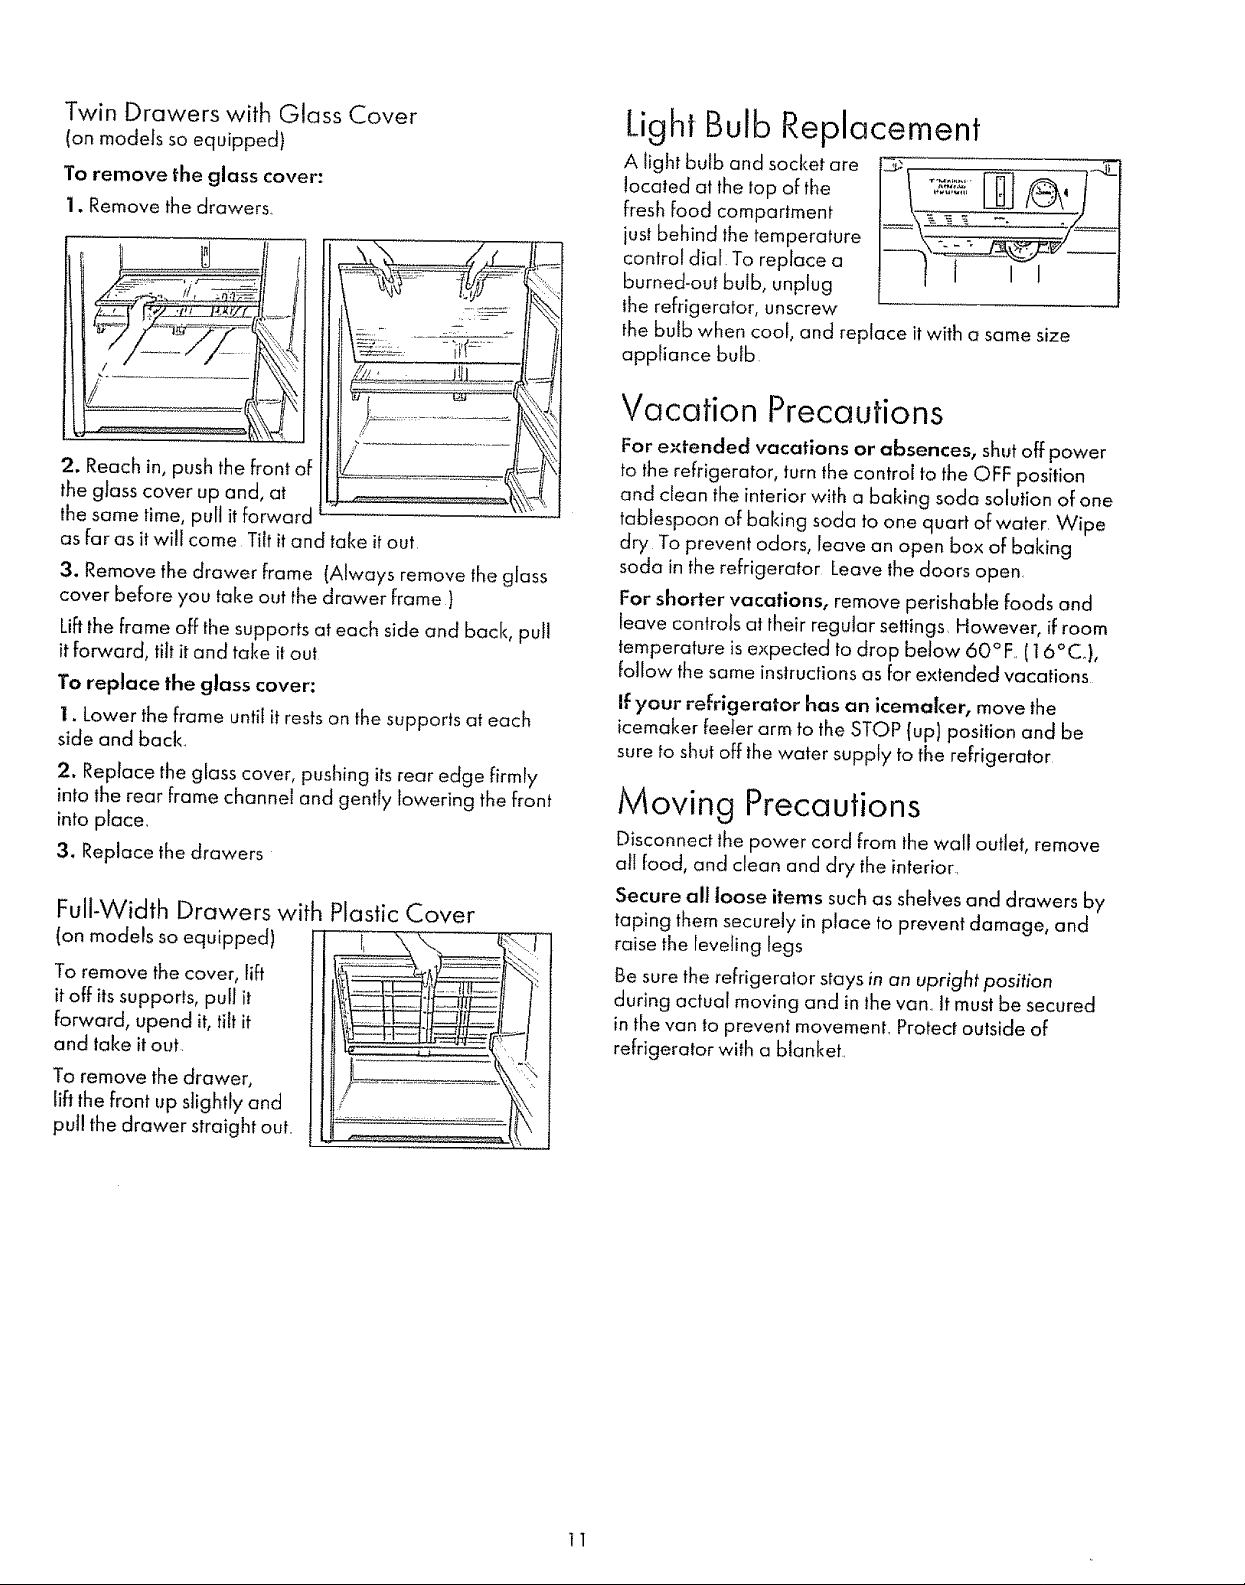
Twin Drawers with Glass Cover
(on models so equipped)
To remove the glass cover:
1. Remove the drawers_
2. Reach in, push the front of I ! _i'_i
the glass cover up and, at .... ._.............._._.._........................iv.......i_.
the same time, pull it forward
as far as itwill come Tilt it and take it out.
3. Remove the drawer frame (Always remove lhe glass
cover before you take out the drawer frame )
Liftthe frame off the supports at each side and back, pull
it forward, tilt it and take it out
To replace the glass cover:
1. Lower the frame until it rests on the supports at each
side and back..
2. Replace the glass cover, pushing its rear edge firmly
into the rear frame channel and gently lowering the front
into place..
3. Replace the drawers
Full-Width Drawers with Plastic Cover
(on models so equipped)
To remove the cover, lift
it off its supporls, putt it
forward, upend it, tilt it
and take it out..
To remove the drawer,
lift the front up slightly and
put! the drawer straight out..
Light Bulb Replacement
A light bulb and socket are
located at the top of the
fresh Food compartment
just behind the temperature
control dial To replace a
burned-out bulb, unplug
lhe refrigerator, unscrew
the bulb when coo_, and replace it with a same size
appliance bulb
Vacation Precautions
For extended vacations or absences, shut off power
to the refrigerator, turn the control to the OFF position
and clean the interior with a baking soda solution of one
tablespoon of baking soda to one quart of water. Wipe
dry To prevent odors, leave an open box of baking
soda in the refrigerator Leave the doors open.
For shorter vacations, remove perishable foods and
leave controls at their regular settings However, if room
temperature is expected to drop below 60 °F..(16°C),
follow the same instructions as for extended vacations
if your refrigerator has an icemaker, move the
icemaker feeler arm to the STOP (up) position and be
sure to shut off the water supply to the refrigerator
Moving Precautions
Disconnect the power cord from the wall outlet, remove
all food, and clean and dry the interior.
Secure all loose items such as shelves and drawers by
taping them securely in place to prevent damage, and
raise the leveling legs
Be sure the refrigerator stays in an upright position
during actual moving and in the van_ It must be secured
in the van to prevent movement. Protect outside of
refrigeralor with a blanket..
11
Before You Call for Service
Save time and money Check this listof causes of minor
operating problems you can correct yourself.
Refrigerator does not operate
" May be in defrost cycle when motor does not operate for
about 30 minutes
° Temperature control in OFF position
• If interior light is not on, refrigerator may not be plugged in
at wall outlet
° If plug is secure and refrigerator fails to operate, piug
lamp or small appliance into same outlet to determine if
there is tripped circuit breaker or burned out fuse
Motor operates for long periods
" Modern refrigerators with more storage space and a
larger freezer compartment require more operating time.
° Normal when refrigerator isfirst delivered to your home-
usual}y requires 24 hours to completely cool down
° Large amounts of food placed in refrigerator to be cooled
or frozen..
° Hot weather-frequent door openings,,
" Door left open
°Temperature control settoo cold
• Condenser needs cleaning
Motor staffs & stops frequently
"Temperature control startsand stops motor to maintain
even temperatures This isnormal
Vibration or rattling
° if refrigerator vibrates, more than likely it is not resting
solidly on the floor The front leveling legs need adiusting, or
floor isweak or uneven
"If dishesvibrate on shelves, try moving them Slight
vibration is normal
Operating sounds
"The high speed compressor motor required to maintain
near zero temperatures in the large freezer compartment
may produce higher sound levels thanyour old refrigerator
• Norma! fan air flow-one fan blows cold air through the
refrigerator and freezer compartments-another fan cools
the compressor motor
"TheseNORMAL sounds will also beheard fromtime to time:
-Defrost timer switch clicks at defrost
-Defrost water dripping
-Temperature control clicks ON or OFE
-Refrigerant boiling or gurgling
-Cracking or popping of cooling coils caused by expansion
and contraction during defrost and refrigeration following
defrost
-Ice cubes dropping into the bin and water running in pipes
asicemaker refills
Foods dry out
"Foodsnot covered, wrapped or sealed properly
Fresh food or' freezer compartment temperature
too warm
"Temperature control not set cold enough
" Warm weather-frequent door openings.
"Door leftopen for long time
• Package may be holding door open or blocking air duct in
freezer compartment
Frostor ice crystals on frozen food
"Door may have been leftajar or package holding door open
"Too frequent or too long door openings
" Frostwithin package is normal
Automatic icemaker does not work (onmodels soequipped}
" Icemaker feeler arm inSTOP (up) position.
" Water supply turned off or not connecte&
• Freezer compartment too warm
Cubes too small
"Water shutoff valve connecting refrigerator to home water
line may be clogged
Slow ice cube freezing
" Door may have been leftajar
"Turn temperature control to colder setting
Ice cubes have odor/taste
•aid cubesneed to bediscarded Emptyicebin every30 days
• Ice storage bin needs to bewashed.
• Unsealed packages in refrigerator and/or freezer
compartments may be transmitting odor/taste to ice cubes
• Interior of refrigerator needs cleaning
Moisture forms on cabinet surface between the doors
" Not unusual during periods of high humidity To help
prevent rust, wipe surface dry and reset temperaturecontrol
one setting colder'
Moisture collects inside
" Too frequent or too long door openings
• In humid weather, air carries moisture into refrigerator
when doors are opened
Refrigerator has odor
• Food with strong odors should be tightly covered
• Check for spoiled food_
• Interior needs cleaning
- Keep open box of baking soda in refrigerator; replace
every three months
Interior light does not work
• No power at outlet
• Light bulb needs replacing
t2

ReversingDoor Swing
Your refrigerator has reversible doors so the door
opening can be changed to suit your particular needs.
These instructions tell you how to change the hinges from
the right side to the left side._If you ever want to change
the hinges back to the right side, follow these same
instructions-merely reverse all references to left and right,
- Read these instructions all the way through before
you start°
- Handle parts carefully to avoid scratching painL
• Set screws down by their related parts to avoid using
them in the wrong places..
o Provide a non-scratching work surface for the doors,.
o CAUTION: Do not let either door drop to the floor.
To do so could damage the door stop..
Tools required
° T20 orT25 Torxdriver
. Masking tape
. 5/16" end wrench
• Putt'/knife or thin-bladed screwdriver (end of
too! should be covered with tape to help prevent
scratching paint)°
Removing the doors
Step 1-General
(a) Unplug refrigerator from its electrical outlet,
(b) Empty all door shelves, including handi.bin and
butter bin,,
Step 2--Removing the freezer door
(a) Tape door shut with
masking tape.,
(b) Use a 5/16" hex.head
socket screwdriver to remove
2 screws that hold the top
hinge to the cabinet.
(c) Lift hinge (and shim glued
to it) straight up to free the
hinge pin from the socket in
the top of the door and set it
aside, along with itsscrews.
(d) Remove tape, tilt door
away from cabinet and lift itto free its bottom socket from
the hinge pin on the center hinge bracket..
(If the plastic washer sticks to the door bottom, put it back
on the hinge.)
(e) Set door outside-up on a non,scratching surface.
° 5/1 6" hex-head
socket screwdriver
o Phillips screwdriver
(f) Using a Torxdriver, transfer the two screws from the
opposite side of the cabinet to the screw holes vacated
by the top hinge removal
Step 3--Removing the fresh food door
(a) Tape door shut with
masking tape,,
(b) Use a 5/16" hex-head
socket screwdriver and
5/16" end wrench to
remove the two screws
holding the center hinge
(and shim glued to it) to the
cabinet,. Liftthe center hinge
to free itspin from the socket
in the top of the door, and set
hinge and screws aside
(c) Remove tape, tilt door away from cabinet, and lift it
from the pin in the bottom hinge bracket.
(If the plastic washer sticks to the door bottom, put it back
on the hinge.)
(d) Set door outside-up on a non-scratching surface,
(e) Using a Torxdriver, transfer the two screws Fromthe
opposite side of the cabinet to the screw holes vacated
by the center hinge removal,
(f) Take one oFthe screws removed in step (b) and start it
in the outermost screw hole on the opposite side. Do not
drive it all the way down-leave enough space under the
screw head for thickness of shim and bracket
Center Hinge Bracket
Hinge
Transferring the bottom hinge
(a) Remove the base
grille if your refrigerator
has one° Grasp it at the
bottom and pull it
straight out.
(b) Using a Torxdriver,
remove the hinge (and
shim glued to it) and
plastic washer from
the bottom right side
of the cabinet°
(c) Reinstall the hinge
(and shim glued to it)
and plastic washer to
the bottom left side of
the cabinet.
-_ IHinge Plastic
i e,j /
Center// "_-.,_
Hinge"" _L_
Bracket
LEFT SIDE
RIGHT SiDE
[Pin Washer
..... i
(continued next page)
13
ReversingDoor Swing (continued)
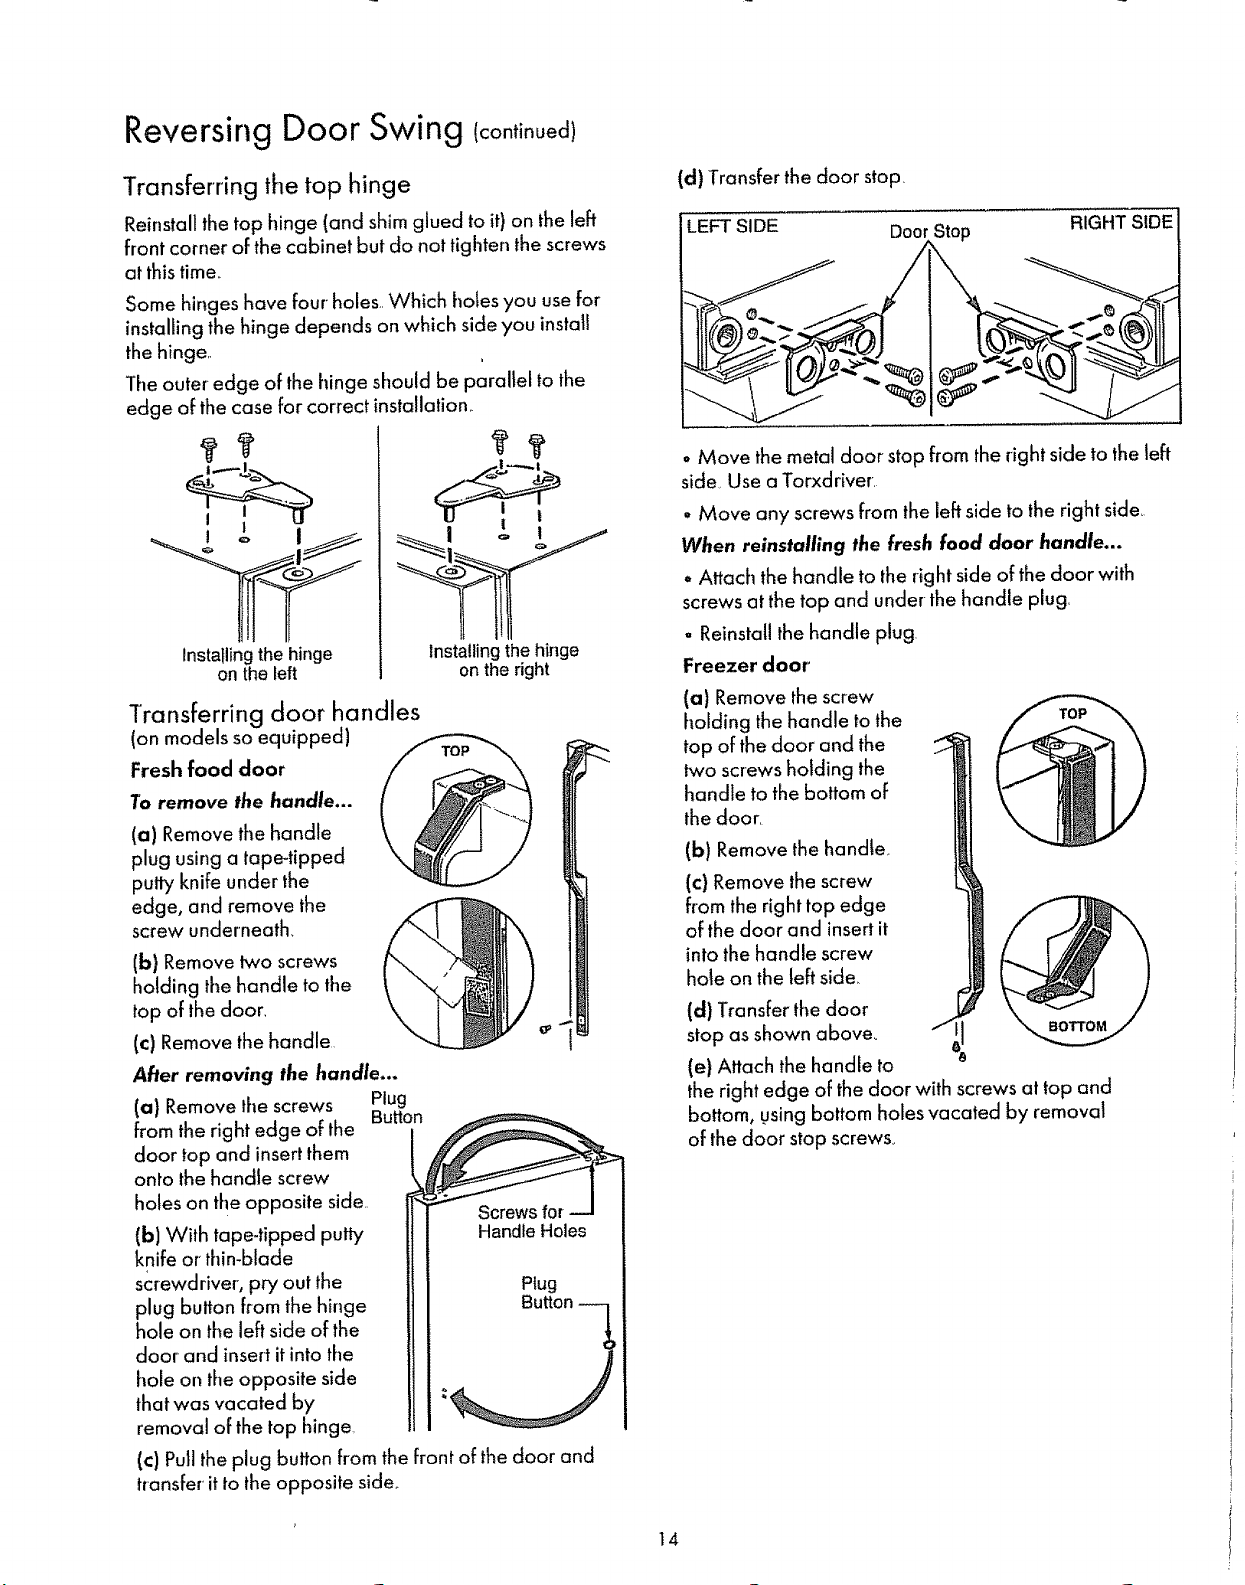
Transferring the top hinge
Reinstall the top hinge (and shim glued to it) on the left
front corner of the cabinet but do not tighten the screws
at this time_
Some hinges have four holes Which holes you use for
installing the hinge depends on which side you insta_i
the hinge,.
The outer edge of the hinge should be parallel to the
edge of the case for correct installation.
| t
installing the hinge
on the left
Installing the hinge
on the right
Transferring door handles
(on models so equipped)
Fresh food door
To remove the handle...
(a) Remove the handle
plug using a tape-tipped
putty knife under the
edge, and remove the
screw underneath,
(b) Remove lwo screws
holding the handle to the
top of the door_
(c) Remove the handle
After removing the handle...
(a) Remove the screws Plug
from the right edge of the Button
door top and insert them
onto the handle screw
holes on fi!e opposite side..
(b) With tape-tipped putty Handle Holes
knife or' thin-blade
screwdriver, pry out the Plug
plug button from the hinge Button
hole on the left side of the
door' and insertit into the
hole on the opposite side
that was vacated by
removal of the top hinge
(c) Purlthe plug button from the front of the door and
transfer it to the opposite side,
(d) Transfer the door stop
LEFT SIDE Door Stop
° Move the metal door stop from the right side to the left
side Use a Torxdriver,
• Move any screws from the left side to the right side,
When reinstalling the fresh food door handle...
° Attach the handle to the right side of the door with
screws at the top and under the handle plug,
. Reinstall the handle plug.
Freezer door
(a) Remove the screw
holding the handle to the
top of the door and the
lwo screws holding the
handle to the bottom of
the door.
(b) Remove the hand_e,
(c) Remove the screw
from the right top edge
of the door and insert it
into the handle screw
hole on the left side_
(d) Transfer the door
stop as shown above.
(e) Attach the handle to
the right edge of the door with screws at top and
bottom, using bottom holes vacated by removal
of the door stop screws.
I4
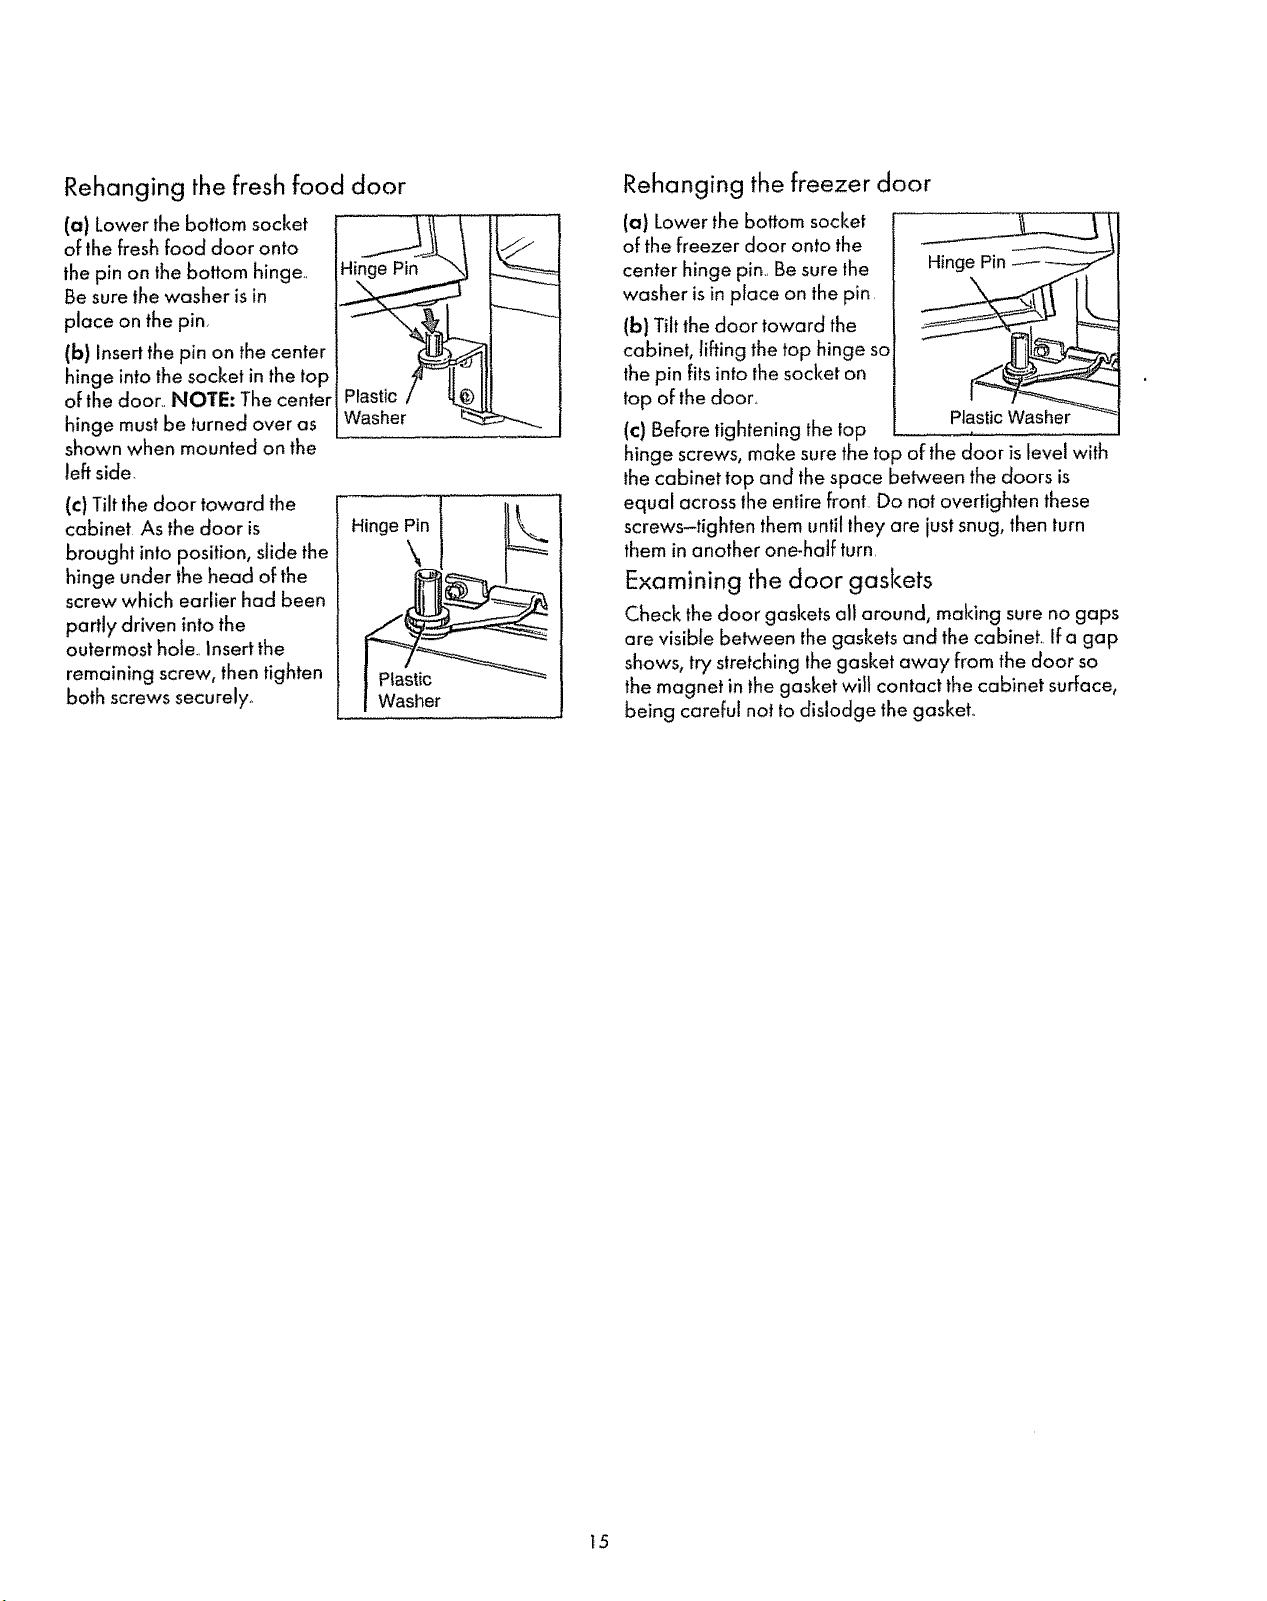
Rehanging the fresh food door
(a) Lower the bottom socket
of lhe fresh food door onto
the pin on the bottom hinge.
Be sure the washer isin
place on the pin
(b) Insertthe pin on the center
hinge into the socket in the top
of the door.. NOTE: The center
hinge must be turned over as
shown when mounted on the
left side
(c) Tilt the door toward the
cabinet As the door is
brought into position, slide the
hinge under the head of the
screw which earlier had been
partly driven into the
outermost hole., insert the
remaining screw, then tighten
both screws securely°
Washer L:_
Hinge Pin
Rehanging the freezer door
(a) Lower the bottom socket
t_
!
\
of the freezer door onto the
center hinge pin.. Be sure the
washer is in place on the pin
(b) Tilt the door toward the
cabinet, lifting the top hinge so
the pin fitsinto the socket on
top of the door._
(c) Before tightening the top
hinge screws, make sure the top of thedoor iSlevel with
the cabinet top and the space between the doors is
equal across the entire front Do not overtighten these
screws-tighten them until they are just snug, then turn
them in another one-half turn.
Examining the door gaskets
Check the door gaskets all around, making sure no gaps
are visible between the gaskets and the cabineL Ifa gap
shows, try stretching the gasket away from the door so
the magnet in the gasket will contact the cabinet surface,
being careful not to dislodge the gaskeL
15

t6

Table des mati res
° Mesures de s6curit_ ................................ t 8
° Mise 6 la terre ............................................ 18, 19
'_Mise en marche du r_kig_rateur .......................... 19
° R6glage des commandes ............................... 19
° Conservation des aliments ............................... 20, 21
o Clayettes ........................................................ 21,22
• Bac 6 aliments .................................................. 22
° N_cessaire 6 glagons ........................................23, 24
° Caract_ristiques ...................................................... 25
° Entretien et nettoyage ...................................... 26, 27
° Vacances et cl6m_nagement ................................. 27
oAvant d'appeler un r6paraTeur ..............................28, 29
" Inversion de I'ouverture des portes ............... 30-32
° Garantie ...................................................................... 33
Votre ancien r_frig_rateur a un syst_me de refroidissement
qui a utilis_ les CFC (chJorofluorocarbones)_ Les CFC sont
jug,s nocifs pour I'ozone stratosph_rique
Si vous vous d6barrassez de votre ancien r_;frig_rateur,
assurez-vous que le frigorig_ne avec CFC soit enlev_
correctement par un technicien qualifi_o Si vous lib_rez
intentionnellement ce frigorig_ne avec CFC vous pouvez
_tre soumis aux contraventions et 6 l'emprisonnement sous
provisions du Clean Air Act f_d6ral
Veuillez inscrire ci-dessous le num6ro de mod_b, Jenum6ro de s6rie et la date d'achat de votre r6frig6rateur Kenmore
Pour conna'_treI'emplacement des num_ros de module el de s6rie, reportez-vous 6 la page 25.
Num_ro de mod_fe Num6ro de s_rie Date d'acha!
SEARS,ROEBUCK AND CO., Hoffman Estates, IL 60179 USA
ModUles sans givre 6 compartiment
sup_rieur de 14 et 16 pleds cubiques
17

MESURES DE SECURITEIMPORTANTES
Veui_ez iire routes nes directives csvant
d'ufffiser J'appareik
MtSE EN GARDE--Lorsque vous utiiisez cet
_lectrom_nager, observez toujours ]es mesures de
s6curit_ de base, notamment les suivantes :
• N'utilisez cet appareil que pour I'usage auquel il
est destin_, comme expliqu_ dans ie present Guide
d'utilisation_
, Avant d'utiliser votre r_frig_rateur, assurez-vous
qu'ii a _t_ ad_quatement installS, conform_ment
aux directives d'installation. Voir les directives de mise
la terre dans ie present Guide,
- Ne d_branchez jamais le r_frig_rateur en tirant sur
le cordon d'alimentation. Saisissez fermement la fiche
du cordon et tirez-la bien droit de la prise de courant
• R_parez ou remplacez imm_diatement tout
cordon d'alimentation effiloch_ ou endommag_.
N'utilisez pas un cordon dont !'isotantest fendflt_ ou
montre des signes d'usure.
• Lorsque vous d_placez votre r6frig_rateur, faites
attention de ne paste faire rouler sur le cordon
d'alimentation afin de ne pas I'endommager.
• Lorsque le r6frig_rateur est en marche, ne touchez
pas aux surfaces froides, surtout sivous avez les
mains humides. La peau risque d'adh6rer _ ces surfaces
"Si votre r&frig_rateur est dot_ d'une machine
gla_:ons automatique, ne mettez pastes dolgts
dans le m_canisme de la machine pendant que
le r_frig_rateur est branch,. Vous risquez de vous
blesser et de bioquer lespi_ces mobiles du m_canisme
d'_jection ou de toucher 6 l'_l_ment chauffant qui
d_moule les glacons_
• Ne rangez pas ou n'utilisez pas d'essence ou
autres vapeurs ou liquides inflammables
proximit_ de votre r_frig_rateur ou de tout autre
@lectrom_nager'.
- Ne faites pas recongeler des aliments surgel_squi
ont compl_tement d_gel_. Leminist_re de i'Agriculture
des Etats-Unis affirme dans le n° 69 du p_riodique Home
and Garden Bulletin :
_cVouspouvez recongeier des aliments partiellement
d_gel6s s'ils renferment encore des cristaux de glace ou
s'ils sont encore tr_s froids-moins de 40 °F. (14 °C.).)_
_La viande hach_e, la volaille ou le poisson d6gel_S dont
f'odeur ou la couleur sont suspectes ne doivent pas _tre
recongel_s ni consommes La cr_me glac_e d_congel_e
dolt _tre jet_e Si ['odeur ou la couleur d'un aliment vous
semblent anormales, jetez-le, l! pourrait _tre dangereux
de Ie consommer_))
_M_me une d_cong_lation partiel[e, suivie d'une
recong_lation, peut alt_rer la qualit_ des aliments,
surtout celle des fruits, des l_gumes et des plats cuisines.
Lesviandes rouges sont moins sensibles _ cet effet que
la plupart des autres aliments. Veillez _ consommer les
aliments recongel_s le plus rapidement possible._
• Si vous oyez gard_ votre ancien r_frig_rateur et
que vous ne vous en servez pas, oyez soin d'enlever
les portes, afin de r_duire les risques pour les enfants.
"Ne laissez pas les enfants grimper, s'asseoir ou
monter sur tes clayettes du r_frig_rateur:, ou s'y
agripper. Ils pourraient endommager le r_frig_rateur et
se blesser s_rieusemenL
" D_branchez votre r_frig_rateur avant de le
nettoyer ou de le r_parer. REMARQUE : Nous vous
recommandons fortement de confier route r_paration 6
un technicien qualifi_
• Avant de remplacer une ampoule grill_e,
d_branchez le r_frig_rateur ou coupez I'alimentation
_Jectrique en entevant le fusible ou en d_clenchant le
disjoncteur , afin d'_viter tout contact avec le filament sous
tension de I'ampoule, (Une ampoule grill_e peut se casser
Iorsque vous Ia remplacez ) REMARQUE : Lorsque vous
r_glez la commande de temperature _ €OFF)) (_teint), vous
ne coupez pas lecourant qui alimente le circuit de la lampe.
CONSERVEZ CES DIRECTIVES
Mise 6 la terre Irnportant--Veuilieziire aftentivemen_.
Raccordement _lectrique
Pour votre s6curit_,
cet appareil dolt _tre
correctement mis _ la terre.
Le cordon d'aJimentation de cet
appareil est muni d'une fiche 6
trois broches (raise 6 la terre)
qui se branche dons une prise
muraie ordinaire 6 lroisatv6oles
r_duire au minimum les risques de chocs 61ectriques 18
!t,_ A LA TERFIE AVANT
. /;/. DE BRANCHER
mise 6 ia terre) pour
Faites examiner la prise de courant et le circuit par un
61ectricien qualifi6 pour vous assurer que la prise est
correctement raise 6 la terre
Si la prise murale est du type standard _ deux alv_oles, it
vous incombe de la faire remplacer par une prise _ trois
aJv_otes, correctement raise 6 la terre
NE COUPEZ NI RETIREZ EN AUCUN CAS LA
TROISlEME BROCHE (MISE A LA TERRE) DE LA
FICHE DU CORDON D'ALIMENTATION.

Mise en marche du r frig rateur
Utilisation d'une fiche d'adaptation
Nous vous recommandons fortement de ne pas utiliser une
fiche d'adaptation 6 cause des risques potentiels qu'elle
pr_sente dans certaines circonstances. Toutefois, si vous
dScidez d'utiliser tout de m6me une fiche d'adaptation,
vous pouvez effectuer un RACCORDEMENT
TEMPORAIRE, si les codes Iocaux le permettent, dons une
prise de courant 6 deux alv_oles ad6quatement mise _ la
terre en utilisant une fiche d'adaptation homologu_e UL,en
vente dans Ja pbpart des quincaiJieries.
La fente la plus iongue de
la fiche doit 6Ire align_e avec
la fente la pJusIongue de ia
prise murale afin d'assurer la
MI_THODETEMPORAIRE
(FICHESD'ADAPTATION NON
PERMISESAU CANADA) f____
AUGNE_LA_ROCHE !_
LARGEAVEC LA It t'_,, I I
poiarit8 appropri_e pour le
branchement du cordon
d'alimentation.
ATTENTION : Le fait de fixer
la borne de mise 6 la terre
-€_t" Vi_RtFIER LA MISE A
II LATERREETLE
i.] RACCORDEMENT
AVANT DE BRANCHER
de la fiche d'adaptation 6 la
plaque de la prise de courant n'assure pas
automatiquement la raise& la terrede l'appareil., li tout que
la vis salt en m_tal, non isotSe,et que fa prise de courant salt
mise 6 la terre par l'entremise du cSblage de la r6sidence
Faitesv_rifier tecircuit par un 61ectricienqualifi_ pour vous
assurer que la prise estad6quatement mise 6 la terre..
Lorsque vous d6branchez te cordon d'alimentatlon
de la fiche d'adaptation, saisisseztoujours la fiche d'une
main pendant que vous tirez sur la fiche du cordon
d'alimentation de I'autre. Sinon, la borne de raise 5 la terre
de Ja fiche d'adaptation risque de casser avec letemps_
Sila borne de raise _ ia terre de la fiche casse,
N'UTILISEZ PAS l'appareil tant qu'une raise _ la
terre ad6quate n'aura pas 8t_ rStablie.
Utilisation de cordons prolongateurs
Nous vous recommandons fortement de ne pas utiliser de
cordons prolongafeurs 5 cause des risques potentiels qu'ils
pr_sentent dans certaines conditions. Toutefois, si vous
d_cidez d'utiliser tout de mSme uncordon prolongateur, ii
estabsolument n6cessaire qu'il s'agisse d'un cordon 5 trois
fils avec raise 5 la terre pour appareils 61ectromSnagers,
homologu6 UL, pourvu d'une fiche et d'une prise raises5 la
terre de 15 amperes (minimum) et de 120 volts
Exigences 81ectriques
Le r_frig_rateur dolt toujours 6tre branch& dans sa
propre prise de courant dont la tension nominale est
identique 6 celle indiqu_e sur la plaque signal6tique
de I'appareil. Cette pr6caution est recommand_e pour
garantir un rendement optimum et _.viter une surcharge
des circuits 81ectriques de ta r_sidence, ce qui pourrait
cr6er un risque d'incendie par surchauffe des ills..
Emplacement
" lnstaJlez le r_frig6rateur sur un plancher suffisamment
solide pour supporter !'appareil lorsqu'il est plein.
- N'installez pas le r_frig_rateur dans une pi_bceog ta
temp6rature sera inf6rieure 6 60 °F. (] 6 °C.)parce qu'il
risque alors de ne pas fonctionner assez souvent pour
maintenant _ J'int_rieur la temp6rature appropri6e..
• Ne l'installez pas 6 proximit_ de volre cuisini_re, d'une
bouche de chauffage ou 6 un endroit o_silsera
directement expos_ aux rayons du soleiL
D6gagements
Pr6voyez les d_gagements suivants pour faciliter
t'installation, assurer une circulation d'air ad,_quate et
permettre les raccordements d'_.lectricit6 et de plomberie :
C6t6s .................................................................3/4 po j 19 mm)
Dessus ............................................................................1 po (25 mm)
ArriSre ........................................................................1 po (25 mm)
Roulettes/pieds de nivellement
Les pieds de nivellement, silu6s dans lescoins avant du
r6kig_rateur, sont r_gJabtes.Iis permeffent 6 I'appareil de
reposer solidement surle sol et emp6chent lesparses de
s'ouvrir lorsqu'elles sont fermSes, lisdoivent 6tre rSgl6s de
_aconque i'avant de l'appareil salt suffisamment relev8
pour que lesportes sereferment
d'elles-m6mes Iorsqu'elles sont
ouvertes 6 moitiS. Tournez lespieds
de nivellement vers la droite pour
retever le r6[rig6rateur et vers la
gauche pour l'abaissero
Les roulettes, situ_es6 c6t6 des pieds de nivellement, vous
permettent de dSplacer le r_frigSrateur pour le nettoyer_
Tournez les pieds de niveffement vers ia gauche jusqu'6 ce
que le rSffig6rateur repose maintenant suriesroulettes,
Apr_s avoir remis le r6frig_rateur en place, tournez lespieds
de nivellement vers la droite iusqu'6 ce que le r6ffigSrateur
soit de nouveau support8 par les pieds de nivellement.
Commande de temp6rature
La commande de temperature
comporle neuf r6glages en plus de
la position OFF (_teint)oLe r_glage
<¢1_ correspond 6 la temp_.rature
la plus _lev6e, tandis que _<9_>
reprSsente la temperature la plus basse..
Au d_part, r_glez la commande de temperature _ <€5>>o
Apr_s avoir utilis_ le r_frig6raleur, r_giez au besoin la
commande de temp6rature. Pourcefake, ins6rez unepiece de
monnaie dans la fenteau mifieu de la commandeet tournez le
cadran au r_glage qui r6pond le mieux 6 vos besoin. Attendez
24 heures pour permettre _ la |emp6ralure de se stabiliser
REMARQUE : Lorsque vous toumez la commande de
temp6rature _ OFF (_telnt), ie refroidissement cesse
19
dons les deux compartiments-r_frig_rateur etcong_lateur_.

Conservation des aliments
P_riodes de conservation sugg_r_es
RIEFRIG_RATION CONGI_LATION
La qualit_ des 35 _ 40 °F. 0 °F_
aliments diminue apr_s (2 _ 4 aC.) (-18 °C.)
la p_riode indiqu_e Nbre de jours Nbre de mois
Viande fra'iche
R6tis (boeuf et agneau) ............3 _ 5 ................... 6 _ 12
R6tis (porc et veau} ..................3 6 5 .................. 4 6 8
Biffecks (boeuf) ...........................3 _ 5 ........................6 _ 12
C6telettes (agneau) ..................3 6 5 ................. 6 6 9
C6telettes (porc) ........................ 3 6 5 ................. 3 _s4
Viande hach_e et _ ragogt .....1 6 2 ................... 3 _ 4
Aba_scomestibles .................. ! 6 2 ................... 3 _ 4
Saucisses(porc) ....................... 1_ 2 ................. 1 _ 2
Viande pr_par_e
Bacon ...................................... 7 ...................... t
Sagcissesfutures ........................ 7 .......................... 1/2
Jambon (entier) .................... 7 ..................... t _ 2
Jambon (demi) ..................... 3 _ 5 ..................... ! 6 2
Jambon (tranches) .........................3 ......................... 1_ 2
Pain de viande pr_par_ ........... 3 _ 5 .............. Cong_lation
Saucisson (_'um_) ....................... 7 ..................... non
Saucisson (sec etdemi-sec) ...t 4 _ 21 ........... recommand_e
Viande cuite
Viande cuite et plots 6
base de viande ................. 3 & 4 ................ 2 6 3
Sauces et bouillons ........... 1 _ 2 ................. 2 6 3
Volailte fraTche
Poulet et dinde (enliers) .............1_ 2 ..................... 12
Poutet (morceaux) ................... 1 _ 2 ..........................9
Dinde (morceaux) .................. 1 6 2 ..................... 6
Canard etoie (enllers) ..............t 6 2 ..........................6
Abaffis ..........................................1 _ 2 ....................... 3
Volaiile cuite
Marceaux (dons du bauiflonl 1 6 2 ........................ 6
Morceaux (sans bouillon) ...... 3 6 4 ..................... 1
Platsb base de
volaille cuile ........................ 3 _ 4 ..................... 4 6 6
Poulet Frit .................................. 3 6 4 ............................4
(Autres aliments) CONGELATION
Laplupart des fruitset 16gumes .............................8-t 2 mois
Poissonmaigre ....................................................... 6-8 mois
Poissongras, pains et brioches,
soupesoragoOts, casserobs .............................. 2-3 mois
G_leaux, la_tes, sandwichs,
testes (cults),
cr_me glac_e (emballage d'origine) ............ 1 mais max
La qualit_ et la frai'cheur de la viande, du poisson ou de la
volaiIle achet_s 6 I'_picerie varient; le d_lai de conservation
dons votre r_ffig_rateur varie donc en consequence
Pour d'autres renseignements sur la conservation de la
viande et de la volaitle, veuillez appeler le Minist_re de
l'Agriculture des Etats-Unis au 800-535-4555_
De nouvelles techniques sont constamment mises au
poin_ Renseignez-vous aupr_s des services d'appoint de
votre r6gion ou de votre foumisseur d'_lectricit_ pour
recevoir I'information ta plus r_cente sur la conservation
et la cong_lation des aliments_
Conseiis pour la r_frig_ration
Pour conserver de la viande, du poisson et de la
volaille non congel_s au r_frig_rateur :
. Enlevez toujours l'emballage d'origine_
- Envefoppez I'aliment dans du papier d'aluminium, du
papier cir_ ou une peflicule de plastique, puis mettez-le
imm_diatement au r_t:rig_rateur.
Pour conserver du fromage au r_frig_rateur,
enveloppez.le bien dons du papier cir_ ou du papier
d'aluminium, ou mettez-le dans un sac de plastique._
. Enveloppez-le de fa?on €_chasser le plus d'air possible
afin de pr_venir la rnoisissure.
. Vous pouvez conserver le fromage dons son
emballage d'origine_
Pour conserver les I_gumes au r_frig_rateur, placez-
les dons les bacs 6 I_gumes-ils sont sp6cialement con_:us
pour preserver I'humidit_ et la frai"cheur naturelle des
l_gumes,
• Couvrez les I_gumes d'un essuie-tout humide pour qu'ils
demeurent croquants.
- Les l_gumes pr&emball_s se c0nservent mieux dans
leur emballage d'origine.
Conseils pour la cong_lation
1. Ne congelez que des aliments de premi_bre
qualitY. La cong_lation permet de conserver la quafit_ et
la saveur, mais elle ne les am_liore pas._
2. Congelez rapidement les fruits et les i_gumes
apr_s leur cueillette. Plusils sont conget_s rapidement,
plus leur quafit_ est _lev_e, sans compter que vous
n'aurez pas 6 loire un deuxi_me trL
3. Utilisez des produits d'emballage congus
sp_cialement pour la cong_lation.
Pour congeler de la viande, du poisson et de la
volaille, emballez-les dans du papier d'aluminium pour
la cong_lation (ou tout autre mat_riau d'emballage
r_sistant) de facon que le papier 6pouse soigneusement
la forme de I'aliment pour chasser le plus d'air possible,
Repliez et scellez tes extr_mit6s de l'emballage pour
obtenir un joint herm_tique durable_
Ne recongelez jamais de la viande crue qui a
compl_tement d_gel_ Quelle soit crue ou cuite, la
viande ne peut _tre congel_e qu'une seute Fois.
Ne faites congeler que 12 livres (.5 kg) de fruits de mer
ou de viande fiats (non congel_s) 6 la lois,
2O

Clayettes
Pour conserver la cr_me glac_e--La cr6me glac_e de
qualitY, 6 forte teneur en cr_me, exige habituellement
une temp6rature plus froide que les cr6mes gtac6es
I_g6res qui renferment moins de cr6me
• Seule I'exp_rience vous permettra de conna'_tre avec
precision le r_glage de temperature et l'emplacement
dans le compartiment cong61ateur appropri_s pour
conserver la cr'eme glac6e 6 la temp6rature de service
d_sir_e_
• Latemperature est l_g6rement plus basse 6 I'arri6re du
compartiment cong61ateur qu'6 I'avanL
Pour plus de commodit_.._
• Rangez les aliments similaires ensemble_ Vous
gagnerez ainsi du temps et 6conomiserez de l'61ectricit6
car vous pourrez trouver plus facilement les aliments que
vous cherchez
- Placez tes aliments les plus _<anciens_>6 J'avant, de
fa_:on 6 lesconsommer en premier.
• Rangez dans les balconnets de porte les aliments les
plus souvent utilis6s
Pour 6conomiser de I'argent et de l'6nergie._
- Couvrez les aliments 6 forte teneur en humidit_ au
moyen d'un couvercle 6tanche, d'une pellicule de
plastique ou de papier d'aluminium,
• Les t_gumes 6 feuilles et ies fruits se conserveront plus
Iongtemps dans les bacs lorsqu'ilssont dans des
contenants de plastique _tanches ou envelopp6s dans
une pellicule de plastique
• Ne rangez pas d'un seul coup dans votre compartiment
r6frig_rateur ou cong61ateur une grande quantit6
d'aliments non r6frig_r6s,
• Ouvrez les portes le moins souvent possible afin
d'_conomiser de 1'61ectricit6
Clayettes r_glages
Lescr6maill_res 6 r_glage multiple vous permettent de
d_placer de temps 6 autre vos clayetfes en fonction de
vos besoins de rangement dans le r_frig_rateur
Demi-clayettes (surcertains modules seulement)
Une extr_mit6 de la clayette
repose sur un support moul6
dans la paroi lat6rale L'autre
extr6mit6 est pourvue d'un
crochet qui s'ins6re dans une
cr6mail!6re sur la paroi
arri6re de I'appareii_
Relever
Pour enlever la clayette,
relevez I'avant de la clayette,
puis soulevez-la et d6gagez-
la de la cr_maill6re.
Pour la remettre en place,
choisissez la hauteur d6sir_e,
En soulevant l_g6rement
I'avant de la clayette,
engagez le crochet dans la
cr6maill6re, puis abaissez la clayette jusqu'6 ce qu'elle
repose sur le support lat6ral_
Lestablettes en verre tremp6 (sur certains mod61es
seulement) s'enl6vent et s'installent de la m6me facon_
REMARQUE : Laclayette de droile est concue pour
s'installer dans la fente de droite de la cr_maill6re, tandis
que la clayette de gauche s'installe dans la fente de
gauche de la cr6mail_6re
I
i
i
!
(suite _ tapage suivante)
- Si vous devez vous absenter pendant plusieurs jours,
laissez le moins d'aliments p6rissables possible dans le
r6frig_rateur. Si votre appareil est dot_ d'une machine 6
glacons automatique, relevez le bras r_gulateur de la
machine 6 glacons 6 la position STOP (ARRL:T-relev6) et
fermez le robinet d'alimentation en eau du r6frig_rateur.
21

Clayettes (suite)
Clayettes pleine largeur
(sur certains modules seulement)
Certains modules sont dot_s
d'une clayette coulissante
m_tallique, d'une tablette fixe
en verre tremp_, ou de deux
clayettes Fixesen m_tal.
Ces clayettes peuvent 6tre
instatl_es 6 n'importe quelle
hauteur dans le compartiment
r_frig_rateur.
La dayette coutissante pleine
largeur estpourvue de buttes
Lorsqu'elle est install_e
correctement sur sessupports,
la dayette bloque pour ne
pas sortir compl_tement du
r_frig_rateur et pour ne pas basculer
Iorsque vous y placez ou en retirez des aliments.
Pour enlever la clayette pleine largeur, soulevez I'arri_re
de ta dayette, puis tirez-la vers vous_
Pour enlever une clayette
plelne largeur lorsque
vous ne pouvez ouvrir _b,
compl_tement la porte
du compartiment
r_frig_rateur, soubvez
I'arri_re de Jadayette, puis
tirez-la vers vous et vers le
bas. inclinez la clayette et
sortez-lao
Clayettes du compartirnent cong_lateur
Certains modules sont dot_s d'une clayette pour moules
6 glacons, tandis que d'autres disposent d'une dayette
d_cal_e pJeine iargeur_
Pour enlever la
clayette pour moules
glacons : soulevez le
c6t_ gauche de ta
dayette de sessupports,
puis tirez la clayette vers
la gauche pour la
d_gager des supports i..
sup_rieurs. Tirez ensuite la clayette vers ta droite pour la
d_gager de sesorifices dans la paroi lat_rale de l'appareil.
Pour enlever la clayette d_cal_e :
(1) Soulevez I_g_rement le c6t_ gauche de la dayette,
puis tirez la clayette vers la gauche pour la d_gager de
sesorifices dans la paroi de droite de !'appareil
(2) Abaissez le c6t_ droit de Ia clayette, puis tirez la
clayette vers la droite pour I'enlever_
Pour r_installer la
clayette d_cai_e :
(1) Incfinez _aclayette
comme indiqu_ dans
l'illustration. Ins_rez les
extr_mit_s de gauche de la
dayette dans les orifices de
la paroi de I'appareil_
(2) Soulevez l_g_rement
le c6t_ gauche de la clayette.
Relevez la clayette et ins_rez
I'extr_mit_ de droite de la
clayette dans les orifices de
la paroi de i'appareil_ Puis
abaissez la clayette en place
Bac aliments
Bac €_I_gurnes (surcertains modulesseulement)
Le bac de gauche est concu .. Ill .....................
fraicheur_.d_ball_spourque conserventlesVousfruitspouvezet I_gumeSleury__....._..........._ "_÷':........ ?
ranger notamment :
• Artichauts • Carottes •L_gumesverts - Petitspois
-Asperges . C_,leri _ feuiffes • Prunes
• Betteraves - Cerises .Lai|ue • Radis
(_queut_es) • Epinards •Ma'_s • Rhubarbe
. Bleuets • Groseilles •Persil •Tomates
mores
Comment darts route installation de conservation r_frig_r_e,
il est recommand_ de conserver dans leur emballage
d'origine lesaliments ayant unefoi'te odeur comme :
• BrocoJi -Choux de Bruxelles • Navets • Panais
- Choux •Choux-fleurs "Oignonsverts
Bac _ l_gumes (surcertains modulesseulement)
Le bac de droite est concu pour maintenir un degr_
d'humidit_ moins _lev_ pour la conservation de fruits et
!_gumes comme :
• Abricots • Fraises • Nectarines • Poires
• Champignons • Framboises • Oranges • Pommes
• Courges • Mandarines • P6ches "Raisins
Bac 6 viande
Ce bac coulissant est concu
pour la conservation de la
charcuterie, du fromage, des
amuse-gueule, des tartinades
et des collations. Le bac et la
clayette 6 taquelle il est fix_
peuvent 6tre places _ n'importe quelle hauteur dans fe
compartiment r_frig_rateur, en fonction de vos besoins
22

N cessaire 6 glacons
Moules 6 glacons (surlesmodules sans
machine _ glacons)
Pour d6mouler les gtacons,
tournez le moule 6 !'envers
Tenez-Je au-dessus d'un
contenant et exercez une torsion
aux deux extr6mit6s
Pour obtenlr un ou deux
glacons seulement, laissez le
moule 6 l'endroiL Exercez une 16g_re torsion aux
deux extr6mit_s, puis prenez te nombre de glacons
que vous voulez
Ne lavez les moules 6 gla_ons que dans de I'eau
ti6de seulement. Ne les lavez pas dans le lave-vaisselle
automatique
N6cessaire de machine 6 glacons
automatique (facultatif, moyennant suppl6ment)
Si votre r_ffig6rateur n'est pas d_j6 dot6 d'une machine
& gJacons automatique, vous pouvez en faire installer
une_Communiquez avec votre magasin Sears au votre
Centre de service Sears
Machine 6 glacons automatique
bur les mod61esdot6s d'une machine 6 gla.cons)
Si vous meffez votre
r_frig_rateur en marche
avant que la machine
glacons ne soit aliment_e
en eau, maintenez le bras
r6gulateur de la machine
glacons en position STOP
(ARRET-relev6).
Lorsque la conduite
d'eau est raccord_e au
r_frig_rateur et que le
roblnet de la condulte
est ouvert, placez le bac
6 glacons sous la machine
6 glacons Ensuite,
abaissez le bras r6gulateur
en position ON
(MARCHE-aBaiss6)
Le moule 6 glacons
se remplira d'eau
automatiquement Iorsqu'il
aura atteint la temp6rature de cong6Jation Les
premiers glacons sont g6n6ralement prgts au bout
de quelques heures
Machine 6 gta?on_
B_as r_gulateur en
posffion STOP
(ARRET-relev6)
_gla?ons
Bras r_gulateur en
position ON
Lorsque les gfacons sont pr_ts, ils sont 6ject6s du moule
par la racfette et tombent dans le bac 6 glacons La
production de glacons se poursuit iusqu'6 ce que le bras
r6gulateur d6tecte une accumulation suffisante de
glacons dans le bac et interrompe provisoirement le
fonctionnement de la machine Assurez_vous que rien ne
g6ne le mouvement du bras r6gutateur
Pour que le bac se remptisse compl_tement, _talez
les glacons de temps 6 autre avec votre main
Lorsque votre machine _ glacons fondionne, jetez
les premiers lots de glacons afin d'61iminer les
impuret6s qui pourraient se trouver dans la conduite
d'eau Faites-le 6galement au retour des vacances ou
Jorsque vous ne vous servez pas de la machine 6 glacons
pendant une longue p6riode
Retevez le bras r6gulateur de la machine 6 glacons
la position STOP (ARRET-relev6) Iorsque :
" l'alimentation en eau de la r_sidence dolt 6tre couple
pendant plusieurs heures;
• vous entevez le bac 6 glacons pendant quelque temps;
• vous partez en vacances (fermez 6galement le robinet
de la conduite d'eau du r6frig6rateur);
"vous tournez la commande de temp6rature 6 OFF (6teint)
Lorsque vous n'utillsez pas souvent de glacons, les
vleux gtacons perdent leur transparence et
prennent un goGt d_sagr_ableo Videz r_guli6rement
le bac & glacons et lavez-te 6 I'eau ti6de
S'il s'agit de votre premi6re machine 6 glacons, vous
entendrez parfois des bruits qui risquent de vous parai'tre
inhabituels II s'agit des Bruits normaux d'une machine 6
glacons ii n'y a donc pas lieu de vous inqui6ter_
Filtre 6 eau facultatif (moyennant suppl6ment)
La qualit_ de vos gtacons d6pend de la qualit6 de l'eau
C'est pourquoi il est conseiH6 de purifier votre eau au
moyen d'un filtre_
Lefiftre 6 eau est une pi6ce facultative que vous pouvez
vous procurer, moyennant suppl6ment, aupr6s de votre
Centre de service Sears Vous pouvez installer le filtre
n° 978488 en quelques minutes seulement au raccord
de la conduite d'eau
N_cessaire d'alimentation en eau
(facultati[, moyennant suppl6ment)
Vous pouvez vous procurer aupr6s de votre magasin Sears
ou de votre Centre de service Sears un N6cessaire
d'alimentation en eau comprenant un tuyau de cuivre, un
robinet d'arr6t, des raccords etdes directives pour raccorder
la machine 6 glacons 6 votre conduite d'eau froide
Voir 6galement la section _Exigences relatives 6
l'installation de la conduite d'eau de la machine 6
glacons_ 6 la page suivante.
23

N6cessaire glacons (suite)
Exigences relatives c_I'installation de la
conduite d'eau de la machine _ glacons
............... L.... 7,-0j 0
pIanche_6 {a froide sous 1°6vier la conduit° d'eau sonitai_esous
conduiSed'eou ffoide de la soil° (amalson
:roide du sous_so! de lavag°
Raccordements usuels _ la conduite d'eau principale
Vous aurez besoin d'un robinet d'arr6t, de deux 6crous a
compression de 1/4 po de dia. ext, de deux manchons
c_compression, et d'une longueur suffisante de tuyau de
cuivre de 1/4 po de dia_ ext..pour relier le r6ffig6rateur
la conduite d'eau_ (Vous pouvez vous procurer aupr_s
de votre magasin ou de votre bureau de vente par
catalogue Sears un ensemble comprenant un robinet
brides etun tuyau de cuivre. Avant d'en faire Vachat,
assurez-vous que I'instaltation d'un robinet _ brides est
permise par le code de plombede de votre Iocalit6,)
ATTENTION : N'instaHez pas le tuyau de la machine 6
glayons dans un endroit o0 la temp6rature descendra
sous le point de cong_alation.
1. P,ep6rez une conduite d'eau FROIDE verticafe de 3/8
po (10 ram) 6 t po (25 ram) de diam_tre _ proximit6 du
r6frig6rateur, Si vous devez raccorder le r6ffig6rateur 6
une conduite d'eau horizontale, effectuez le raccordement
sur le dessus ou le c6t6 de la conduite pour 6v!ter la chute
de s6diments en provenance de la conduite d eauo
2. Mesurez la distance entre I'ENTRI_E& l'arri,_re du
refflgerateur lusqua la condulte d eau. Alou e 7 pieds (2 m)
pour pouvoir d6placer votre r6flig6rateur pour le nettoyage,.
Cette mesure correspond 6 laIongueur de tuyau de cuiwe de
1/4 po de dia_ exL dont vous aurez besoin pour le
raccordement flongueur entre 1'61ectrovanne et la conduite
d'eau PLUS7 pieds [2 m] ).Assurez-vous que les deux
extr6mit6s du tuyau de cuivre sont coup6es 6 angle droit..
3. Fermez le robinet d'alimentation de la conduite
principale, Ouvrez le robinet le plus pros pour permettre
la conduite d'eau de se vider
ATTENTION : Lorsque vous utilisez un ap,p.areil
electrique (comme une perceuse) Iors de l installation,
assurez-vous qu'il est isol6ou branch6 de fayon 6 6viter
tout risque de chocs 61ectricues.
4./k I'aide d'une perceuse
raise 6 la terre, percez un ,,
trou de 3/1 6 po dans la ROS_N_r
conduite d'eau verticale
choisie.
5. Fixez le robinet d'arr6t
6 la conduite d'eau froide
6 l'aide d'une bride.
Assurez-vous que I'entr6e du robinet est sofidement
ins6r6e dans le trou de 3/16 po de la conduite d'eau et
qu'une rondelle a 6t6 plac6e sous la bride.
BRIDE ROND _:LUE
Serrez 1'6crou de serrage, Vissez soigneusement et
uni_orm6ment les vis de la bride pour que la rondelle
assure un raccordement 6tanche. Ne serrez pas de fayon
excessive, car vous risquez d'6craser le tuyau de cuivre,
surtout s'il s'agit d'un tuyau de cuivre mou, Vous pouvez
maintenant raccorder _etu'_au de cuivre,
6. Faites glisser le
manchon _ compression et
ROBINET _CROU
D'ARR_T _ COMPR,ESSION
1'6crou 6 compression sur
letuyau de cuivre, comme
indiquecidessus. Ins6rez
I'extr6mit6 du tuyau le plus
profond6ment possible
dans l'orifice de sortie du
robinet. Serrez 1'6crou
SORTIEDU MANCHON A
RO_,N_ COmPReSSiON
compression sur I'orifice de
sortie 6 I'aide d'une d6 5 molette_Ne serrez pas de rayon
excessive, Ouvrez le robinet de la conduite principale et
laissez couler i'eau jusqu'6 ce qu'elle soit propre Fermez fe
robinet d'arr6t de la conduite d'eau, Vous pouvez
maintenant raccorder I'autre extr6mit6 du tuyau de cuivre
de 1/4 po _ i'61ectrovanne a I'arri_re du r6frig6rateur,
7. L'61ech:ovanne (fournie
avec I'ensemble de
machine & glacons ou d6j6
CONDUITE DE I/4 PO VERS
/' LEROBINET D'ARRk_T
• I (_CROUJ_
I COMPRESSION DE
instatl6e sur voire appareil)
est dot6e d'un raccord 6
compression qui ressort du
panneau du compartiment
compresseur _ I'arri_re du
r6frig6rateur.. Installez
1'6crou _ compression sur
BR
M_TALLIQU_ _
tt "
RACCORD DU'R_FRiG_RATEUR
le raccord 6 compression,
comme indiqu6 ci-dessus, Ins6rez Vextr6mit6 du tuyau
dans le raccord et serrez 1'6crou 6 compression. Assurez-
vous que I'extr6mit6 du tuyau est ins6r6e bien droit et le
plus profond6ment possible dans le connecteur, Ne
serrez pas de facon excessive, Assurez-vous que te tuyau
est suffisamment long (enroul6 pour former trois boucles
d'environ 10 po de diamatre) pour pouvoir 6Ioigner {e
r6frig6rateur du tour apr_s i'instaltation_ Fixez la conduite
d'eau 6 I'aide d'une bride m6ta!lique dans le coin
sup6rieur droit du panneau du compartiment compresseur,
8. Ouvrez le robinet d'arr6L SERREZLESRACCORDS
OU ECROUS QUI FUIENT,
9. Vous pouvez maintenant fixer le tuyau de cuivre au
bas du tour,
10. Laqualit6 de vos glacons d6pend de laqua_it6de i'eau_
C est pourquoi il est conseill6 de purifier I eau au moyen dun
filtre_Vous pouvez vous procurer, moyennant suppl6ment, un
filtre 6 eau facuhatif aupr_s de votre Centre de service Sears,
InstaIlezle filtre n° 978488 au raccord de la conduite d'eau_
11. Pressions d'eau limites: entre 15 tb/po _et 125
Ib/po_ Encas de probl_mes, communiquez avec votre
sen,ice des eaux_
IMPORTANT : tl faut pr6voir jusqu'6 24 heures avant que
votre machine 6 glacons commence 6 produire des gla_;ons
Jetez les premiers lots de glacons afin d'61iminer les
24
impuret6s r6siduelles de la conduite d'eau_

Carad@ristiques*
MOULES A GLA_:ONS FLEXIBLES
Exercez une forsion aux deux
exfr_mJJ_s de ces mouJes ef versez
Jes glaqons dons un bac ou retirez
les gJa?onsun 6 la lois. Offerts
seutement sur les modSles non
dot@sd'une machine 6 glacons
EMPLACEMENT DE LA
MACHINE ,,_GLACONS
AUTOMATIQUE
Si votre r_frig6rateurestdot_
d'une machine 6 glacons
automatlque, vok lesdirectives
de fonctionnement _ ia page 23
Sinon, vous pouvez en fake
installer une, Vous pouvez vous
procurer aupr_s de votre
magasin ou Centre de service
Sears un ensemble de machine
glacons automatique.
_:TIQUETTE D'UTILISATION
ET D'ENTRETIEN
Vous trouverez surla paroi du
r_ffig@rateur lesrenseig nements
dont vous avez besoin, y
compris f'entretien quotidien
COMMANDE DE
TEMPERATU RE
R@glezla commande
¢5_>.11vous faudra
modifier le r@
tardo Voir _ Ic
DE CONGI_LATEUR
PRATIQUES
Certains modules sont dot_s d'une
€layette pour moules _ giacons.
D'autres mod@lesposs_dent une
clayette plus basse _ la droite de la
clayelle pour moules
glacons, tandis que d'autres
sont pourvus d'une dayette
d@cal@epleine largeur pour
une plus grande souplesse de
rangement.
BAC UTILITAIRE
Bac 6 double usage pour te
rangement de deux
douzaines d'oeufs dons leur
embaHage d'origine, ou pour
disposer d'une provision
suppl@mentairede glacons
dons le cong_lateur pour les
occasions sp_ciales.
- CASIER ._,PRODUITS
LAITIERS
Cosier dot@d'un portillon
pour que le beurre etautres
produits similaires pr6sentent
la consistance voulue.
EMPLACEMENT DES
NUMI_ROS DE MODELE
ETDE SERIE
Ces num@rossontinscrits ici Pour
commander des pi_ces, consultez
Jaliste des pisces fournie avec votre
r@frig@rateurou adressezovousau
Centre de service le plus pros, en
indiquant ces num@ros.
BAC ,_ VIANDE
Bac pratique pour les collations, (es
amuse-gueule, ]a charcuterie, le
bacon, le fromage et les tartinades
SANS GIVRE
Ii n'est pas n@cessairede d6givrer les
compartiments rSfrig@rateurou
cong@loteur_Votre appareif estcon?u
pour se dSgivrer automatiquement,
*Ces carod_ristiques nesont pas offedes
sur tousles modules
Lebac de droite est congu pour
assurerune circulation d'air plus
grande afin de maintenirun
degr_ d!humidil_ moins 61eW
pour la conservaiion de la
plupart des frUitsl
BAC ._ L_GUMES
Le bac de gauche estconcu
pour mainfenirun degr8
d'humidit8 plus:_teV_ pour
la conservation desaliments
d_ball6s et de la piupart
des I_gumes. Surcertains
mod$1es,une C0mmande
r_glable vous permet de" :'
contr61er le d@bitd'air
froid dons le bac.
BAC PRATIQUE
Leportillon du bac demeure ouvert
pour faciliter I'accgs aux produits
laitiers.
CLAYETTES RI':GLABLES
Ces clayettes vous permettent
d'am@nager I'int_rieur de votre
r_frig_rateur en fonction de vos
besoins.
_- JOINTS DE PORTE
MAGNr:TIQUES
Lesportes se ferment en douceur et]es
joints assurent une bonne @ranch@it@
Jorsque le r@frig@rateurestde niveau,
Volr 8 la page ] 9.
PORTES EN ACIER TEXTURE
Vosdoigtsnelaissentpas de marques
surles portes textur@es.
25

Entretien et nettoyage
Ext&rieur
Les poign_es de porte et les enjoliveurs peuvent 6tre
nettoy_s avec un cFliffon imbib_ d'une solution d'eau et
de d_tergent liquide doux pour la vaisselle S_chez
ensuite avec un linge doux. N'appliquez pas de cite sur
les poign_es ou les enjoliveurs
Gardez le fini propre. Essuyez-le avec un linge propre
I_g_rement humect_ de cire pour _tectrom_nagers ou de
d_tergent liquide doux pour la vaisselle_Essuyez etpolissez
avec un linge doux et propre_ N'essuyez pas le
r_frig_rateur avec un linge 6 vaisselle sale ou une serviette
humide car ilslaisseront un r_sidu qui peut endommager la
peinture_ N'utilisez pas de tampons 6 r_curer, de produits
nettoyants en poudre, de javellisants ou de produits
nettoyants contenant un javeJlisant, car ces produits peuvent
6gratigner la peinture ou la rendre moins r_sistante.
Prot_gez le fini de I'appareiL La carrosserie du
r_frig_rateur est recouverte d'une peinture de haute
qualit_ cuite au bur, Si vous l'entretenez de la facon
appropri_e, lefini ne rouillera pas et gardera son aspect
neuf pendant des armies. Appliquez une couche de cire
pour _lectrom_nagers Iorsque vous recevez votre
r_frig_rateur et, par la suite, au moins deux fois par annie.
lnt_rieur
Pour emp_cher J'apparition d'odeurs, laissez une boTte
ouverte de bicarbonate de soude 6 t'arri_re du
r_t_rig&rateur, sur la clayette du haut. Remplacez la bo_te
tousles trois mois Pour enrayer Ies odeurs de renferm_,
placez _galement une boTteouverte de bicarbonate
dans te cong_lateur_
Ne lavez aucune piece de plastique de votre
r_frig_rateur dons le lave-vaisselle automatique.
• 1
Derriere le r_frig_rateur
Lorsque vous _loignez le r_frig_rateur du mur, prenez
soin de ne pas endommager le rev_tement de sof, surtout
les couvre-planchers coussin_s et ceux dont la surface
est gaufr_e.
Tournez les pieds de niveilement vers la gauche jusqu'6
ce que le r_frig_rateur repose sur les roulettes_
Tirez le r_frig_rateur en ligne droite et, lorsque vous le
remettez en place, poussez-le vers le tour en ligne droite_
Lesd_placements lat_raux du r_frig_rateur pourraient
endommager le rev_tement de sol ou fe r_h'ig_rateur.
Apr_s avoir remis le r_frig_rateur en place, tournez les
pieds de niveilement vers la droite pour que le r_frig_rateur
repose de nouveau sur lespieds de nivellemenL
Nettoyez les compartiments r_frig_rateur et
cong_lateur au moins une fois par annie.
D_branchez le r_frig_rateur avant de le nettoyer_ S'il est
trop difficile de le faire, essorez bien votre linge ou votre
6ponge pour enlever I'exc_s d'eau Iorsque vous nettoyez
autour des interrupteurs, des lampes ou des commandes_
Appliquez un peu de cite pour _lectrom_nagers sur la
surface int_rieure, entre les portes..
Utilisez une solution d'eau tilde et de bicarbonate de
soude-environ une cuill_re 6 soupe (! 5 ml) de b,carbonate
par pinte (1 L)d'eau-afin de nettoyer tout en neutralisant
les odeurs_ Rincez bien et s6chez avec un linge_
Lesautres pi_bcesdu r_frig_rateur-notamment tesjoints
de porte, les bacs 6 I_gumes, les moules 6 gla?ons et
toutes les pi_ces de plastique-peuvent _tre nettoy_es de
la m6me fagon_ Apr_s avoir nettoy_ les joints de porte,
appliquez une mince couche de gel6e de p6trole sur les
joints du c6t_ des charni_res pour emp_cher les joints de
coller et de se d_former_ N'utilisez pas de poudres 6
r_curer ni de produits nettoyants abrasifs.
Evitez de laver les tableffes de verre froides (sur certains
modules seulement) dans de I'eau tr_s chaude car eJles
risquent de casser en raison de la difference extreme de
temp_ratureo
Sous le r_frig_rateur
Lecondenseur setrouve derriere la grille inf_rieure, Pour
obtenir un rendement optimum, il t:autgarder le
condenseur propre Pour ce loire, tournez Jacommande
de temperature 6 OFF (_teint). Enlevez la poussi_re sur
les serpentins du condenseur
6 I'aide d'un balai ou d'un
aspirateur. Ramenez la
commande de temperature
6 son r_glage initial. Pour
un nettoyage plus efficace, Nettoyerlecondenseurau
utilisez une brosse moinsuneloisparannie
sp_ciatement concue _ cette
fin, en vente 6 votre magasin ou Centre de service Sears..
Ce nettoyage facile dolt _tre effectu_ au moJnsune lois
par annie.
Bacs 6 aliments
Lesbacs situ_s au bas du compartiment r_frig_rateur sont
dot_s de buttes qui lesemp_chent de sortir compl&tement
du r_frig_rateur afin que leur contenu ne se renverse pas
sur le p}ancher Lesbacs s'enl_vent facilement Saisissez-
les par les c6t_s et soufevez-les i_g_rement tout en tirant
pour qu'ils d_passent la <_but_e>>.
Pour enlever les bacs lorsquela porte de votre compartiment
r_frig_rateur ne peut _.trecompl_tement ouverte, suivez
les directives qui s'appliquent 6 votre module,.
26

Bac double dot_ d'un couvercle en verre
(sur certains modules seulement}
Pour enlever le couvercle en verre :
1. Enlevez les bacs..
couvercle tout en le tirant vers
vouso Inclinez-le et sortez-le.
,3. Enlevez le cadre des bacs. (Avant d'entever ce
cadre, enlevez toujours le couvercle en verre..)
Soulevez le cadre pour le d_gager de ses supports
lat_raux et arri_re. Tirez-le vers vous, inclinez-le, puis
sorlez-le.
Pour remettre le couvercle en place :
1. Abaissez le cadre jusqu'6 ce qu'il repose sur ses
supports latSraux et arri_re.
2. Remettez le couvercle en place en ins_rant la partie
arri_re du couvercle dans le profil_ arri_re du cadre
Ensuite, abaissez lentement le couvercle pour qu'il soit
bien en place.
3. R6installez les bacs..
Rernplacernentde I'ampoule
Une lampe est install_e 6
la partie sup6rieure du
compartiment r_frig_,rateur,
derriere la commande
de temperature.. Pour
remplacer une ampoule
grill_e, d_branchez le
r_frig_rateur. Laissez refroidir I'ampoule, puis d_vissez-
la et remplacezJa par une ampoule pour
61ectrom6nagers de m6me format.
Vacances
Lorsque vous vous absentez pendant une p_riode
prolong&e, d_branchez le r_frig_rateur, tournez la
commande de temperature 6 OFF (_teint) et nettoyez
I'int6rieur avec une solution d'eau et de bicarbonate de
soude, 6 raison d'une cuillSre 6 soupe de bicarbonate
par pinte d'eau. Essuyez. Pour emp6cher Vapparition
d'odeurs, laissez une boi'te ouverte de bicarbonate de
soude dans le r_frig_rateur et laissez les portes ouvertes.
Lorsque votre absence est moins iongue, retirez les
aliments p6rissables et laissez la commande au r_glage
habiluel. Toutefois, si la temperature de la piSce risque
d'6tre inf_rieure 6 60 °F..(16 °C), suivez les m6mes
directives que pour une absence prolong_e..
Sivotre rSfrig_rateur est dot_ d'une machine 6
glacons, relevez le bras r&gulateur de la machine 6
gla?ons en position STOP (ARRt_T-relev_) et fermez
le robinet de la conduite d'alimentation en eau du
r_frig_rateur..
Bacs pleine largeur dot_s d'un couvercle en
plastique (surcertains modules seulement)
Pour entever le couvercle,
soulevez-te pour le d_gager
de ses supports. Tirez-le
vers vous, puis relevez-le
compl_lement., inclinez-te
et sortez-le..
Pour enlever le bac,
soulevez I_g_rement
I'avant du bac et tirez-le
vers vous,,
D m nagement
DSbranchez te cordon d'alimentation. Retirez tous
les aliments du r_frigSrateur, puis nettoyez et s_chez
i'int_rieur,,
Immobilisez toutes les pi6ces amovibles, comme
les clayettes et les bacs, 6 I'aide de ruban gomm_ pour
_viter de lesendommager, puis refevez les pieds de
nivetlement,
Assurez-vous que le r_frig_raleur demeure debout
pendant son d_m_nagement et dans le camion_ I1dolt
6tre bien immobilis8 dans le camion afin d'6viter qu'il se
d_place_ ProtSgez la carrosserie du rSfrig_rateur 6
I'aide d'une couvertureo
27

Avant d'appeler un r parateur
I_conomisez du temps et de t'argent. Consultez ce guide
de d6pannage. Vous y trouverez les causes de
probl6mes de fonctionnement mineurs que vous pouvez
corriger vous-m_me,
Le r_frlg_rateur ne fonctionne pas
"Cycle de d_givrage en cours Iorsque le moteur ne
fonctionne pas pendant 30 minutes environ.
• Commande de temperature r_gl_e 6 OFF (6teint).
- Si la lampe int6rieure ne s'allume pas, il est possible
que le r_frig6rateur ne soit pas branch&.
• Si le cordon d'alimentation est bien branch_ et que le
r_frig_rateur ne fonctionne pas, branchez une lampe ou
un petit appareil m6nager dans cette prise de courant
pour v6rifier si le disjoncteur s'est d6clench_ ou sile
fusible est grill_
Le moteur fonctionne pendant de Iongues p_riodes
• Lesr_frig6rateurs modernes, plus gros et poss6dant un
cong_lateur plus grand, fonctionnent plus Iongtemps
- Situation normale Iorsque vous venez de recevoir votre
r_ffig6rateur. II taut g6n_ralement pr_voir 24 heures
pour que ta temperature se stabitise compl_btement,
• Vous avez plac6 dans le r6ffig_rateur ou le cong61ateur
une grande quantit_ d'aliments..
• Temps chaud-ouverture fr_quente des portes.
• Porte laiss_e ouverte
" Commande r6gf6e 6 une temp6rature trop basse
- !1taut nettoyer te condenseur..
Le moteur se met en marche et s'arr_te fr_quemment
• Situation normale, La commande de temp6rature fait
d_marrer et arr6te le moteur pour maintenir une
temperature uniforme.
Vibrations ou cliquetis
• Si le r6frig6rateur vibre, il est probable qu'il ne repose
pas solidement sur le ptancher. Soit que les pieds de
nivellement avant ont besoin d'etre r_gl_s, soit que le
plancher est in_gat ou qu'il n'est pas assez solide..
• Si des r_cipients vibrent sur les dayettes, dL,placez-les.
II est normal de constater une I_g_re vibration.
Bruits de fonctionnement
• Le moteur 6 grande vitesse du compresseur, n_cessaire
pour maintenir une temp6rature proche du point de
cong61ation dans le grand compartiment cong_lateur, peut
8tre plus bruyant que celui de votre ancien r6frig_rateur,_
• Circulation normale de I'ai_-un ventilateur fait circuter
I'air froid dans les compartiments r6frig_rateur et
cong_lateur, tandis qu'un autre ventilateur refroidit te
moteur du compresseur.
• Lesbruits NORMAUXsuivants se font aussi entendre de,
temps 6 autre :
-D_ctics de la minuterie de d6givrage Iors du d_givrage.
-I_coulement de I'eau de dSgivrage.
-D6dics de la commande de temp6rature,
-Bouillonnement ou _gargouillement_ du frigorig6ne.
-Cr6pitement ou craquement des serpentins de
I'_vaporateur, caus_ par ta dilatation et la contraction
du m6tal Iors du d_givrage.et du cycle de r_frig6ration
subsequent..
-Glacons qui tombent dans le bac et I'eau qui circule
dans les tuyaux forsque la machine _ glacons se remplit,
Les aliments se dess_chent
• Aliments non couverts, real envetopp_s ou non
emball_s de facon herm_tique..
Temperature trop _lev_e darts le r_frlg_rateur ou
ie cong_lateur
• La commande n'est pas r_gl6e 6 une temp6ratu_e
assez basse,
" Temps choud-ouverture fr_quente des portes,
" Porte laiss_e ouverte pendant une pSriode prolong&e,
" Paquet emp6chant la porte de se fermer ou bloquant le
conduit d'air dans le compartiment cong_iateur,
Givre ou cristaux de glace sur les aliments congel6s
• La porte peut avoir _,t6_aiss_eouverte ou un paquet
t'emp6che de se fermer..
• Ouverture trop Fr6quente ou trop protong_e des portes.
• II est normal qu'il y ait du givre 6 I'int6rieur des
emballages..
La machine e gtacons ne fonctionne pas (sur certains
modules seulement)
• Lebras r_gu]ateurde la machine 6 glacons est en
position STOP (ARRET-relev_).
"L'alimentation en eau est ferm_e ou n'est pas raccordSe
I'appareil
• Latemp6rature dans le cong6tateur n'est pas assez basse.
Les glacons sont trop petits
• Le robinet d'arr6t du tuyau qui relie le r_frig_rateur _]la
conduite d'eau de la r_sidence peut 6tre obstru_.
Formation lente des glac, ons
• La porte a peut-6tre 6t6 laiss_e entrouverte
" R_glez la commande 6 une tempSrature plus basse.
28

Inversionde I'ouverturedesportes
Les glac;ons ant une odeur/un go0t
. Jetez lesvieux gla?ons.Videz le bac _ glac;onstous
les mois
• II faut nettoyer le bac _ gla?ons
• Lesemballages non herm_tiques dans le r_frig_rateur
ou le cong_tateur peuvent transmettre une odeur ou un
go0t aux gla_:ons.
. tlfaut nettoyer I'int_rieur du r6frig6rateur
De la condensation se forrne entre les portes
" Ce ph_nom_ne est normal Iorsque le temps est tr_bs
humideo Pourpr6venir la corrosion, essuyez cette
condensation et abaissez la commande d'un r_glage
pour obtenir une temp&rature plusbasse
De la condensation se forrne _ I'int_rieur
. Ouverture trop fr_quente ou trop protong6e des portes.
• Par temps humide, t'air introduitde I'humidit_ dans
le r6frig6rateur !orsque les portes sont ouvertes.
Le r_frlg_rateur d_gage une odeur
• Lesaliments ayant une forte odeur doivent _tre
emball_s herm_tiquement,
• V_rifiez si des aliments sont avari_s_
- II faut nettoyer I'int_rieur du r_frig6rateuro
• Gardez une bo_te ouverte de bicarbonate de soude
dons le r_frig_rateuro Remplacez-la tousles trois mois_
La larnpe int_rleure ne s'allurne pas
. Aucun courant _ la prisede couranL
" IIfaut remplacer I'ampoule
Votre r_frig_rateur est dot_ de portes r_versibles,de sorte
que vous pouvez inverser le sens d'ouverture des portes
en fonction de vos besoins. Lesdirectives qui suivent vous
indiquent de queHe fad:on transf_rer les charni_res du c6t_
droit vers te c6t_ gauche Si jamais vousd_sirez retransf_rer
les charni_res du c6t_ droit, suivez lesm_mes directives-en
remplac;:ant seulement le mot _gauche_ par le mot _droit_
• Veuilbz tire toutes Jesdirectives avant de commencer
• Manipulez les pi_ces avec soin pour _viter d'_gratigner
la peinture_
• PEacezles vis _ c6t6 de leur piece afin d'_viter de les
visser aux mauvais endroits
• Pr_voyez une surface de travail douce afin de ne pas
_gratigner les portes
• ATTENTION : Evitez de laisser tomber les portes sur le
plancher,
Vous pourriez endommager les buttes de porte
Outils n_cessaires
. Tournevis _Torx_ T20 ou T25
• Ruban-cache
• CI_ _ fourche de 5/16 po
. Tourne_crou hexagonal de 5/t 6 po
"Tournevis Phitlips
. Couteau _ mastic ou tournevis _ embout plat (couvrez
I'extr_mit_ de I'outil de ruban gomm_ afin de ne pas
_gratigner la peinture)
Enl_vement des portes
1 etape--Generahtes
(a) D_branchez le r_frig_rateur
(b) Videz tousles balconnets de porte, y compris le bac
utilitaire et le cosier _ produits laitiers
2" _tape-.Enl_vement de la porte du cong_lateur
(a) Maintenez la porte
o oo0moyoode
ruban_cache sup_rieure
(b) A i'aide d'un tourne-
_crou hexagonal de
5/I 6 po, enlevez les
deux vis qui retiennent
la charni_re sup_rieure _
_acarrosserie
(c) Soulevez la
charni_re (et la caJe
qui y est collie) pour
d_gager I'axe de charni_re de la douille situ_e sur le
dessus de la porte, puis mettezola de c6t_ avec les vis
(suite_ la page suivanle)
29

Inversion de I'ouverture des portes Is0 te!
(d) Enlevez Jeruban-cache.. Eioignez la porte de la
carrossede en I'indinant, puis soulevezJa pour la
dL,gager de I'axe de la charni_re interm_diaire_
(Si la rondelle de plastique demeure coffee sous la porte,
remettezJa sur la charni_re.)
(e) Couchez la porte sur sa contre-porte, sur une surface
douce pour ne pas I'_gratigner
(f) A l'aide d'un tournevis ¢_Torx_,d6placez les deux vis du
c6t$ oppos8 de la carrosserie et vissez-ies dans les trous
laiss_s libres par I'enl_vement de la charni_re sup_rieure
3° _tape--Enl_vement de la
(a) Maintenez la porte
fermSe au moyen de
ruban-cache._
(b) A I'aide d'un tourne-
_crou hexagonal de 5/16
poet d'une cl8 ouverte
de 5/16 po, enlevez les
deux vis qui retiennent la
charni_re intermSdiaire (et
la cale qui y est collie) 6
la carrosserie. Soulevez la
charni_re interm_diaire pour d_gager son axe de la
douille situ_e sur le dessus de la porte. Mettez la
charni_re et les vis de c6t_
:)orte du r_frig_,rateur
Charni6re
interm_diaire
Axode
(c) R6installez la charni_re
(et la cale qui y est collie) et
la rondetle de plastique du
c6t_ inf_rieur gauche de
I'appareil.
C(bTE
GAUCHE
Transfert de la charni_re sup_rieure
R_installez la charni_re sup_rieure (et la cale qui y est
collie) dans le coin avant gauche de la carrosserie, mais
ne serrez pas compl_tement les vis pour te moment..
Certaines charni_res sont dot_es de quatre trous..Les
trous que vous devez utiliser pour I'installation de la
charni_re d6pendent du cSt_ og vous I'instaltez
Lorsque la charni_re est correctement install_e, son
rebord ext_rieur est parall_le au rebord de la carrosserie_
(c) Enlevez le ruban-cache !'='loignezla porte de la
carrosserie en l'inclinant, puis soulevezJa pour la
d_gager de la charni_re inf_rieure.
(Si la rondelfe de plasfique demeure coll6e sous la porte,
remettezJa sur la charni_re.)
(d) D6posez la porte sur sa contre-porte, sur une surface
douce pour ne pas I'_gratigner.
(e) ,_ I'aide d'un tournevis Torx, d_placez les deux vis du
c6t_ oppos8 de la carrosserie et vissezJes dans les trous
laiss_s libres par !'enl*bvementde la charni_re interm_dlaire_
(f) Prenez une des visenlev_es 6 t'_tape (b) et ins_rez-la du
c6t_ oppose, dans le trou le plus 6 i'ext_rieur Ne vissez pas
la vis compl_tement-laissez sous la t6te de vis un espace
_quivalent 6 I'_paisseur de la cale et de la charniSre.
Transfert de la charni_re inf_rieure
(a) Si votre r_frig_rateur est
dot_ d'une grille, enlevez-la_
SaisissezJa par le baset
tirez-la vers vous..
(b) ,_,I'aide d'un tournevis
_Torx_, enlevez la charni_re
(et la cale qui y est collie)
et la rondelle de plastique
du c6t_ inf_rieur droit de
I'appareil
COTE DROIT
Axe de Rondelle de
- Icharn _re plastique
/ " ,,
Charniere / _
interm_diaire
Installation de ia chamiere Installationde la
du cSt_gauche charni_re du c6t_ droit
Transfert des poign_es de porte
(surcertains mod_[es seulement)
Porte du r_frig_rateur
Pour enlever la poign_e...
(a) Enlevez le capuchon
d_coratif en placant sous
le rebord la lame d'un
couteau 6 mastic recouverte
de ruban gomm& Enlevez
ensuite la vis.
(b) Enlevez les deux vis qui
retiennent la poign_e sur le
dessus de la porte.
(¢) Enlevez la poign_e_
3O

Apr_s avoir enlev_ la polgn6e,..
(a) Enlevez lesvis situ_es
du c6t6 droit sur le dessus
de la porte, puis ins6rez-
les du c6t6 oppos6 dans
1astrous des vis de ta
poign_e.
(b) A J'aide de la lame
Capuc__
trous de la
poign_e
d'un couteau 6 mastic ou
de I'embout d'un
tournevis recouvert de
Capuchon --_
ruban gamin6, enlevez le
capuchon install6dans le
trou de charni_re du c6t6
gauche de la porte et
ins6rez-le dans le trou du c6t_ oppos6, laiss6 libre per
I'enl6vement de la charni_re sup6rieure_
(c) Enlevez le capuchon & t'avant de la porte et
transf6rez-le du c6t6 oppos6
(d) Transf_rez la but6e de porte
COTE GAUCHE
Butte de porte
COT# DROIT
Porte du cong61ateur
(a) Enlevez la vis qui
retient la poign6e sur le
dessus de la porte, ainsi
que les deux vis qui
retiennent la poign6e
au bas de la porte
(b) Enlevez la poign6e
(c) Enlevez la vis qui se
trouve du c6t_ droit sur
le dessus de la porte, et
ins6rez-la du c6t6
gauche dans le trou de
la vis de la poign6e
(d) Transf6rez la but6e
de porte de la facon
indiqu6e ci-dessus
(e) Fixez la poign6e au c616 droit de la porte en ins6rant
des vis sur le dessus et au-dessous de la porte, dans les
trous laiss6s tibres par l'enl6vement des vis de la but6e
de porte
R6installation de ta porte du r6frig6rateur
- D$placez la butte de porte m6tallique du c6t6 droit
vers le c6t6 gauche €_i'aide d'un tournevis _Torx_.
• D6placez lesvis du c6t6 gauche vers le c6t6 droit
Pour r_installer ia polgn6e de porte du
r6frig6rateur...
• Fixez la poign_e du c6t6 droit de la porte en ins6rant
les vis sur le dessus de la poign6e et sous le capuchon
d6coratif de la poign6e
- Remettez en place le capuchon d6coratif de to poign6e
(a) installez la porte du
r6frig6rateur de facon que
t'axe de la charni6re inf6rieure
Axe de
:harni_re
salt ins6r6 dans ta douilte sous
la porte Assurez-vous que la
rondelle est bien en place sur
I'axe de charni6re
(b) lns6rez I'axe de la
charni6re interm6diaire dans
Rondelle de
pfastique
la douille silu6e sur le dessus
de la porte REMARQUE : La charni6re interm6diaire
doit 8tre tourn6e 5 I'envers, de ta facon indiqu_e,
lorsqu'elle est insia!16e du c6t6 gauche
(c) Indinez la porte vers la Axe de 11!
carrosserie Lorsque la porte charniere
est bien en place, faites
glisser la charni6re sous la _ R..j_
t&te de la vis que vous avez
viss6e partiellement un peu
plus t6! dans le trou le plus a
I'ext6rieur tns6rez I'autre vis
puis serrez solidement les
deux vis
(suite _ la page suivante)
31

inversion de i'ouverture des portes (suite)
R_installation de ta porte du cong_lateur
(a) lnstallez la porte du
cong_lateur de sorte que I'axe
de la charni_re interm_diaire
soit ins_r8 dans la douille sous
la porte. Assurez-vous que ta
rondelle est bien en place sur
l'axe de charni_re..
(b) Inclinez la porte vers la
carrosserie, en soulevant la Rondelle de plastique
charni_re supSrieure de sorte
que I'axe de charni_re soit insSr_ dans
la douille situ_e sur le dessus de la porte_
(c) Avant de serrer les vis de la charni_re sup_rieure,
assurez-vous que le haut de ta porte est de niveau avec
le dessus du r_frig_rateur et que le jeu entre tes portes est
uniforme. Ne serrez pas trop ces vis-vissez-la jusqu'_ ce
qu'elle soit serr_e, puis vissez-la encore d'un demi-tour..
Inspection des joints de porte
V_rifiez le joint magn6tique autour des portes_ Assurez-
vous qu'il n'y a pas de jeu visible entre le joint et ta
carrosserie_ Si vous remarquez un jeu, tirez sur le joint
pour que I'aimant 6 I'int_rieur du joint entre bien en
contact avec la carrosserie_ Faites attention de ne pas
dSplacer le joint.
32

GARANTUE COMPLETE O'UN
AN SUR LEREFRBGERATEUR
Pendant un an _ compter de la date d'achat, _ condition que t'appareit soit utilis_ et entretenu
conform_ment aux directives fournies avec te produit, Sears r_parera sans frais route piece de
ce r&frig_rateur qui se r_v_le d_fectueuse en raison d'un vice de mati_res ou de fabrication.
GARANTnE COMPLETE DE C NQ
ANS SUR LEGROUPE FIR GORNF QUE
Pendant cinq ans 6 compter de la date d'achat, 6 condition que I'appareil soit utilis_ et
entretenu canform_ment aux directives foumies avec le produit, Sears r_parera sans frais toute
piece du groupe frigorifique !comprenant le frigorig_ne, les tubes de raccordement et le moteur
i::du compresseur) qui se rSvele defectueuse en raison d'un vice de mati_res ou de fabrication.
.... utilis_s _ des fins domestiques pour la conservation des aliments.
i
i ON PEUT OBTENIR UN SERVICE DE REPARATION SOUS GARANTIE AUX ETATS-UNIS, EN
iCOMMUNIQUANT AVEC LECENTRE/DEPARTEMENT DE SERVlCE SEARS LEPLUS PRES.
i i• La pr_sente garantie ne s'applique que Iorsque le produit est utilis_ aux Etats-Unis.
i: i _ La pr_sente garantie vous confute des droits iuridiques sp_cifiques. Vous
..... pouvez egatement beneflcler d autres drmts, qu_ vanent dun etat a I autre.
SEARS, ROEBUCK AND CO., Dept. 817WA, 3333 Beverly Rd., Hoffman Estates, IL 60179
ii
.... La garantie ci-dessus ne s'applique qu'aux rSfrigSrateurs
LE SERVICE SEARS EST VOTRE DISPOSITION
Lavaleur de votre appareil Kenmore est encore plus
grande lorsque vous tenez compte du fait que Sears
poss_de des centres de service partout au pays et
compte sur destechniciens bien form,s. Cestechniciens
professionnels ont recu une formation sp_ciale pour
r_parer les _lectrom_nagers SEARS. IIs poss_dent tes
pi_ces, lesoutils et I'_qulpement n_cessaires pour
s'assurer que nous sommes _ la hauteur de notre
engagement envm's vous :_Nous r_parons les
produits que nousvendons_. COMMUNIQUEZ AVEC
LESERVICE DE REPARATION AU I_800_4_REPAIR.
SEARS, ROEBUCK AND CO., Dept_ 702PS0, 3333 Beverly Rd, Hoffman Estates, IL 60179
Ce manuel est imprim# sur papier recyc!#..
AUGMENTEZ LA VALEUR DE VOTRE APPAREIL
KENMORE EN ACHETANT UN CONTRAT
D'ENTRETIEN PROLONGE DE SEARS
Lesr_frigSrateurs Kenmore de Sears ont _t_ concus,
fabriqu_s et v_rifi_s afin de vous offrir un rendernent
fiable pendant des annSes_ Cependant, tout appareil
moderne peut avoir besoin de rSparation de temps
outre. La garantie de Sears et le contrat d'entretien
prolong8 de Sears vous protSgent contre les frais de
rSparation imprSvus. Pour de plus amples
renseignements, communlquez avec votre vendeur
ou le Centre de service le plus pr_s.
Imprim_ aux E.U.
33

34

Contenido
° lnstrucciones de seguridad .................... 36
° Requisitos para conexi6n a tierra ........... 36, 37
- Funcionamiento del refrigerador ................ 37
° Regutaci6n de los contrdes .................... 37
° Sugerencias para el almacenamienlo
de los alimentos ................................ 38, 39
o Parrillas ................................. 39, 40
- Cajones de almacenamiento ............................. 40
° Servicio de hielo .................................. 41,42
Caracteristicas .......................................... 43
o Cuidado y limpieza ..................................... 44, 45
° Precauciones para moverlo y para
tas vacaclones ............................................ 45
° Antes de Ilamar al servicio ...................... 46, 47
o Puertas reversibles ....................................... 47-50
° Garantia ......................................................... 51
Su antigua refrigerador tiene un sistema de refrigeraci6n
que us6 CFC (clorofluorocarbonos). Se cree que los CFC
son nocivos para el ozono estratosf6rico
Si se desperdicia del antiguo refrigerador, aseg6rese de
que se deshaga del refrigerante con CFC correctamente
por un t6cnico calificado Si se libera a prop6sito e!
refrigerante con CFC usted puede estar sujeto alas muftas
: y a! encarcelamiento bajo las estipulaciones det Clean Air
.... Act federal,
:::,i,:i)i:_i:'(_!i_::i)_i):);_':_i:i¸::,:!:::)!i!,_::))i::::_:,i::i:::,%::::;,!_!%':)yi%)ik)::_::_/:!:!/))i::/::_::::(0¸,:% _ •
.... favor; an0teen el siguiente espacio e/n6mero del modelo, et nOmero de serie y la fecha en que usted
]:i:::::;i]compr6:sU reirigerador Kenmorel En la p6gina 43 semuestra ta ubicaci6n de los nOmerosde serie y modelo
: N_merode:m0cleto: : ] : N6merode serie Fechade compra
HofimonE=a,o , USA
Modelos de congelador superior sin
35
escarcha de 14 y 16 pies cObicos

INSTRUCCIONES IMPORTANTES DE SEGURIDAD
Lea todas instrucciones antes de
utimizareste aparato.
ADVERTENCIA--Cuando utilice esteaparato, tome
los medidas de seguridad b6sicas, inclusive lasque
se describen a continuaci6n:
- Utilice este aparato s61o para et prop6sito para
el que fue disefiado, como se describe en el Manual
del propietario_
- Este refrigerador debe instalarse debidamente de
acuerdo con las Instrucciones de Instalaci6n antes
de utilizarse. Vea los requisitos para la conexi6n a
tierra en este libro_
• Nunca desconecte su refrigerador jalando el
cable conductor de la corriente. Siempre suiete la
clavija firmemente y j61ela en forma recta
- Repare o reemplace inmedlatamente tados los
cables del sistema el6ctrico que se hayan desgastado
o se hayan dafiado de alguna atra forma. No utilice un
cabJe que muestre da_os o partes desgastadas a Iolargo
del mismo, en la davija o enet otto extremo de conexi6n,
• Cuando separe su refrlgerador de la pared
tenga cuidado de no pasar por encima del cable
o de dafiarlo,
• Despu_s de que su refrigerador comience a
funcionar, no toque las superficies frias en el
cornpartimiento del congelador, en especial
cuando tenga las manos hgmedas o mojadas.
La pie1se puede adherir a los superficies que se
encuentren extremadamente frlas
• Si su refrigerador tiene una m6quina para
hacer hiela, no ponga los dedos o las manos en el
mecanismo autom6tico para hacer hielo mientras
el refrigerador est_ conectado. Esto Jeayudar6 a evitar
una posibb lesi6n_Tambi_n impedir6 la intederencia con
las partes m6viJesdel mecanismo expulsi6n o con
etemento calentador que libera los cubos_
" No almacene o utilice gasolina u otros gases o liquidos
inflamables cerca de este o cualquier otro aparato.
• No vuelva a congelar alimentos congelados que
ya se hayan descongelddo completamente. El
Departamento de Agricultura de los Estados Unidos en et
Boletin 69 de Casa y jardfn expresa:
"Se pueden congelar de manera segura alimentos
congelados que se hayan descongelado si todavfa
contienen cristales de hielo o si todavla conservan una
temperatura inferior a los 40 °F. (4 °C.).
" Za carne, el polio o el pescado derretidoS que tengan
un olor desagradable o est_n descoloridos no deben
volver a congelarse ni deben set ingeridos. Se debe
retirar los helados derretidos, Si el olor o el color de
cualquier alimento no es bueno, eliminelo. Elalimento
puede ser peligroso si se ingiere.
"lncluso el hecho de descongelar parcialmente y volver
a congelar reduce ia calidad de Iosalimentos,
particutarmente frutas, vegetales y comida preparada.
La calidad det gusto de las carnes rojas es de las menos
aFectadas con respec|o a otros alimentos° Utilice los
afimentos que sevolvieron a congelar to m6s pronto
posible para salvar Io m6s que se pueda de su calidad."
• Si su refrigerador todavfa se encuentra en su casa y no
lo est6 utilizando, aseg6rese de quitar los puertas. Esto
reducir6 la posibilidad de petigro para los nifios.
• No permita que los nifios se suban, se sienten, se
paren o se cuelguen de las parrillas del refrigera dot.
Podrian da_ar e! refrigerador y lastimarse de gravedad,
• Desconecte su refrigeradar antes de limplarlo y hacer
reparaciones. NOTA: Recomendamos ampliamente que
cuatquier servicio Jo realice personal calificado_
• Antes de cambiar un foco fundida, desconecte el
reffigerador o corte et suministro de corriente del
interruptor o de la caja de fusiblespara evitar el contacto
con un filamento con corriente, (El Focofundido puede
rornperse mientras se est6 cambiando). NOTA: Elhecho
de poner el control en OFF (apagadol no elimina la
energia en el circuito el6ctrico,
CONSERVEESTASINSTRUCCIONES
Requisitospa ra conectar a tierra Importante--Porfavor i alos cuidadosamente.
Para conectar la electricidad
Pot su seguridad personal,
este aparato debe estar
aterrizado de manera
correcta,
El cable de corriente de este
aparato tiene una clavija de tres
paras o espigas (para aterrizar!o)
que se debe conectar a una toma
de corriente de pared est6ndar de tres entradas y de este
modo sereduce at minimo ta posibitidad del riesgo de
choque et6ctrico causado por este aparato
METODO QUE
SEPREFIERE i_
t_ASEGURESE DE QUE
#! EXlSTEUNA
USAR $U APARATO
Haga que unelectricista catificado verifique la toma de
corriente de la pared para asegurarse de que est_
conectada a tierra de manera correcta
Si la toma de pared es de dos entradas, es su
responsabilidad y obligaci6n cambiarfa por una toma
de corriente de pared de Wesentradas que est6
debidamente aterrizada
BAJO NINGUNA CIRCUNSTANCIA CORTE O
ELIMIN E LA TERCERA ESPIGA O PATA (CONEXION A
TIERRA) DEL CABLE CONDUCTOR DE LA CORRIENTE.
36

Funcionamiento del refrigerador
Utilizaci6n del adaptador
Debido a los peligros potenciales para la seguridad
en ciertas condiciones, en_rgicamente rechazamos
la utitizaci6n de clavijas que se usan como adaptadores
Sin embargo, si aL'Jnasl usted elige usar un adaptador,
donde los c6digos locales Io permiten, puede hacerse
una CONEXION TEMPORAL a una toma de corriente
de pared de dos espigas debidamente aterrizada
haciendo uso de un adaptador enlistado en UL y
que est6 disponibte en ferreterias locales
La ranura m6s grande en el
adaptador debe alinearse
con la ranura m6s grande de
la toma de pared para dar
una polaridad adecuada en
Ia conexi6n del cable
conductor de corriente
CUtDADO: La uni6n de la
terminal de la conexi6n a
tierra del adaplador con el
tornilIo de ta cubierta de la
toma de pared no significa que el aparto quede aterrizado,
a menos que e!tornillo de fa cubierta sea de metal, y no
est_ aislado, y que la toma de la pared est6 aterrizada por
medio del cableado de la casa Haga que un electricista
calificado revise laloma de corriente de pared y el circuito
para asegurarse que la toma est6 debidamente aterrizada
Cuando desconecte el cable conductor de corriente
del adaptador, siempre sujete el adaptador con una
mano mientras tira de ta clavija del cable con la otra Si
esto no se hace, la terminal a tierra dei adaptador estar6
propensa a romperse si se usa repetidamente_
Si se rompe la terminal a tierra del adaptador, NO
UTILtCE el oporto hosta que se haya establecido
una tierra aproplada otra vez.
t
METODO TEMPORAL
(LOS ADAPTADORES NO ESTAN
PERMmDOS EN CANADA)
HAGACO_NC'D'R
GRANDE CON LA Jl_ 1 I
Uso de extensiones
Debido a los peligros potenciales para la seguridad en
ciertas condiciones, en6rgicamente rechazamos la
utilizaci6n de extensiones.. Sin embargo, si a0n asi usted
elige usar una extensi6n, es necesario que sea una
extensi6n con conexi6n a tierra, de 3 alambres, que est6
enlistada en UL y tenga una clavija y toma con conexi6n
a tierra y que ta potencia el_ctrica del cable sea de 15
amperios (minimo) y de 120 voltios
Requerimientos el_ctricos
E1refrlgerador siempre debe estar conectado en su
propia toma el_ctrica ia cual debe tenet una
capacidad de voltaje que corresponda a la plata
indicadora. Estoproporciona el mejor desempe_o y
tambi6n evita la sobrecarga en bs circuitos de cableado
de la casa, lo que podrla causar un incendio en el caso de
que los cables sesobrecalienten
Ubicaci6n
• Coloque el refrigerador en un tipo de suelo que sea 1o
suficientemente fuerte para sostenerlo cuando est_
compietamente Ileno
• No to instab donde la temperatura vaya a serinferior a los
60 °F (16 °C), ya que no funcionar6 con ia continuidad
necesaria para mantener temperaluras apropiadas
. No Io instale cerca de fa estufa, de una satida de
catefacci6n o donde el sol d_ directamente sobre _L
Espacios libres
Deje los siguientes espacios libres para una instataci6n
f6cil, para una adecuada circu_aci6n de aire y para
conexiones et_ctricas y de plomerla:
Lados .....................................................................3/4" (19 mm)
Parle superior ......................................................I" (25 ram)
Parle trasera .....................................................1" (25 ram)
Ruedas/Patas de nivelaci6n
Los patas de nivelaci6n que est6n cerca de cada esquina
frontal det refrigerador son ajustabtes Sostienen al
refrigerador en posici6n firme y evitan que se abran sus
puertas Deben colocarse de manera que el frente se
tevante 1osuficiente para que las puertas cierren f6cilmente
cuando est6n abiertas aproximadamente s61oa la mitad
Haga girar tas palas de nivelaci6n
en el sentido de los manecillas
del reloj para subir el refrigerador
y en sentido opuesto a las
manecillas del reloj para bajarlo.
Las ruedas que est6n cerca de las
patas de nivelaci6n le permiten separar al refrigerador
de la pared para su limpieza Haga girar las patas en
sentido opuesto al de los manecillas det retoj hasta que
el peso del refrigerador pose de las palas a los ruedas
Despu_s de regresar al refrigerador a su lugar, haga
girar las patas en sentido de las manecilfas del reloj
hasta que las patas sostengan el refrigerador
Control de temperatura
Eldisco de control de temperatura
tiene nueve posiciones m6sOFF
(apagado) "1 "es la m6scaliente;
"9" es la m6sfria Para comenzar
coloque el disco en "5"
Despu_sde usarel refrigerador durante un tiempo, ajuste el
control de la temperatura si es necesario, lnserte una moneda
en la ranura que est6 en medio del disco, haga girar el disco
y col6quelo en laposici6n que seajuste a susnecesidades
Deje pasar 24 horas para que la temperatura seeslabitice_
NOTA: AI hacer girar el disco de control de temperatura
y ponerlo en OFF (apagado) se suspende el enfriamiento
37
en ambos compartimientos: alimentosfrescosy congelador

Sugerencias para el aimacenamiento de losalimentos
Tiempo de almacenamiento de los alimentos
DIAS EN EL MESES EN EL
REFRIGERADOR CONGELADOR
La calidad de los
allmentos baja despu_s
del tiempo sefialado
Carnes frescos
Asadas (resy cordero) ................3 a 5.................. 6 a 12
Asadas (puerco y lernera) ..........3 a 5 ......................4 a 8
Biffecs (res) ........................................3 a 5 .................. 6 a 12
Chuletas (cordero) ....................3 a 5 ................... 6 a 9
Chulelas (puerco} ........................ 3 a .5 .................. 3 a 4
Molida y eslofado .......................1a 2 ................. 3 a 4
Comidas diversas .........................t a 2 ................. 3 a 4
Embufido (puerco) ......................1 a 2 ......................1a 2
Carnes procesadas
Tocino ............................................................................ 1
Salchicha alemana .........................7 ..................... 1/2
Jam6n (completo) ............................7 ................ 1a 2
Jam6n (mitad) ........................... 3 a 5 ................ 1 a 2
.lam6n (rebanadas) ..........................3 ...........................1a 2
Refrigerios _:.................................. 3 a 5................... No se
Salchicha (ahumada) ......................7 ...................recomienda
Salchlcha (seca y semiseca) ...14 a 21 ..............congelar
Carnes cocinadas
Cames cocinadas y
plalitJos ............................. 3 a 4 ............... 2 a 3
Salsa y caldo de came ............... 1 a 2 ................... 2 a 3
Aves de corral frescas
Polio y pavo (completo) ........ 1 a 2 .................... 12
Polio (piezas) ................................t a 2 .........................9
Pavo (piezas) ............................ 1 a 2........................6
Pato y ganzo (completo) ..............1 a 2 .........................',.6
Menudencias ...................................1 a 2 ........................3
Ayes de corral cocinadas
Piezas (cubiertas con caldo) ..... ! a 2.................... 6
Piezas (no cubiertas) ....................3 a 4 ............................1
Pfatillos coclnados de
aves de corral ......................... 3 a 4 .................. 4 a 6
Polio frito .............................................3 a 4 ............................4
(Alimentos que no son carne y ayes de corral)
La mayorla de ffutas y vegetates ..........................8-t 2 meses
Pescado magro .....................................................6-8 meses
Pescado con grasa, panecillos y pan
sopas, estofado, cazuelas ............................... 2-3 meses
Pasteles, pays, sandwiches,
restos (cocin_dos),
helado (empaque original) ......................... 1ruesm6x
La came, el pescado y las ayes de corral compradas en
la tienda vadan en calidad y tiempo, por 1otanto, los
tiempos seguros de almacenamiento variar6n, Para
informaci6n sobre came y aves Ilame et Departamento
de Agricultura de los Estados Unidos a 800-53 5-45 55v
Se est6n desarrollando constantemente nuevas t_cnicas,
Consulte en la Universidad, en el Servicio de Extensi6n
det Ayuntamiento o en la Empresa de Sefvicio POblico de
su localidad la 61tima informaci6n acerca del
congelamiento y almacenamiento de alimentos
A A
35 a 40 °F. 0 °F.
(2 a4 oc.) (-18oc.)
CONGELADOR
Consejos para guardar alimentos frescos
Para almacenar carnes, pescado y ayes de corral:
- Siempre quite las envolturas de la tienda._
• Envuelva con aluminio, pl6stico o con papel encerado
y meta al refrigerador de inmediato.,
Para almacenar queso, envuSlvalo bien con papel
encerado o papel aluminio o p6ngalo en una bolsa de
pl6stica.
° Envuelva con mucho cuidado para sacar todo el aire y
evitar que se Forme moho..
• Elqueso empaquetado puede almacenarse en su
propia envoltura
Para almacenar vegetales, utilice los cajones para
vegetales. Estoshan sido diseF_adospara conservar la
hurnedad natural y frescura del producto..
- Cubriendo los vegetales con una toalla h6meda se
mantiene la frescura.
. Como una ayuda adicionat para mantener la frescura,
los vegetales empaquetados pueden almacenarse en su
envoltura original.
Consejos para congetar alimentos
1. Congele s61o alimentos de alia calidad. AI
congelarlos se conserva la calidad y el sabot. No se
mejora su calidad.
2. Congele r6pidamente las frutas y vegetales
ctespu_s de recolectarlos., Entre m6s pronto Io haga, el
producto se congelar6 m.ejor,Ahorra tiempo tambi_n si
tiene que seleccionar y desechar menos_
3. Utilice envolturas disefiadas especialmente para
congelar.
Para congelar came, pescado y ayes de corral
envu_tvalos bien en papel aluminio para congelar (o en
otto material pesado para envolver) formando con
cuidado la figura del contenido. Esto expulsar6 el aireo
Doble y presione bien losextremos det paquete para
dejarlo bien sellado.
No congele came que se ha descongelado
completamente; la comida, cruda o cocida, puede ser
congelada s61ouna vez con buen resultado_
El Ifmite de congetamiento de comida fresca (que no es
congelada) o de madscos y pescados esde 12 libras
(5 kg) al mismo tiempo..
38

Parriilas
Para almacenar helado--Los he!ados de muy buena
calidad, con gran contenido de crema, requerir6n
normalmente temperaturas un poco m6s bajas que !a
mayorla de !as marcas de helados empaquetados con
un contenido de crema menor_
° Experimente para determinar la parte del congelador y
la posici6n del control de la temperatura para mantener
su helado a !a temperatura ideal para servir_
- La parte posterior del congelador es ligeramente m6s
frfa que la delanlera
Por conveniencia...
oAlmacene cosas semejantes en un mismo iugar.. Esto le
ahorrar6 tanto tiempo como electricidod, ya que Usted
podr6 encontrar los alimentos m6s r6pidamente..
', Ponga los articulos que tienen m6s tiempo al frente
para que puedan utilizarse !o m6s pronto posible.
• Utilice los compartimientos de la puerta para !os
artfculos de uso m6s frecuente_
Para ahorrar dinero en energfa y alimentos_,,_
oCubra los alimentos h0medos con tapas ligeras,
pl6stico o atuminio,
,,Vegetales de hojas y frutas colocadas en los caiones
durar6n m6s tiempo si los mete en recipientes de pl6stico
o los envuelve con pl6stico_
• No sobrecargue el congelador o el compartimiento de
alimentos frescos con mucha comida caliente introducida
al mismo tiempo
. Abra Ias puertas el menor nOmero de veces posible
para ahorrar energia el_ctrica.
- Cuando salga de casa pot varios dias, deje el menor
n_mero de articulos perecederos en el refrigerador_ Si su
refrigerador tiene una m6quina para hacer hielo, mueva
la palanca indicadora hasta la posici6n STOP (PARADA-
hacia arriba) y cierre el agua al refrigeradoro
Parrillas ajustables
Lossujetadores de parrillas colocados en varios niveles le
permiten reacomodar las parrillas las veces que usted
necesite para almacenar sudiverso inventario de alimentos
Parrillas de medio ancho
(en modelos asl equipados)
Un extremo de la parrilla
permanece en un soporte
moldeado que se encuentra
en la pared latera!; una
pieza de montaje en el otro
extremo se engancha en un
canal que se encuentra en la
pared posterior del gabinete_
Para quitarlo, levante la
parrilta por la parte
delantera, despu_s !evante
la parrilla sobre el soporte
y s6quela del canal
Para voiverla a poner, eliia
la altura deseada de la
parrilla_ Con la parte frontal
levantada ligeramente,
enganche la agarradera superior de la pieza de
montaie en el canal y bate ia parrilla hasta el soporte..
Las parril!as de vidrio templado (en modelos asi
equipados) seajustan de la misma manera,
NOTA: La parrilia a la derecha del cana! est6 dise_ada
para engancharse en la ranura que est6 a mano derecha,
la parritia que seencuentra a la izquierda est6 dise_ada
para engancharse en la ranura que est6 amano izquierda..
Incline hacia arriba
fpase a ta p6gina siguiente)
39

Parrillas (pase)
Parrillas completas
(en modelos asi equipados)
Aigunos modelos tienen una
parrilla corrediza de varillas
de acero, una parrilla fija de
vidrio templado o dos
parritlas fijas de varillas de
acero. Estas parritlas pueden
colocarse en cualquier parte
del compartimiento de
alimentos frescos..
La parriHa corrediza
completa tiene seguros de
tope. Cuando est6 colocada
correctamente sobre los
soportes, la parriIla se detendr6 antes de que est_
completamente fuera del reffigerador y no se inclinar6
cuando usted ponga alimentos o los retire de eJla.
Para sacar cualquier parrilla completa, levante la parte
posterior de la parriila y tire de ella hacia adetante..
Para quitar una
parrilla completa
cuando la puerta
det compartimiento
de alimentos frescos
no puede abrirse
completamente,
levante laparte
posterior de la parrilla,
j61efa hacia adelante y hacia
abajo, incline la parrilla y s6quela,
Para cambiar la parrilla
escalonda:
(1) Con la parrilla inclinada
como se muestra en la figura,
coloque las terminaciones def
lado izquierdo en los hoyos
de ta pared del gabinete_
(2) Levante el lado
izquierdo de la parrilla
Figeramente, suba la
parrilla, aiuste las
terminaciones del lado
derecho de la parrilla
en los hoyos de la pared
del gabinete y baje la parrilla.
Cajones de almacenamiento
Caj6n para frutas y verduras
(en algunos modelos) _ ......_ Ill .......
Elcaj6n de laizquierda ]'------_- F---_,[
est6 diseSado para guardar
los alimentos frescos sin
envolver, conservando el contenido
de humedad natural de afimentos tales como:
•Alcachofas • Ciruetas "jitomates • R6bano
-Apio • Esp6rragos maduros • Ruibarbo
•Ar6ndano - Espinaca • Lechuga • Verduras
•Betarraga, • Groselta • Maiz con hoias
hierbas • Guisantes • Perejil • Zanahorias
"Cereza
Parrillas del compartimiento del congelador
Algunos modelos tienen una bandeia para hielo y otros
tienen una parrilla completa para Ifquido derramado
Para retlrar la
bandeja de hielo: Soportes
Levante el lado
izquierdo de fa parrilla
y sep6rela de sus
soportes, despu_s jale
la bandeja hacia la
izquierda para liberarla !
de los soportes Empuje la bandeja hacia Ia derecha para
liberar las espigas de los hoyos de la pared del gabinete.,
Para quitar la parrilla escalonada:
(1) Levante el lado izquierdo de la parrilla ligeramente,
mueva la parrilla hacia la izquierda para liberar su
extremo derecho de los hoyos de Ia pared del gabinete.
(2) Baje el lado derecho de la parrilla, mueva la parrilla
hacia fa derecha y s6quela,
Como en cualquier 6rea de refrigefaci6n, losalimentos con
olores fuertes deben guardarse envueltos. Alimentos como:
• Br6culi -Cebotta de Cambray "Coliflor • Nabo
• Col •Col de Bruselas -Pastinaca
Caj6n para frutas y verduras (enalgunos modelos)
Elcaj6n de la derecha est6 disefiado para proporcionar
menor humedad en el atmacenamiento de alimentos como:
"Albaricoques • Fresas • Melocot6nes • Tangerinas
• Champi_ones "jugosde • Naranjas ' Uvas
• Duraznos ffutas • Peras
"Frambuesas •Manzanas
Caj6n para carnes
Este caj6n corredizo es
adecuado para guardar la
comida para el almuerzo, el
queso, los entremeses, los
alimentos para untar y los
tentempi6s. Estecaj6n y la
parritla con la que est6 unido
pueden colocarse en cualquier [ugar det compartimiento
4O
de los alimentos frescos de acuerdo con sus necesidades

Servicio de hielo
Bandejas para hielo (en modefos que no
tienen la m6quina autom6tica para hacer hielo)
Pora sacar los cubos de hielo,
voltee ia bandeja, sui_teia
sobre un recipiente y tuerza
ambos lados
Para s6to uno o dos cubos,
no voltee la bandeja, tuerza
ambos lados ligeramente y
saque Joscubos que desee
Lave las bandejas de hielo s61o con agua tibia.
No las ponga en una lavavaiilias autom6tica,
Juego de accesorios para la M6quina
autom6tica para hacer hieJo
(opcional con cargo extra)
Si su reffigerador no viene equipado con una m6quina
autom6tica para hater hieio, usted le puede adaptar
uno. P6ngase en contacto con su tienda Sears o con su
Centro de servicio Sears.
M6quina autom6tica para hacer hielo
(en modeios equipados con la m6quina para hacer hieio)
Si se pone en
funcionamiento su
refrigerador antes de
que se conecte el agua
al aparato, mantenga la
palanca indicadora en la
posici6n STOP (PARADA-
hacia arriba)_
Cuando se haya
conectado el refrigerador
al suministro de agua y
se haya abierto la Itave
del agua, ponga el caj6n
de almacenamiento de
hielo debajo de la
m6quina para hacer
hielo. Cambie entonces
la palanca indicadora a la
posici6n ON (ACTIVADA-
hacia abajo)
El molde de los cubos de
hielo se ilenar6 autom6ticamente con agua despu_s de
que pose la temperatura de fda a congelante y tos
primeros cubos normalmente se congelar6n despu6s de
varias horas
M6quina autom6_ica
para hacer hielo
i
,.,'_._:_1 pos]ci6n ON
Pala_ca
indicadoraa la
posici6n STOP
(PARADA-
hacia
a_riba)
Cai6n de
_lmacenomienlo
de hlelo
Palanca
indicadora a Ia
(ACTIVADA-
ia oboio)
Cuando los cubos est6ns61idamente congelados, ser6n
expufsados det molde al caj6n de almacenamiento de
hieb por medio de una palanca barredora Lam6quina
seguir6 produciendo hielo hasta que [a palanca
indicadora detecte que no hay suficientes cubos en el
caj6n y suspenda la operaci6n temporalmente_ Aseg0rese
que nada interfiere con la lrayectoria de la palanca,
Para almacenar m_sscubos de hielo, de vez en
cuando empareje los cubos almacenados con su mano
Una vez que su m6quina est_ funclonando, tire los
primeros grupos de cubos de hielo. Esto eliminar6
cualquier impureza que haya estado en la tuber_a de
agua. Haga Io mismo despu6s de los vacadones o de
largos per_odos en los que el hie[o no se utiliz6
Mueva la palanca hacia la posici6n STOP
(PARADA--hacia arriba)cuando:
• el suministro de agua se va a suspender por varias horasH
• el caj6n para el afmacenamiento de hielo se va a
retirar pot un tiempo
• se va de vacaciones (Tambi_n cierre la Ilave de paso
de fa tuberia de suministro de agua para el refrigerador )
• Ponga el control de la temperatura en la posici6n
OFF (apagado)
Si no se utiliza el hlelo con frecuencia, los cubos
viejos se nublar6n y sabr6n mal. Vade et caj6n de
atmacenamiento de hielo peri6dicamente y 16velo con
agua tibia.,
Si este es la primera m6quina para hacer hlelo que
tiene, escuchar6 de vez en cuando ruidos que tal vez no
sean comunes para usted Son ruidos normales de Ia
m6quina y no hay raz6n para preocuparse
Accesorio para el filtro de agua
(opcional con cargo extra)
Lafrescura de suscubos de hielo depende directamente de
la frescura det agua con la que est_n hechos, Espot eso
que es buena idea purificar et agua con un filtro de agua
EIfiltro de agua esuna parte opcionat que fiene un costo
extra y se puede conseguir en suCentro de servicio Sears_
Pida el filtro No_ 978488 y se instaJar6 en unos minutos
cuando seuna la conexi6n de entrada del tubo de agua
Juego de accesorios para el suministro de agua
(opciona! con cargo extra)
Un juego de suministro de agua que contiene tubos de
cobre, tlave de paso, adaptadores e instrucciones
necesarias para conectar la m6quina para hacer hielo a
Jatuberia de agua frla tambi_n est6 disponible en Sears
o en suCentro de servicio Sears
tuberia de agua para la m6quina autom_tica
j Consuhe los Requisitos de instalaci6n de la
para hater hieio en la slguiente p6glna.
41
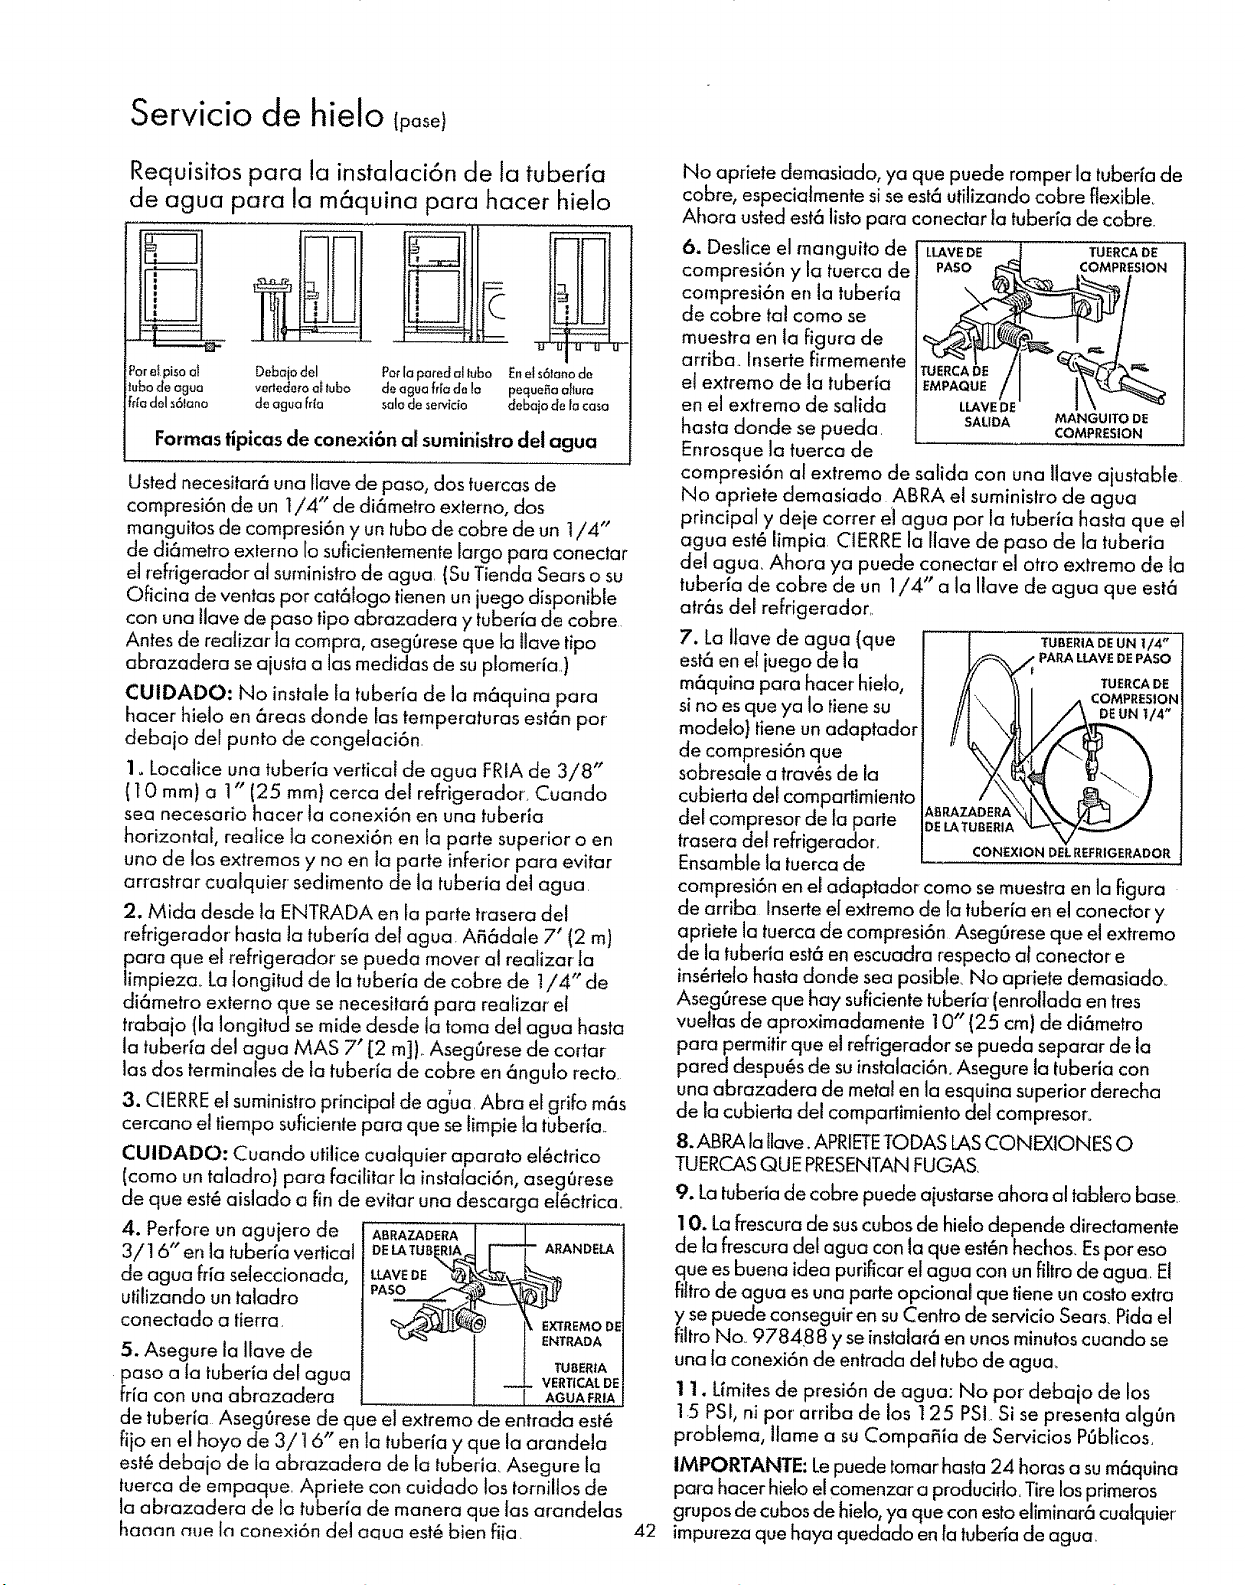
Servicio de hielo (pase)
Requisitos para la instalaci6n de la tuberia
de agua para la m6quina para hacer hielo
Poret pisoal Oebajo del Po_la pared ol tuBo Enel s61anode
lubo de agua verledero aI _ubo de agua frla do la peque._a aIlura
fi',_adel s61ano de cgua ffta salo de servicio debaja de Ia casa
Formas tipicas de conexi6n al suministro dei agua
Usted necesitar6 una llave de paso, dos tuercas de
compresi6n de un 1/4" de di6metro externo, dos
manguitos de compresi6n y un tubo de cobre de un 1/4"
de di6metro externo Io suficientemente largo para conectar
el reffigerador al suministro de agua (SuTienda Sears o su
Oficina de ventas por cat61ogo tienen un juego disponible
con una llave de paso tipo abrazadera y tuberia de cobre
Antes de realizar la compra, aseg,._reseque la llave tipo
abrazadera se ajusta alas medidas de su plomeria_)
CUIDADO: No instale la tuberfa de la m6quina para
hacer hielo en 6reas donde las temperaturas estan por
debajo del punto de congelaci6n
1_ Locatice una tuberfa vertical de agua FRIA de 3/8"
( I 0 mm) a 1" (25 ram) cerca del refrigerador, Cuando
sea necesario hacer ta conexi6n en una tuberia
horizontal, realice la conexi6n en la parte superior o en
uno de los extremos y no en la parte inferior para evitar
arrastrar cualquier sedimento de la tuberia del agua_
2. Mida desde la ENTRADA en fa parte trasera del
rekigerador hasta la tuberla del agua_ Afi6dale 7' (2 m)
para que el ret:rigerador se pueda mover a! reatizar fa
limpieza,_ La tongitud de la tuberia de cobre de 1/4" de
di6metro externo que se necesitar6 para realizar el
trabajo (la longitud se mide desde ta toma del agua hasta
la tuberia del agua MAS 7' [2 m])_Aseg0rese de cortar
1asdos terminales de la tuberfa de cobre en 6ngulo recto.
3. CIERREel suministro principal de ag'ua Abra elgril:o m6s
cercano el tiempo suficiente para que selimpie la tuberia.
CUIDADO: Cuando utilice cuatquier aparato el6ctrico
(como un taladro) para I:acilitar la instafaci6n, asegOrese
de que est6 aislado a fin de evitar una descarga et6ctrica_
4. Perfore un agujero de
3/16" en la tuberiavertical
de agua fr_aseleccionada,
utilizando un taladro
conectado a tierra.
5. Asegure la Ilave de
paso a la tubeda det agua
_:rfacon una abrazadera
de tuberia AsegOrese de que el extremo de entrada est6
fijo en el hoyo de 3/16" en la tuberia y que la arandela
est6 debajo de la abrazadera de la tuberia.. Asegure la
tuerca de empaque Apriete con cuidado los tornillos de
la abrazadera de la tuberia de manera que tas arandelas
hanan hue tn conexi6n del aaua est6 bien fiia_
A",AZADE.AI
__ l\ EXTREMO DE_
_ -"_ l ENTRADA
[ AGUA FRIA
No apriete demasiado, ya que puede romper la tuberla de
cobre, especiatmente si se est6 utilizando cobre flexible_
Ahora usted est6 listopara conectar la tubeda de cobre.
6. Deslice el manguito de
compresi6n y la tuerca de
compresi6n en la tuberia
LLAVE DE
PASO _
COMPRESION
de cobre tal como se
muestra en ia figura de
arriba, lnserte firmemente
el extremo de la tuberia
en el extremo de salida
hasta donde se pueda.
EMPAQUE
TUERCA DE /
LLAVE DE
SALIDA
MANGUITO D_
COMPR_:SION
Enrosque la tuerca de
compresi6n al extremo de salida con una llave ajustable
No apriete demasiado ABRA el suministro de agua
principal y de'e correr el agua por la tubeda hasta que el
agua est6 limpia CIERREla Ilave de paso de la tuberia
del agua_ Ahora ya puede conectar el otro extremo de la
tubeda de cobre de un 1/4" a la Ilave de agua que est6
atr6s del refrigerador,_
7. La itave de agua (que
est6 en el iuego de la
m6quina para hacer hielo,
sino es que ya io tiene su
" I TUBERIA DE UN I/4"
_,_ PAP,A LLAVEDEPASO
/." \\ TUERCA DE
tl I .r oMP. S,O.
modelo) tiene un adaptador
de compresi6n que
sobresale a trav6s de la
cubieda del compartimiento
del compresor de la parte
trasera del refrigeradoL
Ensamble la tuerca de
ABRAZADERANI\_._ _ _/
CON£XtON DELREFRIGERADOR
compresi6n en el adaptador como semuestra en la figura
de arriba Inserte el extremo de la tuberia en el conector y
apriete la tuer_a de compresi6n Asegr_rese que el extremo
de la tuberla est6 en escuadra respecto al conector e
ins6rtelo hasta donde sea posible No apriete demasiado_
AsegOrese que hay suficiente tuberia (enroltada en tres
vueltas de aproximadamente 10" (25 cm) de di6metro
para permitir que el refrigerador se pueda separar de la
pared despu_s de su instalaci6n. Asegure la tuberia con
una abrazadera de metal en la esquina superior derecha
de la cubierta del comparfimiento del compresoro
8. ABRAla ilave. APRIETETODAS LASCONEXIONES O
TUEP,CASQUE PRESENTANFUGAS
9. Latuberia de cobre puede ajustarseahora al tablero base.
10. La fl'escura de suscubos de hielo depende directamente
de la frescura del agua con la que est_n hechos. Espor eso
que es buena idea purificar el agua con un filtro de agua_E!
filtro de agua es una parte opcional que tiene un costo extra
y sepuede conseguir en suCentro de servicio Sears. Pidael
filtro No.. 978488 y se instalar6 en unos minutos cuando se
una la conexi6n de entrada del tubo de agua,.
11. Limites de presi6n de agua: No pot debajo de los
1.5PSI, ni por arriba de los ] 25 PSI.Si se presenta algOn
problema, llame a su Compa5ia de Servicios P6blicos,
IMPORTANTE: Lepuede tomar hasta 24 horas a sum6quina
pafa hacer hielo elcomenzar a produci_o, Tirelosprimeros
grupos de cubos de hielo, ya que con esto eliminar6 cualquier
42
impureza que haya quedado en la tuberfa de agua.
TUERCA DE

Caracterisficas*
• /
i • , i_ :_
BANDEJAS FLEXiBLES DE
CUBOS DE HIELO
Tuerza ambos extremos de estas
bandejas yvacle los cubos de hielo
en un redpiente o saque los cubos uno
pot uno_Disponible s6!o en modelos
que no tienen la m6quina
autom6tica para hacer hieto.
M,_QUINA AUTOMATICA
PARA HACER HIELO O
DISPOSICION PARA UNA
Si su refrigerador tiene la
m6quina autom6_ica para
hacer hiefo, consulte fa p_gina
41 para vet las instrucciones de
operaci6n. Si no, usted puede
agregafle una Se puede
adquirir un juego de accesorios
de la m6quina para hacer hielo
en su tienda Sears o en et
Centro de servicio Sears
INDICACIONES PARA EL
USO Y MANTENIMIENTO
Lainformaci6n que usted
quiera saber est6 justo en el
refrigerador, inciuyendo et
cuidado diario.
CONTROLES DE
TEMPERATURA
i Autocontrol en el n6mero
"5." Tat vez sea necesario
ajustarlo m6s tarde.
Consulte la p6gina,
EN EL
CONGELADOR SEGUN
SU CONVENIENClA
Algunos modelos tienen una parrilla
para Ia bandeja de hielo que mantiene
a la bandeja en un lugar que no
estorbe_Algunos tienenuna
parrilta m6s abajo, a la
derecha de la parriIla de la
bandeja de hieto, y otros
tienen una parrilla escalonada
comp]eta para una flexibilidad
de almacenamiento adiciona!_
CAJON DE USO
PRACTICO
Loscajones de uso doble
guardan 2 docenas de huevos
en suscartones o almacenan
una reserva de cubos de hielo
en el congelador para
ocasiones especiates.
CAJON DE LACTEOS
Elcompartlmiento cubierto
manfiene a la mantequilla y
a productos similarescon
una consistencia apropiada
para que sepuedan untar
f6citmente.
UBICACION DE LOS NUMEROS
DE SERIEY DE MODELO
Usted encontrar6 estos ngmeros aquL
Para ordenar ta reparaci6n de partes
vea la lisla de partes que viene con su
refrigerador o fteve estosn_meros a
suCentro de servicio Sears m6s
cercano y ellos ie ayudar6n_
CAJONES PARA CARNES ---
Elcaj6n proporciona el
almacenamiento conveniente
para tentempi_s, entremeses,
comida para et almuerzo, tocino,
queso y aiimentos para untar.
NO HAY QUE DESCONGELAR
No es necesario descongelar los
compartimientos de afimentos frescos
o el congelador Su congelador est6
diseF_adoy equipado para
descongelarse autom6ticamente,
*Todasestas caJacter_sticasnoest6nen
todos losmodelos
CAJON PARA FRUTAS Y
VERDURAS
El caj6n de la derecha est6
disefiado para permitir una
mayor circulaci6n de alre para
proporcionar niveles m6s bajos
de humedad para la mayorla
de los frutas.
CAJON PAPA FRUTAS Y
VERDURAS
El caj6n de la izquierda
est6 disefiado para mantener
niveles m6s altos de humedad
para alimentos sin envolver
y la mayoria de los vegetales.
Un control de humedad,
ajustable en atgunos modelos,
le permite regular la cantidad
de aire frio en el caj6n.
43
CAJON PARA TENER LOS
PRODUCTOS A LA MANO
Lapuerto permanece abierta mientras
el caj6n est6 en uso. Estoproporciona
f_cil acceso a los producios 16cteos_
PARRILLAS AJUSTABLES
Estasparrillas le permilen acomodar
I y reacomodar el interior de su
refrigerador de acuerdo con sus
necesidades de almacenamiento..
L__
EMPAQUES MAGNETICOS
EN LA PUERTA
Laspuertas cierran silenciosamente
y losempaques setlan ligeramente
cuando el refrigerador est6 nivelado
Vea Ia p6gina 37_.
PUERTAS CON TEXTURA
DE ACERO
Toque ias puertas contextura de acero
No deben quedar huellasdigitales.

Cuidado y limpieza
Exterior
Se puede limpiar las manljas y el adorno de la puerta
con un paso humedecido con una soluci6n hecha de'
detergente liquido suave para platos y agua_ S6quelos
con un paso suave No encere las maniias o el adorno
Mantenga limpio el acabado. Limpielo con un paso
limpio ligeramente humedecido con cera especial para
aparatos el_ctricos de cocina o con detergente Ifquido
suave para ptatosoS_quelo y 16strelocon un pa_.o suave y
limpio.. No limpie el refrigerador con un paF_opara lavar
platos sucios o con una toalla mojada: estos podr_an dejar
un residuo que puede da_ar la pintura No utilice fibras,
limpiadores en polvo, blanqueadores o limpiadores que
contengan blanqueador porque estos productos pueden
raspar y debilitar el acabado de la pintura.
Proteja el acabado de la pintura, La parte exterior det
refrigerador es de alta calidad, con acabado de pintura
horneada Con el cuidado apropiado, permanecer6 con
la apariencia de nuevo y fibre de oxidaciones durante
a_os.,Aplique una capa de cera para aparatos de
cocina cuando el refrigerador sea nuevo y despu_s
h6galo al menos dos veces al a_o,.
interior
Limpie el interior de los compartimientos para los
alimentos frescos y el congelador al menos una vez
al afio. Desconecte el refrigerador antes de limpiarlo,
Si esto no se puede, quite todo el exceso de humedad
de Ja esponja o del patio cuando timpie alrededor de
los interruptores, las luces o los controles.
Aplique una cera o abrillantador para aparatos de
cocina en ta superficie interior entre las puertas
Utilice agua tibia y una soluci6n de bicarbonato de
sodio hecha con aproximadamente una cucharadita
(1 5 ml)de bicarbonato de sodio mezdada en uncuarto
( 1L)de agua Esta soluci6n limpiar6 y neutralizar6 los
olores.. Eniuague con agua y s_quelo_
Se puede limpiar de la misma manera otras partes del
refrigerador, tales como tas juntas de la puerta, Ios cajones
para tas verduras, las bandejas de hieJoy todas Jaspiezas
de pr6stico._Despu6s de limpiar las juntas de la puerta,
aplique una capa delgada de petrolato a dichas juntas en
el lado de la bisagra. Esto ayuda a que las juntas no se
atasquen o sedoblen hasta perder su forma.. No utilice
polvos limpiadores u otros timpiadores abrasivos..
Evite limpiar las parrillas de vidrio (que se encuentran en
algunos modelos) con agua caliente porque la diferencia
de una temperatura extrema lospuede romper.
Para ayudar a prevenir maios olores, deje una caja
de bicarbonato de sodio abierta en la parte trasera
del refrigerador, en la parrilla superior, Cambie
dicha caia cada tres meses. Si coloca una caja de
bicarbonato de sodio abierta en el congelador
absorber6 los malos olores.
No lave ninguna pieza de pl6stico de surefrigerador en su lavavajillas autom6tica.
Detr6s del refrigerador
Tenga cuidado al mover su refrigerador y separarb de
la pared Cuatquier tipo de cubierta de pisos,
particularmente las cubiertas acojinadas y aquellas
superficies grabadas, se pueden dafiar..
Haga girar las paras niveladoras en sentido contrario al
de las manecil_as del relo i hasta que el peso del
reFrigerador recaiga sobre las ruedas.
Tire en forma recta el refrigerador y emp0jelo otra vez en
forma recta.. Si 1omueve de un solo lado se podrta daF,ar
la cubierta del piso o el refrigerador.
Despu_s de mover rodando el refrigerador a su lugar,
gire las paras en sentido de las manecillas del retoj hasta
que el peso del refrigerador recaiga sobre 6stas
Debajo del refrigerador
F-.Icondensador se encuentra detr6s det citindro de la
base. Para que su refrigerador opere con m6s eficiencia,
necesita mantener el condensador siempre limpio. Gire
el disco de control de la temperatura hasta la posici6n
OFF (apagado).. Barra o
aspire el polvo que se
puede quitar sin dificultad
de las bobinas del
condensador, despu6s
vuelva a encender el Limpielasbobinasdel
control de temperatura unavezala_o
coloc6ndolo en la posici6n
encendida. Para obtener mejores resultados, utilice un
cepillo disefiado especialmente para este prop6sito. Este
cepillo est6 disponible en [a tienda Sears o en un Centro
de servicio Sears.. Esta senciJla operaci6n de limpieza
debe hacerse al menos una vez al a_o
condensadoralmenos
44

Cajones de almacenamiento
Loscajones que se encuentran en la parte baja del
compartimiento de alimentos frescos se detendr6n antes
de salir completamente det refrigerador, con esto se
evita queet contenido de dichos cajones se caiga en el
pisQ Los caiones se pueden sacar f6cilmente, debe
tomar los dos lados y levantados ligeramente, mientras
los jala de la posici6n en que estos se detienen.
Si desea sacar los cajones cuando la puerta del
compartimiento de los alimentos frescos no est6
completamente abierta, siga el procedimiento
correspondiente al modelo de su refrigerador,
Cajones gemelos con cubierta de vidrio
(en mode!os asi equipados)
Para quitar la cubierta de vidrio:
1. Quite los cajones.
Cajones de ancho completo con cubierta
de plastico (en modelos asi equipados)
Para quitar la cubierta
]ev6ntela de los soportes,
j61ela hacia adelante,
inclfnela y s6quela,.
Para quitar el caj6n, levante
el frente ligeramente y jale
el caj6n hacia afuera_
i
Cambio del foco
Se encuentra un foco y un
z6calo en la parte superior
del compartimiento de los
alimentos frescos, justo
detr6s de la perilla de
control de temperatura
Para reemplazar un foco
quemado, desconecte el refrigerador, desatornille el
foco cuando est6 frlo y reempl6ce!o con un foco para
aparatos ei6ctricos del mismo tama_o,
_ '=- = _.
2. Meta la mano por
debajo, empuje el frente de
la cubierta de vidrio hacia
arriba y, al mismo tiempo, j6teto Jom6s
adelante que se pueda, Inclinefo y s6quelo,
3. Quite et marco del caj6n (Siempre remueva la
cubierta de vidrio antes de sacar el marco del caj6n,)
Levante el marco y sep6relo de los soportes de cada
lado y de la parte de atr6s, j61elo hacia adelante,
incllnelo y s6quelo,
Para reemplazar la c,bierta de victrio:
1. Baie el marco hasta que se apoye en los soportes de
cada uno de los lados y de la parte de atr6s,
2. Reemplace la cubierta de vidrio oprimiendo la orilla
trasera firmemente en el canal del marco trasero y
suavemente baie el frente a su lugaro
3. Reemplace los cajones
Precaucionesque deben tornarse
cuando salede vacaciones
Cuando vaya a salir de vacaciones o se vaya a
ausentar durante una larga temporada, interrumpa
la energla e16ctrica del refrigerador, gire el control a la
posici6n OFF [apagado) y limpie el interior con una
soluci6n de bicarbonato de sodio, hecha con una
cucharadita mezc!ada en un cuarto de agua.. S_quelo,
Para prevenir el mal olor, deje una caja de bicarbonato de
sodio abierta en el refrigerador Deie las puertas abiertas.
Para vacaciones m6s cortas, quite los alimentos
perecederos y deje los controles como normalmente
est6n. Sin embargo, si espera que la temperatura del
cuarto baje a menos de 60 °F_ (I 6 °C._),siga las mismas
instruccionesde las vacaciones largas
Si su refrigerador tiene una rn6quina para hater
hielo, mueva la palanca de mando en la posici6n STOP
(PARADA-hacia arriba) y asegOrese de que ha
suspendido el suministro de agua al refrigerador,
Precaucionessiva a mudarse
Desconecte el cable de la energia del contacto de la
pared, saque toda la comida, limpie y seque el interior,
Asegure todas las cosas sueltas, tales como las
parrillas y los caiones, para prevenir que sedarien y
levante 1asparas niveladoras,_
AsegOrese de que el refrigerador se mantenga en una
posici6n vertical a la hora de movedo y en la mudanza
Debe asegurarse en la mudanza para que no se mueva
en el camino, Proteja et exterior del refrigerador con
45
una cobija,
Antes de solicitar un servicio
Ahorre tiempo y dinero, Revise esta lista de causas de
problemas de operaci6n menores que usted mismo
puede corregir
E!refrigerador no funciona
" Si el motor no funciona pot cerca de 30 minutos,
puede estar en el ciclo de descongelaci6n_
• El control de temperatura est6 en la posici6n
OFF (apagado),
° Sila luz interior no enciende, el refrigerador puede
estar desconectado_
" Si la davija est6 asegurada y el reffigerador no
funciona, conecte una 16mpara o un aparato eJ_ctrico
peque_o en el mismo contacto para determinar si se
trata de un interruptor autom6tico de circuito o de un
fusible quemado
El motor funciona durante periodos largos
• Losrefrigeradores modernos con m6s espacios de
atmacenamiento y un compartimiento de congelador m6s
grande requieren de un mayor fiempo de funcionamiento
• Esnormal cuando el refrigerador apenas es Ilevado a
su casa debido a que usuaimente _ste necesita de 24
horas para enfriarse por completo
- Gran cantidad de alimentos colocados en el
reffigerador para ser enffiados o congeladoso
- Clima c6tido-se abre con frecuencia ta puerta
• Se deja la puerta abierta
• El control de temperatura est6 colocado en frio excesivo_
• El condensador necesita limpieza
Elmotor comienza a funcionar y se_detiene
frecuentemente
- El control de temperatura empieza a Funcionar y
detiene al motor para mantener las temperaturas
constantes, Esto es normal
Vibraci6n o cascabeleo
" Si el refrigerador vibra, casi siempre es porque no se
encuentra apoyado s61idamente en el piso_ Lasparas
niveladoras de enfrente necesitan set ajustadas, o el
piso es d_bil o est6 disparejo
" Si los platos vibran en las parrillas, intente cambiarlos
de lugar Una vibraci6n ligera es normal
Sonidos de funcionamiento
• El motor del compresor de alta velocidad que requiere
mantener una temperatura de casi cero en el
compartimiento del congelador m6s grande, puede
producir niveles de sonido m6s altos que su refrigerador
anterior_
• Elflujo normal del aire del ventilador Un ventilador
sopla aire frio a trav_s de los compartimientos del
refrigerador y del congelador y otro ventilador enffla el
motor del cornpresor,
" Estossonidos NORMALES tambi_n se escuchar6n de
vez en cuando:
-El interruptor del reloj de descongelaci6n suena
cuando est6 descongelando_
-Agua escurriendo debido a la descongelaci6n
-El control de temperatura suena en ON (encendido) o
en OFF (apagado}_
-El reffigerante est6 hirviendo o produce un gorgoteo_
-Crujido y chasquido de las bobinas de enfriamiento
causados pot la expansi6n y contracci6n durante la
descongelaci6n y la refrigeraci6n posterior a una
descongelaci6n
-Cubos de hielo cayendo al recipiente y agua corriendo
por lostubos cuando la m6quina para hacer hielo se
vuelve a Ilenar de agua_
Los alimentos se secan
• Losafimentos no seencuentran tapados, envueltos o
seIlados correctamente_
La temperatura del compartimiento de los alimentos
frescos o del congelador est6 demasiado tibia
• EIcontrol de temperatura no est6 io suficientemente fr_o
• Clima c61ido-la puerta se abre con ffecuencia_
• La puerta se deja abierta pot mucho tiempo.
- Un paquete puede estar dejando la puerta abierta o
bloqueando el ducto del aire en el compartimiento del
congetador
Escarcha o cristales de hielo en los alimentos
congelados
• La puerta debi6 haber estado abierta o un paquete la
dejaba abierta_
• Se abre la puerta pot un periodo muy largo o se abre
con mucha frecuencia_
• Escarcha entre los paquetes es normal
La m6quina autom6tica para hacer hielo no
funciona (en modelos asi equipados)
- Lapalanca de la m6quina para hacer hieto est6 hacia
arriba, esdecir, en posici6n STOP (PARADA-hacia arriba).
• El abastecedor del agua est6 apagado o no est6
conectado
• Etcompartimiento del congelador no est6
suficientemente fr_o
Cubos de hielo demasiado pequefios
• La Ilave de paso del agua que conecta el refrigerador
a la tuberla del agua de la casa puede estar
obstaculizada
Lenta congelaci6n de los cubos de hielo
- La puerta debe haberse quedado abierta
- Gire el control de temperatura a un nivel m6s frio_
46

Puertasreversibles
Los cubos de hielo tienen olor o sabor
"Se debe deshacerse de los cubos viejos Vacie el
recipiente de los hielos cada treinta dias
• Se necesita lavar e! recipiente de almacenamiento de
los hielos
• Lospaquetes no sellados en los compartimientos del
refrigerador y/o en los del congelador pueden estar
transmitiendo olores o sabores a los cubos de hielo
" Se necesita limpiar el interior del refrigerador
Se forma humedad en la superficie del gabinete
entre las puertas
- Frecuenteen los per_odos de alta humedad Para ayudar
a prevenir la oxidoci6n, sequela superficie y vuelva a
poner el control de temperatura en un nivel m6s fdo,
La humedad se mantiene adentro
• Se abre la puerta por un perlodo de tiempo muy largo
o se abre con mucha frecuencia
• En el clima h0medo, el aire introduce la humedad al
refrigerador cuando la puerta se encuentra abierta
El refrigerador huele real
. Un alimento con un olor muy fuerte debe estar mal
cubierto_
• Revise si hay comida en malas condiciones,
- Se necesita limpiar el interior del refrigerador
• Guarde una caja de bicarbonato de sodio abierta en
el refrigerador y reempl6cela cada tres meses
La luz interior no enciende
Su refrigerador cuenta con puertas reversibles por Io que
puede cambiar el lado por donde abren segOn su
conveniencia+ Lassiguientes instrucciones le indican
c6mo cambiar las bisagras del iado derecho al lado
!zquierdo Si alguna vez quiere volver a cambiar las
bisagras al lado derecho, siga las mismas instrucciones
simplemente invirtiendo todas las referencias para la
derecha e izquierda
• Lea todas las instrucciones antes de comenzar
• Maneje con cuidado todas las partes para evitar rayar
la pintura
• Coloque lostorniltos cerca de suspartes correspondientes
para evitar utitizarlos en losfugares equivocados_
• Disponga una superficie lisa para trabajar sin rayar
ias puertas
• PRECAUCION: Cuide que la puerta no caiga al piso
ya que el tope de ta misma podda resuhar dafiado_
Herramienta necesaria
• Herramienta Torxdriver T20 o T25
• Desarmador de cabeza hexagonal hueca de 5/16"
oCinta adhesiva (cinta para cubrir)
• Llave inglesa de 5/16"
- Desarmador Phillips
• Esp6tula o desarmador de punta delgada (la punta del
filo deber6 cubrirse con cinta adhesiva para evltar que
se raye la pintura)
• Etcontacto no tiene energ_a
• Se necesita cambiar el foco,
C6mo quitar las puertas
Paso 1--General
(a) Desconecte el cable del rekigerador,
(b) Vac[e todos los compartimientos de la puerta induyendo
el para tenerlos productos a la mano y el de la mantequilla_
Paso 2-C6mo qultar la puerta del congelador
(a) Asegure la puerta con la
cinta adhesiva,
(b) Utilice e! desarmador de
cabeza hexagonal hueca
de 5/16" para quitar los
dos tornillos que sostienen
la bisagra de la parte
superior del gabinete o
(c) Levante la bisagra (y el
calzo que est6 pegado a
ella) para poder sacar el
pasador de la bisagra del
agujero que se encuentra en la parte superior de la
puerta y col6quela a un lado junto con los tornilfos
47
superior
Bisagra ? ?
a
(pase a la p6gina siguierffe)

Puertas reversibles (pase)
(d) Quite la cinta, incline la puerta apart6ndola del
gabinete hasta sacar el pasador del agujero inferior' de
la abrazadera de la bisagra central
(Si la arandela se pega a la parte de aloajo, p6ngala de
nuevo en la bisagra.)
(e) Coloque la puerta con la parte exterior hacia arriba
en una superficie lisa..
(f) Utilizando un Torxdriver, cambie tos dos tornillos del
lado opuesto del gabinete a los agujeros de donde se
quit6 la bisagra superior
Paso 3--C6mo quitar la puerta de alimentos frescos
(a) Asegure la puerta con
cinta adhesiva.
Abrazadera de la
bisag_a central
(b) Utilice un desarmador de
cabeza hexagonal hueca de
5/] 6" y una Itave inglesa de
5/1 6" para quitar losdos
tomillos sujetando la bisagra
central, asi como el calzo
para ajuste pegado a ella, al
gabinete. Levante la bisagra
central para sacar su pasador
del agujero en la parle superior de la puerta
y cotoque la bisagra y lostornillos a un lado.
(c) Retire la cinta adhesiva, incline la puerla alej6ndola
del gabinete y lev6ntela del pasador de la abrazadera
de la bisagra inferior.
(Si la arandela de pl6stico se pega a la parle inferior de
la puerta, col6quela de nuevo en la bisagra.)
(d) Coloque la puerta en una superficie lisa con la parle
exterior hacia arriba.
(e) Utilizando una herramienta Torxdriver, cambie los
tomillos del lado opuesto del gabinete a los agujeros de
donde se quit6 la bisagra central.
(f) Tome uno de los tornillos que sequitaron en el paso
(b) y col6quelo en el agujero exterior del lado opuesto
No Io introduzca todo, deje espacio suficiente para que
quepa la arandela y la abrazadera..
C6mo cambiar ta bisagra inferior
(a) Si su refrigerador tiene
rejilla retiYela. Suj_teJa pot
la parte inferior y jale
hacia uste&
LADO DERECHO
Pasador de
Arandela
de
pl_stico
(c) Coloque la bisagra (y el
calzo para ajuste que est6
LADO
IZQUIERDO
pegado a ella) asicomo la
arandela de pt6stico en el
lado izquierdo inferior de
gabinete.
C6mo cambiar la bisagra superior
Coloque ia bisagra superior (y el calzo para ajuste que
est6 pegado a ella) en la esquina frontal izquierda del
gabinete pero todavia no apriete los tornillos_
Algunas bisagras tienen cuatro agujeros.. Dependiendo del
lado en que instale la bisagra ser6n los agujeros que utitice.
Para una instalaci6n correcta el borde exterior de la
bisagra deber6 estar paralelo al borde del gabinete..
Instafaci6n de la bisagra
def lado izquierdo
Instataci6n de la bisagra
del lado derecho
C6mo cambiar las rnanijas de las puertas
(en modelos asf equipados)
Puerta de alimentos frescos
Para quitar la manija...
(a) Retire el tap6n de la
manija colocando una
esp6tula con cinta adhesiva
en la punta debajo del
borde y quite el tornillo que
hay debajo de 81.
(b) Retire dos tornillos
manteniendo fa manija
pegada a la parle superior
de la puerta.
(c) Retire la maniia_
(b) Utilizando una
herramienta Torxdriver,
retire la bisagra (y el calzo
para ajuste que est6 pegado
a ella) asi'como la arandela
de pl6stico del lado derecho
inferior del gabinete
Abrazadera de la
bisagra central
48

Despu6s de que haya quitado la manija.o.
(a) Retire los torniltos
del borde derecho Tapq°
superior de la puerta e
ins6rtelos en los agujeros
de la manivela del lado
opuesto, Tomillos
(b) Con una esp6tula de la manJja
con cinta adhesiva en
la punta o con un
desarmador de punta
detgada, saque el tap6n
del agujero de ia bisagra
del lado izquierdo de ta
puerta y col6quelo en el
lado opuesto, en el agujero
que qued6 al quitar la bisagra superior.
(c) Retire el tap6n de ta parte frontal de la puerla y
c6mbiela al fado opuesto
(d) Cambie el tope de la puerta
LADO IZQUIERDO LADO DERECHO
Tope de la puerta
los agujeros
Puerta del congelador
(a) Retire el tornilfo
manteniendo ia maniia
pegada a la parte
superior de la puerta y
los dos tornillos
manteniendo la maniia
pegada a la parte
inferior de la puerta
(b) Retire la maniia
(c) Retire el tornillo del
borde superior derecho
de ta puerta e ins6rte!o
en el agujero de la
manija del lado
izquierdo
(d) Cambie el tope de la puerta como se muestra en la
parte a la izquierda_
(e) Asegure ta manija al borde derecho de la puerta
con torniltos en la parte superior e inferior, utilizando los
agujeros de ta parte inferior que quedaron al quitar los
tornillosdel tope de la puerta
" Cambie el tope de metal del lado derecho al
izquierdo. Utilice una herramienta torxdriver
"Cambie todos los tornillos del tado izquierdo al
lado derecho.
Cuando reinstale ia manija de la puerfa de
alimentos frescos...
• Asegure la maniia al tado derecho de ta puerta
con tornillos en la parte superior y debaio del tap6n
de la manija
• Cotoque de nuevo el tap6n de la maniia
C6mo colocar de nuevo la puerta del
compartimiento para alimentos frescos
(a) Baje la puerta del
compartimiento e inserteel
agujero inferior en el pasador
de la bisagra inferior_
AsegOrese de que la
arandela est6 en sulugar
en el pasador
(b) Inserte el pasador de ta
bisagra central en el aguiero
de la par're superior de la
puerta NOTA: Deber6
voltearse fa bisagra central
como se muestra al montarla
en el lado izquierdo
(c) Incline ta puerta hacia
el gabinete_ A medida que
pone la puerta en la posici6n
adecuada, deslice la bisagra
debajo de la cabeza de!
tornillo que habia sido
parcialmente enroscado
antedormente en el agujero
exterior Inserte la parte
restante del lornillo y luego
apriete bien ambos tornillos.
Arandela de
pl&stico
(pase a la p6gina siguiente)
fj_
49

Puertas reversibles (pose}
C6mo colocar de nuevo la puerta
de! congelactor
(a) Baje la puerta del
congeJador e inserte et
agujero inferior en el pasador
de la bisagra central,
AsegOrese de que la arandela
est6 en sulugar en el pasador.,
(b) Incline la puerta hacia
el gabinete levantando fa
bisagra superior hasta que
el pasador entre en el agujero
en la parte superior de'la puerta
(¢) Antes de apretar los tornillos de la bisagra superior,
asegOrese de que la parte superior de la puerta esta
nivelada con la parte superior del gabinete y de que el
espacio entre las puertas es igual a Io Iargo de toda la
porte frontal, No apriete excesivamente los tornillos-
apriatelos hasta que Ileguen ai tope y luego dales otra
media vueha mas.
Pasadore_ _!
C6mo examinar los empaques de las puertas
Reviselos empaques todo atrededor de las puertas
asegur6ndose de que no haya espacios entre los
empaques y el gabinete Si detecta algOn espacio, intente
estirar el empaque alej_ndolo de la puerta para que el
im6n del empaque haga contacto con la superficie del
gabinete, teniendo cuidado de no sacar el empaque
5O

GARANTnA TOTAL POR UN
i Ali O DE SU REFRnGERADOR
i Sears reparar6 este refrigerador sin costa par defectos de fabricaci6n o mano de obra por un
a_o a partir de la fecha de compra, siempre y cuando sea operado y se le preste mantenimiento
de acuerdo con las instrucciones ane-¢as o que le fueron proporcionadas junto con el producto.
GARANTUA TOTAL IPORC NCO ANOS EINREFRUGERADORES
CON S STEMA DE REFRBGERACION SELLADO
Sears reparar6 el sistema sellado (que consiste en refrigerante, tuberia de conexi6n y motor
compresor), sin costo pot cualquier defecto de fabricaci6n o manufactura durante cinco afios a
partir de ia fecha de compra, siempre y cuando este refrlgerador sea operado y se le preste
mantenimiento de acuerdo con las instrucciones anexas o proporcionadas junto con el producto.
La cobertura de la garantia vale s61o para refrigeradores que son
utilizados para almacenar alimentos con prop6sitos dom_sticos.
ELSERVtCIO DE GARANTIA ESTA DISPONtBLE PONIENDOSE EN CONTACTO CON
ELCENTRO!DEPARTAMENTO DE SERVICIOS DE SEARSMAS CERCANO EN LOS ESTADOS UNIDOS.
Esta garantia aplica Onicamente cuando el producto sea utilizado en los Estados Unidos.
Esta garantia te otorga derechos legales especificos;
usted podria gozar de otros derechos que varian dependiendo del estado.
SEARS, ROEBUCK AND CO., Dept. 817WA, 3333 Beverly Rd., Hoffman Estates, IL60179
"SERVIC[OS SEARS" ESTA A SU SERVICnO
Su Kenmore es mas valioso si considera que Sears
cuenta con unidades de servicio en todo el pals con
tacnicos capacitados pot Sears.o.tacnicos
profesionales especialmente capacitados para dar
servicio a los aparatos de Sears, quienes cuentan con
las partes, equlpo y herramientas para asegurarle
que cumpliremos con nuestro compromiso con
usted...'Damos servicio a !o que vendemos."
PARA SOLICITAR SERVICIO LLAME A: 1-800-4_REPAIR
SEARS, ROEBUCK AND CO., Dept. 702PS0, 3333 Beverly Rd., Hoffman Estates, IL 60179
Este folleto esta impreso en papef reciclado,
Ai_IADALE VALOR A SU KENMORE, COMPRE UN
SEGURO DE MANTENIMIENTO SEARS
Los refrigeradores Sears Kenmore est6n dlse_ados,
construidos y probados para que den afios de
servicio confiableo Sin embargo, cuatquier aparato
moderno puede necesitar servicio de vez en cuando.
La garantia Sears m6s el seguro de mantenimlento
Sears le brindan protecci6n contra gastos de
reparaci6n inesperados. Para m6s detalles p6ngase
en contacto con su vendedor o con su centro de
servicios m6s cercano_
Impreso en los EJU_
51

FULLONE YEAR
WARRANTY ON REFRBGERATOR
For one year from date of purchase, when this refrigerator is operated and maintained
according to instructions attached to or furnished with the product, Sears will repair this
refrigerator, free of charge, if defective in material or workmanship.
FULLFIVE-YEAR WARRANTY
ON SEALEDREFRnGERATUONSYSTEM
For five years from date of purchase, when this refrigerator isoperated and
maintained according to owner's instructions attached to or furnished with the product,
Sears will repair the sealed system (consisting of refrigerant, connecting tubing and
compressor motor), free of charge, if defective in material or workmanship.
The above warranty coverage applies only to refrigerators which
are used for storage of food for private household purposes.
WARRANTY SERVICE IS AVAILABLE BY CONTACTING THE
NEAREST SEARS SERVICE CENTER/DEPARTMENT IN THE UNITED STATES.
Thiswarranty" applies only while this product is inuse in the United States.
Thiswarranty gives you specific legat rights,
and you may also have other rights which may vary from state to state.
SEARS, ROEBUCK AND CO., Dept. 817WA, 3333 Beverly Rd., Hoffman Estates, IL60179
SEARS SERVICE IS AT YOUR SERVICE
Your Kenmore has added value when you consider'
that Sears has nationwide service unitsstaffed by
Sears-trained technicians...professional technicians
specifically trained to service SEARSappliances,
having the parts, tools and equipment to insure that we
meet our' pledge to you..o'We Service What We Sell."
FOR SERVICECALL: 1-800-4-REPAIR
SEARS, ROEBUCK AND CO., Dept. 702PS0, 3333 Beverly Rd, Hoffman Estates, IL 60179
This book is printed on recycled paper:,
[ Part No. SR6174 1
097 CG
ADD TO THE VALUE OF YOUR KENMORE,
BUY A SEARS MAINTENANCE AGREEMENT
Sears Kenmore refrigerators are designed, built and
tested for years of dependable use. Yet any modern
appliance may need service from time to time. The
Sears warranty plus the Sears maintenance
agreement give protection from unexpected repair'
bills.Contact your' salesperson or nearest service
center for details.
Printed in U.S.A.
162D3814P013
Top Freezer, No-Frost
14 & 16 cuo ft. Models
 Loading...