

Kenmore 3639564750, 3639564725, 3639564720, 36358092890 Owner’s Manual
Side by Side
30 and 24 Models
Caution'.
Read and Follow
All Safety Rules and
Operating Instructions
Before First Use of
This Appliance.
Kenmope
REFRIGERATOR
Safety Instructions
Water Line Installation
Operation
Care and Maintenance
Troubleshooting
Fili in these spaces:
Model No.
Serial No.
Purchase Date
Sears,Roebuck and Co., Hoffman Estates,IL 60179 U.S.A.
Important Safe Instructions ....
WARNING: Please follow basic precautions, including the following:
DO NOT store or use gasoline or other flammable
this appliance.
Use this appliance only for its
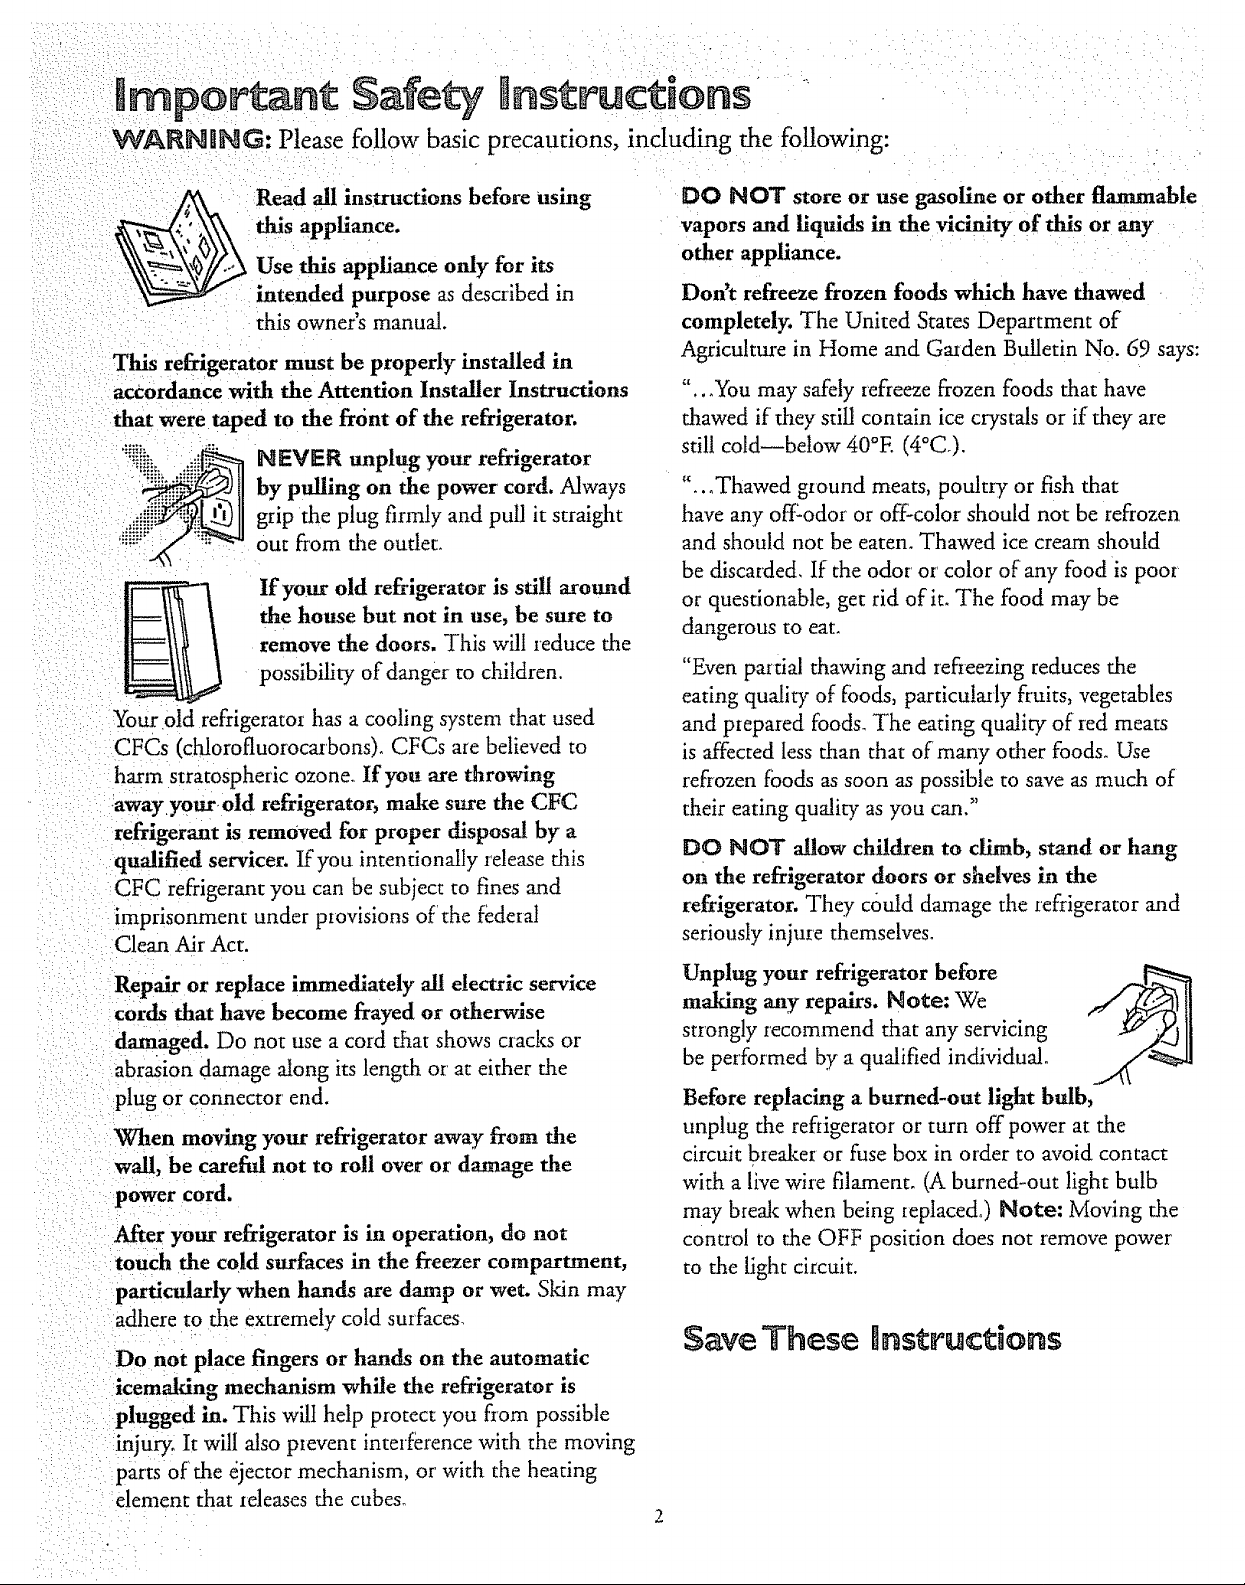
Read all instructions before using
intended purpose as described in
this owner's manual.
This refrigerator must be properly installed in
accordance with the Attention Installer Instructions
that were taped to the front of the refrigerator.
"!i[ii_. NEVER unplug your refrigerator
by pulling on the power cord. Always
grip the plug firmly and pull it straight
_iii_.:; our from the outlet.
If your old refrigerator is still around
the house but not in use, be sure to
remove the doors. This will reduce the
possibility of danger to children
Your old refrigerato_ has a cooling system that used
CFCs (chlorofluorocarbons). CFCs are believed to
harm stratospheric ozone. If you are throwing
awayyourold refrigerator, make sure the CFC
refrigerant is removed for proper disposal by a
qualified servicer. If you intentionally release this
CFC refrigerant you can be subject to fines and
imprisonment under provisions of the federaI
Clean Air Act.
Repair or replace immediately all electric service
cords that have become frayed or otherwise
damaged. Do nor use a cord that shows cracks or
abrasion damage along its length or at either the
plug or connector end.
When moving your refrigerator away from the
wall, be careful not to roll over or damage the
power cord.
After your refrigerator is in operation, do not
touch the cold surfaces in the freezer compartment,
particularly when hands are damp or wet. Skin may
adhere to the extremely cold surfaces.
Do not place fingers or hands on the automatic
icemaking mechanism while the refrigerator is
plugged in. This wilt help protect you from possible
injury. It will also pievent interference with the moving
parrs of the ejector mechanism, or with the hearing
element that releases the cubes°
vapors and liquids in the vicinity of this or any
other appliance.
Don't refreeze frozen foods which have thawed
completely. The United States Department of
Agriculture in Home and Garden Bulletin No. 69 says:
"...You may safely refreeze frozen foods that have
thawed if they still contain ice crystals or if they are
still cold--below 40°E (4°C).
"...Thawed ground meats, poultry or fish that
have any off-odor or off-color should not be refrozen
and should not be eaten. Thawed ice cream should
be discarded, If the odor or color of any food is poot
or questionable, get rid of it. The food may be
dangerous ro eat.
"Even partial thawing and refieezing reduces the
eating quality of foods, particularly fruits, vegetables
and prepared foods. The eating quality of red meats
is affected less than that of many other foods. Use
refrozen foods as soon as possible to save as much of
their eating quality as you can."
DO NOr allow children to climb, stand or hang
on the refrigerator doors or shelves in the
refrigerator. They could damage the refrigerator and
seriously injure themselves.
Unplug your refrigerator before
making any repairs. Note: We
strongly recommend that any servicing
be performed by a qualified individual.
Before replacing a burned-out light bulb,
unplug the refrigerator or turn off power at the
circuit breaker or fuse box in order to avoid contact
with a live wire filament. (A burned-out light bulb
may break when being replace&) Note: Moving the
control to the OFF position does not remove power
to the light circuit.
Save These rlnstructions
English Version 2
Version fran_aise 29
Versi6n en espafiol 59
Safety Instructions 2
Grounding Requirements 3, 4
Refrigerator Installation 4-6
Trim Kits and Decorator Panel Installation 6-9
Water IAne Installation 10-12
Temperature Controls 13
Refrigerator Door's 13
Grounding Requirements
DHPORTANT: Please read carefully.
Food Storage Suggestions
Shelves and Storage Drawers
Automatic tcemaker
Ice and Water Dispenser
Care and Cteaning
Vacation and Moving Precautions
Before You Call for Service
Normal Operating Sounds
Consumer Service
Warranty
14
t5, 16
17
18, 19
20-22
21
23-26
23
27
Back Cover
To Connect Eaectricity
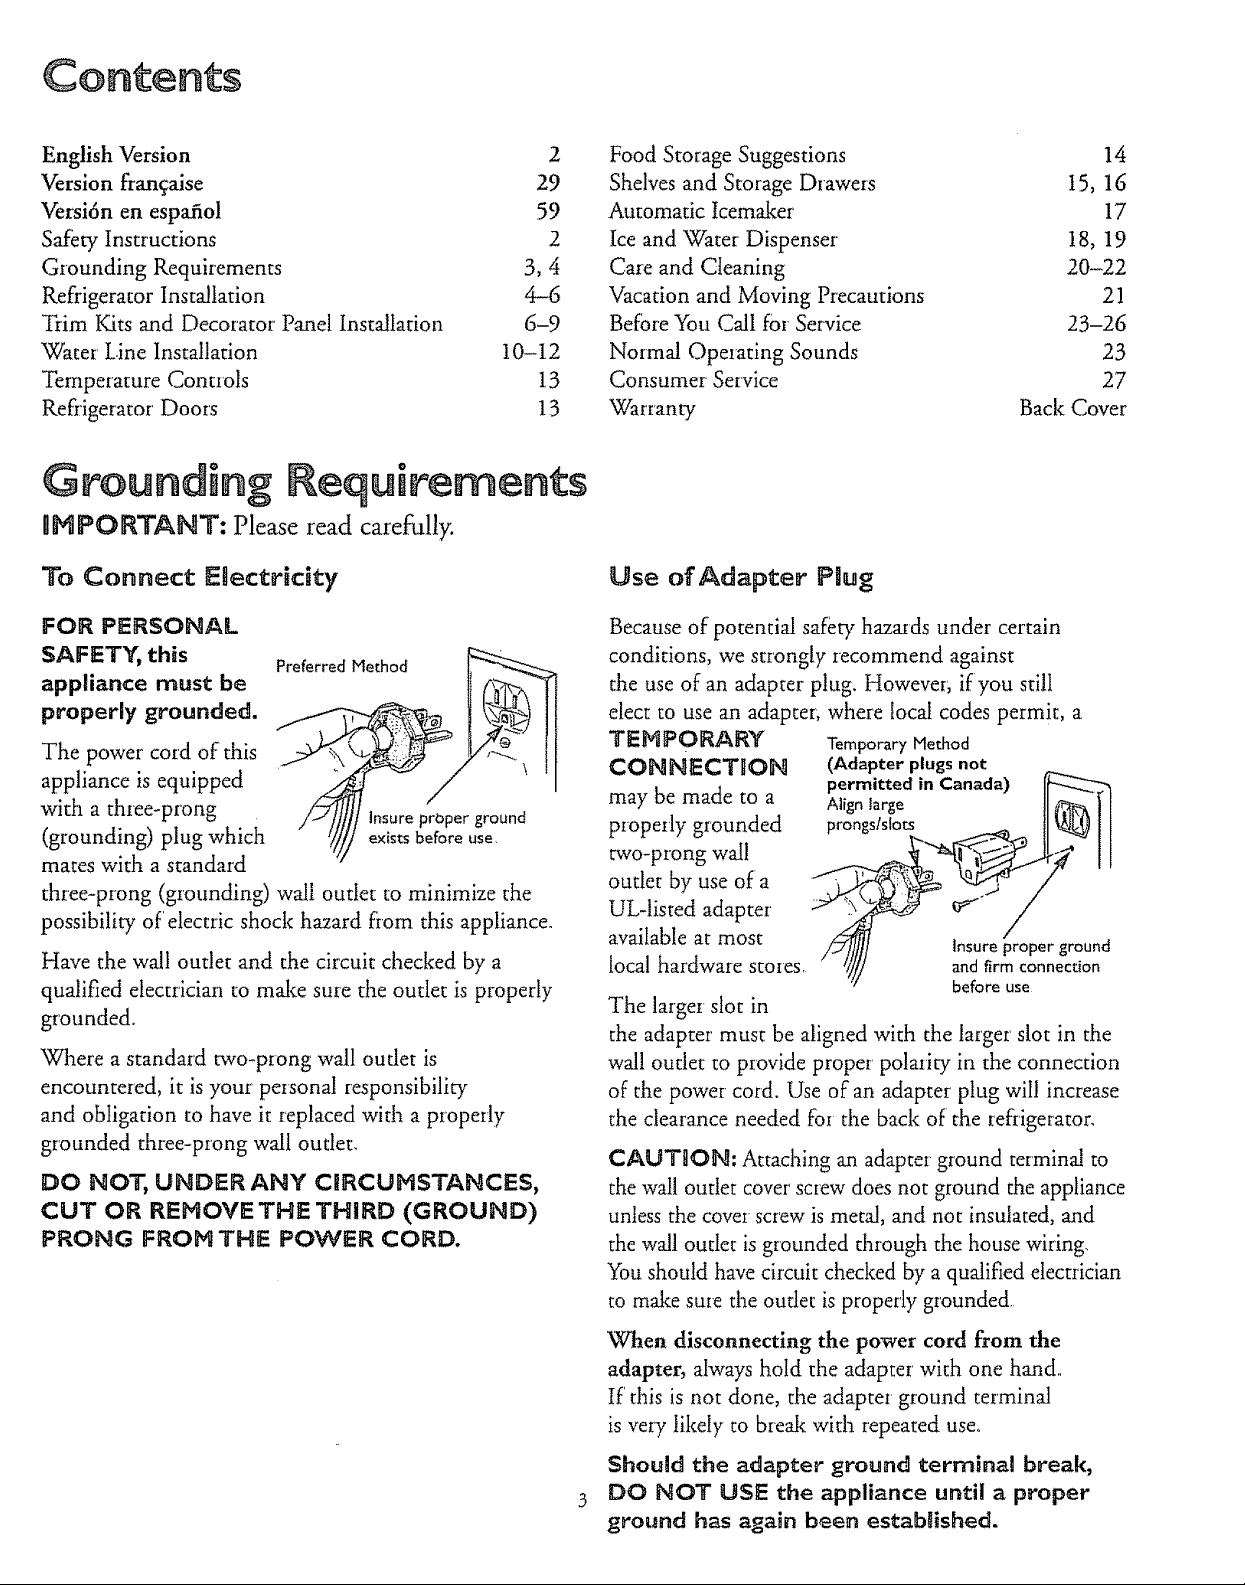
FOR PERSONAL
SAFETY, this
appliance must be
properly grounded.
The power cord of this
appliance is equipped
with a three-prong
(grounding) plug which
mates with a standard
three-prong (grounding) wall outlet to minimize the
possibility of electric shock hazard firom this appliance.
Have the wall outlet and the circuit checked by a
qualified electrician to mal_e sure the outlet is properly
grounded_
Where a standard two-prong wall outlet is
encountered, it is your personal responsibility
and obligation to have it replaced with a properly
grounded three-prong wall outlet,
DO NOT, UNDER ANY CIRCUHSTANCES,
CUT OR REHOVE THE THIRD (GROUND)
PRONG FROHTHE POWER CORD.
Preferred Method __
Use of Adapter Plug
Because of potential safety hazasds under certain
conditions, we strongly recommend against
the use of an adapter plug. However, if you still
elect to use an adapter, where local codes permit, a
TEHPORARY
CONNECTION
may be made to a
properly grounded
two-prong wall
outlet by use of a
UL-listed adapter
available at most
local hardware storeSr
The larger slot in
the adapter must be aligned with the larger slot in the
wall outlet to provide proper' polarity in the connection
of the power cord. "Use of an adapter plug will increase
the clearance needed fo_ the back of the refrigerator.
CAUTnO_'q: Attaching an adapter ground terminal to
the wall outlet cover' screw does not ground the appliance
unless the cover screw is metal, and not insulated, and
the wall outlet is grounded through the house wiring.
You should have circuit checked by a qualified electrician
to mal_e sure the outlet is properly grounded
Temporary Method
(Adapter plugs not
permitted in Canada)
Align Iarge
prongs/slots
insure proper ground
and firm connection
before use
"_Vhen disconnecting the power cord from the
adapter, always hold the adapter' with one hand,,
If this is not done, the adapter ground terminal
is very likely to break with repeated use.
Should the adapter ground terminaU break,
DO NOT USE the appliance until a proper
ground has again been established.
Grounding Requirements
Use of Extension Cords
Because of potential safety hazards under certain
conditions,we strongly recommend against the use
of an extension cord. However, if you still electto use
an extension cord, it is absolutely necessary that it be a
UL-listed, 3-wire grounding type appliance extension
cord having a grounding type plug and outlet and that
the electrical rating of the cord be t5 amperes
(minimum) and 120 volts.
Use of an extension cord wilt increase the clearance
needed for the back of' the refrigerator.
Refrigerator mnstallation
Location
* Install the refrigerator on a floor strong enough
to support it when it is fully loaded.
o Do not install it where the temperature will
go below 60°E (I 6°Co) because it will not run
often enough to maintain proper temperatures.
° Do not install it next to your range, a heating
vent or where the sun will shine directly on it.
Electrical Requirements
The refrigerator should always be plugged into its
own individual electrical outlet which has a voltage
rating that matches the rating plate.
This provides the best performance and also prevents
overloading house "wiring circuits "which could cause a
fire hazard from overheated wires.
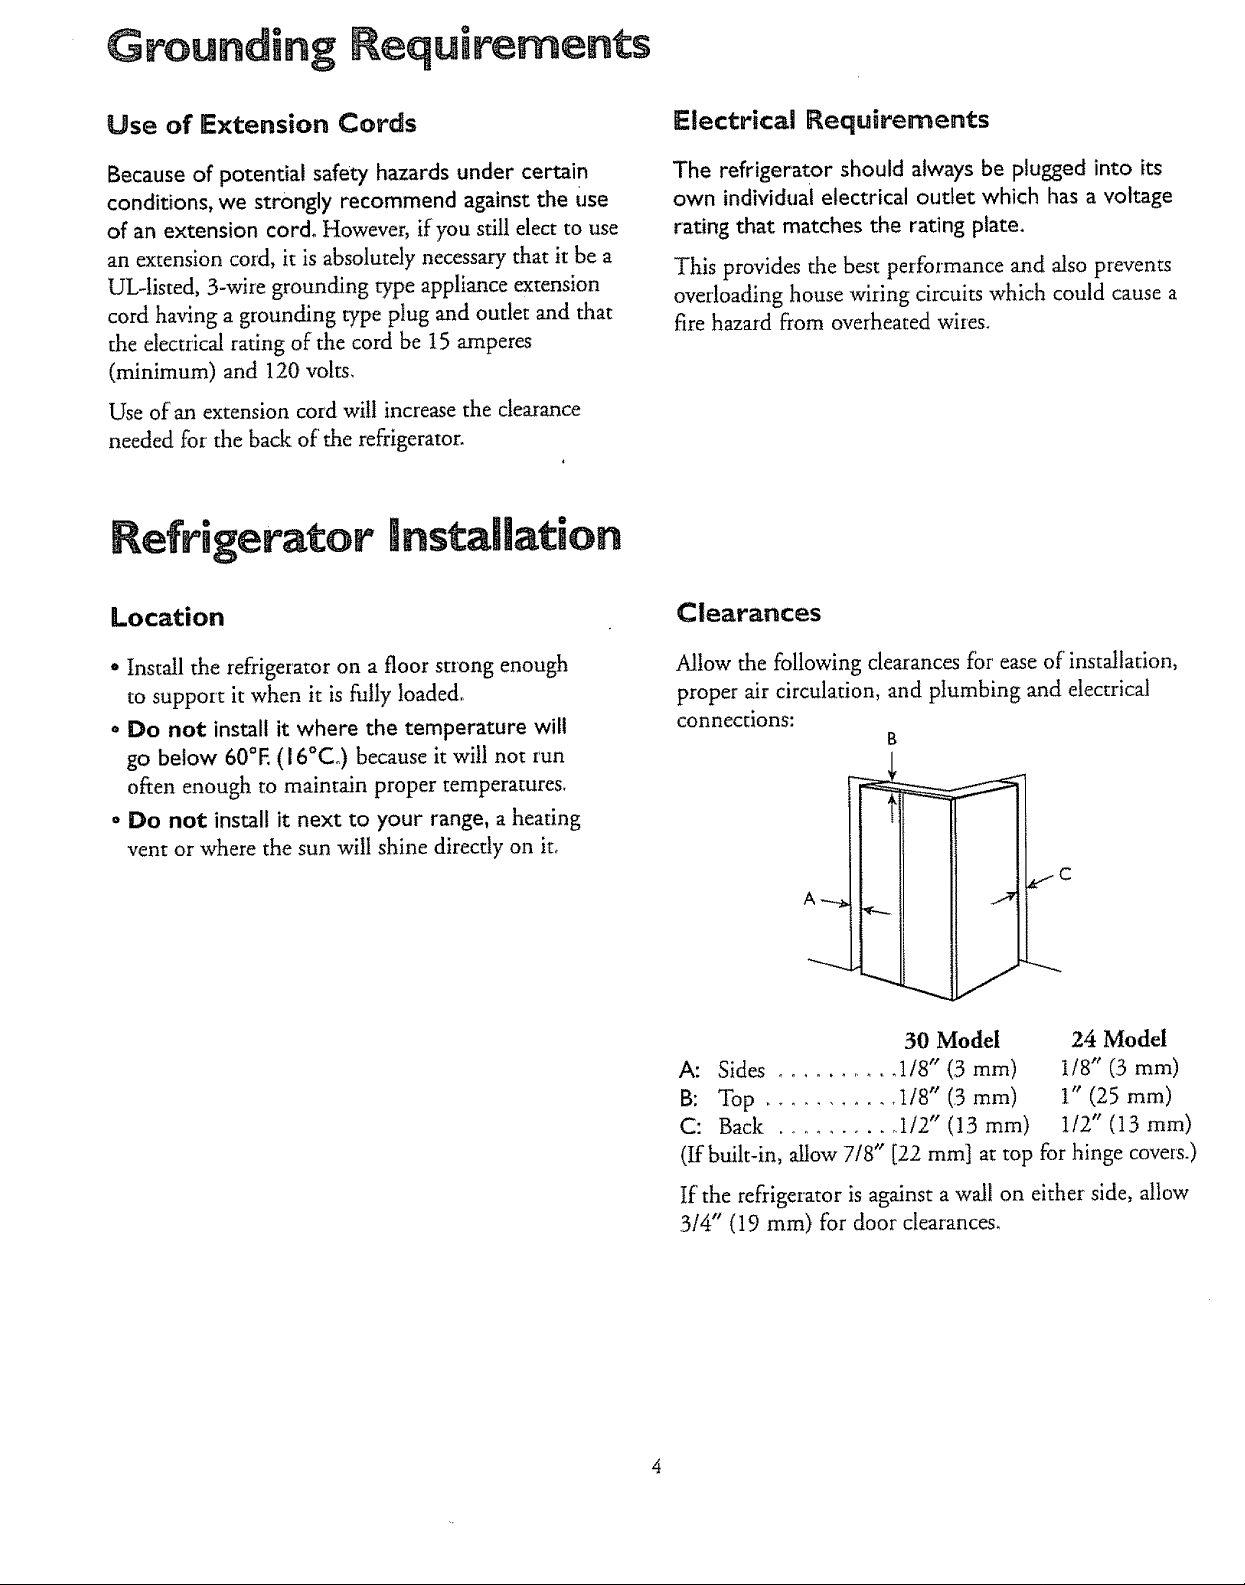
Clearances
Allow the following clearances for ease of installation,
proper air circulation, and plumbing and electrical
connections:
B
i
30 Model 24 Model
A: Sides ........... 1/8" (3 mm) 1/8" (3 mm)
B: Top ........... t/8" (3 mm) 1" (25 mm)
C: Back ........... I/2" (13 mm) t!2" (1.3 ram)
(If built-in, allow 7/8" [22 mm] at top for hinge cove_s.)
If' the refrigerator is against a wall on either side, allow
3/4" (19 mm) for door clearances.
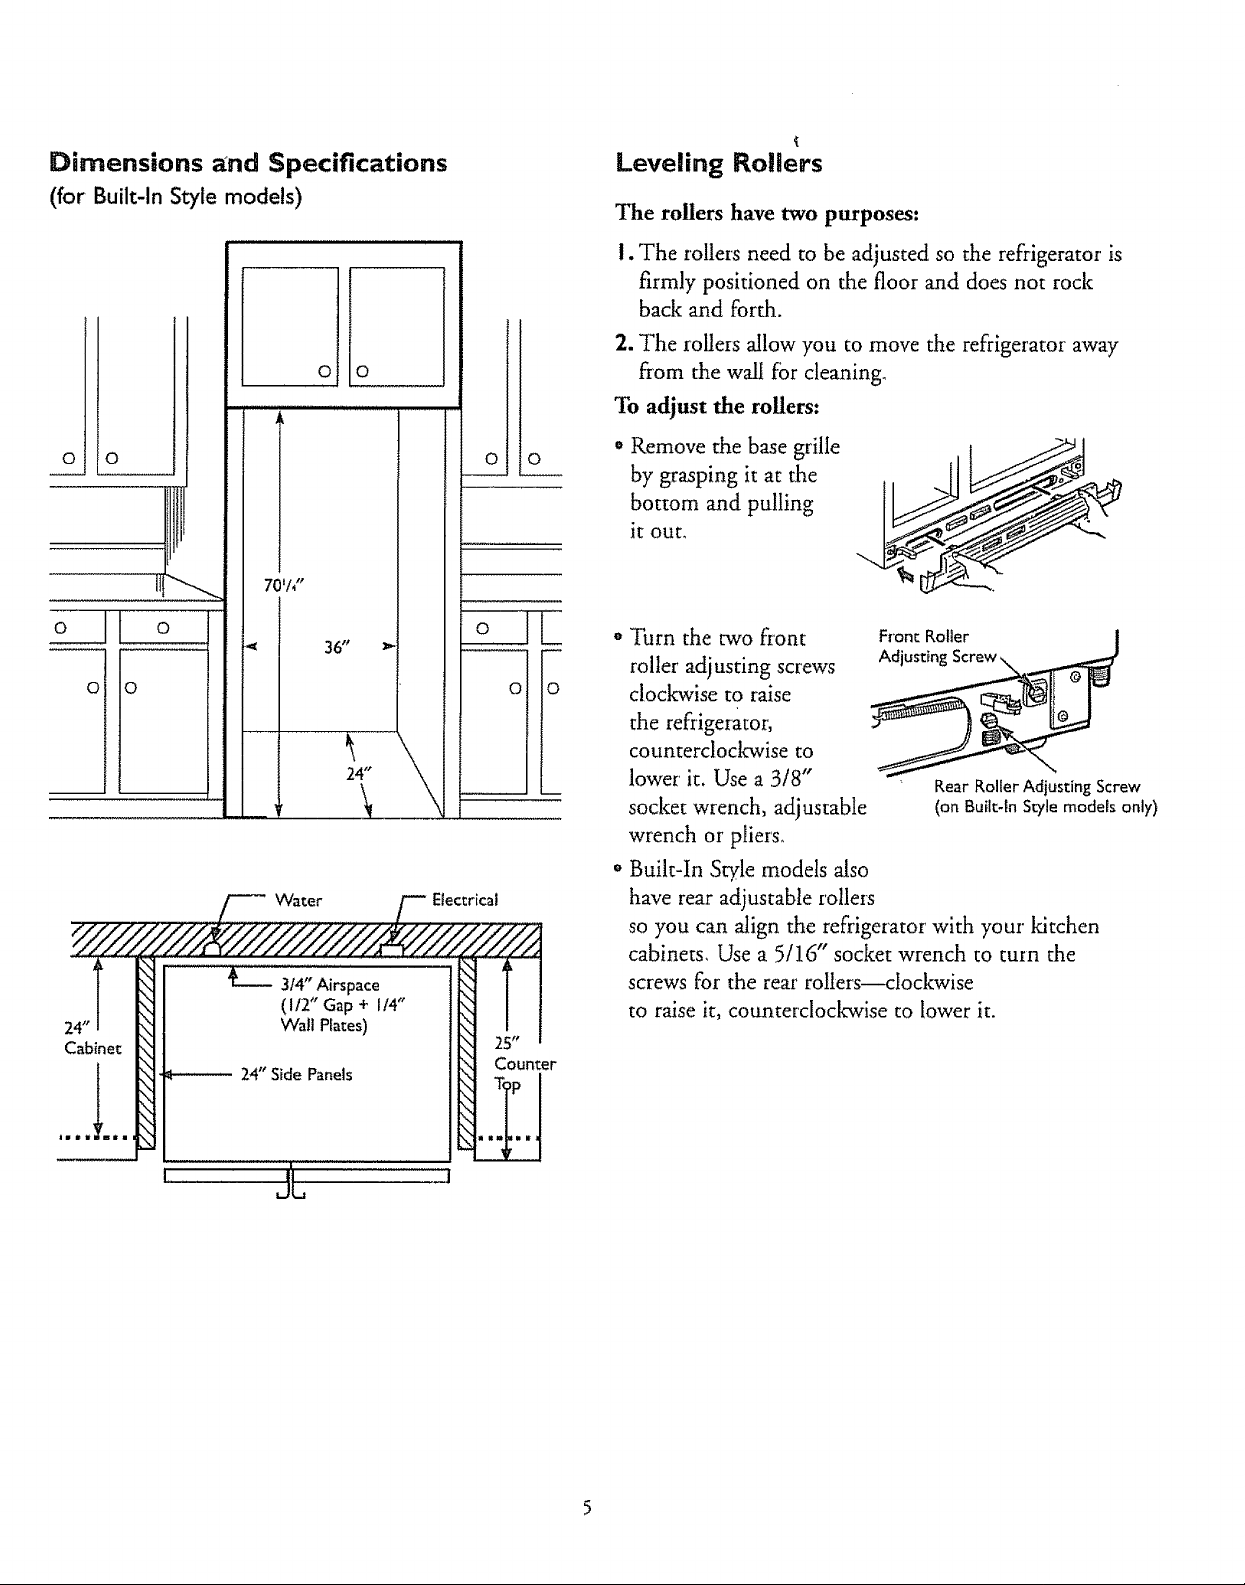
Dimensions _nd Specifications
(for Built-In Style models)
Leveling Rollers
The rollers have two purposes:
I. The rollers need to be adjusted so the refrigerator is
firmly positioned on the floor and does not rock
back and forth.
__0o o
oj 0
o o
............ L _'
24"
Cabinet
tit
o!lo
36 t'
314"Airspace
(I 12" Gap + I/4"
Wall Plates)
24" Side Panels
't
24"
2. The rollers allow you to move the refrigerator away
fzom the wall for cleaning.
To adjust the rollers:
o o
o
\
\
Electrical
Counter
• Remove the base grille
by grasping it at the
bottom and pulling
it out.
" Turn the two front
roller adjusting screws
clockwise to raise
the refrigerator,
counterclockwise to
lower it. Use a 3/8"
socket wrench, adjustable
wrench or pliers.
o Bulk-In Style models also
have rear adjustable rollers
so you can align the refrigerator with your kitchen
cabinets. Use a 5/16" socket wrench to turn the
screws for the rear rolters--cloclcwise
to raise it, countercloclcwise to lower it.
RearRoller Adjusting Screw
(on Built-In Stile models only)
|
JL
7Ll
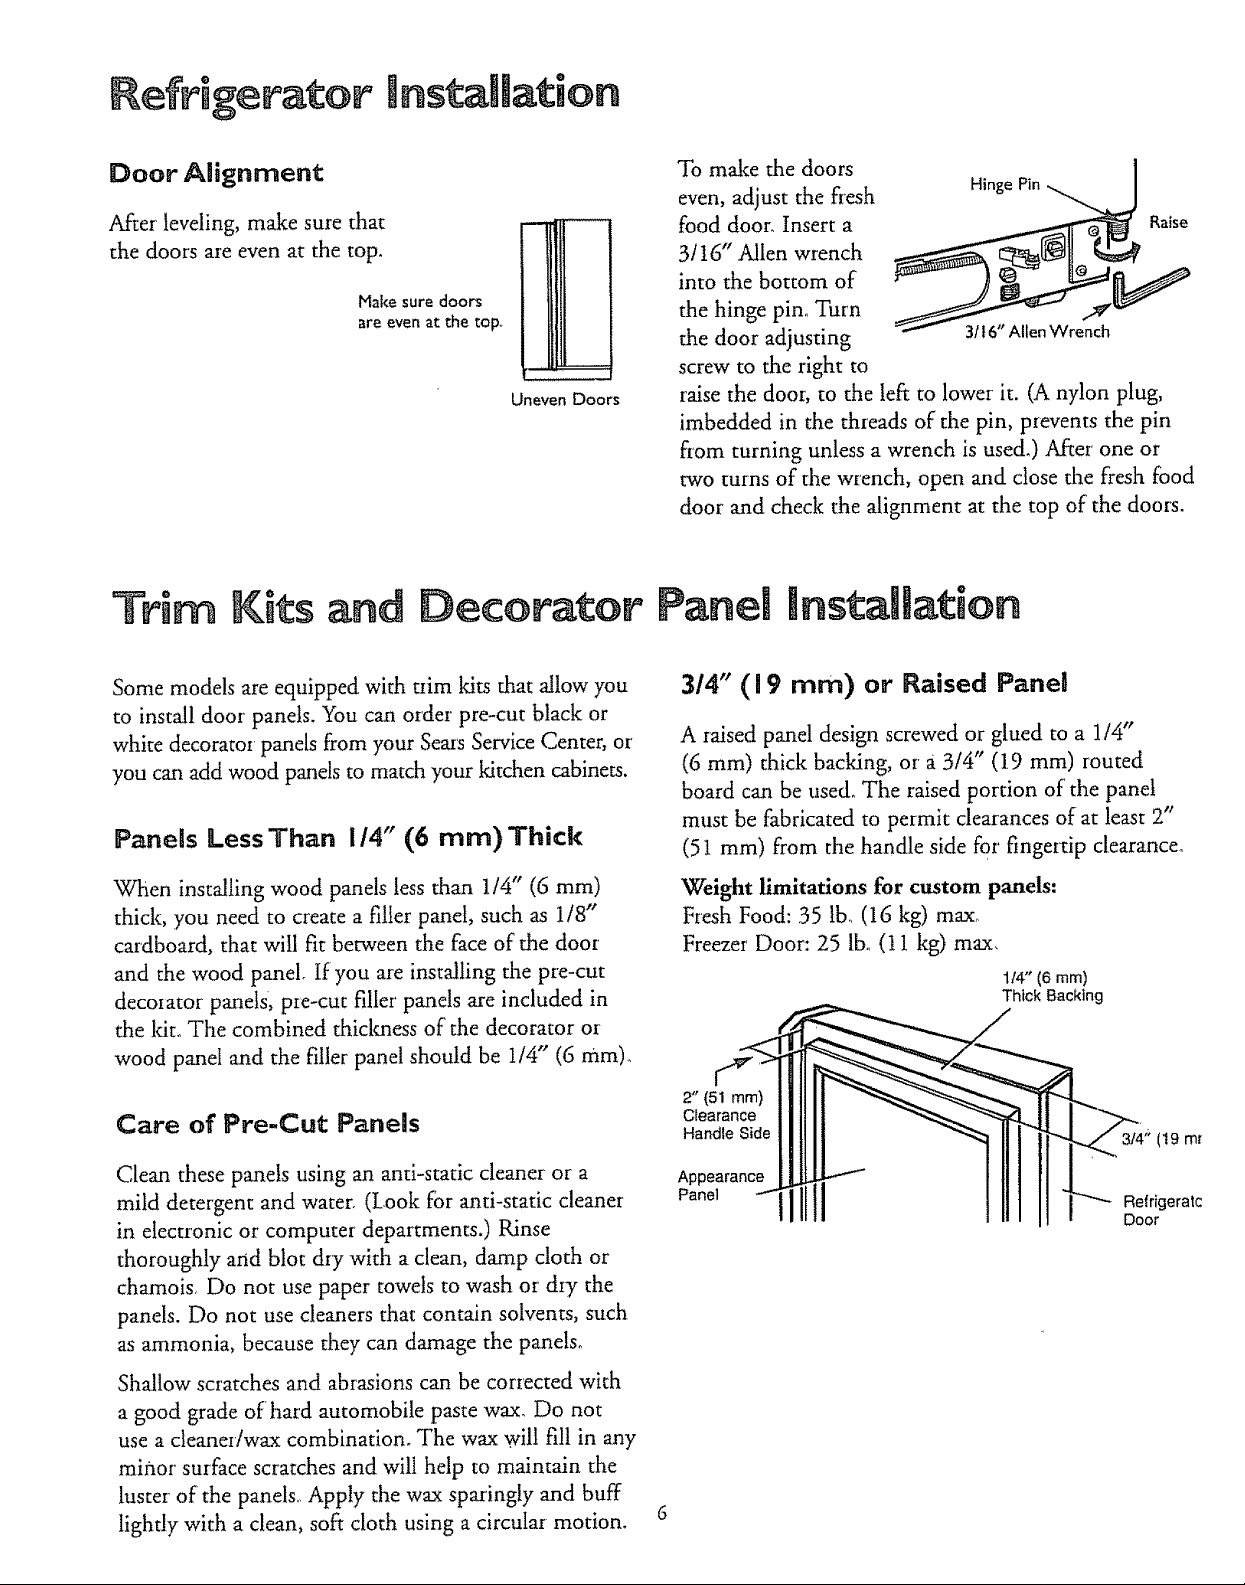
Refrigerator lnstaUmation
Door Alignment
After leveling, make sure that
the doors are even at the top.
Make sure doors
are even at the top,,
k
L_
Uneven Doors
To make the doors
even, adjust the ftesh HingePin
food door_ Insert a Raise
3116" Allen wrench
into the bottom of
the hinge pin. Turn
the door adjusting 3116" Allen Wrench
screw to the right to
raise the door; to the left to lower it. (A nylon plug,
imbedded in the threads of the pin, prevents the pin
from turning unless a wrench is used.) After one or
two turns of the wrench, open and close the fresh food
door and check the alignment at the top of the doors.
Trim Kits and Decorator Panel mnstaHation
Some models are equipped with trim kits that allow you
to install door panels. You can order pre-cut black or
white decorator panels from your Seas Service Center, or
you can add wood panels to match your kitchen cabinets.
Panels Less Than i/4" (6 mm) Thick
3/4" (19 ram) or Raised Pane!
A raised panel design screwed or glued to a 1/4"
(6 ram) thick backing, or a 3/4" (19 ram) routed
board can be used. The raised portion of' the panel
must be fabricated to permit clearances of at least 2"
(51 mm) from the handle side for fingertip clearance°
When installing wood panels less than 1/4" (6 mm)
thick, you need to create a filler panel, such as 1/8"
cardboard, that will fit between the face of the door
and the wood panel. If you are installing the pre-cut
decorator panels; p_e-cut filler panels are included in
the ldto The combined thickness of the decorator or
wood panel and the filler panel should be 1/4" (6 rnm).
Care of Pre-Cut Panels
Clean these panels using an anti-static cleaner or a
mild detergent and water. (Look for anti-static cleaner
in electronic or computer departments.) Rinse
thoroughly and blot dry with a clean, damp cloth or
chamois_ Do not use paper towels to wash or dry the
panels. Do not use cleaners that contain solvents, such
as ammonia, because they can damage the panels.
Shallow scratches and abrasions can be corrected with
a good grade of hard automobile paste wax. Do not
use a cleaner!wax combination. The wax will fill in any
minor surface scratches and will help to maintain the
luster of the panels.. Apply the wax sparingly and buff
lightly with a clean, soft cloth using a circular motion.
Weight limitations for custom panels:
Fresh Food: 35 lb_ (16 kg) max,
Freezer Door: 25 lb, (11 kg) max,
1t4" (6 mm)
Thick Backing
2"(51
Clearance I I II I!
_3/4 '; (!9 mt"
" °°'°s'°eilllli_
Appearance | _
Re_'rigeralc
Door
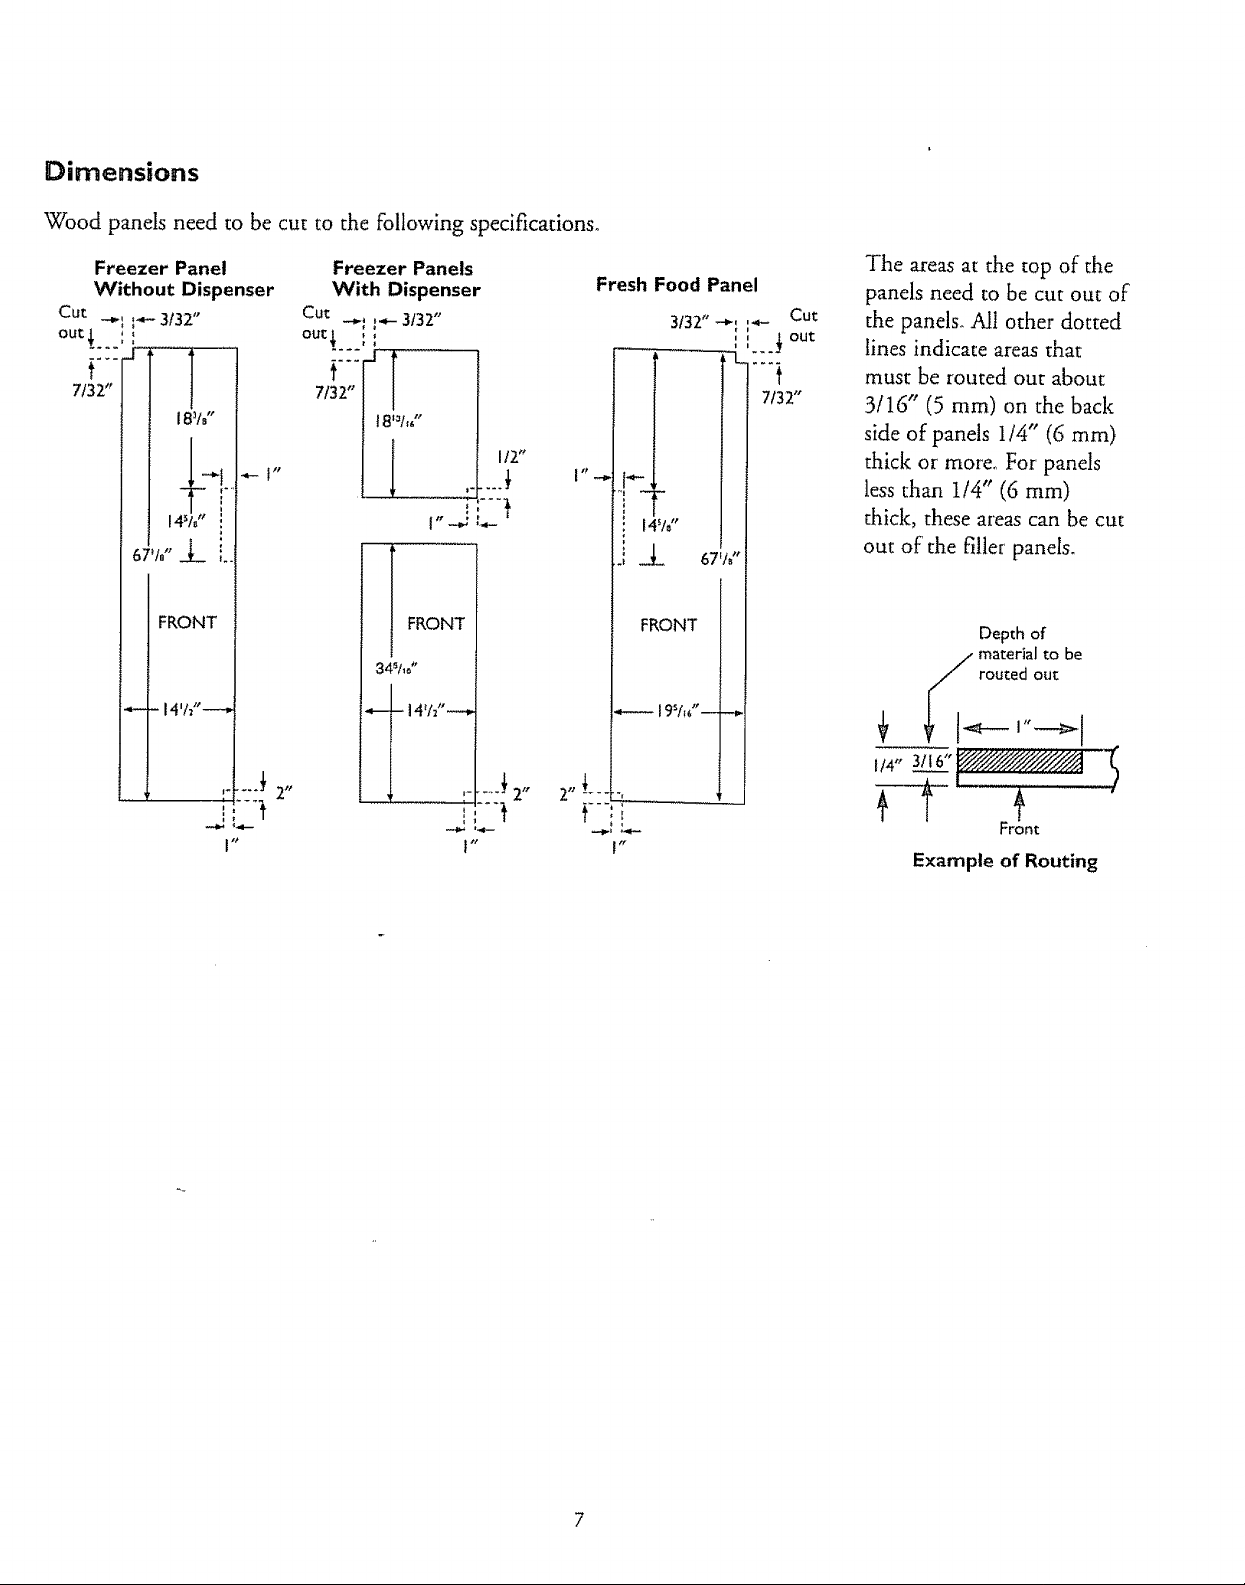
Dimensions
Wood panels need to be cut to the following specifications°
Freezer Panel
Without Dispenser
Cut _.,._ __ 3f32"
out_ :
7132't
Freezer Panels
With Dispenser
Cut
-,. l_-- 3t32"
out_, ,
7f32"
18'_h,"
112"
"'7
,;,._Li..
Fresh Food Panel
3132"-_ ,_--
14W'
.1 _J_ 67W"
7/32"
Cut
The areas at the top of the
panels need to be cut out of
the panels. All other dotted
tines indicate areas that
must be routed our about
3ll6" (5 ram) on the back
side of panels I/4" (6 ram)
thick or more.. For panels
less than 1t4" (6 ram)
thick, these areas can be cut
out of the fillet panels.
FRONT
:..... _ 2"
I"
FRONT
345h_"
.....!2,,
FRONT
19_M"- -,
t
V"
Example of Routing
Depth of
/ material to be
y routed out
Front

Inserting the Door Panels
I. Loosen the Top Trim on the freezer and fresh
food doors.
o Using a T-20 Tozx driver, loosen the two screws
attaching the Top Trim about I/4" (6 ram).
2. Insert the panels.
Top freezer panel and fresh food panel
o Lift the Top Trim up !14" (6 mm) and carefully push
the top freezer panel in until it slides into the slot
behind the door handle. Push the filler panel
(requi_ed with some door panels) in behind the
decorator panel. Repeat for fresh food panel.
Bottom freezer panel
° Carefully push the panel in until it slides into the
slot behind the door handle° Push the fillet panel
(required with some door panels) in behind the
decorator' panel.
3. Tighten the two screws on the Top Trim to 30
in-lbs torque.
4. Install the Side Trim. These pieces are tucked
inside the fresh food door handle.
Blue
Tape
Liner
Side
Trim
Cut-Out
Side
Trim
Do not remove the protective film on the outside
of the Side Trim until the Side Trim is installed°
o Fit the bottom of the Side Trim under the Bottom
Trim as illustlated.
o Hold the Side Trim against the front face of the
decorator panels and fit the Side Trim under the Top
Trim. Make sure the Side Trim is fitted correctly and
that you are satisfied with the appearance of all the
parts before pulling the blue tape liner'.
5. Secure the Side Trim.
o Place one hand between the two pieces of blue tape
liner and hold the Side Trim firmly against the panels
and the side of the door.
° Pull the top blue tape liner up about 3" (8 mm),
pressing the trim with your hand as the adhesive is
exposed to the door. Then pull the bottom blue tape
liner' down about 3" (8 ram)° Follow the tape with
your hand, pressing the trim adhesive against the door.
° Continue pulling the tape liner' loose, alternating
between the top and bottom and pressing the Side
Trim against the dooL
6. Remove the protective film from the outside of
the Side Trim.
!
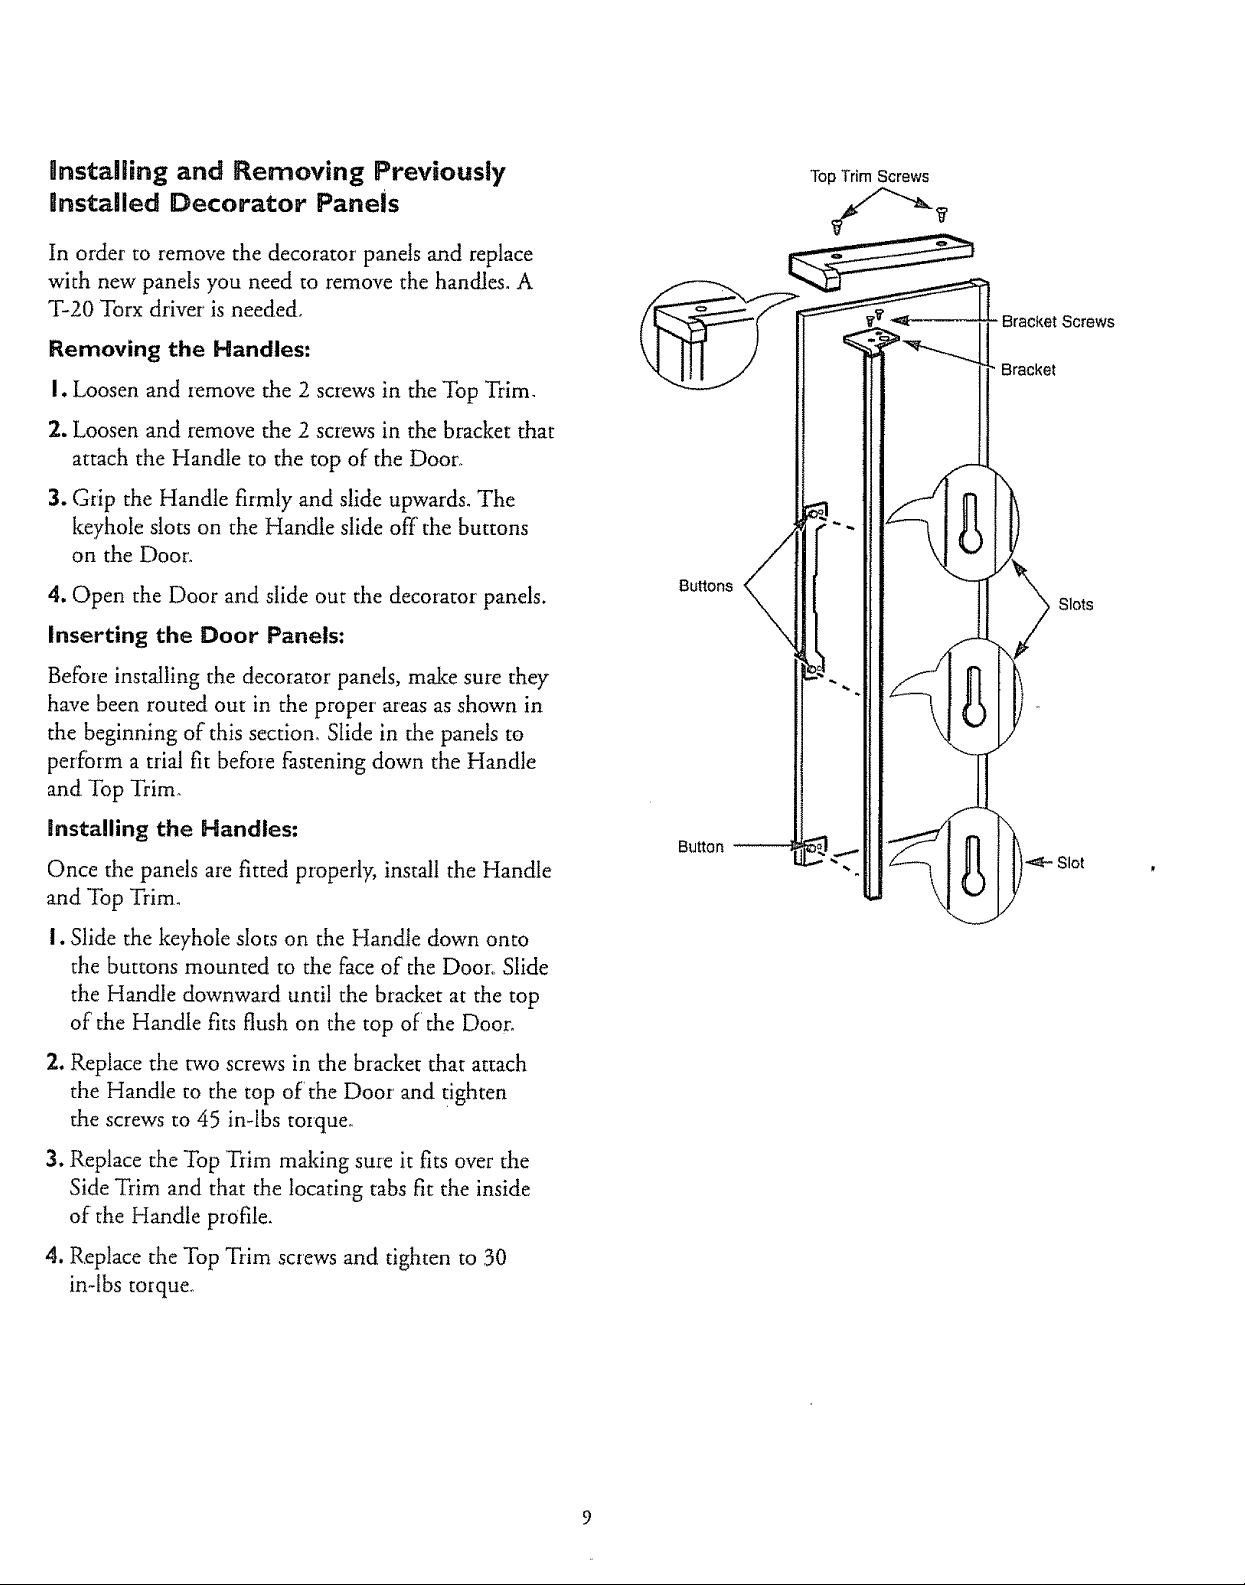
Unstalling and Removing Previously
gnstalled Decorator Panels
In order to remove the decorator panels and replace
with new panels you need to remove the handles. A
T-20 Torx driver is needed.
Removing the Handles:
I. Loosen and remove the 2 screws in the Top Trim.
2. Loosen and remove the 2 screws in the bracket that
attach the Handle to the top of the Door.
3. Grip the Handle firmly and slide upwards. The
keyhole slots on the Handle slide off the buttons
on the Door'.
4. Open the Door and slide out the decorator panels.
Inserting the Door Panels:
Before installing the decorator panels, make sure they
have been routed out in the proper areas as shown in
the beginning of this section. Slide in the panels to
perform a trial fit before fastening down the Handle
and Top Trim.
Top Trim Screws
Bracket Screws
Bracket
Buttons
Slots
installing the Handles:
Once the panels are fitted properly, install the Handle
and Top Trim.
i. Slide the keyhole slots on the Handle down onto
the buttons mounted to the face of the Door Slide
the Handle downward until the bracket at the top
of the Handle fits flush on the top of the Door.
2, Replace the two screws in the bracket that attach
the Handle to the top of the Door and tighten
the screws to 45 in-lbs torque_
3. Replace the Top Trim making sure it fits over the
Side Trim and that the locating tabs fit the inside
of the Handle profile.
4. Replace the Top Trim screws and tighten to 30
in-lbs torque.
Slot
CAUTION:
o If you use your refiigerator before connecting the
water line, make sure the icemaker feeler arm is kept
in the STOP (up) position.
o Do not install the icemalcer tubing in areas where
temperatures fall below freezing,
° When using any electrical device (such as a power
drill) during installation, be sure the device is
insulated or wired in a manner to prevent the hazard
of electric shock_
° All installations must be in accordance with local
plumbing code requirements_
WhatYou Wiff Need
• If your existing water line has a flared fitting at the
end, you will need an adapter (available at plumbing
supply stores) to connect the water line to the
refrigerator OR_you can cut off the flared fitting
with a tube cutter and then use a compression fitting.
[_] Shut Off the Hain Water Supply.
Turn on the nearest faucet long enough to clear the
line of water.
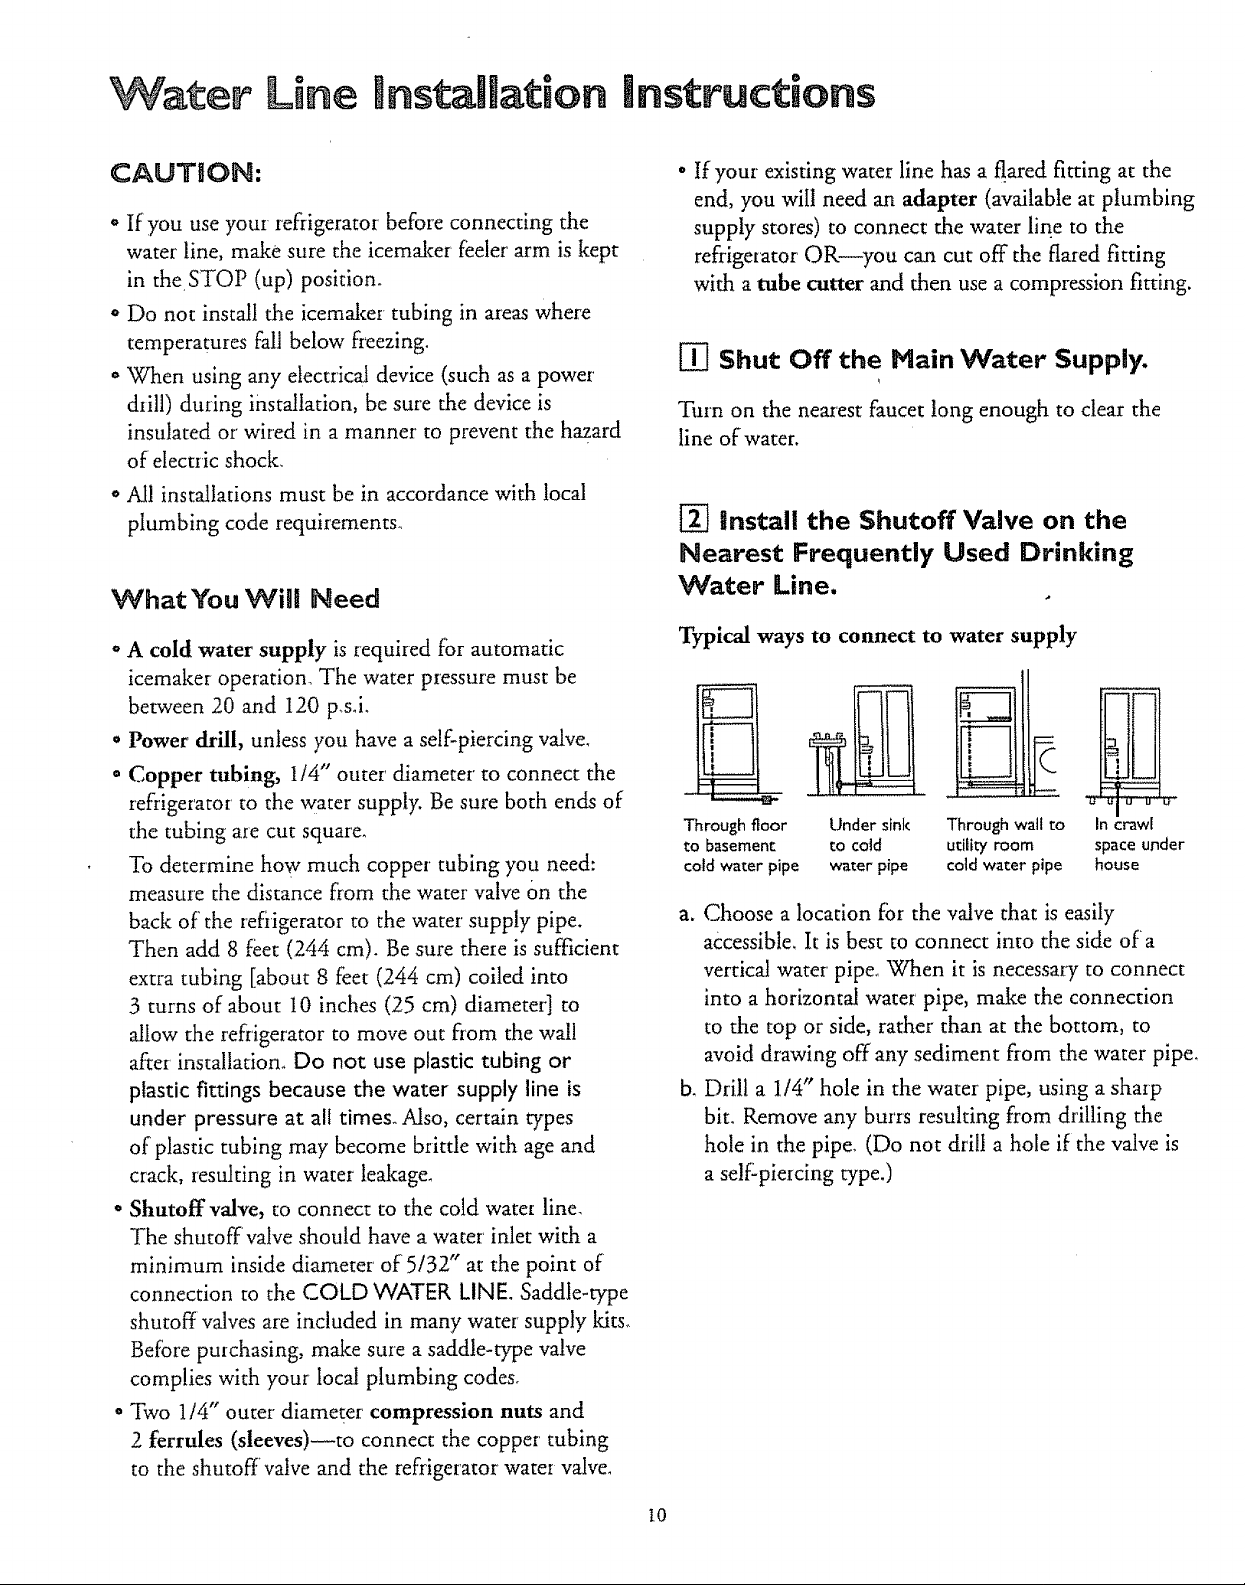
]-_ install the Shutoff Valve on the
Nearest Frequently Used Drinking
Water Line.
o A cold water supply is required for automatic
icemaker operatiom The water pressure must be
between 20 and 120 p_s°i.
° Power drill, unless you have a self-piercing valve,
• Copper tubing, 1/4" outer diameter to connect the
refrigerator to the water supply. Be sure both ends of
the tubing are cut squarer
To determine how much copper tubing you need:
measure the distance from the water valve on the
back of the refiigerator to the water supply pipe.
Then add 8 feet (244 cm). Be sure there is sufficient
extra tubing [about 8 feet (244 cm) coiled into
.3 turns of about 10 inches (25 cm) diameter] to
allow the refrigerator to move out flora the wall
after installation. Do not use plastic tubing or
plastic fittings because the water supply line is
under pressure at all times_ Mso, certain types
of plastic tubing may become brittle with age and
crack, resulting in water leakage.
° Shutoff valve, to connect to the cold water line_
The shutoff valve should have a water inlet with a
minimum inside diameter' of 5/32" at the point of
connection to the COLD 'WATER LINE. Saddle-type
shutoff valves are included in many water supply kits_
Before purchasing, make sure a saddle-type valve
complies with your local plumbing codes_
° Two 1/4" outer diameter compression nuts and
2 ferrules (sleeves)_to connect the copper tubing
to the shutoff valve and the refrigerator water valve.
Typical ways to connect to water supply
. .io ..
Through floor Under sink Through wall to In crawl
to basement to cold utility room space under
cord water pipe water pipe cold water pipe house
a. Choose a location for the valve that is easily
accessible_ It is best to connect into the side of a
vertical water pipe_ '_q'_en it is necessary to connect
into a horizontal water pipe, make the connection
to the top or side, rather than at the bottom, to
avoid drawing off any sediment from the water pipe_
b. Drill a 1f4" hole in the "water pipe, using a sharp
bit. Remove any burrs resulting from drilling the
hole in the pipe. (Do not drill a hole if the valve is
a self-piercing type.)
l0
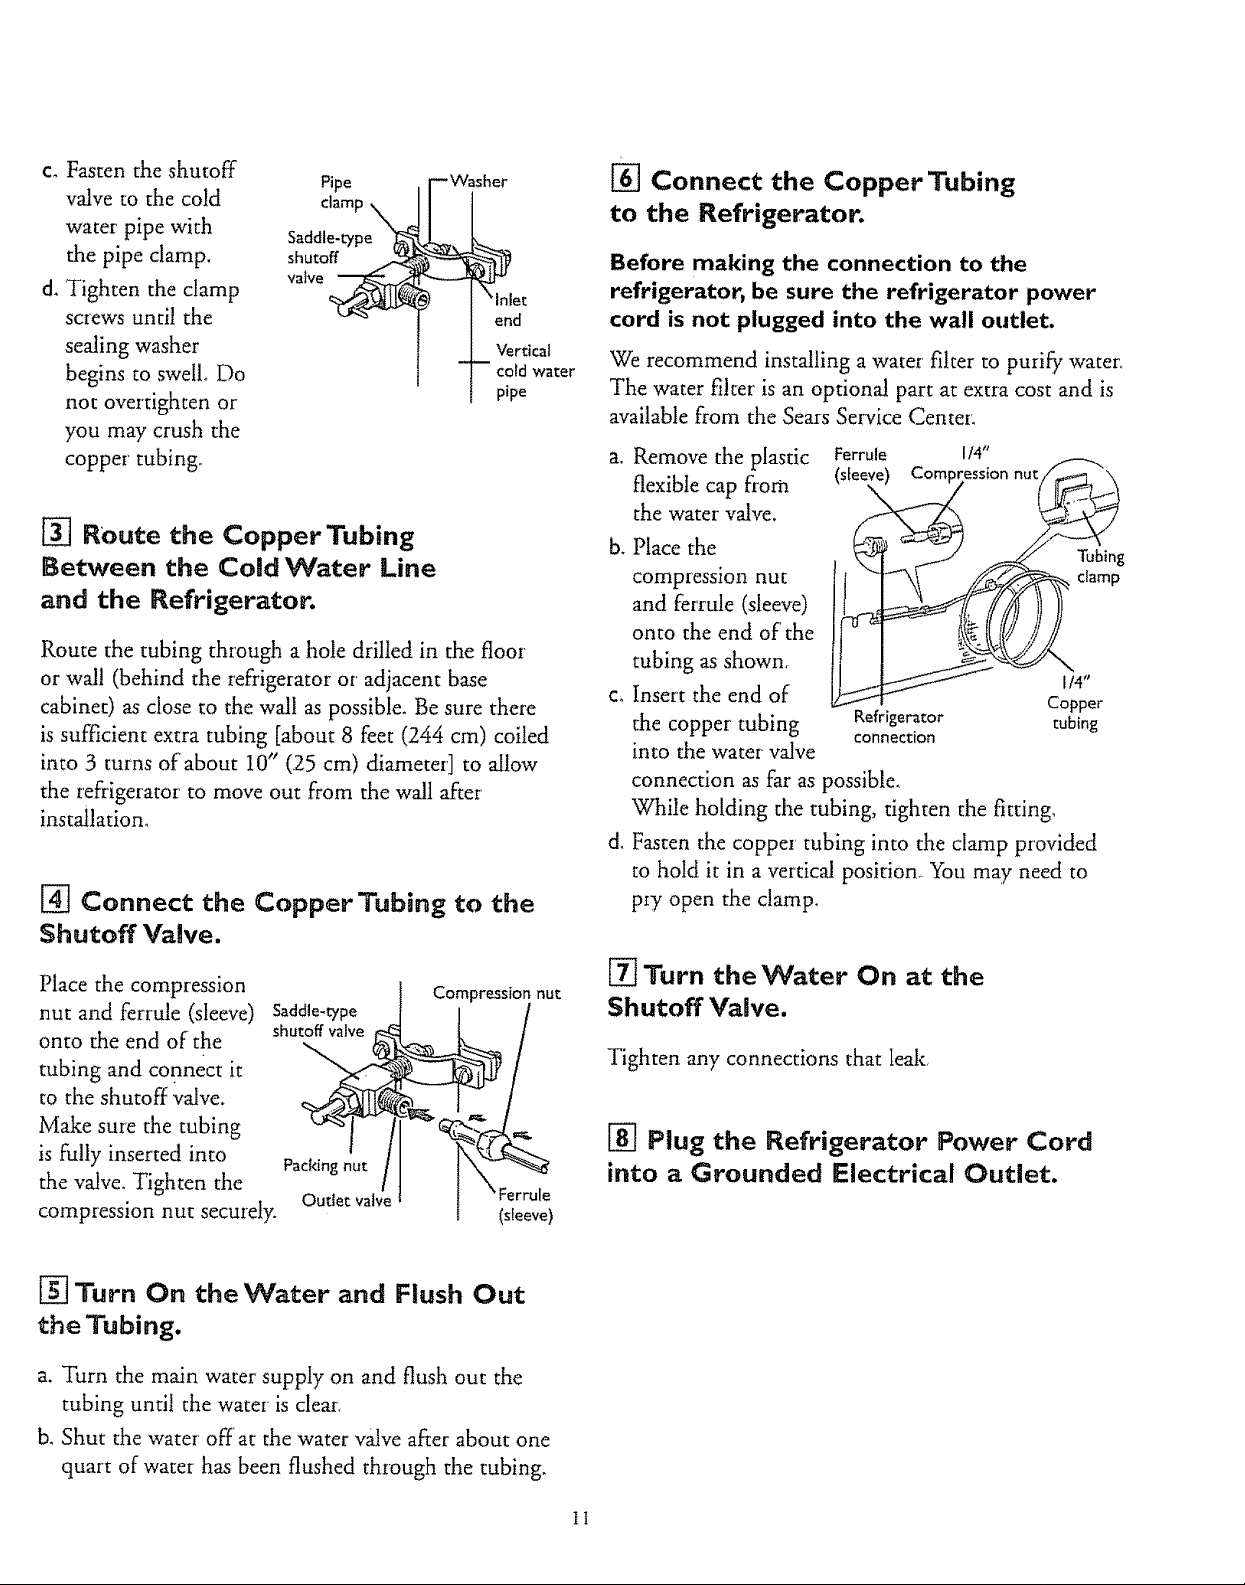
c. Fasten the shutoff
valve to the cold
water pipe with
the pipe clamp.
d. Tighten the clamp
screws until the
sealing washer
begins to swell. Do
not overtighten or
you may crush the
copper tubing.
Pipe
Washer
end
Vertical
cold water
pipe
[_] ROute the Copper Tubing
Between the Cold Water Line
and the Refrigerator.
Route the tubing through a hole drilled in the floor
or wa!! (behind the refrigerator or adjacent base
cabinet) as close to the wall as possible. Be sure there
is sufficient extra tubing [about 8 feet (244 cm) coiled
into 3 turns of about 10" (25 cm) diameter] to allow
the refrigerator to move out from the wall after
installation.
[_ Connect the CopperTubing to the
Shutoff Valve.
[] Connect the Copper Tubing
to the Refrigerator.
Before making the connection to the
refrigerator, be sure the refrigerator power
cord is not plugged into the wall outlet.
We recommend installing a water filter to purif!i water,
The water filter is an optional part at extra cost and is
available from the Sears Service Center.
Remove the plastic
flexible cap flora
the water valve.
b_ Place the
compression nut
and ferrule (sleeve)
onto the end of the
tubing as shown,
c. Insert the end of
the copper tubing
into the water valve
connection as far as possible.
While holding the tubing, tighten the fitting,
d.
Fasten the copper tubing into the clamp provided
to hold it in a vertical position° You may need to
p_y open the clamp.
Ferrule 114"
(sleeve) Compression nut_\
Refrigerator tubing
connection
Place the compression
nut and ferrule (sleeve)
onto the end of the
tubing and connect it
to the shutoff valve.
Make sure the tubing
is fully inserted into
the valve. Tighten the
compression nut securely.
Saddle-type
Packingnut
Outlet valve
Compression nut
(sleeve)
1-_Turn On the Water and Flush Out
theTubing.
a. Turn the main water supply on and flush out the
tubing until the water is clear_
b. Shut the water off at the water valve after about one
quart of water has been flushed through the tubing.
[_ Turn the "Water On at the
Shutoff Valve.
Tighten any connections that lealc
[_ Plug the Refrigerator Power Cord
into a Grounded Electrical Outlet.
II
[] Set the kemaker Feeler Arm to the
ON (Down) Position.
Move the Refrigerator Back
to the Wall.
The icemaker wilt not begin to operate until it reaches
its operating temperature of l 5°E (-9°C) or below, tt
will then begin operation automatically if the icemaker
is in the ON (down) position,
Note: The icemaker may double-cycle when it first
starts, causing some water spillage from the icemaker
into the ice bucket. This is normal and should not
happen again° The first few batches of cubes should be
thrown away, so that remaining impurities in the water
line will be flushed out_
Arrange the coil of copper tubing so that it does not
vibrate against the back of the refrigerator or against
the wall_
12
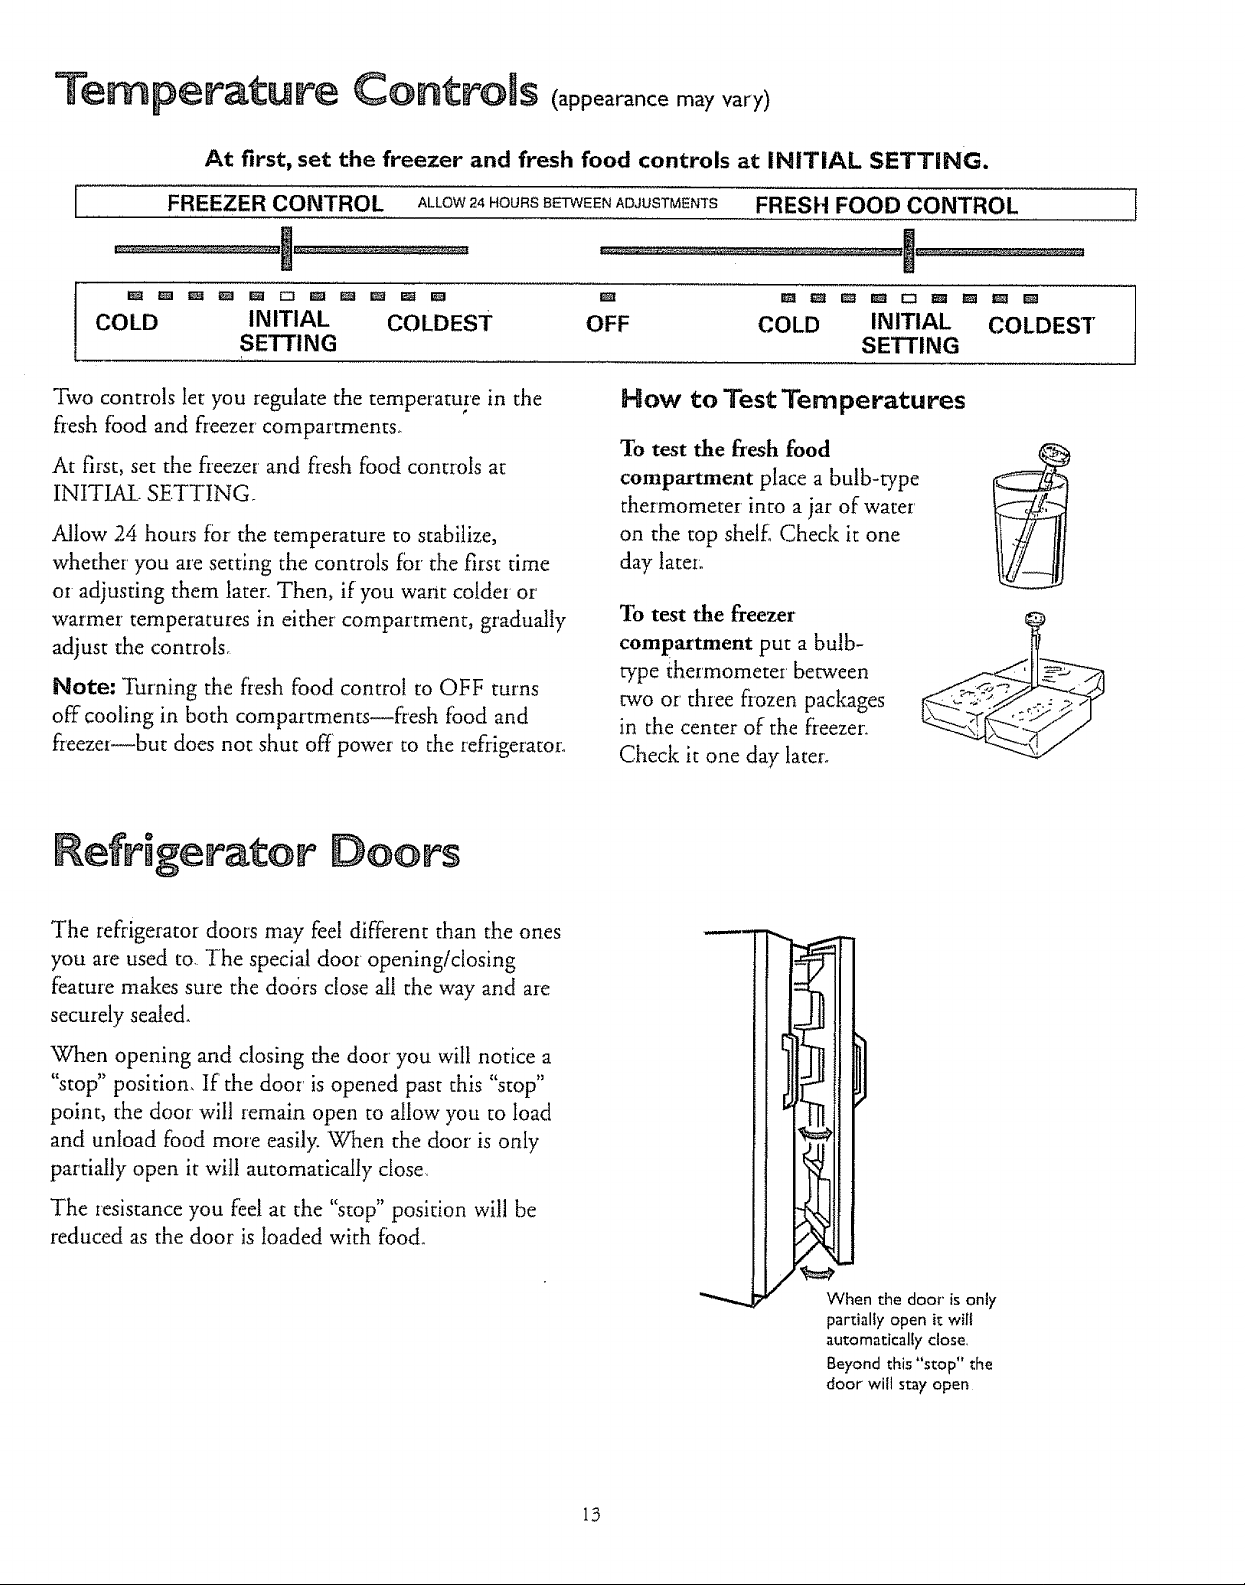
ernperature Controls (appearance may vary)
At first, set the freezer and fresh food controls at INITIAL SETTING.
FREEZER CONTROL ALLOW24HOURSBETWEENA_JUSTMENTS FRESH FOOD CONTROL
J
COLD INITIAL COLDEST
SETTING
Two controls let you regulate the temperature in the
fresh food and freezer compartments_
At first, set the freezer and fresh food conuols at
INITIAL-SETTING.
Allow 24 hours for the temperature to stabilize,
•whether' you are setting the controls for the first time
oz adjusting them_ later. Then, if you want colder or
warmer temperatures in either compartment, gradually
adjust the controls_
Note: Turning the fresh food control to OFF turns
off cooling in both compartments_fresh food and
freezei_but does not shut off'power to the refrigerator°
f
OFF COLD INITIAL COLDEST
SETTING
How to Test Temperatures
To test the fresh food
compartment place a bulb-type
thermometer into a jar of water
on the top shelf[ Check it one
day late_:
To test the freezer
compartment put a bulb-
type thermometer between
two or three frozen packages
in the center of the freezer_
Check it one day later
Refrigerator Doors
The refrigerator doors may feel different than the ones
you are used to. The special door opening/closing
feature makes sure the do6rs close al! the way and are
securely sealed.
When opening and closing the door you will notice a
"stop" position. If the door is opened past this "stop"
point, the door wil! remain open to allow you to load
and unload food more easily. Wl_en the door is only
partially open it will automatically close_
The resistance you feel at the "stop" position will be
reduced as the door is loaded with food.
the door is only
partially open it will
automatically close
Beyond this "stop" the
door will stay open
13
Food Storage Suggestions
Fresh Food Storage Tips
To store unfrozen meats, fish and poultry"
€ Always remove store wrappings.
o Rewrap in f0il, film or wax paper and refrigerate
immediately.
To store cheese, wrap well with wax paper or
aluminum f0il, or put in a plastic bag_
o Carefully wrap to expel air and help prevent mold.
• Store pre-packaged cheese in its own wrapping
if you wish.
To store vegetables, use the vegetable drawers--
they've been designed to preserve the natural moisture
and freshness of produce
o Covering vegetables with a moist towel helps
maintain crispness.
o As a further aid to freshness, pre-packaged vegetables
can be stored in their original wrapping.
Tips on Freezing Foods
o Freeze only top-quality foods. Freezing retains
quality and flavor; it cannot improve quality°
o Freeze fruits and vegetables quicldy after picking.
The sooner you do, the better the frozen product will
be, with less dulling and sorting to do.
• Use food wraps designed especially for freezing.
To store ice cream--Fine-quallcy ice cream, with high
cream content, will normally requ!re slightly lower
temperatures than more "airy" already-packaged brands
with low cream content.
° It will be necessary to experiment to determine the
freezer compartment location and temperature
control setting to keep your ice cream at the right
serving temperature.
o The reai of the freezer compartment is slightly colder
than the front_
To freeze meat, fish and poultry, wrap well in
freezer-weight foil (or other heavy-duty wrapping
material) forming it carefully to the shape of the
contents.. This expels air. Fold and crimp ends of
the package to provide a good, lasting seal.
Don't iefreeze meat that has completely thawed;
meat, whether raw or cooked, can be fiozen
successfully only once.
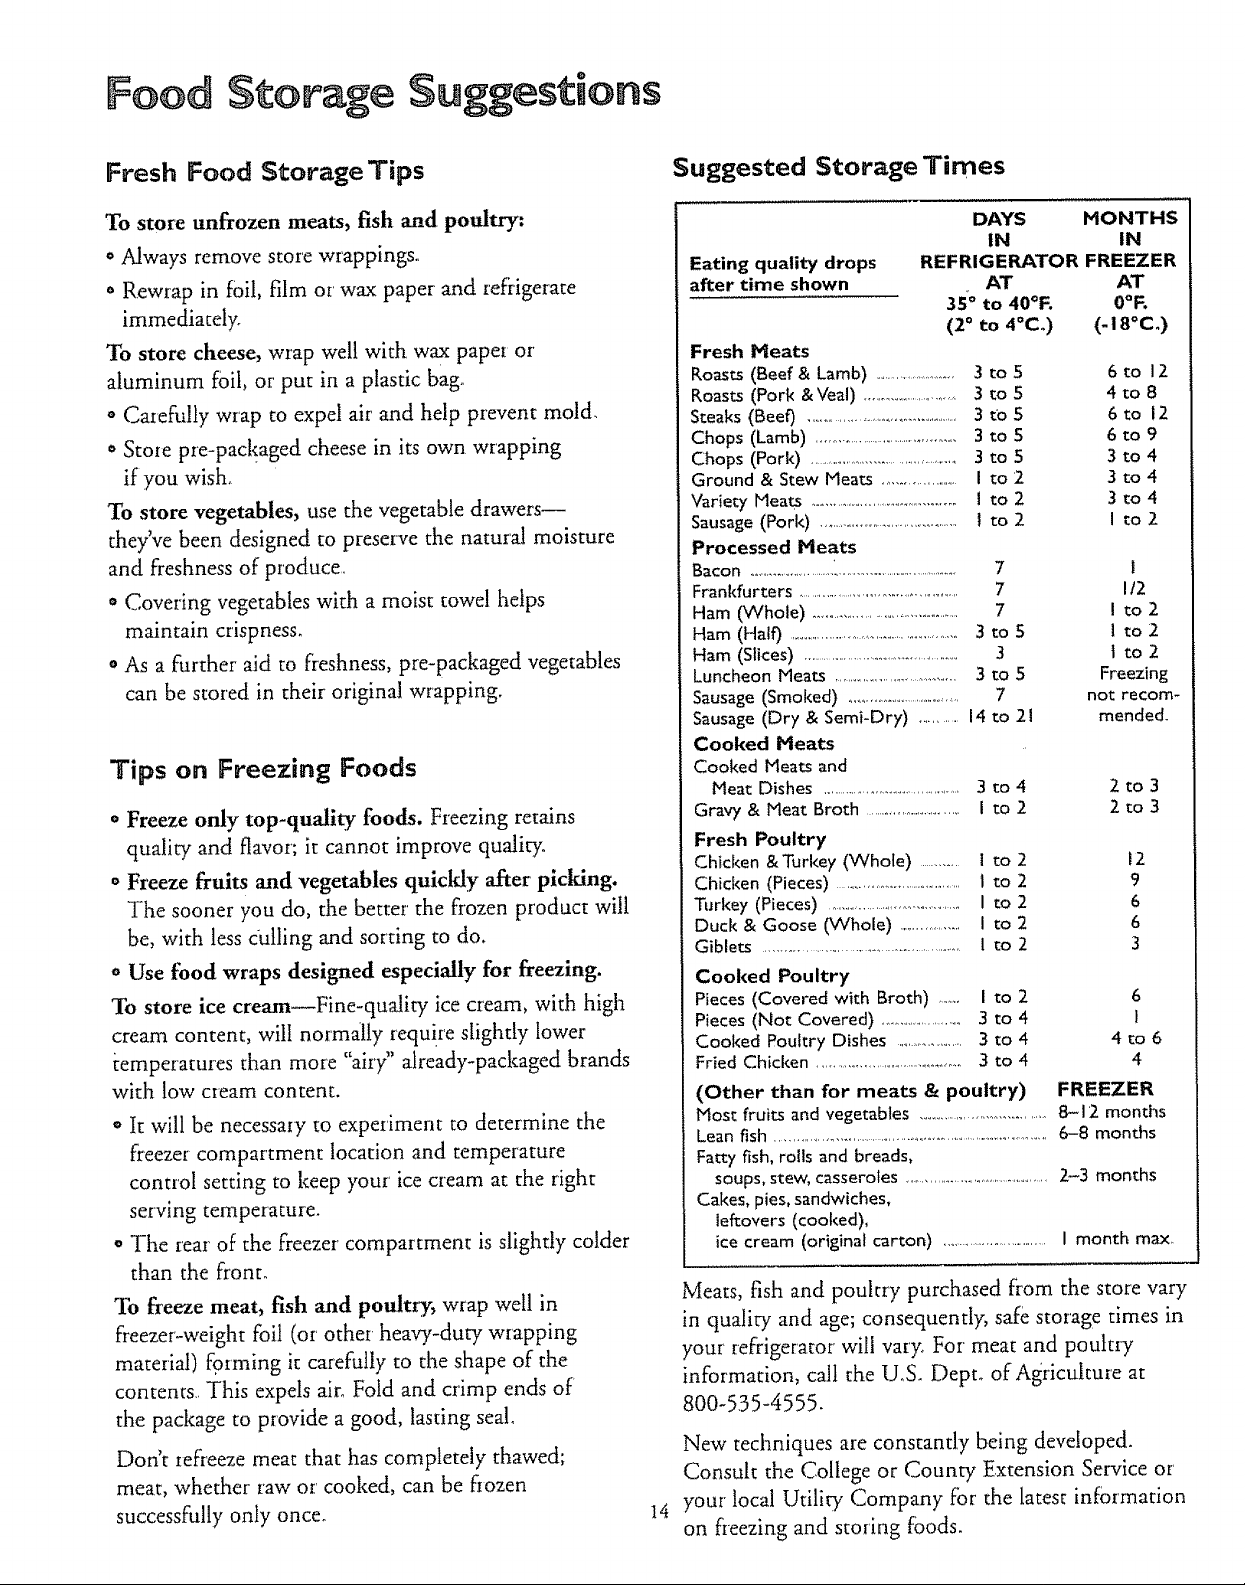
Suggested Storage Times
DAYS MONTHS
IN IN
Eating qualit_t drops
after time shown
REFRIGERATOR FREEZER
AT AT
35_ to 40°i=. 0°F.
(2° to 4°C.) (-18°C.)
Fresh Heats
Roasts (Beef & Lamb) ...........................3 to 5
Roasts (Pork & Veal) ..............................3 to S
Steaks (Beef) ..............................................3 m S
Chops (Lamb) ..........................................3 to S
Chops (Pork) ............................................3 to 5
Ground & Stew Heats .......................I to 2
Variety Meats ...........................................I to 2
Sausage (Pork) ........................................I to 2
Processed Heats
Bacon ......... ......................................................... 7
Frankfurters ................................................7
Ham (VVhole) .........................................7
Ham (Half) ........................................................3 to S
Ham (Slices) ...................................................3
Luncheon Meats ......................................3 to 5
Sausage (Smoked) ......................................7
Sausage (Dry & Semi-Dry) ............14 to 21
Cooked Heats
Cooked Meats and
Meat Dishes ...............................................3 to 4
Gravy & Meat Broth ................................I to 2
Fresh Poultry
Chicken &Turkey (Whole) ............. I to 2
Chicken (Pieces) ........................................I to 2
Turkey (Pieces) ........................................I to 2
Duck & Goose (Whole) ....................I to 2
Giblets .............................................................I to 2
Cooked Poultry
Pieces (Covered with Broth) ...... I to 2 6
Pieces (Not Covered) ........................3 to 4 1
Cooked Poultry Dishes ......................3 to 4 4 to 6
Fried Chicken ........................................3 to 4 4
(Other than for meats & poultry) FREEZER
Host fruits and vegetables ........................................8-12 months
Lean fish ....................................................................................6-8 months
Fatty fish, rolls and breads,
soups, stew, casseroles ................................................2-3 months
Cakes, pies, sandwiches,
leftovers (cooked),
ice cream (original carton) ...............................I month max°
Meats, fish and poultry purchased from the store vary
in quality and age; consequently, safe storage times in
your refrigerator will vary, For meat and poultry
information, call the U,S. Dept. of Agriculture at
800-535-4555.
New techniques are constantly being developed.
Consult the College or County Extension Service or
your local Utility Company for the latest information
14
on freezing and storing foods.
6to 12
4to8
6to 12
6to 9
3 to4
3 to4
3 to4
Freezing
not recom-
mended.
2to3
2to 3
I to2
1
1t2
I to2
1to2
I to2
12
9
6
6
3
She ves and Storage Drawers
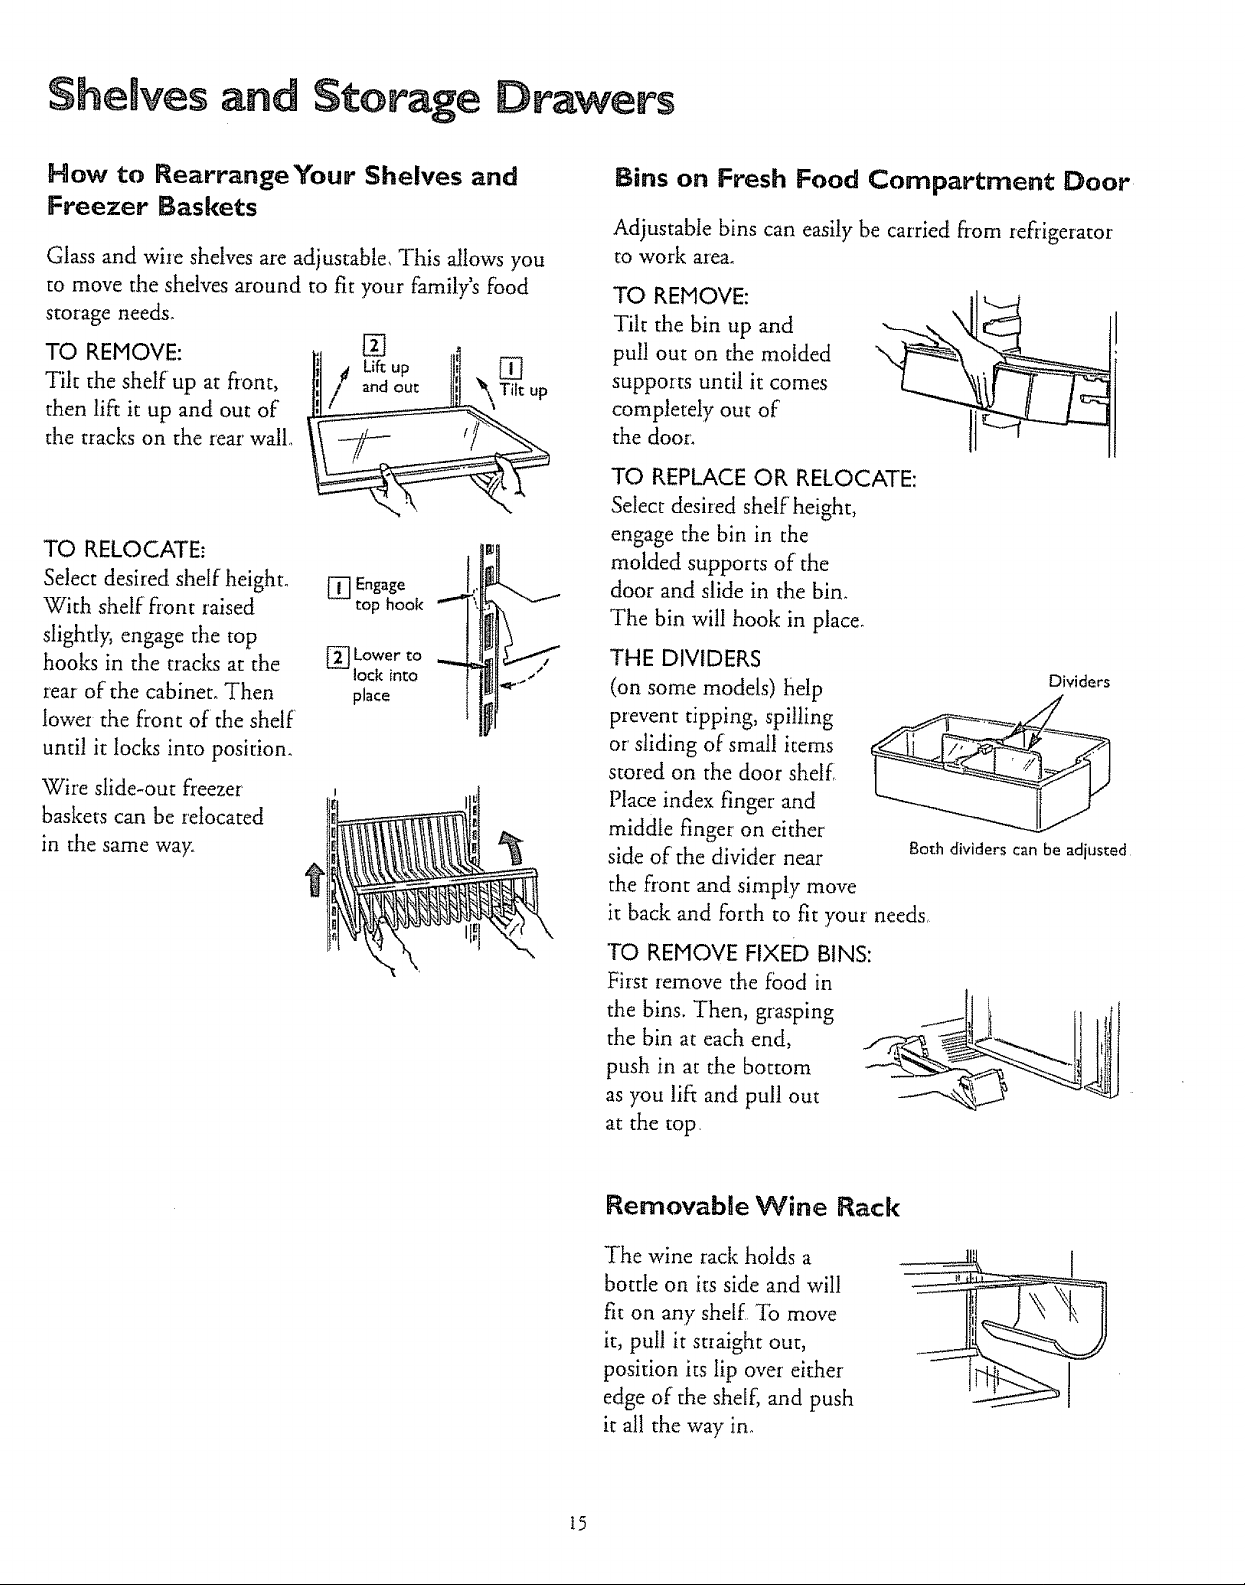
How to Rearrange Your Shelves and
Freezer Baskets
Glass and wire shelvesare adjustable, This aJlows you
to move the shelves around to fit your family's food
storage needs.
TO REMOVE: []
Tilt the shelf up at front, andout
then lift it up and out of
the tracks on the rear wall..
TO RELOCATE"
Select desired shell: height.
With shelf front raised
slightly, engage the top
hooks in the tracks at the
rear of the cabinet. Then
lower the f_'ont of the shelf
until it locks into position°
Wire slide-out freezer'
baskets can be relocated
in the same way.
Lift up
[] Engage
top hook _'+
]Lower to ...
lock into
place
Bins on Fresh Food Compartment Door
Adjustable bins can easily be carried from refrigerator
to work area.
TO REMOVE:
Tilt the bin tip and
pull out on the molded
supports until it comes
completely out of
the door',
TO REPLACE OR RELOCATE:
Select desired shelf height,
engage the bin in the
molded supports of the
door and slide in the bin.
The bin will hook in place°
THE DIVIDERS
(on some models) help
prevent tipping, spilling
or' sliding of small items
stored on the door shelf
Place index finger and
middle finger' on either
side of the divider near
the front and simply move
it back and forth to fit your needs,
TO REMOVE FIXED BINS:
First remove the food in
the bins. Then, grasping
the bin at each end,
push in at the bottom
as you lift and pul! out
at the top.
Both dividers can be adjusted
Dividers
RemovabBe Vqine Rack
The wine rack holds a
bottle on its side and will
fit on any shell: To move
it, pull it straight out,
position its lip over either
edge of the shelf, and push
it all the way ino
15
Seamed Crisper Drawer
This drawer keeps |_
unwrapped foods fresh
by retaining the natural
moisture content of
foods such as: ,
o AMchokes o Celery o Lettuce ° Radishes
o Asparagus ° Cherries ° Parsley ° Rhubarb
° Beets, topped • Corn ° Peas, green ° Spinach
• Blueberries ° Currants o Plums ° T9matoes,
° Carrots ° Greens, leafy r_pe
Adjustable Humidity Drawers
(on some models)
These drawers have
individual, adjustable
humidity controls that
let you control the
amount of cold air
entering the drawers,
Slide the control all the way to the HIGH setting
and the drawer provides higher humidity levels
recommended for most vegetables°
Foods with strong odms should be wrappe&
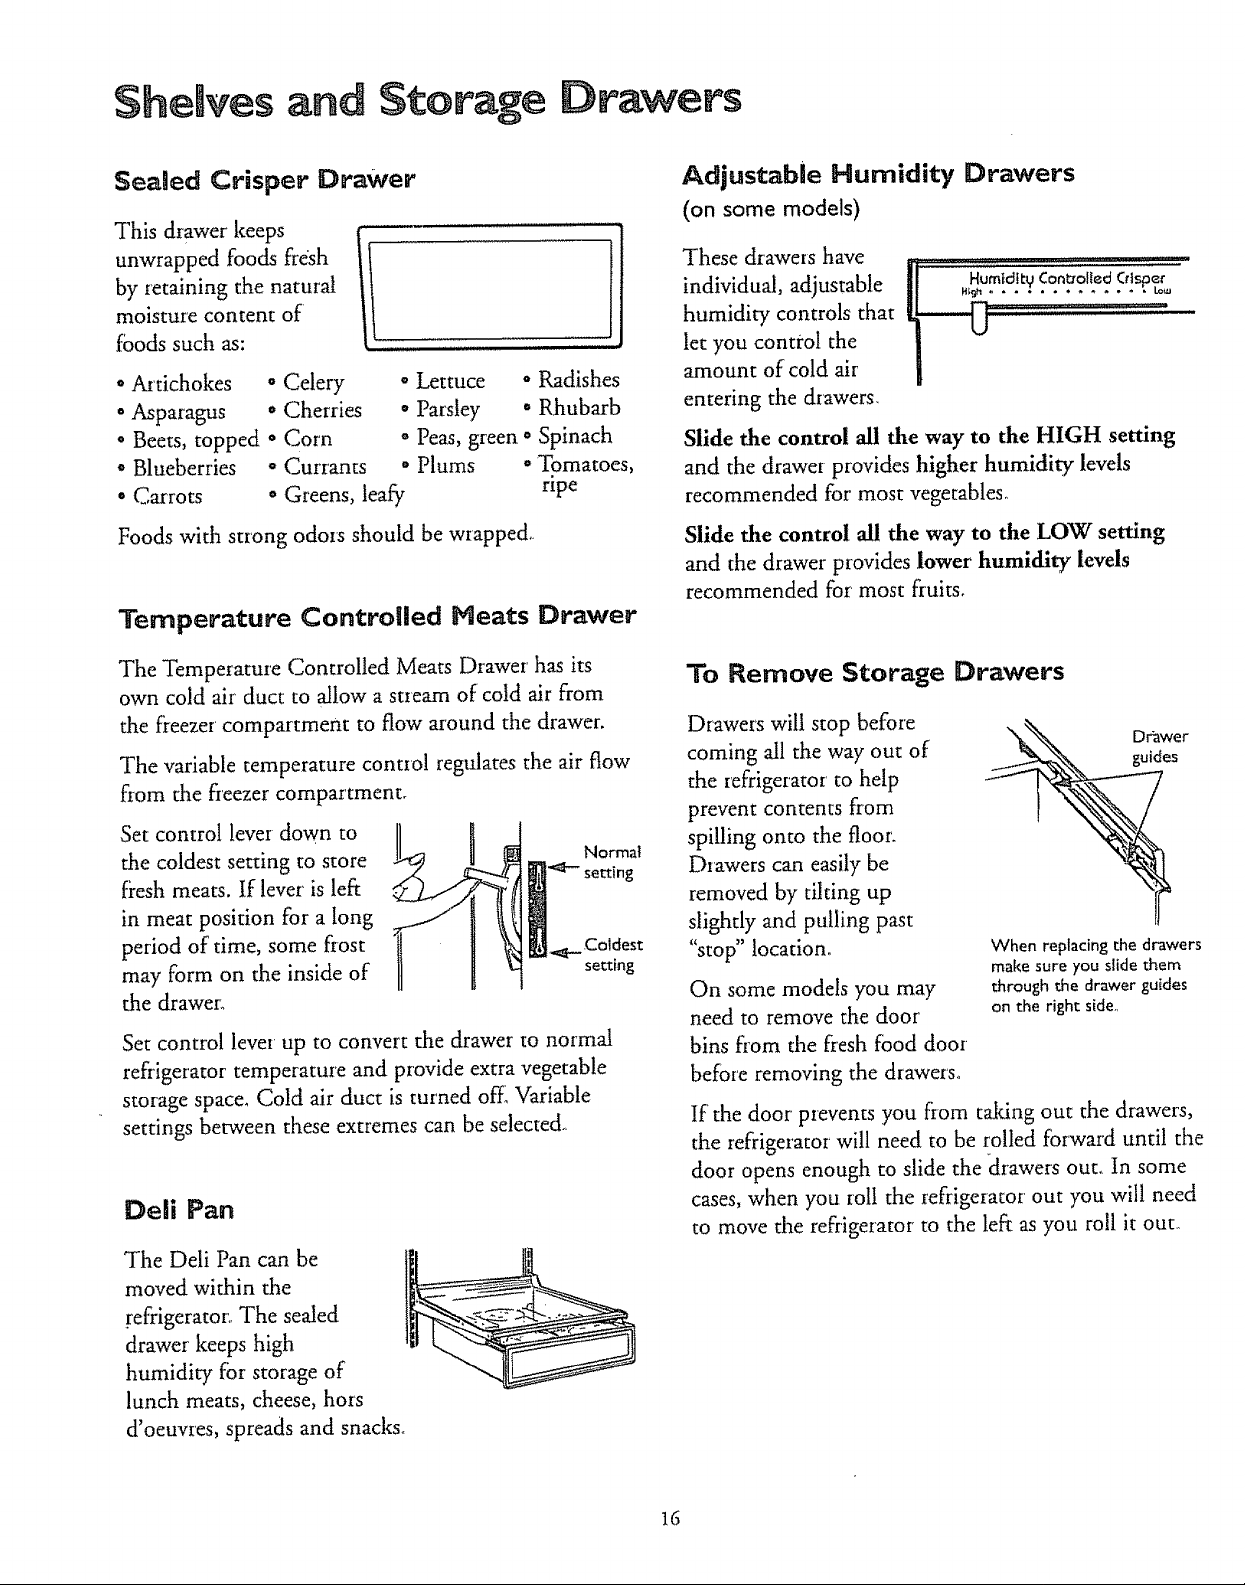
Temperature Controlled Heats Drawer
The Temperature Controlled Meats Drawer has its
own cold air duct to allow a stream of cold air from
the freezer compartment to flow around the drawer.
The variable temperature control regulates the air flow
from the fieezer cornpartment.
Set control lever down to
the coldest setting to store
fi'esh meats, tf lever is left
in meat position for a long
period of' time, some frost
may form on the inside of
the drawer°
Set control lever up to convert the drawer to normal
refrigerator temperature and provide extra vegetable
storage space. Cold air duct is turned offl Variable
settings between these extremes can be selected..
Norrnal
setting
.__ Coldest
setting
Dell Pan
The Dell Pan can be
moved within the
refrigerator'., The sealed
drawer keeps high
humidity for storage of
lunch meats, cheese, hors
d'oeuvres, spreads and snacks°
Slide the control all the way to the LOW setting
and the drawer provides lower humidity levels
recommended for most fruits.
To Remove Storage Drawers
Drawers will stop before
coming all the way out of
the refrigerator to help
prevent contents from
spilling onto the floor.
Drawers can easily be
removed by tilting up
slightly and pulling past
"stop" location.
On some models you may
need to remove the door
bins flora the flesh food door
before removing the drawers°
If the door' pzevents you from taldng out the drawers,
the refrigerator will need to be roUed forward until the
door opens enough to slide the _irawers out. tn some
cases, when you roll the refrigerator out you will need
to move the refrigeraror to the left as you roll it out..
When replacing the drawers
make sure you slide them
through the drawer guides
on the right side,,
16
Automatic Hcemaker
A newly installed refrigerator may take up to
24 hours to begin making ice.
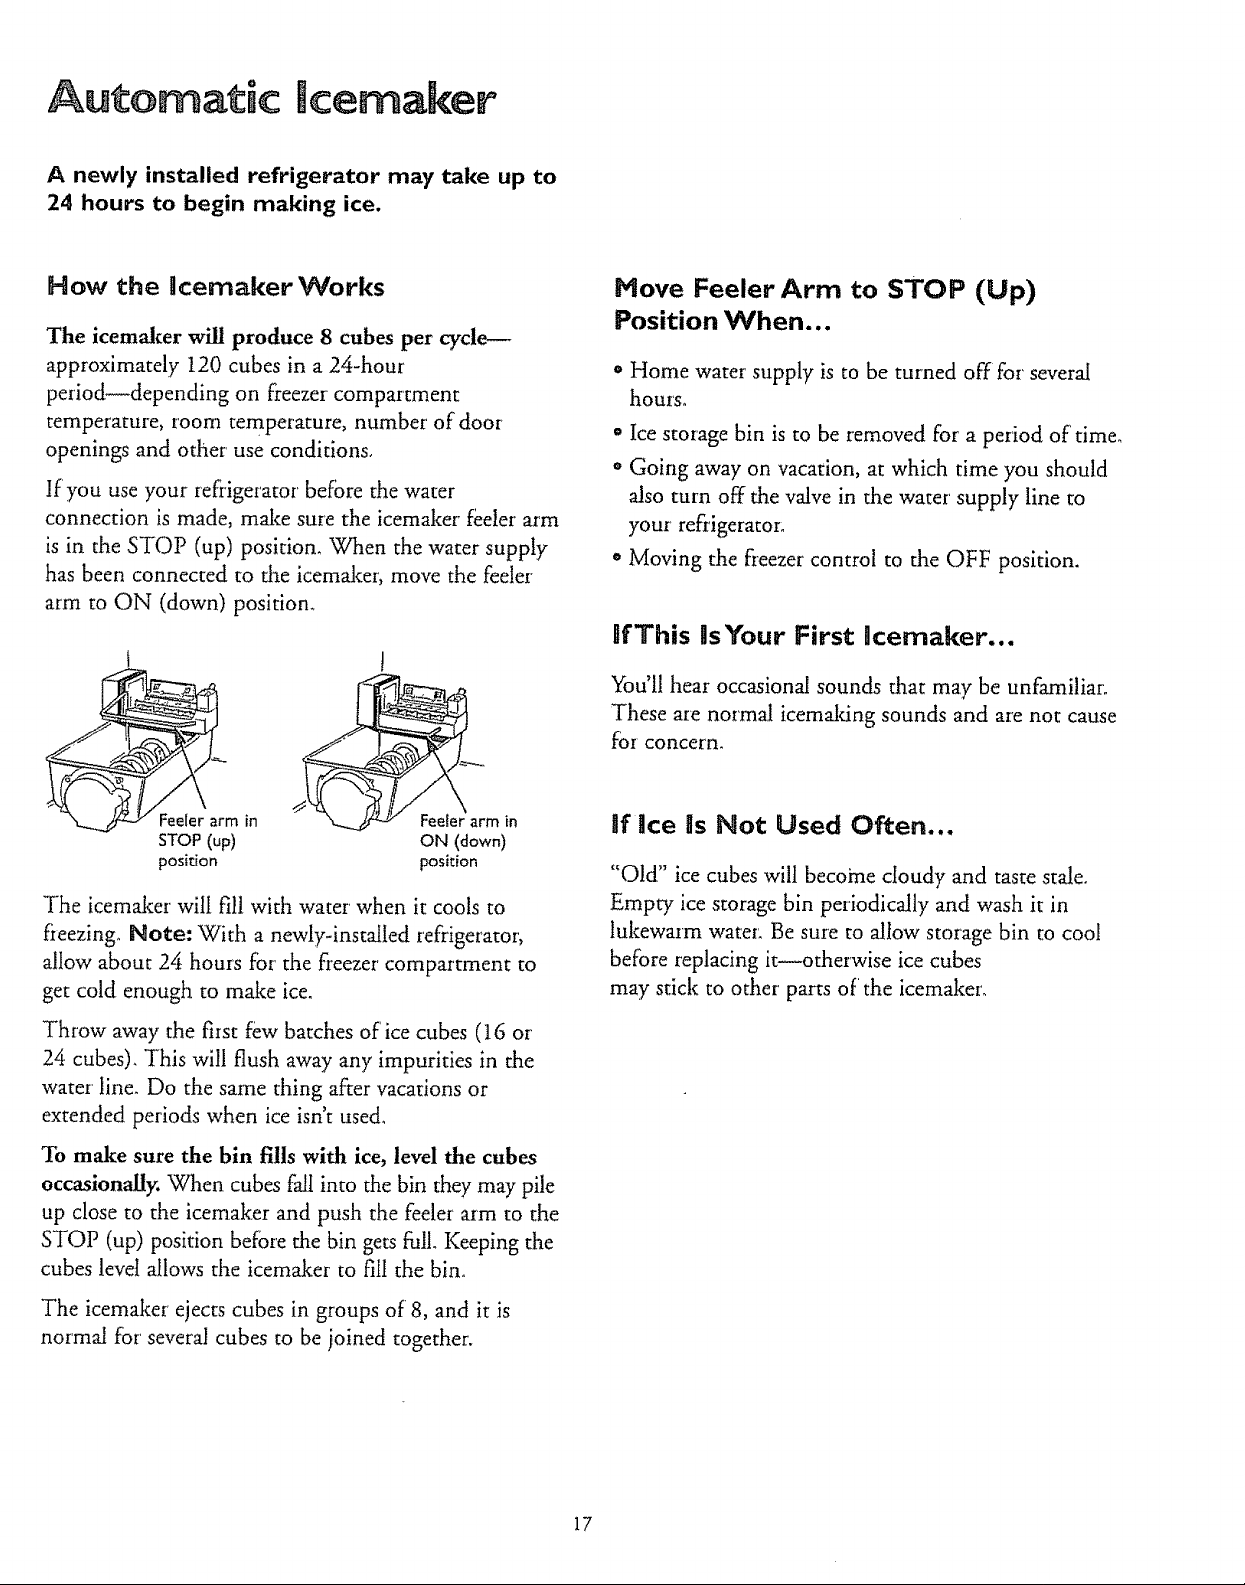
How the ncemaker Works
The icemaker will produce 8 cubes per cycle--
approximately 120 cubes in a 24-hour
period--depending on freezer compartment
temperature, room temperature, number of door
openings and other use conditions,
If you use your refrigerator befbre the water
connection is made, make sure the icemaker fi_eler arm
is in the STOP (up) position. When the water supply
has been connected to the icemaker, move the feeler
arm to ON (down) position.
J
Feeler arm in
STOP (up)
position
The icemaker will fill with water when it cools to
fieezing. Note: With a newly-installed refrigeratoz;
allow about 24 hours for the freezer compartment to
get cold enough to make ice.
arm in
ON (down)
position
Move Feeler Arm to STOP (Up)
Position When...
° Home water supply is to be turned off for several
hours.
• ice storage bin is to be removed for a period of time_
• Going away on vacation, at which time you should
also turn off the valve in the water supply line to
your refi'igerator:
o Moving the fieezer control to the OFF position.
ffThis HsYour First Hcemaker...
You'll hear occasional sounds that may be unfamiliar.
These ate normal icemaldng sounds and are not cause
foe concern.
ff Ice Ils Not Used Often...
"Old" ice cubes wilt become cloudy and taste stale°
Empty ice storage bin periodically and wash it in
lukewarm water: Be sure to allow storage bin to cool
before replacing it_otherwise ice cubes
may stick to other parts of the icemaker_
Throw away the first few batches of ice cubes (16 or
24 cubes)_ This will flush away any impurities in the
water line. Do the same thing after vacations or
extended periods when ice isn't used.
To make sure the bin Ells with ice, level the cubes
occasionally. When cubes fall into the bin they may pile
up close to the icemaker and push the feeler arm to the
STOP (up) position before the bin gets full Keeping the
cubes level allows the icemaker to fill the bin_
The icemaker ejects cubes in groups of 8, and it is
normal for several cubes to be joined together.
17
Uceand Nater Dispenser
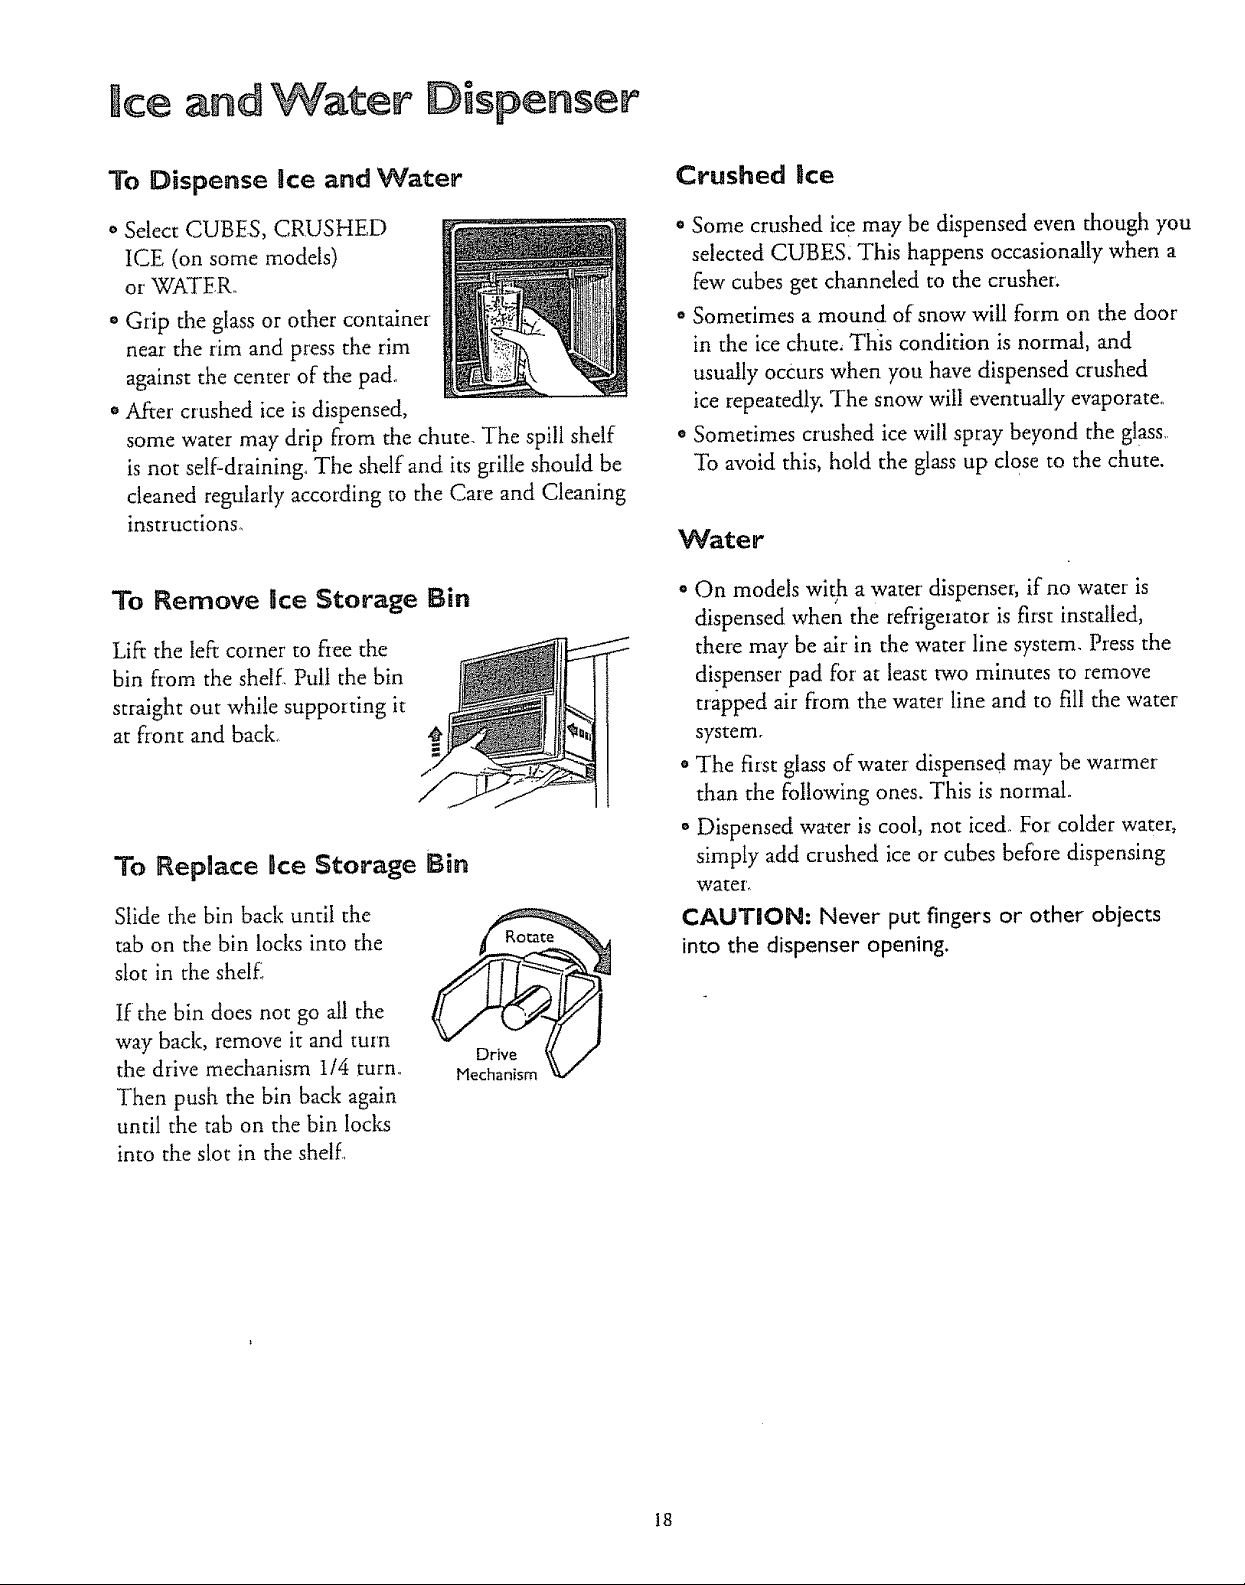
To Dispense Rce and Water
o Select CUBES, CRUSHED
ICE (on some models)
or WATER_
o Grip the glass or other container
near the rim and press the rim
against the center of the pad..
, After crushed ice is dispensed,
some water may drip from the chute. The spill shelf
is not self-draining. The shelf and its grille should be
cleaned regularly according to the Care and Cleaning
instructions_
To Remove ace Storage Bin
Lift the left corner to flee the
bin fi'om the shelf[ Pull the bin
straight out while suppmting it
at f_ont and back_
To Replace Dee Storage Bin
Slide the bin back until the
tab on the bin locks into the
slot in the shelf_
Crushed ice
o Some crushed ice may be dispensed even though you
selected CUBE& This happens occasionally when a
few cubes get channeled to the crusher.
o Sometimes a mound of snow "will form on the door
in the ice chute, Th'is condition is normal, and
usually occurs when you have dispensed crushed
ice repeatedly. The snow will eventually evaporate.
• Sometimes crushed ice will spray beyond the glass,
To avoid this, hold the glass up close to the chute.
Water
° On models with a water dispenser, if no water is
dispensed when the refrigerator is first installed,
there may be air in the water line system. Press the
dispenser pad for at least two minutes to remove
trapped air fEom the water line and to fill the water
system.
o The first glass of water dispensed may be warmer
than the following ones. This is normal.
° Dispensed wa, er is cool, not iced_ For colder water,
simply add crushed ice or cubes before dispensing
water_
CAUTION: Never put fingers or other objects
into the dispenser opening.
If the bin does not go all the
way back, remove it and turn
the drive mechanism t14 turn.
Then push the bin back again
until the tab on the bin locks
into the slot in the shelf.
Drive
Mechanism
18

Bmportant Facts About Your
ice & Water Dispenser
Water Filter Accessory
(optional at extra cost)
o If this is your first icemaker you'll hear occasional
sounds that may be unfamiliar. These are normal
icemaldng sounds and are not cause for concern_
,, Your icemaker will produce 8 cubes per cycle--
approximately 120 cubes in a 24-hour period--
depending on fieezer compartment temperature,
room temperature, number of door openings and
other use conditions.
o Intermittent dispensing of ice is normal. If ice flow
interruption is more than brief, ice clump(s) may be
the cause and should be iemoved following
instructions in this section_
o Avoid over-filling glasses with ice and using
narrow or extra-tall glasses. This can jam the
chute or cause the door in the chute to fieeze shuL
Periodically open the freezer compartment door' and
look down into the chute. If ice is blocldng the
chute, poke it through with a wooden spoon,
o To help keep bits of ice from being sprayed
beyond the glass, place the glass ciose to the ice
chute--but not so close that it blocks out-coming ice.
o Add ice before adding beverage to prevent
splashing.
o Beverages and foods should not be quick-chilled
in the ice storage bin. Cans, bottles or food
packages in the storage bin may cause the icemaker
or auger to jam,
° Do not add ice from trays or bags to the storage
bin. It may not crush or dispense well,
Your' ice cubes can only be as fresh-tasting
as the water that produces them, That's
why it's a good idea to purify the water
with a water filter'.
The water filter is an optional part at extra
cost and is available from your Sears Service
Center_ It may be installed in minutes when
attached to the inlet water tube connection,
Water Supply Accessory Kit
(optionalat extra cost)
A water supply lit containing copper' tubing, shutoff
valve, fittings and instructions needed to connect the
icemal:er to your cold water line is also available flora
your Sears store or Sears Service Center_
19
Care and C eaning
Outside
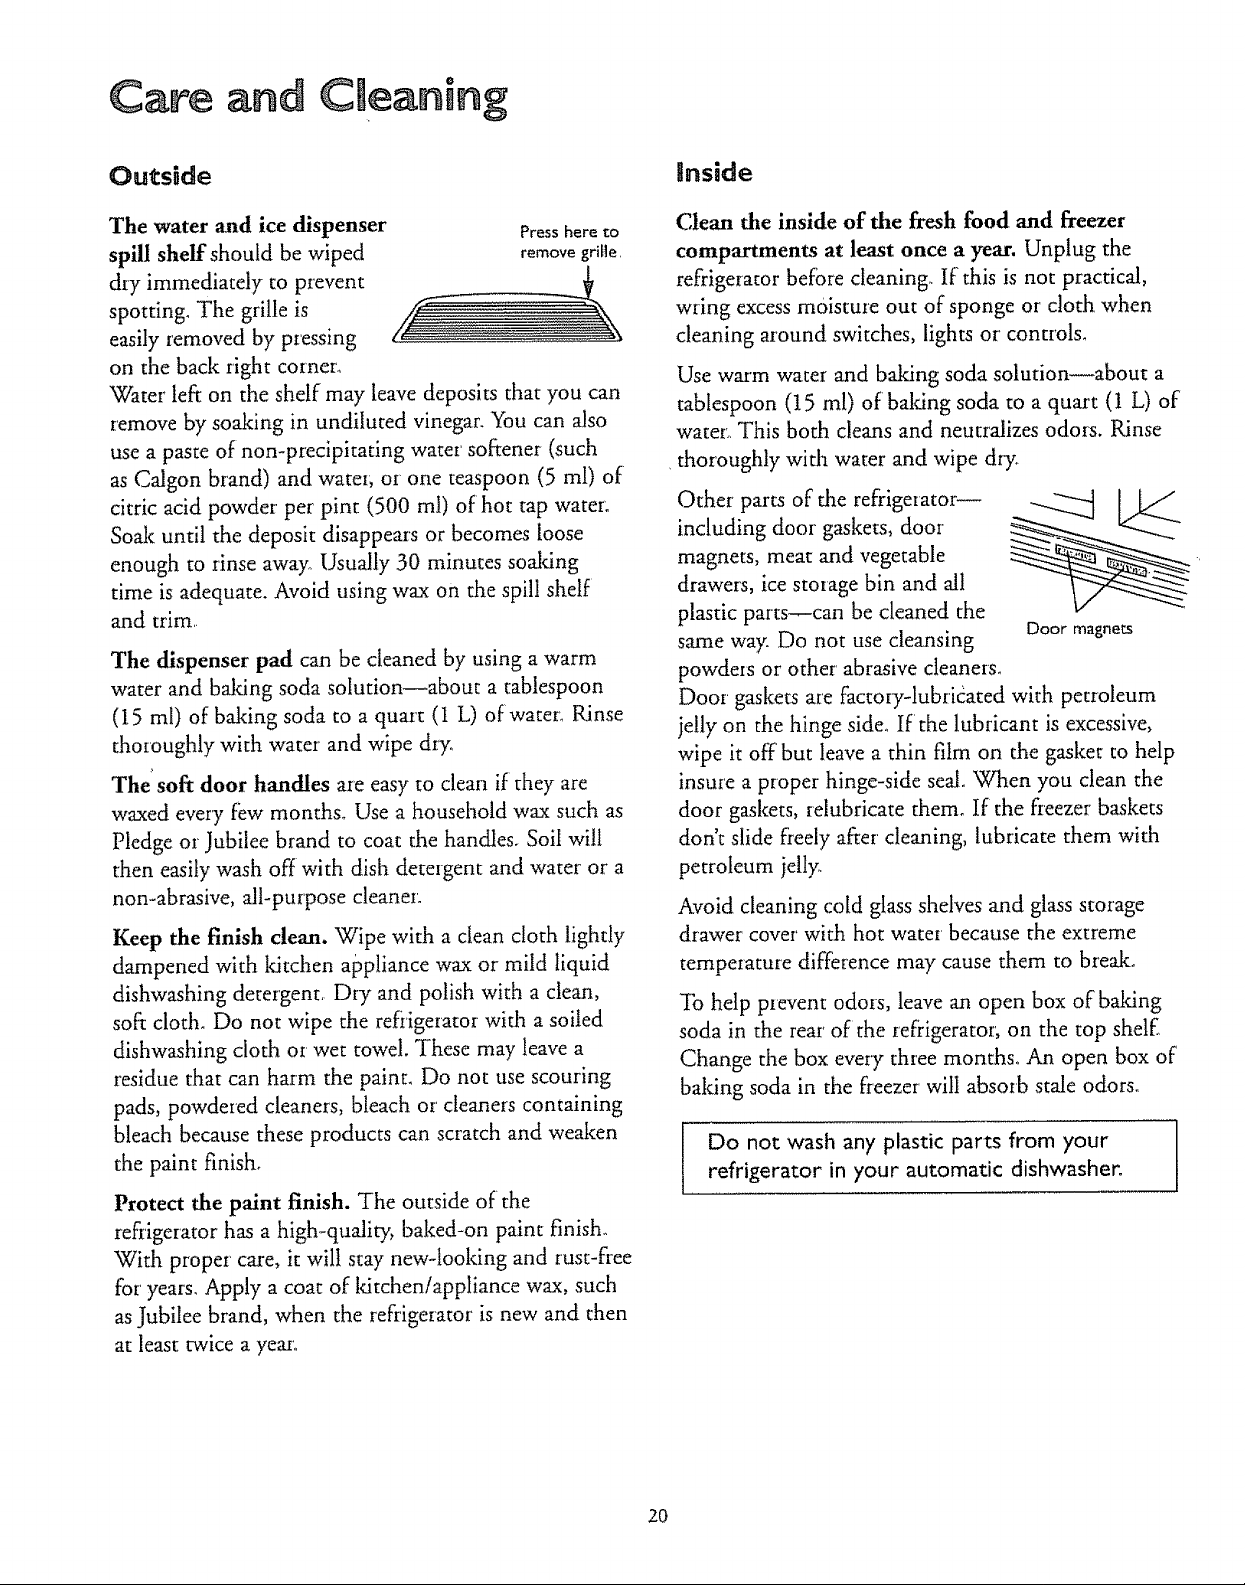
The water and ice dispenser Presshereto
spill shelf should be wiped remove grille,
dry immediately to prevent
spotting, The grille is
easily removed by pressing
on the back right corner°
Water left on the shelf may leave deposits that you can
remove by soaking in undiluted vinegar. You can also
use a paste of non-precipitating water softener (such
as Calgon brand) and water; or one teaspoon (5 m!) of
citric acid powder per pint (500 ml) of hot tap water.
Soak until the deposit disappears or becomes loose
enough to rinse away,, Usually 30 minutes soaking
time is adequate. Avoid using wax on the spill shelf
and trim
The dispenser pad can be cleaned by using a warm
water and baldng soda solution--about a tablespoon
(15 ml) of baking soda to a quart (1 L) ofwater_ Rinse
thoroughly with water and wipe dry.
The' soft door handles are easy to clean if they are
waxed every few months° Use a household wax such as
Pledge or Jubilee brand to coat the handles. Soil will
then easily wash off with dish detergent and water or a
non-abrasive, all-purpose cleaner.
Keep the finish clean. Wipe with a clean cloth lightly
dampened with ldtchen appliance wax or mild liquid
dishwashing detergent, Dry and polish with a clean,
soft cloth. Do not wipe the refiigerator with a soiled
dishwashing cloth or wet towel. These may leave a
residue that can hasm the paint. Do not use scouring
pads, powdered cleaners, bleach or cleaners containing
bleach because these products can scratch and weaken
the paint finish°
Protect the paint finish. The outside of the
refrigerator has a high-quality, baked-on paint finish°
With proper care, it wilt stay new-looking and rust-free
for years, Apply a coat of ldtchen!appliance wax, such
as Jubilee brand, when the refrigerator is new and then
at least twice a yeas.
!Inside
Clean the inside of the fresh food and fre_er
compartments at least once a year. Unplug the
refrigerator before cleaning If this is not practical,
wring excess moisture out of sponge or cloth when
cleaning around switches, lights or controls.
Use warm water and baking soda solution--about a
tablespoon (15 ml) of baldng soda to a quart (t L) of
water.,This both cleans and neutralizes odors. Rinse
thoroughly with water and wipe dry_
Other parts of the refrigetator_
including door gaskets, door
magnets, meat and vegetable
drawers, ice storage bin and all
plastic parts_can be cleaned the
same way. Do not use cleansing Door magnets
powders or other abrasive cleaners.
Door gaskets are factory-lubricated with petroleum
jelly on the hinge side. If the lubricant is excessive,
wipe it off but leave a thin film on the gasket to help
insure a proper hinge-side seal. When you clean the
door gaskets, relubricate them. If the freezer baskets
don't slide fi'eely after cleaning, lubricate them with
petroleum jelly_
Avoid cleaning cold glass shelves and glass storage
drawer cover' with hot water because the extreme
temperature difference may cause them to break°
To help prevent odors, leave an open box of baldng
soda in the rear of the refrigerator, on the top shelf_
Change the box every three months. An open box of
baldng soda in the freezer will absorb stale odors,.
Do not wash any plastic parts from your
refrigerator in your automatic dishwasher.
2O
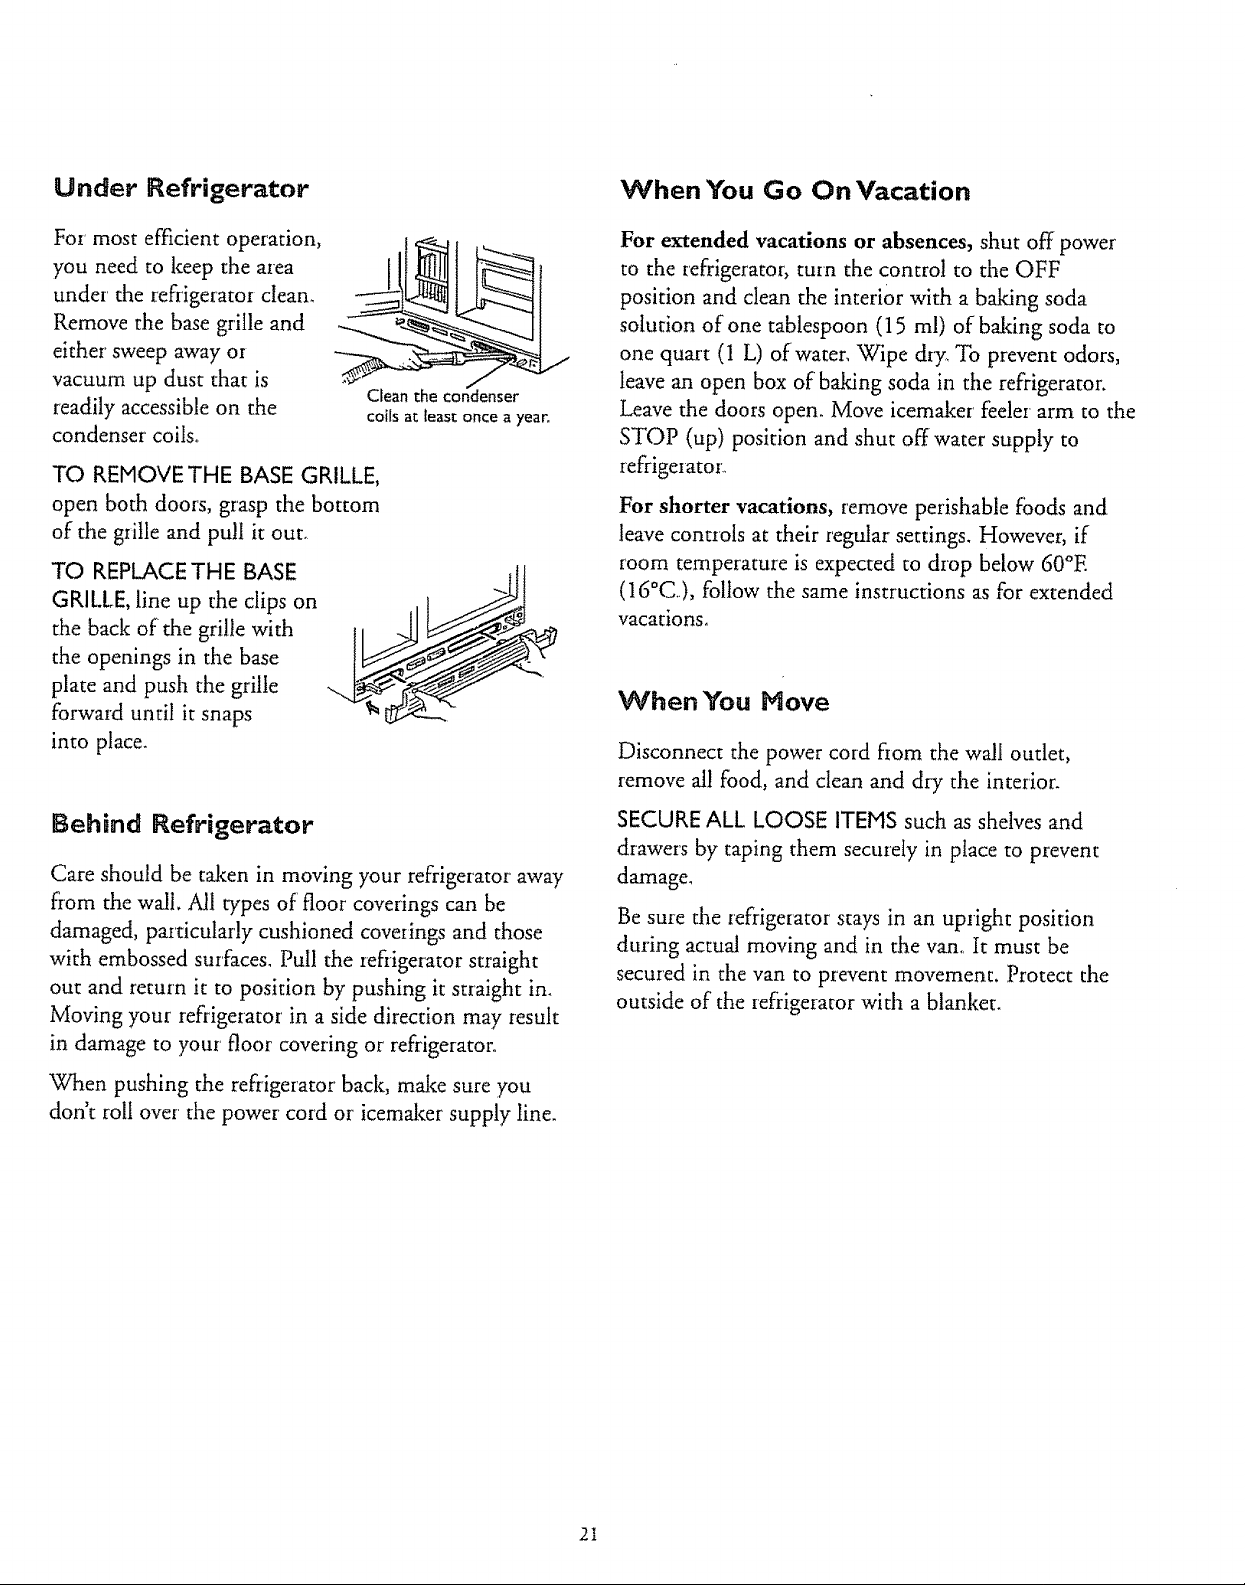
Under Refrigerator
When You Go On Vacation
For most efficient operation,
you need to keep the area
under the refrigerator clean.
Remove the base grille and
either sweep away or
vacuum up dust that is
readily accessible on the
condenser coils°
TO REMOVE THE BASE GRILLE,
open both doors, grasp the bottom
of the grille and pull it out_
TO REPLACE THE BASE
GRlt.LE, line up the clips on
the back of the grille with
the openings in the base
plate and push the grille
forwaM until it snaps
into place.
Clean the condenser
coils at least once a year,
Behind Refrigerator
Care should be taken in moving your refrigerator away
from the wall, M1 types of floor coverings can be
damaged, particularly cushioned coverings and those
with embossed surfaces. Pull the refrigerator straight
out and return it to position by pushing it straight in.
Moving your refrigerator in a side direction may result
in damage to your' floor covering or refrigerator..
For extended vacations or absences, shut off power
to the refrigerator, turn the control to the OFF
position and clean the interior with a baking soda
solution of one tablespoon (15 ml) of baking soda to
one quart (1 L) ofwater, Wipe d_y,,To prevent odors,
leave an open box of baking soda in the refrigerator.
Leave the doors open. Move icemaker feeler arm to the
STOP (up) position and shut off water supply to
refrigerator.,
For shorter vacations, remove perishable foods and
leave controls at their regular settings. However, if
room temperature is expected to drop below 60°E
(16°C), follow the same instructions asfor extended
vacations.
When You Hove
Disconnect the power cord fIom the wall outlet,
remove all food, and clean and dly the interior.
SECURE ALL LOOSE ITEMS such as shelves and
drawers by taping them securely in place to prevent
damage_
Be sure the refrigerator stays in an upright position
during actual moving and in the van° It must be
secured in the van to prevent movement. Protect the
outside of the refi:igerator with a blanket.
When pushing the refrigerator back, make sure you
don't roll over' the power cord or icemaker supply line.
21
Care ¸and ¢Jeaning
Light Bulb Replacernent
Unplug refrigerator before changing a
light bulb.
Before replacing a burned-out light bulb, unplug
the refrigerator or turn off power at the circuit breaker
or' fuse box in order* to avoid contact with a live wire
filament. (A burned-out light bulb may break when
being replaced.) Note: Moving the control to the
OFF position does not remove power to the light
circuit.
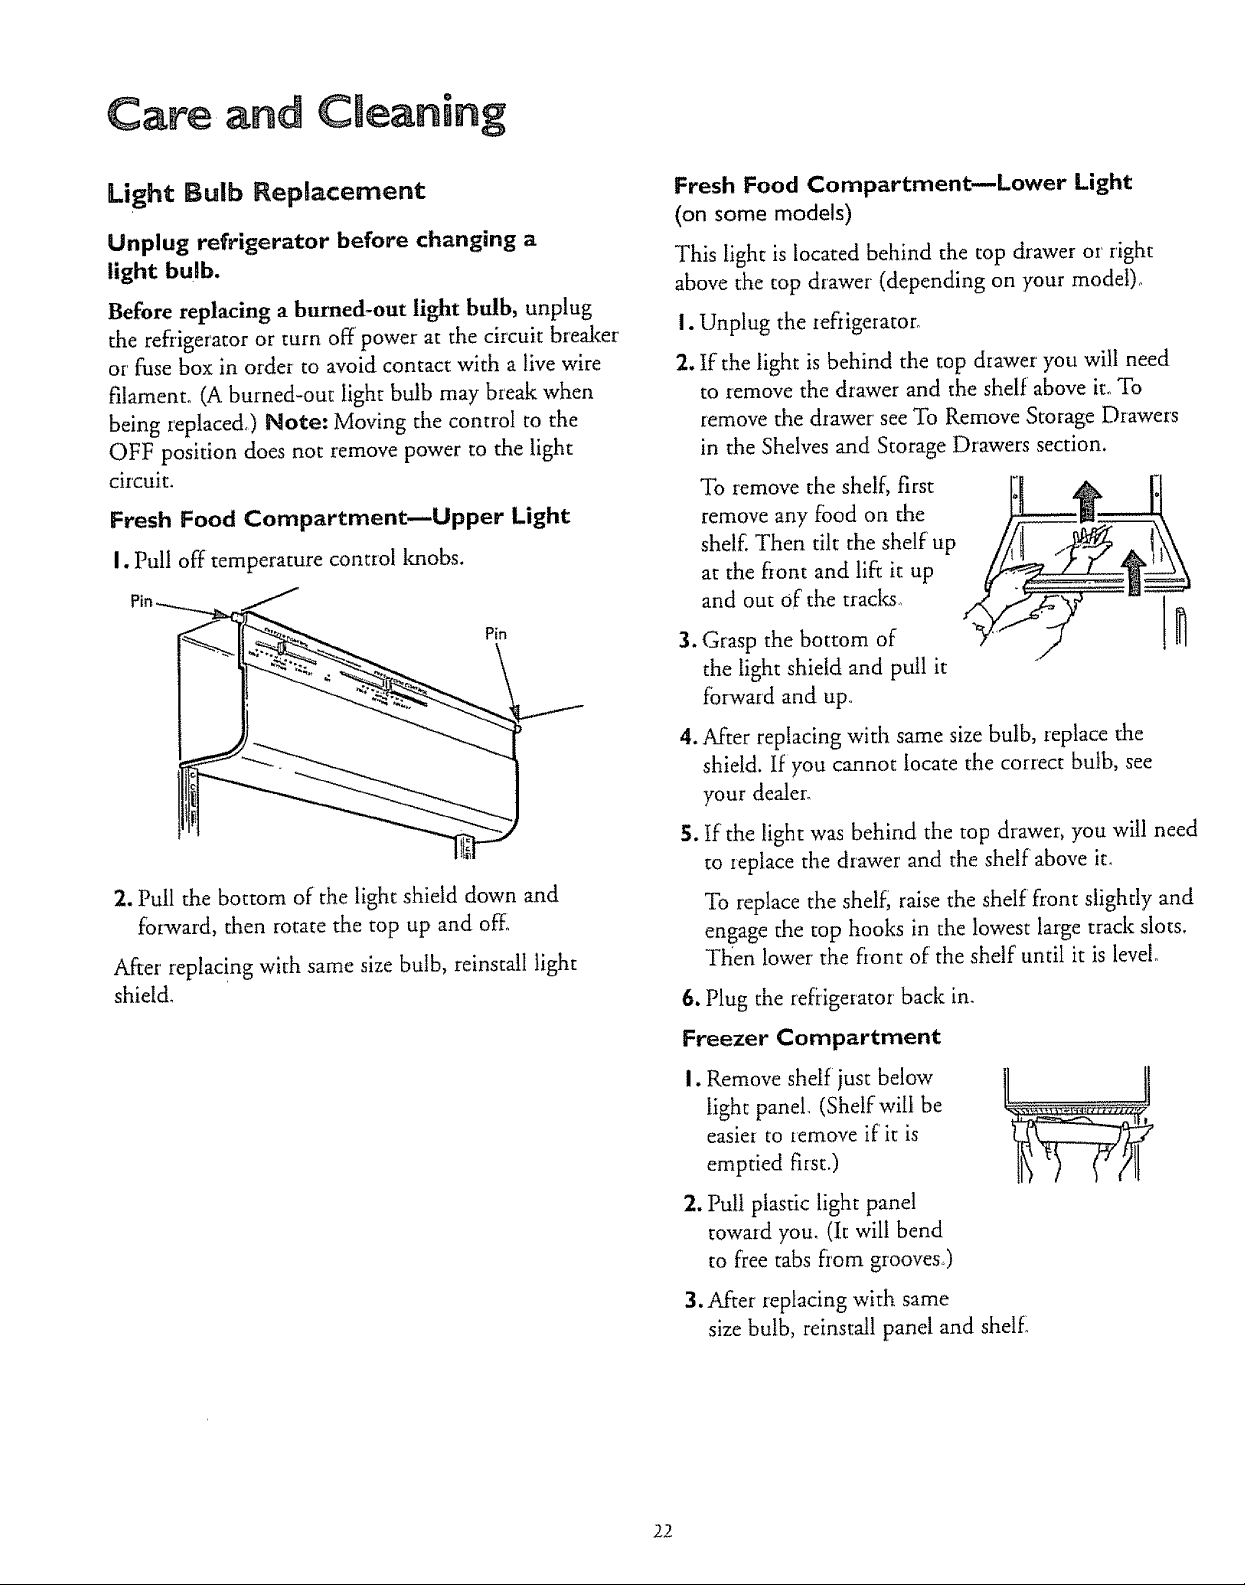
Fresh Food Compartment---Upper Light
I. Pull off temperature control knobs.
Pin
Fresh Food Compartment_Lower Light
(on some models)
This light is located behind the top drawer or right
above the top drawer (depending on your model)°
J. Unplug the _efrigeratoro
2,
If the light is behind the top drawer' you will need
to remove the drawer and the shelf above it,. To
remove the drawer see To Remove Storage Drawers
in the Shelves and Storage Drawers section.
To remove the shelf, first
remove any food on the
shelf. Then tilt the shelf up
at the fiont and lift it up
and out of the traclcs,
3_
Grasp the bottom of
the light shield and pull it
forward and up,,
,
After replacing with same size bulb, replace the
shield. If you cannot locate the correct bulb, see
your dealer_
2. Pull the bottom of the light shield down and
forward, then rotate the top up and off.
After replacing with same size bulb, reinstall light
shield.
.
tf the light was behind the top drawer, you will need
to replace the drawer and the shelf above it.
To replace the shelfl raise the shelffront slightly and
engage the top hooks in the lowest large track slots,
Tl-ien lower the front of the shelf until it is level_
6.Plug the refrigerator back in.
Freezer Compartment
IJ
Remove shelf just below
light panel. (Shelf will be
easie_ to remove if ir is
emptied first.)
2_
Pull plastic light panel
towazd you, (It will bend
to flee tabs f_om grooves0
3. After' replacing with same
size bulb, reinstall panel and shelf,
22
BeforeYou Call for Service
Normal Operating Sounds
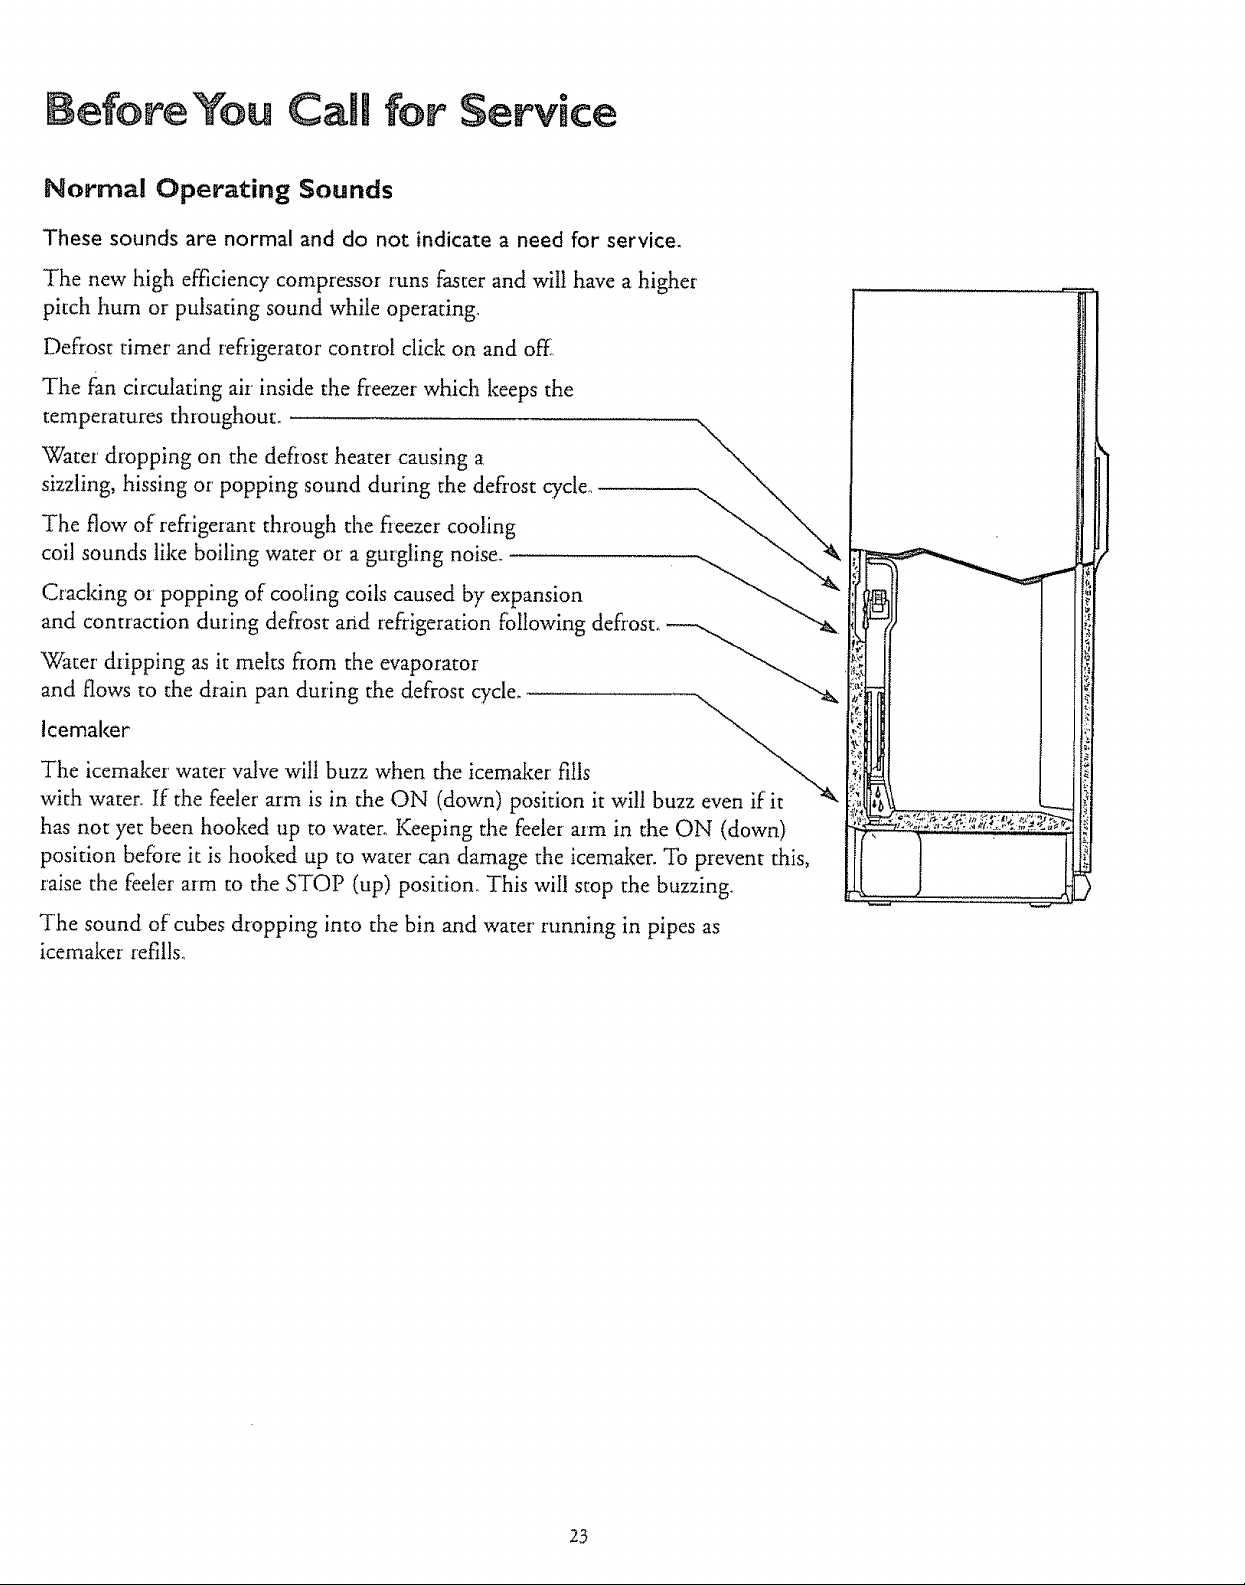
These sounds are normal and do not indicate a need for service.
The new high efficiency compressor runs faster and will have a higher
pitch hum or pulsating sound while operating.
Defrost timer and refrigerator control click on and off,
The fan circulating air inside the freezer which keeps the
temperatures throughout.
Water dropping on the defrost heater causing a
sizzling, hissing or' popping sound during the defrost cycle.,
The flow of refi'igerant through the fieezer cooling
coil sounds like boiling water or a gurgling noise.
Cracking o_ popping of cooling coils caused by expansion
and contraction during defrost arid refrigeration following defrost.
Water dripping as it melts from the evaporator _--._.._
and flows to the drain pan during the defrost cycle.
The icemaker water valve will buzz when the icemaker fills
lcemaker i_
with water. If:the feeler arm is in the ON (down) position it will buzz
has not yet been hooked up to water,, Keeping the feeler arm in the ON (down)
position before it is hooked up to water can damage the icemaker. To prevent this,
raise the feeler arm to the STOP (up) position. This wil! stop the buzzing.
The sound of cubes dropping into the bin and water running in pipes as
icemaker refills.
5
23
BeforeYou CaM!for Service
Save time and money.
Check this list of causes of minor operating problems you can correct yourself.
Problem Possible Cause
Refrigerator does o May be in defrost cycle when fan and compressor motor do not operate for about
not operate 30 minutes_.
* Temperature control in OFF position.
* If the interior light is not on, the refrigerator may not be plugged in at the wall outtet_
* If the plug is secure and the refrigerator fails to operate, plug a lamp or a small
appliance into the same outlet to determine if there is a tripped circuit breaker or a
burned-out fiase.
Compressor operates * Modem refrigerators with more storage space and a larger fi:eezer compartment
for long periods require more operating time.
o Normal when ref_'igerator is first delivered to your home--usually requires 24 hours
to completely cool down.
= Large amounts of food placed in refiigerator to be cooled or frozen_
o Hot weather--frequent door openings.
o Door left open or door' is not sealing when closed because refrigerator is not level.
o Temperature controls are set too cold.
= Condenser needs cleaning.
Motor starts and * Temperature control starts and stops motor to maintain even temperatures,.
stops frequently This is normal_
Vibration or rattling * If refrigerator vibrates, more than likely it is not resting solidly on the floor_
The rollers need adjusting, or floor is weak or uneven.
* If dishes vibrate on shelves, t_'y moving them. Slight vibration is normal
* Icemaker supply line may be rattling; move the refrigerator 1/2" (I 3 ram) out flora the wall.
Hot air from bottom • Normal air flow cooling motor'. In the refrigeration process, it is normal that heat
of refrigerator be expelled in the area under the _efrigerator. Some floor coverings will discolor at
these normal and safe operating temperatures. Your floor covering supplier should
be consulted if you object to this discoloration,,
Foods dry out ° Foods not covered, wrapped or sealed properly.
Fresh food or freezer • Temperature control not set cold enough.
compartment ° Warm weather--frequent door openings.
temperature too
warm ° Door left open for long time.
o Package may be holding door open, door may be overloaded oK the magnets are not
malting contact with the doors. You may need to clean the magnets_
24
Problem
Possible Cause
Frost or ice crystals
on frozen food
Slow ice cube
freezing
Ice cubes have
odor/taste
Automatic icemaker
does not work
° Door may have been left ajar or package holding door open°
° Too frequent or too long door openings._
° Frost within package is normal.
° Door may have been left ajarr
o Turn temperature of freezer' compartment colder,,
" Old cubes need to be discarded. Empty ice bin every 30 days.
° Ice storage bin needs to be washed.
° Unsealed packages in refrigerator and/oI freezer' compartments may be transmitting
odorttaste to ice cubes,
° Interior of refrigerator needs cleaning.
o Poor-tasting incoming watez_, Install a water filte_--see Water Filter Accessory in the
Ice and Water Dispenser section.
° Icemaker feeler arm in STOP (up) position.
° Water supply turned off, not connected, or the water tubing is clogged,,
° Freezer compartment too warm.
Cube dispenser
does not work
Ice clumps form
in the storage bin
° Cubes too small--water shutoffvalve connecting refrigerator to home water line
may be c!ogged.
° Sometimes cubes fuse to the side of the ice mold and hold the feeler arm in the
STOP (up) position,, Remove this ice to restart the icemakei:
° Piled up cubes in storage bin may cause icemaker to shut off prematurely_
With icemaker feeler arm in STOP (up) position, level cubes in bin by hand.
° When reaching foE' cubes by hand, you may have pushed the feeler arm into the
STOP (up) position by mistaken
° Remove storage container. If cubes are frozen to wire arm, remove cubes.
° Icemaker or water supply turned off_
° If you find irregular ice clumps in the storage container, break up as many as you can
with fingertip pressure and discard the remaining clumps_
° If you don't use the ice very often, ice clumps may form in the storage bin and can clog
the dispenser. Remove the storage bin from the freezer and break up ice clumps with
your' hands. Throw away any clumps that you can't break up.
25
Before You CaR for Service
Problem
Water dispenser
does not work
Water has poor
taste/odor
Water in first
glass is warm
Hoisture forms
on outside of
refrigerator
Possible Cause
, Water supply line turned off or not connected_
- Supply line may be clogged with sediment,,
° If no water is dispensed when the refrigerator is first installed, there may be air in the
water' system. Press the dispenser pad for at least two minutes to remove trapped air
from the water line and to fill the water' system_
o If' the water dispenser has not been used for an extended period, dispense water' in
regular' manner until all water' in the system is replenished with fresh water,
° Poor-tasting incoming water', Install a water filter_--see Water Filter Accessory in the
Ice and Water Dispenser section°
• Mlow about 24 hours for water to cool to proper temperature after refi'igerator is first
first installed.
If water dispenser has not been used for' extended period, water in first glass will not
be as cool as in succeeding glasses_
° If the water system has been drained, allow several hours for replenished supply to chill,
. Not unusual during periods of high humidity.
Hoisture collects
inside
Refrigerator
has odor
Interior light
does not work
Divider between
fresh food and freezer
compartments
feels warm
Door not closing
properly or only
partially closing
° Too frequent or too long door' openings,
° In humid weather, air carries moisture into refrigerator when doors are opened.
* Food with strong odors should be tightly covered.
o Check for spoiled fbod_
o Interior needs cleaning,.
° Keep open box of baldng soda in refrigerator; replace every three months.
° No power at outlet.
o Light bulb needs replacing.
° Normal warmth is created by automatic energy saver system circulating warm liquid
around front edge of fieezer compartment to help prevent condensation on outside
of refrigerator in hot, humid weather.
° Door gasket on hinge side sticldng or folding over. To correct, put a small amount of
petroleum jelly on face of gasket.
• The doors are designed to stay open partway for ease of' loading food.
26
Forthe repaBror repnacemeatpartsyouneed
Call7 am - 7 pm,7 daysaweek
1°8@@o366°PART
(1-888-368-7278)
ForJ.-home major brand[epai[ service
Call24 hoursa day,7 daysaweek
1°8@@°4°R
(1-888-473-7247)
Forthe Ilocatioa of a
$ears Repair Service Ce.ter i. yourarea
Call24 hoursa day,7 daysa week
°8@@°488°_
Forinfermatiofl oa purchasia9a Sears
Mai.tenaace A#reeme.t or to inquire
a#oat aa existS.# Asreement
call 9 am- 5 pm, Monday-Saturday
t °8@@°827°6655
America's Repair Specialists
27
 Loading...