

Kenmore 36359572994, 36359572990, 36358772891, 36358557891, 36358477894 Owner’s Manual
...
®
BY
GERATO
Use and Care Guide
RI_FRI " " " "
GERATEUR COTE A COTE
Guide d'Utilisation et d'Entretien
REFRIGERADOR
DOS PU
Manual de Uso y Cuidado
Sears, Roebuck and Co., Hoffman Estates, IL 60179 U.S.A.
Visit our Sears website: wwwosears+com
Part No+ 162D9061P006
Pub+ No. SR6195
1/00 JR
Printed in the United States
English Version
Version franqaise
Versibn en espahol
Warranty
Safety Instructions
Grounding Requirements
Parts and Features
Refrigerator Installation
Water Line Installation
Temperature Controls
Food Storage Suggestions
Water Filter Cartridge
32
62
3,4
8-10
11
11, 12
13
2
2
5
6
7
Shelves and Storage Drawers
ice Service
ice and Water Dispenser
Care and Cleaning
Vacation and Moving Precautions
Sound Map
Troubleshooting Guide
State of California Water
Treatment Device Certificate
Cartridge Performance Data Sheet
Sears Maintenance Agreement
Customer Service
14-I6
18, 19
20-22
23-27
Back Cover
FULL ONE-YEAR WARRANTY ON REFRIGERATOR
For one year from the date of purchase, when this refrigerator is operated and maintained according to instructions attached
to or furnished with the product, Sears wil! repair this refrigerator, free of charge, if defective in material or workmanship
17
2I
23
28
29
30
FULL FIVE-YEAR WARRANTY ON SEALED REFRIGERATION SYSTEM
For five years from the date of purchase, when this refrigerator is operated and maintained according to owner's
instructions attached to or furnished with the product, Sears will repair the sealed system (consisting of refrigeration,
connecting tubing, and compressor), free of charge, if defective in material or workmanship..
The above warranty coverage applies only to refrigerators which are used for storage of food for private household
purposes and excludes original and replacement Kenmore Filtered Ice & Water filter cartridges (if equipped with the
filter system).. Original and replacement cartridges are warranted for 30 days, parts only, against defects in material or
workmanship.
WARRANTY SERVICE IS AVAILABLE BY CONTACTING THE NEAREST SEARS SERVICE CENTER IN THE
UNITED STATES OR CANADA.
This warranty applies only while this product is in use in the United States or Canada_ This warranty gives you
specific legal dghts, and you may also have other rights which vary from state to state or province to province.
Warranty terms may vary in Canada. Contact your local Sears Service Center for complete details.
Sears, Roebuck and Co., Dept. 817WA, Hoffman Estates, IL 60179
Sears Canada, tnc., Toronto, Ontario, Canada M5B 2B8
In the space below, record the date of purchase, model and serial number of your product. You will find the model and sedal
number printed on an identification plate located on the wall beside the top drawer or at the bottom, just inside the fresh
food compartment door Have these items of information available whenever you contact Sears concerning your product..
Model Noo
Serial No, 363,
Save these instructions and your sales receipt for future reference
@Sears, Roebuck and Co
Date of Purchase
2_

This manual contains many important safety messages.
Always read and obey all safety messages.
This is the safety alert symbol.. It alerts you to safety messages that inform you
of hazards that can kill or hurt you or others, or cause damage to the product,
Alf safety messages will be preceded by the safety alert symbol and the hazard
signal word DANGER, WARNING, or CAUTION These words mean:
You will be killed or seriously injured if you don't follow instructions_
You can be killed or seriously injured if you don't follow instructions..
Indicates an imminently hazardous situation which, if not avoided,
may result in minor or moderate injury, or product-damage-only.
All safety messages will identify the hazard, tell you how to reduce the chance of injury,
and tell you what can happen if the instructions are not followed°
To reduce the risk of fire, electric shock, or injury
to persons when using your product, basic safety
precautions should be followed, including the
following:
• NEVER unplug your refrigerator by pulling on the
power cord, Always grip the plug firmly and pull it
straight out from the outlet
• Repair or replace immediately all electric service
cords that have become frayed or otherwise
damaged.. Do not use a cord that shows cracks or
abrasion damage along its length or at either the
plug or connector end.
• When moving your refrigerator away from the wall,
be careful not to roll over or damage the power cord.
• DO NOT store or use gasoline or other flammable
vapors and liquids in the vicinity of this or any other
appliance.
DO NOT allow children to climb, stand or hang on
the refrigerator doors or shelves in the refrigerator.
They could damage the refrigerator and seriously
injure themselves.
Unplug your refrigerator before making any repairs.
NOTE: We strongly recommend that any servicing
be performed by a qualified individual.
Before replacing a burned-out light bulb, unplug
the refrigerator or turn off power at the circuit
breaker or fuse box in order to avoid contact with
a live wire filament. (A burned-out light bulb may
break when being replaced.) NOTE: Moving the
control to the OFF position does not remove
power to the light circuit°
For personal safety, this appliance must be properly
grounded_ Have the wall outlet and the circuit
checked by a qualified electrician to make sure the
outlet is properly grounded,
3
• Read atl instructions before using this appliance
Use this appliance only for its intended purpose as
described in this owner's guide_
• This refrigerator must be properly installed in
accordance with the Attention Installer Instructions that
were taped to the front of the refrigerator,
• After your refrigerator is in operation, do not touch the
cold surfaces in the freezer compartment when hands
are damp or wet. Skin may adhere to the extremely
cold surfaces.
• DO NOT place fingers or hands on the automatic
icemaking mechanism while the refrigerator is plugged
in. This will help protect you from possible injury It will
also prevent interference with the moving parts of the
ejector mechanism, or with the heating element that
releases the cubes.
• DO NOT refreeze frozen foods which have thawed
completely The United States Department of
Agriculture in Home and Garden Bulletin No 69 says:
"o You may safely refreeze frozen foods that have
thawed if they still contain ice crystals or if they are still
cold--below 40°F (4°C).
'L..Thawed ground meats, poultry or fish that have any
off-odor or off-color should not be refrozen and should
not be eaten_ Thawed ice cream should be discarded..
tf the odor or color of any food is poor or questionable,
get rid of it. The food may be dangerous to eat.
"Even partial thawing and refreezing reduces the
eating quality of foods, particularly fruits, vegetables
and prepared foods. The eating quality of red meats
is affected less than that of many other foods. Use
refrozen foods as soon as possible to save as much of
their eating quality as you can."
SAVE THESE INSTRUCTIONS
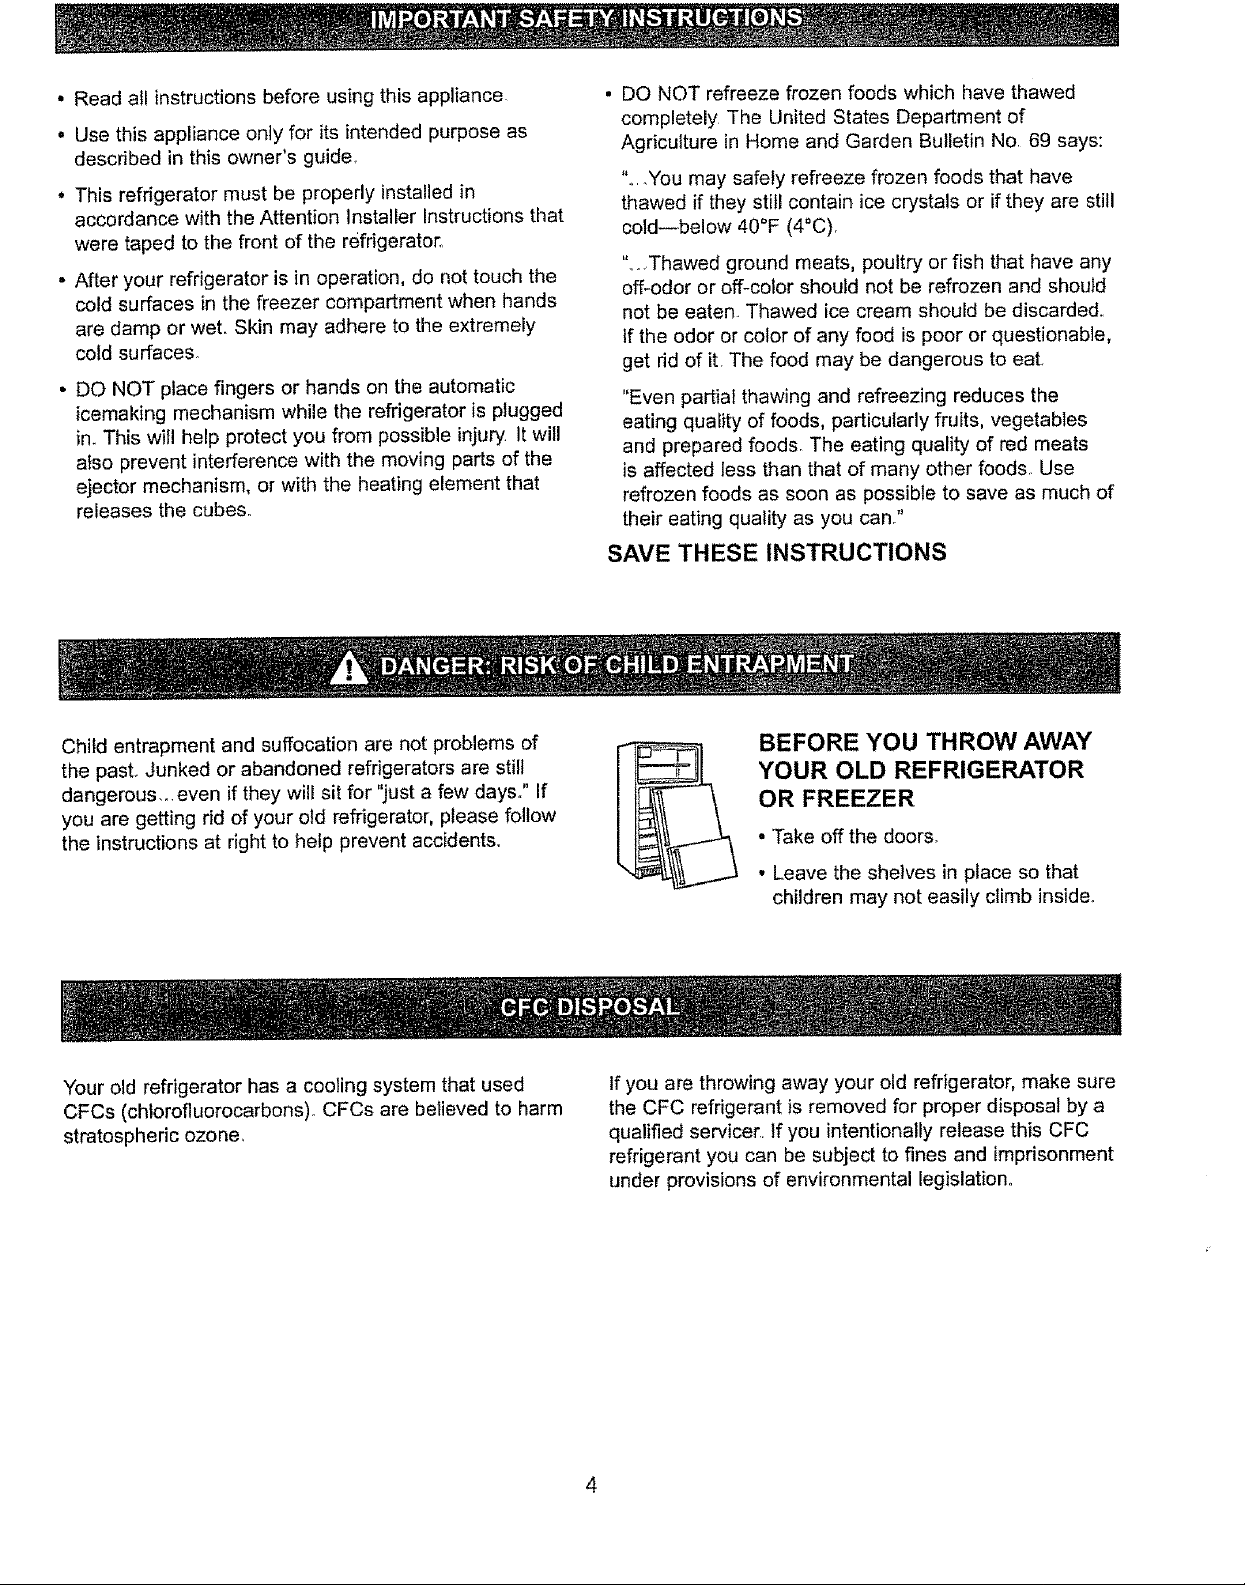
Child entrapment and suffocation are not problems of
the past. Junked or abandoned refrigerators are still
dangerous,..even if they will sit for "just a few days." If
you are getting rid of your otd refrigerator, please follow
the instructions at right to help prevent accidents_
Your old refrigerator has a cooling system that used
CFCs (chlorofluorocarbons). CFCs are believed to harm
stratospheric ozone.
BEFORE YOU THROW AWAY
YOUR OLD REFRIGERATOR
OR FREEZER
• Take off the doors.
• Leave the shelves in place so that
children may not easily climb inside.
tf you are throwing away your old refrigerator, make sure
the CFC refrigerant is removed for proper disposal by a
qualified servicer.. If you intentionally release this CFC
refrigerant you can be subject to fines and imprisonment
under provisions of environmental legislation..
IMPORTANT: Please read carefully.
RECOMMENDED GROUNDING METHOD
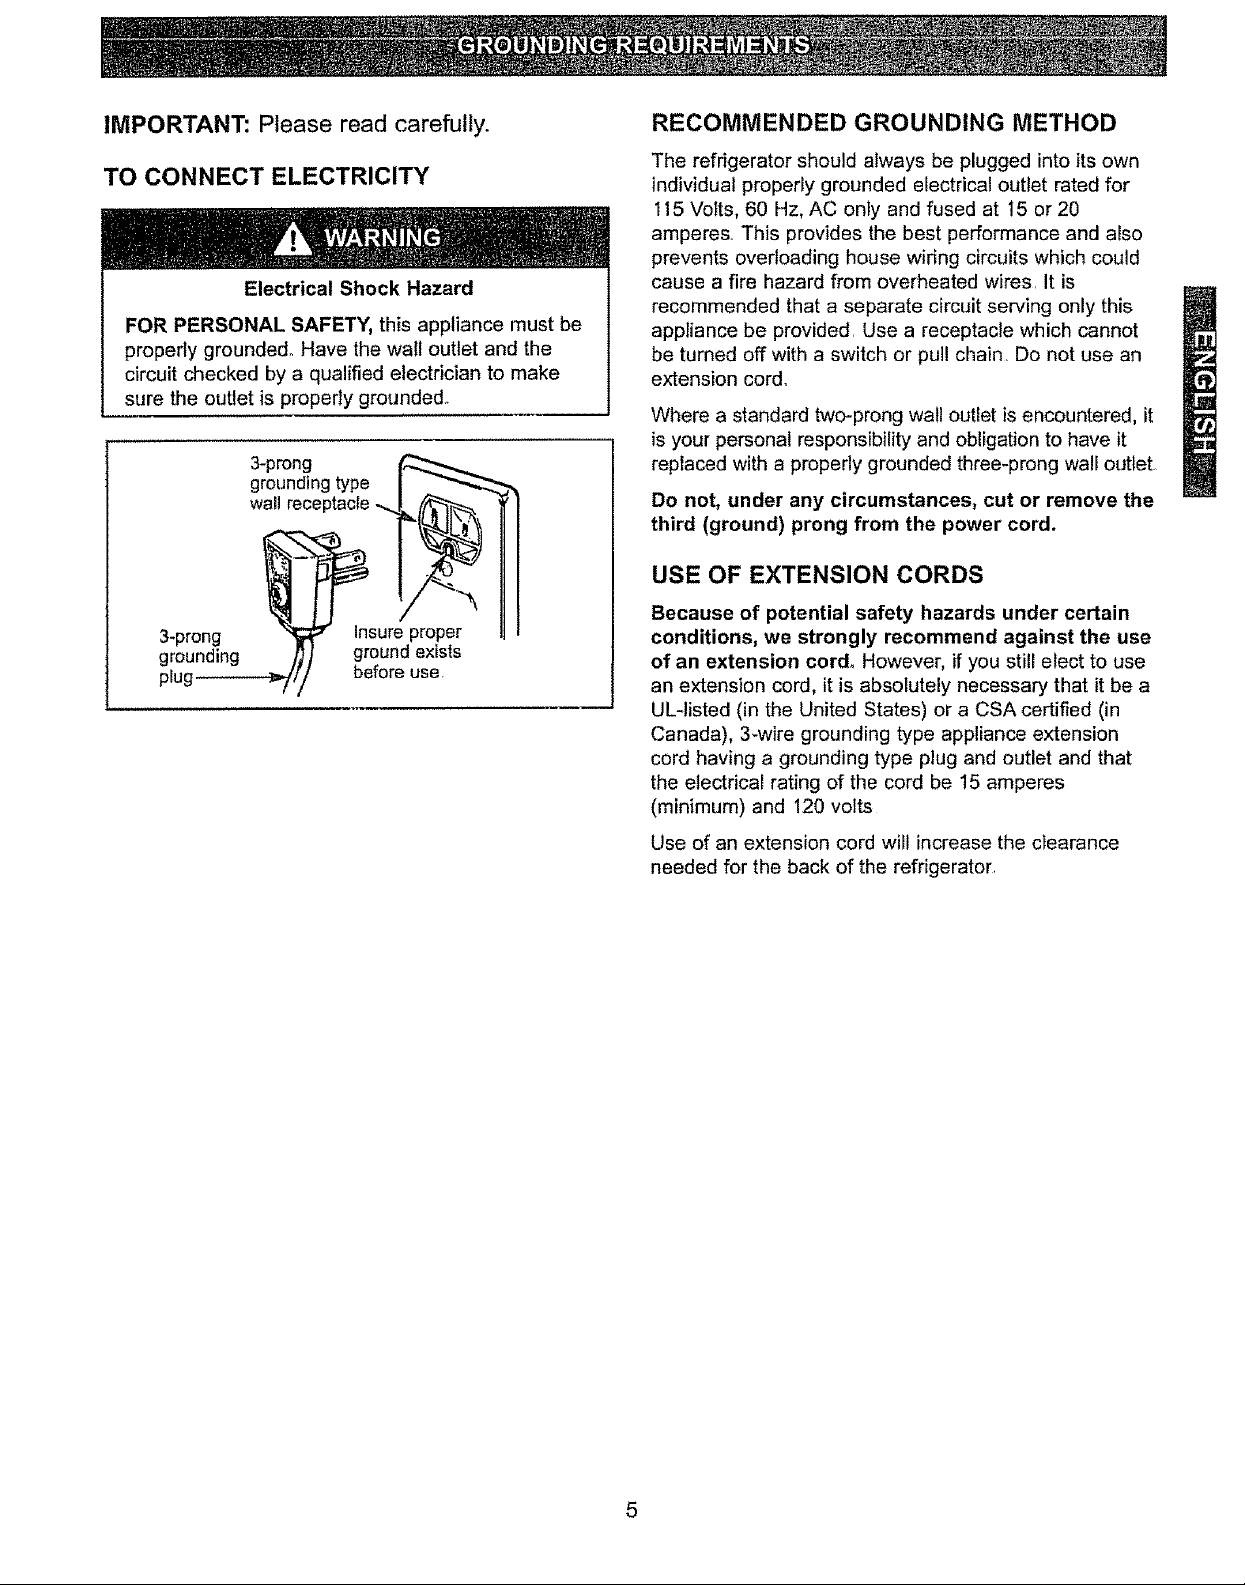
TO CONNECT ELECTRICITY
Electrical Shock Hazard
FOR PERSONAL SAFETY, this appliance must be
properly grounded.. Have the wail outlet and the
circuit checked by a qualified electrician to make
sure the outlet is properly grounded.
3-prong
grounding type
wall receptacle .,.,..
3-prong
grounding
plug
Insure proper
ground exists
before use.
The refrigerator should always be plugged into its own
individual properly grounded electrical outlet rated for
115 Volts, 60 Hz, AC only and fused at 15 or 20
amperes This provides the best performance and also
prevents overloading house wiring circuits which could
cause a fire hazard from overheated wires It is
recommended that a separate circuit serving only this
appliance be provided Use a receptacle which cannot
be turned off with a switch or pull chain. Do not use an
extension cord°
Where a standard two-prong wal! outlet isencountered, it
is your personal responsibility and obligation to have it
replaced with a properly grounded three-prong wall outlet
Do not, under any circumstances, cut or remove the
third (ground) prong from the power cord.
USE OF EXTENSION CORDS
Because of potential safety hazards under certain
conditions, we strongly recommend against the use
of an extension cord° However, if you still elect to use
an extension cord, it is absolutely necessary that it be a
UL-listed (in the United States) or a CSA certified (in
Canada), 3-wire grounding type appliance extension
cord having a grounding type plug and outlet and that
the electrical rating of the cord be 15 amperes
(minimum) and 120 volts
Use of an extension cord will increase the clearance
needed for the back of the refrigerator.
5
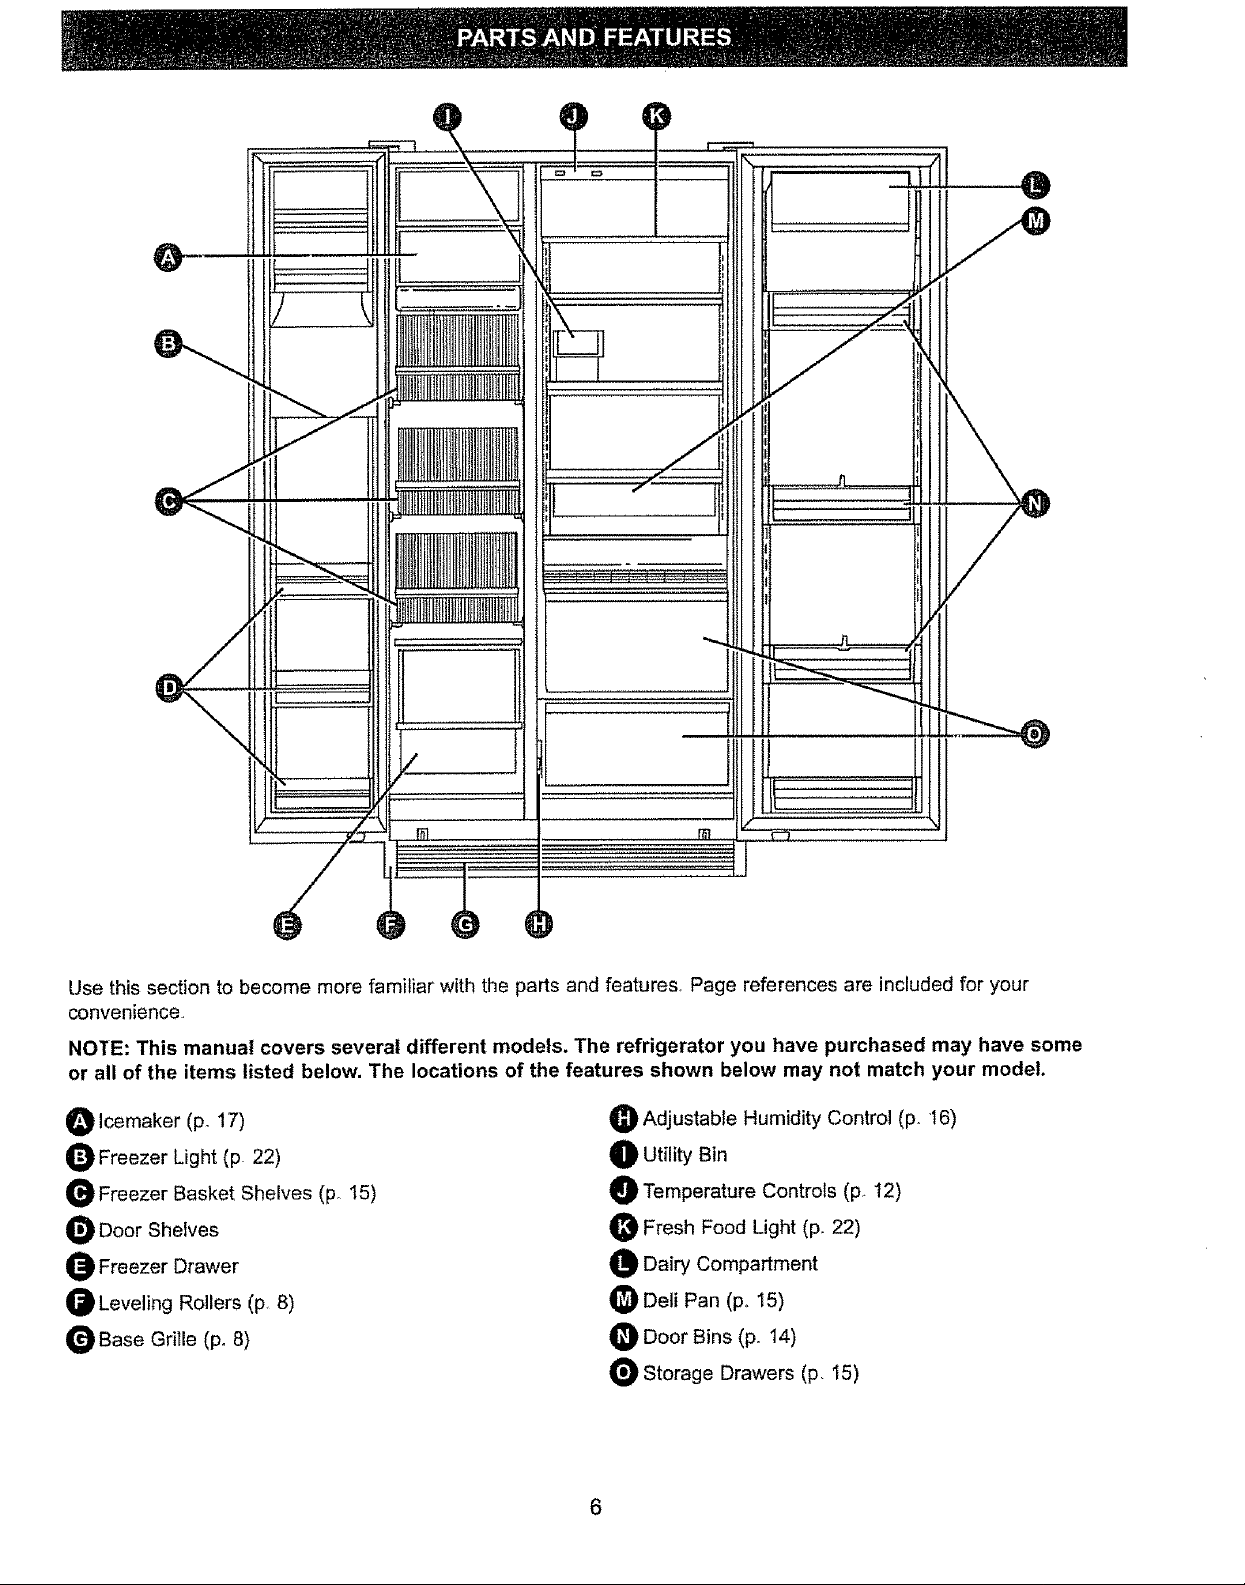
Use this section to become more familiar with the parts and features, Page references are included for your
convenience
NOTE: This manual covers several different models. The refrigerator you have purchased may have some
or all of the items listed below. The locations of the features shown below may not match your model.
O Icemaker (p_ 17)
O Freezer Light (p. 22)
G Freezer Basket Shelves (p. 15)
O Door Shelves
O Freezer Drawer
Leveling Rollers (p 8)
Base Grille (po 8)
Adjustable Humidity Control (p. 16)
O Utility Bin
O Temperature Controls (F 12)
O Fresh Food Light (p, 22)
O Dairy Compartment
O Deii Pan (p_ 15)
Door Bins (p, 14)
Storage Drawers (p, t5)

LOCATION
ROLLERS
• Install the refrigerator on a floor strong enough to
support it when it is fully loaded°
• Do not install it where the temperature will go
below 60°F (16°C) because it wil! not run often
enough to maintain proper temperatures.
• Do not install it next to your range, a heating vent
or where the sun will shine directly on it,
CLEARANCES
Allow the following clearances for ease of installation,
proper air circulation, and plumbing and electrical
connections:
I ,t
Adjustable rollers behind the base grille enable you to
move the refrigerator away from the wall for cleaning.
These rollers should be set so the refrigerator rests
firmly on the floor. To assure that the doors will close
automatically from a halfway-open position, there is a
built-in tilt from the front to the back of the cabineto Side-
by-side refrigerators also have specially designed door
hinges that lift both doors slightly when opened, allowing
the force of gravity to help close them securely°
To adjust the rollers:
• Remove the base
grille by grasping the
bottom of the grille
and pulling it out°
• Turn the roller adjusting
screws clockwise to
raise the refrigerator,
counterclockwise to
lower it,
Sides .................................. 5/8" (t6 mm)
Top ........................................ 1" (25 mm)
Back ......................................... 1" (25 mm)
[tf built-in, allow 7/8" (22 mm) at top for hinge covers..]
tf the refrigerator is against a wall on either side,
allow the following door clearances:
For models up to and including 25, allow 3/4" (!9 mm),
For 27 models, allow 11/2"(38 mm).
• To replace the base grille,
line up the prongs on the
grille with the clamps on
the refrigerator and push
back until the grille snaps
into place.
7
BEFORE YOU BEGIN
Electrical Shock Hazard
• Disconnect electrical supply to refrigerator before
installing.
o Electrical drill must be grounded before drilling
holes in water lineo
WHAT YOU WILL NEED
• Cold water supply, The water pressure must be
between 20 and !20 p,si (14--8,2 bar) on models
without a water filter and between 40 and 120 p,s.i.
(2°8-8,2 bar) on models with a water filter
• Power drill.
• A water supply kit containing the following items
can be purchased from your Sears store or Sears
Service Center,
Failure to do so could result in electrical shock,
sedous injury, or death
. If the water supply to the refrigerator is from a Reverse
Osmosis Water Filtration System AND the refrigerator
is equipped with a built-in filtration system, use the
refrigerator's filter bypass plug. Using the refrigerator's
water filtration cartridge in conjunction with the RO
filter can result in hollow ice cubes and slower water
flow from the water dispenser.
• Follow these instructions carefully to minimize the risk
of expensive water damage.
• Water hammer (water banging in the pipes) in house
ptumbing can cause damage to refrigerator parts and
lead to water leakage or flooding. Call a qualified
plumber to correct water hammer before installing the
water supply line to the refrigerator.
- To prevent burns and product damage, do not hook up
the water line to the hot water line.
- If you use your refrigerator before connecting the water
line, make sure the icemaker feeler arm is kept in the
STOP (up) position,
• DO NOT install the icemaker tubing in areas where
temperatures fall betow freezing.
° When using any electrical device (such as a power
drill) during installation, be sure the device is
insulated or wired in a manner to prevent the hazard
of eiectdc shock.
• All installations must be in accordance with local
plumbing code requirements_
Copper tubing, 1/4" outer diameter to connect the
refrigerator to the water supply, Be sure both ends of
the tubing are cut square..
To determine how much copper tubing you need:
Measure the distance from the water valve on the back
of the refrigerator to the water supply pipe, Then add
8 feet (244 cm). Be sure there is sufficient extra tubing
[about 8 feet (244 cm) coiled into 3 turns of about
10 inches (25 cm) diameter] to allow the refrigerator
to move out from the wal! after installation,
DO NOT use 1!4" outer diameter plastic tubing or
plastic fittings.
Two 1/4" outer diameter compression nuts and
2 ferrules (steeves)--to connect the copper tubing
to the shutoff valve and the refrigerator water valve°
Shutoff valve to connect to the cold water line. The
shutoff valve should have a water inlet with a minimum
inside diameter of 5132" at the point of connection to
the COLD WATER LINE DO NOT use self-piercing
3/16" diameter saddle valves, Both may reduce water
flow and clog easily° Saddle-type shutoff valves are
included in many water supply kits_ Before purchasing,
make sure a saddle-type valve complies with your
local plumbing codes.
NOTE: If your existing water line has a flared fitting
at the end, you will need an adapter (available at
plumbing supply stores) to connect the water line to
the refrigerator OR you can cut off the flared fitting
with a tube cutter and then use a compression fitting°
[!] SHUT OFF THE MAIN WATER SUPPLY.
Turn on the nearest faucet long enough to clear the
line of water.
[] INSTALL THE SHUTOFF VALVE.
a. Install the shutoff valve on the nearest frequently
used drinking water line
_-] ROUTE THE COPPER TUBING AND
CONNECT IT TO THE SHUTOFF VALVE.
Route the copper tubing between the cold water line
and the refrigerator.
Route the tubing through a hole ddlled in the wall or
floor (behind the refrigerator or adjacent base cabinet)
as close to the wall as possible.
b. Choose a location for the valve that is easily
accessible° It is best to connect into the side of a
vertical water pipe When it is necessary to connect
into a horizontal water pipe, make the connection to
the top or side, rather than at the bottom, to avoid
drawing off any sediment from the water pipe
c. Drill a !14" hole in the water pipe, using a sharp bit.
Remove any burrs resulting from drilling the hole in
the pipe
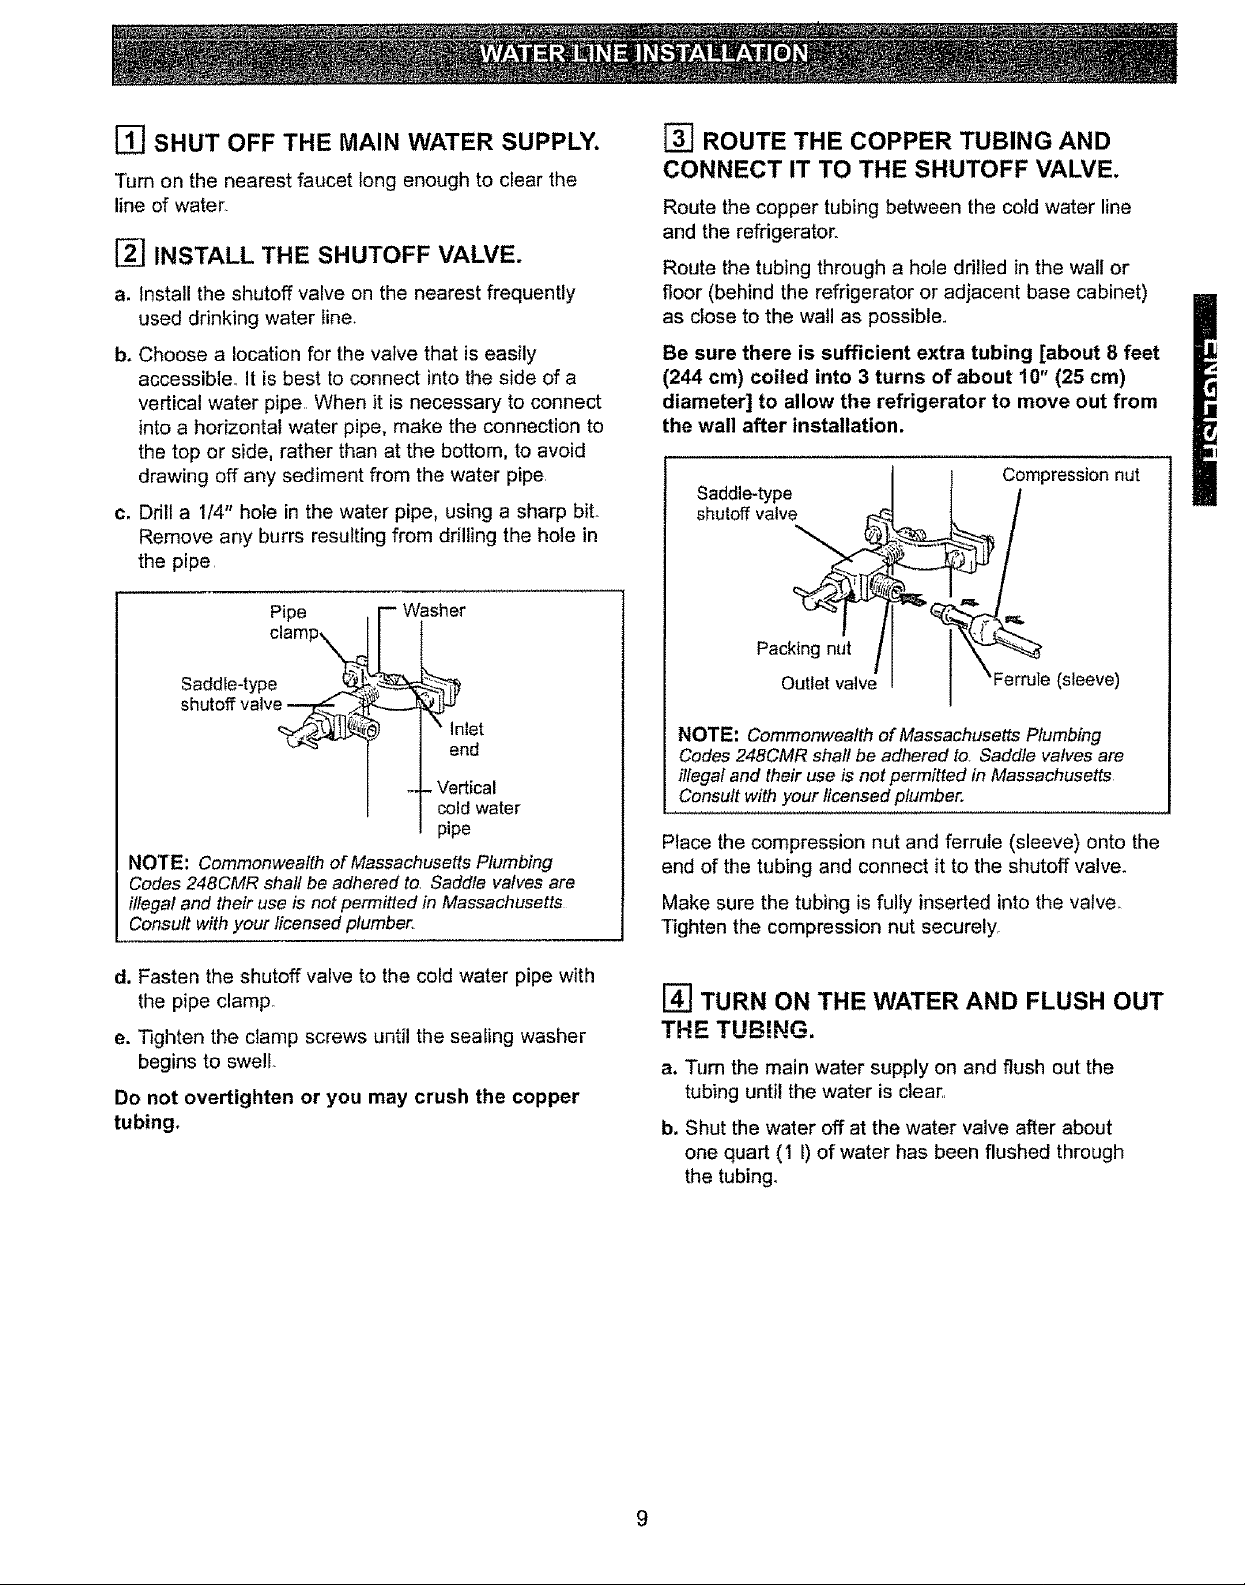
Pipe
Saddle-type
clamp'x_
shutoff valve_
Washer
Inlet
end
- Vertical
cold water
pipe
NOTE: Commonwealth of Massachusetts Plumbing
Codes 248CMR shall be adhered to Saddle valves are
illegal and their use is not permitted in Massachusetts
Consult with your licensed plumber,
Be sure there is sufficient extra tubing ['about 8 feet
(244 cm) coiled into 3 turns of about t0" (25 cm)
diameter] to allow the refrigerator to move out from
the wall after installation.
Saddle-type
shutoff valve
_ L_ Compression nut
Packing nut
Outlet valve
NOTE: Commonwealth of Massachusetts Plumbing
Codes 248CMR shall be adhered to Saddle valves are
illegal and their use is not permitted in Massachusetts
Consult with your licensed plumber.
Ferrule (sleeve)
Place the compression nut and ferrule (sleeve) onto the
end of the tubing and connect it to the shutoff valve.
Make sure the tubing is fully inserted into the valve.
Tighten the compression nut securely
d, Fasten the shutoff valve to the cold water pipe with
the pipe clamp°
e. Tighten the clamp screws until the sealing washer
begins to swell.
Do not overtighten or you may crush the copper
tubing,
[] TURN ON THE WATER AND FLUSH OUT
THE TUBENG.
a. Turn the main water supply on and flush out the
tubing until the water is clear
b, Shut the water off at the water valve after about
one quart (1 I) of water has been flushed through
the tubing.
[_] CONNECT THE TUBING TO THE
REFRIGERATOR.
Electrical Shock Hazard
Before making the connection to the refrigerator,
be sure the refrigerator power cord is not plugged
into the wall outlet
TURN THE WATER ON AT THE
SHUTOFF VALVE.
Tighten any connections that leak,
E_] PLUG IN THE REFRIGERATOR.
Arrange the coil of copper tubing so that it does not
vibrate against the back of the refrigerator or against
the wall
Check for leaks again after 24 hours.,
We recommend installing a water filter if your water
supply has sand or particles that could clog the screen
of the refrigerator's water valve, Install it in the water line
near the refrigerator.,
a. Remove the plastic flexible cap from the water valve
b. Place the compression nut and ferrule (sleeve) onto
the end of the tubing as shown,
c. Insert the end of the copper tubing into the water
valve connection as far as possible, While holding
the tubing, tighten the fitting,
d° Fasten the copper tubing into the clamp provided
on the back of the refrigerator. You may need to pry
open the clamp This will hold the tubing in position
and prevent leaks when the refrigerator is pushed
away from the wall,
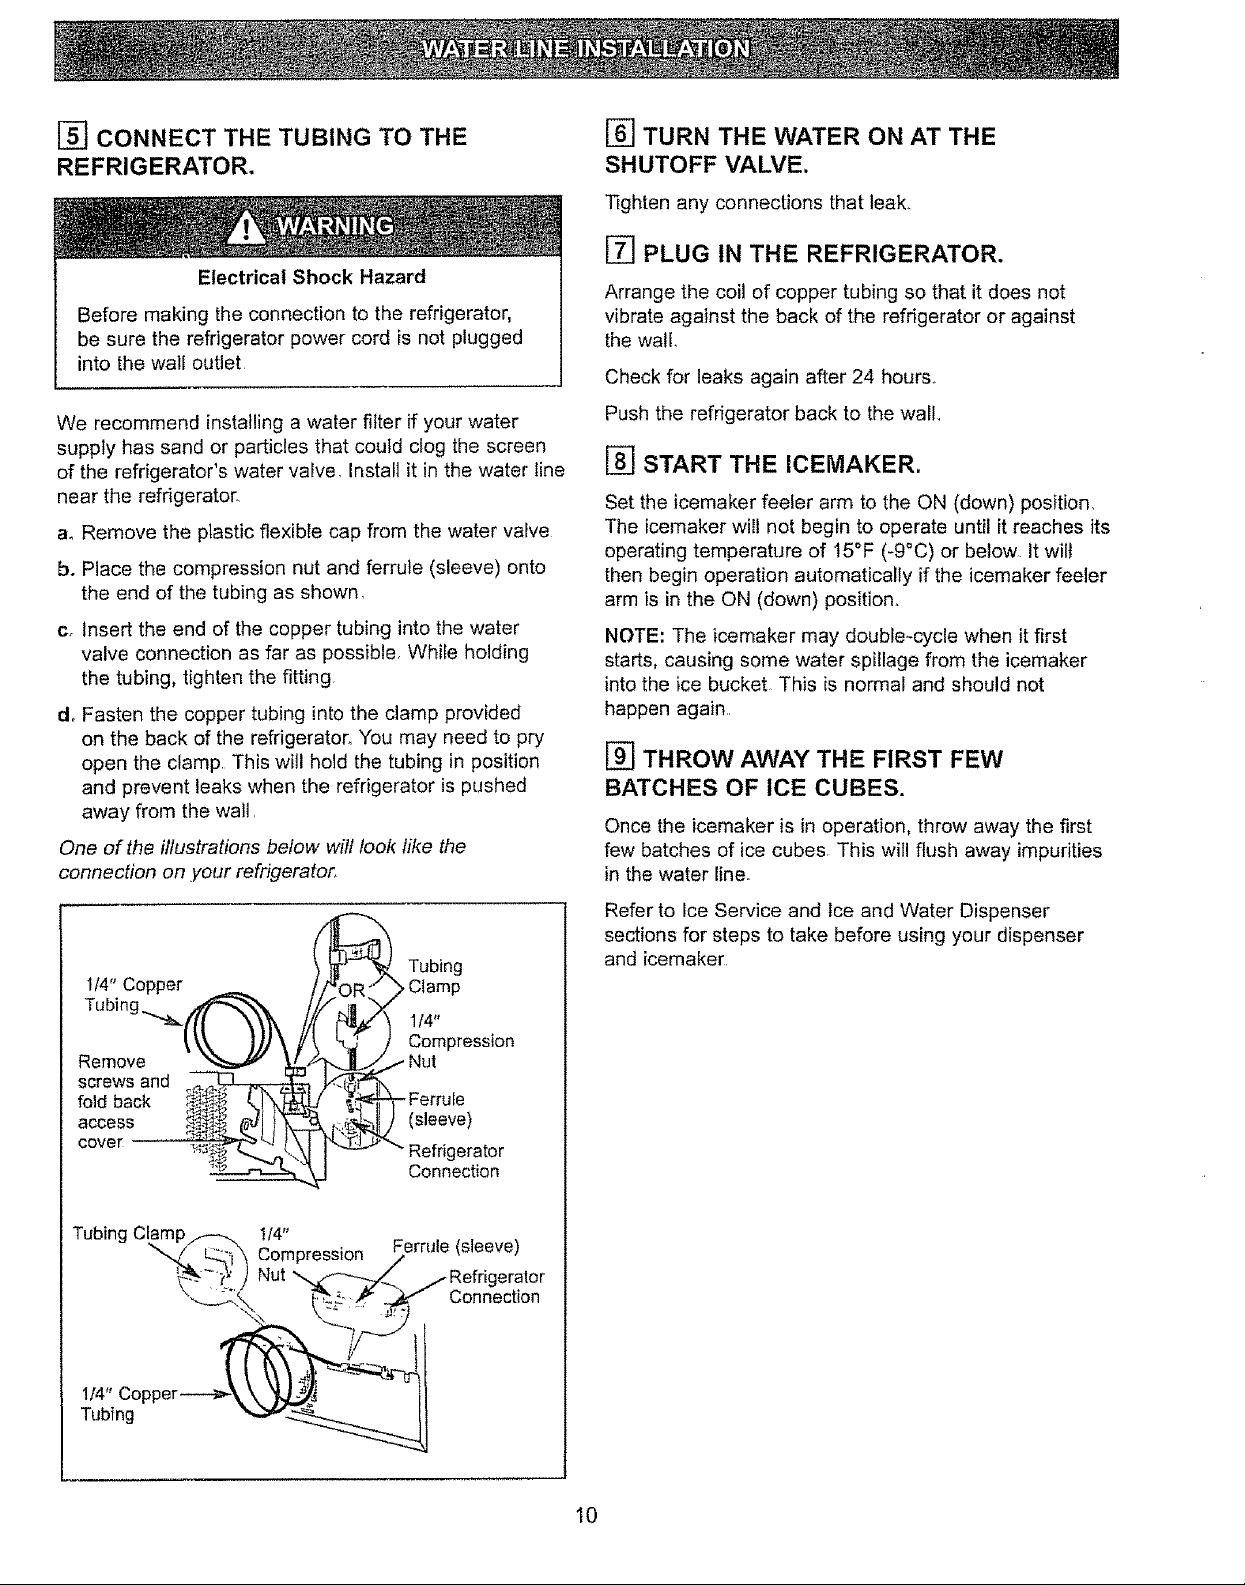
One of the illustrations below will took like the
connection on .your refrigerator,
_Tubing
1t4" Copper "/_ Clamp
Remove i.- Nut
screws and
fold back
access (sleeve)
cover _ Refrigerator
x',
'_ 114"
] Compression
Connection
Push the refrigerator back to the wall.
[_] START THE ICEMAKER.
Set the icemaker feeler arm to the ON (down) position,
The icemaker will not begin to operate until it reaches its
operating temperature of 15°F (-9°C) or below It wilt
then begin operation automatically if the icemaker feeler
arm is in the ON (down) position,,
NOTE: The icemaker may double-cycle when it first
starts, causing some water spillage from the icemaker
into the ice bucket This is normal and should not
happen again
[] THROW AWAY THE FIRST FEW
BATCHES OF ICE CUBES.
Once the icemaker is in operation, throw away the first
few batches of ice cubes This will flush away impurities
in the water line.
Refer to Ice Service and lce and Water Dispenser
sections for steps to take before using your dispenser
and icemaker
Tubing Clamp f--.. 114" _ ....
"_ L_,I"_ Compression _-errute_sleeve)
_7 ? ) Nut _ _.,-_/t Refrigerator
114 Copper-----__ _1
Tubing ",,...'_'_
I0
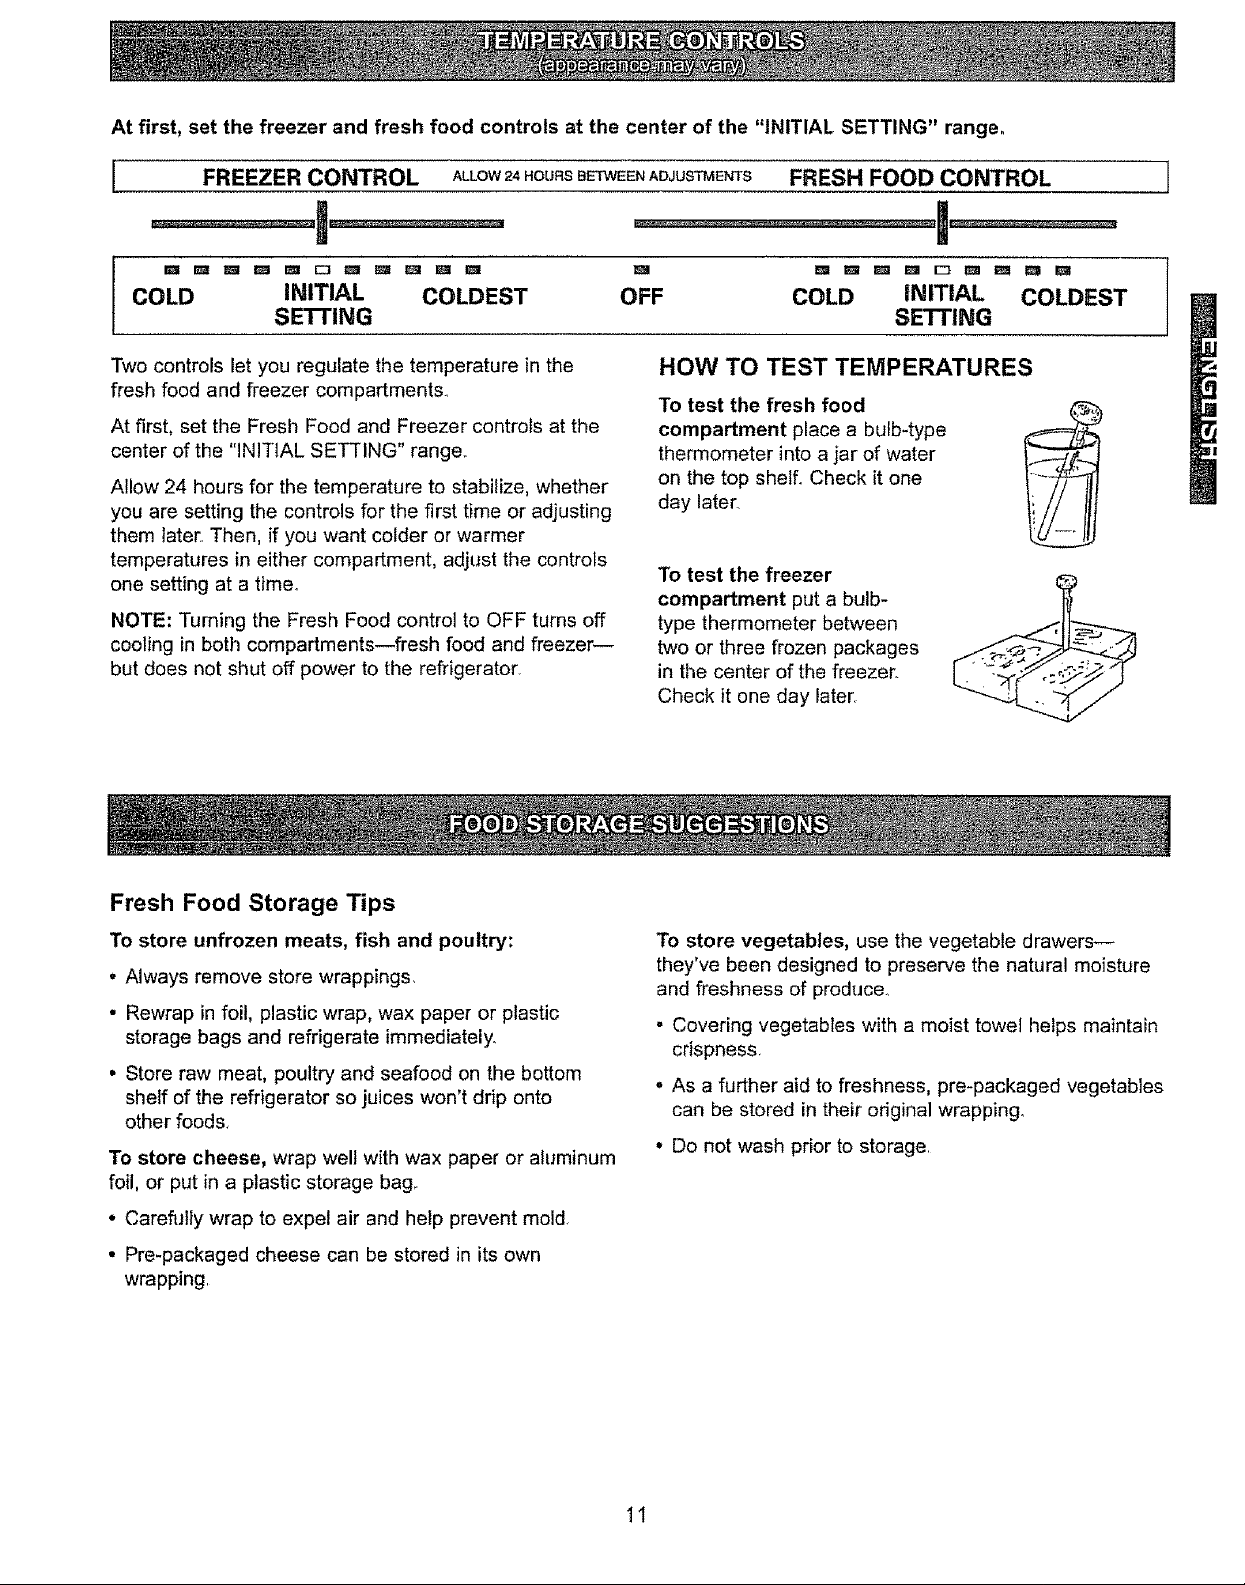
At first, set the freezer and fresh food controls at the center of the "INITIAL SETTING" ranger
[ FREEZER CONTROL ALLOW24HOURSBETWEENADJUSTMENTS FRESH FOOD CONTROL
m _ •
13 _ Ul I_1 ml C:3 E_I W m Im H
COLD INITIAL COLDEST
SE'FriNG
Two controls let you regulate the temperature in the
fresh food and freezer compartments..
At first, set the Fresh Food and Freezer controls at the
center of the "iNITIAL SETTING" range..
Allow 24 hours for the temperature to stabilize, whether
you are setting the controls for the first time or adjusting
them later. Then, if you want colder or warmer
temperatures in either compartment, adjust the controls
one setting at a time.
NOTE: Turning the Fresh Food control to OFF turns off
cooling in both compartments--fresh food and freezer--
but does not shut off power to the refrigerator.
D W H _ _ E3 ma U M B l
OFF COLD INITIAL COLDEST
ISETTING
HOW TO TEST TEMPERATURES
To test the fresh food
compartment place a bulb-type
thermometer into a jar of water
on the top shelf° Check it one
day later.
To test the freezer
compartment put a bulb-
type thermometer between
two or three frozen packages
in the center of the freezer.
Check it one day later_
Fresh Food Storage Tips
To store unfrozen meats, fish and poultry;
• Always remove store wrappings.
• Rewrap in foil, plastic wrap, wax paper or plastic
storage bags and refrigerate immediateiy_
• Store raw meat, poultry and seafood on the bottom
shelf of the refrigerator so juices won't drip onto
other foods,
To store cheese, wrap well with wax paper or aluminum
foil, or put in a plastic storage bag,.
• Carefully wrap to expel air and help prevent mold.
• Pre-packaged cheese can be stored in its own
wrapping.
To store vegetables, use the vegetable drawers--
they've been designed to preserve the natural moisture
and freshness of produce_
= Covering vegetables with a moist towel helps maintain
crispness.
• As a further aid to freshness, pre-packaged vegetables
can be stored in their original wrapping,
• De net wash prior to storage
11
TIPS ON FREEZING FOODS
. Freeze only top-quality foods. Freezing retains
quality and flavor; it cannot improve quality
• Freeze fruits and vegetables quickly after picking
to retain quality.
. Use food wraps or storage bags designed
especially for freezing.
To store ice cream--Fine-quality ice cream, with high
cream content, will normally require slightly lower
temperatures than more "airy" already-packaged brands
with low cream content,
. it will be necessary to experiment to determine the
freezer compartment location and temperature control
setting to keep your ice cream at the right serving
temperature,
° The rear of the freezer compartment is slightly colder
than the front
To freeze meat, fish and poultry, wrap welt in
freezer-weight foil (or other heavy-duty wrapping
material) forming it carefully to the shape of the
contents. This expels air Fold and crimp ends of
the package to provide a good, lasting seat,
Do not refreeze meat that has completely thawed;
meat, whether raw or cooked, can be frozen
successfully only once.
SUGGESTED STORAGE TIMES
Meats, fish and poultry purchased from the store vary in
quality and age; consequently, safe storage times in your
refrigerator will vary, For meat and poultry information,
call the UoS. Dept, of Agriculture at 800-535-455&
New techniques are constantly being developed° Consult
the College or County Extension Service or your local
Utility Company for the latest information on freezing and
storing foods
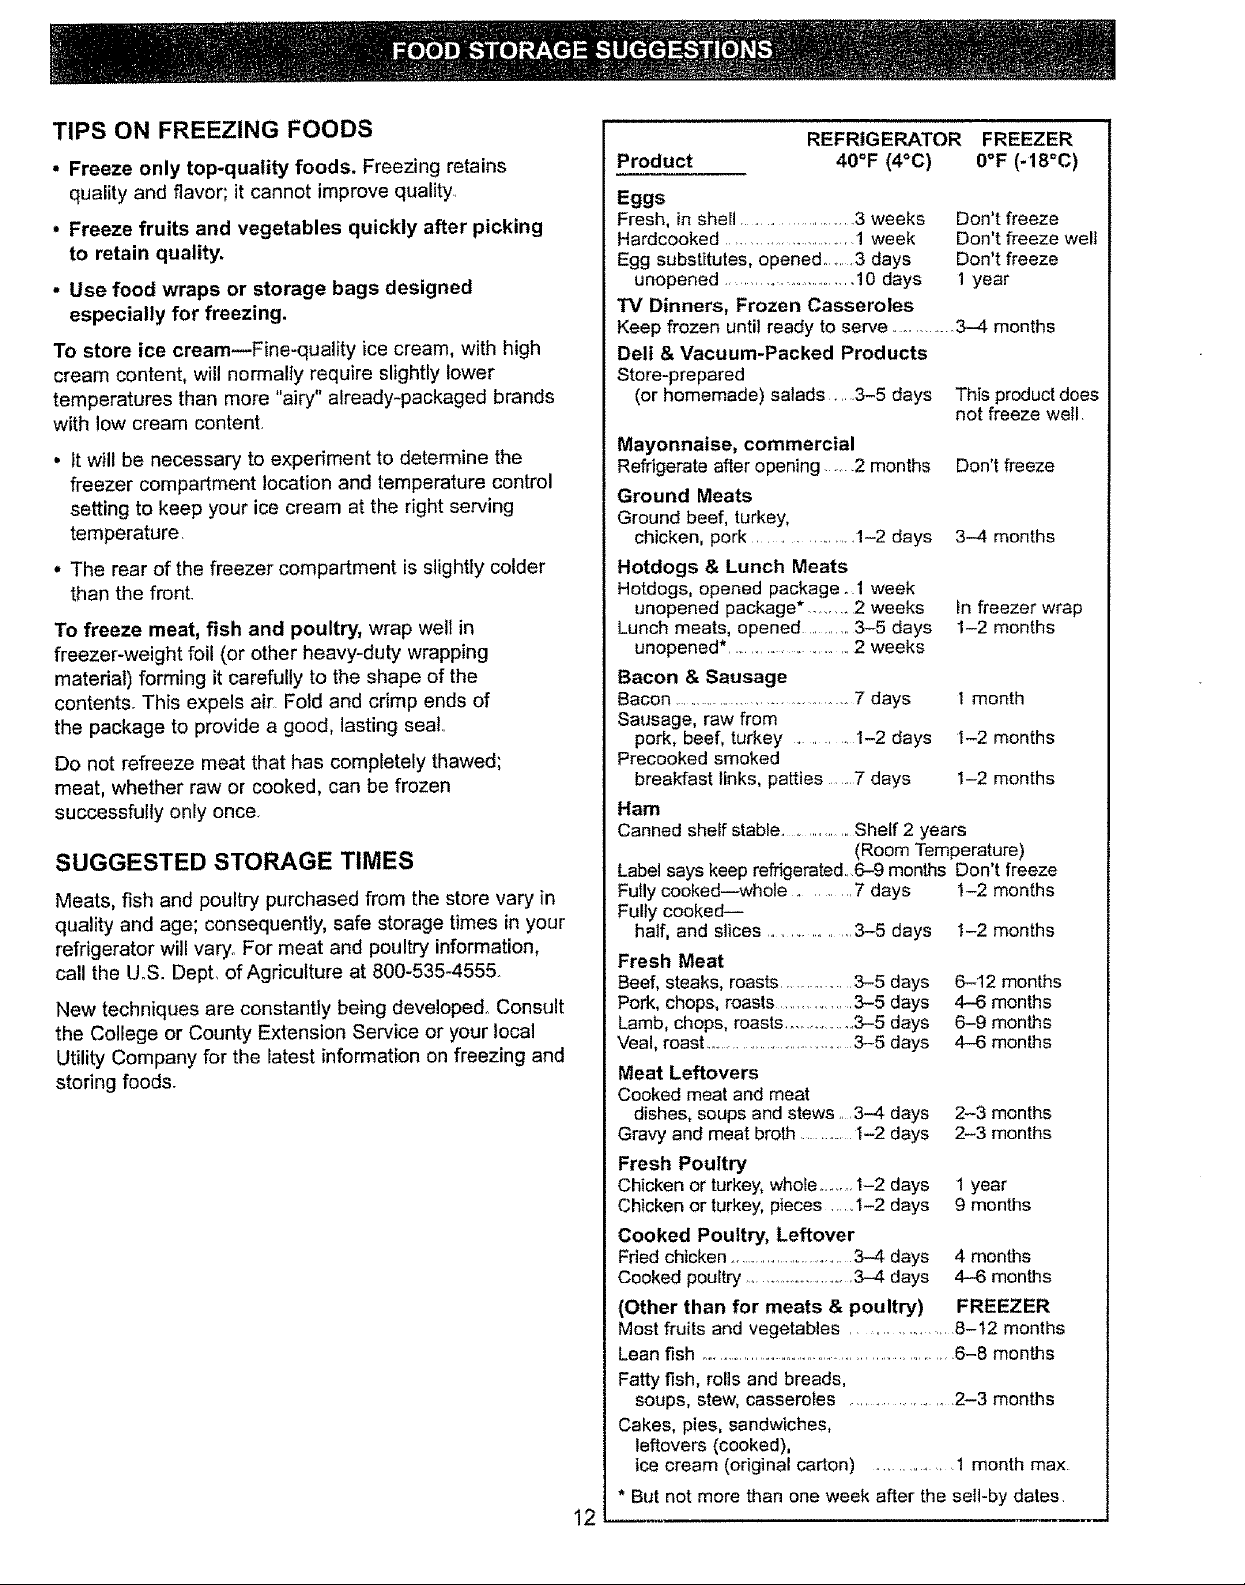
REFRIGERATOR FREEZER
Product 40°F (4°C) 0°F (-18°C)
Eggs
Fresh, in shell ..........................3 weeks Don't freeze
Hardcooked ............................. ! week Don't freeze well
Egg substitutes, opened .......3 days Don't freeze
unopened .............................10 days 1 year
TV Dinners, Frozen Casseroles
Keep frozen until ready to serve ............ 3-4 months
Deli & Vacuum-Packed Products
Store-prepared
(or homemade) salads .......3-5 days
Mayonnaise, commercial
Refrigerate after opening .......2 months Don't freeze
Ground Meats
Ground beef, turkey,
chicken, pork .................. 1-2 days 3-4 months
Hotdogs & Lunch Meats
Hotdogs, opened package. 1 week
unopened package* .........2 weeks
Lunch meats, opened ..........3-5 days
unopened* ...................... 2 weeks
Bacon & Sausage
Bacon ................................ 7 days t month
Sausage, raw from
pork, beef, turkey ............ 1-2 days 1-2 months
Precooked smoked
breakfast links, patties ........7 days 1-2 months
Ham
Canned sheff stabfe ............... Shelf 2 years
(Room Temperature)
Label says keep refrigerated. 6-9 months Don't freeze
Fully cooked--whole ......... 7 days I-2 months
Fully cooked--
half, and slices ................. 3-5 days I-2 months
Fresh Meat
Beef, steaks, roasts ................. _5 days
Pork, chops, roasts ................ 3-5 days
Lamb, chops, roasts .................3-5 days
Veal, roast ........................................3-5 days
Meat Leftovers
Cooked meat and meat
dishes, soups and stews 3-4 days
Gravy and meat broth .............1-2 clays
Fresh Poultry
Chicken or turkey, whole ...... 1-2 days
Chicken or turkey, pieces .....1-2 days
Cooked Poultry, Leftover
Fried chicken .................................3-4 days
Cooked poultry ..........................3-4 days
(Other than for meats & poultry)
Most fruits and vegetables .................. 8-12 months
Lean fish ................................................................. 6-8 months
Fatty fish, rolls and breads,
soups, stew, casseroles ................. 2-3 months
Cakes, pies, sandwiches,
leftovers (cooked),
ice cream (original carton) ..................1 month max
* But not more than one week after the sell-by dates
This product does
not freeze well
In freezer wrap
1-2 months
6-12 months
4-6 months
6-9 months
4-6 months
2-3 months
2-3 months
1 year
9 months
4 months
4-6 months
FREEZER
12
The Kenmore Filtration System _9905 cartridge is
located in the upper right-hand corner of the fresh food
compartment, right below the temperature controls
The filter cartridge should be replaced every six months
or earlier if the flow of water to the water dispenser or
icemaker decreases.
INSTALLING THE FILTER CARTRIDGE
1. If you are replacing the cartridge, first remove the old
one by slowly turning it to the leA, DO NOT pull down
on the cartridge, A small amount of water may drip
down.
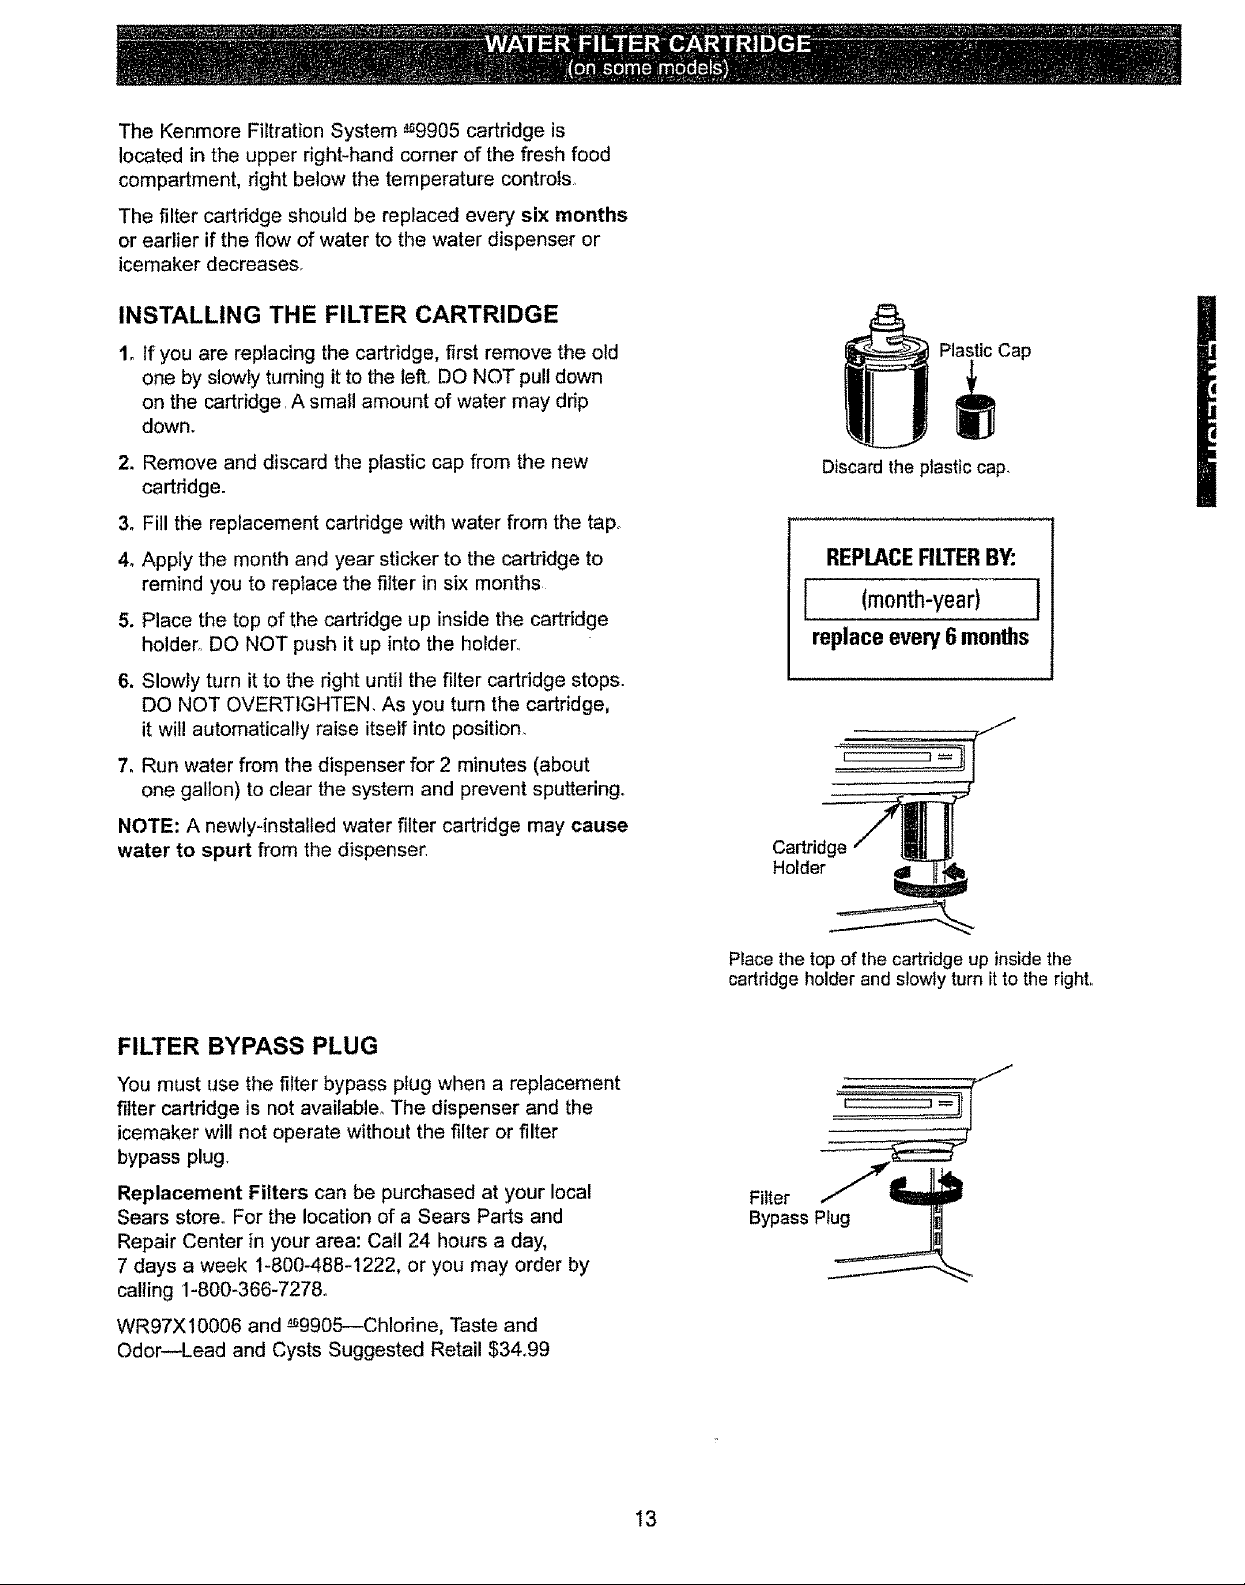
2. Remove and discard the plastic cap from the new
cartridge.
3. Fill the replacement cartridge with water from the tap°
4oApply the month and year sticker to the cartridge to
remind you to replace the filter in six months
5. Place the top of the cartridge up inside the cartridge
holder,, DO NOT push it up into the holder.,
6. Slowly turn it to the dght until the filter cartridge stops.
DO NOT OVERTIGHTEN. As you turn the cartridge,
it wil! automatically raise itself into position,
7. Run water from the dispenser for 2 minutes (about
one gallon) to clear the system and prevent sputtering.
NOTE: A newly-installed water filter cartridge may cause
water to spurt from the dispenser
Plastic Cap
Discard the ptastic cap,
REPLACERLTERBY:
J (month-year) ]
replace every 6 months
Cartridge
Holder
FILTER BYPASS PLUG
You must use the filter bypass plug when a replacement
filter cartridge is not available, The dispenser and the
icemaker will not operate without the filter or filter
bypass plug
Replacement Filters can be purchased at your local
Sears store° For the location of a Sears Parts and
Repair Center in your area: Call 24 hours a day,
7 days a week 1-800-488-t222, or you may order by
calling 1-800-366-7278.
WR97X10006 and _9905--Chlodne, Taste and
Odor--Lead and Cysts Suggested Retail $34.99
Place the topof the cartridge up insidethe
cartridge holder and slowly turn it to the right.
13
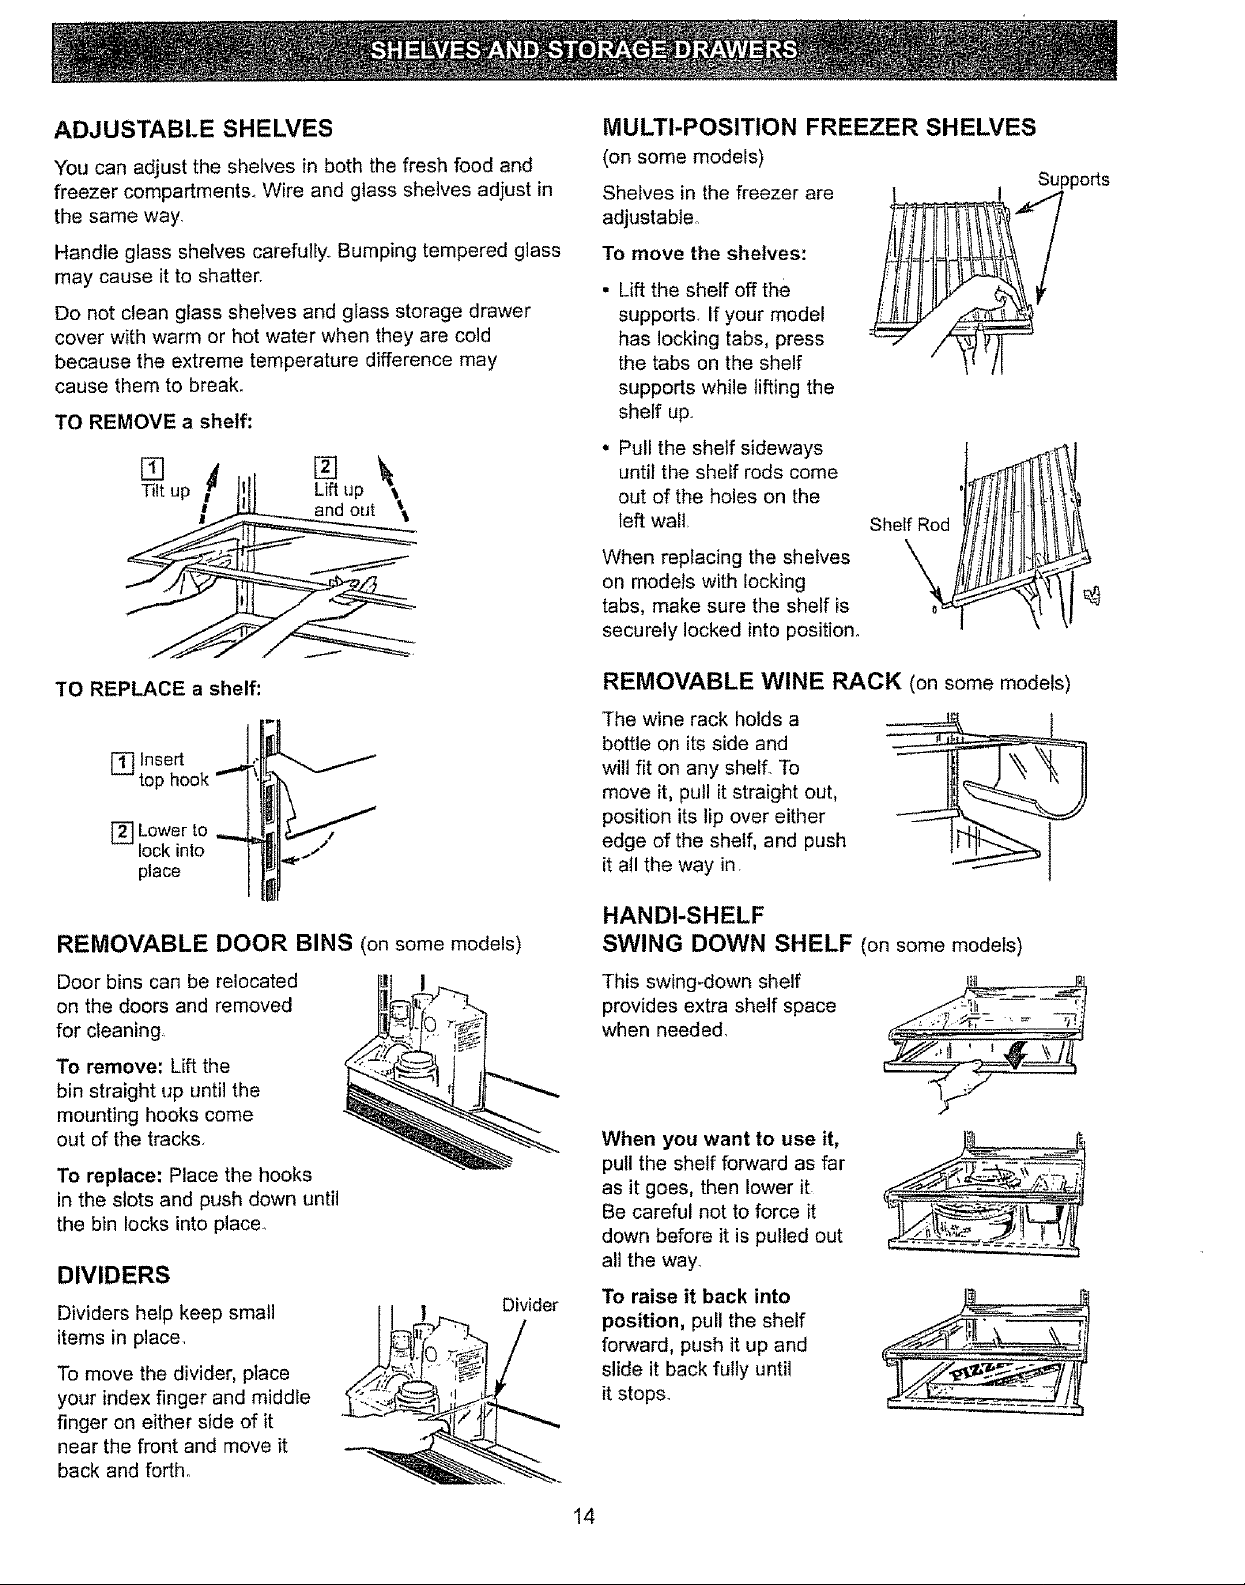
ADJUSTABLE SHELVES
You can adjust the shelves in both the fresh food and
freezer compartments. Wire and glass shelves adjust in
the same way.
Handle glass shelves carefully. Bumping tempered glass
may cause it to shatter.
Do not clean glass shelves and glass storage drawer
cover with warm or hot water when they are cold
because the extreme temperature difference may
cause them to break.
TO REMOVE a shelf:
MULTI-POSITION FREEZER SHELVES
(on some models)
Shelves in the freezer are
adjustable.
To move the shelves:
Lift the shelf off the [
supports If your model
has locking tabs, press
the tabs on the shelf
supports while lifting the
shelf up.
Pull the shelf sideways
until the shelf rods come
out of the holes on the
left wall,
When replacing the shelves
on models with locking
tabs, make sure the shelf is
securely locked into position°
t
Shelf Rod
Supports
TO REPLACE a shelf:
[] Insert
tel:
[] Lower to
lock into
place
REMOVABLE DOOR BINS (on some models)
Door bins can be relocated
on the doors and removed
for cleaning
To remove: Lift the
bin straight up until the
mounting hooks come
out of the tracks.
To replace: Place the hooks
in the slots and push down until
the bin locks into place..
DIVIDERS
Dividers help keep small
items in place,
To move the divider, place
your index finger and middle
finger on either side of it
near the front and move it
back and forth.
Divider
REMOVABLE WINE RACK (on some models)
The wine rack holds a
bottle on its side and
will fit on any shelf. To
move it, pull it straight out,
position its lip over either
edge of the shelf, and push
it all the way in
HANDI-SHELF
SWING DOWN SHELF (on some models)
This swing-down shelf
provides extra shelf space
when needed,
"t fY ......
When you want to use it,
pull the shelf forward as far
as it goes, then lower it
Be careful not to force it
down before it is pulled out
all the way,
To raise it back into
position, pull the shelf
forward, push it up and
slide it back fully until
it stops.
14

REMOVABLE FREEZER BASKET SHELVES
(on some models)
Shelves in the freezer will
stop before coming all the
way out to help prevent
contents from spilling onto
the floor. They can be
removed easily by lifting up
slightiy and pulling past the
"stop" location..
HANDY DISHES (on some models)
SEALED CRISPER DRAWER (on some models)
unwrapped foods fresh
by retaining the natural
moisture content of
Th,s awe keepstl
foods such as:
oArtichokes • Celery ° Lettuce • Radishes
• Asparagus • Cherries ° Parsley • Rhubarb
° Beets, topped ° Corn ° Peas, green. Spinach
• Blueberries . Currants • P_ums ° Tomatoes,
• Carrots • Greens, leafy ripe
Cooking-serving-storage
dishes with durable see-
through lids fit into a
rack that hangs on the
fresh food or freezer
compartment door,. Dishes
can be removed from and returned to the rack as
needed, and the rack can be removed and relocated
on either door in the same manner as the door bins.
Dishes and lids are safe for use in microwave ovens,
refrigerators, freezers, and are dishwasher-safe The
dishes should not be used for cooking high-fat foods
such as bacon and high-sugar foods such as candy
and syrup. The high temperatures of the fat and sugar
can cause bubbles to form on the inside of the dish°
CAUTION: Dishes and lids are not designed for
use in the regular oven, on the range-top or in the
broiler. Such use can be hazardous.
DELl PAN (on some models)
The Dell Pan can be
moved within the refrigerator,
The sealed drawer keeps
high humidity for storage of
lunch meats, cheese, hors
d'oeuvres, spreads and
snacks.
Foods with strong odors should be wrapped,
TEMPERATURE CONTROLLED MEATS
DRAWER (on some models)
The Temperature Controlled Meats Drawer has its own
cold air duct to allow a stream of cold air from the
freezer compartment to flow around the drawer
The variable temperature control regulates the air flow
from the freezer compartment.
Set control lever down to
the coldest setting to store
fresh meats, tf lever is left
in meat position for a long
period of time, some frost
may form on the inside of
the drawer.
Set control lever up to convert the drawer to normal
refrigerator temperature and provide extra vegetable
storage space. Cold air duct is turned off. Variable
settings between these extremes can be selected..
..ca-Normal
Setting
15
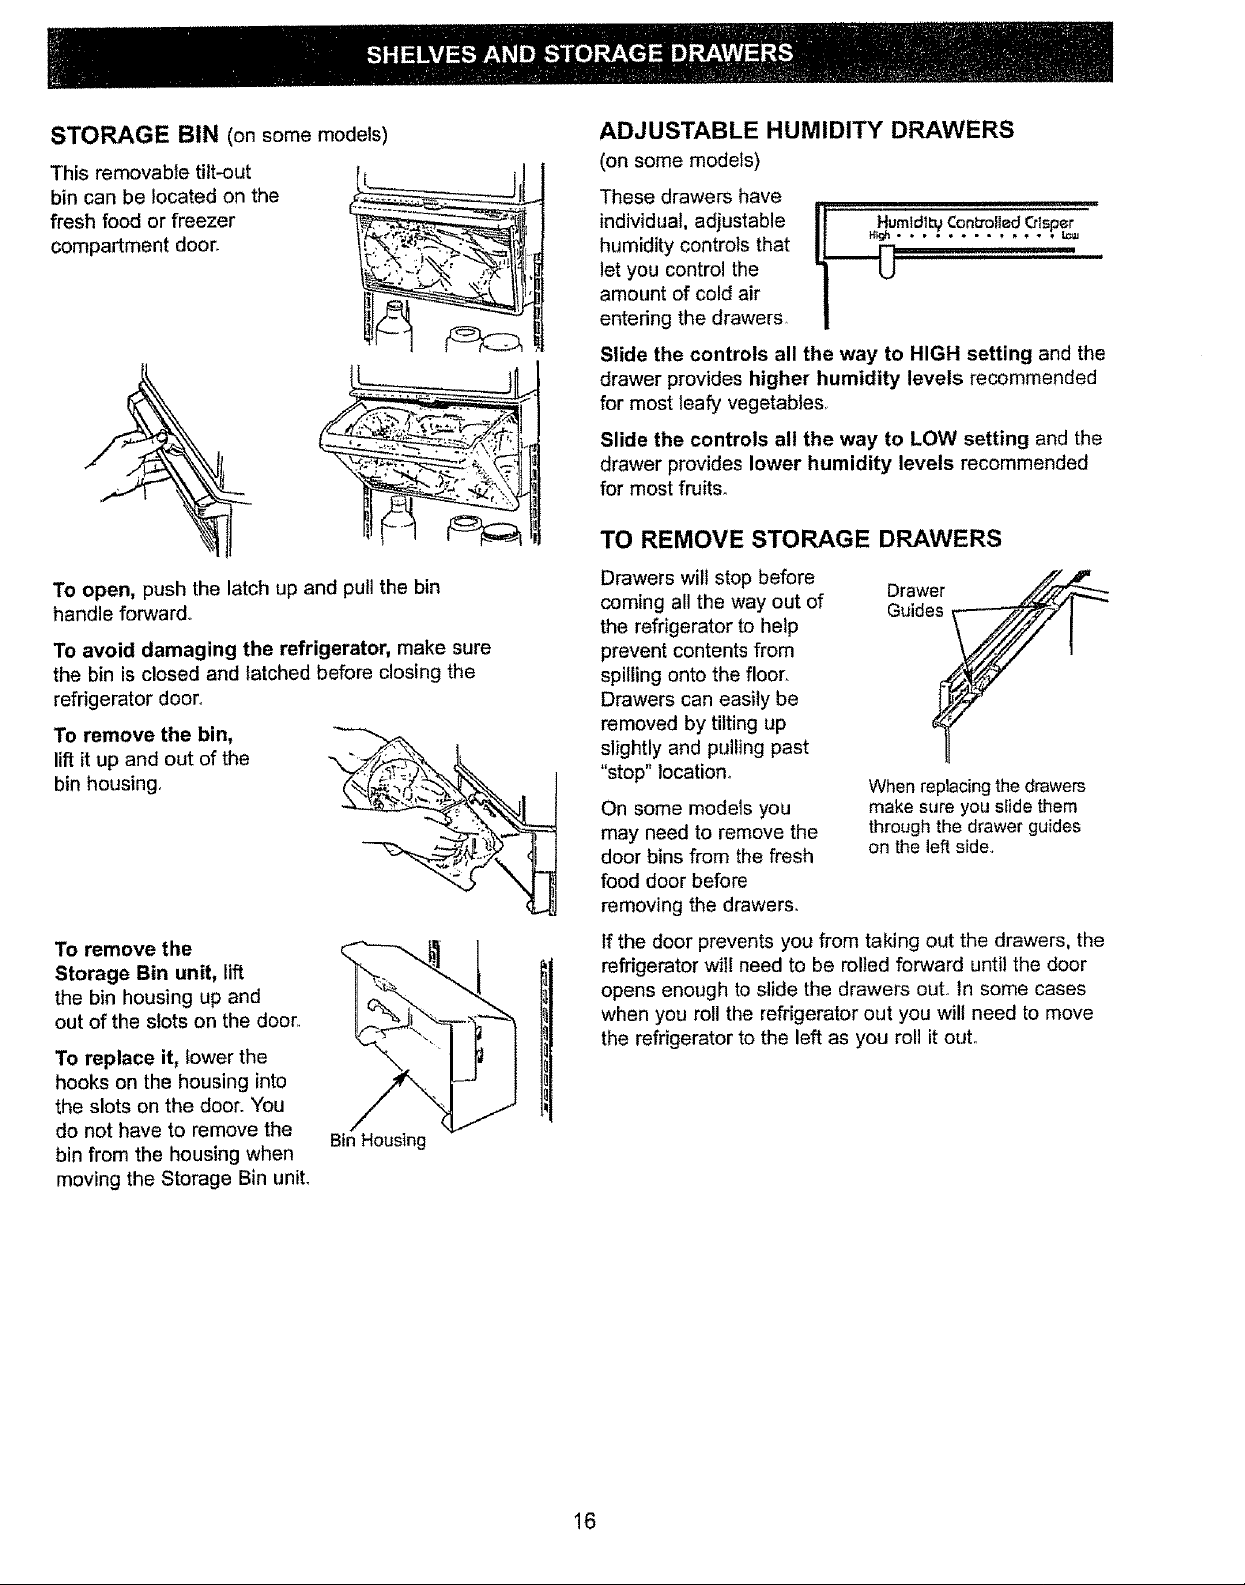
STORAGE BIN (onsome models)
This removable tilt-out
bin can be located on the
fresh food or freezer
compartment door.
ADJUSTABLE HUMIDITY DRAWERS
(on some modets)
These drawers have
individual, adjustable
humidity controls that
let you control the
amount of cold air
entering the drawers
Slide the controls all the way to HIGH setting and the
drawer provides higher humidity levels recommended
for most leafy vegetables,
Slide the controls all the way to LOW setting and the
drawer provides lower humidity levels recommended
for most fruits.
TO REMOVE STORAGE DRAWERS
To open, push the latch up and pull the bin
handle forward.
To avoid damaging the refrigerator, make sure
the bin is closed and latched before closing the
refrigerator door°
To remove the bin,
lift it up and out of the
bin housing.
To remove the
Storage Bin unit, lift
the bin housing up and
out of the slots on the door,
To replace it, Iower the
hooks on the housing into
the slots on the door: You
do not have to remove the
bin from the housing when
moving the Storage Bin unit.
Bin Housing
Drawers wilt stop before
coming all the way out of
the refrigerator to help
prevent contents from
spilling onto the floor,.
Drawers can easily be
removed by tilting up
slightly and pulling past
"stop" location.
On some models you
may need to remove the
door bins from the fresh
food door before
removing the drawers.
If the door prevents you from taking out the drawers, the
refrigerator wil! need to be rolled forward until the door
opens enough to slide the drawers out. In some cases
when you roll the refrigerator out you will need to move
the refrigerator to the left as you roll it out.
When replacing the drawers
make sure you slide them
through the drawer guides
on the left side,,
16
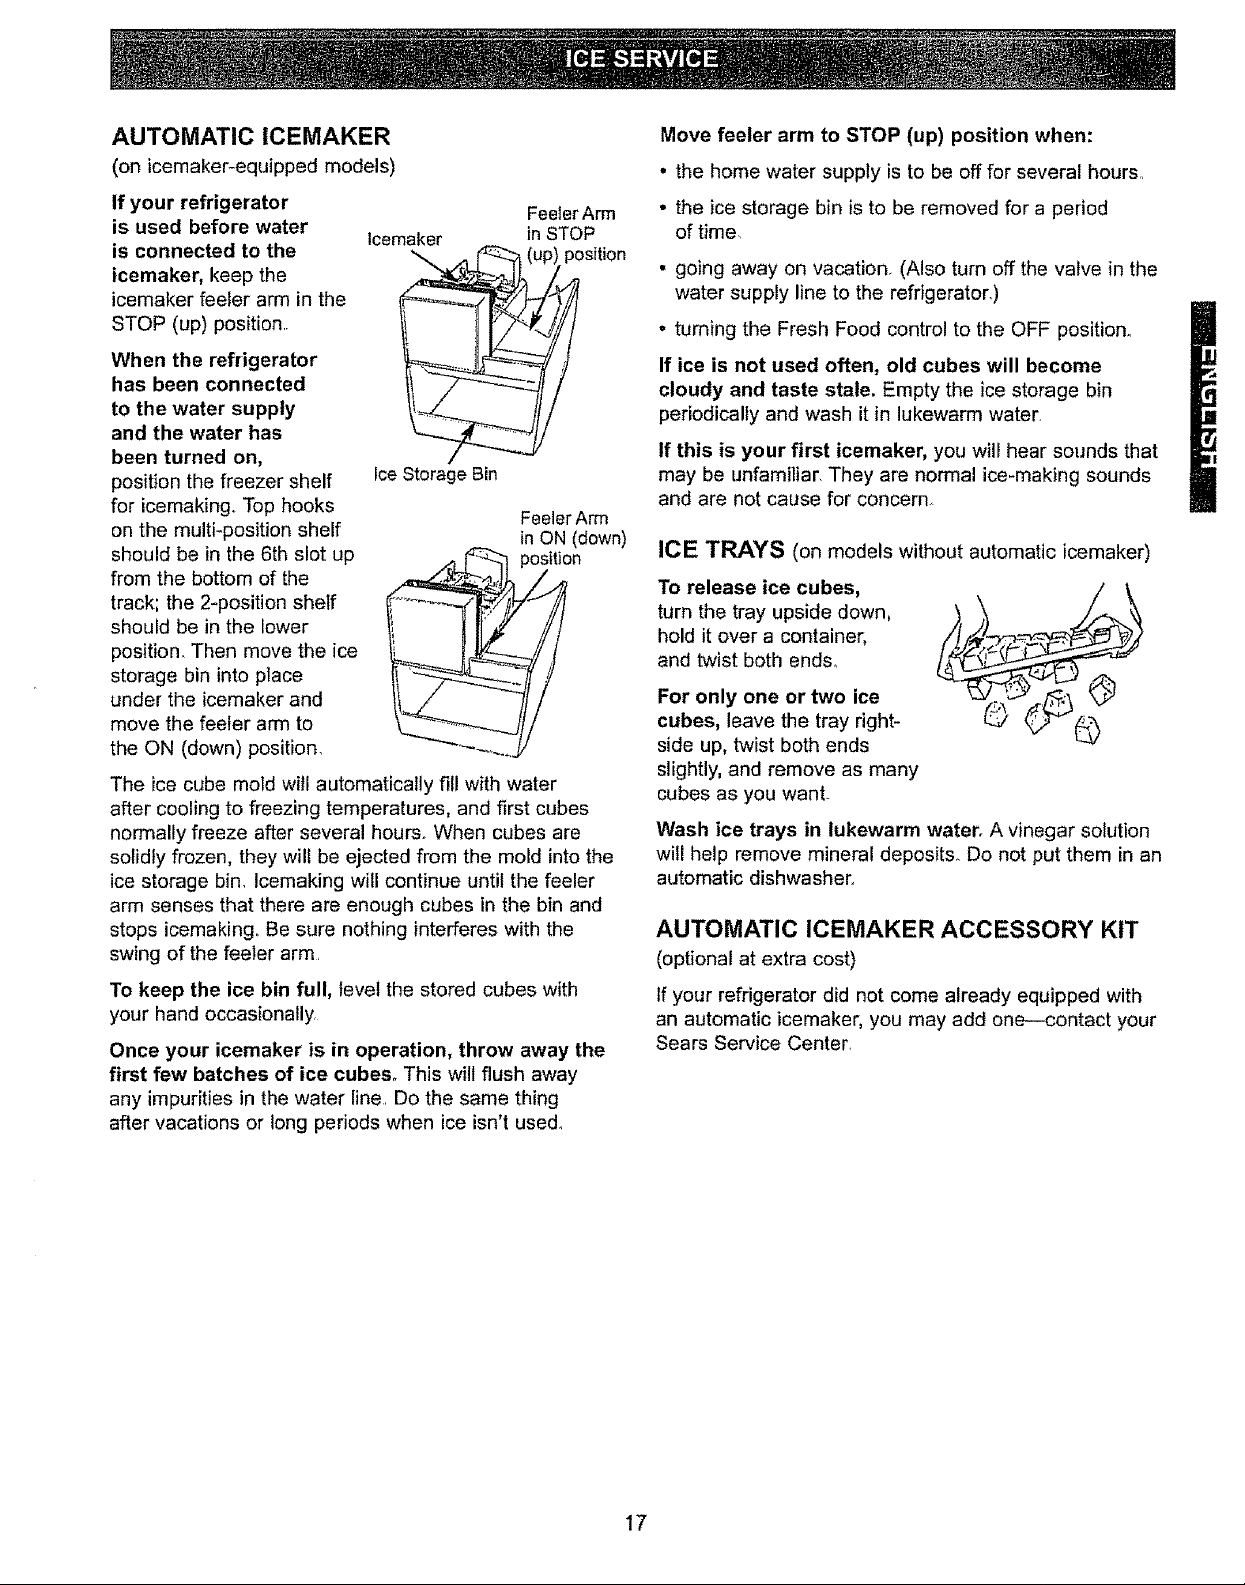
AUTOMATIC ICEMAKER
(on icemaker-equipped models)
If your refrigerator
is used before water
is connected to the
lcemaker
icemaker, keep the
icemaker feeler arm in the
STOP (up) position.
When the refrigerator
has been connected
to the water supply
and the water has
been turned on,
position the freezer shelf
Ice Storage Bin
for icemaking,, Top hooks
on the multFposition shelf
should be in the 6th slot up
from the bottom of the
track; the 2-position shelf
should be in the lower
position. Then move the ice
storage bin into place
under the icemaker and
move the feeler arm to
the ON (down) position.
The ice cube mold will automatically fil! with water
after cooling to freezing temperatures, and first cubes
normally freeze after several hours° When cubes are
solidly frozen, they will be ejected from the mold into the
ice storage bin. Icemaking will continue until the feeler
arm senses that there are enough cubes in the bin and
stops icemaking. Be sure nothing interferes with the
swing of the feeler arm.
To keep the ice bin full, level the stored cubes with
your hand occasionally.
Once your icemaker is in operation, throw away the
first few batches of ice cubes. This wilt flush away
any impurities in the water line. Do the same thing
after vacations or long periods when ice isn't used°
Feeler Arm
in STOP
Feeler Arm
in ON (down)
position
Move feeler arm to STOP (up) position when:
• the home water supply is to be off for several hours,
• the ice storage bin is to be removed for a period
of time,
• going away on vacation. (Also turn off the valve in the
water supply line to the refrigerator.)
• turning the Fresh Food control to the OFF position°
If ice is not used often, old cubes will become
cloudy and taste stale, Empty the ice storage bin
periodically and wash it in lukewarm water,
if this is your first icemaker, you will hear sounds that
may be unfamiliar. They are normal ice-making sounds
and are not cause for concem.
ICE TRAYS (on models without automatic icemaker)
To release ice cubes,
turn the tray upside down,
hold it over a container,
and twist both ends_
For only one or two ice
cubes, leave the tray right-
side up, twist both ends
slightly, and remove as many
cubes as you want-
Wash ice trays in lukewarm water. A vinegar solution
will help remove mineral deposits. Do not put them in an
automatic dishwasher.
AUTOMATIC ICEMAKER ACCESSORY KIT
(optional at extra cost)
If your refrigerator did not come already equipped with
an automatic icemaker, you may add one--contact your
Sears Service Center.
17

HOW IT WORKS
Some models have an automatic icemaker and a
dispenser that dispenses water, ice cubes and crushed
ice (on some models) through the freezer door Here's
how they work,
Water flows from
the household supply
through a
(1) duat solenoid
valve to the
(2) water tubing
and to the
(3) automatic
icemaker
as needed.
Water is frozen in the
(4) cube mold and
ejected into the
(5) storage bin where a motor-powered auger moves
cubes forward,,
Cubes dispense through the chute in the door when the
pad is pressed.
When the switch is moved to CRUSHED (on some
models), a baffle channels cubes through the crusher
and crushed ice falls through a chute into the glass,
Water flows through the
(6) tubing in the door and is dispensed when the pad
is pressed.
(7) A light switch (on some models) turns the night
light in the dispenser on or off. The light also
comes on when the pad is pressed.
The light in the dispenser should be replaced with a
7 watt maximum bulb when it burns out
iMPORTANT FACTS ABOUT YOUR ICE AND
WATER DISPENSER
, You can reach the ice through
the ice access door,
= intermittent dispensing of ice is
normal tf ice flow interruption
is more than brief, ice clump(s)
may be the cause and should be
removed following instructions
in this section.
o Avoid over filling glasses with ice and using
narrow or extra-tall glasses, This can jam the chute
or cause the door in the chute to freeze shut. Open
the freezer compartment door and look down into the
chute If ice is blocking the chute, poke it through with
a wooden spoon.
° To help keep bits of ice from being sprayed
beyond the glass, place the glass close to the ice
chute--but not so close that it blocks outcoming ice.
, Add ice before adding beverage to prevent
splashing.
, Beverages and foods should not be quick-chilled
in the ice storage bin. Cans, bottles or food packages
in the storage bin may cause the icemaker or auger
to jam.
• Do not add ice from trays or bags to the storage bin.
It may not crush or dispense well,
BEFORE USING YOUR DISPENSER
On models with a water dispenser,
if no water is dispensed when the
refrigerator is first installed, there
may be air in the water line
system. Press the dispenser pad
for at least two minutes to remove
trapped air from the water line
and to fill the water system.
Clean out the water line
by pouring the first six
glassfuls of water in the
kitchen sink. The first water
through the system picks
up a slight "plastic" taste
from the water tubing.
Push the dispenser
pad until the water fine
is filled,
NOTE: With a newlyqnstalled refrigerator, allow about
24 hours for the freezer compartment to cool down to
the proper icemaking temperature..
18

TO DISPENSE ICE AND WATER
• Set the selector switch to CUBES, CRUSHED ICE
(on some models) or WATER.
• Grip the glass or other container near the rim and
press the rim against the center of the pad,
When Dispensing Ice:
* Some crushed ice may be dispensed even though
you selected CUBES. This happens occasionally
when a few cubes get channeled to the crusher.,
• Sometimes a mound of snow will form on the door in
the ice chute° This condition is normal, and usually
occurs when you have dispensed crushed ice
repeatedly The snow wiil eventually evaporate,.
• Sometimes crushed ice will spray beyond the glass.
To avoid this, hold the glass up close to the chute,.
When Dispensing Water:
. The first glass of water
dispensed may be warmer
than the following ones,.
This is normal
IF ICE CLUMPS FORM IN THE
STORAGE BIN...
The icemaker ejects cubes in groups of eight, and
it is normal for several cubes to be joined together°
However, if you don't use the ice very often ice clumps
may form in the storage bin and can clog the dispenser.
If this happens:
. Remove the storage bin from the freezer,
• Break up ice clumps with your hands Throw away any
clumps that you can't break uF
• Replace the bin before the remaining cubes melt and
fuse together°
• After washing the bin, allow itto cool before replacing
it, otherwise ice will stick to the metal auger.
TO REMOVE ICE STORAGE BIN
Lift the left corner to free the
bin from the shelf. Pull the bin
straight out while supporting it at
front and back.
o Dispensed water is cool, not
iced. For colder water, simply
add crushed ice or cubes
before dispensing water_
CAUTION: Never put fingers or other objects into the
dispenser opening,,
TO STOP DISPENSING
Release pressure from the
pad and wait a few seconds
to catch the last bits of ice or
drops of water, There may be
some dripping after dispensing
of crushed ice or water° If there
is a lot of dripping, the spill
should be wiped dry right away.
Do not pour water in the spill
shelf because it is not self draining--pour it in the
kitchen sink. The shelf and its grille should be cleaned
regularly according to Care and Cleaning instructions.,
Press here to
remove grille
The grille is easily removed
by pressing on the back
right corner,
TO REPLACE ICE STORAGE BIN
Slide the bin back until the
tab on the bin locks into the
slot in the shelf,,
If the bin does not go all the
way back, remove it and turn
the drive mechanism 1/4 turn.
Then push the bin back again
until the tab on the bin locks
into the slot in the shelf,
19
OUTSIDE
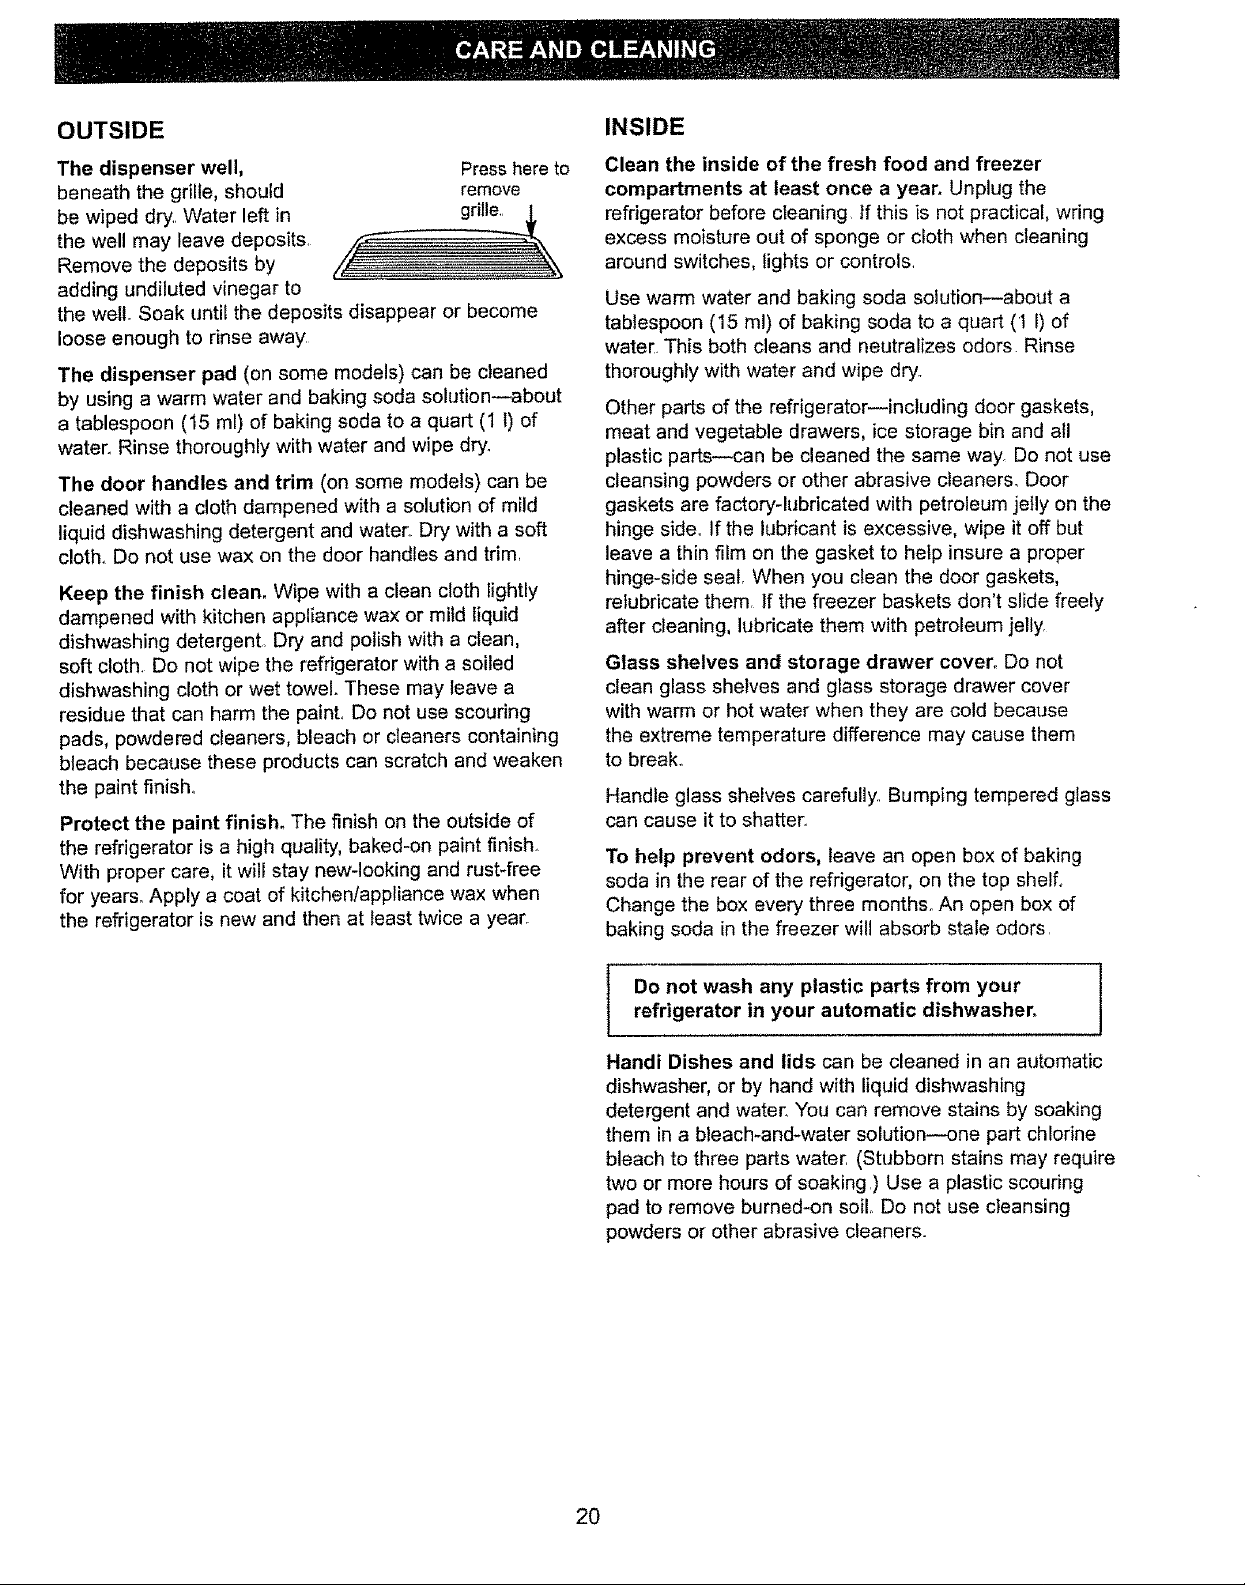
The dispenser well,
beneath the grille, should
be wiped dry..Water left in
the well may leave deposits.
Remove the deposits by
adding undiluted vinegar to
the welt. Soak until the deposits disappear or become
loose enough to rinse away'
The dispenser pad (on some models) can be cleaned
by using a warm water and baking soda solution--about
a tablespoon (15 ml) of baking soda to a quart (1 l) of
water_ Rinse thoroughly with water and wipe dry.
The door handles and trim (on some models) can be
cleaned with a cloth dampened with a solution of mild
liquid dishwashing detergent and water. Dry with a soft
cloth. Do not use wax on the door handles and trim,
Keep the finish clean. Wipe with a clean cloth lightly
dampened with kitchen appliance wax or mitd liquid
dishwashing detergent Dry and polish with a clean,
soft cloth. Do not wipe the refrigerator with a soiled
dishwashing cloth or wet towel. These may leave a
residue that can harm the paint. Do not use scouring
pads, powdered cleaners, bleach or cleaners containing
bleach because these products can scratch and weaken
the paint finish°
Protect the paint finish. The finish on the outside of
the refrigerator is a high quality, baked-on paint finish.
With proper care, it will stay new-looking and rust-free
for years. Apply a coat of kitchen/appliance wax when
the refrigerator is new and then at least twice a year°
Press here to
remove
INSIDE
Clean the inside of the fresh food and freezer
compartments at least once a year, Unplug the
refrigerator before cleaning, If this is not practical, wring
excess moisture out of sponge or cloth when cleaning
around switches, lights or controls,
Use warm water and baking soda solution--about a
tablespoon (15 m!) of baking soda to a quart (1 I) of
water. This both cleans and neutralizes odors. Rinse
thoroughly with water and wipe dry.,
Other parts of the refrigerator--including door gaskets,
meat and vegetable drawers, ice storage bin and all
plastic parts--can be cleaned the same way. Do not use
cleansing powders or other abrasive cleaners. Door
gaskets are factory-lubricated with petroleum jelly on the
hinge side,, If the lubricant is excessive, wipe it off but
leave a thin film on the gasket to help insure a proper
hinge-side seal, When you clean the door gaskets,
relubricate them, If the freezer baskets don't slide freely
after cleaning, lubricate them with petroleum jelly,
Glass shelves and storage drawer cover° Do not
clean glass shelves and gtass storage drawer cover
with warm or hot water when they are cold because
the extreme temperature difference may cause them
to break,.
Handle glass shelves carefully' Bumping tempered glass
can cause it to shatter..
To help prevent odors, leave an open box of baking
soda in the rear of the refrigerator, on the top shelf.
Change the box every three months. An open box of
baking soda inthe freezer will absorb stale odors,
Do not wash any plastic parts from yourrefrigerator in your automatic dishwasher,
Handi Dishes and lids can be cleaned in an automatic
dishwasher, or by hand with liquid dishwashing
detergent and water_ You can remove stains by soaking
them in a bleach_and-water solution--one part chlorine
bleach to three parts water, (Stubborn stains may require
two or more hours of soaking .) Use a plastic scouring
pad to remove burned-on soil Do not use cleansing
powders or other abrasive cleaners.
20
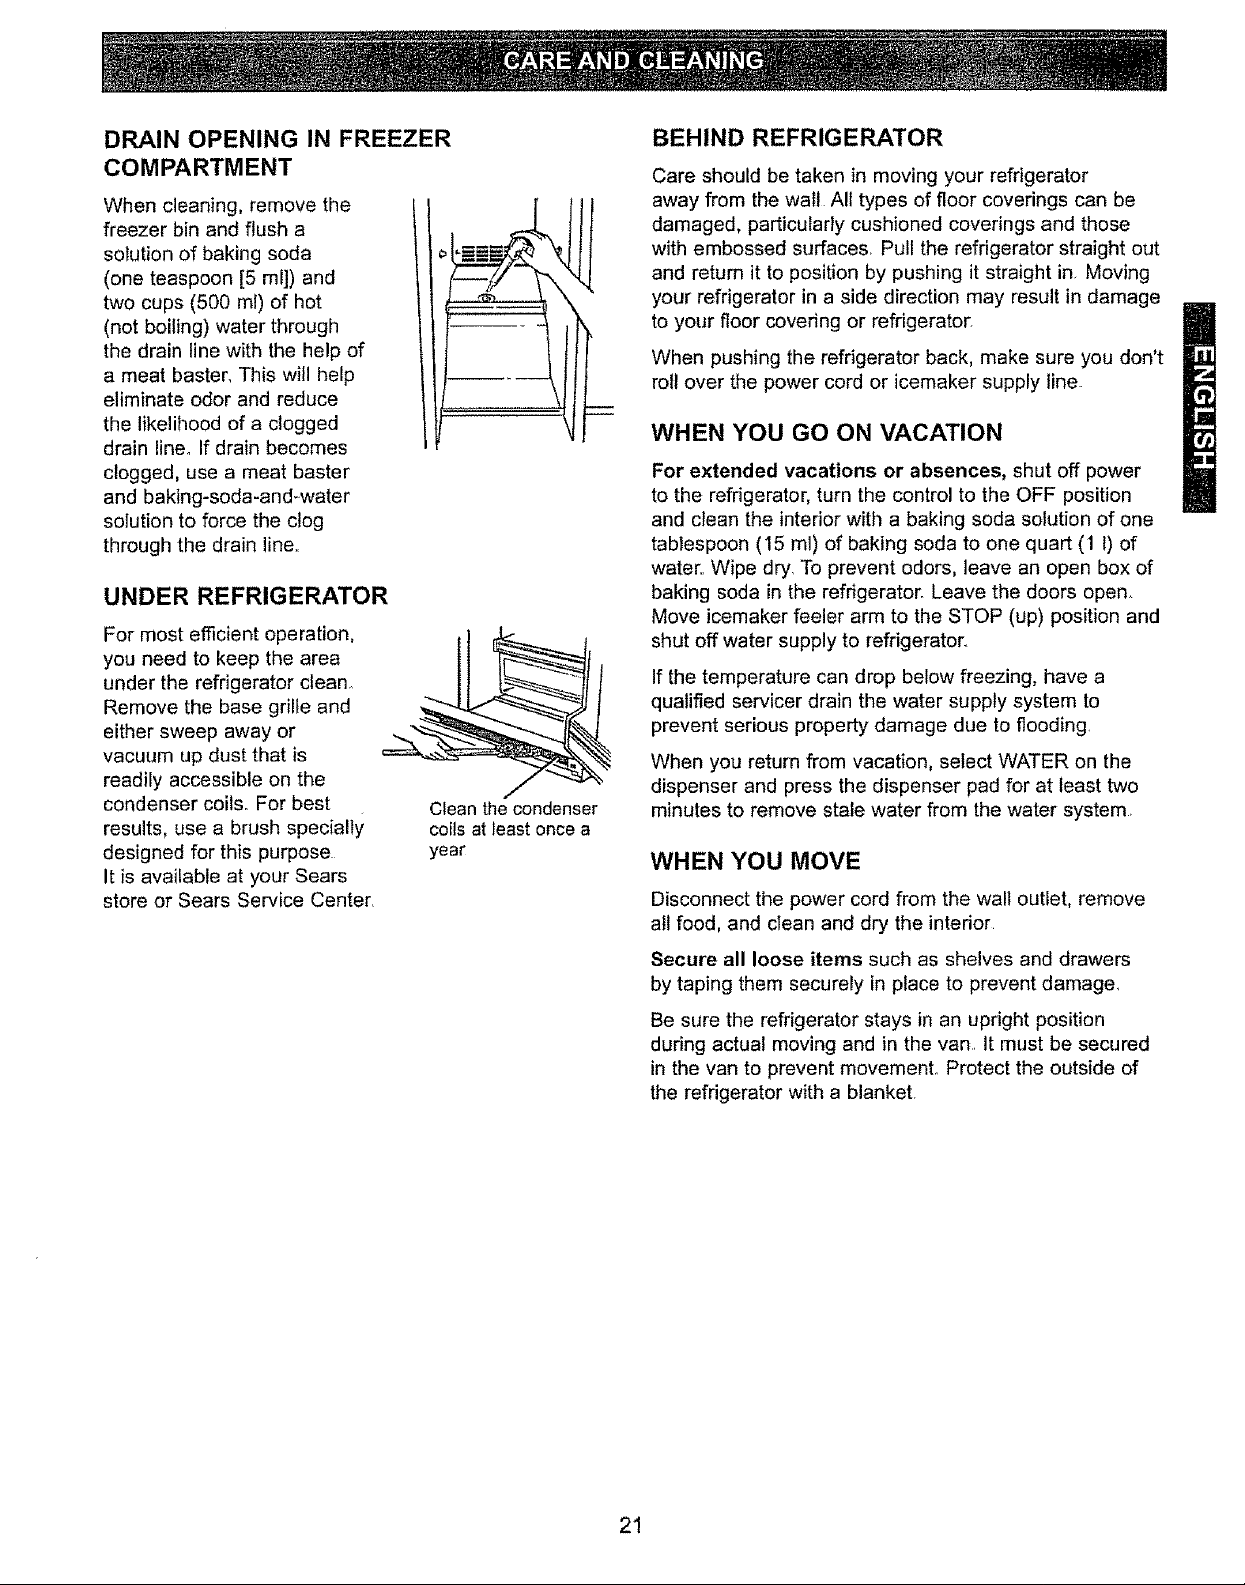
DRAIN OPENING IN FREEZER
COMPARTMENT
When cleaning, remove the
freezer bin and flush a
solution of baking soda
(one teaspoon [5 ml]) and
two cups (500 ml) of hot
(not boiling) water through ---
the drain line with the help of
a meat baster, This will help
eliminate odor and reduce
the likelihood of a clogged
drain lineoIf drain becomes
clogged, use a meat baster
and baking-soda-and-water
solution to force the clog
through the drain line..
UNDER REFRIGERATOR
For most efficient operation,
you need to keep the area
under the refrigerator clean°
Remove the base grille and
either sweep away or
vacuum up dust that is
readily accessible on the
condenser coils. For best
results, use a brush specially
designed for this purpose
It is available at your Sears
store or Sears Service Center.
Clean the condenser
coFIsat least once a
year
BEHIND REFRIGERATOR
Care should be taken in moving your refrigerator
away from the wall All types of floor coverings can be
damaged, particularly cushioned coverings and those
with embossed surfaces. Pull the refrigerator straight out
and return it to position by pushing it straight in. Moving
your refrigerator in a side direction may result in damage
to your floor covedng or refrigerator.
When pushing the refrigerator back, make sure you don't
roll over the power cord or icemaker supply line-
WHEN YOU GO ON VACATION
For extended vacations or absences, shut off power
to the refrigerator, turn the control to the OFF position
and clean the interior with a baking soda solution of one
tablespoon (15 ml) of baking soda to one quart (1 1)of
water.. Wipe dry. To prevent odors, leave an open box of
baking soda inthe refdgeratoro Leave the doors open_
Move icemaker feeler arm to the STOP (up) position and
shut off water supply to refrigerator_
If the temperature can drop below freezing, have a
qualified servicer drain the water supply system to
prevent serious property damage due to flooding.
When you return from vacation, select WATER on the
dispenser and press the dispenser pad for at least two
minutes to remove stale water from the water system.
WHEN YOU MOVE
Disconnect the power cord from the wall outlet, remove
atl food, and clean and dry the intedor
Secure all loose items such as shelves and drawers
by taping them securely in place to prevent damage_
Be sure the refrigerator stays in an upright position
during actual moving and in the van. It must be secured
in the van to prevent movement. Protect the outside of
the refrigerator with a blanket.
21
LIGHT BULB REPLACEMENT
Fresh Food Compartment--Lower Light
(on some models)
Electrical Shock Hazard
Before replacing a burned-out light bulb, either
unplug the refrigerator or turn off power at the
circuit breaker or fuse box.
NOTE: Moving the control to the OFF position
does not remove power to the light circuit,
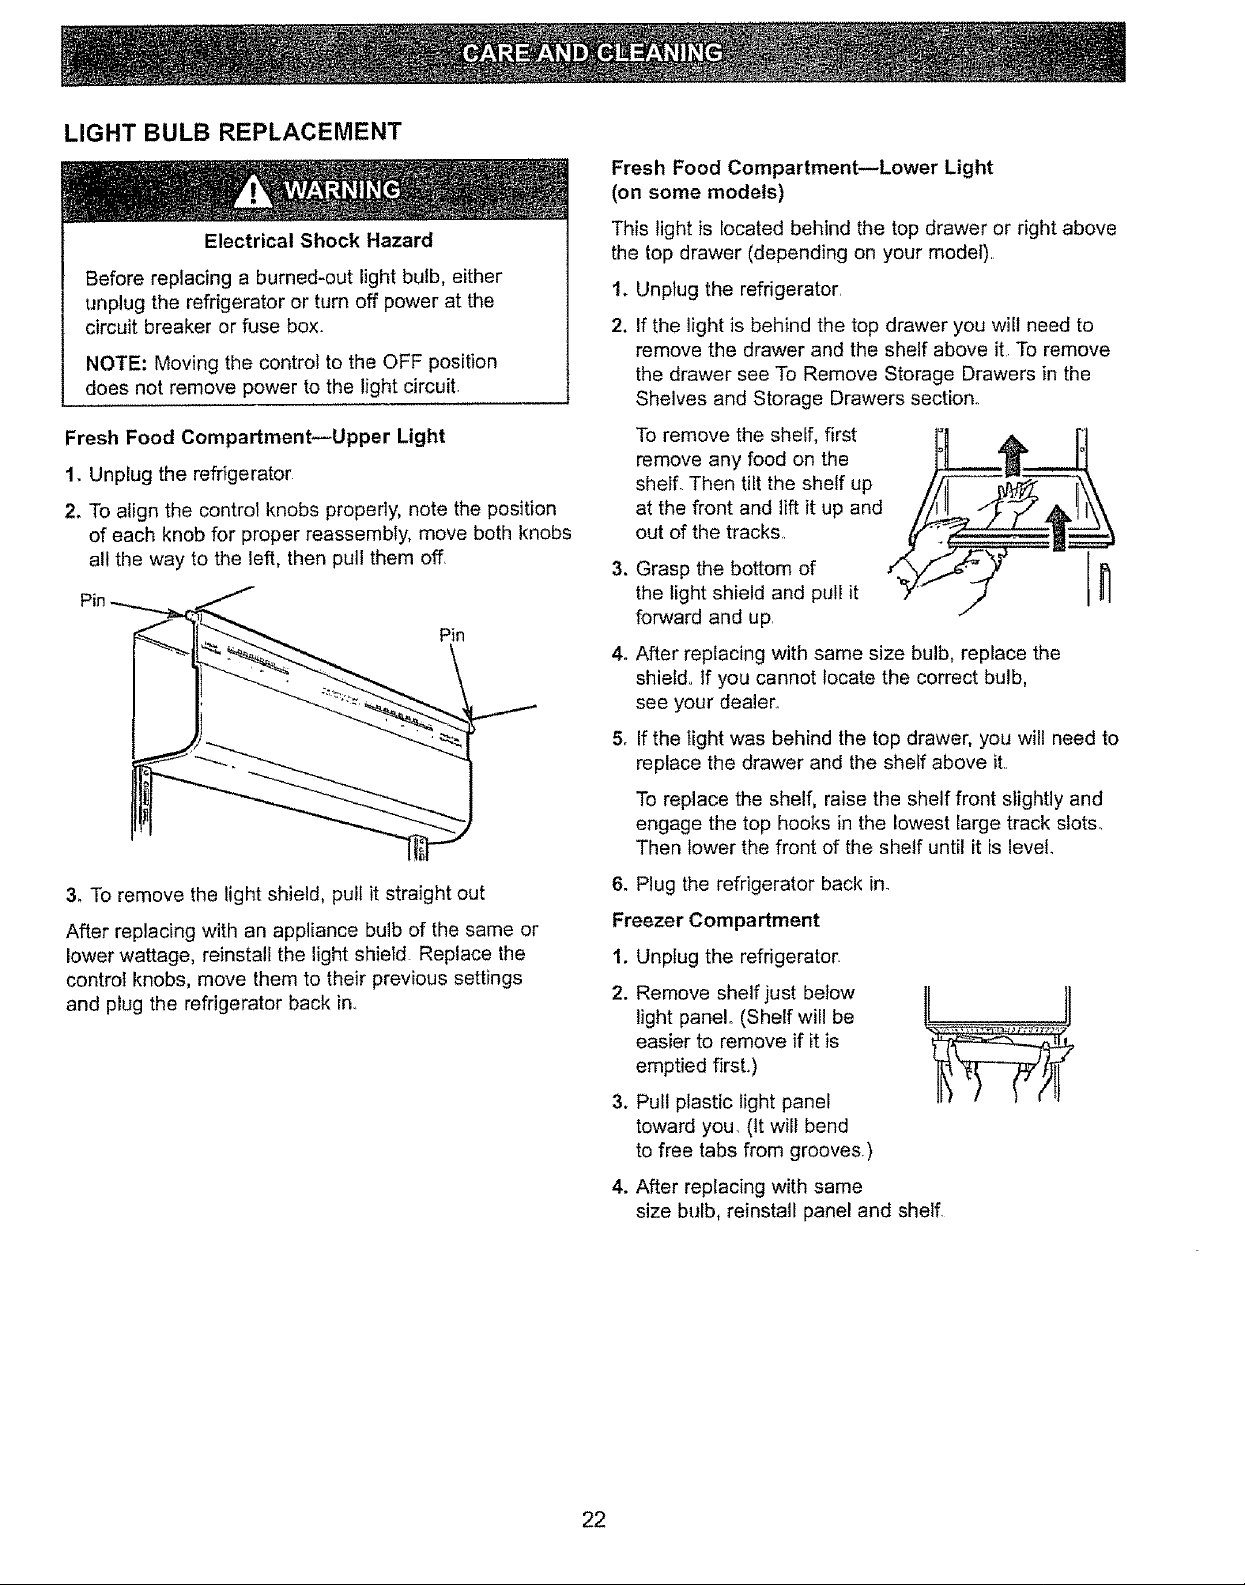
Fresh Food Compartment--Upper Light
1, Unplug the refrigerator
2. To align the control knobs properly, note the position
of each knob for proper reassembly, move both knobs
all the way to the left, then pull them off,
Pin
This light is located behind the top drawer or right above
the top drawer (depending on your model),
1. Unplug the refrigerator,
2. If the light is behind the top drawer you will need to
remove the drawer and the shelf above it To remove
the drawer see To Remove Storage Drawers in the
Shelves and Storage Drawers section.
To remove the shelf, first
remove any food on the
shelf,, Then tilt the shelf up
at the front and lift it up and
out of the tracks,
,
Grasp the bottom of
the light shield and pull it
forward and up,
4_
After replacing with same size bulb, replace the
shield. If you cannot locate the correct bulb,
see your dealer,,
5,
If the Iight was behind the top drawer, you will need to
replace the drawer and the shelf above it,,
To replace the shelf, raise the shelf front slightly and
engage the top hooks in the lowest large track slots.
Then lower the front of the shelf until it is level.
3. To remove the light shield, pull it straight out
After replacing with an appliance bulb of the same or
lower wattage, reinstall the light shield Replace the
controI knobs, move them to their previous settings
and plug the refrigerator back inn
6. Plug the refrigerator back in.
Freezer Compartment
1. Unplug the refdgerator.
2. Remove shelf just below
light panel. (Shelf will be
easier to remove if it is
emptied first,)
3. Pull plastic light panel
toward you, (it will bend
to free tabs from grooves.)
4. After replacing with same
size bulb, reinstall panel and shelf
22
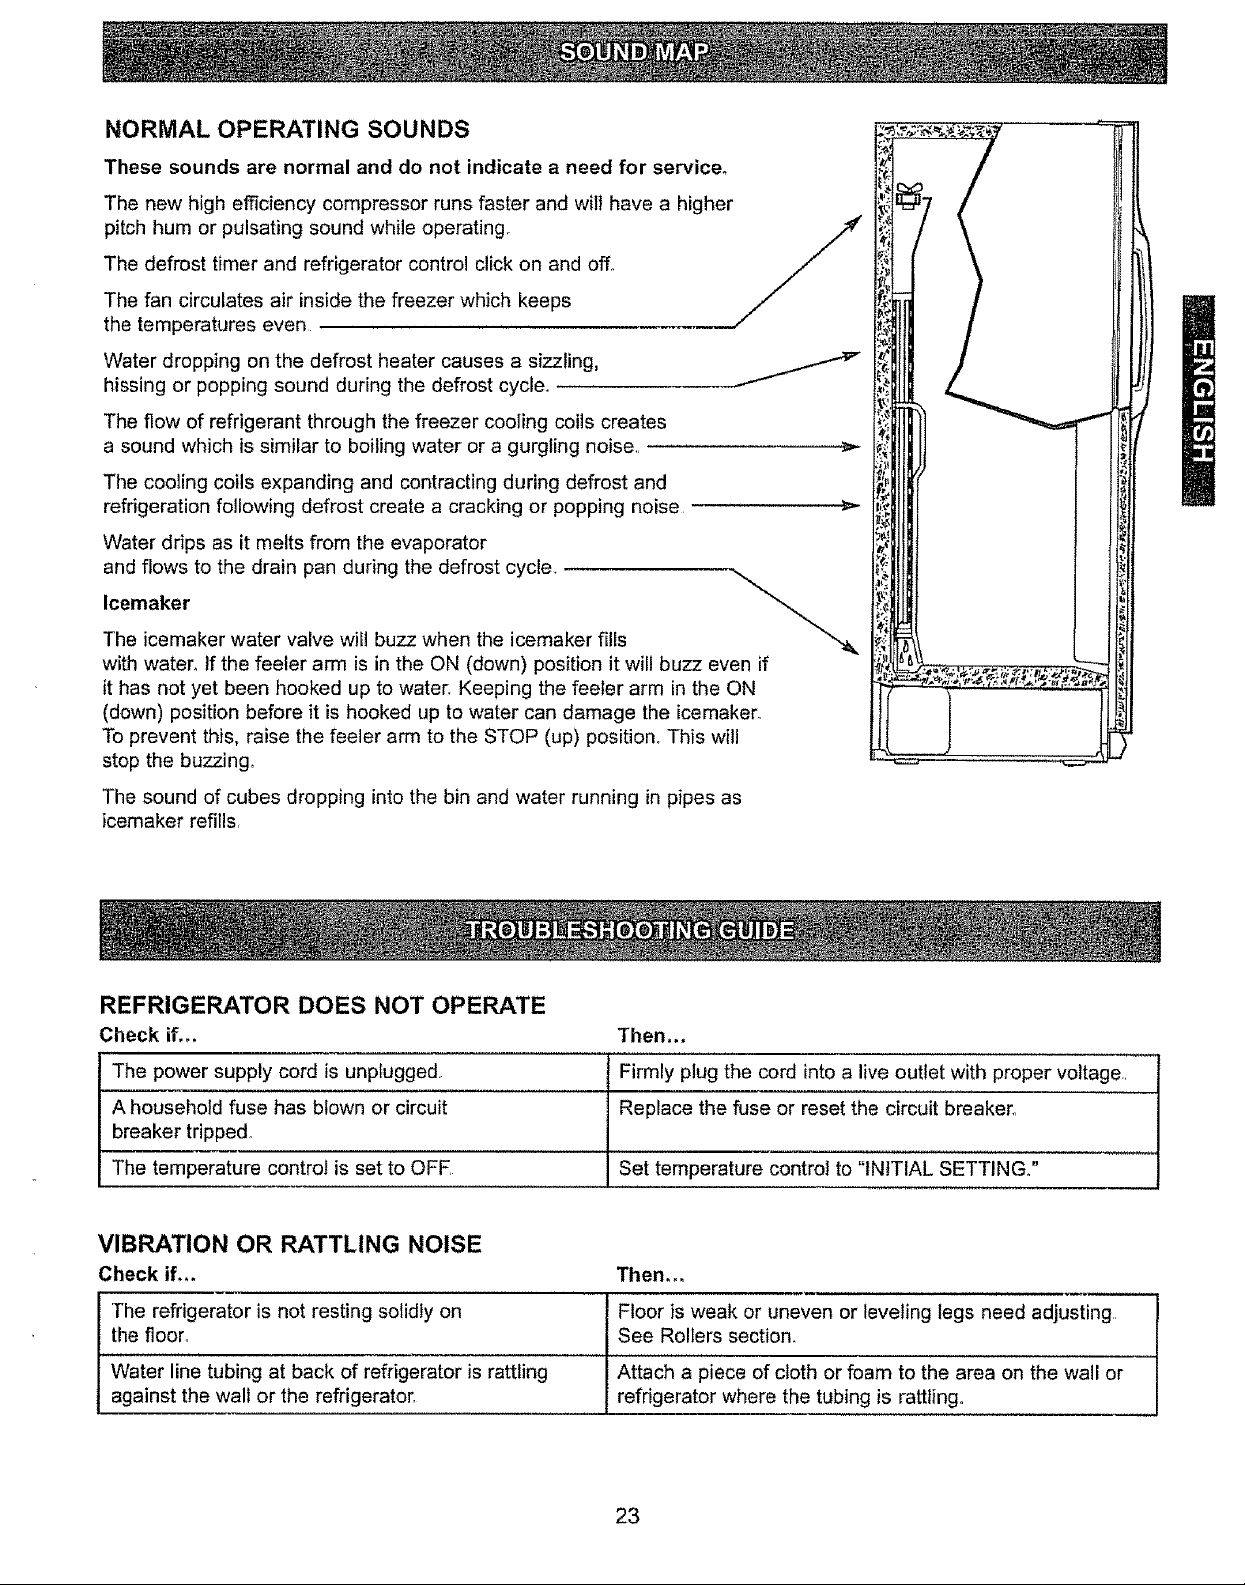
NORMAL OPERATING SOUNDS
These sounds are normal and do not indicate a need for servicer
The new high efficiency compressor runs faster and wilt have a higher
pitch hum or pulsating sound while operating,
The defrost timer and refrigerator control click on and off°
The fan circulates air inside the freezer which keeps
the temperatures even
Water dropping on the defrost heater causes a sizzling,
hissing or popping sound during the defrost cycle.
The flow of refrigerant through the freezer cooling coils creates
a sound which is similar to boiling water or a gurgling noise,,
The cooling coils expanding and contracting during defrost and
refrigeration following defrost create a cracking or popping noise -
Water drips as it melts from the evaporator
and flows to the drain pan during the defrost cycle.
Icemaker
The icemaker water valve wift buzz when the icemaker fills
with water, tf the feeler arm is in the ON (down) position it will buzz even if
it has not yet been hooked up to water, Keeping the feeler arm in the ON
(down) position before it is hooked up to water can damage the icemaker.
To prevent this, raise the feeler arm to the STOP (up) position° This will
stop the buzzing,,
The sound of cubes dropping into the bin and water running in pipes as
icemaker refills,
REFRIGERATOR DOES NOT OPERATE
Check if_.
The power supply cord is unplugged,
A household fuse has blown or circuit
breaker tripped
The temperature controi is set to OFE
Then..,
Firmly plug the cord into a live outlet with proper voltage.,
Replace the fuse or reset the circuit breaker,,
Set temperature control to "INITIAL SETTING."
VIBRATION OR RATTLING NOISE
Check if.. Then..
The refrigerator is not resting solidty on Floor is weak or uneven or leveling legs need adjusting
the floor_ See Rollers section.
Water line tubing at back of refrigerator is rattling Attach a piece of cloth or foam to the area on the wall or
against the wall or the refrigerator, refrigerator where the tubing is rattling,,
23
LIGHTS DO NOT WORK
Check if,. Then..°
The power supply cord is unplugged Firmly plug the cord into a live outlet with proper voltage.
A light bulb is loose in the socket. Turn the temperature control to OFF and unplug the
refrigerator. Gently remove the bulb and reinsert, Then
plug in refrigerator and reset the temperature control,
A light bulb has burned OUtr Replace with an appliance bulb of the same wattage, size,
and shape available at your local hardware store. Turn the
temperature control to OFF and unplug the refrigerator
prior to replacement.
REFRIGERATOR MOTOR SEEMS TO RUN TOO MUCH
Check if.,. Then...
The refrigerator that was replaced was an Modern refrigerators with more storage space require
older model° more operating time°
The room temperature is hotter than normal, The motor will run longer under warm conditions.,
The door is opened often or a large amount Adding food and opening the door warm the refrigerator.
of food has just been added. It is normal for the refrigerator to run longer in order to
cool the refrigerator back down°
The refrigerator was recently plugged in and The refrigerator wilt take up to 24 hours to cool
the temperature controls were set, completely,
The temperature controls are set too cold. See Temperature Controls section,
DOORS WILL NOT CLOSE COMPLETELY OR ARE NOT ALIGNED
Doors will close when an extra push is given.
Check if... Then...
The refrigerator is not level.
J See Rollers section to level refrigerator,,
Food packages are blocking the door open°
The ice bin, shelves, door bins, or drawers
are out of position.
Rearrange food containers to clear door and door shelves
I Push bins all the way in and put drawers and shelves into
their correct positions°
FROST OR ICE CRYSTALS ON FROZEN FOOD
Check ifo- Then...
The door is opened often
I The door is not closing properly,, See "Doors will not close completely or are not aligned"
When the door is opened, warm, humid air is allowed in
the freezer resulting in frost.
TEMPERATURE IS TOO COLD
Check if.,. Then...
Lettuce freezes in the Temperature Controlled Adjust the control lever for the Temperature Controlled
Meats Drawer. Meats Drawer to a warmer setting.
24
TEMPERATURE IS TOO WARM OR THERE IS INTERIOR MOISTURE BUILD-UP
Check if... Then...
The air vents are blocked., Cold air circulates Locate air vents by using your hand to sense airflow and
from the freezer to the fresh food section and move all packages that block vents and restrict airflow.
back again through air vents in the wall dividing
the two sections,,
The doors are opened often. When the door is opened, warm humid air is allowed into
the refrigerator. The more the door is opened, the faster
the humidity builds up, and the more warm air the
refrigerator must cool,
The controls are not set properly, Set the temperature controls at "INITIAL SETTING."
Wait 24 hours for temperatures to stabilize or even out. If
the temperature is too cold or too warm, move the controls
one setting at a time,
A large amount of food has just been added Adding food warms the refrigerator, it can take a few hours
to the refrigerator or freezer, for the refrigerator to return to normal temperature°
The food is not packaged correctly,, Wrap food tightly and wipe off damp containers prior to
storing in the refrigerator to avoid moisture accumulation.
The doors are not aligned or not closing See "Doors will not close completely or are not aligned."
completely.
The weather is humid. In humid weather, air carries moisture into refrigerator
when doors are opened.
ICE HAS OFF-TASTE OR ODOR
Check if, o. Then.,,
The icemaker was recently installed, Discard first few batches of ice to avoid discolored or
off-flavored ice.
The ice has been stored for too tong, Throw away old ice and make new supply,,
The food has not been wrapped tightly in Rewrap foods since odors may migrate to the ice if food
either compartment, is not wrapped properly.
The water supply contains minerals such as sulfur A filter may need to be installed to eliminate taste and
odor problems°
The interior of refrigerator needs cleaning. See Care and Cleaning section,
DISPENSED WATER IS NOT COLD ENOUGH
Check if.o. Then.°.
The refrigerator has been newly installed. Allow 24 hours for the tank to cool completely,.
A large amount of water has been recently Allow 24 hours for the tank to cool completely.
dispensed,
No water has been recently dispensed. The first glass of water may not be cool. Discard the
first glass
25
HOT AIR AROUND REFRIGERATOR
Check if...
The hot air is coming from the bottom of the
refrigerator,
DISPENSER DOES NOT WORK
"heck if..o
Then,.,
in the refrigeration process, it is normal that heat be
expelled in the area under the refrigerator_ Some floor
coverings will discolor at these normal and safe operating
temperatures. Your floor covering supplier should be
consulted if you object to this discoloration,
Then.,.
The freezer door is not closed completely.
The ice has frozen in the storage bin.
Ice is btocking the delivery chute_
The ice storage bin is not installed correctly,.
Icemaker is working_
WATER DISPENSER DOES NOT WORK
Check if._,
The freezer door is not closed completely.
Refrigerator was recently installed,
The water supply is turned off, disconnected
or the water tubing is clogged,
A water filter has been installed on the water
line outside the refrigerator.
The water supply is incorrectly installed or
not connected,_
Push door firmly shut Ifdoor will not close fully see
"Doors will not close completely or are not aligned,"
Remove storage bin and discard cubes and wait 24 hours
for ice to restock.
Poke ice through with a wooden spoon. Do not use
anything sharp to remove the ice or damage could occur°
Push the ice bin in fully and check to make sure it installed
correctly. See Ice and Water Dispenser section°
Call for service. To avoid this problem in the future, adjust
the lever for the Temperature Controlled Meats Drawer to
a warmer setting°
Then,,
Push door firmly shut_ If door will not close fully see
"Doors will not close completely or are not aligned."
There may be air in the water system° Press the dispenser
pad for at least two minutes to remove trapped air from
the water line and to fill the water system,
Check the water supply connection in your house and turn
on the water supply if necessary,
Check for filter clogs or improper installation of the filter,
See the Water Line installation Instructions° Use only
copper tubing. Do not use piercing-type valves.
Water filter is clogged°
Icemaker is working
Shutoff valve is not turned ono
Supply line is clogged°
NO WATER OR ICE CUBE PRODUCTION
Check if...
f Supply line or shutoff valve is clogged,.
Water filter is clogged.
Replace the filter cartridge or remove the filter and
install a plug.
Water in reservoir is frozen, Call for service,.
Turn on shutoff valve,.
Call a plumber.
Then.,,
t Call a plumber.
Replace cartridge or remove filter and install plug_
26
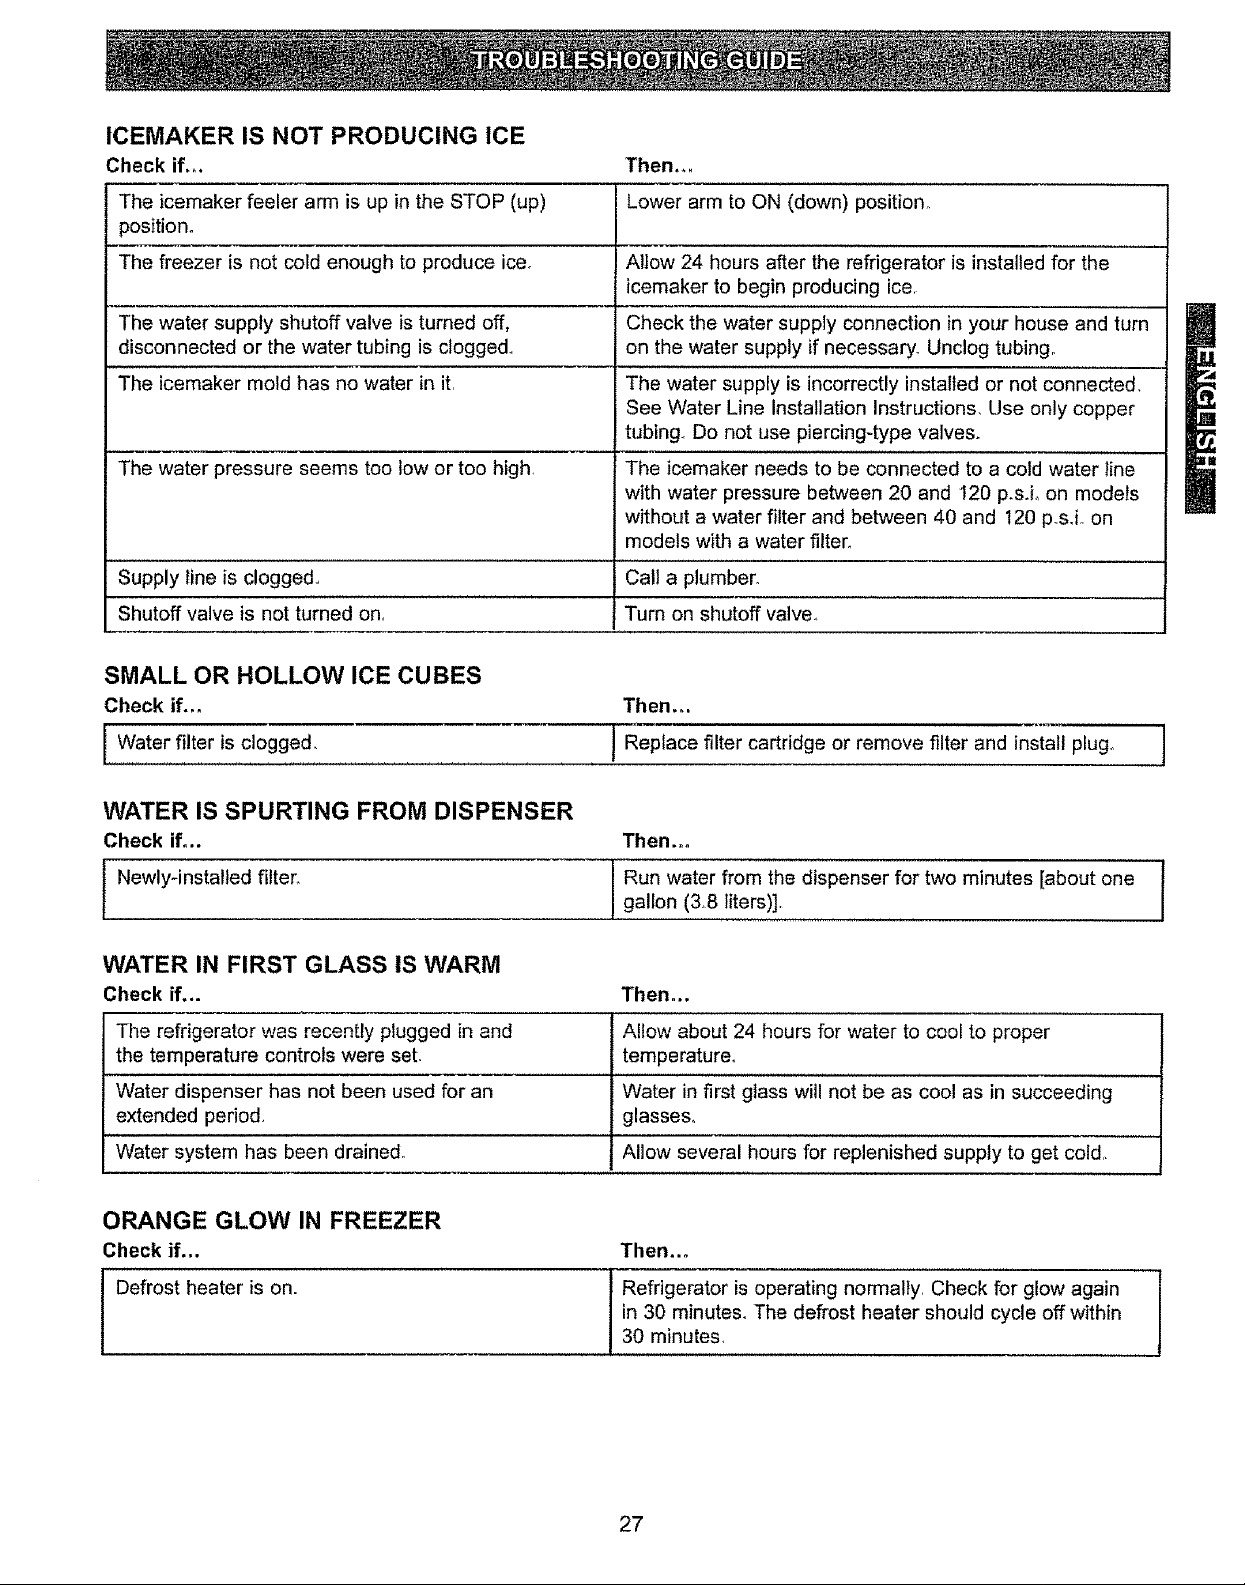
ICEMAKER IS NOT PRODUCING ICE
Check if,°. Then,,,
The icemaker feeler arm is up in the STOP (up) Lower arm to ON (down) position_
position°
The freezer is not cold enough to produce ice.
The water supply shutoff valve is turned off,
disconnected or the water tubing is clogge&
The icemaker mold has no water in it.
__m
The water pressure seems too low or too high.
Supply line is clogged., Call a plumber.
Shutoff valve is not turned on. Turn on shutoff valve.
Allow 24 hours after the refrigerator is installed for the
icemaker to begin producing ice.
Check the water supply connection in your house and turn
on the water supply if necessary. Unclog tubing°
The water supply is incorrectly installed or not connected.
See Water Line installation Instructions. Use only copper
tubing Do not use piercing-type valve&
The icemaker needs to be connected to a cold water line
with water pressure between 20 and 120 p.sJo on models
without a water filter and between 40 and t20 p_s.i, on
models with a water filter.
SMALL OR HOLLOW ICE CUBES
Check if.,. Then.°.
[ Water filter is clogged, l Replace filter cartridge or remove filter and instal! plugo J
WATER IS SPURTING FROM DISPENSER
Check if... Then.°°
Newly-insta,led filter. I Run water fr°m the dispenser f°r tw° minutes [ab°ut oneIgal,on (3.8 ,iters)].
WATER IN FIRST GLASS IS WARM
Check if,.. Then..,
The refrigerator was recently plugged in and Allow about 24 hours for water to cool to proper
the temperature controls were seL temperature,,
Water dispenser has not been used for an Water in first glass will not be as cool as in succeeding
extended period glasses,
Water system has been draine& Allow several hours for replenished supply to get cold,,
ORANGE GLOW IN FREEZER
Check if... Then..°
Defrost heater is on. Refrigerator is operating normally. Check for glow again
in 30 minutes. The defrost heater should cycle off within
30 minutes_
27

State of California
Department of Health Services
Water Treatment Device
Certificate Number
97-133t
Date Issued: November 20, 1997
Date Revised: FebmaIy 26, I999
Trademark/Model Designation
Kenmore WR97X 10006
Kenmore Filtration System 469905
Manufacturer: Sears Roebuck & Co_
The water treatment device(s) listed on this certificate have met the testing requirements pursuant to Section
116830 of the Health and Safety Code for the following health related contaminants:
Microbiolo_cal €ontarniiiants and :Turbidi_ _ : - Inorganic/Radiologieai Contaminants
Cysts (protozoan) ., Lead
Turbidity
Organic Contaminants :_- _::
None
Replacement Elements
WR97X 10006
469905
Rated Service Capacity: 200 gallons ..... , . : RaGed Service Flow: 0_5 gpm
Do not use with water that is microbiologicaily unsafe or With water of unknown quality, except that
systems claiming cyst reduction may be used on water containing cysts.
For Purchases Made In Iowa: This form must be signed and dated by the buyer and seller prior
to the consummation of this sale.This form should be retained on file by the seller for a minimum
of two years.
BUYER: SELLER:
Name
Address
City State Zip
Signature Date
Name
Address
City State Zip
Signature Date
28
 Loading...