

Kenmore 25599789, 25599783110, 25599782 Owner’s Manual
KENMORE LiMiTED WARRANTY
FOR ONE YEAR from the date of sale this appliance is warranted
against defects in material or workmanship when it is instaffed,
operated and maintained according to aft suppled instructions.
WiTH PROOF OF SALE, return a defective product to the retailer
from which it was purchased for free repair or replacement at
option of seffer.
This warranty is void if this product is ever used far other than
private household purposes°
This warranty gives you specific Jegal rights, and you may also
have other rights which vary from state to state°
Sears Brands Management Corporation, Hoffman Estates, JL60179
Use & Care Guide
Manual de Usa y Cuidado
English/ Espaiol
erlrnore
®
KENMORE GARANTJA LIMITADA
DENTRO DE UN ANO a parfir de la fecha de venta, este aparato
est_ garanffzado contra defectos de material y mano de obra si ta
instalaci6n, la utilizaci6n y el mantenimiento se realzan de acuerdo
con todas las instrucciones suministradas.
CON LA PRUEBA DE VENTA, puede devoNer eJ producto con defecto
al detaffista desde eJcual se compr6 el producto para un servicio de
arreglo gratuito o reemplazo seg_n la opci6n deJ vendedor
Esta garantia ser_ nuJa si este producto se ufiJiza para arras fines que
no sean el usa famliar privado.
Esta garantia ie otorga derechos legaJes especiflcos. Usted puede tenet
adem_s arras derechos que varian de un estado a otto.
Sears Brands Management Corporation, Hoffman Estates, IL 60179
1%, '%_ II
4.4 C ,ofll"o
IM I
4°,4 '*'=°÷÷
Mo_iels iM®delos : 255" ,,,,,,s,,_,_,<,/ _ 4
P/N 134779000B (0807)
Sears Brands Management Corporation
Hoffman Estates, IL 60179 U.S.A.
www.kenmore.com
www.sears.com
_® c(_)us
%_;S,,; I I @
215,, F_gR'89
1
/
2
3
/
/
//
4
6
Riskof child entrapment. Before you throw away your old refrigerator,
take off the doors. Leave the shelvesin place so that children may
not easily climb inside.
7
CFC/HCFC DISPOSAL
Yourold refrigerator may havea cooling systemthat usedCFCsor HCFCs
(chlorof/uorocarbonsor hydrochlorofiuorocarbons).CFCsand HCFCsare believedto harm
stratosphericozoneif releasedto theatmosphere.Other refrigerantsmay alsocauseharm
to theenvironmentifreleasedto theatmosphere.
Ifyouare throwingaway your old refrigerator,makesurethe refrigerant isremovedfor
proper disposalby a qualifiedtechnician.If youintentionallyreleaserefrigerant,you may
be subjectto finesand imprisonmentunder provisionsof environmentallegislation.
WARNING: When handling,moving,usingor cleaning this refrigerator, be careful to
avoid damaging refrigerant tubing. Tubingdamage may allow flammable refrigerant
gas leakage, which can result in personal injury.
DANG
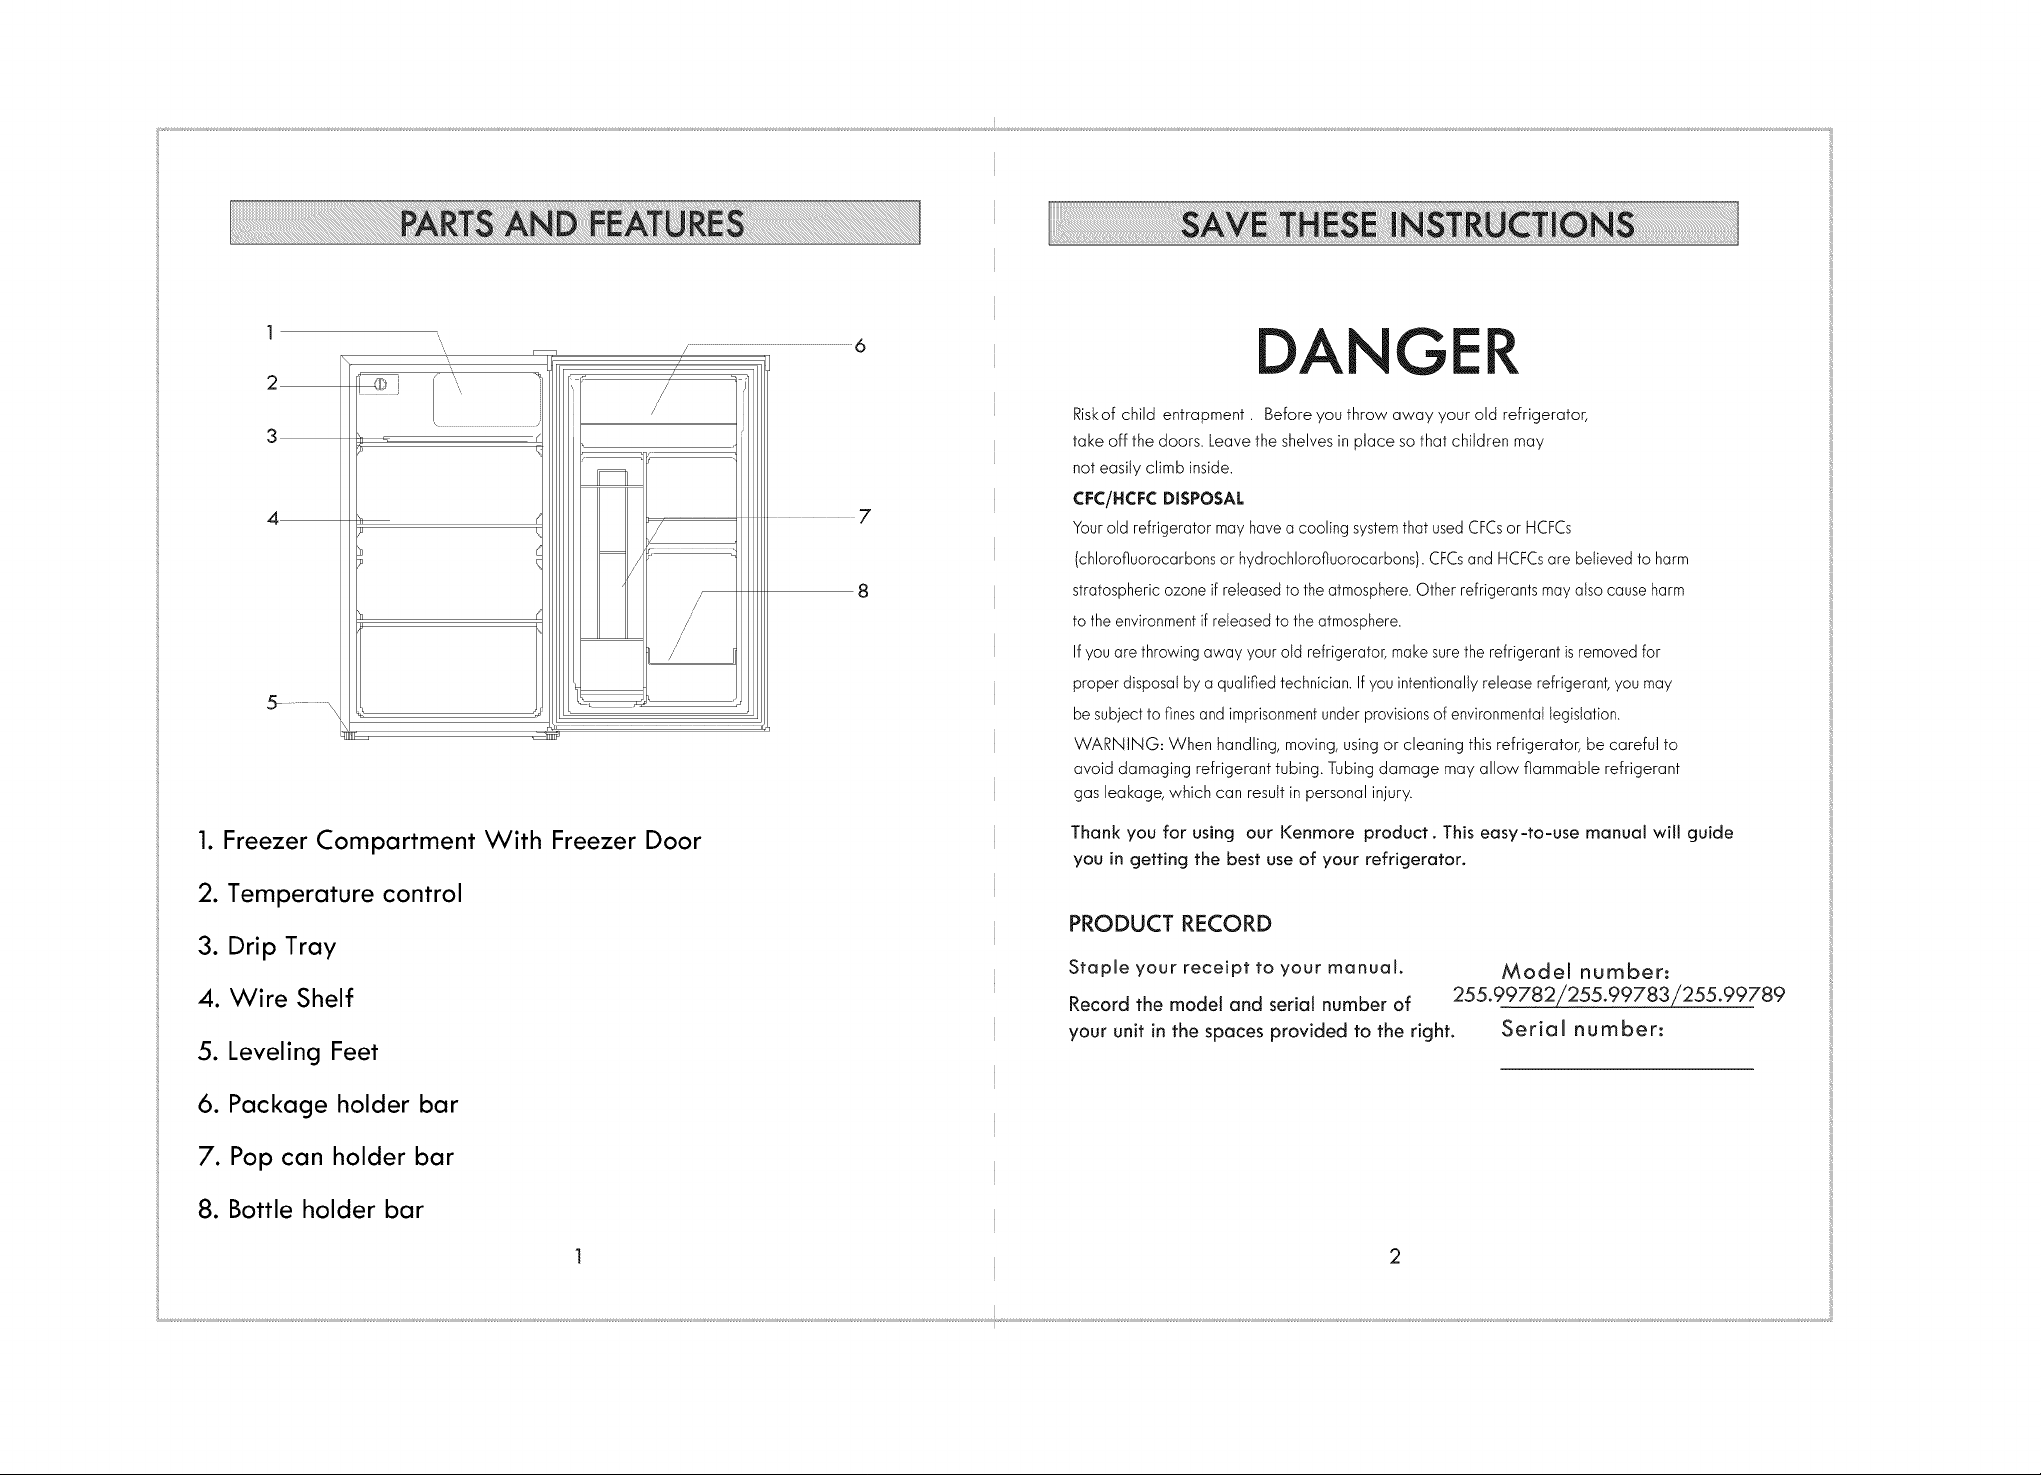
1. Freezer Compartment With Freezer Door
2. Temperature control
3. Drip Tray
4. Wire Shelf
5. Leveling Feet
6. Package holder bar
7. Pop can holder bar
8. Bottle holder bar
Thank you for using our Kenmore product. This easy-to-use manual will guide
you in getting the best use of your refrigerator.
PRODUCT RECORD
Staple your receipt to your manual. Model number:
Record the model and serial number of 255.99782/255,99783/255.99789
your unit in the spaces provided to the right, Serial number:
2
Unpacking Your Refrigerator
l. Remove all packaging material. This includes the foam base and all adhesive
tape holding the refrigerator accessories inside and outside. Slide out and
remove the plastic or foam guard used to protect the compressor from shipping
damage due to vibration and shock.
2. Inspect and remove any remaining packaging, tape or printed materials
before powering on the refrigerator.
3. Check to be sure you have all accessories and parts listed in the Parts and
Features section.
Proper Air Circulation
To ensure that your refrigerator works at the maximum efficiency it was
designed for, you should install it in a location where there is proper air
circulation, plumbing and electrical connections.
The following are recommended clearances around the refrigerator :
Sides ...................3/4 inches (18mm)
Top......................2 inches (50mm)
I
Back .................. 2 inches (50mm)
Electrical Requirements
Make sure there is a suitable power outlet (115volts, 15amps) with
proper grounding to power the refrigeraton
WARNING: Avoid the use of three prong adapters. NEVER cut off the third
grounding prong inorder to accommodate a two prong outlet. Cutting off the
grounding prong isa dangerous practice since it provides no effective grounding
for the refrigerator and may result in serious injury from electrical shock.
I
Installation
Your refrigerator is designed for freestanding installation ont4 It should not be
recessed or built-in. Place the refrigerator on a floor strong enough to support it fully
loaded. When moving the refrigerator, never tilt it by more than a 45 degrees angle. This
could damage the compressor and the sealed system.
tf the refrigerator has been tilted more than 45 degrees, let it stand in an upright
position for at least 24 hours prior to plugging it into the power source. This
will allow the refrigerant to settle and reduce the possibility of a malfunction in
the cooling system.
Plug the refrigerator into an exclusive, properly installed grounded wall outlet.
Do not plug another appliance into the same outlet as the refrigeraton
Do not under any circumstances cut or remove the third (grounding) prong from
the power cord. See the WARNING in Electrical Requirements on the previous
page. Any questions concerning power and/or grounding should be directed
toward a certified electrician or a Sears or other qualified service dealer
After plugging the appliance into a wall outlet, allow the unit to cool down for
2-3 hours before placing food into the refrigeraton
Installation Limitations
Do not install your refrigerator in any location not properly insulated or
heated, such as a garage, etc. Your refrigerator was not designed to operate in temperature
settings below 55 °Fahrenheit. Select a suitable location for the refrigerator on a hard
even surface away from direct sunlight or heat sources such as radiators, baseboard heaters,
cooking appliances, etc.
Leveling Feet
There are two leveling feet on the bottom of the unit near the unit front. Turn the leveling
foot knobs to the left to raise the cabinet, and to the right to lower the cabinet.
4
6/8/10
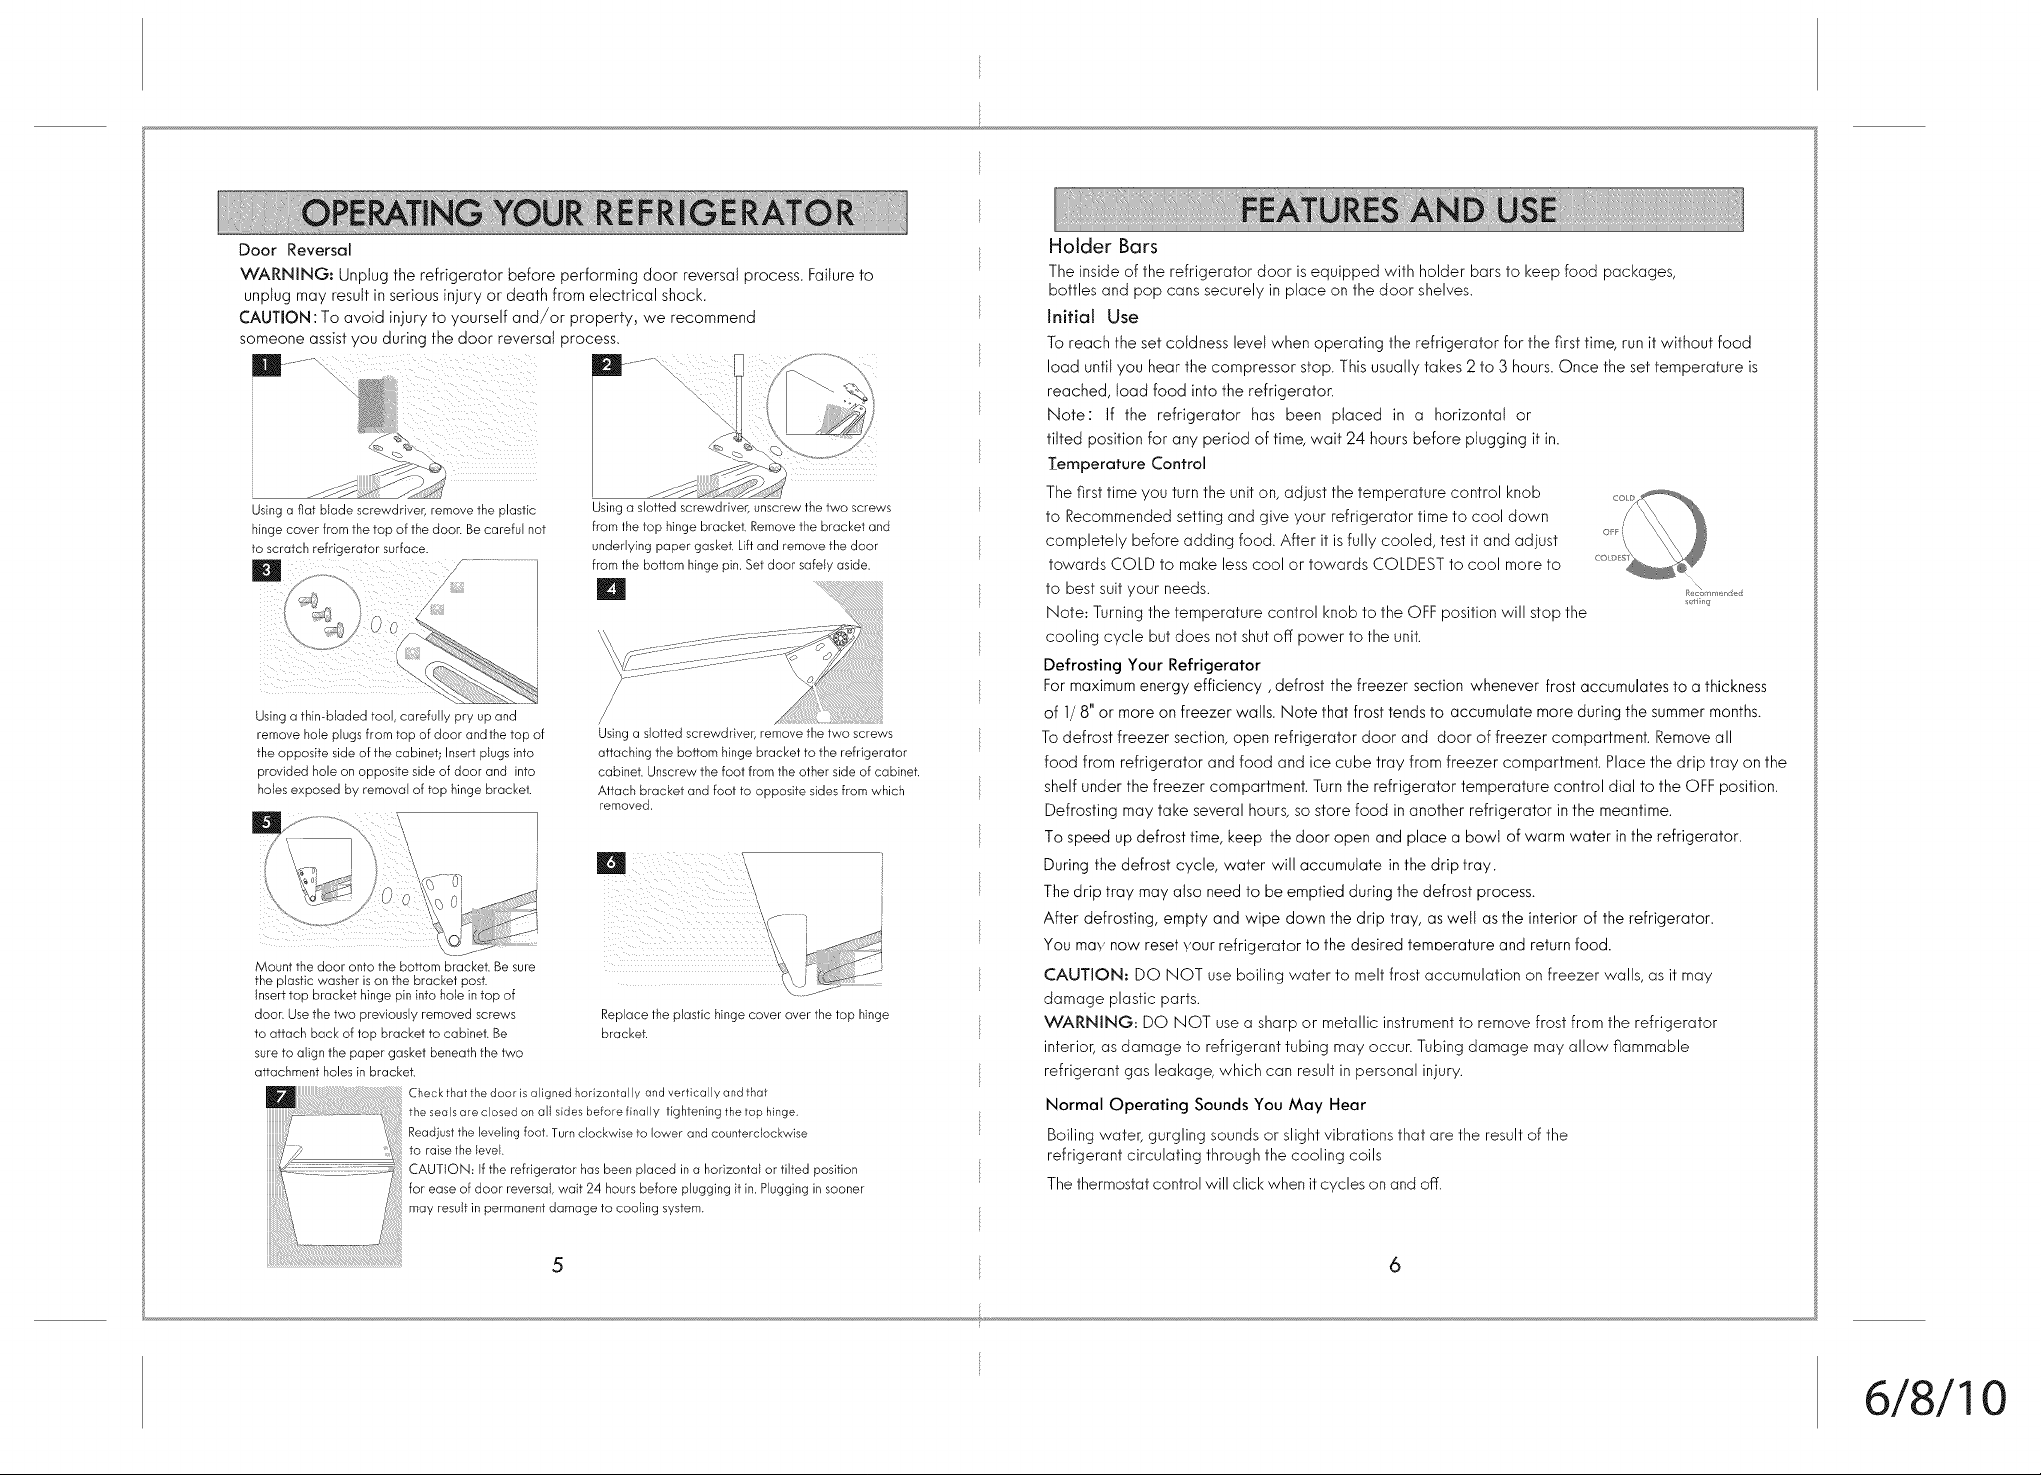
Door Reversal
WARNING: Unplug the refrigerator before performing door reversal process. Failureto
unplug may resultin serious injury or death from electrical shock.
CAUTION :To avoid injury to yourself and/or property, we recommend
someoneassistyou during the door reversal process.
Using a fiat blade screwdriver, remove the plastic
hinge cover from the top of the door. Be careful not
to scratch refrigerator surface.
m
Using a slotted screwdriver, unscrew the two screws
from the top hinge bracket, Remove the bracket and
underlying paper gasket, Lift and remove the door
from the bottom hinge pin, Set door safely aside.
IN
Using a thin-bladed tool, carefully pry up and
remove hole plugs from top of door andthe top of
the opposite side of the cabinet; Insert plugs into
provided hole on opposite side of door and into
holes exposed by removal of top hinge bracket.
/
Using a slotted screwdrivel, remove the two screws
attaching the bottom hinge bracket to the refrigerator
cabinet. Unscrew the foot from the other side of cabinet.
Attach bracket and foot to opposite sides from which
removed.
imp,...............
i
\
Mount the door onto the bottom bracket. Be sure
the plastic washer is on the bracket post.
Insert top bracket hinge pin into hole in top of
door. Use the two previously removed screws Replace the plastic hinge cover over the top hinge
to attach back of top bracket to cabinet. Be bracket.
sure to align the paper gasket beneath the two
attachment holes in bracket.
Check that the door is aligned horizontally and vertically and that
the seals are closed on all sides before finally tightening the top hinge.
Readjustthe leveling foot. Turn clockwise to lower and counterclockwise
to raise the level.
CAUTION: If the refrigerator has been placed in a horizontal or tilted position
for ease of door reversal, wait 24 hours before plugging it in. Plugging in sooner
may result in permanent damage to cooling system.
ii¸ ? i : \
Holder Bars
Theinside of the refrigerator door isequipped with holder barsto keep food packages,
bottles and pop cans securely in place on the door shelves.
Initial Use
Toreach the set coldness level when operating the refrigerator for the first time, runit without food
load until you hear the compressor stop. Thisusually takes 2 to 3 hours.Once the set temperature is
reached, load food into the refrigerator.
Note: If the refrigerator has been placed in a horizontal or
tilted positionfor any period of time, wait 24 hoursbefore plugging it in.
Temperature Control
Thefirst time you turnthe uniton, adjust the temperature control knob
to Recommendedsettingand give your refrigerator time to cool down
completely before adding food. After it isfully cooled, test it and adjust
towards COLD to make lesscool or towards COLDESTto cool more to
to bestsuit your needs. ........d_
Note: Turningthe temperature control knob to the OFFposition will stop the
seflg
cooling cycle but does not shutoff power to the unit.
Defrosting Your Refrigerator
Formaximumenergy efficiency, defrost the freezer section whenever frost accumulatesto a thickness
of 1/8" or more on freezer walls. Note that frost tendsto accumulate more during the summermonths.
Todefrost freezer section, open refrigerator door and door of freezer compartment. Removeall
food from refrigerator and food and ice cube tray from freezer compartment. Place the drip tray on the
shelfunder the freezer compartment. Turnthe refrigerator temperature control dial to the OFFposition.
Defrosting may take several hours,sostore food in another refrigerator in the meantime.
Tospeed up defrost time, keep the door open and place a bowl of warm water inthe refrigerator.
Duringthe defrost cycle, water will accumulate in the drip tray.
Thedrip tray may also need to be emptied during the defrost process.
After defrosting, empty and wipe down the drip tray, asweii asthe interior of the refrigerator.
You mas'now resetyour refrigerator to the desiredtemoerature and returnfood.
CAUTION: DO NOT useboiling water to melt frost accumulation on freezer walls, as it may
damage plastic parts.
WARNING: DO NOT usea sharp or metallic instrumentto removefrost from the refrigerator
interior,as damage to refrigerant tubing may occur. Tubingdamage may allow flammable
refrigerant gas leakage, which can result in personal injury.
Normal Operating Sounds You May Hear
Boiling water, gurgling soundsor slight vibrations that are the resultof the
refrigerant circulating through the cooling coils
Thethermostatcontrol will clickwhen it cycles on and off.
5
6
6/8/10
 Loading...