

Kenmore 2539750841 Owner’s Manual
Important Safety Instructions .................................................... 2
How and Why .......................................................................... 2
Energy Saving Ideas ..................................................................... 3
Installation ...........................................................................................3-4
Using the Air Conditioner ......................................................... 5
Air Conditioner Features ..................................................... 5-6
Care and Cleaning .................................................................. 6-7
Routine Maintenance .......................................................................8
Before You Call For Service ..........................................................9
Sears Service ........................................................................... 10
Warranty ....................._....................... /¥,_ _.......................... 10
Read and Save These instructions
This Useand Care Manual provides specific operating instructions for your model Usethe air conditioner only as instructed
in this manual, Theseinstructions are not meant to covereverypossiblecondition and situation that mayoccur Corn mon sense
and caution must be practiced when installing, operating, and maintaining any appliance
Record Your Model and Serial Numbers
Record in the space provided below the model and serial numbers The serial plate is located behind the left front louvers
Reading the numbers may be easier by using a flashlight or by removing the cabinet front as instructed under "Care and
Cleaning" On compact models, it is located on the outside of the cabinet.
Model Number:
Serial Number:
Purchase Date:
P/N 955R-D02(9411)
Important Safety
Instructions
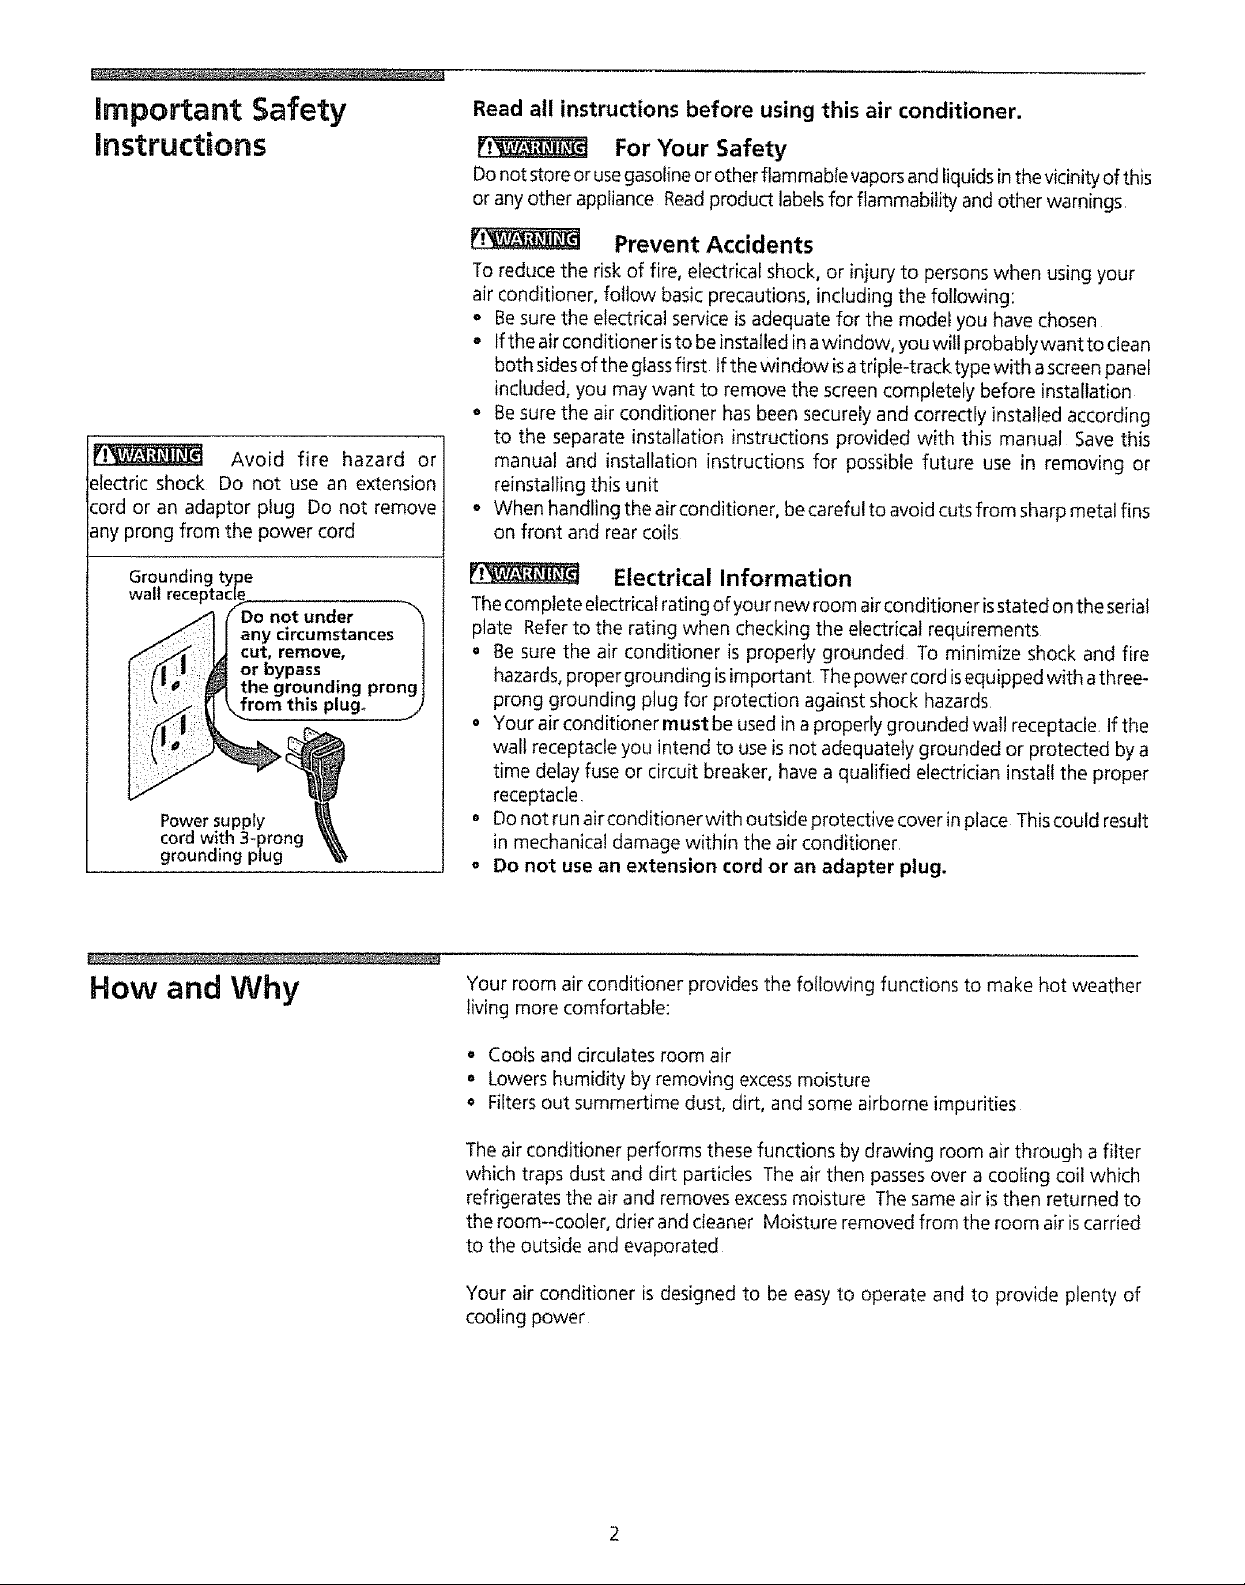
Avoid fire hazard or
electric shock Do not use an extension
cord or an adaptor plug Do not remove
any prong from the power cord
Read all instructions before using this air conditioner.
For Your Safety
Donot store or usegasoline or other flammable vaporsand liquidsinthe vicinity of this
or any other appliance Readproduct labelsfor flammability and other warnings
Prevent Accidents
To reduce the risk of fire, electrical shock, or injury to persons when using your
air conditioner, follow basic precautions, including the following:
° Besure the electrical service is adequate for the model you have chosen
° Ifthe air conditioner isto be installed inawindow, you will probablywant to clean
both sidesof the glassfirst tf the window isatriple-track type with ascreen panel
included, you may want to remove the screen completely before installation
o Besure the air conditioner has been securely and correctiy installed according
to the separate installation instructions provided with this manual Save this
manual and installation instructions for possible future use in removing or
reinstalling this unit
o When handling the air conditioner, be careful to avoid cutsfrom sharp metal fins
on front and rear coils
Groundin(
wall
|e
not under _'_
any circumstances|
cut, remove, 1
or bypass |
the grounding prong 1
romthi plug .j
Power supply
cord with 3-prong
grounding plug
How and Why
Fi_ Electrical Information
Thecornplete electrical rating of your new room air conditioner isstated on the serial
plate Referto the rating when checking the electrical requirements
• Be sure the air conditioner is properly grounded To minimize shock and fire
hazards, proper grounding isimportant Thepower cord isequipped with athree-
prong grounding plug for protection against shock hazards
• Your air conditioner must be used in a properly grounded wall receptacle If the
wall receptacle you intend to useis not adequately grounded or protected by a
time delay fuse or circuit breaker, have a qualified electricianinstall the proper
receptacle
o Do not run airconditionerwith outside protective cover in place Thiscould result
in mechanical damage within the air conditioner
o Do not use an extension cord or an adapter plug.
Your room air conditioner provides the following functions to make hot weather
living more comfortable:
° Cools and circulates room air
° Lowers humidity by removing excessmoisture
Filtersout summertime dust, dirt, and some airborne impurities
The air conditioner performs these functions by drawing room air through a filter
which traps dust and dirt particles The air then passesover a coofing coil which
refrigerates the air and removes excessmoisture The sameair is then returned to
the room--cooler, drier and cleaner Moisture removed from the room air iscarried
to the outside and evaporated
Your air conditioner is designed to be easy to operate and to provide plenty of
cooling power
Energy Saving Ideas
• Thecapacity of the room air conditioner must fit the room sizefor efficient and
satisfactory operation
• Install the room air conditioner on the shady side of your home A window that
faces north is best because it is shaded most of the day,
• Do not block air flow inside with blinds, curtains or furniture; or outside with
shrubs, enclosures, or other buildings,
• Closethe fireplace damper, floor and wall registers so coot air does not escape
up the chimney and into the duct work
• Keepblindsand drapes inother windows closedduring the sunniestpartof the day.
• Clean the air filter as recommended in the section "Care and Cleaning"
o Proper insulation and weatherstripping inyour homewill help keepwarm air out
and cool air in
• External house shading with trees, plants or awnings will help reduce the air
conditioner's work load
° Operate heat producing appliances such as ranges, washers, dryers and
dishwashers during the coolest part of the day
Unstallation
7%____t;€ ,, -"i :•
_L
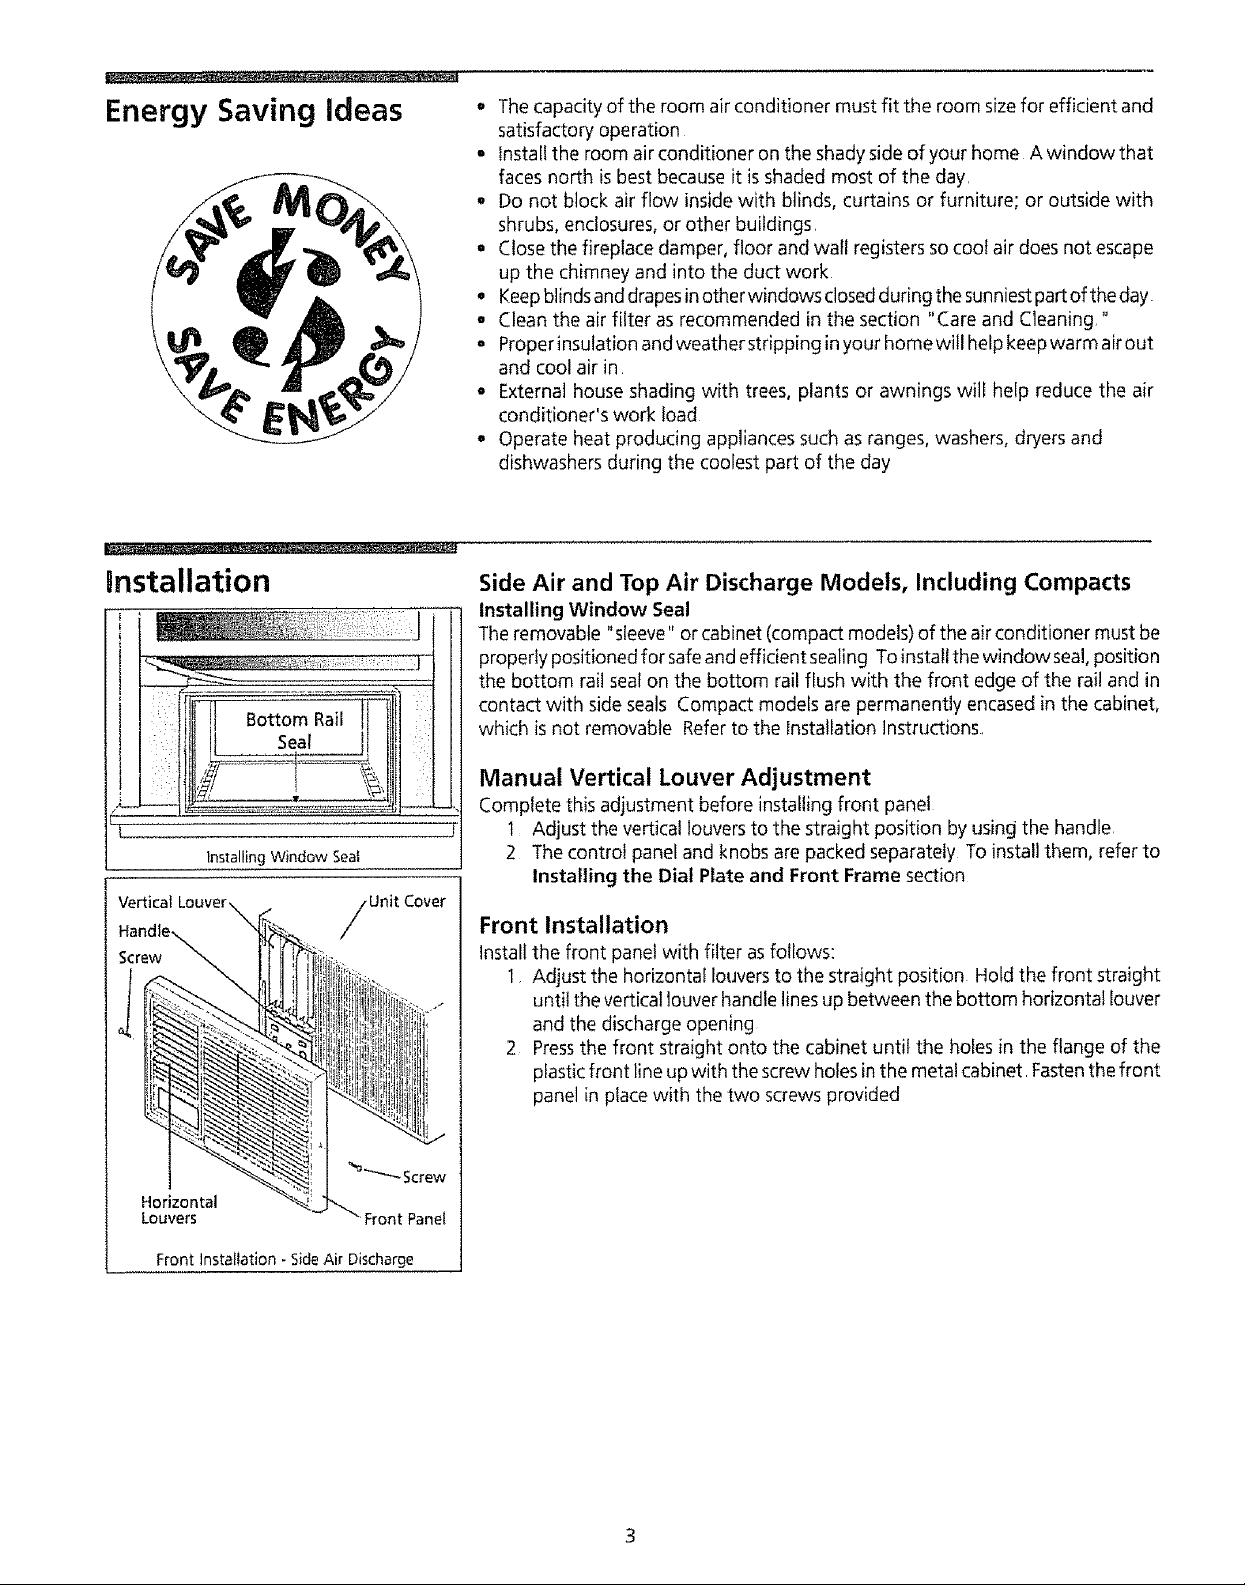
Installing Window Seal
Vertical Louver_
Horizontal
Louvers
Unit Cover
',1ti t t_ :ii'"
; It t_;,i
,!/_ t
4,I, I,
11,
%_-_-_ Screw
_" Front Panel
Side Air and Top Air Discharge Models, Including Compacts
Installing Window Seal
Theremovable "sleeve" or cabinet (compact models) of the air conditioner must be
properly positioned for safeand efficient sealing To instatlthe window seal,position
the bottom rail seal on the bottom rail flush with the front edge of the rail and in
contact with side seals Compact models are permanently encased in the cabinet,
which isnot removable Refer to the Installation Instructions,
Manual Vertical Louver Adjustment
Complete this adjustment before installing front panel
1 Adjust the vertical louversto the straight position by using the handle,
2 The control panel and knobs are packed separately To install them, refer to
Installing the Dial Plate and Front Frame section
Front Installation
Install the front panel with filter asfollows:
1 Adjust the horizontal louvers to the straight position Hold the front straight
until the vertical louver handle linesup between the bottom horizontal louver
and the discharge opening
2 Pressthe front straight onto the cabinet until the holes in the flange of the
plastic front line upwith the screw holes inthe metal cabinet Fastenthe front
panel in place with the two screws provided
Front Installation - Side Air Discharge
nnstaDlation (continued)
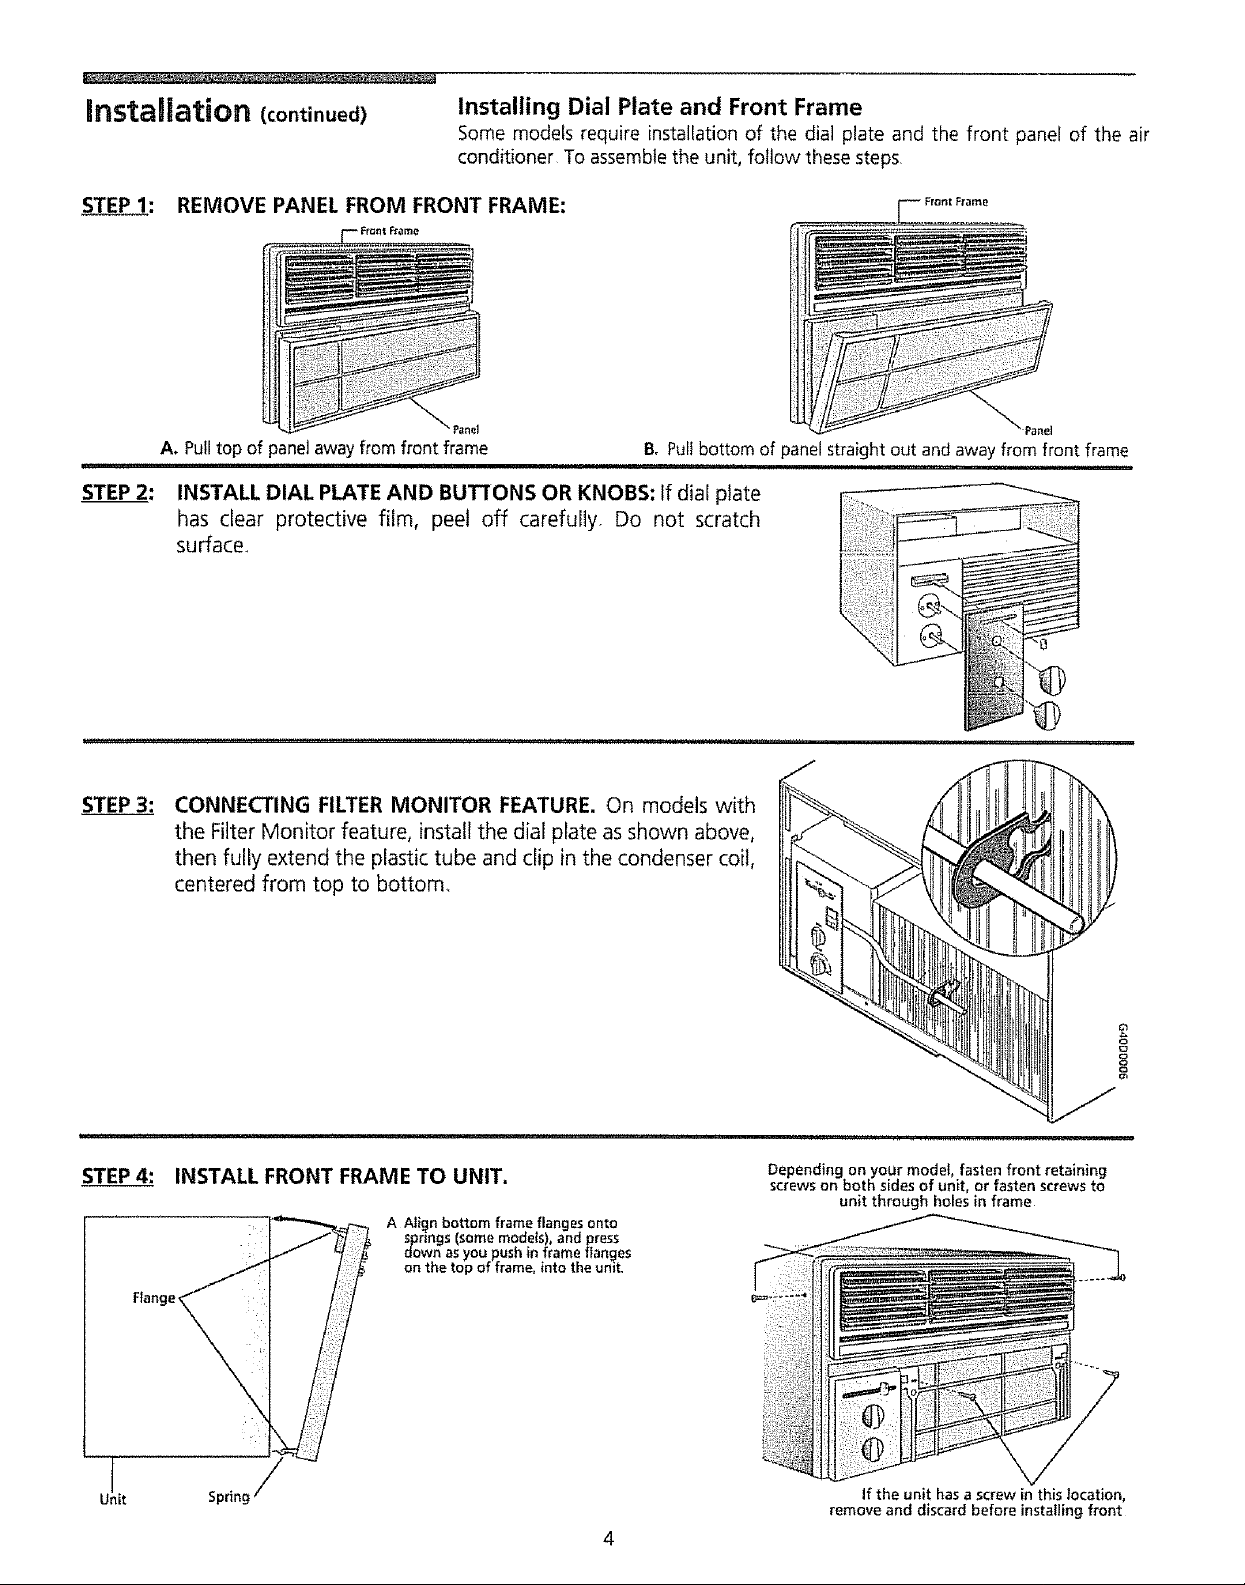
Installing Dial Plate and Front Frame
Some models require installation of the dial plate and the front panel of the air
conditioner To assemblethe unit, follow these steps
STEP 1: REMOVE PANEL FROM FRONT FRAME:
A, Pull top of panel away from front frame
B. Pull bottom of panel straight out and away from front frame
STEP 2: INSTALL DIAL PLATE AND BUTTONS OR KNOBS: If dial plate
has clear protective film, peel off carefully Do not scratch
sufface_
STEP 3:
CONNECTING FILTER MONITOR FEATURE. On models with
the Filter Monitor feature, install the dial plate as shown above,
then fully extend the plastic tube and clip in the condenser coil,
centered from top to bottom_
q
Unit
ii , ,
INSTALL FRONT FRAME TO UNIT.
A A_ign bottom frame flanges onto
springs {some mode{s), and press
down as you push in frame flanges
on the top of frame, into the unit,
Spring
Depending on your model, fasten front retaining
screws on both sides of unit, or fasten screws to
unit through holes in frame
If the unit has a screw in this location,
remove and discard before installing front
4
Using the Air Conditioner
NOTE: tf the air conditioner is turned off,
wait 3 minutes before restarting This
allows pressure inside the compressor to
equalize Failure to follow these
instructions may cause inefficient
operation
To reduce the riskof fire, electric shock, or injury to persons, read the
IMPORTANTSAFETYINSTRUCTIONSbefore operating this appliance
To begin operating the air conditioner, follow these steps:
I Pluginthe air conditioner (Toprevent electrical hazards,do notuseanextension
cord or an adapter plug )
2 Setthe exhaust vent to the CLOSEDposition
3 Setthe TEMPControl to the coolest setting,
4 Set the fan control at the highest level
5 Adjust the louvers for comfortable air flow,
6 Once the room has cooled, set the fan to the POWERSAVERFANsetting and/
or adjust the TEMPControl to the setting you find most comfortable
Reviewthe "Air Conditioner Features" section for other settings
Air Conditioner Features
VENT
EXHAUST CLOSED
OFF
HIGH HIGH
/
: Y
LOW LOW
POWER NORMAL
SAVER
TEMP
COOLER
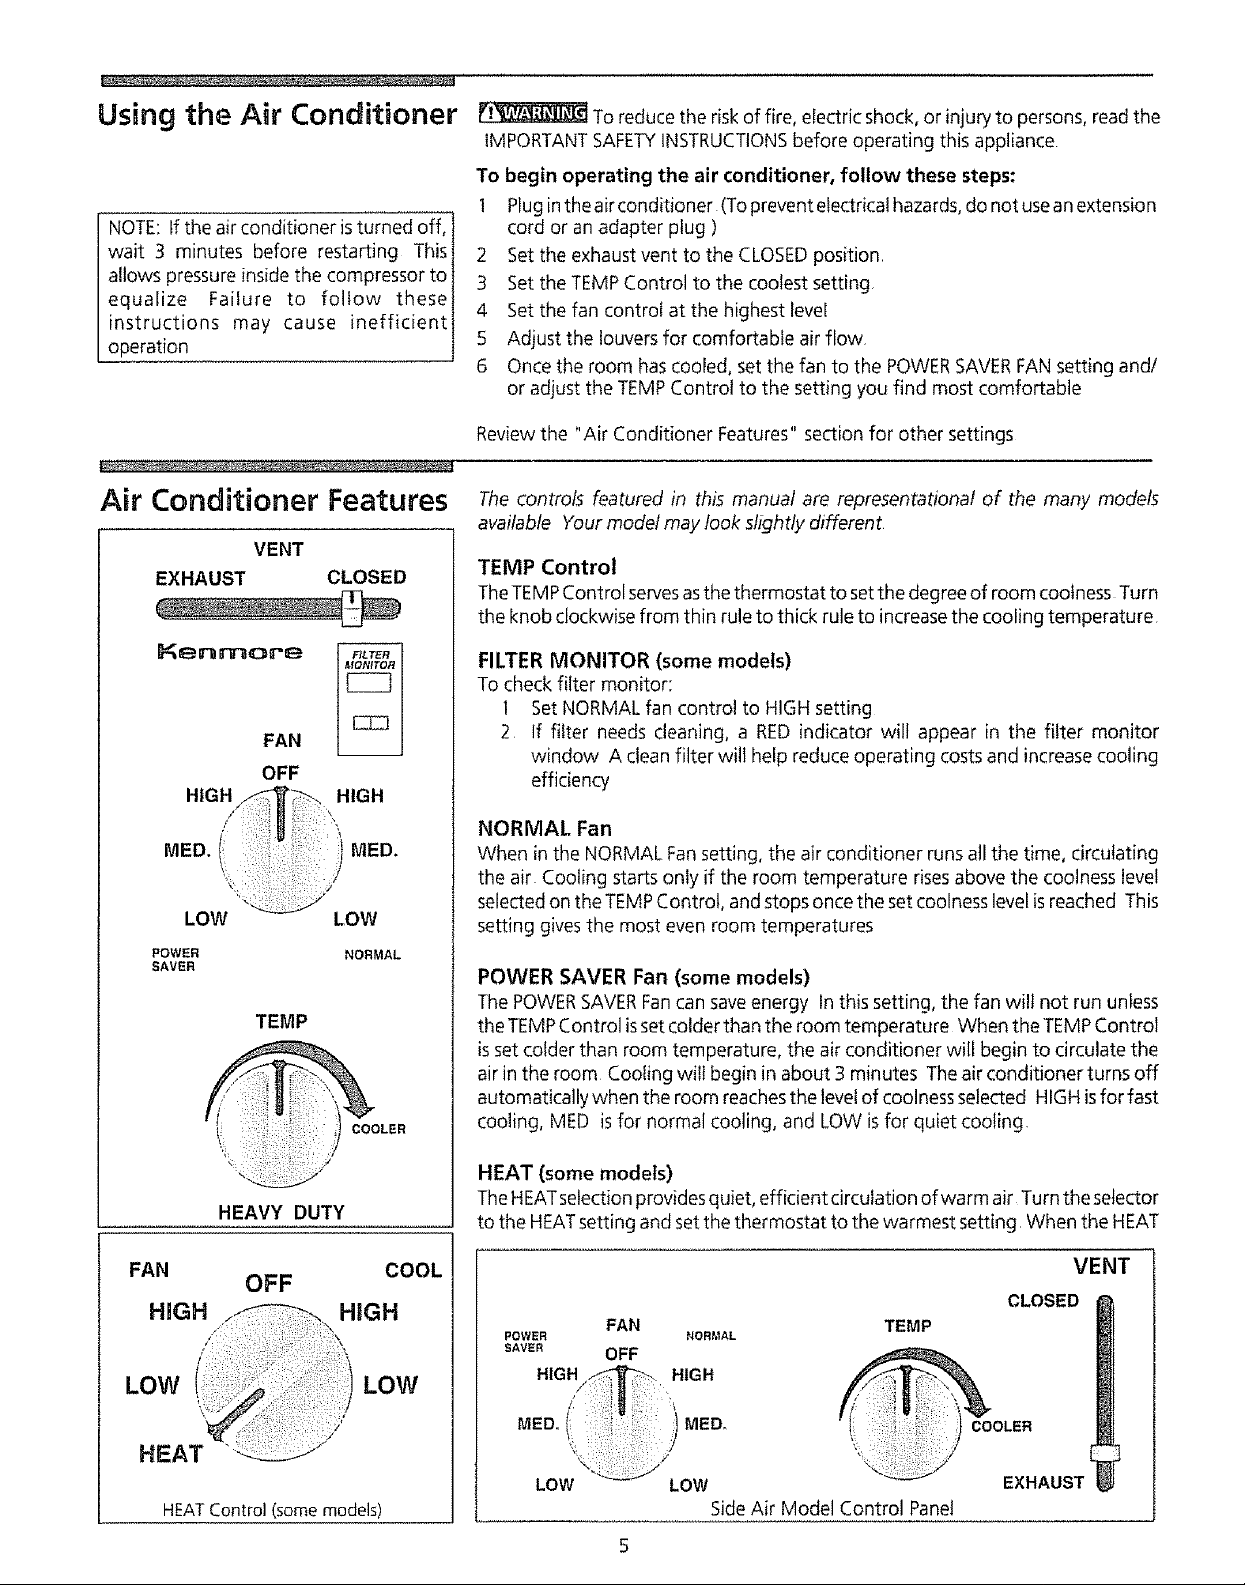
The controls featured in this manual are representational of the many models
available Yourmodel may look slightly different
TEMP Control
TheTEMPControl servesasthe thermostat to setthe degree of room coolness Turn
the knob clockwise from thin rule to thick rule to increasethe cooling temperature
FILTER MONITOR (some models)
To check filter monitor;
1 Set NORMAL fan control to HIGH setting
2 If filter needs cleaning, a RED indicator will appear in the filter monitor
window A clean filter will help reduce operating costsand increasecooling
efficiency
NORMAL Fan
When in the NORMAL Fansetting, the air conditioner runs all the time, circulating
the air Cooling starts only if the room temperature rises above the coolness level
selectedon the TEMPControl, andstops oncethe setcoolness level isreached This
setting givesthe most even room temperatures
POWER SAVER Fan (some models)
The POWERSAVERFancan save energy In this setting, the fan wilt not run unless
the TEMPControl isset colderthan the roomtemperature When the TEMPControl
isset colder than room temperature, the air conditioner wilebegin to circulate the
air in the room Coo{ing wilt begin in about 3 minutes The air conditioner turns off
automatically when the room reachesthe levelof coolnessselected HIGH isfor fast
cooling, MED isfor normal cooling, and LOW is for quiet coo{ing,
HEAVY DUTY
FAN COOL
OFF
HiGH HiGH
LOW
LOW
HEAT "
HEATControl (some models)
HEAT (some models)
TheHEATselection provides quiet, efficient circulation of warm air Turn the selector
to the HEATsetting and setthe thermostat to the warmest setting When the HEAT
VENT
CLOSED
POWER NORMAL
FAN
SAVER OFF
HIGH HIGH
/
MED. I MED_
/
LOW LOW
SideAir Model Control Panel
TEMP
OLER
Air Conditioner Features
(continued)
VentControl - CompactModels
setting is selected, the thermostat maintains the temperature by automatically
turning the heater on and off in responseto room temperature. Once the room is
warm, adjust the thermostat to a cooler setting The fan runs continuously to
circulate air in the room
A slight heat odor maycome from the unit when first switching to HEATafter the
cooling season isover This odor, caused by fine dust particles on the heater, will
disappear quickly
Vent Control
TheVent Control allows the air conditioner to either recircufate insideair (CLOSED)
or exhaust air to the outside (OPEN)
• TheCLOSEDposition isusedwhen maximum cooling isdesired,It mayalsobeused
for air recirculation without cooling when the air conditioner isset in the FAN
position
= The OPENposition removesstaleair from the roomand exhaustsitto the outside
Freshair isdrawn intothe room through normal air passagesfound in homes
• TheOPENor CLOSEDposition can be usedwith any fan selection,,
o Forcompact modeJs,push the slide in to CLOSE,pull out to OPEN,
The air directional louvers control the air flow direction Adjust louvers up, down,
left or right The outside tabs adjust the airup or down The center leversdirect the
air left or right,
Care and Cleaning
Remove /
Knobs
I_-'_.._ Locking
Remove _ " : it/f /_ :
Press firmly on each side of R
case to release locking tabs--
Removing Decorative Front - Some Compact Models
Figure I
Clips
Clean your airconditioner occasionally to keep itlooking new, Be sureto unplug
the unitbeforecleaningto preventshockor firehazards.
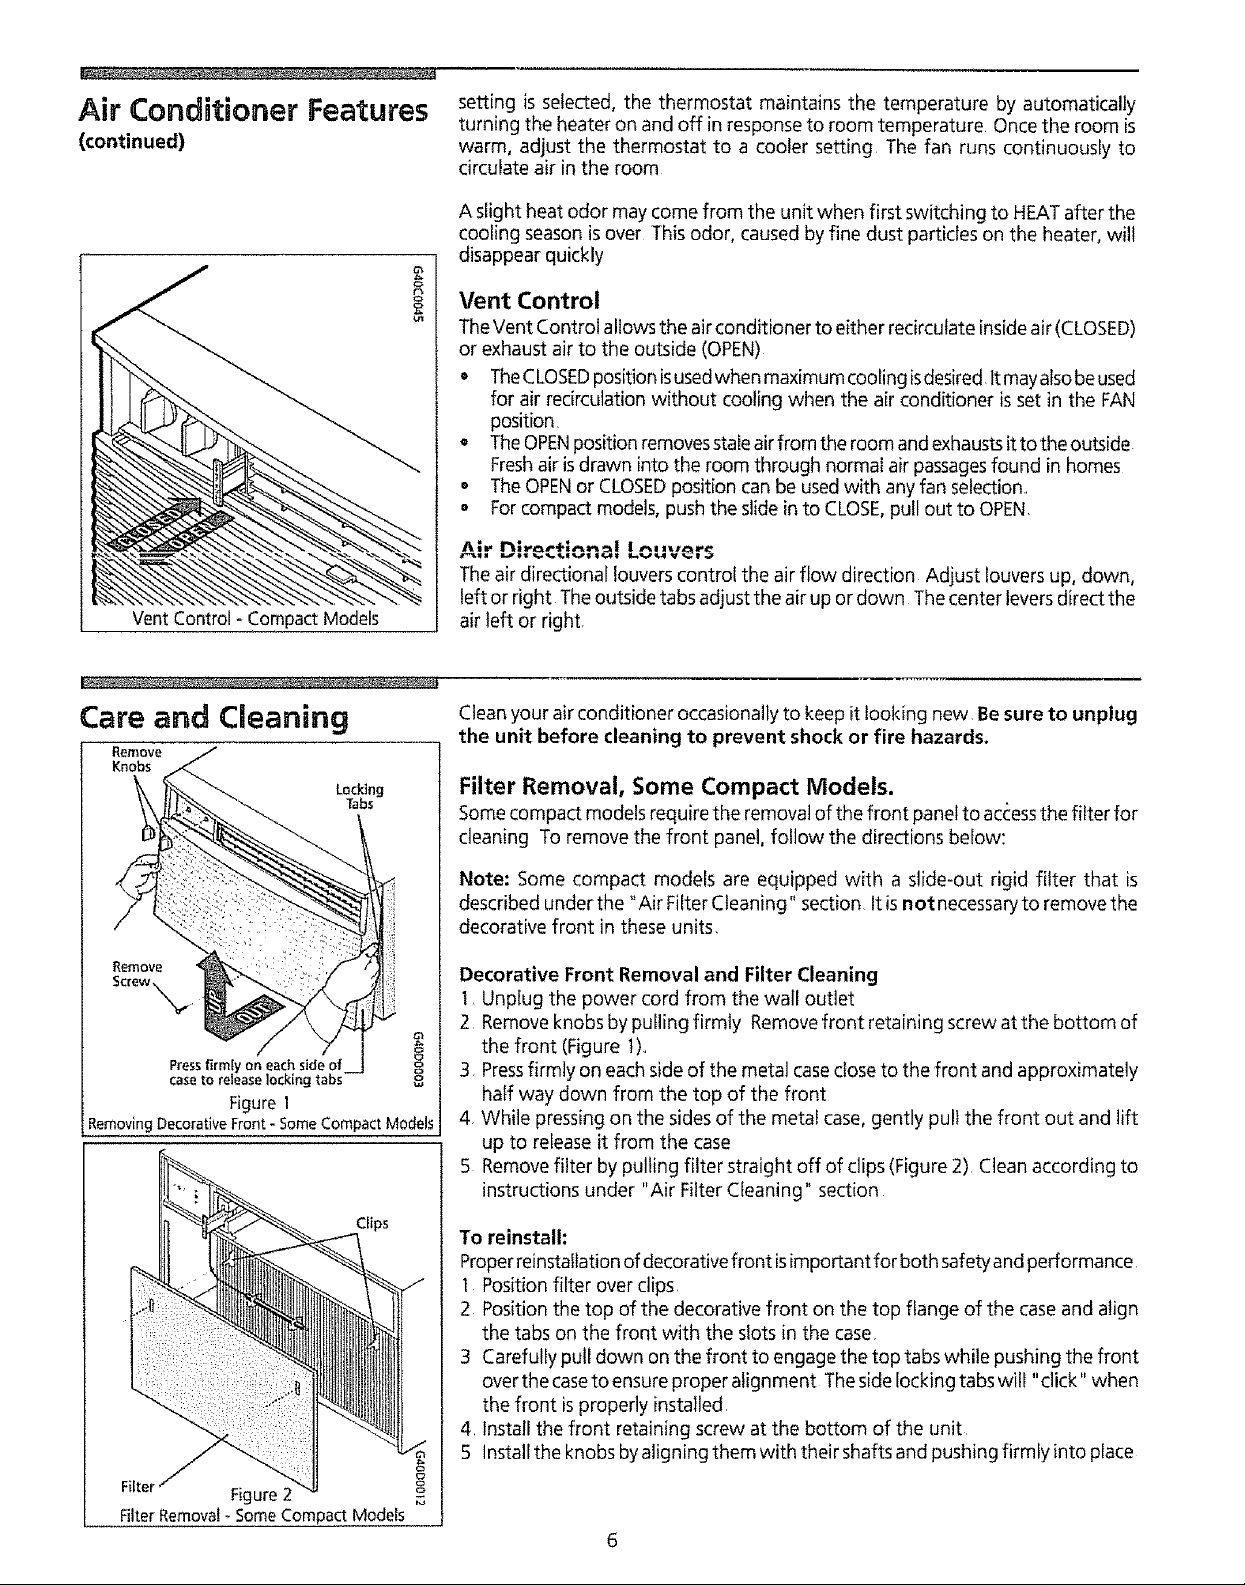
Filter Removal, Some Compact Models.
Somecompact models require the removal of the front panel to accessthe filter for
cleaning To remove the front panel, follow the directions below:
Note: Some compact models are equipped with a slide-out rigid filter that is
described under the "Air Filter Cleaning" section Itis not necessaryto remove the
decorative front in these units,
Decorative Front Removal and Filter Cleaning
1, Unplug the power cord from the wall outlet
2 Removeknobs by pulling firmly Removefront retaining screw at the bottom of
the front (Figure t).,
3 Pressfirmly on each sideof the metal caseclose to the front and approximately
half way down from the top of the front
4, While pressing on the sidesof the metal case, gently puli the front out and lift
up to release it from the case
5 Remove filter by pulling filter straight off of clips (Figure 2) Clean according to
instructions under "Air Filter Cleaning" section
To reinstall:
Properreinstallation of decorative front isimportant for both safety and performance
I Position filter over clips
2 Position the top of the decorative front on the top flange of the case and align
the tabs on the front with the slots in the case
3 Carefully pull down on the front to engage the top tabs while pushing the front
overthe caseto ensure proper align ment The side locking tabswill "click" when
the front isproperly installed,
4, Install the front retaining screw at the bottom of the unit
5 Install the knobs byaligning them with their shaftsand pushing firmfy into place
Figure2
Filter Removal - Some Compact Models
6
 Loading...