

Kenmore 2539668422 Owner’s Manual

Important Safety Instructions .................................. 2
First Steps .................................................... 3
Energy Saving Ideas ............................... 4
Setting the Controls ............................... 4
Fresh Food Storage ...................................................... 5
Care and Cleaning ............................................. 6-7
Automatic Ice Maker (some models) .............................. 7
Reversible Door Instructions ............................................ 8-10
Avoid Service Checklist ............................... 10-11
Normal Operating Sounds .............................................. 11
Refrigerators
Model and Serial
Number Plate
Sears Service ................................................................... 12
Refrigerator Warranty ............................................................... 12
Sears Service in Canada .......................................... t3
Warranty in Canada ........................................... 14
Read and Save These nstructions
z/
Record Your Model and Serial Numbers
Record inthe space provided below the model and serial numbers found on
the serialplate ]ocated on the top left wall of the refrigerator compartment
Model Number:
Serial Number:
Purchase Date:
P/N 218697300 (95!
Important Safety
nstructions
This Owner's Guide contains general
operating instructions for your
refrigerator andfeatures information for
several models Your refrigerator may
not have all the described features
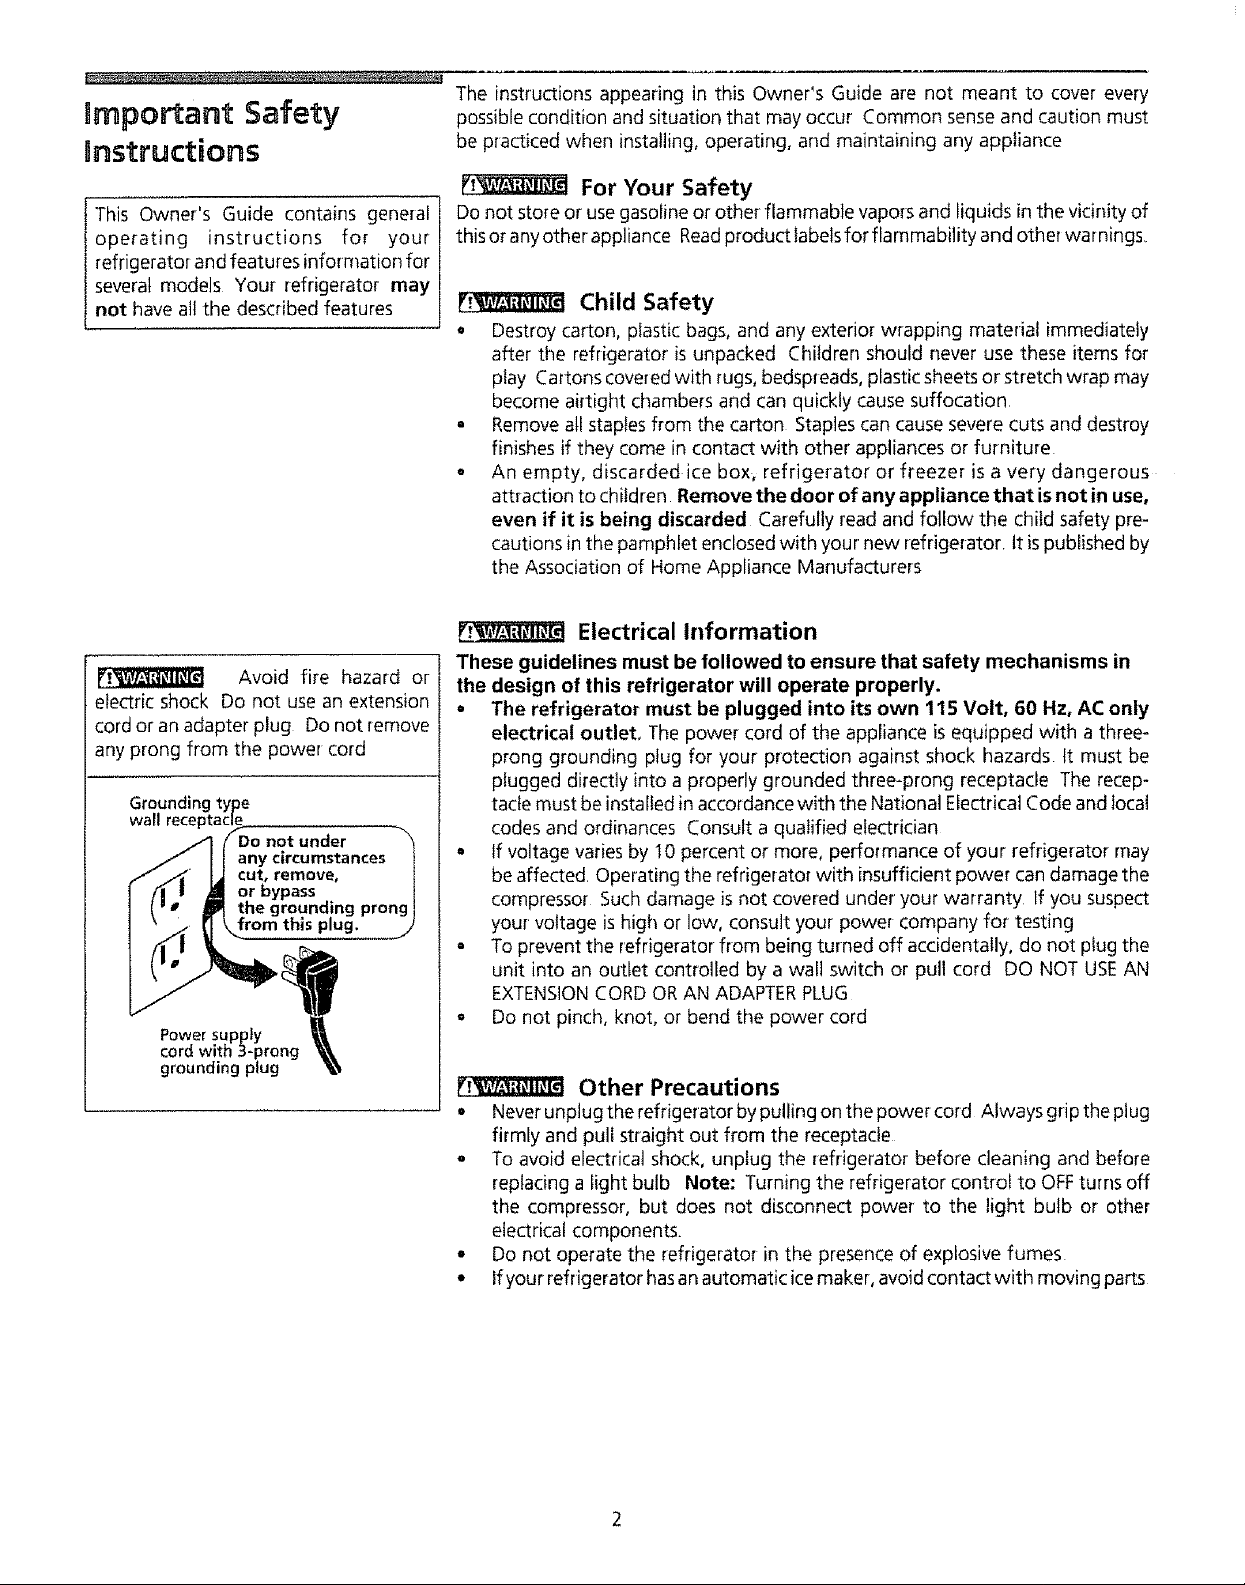
Avoid fire hazard or
electric shock Do not use an extension
cord or an adapter plug Do not remove
any prong from the power cord
Grounding type
wall receptacle_
J I I any circumstances |
/ J_ IJ cut, remove, I
I /N I _ or bypass |
I ( _a _1_ the grounding prong I
Power supply
cord with 3-prong _,_t,
grounding plug '_.'S
fDo not under "_
from this p!ug" J
The instructions appearing in this Owner's Guide are not meant to cover every
possible condition and situation that may occur Common senseand caution must
be practiced when installing, operating, and maintaining any appliance
For Your Safety
Do not store or usegasoline or other flammable vapors and liquids in the vicinity of
this orany other appliance Readproduct labelsfor flammability and other war nings
Child Safety
o Destroy carton, plastic bags, and any exterior wrapping materia! immediately
after the refrigerator is unpacked Children should never use these items for
play Cartons covered with rugs, bedspreads, plastic sheets or stretch wrap may
become airtight chambers and can quickly cause suffocation
- Remove all staples from the carton Staples can cause severe cuts and destroy
finishes if they come in contact with other appliances or furniture
o An empty, discarded ice box, refrigerator or freezer is a very dangerous
attraction to chifdren Remove the door of any appliance that is not in use,
even if it is being discarded Carefully read and follow the child safety pre-
cautions in the pamphlet enclosed with your new refrigerator. It ispublished by
the Association of Home Appliance Manufacturers
Electrical Information
These guidelines must be followed to ensure that safety mechanisms in
the design of this refrigerator will operate properly.
• The refrigerator must be plugged into its own 115 Volt, 60 Hz, AC only
electrical outlet. The power cord of the appliance is equipped with a three-
prong grounding plug for your protection against shock hazards. It must be
plugged directly into a properly grounded three-prong receptacle The recep-
tacle must be installed inaccordance with the National Electrical Code and local
codes and ordinances Consult a qualified electrician
• If voltage varies by 10 percent or more, performance of your refrigerator may
be affected Operating the refrigerator with insufficient power can damage the
compressor Such damage is not covered under your warranty If you suspect
your voltage is high or low, consult your power company for testing
° To prevent the refrigerator from being turned off accidentally, do not plug the
unit into an outlet controlled by a walt switch or pull cord DO NOT USEAN
EXTENSIONCORD OR AN ADAPTERPLUG
= Do not pinch, knot, or bend the power cord
Other Precautions
° Neverunplug the refrigerator by pulling on the power cord Always grip the plug
firmly and pull straight out from the receptacle
= To avoid electrical shock, unplug the refrigerator before cleaning and before
replacing a light bulb Note: Turning the refrigerator control to OFFturns off
the compressor, but does not disconnect power to the light bulb or other
electrical components.
° Do not operate the refrigerator in the presence of explosive fumes
• Ifyour refrigerator hasan automatic icemaker, avoid contact with moving parts
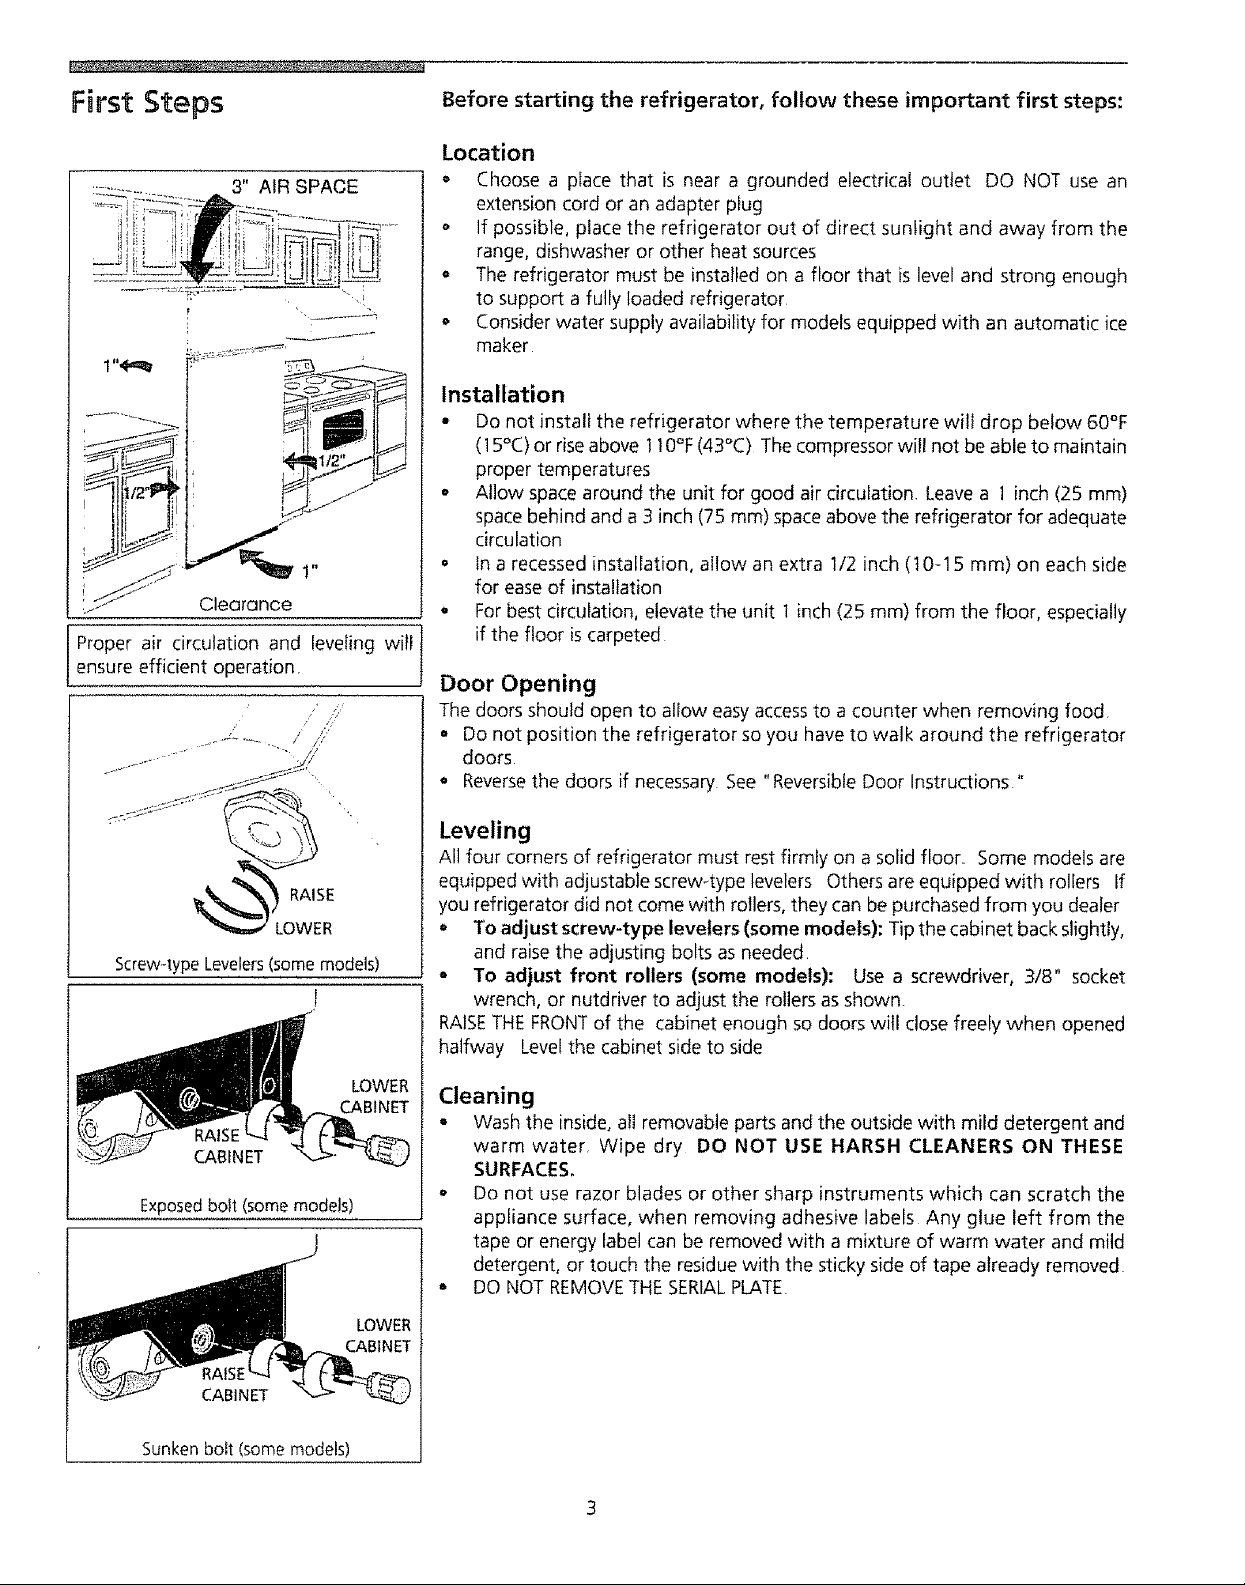
First Steps
3"_IR SPACE
Ii!_!
=-Jl iiL._'J
Clearance
Proper air circulation and leveling will
ensure efficient operation.
" / //
......... y.y
Before starting the refrigerator, follow these important first steps:
Location
o Choose a piace that is near a grounded electrical outlet DO NOT use an
extension cord or an adapter ptug
o If possible, place the refrigerator out of direct sunlight and away from the
range, dishwasher or other heat sources
o The refrigerator must be installed on a floor that is level and strong enough
to support a fully loaded refrigerator
• Consider water supply availability for models equipped with an automatic ice
maker
Installation
• Do not instalt the refrigerator where the temperature wili drop below 60°F
(15°C) or riseabove t ! 0°F (43°C) The compressor will not beable to maintain
proper temperatures
. Allow space around the unit for good air circulation Leave a 1 inch (25 mm)
space behind and a 3 inch (75 ram) space above the refrigerator for adequate
circulation
• tn a recessed installation, allow an extra 1/2 inch (t0-15 ram) on each side
for easeof installation
. For best circulation, elevate the unit 1 inch (25 mm) from the floor, especially
if the floor iscarpeted
Door Opening
The doors should open to allow easy accessto a counter when removing food
• Do not position the refrigerator so you have to walk around the refrigerator
doors
o Reversethe doors if necessary See "Reversible Door Instructions"
LOWER
Screw-typeLevelers(somemodels)
I
i
LOWER
CABINET
CABINET
Exposed bolt (some models)
LOWER
CABINET
CABINET
Leveling
All four corners of refrigerator must rest firmly on a solid floor, Some models are
equipped with adjustable screw_type levelers Others are equipped with rollers If
you refrigerator did not come with rollers, they can be purchased from you dealer
• To adjust screw-type levelers (some models): Tipthe cabinet back slightly,
and raise the adjusting bolts as needed
• To adjust front rollers (some models): Use a screwdriver, 3/8" socket
wrench, or nutdriver to adjust the rollers as shown.
RAISETHE FRONTof the cabinet enough so doors will close freely when opened
halfway Levelthe cabinet side to side
Cleaning
• Wash the inside, oil removable parts and the outside with mild detergent and
warm water Wipe dry DO NOT USE HARSH CLEANERS ON THESE
SURFACES.
. Do not use razor blades or other sharp instruments which can scratch the
appliance surface, when removing adhesive labels Any glue left from the
tape or energy label can be removed with a mixture of warm water and mild
detergent, or touch the residue with the sticky side of tape already removed
o DO NOT REMOVETHE SERIALPLATE
Sunken bolt (some models)

Energy Saving ndeas
o Locate the refrigerator in the coolest part of the room, out of direct sunlight and
away from heating ducts or registers Do not place the refrigerator next to heat-
producing appliances such asarange, oven or dishwasher If this isnot possible,
a section of cabinetry or an added layer of insulation between the two appliances
wil! help the refrigerator operate more efficiently
• Level the refrigerator so the doors close tightly
• Refer to this Owner's Guide for the suggested refrigerator settings
o Periodic cleaning of the condenser will help the refrigerator run more efficiently
See Outside in the "Care and Cleaning" section
= Do not overcrowd the refrigerator or block cold air vents Doing so causes the
refrigerator to run longer and usemore energy Shelvesshould not be lined with
aluminum foil, wax paper or paper toweling Liners interfere with cold air
circulation, making the refrigerator less efficient, which could cause food
spoilage
, Cover foods and wipe containers dry before placing them in the refrigerator This
cuts down on moisture build-up inside the unit
• Organize the refrigerator to reduce door openings Remove as many items as
needed at one time and close the door as soon as possible
Setting the Controls
REFRIGJ_TOR
RefrigeratorControl
: : FREEZER :
TEMPERATURE: : ..... :
Freezer Control
Cool Down Period
To ensure safe food storage, allow the refrigerator to operate with the doors closed
for at least8 to 12 hours before loading with food
Refrigerator Control
• Setthe refrigerator control dial to the midpoint for a trial period of 24 hours
o After 24 hours, adjust the contro! as needed For colder temperatures, turn the
dial toward COLDEST. Forwarmer temperatures, turn the dial toward COLD.
Adjust temperatures one incrementat atime The temperature will increase
or decrease, but not necessarily by 1, 2, or 3 degrees,
Freezer Control
• Set the freezer control to the midpoint of the dial for a trial period of 24
hours
• After 24 hours, adjust the control as needed For colder temperatures, turn
the dial a notch toward COLDEST Forwarmer temperatures, turn the dial a
notch toward COLD Adjust temperatures one notch at a time
An adjustment made to one compartment may require an adjustment to the other:
o Turning the refrigerator control will change the temperature in BOTH
compartments If the refrigerator control is turned to OFF, cooling stops
in both compartments.
* Turning the freezer control will change only the temperature in the freezer
compartment
REDUCE EXTERIOR
MOISTURE
Energy Saver
SAVER
e¢o
ENERGY
To maintain temperatures, a fan circulates air in the refrigerator and freezer
compartments For good circulation, do not block cold air vents with food items
Energy Saver Switch (somemodels)
tf your refrigerator isequipped ,with an Energy Save[ Switch, keep it set on ENERGY
8
SAVERfor lowest energy usage During humid weather, or if moisture appears on
o
the cabinet between the doors, set the control to REDUCEEXTERIORMOISTURE A
c_
==
heater wilt warm the surface and allow the moisture to evaporate When humidity
lowers, or moisture disappears, return the switch to ENERGYSAVER
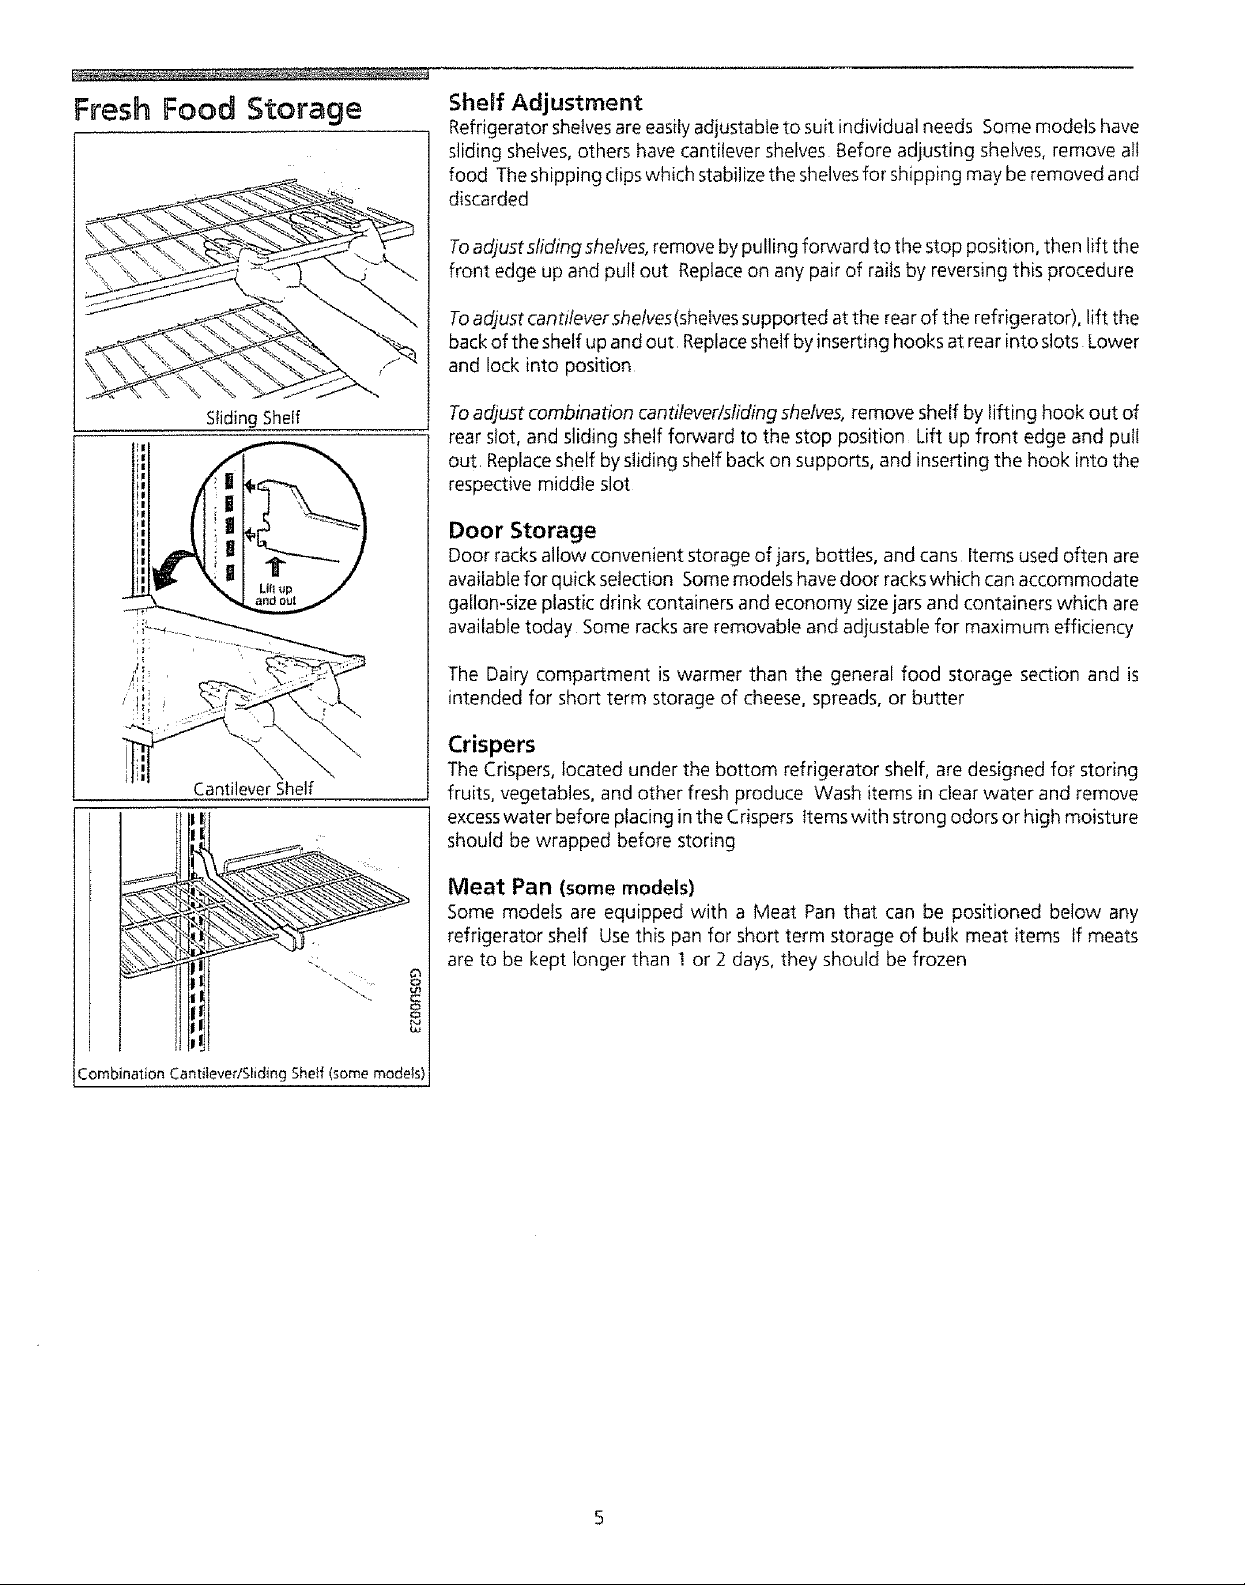
Fresh Food Storage
Shelf Adjustment
Refrigerator shelvesare easily adjustable to suit individual needs Some models have
sliding shelves, others have cantilever shelves Before adjusting shelves, remove all
food The shipping clipswhich stabilize the shelvesfor shipping may be removed and
discarded
Toadjuststiding shelves,remove bypulling forward to the stop position, then lift the
front edge up and pull out Replaceon any pair of rails by reversing this procedure
Toadjust cantitevershetves(shelves supported atthe rearof the refrigerator), lift the
back of the shelf up and out Replaceshelf by inserting hooks at rear into slots Lower
and lock into position
Sliding Shelf
Cantilever Shelf
Toadjust combination cantilever/sliding shelves, remove shelf by lifting hook out of
rear slot, and sliding shelf forward to the stop position Lift up front edge and pull
out_Replaceshelf bysliding shelf backon supports, and inserting the hook into the
respective middle slot
Door Storage
Door racksallow convenient storage of jars, bottles, and cans Items used often are
availablefor quick selection Some models havedoor rackswhich can accommodate
gallon-size plastic drink containers and economy sizejars and containers which are
available today Some racks are removable and adjustable for maximum efficiency
The Dairy compartment is warmer than the general food storage section and is
intended for short term storage of cheese, spreads, or butter
Crispers
The Crispers, located under the bottom refrigerator shelf, are designed for storing
fruits, vegetables, and other fresh produce Wash items in clear water and remove
excesswater before placing inthe Crispers Items with strong odors or high moisture
should be wrapped before storing
Meat Pan (some models)
Some models are equipped with a Meat Pan that can be positioned below any
refrigerator shelf Usethis pan for short term storage of bulk meat items tf meats
are to be kept longer than 1 or 2 days, they should be frozen
C_
o
o=
!I FJ
Combination Cantilever/Sliding Shelf (some models)
Care and Cleaning
Damp objects stick to cold
metal surfaces Do not touch refriger-
ated surfaces with wet or damp hands
To avoid damage and help
the refrigerator run as efficiently as
possible, clean the condenser
periodically
Keep your refligerator andfreezer clean to prevent odor build-up Wipe upanyspills
immediately and clean both sections at least twice a year Never use metallic
scouring pads, brushes, abrasivecleaners or strong alkaline solutions on anysurface
Do not wash any removable parts in a dishwasher
Always unplug the power' cord from the wall outlet before cleaning_Turning
the control to OFFdoes not disconnect power to the controls, light bulb, or other
electrical components
Inside
Wash inside surfaces of the refrigerator and freezer with a solution of 2 tablespoons
baking soda in I quart warm water Rinseand dry thoroughly Be sure to wring
excess water out of sponge or cloth before cleaning around the controls,
light bulb, ot any electrical parts.
Wash removable parts such as shelvesand drawers with baking soda solution or mild
detergent and warm water DO NOT USE HARSH CLEANERS ON THESE SUR-
FACES.Rinseand dry thoroughly Clean the door gaskets with mitd suds, rinse with
clear water and wipe dry Do not use razor blades or other sharp instruments which
can scratch the appliance surface when removing adhesive labels Any glue left from
the tape o_energy label can be removed with a mixture of warm water and mild
detergent, or, touch the residue with the sticky side of tape already removed DO
NOT REMOVE THE SERIAL PLATE
Outside
Wash the cabinet and handleswith warm water and mild liquid detergent Rinsewell
and wipe dry with a clean soft cloth
When moving the refrigerator, pull straight out Do not shift the refrigerator from
side to side as this may tear or gouge the floor covering, If the refrigerator has an
automatic ice maker, be careful not to move the refrigerator beyond plumbing
connections
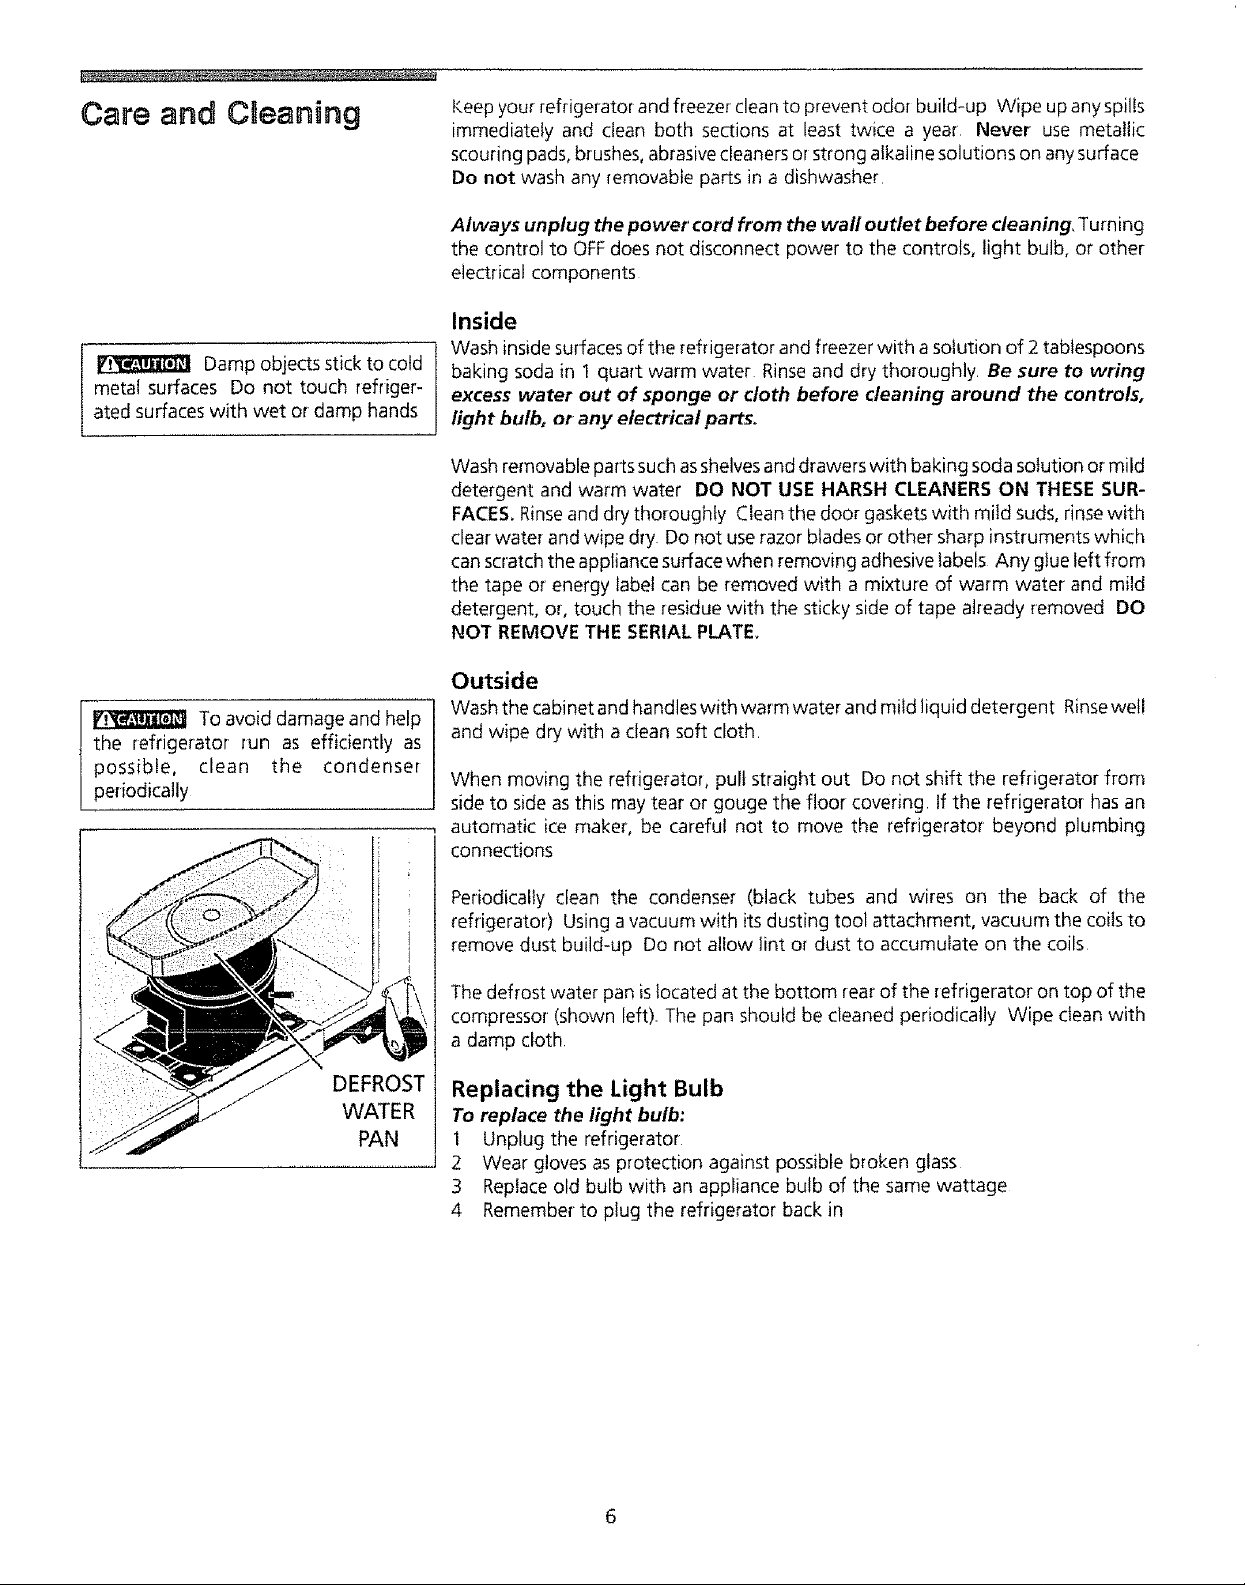
DEFROST
WATER
PAN
Periodically clean the condenser (black tubes and wires on the back of the
refrigerator) Using a vacuum with its dusting tool attachment, vacuum the coilsto
remove dust build-up Do not allow lint or dust to accumulate on the coils
The defrost water pan islocated at the bottom rear of the refrigerator on top of the
compressor (shown left), The pan should be cleaned periodically Wipe clean with
a damp cloth
Replacing the Light Bulb
To replace the light bulb:
1 Unplug the refrigerator
2 Wear gloves as protection against possible broken glass
3 Replace old bulb with an appliance bulb of the same wattage
4 Remember to plug the refrigerator back in
Care and Cleaning
(continued)
Vacation and Moving Tips
Short vacations: Leavethe refrigerator operating during vacations of I to 3weeks
Use up all perishable items from the refrigerator section Wrap and store other
items in the freezer If the unit hasan automatic ice maker, turn off the ice maker
Long vacations: Removeall food and ice if you will begone t month or more Turn
the control to OFFand disconnect the power If the unit has an automatic ice
maker, turn off the ice maker and turn the water supply valve to the closed
position Defrost and clean the interior thoroughly Leave both doors open to
prevent odor and mold buildup Block open if necessary
Moving: When moving the refrigerator, follow these guidelines to prevent
damage:
• Remove all food and other items from both the refrigerator and freezer
compartments Empty the ice storage bin Defrost and clean the
interior thoroughly
If a hand truck isused in moving, toad the refrigerator from the side
o Turn front rollersas far up aspossible (some models) This will protect them
during sliding or moving
• The cabinet should be well padded and handled with care DO NOT
DROP.
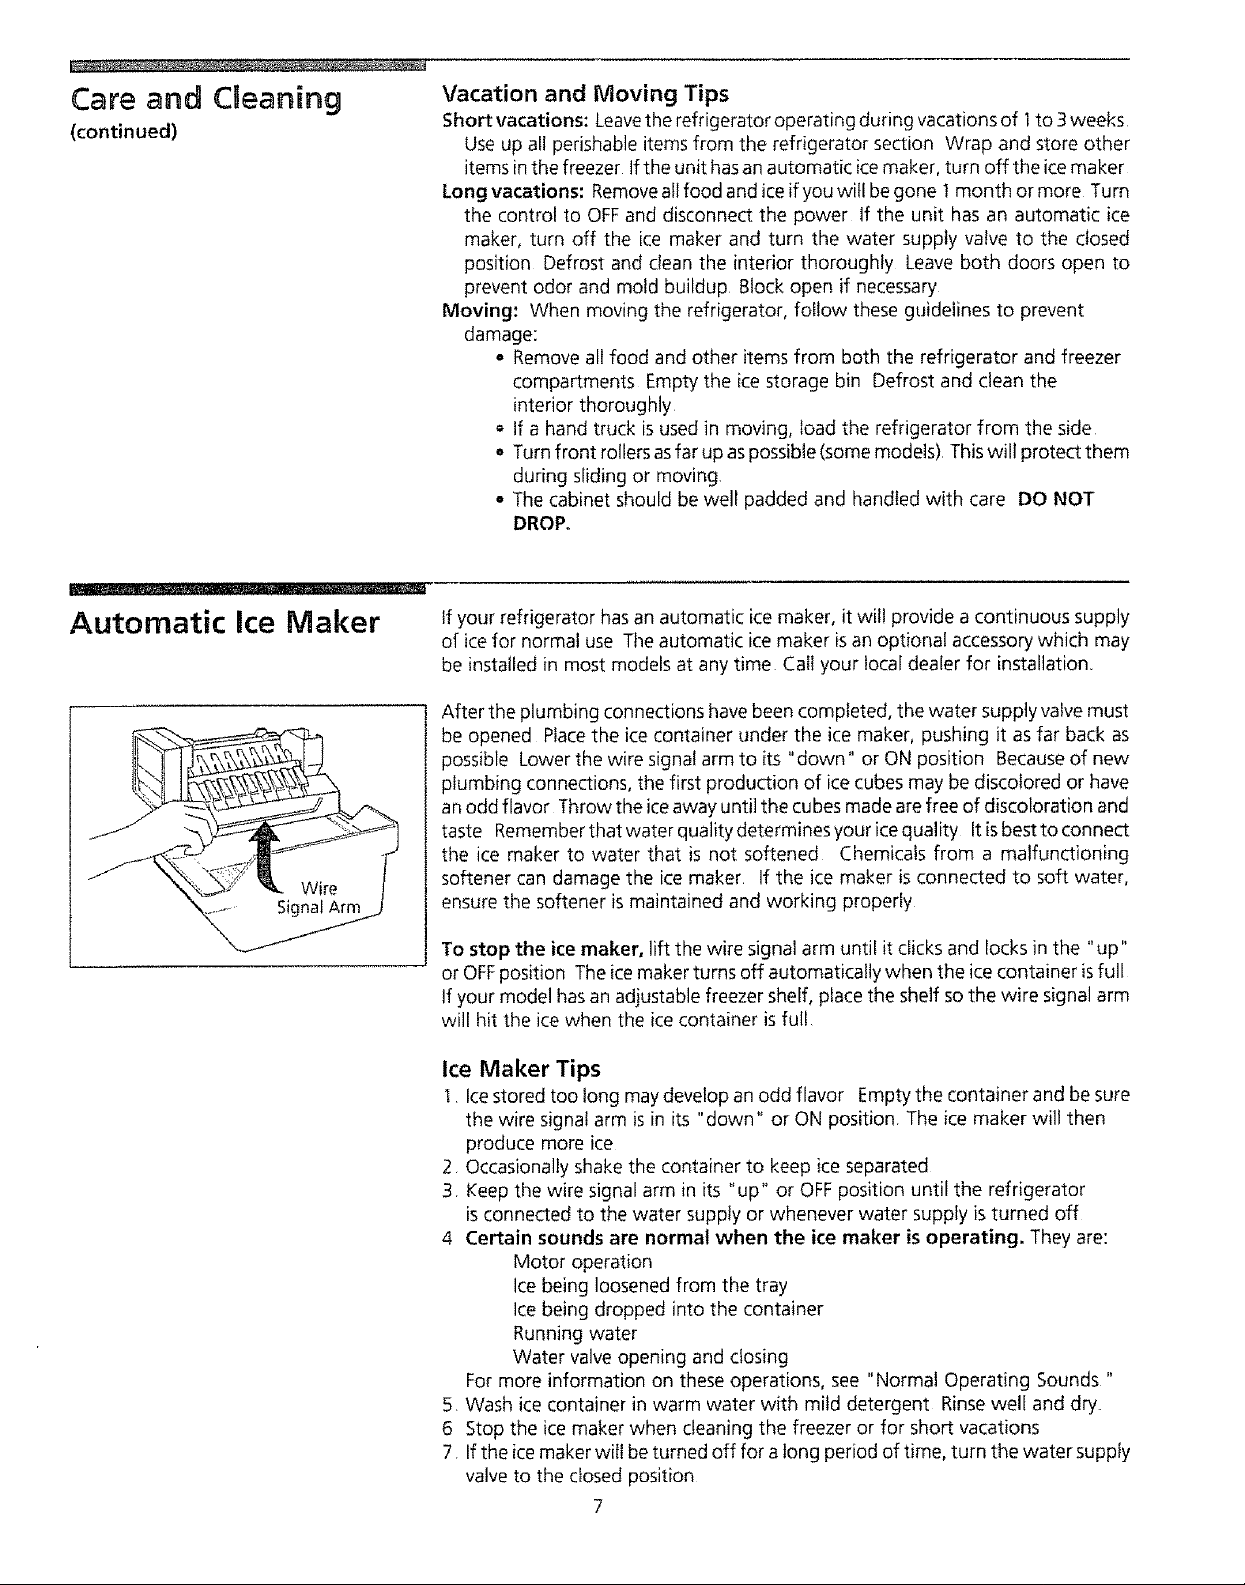
Automatic Ice Maker
If your refrigerator has an automatic ice maker, it will provide a continuous supply
of icefor normal use Tile automatic ice maker is an optional accessory which may
be installed in most models at any time Call your local dealer for installation,
After the plumbing connections havebeen completed, the water supply valve must
be opened Place the ice container under the ice maker, pushing it asfar back as
possible Lower the wire signal arm to its "down" or ON position Becauseof new
plumbing connections, the first production of ice cubes may be discolored or have
an odd flavor Throw the iceaway until the cubes made are free of discoloration and
taste Rememberthatwaterqualitydeterminesyouricequality Itisbesttoconnect
the ice maker to water that is not softened Chemicals from a malfunctioning
softener can damage the ice maker If the ice maker is connected to soft water,
ensure the softener is maintained and working properly
To stop the ice maker, lift the wire signal arm until it clicks and Iocks in the "up"
or OFFposition The icemaker turns off automatically when the ice container isfull
If your model hasan adjustable freezer shelf, place the shelf sothe wire signal arm
will hit the ice when the ice container is ful!
Ice Maker Tips
! Icestored too long may develop an odd flavor Empty the container and be sure
the wire signaJarm isin its "down" or ON position The ice maker will then
produce more ice
2 Occasionally shake the container to keep ice separated
3 Keep the wire signal arm in its "up" or OFF position until the refrigerator
isconnected to the water supply or whenever water supply isturned off
4 Certain sounds are normal when the ice maker isoperating, They are:
Motor operation
Ice being loosened from the tray
Ice being dropped into the container
Running water
Water valve opening and closing
For more information on these operations, see "Normal Operating Sounds"
5 Wash icecontainer in warm water with mild detergent Rinse well and dry
6 Stop the ice maker when cleaning the freezer or for short vacations
7 If the icemaker wiIl be turned off for a tong period of time, turn the water supply
valve to the closed position
7
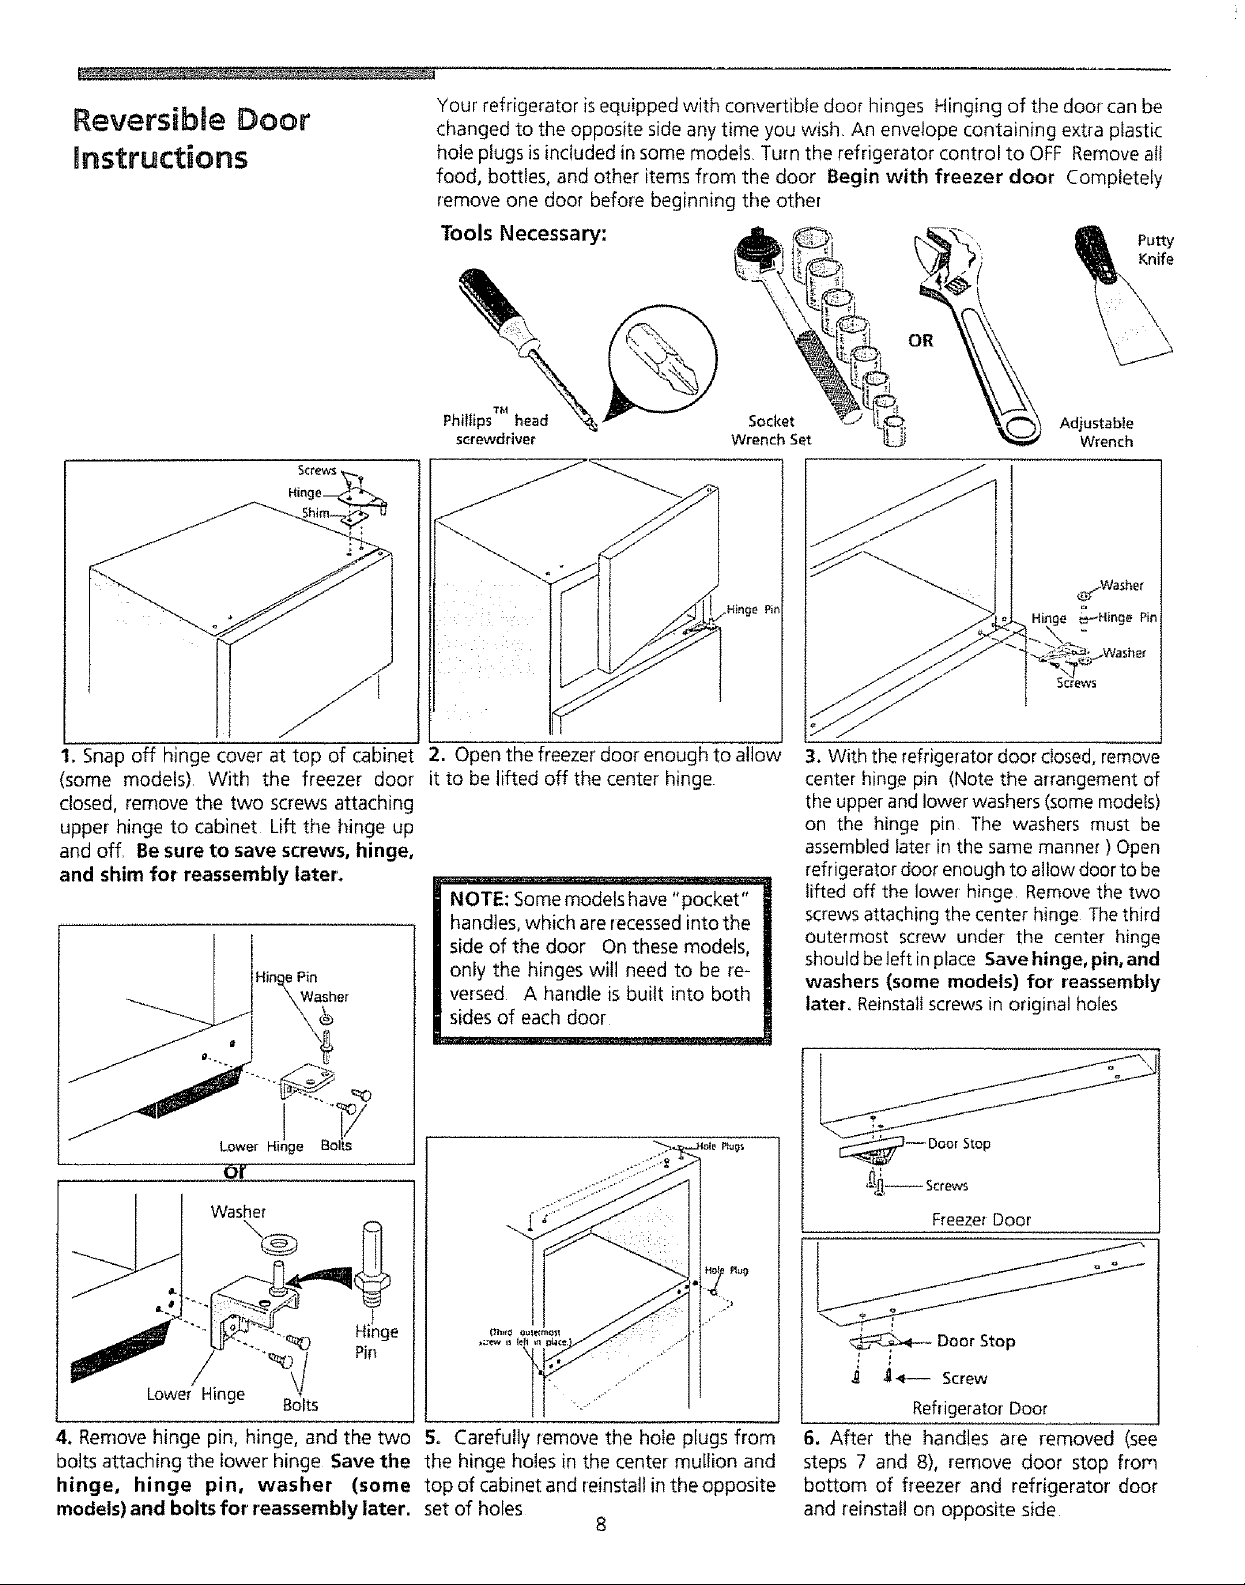
Reversible Door
nstructions
Your refrigerator is equipped with convertible door hinges Hinging of the door can be
changed to the opposite side any time you wish An enve!ope containing extra plastic
hole plugs is included in some models, Turn the refrigerator control to OFF Remove all
food, bottles, and other items from the door Begin with freezer door Completely
remove one door before beginning the other
Putty
Tools Necessary:
Phillips he_ad_ _ Socket
screwdriver Wrench Set
,Hinge Pin
J
1. Snap off hinge cover at top of cabinet 2. Openthe freezer door enough to altow
(some models) With the freezer door
closed, remove the two screws attaching
upper hinge to cabinet Lift the hinge up
and off, Be sure to save screws, hinge,
and shim for reassernbly later.
Hinge Pin
it to be lifted off the center hinge
NOTE: Some models have "pocket"
handles, which are recessedinto the
side of the door On these models,
only the hinges will need to be re-
versed A handle is built into both
sides of each door
Adjustable
Wrench
e._Washer
. Hi_.e _Hinge Pin
Screws
3. With the refrigerator door closed, remove
center hing.e pin (Note the arrangement of
the upper and lower washers (some models)
on the hinge pin The washers must be
assembled later in the same manner ) Open
refrigerator door enough to allow door to be
lifted off the lower hinge Remove the two
screws attaching the center hinge The third
outermost screw under the center hinge
should be left in place Save hinge, pin, and
washers (some models) for reassembly
latet. Reinstall screws in original holes
or
\®
Washer
Lower Hinge Bolts
4. Remove hinge pin, hinge, and the two
bolts attaching the lower hinge Save the
hinge, hinge pin, washer (some
models) and bolts for reassembly hater.
Hi_nge
Pin
5, Carefully remove the hole plugs from
the hinge holes in the center mullion and
top of cabinet and reinstall in the opposite
set of holes
8
,_-- Screws
Freezer Door
Door Stop
_ _-- Screw
RefrigeratorDoor
6. After the handles are removed (see
steps 7 and 8), remove door stop from
bottom of freezer and refrigerator door
and reinsta!] on opposite side
Reversible Door
OnstructJons (continued)
Freezer Door
Omvelall
"_ t _" -_, "_, Magnetic
5gfSW$
7o (When needed, please refer to your literature
pack). Reverse handles while doors are off Removethe
two screws attaching the handle to the bottom of the
freezer door Swing bottom of handle away from the
door and slide handle straight up and off of dovetail
button Remove screw and dovetail button and install
on other side using the same holes as the nameplate To
move nameplate to other side, remove the nameplate
from its frame, turn frame upside down and install in
old handle holes Insert nameplate into frame Reverse
instructions for reattaching handle Start with handle
offset away from the door Place top of handle over
dovetail button, swing handle into an upright position
and push upward, locking it into place Secure bottom
of handte with screws
Loc_ Handlo Over
a_velail _utton
".... J Nomop,are
B,.(When needed, please refer
to your literature pack)° To
remove handle:Removethe two
screws attaching the handle to
the top of the refrigerator door
Swing the top of handle away
from the door an slide handle
down and off of dovetaii button
Removescrewand dovetail button
and instati on other side, moving
hole plugs from corresponding
hatesto the opposite side Reverse
Adhesive
instructions for reattaching
handte Start with the handle
offset away from the door Place
bottom of handle over dovetail
button, sing handle into anupright
position and push downward,
locking it into place Secure top
of handle with screws
T_im I_ock
Trim Removal (Full-Length Trim
models only):
In some models, the refrigerator door hasa full len_ piece which
continues from the bottom of the handle to the bottom of "thedoor The
top of the trim fits into the baseof the handle An adhesive "trim lock" is
positioned about half-way down The bottom of the trim isheld inplaceby
either an adhesive trim _ock,or a trim lock with two prongs inserted into a
hole on the faceof the door Removethe trim by gently pulling the trim lock
areasout and away from the door When the trim is free from the door,
gently pull the trim down and away from the baseof the handle
To reattach trim: Slide both trim locks out of trim insert the new adhesive
trim !ocks contained in your literature pack NOTE: Trim lock must be
removed and installed by sliding OVER the two donut shaped areas Install
trim to handle by sliding under base of handle Carefully align trim and press
down at trim lock locations Replace hole plug on opposite side Use
rubbing alcohol to remove any adhesive residue from old trim tack
tocation(s)
or
Baits
Lower Hinge
9. Using a putty knife, remove black plastic
plug (not shown) from front of base and
reinstall in the opposite set of lower hinge
holes Assemble lower hinge to cabinet
lnstall hinge pin in opposite hinge hole from
which it was removed Install the washer
(some models) on the lower hinge pin and
insert hinge bolts, but do not tighten
Hinges wilt have to remain loose against
cabinet to align door
H_le P)u!
Center Hinge
(upsidedawn)
l& Turn center hinge upside down and
secureto cabinet asshown, usingthe screws
which are in the new holes Install
refrigerator door on lower hinge pin Align
door with edge of cabinet Holdthe door on
front of cabinet
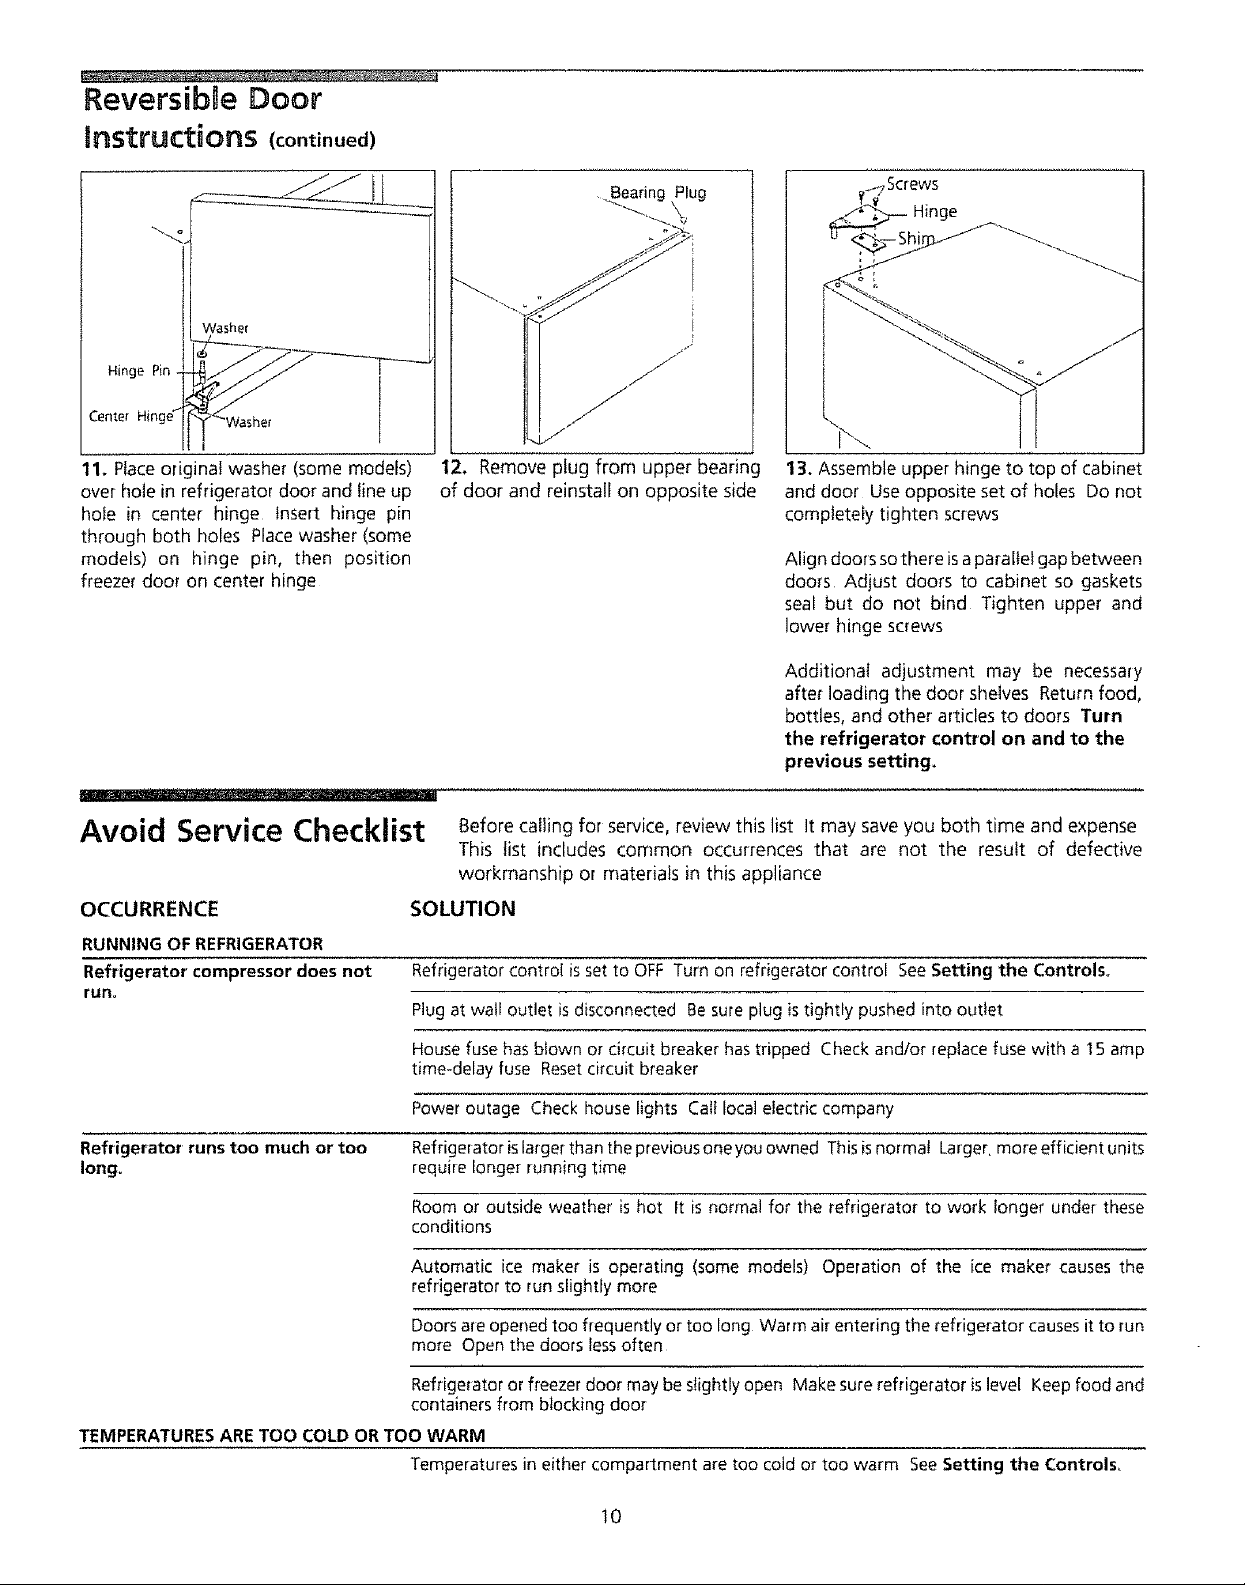
Reversible Door
instructions (continued)
li _
Washer
Hinge Pin i
Center Hinge" I
11. Ptace onginat washer (some models)
over hote in refrigerator door and line up
hole in center hinge Insert hinge pin
through both holes Place washer (some
models) on hinge pin, then position
freezer door on center hinge
_Washer
jr
12. Remove plug from upper bearinc
of door and reinstall on opposite side
13. Assemble upper hinge to top of cabinet
and door Use opposite set of holes Do not
completely tighten screws
Align doorssothere isaparallelgapbetween
doors Adjust doors to cabinet so gaskets
seal but do not bind Tighten upper and
lower hinge screws
Additional adjustment may be necessary
after loading the door shelves Return food,
bottles, and other articles to doors Turn
the refrigerator control on and to the
previous setting.
Avoid Service Checklist Before callingfor service, review this list It may save you both time and expense
This list includes common occurrences that are not the result of defective
workmanship or materials in this appliance
OCCURRENCE
RUNNING OF REFRIGERATOR
Refrigerator compressor does not
run°
Refrigerator runs too much or too
long.
TEMPERATURES ARE TOO COLD OR TOO WARM
SOLUTION
Refrigerator control is set to OFF Turn on refrigerator control See Setting the Controls°
Plug at wall outlet is disconnected Be sure plug is tightly pushed into outlet
House fuse has biown or circuit breaker has tripped Check and/or replace fuse with a t5 amp
time-delay fuse Reset circuit breaker
Power outage Check house lights Catt local electric company
Refrigeratorislarger thanthepreviousoneyouowned This is normat Larger. moreefficientunits
require longer running time
Room or outside weather is hot It is normal for the refrigerator to work longer under these
conditions
Automatic ice maker is operating (some models) Operation of the ice maker causes the
refrigerator to run slightly more
Doors are opened too frequently or too long Warm air entering the refrigerator causes it to run
more Open the doors less often
Refrigerator or freezer door may be stightly open Make sure refrigerator is level Keep food and
containers from blocking door
Temperatures in either compartment are too cold or too warm See Setting the Controls,
10
OCCURRENCE SOLUTION
AUTOMATIC ICE MAKER (some models)
ice maker is not making any ice° ice maker wire signal arm is in _'up' or OFFposition Move wire signal arm to "down" or ON
--T_ • epees FITTING
position
_ SCREEN Household water line valve is not open Turn on household water line valve
Water supplyvalve in refrigerator isbeing blocked by foreign material Unplug the refrigerator and
[urn off water supply. Slide refrigerator out and locate where water is connected to the valve.
_\ s_ w,_'f_eu_ --- Unscrew the brass fitting and pull out the screen from inside the valve mesh Clean the screen offoreign material Replacescreen and brass fitting and turn the water supply on; check for leaks
OUghTTO_SE_,_s_re, Plug in refrigerator and slide into place
WATER/MOISTURE/FROSTINSIDEREFRIGERATOR
Moisture collects on inside of Weather is hot and humid which increases rate of frost buildup and internal sweating This is
refrigerator walls, normal Besure doors are sealed tightly Open doors less often
Water collects under drawer cover or vegetablescontainandgiveoffmoisture Washedvegetablesandfruitsdrainwhiteinthedrawer
in bottom of drawer. This is norma! Pat rinsed vegetables dry with a towel before storing Clean and dry crispers as
necessar2
WATERIMOISTURE/FROSTOUTSIDEREFRIGERATOR ,
Moisture forms on outside of Door is slightly open, causing cold air from inside the refrigerator to meet warm air from outside
refrigerator or between doors.
This is normaf in humid weather When humidity is lower, the moisture should disappear Setthe
Energy Saver to the Reduce Exterior Moisture position
ODORS IN REFRIGERATORtFREEZER
interior needs to be cleaned Clean interior with a sponge, warm water, and baking soda
Food with strong odor is in refrigeratodfreezer Cover food tightty
Ice has picked up odor or flavor from strong food stored in refrigerator or freezer Cover foods
tightiy Discard stale ice
LIGHT BULB IS NOT ON
Light bulb is burned out See "Replacing the Light Bulb" in Care and Cleaning.
Light switch is stuck Light switch islocated on the ceiling of the refrigerator compartment near
the temperature control box Push in light switch to release
No electric current is reaching refrigerator SeeRUNNINGOFREFRIGERATORabove
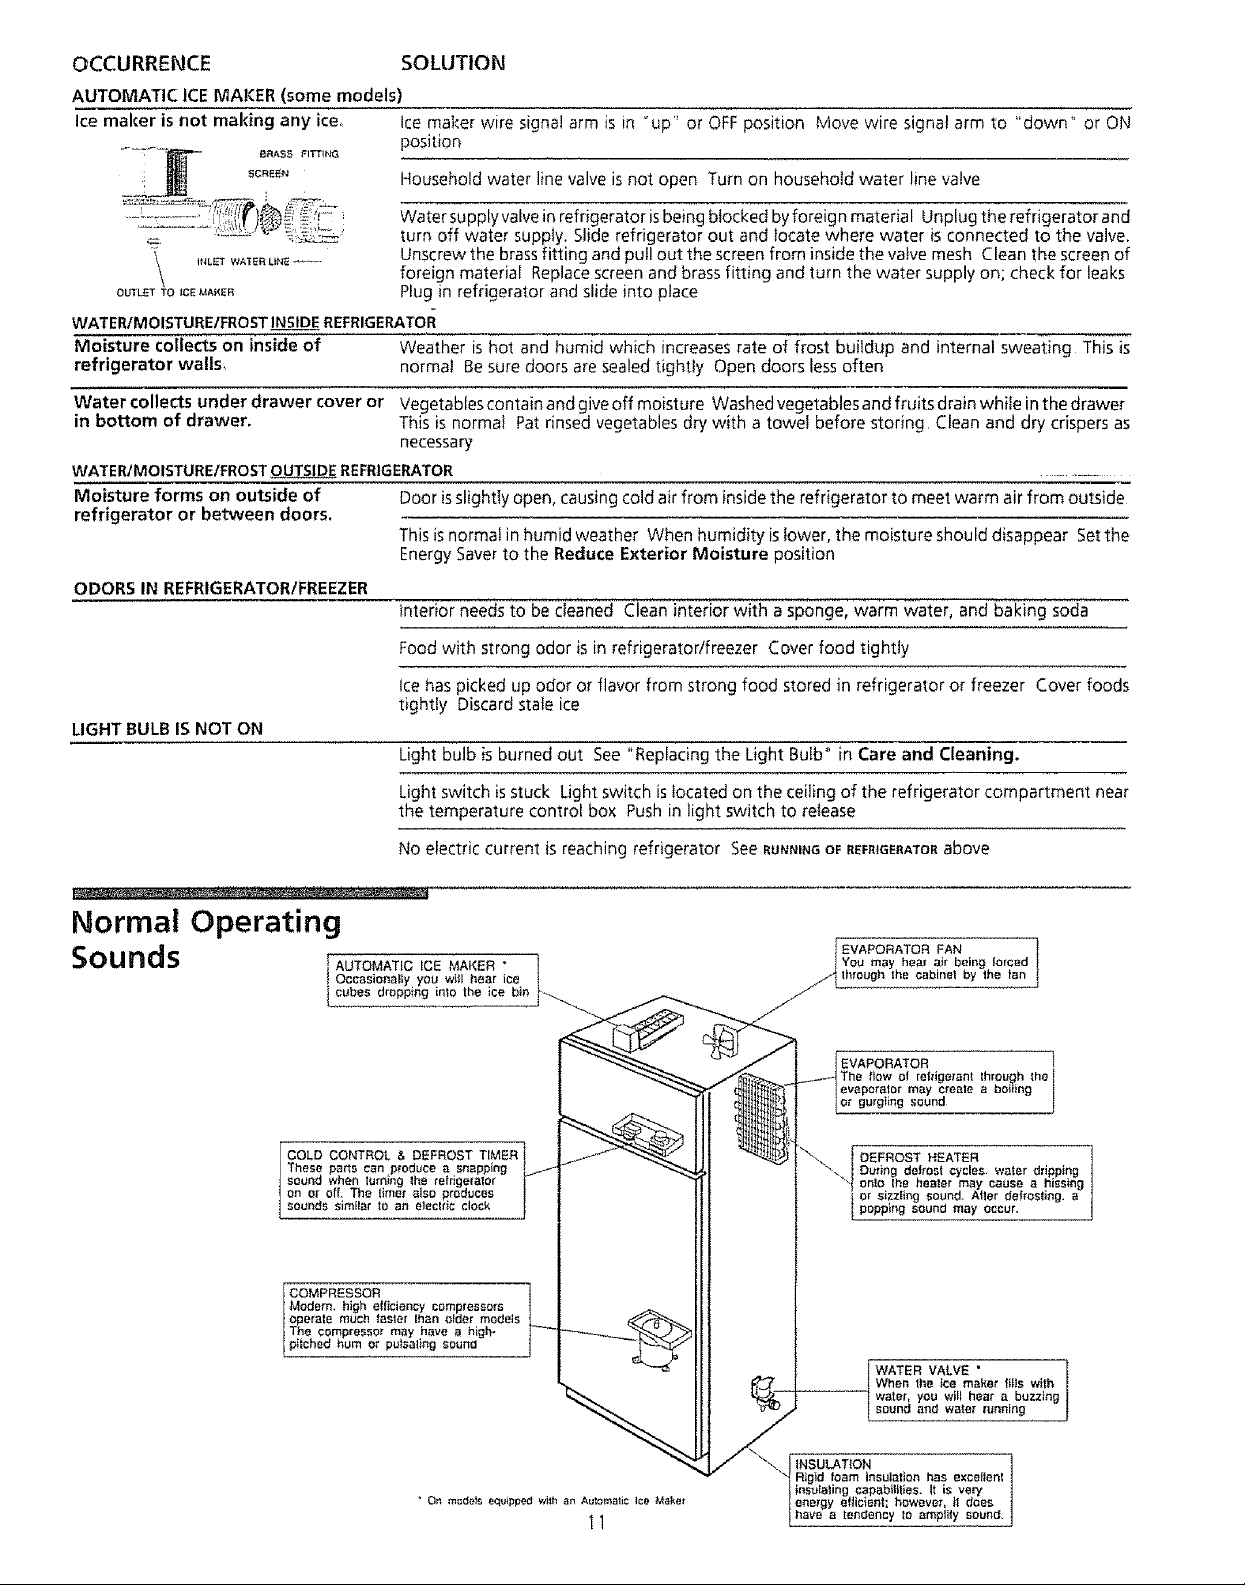
Normal Operating
Sounds TOMA ,C,CO 1
Occasionally you wHI hear ice
tcubes dropping into he ice bin J
COLD CONTROL & DEFROST TIMER
These ports con produce o snapping
sound when turnlng lhe refrigerator
on or off, The timer also produces
sounds similar to an elecIee clock
f, .,._tl EVAPORATOR FAN
YOU may hea_ ai_ being lotted
through the cabinet by the fan j
EVAPORATOR l
The flow of rofrigei'ant through the I
evaporator may create a boiling I
or gurg}ing sound
DEFROST HEATER
During defrost cycles, water dripping
onto Ihe healer may cause a hissing
or si;_z!I_ sound. AIler defrosting, apopping sound may occur.
COMPRESSOR
Modem. high efficiency compressors
operate much taster lhan o_der models
The compressor may hove o high-
pi chad hum or pu soling sound
[WATER VALVE '
--| water, you will hear a buzzing
INSULATION
| When the ice maker fistswith
[ sound and warm- ,running
foam insulatioo has excellent
It is vary
however, }t does
to amplily sound,
Sears Service
SEAl, S
"We ServiceWhat We Sell" is our assurance you can depend on Searsfor service
and Sears service is nationwide Your refrigerator has added value when you
consider that Sears has service units nationwide, staffed with professional
technicians specifically trained on Sears appliances and having parts, tools and
equipment to insure that we meet our pledge to you "We Service What We Sell _'
Sears Maintenance Agreement
Maintain the value of your Kenmore® refrigerator with a Sears Maintenance
Agreement Searsrefrigerators are designed, manufactured, and tested for yearsof
dependableoperation Yet, any modem appliance may require service from timeto
time
The Sears Maintenance Agreement
• Is your way to buy tomorrow's service at today's price
• Eliminates repair bills resulting from normal use
o Allows for as many service calls as required
• Provides for service by professional Sears-trained technicians
• Offers an annual preventive maintenance check-up at your request
This maintenance agreement does not cover original installation, reinstallation,or
damage resulting from external causessuch asacts of God, abuse, theft, fire, flood,
wind, lightning, freezing, power failure, power reduction, etc Please ask a
salesperson to see the agreement for all of the terms and conditions
Refrigerator Warranty
Full One-Year Warranty on Refrigerator
For one year from date of purchase, when this refrigerator is operated and
maintained according to the instructionsprovided in this Owner's Guide, Searswill
repair this refrigerator', free of charge, if defective in material or workmanship
Full Five-Year Warranty on Sealed Refrigeration System
For five years from the date of purchase, when this refrigerator is operated and
maintained according to the instructions provided in this Owner's Guide, Searswill
repair the sealed system (consisting of refrigerant, connecting tubing, and
compressor motor), free of charge, if defective in material or workmanship
The above warranty coverage applies only to refrigerators which are used for
storage of food for private household purposes
Warranty service is available by contacting the NEARESTSEARSSERVICE
CENTER/DEPARTMENTin the United States or call 1-800-4-REPAIR
For parts, call 1-800-FON-PART
This warranty gives you specific legal rights, and you may have other dghts which
vary from state to state
SEARS, ROEBUCK and CO.
3333 Beverly Road
Hoffman Estates, IL 60179
12
PRINTED IN U S A
Sears Service in
Dear Customer:
Canada
Inmanufacturing this product, many stepst_avebeen taken to provide you with the
highest quality Unfortunately, errors or omissions occasionaly occur In the event
you find a missing or defective part, please contact your nearest Sears store
If you have any suggestions that would help usto improve our assembly/operation
instructions or this product, please write them down, including the information
listed below and mail to: Sears Canada, Inc_ Attn: Buyer Depto 646
222 Jarvis Street
Toronto, Ontario
MSB 2B8
Purchased by:
NAME:
ADDRESS:
CITY:
POSTALCODE:
MODEL No :
DATE OF PURCHASE / /
COMMENTS:
PROV:
PHONE:
SERIALNo :
LOCATION OF PURCHASE:
I3
 Loading...