

Kenmore 2539305287, 2539305285 Owner’s Manual

t
Kenmo
,r ............. ...... 7 ........ ' .......... _"'"......... _......... ............. ................ ¸¸¸¸7""¸¸'"'¸ ...............:: .........
FOR FUTURE USE, PLEASE RECORD THE MODEL NUMBER, SERIAL NUMBER AND THE DATE
YOU PURCHASED YOUR KENMORE REFRIGERATOR IN THE SPACES PROVIDED BELOW:
_IODEL_
SERIAL NU[_BER
DATE PURCHASED,
MODEL AND SERIAL NUI_BERS
ARE LOCATED ON THE LEFT WALL
OF REFRIGERATOR SECTION,
START/ADJ UST CONTROLS
LOCATE
Your refrigerator must have air space_ A one inch space
is needed between the wall and the coils in the rear
of your refrigerator. At least three inches of open space
is needed directly above the refrigerator. Always allow
one half inch space on each side of refrigerator for
ease of installation and cleaning, if refrigerator is in-
stalled in a corner, additional space is needed to allow
doors to be opened.
Your refrigerator is designed to operate at a room
temperature of 600F or warmer When the room
temperature drops below 60OF the compressor will not
operate often or tong enough to maintain a freezer
storage temperature of 0OF to +5OE
ELECTRICAL GROUNDING
Your refrigerator must be grounded. Use 120 Volt,
60 Hz outlet. Do not use extension cord or adapter
plug. Use 3-prong plug with 3-prong grounded wall
outleL (Only this method complies with National Elec-
trical Code, local codes and ordinances.,)
Ground Plug
o
Power Supply Cord t ttl Type Wall Reoepticle
UNLESS THE ABOVE GROUNDING METHOD iS
FOLLOWED, YOU ARE NOT PROTECTED AGAINST
A SEVERE OR LETHAL SHOCK BNTHE EVENT OF
A SHORT CaROUIT OF AN ELECTRICAL COMPO-
NENT OR WtRRNG OF REFRIGERATOR.
3 Prong Grounding
iNSTALL
Raise
nd Lower
To adjust levelers (screw-type), tip the cabinet back
slightly and raise or lower the screws as needed.
To adjust rollers, open the refrigerator door Turn the
bolts with an adjustable wrench until the refrigerator is
level and stable. If your appliance did not come with
rollers, they can be purchased from your dealer. Rollers
make it easier to move the refrigerator when cleaning.
---',._2
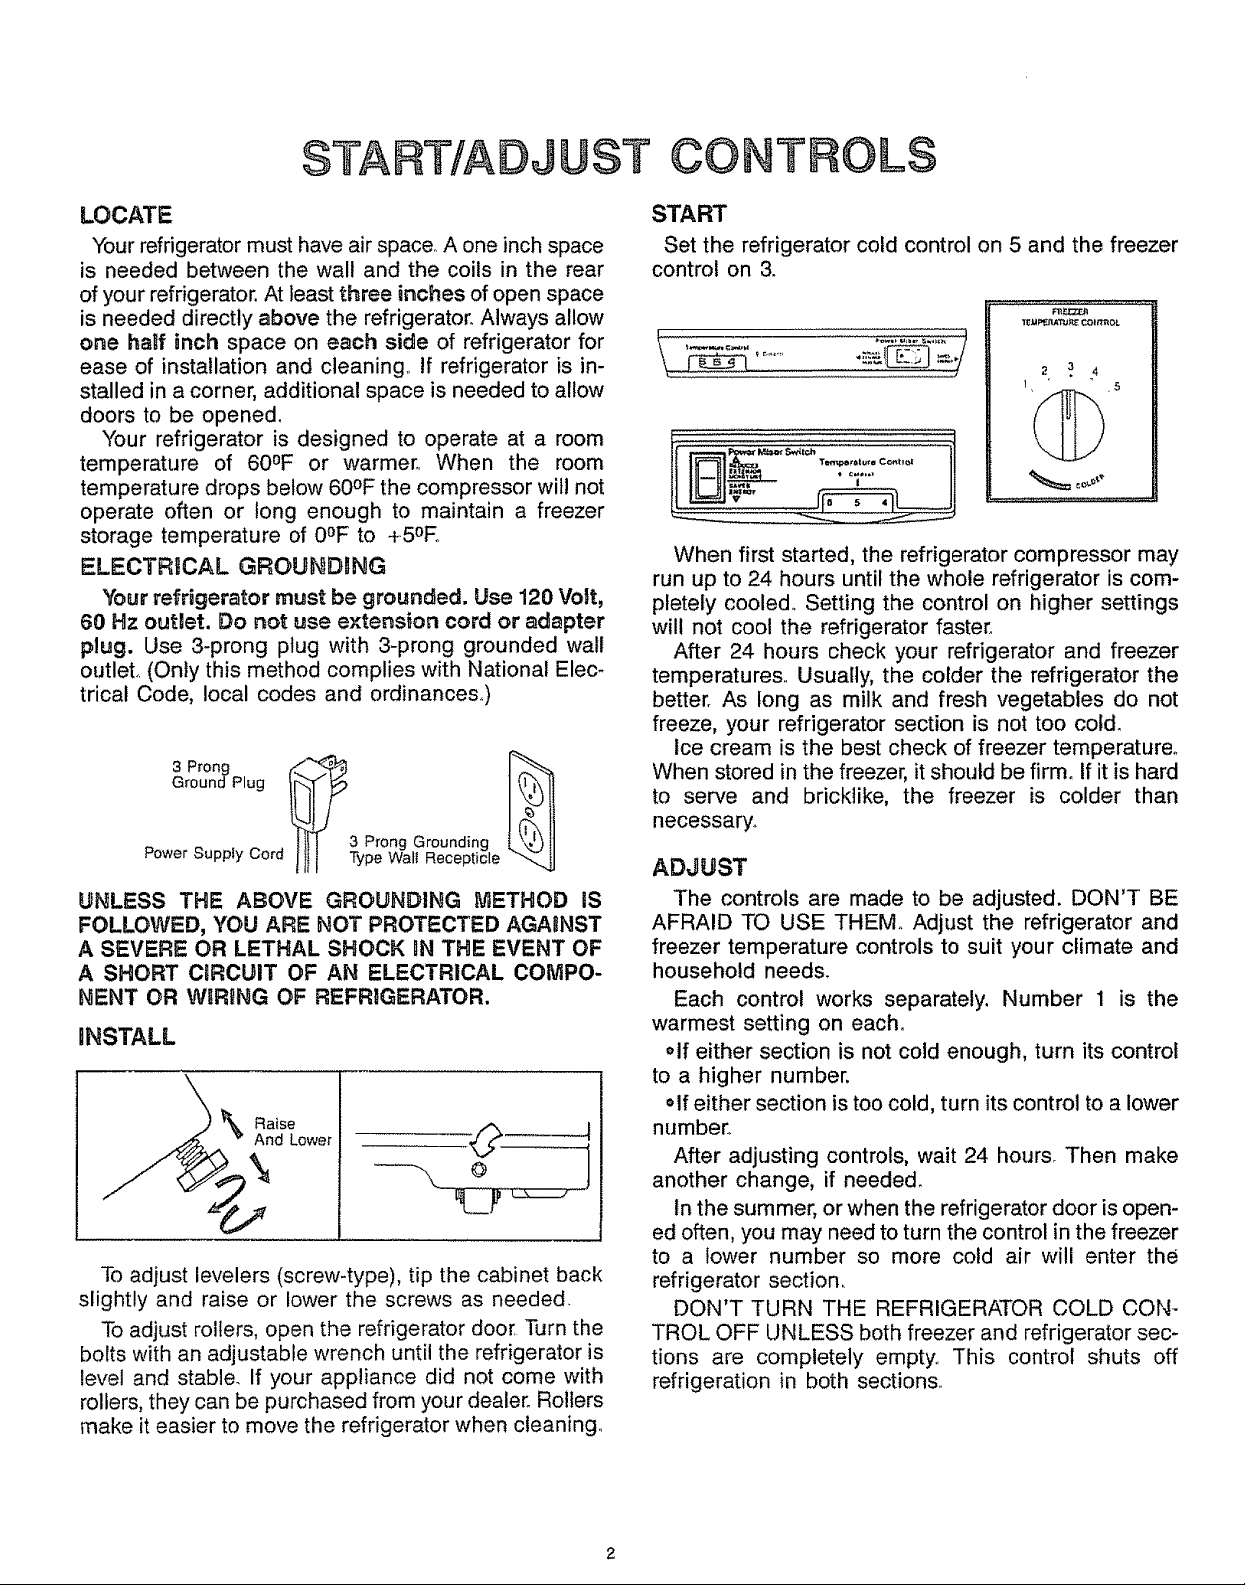
START
Set the refrigerator cold control on 5 and the freezer
control on 3.
'[I_MP_'_31K13/_COIt_OL
\ ./
When first started, the refrigerator compressor may
run up to 24 hours until the whole refrigerator is com-
pletely cooled° Setting the control on higher settings
wilt not cool the refrigerator faster.
After 24 hours check your refrigerator and freezer
temperatures.. Usually, the colder the refrigerator the
better. As long as milk and fresh vegetables do not
freeze, your refrigerator section is not too cold.
Ice cream is the best check of freezer temperature°
When stored in the freezer, it should be firm. If it is hard
to serve and bricktike, the freezer is colder than
necessary..
2 3 4
1 5
ADJUST
The controls are made to be adjusted. DON'T BE
AFRAID TO USE THEM° Adjust the refrigerator and
freezer temperature controls to suit your climate and
household needs.
Each control works separately. Number 1 is the
warmest setting on each.
,,If either section is not cold enough, turn its control
to a higher number.
olf either section is too cold, turn its control to a lower
number°
After adjusting controls, wait 24 hours, Then make
another change, if needed.
In the summer, or when the refrigerator door is open-
ed often, you may need to turn the control in the freezer
to a lower number so more cold air will enter the
refrigerator section.
DON'T TURN THE REFRIGERATOR COLD CON-
TROL OFF UNLESS both freezer and refrigerator sec-
tions are completely empty This control shuts off
refrigeration in both sections°
FOO STORAG
T! AND TIPS
Use these storage times as a guide. Actual storage
times vary since food quality always varies.
FOR THE REFRIGERATOR SECTION
Moving air is the best way to cool food_ but it can carry
odors and dry out food. If not wrapped, most food
becomes limp, stale and unappetizing, To protect food
from air, cover it or place it in a freezer container or bag
before refrigerating°
Wrap att food unless you're putting it in the storage
d rawers.
Bread= Refrigeration slows molding but bread still gets
stale with time, so use within three days.
Dairy products: Keep product carton close& Use milk,
cream or cottage cheese within 5 day& Wrap cheese
tightly with foil or plastic wrap, Hard cheese (cheddar,
etc.) will keep as long as a month. Soft cheeses will keep
up to two weeks, Store enough unwrapped butter for
table use in the butter compartment. Use in two days.
Wrapped butter keeps about two weeks.
Eggs: Store unwashed. Use within two weeks.
Fish: Clean. Wrap tightly.. Freeze, unless you use it the
same day you buy it.
Fruits: Wash, dry and store in crisper or humidrawer
compartment. Store fruits with strong aromas (apples,
melons) in plastic bags. Berries keep up to three days
if stored, unwashed, in a shaIlow, cove_ed bowl
ke1±_er8: Let cooi be_c.i'estodng W_ap ',:_fe',i..Use 7_,!thi_
two days (or freeze).
Meat: Wrap fresh meats bosely te_,d seal? W_p smok--
÷d meats tightly. Use foiI or pIastic w_ap.. Store in meat
drawer or on !ower shetf. For beat _÷s:...:l,_:_u_;,_ _'ithhq
times shown beto'w,:
R_FRfGBR_-.TOR STO RAC¢_. "f_I[,,_BS
i'fc ionge_ than
Bacon and other Smoked M,sats !4 days
Cold Cutso.(Date on Package). or3 days
Ground Meat ................. t-2 days
Liver and other Organ Meats ............. t-2 days
Steaks and Roasts (Fresh) ............... 2-3 days
Pe,u_tn/: Rinse before storing. Wrap looseiy in foit or
plastic wrap and seal_ (Wrap giblets separately.) Use
within 2 days.
VegetabRes: Wash, drain and store in crisper or
humidrawer compartment or store unwashed in plastic
wrap.
FOR THE FREEZER
Food to go in the freezer needs special packaging
Many times supermarket wrappings are not good
enough., Food must have a second wrapping or be
repackaged if it will be stored !onger than a week or two_
Wrap carefully and seal. Contact with air shortens the
life of food. Containers must be airtight,. Fresh foods
that are already packaged, such as bread or poultry,
should be rewrappedo Use heavy-duty aluminum foil,
freezer paper and tape or special freezer containers with
tight fitting lids
Freeze food only when it is fresh and in top condi-
tion. Do not refreeze.
Label and date each package. Use food with the
oldest date first,
When loading the freezer, leave enough space at the
front to tet the door close completely and seal,
FREEZER STORAGE TBMES
No longer than
Bread ................................... 6 months
Butter, Margarine ................... 6,.9 months
Cooked Dishes .............................. 3 months
Fish (Packaged Frozen) .................... 3 months
Fruits ........................................ 12 months
Ice Cream ...................................... 1 month
Juice Concentrate ........................ 6 months
Meats
Bacon and other Smoked Meats ....... I month
Beef or Lamb ........................ 5-6 months
Ground Meat ......................... 2-3 months
Liver and other Variety Meats ....... 3-4 months
Pork or Vea! .......................... 8-9 months
Poultry ....................................... 4-6 months
Poultry Giblets ............................ 3 months
Vegetables ................................... 12 months
5[',!ERGY SAVING T_P$
_,_=_o.to, save power and rr_or_ey
arid s,t_ ea}oy your I(enmore
I O!OSe ,],e COOt as sooFL ,=_-..'-you c:a.I_, k4a".e
sure door is shut after each use so cold air
2 Reduce door openings.. _{bur cooling syster,q
won't have to run as ofter_
3 Keep the coils on the rear of refrigerator
clean. '_sur refrigerator motor works harder
when coils are dusty,, Clean the coils at _east
every three months
4. Adjust temperature controls,, fly a warmer
setting,. Your _efrigerator may be colder than
needed° Check fleezer temperature with ice
cream,, if it is hard to serve, the freezer is
colder than needed,. Check refrigerator with
milk. long as it keeps wel_, your
refrigerator is cold enough,.
5. Don't put hot foods in refrigerator.
6. Don't block the inside air vents. When food
blocks the air flow, temperatures may be
uneven and cooling less effective,
7. Keep your refrigerator level and stable so the
doors seal tightly. See INSTALL on page 2.
8, Keep refrigerator away from stove or other
heat source& A cool and dry place lets your
refrigerator work best.
USE AND CA
I FOR ATION
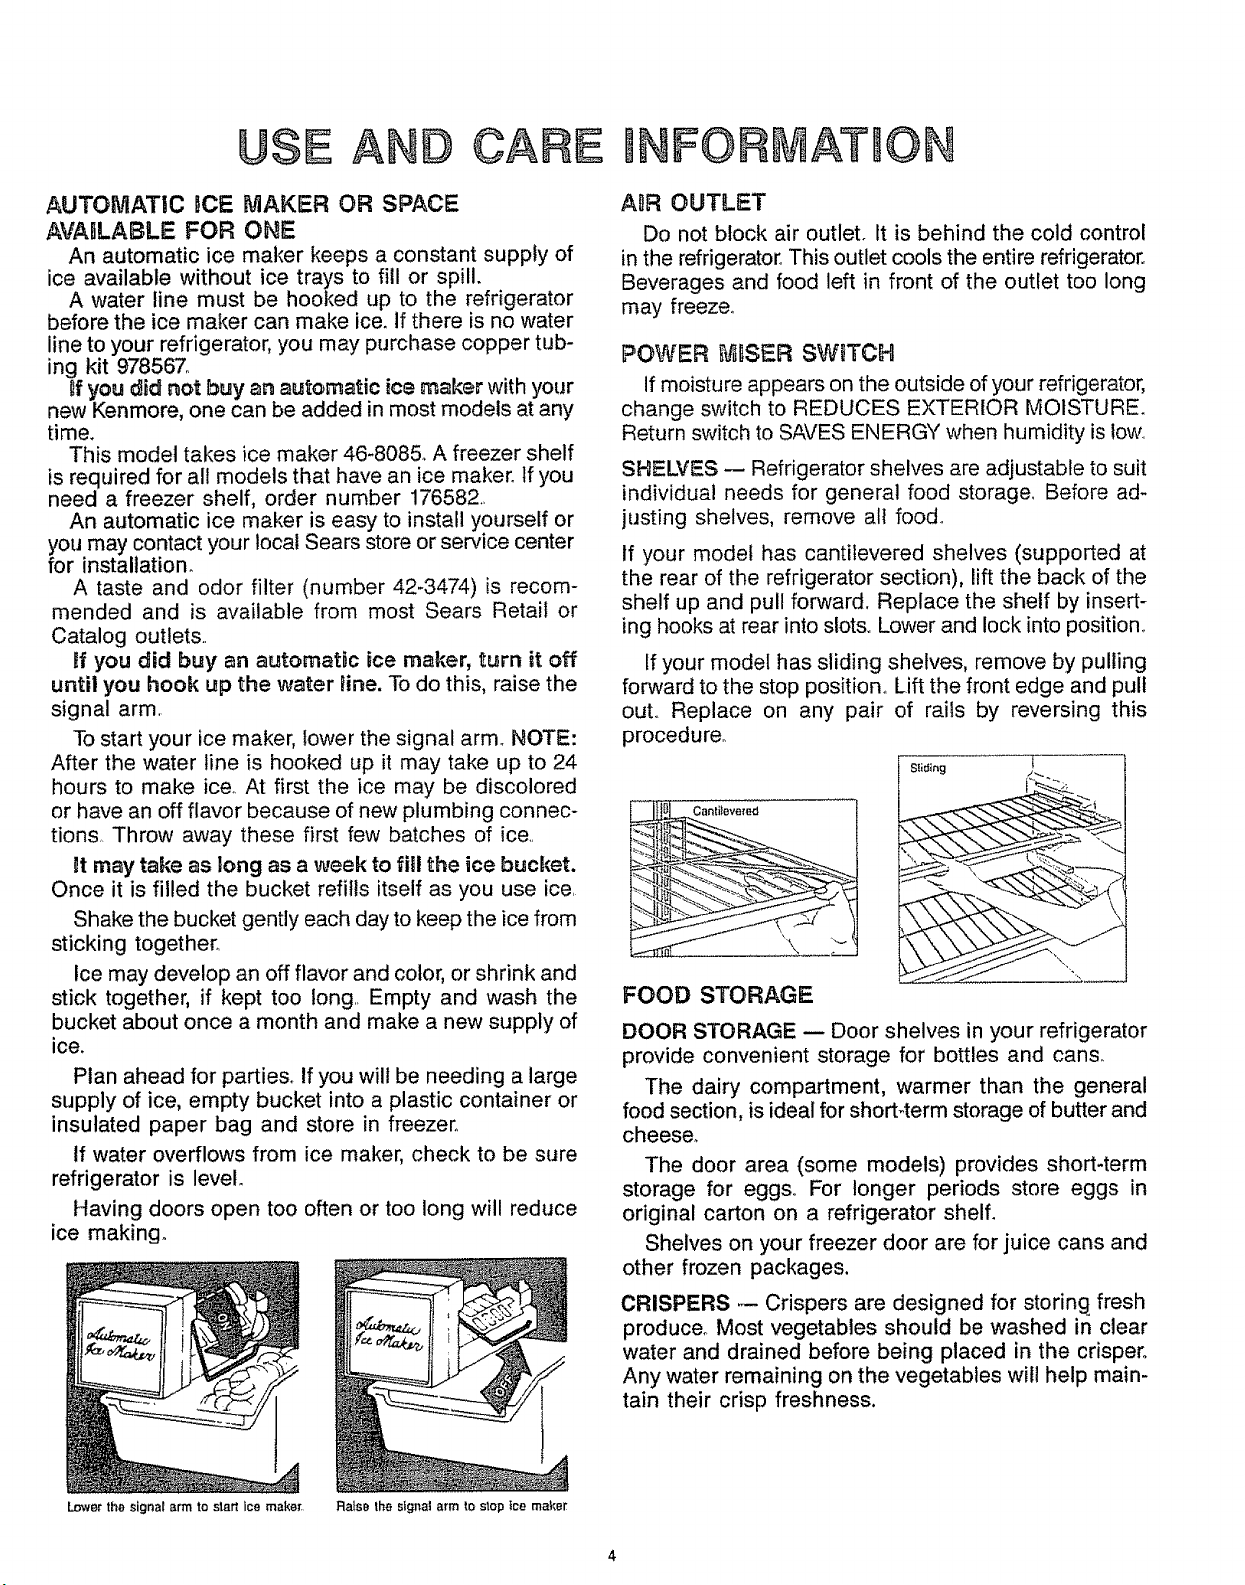
AUTOMATIC ICE MAKER OR SPACE
AVABLABLE FOR ONE
An automatic ice maker keeps a constant supply of
ice available without ice trays to fill or spill.
A water line must be hooked up to the refrigerator
before the ice maker can make ice. If there is no water
line to your refrigerator, you may purchase copper tub-
ing kit 978567°
tf you did net buy an automatic ice maker with your
new Kenmore, one can be added in most models at any
time.
This model takes ice maker 46-8085. A freezer shelf
is required for all models that have an ice maker. If you
need a freezer shelf, order number 176582.,
An automatic ice maker is easy to install yourself or
you may contact your local Sears store or service center
for installation.
A taste and odor filter (number 42-3474) is recom-
mended and is available from most Sears Retail or
Catalog outlets..
tf you did buy an automatic ice maker, turn it off
until you hook up the water line. To do this, raise the
signal arm,
To start your ice maker, lower the signal arm° NOTE:
After the water line is hooked up it may take up to 24
hours to make ice. At first the ice may be discolored
or have an off flavor because of new plumbing connec-
tions,. Throw away these first few batches of ice..
Utmay take as long as a week to fll the ice bucket.
Once it is filled the bucket refills itself as you use ice,
Shake the bucket gently each day to keep the ice from
sticking together°
Ice may develop an off flavor and color, or shrink and
stick together, if kept too long.. Empty and wash the
bucket about once a month and make a new supply of
ice.
Plan ahead for partie& If you will be needing a large
supply of ice, empty bucket into a plastic container or
insulated paper bag and store in freezer°
if water overflows from ice maker, check to be sure
refrigerator is level.
Having doors open too often or too long will reduce
ice making.
AIR OUTLET
Do not block air outlet. It is behind the cold control
in the refrigerator, This outlet cools the entire refrigerator.
Beverages and food left in front of the outlet too long
may freeze°
POWER [_ISER SWITCH
if moisture appears on the outside of your refrigerator,
change switch to REDUCES EXTERIOR MOISTURE.
Return switch to SAVES ENERGY when humidity is low
SHELVES -- Refrigerator shelves are adjustable to suit
individual needs for general food storage, Before ad-
justing shelves, remove all food,.
If your model has cantilevered shelves (supported at
the rear of the refrigerator section), lift the back of the
shelf up and pull forward. Replace the shelf by insert-
ing hooks at rear into slots° Lower and lock into position.
If your model has sliding shelves, remove by pulling
forward to the stop position° Lift the front edge and pull
out.. Replace on any pair of rails by reversing this
procedure°
FOOD STORAGE
DOOR STORAGE -- Door shelves in your refrigerator
provide convenient storage for bottles and cans.
The dairy compartment, warmer than the general
food section, is ideal for short4erm storage of butter and
cheese°
The door area (some models) provides short-term
storage for eggs° For longer periods store eggs in
original carton on a refrigerator shelf.
Shelves on your freezer door are for juice cans and
other frozen packages.
Lower the signal arm to start ice maker.
CRISPERS -- Crispers are designed for storing, fresh
produce° Most vegetables should be washed in clear
water and drained before being placed in the crisper.
Any water remaining on the vegetables will help main-
tain their crisp freshness.
Ra}se Iha signal arm to stop ice raaker
 Loading...