

Kenmore 25377189507, 25377189506, 25377189505, 25377182507, 25377182506 Owner’s Manual
...
Refrigerator
Top Mount
Use & Care Guide
Refrigerador
Congelador Superior
Gufa para su uso y cuidado
R_frig_rateur
Compartiments Superposes
Guide d'utilisation et d'entretien
Sears, Roebuck and Co., Hoffman Estates, IL 60179 U.S.A.
Sears Canada, Inc., Toronto, Ontario, Canada M5B 2B8
2
Z
m
www.sears.com
241797000 (1006)

important Safety
Congratulations
Congratulations on your purchase of a new refrigerator!
We here at Sears are very proud of our product and we
are completely committed to providing you with the best
service possible. Your satisfaction is our #1 priority.
We know you'll enjoy your new refrigerator and Thank
You for choosing our product. We hope you consider us
for future purchases.
PLEASE READ AND SAVE THESE INSTRUCTIONS
This Owner's Guide provides specific operating
instructions for your model. Use your refrigerator only as
instructed in this manual. These instructions are not
meant to cover every possible condition and situation that
may occur. Common sense and caution must be
practiced when installing, operating and maintaining any
appliance.
Please record your model and serial numbers below
for future reference. This information is found on the
serial plate located inside the refrigerator
compartment.
NOTE: use only soap and water to clean Serial platel bedspreads, plastic sheets or stretch wrap may become
Model Number: 253
or: 970
Serial Number:
Purchase Date:
TABLE OF CONTENTS the past. Junked or abandoned
Welcome ............................................. 2
Safety Instructions ............................... 2-3
Warranty .............................................. 3
Protection Agreements ........................ 4
Installation--Includes Connecting Optional Ice
Maker To Water Supply ..................................... 5-6
Door Removal & Reversal .................. 7-8
Features At A Glance ......................... 9
Temperature Controls .......................... 10
Looking Inside ..................................... 11-13
Ice Service .......................................... 14
Food Storage & Energy Saving Tips ... 15
Normal Operating Sounds & Sights .... 16
Care & Cleaning .................................. 17-18
Before You Call .................................... 19
FOR YOUR SAFETY
• Do not store or use gasoline, or other flammable liquids
inthe vicinity of this or any other appliance. Read product
labels for warnings regarding flammability and other
hazards.
• Do not operate the refrigerator in the presence of
explosive fumes.
Avoid contact with any moving parts of automatic ice
maker.
Remove all staples from the carton. Staples can cause
severe cuts, and also destroy finishes if they come in
contact with other appliances or furniture.
CHILD SAFETY
Destroy or recycle the carton, plastic bags, and any
exterior wrapping material immediately after the
refrigerator is unpacked. Children should NEVER use
these items to play. Cartons covered with rugs,
airtight chambers, and can quickly cause suffocation.
PROPER DISPOSAL OF YOUR REFRIGERATOR
OR FREEZER
Risk of child entrapment
Child entrapment and
suffocation are not problems of
refrigerators or freezers are still
dangerous - even if they will sit
for "just a few days." If you are
getting rid of your old
refrigerator or freezer, please
follow the instructions below to
help prevent accidents.
Before you throw away your old refrigerator/freezer:
• Remove doors.
Leave shelves in place so children may not easily climb
inside.
Have refrigerant removed by a qualified service
technician.
Instructions
Please Read All instructions Before
Using This Refrigerator.

Instructions(cont.)
KENIVIORE APPLIANCE WARRANTY
These Guidelines Must Be FollowedTo EnsureThat OneYear Limited Warranty
Safety Mechanisms in This Refrigerator Will When installed, operated and maintained according to all
operate Properly. instructionssupplied with the product, ifthis appliance
fails due to a defect in material or workmanship within one
ELECTRICAL INFORMATION
• The refrigerator must be plugged into its own
dedicated 115 Volt, 60 Hz., AC only electric outlet.
The power cord of the appliance is equipped with a
three-prong grounding plug for your protection against
electrical shock hazards, itmust be plugged directly
intoa properly grounded three-prong receptacle. The
receptacle must be installed in accordance with local
codes and ordinances. Consult a qualified electrician.
Do not use an extension cord or adapter plug.
• Immediately repair or replace any power cord that
becomes frayed or damaged.
• Never unplug the refrigerator by pulling on the power
cord. Always grip the plug firmly, and pull straight out
from the receptacle to prevent damaging the power cord.
• Unplug the refrigerator before cleaning and before
replacing a light bulb to avoid electrical shock.
• Performance may be affected if the voltage varies by
10% or more. Operating the refrigerator with insufficient
power can damage the compressor. Such damage is
not covered under your warranty.
• Do not plug the unit into an outlet controlled by a wall
switch or pull cord to prevent the refrigerator from being
turned off accidentally.
• Avoid connecting refrigerator to a Ground Fault Interruptor
(GFI) circuit.
IMPORTANT: Turning the refrigerator temperature
control to "0" turns off the compressor and prevents
your refrigerator from cooling, but does not disconnect
the power to the light bulbs and other electrical
components.To turn off power to your refrigeratoryou
must unplug the power cord from the wall outlet.
Grounding type
wall receptacle
fDo not, under _"
any circumstances
cut, remove,
or bypass the
grounding prong.
Power cord with
3-prong grounded plug
year from the date of purchase, call 1-800-4-MY-HOME®
to arrange for free repair.
if this appliance is used for other than private family
purposes, this warranty applies for only 90 days from the
date of purchase.
This warranty covers only defects in material and
workmanship. Sears will NOT pay for:
1. Expendable items that can wear out from normal use,
including but not limited to filters, belts, light bulbs and
bags.
2. A service technician to instruct the user in correct
product installation, operation or maintenance.
3. A service technician to clean or maintain this product.
4. Damage to or failure of this product if it is not installed,
operated or maintained according to all instructions
supplied with the product.
5. Damage to or failure of this product resulting from
accident, abuse, misuse or use for other than its
intended purpose.
6. Damage to or failure of this product caused by the use
of detergents, cleaners, chemicals or utensils other
than those recommended in all instructions supplied
with the product.
7. Damage to or failure of parts or systems resulting from
unauthorized modifications made to this product.
Disclaimer of impliedwarranties; limitation ofremedies
Customer's sole and exclusive remedy under this limited
warranty shall be product repair as provided herein, implied
warranties, including warranties of merchantability or
fitness for a particular purpose, are limited to one year or
the shortest period allowed by law.Sears shall not be
liable for incidental or consequential damages. Some
states and provinces do not allow the exclusion or limita-
tion of incidental or consequential damages, or limitations
on the duration of implied warranties of merchantability or
fitness, so these exclusions or limitations may not apply
to you.
This warranty applies only while this appliance is used in
the United States and Canada.
This warranty gives you specific legal rights, and you may
also have other rights which vary from state to state.
Sears, Roebuck and Co., Dept. 817WA, Hoffman Es-
tates, IL 60179
Sears Canada Inc.,Toronto, Ontario, Canada M5B 2B8
In the U.S.A.
In Canada
Master Protection Agreements
Congratulations on making a smart purchase. Your
new Kenmore ®product is designed and manufactured
for years of dependable operation. But like all
products, it may require preventive maintenance or
repair from time to time. That's when having a Master
Protection Agreement can save you money and
aggravation.
Purchase a Master Protection Agreement now and
protect yourself from unexpected hassle and expense.
The Master Protection Agreement also helps extend
the life of your new appliance. Here's what's included
in the Agreement:
_" Expert service by our 12,000 professional repair
specialists
_( Unlimited service and no charge for parts and
labor on all covered repairs
•" "No-lemon" guarantee- replacement of your
covered product if four or more product failures
occur within twelve months
_" Product replacement if your covered product
can't be fixed
•" Annual Preventive Maintenance Check at your
request - no extra charge
_" Fast help by phone - phone support from a
Sears technician on products requiring in-home
repair, plus convenient repair scheduling
•" Power surge protection against electrical
damage due to power fluctuations
_" Rental reimbursement if repair of your covered
product takes longer than promised
Maintenance Agreements
Your purchase has added value because you can
depend on Sears HomeCentral ®for service. With over
2400 Service Technicians and more than a million
parts and accessories, we have the tools, parts,
knowledge and skills to back our pledge:
We Service What We Sell.
Your Kenmore ®product is designed, manufactured
and tested to provide years of dependable operation.
But like all products, it may require service from time to
time. The Sears Maintenance Agreement offers you an
outstanding service program, affordably priced.
The Sears Maintenance Agreement
• Is your way to buy tomorrow's service at today's
price.
• Eliminates repair bills resulting from normal wear
and tear.
• Provides phone support from a Sears technician
on products requiring in-home repair.
• Even if you don't need repairs, provides an annual
Preventive Maintenance Check, at your request, to
ensure that your product is in proper running
condition.
Some limitations apply. For more information
about concerning Sears Canada Maintenance
Agreements, call 1-800-361-6665.
Once you purchase the Agreement, a simple phone
call is all that it takes for you to schedule service. You
can call anytime day or night, or schedule a service
appointment online.
Sears has over 12,000 professional repair specialists,
who have access to over 4.5 million quality parts and
accessories. That's the kind of professionalism you
can count on to help prolong the life of your new
purchase for years to come. Purchase your Master
Protection Agreement today!
Some limitations and exclusions apply. For prices
and additional information, call 1-800-827-6655.
Sears Installation Service
For Sears professional installation of home appliances
and items like garage door openers, water heaters,
and other major home items, in the U.S.A. call
1-800-4MY-HOME ®.
This Use & Care Manual provides specific operating
instructions for your model. Use the refrigerator only as
instructed in this Use & Care Manual. Before starting the
refrigerator, follow these important first steps.
LOCATION
• Choose a place that is near a grounded electrical outlet.
Do Not use an extension cord or an adapter plug.
• If possible, place the refrigerator out of direct sunlight
and away from the range, dishwasher or other heat
sources
The refrigerator must be installed on a floor that is level
and strong enough to support a fully loaded refrigerator.
Consider water supply availability for models equipped
with an automatic ice maker.
INSTALLATION
Do Not install the refrigerator where
the temperature will drop below 55°F
(13°C) or rise above 110°F (43°C). At these
temperature extremes, the compressor will not be
able to maintain proper temperatures inside the
refrigerator.
Do Not block the toe grille on the lower
front of your refrigerator. Sufficient air circulation
is essential for the proper operation of your
refrigerator.
Installation Clearances
• Allow the following clearances for ease of installation.
proper air circulation, and plumbing and electrical
connections:
Sides & Top 3/8"
Back 1"
NOTE: Ifyou see black coils/tubing on the back of your
refrigerator (air-cooled condenser leave 3" clearance
at top of refrigerator.
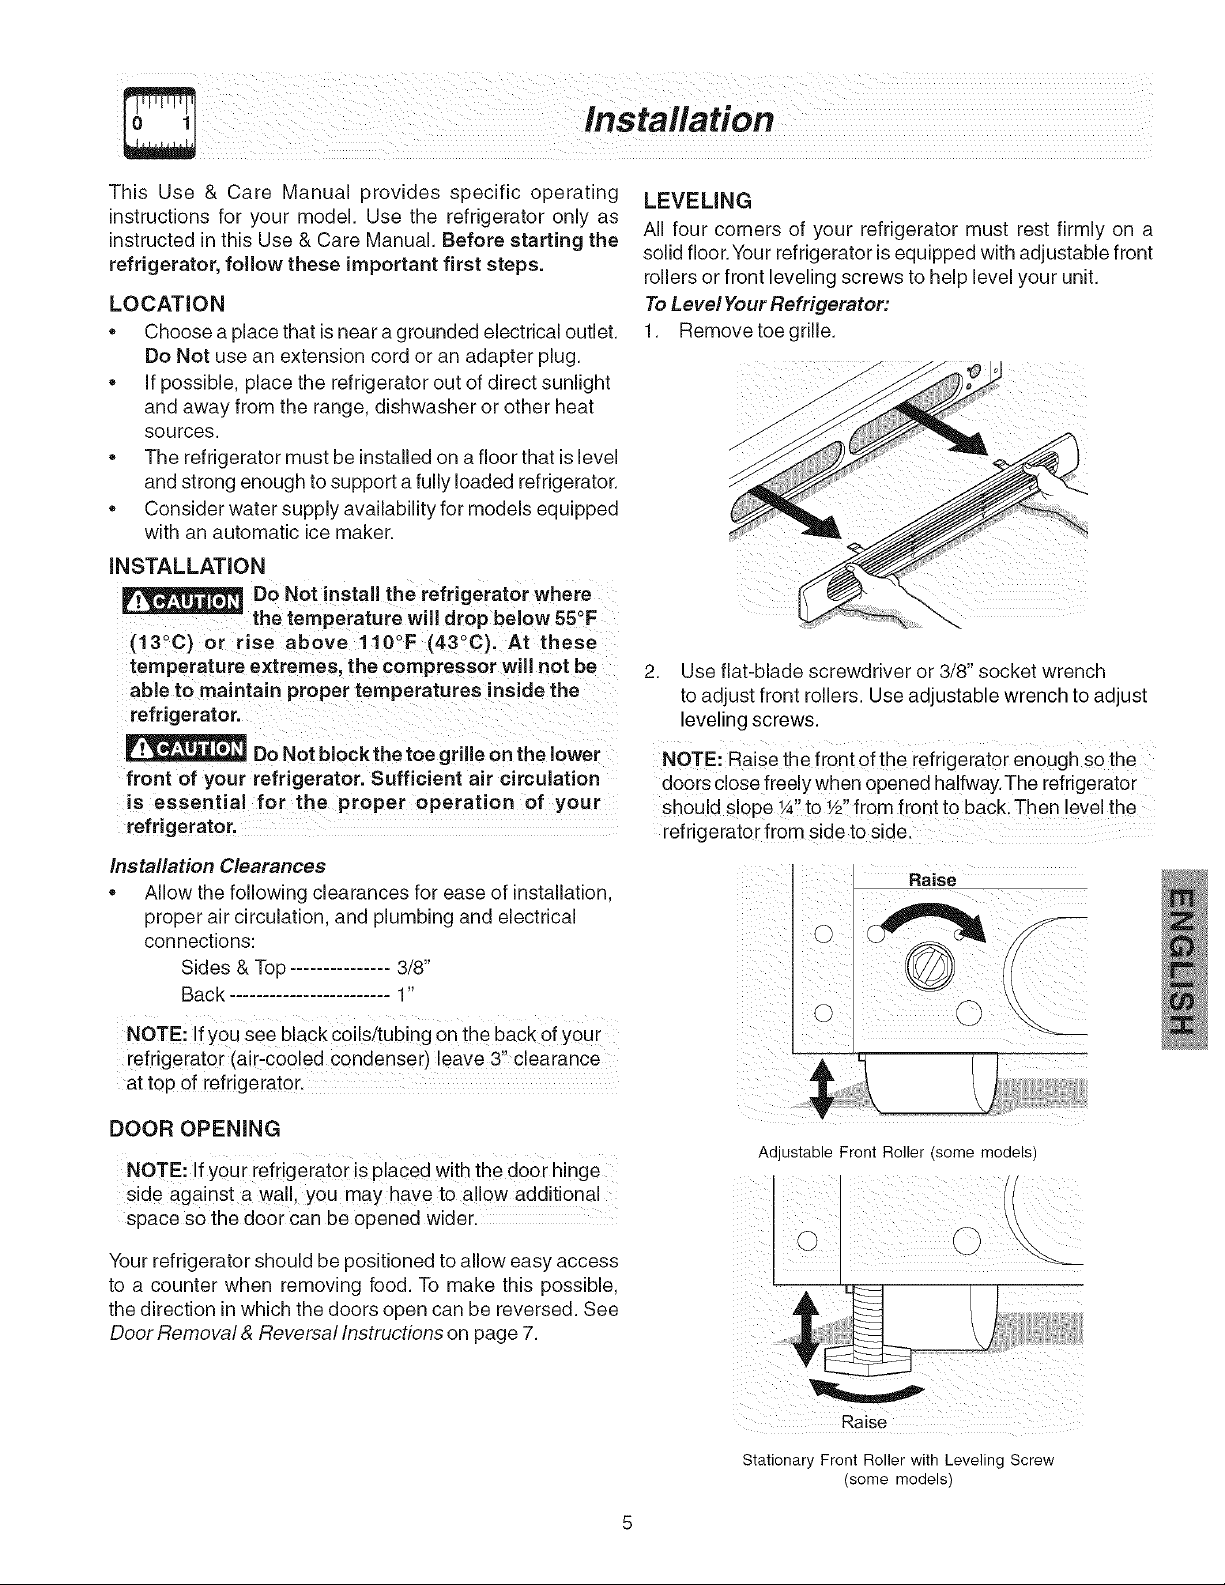
LEVELING
All four corners of your refrigerator must rest firmly on a
solid floor. Your refrigerator is equipped with adjustable front
rollers or front leveling screws to help level your unit.
To Level Your Refrigerator:
1. Remove toe grille.
2. Use flat-blade screwdriver or 3/8" socket wrench
to adjust front rollers. Use adjustable wrench to adjust
eveling screws
NOTE: Raise the front of the refrigerator enough so the
doors close freely when opened halfway.The refrigerator
should slope ¼" to W' from front to back.Tqen level the
refrigerator from side to side.
Raise
©
o C
DOOR OPENING
NOTE: If your refrigerator is placed with the door hinge
side against a wall, you may have to a!low additional
space so the door can be opened wider.
Your refrigerator should be positioned to allow easy access
to a counter when removing food. To make this possible,
the direction in which the doors open can be reversed. See
Door Removal & Reversal Instructions on page 7.
Adjustable Front Roller (some models)
/
Stationary Front Roller with Leveling Screw
(some models)
lrtstallatiort - Connecting Optional Ice Maker To Water Supply
To avoid electric shock, which can cause death or severe personal injury, disconnect the
refrigerator from eJectrical power before connecting a water supply line to the refrigerator.
To Avoid Property Damage:
* Copper tubing is recommended for the water supply line. Water supply tubing made of W' plastic is not
recommended since it greatly increases the potential for water leaks. Manufacturer will not be responsible
for any damage if plastic tubing is used for supply line.
= DO NOT install water supply tubing in areas where temperatures fall below freezing.
, Chemicals from a malfunctioning softener can damage the ice maker, if the ice maker is connected to soft
water, ensure that the softener is maintained and working properly.
IMPORTANT: Ensure that your water supply line connections comply with all local plumbing codes.
Before Instalfing The Water Supply Line, You Will Need
• BasicTools: adjustable wrench, flat-blade screwdriver, and Phillips TM screwdriver
• Access to a household cold water line with water pressure between 30 and 100 psi.
• A water supply line made of tA inch (6.4 mm) OD, copper tubing or braided water line. To determine the length of
copper tubing needed, you will need to measure the distance from the ice maker inlet valve at the back of the
refrigerator to your cold water pipe. Then add approximately 7 feet (2.1 meters), so the refrigerator can be moved out
for cleaning (as shown).
• A shutoff valve to connect the water supply line to your household water system. DO NOT use a self-piercing type
shutoff valve.
• A compression nut and ferrule (sleeve) for connecting the water supply line to the ice maker inlet valve.
NOTE: A water line kit is available from sears stores or sears Parts & Repair at an additional cost.
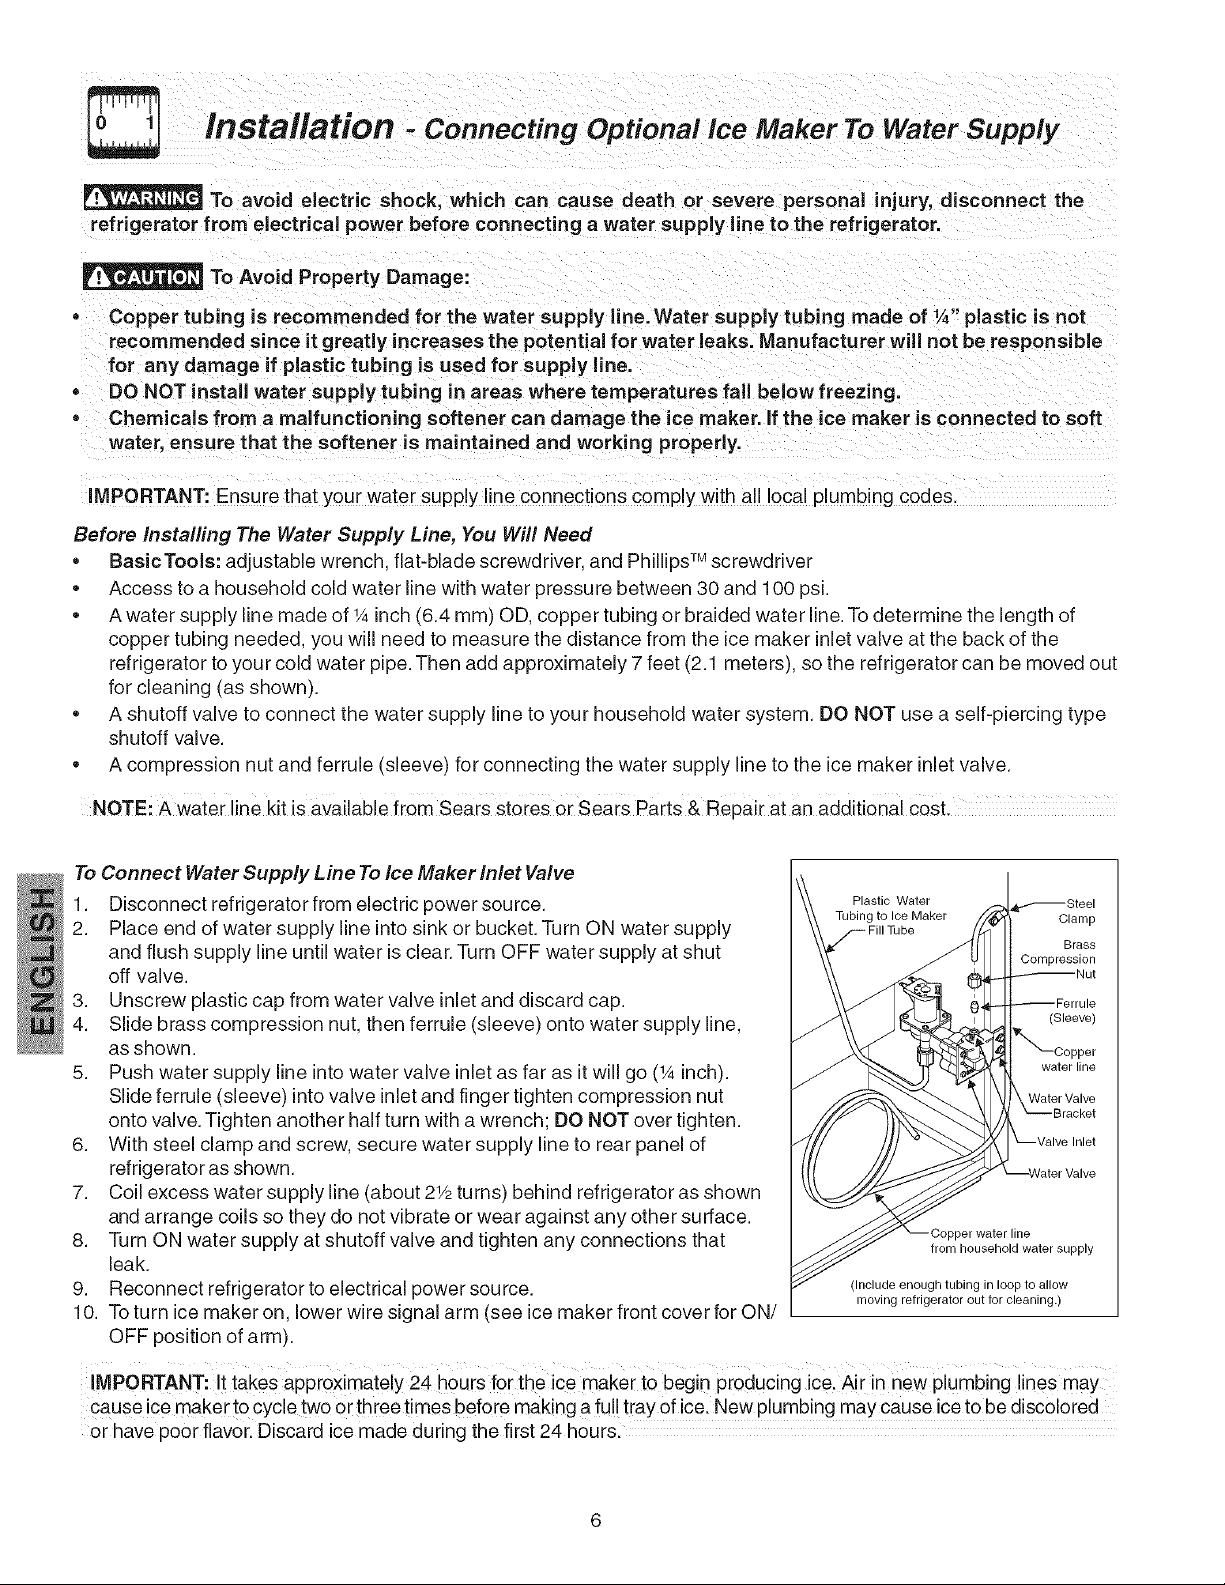
To Connect Water Supply Line To Ice Maker Inlet Valve
1. Disconnect refrigerator from electric power source.
2. Place end of water supply line into sink or bucket. Turn ON water supply
and flush supply line until water is clear. Turn OFF water supply at shut
off valve.
3. Unscrew plastic cap from water valve inlet and discard cap.
Plastic Water
Tubing to Ice Maker
.J_Steel
Compression
_Nut
_Ferrule
4. Slide brass compression nut, then ferrule (sleeve) onto water supply line,
as shown.
5. Push water supply line into water valve inlet as far as it will go (tA inch).
_"_-Copper
water line
Slide ferrule (sleeve) into valve inlet and finger tighten compression nut
onto valve. Tighten another half turn with a wrench; DO NOT over tighten.
6. With steel clamp and screw, secure water supply line to rear panel of
refrigerator as shown.
7. Coil excess water supply line (about 2t/2turns) behind refrigerator as shown
and arrange coils so they do not vibrate or wear against any other surface.
8. Turn ON water supply at shutoff valve and tighten any connections that
from household water supply
leak.
9. Reconnect refrigerator to electrical power source.
10. Toturn ice maker on, lower wire signal arm (see ice maker front cover for ON/
(Include enough tubing in loop to allow
moving refrigerator out for cleaning.)
OFF position of arm).
IMPORTANT:I ttakes approximate!Y 24 hours for the ice maker to begin producing ice. Air in new plumbing lines may
cause ice maker to cycle two er three times before making a ful! tray of ice. New plumbing may cause iceto be discolored
or have poor flavor. Discard ice made during the first 24 hoursl
Clamp
Brass
(Sleeve)
 Loading...