

Kenmore 25323082102, 25323082101, 25313051102 Owner’s Manual
E L T E
®
Freezer
Use & Care Guide
Congelador
Gufa para su uso y cuidado
Congdlateur
Guide d'utilisation etd'entretien
\
Sears, Roebuck and Co., Hoffman Estates, IL 60179 U.S.A.
Sears Canada, Inc., Toronto, Ontario, Canada M5B 2B8 www.sears.com
216902500 (0212)
Record Serial/Model Numbers ............ 2
Safety .................................................. 2-3
Warranty .............................................. 3
Canada - Limited Warranty ................. 4
First Steps ........................................... 5-6
Energy Saving Tips ............................. 6
Setting the Temperature Control ......... 6
Freezer Optional Features .................. 7-8
Care and Cleaning .............................. 9-10
Power Failure/Freezer Failure ........... 10
Troubleshooting Guide ......................... 11-12
Sears Service ...................................... 13
Sears Canada Customers ................... 13
READ AND SAVE THESE INSTRUCTIONS
This Owner's Guide provides specific operating instructions
for your model. Use your freezer only as instructed in this
guide. These instructions are not meant to cover every
possible condition and situation that may occur. Common
sense and caution must be practiced when installing,
operating, and maintaining any appliance.
Record Your Model and Serial Numbers
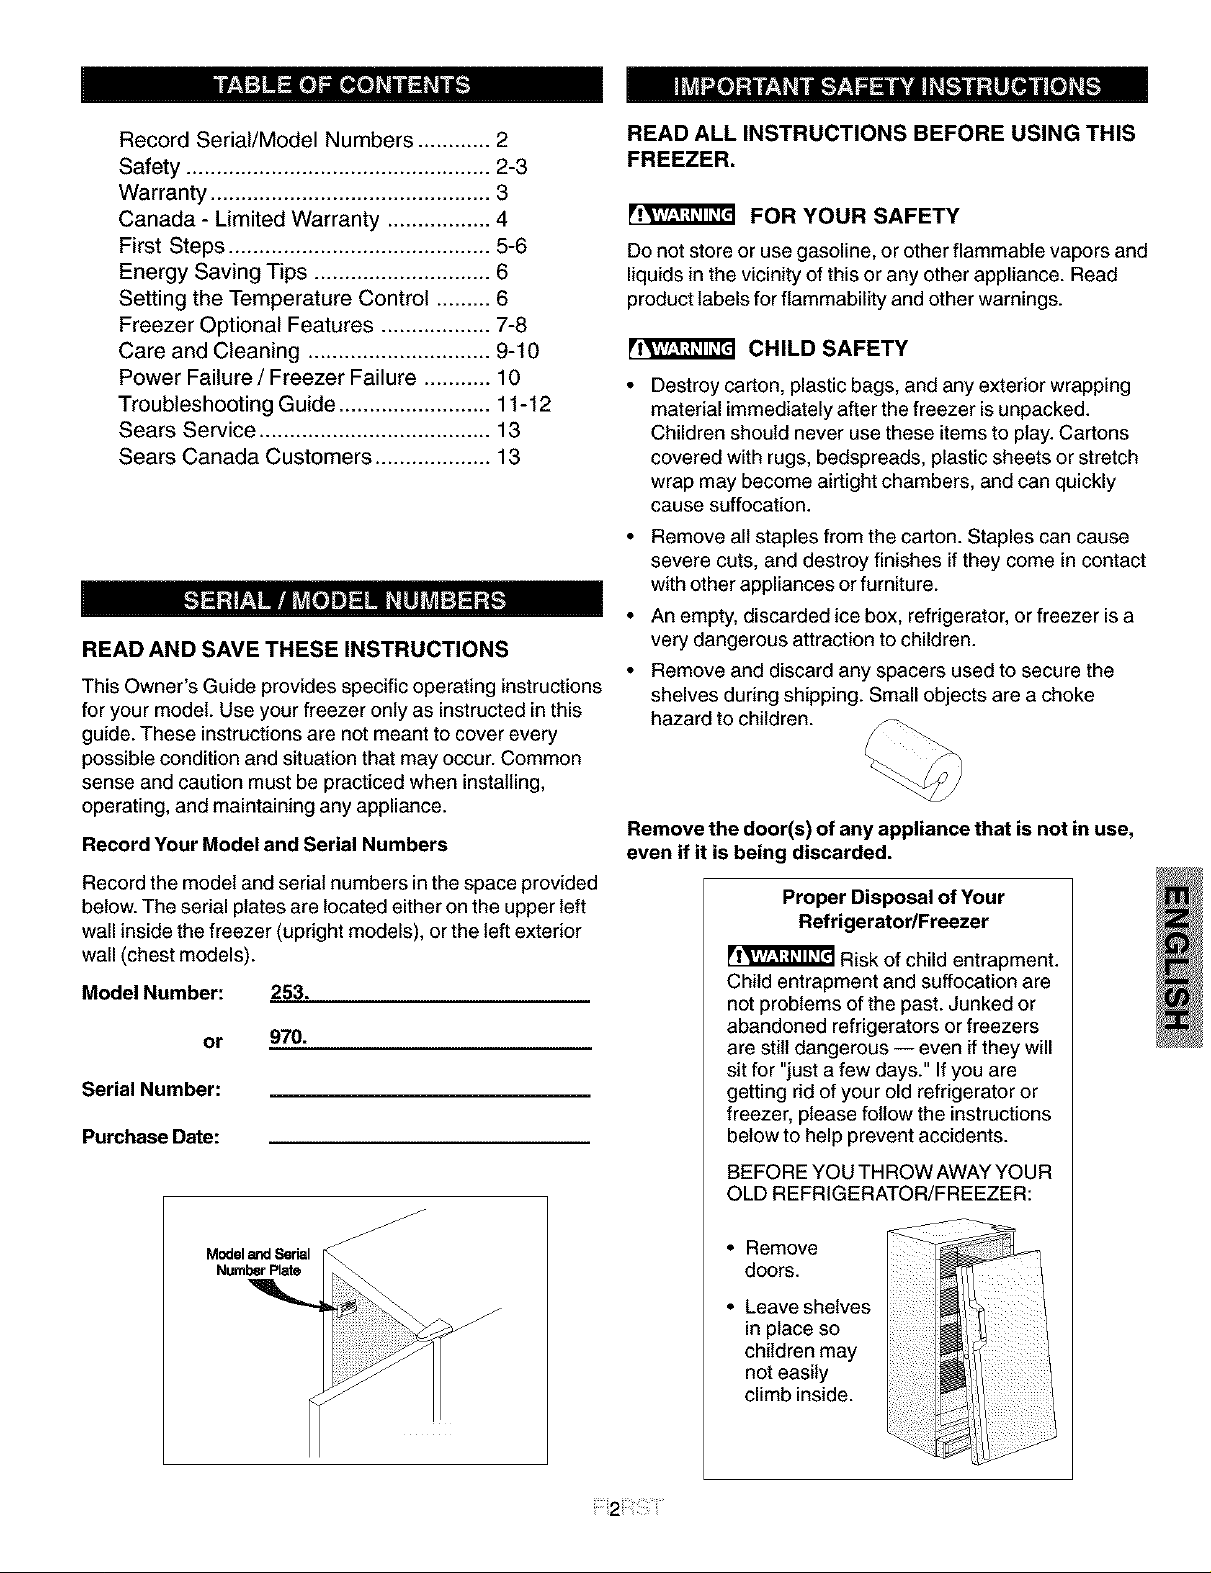
Record the model and serial numbers in the space provided
below. The serial plates are located either on the upper left
wall inside the freezer (upright models), or the left exterior
wall (chest models).
Model Number: 253.
or 970.
Serial Number:
Purchase Date:
READ ALL INSTRUCTIONS BEFORE USING THIS
FREEZER.
F_ FOR YOUR SAFETY
Do not store or use gasoline, or other flammable vapors and
liquids in the vicinity of this or any other appliance. Read
product labels for flammability and other warnings.
CHILD SAFETY
• Destroy carton, plastic bags, and any exterior wrapping
material immediately after the freezer isunpacked.
Children should never use these items to play. Cartons
covered with rugs, bedspreads, plastic sheets or stretch
wrap may become airtight chambers, and can quickly
cause suffocation.
• Remove all staples from the carton. Staples can cause
severe cuts, and destroy finishes if they come in contact
with other appliances or furniture.
• An empty, discarded ice box, refrigerator, or freezer is a
very dangerous attraction to children.
• Remove and discard any spacers used to secure the
shelves during shipping. Small objects are a choke
hazard to children.
Remove the door(s) of any appliance that is not in use,
even if it is being discarded.
Proper Disposal of Your
Refrigerator/Freezer
FJ_ Risk of child entrapment.
Child entrapment and suffocation are
not problems of the past. Junked or
abandoned refrigerators or freezers
are still dangerous -- even if they will
sit for "just a few days." If you are
getting rid of your old refrigerator or
freezer, please follow the instructions
below to help prevent accidents.
BEFORE YOU THROW AWAY YOUR
OLD REFRIGERATOR/FREEZER:
ModelaridSerial
NumberPlate
• Remove
doors.
• Leave shelves
in place so
children may
not easily
climb inside.
ELECTRICAL INFORMATION
These guidelines must be followed to ensure that
safety mechanisms in the design of this freezer will
operate properly.
• Refer to the serial plate for correct electrical rating.
The power cord of the appliance is equipped with a
three-prong grounding plug for your protection against
shock hazards. It must be plugged directly into a
properly grounded three-prong receptacle, protected with
a 15 amp time delay fuse or circuit breaker. The
receptacle must be installed in accordance with local
codes and ordinances. Consult a qualified electrician.
Receptacles protected by Ground Fault Circuit
Interrupters (GFIC) are NOT RECOMMENDED. De net
use an extension cord or adapter plug.
• IfvoltagevariesbylO%ormore, freezerperformance
may be affected. Operating freezer with insufficient
power can damage the motor. Such damage is not
covered under the warranty. Ifyou suspect your house
hold voltage is high or low, consult your power company
for testing.
• To prevent the freezer from being turned off
accidenticatly, do not plug unit into an outlet controlled
by a wall switch or pull cord.
• Do not pinch, knot, or bend the cord in any manner.
OTHER PRECAUTIONS
• Never unplug the freezer by pulling on the cord.
Always grip the plug firmly, and pull straight out from
the receptacle.
NOTE: Turning the temperature control to OFF turns off the
compressor, but does not disconnect the power to the light
bulb or other electrical components.
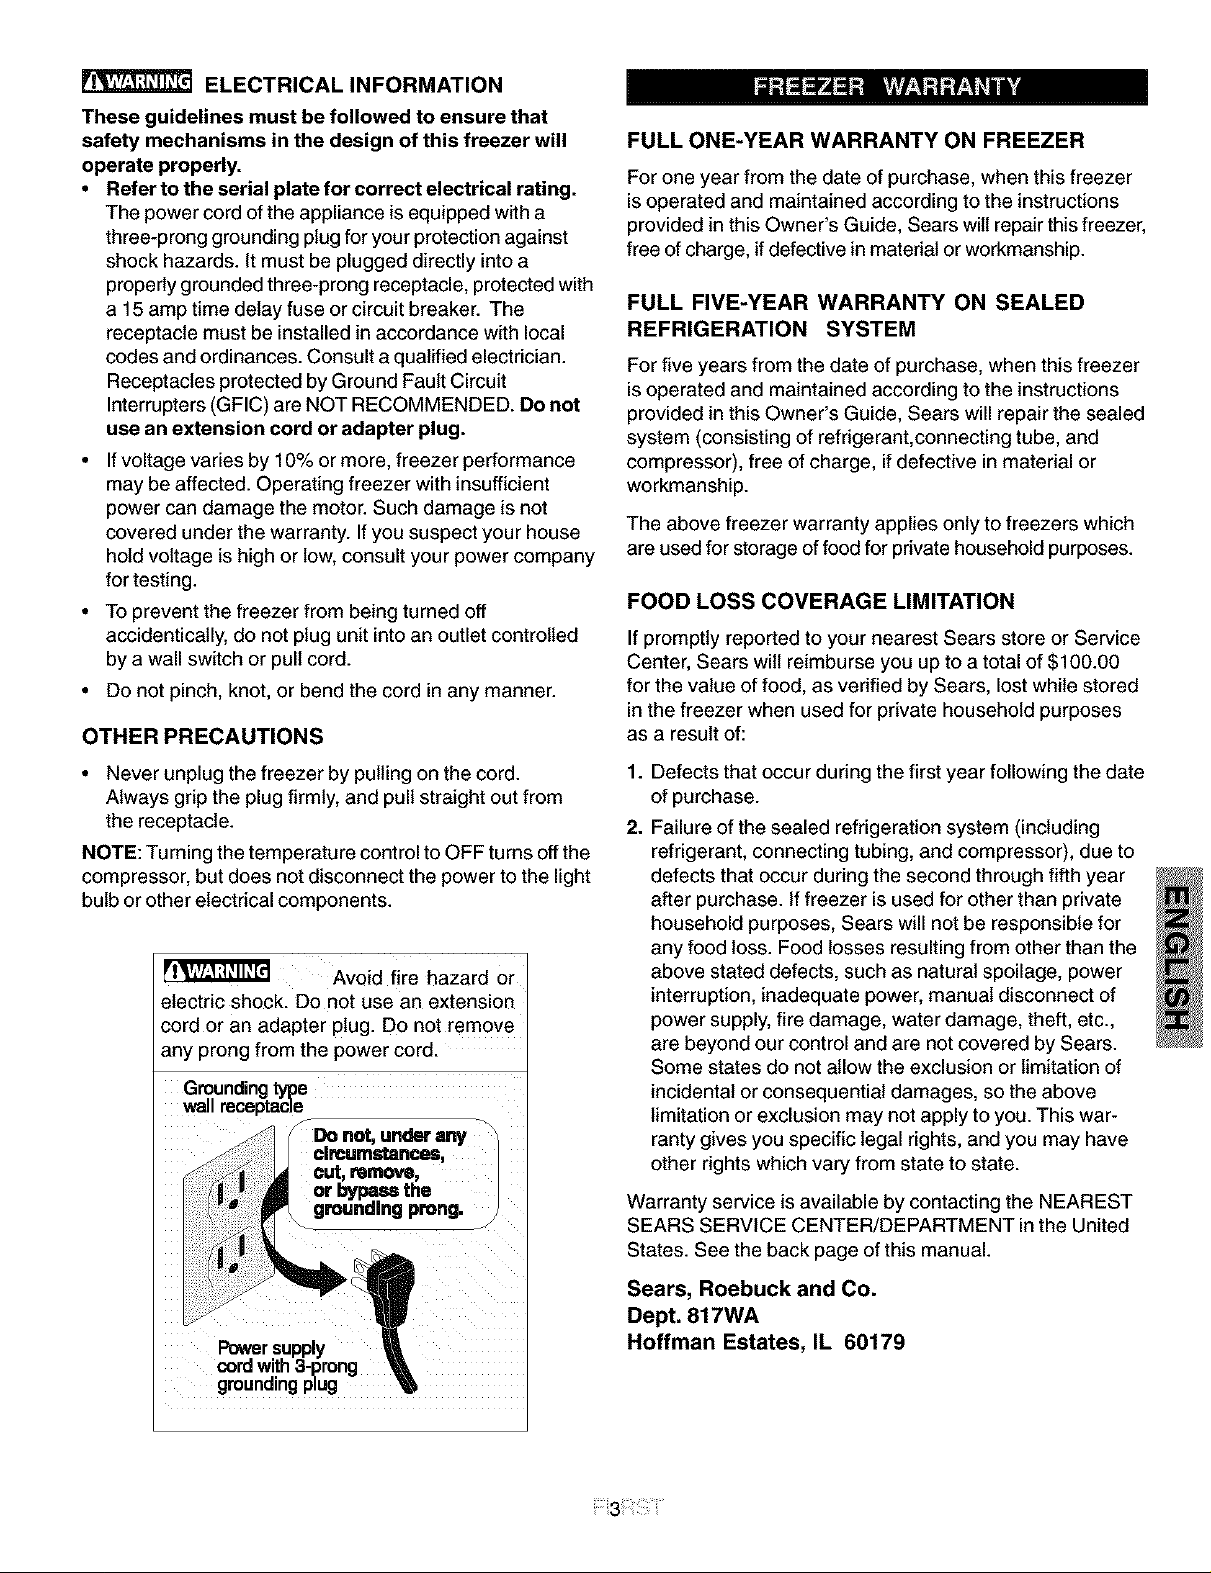
_r_ Avoid fire hazard or
electric shock. Do not use an extension
cord or an adapter plug. Do not remove
any prong from the power cord.
Groundingtype
wa receptacle
_Do not, under any
lclrcumstances,
CUt, remove,
|_w m or bypassthe
grounding prong. _)
FULL ONE-YEAR WARRANTY ON FREEZER
For one year from the date of purchase, when this freezer
is operated and maintained according to the instructions
provided in this Owner's Guide, Sears wilt repair this freezer,
free of charge, if defective in material or workmanship.
FULL FIVE-YEAR WARRANTY ON SEALED
REFRIGERATION SYSTEM
For five years from the date of purchase, when this freezer
is operated and maintained according to the instructions
provided in this Owner's Guide, Sears will repair the sealed
system (consisting of refrigerant,connecting tube, and
compressor), free of charge, if defective in material or
workmanship.
The above freezer warranty applies only to freezers which
are used for storage of food for private household purposes.
FOOD LOSS COVERAGE LIMITATION
If promptly reported to your nearest Sears store or Service
Center, Sears wilt reimburse you up to a total of $100.00
for the value of food, as verified by Sears, lost while stored
in the freezer when used for private household purposes
as a result of:
1.
Defects that occur during the first year following the date
of purchase.
2.
Failure of the sealed refrigeration system (including
refrigerant, connecting tubing, and compressor), due to
defects that occur during the second through fifth year
after purchase. If freezer is used for other than private
household purposes, Sears will not be responsible for
any food loss. Food losses resulting from other than the
above stated defects, such as natural spoilage, power
interruption, inadequate power, manual disconnect of
power supply, fire damage, water damage, theft, etc.,
are beyond our control and are not covered by Sears.
Some states do not allow the exclusion or limitation of
incidental or consequential damages, so the above
limitation or exclusion may not apply to you. This war-
ranty gives you specific legal rights, and you may have
other rights which vary from state to state.
Warranty service is available by contacting the NEAREST
SEARS SERVICE CENTER/DEPARTMENT in the United
States. See the back page of this manual.
Powersupply
cordwith3-prong
groundingplug
Sears, Roebuck and Co.
Dept. 817WA
Hoffman Estates, IL 60179
CANADA LIMITED WARRANTY
E L T E
®
Freezers
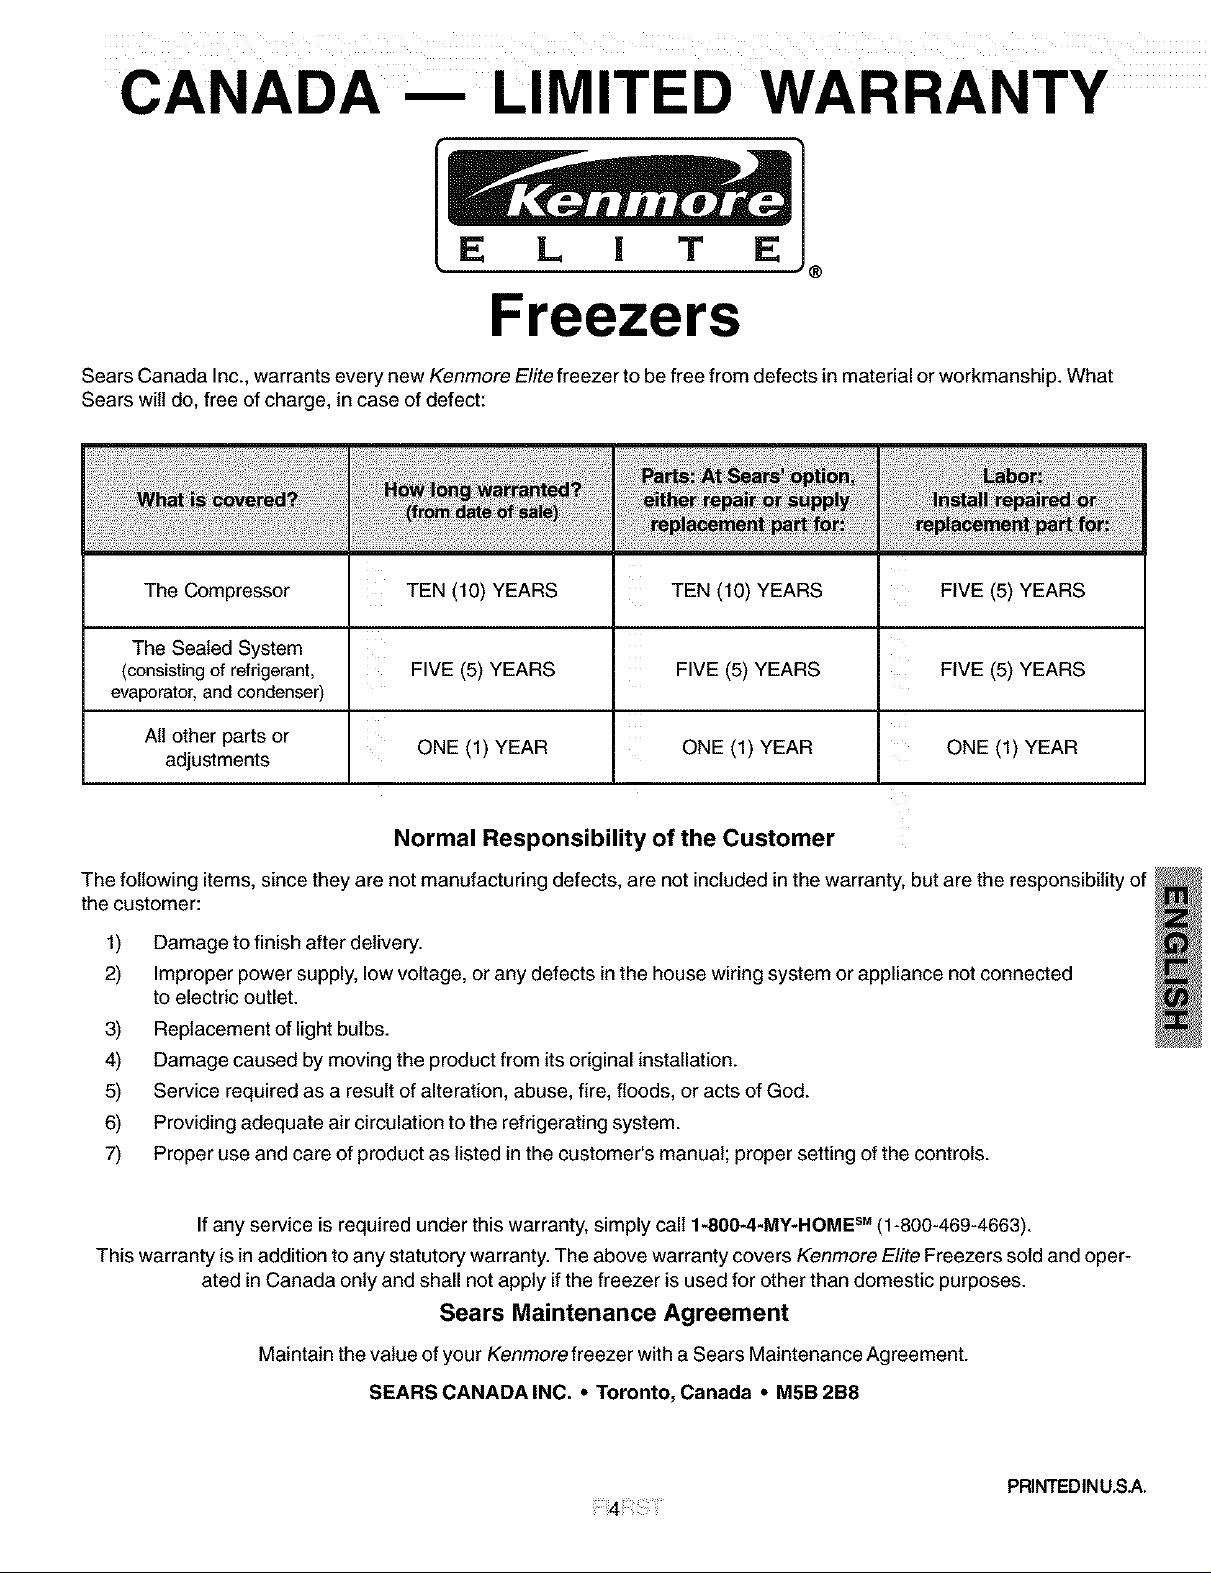
Sears Canada Inc., warrants every new Kenmore Elite freezer to be free from defects in material or workmanship. What
Sears will do, free of charge, in case of defect:
The Compressor TEN (10) YEARSTEN (10) YEARS FIVE (5) YEARS
The Sealed System
(consisting of refrigerant, FIVE (5) YEARS FIVE (5) YEARS FIVE (5) YEARS
evaporator,and condenser)
All other parts or ONE (1) YEAR ONE (1) YEAR ONE (1) YEAR
adjustments
Normal Responsibility of the Customer
The following items, since they are not manufacturing defects, are not included in the warranty, but are the responsibility of
the customer:
1) Damage to finish after delivery.
2) Improper power supply, low voltage, or any defects in the house wiring system or appliance not connected
to electric outlet.
3) Replacement of light bulbs.
4) Damage caused by moving the product from its original installation.
5) Service required as a result of alteration, abuse, fire, floods, or acts of God.
6) Providing adequate air circulation to the refrigerating system.
7) Proper use and care of product as listed in the customer's manual; proper setting of the controls.
If any service is required under this warranty, simply call 1-800-4-MY-HOME sM(1-800-469-4663).
This warranty is in addition to any statutory warranty. The above warranty covers Kenmore Elite Freezers sold and oper-
ated in Canada only and shall not apply if the freezer is used for other than domestic purposes.
Sears Maintenance Agreement
Maintain the value of your Kenmore freezer with a Sears Maintenance Agreement.
SEARS CANADA INC. ,, Toronto, Canada ,, M5B 2B8
PRINTEDIN U.S.A.
This Owner's Guide provides specific operating instructions
for your model. Use the freezer only as instructed in this
Owner's Guide. Before starting the freezer, follow these
important first steps.
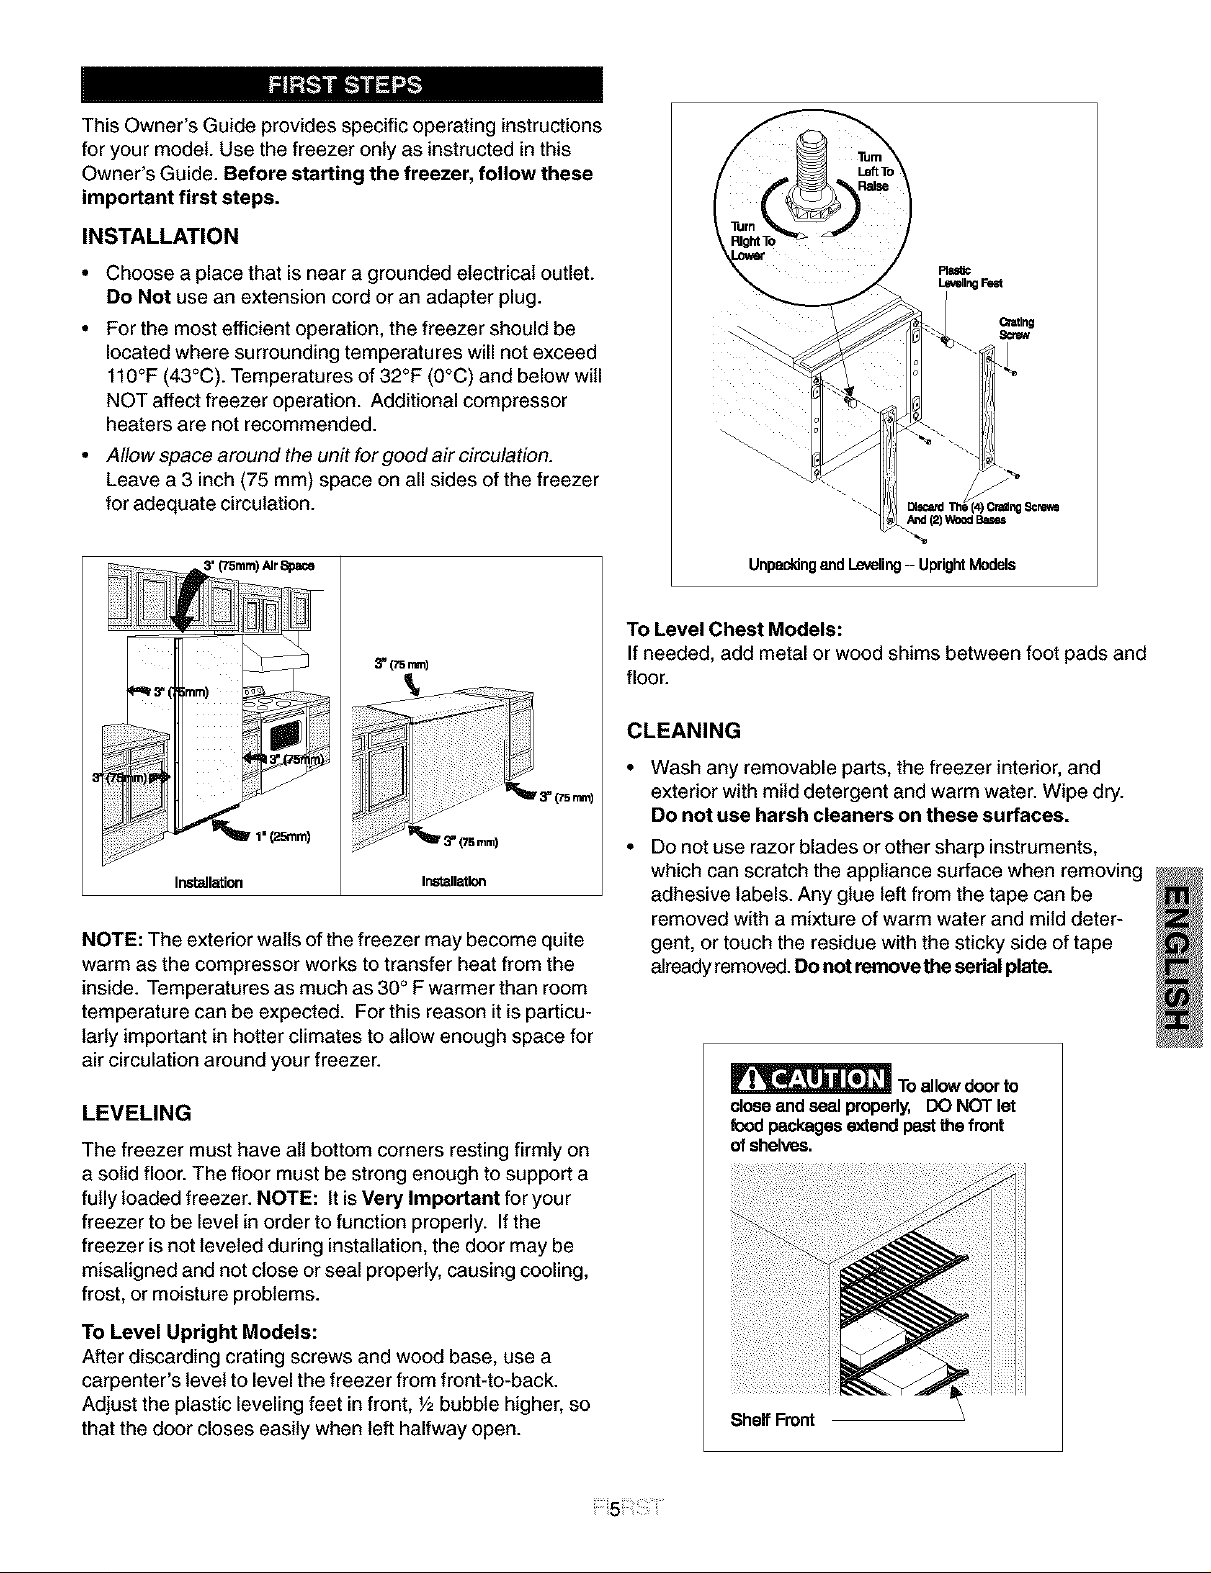
INSTALLATION
• Choose aplace that is near a grounded electrical outlet.
Do Not use an extension cord or an adapter plug.
• For the most efficient operation, the freezer should be
located where surrounding temperatures will not exceed
110°F (43°C). Temperatures of 32°F (0°C) and below will
NOT affect freezer operation. Additional compressor
heaters are not recommended.
• AIIowspacearoundtheunitforgoodaircirculation.
Leave a 3 inch (75 mm) space on all sides of the freezer
for adequate circulation.
Rema¢
Leveling
_' (75turn)AlrSpace
_ (75mm)
Inst_Imion Installatlon
NOTE: The exterior walls of the freezer may become quite
warm as the compressor works to transfer heat from the
inside. Temperatures as much as 30 ° F warmer than room
temperature can be expected. For this reason it is particu-
larly important in hotter climates to allow enough space for
air circulation around your freezer.
LEVELING
The freezer must have all bottom corners resting firmly on
a solid floor. The floor must be strong enough to support a
fully loaded freezer. NOTE: It isVery Important for your
freezer to be level in order to function properly. If the
freezer is not leveled during installation, the door may be
misaligned and not close or seal properly, causing cooling,
frost, or moisture problems.
Unpaddngend I.e_eling-- UprightModels
To Level Chest Models:
If needed, add metal or wood shims between foot pads and
floor.
CLEANING
• Wash any removable parts, the freezer interior, and
exterior with mild detergent and warm water. Wipe dry.
Do not use harsh cleaners on these surfaces.
Do not use razor blades or other sharp instruments,
which can scratch the appliance surface when removing
adhesive labels. Any glue left from the tape can be
removed with a mixture of warm water and mild deter-
gent, or touch the residue with the sticky side of tape
already removed. Do not removethe serialplate.
_To allow doorto
closeand seal properly, DO NOT let
food packages extend past the front
ofshelves,
To Level Upright Models:
After discarding crating screws and wood base, use a
carpenter's level to level the freezer from front-to-back.
Adjust the plastic leveling feet in front, V2bubble higher, so
that the door closes easily when left halfway open.
Sheff Front
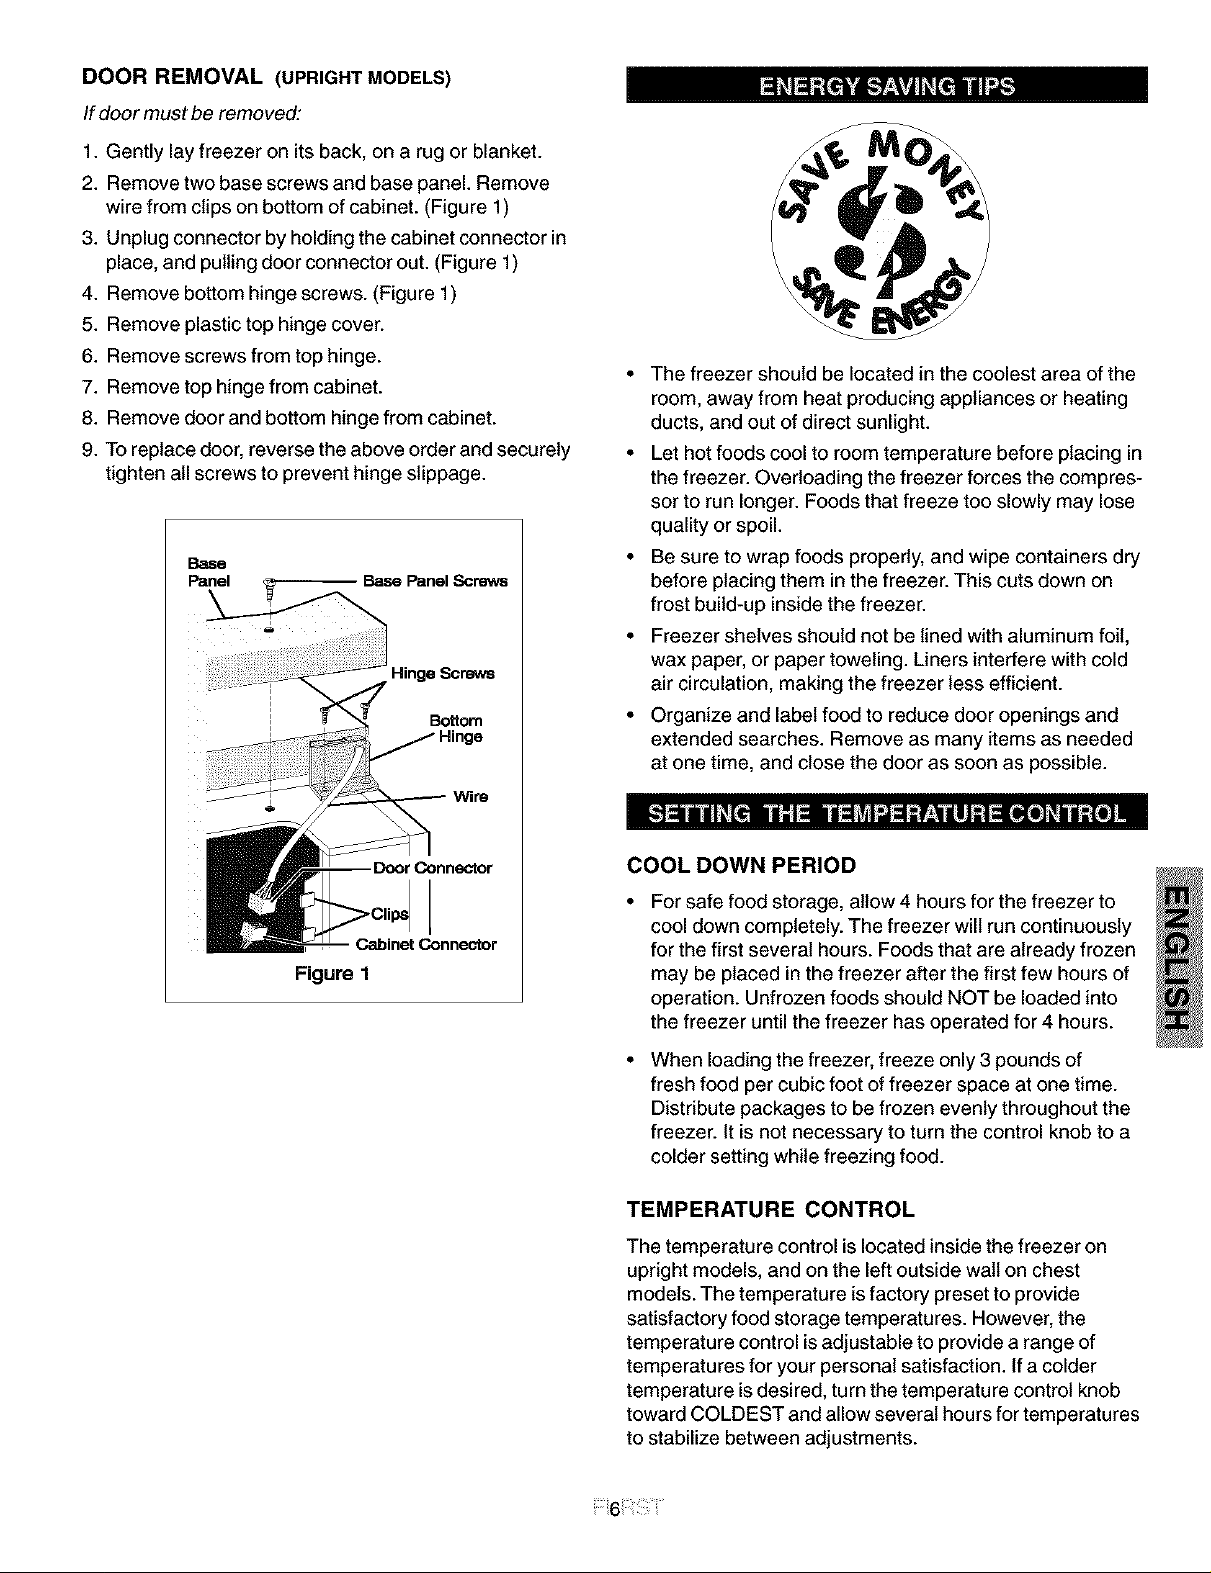
DOOR REMOVAL (UPRIGHT MODELS)
If door must be removed:
1. Gently lay freezer on its back, on a rug or blanket.
2. Remove two base screws and base panel. Remove
wire from clips on bottom of cabinet. (Figure 1)
3. Unplug connector by holding the cabinet connector in
place, and pulling door connector out. (Figure 1)
4. Remove bottom hinge screws. (Figure 1)
5. Remove plastic top hinge cover.
6. Remove screws from top hinge.
7. Remove top hinge from cabinet.
8. Remove door and bottom hinge from cabinet.
9. To replace door, reverse the above order and securely
tighten all screws to prevent hinge slippage.
Base Panel Screws
Hinge Screws
Bottom
• The freezer should be located in the coolest area of the
room, away from heat producing appliances or heating
ducts, and out of direct sunlight.
• Let hot foods cool to room temperature before placing in
the freezer. Overloading the freezer forces the compres-
sor to run longer. Foods that freeze too slowly may lose
quality or spoil.
• Be sure to wrap foods properly, and wipe containers dry
before placing them in the freezer. This cuts down on
frost build-up inside the freezer.
• Freezer shelves should not be lined with aluminum foil,
wax paper, or paper toweling. Liners interfere with cold
air circulation, making the freezer less efficient.
• Organize and label food to reduce door openings and
extended searches. Remove as many items as needed
at one time, and close the door as soon as possible.
Figure 1
COOL DOWN PERIOD
For safe food storage, allow 4 hours for the freezer to
cool down completely. The freezer will run continuously
for the first several hours. Foods that are already frozen
may be placed in the freezer after the first few hours of
operation. Unfrozen foods should NOT be loaded into
the freezer until the freezer has operated for 4 hours.
When loading the freezer, freeze only 3 pounds of
fresh food per cubic foot of freezer space at one time.
Distribute packages to be frozen evenly throughout the
freezer. It is not necessary to turn the control knob to a
colder setting while freezing food.
TEMPERATURE CONTROL
The temperature control islocated inside the freezer on
upright models, and on the left outside walt on chest
models. The temperature is factory preset to provide
satisfactory food storage temperatures. However, the
temperature control is adjustable to provide a range of
temperatures for your personal satisfaction. If a colder
temperature is desired, turn the temperature control knob
toward COLDEST and allow several hours for temperatures
to stabilize between adjustments.

Alarm Function Table
NOTE: Your freezer may have some, or all of the
features listed below. Become familiar with these
features, and their use and care.
SECURITY LOCK WITH POP-OUT KEY
This security lock fastens the door snugly, ensuring stored
food is secure. To lock or unlock the freezer, push the key
into the lock and turn. The key pops out of the lock after it
has been turned.
POWER ON LIGHT
The yellow Power On indicator light indicates that the freezer is
properly connected to electrical power. The light glows even
when the temperature control is turned to OFF. If the light goes
out, refer to Freezer Does Not Run Section in the Trouble-
shooting Guide. If the freezer appears to be operating, the
light element may be burned out. Call an authorized servicer
for replacement.
TEMP ALARM (ELECTRONIC MODELS)
This feature is designed to provide a warning if the inside
temperatures reach an unsafe level. The Temp. Alarm Feature
operates on household electricity. It will not function if house-
hold electricity is interrupted. (Battery backup models only: A
battery backup feature will take over the alarm system if the
household electricity is interrupted.)
i!i!! Chest Models
i!i!!
iiill
.... iiii! i! i
ii!!_f
Indicator
Yellow LED
Red LED No alarm condldon None
Green LED Off Quick freeze OFF None
Audible Off Normal Operation None
Buzzer
Condition
Steady on
Flashing
(Batleey Me_els
Only)
Off
Flashing [n_rlor temperature too Pressing a_ld hold alarm
Flasillng ev{_ry 5 Power Iost to the unit and When power i_ reslore;l, red
$ef_nds in[erlor temt'_ratur¢ t{,,o LED flashe_ untiJ inlerlor
(Battecy Me_lels warm temperature drops
Onl_l
On Quick freeze ON None
One chirp _v_ry 4 Interior temperature too M0rp#nt_ri]y pressing _arm off
s_x;onds warm button shut_ off audlbte alarm
Two chirps every T0 s_p chirp p_ss and iloId ataml
10 seconds Low / No battery off button _r 3 seconds¸ Replace
(Battecy Me_lels with new 9 voIt battery.
Onl_l
Two shot[ chirps Power Iost to the unit and Morp#nt_ri]y pressing _arm off
every 5 seconds in[erlor temt'_ratur¢ t{,,o button shut_ off audlbte alarm
(Battecy Me_lels warm
Only)
Function
Normal Operadon
Low / No battery
warm 0ff butch until red
Replace with new 9 volt battery
LED stops flashing.
Re.spouse
Nolle
HIGH-TEMP ALARM SWITCH (SOME MODELS)
An audible alarm will sound if the freezer temperature reaches
unsafe levels. The alarm operates on household electricity. If
the power fails, the alarm will not perform.
An ON/OFF switch allows the high temperature alarm to be
deactivated if desired. NOTE: You must open the freezer door to
view the alarm switch. The freezer is shipped with the switch in
the OFF position. After the freezer has run long enough to
lower the temperature, you may set the switch to the ON
position.
• To activate the alarm, set the switch to the ON position.
• To deactivate the alarm, set the switch to the OFF position.
UprightModels
When the freezer is initially plugged in, the red Temp. Alarm
Indicator Light blinks. The indicator light will continue to blink
until the freezer has reached a safe freezing temperature. If a
malfunction causes an unsafe temperature inside the freezer,
the red light will blink and the buzzer will sound. To silence the
buzzer, press the ALARM OFF button. The Indicator Light will
continue to blink until a safe freezing temperature is again
reached. If the problem is not resolved within 12 hours, the
buzzer will turn on again.
If the ALARM OFF button is not pressed, the buzzer will turn
itself off automatically after 48 hours, but the red Temp Alarm
Light will continue to blink.
High:Temp Alarm Switch
BLUE DEFROST BUTTON (SOME CHEST MODELS)
IMPORTANT:It is time to defrost and clean the freezer when the
blue defrost button is completely covered with frost.
QUICK FREEZE (SOMEMODELS)
To activate the Quick Freeze feature, push the switch to the ON
position. The green light will appear, and the freezer will run
continuously (except when in Flash Defrost), driving freezer
temperature to the coldest possible temperatures. The switch
automatically turns off after 72 hours. Use this feature just prior
to adding large quantifies of unfrozen foods (not to exceed 3
pounds per cubic foot of freezer space).
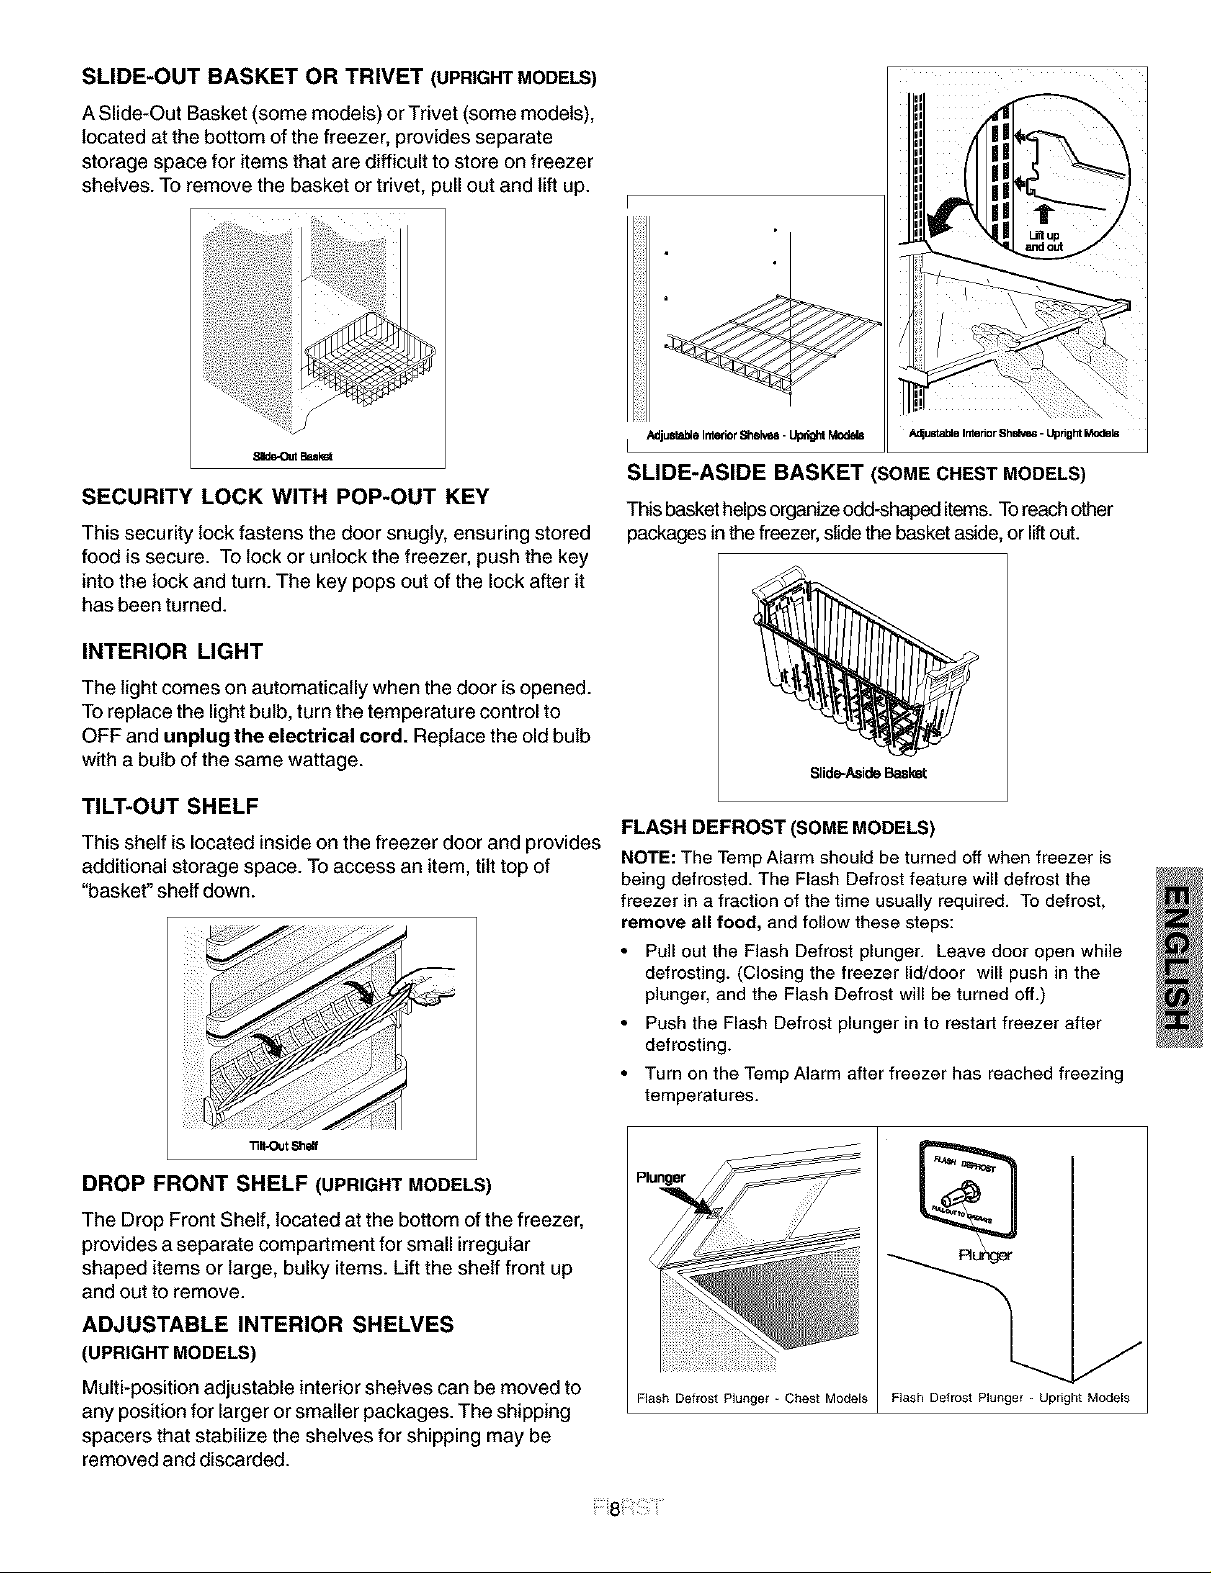
SLIDE-OUT BASKET OR TRIVET (UPRIGHTMODELS)
A Slide-Out Basket (some models) orTrivet (some models),
located at the bottom of the freezer, provides separate
storage space for items that are difficult to store on freezer
shelves. To remove the basket or trivet, pull out and lift up.
q I||1
I Illll
I IIl|l
Illl
Bam_
SECURITY LOCK WITH POP-OUT KEY
This security lock fastens the door snugly, ensuring stored
food is secure. To lock or unlock the freezer, push the key
into the lock and turn. The key pops out of the lock after it
has been turned.
INTERIOR LIGHT
The light comes on automatically when the door is opened.
To replace the light bulb, turn the temperature control to
OFF and unplug the electrical cord. Replace the old bulb
with a bulb of the same wattage.
TILT-OUT SHELF
This shelf is located inside on the freezer door and provides
additional storage space. To access an item, tilt top of
"basket" shelf down.
AdjustableInterior8helve8- tJpdg_Modd8
I
A_ustable Intedor 8hslve6 - Upnght Models
SLIDE-ASIDE BASKET (SOME CHEST MODELS)
This basket helpsorganizeodd-shapeditems.Toreach other
packages in the freezer,slide the basket aside or liftout.
Slide-AsideBasket
FLASH DEFROST (SOME MODELS)
NOTE: The Temp Alarm should be turned off when freezer is
being defrosted. The Flash Defrost feature will defrost the
freezer in a fraction of the time usually required. To defrost,
remove all food, and follow these steps:
Pull out the Flash Defrost plunger. Leave door open while
defrosting. (Closing the freezer lid/door will push in the
plunger, and the Flash Defrost will be turned off.)
Push the Flash Defrost plunger in to restart freezer after
defrosting.
• Turn on the Temp Alarm after freezer has reached freezing
temperatures.
DROP FRONT SHELF (UPRIGHT MODELS)
The Drop Front Shelf, located at the bottom ofthe freezer,
provides a separate compartment for small irregular
shaped items or large, bulky items. Lift the shelf front up
and out to remove.
ADJUSTABLE INTERIOR SHELVES
(UPRIGHTMODELS)
Multi-position adjustable interior shelves can be moved to
any position for larger or smaller packages. The shipping
spacers that stabilize the shelves for shipping may be
removed and discarded.
Plu
Flash Defrost Plunger - Chest Models Flash Deirost Plunger - Upright Models
cold metal surfaces. Do not touch
Damp objects stick to
interior metal surfaceswithwet or
damp hands.
Some upright freezers are frost-free and defrost automati-
cally, but should be cleaned occasionally.
On chest models with a defrost drain, place a shallow
pan or the Divider/Drain Pan (some models) beneath the
drain outlet (Figure 2). A V2inch garden hose adapter
can be used to drain the freezer directly into a floor drain
(Figure 3). Pull out the drain plug inside the freezer, and
pull off the outside defrost drain plug (Figure 4).
BETWEEN DEFROSTINGS
To avoid frequent defrosting, occasionally use a plastic
scraper to remove frost. Scrape with a pulling motion.
Never use a metal instrument to remove frost.
DEFROSTING
It is importantto defrost and clean the freezer when _Ato V2
inch of frost has accumulated. Frost may tend to accumu-
late faster on the upper part of the freezer due to warm,
moist air entering the freezer when the door is opened.
Remove food and leave the door open when defrosting the
freezer.
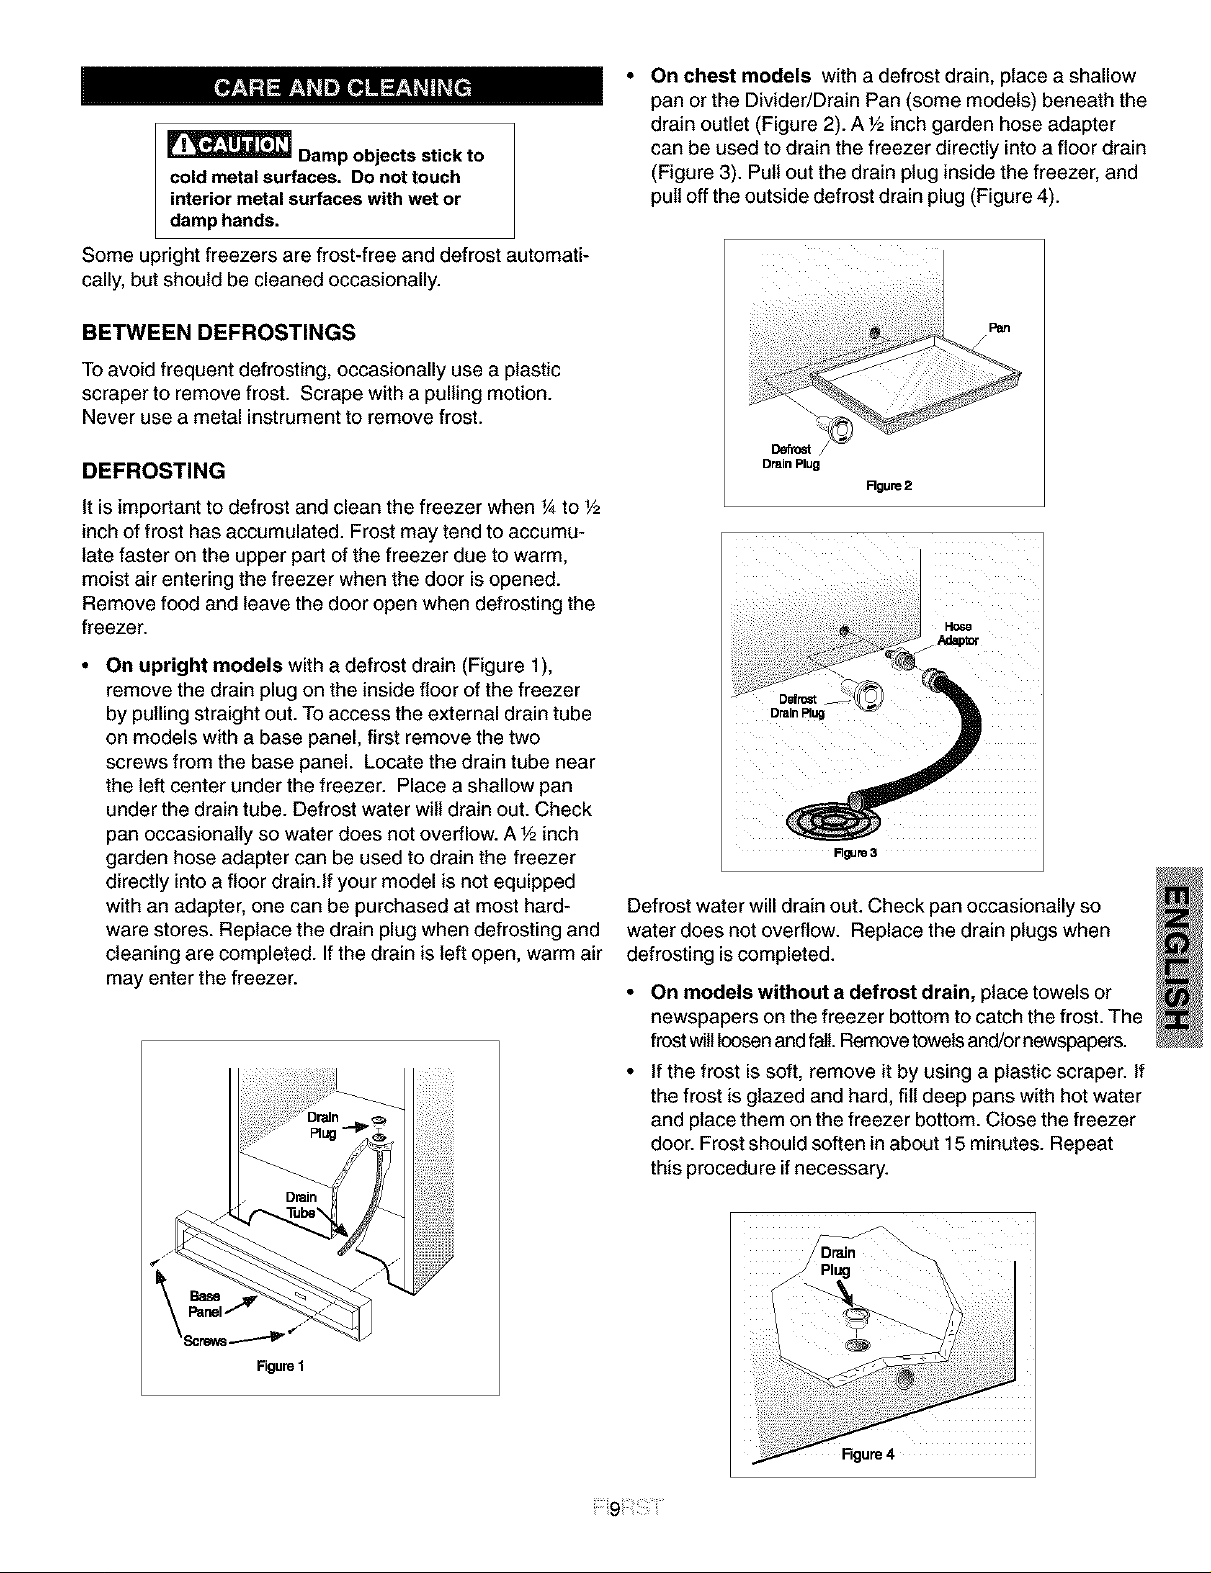
• On upright models with a defrost drain (Figure 1),
remove the drain plug on the inside floor of the freezer
by pulling straight out. To access the external drain tube
on models with a base panel, first remove the two
screws from the base panel. Locate the drain tube near
the left center under the freezer. Place a shallow pan
under the drain tube. Defrost water will drain out. Check
pan occasionally so water does not overflow. A V2inch
garden hose adapter can be used to drain the freezer
directly into a floor drain.If your model is not equipped
with an adapter, one can be purchased at most hard-
ware stores. Replace the drain plug when defrosting and
cleaning are completed. If the drain is left open, warm air
may enter the freezer.
Pan
Drain Plug
Rgure2
D_frcst
DrainRug
R_Jre 3
Defrost water will drain out. Check pan occasionally so
water does not overflow. Replace the drain plugs when
defrosting is completed.
On models without a defrost drain, place towels or
newspapers on the freezer bottom tocatch the frost. The
frostwill loosen andfall. Removetowels and/or newspapers.
If the frost is soft, remove it by using a plastic scraper. If
the frost is glazed and hard, fill deep pans with hot water
and place them on the freezer bottom. Close the freezer
door. Frost should soften in about 15 minutes. Repeat
this procedure if necessary.
Base
Panel
Figure1
 Loading...