


Use & Care Guide
Manual de Usoy Cuidado
English / Espa6ol
Models/Modelos: 116.21714
I(enmore
Canister Vacuum
Aspiradora
PiN C01ZDPTOIDUO_- I(COlZDPTZOUD
Sears Brands Management Corporat_o_
Hoffman Estates, JL60179 U.S.A
www.kenmore.com
Ww_.seat's.com
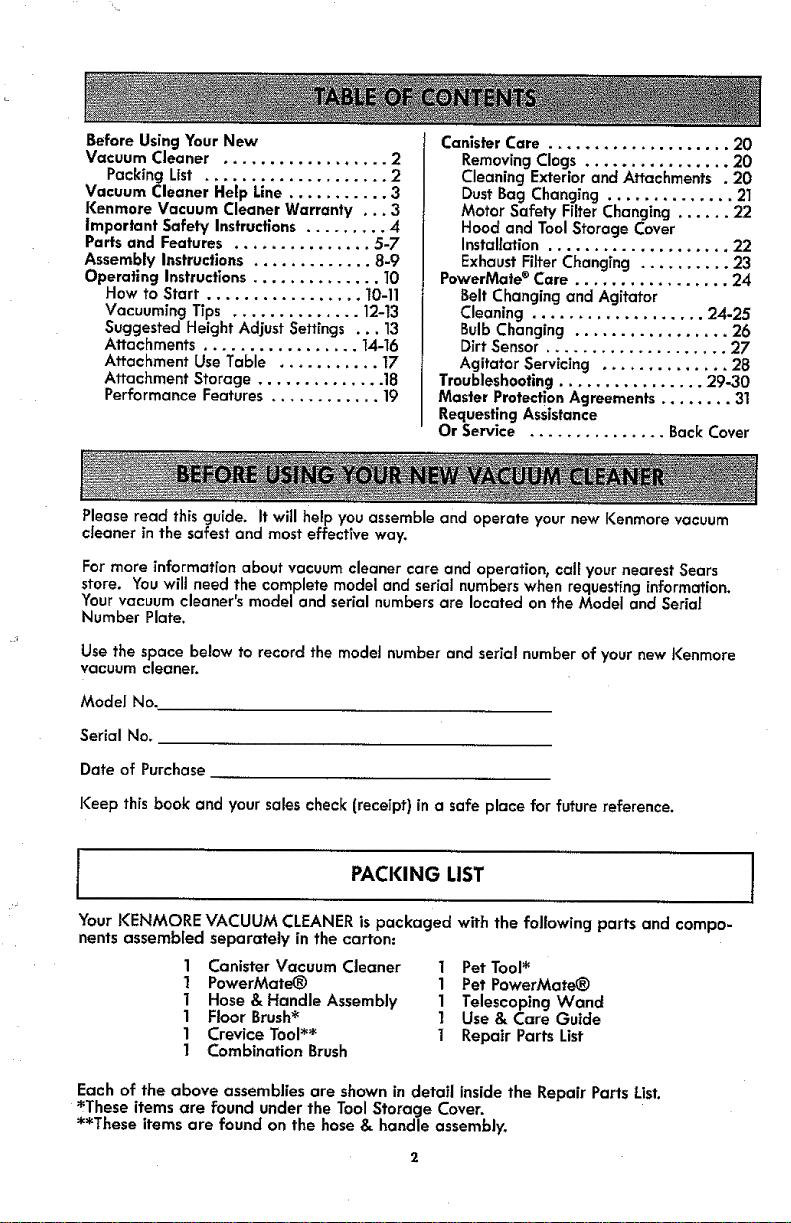
Before Using Your New
Vacuum Cleaner .................. 2
Packing List .................... 2
Vacuum Cleaner Help Line ........... 3
l(enmore Vacuum Cleaner Warranty .. _3
Important Safety Instructions ......... 4
Parts and Features ............... 5-7
Assembly Instructions ............. 8-9
Operating Instructions .............. 10
How to Start ................. 10-11
Vacuuming TTps .............. 12-13
Suggested Height Adjust Settings ... 13
Attachments ................. 14-I6
Attachment Use Table ........... 17
Attachment Storage .............. 18
Performance Features ............ 19
Pleaseread thisguide. It will helpyou assembleand operate your newKenmorevacuum
cleaner in the safest and most effectTveway.
For more information about vacuum cleaner care and operation, call your nearest Sears
store. You will need the complete model and serial numbers when requesting information,
Your vacuum cleaner's model and serial numbers are located on the Model and Serial
Number Plate.
Use the space below to record the modet numberand serial numberof yournewKenmore
vacuumcleaner.
Model No.
Serial No,
Date of Purchase
Canisler Care .................... 20
Removing Clogs ................ 20
Cleaning Exterior and Attachments . 20
Dust Bag Changing .............. 21
Motor Safety Filter Changing ...... 22
Hood and Tool Storage Cover
Installation .................... 22
Exhaust Filter Changing .......... 23
PowerMate ®Care ................. 24
Belt Changing and Agitator
::
Dirt Sensor .................... 27
Agitator Servicing .............. 28
Troubleshooting ................ 29-30
Master Protection Agreements ........ 31
Requesting Assistance
Or Service ............... Back Cover
Keep this book and your sales check (receipt) in a safe place for future reference.
I PACKING LIST [
'(our KENMORE VACUUM CLEANERispackaged with the following parts and compo-
nents assembled separately in the carton:
1 Canister Vacuum Cleaner 1 Pet Tool*
1 PowerMate_ 1 Pet PowerMate®
1 Hose & Handle Assembly 1 Telescoping Wand
1 Floor Brush* ] Use & Care Guide
1 Crevice Tool** 1 Repair Parts List
1 Combination Brush
Each of the above assemblies are shown in detail inside the Repair Parts List.
*These items are found under the Tool Storage Cover.
**These items are found on the hose & handle assembly.
1-877-531-7321
8:00am-S:00pm EST, M-F
(U.S.A. and Canada)
One Year Limited Warranty
When assembled, operated and maintained according to all instructions supplied with
the product, if this vacuum cleaner fails due to a defect in material or workmanship
within one year from the date of purchase, return it to any Sears store, Sears Parts &
Repair Center or other Kenmore outlet for free repair.
If this vacuum cleaner isused for otherthan private family purposes,this warranty
appliesfor only 90 days from the date of purchase.
This warranty covers only defects in material and workmanship. Sears will NOT pay for:
I. Expendable items that can wear out from normal use, including but not limited to
filters, belts, light bulbs, and bags.
2. A service technician to instruct the user in correct product assembly, operation or
maintenance.
3. A service technician to clean or maintain this product.
4. Damage to or failure of this product if it is not assembled, operated or maintained
according to all instructions supplied with the product.
5. Damage to or failure of this product resulting from accident, abuse, misuse or use for
other than its intended purpose.
6. Damage to or failure of this product caused by the use of detergents, cleaners,
chemicals or utensils other than those recommended in all instructions supplied with
the product.
Z Damage to or failure of parts or systems resulting from unauthorized modifications
made to this product.
Disclaimer of implied warranties; limitation of remedies
Customer's sole and exclusive remedy under this limited warrant/shall be product
repair as provided herein. Implied warranties, including warranties of merchantability or
fitness for a particular purpose, are limited to one year or the shortest period allowed
by law. Sears shall not be liable for incidental or consequential damages. Some states
and provinces do not allow the exclusion or limitation of incidental or consequential
damages, or limitations on the duration of implied warranties of merchantability or
fitness, so these exclusions or limitations may not apply to you.
This warranty applies only while this vacuum cleaner is used in the United States and
Canada.
Thiswarranty givesyou specificlegal rights, and you may also have other rightswhich
vary from state to state.
Sears Brands Management Corporation, Hoffman Estates, IL 60179 U.S.A
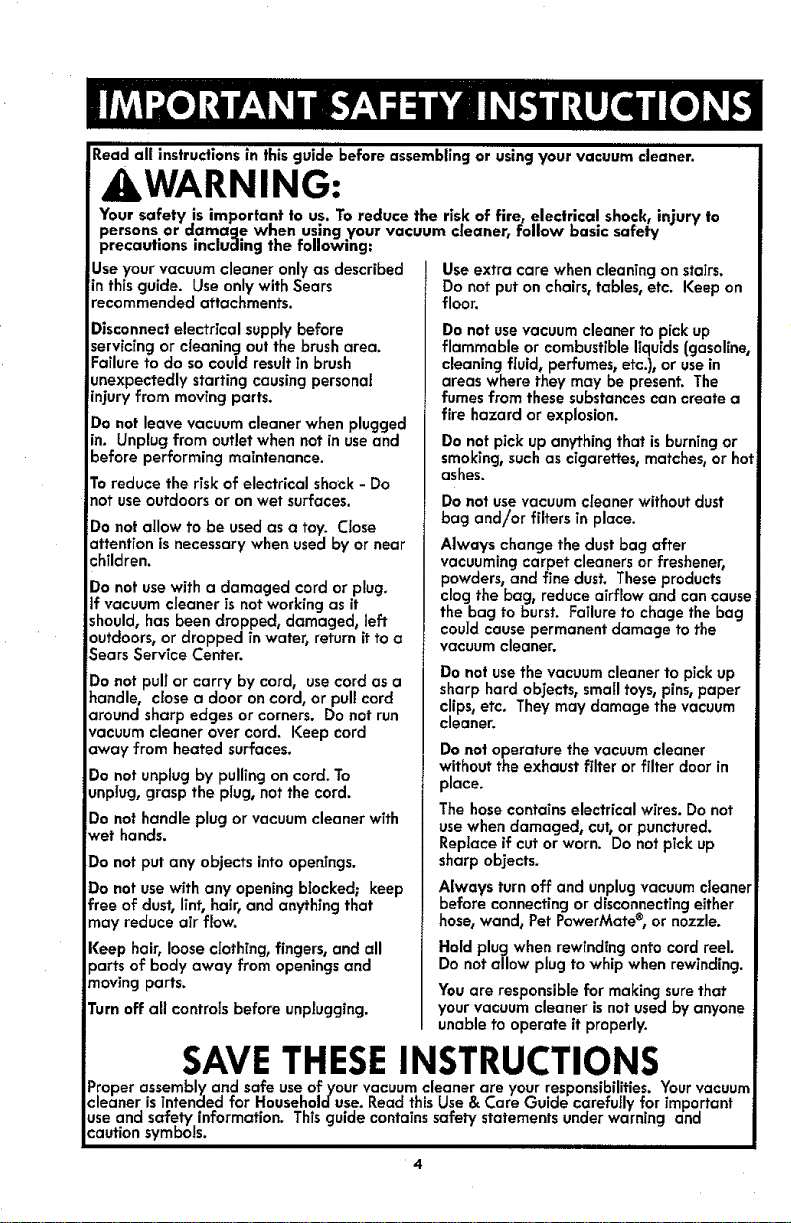
Read all instructions in this guide before assembling or using your vacuum cleaner.
iiiiiiiiiii
,WARNING:
Your safety is important to us. To reduce the risk of fire, electrical shock, injury to
persons or damage when using your vacuum cleaner, follow basic safety
precautions incluaing the following:
Use your vacuum cleaner only as described
in this guide. Use only with Sears
recommended attachments.
Disconnect electrical supply before
servicing or cleaning out the brush area.
Failure to do so could result in brush
unexpectedly starting causing personal
injury from moving parts.
Do not leave vacuum cleaner when plugged
in. Unplug from outlet when not in use and
before performing maintenance.
To reduce the risk of electrical shock - Do
not use outdoors or on wet surfaces.
Do not allow to be used as a toy. Close
attention is necessary when used by or near
children.
Do not use with a damaged cord or plug.
if vacuum cleaner is not working as it
should, has been dropped, damaged, left
outdoors, or dropped Tnwater, return it to a
Sears Service Center.
Do not pull or carry by cord, use cord as a
handle, close a door on cord, or pull cord
around sharp edges or corners. Do not run
vacuum cleaner over cord. Keep cord
away from heated surfaces.
Do not unplug by pulling on cord. To
unplug, grasp the plug, not the cord.
Do not handle plug or vacuum cleaner with
wet hands.
Do not put any objects into openings.
Do not use with any opening blocked; keep
free of dust, lint, hair, and anything that
may reduce air flow.
Keep hair, loose clothing, fingers, and all
parts of body away from openings and
moving parts.
Turn off all controls before unplugging.
Use extra care when cleaning on stairs.
Do not put on chairs, tables, etc. Keep on
floor.
Do not usevacuum cleaner to pick up
flammable or combustible liquids (gasoline,
cleaning fluid, perfumes, etc.), or use in
areas where they may be present. The
fumes from these substances can create a
fire hazard or explosion.
Do not pick up anything that is burning or
smoking, such as cigarettes_ matches, or hot
ashes.
Do not use vacuum cleaner without dust
bag and!or filters in place.
Always change the dust bag after
vacuuming carpet cleaners or freshener,
powders, and fine dust. These products
clog the bag, reduce airflow and can cause
the bag to burst. Failure to chage the bag
could cause permanent damage to the
vacuum cleaner.
Do not usethe vacuum cleaner to pick up
sharp hard objects, small toys, pins, paper
clips, etc. They may damage the vacuum
cleaner.
Do not operature the vacuum cleaner
without the exhaust filter or filter door in
place.
The hose contains electrical wires. Do not
use when damaged, cut, or punctured.
Replace if cut or worn. Do not pTckup
sharp objects.
Always turn off and unplug vacuum cleaner
before connecting or disconnecting either
hose, wand, Pet PowerMate _, or nozzle.
Hold plug when rewinding onto cord reel.
Do not allow plug to whip when rewinding.
You are responsible for making surethat
your vacuum cleaner isnot used by anyone
unable to operate it properly.
SAVE THESEINSTRUCTIONS
PFoperassembly and safe use of your vacuum cleaner are your responsibilities. Your vacuum
cleaner is intended for Household use. Read this Use & Care Guide carefully for important
useand safety intormation. This guide contains safety statements under warning and
caution symbols.
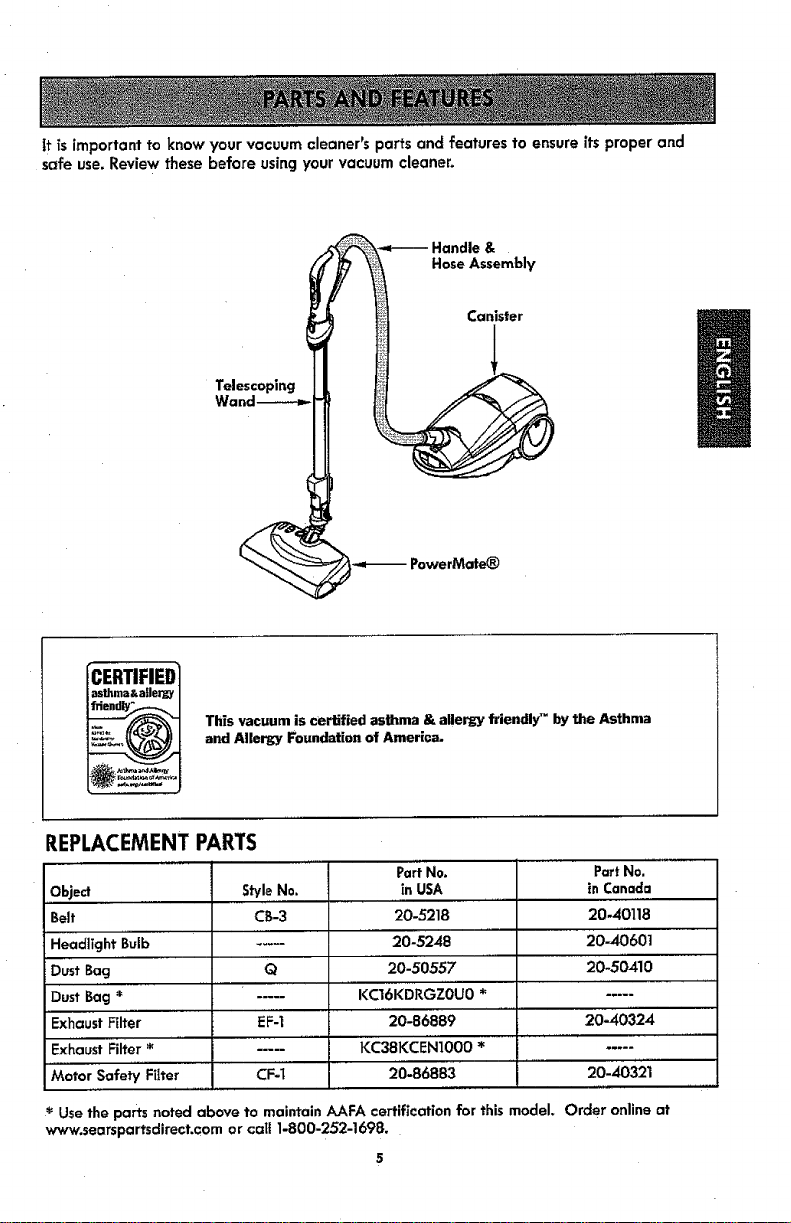
It is important to know your vacuum cleaner's parts and features to ensure its proper and
safe use. Review these before using your vacuum cleaner.
&
HoseAssembly
Canister
1
Telescoping
This vacuum is certified asthma & aUergy friendly" by the Asthma
and Allergy Foundation of America.
REPLACEMENTPARTS
PartNo. PartNo.
Object StyleNo. in USA ..... in Canada
Belt CB-3 20-5218 20-40118
Headlight Bulb ..... '" 20-5248 20-40601
Dust Bag Q " 20-50557 20-50410
Dust Bag * ..... KCI6KDP.GZOU0 * .....
Exhaust Filter _:F-I ....20-86889 .... 20-40324
Exhaust Filter * " -.... KC38KCE'N1000 * ....... -....
MotorSafo_Filter CF_t 20-86883 " ' 2o-4os_i
Use the parts noted above to maintain AAFA certification for this model. Order onlineat
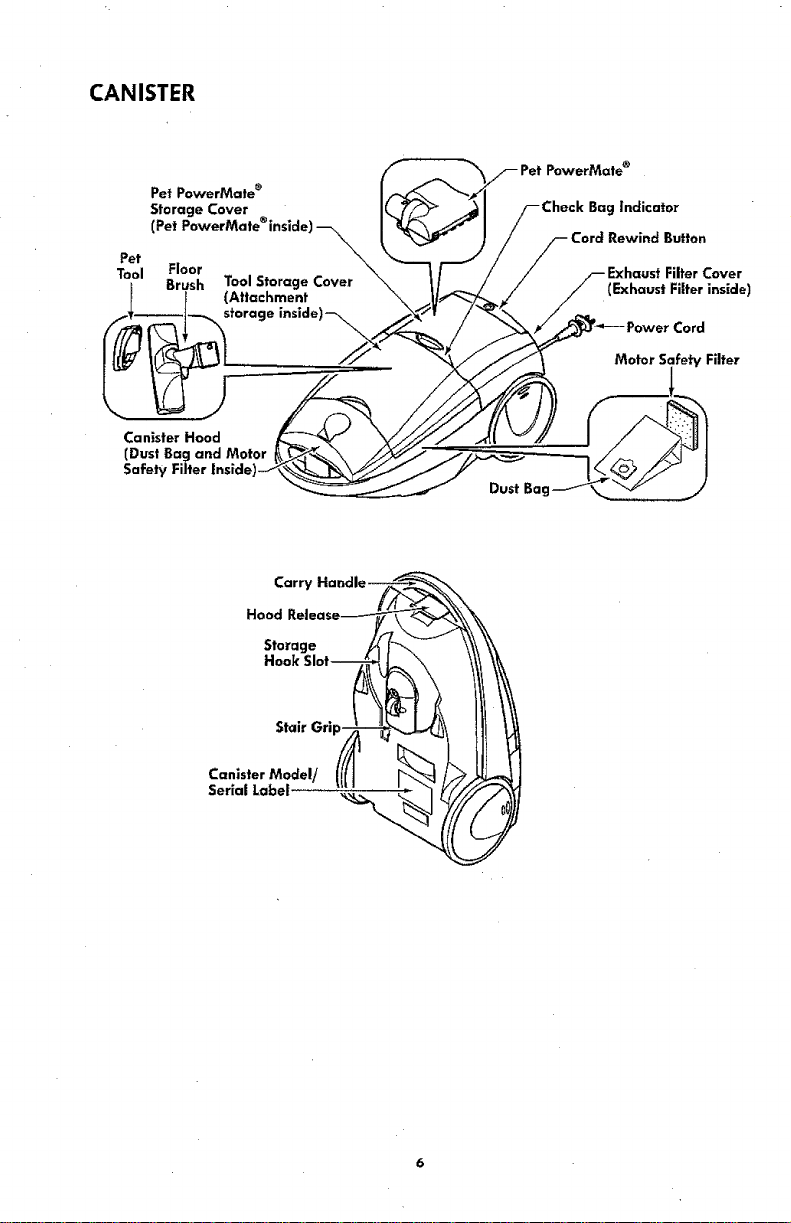
CANISTER
Pet PowerMate _ I,,_'_,
Storage Cover I(_ _'_ .4 /-Check Bag Indicator
//-- Pet PowerMate ®
,,°,,o._o._,o,°°,°.,_°,\.... k-%_ / roo._°e.v,°_o°,,o°
TPo_tl Floor Tool.tora eCover\_"_[ "-_ / / .-- Exhaust Fiiter Cover
Brush ,_L_2q,.ever \. !l_ ,/ / (Exhaust Filter inside)
} (All ....... ., "-. .U_" "-L _._" /
-*_1-'_"°'°°°"'"°'_- X'' /_a/'._--,ow°,_o,,
( g ' _ "
Hood
Storage
Hook
Stair
Canister Model/
Serial Label.
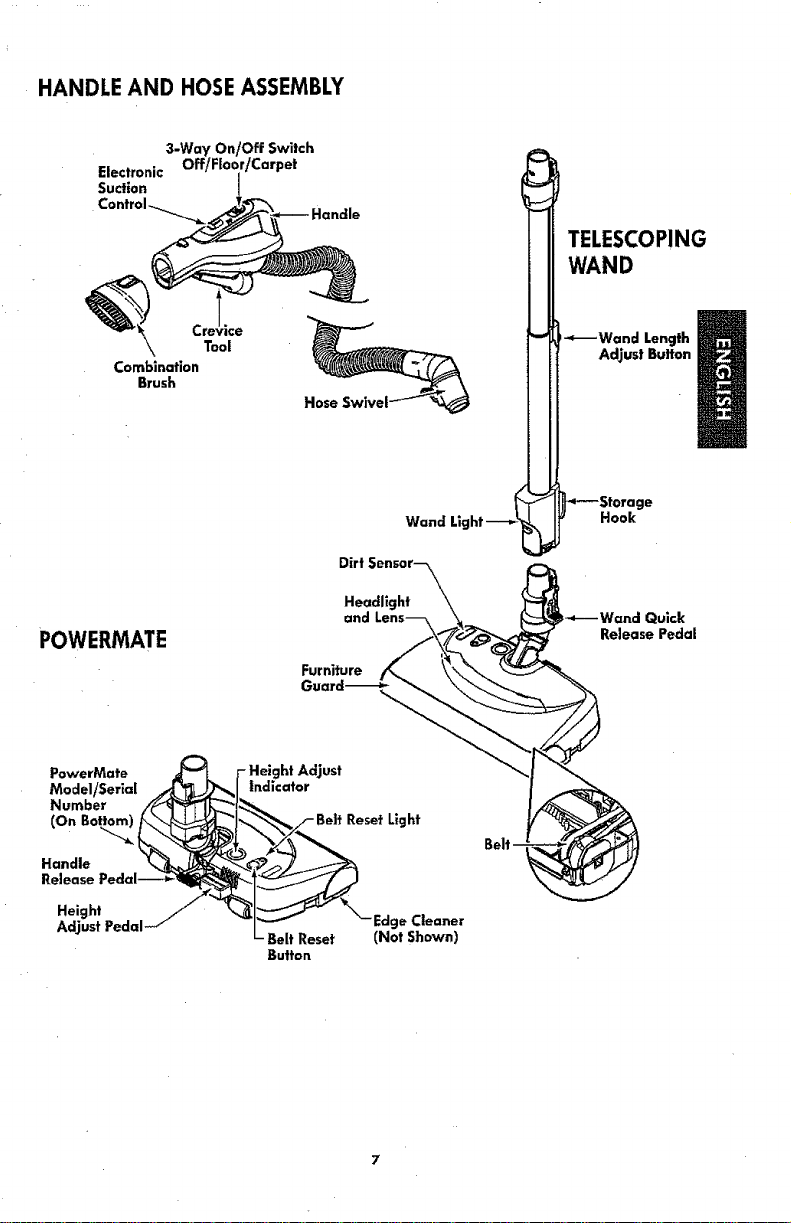
HANDLE AND HOSE ASSEMBLY
3-Way On/Off Switch
Electronic
Suction
TELESCOPING
WAND
Tool
Combination
Brush
Hose
Dirt Sensor--_\
Headlight \\
and Lens_
POWERMATE
Furniture _'_'\\
Ouard__,,
PowerMate _ _-Height AdJust
Model/Serial ,_J Indicator
Number /_d"_:_'ff,'-_!_.._
(On Bottom) [__, _1_"_'_,/- Belt Reset Light
Handle '_._'_._ .P"_
• _1-/ "_ _ " Edge Cleaner
Adjust Pedal *J"
L- Belt Reset (Not Shown)
Button
Wand Light-_
Adjust Buffon
_Wand Length
,_'---Storage
Hook
_---Wand Quick
Release Pedal
i iii
j_ Please pay special attention to these hazard alert boxes, and follow any instruc-
tions given. WARNING statements alert you to such dangers as fire, electric
shock, burns and personal injury. CAUTION statements alert you to such dan-
gers as personal injury and/or property damage.
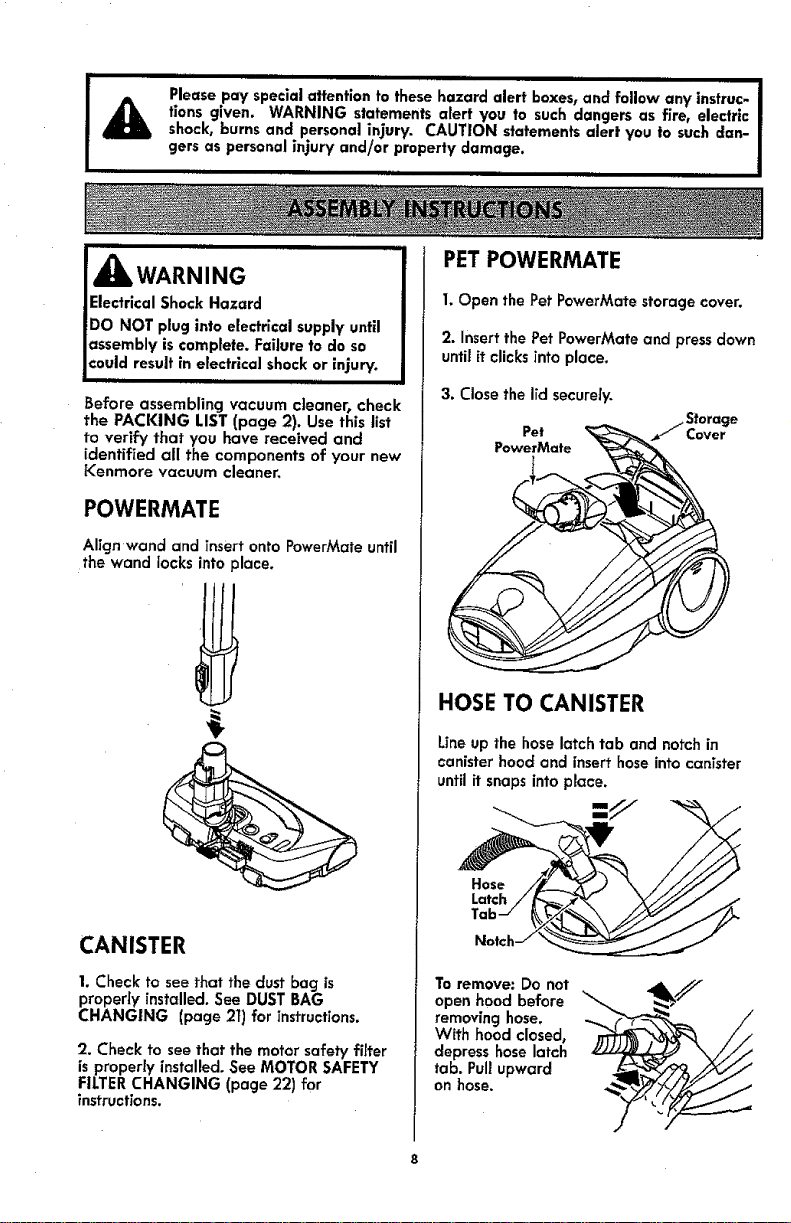
PETPOWERMATE
AWARNING
Electrical Shock Hazard
DO NOT plug into electrical supply until
assembly is complete. Failure to do so
could result in electrical shock or injury.
Before assembling vacuum cleaner, check
the PACKING LIST (page 2). Use this list
to verify that you have received and
identified all the components of your new
[_enmore vacuum cleaner,
1. Open the Pet PowerMate storage cover.
2. Insert the Pet PowerMate and press down
until it clicks into place.
3. Close the lid securely.
Pet ._ Cover
PowerMate
Storage
POWERMATE
Align wand and insert onto PowerMate until
the wand locks into place.
CANISTER
1. Check to see that the dust bag is
propedy installed. See DUST BAG
CHANGING (page 2t) for instructions.
2. Check to see that the motor safety filter
is properly installed. See MOTOR SAFETY
FILTER CHANGING (page 22) for
instructions.
HOSE TO CANISTER
Line up the hose latch tab and notch in
canister hood and insert hose into canTster
until it snaps into place.
Hose
Latch
To remove: Do not
open hood before
removing hose.
With hood closed,
depress hose latch
tab. Pullupward
on hose.
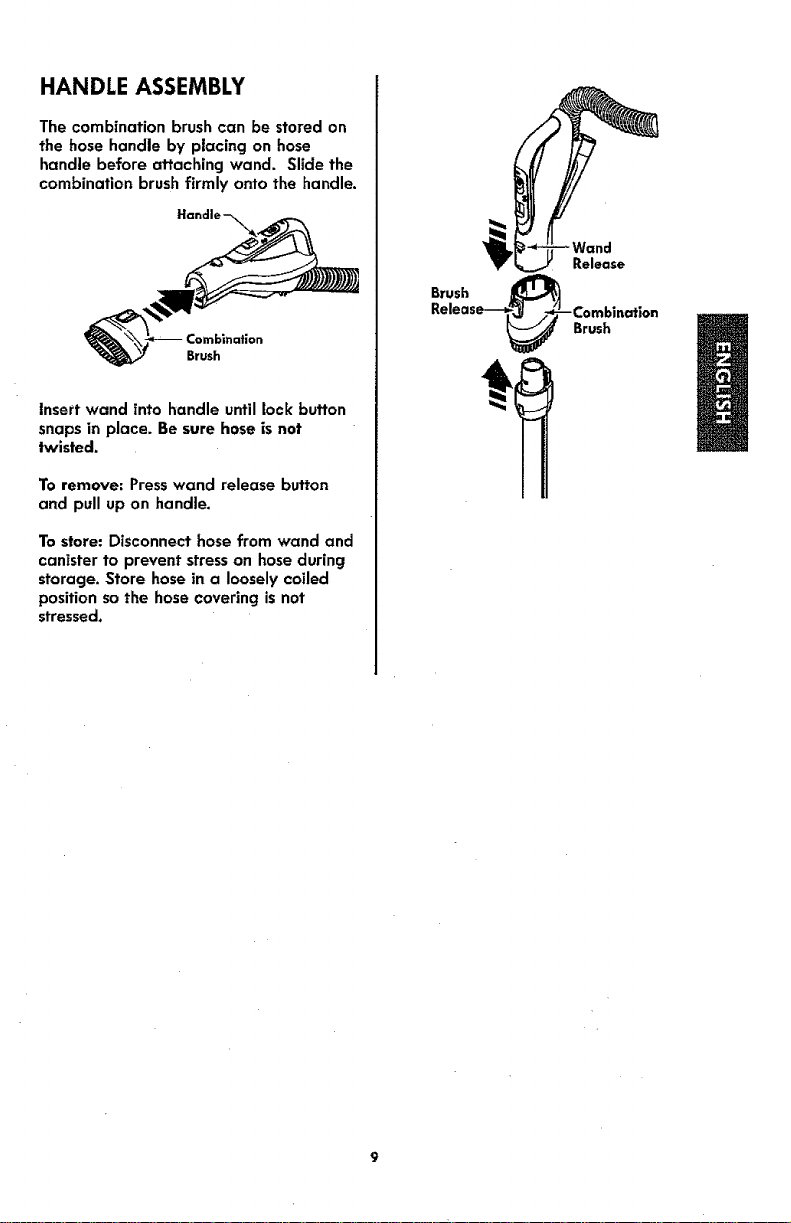
HANDLE ASSEMBLY
The combination brush can be stored on
the hose handle by placing on hose
handle before attaching wand. Slide the
combination brush firmly onto the handle.
Brush
insert wand into handle until lock button
snaps in place. Be sure hose is not
twisted.
To remove: Press wand release button
and pull up on handle,
To store: Disconnect hose from wand and
canister to prevent stress on hose during
storage. Store hose in a loosely coiled
position so the hose covering is not
stressed,
Release
Brush
Release---_:_ /-'_-Combinat]on
Brush
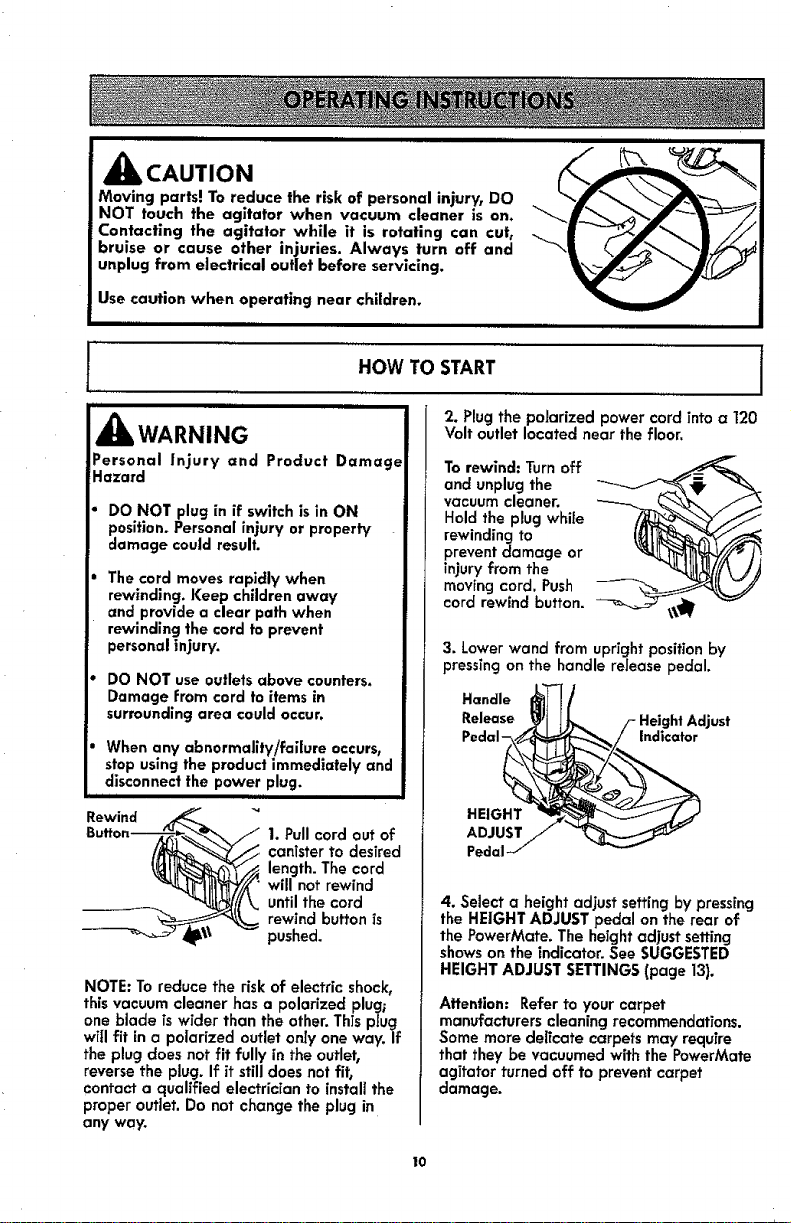
CAUTION
Moving parts! To reduce the risk of personal injury, DO
NOT touch the agitator when vacuum cleaner is on.
Contacting the agitator while it is rotating can cut,
bruise or cause other injuries. Always turn off and
unplug from electrical outlet before servicing.
Use caution when operating near children.
HOW TO
ii
_WARNING
Personal Injury and Product Damage
Hazard
DO NOT plug in if switch is in ON
position. Personal injury or property
damage could result.
The cord moves rapidly when
rewinding. Keep children away
and provide a clear path when
rewinding the cord to prevent
personal injury.
DO NOT use outlets above counters.
Damage from cord to items in
surrounding area could occur.
When any abnormality/failure occurs,
stop using the product immediately and
disconnect the power plug.
II I I
1. Pull cord out of
canister to desired
length. The cord
will not rewind
until the cord
rewind button is
pushed.
NOTE:To reduce the risk of electric shock,
this vacuum cleaner has a polarized plugs
oneblade is wider than the other. This plug
w[il fit in a polarized outlet only oneway. If
the plug does not fit fully inthe outlet,
reversethe plug. If it stilldoes not fit,
contact a qualified electrician to installthe
proper outlet. Do not change the plug in
any way.
START I
2. Plug the polarized power cord into a 120
Volt outlet located near the floor.
To rewind: Turn off
and unplug the
vacuum cleaner.
Hold the plug while
rewinding to
prevent damage or
injury from the
moving cord. Push
cord rewind button.
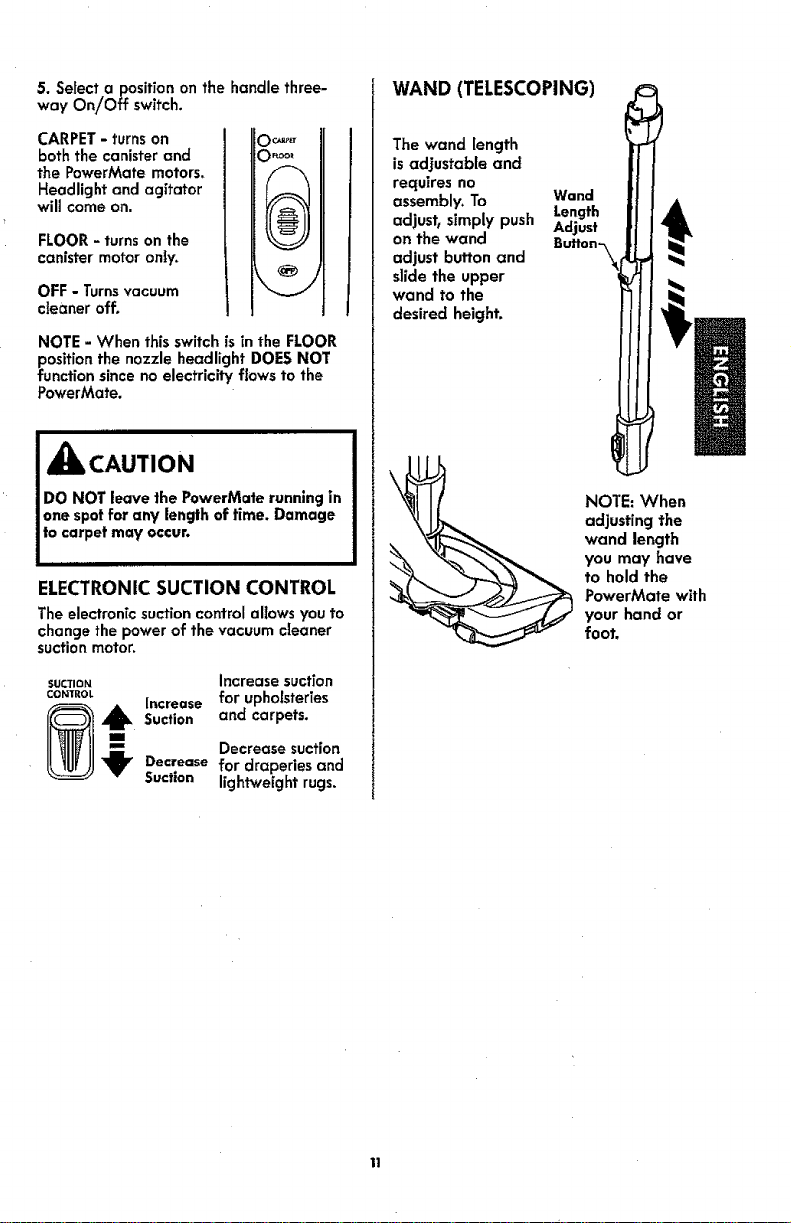
3. Lower wand from upright position by
pressing on the handle release pedal.
PedaIHEtGHT__/____ _ Mdicator
4. Select a height adjust setting by pressing
the HEIGHT ADJUST pedal on the rear of
the PowerMate. The height adjust setting
shows on the indicator. See SUGGESTED
HEIGHT ADJUST SETTINGS (page 13).
Afleniion: Refer to your carpet
manufacturers cleaning recommendations.
Some more deffcate carpets may require
that they be vacuumed with the PowerMate
agitator turned off to prevent carpet
damage.
I0
5. Select a position on the handle three-
way On/Off switch.
CARPET - turnson
both the canister and
the PowerMate motors,
Headlight and agitator
will come on.
FLOOR - turns on the
canister motor only,
OFF - Turnsvacuum
cleaner off.
NOTE - When this switch is in the FLOOR
position the nozzle headlight DOES NOT
function since no electricity flows to the
PowerMate.
®
! _IbCAUTION
DO NOT leave the PowerMate running in
one spot for any length of time. Damage
to carpet may occur.
ELECTRONICSUCTION CONTROL
The electronic suction control allows you to
change the power of the vacuum cleaner
suction motor,
SUCTION Increase suction
CONTROL increase for upholsteries
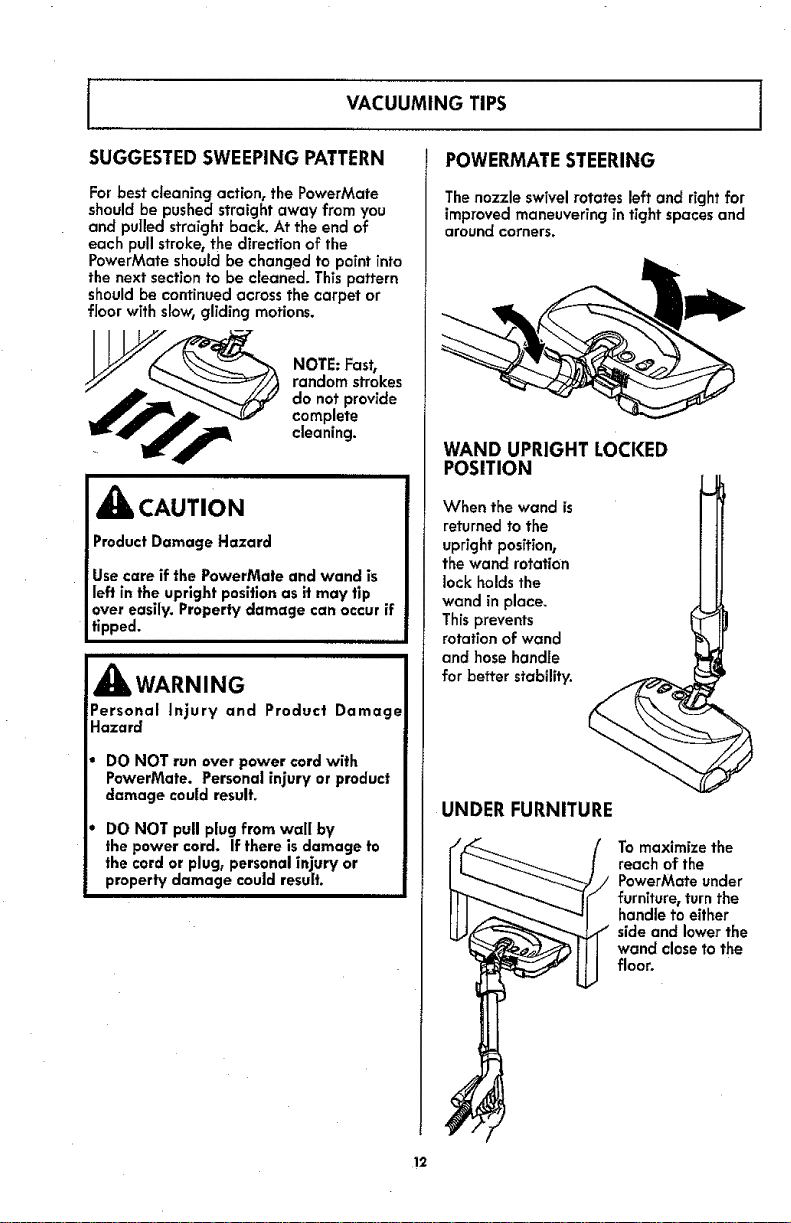
WAND (TELESCOPING)
The wand length
is adjustable and
requires no
assembly. To
adjust, simply push
on the wand
adjust button and
slide the upper
wand to the
desired height,
Wand
Length
Adjust
Button--_\
NOTE: When
adjusting the
wand length
you may have
to hold the
PowerMate with
your hand or
foot.
=J-- Decrease suction
41k Suction and carpets,
Decrease for draperies and
Suction lightweight rugs.
I VACUUMING TIPS I
SUGGESTEDSWEEPING PATTERN
For best cleaning action, the PowerMate
should be pushed straight away from you
and pulled straight back. At the end of
each pull stroke, the direction of the
PowerMate should be changed to point into
the next section to be cleaned. This pattern
should be continued across the carpet or
floor with slow, gliding motions.
NOTE: Fast,
random strokes
do not provide
complete
cleaning.
A CAUTION
Product Damage Hazard
Use care if the PowerMate and wand is
left in the upright position as it may tip
over easily. Property damage can occur if
tipped.
IlUffll/11 I I/I
AWARNING
Personal Injury and Product Damage
Hazard
POWERMATESTEERING
The nozzle swivel rotates left and right for
improved maneuvering in tight spaces and
around corners.
WAND UPRIGHT LOCKED
POSITION
When the wand is
returned to the
upright posftion,
the wand rotation
lock holds the
wand in place.
This prevents
rotation of wand
and hose handle
for better stability.
DO NOT run over power cord with
PowerMate. Personal injury or product
damage could result.
DO NOT pull plug from wail by
the power cord. If there is damage to
the cord or plug, personal injury or
properly damage could result.
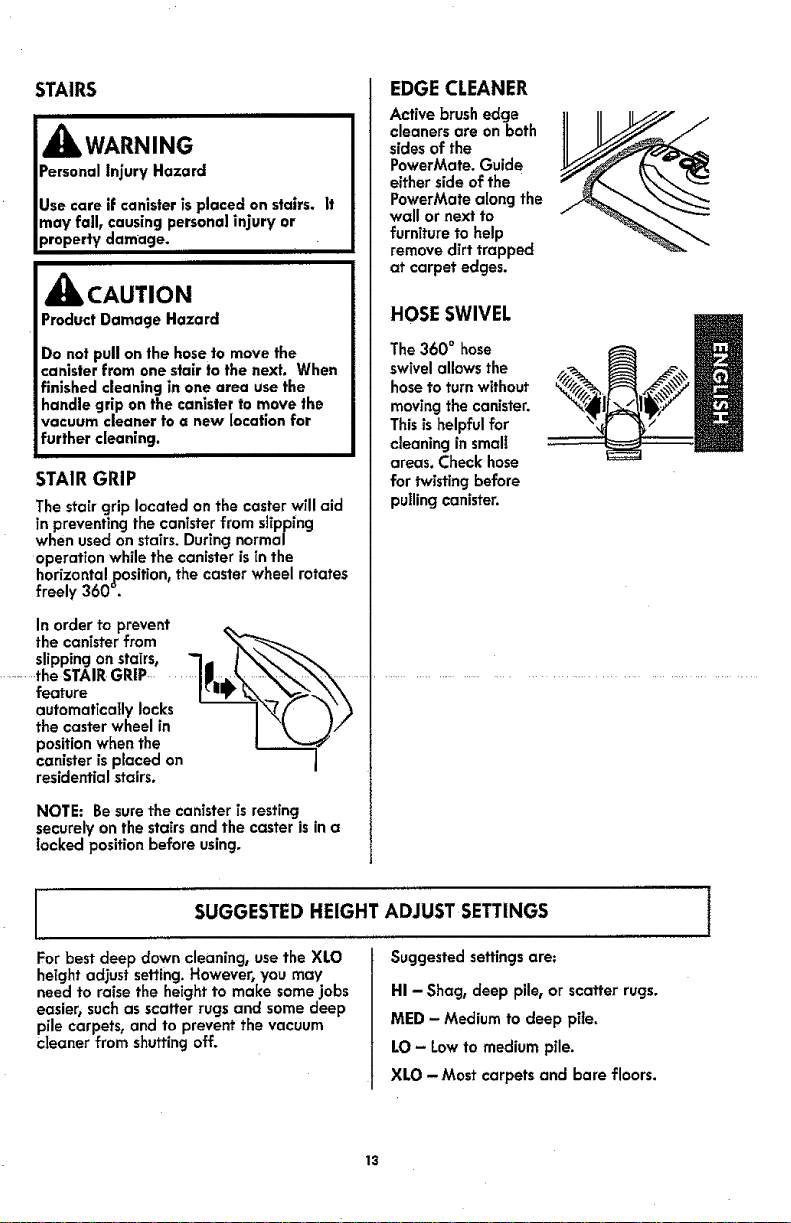
UNDER FURNITURE
To maximize the
reach of the
PowerMate under
furniture, turn the
handle to either
side and lower the
wand close to the
floor.
]2
STAIRS
WARNING
Personal Injury Hazard
Use care if canister is placed on stairs. It
may fall, causing personal injury or
property damage. .
,_ CAUTION
Product Damage Hazard
Do not pull on the hose to move the
canister from one stair to the next. When
finished cleaning in one area use the
handle grip on the canister to move the
vacuum cleaner to a new location for
further cleaning.
;TAIRGRIP
Thestairgrip located onthe casterwill aid
in preventing thecanister from slipping
whenusedon stairs. During normal
operation whilethe canister isin the
horizontal position, the caster wheel rotates
freely 360".
In order to prevent
the canister from
slipping on stairs,
............the STAIR GRIP-
feature
automaticaIly locks
the caster wheel in
position when the
canister is placed on
residential stairs.
NOTE: Be sure the canister is resting
securely on the stairs and the caster is in a
locked position before using.
i
EDGE CLEANER
Active brush edge
cleanersareonboth
sidesof the
PowerMate.Guide
either sideof the
PowerMatealong the
wall or nextto
furniture to help
removedirt trapped
at carpet edges.
HOSESWIVEL
The 360 ° hose
swivel allows the
hose to turn without
moving the canister.
Thisis helpful for
cleaning in small
areas. Check hose
for twisting before
pulling canister.
SUGGESTEDHEIGHT ADJUST SETTINGS
For best deep down cleaning, use the XLO
height adjust setting. However, you may
need to raise the height to make some jobs
easier, such as scatter rugs and some deep
pile carpets, and to prevent the vacuum
cleaner from shutting off.
Suggestedsettingsare=
HI - Shag, deep pile,or scatterrugs.
MED- Mediumto deep pite.
LO- Lowto medium pile.
XLO- Mostcarpets and bare floors.
13
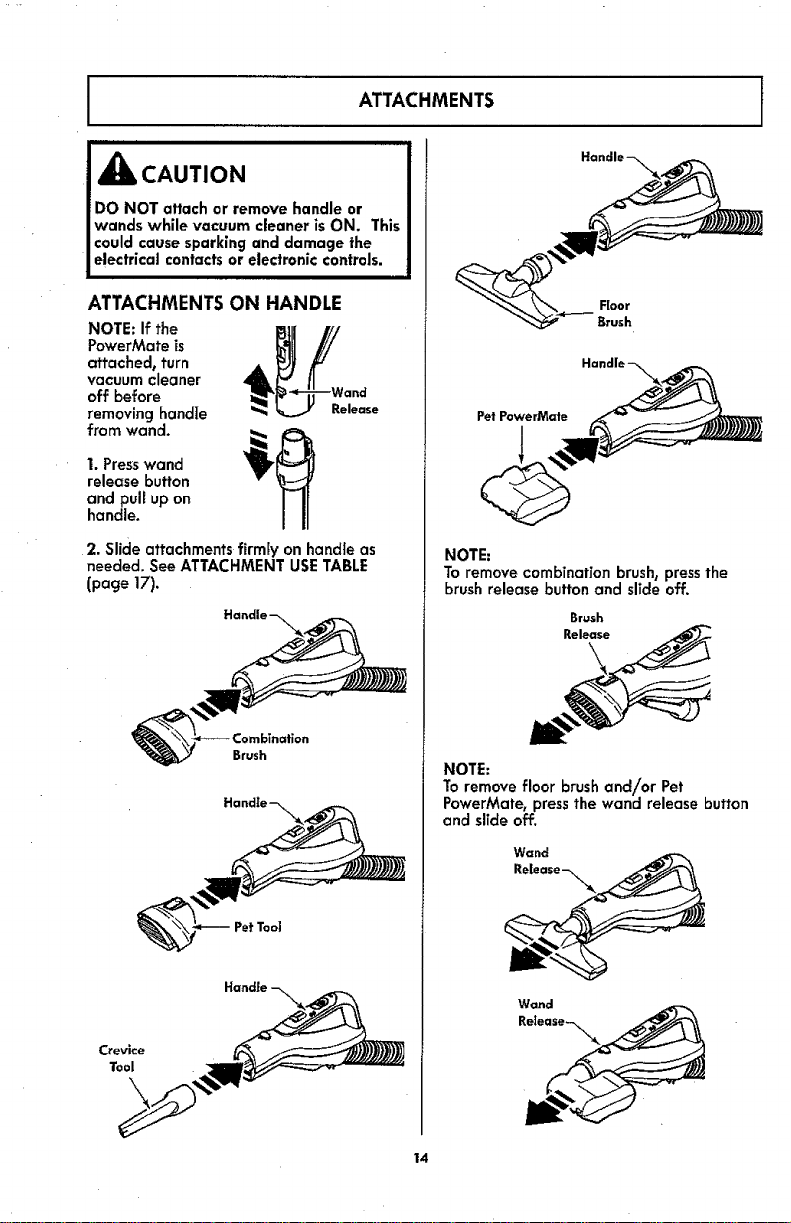
ATTACHMENTS
DO NOT attach or remove handle or
wands while vacuum cleaner is ON. This
,_ CAUTION I
could cause sparking and damage the
electrical contacts or electronic controls.
ATTACHMENTS ON HANDLE
NOTE: If the
PowerMate is
attached, turn
vacuum cleaner
off before
removing handle
from wand.
1. Press wand
release button
and pull up on
handle.
2. Slide attachments firmly on handfe as
needed. See ATTACHMENT USE TABLE
(page 17).
Release
Pet PowerMate
NOTE:
To remove combination brush, press the
brush release button and slide off.
Brush
Release
C_'evice
Tool
Brush
Pet Tool
NOTE:
To remove floor brushand!or Pet
PowerMate, press the wand release button
and slTdeoff.
Wand
14
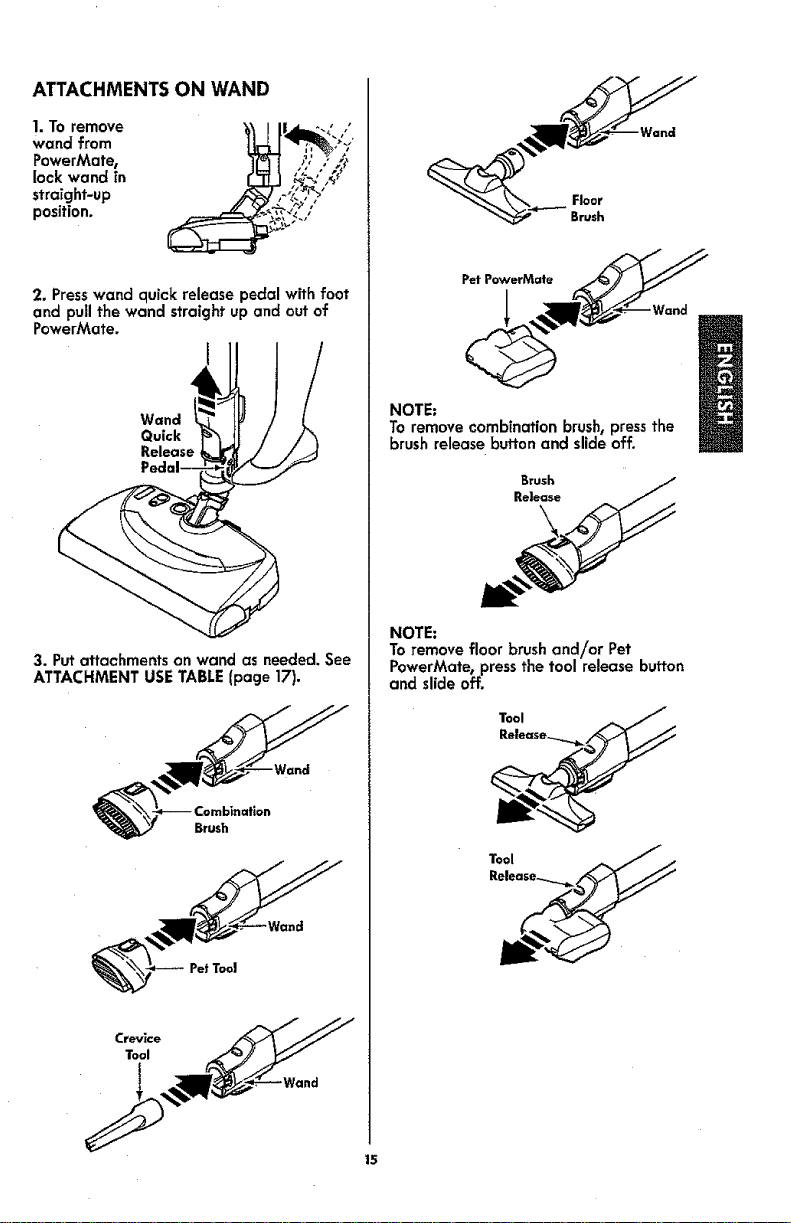
ATTACHMENTS ON WAND
1. To remove
wand from
PowerMate,
lock wand in
straight-up
position.
Floor
Brush
2. Press wand quick release pedal with foot
and pull the wand straight up and out of
PowerMate.
Quick
Wand
Release
3. Put attachments on wand as needed. See
ATTACHMENT USE TABLE (page 17).
Brush
PetPowerMate
l
NOTE:
To remove combination brush, pressthe
brush release buffon and slide off.
Brush
Release
NOTE:
To remove floor brush and/or Pet
PowerMate, press the tool release button
and slide off.
Tool
Crevice
Tool
Pet Tool
15
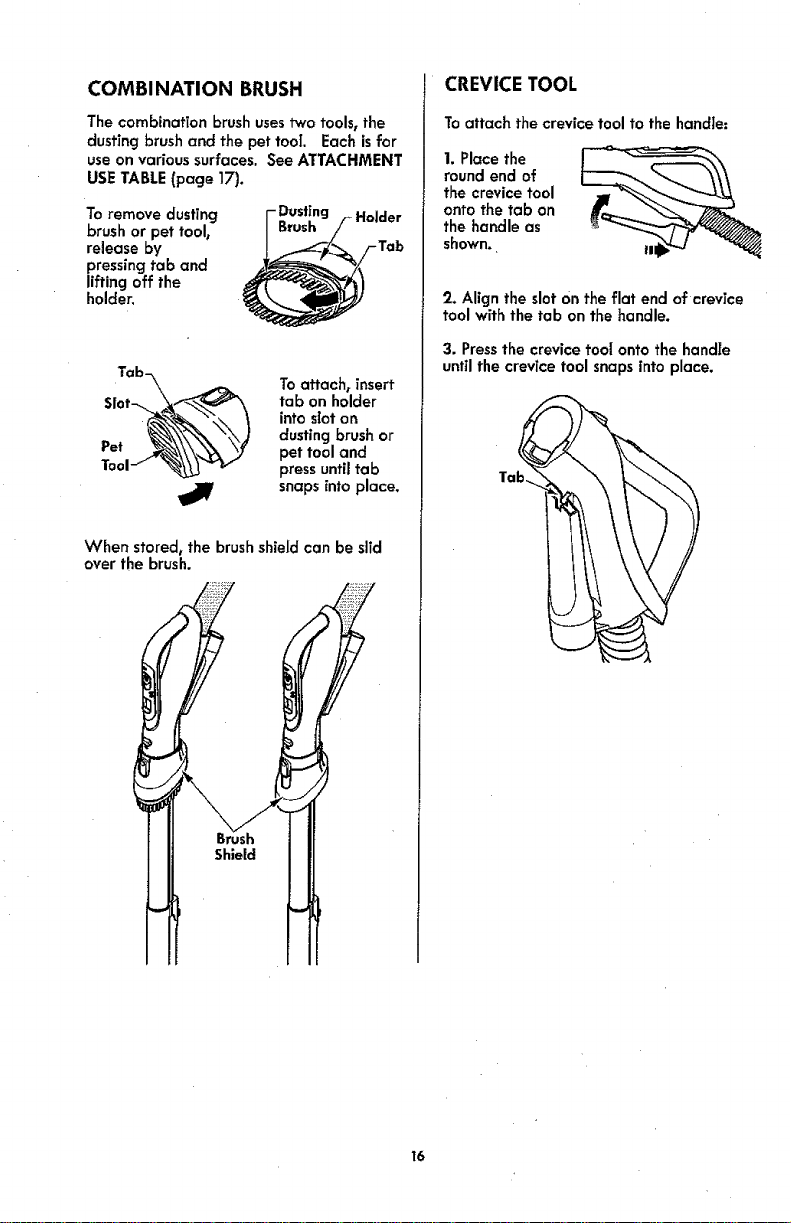
COMBINATION BRUSH
The combination brush usestwo tools, the
dusting brush and the pet toot. Each is for
use on various surfaces. See ATTACHMENT
USE TABLE (page 17).
To remove dusting J- Holder
brush or pet tool, BDrUuSstLngf
pressing tab and
lifting off the
holder,
release by ___!-Tab
Tab-
$1et-_ tab on holder
1 dusting brush or
Pet pet tool and
When stored, the brush shield can be slid
over the brush.
To attacheinsert
into sloton
press until tab
snaps _nto place,
CREVICETOOL
To attach the crevice tool to the handle:
1. Place the
round end of
the crevice tool
onto the tab on
the handle as
shown.
2. Align the slot On the flat end of crevice
tool wffh the tab on the handle.
3. Pressthe crevice tool onto the handle
until the crevice tool snaps into place.
Tab l
Shield
16
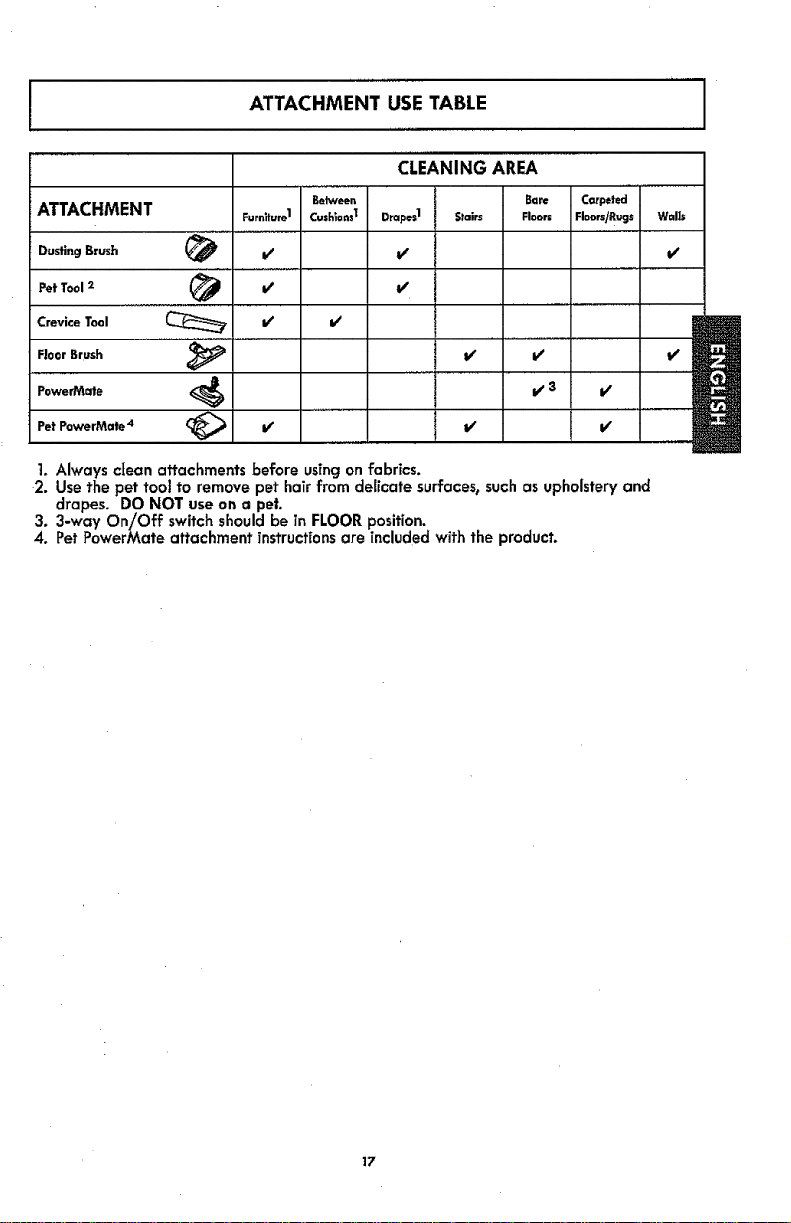
I ATTACHMENT USE TABLE
CLEANING AREA
ATTACHMENT Fumlture] Cush;ons ! Drapes ] SIairs Floor; Floors/Augs Walls
Dusting Brush (_ Vi I/ V*
PetTool2 _ it IV'
CreviceTool V' V'
FloorBrush V' V' i/ Ju
Power_,e _ ,3 _
Pet PowerMate
1. Always clean attachments before using on fabrics.
2. Use the pet tool to remove pet hair from delicate surfaces, such as upholstery and
drapes. DO NOT use on a pet.
3. 3-way On/Off switch should be in FLOOR position.
,4. Pet PowerMate attachment instructions are Tncluded with the product.
4
Between Bare Carpeted
m
-
m
17
ATTACHMENT STORAGE
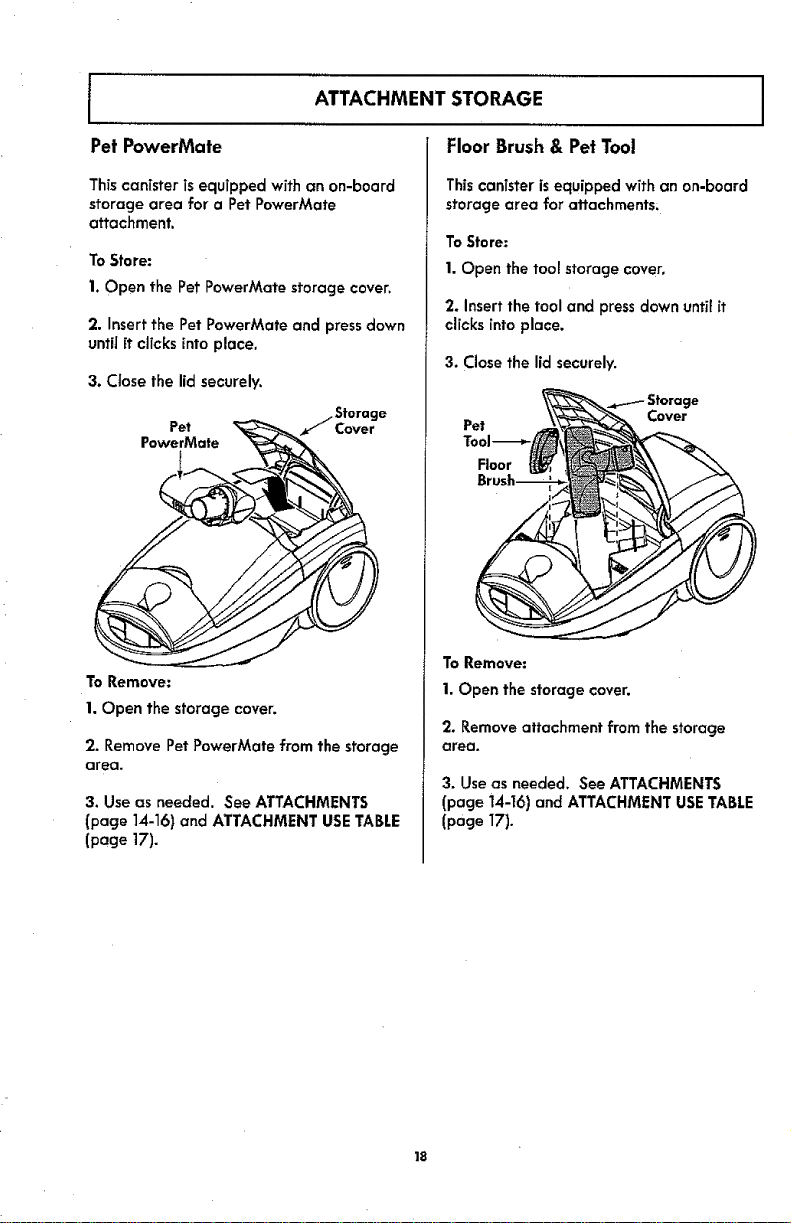
Pet PowerMate
ThTscanTster is equipped with an on-board
storage area for a Pet PowerMate
attachment.
ToStore:
1.Open the PetPowerMate storagecover.
2. Insert the Pet PowerMate and press down
until ff clicks into place.
3. Close the lid securely.
Pet J Cover
PowerMate
To Remove:
1. Open the storage cover.
2. Remove Pet PowerMate from the storage
area.
3. Use as needed. See ATTACHMENTS
(page 14-16) and ATTACHMENT USE TABLE
(page 17).
/Sf°rage
I"
FloorBrush & Pet Tool
This canister isequipped with an on-board
storage area for attachments:
To Store:
1. Open the tool storage cover.
2. Insert the tool and press down until it
clicks into place.
3. Close the lid securely.
Storage
Cover
To Remove:
1. Open the storage cover.
2. Remove attachment from the storage
area.
3. Use as needed. See ATTACHMENTS
(page 14-16) and ATTACHMENT USE TABLE
(page 17).
PERFORMANCEFEATURES
,_ WARNING
Personal injury Hazard
Always turn off and unplug the vacuum
cleaner before cleaning the agitator area
as agitator may suddenly restart. Failure
to do so can result in personal injury.
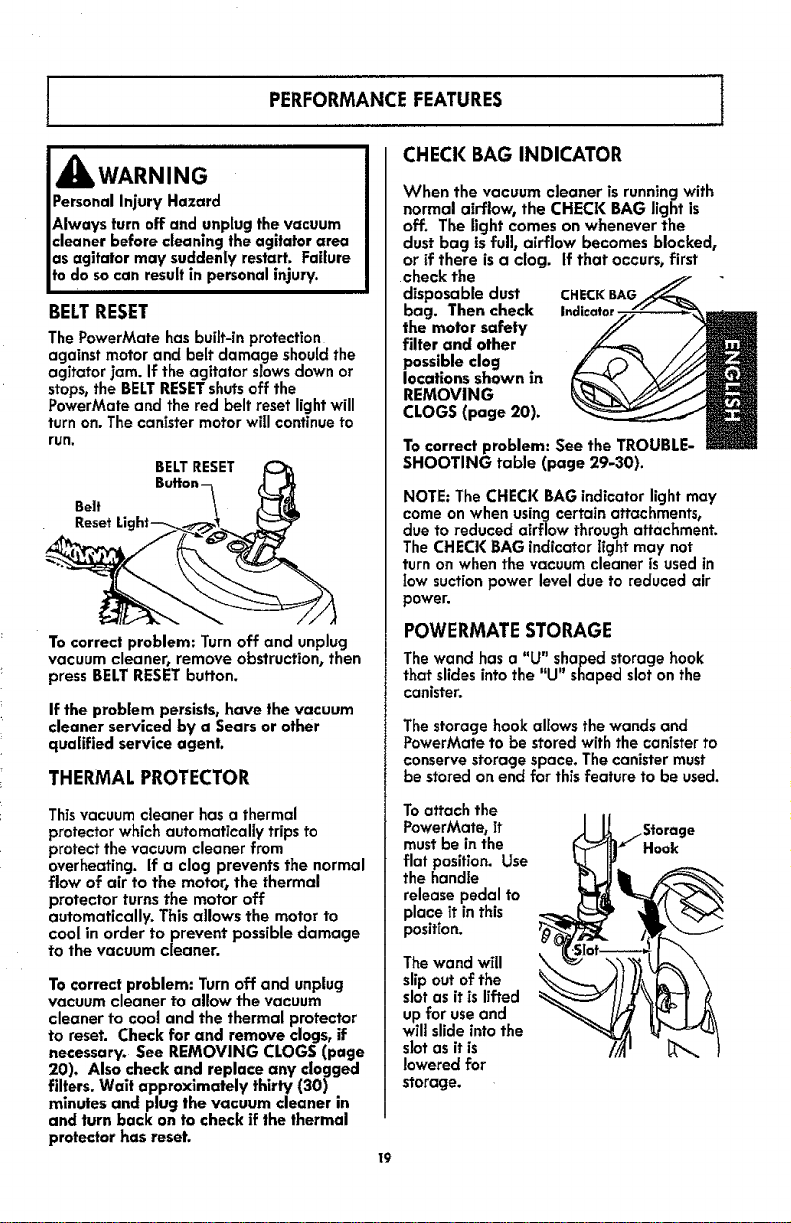
BELTRESET
The PowerMate has built-in protection
against motor and belt damage should the
agitator jam. If the agitator slows down or
stops,the BELT RESETshuts off the
PowerMate and the red belt reset light will
turn on. The canister motor will continue to
ruff,
BELT RESET
Buflon-
Belt
Res_
To correct problem: Turn off and unplug
vacuum cleaner, remove obstruction, then
press BELT RESET button.
If the problem persists_ have the vacuum
cleaner serviced by a Sears or other
qualified service agent.
THERMAL PROTECTOR
Thisvacuum cleaner has a thermal
protector which automatically trips to
protect the vacuum cleaner from
overheating, if a clog prevents the normal
flow of air to the motor, the thermal
protector turns the motor off
automatically. This allows the motor to
cool in order to prevent possible damage
to the vacuum cleaner.
To correct problem: Turn off and unplug
vacuum cleaner to allow the vacuum
cleaner to cool and the thermal protector
to reset. Check for and remove clogs, if
necessary. See REMOVING CLOGS (page
20). Also check and replace any clogged
filters. Wait approximately thirty (30)
minutes and plug the vacuum cleaner in
and turn back on to check if the thermal
protector has reset.
CHECK BAG INDICATOR
When the vacuum cleaner is running with
normal airflow, the CHECK BAG light is
off. The light comes on whenever the
dust bag is full, airflow becomes blocked,
or if there is a clog. tf that occurs, first
check the
disposable dust CHECKBAG
bag. Then check Indicator,
the motor safety
filter and other
possible clog
locations shown in
REMOVING
CLOGS (page 20).
To correct problem: See the TROUBLE-
SHOOTING table (page 29-30).
NOTE: The CHECK BAG indicator light may
come on when using certain attachments,
due to reduced airflow through attachment.
The CHECK BAG indicator light may not
turn on when the vacuum cleaner isused in
low suction power level due to reduced air
power.
POWERMATESTORAGE
The wand has a "U" shaped storage hook
that slides into the "U" shaped slot on the
canister.
The storage hook allows the wands and
PowerMate to be stored with the canister to
conserve storage space. The canister must
be stored on end for this feature to be used.
To attach the
PowerMate, ff
must be in the
flat position. Use
the handle
release pedal to
place it in this
position.
The wand will
slip out of the
slot as it is lifted
up for use and
will slide into the
slot as it is
lowered for
storage.
I9
"1_/Hook
i _L _Storage
i

REMOVING CLOGS j
The vacuum cleaner creates suction that
picks up dirt. Rapidly moving air carries //'/j-/_.,_
the dirt to the dust bag through the airflow /_1_/ -'_
assoges.ThedustbagLetstheairpass 777"° M/
through, while it traps the dirt../'_//'//7" ///
For best cleaning results, keep the ///_._" /// Motor
airflow passage open Check the ._'_%_ _ .......
starred (gr) areas occasionally /_,_ \\\ =,,_ t
for clogs. Turn off and unplug ,_, ,,_.O"_ \_,___ "_" Filter
TO CHECK FOR CLOGS:
• Check dust bag and change if full. See
DUST BAG CHANGING (page 21).
Check motor safety filter and exhaust
filter and replace if dirty. See MOTOR
SAFETY FILTER CHANGING (page 22}
and EXHAUST FILTER CHANGING
(page 23).
- Check PowerMate for any dirt or debris
in the belt path area or in the agitator
area. Carefully remove any string or
debris located on the agitator or end
caps. See TO CLEAN AGITATOR (page
25).
If the vacuum cleaner still has poor
suction, do the following:
1.
Connect the hose to the canister and
turn vacuum cleaner on. Check the end
of the hose for suction. If there is good
suction on the hose handle, there is no
clog in the hose. tf the suction is bad,
remove any dirt or debris in the hose
and handle.
2, Connect hose handle to wand. Check
the end of the wand for suction. If
there is good suction at the end of the
wand, there is no clog in the wand. If
the suction is bad_ remove any dirt or
debris in the wand.
3. Check PowerMate swivel. Remove any
dirt or debris.
I CLEANING EXTERIORAND ATTACHMENTS ......... I
1. Turn off and unplug vacuum cleaner. DO
NOT drip water on vacuum cleaner.
2. To clean exterior_ or to reduce static
electricity and dust build-up, wipe outer
surface of vacuum cleaner and attach-
ments. Use a clean, soft cloth that has
been dipped in a solution of mild liquid
detergent and water, then wrung dry. Wipe
dry after cleaning.
CAUTION
Do not use attachments if they are wet.
Attachments used in dirty areas, such as
under a refrigerator, should not be used
on other surfaces until they are washed.
They could leave marks.
2O

DUSTBAG CHANGING
For best cleaning results, the dust bag should be changed often. The CHECK BAG indicator
light will come on when the dust bag needs to be changed or the airflow is blocked.
NOTE: Use replacement dust bag STYLE Q or i(C16KDRGZOUO, see part number detait in
REPLACEMENT PARTS (page 5).
I
REMOVING DUSTBAG
1.Turn off and unplug vacuum cleaner.
2. Remove hose from canister. (See
ASSEMBLY INSTRUCTION5_ page 8).
3. Pull hood release out and up.
4. Lift canister hood.
5. Pulldust bag out
of the red bag
mount and dispose
of dust bag.
NOTE: Check the
motor safety filter
and replace, if
necessary. (See
MOTOR SAFETY
FILTER CHANGING,
page 22).
NOTE: The red bag mount will flip forward
after removing dust bag. This will prevent
the hood from closing untila new dust bag
is installed.
Red Bag
Mount
REPLACING DUST BAG
Note: DO NOT bend or crease the
middle of the cardboard when installing
the dust bag into the bag mount slots.
1. Verify that vacuum cleaner is
unplugged.
2. Rotate red bag
mount clownand "\_
install dust bag into
slots per illustration, _._
pushing down until
the cardboard tab
locks into position
and the holes align.
3. Tuck the dust bag securely into the bag
cavity so that none of the dust bag is able
to be pinched by the hood,
4. Close and latch canister hood.
5. Insert hose into canister until it snaps in
place. (See ASSEMBLY INSTRUCTIONS,
page 8).
CAUTION
NEVER EMPTY OUT AND REUSE A DUST
iBAG. Very fine materials, such as carpet
freshener, face powder, fine dust, plaster,
soot, new carpet lint, etc. can clog the
idust bag and cause it to burst before it is
full and may cause damage to vacuum
cleaner motor. Change dust bag more
often when vacuuming these materials.
2!

I
The motor safety filter must be replaced when dirty. It should be replaced regularly
depending on use conditions. The motor safety filter CANNOT be washed as it will lose its
dust trapping ability.
NOTE: Use replacement motor safety filter STYLECF-1 or 8175084, see part number detail in
REPLACEMENT PARTS (page 5).
MOTOR SAFETYFILTERCHANGING
I
iiiiil,,iii,i i
IEiectrlcal Shock Hazard
Turn off and unplug vacuum cleaner from
electrical outlet. Do not operate the
vacuum cleaner without the motor safely
filter. Be sure the filter is dry and properly
installed to prevent motor failure and!or
electrical shock.
iii i
1. Remove the dust bag as outlined in the
DUST BAG CHANGING section (page 21).
2. Lift the rubber retainer and pull out motor
safety filter as shown.
HOOD AND TOOL STORAGECOVER INSTALLATION j
3. Replace the motor safety filter, white
side facing toward dust bag, by sliding it
back into place under the ribs In the bag
cavity. Tuck motor safety filter in so that it
fits completely under the rubber retainer.
4. Replace the dust bog as outlined in the
DUST BAG CHANGING section (page 21).
It is normal for the canister hood and tool
storage cover to come off when opened
further than needed. Line up the hinge slots,
insert the hinges into the slots, and close
the hood and tool storage cover to
reinstall.
"_CAUTION
Never open canister hood with the tool
storage cover open. This will help to
prevent damage from occurring to the
canlster,htod andlor tool storage cover.
22

EXHAUST FILTERCHANGING
The exhaust filter must be replaced regularly. Replace the exhaust filter when the entire sur-
face area is covered evenly. The exhaust filter CANNOT be washed as it will lose its dust
trapping ability.
NOTE: Use replacement exhaust filter STYLE EF-1 or I(C381(CENI000, see part number detail
in REPLACEMENT PARTS (page 5).
3. Replace the
,_k WARNING
Fire and!or Electrical Shock Hazard
Do not operate with a clogged exhaust
filter or without the exhaust filter installed.
Do not operate without filler cover
installed.
1. Pull out and down on
the exhaust fiffer cover
to remove from the
canister and lay aside.
2. Pullthe exhaust
Filter
filter up and out
from the rear of
the canister.
exhaust filter.
Place the new
exhaust fitter
into the
canister with
the foam seal
facing towards
the canister,
Stofs
T_bs until it snaps closed.
exhaust filter cover
by placing the two
tabs on the filter
cover into the slots
4. Replace the
on the canister and
rotate into place
\\
I
23

Always follow all safety precautions when performing maintenance to the PowerMate.
Electrical Shock Or Personal Injury Hazard
Always turn off and unplug vacuum
cleaner before performing maintenance
to the vacuum cleaner. Failure to do so
could result in electrical shock or personal
injury from vacuum cleaner suddenly
starting.
,HI
BELTCHANGING AND AGITATOR CLEANING I
TO REMOVE BELT
6. Lift rear
latches up.
Sid_
Rl_ar
Latches
7. Grasp the s_de
latches and pull
out,
8. Lift cover
upward from
back to remove.
9. Note the
position of all
wiring and dirt
sensor board. Lift
agitator assembly
out and remove
worn belt.
10. Check and clean end cap areas. See
AGITATOR ASSEMBLY (page 25) for picture
of complete ag!tator assembly.
Wand
Quick
Release
3. Turn
PowerMate
upside down and
unscrew four (4)
PowerMate cover
screws.
1.Turn off and
unplug vacuum
cleaner.
2. Remove the
wand by pressing
the quick release
pedal and lifting
up on the wand.
ScYew$
4. Turn PowerMate
right side up.
5. While holding
the swivel, press
handle release
pedal and lower
the swivel.
I
i
Latch
24

TO CLEAN AGITATOR:
NOTE: In order to keep cleaning efficiency
high and to prevent damage to your
vacuum cleaner, the agitator must be
cleaned every time the belt is changed.
The agitator must also be cleaned
according to the following schedule:
Vacuum Cleaner Use Clean A¢itator
HEAVY . every week
(used daily)
MODERATE -
(used 2-3 times!week)
LIGHT -
(used ] time/week)
IMPORTANT
Disconnect vacuum cleaner from electrical
outlet. Check and remove hair, string and
lint build-up frequently in the PowerMate
agitator and end cap areas.
Remove any dirt or debris in the belt
path area or in the brush roller area.
Carefully remove
any string or
debris located
on the agitator
or end caps. _,
every month
every 2 months
AGITATOR ASSEMBLY
-End Cap
BrushUnit End Ca
TO REPLACE BELT
NOTE: Use replacement belt STYLECB-3,
see part number detail in REPLACEMENT
PARTS (page 5).
1, Install new
belt over
motor drive, Drive
then over
belt path. Path
Agitator
2. Place agitator
assembly into
PowerMate.
3, NOTE: Be sure that the dirt sensor
board is positioned in slots and all wiring is
tucked back in place.
4. Line up front of cover and base. Rest
cover on front edge of base as shown.
5. Rotate cover
back, Press cover
firmly until side
latches snap Into
place.
6, Make sure there is no gap between the
cover and base and that the rear latches
are snapped in place.
Z Turn PowerMate upside down and replace
four (,4) cover screws.
25
BULBCHANGING
,_WARNING
Electrical Shock Or Personal Injury
Hazard
Turn off and unplug vacuum cleaner
before performing maintenance to the
vacuum cleaner. Failure to do so could
result in electrical shock or personal
injury from the vacuum cleaner
suddenly starting.
I_llb CAUTION
Do not plug in or turn on until the vacuum
cleaner is completely reassembled.
NOTE: Use replacement bulb number
20-5248, see part number detail in
REPLACEMENT PARTS(page 5).
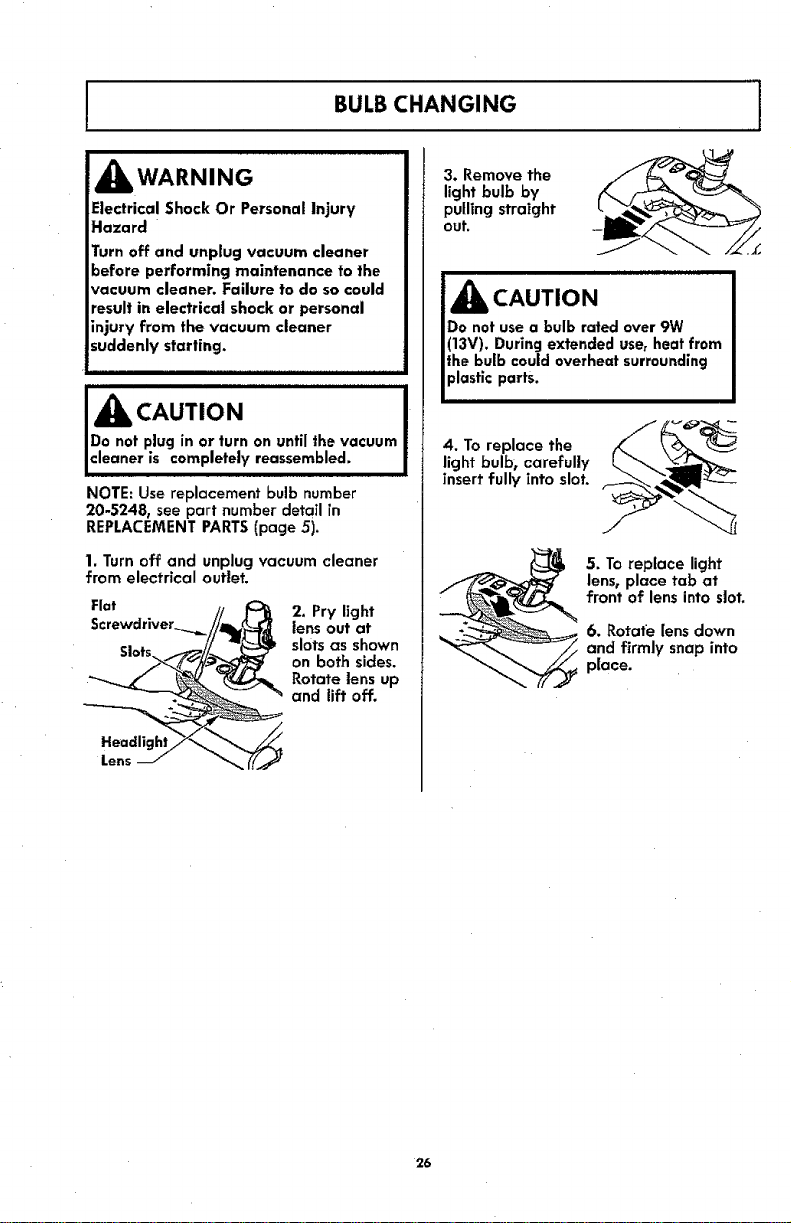
1. Turn off and unplug vacuum cleaner
from electrical outlet.
Fiat // lOB 2. Pry light
__ on both sides.
Heacllight_'_
Lens _/ -_ ('{'._
lens out at
slots as shown
Rotate lens up
and lift off.
3. Remove the
light bulb by
pulling straight
out,
i i ill I,ullulWlHUlll.lllll,
IDo not use a bulb rated over 9W
1(13V). During extended use, heat from
Ithe bulb could overheat surrounding
plastic parts.
4. To replace the
light bulb, carefully
insert fully into slot.
5. To replace light
lens, place tab at
front of lens into slot.
6. Rotate lens down
and firmly snap into
place.
26

DIRT SENSOR
I
Although the dirt sensor feature in your
Kenmore PowerMate ® is designed for
years of trouble free use, the passage of
dirt through the air passage system can
coat the lenses causing the green light to
come on and stay on - never switching to
red. When this happens the lenses must
be cleaned.
_CAUTION
Never use water or any cleaning solution
when cleaning the lenses. The residue of
the water or cleaners will accelerate the
recaatlng of the lenses and make cleaning
necessary sooner.
TO CLEAN THE LENSES
1. Remove the wand from the PowerMate
by pressing the quick release pedal and
lifting up on the wand.
Wand
Quick
2. As indicated by the illustration, the two
dirt sensor elements are located on the
inside of the swivel, approximately 4
inches/lO cm down, (note the arrows).
Each element should be cleaned periodi-
cally. To reach the sensor elements, use a
small brush such as a bottle brush. Brush
each sensor element several times to
remove dust and dirt.
CrossSectionView
2. Reinstallthe wand after cleaning the
sensors.
27

AGITATOR SERVICING
_llb WARNING
Electrical Shock Or Personal Injury
Hazard
Always turn off and unplug vacuum
cleaner before performing maintenance
to the vacuum cleaner. Failure to do so
could result in electrical shock or personal
injury from vacuum cleaner suddenly
starting.
TO CHECK THE BRUSHES
When brushes are worn to the level of the
base support bars, repZace the agitator
assembly.
New Brushes Worn Brushes
Support
Bar
TO REPLACEAGITATOR
ASSEMBLY
1. Remove PowerMate cover, belt and
agitator assembly. See "To Remove Belt" in
BELTCHANGING AND AGITATOR
CLEANING (page 24-25).
2. Replace agitator assembly. See your
separate repair parts list for part number.
3. ReTnstallbeJt and PowerMate cover. See
"To replace belt" in BELTCHANGING AND
AGITATOR CLEANING (page 24-25).
28

Review this table to find do-it-yourself solutionsfor minor performance problems. Any other
service needed should be performed by a Sears or other qualified service agent.
iiiii iii IIIIH
J kWARNING
IAiways turn off and unplug vacuum cleaner before performing maintenance to the
vacuum cleaner. Failure to do so could result in electrical shock or personal injury.
PowerMate will not
run when affached.
• t lawn
fuseat householdservice panel.
3. Loosehoseelectrical
connections.
1, Fullorclogged dustbag.
2. Clogged airflow passages.
3. Dirlyriflers.
4. Wrong height adjust setting.
5. Wrong power levelselected,
6, Hole inhose.
Z Worn PowerMateagitator.
8, Worn or brokenbuff.
9, Dirtyagitator or end caps.
10, Trippedbelt resetin PowerMate.
1. Hoseorhood electrical
connections.
2, Tripped belt reset inPowerMate.
3. Tripped thermal protector
in canister.
1. PowerMate connections
unplugged.
2. Worn or broken belt,
3, Dirty agitator or end caps.
4. Tripped belt resetin PowerMote.
5. Switchnot in CARPETpodtlon.
' P::go;f,ro,y0posho VoF . .ch
2. Resetcircuitbreaker or replacefuse. B
3. Reconnect hoseends.(page 8-9)
1. Change bog. (page 21) J
2. Clear ai_ow passages.(page 20) J
3. Change filters,(page 22-23} J
4. Adjustsetting, (page 10, 13) J
5. Adjustcontrol. (page 11) J
6. Replace hose, J
Z Changeagitator. (page 2_-25) J
8 & 9. SeeBELTCHANGING AND J
AGITATORCLEANING (page 2,4-25), J
10. Removeany itemsthat may be J
caughtor jammed_ then reset. If l
vacuumcleaner starts and stops J
again, cleanagitator and end caps, J
thenreset.(page 19, 24-25} /
1. Check connections,reconnecthose J
ends. (page 8-9) J
2. Removeany itemsthat may be /
caughtor jammed, then reset. If |
vacuumcleaner stods and stops
again, cleanagitator and end caps,
then reset.(page I9, 24-25) 1
3. See PERFORMANCEFEATURES- 1
"ThermalProtector"(page I9). /
I, Pluginfirmly. /
2 & 3, SeeBELTCHANGING AND /
AGITATORCLEANING (page 24,25). /
4, Removeany ffems that may be [
caught or jammed_then reset. If |
vacuumcleaner starls and stops
again, clean agitator and end caps, J
then reset. (page 19,2A-25) J
5. Move switch to CARPETposition. J
(page11) l
il
/
/
/
/
29

CHECKBAG Indicator
activates.
Vacuum eEeaner picks up
moveable rugs -or-
PowerMaie pushes
too hard.
Cord won't rewind.
Vacuum cleanerleaves I. Wrong vacuumingpattern. 1. See VACUUMING TIPS(page 12).
marks on carpel
Constantgreen light on 1. Dirt passage isclogged. 1. Checkfor ctogs in air passages.
in dirtsensor, (page 20)
No greenor red d|r! 1, Switch notin CARPETposifion. 1. Move switchto CARPETpos[tlon.
sensorlights. Ipage 11}
Redlightfar BELT 1. Tripped belt resetin PowerMate. 1. Removeany itemsthat may be
RESET_sllt on the caughtor ]csmmed_then reset. If
PowerMale, vacuumcleanerstarts and stops
1. Full or clogged dust bag.
2. Dirty filters.
3. Blockedairflow passage.
4. Certain attachment tools.
1. Wrong heightadjust setting.
2. Suctiontoo strong.
1. Dirty power cord. I. Cleonthe power cord.
2. Cord jammed. 2, Pullout cord and rewind, (page 10)
2. Lensesare dirty 2, Cleanlenses.(page 27)
2. No power to sensorboard. 2. Taketo your nearestSearsService
1, Change bag. (page21}
2, Change filters.(page 22-23}
3. Clear blockage from airflow
passage.(page 20)
4. Thisis normal.Lightshould go off
when toolis removed_
1, Adjustsetting.Ipage lOj t3)
2. Select lower powerLevel.(page 11t
Center.
again, dean agitator and endcaps,
then reset. (page 19,2€.25)
Vacuum Cleaner Help Line:
1-877-531-7321
8:00am-5:OOpm EST, M-F
(U.S.A. and Canada)
3o

Master Protection Agreements
Congratulationson making a smart purchase. Yournew Kenmore_) product is designed and
manufactured for years of dependable operation. Butlike all products, it may require
preventive maintenance or repair from time to ffme. That's when having a Master Protection
Agreement can save you money and aggravation.
The Master Protection Agreement also helps extend the llfe of your new product. Here's what
the Acjreement _ includes=
[]
Parts and labor needed to help keep products operating properly under normal use
just defects. Our coverage goes well beyond the product warranty. No deductibles, no
functional failure excluded from coverage -- real protection.
I_ Expert service by a force of more than 10,000 authorized Sears service technicians_
which means someoneyou can trust will be working on your product.
[] Unlimited service calls and nationwide service, as often as you want us,whenever you
want us.
[] "No-lemon" guarantee - replacement of your covered product if four or more product
failures occur withintwelve months.
[] Productreplacement if your covered product can't be fixed.
[] Annual Preventive Maintenance Check at your request - no extra charge.
Fast help by phone - we call it Rapid Resolution- phone support from a Sears
representative onall products.Thinkof usas a "talking owner's manual."
I_ Power surge protection against electrical damage due to power fluctuations.
$250 Food LossProtectionannually for any food spoilage that is the resultof
mechanical failure of anycovered refrigerator or freezer.
I_ Rental reimbursement if repair of your covered product takes longer than promised.
10% discountoff the regular price of any non-covered repair service and related
installed parts.
Once you purchase the Agreement, a simple phone call isall that it takes for you to schedule
service. Youcan call anytime day or night,or schedule a service appointment online.
The Master ProtectionAgreement is a risk free purchase, if you cancel for any reason during
the product warranty period, we will provide a full refund. Or, a prorated refund anytime after
the product warranty period expires. Purchaseyour Master Protection Agreement today!
Some limitations and exclusionsapply. For prices and additional information in the U.S.A.call
1-800-827_6655.
Coverage in Canada varies on some items. For full details call Sears Canada at 1-800-361-
6665.
Sears installation Service
For Sears professional installation of home appliances, garage door openers,water heaters,
and other major home items, in the U.S.A. or Canada call 1-800-4-MY-HOME@.
31

Antes de usar su asp|radora nueva °.. 1
Listade embalaje ............... I
Lfnea de cryuda de asplractoras ...... 2
Gorantia de la aspiradora
de Kenmore .................... 2
Instrucciones importantes
de seguriclad .................... 3
Piezas y caracterfsficas ........... 4-6
Instmcciones de ensamble ........ 7-8
Instrucclones de operaci6n ......... 9
Para comenzar .............. 9-10
Sugerencias para aspirar ..... 11-12
$ugerencias sobre el ajuste de
nivel de pelo de la alfombra ..... 12
Accesorios ................. 13-15
Cuadro de uso de los accesorios .. 16
Almacenaje del Pet PowerMate y
accesorios .................... 17
Caracterfsticas de
rendimiento .................. 18
Cuidado del receptciculo .......... 19
Qultar de los residuos de basura
en los conductos .............. 19
Limpieza del exterior y de los
accesorios ................... 19
Cambio de ta bolsa de polvo .... 20
Cambio del fittro de seguridad
del motor .................... 21
Ensambie de la tapa y la
cubierta .................... 21
Cambio del filtro de escape ..... 22
Cuidado de la PowerMate ® ........ 23
Cambio de la correa y limpleza
del agitador ............... 23-24
Cambio de la bombllla .......... 25
Detector de polvo ............. 26
Cuidado del agitador .......... 27
Reconoclmiento de problemas ... 28-29
Acuerdos maestros de protecci6n ... 30
Informaci6n de aslstencia
a servicio .......... Posterior Cubierta
Por favorlea estaguTaqueleayudaraa ensamblary operarsuaspiradoranuevadeKenmore
en unamanera rnc_sseguray efect[va.
Para masinformaci6nacercadel cuidadoyoperaci6ndeestaaspiradora,Ilamea sutienda
Searsmascercana. Cuandopregunteporinformaci6nustednecesitardeln_merocompletode
seriey mode_ode la aspiradoraqueest6Iocalizadoenla plata de losnOmerosdemodeloy
serie.
Useelespaciode abajopara registrarel n0merode modeloy seriepara sunuevaaspimdora
Kenmore.
N_Jrnerode Modelo
NOmero de Serie
Fecha de Compra
Mantenga este ffbro y su recibo en un lugar seguro para referencias futuras.
I LISTADE EMBALAJE
Su ASPIRADORA KENMORE se empaca con las sicjuientes piezas y componentes por
separado:
Cada uno de estos ensambles es mostrado detalladamente en la lista de piezas para
reparaci6n.
• Estos arffculos se encuentran bajo la cubierta de almacenamiento para accesorios.
• *Estos artfculos se encuentran en el ensamble clel mango y la manguera.
1 Receptdculo 1 Cepillo para combinaci6n _
1 PowerMate® 1 Cepillo para animales *
1 Manguera 1 Pet PowerMate®
1 Cepitlo para pisos* I Tubo telescopico
1 Herramienta para 1 Manual de uso y cuidado
hendiduras** 1 Usta de partes
1-877-531-7321
8:00am-5:OOpm EST, M-F
(U.S.A. and Canada)
Garantla llmltada de un aria
Siesta aspiradora falla per un defecto en sus materiales o fabricaci6n en et perfodo de
un aria desde la fecha de compra, cuando se instala, maneja y mantiene siguiendo
todas las instrucciones incluidas con el producto, devu(itvala a cualquier tienda Sears,
Sears Parts & Repair Center (Centro de Reparaciones y Piezas Sears) o a otro
distribuidor Kenmore para que reparen et aparato de forma gratuita.
Esta garanffa es v_lida solamente durante 90 dfas desde la fecha de compra,
si la aspiradora se utiliza para otros fines que no sean el usa familiar privado.
Esta garantia cubre exclusivamente los defectos de materiales y fabricaci6n. Sears NO
pagar6:
1. Los elementos desechables que puedan desgastarse con un usa normal, incluyendo
sin car6cter excluyente, filtros, correas, 16mparas y balsas.
2. Un t_cnico del servicio t_cnico para que ensefie al usuario a instalar, manejar o
mantener correctamente el producto.
3. Un t_cnico del serviclo t_cnico para limpiar o mantener este producto.
_. Dafios o averra de este producto si no se ha instalado, manejado o mantenido
siguiendo todas las instrucciones incluidas con el producto.
,5. Dafios o averfa a este producto originados par accidente, abuso, usa incarrecto o
usa del producto para otros fines distintos de los indicados.
6. Dafios o averfa de este producto causados par el usa de detergentes, limpiadores,
productos qufmicos o utensilios diferentes a los recomendados en todas las
instrucciones que se incluyen con el producto.
Z Dafios o averfas de las piezas o sistemas causados par modificaciones no
autorizadas que se hayan hecho a este producto.
Limitaci6n de responsabilidad de las garantias impficltas; limitaci6n de remedios
El 0nico y exclusivo remedio del cliente bajo esta garanffa limitada ser6 la reparaci6n
del producto segOn Io indicado en este documento. Las garant[as implfcitas, incluyendo
las garantfas de comerciabilidad o idoneidad para un prop6sito especffico, se limitan a
un aria o el perfodo m6s corto permitido par la ley. Sears no serc_responsable par
dafios incidentales ni consecuenciales. Algunos estados o provincias no permiten la
exclusi6n o limitaci6n de dafios incidentales o consecuenciales, ni limitaciones en la
duraci6n de las garantias impffcitas de comerciabilidad o idoneidad, par Io que estas
exctusiones o limitaciones podrian no aplicar en su caso.
Esta garanffa aplica solamente cuando esta aspiradora se utiliza en Estados Unidos o
Canad6.
Estagaranffa le otorga derechoslegatesespecrficos,y ustedpodrla tener otros
derechos que varfan enfunci6n decada estado.
Sears Brands Management Corporation, Heft=man Estates, IL 60179

lea ias instruccienes en este manual antes de armar o usar su as'piradora.
ADVERTENCIA:
Su seguridad es muy importante para nosotros, Para reducir el riesgo de incendlo, cheque
el_ctrico, ]esi6n corpora[ o dafios al utilizar su aspiradora, actOe de acuerdo con precauciones
b6sicas de seguridad, entre elias:
Jse suaspiradora 0nicamenteen la farina
descdta en estemanuaLUseOnlcamente con
accesoriosrecomendados par Sears.
Desconecteel cord6n el_ctdco antesde
cornponero limpTarel _rea del cepillo.La falla
de hacer estopuede resultaren choque
el_ctrico o en el s0bito arranquedel cap!Ha.
No abandone la aspiradora cuandoest(_
conectada. Descon_ctelacuandono la est6
usandoy antes de dade mantenimento.
Para reducir el riesgo de choqueeZ_ctrico,no
usesuaspiradora al aire libre nisabre
superficlesmojadas.
No perrnltaque sea utilizada coma juguete.Se
requiere tenet mayor cuidadoeuando sea
ufflJzadaen la proxirnidadde nTfioso pernifios,
No usela asp_radorasiel cord6n o el enchufe
est6ndafiados.Si la aspiraciorano est6
funcionando adecuadamente o si se ha dejado
caer,est6 da_ada, se ha dejacioexpuestaala
intemper|eo seha dejado caer en ague,
devu_lvataa un Centrode servictode Sears.
Nojale nitransporte la aspiradora parel
cord6n; no useel cord6ncome mango;no derre
puertassabreel cord6n; no.iateel cord6nsabre
rebordes aguclosnlesquinas.No pasela
aspiradorasabre el cord6n. Mantenga el cord6n
alejado de superficiescalientes.
No desconecteIa aspiradora tlrando del cord6n
el_ctrico.Pare desconectarla, jale el enchufe,no
_1cord6n.
No toque _a aspiradora nTel enchufe con las
manes mojadas.
No coloque objetos en las aberturas.
No utilice la aspiradora sl alguna abertura est6
bloqueada; mant_ngata libre de poivo, pelusa,
:abellos y cualquiera case que podrla dlsmlnuir
_I flujo de aTre.
Mantenga el cabeHo, rope suelta, dedos y todas
las partes del cuerpo alejados de las aberturas
y plezas mec6nicas.
GUARDEESTASINSTRUCCIONES
Elarrnado y usa segurode suaspiradorasonsuresponsabffTdaci.Estaaspiradoraha sided!sefiada
excludvarnentepara usadorn_stico. La aspiradora deber_ a!rnacenarse en un lugarsecoy en el
[ntedonLea esteManual de Usay Cuidadodetenidamente, puescontieneinformaci6nimportante
sabreseguridad y usa. Estaguia cant!erieinformad6n sabreseguridad debajo de sfmbolosde
advertencia cuidado.
Apague todosloscontrolesantesde
desenchufar.
Tengacuidado especialat ufilizar la aspiradora
en escalones.No la coloquesabresillas,mesas,
etc. Mant_ngala en el pJso.
No usela aspiradora para aspirar ffquidos
inflamables o combustibles(gaso|ina,l[quidos
para limpieza,perfumes,etc.) nila useen
lugaresdonde6stos podr_anester presentes.Los
vaporesde estassustancias puedencrear un
peligro de incendioo expJosi6n.
No levanteningunacosa que seest6 quernando
o emitiendohurno,cornocigarrillos,cerlJloso
cenizascalientes.
No usela aspiradora sTntenet lnstalada la balsa
para polvoy!o tosfiltros.
Carnbie siemprea balsade polvopare e! polvo
despu_,sde asplrar llrnpiadoreso refrescantes
de alfornbra, polvos,y polvoflno. Estos
productosatascan la balsa de polvo,reducenla
circuZaci6nde aim y puedencauser que reviente
la balsade polvo. Lafalla de cambiar la balsa
puedecauser dafio perrnanenteala asptradora,
No usela asptradora pare levantar objetos
agudos,juguetes pequefios,alflleres,
sujetapapeles,etc. Poddandafiar la asp_radora.
No operesinel filtro de escape n|la cubterta
del filtro de escape instalados.
La manguera contiene cablesel6ctricos.No la
usecuandoest_ dafiada, cortada, o
_erforoda. Reemplace slest6 cortada o
esgastada. No levanteobjetosafilados.
51ernpreapagu_ y desconectela asp!fedora
antesde conectar o desconectarla
rnanguera, el tuba, PetHandiMate, ola
boquilla.
Sujeteel enchufecon la rnano al enrollar el
cord6ne!_ctrlco. Pare desconectarla,jale e]
enchufe,no el cord6n.
Ustedes responsablede asegurarque su
aspiradora nosea utillzada par ningunapersona
que no puedamanejarla correctamente.

Esimportante conocer las piezas y caracteristicas de su aspiradora para asegurar suusaade-
cuado y seguro. Examrnelas antes de usar su aspiradora.
Mango y
Manguera
As )iradora
_b:sco p,co
PowerMate®
CERTIFIED
asthma&allergy
Esta Asplradora es certfficada asthma & allergy friendly" pot la
Asthma and Allergy Foundation of America,
PARTESDE REEMPLAZO
PiezaN° PiezaN°
,,ObjetO Esti|oNo, ,..... en EUA ..... en Canad6 ....
Correa CB-3 20-5218 20-40118
Bornbilla ..... 20-5248 20-40601
Balsade polvo Q "20-50557 ........20-50410
Balsa_epolvo* ----- KC_6KO_GZ0U0* ...._
Ffftrode escape EF-_ 20-86889 20-40324
Ffftrode escape_ ..... KC38KCEN1000 * .....
Fi|tmde seguridad CF-I 20-86883 20-40321
del motor
Utilizar las partes mencionadas anterlormente para mantener cerfificaci6n AAFA para este

RECEPTACULO
Cublerta de
a|macenamiento
para Pet PowerMate ®
(Pet PowerMale_adentro).
Cepillo para \.\\
polo de
anima|es Cepillo Cubierta de
Tapa de la asplradora
(Bolsa tie polvo y Fi|tro de
protecci6n del molor adentro
plsos almacenamiento
de accesorios
(accesorlos
adentrc
Pos,,,,o_o,o,opo-___,
Ranura del gancho _ I _'_ \\\ \\
de almacenamiontoJ _'_ \11\_
retracci6n
polvo
"
PowerMate ®
de
de escepe (Filtro
de escape adentro)
el_ctrEco
Filtro de protecci6n
del motor (detr6s de
._polvo)
N0mero de serie y (_ _'_L_

MANGUERA & ACCESORIOS
Interrupter de encendldo!
apagado de tres posic[ones
(OFF/FLOOR/CARPET)
(Apagado /Piso / Alfombra )
Control de
succi6n
elecfr6ni
Herral enta
para hendiduras
Cepillo para
comblnaci6n
glratorlo de
la manguera
TUBe TELESCOPICO
Bot6n de
ajuste de
extensi6n
_-'- Pedal de
llberaci6n
r6pida del
tube

Porfavor ponga especial atenci6n a _stos recuadros conalerta de rlesgo.
ADVERTENCIA: Esta informaci6n le alertar6 del peligro de fuego, choque el4ctri¢o,
quemaduras y ]es]ones. CUIDADO: Esfa informaci6n |e alertara de peligros como
lesiones y dafios a [a propledad.
I Peligro de choque eJ6cttico !
INoconecte la asplradora hastaque termine |
Jdearmada, De Io contrarlo podria causar un |
Jchoque e]_ctrico o lesi6n corporal. J
Antes de armar la aspiradora, reivise la
L|STA DE EMBALAJE(pdg t). Use esta ltsta
para verificar e identificar que ha recibido
todos loscomponentes de su nueva aspirado-
ra Kenmore.
POWERMATE
Alinar el tubo telescopi-
co y introduzca en la
PowerMate hasta que e_
pedal de liberaci6n
quede fijo en posici6n.
PETPOWERMATE
1. Abra la cubierta de almacenaje del Pet
PowerMate.
2. Inserteel Pet PowerMate0presi6neloen
su [ugarhacia abajo.
3. Cierre la cubierta con seguridad.
Pet Cublerta
PowerMate
RECEPTACULO
I. Abra la tapa del receptdculo.
2. Examine que la bolsa para polvo este
instalada correctamente. Consulte los instruc-
clonesde |nstalacl6n en: CAMBIO DE LA
BOLSA DE POLVO (pdg 20),
3. Examine que el fiitro de seguridad del
motor que este instalado correctamente.
Consultelas instrucciones de instalaci6n en:
CAMBIO DEL FILTRO DE SEGURIDAD DEL
MOTOR (pdg 21).
MANGUERA
Alinee [a pestafia de sujeci6n de la manguera
y la mnura de la cubierta del receptdculo e
introduzca la manguera en el receptdculo
hasta que quede fija en posici6n.
de sujeci6n
de la
manguera
Para retiran
No abra la cubierta
antes de desprender
la manguera. Con la
cubierta cerradao tire
hac|a arriba la
lengUeta de
seguridad y jale de
la rnanguera.

MANGO
El Cepillo de combinacion puede ser
almacenado en el mango de la manguera,
colocandolo en el mango antes de
conectar el tubo teiescop_co. Desliza el
cepillo de combinaci6n firmemente dentro
del mango.
cembinaci6n
Introduzca el tul0o en e! mango basra que eJ
bot6n quede en posici6n.Aseg_rese de que la
manguera noest_ torclda.
Para retlrar: Oprima el bot6n de liberaci6n
r_pida del mango para liberar el mango y
tire del mango hac[a arriba.
Para Guardar: Para prevenir la presi6n de la
manguera mientras se guarda, desuna la
manguera del tubo de la aspiradora. Guarde
la manguera en una posici6nemollada y floja
de tal manera que la tapa de la manguera no
seestire.

iPartesenmovimlento!Parareduclre!riesgodedafios
est8 encendida. E| tocar e| agitador mientras que est6
girando puede €ortar, €ontusionar o causar otras
lesiones° Siempre apague y desconecte del
corporales, no toque el agitador cuando |a aspiradora _H__--_/.___ I__
tomacorriente antes de dar mantenimiento. Tenga
cuidado al asplrar cerca de nifios.
PARA COMENZAR
,_ ADVERTENCIA
Peligro de lesi6n personal y dafio al
_roducto
SIEMPRE apague ante de desconectar.
El cord6n el_ctrico se mueve
rc_pidamentedurante el enrollamlento.
Mantenga alejados a losnifios y
asegure espacio iibre suficientepara
evitar lesiones personales al enrollar
el cord6n,
NO use losenchufes Iocalizados sobre
los muebles. Losobjetos cercanos
podrian resultar dafiados°
Cuando alguna anormalidad/desperfec-
to ocurra, pare de usar el producto
inmediatamente y descon6ctelo del
toma corrlente.
Bot6n
de _ 1, Tire del cord6n
receptdculo hasta
tener la Iongitud
deseada, El cord6n
__para sacarlo del
NOTA: ?ara reducir el riesgode cheque
el_ctrico, esta aspiradora cuenta con una
clavija poIarizada, unode los contaetos es
m_s ancho que el otto. La elavija s61opuede
intmducirse de una manera en el enchufe.Si
la clavija no cabe bien en el enchufe,
invi_rtala. Sid0n no cabe, flame a un
electricista para que instaleun enchufe
correcto. No altere la clavija de ninguna
manera.
no seenrollar6 basra
que oprima el bot6n
para enrollarlo,
2. Conecte el cord6n el_ctrico polarizado en
un enchufe de 120 voltiosque se encuentre
cerca del plso.
Para enrollar: Apagu_ y
desconect($la aspiradora.
Sujete el enchufe mientras
enrolla el cord6n para
impedir da_o o tesl6n cor-
poral por el movimiento
del cord6n, Oprima el
bot6n del cord6n eldctrico
con la mano o con el pie.
3. Baje el tubo desde la poslcl6n vertical
pisando el pedal de liberaci6n del mango
(HANDLE RELEASE).
Pedal de
liberaci6n nivel de pe[o
del
Pedal de
HEIGHT
ADJUST
{selecci6n de
nivel del pe|o
de la
4. Selecclone una altura del pelo de la
alfombra usandoel pedal pequefio
ubicado en la parte posterior de la
PowerMate. El nivel del pelo la alfombra se
muestra en el |ndicador. Consulte
SUGERENCIAS SOBRE EL AJUSTE DE NIVEL
DE PELODE LA ALFOMBRA (p6g 12).
de la alfombra
Atenci6n:Refi6rasealas recomendaciones
delfabricante para limpiarsualfombra.
Algunasalfombrasm6sdelicadaspueden
requerirelusode la asplradoraconel
agitadorPowerMatedesconectadopara
preventrquela alfombraseadafiada.
/

5. Seleccione una posici6n del interruptor de
tres-posrcionesen e] mango,
CARPET(ALFOMBP,A)-
enciende los motores del
recept6eulo y de la
PowerMate. La bombilla
delantera y el agitador se
encenderan.
FLOOR (PISO) - s61o
enciende el motor del
OCAR_T
recept6culo.
OFF (APAGADO) - Apague la aspiradora.
NOTA - Cuando este control est6 en la
posici6n FLOOR (PISO), la luzde PowerMate,
no funciona porque la electric[dad nofluye al
PowerMate.
CUIDADO
j _ iiiii
I NO deje la PowerMate funcionando en un
| lugar durante ning0n espacio de fiempo: se
Jpuede dafiar la alfombra.
CONTROL ELECTRONICO DE
ASPIRACION
El control electronico de aspiraci6n le
permite cambiar la potencia de succi6n
de |a aspiradora.
Aumento la
SUCTION
CONTROL limpiar muebIes y
aspiraci6n
_,_1_ Aumentar alfombras,
" Disminuci6n de la
ljlFDisminuir succidn para
aspiraci6n limpiar cortinas y
succi6n para
tapetes delgados.
TUBO TELESCOPICO
La extensi6n del
tubo es ajustable y
no requeire eI
montaje.Para
ajustar,empuje el
bot6n de ajuste de
extensi6n y mueva
el tubo superior a la
posici6ndedeada
ajuste de
extensi6n -
Bot6n de
NOTA: Cuando
ajuste la
Iongitud de la
tener el
PowerMate con la
mano o el pie.
vara hay que
10

SUGERENCIASPAPAASPIRAR
I
Estilode llmpieza sugerido.
Paraobtenerla mejoracci6nde limpiezase
recomiendaempujarla PowerMateendimc-
ci6ndirectamenteopuestaa ustedy jalada en
ffnearecta.AIfinalde cada pasadade
recjreso,cambiela direcci6nde la PowerMate
haciala siguientesecci6na Iimpiar.Confin0e
asi a trav_sdetoda taalfombraopisode una
maneralentay deslizante.
NOTA:Las
pasadasrdpidasy
al azar noIocjran
unalimpieza
cornpleta.
_ILCUIDADO
Peticjrode lesi6n personal y dafio al
producto
Tenga cuidado si el PowerMate y [a
nanguera se dejan en posici6nvertical pues
_ueden caerse f6cilmente. Si se voltean
_uede haber dafio de propiedad,
_IbADVERTENCIA
Pe[igrode lesi6n personal y dafio al
_roducta
DISPOSITIVO GIRATORIO DEL
POWERMATE
El dispositivo cjtratorio cjira a la izquierda y
a la derecha para maniobrar me)or en
espac[os reducldos y alrededor de
esquinas.
SUJETADORDE TUBa
TELESCOPICOEN POSICION
Cuando el tube
telescop_co es
retornado a {a
posici6n vertical, el
seguro de rotaci6n
encjancha el tuba
telescopico en su
lugar, esto previene
la rotaci6n del
tuba telescoplco y
el mancjo de la
mancjuera para
una me]or
estabilidad.
No atropelle el cord6n el6ctrica con la
PowerMate. Hay un petigrode lesi6n
corporal o dafios de propiedad.
No fire del €ord6n ei_ctr]copara
desenchufarlo de la pared. Sihay dafios
en el cord6n el6ctricoa el enchufe, hay un
pellgro de lesi6n corporal o dafiosde
propiedad.
POR DEBAJO DE LOSMUEBLES /
Para maximizar
el alcance de la
PowerMate pot
clebajo de los
muebles0 voltear
el mango para
el lade deseado
y 10ajar el tuba
telescop_co
cerca det piso.
11
I]

ESCALERAS
IIIII I I
I_ADVERTENCIA
Pellgro de lesi6n personal
JTenga cuidado si coloca el recept¢iculo sobre
Jescalones. Si se cae, podrla causar lesi6n
]personal o dafio a la propiedad.
CUIDADO
Peligro de lesi6n personal y dafio al
produdo
No ]ale de la manguera para mover ta
asplradora de un escal6n al siguiente.
Cuanctotermlne de llmpiar un _rea use la
manija en la aspiradora para moverla a
otto tugar para €ontinuar la limpieza.
SOSTEN PARA LA ESCALERA
El sost_n para laesca[era esta situado en el
cuerpo y ayudar6 a evffar que la
aspiradora se deslice cuando se est6
utTlizado en las escaleras. Durante la
operaci6n normal de la asp|radora mientras
que est6 en la posici6n horizontal, las
ruedas del cuerpo giren ffbremente 360 °.
La caracteri'stica del
STAIR GRIP [Sost_n
para la Escalera)
permite que las
ruedas del cuerpo se
traben automatic-
amente en posicT6n
cuando la aspiradora esta
colocada en escaleras
res[denciales.
LIMPIADORDE ORILLAS
Losactivos cepillos
limpiadores de orillas
estan en cada lado
de la PowerMate.
Pasela PowerMate
]unto a las paredes o
]unto a los muebles
para ayudar a elirni-
IIII
nar la fierra
ii
acumuIada en lasori-
Ilasde la alfombra.
El dispositivogiratorio
permite que _sta gire _,_
de 'a manguera 360° _ __
sinnecesidad de too- _,_2-_..
ver el receptdculo. _'_11_11_*/"
Esto es muy _itil para .______
limpiar on 6reas pe-
quefias. Aseggrese de
que la manguera no
est6 torcida antes de jalar el receptdculo.
NOTA: AsegOrese que la aspTradora est_
descansando con seguridad sobre las
escaleras y el base para piso est6 en la
posici6n bloqueada antes de usarla.
SUGERENCIASSOBREELAJUSTEDENIVELDEPELODELAALFOMBRA 1
Use el ajuste XLO (ba]o) para obtener la
me]or limpieza a rondo. Porotra parte, quiz6s
se requiera elevar el nivel para facilitar algu-
has tareas, como por ejemplo cuando setrata
de tapetes y algunas alfombras de pelo
largo, y para impedir que Ja aspiradora se
apague. Se sugieren lossiguientesajustes:
HI - Pelo muy largo y suelto, tapetes, alfom-
bras muy acojinadas.
MED - Pelomediano a largo.
LO- Pefo corto a mediano.
XLO - La mayor_a de las alfombras y pisos
descubiertos.
12

I
ACCESORIOS
cu,oAoo .....i
NO instale ni retire e] mango ni los tubas I
cuando la aspiraciora est6 encendida. Esto |
podria causar chispas ¥ dafiar los contac- I
tos el_ctricos e control electronico. I
ACCESORIOSDELMANGO
NOTA: S]t/ene insta]ada la
PowerMate, apague la aspJradora antes de
quitar el mango de los tubas.
I IIIIIII IIIIIIIIII J
,illo
para pisos
bot6n de
1. Oprima e[ __ _
liberaci6n r6pida n
del mango para de!tuba
y tire del mango
hacia arriba.
[iberar el mango _
2. Desliceel accesorio deseado con flrmeza
sabre el mango. Consulte.CUADRO DE usa
DELOS ACCESORIOS (pc_g 16).
€ombinaci6n
PetPowerMate
NOTA:
Para remover el cepil[o de combinaci6n,
presione e| bot6n liberador y sep_relo.
Bot6nde
|iberacl6n
NOTA:
Para remover el cepillo de piso y/o el
cepillo para pelo de mascotas, prestone
el bot6n liberador del tuba y sep6relo.
Bot6n de
llberaci6n
Herramlenta
para hend|duras
13

ACCESORIOSDELTUBO
lostubosde la _;_'_,
PowerMate, ,,' .".T;?
col6quelos en _-" _
la posicJ6n _",_,_',,
vertical de _,_:.,
bloqueo. _
2. Piseel pedal de liberaci6n r6pida del tubo
y tire del tubo hacia arriba paro desprenderlo
de ta PowerMate.
I
ti
Pedalde ' I
liberaci6n
r6plda
3. Coloque el accesorio deseado sobre el
tubo. Consulte la CUADRO DEUSO DE LOS
ACCESORIOS (p6g 16).
o
para plsos
Pet PowerMate
NOTA:
Para remover el cepHIo de combinaci6n,
presione el bot6n de Iiberador del cepilJo
y sep6relo.
Bot6n de ]iberaci6n
del cepillo
NOTA:
Para remover el cepillo de piso y!o el
cepillo para pelo de mascotas, presione et
bot6n Ifberador del acCesorio y sep6reto.
Herramlenta
para hend[duras
Bat6n de Iiberaci6n
delacceso_
_bo
telescoplco
14

CEPILLO PARA COMBINACION
Elcepilto de combinaci6n tiene dos
accesorios_el cepillo para polvo y el cepillo
para pelo de animales, estos se utilizan en
diferentes superficies, ver CUADRO DE USO
DE LOS ACCESORIOS (Pacj 16).
Para remover el cepillo para po[vo o el
cepillo para peio de animales, presione la
lencjUetay desprenda el cepillo
Para conectarlo,
Leng(Jeta-\\
p=ra _\_\_ "_
animales-_ "_'_'_3/
Cuandoseguarde, la cubiertadel cepillose
desliza sobreel cepillo
inserte la lencjUeta
superior en la
ranura del cepillo
para polvo o el
cep_lJopara pe]o
de animales,
presione basra que
este quede fijo.
HERRAMIENTA PARAHENDIDURAS
Para conectar la herramienta para
hendtduras=
1. Poner la base
def tubo
esquinero dentro
del [a lencjiJeta
en el mancjo
corno se muestra.
2. Alinear la ranura en la parte plana de1
tubo equinero con la lengUeta en el mancjo.
3. Presione el tubo esquinero en el mango
hasta que quede fijo.
LencjUeta.
Cublerta
de cepillo
15

I CUADRODEUSODELOSACCESORIOS
Area de Limpleza
Entre
ACCESORIO Mueble._! _o,_ines1
Corfirv=sI £_alo_e$ _escublertosalfombrados/ Paredes
Cepilloparasacudff (_ e° I/' V'
Cepillopara animales2 (_ _ e_
Herramienta
para hendiduras _ I/ V'
Cepilloparaplsos _ _ _ I_
PowerMate < _ Vr 3 V'
PefPowerMate4 (_ I/ V' t4
1. Siempre limpJelos accesorios antes de usarsobre telas.
2. Use el cepiilo para pelo de animales para remover los cabellos de superficies delicadas,
como Io son tapicerias y cortinas. NO se utilice en animales.
3. El interruptor de 3 posicionesdebe estar en la posici6n FLOOR (PISO).
4. Pet PowerMate inc[wen suspropias instruccionespara uso de accesorios.
Plsos Piso_
Alfombr_
16

ALMACENAJE DEL PET POWERMATE Y ACCESORIOS
PETPOWERMATE CEPILLOPARAPISOSY CEPILLO
PARAANIMALES
Est6aspiradoraesta equ_padacon
almac_na bordo para el accesorioPet
PowerMate_
Para atmacenar:
1. Abra la cubierta de almacenaje de| Pet
PowerMate.
Est6 aspiradora esta equipada con
almac_n a bordo para accesorfos.
Para almacenar:
I. Abra la cubierta de almacenaje del
accesor_os.
2. Inserte el Pet PowerMate, pres[6nelo en
su lugar hacia abajo.
3. Cierre la cubierta con seguridad.
Pet Cublerta
PowerMale
Para quitar"
1. Abra la cubierta de almacenaje.
2. Levante el Pet PowerMate de su Iugar.
3. UtiffceIo como sea necesarTo. V_ase
ACCESORIOS (p6g !3-15) y CUADRO DE
U$O DE LOSACCESOR|OS (p6g 16).
2. Coloque el cepillo para pisos y eJ cepillo
para animales, presi6nelo en su lugar hacia
abajo.
3. C|erre la cublerta con seguridad.
Cepi]lo para
pelo de
Cepillo s
Para qultar:
1. Abra la cubierta de almacenaje.
2. Levante los accesorios de su lugar.
3. Ufiffcelo como sea necesario, V_ase
ACCESORIOS (p_g 13-15) y CUADRO DE
USO DE LOS ACCESORIOS (pcig 16).
17

J CARACTER|STICASDERENDIMIENTO j
,_k ADVERTENCIA
Peligrode lesionespersonales
Apagu_ y desconecte siempre la aspiradora
antes de limpiar las 6reas de la agitador
pues _stos podrian arrancar de manera
imprevista. El no bacerlo, podria resultar en
leslones personales,
PROTECTOR CONTRA SOBRECARGAS
La PowerMate cuenta conprotecc[6n
incorporada contra clafio del motor y la
correa en caso de
atascamiento del
agitador. Siel
agitador funciona
m6s despacio o se
atasca, el bot6n de
BELTRESETse
activa y la iuz roja
se enciende. EImo-
tor del recept6culo
continuarc_funcionando.
Para corregir el problema: Apagu_ y
desconect_ la asplradorat limpie la
obstrucci6n, y despu_s presione ef bot6n de
BELTRESET{protector de sobrecarga).
Siel problema perslste,busque un t_cnico
calificado que haga el servicio de la
asplradora,
PROTECTORTERMAL
Esta aspiradora tiene un protector termal
que se ajusta autom6ticamente para
proteger a la aspiradora del sobre-
calentamiento. Si una obstruccr6n Tmpide el
flujo normal de aire al motor_ el protector
termal apaga el motor autom6ticamente
para permitir que el motor se enfr_e a fin
de evitar posibles da_os a la aspkadora.
Para corregir el problema: Apagu6 y
desconect_ la aspiradora para permitir que
la aspiradora se enfrfe y que el protector
terma! se reajuste. Busque y saque las
obstrucciones, si es necesar|o, Examine
tambi_n y reemplace/limpie cualquler filtro
obstruldo, V_ase QUITAR DE LOS
RESIDUOS DE BASURA EN LOS
CONDUCTOS (p_g 19). Espere
aproxlmadamente treinta (30) minutos y
enchufe la aspiradora y volt_ela para
checar si el protector termal se ha
reajustado.
Bot6n de
BELTRESET-_
Luz de protector
INDICADOR DE CHECKBAG
Cuando la aspiradora Indicatorde / _
el flujo normal de aire,
est_ funcionando con CHECKBAG_-_--.,_/_f_
el indicador de CHECK
Se encJendela luz
BAG est6 apagado. _/_/
cuando la bolsa esta
Ilena, e_flujo de aire est_ obstruido, o si hay
una obstruccion. Si esto sucede, revisela
bolsa para polvo, el fiffro de Ja seguridad del
motor y otros fugares posiblespot residuos de
basura. V_ase QUITAR DE LOS RESlDUO5
DE BASURA EN LOS CONDUCTOS (p6g
19).
Para correglrel problema=V_ase el diagrama
RECONOCIMIENTO DE PROBLEMAS(p6g 28-
29),
Nora: Es posible que La luz del indicador de
CHECK BAG encienda al usar losaccesorios
porque el flujo de aire es reducido por los
accesorios. La [uz del indicador de CHECK
BAG puede que no prenda cuando la
aspkadora es usada con la succi6n baja
debido a la reducci6n de aire.
TAPA Y ALMACENAMIENTO
PARA POWERMATE
El tubo tiene un reborde en forma de "U"
se desliza dentro en una ranura en forma
de "U" de la aspiradora.
La ranura permite almacenar los tubos y
la PowerMate con el tubo para economi-
zar el espacio requerido para su
almacen-amiento. Para usar esta carac-
ter_stica es necesario almacenar el re-
cept6culo en forma vertical.
La PowerMate
debe estar en la
posici6n liana.
Use el mango del
pedal de
liberaci6n para
moverJa a esta
posici6n.
Eltubo se sale de
la ranura al ser
levantado para
usarloy se desli-
za dentro de _sta
al bajarlo para
almacenarlo.
18
_"_- Reborde

QUITARDE LOSRESIDUOSDE BASURAEN LOSCONDUCTOS
La aspiradora crea succi6n o aspiraci6n que levanta
la tierra. La tierra es impulsada a tray, s de las _-._._
v[as de flujo aire hasta la balsa par una rdpida i,!_.f--'-
corriente de aire. La balsa para polvo permite /_ir"
el flujo de aire, pero atrapa la tierra. ///:,_
Po,o,o o,10,mejo osrosoJta os
limpieza, mantenga abiertas las v[as ,_ft;'-_t,,O"
de aire. Examine peri6dicamente //_'
las cfreastndicadas con asteriscos /_./_
(_) para asecjurarsede que no _-/_"
est6n bloqueadas. Apagu_ y _'//_._-
desconecte del _-_=_'_"
receptdculo antes de _/_
revisarlo. _----_-
PARA CHECAR OBSTRUCCIONES:
Checar la balsa de polvo y cambiar al
estar llena. Ver CAMBIO DE LA BALSA
DE POLVO (pdg 20).
Checar filtro de seguridad del motor y el
filtro de escape y cambielo siesta suc[o.
Ver CAMBIO DE FILTRO DE SEGURIDAD
DEL MOTOR (p6g 21) y CAMBIO DE
FILTRO DE ESCAPE (pdg 22).
Checar Power Mate sabre cualquier
suciedad u obstruccion en el area de la
banda o el area del agitador.
Cuidadosamente remueva cualquTer
obstruccion u objeto Iocatizados en el
agitador o sus tapas. Vet LIMP|EZA DEL
AGITADOR (prig 24).
//__"
Si [a aspiradora aun fiene una baja succion,
haga |o siguiente.
1.Conecte la maguera a la aspiradora y
enciendata. Cheque el final de la
manguera para la sucoion. Si hay buena
succion en el mango de la manguera, no
hay obstruccion en la manguera. Si la
suction es mala, remueva oualquier
suciedad u objeto en la maguera y
mango.
2. Conecte la manguera al tuba telescoplco.
Cheque el final del tuba telescopico para
la succion. Si hay buena succtonal final,
significa que no hay obstruccion en el
tuba tetescopico. Si la succton es mala,
remover cualquier suciedad u objeto en
el tuba telescopico.
3. Revisar el conducto de succion del
Power Mate. Remover cualquier
suciedad u objeto.
Filtro de
seguridad
Filtro de
polvo
LIMPIEZA DELEXTERIORY DE LOSACCESORIOS
1. Apagu_ y desconecte elcord6n el6ctrico de
la clavija de la pared. NO rocle agua sabre la
aspiradora.
2. Paralimpiarel exterioro reducirla
electricrdadest6ticay acumuiaci6n de
polvo,limpiela superficieexteriorde la
aspiradoray losaccesorios.Useuntrapo
suavey limpio,m6]eloen unasoluci6nde
agua y detergente ffquido, y expr[malo
seco.S_queladespu6sde limpiar.
_Ib CUIDADO
No use los accesorios si estan mojados. Los
accesorios que se utilicen en 6teas sucias,
debajo del refrigerador, no deben usarse en
otras superficies sin antes ser lavados.
Podrian dejar marcas.
19

CAMBIO DE LABOLSADE POLVO
La balsa de polvo debe ¢ambiarse seguido para Iograr losmejores resultados de limpieza. EI indi-
cador CHECK BAG prendera cuando esta necesite set cambiada o ¢uando el fluido de aim este
bbqueado.
NOTA: Use el reemplazo de la balsa de polvo ESTILO Q o KC16KDRGZ0U0, ver en detalle el
ngmero de parte en PARTES DE REEMPLAZO (P6g 4).
• I
REMOVIENDO LABOLSADE
POLVO
1. Apagu_ y desconect_ la aspiradora.
2. Quite ta manguera de la aspTradora. (Ver
INSTRUCCIONES DE ENSAMBLE, p6g 7}.
3. Tire det pestiflo de la tapa hacTafuera y
hacia arriba.
Pestillo
de la la
4. Levante la tapa de[ recept6culo.
5. Saque la balsa de -_/_-_
polvo del montaje
rojo, \
NOTA: Revisey _\,_ '_
cambie elfiJtrode
seguridad del motor,
cuando sea necesario.
(Ver CAMBIO DEL
FILTRO DE
$EGURtDAD DEL
MOTOR, p6g 21).
NOTA: El montaje rojo de la balsa de polvo
se inclinar6 hacia adelante despu_sde que
retire la balsa. Estoimpedir6 que la tapa se
cierre antes de instalar una balsa nueva.
Montage
rojo
REEMPLAZANDO LA BOLSA DE
POLVO
NOTA: NO doble ni pliegue el centro del
cort6n al instalar la balsa de polvo en las
ranuras del montaje de la balsa balsa de
polvo.
1. Verifique que |a aspiradora este
desconectada.
2. Gire hacia abajo
el soporte para la
balsa roja y para
insertaria balsa de
polvoen las ranuras
empuje hacia abajo
hasta que las
lengUetasde cart6n
encierren
seguramente en lasposicTonesapropiodas
coma seve en el diagrama,
3. Empujela balsa de polvo asegur6ndola
dentro de la cavidad para evitar que sea
trabada par la tapa de la aspiradora.
4. Baje fa cubierta del receptdculo y cierre el
pestillo,
5. Introduzca la manguera en el recept6culo
basra que quede fija en posici6n (Ver
ENSAMBLE, p6g 7}.
iii1,1111i i
_IbCUIDADO
NUNCA VACIE Y REUTILICE UNA
BOLSA PARA POLVO. Los materlales
muy finos, tales coma desodorantes
para alfombras, talco facial, polvo
fino, yeso, hollin, pelusa de alfom-
bras nuevas, etc., pueden atascar la
balsa y causar que se tampa antes
de que est,, Ilena y puede daF,ar el
motor de la aspiradora. Cambie la
balsa mas seguido cuando aspire
este tipo de materiales.
2O

CAMBIO DELFILTRODESEGURIDADDELMOTOR
Estefi|tro se tiene que camb_ar cuando est_ sucio. Debe cambiarse peri6dicamente seg6n los
condiciones de uso. E!filtro de seguridad del motor no se puede laver pues perderia su capaci-
dad para atrapar polvo.
NOTA: Use el reemplazo det filtro de seguridad del motor ESTILO CF-1 o 8175084, ver en
detalle el n6mero de porte en PARTESDE REEMPLAZO (P6g 4).
ii
_kADVERTENCIA
Peligro de choque el_ctrlco
Apagu6 y desconect6 la aspiradora. No
opere la aspiradora sin el filtro de seguriclad
del motor. Aseg_urese de que el filtro est6
secoe instalado adecuadamente para
impedlr que el motor falle ¥/o que se pro-
duzca un choque el6ctrico.
3. Reempiaceel flltrode seguridaddel motor,
instalela superficieblancadeellado de la
bolsade polvodesiizandoesteen |ascostitlas
de la cavidad,Meta el filtrode segurtdaddel
motorpara quequepaporcompletodeba]o
deldisposit[vode retenc|6nde qoma.
I
1. Para quitar la bolsa, siga las instrucciones
en CAMBIO DE LA BOLSA DE POLVO [p6g
20).
2. Levante el dispositivode retenci6n de
goma y saque el filtro de seguridad como se
ve en el diacjrama.
de
de goma
4. V6aseCAMBIODELABOLSADEPOLVO
(p6g 20) paracambiarlo bolsa.
tDispositivo de
retenci6n de goma
I ENSAMBLEDE LATAPAY LACUBIERTA
Es normal que la tapa del recept6culo se
desprenda al set abierta m6s de Io necesario.
Para colocar nuevamente ta tapa, alinee los
ranuras de la bisagra, ins_rtelasy cierre la
tapa.
IAcu,oAoo
|Nunca debe abrir la capucha del
|contenedor estando[a tapa abierta. Asi
lse evitar6 clafiosa la capucha del
i i ,,i,i
loonteoodory: tapo
21

CAMBIO DELFILTRODEESCAPE
Estefiltro de escape debe set reemplazado regularmente, Cambie el fi|tro de escape cuando el
6rea superficial est_ cubierta par complete, El filtro de escape no se puede lavar pues perderla
su capacidad para atrapar polvo.
NOTA: Use el reempFazo de| filtro de escape ESTILO EF-1o KC38KCENlO00, ver en detalle
el ngmero de parte en PARTES DE REEMPLAZO (P6g 4).
3. Reemplace el
ADVERTENCIA
Peligra de fuego o cheque e|_ctrico
No opere con un filtro de escape bloqueado
o sin el filtro de escape |nstalades. No
opere sin la cubierta 8et filtro de escape
insta|ada,
III III II
1..tale y baje la
cubierta de] filtro de
escape para quitarla
de la aspiradora y
col6quela a un|ado.
2. Jale el filtro de
escape
escape hacia
arriba y hacia
fuera de |a parte
posterior de la
aspiradora.
filtro del escape.
Coloque el filtro de
escape nuevo en la
aspiradora con el
lade de esponja en
direcci6n a [a
aspiradora.
LengGetas
escape
4. Monte la
cubierta del filtro
de escape
colocando |as dos
lenggetasen ia
cubierta delfiltro
en las ranuras de
la aspiradara y
gire en sulugar
hasta que cierre
compietamente.
22

Siempre deberdn seguirse todas los precauciones de seguridad antes de efectuar el
mantenimiento a la PowerMate,
ii
ADVERTENCIA
Peligro de choque el_ctri¢o o lesi6n cor-
poral
Apagu_ y desconect_ la aspiradora
antes de efectuar e! mantenimiento a su
aspiradora. De Io contrario podria pro-
ducirse un choque el_ctrico o causar
lesi6n corporal slla aspiradora arranca
de manera imprevista.
l
CAMBIO DE LA CORREA Y LIMPIEZA DELAGITADOR
PARARETIRARLACORREA
" _ ; 1. Apagu_y
Pedalde aspiradora.
lib_raci6.F_ Jl //
r6pida _ x / //_ 2. Piseel pedal de
3. Gire la
PowerMate para
mostrar la parte
inferior hacia
arriba y
desatornille cuatro
(4) tornillos de la
cubierto.
Pedal de
liberaci6n
del
desconect_ la
del tubo y tire del
tuba hacia arfiba
para desprenderlo
de la PowerMate,
Tornillos
4. Gire la
PowerMateconla
portesuperior
hac[aarriba.
5. Apriete el
pedal del
mango de
liberaci6n y baje
la articulaci6n
giratoria
6. Jale hacia
lateroles
fuera y [evante
los cierres
posteriores.
9. Observe la
posici6n de rode el
cableado y la
tarjeta del sensor
de polvo. Quite el
agitador y la correa
gastada.
_ Pestillo_
Pestillos
traseros
7. Agarre los
cierres laterales
y jale hacla a
fuera y levante.
8. Levante la
cubierta hacia
arriba y
quedara
liberada ]a
cubierta.
extremo
10. Examiney
limpielos6teas detapa del extremo.Enla
ENSAMBLEDELAGITADOR(p6g24) se
proporclonaunailustraci6nde todoel
ensambledelagitador.
23

LIMPIEZADELAGITADOR:
NOTA" Para mantener una alta eficiencia
de limpieza y evitar dafios a la aspkado-
ra, hay que limpiar el agitador coda vez
que se cambla la ¢orrea.
Tambi_n hay que limp[at el agitador
segOn el siguiente calendado:
El use de la Limpie el
aspiradora ac_itador
Frecuente - coda semana
{usada diariamente)
Moderado - coda mes
(usada 2 o 3 veces
pot semana)
Ligero - coda 2 meses
(usada 1vez por semana)
IMPORTANTE
Apagu_ y desconect_ la aspiradora. Exa-
mine frecuentemente el agitador y los
c_reas de soporte del mismo en la
PowerMate y elimine todo cabello, hilo y
pelusa acumulada.
Retire todo indicio de basura o suciedad
de la ruta de la correa y del rodiilo del
agitador.
Con cuidado
saque las topos
y quite el hilo o
los restos
ubicados en el
agitador,
PARACAMBIAR LACORREA
NOTA: Use el reemplazo de la correa
ESTILO CB-3, ver en detaIle el nOmero de
parte en PARTES DE REEMPLAZO (P6g 4).
1.1nstaleuna
correa nueva
sobre el eje
de[ motor y del motor
luego sobre -Ruta de
lapolea del la cerrea
agitador.
3. NOTA: Aseg0rese que la tarjeta del sensor
de polvo este colocada en las ranurasy todo
el cabteado este ubicado en sulugar.
4.Alinee la parte frontal de la cubierta con
la base. Coloque la cubie_a sobre el borde
delantero de la base corno semuestra.
5. Rote la cubierta
hacia atr6s,
Apdete con poca
fuerza hasta que
las lengUetas
laterales y traseras
encierren
seguramente.
Agitador Tapa del
extremo
2. Coloqueotra vez
la unidad de] agita-
dot en la
PowerMate.
ENSAMBLE DELAGITADOR
-Tapa del la correa7
extremo
Unidad del extremoJ
cepilto
Ruta de
6. Cerci6rese que no hay espacio entre la
cubierta y la base.
/
Z Coloque la PowerMate con la porte
inferior hacia arriba e inserte loscuatro (4}
tornillosen la cubierta.
24

l CAMBIO DE LA BOMBILLA i
ADVERTENCIA
IPeligrode choque el_ctrico o |esi6n cot- J
Ip°'al I
|Apagu_ y desconecte la un|dad andes de I
||impiarla o darle servicio. De Io contra- I
Irio podrta producirse un choque el_ctrlco I
|o causar lesi6n corporal sl la aspiradora I
larranca de manera imprevisla. I
I&CU,DAOO
INo conecte o encencle la aspiradora antes
de armarla €ompletamente.
NOTA: Use el reemplazo de la bombilla
numero 20-5248, vet en detalle el n_mero
de parte en PARTES DE REEMPLAZO (P_=g
4).
I. Apagu_ y desconect_ ia aspiradora.
Destornillador//
.,o.o
y.)-..j
de|uz-/
II
2. Extraiga el
lente de la hen-
d{dura insertan-
do el desar-
mador en la
rendija, empuje
hacia al0ajo el
lente y girelo
con el desa
mador en
diracci6n hacia
|a unidad.
3. Quite la bombilla // _==_=_€,_
vieja del portal6mparas
jalando derecho hacia
fuera.
ll,i
l u,o 0o I
INouse una bombilla de mcis de 9W (13V).I
ICuando se use la aspiradora por un largo I
Jperiodo de tiempo, el calor de la bombilla J
Jpuede calentar las partes de plasffco J
Icerca".... I
4. Para reemplazar la
bombilla cuidadosa-
mente ins_rtela segura-
menteen 1a ranura.
5. Substituya ta cubler-
ta de la lente insertan-
do la parte [nferior de
la lente en la ranura.
6. Un sonfdo "pop"
indica que la lente est6
colocada correcta-
mente en su _ugar.
25

DETECTOR DE POLVO J
Aunque la funci6n de detecci6n de polvo de la
aspiradora Kenmore est_ disefiada para
brindar muchos afios de funcionamiento
interrumpido, el paso de polvo a tray,s del
sistema de las vias de aire puede causar una
escama en las lentes,haciendo que se
encienda y contin0e encendido el indicador
verde, sin cambiar nunca a rojo. Cuando esto
suceda, se fienen que limp|at laslentes.
CUlDADO
IA I
INo utillce nunca agua ni so|uci6n llmpladora J
Jpara limplar las lentes. El residuo del agua ol
Jdel limpiador causar6 que las lentes se J
Jcubran de fierra mcis r6pldo, requiriendo I
Jlimpieza con mayor frecuencia. J
PARALIMPIAR LASLENTES
1. Remueva |a extensi6n pisando el pedal de
liberaci6n rcipida del tuba y jale del tubo
hacia arriba para desprenderlo dela
PowerMate:
2. Como se ve en el diagrama losdos indi-
cadores de polvoest6n colocados dentro de
la arficulaci6n giratoria, aproximadamente 4
putcjadaso 10 crn abaio, Observe las fie-
chas). Para [legar a los elementos del detec-
tor, useun cepillo peguefio, como pot ejernpio
para boteIlas. Cepille cada detector varias
veces para eliminar ia t_erra y el potvo.
Corte transversal
Pedal de
liberaci6n
r6pida
2. Vuelva a instalar el tubo despu_sde
Ifmpiar los detectores.
26

J CUIDADO DELAGITADOR
_EADVERTENCIA
Peligro de choque ei6ctrico o |esi6n cor-
poral
Desconecte la corrlente antes de efectu-
ar el mantenimiento a su aspiradora.
De Io €ontrario podrfa producirse un
choque el6ctrico o causar lesi6n corpo-
ral slla asplradora arranca de manera
imprevista.
PARAREVISARLOSCEPILLOS
Cuando los cepillos est_n gastados al nivel de
losbarras de soporte en |a base, cambTeel
agitador completo.
Cepillos Nuevos Cepil|os Desgastado
Barro de
soporte
de la base
PARA CAMBIAR ELAGITADOR
1. Retire la cubierta, correa y ensamble
del agitador de la PowerMate. Consuite
"Para retirar la correa" bajo CAMBIO DE
LA CORREA Y LIMPIEZA DEL AGITADOR
(p_g 23-24).
2. Reemp|ace el agitador. Ver per
separado su lista de partes de reparacion
para el numero de parte.
3. Instaleta correa, y la cubiertade la
PowerMate. Consulte"Para cambiar la
correa" ba]o CAMBIO DE LA CORREAY
LIMPIEZA DELAGITADOR (p6g 23-24).
27

Revise este recuadro pare encontrar solucionesa pmblemas qua puede corregir usted mismo.
Cualquier otto servicio debe set realizado par SEARSu otto agente de servicTocalificado.
,4 kADVERTENCIA
Apagu_ y desconect_ la aspiradora antes de efectuar el mantenimiento a su asplrado-
ra. De Io contrario podr/a proclucirse un cheque el_ctrlco o causar lesi6n corporal.
n l
La asplradora no errenca. L Est6 descanectada. 1, Conecte bien_ presione el bot6n
2. Cortaclrcuffosbotado a fusible
quemadoen el tablero de servicio
dela resldencia.
3. ConexloneselEictrieasde la 3.
manguera sueltas,
No asplra
satisfactorlamente.
La asplradora arranca,
pero seapaga.
LaPawerMafe notune;one
caande est6 instaiada.
I. Balsapara polvoJlenao atascada. 1.
2. Vias de flujo de a#e atascadas, 2.
3. Fiffrossucios. 3,
4, Ajustetncorrectode nivel de 4.
pale de la alfombra,
5. Incorrectaselecci6n denivel de poder 5.
6. Manguera rata. 6,
Z Agltador de la PowerMate Z
desgastados.
8. Correa desgastada o rata, 8 &9.
9. Agltadar o tapas de los extremes
sue_os,
tO, BELTRESETde la PowerMote 10.
botado.
.....i. Conexionesel_ctricasde la manguera 1,
o de la tape,
2. BELTRESETde la PowerMate 2,
botado.
3. Protector termal botado 3.
enel receptc_cu[o.
I, Conexionesde la PowerMate 1.
desconectadas,
2, Correa desgostadao rata. 2&&
3. Agitador o tapes de extremesde
_stesucios.
4. BELTRESETde la PawerMate 4.
botado,
5. El switchno estaenla posicf6n
CARPET(alfombra).
28
ON/O_=F.
2. Restablezca el cortaclrcuitese
cambie et fusible,
Vuelva a conectar los exffernasde
la manguera.(p_cj7-8)
Cambie la balsa. (p_g 20)
Umpie losviesde flujo de aire.
(page 19)
Cambie los filtros.(pc_g21-22)
Ajusfeel niveL(p_g 9, t2)
Ajusteel control (peg 10)
Cambie Ia manguera.
Cambie Ia agffador. (pcig 23-24}
ConsulteCAMBIO DE LA CORREAY
LIMPIEZADELAGITADOR.
(pacj23-24)
Retirecualquierobjeto atoradoo
atascado, luego restablezca. Sila
asp[radoraarranca pera se vuelvea
apogar, limpieel agitador y los tapas
del extremes de _ste_leego
restablezca. (pc_g18, 23-24}
Examinelos eanexionesel_ctricas,
vue[vaa conectarlos extremes
dela manguera.(pc_g7-8)
Retirecualquierobjeto atorado o
atascado,Iuego restablezea,Sila
aspiradoraarcancapera sevuelvea
apagar, limpiee] agltadoty los tapas
del extremesde _ste,luego
restabiezca,{p_g 18,23_24)
Consulte CARACTERISTICASDE
RENDIMIENTO- "ProtectorTermal."
Conectebien.
Consu[teCAMBIO DE LA CORREAY
LIMPIEZADELAGITADOR.
(peg 23-24)
Retirecualqulerobjeto atoradoo
ataseadoj It_egarestablezca.Sila
aspiraclara arranca pera se vuelvea
apagar, limpieel agltodor y los topos
del extremes de 6ste,Iuego
re_tablezca. (p6g 18, 23-24)
5.
Mover e] switcha Japostc_6n
CARPET(alfombra). (p6g 10)

Elindlcador de CHECK 1. Balsa pare polvo llena o ataseada
BAG (indicator 2. Fi[tros sucios.
electr6nlco de (a balsa) 3. Vies de flujo de aire atoscadas.
enclende.
La asp|fedora levanta 1. A]uste incorrecto de hive( de L
tapetes o es dJff_l pelo de la alfombra,
empujer ]a PowerMate. 2. Asplrod6n demasiado potente. 2. Selecc[onar nive) de poder
El ¢ord6n no se enrolla. 1, Cord6n el_ctr(co suc(o. 1. Umpie ei oord6n el_ctrlco.
La aspiradora deja 1. Estilo de I(mpieza incorreda. 1, Consuite SUGERENCIAS PAPA
marcas en la alfombra. ASPIRAR. (p_g 11)
|ndicador verde encen- 1.
dido confinuamente
en el detector de polvo. 2,
No se enclenden los L
indlcadores verde o rojo
de detecc|6n de tierro, 2,
La luz roja para el BELT L
RESET(Protector contra
sobrecargo) PowerMate
se prende.
4. Ciertos accesortos.
..........l.......................
2, Cord6n atascado. 2. Tire deI cord6n y despu_s
La via de paso de Herra ola 1. Determine s] est6n bloqueadas las
balsa depoivo est6n bloqueados, v(as de aTre. (p,qg19)
Lente sucia, 2. UmpIe (as (entes. (p_g 26)
Elsw(tch no esta en la posici6n I, Mover el sv,4tchala posici6n
CARPET (alfombra). CARPET (alfombra}. (p6g 10)
No hay sum(ns|trode energ(a at 2. Acuda aI Centre de ServicIo de
tab(ere detector. Sears m6s cercano.
BELTRESETde (a PowerMate 1. Retire cue(quiet objeto atorado o
botado, atascado_ luego restab[ezca, Sila
1, CambTe [a balsa. (p_g 20)
2. Cambie los filtros, (pSg 21-22)
3. DesbIoquee (as "_as de fIujo de
aire. (p6g 19)
4. Esto es normal, E| (ndicador debe
set normal cuando Ia herramTenta
est6 quitada.
AjUsteel nivel, (p_g 9_12)
bajo.(p_g10)
enr6ffelo. {p6g 9)
asplradora arranca pero so rue(re
a se prende, apagar_ Iimp[e el agI
radar y los tapes de( extremos de
/_stes (uego resta101ezca.
(p_:g 18s 23-2,4)
Linea de ayuda de aspiradoras:
1-877-531-7321
8:00am-5:00pm EST.. M-F
(U.S.A.and Canada)
29

Acuerdos Maestros de Protecci6n
Enhorabuena par hacer una compra inteligente. Su nuevo producto Kenmore® est_ disefiado y
fabricado para ofrecerle arias de funcionamiento €onffable, Pete al igual que redes los productos
pueden precisar un mantenlmlenta preventive o alguna reparaci6n de vez en cuando. Par esfe motive,
tenet un Acuerdo Maestro de Protecci6n puede ahorrarte dinero e inconvenientes.
El Acuerdo Maestro de Protecci6n tambi_n le ayuda a prolongar la v]da 0ill de su nueva producto, A
continuaci6n indicamos Io que el Acuerdo _ inciuye:
[_ Partes y mane de obra necesarTos para ayudar a clue estos productos func|onen correctameele
bajo condicionales normates de usa, no simp{emente defectos. Nuestra cobertura va touche m6s
all6 de ta garanti'a del producto. Ning_n deducible, ninguna aver{a funclonat queda exctulda de
[a cobertura- protecci6n real
1_ Servicio experto offecldo par una lista de m6s de 10,000 t_cn_cos autorizados del servicio t_,cn_€o
de Sears, Io que signTflca que algulen en quien usted puede cant|at estar6 trabajando en su
producto.
[_ N_mero illm|tado de ]]amadas al serv_c|o t6cnlco y servlcio en toda la naci6n_ tan €ontinua coma
usted has Io so|iclte_ sin |mportar donde est6.
[_r Garantla serla de sustituci6n del producto. La sustifuci6n de su producto cubierto si se praducen
cuatro o m6s averias en dace meses.
[_ Sustituc|6n de| producto par afro nuevo si su producto cubierto no puede repatarse.
[_ Rev_si6n y mantenimiento anual preventive slempre que 3o desee y sin cargo alguno.
[_ Ayuda r6pida per tel_Fona - Nosotros ]o llamamas t_esoluci6n r6pida. Soporte telef6n_co de un
representanfe de Sears en lodes los productos. Please en nosotros come un "manua| del usuario
parlante".
[_ Pmfecci6n contra subidas de tensi6n que provoquee duties e|&ctricos causados per las
fluctuaclones de la corrlente.
[_ $250 de protecci6n contra la p_rdlda de allmentos anualmente en case de que se estropee algOn
a|imento coma resu|tado de una averfa mec6nlca de eualquier congelador e refrigerador
cubierto.
P,eembolso del alquiler sl la reparaci6n de su producto cublerto toma m6s fiempo del promefido.
[_ 10% de descuenta en el precio regular de euQIqu_er servlcio de reparaci6n no cubierto y de |as
piezas instaladczs re_acionadas.
Una vez que €ompre el Acuerdo, s61obastar6 una simple Ilamada telef6nlca para que pueda programar
un servlclo. Puede Ilamar a cualquier hera de| d[a o de lu noche, o concertar una cita de servlcio ea
ffnea.
El Acuerdo maestro de protecci6n es una €ompra libre de rlesgos. Si par cualquler raz6n cancela
durante el pervade de garanffa del producto, le devolveremos redo el dinero. O, un reembolso
prorrateado despu6s de| periodÜ de vencimiento de la garant[a_ iCompre su Acuerdo maestro boy!
Apllcan algunas |imitaclones y exclusiones. Paru preclos y m6s informaci6n en EE.UUotflame a| 1-800-
827-6655.
La €obertura en Canad6 varia en algunos arffculos. Para obtener todos los detalles, flame a Sears
Canadc_ 1-800-361-6665.
$erviclo de instaiaci6n de Sears
Para la insta|aci6n profeslonal par parte de Sears de e|ectrodom_stlcos, abridores de puertas de
garajes, calentaderes de agua y otros artfculos principa|es para el hogar, en EE.UU. o Canad6 Ilame a|
1-800-4-MY-HOME®.
3O

Your Home
@
www.managemylife.com
For repair- in your home - of all major brand appliances,
tawn and garden equipment,or heatingand coolingsystems,
no matter who made it, no matter who sold it!
Forthe _eplacement parts,accessories and
owner's manuals that you need to do-it-yourself.
ForSears professional instalation ofhome appliances
and items like garage door openers and water heaters.
1,800-4-MY-HOME_ c_ta.#rr_, dayor._ght
(t-800_69-4653) (U.S.A. and Canada)
www.sears.com www.sears.ca
Our Home
For repair of carryAn items fke vacuums, lawn equipment,
and e_ectronics, cal anytime for the localon of the nearest
Sears Parts & Repair Service Center
t-800488-1222 (U.S__.) "[_800_469-4663(_arm_)
To purchase aprotection agreement on a product sen/iced by Sears:
1-800-827-6655 (u.sA} 1-800-36_1-6665 (Cash)
Au Canadapou_serviceenfran_;ais:
1-800-LE-FOYER_
R_P._'_ Trad_ark ,__ Tra_P..ma_ of KCO Ip, LLC in the Ur_ States, or .'_am l_aod_> LLC _nother ¢o_bis=
® Marc_ Reg_b'ad_ t'n_ Marca de F_0_ca de KCD tP, LLC en _ tJnidos, o Seres Brands, LLC bl obos p_es
u_ Ma_que de omlmerce # _ Ma=rqued_pos_ d_ :Sears Brand_ LLC
 Loading...